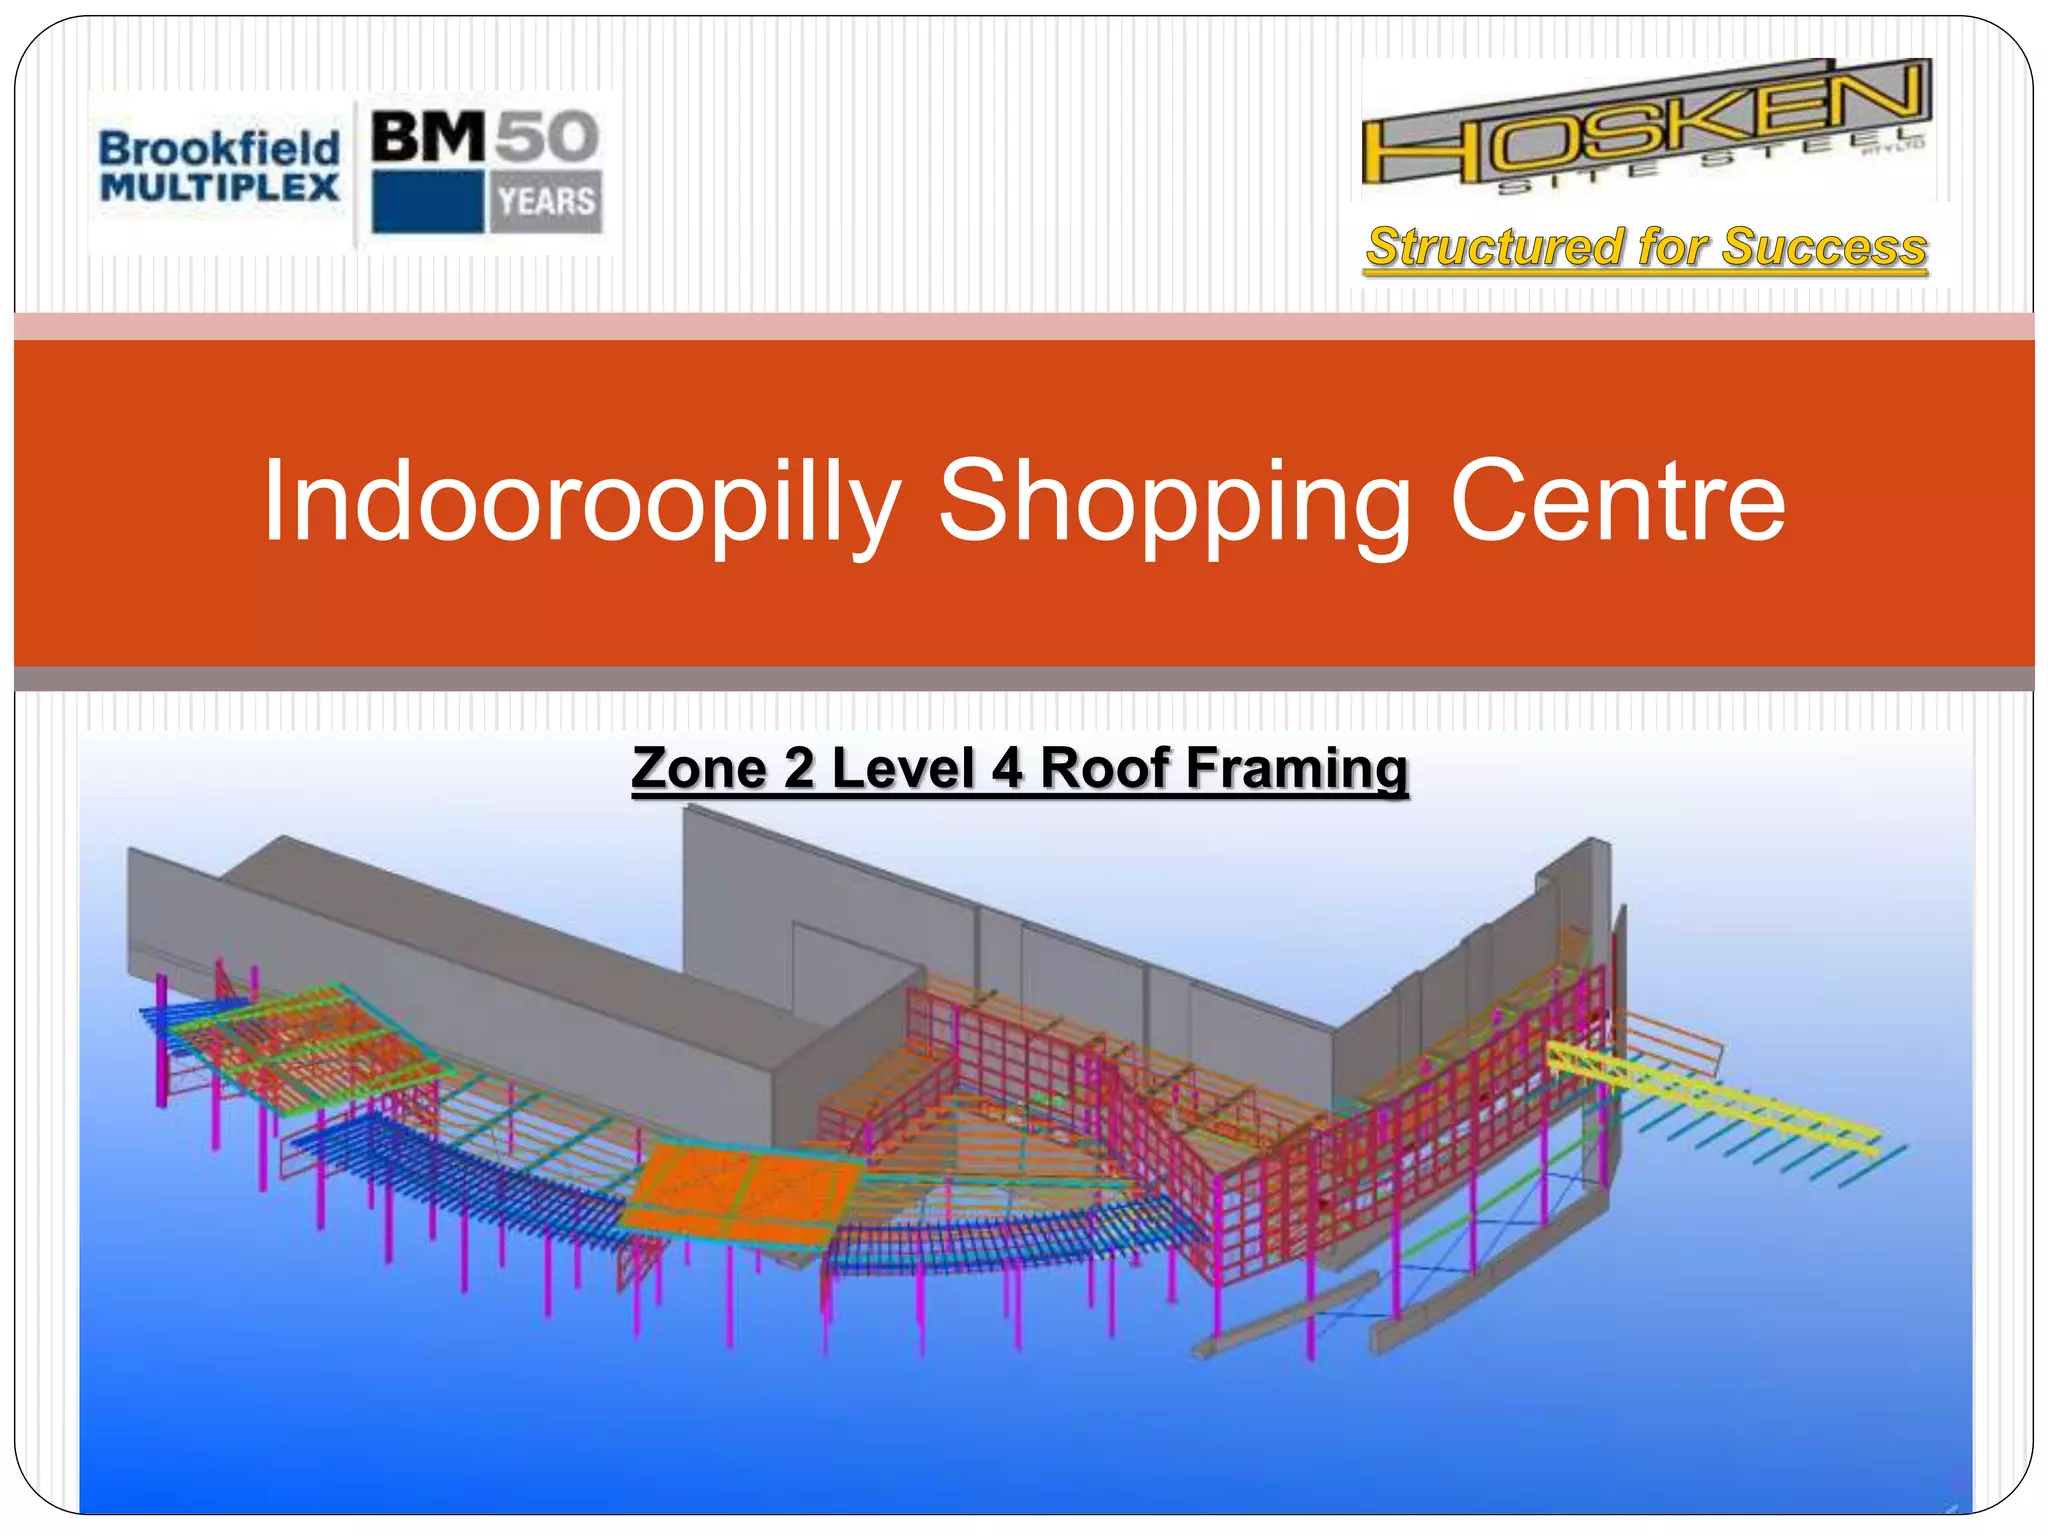
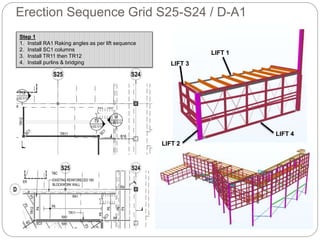
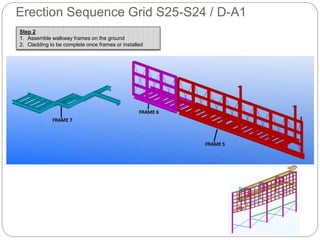
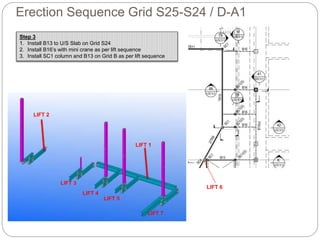
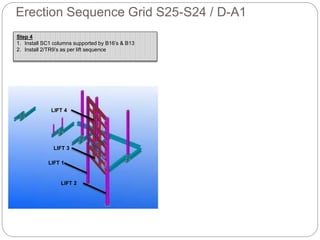
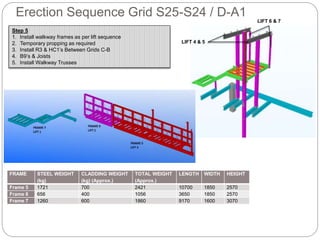
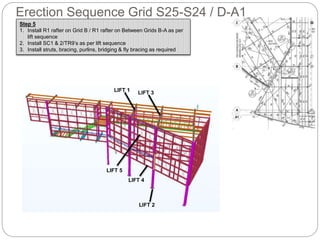
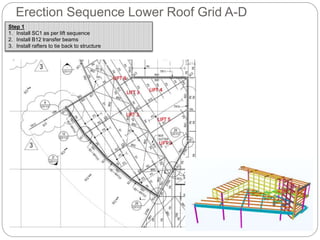
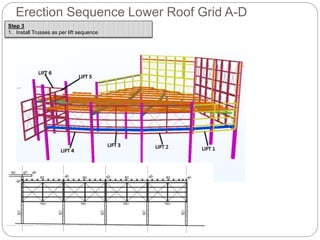
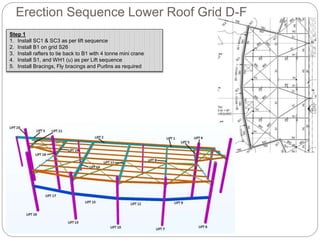
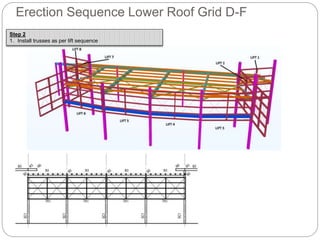
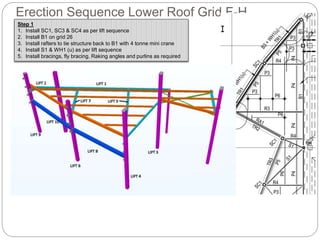
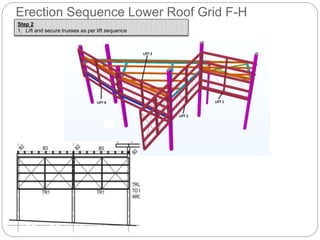
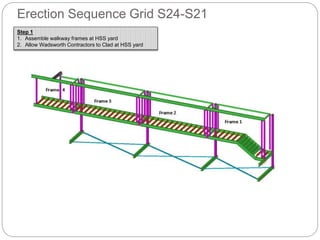
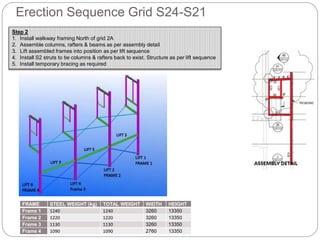
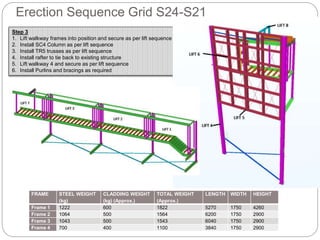
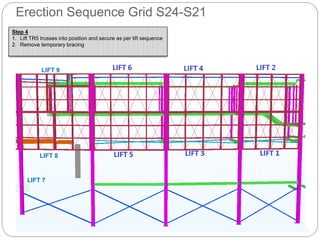
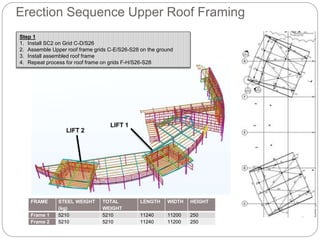
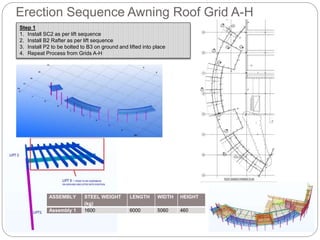
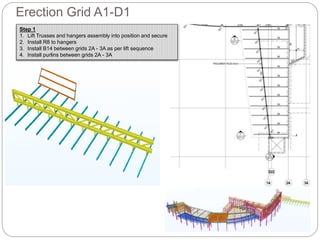
3. Erection Sequence Grid S25-S24 / D-A1
Step 2
1. Assemble walkway frames on the ground
2. Cladding to be complete once frames or installed
4. Erection Sequence Grid S25-S24 / D-A1
Step 3
1. Install B13 to U/S Slab on Grid S24
2. Install B16’s with mini crane as per lift sequence
3. Install SC1 column and B13 on Grid B as per lift sequence
LIFT 1
LIFT 2
LIFT 3
LIFT 4
LIFT 5
LIFT 7
LIFT 6
7. Erection Sequence Grid S25-S24 / D-A1
Step 5
1. Install R1 rafter on Grid B / R1 rafter on Between Grids B-A as per
lift sequence
2. Install SC1 & 2/TR9’s as per lift sequence
3. Install struts, bracing, purlins, bridging & fly bracing as required
LIFT 1 LIFT 3
LIFT 2
LIFT 4
LIFT 5
8. Erection Sequence Lower Roof Grid A-D
Step 1
1. Install SC1 as per lift sequence
2. Install B12 transfer beams
3. Install rafters to tie back to structure
9. Erection Sequence Lower Roof Grid A-D
Step 2
1. Install SC1’s as per lift sequence
2. Install Rafter to tie back to B12 with 4 tonne mini crane
3. Install WH1(u) and S1 as per lift sequence
4. Install Bracings, Raking angles, Fly bracings and
Purlins as required
11. Erection Sequence Lower Roof Grid D-F
Step 1
1. Install SC1 & SC3 as per lift sequence
2. Install B1 on grid S26
3. Install rafters to tie back to B1 with 4 tonne mini crane
4. Install S1, and WH1 (u) as per Lift sequence
5. Install Bracings, Fly bracings and Purlins as required
13. Erection Sequence Lower Roof Grid F-H
Step 1
1. Install SC1, SC3 & SC4 as per lift sequence
2. Install B1 on grid 26
3. Install rafters to tie structure back to B1 with 4 tonne mini crane
4. Install S1 & WH1 (u) as per lift sequence
5. Install bracings, fly bracing, Raking angles and purlins as required
14. Erection Sequence Lower Roof Grid F-H
Step 2
1. Lift and secure trusses as per lift sequence
15. Erection Sequence Grid S24-S21
Step 1
1. Assemble walkway frames at HSS yard
2. Allow Wadsworth Contractors to Clad at HSS yard
16. Erection Sequence Grid S24-S21
Step 2
1. Install walkway framing North of grid 2A
2. Assemble columns, rafters & beams as per assembly detail
3. Lift assembled frames into position as per lift sequence
4. Install S2 struts to tie columns & rafters back to exist. Structure as per lift sequence
5. Install temporary bracing as required
FRAME STEEL WEIGHT (kg) TOTAL WEIGHT WIDTH HEIGHT
Frame 1 1240 1240 3260 13350
Frame 2 1220 1220 3260 13350
Frame 3 1130 1130 3260 13350
Frame 4 1090 1090 2760 13350
17. Erection Sequence Grid S24-S21
Step 3
1. Lift walkway frames into position and secure as per lift sequence
2. Install SC4 Column as per lift sequence
3. Install TR5 trusses as per lift sequence
4. Install rafter to tie back to existing structure
5. Lift walkway 4 and secure as per lift sequence
6. Install Purlins and bracings as required
FRAME STEEL WEIGHT
(kg)
CLADDING WEIGHT
(kg) (Approx.)
TOTAL WEIGHT
(Approx.)
LENGTH WIDTH HEIGHT
Frame 1 1222 600 1822 5270 1750 4260
Frame 2 1064 500 1564 6200 1750 2900
Frame 3 1043 500 1543 6040 1750 2900
Frame 4 700 400 1100 3840 1750 2900
18. Erection Sequence Grid S24-S21
Step 4
1. Lift TR5 trusses into position and secure as per lift sequence
2. Remove temporary bracing
LIFT 7
LIFT 8
LIFT 9
19. Erection Sequence Upper Roof Framing
FRAME STEEL WEIGHT
(kg)
TOTAL
WEIGHT
LENGTH WIDTH HEIGHT
Frame 1 5210 5210 11240 11200 250
Frame 2 5210 5210 11240 11200 250
Step 1
1. Install SC2 on Grid C-D/S26
2. Assemble Upper roof frame grids C-E/S26-S28 on the ground
3. Install assembled roof frame
4. Repeat process for roof frame on grids F-H/S26-S28
LIFT 1
LIFT 2
20. Erection Sequence Awning Roof Grid A-H
Step 1
1. Install SC2 as per lift sequence
2. Install B2 Rafter as per lift sequence
3. Install P2 to be bolted to B3 on ground and lifted into place
4. Repeat Process from Grids A-H
ASSEMBLY STEEL WEIGHT
(kg)
LENGTH WIDTH HEIGHT
Assembly 1 1600 6000 5060 460
21. Erection Grid A1-D1
Step 1
1. Lift Trusses and hangers assembly into position and secure
2. Install R8 to hangers
3. Install B14 between grids 2A - 3A as per lift sequence
4. Install purlins between grids 2A - 3A