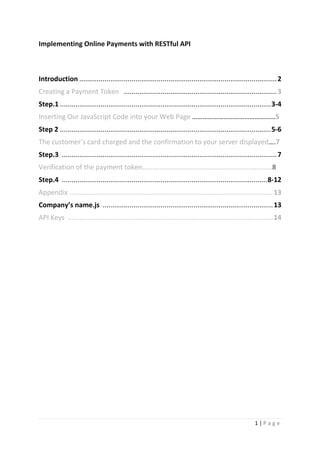
1) The document provides steps for developers to implement online payments on a merchant website using RESTful APIs from a payment company.
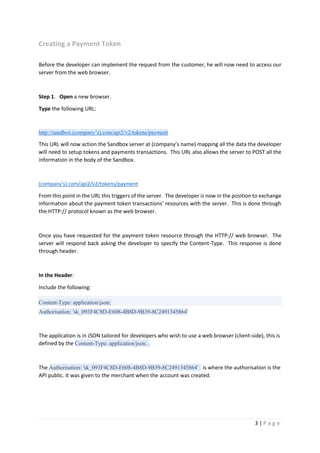
2) Developers are instructed to create a payment token by making an API call to the payment company's sandbox server and including the merchant's API key.
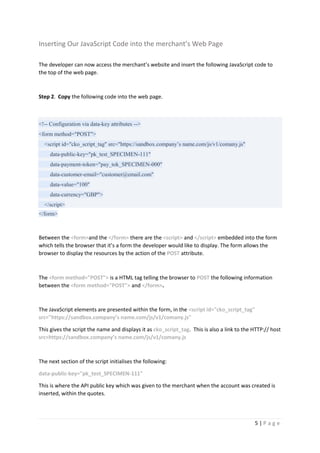
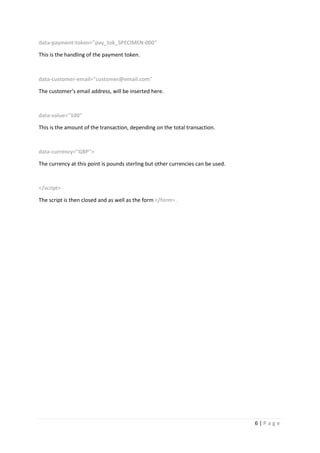
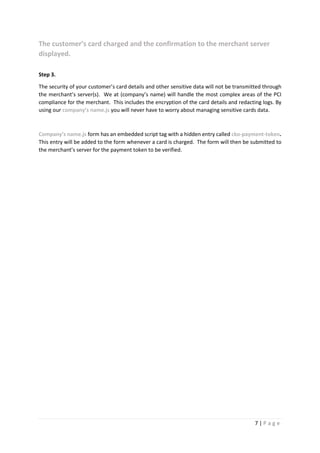
3) JavaScript code is then inserted into the merchant website to initialize the payment process by referencing the payment token and API keys. When a customer enters their payment details, it is sent to the payment company for processing without exposing sensitive card data.
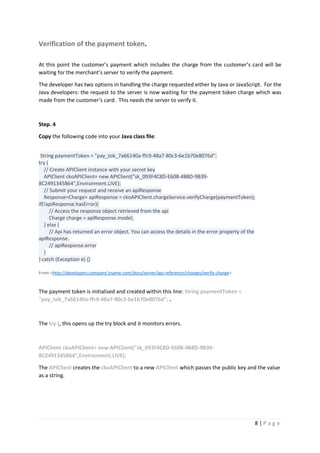
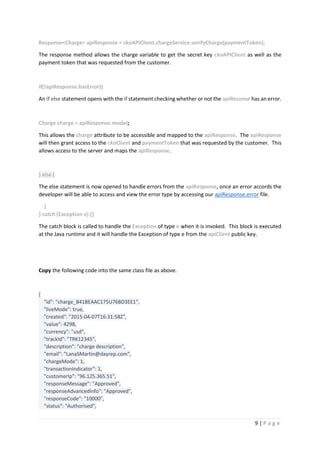
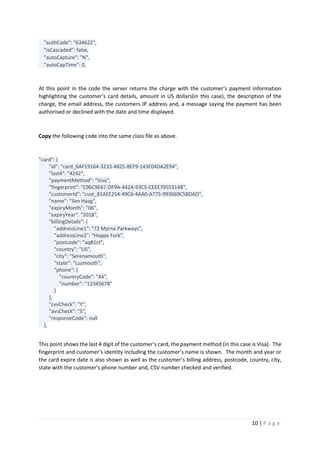
4) The payment company returns a token to the merchant server, which then needs to call the payment company's API to verify the payment using the token, thus completing the transaction.
OAuth 2.0
Oauth2.0 is an “authorization” framework for web applications. It permits selective access to a user’s resource without disclosing the password to the website which asks for the resource.
Agenda for the session:
What is Oauth 2.0
Oauth 2.0 Terminologies
Oauth workflow
Exploiting Oauth for fun and profit
Reference
Payment Request API with a React high order componentMarco Lanaro
I'm presenting how to consume Payment Request API. I'm also explaining how to implement a high order component in React so to encapsulate business logic in a composable way.
These are the slides from our January presentation of our in-Flash payment solution.
It gives a brief overview of Social Gold as well as a technical presentation that shows how to integrate the our in-Flash solution with your Flash game.
Enjoy!
AI: Mobile Apps That Understands Your Intention When You TypedMarvin Heng
With Microsoft's Cognitive Services - Language Understanding Intelligent Service (LUIS), we can build a smart app. By following this tutorial, you should learn how to create a intelligent cross platform Mobile App that understands what is your intention.
Read more @ www.techconnect.io
By Marvin Heng
Twitter: @hmheng
Blog: www.techconnect.io
Talk about standard synchronisation pattern on Android (SyncAdapter + Authenticator + ContentProvider). Presentation given at KrakDroid 2012 (http://www.krakdroid.pl). Video from the talk (in Polish): http://www.youtube.com/watch?v=8Oti4qf7P84.
OAuth 2.0 for developers – the technology you need but never really learnedLetsConnect
OAuth 2.0 has become the defacto way to authenticate to IBM Connections and cloud services such as IBM Connections Cloud, Google and SalesForce and is *the* way to bridge systems. Despite being very powerful surprisingly few IBM Connections developers actually know of it or enough about it. OAuth 2.0 has been in IBM Connections for many releases and allows other services or API programs to impersonate users – and hence work as the user – without the user relinquishing control of their credentials. It’s very powerful stuff. This session acts as a primer on OAuth 2.0 for developers and administrators teaching you the ropes as well as teaching developers how to start utilizing OAuth 2.0 for IBM Connections on-premises as well as for IBM Connections Cloud. If you are developing for IBM Connections this is for you. Be warned – there will be code…
Just recently on October 10th, Google announced a change in name of API.AI into DialogFlow. There are a couple of new features following this change. Regardless of what has been changed, in this post we are going to share a simple way of how to integrate your agents that is created using DialogFlow into any Qiscus chat SDK application.
How to build twitter bot using golang from scratchKaty Slemon
Check out how to build Twitter Bot Using Golang From Scratch without using any third-party library to develop the demo app in this step-by-step tutorial
Οι διαφάνειες αυτές ως επί το πλείστον αποτέλεσαν υλικό των τριήμερων εκπαιδευτικών που διοργανώθηκαν στα πλαίσια του προγράμματος "Πολίτες ενάντια στην Κατάθλιψη". Περισσότερες πληροφορίες για το πρόγραμμα μπορείτε να βρείτε στα εξής μέρη:
Στην επίσημη ιστοσελίδα του προγράμματος: http://www.citizensagainstdepression.gr
Στην σελίδα του προγράμματος στο facebook: https://www.facebook.com/citizensagainstdepression?fref=ts
Στον twitter λογαριασμό: https://twitter.com/citizensvsdepre
Affordable led lighting singaporepatternStanley Tay
We are committed to deliver high quality LED lighting in Singapore, energy saving lights and table lamp for home at reasonable prices to our customers.
A Detailed Guide to Securing React applications with Keycloak - WalkingTree ...Ganesh Kumar
With KeyCloak you can setup multiple identity providers from existing social networks or setup user-defined authentication servers and use it to secure all your React applications with ease. In this blog, We elaborate on how to setup KeyCloak server, configure it with Google as its identity provider and use it to secure a simple React application.
How to integrate paytm payment gateway using react js in seven easy stepsKaty Slemon
Are you stuck with integrating a payment gateway into your project? If Yes, here learn how to Integrate Paytm Payment Gateway using ReactJS in this guide.
Restoring Abandoned Destroyed Phone, Found a lot of broken phones and more!https://linktr.ee/hmaadi https://linktr.ee/hmaad
Restoring Abandoned Destroyed Phone, Found a lot of broken phones and more!https://linktr.ee/hmaadi https://linktr.ee/hmaadihttps://uii.io/ref/hmaadihttps://uii.io/ref/hmaadii
Ponencia ofrecida por Jesús Arias de Pay Pal en Droidcon Spain. Sinopsis: Presente y futuro de los pagos móviles. Descripción de las APIs de PayPal y cómo interaccionan para permitir el pago por móvil, de eso versará la conferencia de PayPal.
in this presentation we give a brief intro to Social Gold, an overview of the in-flash solution architecture followed by a step by step integration example.
Integration of payment gateways using Paypal account Phenom People
E-commerce application service provider service that authorizes payments for e-businesses, online retailers, bricks and clicks or traditional brick and mortar. It is the equivalent of a physical point of sale terminal located in most retail outlets. Payment gateway protects credit cards details encrypting sensitive information, such as credit card numbers, to ensure that information pass securely between the customer and the merchant and also between merchant and payment processor.
Microsoft identity platform and device authorization flow to use azure servic...Sunil kumar Mohanty
Microsoft Identity platform allows users to sign in to input-constrained devices. It leverages MASL for Java (MSAL4J) from an app that does not have the capability of providing interactive authentication experience. The user visits a web page in their browser to login in. Once login success, the device will able to get access token and able to perform actions on the authorized Azure resources. In this article the access token will be used to publish message to azure service bus.
Razorpay Payment Gateway Integration In iOS SwiftInnovationM
Razorpay is the fastest growing Payment Solution. Most of the developers prefer Razorpay as the Payment solution in India. It is robust and provides developer friendly API & SDK for Android, iOS etc.
InReceipts Plug N Play Client & REST APIs for billing softwares v1.0InReceipts
Big Retailers and those who are using home grown customized POS do not prefer to install a 3rd party client for digital receipts.
InReceipts REST APIs are a super easy few lines APIs to enable digital receipts at all their counters in one go. With this, the big retailers can roll-out engagement based on campaigns on their captive audience base using InReceipts.
To know more about Contextual targeting, contact InReceipts.
1) Mobile Behavior Targeting Hierarchy
(Where(*), When(before), Whom(me, family, &friends), What(products&events))
2) Mobile Geo-spatial Targeting Hierarchy
(Where(pos), When(now), Whom(me), What(*))
Video available at http://www.youtube.com/watch?v=4sQYYCx_CQM&feature=em-share_video_user
Presentation on In-App Payments with HTML5 at Silicon Valley Code Camp (October 7th, 2012)
Use Windows Azure Service Bus, BizTalk Services, Mobile Services, and BizTalk...BizTalk360
The Service Bus is part of Windows Azure and is designed to provide connectivity, queuing, and routing capabilities not only for the cloud applications but also for on-premises applications. Microsoft BizTalk Server enables organizations to connect and extend heterogeneous systems across the enterprise and with trading partners. Using both together enables a significant number of scenarios in which you can build secure, reliable and scalable hybrid solutions that span the cloud and on premises environments.
Windows Azure BizTalk Services is a simple, powerful, and extensible cloud-based integration service that provides Business-to-Business (B2B) and Enterprise Application Integration (EAI) capabilities for delivering cloud and hybrid integration solutions. Windows Azure Mobile Services accelerates connected client application development by streamlining common backend tasks like structuring storage, authenticating users, and sending push notifications. In this session you will see how to integrate these technologies to build secure, reliable and scalable hybrid solutions that span the cloud and on premises environments.
Abandoned carts carry millions of products and the customer needs a little push to complete them. Netmera helps you reach those customers at the right moment. Catch the abandoned cart right before it expires and encourage customer with push notifications. Use autotriggered messages to make it easy! Visit our website for more: www.netmera.com
2. 1 | P a g e
Implementing Online Payments with RESTful API
Introduction ......................................................................................................2
Creating a Payment Token ...............................................................................3
Step.1 .............................................................................................................3-4
Inserting Our JavaScript Code into your Web Page …………………………………………5
Step 2 .............................................................................................................5-6
The customer’s card charged and the confirmation to your server displayed….7
Step.3 ...............................................................................................................7
Verification of the payment token…………………………………………………………………8
Step.4 ..........................................................................................................8-12
Appendix .........................................................................................................13
Company’s name.js ........................................................................................13
API Keys ..........................................................................................................14
3. 2 | P a g e
Implementing (company’s name) Online Payment System using Java and
JavaScript RESTful API
Introduction
This is a developer’s guide which gives the developer an Open Source instructional steps on how- to
implement (company’s name) online payment system, using Java and JavaScript API. The online
payment developer’s guide will allow the developer to embed (company’s name) online payment
system into the merchant’s website(s).
The developer will need to firstly, integrate the payment methods into the website and then he will
incorporate forms, customers’ inputs and payment charge validations from the customer’s credit or
debit card, over a secure payment process.
The developer will also have access to our server through the web browser and request for a payment
token transaction resource. Our server will then respond back to the developer, by asking for the
requested Content-Type and the merchant’s API key (this was given to the merchant when the
merchant’s account was created). The payment request and response with our server and the
developer will then take place.
Once the developer has implemented the requested customer’s payments and information in
JavaScript. The developer would need to implement the response to the request of the customer’s
payment. This request will be pending in the merchant’s server awaiting the server’s response. The
implementation of this response to the customer is done in Java. The developer would then
implement the verification to the payment token from the customer and, the charge will be processed
giving an authentication access to all available resources.
4. 3 | P a g e
Creating a Payment Token
Before the developer can implement the request from the customer, he will now need to access our
server from the web browser.
Step 1. Open a new browser.
Type the following URL:
http://sandbox.(company’s).com/api2/v2/tokens/payment
This URL will now action the Sandbox server at (company’s name) mapping all the data the developer
will need to setup tokens and payments transactions. This URL also allows the server to POST all the
information in the body of the Sandbox.
(company’s).com/api2/v2/tokens/payment
From this point in the URL this triggers of the server. The developer is now in the position to exchange
information about the payment token transactions’ resources with the server. This is done through
the HTTP:// protocol known as the web browser.
Once you have requested for the payment token resource through the HTTP:// web browser. The
server will respond back asking the developer to specify the Content-Type. This response is done
through header.
In the Header:
Include the following:
Content-Type: application/json;
Authorisation: 'sk_093F4C8D-E608-4B8D-9B39-8C2491345864'
The application is in JSON tailored for developers who wish to use a web browser (client-side), this is
defined by the Content-Type: application/json; .
The Authorisation: 'sk_093F4C8D-E608-4B8D-9B39-8C2491345864' is where the authorisation is the
API public. It was given to the merchant when the account was created.
5. 4 | P a g e
The developer can REQUEST in the URL the payment amount and currency in pounds sterling.
{
"value": 100,
"currency": "GBP"
}
The server will then RESPOND with the customer’s payment token
{
"id": "pay-tok_SPECIMEN-000",
}
Note: the Header contain the Metadata of the API private or public key needed for authorisation.
6. 5 | P a g e
Inserting Our JavaScript Code into the merchant’s Web Page
The developer can now access the merchant’s website and insert the following JavaScript code to
the top of the web page.
Step 2. Copy the following code into the web page.
<!-- Configuration via data-key attributes -->
<form method="POST">
<script id="cko_script_tag" src="https://sandbox.company’s name.com/js/v1/comany.js"
data-public-key="pk_test_SPECIMEN-111"
data-payment-token="pay_tok_SPECIMEN-000"
data-customer-email="customer@email.com"
data-value="100"
data-currency="GBP">
</script>
</form>
Between the <form>and the </form> there are the <script> and </script> embedded into the form
which tells the browser that it’s a form the developer would like to display. The form allows the
browser to display the resources by the action of the POST attribute.
The <form method="POST"> is a HTML tag telling the browser to POST the following information
between the <form method="POST"> and </form>.
The JavaScript elements are presented within the form, in the <script id="cko_script_tag"
src="https://sandbox.company’s name.com/js/v1/comany.js"
This gives the script the name and displays it as cko_script_tag. This is also a link to the HTTP:// host
src=https://sandbox.company’s name.com/js/v1/comany.js
The next section of the script initialises the following:
data-public-key="pk_test_SPECIMEN-111"
This is where the API public key which was given to the merchant when the account was created is
inserted, within the quotes.
7. 6 | P a g e
data-payment-token="pay_tok_SPECIMEN-000"
This is the handling of the payment token.
data-customer-email="customer@email.com"
The customer’s email address, will be inserted here.
data-value="100"
This is the amount of the transaction, depending on the total transaction.
data-currency="GBP">
The currency at this point is pounds sterling but other currencies can be used.
</script>
The script is then closed and as well as the form </form> .
8. 7 | P a g e
The customer’s card charged and the confirmation to the merchant server
displayed.
Step 3.
The security of your customer’s card details and other sensitive data will not be transmitted through
the merchant’s server(s). We at (company’s name) will handle the most complex areas of the PCI
compliance for the merchant. This includes the encryption of the card details and redacting logs. By
using our company’s name.js you will never have to worry about managing sensitive cards data.
Company’s name.js form has an embedded script tag with a hidden entry called cko-payment-token.
This entry will be added to the form whenever a card is charged. The form will then be submitted to
the merchant’s server for the payment token to be verified.
9. 8 | P a g e
Verification of the payment token.
At this point the customer’s payment which includes the charge from the customer’s card will be
waiting for the merchant’s server to verify the payment.
The developer has two options in handling the charge requested either by Java or JavaScript. For the
Java developers: the request to the server is now waiting for the payment token charge which was
made from the customer’s card. This needs the server to verify it.
Step. 4
Copy the following code into your Java class file:
String paymentToken = "pay_tok_7a66140a-ffc9-48a7-80c3-6e1b70e8076d";
try {
// Create APIClient instance with your secret key
APIClient ckoAPIClient= new APIClient("sk_093F4C8D-E608-4B8D-9B39-
8C2491345864",Environment.LIVE);
// Submit your request and receive an apiResponse
Response<Charge> apiResponse = ckoAPIClient.chargeService.verifyCharge(paymentToken);
if(!apiResponse.hasError){
// Access the response object retrieved from the api
Charge charge = apiResponse.model;
} else {
// Api has returned an error object. You can access the details in the error property of the
apiResponse.
// apiResponse.error
}
} catch (Exception e) {}
From <http://developers.company’sname.com/docs/server/api-reference/charges/verify-charge>
The payment token is initialised and created within this line: String paymentToken =
"pay_tok_7a66140a-ffc9-48a7-80c3-6e1b70e8076d"; .
The try {, this opens up the try block and it monitors errors.
APIClient ckoAPIClient= new APIClient("sk_093F4C8D-E608-4B8D-9B39-
8C2491345864",Environment.LIVE);
The APIClient creates the ckoAPIClient to a new APIClient which passes the public key and the value
as a string.
10. 9 | P a g e
Response<Charge> apiResponse = ckoAPIClient.chargeService.verifyCharge(paymentToken);
The response method allows the charge variable to get the secret key ckoAPIClient as well as the
payment token that was requested from the customer.
if(!apiResponse.hasError){
An if else statement opens with the if statement checking whether or not the apiResonse has an error.
Charge charge = apiResponse.model;
This allows the charge attribute to be accessible and mapped to the apiResponse. The apiResponse
will then grant access to the ckoClient and paymentToken that was requested by the customer. This
allows access to the server and maps the apiResponse.
} else {
The else statement is now opened to handle errors from the apiResponse, once an error accords the
developer will be able to access and view the error type by accessing our apiResponse.error file.
}
} catch (Exception e) {}
The catch block is called to handle the Exception of type e when it is invoked. This block is executed
at the Java runtime and it will handle the Exception of type e from the apiClient public key.
Copy the following code into the same class file as above.
{
"id": "charge_B41BEAAC175U76BD3EE1",
"liveMode": true,
"created": "2015-04-07T16:31:58Z",
"value": 4298,
"currency": "usd",
"trackId": "TRK12345",
"description": "charge description",
"email": "LanaSMartin@dayrep.com",
"chargeMode": 1,
"transactionIndicator": 1,
"customerIp": "96.125.365.51",
"responseMessage": "Approved",
"responseAdvancedInfo": "Approved",
"responseCode": "10000",
"status": "Authorised",
11. 10 | P a g e
"authCode": "634622",
"isCascaded": false,
"autoCapture": "N",
"autoCapTime": 0,
At this point in the code the server returns the charge with the customer’s payment information
highlighting the customer’s card details, amount in US dollars(in this case), the description of the
charge, the email address, the customers IP address and, a message saying the payment has been
authorised or declined with the date and time displayed.
Copy the following code into the same class file as above.
"card": {
"id": "card_6AF19164-3233-4825-BEF9-143F04DA2E94",
"last4": "4242",
"paymentMethod": "Visa",
"fingerprint": "C96C9E67-DF9A-442A-93C5-CEEE7955314B",
"customerId": "cust_81AEE254-49C6-4AA0-A775-993669C5BDAD",
"name": "Sim Haag",
"expiryMonth": "06",
"expiryYear": "2018",
"billingDetails": {
"addressLine1": "72 Myrna Parkways",
"addressLine2": "Hoppe Fork",
"postcode": "aq81ct",
"country": "US",
"city": "Serenamouth",
"state": "Luzmouth",
"phone": {
"countryCode": "44",
"number": "12345678"
}
},
"cvvCheck": "Y",
"avsCheck": "S",
"responseCode": null
},
This point shows the last 4 digit of the customer’s card, the payment method (in this case is Visa). The
fingerprint and customer’s identity including the customer’s name is shown. The month and year or
the card expire date is also shown as well as the customer’s billing address, postcode, country, city,
state with the customer’s phone number and, CSV number checked and verified.
12. 11 | P a g e
Copy the following code in the same class file as above.
},
"metadata": {
"key1": "value1"
},
"shippingDetails": {
"addressLine1": "333 Cormier Bypass",
"addressLine2": "Rolfson Alley",
"postcode": "ue0 2ou",
"country": "US",
"city": "Schmittchester",
"state": "Jakubowskiton",
"phone": {
"countryCode": "44",
"number": "12345678"
},
This is the metadata displaying the results of the key and its value. It is also presented in the header
as well as the customer’s shipping address details including the postcode, country, city, delivery and,
contact number which are shown in a printable A4 paper.
Copy the following code in the same class file as above
"products": [
{
"description": "Tablet 1 gold limited",
"image": null,
"name": "Tablet 1 gold limited",
"price": 100,
"quantity": 1,
"shippingCost": 10,
"sku": "1aab2aa",
"trackingUrl": "https://www.tracker.com"
},
This displays the product description, name of the product, price, quantity, shipping cost and, SKU are
presented and tracked to https://www.tracker.com website, which provides the protection of customers’
sensitive data that are transported over the internet.
13. 12 | P a g e
Copy the following code in the same class file as above:
{
"description": "Tablet 2 gold limited",
"image": null,
"name": "Tablet 2 gold limited",
"price": 200,
"quantity": 2,
"shippingCost": 10,
"sku": "1aab2aa",
"trackingUrl": "https://www.tracker.com"
}
This is repeated depending on the quantity of the product and the price. Increases will happen each
time an additional item is added.
Now copy the final code in to the same class file as above.
},
"udf1": "udf 1 value",
"udf2": "udf 2 value",
"udf3": "udf 3 value",
"udf4": "udf 4 value",
"udf5": "udf 5 value"
}
You have now created a client-server application using the RESTful API with Java and JavaScript for
the use of our online payment transaction over, the HTTP protocol.
14. 13 | P a g e
Appendix:
Company’s name.js
Data-Key Attributes Javascript Keys Description
data-public-key publicKey Your public key obtained from company’s name Hub
data-payment-token paymentToken Your payment token
data-customer-email customerEmail Customer e-mail address
data-value value Transaction value
data-currency currency Transaction currency
15. 14 | P a g e
API KEYS
Key type Key subtype Prefix Description
Private
(secret)
Only used for requests from the merchant server to the API
Live ‘sk_’ Live mode
Test ‘sk_test_’ Test mode
Public Used for requests from the client (browser) to the API
Live ‘pk_’ Live mode
Test ‘pk_test_’ Test mode