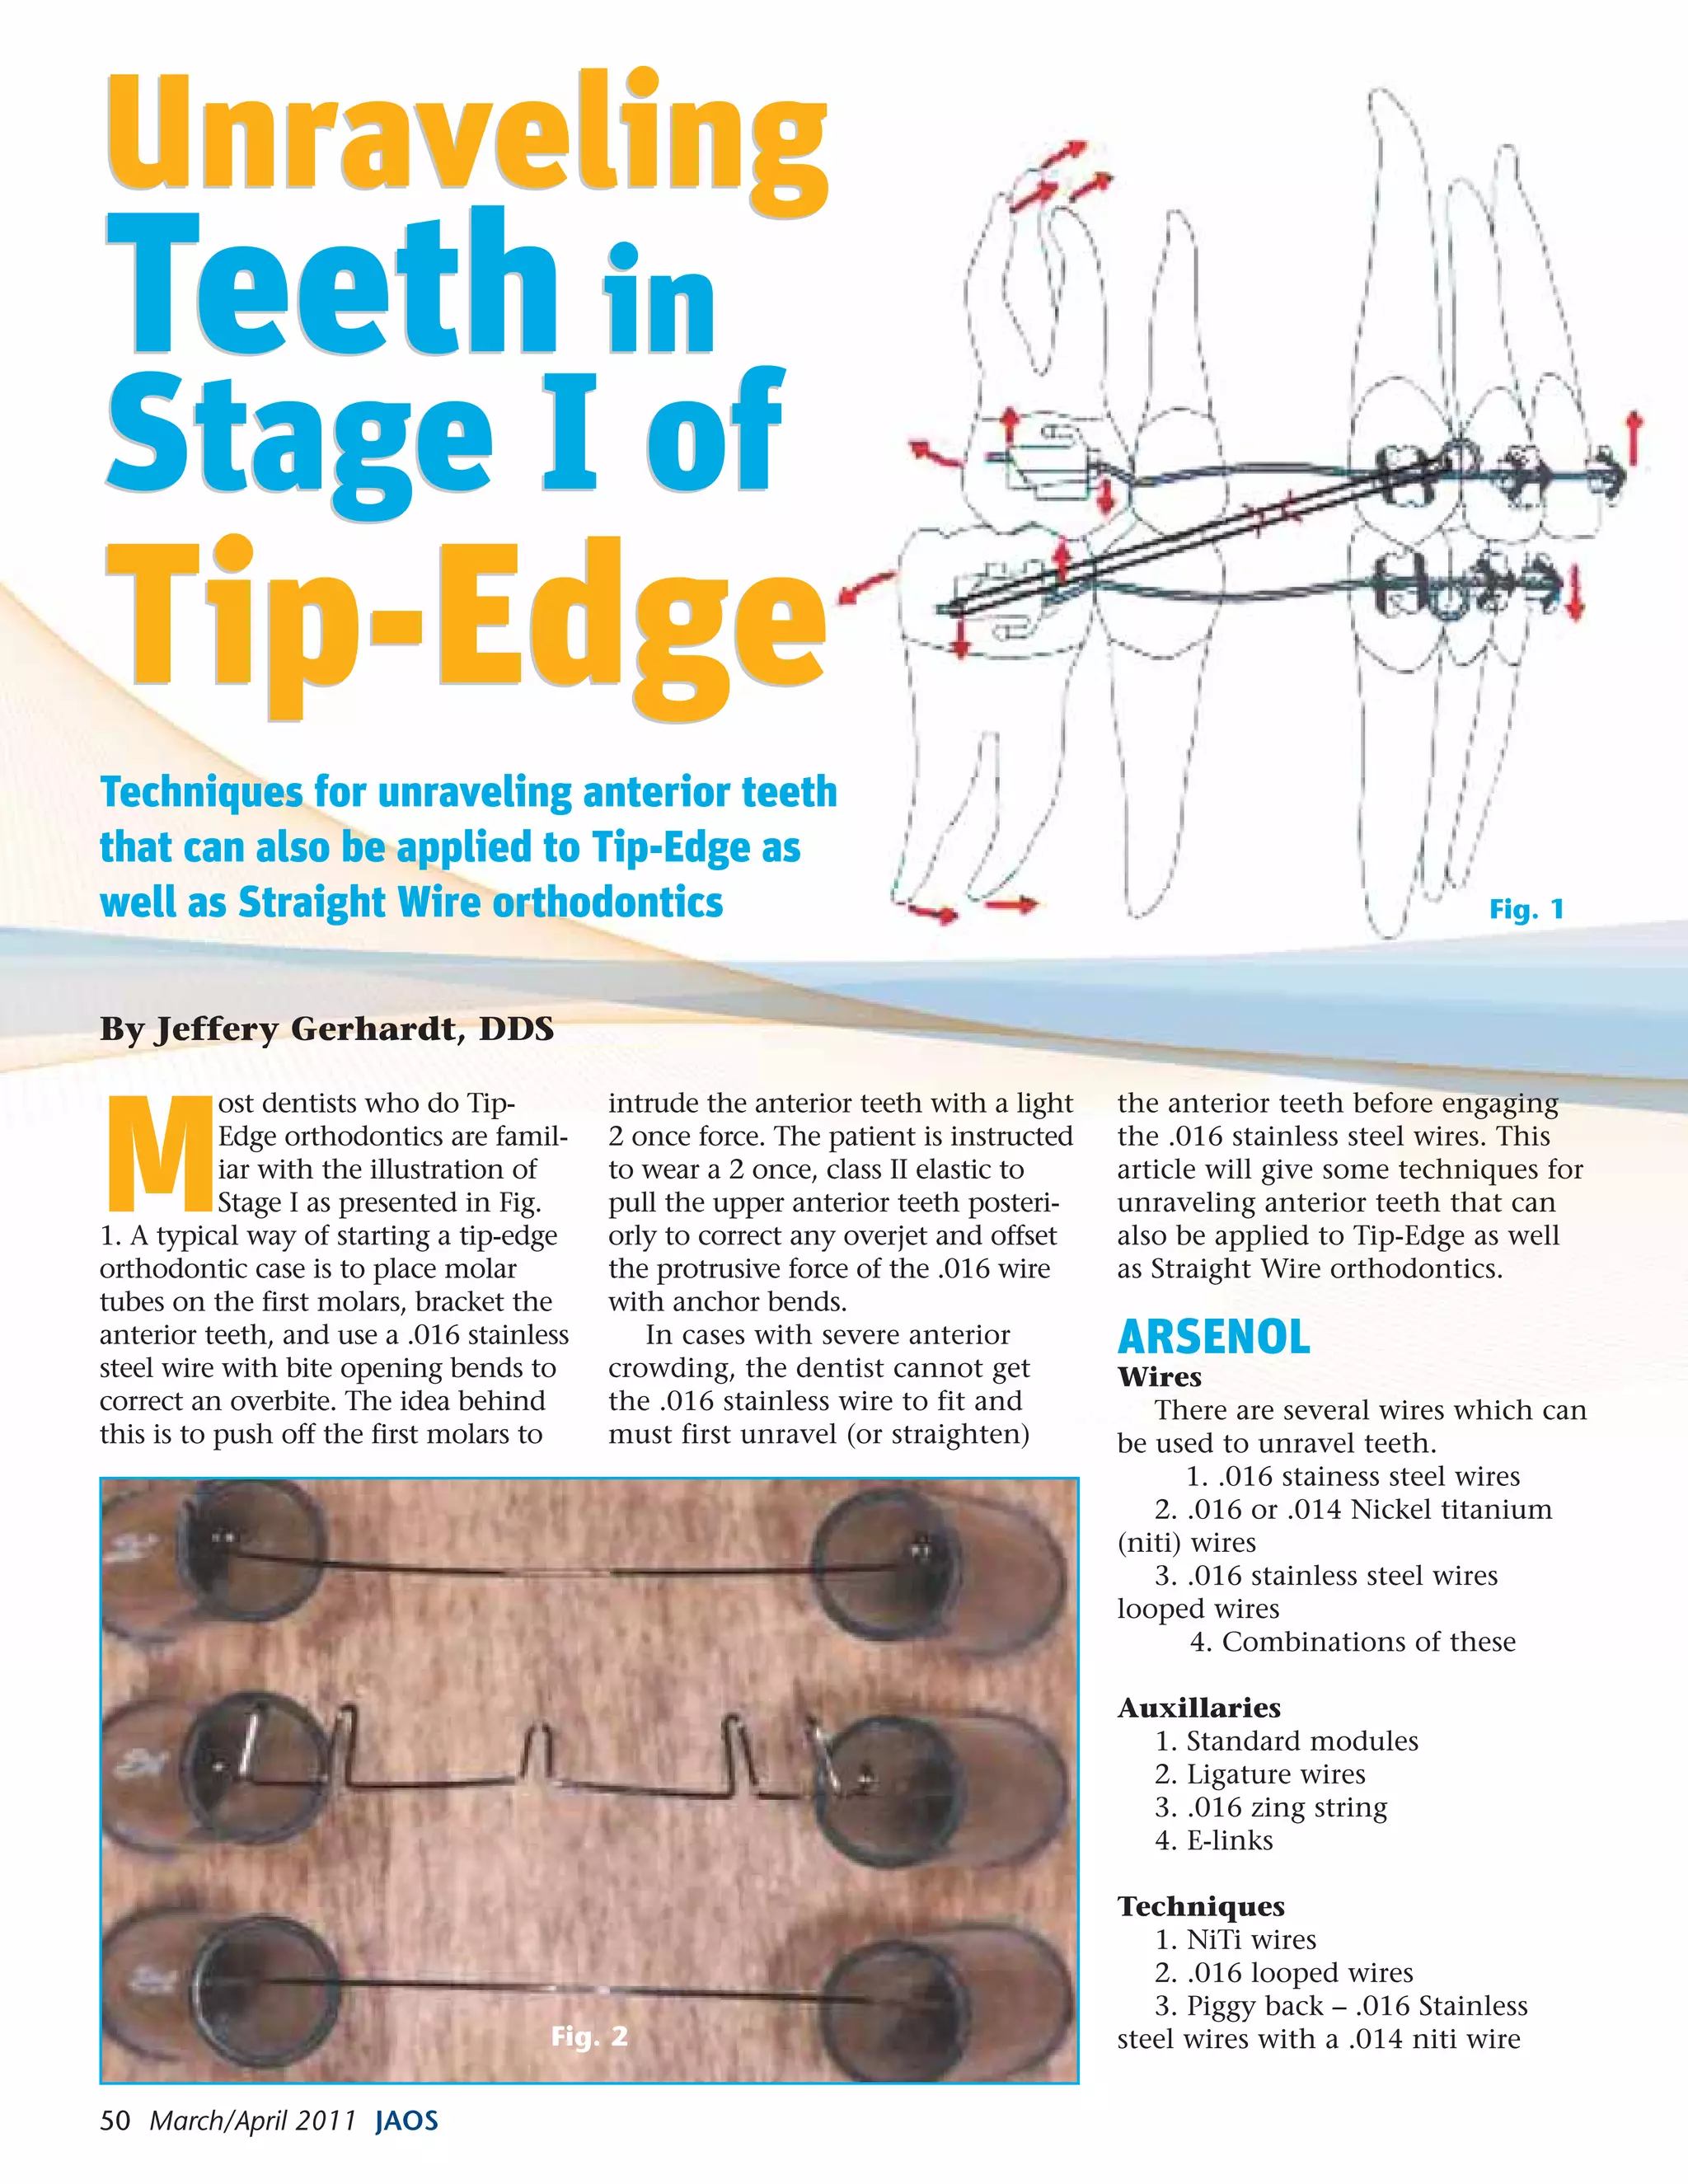
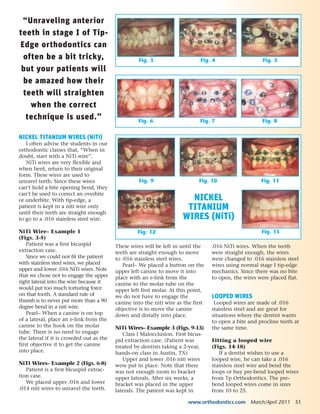
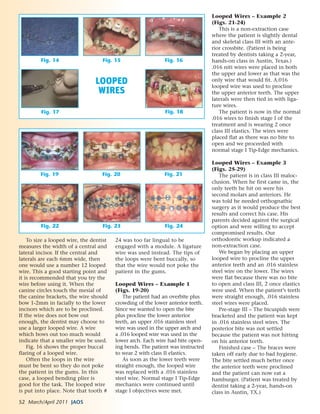
Orthodontic alignment phase of pre-adjusted fixed appliance ...
JAOSm-a11_Gerh
1. 50 March/April 2011 JAOS
M
ost dentists who do Tip-
Edge orthodontics are famil-
iar with the illustration of
Stage I as presented in Fig.
1. A typical way of starting a tip-edge
orthodontic case is to place molar
tubes on the first molars, bracket the
anterior teeth, and use a .016 stainless
steel wire with bite opening bends to
correct an overbite. The idea behind
this is to push off the first molars to
intrude the anterior teeth with a light
2 once force. The patient is instructed
to wear a 2 once, class II elastic to
pull the upper anterior teeth posteri-
orly to correct any overjet and offset
the protrusive force of the .016 wire
with anchor bends.
In cases with severe anterior
crowding, the dentist cannot get
the .016 stainless wire to fit and
must first unravel (or straighten)
the anterior teeth before engaging
the .016 stainless steel wires. This
article will give some techniques for
unraveling anterior teeth that can
also be applied to Tip-Edge as well
as Straight Wire orthodontics.
ARSENOL
Wires
There are several wires which can
be used to unravel teeth.
1. .016 stainess steel wires
2. .016 or .014 Nickel titanium
(niti) wires
3. .016 stainless steel wires
looped wires
4. Combinations of these
Auxillaries
1. Standard modules
2. Ligature wires
3. .016 zing string
4. E-links
Techniques
1. NiTi wires
2. .016 looped wires
3. Piggy back – .016 Stainless
steel wires with a .014 niti wire
Unraveling
Teeth in
Stage I of
Tip-Edge
Unraveling
Teeth in
Stage I of
Tip-Edge
By Jeffery Gerhardt, DDS
Techniques for unraveling anterior teeth
that can also be applied to Tip-Edge as
well as Straight Wire orthodontics Fig. 1
Fig. 2
2. NICKEL TITANIUM WIRES (NiTi)
I often advise the students in our
orthodontic classes that, “When in
doubt, start with a NiTi wire”.
NiTi wires are very flexible and
when bent, return to their original
form. These wires are used to
unravel teeth. Since these wires
can’t hold a bite opening bend, they
can’t be used to correct an overbite
or underbite. With tip-edge, a
patient is kept in a niti wire only
until their teeth are straight enough
to go to a .016 stainless steel wire.
NiTi Wire– Example 1
(Figs. 3-5)
Patient was a first bicuspid
extraction case.
Since we could not fit the patient
with stainless steel wires, we placed
upper and lower .016 NiTi wires. Note
that we chose not to engage the upper
right lateral into the wire because it
would put too much torturing force
on that tooth. A standard rule of
thumb is to never put more than a 90
degree bend in a niti wire.
Pearl– When a canine is on top
of a lateral, place an e-link from the
canine to the hook on the molar
tube. There is no need to engage
the lateral if it is crowded out as the
first objective it to get the canine
into place.
NiTi Wires– Example 2 (Figs. 6-8)
Patient is a first bicuspid extrac-
tion case.
We placed upper .016 and lower
.014 niti wires to unravel the teeth.
These wires will be left in until the
teeth are straight enough to move
to .016 stainless steel wires.
Pearl– We placed a button on the
upper left canine to move it into
place with an e-link from the
canine to the molar tube on the
upper left first molar. At this point,
we do not have to engage the
canine into the niti wire as the first
objective is to move the canine
down and distally into place.
NiTi Wires– Example 3 (Figs. 9-13)
Class I Malocclusion. First bicus-
pid extraction case. (Patient was
treated by dentists taking a 2-year,
hands-on class in Austin, TX)
Upper and lower .016 niti wires
were put in place. Note that there
was not enough room to bracket
upper laterals. After six weeks, a
bracket was placed in the upper
laterals. The patient was kept in
.016 NiTi wires. When the teeth
were straight enough, the wires
were changed to .016 stainless steel
wires using normal stage I tip-edge
mechanics. Since there was no bite
to open, the wires were placed flat.
LOOPED WIRES
Looped wires are made of .016
stainless steel and are great for
situations where the dentist wants
to open a bite and procline teeth at
the same time.
Fitting a looped wire
(Figs. 14-18)
If a dentist wishes to use a
looped wire, he can take a .016
stainless steel wire and bend the
loops or buy pre-bend looped wires
from Tp Orthodontics. The pre-
bend looped wires come in sizes
from 10 to 25.
“Unraveling anterior
teeth in stage I of Tip-
Edge orthodontics can
often be a bit tricky,
but your patients will
be amazed how their
teeth will straighten
when the correct
technique is used.”
Fig. 3 Fig. 4 Fig. 5
Fig. 6 Fig. 7 Fig. 8
Fig. 9
Fig. 12 Fig. 13
Fig. 10 Fig. 11
www.orthodontics.com March/April 2011 51
NICKEL
TITANIUM
WIRES (NiTi)
3. 52 March/April 2011 JAOS
To size a looped wire, the dentist
measures the width of a central and
lateral incisor. If the central and
laterals are each 6mm wide, then
one would use a number 12 looped
wire. This a good starting point and
it is recommended that you try the
wire before using it. When the
canine circles touch the mesial of
the canine brackets, the wire should
bow 1-2mm in facially to the lower
incisors which are to be proclined.
If the wire does not bow out
enough, the dentist may choose to
use a larger looped wire. A wire
which bows out too much would
indicate that a smaller wire be used.
Fig. 16 shows the proper buccal
flaring of a looped wire.
Often the loops in the wire
must be bent so they do not poke
the patient in the gums. In this
case, a looped bending plier is
good for the task. The looped wire
is put into place. Note that tooth #
24 was too far lingual to be
engaged with a module. A ligature
wire was used instead. The tips of
the loops were bent buccally, so
that the wire would not poke the
patient in the gums.
Looped Wires – Example 1
(Figs. 19-20)
The patient had an overbite plus
crowding of the lower anterior teeth.
Since we wanted to open the bite
plus procline the lower anterior
teeth, an upper .016 stainless steel
wire was used in the upper arch and
a .016 looped wire was used in the
lower arch. Each wire had bite open-
ing bends. The patient was instructed
to wear 2 with class II elastics.
As soon as the lower teeth were
straight enough, the looped wire
was replaced with a .016 stainless
steel wire. Normal stage I Tip-Edge
mechanics were continued until
stage I objectives were met.
Looped Wires – Example 2
(Figs. 21-24)
This is a non-extraction case
where the patient is slightly dental
and skeletal class III with an ante-
rior crossbite. (Patient is being
treated by dentists taking a 2-year,
hands-on class in Austin, Texas.)
.016 niti wires were placed in both
the upper and lower as that was the
only wire that would fit. A.016
looped wire was used to procline
the upper anterior teeth. The upper
laterals were then tied in with liga-
ture wires.
The patient is now in the normal
.016 wires to finish stage I of the
treatment and is wearing 2 once
class III elastics. The wires were
placed flat as there was no bite to
open and we proceeded with
normal stage I Tip-Edge mechanics.
Looped Wires – Example 3
(Figs. 25-29)
The patient is in class III maloc-
clusion. When he first came in, the
only teeth he hit on were his
second molars and anteriors. He
was told he needed orthognathic
surgery as it would produce the best
results and correct his case. His
parents decided against the surgical
option and were willing to accept
compromised results. Our
orthodontic workup indicated a
non-extraction case.
We began by placing an upper
looped wire to procline the upper
anterior teeth and an .016 stainless
steel wire on the lower. The wires
were flat because there was no bite
to open and class III, 2 once elastics
were used. When the patient’s teeth
were straight enough, .016 stainless
steel wires were placed.
Pre-stage III – The bicuspids were
bracketed and the patient was kept
in .016 stainless steel wires. The
posterior bite was not settled
because the patient was not hitting
on his anterior teeth.
Finished case – The braces were
taken off early due to bad hygiene.
The bite settled much better once
the anterior teeth were proclined
and the patient can now eat a
hamburger. (Patient was treated by
dentist taking a 2-year, hands-on
class in Austin, TX.)
Fig. 14
Fig. 17 Fig. 18
Fig. 15 Fig. 16
Fig. 19 Fig. 20 Fig. 21
Fig. 22 Fig. 23 Fig. 24
LOOPED
WIRES
4. www.orthodontics.com March/April 2011 53
PIGGY BACK WIRES
This technique incorporates a
.016 stainless steel wire on top of a
.014 niti wire. An .016 niti wire can
also be used, but we find it easier to
engage the .014 niti into the bracket
slot. This technique is used when the
dentist wants to open the bite and
unravel the teeth at the same time.
An alternative technique would be
to use a looped wire. This technique
is primarily used when the patient
has an overbite of 80% or more
along with severe anterior crowding.
If the patient has less than an 80%
overbite, it is best to start with .016
niti wires alone and then move to
.016 stainless steel wires when the
teeth are straight enough.
Examples of the Piggy Back
Technique Piggy Back –
Example 1 (Figs. 30-32)
The patient had a 90% overbite
and lower crowding. A .016 stainless
steel wire was placed in the upper
arch. In the lower arch, tooth # 23
was too far lingual to engage in the
stainless steel wire, so a .014 niti wire
was placed from canine to canine in
order to move tooth #23 facially. A
.016 Stainless steel wire was placed
on top of the niti wire. Both stainless
steel wires have bite opening bends
placed in them. We removed the
underlying niti wire when tooth #23
was straight enough to engage it into
the stainless steel wire.
Piggy Back– Example 2 (Figs.
33-34)
This patient had a class III maloc-
clusion and was a second bicuspid
extraction case. The patient received
placement of .016 stainless steel
wires with bite opening bends in
both the upper and lower. In the
upper arch, a .014 niti wire was
piggy backed (an upper looped wire
could have been used in this case
also). Tooth # 23 was tied onto the
lower wire with a zing string. The
patient in is now in stage II of treat-
ment and has .022 stainless steel
wires in both the upper and lower.
Finished case. (Patient treated by
dentists taking a 2-year, hands-on
class in Austin, TX)
CONCLUSION
A dentist can follow some simple
guidelines for wire selection in stage
I of Tip-Edge orthodontics:
ᕡ If the teeth are straight
enough, use .016 stainless
steel wires.
ᕢ Start with niti wires on
patients with severe crowding,
but not a severe overbite or
underbite to correct.
ᕣ Consider looped wires or the
piggy back technique on
patients with severe crowding
and overbites.
A. Use looped wires if you need
to procline the anterior teeth.
B. Use the piggy back technique
if proclining is not needed.
Unraveling anterior teeth in
stage I of tip-edge orthodontics can
often be a bit tricky, but your
patients will be amazed how their
teeth will straighten when the
correct technique is used.
Fig. 25
Fig. 28
Fig. 33 Fig. 34
Fig. 35 Fig. 34
Fig. 29
Fig. 26 Fig. 27
PIGGY
BACK
WIRES
Fig. 30 Fig. 31 Fig. 32