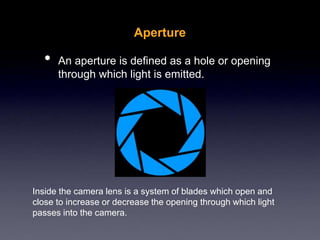
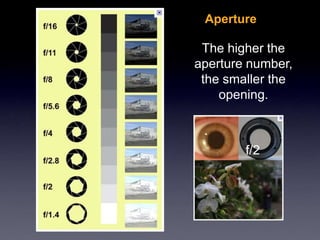
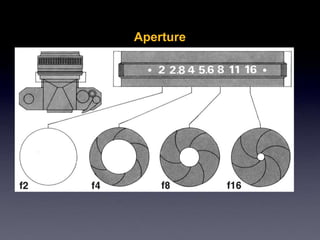
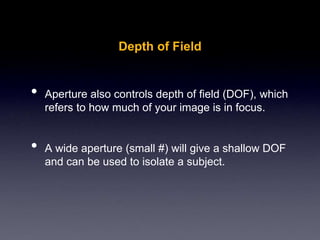
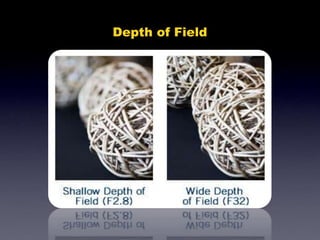
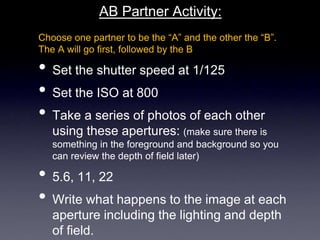
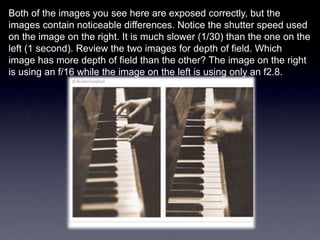
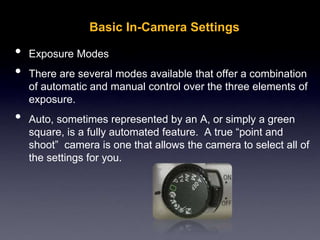
Camera Parts and Functions
Aperture (f-stops)
Bellwork:
Review with a partner the notable
differences between using a fast
shutter speed and a slow shutter
speed. Be ready to share with the
class as non-volunteers will be called
on to share responses.
Aperture
• An aperture is defined as a hole or opening
through which light is emitted.
Inside the camera lens is a system of blades which open and
close to increase or decrease the opening through which light
passes into the camera.
Aperture
The higher the
aperture number,
the smaller the
opening.
f/2
Aperture
• Often referred to as an f-stop, aperture is usually
represented by numbers such as: f/1.8, or f/5.6
• A smaller number means a wider opening and is
referred to as a larger value (ex. A large aperture
of 2.0, a small aperture of 22).
• The wider the lens is open (larger aperture value),
the more light gets in (you can use faster shutter
speeds).
Aperture
Depth of Field
• Aperture also controls depth of field (DOF), which
refers to how much of your image is in focus.
• A wide aperture (small #) will give a shallow DOF
and can be used to isolate a subject.
Depth of Field
AB Partner Activity:
Choose one partner to be the “A” and the other the “B”.
The A will go first, followed by the B
• Set the shutter speed at 1/125
• Set the ISO at 800
• Take a series of photos of each other
using these apertures: (make sure there is
something in the foreground and background so you
can review the depth of field later)
• 5.6, 11, 22
• Write what happens to the image at each
aperture including the lighting and depth
of field.
Both of the images you see here are exposed correctly, but the
images contain noticeable differences. Notice the shutter speed used
on the image on the right. It is much slower (1/30) than the one on the
left (1 second). Review the two images for depth of field. Which
image has more depth of field than the other? The image on the right
is using an f/16 while the image on the left is using only an f2.8.
Basic In-Camera Settings
• Exposure Modes
• There are several modes available that offer a combination
of automatic and manual control over the three elements of
exposure.
• Auto, sometimes represented by an A, or simply a green
square, is a fully automated feature. A true “point and
shoot” camera is one that allows the camera to select all of
the settings for you.
Also, the tripod socket is located at the camera base.
Basic In-Camera Settings
• AV, or Aperture Priority, allows you to choose the
aperture value while the camera selects the
shutter speed required to obtain a correct
exposure.
• TV, or Shutter Priority, allows you to choose the
shutter speed while the camera selects the
aperture, which would produce the correct
exposure.
• M, or Manual, gives you complete manual control.
You will need to select shutter speed and aperture.
Basic In-Camera Settings
• Scene Modes are basically fully automatic modes
designed specifically for a certain situation. They
typically place emphasis on one or more settings
based on the typical circumstances of the situation
chosen.
• Most digital cameras have very similar scene
modes available.
Scene Modes
• Backlight - eliminates dark shadows when light is
coming from behind a subject, or when the subject
is in the shade. The built-in flash automatically fires
to "fill in" the shadows.
• Beach/Snow - photograph beach, snow, and sunlit
water scenes. Exposure and white balance are set
to help prevent the scene from becoming washed
out.
Scene Modes
• Fireworks - shutter speed and exposure are set for
shooting fireworks; pre-focusing & use of tripod
recommended.
• Landscape - take photos of wide scenes. Camera
automatically focuses on a distant object.
• Macro - take close-up shots of small objects,
flowers and insects. Lens can be moved closer to
the subject than in other modes. Hold the camera
steady or use a tripod.
Scene Modes
• Night Portrait - take photos of a subject against a
night scene. The built-in flash and red-eye
reduction are enabled; shutter-speeds are low.
Use of tripod recommended.
• Night Scene - photograph nightscapes.
Preprogrammed to use slow shutter speeds. Use
of tripod recommended.
Scene Modes
• Portrait - main subject is clearly focused and the
background is out of focus (has less depth of field).
Best when taking shots outside during the day.
Shoot using a mid to long telephoto lens, stand
close to your subject within the recommended
camera range and, when possible, select an
uncomplicated background that is far from the
subject.
Scene Modes
• Sports (also called Kids & Pets)- take photos of a
fast moving subject; fast shutter speeds "freeze"
the action. Best when shots are taken in bright
light; pre-focusing recommended.
• Sunset - take photos of sunsets and sunrises;
helps keep the deep hues in the scene.
CLOSURE:
Ticket to Leave
3-2-1
Take an index card, write name & period
on it and then …
important terms from this lesson
you learned today.
key ideas you’d still like to know
more about.
concept you believe you fully
understand.
A few non-volunteers are chosen to report their
responses on the KWI assignment.

Intro to Digital Photography and Functions

  • 1.
    Camera Parts andFunctions Aperture (f-stops)
  • 2.
    Bellwork: Review with apartner the notable differences between using a fast shutter speed and a slow shutter speed. Be ready to share with the class as non-volunteers will be called on to share responses.
  • 3.
    Aperture • An apertureis defined as a hole or opening through which light is emitted. Inside the camera lens is a system of blades which open and close to increase or decrease the opening through which light passes into the camera.
  • 4.
    Aperture The higher the aperturenumber, the smaller the opening. f/2
  • 5.
    Aperture • Often referredto as an f-stop, aperture is usually represented by numbers such as: f/1.8, or f/5.6 • A smaller number means a wider opening and is referred to as a larger value (ex. A large aperture of 2.0, a small aperture of 22). • The wider the lens is open (larger aperture value), the more light gets in (you can use faster shutter speeds).
  • 6.
  • 7.
    Depth of Field •Aperture also controls depth of field (DOF), which refers to how much of your image is in focus. • A wide aperture (small #) will give a shallow DOF and can be used to isolate a subject.
  • 8.
  • 9.
    AB Partner Activity: Chooseone partner to be the “A” and the other the “B”. The A will go first, followed by the B • Set the shutter speed at 1/125 • Set the ISO at 800 • Take a series of photos of each other using these apertures: (make sure there is something in the foreground and background so you can review the depth of field later) • 5.6, 11, 22 • Write what happens to the image at each aperture including the lighting and depth of field.
  • 10.
    Both of theimages you see here are exposed correctly, but the images contain noticeable differences. Notice the shutter speed used on the image on the right. It is much slower (1/30) than the one on the left (1 second). Review the two images for depth of field. Which image has more depth of field than the other? The image on the right is using an f/16 while the image on the left is using only an f2.8.
  • 11.
    Basic In-Camera Settings •Exposure Modes • There are several modes available that offer a combination of automatic and manual control over the three elements of exposure. • Auto, sometimes represented by an A, or simply a green square, is a fully automated feature. A true “point and shoot” camera is one that allows the camera to select all of the settings for you.
  • 12.
    Also, the tripodsocket is located at the camera base.
  • 13.
    Also, the tripodsocket is located at the camera base.
  • 14.
    Basic In-Camera Settings •AV, or Aperture Priority, allows you to choose the aperture value while the camera selects the shutter speed required to obtain a correct exposure. • TV, or Shutter Priority, allows you to choose the shutter speed while the camera selects the aperture, which would produce the correct exposure. • M, or Manual, gives you complete manual control. You will need to select shutter speed and aperture.
  • 15.
    Basic In-Camera Settings •Scene Modes are basically fully automatic modes designed specifically for a certain situation. They typically place emphasis on one or more settings based on the typical circumstances of the situation chosen. • Most digital cameras have very similar scene modes available.
  • 16.
    Scene Modes • Backlight- eliminates dark shadows when light is coming from behind a subject, or when the subject is in the shade. The built-in flash automatically fires to "fill in" the shadows. • Beach/Snow - photograph beach, snow, and sunlit water scenes. Exposure and white balance are set to help prevent the scene from becoming washed out.
  • 17.
    Scene Modes • Fireworks- shutter speed and exposure are set for shooting fireworks; pre-focusing & use of tripod recommended. • Landscape - take photos of wide scenes. Camera automatically focuses on a distant object. • Macro - take close-up shots of small objects, flowers and insects. Lens can be moved closer to the subject than in other modes. Hold the camera steady or use a tripod.
  • 18.
    Scene Modes • NightPortrait - take photos of a subject against a night scene. The built-in flash and red-eye reduction are enabled; shutter-speeds are low. Use of tripod recommended. • Night Scene - photograph nightscapes. Preprogrammed to use slow shutter speeds. Use of tripod recommended.
  • 19.
    Scene Modes • Portrait- main subject is clearly focused and the background is out of focus (has less depth of field). Best when taking shots outside during the day. Shoot using a mid to long telephoto lens, stand close to your subject within the recommended camera range and, when possible, select an uncomplicated background that is far from the subject.
  • 20.
    Scene Modes • Sports(also called Kids & Pets)- take photos of a fast moving subject; fast shutter speeds "freeze" the action. Best when shots are taken in bright light; pre-focusing recommended. • Sunset - take photos of sunsets and sunrises; helps keep the deep hues in the scene.
  • 21.
    CLOSURE: Ticket to Leave 3-2-1 Takean index card, write name & period on it and then … important terms from this lesson you learned today. key ideas you’d still like to know more about. concept you believe you fully understand. A few non-volunteers are chosen to report their responses on the KWI assignment.