How to training series - changing a tire on the roadside
INSTRUCTIONS HYBRID
1. • Attach the seat to the
seat post.
(use a 14mm spanner, or
a shifter)
• IMPORTANT!
Make sure the seat
is tightly fixed before
moving to step 2.
1
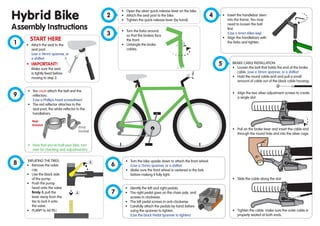
START HERE
• Open the silver quick-release lever on the bike.
• Attach the seat post to the bike.
• Tighten the quick-release lever (by hand).Hybrid Bike
Assembly Instructions
BRAKE CABLE INSTALLATION:
• Loosen the bolt that holds the end of the brake
cable. (use a 10mm spanner, or a shifter)
• Hold the round cable-end and pull a small
amount of cable out of the black cable housing:
• Align the two silver adjustment screws to create
a single slot:
• Pull on the brake lever and insert the cable end
through the round hole and into the silver cage.
• Slide the cable along the slot:
• Tighten the cable: make sure the outer cable is
properly seated at both ends.
2
3
4
5
• Turn the forks around
so that the brakes face
the front.
• Untangle the brake
cables.
• Turn the bike upside down to attach the front wheel.
(Use a 15mm spanner, or a shifter)
• Make sure the front wheel is centered in the fork
before making it fully tight.
6
• Insert the handlebar stem
into the frame. You may
need to loosen the bolt
first.
(Use a 6mm Allen key)
• Align the handlebars with
the forks and tighten.
7
• Identify the left and right pedals.
• The right pedal goes on the chain side, and
screws in clockwise.
• The left pedal screws in anti-clockwise
• Carefully attach the pedals by hand before
using the spanner to tighten.
(Use the black Pedal Spanner to tighten)
INFLATING THE TIRES:
• Remove the valve
cap
• Use the black side
of the pump.
• Push the pump
head onto the valve
firmly & pull the
lever away from the
tire to lock it onto
the valve.
• PUMP! to 60 P.S.I.
8
Front
Bracket
• You must attach the bell and the
reflectors.
(Use a Phillips-head screwdriver)
• The red reflector attaches to the
seat post, the white reflector to the
handlebars.
• Now that you’ve built your bike, turn
over for checking and adjustments!z
9
Rear
Bracket
A
B
2. GOOD BAD!
• Check that the front wheel is properly
aligned. Stand in front of the bike and
compare the line of the wheel to the line
of the fork.
• If it doesn’t line up, loosen the wheel nuts
slightly and tighten them, making sure
that the wheel stays centred in the fork.
CHECK:
• Test that the wheel nuts are tight enough:
• Standing next to the bike, hold the bike
with one hand and hold the wheel in the
other. Rock the wheel towards you and
away from you. It shouldn’t move at all.
• If it rocks or rattles you need to tighten the
wheel nuts.
(Use a 15mm spanner or a shifter)
• Make sure the handlebars align with the
wheel before you make them tight.
CHECK:
• Put the front wheel between your knees,
and try to twist the handlebars.
If they move they need to be tightened.
• Tighten the handlebars by tightening the
single bolt on top of the stem.
(Use a 6mm Allen key)
1
Hybrid Bike
FINAL CHECK
+ Adjustments
2 3 4
• Adjust the height of the saddle. It should
line up to the top of your hip. If it’s too low
you will get sore knees when you ride!
• Adjust the angle of the saddle. It should
be level with the ground.
CHECK:
• Hold the saddle with two hands and try to
twist it from side to side.
• If it turns, you’ll need to tighten either the
bolt under the saddle
(with a 14mm spanner)
• ... or make the quick-release seat-post
clamp even tighter
HANDLEBARS
SADDLE
WHEELS
BRAKES
• Do each check on your own bike before
checking another bike in your group.
• The brake levers
should be at a
45 degree angle.
• Brake levers should be
clamped tightly to the handlebars.
(Use a 5mm Allen key to tighten)
If you’re not confident adjusting the
brakes, skip this step. We’ll check the
brakes for you at the final check station.
• The brake pads should line up exactly
with the rims.
(Use a 5mm Allen key to tighten)
• Tighten the brake cable so that the pads
grab the rim.
(Use a 10mm spanner to tighten)
• If you can squeeze the brake lever all the
way to the handlebar, the cable needs to
be tighter.
5
• It’s almost time to start riding!
• Once you’ve finished checking your
bike, help someone else in your group
to check their bike.
• When you’ve both finished, walk your
bikes to the checking station.
• The Happiness Cycle mechanics will
check everything to make sure your bike
is safe.
• When the check is complete, you can
go outside and collect your helmet, lock
and lights, and try out our Bike Skills
Challenge!
FINISHED!
45˚
Front