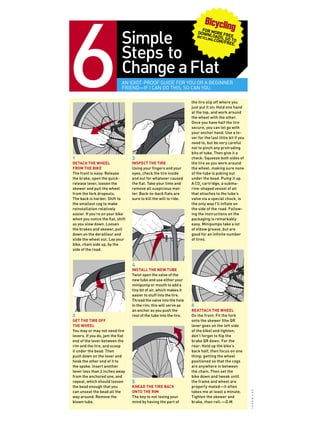
SlideShare a Scribd company logo
1 of 1
Download to read offline
Simple
Steps to
Change aFlat
An idiot-proof guide for you or a beginner
friend—if I can do this, so can you.
1
Detach the wheel
from the bike
The front is easy: Release
the brake, open the quick-
release lever, loosen the
skewer and pull the wheel
from the fork dropouts.
The back is harder. Shift to
the smallest cog to make
reinstallation relatively
easier. If you’re on your bike
when you notice the flat, shift
as you slow down. Loosen
the brakes and skewer, pull
down on the derailleur and
slide the wheel out. Lay your
bike, chain side up, by the
side of the road.
2
Get the tire off
the wheel
You may or may not need tire
levers. If you do, jam the flat
end of the lever between the
rim and the tire, and scoop
it under the bead. Then
push down on the lever and
hook the other end of it to
the spoke. Insert another
lever less than 2 inches away
from the anchored one, and
repeat, which should loosen
the bead enough that you
can unseat the bead all the
way around. Remove the
blown tube.
3
Inspect the tire
Using your fingers and your
eyes, check the tire inside
and out for whatever caused
the flat. Take your time and
remove all suspicious mat-
ter. Back-to-back flats are
sure to kill the will to ride.
4
Install the new tube
Twist open the valve of the
new tube and use either your
minipump or mouth to add a
tiny bit of air, which makes it
easier to stuff into the tire.
Thread the valve into the hole
in the rim; this will serve as
an anchor as you push the
rest of the tube into the tire.
5
Knead the tire back
onto the rim
The key to not losing your
mind by having the part of
the tire slip off where you
just put it on: Hold one hand
at the top, and work around
the wheel with the other.
Once you have half the tire
secure, you can let go with
your anchor hand. Use a le-
ver for the last little bit if you
need to, but be very careful
not to pinch any protruding
bits of tube. Then give it a
check: Squeeze both sides of
the tire as you work around
the wheel, making sure none
of the tube is poking out
under the bead. Pump it up.
A CO2
cartridge, a subma-
rine-shaped vessel of air
that attaches to the tube’s
valve via a special chuck, is
the only way I’ll inflate on
the side of the road. Follow-
ing the instructions on the
packaging is remarkably
easy. Minipumps take a lot
of elbow grease, but are
good for an infinite number
of tires.
6
Reattach the wheel
On the front: Fit the fork
onto the skewer (the QR
lever goes on the left side
of the bike) and tighten;
don’t forget to flip the
brake QR down. For the
rear: Hold up the bike’s
back half, then focus on one
thing: getting the wheel
positioned so that the cogs
are anywhere in between
the chain. Then set the
bike down and tweak until
the frame and wheel are
properly mated—it often
takes me at least a minute.
Tighten the skewer and
brake, then roll.—D.M.
jasonlee
For More Free
Downloads, go to
bicycling.com/free.

More Related Content

Similar to FIX_A_FLAT

Bike maintainance level 1
Bike maintainance level 1Bike maintainance level 1
Bike maintainance level 1Zulhikmi Zali
 
How To Change A Tire1
How To Change A Tire1How To Change A Tire1
How To Change A Tire1auroracr123
 
How to change brakes powerpoint
How to change brakes powerpointHow to change brakes powerpoint
How to change brakes powerpointcabajames89
 
How to training series - changing a tire on the roadside
How to training series - changing a tire on the roadsideHow to training series - changing a tire on the roadside
How to training series - changing a tire on the roadsideSylvia Kay
 
How+To+Change+A+Tire
How+To+Change+A+TireHow+To+Change+A+Tire
How+To+Change+A+TireHallte
 
Checking piston valve clearance
Checking piston valve clearanceChecking piston valve clearance
Checking piston valve clearanceJomer Almozara
 
INSTRUCTIONS HYBRID
INSTRUCTIONS HYBRIDINSTRUCTIONS HYBRID
INSTRUCTIONS HYBRIDMatt Briody
 
Thunderbike Triumph Thunderbird 16/1700 Fork Cap Fitting Instructions
Thunderbike Triumph Thunderbird 16/1700 Fork Cap Fitting InstructionsThunderbike Triumph Thunderbird 16/1700 Fork Cap Fitting Instructions
Thunderbike Triumph Thunderbird 16/1700 Fork Cap Fitting InstructionsThunderbike Engineering Ltd
 
Suspension system
Suspension systemSuspension system
Suspension systemAlvin Au
 
How to fix a broken bicycle chain
How to fix a broken bicycle chainHow to fix a broken bicycle chain
How to fix a broken bicycle chaineastmanglobal2
 
Complete bicyle assembly
Complete bicyle assemblyComplete bicyle assembly
Complete bicyle assemblyandonis-artist
 
Complete bike assembly
Complete bike assemblyComplete bike assembly
Complete bike assemblyandonis-artist
 
Chapter 5 : Clutches and Brakes
Chapter 5 : Clutches and BrakesChapter 5 : Clutches and Brakes
Chapter 5 : Clutches and BrakesAriefHaekal
 
How to change a tire
How to change a tireHow to change a tire
How to change a tirebraulionova
 

Similar to FIX_A_FLAT (20)

Bike maintainance level 1
Bike maintainance level 1Bike maintainance level 1
Bike maintainance level 1
 
Basic operations with your bicycle
Basic operations with your bicycleBasic operations with your bicycle
Basic operations with your bicycle
 
Week 1 Clinic
Week 1 ClinicWeek 1 Clinic
Week 1 Clinic
 
How To Change A Tire1
How To Change A Tire1How To Change A Tire1
How To Change A Tire1
 
How to change brakes powerpoint
How to change brakes powerpointHow to change brakes powerpoint
How to change brakes powerpoint
 
How to training series - changing a tire on the roadside
How to training series - changing a tire on the roadsideHow to training series - changing a tire on the roadside
How to training series - changing a tire on the roadside
 
How+To+Change+A+Tire
How+To+Change+A+TireHow+To+Change+A+Tire
How+To+Change+A+Tire
 
Checking piston valve clearance
Checking piston valve clearanceChecking piston valve clearance
Checking piston valve clearance
 
INSTRUCTIONS HYBRID
INSTRUCTIONS HYBRIDINSTRUCTIONS HYBRID
INSTRUCTIONS HYBRID
 
Thunderbike Triumph Thunderbird 16/1700 Fork Cap Fitting Instructions
Thunderbike Triumph Thunderbird 16/1700 Fork Cap Fitting InstructionsThunderbike Triumph Thunderbird 16/1700 Fork Cap Fitting Instructions
Thunderbike Triumph Thunderbird 16/1700 Fork Cap Fitting Instructions
 
Suspension system
Suspension systemSuspension system
Suspension system
 
Brake pads
Brake padsBrake pads
Brake pads
 
Cycle
CycleCycle
Cycle
 
How to fix a broken bicycle chain
How to fix a broken bicycle chainHow to fix a broken bicycle chain
How to fix a broken bicycle chain
 
Diytc final
Diytc finalDiytc final
Diytc final
 
How to change a tire
How to change a tireHow to change a tire
How to change a tire
 
Complete bicyle assembly
Complete bicyle assemblyComplete bicyle assembly
Complete bicyle assembly
 
Complete bike assembly
Complete bike assemblyComplete bike assembly
Complete bike assembly
 
Chapter 5 : Clutches and Brakes
Chapter 5 : Clutches and BrakesChapter 5 : Clutches and Brakes
Chapter 5 : Clutches and Brakes
 
How to change a tire
How to change a tireHow to change a tire
How to change a tire
 

FIX_A_FLAT

  • 1. Simple Steps to Change aFlat An idiot-proof guide for you or a beginner friend—if I can do this, so can you. 1 Detach the wheel from the bike The front is easy: Release the brake, open the quick- release lever, loosen the skewer and pull the wheel from the fork dropouts. The back is harder. Shift to the smallest cog to make reinstallation relatively easier. If you’re on your bike when you notice the flat, shift as you slow down. Loosen the brakes and skewer, pull down on the derailleur and slide the wheel out. Lay your bike, chain side up, by the side of the road. 2 Get the tire off the wheel You may or may not need tire levers. If you do, jam the flat end of the lever between the rim and the tire, and scoop it under the bead. Then push down on the lever and hook the other end of it to the spoke. Insert another lever less than 2 inches away from the anchored one, and repeat, which should loosen the bead enough that you can unseat the bead all the way around. Remove the blown tube. 3 Inspect the tire Using your fingers and your eyes, check the tire inside and out for whatever caused the flat. Take your time and remove all suspicious mat- ter. Back-to-back flats are sure to kill the will to ride. 4 Install the new tube Twist open the valve of the new tube and use either your minipump or mouth to add a tiny bit of air, which makes it easier to stuff into the tire. Thread the valve into the hole in the rim; this will serve as an anchor as you push the rest of the tube into the tire. 5 Knead the tire back onto the rim The key to not losing your mind by having the part of the tire slip off where you just put it on: Hold one hand at the top, and work around the wheel with the other. Once you have half the tire secure, you can let go with your anchor hand. Use a le- ver for the last little bit if you need to, but be very careful not to pinch any protruding bits of tube. Then give it a check: Squeeze both sides of the tire as you work around the wheel, making sure none of the tube is poking out under the bead. Pump it up. A CO2 cartridge, a subma- rine-shaped vessel of air that attaches to the tube’s valve via a special chuck, is the only way I’ll inflate on the side of the road. Follow- ing the instructions on the packaging is remarkably easy. Minipumps take a lot of elbow grease, but are good for an infinite number of tires. 6 Reattach the wheel On the front: Fit the fork onto the skewer (the QR lever goes on the left side of the bike) and tighten; don’t forget to flip the brake QR down. For the rear: Hold up the bike’s back half, then focus on one thing: getting the wheel positioned so that the cogs are anywhere in between the chain. Then set the bike down and tweak until the frame and wheel are properly mated—it often takes me at least a minute. Tighten the skewer and brake, then roll.—D.M. jasonlee For More Free Downloads, go to bicycling.com/free.