08/10/2017 Industrial Training Report
https://www.slideshare.net/shubhamchakraborty108/itr-50388753 1/35
SlideShare Explore Search You
Upload
Login
Signup
Search
Home
Presentation Courses
PowerPoint Courses
EdTech & E-Learning Courses
by LinkedIn Learning
Search
08/10/2017 Industrial Training Report
https://www.slideshare.net/shubhamchakraborty108/itr-50388753 2/35
08/10/2017 Industrial Training Report
https://www.slideshare.net/shubhamchakraborty108/itr-50388753 3/35
08/10/2017 Industrial Training Report
https://www.slideshare.net/shubhamchakraborty108/itr-50388753 4/35
08/10/2017 Industrial Training Report
https://www.slideshare.net/shubhamchakraborty108/itr-50388753 5/35
08/10/2017 Industrial Training Report
https://www.slideshare.net/shubhamchakraborty108/itr-50388753 6/35
08/10/2017 Industrial Training Report
https://www.slideshare.net/shubhamchakraborty108/itr-50388753 7/35
08/10/2017 Industrial Training Report
https://www.slideshare.net/shubhamchakraborty108/itr-50388753 8/35
08/10/2017 Industrial Training Report
https://www.slideshare.net/shubhamchakraborty108/itr-50388753 9/35
08/10/2017 Industrial Training Report
https://www.slideshare.net/shubhamchakraborty108/itr-50388753 10/35
08/10/2017 Industrial Training Report
https://www.slideshare.net/shubhamchakraborty108/itr-50388753 11/35
08/10/2017 Industrial Training Report
https://www.slideshare.net/shubhamchakraborty108/itr-50388753 12/35
08/10/2017 Industrial Training Report
https://www.slideshare.net/shubhamchakraborty108/itr-50388753 13/35
08/10/2017 Industrial Training Report
https://www.slideshare.net/shubhamchakraborty108/itr-50388753 14/35
08/10/2017 Industrial Training Report
https://www.slideshare.net/shubhamchakraborty108/itr-50388753 15/35
08/10/2017 Industrial Training Report
https://www.slideshare.net/shubhamchakraborty108/itr-50388753 16/35
08/10/2017 Industrial Training Report
https://www.slideshare.net/shubhamchakraborty108/itr-50388753 17/35
08/10/2017 Industrial Training Report
https://www.slideshare.net/shubhamchakraborty108/itr-50388753 18/35
08/10/2017 Industrial Training Report
https://www.slideshare.net/shubhamchakraborty108/itr-50388753 19/35
08/10/2017 Industrial Training Report
https://www.slideshare.net/shubhamchakraborty108/itr-50388753 20/35
08/10/2017 Industrial Training Report
https://www.slideshare.net/shubhamchakraborty108/itr-50388753 21/35
08/10/2017 Industrial Training Report
https://www.slideshare.net/shubhamchakraborty108/itr-50388753 22/35
08/10/2017 Industrial Training Report
https://www.slideshare.net/shubhamchakraborty108/itr-50388753 23/35
08/10/2017 Industrial Training Report
https://www.slideshare.net/shubhamchakraborty108/itr-50388753 24/35
Upcoming SlideShare
Loading in …5
×
23 of 23
Like this document? Why not share!
08/10/2017 Industrial Training Report
https://www.slideshare.net/shubhamchakraborty108/itr-50388753 25/35
Share
Email
Industrial Training Report-1 by Rohit Grandhi, EIT
207068 views
AMTEK Research Report by Peeyush Sahu CAPM®
1073 views
Amtek training Aman (11 me-06) by Aman5252 2614 views
Industrial Training Report
1,160 views
Share
Like
Download
Shubham Chakraborty
Follow
Published on Jul 10, 2015
Industrial Training Report on Amtek Auto Ltd. For Engineering Students
08/10/2017 Industrial Training Report
https://www.slideshare.net/shubhamchakraborty108/itr-50388753 26/35
HEC Project Report by Ashish Raj 3839 views
Summer training by Ranjit Kandel 211 views
Amtek persentation aman (11 me-06) by Aman5252 1130 views
...
Published in: Engineering
0 Comments
4 Likes
Statistics
Notes
Full Name
Comment goes here.
12 hours ago Delete Reply Spam Block
Are you sure you want to Yes No
Your message goes here
Share your thoughts…
Post
Be the first to comment
Shree Nath , --
9 months ago
Satnam Singh , Attended G.g.i
1 year ago
yajat sharma
1 year ago
Ashish Sk
2 years ago
No Downloads
Views
Total views
1,160
On SlideShare
0
From Embeds
0
Number of Embeds
08/10/2017 Industrial Training Report
https://www.slideshare.net/shubhamchakraborty108/itr-50388753 27/35
2
Actions
Shares
0
Downloads
109
Comments
0
Likes
4
Embeds 0
No embeds
No notes for slide
Industrial Training Report
1. 1. 1 AN INDUSTRIAL TRAINING REPORT Done by Shubham Chakraborty Enrollment no: 12345678
At Amtek Auto Ltd. Mandideep Industrial Area, Bhopal, Madhya Pradesh. Submitted to Department of
Mechanical Engineering July 2015
2. 2. 2 ACKNOWLEDGEMENT An engineer with only theoretical knowledge is not a complete engineer.
Practical knowledge is very important to develop and apply engineering skills. It gives me great pleasure
to have an opportunity to acknowledge and to express gratitude to those who were associated with me
during my training at Amtek Auto Ltd., Mandideep. Special thanks to Mr. Ramesh Thakur for providing
me with an opportunity to undergo training under his able guidance and offering me a very deep
knowledge of practical aspects of industrial work culture. I express my sincere thanks and gratitude to
Amtek Auto Ltd. authorities for allowing me to undergo the training in this prestigious organization. I will
always remain indebted to them for their constant interest and excellent guidance in my training work,
moreover for providing me with an opportunity to work and gain experience
3. 3. 3 PREFACE Practical knowledge means the visualization of the knowledge, which we read in our
books. For this, we perform experiments and get observations. Practical knowledge is very important in
every field. One must be familiar with the problems related to that field so that he may solve them and
become a successful person. After achieving education, an engineer has to enter professional life.
Accordingly, he has to serve an industry, may be public or private sector or self-own. For the efficient
work in the field, he must be well aware of the practical knowledge as well as theoretical knowledge. To
be a good engineer, one must be aware of the industrial environment and must know about management,
working in such an industry, labor problems etc., so that he can tackle them successfully. Due to all the
above reasons and to bridge the gap between theory and practical, our engineering curriculum provides a
practical training. During this period, a student works in the industry and gets all type of experience and
knowledge about the working and maintenance of various types of machinery. I have undergone my 15
days training at AMTEK AUTO LIMITED. This report is based on the knowledge, which I acquired
during my training period at the plant.
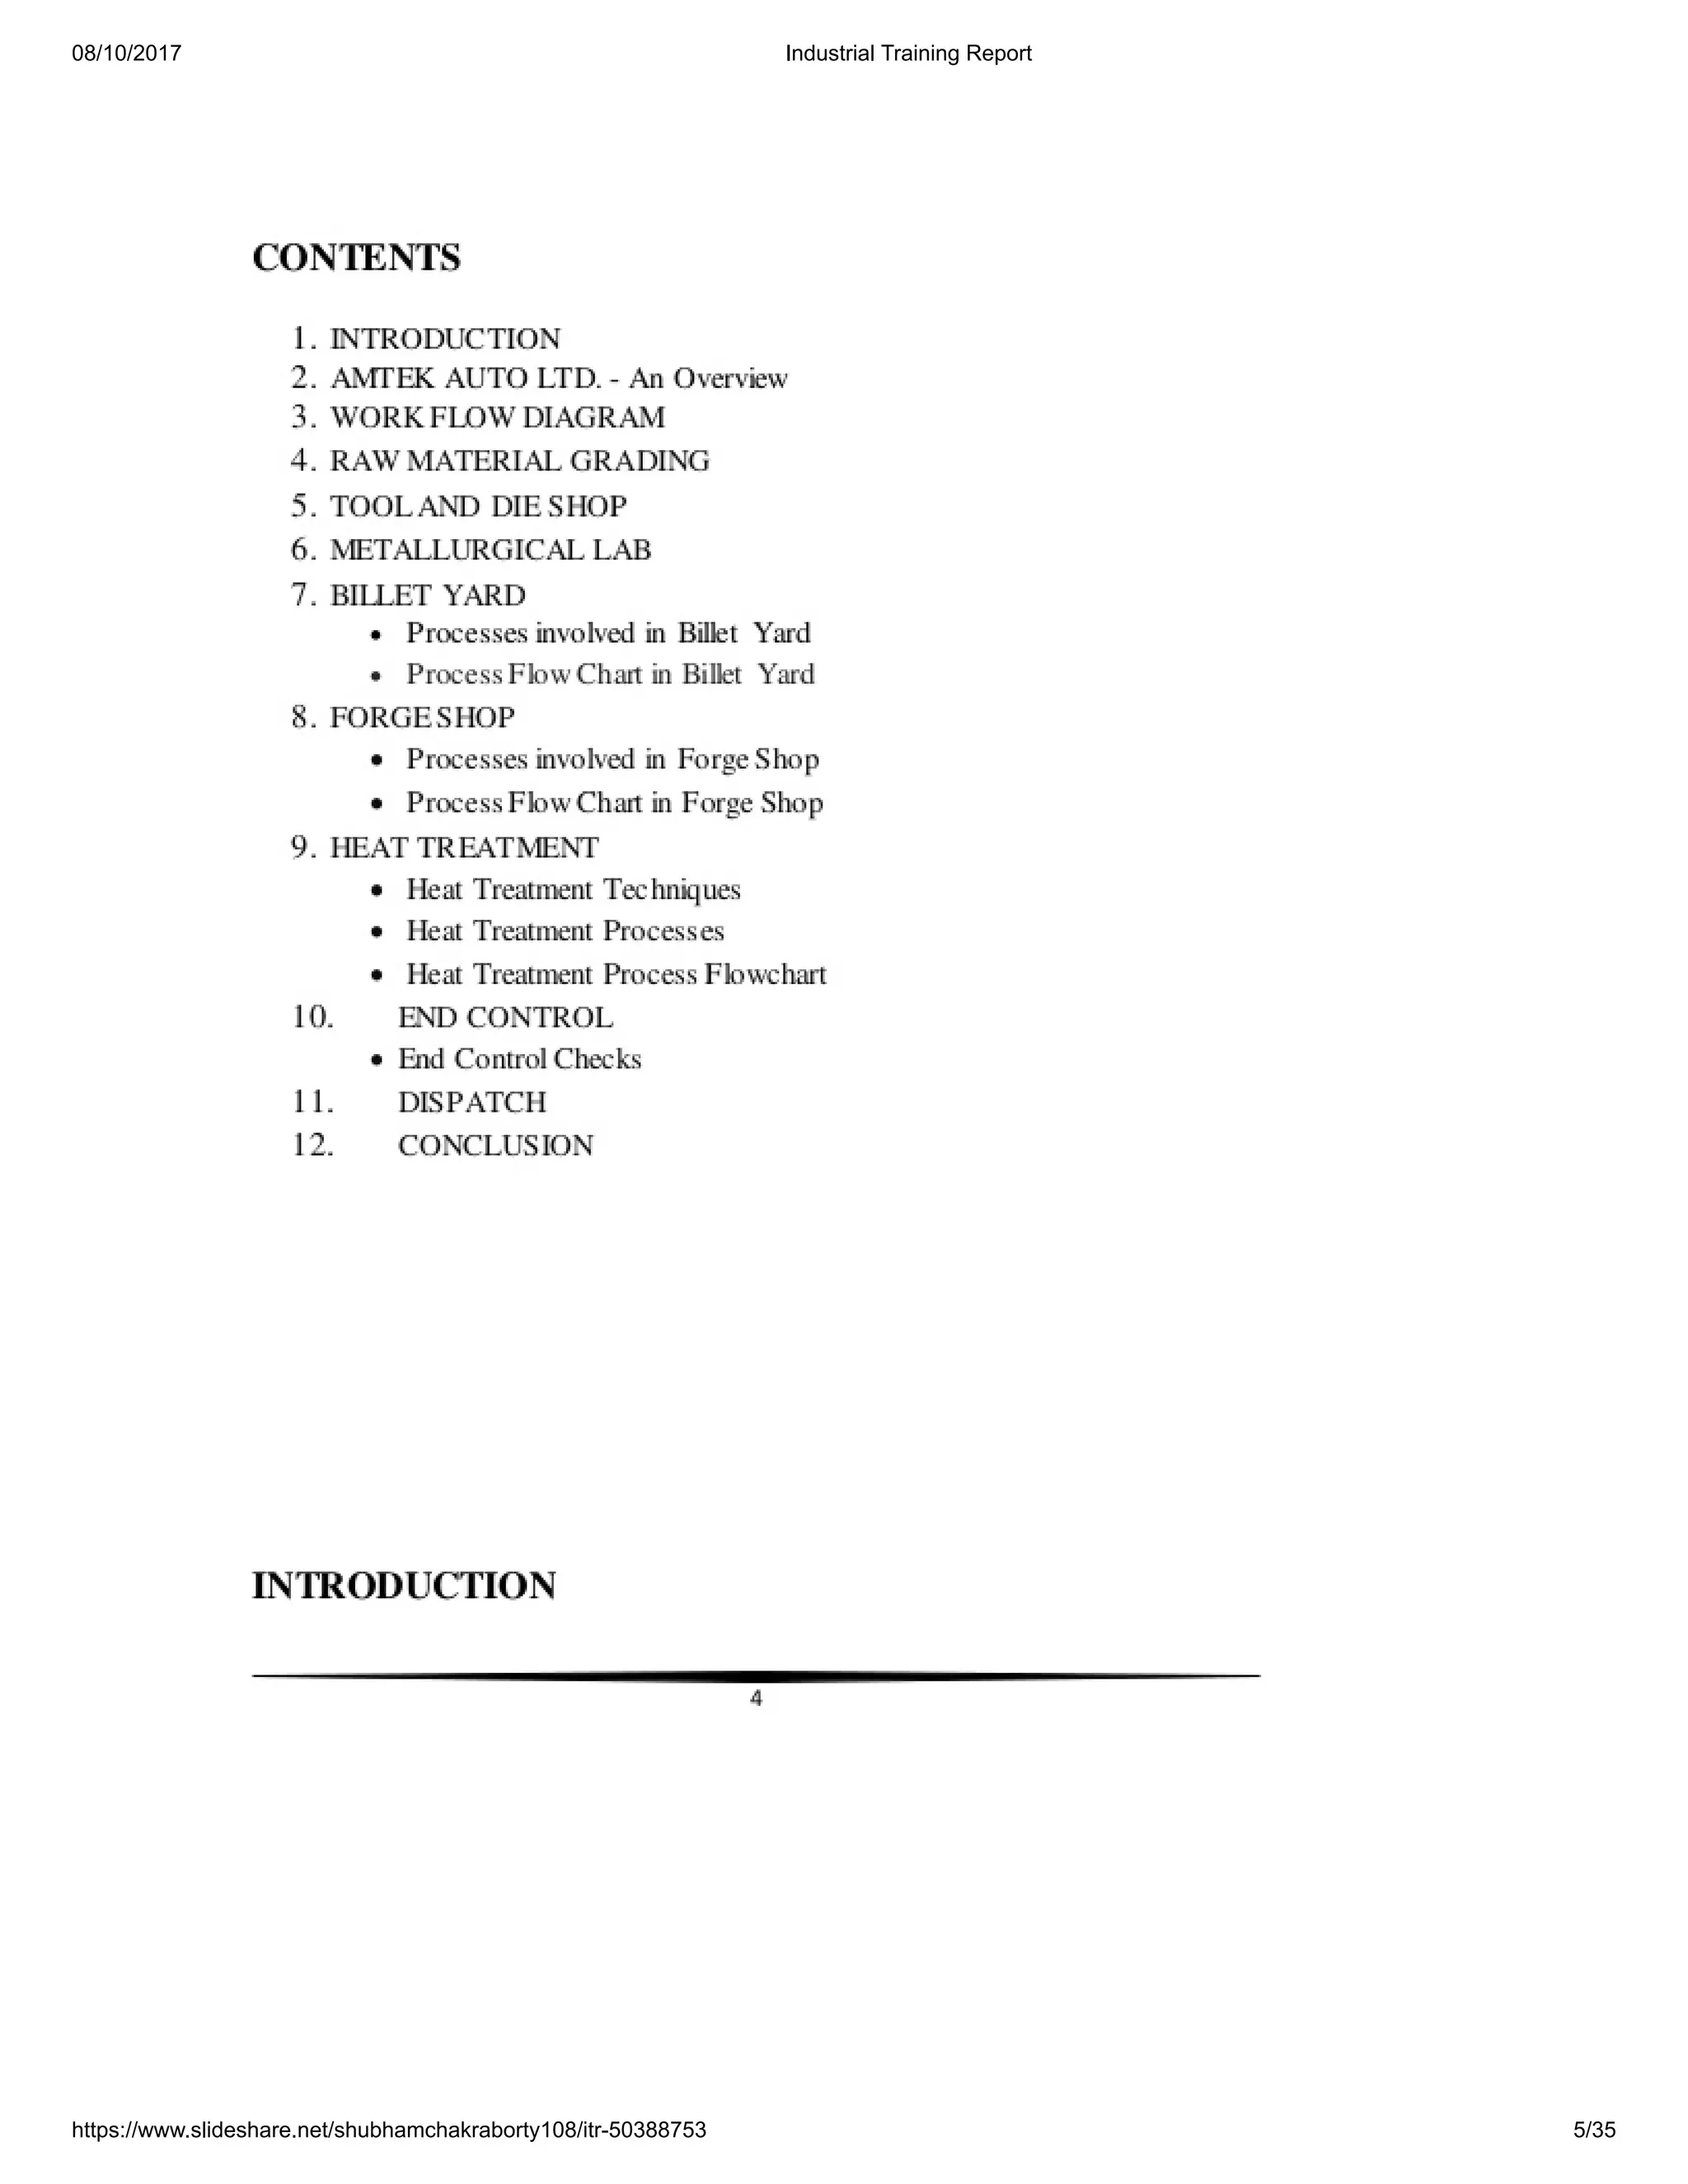
4. 4. 4 CONTENTS 1. INTRODUCTION 2. AMTEK AUTO LTD. - An Overview 3. WORK FLOW
DIAGRAM 4. RAW MATERIAL GRADING 5. TOOLAND DIE SHOP 6. METALLURGICAL LAB 7.
BILLET YARD Processes involved in Billet Yard Process Flow Chart in Billet Yard 8.
FORGESHOP Processes involved in Forge Shop Process Flow Chart in Forge Shop 9. HEAT
TREATMENT Heat Treatment Techniques Heat Treatment Processes Heat Treatment Process
Flowchart 10. END CONTROL End ControlChecks 11. DISPATCH 12. CONCLUSION
INTRODUCTION
5. 5. 5 Amtek Group was established with the incorporation of the flagship company, Amtek Auto in 1985.
Since then, it has grown rapidly and emerged as a frontrunner in the global automotive component
industry with a worldwide presence across North America, Europe, and Asia. Amtek's manufacturing
capabilities include Iron and Aluminum Castings, Forgings, Complex Machining & Ring Gears Flywheel
08/10/2017 Industrial Training Report
https://www.slideshare.net/shubhamchakraborty108/itr-50388753 28/35
Assembly. Amtek Auto manufactures components such as connecting rod assemblies, flywheel ring gears
and assembly, steering knuckles, suspension and steering arms, CV joints, crankshaft assemblies and
torque links. It is backed by in–house design and development facilities engaged in developing new
product and processes. Amtek Group is a leading international manufacturer of automotive components
and assemblies with production facilities located strategically across North America, Europe & Asia. The
Group's extensive manufacturing capabilities encompass Sub assemblies, Iron, Gravity & Aluminium
Castings, Forgings, Complex Machining & Ring Gears Flywheel Assembly. AMTEK AUTO LTD. - An
Overview The Amtek Group, headquartered in India, is one of the largest integrated component
manufacturers in India with a strong global presence. It has also become one of the world’s largest global
forging and integrated machining companies. The Group has operations across Forging, Iron and
Aluminium Casting, Machining and Sub-Assemblies. It has world-class facilities across India, UK,
Germany, Brazil, Italy, Mexico, Hungary and US. The Amtek Group is comprised of corporate entities
Amtek Auto, JMT Auto, Amtek Global Technologies and other subsidiaries and associates. With the
infrastructure and technology platform developed over 25 years, the Group is well positioned in the Indian
Auto and Non-Auto component markets. Different divisions of the company are: Amtek Centre of
Excellence (ACE) Amtek Forging Division (AFD) Amtek Iron Casting Division (AICD) Amtek
Aluminum Casting Division (AACD) Amtek Automotive Machining Division (AAMD) Amtek Ring
Gear Division(ARGD) Amtek JVS Product range of the company includes:
6. 6. 6 Amtek product portfolio consists of an extensive range of components for 2–3 wheelers, Cars,
Tractors, LCV, HCV and Stationary engines. The major categories of components manufactured are,
Connecting Rod Assemblies Flywheel Ring Gears and Assembly Steering Knuckles Suspension
and Steering Arms CV joints Crankshaft Assemblies Torque Links. Clientele: Ashok Leyland
Limited Aston Martin Bajaj Auto Limited BMW Briggs & Stratton CNH Global CNH New
Holland Cummins CYT Dana Italia Davis Industries Defence Delco Machining Eicher
Motors Limited Escorts Fairfield Fiat India Ford General Motors GE Transportation
GWK Ltd Hero Honda
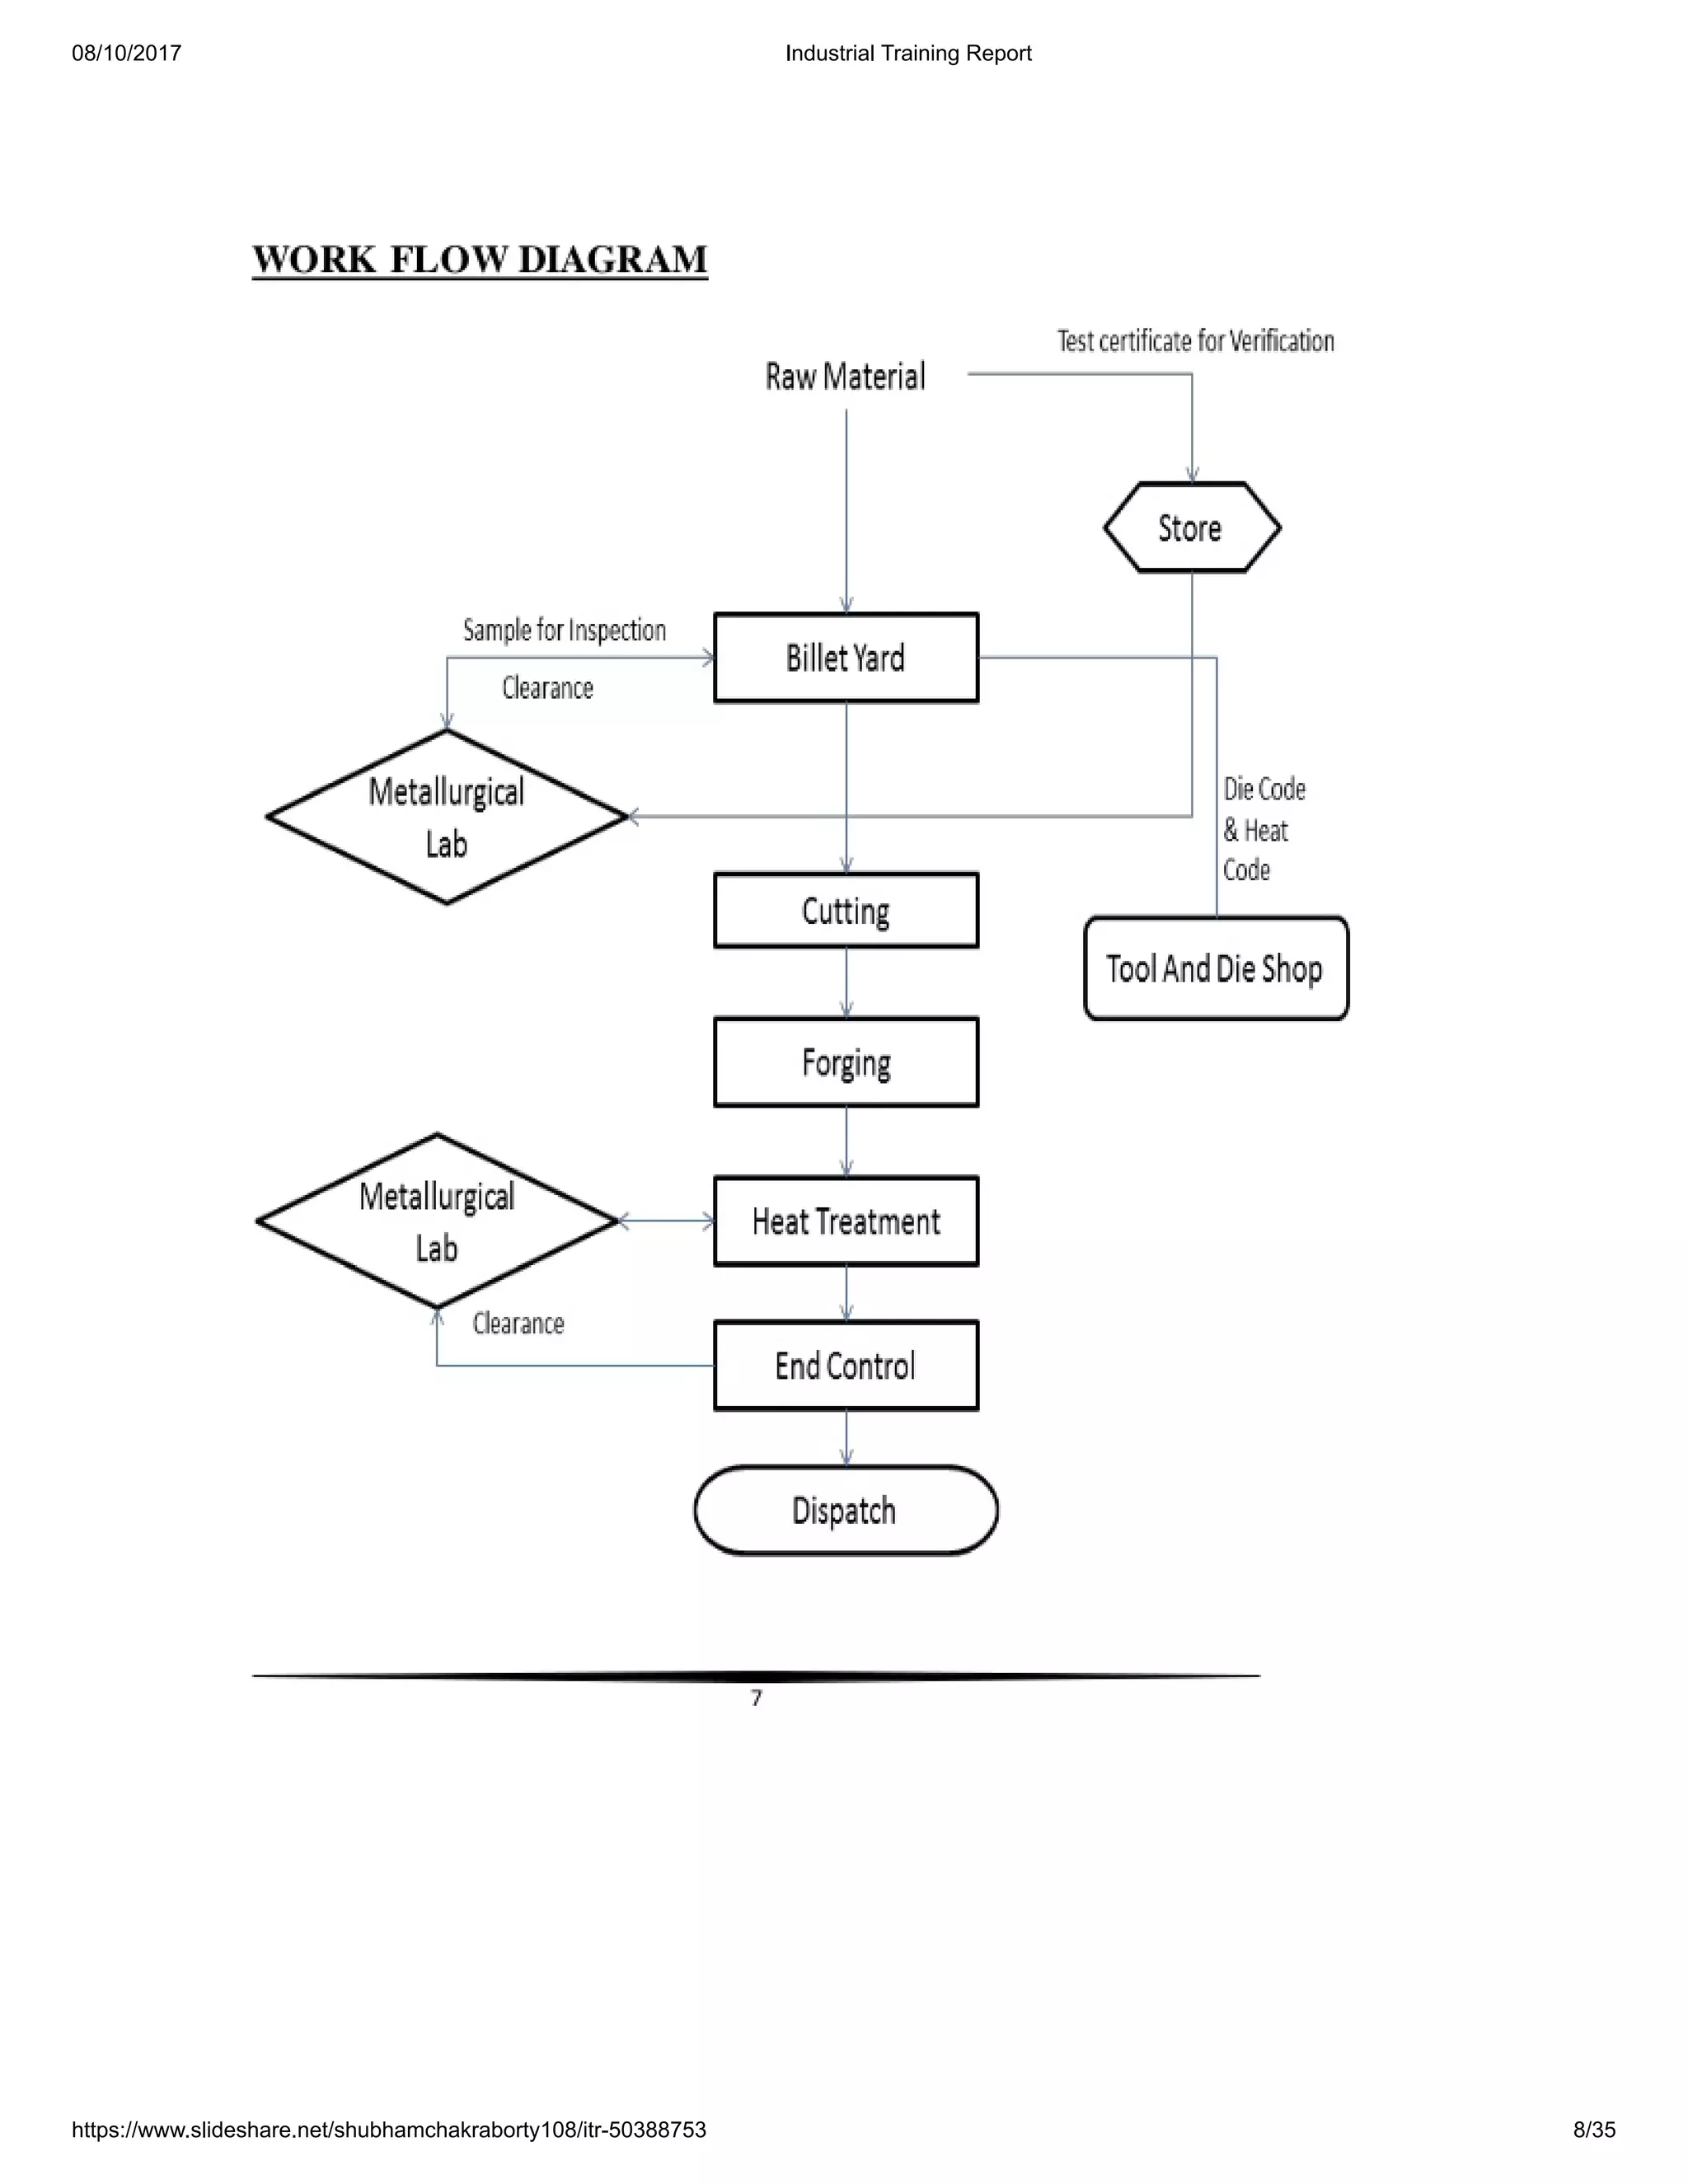
7. 7. 7 WORK FLOW DIAGRAM
8. 8. 8 RAW MATERIAL GRADING Raw Material Grading S. No Steel Grade Color Code Color 1 348C
Dia 50/56/60 mm White (Sunflag) Yellow (Adhunik) 2 20 MnCr5H Dia 50/52 mm Light Blue 3 16
MnCr5 Dark Blue 4 SAE 1141 Dia 40/45/48 mm Purple 5 MSAE 1541 (B) Dia 60 mm Brown 6 SCM
420H Dia 58/70 mm Green SCM 420H Dia 25/28/36 mm White base black cross 7 SAE 8260H Dia 56
mm Silver 8 C35 Dia 50 mm Pink 9 EN8D Dia 63/70 mm Black 10 EN8DM Dia 65 mm Gray
9. 9. 9 TOOL AND DIE SHOP In the Tool and Die shop, the Die on which the forged material is shaped is
made. Here, the raw material comes in the form of metallic cylinders which are then machined into the
form of hollow cavities. These hollow cavities are then used for forging the billets. Usually a pair of Dies
has a lifespan of 10000 cycles but it varies from type of forge material. The Dies are made with highly
sophisticated CNC (Computerised numerical control) lathe and VMC (Vertical milling control) machines.
CNC machine can work in vertical direction i.e. (x-z plane). VMC machine can work in vertical,
horizontal directions i.e. (x-y-z plane). M codes and G codes are used for the smooth and automatic
working of these machines. Traditional Milling, Drilling and Lathe machines are also utilised for
machining the dies for rough machining works. There are a series of internal checks n the Tool and Die
shop which requires expertise. These dies are made with high surface finish and dimensional accuracy.
10. 10. 10 METALLURGICAL LAB In this department a large number of tests are done to test the job and
the dies obtained at various stages of the manufacturing process. Metallurgical microscope
Metallurgical microscope is the optical microscope, differing from other microscopes in the method of the
specimen illumination. Since metals are opaque substances they must be illuminated by frontal lighting,
therefore the source of light is located within the microscope tube. This is achieved by plain glass
reflector, installed in the tube. The optical scheme of metallurgical microscope is shown in the picture.
The image quality and its resolving power are mainly determined by the quality of the objective. The
objective magnification depends on its focal length (the shorter focal length, the higher magnification).
The eyepiece is the lens nearest the eye. The image is magnified by eyepiece in x6, x8 or x10. The total
magnification of the microscope may be calculated by the formula: M = L*E/ F Where L- Distance from
back of objective to eyepiece; F - Focal length of the objective;
08/10/2017 Industrial Training Report
https://www.slideshare.net/shubhamchakraborty108/itr-50388753 29/35
11. 11. 11 E- Magnifying power of the eyepiece. The common magnification of metallurgical microscope is in
the range x50 – x1000. Brinell Hardness test The Brinell method applies a predetermined test load (F)
to a carbide ball of fixed diameter (D) which is held for a predetermined time period and then removed.
The resulting impression is measured across at least two diameters – usually at right angles to each other
and these result averaged (d). A chart is then used to convert the averaged diameter measurement to a
Brinell hardness number. Test forces range from 500 to 3000 kgf. Test Method Illustration D = Ball
diameter d = impression diameter F = load HB = Brinell result Rockwell hardness test The Rockwell
method measures the permanent depth of indentation produced by a force/load on an indenter. First, a
preliminary test force (commonly referred to as preload or minor load) is applied to a sample using a
diamond indenter. This load represents the zero or reference position that breaks through the surface to
reduce the effects of surface finish. After the preload, an additional load, call the major load, is applied to
reach the total required test load. This force is held for a predetermined amount of time (dwell time) to
allow for elastic recovery. This major load is then released and the final position is measured against the
position derived from the preload, the indentation depth variance between the preload value and major
load value. This distance is converted to a hardness number. Eddy current test In this check the cracks
present inside the material of the face of job is checked. A current is passed and detected. If the sensors
detect any slight irregularity in composition or cracks then the job is rejected.
12. 12. 12 Jominy apparatus This apparatus is used for determining the Harden-ability of steel by an
experiment called Quench Test. This provides information about the Harden-ability characteristics of
different alloying element. Muffle furnace test A muffle furnace is a furnace with an externally heated
chamber, the walls of which radiantly heat the contents of the chamber, so that the material being heated
has no contact with the flame. Muffle furnaces are most often utilized in laboratories as a compact means
of creating extremely high-temperature atmospheres. They are employed to test the characteristics of
materials at extremely high and accurate temperatures. A muffle furnace is also known as a retort furnace.
13. 13. 13 BILLET YARD Processes involved in billet yard Raw material is supplied in the form of rods of
diameters according to demand. Heat code and color coding is done. EOT Cranes are used for handling of
these pipes due to their weight and size. The rods are then loaded to the billet shearing machine (MANYO
LBS450). The combination of hydraulic, conveyer and electronic sensors provide a steady rate of input to
the shearing machine which is termed as Loader mechanism. The rod is held by die. Die is held by Die
clamp and packing. The machine applies a 450 kg/mm2 pressure on the rod with help of blade. The part of
rod that is obtained is termed as Billet. It of cylindrical shape. The billet yard also contains an End pieces
area where the diameter and length of billet is reduced with the help of lathe machine and lathe cutting
machine. Process Flow Chart in Billet Yard
14. 14. 14 FORGE SHOP In forge shop of Amtek Auto Ltd., Mandideep, Forging is done to transform raw cut
billets into required shape according to the die used. In the Forge Shop of Amtek Auto Ltd., for the
forging operation, there are 6 Crank press forging machines and 3 screw press forging machines. Hot,
press forging is done on the billets to shape them as requirement. The crank presses (HANOUL HNFG-
1350) apply 1000 ton force on the red hot billet. The crank press runs on the principle of clutch-plate
brake mechanism. Power is developed in the press due pressurized air. To provide pressurize air to
the presses a number compressors are employed. There are 3 screw presses (Vaccari) which apply a
pressure of 730 tonnes. They work on the principle of power screw mechanism. Processes involved in
forge shop Billet loading In this process, the raw cut billets are transferred from billet shop in gaskets to be
loaded in the induction heater. The loading mechanism consists of conveyer mechanism and electronic
sensors for better control and automatic functioning. Induction Heating In this process, the billets are
passed into an industrial induction heater which heats the billet at above 1100 C usually 1200 C, which
recrystallizes the metal for easy forging to commence. The induction heater uses magnetic flux to heat the
metal between the coils. Forging In this process, the upper die is clamped to the hammer and the lower die
remains stationary. The red-hot billet is vertically positioned and hammer blow forces it to acquire the
shape of the dies. Extra metal is forced out from the exposed face. Trimming Trimming is a process in
which the extra metal projecting out of the curved surface of the sides termed as ‘flash’ is removed with
the help of a trimming press. It is similar to forging machine, but much less force s applied on the top face.
In this the required material is forced vertically downward and the flash remains clamped on the vices.
15. 15. 15 Flash removal In this, the ‘flash’ is obtained and transported to the scrap yard with the help of
gaskets. Process Flow Chart in Forge Shop
08/10/2017 Industrial Training Report
https://www.slideshare.net/shubhamchakraborty108/itr-50388753 30/35
16. 16. 16 HEAT TREATMENT Heat treating is a group of industrial and metalworking processes used to
alter the physical, properties of a material. Heat treatment involves the use of heating or chilling, normally
to extreme temperatures, to achieve a desired result such as hardening or softening of a material. Heat
treatment techniques include annealing, case hardening, precipitation strengthening, tempering and
quenching. Metallic materials consist of a microstructure of small crystals called "grains" or crystallites.
The nature of the grains (i.e. grain size and composition) is one of the most effective factors that can
determine the overall mechanical behaviour of the metal. Heat treatment provides an efficient way to
manipulate the properties of the metal by controlling the rate of diffusion and the rate of cooling within the
microstructure. Heat treating is often used to alter the mechanical properties of a metallic alloy,
manipulating properties such as the hardness, strength, toughness, ductility, and elasticity. Heat Treatment
Techniques Annealing Annealing consists of heating a metal to a specific temperature and then cooling at
a rate that will produce a refined microstructure. The rate of cooling is generally slow. In ferrous alloys,
annealing is usually accomplished by heating the metal beyond the upper critical temperature and then
cooling very slowly, resulting in the formation of pearlite. In both pure metals and many alloys that cannot
be heat treated, annealing is used to remove the hardness caused by cold working. The metal is heated to a
temperature where recrystallisation can occur, thereby repairing the defects caused by plastic deformation.
Ferrous alloys are usually either "full annealed" or "process annealed." Full annealing requires very slow
cooling rates, in order to form coarse pearlite. In process annealing, the cooling rate may be faster; up to,
and including normalizing. The main goal of process annealing is to produce a uniform microstructure.
Normalizing Normalizing is a technique used to provide uniformity in grain size and composition
throughout an alloy. The term is often used for ferrous alloys that have been austenitized and then cooled
in open air. Normalizing not only produces pearlite, but also sometimes martensite, which gives harder
and stronger steel, but with less ductility for the same composition than full annealing. Aging
17. 17. 17 Some metals are classified as precipitation hardening metals. When a precipitation hardening alloy
is quenched, its alloying elements will be trapped in solution, resulting in a soft metal. Aging a
"solutionized" metal will allow the alloying elements to diffuse through the microstructure and form
intermetallic particles. These intermetallic particles will nucleate and fall out of solution and act as a
reinforcing phase, thereby increasing the strength of the alloy. Alloys may age "naturally" meaning that
the precipitates form at room temperature, or they may age "artificially" when precipitates only form at
elevated temperatures. Quenching Quenching is a process of cooling a metal at a rapid rate. This is most
often done to produce a martensite transformation. In ferrous alloys, this will often produce a harder
metal, while non- ferrous alloys will usually become softer than normal. To harden by quenching, a metal
(usually steel or cast iron) must be heated above the upper critical temperature and then quickly cooled.
Cooling is done with Liquids, due to their better thermal conductivity, such as oil. Upon being rapidly
cooled, a portion of austenite (dependent on alloy composition) will transform to martensite, a hard, brittle
crystalline structure. Tempering Untempered martensitic steel, while very hard, is too brittle to be useful
for most applications. A method for alleviating this problem is called tempering. . Tempering consists of
heating steel below the lower critical temperature, (often from 400 to 1105 ˚F or 205 to 595 ˚C, depending
on the desired results), to impart some toughness. Flame hardening Flame hardening is used to harden
only a portion of a metal. Unlike differential hardening, where the entire piece is heated and then cooled at
different rates, in flame hardening, only a portion of the metal is heated before quenching. Case hardening
Case hardening is a thermochemical diffusion process in which an alloying element, most commonly
carbon or nitrogen, diffuses into the surface of a monolithic metal. The resulting interstitial solid solution
is harder than the base material, which improves wear resistance without sacrificing toughness.
18. 18. 18 Heat treatment processes Heat treatment of the forged material obtained from forge shop is done
in a furnace. The temperature of furnace ranges from 880 C to 1100 C according to the requirement.
The Burner fuels used in the furnace maybe Diesel, LDO or Gas. Usually the temperature required for
hardening process is 870 to 900 C. Temperature required for tempering process is 580 C. The forged
jobs are loaded in a gasket and put inside the furnace with the help of pulley mechanism. The doors are
the shut using a combination of sliding mechanism and electronic sensors to provide a sealed environment
for heat treatment. The gasket is obtained from the other end of the furnace. At any point of time
there are 6-8 gaskets within the furnace. These gaskets are slowly moving towards the other end of the
furnace due to rolling mechanism in the furnace. The time required for the total process for one gasket
is 10 minutes. After this, oil quenching is done. The obtained treated job is handled with the help of
08/10/2017 Industrial Training Report
https://www.slideshare.net/shubhamchakraborty108/itr-50388753 31/35
stretcher and is either sent for further heat treatment or to End Control for final inspection. The oil
becomes hot after the heated metal is immersed in it. To prevent overheating of oil, a Plate Type Heat
Exchanger (PHE) is employed which circulates cold oil in the quenching bucket. The PHE is itself
cooled with the help of Natural circulation wet type cooling towers.
19. 19. 19 Heat treatment Process Flowchart
20. 20. 20 END CONTROL End Control is the department in which the final quality checks and finishing of
the product is done. In End Control, there are various processes. Shot Blasting Cold Coining or
Knuckle press Visual Check Total Parameter Check Eddy Current Check Ultrasonic Check
Magnetic Crack Detection End Control Checks Shot Blasting In shot blasting, steel shots are passed in a
shot blasting machine through small holes in a rotating, hollow, rubber-lined surface. The heat treated
material has a rough surface due to accumulation of oxide layer. To remove this oxide layer, the metals are
loaded in the shot blasting machine and the abrasive action of the spherical steel shots remove the oxide
layer. The oxide layer is the sucked in through an ash handling pump and is disposed off as dust. Cold
Coining It is a process through which the flatness and Total Indicated Runout of the job is altered by
applying a hammer blow to the face of the crankshaft. The machine used in this process is called knuckle
press. Total parameter check In this the dimensions of the material are checked and compared with the
standard values. It also checks the phenomenon of under-height of job and improper trimming.
21. 21. 21 Visual check Visual check encompasses a large number of checks for various defects like Pitting,
Stem underfilling, Boss underfilling, Shoulder underfilling, Die marks, Corner underfilling, Top Flange
underfilling, Rib underfilling, Dent Fitting etc. Eddy current check In this check the cracks present inside
the material of the face of job is checked. A current is passed and detected. If the sensors detect any slight
irregularity in composition or cracks then the job is rejected. Ultrasonic Check In this check the vertical
internal cracks present in the stem of job is checked. An X-ray is passed through a probe positioned at the
bottom face of the stem and penetrating x-rays detect the number of cracks. If the sensors detect any slight
irregularity in composition or cracks then the job is rejected. Magnetic Crack Detection In this the
microscopic cracks present on the surface of the job is determined and checked and if the job is found
faulty then it is rejected. For this a magnetic flux is passed and sensors detect the overall flux produced.
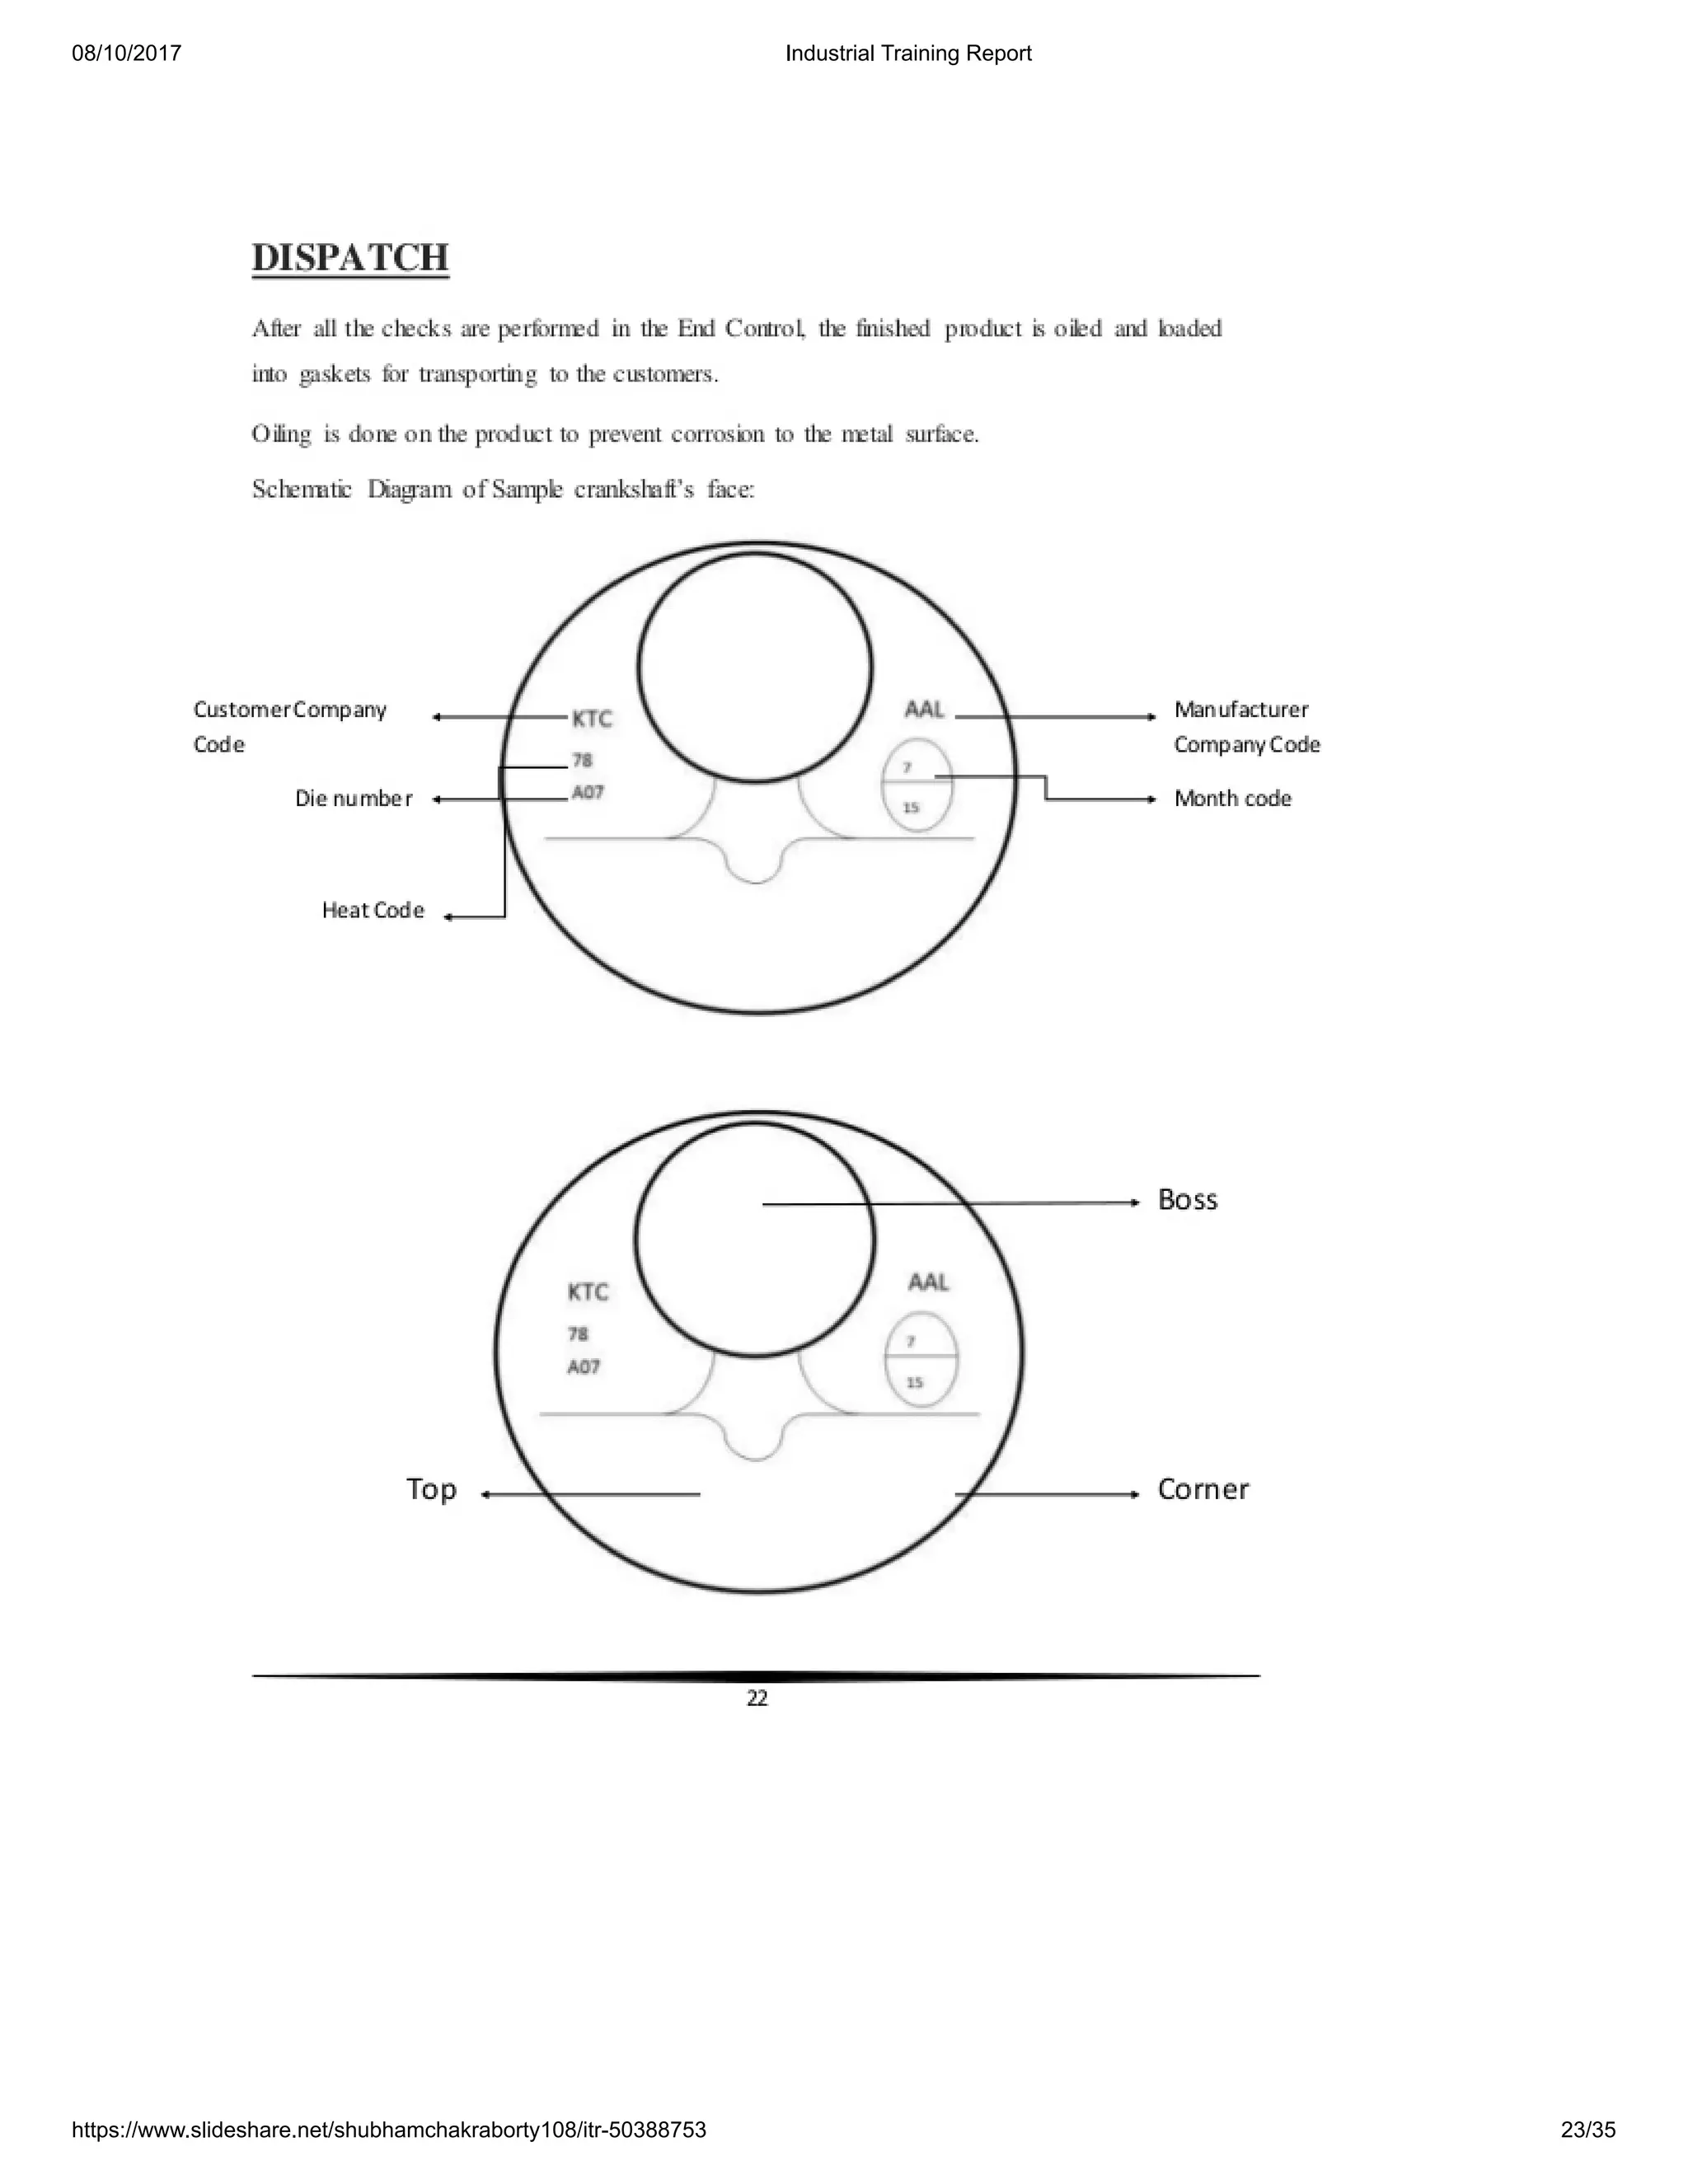
22. 22. 22 DISPATCH After all the checks are performed in the End Control, the finished product is oiled and
loaded into gaskets for transporting to the customers. Oiling is done on the product to prevent corrosion to
the metal surface. Schematic Diagram of Sample crankshaft’s face: Manufacturer CompanyCode
CustomerCompany Code Die number Month code Heat Code Boss CornerTop
23. 23. 23 CONCLUSION As an undergraduate I would like to say that this training program is an excellent
opportunity for us to get to the ground level and experience the things that we would have never gained
through going straight into a job. The main objective of the industrial training is to provide an opportunity
to undergraduates to identify, observe and practice how engineering is applicable in the real industry. It is
not only to get experience on technical practices but also to observe management practices and to interact
with fellow workers. It is easy to work with sophisticated machines, but not with people. The only chance
that an undergraduate has to have this experience is the industrial training period. I feel I got the maximum
out of that experience. Also I learnt the way of work in an organization, the importance of being punctual,
the importance of maximum commitment, and the importance of team spirit. In my opinion, I have gained
lots of knowledge and experience needed to be successful in a great engineering challenge, as in my
opinion, Engineering is after all a Challenge, and not a Job.
Recommended
Leadership Fundamentals
08/10/2017 Industrial Training Report
https://www.slideshare.net/shubhamchakraborty108/itr-50388753 32/35
Managing Teams
Coaching and Developing Employees
Industrial Training Report-1
Rohit Grandhi, EIT
AMTEK Research Report
Peeyush Sahu CAPM®
Amtek training Aman (11 me-06)
Aman5252
08/10/2017 Industrial Training Report
https://www.slideshare.net/shubhamchakraborty108/itr-50388753 33/35
HEC Project Report
Ashish Raj
Summer training
Ranjit Kandel
Amtek persentation aman (11 me-06)
Aman5252
ring gear production
Sachin Sharma
English
Español
Português
Français
Deutsch
About
Dev & API
Blog
Terms
Privacy
Copyright
Support
08/10/2017 Industrial Training Report
https://www.slideshare.net/shubhamchakraborty108/itr-50388753 34/35
LinkedIn Corporation © 2017
×
Share Clipboard
×
Email
Enter email addresses
From
Add a message
Send
Email sent successfully..
Facebook
Twitter
LinkedIn
Link
Public clipboards featuring this slide
×
No public clipboards found for this slide
×
Save the most important slides with Clipping
Clipping is a handy way to collect and organize the most important slides from a presentation. You
can keep your great finds in clipboards organized around topics.
Start clipping
No thanks. Continue to download.
Select another clipboard
08/10/2017 Industrial Training Report
https://www.slideshare.net/shubhamchakraborty108/itr-50388753 35/35
×
Looks like you’ve clipped this slide to already.
Search for a clipboard
Create a clipboard
You just clipped your first slide!
Clipping is a handy way to collect important slides you want to go back to later. Now customize the name of a
clipboard to store your clips.
Name* Best of Slides
Description Add a brief description so oth
Visibility
Others can see my Clipboard
Cancel Save
Save this document

Industrial training report

  • 1.
    08/10/2017 Industrial TrainingReport https://www.slideshare.net/shubhamchakraborty108/itr-50388753 1/35 SlideShare Explore Search You Upload Login Signup Search Home Presentation Courses PowerPoint Courses EdTech & E-Learning Courses by LinkedIn Learning Search
  • 2.
    08/10/2017 Industrial TrainingReport https://www.slideshare.net/shubhamchakraborty108/itr-50388753 2/35
  • 3.
    08/10/2017 Industrial TrainingReport https://www.slideshare.net/shubhamchakraborty108/itr-50388753 3/35
  • 4.
    08/10/2017 Industrial TrainingReport https://www.slideshare.net/shubhamchakraborty108/itr-50388753 4/35
  • 5.
    08/10/2017 Industrial TrainingReport https://www.slideshare.net/shubhamchakraborty108/itr-50388753 5/35
  • 6.
    08/10/2017 Industrial TrainingReport https://www.slideshare.net/shubhamchakraborty108/itr-50388753 6/35
  • 7.
    08/10/2017 Industrial TrainingReport https://www.slideshare.net/shubhamchakraborty108/itr-50388753 7/35
  • 8.
    08/10/2017 Industrial TrainingReport https://www.slideshare.net/shubhamchakraborty108/itr-50388753 8/35
  • 9.
    08/10/2017 Industrial TrainingReport https://www.slideshare.net/shubhamchakraborty108/itr-50388753 9/35
  • 10.
    08/10/2017 Industrial TrainingReport https://www.slideshare.net/shubhamchakraborty108/itr-50388753 10/35
  • 11.
    08/10/2017 Industrial TrainingReport https://www.slideshare.net/shubhamchakraborty108/itr-50388753 11/35
  • 12.
    08/10/2017 Industrial TrainingReport https://www.slideshare.net/shubhamchakraborty108/itr-50388753 12/35
  • 13.
    08/10/2017 Industrial TrainingReport https://www.slideshare.net/shubhamchakraborty108/itr-50388753 13/35
  • 14.
    08/10/2017 Industrial TrainingReport https://www.slideshare.net/shubhamchakraborty108/itr-50388753 14/35
  • 15.
    08/10/2017 Industrial TrainingReport https://www.slideshare.net/shubhamchakraborty108/itr-50388753 15/35
  • 16.
    08/10/2017 Industrial TrainingReport https://www.slideshare.net/shubhamchakraborty108/itr-50388753 16/35
  • 17.
    08/10/2017 Industrial TrainingReport https://www.slideshare.net/shubhamchakraborty108/itr-50388753 17/35
  • 18.
    08/10/2017 Industrial TrainingReport https://www.slideshare.net/shubhamchakraborty108/itr-50388753 18/35
  • 19.
    08/10/2017 Industrial TrainingReport https://www.slideshare.net/shubhamchakraborty108/itr-50388753 19/35
  • 20.
    08/10/2017 Industrial TrainingReport https://www.slideshare.net/shubhamchakraborty108/itr-50388753 20/35
  • 21.
    08/10/2017 Industrial TrainingReport https://www.slideshare.net/shubhamchakraborty108/itr-50388753 21/35
  • 22.
    08/10/2017 Industrial TrainingReport https://www.slideshare.net/shubhamchakraborty108/itr-50388753 22/35
  • 23.
    08/10/2017 Industrial TrainingReport https://www.slideshare.net/shubhamchakraborty108/itr-50388753 23/35
  • 24.
    08/10/2017 Industrial TrainingReport https://www.slideshare.net/shubhamchakraborty108/itr-50388753 24/35 Upcoming SlideShare Loading in …5 × 23 of 23 Like this document? Why not share!
  • 25.
    08/10/2017 Industrial TrainingReport https://www.slideshare.net/shubhamchakraborty108/itr-50388753 25/35 Share Email Industrial Training Report-1 by Rohit Grandhi, EIT 207068 views AMTEK Research Report by Peeyush Sahu CAPM® 1073 views Amtek training Aman (11 me-06) by Aman5252 2614 views Industrial Training Report 1,160 views Share Like Download Shubham Chakraborty Follow Published on Jul 10, 2015 Industrial Training Report on Amtek Auto Ltd. For Engineering Students
  • 26.
    08/10/2017 Industrial TrainingReport https://www.slideshare.net/shubhamchakraborty108/itr-50388753 26/35 HEC Project Report by Ashish Raj 3839 views Summer training by Ranjit Kandel 211 views Amtek persentation aman (11 me-06) by Aman5252 1130 views ... Published in: Engineering 0 Comments 4 Likes Statistics Notes Full Name Comment goes here. 12 hours ago Delete Reply Spam Block Are you sure you want to Yes No Your message goes here Share your thoughts… Post Be the first to comment Shree Nath , -- 9 months ago Satnam Singh , Attended G.g.i 1 year ago yajat sharma 1 year ago Ashish Sk 2 years ago No Downloads Views Total views 1,160 On SlideShare 0 From Embeds 0 Number of Embeds
  • 27.
    08/10/2017 Industrial TrainingReport https://www.slideshare.net/shubhamchakraborty108/itr-50388753 27/35 2 Actions Shares 0 Downloads 109 Comments 0 Likes 4 Embeds 0 No embeds No notes for slide Industrial Training Report 1. 1. 1 AN INDUSTRIAL TRAINING REPORT Done by Shubham Chakraborty Enrollment no: 12345678 At Amtek Auto Ltd. Mandideep Industrial Area, Bhopal, Madhya Pradesh. Submitted to Department of Mechanical Engineering July 2015 2. 2. 2 ACKNOWLEDGEMENT An engineer with only theoretical knowledge is not a complete engineer. Practical knowledge is very important to develop and apply engineering skills. It gives me great pleasure to have an opportunity to acknowledge and to express gratitude to those who were associated with me during my training at Amtek Auto Ltd., Mandideep. Special thanks to Mr. Ramesh Thakur for providing me with an opportunity to undergo training under his able guidance and offering me a very deep knowledge of practical aspects of industrial work culture. I express my sincere thanks and gratitude to Amtek Auto Ltd. authorities for allowing me to undergo the training in this prestigious organization. I will always remain indebted to them for their constant interest and excellent guidance in my training work, moreover for providing me with an opportunity to work and gain experience 3. 3. 3 PREFACE Practical knowledge means the visualization of the knowledge, which we read in our books. For this, we perform experiments and get observations. Practical knowledge is very important in every field. One must be familiar with the problems related to that field so that he may solve them and become a successful person. After achieving education, an engineer has to enter professional life. Accordingly, he has to serve an industry, may be public or private sector or self-own. For the efficient work in the field, he must be well aware of the practical knowledge as well as theoretical knowledge. To be a good engineer, one must be aware of the industrial environment and must know about management, working in such an industry, labor problems etc., so that he can tackle them successfully. Due to all the above reasons and to bridge the gap between theory and practical, our engineering curriculum provides a practical training. During this period, a student works in the industry and gets all type of experience and knowledge about the working and maintenance of various types of machinery. I have undergone my 15 days training at AMTEK AUTO LIMITED. This report is based on the knowledge, which I acquired during my training period at the plant. 4. 4. 4 CONTENTS 1. INTRODUCTION 2. AMTEK AUTO LTD. - An Overview 3. WORK FLOW DIAGRAM 4. RAW MATERIAL GRADING 5. TOOLAND DIE SHOP 6. METALLURGICAL LAB 7. BILLET YARD Processes involved in Billet Yard Process Flow Chart in Billet Yard 8. FORGESHOP Processes involved in Forge Shop Process Flow Chart in Forge Shop 9. HEAT TREATMENT Heat Treatment Techniques Heat Treatment Processes Heat Treatment Process Flowchart 10. END CONTROL End ControlChecks 11. DISPATCH 12. CONCLUSION INTRODUCTION 5. 5. 5 Amtek Group was established with the incorporation of the flagship company, Amtek Auto in 1985. Since then, it has grown rapidly and emerged as a frontrunner in the global automotive component industry with a worldwide presence across North America, Europe, and Asia. Amtek's manufacturing capabilities include Iron and Aluminum Castings, Forgings, Complex Machining & Ring Gears Flywheel
  • 28.
    08/10/2017 Industrial TrainingReport https://www.slideshare.net/shubhamchakraborty108/itr-50388753 28/35 Assembly. Amtek Auto manufactures components such as connecting rod assemblies, flywheel ring gears and assembly, steering knuckles, suspension and steering arms, CV joints, crankshaft assemblies and torque links. It is backed by in–house design and development facilities engaged in developing new product and processes. Amtek Group is a leading international manufacturer of automotive components and assemblies with production facilities located strategically across North America, Europe & Asia. The Group's extensive manufacturing capabilities encompass Sub assemblies, Iron, Gravity & Aluminium Castings, Forgings, Complex Machining & Ring Gears Flywheel Assembly. AMTEK AUTO LTD. - An Overview The Amtek Group, headquartered in India, is one of the largest integrated component manufacturers in India with a strong global presence. It has also become one of the world’s largest global forging and integrated machining companies. The Group has operations across Forging, Iron and Aluminium Casting, Machining and Sub-Assemblies. It has world-class facilities across India, UK, Germany, Brazil, Italy, Mexico, Hungary and US. The Amtek Group is comprised of corporate entities Amtek Auto, JMT Auto, Amtek Global Technologies and other subsidiaries and associates. With the infrastructure and technology platform developed over 25 years, the Group is well positioned in the Indian Auto and Non-Auto component markets. Different divisions of the company are: Amtek Centre of Excellence (ACE) Amtek Forging Division (AFD) Amtek Iron Casting Division (AICD) Amtek Aluminum Casting Division (AACD) Amtek Automotive Machining Division (AAMD) Amtek Ring Gear Division(ARGD) Amtek JVS Product range of the company includes: 6. 6. 6 Amtek product portfolio consists of an extensive range of components for 2–3 wheelers, Cars, Tractors, LCV, HCV and Stationary engines. The major categories of components manufactured are, Connecting Rod Assemblies Flywheel Ring Gears and Assembly Steering Knuckles Suspension and Steering Arms CV joints Crankshaft Assemblies Torque Links. Clientele: Ashok Leyland Limited Aston Martin Bajaj Auto Limited BMW Briggs & Stratton CNH Global CNH New Holland Cummins CYT Dana Italia Davis Industries Defence Delco Machining Eicher Motors Limited Escorts Fairfield Fiat India Ford General Motors GE Transportation GWK Ltd Hero Honda 7. 7. 7 WORK FLOW DIAGRAM 8. 8. 8 RAW MATERIAL GRADING Raw Material Grading S. No Steel Grade Color Code Color 1 348C Dia 50/56/60 mm White (Sunflag) Yellow (Adhunik) 2 20 MnCr5H Dia 50/52 mm Light Blue 3 16 MnCr5 Dark Blue 4 SAE 1141 Dia 40/45/48 mm Purple 5 MSAE 1541 (B) Dia 60 mm Brown 6 SCM 420H Dia 58/70 mm Green SCM 420H Dia 25/28/36 mm White base black cross 7 SAE 8260H Dia 56 mm Silver 8 C35 Dia 50 mm Pink 9 EN8D Dia 63/70 mm Black 10 EN8DM Dia 65 mm Gray 9. 9. 9 TOOL AND DIE SHOP In the Tool and Die shop, the Die on which the forged material is shaped is made. Here, the raw material comes in the form of metallic cylinders which are then machined into the form of hollow cavities. These hollow cavities are then used for forging the billets. Usually a pair of Dies has a lifespan of 10000 cycles but it varies from type of forge material. The Dies are made with highly sophisticated CNC (Computerised numerical control) lathe and VMC (Vertical milling control) machines. CNC machine can work in vertical direction i.e. (x-z plane). VMC machine can work in vertical, horizontal directions i.e. (x-y-z plane). M codes and G codes are used for the smooth and automatic working of these machines. Traditional Milling, Drilling and Lathe machines are also utilised for machining the dies for rough machining works. There are a series of internal checks n the Tool and Die shop which requires expertise. These dies are made with high surface finish and dimensional accuracy. 10. 10. 10 METALLURGICAL LAB In this department a large number of tests are done to test the job and the dies obtained at various stages of the manufacturing process. Metallurgical microscope Metallurgical microscope is the optical microscope, differing from other microscopes in the method of the specimen illumination. Since metals are opaque substances they must be illuminated by frontal lighting, therefore the source of light is located within the microscope tube. This is achieved by plain glass reflector, installed in the tube. The optical scheme of metallurgical microscope is shown in the picture. The image quality and its resolving power are mainly determined by the quality of the objective. The objective magnification depends on its focal length (the shorter focal length, the higher magnification). The eyepiece is the lens nearest the eye. The image is magnified by eyepiece in x6, x8 or x10. The total magnification of the microscope may be calculated by the formula: M = L*E/ F Where L- Distance from back of objective to eyepiece; F - Focal length of the objective;
  • 29.
    08/10/2017 Industrial TrainingReport https://www.slideshare.net/shubhamchakraborty108/itr-50388753 29/35 11. 11. 11 E- Magnifying power of the eyepiece. The common magnification of metallurgical microscope is in the range x50 – x1000. Brinell Hardness test The Brinell method applies a predetermined test load (F) to a carbide ball of fixed diameter (D) which is held for a predetermined time period and then removed. The resulting impression is measured across at least two diameters – usually at right angles to each other and these result averaged (d). A chart is then used to convert the averaged diameter measurement to a Brinell hardness number. Test forces range from 500 to 3000 kgf. Test Method Illustration D = Ball diameter d = impression diameter F = load HB = Brinell result Rockwell hardness test The Rockwell method measures the permanent depth of indentation produced by a force/load on an indenter. First, a preliminary test force (commonly referred to as preload or minor load) is applied to a sample using a diamond indenter. This load represents the zero or reference position that breaks through the surface to reduce the effects of surface finish. After the preload, an additional load, call the major load, is applied to reach the total required test load. This force is held for a predetermined amount of time (dwell time) to allow for elastic recovery. This major load is then released and the final position is measured against the position derived from the preload, the indentation depth variance between the preload value and major load value. This distance is converted to a hardness number. Eddy current test In this check the cracks present inside the material of the face of job is checked. A current is passed and detected. If the sensors detect any slight irregularity in composition or cracks then the job is rejected. 12. 12. 12 Jominy apparatus This apparatus is used for determining the Harden-ability of steel by an experiment called Quench Test. This provides information about the Harden-ability characteristics of different alloying element. Muffle furnace test A muffle furnace is a furnace with an externally heated chamber, the walls of which radiantly heat the contents of the chamber, so that the material being heated has no contact with the flame. Muffle furnaces are most often utilized in laboratories as a compact means of creating extremely high-temperature atmospheres. They are employed to test the characteristics of materials at extremely high and accurate temperatures. A muffle furnace is also known as a retort furnace. 13. 13. 13 BILLET YARD Processes involved in billet yard Raw material is supplied in the form of rods of diameters according to demand. Heat code and color coding is done. EOT Cranes are used for handling of these pipes due to their weight and size. The rods are then loaded to the billet shearing machine (MANYO LBS450). The combination of hydraulic, conveyer and electronic sensors provide a steady rate of input to the shearing machine which is termed as Loader mechanism. The rod is held by die. Die is held by Die clamp and packing. The machine applies a 450 kg/mm2 pressure on the rod with help of blade. The part of rod that is obtained is termed as Billet. It of cylindrical shape. The billet yard also contains an End pieces area where the diameter and length of billet is reduced with the help of lathe machine and lathe cutting machine. Process Flow Chart in Billet Yard 14. 14. 14 FORGE SHOP In forge shop of Amtek Auto Ltd., Mandideep, Forging is done to transform raw cut billets into required shape according to the die used. In the Forge Shop of Amtek Auto Ltd., for the forging operation, there are 6 Crank press forging machines and 3 screw press forging machines. Hot, press forging is done on the billets to shape them as requirement. The crank presses (HANOUL HNFG- 1350) apply 1000 ton force on the red hot billet. The crank press runs on the principle of clutch-plate brake mechanism. Power is developed in the press due pressurized air. To provide pressurize air to the presses a number compressors are employed. There are 3 screw presses (Vaccari) which apply a pressure of 730 tonnes. They work on the principle of power screw mechanism. Processes involved in forge shop Billet loading In this process, the raw cut billets are transferred from billet shop in gaskets to be loaded in the induction heater. The loading mechanism consists of conveyer mechanism and electronic sensors for better control and automatic functioning. Induction Heating In this process, the billets are passed into an industrial induction heater which heats the billet at above 1100 C usually 1200 C, which recrystallizes the metal for easy forging to commence. The induction heater uses magnetic flux to heat the metal between the coils. Forging In this process, the upper die is clamped to the hammer and the lower die remains stationary. The red-hot billet is vertically positioned and hammer blow forces it to acquire the shape of the dies. Extra metal is forced out from the exposed face. Trimming Trimming is a process in which the extra metal projecting out of the curved surface of the sides termed as ‘flash’ is removed with the help of a trimming press. It is similar to forging machine, but much less force s applied on the top face. In this the required material is forced vertically downward and the flash remains clamped on the vices. 15. 15. 15 Flash removal In this, the ‘flash’ is obtained and transported to the scrap yard with the help of gaskets. Process Flow Chart in Forge Shop
  • 30.
    08/10/2017 Industrial TrainingReport https://www.slideshare.net/shubhamchakraborty108/itr-50388753 30/35 16. 16. 16 HEAT TREATMENT Heat treating is a group of industrial and metalworking processes used to alter the physical, properties of a material. Heat treatment involves the use of heating or chilling, normally to extreme temperatures, to achieve a desired result such as hardening or softening of a material. Heat treatment techniques include annealing, case hardening, precipitation strengthening, tempering and quenching. Metallic materials consist of a microstructure of small crystals called "grains" or crystallites. The nature of the grains (i.e. grain size and composition) is one of the most effective factors that can determine the overall mechanical behaviour of the metal. Heat treatment provides an efficient way to manipulate the properties of the metal by controlling the rate of diffusion and the rate of cooling within the microstructure. Heat treating is often used to alter the mechanical properties of a metallic alloy, manipulating properties such as the hardness, strength, toughness, ductility, and elasticity. Heat Treatment Techniques Annealing Annealing consists of heating a metal to a specific temperature and then cooling at a rate that will produce a refined microstructure. The rate of cooling is generally slow. In ferrous alloys, annealing is usually accomplished by heating the metal beyond the upper critical temperature and then cooling very slowly, resulting in the formation of pearlite. In both pure metals and many alloys that cannot be heat treated, annealing is used to remove the hardness caused by cold working. The metal is heated to a temperature where recrystallisation can occur, thereby repairing the defects caused by plastic deformation. Ferrous alloys are usually either "full annealed" or "process annealed." Full annealing requires very slow cooling rates, in order to form coarse pearlite. In process annealing, the cooling rate may be faster; up to, and including normalizing. The main goal of process annealing is to produce a uniform microstructure. Normalizing Normalizing is a technique used to provide uniformity in grain size and composition throughout an alloy. The term is often used for ferrous alloys that have been austenitized and then cooled in open air. Normalizing not only produces pearlite, but also sometimes martensite, which gives harder and stronger steel, but with less ductility for the same composition than full annealing. Aging 17. 17. 17 Some metals are classified as precipitation hardening metals. When a precipitation hardening alloy is quenched, its alloying elements will be trapped in solution, resulting in a soft metal. Aging a "solutionized" metal will allow the alloying elements to diffuse through the microstructure and form intermetallic particles. These intermetallic particles will nucleate and fall out of solution and act as a reinforcing phase, thereby increasing the strength of the alloy. Alloys may age "naturally" meaning that the precipitates form at room temperature, or they may age "artificially" when precipitates only form at elevated temperatures. Quenching Quenching is a process of cooling a metal at a rapid rate. This is most often done to produce a martensite transformation. In ferrous alloys, this will often produce a harder metal, while non- ferrous alloys will usually become softer than normal. To harden by quenching, a metal (usually steel or cast iron) must be heated above the upper critical temperature and then quickly cooled. Cooling is done with Liquids, due to their better thermal conductivity, such as oil. Upon being rapidly cooled, a portion of austenite (dependent on alloy composition) will transform to martensite, a hard, brittle crystalline structure. Tempering Untempered martensitic steel, while very hard, is too brittle to be useful for most applications. A method for alleviating this problem is called tempering. . Tempering consists of heating steel below the lower critical temperature, (often from 400 to 1105 ˚F or 205 to 595 ˚C, depending on the desired results), to impart some toughness. Flame hardening Flame hardening is used to harden only a portion of a metal. Unlike differential hardening, where the entire piece is heated and then cooled at different rates, in flame hardening, only a portion of the metal is heated before quenching. Case hardening Case hardening is a thermochemical diffusion process in which an alloying element, most commonly carbon or nitrogen, diffuses into the surface of a monolithic metal. The resulting interstitial solid solution is harder than the base material, which improves wear resistance without sacrificing toughness. 18. 18. 18 Heat treatment processes Heat treatment of the forged material obtained from forge shop is done in a furnace. The temperature of furnace ranges from 880 C to 1100 C according to the requirement. The Burner fuels used in the furnace maybe Diesel, LDO or Gas. Usually the temperature required for hardening process is 870 to 900 C. Temperature required for tempering process is 580 C. The forged jobs are loaded in a gasket and put inside the furnace with the help of pulley mechanism. The doors are the shut using a combination of sliding mechanism and electronic sensors to provide a sealed environment for heat treatment. The gasket is obtained from the other end of the furnace. At any point of time there are 6-8 gaskets within the furnace. These gaskets are slowly moving towards the other end of the furnace due to rolling mechanism in the furnace. The time required for the total process for one gasket is 10 minutes. After this, oil quenching is done. The obtained treated job is handled with the help of
  • 31.
    08/10/2017 Industrial TrainingReport https://www.slideshare.net/shubhamchakraborty108/itr-50388753 31/35 stretcher and is either sent for further heat treatment or to End Control for final inspection. The oil becomes hot after the heated metal is immersed in it. To prevent overheating of oil, a Plate Type Heat Exchanger (PHE) is employed which circulates cold oil in the quenching bucket. The PHE is itself cooled with the help of Natural circulation wet type cooling towers. 19. 19. 19 Heat treatment Process Flowchart 20. 20. 20 END CONTROL End Control is the department in which the final quality checks and finishing of the product is done. In End Control, there are various processes. Shot Blasting Cold Coining or Knuckle press Visual Check Total Parameter Check Eddy Current Check Ultrasonic Check Magnetic Crack Detection End Control Checks Shot Blasting In shot blasting, steel shots are passed in a shot blasting machine through small holes in a rotating, hollow, rubber-lined surface. The heat treated material has a rough surface due to accumulation of oxide layer. To remove this oxide layer, the metals are loaded in the shot blasting machine and the abrasive action of the spherical steel shots remove the oxide layer. The oxide layer is the sucked in through an ash handling pump and is disposed off as dust. Cold Coining It is a process through which the flatness and Total Indicated Runout of the job is altered by applying a hammer blow to the face of the crankshaft. The machine used in this process is called knuckle press. Total parameter check In this the dimensions of the material are checked and compared with the standard values. It also checks the phenomenon of under-height of job and improper trimming. 21. 21. 21 Visual check Visual check encompasses a large number of checks for various defects like Pitting, Stem underfilling, Boss underfilling, Shoulder underfilling, Die marks, Corner underfilling, Top Flange underfilling, Rib underfilling, Dent Fitting etc. Eddy current check In this check the cracks present inside the material of the face of job is checked. A current is passed and detected. If the sensors detect any slight irregularity in composition or cracks then the job is rejected. Ultrasonic Check In this check the vertical internal cracks present in the stem of job is checked. An X-ray is passed through a probe positioned at the bottom face of the stem and penetrating x-rays detect the number of cracks. If the sensors detect any slight irregularity in composition or cracks then the job is rejected. Magnetic Crack Detection In this the microscopic cracks present on the surface of the job is determined and checked and if the job is found faulty then it is rejected. For this a magnetic flux is passed and sensors detect the overall flux produced. 22. 22. 22 DISPATCH After all the checks are performed in the End Control, the finished product is oiled and loaded into gaskets for transporting to the customers. Oiling is done on the product to prevent corrosion to the metal surface. Schematic Diagram of Sample crankshaft’s face: Manufacturer CompanyCode CustomerCompany Code Die number Month code Heat Code Boss CornerTop 23. 23. 23 CONCLUSION As an undergraduate I would like to say that this training program is an excellent opportunity for us to get to the ground level and experience the things that we would have never gained through going straight into a job. The main objective of the industrial training is to provide an opportunity to undergraduates to identify, observe and practice how engineering is applicable in the real industry. It is not only to get experience on technical practices but also to observe management practices and to interact with fellow workers. It is easy to work with sophisticated machines, but not with people. The only chance that an undergraduate has to have this experience is the industrial training period. I feel I got the maximum out of that experience. Also I learnt the way of work in an organization, the importance of being punctual, the importance of maximum commitment, and the importance of team spirit. In my opinion, I have gained lots of knowledge and experience needed to be successful in a great engineering challenge, as in my opinion, Engineering is after all a Challenge, and not a Job. Recommended Leadership Fundamentals
  • 32.
    08/10/2017 Industrial TrainingReport https://www.slideshare.net/shubhamchakraborty108/itr-50388753 32/35 Managing Teams Coaching and Developing Employees Industrial Training Report-1 Rohit Grandhi, EIT AMTEK Research Report Peeyush Sahu CAPM® Amtek training Aman (11 me-06) Aman5252
  • 33.
    08/10/2017 Industrial TrainingReport https://www.slideshare.net/shubhamchakraborty108/itr-50388753 33/35 HEC Project Report Ashish Raj Summer training Ranjit Kandel Amtek persentation aman (11 me-06) Aman5252 ring gear production Sachin Sharma English Español Português Français Deutsch About Dev & API Blog Terms Privacy Copyright Support
  • 34.
    08/10/2017 Industrial TrainingReport https://www.slideshare.net/shubhamchakraborty108/itr-50388753 34/35 LinkedIn Corporation © 2017 × Share Clipboard × Email Enter email addresses From Add a message Send Email sent successfully.. Facebook Twitter LinkedIn Link Public clipboards featuring this slide × No public clipboards found for this slide × Save the most important slides with Clipping Clipping is a handy way to collect and organize the most important slides from a presentation. You can keep your great finds in clipboards organized around topics. Start clipping No thanks. Continue to download. Select another clipboard
  • 35.
    08/10/2017 Industrial TrainingReport https://www.slideshare.net/shubhamchakraborty108/itr-50388753 35/35 × Looks like you’ve clipped this slide to already. Search for a clipboard Create a clipboard You just clipped your first slide! Clipping is a handy way to collect important slides you want to go back to later. Now customize the name of a clipboard to store your clips. Name* Best of Slides Description Add a brief description so oth Visibility Others can see my Clipboard Cancel Save Save this document