### 1. Tổng quan về sách
Trong thế giới giao dịch tài chính, việc có một kế hoạch giao dịch chi tiết và bài bản là yếu tố then chốt quyết định thành công của một trader. Cuốn sách *ICT - Full Trading Plan - Mulham Trading* chính là một hướng dẫn toàn diện giúp các nhà giao dịch nắm bắt được cách tiếp cận thị trường một cách khoa học và có hệ thống.
Cuốn sách này dựa trên phương pháp của Inner Circle Trader (ICT) – một trong những hệ thống giao dịch nổi tiếng với cách tiếp cận thị trường thông minh, kết hợp giữa phân tích kỹ thuật, dòng tiền tổ chức và tâm lý giao dịch. *ICT - Full Trading Plan - Mulham Trading* không chỉ hướng dẫn các chiến lược giao dịch thực tiễn mà còn giúp trader xây dựng kỷ luật và tư duy đúng đắn để tồn tại lâu dài trong thị trường.
### 2. Nội dung chính của sách
Cuốn sách được chia thành nhiều phần quan trọng, giúp người đọc hiểu sâu về cách lập kế hoạch giao dịch hiệu quả.
#### **Chương 1: Giới thiệu về phương pháp ICT**
- Tổng quan về phương pháp Inner Circle Trader (ICT).
- Tại sao ICT được đánh giá cao trong cộng đồng trader chuyên nghiệp?
- Cách tiếp cận thị trường dựa trên dòng tiền tổ chức.
#### **Chương 2: Xây dựng kế hoạch giao dịch từ A-Z**
- Tầm quan trọng của việc lập kế hoạch trước khi giao dịch.
- Các yếu tố cần có trong một kế hoạch giao dịch.
- Cách xác định mục tiêu và kỳ vọng lợi nhuận.
#### **Chương 3: Phân tích kỹ thuật theo phương pháp ICT**
- Cách sử dụng mô hình giá của ICT.
- Phân tích các vùng thanh khoản và cách thị trường phản ứng.
- Cách sử dụng khung thời gian trong giao dịch ICT.
#### **Chương 4: Quản lý rủi ro và vốn**
- Tại sao quản lý vốn quan trọng hơn chiến lược giao dịch?
- Các phương pháp quản lý rủi ro hiệu quả.
- Cách tối ưu hóa lợi nhuận mà vẫn bảo toàn vốn.
#### **Chương 5: Chiến lược giao dịch thực tiễn**
- Chiến lược giao dịch dựa trên thanh khoản.
- Cách nhận diện điểm vào lệnh chất lượng.
- Ví dụ thực tế về các lệnh giao dịch theo ICT.
#### **Chương 6: Kiểm soát tâm lý giao dịch**
- Tầm quan trọng của tâm lý giao dịch.
- Làm thế nào để giữ vững kỷ luật khi giao dịch?
- Cách vượt qua cảm giác sợ hãi và lòng tham.
#### **Chương 7: Hành trình trở thành trader chuyên nghiệp**
- Những điều cần chuẩn bị để giao dịch toàn thời gian.
- Lộ trình phát triển từ trader mới đến trader chuyên nghiệp.
- Các bài học từ những trader thành công theo phương pháp ICT.
### 3. Giá trị mà cuốn sách mang lại
*ICT - Full Trading Plan - Mulham Trading* không chỉ đơn thuần là một tài liệu hướng dẫn giao dịch, mà còn là kim chỉ nam giúp trader xây dựng một tư duy vững chắc và chiến lược hiệu quả để thành công trong thị trường. Một số lợi ích nổi bật của cuốn sách:
- **Giúp người mới tiếp cận giao dịch một cách bài bản**: Cung cấp hướng dẫn chi tiết từng bước, dễ hiểu.
- **Nâng cao khả năng phân tích thị trường**: Trader sẽ học cách đọc thị trường dựa trên hành vi của dòng tiền tổ chức.
- **Xây dựng kế hoạch giao dịch rõ ràng**: Gi


![KILLZONE TIME
ASIAN 20:00-00:00
LONDON 2:00-5:00
NEW YORK 7:00-10:00
TIMING
KILLZONES
8
MACROS
A Macro is a period in which the algorithm seeks
out buy side or sell side liquidity, or endeavors to
rebalance the price at a point of interest between
the opening and closing times of the Macro
ALL TIMES ARE IN NEW YORK TIME ZONE
Accumulation
[Creates Liquidity]
distribution
[Expansion]
Manipulation
[Liquidity Sweep]
London NY AM NY PM
2:33-3:00 8:50-9:10 11:50-12:10
4:03-4:30 9:50-10:10 13:10-13:40
- 10:50-11:10 15:15-15:45
Trade This!](https://image.slidesharecdn.com/ict-fulltradingplan-mulhamtrading-250401144545-9821d8b2/85/ICT-Full-Trading-Plan-Mulham-Trading-pdf-10-320.jpg)
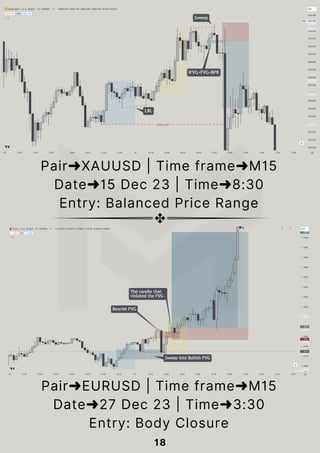
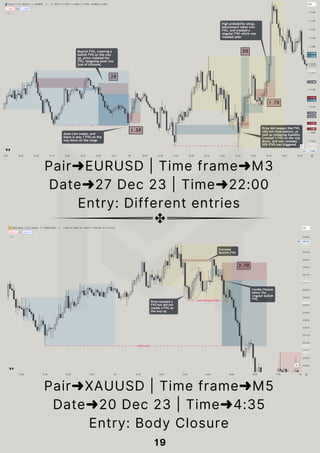
![11
4 FVG + FVG [BPR]
This is a very high
probability entry. We are
looking for price to violate
the FVG with a FVG. Entry
can be at:
➤ Beginning of the FVG
➤ 50% of the FVG
➤ Beginning or 50% of
Balanced Price Range [BPR]
which is the overlapped
zone of two FVGs.
Pros: Very high in
probability entry, better
entry & Reward to Risk
Cons: Missing trades
Entry
All entry types are effective! You simply need to
adapt one based on an understanding of its pros
and cons, finding the approach that aligns with
your personality, account, and risk management.
You'll delve deeper into this in the next chapter!](https://image.slidesharecdn.com/ict-fulltradingplan-mulhamtrading-250401144545-9821d8b2/85/ICT-Full-Trading-Plan-Mulham-Trading-pdf-13-320.jpg)


![ICT Trading Style Abbreviations and Terminologies [FVGs, OBs, PO3 & MMXM]](https://cdn.slidesharecdn.com/ss_thumbnails/icttradingstyleabbreviationsandterminologiesfvgsobspo3mmxm-250527052348-38610370-thumbnail.jpg?width=640&height=640&fit=bounds)


![Tania - Free Trading Course [2025] (2).pdf](https://cdn.slidesharecdn.com/ss_thumbnails/tania-freetradingcourse20252-260125120506-6c08f395-thumbnail.jpg?width=640&height=640&fit=bounds)


