More Related Content

PDF

PDF

KEY

PPTX

PDF

PDF

PPTX

PDF
What's hot

PDF
Using ngx_lua / lua-nginx-module in pixiv 
PDF

PPTX
Webサーバ勉強会4 nginx で php-fpm を動かしてみた 
PPTX
OpenShift from Easy way to Hard ? Way 
PDF

PPTX

PDF
10分で作る Node.js Auto Scale 環境 with CloudFormation 
KEY

PDF

PDF
serverspecでサーバ環境のテストを書いてみよう 
PPTX
Windows azureを知ろう ロール&ストレージ編 
PDF
Serverspecを自分好みにアレンジ スクリーンショットで証跡保存を撲滅- 
PPTX

PDF

PPTX
Windows Azure Storage:Best Practices and Internals 
PPTX

PDF
New configurationoferogamescaperev2 
PDF

PDF
Docker+CoreOS+GCEで自動スケール分散レイトレ 
PDF
Word press on conoha このべん #3 Viewers also liked

PPT

PPTX
PPT

PPT
Web Server Hardware and Software 
PPTX

PDF
Creative Web 2.0 Learning 
PPTX

PDF
E book mahir administrasi server dan router linux ubuntu 12.04 lts Similar to 簡単なHTTPサーバの作成

PDF
NGINXセミナー(基本編)~いまさら聞けないNGINXコンフィグなど基本がわかる! 
PDF

PDF
「これからはじめるNGINX技術解説~基本編」セミナー (NGINX Back to Basic in JP) 
PDF

PDF

PPTX

PDF
HTTP/2 in nginx(2016/3/11 社内勉強会) 
PDF
Lapp環境をソースからインストールする(centos) 
PDF
いまさら聞けないNGINXコンフィグ_F5-NGINX-Community-20200805 
PPTX
EC2でNginxを使ってみよう JAWS大阪第9回勉強会資料 
PDF
PHP-FPMとuWSGI——mod_php以外の選択肢を探る 
PPT

PDF

PPTX

PDF

PPTX

PDF

PDF

PDF
httpd.conf line 1 to 7, 24 
PDF
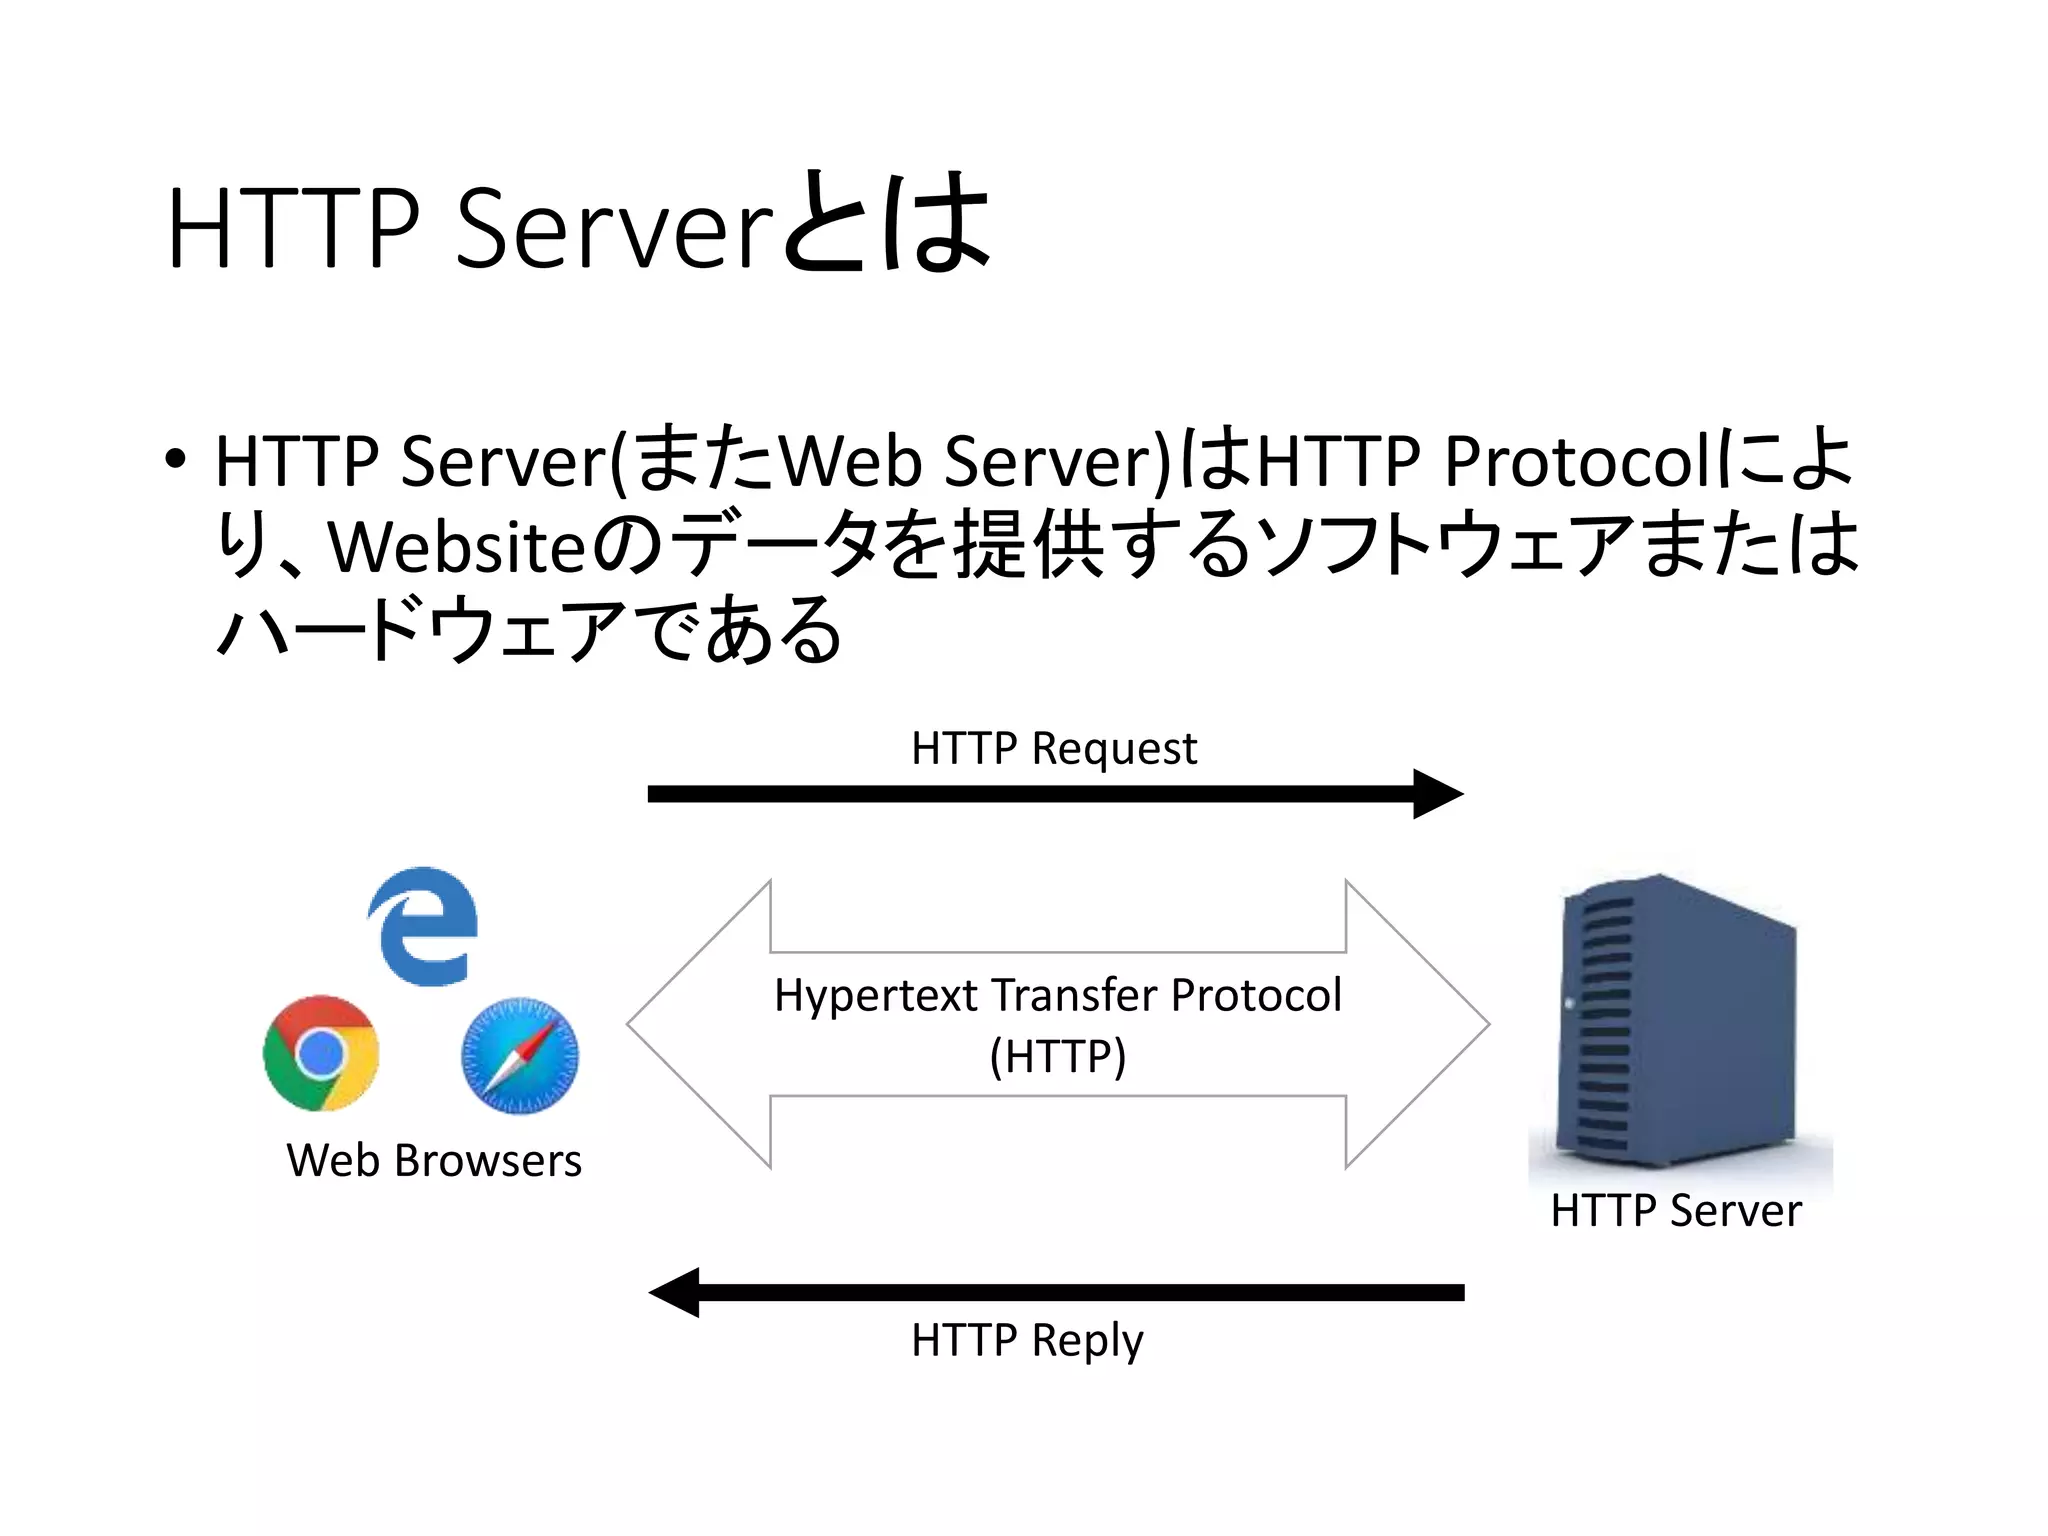
簡単なHTTPサーバの作成
- 1.
- 2.
- 3.
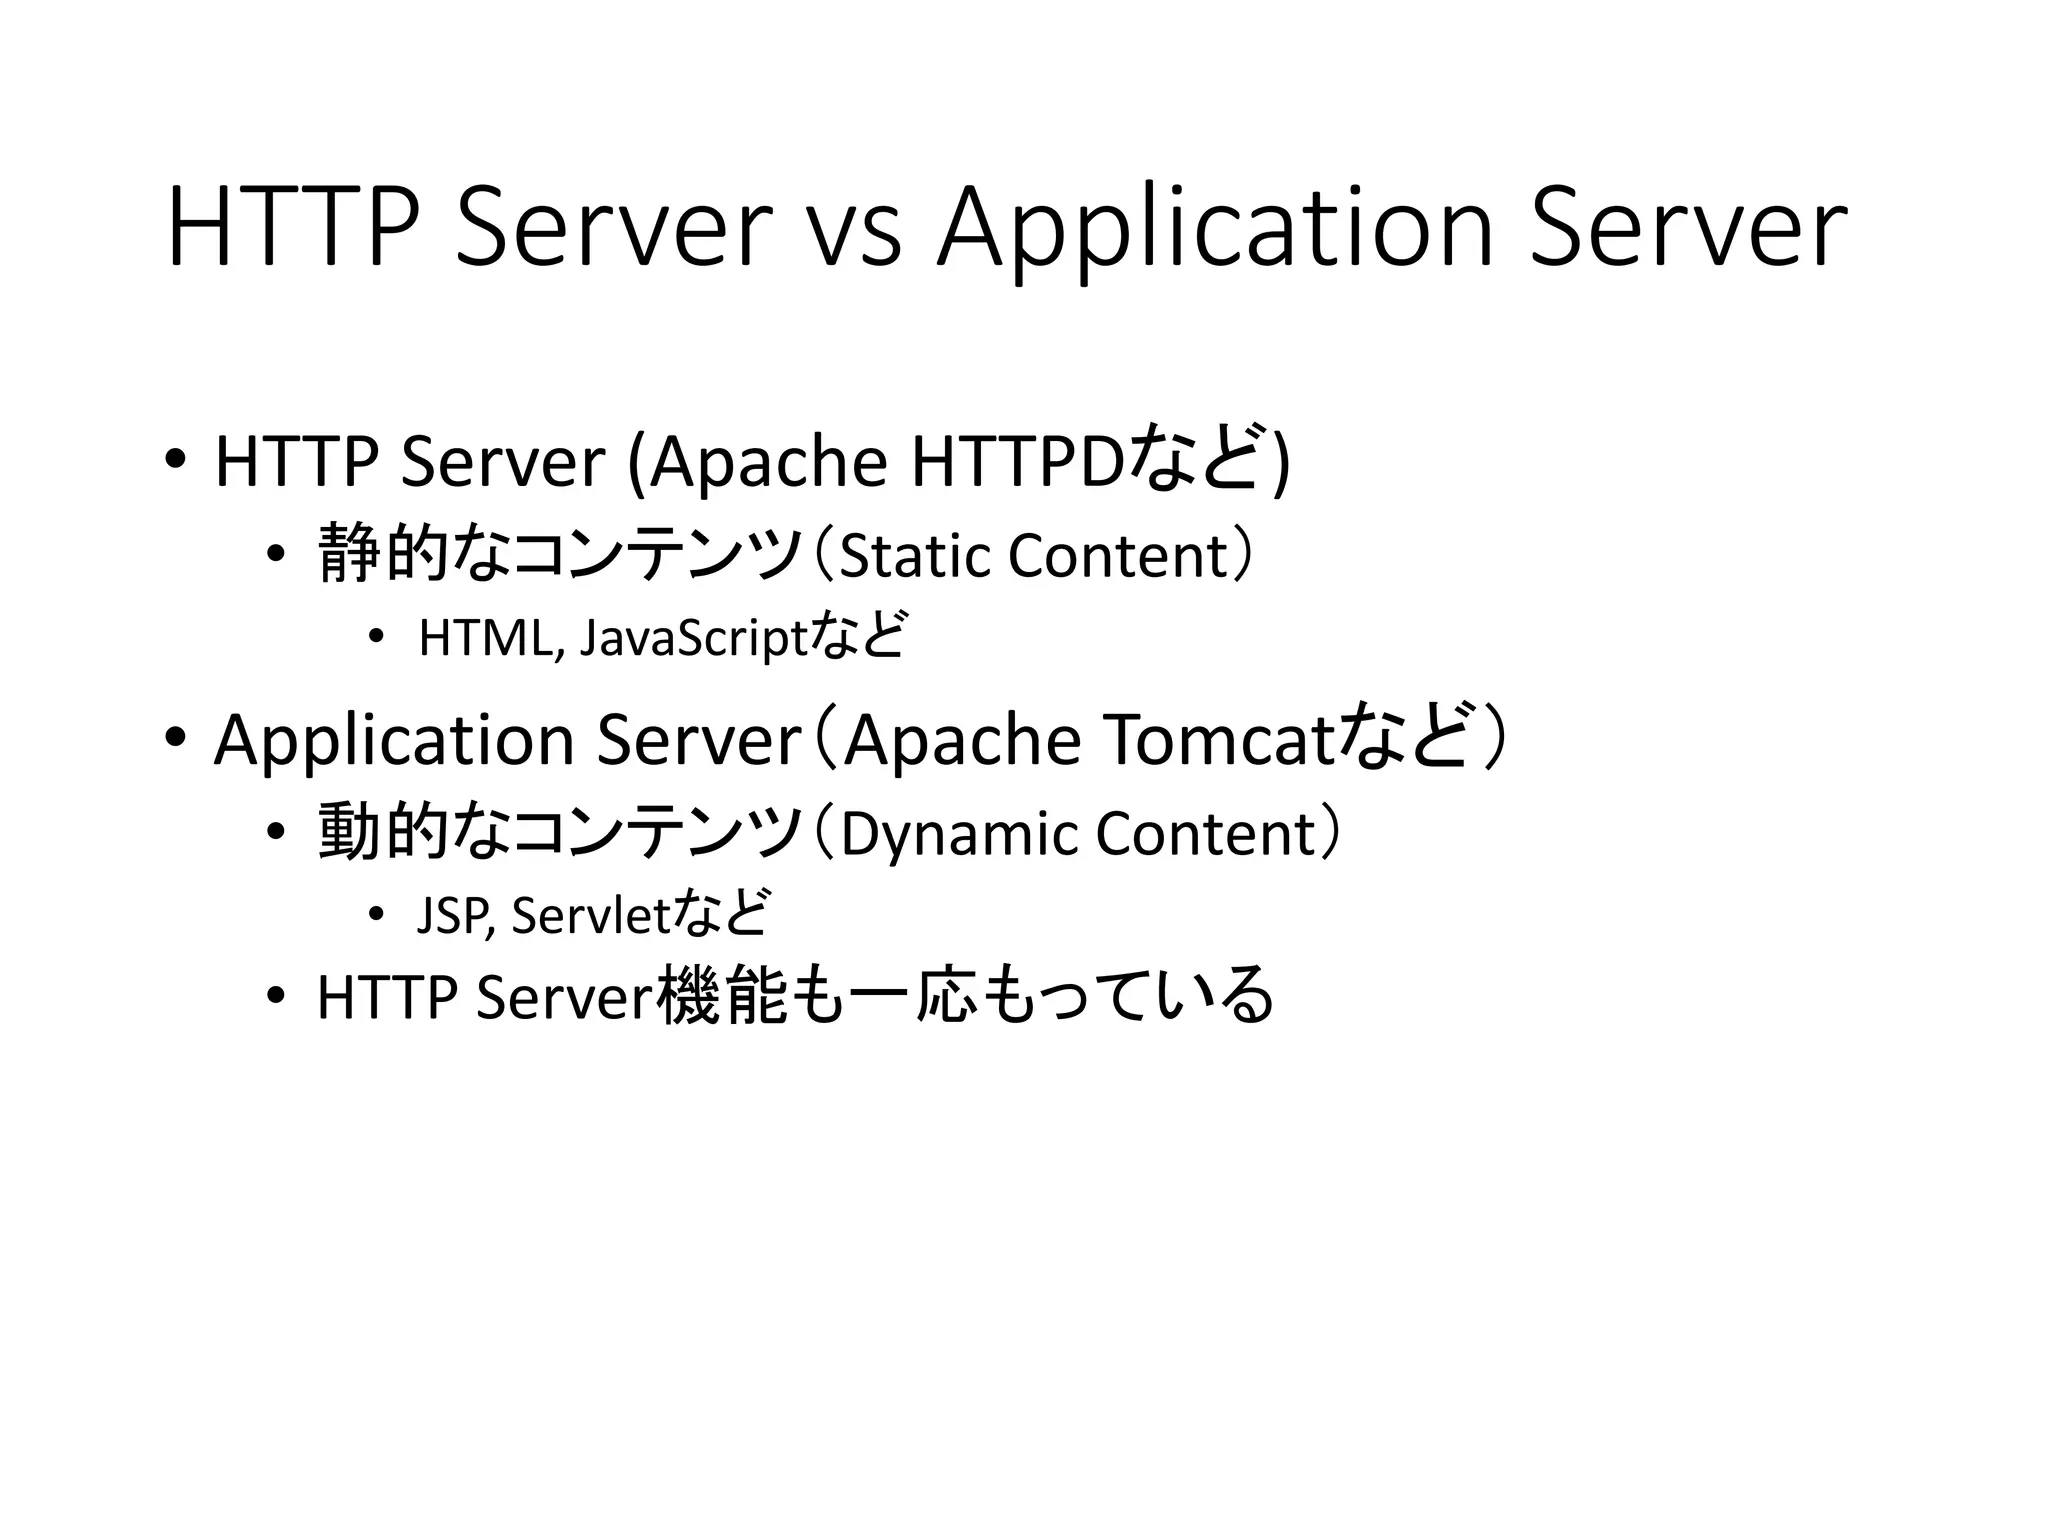
HTTP Server vsApplication Server
• HTTP Server (Apache HTTPDなど)
• 静的なコンテンツ(Static Content)
• HTML, JavaScriptなど
• Application Server(Apache Tomcatなど)
• 動的なコンテンツ(Dynamic Content)
• JSP, Servletなど
• HTTP Server機能も一応もっている
- 4.
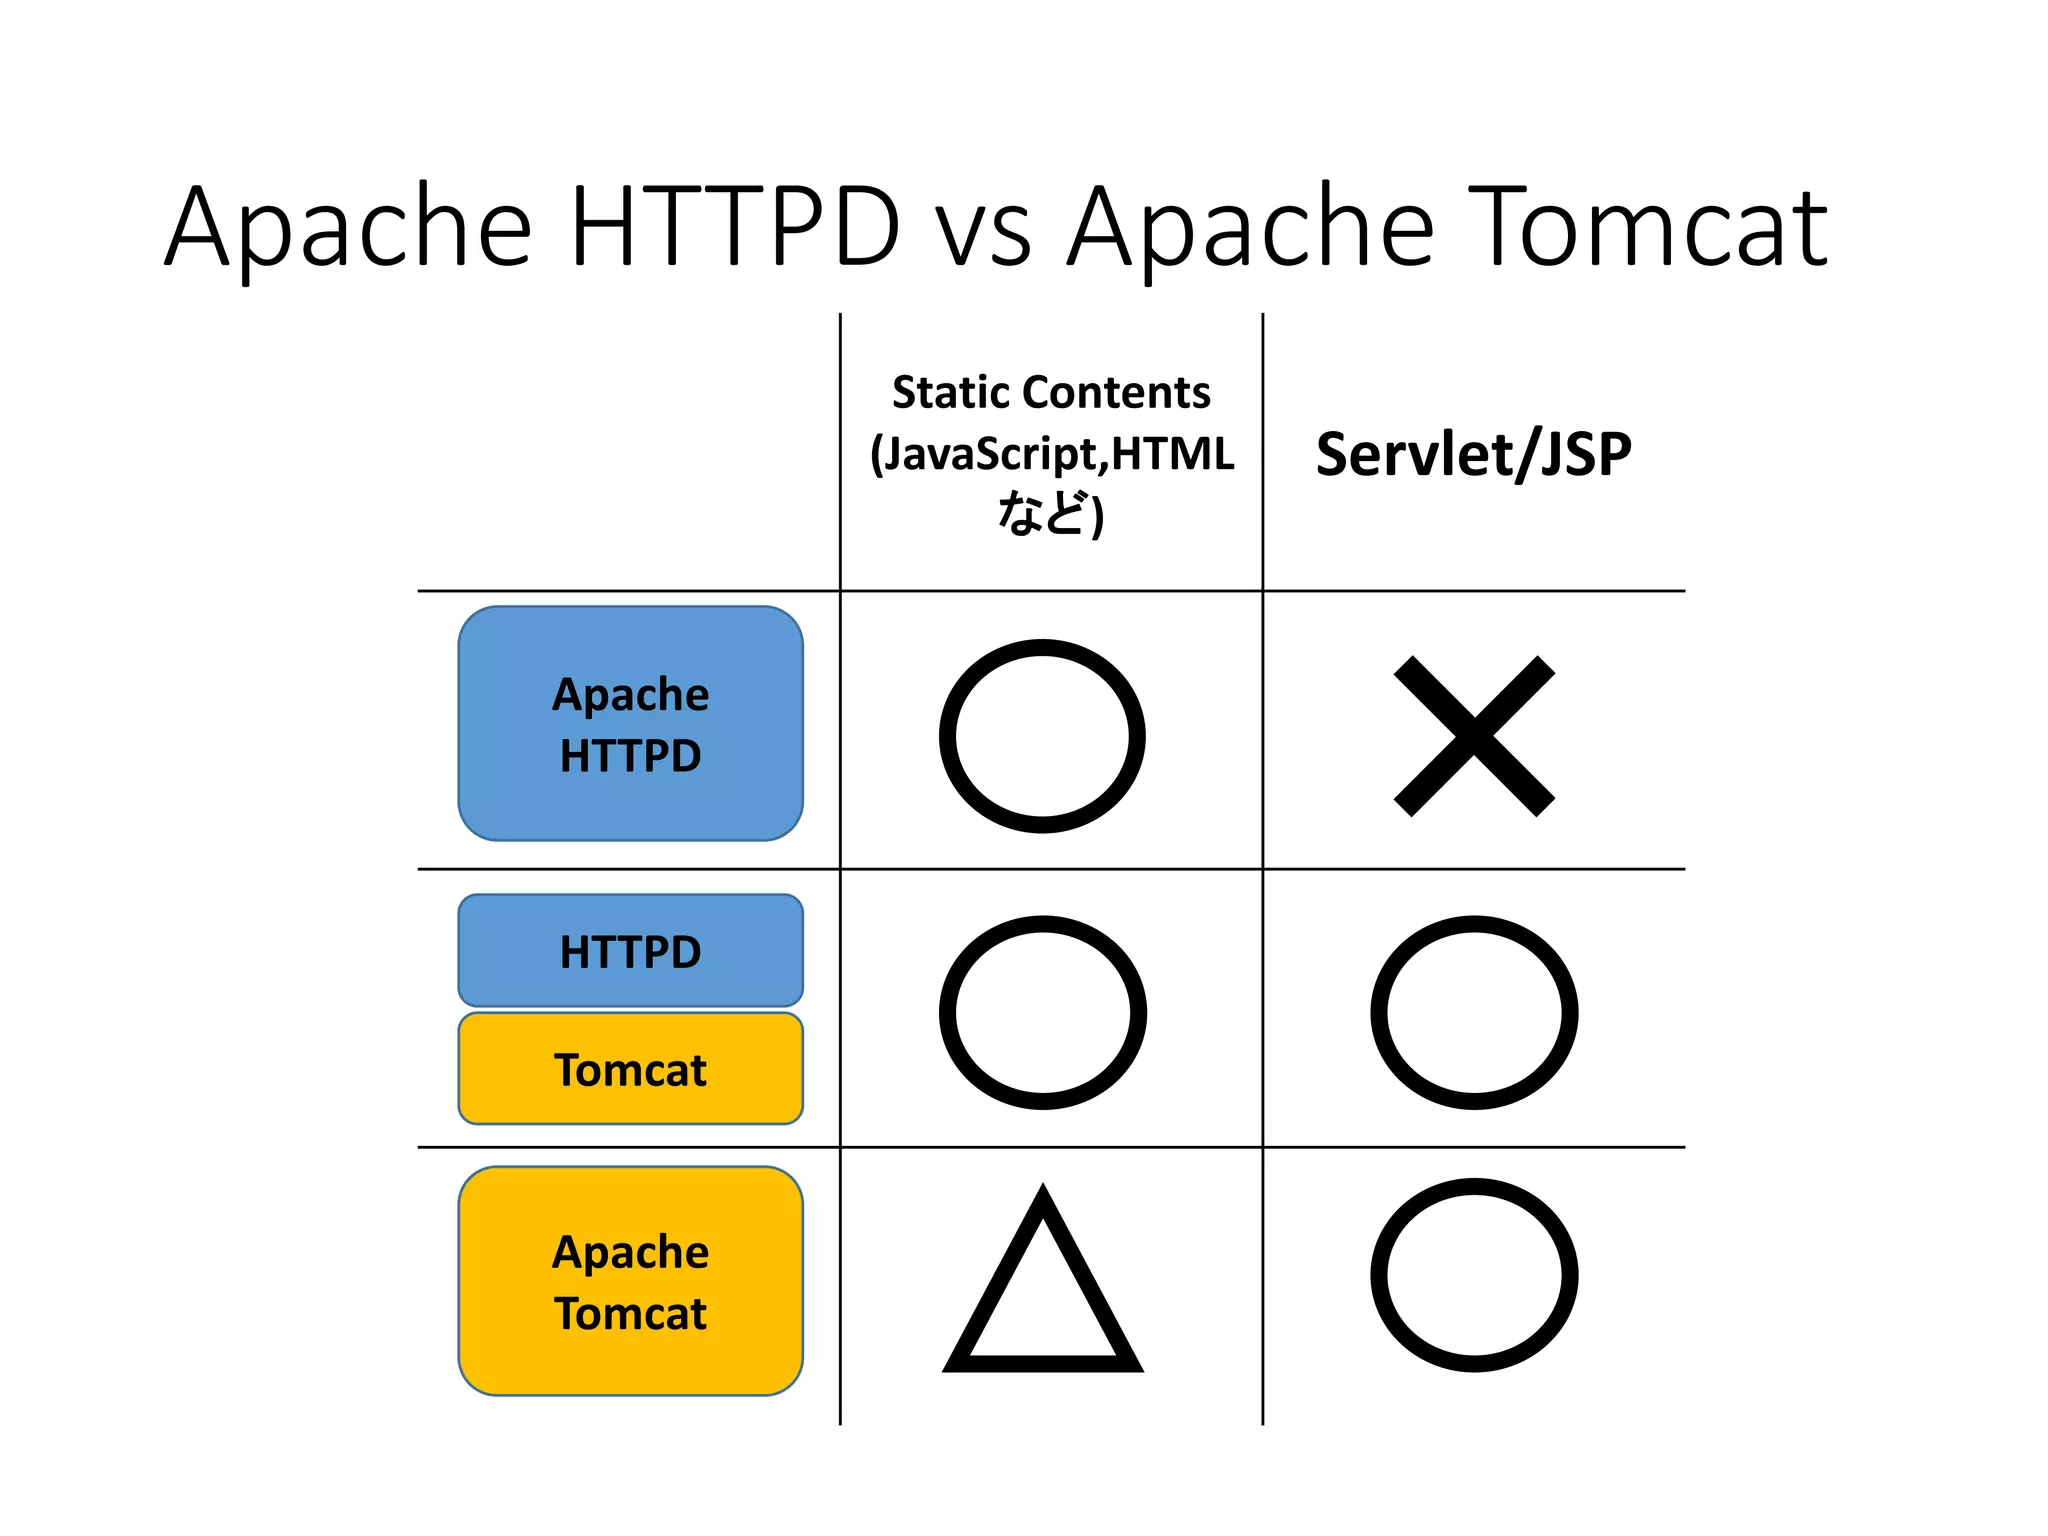
Apache HTTPD vsApache Tomcat
Static Contents
(JavaScript,HTML
など)
Servlet/JSP
Apache
HTTPD
Apache
Tomcat
HTTPD
Tomcat
- 5.
- 6.
- 7.
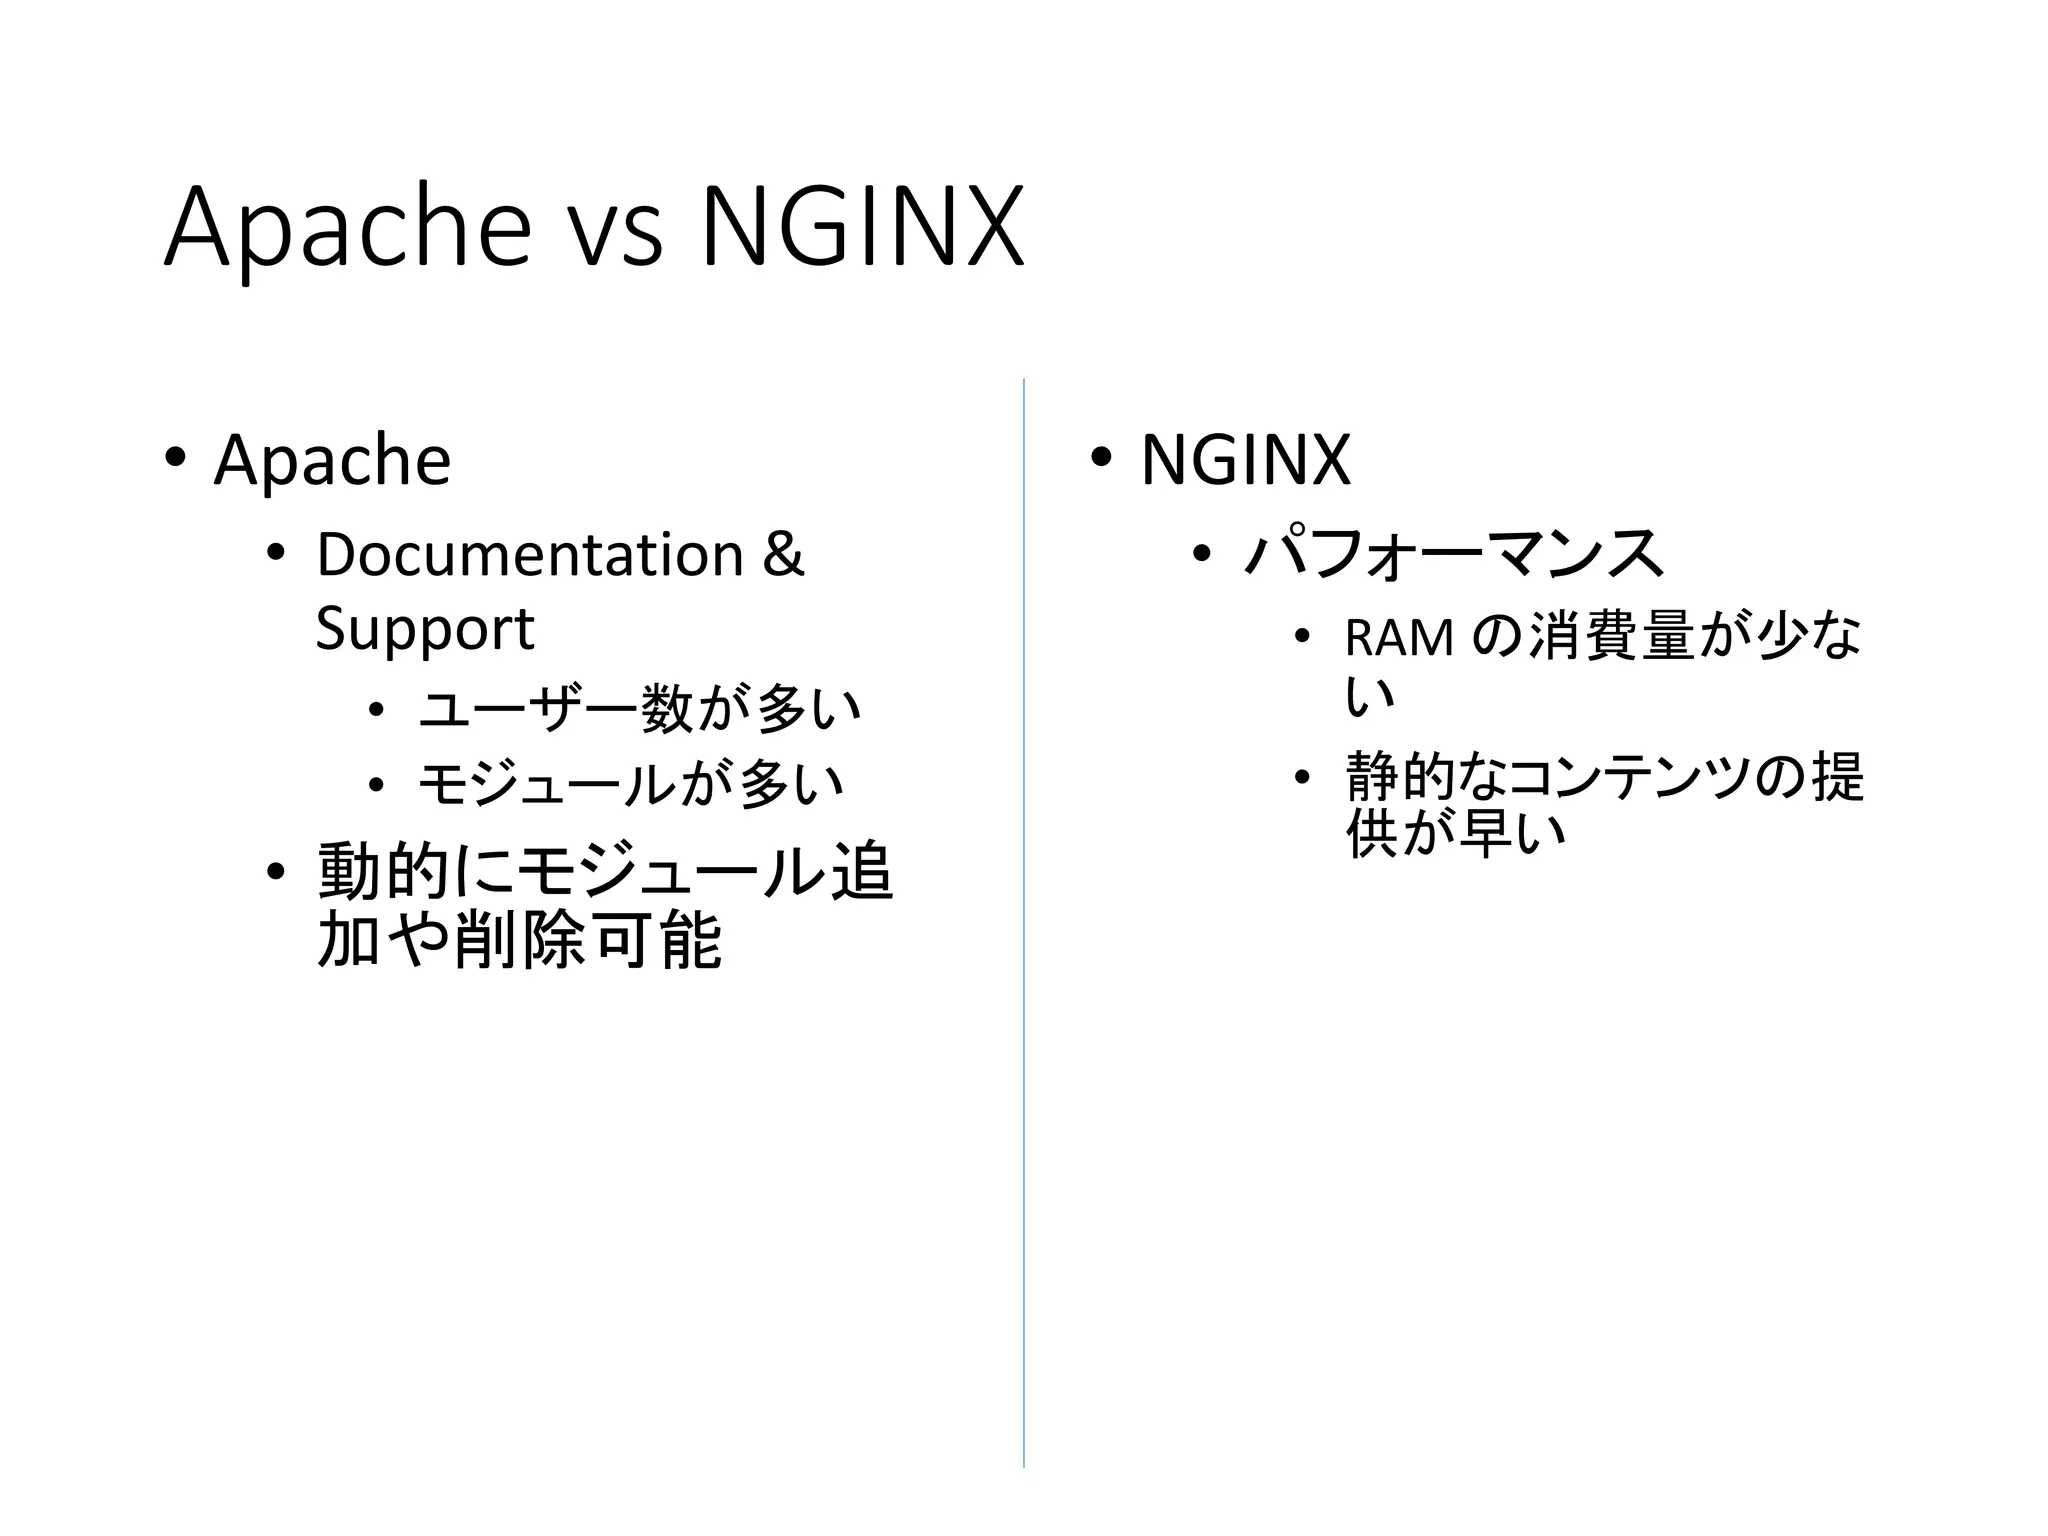
Apache vs NGINX
•Apache
• Documentation &
Support
• ユーザー数が多い
• モジュールが多い
• 動的にモジュール追
加や削除可能
• NGINX
• パフォーマンス
• RAM の消費量が少な
い
• 静的なコンテンツの提
供が早い
- 8.
- 10.
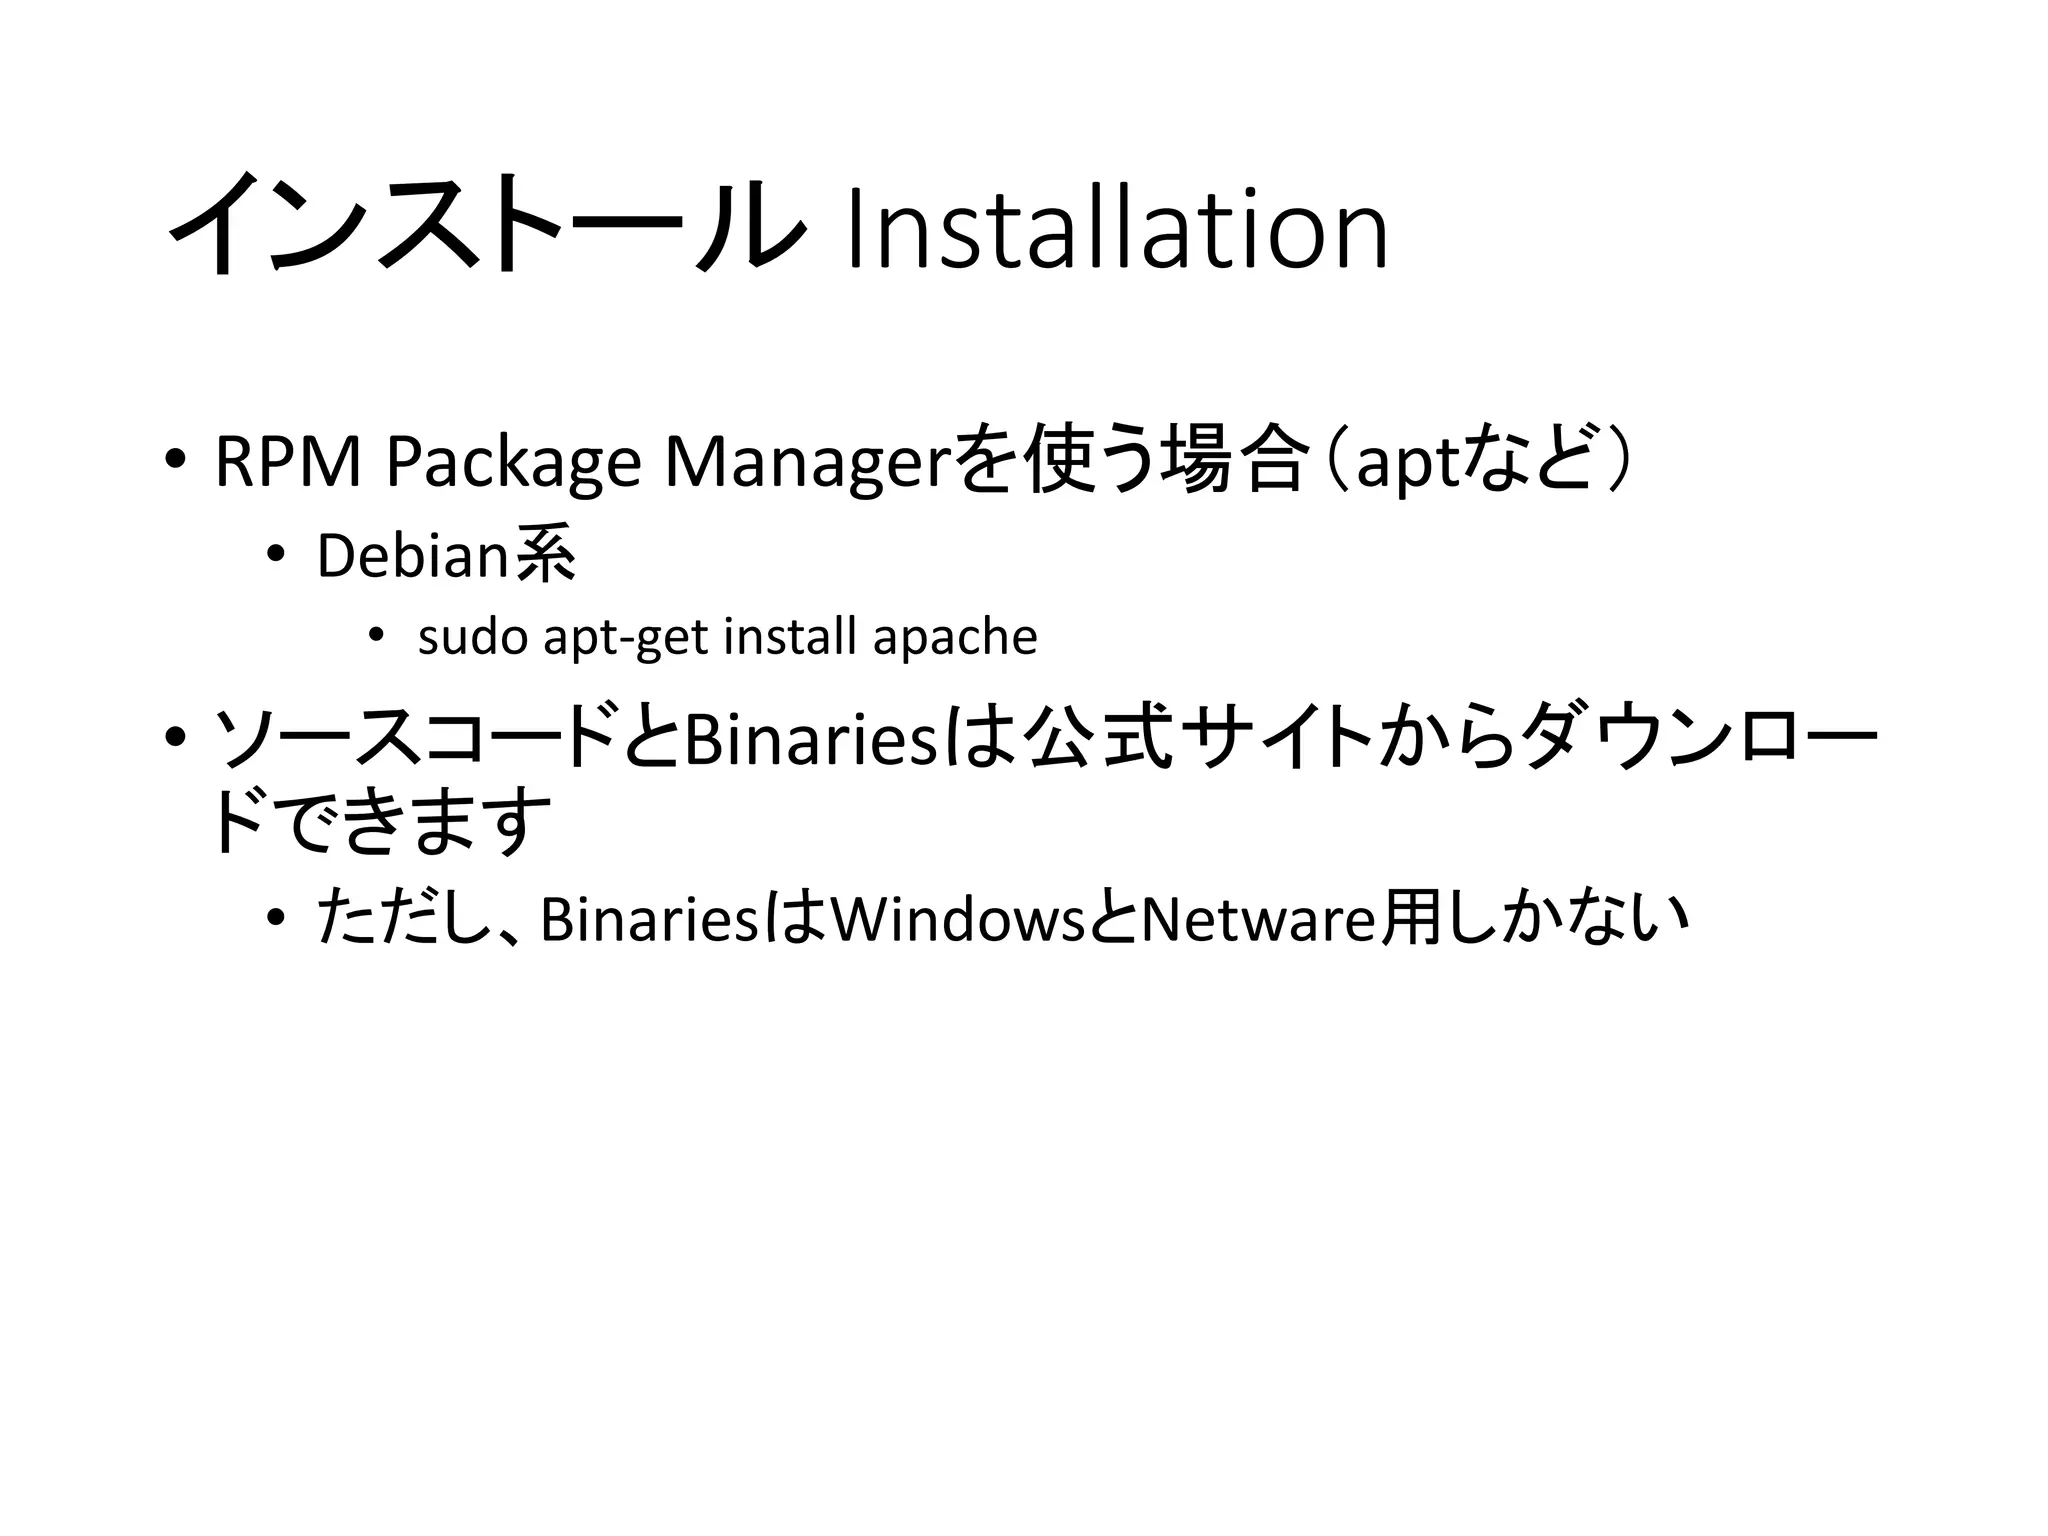
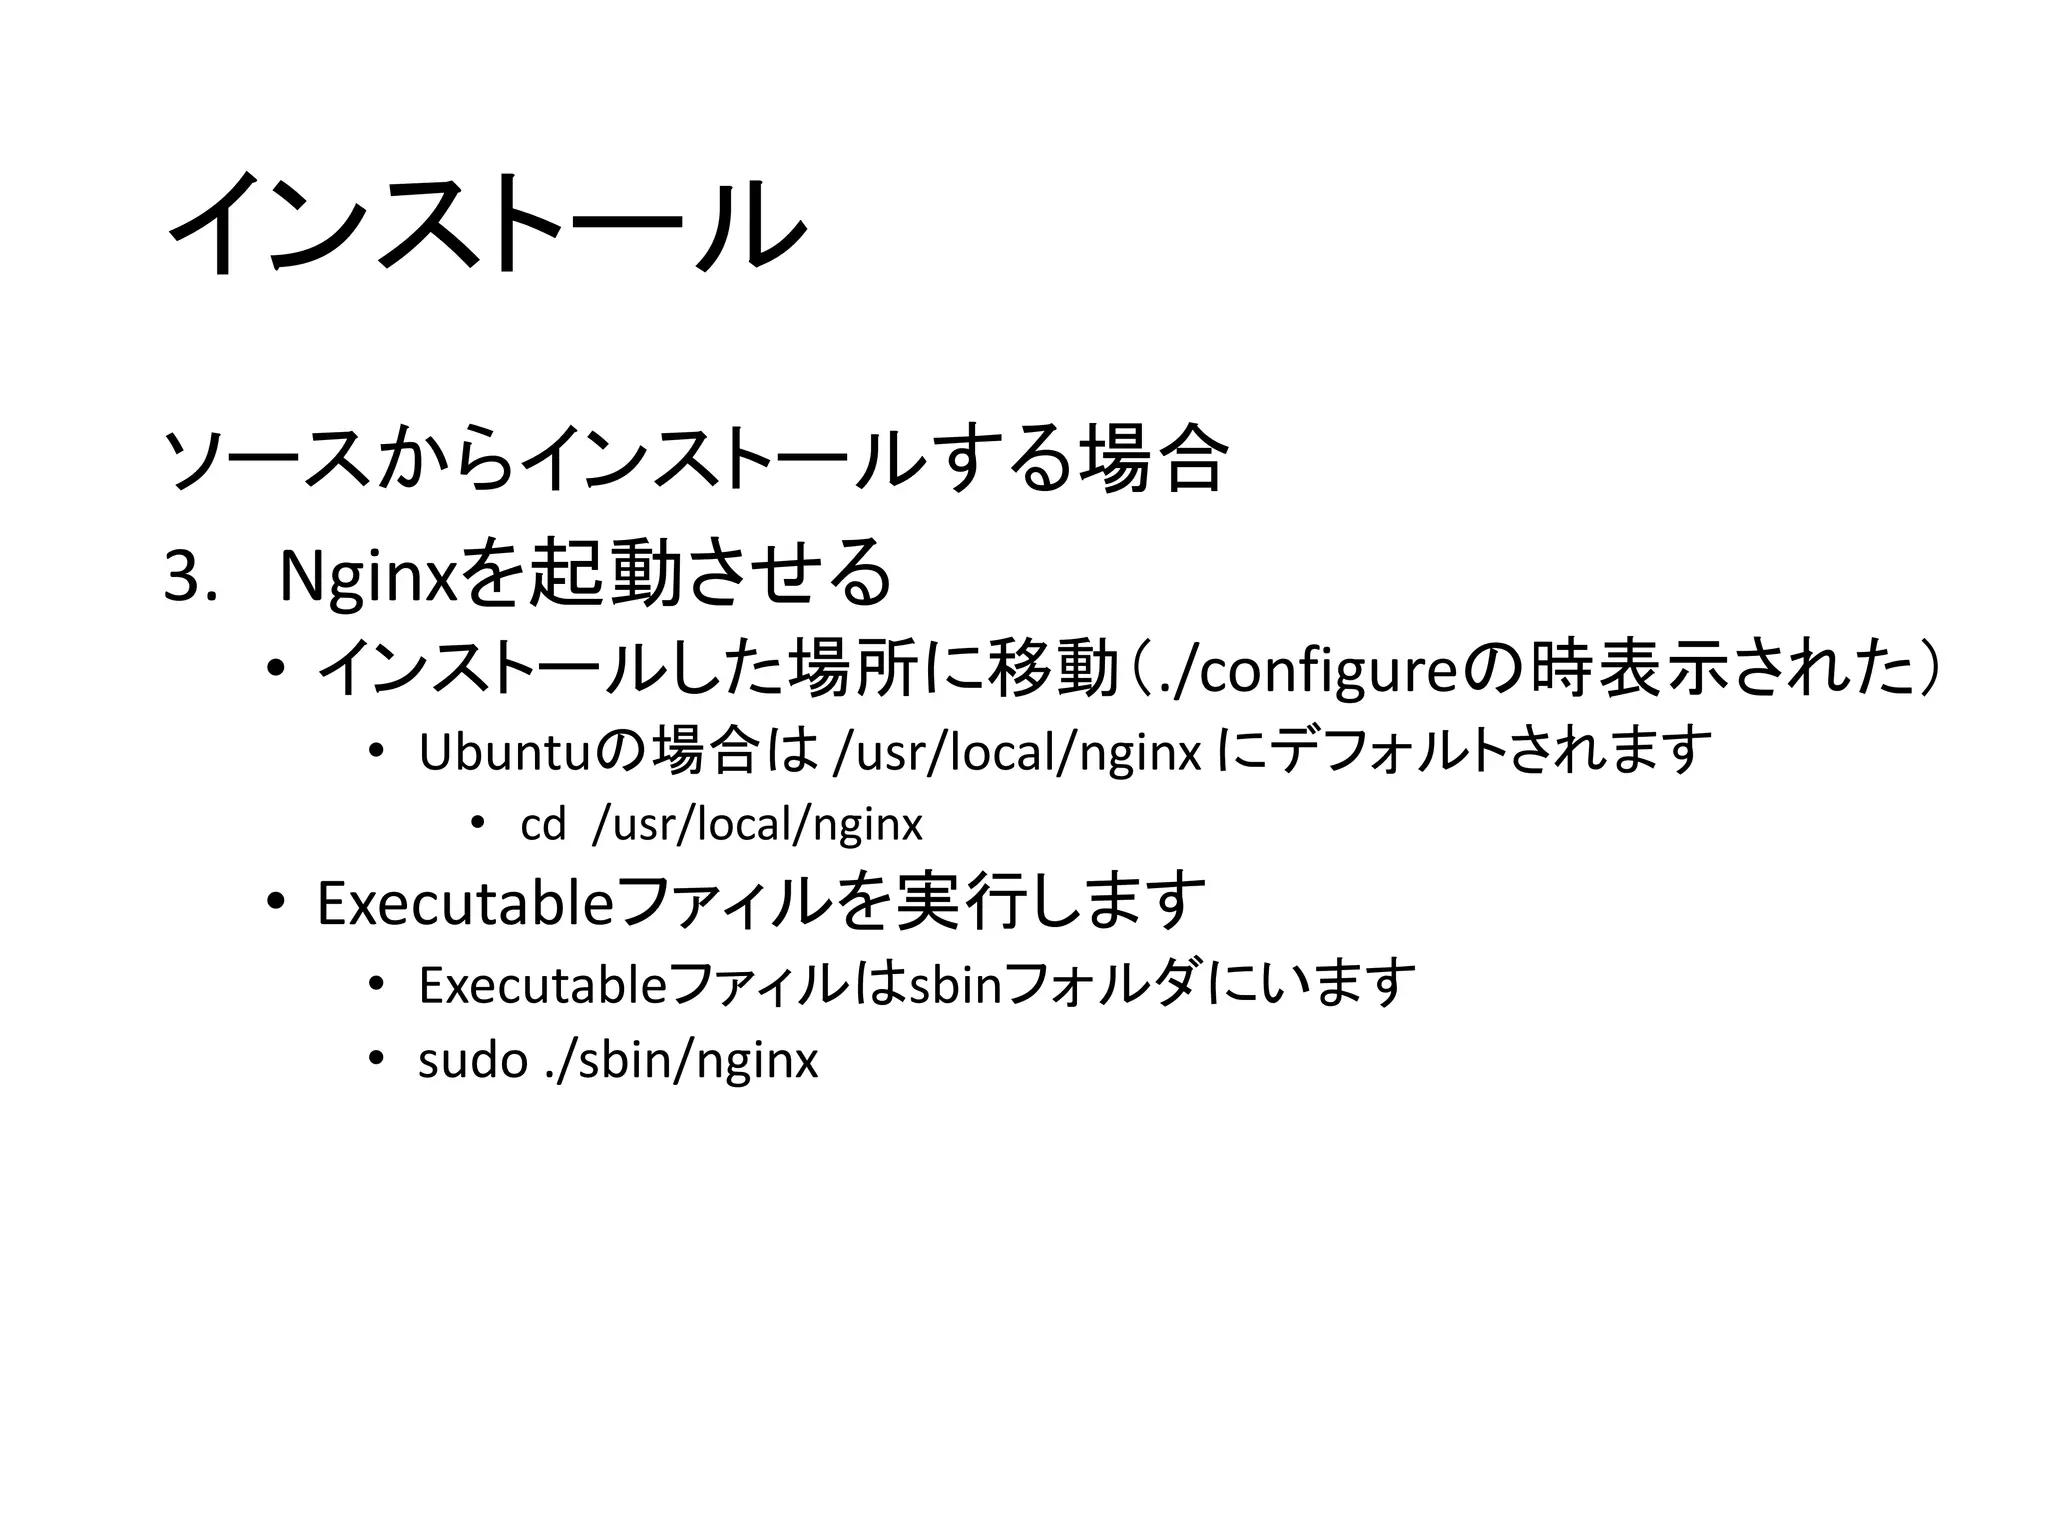
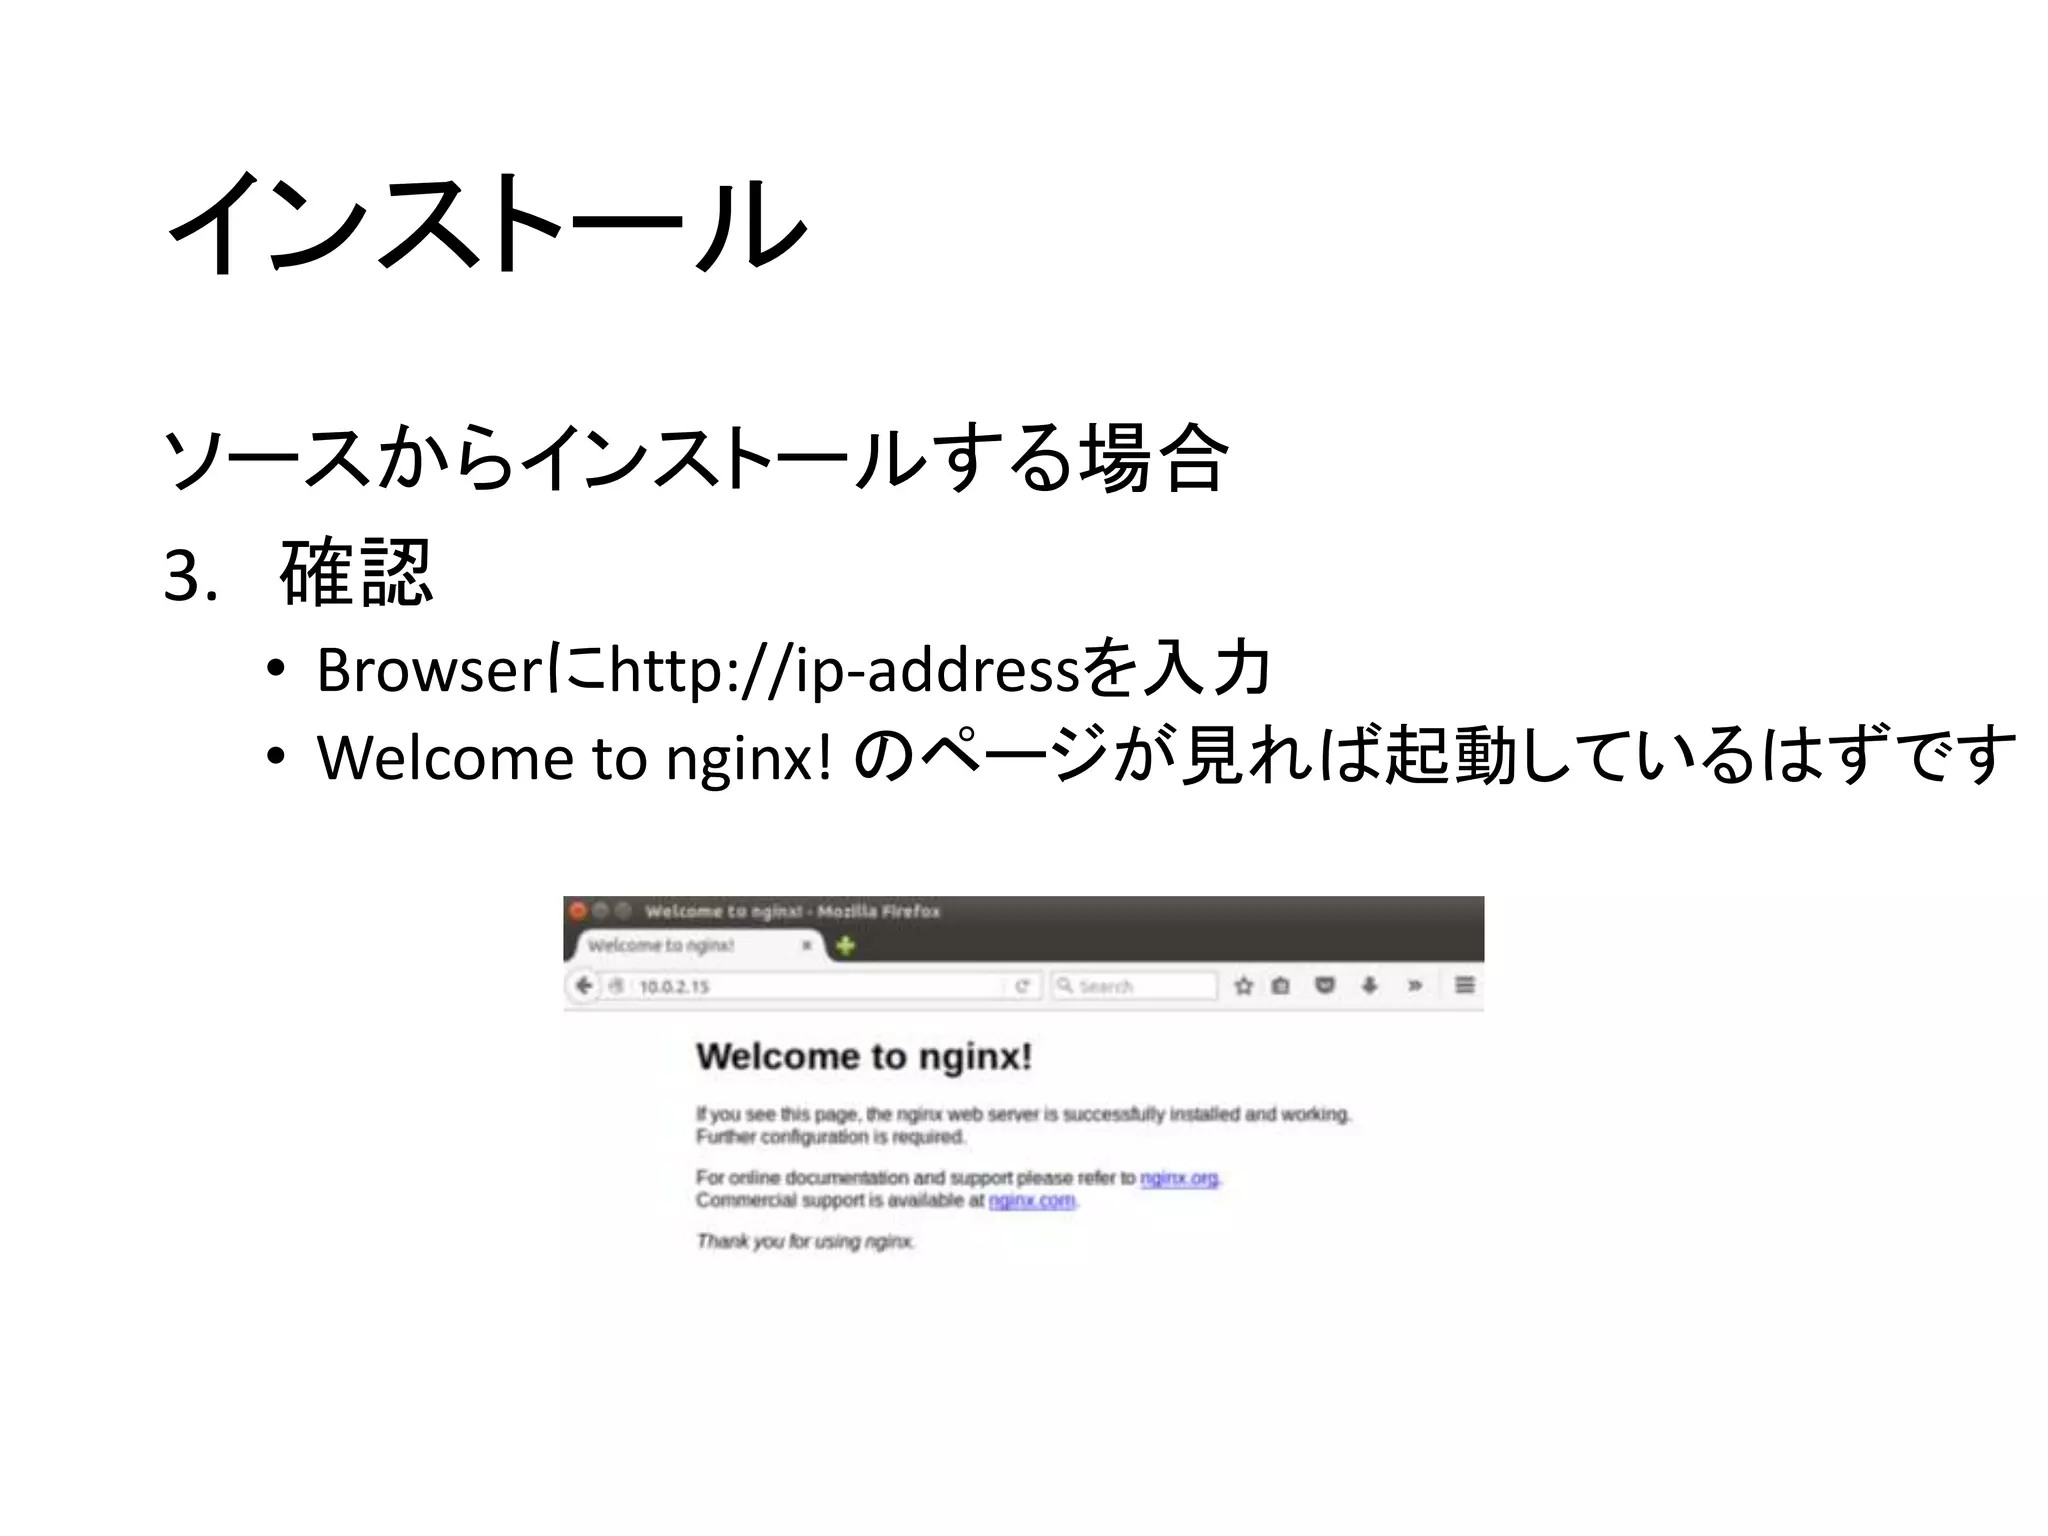
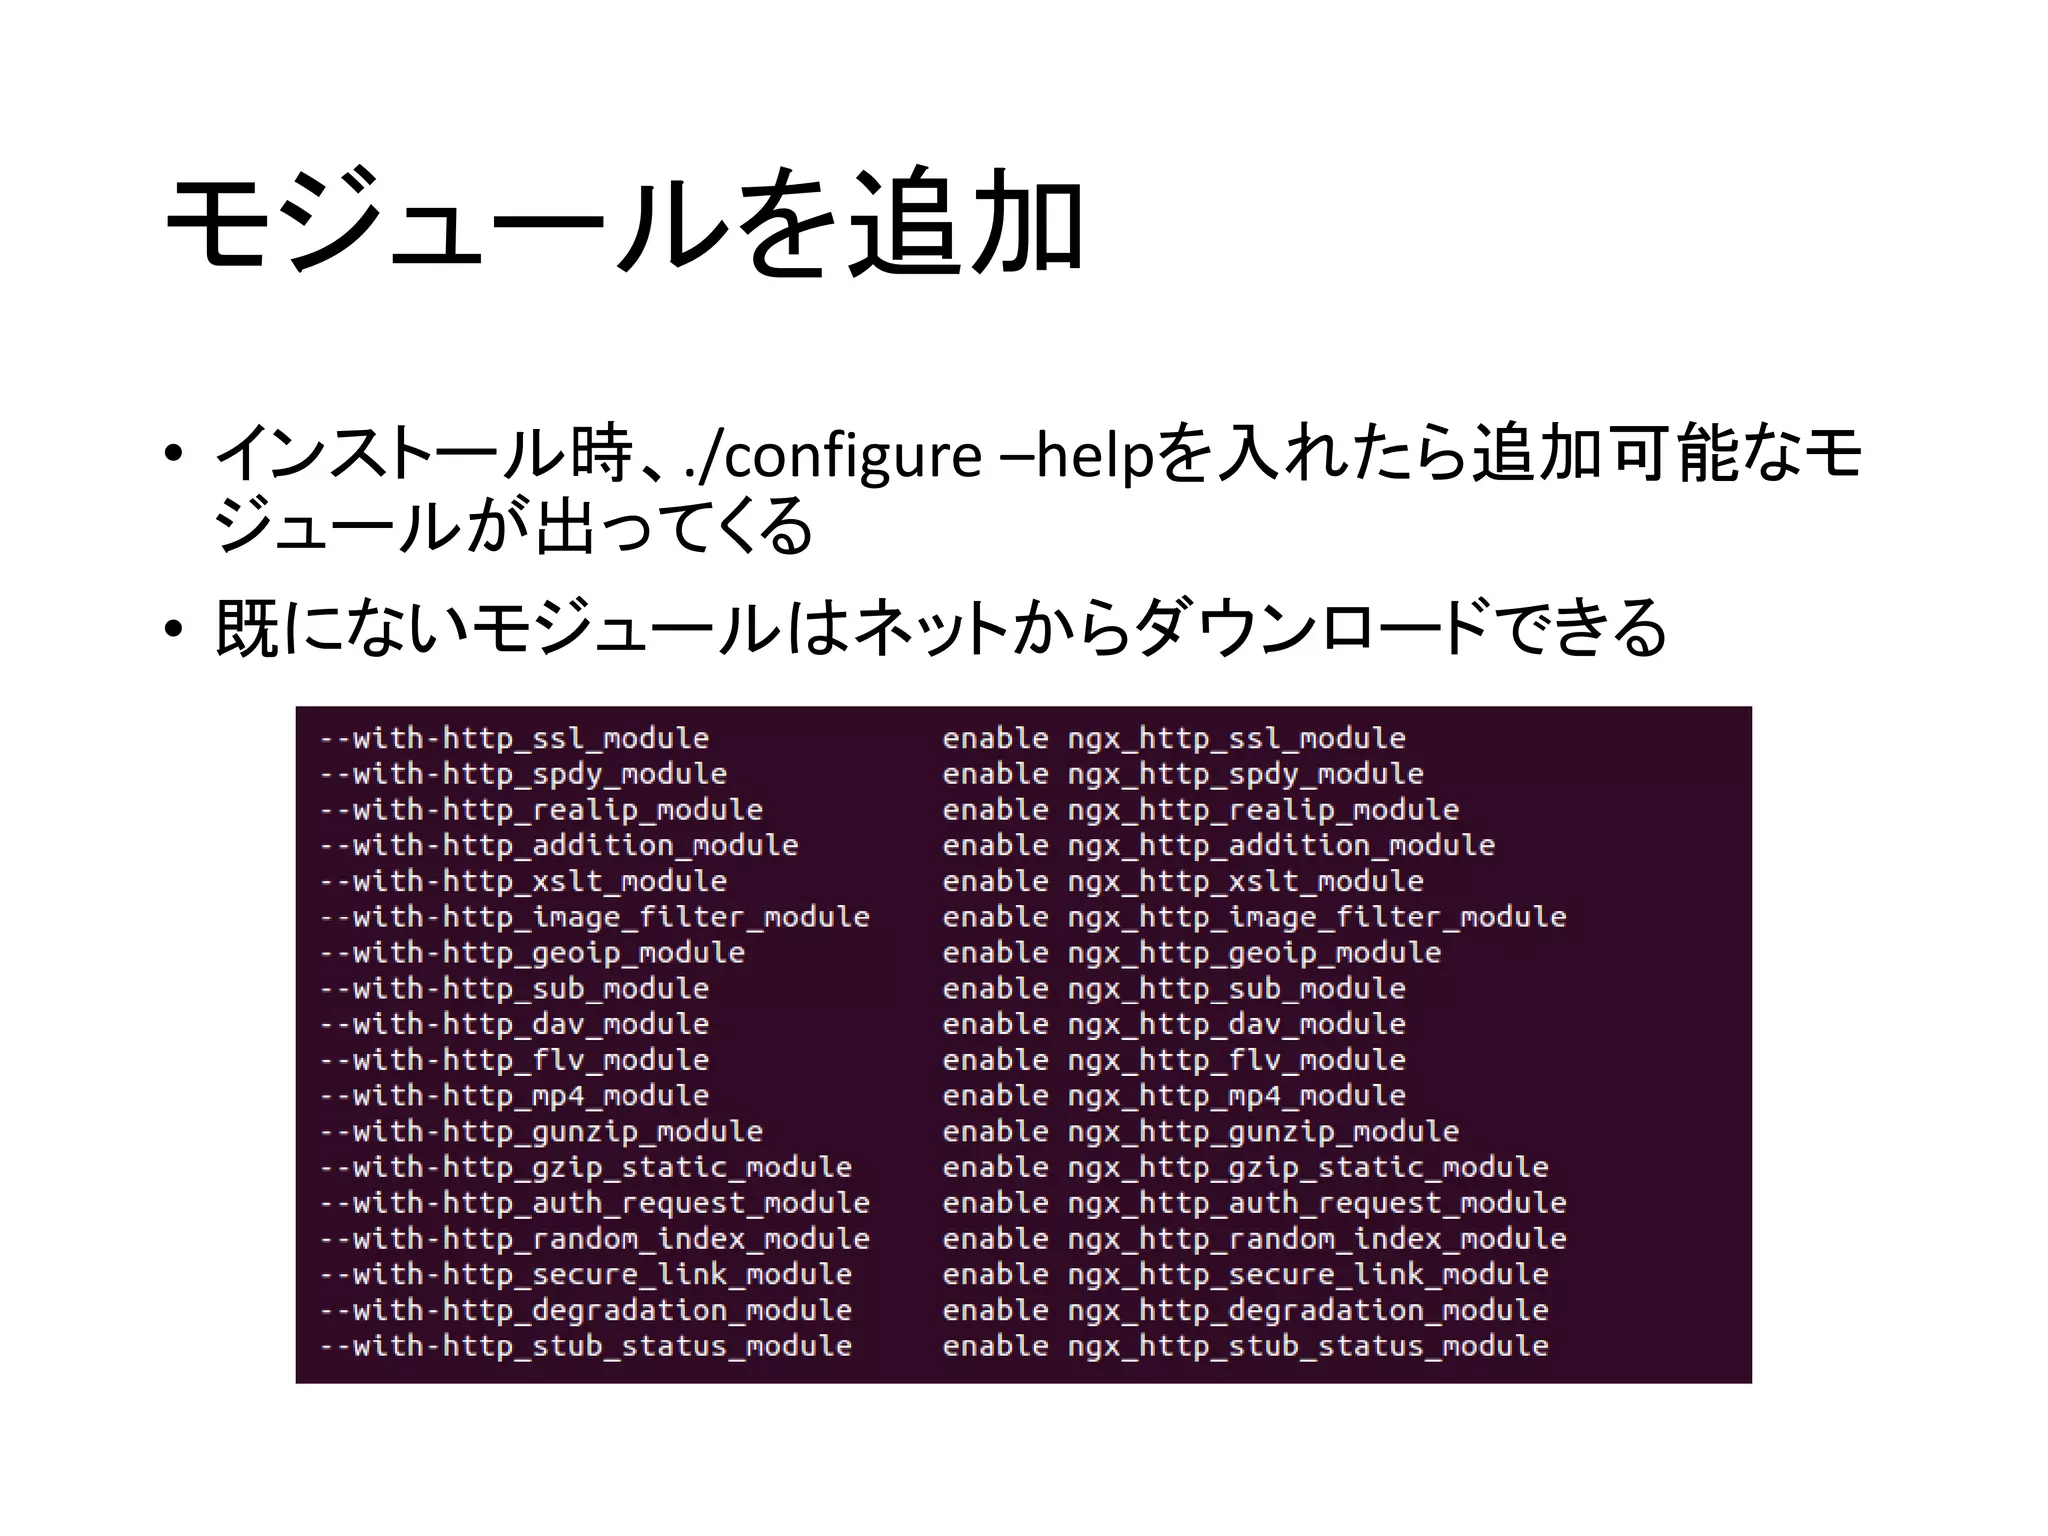
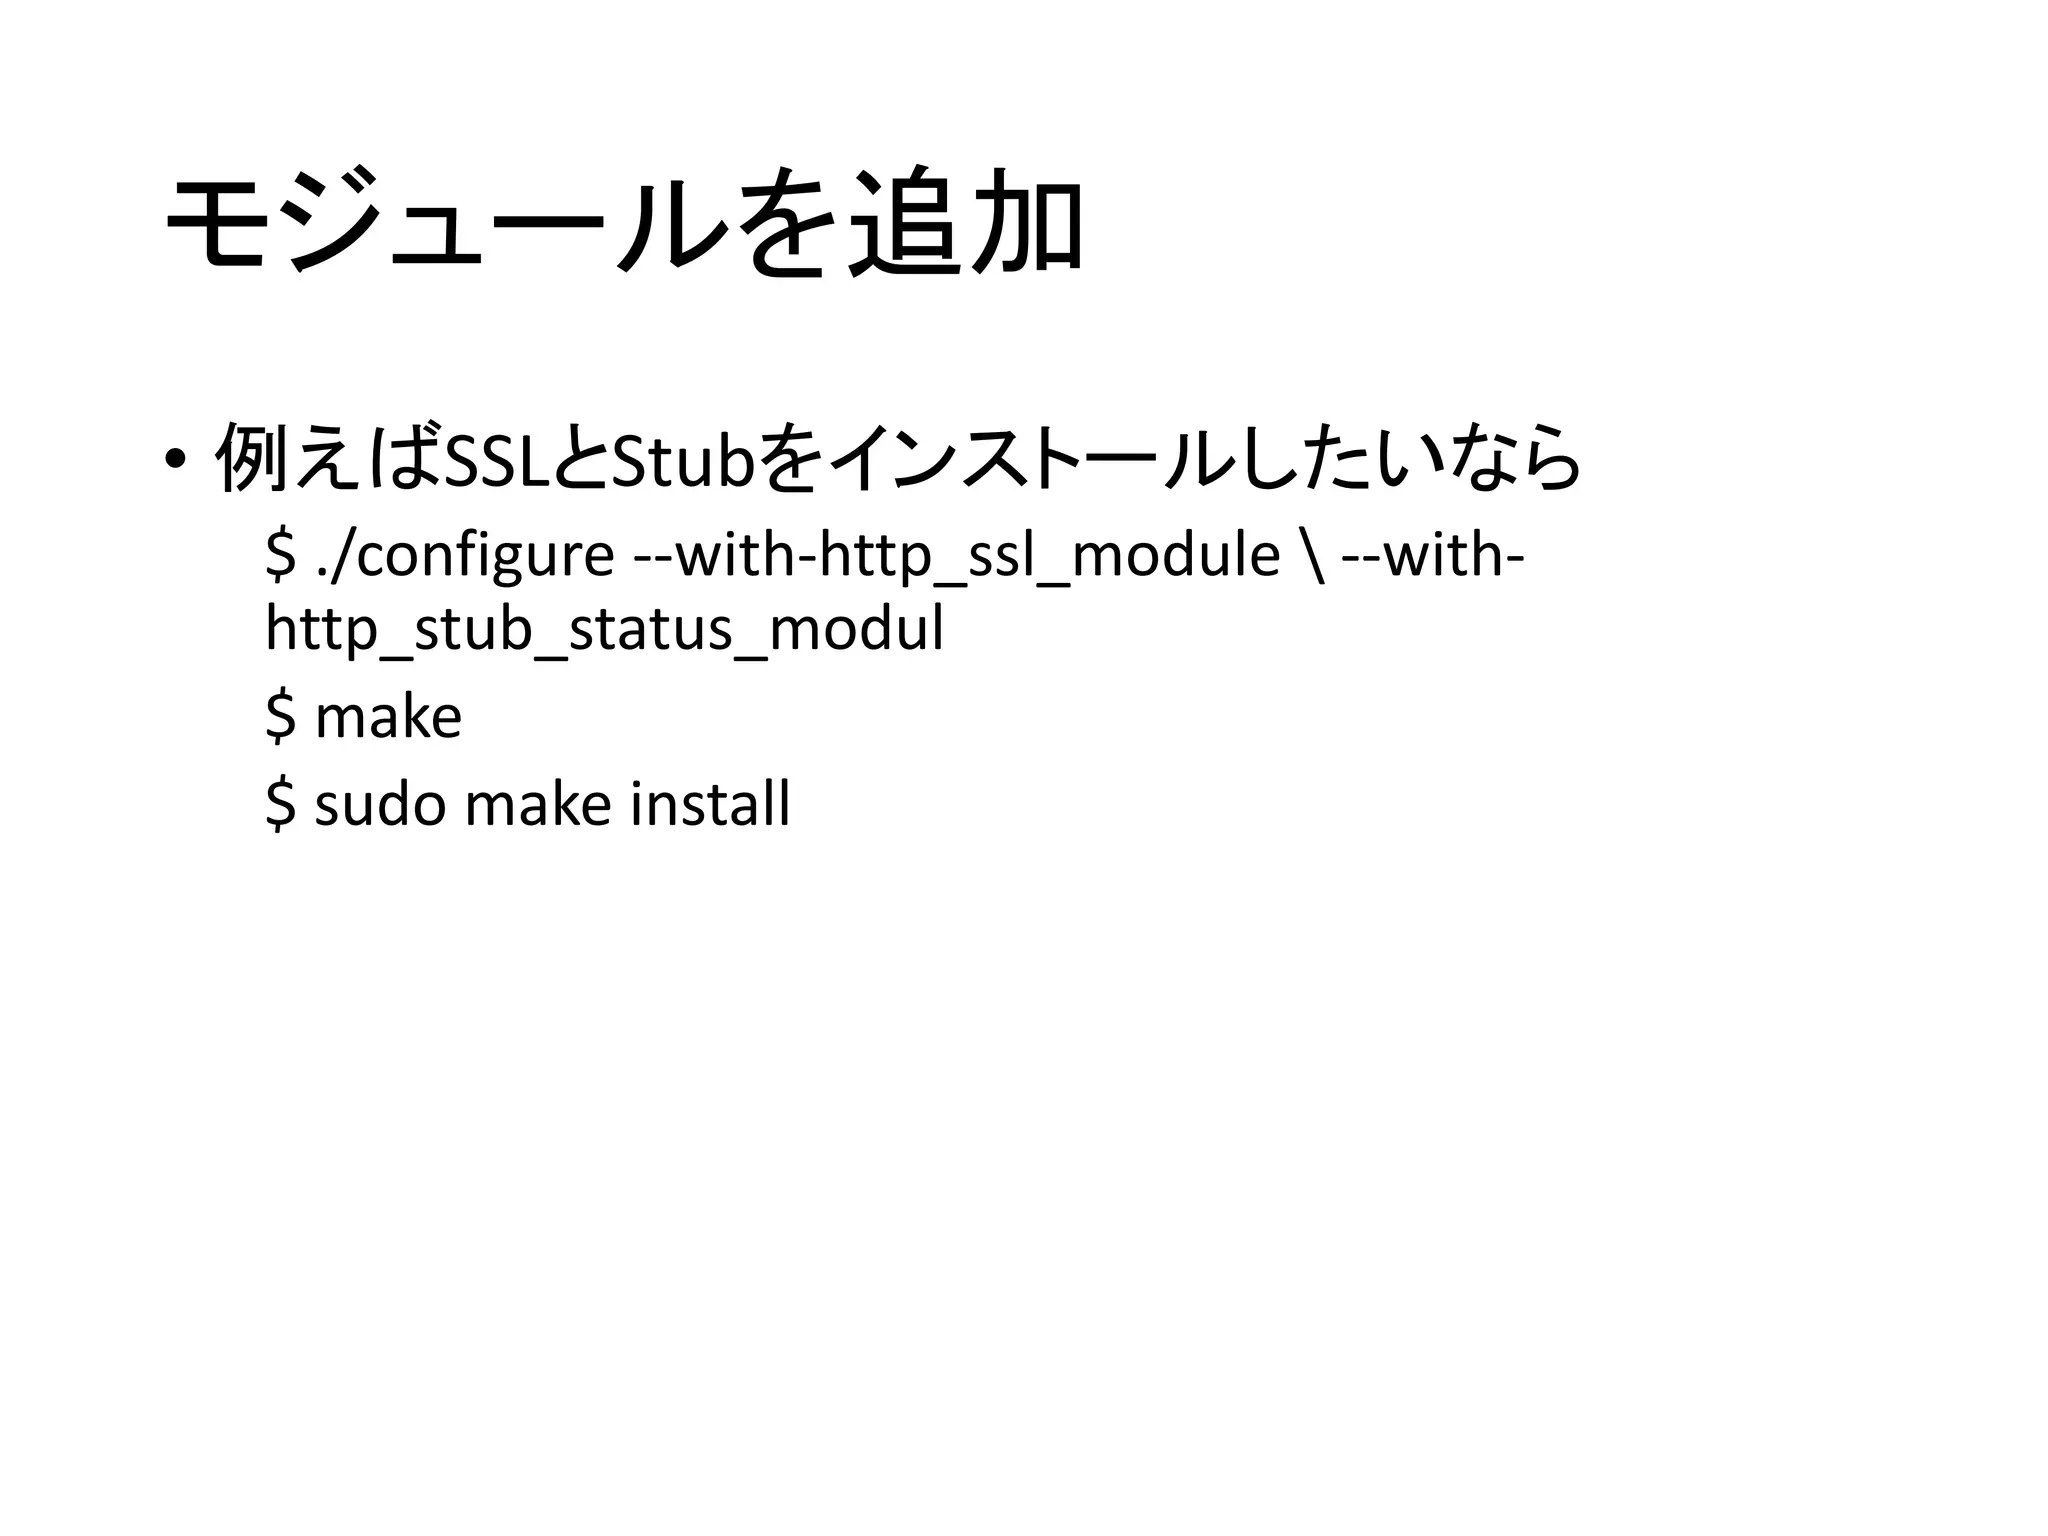
インストール Installation
• RPMPackage Managerを使う場合(aptなど)
• Debian系
• sudo apt-get install apache
• ソースコードとBinariesは公式サイトからダウンロー
ドできます
• ただし、BinariesはWindowsとNetware用しかない
- 11.
- 12.
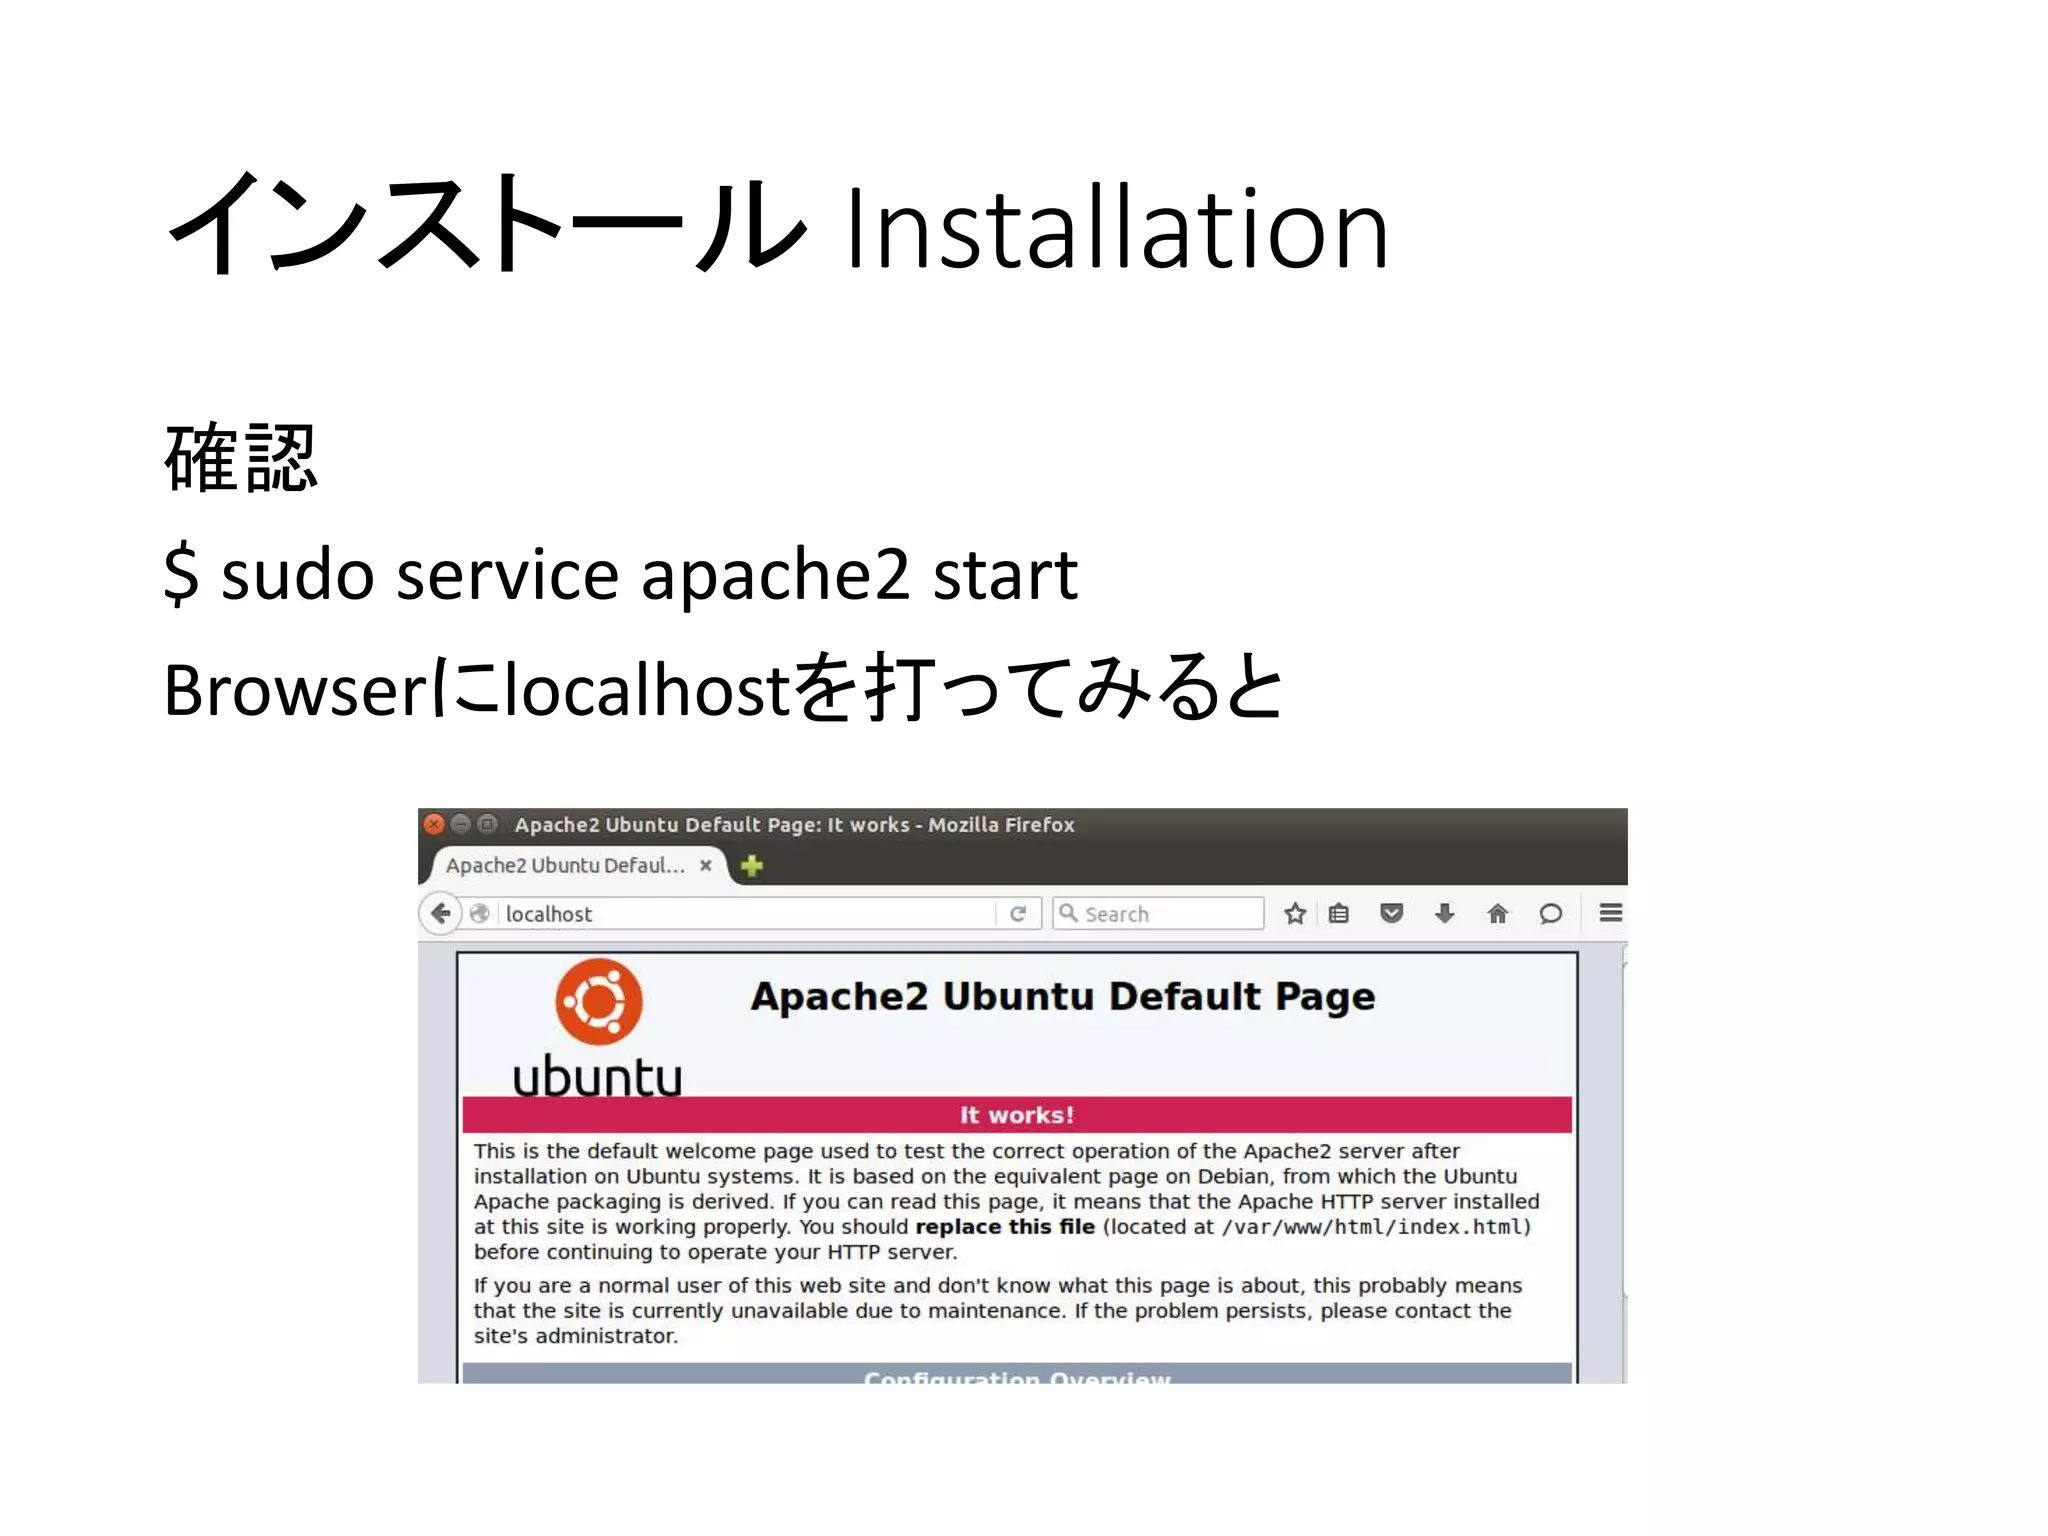
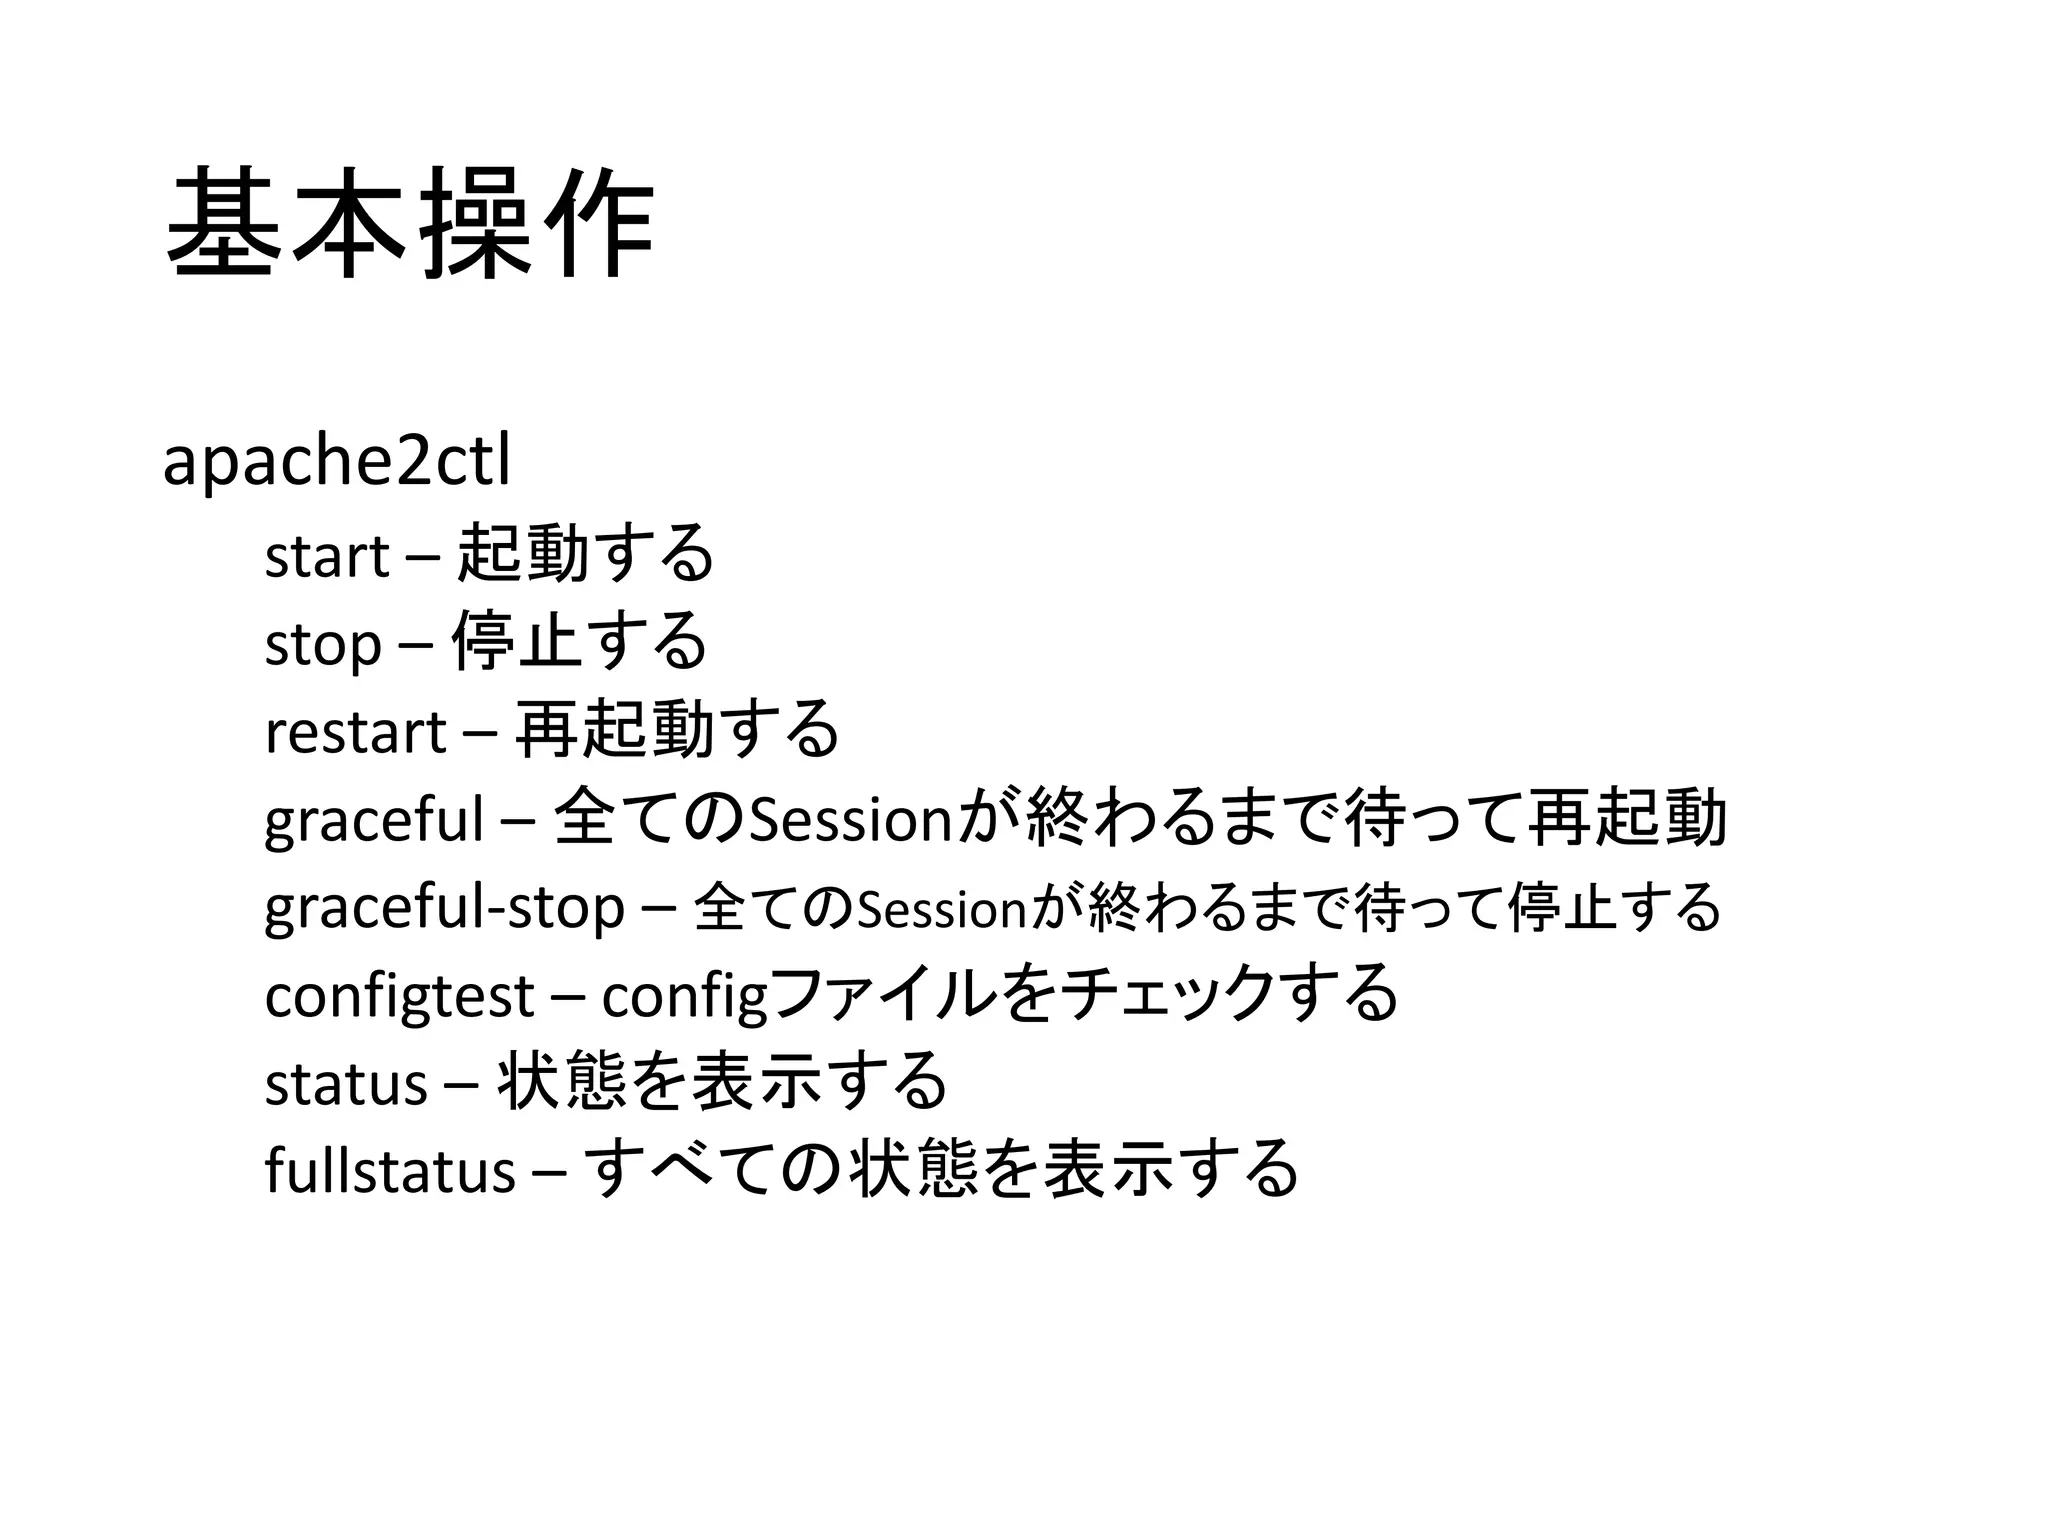
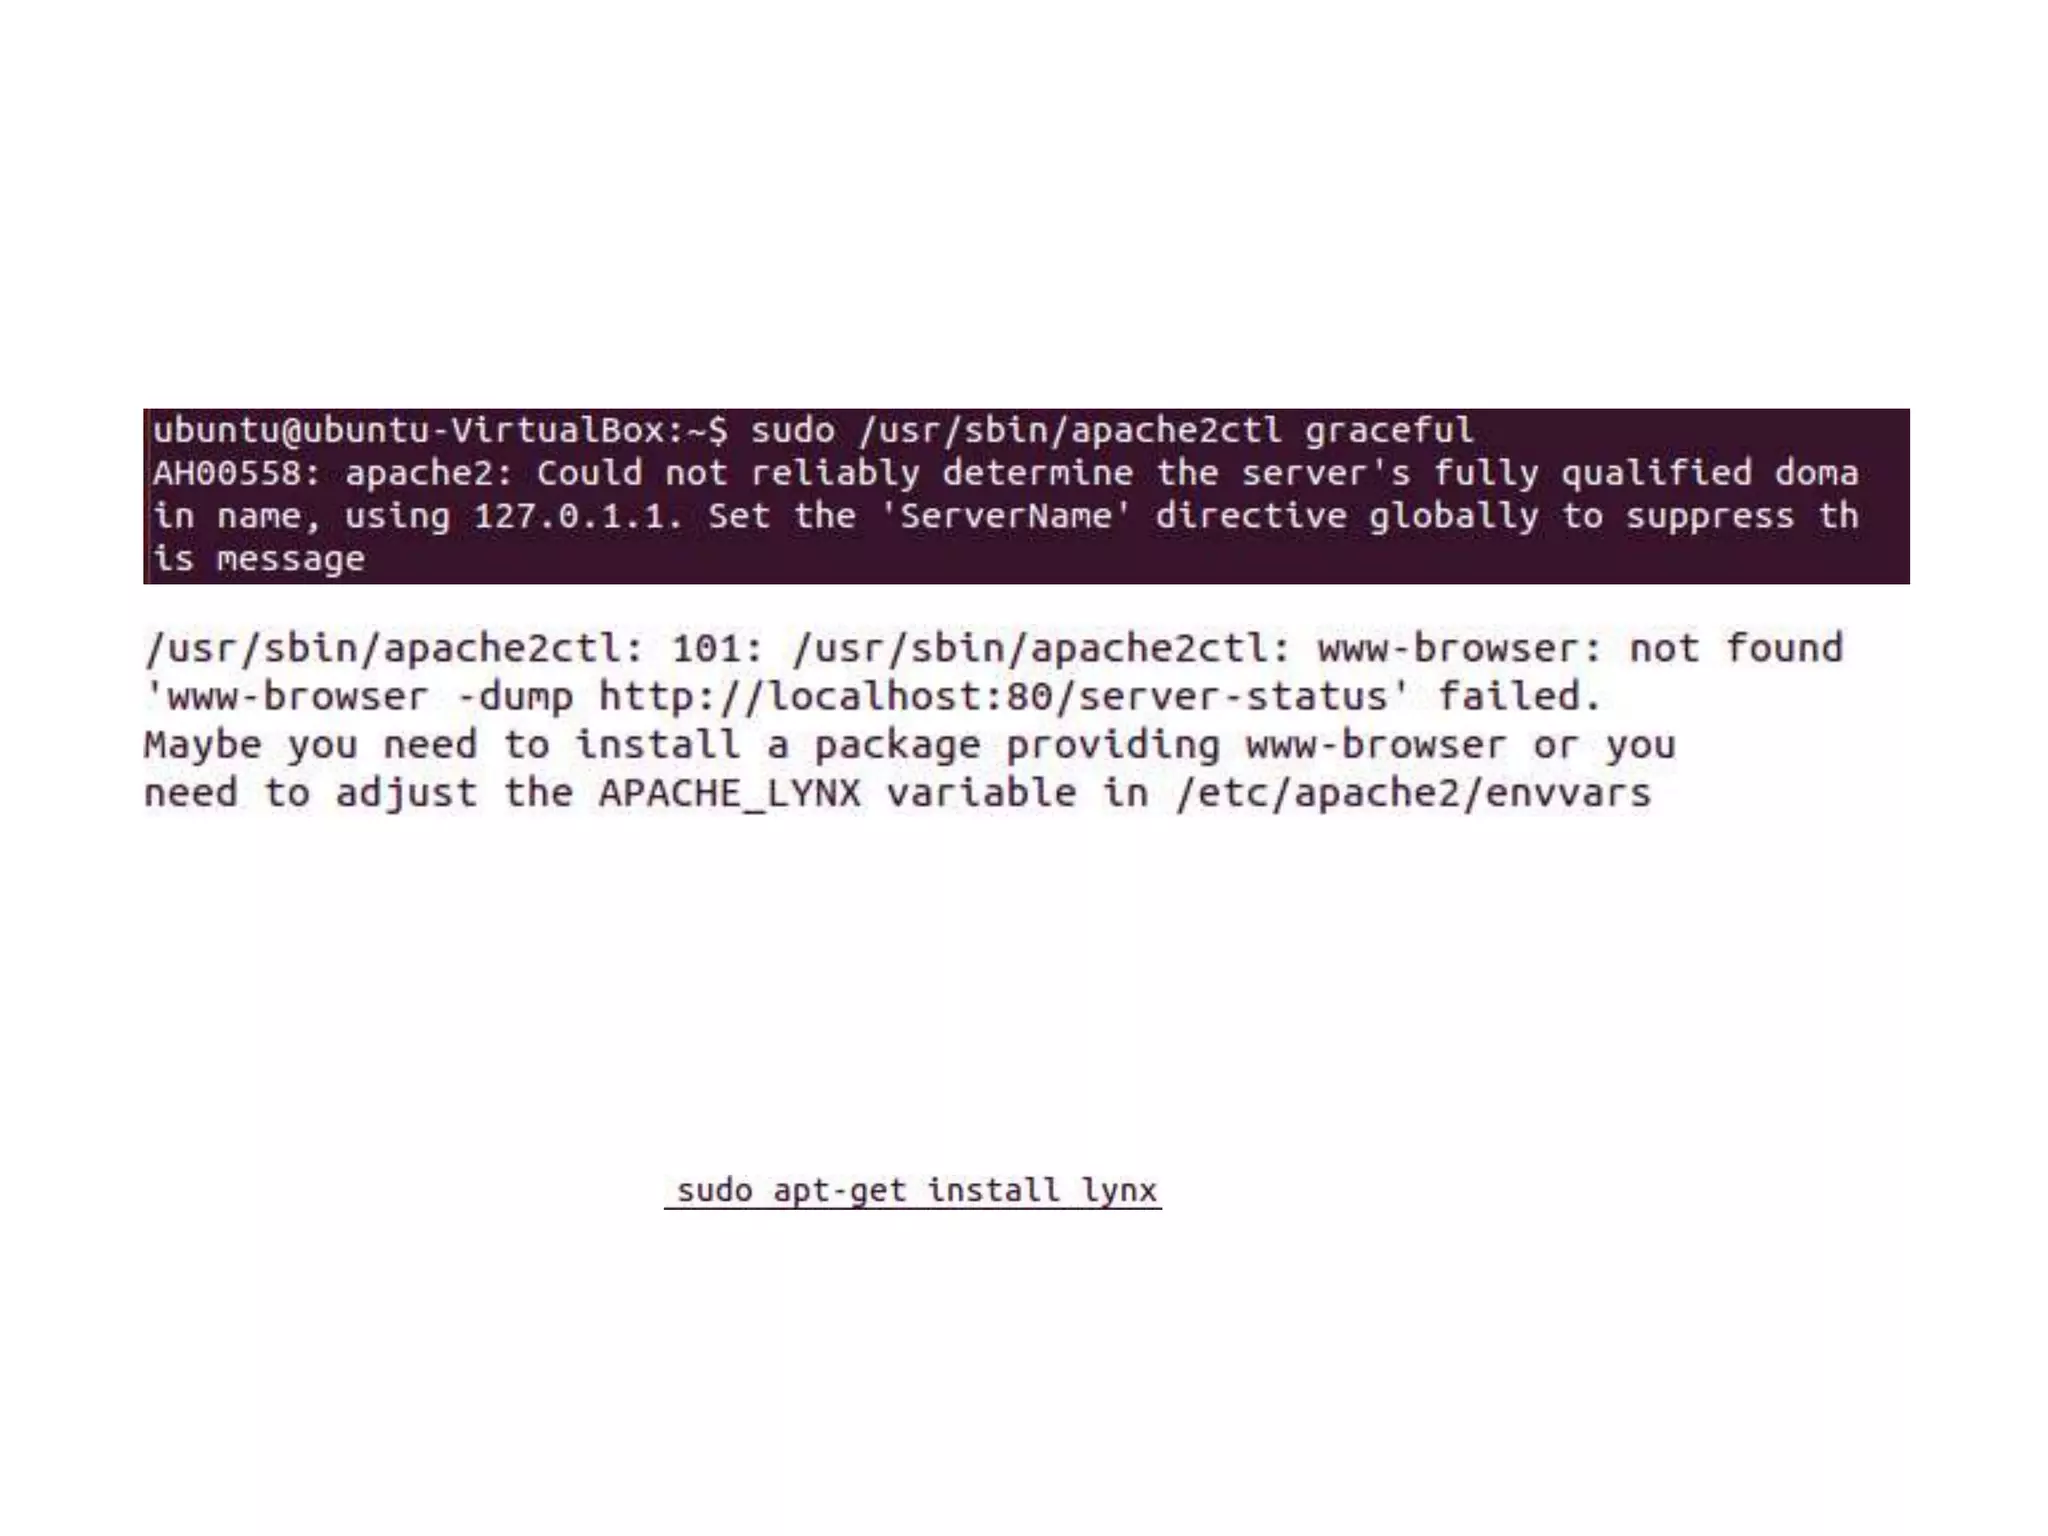
基本操作
apache2ctl
start – 起動する
stop– 停止する
restart – 再起動する
graceful – 全てのSessionが終わるまで待って再起動
graceful-stop – 全てのSessionが終わるまで待って停止する
configtest – configファイルをチェックする
status – 状態を表示する
fullstatus – すべての状態を表示する
- 13.
- 14.
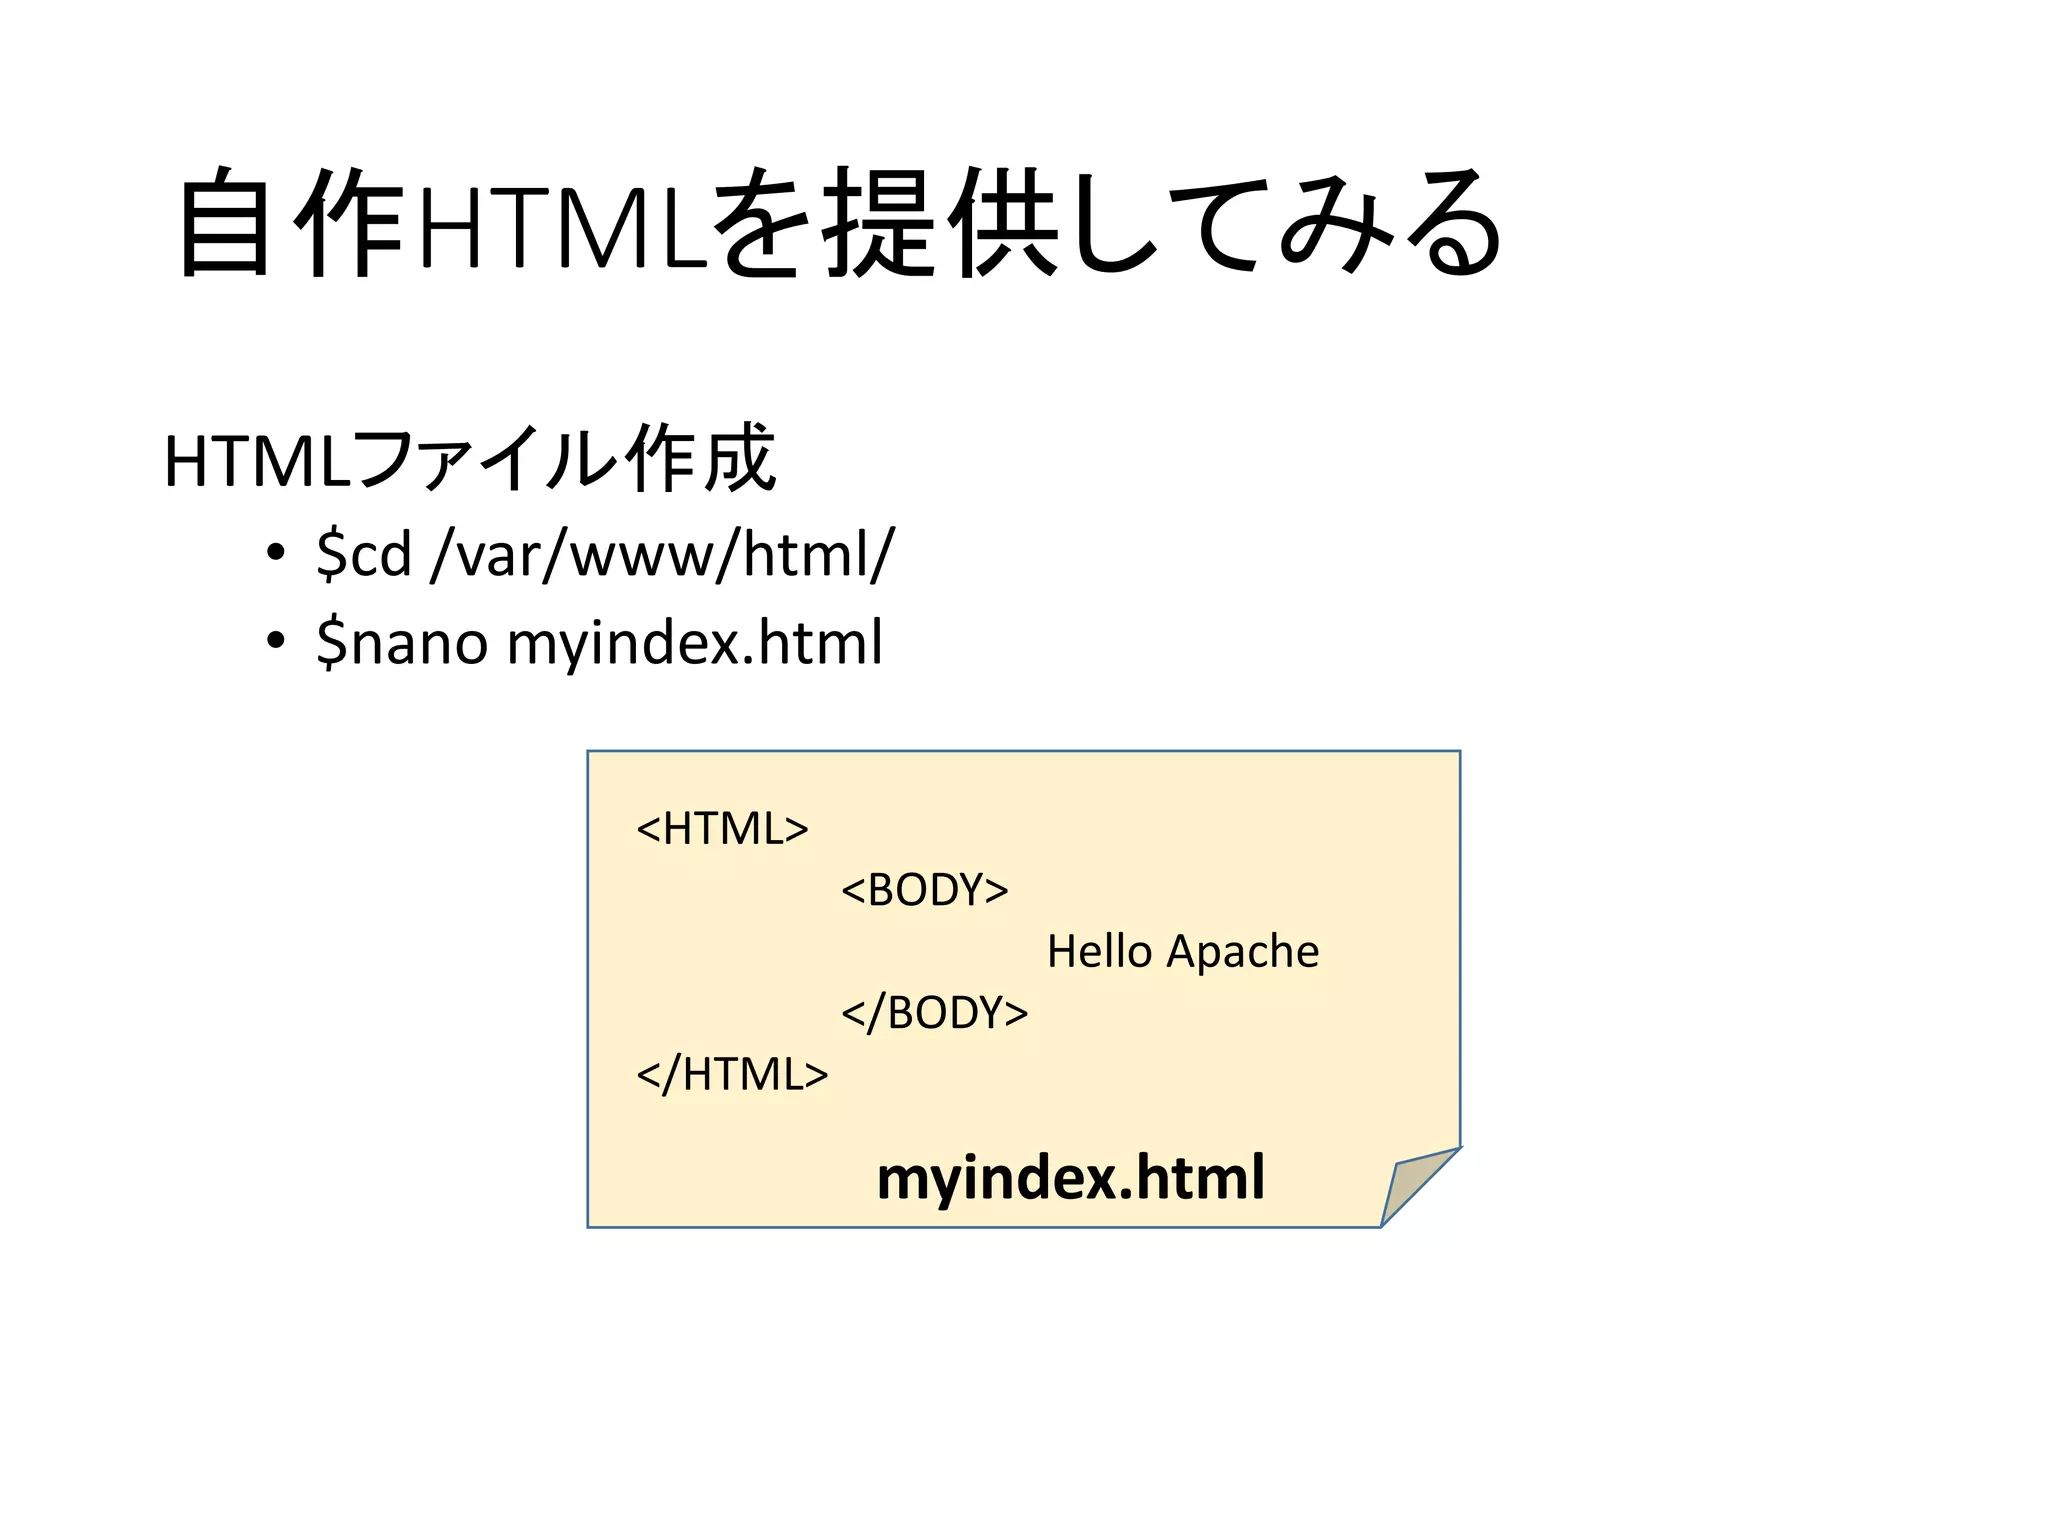
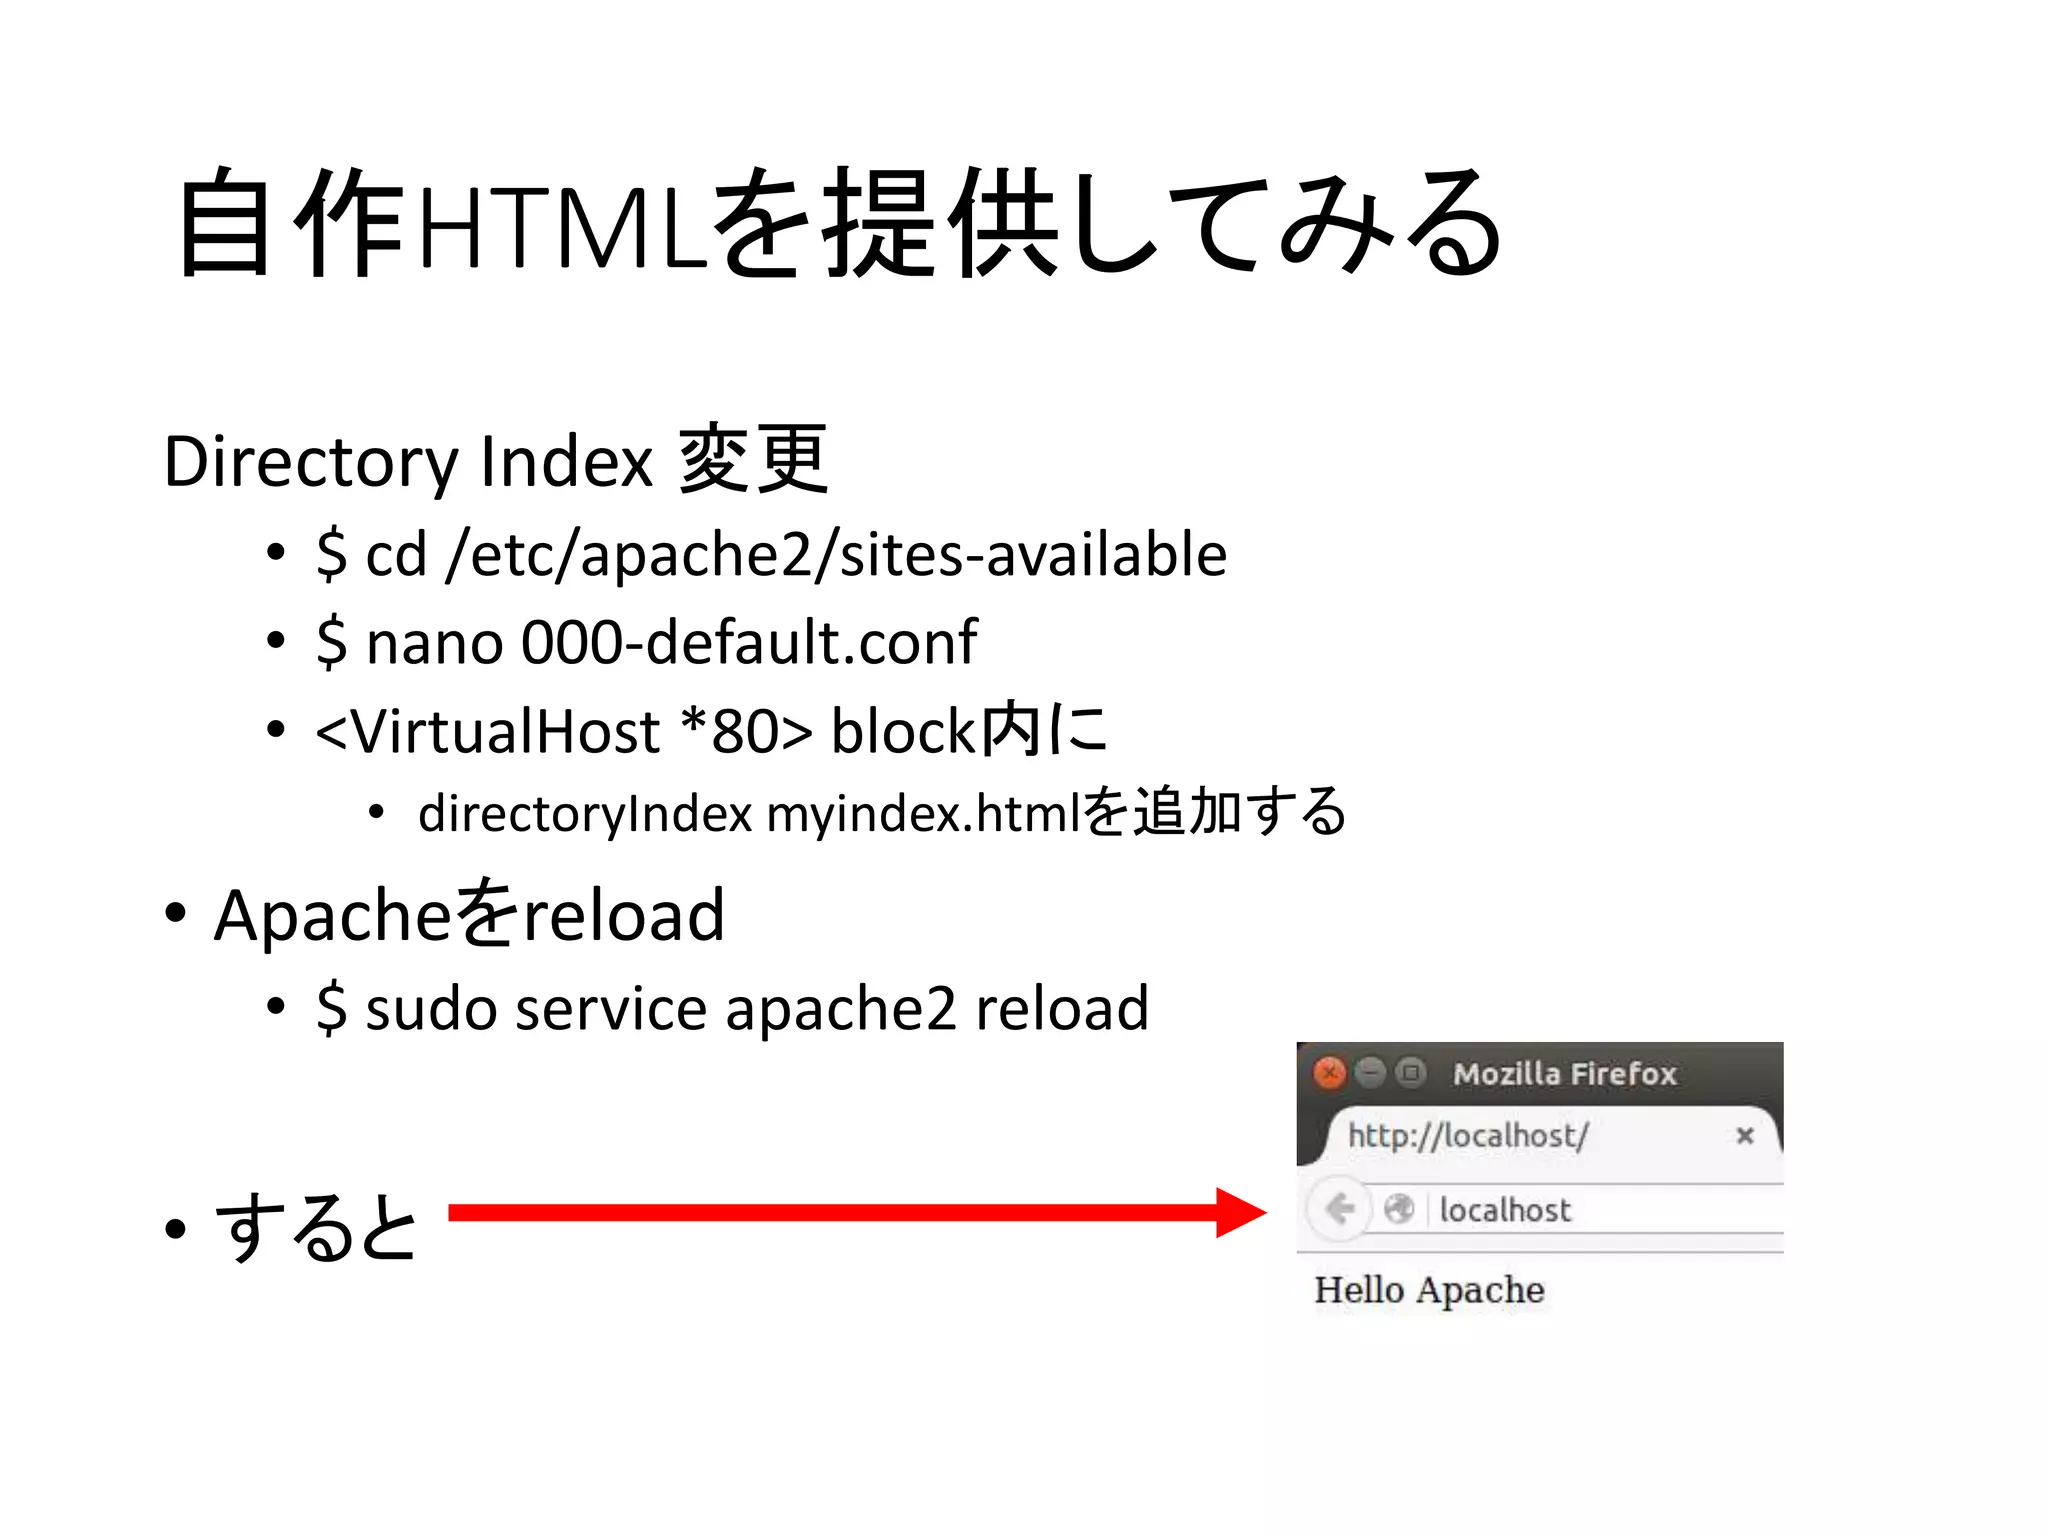
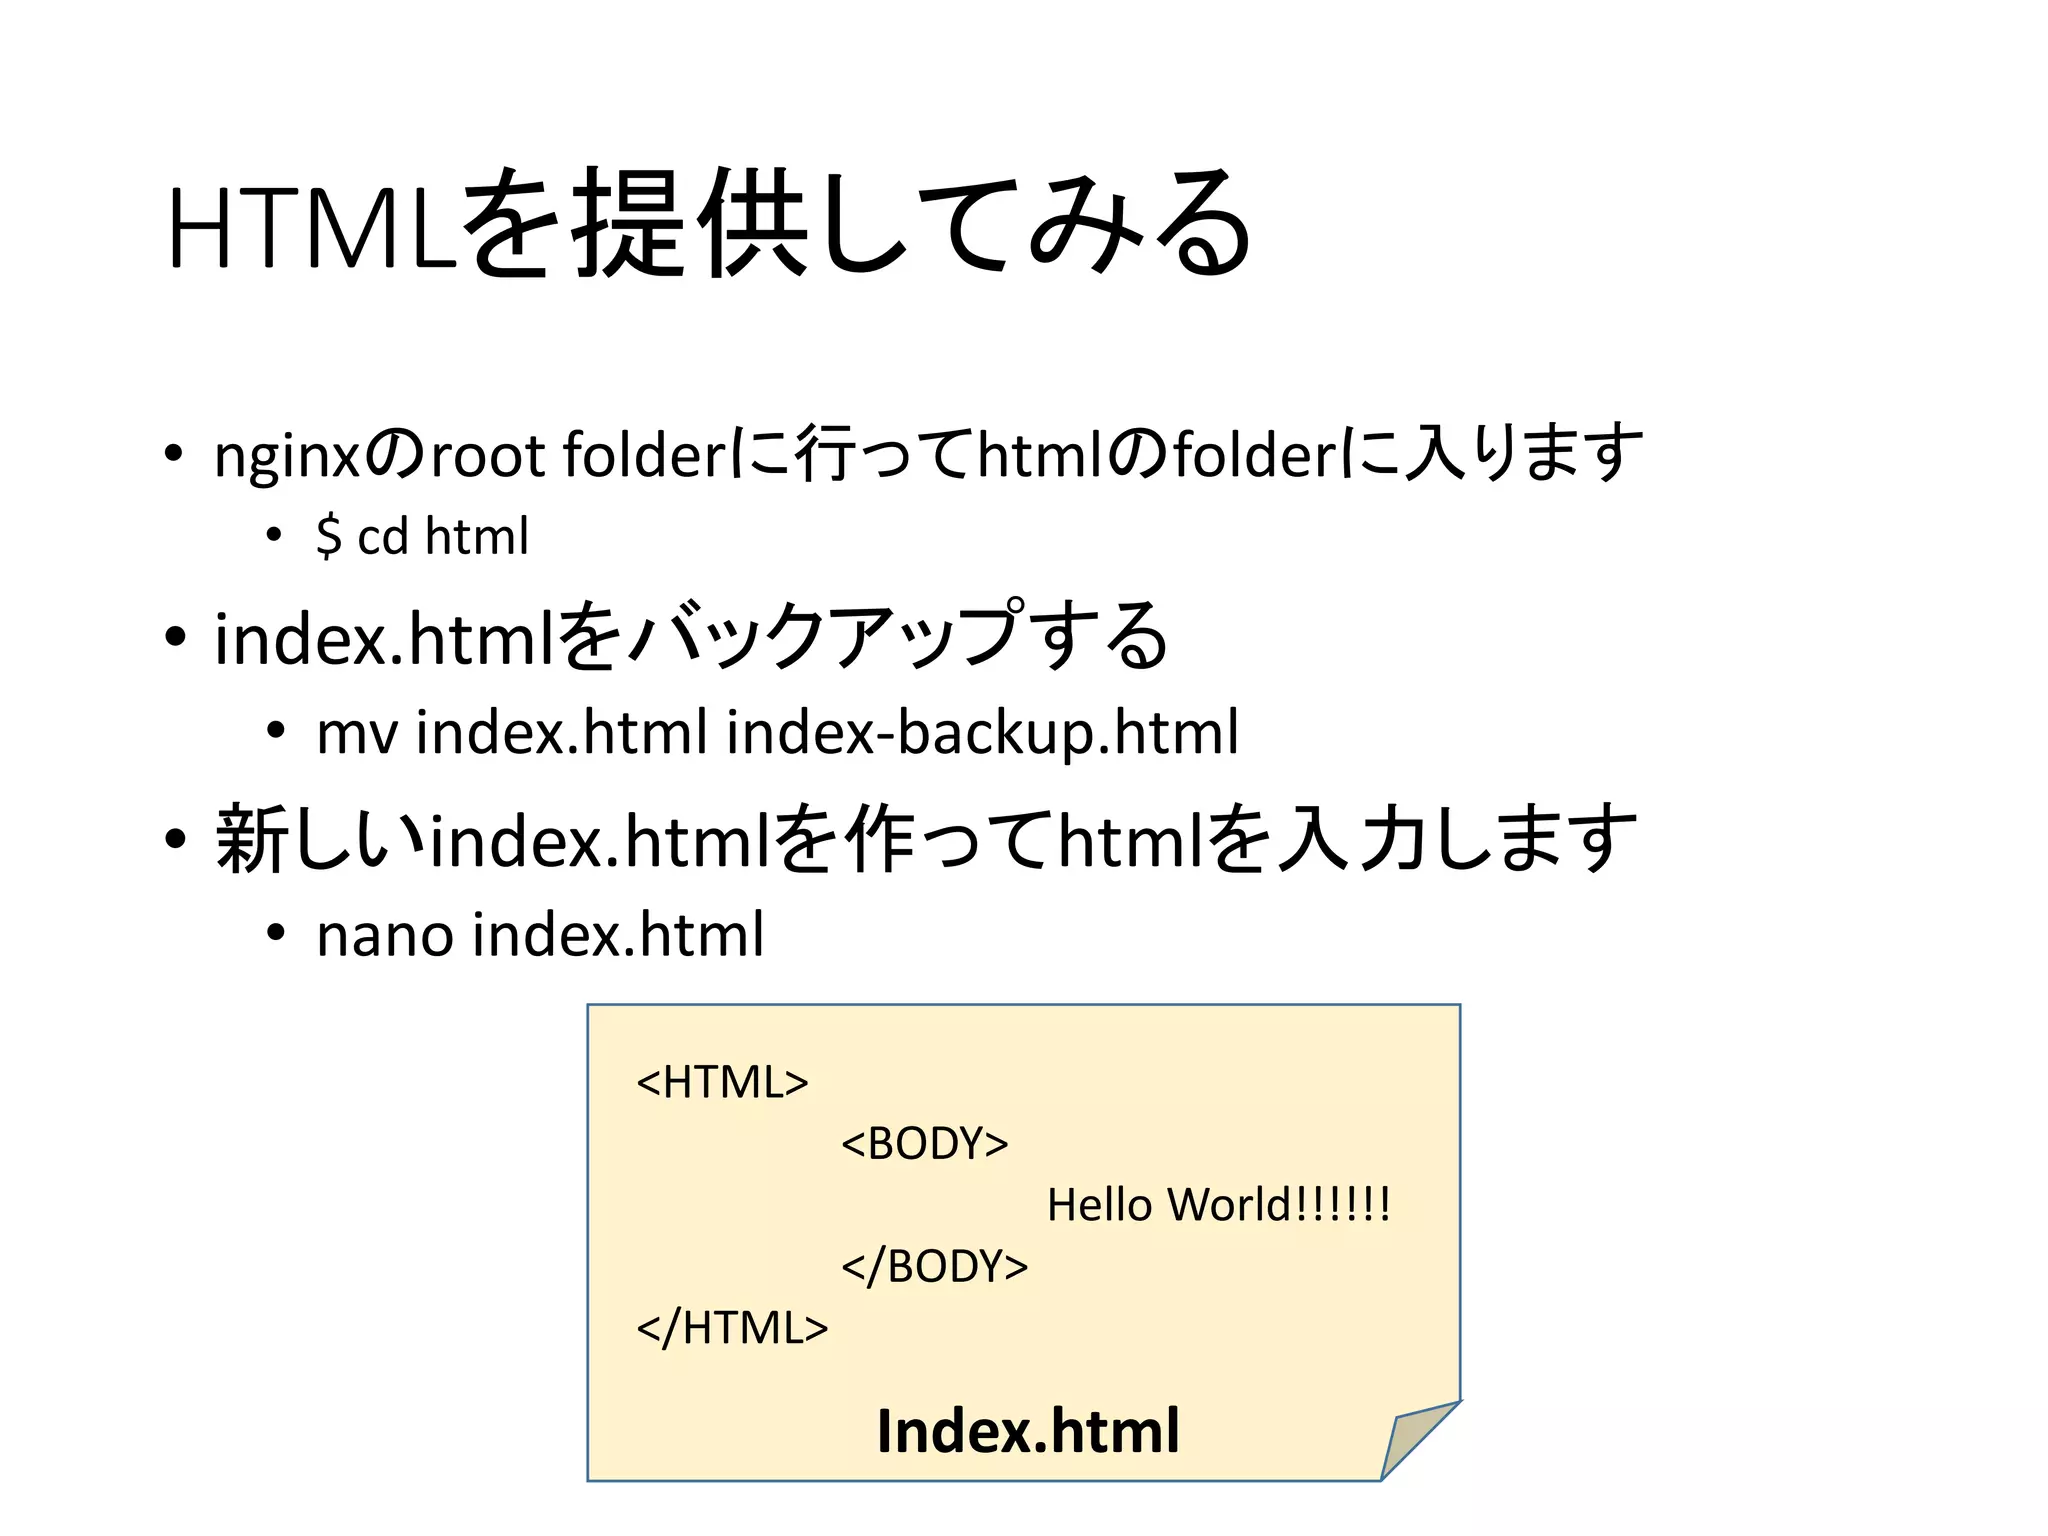
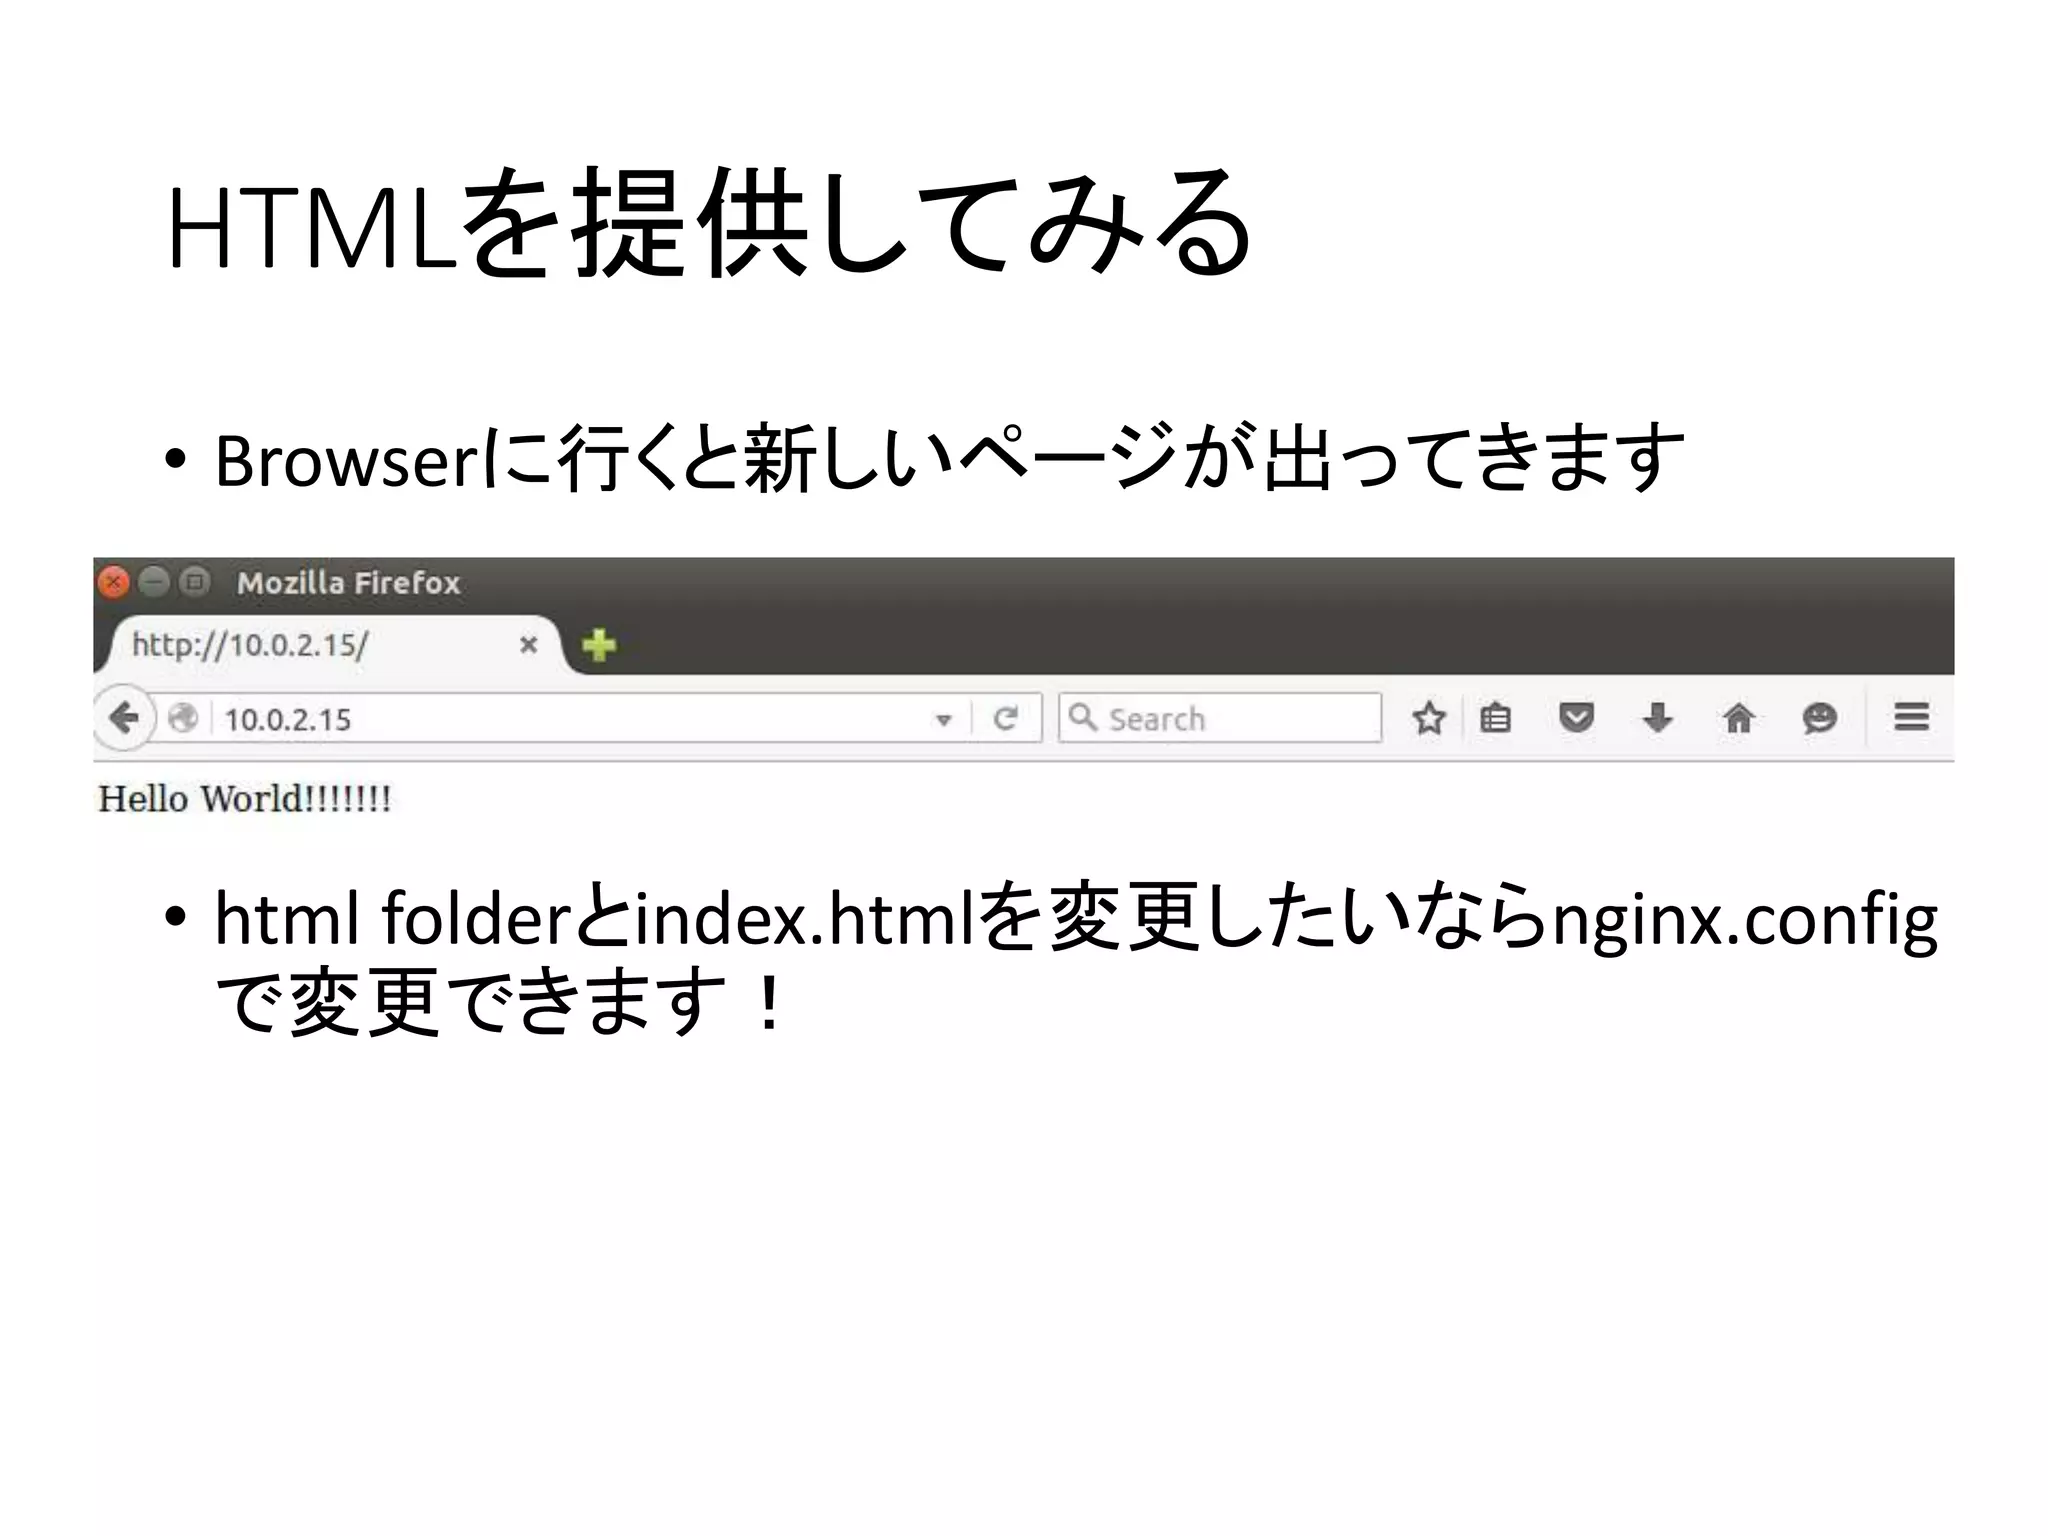
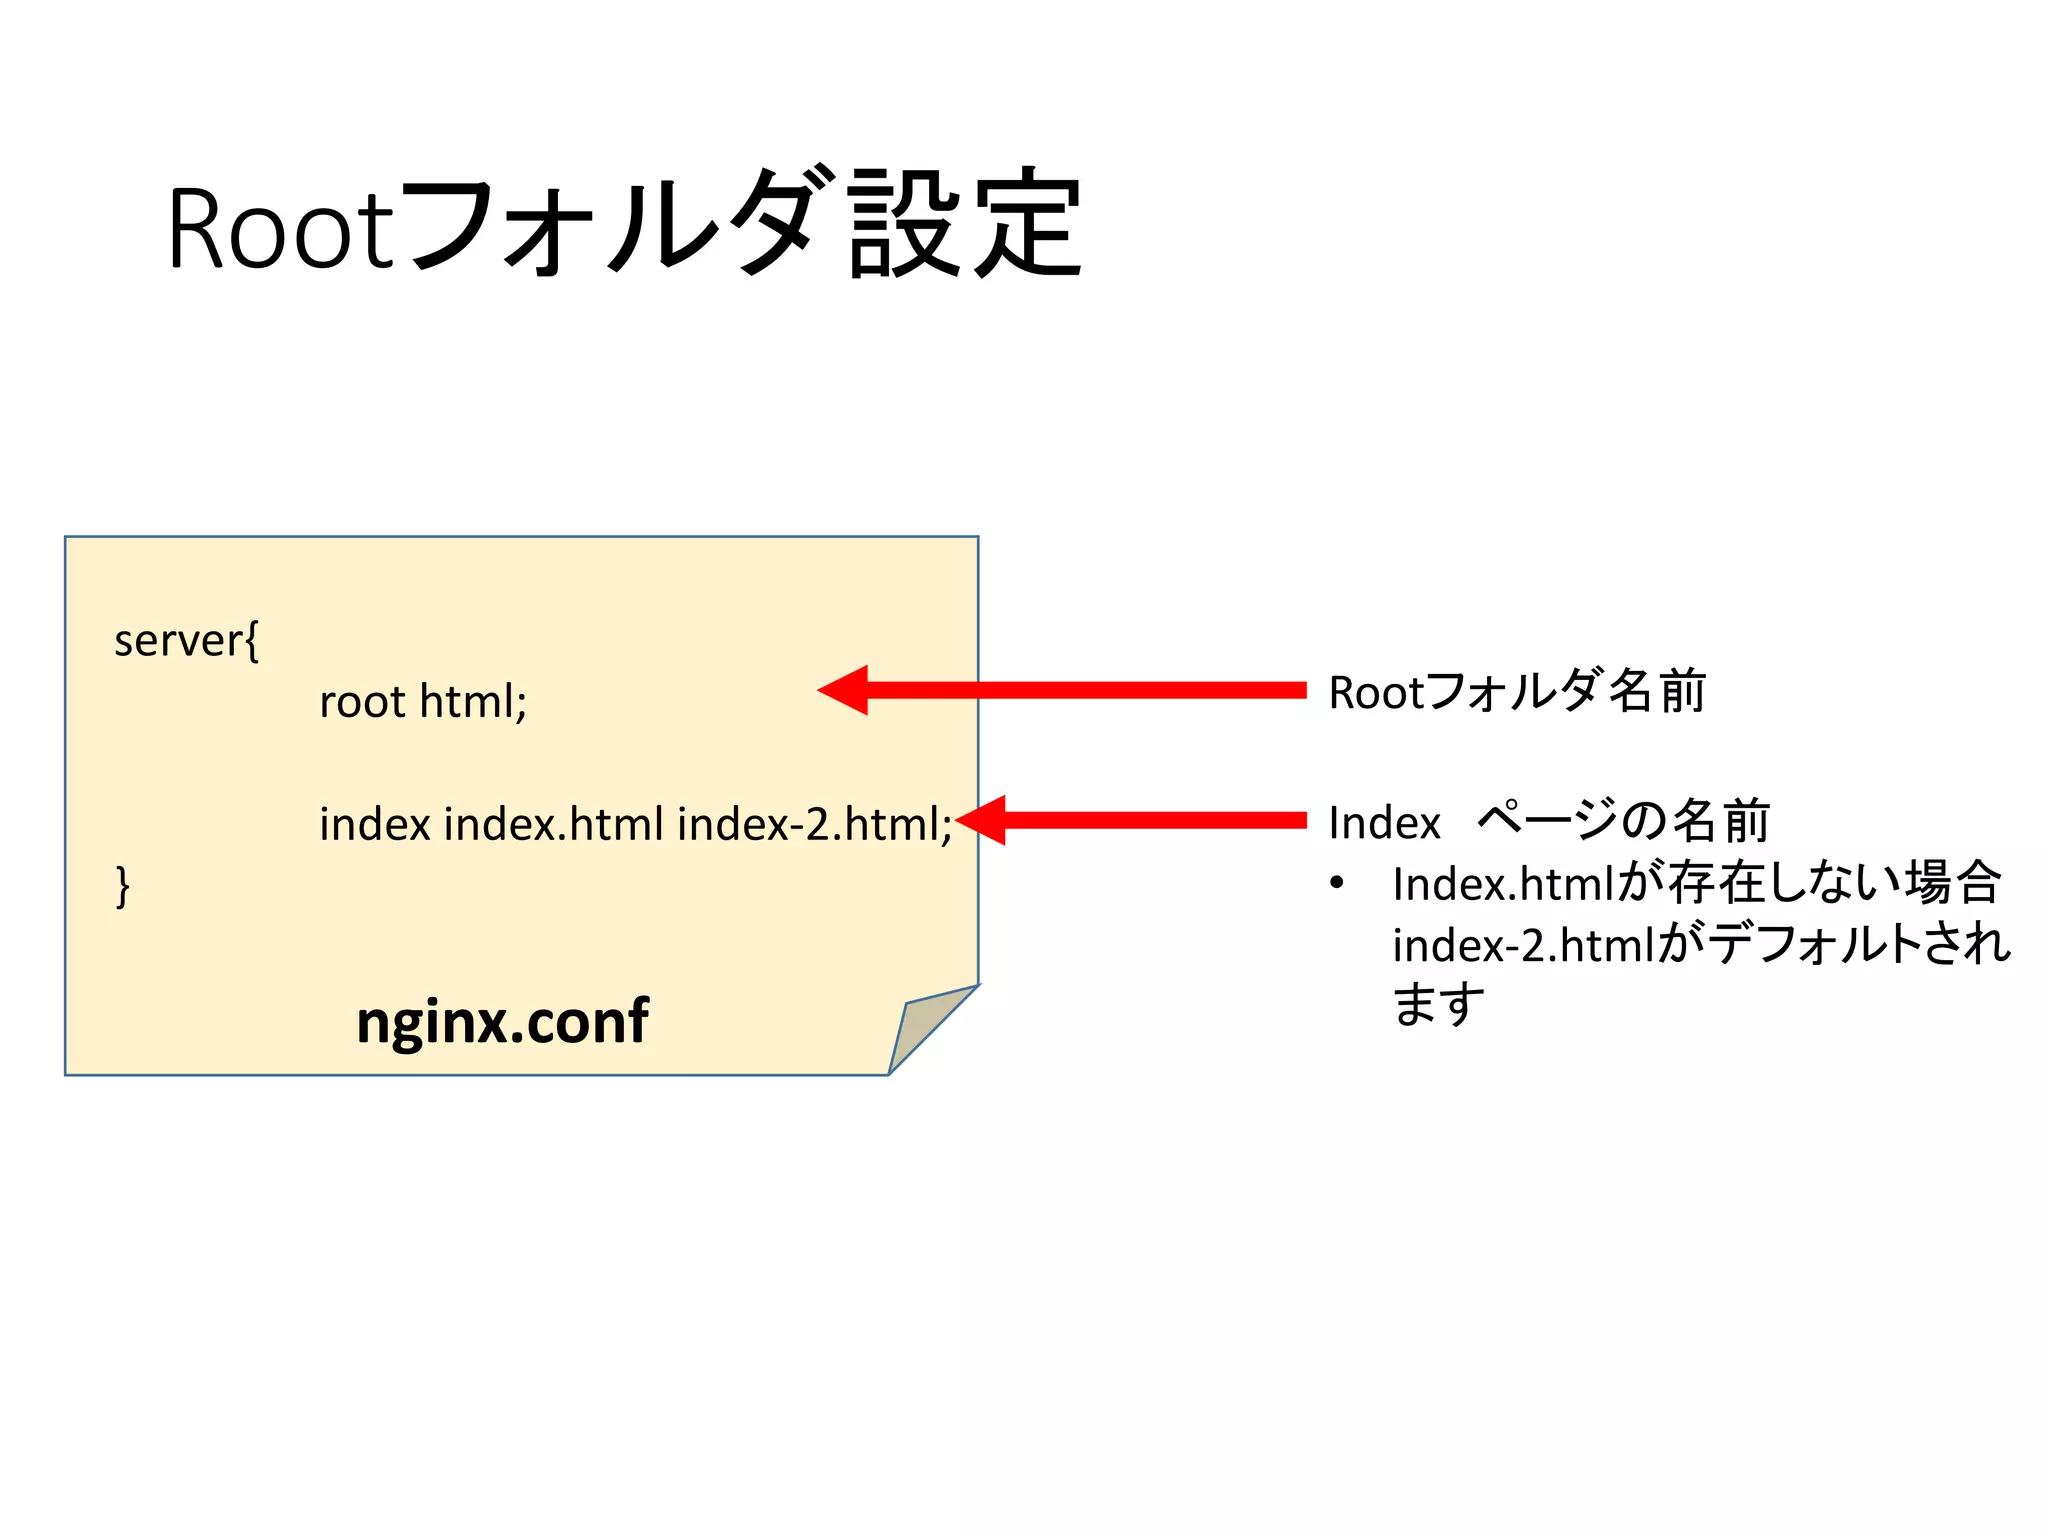
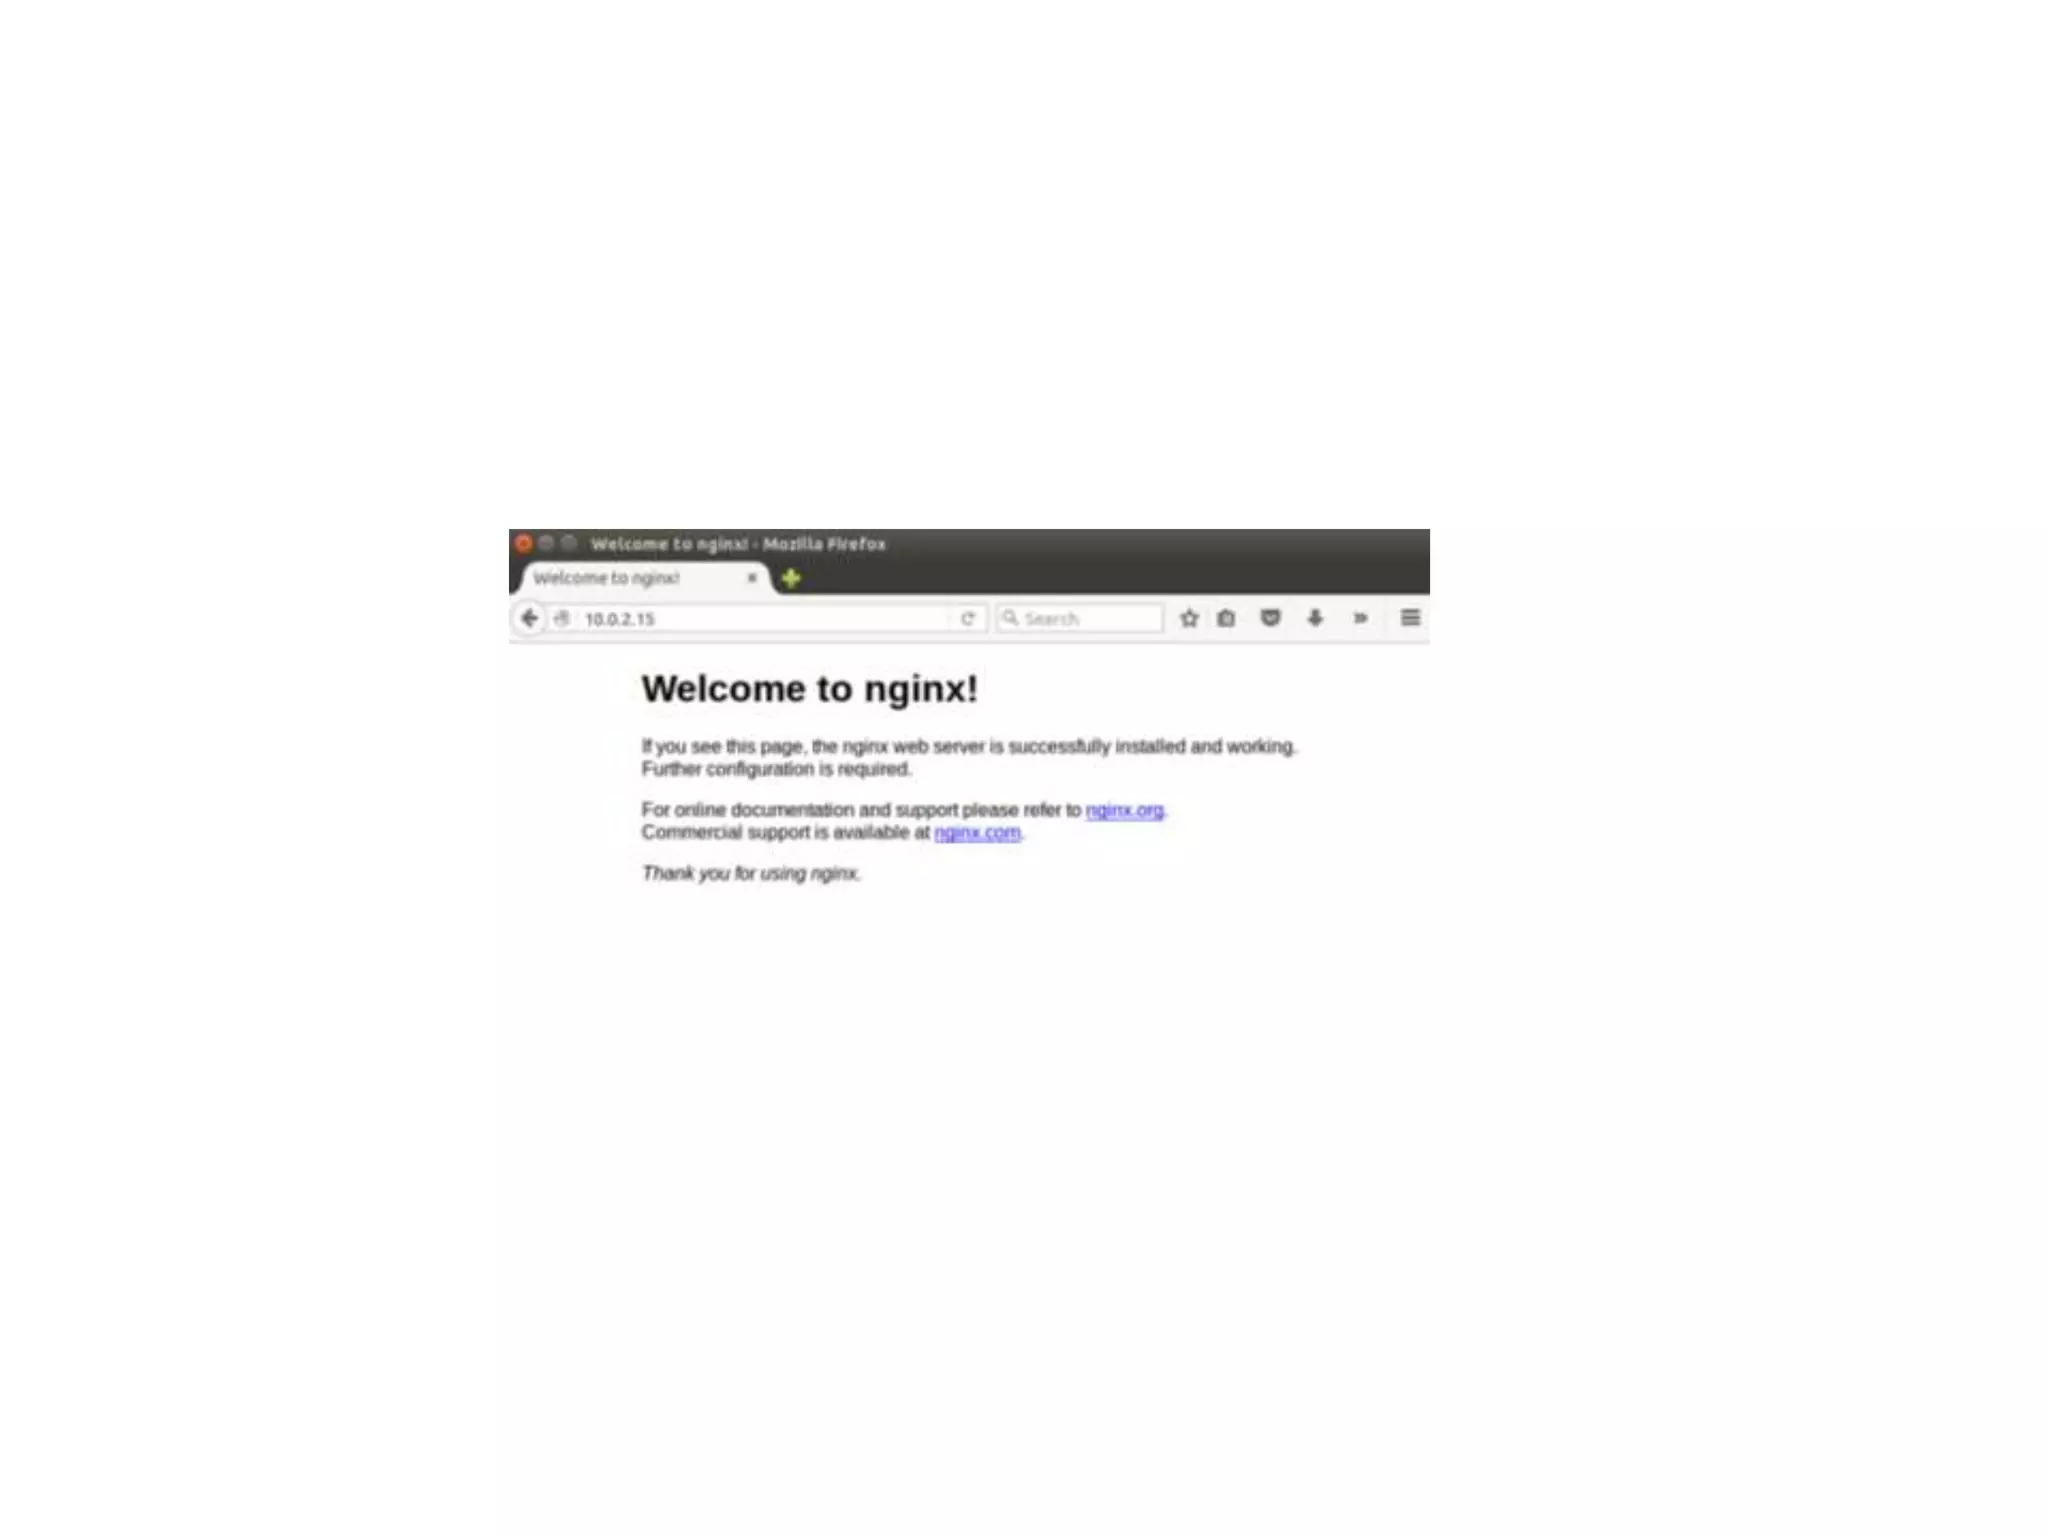
自作HTMLを提供してみる
Directory Index 変更
•$ cd /etc/apache2/sites-available
• $ nano 000-default.conf
• <VirtualHost *80> block内に
• directoryIndex myindex.htmlを追加する
• Apacheをreload
• $ sudo service apache2 reload
• すると
- 15.
sites-available & sites-enable
•Apacheのroot directory内
• 2つのフォルダがあって
• sites-available
• sites-enable
sites-available sites-enable
000-default.config @000-default.config
virtualhost2.config @virtualhost2.config
virtualhost3.config @virtualhost3.config
$ ln から作られたlink
- 16.
- 17.
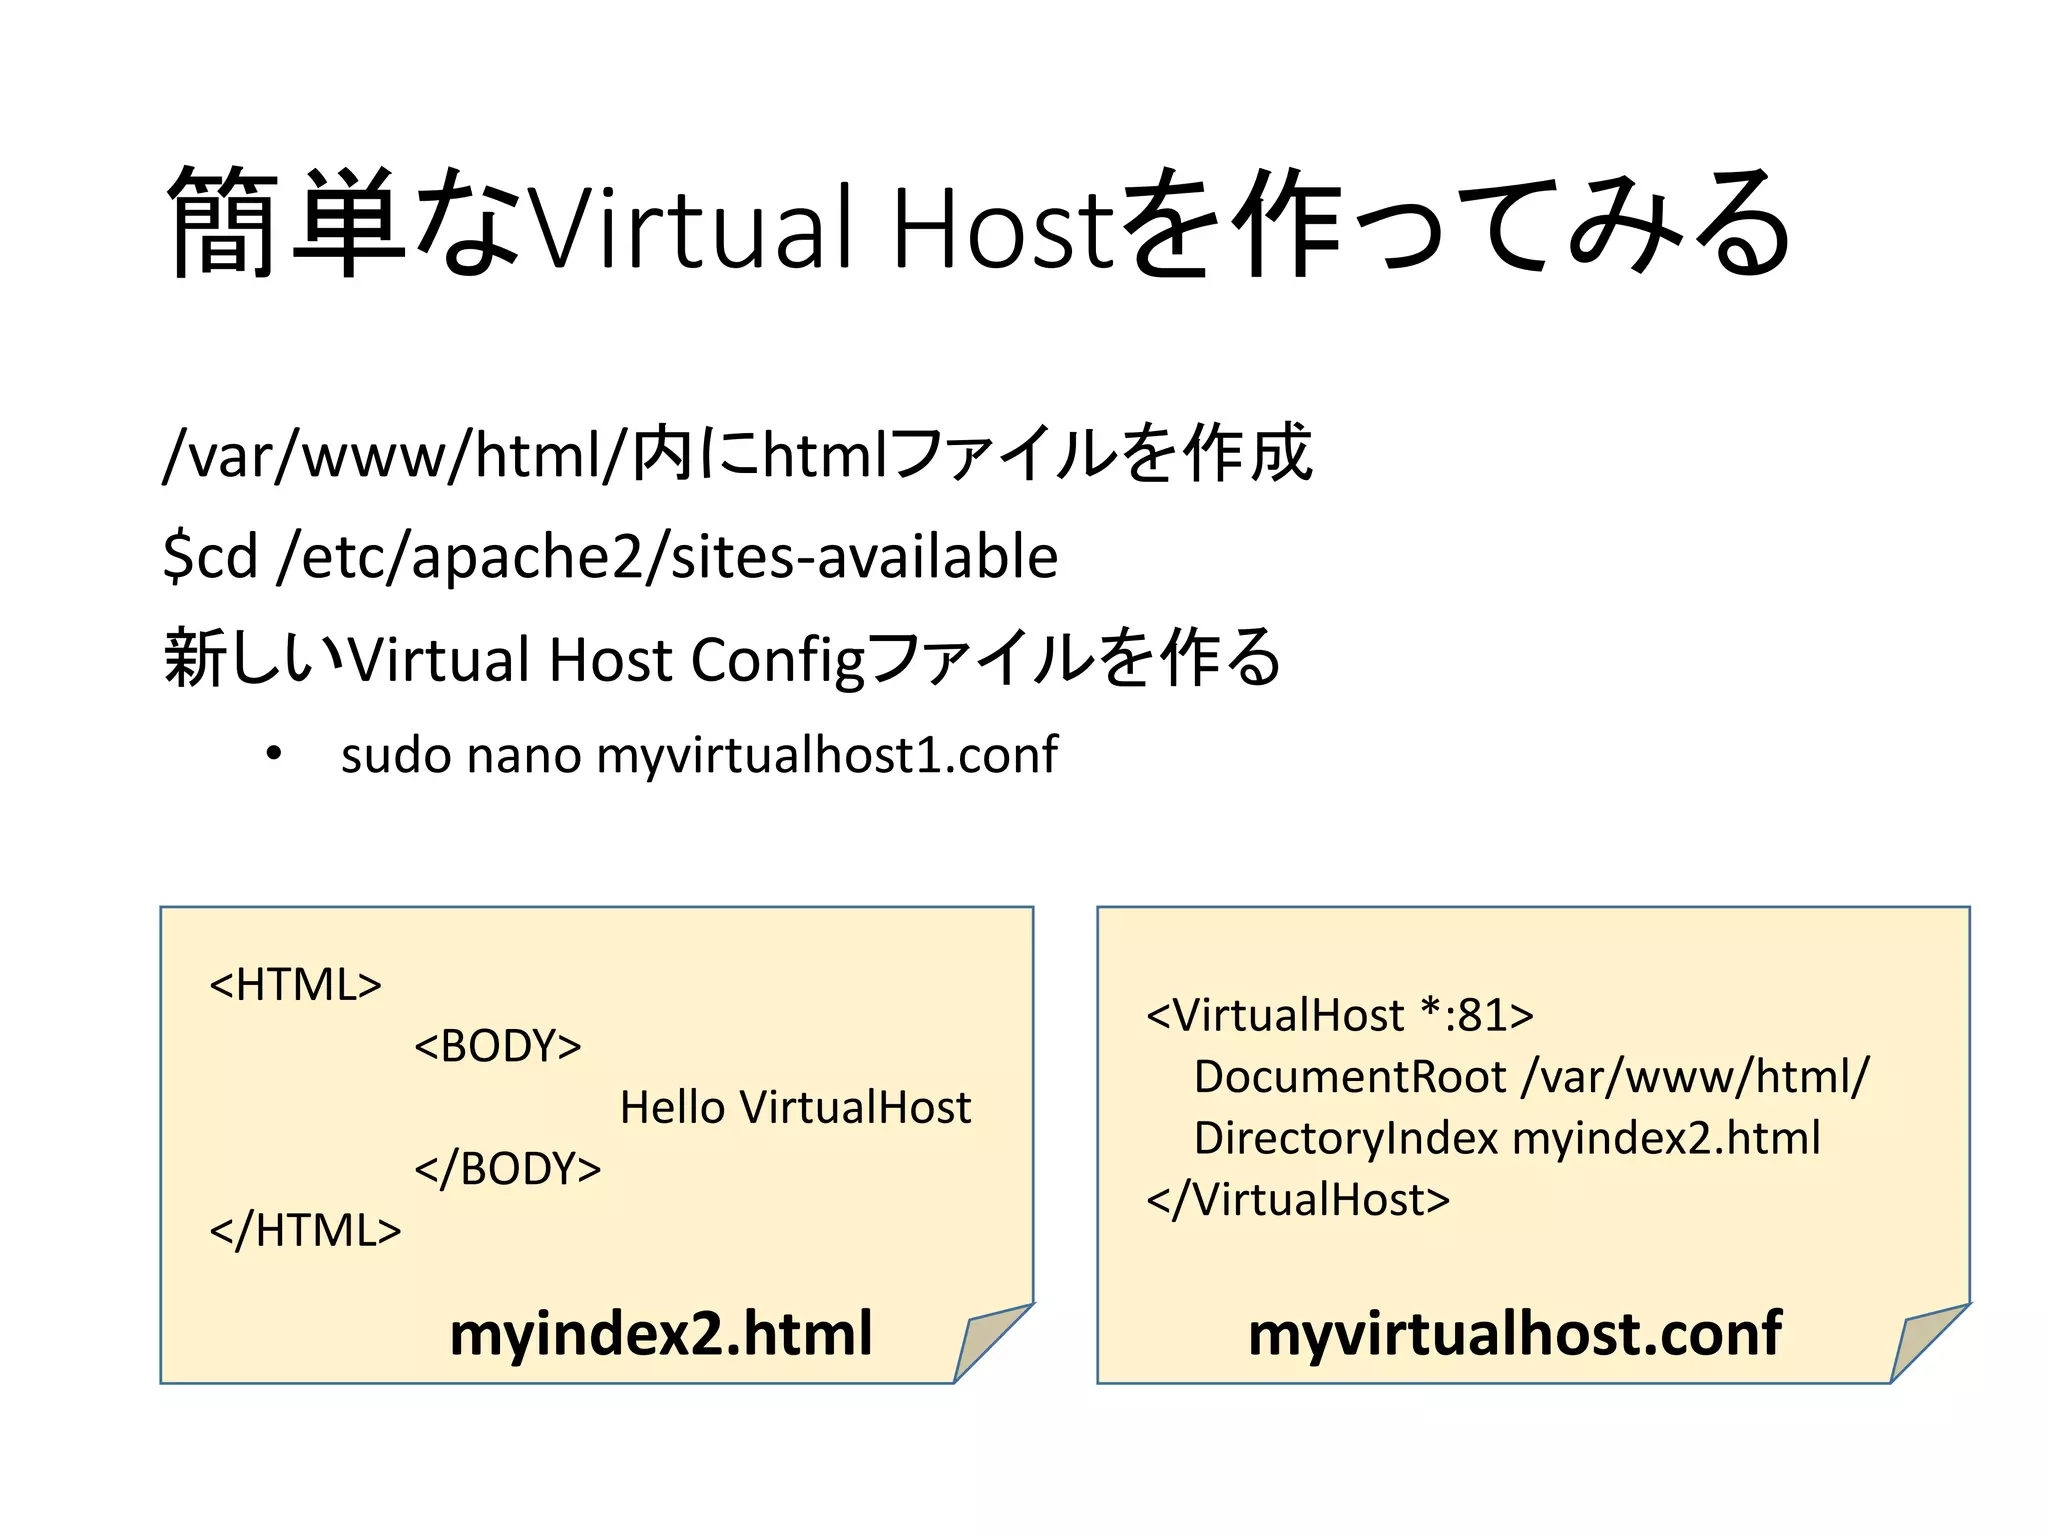
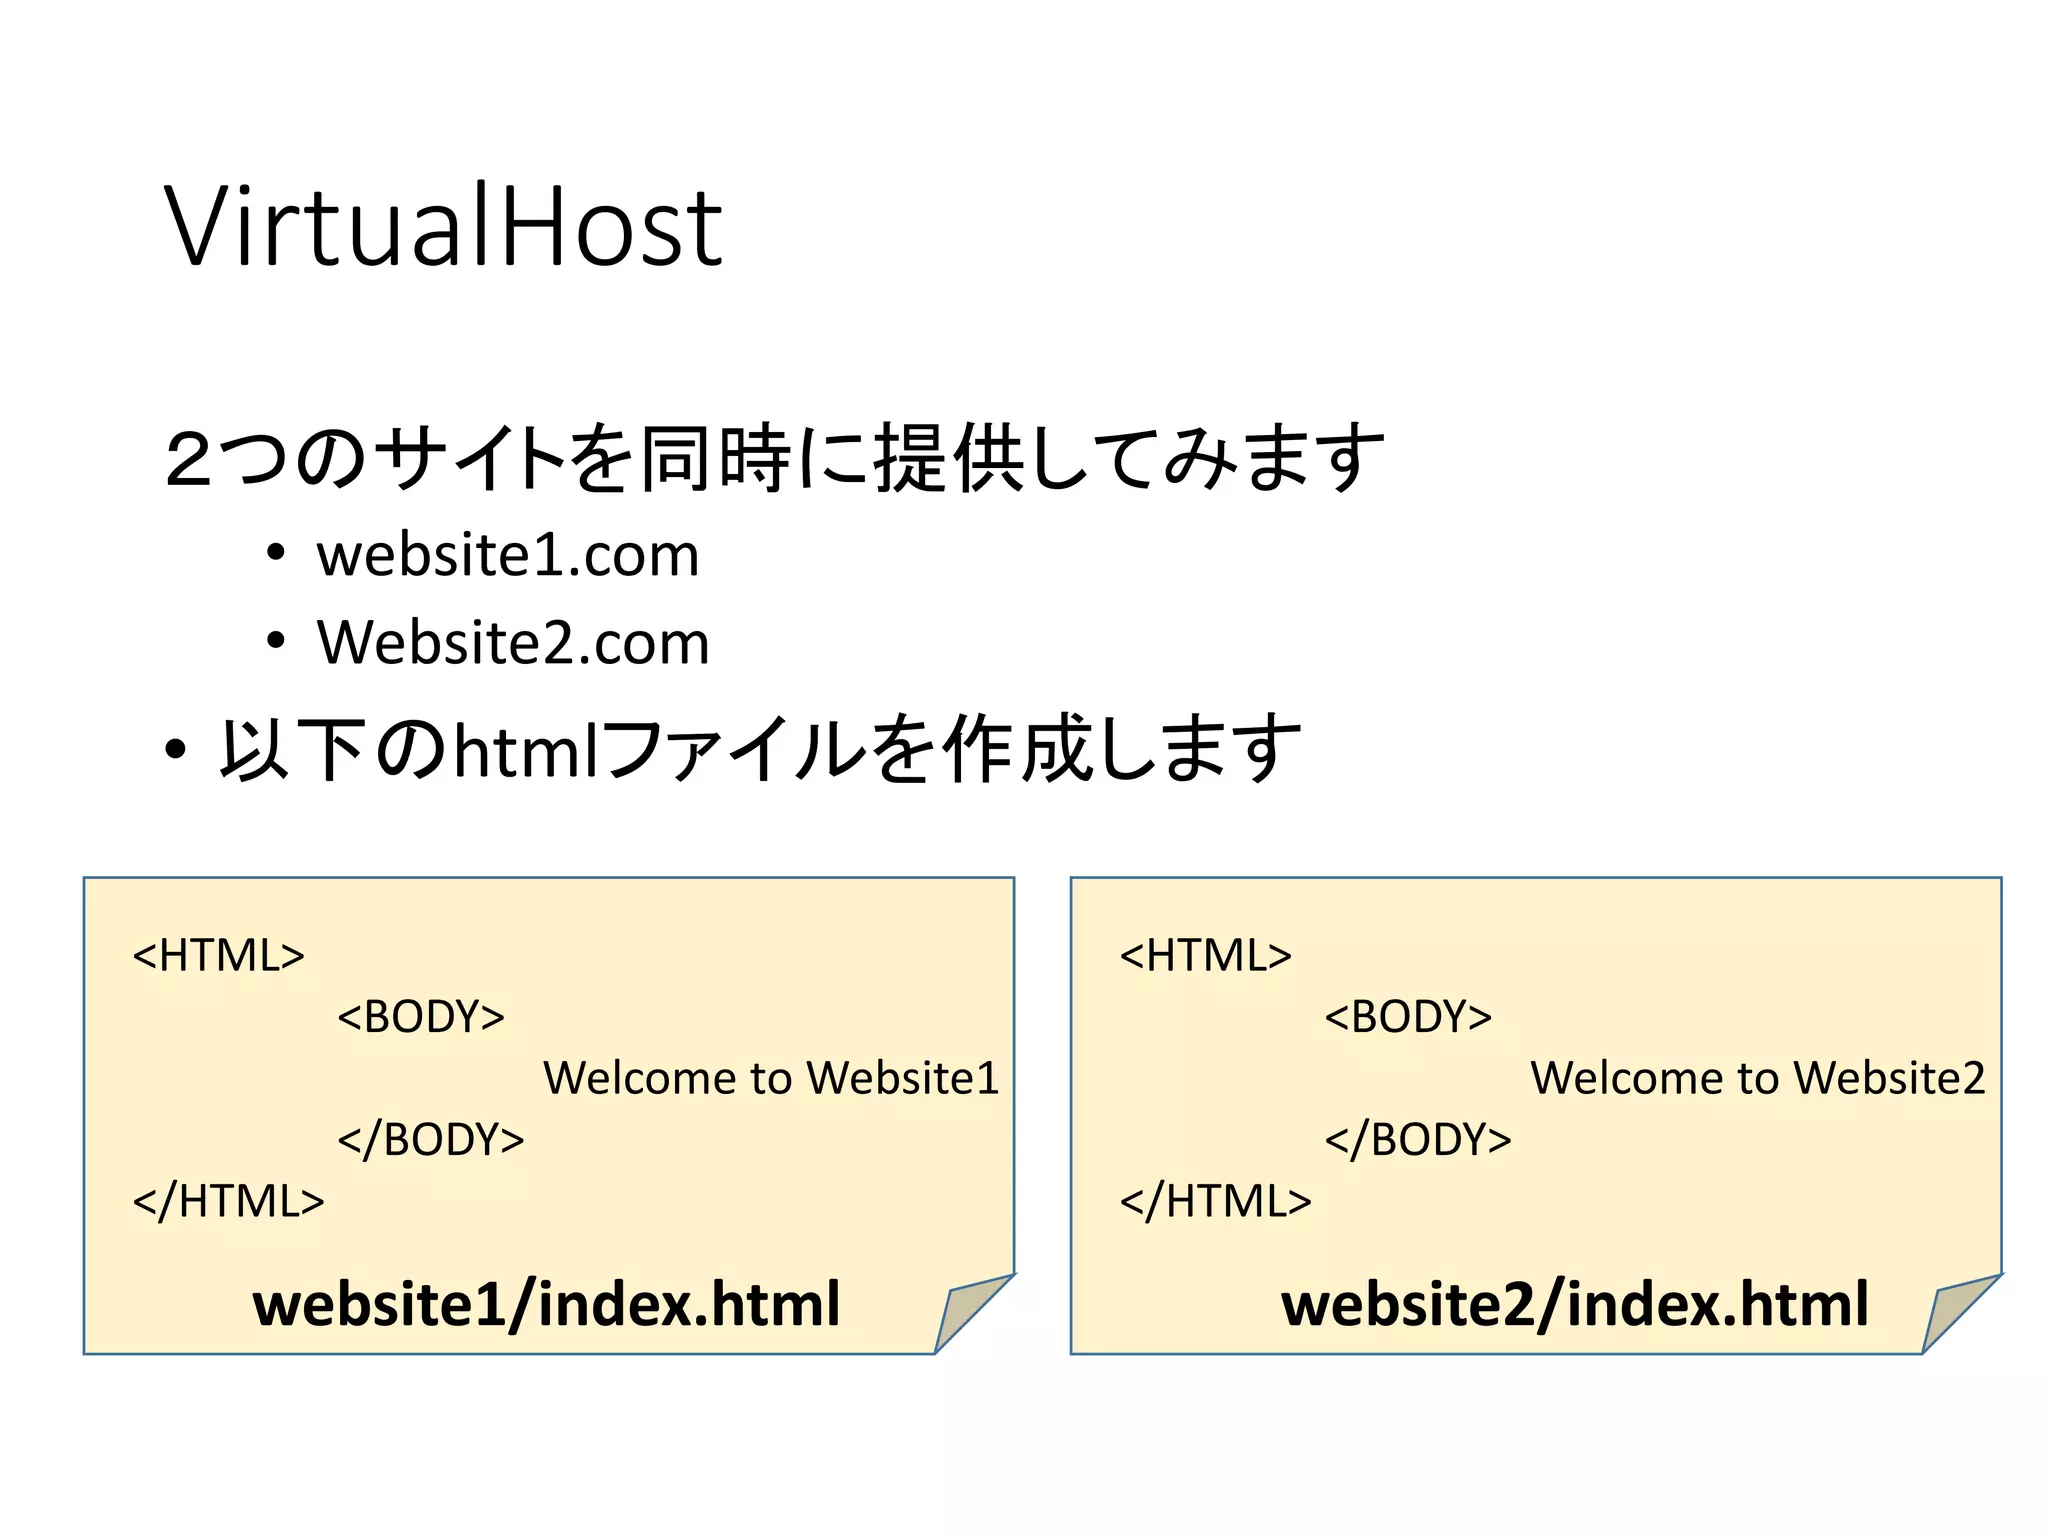
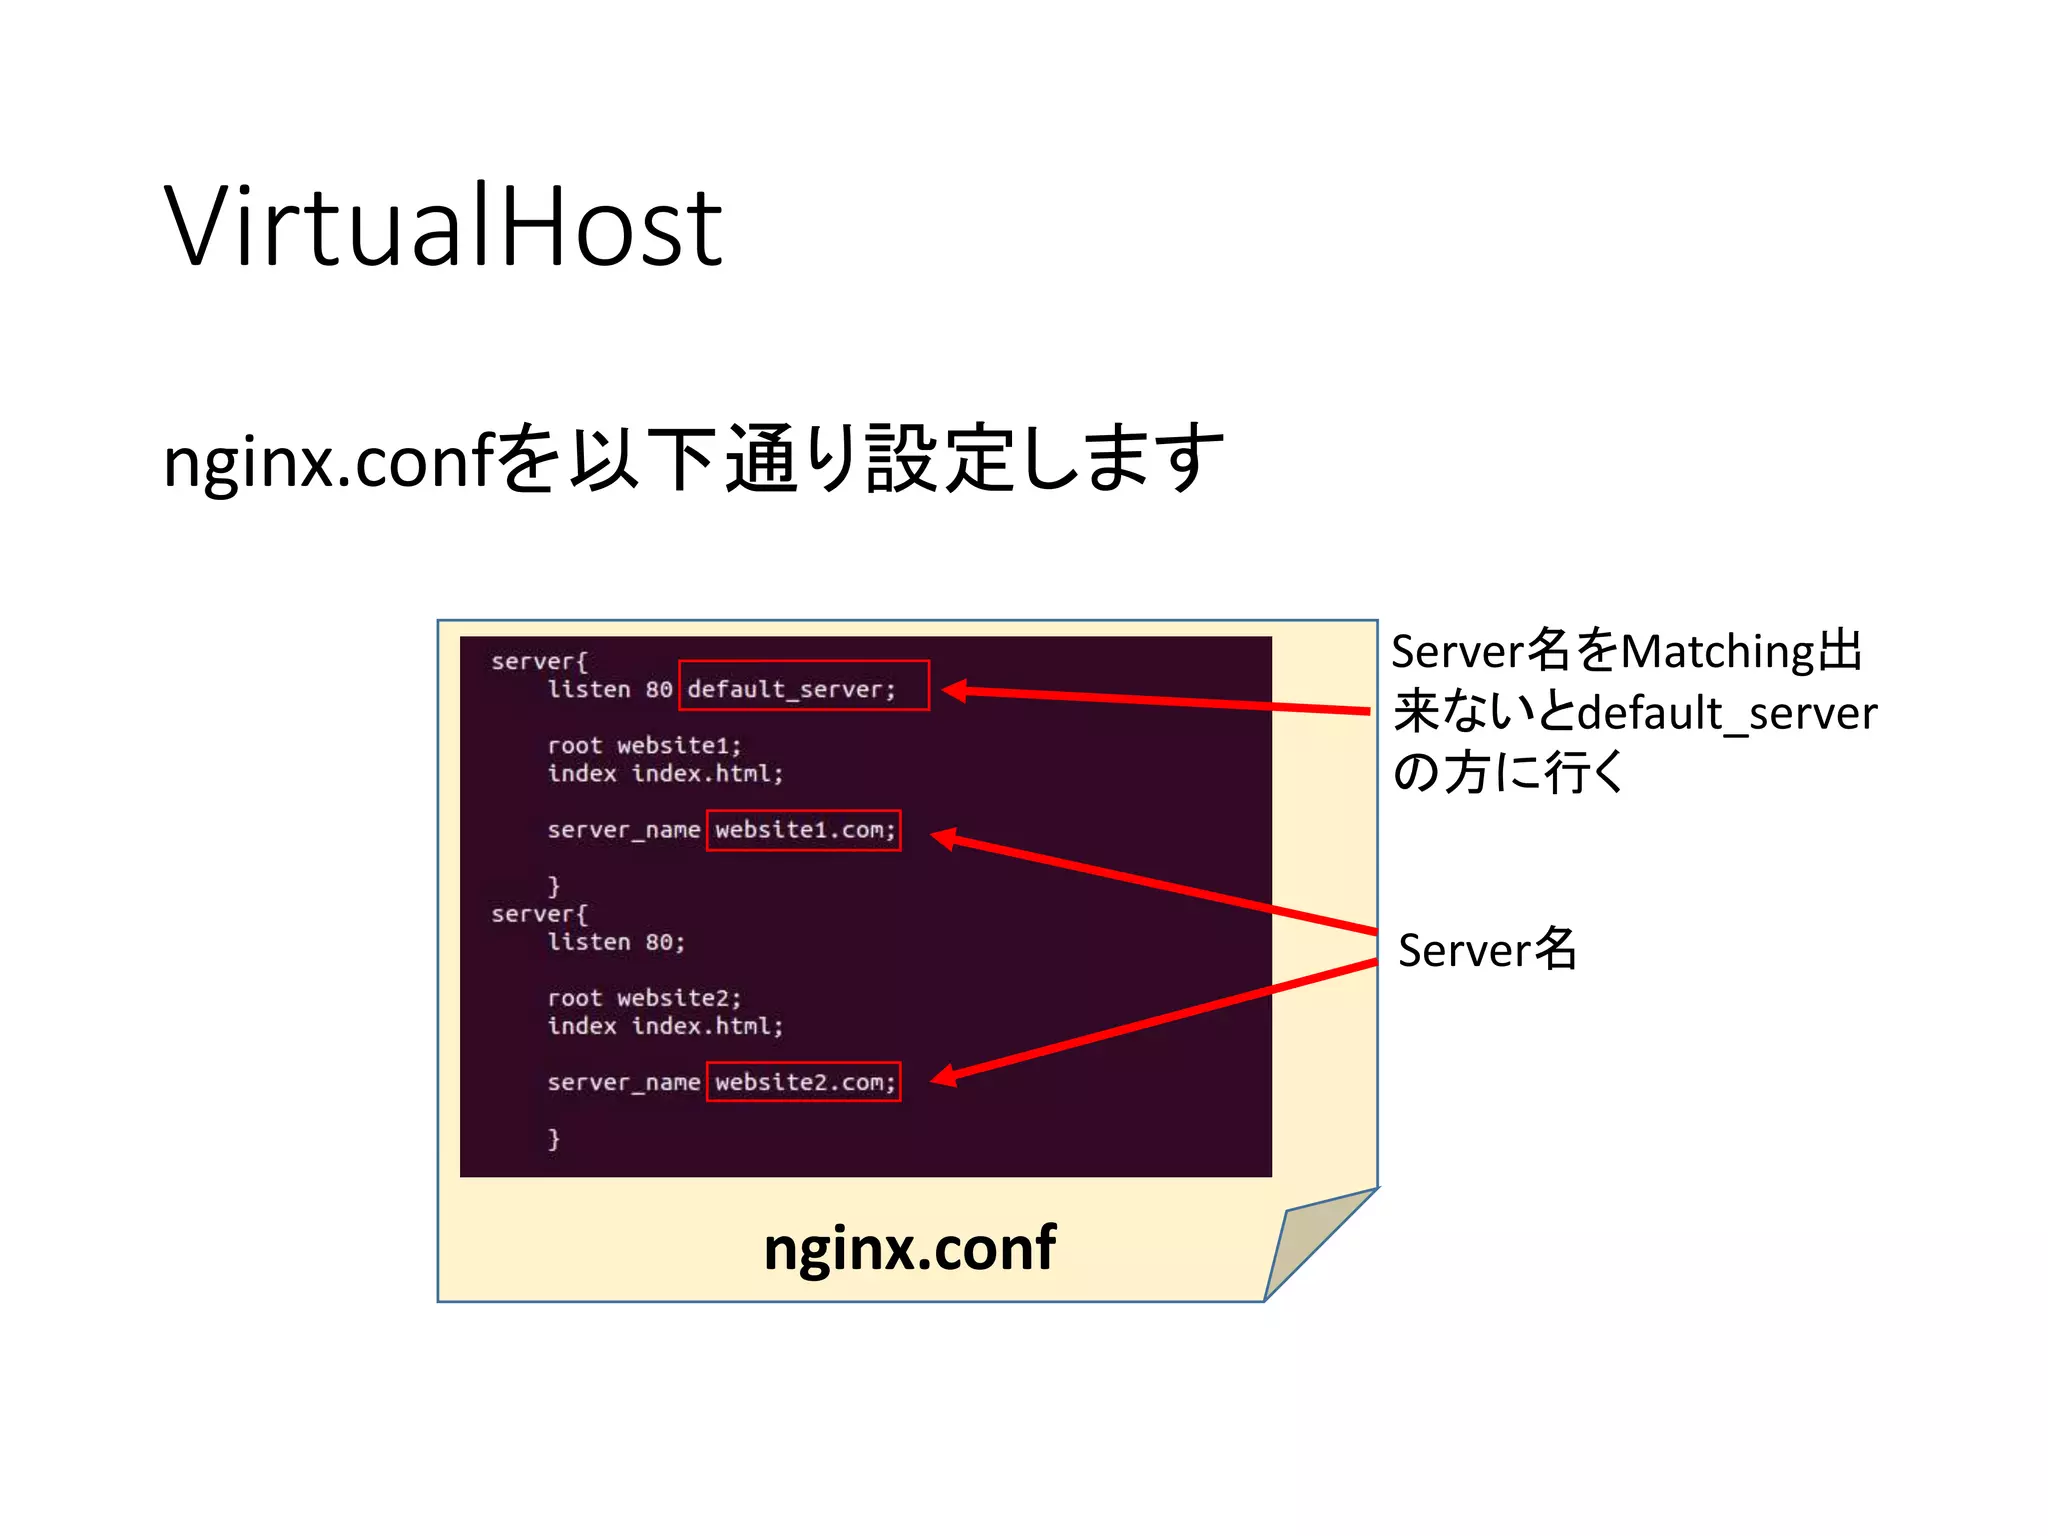
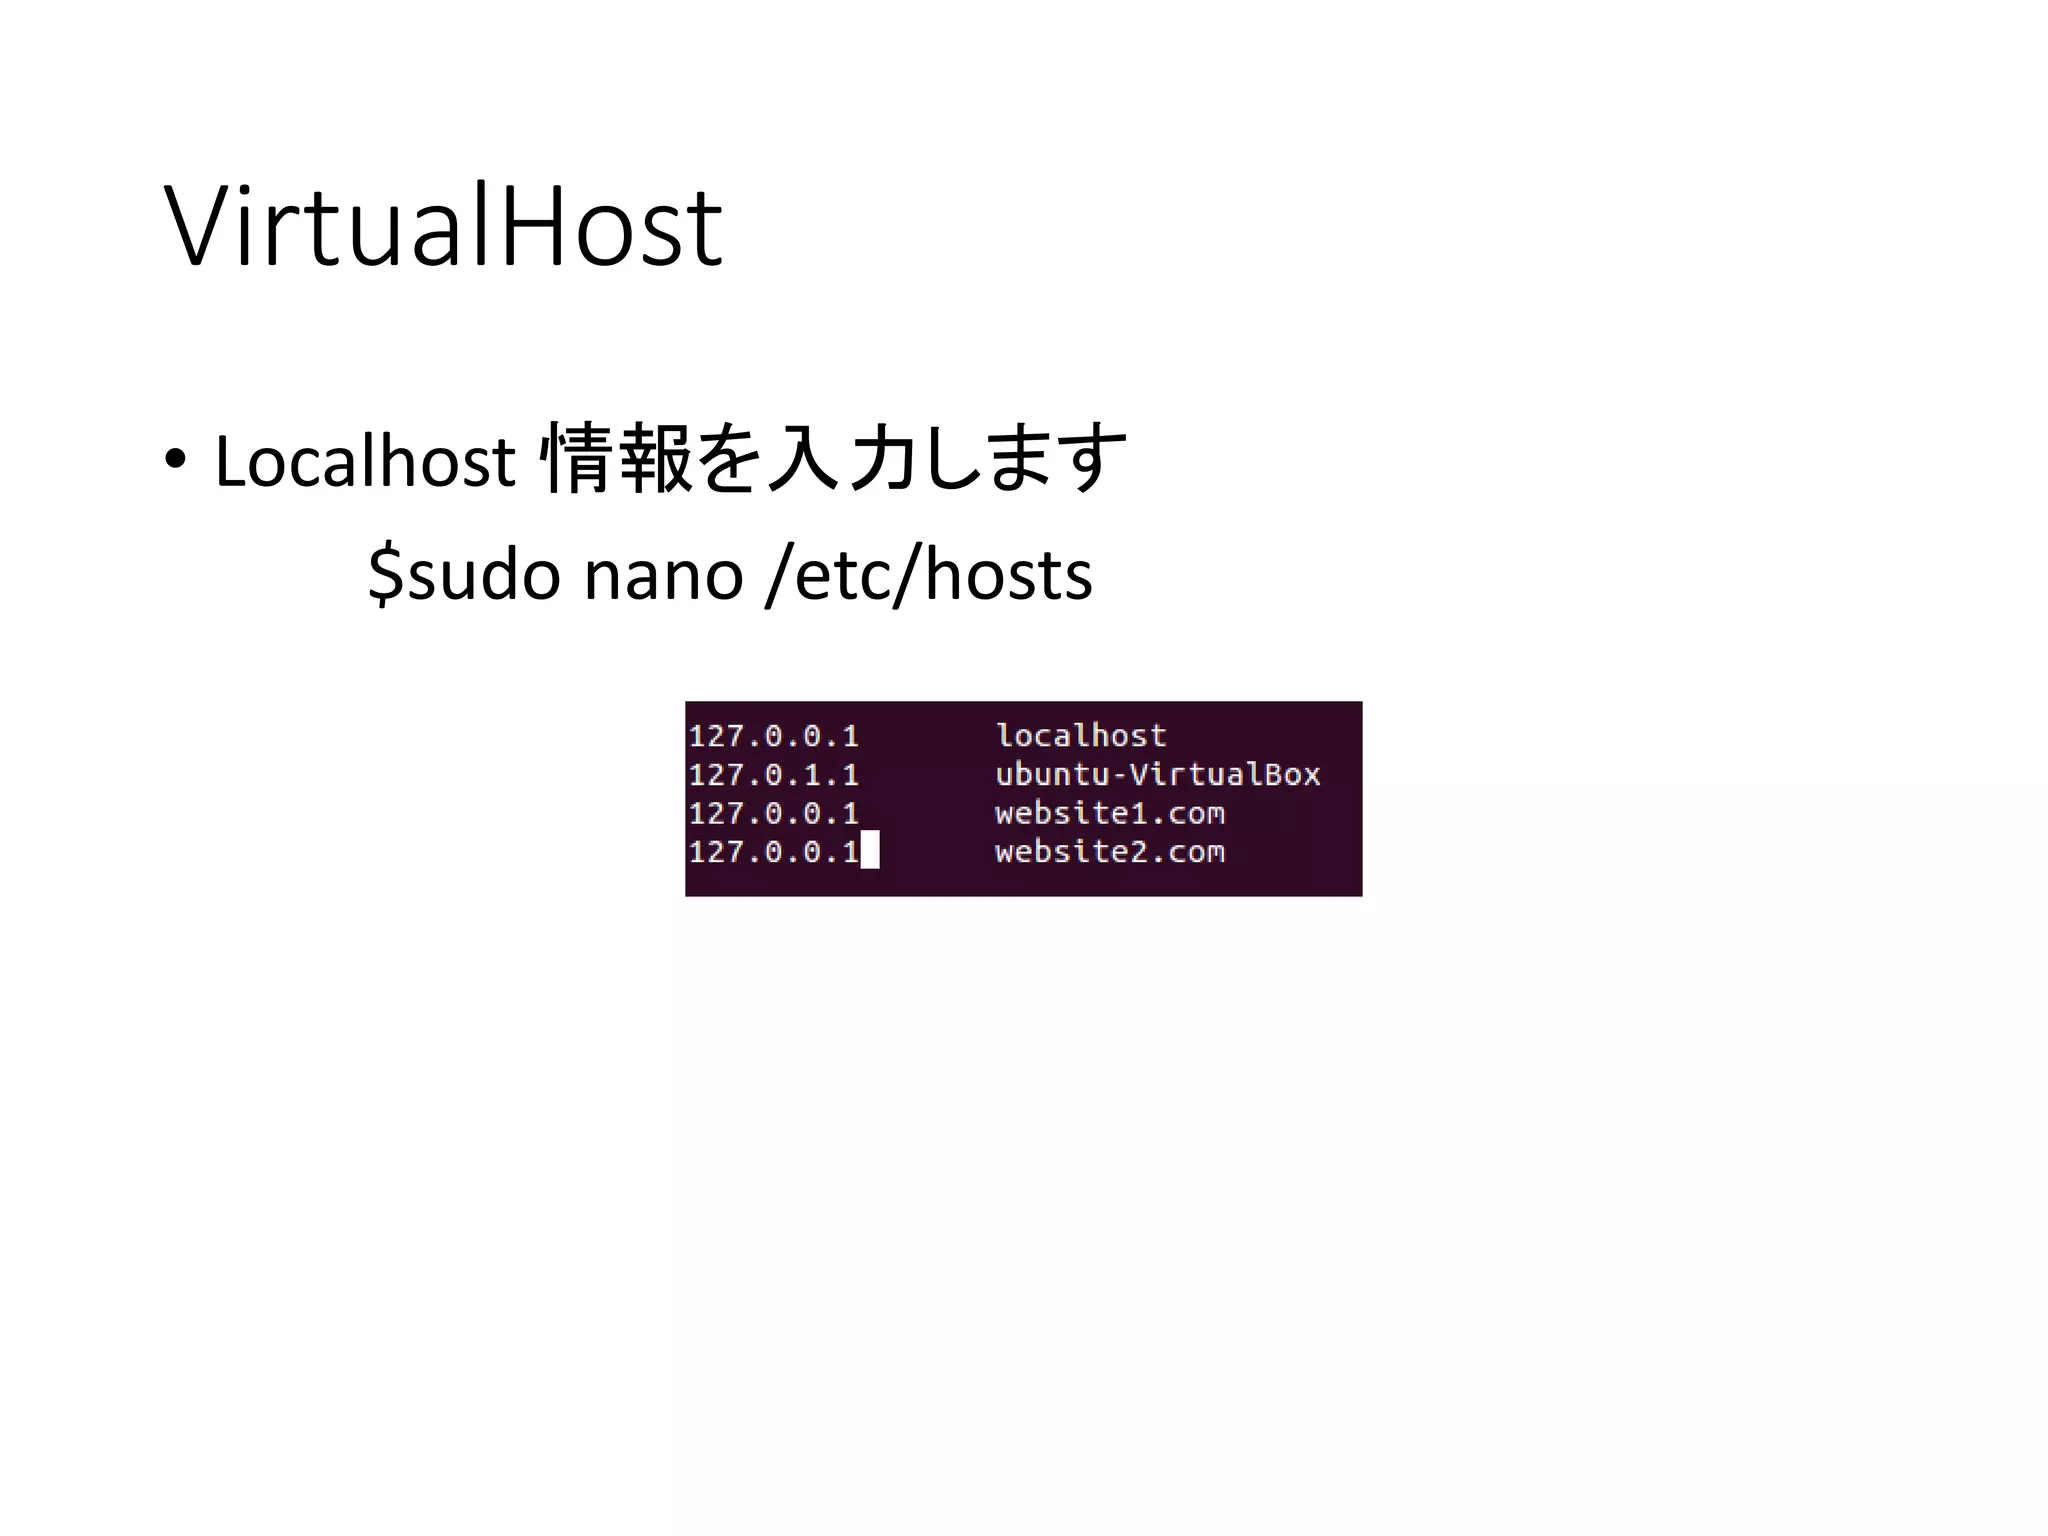
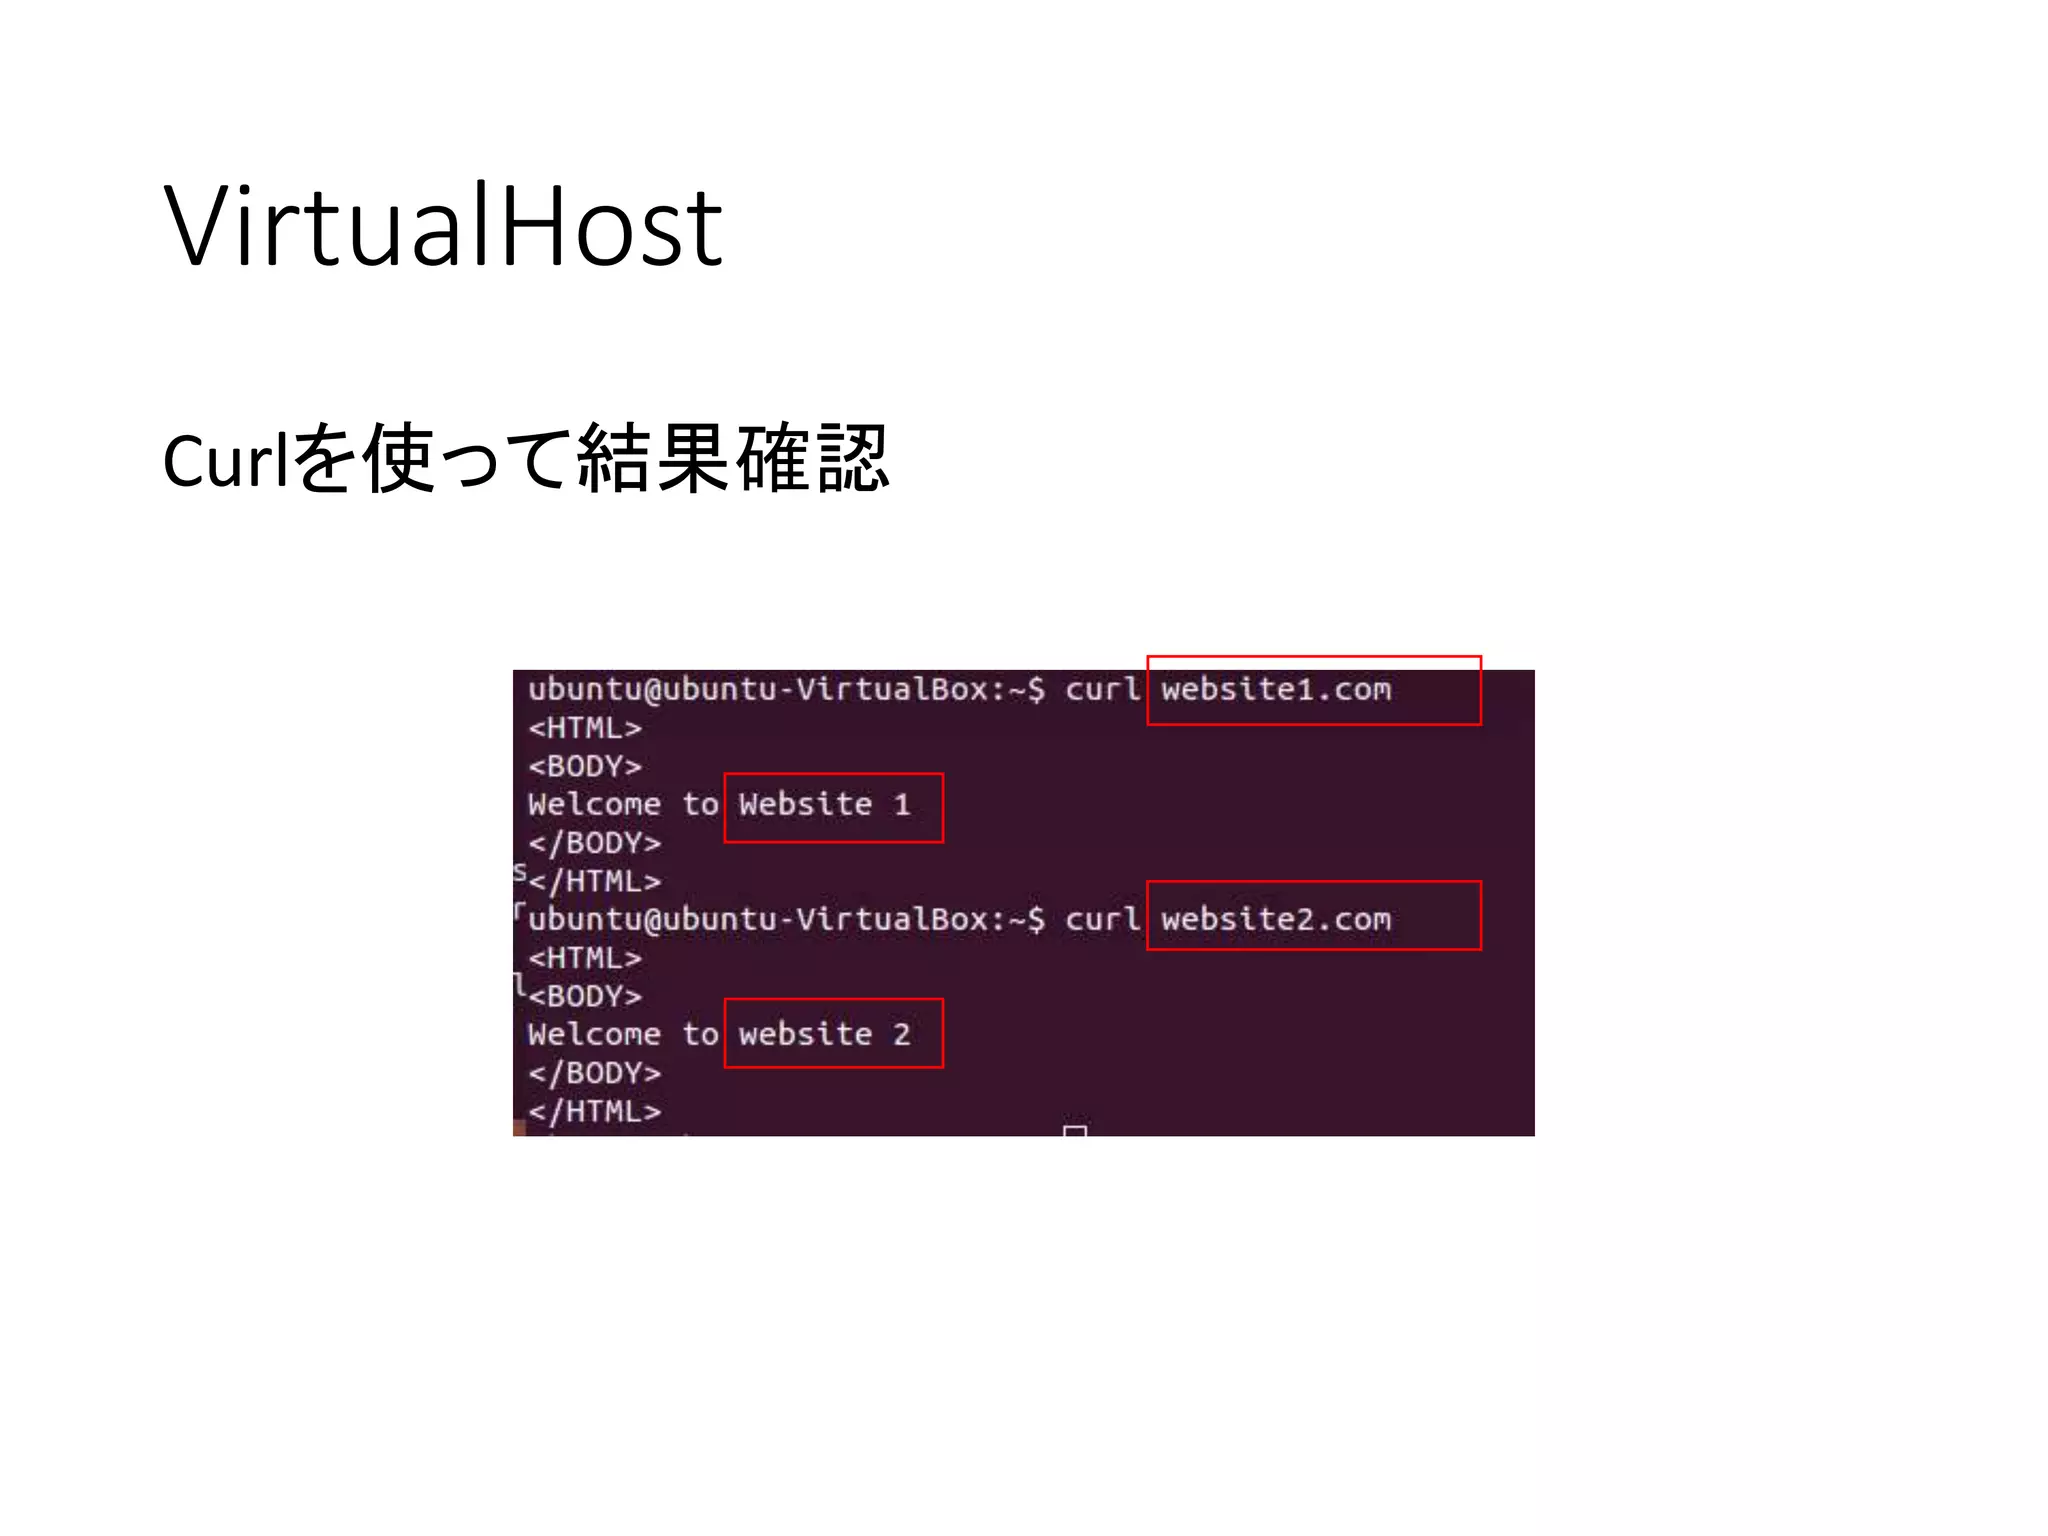
簡単なVirtual Hostを作ってみる
a2ensite &a2dissite
• ~/sites-available/ 内に
• sudo a2ensite myvirtualhost1.conf
• myvirtualhost1をenableする
• sudo a2disite myvirtualhost1.conf
• myvirtualhost1をdisableする
- 19.
- 20.
- 21.
- 22.
- 23.
- 24.
- 25.
- 26.
- 27.
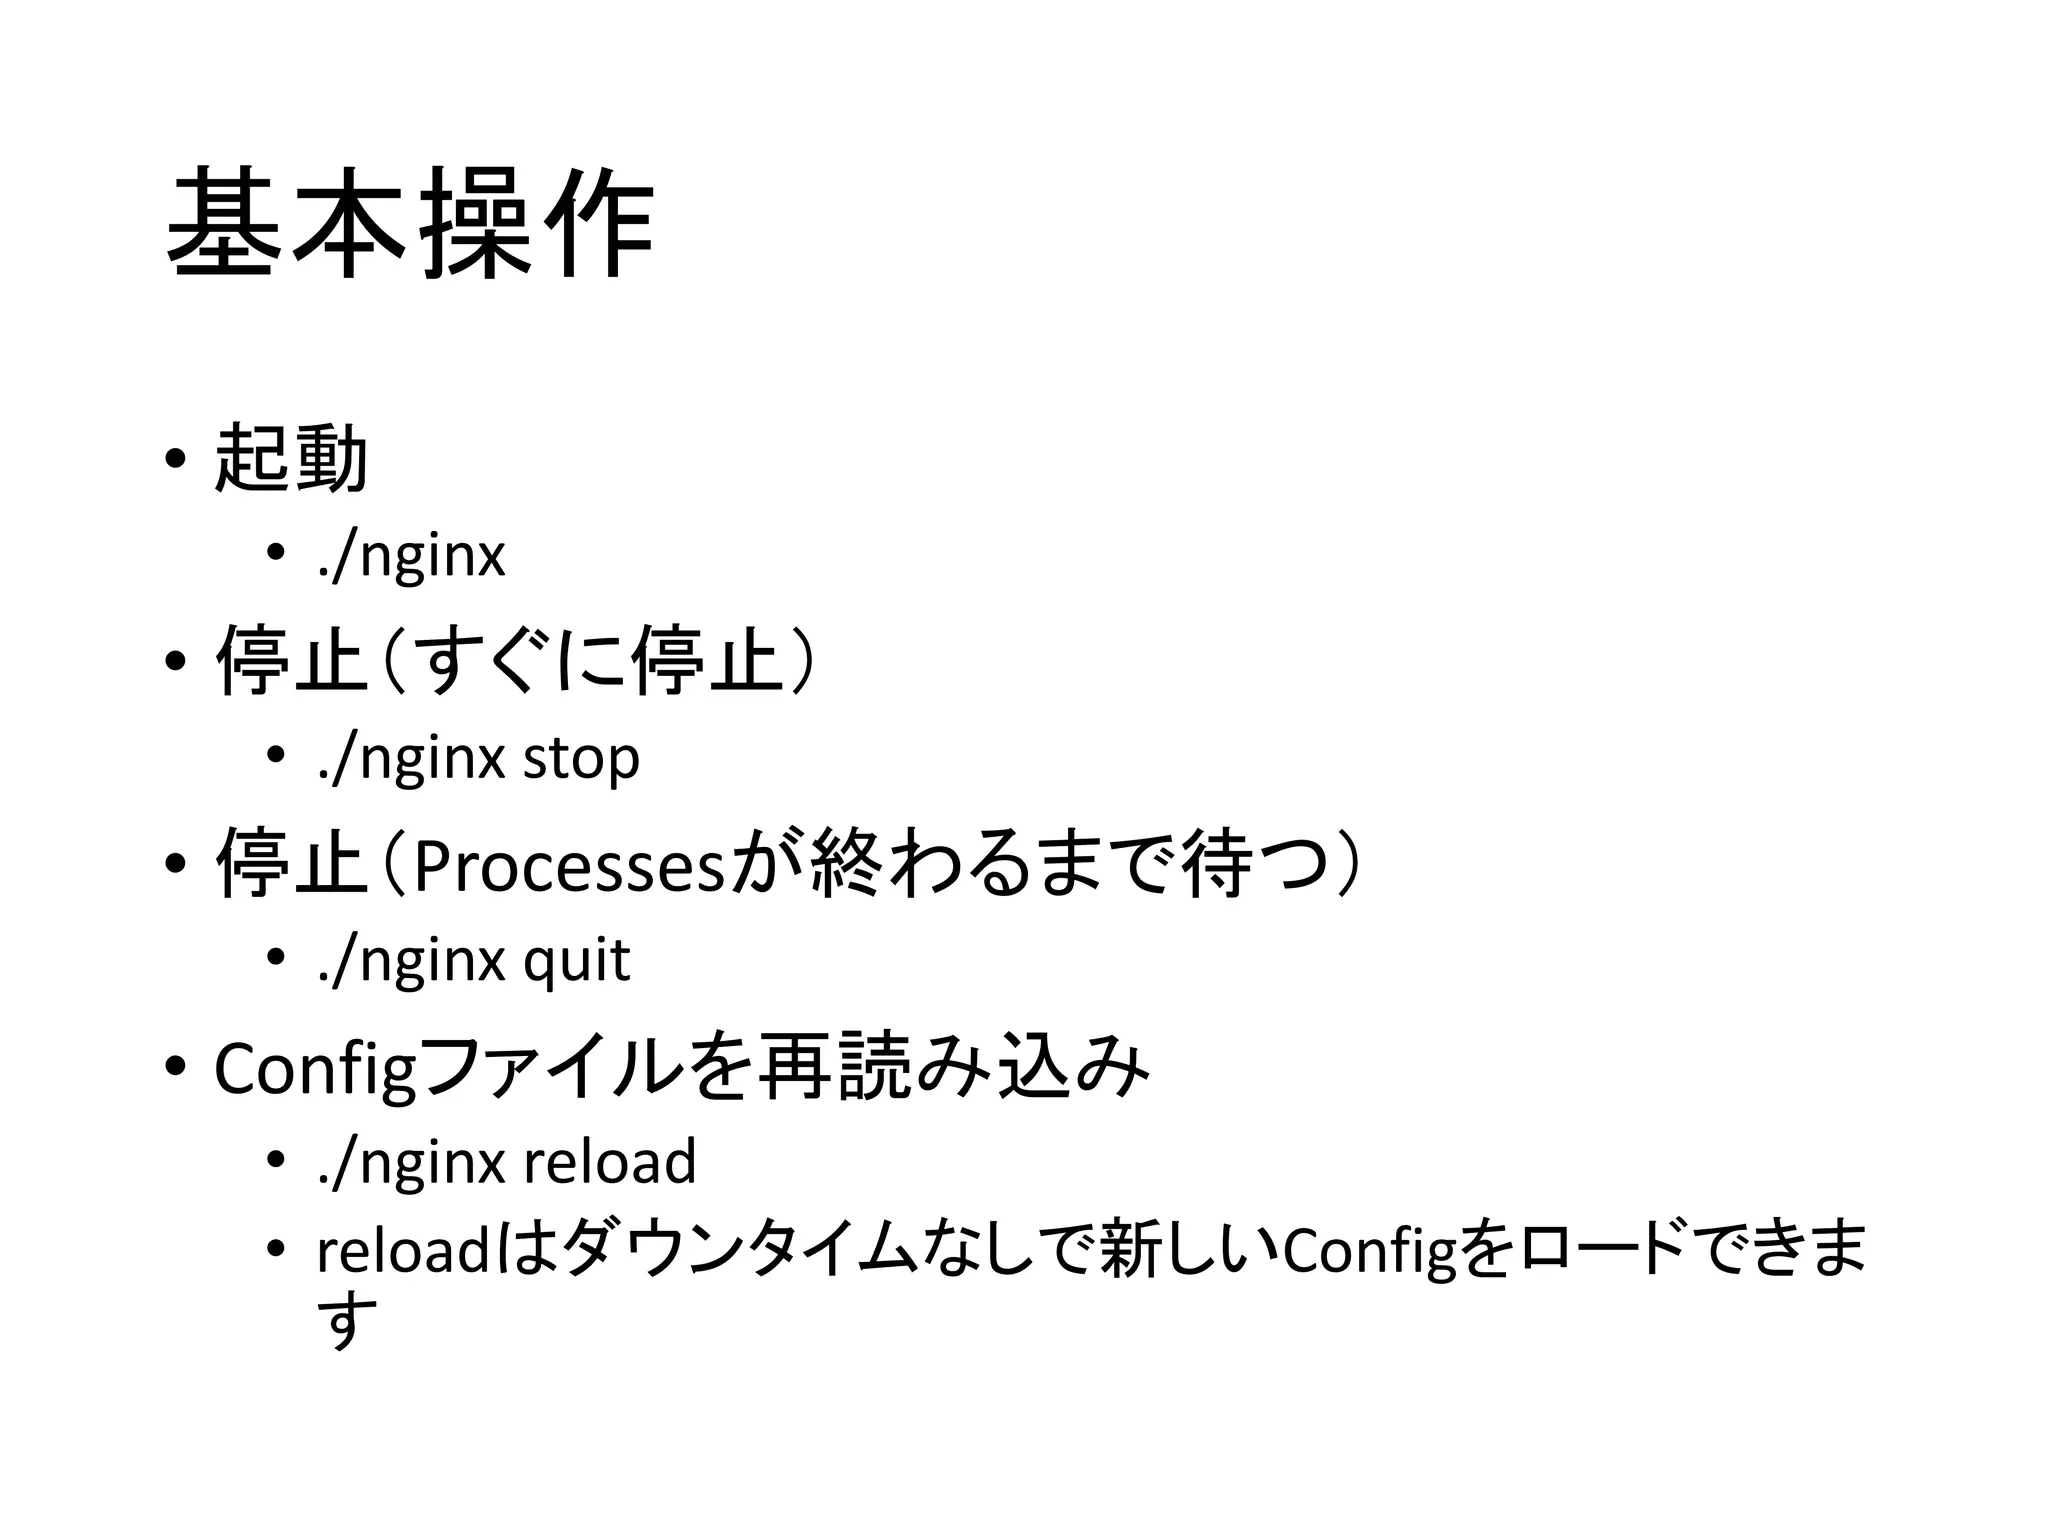
基本操作
• 起動
• ./nginx
•停止(すぐに停止)
• ./nginx stop
• 停止(Processesが終わるまで待つ)
• ./nginx quit
• Configファイルを再読み込み
• ./nginx reload
• reloadはダウンタイムなしで新しいConfigをロードできま
す
- 28.
- 29.
- 30.
- 31.
- 32.
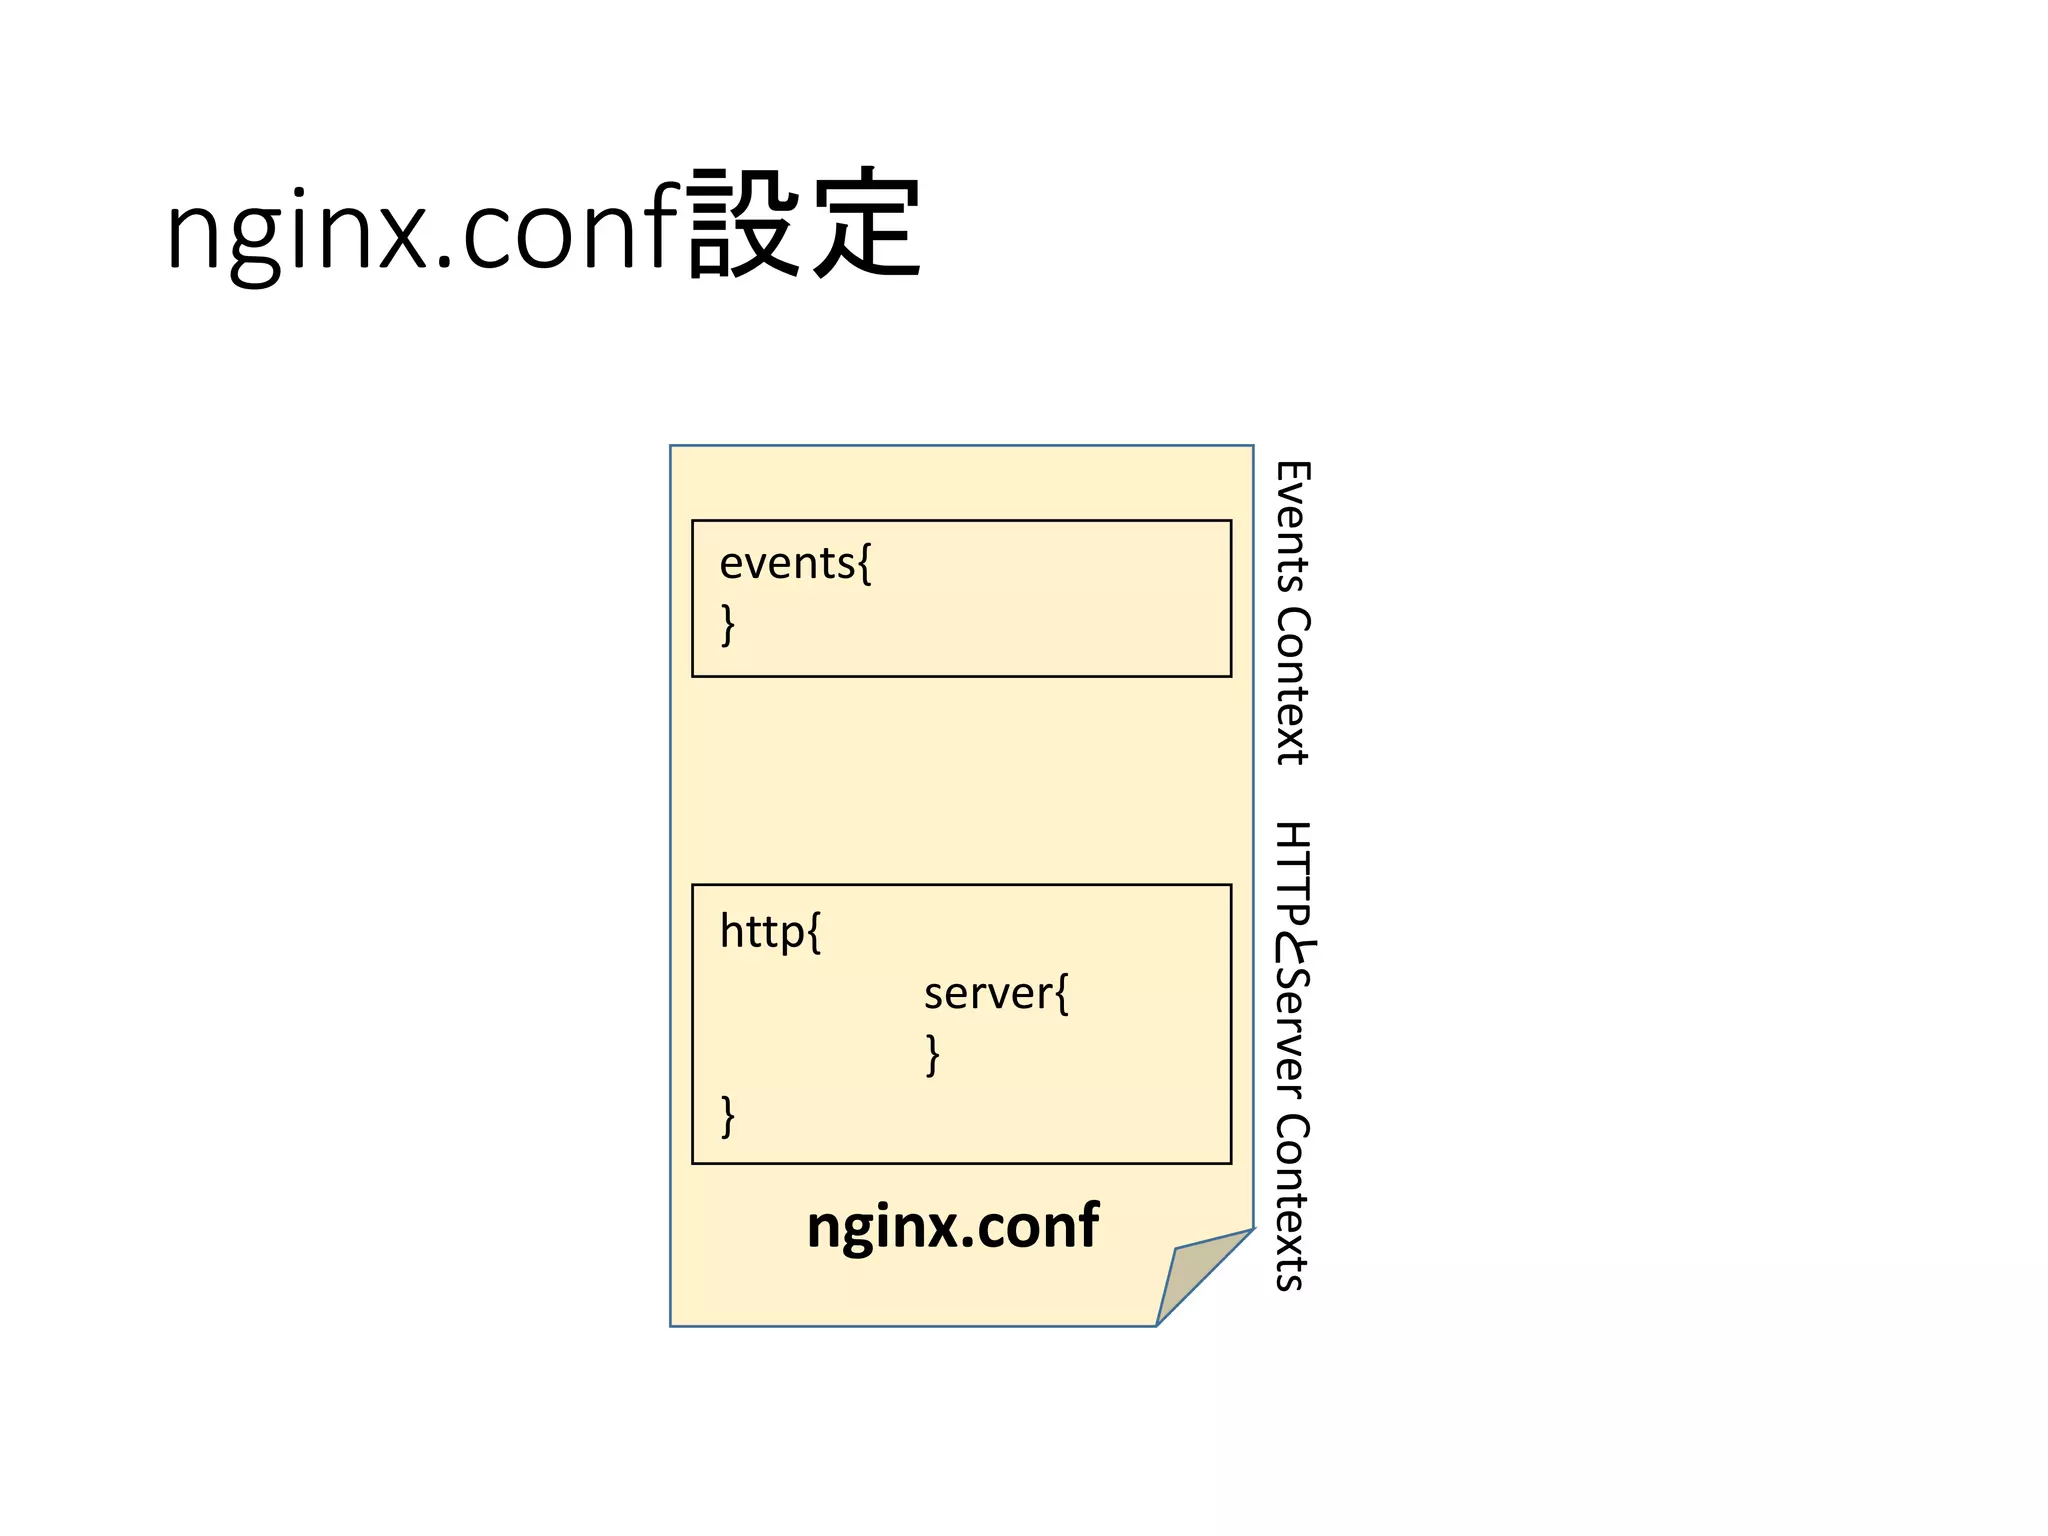
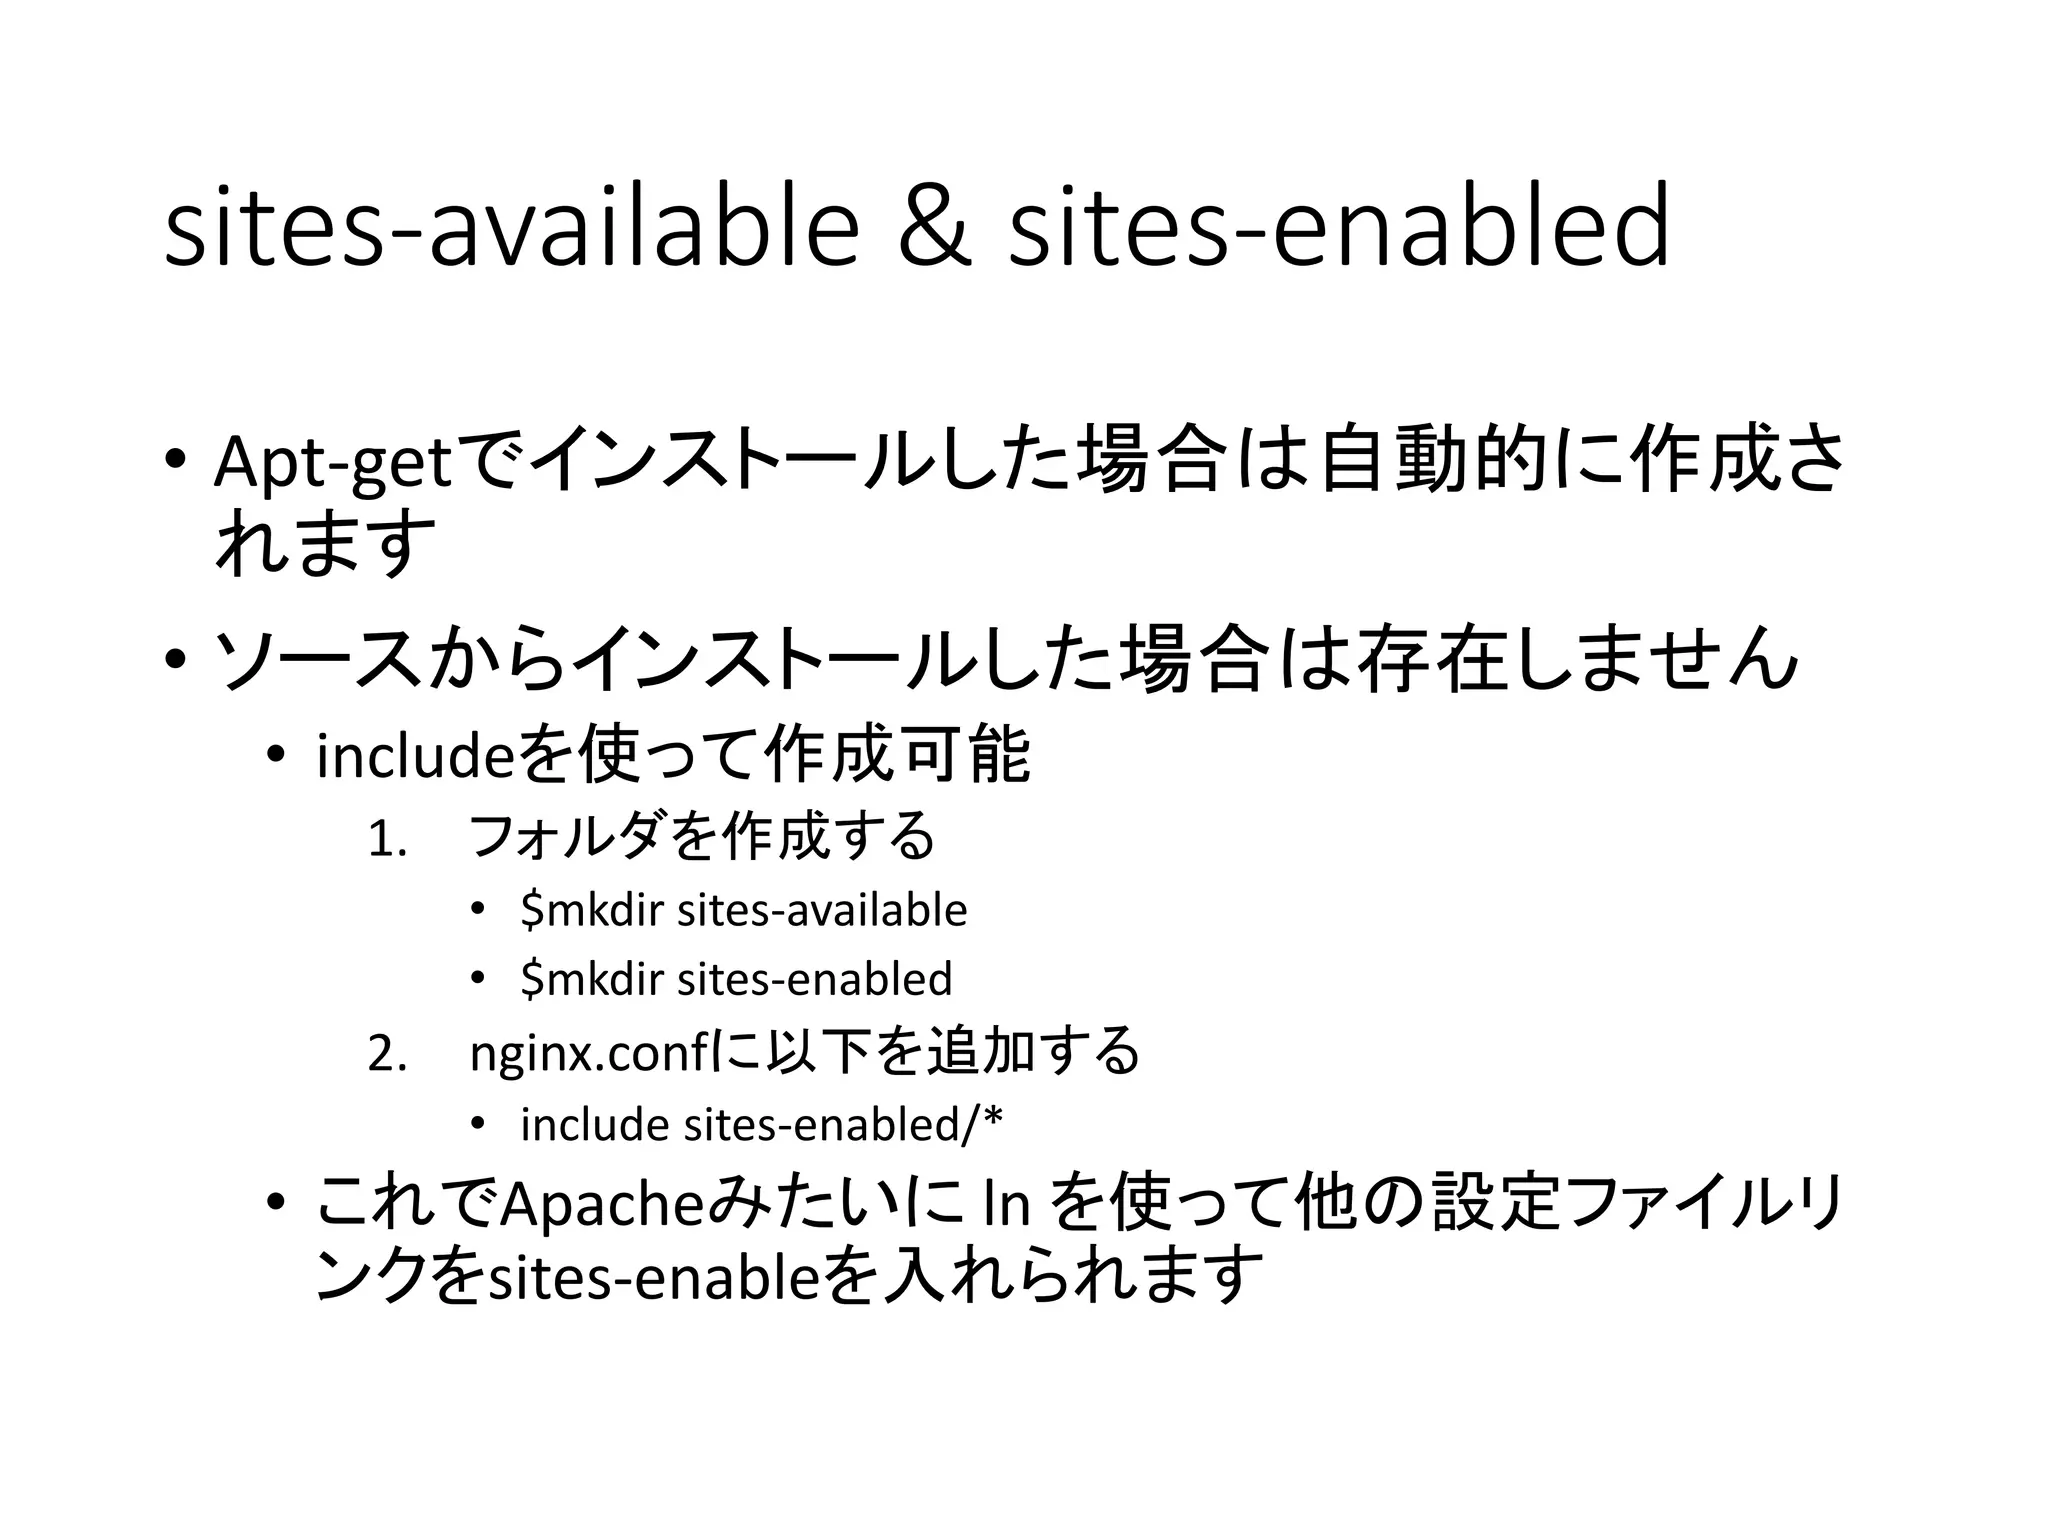
sites-available & sites-enabled
•Apt-getでインストールした場合は自動的に作成さ
れます
• ソースからインストールした場合は存在しません
• includeを使って作成可能
1. フォルダを作成する
• $mkdir sites-available
• $mkdir sites-enabled
2. nginx.confに以下を追加する
• include sites-enabled/*
• これでApacheみたいに ln を使って他の設定ファイルリ
ンクをsites-enableを入れられます
- 33.
- 34.
- 35.
- 36.
- 37.
- 38.
- 39.
- 40.
- 41.
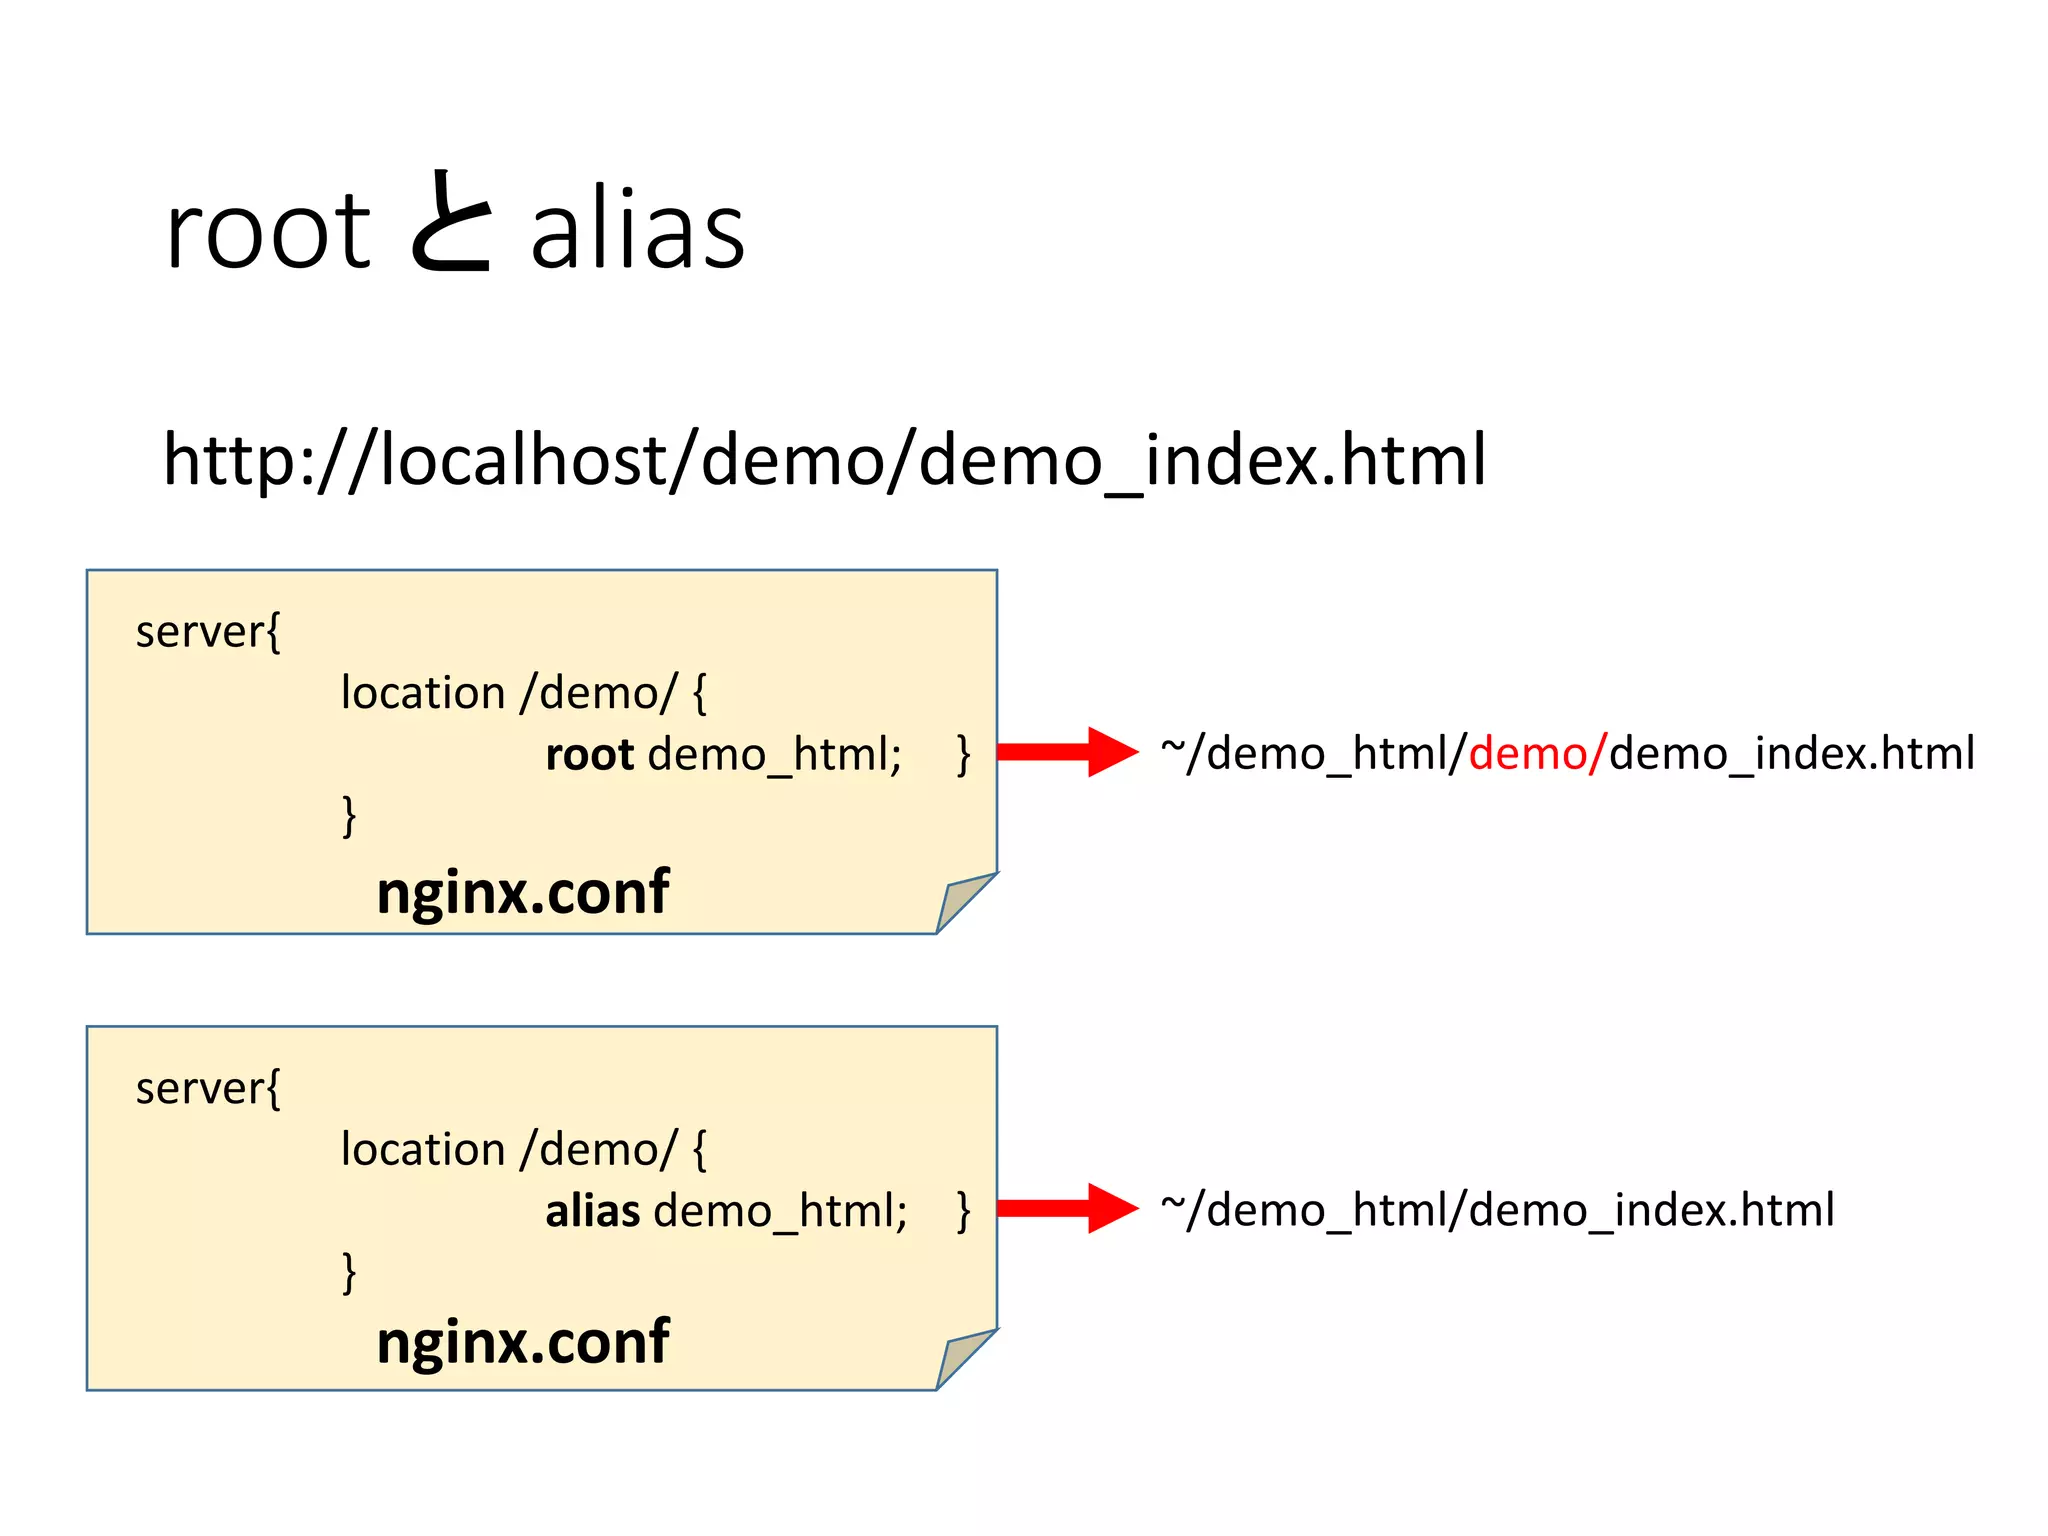
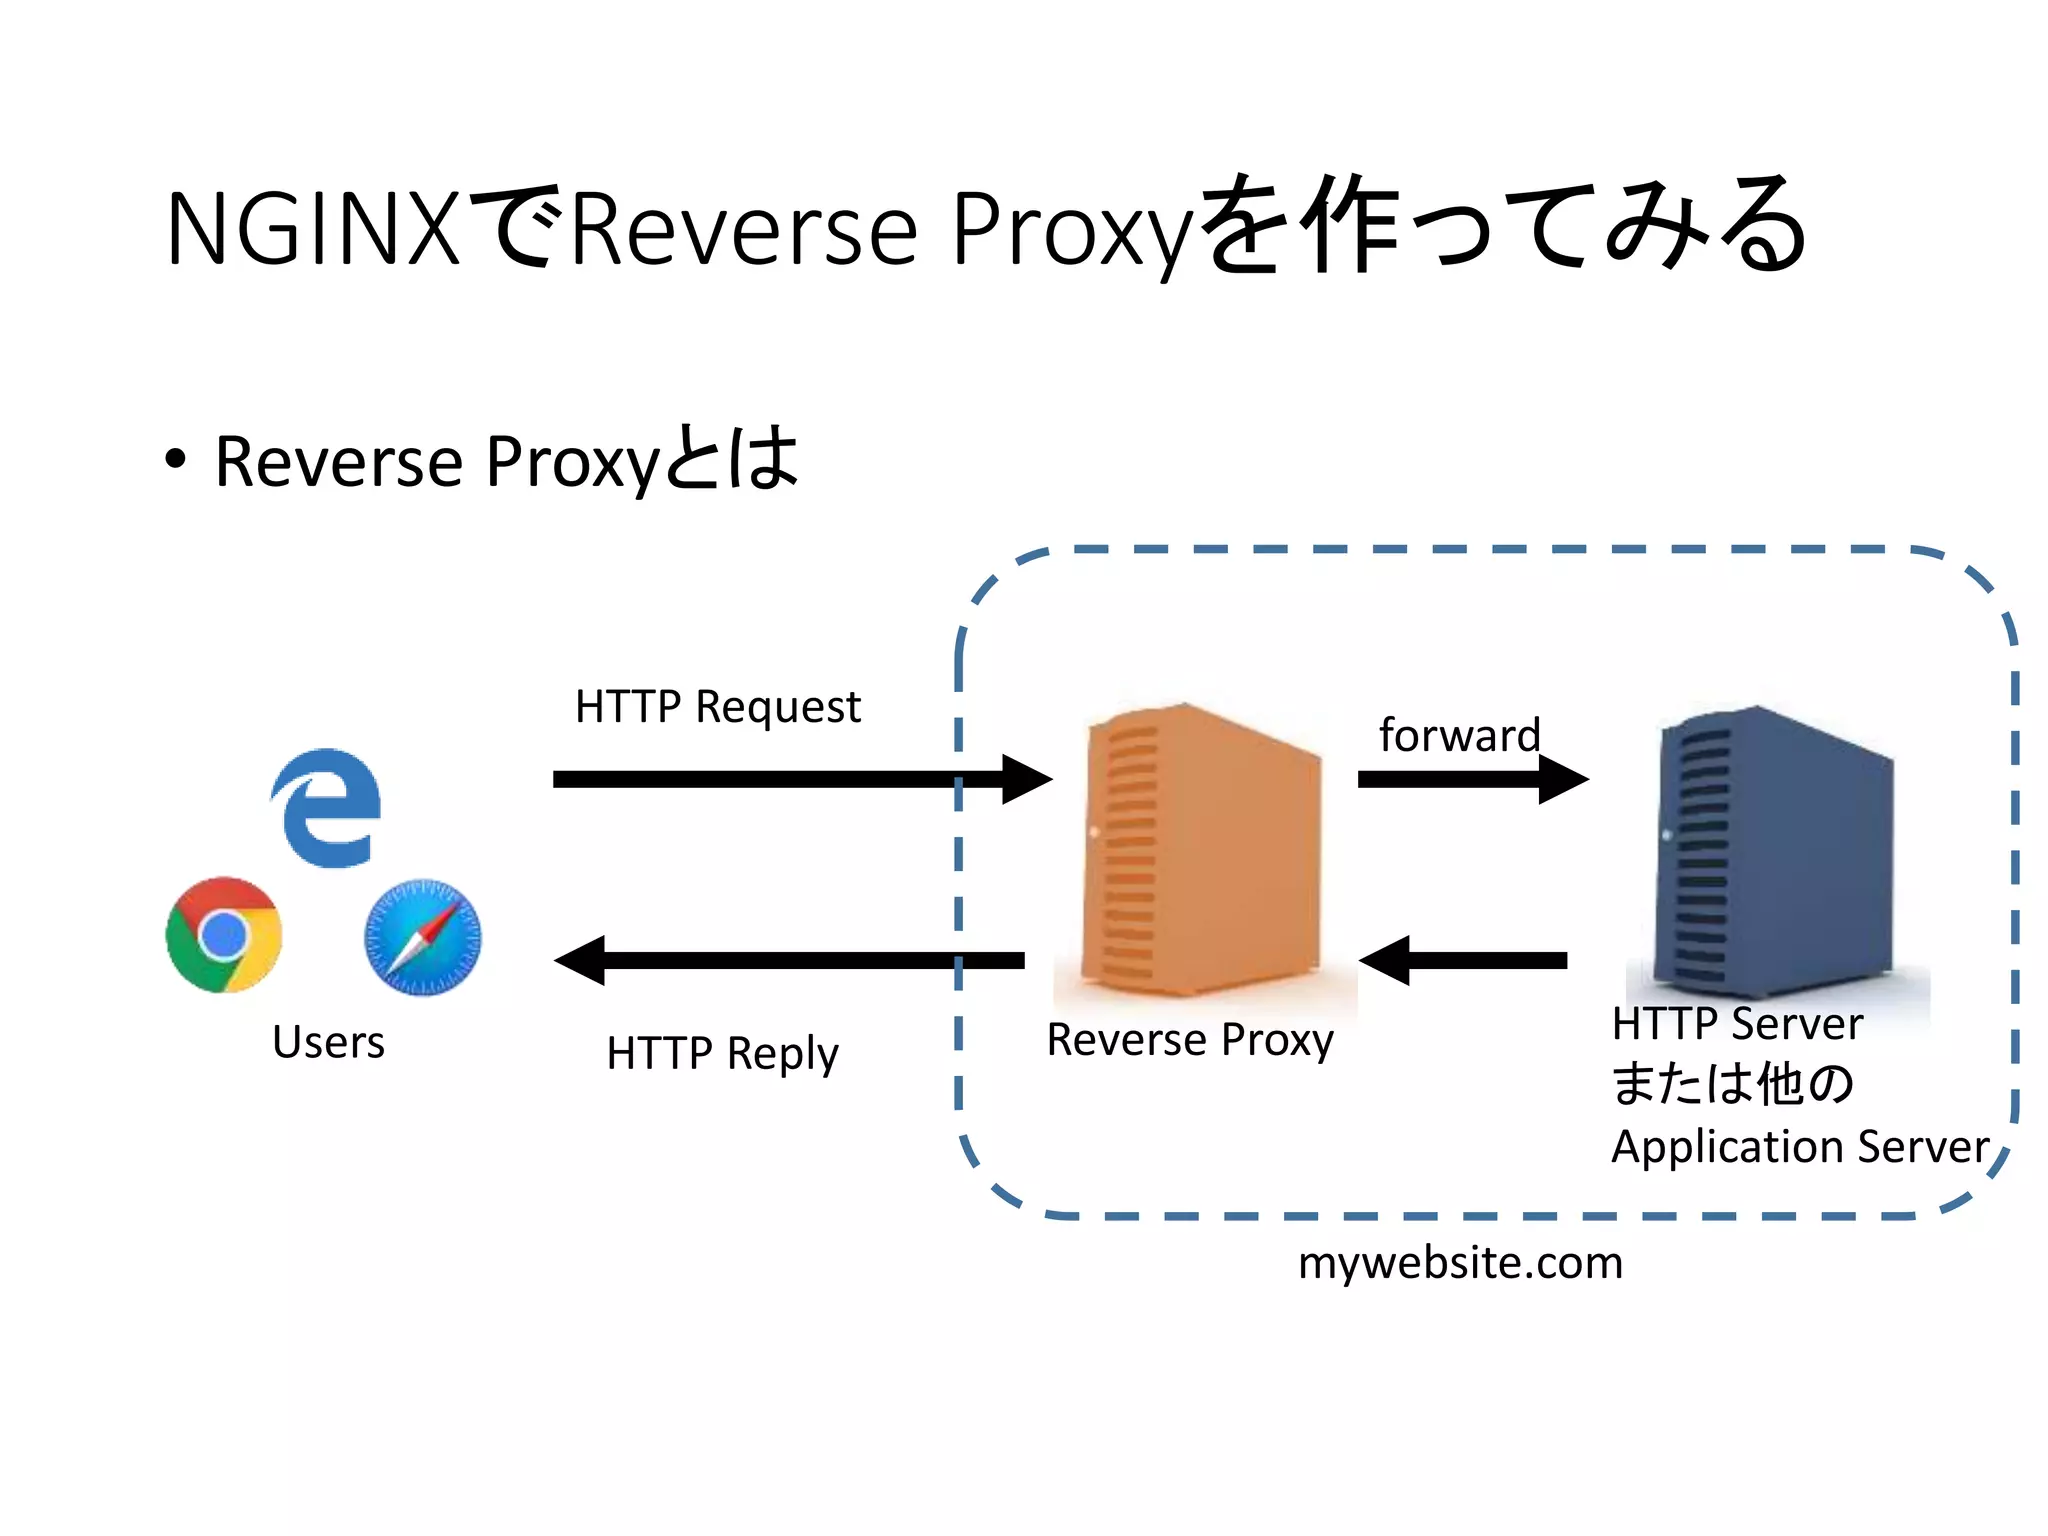
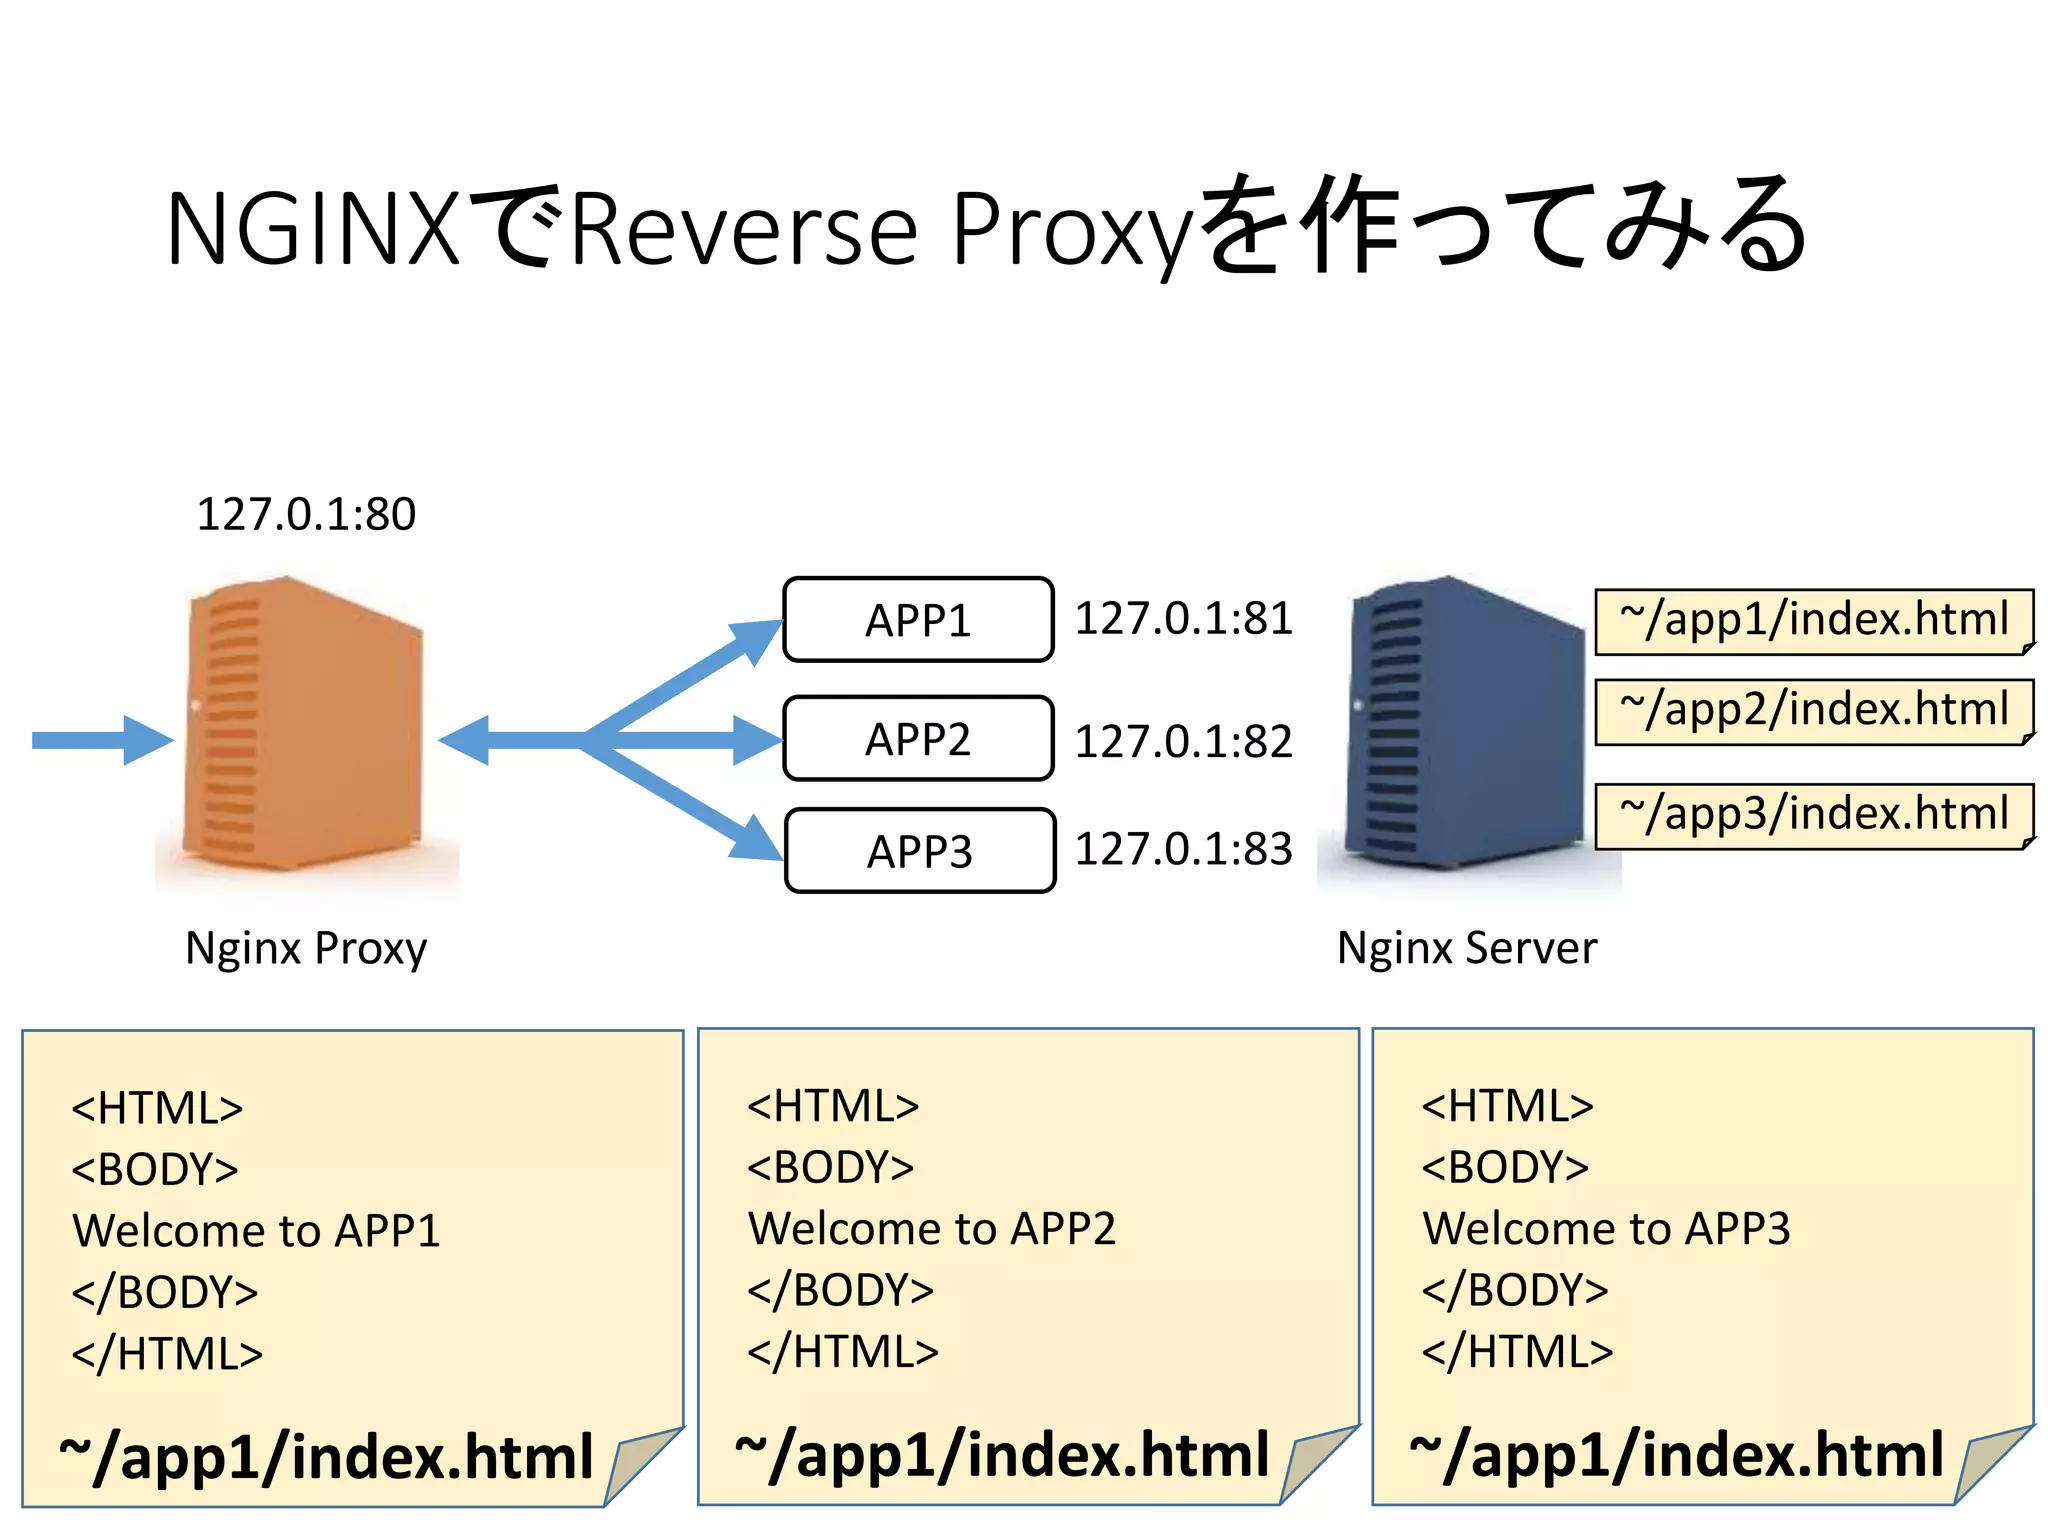
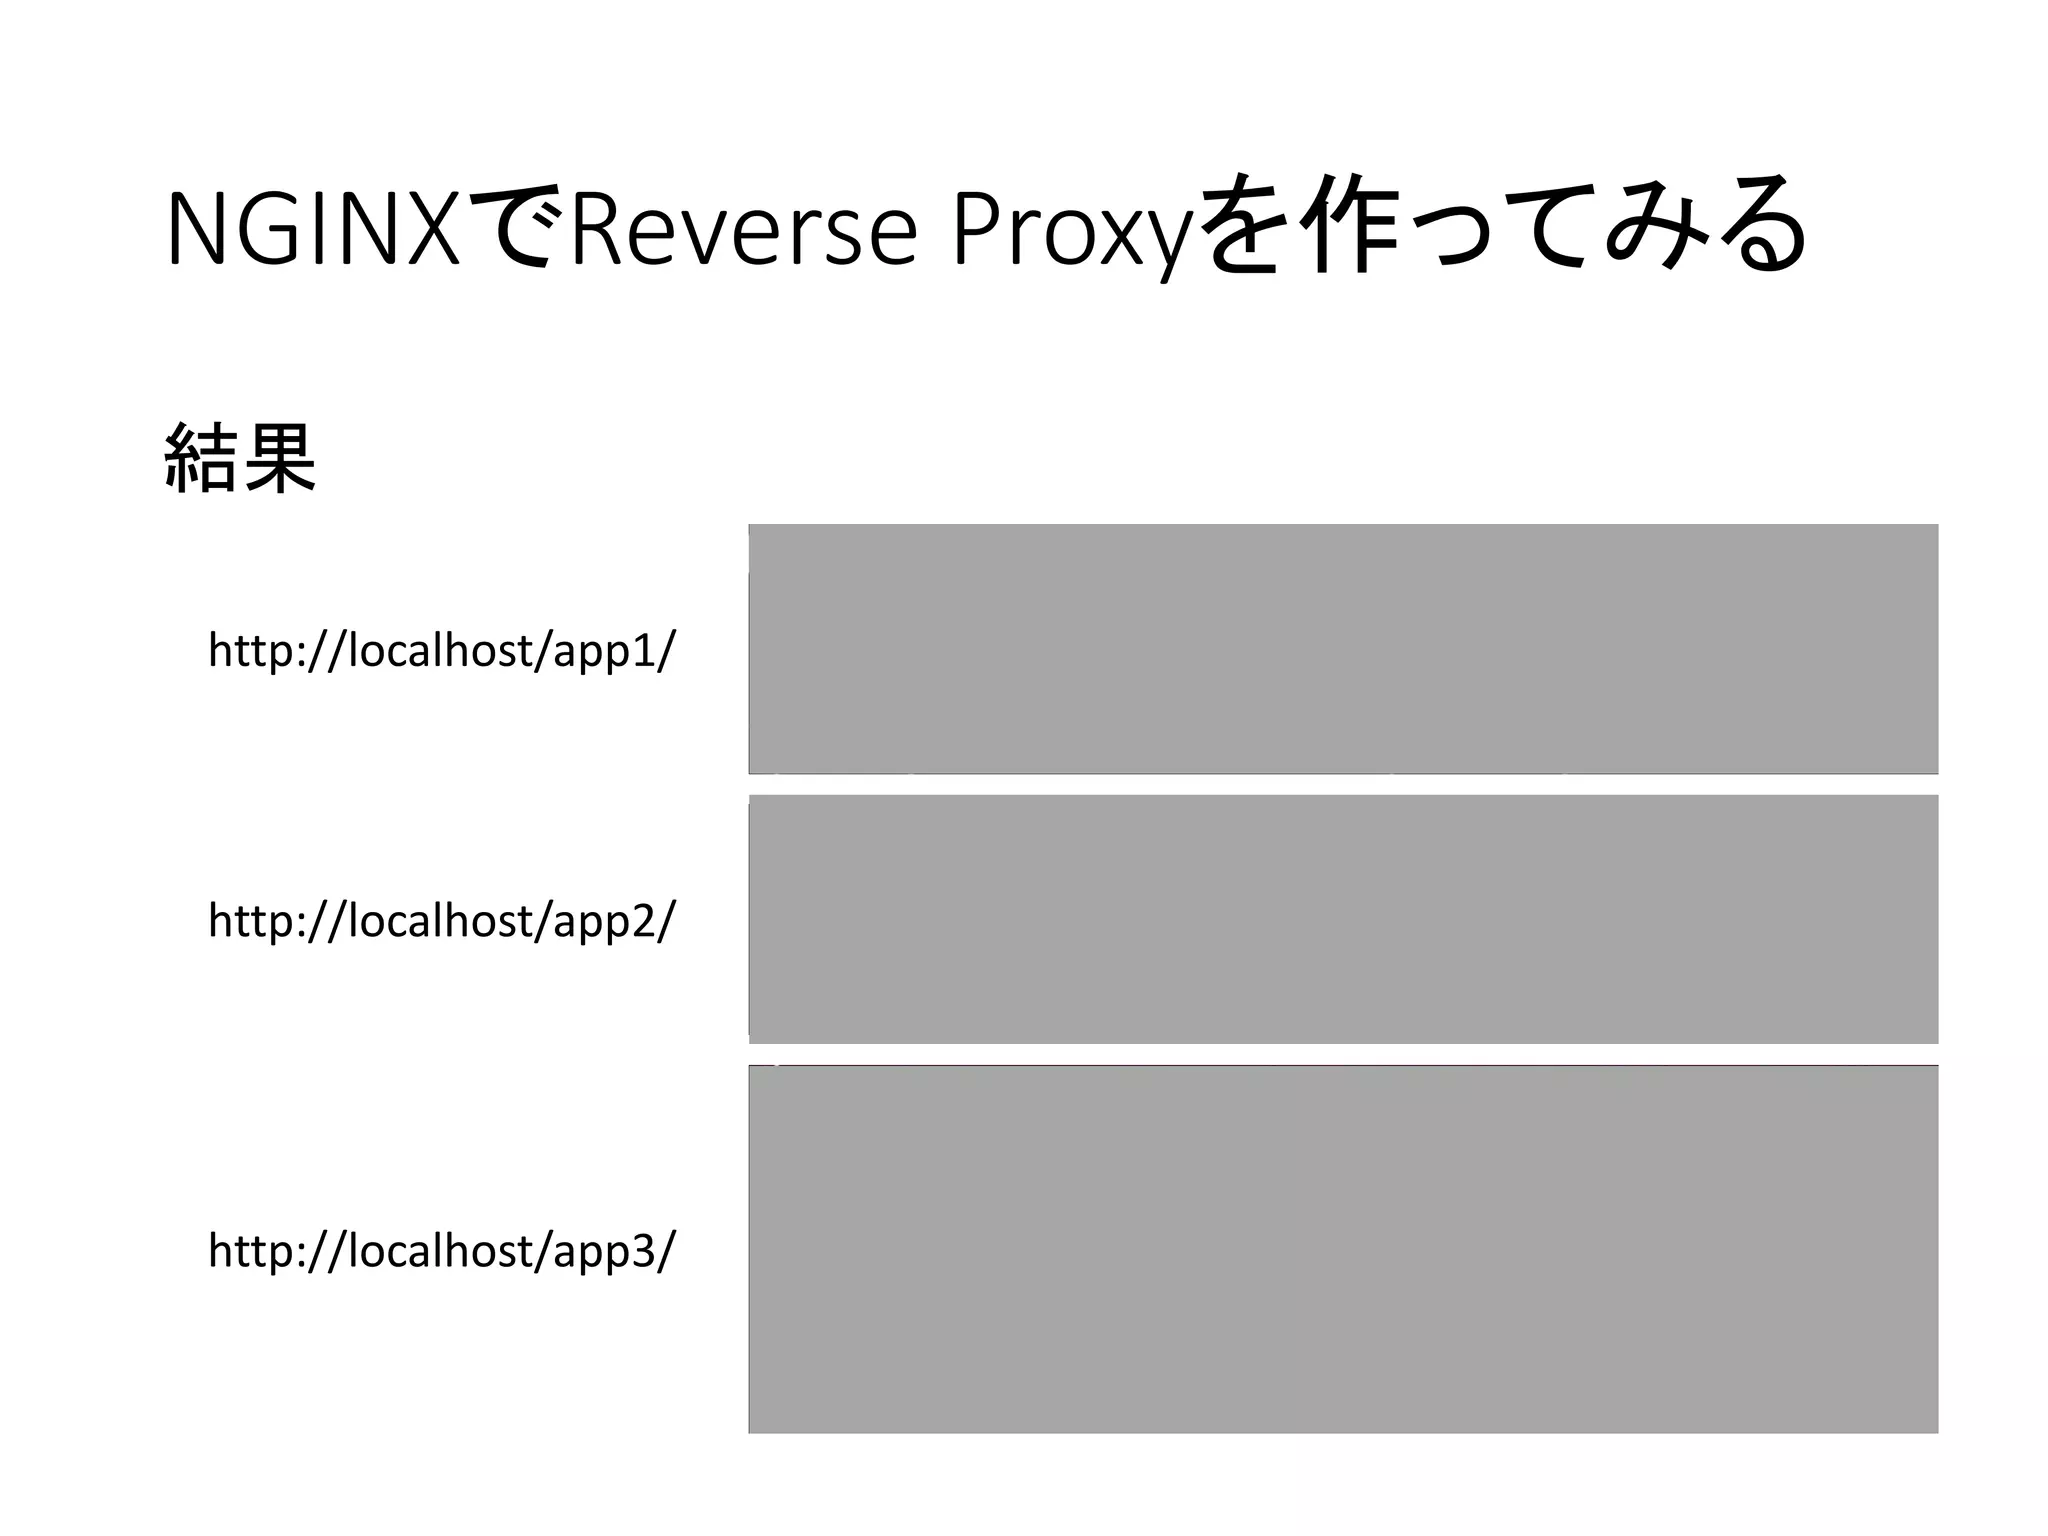
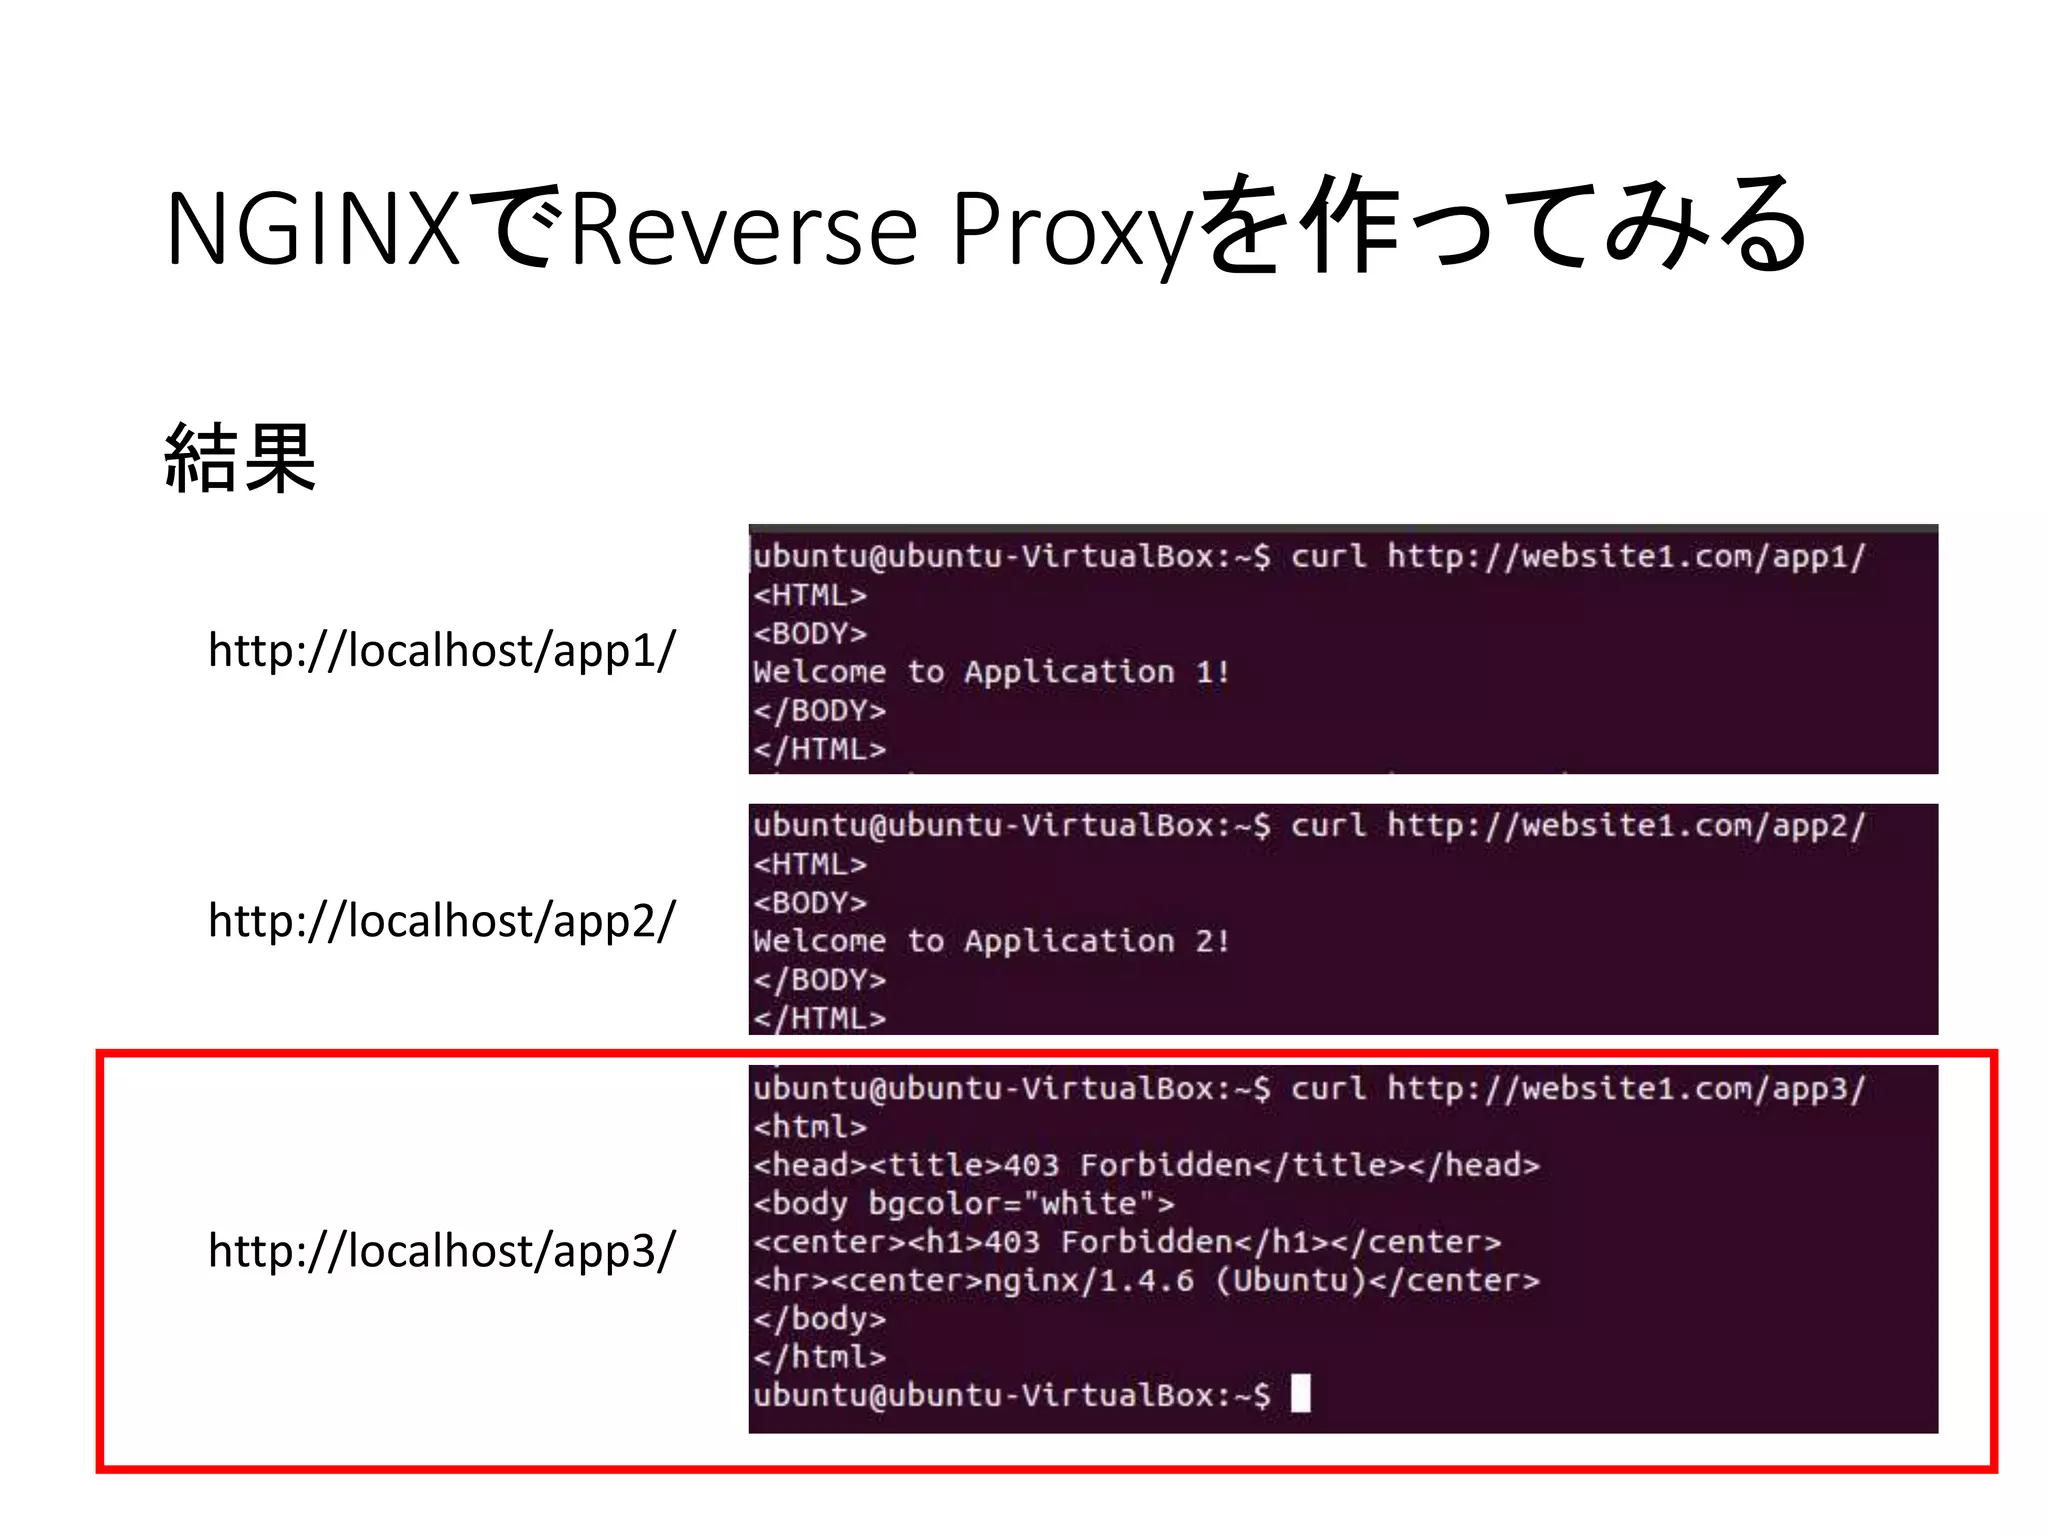
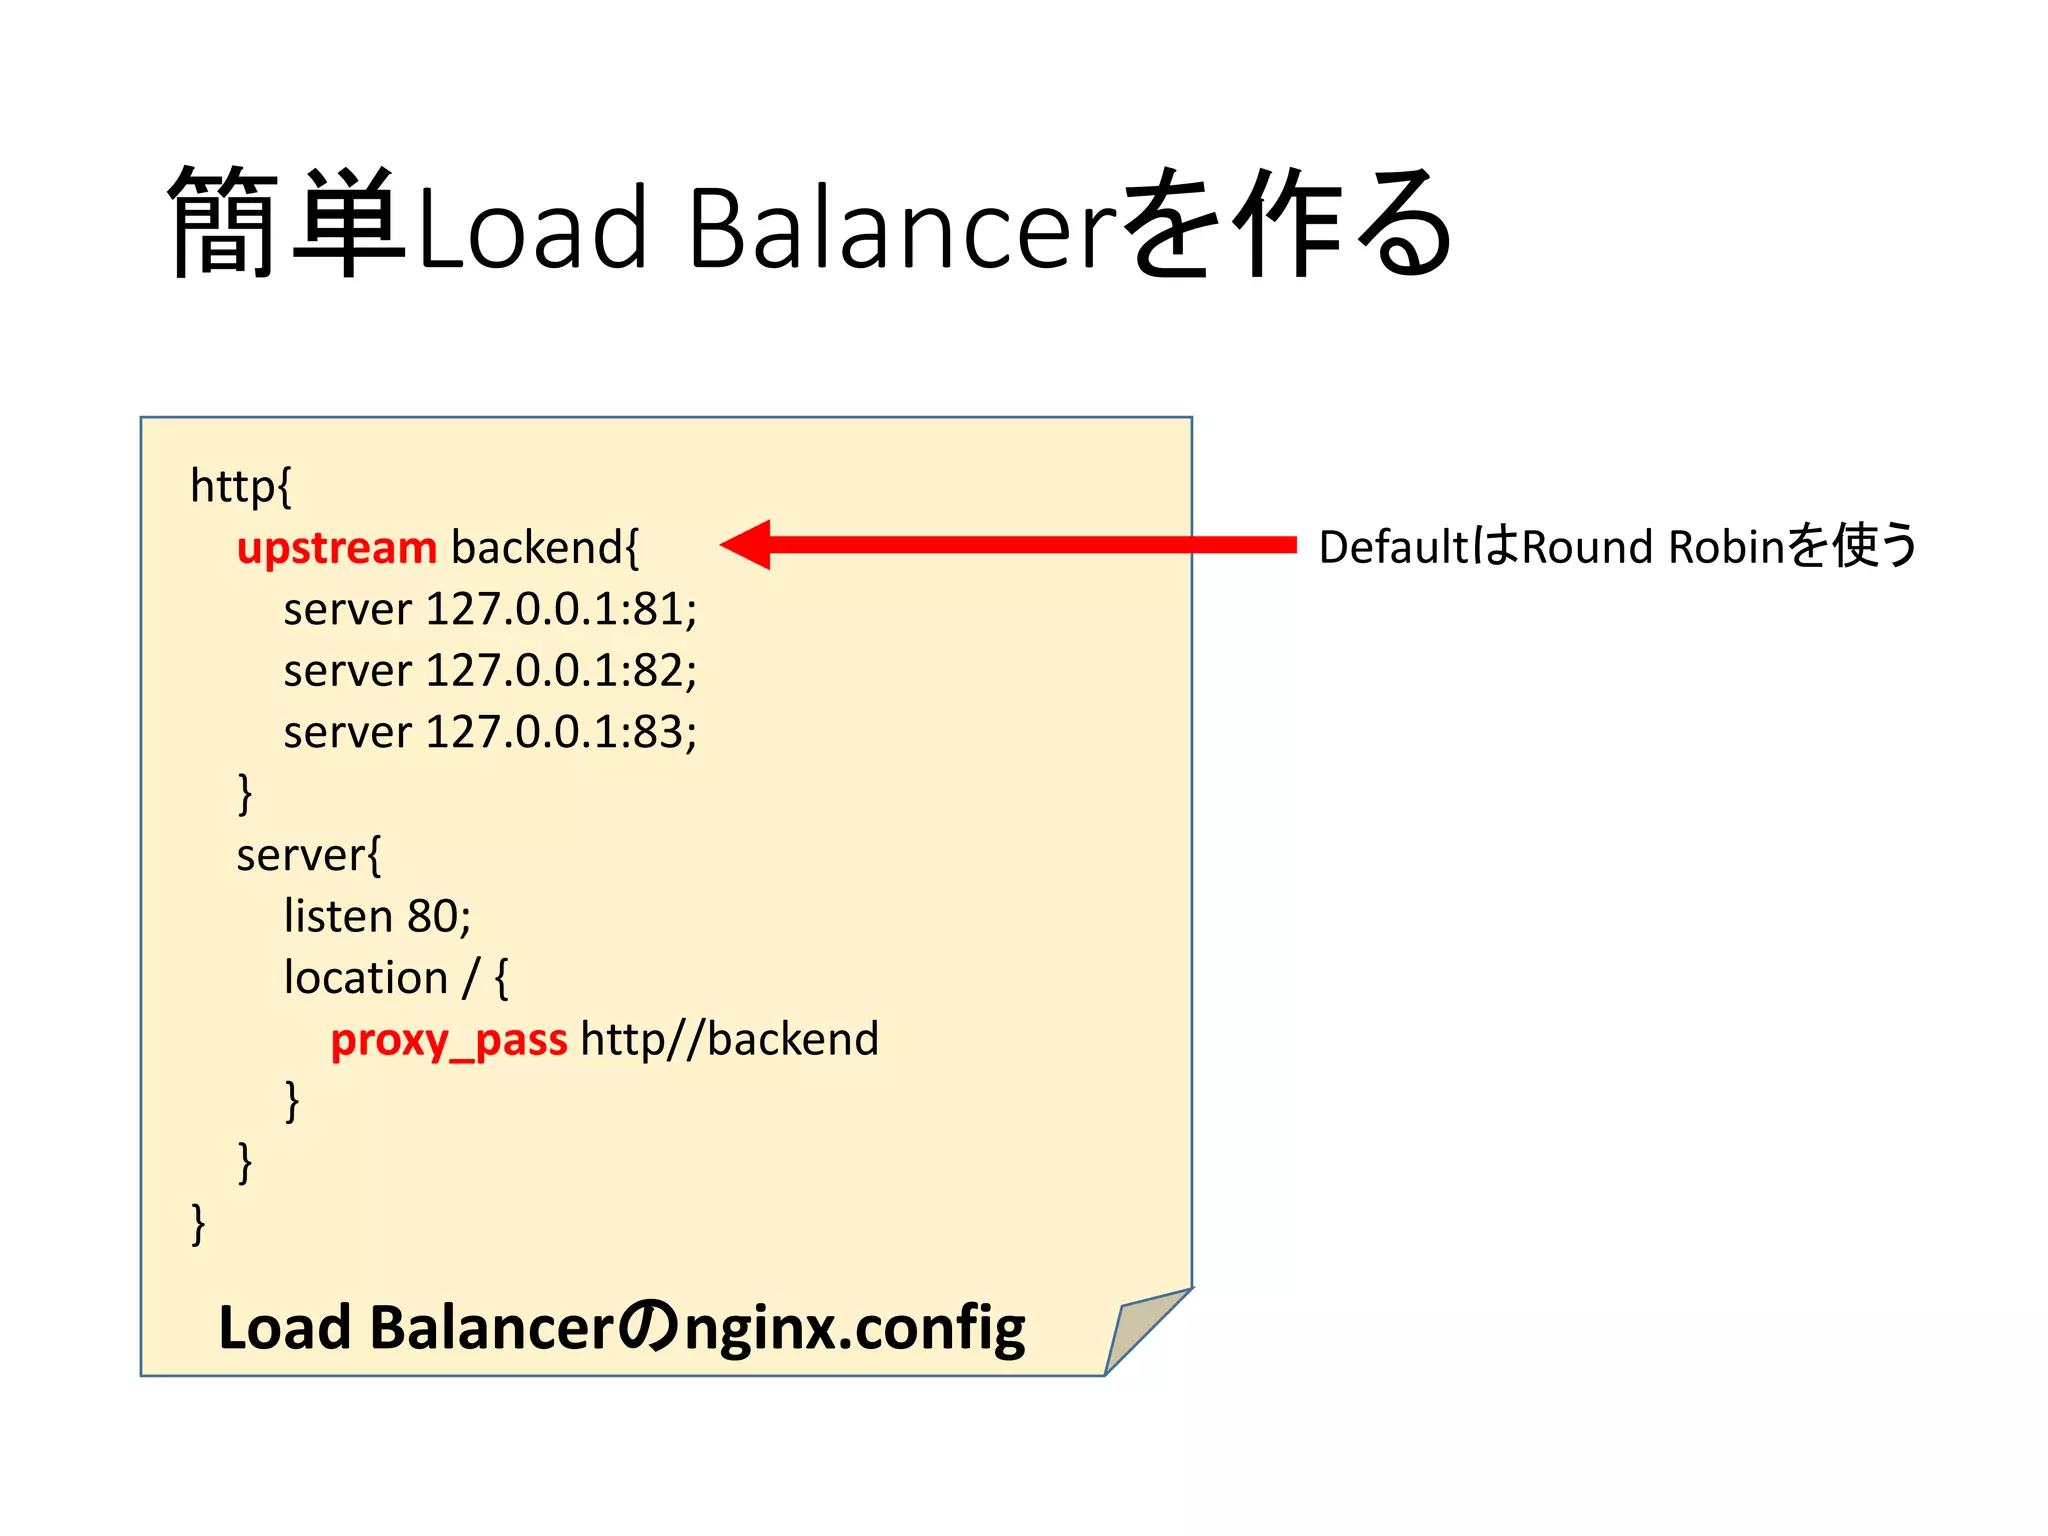
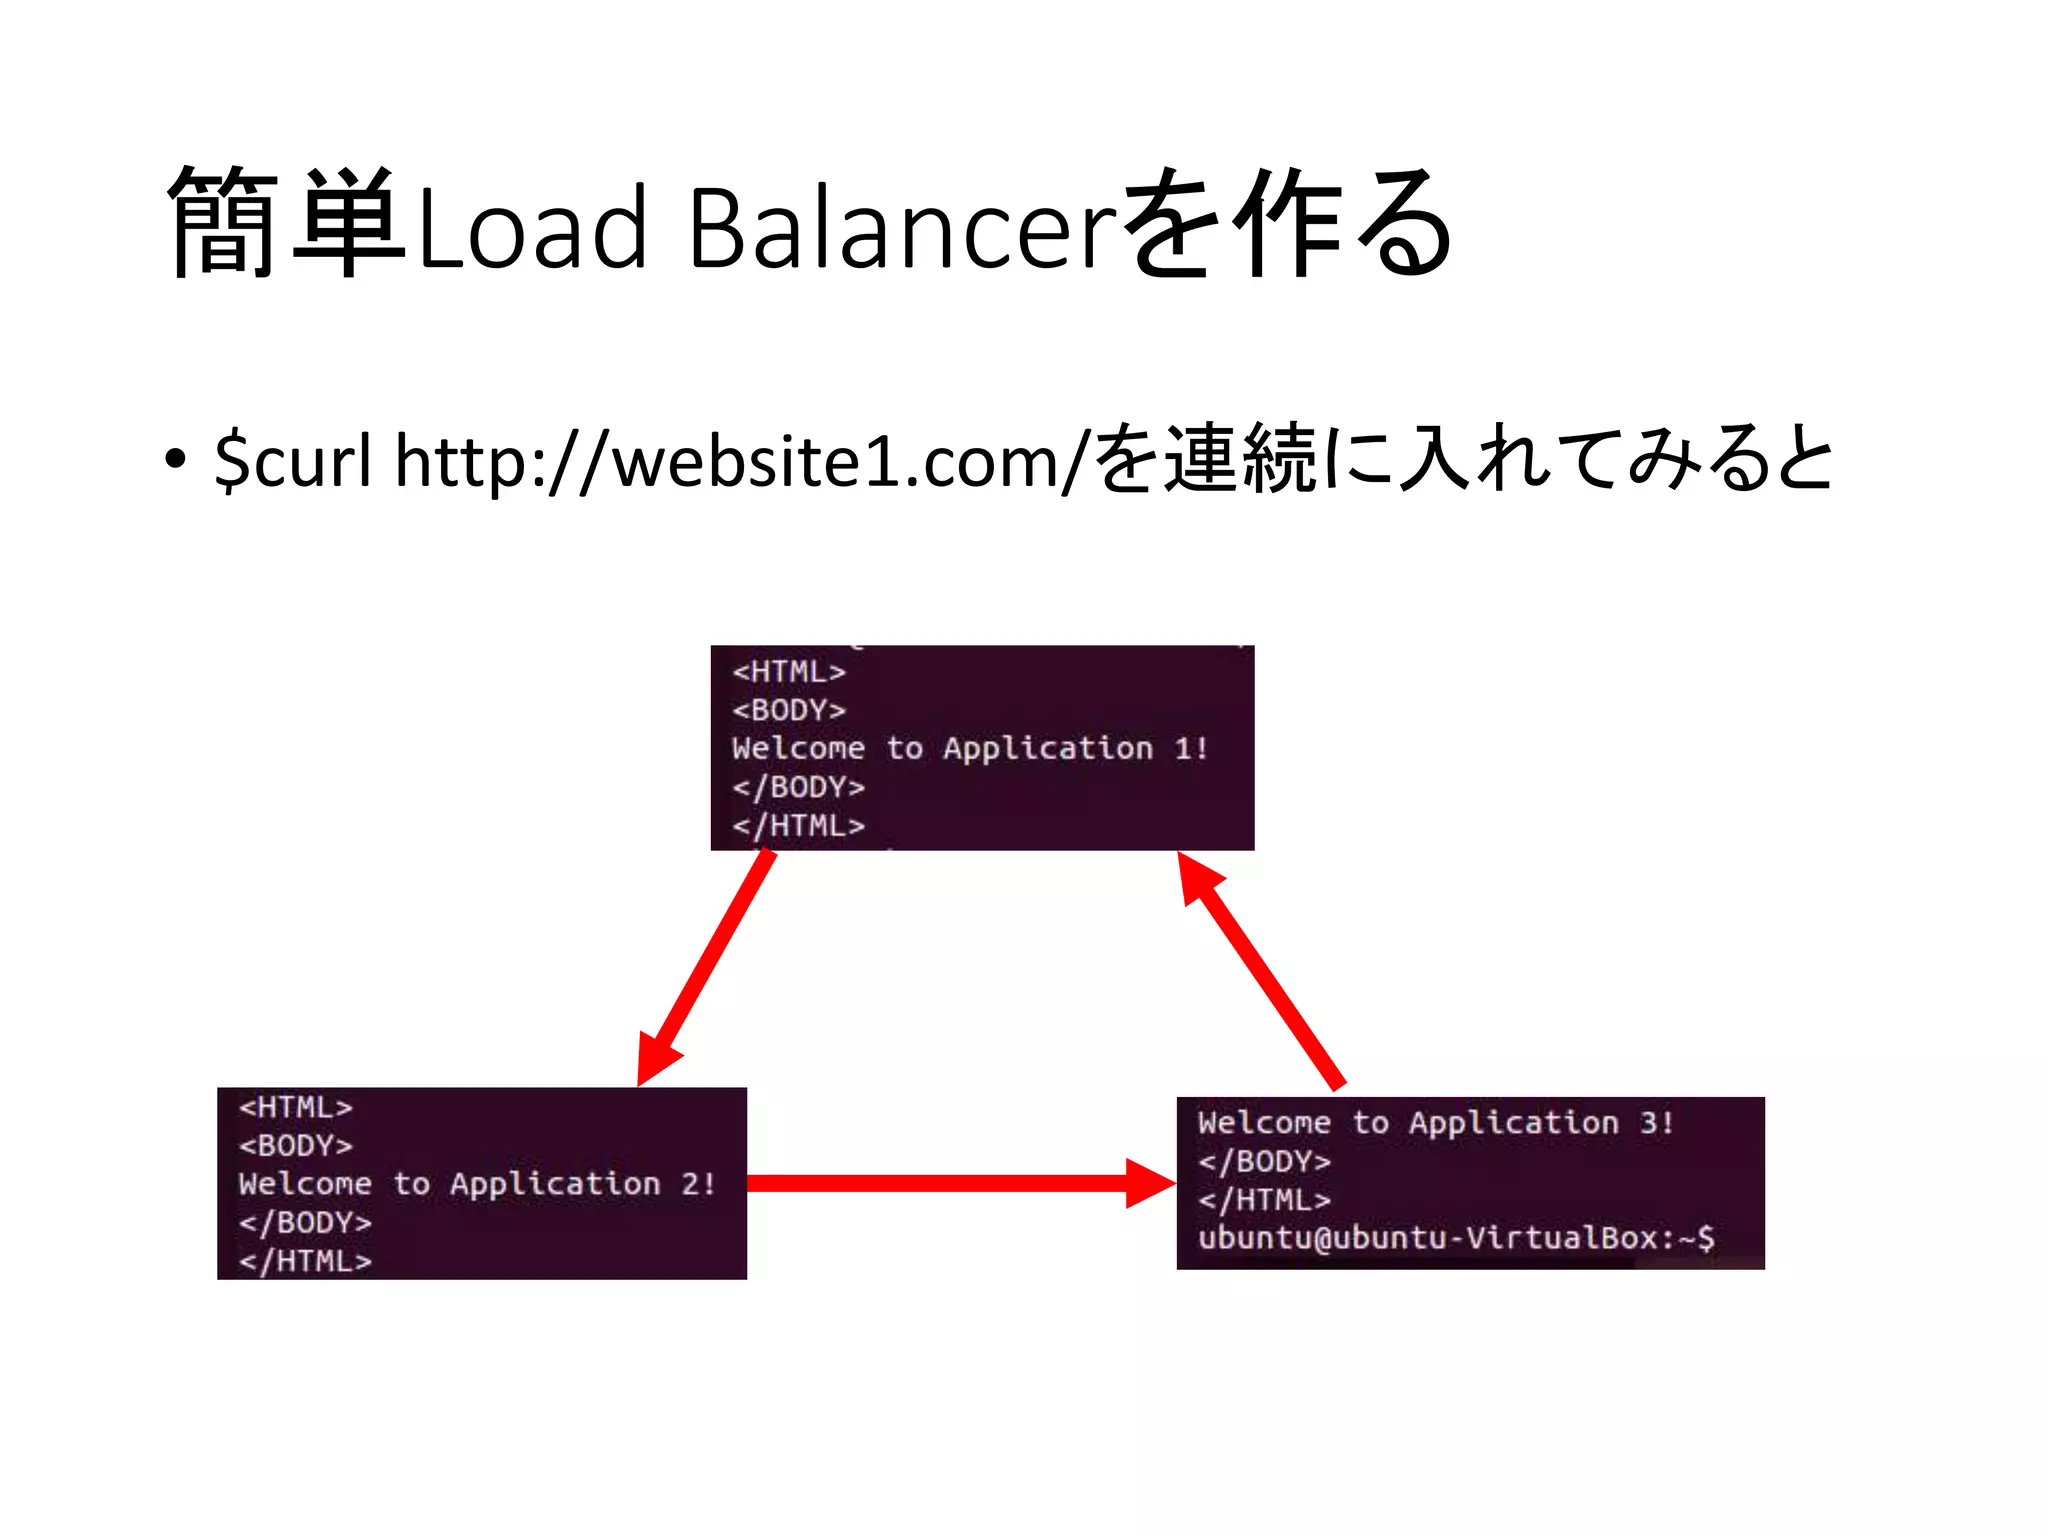
NGINXでReverse Proxyを作ってみる
Nginx ProxyNginx Server
127.0.1:80
127.0.1:81
127.0.1:82
127.0.1:83
APP1
APP2
APP3
~/app1/index.html
~/app2/index.html
~/app3/index.html
<HTML>
<BODY>
Welcome to APP1
</BODY>
</HTML>
~/app1/index.html
<HTML>
<BODY>
Welcome to APP2
</BODY>
</HTML>
~/app1/index.html
<HTML>
<BODY>
Welcome to APP3
</BODY>
</HTML>
~/app1/index.html
- 42.
- 43.
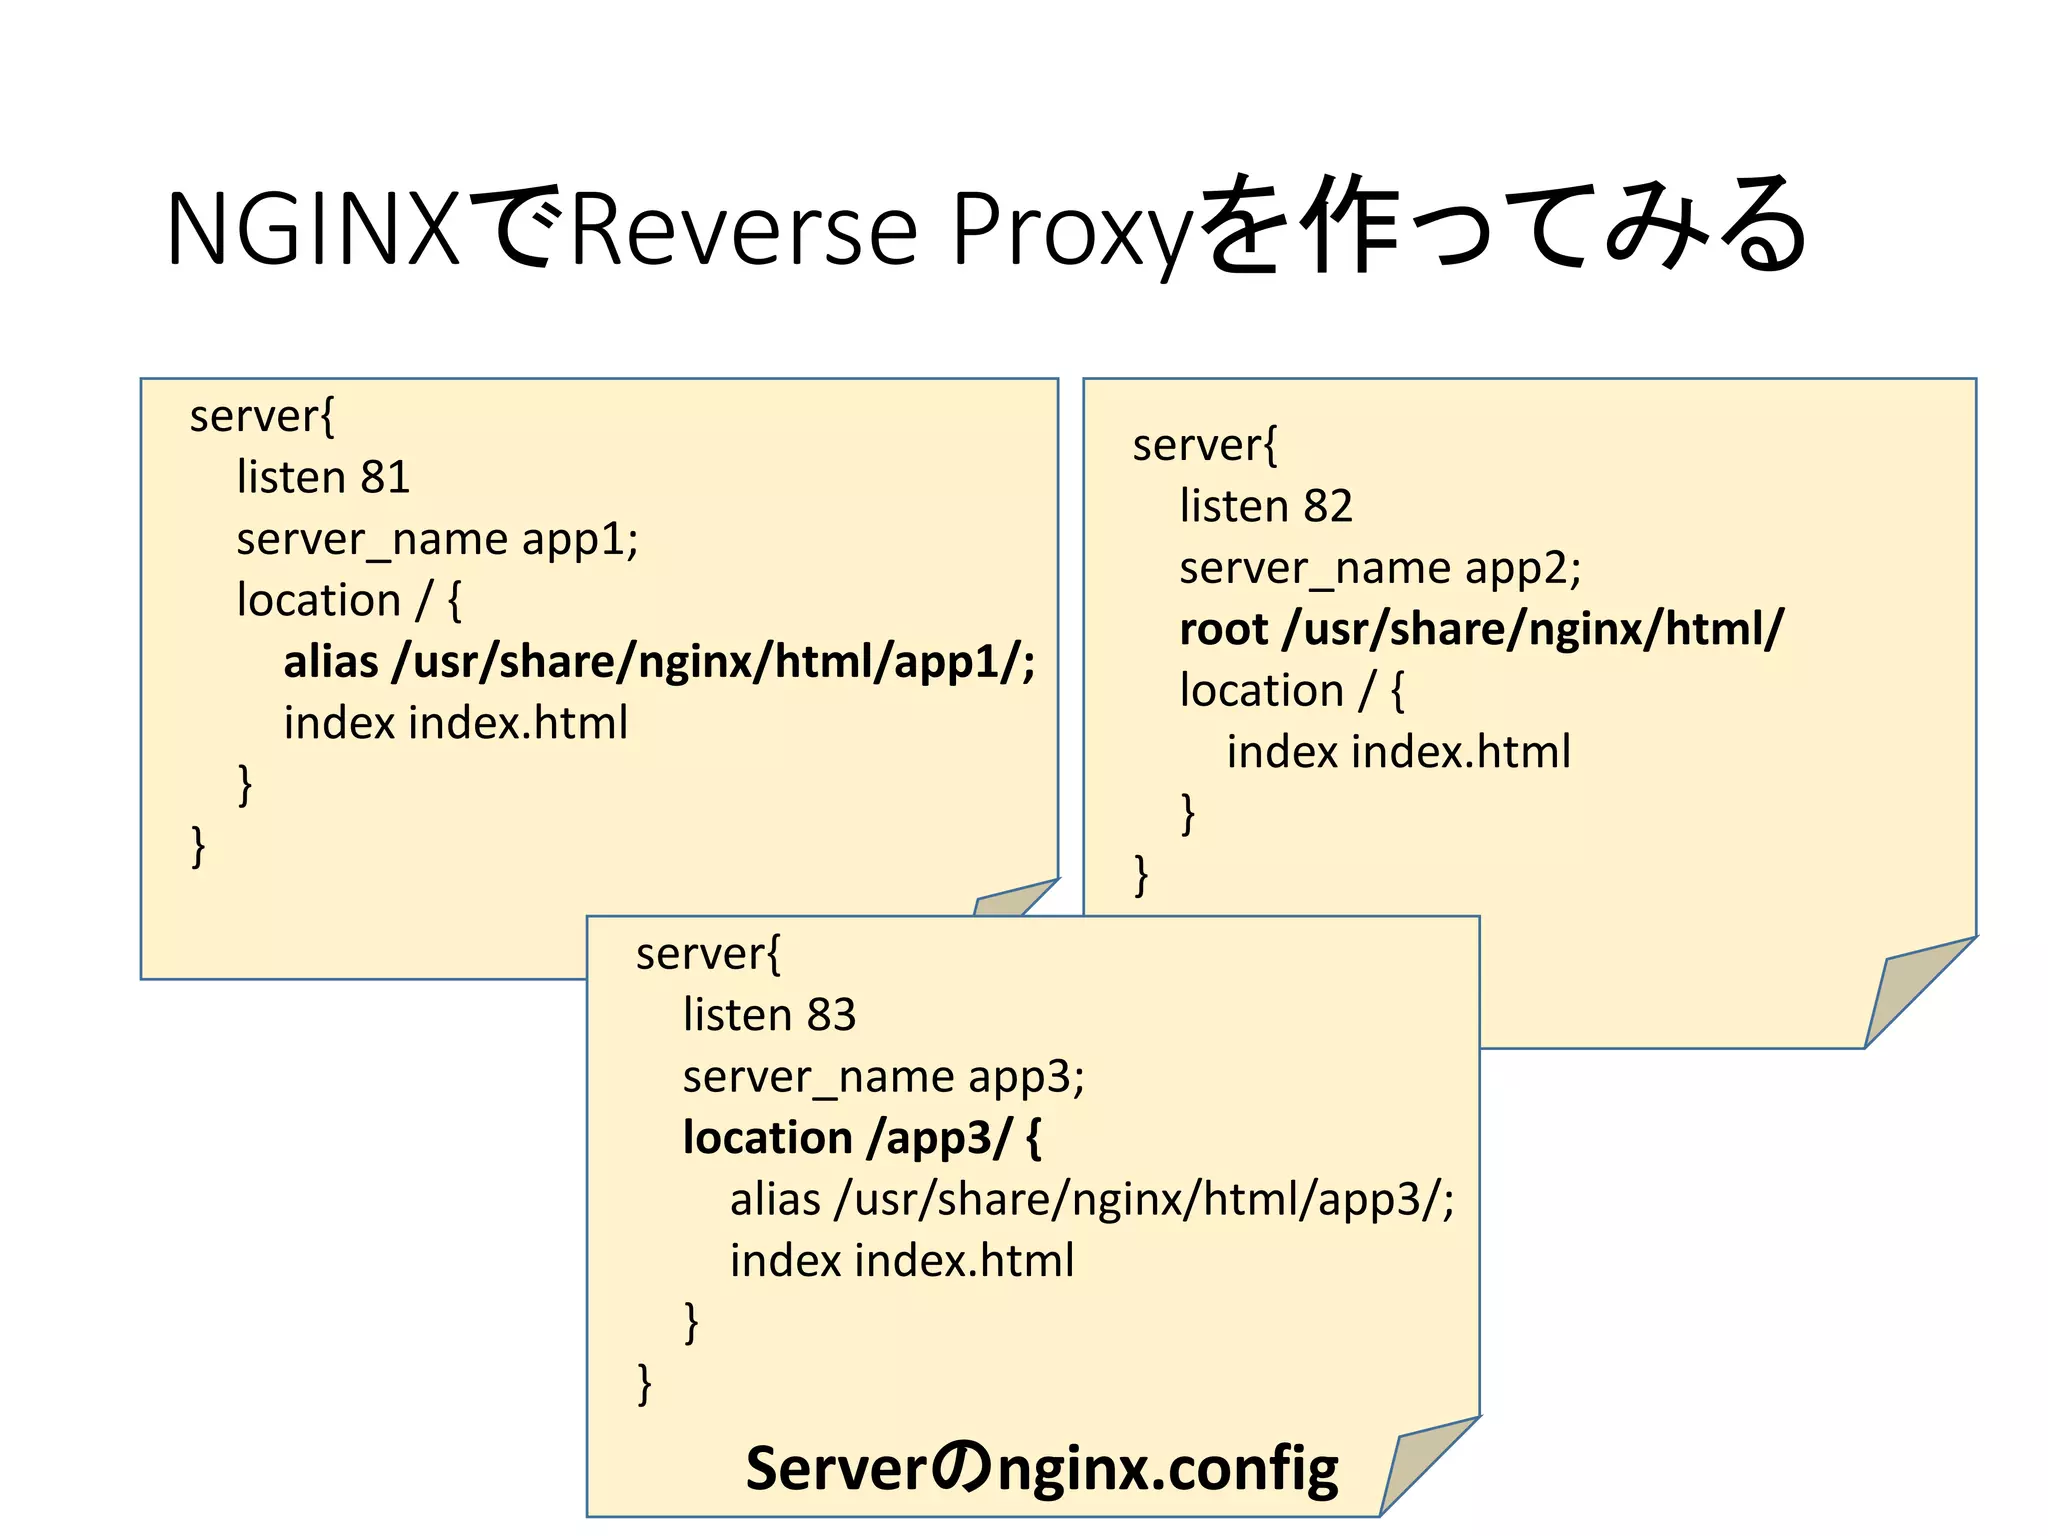
NGINXでReverse Proxyを作ってみる
server{
listen 81
server_nameapp1;
location / {
alias /usr/share/nginx/html/app1/;
index index.html
}
}
server{
listen 82
server_name app2;
root /usr/share/nginx/html/
location / {
index index.html
}
}
server{
listen 83
server_name app3;
location /app3/ {
alias /usr/share/nginx/html/app3/;
index index.html
}
}
Serverのnginx.config
- 44.
- 45.
- 46.
- 47.
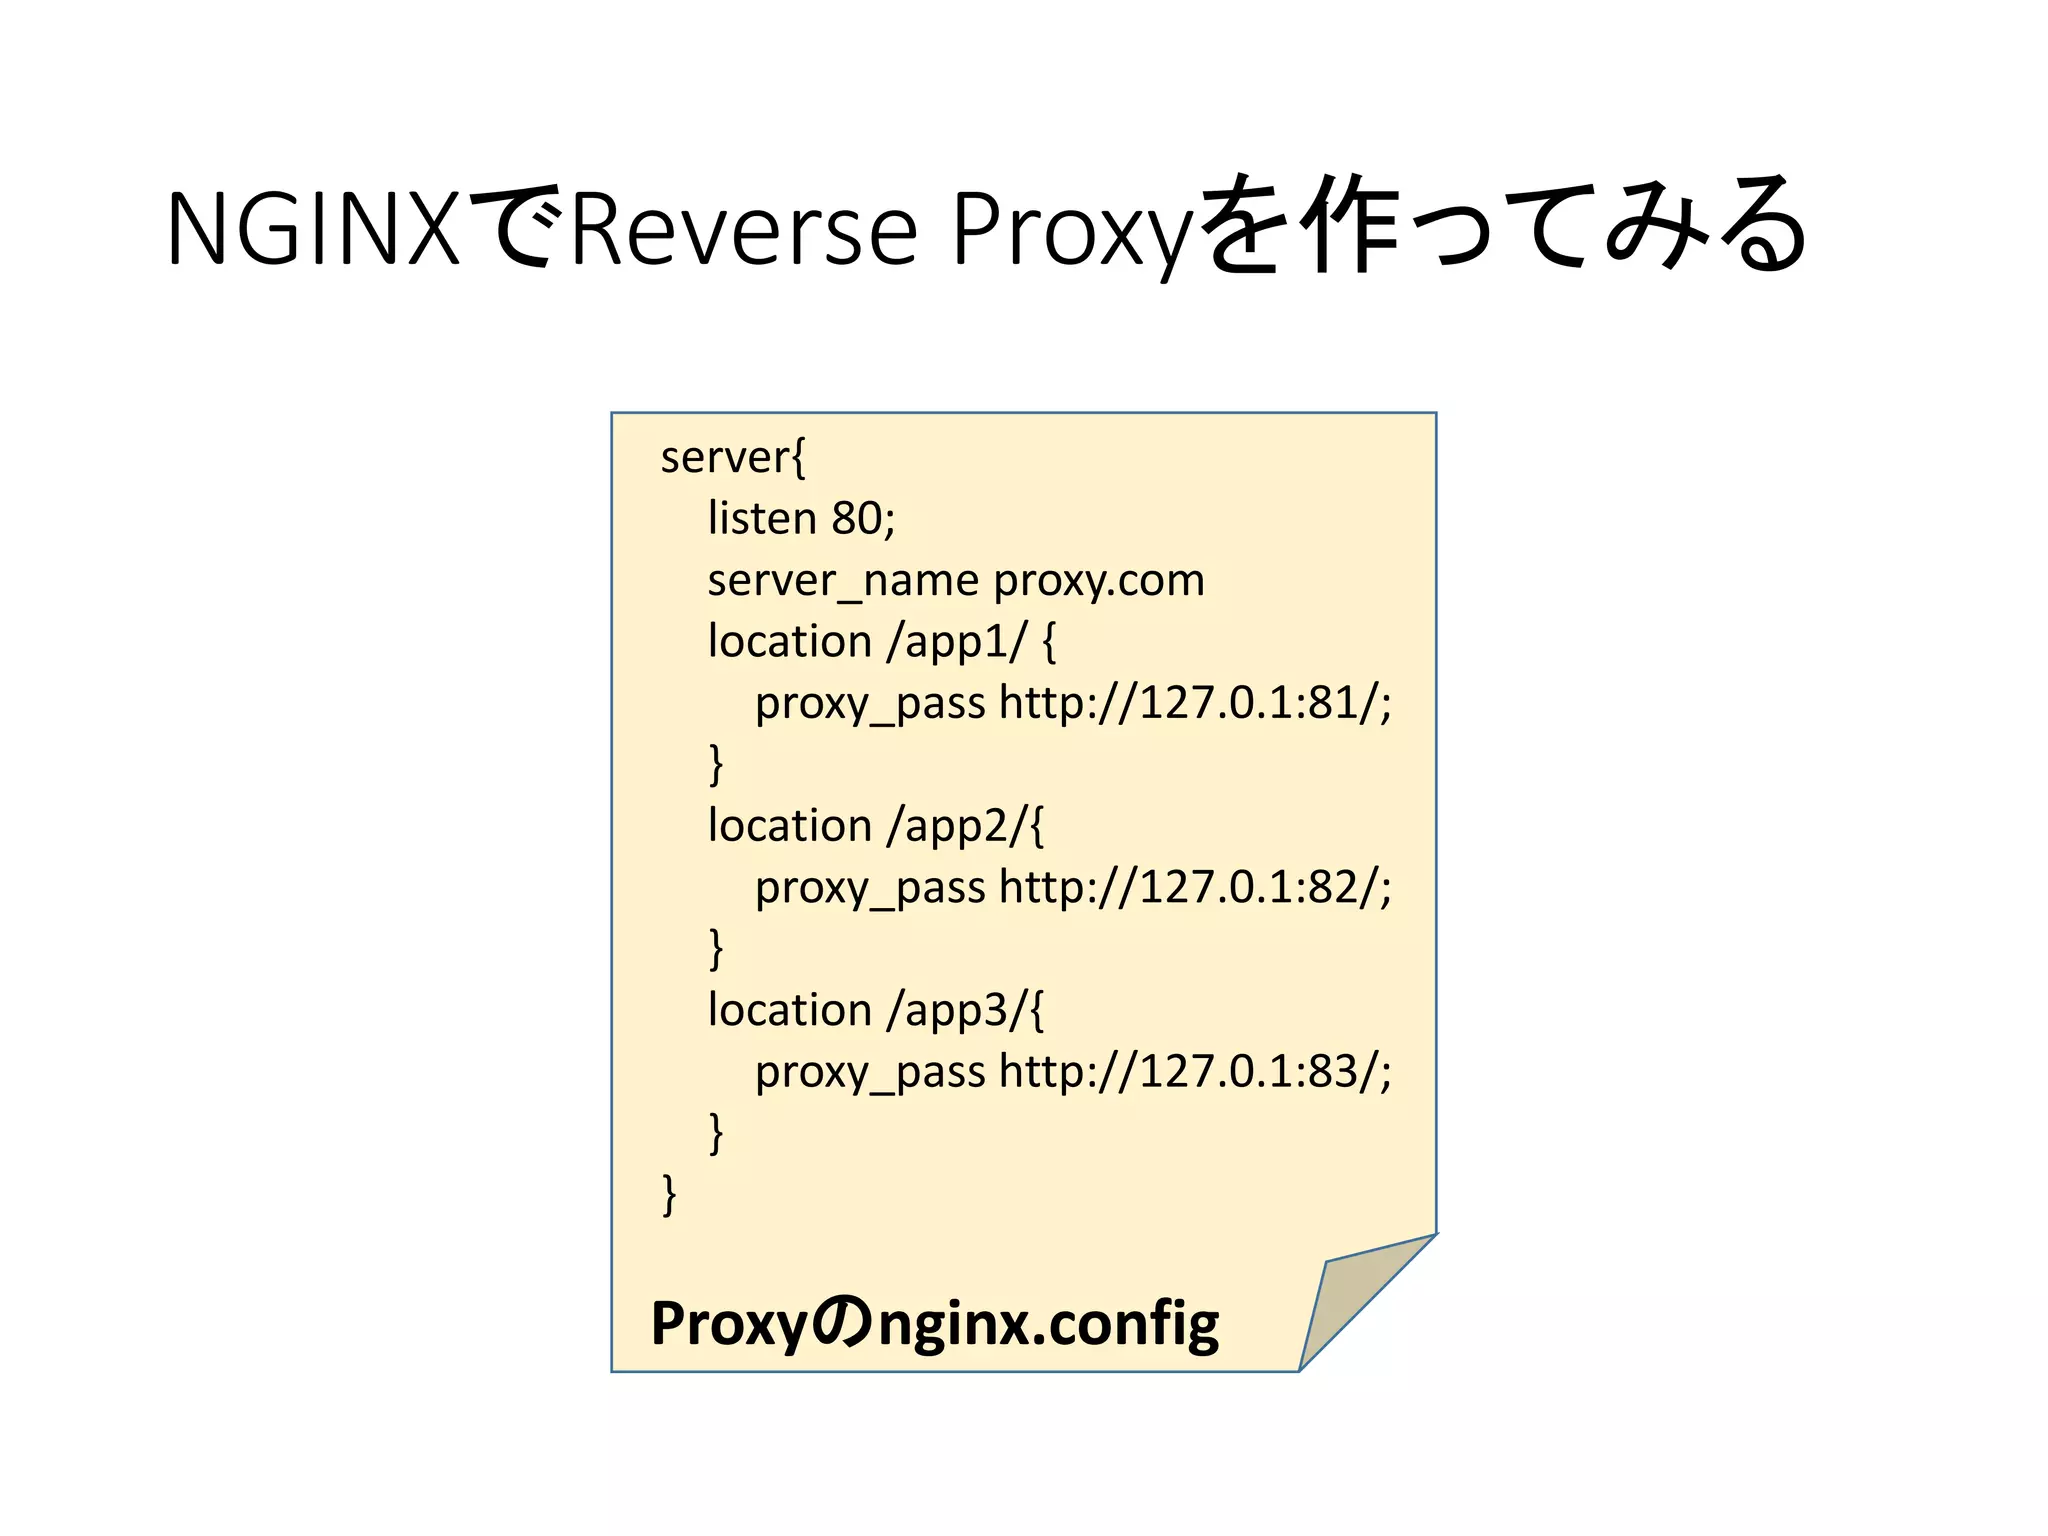
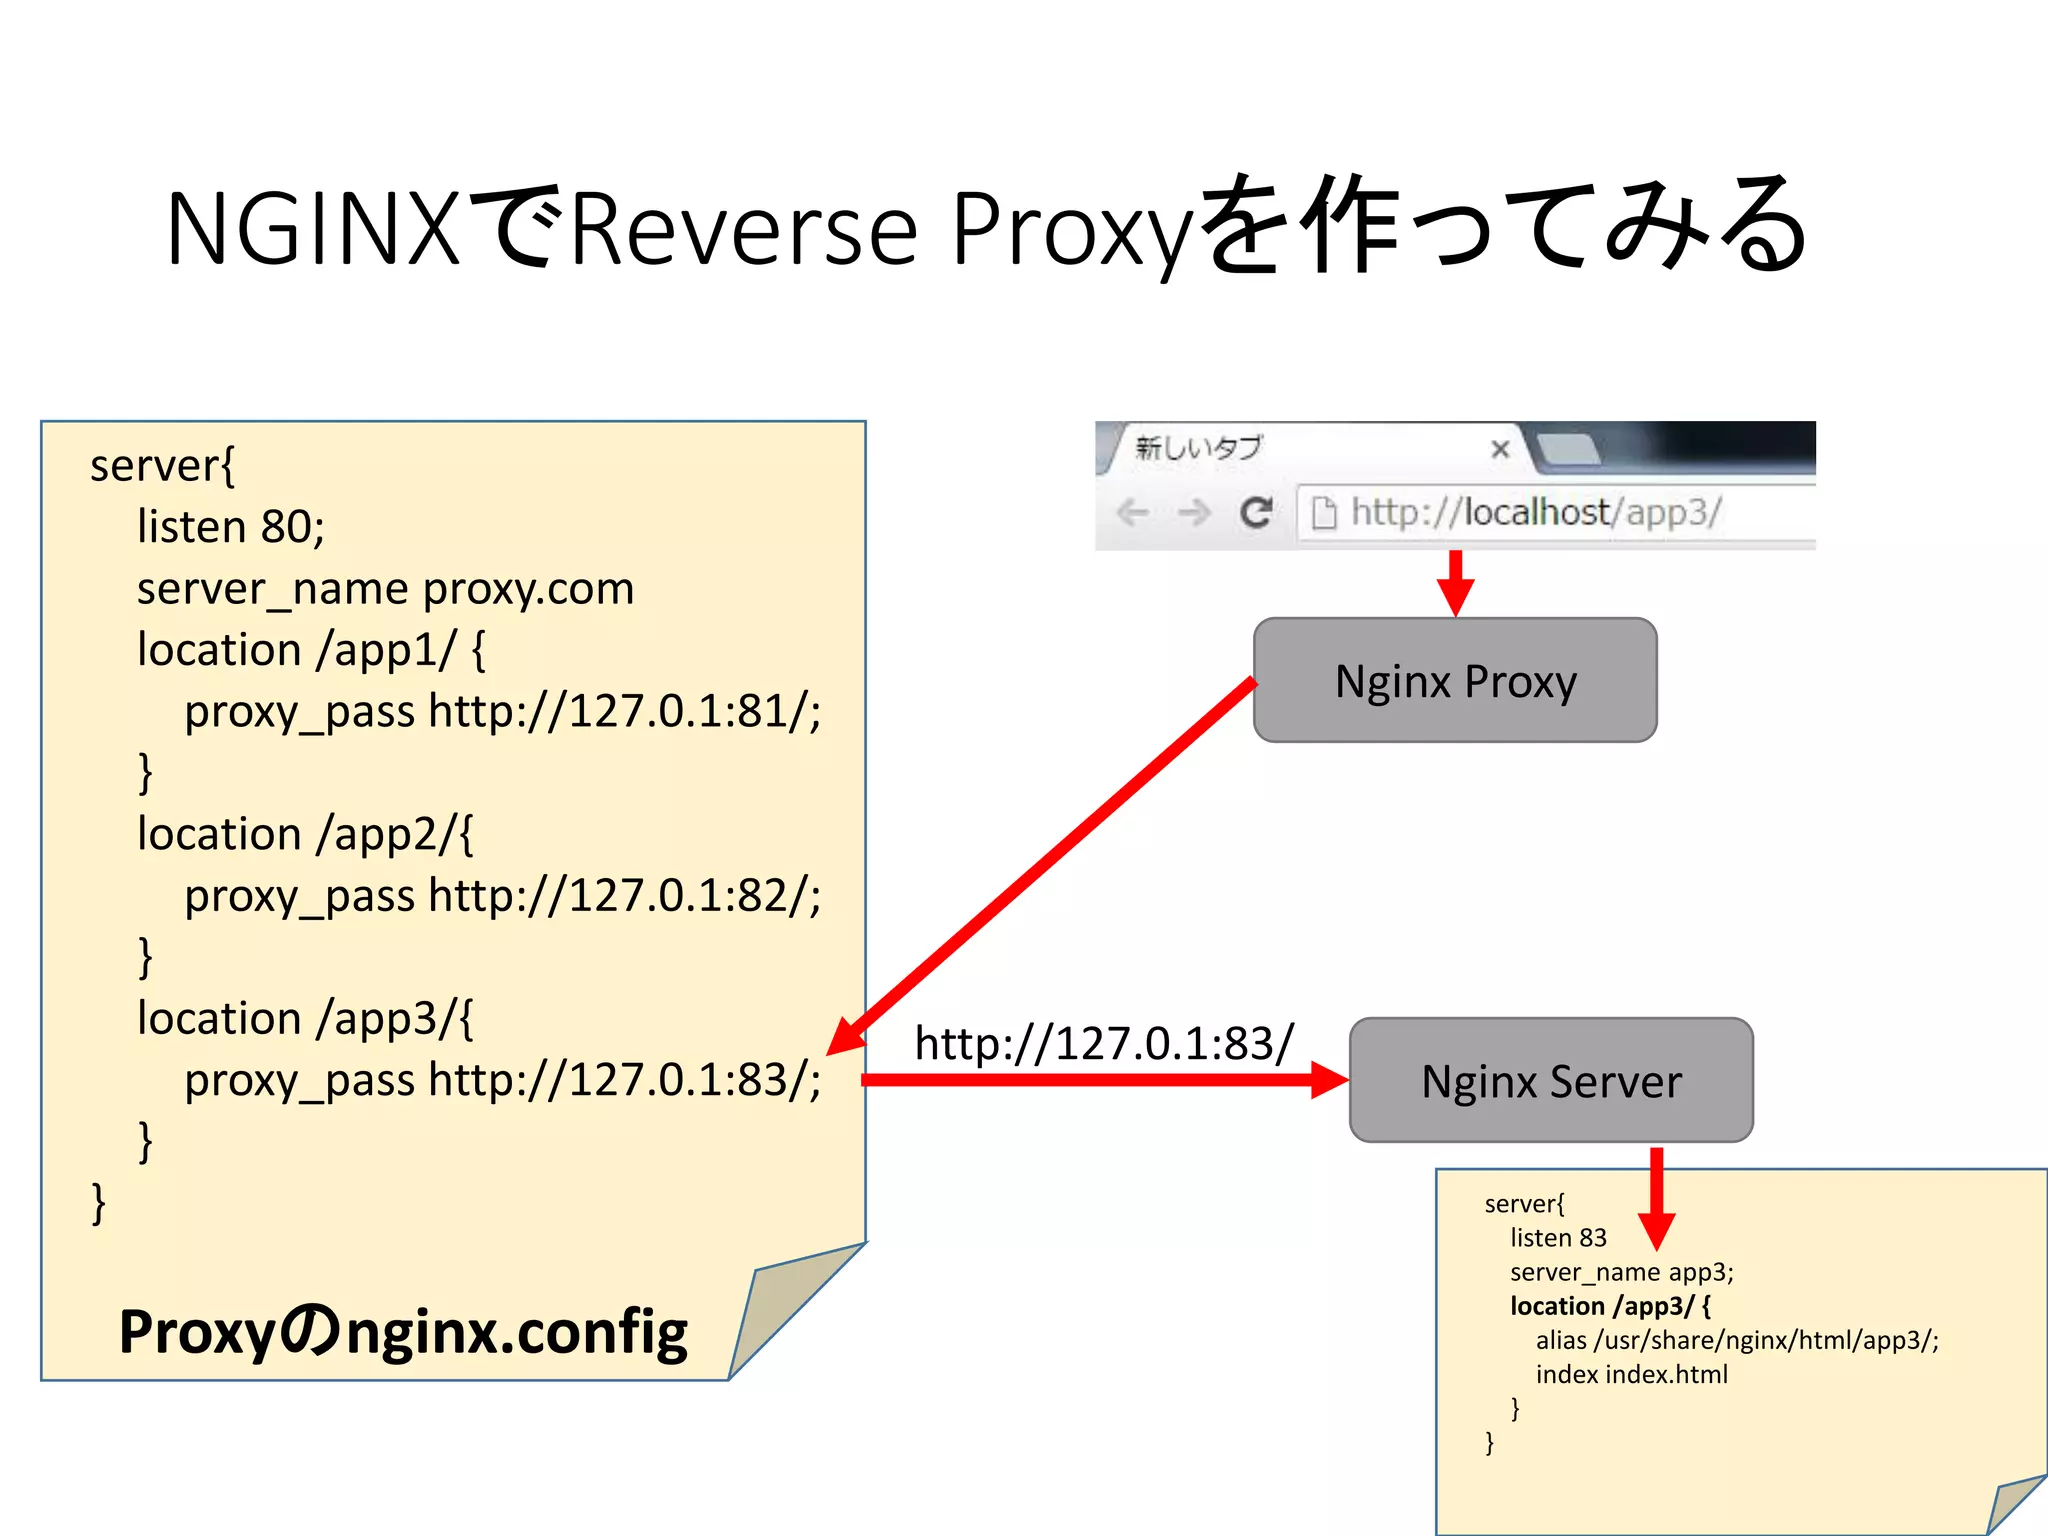
NGINXでReverse Proxyを作ってみる
server{
listen 80;
server_nameproxy.com
location /app1/ {
proxy_pass http://127.0.1:81/;
}
location /app2/{
proxy_pass http://127.0.1:82/;
}
location /app3/{
proxy_pass http://127.0.1:83/;
}
}
Proxyのnginx.config
Nginx Proxy
http://127.0.1:83/
server{
listen 83
server_name app3;
location /app3/ {
alias /usr/share/nginx/html/app3/;
index index.html
}
}
Nginx Server
- 48.
- 49.
- 50.
- 51.
- 52.
- 53.
- 58.