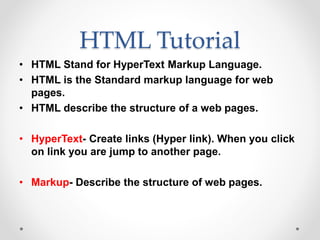
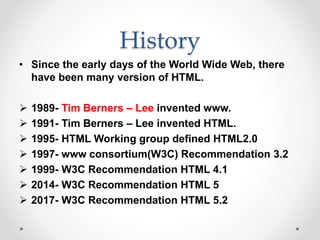
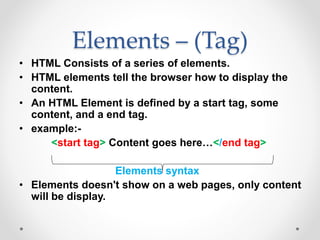
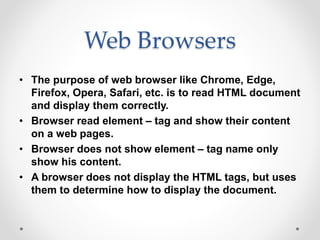
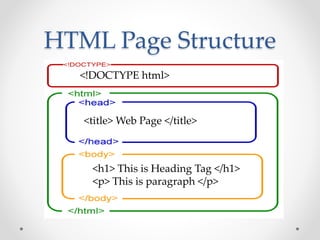
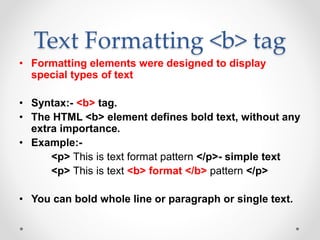
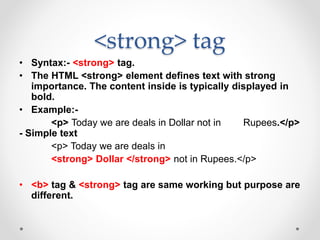
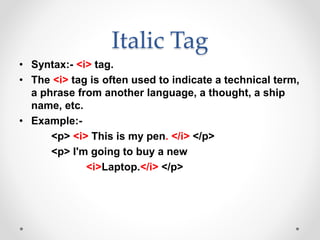
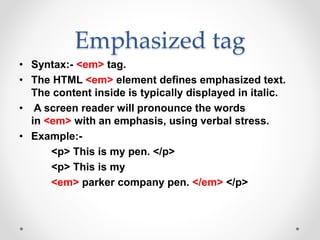
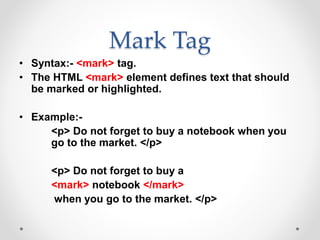
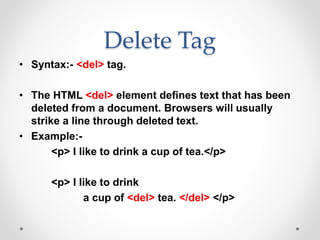
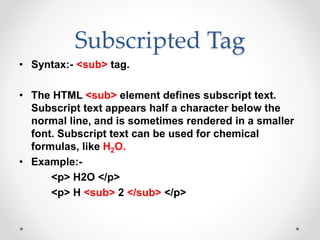
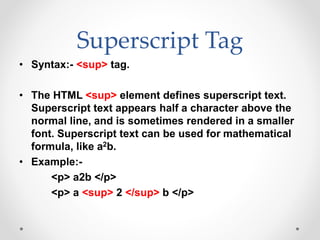
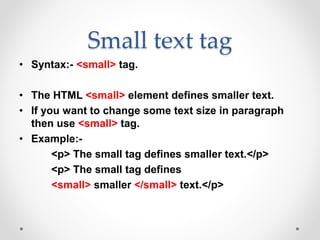
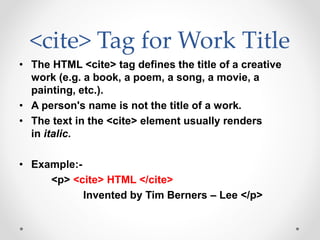
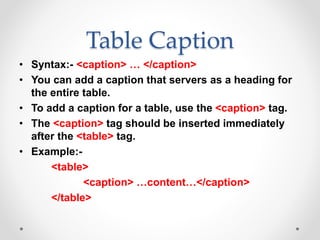
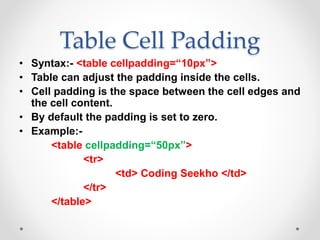
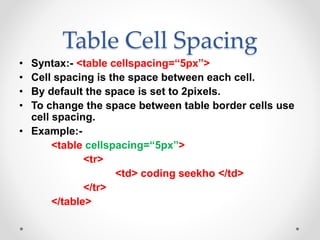
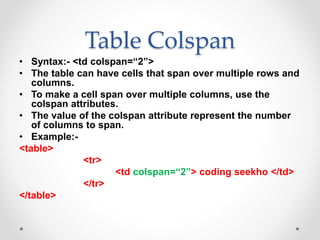
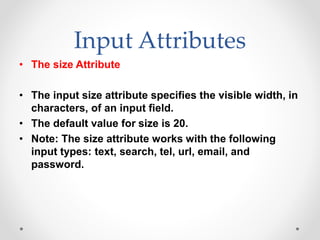
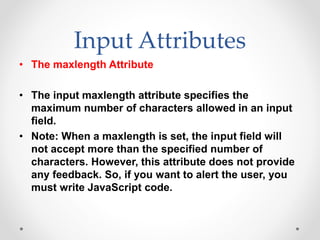
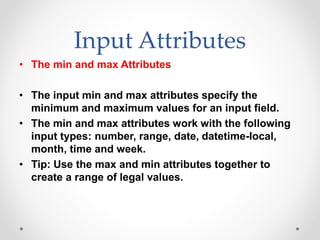
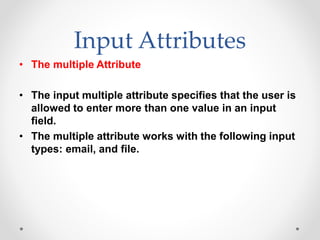
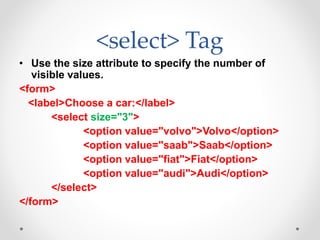
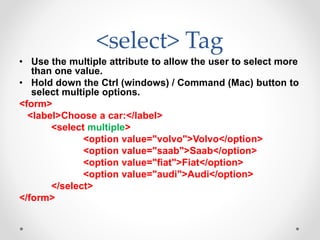
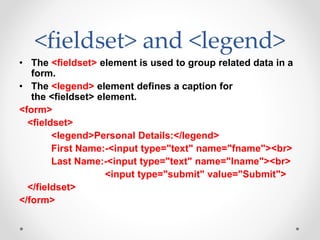
HTML
HyperText Markup Language
By- Rameshkumar Yadav
HTML Tutorial
• HTML Stand for HyperText Markup Language.
• HTML is the Standard markup language for web
pages.
• HTML describe the structure of a web pages.
• HyperText- Create links (Hyper link). When you click
on link you are jump to another page.
• Markup- Describe the structure of web pages.
History
• Since the early days of the World Wide Web, there
have been many version of HTML.
 1989- Tim Berners – Lee invented www.
 1991- Tim Berners – Lee invented HTML.
 1995- HTML Working group defined HTML2.0
 1997- www consortium(W3C) Recommendation 3.2
 1999- W3C Recommendation HTML 4.1
 2014- W3C Recommendation HTML 5
 2017- W3C Recommendation HTML 5.2
Elements – (Tag)
• HTML Consists of a series of elements.
• HTML elements tell the browser how to display the
content.
• An HTML Element is defined by a start tag, some
content, and a end tag.
• example:-
<start tag> Content goes here…</end tag>
Elements syntax
• Elements doesn't show on a web pages, only content
will be display.
Web Browsers
• The purpose of web browser like Chrome, Edge,
Firefox, Opera, Safari, etc. is to read HTML document
and display them correctly.
• Browser read element – tag and show their content
on a web pages.
• Browser does not show element – tag name only
show his content.
• A browser does not display the HTML tags, but uses
them to determine how to display the document.
HTML Page Structure
<!DOCTYPE html>
<title> Web Page </title>
<h1> This is Heading Tag </h1>
<p> This is paragraph </p>
HTML Editor
• For HTML document we need a simple text editor like
Notepad for windows.
• TextEdit for mac (ios apple).
• Web pages can be created and modified by using
professional HTML editors.
• Like – VS Code,
Sublime text,
Notepad ++,
Atom etc.
• In HTML program when you save your document you can
use “.html” extension is must.
• Saved file(HTML document) open in browser (Chrome,
edge) to display pages.
Hello world
<!DOCTYPE html>
<html>
<head>
<title> Web Page </title>
</head>
<body>
Hello world….
</body>
</html>
HTML Documents
• All HTML Documents must start with a document
type declaration.
• <!DOCTYPE html> - defines that this is an HTML5
document.
• The HTML document itself begins with <html> and
ends with </html>.
• <head> element contains meta information about the
HTML pages.
• <title> define title for the HTML page, which is shown
in the browser’s title bar (tab).
• The visible part of the HTML document is between
<body> tag </body>.
Headings
• HTML headings are titles or subtitles that you want
to display on a webpage.
• HTML headings are defined with the <h1> to <h6>
tags.
• <h1> defines the most important heading followed
by <h2> then the other <h3> to <h6> less important.
• Search engines use the headings to index the
structure and content of your web pages.
Heading Example
<h1> Coding Seekho </h1>
<h2> Coding Seekho </h2>
<h3> Coding Seekho </h3>
<h4> Coding Seekho </h4>
<h5> Coding Seekho </h5>
<h6> Coding Seekho </h6>
Comment Tag
• Syntax:- <!-- This is comment tag -->
• HTML comments are not displayed in the browser,
but they can help document your HTML source code.
• With comments you can place notifications and
reminders in your HTML code.
• Comments can be used to hide content.
• This can be helpful if you hide content temporarily:
• You can also hide more than one line. Everything
between the <!-- and the --> will be hidden from the
display.
Paragraphs Tag
• A paragraph always starts on a new line, and is usually a
block of text.
• The HTML <p> element defines a paragraph.
• Example:-
<p> This is paragraph </p>
• A paragraph always starts on a new line.
• With this tag you cannot change the line by Enter or
adding extra spaces or extra lines in your code.
• The browser will automatically remove any extra spaces
and lines when the page is displayed on web browser.
<br> Tag
• The <br> tag defines a line break in a code.
• Use <br> tag for jump on a new line without starting
a new paragraph.
• The <br> tag is an empty tag, which means that it
has no end tag.
• Example:-
<p> This is paragraph first line <br>
this is paragraph second line. </p>
• <br> tag insert a single line break.
Non Breaking Space
• Syntax:- &nbsp;
• A non-breaking space is a space that will not break
into a new line.
• If you write 10 spaces in your text, the browser will
remove 9 of them. To add real spaces to your text,
you can use the &nbsp;
• Example:-
<p> This is my first &nbsp; &nbsp; &nbsp; web
page program. </p>
Horizontal Rule
• Syntax:- <hr> tag.
• The <hr> tag defines a thematic break in an HTML page,
and is most often displayed as a horizontal rule.
• The <hr> element is used to separate content (or define a
change) in an HTML page:
• The <hr> tag is an empty tag, which means that it has no
end tag.
• Example:-
<p> This is horizontal line </p> <hr>
<p> above is horizontal line </p>
Poem Tag
• Syntax:- <pre> tag.
• The HTML <pre> element defines preformatted text.
• The text inside a <pre> element is displayed in a fixed-
width font (usually Courier), and it preserves both spaces
and line breaks.
• Example:-
• <pre>
“Dream is not that which you see while
sleeping it is something that does not let you
sleep.”
</pre>
Pre tag example
<pre>
Twinkle, twinkle, little star,
How I wonder what you are!
Up above the world so high,
Like a diamond in the sky.
When the blazing sun is gone,
When he nothing shines upon,
Then you show your little light,
Twinkle, twinkle, all the night.
</pre>
Text Formatting <b> tag
• Formatting elements were designed to display
special types of text
• Syntax:- <b> tag.
• The HTML <b> element defines bold text, without any
extra importance.
• Example:-
<p> This is text format pattern </p>- simple text
<p> This is text <b> format </b> pattern </p>
• You can bold whole line or paragraph or single text.
<strong> tag
• Syntax:- <strong> tag.
• The HTML <strong> element defines text with strong
importance. The content inside is typically displayed in
bold.
• Example:-
<p> Today we are deals in Dollar not in Rupees.</p>
- Simple text
<p> Today we are deals in
<strong> Dollar </strong> not in Rupees.</p>
• <b> tag & <strong> tag are same working but purpose are
different.
Italic Tag
• Syntax:- <i> tag.
• The <i> tag is often used to indicate a technical term,
a phrase from another language, a thought, a ship
name, etc.
• Example:-
<p> <i> This is my pen. </i> </p>
<p> I'm going to buy a new
<i>Laptop.</i> </p>
Emphasized tag
• Syntax:- <em> tag.
• The HTML <em> element defines emphasized text.
The content inside is typically displayed in italic.
• A screen reader will pronounce the words
in <em> with an emphasis, using verbal stress.
• Example:-
<p> This is my pen. </p>
<p> This is my
<em> parker company pen. </em> </p>
Mark Tag
• Syntax:- <mark> tag.
• The HTML <mark> element defines text that should
be marked or highlighted.
• Example:-
<p> Do not forget to buy a notebook when you
go to the market. </p>
<p> Do not forget to buy a
<mark> notebook </mark>
when you go to the market. </p>
Delete Tag
• Syntax:- <del> tag.
• The HTML <del> element defines text that has been
deleted from a document. Browsers will usually
strike a line through deleted text.
• Example:-
<p> I like to drink a cup of tea.</p>
<p> I like to drink
a cup of <del> tea. </del> </p>
Insert Tag
• Syntax:- <ins> tag.
• The HTML <ins> element defines a text that has been
inserted into a document. Browsers will usually
underline inserted text.
• Example:-
<p> I like to drink a cup of tea.</p>
<p> I like to drink
a cup of <del> tea. </del>
<ins> coffee </ins> </p>
Subscripted Tag
• Syntax:- <sub> tag.
• The HTML <sub> element defines subscript text.
Subscript text appears half a character below the
normal line, and is sometimes rendered in a smaller
font. Subscript text can be used for chemical
formulas, like H2O.
• Example:-
<p> H2O </p>
<p> H <sub> 2 </sub> </p>
Superscript Tag
• Syntax:- <sup> tag.
• The HTML <sup> element defines superscript text.
Superscript text appears half a character above the
normal line, and is sometimes rendered in a smaller
font. Superscript text can be used for mathematical
formula, like a2b.
• Example:-
<p> a2b </p>
<p> a <sup> 2 </sup> b </p>
Small text tag
• Syntax:- <small> tag.
• The HTML <small> element defines smaller text.
• If you want to change some text size in paragraph
then use <small> tag.
• Example:-
<p> The small tag defines smaller text.</p>
<p> The small tag defines
<small> smaller </small> text.</p>
Big tag
• Syntax:- <big> tag.
• The HTML <big> element defines bigger text.
• If you want to change some text size in paragraph
then use <big> tag.
• Example:-
<p> The big tag defines bigger text.</p>
<p> The big tag defines
<big> bigger </big> text.</p>
What is Attributes
• Attributes provide additional information about
HTML elements (tag).
• All HTML tags can have attributes.
• Attributes are always specified in the start tag.
• Attributes usually come in name/value pairs like
attribute name=“attribute value”
Example:-
<Img src=“nature.png”/>
• src attribute specifies the path of image which load
on a web page.
Image Tag
• Syntax:- <img />
• HTML images are defined with the <img> tag.
• Images can improve the design and the appearance
of a web page.
• Images are not technically inserted into a web page,
images are linked to web page.
• The <img /> tag creates a holding space for the
referenced images.
• The <img /> tag is empty, it contains attributes only,
and does not have a closing tag.
Image Tags Attributes
• The <img /> tag has many attributes.
src- it means Source, specifies the path (URL) of
images.
When a web page loads, it is the browser, at the
moment, that gets the image from a web server
and insert it into the page.
alt- it means Alternate, specifies an alternate text for
images. If a browser cannot find an image, it
will display the value of the alt attribute.
Example:- <img src=“logo.png”
alt=“coding seekho logo”/>
Image Tags Attributes
Width & height – if you want to increase the size of
images which is loaded on your web page you can
use width & height attribute, value provide in
width & height should be in px format (500px).
Always specify the width and height of an
image. If width and height are not specified the web
page might flicker while the image loads on a web page.
Title – title attribute provide name for a image, when you
move your mouse on a image that time title name
appear on a image.
Example:-<img src=“logo.png” title=“Coding Seekho”
width=“250px” height=“200px”/>
1. Absolute URL
• If you have links to an external image that is hosted
on another website not in your laptop or pc.
• Example:-
<img
src=“http://www.codingseekho.in/images/logo.png”/>
• External images might be under copyright.
• If you do not get permission to use it, you may be in
violation of copyright laws.
• Mainly, you cannot control external images it can
suddenly be removed or changed.
2. Relative URL
• Links to an images that is hosted within the website,
or in your Laptop/PC.
• Here, the URL does not include the domain name.
• If the URL begins without a slash, it will be relative to
the current page.
Example:-
<img src=“logo.png”/>
• If the URL begins with a slash, it will be relative to
the domain.
Example:-
<img src=“/images/logo.png”/>
Image in a Folder
• Images in another folder:-
• If you have your images in a folder, you must include
the folder name in the src attribute.
• Example:-
<img src=“/image/logo.png”
alt=“coding seekho logo”/>
• If you have multiple folder, then use multiple ( / ) and
their relative folder name.
<figcaption> Tag
• Use a <figure> element to mark up a photo in a
document, and a <figcaption> element to define a
caption for the photo.
• The <figcaption> tag defines a caption for
a <figure> element.
• The <figcaption> element can be placed as the first
or last child of the <figure> element.
• Example:-
<figure>
<img src=“logo.png" alt=“logo" width=“100px”>
<figcaption>Fig.1 – CS Logo.</figcaption>
</figure>
HTML Style
• The HTML style attribute is used to add styles to an
element, such as color, font, size and many more.
• Setting the style of an HTML tags, can be done with
the style attribute.
• The HTML style attribute has the following syntax:-
• <tag name style=“property:value;”>
Content goes here… </tag name>
Example:-
<h1 style=“color:green;”> Coding Seekho </h1>
Background Color
• If you want to change the background color of your
page then use background-color property, value
should be as per your choice like red, green, yellow
etc.
• When you set the value, your whole web page
background color change by given value.
• Example:-
<body style=“background-color:yellow;”>
</body>
Background Color
• If you want to change the background color of HTML tags
then use background-color property in your tag.
• When you set the value, whole tag background color
change by given value.
• You can set background color for many different tags.
• Example:-
<h1 style=“background-color:red”>
Coding Seekho </h1>
<p style=“background-color:green”>
VS Programming Institute </p>
Text Color
• The color property defines the text color for an HTML
tags.
• If you want to change your text color for many tags
in different color you can do this by color property
and its value.
• Example:-
<h1 style=“color:blue”> Coding Seekho </h1>
<p style=“color:pink”>
VS Programming Institute </p>
Font Style
• The font-family property defines the font to be used
for an HTML element.
• Font types like – Verdana, Arial, Times New Roman,
Futura, Comic Sans, Coronet, Courier etc.
• Example:-
<h1 style=“font-family:verdana”>
Coding Seekho </h1>
<h2 style=“font-family:coronet”>
Coding Seekho </h2>
<h2 style=“font-family:arial”>
Coding Seekho </h2>
Text Size
• The font-size property defines the text size for an
HTML tags.
• You can increase your text size as well as decrease
the text size.
• Example:-
<p style=“font-size:80px”> I like to read books. </p>
<p style=“font-size:30px”> I like to read books. </p>
<p style=“font-size:50px”> I like to read books. </p>
Text Alignment
• The text-align property defines the horizontal text
alignment for an HTML tags.
• Text-align property is only use for text or paragraph
not for images and many more.
• Example:-
<p style=“text-align:center”> Coding Seekho </p>
<p style=“text-align:left”> Coding Seekho </p>
<p style=“text-align:right”> Coding Seekho </p>
Anchor Tag
• HTML links are hyperlinks.
• You can click on a link and jump to another
document.
• Links are found in nearly all web pages. Links allow
users to click their way from page to page.
• When you move the mouse over a link, the mouse
arrow will turn into a little hand.
• The HTML <a> tag defines a hyperlink.
• Syntax:-
<a href=“https://www.google.com/”>
Go to Google </a>
Links Attributes
• href -
• The most important attribute of the <a> element is
the href attribute, which indicates the link's destination.
• Clicking on the link text, will send the reader to the
specified URL address.
• There are two types of URL –
1. Absolute URL – Other websites URL
<a href=https://www.google.com/>
Go to Google </a>
2. Relative URL – Your web pages URL
<a href=“home.html”> Go to Home </a>
The target Attribute
• By default, the linked page will be displayed in the
current browser window. To change this, you must
specify another target for the link.
• The target attribute specifies where to open the
linked document.
• _blank - Opens the document in a new window or tab
• Example:-
<a href=https://www.google.com/
target=“_blank”> Go to Google </a>
Target Value
• _self - Default. Opens the document in the same
window/tab as it was clicked
• _parent - Opens the document in the parent frame
• _top - Opens the document in the full body of the
window
• Example:-
<a href=https://www.google.com/
target=“_self”> Go to Google </a>
<a href=https://www.google.com/
target=“_parent”> Go to Google </a>
<a href=https://www.google.com/
target=“_top”> Go to Google </a>
Paragraph Link
• <p> <a href=“#HTML”>HTML</a> </p>
• <p> <a href=“#CSS”>CSS </a></p>
• <h1><a name=“HTML”> HTML</a> </h1>
• <p> Thisis my first paragraph </p><br>
• <a href=“filename.html”>Top…..</a>
• <h1><a name=“CSS”> CSS</a> </h1>
• <p> This is my first paragraph </p><br>
• <a href=“filename.html”>Top…..</a>
Use an Image as a Link
• To use an image as a link, just put the <img> tag
inside the <a> tag.
• You can adjust the image height and width in img
tag.
• Example:-
<a href=“home.html”>
<img src=“logo.png" alt=“logo”
width=“100px” height=“70px”/>
</a>
Link to an Email Address
• You can create a link for receiving mail from user
who visited at your web pages by creating mail link.
• Use mailto: inside the href attribute to create a link
that opens the user's email program (to let them
send a new email).
•
• Example:-
<a href="mailto:someone@gmail.com">
Send email</a>
Address Tag
• The HTML <address> tag defines the contact information
for the author/owner of a document or an article.
• The contact information can be an email address, URL,
physical address, phone number, social media handle,
etc.
• The text in the <address> element usually renders
in italic.
• Example:-
<address>
Coding Seekho,<br>
college road, nashik.
</address>
<cite> Tag for Work Title
• The HTML <cite> tag defines the title of a creative
work (e.g. a book, a poem, a song, a movie, a
painting, etc.).
• A person's name is not the title of a work.
• The text in the <cite> element usually renders
in italic.
• Example:-
<p> <cite> HTML </cite>
Invented by Tim Berners – Lee </p>
Bi-Directional Override
• BDO stands for Bi-Directional Override.
• The HTML <bdo> tag is used to override the current
text direction.
• <bdo> tag has “dir” attribute it means direction.
• “dir” has to value –
1. “ltr” – left to right.
2. “rtl” – right to left.
Example:-
<bdo dir="rtl">
This text will be written from right to left</bdo>
Abbreviation Tag
• Syntax:- <abbr>
• The HTML <abbr> tag defines an abbreviation or an
acronym, like “HTML”, “CSS”, “VSPI”, “CS” etc.
• Marking abbreviation can give useful information to
browser and search engines.
• Example:-
• <p> The
<abbr title=“VS Programming Institute”>VSPI</abbr>
was found in 2017 </p>
Details Tag
• Syntax:- <details>
<summary> <p> HTML </p> </summary>
</details>
• The <details> tag specifies additional details that the
user can open and close on demand.
• The <details> tag is used to create an interactive
Q&A that user can open and close.
• By default the tag is closed (Q). When open, it
expands, and display the content within (A).
• The <summary> tag is used in conjunction with
<details> to specify a visible for the details.
Table Tag
• Syntax:- <table> …… </table>
• Table tag allow web developers to arrange data into
rows and columns.
• Table tag consists of table cells inside rows and
columns.
• You can create table using
<table>
</table>
Table Row
• Syntax:- <tr> ….. </tr> - Table row
• Each table data filling in row format, every new line
data filled in row format.
• Each table row starts with a
<tr> …. End with a…. </tr>
<table>
<tr>
</tr>
</table>
Table Data
• Each table data is defined by a <td> ….. </td>
• <td> stands for Table Data.
• Everything between <td> …. </td> are the content of the
table cell.
• A table cell can contain all sorts of HTML tags like - text,
images, lists, etc.
• Example:-
<table>
<tr>
<td> Coding Seekho </td>
</tr>
</table>
Table Header
• Syntax:- <th> …. </th> - Table Header/Heading.
• Sometimes you want your cells to be table header cells.
In those cases use the <th> tag instead of the <td> tag.
• First row will be your table header row.
• By default the table text in <th> tag are bold and
centered.
• To use the first column as table headers, define the first
cell in each row as a <th> tag.
• Example:- <table>
<tr>
<th>…Content…</th>
</tr>
</table>
Table Attributes
• Syntax:- <table border=“1px”>
• The tables can have borders of different style and
shapes.
• When you add a border to a table, you also add
border around each table cell.
• Example:-
<table border=“1px”>
<tr>
<td>…content…</td>
</tr>
</table>
Table Size
• Syntax:- <table width=“500px”>
<table height=“300px”>
• Table can have different sizes for each column, row
or the entire table.
• To set the width and height of a table, add the
attributes in table tag.
• To set the size of specific columns or rows add the
height and row attributes in <th> or <td>.
• Example:-
<td width=“200px” height=“100px”>
<th width=“200px” height=“100px”>
Table Caption
• Syntax:- <caption> … </caption>
• You can add a caption that servers as a heading for
the entire table.
• To add a caption for a table, use the <caption> tag.
• The <caption> tag should be inserted immediately
after the <table> tag.
• Example:-
<table>
<caption> …content…</caption>
</table>
Table Cell Padding
• Syntax:- <table cellpadding=“10px”>
• Table can adjust the padding inside the cells.
• Cell padding is the space between the cell edges and
the cell content.
• By default the padding is set to zero.
• Example:-
<table cellpadding=“50px”>
<tr>
<td> Coding Seekho </td>
</tr>
</table>
Table Cell Spacing
• Syntax:- <table cellspacing=“5px”>
• Cell spacing is the space between each cell.
• By default the space is set to 2pixels.
• To change the space between table border cells use
cell spacing.
• Example:-
<table cellspacing=“5px”>
<tr>
<td> coding seekho </td>
</tr>
</table>
Table Colspan
• Syntax:- <td colspan=“2”>
• The table can have cells that span over multiple rows and
columns.
• To make a cell span over multiple columns, use the
colspan attributes.
• The value of the colspan attribute represent the number
of columns to span.
• Example:-
<table>
<tr>
<td colspan=“2”> coding seekho </td>
</tr>
</table>
Table Rowspan
• Syntax:- <td rowspan=“2”>
• The table can have cells that span over multiple rows and
columns.
• To make a cell span over multiple rows, use the rowspan
attributes.
• The value of the rowspan attribute represent the number
of rows to span.
• Example:-
<table>
<tr>
<td rowspan=“2”> coding seekho </td>
</tr>
</table>
List Tag
• HTML lists allow web developers to group a set of related
items in lists.
• List tag (li)
• There are three types in list –
1. Unordered List (ul) - disc,square,circle,none
• HTML
• CSS
• JAVASCRIPT
2. Ordered List (ol) - 1,A,a,I,i
1. HTML
2. CSS
3. JAVASCRIPT
3. Description Lists (dl)
Unordered List
• The HTML <ul> tag defines an unordered (bulleted)
list.
• An unordered list starts with the <ul> tag. Each list
item starts with the <li> tag.
• The list items will be marked with bullets (small
black circles) by default.
• Example:-
<ul>
<li>HTML</li>
<li>CSS</li>
<li>JS</li>
</ul>
Unordered List Type
• There are four types in <ul> tag. All types are
attributes in <ul> tag.
1.Disc - Sets the list item marker to a bullet.
2.Square - Sets the list item marker to a square.
3.Circle - Sets the list item marker to a circle.
4.None - The list items will not be marked.
• Example:-
• <ul type=“disc”> <li> HTML </li> </ul>
• <ul type=“square”> <li> HTML </li> </ul>
• <ul type=“circle”> <li> HTML </li> </ul>
• <ul type=“none”> <li> HTML </li> </ul>
Ordered List
• The HTML <ol> tag defines an ordered list. An
ordered list can be numerical or alphabetical.
• An ordered list starts with the <ol> tag. Each list item
starts with the <li> tag.
• The list items will be marked with numbers by
default.
• Example:-
• <ol>
<li>HTML</li>
<li>CSS</li>
<li>JS</li>
</ol>
Ordered List Type
• There are five types in <ol> tag. All types are attributes in <ol> tag.
1.”1” - The list items will be numbered with numbers
2.”A” - The list items will be numbered with uppercase letters
3.”a” - The list items will be numbered with lowercase
letters
4.”I” - The list items will be numbered with uppercase
roman numbers
5.”i” - The list items will be numbered with lowercase
roman numbers
• Example:-
• <ol type=“1”> <li> HTML </li> </ol>
• <ol type=“A”> <li> HTML </li> </ol>
• <ol type=“a”> <li> HTML </li> </ol>
• <ol type=“I”> <li> HTML </li> </ol>
• <ol type=“i”> <li> HTML </li> </ol>
Control List Counting
• By default, an ordered list will start counting from 1.
If you want to start counting from a specified
number, you can use the start attribute.
• Example:-
• <ol start="50">
<li>HTML</li>
<li>CSS</li>
<li>JS</li>
</ol>
Nested List
• Lists can be nested (list inside list). Unordered type.
• Example:-
• <ul>
<li>Samsung</li>
<li>Iphone
<ul>
<li>Iphone 10</li>
<li>Iphone 11</li>
</ul>
</li>
<li>Oppo</li>
</ul>
Nested List
• Lists can be nested (list inside list). Ordered type.
• Example:-
• <ol>
<li>LG TV</li>
<li>Samsung
<ol>
<li>Touch Screen</li>
<li>Regular Screen</li>
</ol>
</li>
<li>BPL</li>
</ol>
Description Lists
• A description list is a list of terms, with a description
of each term.
• The <dl> tag defines the description list
• The <dt> tag defines the term (name)
• The <dd> tag describes each term:
• Example:-
• <dl>
<dt>HTML</dt>
<dd>- HyperText Markup Language</dd>
<dt>CSS</dt>
<dd>- Cascading Style Sheet</dd>
</dl>
Iframe Tag
• An HTML iframe is used to display a web page within
a web page.
• The HTML <iframe> tag specifies an inline frame.
• An inline frame is used to embed another document
within the current HTML document.
• Syntax
• <iframe src="url" title="description"></iframe>
• Use the height and width attributes to specify the
size of the iframe.
• The height and width are specified in pixels by
default.
HTML Multimedia
• Multimedia on the web is sound, music, videos,
movies, and animations.
• What is Multimedia?
• Multimedia comes in many different formats. It can
be almost anything you can hear or see, like images,
music, sound, videos, records, films, animations,
and more.
• Web pages often contain multimedia elements of
different types and formats.
HTML Multimedia
• Browser Support
• The first web browsers had support for text only, limited
to a single font in a single color.
• Later came browsers with support for colors, fonts,
images, and multimedia!
• Multimedia Formats
• Multimedia elements (like audio or video) are stored in
media files.
• The most common way to discover the type of a file, is to
look at the file extension.
• Multimedia files have formats and different extensions
like: .wav, .mp3, .mp4, .mpg, .wmv, and .avi.
Video Tag
• The HTML <video> element is used to show a video
on a web page.
• To show a video in HTML, use the <video> tag.
• In <video> tag you can use – source
example:-
<video>
<source src=“ulr” type=“video/mp4”>
Source tag for providing video path.
</video>
Video Tag Attributes
• The <source> element allows you to specify
alternative video files which the browser may choose
from. The browser will use the first recognized
format.
• The controls attribute adds video controls, like play,
pause, and volume.
• You can include width and height attributes. If height
and width are not set, the page might flicker while
the video loads.
Video Tag Attributes
• To start a video automatically, use
the autoplay attribute.
• Some times most of the browser not supported
autoplay attributes.
• Add muted after autoplay to let your video start
playing automatically (but muted).
• Then add loop attribute, loop will execute video in
loop form like when video will end it will start again.
• There are three supported video formats: MP4,
WebM, and Ogg.
Audio Tag
• The HTML <audio> element is used to play an audio
file on a web page.
• To play an audio file in HTML, use the <audio> tag.
• In <audio> tag you can use – source
example:-
<audio>
<source src=“ulr” type=“video/mp4”>
Source tag for providing video path.
</audio>
Audio Tag Attributes
• The <source> element allows you to specify
alternative audio files which the browser may
choose from. The browser will use the first
recognized format.
• The controls attribute adds audio controls, like play,
pause, and volume.
• To start an audio file automatically, use
the autoplay attribute.
• Add muted after autoplay to let your audio file start
playing automatically (but muted).
YouTube Videos
• Playing a YouTube Video in HTML
• To play your video on a web page, do the following:
• Define an <iframe> element in your web page.
• Let the src attribute point to the video URL.
• Use the width and height attributes to specify the
dimension of the player.
Block Elements
• Every HTML element has a default display value,
depending on what type of element it is.
• There are two display values: block and inline.
• Block-level Elements
• A block-level element always starts on a new line.
• A block-level element always takes up the full width
available in left and right.
• Two commonly used block elements are: <p> and <div>.
• The <p> element defines a paragraph in an HTML
document.
• The <div> element defines a division or a section in an
HTML document.
Div Tag
• The <div> element is often used as a container for other
HTML tags.
• The <div> element has no required attributes,
but style, class and id are common.
• When used together with CSS, the <div> element can be
used to style blocks of content.
• Example:-
• <div style="background-
color:black;color:white;padding:20px;">
<h2>Div Tag</h2>
<p>The <div> element is often used as a container for
other HTML tags.</p>
</div>
Span Tag
• The <span> element is an inline container used to mark
up a part of a text, or a part of a document.
• The <span> element has no required attributes,
but style, class and id are common.
• When used together with CSS, the <span> element can
be used to style parts of the text:
• Example:-
• <p>My mother has blue eyes and my father has dark
green eyes.</p>
• <p>My mother has <span style="color:blue;font-
weight:bold;">blue</span> eyes and my father
has <span style="color:darkolivegreen;font-
weight:bold;">dark green</span> eyes.</p>
HTML Page Layout
Favicon
• A favicon is a small image displayed next to the page title
in the browser tab.
• Use the HTML <link> element to insert a favicon
• You can use any image you like as your favicon
• To add a favicon to your website, either save your favicon
image to the root directory of your webserver, or create a
folder in the root directory called images, and save your
favicon image in this folder. A common name for a
favicon image is "favicon.ico".
• Next, add a <link> element to your "index.html" file, after
the <title> element.
• <link rel=“icon” href=“logo.png” type=“image/png”>
Marquee Tag
• The Marquee HTML tag is a non-standard HTML
element which is used to scroll a image or text
horizontally or vertically.
• In simple words, you can say that it scrolls the image
or text up, down, left or right automatically.
• Example:-
<marquee>
This is an example of html marquee </marquee>
Marquee Attributes
• Marquee's element contains several attributes that
are used to control and adjust the appearance of the
marquee.
Behavior It facilitates user to set the behavior of the marquee to
one of the three different types: scroll, slide and
alternate.
Direction defines direction for scrolling content. It may be left,
right, up and down.
Width defines width of marquee in pixels or %.
height defines height of marquee in pixels or %.
Marquee Attributes
hspace defines horizontal space in pixels around the
marquee.
vspace defines vertical space in pixels around the marquee.
scrolldelay defines scroll delay in seconds.by default 85.
scrollamount defines scroll amount in number.
loop defines loop for marquee content in number.
bgcolor defines background color. It is now deprecated.
Entities
• Some characters are reserved in HTML.
• Reserved characters in HTML must be replaced with character
entities.
• If you use the less than (<) or greater than (>) signs in your text,
the browser might mix them with tags.
• Character entities are used to display reserved characters in
HTML.
< less than &lt; &#60;
> greater than &gt; &#62;
& ampersand &amp; &#38;
" double quotation mark &quot; &#34;
' single quotation mark &apos; &#39;
Entities
¢ cent &cent; &#162;
£ pound &pound; &#163;
¥ yen &yen; &#165;
€ euro &euro; &#8364;
© copyright &copy; &#169;
® registered
trademark
&reg; &#174;
™ TRADEMARK &trade; &#8482;
Emojis
• Emojis look like images, or icons, but they are not.
• They are letters (characters) from the UTF-8
(Unicode) character set.
• UTF-8 covers almost all of the characters and
symbols in the world.
• 😀 &#128512;
• 😁 &#128513;
• 😂 &#128514;
• 😃 &#128515;
• 😄 &#128516;
• 😅 &#128517;
Forms
• An HTML form is used to collect user input. The user
input is most often sent to a server for processing.
• The HTML <form> element is used to create an HTML
form for user input.
• The <form> element is a container for different types
of input elements, such as: text fields, checkboxes,
radio buttons, submit buttons, etc.
• Using form tag you can create many types of form
like login form, payment gateway form, data
collection form, etc.
The <input> tag
• Syntax:- <input>
• The HTML <input> element is the most used form
element.
• An <input> element can be displayed in many ways,
depending on the type attribute.
• Input Type Text
• <input type="text"> defines a single-line text input field.
• <form>
<input type="text" id="fname" name="fname"><br>
<input type="text" id="lname" name="lname">
</form>
Label
• The <label> tag defines a label for many form elements.
• The <label> element is useful for screen-reader users,
because the screen-reader will read out loud the label
when the user focus on the input element.
• The <label> element also help users who have difficulty
clicking on very small regions (such as radio buttons or
checkboxes) - because when the user clicks the text
within the <label> element, it toggles the radio
button/checkbox.
• The for attribute of the <label> tag should be equal to
the id attribute of the <input> element to bind them
together.
Label Example
• <form>
<label for="fname">First name:</label><br>
<input type="text" id="fname" name="fname"><br>
<label for="lname">Last name:</label><br>
<input type="text" id="lname" name="lname">
</form>
Input Type Password
• <input type="password"> defines a password field.
• Example:-
• The characters in a password field are masked
(shown as asterisks or circles).
<form>
<label for="username">Username:</label><br>
<input type="text" id="username" name="username">
<br>
<label for="pwd">Password:</label><br>
<input type="password" id="pwd" name="pwd">
</form>
Input Type Submit
• <input type="submit"> defines a button
for submitting form data to a form-handler.
• The form-handler is typically a server page with a script
for processing input data.
• The form-handler is specified in the
form's action attribute:
<form action="/action_page.php">
<label for="fname">First name:</label><br>
<input type="text" id="fname" name="fname“
value="John"><br>
<label for="lname">Last name:</label><br>
<input type="text" id="lname" name="lname“
value="Doe"><br><br>
<input type="submit" value="Submit">
</form>
Input Type Reset
• <input type="reset"> defines a reset button that will
reset all form values to their default values.
<form>
<label for="fname">First name:</label><br>
<input type="text" id="fname" name="fname"
value=“John"><br>
<label for="lname">Last name:</label><br>
<input type="text" id="lname" name="lname"
value="Doe"><br><br>
<input type="reset">
</form>
Input Type Radio
• input type="radio"> defines a radio button.
• Radio buttons let a user select ONLY ONE of a limited
number of choices.
• Example:-
• <p>Choose your favourite Web language:</p>
<form>
<input type="radio" id="html" name="fav_language"
value="HTML">
<label for="html">HTML</label><br>
<input type="radio" id="css" name="fav_language“
value="CSS">
<label for="css">CSS</label><br>
</form>
Input Type Checkbox
• <input type="checkbox"> defines a checkbox.
• Checkboxes let a user select ZERO or MORE options
of a limited number of choices.
<form>
<input type="checkbox" id="vehicle1" name="vehicl
e1" value="Bike">
<label for="vehicle1"> I have a bike</label><br>
<input type="checkbox" id="vehicle2" name="vehicl
e2" value="Car">
<label for="vehicle2"> I have a car</label><br>
</form>
Input Type Color
• The <input type="color"> is used for input fields that
should contain a color.
• Depending on browser support, a color picker can
show up in the input field.
• Example:-
<form>
<label for="favcolor">Select your favorite
color:</label>
<input type="color" id="favcolor" name="favcolor">
</form>
Input Type Date
• The <input type="date"> is used for input fields that
should contain a date.
• Depending on browser support, a date picker can
show up in the input field.
• Example:-
<form>
<label for="birthday">Birthday:</label>
<input type="date" id="birthday" name="birthday">
</form>
Min & Max In Date
• You can also use the min and max attributes to add
restrictions to dates.
• Example:-
<form>
<label for="datemax">Enter a date before
1980-01-01:</label>
<input type="date" id="datemax" name="datemax“
max="1979-12-31"><br><br>
<label for="datemin">Enter a date after
2000-01-01:</label>
<input type="date" id="datemin" name="datemin"
min="2000-01-02">
</form>
Input Type Datetime-local
• The <input type="datetime-local"> specifies a date
and time input field, with no time zone.
• Depending on browser support, a date picker can
show up in the input field.
• Example:-
<form>
<label for="birthdaytime">Birthday
(date and time):</label>
<input type="datetime- local"
id="birthdaytime" name="birthdaytime">
</form>
Input Type Button
• <input type="button"> defines a button.
• <input type="button"
onclick="alert('Hello World!')“
value="Click Me!">
• Onclick- type your message which is shown in
dialog box, pop up on display.
Input Type Email
• The <input type="email"> is used for input fields that
should contain an e-mail address.
• Depending on browser support, the e-mail address
can be automatically validated when submitted.
• Some smartphones recognize the email type, and
add ".com" to the keyboard to match email input.
• <form>
<label for="email">Enter your email:</label>
<input type="email" id="email" name="email">
</form>
Input Type Image
• The <input type="image"> defines an image as a
submit button.
• The path to the image is specified in
the src attribute.
• Example:-
• <form>
• <input type="image" src="img_submit.gif"
alt="Submit" width="48" height="48">
</form>
Input Type File
• The <input type="file"> defines a file-select field and
a "Browse" button for file uploads.
• Example:-
<form>
<label for="myfile">Select a file:</label>
<input type="file" id="myfile" name="myfile">
</form>
Input Type Month
• The <input type="month"> allows the user to select a
month and year.
• Depending on browser support, a date picker can
show up in the input field.
<form>
<label for="bdaymonth">Birthday
(month and year):</label>
<input type="month" id="bdaymonth"
name="bdaymonth">
</form>
Input Type Number
• The <input type="number"> defines a numeric input
field.
• You can also set restrictions on what numbers are
accepted.
• The following example displays a numeric input
field, where you can enter a value from 1 to 5:
<form>
<label for="quantity">Quantity
(between 1 and 5):</label>
<input type="number" id="quantity"
name="quantity" min="1" max="5">
</form>
Input Type Range
• The <input type="range"> defines a control for
entering a number whose exact value is not
important (like a slider control). Default range is 0 to
100. However, you can set restrictions on what
numbers are accepted with the min, max,
and step attributes.
<form>
<label for="vol">Volume
(between 0 and 50):</label>
<input type="range" id="vol" name="vol"
min="0" max="50">
</form>
Input Type Search
• The <input type="search"> is used for search fields
(a search field behaves like a regular text field).
example:-
<form>
<label for="gsearch">Search Google:</label>
<input type="search" id="gsearch" name="gsearch">
</form>
Input Type Tel
• The <input type="tel"> is used for input fields that
should contain a telephone number.
• Example:-
<form>
<label for="phone">Enter your phone
number:</label>
<input type="tel" id="phone" name="phone">
</form>
Input Type Time
• The <input type="time"> allows the user to select a
time (no time zone).
• Depending on browser support, a time picker can
show up in the input field.
• Example:-
<form>
<label for="appt">Select a time:</label>
<input type="time" id="appt" name="appt">
</form>
Input Type Url
• The <input type="url"> is used for input fields that should
contain a URL address.
• Depending on browser support, the url field can be
automatically validated when submitted.
• Some smartphones recognize the url type, and adds
".com" to the keyboard to match url input.
<form>
<label for="homepage">Add your homepage:</label>
<input type="url" id="homepage" name="homepage">
</form>
Input Type Week
• The <input type="week"> allows the user to select a
week and year.
• Depending on browser support, a date picker can
show up in the input field.
• Example:-
<form>
<label for="week">Select a week:</label>
<input type="week" id="week" name="week">
</form>
Input Attributes
• The value Attribute
• The input value attribute specifies an initial value for
an input field.
• The disabled Attribute
• The input disabled attribute specifies that an input
field should be disabled.
• A disabled input field is unusable and un-clickable.
• The value of a disabled input field will not be sent
when submitting the form.
Input Attributes
• The size Attribute
• The input size attribute specifies the visible width, in
characters, of an input field.
• The default value for size is 20.
• Note: The size attribute works with the following
input types: text, search, tel, url, email, and
password.
Input Attributes
• The maxlength Attribute
• The input maxlength attribute specifies the
maximum number of characters allowed in an input
field.
• Note: When a maxlength is set, the input field will
not accept more than the specified number of
characters. However, this attribute does not provide
any feedback. So, if you want to alert the user, you
must write JavaScript code.
Input Attributes
• The min and max Attributes
• The input min and max attributes specify the
minimum and maximum values for an input field.
• The min and max attributes work with the following
input types: number, range, date, datetime-local,
month, time and week.
• Tip: Use the max and min attributes together to
create a range of legal values.
Input Attributes
• The multiple Attribute
• The input multiple attribute specifies that the user is
allowed to enter more than one value in an input
field.
• The multiple attribute works with the following input
types: email, and file.
Input Attributes
• The placeholder Attribute
• The input placeholder attribute specifies a short hint
that describes the expected value of an input field (a
sample value or a short description of the expected
format).
• The short hint is displayed in the input field before
the user enters a value.
• The placeholder attribute works with the following
input types: text, search, url, tel, email, and
password.
Input Attributes
• The required Attribute
• The input required attribute specifies that an input
field must be filled out before submitting the form.
• The required attribute works with the following input
types: text, search, url, tel, email, password, date
pickers, number, checkbox, radio, and file.
• The autofocus Attribute
• The input autofocus attribute specifies that an input
field should automatically get focus when the page
loads.
<select> Tag
• The <select> tag defines a drop-down list.
• The <option> elements defines an option that can be
selected.
• By default, the first item in the drop-down list is selected.
<form>
<label>Choose a car:</label>
<select>
<option value="volvo">Volvo</option>
<option value="audi">Audi</option>
</select>
</form>
<select> Tag
• To define a pre-selected option, add the selected attribute
to the option.
<form>
<label>Choose a car:</label>
<select>
<option value="volvo">Volvo</option>
<option value="saab">Saab</option>
<option value="fiat" selected>Fiat</option>
<option value="audi">Audi</option>
</select>
</form>
<select> Tag
• Use the size attribute to specify the number of
visible values.
<form>
<label>Choose a car:</label>
<select size="3">
<option value="volvo">Volvo</option>
<option value="saab">Saab</option>
<option value="fiat">Fiat</option>
<option value="audi">Audi</option>
</select>
</form>
<select> Tag
• Use the multiple attribute to allow the user to select more
than one value.
• Hold down the Ctrl (windows) / Command (Mac) button to
select multiple options.
<form>
<label>Choose a car:</label>
<select multiple>
<option value="volvo">Volvo</option>
<option value="saab">Saab</option>
<option value="fiat">Fiat</option>
<option value="audi">Audi</option>
</select>
</form>
<textarea> Tag
• The <textarea> element defines a multi-line input
field (a text area).
• The rows attribute specifies the visible number of
lines in a text area.
• The cols attribute specifies the visible width of a text
area.
• <textarea name="message" rows="10" cols="30">
The cat was playing in the garden.
</textarea>
<fieldset> and <legend>
• The <fieldset> element is used to group related data in a
form.
• The <legend> element defines a caption for
the <fieldset> element.
<form>
<fieldset>
<legend>Personal Details:</legend>
First Name:-<input type="text" name="fname"><br>
Last Name:-<input type="text" name="lname"><br>
<input type="submit" value="Submit">
</fieldset>
</form>
<datalist> Tag
• The <datalist> element specifies a list of pre-defined options for
an <input> element.
• Users will see a drop-down list of the pre-defined options as
they input data.
• The list attribute of the <input> element, must refer to
the id attribute of the <datalist> element.
<form>
<input list="Courses" name="Courses">
<datalist id="Courses">
<option value="C Programming">
<option value="CPP">
<option value="JAVA">
</datalist>
</form>

HTML 5_cfbe4b8d-092saawww24bb33cb2358.pptx

  • 1.
  • 2.
    HTML Tutorial • HTMLStand for HyperText Markup Language. • HTML is the Standard markup language for web pages. • HTML describe the structure of a web pages. • HyperText- Create links (Hyper link). When you click on link you are jump to another page. • Markup- Describe the structure of web pages.
  • 3.
    History • Since theearly days of the World Wide Web, there have been many version of HTML.  1989- Tim Berners – Lee invented www.  1991- Tim Berners – Lee invented HTML.  1995- HTML Working group defined HTML2.0  1997- www consortium(W3C) Recommendation 3.2  1999- W3C Recommendation HTML 4.1  2014- W3C Recommendation HTML 5  2017- W3C Recommendation HTML 5.2
  • 4.
    Elements – (Tag) •HTML Consists of a series of elements. • HTML elements tell the browser how to display the content. • An HTML Element is defined by a start tag, some content, and a end tag. • example:- <start tag> Content goes here…</end tag> Elements syntax • Elements doesn't show on a web pages, only content will be display.
  • 5.
    Web Browsers • Thepurpose of web browser like Chrome, Edge, Firefox, Opera, Safari, etc. is to read HTML document and display them correctly. • Browser read element – tag and show their content on a web pages. • Browser does not show element – tag name only show his content. • A browser does not display the HTML tags, but uses them to determine how to display the document.
  • 6.
    HTML Page Structure <!DOCTYPEhtml> <title> Web Page </title> <h1> This is Heading Tag </h1> <p> This is paragraph </p>
  • 7.
    HTML Editor • ForHTML document we need a simple text editor like Notepad for windows. • TextEdit for mac (ios apple). • Web pages can be created and modified by using professional HTML editors. • Like – VS Code, Sublime text, Notepad ++, Atom etc. • In HTML program when you save your document you can use “.html” extension is must. • Saved file(HTML document) open in browser (Chrome, edge) to display pages.
  • 8.
    Hello world <!DOCTYPE html> <html> <head> <title>Web Page </title> </head> <body> Hello world…. </body> </html>
  • 9.
    HTML Documents • AllHTML Documents must start with a document type declaration. • <!DOCTYPE html> - defines that this is an HTML5 document. • The HTML document itself begins with <html> and ends with </html>. • <head> element contains meta information about the HTML pages. • <title> define title for the HTML page, which is shown in the browser’s title bar (tab). • The visible part of the HTML document is between <body> tag </body>.
  • 10.
    Headings • HTML headingsare titles or subtitles that you want to display on a webpage. • HTML headings are defined with the <h1> to <h6> tags. • <h1> defines the most important heading followed by <h2> then the other <h3> to <h6> less important. • Search engines use the headings to index the structure and content of your web pages.
  • 11.
    Heading Example <h1> CodingSeekho </h1> <h2> Coding Seekho </h2> <h3> Coding Seekho </h3> <h4> Coding Seekho </h4> <h5> Coding Seekho </h5> <h6> Coding Seekho </h6>
  • 12.
    Comment Tag • Syntax:-<!-- This is comment tag --> • HTML comments are not displayed in the browser, but they can help document your HTML source code. • With comments you can place notifications and reminders in your HTML code. • Comments can be used to hide content. • This can be helpful if you hide content temporarily: • You can also hide more than one line. Everything between the <!-- and the --> will be hidden from the display.
  • 13.
    Paragraphs Tag • Aparagraph always starts on a new line, and is usually a block of text. • The HTML <p> element defines a paragraph. • Example:- <p> This is paragraph </p> • A paragraph always starts on a new line. • With this tag you cannot change the line by Enter or adding extra spaces or extra lines in your code. • The browser will automatically remove any extra spaces and lines when the page is displayed on web browser.
  • 14.
    <br> Tag • The<br> tag defines a line break in a code. • Use <br> tag for jump on a new line without starting a new paragraph. • The <br> tag is an empty tag, which means that it has no end tag. • Example:- <p> This is paragraph first line <br> this is paragraph second line. </p> • <br> tag insert a single line break.
  • 15.
    Non Breaking Space •Syntax:- &nbsp; • A non-breaking space is a space that will not break into a new line. • If you write 10 spaces in your text, the browser will remove 9 of them. To add real spaces to your text, you can use the &nbsp; • Example:- <p> This is my first &nbsp; &nbsp; &nbsp; web page program. </p>
  • 16.
    Horizontal Rule • Syntax:-<hr> tag. • The <hr> tag defines a thematic break in an HTML page, and is most often displayed as a horizontal rule. • The <hr> element is used to separate content (or define a change) in an HTML page: • The <hr> tag is an empty tag, which means that it has no end tag. • Example:- <p> This is horizontal line </p> <hr> <p> above is horizontal line </p>
  • 17.
    Poem Tag • Syntax:-<pre> tag. • The HTML <pre> element defines preformatted text. • The text inside a <pre> element is displayed in a fixed- width font (usually Courier), and it preserves both spaces and line breaks. • Example:- • <pre> “Dream is not that which you see while sleeping it is something that does not let you sleep.” </pre>
  • 18.
    Pre tag example <pre> Twinkle,twinkle, little star, How I wonder what you are! Up above the world so high, Like a diamond in the sky. When the blazing sun is gone, When he nothing shines upon, Then you show your little light, Twinkle, twinkle, all the night. </pre>
  • 19.
    Text Formatting <b>tag • Formatting elements were designed to display special types of text • Syntax:- <b> tag. • The HTML <b> element defines bold text, without any extra importance. • Example:- <p> This is text format pattern </p>- simple text <p> This is text <b> format </b> pattern </p> • You can bold whole line or paragraph or single text.
  • 20.
    <strong> tag • Syntax:-<strong> tag. • The HTML <strong> element defines text with strong importance. The content inside is typically displayed in bold. • Example:- <p> Today we are deals in Dollar not in Rupees.</p> - Simple text <p> Today we are deals in <strong> Dollar </strong> not in Rupees.</p> • <b> tag & <strong> tag are same working but purpose are different.
  • 21.
    Italic Tag • Syntax:-<i> tag. • The <i> tag is often used to indicate a technical term, a phrase from another language, a thought, a ship name, etc. • Example:- <p> <i> This is my pen. </i> </p> <p> I'm going to buy a new <i>Laptop.</i> </p>
  • 22.
    Emphasized tag • Syntax:-<em> tag. • The HTML <em> element defines emphasized text. The content inside is typically displayed in italic. • A screen reader will pronounce the words in <em> with an emphasis, using verbal stress. • Example:- <p> This is my pen. </p> <p> This is my <em> parker company pen. </em> </p>
  • 23.
    Mark Tag • Syntax:-<mark> tag. • The HTML <mark> element defines text that should be marked or highlighted. • Example:- <p> Do not forget to buy a notebook when you go to the market. </p> <p> Do not forget to buy a <mark> notebook </mark> when you go to the market. </p>
  • 24.
    Delete Tag • Syntax:-<del> tag. • The HTML <del> element defines text that has been deleted from a document. Browsers will usually strike a line through deleted text. • Example:- <p> I like to drink a cup of tea.</p> <p> I like to drink a cup of <del> tea. </del> </p>
  • 25.
    Insert Tag • Syntax:-<ins> tag. • The HTML <ins> element defines a text that has been inserted into a document. Browsers will usually underline inserted text. • Example:- <p> I like to drink a cup of tea.</p> <p> I like to drink a cup of <del> tea. </del> <ins> coffee </ins> </p>
  • 26.
    Subscripted Tag • Syntax:-<sub> tag. • The HTML <sub> element defines subscript text. Subscript text appears half a character below the normal line, and is sometimes rendered in a smaller font. Subscript text can be used for chemical formulas, like H2O. • Example:- <p> H2O </p> <p> H <sub> 2 </sub> </p>
  • 27.
    Superscript Tag • Syntax:-<sup> tag. • The HTML <sup> element defines superscript text. Superscript text appears half a character above the normal line, and is sometimes rendered in a smaller font. Superscript text can be used for mathematical formula, like a2b. • Example:- <p> a2b </p> <p> a <sup> 2 </sup> b </p>
  • 28.
    Small text tag •Syntax:- <small> tag. • The HTML <small> element defines smaller text. • If you want to change some text size in paragraph then use <small> tag. • Example:- <p> The small tag defines smaller text.</p> <p> The small tag defines <small> smaller </small> text.</p>
  • 29.
    Big tag • Syntax:-<big> tag. • The HTML <big> element defines bigger text. • If you want to change some text size in paragraph then use <big> tag. • Example:- <p> The big tag defines bigger text.</p> <p> The big tag defines <big> bigger </big> text.</p>
  • 30.
    What is Attributes •Attributes provide additional information about HTML elements (tag). • All HTML tags can have attributes. • Attributes are always specified in the start tag. • Attributes usually come in name/value pairs like attribute name=“attribute value” Example:- <Img src=“nature.png”/> • src attribute specifies the path of image which load on a web page.
  • 31.
    Image Tag • Syntax:-<img /> • HTML images are defined with the <img> tag. • Images can improve the design and the appearance of a web page. • Images are not technically inserted into a web page, images are linked to web page. • The <img /> tag creates a holding space for the referenced images. • The <img /> tag is empty, it contains attributes only, and does not have a closing tag.
  • 32.
    Image Tags Attributes •The <img /> tag has many attributes. src- it means Source, specifies the path (URL) of images. When a web page loads, it is the browser, at the moment, that gets the image from a web server and insert it into the page. alt- it means Alternate, specifies an alternate text for images. If a browser cannot find an image, it will display the value of the alt attribute. Example:- <img src=“logo.png” alt=“coding seekho logo”/>
  • 33.
    Image Tags Attributes Width& height – if you want to increase the size of images which is loaded on your web page you can use width & height attribute, value provide in width & height should be in px format (500px). Always specify the width and height of an image. If width and height are not specified the web page might flicker while the image loads on a web page. Title – title attribute provide name for a image, when you move your mouse on a image that time title name appear on a image. Example:-<img src=“logo.png” title=“Coding Seekho” width=“250px” height=“200px”/>
  • 34.
    1. Absolute URL •If you have links to an external image that is hosted on another website not in your laptop or pc. • Example:- <img src=“http://www.codingseekho.in/images/logo.png”/> • External images might be under copyright. • If you do not get permission to use it, you may be in violation of copyright laws. • Mainly, you cannot control external images it can suddenly be removed or changed.
  • 35.
    2. Relative URL •Links to an images that is hosted within the website, or in your Laptop/PC. • Here, the URL does not include the domain name. • If the URL begins without a slash, it will be relative to the current page. Example:- <img src=“logo.png”/> • If the URL begins with a slash, it will be relative to the domain. Example:- <img src=“/images/logo.png”/>
  • 36.
    Image in aFolder • Images in another folder:- • If you have your images in a folder, you must include the folder name in the src attribute. • Example:- <img src=“/image/logo.png” alt=“coding seekho logo”/> • If you have multiple folder, then use multiple ( / ) and their relative folder name.
  • 37.
    <figcaption> Tag • Usea <figure> element to mark up a photo in a document, and a <figcaption> element to define a caption for the photo. • The <figcaption> tag defines a caption for a <figure> element. • The <figcaption> element can be placed as the first or last child of the <figure> element. • Example:- <figure> <img src=“logo.png" alt=“logo" width=“100px”> <figcaption>Fig.1 – CS Logo.</figcaption> </figure>
  • 38.
    HTML Style • TheHTML style attribute is used to add styles to an element, such as color, font, size and many more. • Setting the style of an HTML tags, can be done with the style attribute. • The HTML style attribute has the following syntax:- • <tag name style=“property:value;”> Content goes here… </tag name> Example:- <h1 style=“color:green;”> Coding Seekho </h1>
  • 39.
    Background Color • Ifyou want to change the background color of your page then use background-color property, value should be as per your choice like red, green, yellow etc. • When you set the value, your whole web page background color change by given value. • Example:- <body style=“background-color:yellow;”> </body>
  • 40.
    Background Color • Ifyou want to change the background color of HTML tags then use background-color property in your tag. • When you set the value, whole tag background color change by given value. • You can set background color for many different tags. • Example:- <h1 style=“background-color:red”> Coding Seekho </h1> <p style=“background-color:green”> VS Programming Institute </p>
  • 41.
    Text Color • Thecolor property defines the text color for an HTML tags. • If you want to change your text color for many tags in different color you can do this by color property and its value. • Example:- <h1 style=“color:blue”> Coding Seekho </h1> <p style=“color:pink”> VS Programming Institute </p>
  • 42.
    Font Style • Thefont-family property defines the font to be used for an HTML element. • Font types like – Verdana, Arial, Times New Roman, Futura, Comic Sans, Coronet, Courier etc. • Example:- <h1 style=“font-family:verdana”> Coding Seekho </h1> <h2 style=“font-family:coronet”> Coding Seekho </h2> <h2 style=“font-family:arial”> Coding Seekho </h2>
  • 43.
    Text Size • Thefont-size property defines the text size for an HTML tags. • You can increase your text size as well as decrease the text size. • Example:- <p style=“font-size:80px”> I like to read books. </p> <p style=“font-size:30px”> I like to read books. </p> <p style=“font-size:50px”> I like to read books. </p>
  • 44.
    Text Alignment • Thetext-align property defines the horizontal text alignment for an HTML tags. • Text-align property is only use for text or paragraph not for images and many more. • Example:- <p style=“text-align:center”> Coding Seekho </p> <p style=“text-align:left”> Coding Seekho </p> <p style=“text-align:right”> Coding Seekho </p>
  • 45.
    Anchor Tag • HTMLlinks are hyperlinks. • You can click on a link and jump to another document. • Links are found in nearly all web pages. Links allow users to click their way from page to page. • When you move the mouse over a link, the mouse arrow will turn into a little hand. • The HTML <a> tag defines a hyperlink. • Syntax:- <a href=“https://www.google.com/”> Go to Google </a>
  • 46.
    Links Attributes • href- • The most important attribute of the <a> element is the href attribute, which indicates the link's destination. • Clicking on the link text, will send the reader to the specified URL address. • There are two types of URL – 1. Absolute URL – Other websites URL <a href=https://www.google.com/> Go to Google </a> 2. Relative URL – Your web pages URL <a href=“home.html”> Go to Home </a>
  • 47.
    The target Attribute •By default, the linked page will be displayed in the current browser window. To change this, you must specify another target for the link. • The target attribute specifies where to open the linked document. • _blank - Opens the document in a new window or tab • Example:- <a href=https://www.google.com/ target=“_blank”> Go to Google </a>
  • 48.
    Target Value • _self- Default. Opens the document in the same window/tab as it was clicked • _parent - Opens the document in the parent frame • _top - Opens the document in the full body of the window • Example:- <a href=https://www.google.com/ target=“_self”> Go to Google </a> <a href=https://www.google.com/ target=“_parent”> Go to Google </a> <a href=https://www.google.com/ target=“_top”> Go to Google </a>
  • 49.
    Paragraph Link • <p><a href=“#HTML”>HTML</a> </p> • <p> <a href=“#CSS”>CSS </a></p> • <h1><a name=“HTML”> HTML</a> </h1> • <p> Thisis my first paragraph </p><br> • <a href=“filename.html”>Top…..</a> • <h1><a name=“CSS”> CSS</a> </h1> • <p> This is my first paragraph </p><br> • <a href=“filename.html”>Top…..</a>
  • 50.
    Use an Imageas a Link • To use an image as a link, just put the <img> tag inside the <a> tag. • You can adjust the image height and width in img tag. • Example:- <a href=“home.html”> <img src=“logo.png" alt=“logo” width=“100px” height=“70px”/> </a>
  • 51.
    Link to anEmail Address • You can create a link for receiving mail from user who visited at your web pages by creating mail link. • Use mailto: inside the href attribute to create a link that opens the user's email program (to let them send a new email). • • Example:- <a href="mailto:someone@gmail.com"> Send email</a>
  • 52.
    Address Tag • TheHTML <address> tag defines the contact information for the author/owner of a document or an article. • The contact information can be an email address, URL, physical address, phone number, social media handle, etc. • The text in the <address> element usually renders in italic. • Example:- <address> Coding Seekho,<br> college road, nashik. </address>
  • 53.
    <cite> Tag forWork Title • The HTML <cite> tag defines the title of a creative work (e.g. a book, a poem, a song, a movie, a painting, etc.). • A person's name is not the title of a work. • The text in the <cite> element usually renders in italic. • Example:- <p> <cite> HTML </cite> Invented by Tim Berners – Lee </p>
  • 54.
    Bi-Directional Override • BDOstands for Bi-Directional Override. • The HTML <bdo> tag is used to override the current text direction. • <bdo> tag has “dir” attribute it means direction. • “dir” has to value – 1. “ltr” – left to right. 2. “rtl” – right to left. Example:- <bdo dir="rtl"> This text will be written from right to left</bdo>
  • 55.
    Abbreviation Tag • Syntax:-<abbr> • The HTML <abbr> tag defines an abbreviation or an acronym, like “HTML”, “CSS”, “VSPI”, “CS” etc. • Marking abbreviation can give useful information to browser and search engines. • Example:- • <p> The <abbr title=“VS Programming Institute”>VSPI</abbr> was found in 2017 </p>
  • 56.
    Details Tag • Syntax:-<details> <summary> <p> HTML </p> </summary> </details> • The <details> tag specifies additional details that the user can open and close on demand. • The <details> tag is used to create an interactive Q&A that user can open and close. • By default the tag is closed (Q). When open, it expands, and display the content within (A). • The <summary> tag is used in conjunction with <details> to specify a visible for the details.
  • 57.
    Table Tag • Syntax:-<table> …… </table> • Table tag allow web developers to arrange data into rows and columns. • Table tag consists of table cells inside rows and columns. • You can create table using <table> </table>
  • 58.
    Table Row • Syntax:-<tr> ….. </tr> - Table row • Each table data filling in row format, every new line data filled in row format. • Each table row starts with a <tr> …. End with a…. </tr> <table> <tr> </tr> </table>
  • 59.
    Table Data • Eachtable data is defined by a <td> ….. </td> • <td> stands for Table Data. • Everything between <td> …. </td> are the content of the table cell. • A table cell can contain all sorts of HTML tags like - text, images, lists, etc. • Example:- <table> <tr> <td> Coding Seekho </td> </tr> </table>
  • 60.
    Table Header • Syntax:-<th> …. </th> - Table Header/Heading. • Sometimes you want your cells to be table header cells. In those cases use the <th> tag instead of the <td> tag. • First row will be your table header row. • By default the table text in <th> tag are bold and centered. • To use the first column as table headers, define the first cell in each row as a <th> tag. • Example:- <table> <tr> <th>…Content…</th> </tr> </table>
  • 61.
    Table Attributes • Syntax:-<table border=“1px”> • The tables can have borders of different style and shapes. • When you add a border to a table, you also add border around each table cell. • Example:- <table border=“1px”> <tr> <td>…content…</td> </tr> </table>
  • 62.
    Table Size • Syntax:-<table width=“500px”> <table height=“300px”> • Table can have different sizes for each column, row or the entire table. • To set the width and height of a table, add the attributes in table tag. • To set the size of specific columns or rows add the height and row attributes in <th> or <td>. • Example:- <td width=“200px” height=“100px”> <th width=“200px” height=“100px”>
  • 63.
    Table Caption • Syntax:-<caption> … </caption> • You can add a caption that servers as a heading for the entire table. • To add a caption for a table, use the <caption> tag. • The <caption> tag should be inserted immediately after the <table> tag. • Example:- <table> <caption> …content…</caption> </table>
  • 64.
    Table Cell Padding •Syntax:- <table cellpadding=“10px”> • Table can adjust the padding inside the cells. • Cell padding is the space between the cell edges and the cell content. • By default the padding is set to zero. • Example:- <table cellpadding=“50px”> <tr> <td> Coding Seekho </td> </tr> </table>
  • 65.
    Table Cell Spacing •Syntax:- <table cellspacing=“5px”> • Cell spacing is the space between each cell. • By default the space is set to 2pixels. • To change the space between table border cells use cell spacing. • Example:- <table cellspacing=“5px”> <tr> <td> coding seekho </td> </tr> </table>
  • 66.
    Table Colspan • Syntax:-<td colspan=“2”> • The table can have cells that span over multiple rows and columns. • To make a cell span over multiple columns, use the colspan attributes. • The value of the colspan attribute represent the number of columns to span. • Example:- <table> <tr> <td colspan=“2”> coding seekho </td> </tr> </table>
  • 67.
    Table Rowspan • Syntax:-<td rowspan=“2”> • The table can have cells that span over multiple rows and columns. • To make a cell span over multiple rows, use the rowspan attributes. • The value of the rowspan attribute represent the number of rows to span. • Example:- <table> <tr> <td rowspan=“2”> coding seekho </td> </tr> </table>
  • 68.
    List Tag • HTMLlists allow web developers to group a set of related items in lists. • List tag (li) • There are three types in list – 1. Unordered List (ul) - disc,square,circle,none • HTML • CSS • JAVASCRIPT 2. Ordered List (ol) - 1,A,a,I,i 1. HTML 2. CSS 3. JAVASCRIPT 3. Description Lists (dl)
  • 69.
    Unordered List • TheHTML <ul> tag defines an unordered (bulleted) list. • An unordered list starts with the <ul> tag. Each list item starts with the <li> tag. • The list items will be marked with bullets (small black circles) by default. • Example:- <ul> <li>HTML</li> <li>CSS</li> <li>JS</li> </ul>
  • 70.
    Unordered List Type •There are four types in <ul> tag. All types are attributes in <ul> tag. 1.Disc - Sets the list item marker to a bullet. 2.Square - Sets the list item marker to a square. 3.Circle - Sets the list item marker to a circle. 4.None - The list items will not be marked. • Example:- • <ul type=“disc”> <li> HTML </li> </ul> • <ul type=“square”> <li> HTML </li> </ul> • <ul type=“circle”> <li> HTML </li> </ul> • <ul type=“none”> <li> HTML </li> </ul>
  • 71.
    Ordered List • TheHTML <ol> tag defines an ordered list. An ordered list can be numerical or alphabetical. • An ordered list starts with the <ol> tag. Each list item starts with the <li> tag. • The list items will be marked with numbers by default. • Example:- • <ol> <li>HTML</li> <li>CSS</li> <li>JS</li> </ol>
  • 72.
    Ordered List Type •There are five types in <ol> tag. All types are attributes in <ol> tag. 1.”1” - The list items will be numbered with numbers 2.”A” - The list items will be numbered with uppercase letters 3.”a” - The list items will be numbered with lowercase letters 4.”I” - The list items will be numbered with uppercase roman numbers 5.”i” - The list items will be numbered with lowercase roman numbers • Example:- • <ol type=“1”> <li> HTML </li> </ol> • <ol type=“A”> <li> HTML </li> </ol> • <ol type=“a”> <li> HTML </li> </ol> • <ol type=“I”> <li> HTML </li> </ol> • <ol type=“i”> <li> HTML </li> </ol>
  • 73.
    Control List Counting •By default, an ordered list will start counting from 1. If you want to start counting from a specified number, you can use the start attribute. • Example:- • <ol start="50"> <li>HTML</li> <li>CSS</li> <li>JS</li> </ol>
  • 74.
    Nested List • Listscan be nested (list inside list). Unordered type. • Example:- • <ul> <li>Samsung</li> <li>Iphone <ul> <li>Iphone 10</li> <li>Iphone 11</li> </ul> </li> <li>Oppo</li> </ul>
  • 75.
    Nested List • Listscan be nested (list inside list). Ordered type. • Example:- • <ol> <li>LG TV</li> <li>Samsung <ol> <li>Touch Screen</li> <li>Regular Screen</li> </ol> </li> <li>BPL</li> </ol>
  • 76.
    Description Lists • Adescription list is a list of terms, with a description of each term. • The <dl> tag defines the description list • The <dt> tag defines the term (name) • The <dd> tag describes each term: • Example:- • <dl> <dt>HTML</dt> <dd>- HyperText Markup Language</dd> <dt>CSS</dt> <dd>- Cascading Style Sheet</dd> </dl>
  • 77.
    Iframe Tag • AnHTML iframe is used to display a web page within a web page. • The HTML <iframe> tag specifies an inline frame. • An inline frame is used to embed another document within the current HTML document. • Syntax • <iframe src="url" title="description"></iframe> • Use the height and width attributes to specify the size of the iframe. • The height and width are specified in pixels by default.
  • 78.
    HTML Multimedia • Multimediaon the web is sound, music, videos, movies, and animations. • What is Multimedia? • Multimedia comes in many different formats. It can be almost anything you can hear or see, like images, music, sound, videos, records, films, animations, and more. • Web pages often contain multimedia elements of different types and formats.
  • 79.
    HTML Multimedia • BrowserSupport • The first web browsers had support for text only, limited to a single font in a single color. • Later came browsers with support for colors, fonts, images, and multimedia! • Multimedia Formats • Multimedia elements (like audio or video) are stored in media files. • The most common way to discover the type of a file, is to look at the file extension. • Multimedia files have formats and different extensions like: .wav, .mp3, .mp4, .mpg, .wmv, and .avi.
  • 80.
    Video Tag • TheHTML <video> element is used to show a video on a web page. • To show a video in HTML, use the <video> tag. • In <video> tag you can use – source example:- <video> <source src=“ulr” type=“video/mp4”> Source tag for providing video path. </video>
  • 81.
    Video Tag Attributes •The <source> element allows you to specify alternative video files which the browser may choose from. The browser will use the first recognized format. • The controls attribute adds video controls, like play, pause, and volume. • You can include width and height attributes. If height and width are not set, the page might flicker while the video loads.
  • 82.
    Video Tag Attributes •To start a video automatically, use the autoplay attribute. • Some times most of the browser not supported autoplay attributes. • Add muted after autoplay to let your video start playing automatically (but muted). • Then add loop attribute, loop will execute video in loop form like when video will end it will start again. • There are three supported video formats: MP4, WebM, and Ogg.
  • 83.
    Audio Tag • TheHTML <audio> element is used to play an audio file on a web page. • To play an audio file in HTML, use the <audio> tag. • In <audio> tag you can use – source example:- <audio> <source src=“ulr” type=“video/mp4”> Source tag for providing video path. </audio>
  • 84.
    Audio Tag Attributes •The <source> element allows you to specify alternative audio files which the browser may choose from. The browser will use the first recognized format. • The controls attribute adds audio controls, like play, pause, and volume. • To start an audio file automatically, use the autoplay attribute. • Add muted after autoplay to let your audio file start playing automatically (but muted).
  • 85.
    YouTube Videos • Playinga YouTube Video in HTML • To play your video on a web page, do the following: • Define an <iframe> element in your web page. • Let the src attribute point to the video URL. • Use the width and height attributes to specify the dimension of the player.
  • 86.
    Block Elements • EveryHTML element has a default display value, depending on what type of element it is. • There are two display values: block and inline. • Block-level Elements • A block-level element always starts on a new line. • A block-level element always takes up the full width available in left and right. • Two commonly used block elements are: <p> and <div>. • The <p> element defines a paragraph in an HTML document. • The <div> element defines a division or a section in an HTML document.
  • 87.
    Div Tag • The<div> element is often used as a container for other HTML tags. • The <div> element has no required attributes, but style, class and id are common. • When used together with CSS, the <div> element can be used to style blocks of content. • Example:- • <div style="background- color:black;color:white;padding:20px;"> <h2>Div Tag</h2> <p>The <div> element is often used as a container for other HTML tags.</p> </div>
  • 88.
    Span Tag • The<span> element is an inline container used to mark up a part of a text, or a part of a document. • The <span> element has no required attributes, but style, class and id are common. • When used together with CSS, the <span> element can be used to style parts of the text: • Example:- • <p>My mother has blue eyes and my father has dark green eyes.</p> • <p>My mother has <span style="color:blue;font- weight:bold;">blue</span> eyes and my father has <span style="color:darkolivegreen;font- weight:bold;">dark green</span> eyes.</p>
  • 89.
  • 90.
    Favicon • A faviconis a small image displayed next to the page title in the browser tab. • Use the HTML <link> element to insert a favicon • You can use any image you like as your favicon • To add a favicon to your website, either save your favicon image to the root directory of your webserver, or create a folder in the root directory called images, and save your favicon image in this folder. A common name for a favicon image is "favicon.ico". • Next, add a <link> element to your "index.html" file, after the <title> element. • <link rel=“icon” href=“logo.png” type=“image/png”>
  • 91.
    Marquee Tag • TheMarquee HTML tag is a non-standard HTML element which is used to scroll a image or text horizontally or vertically. • In simple words, you can say that it scrolls the image or text up, down, left or right automatically. • Example:- <marquee> This is an example of html marquee </marquee>
  • 92.
    Marquee Attributes • Marquee'selement contains several attributes that are used to control and adjust the appearance of the marquee. Behavior It facilitates user to set the behavior of the marquee to one of the three different types: scroll, slide and alternate. Direction defines direction for scrolling content. It may be left, right, up and down. Width defines width of marquee in pixels or %. height defines height of marquee in pixels or %.
  • 93.
    Marquee Attributes hspace defineshorizontal space in pixels around the marquee. vspace defines vertical space in pixels around the marquee. scrolldelay defines scroll delay in seconds.by default 85. scrollamount defines scroll amount in number. loop defines loop for marquee content in number. bgcolor defines background color. It is now deprecated.
  • 94.
    Entities • Some charactersare reserved in HTML. • Reserved characters in HTML must be replaced with character entities. • If you use the less than (<) or greater than (>) signs in your text, the browser might mix them with tags. • Character entities are used to display reserved characters in HTML. < less than &lt; &#60; > greater than &gt; &#62; & ampersand &amp; &#38; " double quotation mark &quot; &#34; ' single quotation mark &apos; &#39;
  • 95.
    Entities ¢ cent &cent;&#162; £ pound &pound; &#163; ¥ yen &yen; &#165; € euro &euro; &#8364; © copyright &copy; &#169; ® registered trademark &reg; &#174; ™ TRADEMARK &trade; &#8482;
  • 96.
    Emojis • Emojis looklike images, or icons, but they are not. • They are letters (characters) from the UTF-8 (Unicode) character set. • UTF-8 covers almost all of the characters and symbols in the world. • 😀 &#128512; • 😁 &#128513; • 😂 &#128514; • 😃 &#128515; • 😄 &#128516; • 😅 &#128517;
  • 97.
    Forms • An HTMLform is used to collect user input. The user input is most often sent to a server for processing. • The HTML <form> element is used to create an HTML form for user input. • The <form> element is a container for different types of input elements, such as: text fields, checkboxes, radio buttons, submit buttons, etc. • Using form tag you can create many types of form like login form, payment gateway form, data collection form, etc.
  • 98.
    The <input> tag •Syntax:- <input> • The HTML <input> element is the most used form element. • An <input> element can be displayed in many ways, depending on the type attribute. • Input Type Text • <input type="text"> defines a single-line text input field. • <form> <input type="text" id="fname" name="fname"><br> <input type="text" id="lname" name="lname"> </form>
  • 99.
    Label • The <label>tag defines a label for many form elements. • The <label> element is useful for screen-reader users, because the screen-reader will read out loud the label when the user focus on the input element. • The <label> element also help users who have difficulty clicking on very small regions (such as radio buttons or checkboxes) - because when the user clicks the text within the <label> element, it toggles the radio button/checkbox. • The for attribute of the <label> tag should be equal to the id attribute of the <input> element to bind them together.
  • 100.
    Label Example • <form> <labelfor="fname">First name:</label><br> <input type="text" id="fname" name="fname"><br> <label for="lname">Last name:</label><br> <input type="text" id="lname" name="lname"> </form>
  • 101.
    Input Type Password •<input type="password"> defines a password field. • Example:- • The characters in a password field are masked (shown as asterisks or circles). <form> <label for="username">Username:</label><br> <input type="text" id="username" name="username"> <br> <label for="pwd">Password:</label><br> <input type="password" id="pwd" name="pwd"> </form>
  • 102.
    Input Type Submit •<input type="submit"> defines a button for submitting form data to a form-handler. • The form-handler is typically a server page with a script for processing input data. • The form-handler is specified in the form's action attribute: <form action="/action_page.php"> <label for="fname">First name:</label><br> <input type="text" id="fname" name="fname“ value="John"><br> <label for="lname">Last name:</label><br> <input type="text" id="lname" name="lname“ value="Doe"><br><br> <input type="submit" value="Submit"> </form>
  • 103.
    Input Type Reset •<input type="reset"> defines a reset button that will reset all form values to their default values. <form> <label for="fname">First name:</label><br> <input type="text" id="fname" name="fname" value=“John"><br> <label for="lname">Last name:</label><br> <input type="text" id="lname" name="lname" value="Doe"><br><br> <input type="reset"> </form>
  • 104.
    Input Type Radio •input type="radio"> defines a radio button. • Radio buttons let a user select ONLY ONE of a limited number of choices. • Example:- • <p>Choose your favourite Web language:</p> <form> <input type="radio" id="html" name="fav_language" value="HTML"> <label for="html">HTML</label><br> <input type="radio" id="css" name="fav_language“ value="CSS"> <label for="css">CSS</label><br> </form>
  • 105.
    Input Type Checkbox •<input type="checkbox"> defines a checkbox. • Checkboxes let a user select ZERO or MORE options of a limited number of choices. <form> <input type="checkbox" id="vehicle1" name="vehicl e1" value="Bike"> <label for="vehicle1"> I have a bike</label><br> <input type="checkbox" id="vehicle2" name="vehicl e2" value="Car"> <label for="vehicle2"> I have a car</label><br> </form>
  • 106.
    Input Type Color •The <input type="color"> is used for input fields that should contain a color. • Depending on browser support, a color picker can show up in the input field. • Example:- <form> <label for="favcolor">Select your favorite color:</label> <input type="color" id="favcolor" name="favcolor"> </form>
  • 107.
    Input Type Date •The <input type="date"> is used for input fields that should contain a date. • Depending on browser support, a date picker can show up in the input field. • Example:- <form> <label for="birthday">Birthday:</label> <input type="date" id="birthday" name="birthday"> </form>
  • 108.
    Min & MaxIn Date • You can also use the min and max attributes to add restrictions to dates. • Example:- <form> <label for="datemax">Enter a date before 1980-01-01:</label> <input type="date" id="datemax" name="datemax“ max="1979-12-31"><br><br> <label for="datemin">Enter a date after 2000-01-01:</label> <input type="date" id="datemin" name="datemin" min="2000-01-02"> </form>
  • 109.
    Input Type Datetime-local •The <input type="datetime-local"> specifies a date and time input field, with no time zone. • Depending on browser support, a date picker can show up in the input field. • Example:- <form> <label for="birthdaytime">Birthday (date and time):</label> <input type="datetime- local" id="birthdaytime" name="birthdaytime"> </form>
  • 110.
    Input Type Button •<input type="button"> defines a button. • <input type="button" onclick="alert('Hello World!')“ value="Click Me!"> • Onclick- type your message which is shown in dialog box, pop up on display.
  • 111.
    Input Type Email •The <input type="email"> is used for input fields that should contain an e-mail address. • Depending on browser support, the e-mail address can be automatically validated when submitted. • Some smartphones recognize the email type, and add ".com" to the keyboard to match email input. • <form> <label for="email">Enter your email:</label> <input type="email" id="email" name="email"> </form>
  • 112.
    Input Type Image •The <input type="image"> defines an image as a submit button. • The path to the image is specified in the src attribute. • Example:- • <form> • <input type="image" src="img_submit.gif" alt="Submit" width="48" height="48"> </form>
  • 113.
    Input Type File •The <input type="file"> defines a file-select field and a "Browse" button for file uploads. • Example:- <form> <label for="myfile">Select a file:</label> <input type="file" id="myfile" name="myfile"> </form>
  • 114.
    Input Type Month •The <input type="month"> allows the user to select a month and year. • Depending on browser support, a date picker can show up in the input field. <form> <label for="bdaymonth">Birthday (month and year):</label> <input type="month" id="bdaymonth" name="bdaymonth"> </form>
  • 115.
    Input Type Number •The <input type="number"> defines a numeric input field. • You can also set restrictions on what numbers are accepted. • The following example displays a numeric input field, where you can enter a value from 1 to 5: <form> <label for="quantity">Quantity (between 1 and 5):</label> <input type="number" id="quantity" name="quantity" min="1" max="5"> </form>
  • 116.
    Input Type Range •The <input type="range"> defines a control for entering a number whose exact value is not important (like a slider control). Default range is 0 to 100. However, you can set restrictions on what numbers are accepted with the min, max, and step attributes. <form> <label for="vol">Volume (between 0 and 50):</label> <input type="range" id="vol" name="vol" min="0" max="50"> </form>
  • 117.
    Input Type Search •The <input type="search"> is used for search fields (a search field behaves like a regular text field). example:- <form> <label for="gsearch">Search Google:</label> <input type="search" id="gsearch" name="gsearch"> </form>
  • 118.
    Input Type Tel •The <input type="tel"> is used for input fields that should contain a telephone number. • Example:- <form> <label for="phone">Enter your phone number:</label> <input type="tel" id="phone" name="phone"> </form>
  • 119.
    Input Type Time •The <input type="time"> allows the user to select a time (no time zone). • Depending on browser support, a time picker can show up in the input field. • Example:- <form> <label for="appt">Select a time:</label> <input type="time" id="appt" name="appt"> </form>
  • 120.
    Input Type Url •The <input type="url"> is used for input fields that should contain a URL address. • Depending on browser support, the url field can be automatically validated when submitted. • Some smartphones recognize the url type, and adds ".com" to the keyboard to match url input. <form> <label for="homepage">Add your homepage:</label> <input type="url" id="homepage" name="homepage"> </form>
  • 121.
    Input Type Week •The <input type="week"> allows the user to select a week and year. • Depending on browser support, a date picker can show up in the input field. • Example:- <form> <label for="week">Select a week:</label> <input type="week" id="week" name="week"> </form>
  • 122.
    Input Attributes • Thevalue Attribute • The input value attribute specifies an initial value for an input field. • The disabled Attribute • The input disabled attribute specifies that an input field should be disabled. • A disabled input field is unusable and un-clickable. • The value of a disabled input field will not be sent when submitting the form.
  • 123.
    Input Attributes • Thesize Attribute • The input size attribute specifies the visible width, in characters, of an input field. • The default value for size is 20. • Note: The size attribute works with the following input types: text, search, tel, url, email, and password.
  • 124.
    Input Attributes • Themaxlength Attribute • The input maxlength attribute specifies the maximum number of characters allowed in an input field. • Note: When a maxlength is set, the input field will not accept more than the specified number of characters. However, this attribute does not provide any feedback. So, if you want to alert the user, you must write JavaScript code.
  • 125.
    Input Attributes • Themin and max Attributes • The input min and max attributes specify the minimum and maximum values for an input field. • The min and max attributes work with the following input types: number, range, date, datetime-local, month, time and week. • Tip: Use the max and min attributes together to create a range of legal values.
  • 126.
    Input Attributes • Themultiple Attribute • The input multiple attribute specifies that the user is allowed to enter more than one value in an input field. • The multiple attribute works with the following input types: email, and file.
  • 127.
    Input Attributes • Theplaceholder Attribute • The input placeholder attribute specifies a short hint that describes the expected value of an input field (a sample value or a short description of the expected format). • The short hint is displayed in the input field before the user enters a value. • The placeholder attribute works with the following input types: text, search, url, tel, email, and password.
  • 128.
    Input Attributes • Therequired Attribute • The input required attribute specifies that an input field must be filled out before submitting the form. • The required attribute works with the following input types: text, search, url, tel, email, password, date pickers, number, checkbox, radio, and file. • The autofocus Attribute • The input autofocus attribute specifies that an input field should automatically get focus when the page loads.
  • 129.
    <select> Tag • The<select> tag defines a drop-down list. • The <option> elements defines an option that can be selected. • By default, the first item in the drop-down list is selected. <form> <label>Choose a car:</label> <select> <option value="volvo">Volvo</option> <option value="audi">Audi</option> </select> </form>
  • 130.
    <select> Tag • Todefine a pre-selected option, add the selected attribute to the option. <form> <label>Choose a car:</label> <select> <option value="volvo">Volvo</option> <option value="saab">Saab</option> <option value="fiat" selected>Fiat</option> <option value="audi">Audi</option> </select> </form>
  • 131.
    <select> Tag • Usethe size attribute to specify the number of visible values. <form> <label>Choose a car:</label> <select size="3"> <option value="volvo">Volvo</option> <option value="saab">Saab</option> <option value="fiat">Fiat</option> <option value="audi">Audi</option> </select> </form>
  • 132.
    <select> Tag • Usethe multiple attribute to allow the user to select more than one value. • Hold down the Ctrl (windows) / Command (Mac) button to select multiple options. <form> <label>Choose a car:</label> <select multiple> <option value="volvo">Volvo</option> <option value="saab">Saab</option> <option value="fiat">Fiat</option> <option value="audi">Audi</option> </select> </form>
  • 133.
    <textarea> Tag • The<textarea> element defines a multi-line input field (a text area). • The rows attribute specifies the visible number of lines in a text area. • The cols attribute specifies the visible width of a text area. • <textarea name="message" rows="10" cols="30"> The cat was playing in the garden. </textarea>
  • 134.
    <fieldset> and <legend> •The <fieldset> element is used to group related data in a form. • The <legend> element defines a caption for the <fieldset> element. <form> <fieldset> <legend>Personal Details:</legend> First Name:-<input type="text" name="fname"><br> Last Name:-<input type="text" name="lname"><br> <input type="submit" value="Submit"> </fieldset> </form>
  • 135.
    <datalist> Tag • The<datalist> element specifies a list of pre-defined options for an <input> element. • Users will see a drop-down list of the pre-defined options as they input data. • The list attribute of the <input> element, must refer to the id attribute of the <datalist> element. <form> <input list="Courses" name="Courses"> <datalist id="Courses"> <option value="C Programming"> <option value="CPP"> <option value="JAVA"> </datalist> </form>