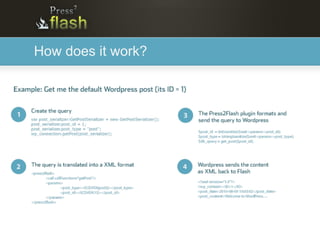
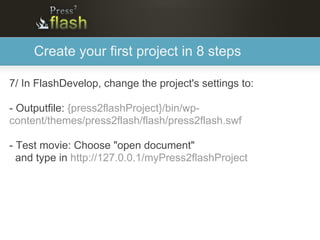
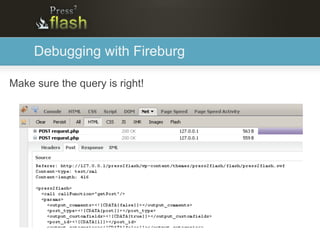
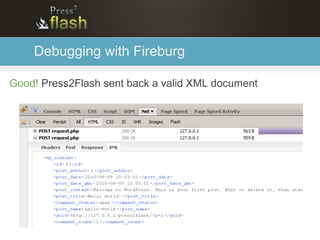
How to get started
with Press2Flash
in 8 Steps


Date: 08/04/2010
Current Press2Flash version: RC1
Author: Erwan Jegouzo
What is Press2Flash?

Add the Flash experience to your
Wordpress-powered Website!
Press2Flash is an AS3 based framework created to add Rich
Media capabilities to your WordPress-powered website.
Press2Flash also provides a Wordpress plugin to enable the
communication between the CMS and Flash.

Check out the website : http://www.press2flash.com
How does it work?
Create your first project in 8 steps

In the next slides, I will show you how to create your first
Press2Flash project.

In this example, I will use FlashDevelop, easyPHP and Firebug
to create and debug the application.
Create your first project in 8 steps

1/ Create a new directory named "myPress2flashProject"
   to host your project.

2/ Create a new Actionscript project in FlashDevelop and
  save it in myPress2flashProject.
Create your first project in 8 steps

3/ Start EasyPHP, Download wordpress and install it in
   myPress2flashProject/bin

  The project url should then be
  http://127.0.0.1/myPress2flashProject/

  If you need help to install Wordpress, check out out this
  tutorial: http://codex.wordpress.org/Installing_WordPress
Create your first project in 8 steps

4/ Checkout the last version of Press2Flash on the repository,
   using your favorite SVN client.

  You have also access to the source code here:
  http://www.press2flash.com/download
Create your first project in 8 steps

5/ Copy the necessary files to your workingspace:

- The theme: myPress2flashProject/wp-content/themes/press2flash

- The plugin: myPress2flashProject/wp-content/plugins/press2flash

- The Actionscript 3 Framework: copy from
  wp-content/themes/press2flash/flash/src to myPress2flashProject/src

- The tutorial files: copy the Classes and the fonts.swf to your
  workspace (make sure Main.as is your document class)
Create your first project in 8 steps

6/ Login to Wordpress to activate the plugin and the theme
Create your first project in 8 steps

7/ In FlashDevelop, change the project's settings to:

- Outputfile: {press2flashProject}/bin/wp-
content/themes/press2flash/flash/press2flash.swf

- Test movie: Choose "open document"
  and type in http://127.0.0.1/myPress2flashProject
Create your first project in 8 steps

8/ Compile and admire!

 If all the steps have been correctly done, you should see the
 default Worpdress post in your Flash application.
How to debug your app

They are many ways to keep track on the exchanges between
Flash and Wordpress:

- Flash Builder Network Monitor
- De MonsterDebugger
- Firebug
Debugging with Fireburg

Make sure the query is right!
Debugging with Fireburg

Good! Press2Flash sent back a valid XML document
Debugging with Fireburg

Error! Press2Flash sent back a PHP error


Errors like this could occur if you modified the PHP code or the
post content is not XML valid!

How to Get started with Press2Flash in 8 Steps

  • 1.
    How to getstarted with Press2Flash in 8 Steps Date: 08/04/2010 Current Press2Flash version: RC1 Author: Erwan Jegouzo
  • 2.
    What is Press2Flash? Addthe Flash experience to your Wordpress-powered Website! Press2Flash is an AS3 based framework created to add Rich Media capabilities to your WordPress-powered website. Press2Flash also provides a Wordpress plugin to enable the communication between the CMS and Flash. Check out the website : http://www.press2flash.com
  • 3.
  • 4.
    Create your firstproject in 8 steps In the next slides, I will show you how to create your first Press2Flash project. In this example, I will use FlashDevelop, easyPHP and Firebug to create and debug the application.
  • 5.
    Create your firstproject in 8 steps 1/ Create a new directory named "myPress2flashProject" to host your project. 2/ Create a new Actionscript project in FlashDevelop and save it in myPress2flashProject.
  • 6.
    Create your firstproject in 8 steps 3/ Start EasyPHP, Download wordpress and install it in myPress2flashProject/bin The project url should then be http://127.0.0.1/myPress2flashProject/ If you need help to install Wordpress, check out out this tutorial: http://codex.wordpress.org/Installing_WordPress
  • 7.
    Create your firstproject in 8 steps 4/ Checkout the last version of Press2Flash on the repository, using your favorite SVN client. You have also access to the source code here: http://www.press2flash.com/download
  • 8.
    Create your firstproject in 8 steps 5/ Copy the necessary files to your workingspace: - The theme: myPress2flashProject/wp-content/themes/press2flash - The plugin: myPress2flashProject/wp-content/plugins/press2flash - The Actionscript 3 Framework: copy from wp-content/themes/press2flash/flash/src to myPress2flashProject/src - The tutorial files: copy the Classes and the fonts.swf to your workspace (make sure Main.as is your document class)
  • 9.
    Create your firstproject in 8 steps 6/ Login to Wordpress to activate the plugin and the theme
  • 10.
    Create your firstproject in 8 steps 7/ In FlashDevelop, change the project's settings to: - Outputfile: {press2flashProject}/bin/wp- content/themes/press2flash/flash/press2flash.swf - Test movie: Choose "open document" and type in http://127.0.0.1/myPress2flashProject
  • 11.
    Create your firstproject in 8 steps 8/ Compile and admire! If all the steps have been correctly done, you should see the default Worpdress post in your Flash application.
  • 12.
    How to debugyour app They are many ways to keep track on the exchanges between Flash and Wordpress: - Flash Builder Network Monitor - De MonsterDebugger - Firebug
  • 13.
    Debugging with Fireburg Makesure the query is right!
  • 14.
    Debugging with Fireburg Good!Press2Flash sent back a valid XML document
  • 15.
    Debugging with Fireburg Error!Press2Flash sent back a PHP error Errors like this could occur if you modified the PHP code or the post content is not XML valid!