This document provides instructions for affiliates on how to create and submit proposals in the One by SMS Assist portal. It explains that proposals are needed when additional work beyond the initial estimate is required. It outlines the different options for creating a proposal, including recovering a rejected one, using a template, or creating a new one. It also describes how to build out a proposal, submit it for approval, and resubmit if it is rejected.
How to accept a work order quick guideDavid DePino
This document provides instructions for affiliates on how to accept work orders from SMS Assist. It explains that pending work orders can be viewed and accepted or declined from the dashboard. To accept an order, affiliates select the work order, then can optionally schedule start/end times and assign a technician, or just accept without adding details. If unable to fulfill a request, affiliates should decline and select a reason so SMS Assist can dispatch to another affiliate.
Emi chapter 2 - step 1 - rev 1 - logging into the jobJeff Weiberg
After receiving job documents, employees log into their job at a computer terminal by entering their employee ID and password. This brings up the active jobs page where the employee can click "Start Job" and then search for their specific job by number to begin the setup process. The employee selects their assembly, operation, and clicks "Setup" to start setup without counting that time against their production quota. After setup is complete, the employee ends the setup and begins production by entering information at the end job page.
The document describes the steps for creating an account and applying for jobs through an online application system. It explains that applicants must first click register to create a profile, then complete tabs for education, licenses, work experience, and references to build a resume. Once the resume is active, applicants can search and apply for jobs by completing additional questions. Applied positions will be listed under a "My Applications" tab.
To find service kits and substitute parts in SPMD, first select the correct region and do an advanced search by service tag to view product details. Copy the original part number, find it in SPMD, and dispatch the service kit if available. To find substitutes, copy the part description from the search results, paste it into SPMD to match specifications with listed parts.
In this article, we are going to see how ClickDimensions enables Marketers to create interactive automations based on prospects or user behaviours which will help to design unique paths for participants to follow as they interact with our messaging it also helps to create Lead-nurture marketing campaigns, Sales engagement campaigns, promotional or event campaigns, new customer on boarding and retention campaigns, and many more.
Form & Survey Builder allows users to create surveys in two steps: building the form elements in Form & Survey Builder, and then distributing the survey to recipients in Launch and Manage Surveys. The document outlines the steps to build a survey form including adding section headers, open-ended text boxes, multiple choice, and rating scale questions. It also describes customizing the survey design, adding recipients, setting preferences like reminders, and launching the live survey.
The document provides 12 steps for creating a quote in CRM from an existing opportunity record, including assigning a quote request task to a sales coordinator, adding quote line items, reviewing the quote details, generating a quote report in PDF format, and creating an order form for production. Key steps involve tasking the coordinator to create the quote, adding items from the product catalog or as write-ins, setting the sort order and owner fields, refreshing totals, and generating the order form.
The document provides 12 steps for creating a quote in CRM from an existing opportunity record, including assigning a quote request task to a sales coordinator, adding quote line items, reviewing the quote details, generating a quote report in PDF format, and creating an order form for production. Key steps involve tasking the coordinator to create the quote, adding items from the product catalog or as write-ins, setting the sort order and owner fields, and generating the order form.
Find nerd project management process help guideFindNerd
FindNerd, a complete suite of project management, mobile game development forums, technology blogs along with features to manage company and employee profiles easily, which is collectively called a social network for developers. Among all these exciting features online project management is one of the powerful features. See detailed information in this document.
The document provides instructions for creating a compliance library, generating compliance from the library, submitting and approving compliance, creating events, and generating reports in a compliance management software. Key steps include uploading an excel file to create a compliance library, assigning compliance to groups and periods, submitting compliance and providing approval/comments, creating events that generate new compliance, and using various filters to search and generate compliance reports.
This document provides an overview of the invoice app by Apptivo, Inc. It describes how the invoice app is integrated with other apps like customers and projects. It explains the different invoice templates for services, items, or both. It also outlines the key fields to include in an invoice like customer details, products, services, and payment terms. Instructions are provided on creating and sending invoices, recording payments, and finding additional resources.
The document discusses the key features and functionality of the Timesheets app by Apptivo. It includes:
1) Creating and submitting timesheets, including adding projects, tasks, customers and time entries. Timesheets can be submitted to managers for approval.
2) Managers can approve or reject timesheets via email notifications. Approved and rejected timesheets are visible to employees in their dashboard.
3) Rejected timesheets can be edited and resubmitted for approval from the dashboard. The dashboard also displays all approved timesheets.
The document provides instructions on how to bill and invoice customers using the Dispatch app, including how to find and create estimates and invoices from within appointments, how to add line items and totals to estimates and invoices, and how to send estimates and invoices to customers via email or signature. Technicians and dispatchers can create estimates to provide customers cost quotes and invoices to bill for completed work directly from the app while in the field. The document also provides contact information for getting help with billing and invoicing in Dispatch.
The document provides a step-by-step guide to using the FidPro debt counseling system. It outlines 14 steps for capturing a client's application information, including personal details, income, expenses, debts, documents, and bank details. It describes how the system automatically calculates some fields, checks for errors, and allows uploading documents. The final steps review the application summary and notes, and submit the completed application for processing.
This document introduces Tariff Checkmate, a tool that allows users to compare electricity and gas tariffs to find the cheapest option. It summarizes the key features and functionality of the tool. The tool pulls rate information from tariff sheets to calculate costs based on user-input consumption data. Screenshots demonstrate the web form interface and backend calculation sheet. The goal of the tool is to help agents quickly and easily answer customers' common questions about whether they are on the cheapest tariff.
This document provides an overview of InterTrade software, an ERP system for trading organizations. It has six main modules: Master, Sales, Purchase, Logistics, Administration, and Finance. The Master module allows users to add and manage core reference data like products, customers, suppliers, etc. The Sales module supports processes like inquiries, quotations, orders, and invoices. The Purchase module enables generation of purchase orders and receipt of goods. Key functions covered include adding products, customers, suppliers, generating sales orders and purchase orders, and receiving goods.
The document describes the process for creating a story using the Country Editor tools on the Instablogs website. It involves 3 main steps: 1) generating leads and selecting contacts to survey, 2) collecting responses and building the story, 3) editing and publishing the completed story. Key sections of the Country Editor tools page include Tools, Reports, and Instabloid Tutorials. The Tools section guides users through sending a survey, viewing responses, and writing the story using the feedback.
Proposify is a tool for creating and sending proposals. It allows CDPeeps to choose a template, enter basic details, attach files, and add fees or costs. The proposal can then be sent to clients for electronic signature or downloaded as a PDF. Clients and CDPeeps can leave comments. Edits can be made if requested by the client before signing. Once signed, the proposal moves to the closed/won category. Proposify integrates with Hubspot for CRM purposes.
The document provides an overview of the Survey Plotter workflow and application. It describes the login process, home screen, menu options including Survey, Product, User, Region, Customer, and Emailer. For each menu item, it explains how to view existing records, create new records, and modify or delete existing records. The overview also describes the survey creation process from selecting a region to adding questions.
Capstone New Century Wellness Group Task Financial.pdfstudywriters
The document provides an overview of the financial analysis for a proposed new patient management system for New Century Wellness Group. It includes a table outlining the tangible costs and benefits of the system, such as annual savings from reducing errors and overtime. It also discusses alternatives for developing the system, such as in-house development or purchasing a vendor package.
This document provides instructions and descriptions for various features of a client management system. It describes the home screen users see upon login, how to access call logs, notes, documents, contacts, calendar features, messaging, leads and more. It also outlines the additional administrative features for creating users, custom reports, and other backend functions.
Final project of management information system abubakarabubakar saith
This document provides step-by-step instructions for setting up a new company and maintaining customer, vendor, and default customer information in Peachtree accounting software. It outlines 7 steps to set up a new company, including entering company information, selecting an accounting method and period, and finalizing the setup. It then describes maintaining customer information by entering details into various tabs, maintaining vendor records through similar tabs, and setting default customer information options. The document is intended as a user guide or tutorial for Peachtree.
This document provides an overview of InterTrade, an ERP software for trading organizations. It describes the various modules including login, sales, purchase, logistics, administration, and finance. The sales module allows users to create inquiries, quotations and orders. The purchase module enables generation of purchase orders and goods receipt notes. The logistics module covers packing lists, dispatch of goods, and reports. The administration module is used to create and manage users. Finally, the finance module provides functionality for accounting tasks like accounts, vouchers, reports.
This document is a project report submitted by four students to their professor for a DBMS project on automating a laundry service. It includes an acknowledgement section thanking the professor and others for their support and guidance. The contents section lists the various parts of the report covering requirements analysis, ERD diagram, normalization, PL/SQL code, and other sections related to implementing the database system for the laundry service. An overview of the proposed automated system and its key functional requirements are provided in the requirements analysis section.
The document requests proposals from website developers to create a new industry-specific website. It should include user profiles for buyers and suppliers, with features like inventory listings, product searching, leads notifications, and ratings/reviews. The homepage needs basic information and login. Profiles need customizable settings and sections for company details, media, etc. Developers should provide details on costs, timelines, and examples of similar work exceeding the quality of samples listed.
Mass Convert Leads in Salesforce using Standard ReportsMarketingAYAN
This document discusses how to use Salesforce's Bulk Object Field Creator (BOFC) application to mass convert leads using standard reports. It provides a step-by-step process to select a standard report on leads, choose conversion options like creating new accounts or opportunities, and then convert the selected leads in bulk. This allows users to convert hundreds of leads with just a few clicks, saving significant time over manual one-by-one conversion.
This document provides a template for training new technicians on how to use the network monitoring and help desk software Spiceworks. It includes step-by-step instructions on viewing user requests, adding new requests, contacting requestors, working on and completing requests, and reopening work orders. The template is meant to be customized for each company's specific policies and procedures.
This add-on allows users to negotiate product prices with store admins. It provides a form for users to request offers on specific products, and gives admins tools to accept, reject, or counter the offers. If an offer is accepted, the user is redirected to checkout with a discount code applied. The extension aims to help stores that provide custom services or quotes.
Tanjore Painting: Rich Heritage and Intricate Craftsmanship | Cottage9Cottage9 Enterprises
Explore the exquisite art of Tanjore Painting, known for its vibrant colors, gold foil work, and traditional themes. Discover its cultural significance today!
More Related Content
Similar to How to create submit a proposal quick guide
Find nerd project management process help guideFindNerd
FindNerd, a complete suite of project management, mobile game development forums, technology blogs along with features to manage company and employee profiles easily, which is collectively called a social network for developers. Among all these exciting features online project management is one of the powerful features. See detailed information in this document.
The document provides instructions for creating a compliance library, generating compliance from the library, submitting and approving compliance, creating events, and generating reports in a compliance management software. Key steps include uploading an excel file to create a compliance library, assigning compliance to groups and periods, submitting compliance and providing approval/comments, creating events that generate new compliance, and using various filters to search and generate compliance reports.
This document provides an overview of the invoice app by Apptivo, Inc. It describes how the invoice app is integrated with other apps like customers and projects. It explains the different invoice templates for services, items, or both. It also outlines the key fields to include in an invoice like customer details, products, services, and payment terms. Instructions are provided on creating and sending invoices, recording payments, and finding additional resources.
The document discusses the key features and functionality of the Timesheets app by Apptivo. It includes:
1) Creating and submitting timesheets, including adding projects, tasks, customers and time entries. Timesheets can be submitted to managers for approval.
2) Managers can approve or reject timesheets via email notifications. Approved and rejected timesheets are visible to employees in their dashboard.
3) Rejected timesheets can be edited and resubmitted for approval from the dashboard. The dashboard also displays all approved timesheets.
The document provides instructions on how to bill and invoice customers using the Dispatch app, including how to find and create estimates and invoices from within appointments, how to add line items and totals to estimates and invoices, and how to send estimates and invoices to customers via email or signature. Technicians and dispatchers can create estimates to provide customers cost quotes and invoices to bill for completed work directly from the app while in the field. The document also provides contact information for getting help with billing and invoicing in Dispatch.
The document provides a step-by-step guide to using the FidPro debt counseling system. It outlines 14 steps for capturing a client's application information, including personal details, income, expenses, debts, documents, and bank details. It describes how the system automatically calculates some fields, checks for errors, and allows uploading documents. The final steps review the application summary and notes, and submit the completed application for processing.
This document introduces Tariff Checkmate, a tool that allows users to compare electricity and gas tariffs to find the cheapest option. It summarizes the key features and functionality of the tool. The tool pulls rate information from tariff sheets to calculate costs based on user-input consumption data. Screenshots demonstrate the web form interface and backend calculation sheet. The goal of the tool is to help agents quickly and easily answer customers' common questions about whether they are on the cheapest tariff.
This document provides an overview of InterTrade software, an ERP system for trading organizations. It has six main modules: Master, Sales, Purchase, Logistics, Administration, and Finance. The Master module allows users to add and manage core reference data like products, customers, suppliers, etc. The Sales module supports processes like inquiries, quotations, orders, and invoices. The Purchase module enables generation of purchase orders and receipt of goods. Key functions covered include adding products, customers, suppliers, generating sales orders and purchase orders, and receiving goods.
The document describes the process for creating a story using the Country Editor tools on the Instablogs website. It involves 3 main steps: 1) generating leads and selecting contacts to survey, 2) collecting responses and building the story, 3) editing and publishing the completed story. Key sections of the Country Editor tools page include Tools, Reports, and Instabloid Tutorials. The Tools section guides users through sending a survey, viewing responses, and writing the story using the feedback.
Proposify is a tool for creating and sending proposals. It allows CDPeeps to choose a template, enter basic details, attach files, and add fees or costs. The proposal can then be sent to clients for electronic signature or downloaded as a PDF. Clients and CDPeeps can leave comments. Edits can be made if requested by the client before signing. Once signed, the proposal moves to the closed/won category. Proposify integrates with Hubspot for CRM purposes.
The document provides an overview of the Survey Plotter workflow and application. It describes the login process, home screen, menu options including Survey, Product, User, Region, Customer, and Emailer. For each menu item, it explains how to view existing records, create new records, and modify or delete existing records. The overview also describes the survey creation process from selecting a region to adding questions.
Capstone New Century Wellness Group Task Financial.pdfstudywriters
The document provides an overview of the financial analysis for a proposed new patient management system for New Century Wellness Group. It includes a table outlining the tangible costs and benefits of the system, such as annual savings from reducing errors and overtime. It also discusses alternatives for developing the system, such as in-house development or purchasing a vendor package.
This document provides instructions and descriptions for various features of a client management system. It describes the home screen users see upon login, how to access call logs, notes, documents, contacts, calendar features, messaging, leads and more. It also outlines the additional administrative features for creating users, custom reports, and other backend functions.
Final project of management information system abubakarabubakar saith
This document provides step-by-step instructions for setting up a new company and maintaining customer, vendor, and default customer information in Peachtree accounting software. It outlines 7 steps to set up a new company, including entering company information, selecting an accounting method and period, and finalizing the setup. It then describes maintaining customer information by entering details into various tabs, maintaining vendor records through similar tabs, and setting default customer information options. The document is intended as a user guide or tutorial for Peachtree.
This document provides an overview of InterTrade, an ERP software for trading organizations. It describes the various modules including login, sales, purchase, logistics, administration, and finance. The sales module allows users to create inquiries, quotations and orders. The purchase module enables generation of purchase orders and goods receipt notes. The logistics module covers packing lists, dispatch of goods, and reports. The administration module is used to create and manage users. Finally, the finance module provides functionality for accounting tasks like accounts, vouchers, reports.
This document is a project report submitted by four students to their professor for a DBMS project on automating a laundry service. It includes an acknowledgement section thanking the professor and others for their support and guidance. The contents section lists the various parts of the report covering requirements analysis, ERD diagram, normalization, PL/SQL code, and other sections related to implementing the database system for the laundry service. An overview of the proposed automated system and its key functional requirements are provided in the requirements analysis section.
The document requests proposals from website developers to create a new industry-specific website. It should include user profiles for buyers and suppliers, with features like inventory listings, product searching, leads notifications, and ratings/reviews. The homepage needs basic information and login. Profiles need customizable settings and sections for company details, media, etc. Developers should provide details on costs, timelines, and examples of similar work exceeding the quality of samples listed.
Mass Convert Leads in Salesforce using Standard ReportsMarketingAYAN
This document discusses how to use Salesforce's Bulk Object Field Creator (BOFC) application to mass convert leads using standard reports. It provides a step-by-step process to select a standard report on leads, choose conversion options like creating new accounts or opportunities, and then convert the selected leads in bulk. This allows users to convert hundreds of leads with just a few clicks, saving significant time over manual one-by-one conversion.
This document provides a template for training new technicians on how to use the network monitoring and help desk software Spiceworks. It includes step-by-step instructions on viewing user requests, adding new requests, contacting requestors, working on and completing requests, and reopening work orders. The template is meant to be customized for each company's specific policies and procedures.
This add-on allows users to negotiate product prices with store admins. It provides a form for users to request offers on specific products, and gives admins tools to accept, reject, or counter the offers. If an offer is accepted, the user is redirected to checkout with a discount code applied. The extension aims to help stores that provide custom services or quotes.
Similar to How to create submit a proposal quick guide (20)
Tanjore Painting: Rich Heritage and Intricate Craftsmanship | Cottage9Cottage9 Enterprises
Explore the exquisite art of Tanjore Painting, known for its vibrant colors, gold foil work, and traditional themes. Discover its cultural significance today!
Heart Touching Romantic Love Shayari In English with ImagesShort Good Quotes
Explore our beautiful collection of Romantic Love Shayari in English to express your love. These heartfelt shayaris are perfect for sharing with your loved one. Get the best words to show your love and care.
➒➌➎➏➑➐➋➑➐➐KALYAN MATKA | MATKA RESULT | KALYAN MATKA TIPS | SATTA MATKA | MATKA.COM | MATKA PANA JODI TODAY | BATTA SATKA | MATKA PATTI JODI NUMBER | MATKA RESULTS | MATKA CHART | MATKA JODI | SATTA COM | FULL RATE GAME | MATKA GAME | MATKA WAPKA | ALL MATKA RESULT LIVE ONLINE | MATKA RESULT | KALYAN MATKA RESULT | DPBOSS MATKA 143 | MAIN MATKA
❼❷⓿❺❻❷❽❷❼❽ Dpboss Kalyan Satta Matka Guessing Matka Result Main Bazar chart Final Matka Satta Matta Matka 143 Kalyan Chart Satta fix Jodi Kalyan Final ank Matka Boss Satta 143 Matka 420 Golden Matka Final Satta Kalyan Penal Chart Dpboss 143 Guessing Kalyan Night Chart
❼❷⓿❺❻❷❽❷❼❽ Dpboss Kalyan Satta Matka Guessing Matka Result Main Bazar chart
How to create submit a proposal quick guide
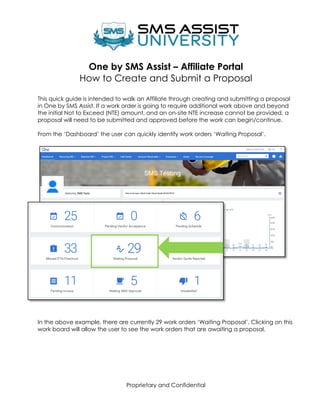
1. Proprietary and Confidential
One by SMS Assist – Affiliate Portal
How to Create and Submit a Proposal
This quick guide is intended to walk an Affiliate through creating and submitting a proposal
in One by SMS Assist. If a work order is going to require additional work above and beyond
the initial Not to Exceed (NTE) amount, and an on-site NTE increase cannot be provided, a
proposal will need to be submitted and approved before the work can begin/continue.
From the ‘Dashboard’ the user can quickly identify work orders ‘Waiting Proposal’.
In the above example, there are currently 29 work orders ‘Waiting Proposal’. Clicking on this
work board will allow the user to see the work orders that are awaiting a proposal.
2. Proprietary and Confidential
A work order will go into “Waiting Proposal” status after the technician
checks out of the mobile app with the status “Pending Vendor Quote.”
Clicking on this work board from the main Affiliate Dashboard will allow
the user to see the work order(s) individually, as shown below.
Clicking on the work order # will bring the user into the details of the work order. Once in the
work order details, the user will be able to see the ‘Proposal’ tab as indicated below. Within
the proposal tab, three options for submitting a proposal will appear.
3. Proprietary and Confidential
Recover: The tab ‘Recover’ will allow the user to recover and reuse a proposal that
was rejected. The user will have the ability to edit this proposal as per the changes
and recommendations by SMS Assist and then resubmit it for review.
If the user selects ‘Recover’ they will be able to upload a rejected proposal into the
proposal builder. To import the proposal, the user will first check the box next to the
work order number on the left, then click ‘Recover Selected’ on the right side of the
popup. This will transfer over the exact line items from the rejected proposal. The
user can then edit line items to reflect the most accurate information for the
specific work order.
From the template to open: The tab “From the template to open” will allow
the user to choose from templates already pre-created by the Affiliate in the
Affiliate Portal. The user can use these templates when completing similar
work and make minor edits when required.
If the user selects “From the template to open” they will be presented with a
popup menu from which they can select a saved template. If the user
chooses to use the template, they will select the option labeled ‘Use it!’ Once
the “Use it!” button is chosen, the proposal template will automatically load
into the proposal tool. The user can then edit line items on the proposal
template to reflect the most accurate information for the specific work order.
4. Proprietary and Confidential
Create a new one (Proposal)
To accurately submit an proposal; the user will need to fill in the appropriate information as
will be indicated below:
1. The ‘Printer’ button will allow the user to print the proposal.
The reverse ‘Clock’ will allow the user to quickly view any proposal history.
2. Repair or Replacement
o Choose whether the job is a ‘Replace’ or ‘Repair’ work order. If the user chooses
‘Replace’ the asset window will appear. Fill in all the asset details for the unit that
2
3
4
1
5
Create new one: This will allow the user to craft a new proposal. The user will also
have the ability to save a newly created proposal as a template prior to submission
If the user chooses the option of ‘Create a new one’, they will be brought to the
proposal builder. The user will then be able to fill in the proposal with the necessary
items for submission. The user will use the steps on the next page to build a proposal
in One by SMS Assist.
5. Proprietary and Confidential
was worked on if it’s already not in the system. If the user fills in the asset details
here, they will automatically transfer to the proposal and invoice details.
Please reference the Asset Management Quick Guide for help with this step.
3. Description of Proposal:
o Provide a description of the proposal. Be as detailed as possible.
4. Attachments (Optional):
o The next step is to provide attachments. Attachments can be anything to support
the charges on the proposal (pictures, images of receipts, etc.) This is an optional
field.
o The attachments do not take the place of check in, check out or before and
after service pictures. Make sure pictures are uploaded in the’ Check In/Out’
section of the work order. These pictures should be auto-filled if the technician
used the App correctly.
o If the technician didn’t utilize the app, make sure to upload pictures in the
‘Attachment’ section of the work order.
5. Incurred Cost:
o An incurred cost is any cost the Affiliate has already taken on as a result of a
service. For example, the Affiliate has already bought a part but the job is going
to be more significant than originally planned. If there are no incurred costs, do
not select this option and continue with the proposal.
Once these steps have been entered and completed, the user can begin to breakdown
the proposal by line item. Lump sums or flat rates will not be accepted. Be as detailed as
possible with each line item
6. Proprietary and Confidential
Please note: The ‘Breakdown’ button will add additional lines if needed for more
information.
After the user has filled in the appropriate charges, select the option to Save as template.
This will allow the user to use the same proposal for future work orders. The Green Check
A popup will appear and
ask if to submit the proposal.
If sure, click Ok. If the user
wants to go back, click
Cancel.
7. Proprietary and Confidential
Creating Multiple Proposal and Comparing Proposals
The user is able create and submit multiple proposals for the same work order. Then, the
client will choose the proposal they wish to use to complete the work. If multiple proposals
have been created or should be submitted for review, then the ‘Compare’ button will allow
the user to select proposals to compare the proposal details.
Upon clicking the compare button, the proposal will be added in the first field as a proposal
awaiting review. Clicking the plus sign button as seen below will allow the user to add
additional proposals to the list.
Once the plus sign button is selected the user will have the options to upload a Template to
open, Recover (from a previous work order) or Create a new one. The example below shows
the user selecting to ‘Recover Sleected from a previous upload.
8. Proprietary and Confidential
Upon clicking the recover button the Proposal History box will open up and the user can
selected a proposal and then click the ‘compare’ button to add it to one of the place
holder compare fields.
Once all the proposals have been added to the ‘Proposal Comparison’ field, the user can
click the green ‘Compare’ button.
Upon clicking the ‘Compare’ button the user is able to see the details of all selected
proposals side by side. At the bottom of the page the user will see two buttons:
9. Proprietary and Confidential
The button labeled ‘Highlighting the different items’ will show all of the line items that
have a different subtotal.
The button labeled ‘Hide the same items’ will remove all subtotals that are the same.
The user will then be able to see all of the items on the work order which are both the
same and different in parallel columns.
The comparison tool will open in a separate browser tab. To exit the comparison tool, click
on the browser tab which contains One by SMS Assist.
10. Proprietary and Confidential
Waiting SMS Approval
After the Affiliate has submitted a proposal, the work order will appear in the Waiting SMS
Approval work board.
Upon clicking on this tab, the Affiliate will see a list of all the work orders pending. The status
column will show the Affiliate if the proposal has been received, submitted, or pending
client review and approval.
11. Proprietary and Confidential
Vendor Quote Rejected
If the work order is rejected, the work order will appear in the Vendor Quote Rejected work
board on the Dashboard. If the proposal was not detailed enough or one more or elements
of the proposal were missing or incorrect, that is reason for a rejection. To view the work
order(s) in this status, click the Vendor Quote Rejected work board.
This will bring the Affiliate to the Vendor Quote Rejected screen. In order to view the work
order with the rejected proposal, click the work order number.
12. Proprietary and Confidential
In order to view the declined proposal, click the tab labeled Proposal.
The reason for the declination will appear in red at the top of the declined proposal.
How to Resubmit a Proposal
In order to resubmit the proposal, click the button in the upper right corner.
This will then open the three proposal options. In order to adjust the rejected proposal click
the Recover option.
13. Proprietary and Confidential
A popup will appear with the declined proposal. To select this item, check the box to the
left of the proposal name you wish to add on. Then, click Recover Selected in the upper
right corner.
The proposal builder tool will now appear and the Affiliate will be able to adjust the
proposal to make changes indicated by SMS Assist.