Downloaded 14 times


![FIRMWARE VERSION 1.0.6.11 GXP1160/GXP1165 USER MANUAL Page 7 of 65
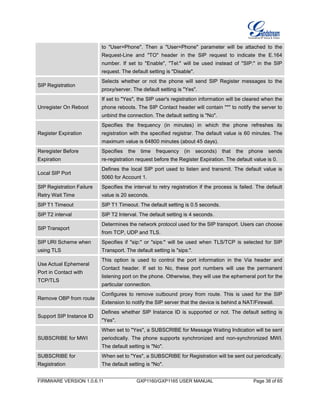
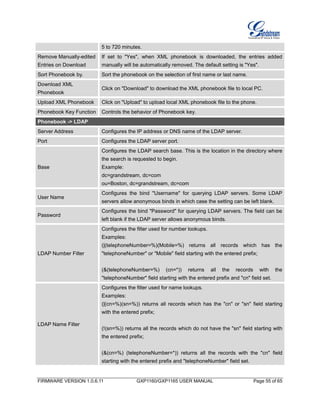
CHANGE LOG
This section documents significant changes from previous versions of user manuals for
GXP1160/GXP1165. Only major new features or major document updates are listed here. Minor updates
for corrections or editing are not documented here.
FIRMWARE VERSION 1.0.6.11
Added phone power special feature. [ACCOUNTS PAGE DEFINITIONS]
Added support for inserting pauses into speed dials and phone book entries. [INSERTING PAUSE
INTO PHONEBOOK ENTRIES]
Added support for Svenska language.
Added “PC port VLAN Tag” under Network setting.[NETWORK PAGE DEFINITIONS]
Added “PC port Priority Value” under Network setting. [NETWORK PAGE DEFINITIONS]
Added “Date Time” setting under Preference setting on menu. [CONFIGURATION VIA KEYPAD]
FIRMWARE VERSION 1.0.6.7
No new feature added.
FIRMWARE VERSION 1.0.5.58
Added “3CX Auto Provision” under Maintenance. [MAINTENANCE PAGE DEFINITIONS]
Added “Second Dial Tone” under Settings. [SETTINGS PAGE DEFINITIONS]
Added “Sort Phonebook by” under Phonebook Management.[PHONEBOOK PAGE DEFINITIONS]
Added “Public Mode Login Expiration” under Settings. [SETTINGS PAGE DEFINITIONS]
Added “Hold Method” under Account setting. [ACCOUNTS PAGE DEFINITIONS]
Added “Crypto Life Time” under Account setting. [ACCOUNTS PAGE DEFINITIONS]
Added “UCM Connection” under LCD Main menu.[CONFIGURATION VIA KEYPAD]
FIRMWARE VERSION 1.0.5.32
Added “Web Access Mode” under Security setting. [SECURITY]
Replaced “Disable Telnet” under Web Access by “Disable SSH” under Security setting page.
[SECURITY]
FIRMWARE VERSION 1.0.5.26](https://image.slidesharecdn.com/gxp1165-150430093109-conversion-gate02/85/Manual-GXP1165-Grandstream-Telefone-IP-9-320.jpg)
![FIRMWARE VERSION 1.0.6.11 GXP1160/GXP1165 USER MANUAL Page 8 of 65
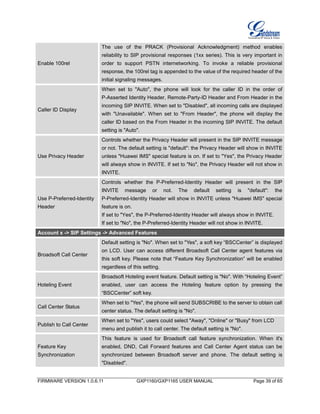
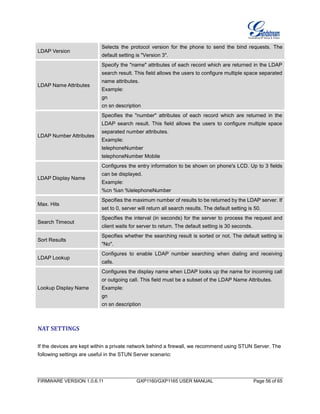
Added “Phonebook Key function” feature under Phonebook Management settings. [PHONEBOOK
PAGE DEFINATION]
Added “Blink message LED on ringing” feature in Call Features. [CALL FEATURES]
FIRMWARE VERSION 1.0.5.24
Updated TFTP server download link for 1.0.5.24. [NO LOCAL TFTP/HTTP SERVERS]
Added “Enable LLDP” feature under Network settings. [NETWORK PAGE DEFINITIONS]
FIRMWARE VERSION 1.0.5.15
Updated Web GUI interface examples with new screenshots for 1.0.5.15. [GUI INTERFACE
EXAMPLES]
Add pin-out information. [Figure 2: GXP1160/GXP1165 Pin-out]
Updated Auto Attended Transfer information. [CALL TRANSFER]
Modified Public Mode information. [PUBLIC MODE]
Updated Click-To-Dial feature information. [EDITING CONTACTS AND CLICK-TO-DIAL]
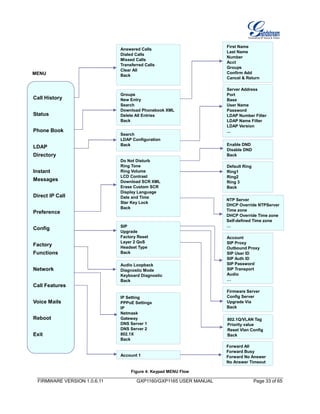
Updated Keypad MENU options and Keypad configuration flow. [CONFIGURATION VIA KEYPAD]
Updated Web GUI options. [DEFINITIONS]
FIRMWARE VERSION 1.0.5.2
This is the initial version.](https://image.slidesharecdn.com/gxp1165-150430093109-conversion-gate02/85/Manual-GXP1165-Grandstream-Telefone-IP-10-320.jpg)


![FIRMWARE VERSION 1.0.6.11 GXP1160/GXP1165 USER MANUAL Page 42 of 65
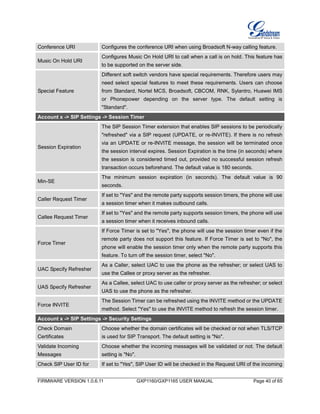
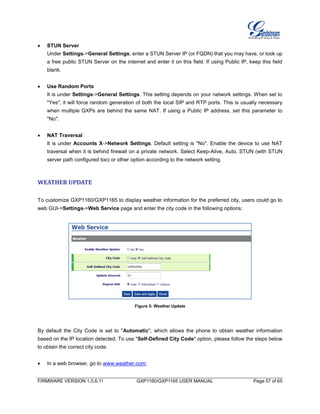
iLBC Payload Type
Specifies iLBC Payload type. The default value is 97. The valid range is
between 96 and 127.
Jitter Buffer Type
Selects either Fixed or Adaptive based on network conditions. The default
setting is "Adaptive".
Jitter Buffer Length
Selects Low, Medium, or High based on network conditions. The default
setting is "Medium".
Account x -> Call Settings
Early Dial
Selects whether or not to enable early dial. If it's set to "Yes", the SIP proxy
must support 484 response. The default setting is "No".
Dial Plan Prefix Sets the prefix added to each dialed number.
Dial Plan
A dial plan establishes the expected number and pattern of digits for a
telephone number. This parameter configures the allowed dial plan for the
phone.
Dial Plan Rules:
1. Accepted Digits: 1,2,3,4,5,6,7,8,9,0 , *, #, A,a,B,b,C,c,D,d;
2. Grammar: x - any digit from 0-9;
a) xx+ or xx. - at least 2 digit numbers
b) xx - only 2 digit numbers
c) ^ - exclude
d) [3-5] - any digit of 3, 4, or 5
e) [147] - any digit of 1, 4, or 7
f) <2=011> - replace digit 2 with 011 when dialing
g) | - the OR operand
Example 1: {[369]11 | 1617xxxxxxx}
Allow 311, 611, and 911 or any 10 digit numbers with leading digits 1617;
Example 2: {^1900x+ | <=1617>xxxxxxx}
Block any number of leading digits 1900 or add prefix 1617 for any dialed 7
digit numbers;
Example 3: {1xxx[2-9]xxxxxx | <2=011>x+}
Allows any number with leading digit 1 followed by a 3 digit number, followed
by any number between 2 and 9, followed by any 7 digit number OR Allows
any length of numbers with leading digit 2, replacing the 2 with 011 when
dialed.](https://image.slidesharecdn.com/gxp1165-150430093109-conversion-gate02/85/Manual-GXP1165-Grandstream-Telefone-IP-44-320.jpg)
![FIRMWARE VERSION 1.0.6.11 GXP1160/GXP1165 USER MANUAL Page 43 of 65
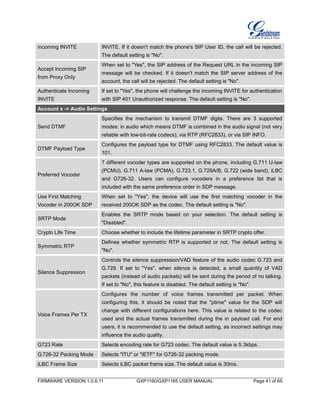
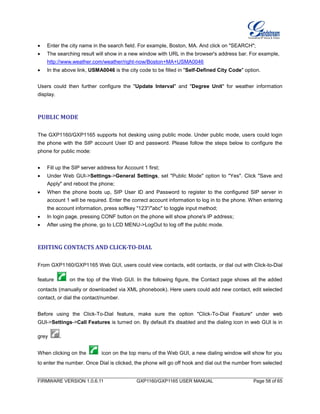
Example of a simple dial plan used in a Home/Office in the US:
{ ^1900x. | <=1617>[2-9]xxxxxx | 1[2-9]xx[2-9]xxxxxx | 011[2-9]x. | [3469]11 }
Explanation of example rule (reading from left to right):
^1900x. - prevents dialing any number started with 1900;
<=1617>[2-9]xxxxxx - allows dialing to local area code (617) numbers by
dialing 7 numbers and 1617 area code will be added automatically;
1[2-9]xx[2-9]xxxxxx |- allows dialing to any US/Canada Number with 11
digits length;
011[2-9]x - allows international calls starting with 011;
[3469]11 - allows dialing special and emergency numbers 311, 411, 611
and 911.
Note:
In some cases where the user wishes to dial strings such as *123 to activate
voice mail or other applications provided by their service provider, the * should
be predefined inside the dial plan feature. An example dial plan will be: { *x+ }
which allows the user to dial * followed by any length of numbers.
Delayed Call Forward
Wait Time
Defines the timeout (in seconds) before the call is forwarded on no answer.
The default value is 20 seconds.
Enable Call Features
The default setting is "Yes". When enabled, call features using star codes will
be supported locally. If set to "No", Call Features and DND options under LCD
menu are supported. And ForwardAll soft key will not be displayed in LCD for
Account 1.
Call Log
Configures Call Log setting on the phone. You can log all calls, only log
incoming/outgoing calls or disable call log. The default setting is "Log All
Calls".
Account Ring Tone
Allows users to configure the ringtone for the account. Users can choose from
different ringtones from the dropdown menu.
Matching Incoming
Caller ID
Specifies matching rules with number, pattern or Alert Info text. When the
incoming caller ID or Alert Info matches the rule, the phone will ring with
selected distinctive ringtone. Matching rules:
Specific caller ID number. For example, 8321123;
A defined pattern with certain length using x and + to specify, where x
could be any digit from 0 to 9. Samples:
xx+ : at least 2-digit number;
xx : only 2-digit number;
[345]xx: 3-digit number with the leading digit of 3, 4 or 5;
[6-9]xx: 3-digit number with the leading digit from 6 to 9.](https://image.slidesharecdn.com/gxp1165-150430093109-conversion-gate02/85/Manual-GXP1165-Grandstream-Telefone-IP-45-320.jpg)
![FIRMWARE VERSION 1.0.6.11 GXP1160/GXP1165 USER MANUAL Page 46 of 65
Disable Call Waiting Tone
Disables the call waiting tone when call waiting is on. The default setting
is "No".
Disable Direct IP Call Disables Direct IP Call. The default setting is "No".
Use Quick IP Call mode
When set to "Yes", users can dial an IP address under the same
LAN/VPN segment by entering the last octet in the IP address. To dial
quick IP call, off hook the phone and dial #XXX (X is 0-9 and XXX
<=255), phone will make direct IP call to aaa.bbb.ccc.XXX where
aaa.bbb.ccc comes from the local IP address REGARDLESS of subnet
mask. #XX or #X are also valid so leading 0 is not required (but OK). No
SIP server is required to make quick IP call. The default setting is "No".
Disable Conference Disables the Conference function. The default setting is "No".
Disable in-call DTMF Display
When it's set to "Yes", the DTMF digits entered during the call will not
display. The default setting is "No".
Enable MPK sending DTMF
Enables Multi Purpose Key to send DTMF during the call. The default
setting is "No".
Disable Transfer Disables the Transfer function. The default setting is "No".
In-call dial number on pressing
transfer key
Configures the number for the phone to dial as DTMF during the call
using TRAN button.
Auto-Attended Transfer
If set to "Yes", the phone will use attended transfer by default. The default
setting is "No".
Do Not Escape # as %23 in
SIP URI
Specifies whether to replace # by %23 or not for some special situations.
The default setting is "No".
Click-To-Dial Feature Enables Click-To-Dial feature. The default setting is "Disabled".
Blink message LED on ringing
Message LED light will blink if there is an incoming call. Default value is
“No”.
Call History Flash Writing:
Write Timeout
Defines the interval (in seconds) to save the call history to phone's flash.
The default value is 300 seconds.
Call History Flash Writing:
Max Unsaved Log
Defines the number of unsaved logs before written to phone's flash. The
default value is 200 entries.
Settings -> Ring Tone
Call Progresses Tones:
System Ring Tone
Dial Tone
Second Dial Tone
Message Waiting
Ring Back Tone
Call-Waiting Tone
Configures ring or tone frequencies based on parameters from local
telecom. The default value is North American standard. Frequencies
should be configured with known values to avoid uncomfortable high
pitch sounds.
Syntax: f1=val,f2=val[,c=on1/off1[-on2/off2[-on3/off3]]];
(Frequencies are in Hz and cadence on and off are in 10ms)](https://image.slidesharecdn.com/gxp1165-150430093109-conversion-gate02/85/Manual-GXP1165-Grandstream-Telefone-IP-48-320.jpg)
![FIRMWARE VERSION 1.0.6.11 GXP1160/GXP1165 USER MANUAL Page 48 of 65
Headset RX gain Configures the receiving gain of the headset. The default value is 0dB.
Handset TX gain
Configures the transmission gain of the handset. The default value is 0
dB.
Settings -> LCD Display
LCD Contrast Configures the LCD contrast level (from 0 to 20). The default value is 10.
Settings -> Date and Time
NTP Server
Defines the URL or IP address of the NTP server. The phone may obtain
the date and time from the server.
Allow DHCP Option 42
Override NTP Server
Defines whether DHCP Option 42 should override NTP server or not.
When enabled, DHCP Option 42 will override the NTP server if it's set up
on the LAN. The default setting is "Yes".
Time Zone
Configures the date/time used on the phone according to the specified
time zone.
Self-Defined Time Zone
This parameter allows the users to define their own time zone.
The syntax is: std offset dst [offset], start [/time], end [/time]
Default is set to: MTZ+6MDT+5,M4.1.0,M11.1.0
MTZ+6MDT+5
This indicates a time zone with 6 hours offset with 1 hour ahead which is
U.S central time. If it is positive (+) if the local time zone is west of the
Prime Meridian (A.K.A: International or Greenwich Meridian) and
negative (-) if it is east.
M4.1.0,M11.1.0
The 1st number indicates Month: 1,2,3.., 12 (for Jan, Feb, .., Dec)
The 2nd number indicates the nth iteration of the weekday: (1st Sunday,
3
rd
Tuesday…)
The 3rd number indicates weekday: 0,1,2,..,6( for Sun, Mon,
Tues, ... ,Sat)
Therefore, this example is the DST which starts from the First Sunday of
April to the 1st Sunday of November.
Date Display Format
Configures the date display format on the LCD. The following formats are
supported:
yyyy-mm-dd: 2012-07-02
mm-dd-yyyy: 07-02-2012
dd-mm-yyyy: 02-07-2012
dddd, MMMM dd: Friday, October 12
MMMM dd, dddd: October 12, Friday
Time Display Format Configures the time display in 12-hour or 24-hour format on the LCD. The](https://image.slidesharecdn.com/gxp1165-150430093109-conversion-gate02/85/Manual-GXP1165-Grandstream-Telefone-IP-50-320.jpg)


The document is the user manual for the GXP1160/GXP1165 IP phone. It provides an overview of the phone's features and specifications. It also includes setup instructions, usage instructions, and details on the phone's configuration options that can be accessed through the phone's keypad menu or web UI. The manual is intended to help users understand and operate the GXP1160/GXP1165 IP phone.


