Set Up Analytics Pageview Tag in GTM
•
0 likes•432 views

Find how to easily create a tag in Google Tag Manager Ver 2.0 interface. In order to get the benefits of other advertising data and Customer Demographics, be sure to Enable Advertiser Features in the Admin panel of your Google Analytics account first. After we’ve set up the Google Analytics Pageview tag, we can collect the first three metrics and dimensions including: Users and Sessions, Traffic Sources, and Customer Demographics.

Recommended
More Related Content
Viewers also liked
Viewers also liked (18)
Similar to Set Up Analytics Pageview Tag in GTM
Similar to Set Up Analytics Pageview Tag in GTM (20)
Recently uploaded
Recently uploaded (20)
Set Up Analytics Pageview Tag in GTM
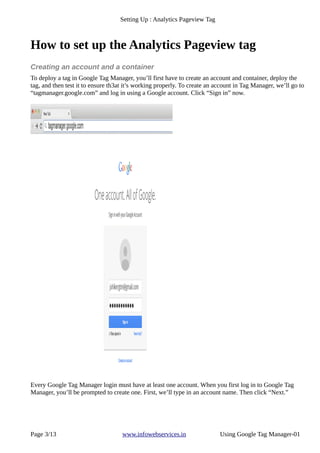
- 1. Setting Up : Analytics Pageview Tag How to set up the Analytics Pageview tag Creating an account and a container To deploy a tag in Google Tag Manager, you’ll first have to create an account and container, deploy the tag, and then test it to ensure th3at it’s working properly. To create an account in Tag Manager, we’ll go to “tagmanager.google.com” and log in using a Google account. Click “Sign in” now. Every Google Tag Manager login must have at least one account. When you first log in to Google Tag Manager, you’ll be prompted to create one. First, we’ll type in an account name. Then click “Next.” Page 3/13 www.infowebservices.in Using Google Tag Manager-01
- 2. Setting Up : Analytics Pageview Tag Now you’ll set up your container. We’ll name the container after the website we’re tagging. Since The Great Outdoors Travel Adventures is a website, under “Where to Use Container” select Web Pages. You can add a domain and a time zone if you wish, but we’ll leave these as the default for now. Now click “Create Account and Container.” To agree to the “Terms of Service,” click “I Accept.” Notice that Tag Manager provides you with the container code that is ready to be copied and pasted. For best results, place this immediately after the opening body tag on every page of your website. If you need to access the container code again, you can find it under “Admin” by selecting the correct container and clicking “Install Google Tag Manager.” We can also add tags if we wish, but for now, just choose “Add Tags Later.” Page 4/13 www.infowebservices.in Using Google Tag Manager-01
- 3. Setting Up : Analytics Pageview Tag Once your account and container have been created, you’ll see the Container Dashboard. The Container Dashboard lets you choose new tags, shows which tags you’re currently editing, and which containers you’ve already published. You can also add notes about your container and view a history of recent changes. You can use the left-hand navigation to create or edit tags, set up triggers, and set up built-in or user-defined variables. Page 5/13 www.infowebservices.in Using Google Tag Manager-01
- 4. Setting Up : Analytics Pageview Tag The Accounts tab will display a list of all of the accounts you have access to, as well as the list of containers within each account, the type, and their ID. To set up a new account, click “Create Account.” We’ll name the account “The Great Outdoors.” Creating a Google Analytics tag Since The Great Outdoors wants to use Google Analytics to help them better understand user behavior, the first tag we’ll add is the standard Google Analytics “Page View” tag. To add a tag to your website, you can select “Tags” in the navigation and then “New,” or you can just select “New Tag.” Select “New Tag” now. To name the tag, click on “Untitled Tag.” To organize your tags, we’ll use the naming convention: tag type, followed by the name of the website, followed by the tag location. Next, choose “Google Analytics.” We’ll select the tag type “Universal Analytics.” Now go ahead and click “Continue.” Page 6/13 www.infowebservices.in Using Google Tag Manager-01
- 5. Setting Up : Analytics Pageview Tag We can add the Google Analytics tracking ID by going into Google Analytics under “Admin.” Then “Property.” Then “Property Settings.” You can also find this ID by clicking “Home” and then expanding the “Account” folder. In order to take advantage of remarketing and get Analytics’ Customer Demographics data, select “Display Advertising Features.” Then select the Track Type “Page View.” Now click “Continue.” Page 7/13 www.infowebservices.in Using Google Tag Manager-01
- 6. Setting Up : Analytics Pageview Tag Since we want this tag to fire on every page of the website in order to track page views, select the trigger “All Pages.” Notice the trigger confirmation below. Then select “Create Tag.” Page 8/13 www.infowebservices.in Using Google Tag Manager-01
- 7. Setting Up : Analytics Pageview Tag You can see that our Google Analytics “Page View” tracking tag now appears in our list of tags. Publishing your Google Analytics tag We’ve created our first tag, but we still have to publish the tag. Click “Publish.” A dialog box will appear with the total number of changes you’re about to publish. Page 9/13 www.infowebservices.in Using Google Tag Manager-01
- 8. Setting Up : Analytics Pageview Tag To inspect your container changes before they go live, click “Preview.” A banner at the top will indicate which version of the tag you are previewing. Let’s open a new tab in our browser and navigate to the Travel Adventures website. Notice that while in “Preview Mode,” a Debug Panel opens at the bottom of the web browser, showing you a summary of the tags that fired. Page 10/13 www.infowebservices.in Using Google Tag Manager-01
- 9. Setting Up : Analytics Pageview Tag You can see that the tracking tag fired in “Preview Mode” when we visited the site. Once we’ve verified that the tag is firing properly, we can return to Tag Manager and click “Publish.” In the confirmation dialog window, click “Publish Now.” You’ll receive a confirmation message telling you that the changes to your container are now live. Page 11/13 www.infowebservices.in Using Google Tag Manager-01
- 10. Setting Up : Analytics Pageview Tag To exit preview mode, click “Leave Preview Mode.” We can also verify that the tag is live by opening up Google Analytics’ Real-Time Reporting and making sure active users and page views are being recorded. How cool is that? If you need to make changes, Tag Manager offers version control for each tag that you publish on the “Versions” tab. You can roll back your tag to a previous version or even save versions of your container without making the changes public. Those are the basic steps to publish a tag to your website using Google Tag Manager. Share this: Was this article helpful? YesNo Submit • ©2015 Google Page 12/13 www.infowebservices.in Using Google Tag Manager-01