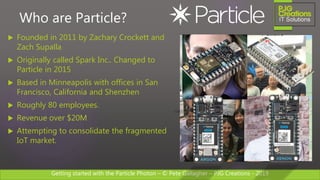
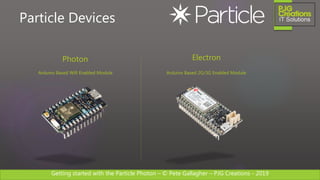
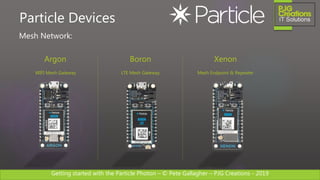
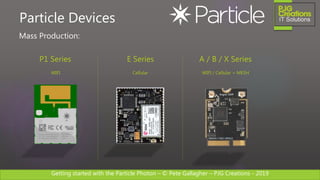
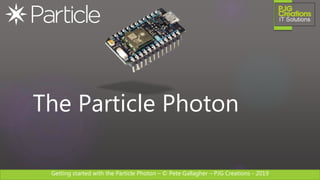
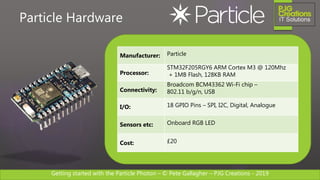
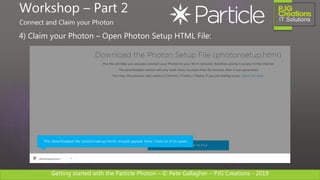
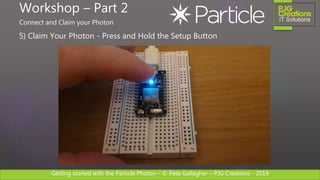
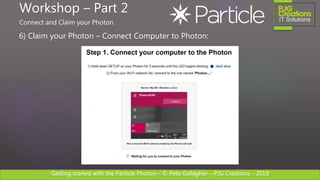
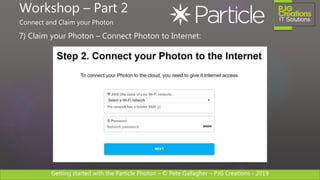
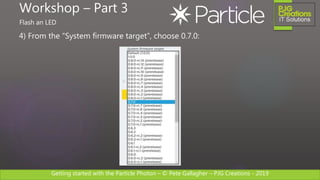
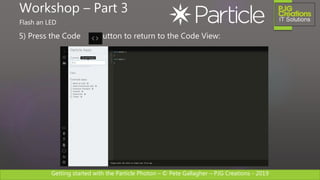
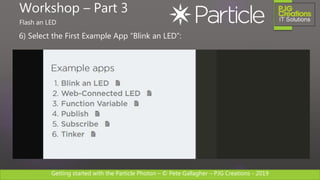
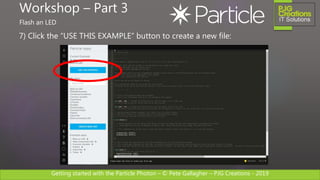
Getting started with the Particle Photon – © Pete Gallagher – PJG Creations - 2019
Getting started with the
Particle Photon
PETE GALLAGHER
PJGCREATIONS.CO.UK
24/01/2019
Getting started with the Particle Photon – © Pete Gallagher – PJG Creations - 2019
About Me
Pete Gallagher
@pete_codes / @PJGCreations
www.PJGCreations.co.uk
Pete@PJGCreations.co.uk
IT Consultant
Decades of Desktop, Web & Embedded Software experience
Gadget Addict
Father of two inquisitive girls
Getting started with the Particle Photon – © Pete Gallagher – PJG Creations - 2019
What we’re going to be doing…
 Who are Particle?
 What devices do they produce?
 The Particle Photon
 Photon Hardware
 Particle Software
 The Web IDE
 The Photon Maker Kit
 Workshop
 Q&A
Getting started with the Particle Photon – © Pete Gallagher – PJG Creations - 2019
Who are Particle?
Getting started with the Particle Photon – © Pete Gallagher – PJG Creations - 2019
Who are Particle?
 Founded in 2011 by Zachary Crockett and
Zach Supalla
 Originally called Spark Inc.. Changed to
Particle in 2015
 Based in Minneapolis with offices in San
Francisco, California and Shenzhen
 Roughly 80 employees.
 Revenue over $20M
 Attempting to consolidate the fragmented
IoT market.
Getting started with the Particle Photon – © Pete Gallagher – PJG Creations - 2019
Particle Devices
Getting started with the Particle Photon – © Pete Gallagher – PJG Creations - 2019
Particle Devices
Photon
Arduino Based Wifi Enabled Module
Electron
Arduino Based 2G/3G Enabled Module
Getting started with the Particle Photon – © Pete Gallagher – PJG Creations - 2019
Particle Devices
Argon
WIFI Mesh Gateway
Boron
LTE Mesh Gateway
Xenon
Mesh Endpoint & Repeater
Mesh Network:
Getting started with the Particle Photon – © Pete Gallagher – PJG Creations - 2019
Particle Devices
P1 Series
WIFI
E Series
Cellular
A / B / X Series
WIFI / Cellular + MESH
Mass Production:
Getting started with the Particle Photon – © Pete Gallagher – PJG Creations - 2019
The Particle Photon
Getting started with the Particle Photon – © Pete Gallagher – PJG Creations - 2019
Manufacturer: Particle
Processor:
STM32F205RGY6 ARM Cortex M3 @ 120Mhz
+ 1MB Flash, 128KB RAM
Connectivity:
Broadcom BCM43362 Wi-Fi chip –
802.11 b/g/n, USB
I/O: 18 GPIO Pins – SPI, I2C, Digital, Analogue
Sensors etc: Onboard RGB LED
Cost: £20
Particle Hardware
Getting started with the Particle Photon – © Pete Gallagher – PJG Creations - 2019
Particle Hardware
Micro USB
For 3v3 power and also PC Access via
the CLI
Getting started with the Particle Photon – © Pete Gallagher – PJG Creations - 2019
Particle Hardware
P0 Module
Contains the Microcontroller, WIFI
module, memory etc
Getting started with the Particle Photon – © Pete Gallagher – PJG Creations - 2019
Particle Hardware
Setup Button
Press and hold to enter Wifi Setup Mode
Getting started with the Particle Photon – © Pete Gallagher – PJG Creations - 2019
Particle Hardware
Reset Button
Used to enter Safe and Firmware Update
Modes
Getting started with the Particle Photon – © Pete Gallagher – PJG Creations - 2019
Particle Hardware
Status LED
Signals the current Status of the Photon
LED Status Docs:
http://bit.ly/photonledstatus
Getting started with the Particle Photon – © Pete Gallagher – PJG Creations - 2019
Particle Hardware
On-board LED
Used for Hello World and your own app
signalling.
Getting started with the Particle Photon – © Pete Gallagher – PJG Creations - 2019
Particle Hardware
GPIO
Power, UART, Digital I/O, Analog I/O etc
Getting started with the Particle Photon – © Pete Gallagher – PJG Creations - 2019
Particle Hardware
Digital I/O
8 Digital I/O pins
(D7 connected to on-board LED)
Getting started with the Particle Photon – © Pete Gallagher – PJG Creations - 2019
Particle Hardware
Analogue I/O
8 Analogue I/O pins
Getting started with the Particle Photon – © Pete Gallagher – PJG Creations - 2019
Particle Hardware
UART
Onboard UART Tx and Rx.
Also extra Digital I/O
Getting started with the Particle Photon – © Pete Gallagher – PJG Creations - 2019
Particle Hardware
RTC Power Supply
3v3 Backup Power for the on-board Real
Time Clock Module and SRAM.
Getting started with the Particle Photon – © Pete Gallagher – PJG Creations - 2019
Particle Hardware
WIFI Aerial
Connector for external WIFI Aerial
Getting started with the Particle Photon – © Pete Gallagher – PJG Creations - 2019
Particle Software
Getting started with the Particle Photon – © Pete Gallagher – PJG Creations - 2019
Web IDE:
Particle Software
Getting started with the Particle Photon – © Pete Gallagher – PJG Creations - 2019
Particle Workbench for VS Code
Particle Software
Getting started with the Particle Photon – © Pete Gallagher – PJG Creations - 2019
Desktop IDE
Particle Software
Getting started with the Particle Photon – © Pete Gallagher – PJG Creations - 2019
Desktop CLI
Particle Software
Getting started with the Particle Photon – © Pete Gallagher – PJG Creations - 2019
Android App
Particle Software
Getting started with the Particle Photon – © Pete Gallagher – PJG Creations - 2019
Web IDE
Getting started with the Particle Photon – © Pete Gallagher – PJG Creations - 2019
1) The Particle Web IDE
Web IDE
Getting started with the Particle Photon – © Pete Gallagher – PJG Creations - 2019
2) The Particle Web IDE – Code Editor
Web IDE
Getting started with the Particle Photon – © Pete Gallagher – PJG Creations - 2019
3) The Particle Web IDE – File Explorer
Web IDE
Getting started with the Particle Photon – © Pete Gallagher – PJG Creations - 2019
4) The Particle Web IDE – Toolbox
Web IDE
Getting started with the Particle Photon – © Pete Gallagher – PJG Creations - 2019
5) The Particle Web IDE – Toolbox Commands - Save
Web IDE
Save
Saves the Code to the
Particle Cloud.
Getting started with the Particle Photon – © Pete Gallagher – PJG Creations - 2019
6) The Particle Web IDE – Toolbox Commands - Verify
Web IDE
Verify
Checks the Code for
Compilation Errors.
Getting started with the Particle Photon – © Pete Gallagher – PJG Creations - 2019
7) The Particle Web IDE – Toolbox Commands - Flash
Web IDE
Flash
Flashes the code to
the device.
Getting started with the Particle Photon – © Pete Gallagher – PJG Creations - 2019
8) The Particle Web IDE – Toolbox Commands - Code
Web IDE
Code
Shows the Code
Editor.
Getting started with the Particle Photon – © Pete Gallagher – PJG Creations - 2019
9) The Particle Web IDE – Toolbox Commands - Libraries
Web IDE
Libraries
Browse extra Code
Libraries.
Getting started with the Particle Photon – © Pete Gallagher – PJG Creations - 2019
10) The Particle Web IDE – Toolbox Commands - Help
Web IDE
Help
Quick Reference Help
(Mainly LED Status).
Getting started with the Particle Photon – © Pete Gallagher – PJG Creations - 2019
11) The Particle Web IDE – Toolbox Commands - Docs
Web IDE
Docs*
Opens the Device
Documentation.
Getting started with the Particle Photon – © Pete Gallagher – PJG Creations - 2019
12) The Particle Web IDE – Toolbox Commands - Devices
Web IDE
Devices
Lists all claimed
Particle Devices.
Getting started with the Particle Photon – © Pete Gallagher – PJG Creations - 2019
13) The Particle Web IDE – Toolbox Commands - Console
Web IDE
Console*
Shows Device Events
and Debug Messages.
Getting started with the Particle Photon – © Pete Gallagher – PJG Creations - 2019
14) The Particle Web IDE – Toolbox Commands - Settings
Web IDE
Settings
Account and Cache
Options.
Getting started with the Particle Photon – © Pete Gallagher – PJG Creations - 2019
Photon Maker Kit
Getting started with the Particle Photon – © Pete Gallagher – PJG Creations - 2019
Photon Maker Kit
Box
Getting started with the Particle Photon – © Pete Gallagher – PJG Creations - 2019
Photon Maker Kit
Particle Photon + Breadboard
Getting started with the Particle Photon – © Pete Gallagher – PJG Creations - 2019
Photon Maker Kit
Micro USB Cable
Getting started with the Particle Photon – © Pete Gallagher – PJG Creations - 2019
Photon Maker Kit
Jumper Wires
Getting started with the Particle Photon – © Pete Gallagher – PJG Creations - 2019
Photon Maker Kit
Rainbow Ribbon Cable
Getting started with the Particle Photon – © Pete Gallagher – PJG Creations - 2019
Photon Maker Kit
ProtoBoard
Getting started with the Particle Photon – © Pete Gallagher – PJG Creations - 2019
Photon Maker Kit
Pin Headers
Getting started with the Particle Photon – © Pete Gallagher – PJG Creations - 2019
Photon Maker Kit
OLED Screen
Getting started with the Particle Photon – © Pete Gallagher – PJG Creations - 2019
Photon Maker Kit
WIFI Antenna
Getting started with the Particle Photon – © Pete Gallagher – PJG Creations - 2019
Photon Maker Kit
Capacitors
Getting started with the Particle Photon – © Pete Gallagher – PJG Creations - 2019
Photon Maker Kit
Resistors
Getting started with the Particle Photon – © Pete Gallagher – PJG Creations - 2019
Photon Maker Kit
LEDs and Diodes
Getting started with the Particle Photon – © Pete Gallagher – PJG Creations - 2019
Photon Maker Kit
Switches, Buttons, Relay, Sounder, PIR
Getting started with the Particle Photon – © Pete Gallagher – PJG Creations - 2019
Photon Maker Kit
Servo
Getting started with the Particle Photon – © Pete Gallagher – PJG Creations - 2019
Photon Maker Kit
Battery Holder
Getting started with the Particle Photon – © Pete Gallagher – PJG Creations - 2019
Photon Maker Kit
Sticker!
Getting started with the Particle Photon – © Pete Gallagher – PJG Creations - 2019
http://bit.ly/photonmakerkittutorials
Photon Maker Kit
More Information…
Getting started with the Particle Photon – © Pete Gallagher – PJG Creations - 2019
Workshop
Getting started with the Particle Photon – © Pete Gallagher – PJG Creations - 2019
Make Something!
Getting started with the Particle Photon – © Pete Gallagher – PJG Creations - 2019
Workshop – Part 1
Create a Particle Account
Getting started with the Particle Photon – © Pete Gallagher – PJG Creations - 2019
1) Register for an account at https://build.particle.io/build
Workshop - Part 1
Create Account
Getting started with the Particle Photon – © Pete Gallagher – PJG Creations - 2019
2) Register for an account at https://build.particle.io/build
Workshop – Part 1
Create Account
Getting started with the Particle Photon – © Pete Gallagher – PJG Creations - 2019
3) The Particle Web IDE
Workshop – Part 1
Create Account
Getting started with the Particle Photon – © Pete Gallagher – PJG Creations - 2019
Workshop – Part 2
Connect and Claim your Photon
Getting started with the Particle Photon – © Pete Gallagher – PJG Creations - 2019
1) Claim your Photon – Goto https://setup.particle.io/
Workshop – Part 2
Connect and Claim your Photon
Getting started with the Particle Photon – © Pete Gallagher – PJG Creations - 2019
2) Claim your Photon – Setup Photon:
Workshop – Part 2
Connect and Claim your Photon
Getting started with the Particle Photon – © Pete Gallagher – PJG Creations - 2019
3) Claim your Photon – Download Photon Setup HTML File:
Workshop – Part 2
Connect and Claim your Photon
Getting started with the Particle Photon – © Pete Gallagher – PJG Creations - 2019
4) Claim your Photon – Open Photon Setup HTML File:
Workshop – Part 2
Connect and Claim your Photon
Getting started with the Particle Photon – © Pete Gallagher – PJG Creations - 2019
5) Claim Your Photon - Press and Hold the Setup Button
Workshop – Part 2
Connect and Claim your Photon
Getting started with the Particle Photon – © Pete Gallagher – PJG Creations - 2019
6) Claim your Photon – Connect Computer to Photon:
Workshop – Part 2
Connect and Claim your Photon
Getting started with the Particle Photon – © Pete Gallagher – PJG Creations - 2019
7) Claim your Photon – Connect Photon to Internet:
Workshop – Part 2
Connect and Claim your Photon
Getting started with the Particle Photon – © Pete Gallagher – PJG Creations - 2019
8) Claim your Photon – Check Photon is Connected:
Workshop – Part 2
Connect and Claim your Photon
Getting started with the Particle Photon – © Pete Gallagher – PJG Creations - 2019
9) Claim your Photon – Name Your Photon:
Workshop – Part 2
Connect and Claim your Photon
Getting started with the Particle Photon – © Pete Gallagher – PJG Creations - 2019
10) Claim your Photon – Photon is Setup:
Workshop – Part 2
Connect and Claim your Photon
Getting started with the Particle Photon – © Pete Gallagher – PJG Creations - 2019
11) Return to the Particle Web IDE – build.particle.io
Workshop – Part 2
Connect and Claim your Photon
Getting started with the Particle Photon – © Pete Gallagher – PJG Creations - 2019
Workshop – Part 3
Flash an LED
Getting started with the Particle Photon – © Pete Gallagher – PJG Creations - 2019
1) Click the Devices Toolbar Button:
Workshop – Part 3
Flash an LED
Getting started with the Particle Photon – © Pete Gallagher – PJG Creations - 2019
2) Click the Star next to your new device to select it for flashing:
Workshop – Part 3
Flash an LED
Getting started with the Particle Photon – © Pete Gallagher – PJG Creations - 2019
3) Press the Right Arrow next to your device to show Details:
Workshop – Part 3
Flash an LED
Getting started with the Particle Photon – © Pete Gallagher – PJG Creations - 2019
4) From the “System firmware target”, choose 0.7.0:
Workshop – Part 3
Flash an LED
Getting started with the Particle Photon – © Pete Gallagher – PJG Creations - 2019
5) Press the Code Button to return to the Code View:
Workshop – Part 3
Flash an LED
Getting started with the Particle Photon – © Pete Gallagher – PJG Creations - 2019
6) Select the First Example App “Blink an LED”:
Workshop – Part 3
Flash an LED
Getting started with the Particle Photon – © Pete Gallagher – PJG Creations - 2019
7) Click the “USE THIS EXAMPLE” button to create a new file:
Workshop – Part 3
Flash an LED
Getting started with the Particle Photon – © Pete Gallagher – PJG Creations - 2019
8) A new file is created ready to Edit or Flash:
Workshop – Part 3
Flash an LED
Getting started with the Particle Photon – © Pete Gallagher – PJG Creations - 2019
9) Press the Flash Button:
Workshop – Part 3
Flash an LED
Getting started with the Particle Photon – © Pete Gallagher – PJG Creations - 2019
10) Verify that the Photon is programmed and the LED is flashing:
Workshop – Part 3
Flash an LED
Getting started with the Particle Photon – © Pete Gallagher – PJG Creations - 2019
Workshop – Part 4
Connect another LED
Getting started with the Particle Photon – © Pete Gallagher – PJG Creations - 2019
1) Connect a 220 Ohm Resister and a LED to the Photon:
Workshop – Part 4
Flash an LED
Getting started with the Particle Photon – © Pete Gallagher – PJG Creations - 2019
2) Connecting up the LED to the Photon:
Workshop – Part 4
Flash an LED
Getting started with the Particle Photon – © Pete Gallagher – PJG Creations - 2019
Workshop – Part 5
A Web Connected LED
Getting started with the Particle Photon – © Pete Gallagher – PJG Creations - 2019
1) Select the Second Example App “Web-Connected LED”:
Workshop – Part 5
A Web Connected LED
Getting started with the Particle Photon – © Pete Gallagher – PJG Creations - 2019
2) Press the “USE THIS EXAMPLE” button to create a new File:
Workshop – Part 5
A Web Connected LED
Getting started with the Particle Photon – © Pete Gallagher – PJG Creations - 2019
3) A new file is created ready to Edit or Flash:
Workshop – Part 5
A Web Connected LED
Getting started with the Particle Photon – © Pete Gallagher – PJG Creations - 2019
4) Press the Flash Button:
Workshop – Part 5
A Web Connected LED
Getting started with the Particle Photon – © Pete Gallagher – PJG Creations - 2019
5) Press the Console Button to open the Console:
Workshop – Part 5
A Web Connected LED
Getting started with the Particle Photon – © Pete Gallagher – PJG Creations - 2019
6) Press the My Devices Button to open the Device List:
Workshop – Part 5
A Web Connected LED
Getting started with the Particle Photon – © Pete Gallagher – PJG Creations - 2019
7) Select your Photon from the List to view its properties:
Workshop – Part 5
A Web Connected LED
Getting started with the Particle Photon – © Pete Gallagher – PJG Creations - 2019
8) In the Functions box, check that the new “led” function exists:
Workshop – Part 5
A Web Connected LED
Getting started with the Particle Photon – © Pete Gallagher – PJG Creations - 2019
9) Enter “on” in the “Argument” box and press the “Call” Button:
Workshop – Part 5
A Web Connected LED
Getting started with the Particle Photon – © Pete Gallagher – PJG Creations - 2019
10) The LED should illuminate and the function returns “led = 1”:
Workshop – Part 5
A Web Connected LED
Getting started with the Particle Photon – © Pete Gallagher – PJG Creations - 2019
11) Enter “off” in the “Argument” box and press the “Call” Button:
Workshop – Part 5
A Web Connected LED
Getting started with the Particle Photon – © Pete Gallagher – PJG Creations - 2019
12) The LED should go off and the function returns “led = 0”:
Workshop – Part 5
A Web Connected LED
Getting started with the Particle Photon – © Pete Gallagher – PJG Creations - 2019
13) More Information…
Workshop – Part 5
A Web Connected LED
http://bit.ly/particlefunctions
Getting started with the Particle Photon – © Pete Gallagher – PJG Creations - 2019
Questions
Getting started with the Particle Photon – © Pete Gallagher – PJG Creations - 2019
Confused… Just Ask!
Getting started with the Particle Photon – © Pete Gallagher – PJG Creations - 2019
 Particle Docs:
https://docs.particle.io
 Photon Docs:
https://bit.ly/photondocs
Links
Getting started with the Particle Photon – © Pete Gallagher – PJG Creations - 2019
 Twitter
@PJGCreations
 Email:
pete@pjgcreations.co.uk
 Notts IoT:
https://www.nottsiot.co.uk
 Today’s Slides:
http://bit.ly/PhotonGetStartedJan19
Contact Me
Getting started with the Particle Photon – © Pete Gallagher – PJG Creations - 2019
Thanks!

Getting started with the Particle Photon

  • 1.
    Getting started withthe Particle Photon – © Pete Gallagher – PJG Creations - 2019 Getting started with the Particle Photon PETE GALLAGHER PJGCREATIONS.CO.UK 24/01/2019
  • 2.
    Getting started withthe Particle Photon – © Pete Gallagher – PJG Creations - 2019 About Me Pete Gallagher @pete_codes / @PJGCreations www.PJGCreations.co.uk Pete@PJGCreations.co.uk IT Consultant Decades of Desktop, Web & Embedded Software experience Gadget Addict Father of two inquisitive girls
  • 3.
    Getting started withthe Particle Photon – © Pete Gallagher – PJG Creations - 2019 What we’re going to be doing…  Who are Particle?  What devices do they produce?  The Particle Photon  Photon Hardware  Particle Software  The Web IDE  The Photon Maker Kit  Workshop  Q&A
  • 4.
    Getting started withthe Particle Photon – © Pete Gallagher – PJG Creations - 2019 Who are Particle?
  • 5.
    Getting started withthe Particle Photon – © Pete Gallagher – PJG Creations - 2019 Who are Particle?  Founded in 2011 by Zachary Crockett and Zach Supalla  Originally called Spark Inc.. Changed to Particle in 2015  Based in Minneapolis with offices in San Francisco, California and Shenzhen  Roughly 80 employees.  Revenue over $20M  Attempting to consolidate the fragmented IoT market.
  • 6.
    Getting started withthe Particle Photon – © Pete Gallagher – PJG Creations - 2019 Particle Devices
  • 7.
    Getting started withthe Particle Photon – © Pete Gallagher – PJG Creations - 2019 Particle Devices Photon Arduino Based Wifi Enabled Module Electron Arduino Based 2G/3G Enabled Module
  • 8.
    Getting started withthe Particle Photon – © Pete Gallagher – PJG Creations - 2019 Particle Devices Argon WIFI Mesh Gateway Boron LTE Mesh Gateway Xenon Mesh Endpoint & Repeater Mesh Network:
  • 9.
    Getting started withthe Particle Photon – © Pete Gallagher – PJG Creations - 2019 Particle Devices P1 Series WIFI E Series Cellular A / B / X Series WIFI / Cellular + MESH Mass Production:
  • 10.
    Getting started withthe Particle Photon – © Pete Gallagher – PJG Creations - 2019 The Particle Photon
  • 11.
    Getting started withthe Particle Photon – © Pete Gallagher – PJG Creations - 2019 Manufacturer: Particle Processor: STM32F205RGY6 ARM Cortex M3 @ 120Mhz + 1MB Flash, 128KB RAM Connectivity: Broadcom BCM43362 Wi-Fi chip – 802.11 b/g/n, USB I/O: 18 GPIO Pins – SPI, I2C, Digital, Analogue Sensors etc: Onboard RGB LED Cost: £20 Particle Hardware
  • 12.
    Getting started withthe Particle Photon – © Pete Gallagher – PJG Creations - 2019 Particle Hardware Micro USB For 3v3 power and also PC Access via the CLI
  • 13.
    Getting started withthe Particle Photon – © Pete Gallagher – PJG Creations - 2019 Particle Hardware P0 Module Contains the Microcontroller, WIFI module, memory etc
  • 14.
    Getting started withthe Particle Photon – © Pete Gallagher – PJG Creations - 2019 Particle Hardware Setup Button Press and hold to enter Wifi Setup Mode
  • 15.
    Getting started withthe Particle Photon – © Pete Gallagher – PJG Creations - 2019 Particle Hardware Reset Button Used to enter Safe and Firmware Update Modes
  • 16.
    Getting started withthe Particle Photon – © Pete Gallagher – PJG Creations - 2019 Particle Hardware Status LED Signals the current Status of the Photon LED Status Docs: http://bit.ly/photonledstatus
  • 17.
    Getting started withthe Particle Photon – © Pete Gallagher – PJG Creations - 2019 Particle Hardware On-board LED Used for Hello World and your own app signalling.
  • 18.
    Getting started withthe Particle Photon – © Pete Gallagher – PJG Creations - 2019 Particle Hardware GPIO Power, UART, Digital I/O, Analog I/O etc
  • 19.
    Getting started withthe Particle Photon – © Pete Gallagher – PJG Creations - 2019 Particle Hardware Digital I/O 8 Digital I/O pins (D7 connected to on-board LED)
  • 20.
    Getting started withthe Particle Photon – © Pete Gallagher – PJG Creations - 2019 Particle Hardware Analogue I/O 8 Analogue I/O pins
  • 21.
    Getting started withthe Particle Photon – © Pete Gallagher – PJG Creations - 2019 Particle Hardware UART Onboard UART Tx and Rx. Also extra Digital I/O
  • 22.
    Getting started withthe Particle Photon – © Pete Gallagher – PJG Creations - 2019 Particle Hardware RTC Power Supply 3v3 Backup Power for the on-board Real Time Clock Module and SRAM.
  • 23.
    Getting started withthe Particle Photon – © Pete Gallagher – PJG Creations - 2019 Particle Hardware WIFI Aerial Connector for external WIFI Aerial
  • 24.
    Getting started withthe Particle Photon – © Pete Gallagher – PJG Creations - 2019 Particle Software
  • 25.
    Getting started withthe Particle Photon – © Pete Gallagher – PJG Creations - 2019 Web IDE: Particle Software
  • 26.
    Getting started withthe Particle Photon – © Pete Gallagher – PJG Creations - 2019 Particle Workbench for VS Code Particle Software
  • 27.
    Getting started withthe Particle Photon – © Pete Gallagher – PJG Creations - 2019 Desktop IDE Particle Software
  • 28.
    Getting started withthe Particle Photon – © Pete Gallagher – PJG Creations - 2019 Desktop CLI Particle Software
  • 29.
    Getting started withthe Particle Photon – © Pete Gallagher – PJG Creations - 2019 Android App Particle Software
  • 30.
    Getting started withthe Particle Photon – © Pete Gallagher – PJG Creations - 2019 Web IDE
  • 31.
    Getting started withthe Particle Photon – © Pete Gallagher – PJG Creations - 2019 1) The Particle Web IDE Web IDE
  • 32.
    Getting started withthe Particle Photon – © Pete Gallagher – PJG Creations - 2019 2) The Particle Web IDE – Code Editor Web IDE
  • 33.
    Getting started withthe Particle Photon – © Pete Gallagher – PJG Creations - 2019 3) The Particle Web IDE – File Explorer Web IDE
  • 34.
    Getting started withthe Particle Photon – © Pete Gallagher – PJG Creations - 2019 4) The Particle Web IDE – Toolbox Web IDE
  • 35.
    Getting started withthe Particle Photon – © Pete Gallagher – PJG Creations - 2019 5) The Particle Web IDE – Toolbox Commands - Save Web IDE Save Saves the Code to the Particle Cloud.
  • 36.
    Getting started withthe Particle Photon – © Pete Gallagher – PJG Creations - 2019 6) The Particle Web IDE – Toolbox Commands - Verify Web IDE Verify Checks the Code for Compilation Errors.
  • 37.
    Getting started withthe Particle Photon – © Pete Gallagher – PJG Creations - 2019 7) The Particle Web IDE – Toolbox Commands - Flash Web IDE Flash Flashes the code to the device.
  • 38.
    Getting started withthe Particle Photon – © Pete Gallagher – PJG Creations - 2019 8) The Particle Web IDE – Toolbox Commands - Code Web IDE Code Shows the Code Editor.
  • 39.
    Getting started withthe Particle Photon – © Pete Gallagher – PJG Creations - 2019 9) The Particle Web IDE – Toolbox Commands - Libraries Web IDE Libraries Browse extra Code Libraries.
  • 40.
    Getting started withthe Particle Photon – © Pete Gallagher – PJG Creations - 2019 10) The Particle Web IDE – Toolbox Commands - Help Web IDE Help Quick Reference Help (Mainly LED Status).
  • 41.
    Getting started withthe Particle Photon – © Pete Gallagher – PJG Creations - 2019 11) The Particle Web IDE – Toolbox Commands - Docs Web IDE Docs* Opens the Device Documentation.
  • 42.
    Getting started withthe Particle Photon – © Pete Gallagher – PJG Creations - 2019 12) The Particle Web IDE – Toolbox Commands - Devices Web IDE Devices Lists all claimed Particle Devices.
  • 43.
    Getting started withthe Particle Photon – © Pete Gallagher – PJG Creations - 2019 13) The Particle Web IDE – Toolbox Commands - Console Web IDE Console* Shows Device Events and Debug Messages.
  • 44.
    Getting started withthe Particle Photon – © Pete Gallagher – PJG Creations - 2019 14) The Particle Web IDE – Toolbox Commands - Settings Web IDE Settings Account and Cache Options.
  • 45.
    Getting started withthe Particle Photon – © Pete Gallagher – PJG Creations - 2019 Photon Maker Kit
  • 46.
    Getting started withthe Particle Photon – © Pete Gallagher – PJG Creations - 2019 Photon Maker Kit Box
  • 47.
    Getting started withthe Particle Photon – © Pete Gallagher – PJG Creations - 2019 Photon Maker Kit Particle Photon + Breadboard
  • 48.
    Getting started withthe Particle Photon – © Pete Gallagher – PJG Creations - 2019 Photon Maker Kit Micro USB Cable
  • 49.
    Getting started withthe Particle Photon – © Pete Gallagher – PJG Creations - 2019 Photon Maker Kit Jumper Wires
  • 50.
    Getting started withthe Particle Photon – © Pete Gallagher – PJG Creations - 2019 Photon Maker Kit Rainbow Ribbon Cable
  • 51.
    Getting started withthe Particle Photon – © Pete Gallagher – PJG Creations - 2019 Photon Maker Kit ProtoBoard
  • 52.
    Getting started withthe Particle Photon – © Pete Gallagher – PJG Creations - 2019 Photon Maker Kit Pin Headers
  • 53.
    Getting started withthe Particle Photon – © Pete Gallagher – PJG Creations - 2019 Photon Maker Kit OLED Screen
  • 54.
    Getting started withthe Particle Photon – © Pete Gallagher – PJG Creations - 2019 Photon Maker Kit WIFI Antenna
  • 55.
    Getting started withthe Particle Photon – © Pete Gallagher – PJG Creations - 2019 Photon Maker Kit Capacitors
  • 56.
    Getting started withthe Particle Photon – © Pete Gallagher – PJG Creations - 2019 Photon Maker Kit Resistors
  • 57.
    Getting started withthe Particle Photon – © Pete Gallagher – PJG Creations - 2019 Photon Maker Kit LEDs and Diodes
  • 58.
    Getting started withthe Particle Photon – © Pete Gallagher – PJG Creations - 2019 Photon Maker Kit Switches, Buttons, Relay, Sounder, PIR
  • 59.
    Getting started withthe Particle Photon – © Pete Gallagher – PJG Creations - 2019 Photon Maker Kit Servo
  • 60.
    Getting started withthe Particle Photon – © Pete Gallagher – PJG Creations - 2019 Photon Maker Kit Battery Holder
  • 61.
    Getting started withthe Particle Photon – © Pete Gallagher – PJG Creations - 2019 Photon Maker Kit Sticker!
  • 62.
    Getting started withthe Particle Photon – © Pete Gallagher – PJG Creations - 2019 http://bit.ly/photonmakerkittutorials Photon Maker Kit More Information…
  • 63.
    Getting started withthe Particle Photon – © Pete Gallagher – PJG Creations - 2019 Workshop
  • 64.
    Getting started withthe Particle Photon – © Pete Gallagher – PJG Creations - 2019 Make Something!
  • 65.
    Getting started withthe Particle Photon – © Pete Gallagher – PJG Creations - 2019 Workshop – Part 1 Create a Particle Account
  • 66.
    Getting started withthe Particle Photon – © Pete Gallagher – PJG Creations - 2019 1) Register for an account at https://build.particle.io/build Workshop - Part 1 Create Account
  • 67.
    Getting started withthe Particle Photon – © Pete Gallagher – PJG Creations - 2019 2) Register for an account at https://build.particle.io/build Workshop – Part 1 Create Account
  • 68.
    Getting started withthe Particle Photon – © Pete Gallagher – PJG Creations - 2019 3) The Particle Web IDE Workshop – Part 1 Create Account
  • 69.
    Getting started withthe Particle Photon – © Pete Gallagher – PJG Creations - 2019 Workshop – Part 2 Connect and Claim your Photon
  • 70.
    Getting started withthe Particle Photon – © Pete Gallagher – PJG Creations - 2019 1) Claim your Photon – Goto https://setup.particle.io/ Workshop – Part 2 Connect and Claim your Photon
  • 71.
    Getting started withthe Particle Photon – © Pete Gallagher – PJG Creations - 2019 2) Claim your Photon – Setup Photon: Workshop – Part 2 Connect and Claim your Photon
  • 72.
    Getting started withthe Particle Photon – © Pete Gallagher – PJG Creations - 2019 3) Claim your Photon – Download Photon Setup HTML File: Workshop – Part 2 Connect and Claim your Photon
  • 73.
    Getting started withthe Particle Photon – © Pete Gallagher – PJG Creations - 2019 4) Claim your Photon – Open Photon Setup HTML File: Workshop – Part 2 Connect and Claim your Photon
  • 74.
    Getting started withthe Particle Photon – © Pete Gallagher – PJG Creations - 2019 5) Claim Your Photon - Press and Hold the Setup Button Workshop – Part 2 Connect and Claim your Photon
  • 75.
    Getting started withthe Particle Photon – © Pete Gallagher – PJG Creations - 2019 6) Claim your Photon – Connect Computer to Photon: Workshop – Part 2 Connect and Claim your Photon
  • 76.
    Getting started withthe Particle Photon – © Pete Gallagher – PJG Creations - 2019 7) Claim your Photon – Connect Photon to Internet: Workshop – Part 2 Connect and Claim your Photon
  • 77.
    Getting started withthe Particle Photon – © Pete Gallagher – PJG Creations - 2019 8) Claim your Photon – Check Photon is Connected: Workshop – Part 2 Connect and Claim your Photon
  • 78.
    Getting started withthe Particle Photon – © Pete Gallagher – PJG Creations - 2019 9) Claim your Photon – Name Your Photon: Workshop – Part 2 Connect and Claim your Photon
  • 79.
    Getting started withthe Particle Photon – © Pete Gallagher – PJG Creations - 2019 10) Claim your Photon – Photon is Setup: Workshop – Part 2 Connect and Claim your Photon
  • 80.
    Getting started withthe Particle Photon – © Pete Gallagher – PJG Creations - 2019 11) Return to the Particle Web IDE – build.particle.io Workshop – Part 2 Connect and Claim your Photon
  • 81.
    Getting started withthe Particle Photon – © Pete Gallagher – PJG Creations - 2019 Workshop – Part 3 Flash an LED
  • 82.
    Getting started withthe Particle Photon – © Pete Gallagher – PJG Creations - 2019 1) Click the Devices Toolbar Button: Workshop – Part 3 Flash an LED
  • 83.
    Getting started withthe Particle Photon – © Pete Gallagher – PJG Creations - 2019 2) Click the Star next to your new device to select it for flashing: Workshop – Part 3 Flash an LED
  • 84.
    Getting started withthe Particle Photon – © Pete Gallagher – PJG Creations - 2019 3) Press the Right Arrow next to your device to show Details: Workshop – Part 3 Flash an LED
  • 85.
    Getting started withthe Particle Photon – © Pete Gallagher – PJG Creations - 2019 4) From the “System firmware target”, choose 0.7.0: Workshop – Part 3 Flash an LED
  • 86.
    Getting started withthe Particle Photon – © Pete Gallagher – PJG Creations - 2019 5) Press the Code Button to return to the Code View: Workshop – Part 3 Flash an LED
  • 87.
    Getting started withthe Particle Photon – © Pete Gallagher – PJG Creations - 2019 6) Select the First Example App “Blink an LED”: Workshop – Part 3 Flash an LED
  • 88.
    Getting started withthe Particle Photon – © Pete Gallagher – PJG Creations - 2019 7) Click the “USE THIS EXAMPLE” button to create a new file: Workshop – Part 3 Flash an LED
  • 89.
    Getting started withthe Particle Photon – © Pete Gallagher – PJG Creations - 2019 8) A new file is created ready to Edit or Flash: Workshop – Part 3 Flash an LED
  • 90.
    Getting started withthe Particle Photon – © Pete Gallagher – PJG Creations - 2019 9) Press the Flash Button: Workshop – Part 3 Flash an LED
  • 91.
    Getting started withthe Particle Photon – © Pete Gallagher – PJG Creations - 2019 10) Verify that the Photon is programmed and the LED is flashing: Workshop – Part 3 Flash an LED
  • 92.
    Getting started withthe Particle Photon – © Pete Gallagher – PJG Creations - 2019 Workshop – Part 4 Connect another LED
  • 93.
    Getting started withthe Particle Photon – © Pete Gallagher – PJG Creations - 2019 1) Connect a 220 Ohm Resister and a LED to the Photon: Workshop – Part 4 Flash an LED
  • 94.
    Getting started withthe Particle Photon – © Pete Gallagher – PJG Creations - 2019 2) Connecting up the LED to the Photon: Workshop – Part 4 Flash an LED
  • 95.
    Getting started withthe Particle Photon – © Pete Gallagher – PJG Creations - 2019 Workshop – Part 5 A Web Connected LED
  • 96.
    Getting started withthe Particle Photon – © Pete Gallagher – PJG Creations - 2019 1) Select the Second Example App “Web-Connected LED”: Workshop – Part 5 A Web Connected LED
  • 97.
    Getting started withthe Particle Photon – © Pete Gallagher – PJG Creations - 2019 2) Press the “USE THIS EXAMPLE” button to create a new File: Workshop – Part 5 A Web Connected LED
  • 98.
    Getting started withthe Particle Photon – © Pete Gallagher – PJG Creations - 2019 3) A new file is created ready to Edit or Flash: Workshop – Part 5 A Web Connected LED
  • 99.
    Getting started withthe Particle Photon – © Pete Gallagher – PJG Creations - 2019 4) Press the Flash Button: Workshop – Part 5 A Web Connected LED
  • 100.
    Getting started withthe Particle Photon – © Pete Gallagher – PJG Creations - 2019 5) Press the Console Button to open the Console: Workshop – Part 5 A Web Connected LED
  • 101.
    Getting started withthe Particle Photon – © Pete Gallagher – PJG Creations - 2019 6) Press the My Devices Button to open the Device List: Workshop – Part 5 A Web Connected LED
  • 102.
    Getting started withthe Particle Photon – © Pete Gallagher – PJG Creations - 2019 7) Select your Photon from the List to view its properties: Workshop – Part 5 A Web Connected LED
  • 103.
    Getting started withthe Particle Photon – © Pete Gallagher – PJG Creations - 2019 8) In the Functions box, check that the new “led” function exists: Workshop – Part 5 A Web Connected LED
  • 104.
    Getting started withthe Particle Photon – © Pete Gallagher – PJG Creations - 2019 9) Enter “on” in the “Argument” box and press the “Call” Button: Workshop – Part 5 A Web Connected LED
  • 105.
    Getting started withthe Particle Photon – © Pete Gallagher – PJG Creations - 2019 10) The LED should illuminate and the function returns “led = 1”: Workshop – Part 5 A Web Connected LED
  • 106.
    Getting started withthe Particle Photon – © Pete Gallagher – PJG Creations - 2019 11) Enter “off” in the “Argument” box and press the “Call” Button: Workshop – Part 5 A Web Connected LED
  • 107.
    Getting started withthe Particle Photon – © Pete Gallagher – PJG Creations - 2019 12) The LED should go off and the function returns “led = 0”: Workshop – Part 5 A Web Connected LED
  • 108.
    Getting started withthe Particle Photon – © Pete Gallagher – PJG Creations - 2019 13) More Information… Workshop – Part 5 A Web Connected LED http://bit.ly/particlefunctions
  • 109.
    Getting started withthe Particle Photon – © Pete Gallagher – PJG Creations - 2019 Questions
  • 110.
    Getting started withthe Particle Photon – © Pete Gallagher – PJG Creations - 2019 Confused… Just Ask!
  • 111.
    Getting started withthe Particle Photon – © Pete Gallagher – PJG Creations - 2019  Particle Docs: https://docs.particle.io  Photon Docs: https://bit.ly/photondocs Links
  • 112.
    Getting started withthe Particle Photon – © Pete Gallagher – PJG Creations - 2019  Twitter @PJGCreations  Email: pete@pjgcreations.co.uk  Notts IoT: https://www.nottsiot.co.uk  Today’s Slides: http://bit.ly/PhotonGetStartedJan19 Contact Me
  • 113.
    Getting started withthe Particle Photon – © Pete Gallagher – PJG Creations - 2019 Thanks!