SlideShare a Scribd company logo
1 of 18
Download to read offline
Tuchenhagen Flow Components, LLC
90 Evergreen Drive, Portland, ME 04031
Tel: (207) 797 9500
Fax: (207) 878 7914
Web: Tuchenhagen-fc.com
Email: inquires@tuchenhagen-fc.com
TYPE D
TYPE D_L
TYPE K
TYPE Y
TYPE B
TYPE B_L
TYPE B_C
TYPE R_L (INTEGRATED)
TYPE T
TYPE T_L (INTEGRATED)
SECTION 3
SPARES PARTS CUT SHEETS
Click box below to access sections
Click boxes designated RETURN to return to this page
CUT SHEETS
CLICK HERE TO
RETURN TO TECHNICAL
FILES CONTENTS
TYPE N
TYPE U
TYPE W
TYPE X
TYPE T_L (MODULAR)
TYPE W_E
TYPE N_E
TYPE M_O
Liquid Processing Division
Tuchenhagen
Original Spare Parts – VARIVENT®
Mixproof Valve Type D - Maintenance
Storage Instruction: Storage acc. DIN 7719, relative humidity
of air approx. ca. 65%, temperature between 15-25° C
(59-77° F), storage to be light protected
Item Qty Designation Material 1" 11/2"/2" 21/2"/3" 4" 6"
1 2 Seal ring Ø 22 22 28 28 35
EPDM 924-084 924-084 924-085 924-085 924-088
FPM 924-082 924-082 924-083 924-083 924-087
5 4 O-ring Ø 42x3 60x3 85x4 113x4 158x5
EPDM 930-309 930-144 930-150 930-156 930-260
FPM 930-168 930-171 930-176 930-178 930-259
6 1 O-ring Ø 8x1,6 8x1,6 8x1,6 8x1,6 9x3
NBR 930-004 930-004 930-004 930-004 930-007
7 1 V-ring Ø 35-5 52-6 76-6 104-6 148-6
EPDM 932-046 932-021 932-024 932-028 932-042
FPM 932-030 932-033 932-035 932-039 932-041
8 2 V-ring Ø 28-5 44-6 68-6 96-6 140-6
EPDM 932-017 932-019 932-023 932-027 932-045
FPM 932-029 932-032 932-034 932-038 932-044
22 1 O-ring Ø 22x3 22x3 28x3 28x3 35x3
EPDM 930-268 930-268 930-243 930-243 930-356
FPM 930-164 930-164 930-244 930-244 930-357
23 1 O-ring Ø 30x3 38x3 38x3 38x3 56x3
EPDM 930-525 930-246 930-246 930-246 930-266
FPM 930-512 930-247 930-247 930-247 930-265
24 1 O-ring Ø 10x2,5 16x3 16x3 16x3 22x3
EPDM 930-368 930-235 930-235 930-235 930-268
FPM 930-616 930-162 930-162 930-162 930-164
29 1 O-ring Ø 20x3 20x3 20x3 20x3 25x3
NBR 930-026 930-026 930-026 930-026 930-035
1.0 Dismantling
1.1 Remove CIP connection (30).
1.2 In the non-actuated position, the valve disks (15 and 16) are in the closed position.
Lift the valve disks (15 and 16) by actuating the valve with compressed air at connection (B) or
using the emergency device.
1.3 Remove hinged clamp (43).
1.4 Interrupt compressed air supply at connection (B), or remove emergency device.
1.5 After removal of the clamps (49) draw off control module (H).
1.6 Withdraw valve insert from the top, complete with actuator (A) and lifting actuator (L).
1.7 Hold actuator (A) with a belt wrench and separate valve disk (15) complete with CIP bonnet
(11) from the actuator (A) at wrench area (C).
1.8 Hold valve disk (15) by inserting a pin Ø 5 mm into bore (C) and remove CIP bonnet (11) by
using a wrench at wrench area (D).
1.9 Remove the hinged clamp (43b) and take out the component parts (1, 2, 3, 4, 5 and 36).
2.0 Replacement of seals
Remove the seals marked with grey in the spare parts drawing. Clean the single parts. Insert
new seals. Do not use oils and grease for the V-rings (7 and 8). For inserting the
V-ring, use the insertion tool and steadily press the V-ring at opposite spots for several times
all over the circumference.
V-ring installation position, see illustration
3.0 Assembly
Assembly is carried out in reverse order
4.0 Function check
After assembly check the valve function.
For this purpose actuate valve with compressed air at (B).
In closed valve position, the bearing plug and CIP bonnet must at flush level.
46a
43
5
1
8
7
43b
5
65
15
16
6
8
9
4
5
5
43a
C
30
A
49
B
H
29
D
2
36
24
23
22
Seal set cpl. Material 1" 11/2"/2" 21/2"/3" 4" 6"
EPDM 221-519.58 221-304.07 221-304.08 221-304.09 221-304.11
FPM 221-519.60 221-519.01 221-519.02 221-519.03 221-519.05
Seals for VARIVENT®
Mixproof Valve Type D
Liquid Processing Division
Tuchenhagen
Original Spare Parts – VARIVENT®
Shut-Off Valve Type N - Maintenance
Storage Instruction: Storage acc. DIN 7719, relative humidity
of air approx. ca. 65%, temperature between 15-25° C
(59-77° F), storage to be light protected
29
43
5
1
5
15
6
5
5
A
49
B
H
C
46
43b
9
7
43a
1.0 Dismantling
1.1 In the non-actuated position, the valve disk (15) is in the closed position.Lift the
valve disk (15) by actuating the valve with compressed air at connection (B) or
using the emergency.
1.2 Remove hinged clamp (43).
1.3 Interrupt compressed air supply at connection (B), or remove emergency device.
1.4 After removal of the clamps (49) draw off control module (H).
1.5 Withdraw valve insert from the top, complete with actuator (A)
1.6 Hold actuator (A) with a belt wrench and separate valve disk (15 from the
actuator (A) at wrench area (C).
2.0 Replacement of seals
Remove the seals marked with blue in the spare parts drawing. Clean the single
parts. Insert new seals. Do not use oils and grease for the V-ring (7). For inserting
the V-ring, use the insertion tool and steadily press the V-ring at opposite spots
for several times all over the circumference.
V-ring installation position, see illustration
3.0 Assembly
Assembly is carried out in reverse order
4.0 Function check
After assembly check the valve function.
For this purpose actuate valve with compressed air at (B).
Item Qty Designation Material 1" 11/2"/2" 21/2"/3" 4" 6"
1 1 Seal ring Ø 22 22 28 28 35
EPDM 924-084 924-084 924-085 924-085 924-088
FPM 924-082 924-082 924-083 924-083 924-087
5 4 O-ring Ø 42x3 60x3 85x4 113x4 158x5
EPDM 930-309 930-144 930-150 930-156 930-260
FPM 930-168 930-171 930-176 930-178 930-259
6 1 O-ring Ø 8x1,6 8x1,6 8x1,6 8x1,6 9x3
NBR 930-004 930-004 930-004 930-004 930-007
7 1 V-ring Ø 35-5 52-6 76-6 104-6 148-6
EPDM 932-046 932-021 932-024 932-028 932-042
FPM 932-030 932-033 932-035 932-039 932-041
29 1 O-ring Ø 20x3 20x3 20x3 20x3 25x3
NBR 930-026 930-026 930-026 930-026 930-035
Seal set cpl. Material 1" 11/2"/2" 21/2"/3" 4" 6"
EPDM 221-304.01 221-304.02 221-304.03 221-304.04 221-304.06
FPM 221-511.80 221-511.81 221-511.82 221-511.83 221-511.85
Seals for VARIVENT®
Shut-Off Valve Type N
Liquid Processing Division
Tuchenhagen
Original Spare Parts – VARIVENT®
Shut-Off Valve Type U - Maintenance
Storage Instruction: Storage acc. DIN 7719, relative humidity
of air approx. ca. 65%, temperature between 15-25° C
(59-77° F), storage to be light protected
1.0 Dismantling
1.1 Remove hinged clamp (43) and locking device (35) at the lower valve housing (40).
1.2 In the non-actuated position, the valve disk (15) is in the closed position.
Lift the valve disk (15) by actuating the valve with compressed air at connection
(B) or using the emergency.
1.3 Loosen valve disk (15) at wrench area (C) by approx. 5 – 6 mm.
1.4 Interrupt compressed air supply at connection (B), or remove emergency device.
Separate valve disk from actuator
1.5 After removal of the clamps (49) draw off control module (H).
1.6 Remove hinged clamp (43) between lantern (9) and the upper valve housing.
1.7 Remove actuator (A) from the top.
2.0 Replacement of seals
Remove the seals marked with blue in the spare parts drawing. Clean the single
parts. Insert new seals. Do not use oils and grease for the V-ring (7). For inserting
the V-ring, use the insertion tool and steadily press the V-ring at opposite spots
for several times all over the circumference.
V-ring installation position, see illustration
3.0 Assembly
Assembly is carried out in reverse order
4.0 Function check
After assembly check the valve function. For this purpose actuate valve with
compressed air at (B).
Item Qty Designation Material 1" 11/2"/2" 21/2"/3" 4" 6"
1 1 Seal ring Ø 22 22 28 28 35
EPDM 924-084 924-084 924-085 924-085 924-088
FPM 924-082 924-082 924-083 924-083 924-087
5 4 O-ring Ø 42x3 60x3 85x4 113x4 158x5
EPDM 930-309 930-144 930-150 930-156 930-260
FPM 930-168 930-171 930-176 930-178 930-259
6 1 O-ring Ø 8x1,6 8x1,6 8x1,6 8x1,6 9x3
NBR 930-004 930-004 930-004 930-004 930-007
7 1 V-ring Ø 35-5 52-6 76-6 104-6 148-6
EPDM 932-046 932-021 932-024 932-028 932-042
FPM 932-030 932-033 932-035 932-039 932-041
29 1 O-ring Ø 20x3 20x3 20x3 20x3 25x3
NBR 930-026 930-026 930-026 930-026 930-035
Seal set cpl. Material 1" 11/2"/2" 21/2"/3" 4" 6"
EPDM 221-304.01 221-304.02 221-304.03 221-304.04 221-304.06
FPM 221-511.80 221-511.81 221-511.82 221-511.83 221-511.85
Seals for VARIVENT®
Shut-Off Valve Type U
29
43
5
1
5
15
6
5
5
A
49
B
H
C
46
43b
9
35
7
6
43a
Liquid Processing Division
Tuchenhagen
Original Spare Parts – VARIVENT®
Shuttle Valve Type W - Maintenance
Storage Instruction: Storage acc. DIN 7719, relative humidity
of air approx. ca. 65%, temperature between 15-25° C
(59-77° F), storage to be light protected
43
5
1
5
15
7
6
9
5
5
43a
A
49
B
H
29
C
5
5
43b
43c
1.0 Dismantling
1.1 In the non-actuated position, the valve disk (15) is in the lower position. Lift the
valve disks (15) by actuating the valve with compressed air at connection (B) or
using the emergency device.
1.2 Remove the hinged clamps (43) and (43a).
1.3 Interrupt compressed air supply at connection (B), or remove emergency device.
1.4 After removal of the clamps (49) draw off control module (H).
1.5 Withdraw valve insert from the top, complete with actuator (A)
1.6 Hold actuator (A) with a belt wrench and separate valve disk (15) from the
actuator (A) at wrench area (C).
2.0 Replacement of seals
Remove the seals marked with blue in the spare parts drawing. Clean the single
parts. Insert new seals. Do not use oils and grease for the V-rings (7 and 8).
For inserting the V-ring, use the insertion tool and steadily press the V-ring at
opposite spots for several times all over the circumference.
V-ring installation position, see illustration
3.0 Assembly
Assembly is carried out in reverse order
4.0 Function check
After assembly check the valve function.
For this purpose actuate valve with compressed air at (B).
Item Qty Designation Material 1" 11/2"/2" 21/2"/3" 4" 6"
1 1 Dichtring Ø 22 22 28 28 35
Seal ring EPDM 924-084 924-084 924-085 924-085 924-088
FPM 924-082 924-082 924-083 924-083 924-087
5 6 O-Ring Ø 42x3 60x3 85x4 113x4 158x5
O-ring EPDM 930-309 930-144 930-150 930-156 930-260
FPM 930-168 930-171 930-176 930-178 930-259
6 1 O-Ring Ø 8x1,6 8x1,6 8x1,6 8x1,6 9x3
O-ring NBR 930-004 930-004 930-004 930-004 930-007
7 2 V-Ring Ø 35-5 52-6 76-6 104-6 148-6
V-ring EPDM 932-046 932-021 932-024 932-028 932-042
FPM 932-030 932-033 932-035 932-039 932-041
29 1 O-Ring Ø 20x3 20x3 20x3 20x3 25x3
O-ring NBR 930-026 930-026 930-026 930-026 930-035
Seal set cpl. Material 1" 11/2"/2" 21/2"/3" 4" 6"
EPDM 221-304.18 221-304.19 221-304.20 221-304.21 221-304.23
FPM 221-511.87 221-511.88 221-511.89 221-511.90 221-511.92
Seals for VARIVENT®
Shuttle Valve Type W
Liquid Processing Division
Tuchenhagen
Original Spare Parts – VARIVENT®
Shuttle Valve Type X - Maintenance
Storage Instruction: Storage acc. DIN 7719, relative humidity
of air approx. ca. 65%, temperature between 15-25° C
(59-77° F), storage to be light protected
1.0 Dismantling
1.1 In the non-actuated position, the valve disk (15) is in the closed position and valve
disk (17) is in the opened position.
1.2 Remove hinged clamp (43c) and the locking device (35).
1.3 Screw-out lower valve disk (17) at wrench area (E).
1.4 Lift the valve disk (15) by actuating the valve with compressed air at connection
(B) or using the emergency device.
1.5 Remove hinged clamp (43).
1.6 Interrupt compressed air supply at connection (B), or remove emergency device.
1.7 After removal of the clamps (49) draw off control module (H).
1.8 Withdraw valve insert from the top, complete with actuator (A)
1.9 Hold actuator (A) with a belt wrench and separate valve disk (15) from the
actuator (A) at wrench area (C).
2.0 Replacement of seals
Remove the seals marked with blue in the spare parts drawing. Clean the single
parts. Insert new seals. Do not use oils and grease for the V-ring (7). For inserting
the V-ring, use the insertion tool and steadily press the
V-ring at opposite spots for several times all over the circumference.
V-ring installation position, see illustration
3.0 Assembly
Assembly is carried out in reverse order. The lower disk (17) must be tightended
with the following torque (wrench area E).
1"-2" = > 24 Nm
21/2"-4" = > 58 Nm
6" = > 70 Nm
4.0 Function check
After assembly check the valve function.For this purpose actuate valve with
compressed air at (B).
Seals for VARIVENT®
Shuttle Valve Type X
Item Qty Designation Material 1" 11/2"/2" 21/2"/3" 4" 6"
1 1 Seal ring Ø 22 22 28 28 35
EPDM 924-084 924-084 924-085 924-085 924-088
FPM 924-082 924-082 924-083 924-083 924-087
5 6 O-ring Ø 42x3 60x3 85x4 113x4 158x5
EPDM 930-309 930-144 930-150 930-156 930-260
FPM 930-168 930-171 930-176 930-178 930-259
6 1 O-ring Ø 8x1,6 8x1,6 8x1,6 8x1,6 9x3
NBR 930-004 930-004 930-004 930-004 930-007
7 2 V-ring Ø 35-5 52-6 76-6 104-6 148-6
EPDM 932-046 932-021 932-024 932-028 932-042
FPM 932-030 932-033 932-035 932-039 932-041
28 1 O-ring Ø 15x3 15x3 23x3 23x3 29x3
EPDM 930-276 930-276 930-350 930-350 930-373
FPM 930-277 930-277 930-269 930-269 930-383
29 1 O-ring Ø 20x3 20x3 20x3 20x3 25x3
NBR 930-026 930-026 930-026 930-026 930-035
Seal set cpl. Material 1" 11/2"/2" 21/2"/3" 4" 6"
EPDM 221-304.24 221-304.25 221-304.26 221-304.27 221-304.29
FPM 221-511.93 221-511.94 221-511.95 221-511.96 221-511.98
43
5
1
7
43b
5
17
15
7
6
9
35
5
5
43a
E
A
49
B
H
29
C
28
5
5
43c
Liquid Processing Division
Tuchenhagen
Original Spare Parts – VARIVENT®
Mixproof Valve Type K - Maintenance
Storage Instruction: Storage acc. DIN 7719, relative humidity
of air approx. ca. 65%, temperature between 15-25° C
(59-77° F), storage to be light protected
1.0 Dismantling
1.1 In the non-actuated position, the valve disks (15 and 16) are in the closed position.
Lift the valve disks (15 and 16) by actuating the valve with compressed air at
connection (B) or using the emergency device.
1.2 Remove hinged clamp (43).
1.3 Interrupt compressed air supply at connection (B), or remove emergency device.
1.4 After removal of the clamps (49) draw off control module (H).
1.5 Withdraw valve insert from the top, complete with actuator (A).
1.6 Screw-off the leakage pipe (37 and 38).
1.7 Hold actuator (A) with a belt wrench and separate valve disk (15) from the
actuator (A) at wrench area (C).
1.8 Hold valve disk (15) at wrench area (C) and screw-out spring plate (13) at wrench
area (D).
2.0 Replacement of seals
Remove the seals marked with blue in the spare parts drawing. Clean the single
parts. Insert new seals. Do not use oils and grease for the V-rings (7 and 8). For
inserting the V-ring, use the insertion tool and steadily press the V-ring at opposi-
te spots for several times all over the circumference.
V-ring installation position, see illustration
3.0 Assembly
Assembly is carried out in reverse order
4.0 Function check
After assembly check the valve function.
For this purpose actuate valve with compressed air at (B).
Seals for VARIVENT®
Mixproof Valve Type K
Item Qty Designation Material 1" 11/2"/2" 21/2"/3" 4" 6"
1 2 Seal ring Ø 22 22 28 28 35
EPDM 924-084 924-084 924-085 924-085 924-088
FPM 924-082 924-082 924-083 924-083 924-087
5 4 O-ring Ø 42x3 60x3 85x4 113x4 158x5
EPDM 930-309 930-144 930-150 930-156 930-260
FPM 930-168 930-171 930-176 930-178 930-259
6 1 O-ring Ø 8x1,6 8x1,6 8x1,6 8x1,6 9x3
NBR 930-004 930-004 930-004 930-004 930-007
7 1 V-ring Ø 35-5 52-6 76-6 104-6 148-6
EPDM 932-046 932-021 932-024 932-028 932-042
FPM 932-030 932-033 932-035 932-039 932-041
8 2 V-ring Ø 28-5 44-6 68-6 96-6 140-6
EPDM 932-017 932-019 932-023 932-027 932-045
FPM 932-029 932-032 932-034 932-038 932-044
22 1 O-ring Ø 22x3 22x3 28x3 28x3 35x3
EPDM 930-268 930-268 930-243 930-243 930-356
FPM 930-164 930-164 930-244 930-244 930-357
25 O-ring Ø 11x3 11x3 15x3 15x3 20x3
EPDM 930-311 930-311 930-276 930-276 930-270
FPM 930-335 930-335 930-277 930-277 930-163
29 1 O-ring Ø 20x3 20x3 20x3 20x3 25x3
NBR 930-026 930-026 930-026 930-026 930-035
Seal set cpl. Material 1" 11/2"/2" 21/2"/3" 4" 6"
EPDM 221-304.12 221-304.13 221-304.14 221-304.15 221-304.17
FPM 221-519.32 221-519.33 221-519.34 221-519.35 221-519.37
46a
43
5
1
8
7
16
6
8
22
9
5
A
49
B
H
29
D
37
25
38
C
13
43b
5
43a
5
Item Qty Designation Material 1" 11/2"/2" 21/2"/3" 4" 6"
1 2 Seal ring Ø 22 22 28 28 35
EPDM 924-084 924-084 924-085 924-085 924-088
FPM 924-082 924-082 924-083 924-083 924-087
5 6 O-ring Ø 42x3 60x3 85x4 113x4 158x5
EPDM 930-309 930-144 930-150 930-156 930-260
FPM 930-168 930-171 930-176 930-178 930-259
6 1 O-ring Ø 8x1,6 8x1,6 8x1,6 8x1,6 9x3
NBR 930-004 930-004 930-004 930-004 930-007
7 2 V-ring Ø 35-5 52-6 76-6 104-6 148-6
EPDM 932-046 932-021 932-024 932-028 932-042
FPM 932-030 932-033 932-035 932-039 932-041
8 2 V-ring Ø 28-5 44-6 68-6 96-6 140-6
EPDM 932-017 932-019 932-023 932-027 932-045
FPM 932-029 932-032 932-034 932-038 932-044
22 1 O-ring Ø 22x3 22x3 28x3 28x3 35x3
EPDM 930-268 930-268 930-243 930-243 930-356
FPM 930-164 930-164 930-244 930-244 930-357
23 1 O-ring Ø 30x3 38x3 38x3 38x3 56x3
EPDM 930-525 930-246 930-246 930-246 930-266
FPM 930-512 930-247 930-247 930-247 930-265
24 1 O-ring Ø 10x2,5 16x3 16x3 16x3 22x3
EPDM 930-368 930-235 930-235 930-235 930-268
FPM 930-616 930-162 930-162 930-162 930-164
26 1 O-ring Ø 20x3 26x3 26x3 38x3
EPDM 930-270 930-252 930-252 930-246
FPM 930-163 930-165 930-165 930-247
27 1 O-ring Ø 23x3 32x3 38x3 38x3 50x3
EPDM 930-350 930-312 930-246 930-246 930-364
FPM 930-269 930-166 930-247 930-247 930-299
29 1 O-ring Ø 20x3 20x3 20x3 20x3 25x3
NBR 930-026 930-026 930-026 930-026 930-035
Liquid Processing Division
Tuchenhagen
Original Spare Parts – VARIVENT®
Mixproof Shuttle Valve Type Y - Maintenance
Storage Instruction: Storage acc. DIN 7719, relative humidity
of air approx. ca. 65%, temperature between 15-25° C
(59-77° F), storage to be light protected
46a
43
5
1
8
7
43c
5
3
15
16
4
2
6
8
9
36
5
5
C
30
A
49
B
H
29
5
1
E
27
7
26
17
24
23
22
43a
43a
1.0 Dismantling
1.1 Remove CIP connection (30).
1.2 Remove the hinged clamp (43c) and take out the component parts (1, 2, 3, 4, 5, 36).
1.3 In the non-actuated position, the valve disks (15 and 16) are in the closed position, the valve
disk (17) is in the opened position.
1.4 Hold actuator (A) with a belt wrench and turn off additional valvs disk (17) at wrench area (E).
1.5 Lift the valve disks (15 and 16) by actuating the valve with compressed air at connection (B) or
using the emergency device.
1.6 Remove the hinged clamp (43)
1.7 Interrupt compressed air supply at connection (B), or remove emergency device.
1.8 After removal of the clamps (49) draw off control module (H).
1.9 Withdraw valve insert from the top, complete with actuator (A)
1.10 Hold actuator (A) with a belt wrench and separate valve disk (15) complete with CIP bonnet
(11) from the actuator (A) at wrench area (D).
1.11 Hold valve disk (15) by inserting a pin Ø 5 mm into bore (C) and remove CIP bonnet (11) by
using a wrench at wrench area (D).
2.0 Replacement of seals
Remove the seals marked with blue in the spare parts drawing. Clean the single parts. Insert
new seals. Do not use oils and grease for the V-rings (7 and 8).
For inserting the V-ring, use the insertion tool and steadily press the V-ring at opposite spots
for several times all over the circumference.
V-ring installation position, see illustration
3.0 Assembly
Assembly is carried out in reverse order
4.0 Function check
After assembly check the valve function. For this purpose actuate valve with compressed
air at (B). In closed valve position, the bearing plug and CIP bonnet must at flush level.
Seals for VARIVENT®
Mixproof Shuttle Valve Type Y
Seal set cpl. Material 1" 11/2"/2" 21/2"/3" 4" 6"
EPDM 221-519.59 221-304.30 221-304.31 221-304.32 221-304.34
FPM 221-519.61 221-519.39 221-519.40 221-519.41 221-519.43
Liquid Processing Division
Tuchenhagen
Original Spare Parts – VARIVENT®
Mixproof Valve Type D.L - Maintenance
Storage Instruction: Storage acc. DIN 7719, relative humidity
of air approx. ca. 65%, temperature between 15-25° C
(59-77° F), storage to be light protected
223
46a
X
Y
204
A
H
49
B
46
43
5
1
8
7
43b
5
3
24
E
L
F
15
16
4
2
6
8
G
22
29
9
36
1
5
5
43a
C
30
203
211
Item Qty Designation Material 1" 11/2"/2" 21/2"/3" 4" 6"
1 1 Seal ring Ø 22 28 28 28 35
EPDM 924-084 924-085 924-085 924-085 924-088
FPM 924-082 924-083 924-083 924-083 924-087
1 1 Seal ring Ø 22 22 28 28 35
EPDM 924-084 924-084 924-085 924-085 924-088
FPM 924-082 924-082 924-083 924-083 924-087
5 4 O-ring Ø 42x3 60x3 85x4 113x4 158x5
EPDM 930-309 930-144 930-150 930-156 930-260
FPM 930-168 930-171 930-176 930-178 930-259
6 1 O-ring Ø 8x1,6 8x1,6 8x1,6 8x1,6 9x3
NBR 930-004 930-004 930-004 930-004 930-007
7 1 V-ring Ø 35-5 52-6 76-6 104-6 148-6
EPDM 932-046 932-021 932-024 932-028 932-042
FPM 932-030 932-033 932-035 932-039 932-041
8 2 V-ring Ø 28-5 44-6 68-6 96-6 140-6
EPDM 932-017 932-019 932-023 932-027 932-045
FPM 932-029 932-032 932-034 932-038 932-044
22 2 O-ring Ø 22x3 28x3 28x3 28x3 35x3
EPDM 930-268 930-243 930-243 930-243 930-356
FPM 930-164 930-244 930-244 930-244 930-357
24 2 O-ring Ø 10x2,5 16x3 16x3 16x3 22x3
EPDM 930-368 (1x) 930-235 930-235 930-235 930-268
FPM 930-616 (1x) 930-162 930-162 930-162 930-164
29 1 O-ring Ø 20x3 20x3 20x3 20x3 25x3
NBR 930-026 930-026 930-026 930-026 930-035
Seal set cpl. Material 1" 11/2"/2" 21/2"/3" 4" 6"
EPDM 221-528.39 221-511.27 221-511.28 221-511.29 221-511.31
FPM 221-528.40 221-519.06 221-519.07 221-519.08 221-519.10
1.0 Dismantling
1.1 Remove CIP connection (30).
1.2 In the non-actuated position, the valve disks (15 and 16) are in the closed position. Lift the
valve disks (15 and 16) by actuating the valve with compressed air at connection (B) or using
the emergency device.
1.3 Remove hinged clamp (43).
1.4 Interrupt compressed air supply at connection (B), or remove emergency device.
1.5 After removal of the clamps (49) draw off control module (H).
1.6 Withdraw valve insert from the top, complete with actuator (A) and lifting actuator (L).
1.7 Remove hinged clamp (46). Hold valve disk (15) by inserting a pin Ø 5 mm into bore (C) and
separate actuator (A) from the lifting actuator (L) using a belt wrench.
1.8 Remove clamps (223) and take out cylindre cover (204).
1.9 Hold valve disk (15) by inserting a pin Ø 5 mm into bore (C) and separate drive spindle (203)
from the valve disk (15) by turning the hexagon (E) to the left.
Caution: Do not pull out drive spindle (203), thrust washer (211) may fall out !
1.10 The double seat disk (16) is separated from the drive spindle using a round rod (inserted in
bore F) and by turning at wrench area (G) and then to be withdrawn from the bottom.
1.11 Remove the hinged clamp (46a) and separate the lifting actuator (L) from the lantern (9).
1.12 Remove the hinged clamp (43b) and take out the component parts (1, 2, 3, 4, 5 and 36).
2.0 Replacement of seals
Remove the seals marked with blue in the spare parts drawing.
Clean the single parts. Insert new seals. Do not use oils and grease for the V-rings (7 and 8).
For inserting the V-ring, use the insertion tool and steadily press the V-ring at opposite spots
for several times all over the circumference.
V-ring installation, see illustration
3.0 Assembly
Assembly is carried out in reverse order
4.0 Function check
After assembly check the valve function and the total stroke. For this purpose actuate valve
with compressed air at (B).
4.1 Check the lifting stroke:
On actuation of the valve via (X) the stroke of the double seat disk (16) must be 1 to 2 mm.
On actuation via (Y) the stroke of the valve disk (15) must must be 0,9 to 1,4 mm.
Seals for VARIVENT®
Mixproof Valve Type D.L
Item Qty Designation Material 2" 21/2"/3" 4" 6"
1 1 Seal ring Ø 28 28 28 35
EPDM 924-085 924-085 924-085 924-088
FPM 924-083 924-083 924-083 924-087
5 4 O-ring Ø 60x3 85x4 113x4 158x5
EPDM 930-144 930-150 930-156 930-260
FPM 930-171 930-176 930-178 930-259
6 1 O-ring Ø 8x1,6 8x1,6 8x1,6 9x3
NBR 930-004 930-004 930-004 930-007
7 1 V-ring Ø 52-6 76-6 104-6 148-6
EPDM 932-021 932-024 932-028 932-042
FPM 932-033 932-035 932-039 932-041
8 2 V-ring Ø 44-6 68-6 96-6 140-6
EPDM 932-019 932-023 932-027 932-045
FPM 932-032 932-034 932-038 932-044
22 2 O-ring Ø 28x3 28x3 28x3 35x3
EPDM 930-243 930-243 930-243 930-356
FPM 930-244 930-244 930-244 930-357
24 2 O-ring Ø 16x3 16x3 16x3 22x3
EPDM 930-235 930-235 930-235 930-268
FPM 930-162 930-162 930-162 930-164
29 1 O-ring Ø 20x3 20x3 20x3 25x3
NBR 930-026 930-026 930-026 930-035
65 1 Seal ring Ø 46 69 97 142
EPDM 924-305 924-296 924-254 924-261
FPM 924-307 924-308 924-309 924-320
Liquid Processing Division
Tuchenhagen
Original Spare Parts – VARIVENT®
Mixproof Valve Type B.L - Maintenance
Storage Instruction: Storage acc. DIN 7719, relative humidity
of air approx. ca. 65%, temperature between 15-25° C
(59-77° F), storage to be light protected
223
46a
X
Y
204
A
H
49
B
46
43
5
1
8
7
43b
5
65
24
E
L
F
16
66
6
8
G
22
29
9
92
15
5
5
C
30
203
211
43a
1.0 Dismantling
1.1 Remove CIP connection (30).
1.2 In the non-actuated position, the valve disks (15 and 16) are in the closed position.
Lift the valve disks (15 and 16) by actuating the valve with compressed air at connection (B) or
using the emergency device.
1.3 Remove hinged clamp (43).
1.4 Interrupt compressed air supply at connection (B), or remove emergency device.
1.5 After removal of the clamps (49) draw-off control module (H).
1.6 Withdraw valve insert from the top, complete with actuator (A) and lifting actuator (L).
1.7 Remove hinged clamp (46). Hold actuator (A) using a belt wrench and separate lifting actuator (L)
from actuator (A) at wrench area C
1.8 Remove clamps (223) and take out cylindre cover (204).
1.9 Hold valve disk (15) at wrench area (C) and separate drive spindle (203) from the valve disk (15)
by turning the hexagon (E) to the left.
Caution: Do not pull out drive spindle (203), circlip (211) may fall out !
1.10 The double seat disk (16) is separated from the drive spindle using a round rod (inserted in
bore F) and by turning at wrench area (G) and then to be withdrawn from the bottom.
1.11 Remove the hinged clamp (46a) and separate the lifting actuator (L) from the lantern (9).
1.12 Remove the hinged clamp (43b) and take out the component parts (5, 65, 66, 92).
2.0 Replacement of seals
Remove the seals marked with blue in the spare parts drawing. Clean the single parts. Insert
new seals. Do not use oils and grease for the V-rings (7 and 8). For inserting the V-ring, use the
insertion tool and steadily press the V-ring at opposite spots for several times all over the cir-
cumference.
V-ring installation position, see illustration
3.0 Assembly
Assembly is carried out in reverse order
4.0 Function check
After assembly check the valve function and the total stroke. For this purpose actuate valve
with compressed air at (B).
4.1 Check the lifting stroke:
On actuation of the valve via (X) the stroke of the double seat disk (16) must be 1 to 2 mm.
On actuation via (Y) the stroke of the valve disk (15) must must be 0,9 to 1,4 mm.
Seals for VARIVENT®
Mixproof Valve Type B.L
Seal set cpl. Material 2" 21/2"/3" 4" 6"
EPDM 221-511.42 221-511.43 221-511.44 221-511.46
FPM 221-519.21 221-519.22 221-519.23 221-519.25
Item Qty Designation Material 2" 3" 4" 6"
1 1 Seal ring Ø 28 28 28 35
EPDM 924-085 924-085 924-085 924-088
5 2 O-ring Ø 60x3 85x4 113x4 158x5
EPDM 930-144 930-150 930-156 930-260
6 1 O-ring Ø 8x1,6 8x1,6 8x1,6 9x3
NBR 930-004 930-004 930-004 930-007
7 1 V-ring Ø 52-6 76-6 104-6 148-6
EPDM 932-021 932-024 932-028 932-042
8 2 V-ring Ø 44-6 68-6 96-6 140-6
EPDM 932-019 932-023 932-027 932-045
22 2 O-ring Ø 28x3 28x3 28x3 35x3
EPDM 930-243 930-243 930-243 930-356
24 2 O-ring Ø 16x3 16x3 16x3 22x3
EPDM 930-235 930-235 930-235 930-268
29 1 O-ring Ø 20x3 20x3 20x3 25x3
NBR 930-026 930-026 930-026 930-035
65 1 Seal ring Ø 46 69 97 142
EPDM 924-305 924-296 924-254 924-261
93 1 O-ring Ø 16x3 20x3 20x3 26x3
EPDM 930-235 930-270 930-270 930-252
Seal set cpl. Material 2" 3" 4" 6"
EPDM 221-519.87 221-519.88 221-519.89 221-519.90
Liquid Processing Division
Tuchenhagen
Original Spare Parts – VARIVENT®
Mixproof Valve Type B.C - Maintenance
Storage Instruction: Storage acc. DIN 7719, relative humidity
of air approx. ca. 65%, temperature between 15-25° C
(59-77° F), storage to be light protected
1.0 Dismantling
1.1 In the non-actuated position, the valve disks (15 and 16)are in the closed position.
Lift the valve disks (15 and 16) by actuating the valve with compressed air at connection
(B) or using the emergency device.
1.2 Remove hinged clamp (43).
1.3 Interrupt compressed air supply at connection (B), or remove emergency device.
1.4 After removal of the clamps (49) draw off control module (H).
1.5 Withdraw valve insert from the top, complete with actuator (A) and lifting actuator (L).
1.6 Remove hinged clamp (46). Hold actuator (A) with a belt wrench and separate the lifting
actuator (L) from the actuator (A) at wrench area (C).
1.7 Remove clamps (223) and take out cylindre cover (204).
1.8 Hold valve disk (15) at wrench area (C) and separate drive spindle (203) from the valve
disk (15) by turning the hexagon (E) to the left.
Caution: Do not pull out drive spindle (203), thrust washer (211) may fall out !
1.9 The double seat disk (16) is separated from the drive spindle using a round rod (inserted
in bore F) turning at wrench area (G) and then withdrawn from the bottom.
1.10 Remove the hinged clamp (46a) and separate the lifting actuator (L) from the lantern (9).
1.11 Remove the hinged clamp (43b) and take out the component parts (5, 65, 66 and 92).
2.0 Replacement of seals
Remove the seals marked with blue in the spare parts drawing. Clean the single parts.
Insert new seals. Do not use oils and grease for the V-rings (7 and 8). For inserting the
V-ring, use the insertion tool and steadily press the V-ring at opposite spots for several
times all over the circumference.
V-ring installation position, see illustration
3.0 Assembly
Assembly is carried out in reverse order.
4.0 Function check
After assembly check the valve function and the total stroke. For this purpose actuate
valve with compressed air at (B).
4.1 Check the lifting stroke:
On actuation of the valve via (X) the stroke of the double seat disk (16)
must be 1 to 2 mm.
On actuation via (Y) the stroke of the valve disk (15) must must be 0,9 to 1,4 mm.
223
46a
X
Y
204
A
H
49
B
46
43
5
1
8
7
43b
5
65
24
E
L
F
16
66
6
8
G
22
29
9
92
15
C
203
211
Seals for VARIVENT®
Mixproof Valve Type B.C
Liquid Processing Division
Tuchenhagen
Original Spare Parts – VARIVENT®
Mixproof Valve Type R.L - Maintenance
Storage Instruction: Storage acc. DIN 7719, relative humidity
of air approx. ca. 65%, temperature between 15-25° C
(59-77° F), storage to be light protected
1.0 Dismantling
1.1 Remove CIP connection (30).
1.2 In the non-actuated position, the valve disks (15 and 16) are in the closed position. Lift the
valve disks (15 and 16) by actuating the valve with compressed air at connection (B) or using
the emergency device.
1.3 Remove hinged clamp (43).
1.4 Interrupt compressed air supply at connection (B), or remove emergency device.
1.5 After removal of the clamps (49) draw off control module (H).
1.6 Withdraw valve insert from the top, complete with actuator (A).
1.7 Hold the piston rod at (E) and unsrew the valve disk (15) by inserting a
pin Ø 5 mm into bore (C).
1.8 The double seat disk (16) is separated from the drive spindle using a round rod (inserted in
bore G) and by turning at wrench area (G) and then to be withdrawn from the bottom.
1.9 Remove the hinged clamp (43b) and take out the component parts (5, 65, 66 and 92).
2.0 Replacement of seals
Remove the seals marked with blue in the spare parts drawing.
Clean the single parts. Insert new seals. Do not use oils and grease for the V-rings (7, 8 and
94). For inserting the V-ring, use the insertion tool and steadily press the V-ring at opposite
spots for several times all over the circumference.
V-ring installation, see illustration
3.0 Assembly
Assembly is carried out in reverse order
4.0 Function check
After assembly check the valve function and the total stroke. For this purpose actuate valve
with compressed air at (B).
4.1 Check the lifting stroke: On actuation of the valve via (X) the stroke of the double seat disk
(16) must be 1 to 2 mm.
On actuation via (Y) the stroke of the valve disk (15) must must be 6 to 7 mm.
94
5
65
D
66
92
43b
15
7
8
5
1
16
43
B
A
49
6
22
24
H
5
43a
30
E
F
G
Y
X
Seal set cpl. Material 1" 11/2"/2" 21/2"/3" 4" 6"
EPDM 221-528.75 221-528.19 221-528.20 221-528.21 221-528.23
FPM 221-528.24 221-528.25 221-528.26 221-528.37
Item Qty Designation Material 1" 11/2"/2" 21/2"/3" 4" 6"
1 1 Seal ring Ø 22 28 28 28 35
EPDM 924-084 924-085 924-085 924-085 924-088
FPM 924-083 924-083 924-083 924-087
5 4 O-Ring Ø 42x3 60x3 85x4 113x4 158x5
EPDM 930-309 930-144 930-150 930-156 930-260
FPM 930-171 930-176 930-178 930-259
6 1 O-Ring Ø 8x1,6 8x1,6 8x1,6 8x1,6 9x3
NBR 930-004 930-004 930-004 930-004 930-007
7 1 V-Ring Ø 35-5 52-6 76-6 104-6 148-6
EPDM 932-046 932-021 932-024 932-028 932-042
FPM 932-033 932-035 932-039 932-041
8 1 V-Ring Ø 28-5 44-6 68-6 96-6 140-6
EPDM 932-017 932-019 932-023 932-027 932-045
FPM 932-032 932-034 932-038 932-044
22 2 O-Ring Ø 22x3 28x3 28x3 28x3 35x3
EPDM 930-268 930-243 930-243 930-243 930-356
FPM 930-244 930-244 930-244 930-357
24 1 O-Ring Ø 10x2,5 16x3 16x3 16x3 22x3
EPDM 930-368 930-235 930-235 930-235 930-268
FPM 930-162 930-162 930-162 930-164
65 1 Seal ring Ø 22 46 69 97 142
EPDM 924-084 924-305 924-296 924-254 924-261
FPM 924-307 924-308 924-309 924-320
94 1 V-Ring (R) Ø 36-7 54-7 78-7 106-7 151-7
EPDM 221-365.13 221-365.07 221-365.08 221-365.09 221-265.16
FPM 221-365.10 221-365.11 221-365.12 221-365.17
Seals for VARIVENT®
Mixproof Valve Type R.L
Liquid Processing Division
Tuchenhagen
Original Spare Parts – VARIVENT®
Mixproof Bottom Valve Type T - Maintenance
Storage Instruction: Storage acc. DIN 7719, relative humidity
of air approx. ca. 65%, temperature between 15-25° C
(59-77° F), storage to be light protected
43a
22
1
30
46
6
9
D
23
24
65
8
C
7
A
H
B
49
43
5
83
8
16
5
5
29
15
4
11
2
1.0 Dismantling
1.1 Remove CIP connection (30).
1.2 In the non-actuated position, the valve disks (15 and 16) are in the closed position. Lift
the valve disks (15 and 16) by actuating the valve with compressed air at connection
(B) or using the emergency device.
1.3 Remove hinged clamp (43).
1.4 Interrupt compressed air supply at connection (B), or remove emergency device.
1.5 After removal of the clamps (49) draw-off control module (H).
1.6 Withdraw valve insert complete with actuator (A) and lantern (9).
1.7 Remove hinged clamp (46). Hold actuator (A) using a belt wrench wrench and separa-
te valve disk (15) from actuator (A) at wrench area C
1.8 Hold valve disk (15) at wrench area (C) and remove CIP bonnet (11) at wrench area (D).
1.9 Remove the hinged clamp (43a) and take out the component parts (1, 2, 4 and 83).
2.0 Replacement of seals
Remove the seals marked with blue in the spare parts drawing. Clean the single parts.
Insert new seals. Do not use oils and grease for the V-rings (7 and 8). For inserting the
V-ring, use the insertion tool and steadily press the V-ring at opposite spots for several
times all over the circumference.
V-ring installation position, see illustration
3.0 Assembly
Assembly is carried out in reverse order
4.0 Function check
After assembly check the valve function.
For this purpose actuate valve with compressed air at (B).
In closed valve position, the bearing plug and CIP bonnet must at flush level.
Item Qty Designation Material 11/2"/2" 21/2"/3" 4"
1 1 Seal ring Ø 28 28 28
EPDM 924-085 924-085 924-085
FPM 924-083 924-083 924-083
5 4 O-ring Ø 60x3 85x4 113x4
EPDM 930-144 930-150 930-156
FPM 930-171 930-176 930-178
6 1 O-ring Ø 8x1,6 8x1,6 8x1,6
NBR 930-004 930-004 930-004
7 1 V-ring Ø 52-6 76-6 104-6
EPDM 932-021 932-024 932-028
FPM 932-033 932-035 932-039
8 2 V-ring Ø 44-6 68-6 96-6
EPDM 932-019 932-023 932-027
FPM 932-032 932-034 932-038
22 1 O-ring Ø 28x3 28x3 28x3
EPDM 930-243 930-243 930-243
FPM 930-244 930-244 930-244
23 1 O-ring Ø 38x3 38x3 38x3
EPDM 930-246 930-246 930-246
FPM 930-247 930-247 930-247
24 1 O-ring Ø 16x3 16x3 16x3
EPDM 930-235 930-235 930-235
FPM 930-162 930-162 930-162
29 1 O-ring Ø 20x3 20x3 20x3
NBR 930-026 930-026 930-026
65 1 Seal ring Ø 48 48 48
EPDM 924-298 924-298 924-298
FPM 924-310 924-310 924-310
Seal set cpl. Material 11/2"/2" 21/2"/3" 4"
EPDM 221-511.47 221-511.48 221-511.49
FPM 221-519.26 221-519.27 221-519.28
Seals for VARIVENT®
Mixproof Bottom Valve Type T
Liquid Processing Division
Tuchenhagen
Original Spare Parts – VARIVENT®
Mixproof Bottom Valve Type T.L - Maintenance
Storage Instruction: Storage acc. DIN 7719, relative humidity
of air approx. ca. 65%, temperature between 15-25° C
(59-77° F), storage to be light protected
C
A
H
B
49
22
1
30
46
24
65
8
7
5
83
8
16
5
5
29
15
6
2
43b
43a
F
46
211
X
Y
203
L
E
204
223
G
43
1.0 Dismantling
1.1 Remove CIP connection (30).
1.2 In the non-actuated position, the valve disks (15 and 16) are in the closed position. Lift the valve
disks (15 and 16) by actuating the valve with compressed air at connection (B) or using the
emergency device.
1.3 Remove hinged clamp (43).
1.4 Interrupt compressed air supply at connection (B), or remove emergency device.
1.5 After removal of the clamps (49) draw off control module (H).
1.6 Withdraw valve insert complete with actuator (A) and liftin actuator (L).
1.7 Remove hinged clamp (46). Hold valve disk (15) at wrench area (C) and separate actuator (A)
from lifting actuator using (L) using a belt wrench.
1.8 Remove clamps (223) and take out cylindre cover (204).
1.9 Hold drive spindle (203) at hexagon (E), by turning the valve disk (15) at wrench area (C) to the
left, unscrew the the valve disk (15).
CAUTON: Do not pull out drive spindle (203), thrust washer (211) may fall out !
1.10The double seat disk (16) is separated from the drive spindle using a round rod (inserted in bore
F) and by turning at wrench area (G) and then withdrawn.
1.11Remove the hinged clamp (46a) and separate the lifting actuator (L) from the lantern (9).
1.12Remove the hinged clamp (43b) and take out the seat ring (34).
1.13Remove the hinged clamp (43) and separate the leaking housing (73) from the lantern (9).
2.0 Replacement of seals
Remove the seals marked with blue in the spare parts drawing. Clean the single parts. Insert
new seals. Do not use oils and grease for the V rings (7 and 8). For inserting the V ring, use the
insertion tool and steadily press the V ring at opposite spots for several times all over the
circumference.
V ring installation, see illustration
3.0 Assembly
Assembly is carried out in reverse order
4.0 Function check
After assembly check the total stroke.
For this purpose actuate valve with compressed air and check whether the valve stroke is cor-
rect. If necessary, adjust the feedback switch or the proximity switch.
Check the lifting stroke:
On actuation of the valve via (X), the stroke of the double seat disk (16) must be 1 to 2 mm.
On actuation via (Y), the stroke of the valve disk (15) must must be 0,9 to 1,4 mm.
Item Qty Designation Material 11/2"/2" 21/2"/3" 4"
1 1 Seal ring Ø 28 28 28
EPDM 924-085 924-085 924-085
FPM 924-083 924-083 924-083
5 4 O-ring Ø 60x3 85x4 113x4
EPDM 930-144 930-150 930-156
FPM 930-171 930-176 930-178
6 1 O-ring Ø 8x1,6 8x1,6 8x1,6
NBR 930-004 930-004 930-004
7 1 V-ring Ø 52-6 76-6 104-6
EPDM 932-021 932-024 932-028
FPM 932-033 932-035 932-039
8 2 V-ring Ø 44-6 68-6 96-6
EPDM 932-019 932-023 932-027
FPM 932-032 932-034 932-038
22 2 O-ring Ø 28x3 28x3 28x3
EPDM 930-243 930-243 930-243
FPM 930-244 930-244 930-244
24 2 O-ring Ø 16x3 16x3 16x3
EPDM 930-235 930-235 930-235
FPM 930-162 930-162 930-162
29 1 O-ring Ø 20x3 20x3 20x3
NBR 930-026 930-026 930-026
65 1 Seal ring Ø 48 48 48
EPDM 924-298 924-298 924-298
FPM 924-310 924-310 924-310
Seal set cpl. Material 11/2"/2" 21/2"/3" 4"
EPDM 221-511.50 221-511.51 221-511.52
FPM 221-519.29 221-519.30 221-519.31
Seals for VARIVENT®
Mixproof Bottom Valve Type T.L
Liquid Processing Division
Tuchenhagen
Original Spare Parts – VARIVENT®
Mixproof Valve Type B - Maintenance
Storage Instruction: Storage acc. DIN 7719, relative humidity
of air approx. ca. 65%, temperature between 15-25° C
(59-77° F), storage to be light protected
46a
43
5
1
8
7
43b
5
65
15
16
6
8
24
9
66
5
5
43a
C
30
A
49
B
H
29
C
92
23
22
1.0 Dismantling
1.1 Remove hinged clamp (43) and locking device (35) at the lower valve housing (40).
1.2 In the non-actuated position, the valve disk (15) is in the closed position.
Lift the valve disk (15) by actuating the valve with compressed air at connection
(B) or using the emergency.
1.3 Loosen valve disk (15) at wrench area (C) by approx. 5 – 6 mm.
1.4 Interrupt compressed air supply at connection (B), or remove emergency device.
Separate valve disk from actuator
1.5 After removal of the clamps (49) draw off control module (H).
1.6 Remove hinged clamp (43) between lantern (9) and the upper valve housing.
1.7 Remove actuator (A) from the top.
2.0 Replacement of seals
Remove the seals marked with blue in the spare parts drawing. Clean the single
parts. Insert new seals. Do not use oils and grease for the V-ring (7). For inserting
the V-ring, use the insertion tool and steadily press the V-ring at opposite spots
for several times all over the circumference.
V-ring installation position, see illustration
3.0 Assembly
Assembly is carried out in reverse order
4.0 Function check
After assembly check the valve function. For this purpose actuate valve with com-
pressed air at (B).
Item Qty Designation Material 2" 21/2"/3" 4" 6"
1 1 Seal ring Ø 22 28 35 35
EPDM 924-084 924-085 924-088 924-088
FPM 924-082 924-083 924-087 924-087
5 4 O-ring Ø 60x3 85x4 138x4 158x5
EPDM 930-144 930-150 930-372 930-260
FPM 930-171 930-176 930-409 930-259
6 1 O-ring Ø 8x1,6 8x1,6 9x3 9x3
NBR 930-004 930-004 930-007 930-007
7 1 V-ring Ø 52-6 76-6 128-6 148-6
EPDM 932-021 932-024 932-060 932-042
FPM 932-033 932-035 932-062 932-041
8 2 V-ring Ø 44-6 68-6 120-6 140-6
EPDM 932-019 932-023 932-059 932-045
FPM 932-032 932-034 932-063 932-044
22 1 O-ring Ø 22x3 28x3 35x3 35x3
EPDM 930-268 930-243 930-356 930-356
FPM 930-164 930-244 930-357 930-357
23 1 O-ring Ø 38x3 38x3 56x3 56x3
EPDM 930-246 930-246 930-266 930-266
FPM 930-247 930-247 930-265 930-265
24 1 O-ring Ø 16x3 16x3 22x3 22x3
EPDM 930-235 930-235 930-268 930-268
FPM 930-162 930-162 930-164 930-164
29 1 O-ring Ø 20x3 20x3 25x3 25x3
NBR 930-026 930-026 930-035 930-035
65 1 Seal ring Ø 46 69 122 142
EPDM 924-305 924-296 924-262 924-261
FPM 924-307 924-308 924-319 924-320
Seal set cpl. Material 2" 21/2"/3" 4" 6"
EPDM 221-511.37 221-511.38 221-511.39 221-511.41
FPM 221-519.16 221-519.17 221-519.18 221-519.20
Seals for VARIVENT®
Mixproof Valve Type B
Liquid Processing Division
Tuchenhagen
Original Spare Parts – ECOVENT®
Shuttle Valve Type W.S - Maintenance
Storage Instruction: Storage acc. DIN 7719, relative humidity
of air approx. ca. 65%, temperature between 15-25° C
(59-77° F), storage to be light protected
S1+
S1-
S2+
S2-
Y11
Y12
Y21
Y22
Y31
Y32
S3+
S3-
RM1
RM2
RM3
V1
V2
V3
L+
L-
7
5
15
43
H
1
5
5
A
43a
N
F
M
B C
1.0 Dismantling
1.1 In the non-actuated position, the valve disk (15) is in the closed positi-
on.Lift the valve disk (15) by actuating the valve with compressed air at
connection (B).
1.2 Remove hinged clamps (43 and 43a).
1.3 Interrupt compressed air supply at connection (B).
1.4 Slacken screws (N) at installa-tion base (M) and draw off control module
(H).
1.5 Withdraw valve insert from the top, complete with actuator (A)
1.6 Hold valve disk (15) by inserting a pin Ø 5 mm into bore (C) and separate
switch bar from valve disk (15) by turining a pin gat bore (F).
2.0 Replacement of seals
Remove the seals marked with blue in the spare parts drawing. Clean the
single parts. Insert new seals. Do not use oils and grease for the V-ring
(7). For inserting the V-ring, use the insertion tool and steadily press the
V-ring at opposite spots for several times all over the
circumference.
V-ring installation
position,
see illustration
3.0 Assembly
Assembly is carried out in reverse order
4.0 Function check
After assembly check the valve function.
For this purpose actuate valve with compressed air at (B).
Item Qty Designation Material 1" 11/2"/2" 21/2"/3" 4"
1 1 Seal ring Ø 28 28 28 28
EPDM 924-085 924-085 924-085 924-085
FPM 924-083 924-083 924-083 924-083
5 3 O-ring Ø 42x3 60x3 85x4 113x4
EPDM 930-309 930-144 930-150 930-156
FPM 930-168 930-171 930-176 930-178
7 2 V-ring Ø 35-5 52-6 76-6 104-6
EPDM 932-046 932-021 932-024 932-028
FPM 932-030 932-033 932-035 932-039
29 1 O-ring Ø 20x3 20x3 20x3 20x3
NBR 930-029 930-029 930-029 930-029
98 1 O-ring Ø 34x3 34x3 34x3 34x3
NBR 930-046 930-046 930-046 930-046
Seal set cpl. Material 1" 11/2"/2" 21/2"/3" 4"
EPDM 221-489.01 221-489.03 221-489.05 221-489.07
FPM 221-489.02 221-489.04 221-489.06 221-489.08
Seals for ECOVENT®
Shuttle Valve Type W.S
Liquid Processing Division
Tuchenhagen
Original Spare Parts – ECOVENT®
Shut-Off Valve Type N.S - Maintenance
Storage Instruction: Storage acc. DIN 7719, relative humidity
of air approx. ca. 65%, temperature between 15-25° C
(59-77° F), storage to be light protected
1.0 Dismantling
1.1 In the non-actuated position, the valve disk (15) is in the closed positi-
on.Lift the valve disk (15) by actuating the valve with compressed air at
connection (B).
1.2 Remove hinged clamp (43).
1.3 Interrupt compressed air supply at connection (B).
1.4 Slacken screws (N) at installa-tion base (M) and
draw off control module (H).
1.5 Withdraw valve insert from the top, complete with actuator (A)
1.6 Hold valve disk (15) by inserting a pin Ø 5 mm into bore (C) and separate
switch bar from valve disk (15) by turining a pin gat bore (F).
2.0 Replacement of seals
Remove the seals marked with blue in the spare parts drawing. Clean the
single parts. Insert new seals. Do not use oils and grease for the V-ring
(7). For inserting the V-ring, use the insertion tool and steadily press the
V-ring at opposite spots for several times all over the
circumference.
V-ring installation position, see illustration
3.0 Assembly
Assembly is carried out in reverse order
4.0 Function check
After assembly check the valve function.
For this purpose actuate valve with compressed air at (B).
S1+
S1-
S2+
S2-
Y11
Y12
Y21
Y22
Y31
Y32
S3+
S3-
RM1
RM2
RM3
V1
V2
V3
L+
L-
H
A
N
7
5
15
43
1
5
5
43a
F
M
B C
Item Qty Designation Material 1" 11/2"/2" 21/2"/3" 4"
1 1 Seal ring Ø 28 28 28 28
EPDM 924-085 924-085 924-085 924-085
FPM 924-083 924-083 924-083 924-083
5 1 O-ring Ø 42x3 60x3 85x4 113x4
EPDM 930-309 930-144 930-150 930-156
FPM 930-168 930-171 930-176 930-178
7 1 V-ring Ø 35-5 52-6 76-6 104-6
EPDM 932-046 932-021 932-024 932-028
FPM 932-030 932-033 932-035 932-039
29 1 O-ring Ø 20x3 20x3 20x3 20x3
NBR 930-029 930-029 930-029 930-029
98 1 O-ring Ø 34x3 34x3 34x3 34x3
NBR 930-046 930-046 930-046 930-046
Seal set cpl. Material 1" 11/2"/2" 21/2"/3" 4"
EPDM 221-304.92 221-304.94 221-304.96 221-304.98
FPM 221-304.93 221-304.95 221-304.97 221-304.99
Seals for ECOVENT®
Shut-Off Valve Type N.S
Liquid Processing Division
Tuchenhagen
Original Spare Parts – VARIVENT®
Mixproof Valve Type M.O - Maintenance
Storage Instruction: Storage acc. DIN 7719, relative humidity
of air approx. ca. 65%, temperature between 15-25° C
(59-77° F), storage to be light protected
H
7
5
92
65
43a
1
5
108
16
15
93
8
103
E
B
A
49
91
106
D
94
20
43
1.0 Dismantling
1.1 In the non-actuated position, the valve disks (15 and 16) are in the closed position.
Lift the valve disks (15 and 16) by actuating the valve with compressed air at
connection (B) or using the emergency device.
1.2 Remove hinged clamp (43).
1.3 Interrupt compressed air supply at connection (B), or remove emergency device.
1.4 After removal of the clamps (49) draw off control module (H).
1.5 Withdraw valve insert from the top, complete with actuator (A)
1.6 Hold piston rod at wrench area (E) and unscrew valve disk (15) using a face socket
wrench.
1.7 Hold drive sleeve (106) at wrench area (D) and unscrew double seat disk (16) using
a pin punch.
1.8 Remove leakage detector (91) off the double seat disk (16).
1.9 Remove the hinged clamp (43a) and take out the component parts (5; 65; 92).
2.0 Replacement of seals
Remove the seals marked with * in the spare parts drawing. Clean the single
parts. Insert new seals. Do not use oils and grease for the V rings (7 and 8). For
inserting the V ring, use the insertion tool and steadily press the V ring at
opposite spots for several times all over the circumference.
V ring installation position, see illustration
3.0 Assembly
Assembly is carried out in reverse order
4.0 Function check
After assembly check the total stroke.
Item Qty Designation Material 2" 21/2" 3" 4"
1 1 Sealing ring FPM 924-308 924-309 924-319 924-320
5 2 O-ring EPDM 930-150 930-156 930-372 930-260
FPM 930-176 930-178 930-409 930-259
7 1 V-ring EPDM 932-024 932-028 932-060 932-042
FPM 932-035 932-039 932-062 932-041
8 1 V-ring EPDM 932-023 932-027 932-059 932-045
FPM 932-034 932-038 932-063 932-044
20 1 Rod guide ring Turcite 935-018 935-018 935-025 935-025
65 1 Sealing ring RA FPM 221-367.08 221-367.09 221-367.10 221-367.11
92 1 Balancer locking 1.4404 221-538.01 221-538.02 221-538.03 221-538.04
93 1 O-ring FPM 930-163 930-163 930-165 930-165
94 1 V-ring RA EPDM 221-365.08 221-365.09 221-365.14 221-365.16
FKF 80 221-365.11 221-365.12 221-365.15 221-365.17
108 1 O-ring EPDM 930-243 930-243 930-356 930-356
FPM 930-244 930-244 930-357 930-357
109 1 O-ring EPDM 930-701 930-701 930-701 930-701
FPM 930-606 930-606 930-606 930-606
Seals for VARIVENT®
Mixproof Valve Type M.O

More Related Content

What's hot

Sop for air compressors
Sop for air compressorsSop for air compressors
Sop for air compressorschaosbrigade
 
Caterpillar cat 3054 c industrial engine (prefix 334) service repair manual (...
Caterpillar cat 3054 c industrial engine (prefix 334) service repair manual (...Caterpillar cat 3054 c industrial engine (prefix 334) service repair manual (...
Caterpillar cat 3054 c industrial engine (prefix 334) service repair manual (...fujsefkskekmm
 
Caterpillar cat 3054 c industrial engine (prefix 334) service repair manual (...
Caterpillar cat 3054 c industrial engine (prefix 334) service repair manual (...Caterpillar cat 3054 c industrial engine (prefix 334) service repair manual (...
Caterpillar cat 3054 c industrial engine (prefix 334) service repair manual (...fjsjekksemm
 
valve maintenance-packing-replacement
valve maintenance-packing-replacementvalve maintenance-packing-replacement
valve maintenance-packing-replacementIzzuwan Yusoff
 
Kode error-dan-manual-kelistrikan-mesin-3 sz-ve-k3-ve
Kode error-dan-manual-kelistrikan-mesin-3 sz-ve-k3-veKode error-dan-manual-kelistrikan-mesin-3 sz-ve-k3-ve
Kode error-dan-manual-kelistrikan-mesin-3 sz-ve-k3-veAgus Irawan
 
Caterpillar cat 420 e backhoe loader parts catalogue manual
Caterpillar cat 420 e backhoe loader parts catalogue manualCaterpillar cat 420 e backhoe loader parts catalogue manual
Caterpillar cat 420 e backhoe loader parts catalogue manualdidkkmmdm
 
Floating head heat exchanger - Maintainance
Floating head heat exchanger - MaintainanceFloating head heat exchanger - Maintainance
Floating head heat exchanger - MaintainanceAbhishek Srivastav
 
Volvo Wheel Loader L120d Service Manual
 Volvo Wheel Loader L120d Service Manual  Volvo Wheel Loader L120d Service Manual
Volvo Wheel Loader L120d Service Manual SantySingh5
 
Caterpillar cat dp50 k forklift lift trucks service repair manual snet28b 500...
Caterpillar cat dp50 k forklift lift trucks service repair manual snet28b 500...Caterpillar cat dp50 k forklift lift trucks service repair manual snet28b 500...
Caterpillar cat dp50 k forklift lift trucks service repair manual snet28b 500...fjjskekdmnsme
 
Forklift Fork Maintenance: Caliper Guide from Cascade Corporation
Forklift Fork Maintenance: Caliper Guide from Cascade CorporationForklift Fork Maintenance: Caliper Guide from Cascade Corporation
Forklift Fork Maintenance: Caliper Guide from Cascade CorporationForklift Trucks in Minnesota
 
Manual de Taller Retroexcavadora Komatsu WB146-5.pdf
Manual de Taller Retroexcavadora Komatsu WB146-5.pdfManual de Taller Retroexcavadora Komatsu WB146-5.pdf
Manual de Taller Retroexcavadora Komatsu WB146-5.pdfCristianCardenasNez
 
Caterpillar Cat 938F Wheel Loader (Prefix 7SN) Service Repair Manual (7SN0000...
Caterpillar Cat 938F Wheel Loader (Prefix 7SN) Service Repair Manual (7SN0000...Caterpillar Cat 938F Wheel Loader (Prefix 7SN) Service Repair Manual (7SN0000...
Caterpillar Cat 938F Wheel Loader (Prefix 7SN) Service Repair Manual (7SN0000...udjjsjejkkkemm
 
CATÁLOGO HENGST 2015 LINHA PESADA - COMPLETO
CATÁLOGO HENGST 2015 LINHA PESADA - COMPLETOCATÁLOGO HENGST 2015 LINHA PESADA - COMPLETO
CATÁLOGO HENGST 2015 LINHA PESADA - COMPLETOLuiz Paulo dos Santos
 
Volvo g946 b motor grader service repair manual
Volvo g946 b motor grader service repair manualVolvo g946 b motor grader service repair manual
Volvo g946 b motor grader service repair manualjfskemsemm
 
Design and Model of Bucket Elevator
Design and Model of Bucket ElevatorDesign and Model of Bucket Elevator
Design and Model of Bucket ElevatorUtkarsh Amaravat
 

What's hot (20)

Sop for air compressors
Sop for air compressorsSop for air compressors
Sop for air compressors
 
Pt fuel system
Pt fuel systemPt fuel system
Pt fuel system
 
Caterpillar cat 3054 c industrial engine (prefix 334) service repair manual (...
Caterpillar cat 3054 c industrial engine (prefix 334) service repair manual (...Caterpillar cat 3054 c industrial engine (prefix 334) service repair manual (...
Caterpillar cat 3054 c industrial engine (prefix 334) service repair manual (...
 
Zf ecomat and-ecomat_2
Zf ecomat and-ecomat_2Zf ecomat and-ecomat_2
Zf ecomat and-ecomat_2
 
Caterpillar cat 3054 c industrial engine (prefix 334) service repair manual (...
Caterpillar cat 3054 c industrial engine (prefix 334) service repair manual (...Caterpillar cat 3054 c industrial engine (prefix 334) service repair manual (...
Caterpillar cat 3054 c industrial engine (prefix 334) service repair manual (...
 
Motor 9 litros Scania
Motor 9 litros ScaniaMotor 9 litros Scania
Motor 9 litros Scania
 
Fuel d13
Fuel d13Fuel d13
Fuel d13
 
valve maintenance-packing-replacement
valve maintenance-packing-replacementvalve maintenance-packing-replacement
valve maintenance-packing-replacement
 
Kode error-dan-manual-kelistrikan-mesin-3 sz-ve-k3-ve
Kode error-dan-manual-kelistrikan-mesin-3 sz-ve-k3-veKode error-dan-manual-kelistrikan-mesin-3 sz-ve-k3-ve
Kode error-dan-manual-kelistrikan-mesin-3 sz-ve-k3-ve
 
Manual de Operacion y Mantenimiento Motores C4.4 ACERT (ingles)
Manual de Operacion y Mantenimiento Motores C4.4 ACERT (ingles)Manual de Operacion y Mantenimiento Motores C4.4 ACERT (ingles)
Manual de Operacion y Mantenimiento Motores C4.4 ACERT (ingles)
 
Caterpillar cat 420 e backhoe loader parts catalogue manual
Caterpillar cat 420 e backhoe loader parts catalogue manualCaterpillar cat 420 e backhoe loader parts catalogue manual
Caterpillar cat 420 e backhoe loader parts catalogue manual
 
Floating head heat exchanger - Maintainance
Floating head heat exchanger - MaintainanceFloating head heat exchanger - Maintainance
Floating head heat exchanger - Maintainance
 
Volvo Wheel Loader L120d Service Manual
 Volvo Wheel Loader L120d Service Manual  Volvo Wheel Loader L120d Service Manual
Volvo Wheel Loader L120d Service Manual
 
Caterpillar cat dp50 k forklift lift trucks service repair manual snet28b 500...
Caterpillar cat dp50 k forklift lift trucks service repair manual snet28b 500...Caterpillar cat dp50 k forklift lift trucks service repair manual snet28b 500...
Caterpillar cat dp50 k forklift lift trucks service repair manual snet28b 500...
 
Forklift Fork Maintenance: Caliper Guide from Cascade Corporation
Forklift Fork Maintenance: Caliper Guide from Cascade CorporationForklift Fork Maintenance: Caliper Guide from Cascade Corporation
Forklift Fork Maintenance: Caliper Guide from Cascade Corporation
 
Manual de Taller Retroexcavadora Komatsu WB146-5.pdf
Manual de Taller Retroexcavadora Komatsu WB146-5.pdfManual de Taller Retroexcavadora Komatsu WB146-5.pdf
Manual de Taller Retroexcavadora Komatsu WB146-5.pdf
 
Caterpillar Cat 938F Wheel Loader (Prefix 7SN) Service Repair Manual (7SN0000...
Caterpillar Cat 938F Wheel Loader (Prefix 7SN) Service Repair Manual (7SN0000...Caterpillar Cat 938F Wheel Loader (Prefix 7SN) Service Repair Manual (7SN0000...
Caterpillar Cat 938F Wheel Loader (Prefix 7SN) Service Repair Manual (7SN0000...
 
CATÁLOGO HENGST 2015 LINHA PESADA - COMPLETO
CATÁLOGO HENGST 2015 LINHA PESADA - COMPLETOCATÁLOGO HENGST 2015 LINHA PESADA - COMPLETO
CATÁLOGO HENGST 2015 LINHA PESADA - COMPLETO
 
Volvo g946 b motor grader service repair manual
Volvo g946 b motor grader service repair manualVolvo g946 b motor grader service repair manual
Volvo g946 b motor grader service repair manual
 
Design and Model of Bucket Elevator
Design and Model of Bucket ElevatorDesign and Model of Bucket Elevator
Design and Model of Bucket Elevator
 

Similar to GEA Tuchenhagen spare parts

OPERATING MANUAL VALVES Imm 55 cg1-tf128_gb-b
OPERATING MANUAL VALVES Imm 55 cg1-tf128_gb-bOPERATING MANUAL VALVES Imm 55 cg1-tf128_gb-b
OPERATING MANUAL VALVES Imm 55 cg1-tf128_gb-bFrontierIndustrie
 
Specialising in Pneumatic Mining and Plant Equipment
Specialising in Pneumatic Mining and Plant EquipmentSpecialising in Pneumatic Mining and Plant Equipment
Specialising in Pneumatic Mining and Plant EquipmentPaul Neuman
 
John deere 410 d backhoe loaders service repair technical manual (tm1513)
John deere 410 d backhoe loaders service repair technical manual (tm1513)John deere 410 d backhoe loaders service repair technical manual (tm1513)
John deere 410 d backhoe loaders service repair technical manual (tm1513)udjjjskkkdmm
 
John deere 510 d backhoe loaders service repair technical manual (tm1513)
John deere 510 d backhoe loaders service repair technical manual (tm1513)John deere 510 d backhoe loaders service repair technical manual (tm1513)
John deere 510 d backhoe loaders service repair technical manual (tm1513)fusefjjskekemm
 
John deere 510 d backhoe loaders service repair technical manual (tm1513)
John deere 510 d backhoe loaders service repair technical manual (tm1513)John deere 510 d backhoe loaders service repair technical manual (tm1513)
John deere 510 d backhoe loaders service repair technical manual (tm1513)udfjjsjekkdmm
 
Caterpillar Cat CS-531C Vibratory Compactor (Prefix 9RN) Service Repair Manua...
Caterpillar Cat CS-531C Vibratory Compactor (Prefix 9RN) Service Repair Manua...Caterpillar Cat CS-531C Vibratory Compactor (Prefix 9RN) Service Repair Manua...
Caterpillar Cat CS-531C Vibratory Compactor (Prefix 9RN) Service Repair Manua...oi9rsiik1m5
 
Caterpillar Cat CS-531C Vibratory Compactor (Prefix 9RN) Service Repair Manua...
Caterpillar Cat CS-531C Vibratory Compactor (Prefix 9RN) Service Repair Manua...Caterpillar Cat CS-531C Vibratory Compactor (Prefix 9RN) Service Repair Manua...
Caterpillar Cat CS-531C Vibratory Compactor (Prefix 9RN) Service Repair Manua...youyong9098
 
Caterpillar Cat CS-531C Vibratory Compactor (Prefix 9RN) Service Repair Manua...
Caterpillar Cat CS-531C Vibratory Compactor (Prefix 9RN) Service Repair Manua...Caterpillar Cat CS-531C Vibratory Compactor (Prefix 9RN) Service Repair Manua...
Caterpillar Cat CS-531C Vibratory Compactor (Prefix 9RN) Service Repair Manua...pengdi0699527652
 
Caterpillar Cat CS-531C Vibratory Compactor (Prefix 9RN) Service Repair Manua...
Caterpillar Cat CS-531C Vibratory Compactor (Prefix 9RN) Service Repair Manua...Caterpillar Cat CS-531C Vibratory Compactor (Prefix 9RN) Service Repair Manua...
Caterpillar Cat CS-531C Vibratory Compactor (Prefix 9RN) Service Repair Manua...mikeme1900
 
Caterpillar Cat CS-531C Vibratory Compactor (Prefix 9RN) Service Repair Manua...
Caterpillar Cat CS-531C Vibratory Compactor (Prefix 9RN) Service Repair Manua...Caterpillar Cat CS-531C Vibratory Compactor (Prefix 9RN) Service Repair Manua...
Caterpillar Cat CS-531C Vibratory Compactor (Prefix 9RN) Service Repair Manua...qiaolin7012
 
Caterpillar Cat CS-531C Vibratory Compactor (Prefix 9RN) Service Repair Manua...
Caterpillar Cat CS-531C Vibratory Compactor (Prefix 9RN) Service Repair Manua...Caterpillar Cat CS-531C Vibratory Compactor (Prefix 9RN) Service Repair Manua...
Caterpillar Cat CS-531C Vibratory Compactor (Prefix 9RN) Service Repair Manua...ivsp76367868
 
Caterpillar Cat CS-531C Vibratory Compactor (Prefix 9RN) Service Repair Manua...
Caterpillar Cat CS-531C Vibratory Compactor (Prefix 9RN) Service Repair Manua...Caterpillar Cat CS-531C Vibratory Compactor (Prefix 9RN) Service Repair Manua...
Caterpillar Cat CS-531C Vibratory Compactor (Prefix 9RN) Service Repair Manua...qrw192677
 
Caterpillar Cat CS-531C Vibratory Compactor (Prefix 9RN) Service Repair Manua...
Caterpillar Cat CS-531C Vibratory Compactor (Prefix 9RN) Service Repair Manua...Caterpillar Cat CS-531C Vibratory Compactor (Prefix 9RN) Service Repair Manua...
Caterpillar Cat CS-531C Vibratory Compactor (Prefix 9RN) Service Repair Manua...yongpan22957
 
Claas swath up 450 na (444) pick up service repair manual
Claas swath up 450 na (444) pick up service repair manualClaas swath up 450 na (444) pick up service repair manual
Claas swath up 450 na (444) pick up service repair manualfjjskmdmem
 
Claas swath up 450 na (444) pick up service repair manual
Claas swath up 450 na (444) pick up service repair manualClaas swath up 450 na (444) pick up service repair manual
Claas swath up 450 na (444) pick up service repair manualfhsjekdmme
 
Claas swath up 450 na (444) pick up service repair manual
Claas swath up 450 na (444) pick up service repair manualClaas swath up 450 na (444) pick up service repair manual
Claas swath up 450 na (444) pick up service repair manualufsiekdolskek
 
Jcb 540 170 telescopic handler service repair manual sn from 2460601 onwards
Jcb 540 170 telescopic handler service repair manual sn from 2460601 onwardsJcb 540 170 telescopic handler service repair manual sn from 2460601 onwards
Jcb 540 170 telescopic handler service repair manual sn from 2460601 onwardsfudjjjskeskmmd
 

Similar to GEA Tuchenhagen spare parts (18)

OPERATING MANUAL VALVES Imm 55 cg1-tf128_gb-b
OPERATING MANUAL VALVES Imm 55 cg1-tf128_gb-bOPERATING MANUAL VALVES Imm 55 cg1-tf128_gb-b
OPERATING MANUAL VALVES Imm 55 cg1-tf128_gb-b
 
Specialising in Pneumatic Mining and Plant Equipment
Specialising in Pneumatic Mining and Plant EquipmentSpecialising in Pneumatic Mining and Plant Equipment
Specialising in Pneumatic Mining and Plant Equipment
 
John deere 410 d backhoe loaders service repair technical manual (tm1513)
John deere 410 d backhoe loaders service repair technical manual (tm1513)John deere 410 d backhoe loaders service repair technical manual (tm1513)
John deere 410 d backhoe loaders service repair technical manual (tm1513)
 
John deere 510 d backhoe loaders service repair technical manual (tm1513)
John deere 510 d backhoe loaders service repair technical manual (tm1513)John deere 510 d backhoe loaders service repair technical manual (tm1513)
John deere 510 d backhoe loaders service repair technical manual (tm1513)
 
John deere 510 d backhoe loaders service repair technical manual (tm1513)
John deere 510 d backhoe loaders service repair technical manual (tm1513)John deere 510 d backhoe loaders service repair technical manual (tm1513)
John deere 510 d backhoe loaders service repair technical manual (tm1513)
 
Caterpillar Cat CS-531C Vibratory Compactor (Prefix 9RN) Service Repair Manua...
Caterpillar Cat CS-531C Vibratory Compactor (Prefix 9RN) Service Repair Manua...Caterpillar Cat CS-531C Vibratory Compactor (Prefix 9RN) Service Repair Manua...
Caterpillar Cat CS-531C Vibratory Compactor (Prefix 9RN) Service Repair Manua...
 
Caterpillar Cat CS-531C Vibratory Compactor (Prefix 9RN) Service Repair Manua...
Caterpillar Cat CS-531C Vibratory Compactor (Prefix 9RN) Service Repair Manua...Caterpillar Cat CS-531C Vibratory Compactor (Prefix 9RN) Service Repair Manua...
Caterpillar Cat CS-531C Vibratory Compactor (Prefix 9RN) Service Repair Manua...
 
cl.pdf
cl.pdfcl.pdf
cl.pdf
 
Claas swath up 450 na (444) pick up service repair manual
Claas swath up 450 na (444) pick up service repair manualClaas swath up 450 na (444) pick up service repair manual
Claas swath up 450 na (444) pick up service repair manual
 
Claas swath up 450 na (444) pick up service repair manual
Claas swath up 450 na (444) pick up service repair manualClaas swath up 450 na (444) pick up service repair manual
Claas swath up 450 na (444) pick up service repair manual
 
Claas swath up 450 na (444) pick up service repair manual
Claas swath up 450 na (444) pick up service repair manualClaas swath up 450 na (444) pick up service repair manual
Claas swath up 450 na (444) pick up service repair manual
 
Jcb 540 170 telescopic handler service repair manual sn from 2460601 onwards
Jcb 540 170 telescopic handler service repair manual sn from 2460601 onwardsJcb 540 170 telescopic handler service repair manual sn from 2460601 onwards
Jcb 540 170 telescopic handler service repair manual sn from 2460601 onwards
 

More from Sandro Marques Solidario

SKF - A Guide to the Interpretation of Vibration Frequency and Time Spectrums...
SKF - A Guide to the Interpretation of Vibration Frequency and Time Spectrums...SKF - A Guide to the Interpretation of Vibration Frequency and Time Spectrums...
SKF - A Guide to the Interpretation of Vibration Frequency and Time Spectrums...Sandro Marques Solidario
 
Apresentação sobre compósitos para a aula de conformação mecânica
Apresentação sobre compósitos para a aula de conformação mecânicaApresentação sobre compósitos para a aula de conformação mecânica
Apresentação sobre compósitos para a aula de conformação mecânicaSandro Marques Solidario
 
HCIA-Data Center Facility V2.0 Training Material.pdf
HCIA-Data Center Facility V2.0 Training Material.pdfHCIA-Data Center Facility V2.0 Training Material.pdf
HCIA-Data Center Facility V2.0 Training Material.pdfSandro Marques Solidario
 
Cálculo de diâmetro nominal de tubulação
Cálculo de diâmetro nominal de tubulaçãoCálculo de diâmetro nominal de tubulação
Cálculo de diâmetro nominal de tubulaçãoSandro Marques Solidario
 
Tabela de Referência de Óleos Lubrificantes Minerais Industriais
Tabela de Referência de Óleos Lubrificantes Minerais IndustriaisTabela de Referência de Óleos Lubrificantes Minerais Industriais
Tabela de Referência de Óleos Lubrificantes Minerais IndustriaisSandro Marques Solidario
 
Catalogo Maquinas de Moldar Gazzola mod. 3313/4318/5588
Catalogo Maquinas de Moldar Gazzola mod. 3313/4318/5588Catalogo Maquinas de Moldar Gazzola mod. 3313/4318/5588
Catalogo Maquinas de Moldar Gazzola mod. 3313/4318/5588Sandro Marques Solidario
 
APRESENTAÇÃO - INSPEÇÃO PREDITIVA EM MANCAIS DE ROLAMENTO DE UMA BOMBA CENTR...
APRESENTAÇÃO -  INSPEÇÃO PREDITIVA EM MANCAIS DE ROLAMENTO DE UMA BOMBA CENTR...APRESENTAÇÃO -  INSPEÇÃO PREDITIVA EM MANCAIS DE ROLAMENTO DE UMA BOMBA CENTR...
APRESENTAÇÃO - INSPEÇÃO PREDITIVA EM MANCAIS DE ROLAMENTO DE UMA BOMBA CENTR...Sandro Marques Solidario
 
Ferramentas para Manutenção de Rolamentos - NSK
Ferramentas para Manutenção de Rolamentos - NSKFerramentas para Manutenção de Rolamentos - NSK
Ferramentas para Manutenção de Rolamentos - NSKSandro Marques Solidario
 

More from Sandro Marques Solidario (20)

SKF - A Guide to the Interpretation of Vibration Frequency and Time Spectrums...
SKF - A Guide to the Interpretation of Vibration Frequency and Time Spectrums...SKF - A Guide to the Interpretation of Vibration Frequency and Time Spectrums...
SKF - A Guide to the Interpretation of Vibration Frequency and Time Spectrums...
 
Apresentação sobre compósitos para a aula de conformação mecânica
Apresentação sobre compósitos para a aula de conformação mecânicaApresentação sobre compósitos para a aula de conformação mecânica
Apresentação sobre compósitos para a aula de conformação mecânica
 
Modelo Toyota de Excelencia em Serviços
Modelo Toyota de Excelencia em ServiçosModelo Toyota de Excelencia em Serviços
Modelo Toyota de Excelencia em Serviços
 
STP - SHIGEO SHINGO
STP - SHIGEO SHINGOSTP - SHIGEO SHINGO
STP - SHIGEO SHINGO
 
RADIOGRAFIA INDUSTRIAL.pdf
RADIOGRAFIA INDUSTRIAL.pdfRADIOGRAFIA INDUSTRIAL.pdf
RADIOGRAFIA INDUSTRIAL.pdf
 
Manual Lada Niva 1600
Manual Lada Niva 1600 Manual Lada Niva 1600
Manual Lada Niva 1600
 
Portaria nº 185, do INMETRO
Portaria nº 185, do INMETROPortaria nº 185, do INMETRO
Portaria nº 185, do INMETRO
 
Nitretação
NitretaçãoNitretação
Nitretação
 
Administração Industrial e Geral
Administração Industrial e GeralAdministração Industrial e Geral
Administração Industrial e Geral
 
Dicionário de termos técnicos
Dicionário de termos técnicosDicionário de termos técnicos
Dicionário de termos técnicos
 
3 ways to improve pump reliability
3 ways to improve pump reliability3 ways to improve pump reliability
3 ways to improve pump reliability
 
HCIA-Data Center Facility V2.0 Training Material.pdf
HCIA-Data Center Facility V2.0 Training Material.pdfHCIA-Data Center Facility V2.0 Training Material.pdf
HCIA-Data Center Facility V2.0 Training Material.pdf
 
FÓRMULAS TÉCNICAS HIDRÁULICAS
FÓRMULAS TÉCNICAS HIDRÁULICASFÓRMULAS TÉCNICAS HIDRÁULICAS
FÓRMULAS TÉCNICAS HIDRÁULICAS
 
Cálculo de diâmetro nominal de tubulação
Cálculo de diâmetro nominal de tubulaçãoCálculo de diâmetro nominal de tubulação
Cálculo de diâmetro nominal de tubulação
 
Tabela de Referência de Óleos Lubrificantes Minerais Industriais
Tabela de Referência de Óleos Lubrificantes Minerais IndustriaisTabela de Referência de Óleos Lubrificantes Minerais Industriais
Tabela de Referência de Óleos Lubrificantes Minerais Industriais
 
Catalogo Maquinas de Moldar Gazzola mod. 3313/4318/5588
Catalogo Maquinas de Moldar Gazzola mod. 3313/4318/5588Catalogo Maquinas de Moldar Gazzola mod. 3313/4318/5588
Catalogo Maquinas de Moldar Gazzola mod. 3313/4318/5588
 
APRESENTAÇÃO - INSPEÇÃO PREDITIVA EM MANCAIS DE ROLAMENTO DE UMA BOMBA CENTR...
APRESENTAÇÃO -  INSPEÇÃO PREDITIVA EM MANCAIS DE ROLAMENTO DE UMA BOMBA CENTR...APRESENTAÇÃO -  INSPEÇÃO PREDITIVA EM MANCAIS DE ROLAMENTO DE UMA BOMBA CENTR...
APRESENTAÇÃO - INSPEÇÃO PREDITIVA EM MANCAIS DE ROLAMENTO DE UMA BOMBA CENTR...
 
ROLAMENTOS PARA BOMBAS INDUSTRIAIS - NSK
ROLAMENTOS PARA BOMBAS INDUSTRIAIS - NSKROLAMENTOS PARA BOMBAS INDUSTRIAIS - NSK
ROLAMENTOS PARA BOMBAS INDUSTRIAIS - NSK
 
Ferramentas para Manutenção de Rolamentos - NSK
Ferramentas para Manutenção de Rolamentos - NSKFerramentas para Manutenção de Rolamentos - NSK
Ferramentas para Manutenção de Rolamentos - NSK
 
Prefixos e sufixos - NSK
Prefixos e sufixos - NSKPrefixos e sufixos - NSK
Prefixos e sufixos - NSK
 

Recently uploaded

OSVC_Meta-Data based Simulation Automation to overcome Verification Challenge...
OSVC_Meta-Data based Simulation Automation to overcome Verification Challenge...OSVC_Meta-Data based Simulation Automation to overcome Verification Challenge...
OSVC_Meta-Data based Simulation Automation to overcome Verification Challenge...Soham Mondal
 
(ANJALI) Dange Chowk Call Girls Just Call 7001035870 [ Cash on Delivery ] Pun...
(ANJALI) Dange Chowk Call Girls Just Call 7001035870 [ Cash on Delivery ] Pun...(ANJALI) Dange Chowk Call Girls Just Call 7001035870 [ Cash on Delivery ] Pun...
(ANJALI) Dange Chowk Call Girls Just Call 7001035870 [ Cash on Delivery ] Pun...ranjana rawat
 
Call for Papers - African Journal of Biological Sciences, E-ISSN: 2663-2187, ...
Call for Papers - African Journal of Biological Sciences, E-ISSN: 2663-2187, ...Call for Papers - African Journal of Biological Sciences, E-ISSN: 2663-2187, ...
Call for Papers - African Journal of Biological Sciences, E-ISSN: 2663-2187, ...Christo Ananth
 
Microscopic Analysis of Ceramic Materials.pptx
Microscopic Analysis of Ceramic Materials.pptxMicroscopic Analysis of Ceramic Materials.pptx
Microscopic Analysis of Ceramic Materials.pptxpurnimasatapathy1234
 
Coefficient of Thermal Expansion and their Importance.pptx
Coefficient of Thermal Expansion and their Importance.pptxCoefficient of Thermal Expansion and their Importance.pptx
Coefficient of Thermal Expansion and their Importance.pptxAsutosh Ranjan
 
VIP Call Girls Service Kondapur Hyderabad Call +91-8250192130
VIP Call Girls Service Kondapur Hyderabad Call +91-8250192130VIP Call Girls Service Kondapur Hyderabad Call +91-8250192130
VIP Call Girls Service Kondapur Hyderabad Call +91-8250192130Suhani Kapoor
 
SPICE PARK APR2024 ( 6,793 SPICE Models )
SPICE PARK APR2024 ( 6,793 SPICE Models )SPICE PARK APR2024 ( 6,793 SPICE Models )
SPICE PARK APR2024 ( 6,793 SPICE Models )Tsuyoshi Horigome
 
(RIA) Call Girls Bhosari ( 7001035870 ) HI-Fi Pune Escorts Service
(RIA) Call Girls Bhosari ( 7001035870 ) HI-Fi Pune Escorts Service(RIA) Call Girls Bhosari ( 7001035870 ) HI-Fi Pune Escorts Service
(RIA) Call Girls Bhosari ( 7001035870 ) HI-Fi Pune Escorts Serviceranjana rawat
 
College Call Girls Nashik Nehal 7001305949 Independent Escort Service Nashik
College Call Girls Nashik Nehal 7001305949 Independent Escort Service NashikCollege Call Girls Nashik Nehal 7001305949 Independent Escort Service Nashik
College Call Girls Nashik Nehal 7001305949 Independent Escort Service NashikCall Girls in Nagpur High Profile
 
Sheet Pile Wall Design and Construction: A Practical Guide for Civil Engineer...
Sheet Pile Wall Design and Construction: A Practical Guide for Civil Engineer...Sheet Pile Wall Design and Construction: A Practical Guide for Civil Engineer...
Sheet Pile Wall Design and Construction: A Practical Guide for Civil Engineer...Dr.Costas Sachpazis
 
the ladakh protest in leh ladakh 2024 sonam wangchuk.pptx
the ladakh protest in leh ladakh 2024 sonam wangchuk.pptxthe ladakh protest in leh ladakh 2024 sonam wangchuk.pptx
the ladakh protest in leh ladakh 2024 sonam wangchuk.pptxhumanexperienceaaa
 
Top Rated Pune Call Girls Budhwar Peth ⟟ 6297143586 ⟟ Call Me For Genuine Se...
Top Rated  Pune Call Girls Budhwar Peth ⟟ 6297143586 ⟟ Call Me For Genuine Se...Top Rated  Pune Call Girls Budhwar Peth ⟟ 6297143586 ⟟ Call Me For Genuine Se...
Top Rated Pune Call Girls Budhwar Peth ⟟ 6297143586 ⟟ Call Me For Genuine Se...Call Girls in Nagpur High Profile
 
APPLICATIONS-AC/DC DRIVES-OPERATING CHARACTERISTICS
APPLICATIONS-AC/DC DRIVES-OPERATING CHARACTERISTICSAPPLICATIONS-AC/DC DRIVES-OPERATING CHARACTERISTICS
APPLICATIONS-AC/DC DRIVES-OPERATING CHARACTERISTICSKurinjimalarL3
 
Introduction to Multiple Access Protocol.pptx
Introduction to Multiple Access Protocol.pptxIntroduction to Multiple Access Protocol.pptx
Introduction to Multiple Access Protocol.pptxupamatechverse
 
(ANVI) Koregaon Park Call Girls Just Call 7001035870 [ Cash on Delivery ] Pun...
(ANVI) Koregaon Park Call Girls Just Call 7001035870 [ Cash on Delivery ] Pun...(ANVI) Koregaon Park Call Girls Just Call 7001035870 [ Cash on Delivery ] Pun...
(ANVI) Koregaon Park Call Girls Just Call 7001035870 [ Cash on Delivery ] Pun...ranjana rawat
 
The Most Attractive Pune Call Girls Budhwar Peth 8250192130 Will You Miss Thi...
The Most Attractive Pune Call Girls Budhwar Peth 8250192130 Will You Miss Thi...The Most Attractive Pune Call Girls Budhwar Peth 8250192130 Will You Miss Thi...
The Most Attractive Pune Call Girls Budhwar Peth 8250192130 Will You Miss Thi...ranjana rawat
 
Extrusion Processes and Their Limitations
Extrusion Processes and Their LimitationsExtrusion Processes and Their Limitations
Extrusion Processes and Their Limitations120cr0395
 
Booking open Available Pune Call Girls Koregaon Park 6297143586 Call Hot Ind...
Booking open Available Pune Call Girls Koregaon Park  6297143586 Call Hot Ind...Booking open Available Pune Call Girls Koregaon Park  6297143586 Call Hot Ind...
Booking open Available Pune Call Girls Koregaon Park 6297143586 Call Hot Ind...Call Girls in Nagpur High Profile
 
High Profile Call Girls Nagpur Meera Call 7001035870 Meet With Nagpur Escorts
High Profile Call Girls Nagpur Meera Call 7001035870 Meet With Nagpur EscortsHigh Profile Call Girls Nagpur Meera Call 7001035870 Meet With Nagpur Escorts
High Profile Call Girls Nagpur Meera Call 7001035870 Meet With Nagpur EscortsCall Girls in Nagpur High Profile
 

Recently uploaded (20)

OSVC_Meta-Data based Simulation Automation to overcome Verification Challenge...
OSVC_Meta-Data based Simulation Automation to overcome Verification Challenge...OSVC_Meta-Data based Simulation Automation to overcome Verification Challenge...
OSVC_Meta-Data based Simulation Automation to overcome Verification Challenge...
 
(ANJALI) Dange Chowk Call Girls Just Call 7001035870 [ Cash on Delivery ] Pun...
(ANJALI) Dange Chowk Call Girls Just Call 7001035870 [ Cash on Delivery ] Pun...(ANJALI) Dange Chowk Call Girls Just Call 7001035870 [ Cash on Delivery ] Pun...
(ANJALI) Dange Chowk Call Girls Just Call 7001035870 [ Cash on Delivery ] Pun...
 
Call for Papers - African Journal of Biological Sciences, E-ISSN: 2663-2187, ...
Call for Papers - African Journal of Biological Sciences, E-ISSN: 2663-2187, ...Call for Papers - African Journal of Biological Sciences, E-ISSN: 2663-2187, ...
Call for Papers - African Journal of Biological Sciences, E-ISSN: 2663-2187, ...
 
Microscopic Analysis of Ceramic Materials.pptx
Microscopic Analysis of Ceramic Materials.pptxMicroscopic Analysis of Ceramic Materials.pptx
Microscopic Analysis of Ceramic Materials.pptx
 
Coefficient of Thermal Expansion and their Importance.pptx
Coefficient of Thermal Expansion and their Importance.pptxCoefficient of Thermal Expansion and their Importance.pptx
Coefficient of Thermal Expansion and their Importance.pptx
 
VIP Call Girls Service Kondapur Hyderabad Call +91-8250192130
VIP Call Girls Service Kondapur Hyderabad Call +91-8250192130VIP Call Girls Service Kondapur Hyderabad Call +91-8250192130
VIP Call Girls Service Kondapur Hyderabad Call +91-8250192130
 
SPICE PARK APR2024 ( 6,793 SPICE Models )
SPICE PARK APR2024 ( 6,793 SPICE Models )SPICE PARK APR2024 ( 6,793 SPICE Models )
SPICE PARK APR2024 ( 6,793 SPICE Models )
 
(RIA) Call Girls Bhosari ( 7001035870 ) HI-Fi Pune Escorts Service
(RIA) Call Girls Bhosari ( 7001035870 ) HI-Fi Pune Escorts Service(RIA) Call Girls Bhosari ( 7001035870 ) HI-Fi Pune Escorts Service
(RIA) Call Girls Bhosari ( 7001035870 ) HI-Fi Pune Escorts Service
 
College Call Girls Nashik Nehal 7001305949 Independent Escort Service Nashik
College Call Girls Nashik Nehal 7001305949 Independent Escort Service NashikCollege Call Girls Nashik Nehal 7001305949 Independent Escort Service Nashik
College Call Girls Nashik Nehal 7001305949 Independent Escort Service Nashik
 
Sheet Pile Wall Design and Construction: A Practical Guide for Civil Engineer...
Sheet Pile Wall Design and Construction: A Practical Guide for Civil Engineer...Sheet Pile Wall Design and Construction: A Practical Guide for Civil Engineer...
Sheet Pile Wall Design and Construction: A Practical Guide for Civil Engineer...
 
the ladakh protest in leh ladakh 2024 sonam wangchuk.pptx
the ladakh protest in leh ladakh 2024 sonam wangchuk.pptxthe ladakh protest in leh ladakh 2024 sonam wangchuk.pptx
the ladakh protest in leh ladakh 2024 sonam wangchuk.pptx
 
Top Rated Pune Call Girls Budhwar Peth ⟟ 6297143586 ⟟ Call Me For Genuine Se...
Top Rated  Pune Call Girls Budhwar Peth ⟟ 6297143586 ⟟ Call Me For Genuine Se...Top Rated  Pune Call Girls Budhwar Peth ⟟ 6297143586 ⟟ Call Me For Genuine Se...
Top Rated Pune Call Girls Budhwar Peth ⟟ 6297143586 ⟟ Call Me For Genuine Se...
 
APPLICATIONS-AC/DC DRIVES-OPERATING CHARACTERISTICS
APPLICATIONS-AC/DC DRIVES-OPERATING CHARACTERISTICSAPPLICATIONS-AC/DC DRIVES-OPERATING CHARACTERISTICS
APPLICATIONS-AC/DC DRIVES-OPERATING CHARACTERISTICS
 
Introduction to Multiple Access Protocol.pptx
Introduction to Multiple Access Protocol.pptxIntroduction to Multiple Access Protocol.pptx
Introduction to Multiple Access Protocol.pptx
 
(ANVI) Koregaon Park Call Girls Just Call 7001035870 [ Cash on Delivery ] Pun...
(ANVI) Koregaon Park Call Girls Just Call 7001035870 [ Cash on Delivery ] Pun...(ANVI) Koregaon Park Call Girls Just Call 7001035870 [ Cash on Delivery ] Pun...
(ANVI) Koregaon Park Call Girls Just Call 7001035870 [ Cash on Delivery ] Pun...
 
The Most Attractive Pune Call Girls Budhwar Peth 8250192130 Will You Miss Thi...
The Most Attractive Pune Call Girls Budhwar Peth 8250192130 Will You Miss Thi...The Most Attractive Pune Call Girls Budhwar Peth 8250192130 Will You Miss Thi...
The Most Attractive Pune Call Girls Budhwar Peth 8250192130 Will You Miss Thi...
 
Call Us -/9953056974- Call Girls In Vikaspuri-/- Delhi NCR
Call Us -/9953056974- Call Girls In Vikaspuri-/- Delhi NCRCall Us -/9953056974- Call Girls In Vikaspuri-/- Delhi NCR
Call Us -/9953056974- Call Girls In Vikaspuri-/- Delhi NCR
 
Extrusion Processes and Their Limitations
Extrusion Processes and Their LimitationsExtrusion Processes and Their Limitations
Extrusion Processes and Their Limitations
 
Booking open Available Pune Call Girls Koregaon Park 6297143586 Call Hot Ind...
Booking open Available Pune Call Girls Koregaon Park  6297143586 Call Hot Ind...Booking open Available Pune Call Girls Koregaon Park  6297143586 Call Hot Ind...
Booking open Available Pune Call Girls Koregaon Park 6297143586 Call Hot Ind...
 
High Profile Call Girls Nagpur Meera Call 7001035870 Meet With Nagpur Escorts
High Profile Call Girls Nagpur Meera Call 7001035870 Meet With Nagpur EscortsHigh Profile Call Girls Nagpur Meera Call 7001035870 Meet With Nagpur Escorts
High Profile Call Girls Nagpur Meera Call 7001035870 Meet With Nagpur Escorts
 

GEA Tuchenhagen spare parts

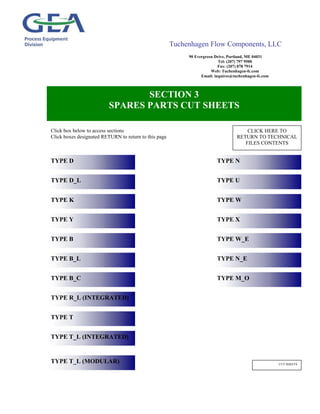
  • 1. Tuchenhagen Flow Components, LLC 90 Evergreen Drive, Portland, ME 04031 Tel: (207) 797 9500 Fax: (207) 878 7914 Web: Tuchenhagen-fc.com Email: inquires@tuchenhagen-fc.com TYPE D TYPE D_L TYPE K TYPE Y TYPE B TYPE B_L TYPE B_C TYPE R_L (INTEGRATED) TYPE T TYPE T_L (INTEGRATED) SECTION 3 SPARES PARTS CUT SHEETS Click box below to access sections Click boxes designated RETURN to return to this page CUT SHEETS CLICK HERE TO RETURN TO TECHNICAL FILES CONTENTS TYPE N TYPE U TYPE W TYPE X TYPE T_L (MODULAR) TYPE W_E TYPE N_E TYPE M_O
  • 2. Liquid Processing Division Tuchenhagen Original Spare Parts – VARIVENT® Mixproof Valve Type D - Maintenance Storage Instruction: Storage acc. DIN 7719, relative humidity of air approx. ca. 65%, temperature between 15-25° C (59-77° F), storage to be light protected Item Qty Designation Material 1" 11/2"/2" 21/2"/3" 4" 6" 1 2 Seal ring Ø 22 22 28 28 35 EPDM 924-084 924-084 924-085 924-085 924-088 FPM 924-082 924-082 924-083 924-083 924-087 5 4 O-ring Ø 42x3 60x3 85x4 113x4 158x5 EPDM 930-309 930-144 930-150 930-156 930-260 FPM 930-168 930-171 930-176 930-178 930-259 6 1 O-ring Ø 8x1,6 8x1,6 8x1,6 8x1,6 9x3 NBR 930-004 930-004 930-004 930-004 930-007 7 1 V-ring Ø 35-5 52-6 76-6 104-6 148-6 EPDM 932-046 932-021 932-024 932-028 932-042 FPM 932-030 932-033 932-035 932-039 932-041 8 2 V-ring Ø 28-5 44-6 68-6 96-6 140-6 EPDM 932-017 932-019 932-023 932-027 932-045 FPM 932-029 932-032 932-034 932-038 932-044 22 1 O-ring Ø 22x3 22x3 28x3 28x3 35x3 EPDM 930-268 930-268 930-243 930-243 930-356 FPM 930-164 930-164 930-244 930-244 930-357 23 1 O-ring Ø 30x3 38x3 38x3 38x3 56x3 EPDM 930-525 930-246 930-246 930-246 930-266 FPM 930-512 930-247 930-247 930-247 930-265 24 1 O-ring Ø 10x2,5 16x3 16x3 16x3 22x3 EPDM 930-368 930-235 930-235 930-235 930-268 FPM 930-616 930-162 930-162 930-162 930-164 29 1 O-ring Ø 20x3 20x3 20x3 20x3 25x3 NBR 930-026 930-026 930-026 930-026 930-035 1.0 Dismantling 1.1 Remove CIP connection (30). 1.2 In the non-actuated position, the valve disks (15 and 16) are in the closed position. Lift the valve disks (15 and 16) by actuating the valve with compressed air at connection (B) or using the emergency device. 1.3 Remove hinged clamp (43). 1.4 Interrupt compressed air supply at connection (B), or remove emergency device. 1.5 After removal of the clamps (49) draw off control module (H). 1.6 Withdraw valve insert from the top, complete with actuator (A) and lifting actuator (L). 1.7 Hold actuator (A) with a belt wrench and separate valve disk (15) complete with CIP bonnet (11) from the actuator (A) at wrench area (C). 1.8 Hold valve disk (15) by inserting a pin Ø 5 mm into bore (C) and remove CIP bonnet (11) by using a wrench at wrench area (D). 1.9 Remove the hinged clamp (43b) and take out the component parts (1, 2, 3, 4, 5 and 36). 2.0 Replacement of seals Remove the seals marked with grey in the spare parts drawing. Clean the single parts. Insert new seals. Do not use oils and grease for the V-rings (7 and 8). For inserting the V-ring, use the insertion tool and steadily press the V-ring at opposite spots for several times all over the circumference. V-ring installation position, see illustration 3.0 Assembly Assembly is carried out in reverse order 4.0 Function check After assembly check the valve function. For this purpose actuate valve with compressed air at (B). In closed valve position, the bearing plug and CIP bonnet must at flush level. 46a 43 5 1 8 7 43b 5 65 15 16 6 8 9 4 5 5 43a C 30 A 49 B H 29 D 2 36 24 23 22 Seal set cpl. Material 1" 11/2"/2" 21/2"/3" 4" 6" EPDM 221-519.58 221-304.07 221-304.08 221-304.09 221-304.11 FPM 221-519.60 221-519.01 221-519.02 221-519.03 221-519.05 Seals for VARIVENT® Mixproof Valve Type D
  • 3. Liquid Processing Division Tuchenhagen Original Spare Parts – VARIVENT® Shut-Off Valve Type N - Maintenance Storage Instruction: Storage acc. DIN 7719, relative humidity of air approx. ca. 65%, temperature between 15-25° C (59-77° F), storage to be light protected 29 43 5 1 5 15 6 5 5 A 49 B H C 46 43b 9 7 43a 1.0 Dismantling 1.1 In the non-actuated position, the valve disk (15) is in the closed position.Lift the valve disk (15) by actuating the valve with compressed air at connection (B) or using the emergency. 1.2 Remove hinged clamp (43). 1.3 Interrupt compressed air supply at connection (B), or remove emergency device. 1.4 After removal of the clamps (49) draw off control module (H). 1.5 Withdraw valve insert from the top, complete with actuator (A) 1.6 Hold actuator (A) with a belt wrench and separate valve disk (15 from the actuator (A) at wrench area (C). 2.0 Replacement of seals Remove the seals marked with blue in the spare parts drawing. Clean the single parts. Insert new seals. Do not use oils and grease for the V-ring (7). For inserting the V-ring, use the insertion tool and steadily press the V-ring at opposite spots for several times all over the circumference. V-ring installation position, see illustration 3.0 Assembly Assembly is carried out in reverse order 4.0 Function check After assembly check the valve function. For this purpose actuate valve with compressed air at (B). Item Qty Designation Material 1" 11/2"/2" 21/2"/3" 4" 6" 1 1 Seal ring Ø 22 22 28 28 35 EPDM 924-084 924-084 924-085 924-085 924-088 FPM 924-082 924-082 924-083 924-083 924-087 5 4 O-ring Ø 42x3 60x3 85x4 113x4 158x5 EPDM 930-309 930-144 930-150 930-156 930-260 FPM 930-168 930-171 930-176 930-178 930-259 6 1 O-ring Ø 8x1,6 8x1,6 8x1,6 8x1,6 9x3 NBR 930-004 930-004 930-004 930-004 930-007 7 1 V-ring Ø 35-5 52-6 76-6 104-6 148-6 EPDM 932-046 932-021 932-024 932-028 932-042 FPM 932-030 932-033 932-035 932-039 932-041 29 1 O-ring Ø 20x3 20x3 20x3 20x3 25x3 NBR 930-026 930-026 930-026 930-026 930-035 Seal set cpl. Material 1" 11/2"/2" 21/2"/3" 4" 6" EPDM 221-304.01 221-304.02 221-304.03 221-304.04 221-304.06 FPM 221-511.80 221-511.81 221-511.82 221-511.83 221-511.85 Seals for VARIVENT® Shut-Off Valve Type N
  • 4. Liquid Processing Division Tuchenhagen Original Spare Parts – VARIVENT® Shut-Off Valve Type U - Maintenance Storage Instruction: Storage acc. DIN 7719, relative humidity of air approx. ca. 65%, temperature between 15-25° C (59-77° F), storage to be light protected 1.0 Dismantling 1.1 Remove hinged clamp (43) and locking device (35) at the lower valve housing (40). 1.2 In the non-actuated position, the valve disk (15) is in the closed position. Lift the valve disk (15) by actuating the valve with compressed air at connection (B) or using the emergency. 1.3 Loosen valve disk (15) at wrench area (C) by approx. 5 – 6 mm. 1.4 Interrupt compressed air supply at connection (B), or remove emergency device. Separate valve disk from actuator 1.5 After removal of the clamps (49) draw off control module (H). 1.6 Remove hinged clamp (43) between lantern (9) and the upper valve housing. 1.7 Remove actuator (A) from the top. 2.0 Replacement of seals Remove the seals marked with blue in the spare parts drawing. Clean the single parts. Insert new seals. Do not use oils and grease for the V-ring (7). For inserting the V-ring, use the insertion tool and steadily press the V-ring at opposite spots for several times all over the circumference. V-ring installation position, see illustration 3.0 Assembly Assembly is carried out in reverse order 4.0 Function check After assembly check the valve function. For this purpose actuate valve with compressed air at (B). Item Qty Designation Material 1" 11/2"/2" 21/2"/3" 4" 6" 1 1 Seal ring Ø 22 22 28 28 35 EPDM 924-084 924-084 924-085 924-085 924-088 FPM 924-082 924-082 924-083 924-083 924-087 5 4 O-ring Ø 42x3 60x3 85x4 113x4 158x5 EPDM 930-309 930-144 930-150 930-156 930-260 FPM 930-168 930-171 930-176 930-178 930-259 6 1 O-ring Ø 8x1,6 8x1,6 8x1,6 8x1,6 9x3 NBR 930-004 930-004 930-004 930-004 930-007 7 1 V-ring Ø 35-5 52-6 76-6 104-6 148-6 EPDM 932-046 932-021 932-024 932-028 932-042 FPM 932-030 932-033 932-035 932-039 932-041 29 1 O-ring Ø 20x3 20x3 20x3 20x3 25x3 NBR 930-026 930-026 930-026 930-026 930-035 Seal set cpl. Material 1" 11/2"/2" 21/2"/3" 4" 6" EPDM 221-304.01 221-304.02 221-304.03 221-304.04 221-304.06 FPM 221-511.80 221-511.81 221-511.82 221-511.83 221-511.85 Seals for VARIVENT® Shut-Off Valve Type U 29 43 5 1 5 15 6 5 5 A 49 B H C 46 43b 9 35 7 6 43a
  • 5. Liquid Processing Division Tuchenhagen Original Spare Parts – VARIVENT® Shuttle Valve Type W - Maintenance Storage Instruction: Storage acc. DIN 7719, relative humidity of air approx. ca. 65%, temperature between 15-25° C (59-77° F), storage to be light protected 43 5 1 5 15 7 6 9 5 5 43a A 49 B H 29 C 5 5 43b 43c 1.0 Dismantling 1.1 In the non-actuated position, the valve disk (15) is in the lower position. Lift the valve disks (15) by actuating the valve with compressed air at connection (B) or using the emergency device. 1.2 Remove the hinged clamps (43) and (43a). 1.3 Interrupt compressed air supply at connection (B), or remove emergency device. 1.4 After removal of the clamps (49) draw off control module (H). 1.5 Withdraw valve insert from the top, complete with actuator (A) 1.6 Hold actuator (A) with a belt wrench and separate valve disk (15) from the actuator (A) at wrench area (C). 2.0 Replacement of seals Remove the seals marked with blue in the spare parts drawing. Clean the single parts. Insert new seals. Do not use oils and grease for the V-rings (7 and 8). For inserting the V-ring, use the insertion tool and steadily press the V-ring at opposite spots for several times all over the circumference. V-ring installation position, see illustration 3.0 Assembly Assembly is carried out in reverse order 4.0 Function check After assembly check the valve function. For this purpose actuate valve with compressed air at (B). Item Qty Designation Material 1" 11/2"/2" 21/2"/3" 4" 6" 1 1 Dichtring Ø 22 22 28 28 35 Seal ring EPDM 924-084 924-084 924-085 924-085 924-088 FPM 924-082 924-082 924-083 924-083 924-087 5 6 O-Ring Ø 42x3 60x3 85x4 113x4 158x5 O-ring EPDM 930-309 930-144 930-150 930-156 930-260 FPM 930-168 930-171 930-176 930-178 930-259 6 1 O-Ring Ø 8x1,6 8x1,6 8x1,6 8x1,6 9x3 O-ring NBR 930-004 930-004 930-004 930-004 930-007 7 2 V-Ring Ø 35-5 52-6 76-6 104-6 148-6 V-ring EPDM 932-046 932-021 932-024 932-028 932-042 FPM 932-030 932-033 932-035 932-039 932-041 29 1 O-Ring Ø 20x3 20x3 20x3 20x3 25x3 O-ring NBR 930-026 930-026 930-026 930-026 930-035 Seal set cpl. Material 1" 11/2"/2" 21/2"/3" 4" 6" EPDM 221-304.18 221-304.19 221-304.20 221-304.21 221-304.23 FPM 221-511.87 221-511.88 221-511.89 221-511.90 221-511.92 Seals for VARIVENT® Shuttle Valve Type W
  • 6. Liquid Processing Division Tuchenhagen Original Spare Parts – VARIVENT® Shuttle Valve Type X - Maintenance Storage Instruction: Storage acc. DIN 7719, relative humidity of air approx. ca. 65%, temperature between 15-25° C (59-77° F), storage to be light protected 1.0 Dismantling 1.1 In the non-actuated position, the valve disk (15) is in the closed position and valve disk (17) is in the opened position. 1.2 Remove hinged clamp (43c) and the locking device (35). 1.3 Screw-out lower valve disk (17) at wrench area (E). 1.4 Lift the valve disk (15) by actuating the valve with compressed air at connection (B) or using the emergency device. 1.5 Remove hinged clamp (43). 1.6 Interrupt compressed air supply at connection (B), or remove emergency device. 1.7 After removal of the clamps (49) draw off control module (H). 1.8 Withdraw valve insert from the top, complete with actuator (A) 1.9 Hold actuator (A) with a belt wrench and separate valve disk (15) from the actuator (A) at wrench area (C). 2.0 Replacement of seals Remove the seals marked with blue in the spare parts drawing. Clean the single parts. Insert new seals. Do not use oils and grease for the V-ring (7). For inserting the V-ring, use the insertion tool and steadily press the V-ring at opposite spots for several times all over the circumference. V-ring installation position, see illustration 3.0 Assembly Assembly is carried out in reverse order. The lower disk (17) must be tightended with the following torque (wrench area E). 1"-2" = > 24 Nm 21/2"-4" = > 58 Nm 6" = > 70 Nm 4.0 Function check After assembly check the valve function.For this purpose actuate valve with compressed air at (B). Seals for VARIVENT® Shuttle Valve Type X Item Qty Designation Material 1" 11/2"/2" 21/2"/3" 4" 6" 1 1 Seal ring Ø 22 22 28 28 35 EPDM 924-084 924-084 924-085 924-085 924-088 FPM 924-082 924-082 924-083 924-083 924-087 5 6 O-ring Ø 42x3 60x3 85x4 113x4 158x5 EPDM 930-309 930-144 930-150 930-156 930-260 FPM 930-168 930-171 930-176 930-178 930-259 6 1 O-ring Ø 8x1,6 8x1,6 8x1,6 8x1,6 9x3 NBR 930-004 930-004 930-004 930-004 930-007 7 2 V-ring Ø 35-5 52-6 76-6 104-6 148-6 EPDM 932-046 932-021 932-024 932-028 932-042 FPM 932-030 932-033 932-035 932-039 932-041 28 1 O-ring Ø 15x3 15x3 23x3 23x3 29x3 EPDM 930-276 930-276 930-350 930-350 930-373 FPM 930-277 930-277 930-269 930-269 930-383 29 1 O-ring Ø 20x3 20x3 20x3 20x3 25x3 NBR 930-026 930-026 930-026 930-026 930-035 Seal set cpl. Material 1" 11/2"/2" 21/2"/3" 4" 6" EPDM 221-304.24 221-304.25 221-304.26 221-304.27 221-304.29 FPM 221-511.93 221-511.94 221-511.95 221-511.96 221-511.98 43 5 1 7 43b 5 17 15 7 6 9 35 5 5 43a E A 49 B H 29 C 28 5 5 43c
  • 7. Liquid Processing Division Tuchenhagen Original Spare Parts – VARIVENT® Mixproof Valve Type K - Maintenance Storage Instruction: Storage acc. DIN 7719, relative humidity of air approx. ca. 65%, temperature between 15-25° C (59-77° F), storage to be light protected 1.0 Dismantling 1.1 In the non-actuated position, the valve disks (15 and 16) are in the closed position. Lift the valve disks (15 and 16) by actuating the valve with compressed air at connection (B) or using the emergency device. 1.2 Remove hinged clamp (43). 1.3 Interrupt compressed air supply at connection (B), or remove emergency device. 1.4 After removal of the clamps (49) draw off control module (H). 1.5 Withdraw valve insert from the top, complete with actuator (A). 1.6 Screw-off the leakage pipe (37 and 38). 1.7 Hold actuator (A) with a belt wrench and separate valve disk (15) from the actuator (A) at wrench area (C). 1.8 Hold valve disk (15) at wrench area (C) and screw-out spring plate (13) at wrench area (D). 2.0 Replacement of seals Remove the seals marked with blue in the spare parts drawing. Clean the single parts. Insert new seals. Do not use oils and grease for the V-rings (7 and 8). For inserting the V-ring, use the insertion tool and steadily press the V-ring at opposi- te spots for several times all over the circumference. V-ring installation position, see illustration 3.0 Assembly Assembly is carried out in reverse order 4.0 Function check After assembly check the valve function. For this purpose actuate valve with compressed air at (B). Seals for VARIVENT® Mixproof Valve Type K Item Qty Designation Material 1" 11/2"/2" 21/2"/3" 4" 6" 1 2 Seal ring Ø 22 22 28 28 35 EPDM 924-084 924-084 924-085 924-085 924-088 FPM 924-082 924-082 924-083 924-083 924-087 5 4 O-ring Ø 42x3 60x3 85x4 113x4 158x5 EPDM 930-309 930-144 930-150 930-156 930-260 FPM 930-168 930-171 930-176 930-178 930-259 6 1 O-ring Ø 8x1,6 8x1,6 8x1,6 8x1,6 9x3 NBR 930-004 930-004 930-004 930-004 930-007 7 1 V-ring Ø 35-5 52-6 76-6 104-6 148-6 EPDM 932-046 932-021 932-024 932-028 932-042 FPM 932-030 932-033 932-035 932-039 932-041 8 2 V-ring Ø 28-5 44-6 68-6 96-6 140-6 EPDM 932-017 932-019 932-023 932-027 932-045 FPM 932-029 932-032 932-034 932-038 932-044 22 1 O-ring Ø 22x3 22x3 28x3 28x3 35x3 EPDM 930-268 930-268 930-243 930-243 930-356 FPM 930-164 930-164 930-244 930-244 930-357 25 O-ring Ø 11x3 11x3 15x3 15x3 20x3 EPDM 930-311 930-311 930-276 930-276 930-270 FPM 930-335 930-335 930-277 930-277 930-163 29 1 O-ring Ø 20x3 20x3 20x3 20x3 25x3 NBR 930-026 930-026 930-026 930-026 930-035 Seal set cpl. Material 1" 11/2"/2" 21/2"/3" 4" 6" EPDM 221-304.12 221-304.13 221-304.14 221-304.15 221-304.17 FPM 221-519.32 221-519.33 221-519.34 221-519.35 221-519.37 46a 43 5 1 8 7 16 6 8 22 9 5 A 49 B H 29 D 37 25 38 C 13 43b 5 43a 5
  • 8. Item Qty Designation Material 1" 11/2"/2" 21/2"/3" 4" 6" 1 2 Seal ring Ø 22 22 28 28 35 EPDM 924-084 924-084 924-085 924-085 924-088 FPM 924-082 924-082 924-083 924-083 924-087 5 6 O-ring Ø 42x3 60x3 85x4 113x4 158x5 EPDM 930-309 930-144 930-150 930-156 930-260 FPM 930-168 930-171 930-176 930-178 930-259 6 1 O-ring Ø 8x1,6 8x1,6 8x1,6 8x1,6 9x3 NBR 930-004 930-004 930-004 930-004 930-007 7 2 V-ring Ø 35-5 52-6 76-6 104-6 148-6 EPDM 932-046 932-021 932-024 932-028 932-042 FPM 932-030 932-033 932-035 932-039 932-041 8 2 V-ring Ø 28-5 44-6 68-6 96-6 140-6 EPDM 932-017 932-019 932-023 932-027 932-045 FPM 932-029 932-032 932-034 932-038 932-044 22 1 O-ring Ø 22x3 22x3 28x3 28x3 35x3 EPDM 930-268 930-268 930-243 930-243 930-356 FPM 930-164 930-164 930-244 930-244 930-357 23 1 O-ring Ø 30x3 38x3 38x3 38x3 56x3 EPDM 930-525 930-246 930-246 930-246 930-266 FPM 930-512 930-247 930-247 930-247 930-265 24 1 O-ring Ø 10x2,5 16x3 16x3 16x3 22x3 EPDM 930-368 930-235 930-235 930-235 930-268 FPM 930-616 930-162 930-162 930-162 930-164 26 1 O-ring Ø 20x3 26x3 26x3 38x3 EPDM 930-270 930-252 930-252 930-246 FPM 930-163 930-165 930-165 930-247 27 1 O-ring Ø 23x3 32x3 38x3 38x3 50x3 EPDM 930-350 930-312 930-246 930-246 930-364 FPM 930-269 930-166 930-247 930-247 930-299 29 1 O-ring Ø 20x3 20x3 20x3 20x3 25x3 NBR 930-026 930-026 930-026 930-026 930-035 Liquid Processing Division Tuchenhagen Original Spare Parts – VARIVENT® Mixproof Shuttle Valve Type Y - Maintenance Storage Instruction: Storage acc. DIN 7719, relative humidity of air approx. ca. 65%, temperature between 15-25° C (59-77° F), storage to be light protected 46a 43 5 1 8 7 43c 5 3 15 16 4 2 6 8 9 36 5 5 C 30 A 49 B H 29 5 1 E 27 7 26 17 24 23 22 43a 43a 1.0 Dismantling 1.1 Remove CIP connection (30). 1.2 Remove the hinged clamp (43c) and take out the component parts (1, 2, 3, 4, 5, 36). 1.3 In the non-actuated position, the valve disks (15 and 16) are in the closed position, the valve disk (17) is in the opened position. 1.4 Hold actuator (A) with a belt wrench and turn off additional valvs disk (17) at wrench area (E). 1.5 Lift the valve disks (15 and 16) by actuating the valve with compressed air at connection (B) or using the emergency device. 1.6 Remove the hinged clamp (43) 1.7 Interrupt compressed air supply at connection (B), or remove emergency device. 1.8 After removal of the clamps (49) draw off control module (H). 1.9 Withdraw valve insert from the top, complete with actuator (A) 1.10 Hold actuator (A) with a belt wrench and separate valve disk (15) complete with CIP bonnet (11) from the actuator (A) at wrench area (D). 1.11 Hold valve disk (15) by inserting a pin Ø 5 mm into bore (C) and remove CIP bonnet (11) by using a wrench at wrench area (D). 2.0 Replacement of seals Remove the seals marked with blue in the spare parts drawing. Clean the single parts. Insert new seals. Do not use oils and grease for the V-rings (7 and 8). For inserting the V-ring, use the insertion tool and steadily press the V-ring at opposite spots for several times all over the circumference. V-ring installation position, see illustration 3.0 Assembly Assembly is carried out in reverse order 4.0 Function check After assembly check the valve function. For this purpose actuate valve with compressed air at (B). In closed valve position, the bearing plug and CIP bonnet must at flush level. Seals for VARIVENT® Mixproof Shuttle Valve Type Y Seal set cpl. Material 1" 11/2"/2" 21/2"/3" 4" 6" EPDM 221-519.59 221-304.30 221-304.31 221-304.32 221-304.34 FPM 221-519.61 221-519.39 221-519.40 221-519.41 221-519.43
  • 9. Liquid Processing Division Tuchenhagen Original Spare Parts – VARIVENT® Mixproof Valve Type D.L - Maintenance Storage Instruction: Storage acc. DIN 7719, relative humidity of air approx. ca. 65%, temperature between 15-25° C (59-77° F), storage to be light protected 223 46a X Y 204 A H 49 B 46 43 5 1 8 7 43b 5 3 24 E L F 15 16 4 2 6 8 G 22 29 9 36 1 5 5 43a C 30 203 211 Item Qty Designation Material 1" 11/2"/2" 21/2"/3" 4" 6" 1 1 Seal ring Ø 22 28 28 28 35 EPDM 924-084 924-085 924-085 924-085 924-088 FPM 924-082 924-083 924-083 924-083 924-087 1 1 Seal ring Ø 22 22 28 28 35 EPDM 924-084 924-084 924-085 924-085 924-088 FPM 924-082 924-082 924-083 924-083 924-087 5 4 O-ring Ø 42x3 60x3 85x4 113x4 158x5 EPDM 930-309 930-144 930-150 930-156 930-260 FPM 930-168 930-171 930-176 930-178 930-259 6 1 O-ring Ø 8x1,6 8x1,6 8x1,6 8x1,6 9x3 NBR 930-004 930-004 930-004 930-004 930-007 7 1 V-ring Ø 35-5 52-6 76-6 104-6 148-6 EPDM 932-046 932-021 932-024 932-028 932-042 FPM 932-030 932-033 932-035 932-039 932-041 8 2 V-ring Ø 28-5 44-6 68-6 96-6 140-6 EPDM 932-017 932-019 932-023 932-027 932-045 FPM 932-029 932-032 932-034 932-038 932-044 22 2 O-ring Ø 22x3 28x3 28x3 28x3 35x3 EPDM 930-268 930-243 930-243 930-243 930-356 FPM 930-164 930-244 930-244 930-244 930-357 24 2 O-ring Ø 10x2,5 16x3 16x3 16x3 22x3 EPDM 930-368 (1x) 930-235 930-235 930-235 930-268 FPM 930-616 (1x) 930-162 930-162 930-162 930-164 29 1 O-ring Ø 20x3 20x3 20x3 20x3 25x3 NBR 930-026 930-026 930-026 930-026 930-035 Seal set cpl. Material 1" 11/2"/2" 21/2"/3" 4" 6" EPDM 221-528.39 221-511.27 221-511.28 221-511.29 221-511.31 FPM 221-528.40 221-519.06 221-519.07 221-519.08 221-519.10 1.0 Dismantling 1.1 Remove CIP connection (30). 1.2 In the non-actuated position, the valve disks (15 and 16) are in the closed position. Lift the valve disks (15 and 16) by actuating the valve with compressed air at connection (B) or using the emergency device. 1.3 Remove hinged clamp (43). 1.4 Interrupt compressed air supply at connection (B), or remove emergency device. 1.5 After removal of the clamps (49) draw off control module (H). 1.6 Withdraw valve insert from the top, complete with actuator (A) and lifting actuator (L). 1.7 Remove hinged clamp (46). Hold valve disk (15) by inserting a pin Ø 5 mm into bore (C) and separate actuator (A) from the lifting actuator (L) using a belt wrench. 1.8 Remove clamps (223) and take out cylindre cover (204). 1.9 Hold valve disk (15) by inserting a pin Ø 5 mm into bore (C) and separate drive spindle (203) from the valve disk (15) by turning the hexagon (E) to the left. Caution: Do not pull out drive spindle (203), thrust washer (211) may fall out ! 1.10 The double seat disk (16) is separated from the drive spindle using a round rod (inserted in bore F) and by turning at wrench area (G) and then to be withdrawn from the bottom. 1.11 Remove the hinged clamp (46a) and separate the lifting actuator (L) from the lantern (9). 1.12 Remove the hinged clamp (43b) and take out the component parts (1, 2, 3, 4, 5 and 36). 2.0 Replacement of seals Remove the seals marked with blue in the spare parts drawing. Clean the single parts. Insert new seals. Do not use oils and grease for the V-rings (7 and 8). For inserting the V-ring, use the insertion tool and steadily press the V-ring at opposite spots for several times all over the circumference. V-ring installation, see illustration 3.0 Assembly Assembly is carried out in reverse order 4.0 Function check After assembly check the valve function and the total stroke. For this purpose actuate valve with compressed air at (B). 4.1 Check the lifting stroke: On actuation of the valve via (X) the stroke of the double seat disk (16) must be 1 to 2 mm. On actuation via (Y) the stroke of the valve disk (15) must must be 0,9 to 1,4 mm. Seals for VARIVENT® Mixproof Valve Type D.L
  • 10. Item Qty Designation Material 2" 21/2"/3" 4" 6" 1 1 Seal ring Ø 28 28 28 35 EPDM 924-085 924-085 924-085 924-088 FPM 924-083 924-083 924-083 924-087 5 4 O-ring Ø 60x3 85x4 113x4 158x5 EPDM 930-144 930-150 930-156 930-260 FPM 930-171 930-176 930-178 930-259 6 1 O-ring Ø 8x1,6 8x1,6 8x1,6 9x3 NBR 930-004 930-004 930-004 930-007 7 1 V-ring Ø 52-6 76-6 104-6 148-6 EPDM 932-021 932-024 932-028 932-042 FPM 932-033 932-035 932-039 932-041 8 2 V-ring Ø 44-6 68-6 96-6 140-6 EPDM 932-019 932-023 932-027 932-045 FPM 932-032 932-034 932-038 932-044 22 2 O-ring Ø 28x3 28x3 28x3 35x3 EPDM 930-243 930-243 930-243 930-356 FPM 930-244 930-244 930-244 930-357 24 2 O-ring Ø 16x3 16x3 16x3 22x3 EPDM 930-235 930-235 930-235 930-268 FPM 930-162 930-162 930-162 930-164 29 1 O-ring Ø 20x3 20x3 20x3 25x3 NBR 930-026 930-026 930-026 930-035 65 1 Seal ring Ø 46 69 97 142 EPDM 924-305 924-296 924-254 924-261 FPM 924-307 924-308 924-309 924-320 Liquid Processing Division Tuchenhagen Original Spare Parts – VARIVENT® Mixproof Valve Type B.L - Maintenance Storage Instruction: Storage acc. DIN 7719, relative humidity of air approx. ca. 65%, temperature between 15-25° C (59-77° F), storage to be light protected 223 46a X Y 204 A H 49 B 46 43 5 1 8 7 43b 5 65 24 E L F 16 66 6 8 G 22 29 9 92 15 5 5 C 30 203 211 43a 1.0 Dismantling 1.1 Remove CIP connection (30). 1.2 In the non-actuated position, the valve disks (15 and 16) are in the closed position. Lift the valve disks (15 and 16) by actuating the valve with compressed air at connection (B) or using the emergency device. 1.3 Remove hinged clamp (43). 1.4 Interrupt compressed air supply at connection (B), or remove emergency device. 1.5 After removal of the clamps (49) draw-off control module (H). 1.6 Withdraw valve insert from the top, complete with actuator (A) and lifting actuator (L). 1.7 Remove hinged clamp (46). Hold actuator (A) using a belt wrench and separate lifting actuator (L) from actuator (A) at wrench area C 1.8 Remove clamps (223) and take out cylindre cover (204). 1.9 Hold valve disk (15) at wrench area (C) and separate drive spindle (203) from the valve disk (15) by turning the hexagon (E) to the left. Caution: Do not pull out drive spindle (203), circlip (211) may fall out ! 1.10 The double seat disk (16) is separated from the drive spindle using a round rod (inserted in bore F) and by turning at wrench area (G) and then to be withdrawn from the bottom. 1.11 Remove the hinged clamp (46a) and separate the lifting actuator (L) from the lantern (9). 1.12 Remove the hinged clamp (43b) and take out the component parts (5, 65, 66, 92). 2.0 Replacement of seals Remove the seals marked with blue in the spare parts drawing. Clean the single parts. Insert new seals. Do not use oils and grease for the V-rings (7 and 8). For inserting the V-ring, use the insertion tool and steadily press the V-ring at opposite spots for several times all over the cir- cumference. V-ring installation position, see illustration 3.0 Assembly Assembly is carried out in reverse order 4.0 Function check After assembly check the valve function and the total stroke. For this purpose actuate valve with compressed air at (B). 4.1 Check the lifting stroke: On actuation of the valve via (X) the stroke of the double seat disk (16) must be 1 to 2 mm. On actuation via (Y) the stroke of the valve disk (15) must must be 0,9 to 1,4 mm. Seals for VARIVENT® Mixproof Valve Type B.L Seal set cpl. Material 2" 21/2"/3" 4" 6" EPDM 221-511.42 221-511.43 221-511.44 221-511.46 FPM 221-519.21 221-519.22 221-519.23 221-519.25
  • 11. Item Qty Designation Material 2" 3" 4" 6" 1 1 Seal ring Ø 28 28 28 35 EPDM 924-085 924-085 924-085 924-088 5 2 O-ring Ø 60x3 85x4 113x4 158x5 EPDM 930-144 930-150 930-156 930-260 6 1 O-ring Ø 8x1,6 8x1,6 8x1,6 9x3 NBR 930-004 930-004 930-004 930-007 7 1 V-ring Ø 52-6 76-6 104-6 148-6 EPDM 932-021 932-024 932-028 932-042 8 2 V-ring Ø 44-6 68-6 96-6 140-6 EPDM 932-019 932-023 932-027 932-045 22 2 O-ring Ø 28x3 28x3 28x3 35x3 EPDM 930-243 930-243 930-243 930-356 24 2 O-ring Ø 16x3 16x3 16x3 22x3 EPDM 930-235 930-235 930-235 930-268 29 1 O-ring Ø 20x3 20x3 20x3 25x3 NBR 930-026 930-026 930-026 930-035 65 1 Seal ring Ø 46 69 97 142 EPDM 924-305 924-296 924-254 924-261 93 1 O-ring Ø 16x3 20x3 20x3 26x3 EPDM 930-235 930-270 930-270 930-252 Seal set cpl. Material 2" 3" 4" 6" EPDM 221-519.87 221-519.88 221-519.89 221-519.90 Liquid Processing Division Tuchenhagen Original Spare Parts – VARIVENT® Mixproof Valve Type B.C - Maintenance Storage Instruction: Storage acc. DIN 7719, relative humidity of air approx. ca. 65%, temperature between 15-25° C (59-77° F), storage to be light protected 1.0 Dismantling 1.1 In the non-actuated position, the valve disks (15 and 16)are in the closed position. Lift the valve disks (15 and 16) by actuating the valve with compressed air at connection (B) or using the emergency device. 1.2 Remove hinged clamp (43). 1.3 Interrupt compressed air supply at connection (B), or remove emergency device. 1.4 After removal of the clamps (49) draw off control module (H). 1.5 Withdraw valve insert from the top, complete with actuator (A) and lifting actuator (L). 1.6 Remove hinged clamp (46). Hold actuator (A) with a belt wrench and separate the lifting actuator (L) from the actuator (A) at wrench area (C). 1.7 Remove clamps (223) and take out cylindre cover (204). 1.8 Hold valve disk (15) at wrench area (C) and separate drive spindle (203) from the valve disk (15) by turning the hexagon (E) to the left. Caution: Do not pull out drive spindle (203), thrust washer (211) may fall out ! 1.9 The double seat disk (16) is separated from the drive spindle using a round rod (inserted in bore F) turning at wrench area (G) and then withdrawn from the bottom. 1.10 Remove the hinged clamp (46a) and separate the lifting actuator (L) from the lantern (9). 1.11 Remove the hinged clamp (43b) and take out the component parts (5, 65, 66 and 92). 2.0 Replacement of seals Remove the seals marked with blue in the spare parts drawing. Clean the single parts. Insert new seals. Do not use oils and grease for the V-rings (7 and 8). For inserting the V-ring, use the insertion tool and steadily press the V-ring at opposite spots for several times all over the circumference. V-ring installation position, see illustration 3.0 Assembly Assembly is carried out in reverse order. 4.0 Function check After assembly check the valve function and the total stroke. For this purpose actuate valve with compressed air at (B). 4.1 Check the lifting stroke: On actuation of the valve via (X) the stroke of the double seat disk (16) must be 1 to 2 mm. On actuation via (Y) the stroke of the valve disk (15) must must be 0,9 to 1,4 mm. 223 46a X Y 204 A H 49 B 46 43 5 1 8 7 43b 5 65 24 E L F 16 66 6 8 G 22 29 9 92 15 C 203 211 Seals for VARIVENT® Mixproof Valve Type B.C
  • 12. Liquid Processing Division Tuchenhagen Original Spare Parts – VARIVENT® Mixproof Valve Type R.L - Maintenance Storage Instruction: Storage acc. DIN 7719, relative humidity of air approx. ca. 65%, temperature between 15-25° C (59-77° F), storage to be light protected 1.0 Dismantling 1.1 Remove CIP connection (30). 1.2 In the non-actuated position, the valve disks (15 and 16) are in the closed position. Lift the valve disks (15 and 16) by actuating the valve with compressed air at connection (B) or using the emergency device. 1.3 Remove hinged clamp (43). 1.4 Interrupt compressed air supply at connection (B), or remove emergency device. 1.5 After removal of the clamps (49) draw off control module (H). 1.6 Withdraw valve insert from the top, complete with actuator (A). 1.7 Hold the piston rod at (E) and unsrew the valve disk (15) by inserting a pin Ø 5 mm into bore (C). 1.8 The double seat disk (16) is separated from the drive spindle using a round rod (inserted in bore G) and by turning at wrench area (G) and then to be withdrawn from the bottom. 1.9 Remove the hinged clamp (43b) and take out the component parts (5, 65, 66 and 92). 2.0 Replacement of seals Remove the seals marked with blue in the spare parts drawing. Clean the single parts. Insert new seals. Do not use oils and grease for the V-rings (7, 8 and 94). For inserting the V-ring, use the insertion tool and steadily press the V-ring at opposite spots for several times all over the circumference. V-ring installation, see illustration 3.0 Assembly Assembly is carried out in reverse order 4.0 Function check After assembly check the valve function and the total stroke. For this purpose actuate valve with compressed air at (B). 4.1 Check the lifting stroke: On actuation of the valve via (X) the stroke of the double seat disk (16) must be 1 to 2 mm. On actuation via (Y) the stroke of the valve disk (15) must must be 6 to 7 mm. 94 5 65 D 66 92 43b 15 7 8 5 1 16 43 B A 49 6 22 24 H 5 43a 30 E F G Y X Seal set cpl. Material 1" 11/2"/2" 21/2"/3" 4" 6" EPDM 221-528.75 221-528.19 221-528.20 221-528.21 221-528.23 FPM 221-528.24 221-528.25 221-528.26 221-528.37 Item Qty Designation Material 1" 11/2"/2" 21/2"/3" 4" 6" 1 1 Seal ring Ø 22 28 28 28 35 EPDM 924-084 924-085 924-085 924-085 924-088 FPM 924-083 924-083 924-083 924-087 5 4 O-Ring Ø 42x3 60x3 85x4 113x4 158x5 EPDM 930-309 930-144 930-150 930-156 930-260 FPM 930-171 930-176 930-178 930-259 6 1 O-Ring Ø 8x1,6 8x1,6 8x1,6 8x1,6 9x3 NBR 930-004 930-004 930-004 930-004 930-007 7 1 V-Ring Ø 35-5 52-6 76-6 104-6 148-6 EPDM 932-046 932-021 932-024 932-028 932-042 FPM 932-033 932-035 932-039 932-041 8 1 V-Ring Ø 28-5 44-6 68-6 96-6 140-6 EPDM 932-017 932-019 932-023 932-027 932-045 FPM 932-032 932-034 932-038 932-044 22 2 O-Ring Ø 22x3 28x3 28x3 28x3 35x3 EPDM 930-268 930-243 930-243 930-243 930-356 FPM 930-244 930-244 930-244 930-357 24 1 O-Ring Ø 10x2,5 16x3 16x3 16x3 22x3 EPDM 930-368 930-235 930-235 930-235 930-268 FPM 930-162 930-162 930-162 930-164 65 1 Seal ring Ø 22 46 69 97 142 EPDM 924-084 924-305 924-296 924-254 924-261 FPM 924-307 924-308 924-309 924-320 94 1 V-Ring (R) Ø 36-7 54-7 78-7 106-7 151-7 EPDM 221-365.13 221-365.07 221-365.08 221-365.09 221-265.16 FPM 221-365.10 221-365.11 221-365.12 221-365.17 Seals for VARIVENT® Mixproof Valve Type R.L
  • 13. Liquid Processing Division Tuchenhagen Original Spare Parts – VARIVENT® Mixproof Bottom Valve Type T - Maintenance Storage Instruction: Storage acc. DIN 7719, relative humidity of air approx. ca. 65%, temperature between 15-25° C (59-77° F), storage to be light protected 43a 22 1 30 46 6 9 D 23 24 65 8 C 7 A H B 49 43 5 83 8 16 5 5 29 15 4 11 2 1.0 Dismantling 1.1 Remove CIP connection (30). 1.2 In the non-actuated position, the valve disks (15 and 16) are in the closed position. Lift the valve disks (15 and 16) by actuating the valve with compressed air at connection (B) or using the emergency device. 1.3 Remove hinged clamp (43). 1.4 Interrupt compressed air supply at connection (B), or remove emergency device. 1.5 After removal of the clamps (49) draw-off control module (H). 1.6 Withdraw valve insert complete with actuator (A) and lantern (9). 1.7 Remove hinged clamp (46). Hold actuator (A) using a belt wrench wrench and separa- te valve disk (15) from actuator (A) at wrench area C 1.8 Hold valve disk (15) at wrench area (C) and remove CIP bonnet (11) at wrench area (D). 1.9 Remove the hinged clamp (43a) and take out the component parts (1, 2, 4 and 83). 2.0 Replacement of seals Remove the seals marked with blue in the spare parts drawing. Clean the single parts. Insert new seals. Do not use oils and grease for the V-rings (7 and 8). For inserting the V-ring, use the insertion tool and steadily press the V-ring at opposite spots for several times all over the circumference. V-ring installation position, see illustration 3.0 Assembly Assembly is carried out in reverse order 4.0 Function check After assembly check the valve function. For this purpose actuate valve with compressed air at (B). In closed valve position, the bearing plug and CIP bonnet must at flush level. Item Qty Designation Material 11/2"/2" 21/2"/3" 4" 1 1 Seal ring Ø 28 28 28 EPDM 924-085 924-085 924-085 FPM 924-083 924-083 924-083 5 4 O-ring Ø 60x3 85x4 113x4 EPDM 930-144 930-150 930-156 FPM 930-171 930-176 930-178 6 1 O-ring Ø 8x1,6 8x1,6 8x1,6 NBR 930-004 930-004 930-004 7 1 V-ring Ø 52-6 76-6 104-6 EPDM 932-021 932-024 932-028 FPM 932-033 932-035 932-039 8 2 V-ring Ø 44-6 68-6 96-6 EPDM 932-019 932-023 932-027 FPM 932-032 932-034 932-038 22 1 O-ring Ø 28x3 28x3 28x3 EPDM 930-243 930-243 930-243 FPM 930-244 930-244 930-244 23 1 O-ring Ø 38x3 38x3 38x3 EPDM 930-246 930-246 930-246 FPM 930-247 930-247 930-247 24 1 O-ring Ø 16x3 16x3 16x3 EPDM 930-235 930-235 930-235 FPM 930-162 930-162 930-162 29 1 O-ring Ø 20x3 20x3 20x3 NBR 930-026 930-026 930-026 65 1 Seal ring Ø 48 48 48 EPDM 924-298 924-298 924-298 FPM 924-310 924-310 924-310 Seal set cpl. Material 11/2"/2" 21/2"/3" 4" EPDM 221-511.47 221-511.48 221-511.49 FPM 221-519.26 221-519.27 221-519.28 Seals for VARIVENT® Mixproof Bottom Valve Type T
  • 14. Liquid Processing Division Tuchenhagen Original Spare Parts – VARIVENT® Mixproof Bottom Valve Type T.L - Maintenance Storage Instruction: Storage acc. DIN 7719, relative humidity of air approx. ca. 65%, temperature between 15-25° C (59-77° F), storage to be light protected C A H B 49 22 1 30 46 24 65 8 7 5 83 8 16 5 5 29 15 6 2 43b 43a F 46 211 X Y 203 L E 204 223 G 43 1.0 Dismantling 1.1 Remove CIP connection (30). 1.2 In the non-actuated position, the valve disks (15 and 16) are in the closed position. Lift the valve disks (15 and 16) by actuating the valve with compressed air at connection (B) or using the emergency device. 1.3 Remove hinged clamp (43). 1.4 Interrupt compressed air supply at connection (B), or remove emergency device. 1.5 After removal of the clamps (49) draw off control module (H). 1.6 Withdraw valve insert complete with actuator (A) and liftin actuator (L). 1.7 Remove hinged clamp (46). Hold valve disk (15) at wrench area (C) and separate actuator (A) from lifting actuator using (L) using a belt wrench. 1.8 Remove clamps (223) and take out cylindre cover (204). 1.9 Hold drive spindle (203) at hexagon (E), by turning the valve disk (15) at wrench area (C) to the left, unscrew the the valve disk (15). CAUTON: Do not pull out drive spindle (203), thrust washer (211) may fall out ! 1.10The double seat disk (16) is separated from the drive spindle using a round rod (inserted in bore F) and by turning at wrench area (G) and then withdrawn. 1.11Remove the hinged clamp (46a) and separate the lifting actuator (L) from the lantern (9). 1.12Remove the hinged clamp (43b) and take out the seat ring (34). 1.13Remove the hinged clamp (43) and separate the leaking housing (73) from the lantern (9). 2.0 Replacement of seals Remove the seals marked with blue in the spare parts drawing. Clean the single parts. Insert new seals. Do not use oils and grease for the V rings (7 and 8). For inserting the V ring, use the insertion tool and steadily press the V ring at opposite spots for several times all over the circumference. V ring installation, see illustration 3.0 Assembly Assembly is carried out in reverse order 4.0 Function check After assembly check the total stroke. For this purpose actuate valve with compressed air and check whether the valve stroke is cor- rect. If necessary, adjust the feedback switch or the proximity switch. Check the lifting stroke: On actuation of the valve via (X), the stroke of the double seat disk (16) must be 1 to 2 mm. On actuation via (Y), the stroke of the valve disk (15) must must be 0,9 to 1,4 mm. Item Qty Designation Material 11/2"/2" 21/2"/3" 4" 1 1 Seal ring Ø 28 28 28 EPDM 924-085 924-085 924-085 FPM 924-083 924-083 924-083 5 4 O-ring Ø 60x3 85x4 113x4 EPDM 930-144 930-150 930-156 FPM 930-171 930-176 930-178 6 1 O-ring Ø 8x1,6 8x1,6 8x1,6 NBR 930-004 930-004 930-004 7 1 V-ring Ø 52-6 76-6 104-6 EPDM 932-021 932-024 932-028 FPM 932-033 932-035 932-039 8 2 V-ring Ø 44-6 68-6 96-6 EPDM 932-019 932-023 932-027 FPM 932-032 932-034 932-038 22 2 O-ring Ø 28x3 28x3 28x3 EPDM 930-243 930-243 930-243 FPM 930-244 930-244 930-244 24 2 O-ring Ø 16x3 16x3 16x3 EPDM 930-235 930-235 930-235 FPM 930-162 930-162 930-162 29 1 O-ring Ø 20x3 20x3 20x3 NBR 930-026 930-026 930-026 65 1 Seal ring Ø 48 48 48 EPDM 924-298 924-298 924-298 FPM 924-310 924-310 924-310 Seal set cpl. Material 11/2"/2" 21/2"/3" 4" EPDM 221-511.50 221-511.51 221-511.52 FPM 221-519.29 221-519.30 221-519.31 Seals for VARIVENT® Mixproof Bottom Valve Type T.L
  • 15. Liquid Processing Division Tuchenhagen Original Spare Parts – VARIVENT® Mixproof Valve Type B - Maintenance Storage Instruction: Storage acc. DIN 7719, relative humidity of air approx. ca. 65%, temperature between 15-25° C (59-77° F), storage to be light protected 46a 43 5 1 8 7 43b 5 65 15 16 6 8 24 9 66 5 5 43a C 30 A 49 B H 29 C 92 23 22 1.0 Dismantling 1.1 Remove hinged clamp (43) and locking device (35) at the lower valve housing (40). 1.2 In the non-actuated position, the valve disk (15) is in the closed position. Lift the valve disk (15) by actuating the valve with compressed air at connection (B) or using the emergency. 1.3 Loosen valve disk (15) at wrench area (C) by approx. 5 – 6 mm. 1.4 Interrupt compressed air supply at connection (B), or remove emergency device. Separate valve disk from actuator 1.5 After removal of the clamps (49) draw off control module (H). 1.6 Remove hinged clamp (43) between lantern (9) and the upper valve housing. 1.7 Remove actuator (A) from the top. 2.0 Replacement of seals Remove the seals marked with blue in the spare parts drawing. Clean the single parts. Insert new seals. Do not use oils and grease for the V-ring (7). For inserting the V-ring, use the insertion tool and steadily press the V-ring at opposite spots for several times all over the circumference. V-ring installation position, see illustration 3.0 Assembly Assembly is carried out in reverse order 4.0 Function check After assembly check the valve function. For this purpose actuate valve with com- pressed air at (B). Item Qty Designation Material 2" 21/2"/3" 4" 6" 1 1 Seal ring Ø 22 28 35 35 EPDM 924-084 924-085 924-088 924-088 FPM 924-082 924-083 924-087 924-087 5 4 O-ring Ø 60x3 85x4 138x4 158x5 EPDM 930-144 930-150 930-372 930-260 FPM 930-171 930-176 930-409 930-259 6 1 O-ring Ø 8x1,6 8x1,6 9x3 9x3 NBR 930-004 930-004 930-007 930-007 7 1 V-ring Ø 52-6 76-6 128-6 148-6 EPDM 932-021 932-024 932-060 932-042 FPM 932-033 932-035 932-062 932-041 8 2 V-ring Ø 44-6 68-6 120-6 140-6 EPDM 932-019 932-023 932-059 932-045 FPM 932-032 932-034 932-063 932-044 22 1 O-ring Ø 22x3 28x3 35x3 35x3 EPDM 930-268 930-243 930-356 930-356 FPM 930-164 930-244 930-357 930-357 23 1 O-ring Ø 38x3 38x3 56x3 56x3 EPDM 930-246 930-246 930-266 930-266 FPM 930-247 930-247 930-265 930-265 24 1 O-ring Ø 16x3 16x3 22x3 22x3 EPDM 930-235 930-235 930-268 930-268 FPM 930-162 930-162 930-164 930-164 29 1 O-ring Ø 20x3 20x3 25x3 25x3 NBR 930-026 930-026 930-035 930-035 65 1 Seal ring Ø 46 69 122 142 EPDM 924-305 924-296 924-262 924-261 FPM 924-307 924-308 924-319 924-320 Seal set cpl. Material 2" 21/2"/3" 4" 6" EPDM 221-511.37 221-511.38 221-511.39 221-511.41 FPM 221-519.16 221-519.17 221-519.18 221-519.20 Seals for VARIVENT® Mixproof Valve Type B
  • 16. Liquid Processing Division Tuchenhagen Original Spare Parts – ECOVENT® Shuttle Valve Type W.S - Maintenance Storage Instruction: Storage acc. DIN 7719, relative humidity of air approx. ca. 65%, temperature between 15-25° C (59-77° F), storage to be light protected S1+ S1- S2+ S2- Y11 Y12 Y21 Y22 Y31 Y32 S3+ S3- RM1 RM2 RM3 V1 V2 V3 L+ L- 7 5 15 43 H 1 5 5 A 43a N F M B C 1.0 Dismantling 1.1 In the non-actuated position, the valve disk (15) is in the closed positi- on.Lift the valve disk (15) by actuating the valve with compressed air at connection (B). 1.2 Remove hinged clamps (43 and 43a). 1.3 Interrupt compressed air supply at connection (B). 1.4 Slacken screws (N) at installa-tion base (M) and draw off control module (H). 1.5 Withdraw valve insert from the top, complete with actuator (A) 1.6 Hold valve disk (15) by inserting a pin Ø 5 mm into bore (C) and separate switch bar from valve disk (15) by turining a pin gat bore (F). 2.0 Replacement of seals Remove the seals marked with blue in the spare parts drawing. Clean the single parts. Insert new seals. Do not use oils and grease for the V-ring (7). For inserting the V-ring, use the insertion tool and steadily press the V-ring at opposite spots for several times all over the circumference. V-ring installation position, see illustration 3.0 Assembly Assembly is carried out in reverse order 4.0 Function check After assembly check the valve function. For this purpose actuate valve with compressed air at (B). Item Qty Designation Material 1" 11/2"/2" 21/2"/3" 4" 1 1 Seal ring Ø 28 28 28 28 EPDM 924-085 924-085 924-085 924-085 FPM 924-083 924-083 924-083 924-083 5 3 O-ring Ø 42x3 60x3 85x4 113x4 EPDM 930-309 930-144 930-150 930-156 FPM 930-168 930-171 930-176 930-178 7 2 V-ring Ø 35-5 52-6 76-6 104-6 EPDM 932-046 932-021 932-024 932-028 FPM 932-030 932-033 932-035 932-039 29 1 O-ring Ø 20x3 20x3 20x3 20x3 NBR 930-029 930-029 930-029 930-029 98 1 O-ring Ø 34x3 34x3 34x3 34x3 NBR 930-046 930-046 930-046 930-046 Seal set cpl. Material 1" 11/2"/2" 21/2"/3" 4" EPDM 221-489.01 221-489.03 221-489.05 221-489.07 FPM 221-489.02 221-489.04 221-489.06 221-489.08 Seals for ECOVENT® Shuttle Valve Type W.S
  • 17. Liquid Processing Division Tuchenhagen Original Spare Parts – ECOVENT® Shut-Off Valve Type N.S - Maintenance Storage Instruction: Storage acc. DIN 7719, relative humidity of air approx. ca. 65%, temperature between 15-25° C (59-77° F), storage to be light protected 1.0 Dismantling 1.1 In the non-actuated position, the valve disk (15) is in the closed positi- on.Lift the valve disk (15) by actuating the valve with compressed air at connection (B). 1.2 Remove hinged clamp (43). 1.3 Interrupt compressed air supply at connection (B). 1.4 Slacken screws (N) at installa-tion base (M) and draw off control module (H). 1.5 Withdraw valve insert from the top, complete with actuator (A) 1.6 Hold valve disk (15) by inserting a pin Ø 5 mm into bore (C) and separate switch bar from valve disk (15) by turining a pin gat bore (F). 2.0 Replacement of seals Remove the seals marked with blue in the spare parts drawing. Clean the single parts. Insert new seals. Do not use oils and grease for the V-ring (7). For inserting the V-ring, use the insertion tool and steadily press the V-ring at opposite spots for several times all over the circumference. V-ring installation position, see illustration 3.0 Assembly Assembly is carried out in reverse order 4.0 Function check After assembly check the valve function. For this purpose actuate valve with compressed air at (B). S1+ S1- S2+ S2- Y11 Y12 Y21 Y22 Y31 Y32 S3+ S3- RM1 RM2 RM3 V1 V2 V3 L+ L- H A N 7 5 15 43 1 5 5 43a F M B C Item Qty Designation Material 1" 11/2"/2" 21/2"/3" 4" 1 1 Seal ring Ø 28 28 28 28 EPDM 924-085 924-085 924-085 924-085 FPM 924-083 924-083 924-083 924-083 5 1 O-ring Ø 42x3 60x3 85x4 113x4 EPDM 930-309 930-144 930-150 930-156 FPM 930-168 930-171 930-176 930-178 7 1 V-ring Ø 35-5 52-6 76-6 104-6 EPDM 932-046 932-021 932-024 932-028 FPM 932-030 932-033 932-035 932-039 29 1 O-ring Ø 20x3 20x3 20x3 20x3 NBR 930-029 930-029 930-029 930-029 98 1 O-ring Ø 34x3 34x3 34x3 34x3 NBR 930-046 930-046 930-046 930-046 Seal set cpl. Material 1" 11/2"/2" 21/2"/3" 4" EPDM 221-304.92 221-304.94 221-304.96 221-304.98 FPM 221-304.93 221-304.95 221-304.97 221-304.99 Seals for ECOVENT® Shut-Off Valve Type N.S
  • 18. Liquid Processing Division Tuchenhagen Original Spare Parts – VARIVENT® Mixproof Valve Type M.O - Maintenance Storage Instruction: Storage acc. DIN 7719, relative humidity of air approx. ca. 65%, temperature between 15-25° C (59-77° F), storage to be light protected H 7 5 92 65 43a 1 5 108 16 15 93 8 103 E B A 49 91 106 D 94 20 43 1.0 Dismantling 1.1 In the non-actuated position, the valve disks (15 and 16) are in the closed position. Lift the valve disks (15 and 16) by actuating the valve with compressed air at connection (B) or using the emergency device. 1.2 Remove hinged clamp (43). 1.3 Interrupt compressed air supply at connection (B), or remove emergency device. 1.4 After removal of the clamps (49) draw off control module (H). 1.5 Withdraw valve insert from the top, complete with actuator (A) 1.6 Hold piston rod at wrench area (E) and unscrew valve disk (15) using a face socket wrench. 1.7 Hold drive sleeve (106) at wrench area (D) and unscrew double seat disk (16) using a pin punch. 1.8 Remove leakage detector (91) off the double seat disk (16). 1.9 Remove the hinged clamp (43a) and take out the component parts (5; 65; 92). 2.0 Replacement of seals Remove the seals marked with * in the spare parts drawing. Clean the single parts. Insert new seals. Do not use oils and grease for the V rings (7 and 8). For inserting the V ring, use the insertion tool and steadily press the V ring at opposite spots for several times all over the circumference. V ring installation position, see illustration 3.0 Assembly Assembly is carried out in reverse order 4.0 Function check After assembly check the total stroke. Item Qty Designation Material 2" 21/2" 3" 4" 1 1 Sealing ring FPM 924-308 924-309 924-319 924-320 5 2 O-ring EPDM 930-150 930-156 930-372 930-260 FPM 930-176 930-178 930-409 930-259 7 1 V-ring EPDM 932-024 932-028 932-060 932-042 FPM 932-035 932-039 932-062 932-041 8 1 V-ring EPDM 932-023 932-027 932-059 932-045 FPM 932-034 932-038 932-063 932-044 20 1 Rod guide ring Turcite 935-018 935-018 935-025 935-025 65 1 Sealing ring RA FPM 221-367.08 221-367.09 221-367.10 221-367.11 92 1 Balancer locking 1.4404 221-538.01 221-538.02 221-538.03 221-538.04 93 1 O-ring FPM 930-163 930-163 930-165 930-165 94 1 V-ring RA EPDM 221-365.08 221-365.09 221-365.14 221-365.16 FKF 80 221-365.11 221-365.12 221-365.15 221-365.17 108 1 O-ring EPDM 930-243 930-243 930-356 930-356 FPM 930-244 930-244 930-357 930-357 109 1 O-ring EPDM 930-701 930-701 930-701 930-701 FPM 930-606 930-606 930-606 930-606 Seals for VARIVENT® Mixproof Valve Type M.O