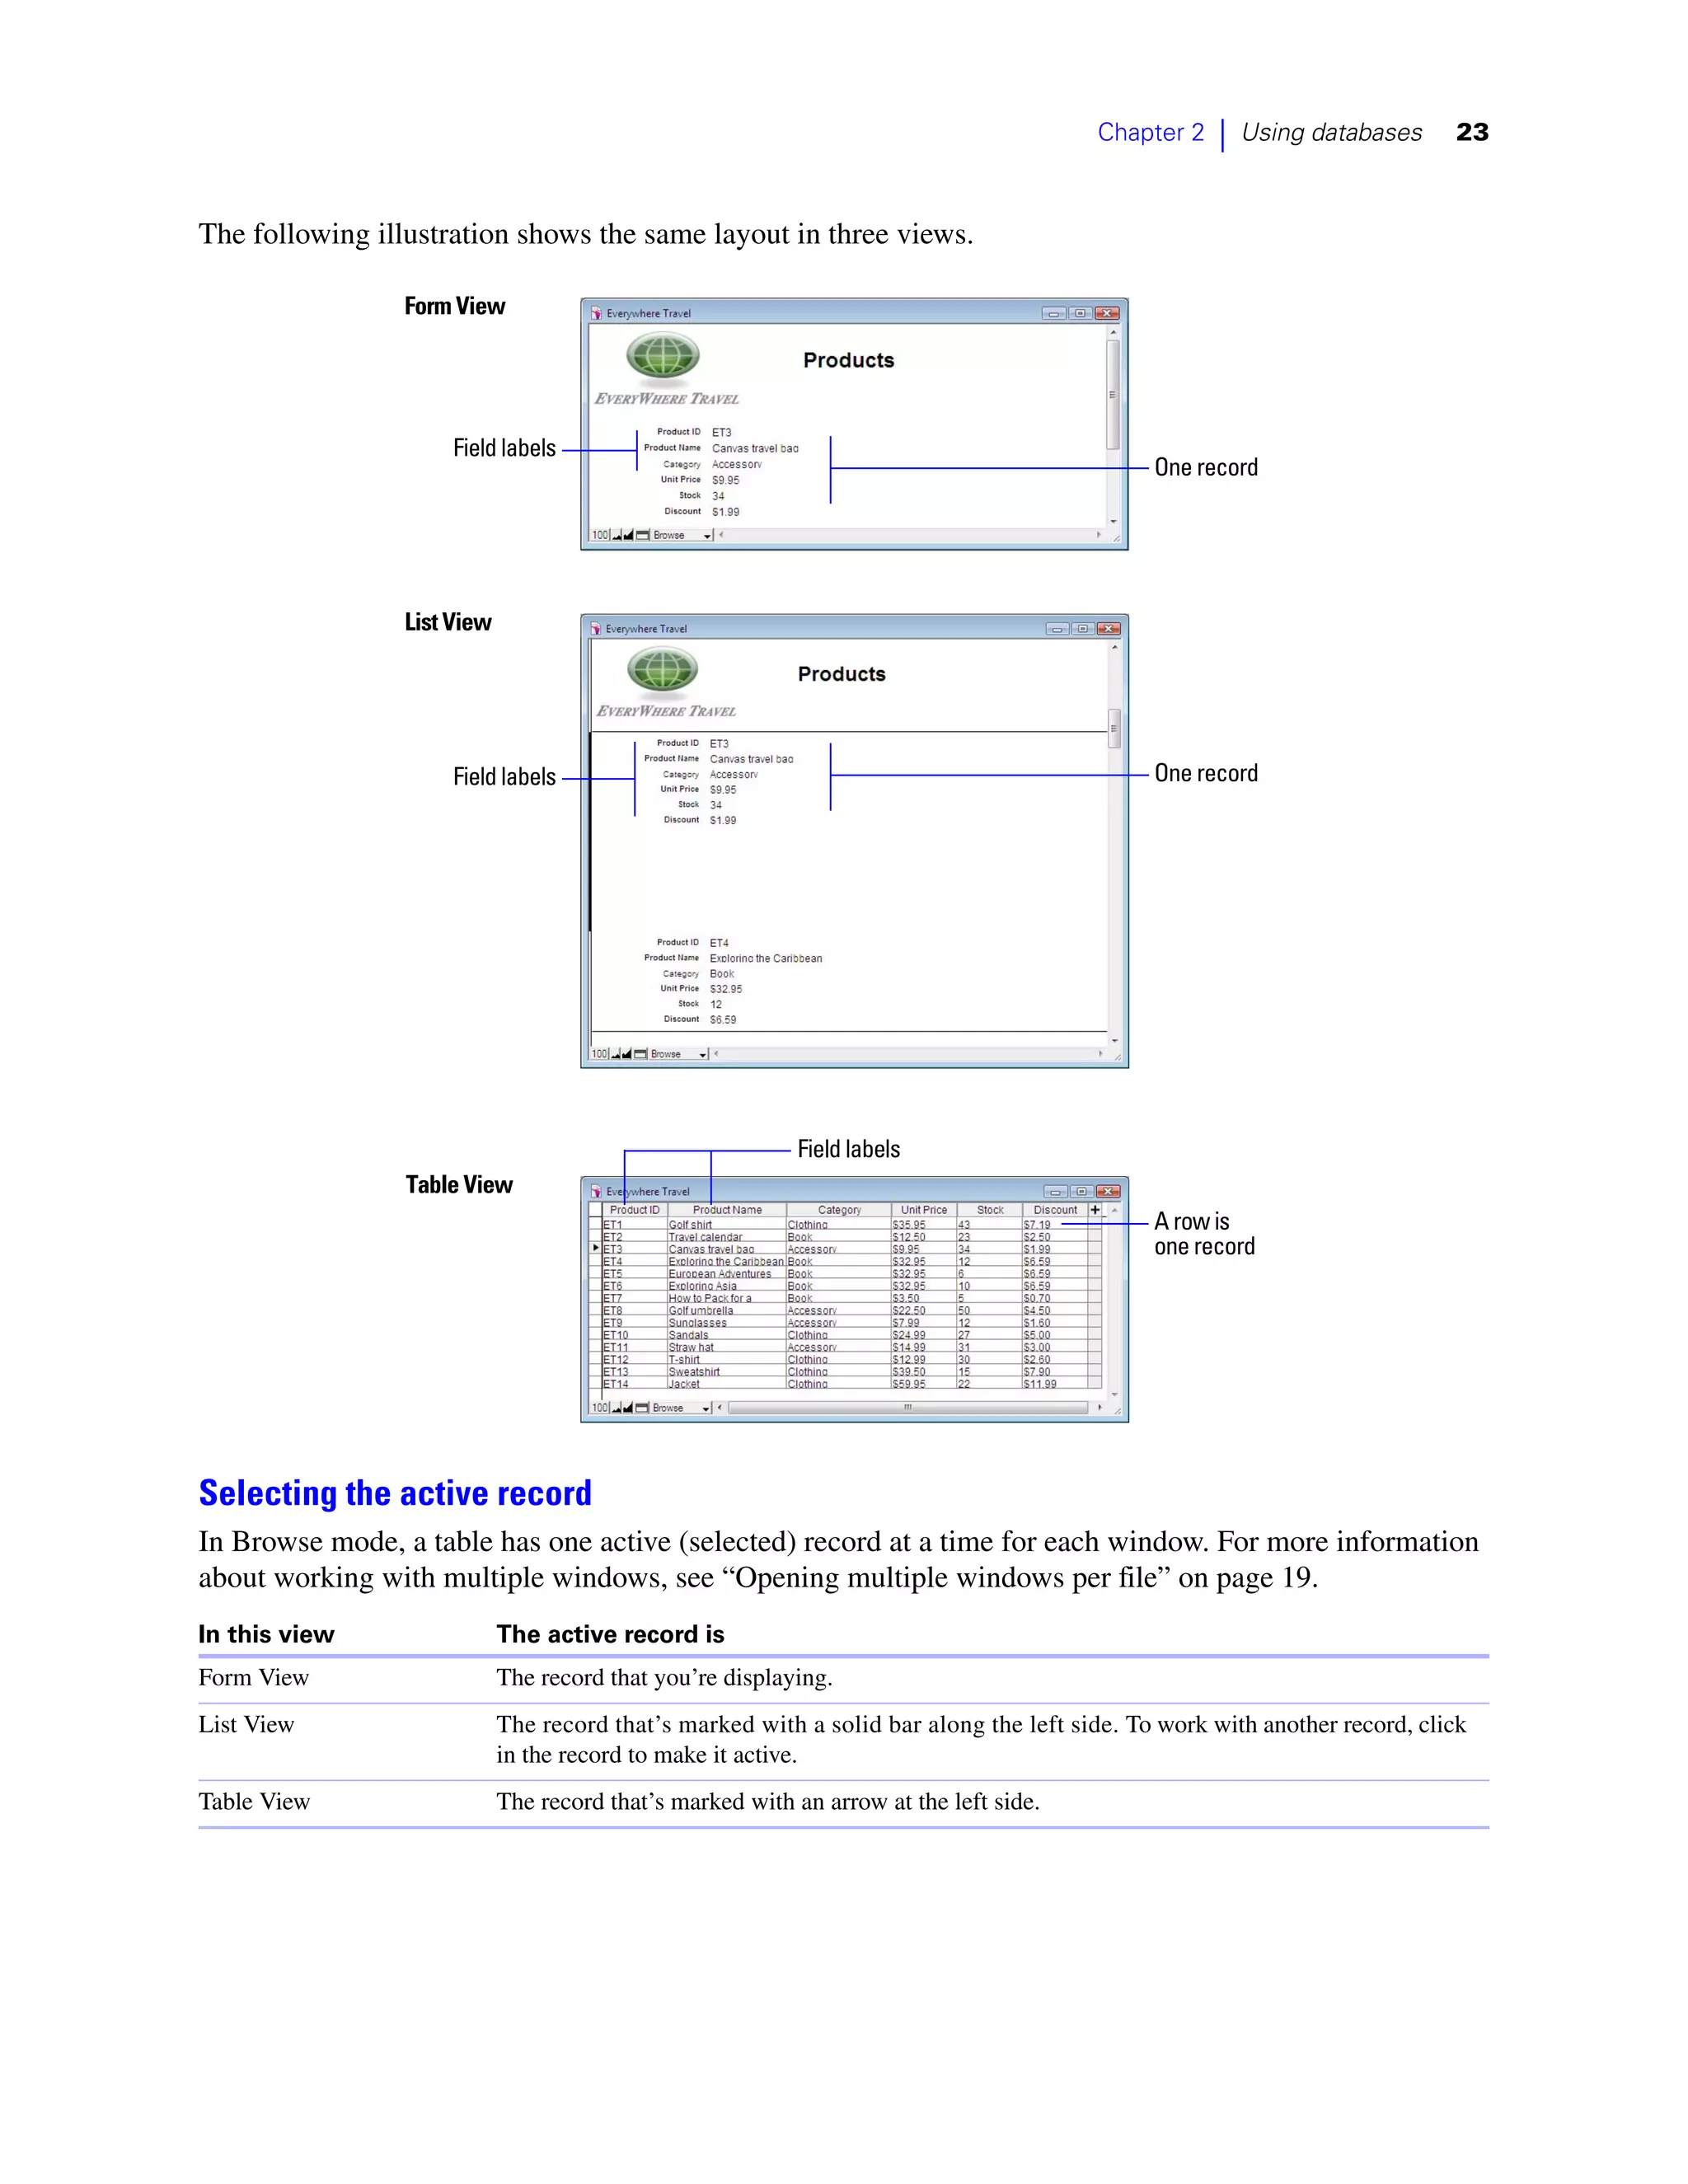
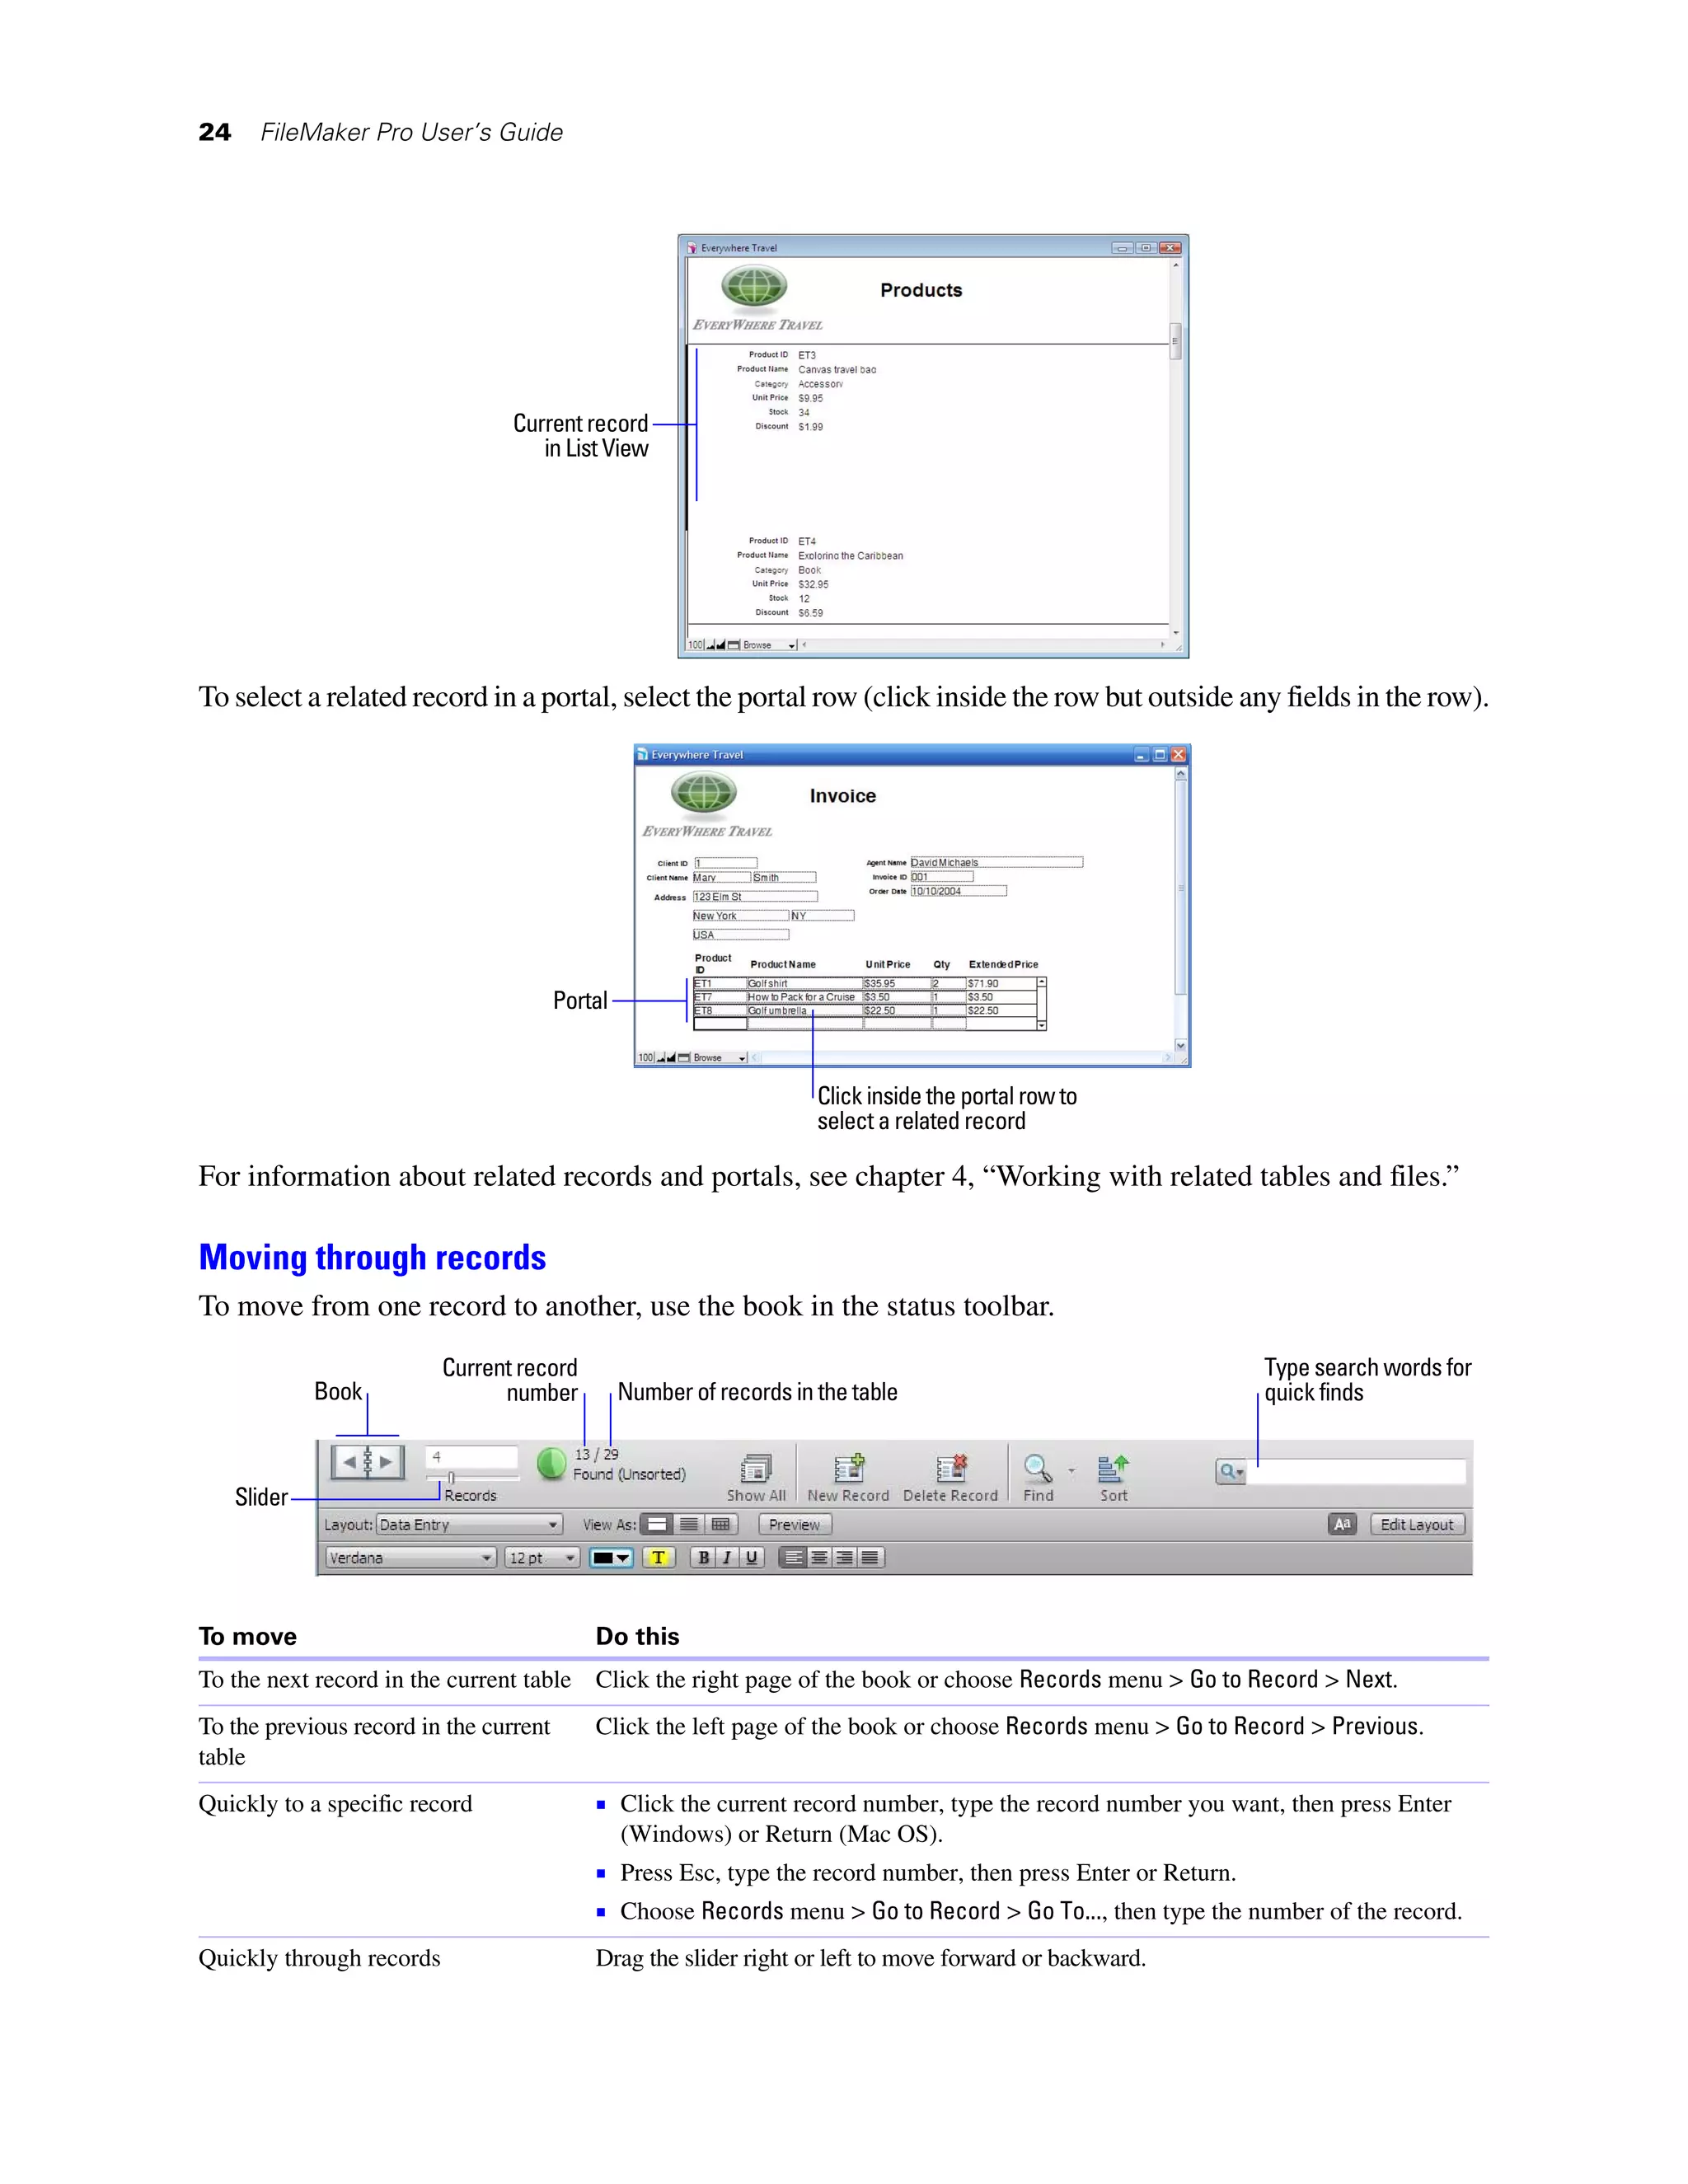
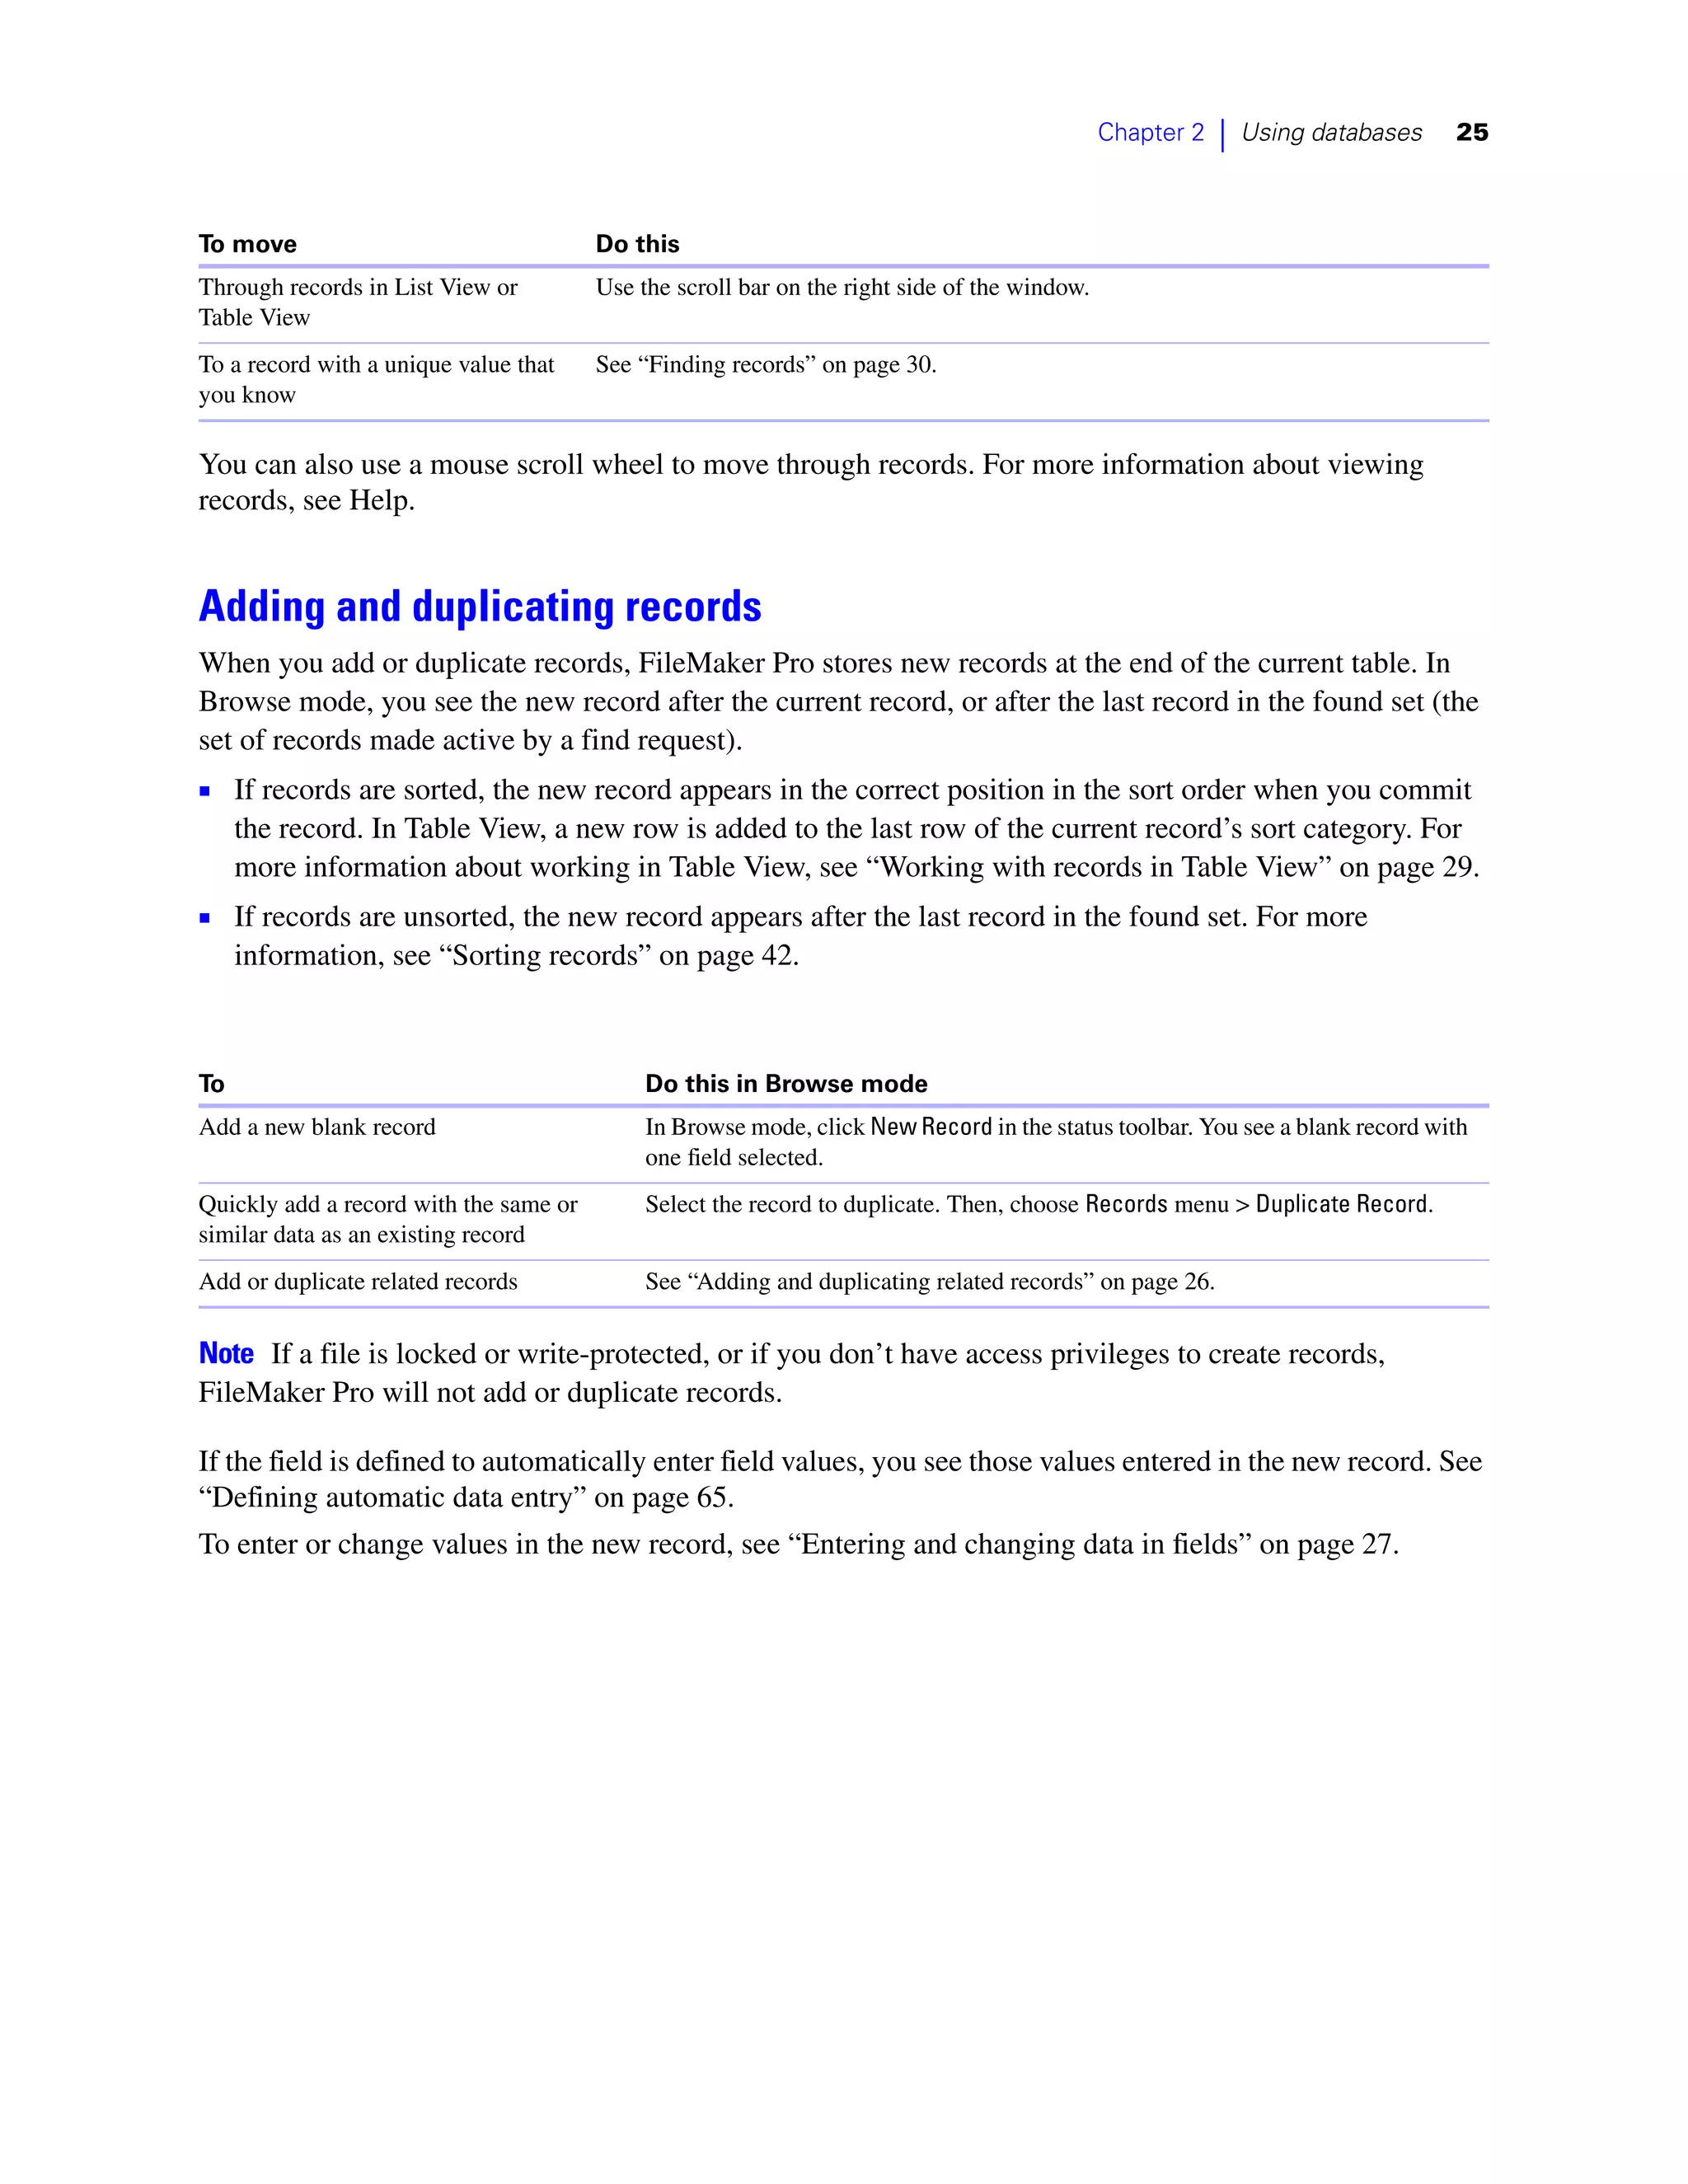
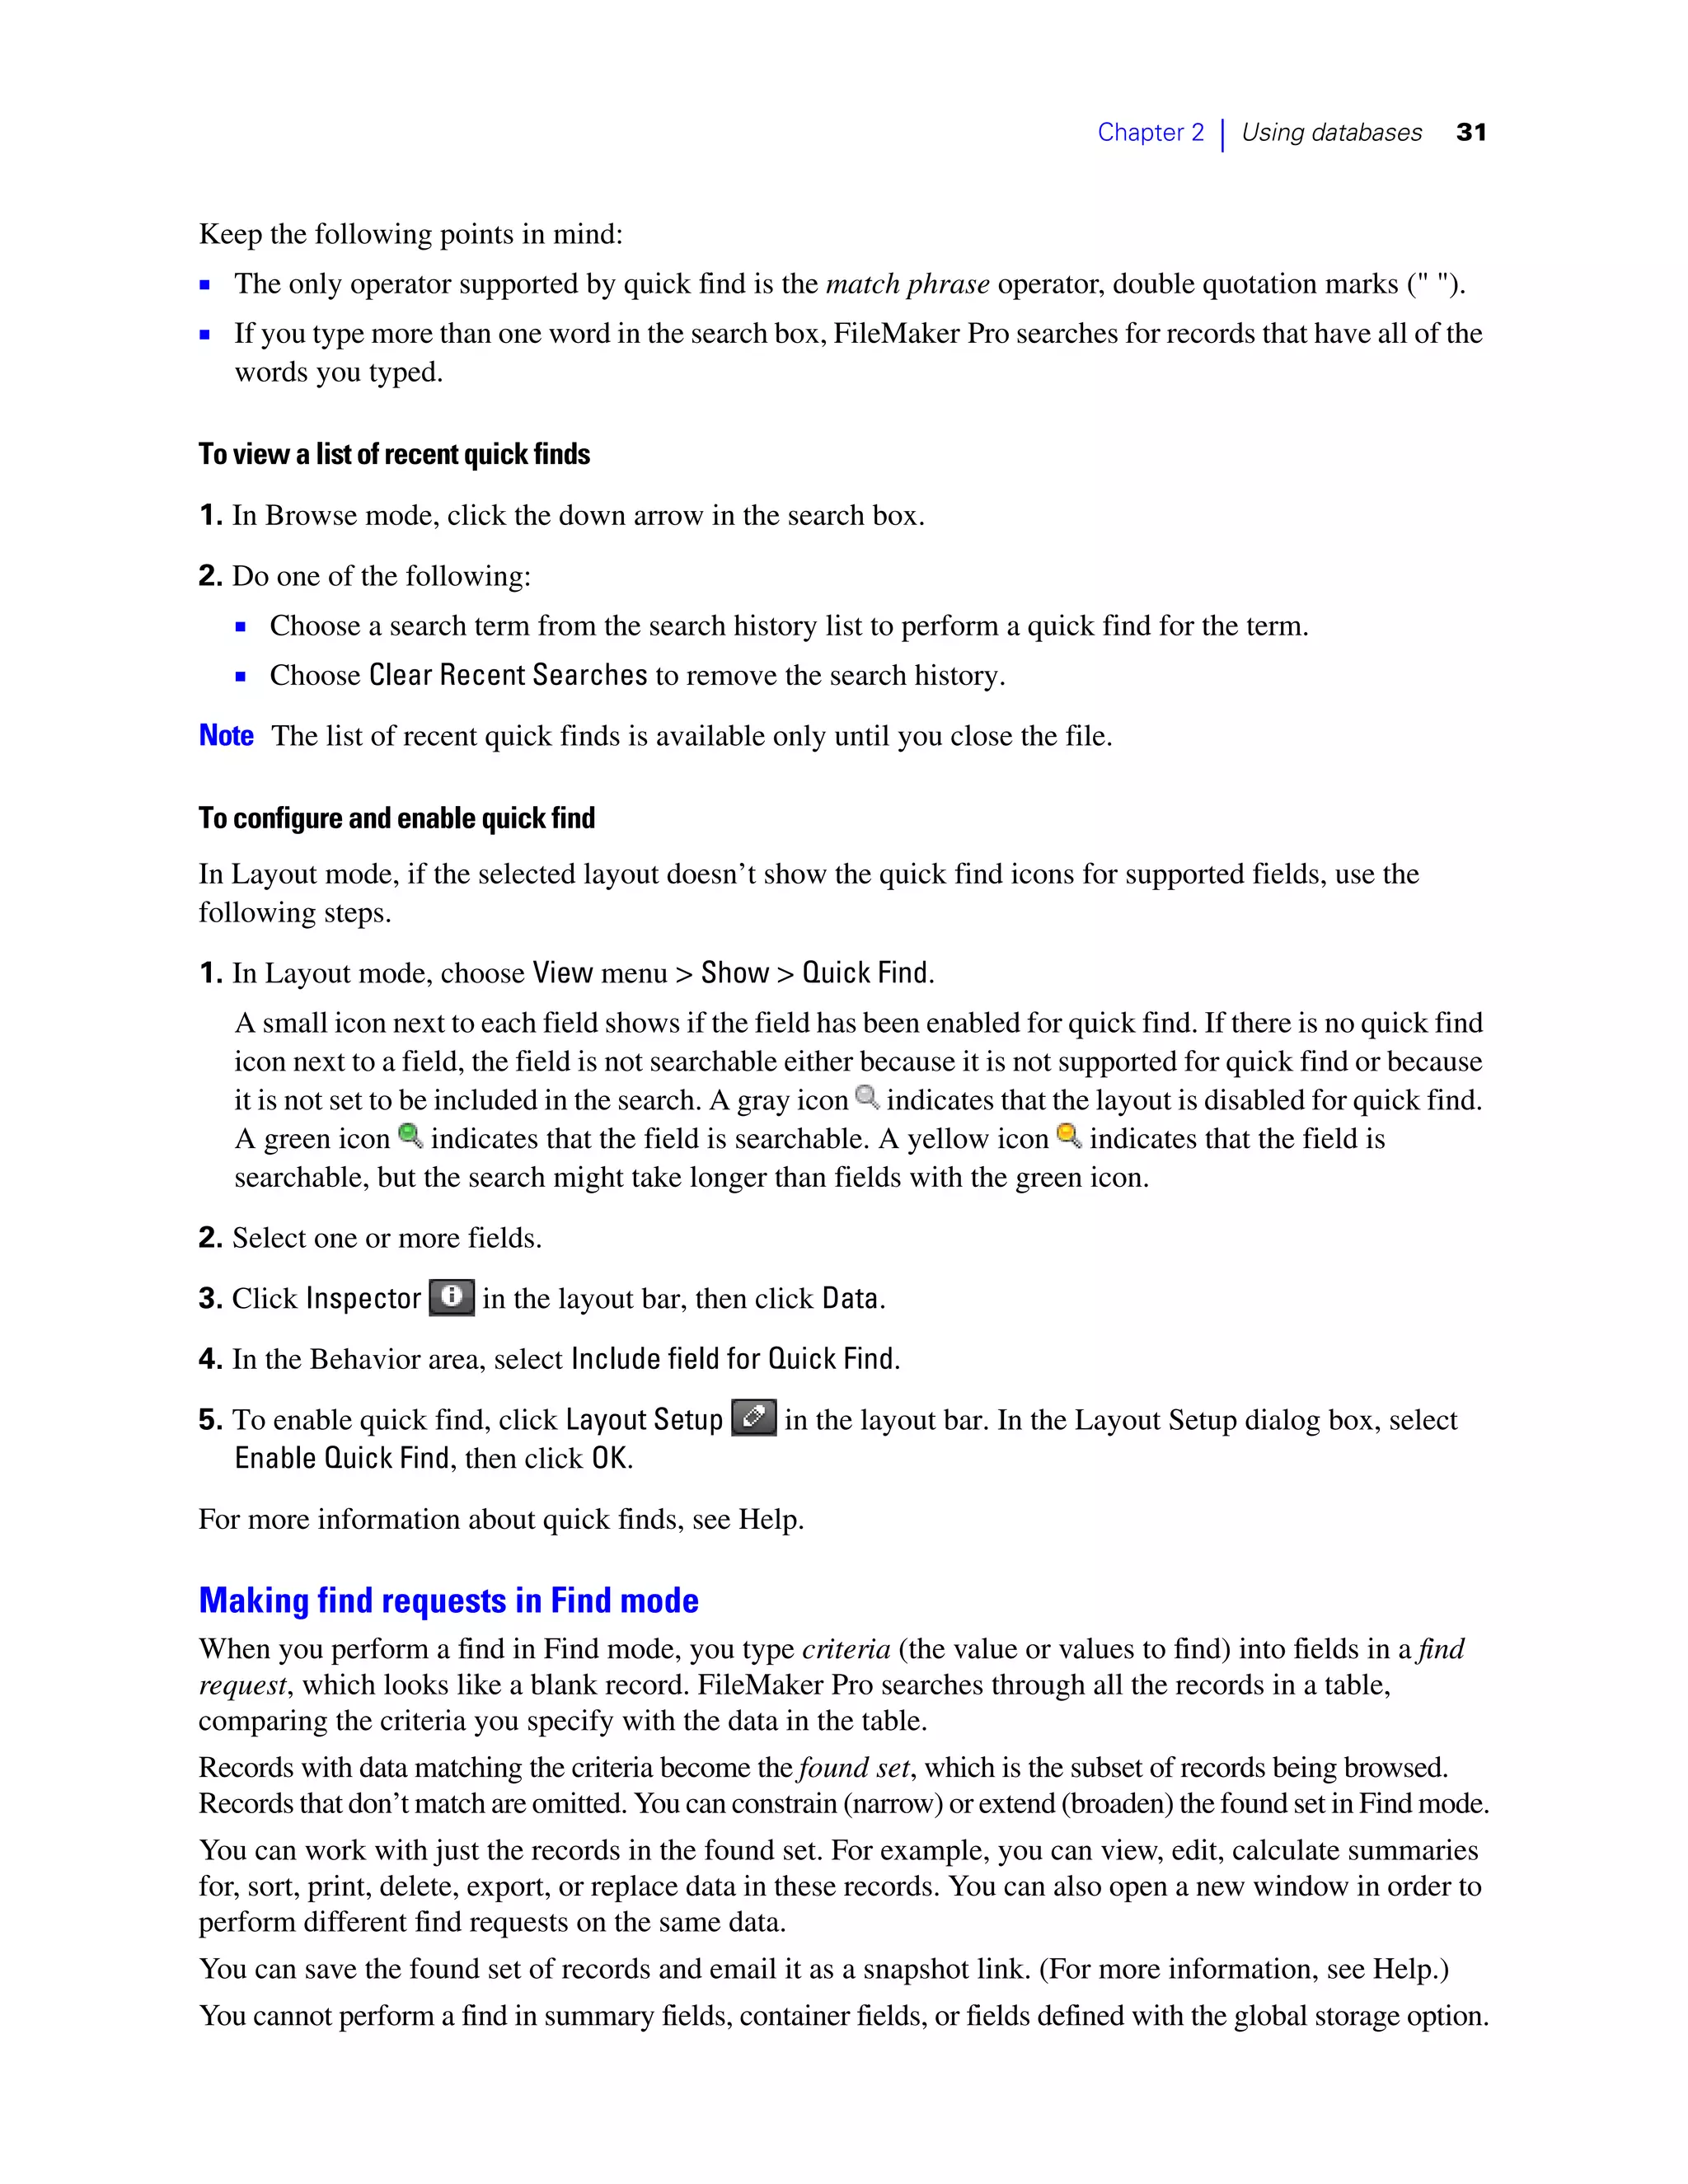
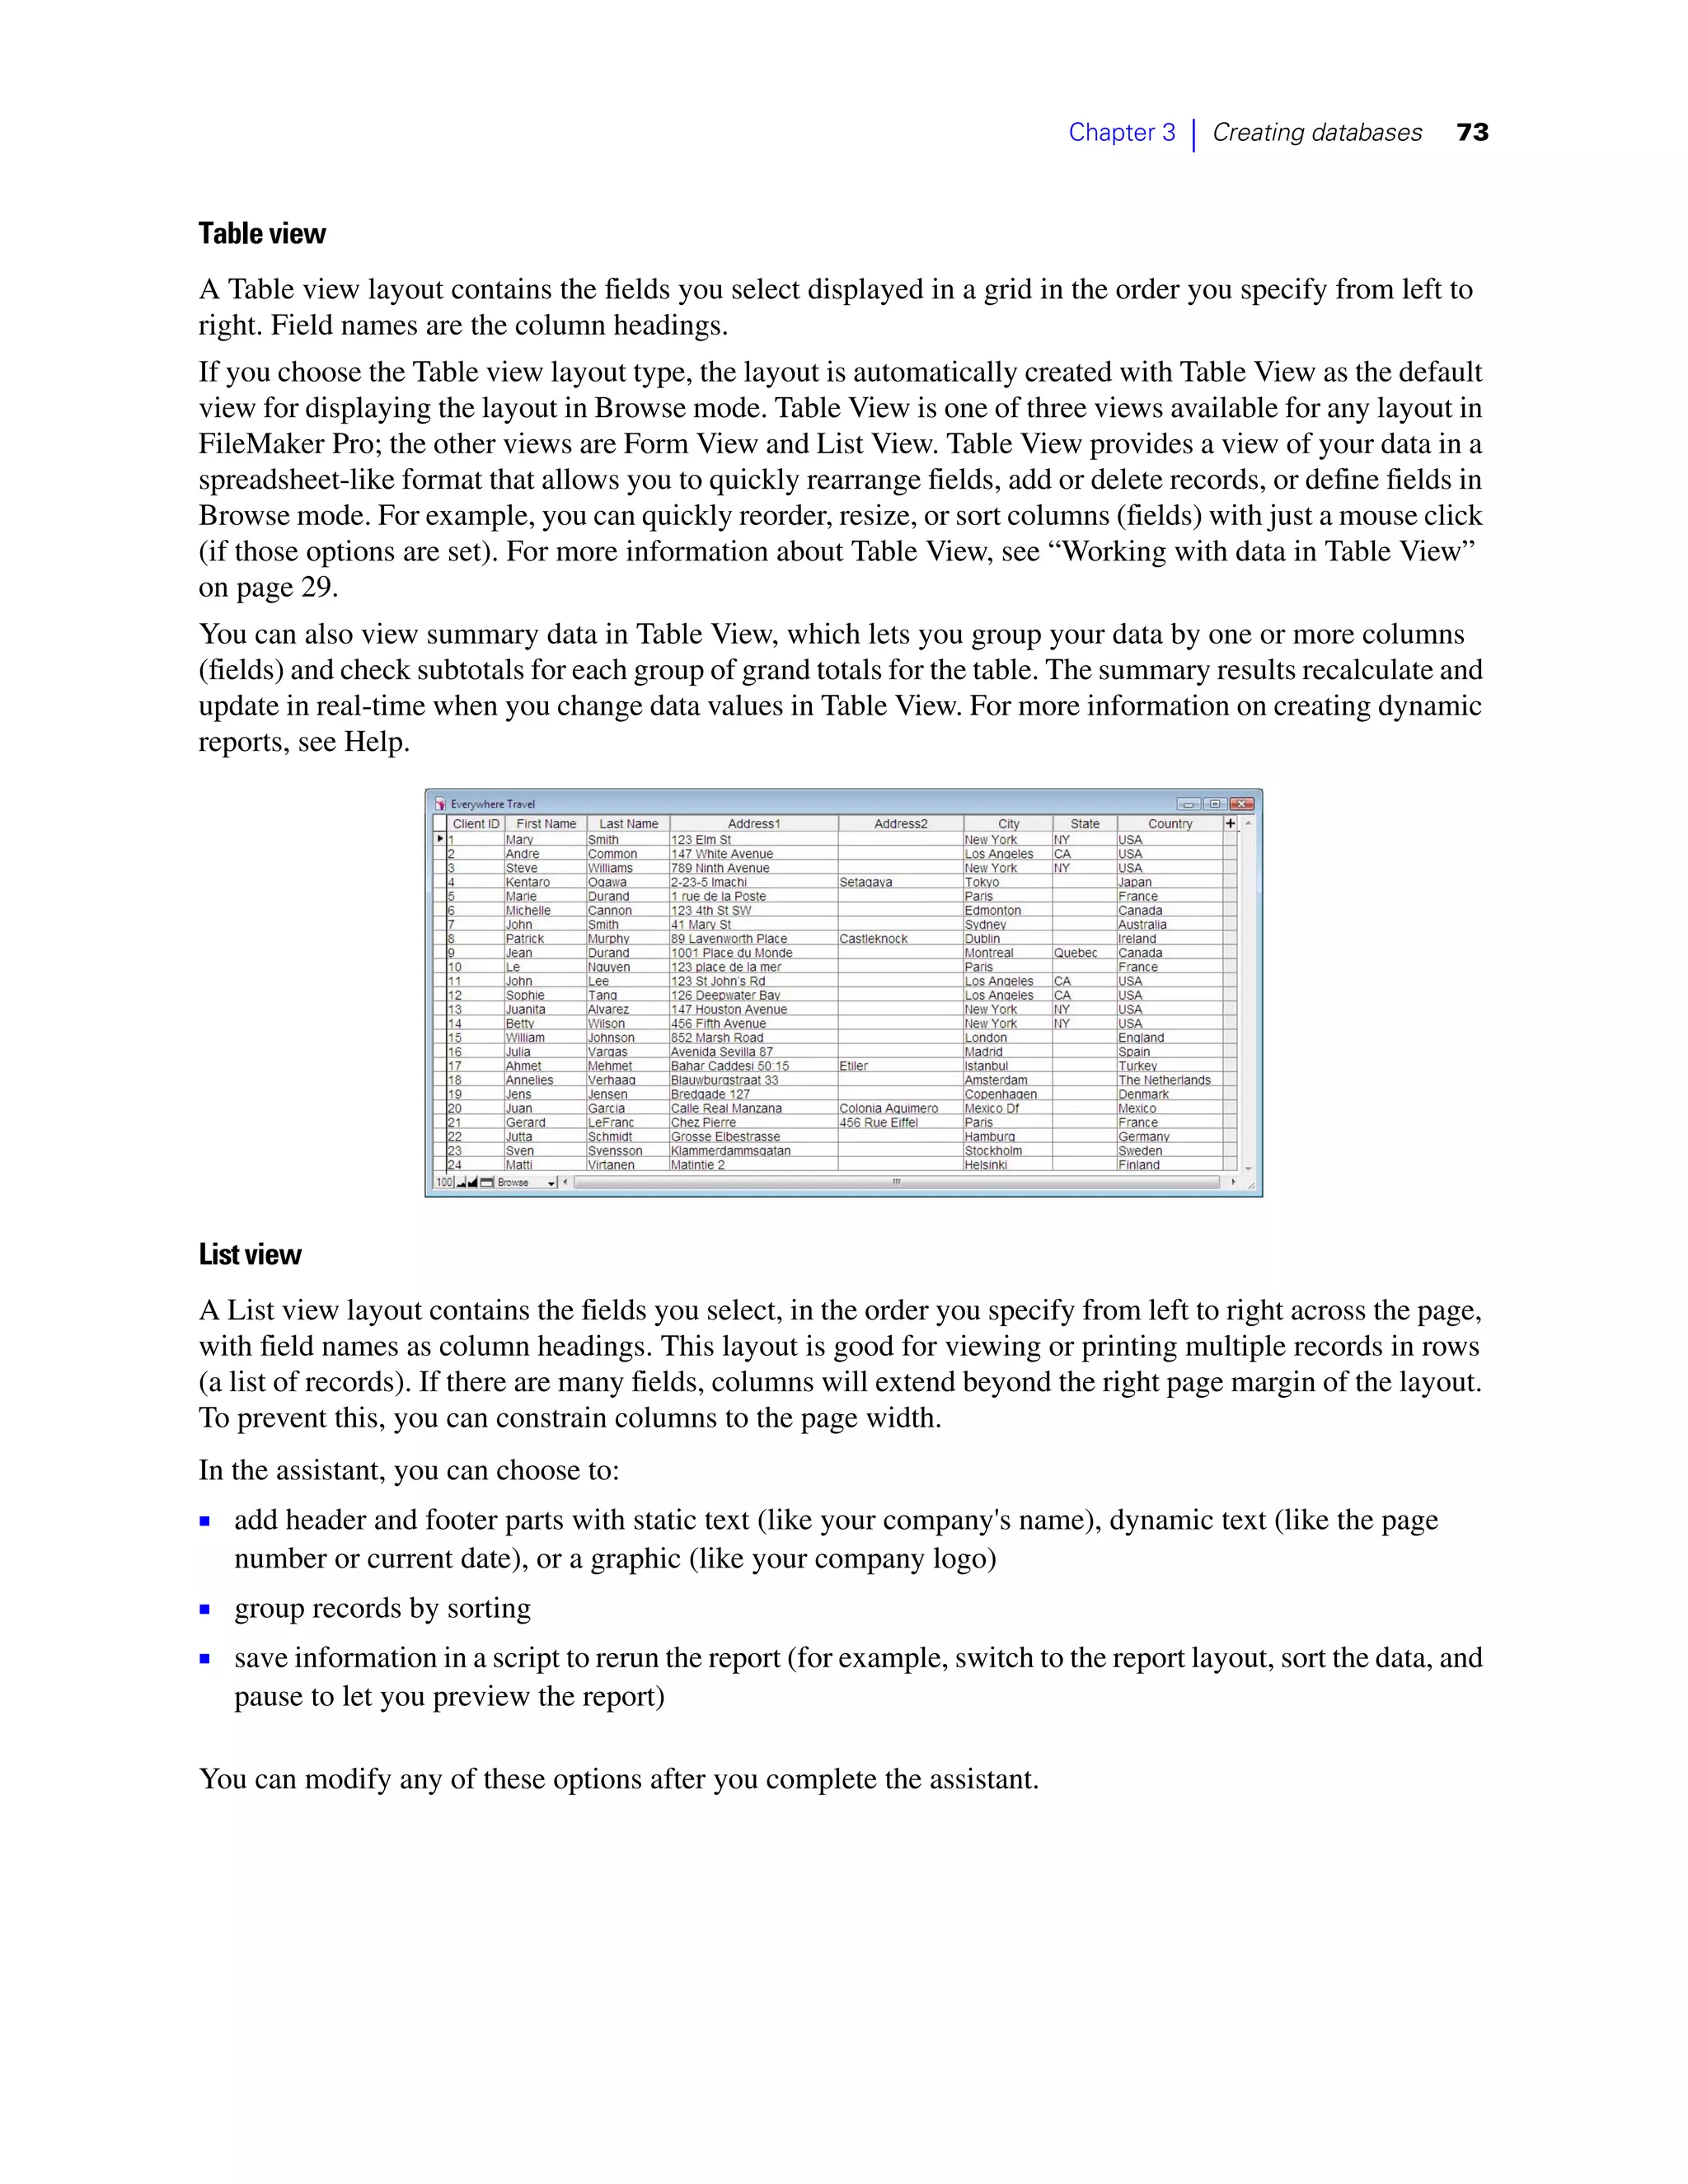
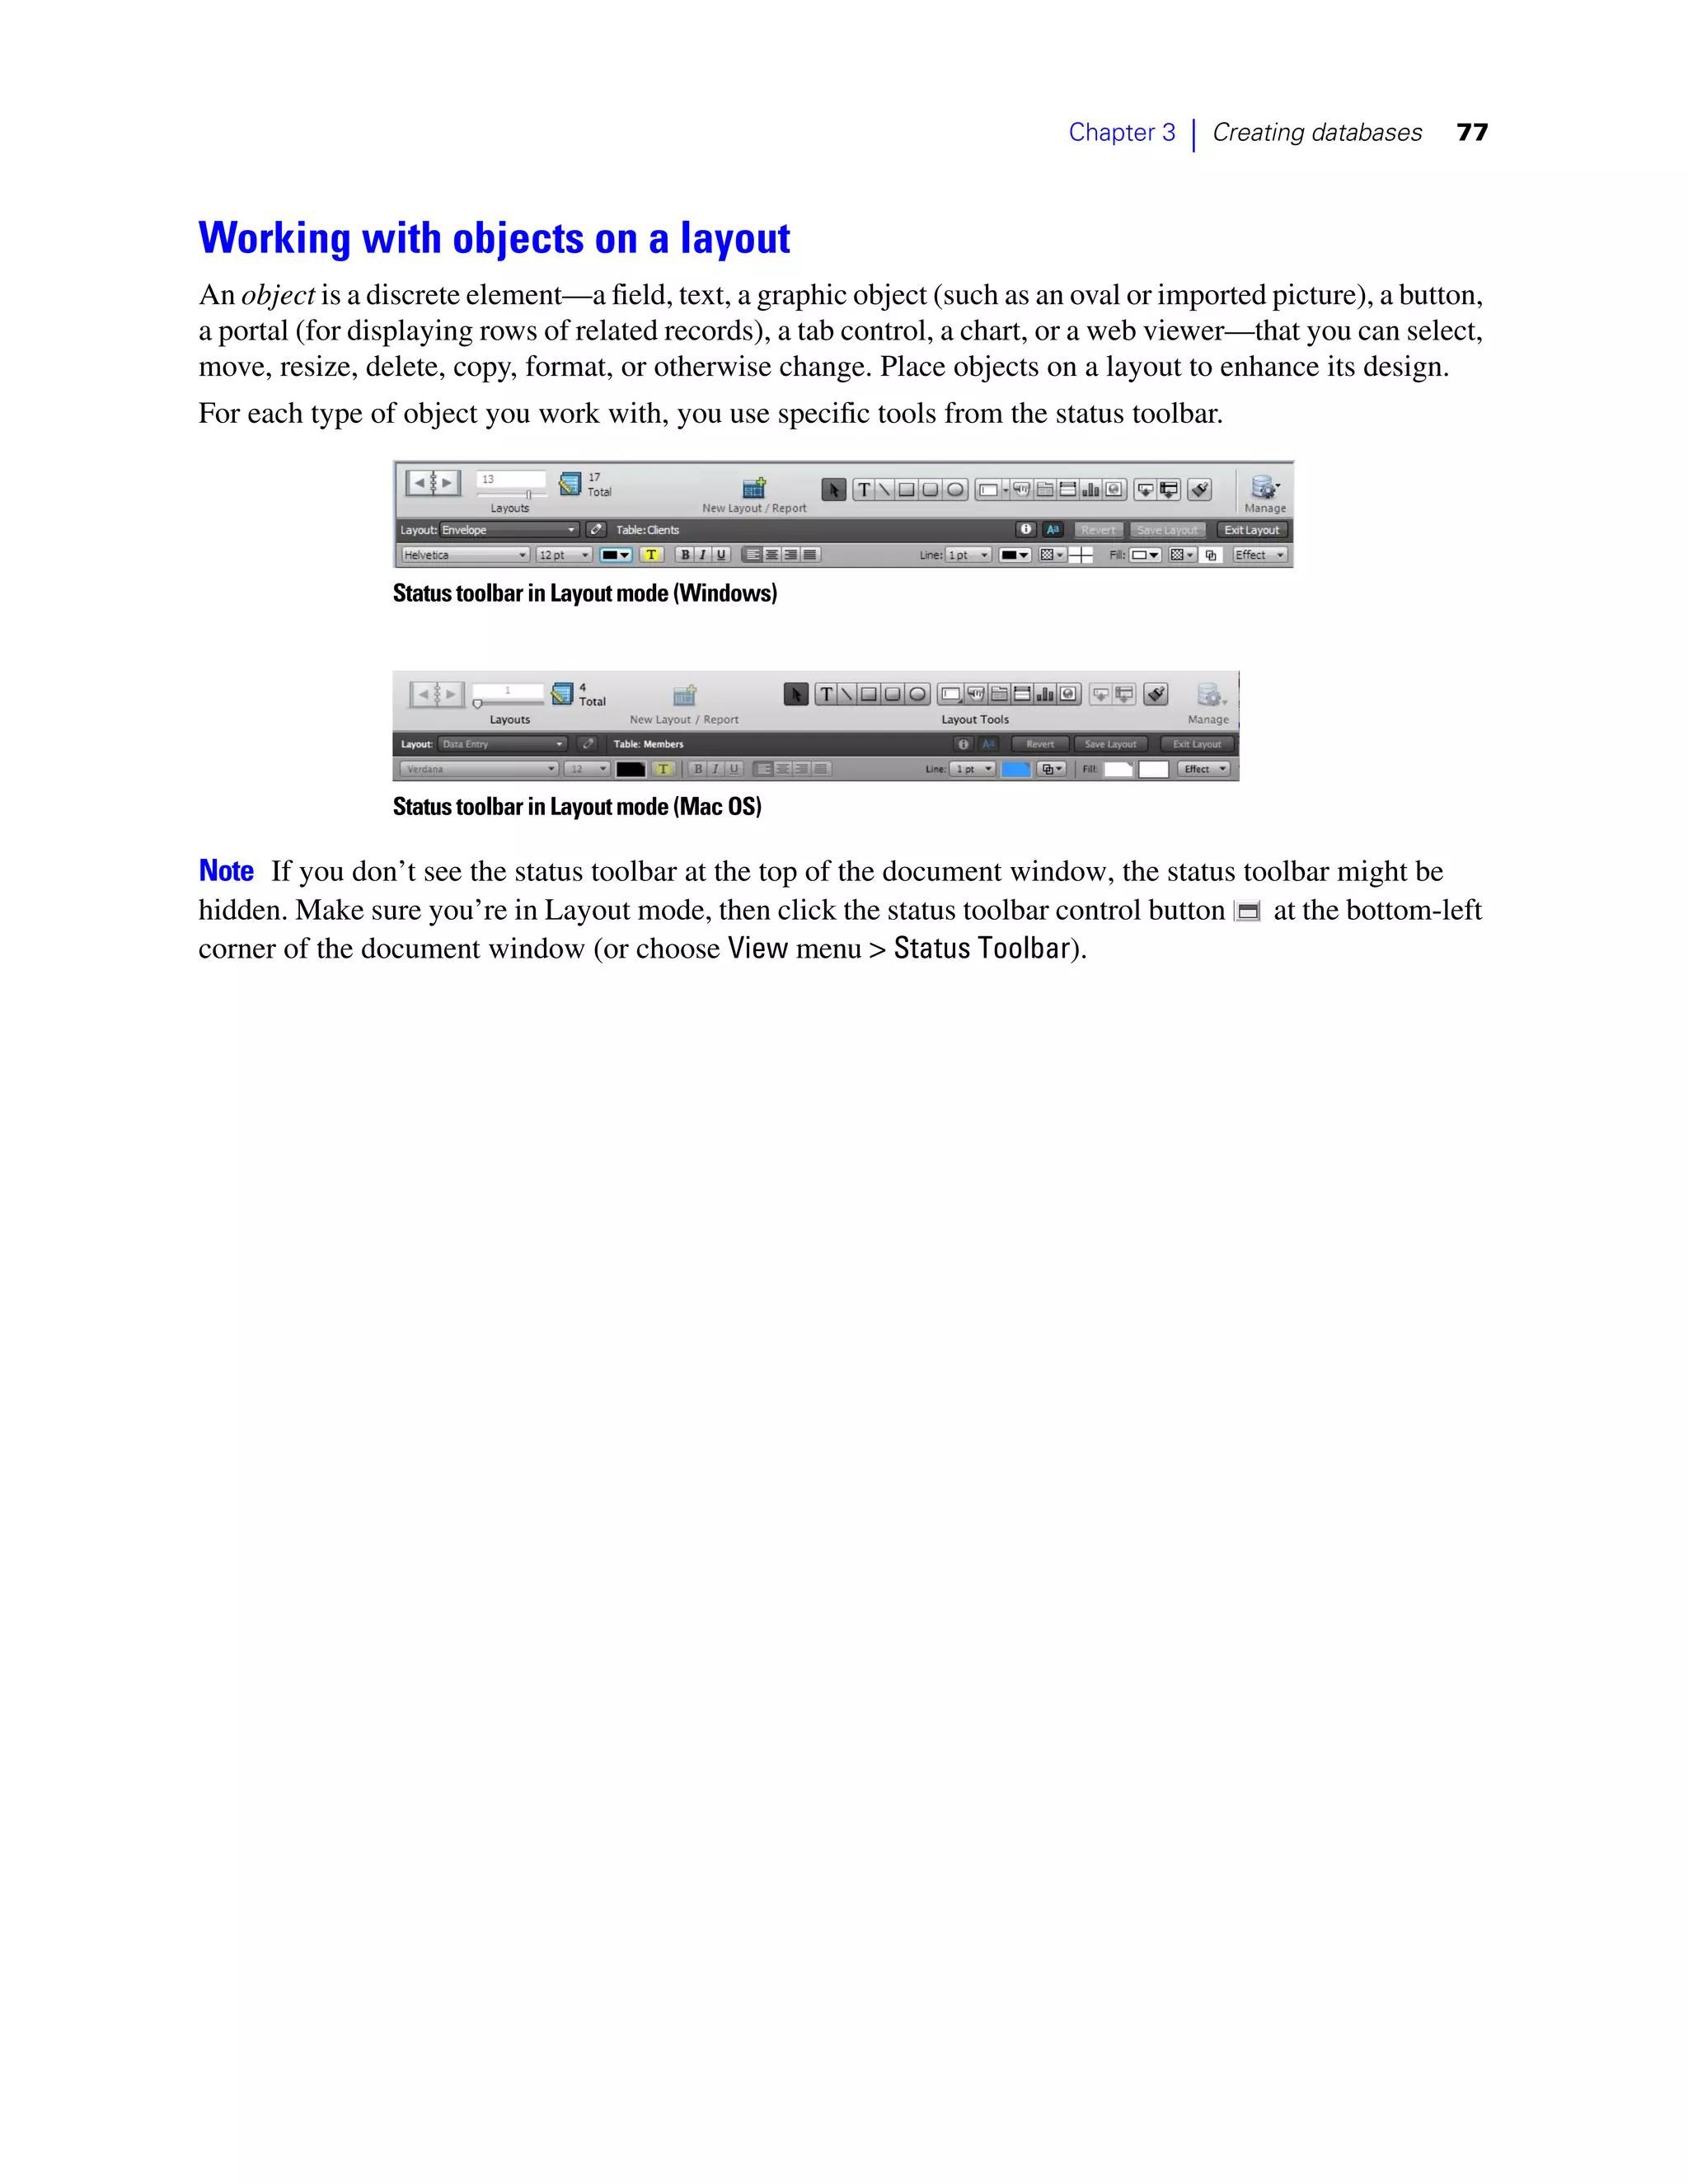
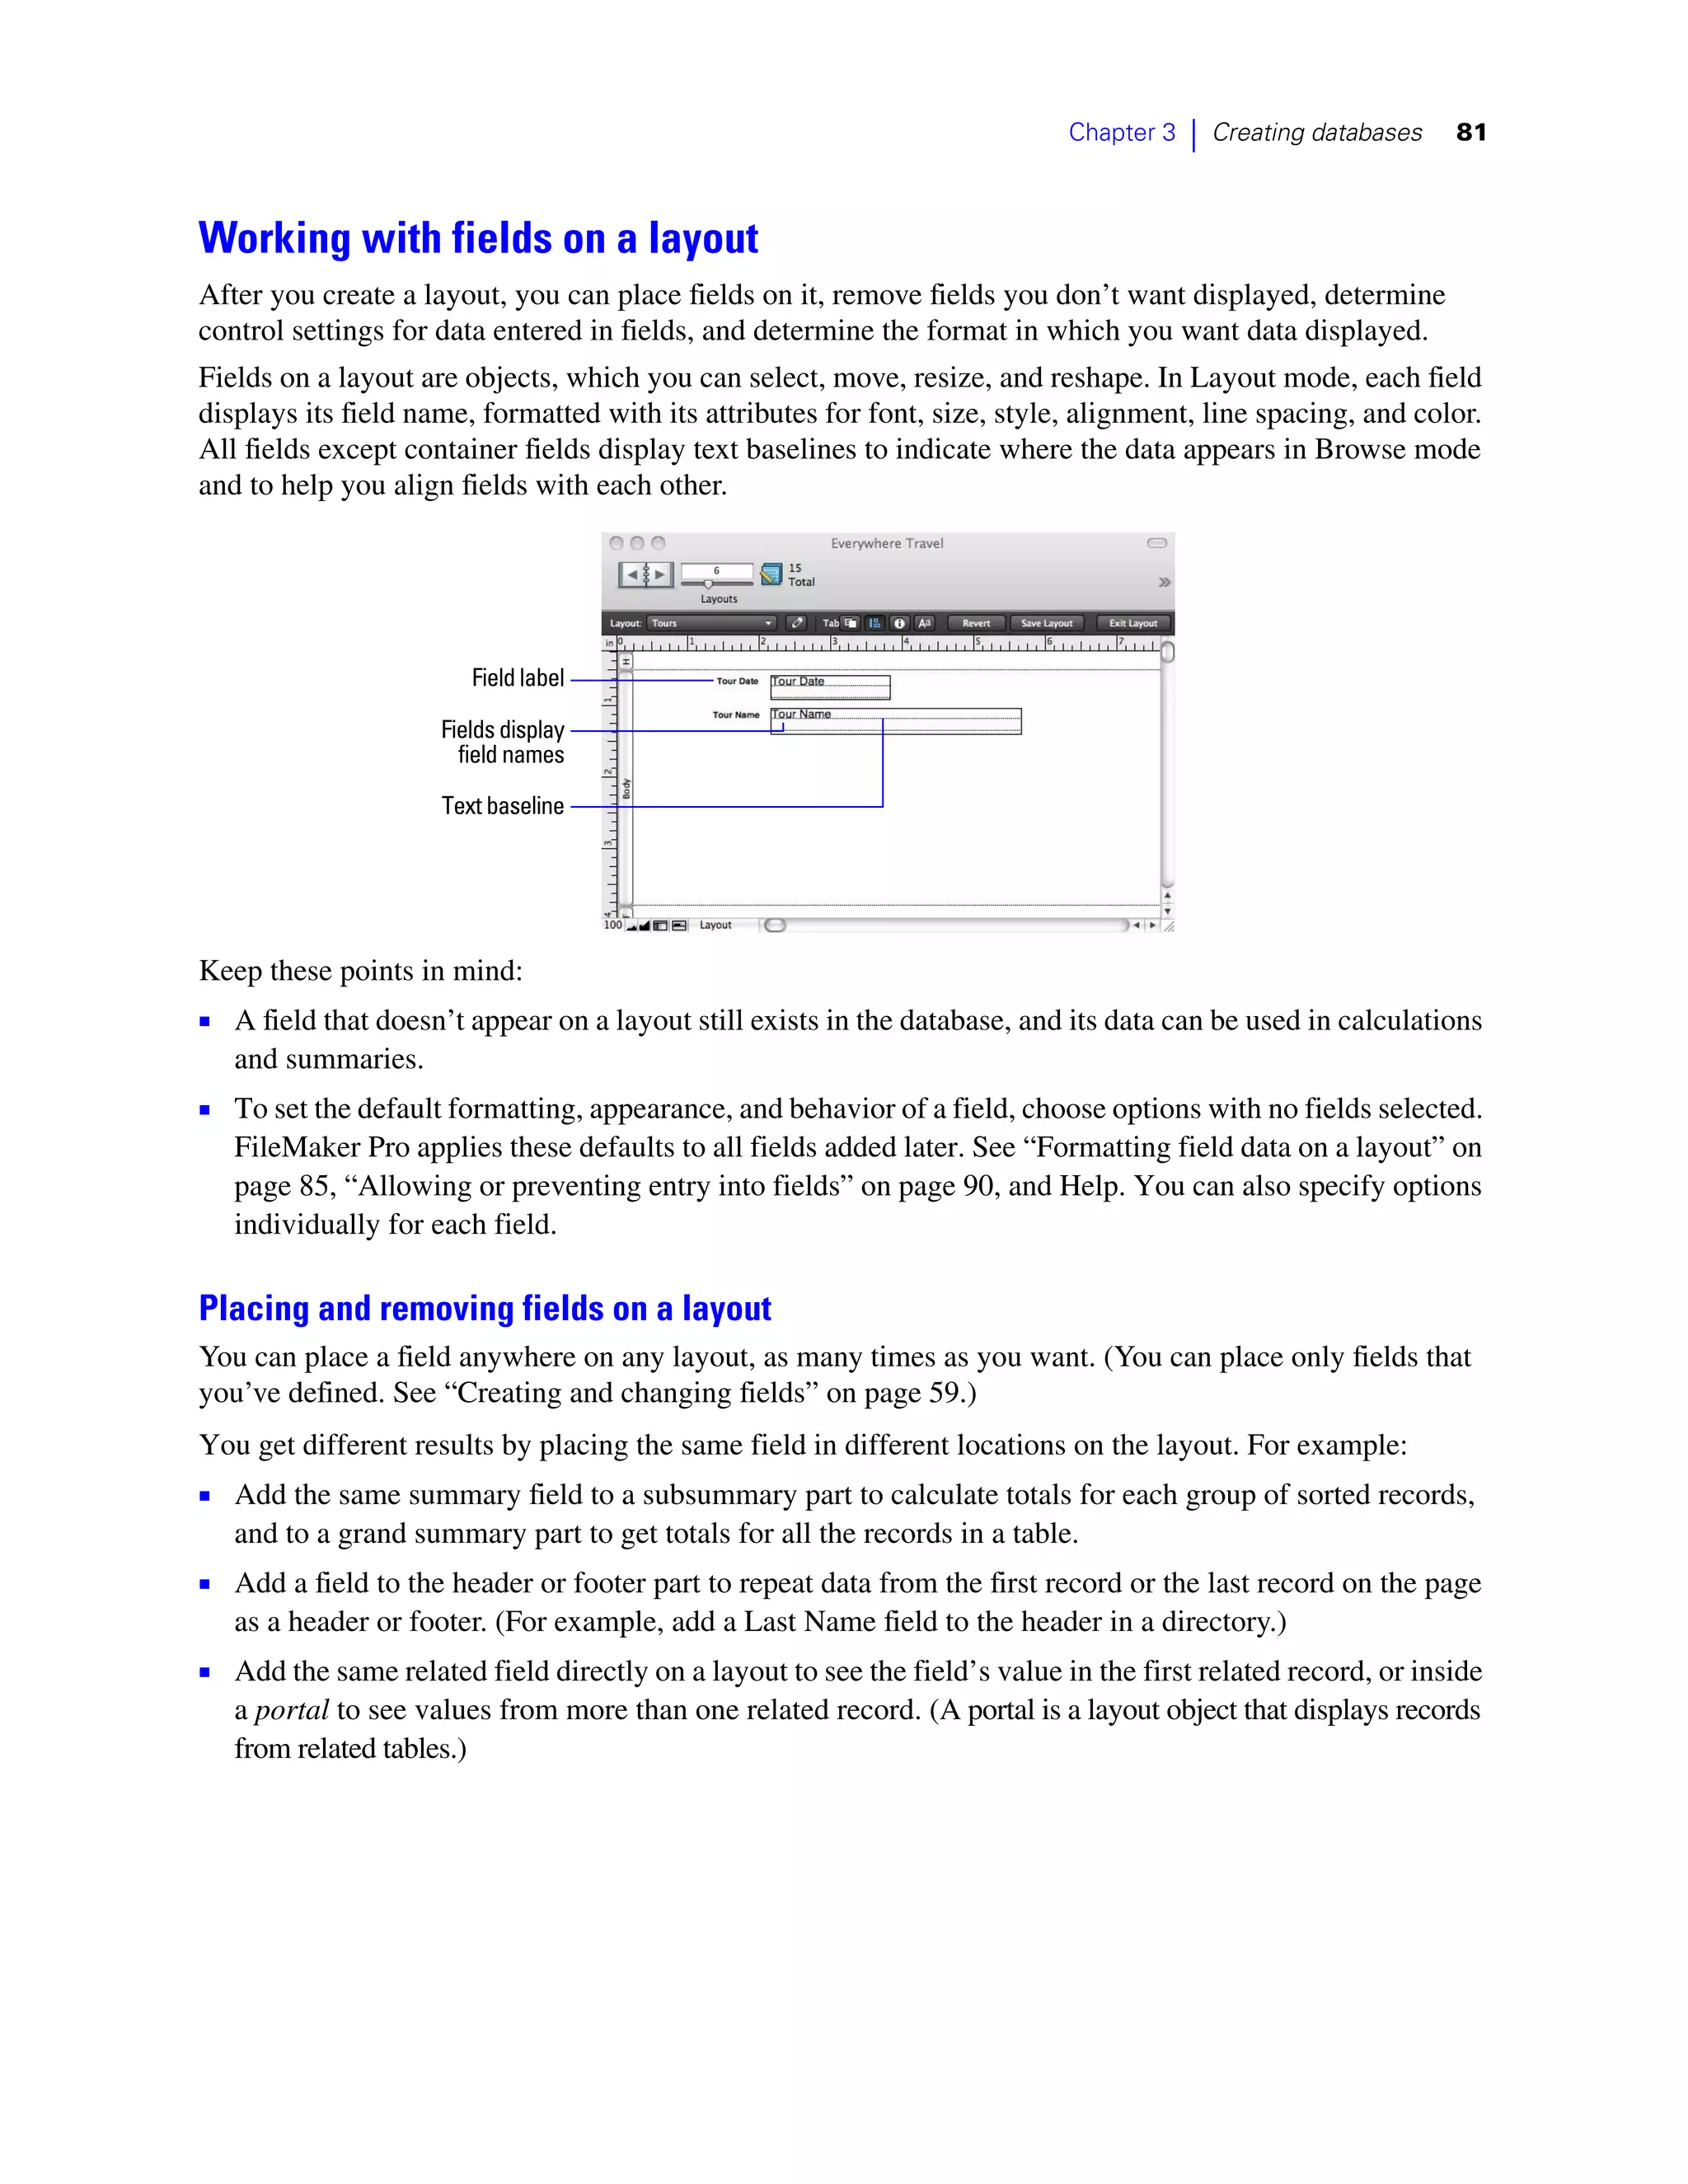
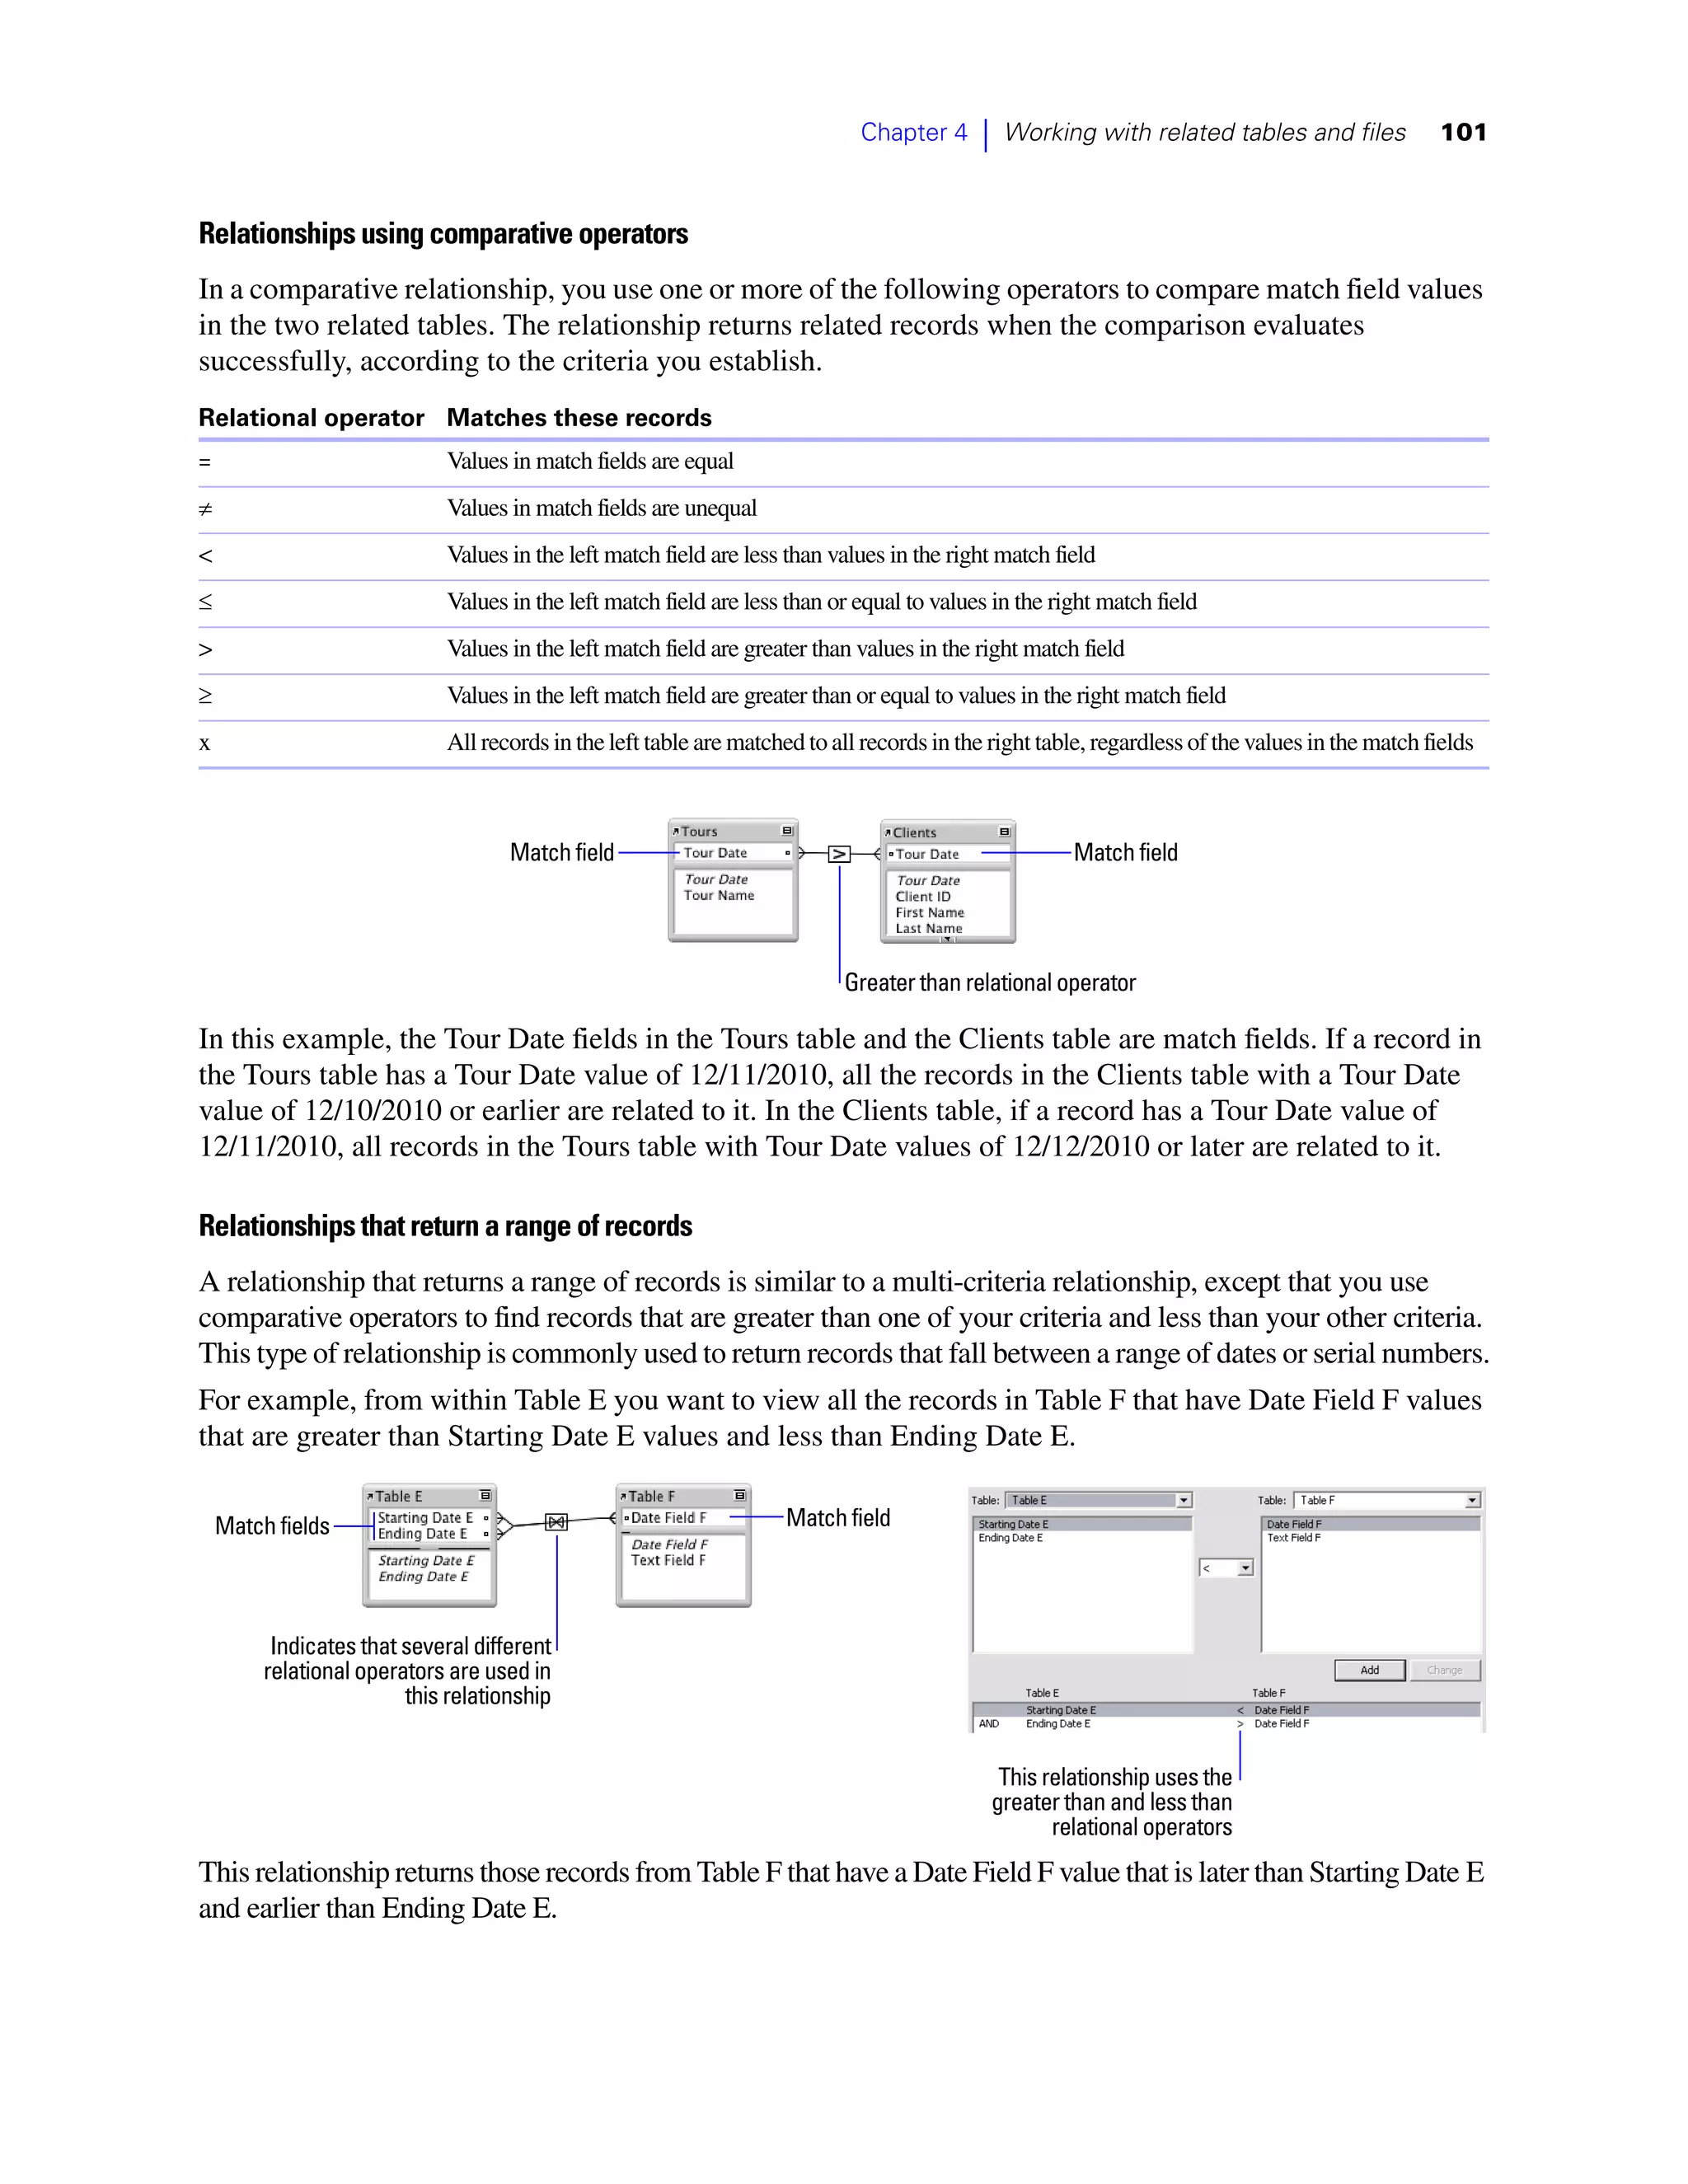
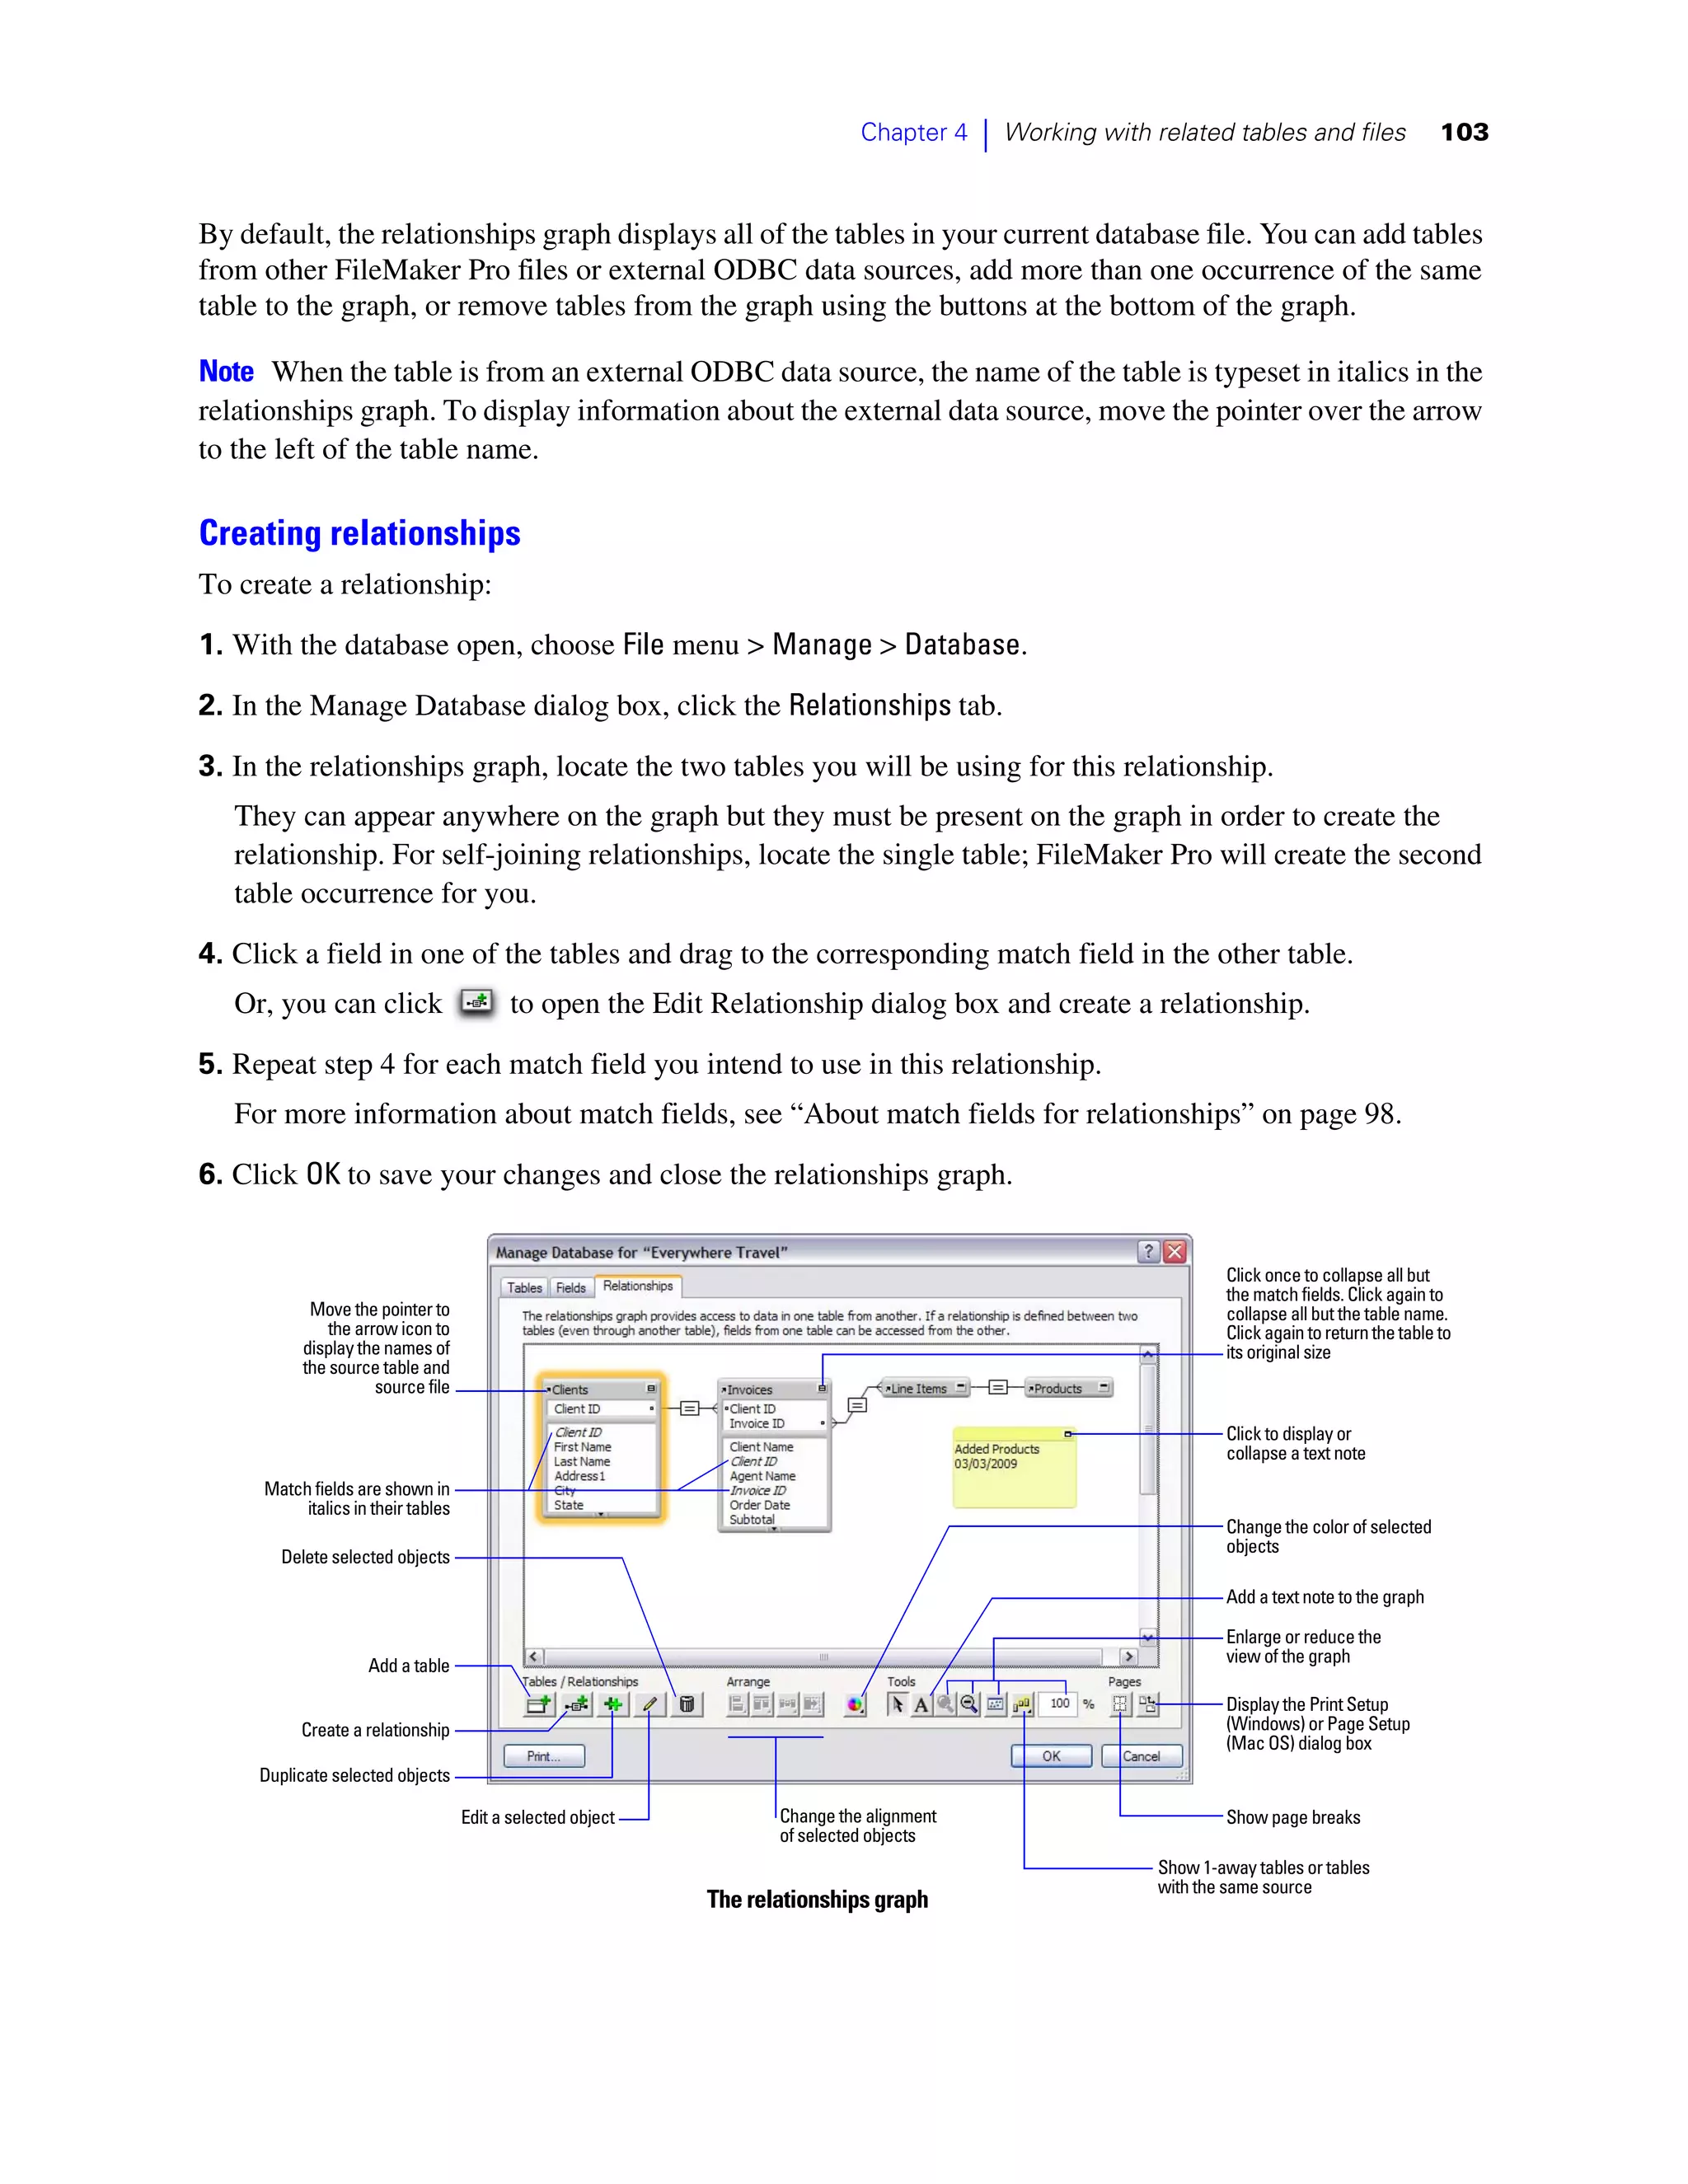
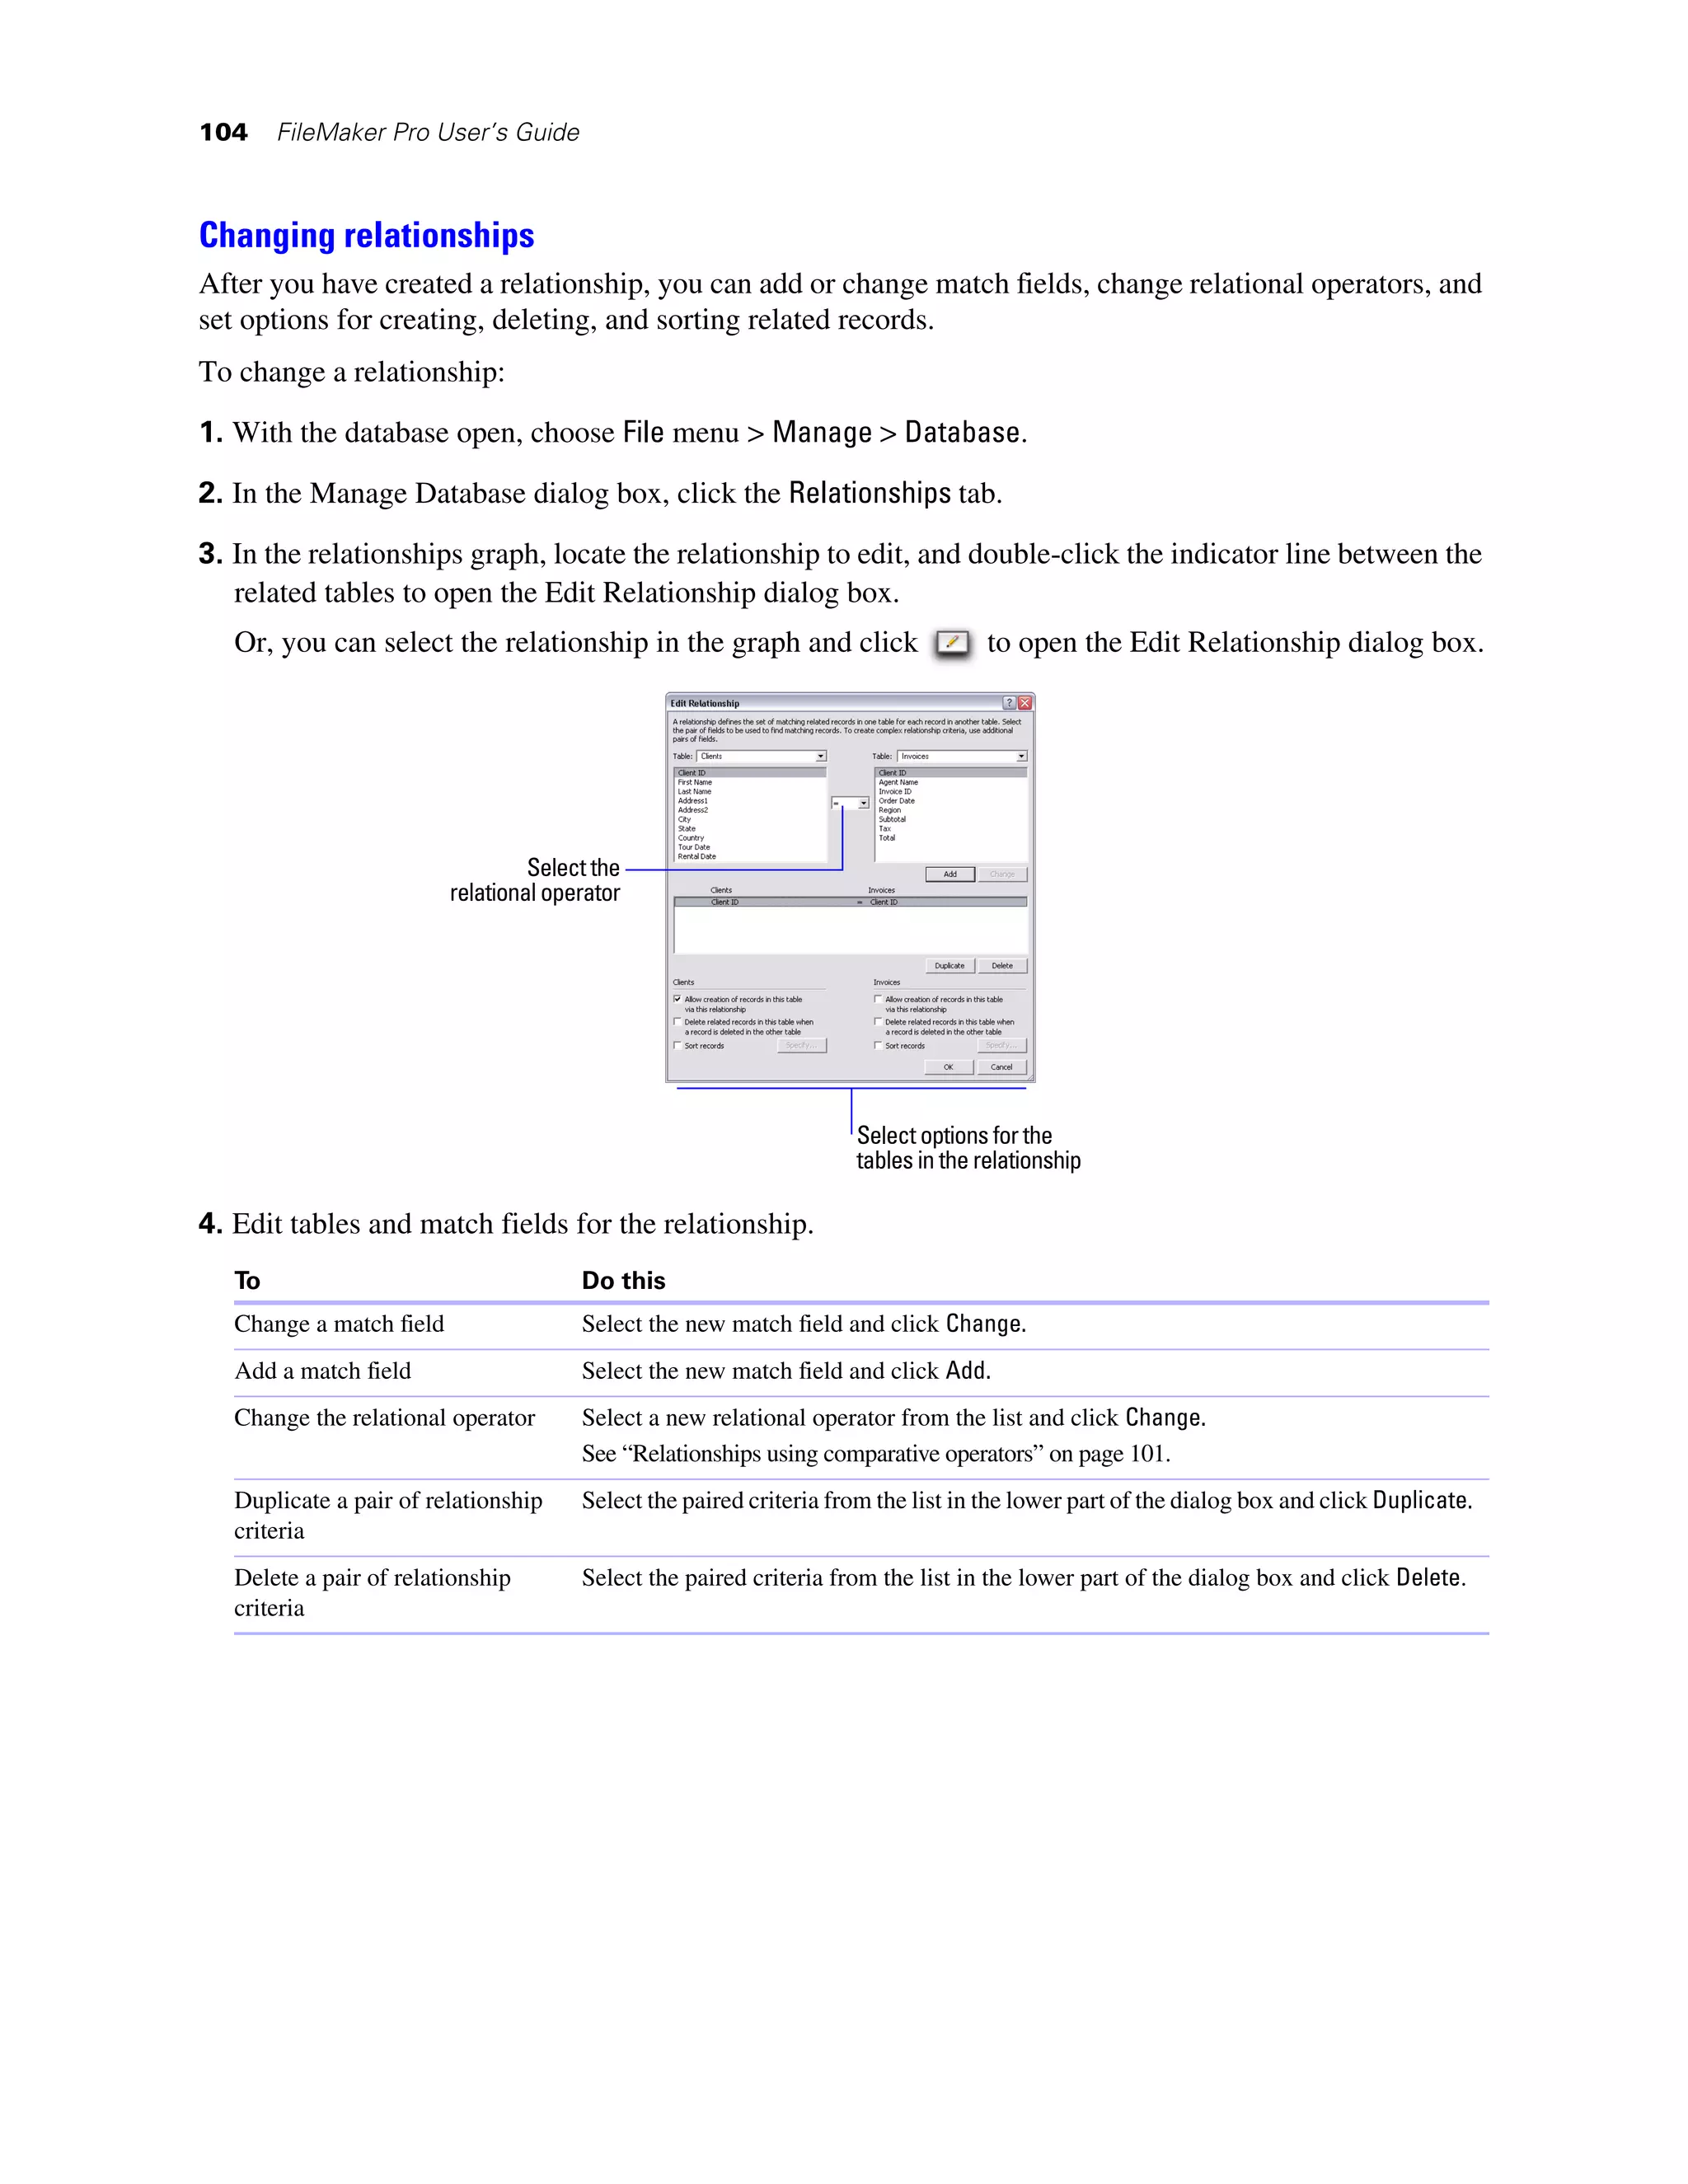
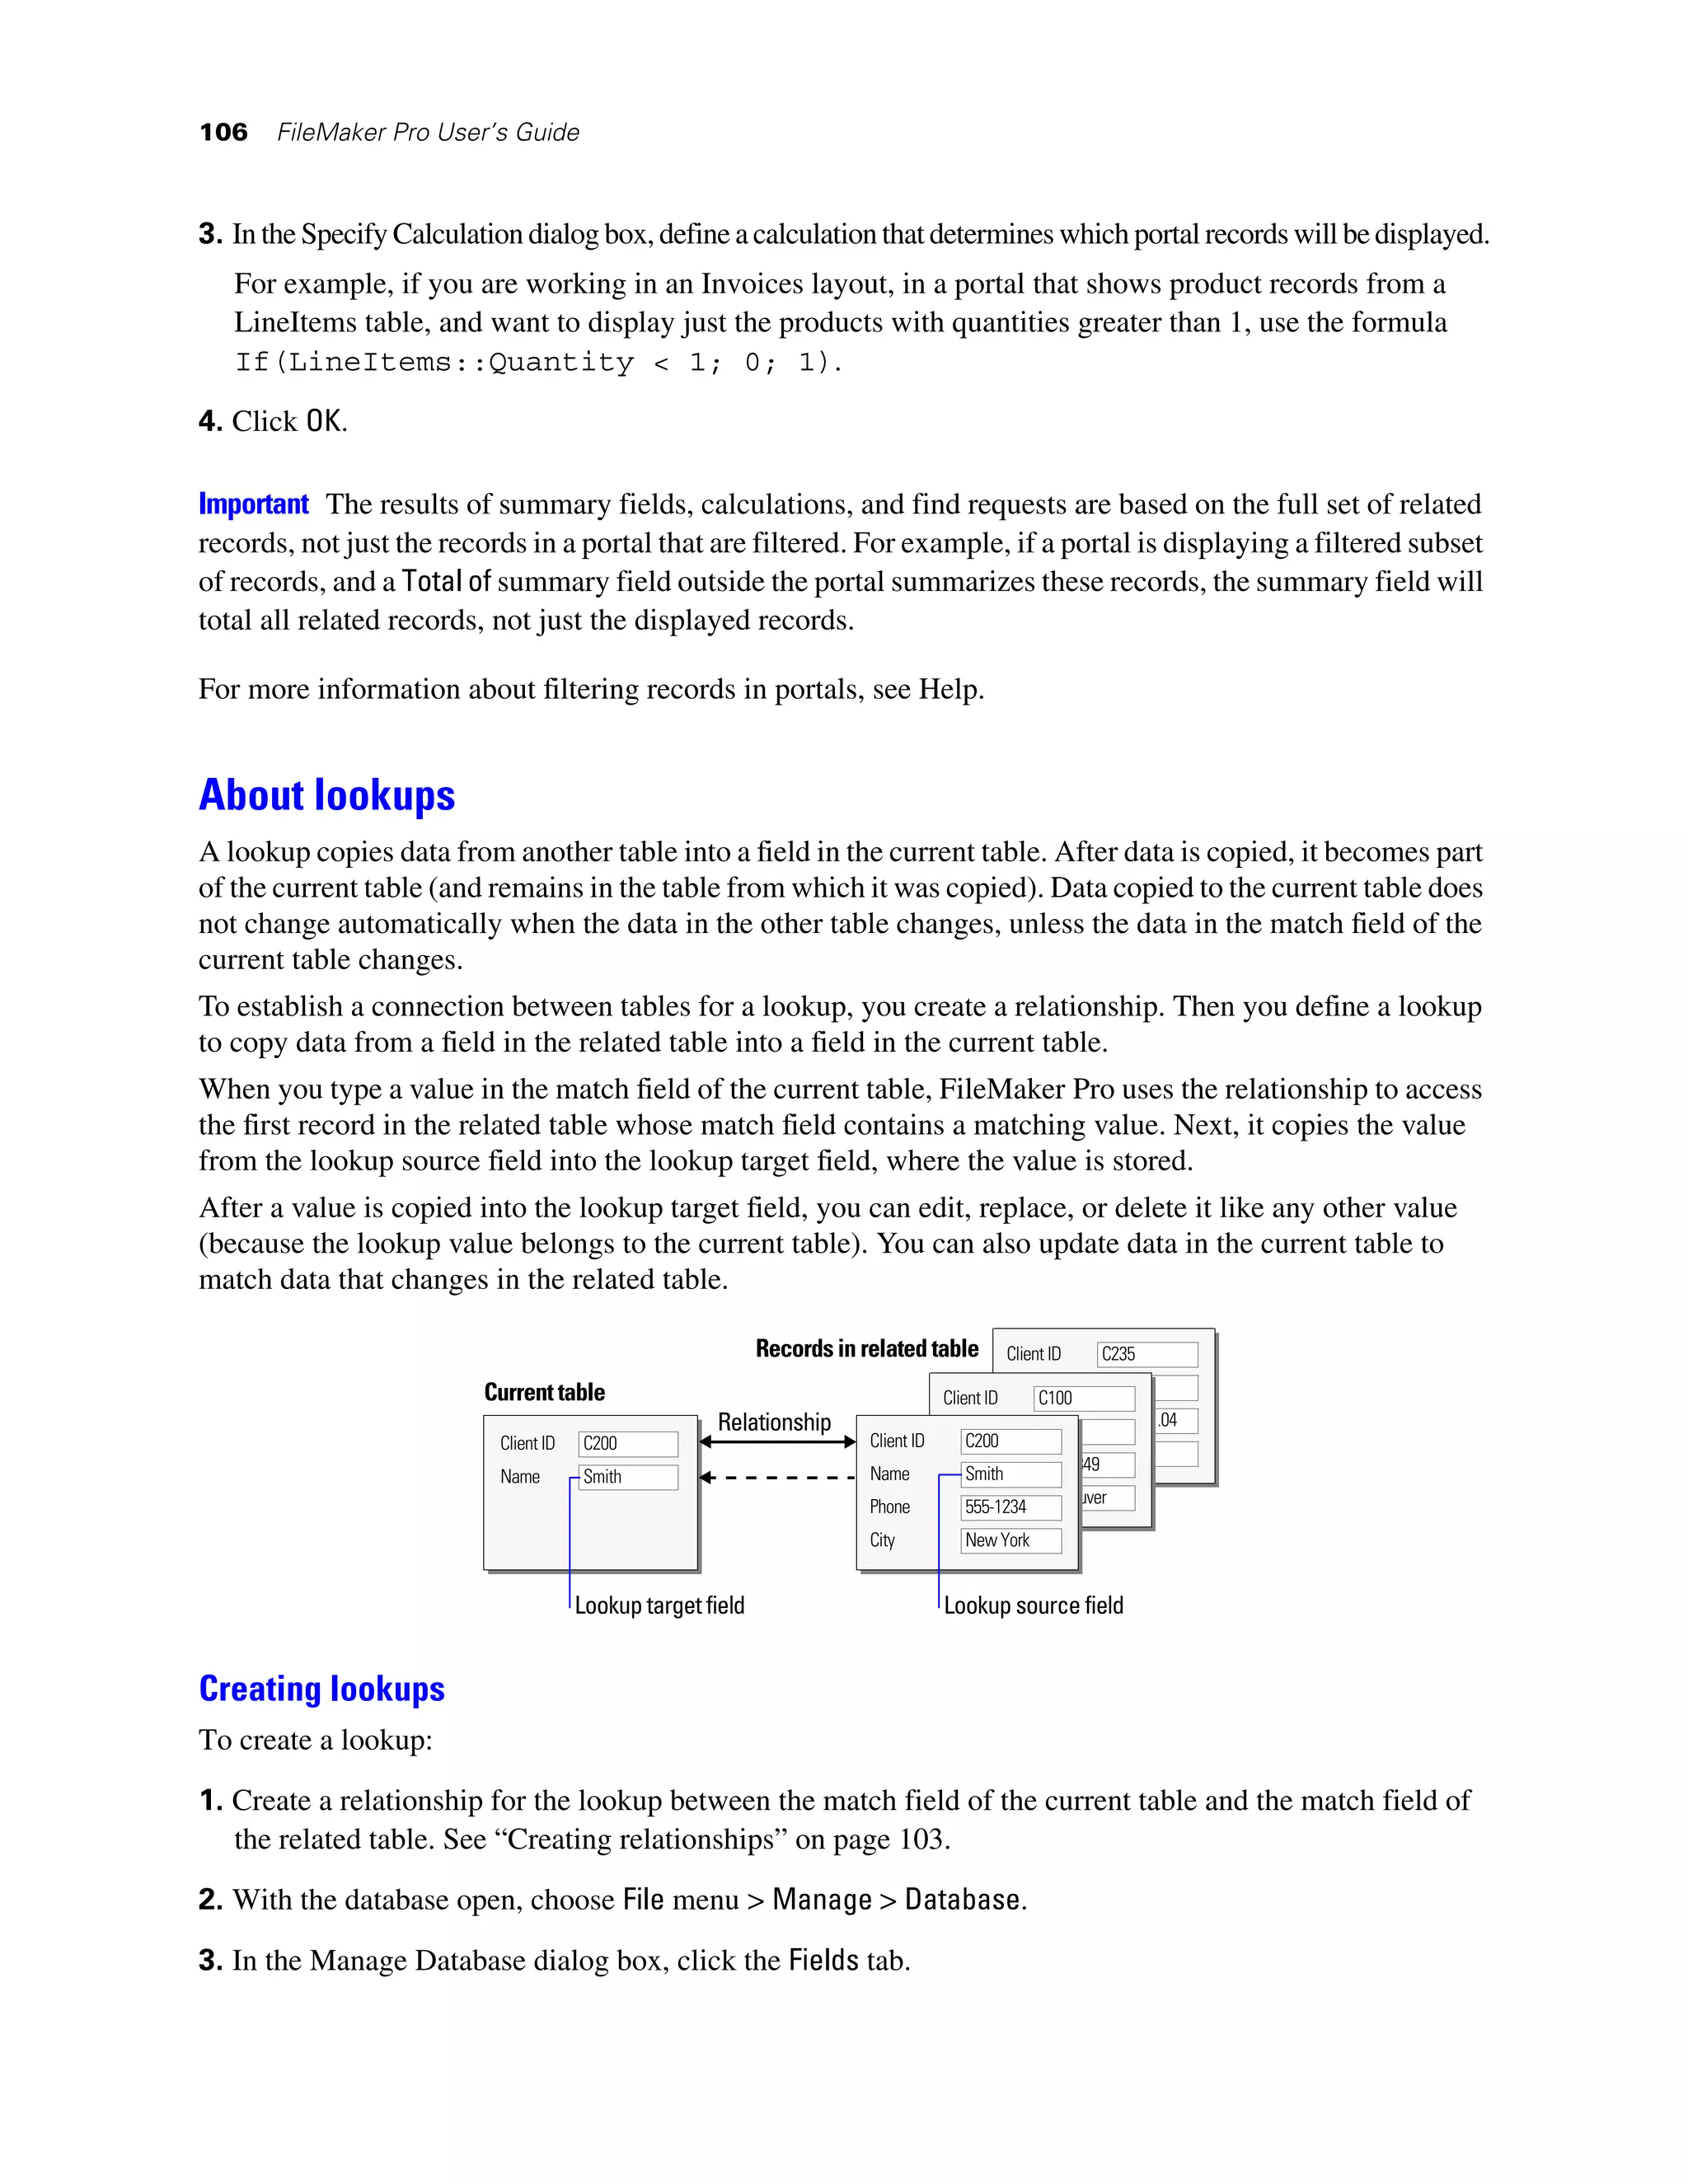
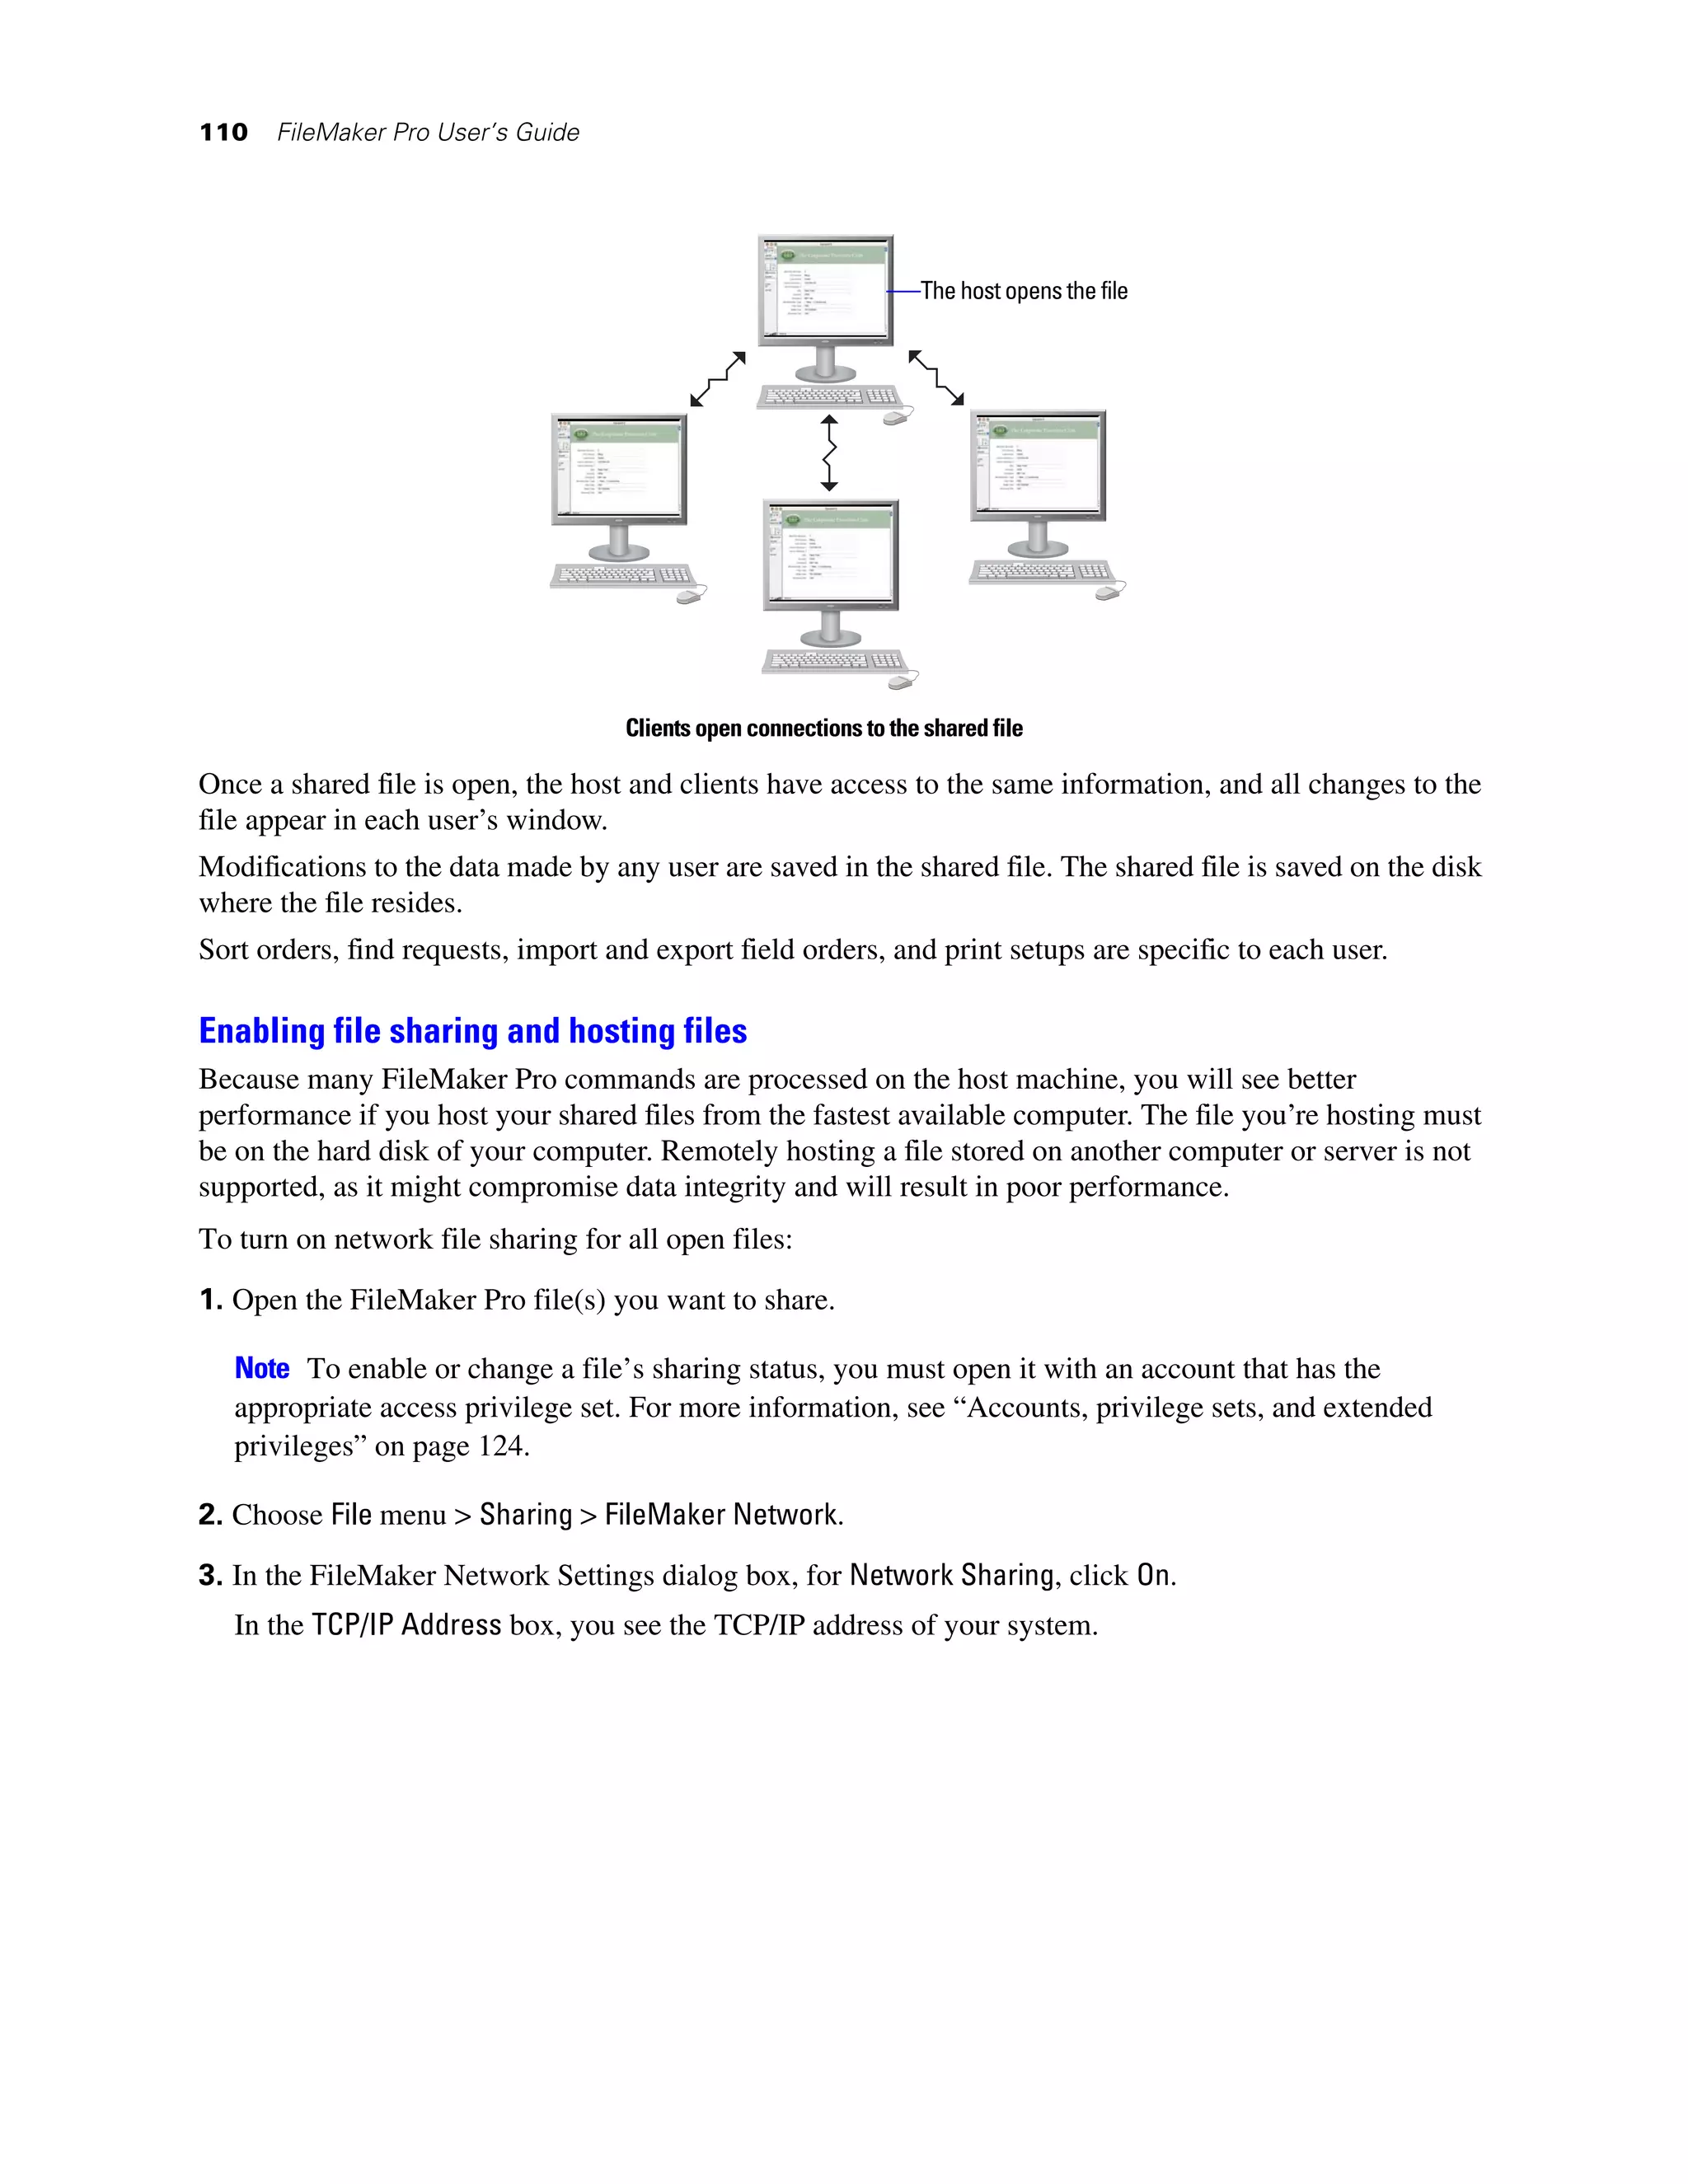
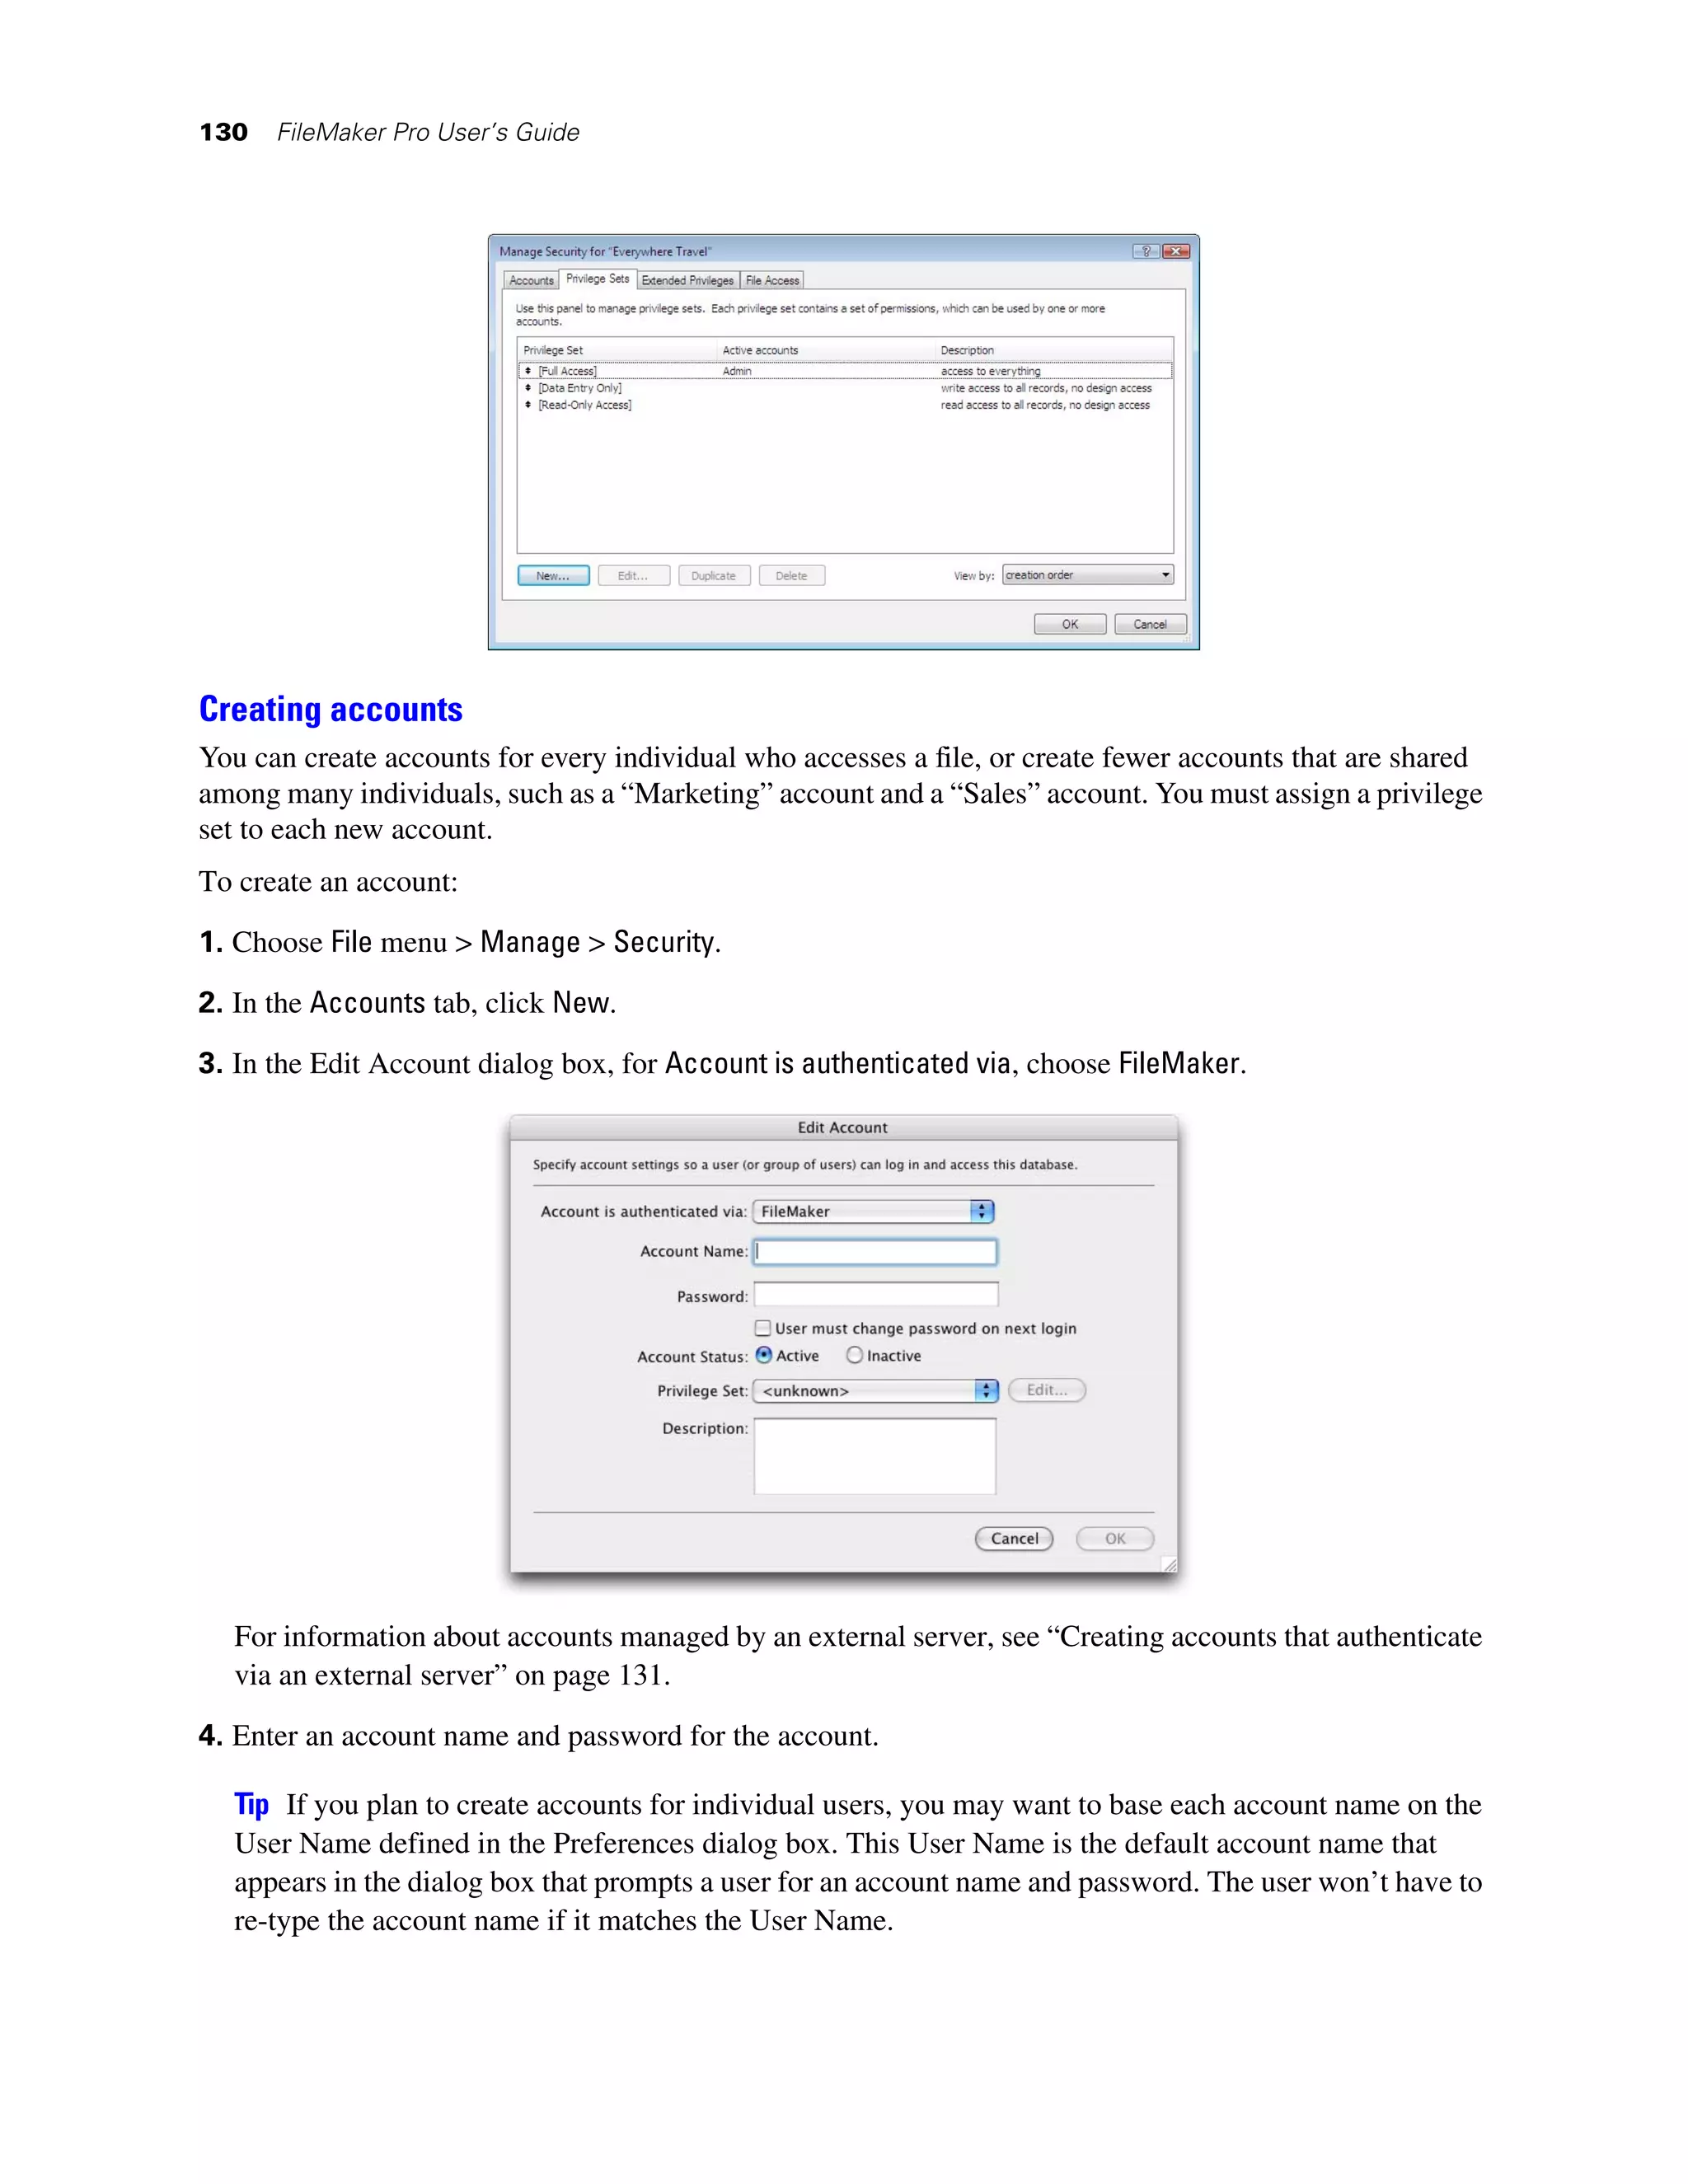
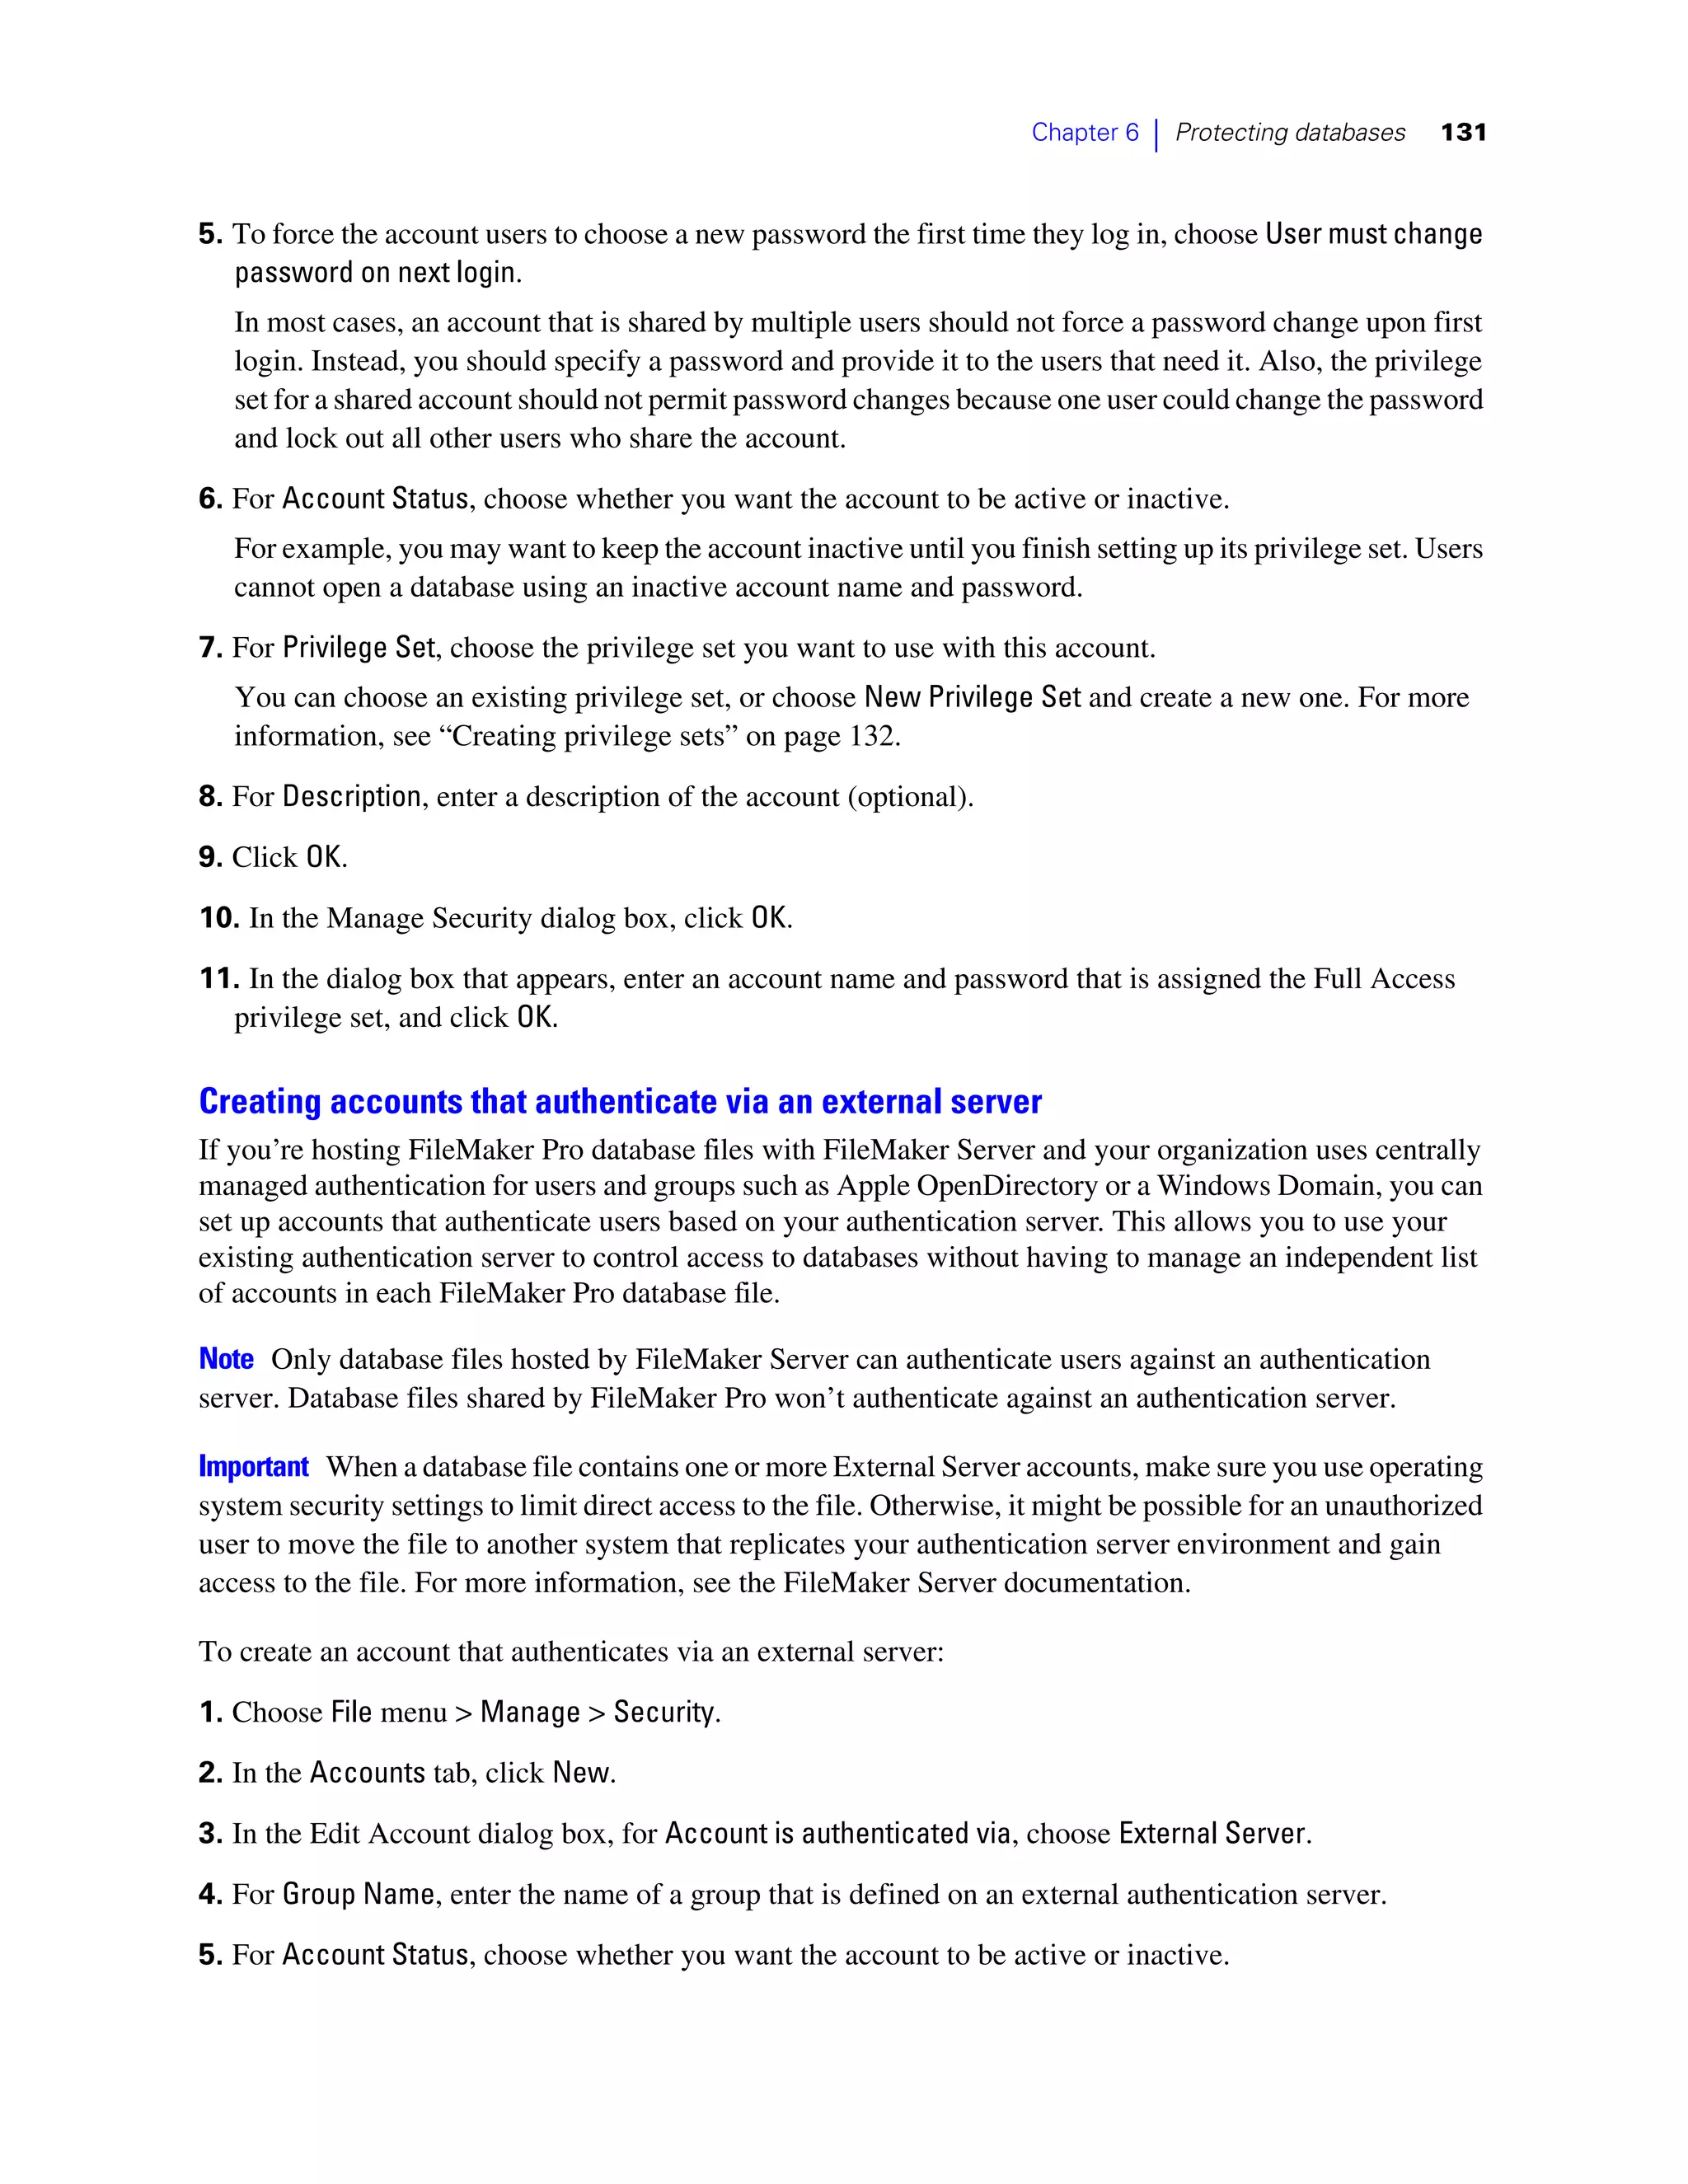
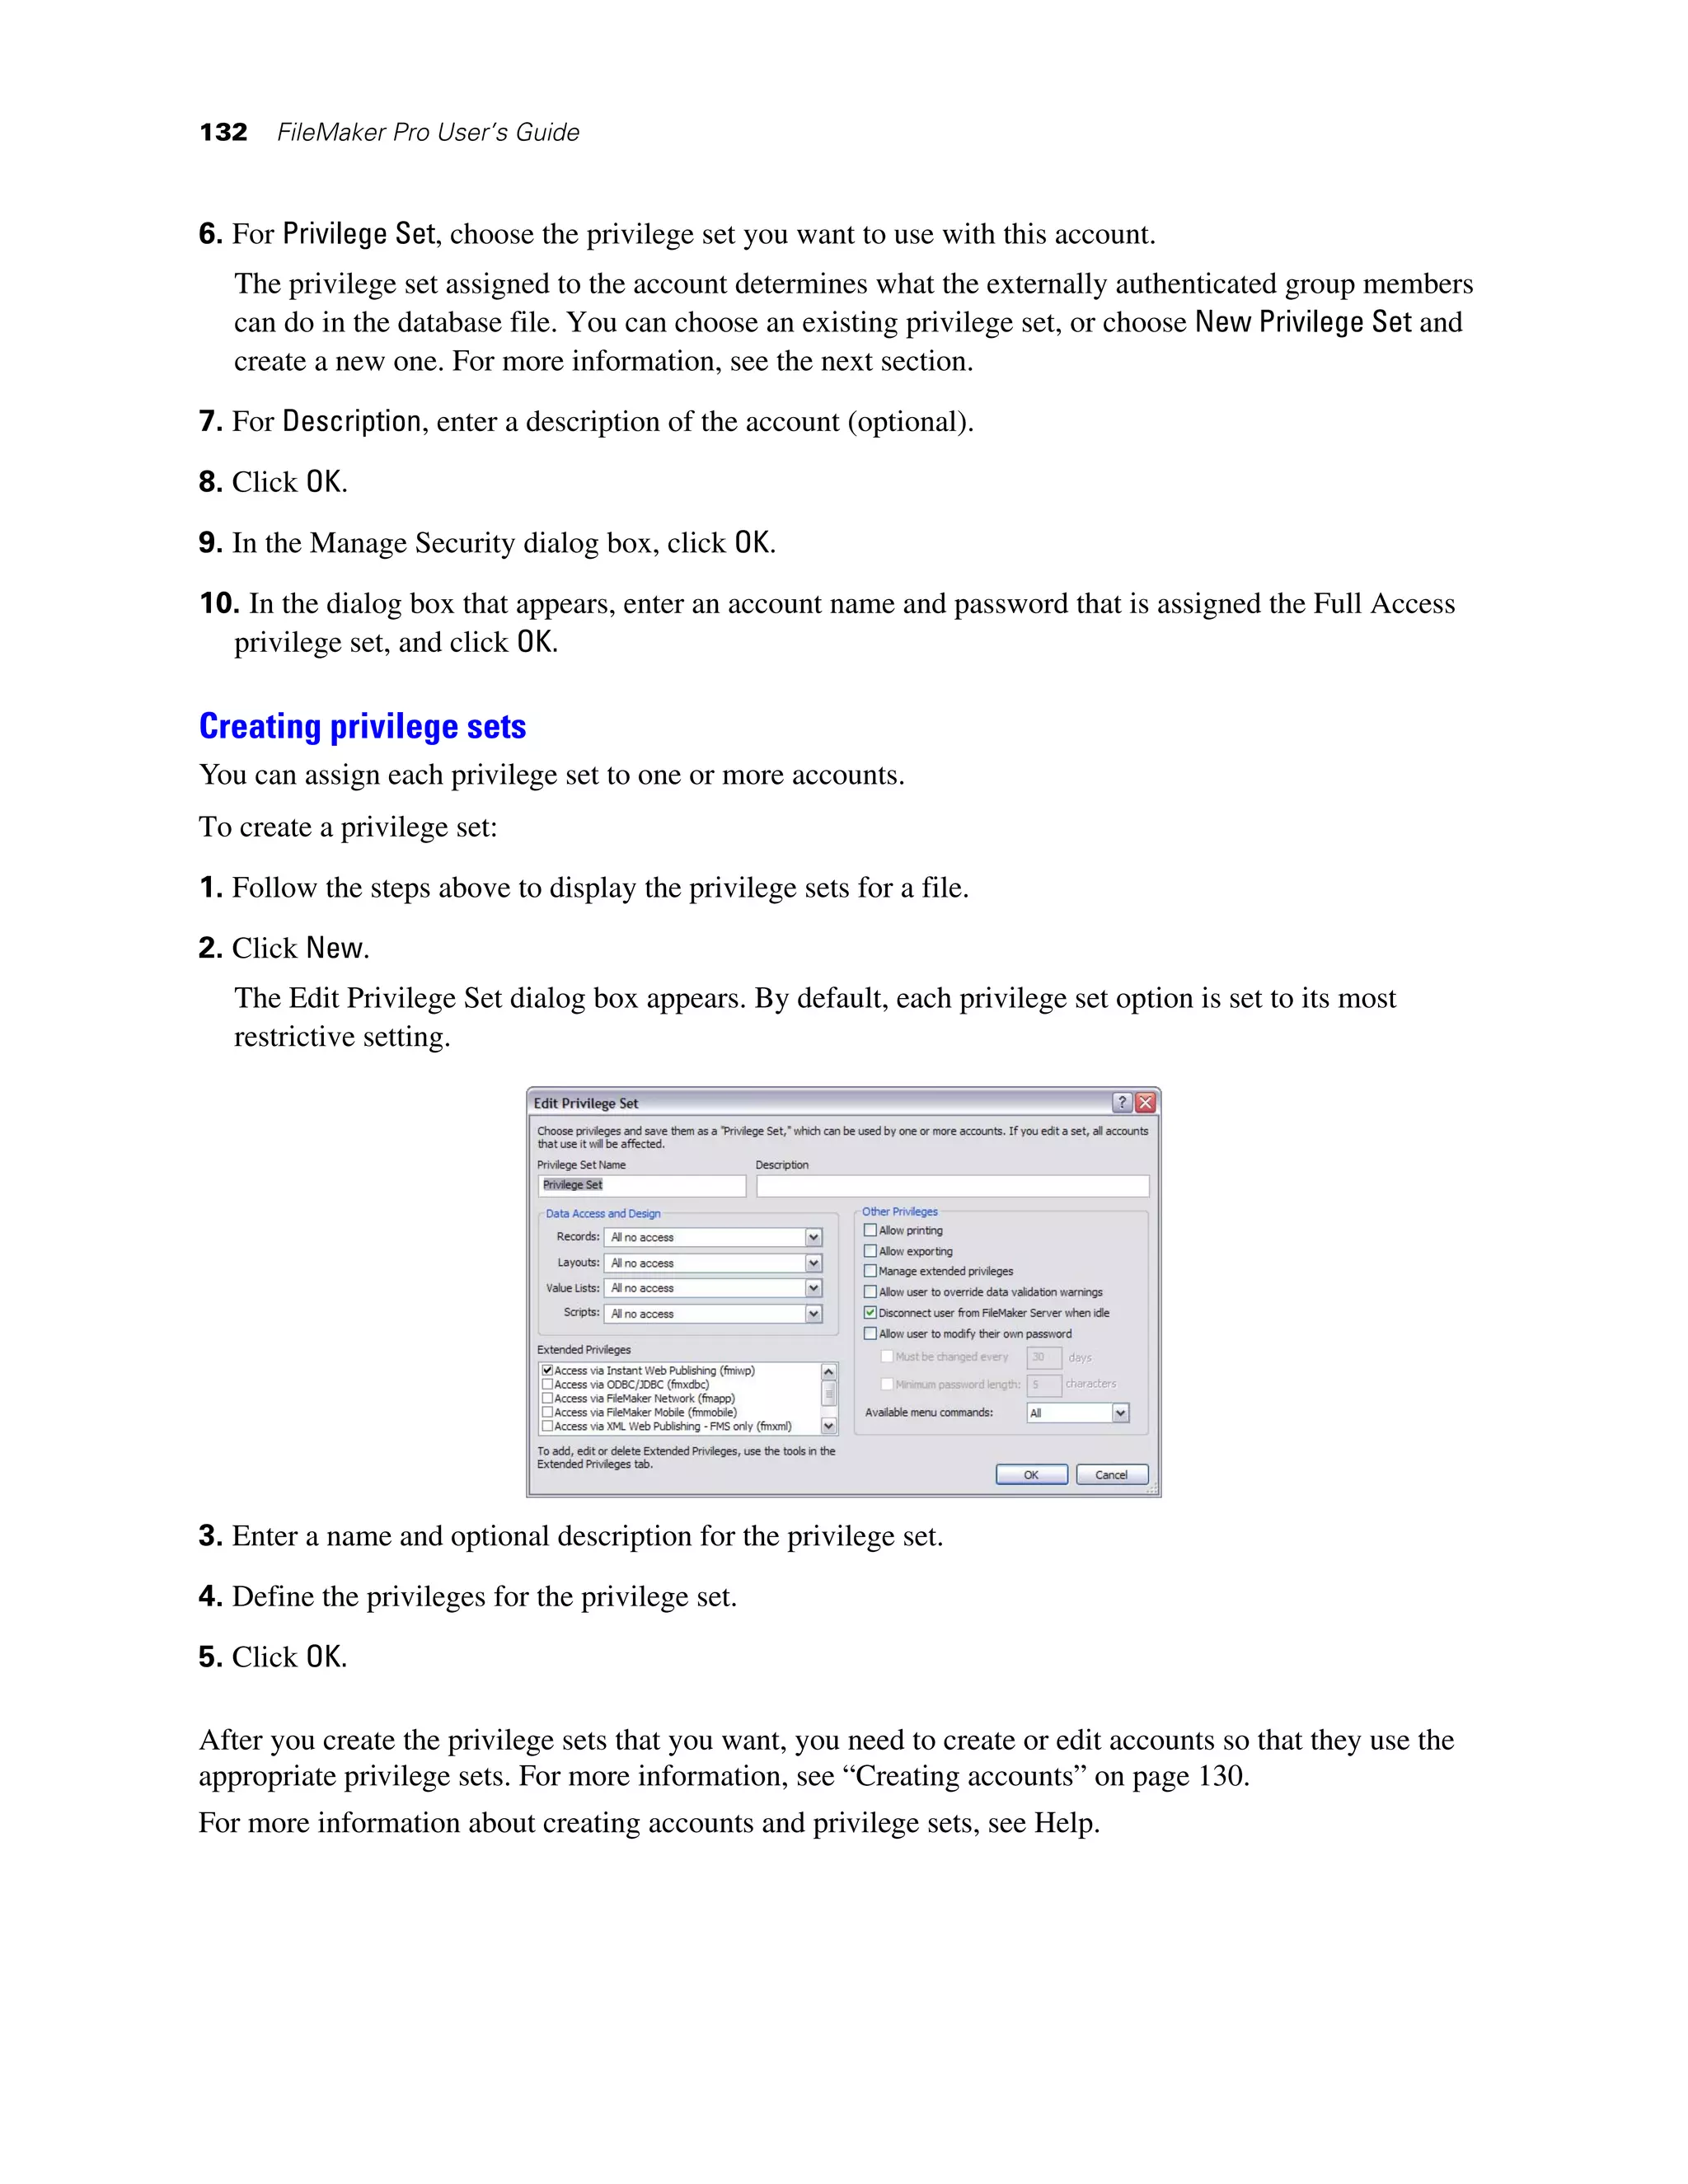
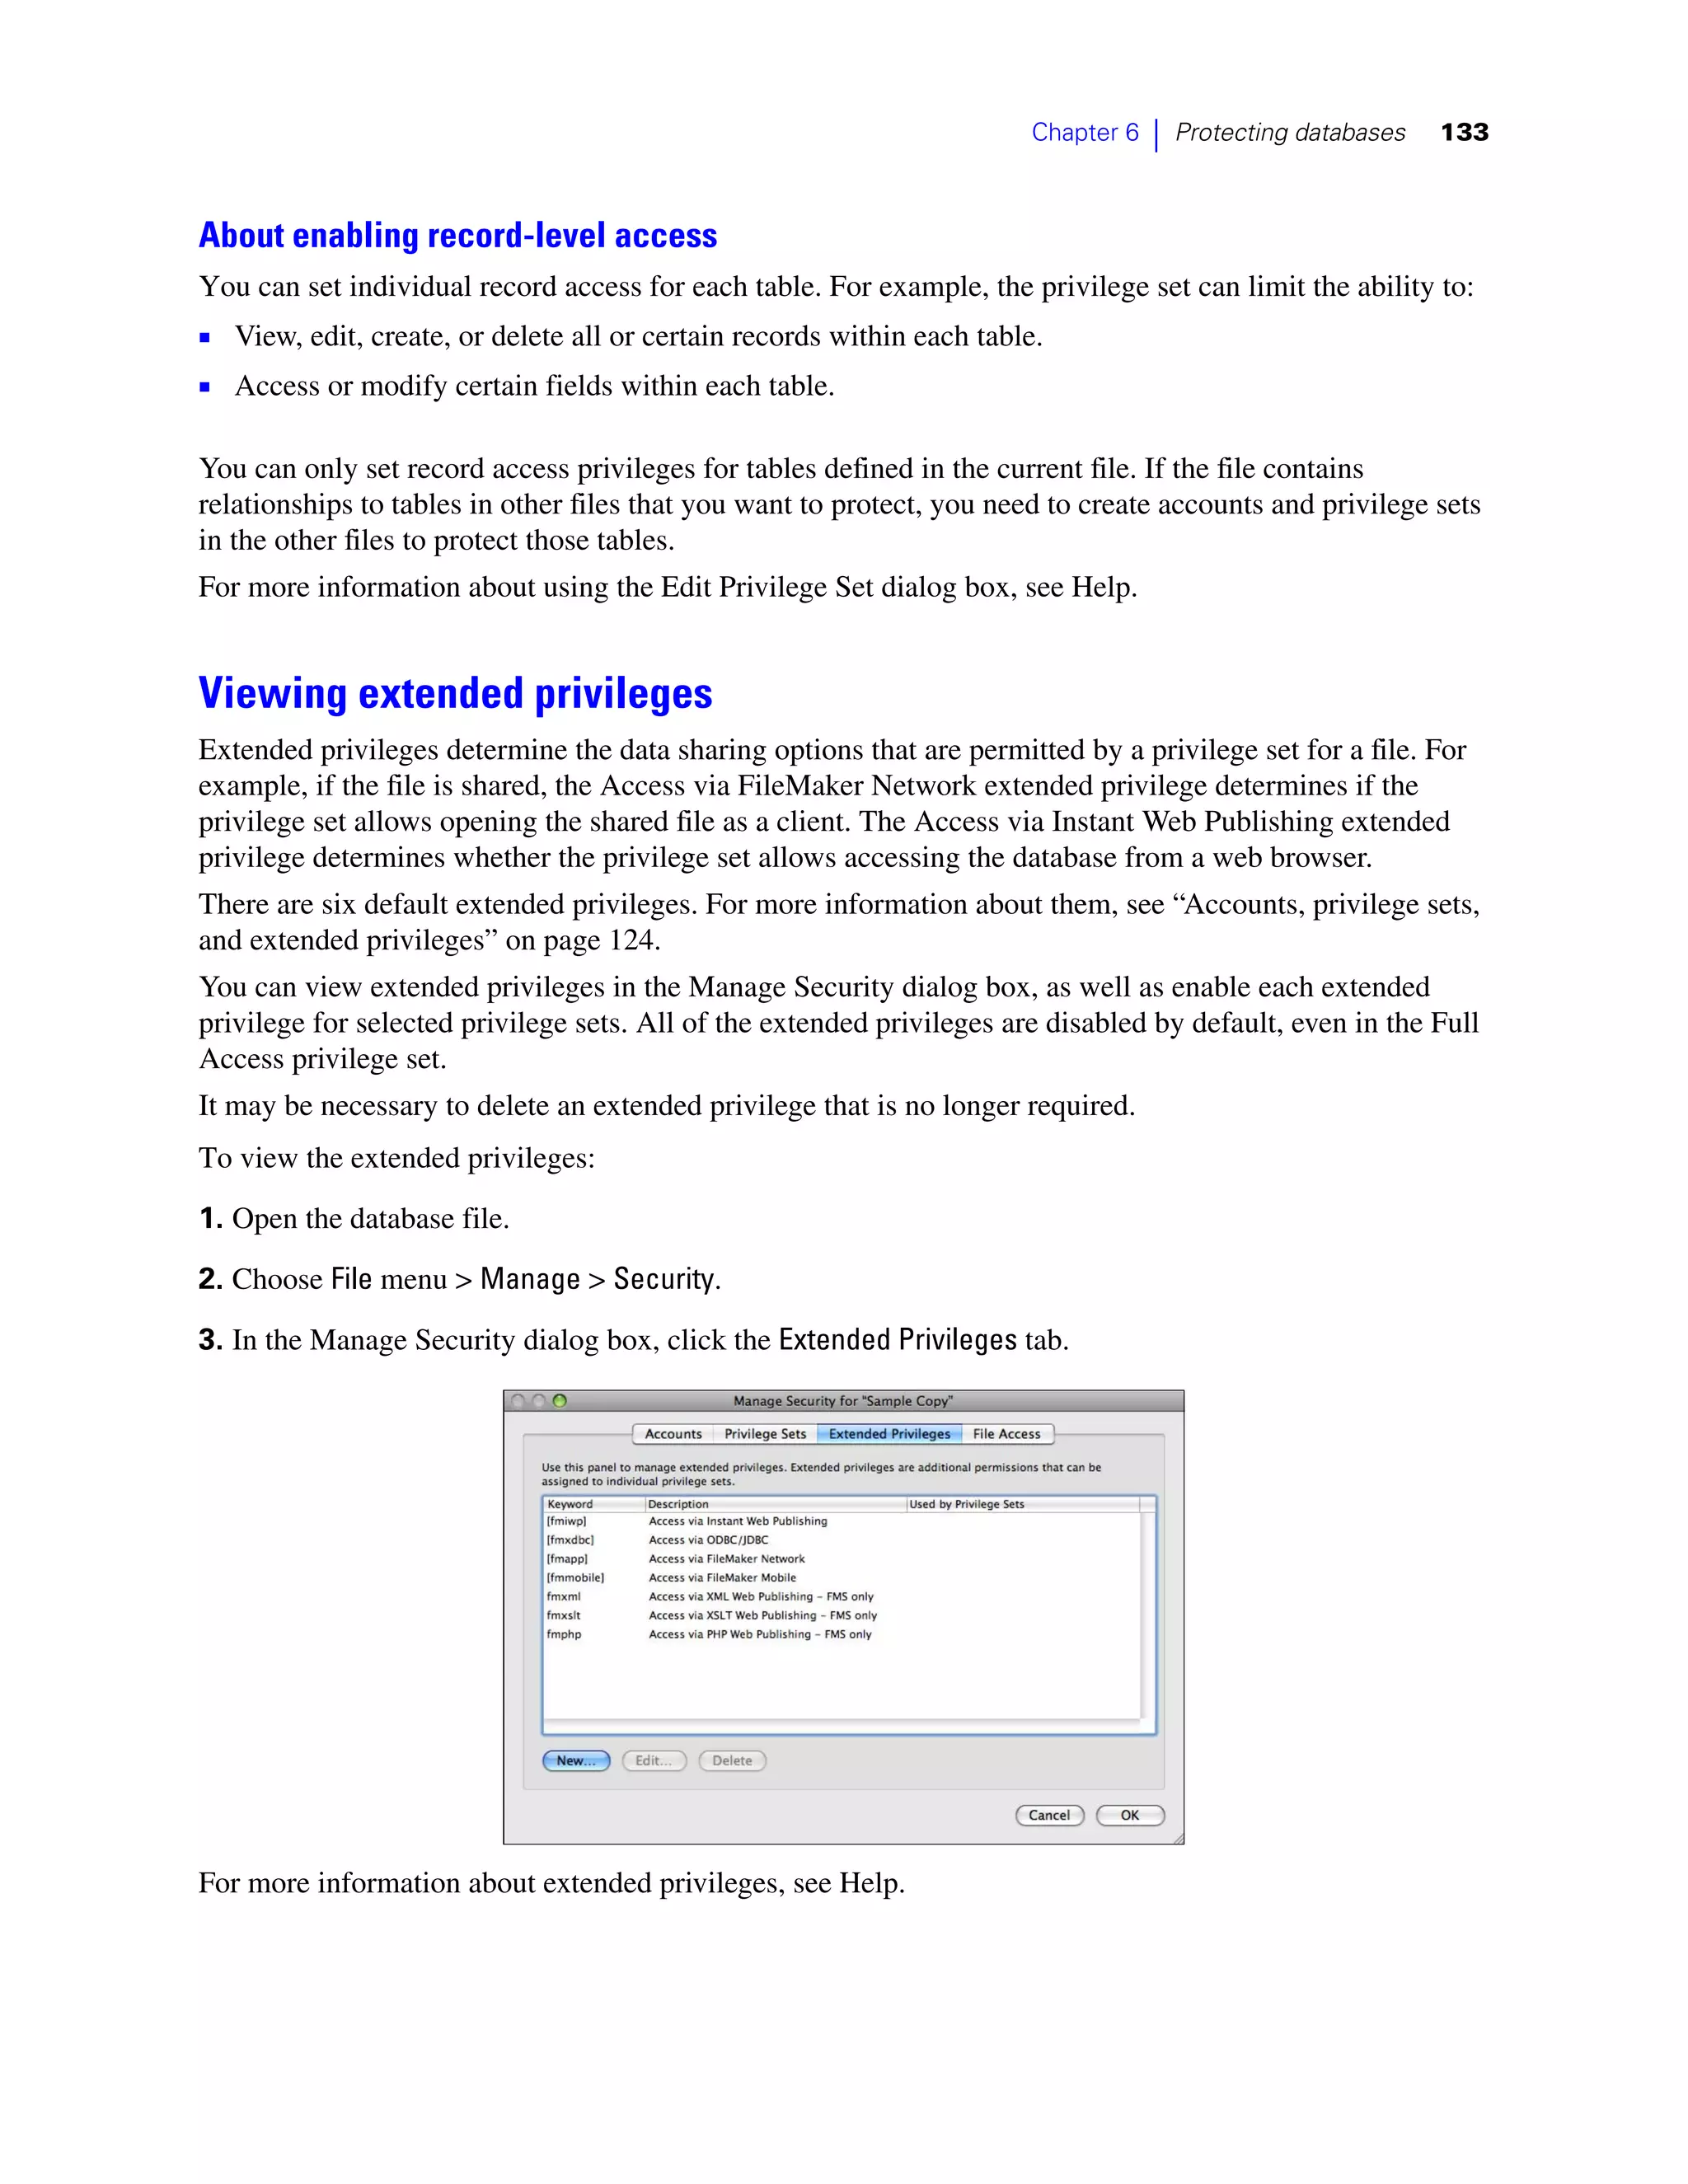
This document provides an overview of FileMaker Pro:
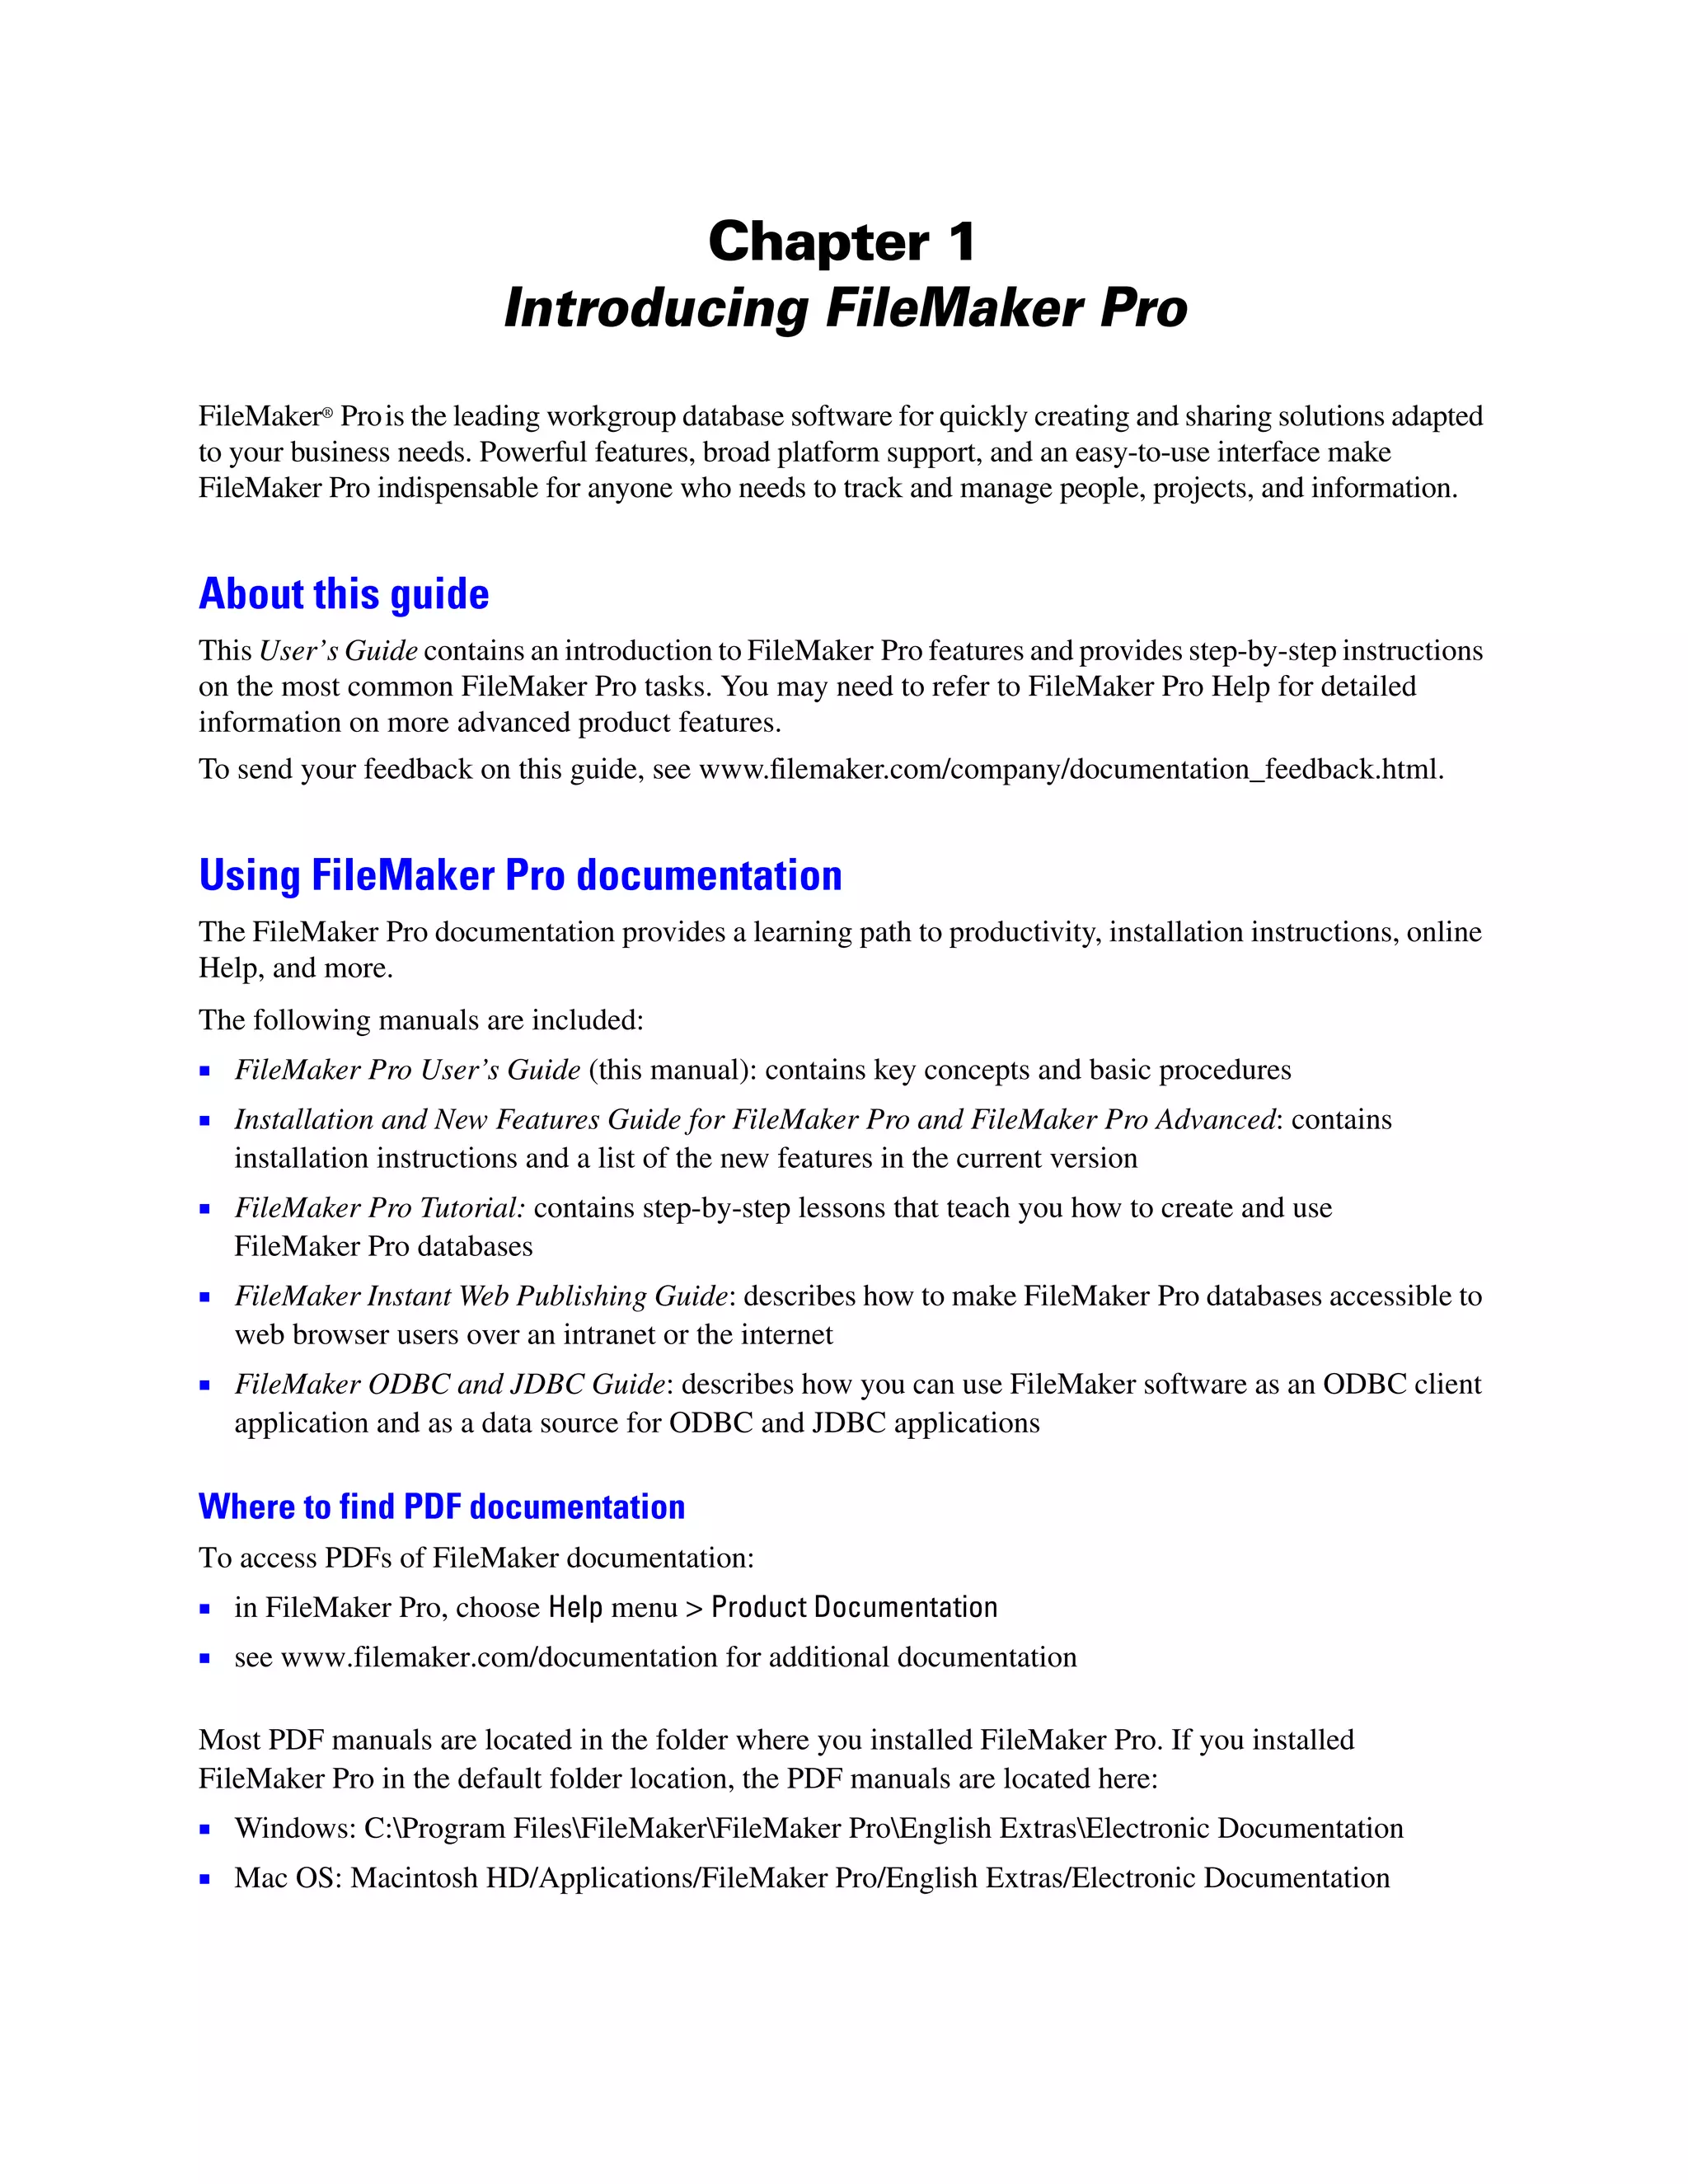
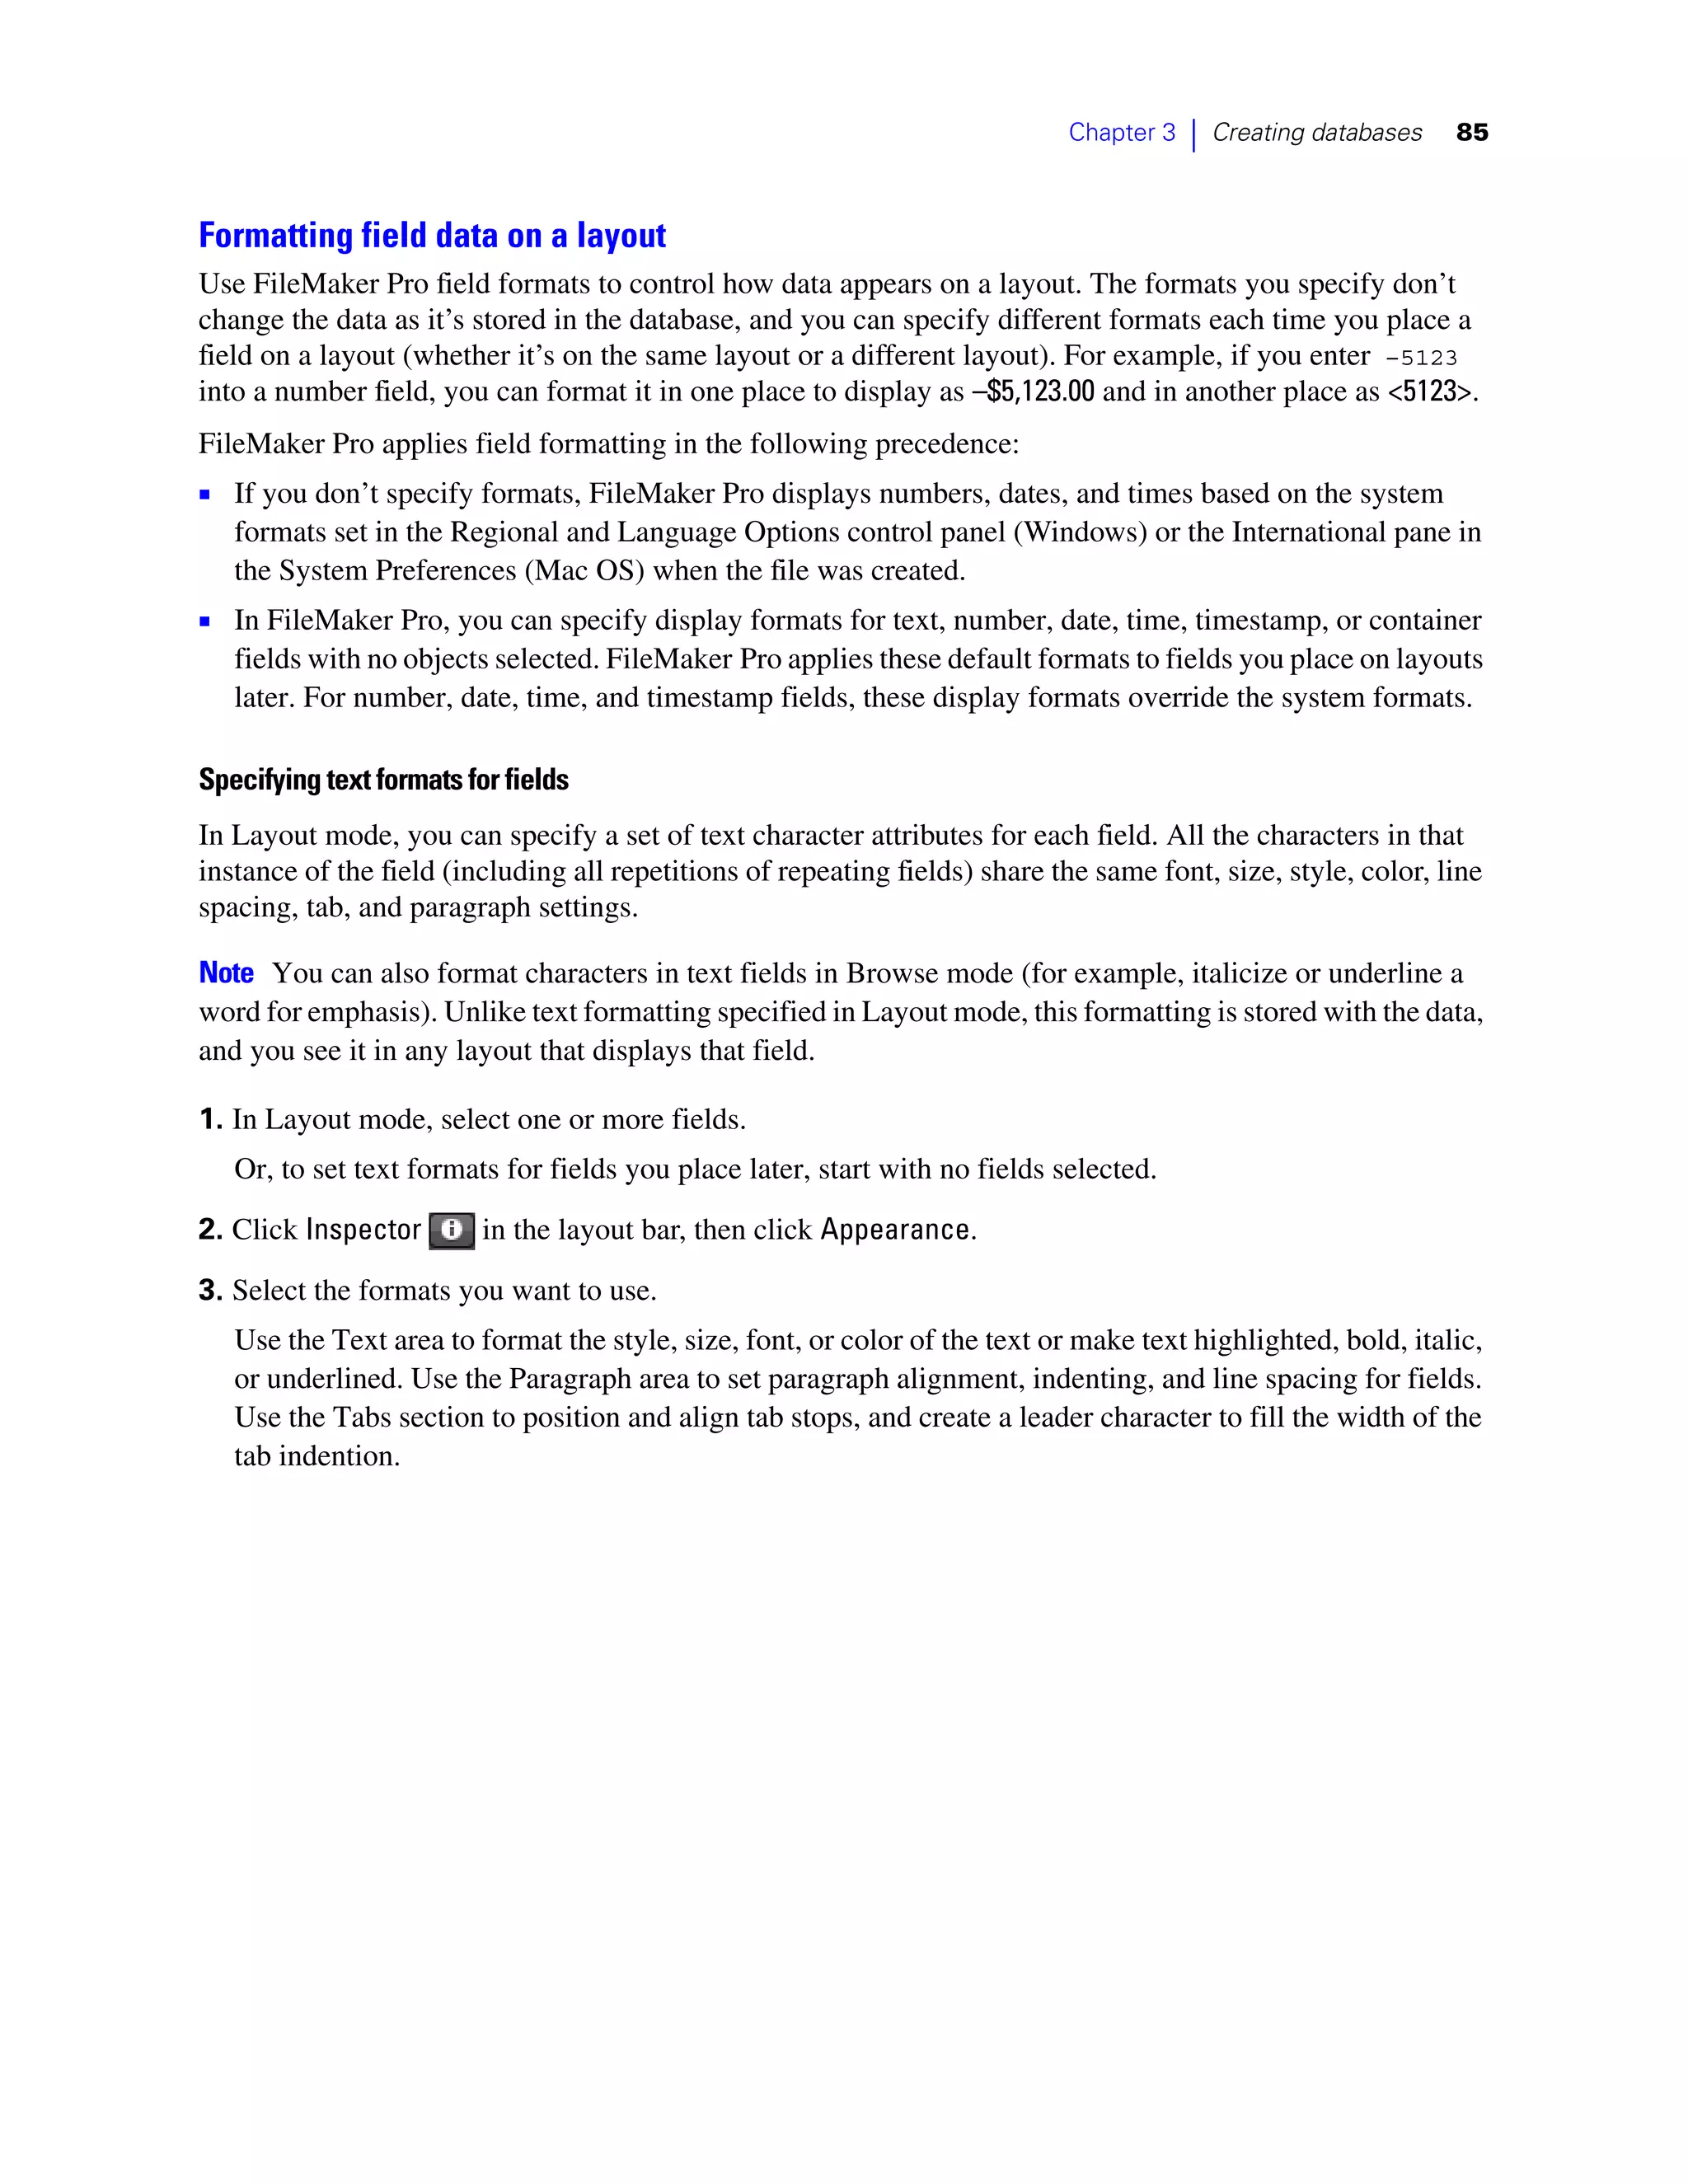
- FileMaker Pro allows users to create simple or complex databases with multiple related tables.
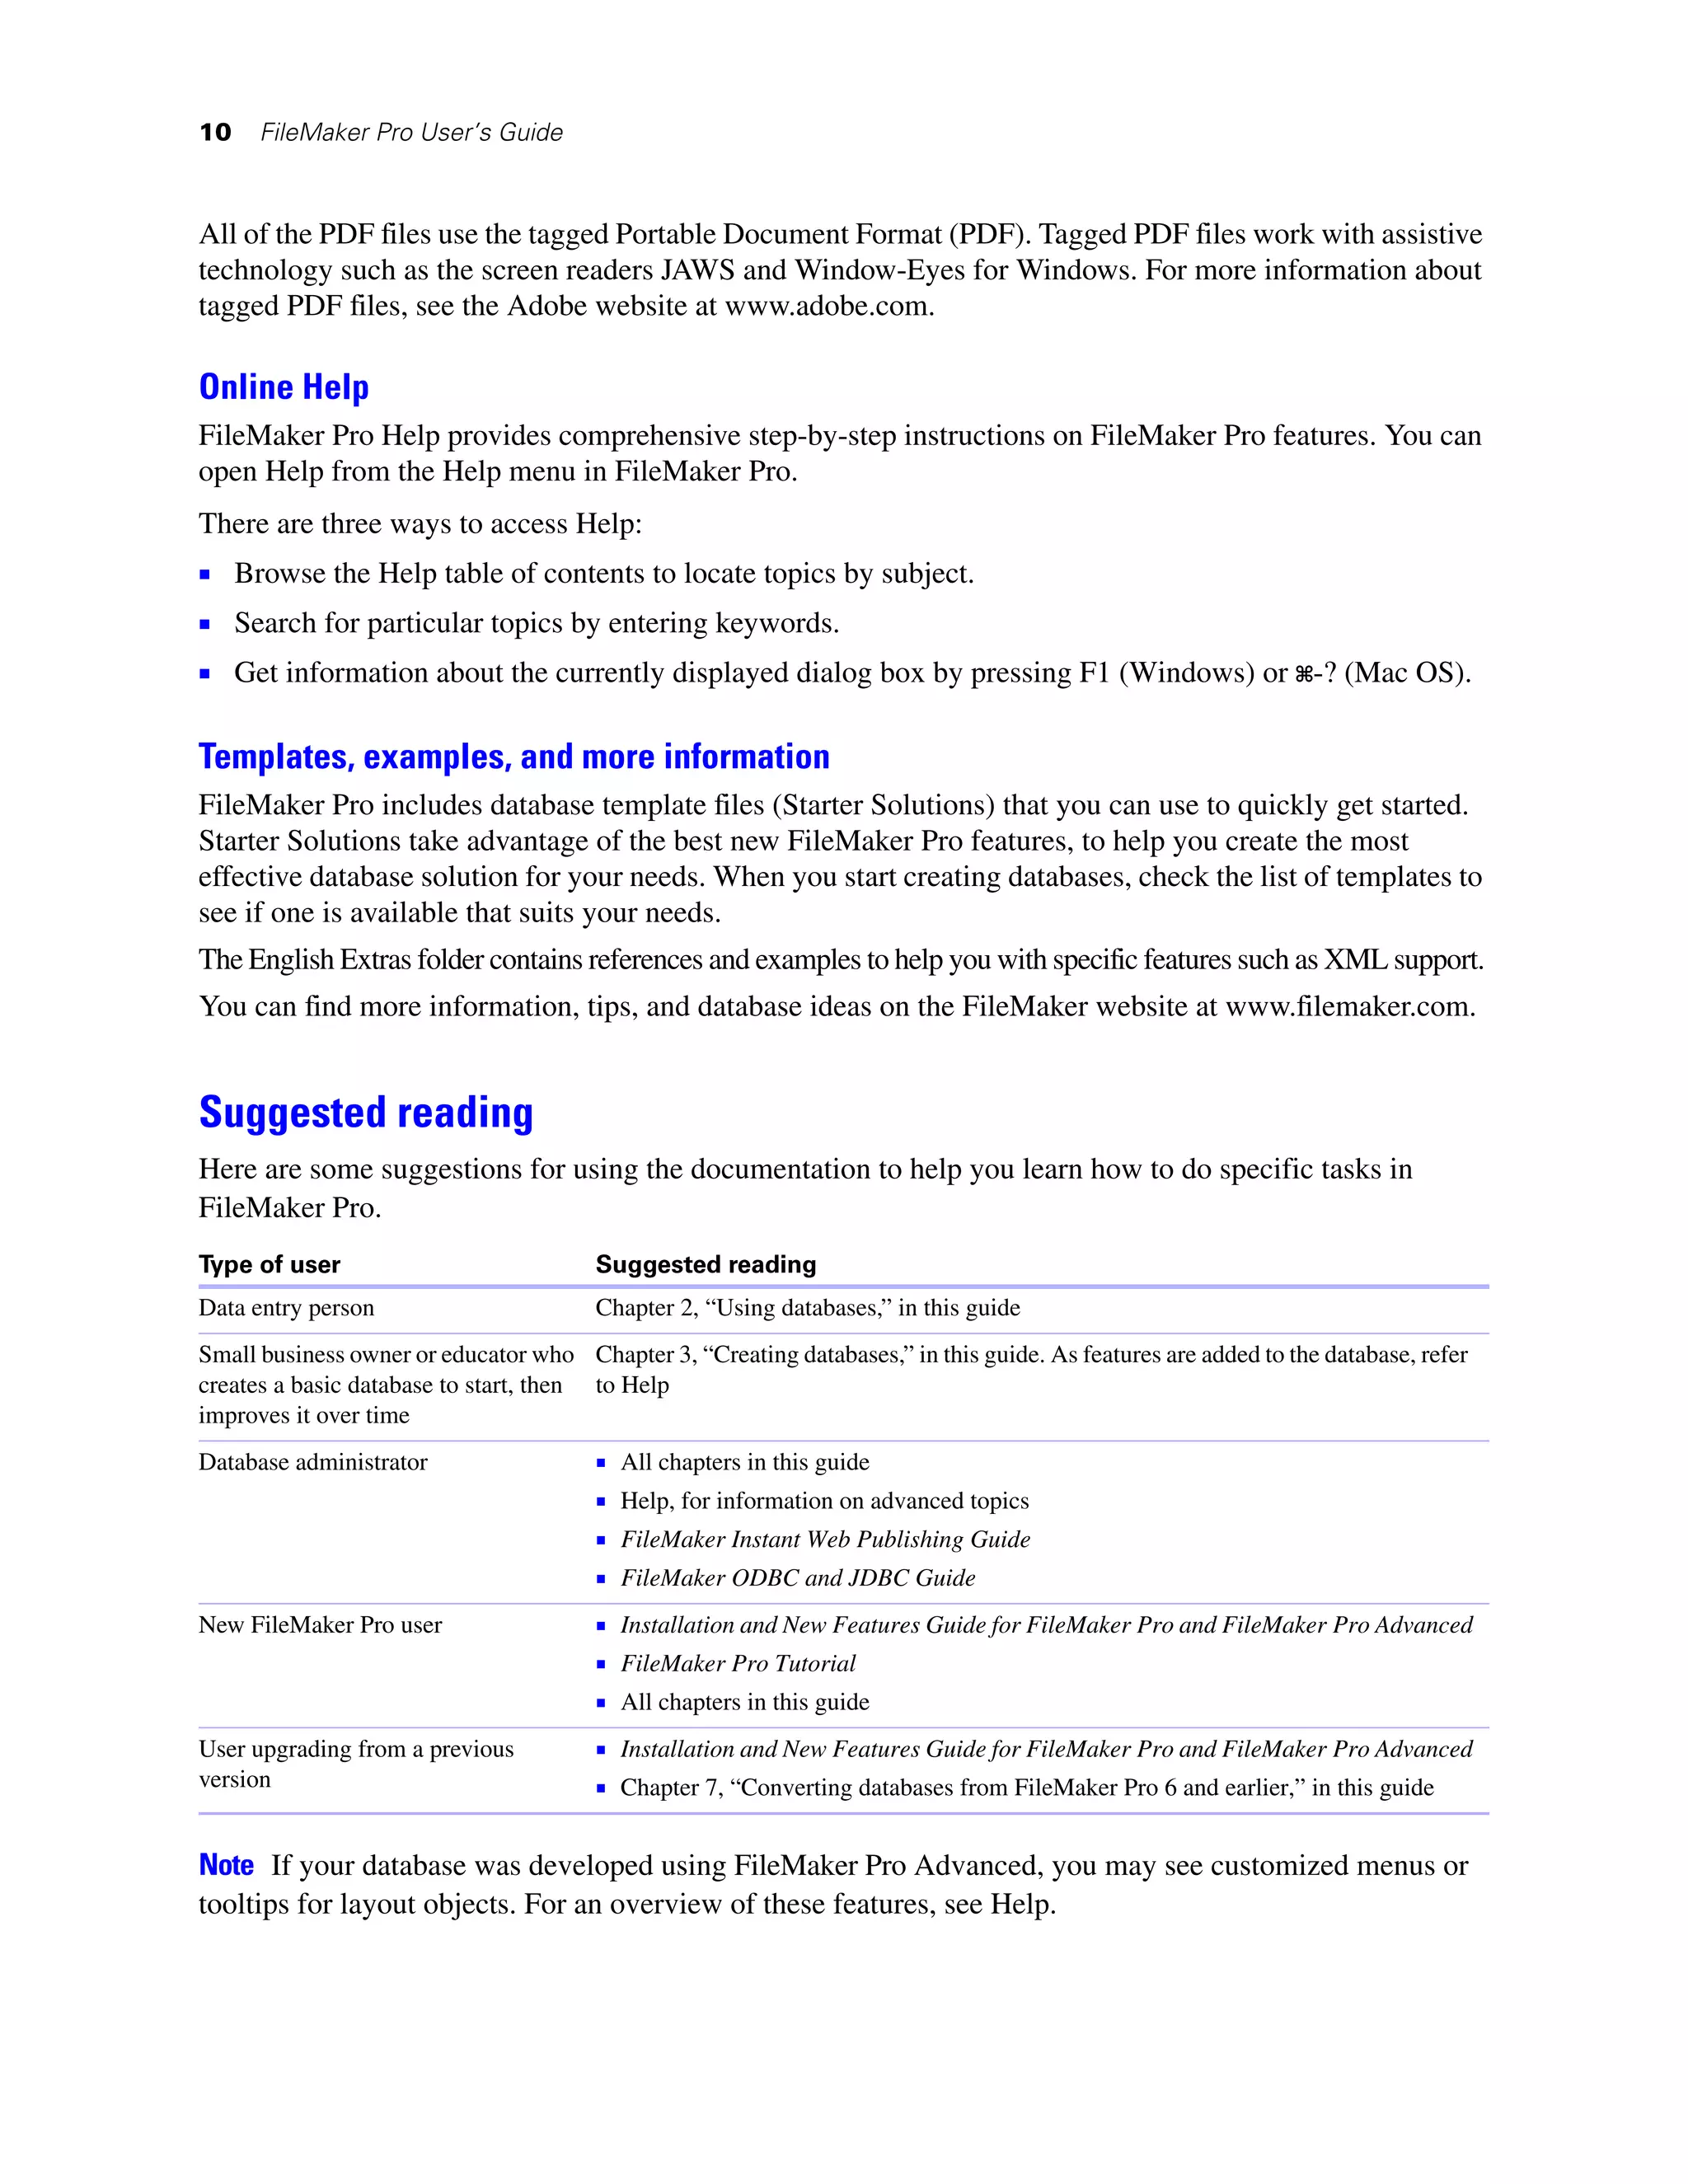
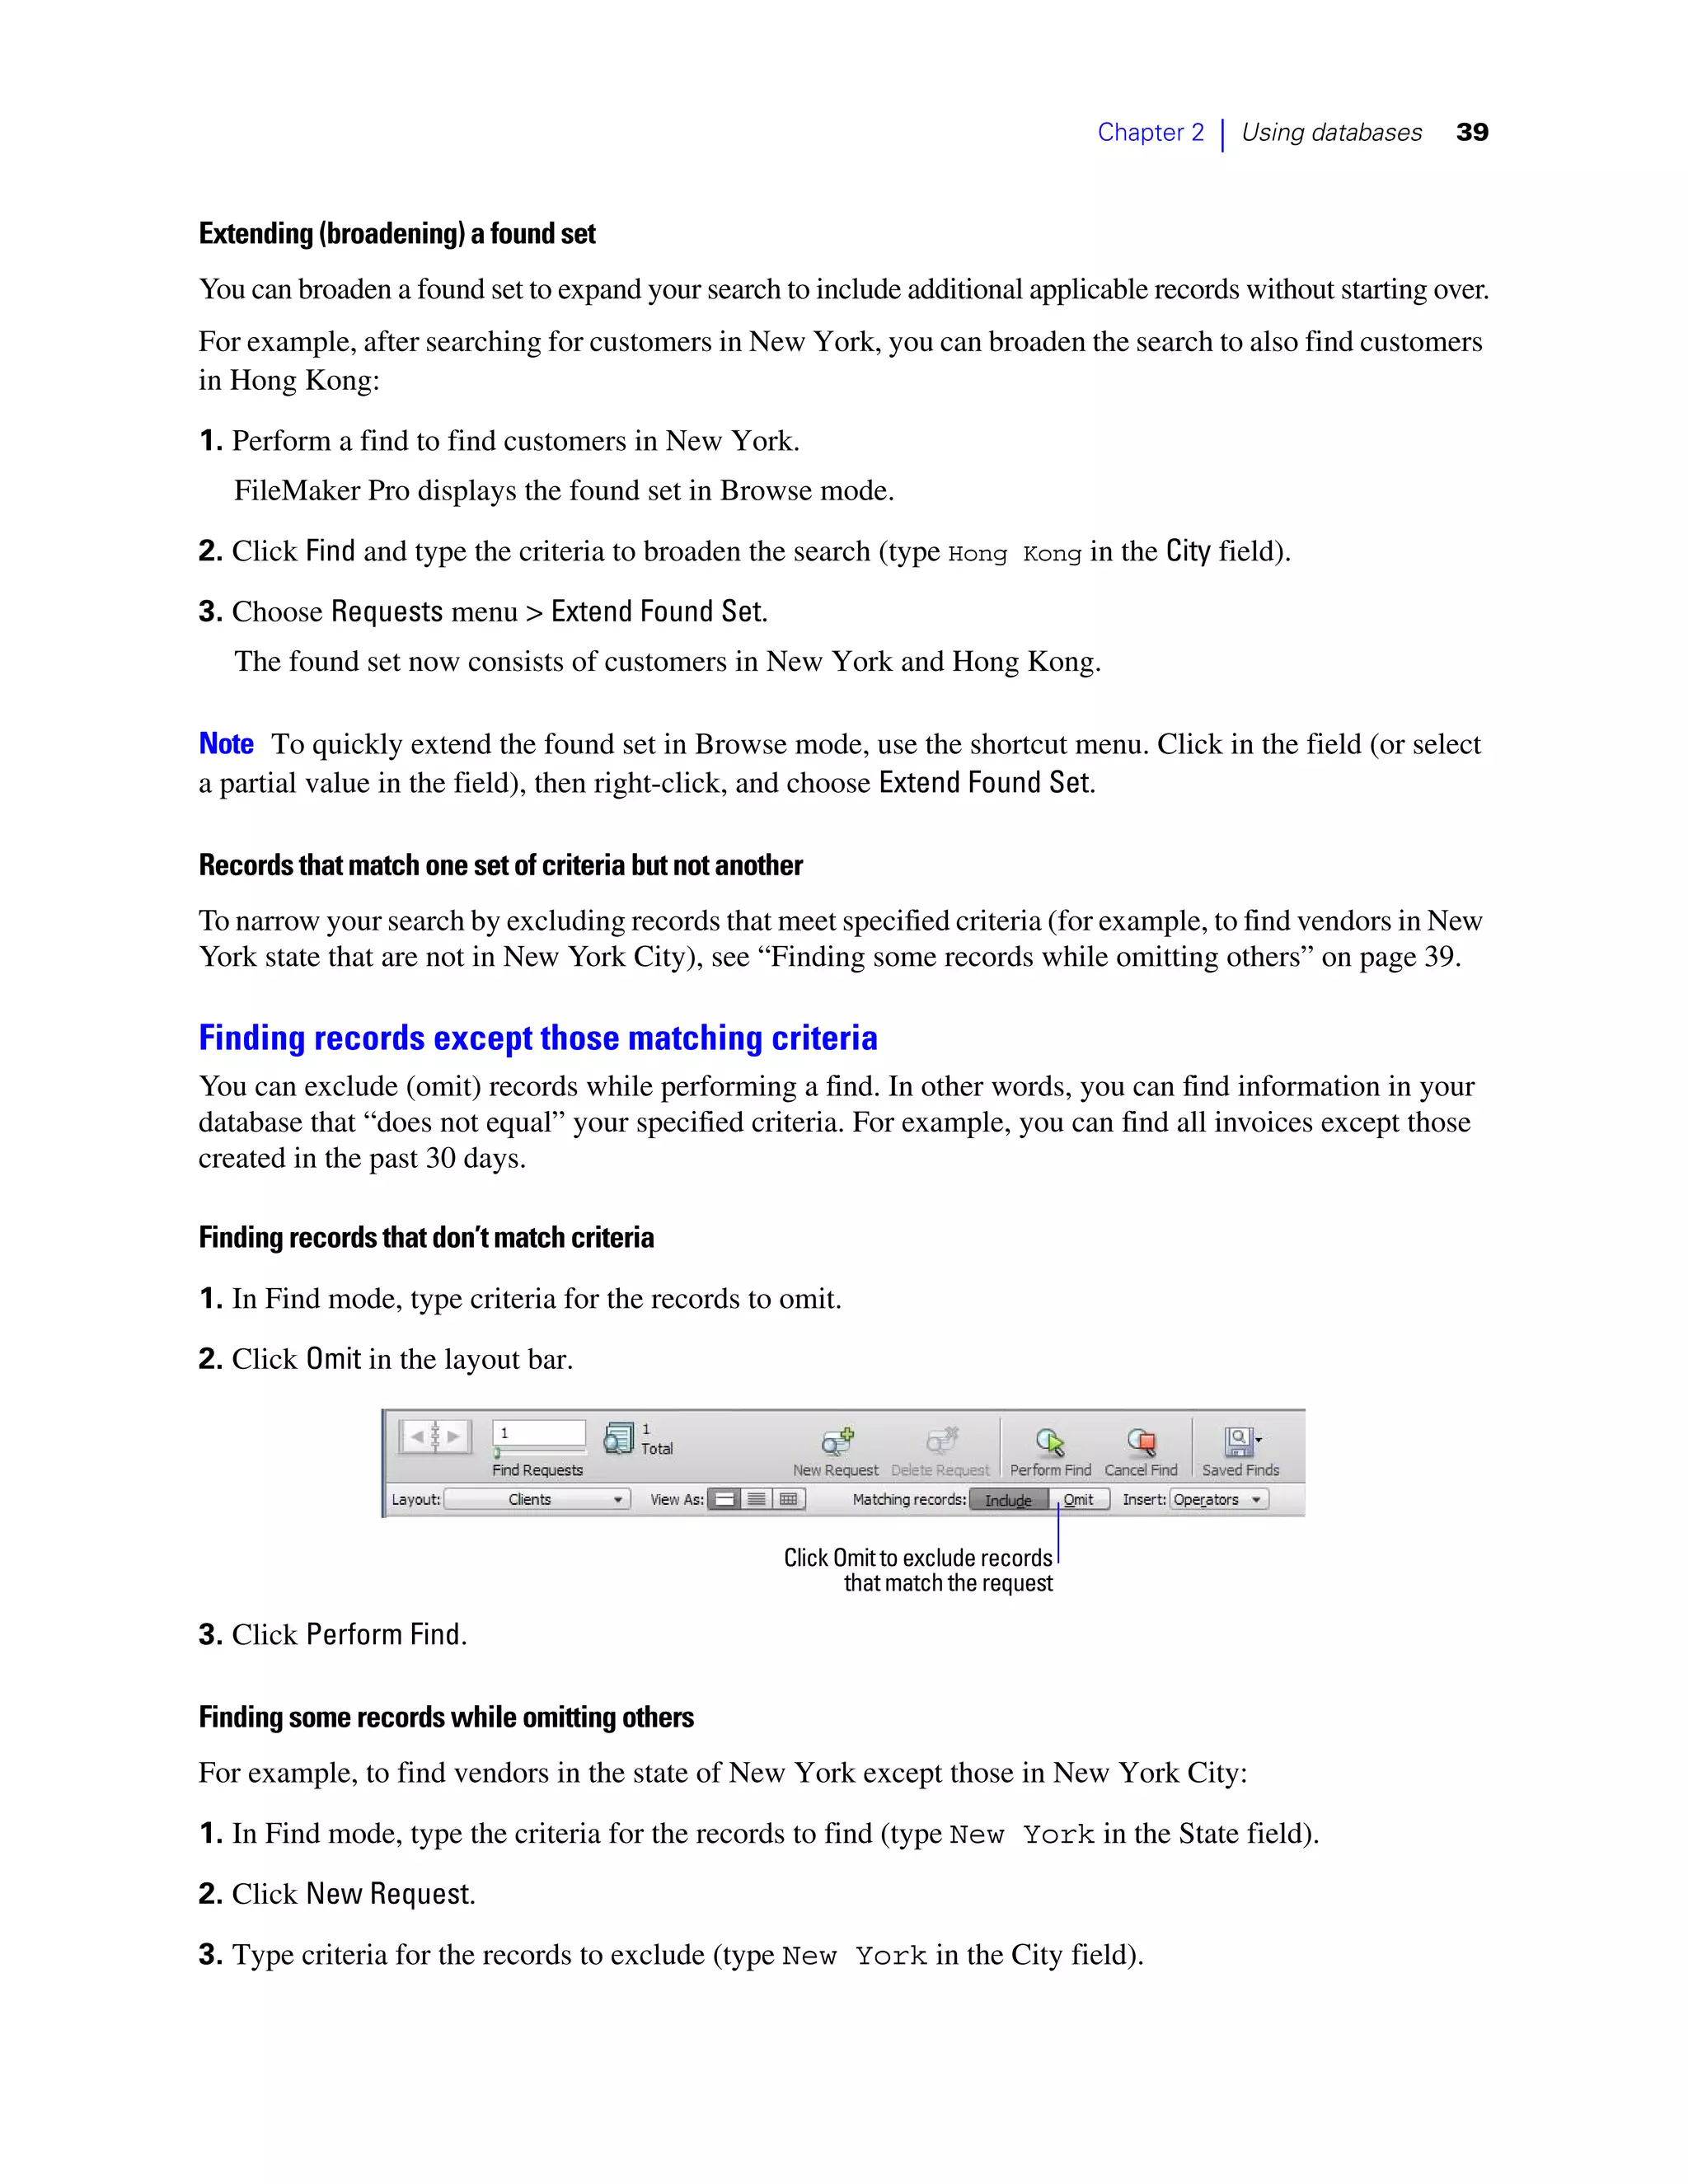
- Layouts are used to display, enter, and print data and do not store data. A single database can have many layouts.
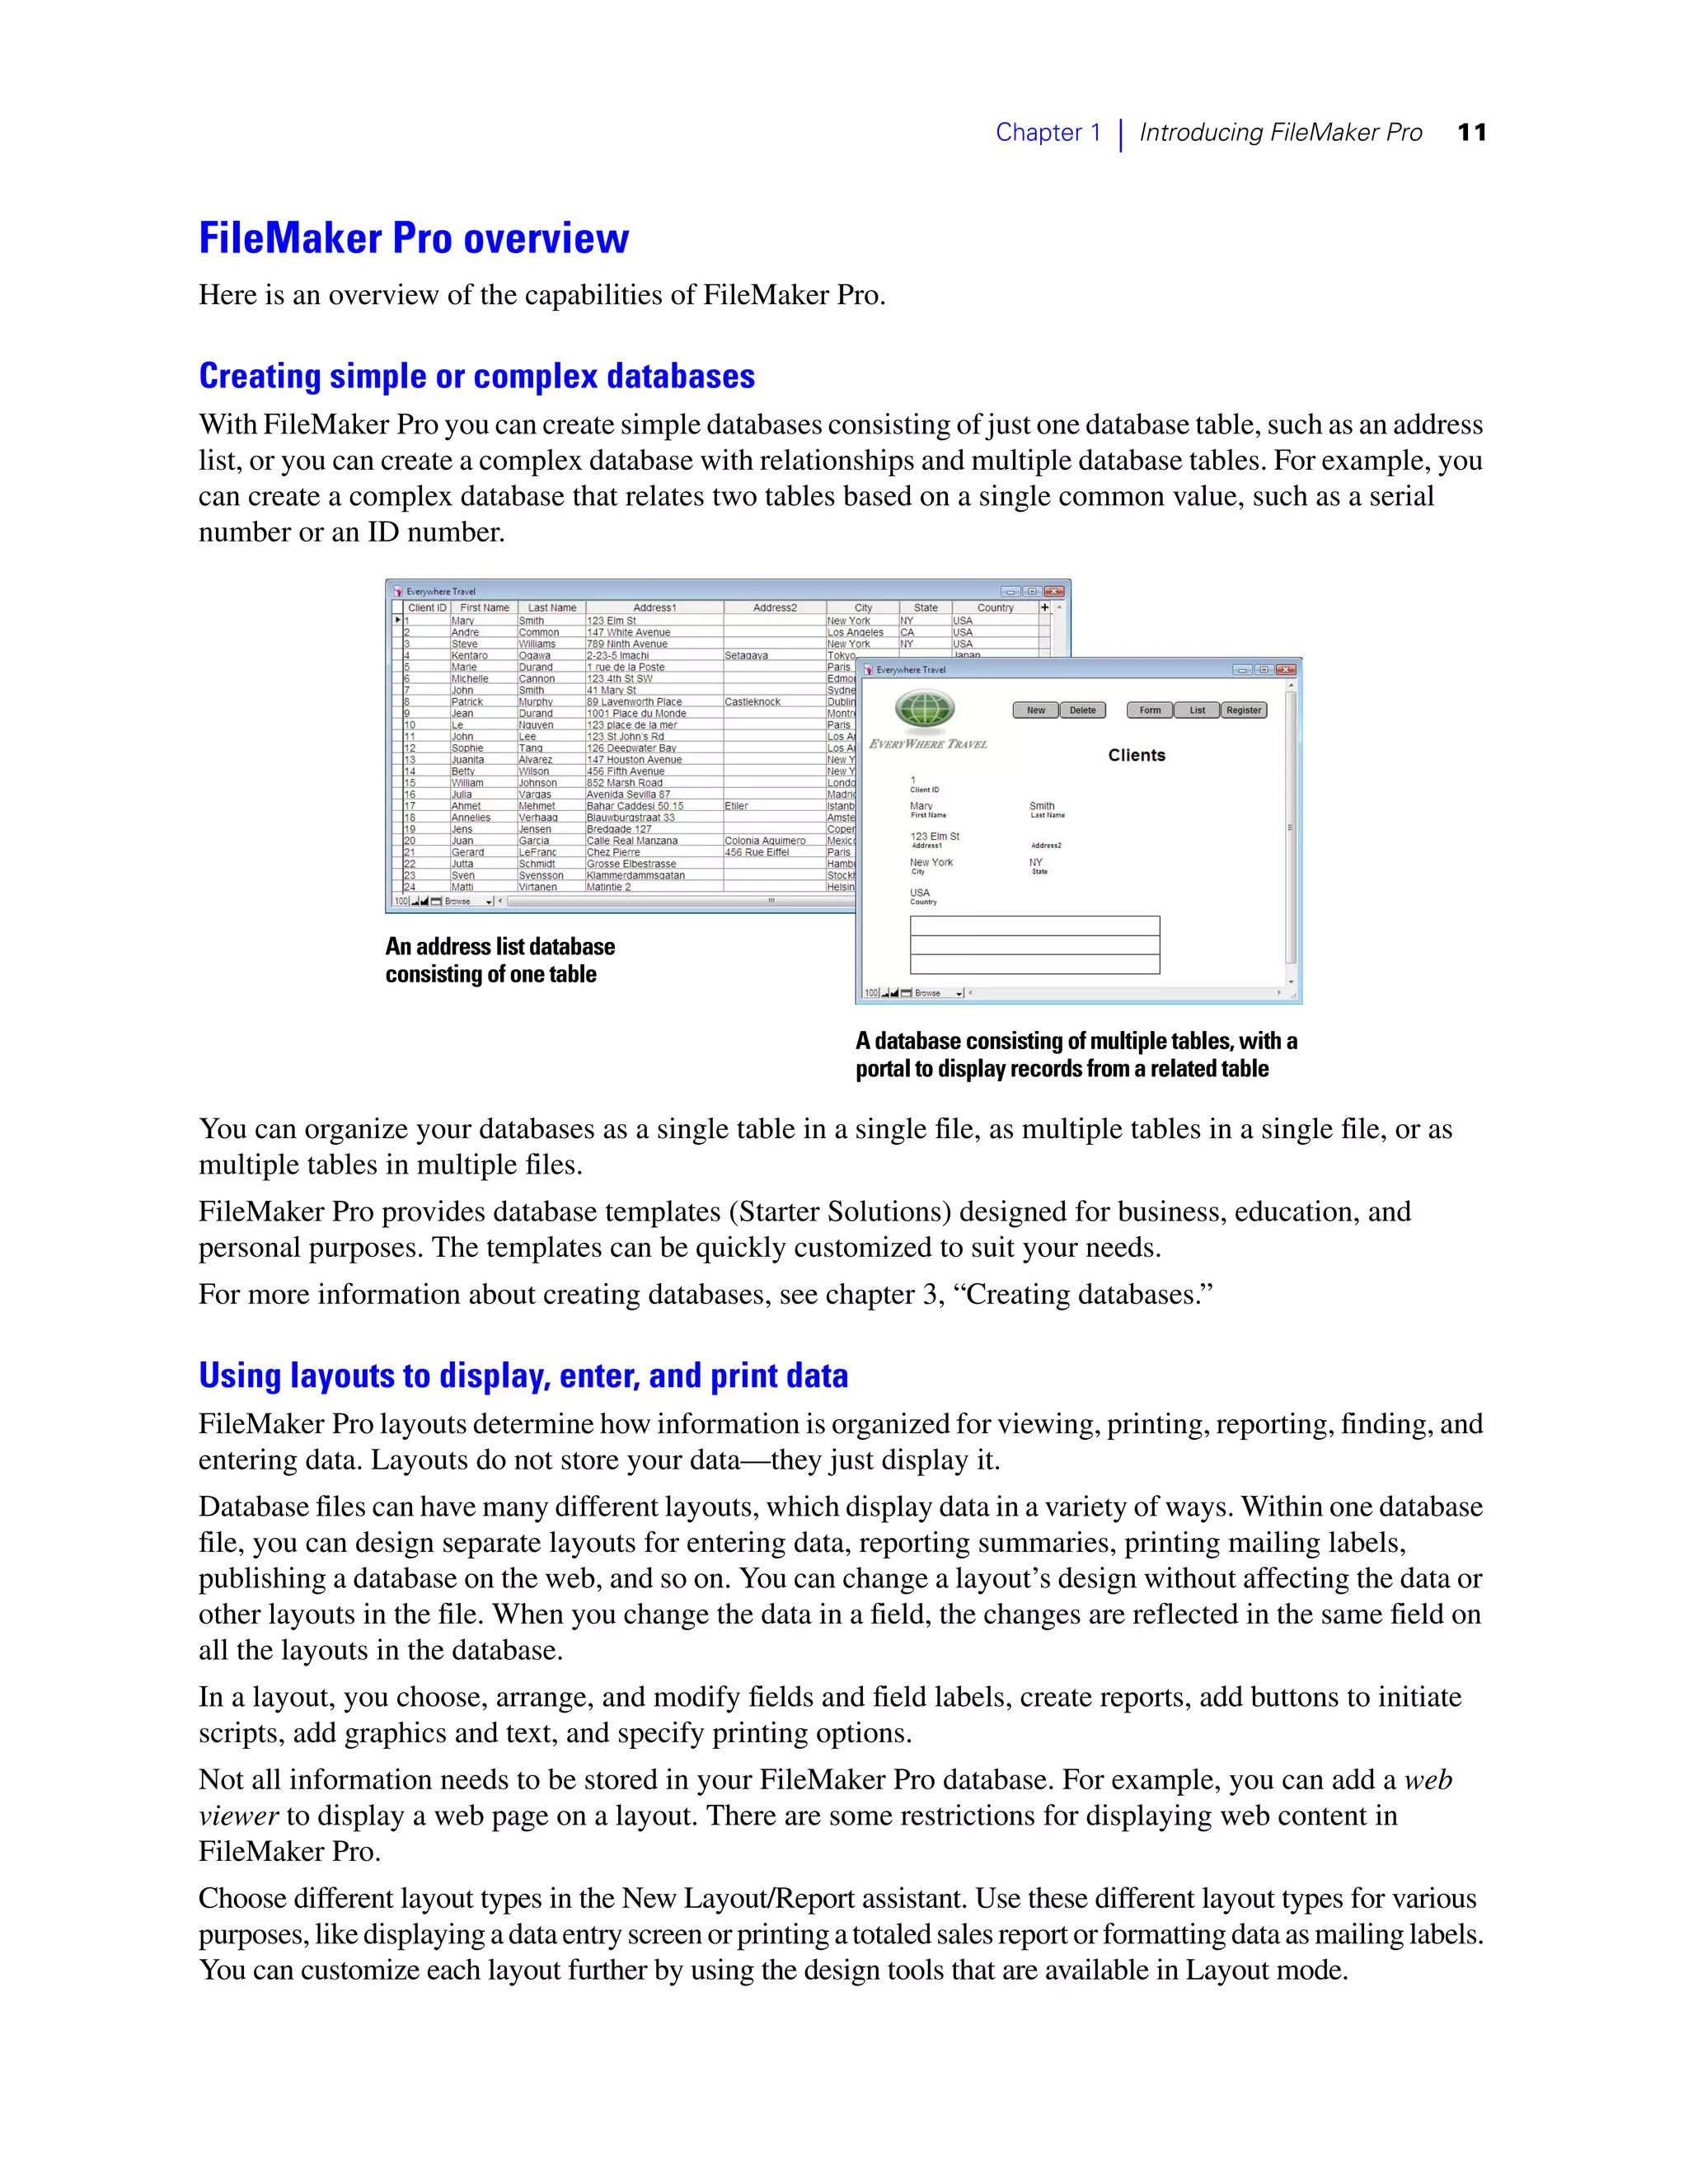
- FileMaker Pro offers features to find, sort, and replace data as well as protect databases.


![Chapter 2 | Using databases 43
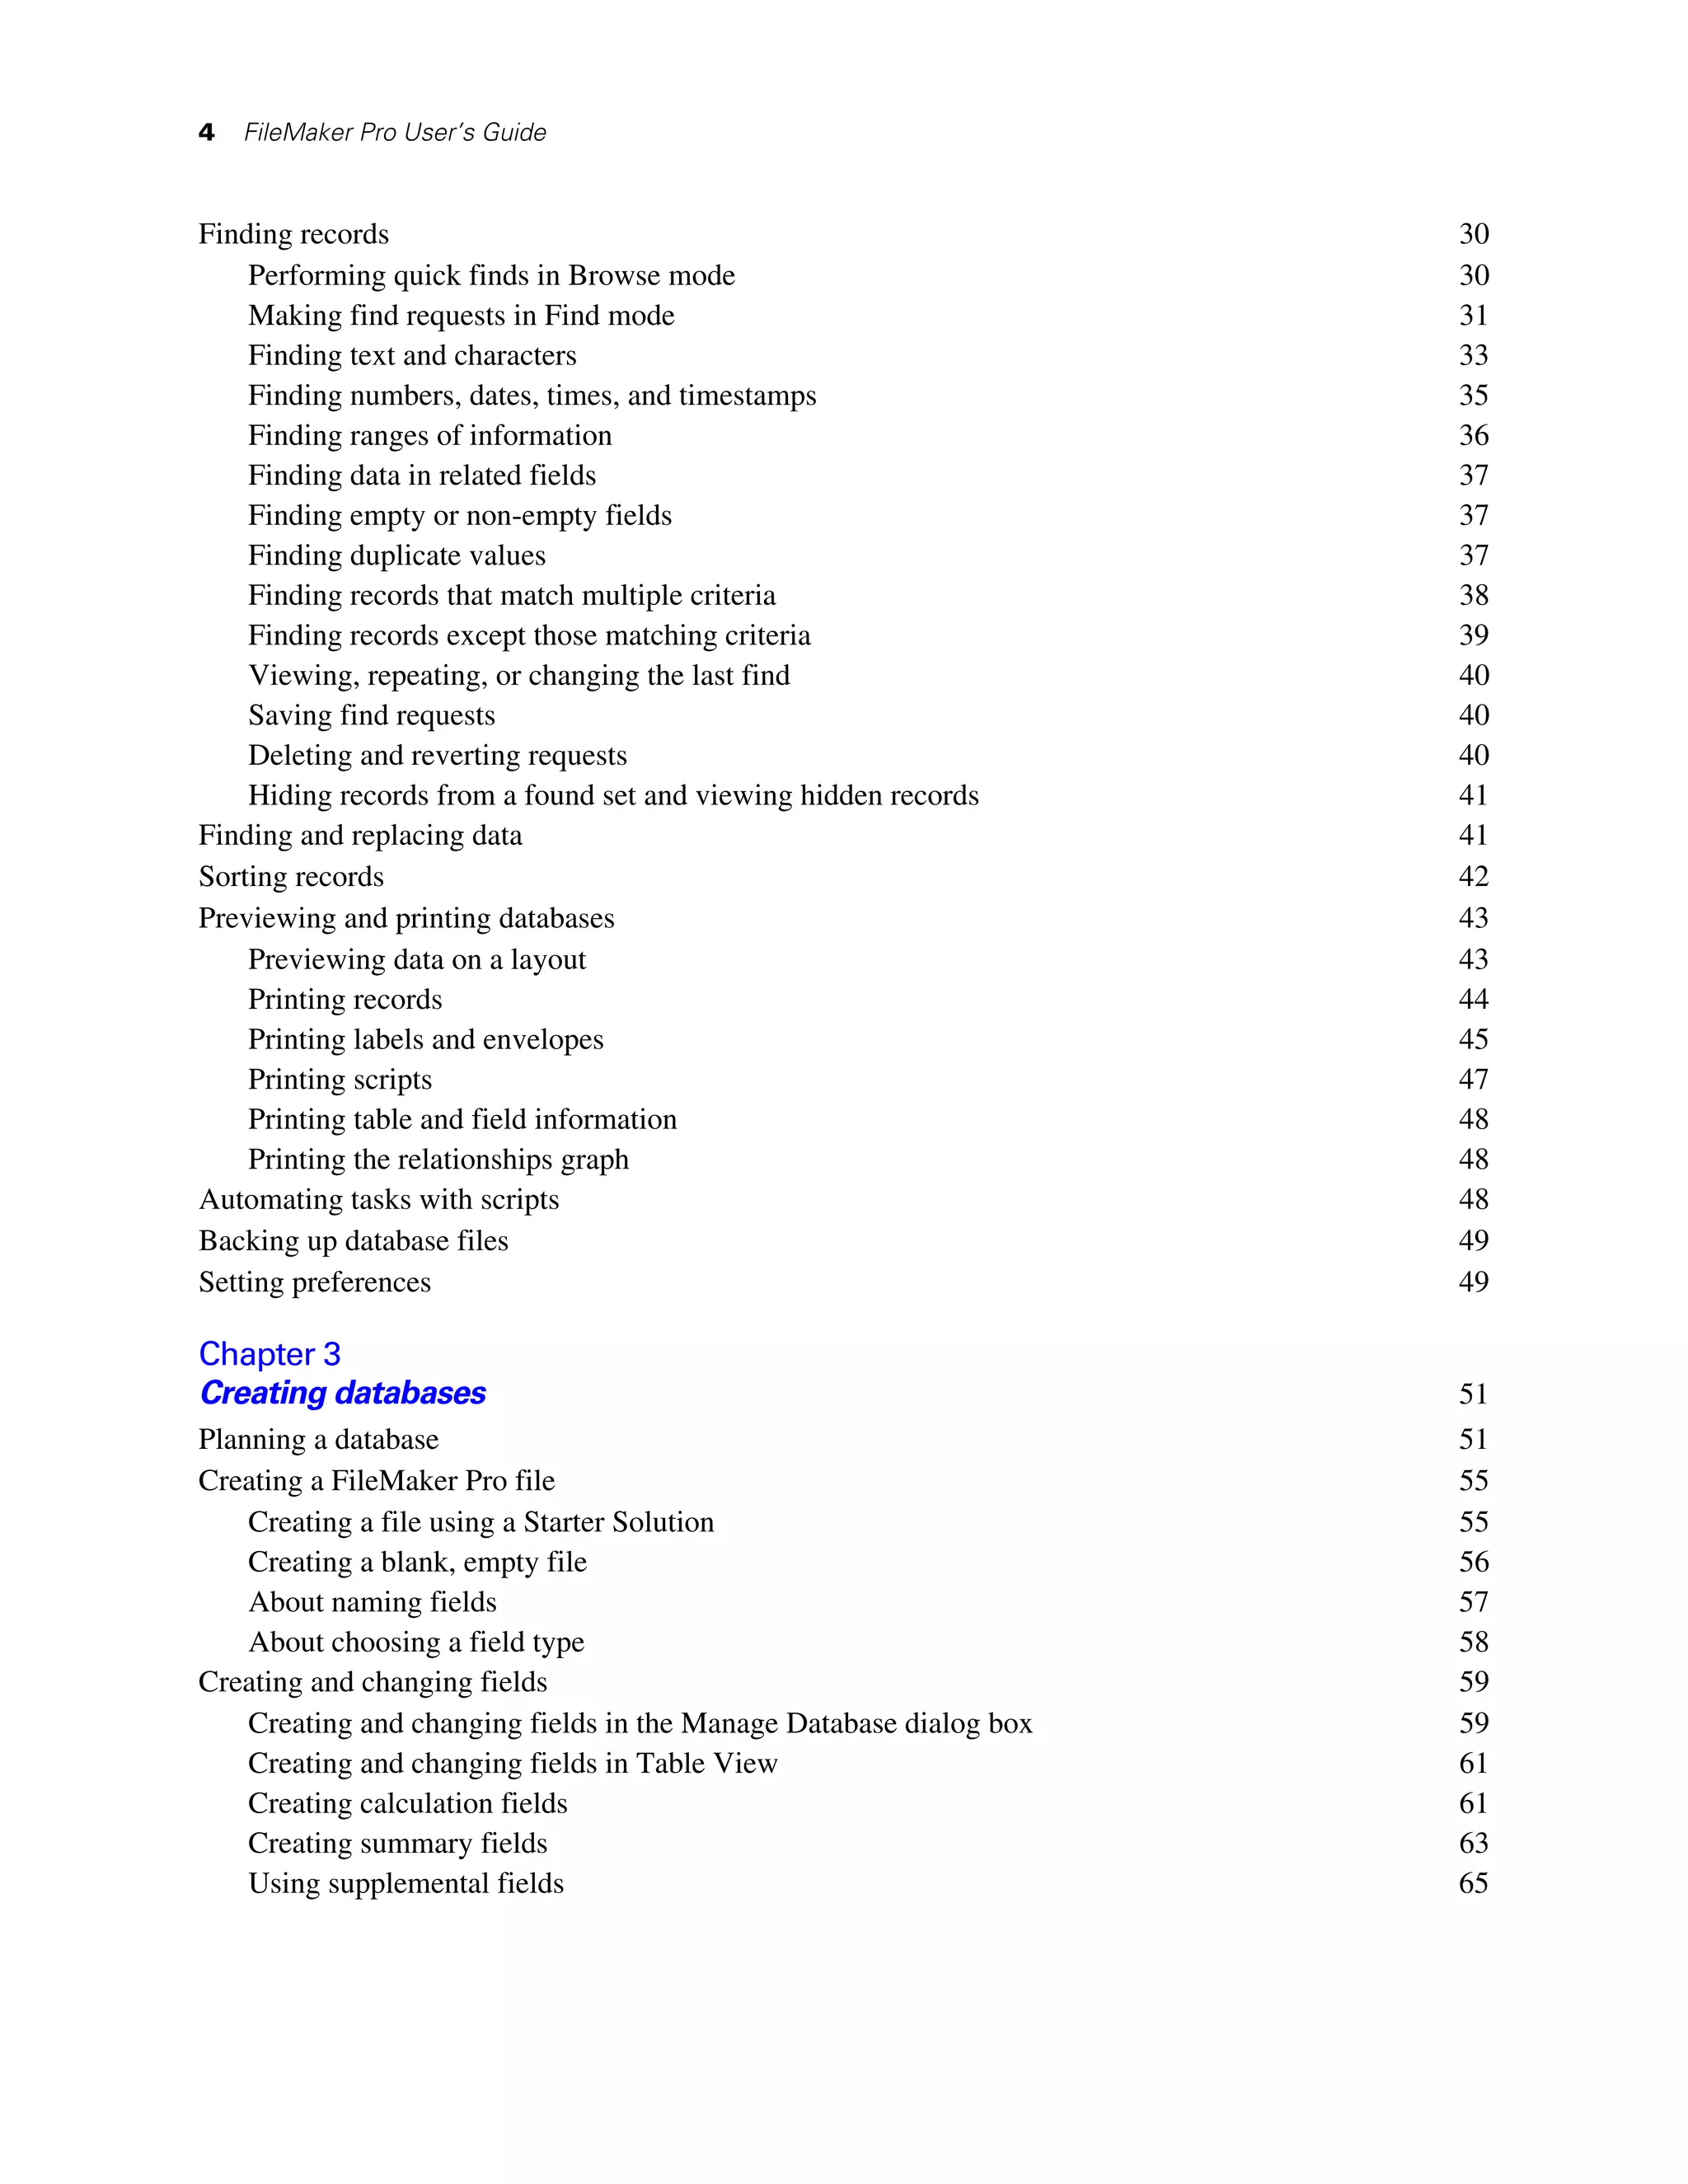
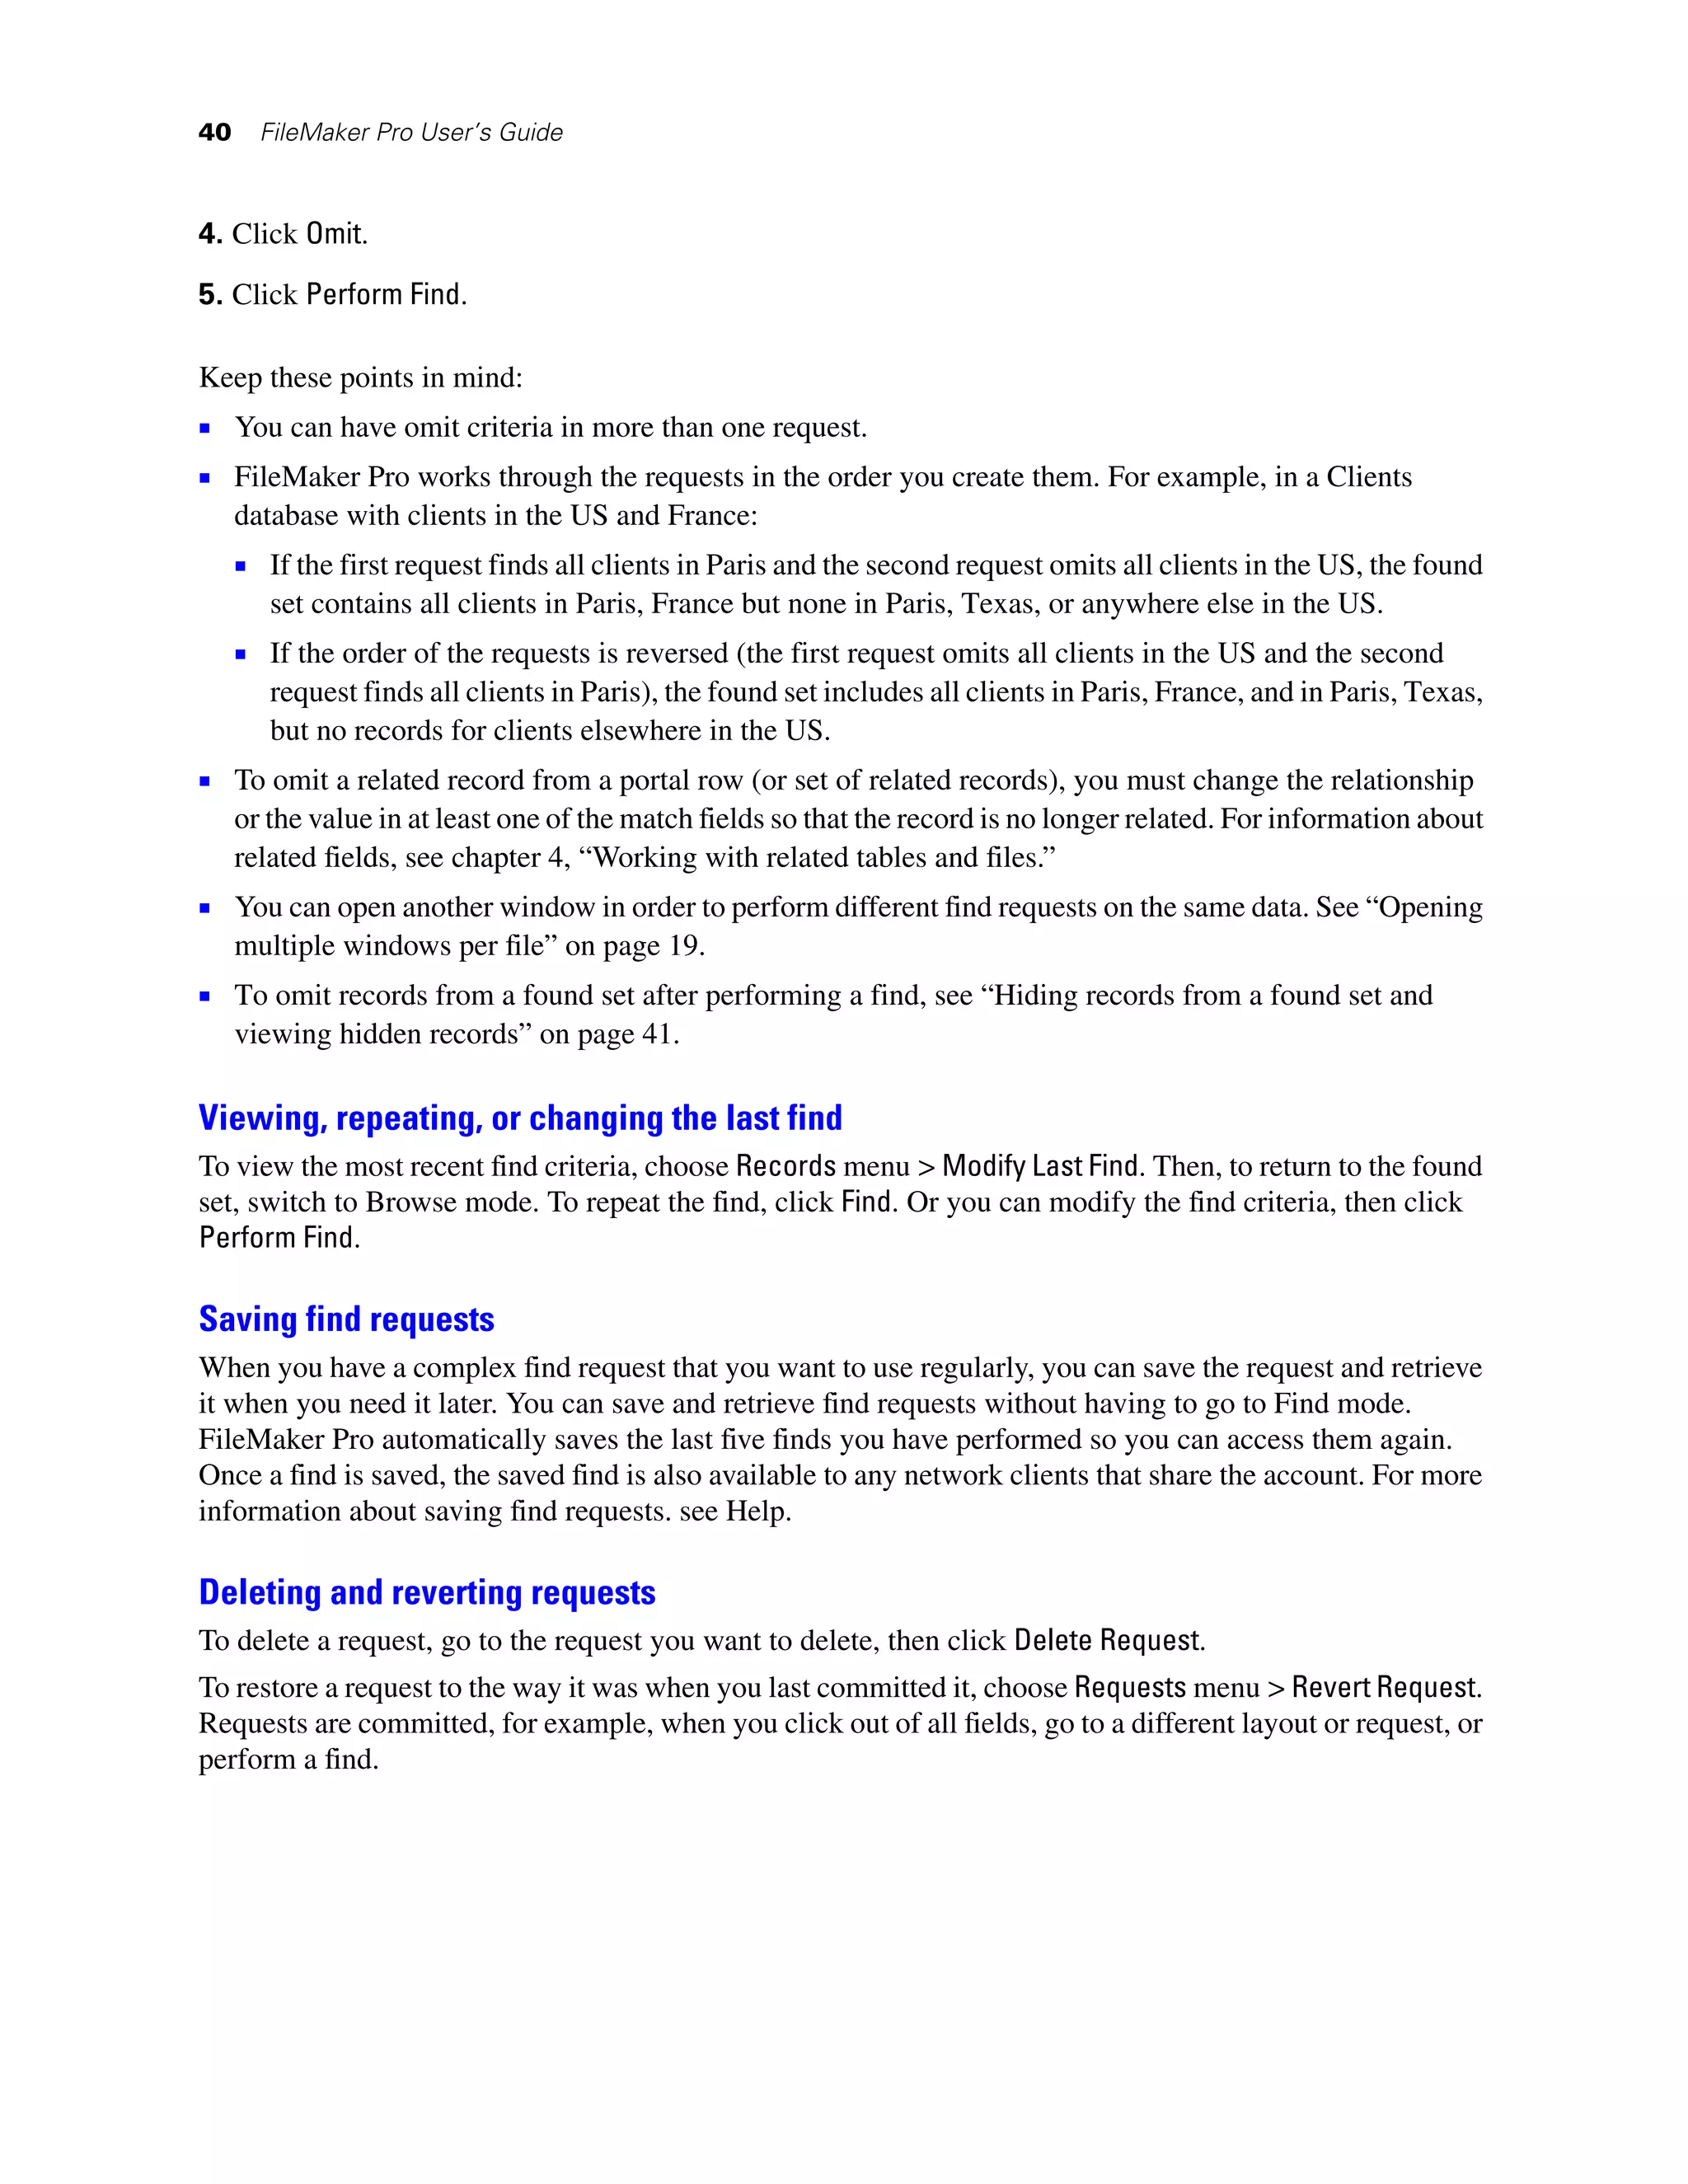
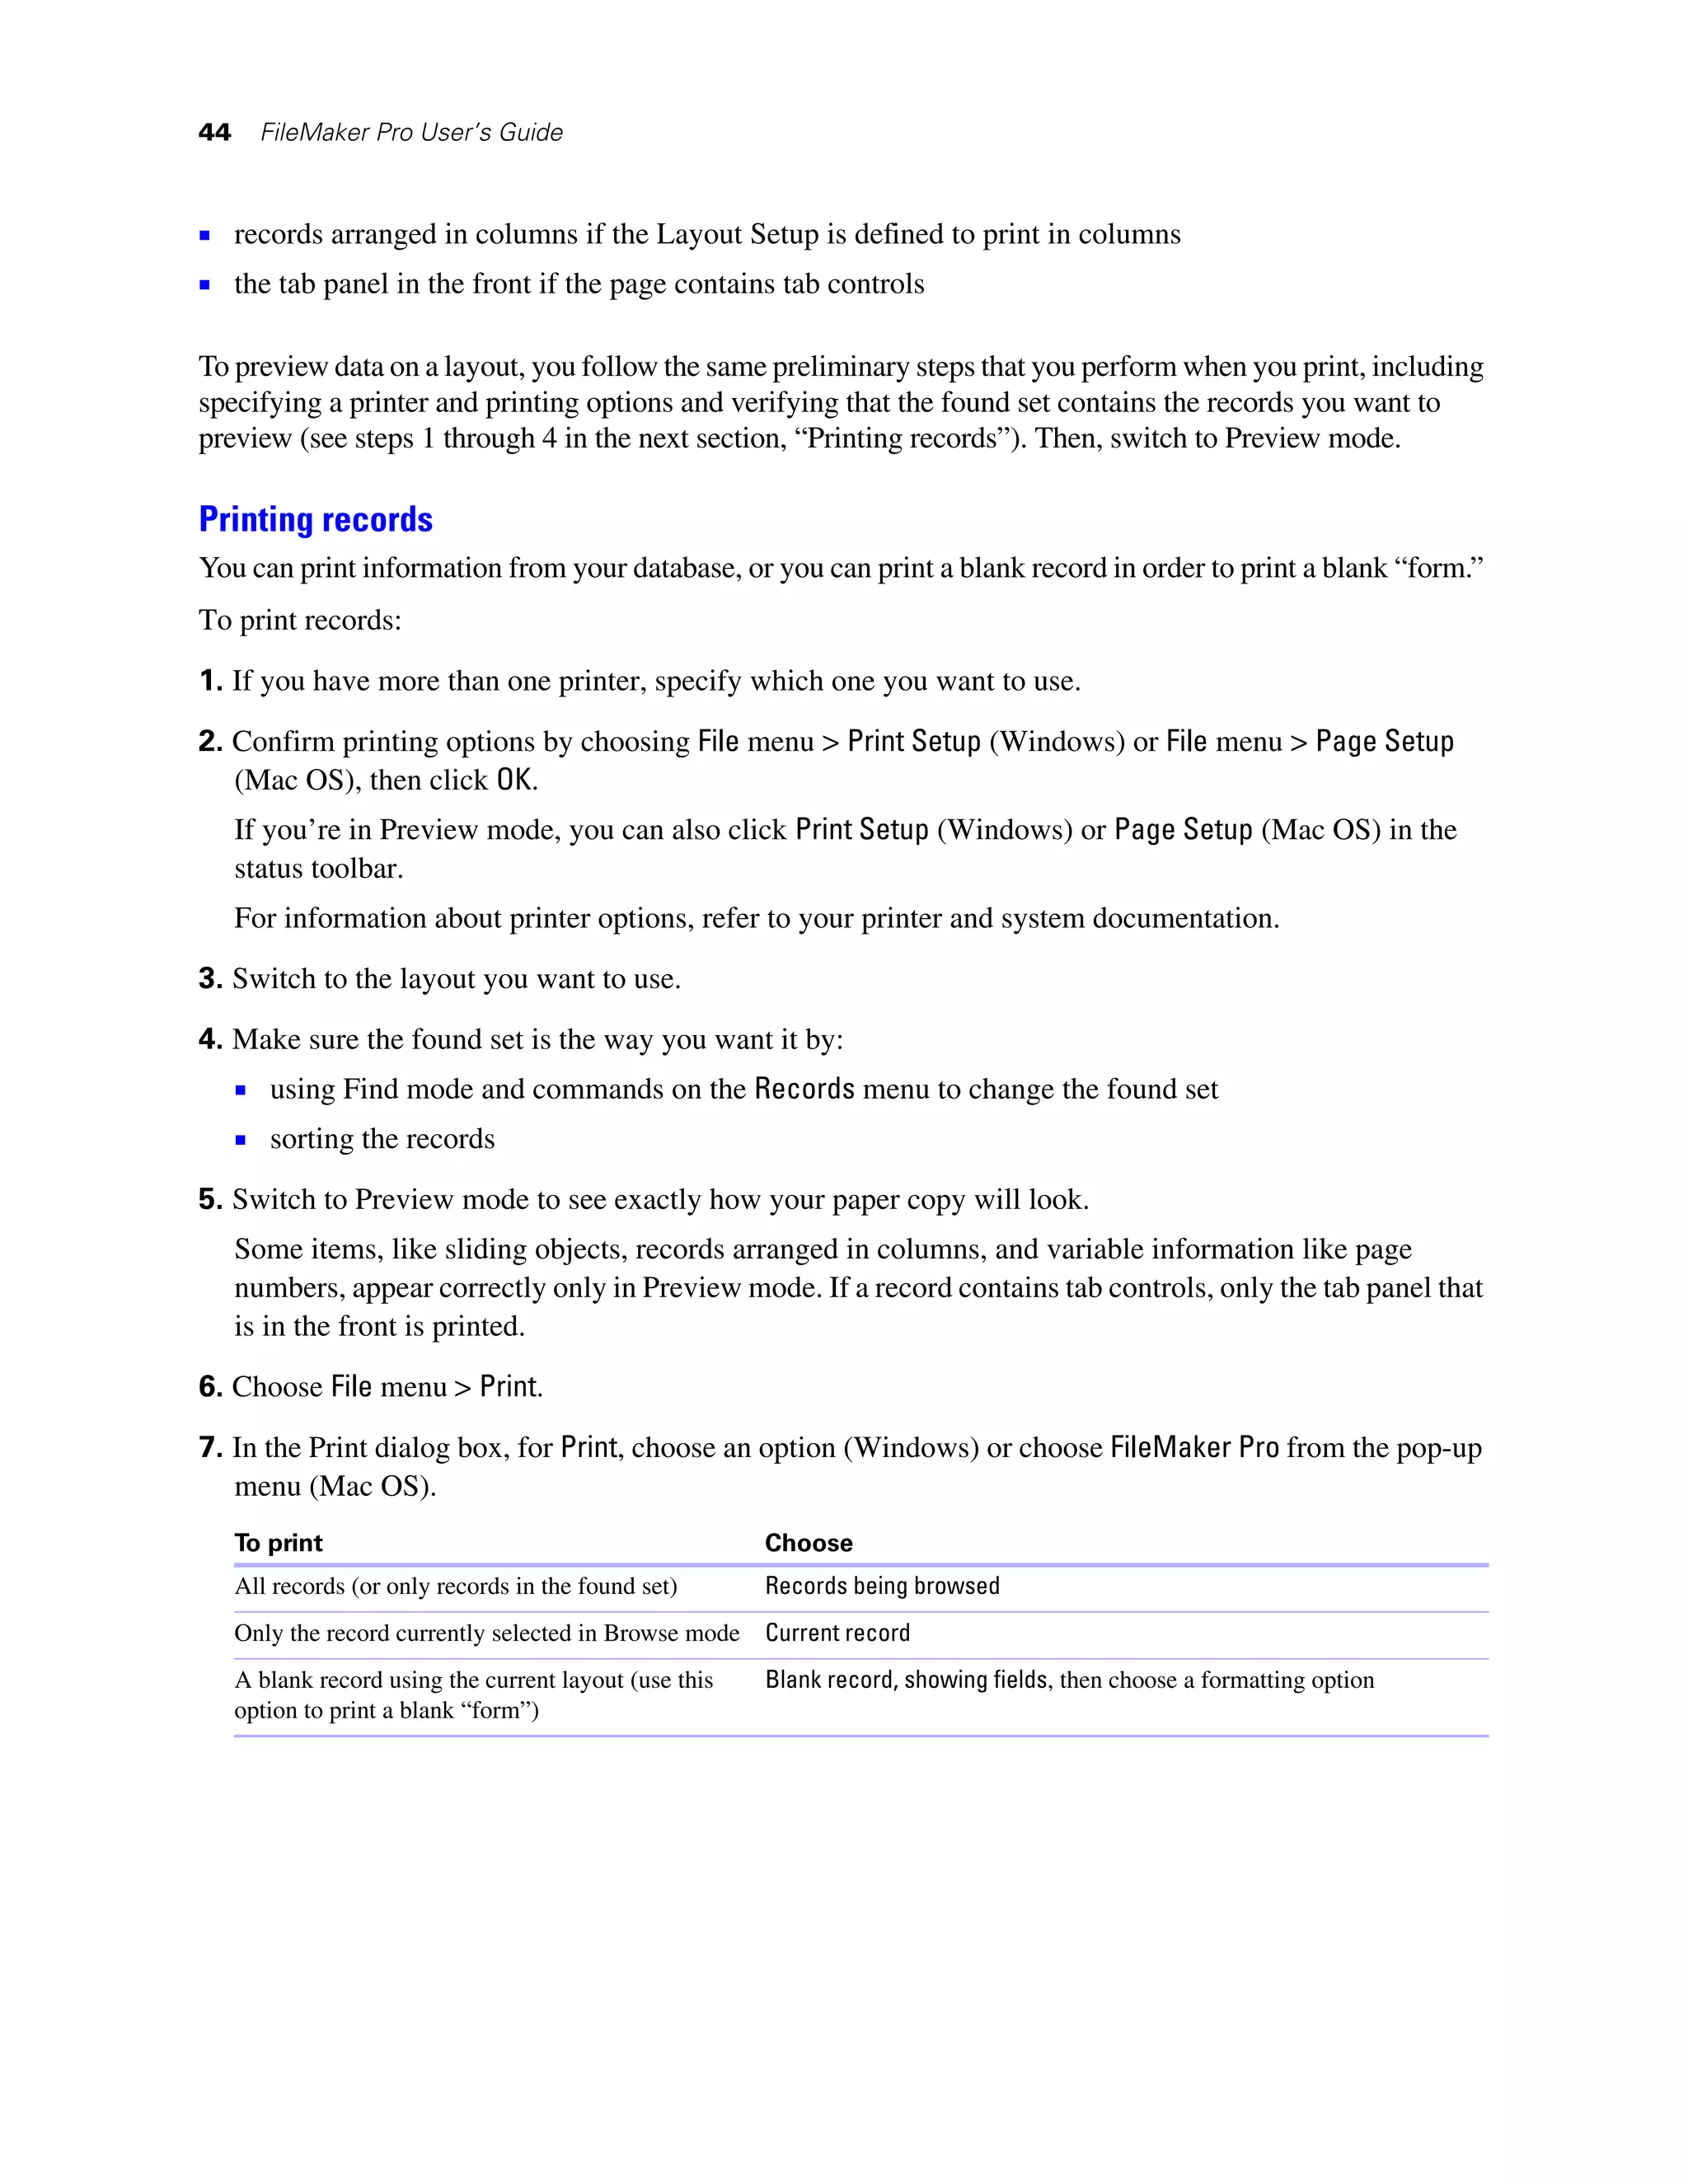
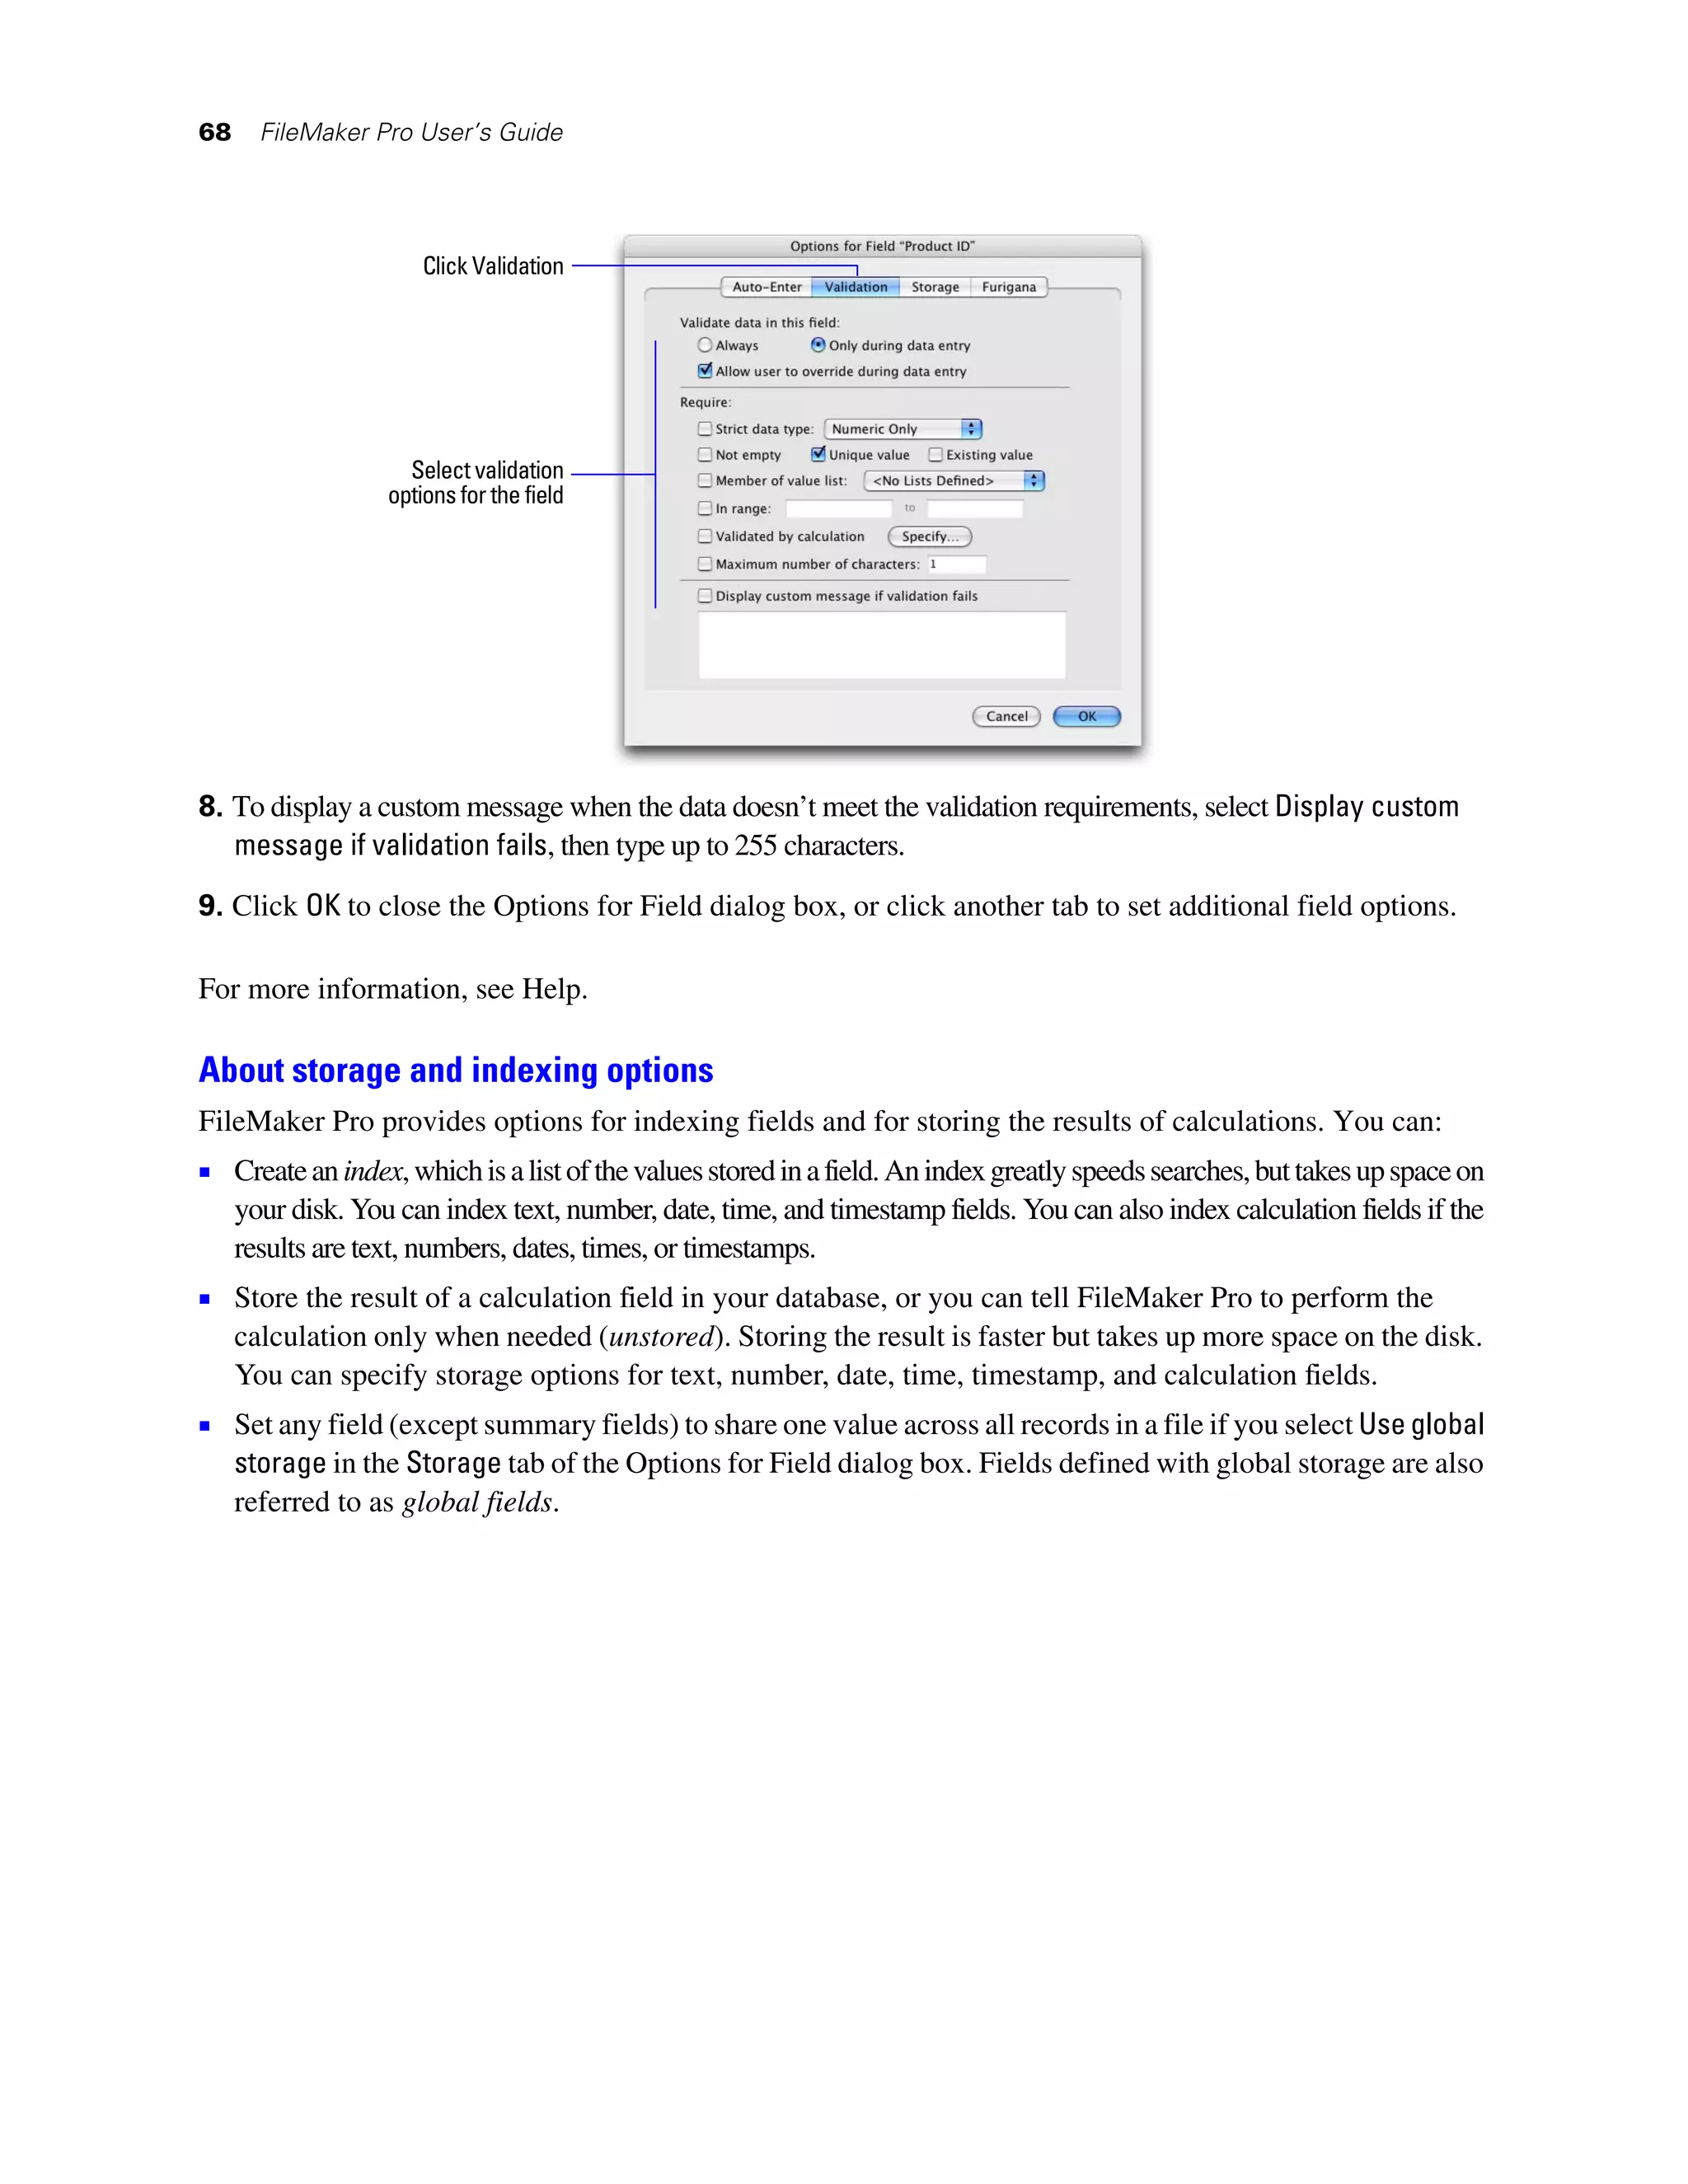
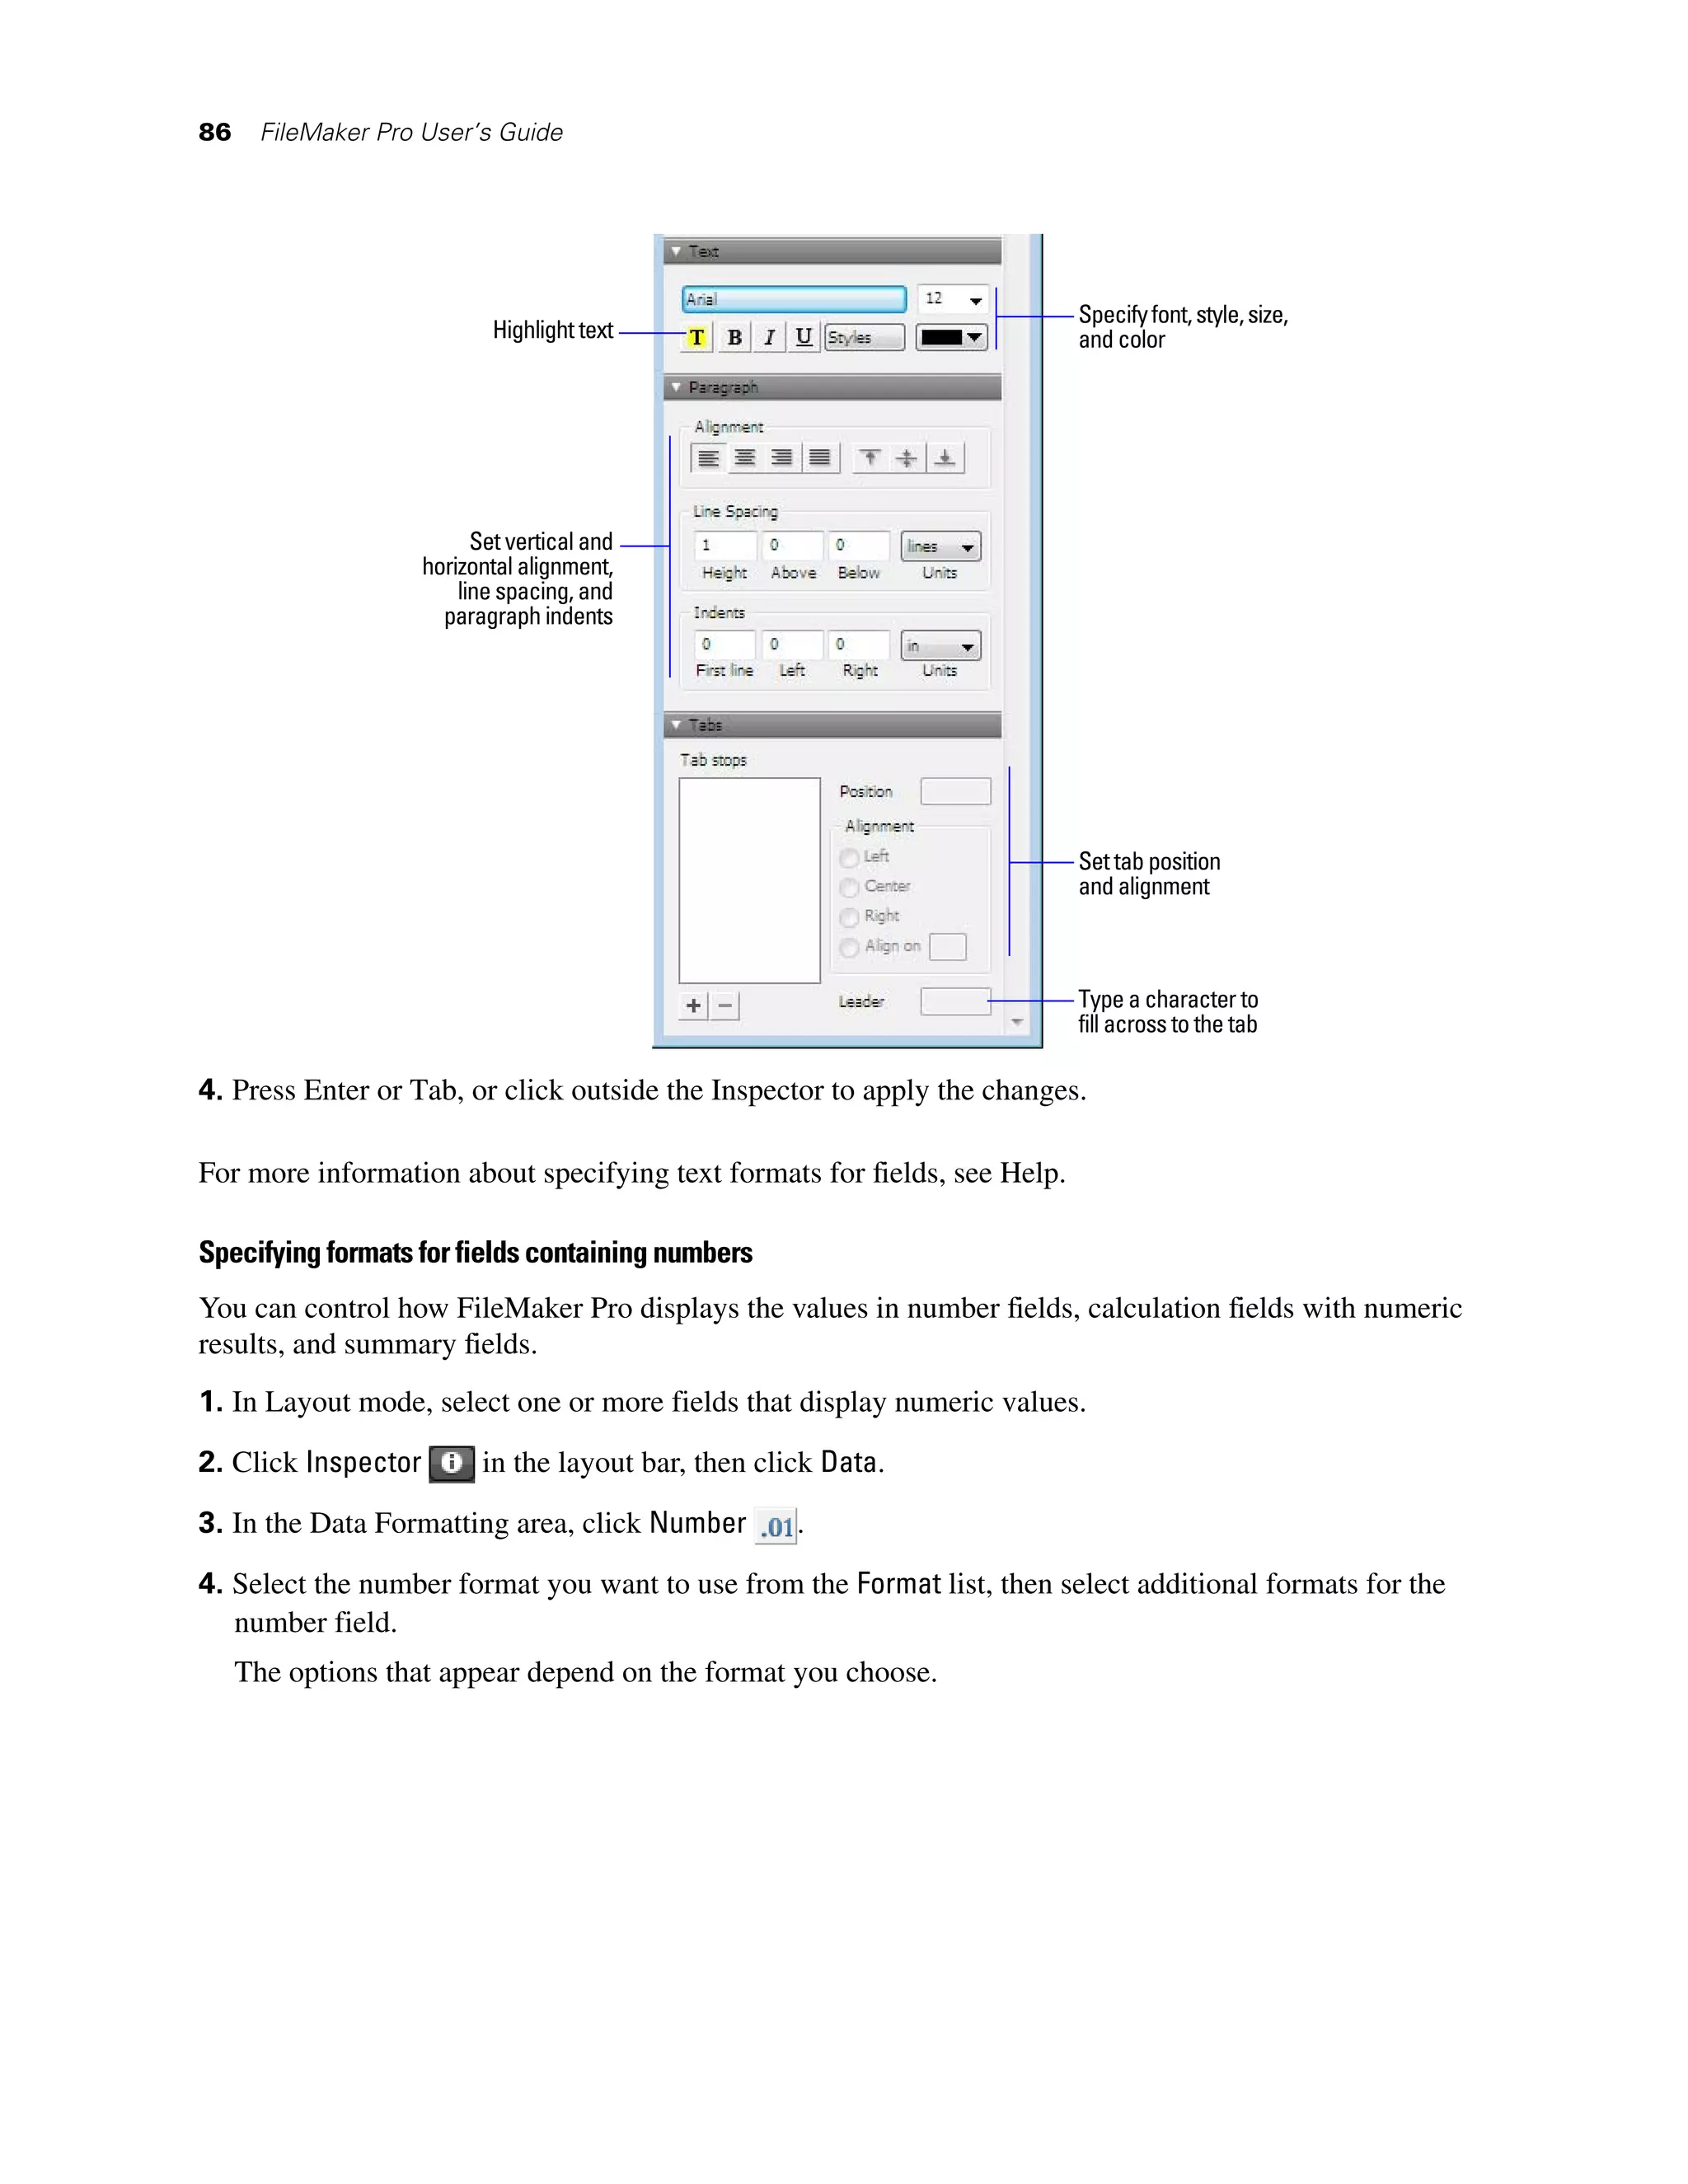
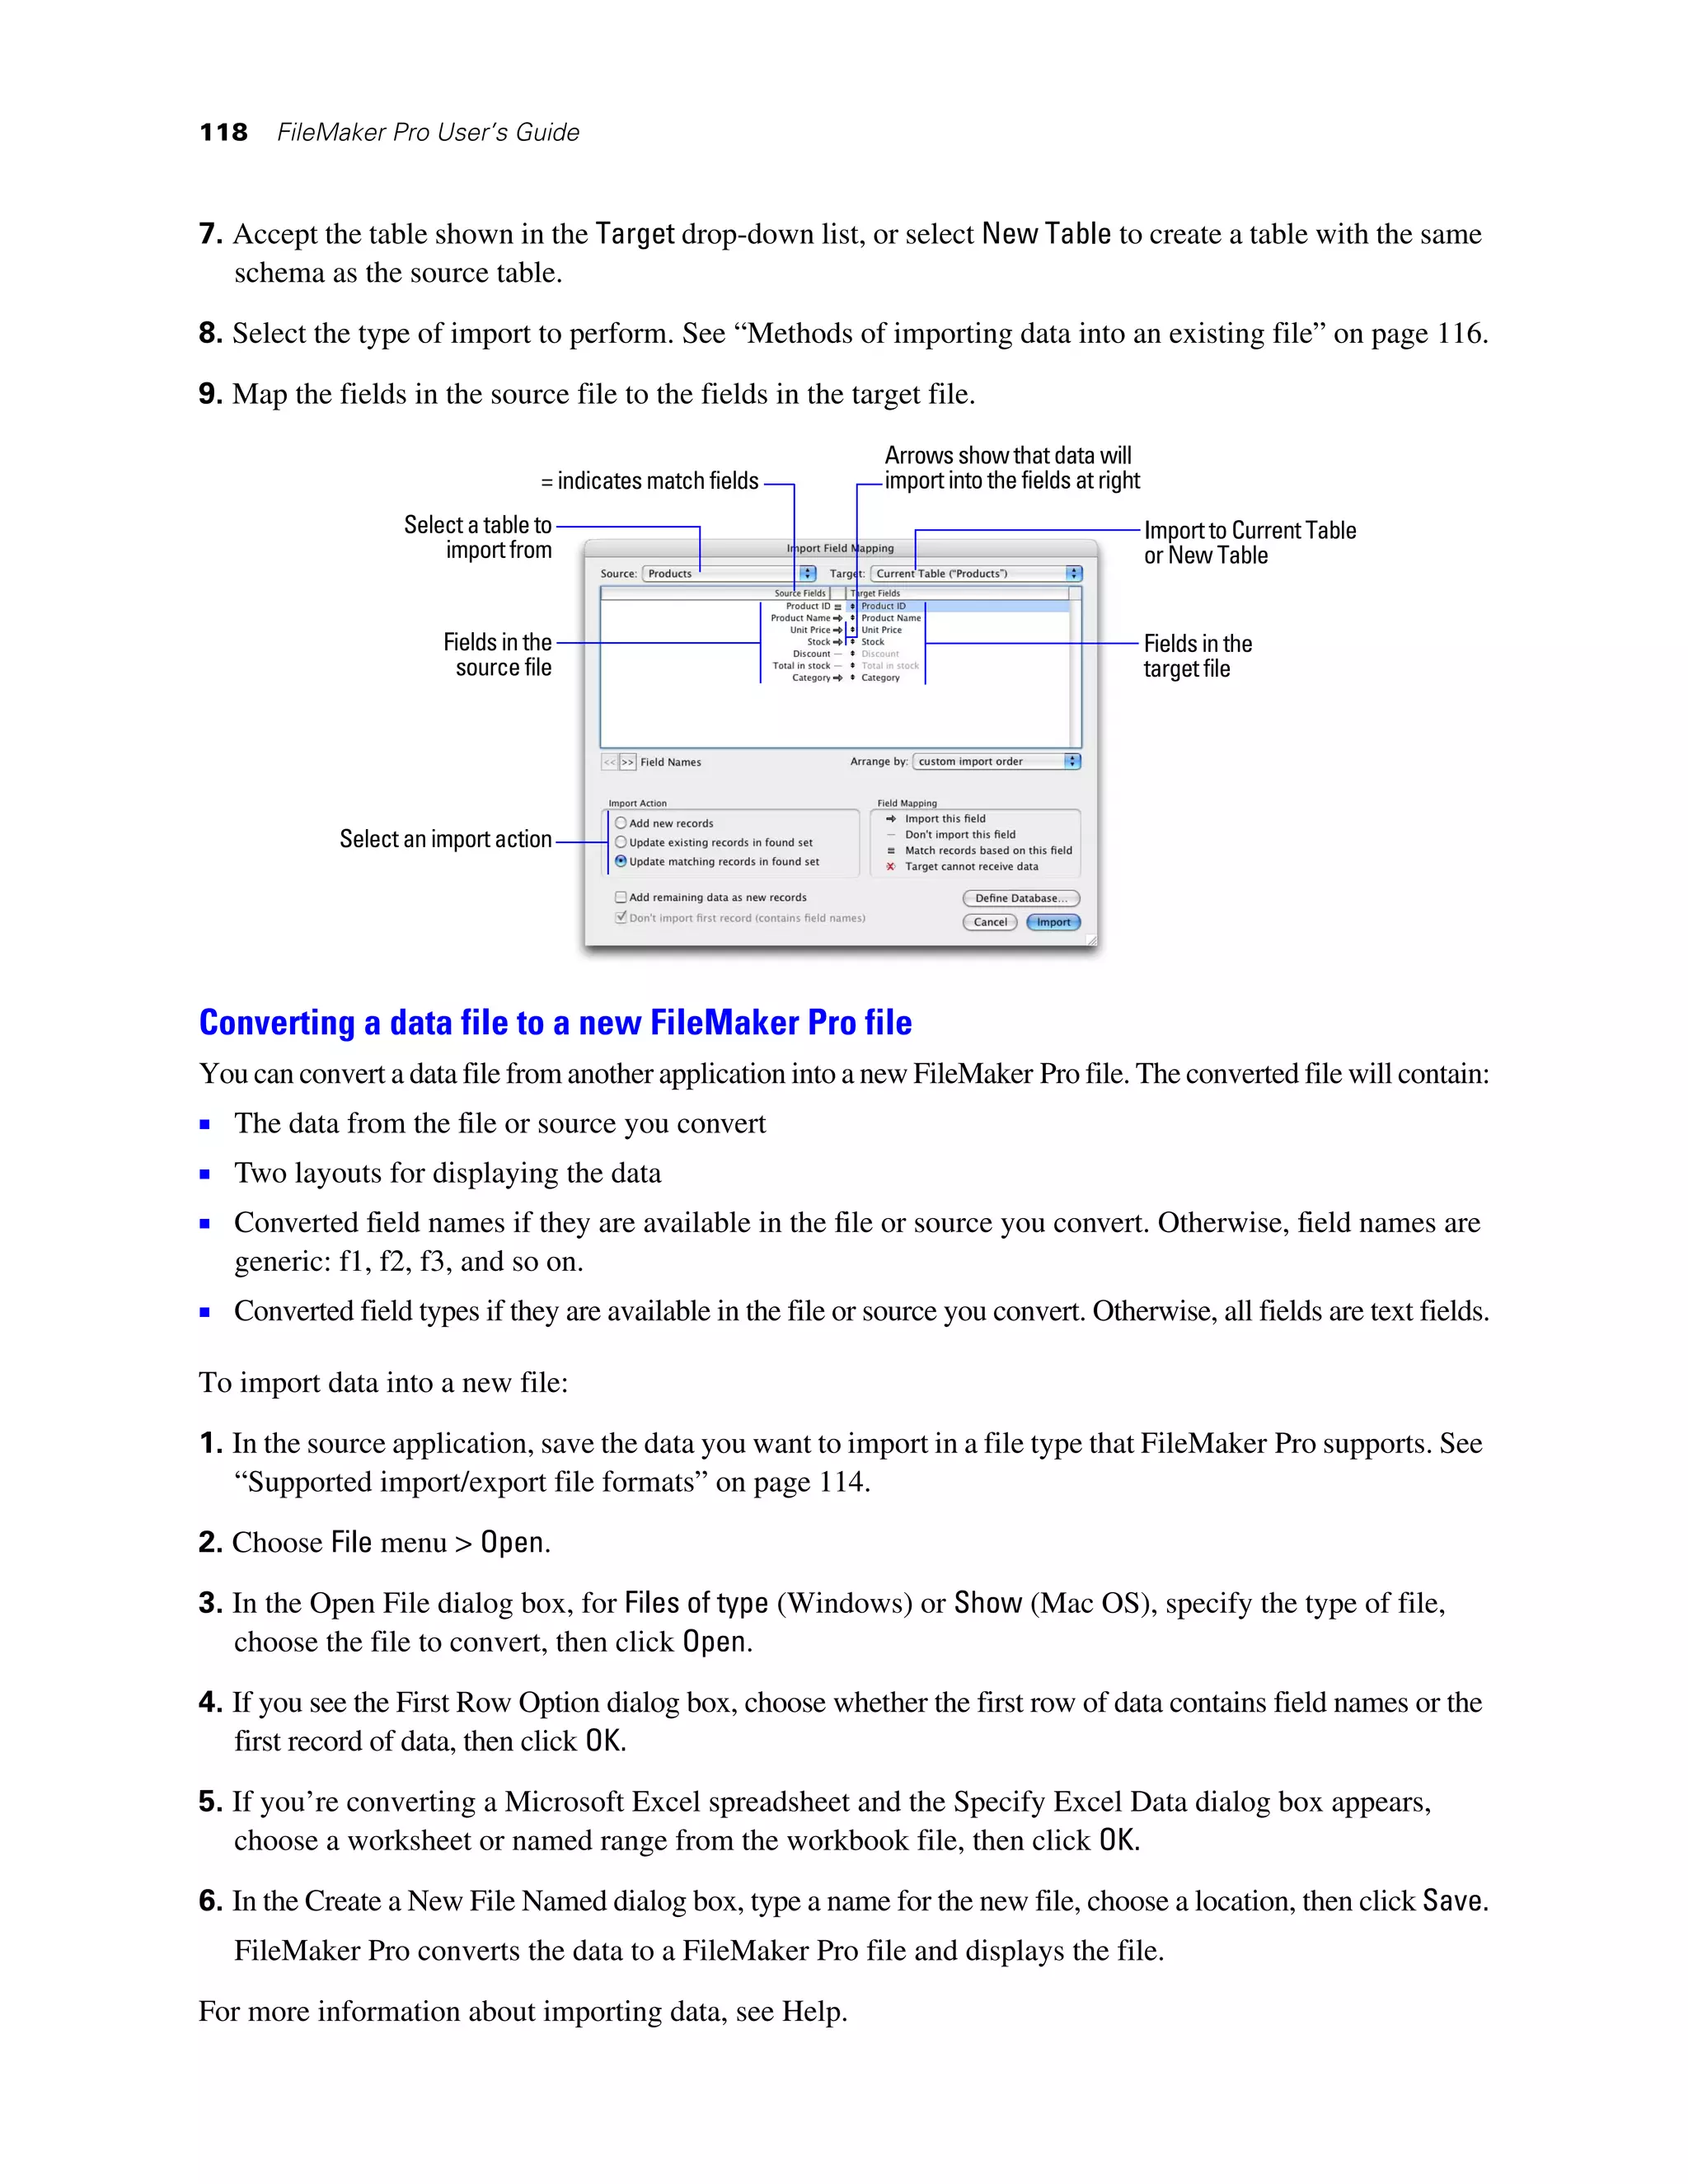
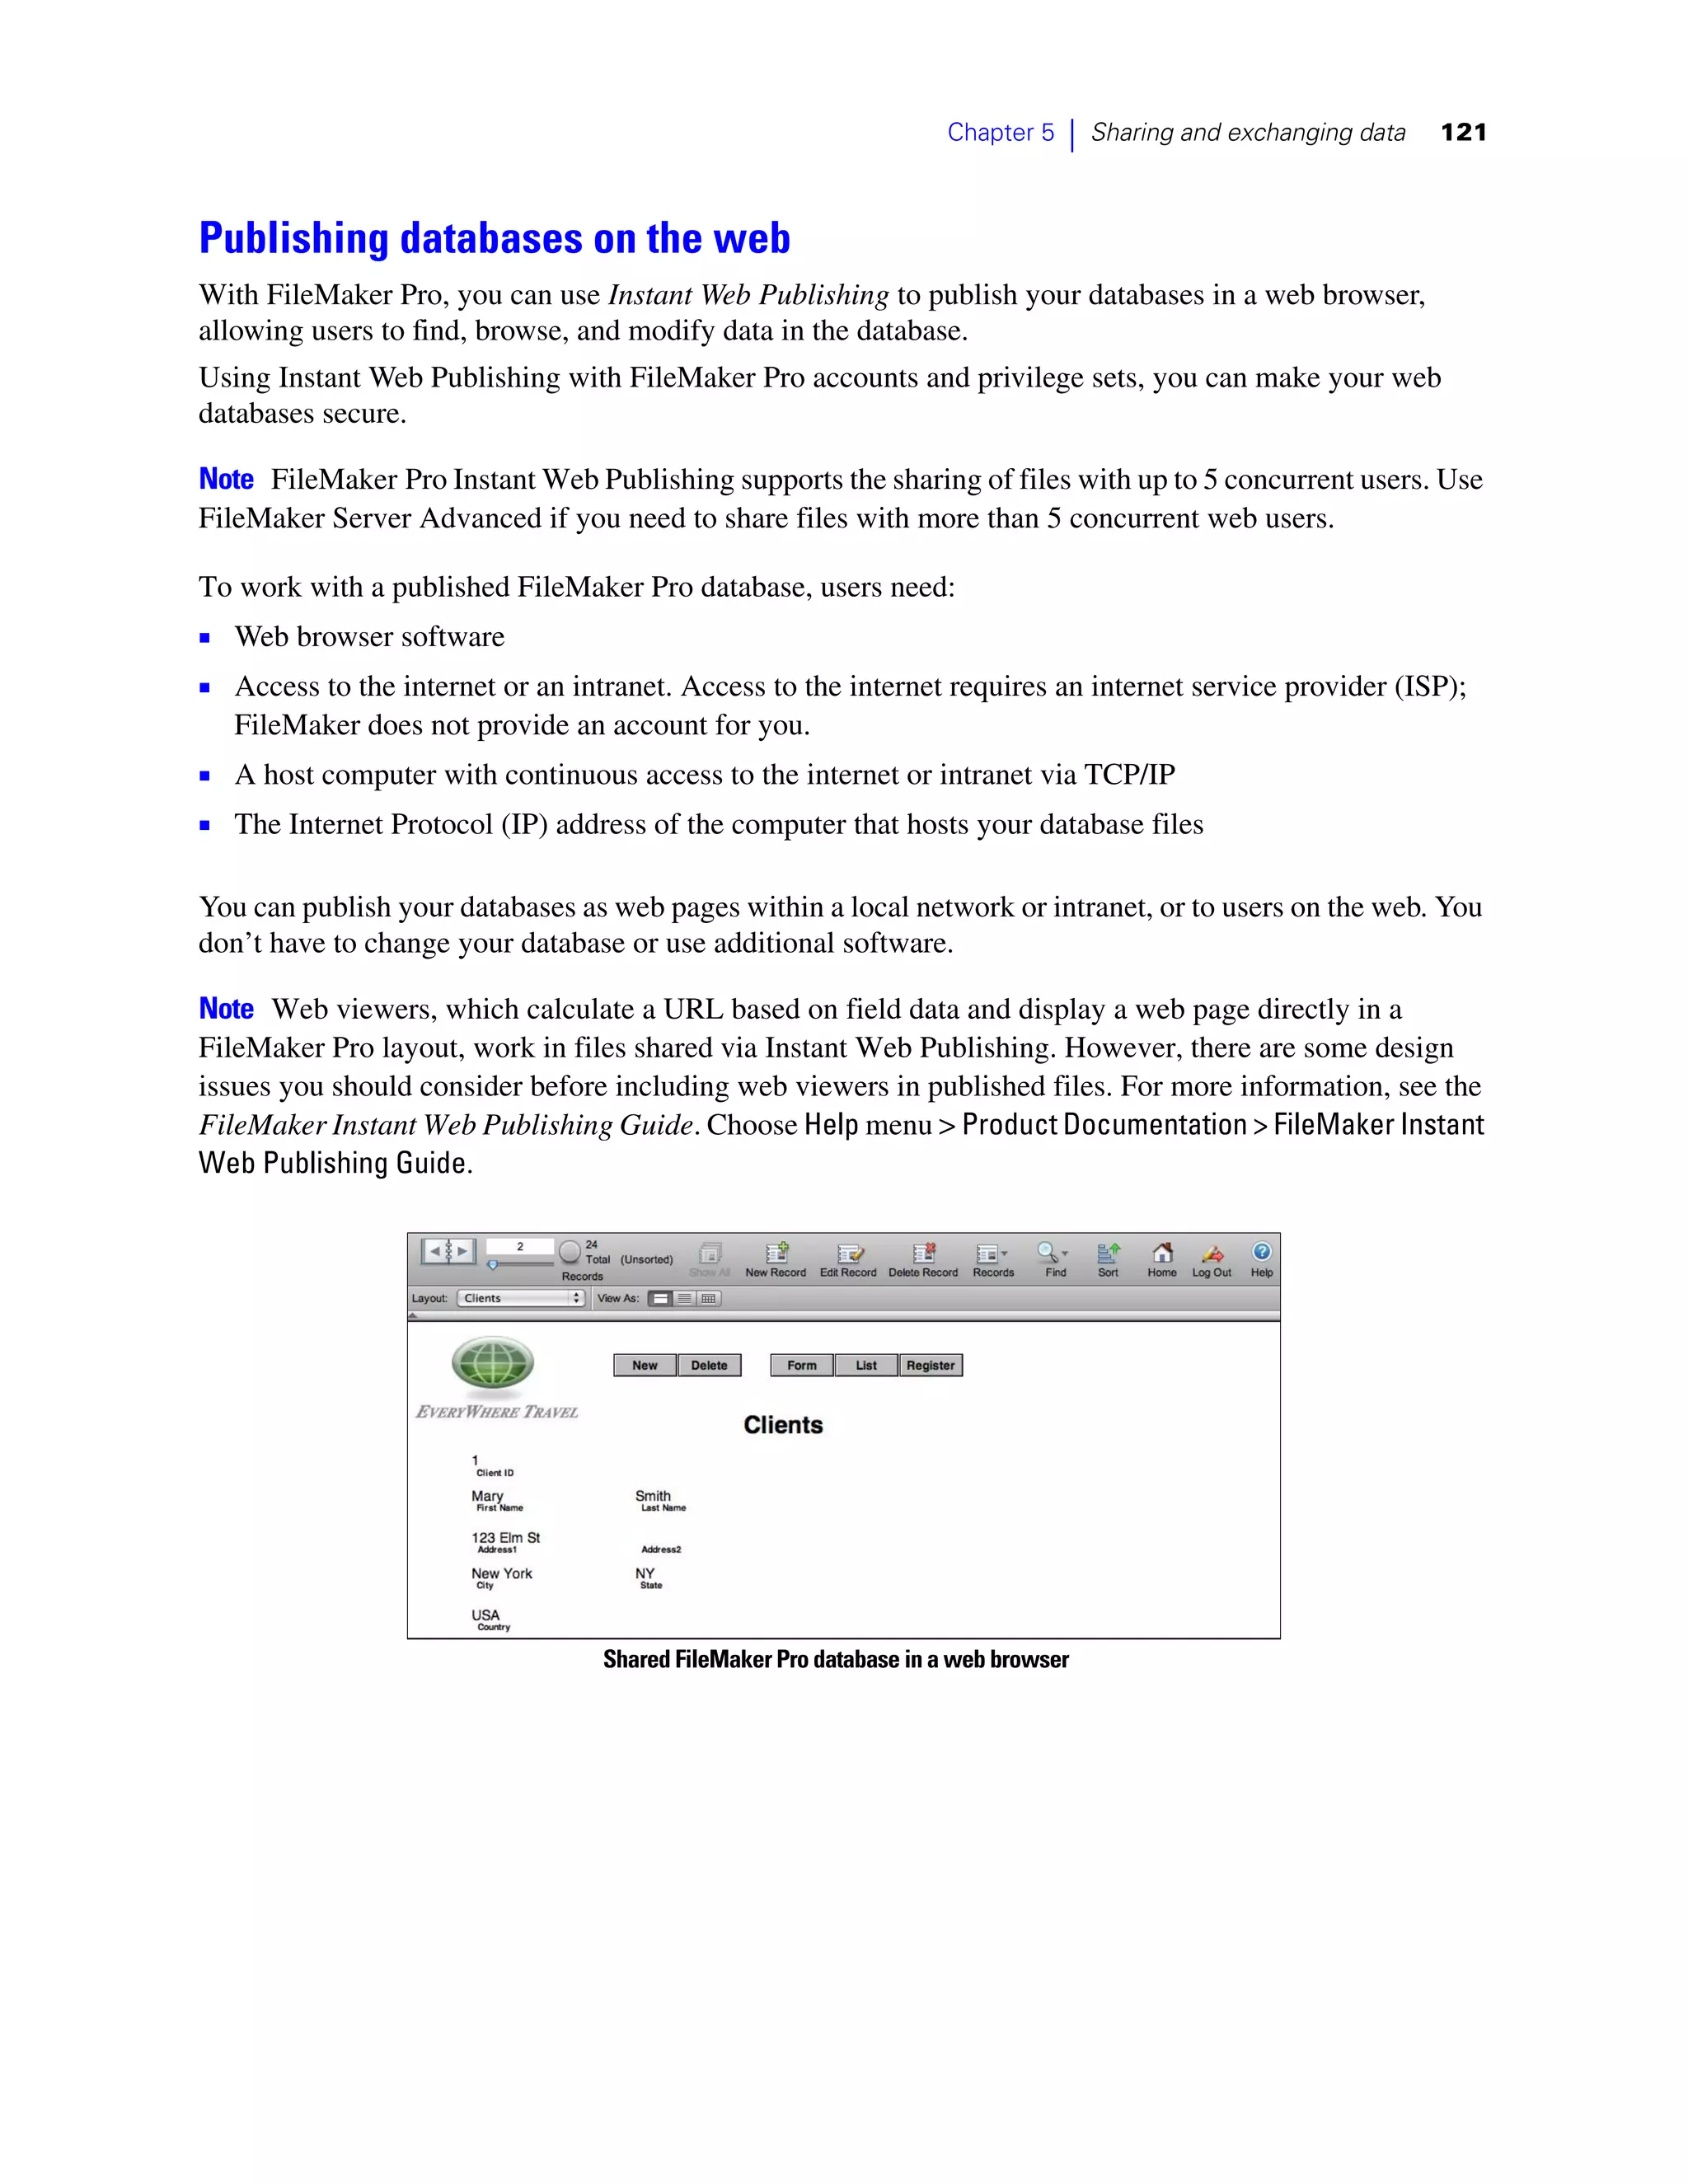
Previewing and printing databases
With FileMaker Pro, you can print:
1 all the records in the database, a subset of the records, or only the current record
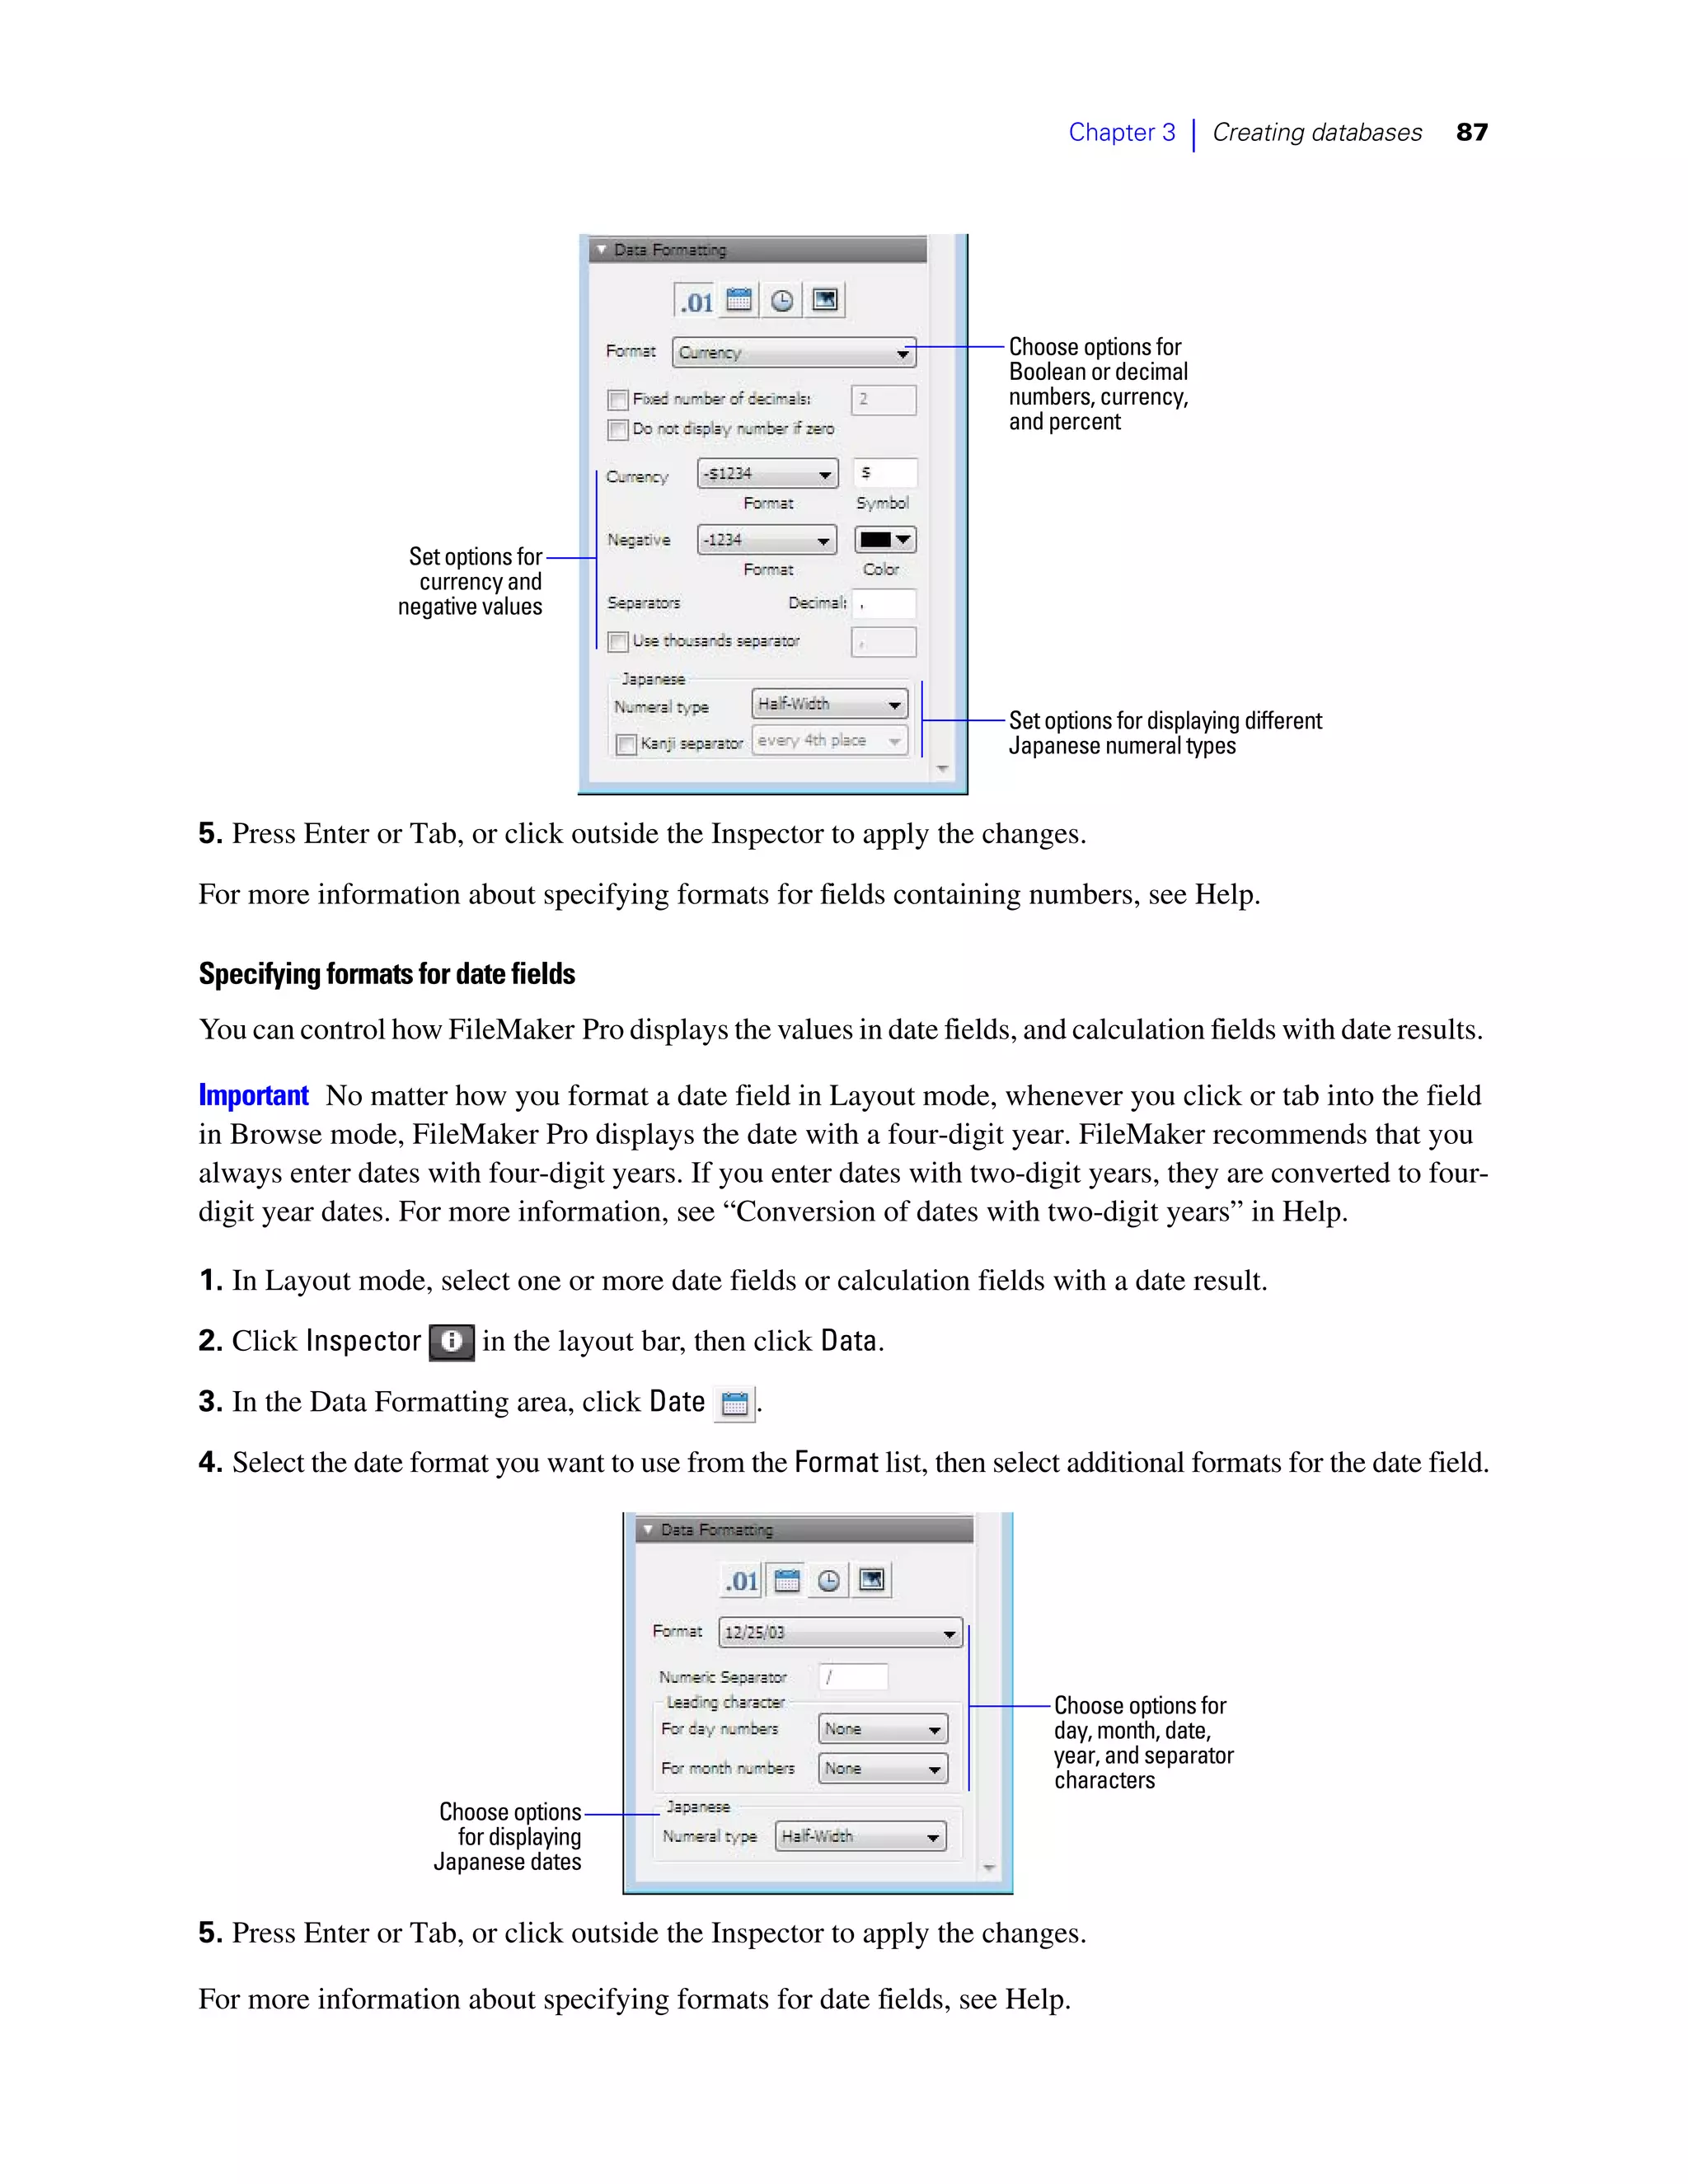
1 a blank record to create a paper form
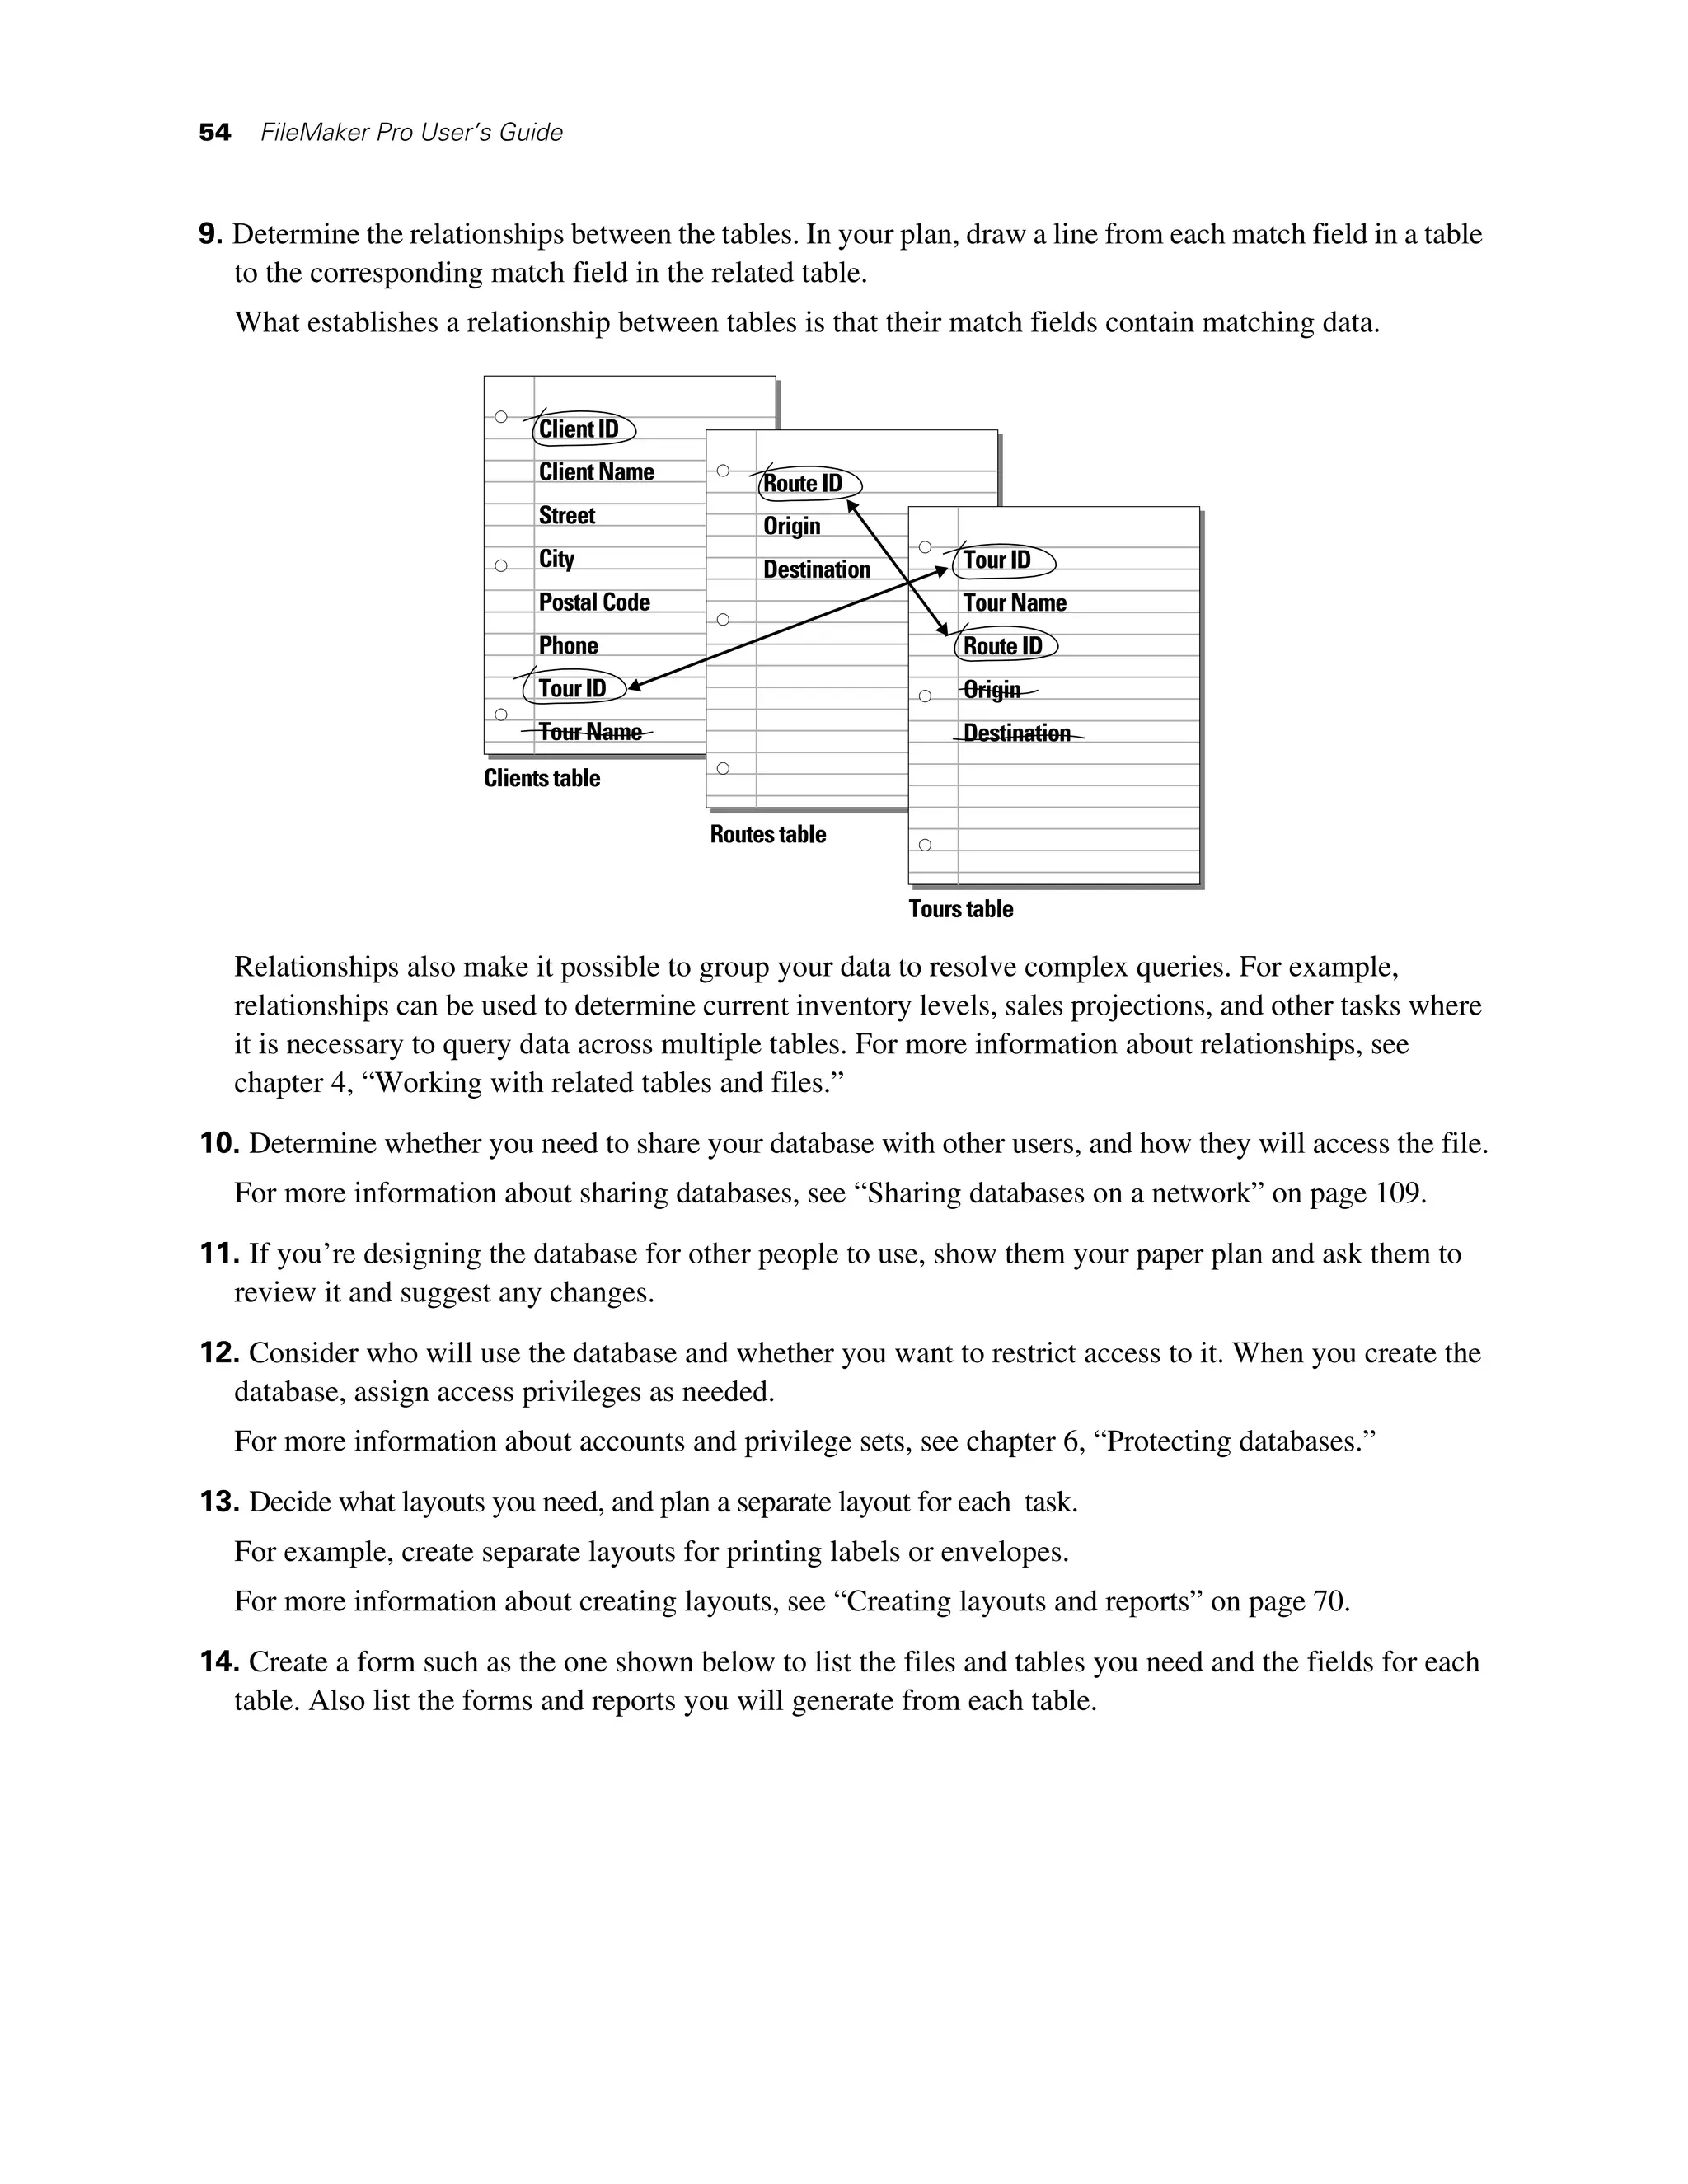
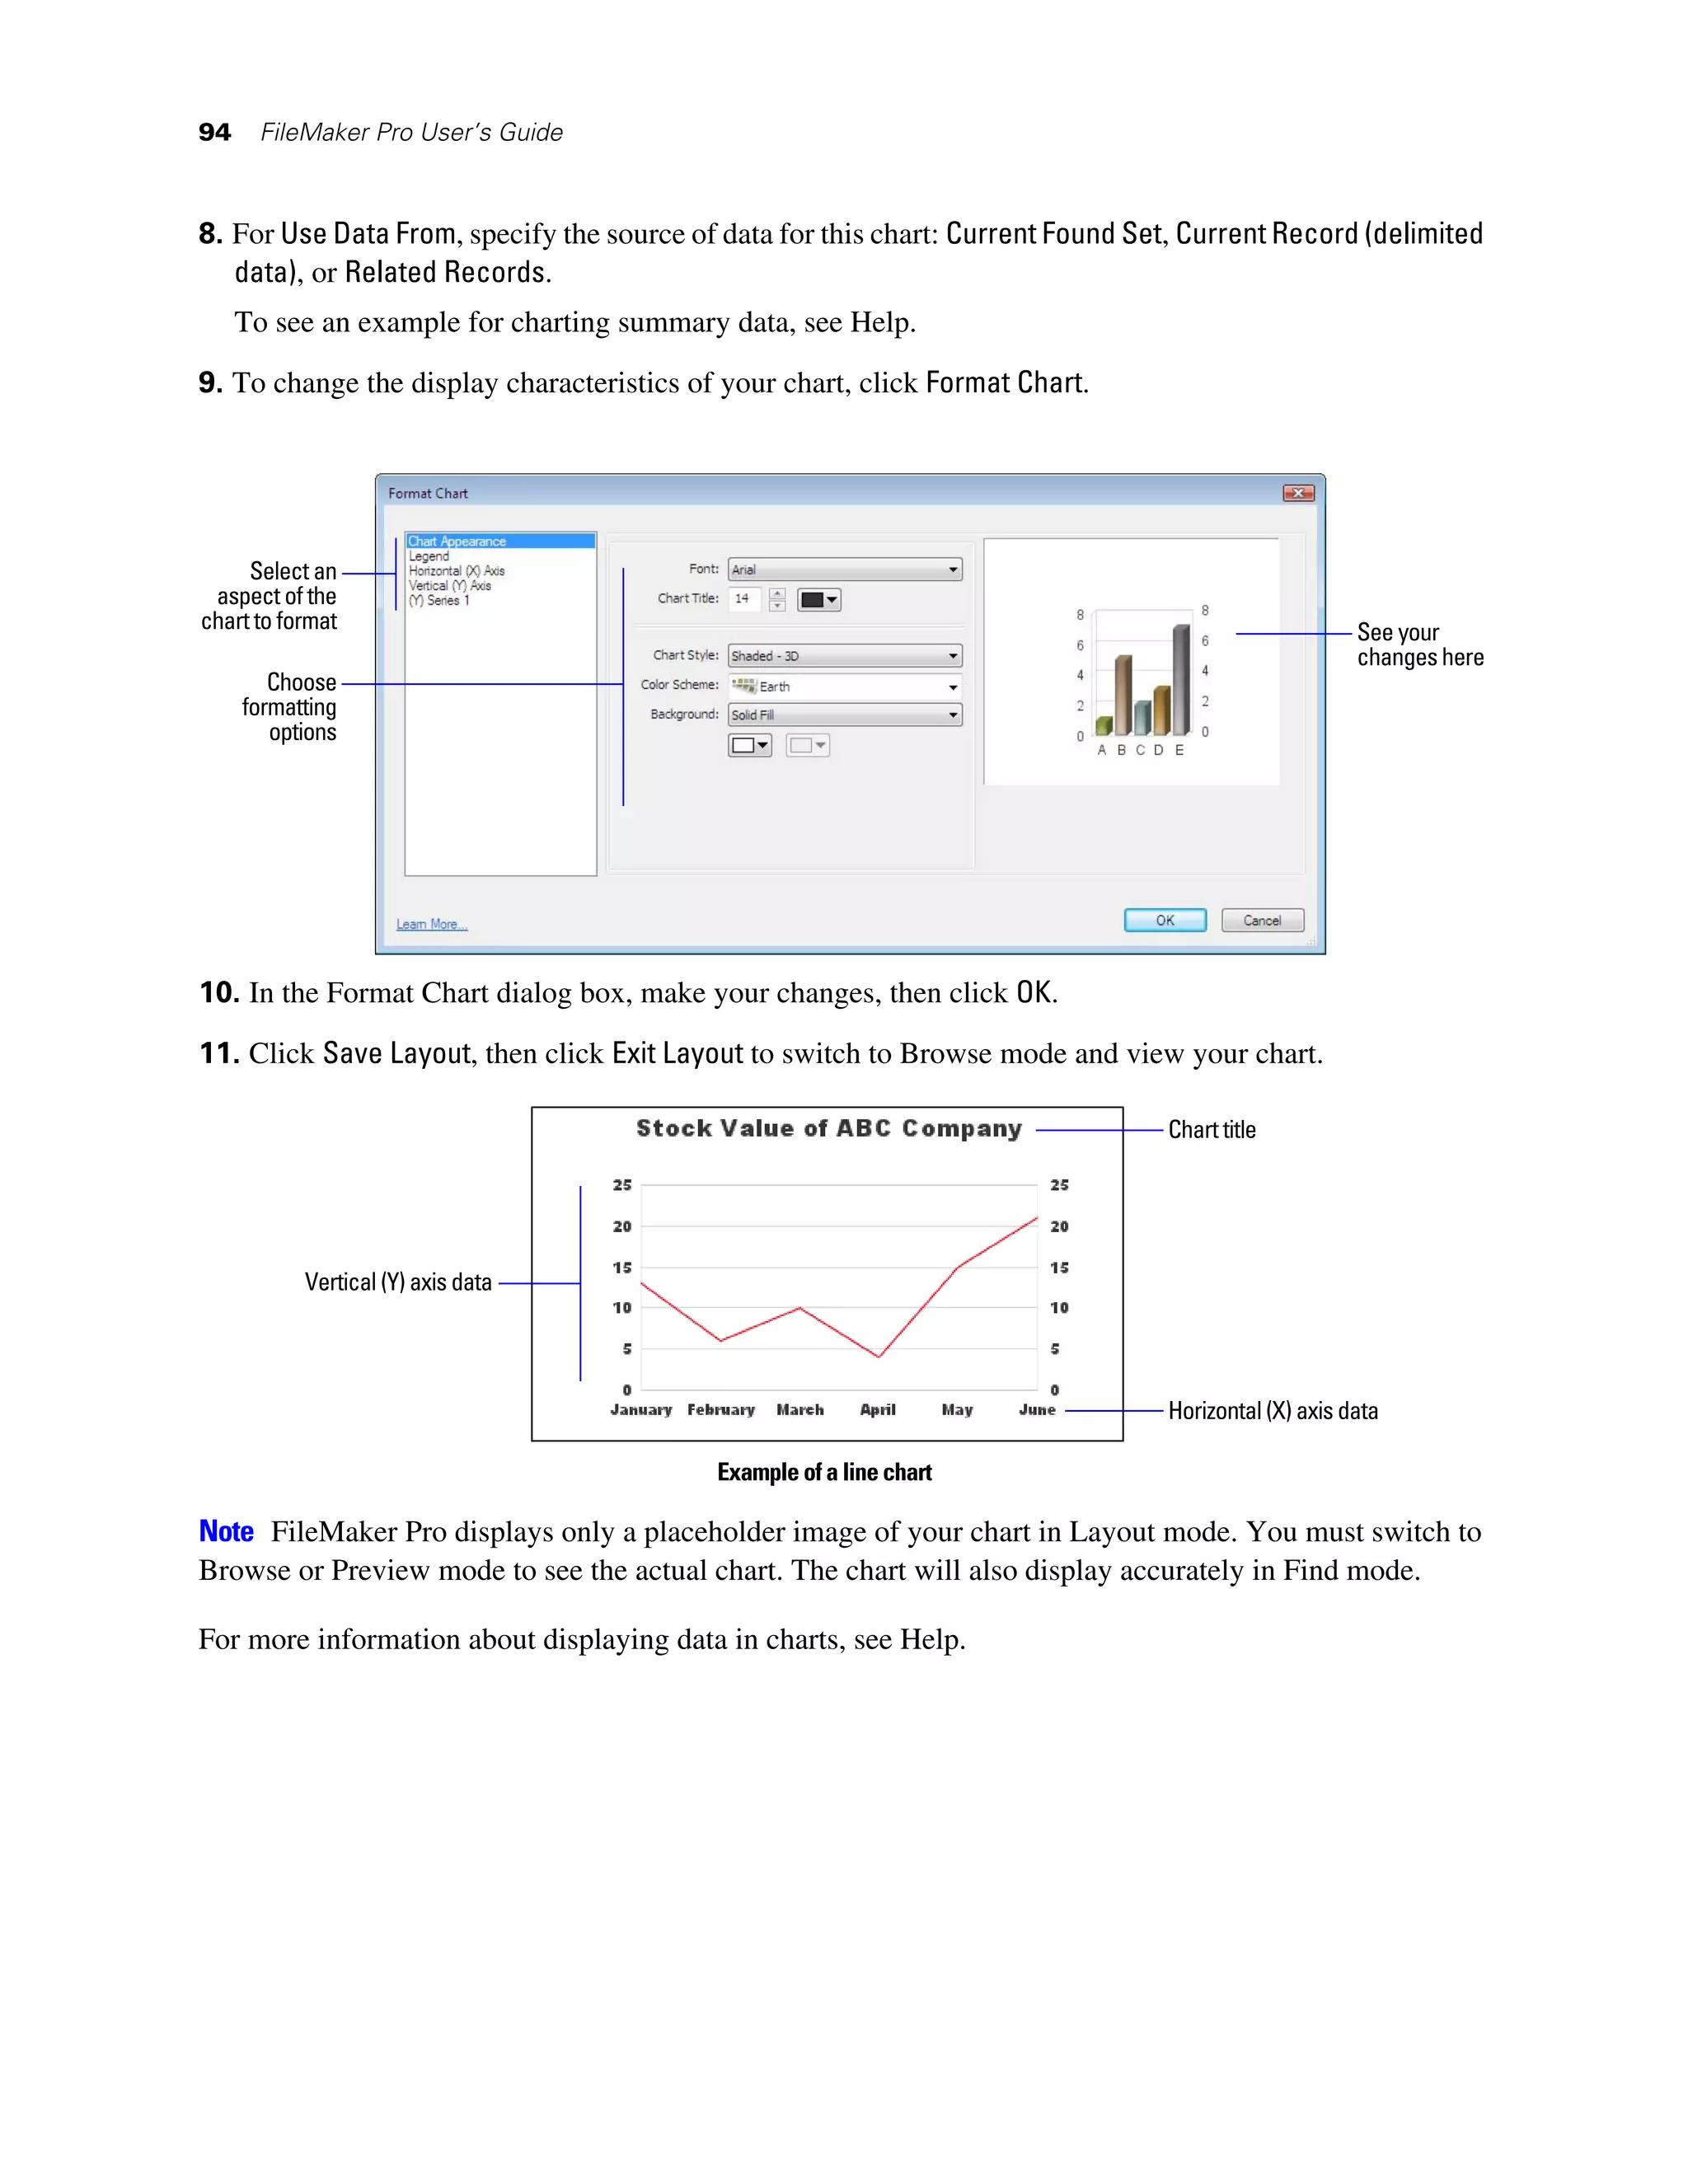
1 definitions of scripts, fields, tables, and relationships to see the structure of your database
1 data saved as a PDF file
FileMaker Pro prints records using the current layout. You can create layouts to print the same data in
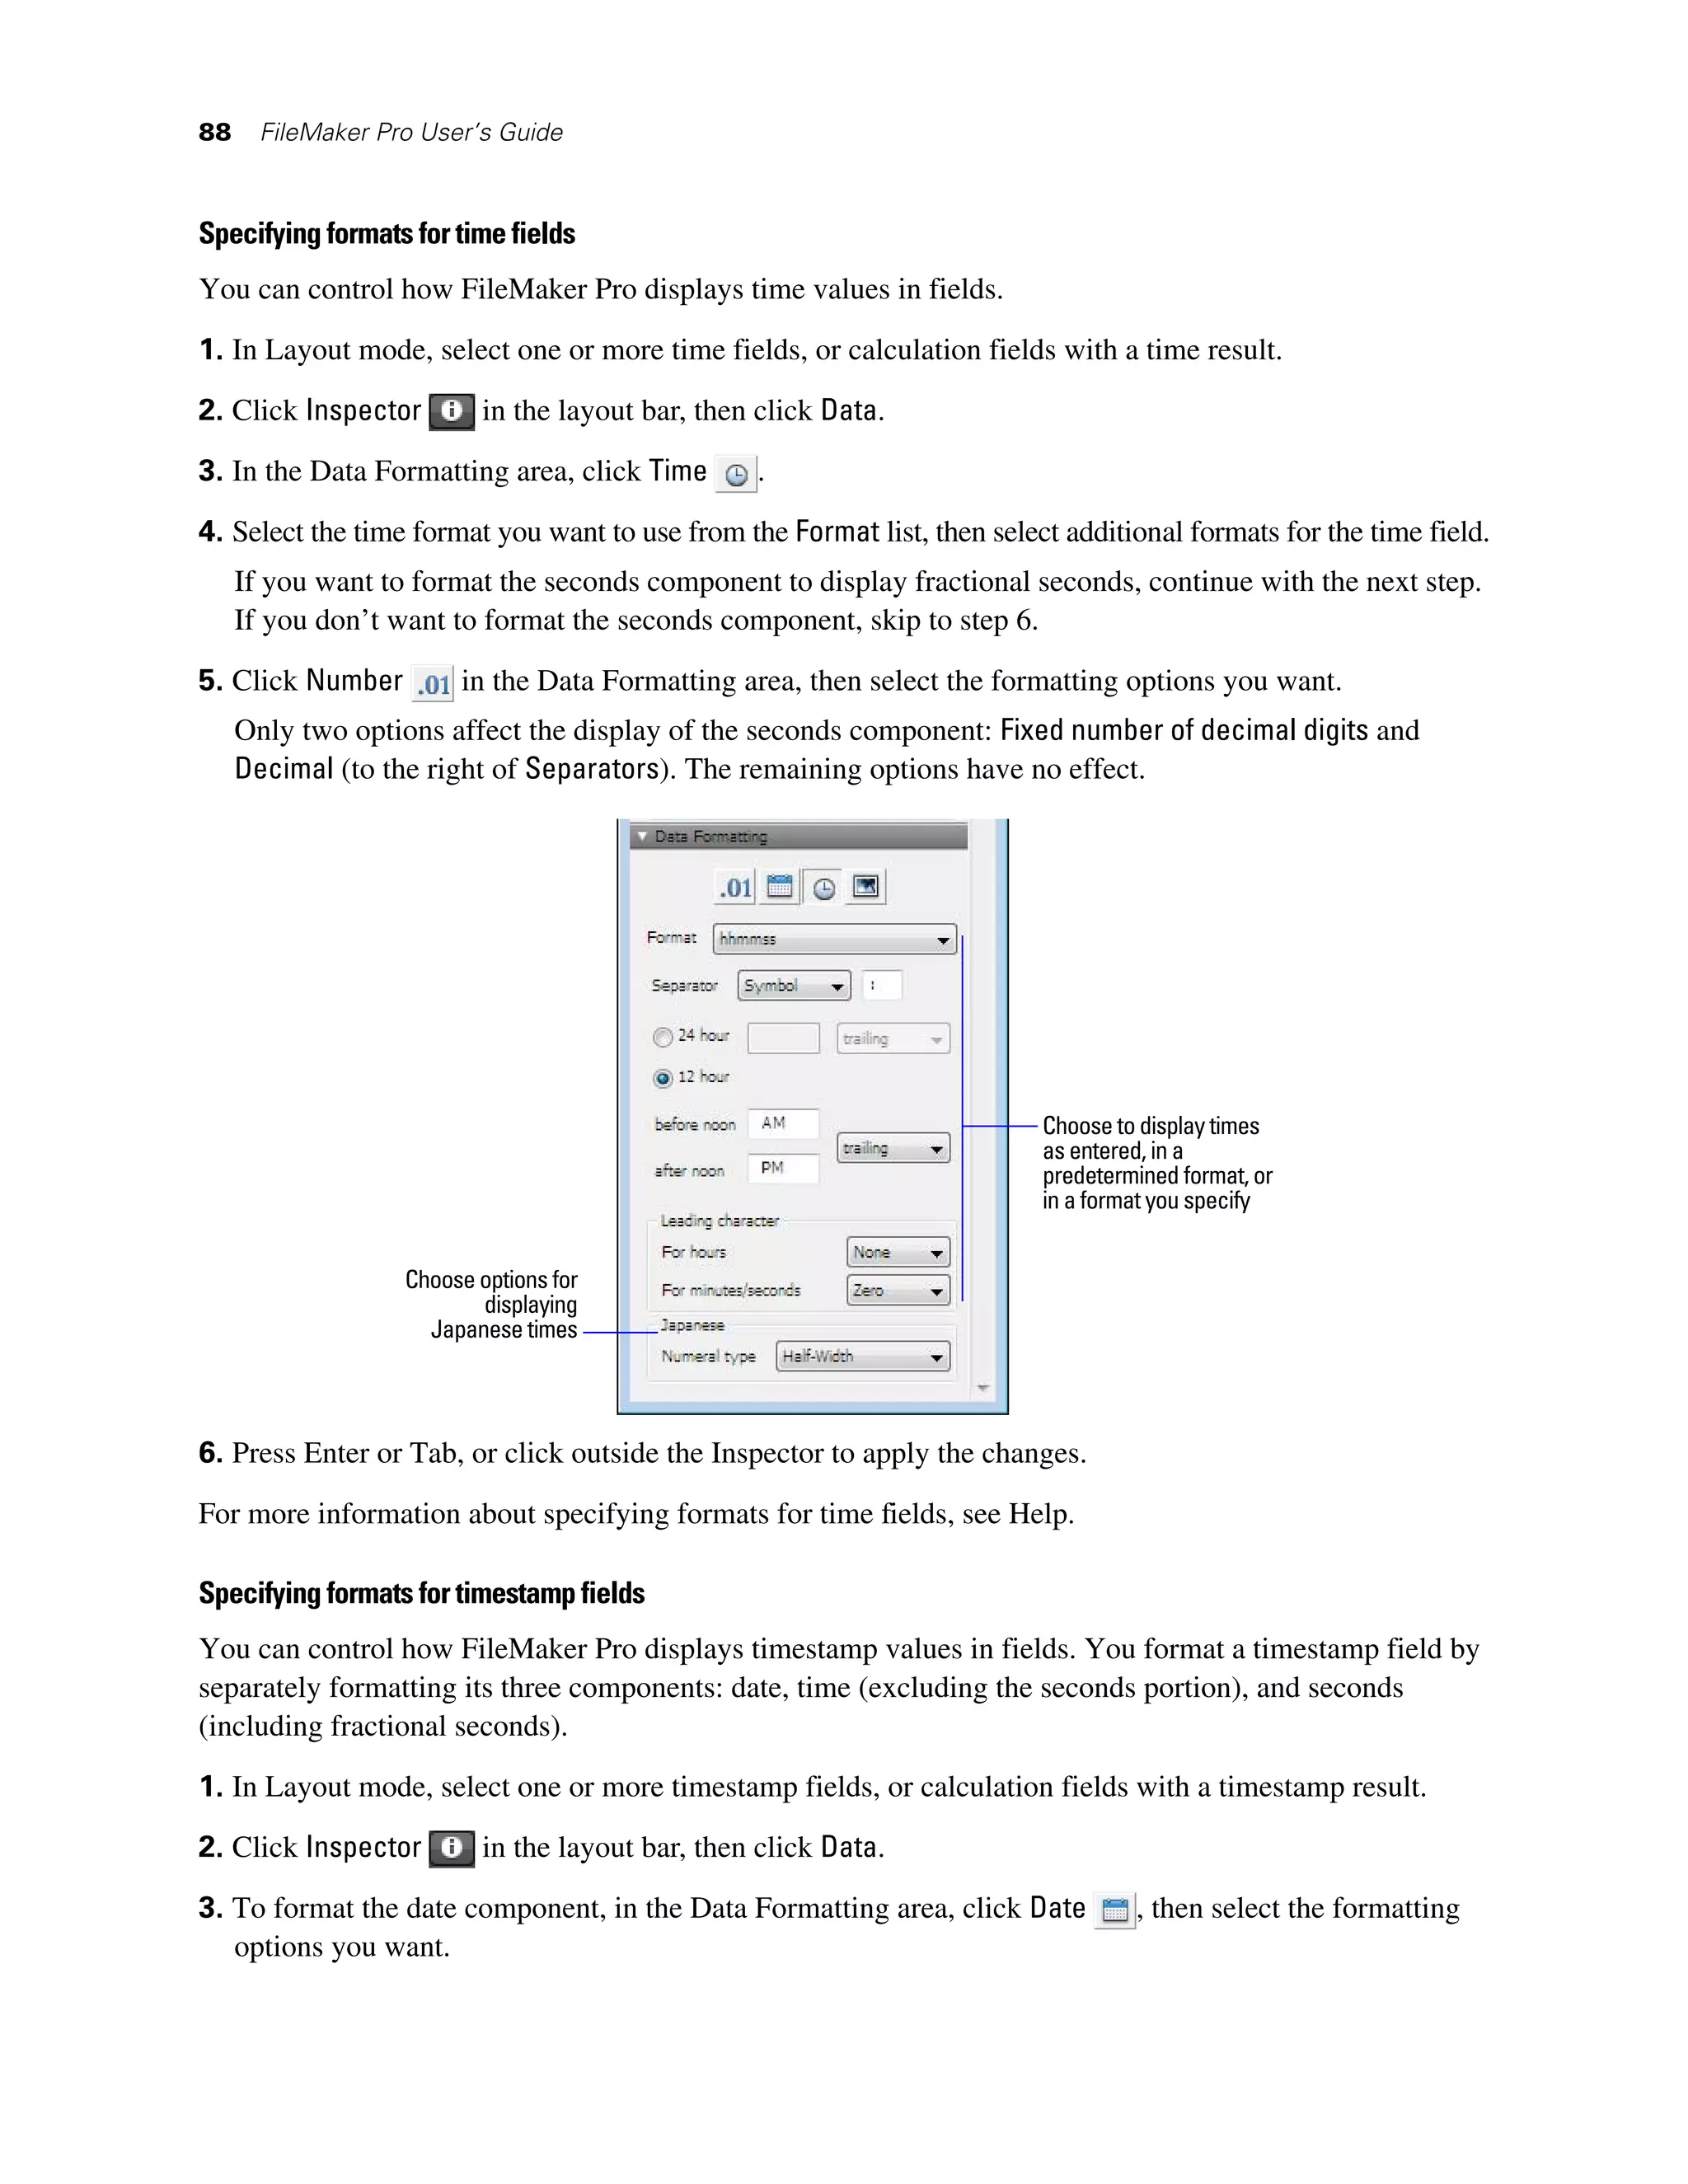
different ways. For example, you can print records one by one, in a columnar list, or in a complex sorted
report with totals, headers, and footers. You can also create layouts for mailing labels or envelopes.
The New Layout/Report assistant (in Layout mode) makes it easy to create such layouts and reports. See
“Creating layouts and reports” on page 70.
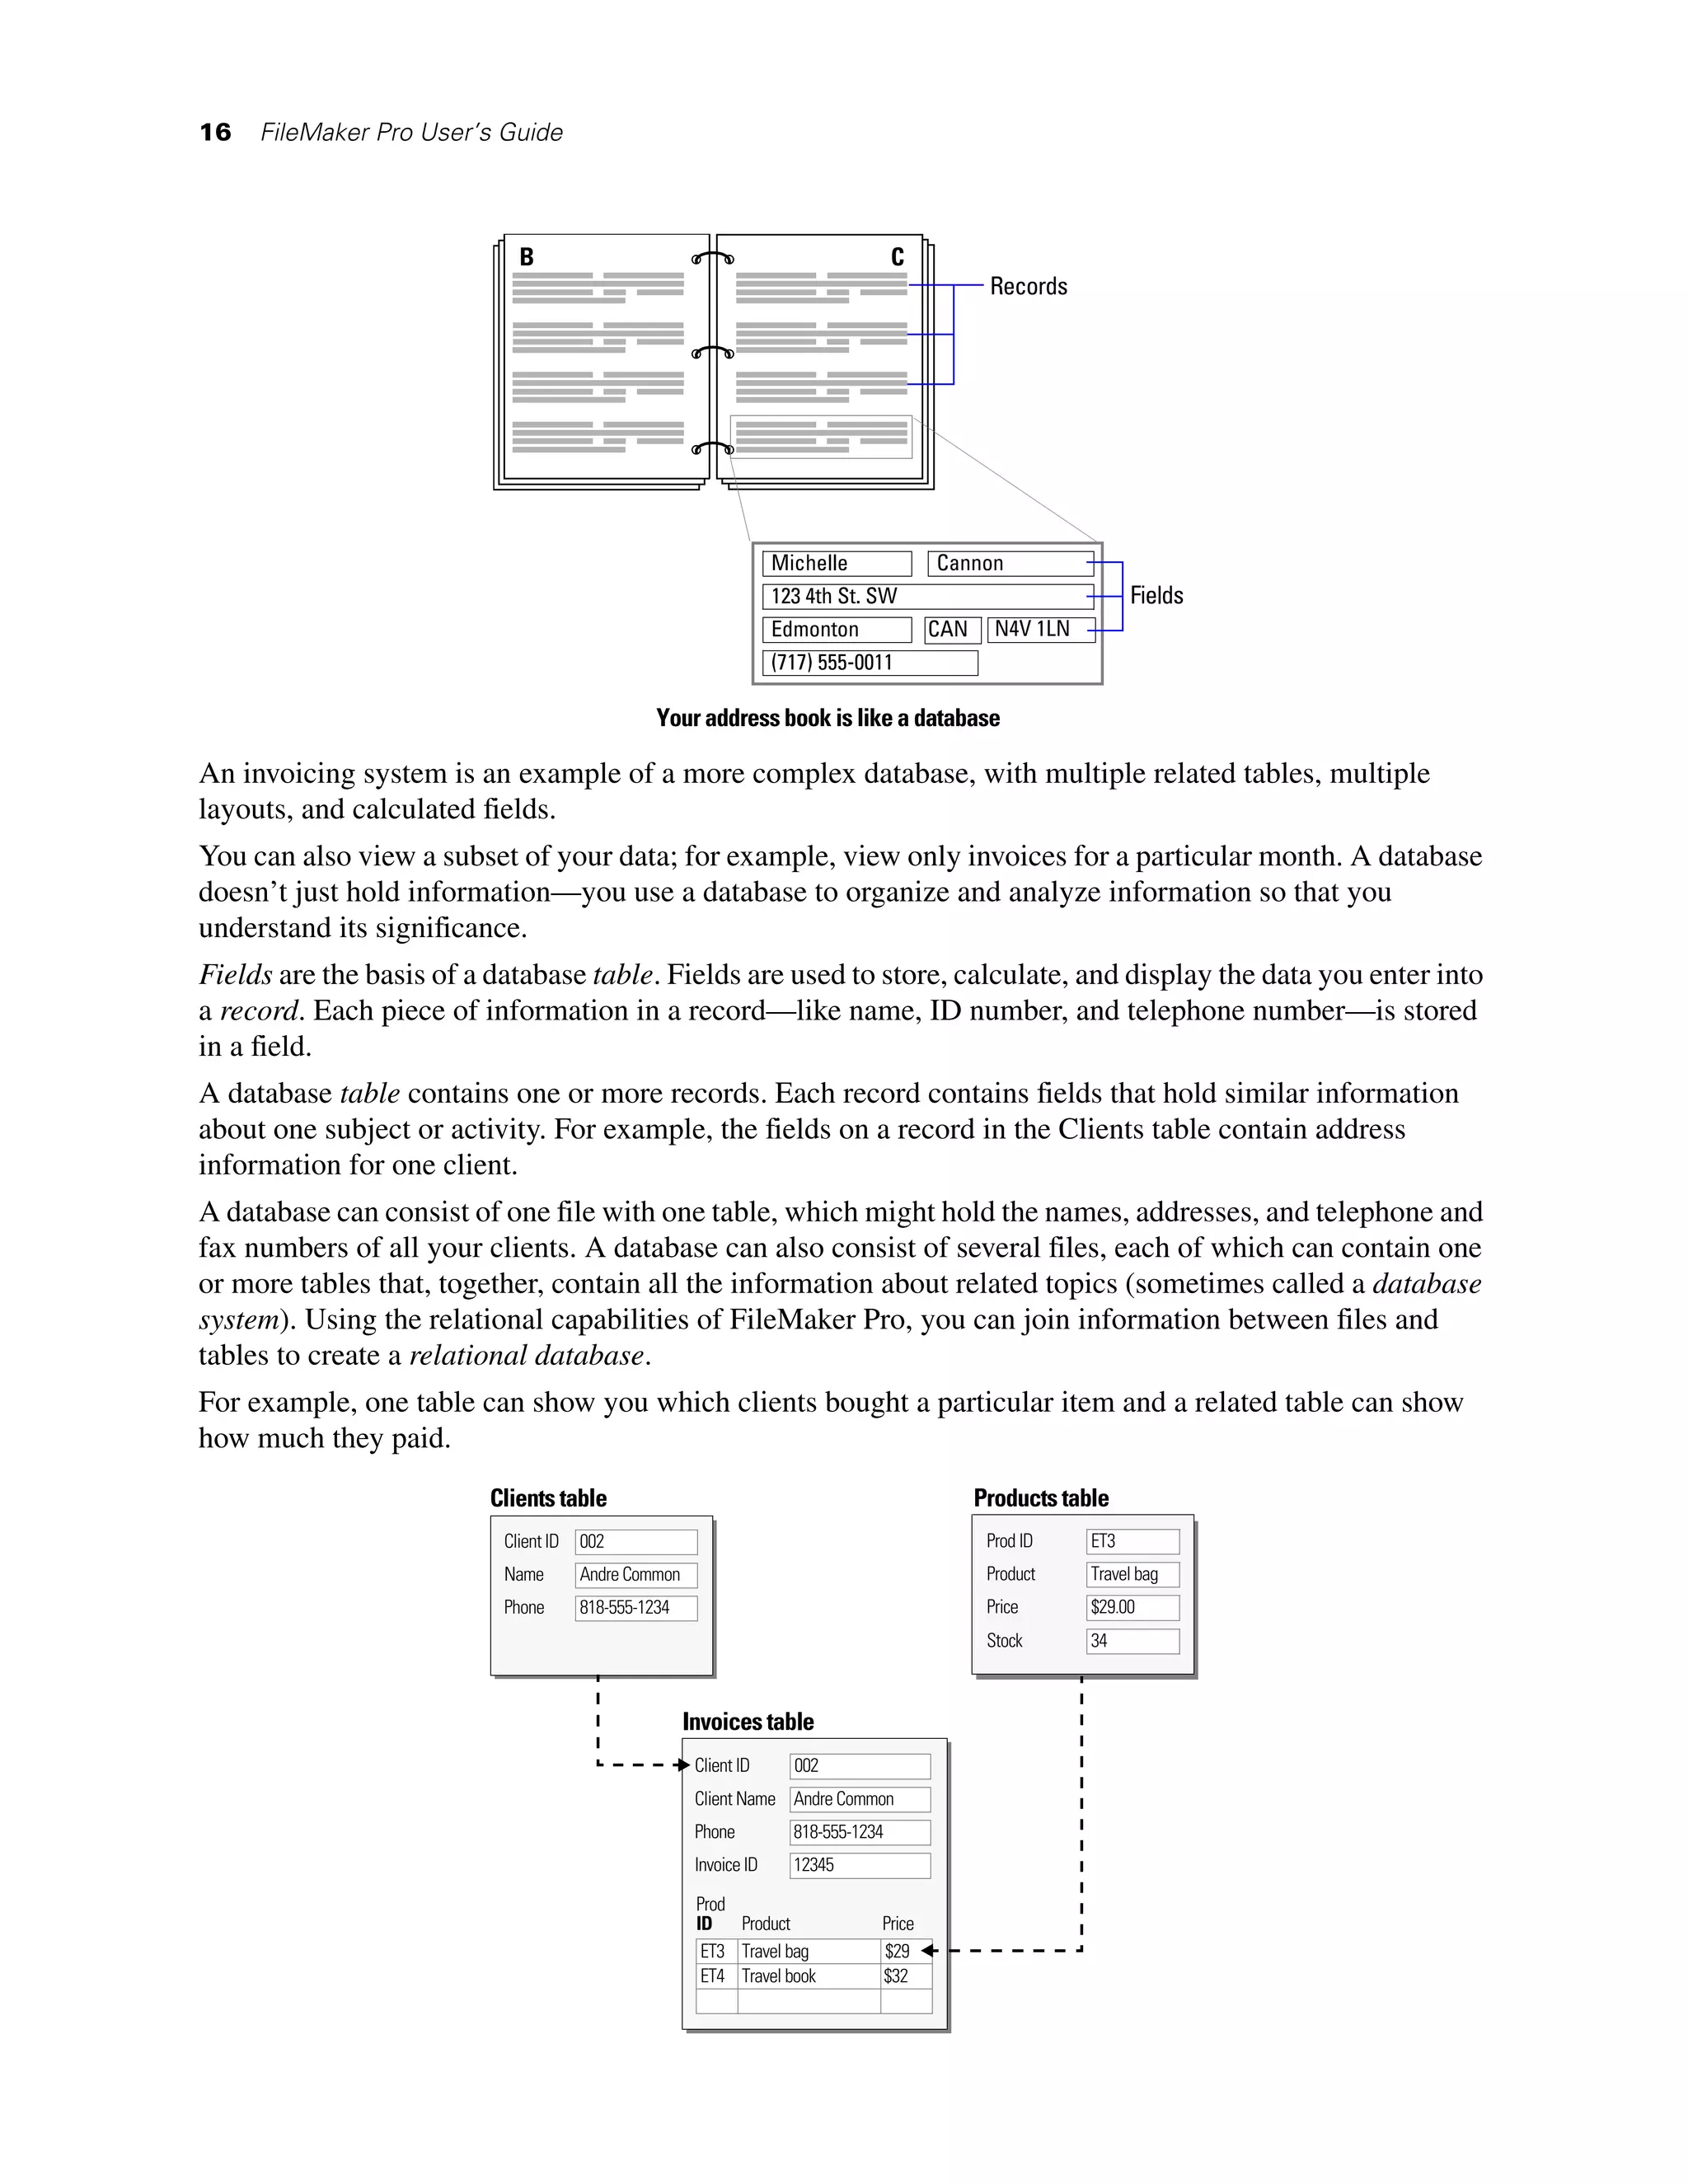
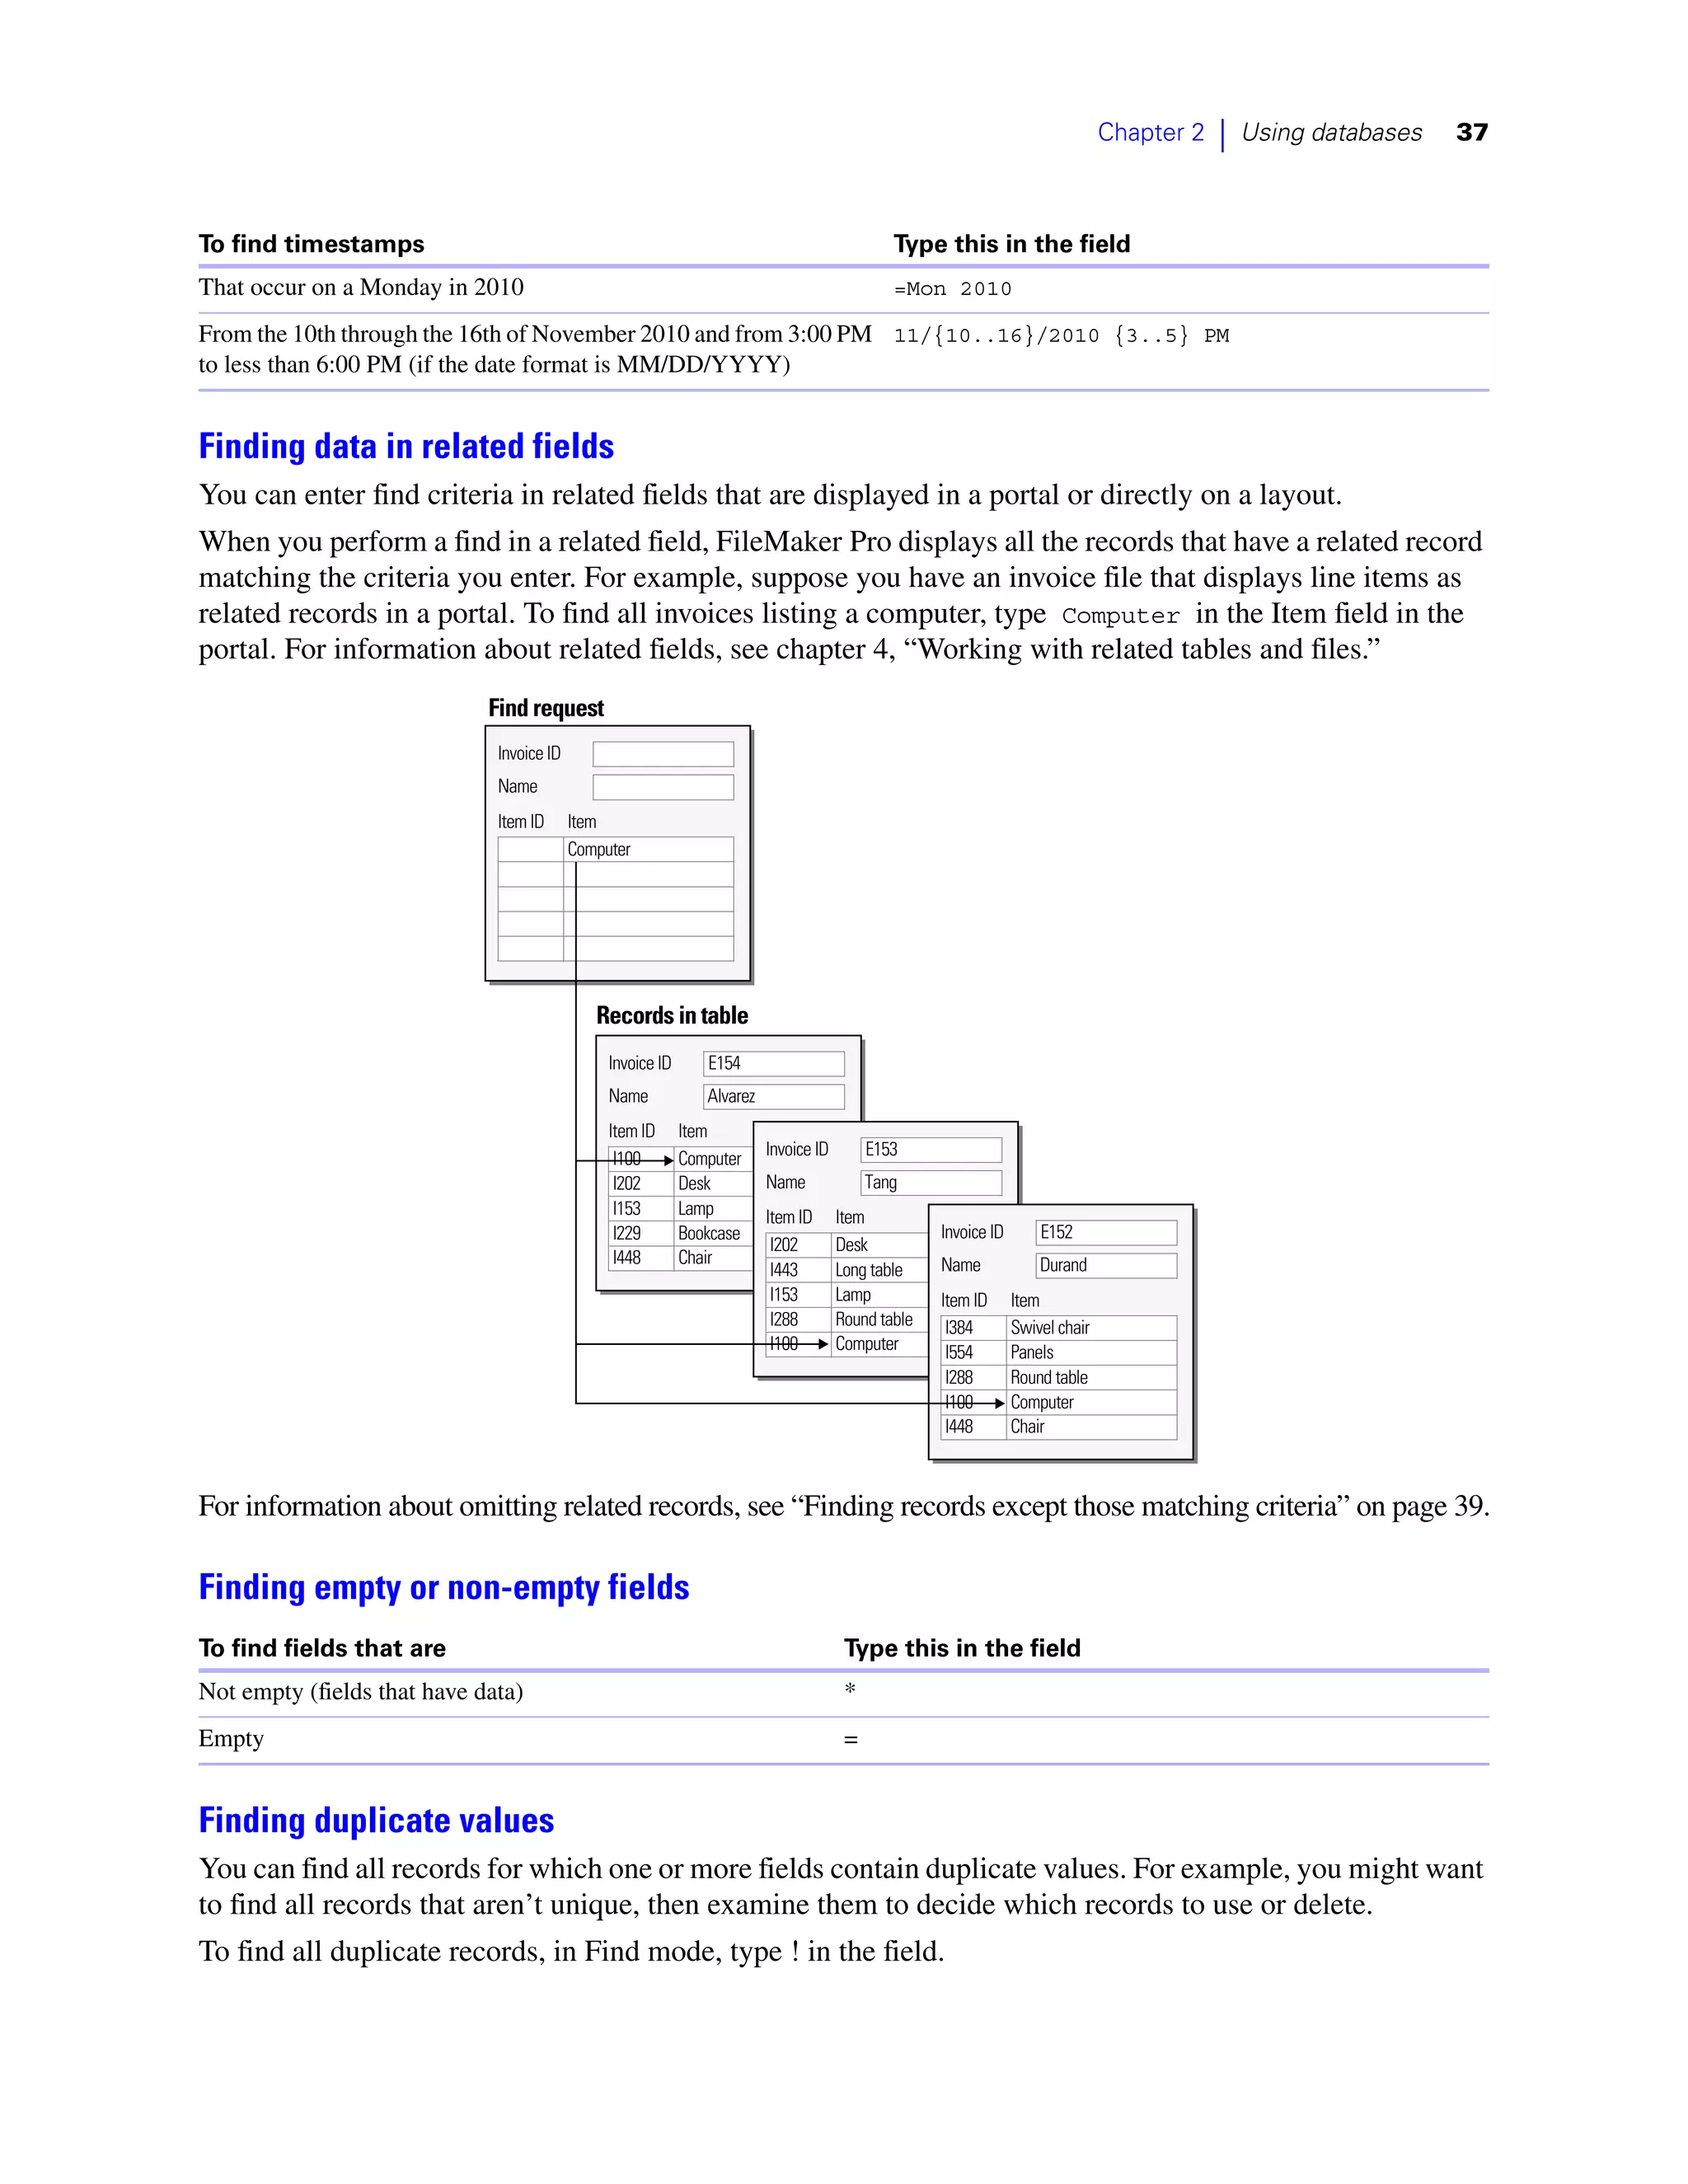
Phone List
Name Phone
Juanita Alvarez 408-555-1234 Phone List
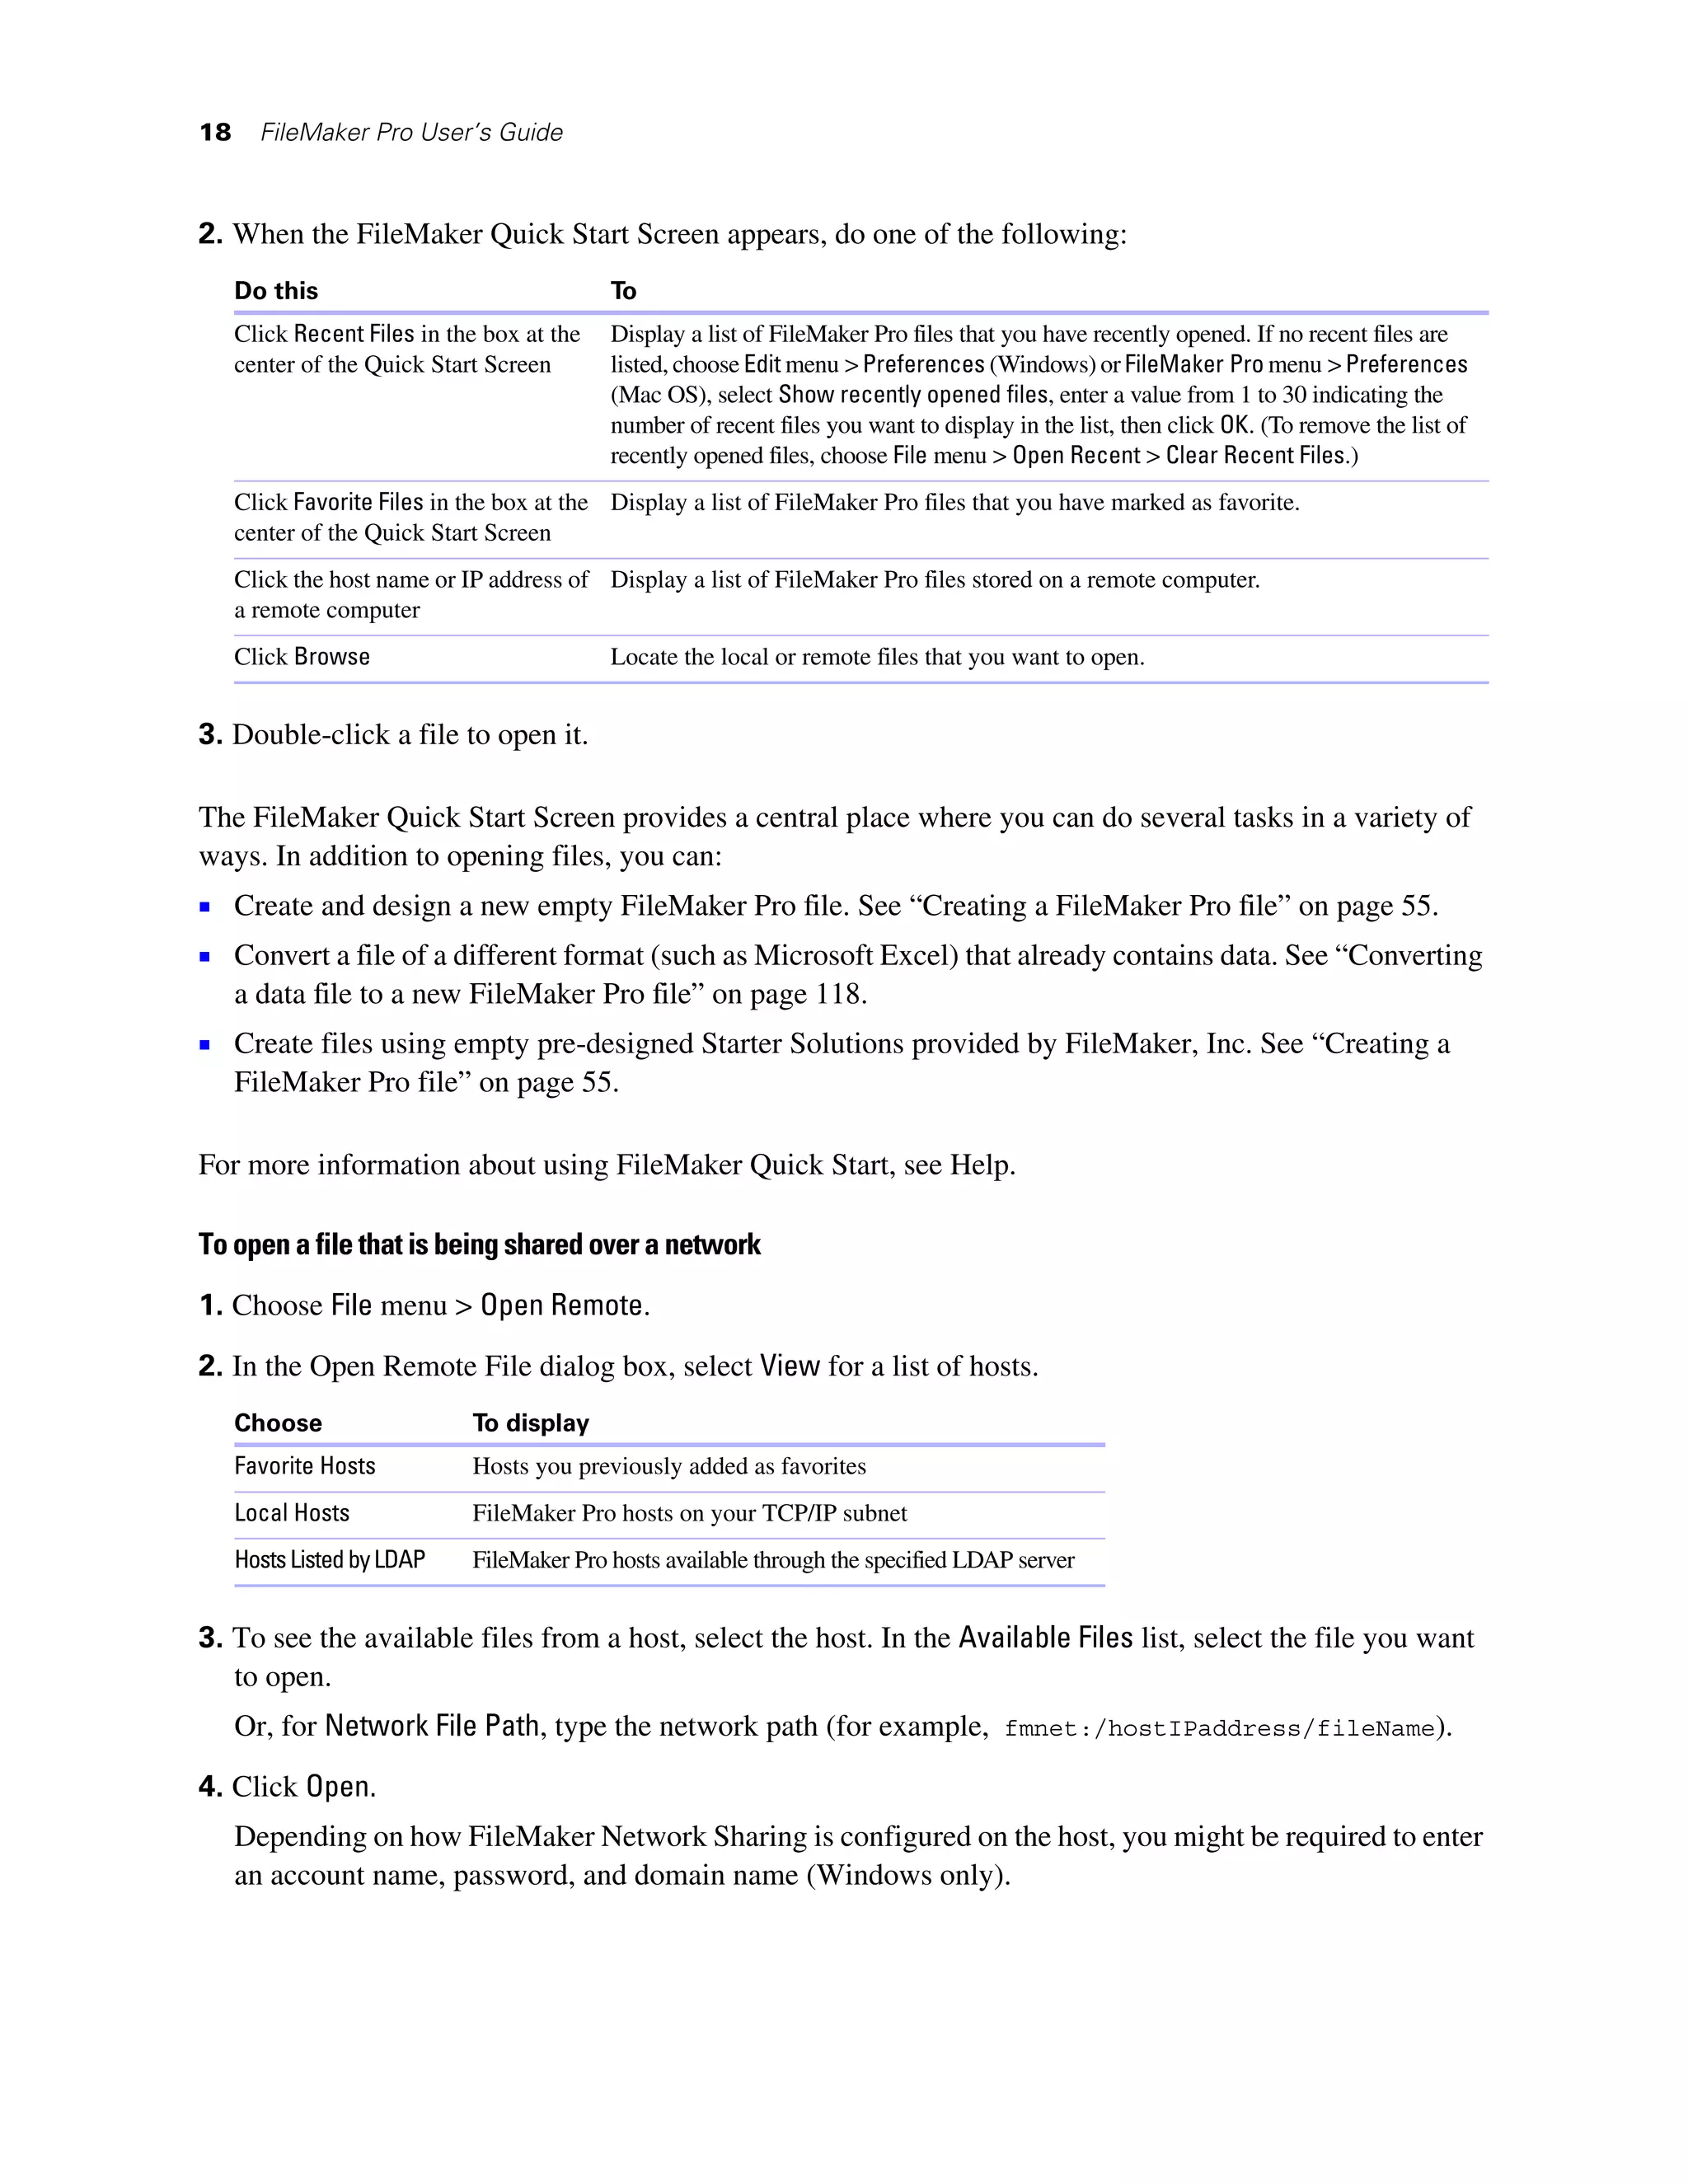
Michelle Cannon 213-555-2345
Andre Common 714-555-3456 Name Phone
Marie Durand 619-555-4567 Phone List
Juanita Alvarez 408-555-1234
Jean Durand 408-555-5678
William Johnson 408-555-6789
Name Phone
Records being
browsed Current record
Print Phone List
Blank record
Go to Layout [Phone List]
Sort [Sort Order: Last name (Ascending) ] Field Name Field Type Formula/Entry Options
[Restore sort order, No Dialog]
Enter Preview Mode First Name Text
[Pause] Last Name Text
Print Address1 Text
[no dialog] Address 2 Text
Enter Browse Mode City Text
State Text
Postal Code Number
Phone Text
Script
Table and field
definitions
Relationships graph
You can print data based on the current layout or print information about
the structure of the database
You can control page margins, remove blank space, and keep specified objects from printing.
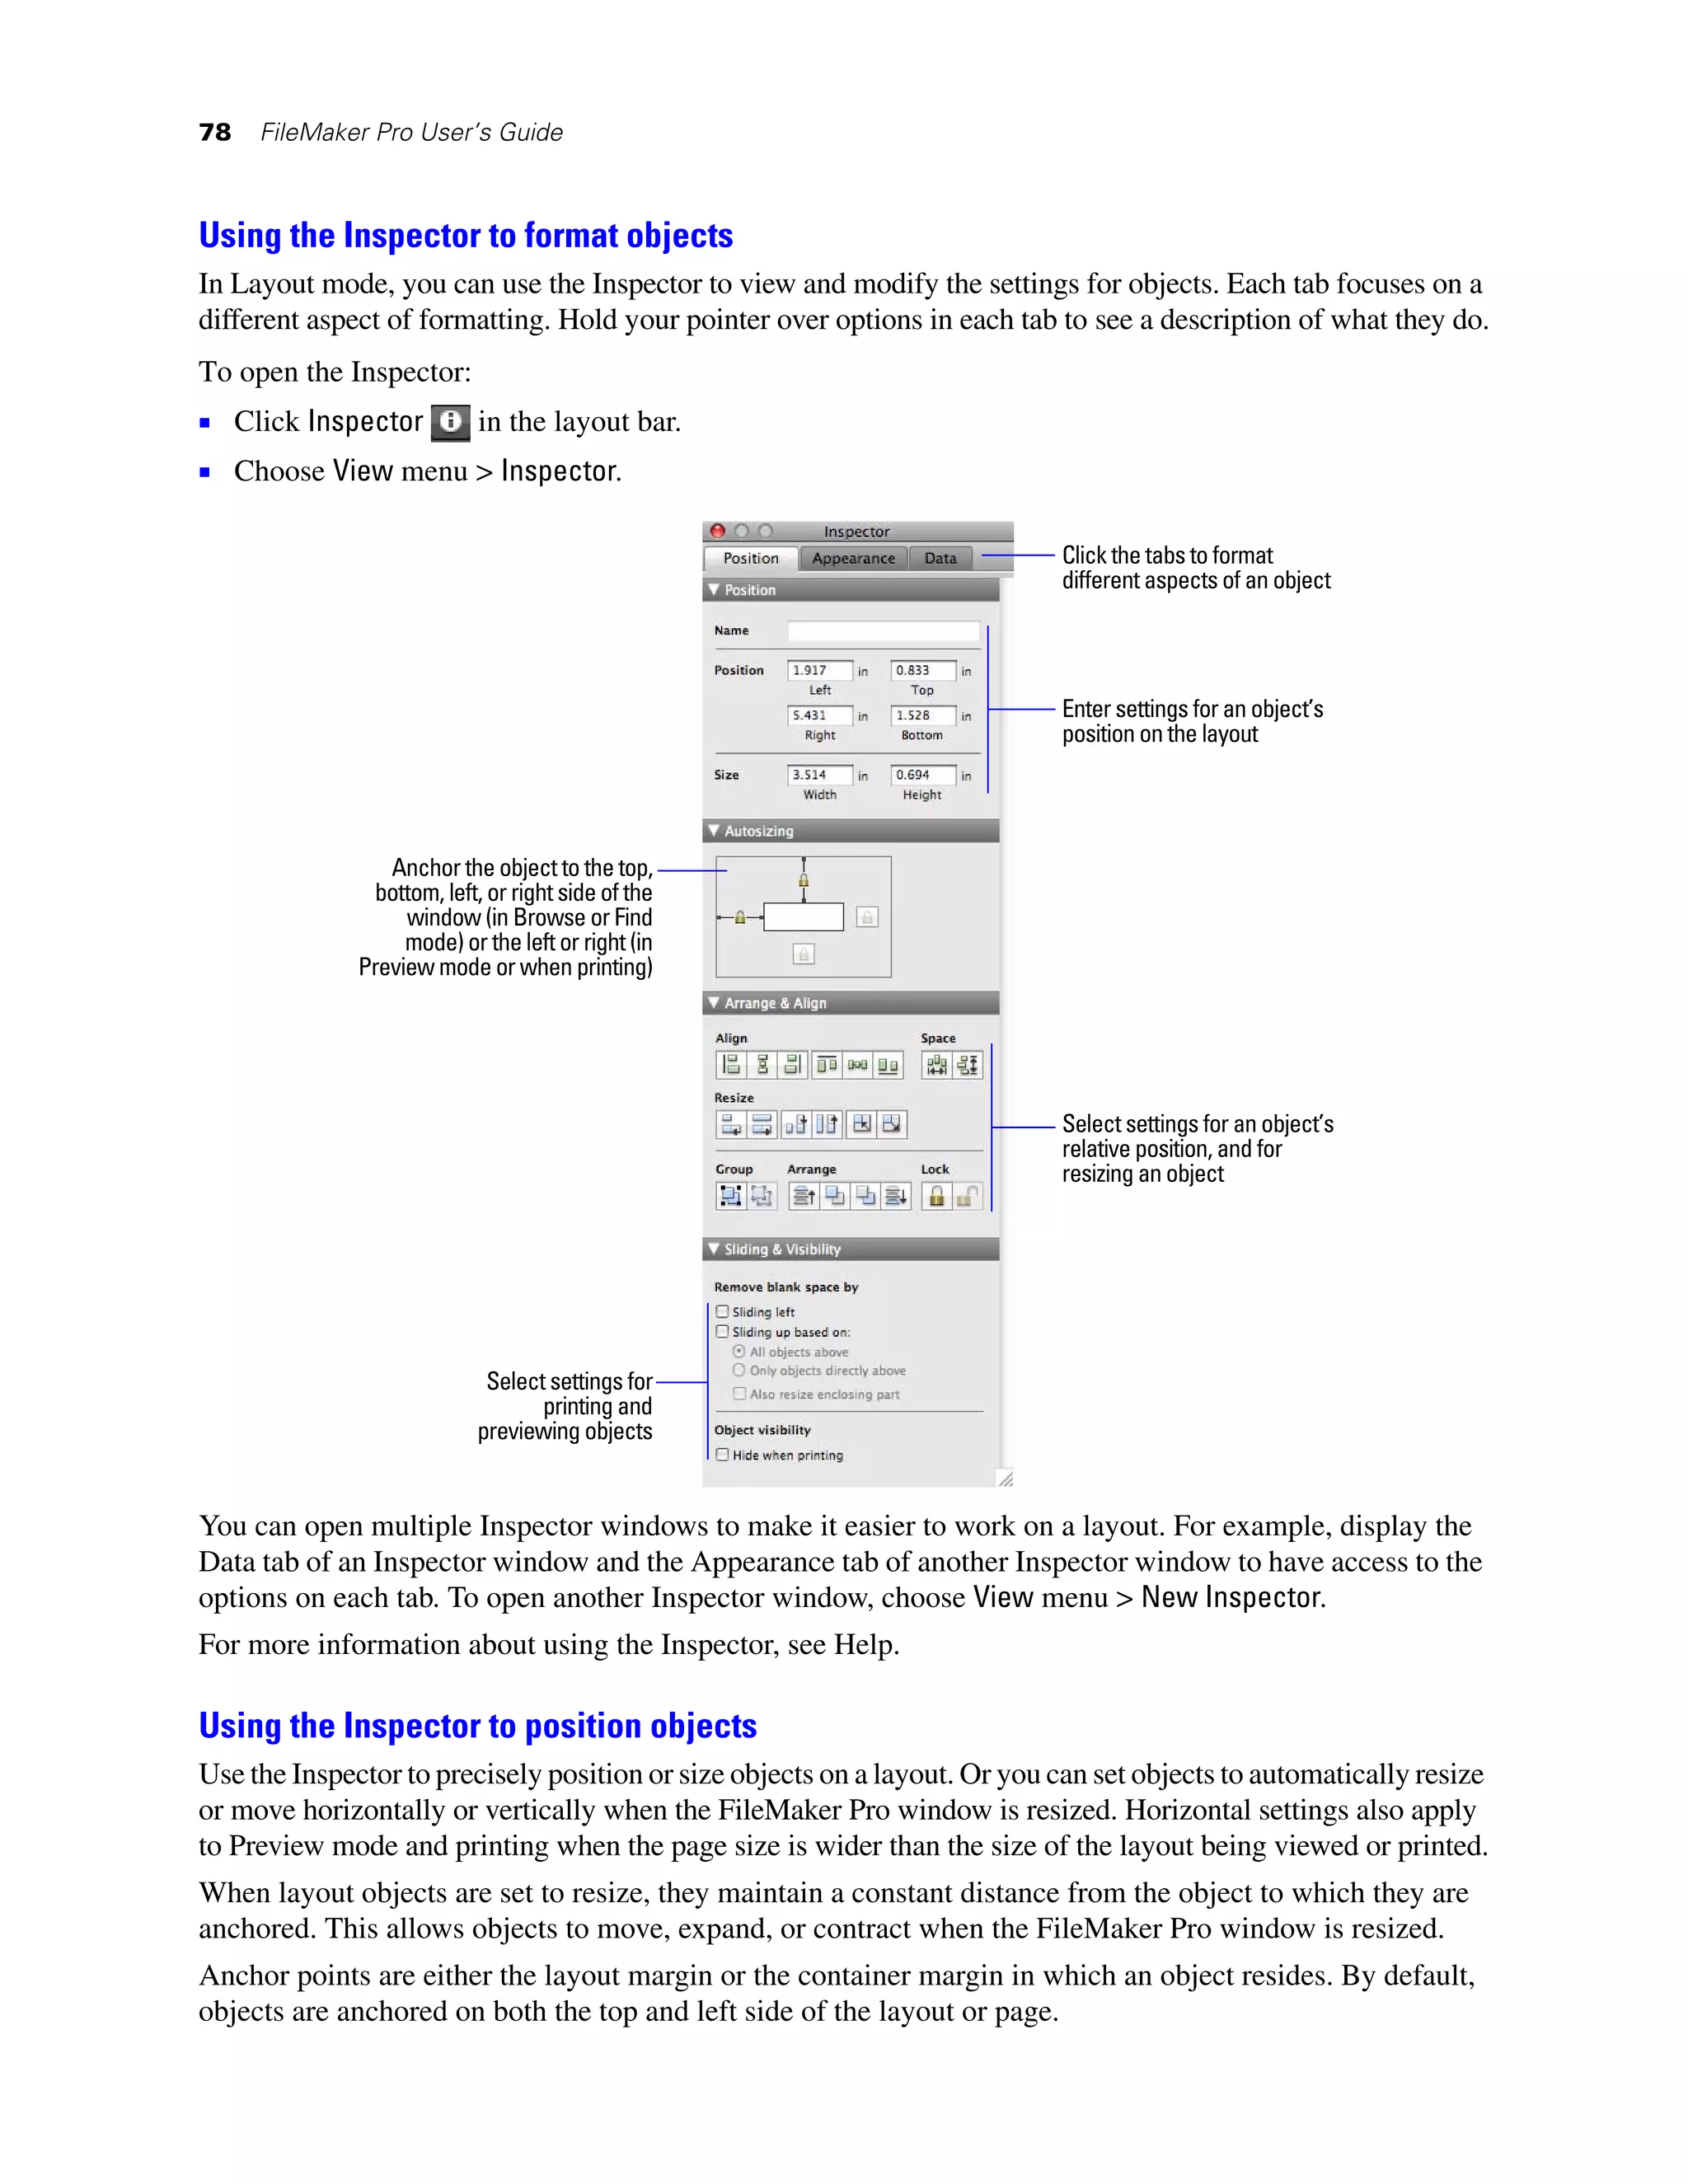
Previewing data on a layout
When you switch to Preview mode, you see the layout as it appears on the printed page. You can’t enter or
edit information in fields in Preview mode.
In Preview mode, you see:
1 how many records fit on a printed page
1 how the pagination settings you choose affect page breaks
1 subsummary parts with calculated summary fields
1 variable information supplied by FileMaker Pro, like page numbers, the current date, and so on
1 the page margins you define
1 how fields set with sliding options close up blank space](https://image.slidesharecdn.com/fmp11usersguide-120414063140-phpapp01/75/Fmp11-users-guide-43-2048.jpg)

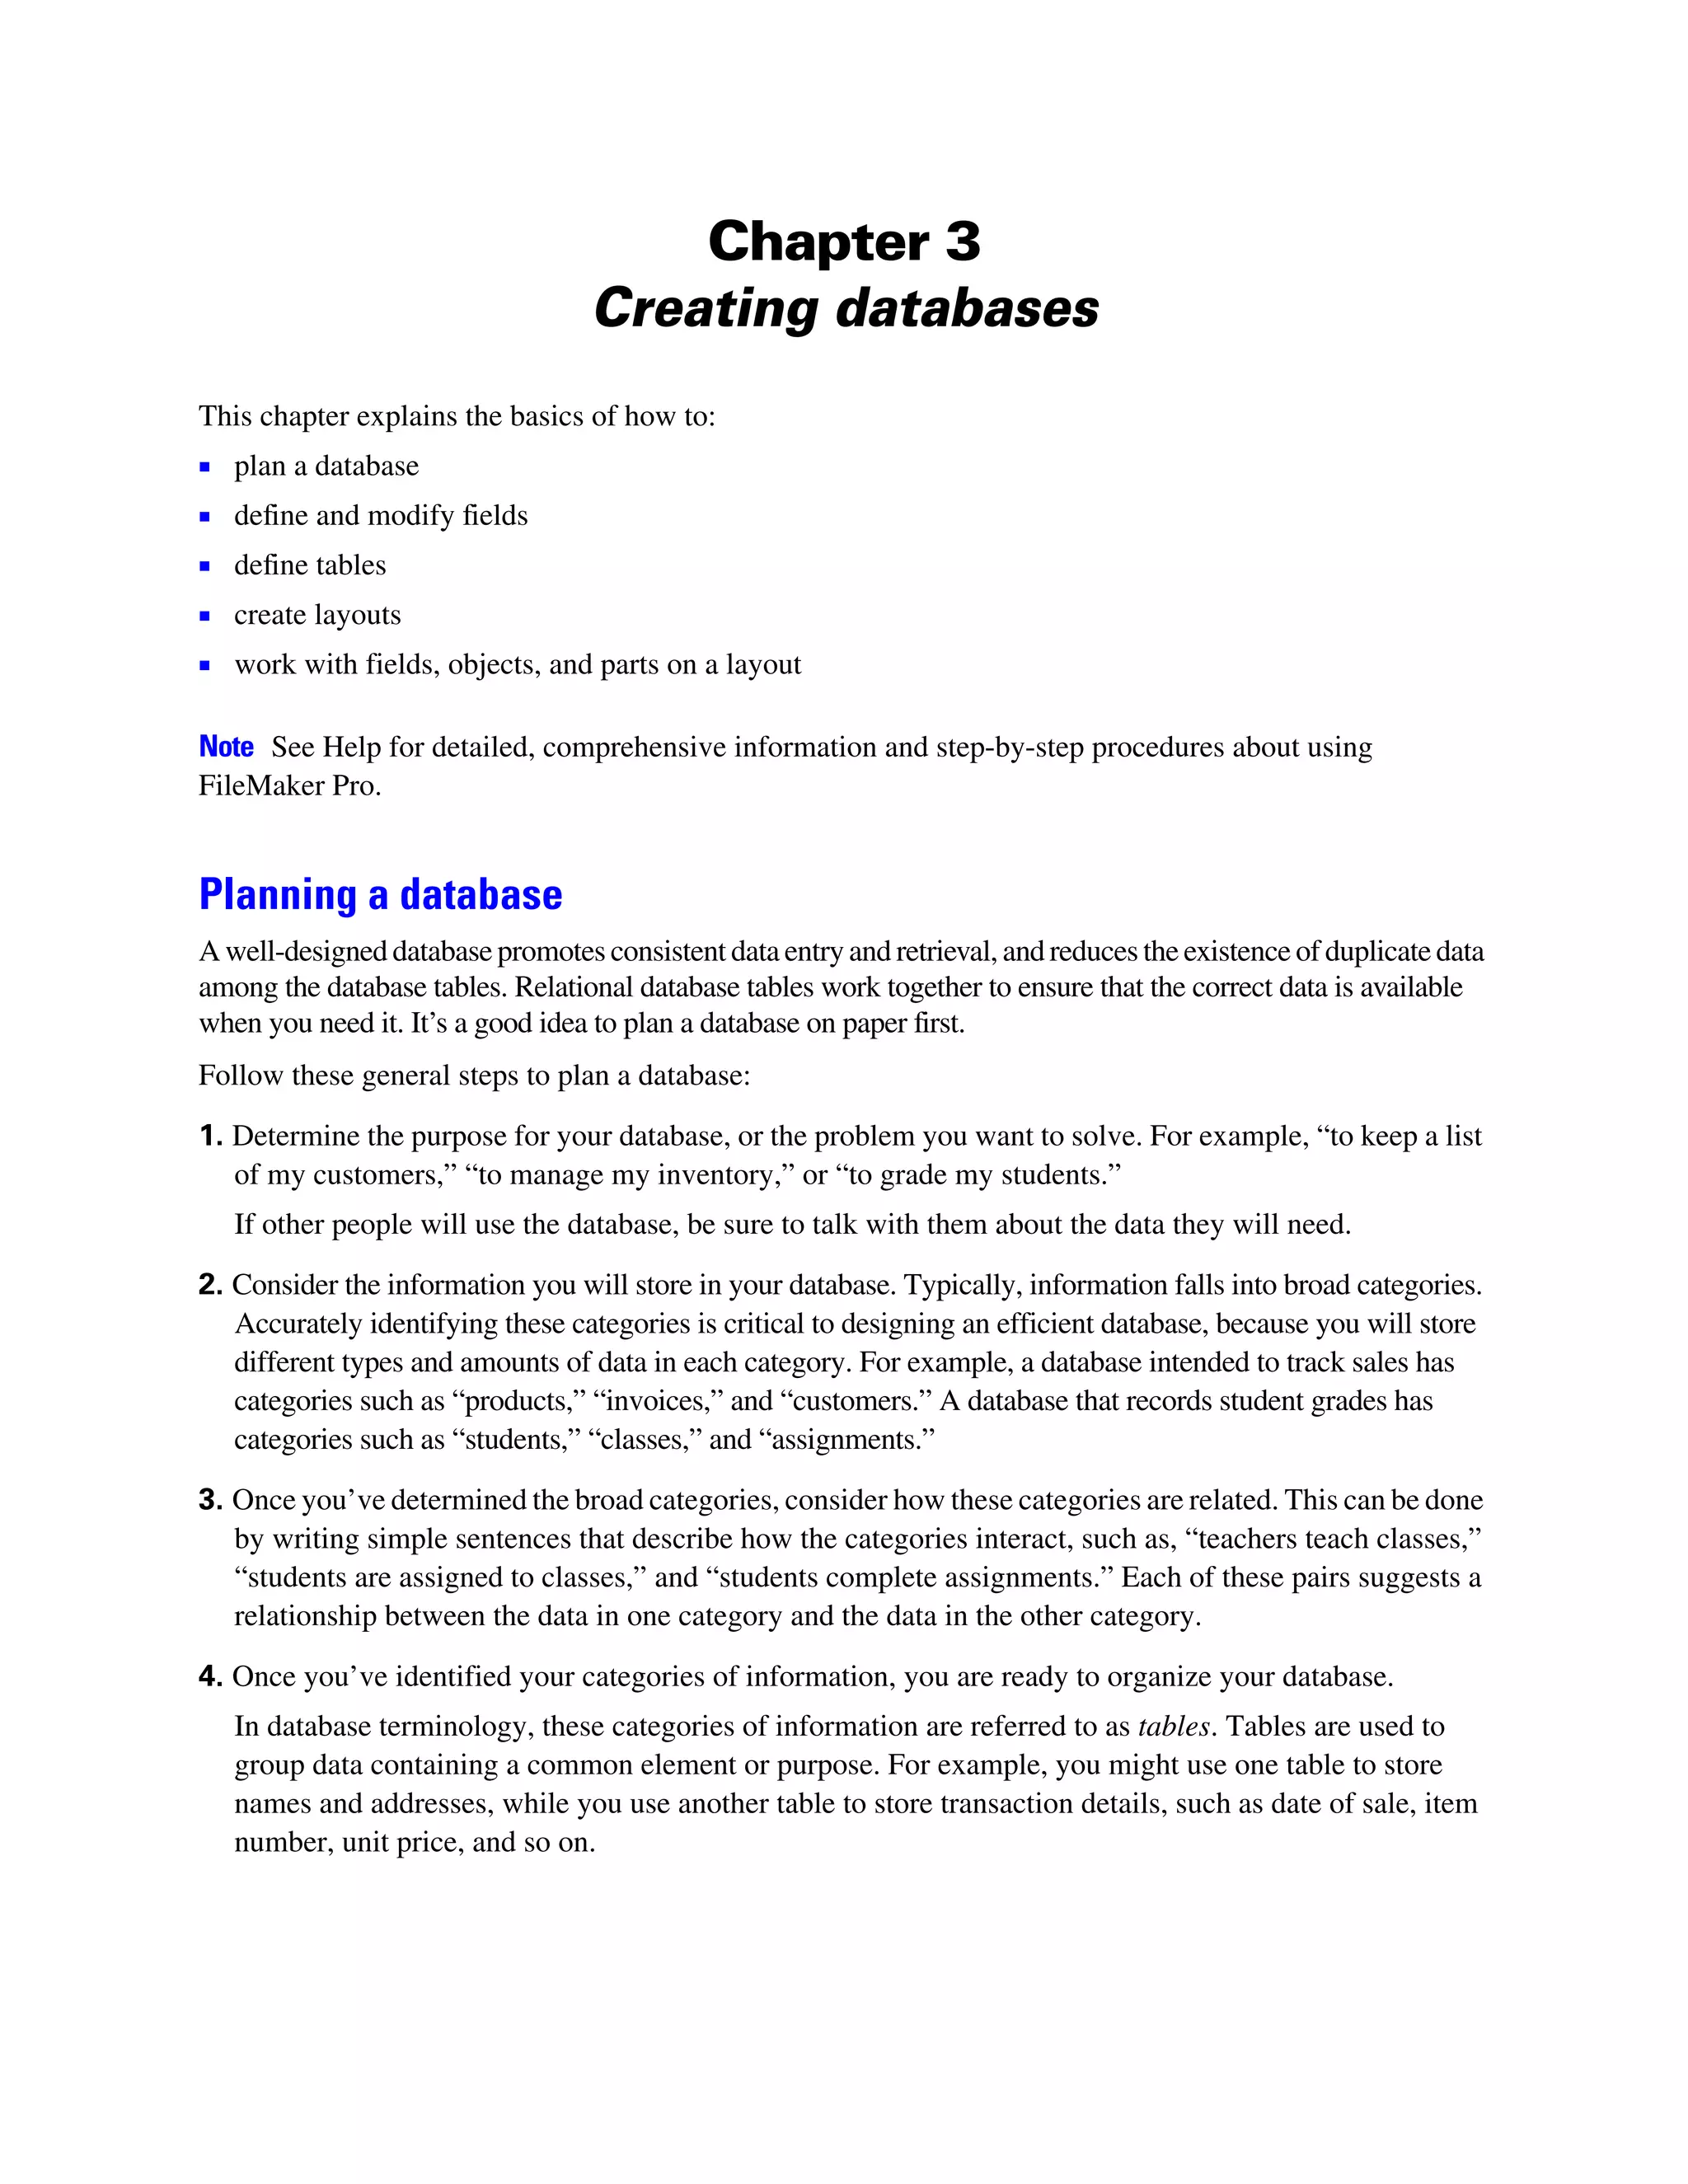

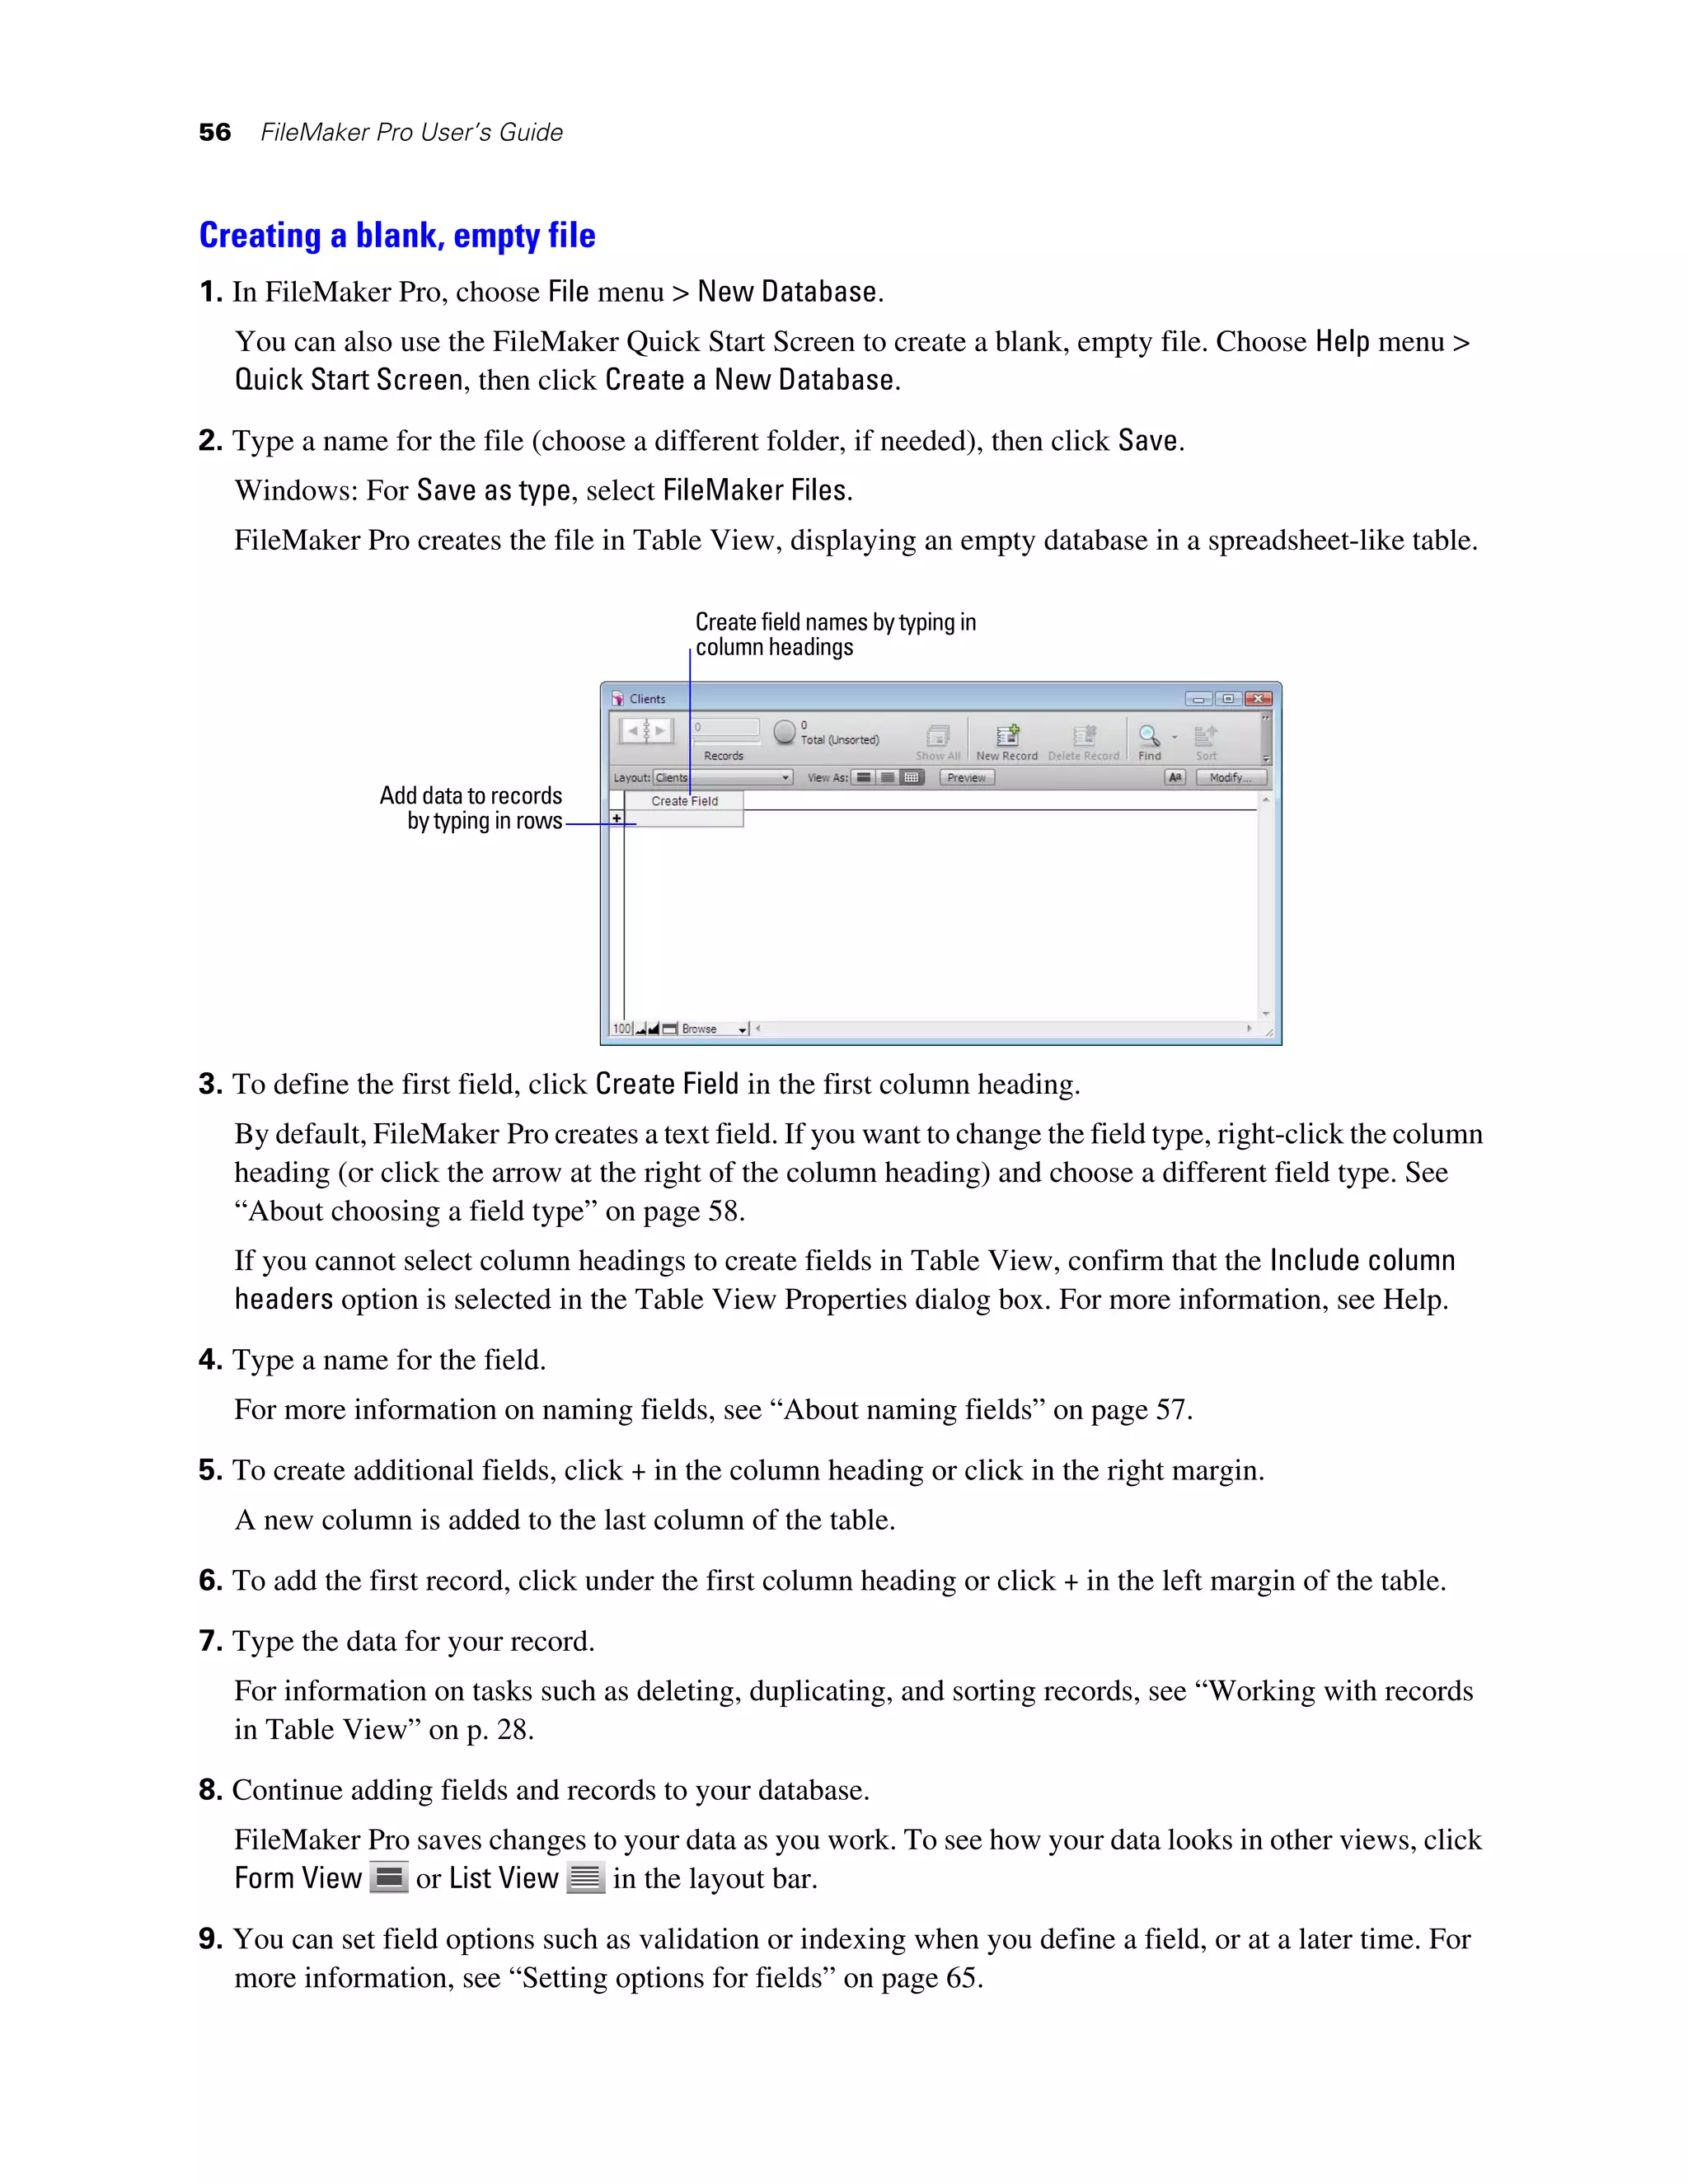
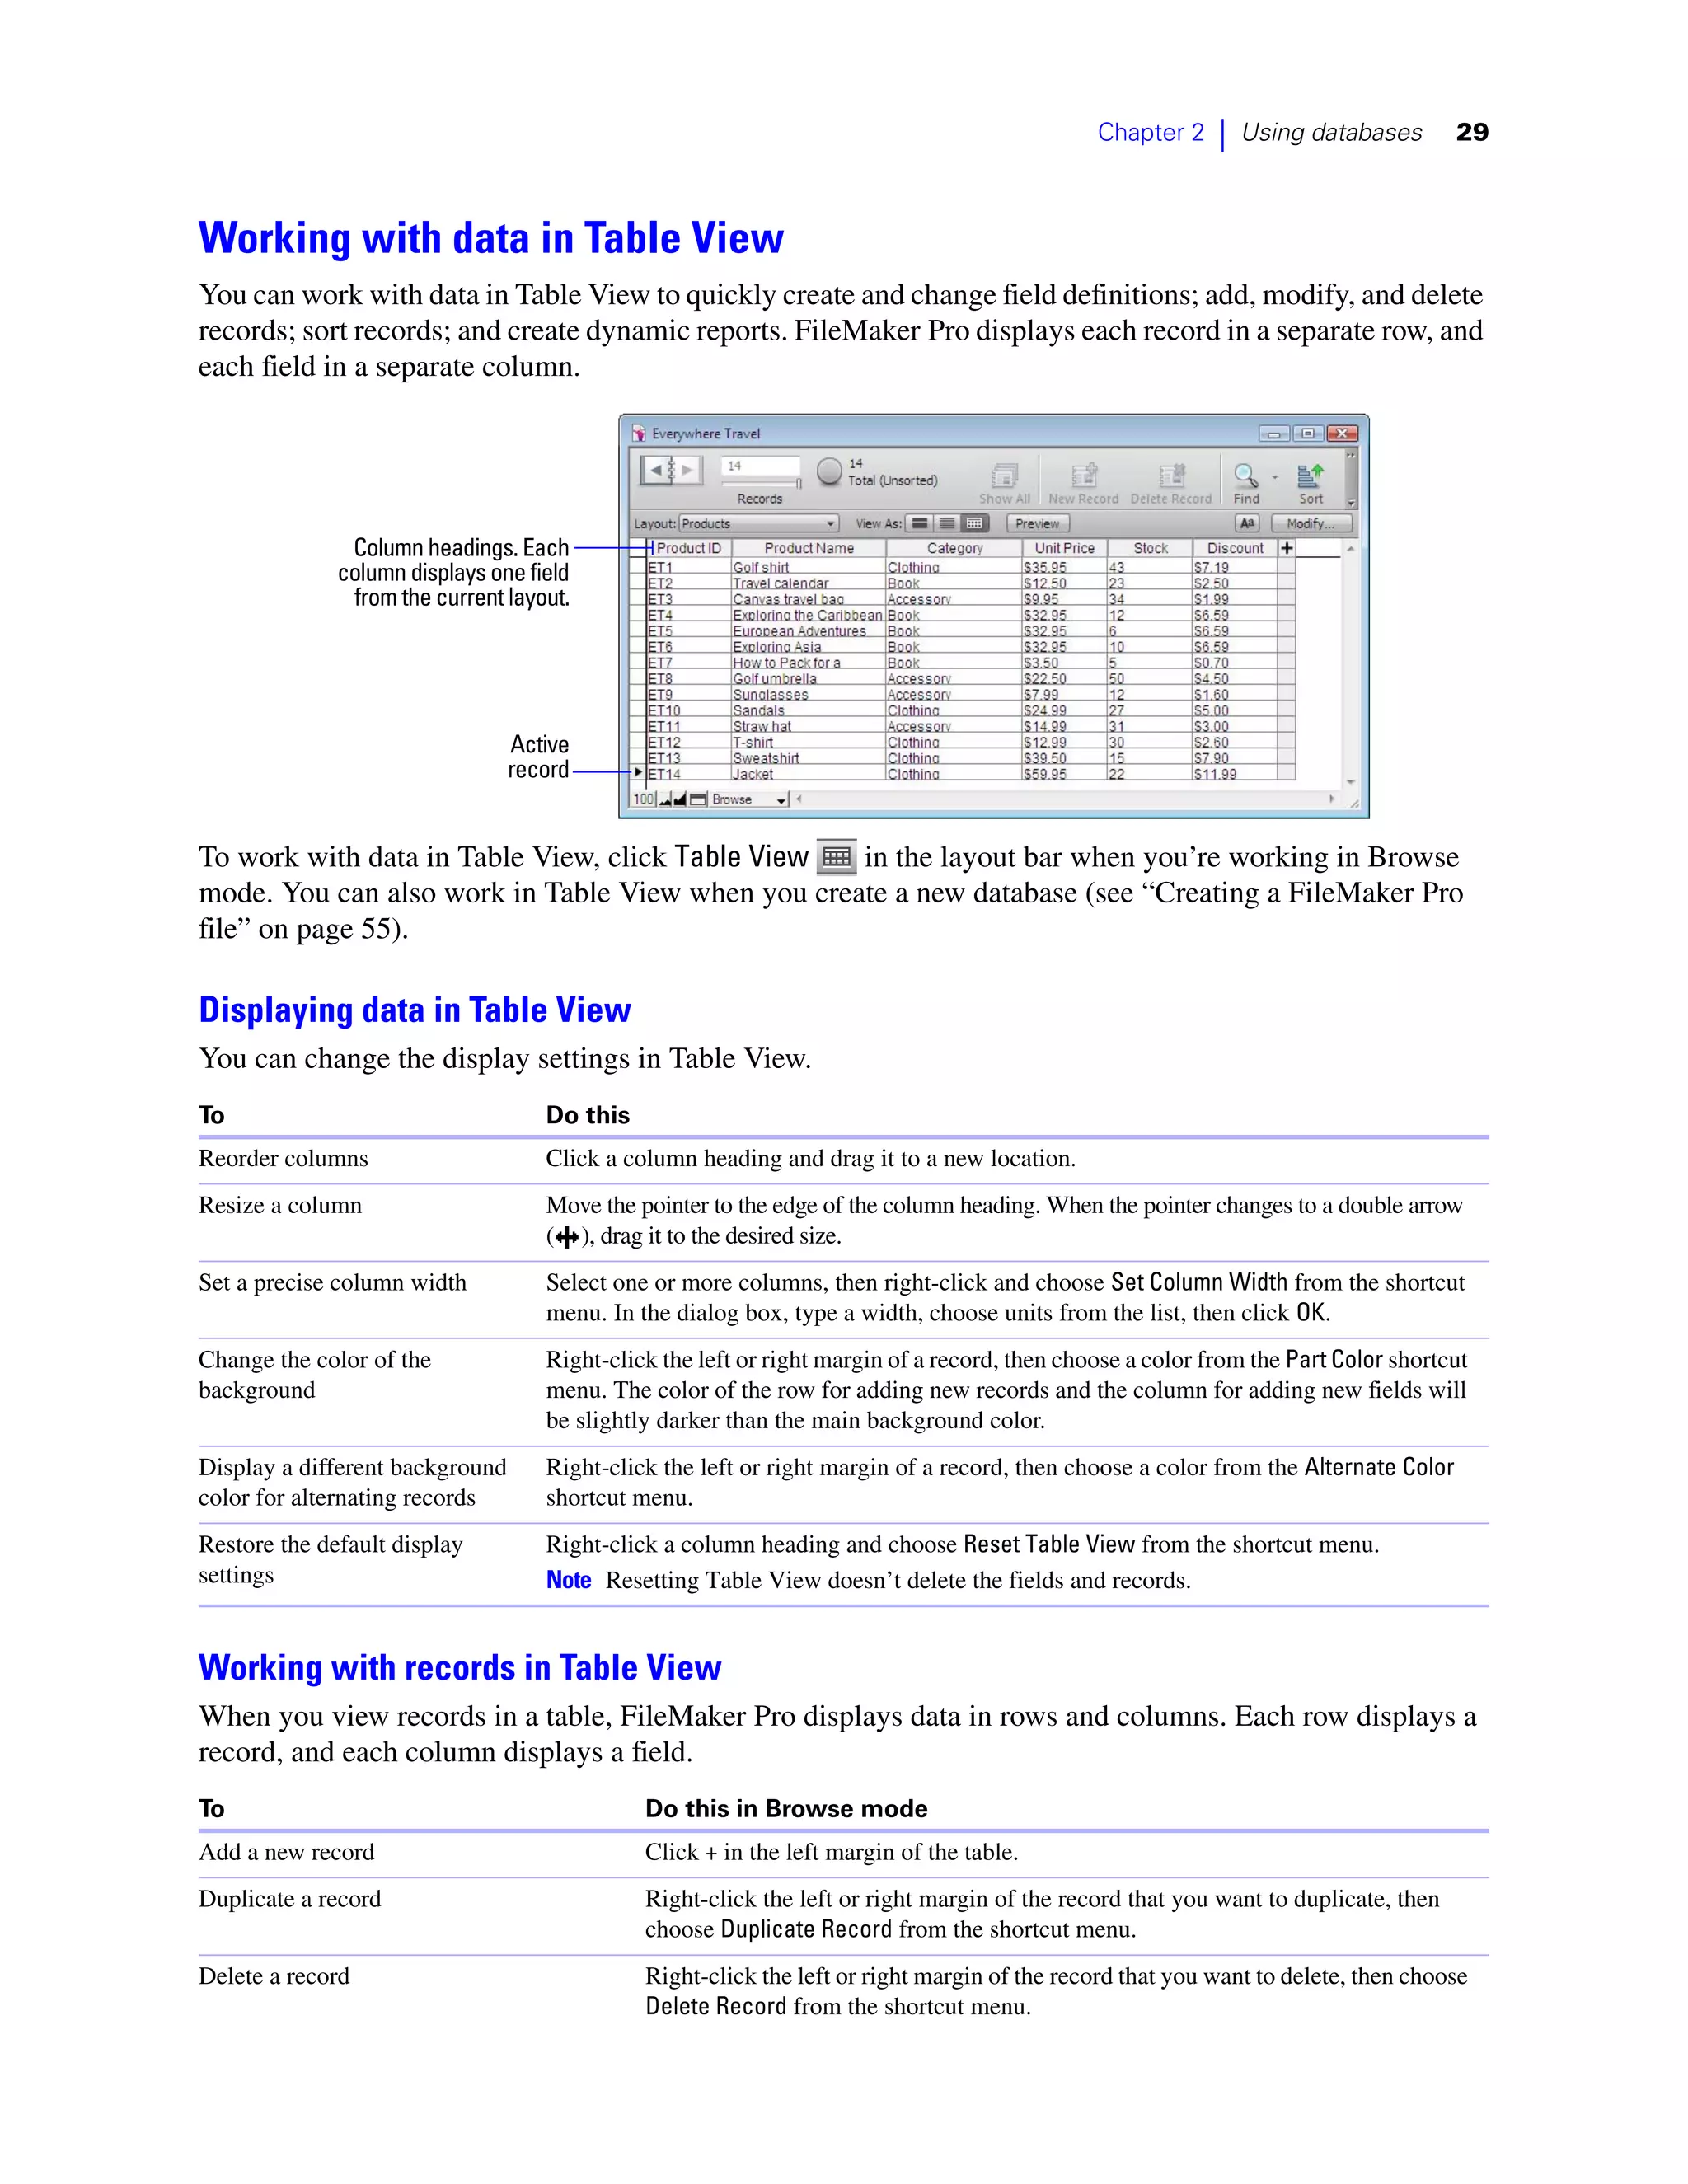
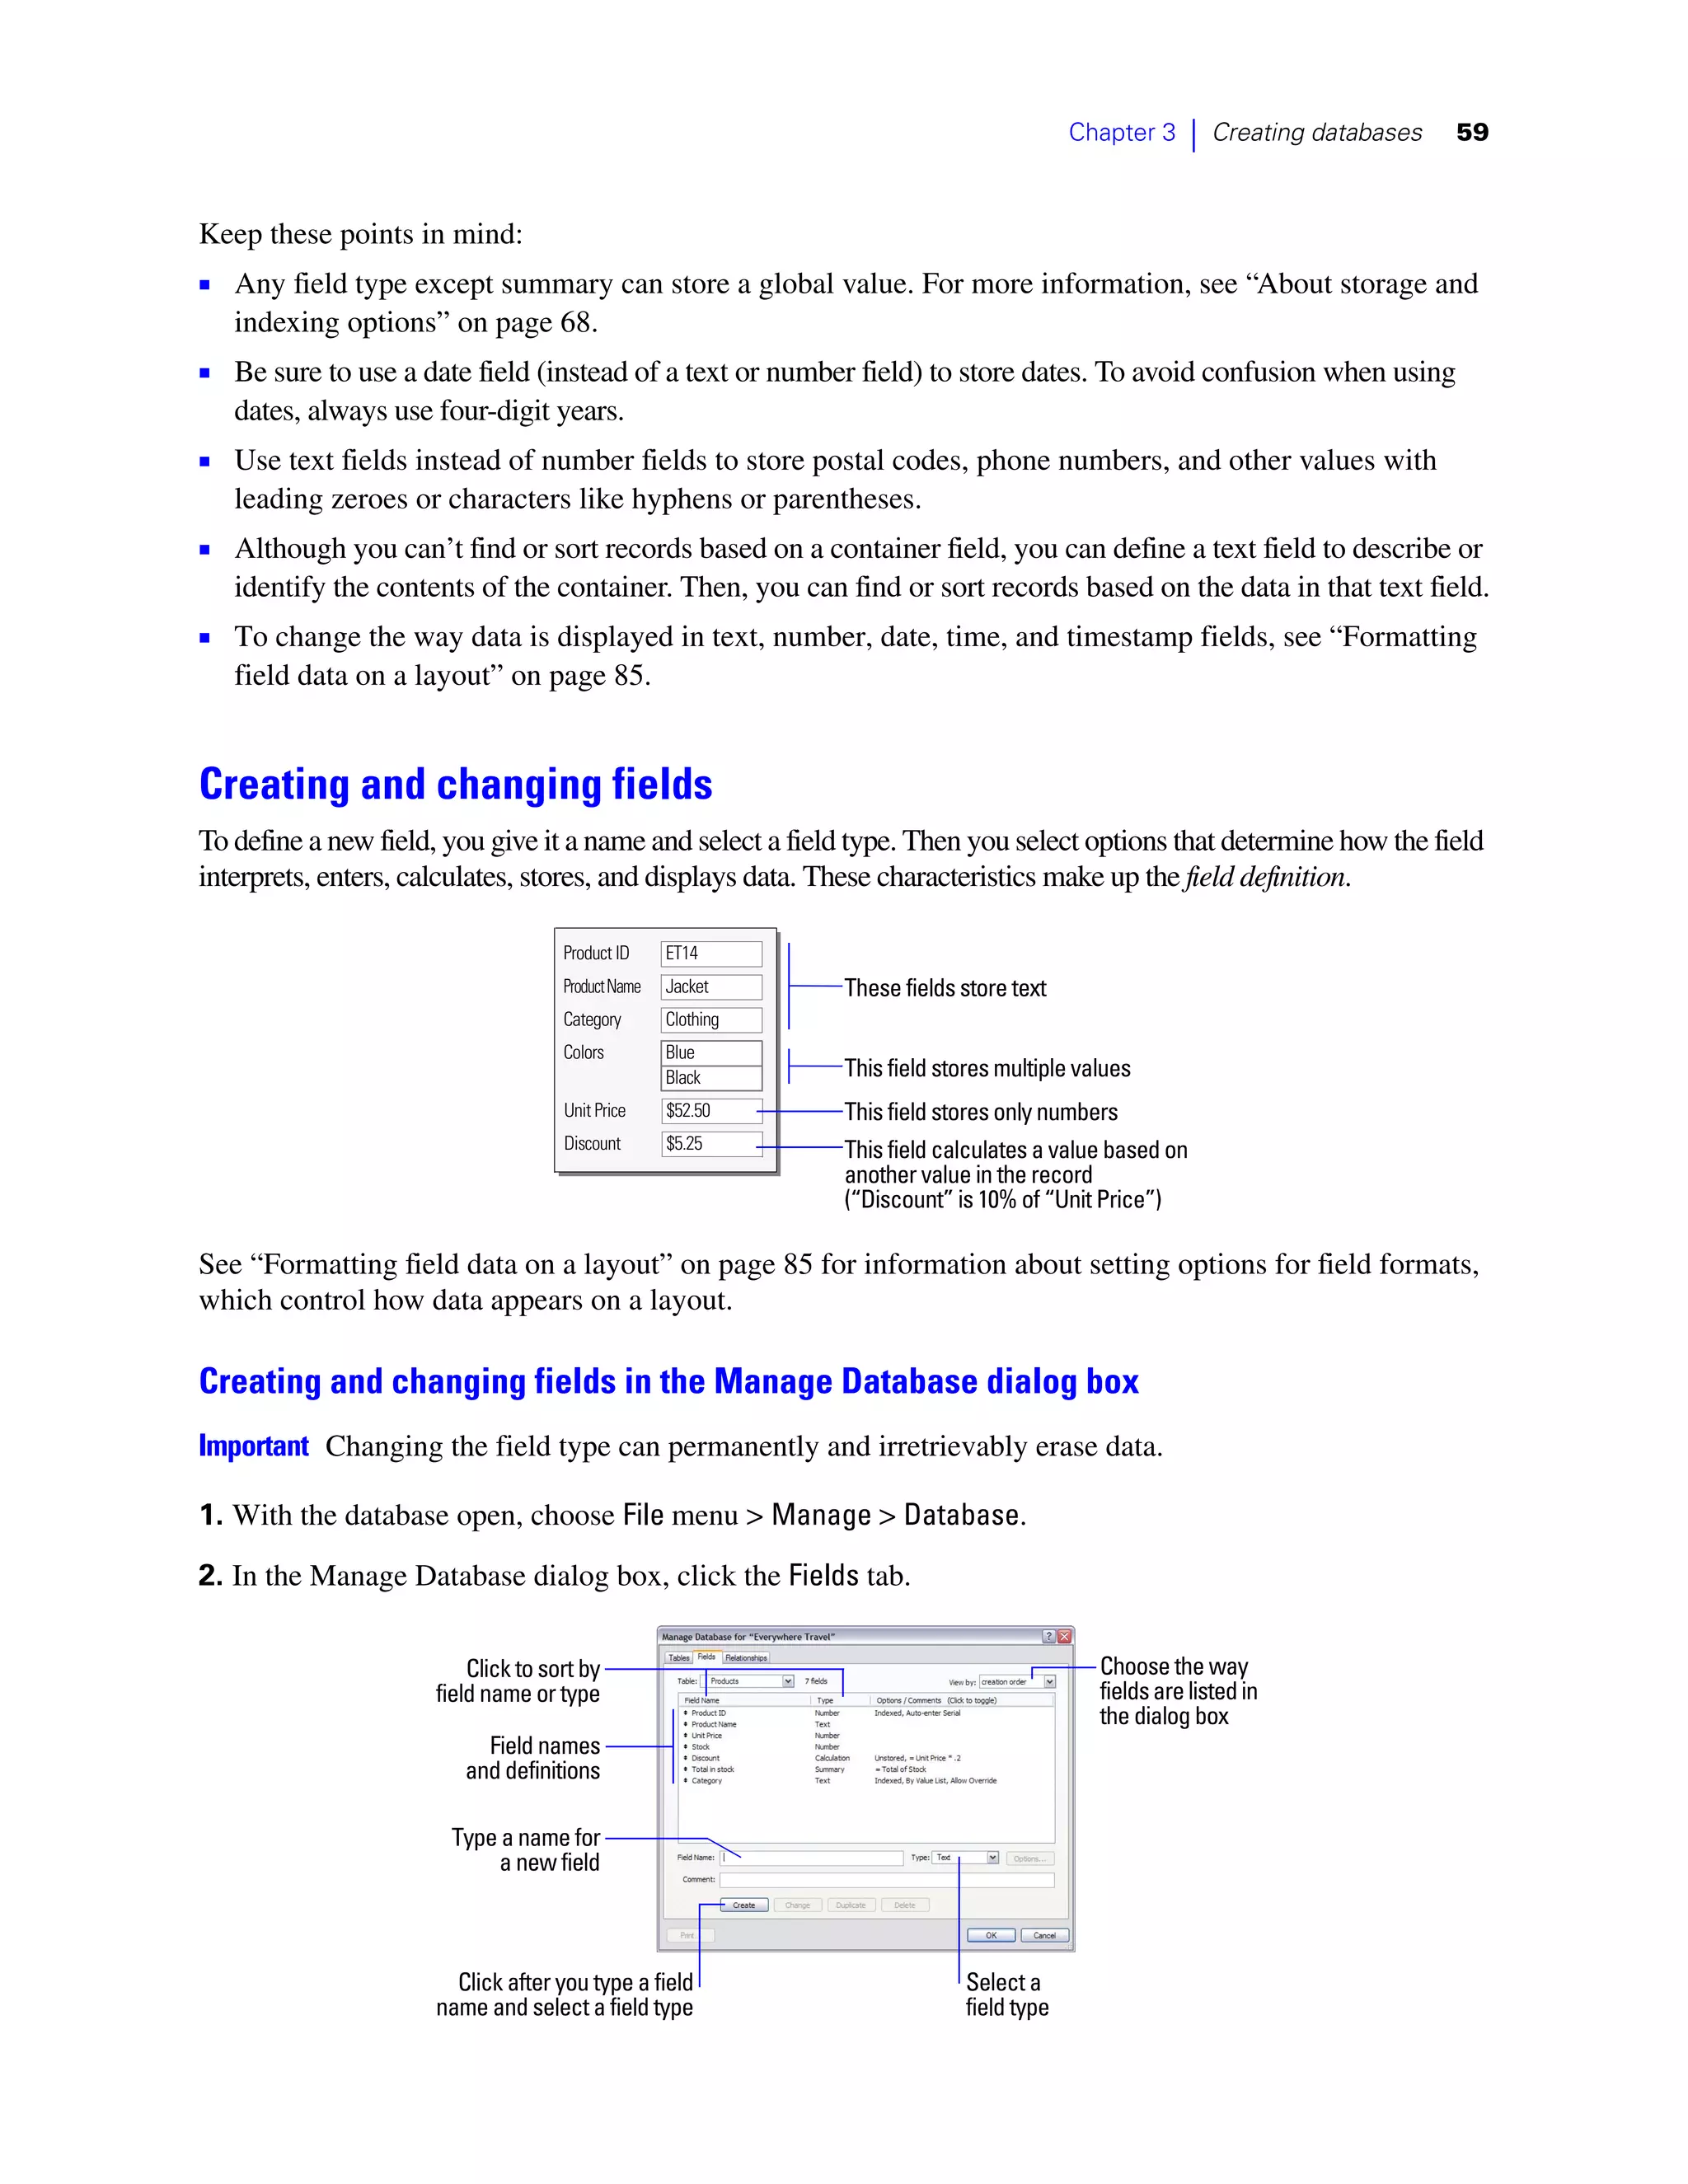
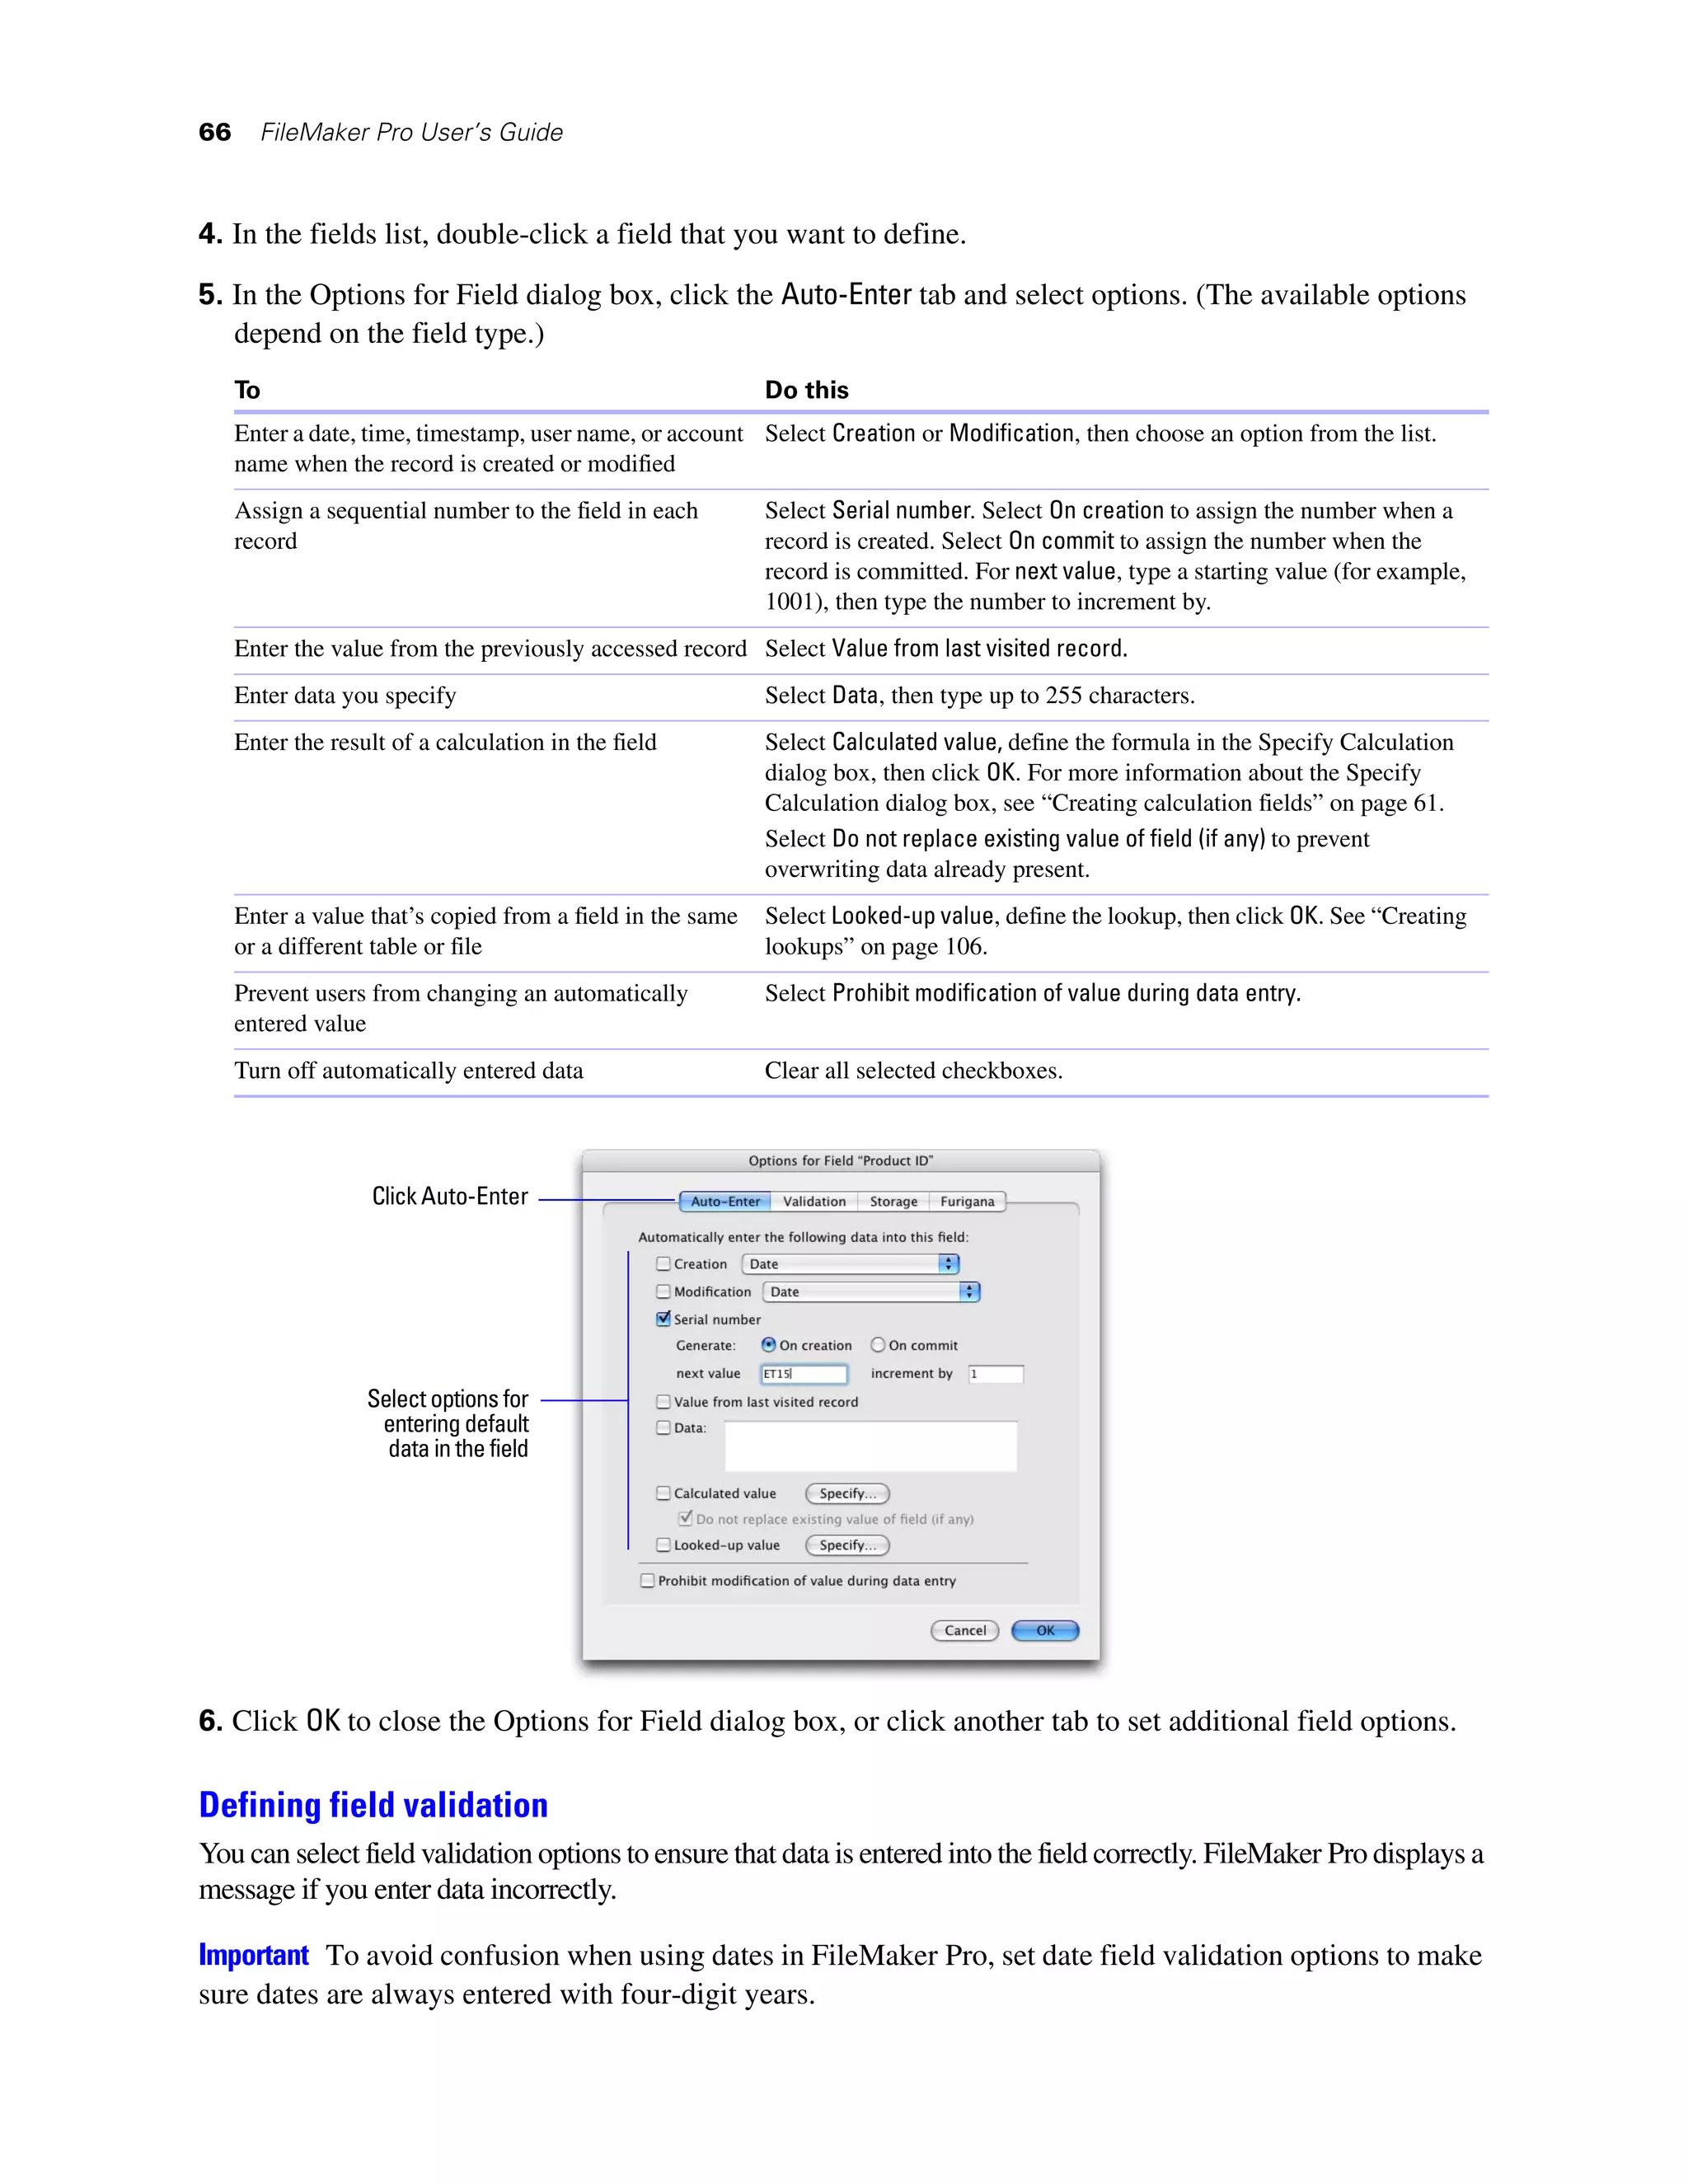
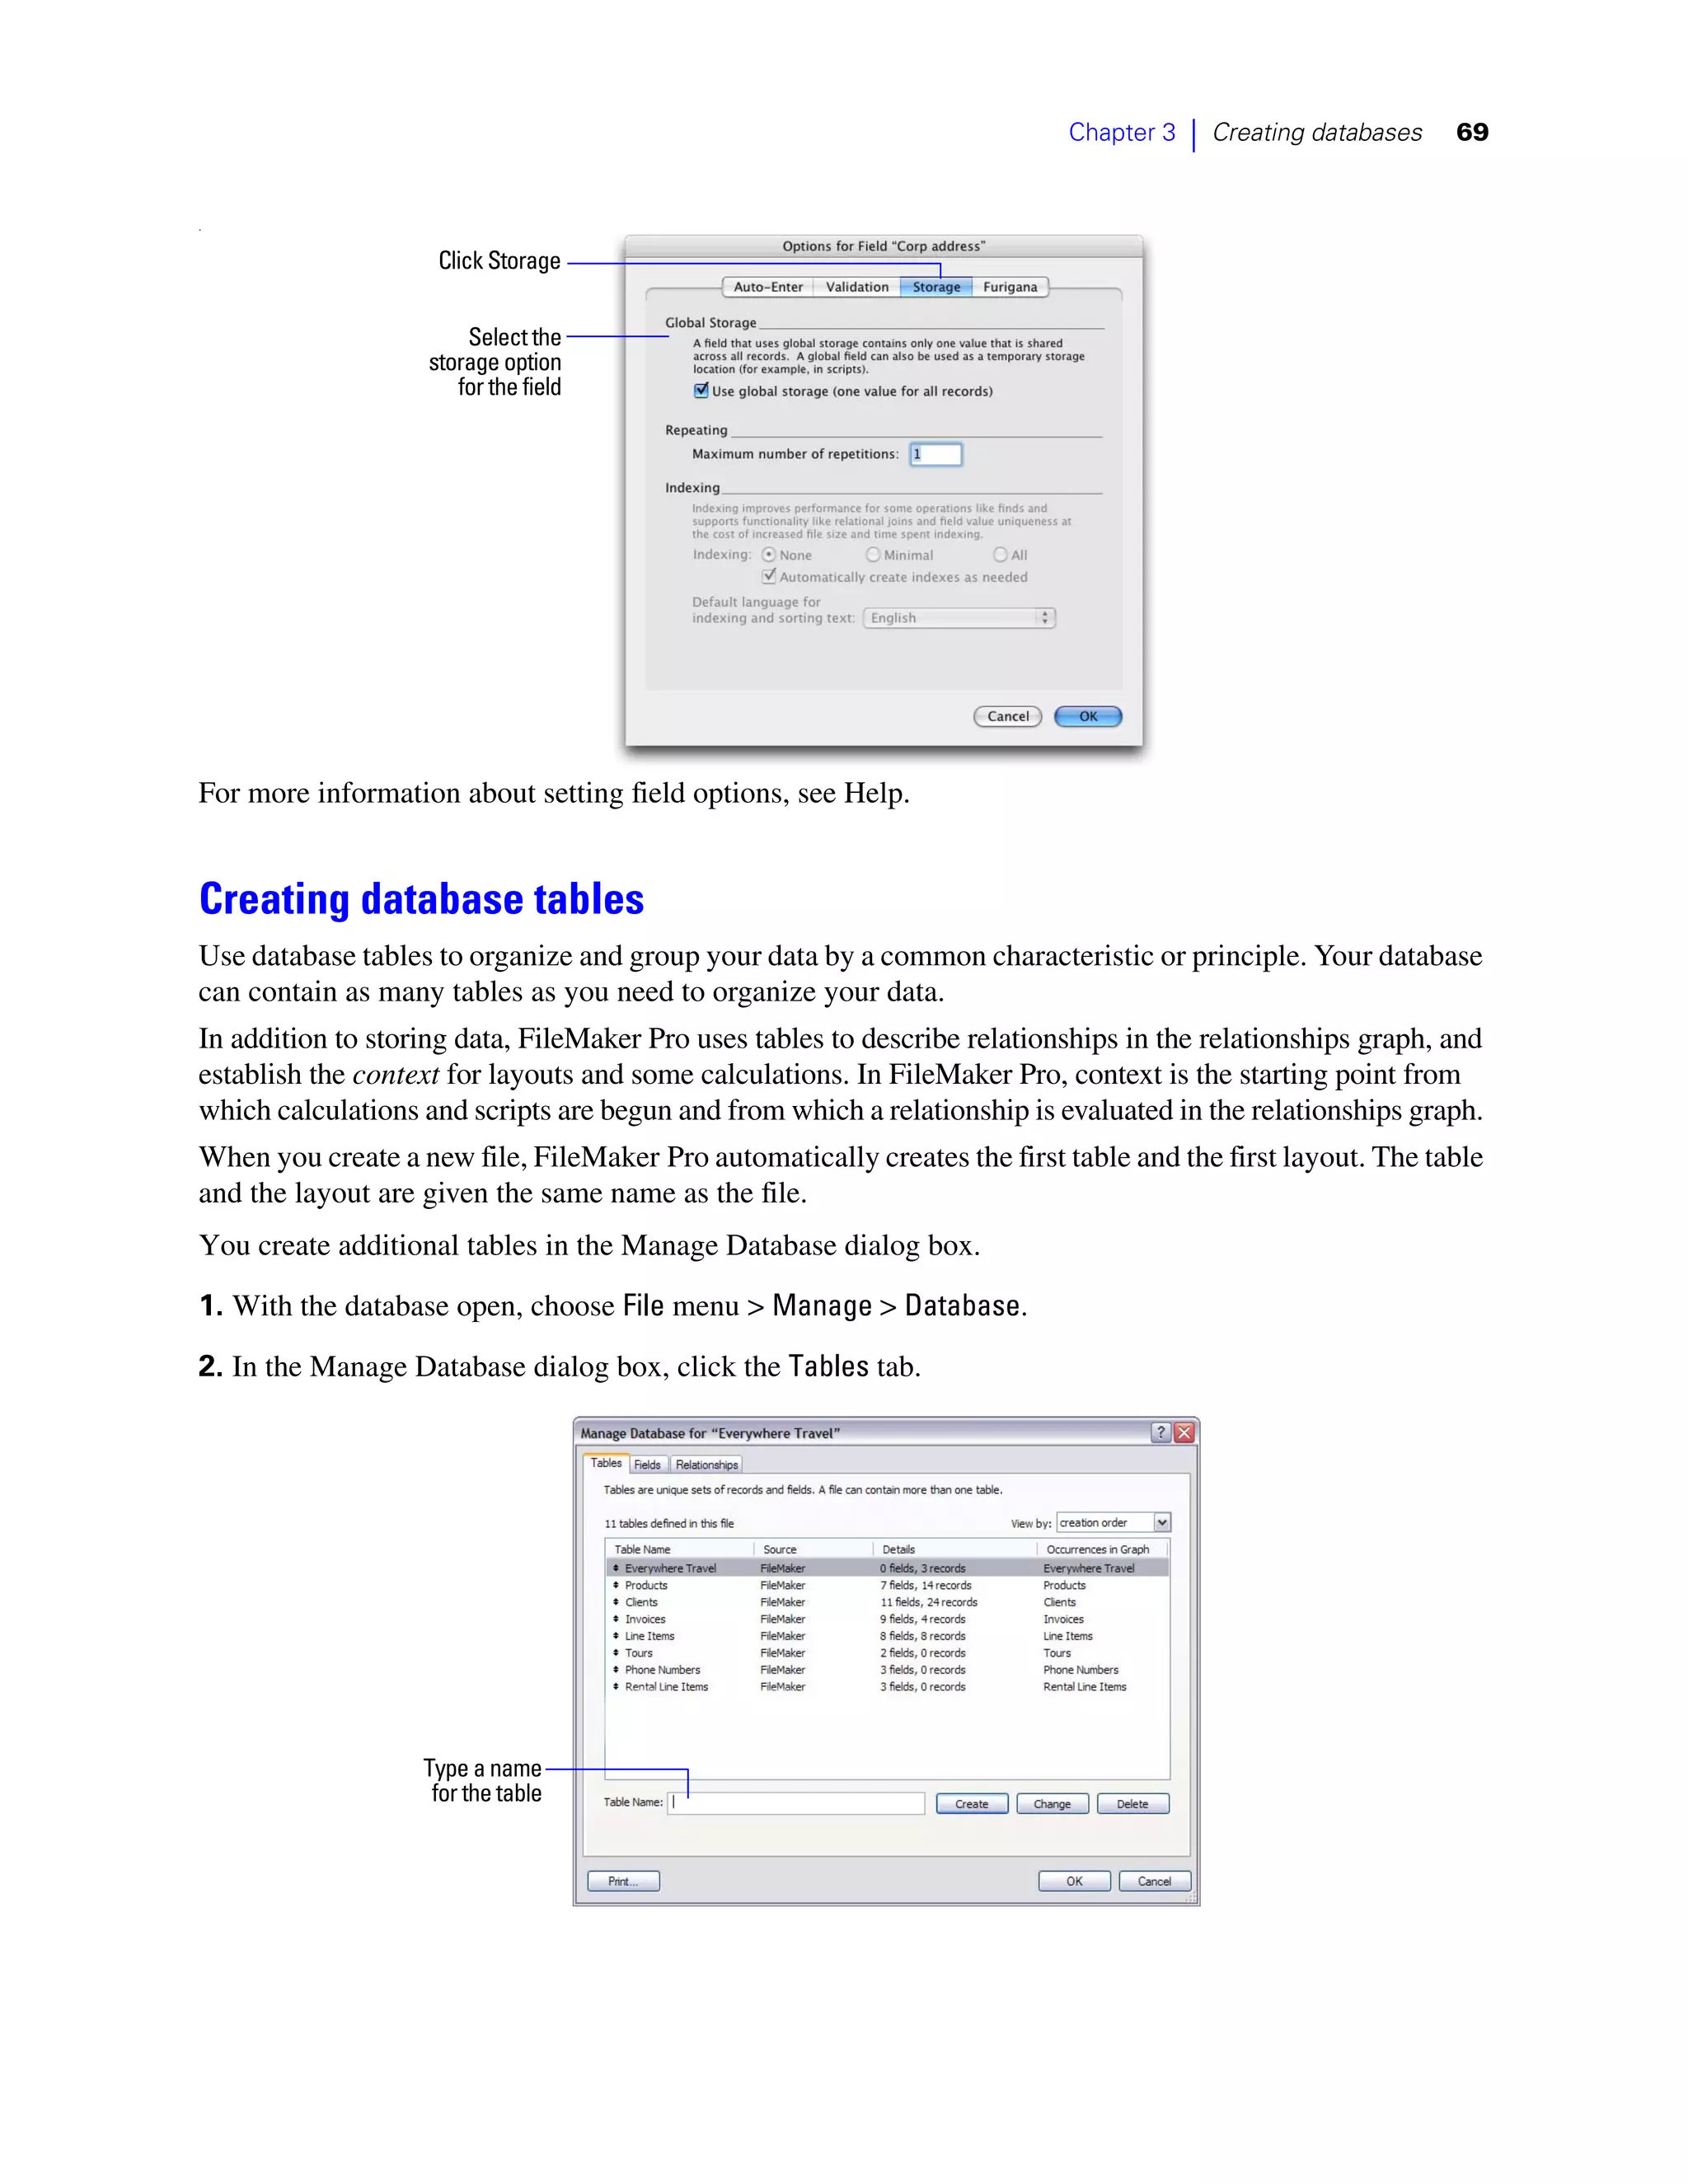
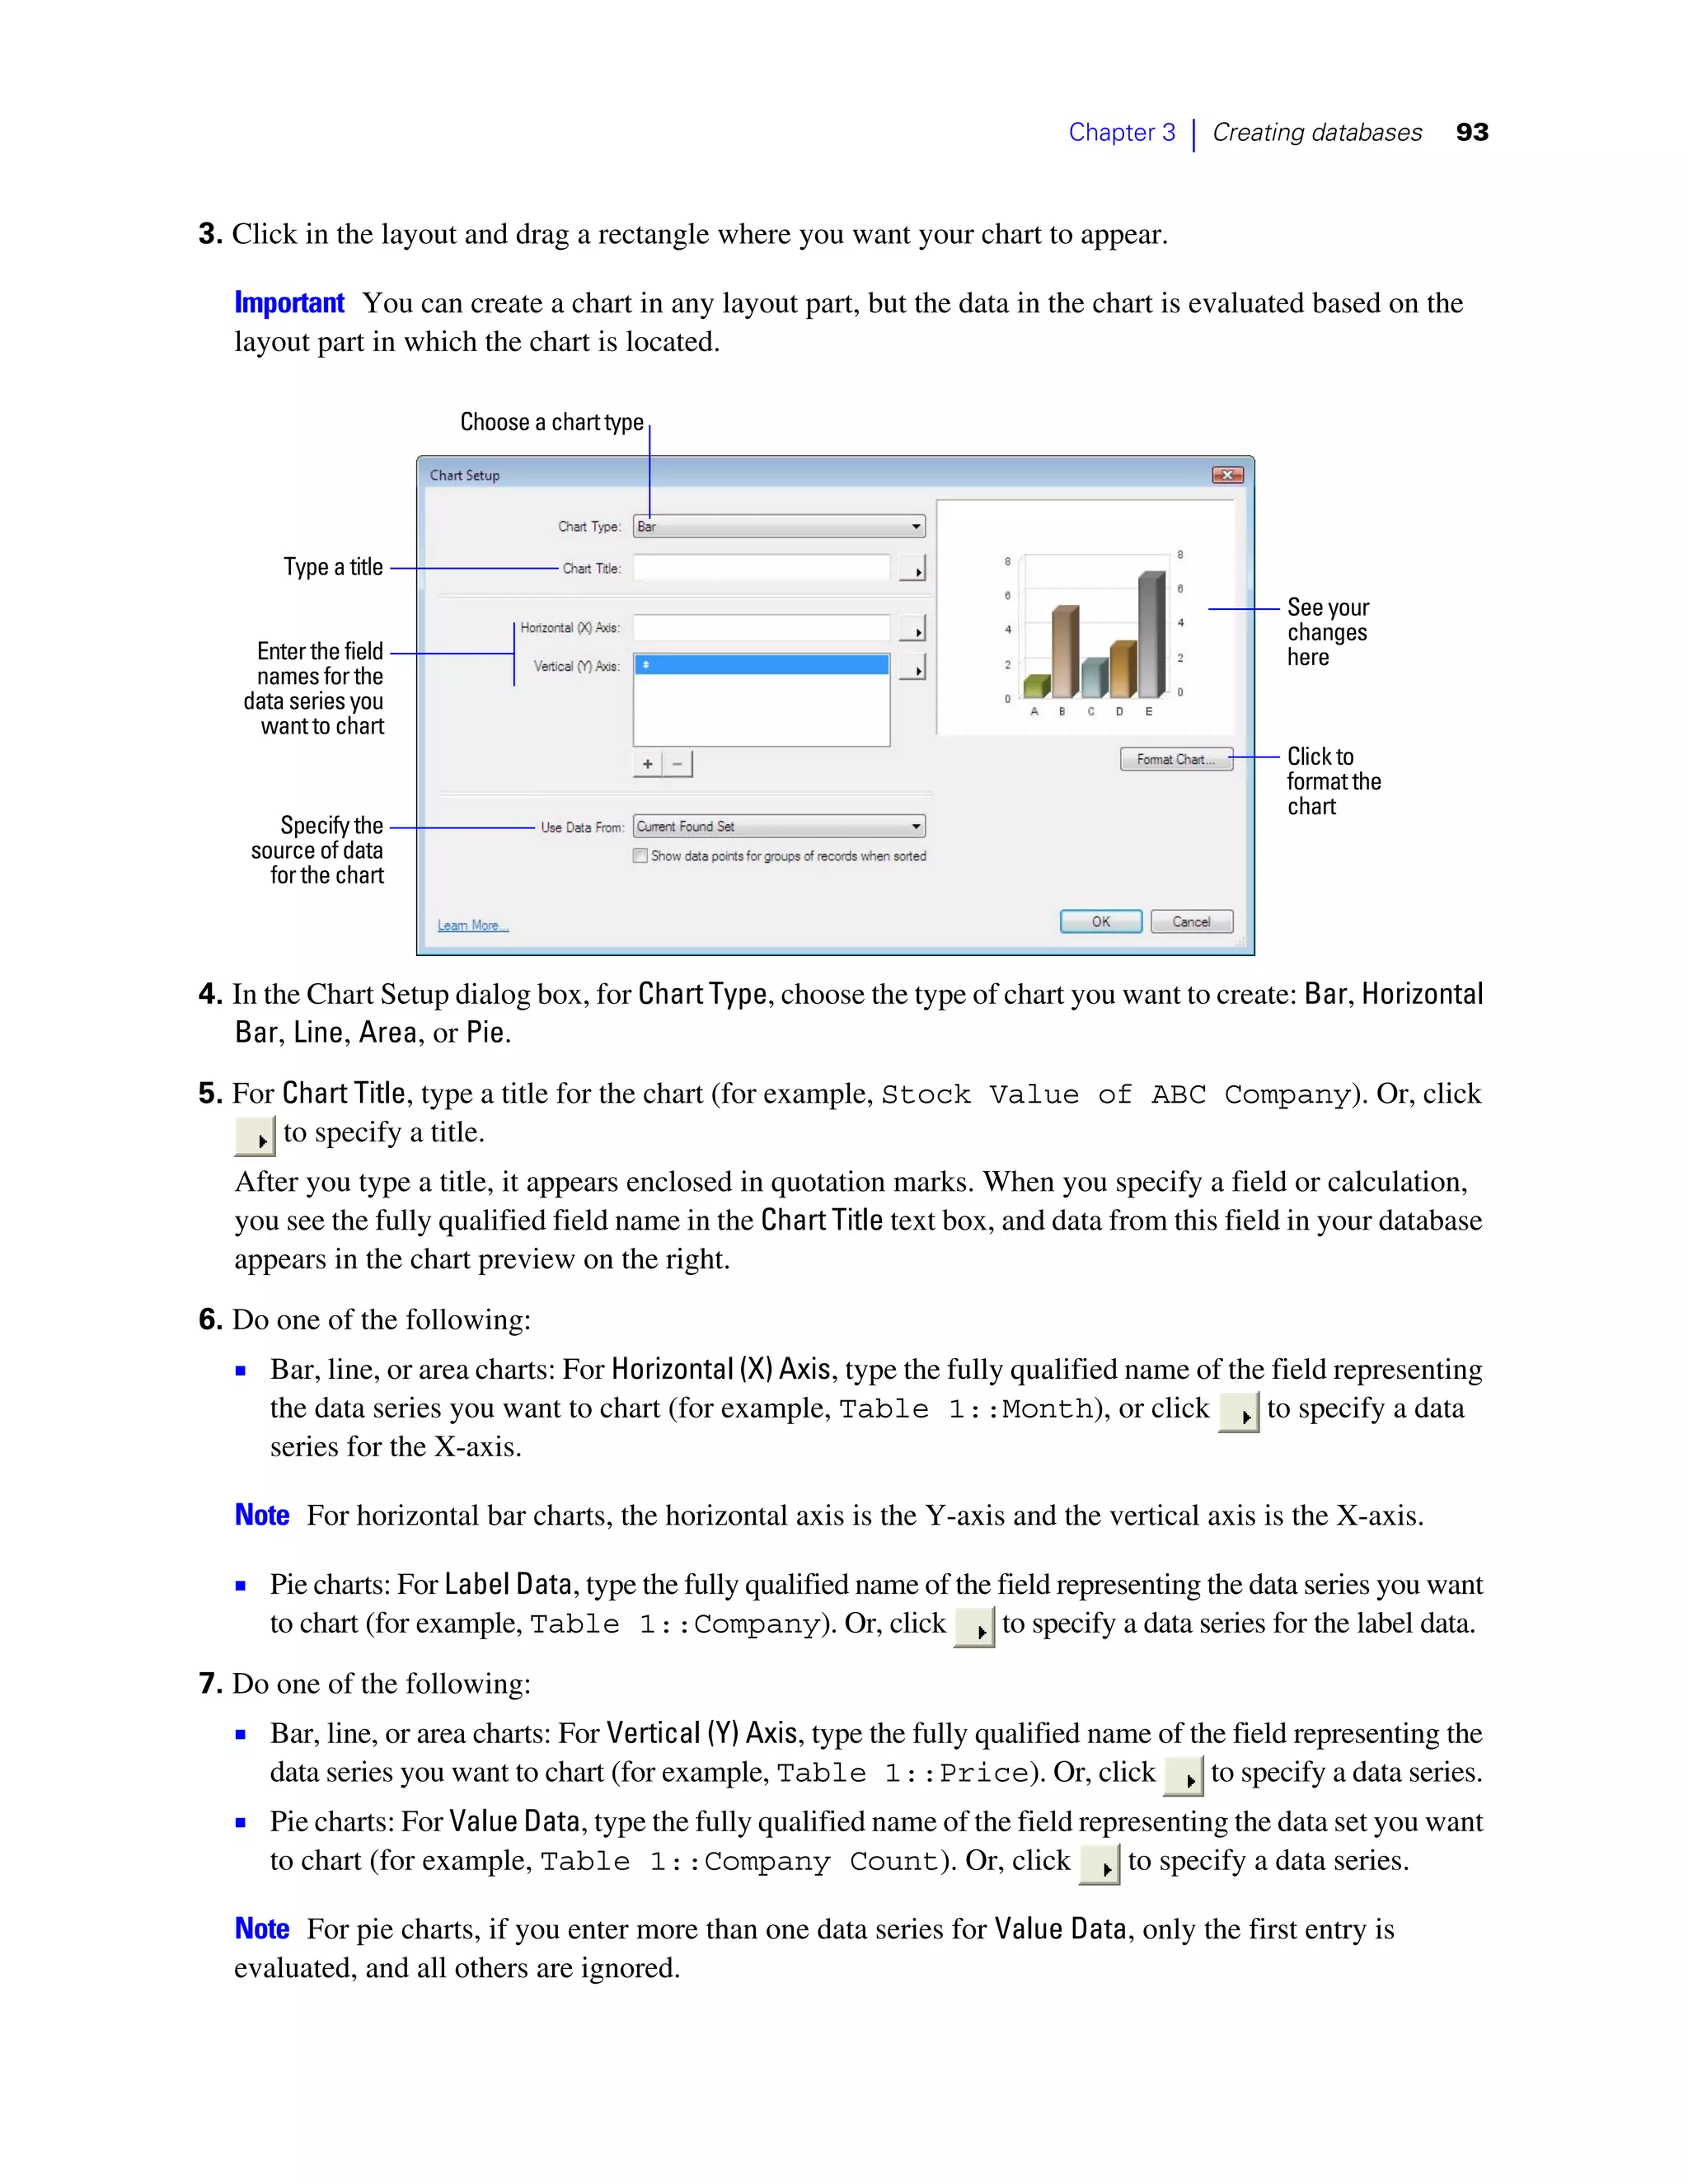
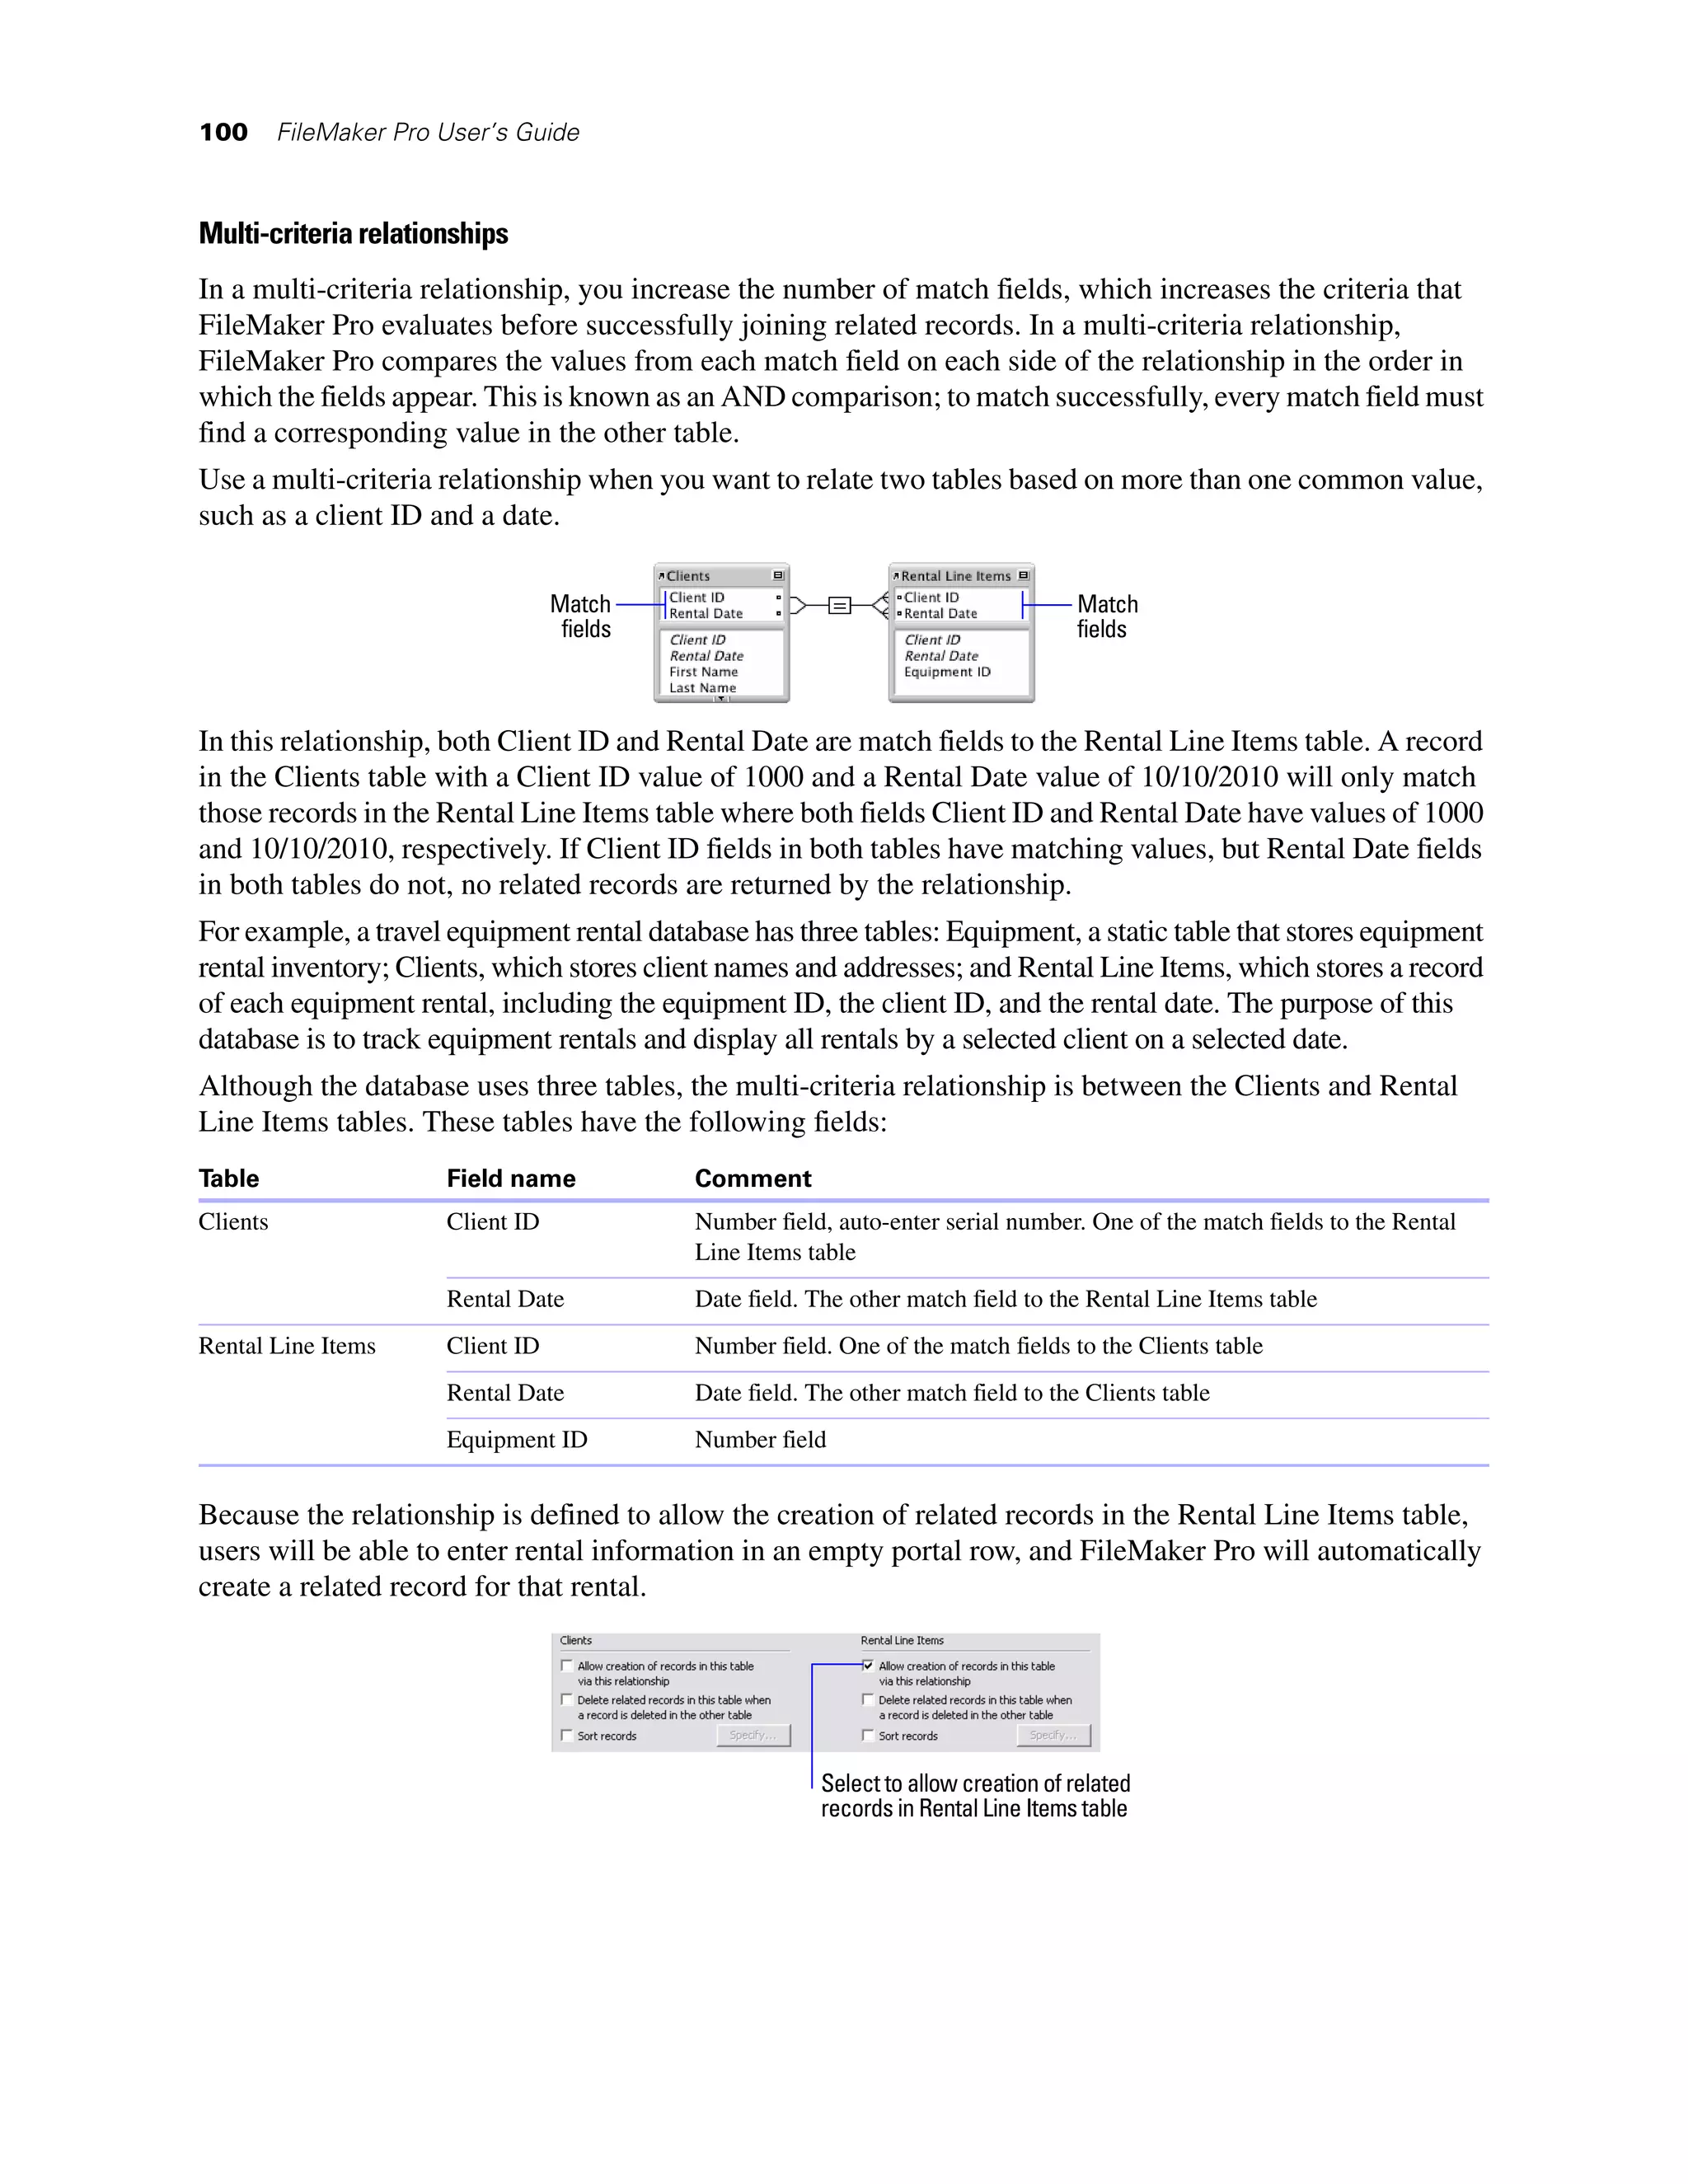
![Chapter 3 | Creating databases 57
The previous steps create a simple, one-table file. In Table View, you can only create and make changes to
fields in local files. However, you can create simple and complex files by choosing File menu > Manage >
Database and working in the Manage Database dialog box. For more information, see “Creating and
changing fields in the Manage Database dialog box” on page 59.
Keep these points in mind:
1 By default, choosing File menu > New Database displays an empty database in Table View. To change
the default setting and open the Manage Database dialog box whenever you create a new database,
choose Edit menu > Preferences (Windows) or FileMaker Pro menu > Preferences (Mac OS). In the
Preferences dialog box, click the General tab, then select Use Manage Database dialog to create files.
(Note that this option does not apply when you create a database using the Quick Start Screen. When you
create a database using the Quick Start Screen, Table View is the default.)
1 To prevent records from being sorted by a field when you click the column heading in Table View,
deselect Sort data when selecting column in the Table View Properties dialog box. For more information,
see Help.
1 You can prevent new fields that you create from being automatically placed on the current layout by
deselecting Add newly defined fields to current layout in the Preferences dialog box. For more
information, see Help.
About naming fields
Follow these guidelines when naming fields:
1 Field names must be unique. They can contain up to 100 characters.
1 Use descriptive names that clearly identify the contents of the field. Avoid abbreviations, acronyms, or
other terms that may cause confusion.
1 Don’t use any of the following symbols or words in the field name:
1 , (comma) + – * / ^ & = ≠ > < ≥ ≤ ( ) [ ] } " ; (semicolon) : (colon) :: (relational indicator) $ (variable
indicator)
1 AND, OR, XOR, NOT, or the name of any FileMaker Pro function
1 Don’t begin a field name to be used in a calculation formula with a space, period (.), or number.
1 Use _ (underscore) in place of a space to avoid restrictions in ODBC (Open Database Connectivity) or
JDBC (Java Database Connectivity), exporting, web publishing, and other operations.
1 If you’re exchanging data with another application, check the field naming restrictions in the file formats
supported by the other application.
1 If you’re using ODBC or JDBC to share FileMaker Pro data, avoid using SQL keywords in field names.](https://image.slidesharecdn.com/fmp11usersguide-120414063140-phpapp01/75/Fmp11-users-guide-57-2048.jpg)


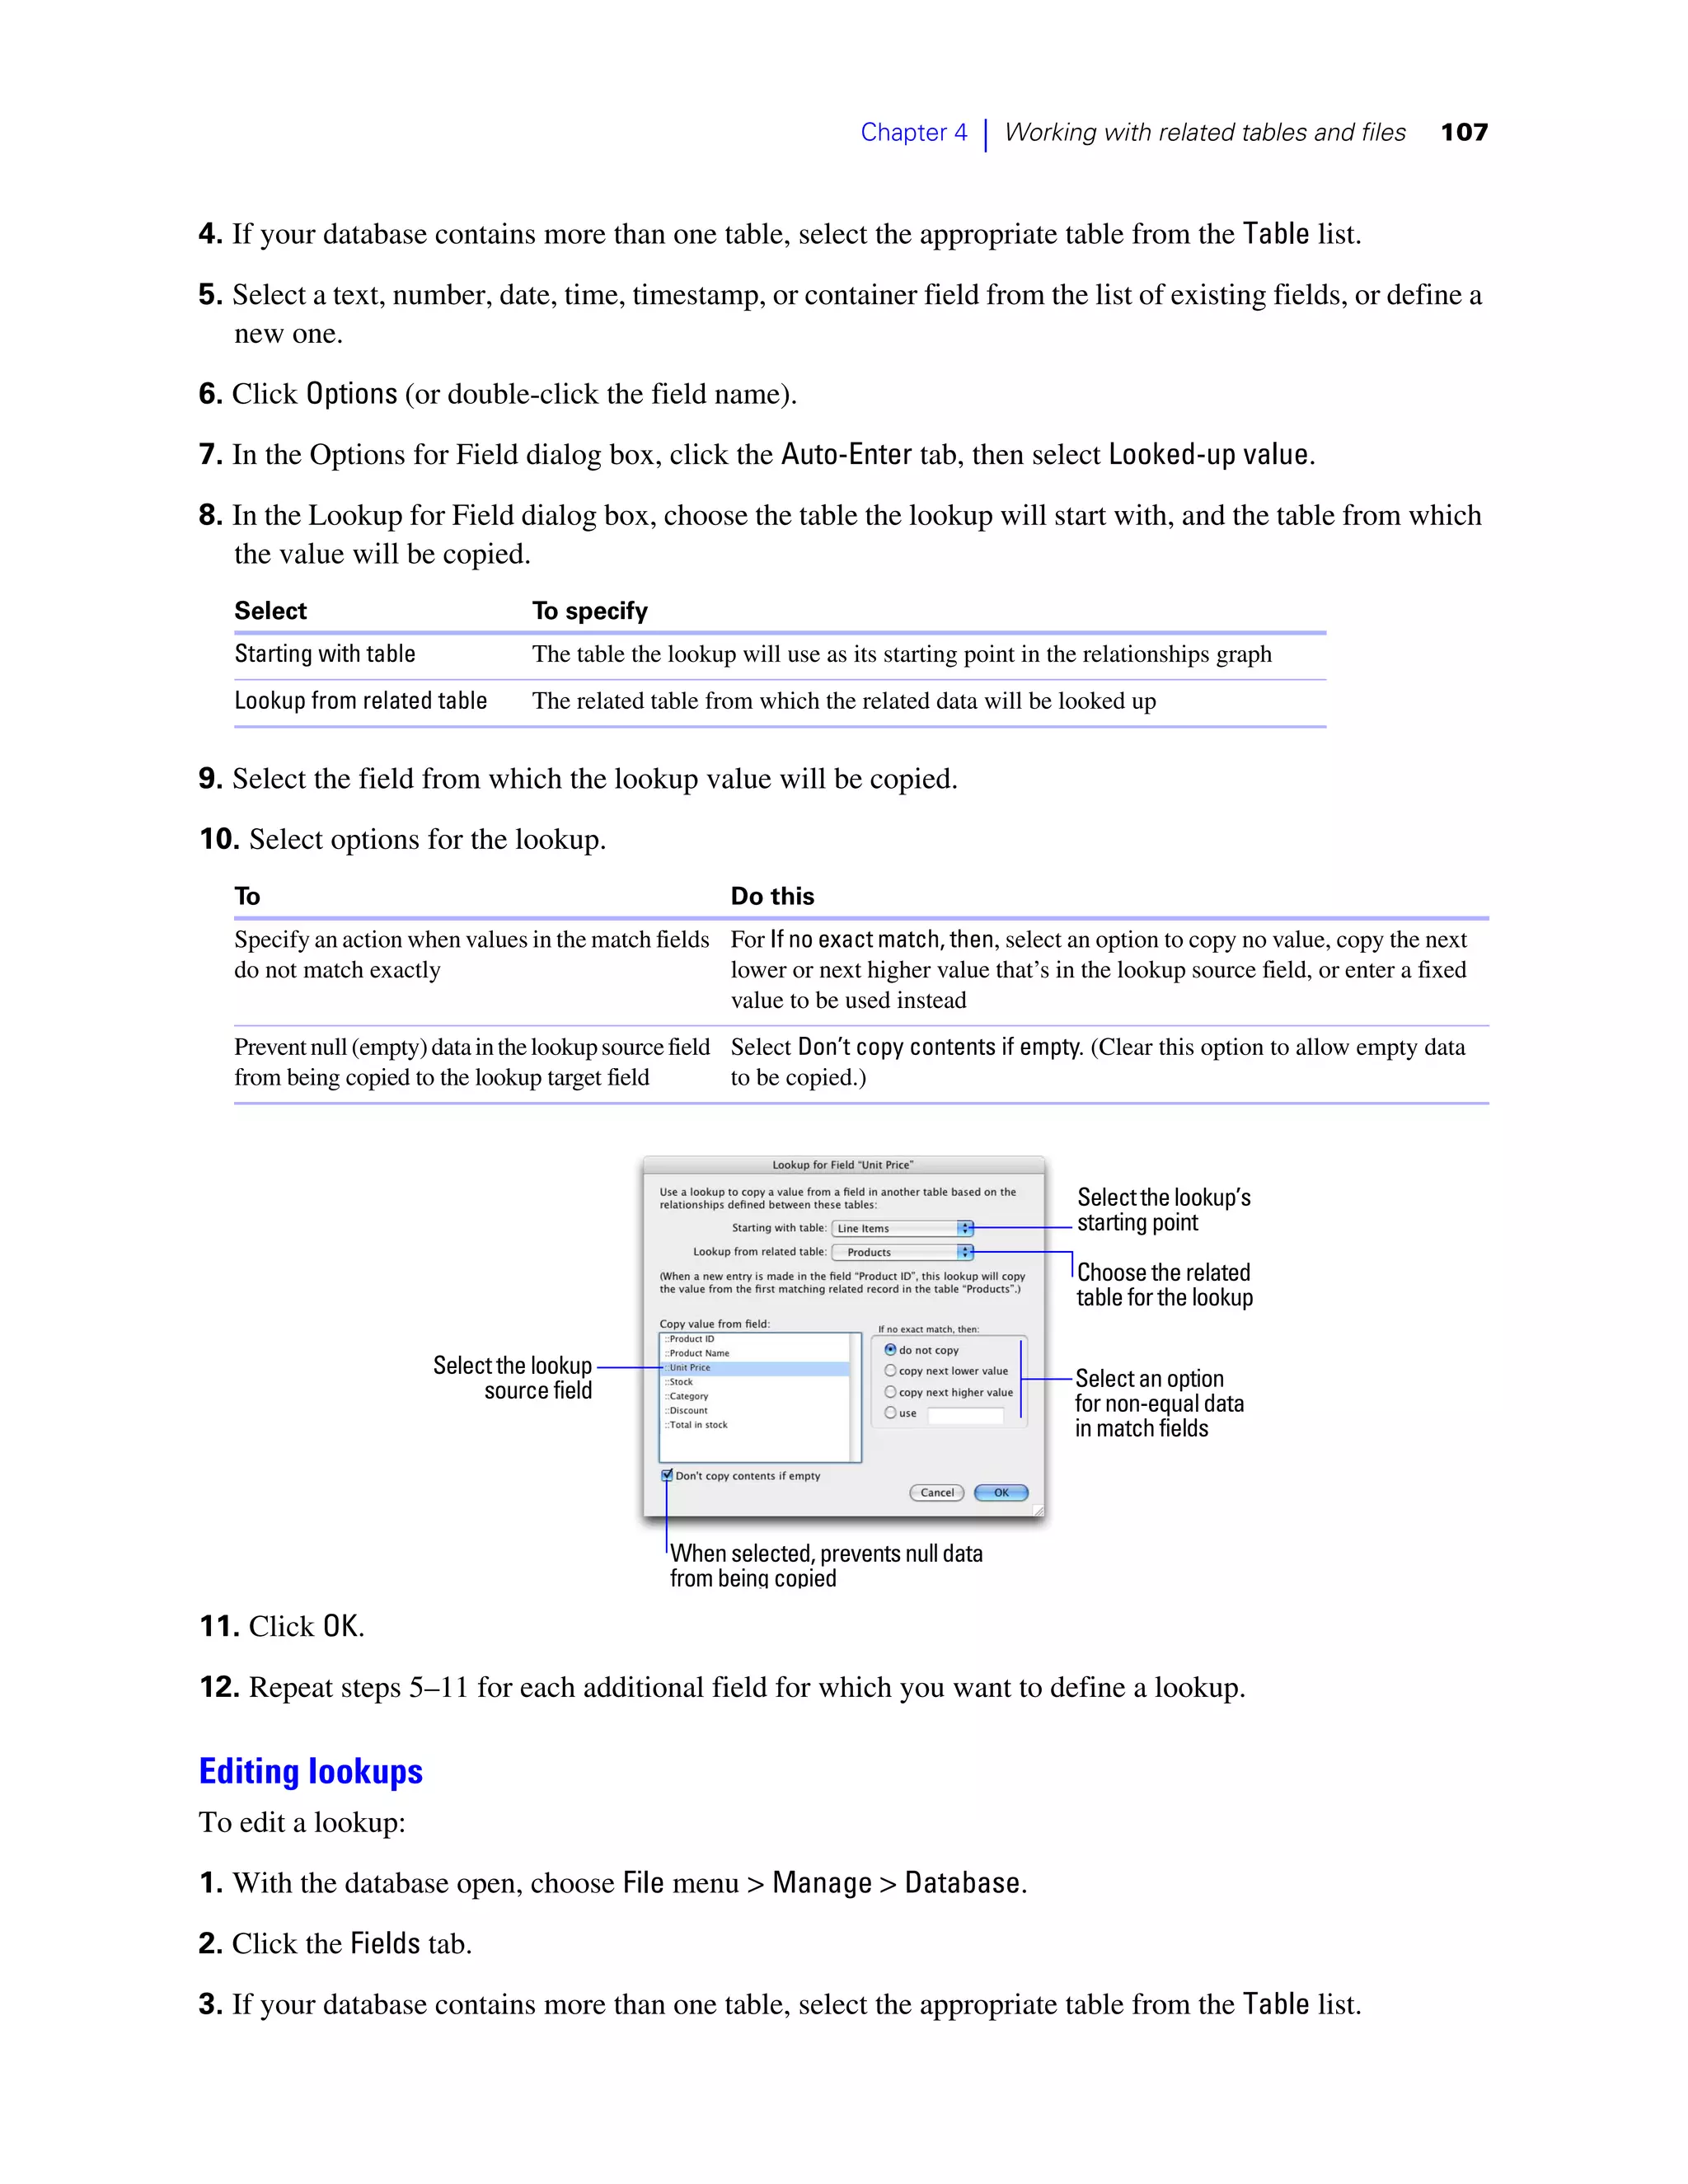
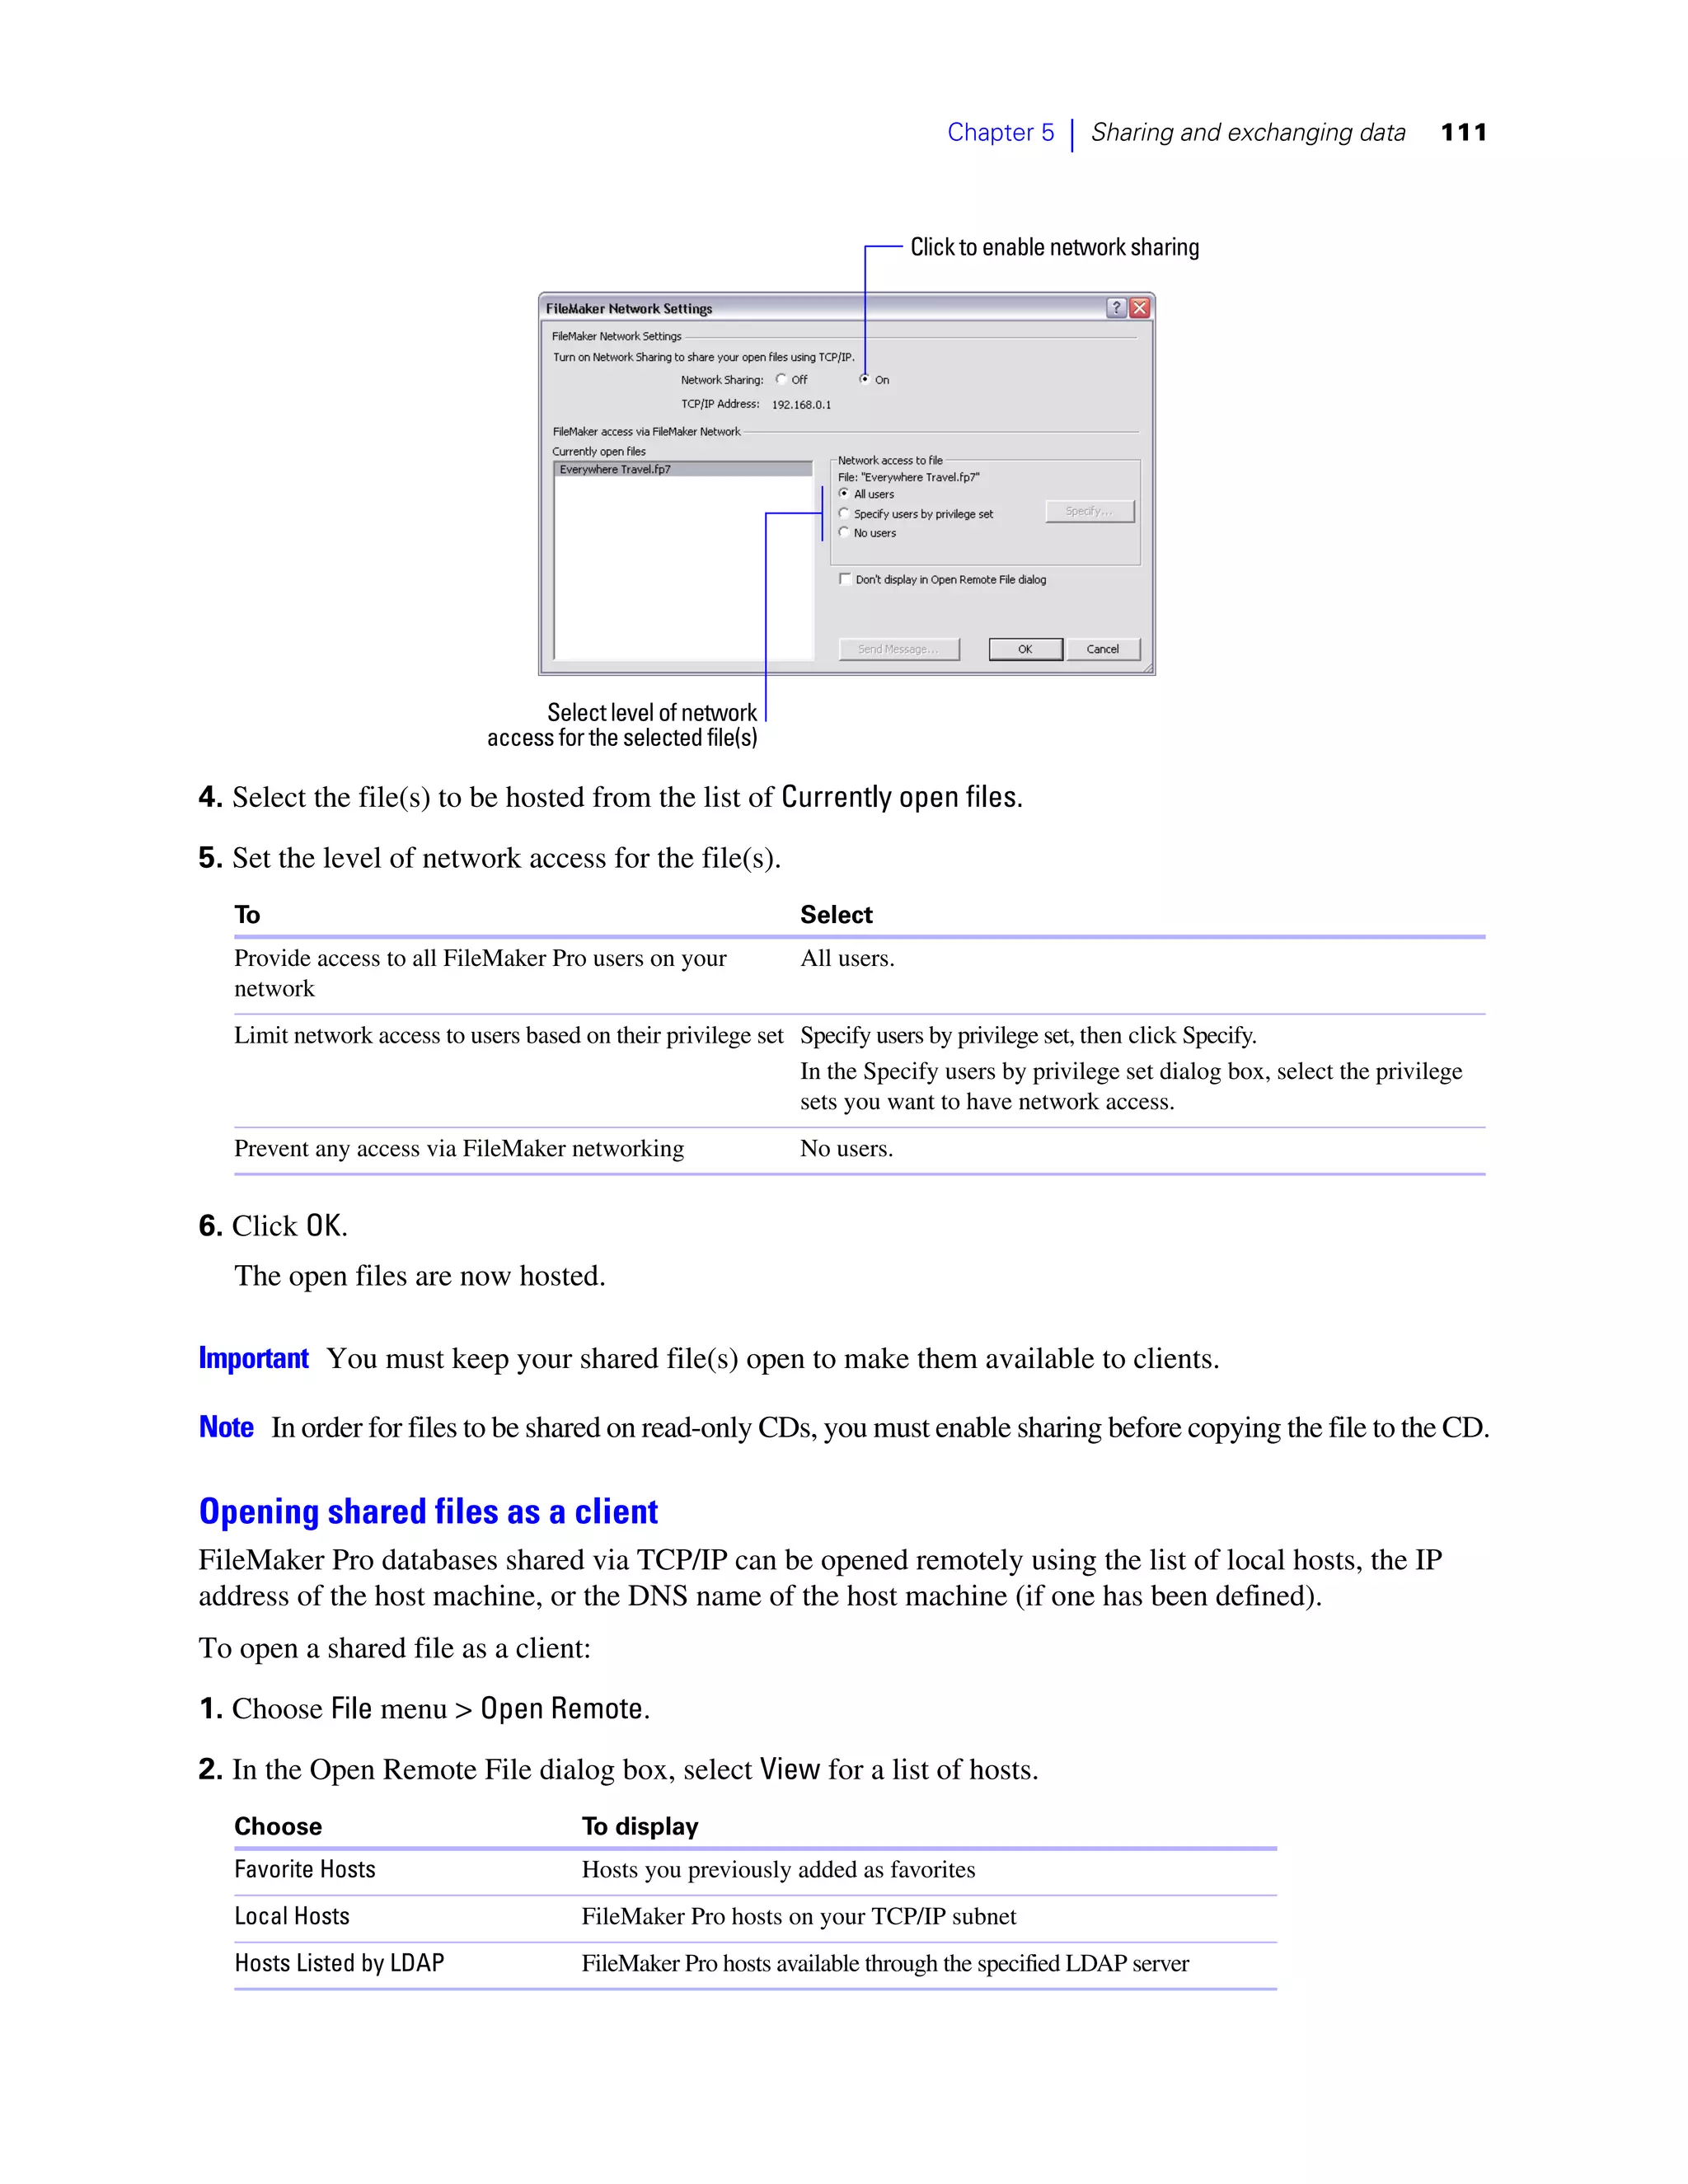
![112 FileMaker Pro User’s Guide
3. To see the available files from a host, select the host. In the Available Files list, select the file you want to open.
Tip To narrow the list of available files, type a few characters in the Filter text box. Only filenames
containing the characters you type are displayed in the list.
Or, for Network File Path, type the network path; for example:
For IPv4: fmnet:/<host IP address>/<filename>
For IPv6: fmnet:/[<host IPv6 address>]/<filename>
4. Click Open.
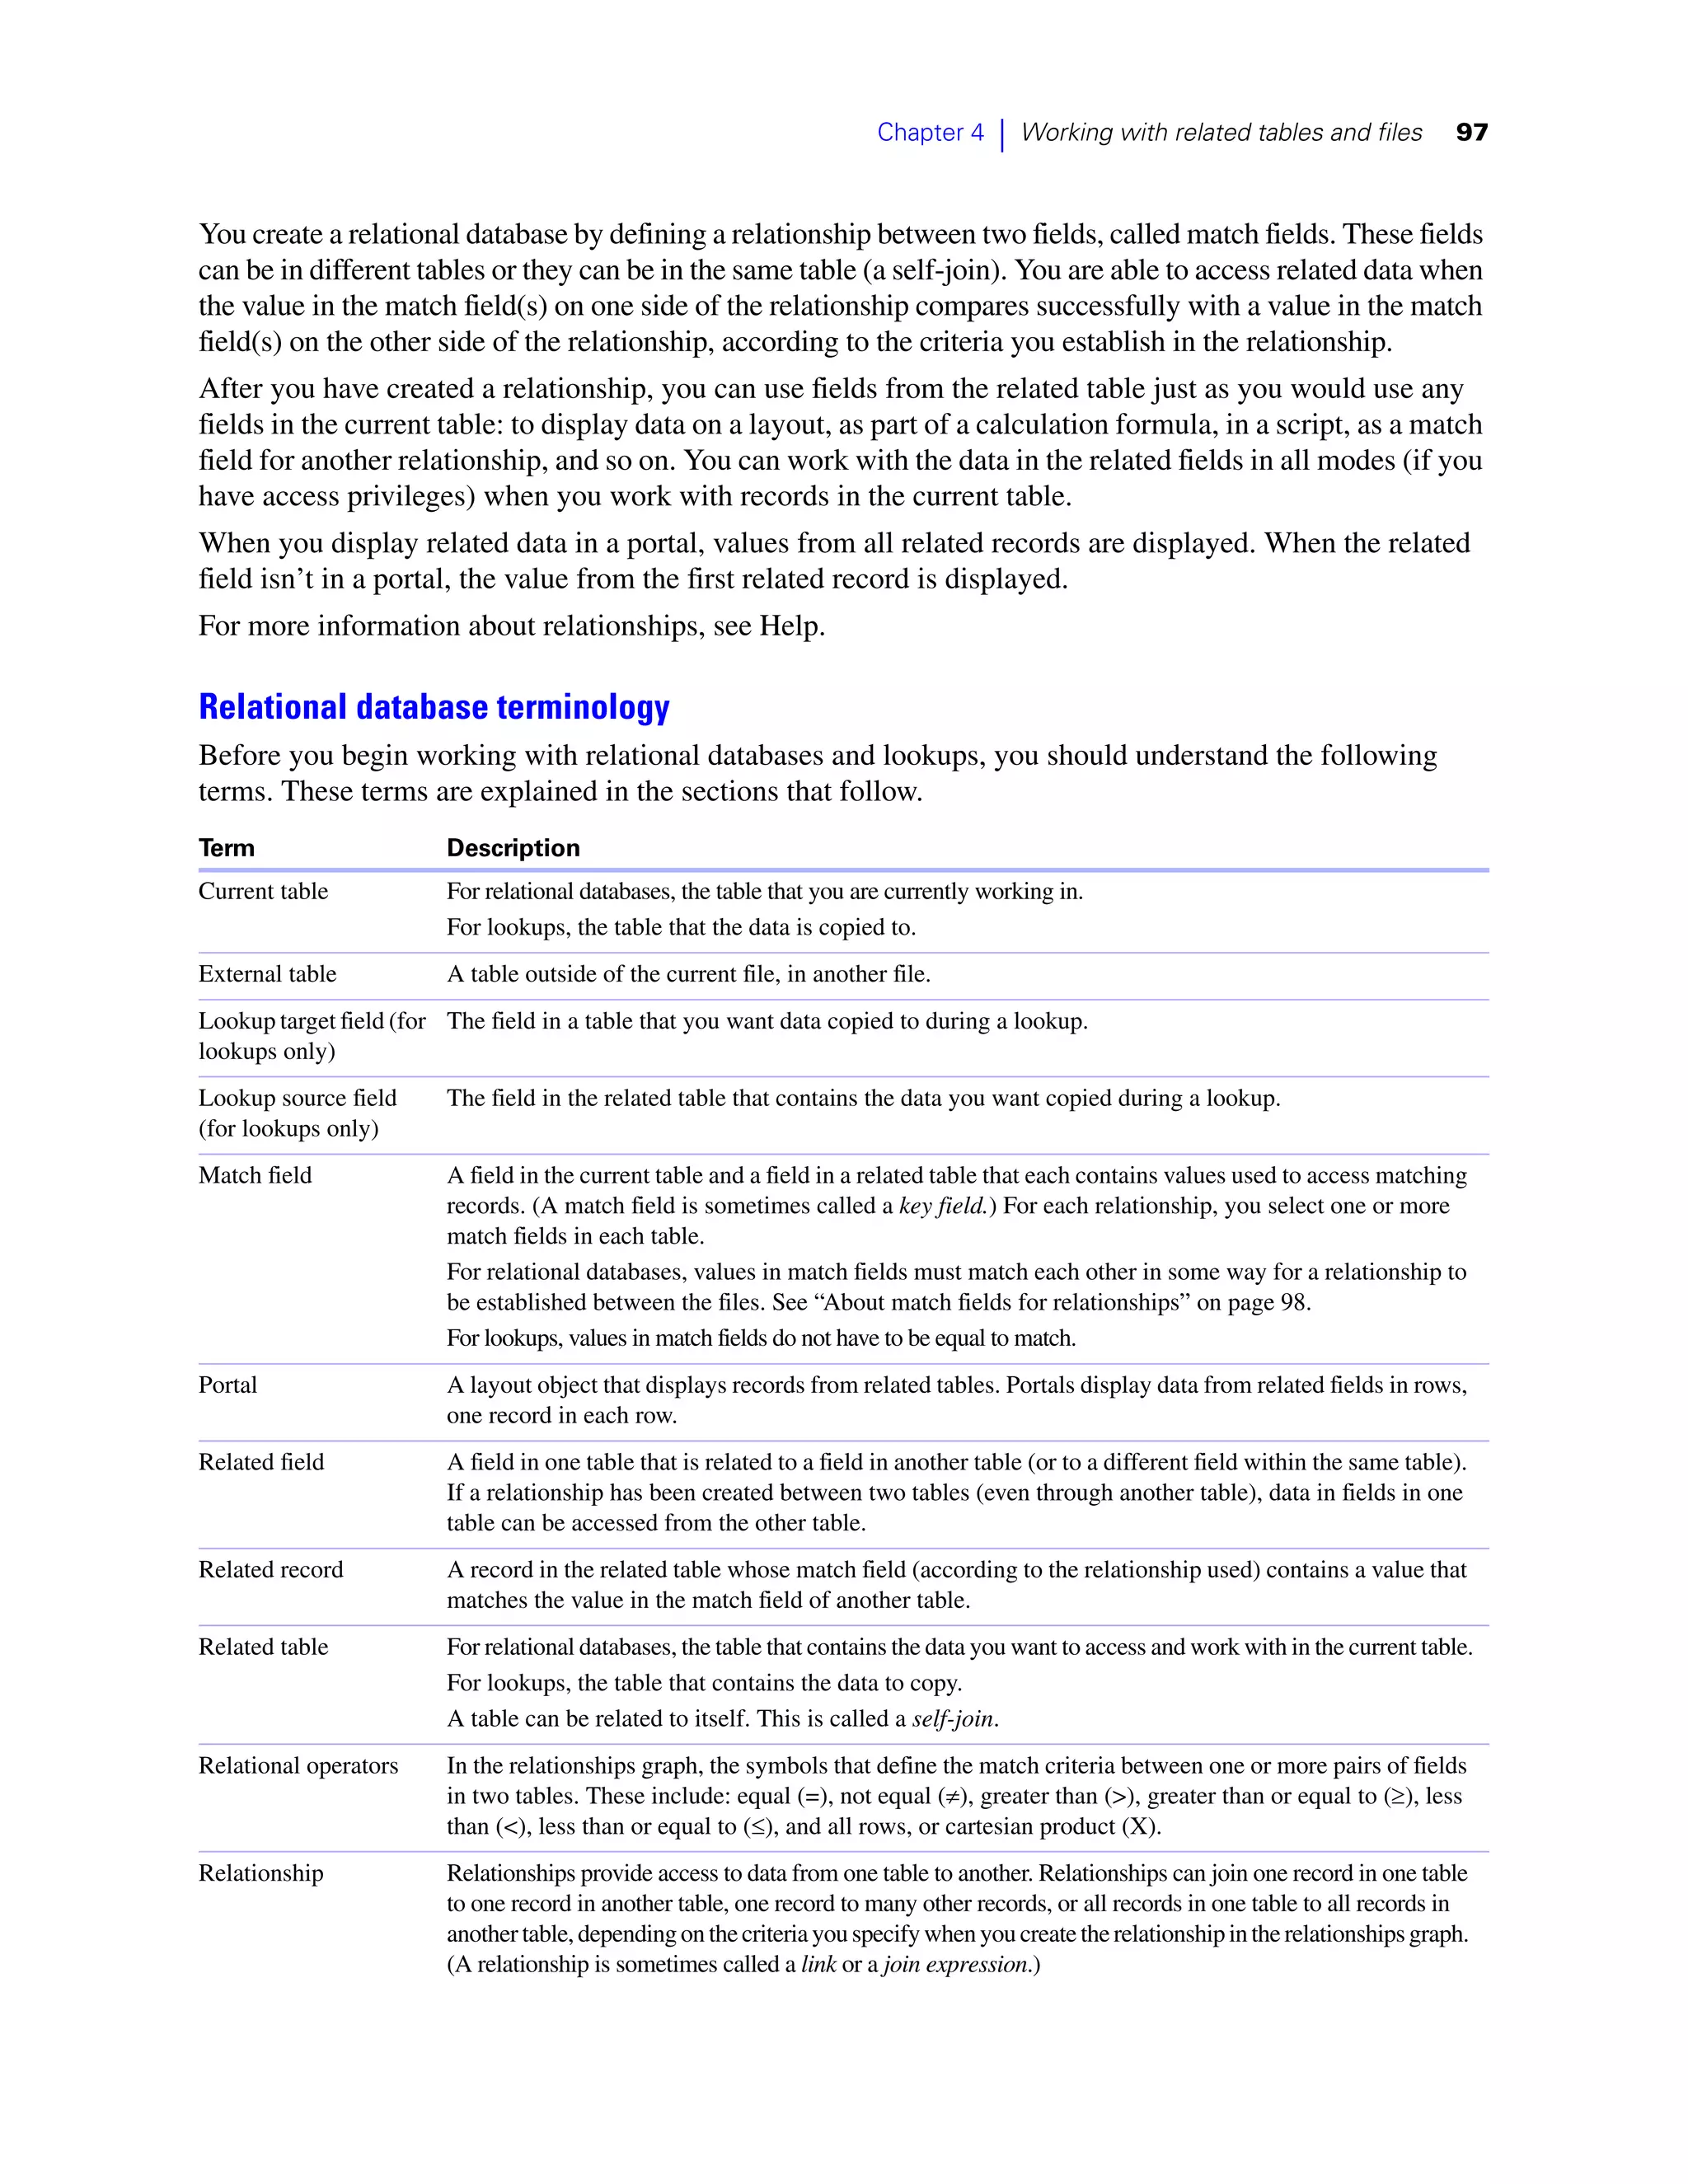
You might be required to enter an account name, password, and domain name (Windows only),
depending on how file sharing is configured on the host.
If the network is very busy, the file might not be listed. To check the network for a longer period of time,
hold down the Ctrl key (Windows) or Option key (Mac OS) as you click an item.
For information about marking remote files as favorites and accessing favorite files, see Help.
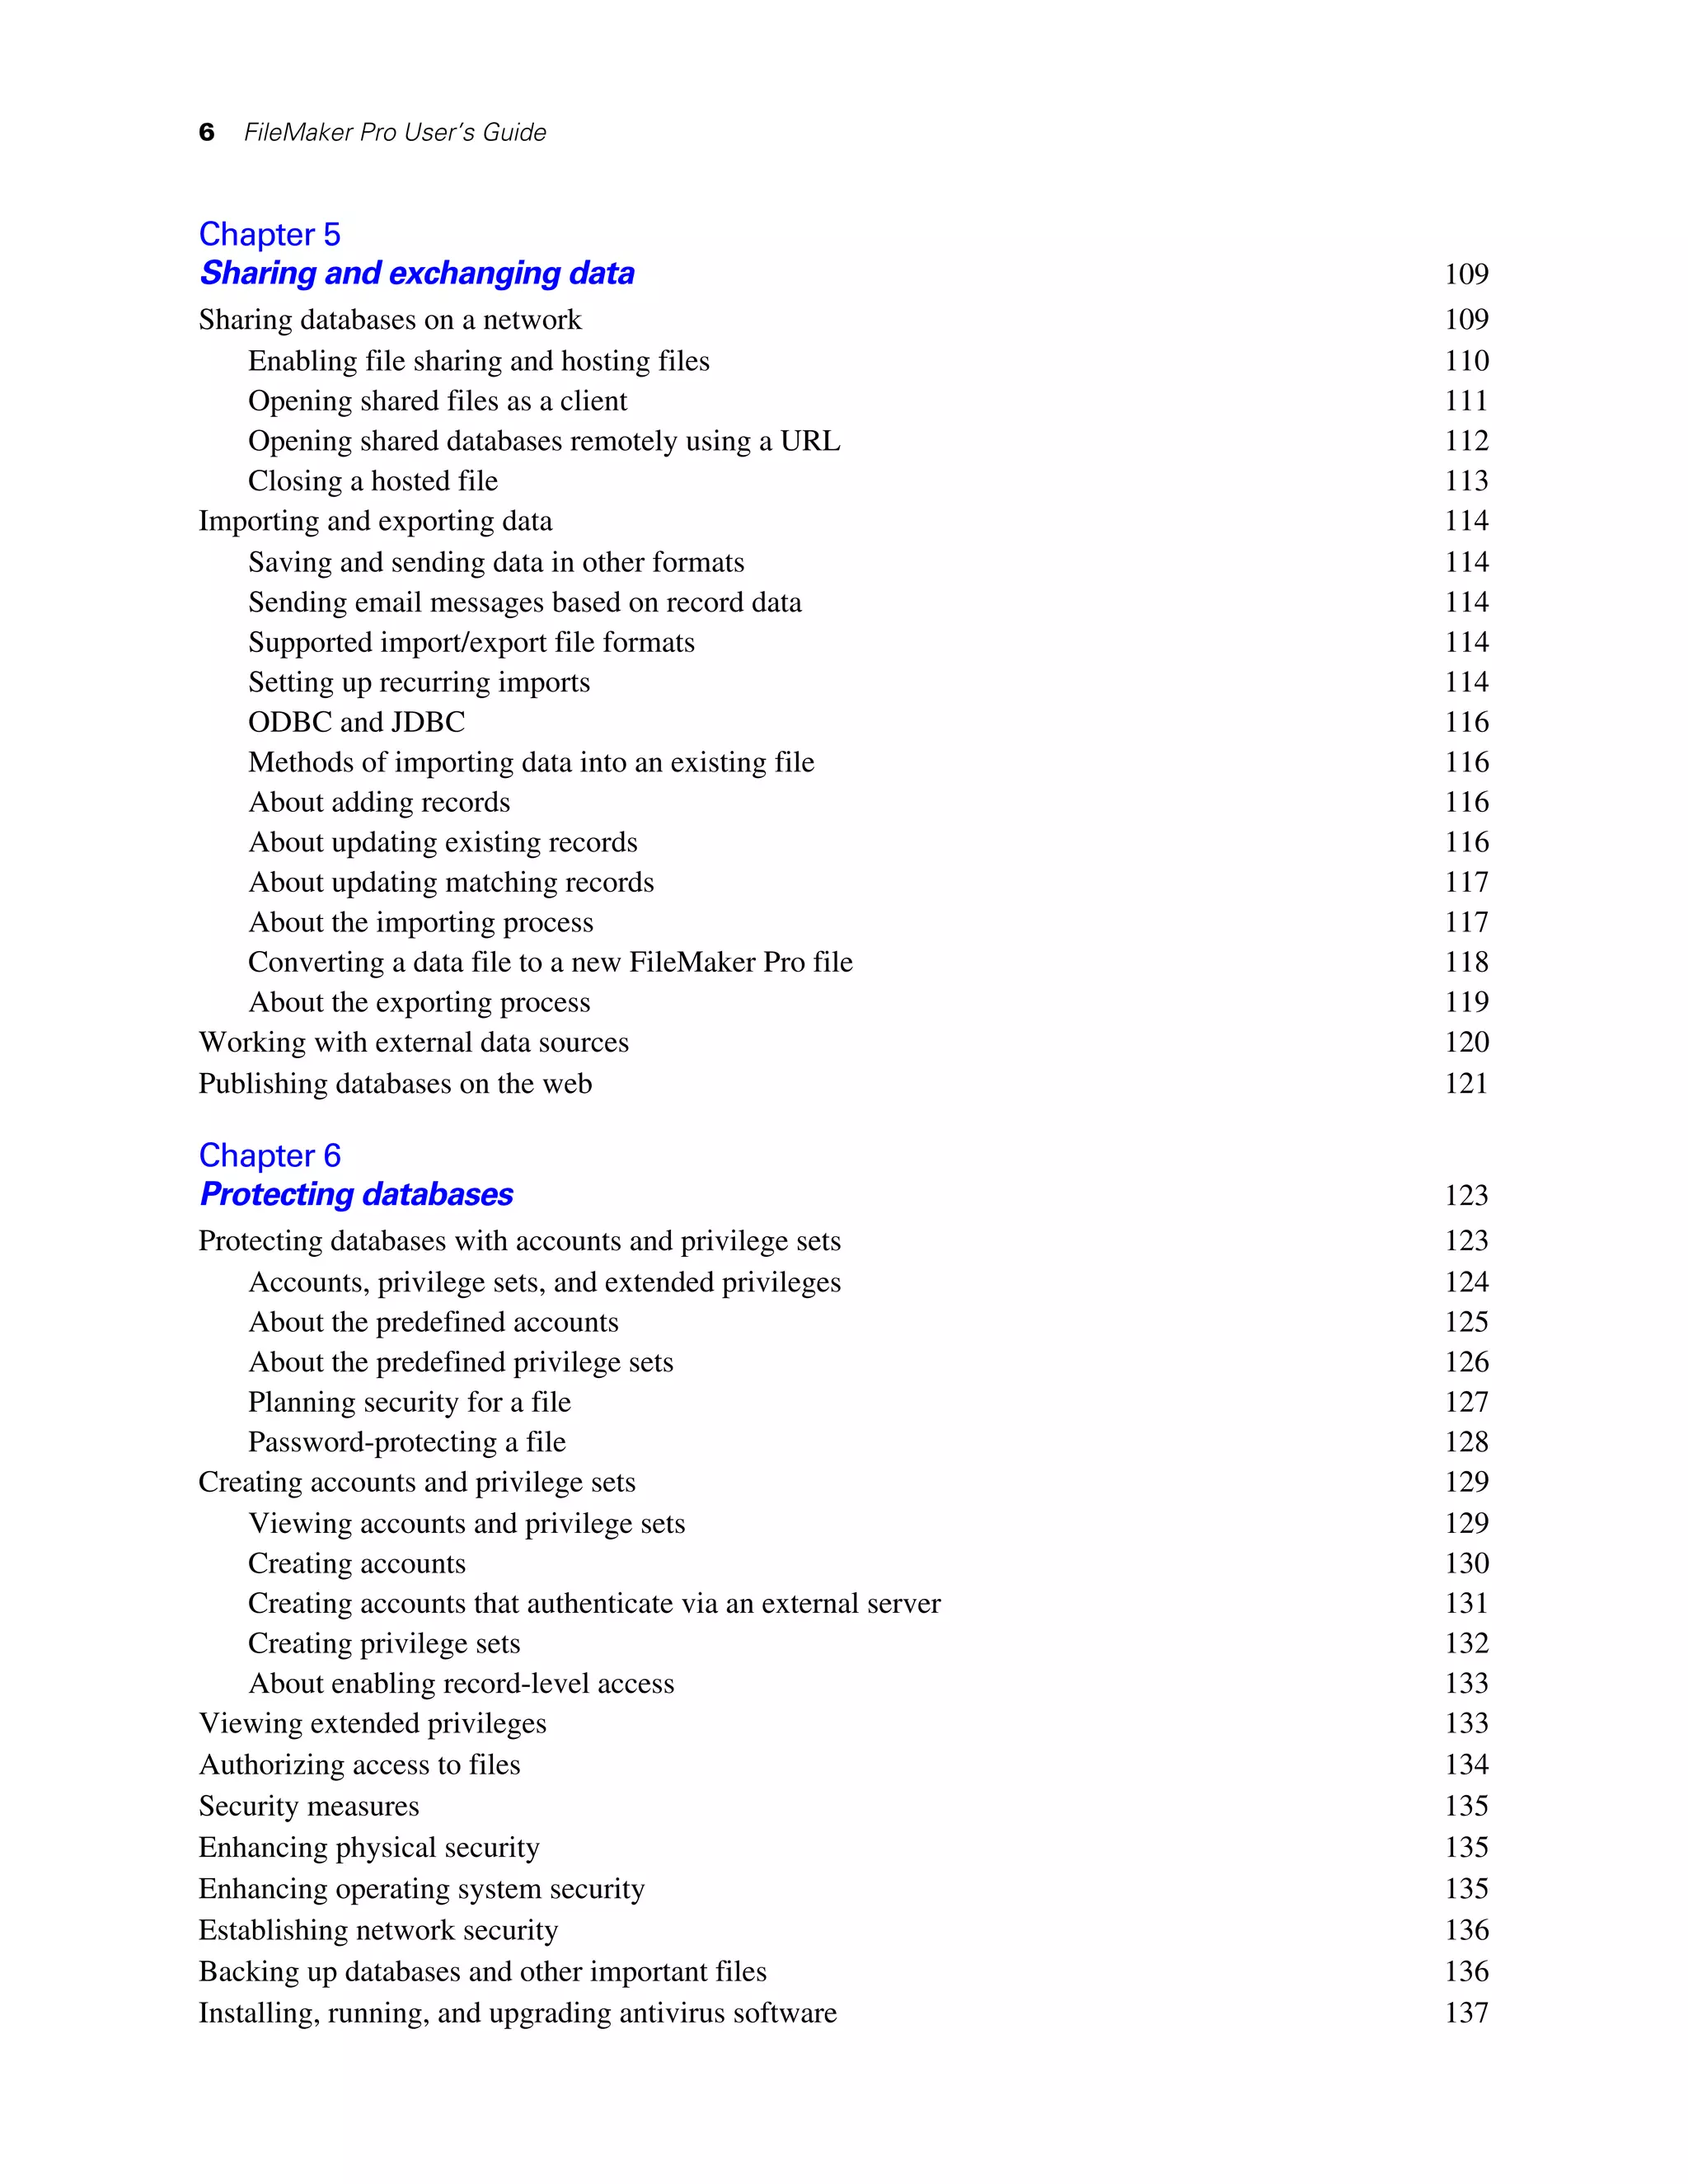
Limitations on changes to shared files
Although it is possible for multiple users to make changes in the same shared file at the same time, there are
limits to the types of simultaneous changes that are permitted. The following table describes the types of
changes you can and cannot make to shared files.
Database change Limitation
Data in layouts and records Two people can’t edit the same record at the same time.
Data in records from external Two people can edit the same record at the same time.
ODBC data sources If two users edit the same record simultaneously, FileMaker Pro posts an alert when either user attempts to
commit changes. The alert provides a user with a choice, allowing changes to be committed (overwriting
any changes the other user might have made), returning to the record without committing changes, or
reverting the record to the state it was when the editing session began.
Layouts and layout elements Two people can’t modify the same layout at the same time.
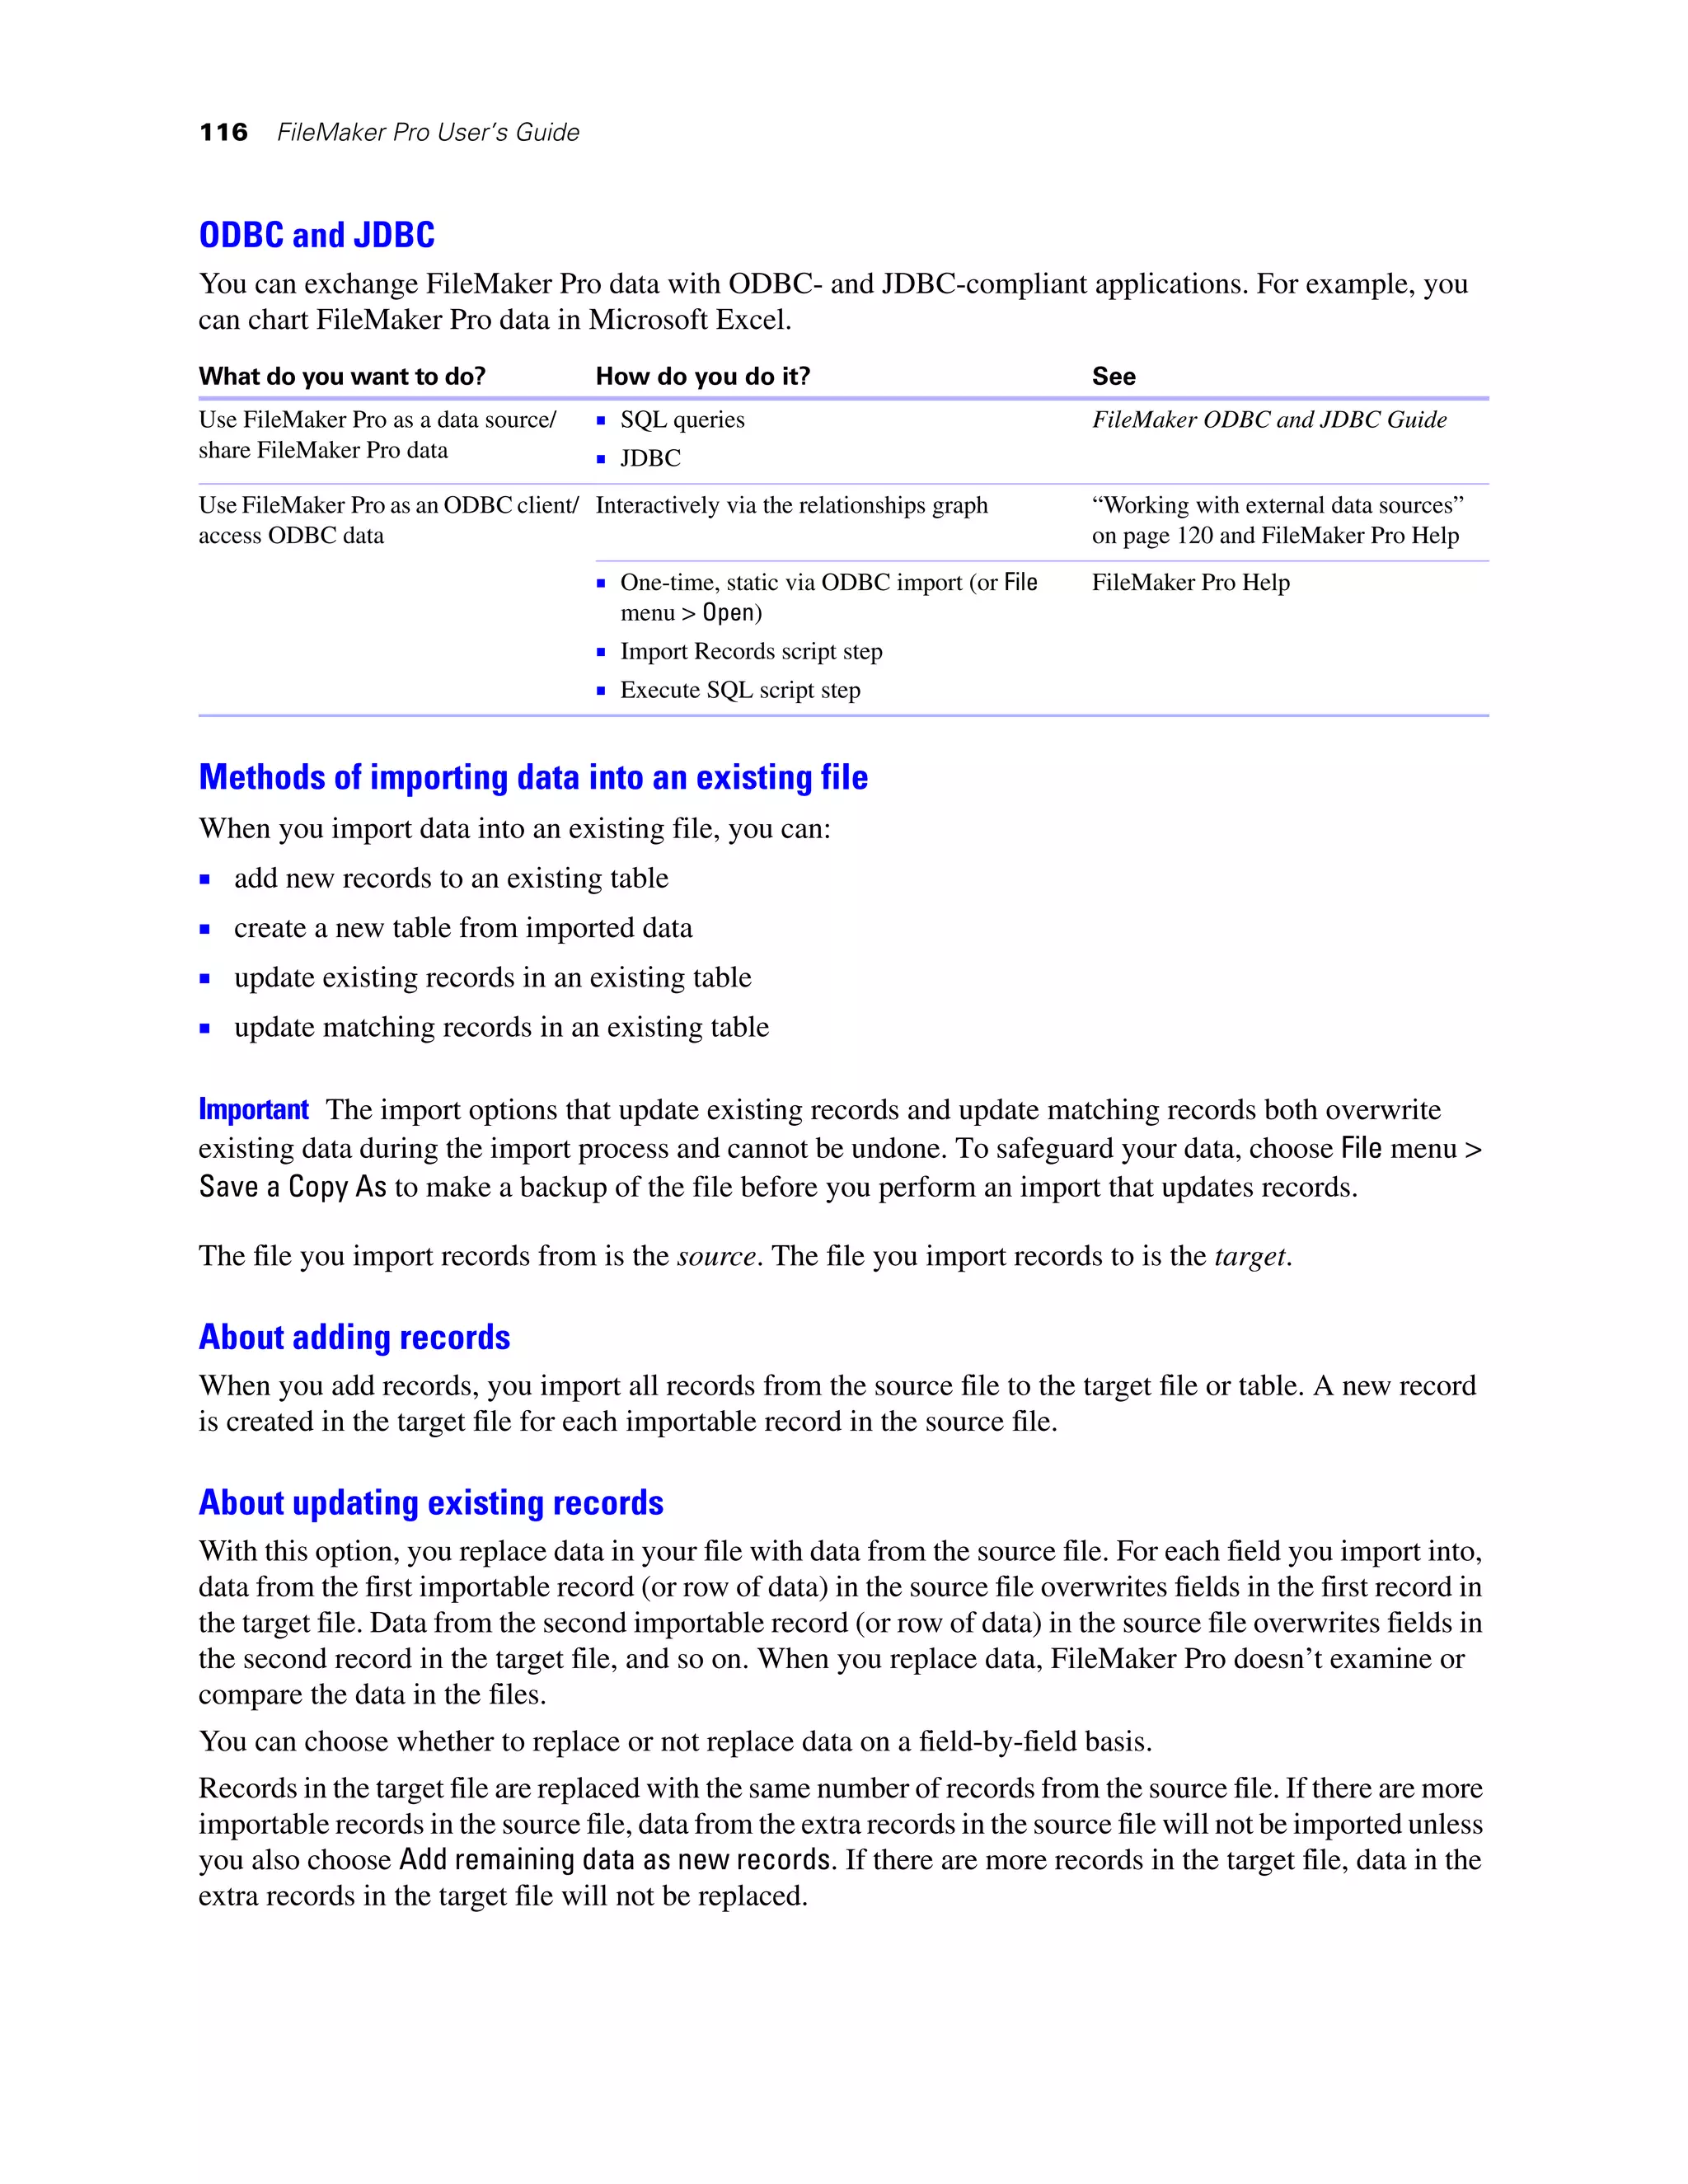
Value lists Two people can’t modify or define the same value list at the same time.
One person can edit a value list while another person is using it in Browse mode or Find mode.
Scripts Two people can’t modify or define the same script at the same time.
One person can edit a script while another person is using it.
Tables, fields, relationships Two people can’t modify any of these elements at one time.
(database schema)
Data sources Two people can’t modify or define the same data source at the same time.
One person can edit a data source reference while another person is using the external file.
Accounts and privileges Two people can’t modify or define accounts and privileges at the same time.
One person can create or modify an account and privileges while another person is using it.
Opening shared databases remotely using a URL
The FileMaker Pro installer registers FMP7 as an internet protocol. This enables you to open a shared
database using a URL.
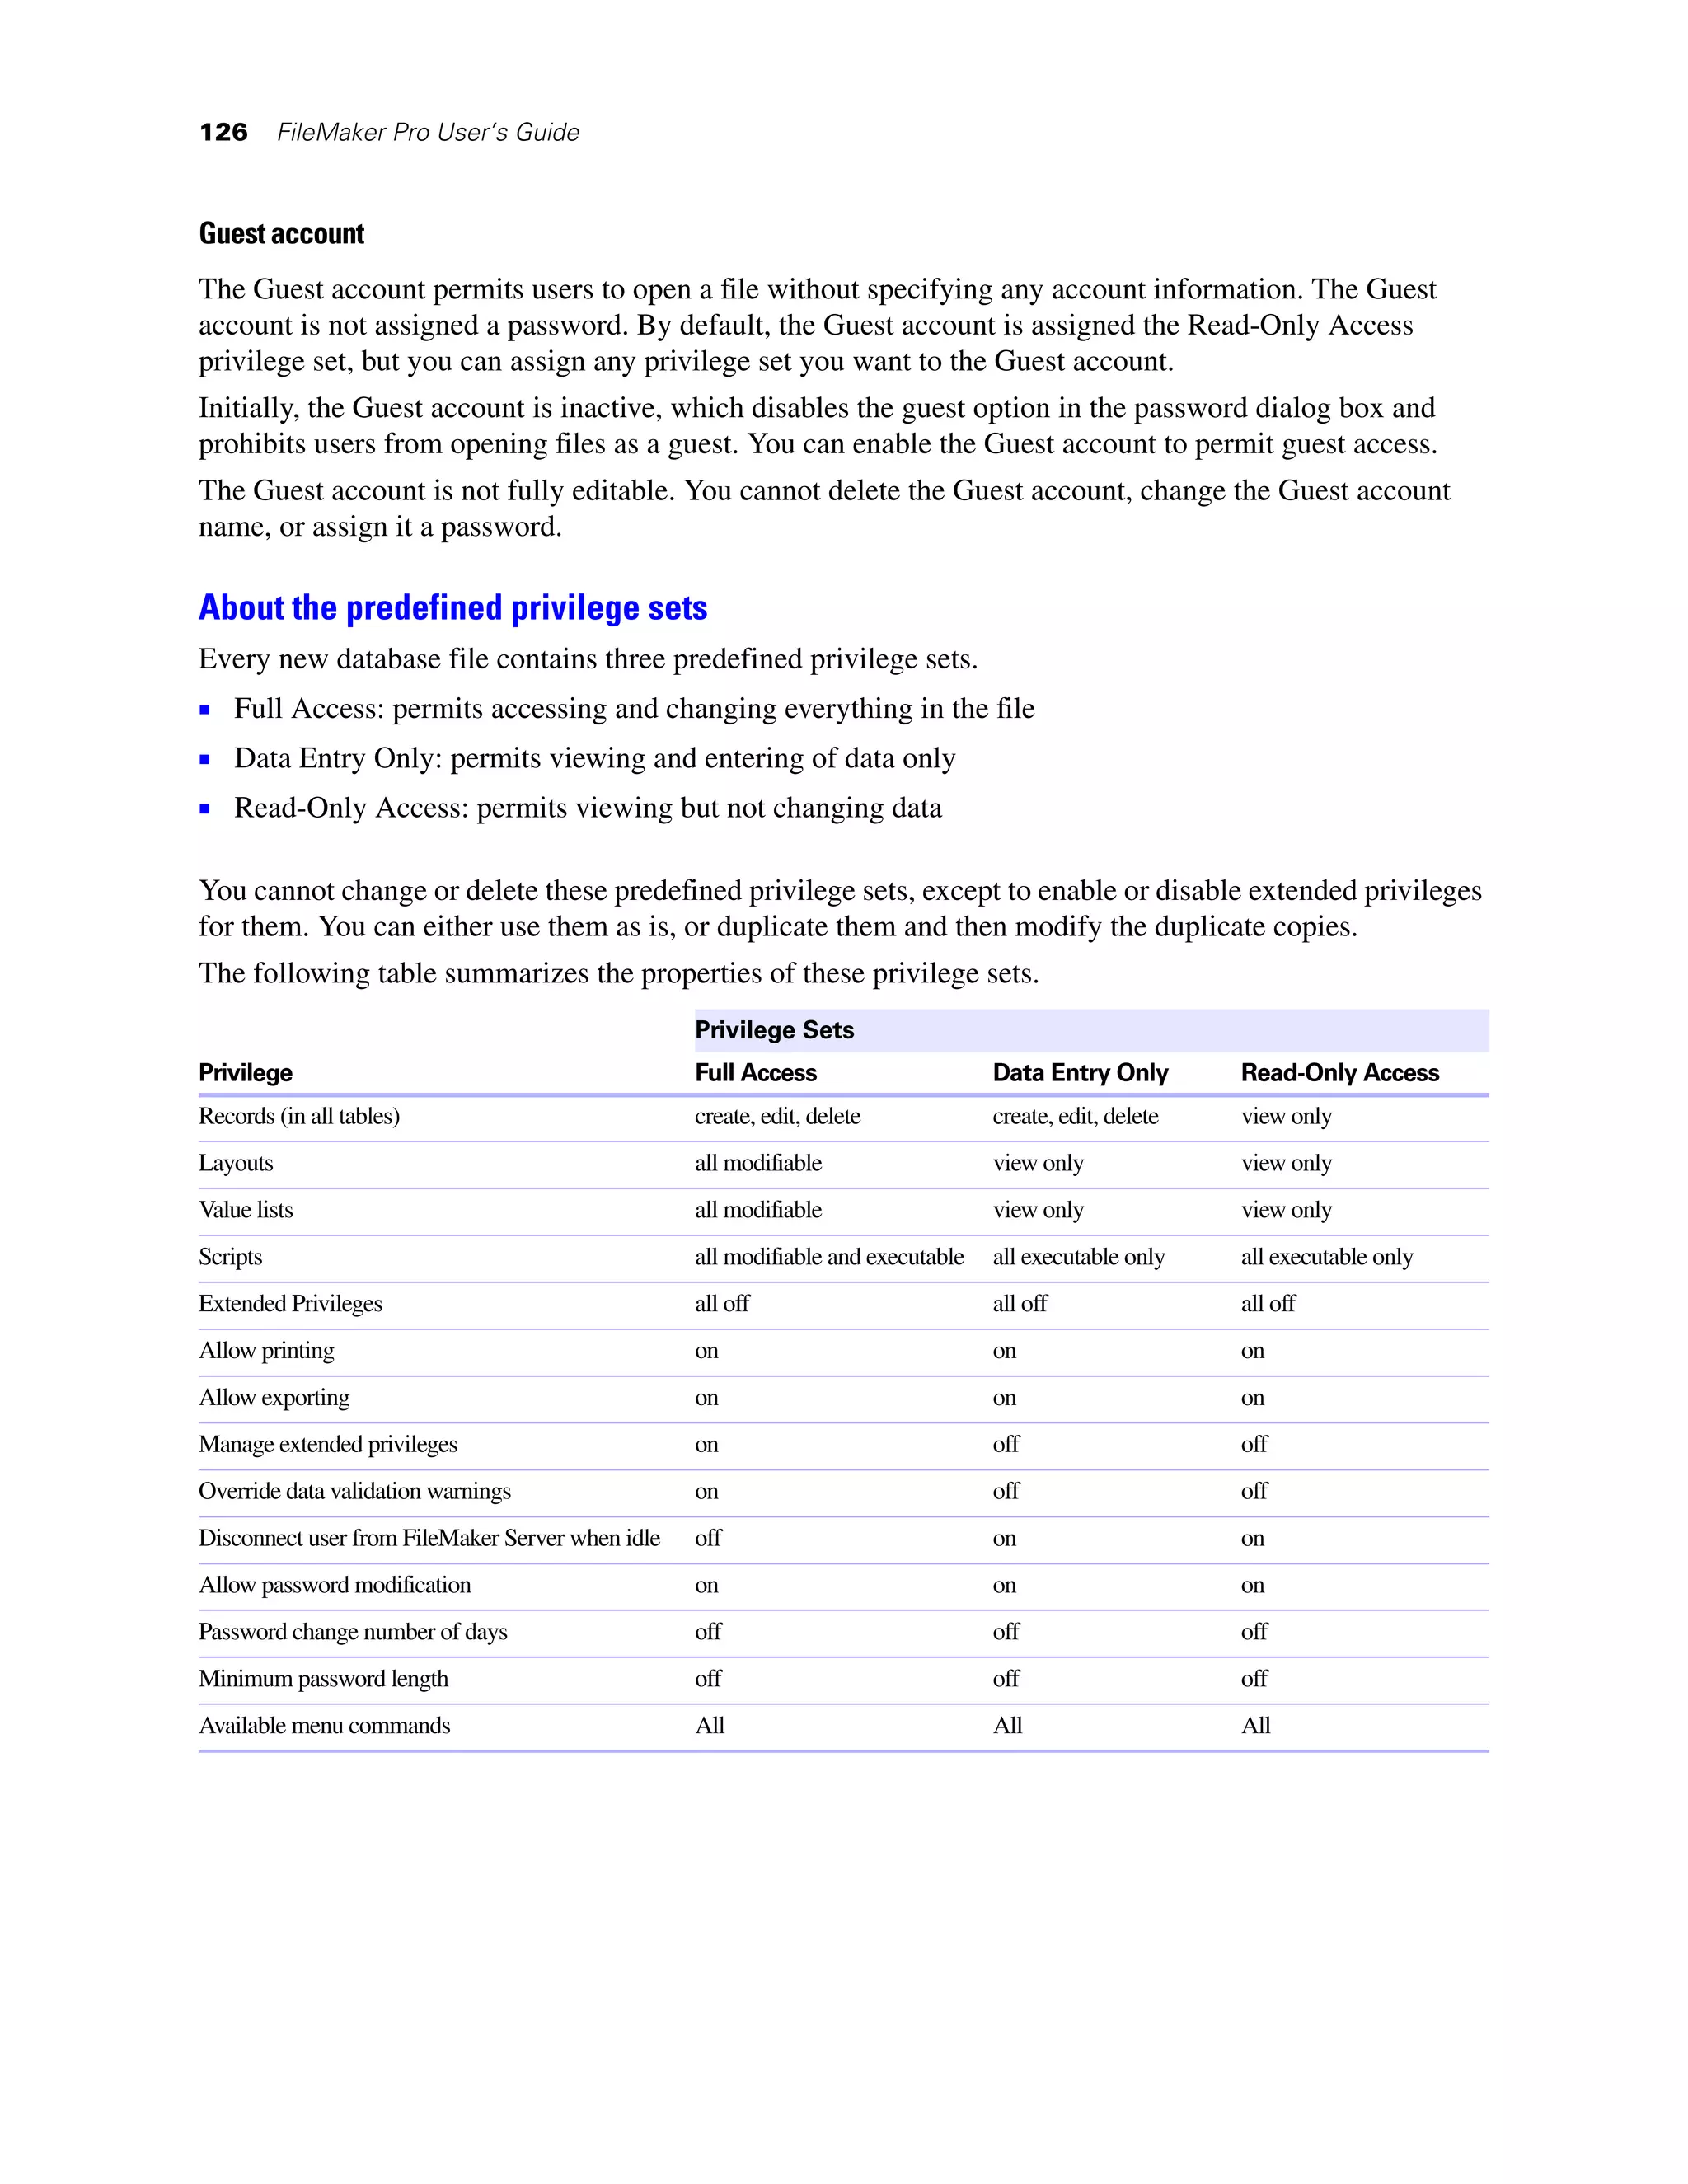
Clients can use a browser to access shared databases by entering the URL of the shared file on the host
machine in a browser’s address area.](https://image.slidesharecdn.com/fmp11usersguide-120414063140-phpapp01/75/Fmp11-users-guide-112-2048.jpg)
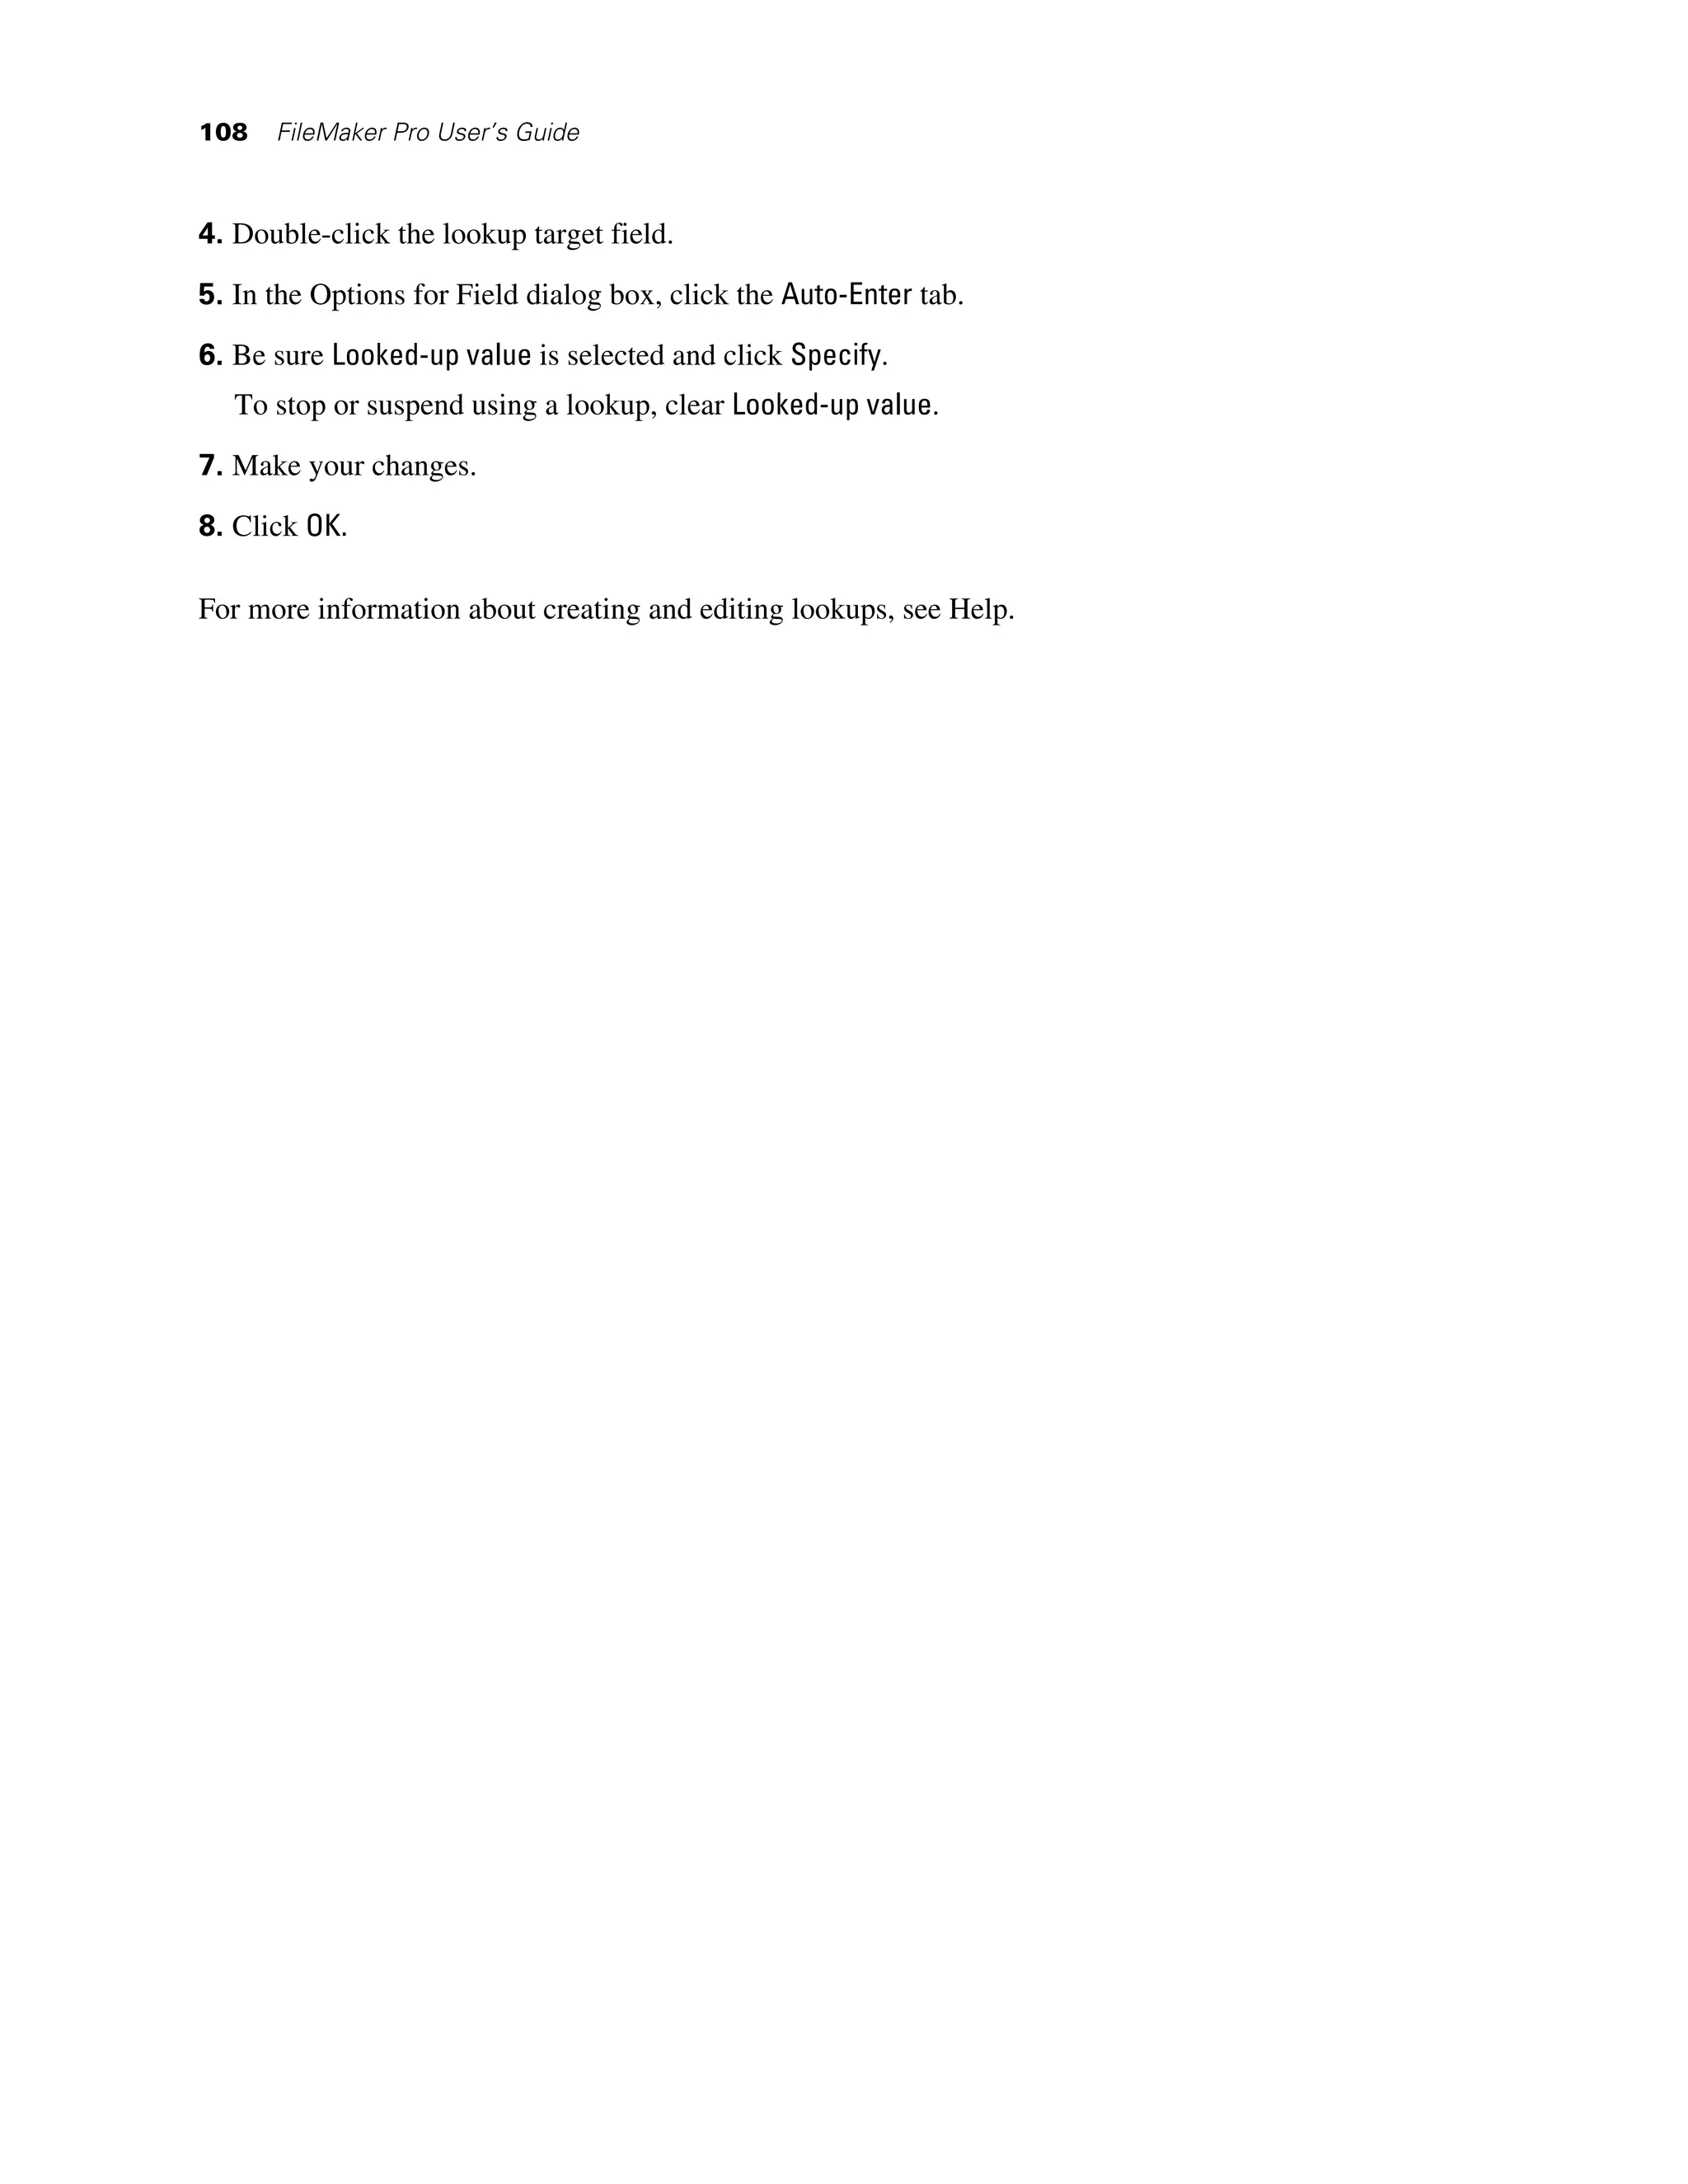
![Chapter 5 | Sharing and exchanging data 113
To identify the URL for the shared database on the host machine and send it to a client user:
1. In the shared file on the host machine, choose File menu > Send > Link to Database.
FileMaker Pro opens an email message in your default email application that contains the URL for the
current database, plus client connection requirements.
2. Address the email message to the client user, then send the message.
To open a shared database on a client machine using a URL, do one of the following:
1 If you received an email message containing the URL of the host machine, click the link indicating the
location of the hosted database. If your email application does not support active links, launch a web
browser on the intended client machine, copy the URL from the email message into your browser’s
address area, then press Enter (Windows) or Return (Mac OS).
1 If you received the URL of the shared database by some other means, launch a web browser on the
intended client machine, enter the URL of the host machine into the browser’s address area using the
following format, then press Enter (Windows) or Return (Mac OS).
[<][URL:]FMP7://[[account:password@]netaddress]/databasename[>]
Optional parameters are indicated by square brackets ([ ]). Because URLs can’t contain spaces, any
spaces in database names are encoded as plus signs (+).
Examples
FMP7://My+Addresses.fp7
FMP7://192.168.10.0/My+Addresses.fp7
FMP7://User1:Password1@12.345.678.900/Filename.fp7
Closing a hosted file
Before a shared file can be closed by a host, all clients must close the file. FileMaker Pro allows you to
prompt networked clients to close the shared file when you do one of the following: close the file, change
the sharing conditions for the file, exit FileMaker Pro, or perform a task that requires all clients to close the
file. If a client does not respond to your request to close a shared file within 30 seconds, FileMaker Pro will
attempt to close the shared file on the client’s machine.
To close a hosted file:
1. On the computer hosting the file, choose File menu > Close.
2. If any clients have the shared file open, you see a dialog box listing those clients. Click Ask to send a
message to these clients requesting that they close the file.
3. Clients see a dialog box requesting that they close the file.
If FileMaker Pro
Clients click Cancel Waits for those clients to close the file
Clients click Close Now Closes the shared file on the client’s computer
Clients do nothing Attempts to close the file after 30 seconds, if it can be closed safely
For more information about sharing files over a network, see Help.](https://image.slidesharecdn.com/fmp11usersguide-120414063140-phpapp01/75/Fmp11-users-guide-113-2048.jpg)


![Index
Symbols A
! 37 Access privileges. See Accounts; Privilege sets
– 57 Access via FileMaker Network 110, 133
" 57, 62 Accounts
" " 31, 33, 34 Admin account 125
# 33 defining 130
$ 57 described 124
External Server account 124, 131
& 57
Guest account 125
( 57, 62 passwords 128
) 57, 62 predefined 125
* 33, 37, 57 setting up recurring imports 115
+ 57, 113 viewing 129
, 57 Active record 23
... 36 Adding
/ 57 See also Defining; Placing
// 35 fields 59
: 57 new find requests 38
records 25
:: 57
related records 26, 105
; 57
tables 69
< 36, 57
Adding fields
<= 36 in Table View 61
= 34, 37, 57 Admin account 125, 127
== 34 Adobe PDFs, saving data as 114
> 36, 57 Aligning
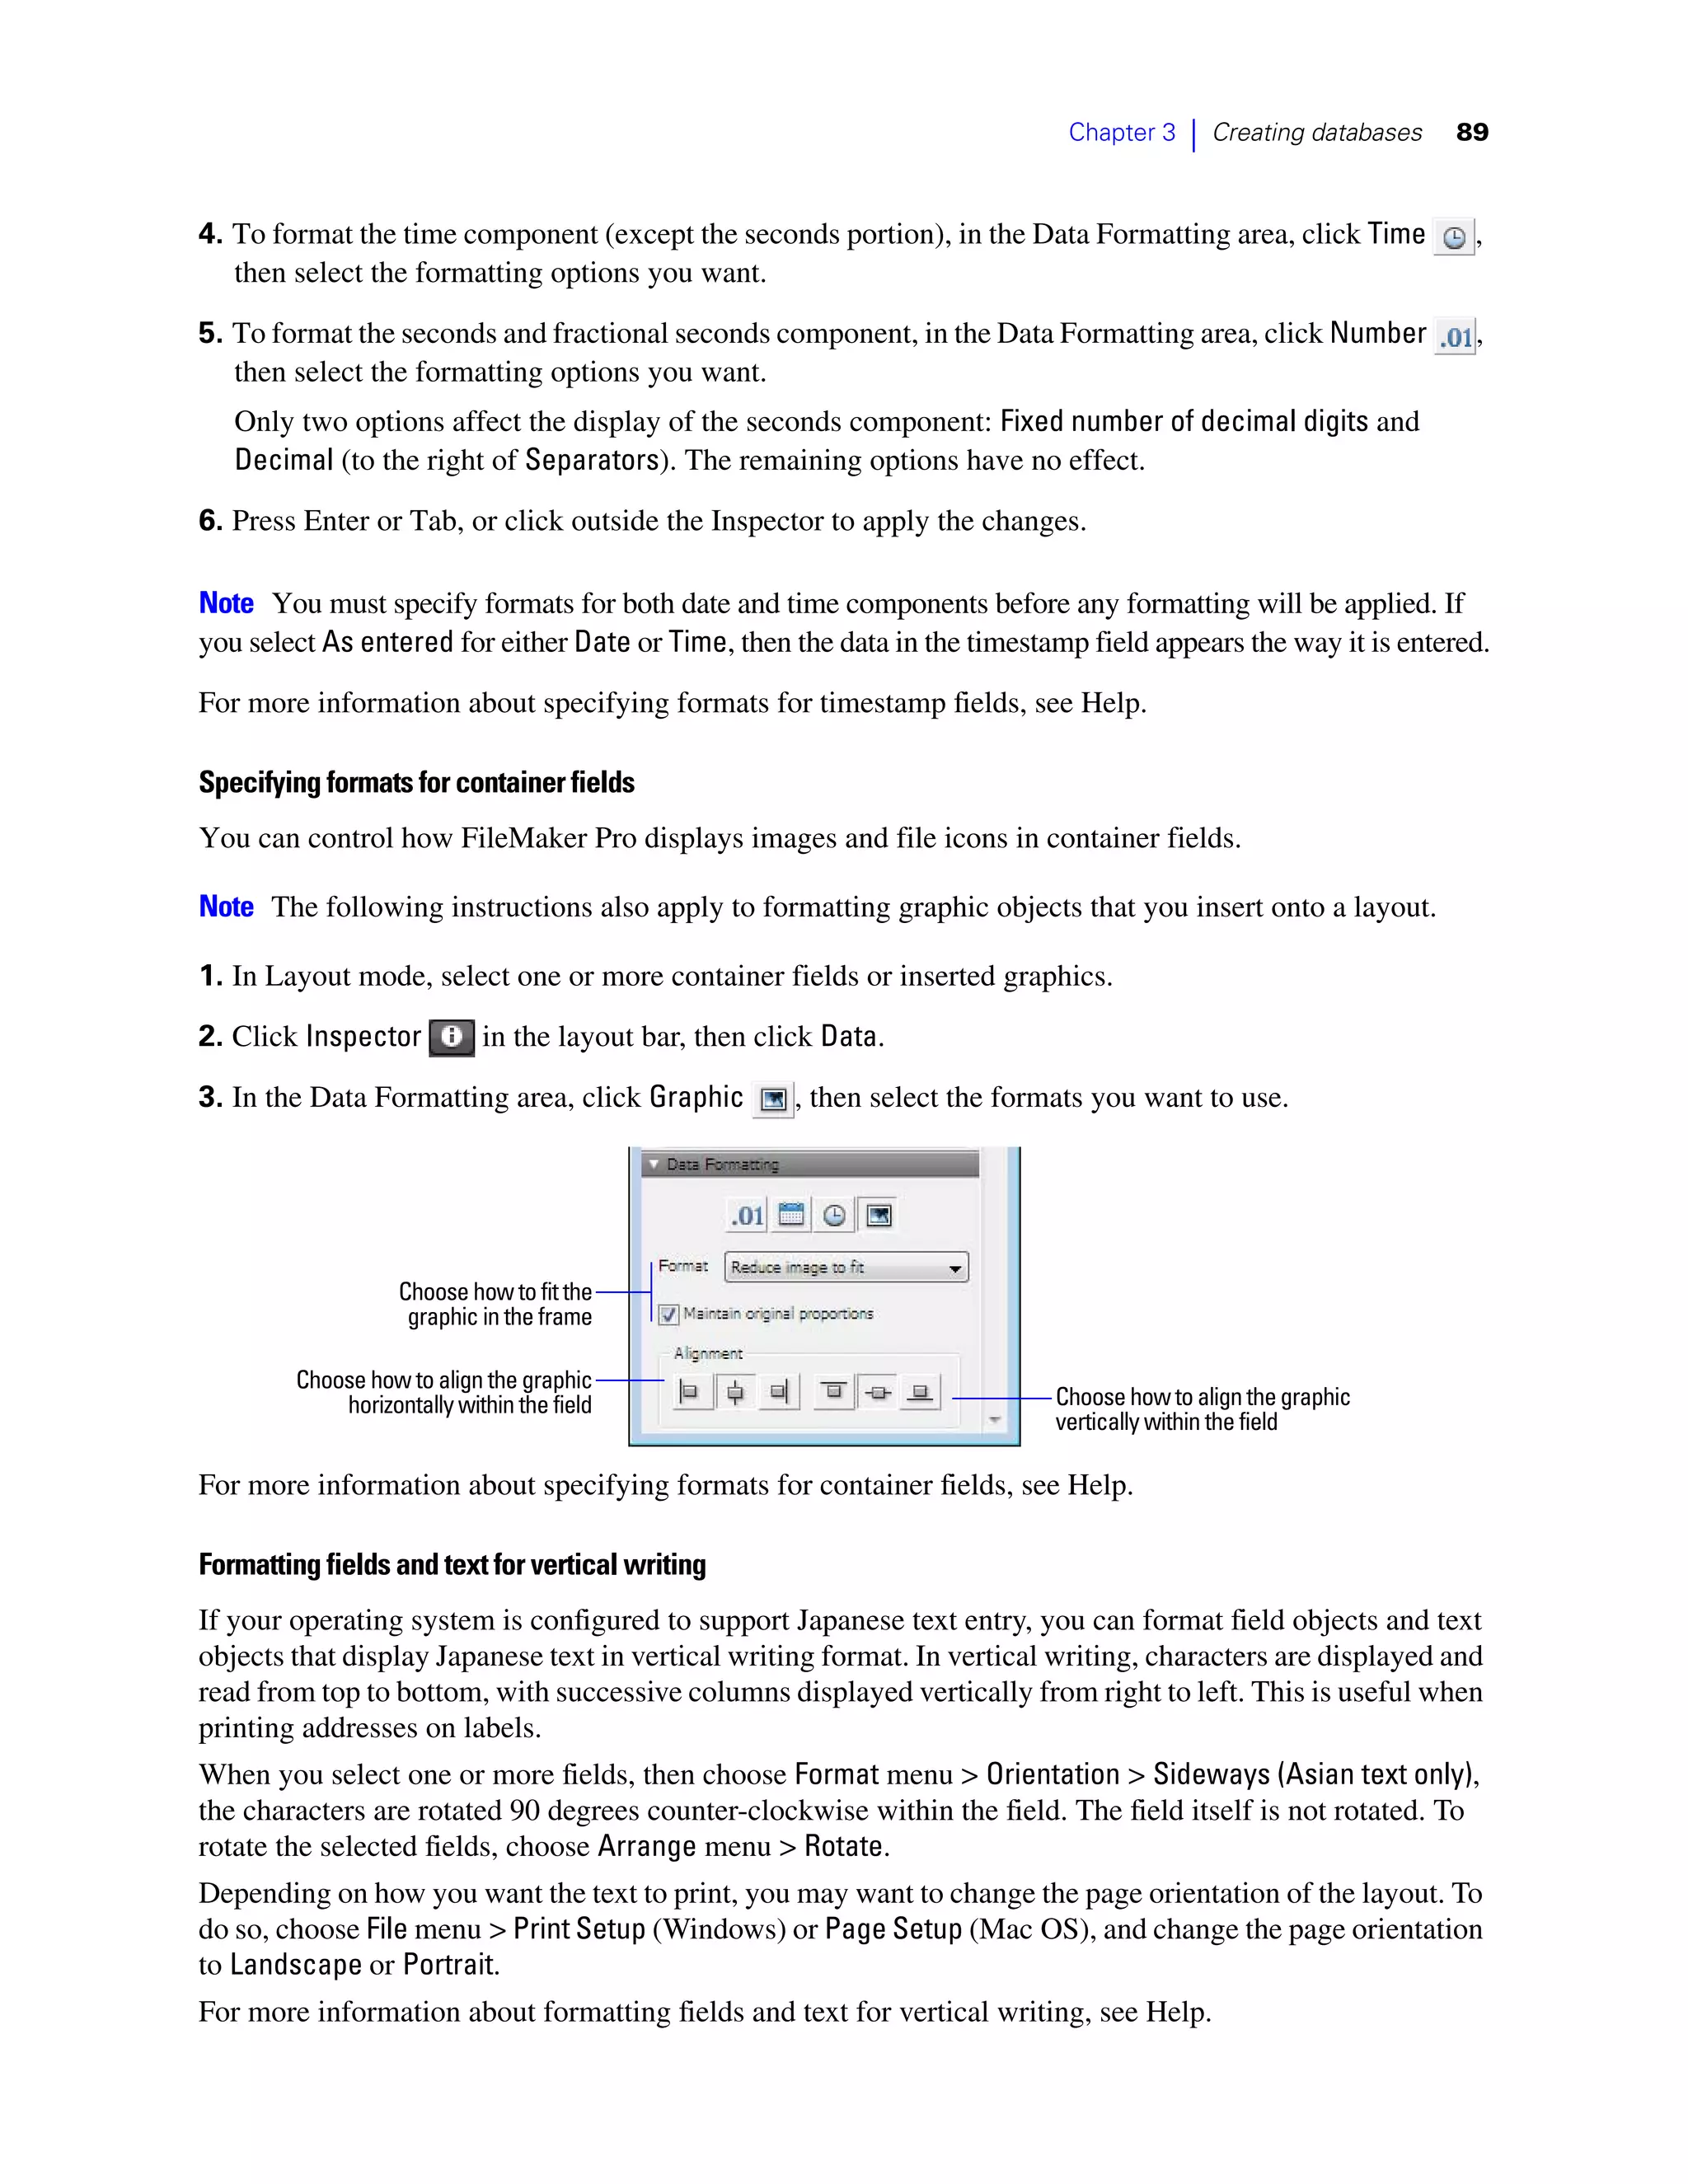
>= 36 container fields to text 89
? 35 objects to other objects 78
@ 33 text in paragraphs 86
[ 57 AND searches 38
] 57 Antivirus software, and database management 137
^ 57 Apple OpenDirectory 131
_ 57 Application preferences 49
} 57 Area charts
~ 34 creating 92
≤ 36, 57 described 92
≥ 36, 57 Asian text
≠ 57 entry 60, 89
printing 89
rotating 89
Attributes, text 85
Authentication 124
Apple OpenDirectory 131
via external server 131
Windows Domain 131
Authorized users. See Accounts; Privilege sets](https://image.slidesharecdn.com/fmp11usersguide-120414063140-phpapp01/75/Fmp11-users-guide-143-2048.jpg)


![ECDL module 5: using databases [To be continued]](https://cdn.slidesharecdn.com/ss_thumbnails/icdlmodule5usingdatabases-150417150536-conversion-gate02-thumbnail.jpg?width=640&height=640&fit=bounds)