1. INTERACTIVE MEDIA DESIGN
Flash Basics ActionScript Basics Animation Advanced ActionScript
FLA SH B A SI C S
The Flash Interface
Symbols, Instances &
the Library
Vector Graphics
Vector Graphics - Trace
Bitmap
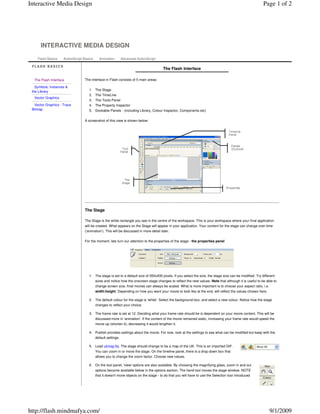
The interface in Flash consists of 5 main areas:
1. The Stage
2. The TimeLine
3. The Tools Panel
4. The Property Inspector
5. Dockable Panels - (including Library, Colour Inspector, Components etc)
A screenshot of this view is shown below:
The Stage
The Stage is the white rectangle you see in the centre of the workspace. This is your workspace where your final application
will be created. What appears on the Stage will appear in your application. Your content for the stage can change over time
('animation'). This will be discussed in more detail later.
For the moment, lets turn our attention to the properties of the stage - the properties panel
1. The stage is set to a default size of 550x400 pixels. If you select the size, the stage size can be modified. Try different
sizes and notice how the onscreen stage changes to reflect the new values. Note that although it is useful to be able to
change screen size, final movies can always be scaled. What is more important is to choose your aspect ratio, i.e.
width:height. Depending on how you want your movie to look like at the end, will reflect the values chosen here.
2. The default colour for the stage is 'white'. Select the background box, and select a new colour. Notice how the stage
changes to reflect your choice.
3. The frame rate is set at 12. Deciding what your frame rate should be is dependent on your movie content. This will be
discussed more in 'animation'. If the content of the movie remained static, increasing your frame rate would speed the
movie up (shorten it), decreasing it would lengthen it.
4. Publish provides settings about the movie. For now, look at the settings to see what can be modified but keep with the
default settings.
5. Load ukmap.fla. The stage should change to be a map of the UK. This is an imported GIF.
You can zoom in or move the stage. On the timeline panel, there is a drop down box that
allows you to change the zoom factor. Choose new values.
6. On the tool panel, 'view' options are also available. By choosing the magnifying glass, zoom in and out
options become available below in the options section. The hand tool moves the stage window. NOTE
that it doesn't move objects on the stage - to do that you will have to use the Selection tool introduced
The Flash Interface
Page 1 of 2Interactive Media Design
9/1/2009http://flash.mindmafya.com/
2. later. Other 'View' options are available from the 'View' menu such as grids. In this case you won't be able to see the
grid as the graphic is in front of it.
1 2 3
Author: Patrick Ingham Last Updated: 5th June 07
Page 2 of 2Interactive Media Design
9/1/2009http://flash.mindmafya.com/