Assure Ecommerce and Retail Operations Uptime with ThousandEyes
Blogger custom domain on go daddy blogger widgets
1. 6/1/13 Blogger Custom Domain on GoDaddy- Blogger Widgets
www.bloggerplugins.org/2009/08/blogger-custom-domain-on-godaddy.html 1/7
SHARE & COMMENT 35
8/05/2009 09:15:00 PM Wednesday, August 5, 2009 Blogging Tips
Blogger Custom Domain on GoDaddy
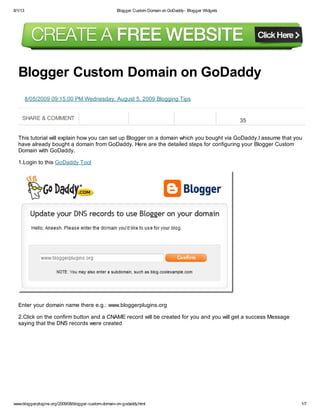
This tutorial will explain how you can set up Blogger on a domain which you bought via GoDaddy.I assume that you
have already bought a domain from GoDaddy. Here are the detailed steps for configuring your Blogger Custom
Domain with GoDaddy.
1.Login to this GoDaddy Tool
Enter your domain name there e.g.: www.bloggerplugins.org
2.Click on the confirm button and a CNAME record will be created for you and you will get a success Message
saying that the DNS records were created
2. 6/1/13 Blogger Custom Domain on GoDaddy- Blogger Widgets
www.bloggerplugins.org/2009/08/blogger-custom-domain-on-godaddy.html 2/7
3. If you are publishing to your www domain, then that’s not sufficient. You will also have to create a set of 4 A
Records.
To do that first login to your GoDaddy Account and go to DNS Manager
4. Now Click on Edit DNS Zone next to the domain name which you want to use as a blogger Custom Domain
3. 6/1/13 Blogger Custom Domain on GoDaddy- Blogger Widgets
www.bloggerplugins.org/2009/08/blogger-custom-domain-on-godaddy.html 3/7
5. You will see a record there under A(Host). Select it and delete it first
6. Now use the Quick Add button to create 4 A(Host) Records as shown in the below screenshot
In the host field you have to give @ and in the points to field, you have to give these IPs respectively
216.239.32.21
216.239.34.21
216.239.36.21
4. 6/1/13 Blogger Custom Domain on GoDaddy- Blogger Widgets
www.bloggerplugins.org/2009/08/blogger-custom-domain-on-godaddy.html 4/7
216.239.38.21
(See the screenshot above to see how to input these values)
7. Now Click on the Save Zone File Button on the top right.
8. Confirm the modification by clicking on the OK button
Finally the Set of A(Host) Records should look like this :
You are done with GoDaddy Settings. Now you have to configure your Blogger Account to publish to this domain.
Publishing your BlogSpot blog to the Custom Domain
1.Login to your Blogger Dashboard and Navigate to Settings > Basic and click on the Add a custom domain
link
5. 6/1/13 Blogger Custom Domain on GoDaddy- Blogger Widgets
www.bloggerplugins.org/2009/08/blogger-custom-domain-on-godaddy.html 5/7
2.Now Switch to advanced settings
3.Provide your Custom Domain URL and click the Save Button
6. 6/1/13 Blogger Custom Domain on GoDaddy- Blogger Widgets
www.bloggerplugins.org/2009/08/blogger-custom-domain-on-godaddy.html 6/7
4. Now Click on the Edit Link Once again
5.Now select the redirection Option and save the settings Once again
5. Now your blog should be visible at your new domain.
Adding Google APPS to your Godaddy Domain(Mail[yourname@yourdomain.com] , Calendar
etc)
1.Once again go to the Godaddy Configuration Tool and key in the following URLs one by one and click on the
Confirm button
mail.bloggerplugins.org
calendar.bloggerplugins.org
7. 6/1/13 Blogger Custom Domain on GoDaddy- Blogger Widgets
www.bloggerplugins.org/2009/08/blogger-custom-domain-on-godaddy.html 7/7
docs.bloggerplugins.org
sites.bloggerplugins.org
You will obviously have to replace bloggerplugins.org with your domain name while doing this.
2. Create MX records for that Domain using this Automatic Configuration Tool
3. Now Signup for Google APPS using this link
4.When you finish the signup process, you will be taken to the Google APPS dashboard. You might be asked to
create a CNAME to verify your domain ownership.
In that case you should create a CNAME(Alias) Record with the following Details
Host: googlefffggghhh12345 [The one provided on your Google Apps dashboard for the verification
purpose.This is just a sample string.You should use the one provided and not this sample string :)] This is the
alias name.
Points To : google.com
You can add this Record in DNS Manager under CNAME(Alias) using the Quick Add button and don’t forget to
Save the Zone File.
5.Once you have verified the ownership, you can access each of the Google Applications. You can also change
them to custom URLs(that's why we created the CNAMES using the Godaddy tool in Step 1).You can change the
URL of the mail application to mail.yourdomain.com(To do that Click on the APP and then Click on the Link
Change URL)