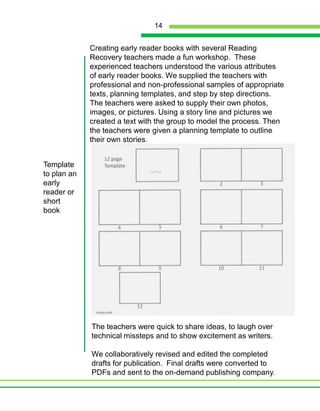
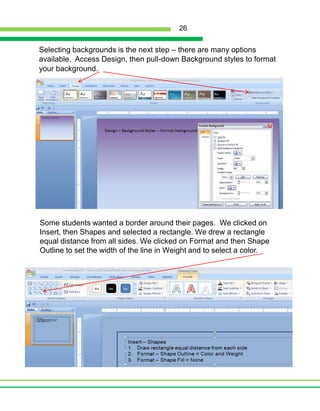
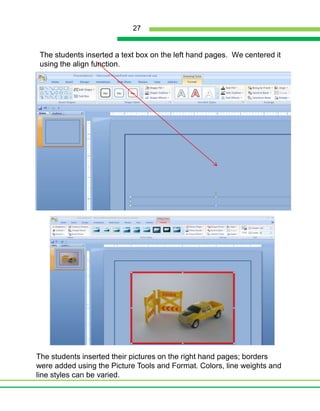
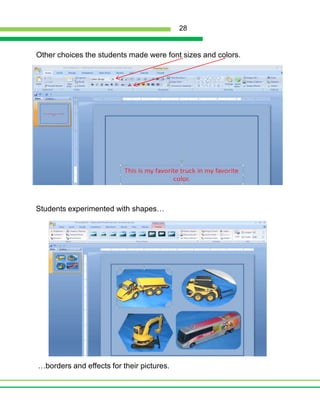
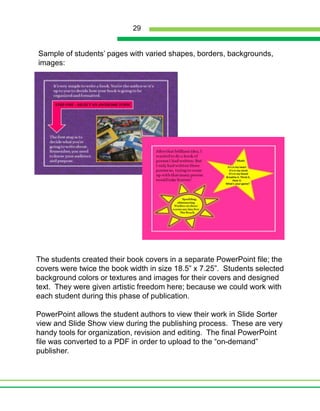
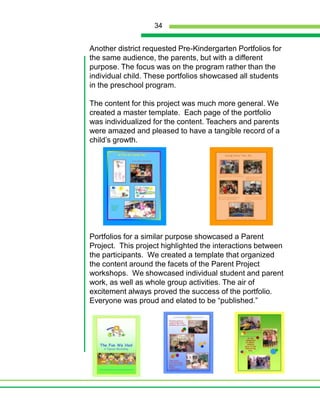
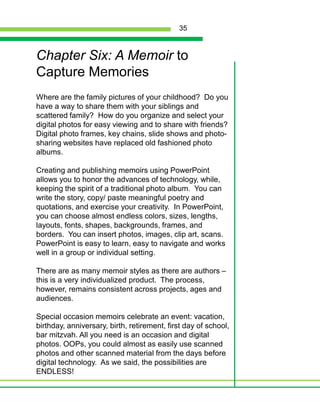
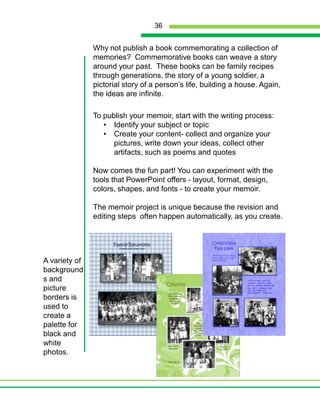
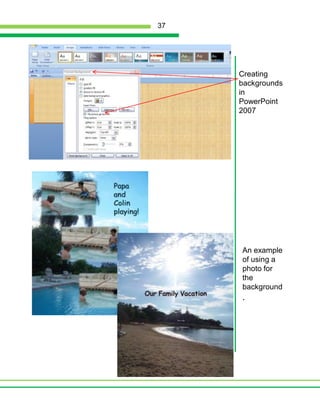
Your friends and family have many irrational fears, such as going to the dentist, being caught naked in public, and having someone read their writing.  In fact, when you ask people what they hated about school, it is often writing.  Yet, we know that early man was driven to record his life experiences on the walls of caves.  We know that early humans developed a written language and materials on which to write – be it stone, bark, paper or cloth.  We know that young children eagerly anticipate being able to record their thinking in images and symbols. So, how and why did we reach a situation where so many people are fearful of the act of writing?We’re not going to try to answer that question. Our book title is Publishing With PowerPoint – Your Guide to PublishingnotWriting Without Fear!What’s your story?  What pictures and experiences would you like to share with family, friends or the world beyond your doorway?  We live in a world where many people are sharing their life experiences moment by moment. People of all ages are writing and creating daily on blogs, Twitter, emails, text messaging; the list is endless. Technology creates infinite yet highly accessible possibilities for written communication and creative sharing.  The fact is, everyone has a story to share.Publishing your story, or someone else’s story is not as difficult as you think. Five years ago we saw the potential for using PowerPoint to publish through on-demand-publishing.  Why PowerPoint?  Simple!  It is easy to use both for the placement of text and graphics; you already have it on your computer. There are limitless possibilities.
Along the way many people became interested in our work. So, we began giving workshops. Fellow teachers saw a classroom application; we worked in many classrooms with students of all ages and their teachers. Friends and family  envisioned the means to create family keepsakes beyond scrapbooks and photo albums; we held “Friends and Family” gatherings on Saturdays and invited a diverse group, who created and published an assortment of books.  It suddenly dawned on us that the best way to address this outpouring of interest was to write a book that would teach people how to publish using PowerPoint. Case in point, we used PowerPoint to create this book.As teachers, we are urged to make our classrooms more student centered, more interactive and to integrate technology as a tool. Teachers are expected to realize which current instructional practices will satisfy this requirement. Our book will help, since on-demand publishing enables teachers to utilize 21st century technology and to engage students by bringing the writing process full circle. So, you’re asking, why should I change what I do and have students publish their work?  How could the results be worth all that extra work? We believe that student publishing provides an authentic purpose and audience for creating a written message. Publishing provides genuine motivation for the writer to create, revise and edit their thinking. Student publishing provides a powerful model for emerging writers. Publishing documents student learning and achievement. As Nancie Atwell writes, “Writing is a public act, meant to be shared with many audiences.  Publication should be taught before writing begins.”Our journey taught us many lessons about publishing and writers. We have repeatedly heard the initial gasp of surprise and seen eyes light up when they see their books in published form.  They feel a sense of accomplishment and pride. We have heard them say, “I’m a real author.”Over time their writing changed accordingly; they approached writing with more confidence, enthusiasm and competence.  When our students knew their work would be published, they asked  important questions,
such as “Is this good enough to publish for others to read?” At this point, they began to understand how to write to a particular audience.  We discovered, as Lucy Calkins noted  (Calkins 263), that other advantages occur when students view themselves as authors. They make connections with what they read. They begin to notice  the techniques of other authors and use them in their own writing. Publishing is a final act of the creative process for communication. We believe that publishing provides the authentic purpose and audience for creating a written message. Only publishing provides genuine motivation for the writer to create, revise and edit their thinking. Publishing provides a powerful model for emerging writers. Publishing documents both learning and achievement, particularly for students.Our book will guide you through the creation and publishing process and introduce you to sample projects that may give you helpful ideas. We hope that this book will inspire you to begin the journey of publishing. Martin, McAlpin and Meyers2011
About the AuthorsPat Martin spent over forty years in public education as a middle level reading specialist and as a building and district administrator.  She pioneered several local literacy groups and remains active  at the local, state and national levels.  She has presented workshops locally and nationally on a variety of literacy related topics. Currently, Pat assists districts with ELA program development and review, grant writing, presenting literacy workshops and coordinating parent workshops. She works with students and teachers as a literacy volunteer. She publishes books with schools and private individuals. Read her blog: MaryAnn McAlpin is an experienced educator who has taught in urban and suburban settings for more than 15 years.  MaryAnn worked as a classroom teacher, a reading specialist and a Reading Recovery ® teacher.  She has provided teacher training at national and regional literacy conferences and trained teachers in the greater Rochester, NY area.  MaryAnn has served on many literacy committees and remains very connected to furthering literacy awareness among teachers, parents and the general public.  She is passionate about teaching young children to read and write.  McAlpin has recently created her own publishing company: Short Tales Press.  Short Tales Press provides excellent reading resources for the emergent reader.  Check out her website: www.shorttalespress.com.
Chapter One ~Set-Up, Layout and DesignSo, you want to self-publish a book? Good for you! This chapter will describe the basics to get you started. The list below represents the tools you will need:ComputerPatiencePowerPoint software and some experience using itChocolateModel bookPlanning sheet and old-fashioned writing instrumentsMore chocolateCapacity to PDFYou need to select the topic or theme, the audience, and the purpose.  We suggest you look at several books to select a model because that will  provide you with a basic plan: picture book or just text, brief or lengthy, color or black/white, photo images or drawings. In the beginning we recommend an actual book for a model; experienced self-publishers may work with a personal image of the final product drawn from several books. Before you begin working you need to check some of the self-publishing sites to see the cost structure and availability of different size books. Later in this book we present many projects we have completed which may give you additional ideas about your first publishing project. It is best, in our opinion, to start with something you want to do because motivation and passion help us over the rough spots.5
The first portion of the chapter will discuss a simple, basic layout technique. We’ll then discuss developing templates created in master slide view.Basic Page Design In Nine Simple StepsOpen up a PowerPoint presentation.Go to Design tab  and select Page SetupSelect your slide orientation. That will be the orientation of your final book. You may want to look back at the model book you chose for this project.Set your Width and Height. Again, use you model text as a guide. Add .25 inches to the width and height you select. This is for “bleed” if you use a colored background. It also allows for “trim” space after printing. (figure 1)Go to Home  tab and pull-down Layout. Select  Blank.Go to View taband select Ruler and Gridlines. In the beginning these are helpful when laying out the book. (figure 2)Decide if you want a background to your pages. Background  choices are found  at the Design tab. There are background designs provided (Themes) or you can customize.To customize, select  Background Styles. You can use Solid fill, Gradient fill, Picture or texture fill.  The Color choices are provided,a s well as, the level of transparency. Before closing Format Background, decide if you want your choices applied to every slide. (figure 3)Do you want borders on your pages? A temporary  border is helpful when laying out the book. Borders are created at the Insert tab. Select Shapes. You might draw a rectangle or an oval. Using the gridlines and ruler, you can make the shape equal6
distant from each side -  perhaps .5 to 1 inch. Clicking on the shape brings up the Format option. You now have the chance to select  Shape Fill (No Fill) , and Shape Outline. Now you can pick a Color, Weight  and Line Style of the border. It is easy to repeat this border whenever you want to use it with Copy/Paste.You are now ready to add text or images to your pages.  Before we explain that process, we’ll discuss template design.~~~~~~~~~~~~~~~~~~~~~~~~~~~~~~Selecting page setup and orientationFigure 1Selecting gridlines and rulerFigure 2Formatting backgroundFigure 37
Whether or not you design a template depends on your audience and purpose.  If you are creating a ‘one-of-a-kind’ text, you will want  your imagination and originality to thrive. If you are publishing with a group, we recommend that you create a template to establish parameters and avoid design problems .Template Design in Thirteen StepsOpen up a PowerPoint presentation.Click on View tab and select Slide Master.Delete all the boxes on the large Master Slide , top slide.Delete all the boxes on the second, smaller slide.Delete all remaining slides.Click on the Home tab and select New Slide. Insert several new slides by clicking  Duplicate selected Slides.Toggle back to  Slide Master.In Slide Master view, you can format  backgrounds, select themes and fonts and set up the page size and orientation. You can insert shapes to create borders or designs. Anything you place on the first master slide will appear on every slide. By using the smaller slides, you can create right and left pages or a variety of design possibilities.  Use the Background Styles or Themes options as outlined in Basic Page Design In Nine Simple Steps.Use the Font option to set a font. You can add a font by selecting Create New Theme Font.Use the Rename option to name the slides you create.In Slide Master view, you can insert page numbers. 8
Click on Insert tab and insert a Text Box wherever you want the page number. Then click Slide Number.  Next click on Home tab and center the slide number. Return to Slide Master view andfollow the steps to place slide numbers on every slide except the master slide.Close Slide Master view.~~~~~~~~~~~~~~~~~~~~~~~~~~~~~You can create one or multiple layouts in slide master viewusing background and insert options.  Slide master  layouts can be accessed when creating slides.9
As you work with publishing you will find that the possibilities are endless. You want to create ‘a look’ that matches your audience and purpose; design decisions and color choices are the essence of graphic design. Serious, dramatic,  trendy, ethereal, natural, or whimsical moods can be conveyed by your graphic design decisions.Font is also important in graphic design. We suggest that you control this aspect of design rigidly unless you want multiple fonts, including Word Art, within a single written selection. If you publish with students you’ve learned, as we have, that students love to experiment with colorful and  unique fonts. Each of us have a horror story of  a ‘face-to-face’ confrontation with a determined student who has devoted endless hours to font choices and scant hours organizing content.Published books, that are similar to you project, are the best resources to use as models .  Font must, first of all, be highly readable.  Font size and color depends on your audience, purpose and the function of the text.  Except for poetry collections, most books use a single font throughout.  We always ask students to find a published model that they would like to mimic. We find this continual reliance on models extremely beneficial. That does not mean that creativity and originality are stifled.Font is found at the Home tab – the small icon at the right allows you to set font.10
Cover DesignThe cover is a separate file from the text.  When you create your cover you will need to set your margins.  Some publishers will require one sheet that includes the front and back of your cover.   For example, a book with margins 8.25” wide and 6.25” height will require the margins for the cover to be 16.50” wide and 6.25” height.  A single sheet cover is easy to design.  Some publishers, like Lulu, will automatically set up your margins. You will only need to insert photos and choose a background for the front, spine and back of the cover.A two sheet cover consists of two slides, one for the front and one for the back cover.  Set your margins  accordingly to the size and allow .25” for bleed.  If your book size is 8.5” in width and11” in height  your margins need to be set at 8.75” and11.25.Single sheet coverfrontTwo page cover front and backback11
Publishing TipsBefore uploading your work to an on-demand publisher, it is important to play editor. Even if you intend to print a draft copy first, we have learned the need to be critical word-by-word  readers for spacing, verb tense, syntax, punctuation, omissions…  the list is endless. Secondly, you need to read the work aloud:Does it sound right?
Does it make sense? Thirdly, invite others to read and critique the work. This is the best way to catch most of the errors before publishing. Once your editing is complete, you must PDF (portable document format) your files. This will protect your files and ensure that content does not change during transmission. In either case your first step is to convert the cover to a PDF using a Adobe Acrobat, if available.  There are free online  software to create a pdf such as: www.primopdf.com/online.aspx
http://www.pdfonline.com/convert-pdf/.There numerous on-demand printers available. To decide which company best suits your needs you will probably want to consider Ease of the publishing process (up-loading your material to their site),
Cost of basic services and any extra services
Options – hard and soft covers, number of pages, binding, color versus black-and-white, book sizes and orientation
Quality of the graphics and paper
Shipping expense
Time frame12
Chapter Two ~ Early Reader BooksThe comment has been made that writing books for children must be easy.  It is thought that children’s books contain simple content and simple language.  This is a total fallacy as the authors of children’s books can attest. Early reader texts require a particular writing structure  that provides support and challenge for the new young reader.  These attributes include: Length of eight to sixteen pages
Combination of text and pictures to convey meaning
Specific spacing between letters, words and lines of text
Simple and repetitive vocabulary
Leveledon a continuum of difficultyWhen creating an early reader book, the author must be cognizant of  both the child’s interests and the reading continuum in order  to tailor the book to the child. Creating books with PowerPoint enables the author to use content that interests and motivates the new young reader. Familiar content also makes comprehension of the text more accessible.  Teaching the young readers to create their own text is another reason to use PowerPoint to publish. When the child is the author, PowerPoint enables them to publish a text modeled after the texts they read in school. Struggling readers are motivated to learn when they write their own story.   13
Creating early reader books with several Reading Recovery teachers made a fun workshop.  These experienced teachers understood the various attributes of early reader books. We supplied the teachers with professional and non-professional samples of appropriate texts, planning templates, and step by step directions. The teachers were asked to supply their own photos, images, or pictures. Using a story line and pictures we created a text with the group to model the process. Then the teachers were given a planning template to outline their own stories. Template to plan an early reader or short book The teachers were quick to share ideas, to laugh over technical missteps and to show excitement as writers.  We collaboratively revised and edited the completed drafts for publication.  Final drafts were converted to PDFs and sent to the on-demand publishing company.14
It is powerful for teachers to engage in an active workshop.  This reinforces the need for learners to be engaged. When the audience participates, rather than just listens, they are empowered to take and use the skills to further their personal and professional development.The participants realized the value of our guiding them through each step of the publishing process.  This will enable them to use the same process in their classroom.  They also observed that each of them adjusted the publishing process to their personal style.Planning is the first step and can be different for each individual.  Some authors will gather the photos to support the story.  Others  will have the photos and then create a story using those photos.  Some  draw first, while others write.  Planning sheets need to support the thinking of the author and provide organization.  A story board or another type of planning tool is needed to draw or write the story.  Once the ideas are down on the planning sheet, one can begin writing a story using PowerPoint.During the planning stage it is important to remember the format of an early reader book: Keep the book short.
Use simple sentences and words that you know the child can read.
Make sure that the text supports the photos.
Double space each word so the reader can easily see the distinction between words and letters. I  went  to  the  zoo. (double spaced)  I went to the zoo. (single space) The photos must support the text.15
Planning is the first step when helping young readers publish. Personal photos that tell a story often make a great starting point.16
In early levels the text is usually typed on one page and the corresponding photo is on the adjacent page.Look  at  the  elephant.Text can also be on the same page as the photo.It is important to stress the value of creating early reader books with emergent readers. Creating books with an emergent reader increases motivation, reading strategies, fluency, and their interest in reading. Keep in mind that the book can be tailored to the child’s interests and needs.  You might, for example, take photos of the child eating favorite foods, or going to a special place, or pictures of the child’s family. These children will read and reread their books to family, friends, teachers and even the family pets and teddy bears.  17
Chapter Three ~ Traveling Through the Human Body with ABC’SWhat is your worst memory of learning vocabulary in school?  Copying endless definitions from dictionaries and glossaries?  Writing meaningless sentences using those vocabulary words?  Maybe, it was the millions of index cards converted to flash cards to serve as study aids.  Recent research into learning, memorization, motivation and engagement has proven what you knew even as a very young student: those mindless activities were not an effective method to increase student learning and achievement.  Learning happens when people connect new information with their prior knowledge or experience. Copying definitions may increase small–motor skills but does not require thinking about the meaning of what one is copying.The vocabulary project, Traveling Through the Human Body with ABC’S, integrated the research of Marzano and Pickering , Building Background Knowledge and Building Academic Vocabulary, Beck and McKeown,. Bringing Words to Life: Robust Vocabulary Instruction and Creating Robust Vocabulary Instruction: FrequentlyAsked Questions and Extended Examples and JanetAllen, Words, Words, Words: Teaching Vocabulary in Grades 4-12. The project required students to develop comparative definitions of parts of the human body. Ninety-six 6th  grade students in an urban/suburban middle school worked collaboratively with two teachers and two technology interns from a local college.18
The teachers wanted to capture students’ learning in a form that could be shared beyond their classrooms. The students just wanted to use technology. The first task was to define their audience and purpose; this is especially critical for student writers in collaborative projects, because it guides the entire creative process. The group decided to organize content from a health unit (vocabulary essential to study human body systems) into a color ABC book for fourth grade students. The book would combine text and visuals.To select content the teachers and students brainstormed an alphabetical list of body parts. They then evaluated these terms for importance and usefulness.  In teams of two, the students selected a part of the human body to explain and compare to an everyday object in terms of function.Because the students did not copy definitions or comparisons, the project required comprehension, analysis, synthesis and evaluation by students. The teachers and interns supported student thinking through conferencing.19
The entire group of ninety-six students, teachers and interns now had to decide how the work would be illustrated. The students wanted to seek images via the internet.  Mini-lessons established the criteria for selecting and downloading appropriate images.  As an initial revision step, teams shared their definitions and illustrations with another student team to elicit feedback for content clarity. Students had to determine which of the 48 comparative definitions represented the highest quality in terms of clarity and comprehensiveness. In many cases teams again revised their work to incorporate elements of another team’s work.  The need and willingness to revise expanded as the sixth graders considered an audience beyond their classrooms.To complete the revision step the teachers worked with the student teams, whose writing required additional revising, while the interns worked with other students who were ready to publish digitally.  Finally, the draft publication was ready for a slide show viewing so the students could determine whether revisions or edits were needed. Before creating a PDF version of the book draft and cover, the teachers and interns made final edits and design repairs.  The PDFs were finally uploaded to an Internet on-demand publisher, Lulu.Everyone waited eagerly for the published draft to arrive. On delivery day our students were elated. They flocked in between classes to celebrate their success as published authors. They were amazed to learn that this printed draft needed to be revisited for any layout changes, spelling, syntax and semantics before the final printing.  20
After a few revisions and edits, another set of PDFs was created and uploaded to Lulu.We asked each other, “Did this project promote literacy growth? Did this project relate to the basic requirements for the 21st C. learner?”  Did this project engage the learner in rigor and relevance?  Did this project incorporate transferable skills and modes of thinking?The teachers evaluated the success of the project. They concluded that the project enabled students to develop proficiency with the tools of technology. Success required that students build relationships with everyone involved , to collaboratively pose and solve problems.  The students’ reflections revealed that working as a collaborative group was a valuable learning experience, which challenged some students’ problem solving skills. The opportunity to work with college interns was a new experience for the teachers and students. Teachers had the chance to work with younger people who were technologically advanced. The sixth grade students discovered that their learning opportunities do not solely derive from their classroom teachers.  Our students were required to manage, analyze and synthesize multiple streams of simultaneous information to create their comparisons and illustrations.  Opportunities to create, critique, analyze and evaluate multi-media texts were an essential aspect of the completed work. These are the most powerful thought processes required to meet 21st Century demands. One criticism of modern technology is the unethical “copy & paste” of others’ material. With this project, students were instructed to use technology to create their work in an ethically responsible manner.  Interns and teachers emphasized the practices of summary and synthesis. It is essential that school districts maintain from the earliest grades and across all disciplines, strict policies prohibiting plagiarism.21
Chapter Four ~ Children’s Summer Publishing ProjectHow did you spend your summer vacation?  Did you publish any books? Thirteen students - 4 high school, 3 middle school, 4 intermediate and 2 primary – answered, “Yes!” to that question after the summer of 2008.  These students, from urban, suburban and rural environments, had a wide range of experience with literacy and technology. Using a small grant, our publishing group provided multiple day “learning lab” sessions to teach these students how to write and publish their own books.  Our goal for the “Summer Publishing Project” was to discover how effectively and efficiently these learners applied the writing process to text publishing.  We  also wanted to observe peer revising and editing across a mixed age group . The lab setting provided a learning environment that allowed us to bridge the students’ knowledge and skill of literacy practices with the publishing experience. Instruction consisted of explicit mini-lessons based on each student’s immediate needs.  The small-group and individual mini-lessons included: audience and purpose, adding details, staying focused on topic, creating titles, hooking the audience, revising, editing, and design. Students selected the topics and audience for their books. This promoted high engagement and ownership for the project. The high school and primary students came in with ideas that were firmly entrenched.  The adolescents, ages 11-14, struggled with selecting their topics. Through our conferencing questions, these students were able to decide what audience and22
purpose they wanted to address. The students were responsible for their photos/ images.The students were keenly aware of the writing process. After initial brainstorming, students were required to plan their content and organization. These drafts varied in detail and complexity, depending on the students’ writing experience. The high school students were able to plan without formal written drafts.Plans do not have to be formal or follow a rigid format.The books were created using PowerPoint 2007.  We taught two of the middle school girls to make a basic template. The template established a simple picture book format with text on the left-hand pages and digital image/picture placeholders on the right-hand pages. There was a title page at the beginning and an author page at the end.  The books were 20 pages long and primarily 9”x 7”. 23
Text BoxThis is my bunny.He has long ears.He has soft fur.Students created a template for the books.A predetermined template is a necessary management technique, when working with a sizable number of students.  The template narrows the students’ design decisions. Choices  - in backgrounds, fonts, colors and image sizes -  can overwhelmed students which detract from their writing.Basic template created by middle school students.24
Sample title page.Sample author page.The page size was set at 9.25” width by 7.25” length to allow for “bleed;” the finished book size will be 9” by 7”.
Selecting backgrounds is the next step – there are many options available.  Access Design, then pull-down Background styles to format your background.Some students wanted a border around their pages.  We clicked on Insert, then Shapes and selected a rectangle. We drew a rectangle equal distance from all sides. We clicked on Format and then Shape Outline to set the width of the line in Weight and to select a color.
The students inserted a text box on the left hand pages.  We centered it using the align function.The students inserted their pictures on the right hand pages; borders were added using the Picture Tools and Format. Colors, line weights and line styles can be varied.
Other choices the students made were font sizes and colors.Students experimented with shapes… …borders and effects for their pictures.

Final draft on template

  • 1.
    Your friends andfamily have many irrational fears, such as going to the dentist, being caught naked in public, and having someone read their writing. In fact, when you ask people what they hated about school, it is often writing. Yet, we know that early man was driven to record his life experiences on the walls of caves. We know that early humans developed a written language and materials on which to write – be it stone, bark, paper or cloth. We know that young children eagerly anticipate being able to record their thinking in images and symbols. So, how and why did we reach a situation where so many people are fearful of the act of writing?We’re not going to try to answer that question. Our book title is Publishing With PowerPoint – Your Guide to PublishingnotWriting Without Fear!What’s your story? What pictures and experiences would you like to share with family, friends or the world beyond your doorway? We live in a world where many people are sharing their life experiences moment by moment. People of all ages are writing and creating daily on blogs, Twitter, emails, text messaging; the list is endless. Technology creates infinite yet highly accessible possibilities for written communication and creative sharing. The fact is, everyone has a story to share.Publishing your story, or someone else’s story is not as difficult as you think. Five years ago we saw the potential for using PowerPoint to publish through on-demand-publishing. Why PowerPoint? Simple! It is easy to use both for the placement of text and graphics; you already have it on your computer. There are limitless possibilities.
  • 2.
    Along the waymany people became interested in our work. So, we began giving workshops. Fellow teachers saw a classroom application; we worked in many classrooms with students of all ages and their teachers. Friends and family envisioned the means to create family keepsakes beyond scrapbooks and photo albums; we held “Friends and Family” gatherings on Saturdays and invited a diverse group, who created and published an assortment of books. It suddenly dawned on us that the best way to address this outpouring of interest was to write a book that would teach people how to publish using PowerPoint. Case in point, we used PowerPoint to create this book.As teachers, we are urged to make our classrooms more student centered, more interactive and to integrate technology as a tool. Teachers are expected to realize which current instructional practices will satisfy this requirement. Our book will help, since on-demand publishing enables teachers to utilize 21st century technology and to engage students by bringing the writing process full circle. So, you’re asking, why should I change what I do and have students publish their work? How could the results be worth all that extra work? We believe that student publishing provides an authentic purpose and audience for creating a written message. Publishing provides genuine motivation for the writer to create, revise and edit their thinking. Student publishing provides a powerful model for emerging writers. Publishing documents student learning and achievement. As Nancie Atwell writes, “Writing is a public act, meant to be shared with many audiences. Publication should be taught before writing begins.”Our journey taught us many lessons about publishing and writers. We have repeatedly heard the initial gasp of surprise and seen eyes light up when they see their books in published form. They feel a sense of accomplishment and pride. We have heard them say, “I’m a real author.”Over time their writing changed accordingly; they approached writing with more confidence, enthusiasm and competence. When our students knew their work would be published, they asked important questions,
  • 3.
    such as “Isthis good enough to publish for others to read?” At this point, they began to understand how to write to a particular audience. We discovered, as Lucy Calkins noted (Calkins 263), that other advantages occur when students view themselves as authors. They make connections with what they read. They begin to notice the techniques of other authors and use them in their own writing. Publishing is a final act of the creative process for communication. We believe that publishing provides the authentic purpose and audience for creating a written message. Only publishing provides genuine motivation for the writer to create, revise and edit their thinking. Publishing provides a powerful model for emerging writers. Publishing documents both learning and achievement, particularly for students.Our book will guide you through the creation and publishing process and introduce you to sample projects that may give you helpful ideas. We hope that this book will inspire you to begin the journey of publishing. Martin, McAlpin and Meyers2011
  • 4.
    About the AuthorsPatMartin spent over forty years in public education as a middle level reading specialist and as a building and district administrator. She pioneered several local literacy groups and remains active at the local, state and national levels. She has presented workshops locally and nationally on a variety of literacy related topics. Currently, Pat assists districts with ELA program development and review, grant writing, presenting literacy workshops and coordinating parent workshops. She works with students and teachers as a literacy volunteer. She publishes books with schools and private individuals. Read her blog: MaryAnn McAlpin is an experienced educator who has taught in urban and suburban settings for more than 15 years. MaryAnn worked as a classroom teacher, a reading specialist and a Reading Recovery ® teacher. She has provided teacher training at national and regional literacy conferences and trained teachers in the greater Rochester, NY area. MaryAnn has served on many literacy committees and remains very connected to furthering literacy awareness among teachers, parents and the general public. She is passionate about teaching young children to read and write. McAlpin has recently created her own publishing company: Short Tales Press. Short Tales Press provides excellent reading resources for the emergent reader. Check out her website: www.shorttalespress.com.
  • 5.
    Chapter One ~Set-Up,Layout and DesignSo, you want to self-publish a book? Good for you! This chapter will describe the basics to get you started. The list below represents the tools you will need:ComputerPatiencePowerPoint software and some experience using itChocolateModel bookPlanning sheet and old-fashioned writing instrumentsMore chocolateCapacity to PDFYou need to select the topic or theme, the audience, and the purpose. We suggest you look at several books to select a model because that will provide you with a basic plan: picture book or just text, brief or lengthy, color or black/white, photo images or drawings. In the beginning we recommend an actual book for a model; experienced self-publishers may work with a personal image of the final product drawn from several books. Before you begin working you need to check some of the self-publishing sites to see the cost structure and availability of different size books. Later in this book we present many projects we have completed which may give you additional ideas about your first publishing project. It is best, in our opinion, to start with something you want to do because motivation and passion help us over the rough spots.5
  • 6.
    The first portionof the chapter will discuss a simple, basic layout technique. We’ll then discuss developing templates created in master slide view.Basic Page Design In Nine Simple StepsOpen up a PowerPoint presentation.Go to Design tab and select Page SetupSelect your slide orientation. That will be the orientation of your final book. You may want to look back at the model book you chose for this project.Set your Width and Height. Again, use you model text as a guide. Add .25 inches to the width and height you select. This is for “bleed” if you use a colored background. It also allows for “trim” space after printing. (figure 1)Go to Home tab and pull-down Layout. Select Blank.Go to View taband select Ruler and Gridlines. In the beginning these are helpful when laying out the book. (figure 2)Decide if you want a background to your pages. Background choices are found at the Design tab. There are background designs provided (Themes) or you can customize.To customize, select Background Styles. You can use Solid fill, Gradient fill, Picture or texture fill. The Color choices are provided,a s well as, the level of transparency. Before closing Format Background, decide if you want your choices applied to every slide. (figure 3)Do you want borders on your pages? A temporary border is helpful when laying out the book. Borders are created at the Insert tab. Select Shapes. You might draw a rectangle or an oval. Using the gridlines and ruler, you can make the shape equal6
  • 7.
    distant from eachside - perhaps .5 to 1 inch. Clicking on the shape brings up the Format option. You now have the chance to select Shape Fill (No Fill) , and Shape Outline. Now you can pick a Color, Weight and Line Style of the border. It is easy to repeat this border whenever you want to use it with Copy/Paste.You are now ready to add text or images to your pages. Before we explain that process, we’ll discuss template design.~~~~~~~~~~~~~~~~~~~~~~~~~~~~~~Selecting page setup and orientationFigure 1Selecting gridlines and rulerFigure 2Formatting backgroundFigure 37
  • 8.
    Whether or notyou design a template depends on your audience and purpose. If you are creating a ‘one-of-a-kind’ text, you will want your imagination and originality to thrive. If you are publishing with a group, we recommend that you create a template to establish parameters and avoid design problems .Template Design in Thirteen StepsOpen up a PowerPoint presentation.Click on View tab and select Slide Master.Delete all the boxes on the large Master Slide , top slide.Delete all the boxes on the second, smaller slide.Delete all remaining slides.Click on the Home tab and select New Slide. Insert several new slides by clicking Duplicate selected Slides.Toggle back to Slide Master.In Slide Master view, you can format backgrounds, select themes and fonts and set up the page size and orientation. You can insert shapes to create borders or designs. Anything you place on the first master slide will appear on every slide. By using the smaller slides, you can create right and left pages or a variety of design possibilities. Use the Background Styles or Themes options as outlined in Basic Page Design In Nine Simple Steps.Use the Font option to set a font. You can add a font by selecting Create New Theme Font.Use the Rename option to name the slides you create.In Slide Master view, you can insert page numbers. 8
  • 9.
    Click on Inserttab and insert a Text Box wherever you want the page number. Then click Slide Number. Next click on Home tab and center the slide number. Return to Slide Master view andfollow the steps to place slide numbers on every slide except the master slide.Close Slide Master view.~~~~~~~~~~~~~~~~~~~~~~~~~~~~~You can create one or multiple layouts in slide master viewusing background and insert options. Slide master layouts can be accessed when creating slides.9
  • 10.
    As you workwith publishing you will find that the possibilities are endless. You want to create ‘a look’ that matches your audience and purpose; design decisions and color choices are the essence of graphic design. Serious, dramatic, trendy, ethereal, natural, or whimsical moods can be conveyed by your graphic design decisions.Font is also important in graphic design. We suggest that you control this aspect of design rigidly unless you want multiple fonts, including Word Art, within a single written selection. If you publish with students you’ve learned, as we have, that students love to experiment with colorful and unique fonts. Each of us have a horror story of a ‘face-to-face’ confrontation with a determined student who has devoted endless hours to font choices and scant hours organizing content.Published books, that are similar to you project, are the best resources to use as models . Font must, first of all, be highly readable. Font size and color depends on your audience, purpose and the function of the text. Except for poetry collections, most books use a single font throughout. We always ask students to find a published model that they would like to mimic. We find this continual reliance on models extremely beneficial. That does not mean that creativity and originality are stifled.Font is found at the Home tab – the small icon at the right allows you to set font.10
  • 11.
    Cover DesignThe coveris a separate file from the text. When you create your cover you will need to set your margins. Some publishers will require one sheet that includes the front and back of your cover. For example, a book with margins 8.25” wide and 6.25” height will require the margins for the cover to be 16.50” wide and 6.25” height. A single sheet cover is easy to design. Some publishers, like Lulu, will automatically set up your margins. You will only need to insert photos and choose a background for the front, spine and back of the cover.A two sheet cover consists of two slides, one for the front and one for the back cover. Set your margins accordingly to the size and allow .25” for bleed. If your book size is 8.5” in width and11” in height your margins need to be set at 8.75” and11.25.Single sheet coverfrontTwo page cover front and backback11
  • 12.
    Publishing TipsBefore uploadingyour work to an on-demand publisher, it is important to play editor. Even if you intend to print a draft copy first, we have learned the need to be critical word-by-word readers for spacing, verb tense, syntax, punctuation, omissions… the list is endless. Secondly, you need to read the work aloud:Does it sound right?
  • 13.
    Does it makesense? Thirdly, invite others to read and critique the work. This is the best way to catch most of the errors before publishing. Once your editing is complete, you must PDF (portable document format) your files. This will protect your files and ensure that content does not change during transmission. In either case your first step is to convert the cover to a PDF using a Adobe Acrobat, if available. There are free online software to create a pdf such as: www.primopdf.com/online.aspx
  • 14.
    http://www.pdfonline.com/convert-pdf/.There numerous on-demandprinters available. To decide which company best suits your needs you will probably want to consider Ease of the publishing process (up-loading your material to their site),
  • 15.
    Cost of basicservices and any extra services
  • 16.
    Options – hardand soft covers, number of pages, binding, color versus black-and-white, book sizes and orientation
  • 17.
    Quality of thegraphics and paper
  • 18.
  • 19.
  • 20.
    Chapter Two ~Early Reader BooksThe comment has been made that writing books for children must be easy. It is thought that children’s books contain simple content and simple language. This is a total fallacy as the authors of children’s books can attest. Early reader texts require a particular writing structure that provides support and challenge for the new young reader. These attributes include: Length of eight to sixteen pages
  • 21.
    Combination of textand pictures to convey meaning
  • 22.
    Specific spacing betweenletters, words and lines of text
  • 23.
  • 24.
    Leveledon a continuumof difficultyWhen creating an early reader book, the author must be cognizant of both the child’s interests and the reading continuum in order to tailor the book to the child. Creating books with PowerPoint enables the author to use content that interests and motivates the new young reader. Familiar content also makes comprehension of the text more accessible. Teaching the young readers to create their own text is another reason to use PowerPoint to publish. When the child is the author, PowerPoint enables them to publish a text modeled after the texts they read in school. Struggling readers are motivated to learn when they write their own story. 13
  • 25.
    Creating early readerbooks with several Reading Recovery teachers made a fun workshop. These experienced teachers understood the various attributes of early reader books. We supplied the teachers with professional and non-professional samples of appropriate texts, planning templates, and step by step directions. The teachers were asked to supply their own photos, images, or pictures. Using a story line and pictures we created a text with the group to model the process. Then the teachers were given a planning template to outline their own stories. Template to plan an early reader or short book The teachers were quick to share ideas, to laugh over technical missteps and to show excitement as writers. We collaboratively revised and edited the completed drafts for publication. Final drafts were converted to PDFs and sent to the on-demand publishing company.14
  • 26.
    It is powerfulfor teachers to engage in an active workshop. This reinforces the need for learners to be engaged. When the audience participates, rather than just listens, they are empowered to take and use the skills to further their personal and professional development.The participants realized the value of our guiding them through each step of the publishing process. This will enable them to use the same process in their classroom. They also observed that each of them adjusted the publishing process to their personal style.Planning is the first step and can be different for each individual. Some authors will gather the photos to support the story. Others will have the photos and then create a story using those photos. Some draw first, while others write. Planning sheets need to support the thinking of the author and provide organization. A story board or another type of planning tool is needed to draw or write the story. Once the ideas are down on the planning sheet, one can begin writing a story using PowerPoint.During the planning stage it is important to remember the format of an early reader book: Keep the book short.
  • 27.
    Use simple sentencesand words that you know the child can read.
  • 28.
    Make sure thatthe text supports the photos.
  • 29.
    Double space eachword so the reader can easily see the distinction between words and letters. I went to the zoo. (double spaced) I went to the zoo. (single space) The photos must support the text.15
  • 30.
    Planning is thefirst step when helping young readers publish. Personal photos that tell a story often make a great starting point.16
  • 31.
    In early levelsthe text is usually typed on one page and the corresponding photo is on the adjacent page.Look at the elephant.Text can also be on the same page as the photo.It is important to stress the value of creating early reader books with emergent readers. Creating books with an emergent reader increases motivation, reading strategies, fluency, and their interest in reading. Keep in mind that the book can be tailored to the child’s interests and needs. You might, for example, take photos of the child eating favorite foods, or going to a special place, or pictures of the child’s family. These children will read and reread their books to family, friends, teachers and even the family pets and teddy bears. 17
  • 32.
    Chapter Three ~Traveling Through the Human Body with ABC’SWhat is your worst memory of learning vocabulary in school? Copying endless definitions from dictionaries and glossaries? Writing meaningless sentences using those vocabulary words? Maybe, it was the millions of index cards converted to flash cards to serve as study aids. Recent research into learning, memorization, motivation and engagement has proven what you knew even as a very young student: those mindless activities were not an effective method to increase student learning and achievement. Learning happens when people connect new information with their prior knowledge or experience. Copying definitions may increase small–motor skills but does not require thinking about the meaning of what one is copying.The vocabulary project, Traveling Through the Human Body with ABC’S, integrated the research of Marzano and Pickering , Building Background Knowledge and Building Academic Vocabulary, Beck and McKeown,. Bringing Words to Life: Robust Vocabulary Instruction and Creating Robust Vocabulary Instruction: FrequentlyAsked Questions and Extended Examples and JanetAllen, Words, Words, Words: Teaching Vocabulary in Grades 4-12. The project required students to develop comparative definitions of parts of the human body. Ninety-six 6th grade students in an urban/suburban middle school worked collaboratively with two teachers and two technology interns from a local college.18
  • 33.
    The teachers wantedto capture students’ learning in a form that could be shared beyond their classrooms. The students just wanted to use technology. The first task was to define their audience and purpose; this is especially critical for student writers in collaborative projects, because it guides the entire creative process. The group decided to organize content from a health unit (vocabulary essential to study human body systems) into a color ABC book for fourth grade students. The book would combine text and visuals.To select content the teachers and students brainstormed an alphabetical list of body parts. They then evaluated these terms for importance and usefulness. In teams of two, the students selected a part of the human body to explain and compare to an everyday object in terms of function.Because the students did not copy definitions or comparisons, the project required comprehension, analysis, synthesis and evaluation by students. The teachers and interns supported student thinking through conferencing.19
  • 34.
    The entire groupof ninety-six students, teachers and interns now had to decide how the work would be illustrated. The students wanted to seek images via the internet. Mini-lessons established the criteria for selecting and downloading appropriate images. As an initial revision step, teams shared their definitions and illustrations with another student team to elicit feedback for content clarity. Students had to determine which of the 48 comparative definitions represented the highest quality in terms of clarity and comprehensiveness. In many cases teams again revised their work to incorporate elements of another team’s work. The need and willingness to revise expanded as the sixth graders considered an audience beyond their classrooms.To complete the revision step the teachers worked with the student teams, whose writing required additional revising, while the interns worked with other students who were ready to publish digitally. Finally, the draft publication was ready for a slide show viewing so the students could determine whether revisions or edits were needed. Before creating a PDF version of the book draft and cover, the teachers and interns made final edits and design repairs. The PDFs were finally uploaded to an Internet on-demand publisher, Lulu.Everyone waited eagerly for the published draft to arrive. On delivery day our students were elated. They flocked in between classes to celebrate their success as published authors. They were amazed to learn that this printed draft needed to be revisited for any layout changes, spelling, syntax and semantics before the final printing. 20
  • 35.
    After a fewrevisions and edits, another set of PDFs was created and uploaded to Lulu.We asked each other, “Did this project promote literacy growth? Did this project relate to the basic requirements for the 21st C. learner?” Did this project engage the learner in rigor and relevance? Did this project incorporate transferable skills and modes of thinking?The teachers evaluated the success of the project. They concluded that the project enabled students to develop proficiency with the tools of technology. Success required that students build relationships with everyone involved , to collaboratively pose and solve problems. The students’ reflections revealed that working as a collaborative group was a valuable learning experience, which challenged some students’ problem solving skills. The opportunity to work with college interns was a new experience for the teachers and students. Teachers had the chance to work with younger people who were technologically advanced. The sixth grade students discovered that their learning opportunities do not solely derive from their classroom teachers. Our students were required to manage, analyze and synthesize multiple streams of simultaneous information to create their comparisons and illustrations. Opportunities to create, critique, analyze and evaluate multi-media texts were an essential aspect of the completed work. These are the most powerful thought processes required to meet 21st Century demands. One criticism of modern technology is the unethical “copy & paste” of others’ material. With this project, students were instructed to use technology to create their work in an ethically responsible manner. Interns and teachers emphasized the practices of summary and synthesis. It is essential that school districts maintain from the earliest grades and across all disciplines, strict policies prohibiting plagiarism.21
  • 36.
    Chapter Four ~Children’s Summer Publishing ProjectHow did you spend your summer vacation? Did you publish any books? Thirteen students - 4 high school, 3 middle school, 4 intermediate and 2 primary – answered, “Yes!” to that question after the summer of 2008. These students, from urban, suburban and rural environments, had a wide range of experience with literacy and technology. Using a small grant, our publishing group provided multiple day “learning lab” sessions to teach these students how to write and publish their own books. Our goal for the “Summer Publishing Project” was to discover how effectively and efficiently these learners applied the writing process to text publishing. We also wanted to observe peer revising and editing across a mixed age group . The lab setting provided a learning environment that allowed us to bridge the students’ knowledge and skill of literacy practices with the publishing experience. Instruction consisted of explicit mini-lessons based on each student’s immediate needs. The small-group and individual mini-lessons included: audience and purpose, adding details, staying focused on topic, creating titles, hooking the audience, revising, editing, and design. Students selected the topics and audience for their books. This promoted high engagement and ownership for the project. The high school and primary students came in with ideas that were firmly entrenched. The adolescents, ages 11-14, struggled with selecting their topics. Through our conferencing questions, these students were able to decide what audience and22
  • 37.
    purpose they wantedto address. The students were responsible for their photos/ images.The students were keenly aware of the writing process. After initial brainstorming, students were required to plan their content and organization. These drafts varied in detail and complexity, depending on the students’ writing experience. The high school students were able to plan without formal written drafts.Plans do not have to be formal or follow a rigid format.The books were created using PowerPoint 2007. We taught two of the middle school girls to make a basic template. The template established a simple picture book format with text on the left-hand pages and digital image/picture placeholders on the right-hand pages. There was a title page at the beginning and an author page at the end. The books were 20 pages long and primarily 9”x 7”. 23
  • 38.
    Text BoxThis ismy bunny.He has long ears.He has soft fur.Students created a template for the books.A predetermined template is a necessary management technique, when working with a sizable number of students. The template narrows the students’ design decisions. Choices - in backgrounds, fonts, colors and image sizes - can overwhelmed students which detract from their writing.Basic template created by middle school students.24
  • 39.
    Sample title page.Sampleauthor page.The page size was set at 9.25” width by 7.25” length to allow for “bleed;” the finished book size will be 9” by 7”.
  • 40.
    Selecting backgrounds isthe next step – there are many options available. Access Design, then pull-down Background styles to format your background.Some students wanted a border around their pages. We clicked on Insert, then Shapes and selected a rectangle. We drew a rectangle equal distance from all sides. We clicked on Format and then Shape Outline to set the width of the line in Weight and to select a color.
  • 41.
    The students inserteda text box on the left hand pages. We centered it using the align function.The students inserted their pictures on the right hand pages; borders were added using the Picture Tools and Format. Colors, line weights and line styles can be varied.
  • 42.
    Other choices thestudents made were font sizes and colors.Students experimented with shapes… …borders and effects for their pictures.