Downloaded 49 times


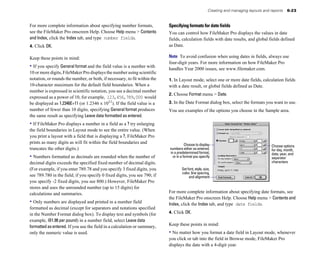
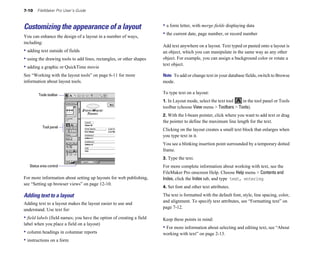
![Chapter 4
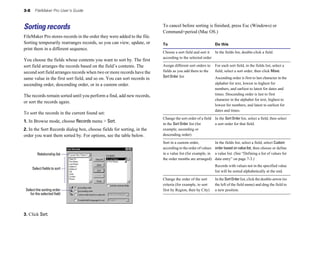
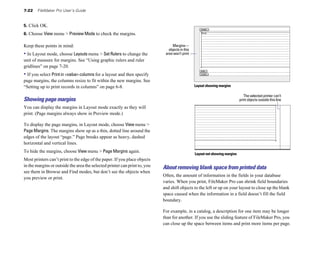
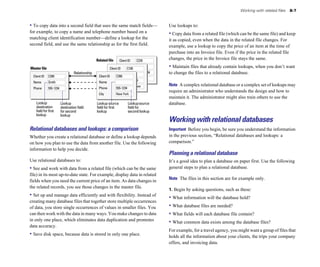
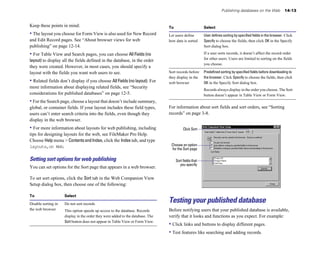
Previewing and printing information
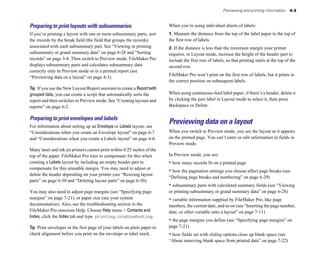
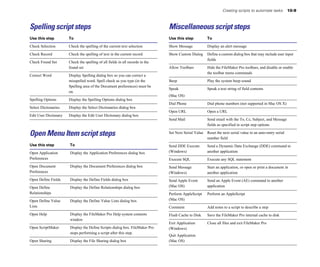
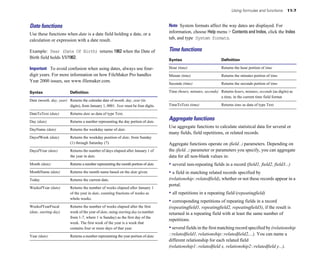
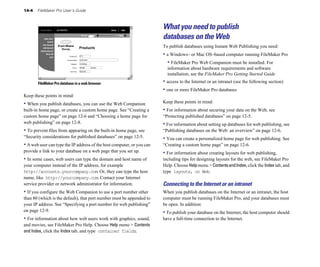
This chapter describes how to: You can print data based on the current layout
• set up a printer and print options or information about the structure of the database
• preview before you print
• print one or more records, a blank record, field definitions, or script
steps
The procedures in the chapter assume that you already have a layout
to print. If you don’t, see chapter 6, “Creating and managing layouts
and reports,” and chapter 7, “Customizing layouts.”
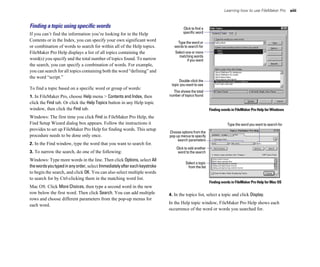
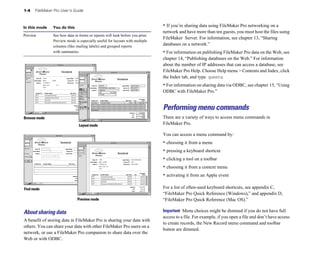
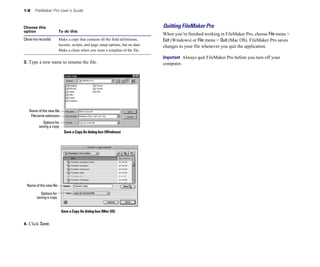
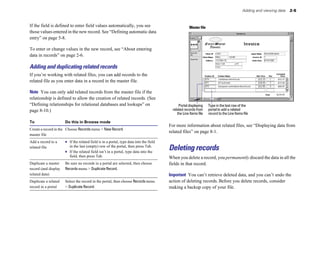
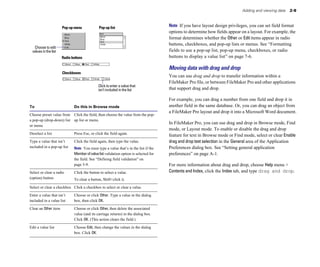
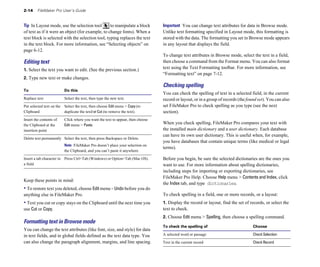
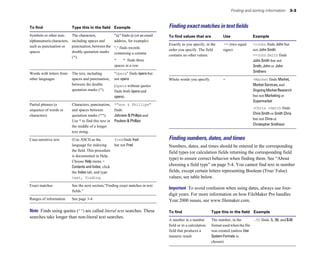
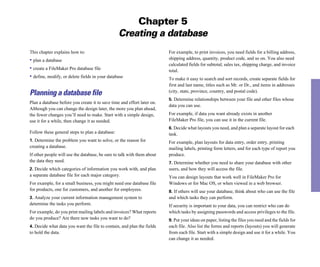
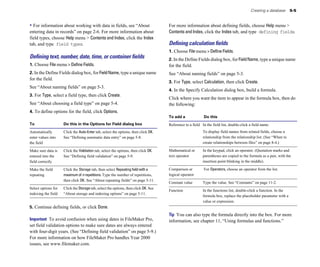
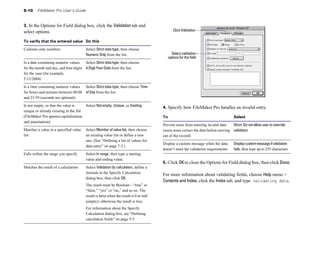
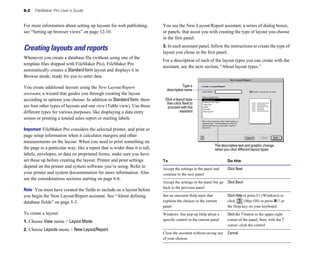
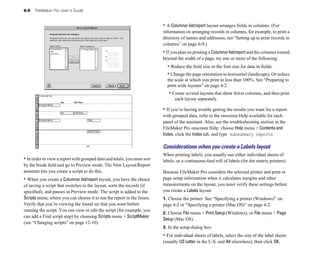
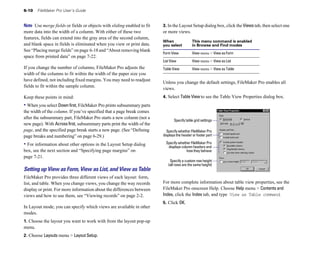
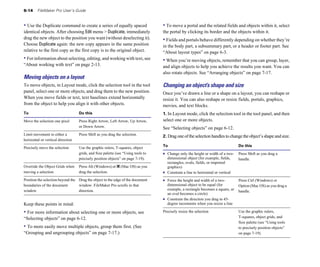
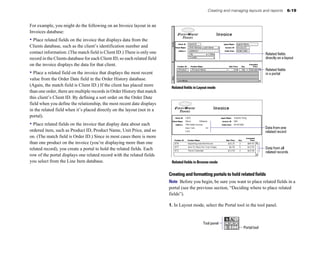
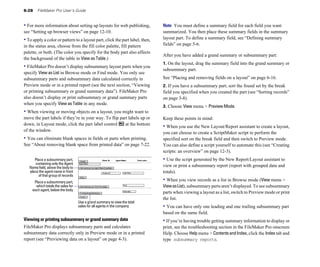
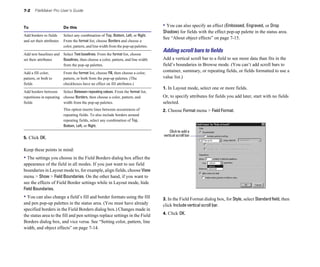
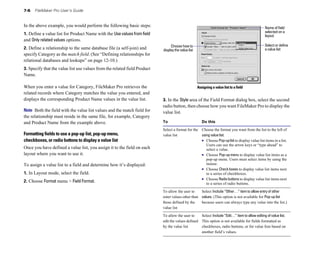
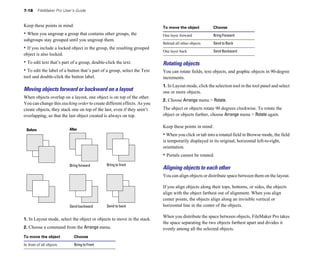
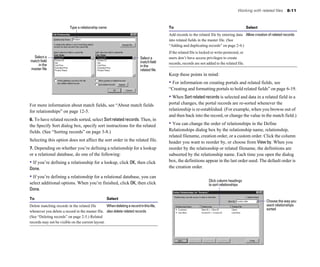
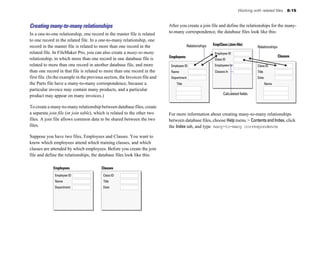
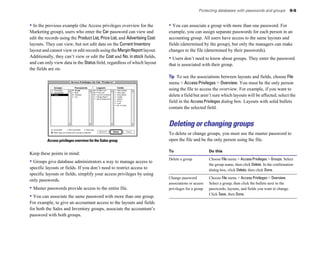
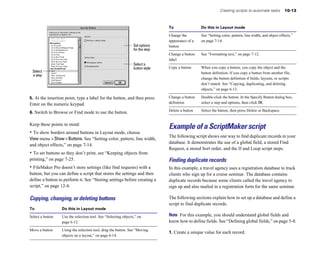
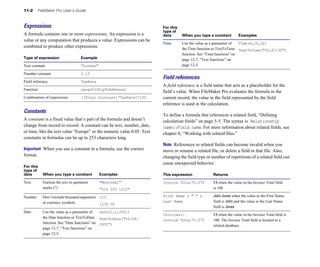
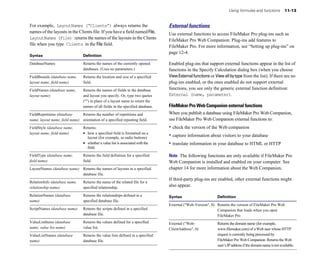
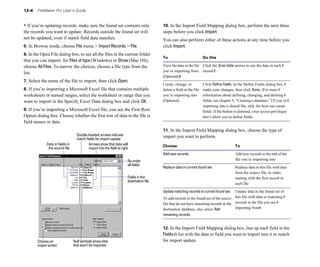
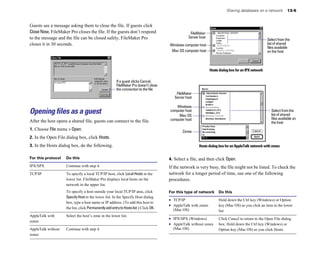
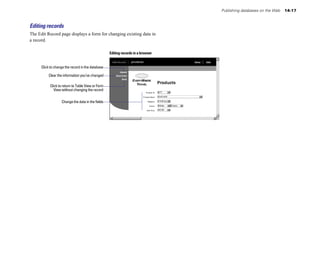
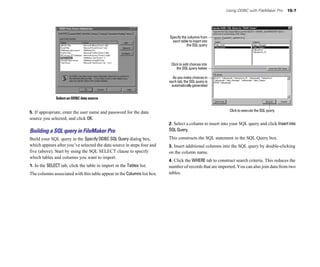
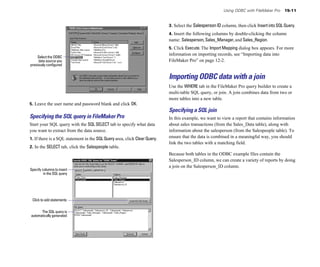
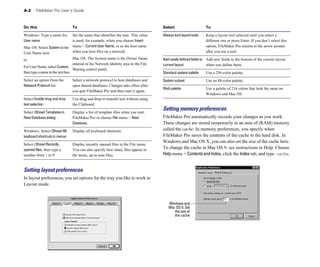
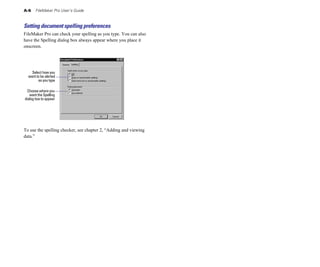
Phone List
Note The information in this chapter does not apply to users working Name Phone
Phone List
Juanita Alvarez 408-555-1234
with databases on the Web. When users work with databases on the Michelle Cannon
Andre Common
213-555-2345
714-555-3456
Name Phone
Phone List
Marie Durand 619-555-4567 Juanita Alvarez 408-555-1234
Web, the web browser software governs printing. Jean Durand 408-555-5678 Name Phone
William Johnson 408-555-6789
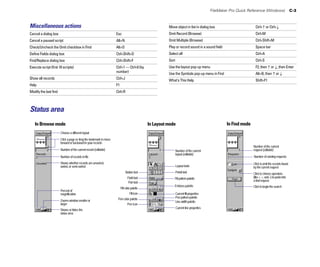
Records being browsed
About printing information in a database Current record
Blank record
With FileMaker Pro, you can print:
• all the records in the database, a subset of the records, or only the Print Phone List
Go to Layout [Phone List]
Sort [Sort Order: Last name (Ascending) ]
current record [Restore sort order, No Dialog]
Enter Preview Mode
Field Name Field Type Formula/Entry Options
[Pause] First Name Text
• a blank record to create a paper form Print
[no dialog]
Enter Browse Mode
Last Name
Address1
Address 2
Text
Text
Text
City Text
• definitions of fields or scripts to see the structure of your database State
Postal Code
Phone
Text
Number
Text
Script
FileMaker Pro prints records using the current layout. You can
create layouts to print the same data in different ways. For example, Field definition
you can print records one by one, in a columnar list, or in a complex
sorted report with totals, headers, and footers. You can also create You can control page margins, remove blank space, and keep
layouts for mailing labels or envelopes. specified objects from printing. See “Controlling how things print”
on page 7-21.
The New Layout/Report assistant (in Layout mode) makes it easy to
create such layouts and reports. See “Creating layouts and reports”
on page 6-2.](https://image.slidesharecdn.com/filemakerpro6usersguide-090829121126-phpapp02/85/File-Maker-Pro-6-User-s-Guide-53-320.jpg)


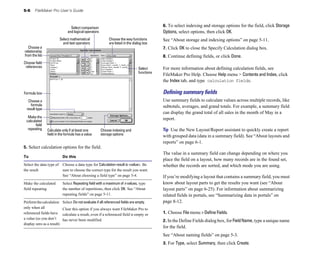


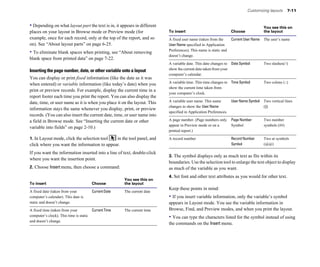


![10-2 FileMaker Pro User’s Guide
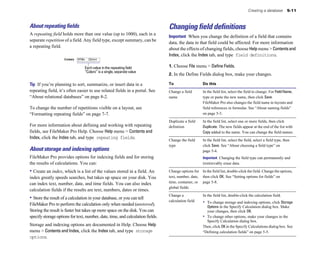
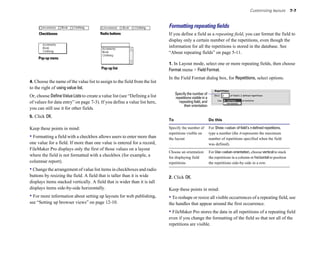
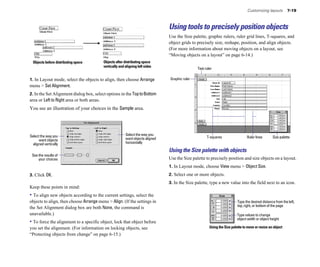
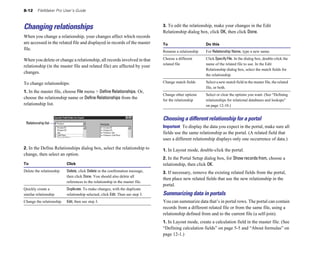
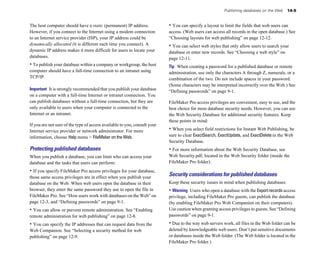
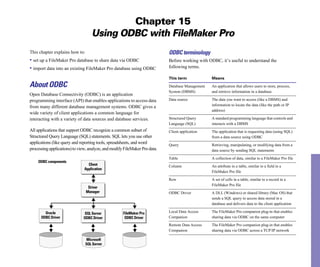
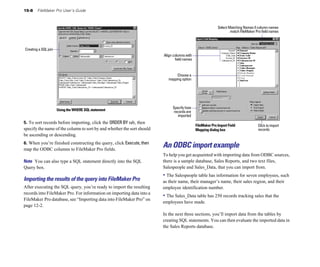
• importing data from the same source The files you work with may already have scripts and buttons that
• dialing phone numbers you can use. For example, the template files included with
FileMaker Pro have buttons that make using the file easier.
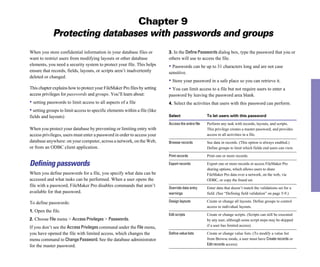
You can perform additional scripts, called subscripts, within a script.
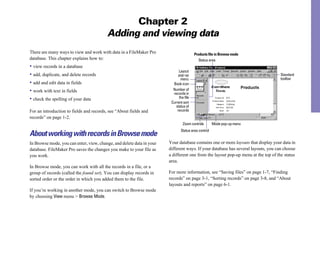
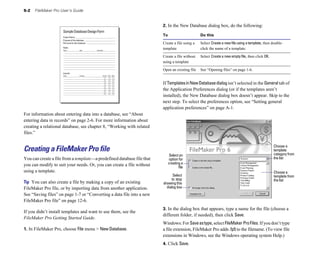
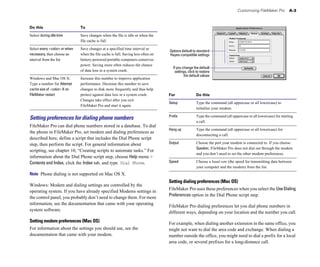
To Do this
Subscripts make it easy to break a complex task into small tasks. For
example, you can find customers with a balance due with one script, Perform a script from the Choose the script name from the Script menu.
and then print form letters requesting payment with another script. Script menu
The first script contains a command that performs the second script Perform a script from the Choose Script menu > ScriptMaker. Select the script
(the subscript). If a subscript is in a different file, it’s called an Define Scripts dialog box name, and then click Perform.
external script. Perform a script using a Type the keyboard shortcut that’s listed next to the
keyboard shortcut script in the Script menu. (See “Listing scripts in
With FileMaker Pro, you can: the Scripts menu,” on page 12-11.)
• define a script that pauses to let you do unscripted tasks, like Perform a script from a Switch to a layout that contains a button for the
entering data. When you resume the script, FileMaker Pro performs button script. In Browse or Find mode, click the button.
the remaining script commands. Perform a script when In the Document Preferences dialog box, set the
• save settings, like find requests and sort orders, in a script. opening or closing a option to perform a startup or shutdown script. See
FileMaker Pro file “Setting document preferences,” on page 12-5.
• print the commands and settings that make up a script. (See
Continue a script after it Click Continue in the status area, or press Enter or
chapter 4, “Previewing and printing information,” for additional
pauses Return. If you switch layouts while a script is
information on printing from FileMaker Pro.)
paused and then continue the script, the remaining
• define passwords that prevent other users from defining or script steps occur in the new layout.
changing scripts. (See “Defining passwords,” on page 9-1.) Stop a paused script Click Cancel in the status area, switch to another
• perform a startup script, a script that runs when you open a mode, close the active window, or quit
FileMaker Pro.
FileMaker Pro file. For example, a startup script can switch to a data
entry layout whenever you open a customer order database. Stop a script (except when Press Esc (Windows) or Command+Period
FileMaker Pro can also perform a shutdown script every time you it is paused) (Mac OS), hide or close the active window, or exit
close a file. (See “Setting document preferences,” on page 12-5.) out of FileMaker Pro. If the script contains a Close
or Toggle Window step that hides the active
• send Internet mail using a separate email client (this requires an window, FileMaker Pro stops the current script and
email account). returns to the script that called it (if there is one).
• launch Web browser software and have it display a specified URL
(Web address—this requires an account with an Internet service Note You can’t stop a script that contains the Allow User Abort
provider). [Off] step.
For a description of the various types of scripts you can perform, see
“About ScriptMaker steps,” on page 12-6.](https://image.slidesharecdn.com/filemakerpro6usersguide-090829121126-phpapp02/85/File-Maker-Pro-6-User-s-Guide-152-320.jpg)


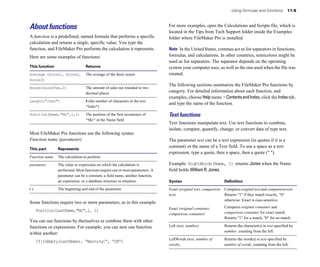
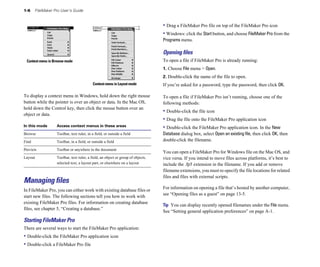
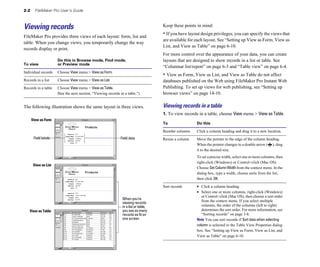
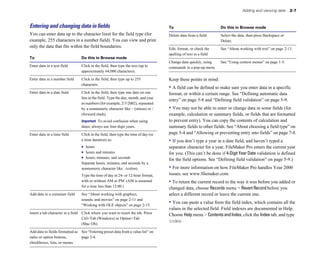
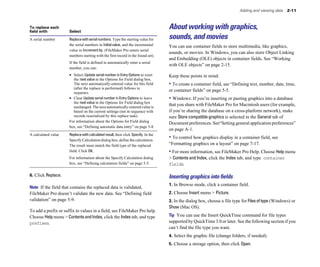
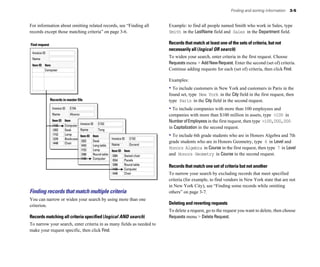
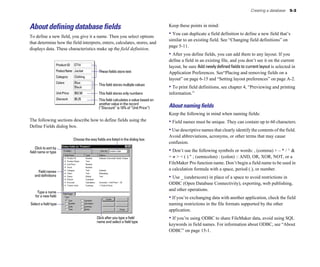
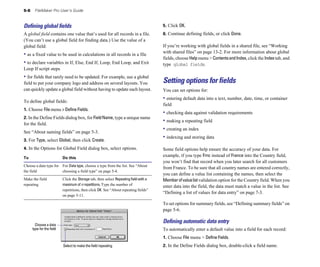
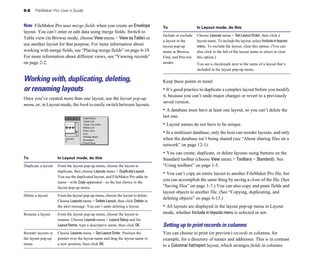
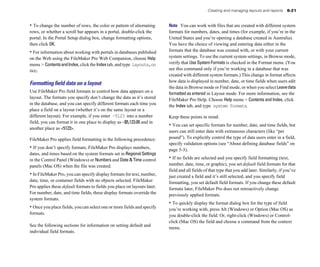
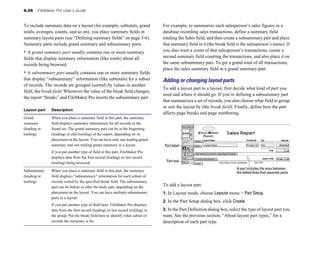
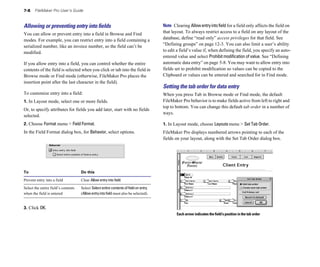
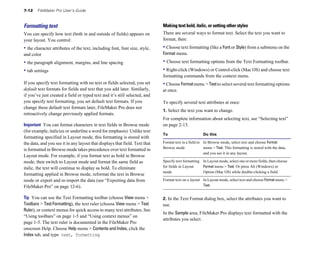
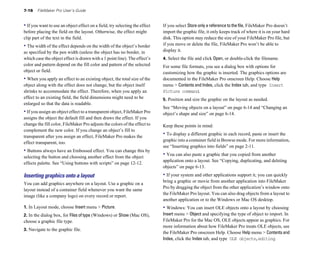
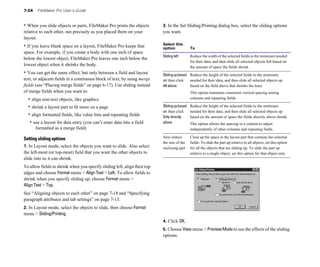
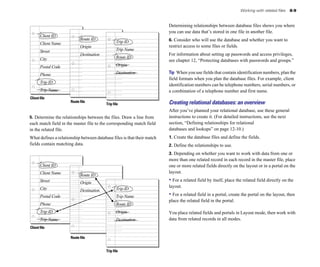
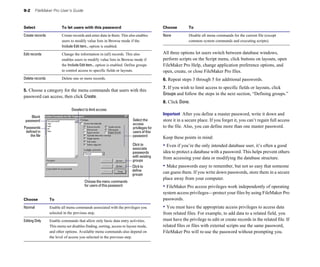
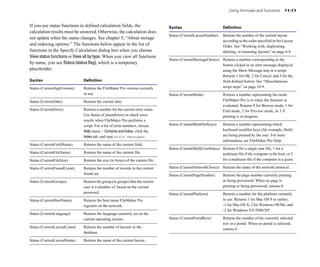
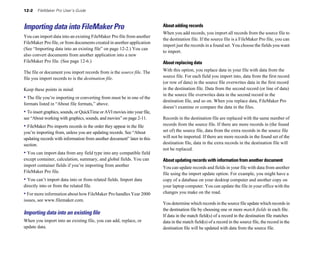
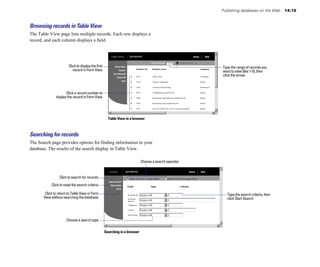
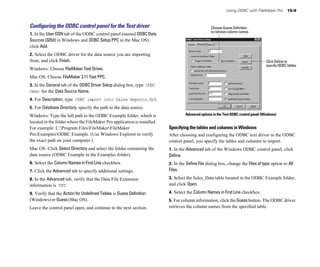
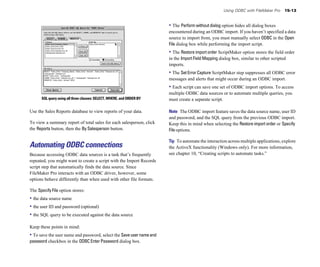
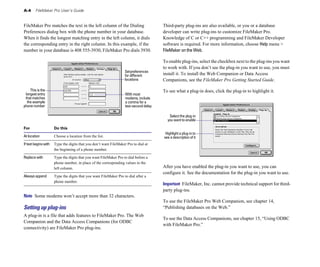
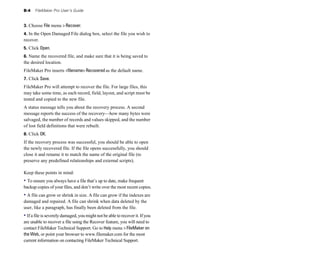
![11-8 FileMaker Pro User’s Guide
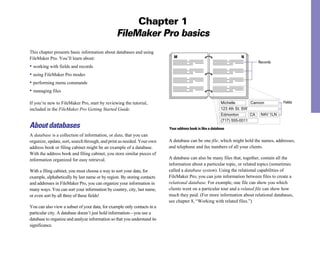
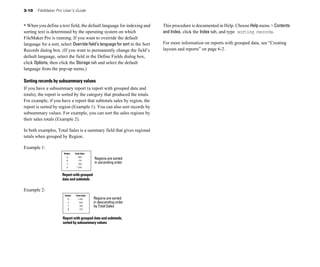
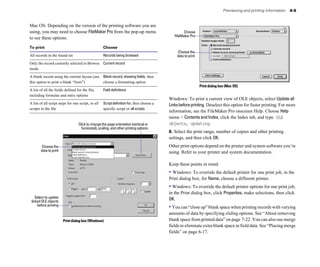
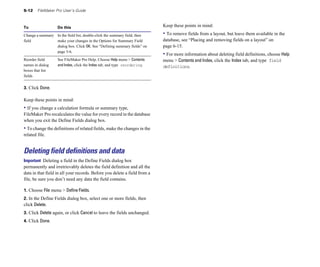
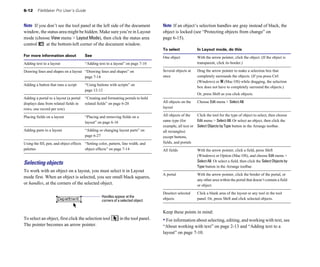
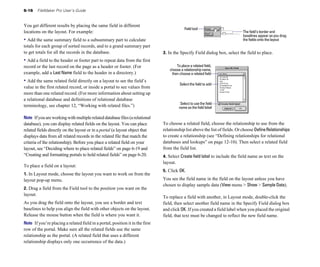
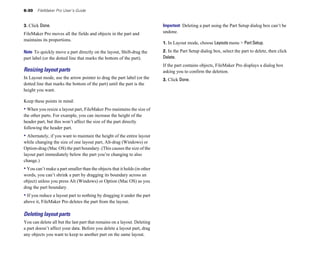
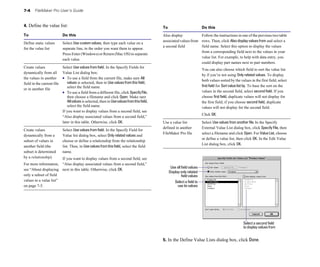
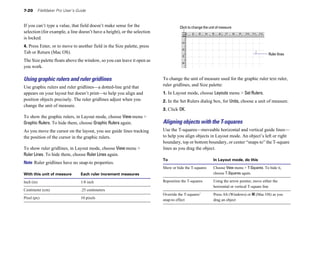
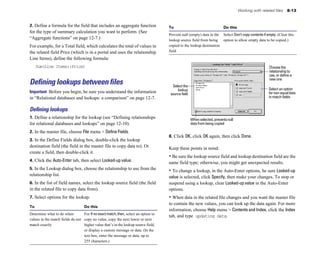
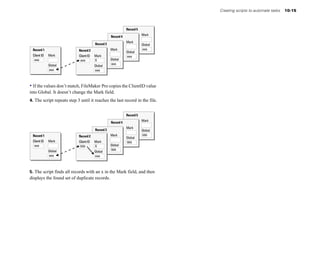
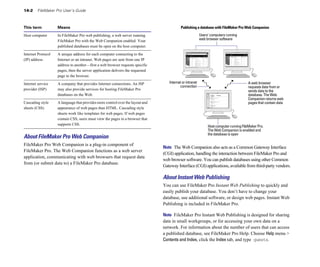
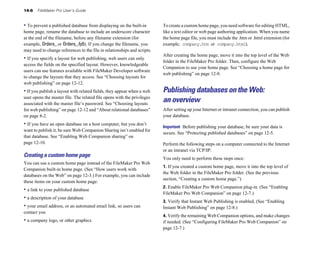
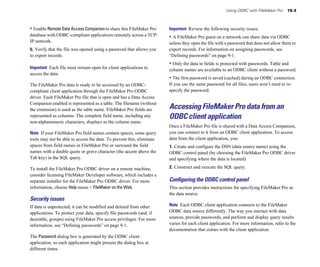
See below for examples of each of these situations. Example 3
1 Repeating field
This function Does this 2
3
Average (field...) Averages the numbers, dates, or times in the (field...)
4
parameter(s) you specify +
Count (field...) Returns the number of items [the (field...) parameter(s) 10 Sum (Repeating field)
you specify], which are not empty
Max (field...) Returns the largest number or time or the latest date in
the (field...) parameter(s) you specify Example 4
1 1 2
Min (field...) Returns the smallest number or time or the earliest date 2 2 4
+ =
in the (field...) parameter(s) you specify 3 3 6
4 4 8
StDev (field...) Returns the standard deviation of the sample
Repeating Repeating Sum (Repeating field 1, Repeating field 2)
represented by a series of values in the (field...) field 1 field 2
parameter(s) you specify
StDevP (field...) Returns the standard deviation of a population
Example 5
represented by a series of values in the (field...)
1 + 4 = 5
parameter(s) you specify
Related Related Sum (Relationship name::Related field 1,
Sum (field...) Adds the numbers or times in the (field...) parameter(s) field 1 field 2 Relationship name::Related field 2)
you specify.
Note You can use aggregate functions to summarize data in a file, as
The following examples show how the Sum function works, an alternative to Summary fields. See “Summarizing data in portals”
depending on the number of parameters, whether the calculations on page 8-12.
involve related, repeating, or non-repeating fields, and whether
results are returned in a repeating or non-repeating field. In these Summary functions
examples, the numbers in the boxes represent values in fields. Summary fields generate grand totals or subtotals of data from many
records. For more information, see “Defining summary fields” on
Example 1 Example 2 page 5-6, and “About layouts and reports” on page 6-1.
1 Field 1 1 Related field
2 Field 2 Use the GetSummary function with a summary field when you want to:
2
+ 3 Field 3
3 Portal • display subsummary values in Browse mode or in a body part
6 Sum (Field 1, Field 2, Field 3) 4 • perform mathematical calculations on a summary field
+
10 Sum (Relationship
name::Related field)](https://image.slidesharecdn.com/filemakerpro6usersguide-090829121126-phpapp02/85/File-Maker-Pro-6-User-s-Guide-174-320.jpg)
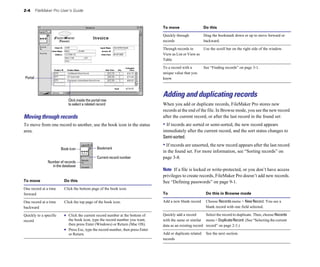
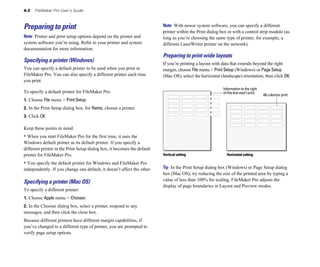
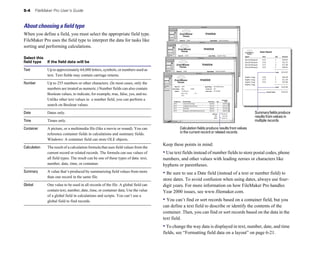
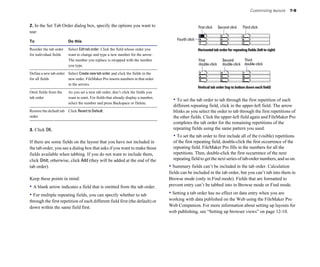
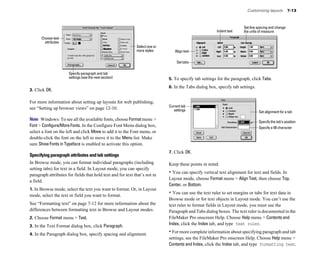
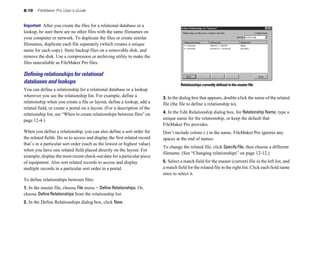
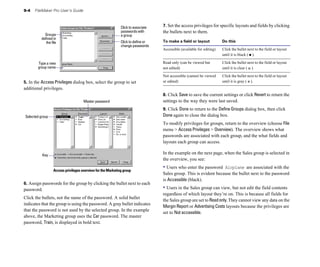
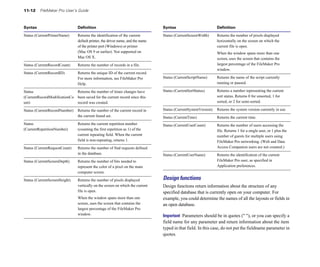
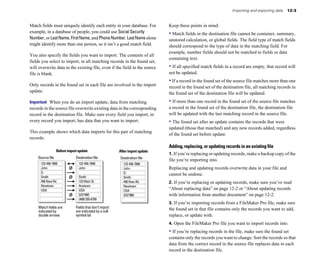
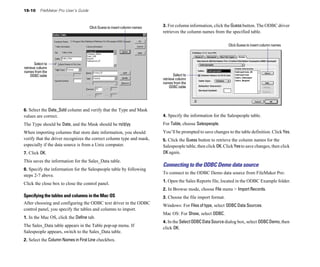
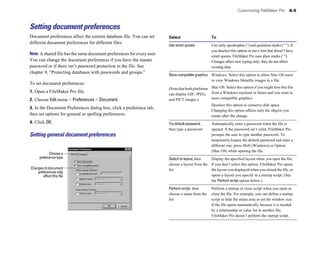
![11-10 FileMaker Pro User’s Guide
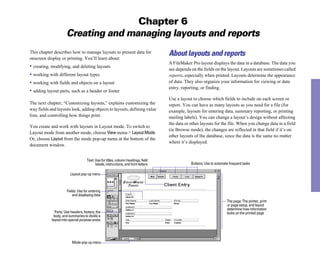
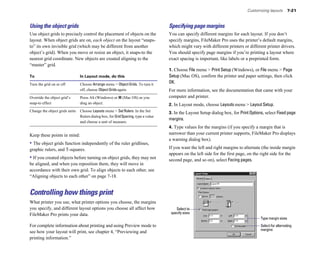
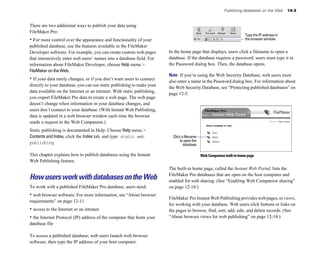
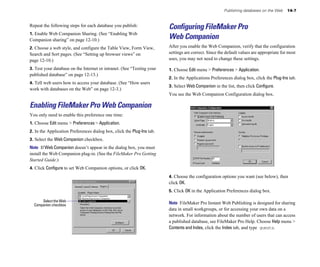
Trigonometric functions
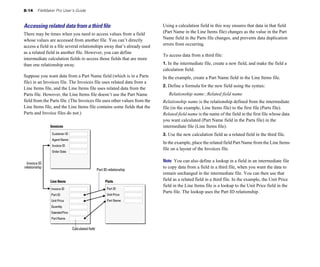
Syntax Definition Syntax Definition
Atan (number) Returns the trigonometric arc (inverse) tangent of Case (test1, result1 [, test2, Evaluates test(s) to produce a result. When test1 is
number. The arc tangent is the angle, in radians, result2, default result]...) true (a nonzero value), returns result1; when test1
whose tangent equals number. is false, evaluates test2. When test2 is true, returns
Cos (number) Returns the cosine of the angle (in radians) of result 2, and so on. When no test is true, returns an
number. empty (null) value, or the default result you
supply.
Degrees (number) Converts number from radians to degrees
(π/180 radians). Choose (test, result0 [, Evaluates test to produce an index number used to
result1, result2]...) choose a result. When index is 0, returns result0;
Ln (number) Returns the base-e (natural) logarithm of number. when index is 1, returns result1, and so on. When
Log (number) Returns the common logarithm (base 10) of number, there’s no corresponding result, returns an empty
which is any positive value. (null) result.
PI Returns the value of pi (π), approximately 3.14159. If (test, result one, result Evaluates test to return a true or false result. When
two) test is true (a nonzero value), returns result one;
Radians (number) Converts degrees (π/180 radians) in number to when test is false (0), returns result two. Test must
radians. Parameters for trigonometric functions return either a numeric or Boolean result. If you
must be in radians—use this function to convert have more than two possible results, consider
values from degrees to radians within a formula. using the Case function.
Sin (number) Returns the sine of an angle expressed in radians. IsEmpty (field) Returns true (1) when field is empty (null);
Tan (number) Returns the tangent of the angle (in radians) in otherwise returns false (0).
number. Tangents for values of 90 degrees (π/2 IsValid (field) Returns false (0) when field is missing from the
radians) or multiples are undefined (infinite). file or when field contains an invalid value;
otherwise returns true (1). For example, if a field
Logical functions in a related file is deleted, references to that field
in the master file are invalid.
Use logical functions to return a different result depending on the
value in a field or fields.
Status functions
Example with two possible results: Use status functions in ScriptMaker scripts to monitor the state of
If(Percent > 50,“Acceptable”,”Not Acceptable”)
your database. For information about scripting, see chapter 10,
“Creating scripts to automate tasks.” For an example script using
Example with more than two possible results: status functions, choose Help menu > Contents and Index, click the
Case (Percent >90, “Excellent”, Percent > 70,
Index tab, and type status functions.
“Adequate”, “Poor”)](https://image.slidesharecdn.com/filemakerpro6usersguide-090829121126-phpapp02/85/File-Maker-Pro-6-User-s-Guide-176-320.jpg)


![B-2 FileMaker Pro User’s Guide
4. Enter the following script: When you have FileMaker Pro save a compressed copy,
Set Field ["Count Field", "Count Field + 1"]
FileMaker Pro rewrites the entire database, fitting as much data into
If ["Count Field > 4"]
each block as is possible. This procedure not only reclaims unused
Save a copy as ["Backup Copy"]
space in the file, it also rebuilds the file’s structure. Compression can
Set Field ["Count Field", "0"]
be time-consuming if the file is large, however, and might be best
End if
accomplished as an overnight task.
5. After adding all the steps above, click OK.
6. Click Done.
Saving a compressed copy
1. Make sure that you have enough room on your intended storage
7. Choose Edit menu > Preferences > Document.
media.
8. In the General tab (Windows) or the General pop-up menu
While a compressed copy may be significantly smaller than an
(Mac OS), under When closing <solution filename>, select the Perform script
uncompressed copy, we strongly recommend that you have at least
checkbox.
as much free space on your intended media as the size of your
9. Select the script Backup. uncompressed file. It is not a good idea to fill any storage media up
10. Click Done. to its maximum capacity.
11. Close the solution file. 2. Choose File menu > Save a Copy As.
3. Choose compressed copy (smaller) from the Save a drop-down list
Once these steps are executed, you will have a script that will create (Windows) or Type pop-up menu (Mac OS). You can also change the
a backup of your file every fifth time you close the file. default name of the file and/or its location at this time.
4. Click Save.
Maintaining files
Understanding file damage
While consistent backups are the most important form of regular
maintenance you can perform on your databases, most heavily used In order to understand how corruption occurs, it is useful to know
databases are also good candidates for routine compression. how FileMaker Pro manages data.
FileMaker Pro is a disk-based application, so it does not need to load
the entire database into RAM as the file is opened. Instead, the
application transfers data as needed from the hard drive to RAM and
back; as the file is used, updated data is written from data buffers in
RAM to the hard drive. The most common cause of file damage is an
unexpected application termination. In most cases, an unexpected](https://image.slidesharecdn.com/filemakerpro6usersguide-090829121126-phpapp02/85/File-Maker-Pro-6-User-s-Guide-236-320.jpg)
![Appendix C
FileMaker Pro Quick Reference (Windows)
Keyboard and mouse shortcuts
Working with layout objects Show/Hide T-squares Ctrl+T
Align objects using the current settings Ctrl+K
Square the object being resized Ctrl+resize
Align to grid off while resizing/moving an object Alt+resize / Alt+drag
Toggle the current tool with the selection tool Enter (numeric keypad)
Bring an object forward Ctrl+Shift+[
Toggle the object grids Ctrl+Y
Bring an object to the front Ctrl+Alt+[
Ungroup objects Ctrl+Shift+R
Constrain a line to 45° increments Ctrl+drag
Unlock an object Alt+Ctrl+Shift+L
Constrain a rectangle to a square Ctrl+drag
Constrain an oval to a circle Ctrl+drag
Formatting text (Layout and Browse)
Constrain movement to vertical or horizontal Shift+drag
Align text center (horizontally) Ctrl+
Constrain resizing to vertical or horizontal Shift+resize
Align text left Ctrl+[
Display an object’s format Alt+double-click
Align text right Ctrl+]
Drag the selected layout part past an object Alt+drag
Align text full (full justification) Ctrl+Shift+
Duplicate by dragging Ctrl+drag
Insert a tab character in text Ctrl+Tab
Field Borders dialog box Alt+Ctrl+Shift+B
Next point size down Ctrl+<, Ctrl+, (comma)
Field Format dialog box Ctrl+Shift+M
Next point size up Ctrl+>, Ctrl+. (period)
Group objects Ctrl+R
Nonbreaking space Ctrl+Space bar
Lock an object Alt+Ctrl+L
One point larger Ctrl+Shift+>
Move the selected object one pixel at a time Arrow keys
One point smaller Ctrl+Shift+<
Redefine a field on a layout Double-click
Reorder the selected part Shift+drag
Selecting text (Layout and Browse)
Extend selection to end of line Shift+End
Re-orient the part labels Ctrl+click
Extend selection to end of text Ctrl+Shift+End
Reset the default format based on an object Ctrl+click
Extend selection to next end of word Ctrl+Shift+B
Rotate an object Alt+Ctrl+R
Extend selection to previous start of word Ctrl+Shift+A
Select items partially contained in the marquee Ctrl+drag
Extend selection to start of line Shift+Home
Select objects by type Ctrl+Shift+A
Extend selection to start of text Ctrl+Shift+Home
Send an object backward Ctrl+Shift+]
Move insertion point to end of line End
Send an object to the back Alt+Ctrl+]
Move insertion point to end of text Ctrl+End
Set Alignment dialog box Ctrl+Shift+K](https://image.slidesharecdn.com/filemakerpro6usersguide-090829121126-phpapp02/85/File-Maker-Pro-6-User-s-Guide-239-320.jpg)

![Appendix D
FileMaker Pro Quick Reference (Mac OS)
Keyboard and mouse shortcuts Set Alignment dialog box Shift-2-K
Show/Hide T-Squares 2-T
Working with layout objects Sliding/Printing dialog box Option-2-T
Align objects using the current settings 2-K
Square the object being resized Option-resize
Align to grid off while resizing/moving an object 2-resize/ 2-drag
Toggle the current tool with the selection tool Enter
Bring an object forward Shift-2-[
Toggle the object grids 2-Y
Bring an object to the front Option-2-[
Ungroup objects Shift-2-R
Constrain a line to 45° increments Option-drag
Unlock an object Shift-Option-2-L
Constrain a rectangle to a square Option-drag
Formatting text (Layout and Browse)
Constrain an oval to a circle Option-drag
Align text center (horizontally) 2-
Constrain movement to vertical or horizontal Shift-drag
Align text left 2-[
Constrain resizing to vertical or horizontal Shift-resize
Align text right 2-]
Display an object’s format Option-double-click
Full text justification Shift-2-
Drag the selected layout part past an object Option-drag
Insert a tab character in text Option-Tab
Duplicate by dragging Option-drag
Next point size down Shift-2-<
Field Borders dialog box Option-2-B
Next point size up Shift-2->
Field Format dialog box Option-2-F
Nonbreaking space Option-Space bar
Group objects 2-R
One point larger Shift-Option-2->
Lock an object Option-2-L
One point smaller Shift-Option-2-<
Move the selected object one pixel at a time Arrow keys
Redefine a field on a layout Double-click
Selecting text (Layout and Browse)
Reorder the selected part Shift-drag
Extend selection to end of line Shift-2-B
Re-orient the part labels 2-click
Extend selection to end of text Shift-2-D
Reset the default format based on an object 2-click
Extend selection to next end of word Shift-Option-B
Rotate an object Option-2-R
Extend selection to previous start of word Shift-Option-A
Select items partially contained in the marquee 2-drag
Extend selection to start of line Shift-2-A
Select objects by type Option-2-A
Extend selection to start of text Shift-2-C
Send an object backward Shift-2-]
Move insertion point to end of line 2-B
Send an object to the back Option-2-]
Move insertion point to end of text 2-D](https://image.slidesharecdn.com/filemakerpro6usersguide-090829121126-phpapp02/85/File-Maker-Pro-6-User-s-Guide-243-320.jpg)


The FileMaker Pro User's Guide provides comprehensive instructions and information about using FileMaker Pro software for both Windows and Mac. It includes details on features, data management, layout customization, and customer support options. Additionally, the document addresses various functionalities such as importing/exporting data, creating relational databases, and automating tasks with scripts.