Purchasing new CNC machine parts is a great way to increase or improve production and to streamline a number of different processes. ITSCNC supports and services everything we sell for as long as you own the equipment.
Refer to the fadal keyboard users manual to help with any command format. Give us a call at 1-818-727-1887 or drop an email at parts@itscnc.com.
Download operator manual for fadal spindle from itscnc.com. With our documentation we also include preventative maintenance tips to help avoid future failures.
Refer to the User's Fadal Power On/Off Operator Manual. Do not install substitute parts or modify the CNC machine without consulting a safety engineer.
https://itscnc.com/fadal-manuals
When you’re looking to purchase replacement parts for your CNC, no one has more industry knowledge or better pricing than Independent Technology Service Inc.
At ITSCNC quality is key and that’s true with our replacement items for CNC machines.
ITSCNC is your one-stop shop for all fadal CNC parts. We offer you the best quality CNC parts with various features.
Refer to the User's Fadal Power On/Off Operator Manual. Do not install substitute parts or modify the CNC machine without consulting a safety engineer.
Download or check out all our Fadal CNC machines and parts manuals. We provide very simple and concise, step-by-step instructions on how to install and get your replacement Fadal parts in and running. With our documentation, we also include Preventative Maintenance tips to help avoid future failures. Simply email us at parts@itscnc.com or go through our website.
https://itscnc.com/parts-manuals
Looking for guidance on operating your Fadal CNC machine? Look no further than the Fadal Operator's Manual available through ITSCNC. This comprehensive manual provides you with the essential information needed to efficiently and effectively utilize your Fadal CNC machine. From setup to maintenance and troubleshooting, this manual covers it all, ensuring that you can make the most of your equipment. Don't leave your CNC operation to chance – get your Fadal Operator's Manual from ITSCNC today and harness the full potential of your Fadal CNC machine.
Speegital Head Up Display CAR100 User Manual | Product of KoreaNipun Kad
Speegital Head Up Display CAR100 User Manual
Product of Korea
SPEEGITAL CAR HUD - It displays driving data on the front windshield such as speed, water temperature, voltage single mileage etc. Avoids the danger of drivers looking down at the dashboard. It ensures the safety of drivers because of watching the data on the car front window glass, and helps drivers to keep the best state on the way.
SAFETY & COMFORT - Data is projected so that it won't distract the driver's attention .More time with their eyes on the road means lesser accidents, and safe driving. You will enjoy a comfortable drive , because you have all the information directly in their line of sight.
PLUG AND PLAY DEVICE - Just plug the power cable and done. Place the HUD on dashboard behind and above the steering wheel so that the reflection gets on the windshield and in front of you while driving. That is it.
Hướng dẫn sử dụng máy đo bức xạ và cường độ sóng vô tuyến RF Tenmars TM-93Tenmars Việt Nam
Hướng dẫn sử dụng máy đo bức xạ và cường độ sóng vô tuyến RF Tenmars TM-93
https://tenmars.vn/san-pham/may-do-buc-xa-tenmars-tm-93/
https://tenmars.vn/danh-muc/do-buc-xa-dien-tu-truong/
ITSCNC offer a variety of fadal miscellaneous user manual which described flood coolant, chip removal system, automatic doors, servo coolant. 1800-342-3475
Programming the schedule
1. Slide the RUN/program switch to .
2. The Switch-point indicator is 1 (1) and the Light indicator ( ) is
on, indicating your settings are for the first switch-point and
will turn the lights on.
NOTE: Odd numbered switch-points always turn the lights on,
and even numbered switch-points always turn the lights off.
3. Repeatedly press the 1…7 button until the Day indicator
points to the days you want your first switch-point to take
place. For example, if you want the first switch-point to take
place only on Tuesdays, press the 1…7 button twice so the
indicator (▲) points to 2 (2=Tuesday).
4. Repeatedly press the h button to set the hour. Make sure the
displayed AM/PM indicator is correct. To rapidly advance the
displayed hour, press and hold the h button.
5. Repeatedly press the m button to set the minute. To rapidly
advance the displayed minute, press and hold the h button.
6. When ready to proceed to the next switch-point, press the
button once. The Switch-point indicator changes to 2 (2) and
the Light indicator ( ) is off.
7. Repeat steps 3 through 6 for each switch-point. You can
program as few as 1 and as many as 16 switch-points. The
maximum number of switch-points for any single day is 8.
8. When your programming is complete, slide the RUN/program
switch to RUN.
Changing or deleting a switch-point
1. Slide the RUN/program switch to .
2. Press the button until the Switch-point indicator is displayed
for the switch-point you want to change.
■ To change the days and time, use the 1…7, h, and m
buttons.
■ To delete the switch-point, simultaneously press and hold
the and buttons until the display flashes 0:00.
3. When your changes are complete, slide the RUN/program
switch to RUN.
Reviewing the schedule
1. Slide the RUN/program switch to .
2. Repeatedly press the button. With each press, the Switch-
point indicator will increase, and the days and time for each
switch-point will be shown.
3. When your review is complete, slide the RUN/program switch
to RUN.
ITSCNC offers an extensive troubleshooting manual for addressing Fadal axis motor runaways on your machines. Empower yourself with comprehensive solutions to ensure optimal performance. For inquiries and further assistance, don't hesitate to contact us at parts@itscnc.com. Trust ITSCNC for reliable resources and expert support in keeping your Fadal machines running smoothly.
Navigate the installation and operation of Fadal parts effortlessly with ITSCNC's comprehensive wiring diagrams. Designed to assist customers, our easy-to-read diagrams provide step-by-step guidance for seamless integration. Explore the ITSCNC website to read or download these valuable resources, ensuring a smooth experience with Fadal parts. Simplify your process with our user-friendly diagrams, available at ITSCNC.
Streamline your Fadal spindle installation or repair with our accessible spindle wiring diagram. Download the PDF effortlessly, eliminating the hassle of extensive searches. We've simplified the process, ensuring you get the information you need without any fuss. Enhance your workflow and save time with our user-friendly approach to Fadal spindle maintenance. Download now for a seamless experience in managing your spindle wiring.
Looking for free technical support? Access our Fadal VMC 4525 MODEL Parts Manual, designed for the standard series of CNC machines. ITSCNC comprehensive manual is your go-to resource for all your Fadal machine needs. Dial 1-800-342-3475 for expert assistance. Get the support you require, hassle-free, with our dedicated team.
For precision rotary axis installations, our guidance draws from the Fadal Rotary Axes User Manual. Discover numerous techniques for seamless setup. Follow our detailed instructions for optimal results. Should you need assistance, don't hesitate to contact us at 1-800-342-3475. Elevate your rotary axis experience with our expert insights.
Access invaluable resources for Fadal CNC machine maintenance and troubleshooting with ITSCNC. Download or browse our comprehensive Fadal Troubleshooting Maintenance Manual PDFs. For any inquiries or assistance, don't hesitate to reach out to our dedicated support team at 1-800-342-3475. Keep your Fadal CNC machines running smoothly and efficiently with the expertise and guidance provided by ITSCNC.
Unlock the full potential of your CNC system with ITSCNC advanced programming guide manual. Dive deep into programming the SINUMERIK 840D/840Di/840Di/810D with comprehensive insights. Whether you're a seasoned pro or just starting, our manual is your key to precision. Call 1-800-342-3475 for any further information about our Fadal parts and support services.
There are a number of ways the rotary axes can be installed, use the following instructions fadal rotary axes user manual as a guide. Reach out us 1-800-342-3475
Access the Fadal 104D Wiring Diagram Manual for comprehensive guidance. This essential wiring diagram PDF is your key to ensuring correct usage. Take a thorough look to understand the intricacies. If any doubts arise, don't hesitate to reach out to us at parts@itscnc.com for expert assistance. We're here to support your needs and ensure seamless operations.
Enhance your CNC experience with ITSCNC's comprehensive Fadal Probe Digitizing Manual. This all-inclusive guide covers installation, seamless start-up, precision digitizing, crystal-clear graphic display, efficient file utilities, and seamless DNC part machining through the probe interface. Elevate your machining processes with expert insights and step-by-step instructions, ensuring optimal utilization of your equipment for unmatched results.
Discover the comprehensive ITSCNC Fadal Probe Digitizing Manual, a complete guide encompassing installation, startup procedures, digitizing techniques, graphic display insights, file utilities utilization, and DNC part machining through the probe interface. Elevate your CNC machine operations with this invaluable resource, empowering you to maximize the potential of your Fadal Probe and enhance overall efficiency in your CNC processes.
Download or check out our fadal maintenance guide manual pdf for fadal parts general information by itscnc.com. For more details, call us at 1-800-342-3475.
Fadal Part Maintenance Manual is a comprehensive guide designed to assist users in understanding and maintaining Fadal parts effectively. This manual offers detailed insights into the functionality, troubleshooting, and care of various components, ensuring optimal performance and longevity of CNC machine. Whether you're a novice or an experienced technician, this resource is a valuable companion for enhancing your Fadal machine's reliability and efficiency. For more details, checkout our website!
Discover a comprehensive selection of Fadal CMC 8030 MODEL Parts Manual at ITSCNC.com. Whether you need new, or reman parts for your CNC machines, we have you covered. Experience top-notch customer service by calling us at 1-800-342-3475 or emailing parts@itscnc.com. Let our expertise help you find the perfect components to keep your Fadal machines running at their best. Trust ITSCNC for all your CNC machine part needs.
ITSCNC offer fadal CMC 8030 MODEL Parts Manual for new, used and remanufactured parts for Fadal machines. Call us at 1-800-342-3475 or email at parts@itscnc.com
ITSCNC offer Fadal Siemens Control Touch Probe Manual that includes installation and setup guide information. If you have any query email us at parts@itscnc.com.
Overview of SINUMERIK 840D/840Di/810D Programming Fundamentals Manual. This manual is included in the documentation available on CD ROM. Download at itscnc.com.
The Fadal CNC USB Installation and User Guide is your go-to resource for seamlessly setting up and operating your Fadal CNC machine. This comprehensive guide provides step-by-step instructions to install the USB interface, ensuring smooth communication between your computer and the CNC controller. With detailed explanations and troubleshooting tips, this guide empowers users to maximize the potential of their Fadal CNC machine and streamline their machining processes with confidence.
Having been involved with the Fadal spindle drives since the very first machine at Fadal, we can say that this is the best Spindle Drive ever to go into a Fadal machine!
ITSCNC offers Fadal Spindle Drive from Glentek, Universal Drive, Inverter works on 5HP to 20HP Spindle Motors, INV-0098G.
View & download of more than Siemens Sinumerik 840D Control maintenance manual, service manuals, operating guides. For any query email at parts@itscnc.com.
Improving profitability for small businessBen Wann
In this comprehensive presentation, we will explore strategies and practical tips for enhancing profitability in small businesses. Tailored to meet the unique challenges faced by small enterprises, this session covers various aspects that directly impact the bottom line. Attendees will learn how to optimize operational efficiency, manage expenses, and increase revenue through innovative marketing and customer engagement techniques.
"𝑩𝑬𝑮𝑼𝑵 𝑾𝑰𝑻𝑯 𝑻𝑱 𝑰𝑺 𝑯𝑨𝑳𝑭 𝑫𝑶𝑵𝑬"
𝐓𝐉 𝐂𝐨𝐦𝐬 (𝐓𝐉 𝐂𝐨𝐦𝐦𝐮𝐧𝐢𝐜𝐚𝐭𝐢𝐨𝐧𝐬) is a professional event agency that includes experts in the event-organizing market in Vietnam, Korea, and ASEAN countries. We provide unlimited types of events from Music concerts, Fan meetings, and Culture festivals to Corporate events, Internal company events, Golf tournaments, MICE events, and Exhibitions.
𝐓𝐉 𝐂𝐨𝐦𝐬 provides unlimited package services including such as Event organizing, Event planning, Event production, Manpower, PR marketing, Design 2D/3D, VIP protocols, Interpreter agency, etc.
Sports events - Golf competitions/billiards competitions/company sports events: dynamic and challenging
⭐ 𝐅𝐞𝐚𝐭𝐮𝐫𝐞𝐝 𝐩𝐫𝐨𝐣𝐞𝐜𝐭𝐬:
➢ 2024 BAEKHYUN [Lonsdaleite] IN HO CHI MINH
➢ SUPER JUNIOR-L.S.S. THE SHOW : Th3ee Guys in HO CHI MINH
➢FreenBecky 1st Fan Meeting in Vietnam
➢CHILDREN ART EXHIBITION 2024: BEYOND BARRIERS
➢ WOW K-Music Festival 2023
➢ Winner [CROSS] Tour in HCM
➢ Super Show 9 in HCM with Super Junior
➢ HCMC - Gyeongsangbuk-do Culture and Tourism Festival
➢ Korean Vietnam Partnership - Fair with LG
➢ Korean President visits Samsung Electronics R&D Center
➢ Vietnam Food Expo with Lotte Wellfood
"𝐄𝐯𝐞𝐫𝐲 𝐞𝐯𝐞𝐧𝐭 𝐢𝐬 𝐚 𝐬𝐭𝐨𝐫𝐲, 𝐚 𝐬𝐩𝐞𝐜𝐢𝐚𝐥 𝐣𝐨𝐮𝐫𝐧𝐞𝐲. 𝐖𝐞 𝐚𝐥𝐰𝐚𝐲𝐬 𝐛𝐞𝐥𝐢𝐞𝐯𝐞 𝐭𝐡𝐚𝐭 𝐬𝐡𝐨𝐫𝐭𝐥𝐲 𝐲𝐨𝐮 𝐰𝐢𝐥𝐥 𝐛𝐞 𝐚 𝐩𝐚𝐫𝐭 𝐨𝐟 𝐨𝐮𝐫 𝐬𝐭𝐨𝐫𝐢𝐞𝐬."
VAT Registration Outlined In UAE: Benefits and Requirementsuae taxgpt
Vat Registration is a legal obligation for businesses meeting the threshold requirement, helping companies avoid fines and ramifications. Contact now!
https://viralsocialtrends.com/vat-registration-outlined-in-uae/
RMD24 | Debunking the non-endemic revenue myth Marvin Vacquier Droop | First ...BBPMedia1
Marvin neemt je in deze presentatie mee in de voordelen van non-endemic advertising op retail media netwerken. Hij brengt ook de uitdagingen in beeld die de markt op dit moment heeft op het gebied van retail media voor niet-leveranciers.
Retail media wordt gezien als het nieuwe advertising-medium en ook mediabureaus richten massaal retail media-afdelingen op. Merken die niet in de betreffende winkel liggen staan ook nog niet in de rij om op de retail media netwerken te adverteren. Marvin belicht de uitdagingen die er zijn om echt aansluiting te vinden op die markt van non-endemic advertising.
[Note: This is a partial preview. To download this presentation, visit:
https://www.oeconsulting.com.sg/training-presentations]
Sustainability has become an increasingly critical topic as the world recognizes the need to protect our planet and its resources for future generations. Sustainability means meeting our current needs without compromising the ability of future generations to meet theirs. It involves long-term planning and consideration of the consequences of our actions. The goal is to create strategies that ensure the long-term viability of People, Planet, and Profit.
Leading companies such as Nike, Toyota, and Siemens are prioritizing sustainable innovation in their business models, setting an example for others to follow. In this Sustainability training presentation, you will learn key concepts, principles, and practices of sustainability applicable across industries. This training aims to create awareness and educate employees, senior executives, consultants, and other key stakeholders, including investors, policymakers, and supply chain partners, on the importance and implementation of sustainability.
LEARNING OBJECTIVES
1. Develop a comprehensive understanding of the fundamental principles and concepts that form the foundation of sustainability within corporate environments.
2. Explore the sustainability implementation model, focusing on effective measures and reporting strategies to track and communicate sustainability efforts.
3. Identify and define best practices and critical success factors essential for achieving sustainability goals within organizations.
CONTENTS
1. Introduction and Key Concepts of Sustainability
2. Principles and Practices of Sustainability
3. Measures and Reporting in Sustainability
4. Sustainability Implementation & Best Practices
To download the complete presentation, visit: https://www.oeconsulting.com.sg/training-presentations
Buy Verified PayPal Account | Buy Google 5 Star Reviewsusawebmarket
Buy Verified PayPal Account
Looking to buy verified PayPal accounts? Discover 7 expert tips for safely purchasing a verified PayPal account in 2024. Ensure security and reliability for your transactions.
PayPal Services Features-
🟢 Email Access
🟢 Bank Added
🟢 Card Verified
🟢 Full SSN Provided
🟢 Phone Number Access
🟢 Driving License Copy
🟢 Fasted Delivery
Client Satisfaction is Our First priority. Our services is very appropriate to buy. We assume that the first-rate way to purchase our offerings is to order on the website. If you have any worry in our cooperation usually You can order us on Skype or Telegram.
24/7 Hours Reply/Please Contact
usawebmarketEmail: support@usawebmarket.com
Skype: usawebmarket
Telegram: @usawebmarket
WhatsApp: +1(218) 203-5951
USA WEB MARKET is the Best Verified PayPal, Payoneer, Cash App, Skrill, Neteller, Stripe Account and SEO, SMM Service provider.100%Satisfection granted.100% replacement Granted.
Attending a job Interview for B1 and B2 Englsih learnersErika906060
It is a sample of an interview for a business english class for pre-intermediate and intermediate english students with emphasis on the speking ability.
Memorandum Of Association Constitution of Company.pptseri bangash
www.seribangash.com
A Memorandum of Association (MOA) is a legal document that outlines the fundamental principles and objectives upon which a company operates. It serves as the company's charter or constitution and defines the scope of its activities. Here's a detailed note on the MOA:
Contents of Memorandum of Association:
Name Clause: This clause states the name of the company, which should end with words like "Limited" or "Ltd." for a public limited company and "Private Limited" or "Pvt. Ltd." for a private limited company.
https://seribangash.com/article-of-association-is-legal-doc-of-company/
Registered Office Clause: It specifies the location where the company's registered office is situated. This office is where all official communications and notices are sent.
Objective Clause: This clause delineates the main objectives for which the company is formed. It's important to define these objectives clearly, as the company cannot undertake activities beyond those mentioned in this clause.
www.seribangash.com
Liability Clause: It outlines the extent of liability of the company's members. In the case of companies limited by shares, the liability of members is limited to the amount unpaid on their shares. For companies limited by guarantee, members' liability is limited to the amount they undertake to contribute if the company is wound up.
https://seribangash.com/promotors-is-person-conceived-formation-company/
Capital Clause: This clause specifies the authorized capital of the company, i.e., the maximum amount of share capital the company is authorized to issue. It also mentions the division of this capital into shares and their respective nominal value.
Association Clause: It simply states that the subscribers wish to form a company and agree to become members of it, in accordance with the terms of the MOA.
Importance of Memorandum of Association:
Legal Requirement: The MOA is a legal requirement for the formation of a company. It must be filed with the Registrar of Companies during the incorporation process.
Constitutional Document: It serves as the company's constitutional document, defining its scope, powers, and limitations.
Protection of Members: It protects the interests of the company's members by clearly defining the objectives and limiting their liability.
External Communication: It provides clarity to external parties, such as investors, creditors, and regulatory authorities, regarding the company's objectives and powers.
https://seribangash.com/difference-public-and-private-company-law/
Binding Authority: The company and its members are bound by the provisions of the MOA. Any action taken beyond its scope may be considered ultra vires (beyond the powers) of the company and therefore void.
Amendment of MOA:
While the MOA lays down the company's fundamental principles, it is not entirely immutable. It can be amended, but only under specific circumstances and in compliance with legal procedures. Amendments typically require shareholder
Discover the innovative and creative projects that highlight my journey throu...dylandmeas
Discover the innovative and creative projects that highlight my journey through Full Sail University. Below, you’ll find a collection of my work showcasing my skills and expertise in digital marketing, event planning, and media production.
3.0 Project 2_ Developing My Brand Identity Kit.pptxtanyjahb
A personal brand exploration presentation summarizes an individual's unique qualities and goals, covering strengths, values, passions, and target audience. It helps individuals understand what makes them stand out, their desired image, and how they aim to achieve it.
Digital Transformation and IT Strategy Toolkit and TemplatesAurelien Domont, MBA
This Digital Transformation and IT Strategy Toolkit was created by ex-McKinsey, Deloitte and BCG Management Consultants, after more than 5,000 hours of work. It is considered the world's best & most comprehensive Digital Transformation and IT Strategy Toolkit. It includes all the Frameworks, Best Practices & Templates required to successfully undertake the Digital Transformation of your organization and define a robust IT Strategy.
Editable Toolkit to help you reuse our content: 700 Powerpoint slides | 35 Excel sheets | 84 minutes of Video training
This PowerPoint presentation is only a small preview of our Toolkits. For more details, visit www.domontconsulting.com
The world of search engine optimization (SEO) is buzzing with discussions after Google confirmed that around 2,500 leaked internal documents related to its Search feature are indeed authentic. The revelation has sparked significant concerns within the SEO community. The leaked documents were initially reported by SEO experts Rand Fishkin and Mike King, igniting widespread analysis and discourse. For More Info:- https://news.arihantwebtech.com/search-disrupted-googles-leaked-documents-rock-the-seo-world/
Cracking the Workplace Discipline Code Main.pptxWorkforce Group
Cultivating and maintaining discipline within teams is a critical differentiator for successful organisations.
Forward-thinking leaders and business managers understand the impact that discipline has on organisational success. A disciplined workforce operates with clarity, focus, and a shared understanding of expectations, ultimately driving better results, optimising productivity, and facilitating seamless collaboration.
Although discipline is not a one-size-fits-all approach, it can help create a work environment that encourages personal growth and accountability rather than solely relying on punitive measures.
In this deck, you will learn the significance of workplace discipline for organisational success. You’ll also learn
• Four (4) workplace discipline methods you should consider
• The best and most practical approach to implementing workplace discipline.
• Three (3) key tips to maintain a disciplined workplace.
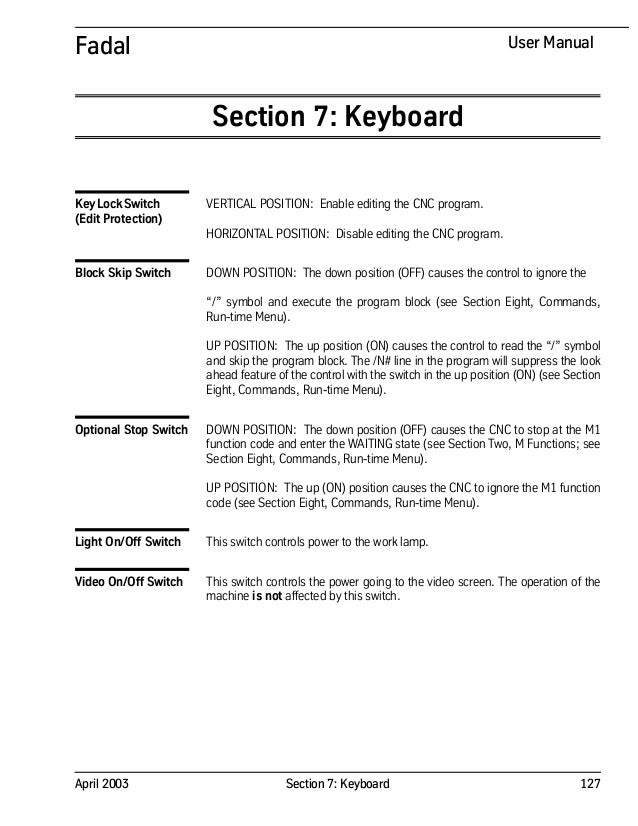
1. April 2003 Section 7: Keyboard 127
Fadal User Manual
Section 7: Keyboard
KeyLockSwitch
(Edit Protection)
VERTICAL POSITION: Enable editing the CNC program.
HORIZONTAL POSITION: Disable editing the CNC program.
Block Skip Switch DOWN POSITION: The down position (OFF) causes the control to ignore the
“/” symbol and execute the program block (see Section Eight, Commands,
Run-time Menu).
UP POSITION: The up position (ON) causes the control to read the “/” symbol
and skip the program block. The /N# line in the program will suppress the look
ahead feature of the control with the switch in the up position (ON) (see Section
Eight, Commands, Run-time Menu).
Optional Stop Switch DOWN POSITION: The down position (OFF) causes the CNC to stop at the M1
function code and enter the WAITING state (see Section Two, M Functions; see
Section Eight, Commands, Run-time Menu).
UP POSITION: The up (ON) position causes the CNC to ignore the M1 function
code (see Section Eight, Commands, Run-time Menu).
Light On/Off Switch This switch controls power to the work lamp.
Video On/Off Switch This switch controls the power going to the video screen. The operation of the
machine is not affected by this switch.
2. 128 Section 7: Keyboard April 2003
Fadal User Manual
Rapid Travel Selector This switch selects the rapid movement speed (G0, G5).
100% of maximum rapid traverse
50% of maximum rapid traverse
25% of maximum rapid traverse
Feed Rate Override
Potentiometer
This potentiometer controls the speed of axis motion.
1) AUTOMATIC mode: Axis motion can be increased to 150% or reduced to
0% of the programmed feed rates. Rapid moves are not affected. The
maximum non-rapid feed rate is 375 ipm. A programmed feed rate above
250 ipm may only be overridden to 375 ipm. (For a 900 ipm rapid travel
machine, the maximum non-rapid feed rate is 600 ipm. A programmed
feed rate above 400 ipm may only be overridden to 600 ipm.)
2) SINGLE STEP mode: All AXIS motion, rapid, or feed rate is controlled by this
override potentiometer.
3) DRY RUN mode: All AXIS motion, rapid, or feed rate is controlled by this
override potentiometer.
4) SLIDE HOLD key:
• After pressing the SLIDE HOLD key, the completion of the current move
is subject to the override potentiometer. During a rapid move, if the
Slide Hold is pressed, when the START key is pressed the feed rate
potentiometer can override the rapid feed rate. If the next program
block is programmed as a rapid move, the feed rate potentiometer will
not override the feed rate.
• An M49 code in the CNC program disables this potentiometer (see Sec-
tion Two, M Functions, M49 Function).
3. April 2003 Section 7: Keyboard 129
Fadal User Manual
Spindle Speed
Override
Potentiometer
This Potentiometer controls the programmed spindle RPM. The maximum
override is 200% of the last programmed spindle speed (S word) executed by
the CNC program or in MDI.The override percentage will not exceed the current
drive RPM range (see Section 1, S Function Range).
WARNING: A setting of 0% will not stop the spindle.
Jog Key and the
Hand Wheel
Pressing the JOG key while in the command mode, or during the WAITING
state while in the AUTO mode, initiates the JOG mode.
Once in the JOG mode, you can select an axis by turning the axis selector
switch on the control panel, or using the keyboard to select the axis to jog by
pressing X, Y, Z, A, B, or C keys.
The jog direction is selected by pressing the + or - key or by the direction the
hand wheel is rotated clockwise for positive and counterclockwise for negative.
The speed of axis motion is selected by pressing the H, M, or L key (High,
Medium, or Low), or by turning the jog increment selector switch.
H = .01 M = .001 L = .0001
Short moves can be made by pressing the JOG key repeatedly or by turning
the hand wheel. If you hold down the JOG key, continuous motion can be
made.
The speed of axis motion can be modified by the feed rate override pot. This
can be used only when the JOG key is held for jog motion. The feed rate
override pot does not affect the speed when using the hand wheel.
To exit the JOG mode, press the MANUAL key. The keyboard uses the familiar
typewriter format for alphanumeric and special characters. The special function
keys are described below (see SLIDE HOLD for JOG AWAY).
Shift This key must be pressed along with another key to get the “upper” character
displayed on that key. The shift key has no effect when pressed with keys that
have only a single character. This key must be depressed while pressing the
Spindle On/Off key to start the spindle manually.
!
4. 130 Section 7: Keyboard April 2003
Fadal User Manual
Enter This key is used to indicate that you have completed the entry of your
command or a line of data.
Delete This key stops input of data on the program line. The data entered prior to the
delete key is disregarded and the control is ready to receive the new data.
Backspace This key allows you to move the cursor backward to correct a keying error. All
characters to the right of the cursor, after backspacing, are disregarded by the
control when the enter key is pressed. This data must be entered again to be
entered in the program.
Spindle On/Off This is an alternating switch that controls the spindle manually. As a safety
feature, in order to turn the spindle on, you are required to first have the SHIFT
key depressed before pressing the SPINDLE ON key. The spindle must be
started manually after the external slide hold has been activated.
SPINDLE OFF does not require the use of the SHIFT key.
Spindle speed may be changed by an S word in the program or in MDI (see
Section Nine, MDI command). The spindle orientation may be released by
pressing the SPINDLE ON/OFF key. This will place the spindle in neutral by
releasing the orientation arm.
5. April 2003 Section 7: Keyboard 131
Fadal User Manual
Auto This key initiates execution of the current CNC program.
Pressing this key in the command mode the CNC displays the AUTO MODE
screen. Pressing AUTO again initiates program processing. The control
continues to process the program until the buffer is filled. If the AUTO key is not
pressed the control enters the WAITING state when the buffer is filled.
When the machine enters the WAITING state, the program may be executed by
pressing the START key or returning to the COMMAND mode by pressing the
MANUAL key.
The AUTO key is also used to end the WAITING state or when you want to end
the SINGLE STEP mode.
Typing MU during the machining cycle causes the CNC to display the
BACKGROUND EDIT MENU. This allows the operator to select dry run options
(run time menu), the offset menu or the functions menu. The changes made in
the BACKGROUND EDIT MENU are not effective until after the last program
block that was processed prior to the change being entered.
Pressing the space bar toggles between the BACKGROUND EDIT MENU and the
AUTO MODE screen (see Background Editing).
6. 132 Section 7: Keyboard April 2003
Fadal User Manual
Slide Hold The SLIDE HOLD button stops the movement of the X,Y, Z, A, & B. The Spindle
and coolant are not affected by the SLIDE HOLD. The CNC will resume motion
after the START or AUTO button is pressed.
WARNING: Before continuing AUTO, check to see if the Spindle or
Coolant was shut off. If so, manually turn on the Spindle by depressing the
SHIFT and SPINDLE ON button. To turn on the Coolant, press the COOLANT
button.
Slide Hold, JOG
AWAY
By pressing the JOG button while in SLIDE HOLD, any axis can be moved
away from its current position. This Jog Away feature allows an optional
automatic return of the jogged axes to that position to complete the machining
cycle. The MANUAL key exits JOG and returns the CNC to SLIDE HOLD.After
pressing the MANUAL key the CNC prompts the operator:
Pressing 1: The CNC will return the axes to the position before the JOG was
initiated. This motion is accomplished at a rapid feedrate. Make sure the Z axis
is in a position to clear work and fixturing.
WARNING: Slide Hold or Feedrate Override Pot will not function while the
CNC is returning the axis to original location! The Rapid Travel selector will
change the return speed.
!
Figure 7-1 Slide Hold, JOG AWAY
!
7. April 2003 Section 7: Keyboard 133
Fadal User Manual
Pressing 2: The CNC will continue the machining operation, change the
position read-out to the last machined position, while retaining the JOG offset
until one of the following conditions cancels the jog offset:
• aborting the AUTO mode.
• a G28 with an axis movement will return all axis to zero.
• a tool change is commanded (M6) Z axis only.
Pressing 3: The CNC will continue the machining operation, retain the JOG
offset, and the position read-out will reflect the current position including the
JOG offset. This will remain active until one of the following are initiated:
• aborting the AUTO mode.
• a G28 with an axis movement will return all axis to zero.
• a tool change is commanded (M6) Z axis only.
Note: A tool change is commanded (M6) does not cancel JOG AWAY for X or
Y axis.
External Slide Hold When the machine is running a program and the doors are opened the external
slide hold is activated. The machine motion and the spindle are stopped. When
the doors are closed and the start button is pressed a message to turn the
spindle on will appear if the spindle is turned off manually.
8. 134 Section 7: Keyboard April 2003
Fadal User Manual
Spacebar,
Background Editing
To use background editing, the programmer must have the control in AUTO
and press the SPACE BAR at the keyboard.
The space bar toggles the screen between the BACKGROUND EDITING MENU
and the AUTO MODE screen. While in the BACKGROUND EDIT MENU the
programmer now has three options to choose from. The active program
currently running in AUTO will be displayed to the screen, and below it will be
displayed the background edit options:
OPTION 1 DRYRUN OPTIONS: Selection will display the dryrun options run
time menu.
OPTION 2 OFFSETS: The operator can edit the FIXTURE and TOOL OFFSETS,
TOOL TIME and the MACRO VARIABLES tables (See the DF, DT, DTT and FO
commands in Section 8 for a detailed description of these tables and their
uses).
OPTION 3 HELP: The operator has several options that are similar to the PAGE
EDIT (PA) command. The active program currently running in AUTO can be
edited.
U-UPT-TOPC-CHANGES-SEARCHP-PROGRAM
D-DOWNB-BOTTOMI-INSERTR-REPLACEJOG
ENTER-PAGE DOWN BACKSPACE-PAGE UP DEL-DELETE
U KEY, move the cursor up.
D KEY, move the cursor down.
T KEY, move the cursor to the top of the program.
B KEY, move the cursor to the bottom of the program.
Figure 7-2 Spacebar, Background Editing
9. April 2003 Section 7: Keyboard 135
Fadal User Manual
C KEY, change line or edit the line on which the cursor points.
I KEY, insert below the cursor line.
S KEY, search for a specified word.
R KEY, search and replace a specified word.
P KEY, change or review programs in memory.
JOG KEY, JOG away from the current position.
WARNING: Be extremely careful when making changes to the current
program in auto!
Background editing will allow the programmer to change, add, or delete any
line of program code other than the lines that are currently being processed by
the control. If a line of code to be changed is within the LOOK AHEAD BUFFER
the control will display a message “CONFLICT WITH AUTO” and the
programmer must wait until the BUFFER has passed by the line to be edited.
This prevents the interruption of continuous machining of the current part
during AUTO. The macro WAIT will prevent the LOOK AHEAD at the M2 (see
Section Eighteen, Macros).
Single Step This key issues the SINGLE STEP command which causes the CNC to enter the
WAITING state between each program block. While in the SINGLE STEP mode
all rapid moves are subject to the feed rate pot override. The WAITING state is
ended by pressing one of the following keys:
• START - executes one block of the CNC program.
• AUTO - exits the SINGLE STEP mode for continuous program operation.
• JOG - initiates the JOG Away feature (see SLIDE HOLD).
• MANUAL - terminates program execution and enters the COMMAND
mode.
Start This key is used to terminate a WAITING state that has been initiated in one of
the following situations:
1) You have just initiated the operation of the machine by use of the AUTO,
HOME or MANUAL DATA INPUT command.
2) The WAITING state has been entered to give you time to make any
necessary preparations for the move.
3) The CNC program has been terminated by an M2 or M30 (end of program)
instruction and the CNC is ready to begin execution from the start.
4) The SLIDE HOLD key was pressed.
!
10. 136 Section 7: Keyboard April 2003
Fadal User Manual
5) The CNC program has issued a M0 or M1 command.
6) The CNC is in the SINGLE STEP mode. This key is also used to override a
programmed dwell command (see Section 3, G4 code).
Emergency Stop This switch is used to disconnect the control from all machine axes and the
spindle. The control will be put in the COMMAND mode. To restart the program
after an emergency stop, reset the EMERGENCY STOP button by turning it
clockwise and press the JOG key to restart the servo amplifiers. The axes in
motion and the spindle will coast to a stop.
Manual This key interrupts the current activity of LIST PROGRAM, PAGE PROGRAM,
SUM PROGRAM, DISPLAY TOOL TABLE, DISPLAY FIXTURE OFFSETS, MENU or
JOG and returns the CNC to the COMMAND mode.
When the CNC is executing a CNC program, this key is ignored unless the CNC
has been put in the WAITING state by the SLIDE HOLD command, M0
command, M1 command, a problem during tool change, the SINGLE STEP
command or an M2 or M30 (end of program) function.
Coolant-1 (FLOOD) This is an alternating switch that controls the COOLANT-1 function manually.
Same as M7 or M8.
Coolant-2 (MIST) This is an alternating switch that controls the COOLANT-2 function manually.
Same as M7 or M8.
Turret CW When this button is pressed, the turret will be rotated clockwise to the next tool
station. If this button is depressed, the turret will rotate as long as the button is
held down.
Turret CCW When this button is pressed, the turret will be rotated counterclockwise to the
next tool station. If this button is depressed, the turret will rotate as long as the
button is held down.