Download to read offline


![Submitting Commands and SQL to the Database
Getting Started with Database Administration 1-9
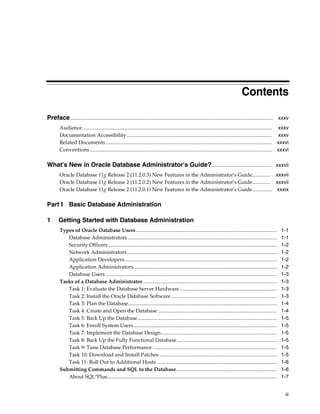
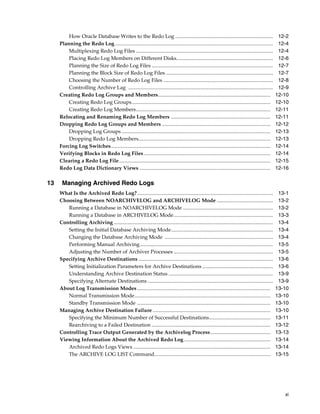
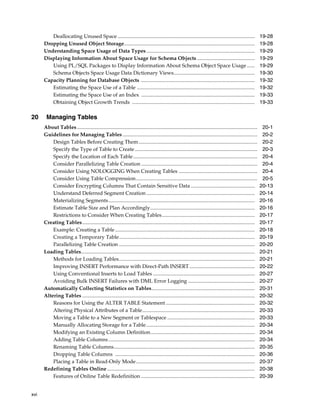
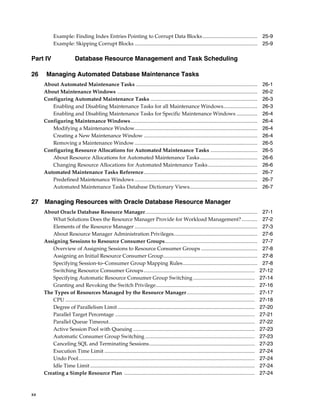
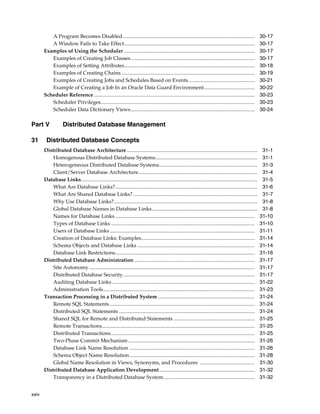
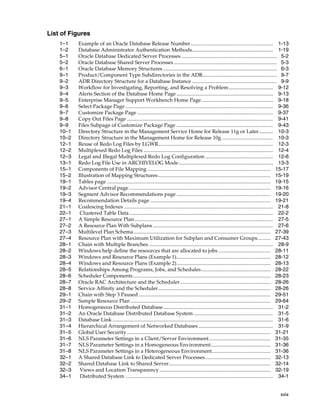
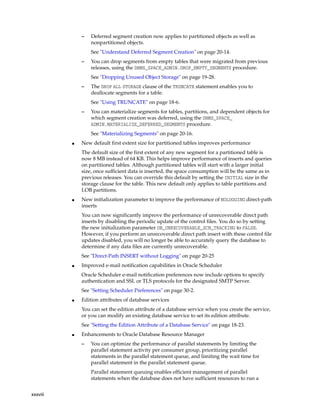
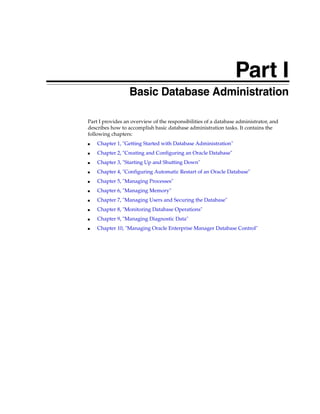
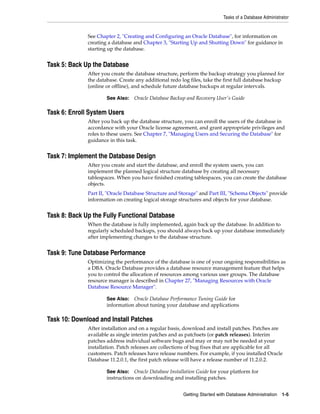
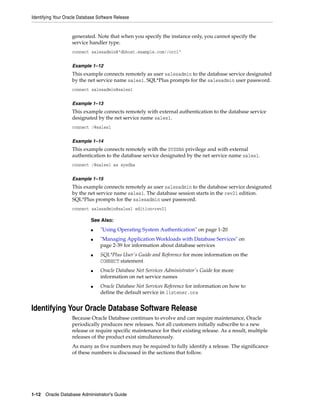
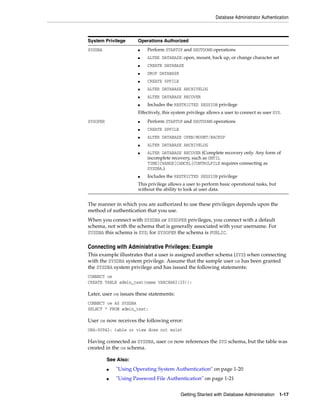
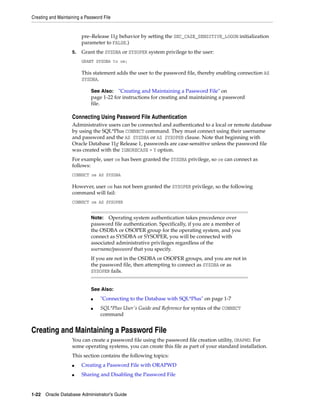
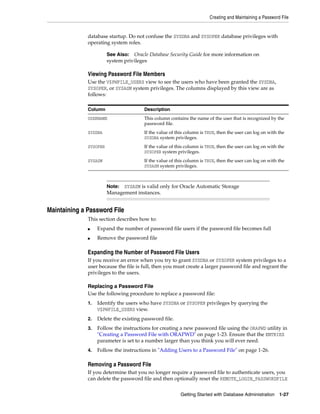
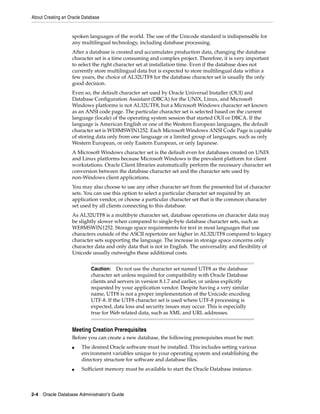
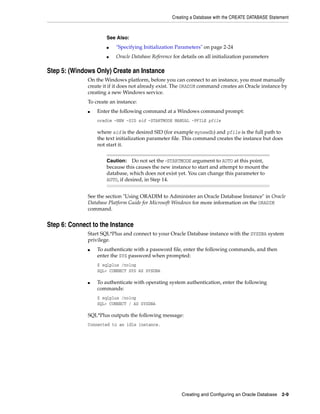
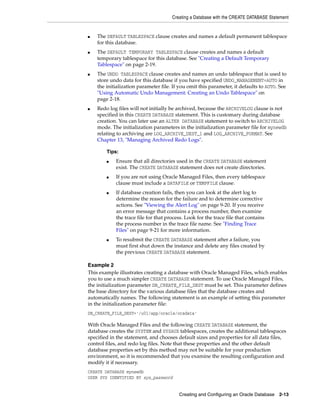
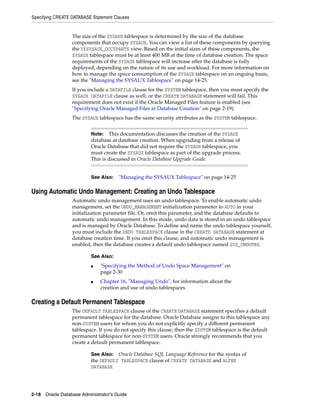
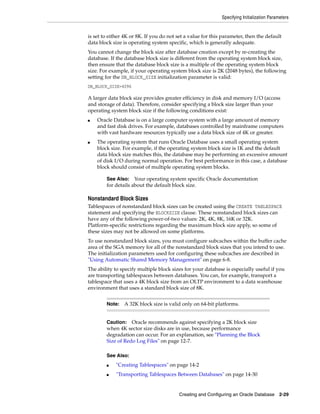
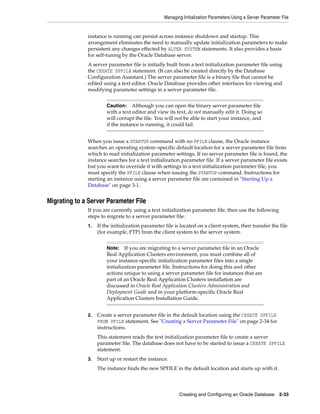
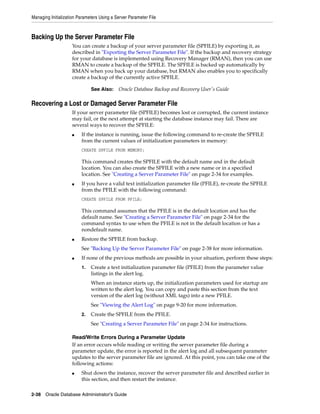
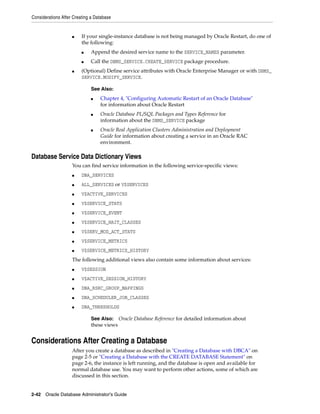
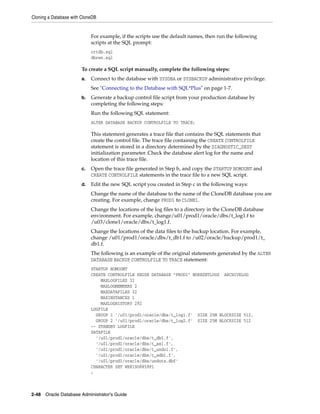
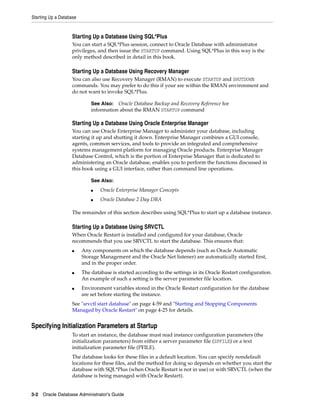
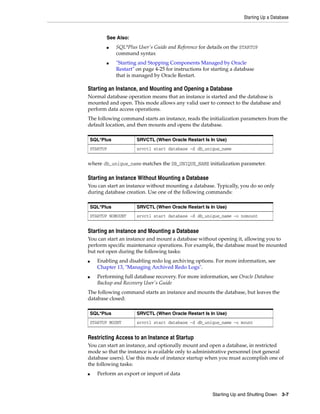
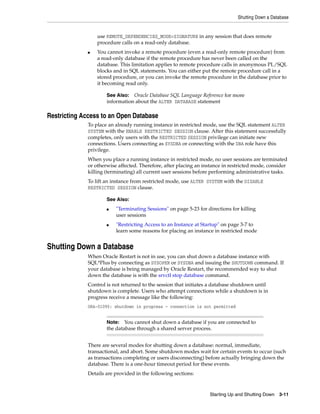
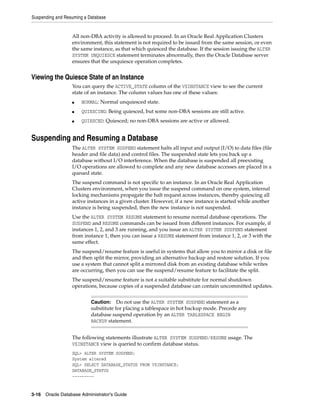
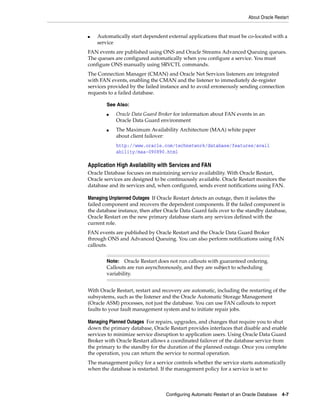
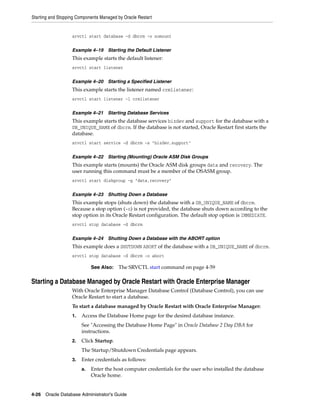
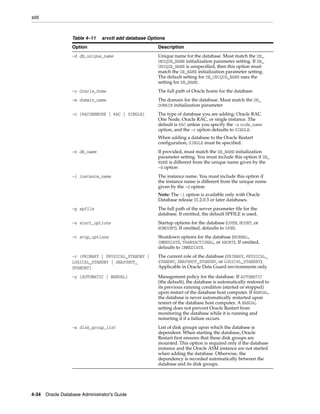
Step 4: Submit the SQL*Plus CONNECT Statement
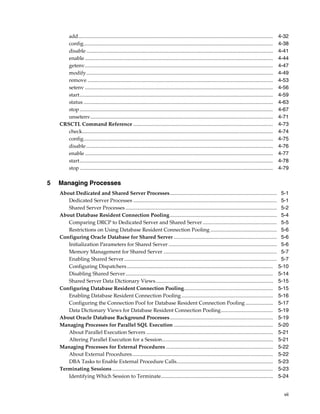
You submit the SQL*Plus CONNECT statement to initially connect to the Oracle instance
or at any time to reconnect as a different user. The syntax of the CONNECT statement is
as follows:
CONN[ECT] [logon] [AS {SYSOPER | SYSDBA}]
The syntax of logon is as follows:
{username | /}[@connect_identifier] [edition={edition_name | DATABASE_DEFAULT}]
When you provide username, SQL*Plus prompts for a password. The password is not
echoed as you type it.
The following table describes the syntax components of the CONNECT statement.
Syntax Component Description
/ Calls for external authentication of the connection request. A
database password is not used in this type of authentication.
The most common form of external authentication is operating
system authentication, where the database user is
authenticated by having logged in to the host operating
system with a certain host user account. External
authentication can also be performed with an Oracle wallet or
by a network service. See Oracle Database Security Guide for
more information. See also "Using Operating System
Authentication" on page 1-20.
AS {SYSOPER | SYSDBA} Indicates that the database user is connecting with either the
SYSOPER or SYSDBA system privilege. Only certain predefined
administrative users or users who have been added to the
password file may connect with these privileges. See
"Administrative Privileges" on page 1-16 for more information.
username A valid database user name. The database authenticates the
connection request by matching username against the data
dictionary and prompting for a user password.
connect_identifier (1) An Oracle Net connect identifier, for a remote connection. The
exact syntax depends on the Oracle Net configuration. If
omitted, SQL*Plus attempts connection to a local instance.
A common connect identifier is a net service name. This is an
alias for an Oracle Net connect descriptor (network address
and database service name). The alias is typically resolved in
the tnsnames.ora file on the local computer, but can be
resolved in other ways.
See Oracle Database Net Services Administrator's Guide for more
information on connect identifiers.](https://image.slidesharecdn.com/e25494-140702182938-phpapp02/85/E25494-53-320.jpg)
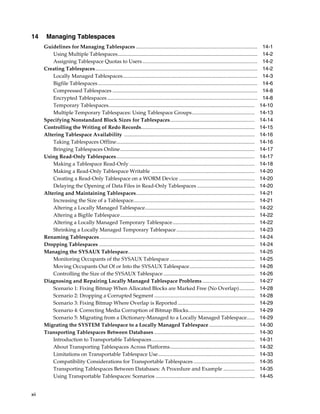
![Submitting Commands and SQL to the Database
1-10 Oracle Database Administrator's Guide
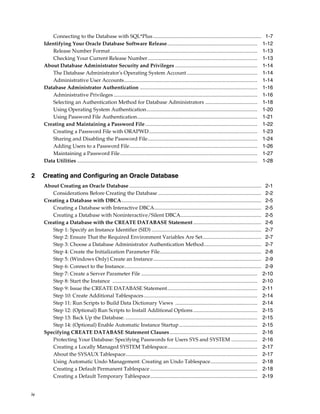
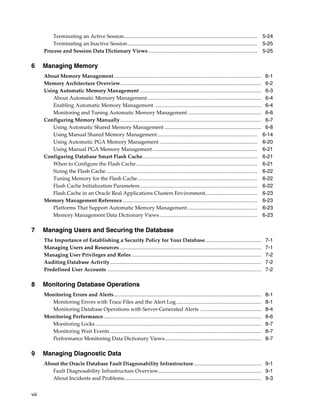
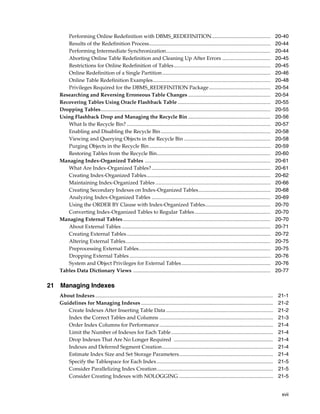
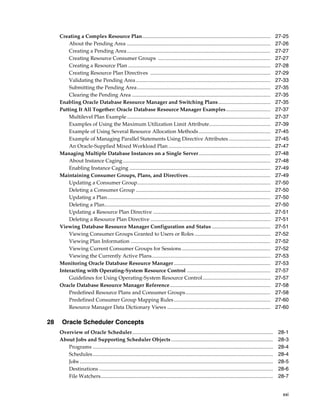
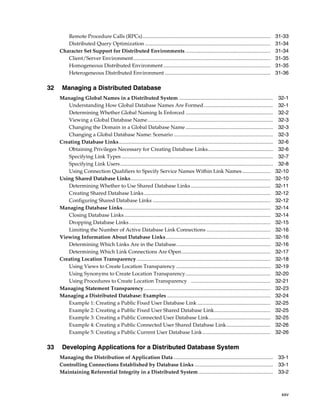
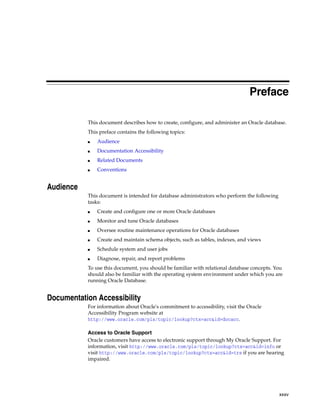
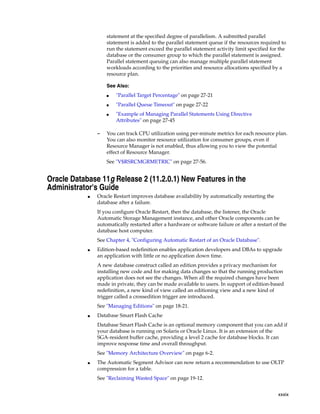
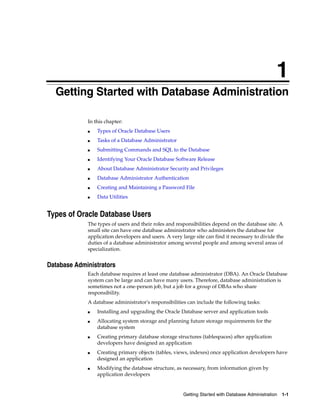
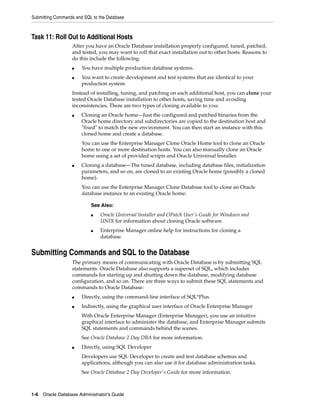
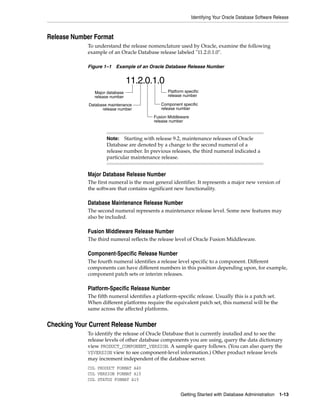
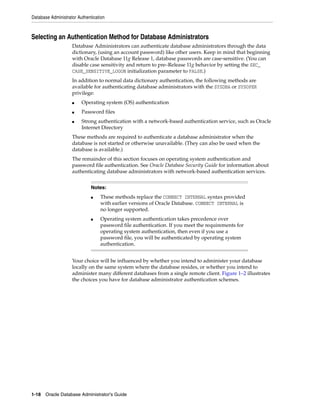
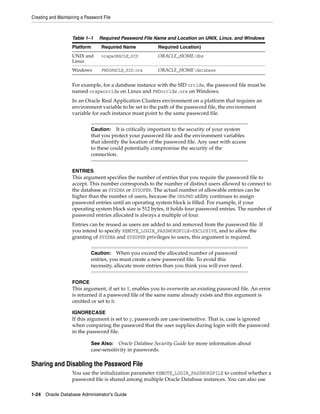
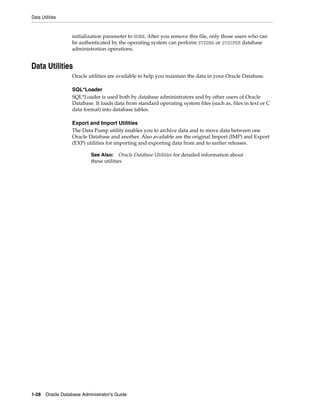
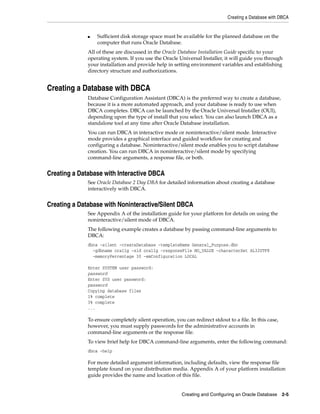
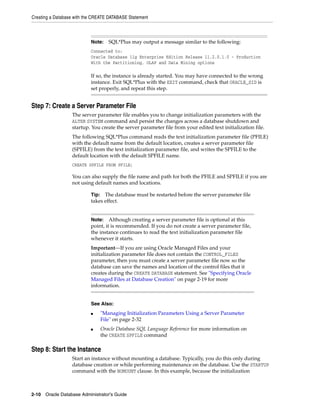
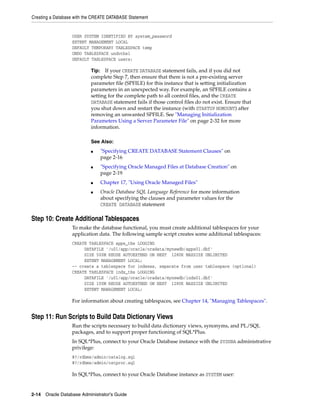
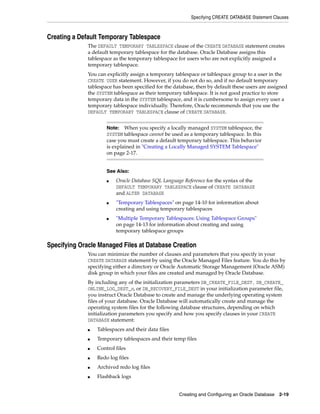
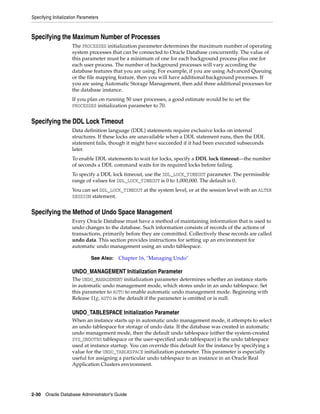
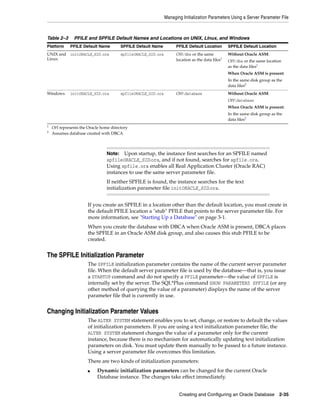
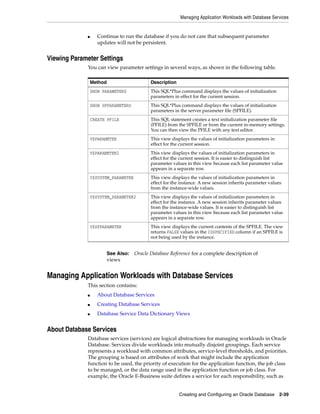
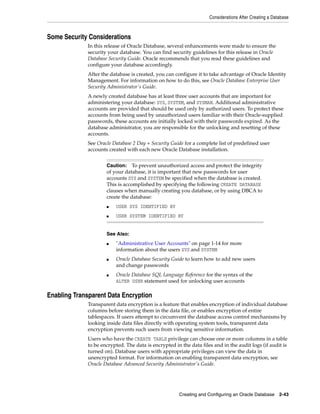
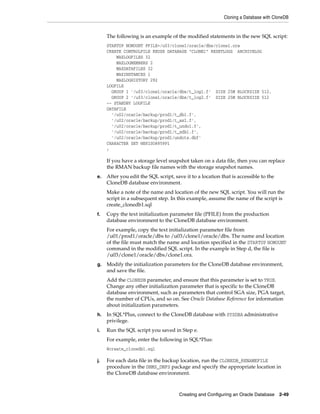
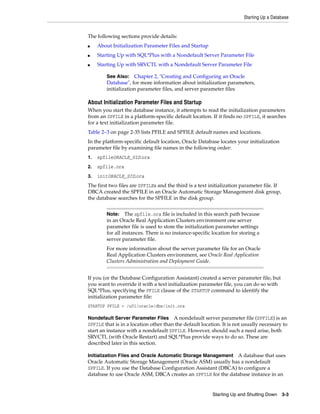
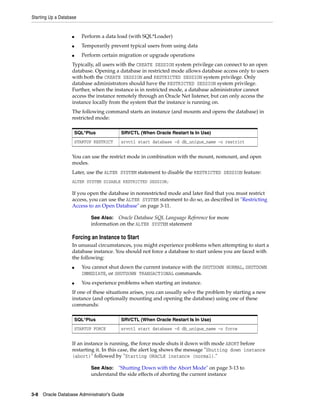
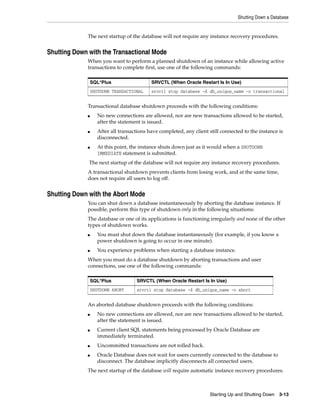
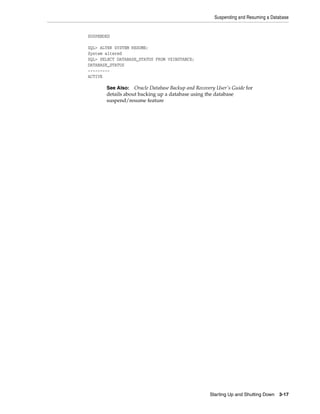
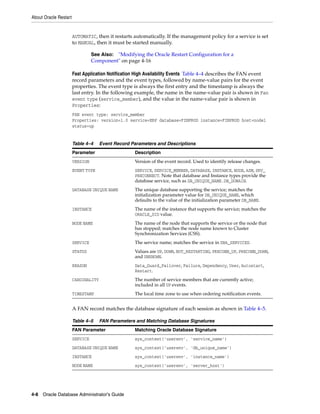
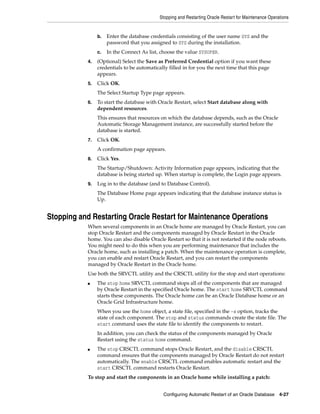
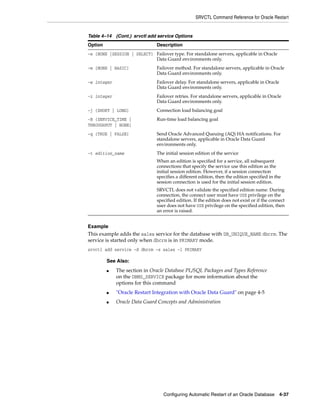
connect_identifier (2) As an alternative, a connect identifier can use easy connect
syntax. Easy connect provides out-of-the-box TCP/IP
connectivity for remote databases without having to configure
Oracle Net Services on the client (local) computer.
Easy connect syntax for the connect identifier is as follows (the
enclosing double-quotes must be included):
"host[:port][/service_name][:server][/instance_name]"
where:
■ host is the host name or IP address of the computer
hosting the remote database.
Both IP version 4 (IPv4) and IP version 6 (IPv6) addresses
are supported. IPv6 addresses must be enclosed in square
brackets. See Oracle Database Net Services Administrator's
Guide for information about IPv6 addressing.
■ port is the TCP port on which the Oracle Net listener on
host listens for database connections. If omitted, 1521 is
assumed.
■ service_name is the database service name to which to
connect. Can be omitted if the Net Services listener
configuration on the remote host designates a default
service. If no default service is configured, service_name
must be supplied. Each database typically offers a
standard service with a name equal to the global database
name, which is made up of the DB_NAME and DB_DOMAIN
initialization parameters as follows:
DB_NAME.DB_DOMAIN
If DB_DOMAIN is null, then the standard service name is just
the DB_NAME. For example, if DB_NAME is orcl and DB_
DOMAIN is us.example.com, then the standard service name
is orcl.us.example.com.
See "Managing Application Workloads with Database
Services" on page 2-39 for more information.
■ server is the type of service handler. Acceptable values
are dedicated, shared, and pooled. If omitted, the default
type of server is chosen by the listener: shared server if
configured, otherwise dedicated server.
■ instance_name is the instance to which to connect. You
can specify both service name and instance name, which
you would typically do only for Oracle Real Application
Clusters (Oracle RAC) environments. For Oracle RAC or
single instance environments, if you specify only instance
name, you connect to the default database service. If there
is no default service configured in the listener.ora file,
an error is generated.You can obtain the instance name
from the instance_name initialization parameter.
See Oracle Database Net Services Administrator's Guide for more
information on easy connect.
edition={edition_name |
DATABASE_DEFAULT}
Specifies the edition in which the new database session starts.
If you specify an edition, it must exist and you must have the
USE privilege on it. If this clause is not specified, the database
default edition is used for the session.
See Oracle Database Advanced Application Developer's Guide for
information on editions and edition-based redefinition.
Syntax Component Description](https://image.slidesharecdn.com/e25494-140702182938-phpapp02/85/E25494-54-320.jpg)
![Submitting Commands and SQL to the Database
Getting Started with Database Administration 1-11
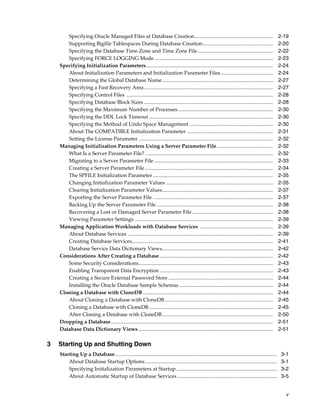
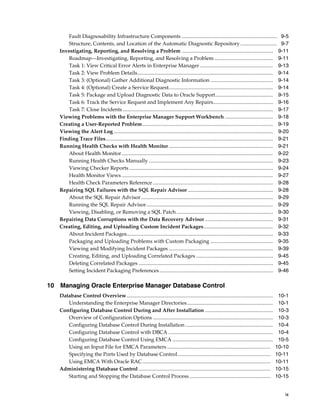
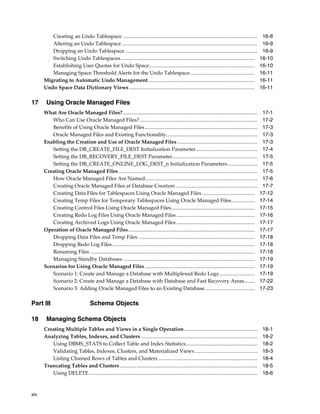
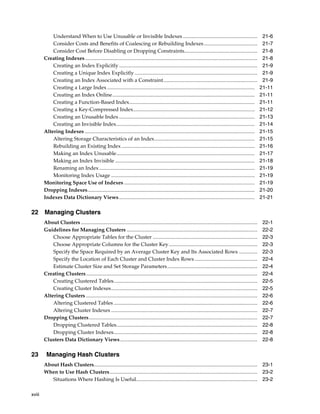
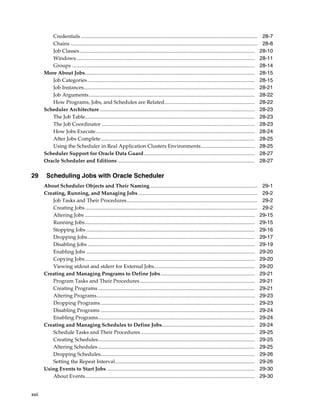
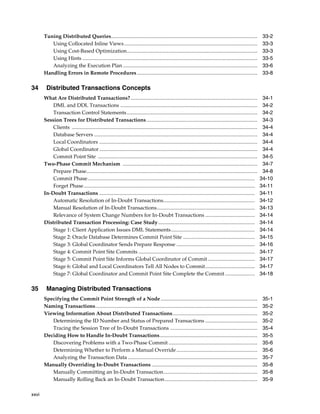
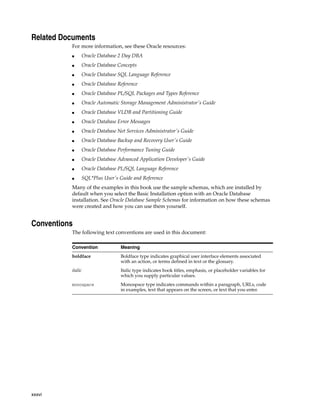
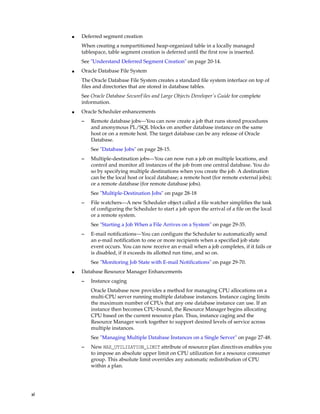
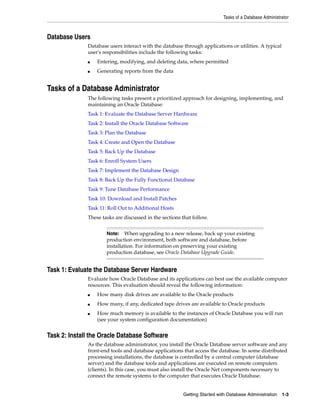
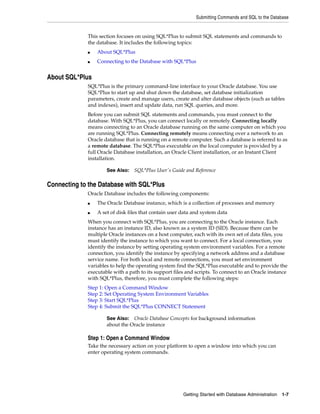
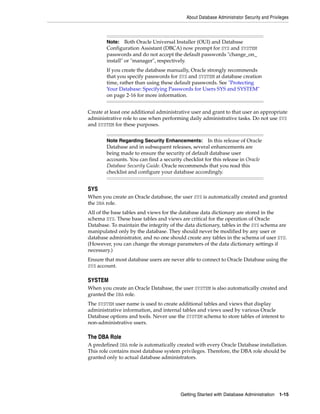
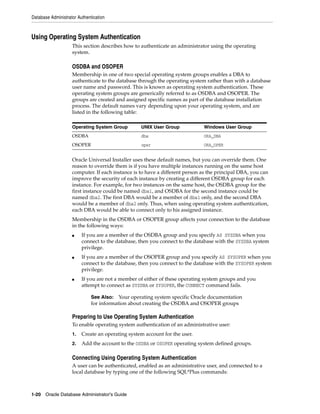
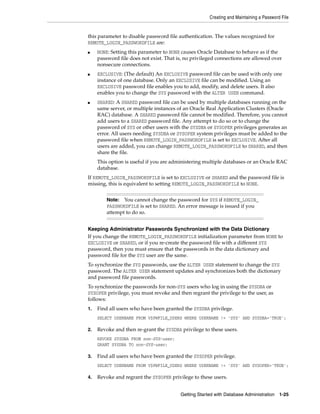
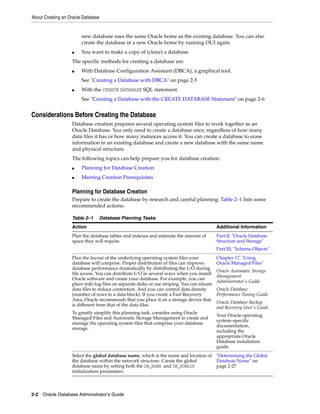
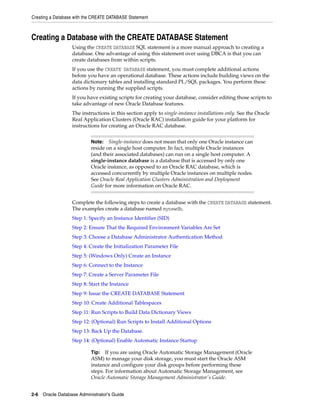
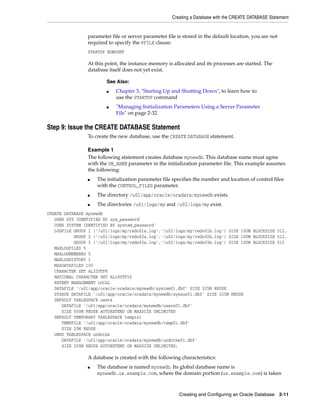
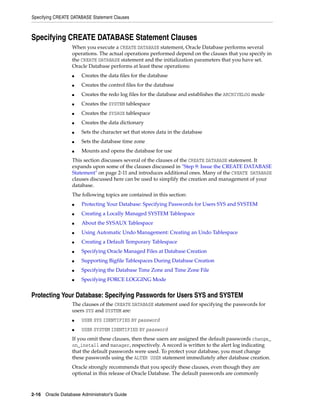
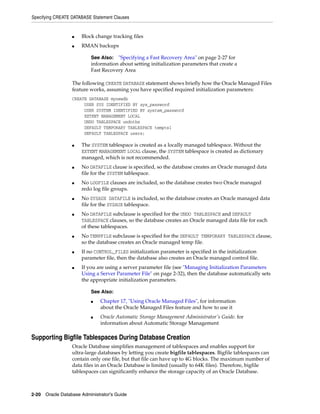
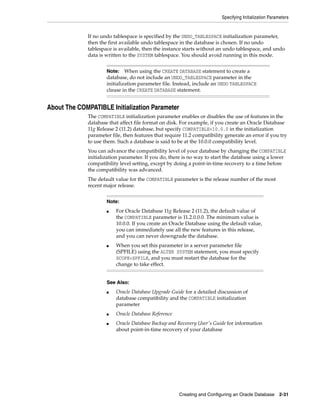
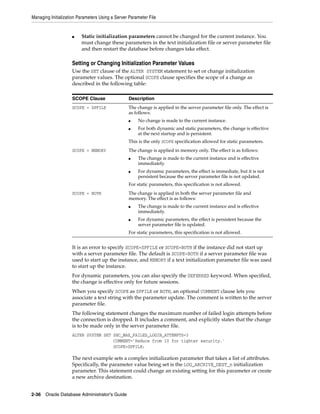
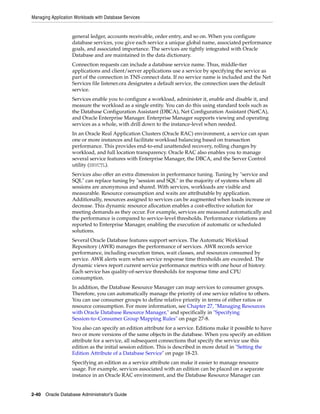
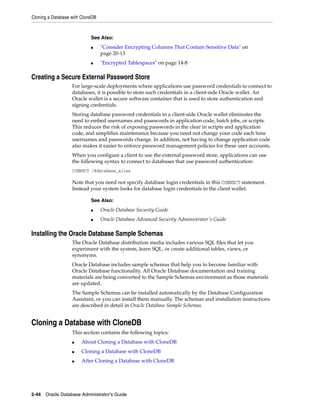
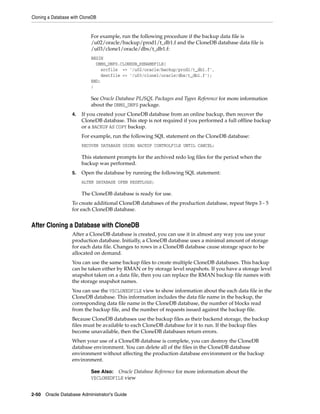
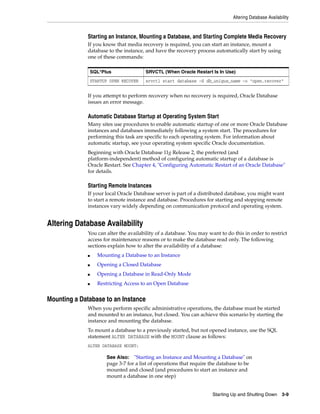
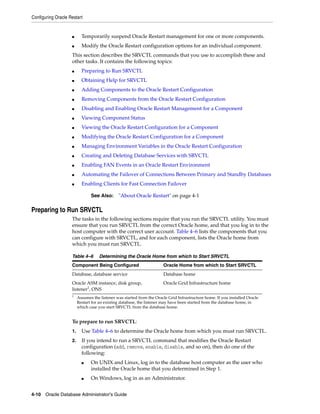
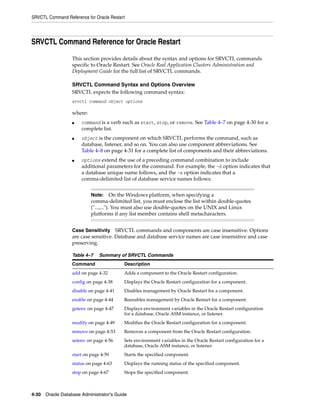
Example 1–3
This simple example connects to a local database as user SYSTEM. SQL*Plus prompts
for the SYSTEM user password.
connect system
Example 1–4
This example connects to a local database as user SYS with the SYSDBA privilege.
SQL*Plus prompts for the SYS user password.
connect sys as sysdba
When connecting as user SYS, you must connect AS SYSDBA.
Example 1–5
This example connects locally with the SYSDBA privilege with operating system
authentication.
connect / as sysdba
Example 1–6
This example uses easy connect syntax to connect as user salesadmin to a remote
database running on the host dbhost.example.com. The Oracle Net listener (the
listener) is listening on the default port (1521). The database service is
sales.example.com. SQL*Plus prompts for the salesadmin user password.
connect salesadmin@"dbhost.example.com/sales.example.com"
Example 1–7
This example is identical to Example 1–6, except that the service handler type is
indicated.
connect salesadmin@"dbhost.example.com/sales.example.com:dedicated"
Example 1–8
This example is identical to Example 1–6, except that the listener is listening on the
nondefault port number 1522.
connect salesadmin@"dbhost.example.com:1522/sales.example.com"
Example 1–9
This example is identical to Example 1–6, except that the host IP address is substituted
for the host name.
connect salesadmin@"192.0.2.5/sales.example.com"
Example 1–10
This example connects using an IPv6 address. Note the enclosing square brackets.
connect salesadmin@"[2001:0DB8:0:0::200C:417A]/sales.example.com"
Example 1–11
This example specifies the instance to which to connect and omits the database service
name. A default database service must have been specified, otherwise an error is](https://image.slidesharecdn.com/e25494-140702182938-phpapp02/85/E25494-55-320.jpg)


![Creating and Maintaining a Password File
Getting Started with Database Administration 1-23
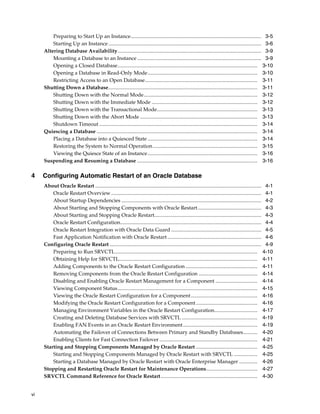
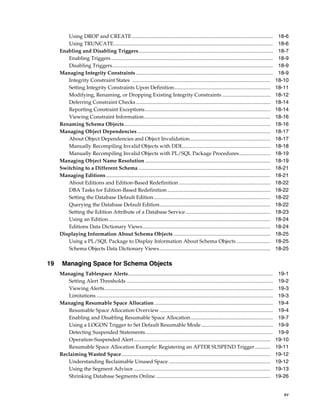
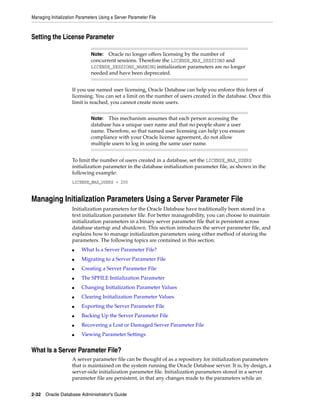
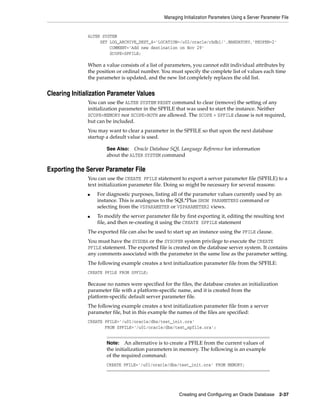
■ Adding Users to a Password File
■ Maintaining a Password File
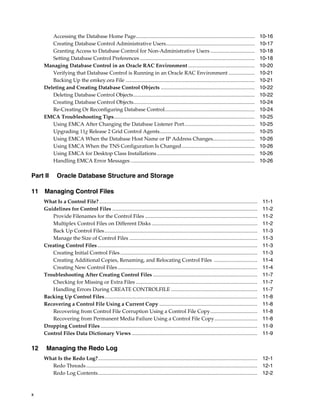
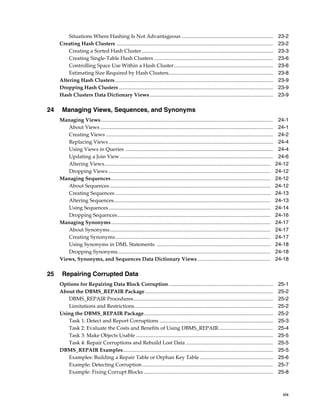
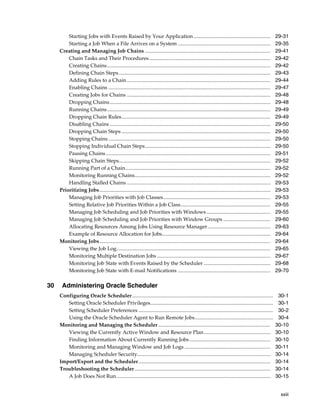
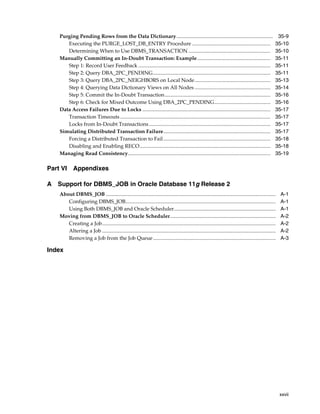
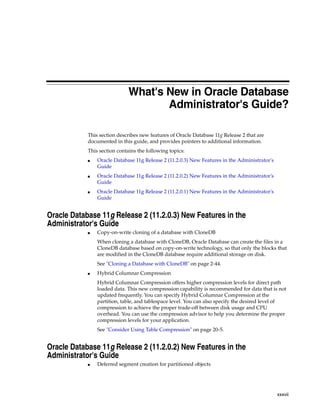
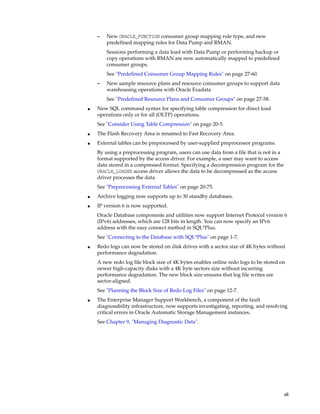
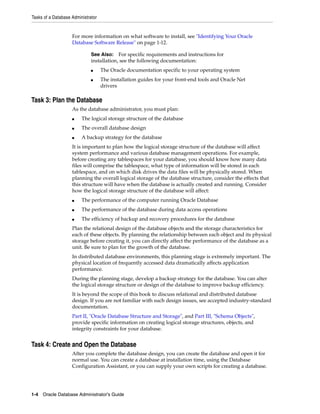
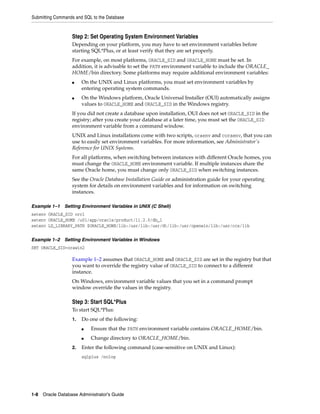
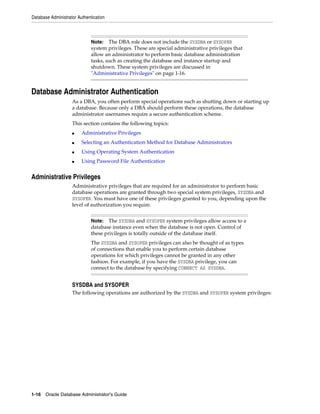
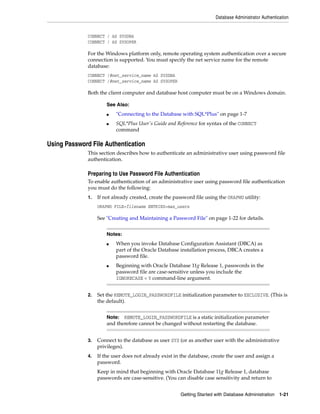
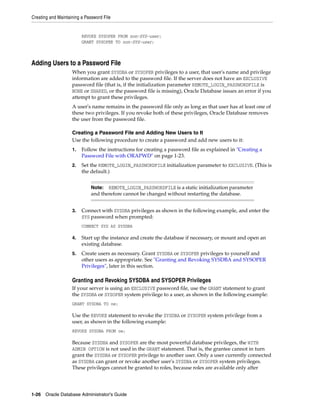
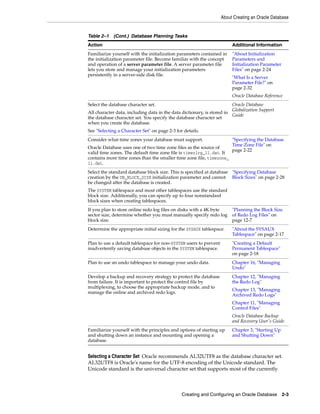
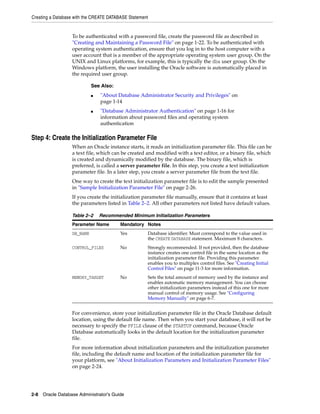
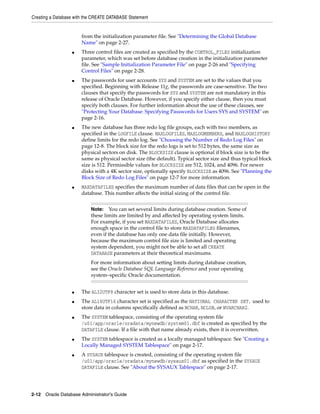
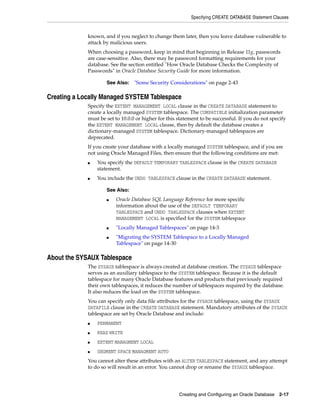
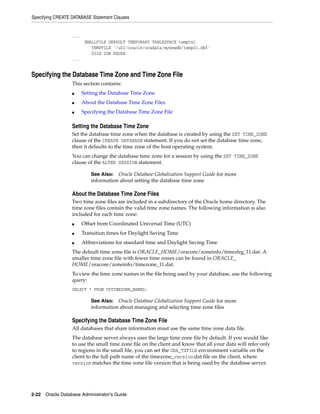
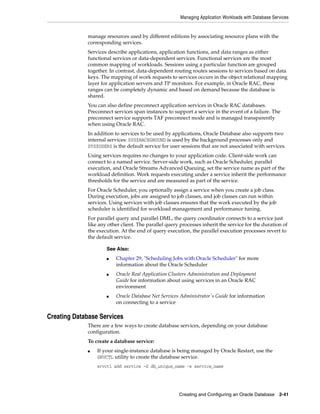
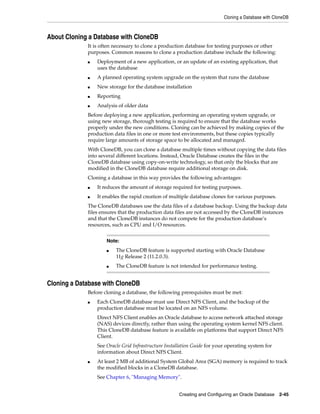
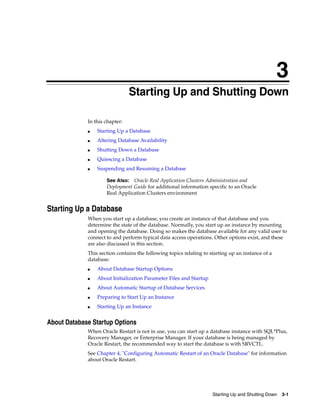
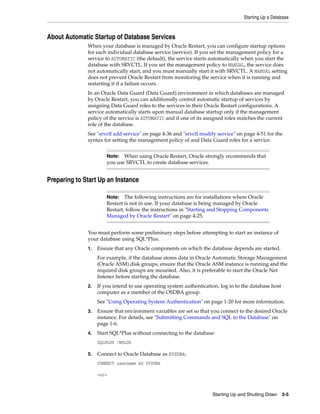
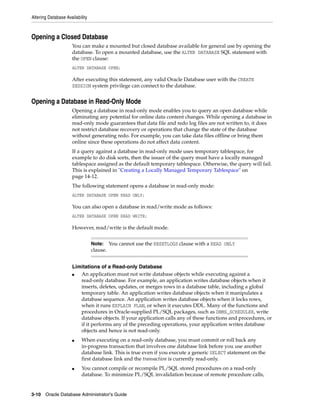
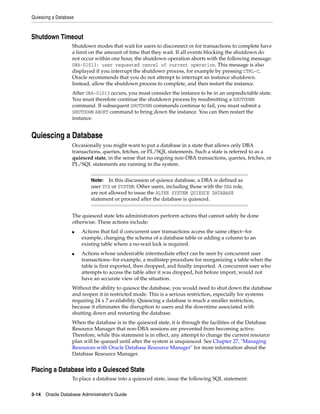
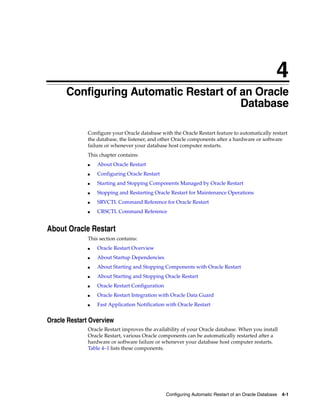
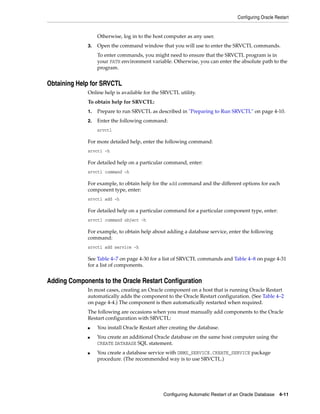
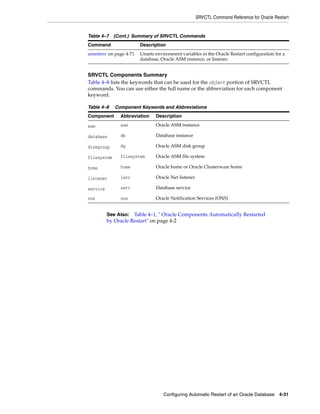
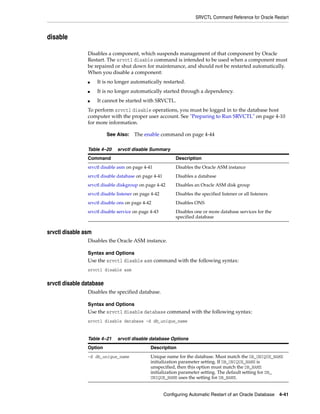
Creating a Password File with ORAPWD
The syntax of the ORAPWD command is as follows:
ORAPWD FILE=filename [ENTRIES=numusers] [FORCE={Y|N}] [IGNORECASE={Y|N}]
Command arguments are summarized in the following table.
There are no spaces permitted around the equal-to (=) character.
The command prompts for the SYS password and stores the password in the created
password file.
Example
The following command creates a password file named orapworcl that allows up to 30
privileged users with different passwords.
orapwd FILE=orapworcl ENTRIES=30
ORAPWD Command Line Argument Descriptions
The following sections describe the ORAPWD command line arguments.
FILE
This argument sets the name of the password file being created. You must specify the
full path name for the file. This argument is mandatory.
The file name required for the password file is operating system specific. Some
operating systems require the password file to adhere to a specific format and be
located in a specific directory. Other operating systems allow the use of environment
variables to specify the name and location of the password file.
Table 1–1 lists the required name and location for the password file on the UNIX,
Linux, and Windows platforms. For other platforms, consult your platform-specific
documentation.
See Also:
■ "Using Password File Authentication" on page 1-21
■ "Selecting an Authentication Method for Database
Administrators" on page 1-18
Argument Description
FILE Name to assign to the password file. You must supply a complete path. If
you supply only a file name, the file is written to the current directory.
ENTRIES (Optional) Maximum number of entries (user accounts) to permit in the file.
FORCE (Optional) If y, permits overwriting an existing password file.
IGNORECASE (Optional) If y, passwords are treated as case-insensitive.](https://image.slidesharecdn.com/e25494-140702182938-phpapp02/85/E25494-67-320.jpg)


![Creating a Database with the CREATE DATABASE Statement
Creating and Configuring an Oracle Database 2-15
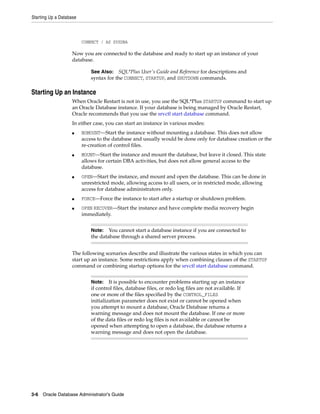
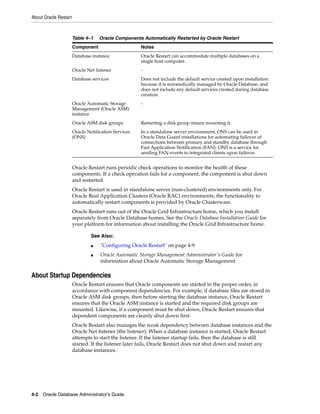
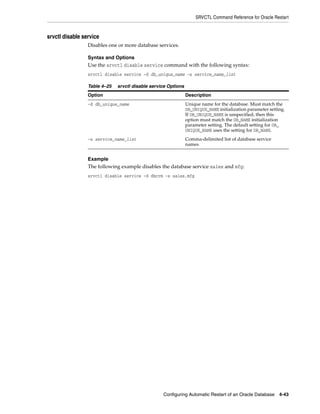
@?/sqlplus/admin/pupbld.sql
The at-sign (@) is shorthand for the command that runs a SQL*Plus script. The question
mark (?) is a SQL*Plus variable indicating the Oracle home directory. The following
table contains descriptions of the scripts:
Step 12: (Optional) Run Scripts to Install Additional Options
You may want to run other scripts. The scripts that you run are determined by the
features and options you choose to use or install. Many of the scripts available to you
are described in the Oracle Database Reference.
If you plan to install other Oracle products to work with this database, then see the
installation instructions for those products. Some products require you to create
additional data dictionary tables. Usually, command files are provided to create and
load these tables into the database data dictionary.
See your Oracle documentation for the specific products that you plan to install for
installation and administration instructions.
Step 13: Back Up the Database.
Take a full backup of the database to ensure that you have a complete set of files from
which to recover if a media failure occurs. For information on backing up a database,
see Oracle Database Backup and Recovery User's Guide.
Step 14: (Optional) Enable Automatic Instance Startup
You might want to configure the Oracle instance to start automatically when its host
computer restarts. See your operating system documentation for instructions. For
example, on Windows, use the following command to configure the database service
to start the instance upon computer restart:
ORADIM -EDIT -SID sid -STARTMODE AUTO -SRVCSTART SYSTEM [-SPFILE]
You must use the -SPFILE argument if you want the instance to read an SPFILE upon
automatic restart.
Script Description
CATALOG.SQL Creates the views of the data dictionary tables, the dynamic
performance views, and public synonyms for many of the views.
Grants PUBLIC access to the synonyms.
CATPROC.SQL Runs all scripts required for or used with PL/SQL.
PUPBLD.SQL Required for SQL*Plus. Enables SQL*Plus to disable commands by
user.
See Also:
■ Chapter 4, "Configuring Automatic Restart of an Oracle Database"
■ The section "Using ORADIM to Administer an Oracle Database
Instance" in Oracle Database Platform Guide for Microsoft Windows
for more information on the ORADIM command.](https://image.slidesharecdn.com/e25494-140702182938-phpapp02/85/E25494-87-320.jpg)


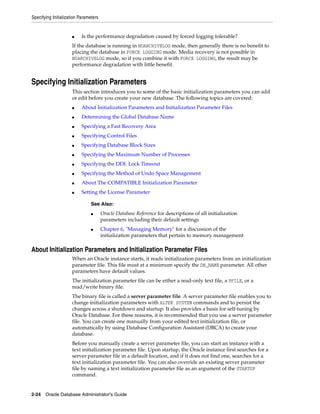
![Specifying Initialization Parameters
Creating and Configuring an Oracle Database 2-25
Default file names and locations for the text initialization parameter file are shown in
the following table:
If you are creating an Oracle database for the first time, Oracle suggests that you
minimize the number of parameter values that you alter. As you become more familiar
with your database and environment, you can dynamically tune many initialization
parameters using the ALTER SYSTEM statement. If you are using a text initialization
parameter file, then your changes are effective only for the current instance. To make
them permanent, you must update them manually in the initialization parameter file,
or they will be lost over the next shutdown and startup of the database. If you are
using a server parameter file, then initialization parameter file changes made by the
ALTER SYSTEM statement can persist across shutdown and startup.
Text Initialization Parameter File Format
The text initialization parameter file (PFILE) must contain name/value pairs in one of
the following forms:
■ For parameters that accept only a single value:
parameter_name=value
■ For parameters that accept one or more values (such as the CONTROL_FILES
parameter):
parameter_name=(value[,value] ...)
Parameter values of type string must be enclosed in single quotes ('). Case (upper or
lower) in filenames is significant only if case is significant on the host operating
system.
For parameters that accept multiple values, to enable you to easily copy and paste
name/value pairs from the alert log, you can repeat a parameter on multiple lines,
where each line contains a different value.
control_files='/u01/app/oracle/oradata/orcl/control01.ctl'
control_files='/u01/app/oracle/oradata/orcl/control02.ctl'
control_files='/u01/app/oracle/oradata/orcl/control03.ctl'
Platform Default Name Default Location
UNIX
and
Linux
initORACLE_SID.ora
For example, the
initialization parameter file
for the mynewdb database is
named:
initmynewdb.ora
ORACLE_HOME/dbs
Windows initORACLE_SID.ora ORACLE_HOMEdatabase
See Also:
■ "Determining the Global Database Name" on page 2-27 for
information about the DB_NAME parameter
■ "Managing Initialization Parameters Using a Server Parameter
File" on page 2-32
■ "About Initialization Parameter Files and Startup" on page 3-3](https://image.slidesharecdn.com/e25494-140702182938-phpapp02/85/E25494-97-320.jpg)


![Cloning a Database with CloneDB
Creating and Configuring an Oracle Database 2-47
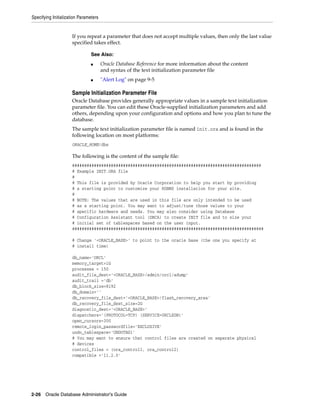
To use the clonedb.pl Perl script, complete the following steps:
a. Set the following environment variables at an operating system prompt:
MASTER_COPY_DIR - Specify the directory that contains the backup created in
Step 1. Ensure that this directory contains only the backup of the data files of
the production database.
CLONE_FILE_CREATE_DEST - Specify the directory where CloneDB database files
will be created, including data files, log files, control files.
CLONEDB_NAME - Specify the name of the CloneDB database.
S7000_TARGET - If the NFS host providing the file system for the backup and
the CloneDB database is a Sun Storage 7000, then specify the name of the host.
Otherwise, do not set this environment variable. Set this environment variable
only if cloning must be done using storage snapshots. You can use S7000
storage arrays for Direct NFS Client without setting this variable.
b. Run the clonedb.pl Perl script.
For an Oracle Database 11g Release 2 (11.2.0.4) or later database, the script is in
the $ORACLE_HOME/rdbms/install directory.
For an Oracle Database 11g Release 2 (11.2.0.3) database, you can download
the script from the My Oracle Support Note 1210656.1 ("Clone your dNFS
Production Database for Testing") at
https://support.oracle.com/CSP/main/article?cmd=show&type=NOT&id=12
10656.1.
The clonedb.pl Perl script has the following syntax:
perl clonedb.pl prod_db_pfile [sql_script1] [sql_script2]
Specify the following options:
prod_db_pfile - Specify the full path of the production database’s PFILE.
sql_script1 - Specify a name for the first SQL script generated by clonedb.pl.
The default is crtdb.sql.
sql_script2 - Specify a name for the second SQL script generated by
clonedb.pl. The default is dbren.sql.
The clonedb.pl script copies the production database’s PFILE to the CloneDB
database’s directory. It also creates two SQL scripts that you will use to create
the CloneDB database.
c. Check the two SQL scripts that were generated by the clonedb.pl Perl script,
and make changes if necessary.
d. Modify the initialization parameters for the CloneDB database environment,
and save the file.
Change any initialization parameter that is specific to the CloneDB database
environment, such as parameters that control SGA size, PGA target, the
number of CPUs, and so on. The CLONEDB parameter must be set to TRUE, and
the initialization parameter file includes this parameter. See Oracle Database
Reference for information about initialization parameters.
e. In SQL*Plus, connect to the CloneDB database with SYSDBA administrative
privilege.
f. Run the SQL scripts generated by the clonedb.pl Perl script.](https://image.slidesharecdn.com/e25494-140702182938-phpapp02/85/E25494-119-320.jpg)


![Starting Up a Database
3-4 Oracle Database Administrator's Guide
Oracle ASM disk group, and then causes a text initialization parameter file (PFILE) to
be created in the default location in the local file system to point to the SPFILE, as
explained in the next section.
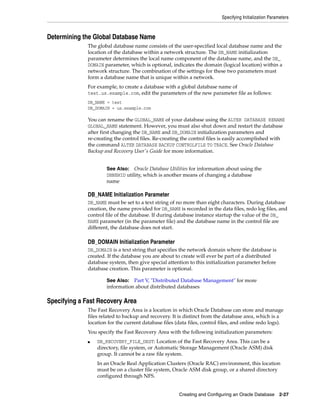
Starting Up with SQL*Plus with a Nondefault Server Parameter File
With SQL*Plus you can use the PFILE clause to start an instance with a nondefault
server parameter file.
To start up with SQL*Plus with a nondefault server parameter file:
1. Create a one-line text initialization parameter file that contains only the SPFILE
parameter. The value of the parameter is the nondefault server parameter file
location.
For example, create a text initialization parameter file /u01/oracle/dbs/spf_
init.ora that contains only the following parameter:
SPFILE = /u01/oracle/dbs/test_spfile.ora
2. Start up the instance pointing to this initialization parameter file.
STARTUP PFILE = /u01/oracle/dbs/spf_init.ora
The SPFILE must reside on the database host computer. Therefore, the preceding
method also provides a means for a client system to start a database that uses an
SPFILE. It also eliminates the need for a client system to maintain a client-side
initialization parameter file. When the client system reads the initialization parameter
file containing the SPFILE parameter, it passes the value to the server where the
specified SPFILE is read.
Starting Up with SRVCTL with a Nondefault Server Parameter File
If your database is being managed by Oracle Restart, you can specify the location of a
nondefault SPFILE by setting or modifying the SPFILE location option in the Oracle
Restart configuration for the database.
To start up with SRVCTL with a nondefault server parameter file:
1. Prepare to run SRVCTL as described in "Preparing to Run SRVCTL" on page 4-10.
2. Enter the following command:
srvctl modify database -d db_unique_name -p spfile_path
where db_unique_name must match the DB_UNIQUE_NAME initialization parameter
setting for the database.
3. Enter the following command:
srvctl start database -d db_unique_name [options]
See "SRVCTL Command Reference for Oracle Restart" on page 4-30 for more
information.
Note: You cannot use the IFILE initialization parameter within a
text initialization parameter file to point to a server parameter file.
In this context, you must use the SPFILE initialization parameter.](https://image.slidesharecdn.com/e25494-140702182938-phpapp02/85/E25494-128-320.jpg)
![Shutting Down a Database
3-12 Oracle Database Administrator's Guide
■ Shutting Down with the Normal Mode
■ Shutting Down with the Immediate Mode
■ Shutting Down with the Transactional Mode
■ Shutting Down with the Abort Mode
■ Shutdown Timeout
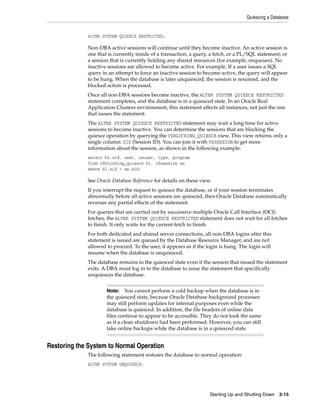
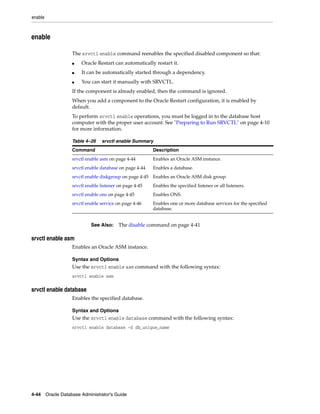
Shutting Down with the Normal Mode
To shut down a database in normal situations, use one of these commands:
The NORMAL clause of the SQL*Plus SHUTDOWN command is optional because this is the
default shutdown method. For SRVCTL, if the -o option is omitted, the shutdown
operation proceeds according to the stop options stored in the Oracle Restart
configuration for the database. The default stop option is immediate.
Normal database shutdown proceeds with the following conditions:
■ No new connections are allowed after the statement is issued.
■ Before the database is shut down, the database waits for all currently connected
users to disconnect from the database.
The next startup of the database will not require any instance recovery procedures.
Shutting Down with the Immediate Mode
Use immediate database shutdown only in the following situations:
■ To initiate an automated and unattended backup
■ When a power shutdown is going to occur soon
■ When the database or one of its applications is functioning irregularly and you
cannot contact users to ask them to log off or they are unable to log off
To shut down a database immediately, use one of the following commands:
Immediate database shutdown proceeds with the following conditions:
■ No new connections are allowed, nor are new transactions allowed to be started,
after the statement is issued.
■ Any uncommitted transactions are rolled back. (If long uncommitted transactions
exist, this method of shutdown might not complete quickly, despite its name.)
■ Oracle Database does not wait for users currently connected to the database to
disconnect. The database implicitly rolls back active transactions and disconnects
all connected users.
See Also: Chapter 4, "Configuring Automatic Restart of an Oracle
Database" for information about Oracle Restart.
SQL*Plus SRVCTL (When Oracle Restart Is In Use)
SHUTDOWN [NORMAL] srvctl stop database -d db_unique_name -o normal
SQL*Plus SRVCTL (When Oracle Restart Is In Use)
SHUTDOWN IMMEDIATE srvctl stop database -d db_unique_name -o immediate](https://image.slidesharecdn.com/e25494-140702182938-phpapp02/85/E25494-136-320.jpg)

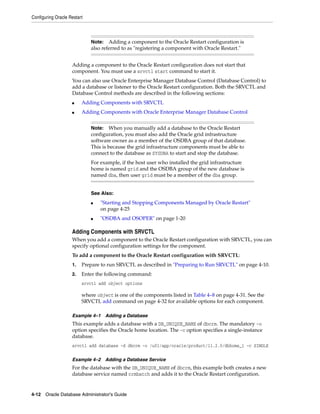
![Configuring Oracle Restart
Configuring Automatic Restart of an Oracle Database 4-9
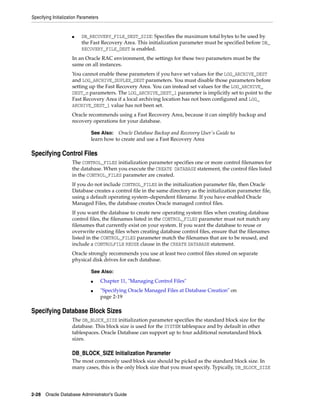
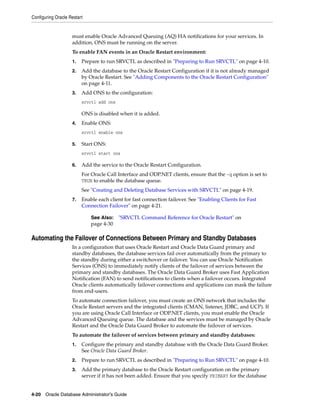
Using Fast Application Notification Callouts FAN callouts are server-side executables that
Oracle Restart executes immediately when high availability events occur. You can use
FAN callouts to automate the following activities when events occur, such as:
■ Opening fault tracking tickets
■ Sending messages to pagers
■ Sending e-mail
■ Starting and stopping server-side applications
■ Maintaining an uptime log by logging each event as it occurs
To use FAN callouts, place an executable in the directory grid_home/racg/usrco on
both the primary and the standby database servers. If you are using scripts, then set
the shell as the first line of the executable. The following is an example file for the
grid_home/racg/usrco/callout.sh callout:
#! /bin/ksh
FAN_LOGFILE= [your path name]/admin/log/`hostname`_uptime.log
echo $* "reported="`date` >> $FAN_LOGFILE &
The following output is from the previous example:
NODE VERSION=1.0 host=sun880-2 status=nodedown reason=
timestamp=08-Oct-2004 04:02:14 reported=Fri Oct 8 04:02:14 PDT 2004
A FAN record matches the database signature of each session, as shown in Table 4–5.
Use this information to take actions on sessions that match the FAN event data.
Oracle Clients That Are Integrated with Fast Application Notification Oracle has integrated
FAN with many of the common Oracle client drivers that are used to connect to Oracle
Restart databases. Therefore, the easiest way to use FAN is to use an integrated Oracle
Client.
You can use the CMAN session pools, Oracle Call Interface, Universal Connection
Pool for Java, JDBC simplefan API, and ODP.NET connection pools. The overall goal is
to enable applications to consistently obtain connections to the available primary
database at anytime.
Configuring Oracle Restart
If you install Oracle Restart by installing the Oracle Grid Infrastructure for a
standalone server and then create your database, the database is automatically added
to the Oracle Restart configuration, and is then automatically restarted when required.
However, if you install Oracle Restart on a host computer on which a database already
exists, you must manually add the database, the listener, the Oracle Automatic Storage
Management (Oracle ASM) instance, and possibly other components to the Oracle
Restart configuration.
After configuring Oracle Restart to manage your database, you may want to:
■ Add additional components to the Oracle Restart configuration.
■ Remove components from the Oracle Restart configuration.
See Also: Table 4–4 on page 4-8 for information about the callout
and event details
See Also: "Automating the Failover of Connections Between
Primary and Standby Databases" on page 4-20](https://image.slidesharecdn.com/e25494-140702182938-phpapp02/85/E25494-151-320.jpg)
![Configuring Oracle Restart
4-14 Oracle Database Administrator's Guide
4. On the confirmation page, click Continue.
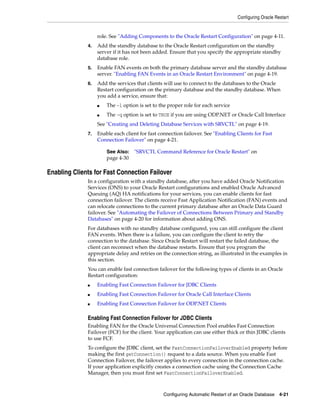
Removing Components from the Oracle Restart Configuration
When you use an Oracle-recommended method to delete an Oracle component, the
component is also automatically removed from the Oracle Restart configuration. For
example, if you use Database Configuration Assistant (DBCA) to delete a database,
DBCA removes the database from the Oracle Restart configuration. Likewise, if you
use Oracle Net Configuration Assistant (NETCA) to delete a listener, NETCA removes
the listener from the Oracle Restart configuration. See Table 4–3 on page 4-5 for more
examples. If you use a non-recommended or manual method to delete an Oracle
component, you must first use SRVCTL to remove the component from the Oracle
Restart configuration. Failing to do so could result in an error.
To remove a component from the Oracle Restart configuration:
1. Prepare to run SRVCTL as described in "Preparing to Run SRVCTL" on page 4-10.
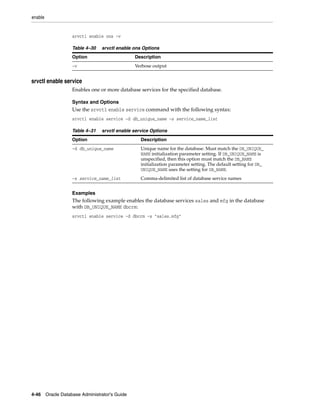
2. Enter the following command:
srvctl remove object [options]
where object is one of the components listed in Table 4–8 on page 4-31. See the
SRVCTL remove command on page 4-53 for available options for each component.
Example 4–4 Removing a Database
This example removes a database with a DB_UNIQUE_NAME of dbcrm.
srvctl remove database -d dbcrm
Disabling and Enabling Oracle Restart Management for a Component
You can temporarily disable Oracle Restart management for a component. One reason
to do this is when you are performing maintenance on the component. For example, if
a component must be repaired, then you might not want it to be automatically
restarted if it fails or if the host computer is restarted.
When maintenance is complete, you can reenable management for the component.
When you disable a component:
■ It is no longer automatically restarted.
■ It is no longer automatically started through a dependency.
■ It cannot be started with SRVCTL.
■ Any component dependent on this resource is no longer automatically started or
restarted.
To disable or enable automatic restart for a component:
1. Prepare to run SRVCTL, as described in "Preparing to Run SRVCTL" on page 4-10.
Note: If the Oracle Restart label shows "Enabled," then the listener is
already being managed by Oracle Restart and there is no need to
continue.
See Also: "SRVCTL Command Reference for Oracle Restart" on
page 4-30](https://image.slidesharecdn.com/e25494-140702182938-phpapp02/85/E25494-156-320.jpg)
![Configuring Oracle Restart
Configuring Automatic Restart of an Oracle Database 4-15
2. Do one of the following:
■ To disable a component, enter the following command:
srvctl disable object [options]
■ To enable a component, enter the following command:
srvctl enable object [options]
Replace object with one of the components listed in Table 4–8 on page 4-31. See
the SRVCTL disable command on page 4-41 and the enable command on
page 4-44 for available options for each component.
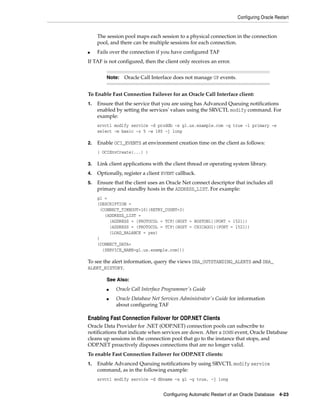
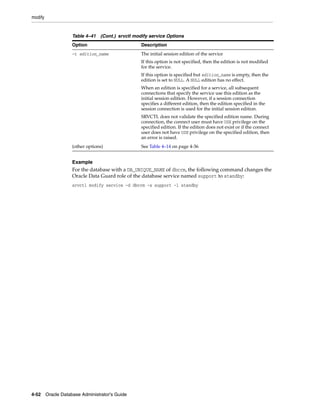
Example 4–5 Disabling Automatic Restart for a Database
This example disables automatic restart for a database with a DB_UNIQUE_NAME of
dbcrm.
srvctl disable database -d dbcrm
Example 4–6 Disabling Automatic Restart for an Oracle ASM Disk Group
This example disables automatic restart for the Oracle ASM disk group named
recovery.
srvctl disable diskgroup -g recovery
Example 4–7 Enabling Automatic Restart for an Oracle ASM Disk Group
This example reenables automatic restart for the disk group recovery.
srvctl enable diskgroup -g recovery
Viewing Component Status
You can use SRVCTL to view the running status (running or not running) for any
component managed by Oracle Restart. For some components, additional information
is also displayed.
To view component status:
1. Prepare to run SRVCTL as described in "Preparing to Run SRVCTL" on page 4-10.
2. Enter the following command:
srvctl status object [options]
where object is one of the components listed in Table 4–8 on page 4-31. See the
SRVCTL status command on page 4-63 for available options for each component.
Example 4–8 Viewing Status of a Database
This example displays the status of the database with a DB_UNIQUE_NAME of dbcrm.
srvctl status database -d dbcrm
Database is running.
See Also: "SRVCTL Command Reference for Oracle Restart" on
page 4-30
See Also: "SRVCTL Command Reference for Oracle Restart" on
page 4-30](https://image.slidesharecdn.com/e25494-140702182938-phpapp02/85/E25494-157-320.jpg)

![Configuring Oracle Restart
Configuring Automatic Restart of an Oracle Database 4-19
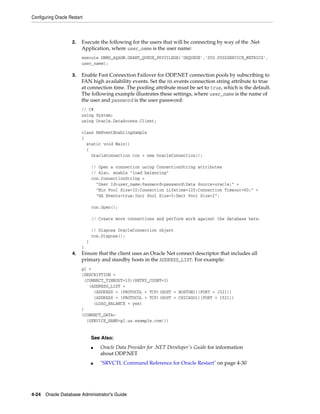
Creating and Deleting Database Services with SRVCTL
When managing a database with Oracle Restart, Oracle recommends that you use
SRVCTL to create and delete database services. When you use SRVCTL to add a
database service, the service is automatically added to the Oracle Restart configuration
and a dependency between the service and the database is established. Thus, if you
start the service, Oracle Restart first starts the database if it is not started.
When you use SRVCTL to delete a database service, the service is also removed from
the Oracle Restart configuration.
To create a database service with SRVCTL:
1. Prepare to run SRVCTL as described in "Preparing to Run SRVCTL" on page 4-10.
2. Enter the following command:
srvctl add service -d db_unique_name -s service_name [options]
The database service is created and added to the Oracle Restart configuration. See
the srvctl add service command on page 4-36 for available options.
Example 4–15 Creating a Database Service
For the database with the DB_UNIQUE_NAME of dbcrm, this example creates a new
database service named crmbatch.
srvctl add service -d dbcrm -s crmbatch
Example 4–16 Creating a Role-Based Database Service
This example creates the crmbatch database service and assigns it the Data Guard role
of PHYSICAL_STANDBY. The service is automatically started only if the current role of the
dbcrm database is physical standby.
srvctl add service -d dbcrm -s crmbatch -l PHYSICAL_STANDBY
To delete a database service with SRVCTL:
1. Prepare to run SRVCTL as described in "Preparing to Run SRVCTL" on page 4-10.
2. Enter the following command:
srvctl remove service -d db_unique_name -s service_name [-f]
The database service is removed from the Oracle Restart configuration. If the -f
(force) flag is present, the service is removed even if it is still running. Without this
flag, an error occurs if the service is running.
Enabling FAN Events in an Oracle Restart Environment
To enable Oracle Restart to publish Fast Application Notification (FAN) events, you
must create an Oracle Notification Services (ONS) network that includes the Oracle
Restart servers and the integrated clients. These clients can include Oracle Connection
Manager (CMAN), Java Database Connectivity (JDBC), and Universal Connection
Pool (UCP) clients. If you are using Oracle Call Interface or ODP.NET clients, then you
See Also: "SRVCTL Command Reference for Oracle Restart" on
page 4-30
See Also: "SRVCTL Command Reference for Oracle Restart" on
page 4-30](https://image.slidesharecdn.com/e25494-140702182938-phpapp02/85/E25494-161-320.jpg)

![Starting and Stopping Components Managed by Oracle Restart
Configuring Automatic Restart of an Oracle Database 4-25
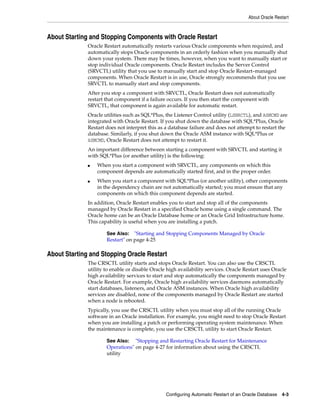
Starting and Stopping Components Managed by Oracle Restart
When Oracle Restart is in use, Oracle strongly recommends that you use the SRVCTL
utility to start and stop components, for the following reasons:
■ When starting a component with SRVCTL, Oracle Restart can first start any
components on which this component depends. When stopping a component with
SRVCTL, Oracle Restart can stop any dependent components first.
■ SRVCTL always starts a component according to its Oracle Restart configuration.
Starting a component by other means may not.
For example, if you specified a server parameter file (SPFILE) location when you
added a database to the Oracle Restart configuration, and that location is not the
default location for SPFILEs, if you start the database with SQL*Plus, the SPFILE
specified in the configuration may not be used.
See the srvctl add database command on page 4-33 for a table of configuration
options for a database instance.
■ When you start a component with SRVCTL, environment variables stored in the
Oracle Restart configuration for the component are set.
See "Managing Environment Variables in the Oracle Restart Configuration" on
page 4-17 for more information.
You can also use Oracle Enterprise Manager Database Control (Database Control) to
start a database managed by Oracle Restart. Both the SRVCTL and Database Control
methods are described in the following sections:
■ Starting and Stopping Components Managed by Oracle Restart with SRVCTL
■ Starting a Database Managed by Oracle Restart with Oracle Enterprise Manager
Starting and Stopping Components Managed by Oracle Restart with SRVCTL
You can start and stop any component managed by Oracle Restart with SRVCTL.
To start or stop a component managed by Oracle Restart with SRVCTL:
1. Prepare to run SRVCTL as described in "Preparing to Run SRVCTL" on page 4-10.
2. Do one of the following:
■ To start a component, enter the following command:
srvctl start object [options]
■ To stop a component, enter the following command:
srvctl stop object [options]
where object is one of the components listed in Table 4–8 on page 4-31. See the
SRVCTL start command on page 4-59 and the stop command on page 4-67 for
available options for each component.
Example 4–17 Starting a Database
This example starts the database with a DB_UNIQUE_NAME of dbcrm:
srvctl start database -d dbcrm
Example 4–18 Starting a Database NOMOUNT
This example starts the database instance without mounting the database:](https://image.slidesharecdn.com/e25494-140702182938-phpapp02/85/E25494-167-320.jpg)
![Stopping and Restarting Oracle Restart for Maintenance Operations
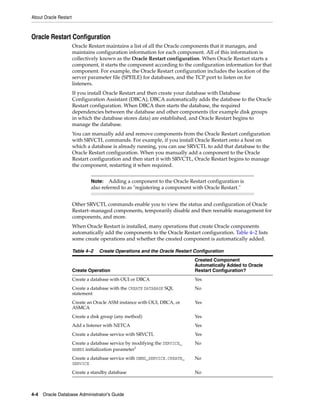
4-28 Oracle Database Administrator's Guide
1. Prepare to run SRVCTL as described in "Preparing to Run SRVCTL" on page 4-10.
2. Use the SRVCTL utility to stop the components managed by Oracle Restart in an
Oracle home:
srvctl stop home -o oracle_home -s state_file [-t stop_options] [-f]
where oracle_home is the complete path of the Oracle home and state_file is the
complete path to the state file. State information for the Oracle home is recorded in
the specified state file. Make a note of the state file location because it must be
specified in Step 7.
Before stopping the components in an Oracle Grid Infrastructure home, ensure
that you first stop the components in a dependent Oracle Database home.
3. If you are patching an Oracle Grid Infrastructure home, then disable and stop
Oracle Restart. Otherwise, go to Step 4.
To disable and stop Oracle Restart, use the CRSCTL utility to run the following
commands:
crsctl disable has
crsctl stop has
4. Perform the maintenance operation.
5. Use the CRSCTL utility to enable automatic restart of the components managed by
Oracle Restart:
crsctl enable has
6. Use the CRSCTL utility to start Oracle Restart:
crsctl start has
7. Use the SRVCTL utility to start the components that were stopped in Step 2:
srvctl start home -o oracle_home -s state_file
The state file must match the state file specified in Step 2.
8. Optionally, use the SRVCTL utility to check the status of the components managed
by Oracle Restart in the Oracle home:
srvctl status home -o oracle_home -s state_file
Example 4–25 Stopping Components Managed by Oracle Restart in an Oracle Home
srvctl stop home -o /u01/app/oracle/product/11.2.0/dbhome_1 -s /usr1/or_state
Example 4–26 Starting Components Managed by Oracle Restart in an Oracle Home
srvctl start home -o /u01/app/oracle/product/11.2.0/dbhome_1 -s /usr1/or_state
Example 4–27 Displaying the Status of Components Managed by Oracle Restart in an
Oracle Home
srvctl status home -o /u01/app/oracle/product/11.2.0/dbhome_1 -s /usr1/or_state](https://image.slidesharecdn.com/e25494-140702182938-phpapp02/85/E25494-170-320.jpg)

![add
4-32 Oracle Database Administrator's Guide
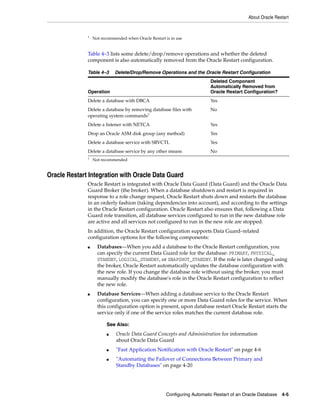
add
The srvctl add command adds the specified component to the Oracle Restart
configuration, and optionally sets Oracle Restart configuration parameters for the
component. After a component is added, Oracle Restart begins to manage it, restarting
it when required.
To perform srvctl add operations, you must be logged in to the database host
computer with the proper user account. See "Preparing to Run SRVCTL" on page 4-10
for more information.
srvctl add asm
Adds an Oracle ASM instance to the Oracle Restart configuration.
Syntax and Options
Use the srvctl add asm command with the following syntax:
srvctl add asm [-l listener_name [-p spfile] [-d asm_diskstring]
]
Table 4–9 srvctl add Summary
Command Description
srvctl add asm on page 4-32 Adds an Oracle ASM instance.
srvctl add database on page 4-33 Adds a database.
srvctl add listener on page 4-35 Adds a listener.
srvctl add ons on page 4-35 Adds an ONS (used by Oracle Data Guard
configurations with Oracle Data Guard Broker).
srvctl add service on page 4-36 Adds a database service managed by Oracle
Restart.
Note: There is no srvctl add command for Oracle ASM disk groups.
Disk groups are automatically added to the Oracle Restart
configuration when they are first mounted. If you remove a disk
group from the Oracle Restart configuration and later want to add it
back, connect to the Oracle ASM instance with SQL*Plus and use an
ALTER DISKGROUP ... MOUNT command.
Table 4–10 srvctl add asm Options
Option Description
-l listener_name Name of the listener with which Oracle ASM should register.
A weak dependency is established with this listener. (Before
starting the Oracle ASM instance, Oracle Restart attempts to
start the listener. If the listener does not start, the Oracle ASM
instance is still started. If the listener later fails, Oracle Restart
does not restart Oracle ASM.)
If omitted, defaults to the listener named listener.
-p spfile The full path of the server parameter file for the database. If
omitted, the default SPFILE is used.](https://image.slidesharecdn.com/e25494-140702182938-phpapp02/85/E25494-174-320.jpg)
![SRVCTL Command Reference for Oracle Restart
Configuring Automatic Restart of an Oracle Database 4-33
Example
An example of this command is:
srvctl add asm -l crmlistener
srvctl add database
Adds a database to the Oracle Restart configuration.
After adding a database to the Oracle Restart configuration, if the database then
accesses data in an Oracle ASM disk group, a dependency between the database that
disk group is created. Oracle Restart then ensures that the disk group is mounted
before attempting to start the database.
However, if the database and Oracle ASM instance are not running when you add the
database to the Oracle Restart configuration, you must manually establish the
dependency between the database and its disk groups by specifying the -a option in
the SRVCTL command. See the example later in this section.
Syntax and Options
Use the srvctl add database command with the following syntax:
srvctl add database -d db_unique_name -o oracle_home [-m domain_name]
[-c {RACONENODE | RAC | SINGLE}] [-n db_name] [-i instance_name]
[-p spfile] [-s start_options] [-t stop_options]
[-r {PRIMARY | PHYSICAL_STANDBY | LOGICAL_STANDBY | SNAPSHOT_STANDBY}]
[-y {automatic | manual}] [-a disk_group_list]
-d asm_diskstring Oracle ASM disk group discovery string. An Oracle ASM
discovery string is a comma-delimited list of strings that limits
the set of disks that an Oracle ASM instance discovers. The
discovery strings can include wildcard characters. Only disks
that match one of the strings are discovered.
See Also: Oracle Automatic Storage Management Administrator's Guide
for more information about Oracle ASM disk group discovery strings
Note: When you manually add a database to the Oracle Restart
configuration, you must also add the Oracle grid infrastructure
software owner as a member of the OSDBA group of that database.
This is because the grid infrastructure components must be able to
connect to the database as SYSDBA to start and stop the database.
For example, if the host user who installed the grid infrastructure
home is named grid and the OSDBA group of the new database is
named dba, then user grid must be a member of the dba group.
Table 4–10 (Cont.) srvctl add asm Options
Option Description](https://image.slidesharecdn.com/e25494-140702182938-phpapp02/85/E25494-175-320.jpg)
![SRVCTL Command Reference for Oracle Restart
Configuring Automatic Restart of an Oracle Database 4-35
Examples
This example adds the database with the DB_UNIQUE_NAME dbcrm:
srvctl add database -d dbcrm -o /u01/app/oracle/product/11.2.0/dbhome_1
This example adds the same database and also establishes a dependency between the
database and the disk groups DATA and RECOVERY.
srvctl add database -d dbcrm -o /u01/app/oracle/product/11.2.0/dbhome_1
-a "DATA,RECOVERY"
srvctl add listener
Adds a listener to the Oracle Restart configuration.
Syntax and Options
Use the srvctl add listener command with the following syntax:
srvctl add listener [-l listener_name] [-p endpoints] [-s] [-o Oracle_home]
Example
The following command adds a listener (named LISTENER) running out of the database
Oracle home and listening on TCP port 1522:
srvctl add listener -p TCP:1522 -o /u01/app/oracle/product/11.2.0/dbhome_1
srvctl add ons
Adds an ONS to an Oracle Restart configuration.
ONS must be added to an Oracle Restart configuration to enable the sending of Fast
Application Notification (FAN) events after an Oracle Data Guard failover.
When ONS is added to an Oracle Restart configuration, it is initially disabled. You can
enable it with the srvctl enable ons command.
Syntax and Options
Use the srvctl add ons command with the following syntax:
See Also:
■ "Oracle Restart Integration with Oracle Data Guard" on page 4-5
■ Oracle Data Guard Concepts and Administration
Table 4–12 srvctl add listener Options
Option Description
-l listener_name Listener name. If omitted, defaults to LISTENER
-p endpoints Comma separated TCP ports or listener endpoints. If omitted,
defaults to TCP:1521. endpoints syntax is:
"[TCP:]port[, ...] [/IPC:key] [/NMP:pipe_name]
[/TCPS:s_port] [/SDP:port]"
-s Skip checking for port conflicts with the supplied endpoints
-o Oracle_home Oracle home for the listener. If omitted, the Oracle Grid
Infrastructure home is assumed.
See Also: "srvctl enable ons" on page 4-45](https://image.slidesharecdn.com/e25494-140702182938-phpapp02/85/E25494-177-320.jpg)
![add
4-36 Oracle Database Administrator's Guide
srvctl add ons [-e em_port] [-l ons_local_port] [-r ons_remote_port] [-t
host[:port],[host[:port]...]] [-v]
srvctl add service
Adds a database service to the Oracle Restart configuration. Creates the database
service if it does not exist. This method of creating a service is preferred over using the
DBMS_SERVICE PL/SQL package.
Syntax and Options
Use the srvctl add service command with the following syntax:
srvctl add service -d db_unique_name -s service_name
[-l [PRIMARY][,PHYSICAL_STANDBY][,LOGICAL_STANDBY][,SNAPSHOT_STANDBY]]
[-y {AUTOMATIC | MANUAL}] [-e {NONE | SESSION | SELECT}] [-m {NONE | BASIC}]
[-w integer] [-z integer] [-j {SHORT | LONG}]
[-B {SERVICE_TIME | THROUGHPUT | NONE}] [-q {TRUE | FALSE}] -t edition_name
Table 4–13 srvctl add ons Options
Option Description
-e em_port ONS listening port for Oracle Enterprise Manager. The default is
2016.
-l ons_local_port ONS listening port for local client connections. The default is
6100.
-r ons_remote_port ONS listening port for connections from remote hosts. The
default is 6200.
-t
host[:port],[host[:port]
,...
A list of host:port pairs of remote hosts that are part of the ONS
network
Note: If port is not specified for a remote host, then ons_remote_
port is used.
-v Verbose output
Table 4–14 srvctl add service Options
Option Description
-d db_unique_name Unique name for the database. Must match the DB_UNIQUE_
NAME initialization parameter setting. If DB_UNIQUE_NAME is
unspecified, then this option must match the DB_NAME
initialization parameter setting. The default setting for DB_
UNIQUE_NAME uses the setting for DB_NAME.
-s service_name The database service name
-l [PRIMARY][,PHYSICAL_
STANDBY][,LOGICAL_
STANDBY][,SNAPSHOT_STANDBY]
A list of service roles. Applicable in Oracle Data Guard
environments only. When this option is present, upon
database startup, the service is started only when one of its
service roles matches the current database role.
-y {AUTOMATIC | MANUAL} Management policy for the service. If AUTOMATIC (the default),
the service is automatically started upon restart of the
database, either by a planned restart (with SRVCTL) or after a
failure. Automatic restart is also subject to the service role,
however (the -l option). If MANUAL, the service is never
automatically restarted upon planned restart of the database
(with SRVCTL). A MANUAL setting does not prevent Oracle
Restart from monitoring the service when it is running and
restarting it if a failure occurs.](https://image.slidesharecdn.com/e25494-140702182938-phpapp02/85/E25494-178-320.jpg)
![config
4-38 Oracle Database Administrator's Guide
config
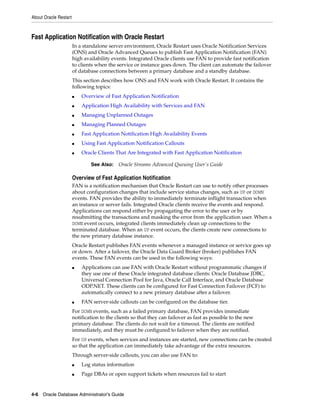
The srvctl config command displays the Oracle Restart configuration of the specified
component or set of components.
srvctl config asm
Displays the Oracle Restart configuration information for the Oracle ASM instance.
Syntax and Options
Use the srvctl config asm command with the following syntax:
srvctl config asm [-a]
Example
An example of this command is:
srvctl config asm -a
asm home: /u01/app/oracle/product/11.2.0/grid
ASM is enabled.
srvctl config database
Displays the Oracle Restart configuration information for the specified database, or
lists all databases managed by Oracle Restart.
Syntax and Options
Use the srvctl config database command with the following syntax:
srvctl config database [-d db_unique_name [-a]]
Table 4–15 srvctl config Summary
Command Description
srvctl config asm on page 4-38 Displays the Oracle Restart configuration information
for the Oracle ASM instance
srvctl config database on page 4-38 Displays the Oracle Restart configuration information
for the specified database, or lists all databases managed
by Oracle Restart
srvctl config listener on page 4-39 Displays the Oracle Restart configuration information
for all listeners or for the specified listener
srvctl config ons on page 4-40 Displays the current configuration information for ONS.
srvctl config service on page 4-40 For the specified database, displays the Oracle Restart
configuration information for the specified database
service or for all database services
Table 4–16 srvctl config asm Options
Option Description
-a Display enabled/disabled status also](https://image.slidesharecdn.com/e25494-140702182938-phpapp02/85/E25494-180-320.jpg)
![SRVCTL Command Reference for Oracle Restart
Configuring Automatic Restart of an Oracle Database 4-39
Examples
An example of this command to list all Oracle Restart–managed databases is:
srvctl config database
dbcrm
orcl
An example of this command to display configuration and enabled/disabled status for
the database with the DB_UNIQUE_ID orcl is:
srvctl config database -d orcl -a
Database unique name: orcl
Database name: orcl
Oracle home: /u01/app/oracle/product/11.2.0/dbhome_1
Oracle user: oracle
Spfile: +DATA/orcl/spfileorcl.ora
Domain: us.example.com
Start options: open
Stop options: immediate
Database role:
Management policy: automatic
Disk Groups: DATA
Services: mfg,sales
Database is enabled
srvctl config listener
Displays the Oracle Restart configuration information for all Oracle Restart–managed
listeners or for the specified listener.
Syntax and Options
Use the srvctl config listener command with the following syntax:
srvctl config listener [-l listener_name]
Example
This example displays the configuration information and enabled/disabled status for
the default listener:
srvctl config listener
Table 4–17 srvctl config database Options
Option Description
-d db_unique_name Unique name for the database. Must match the DB_UNIQUE_NAME
initialization parameter setting. If DB_UNIQUE_NAME is unspecified,
then this option must match the DB_NAME initialization parameter
setting. The default setting for DB_UNIQUE_NAME uses the setting for
DB_NAME.
-a Display enabled/disabled status also
Table 4–18 srvctl config listener Options
Option Description
-l listener_name Listener name. If omitted, configuration information for all Oracle
Restart–managed listeners is displayed.](https://image.slidesharecdn.com/e25494-140702182938-phpapp02/85/E25494-181-320.jpg)
![config
4-40 Oracle Database Administrator's Guide
Name: LISTENER
Home: /u01/app/oracle/product/11.2.0/dbhome_1
End points: TCP:1521
Listener is enabled.
srvctl config ons
Displays the current configuration information for ONS.
Syntax and Options
Use the srvctl config ons command with the following syntax:
srvctl config ons
srvctl config service
For the specified database, displays the Oracle Restart configuration information for
the specified database service or for all Oracle Restart–managed database services.
Syntax and Options
Use the srvctl config service command with the following syntax:
srvctl config service -d db_unique_name [-s service_name] [-a]
Example
An example of this command is:
srvctl config service -d dbcrm -s sales
Service name: sales
Service is enabled
Cardinality: SINGLETON
Disconnect: true
Service role: PRIMARY
Management policy: automatic
DTP transaction: false
AQ HA notifications: false
Failover type: NONE
Failover method: NONE
TAF failover retries: 0
TAF failover delay: 0
Connection Load Balancing Goal: NONE
Runtime Load Balancing Goal: NONE
TAF policy specification: NONE
Edition: e2
Table 4–19 srvctl config service Options
Option Description
-d db_unique_name Unique name for the database. Must match the DB_UNIQUE_NAME
initialization parameter setting. If DB_UNIQUE_NAME is unspecified,
then this option must match the DB_NAME initialization parameter
setting. The default setting for DB_UNIQUE_NAME uses the setting for
DB_NAME.
-s service_name Database service name. If omitted, SRVCTL displays configuration
information for all Oracle Restart–managed services for the
database
-a Display detailed configuration information](https://image.slidesharecdn.com/e25494-140702182938-phpapp02/85/E25494-182-320.jpg)
![disable
4-42 Oracle Database Administrator's Guide
Example
An example of this command is:
srvctl disable database -d dbcrm
srvctl disable diskgroup
Disables an Oracle ASM disk group.
Syntax and Options
Use the srvctl disable diskgroup command with the following syntax:
srvctl disable diskgroup -g diskgroup_name
Example
An example of this command is:
srvctl disable diskgroup -g DATA
srvctl disable listener
Disables the specified listener or all listeners.
Syntax and Options
Use the srvctl disable listener command with the following syntax:
srvctl disable listener [-l listener_name]
Example
An example of this command is:
srvctl disable listener -l crmlistener
srvctl disable ons
Disables ONS.
Syntax and Options
Use the srvctl disable ons command with the following syntax:
srvctl disable ons -v
Table 4–22 srvctl disable diskgroup Options
Option Description
-g diskgroup_name Disk group name
Table 4–23 srvctl disable listener Options
Option Description
-l listener_name Listener name. If omitted, all listeners are disabled.
Table 4–24 srvctl disable ons Options
Option Description
-v Verbose output](https://image.slidesharecdn.com/e25494-140702182938-phpapp02/85/E25494-184-320.jpg)
![SRVCTL Command Reference for Oracle Restart
Configuring Automatic Restart of an Oracle Database 4-45
Example
An example of this command is:
srvctl enable database -d dbcrm
srvctl enable diskgroup
Enables an Oracle ASM disk group.
Syntax and Options
Use the srvctl enable diskgroup command with the following syntax:
srvctl enable diskgroup -g diskgroup_name
Example
An example of this command is:
srvctl enable diskgroup -g DATA
srvctl enable listener
Enables the specified listener or all listeners.
Syntax and Options
Use the srvctl enable listener command with the following syntax:
srvctl enable listener [-l listener_name]
Example
An example of this command is:
srvctl enable listener -l crmlistener
srvctl enable ons
Enables ONS.
Syntax and Options
Use the srvctl enable ons command with the following syntax:
Table 4–27 srvctl enable database Options
Option Description
-d db_unique_name Unique name for the database. Must match the DB_UNIQUE_NAME
initialization parameter setting. If DB_UNIQUE_NAME is
unspecified, then this option must match the DB_NAME
initialization parameter setting. The default setting for DB_
UNIQUE_NAME uses the setting for DB_NAME.
Table 4–28 srvctl enable diskgroup Options
Option Description
-g diskgroup_name Disk group name
Table 4–29 srvctl enable listener Options
Option Description
-l listener_name Listener name. If omitted, all listeners are enabled.](https://image.slidesharecdn.com/e25494-140702182938-phpapp02/85/E25494-187-320.jpg)
![SRVCTL Command Reference for Oracle Restart
Configuring Automatic Restart of an Oracle Database 4-47
getenv
Gets and displays environment variables and their values from the Oracle Restart
configuration for a database, listener, or Oracle ASM instance.
srvctl getenv asm
Displays the configured environment variables for the Oracle ASM instance.
Syntax and Options
Use the srvctl getenv asm command with the following syntax:
srvctl getenv asm [-t name_list]
Example
The following example displays all configured environment variables for the Oracle
ASM instance:
srvctl getenv asm
srvctl getenv database
Displays the configured environment variables for the specified database.
Syntax and Options
Use the srvctl getenv database command with the following syntax:
srvctl getenv database -d db_unique_name [-t name_list]
Table 4–32 srvctl getenv Summary
Command Description
srvctl getenv asm on page 4-47 Displays the configured environment variables for
the Oracle ASM instance
srvctl getenv database on page 4-47 Displays the configured environment variables for
the specified database instance
srvctl getenv listener on page 4-48 Displays the configured environment variables for
the specified listener
See Also:
■ setenv command on page 4-56
■ unsetenv command on page 4-71
■ "Managing Environment Variables in the Oracle Restart
Configuration" on page 4-17
Table 4–33 srvctl getenv asm Options
Options Description
-t name_list Comma-delimited list of names of environment variables to
display. If omitted, SRVCTL displays all configured environment
variables for Oracle ASM.](https://image.slidesharecdn.com/e25494-140702182938-phpapp02/85/E25494-189-320.jpg)
![getenv
4-48 Oracle Database Administrator's Guide
Example
The following example displays all configured environment variables for the database
with DB_UNIQUE_NAME dbcrm:
srvctl getenv database -d dbcrm
srvctl getenv listener
Displays the configured environment variables for the specified listener.
Syntax and Options
Use the srvctl getenv listener command with the following syntax:
srvctl getenv listener [-l listener_name] [-t name_list]
Example
The following example displays all configured environment variables for the listener
named crmlistener:
srvctl getenv listener -l crmlistener
Table 4–34 srvctl getenv database Options
Options Description
-d db_unique_name Unique name for the database. Must match the DB_UNIQUE_NAME
initialization parameter setting. If DB_UNIQUE_NAME is unspecified,
then this option must match the DB_NAME initialization parameter
setting. The default setting for DB_UNIQUE_NAME uses the setting for
DB_NAME.
-t name_list Comma-delimited list of names of environment variables to
display. If omitted, SRVCTL displays all configured environment
variables.
Table 4–35 srvctl getenv listener Options
Options Description
-l listener_name Listener name. If omitted, SRVCTL lists environment variables for
all listeners.
-t name_list Comma-delimited list of names of environment variables to
display. If omitted, SRVCTL displays all configured environment
variables.](https://image.slidesharecdn.com/e25494-140702182938-phpapp02/85/E25494-190-320.jpg)
![SRVCTL Command Reference for Oracle Restart
Configuring Automatic Restart of an Oracle Database 4-49
modify
Modifies the Oracle Restart configuration of a component. The change takes effect
when the component is next restarted.
To perform srvctl modify operations, you must be logged in to the database host
computer with the proper user account. See "Preparing to Run SRVCTL" on page 4-10
for more information.
srvctl modify asm
Modifies the Oracle Restart configuration for the Oracle ASM instance.
Syntax and Options
Use the srvctl modify asm command with the following syntax:
srvctl modify asm [-l listener_name] [-p spfile] [-d asm_diskstring]
Example
An example of this command is:
srvctl modify asm -l crmlistener
srvctl modify database
Modifies the Oracle Restart configuration for a database.
Table 4–36 srvctl modify Summary
Command Description
srvctl modify asm on page 4-49 Modifies the configuration for Oracle ASM
srvctl modify database on page 4-49 Modifies the configuration for a database
srvctl modify listener on page 4-50 Modifies the configuration for the specified listener or
all listeners
srvctl modify ons on page 4-51 Modifies ONS
srvctl modify service on page 4-51 Modifies the configuration for a database service
Table 4–37 srvctl modify asm Options
Option Description
-l listener_name Name of the listener with which Oracle ASM must register. A
weak dependency is established with this listener. (Before Oracle
ASM is started, Oracle Restart ensures that this listener is
started.)
-p spfile The full path of the server parameter file for the database. If
omitted, the default SPFILE is used.
-d asm_diskstring Oracle ASM disk group discovery string. An Oracle ASM
discovery string is a comma-delimited list of strings that limits
the set of disks that an Oracle ASM instance discovers. The
discovery strings can include wildcard characters. Only disks
that match one of the strings are discovered.
See Also: Oracle Automatic Storage Management Administrator's Guide
for more information about Oracle ASM disk group discovery strings](https://image.slidesharecdn.com/e25494-140702182938-phpapp02/85/E25494-191-320.jpg)
![modify
4-50 Oracle Database Administrator's Guide
Syntax and Options
Use the srvctl modify database command with the following syntax:
srvctl modify database -d db_unique_name [-o oracle_home] [-u oracle_user]
[-m domain_name] [-n db_name] [-i instance_name]
[-p spfile] [-s start_options]
[-t stop_options] [-r {PRIMARY | PHYSICAL_STANDBY | LOGICAL_STANDBY |
SNAPSHOT_STANDBY}] [-y {automatic | manual}] [-a disk_group_list] [-z]
Example
The following example changes the role of the database with DB_UNIQUE_NAME dbcrm to
LOGICAL_STANDBY:
srvctl modify database -d dbcrm -r logical_standby
srvctl modify listener
Modifies the Oracle Restart configuration for the specified listener or all listeners.
Syntax and Options
Use the srvctl modify listener command with the following syntax:
srvctl modify listener [-l listener_name] [-p endpoints] [-o Oracle_home]
Example
This example modifies the TCP port on which the listener named crmlistener listens:
srvctl modify listener -l crmlistener -p TCP:1522
Table 4–38 srvctl modify database Options
Option Description
-d db_unique_name Unique name for the database. Must match the DB_UNIQUE_NAME
initialization parameter setting. If DB_UNIQUE_NAME is unspecified,
then this option must match the DB_NAME initialization parameter
setting. The default setting for DB_UNIQUE_NAME uses the setting
for DB_NAME.
-u oracle_user Name of the Oracle user who owns the Oracle home directory
-z Remove the database's dependency on Oracle ASM disk groups
(Other options) See Table 4–11 on page 4-34
See Also:
■ "Oracle Restart Integration with Oracle Data Guard" on page 4-5
■ Oracle Data Guard Concepts and Administration
Table 4–39 srvctl modify listener Options
Option Description
-l listener_name Listener name. If omitted, all listener configurations are
modified.
-p endpoints Comma separated TCP ports or listener endpoints. endpoints
syntax is:
"[TCP:]port[, ...] [/IPC:key] [/NMP:pipe_name]
[/TCPS:s_port] [/SDP:port]"
-o Oracle_home New Oracle home for the listener](https://image.slidesharecdn.com/e25494-140702182938-phpapp02/85/E25494-192-320.jpg)
![SRVCTL Command Reference for Oracle Restart
Configuring Automatic Restart of an Oracle Database 4-51
srvctl modify ons
Modifies ONS.
Syntax and Options
Use the srvctl modify ons command with the following syntax:
srvctl modify ons [-e em_port] [-l ons_local_port] [-r ons_remote_port] [-t
host[:port],[host[:port]...]] [-v]
srvctl modify service
Modifies the Oracle Restart configuration of a database service.
Syntax and Options
Use the srvctl modify service command with the following syntax:
srvctl modify service -d db_unique_name -s service_name]
[-l [PRIMARY][,PHYSICAL_STANDBY][,LOGICAL_STANDBY][,SNAPSHOT_STANDBY]]
[-y {AUTOMATIC | MANUAL}] [-e {NONE | SESSION | SELECT}] [-m {NONE | BASIC}]
[-w integer] [-z integer] [-j {SHORT | LONG}]
[-B {SERVICE_TIME | THROUGHPUT | NONE}] [-q {TRUE | FALSE}] -t edition_name
Table 4–40 srvctl modify ons Options
Option Description
-e em_port ONS listening port for Oracle Enterprise Manager. The default is
2016.
-l ons_local_port ONS listening port for local client connections
-r ons_remote_port ONS listening port for connections from remote hosts
-t
host[:port],[host[:port]
,...
A list of host:port pairs of remote hosts that are part of the ONS
network
Note: If port is not specified for a remote host, then ons_remote_
port is used.
-v Verbose output
Note: Oracle recommends that you limit configuration changes to
the minimum requirement and that you not perform other service
operations while the online service modification is in progress.
Table 4–41 srvctl modify service Options
Option Description
-d db_unique_name Unique name for the database. Must match the DB_UNIQUE_
NAME initialization parameter setting. If DB_UNIQUE_NAME is
unspecified, then this option must match the DB_NAME
initialization parameter setting. The default setting for DB_
UNIQUE_NAME uses the setting for DB_NAME.
-s service_name Service name](https://image.slidesharecdn.com/e25494-140702182938-phpapp02/85/E25494-193-320.jpg)
![SRVCTL Command Reference for Oracle Restart
Configuring Automatic Restart of an Oracle Database 4-53
remove
Removes the specified component from the Oracle Restart configuration. Oracle
Restart no longer manages the component. Any environment variable settings for the
component are also removed.
Before you remove a component from the Oracle Restart configuration, you must use
SRVCTL to stop it. Oracle recommends that you disable the component before
removing it, but this is not required.
To perform srvctl remove operations, you must be logged in to the database host
computer with the proper user account. See "Preparing to Run SRVCTL" on page 4-10
for more information.
srvctl remove asm
Removes an Oracle ASM instance.
Syntax and Options
Use the srvctl remove asm command with the following syntax:
srvctl remove asm [-f]
Example
An example of this command is:
srvctl remove asm
srvctl remove database
Removes a database. Prompts for confirmation first.
Syntax and Options
Use the srvctl remove database command with the following syntax:
Table 4–42 srvctl remove Summary
Command Description
srvctl remove asm on page 4-53 Removes the Oracle ASM instance
srvctl remove database on page 4-53 Removes a database
srvctl remove diskgroup on page 4-54 Removes an Oracle ASM disk group
srvctl remove listener on page 4-54 Removes a listener
srvctl remove ons on page 4-55 Removes an ONS
srvctl remove service on page 4-55 Removes one or more database services
See Also:
■ stop command on page 4-67
■ disable command on page 4-41
Table 4–43 srvctl remove asm Options
Options Description
-f Force remove, even when disk groups and databases that use
Oracle ASM exist or when the Oracle ASM instance is running.](https://image.slidesharecdn.com/e25494-140702182938-phpapp02/85/E25494-195-320.jpg)
![remove
4-54 Oracle Database Administrator's Guide
srvctl remove database -d db_unique_name [-f] [-y] [-v]
Example
An example of this command is:
srvctl remove database -d dbcrm
srvctl remove diskgroup
Removes an Oracle ASM disk group.
Syntax and Options
Use the srvctl remove diskgroup command with the following syntax:
srvctl remove diskgroup -g diskgroup_name [-f]
Examples
This example removes the disk group named DATA. An error is returned if files are
open on this disk group.
srvctl remove diskgroup -g DATA
srvctl remove listener
Removes the specified listener or all listeners.
Syntax and Options
Use the srvctl remove listener command with the following syntax:
srvctl remove listener [-l listener_name] [-a] [-f]
Table 4–44 srvctl remove database Options
Options Description
-d db_unique_name Unique name for the database. Must match the DB_UNIQUE_
NAME initialization parameter setting. If DB_UNIQUE_NAME is
unspecified, then this option must match the DB_NAME
initialization parameter setting. The default setting for DB_
UNIQUE_NAME uses the setting for DB_NAME.
-f Force. Removes the database even if it is running.
-y Suppresses the confirmation prompt and removes immediately
-v Verbose output. A success or failure message is displayed.
Table 4–45 srvctl remove diskgroup Options
Option Description
-g diskgroup_name Disk group name
-f Force. Removes the disk group even if files are open on it.
Table 4–46 srvctl remove listener Options
Options Description
-l listener_name Name of the listener that you want to remove. If omitted, then
the default is LISTENER.
-a Remove all listeners
-f Force. Removes the listener even if databases are using it.](https://image.slidesharecdn.com/e25494-140702182938-phpapp02/85/E25494-196-320.jpg)
![SRVCTL Command Reference for Oracle Restart
Configuring Automatic Restart of an Oracle Database 4-55
Example
The following command removes the listener lsnr01:
srvctl remove listener -l lsnr01
srvctl remove ons
Removes ONS.
Syntax and Options
Use the srvctl remove ons command as follows:
srvctl remove ons -f -v
srvctl remove service
Removes the specified database service.
Syntax and Options
Use the srvctl remove service command as follows:
srvctl remove service -d db_unique_name -s service_name]
Example
An example of this command is:
srvctl remove service -d dbcrm -s sales
Table 4–47 srvctl remove ons Options
Options Description
-f Force. Removes ONS even if it is enabled.
-v Verbose output
Table 4–48 srvctl remove service Options
Options Description
-d db_unique_name Unique name for the database. Must match the DB_UNIQUE_
NAME initialization parameter setting. If DB_UNIQUE_NAME is
unspecified, then this option must match the DB_NAME
initialization parameter setting. The default setting for DB_
UNIQUE_NAME uses the setting for DB_NAME.
-s service_name Service name](https://image.slidesharecdn.com/e25494-140702182938-phpapp02/85/E25494-197-320.jpg)
![setenv
4-56 Oracle Database Administrator's Guide
setenv
The setenv command sets values of environment variables in the Oracle Restart
configuration for a database, a listener, or the Oracle ASM instance.
To perform srvctl setenv operations, you must be logged in to the database host
computer with the proper user account. See "Preparing to Run SRVCTL" on page 4-10
for more information.
srvctl setenv asm
Sets the values of environment variables in the Oracle Restart configuration for the
Oracle ASM instance. Before starting the instance, Oracle Restart sets environment
variables to the values stored in the configuration.
Syntax and Options
Use the srvctl setenv asm command with the following syntax:
srvctl setenv asm {-t name=val[,name=val,...] | -T name=val}
Example
The following example sets the AIX operating system environment variable
AIXTHREAD_SCOPE in the Oracle ASM instance configuration:
srvctl setenv asm -t AIXTHREAD_SCOPE=S
Table 4–49 srvctl setenv and unsetenv Summary
Command Description
srvctl setenv asm on
page 4-56
Sets environment variables in the Oracle Restart configuration for
an Oracle ASM instance
srvctl setenv database on
page 4-57
Sets environment variables in the Oracle Restart configuration for a
database instance
srvctl setenv listener on
page 4-57
Sets environment variables in the Oracle Restart configuration for
the specified listener or all listeners
See Also:
■ getenv command on page 4-47
■ unsetenv command on page 4-71
■ "Managing Environment Variables in the Oracle Restart
Configuration" on page 4-17
Table 4–50 srvctl setenv database Options
Options Description
-t name=val[,name=val,...] Comma-delimited list of name/value pairs of environment
variables
-T name=val Enables single environment variable to be set to a value
that contains commas or other special characters](https://image.slidesharecdn.com/e25494-140702182938-phpapp02/85/E25494-198-320.jpg)
![SRVCTL Command Reference for Oracle Restart
Configuring Automatic Restart of an Oracle Database 4-57
srvctl setenv database
Sets the values of environment variables in the Oracle Restart configuration for a
database instance. Before starting the instance, Oracle Restart sets environment
variables to the values stored in the configuration.
Syntax and Options
Use the srvctl setenv database command with the following syntax:
srvctl setenv database -d db_unique_name {-t name=val[,name=val,...] |
-T name=val}
Example
The following example sets the LANG environment variable in the configuration of the
database with a DB_UNIQUE_NAME of dbcrm:
srvctl setenv database -d dbcrm -t LANG=en
srvctl setenv listener
Sets the values of environment variables in the Oracle Restart configuration for a
listener. Before starting the listener, Oracle Restart sets environment variables to the
values stored in the configuration.
Syntax and Options
Use the srvctl setenv listener command with the following syntax:
srvctl setenv listener [-l listener_name] {-t name=val[,name=val,...] |
-T name=val}
Example
The following example sets the AIX operating system environment variable
AIXTHREAD_SCOPE in the configuration of the listener named crmlistener:
Table 4–51 srvctl setenv database Options
Options Description
-d db_unique_name Unique name for the database. Must match the DB_UNIQUE_
NAME initialization parameter setting. If DB_UNIQUE_NAME is
unspecified, then this option must match the DB_NAME
initialization parameter setting. The default setting for DB_
UNIQUE_NAME uses the setting for DB_NAME.
-t name=val[,name=val,...] Comma-delimited list of name/value pairs of environment
variables
-T name=val Enables single environment variable to be set to a value
that contains commas or other special characters
Table 4–52 srvctl setenv listener Options
Options Description
-l listener_name Listener name. If omitted, sets the specified environment
variables in all listener configurations.
-t name=val[,name=val,...] Comma-delimited list of name/value pairs of environment
variables
-T name=val Enables single environment variable to be set to a value
that contains commas or other special characters](https://image.slidesharecdn.com/e25494-140702182938-phpapp02/85/E25494-199-320.jpg)

![SRVCTL Command Reference for Oracle Restart
Configuring Automatic Restart of an Oracle Database 4-59
start
Starts the specified component or components.
srvctl start asm
Starts the Oracle ASM instance.
For this command, SRVCTL connects "/ as sysasm" to perform the operation. To run
such operations, the owner of the executables in the Oracle Grid Infrastructure home
must be a member of the OSASM group, and users running the commands must also
be in the OSASM group.
Syntax and Options
Use the srvctl start asm command with the following syntax:
srvctl start asm [-o start_options]
Examples
This example starts the Oracle ASM instance, which then mounts any disk groups
named in the ASM_DISKGROUPS initialization parameter:
srvctl start asm
This example starts the Oracle ASM instance without mounting any disk groups:
srvctl start asm -o nomount
srvctl start database
Starts the specified database instance.
Table 4–53 srvctl start Summary
Command Description
srvctl start asm on page 4-59 Starts the Oracle ASM instance
srvctl start database on page 4-59 Starts the specified database
srvctl start diskgroup on page 4-60 Starts (mounts) the specified Oracle ASM disk
group
srvctl start home on page 4-61 Starts all of the components managed by Oracle
Restart in the specified Oracle home
srvctl start listener on page 4-61 Starts the specified listener or all Oracle
Restart–managed listeners
srvctl start ons on page 4-61 Starts ONS
srvctl start service on page 4-62 Starts the specified database service or services
See Also: "Starting and Stopping Components Managed by Oracle
Restart" on page 4-25
Table 4–54 srvctl start asm Option
Option Description
-o start_options Comma-delimited list of options for the startup command (OPEN,
MOUNT, NOMOUNT, or FORCE). If omitted, defaults to normal startup
(OPEN).](https://image.slidesharecdn.com/e25494-140702182938-phpapp02/85/E25494-201-320.jpg)
![start
4-60 Oracle Database Administrator's Guide
For this command, SRVCTL connects "/ as sysdba" to perform the operation. To run
such operations, the owner of the Oracle executables in the database Oracle home
must be a member of the OSDBA group (for example, the dba group on UNIX and
Linux), and users running the commands must also be in the OSDBA group.
Syntax and Options
Use the srvctl start database command with the following syntax:
srvctl start database -d db_unique_name [-o start_options]
Example
An example of this command is:
srvctl start database -d dbcrm -o nomount
srvctl start diskgroup
Starts (mounts) an Oracle ASM disk group.
Syntax and Options
Use the srvctl start diskgroup command with the following syntax:
srvctl start diskgroup -g diskgroup_name
Example
An example of this command is:
srvctl start diskgroup -g DATA
Table 4–55 srvctl start database Options
Option Description
-d db_unique_name Unique name for the database. Must match the DB_UNIQUE_NAME
initialization parameter setting. If DB_UNIQUE_NAME is
unspecified, then this option must match the DB_NAME
initialization parameter setting. The default setting for DB_
UNIQUE_NAME uses the setting for DB_NAME.
-o start_options Comma-delimited list of options for the startup command (for
example: OPEN, MOUNT, NOMOUNT, RESTRICT, and so on)
Notes:
■ This command parameter does not support the PFILE option
or the QUIET option, but it supports all other database
startup options.
■ For multi-word startup options, such as read only and read
write, separate the words with a space and enclose in single
quotation marks (''). For example, 'read only'.
See Also: SQL*Plus User's Guide and Reference for more
information about startup options
Table 4–56 srvctl start diskgroup Options
Option Description
-g diskgroup_name Disk group name](https://image.slidesharecdn.com/e25494-140702182938-phpapp02/85/E25494-202-320.jpg)
![SRVCTL Command Reference for Oracle Restart
Configuring Automatic Restart of an Oracle Database 4-61
srvctl start home
Starts all of the components that are managed by Oracle Restart in the specified Oracle
home. The Oracle home can be an Oracle Database home or an Oracle Grid
Infrastructure home.
This command starts the components that were stopped by a srvctl stop home. This
command uses the information in the specified state file to identify the components to
start.
Syntax and Options
Use the srvctl start home command with the following syntax:
srvctl start home -o oracle_home -s state_file
srvctl start listener
Starts the specified listener or all listeners.
Syntax and Options
Use the srvctl start listener command with the following syntax:
srvctl start listener [-l listener_name]
Example
An example of this command is:
srvctl start listener -l listener
srvctl start ons
Starts ONS.
Syntax and Options
Use the srvctl start ons command with the following syntax:
srvctl start ons -v
Note: Use this command to restart components after you install a
patch in an Oracle home.
Table 4–57 srvctl start home Options
Option Description
-o Complete path of the Oracle home
-s Complete path of the state file. The state file contains the current
state information for the components in the Oracle home and is
created when the srvctl stop home command or the srvctl
status home command is run.
Table 4–58 srvctl start listener Options
Option Description
-l listener_name Listener name. If omitted, all Oracle Restart–managed listeners
are started.](https://image.slidesharecdn.com/e25494-140702182938-phpapp02/85/E25494-203-320.jpg)
![start
4-62 Oracle Database Administrator's Guide
srvctl start service
Starts the specified database service or services.
Syntax and Options
Use the srvctl start service command with the following syntax:
srvctl start service -d db_unique_name [-s service_name_list] [-o start_options]
Example
For the database with a DB_UNIQUE_NAME of dbcrm, the following example starts the
sales database service:
srvctl start service -d dbcrm -s sales
Table 4–59 srvctl start ons Options
Option Description
-v Verbose output
Table 4–60 srvctl start service Options
Option Description
-d db_unique_name Unique name for the database. Must match the DB_UNIQUE_NAME
initialization parameter setting. If DB_UNIQUE_NAME is unspecified,
then this option must match the DB_NAME initialization parameter
setting. The default setting for DB_UNIQUE_NAME uses the setting for
DB_NAME.
-s service_name_list Comma-delimited list of service names. The service name list is
optional and if not provided, SRVCTL starts all of the database's
services
-o start_options Options for database startup (for example: OPEN, MOUNT, NOMOUNT
and so on) if the database must be started first](https://image.slidesharecdn.com/e25494-140702182938-phpapp02/85/E25494-204-320.jpg)
![SRVCTL Command Reference for Oracle Restart
Configuring Automatic Restart of an Oracle Database 4-63
status
Displays the running status of the specified component or set of components.
srvctl status asm
Displays the running status of the Oracle ASM instance.
Syntax and Options
Use the srvctl status asm command with the following syntax:
srvctl status asm [-a]
Example
An example of this command is:
srvctl status asm
ASM is running on dbhost
srvctl status database
Displays the running status of the specified database.
Syntax and Options
Use the srvctl status database command with the following syntax:
srvctl status database -d db_unique_name [-f] [-v]
Table 4–61 srvctl status Summary
Command Description
srvctl status asm on page 4-63 Displays the running status of the Oracle ASM
instance
srvctl status database on page 4-63 Displays the running status of a database
srvctl status diskgroup on page 4-64 Displays the running status of an Oracle ASM disk
group
srvctl status home on page 4-64 Displays the running status of all of the components
that are managed by Oracle Restart in the specified
Oracle home
srvctl status listener on page 4-65 Displays the running status of the specified listener
or all Oracle Restart–managed listeners
srvctl status ons on page 4-65 Displays the running status of ONS
srvctl status service on page 4-65 Displays the running status of one or more services
Table 4–62 srvctl status asm Options
Option Description
-a Display enabled/disabled status also](https://image.slidesharecdn.com/e25494-140702182938-phpapp02/85/E25494-205-320.jpg)
![status
4-64 Oracle Database Administrator's Guide
Example
An example of this command is:
srvctl status database -d dbcrm -v
Database dbcrm is running with online services mfg,sales
srvctl status diskgroup
Displays the running status of an Oracle ASM disk group.
Syntax and Options
Use the srvctl status diskgroup command with the following syntax:
srvctl status diskgroup -g diskgroup_name [-a]
Example
An example of this command is:
srvctl status diskgroup -g DATA
Disk Group DATA is running on dbhost
srvctl status home
Displays the running status of all of the components that are managed by Oracle
Restart in the specified Oracle home. The Oracle home can be an Oracle Database
home or an Oracle Grid Infrastructure home.
This command writes the current status of the components to the specified state file.
Syntax and Options
Use the srvctl status home command with the following syntax:
srvctl status home -o oracle_home -s state_file
Table 4–63 srvctl status database Options
Option Description
-d db_unique_name Unique name for the database. Must match the DB_UNIQUE_NAME
initialization parameter setting. If DB_UNIQUE_NAME is
unspecified, then this option must match the DB_NAME
initialization parameter setting. The default setting for DB_
UNIQUE_NAME uses the setting for DB_NAME.
-f Display a message if the database is disabled
-v Verbose output. Lists the database services that are running.
Table 4–64 srvctl status diskgroup Options
Option Description
-g diskgroup_name Disk group name
-a Display enabled/disabled status also
Table 4–65 srvctl status home Options
Option Description
-o Complete path of the Oracle home](https://image.slidesharecdn.com/e25494-140702182938-phpapp02/85/E25494-206-320.jpg)
![SRVCTL Command Reference for Oracle Restart
Configuring Automatic Restart of an Oracle Database 4-65
srvctl status listener
Displays the running status of the specified listener or of all Oracle Restart–managed
listeners.
Syntax and Options
Use the srvctl status listener command with the following syntax:
srvctl status listener -l listener_name
Example
An example of this command is:
srvctl status listener -l crmlistener
Listener CRMLISTENER is running on dbhost
srvctl status ons
Displays the running status of ONS.
Syntax and Options
Use the srvctl status ons command with the following syntax:
srvctl status ons
srvctl status service
Displays the running status of one or more database services.
Syntax and Options
Use the srvctl status service command with the following syntax:
srvctl status service -d db_unique_name [-s service_name_list] [-f] [-v]
-s Complete path of the state file
Table 4–66 srvctl status listener Options
Option Description
-l listener_name Listener name. If omitted, the status of all listeners is displayed.
Table 4–67 srvctl status service Options
Option Description
-d db_unique_name Unique name for the database. Must match the DB_UNIQUE_
NAME initialization parameter setting. If DB_UNIQUE_NAME is
unspecified, then this option must match the DB_NAME
initialization parameter setting. The default setting for DB_
UNIQUE_NAME uses the setting for DB_NAME.
-s service_name_list Comma-delimited list of service names. If omitted, status is
listed for all database services for the designated database.
-f Display a message if a service is disabled
-v Verbose output
Table 4–65 (Cont.) srvctl status home Options
Option Description](https://image.slidesharecdn.com/e25494-140702182938-phpapp02/85/E25494-207-320.jpg)

![SRVCTL Command Reference for Oracle Restart
Configuring Automatic Restart of an Oracle Database 4-67
stop
Stops the specified component or components.
If you want a component to remain stopped after you issue a srvctl stop command,
disable the component. See the disable command on page 4-41.
srvctl stop asm
Stops the Oracle ASM instance.
Syntax and Options
Use the srvctl stop asm command with the following syntax:
srvctl stop asm [-o stop_options] [-f]
Example
An example of this command is:
srvctl stop asm -o abort -f
Note: If a component is stopped and is not disabled, it could
restart as a result of another planned operation. That is, although a
stopped component will not restart as a result of a failure, it might
be started if a dependent component is started with a srvctl start
command.
Table 4–68 srvctl stop Summary
Command Description
srvctl stop asm on page 4-67 Stops the Oracle ASM instance
srvctl stop database on page 4-68 Stops the specified database instance
srvctl stop diskgroup on page 4-68 Stops (dismounts) the specified Oracle ASM disk group
srvctl stop home on page 4-68 Stops all of the components managed by Oracle Restart
in the specified Oracle home
srvctl stop listener on page 4-69 Stops the specified listener or all listeners
srvctl stop ons on page 4-69 Stops ONS
srvctl stop service on page 4-70 Stops the specified database service or services
See Also: "Starting and Stopping Components Managed by Oracle
Restart" on page 4-25
Table 4–69 srvctl stop asm Option
Option Description
-o stop_options Options for the shutdown operation, for example, NORMAL,
TRANSACTIONAL, IMMEDIATE, or ABORT
-f Force. Must be present if disk groups are currently started
(mounted). This option enables SRVCTL to stop the disk groups
before stopping Oracle ASM. Each dependent database instance is
also stopped according to its stop options, or with the ABORT option
if the configured stop options fail.](https://image.slidesharecdn.com/e25494-140702182938-phpapp02/85/E25494-209-320.jpg)
![stop
4-68 Oracle Database Administrator's Guide
srvctl stop database
Stops a database.
Syntax and Options
Use the srvctl stop database command with the following syntax:
srvctl stop database -d db_unique_name [-o stop_options] [-f]
Example
An example of this command is:
srvctl stop database -d dbcrm
srvctl stop diskgroup
Stops (dismounts) an Oracle ASM disk group.
Syntax and Options
Use the srvctl stop diskgroup command with the following syntax:
srvctl stop diskgroup -g diskgroup_name [-f]
Examples
This example stops the disk group named DATA. An error is returned if files are open
on this disk group.
srvctl stop diskgroup -g DATA
srvctl stop home
Stops all of the components that are managed by Oracle Restart in the specified Oracle
home. The Oracle home can be an Oracle Database home or an Oracle Grid
Infrastructure home.
This command identifies the components that it stopped in the specified state file.
Table 4–70 srvctl stop database Options
Option Description
-d db_unique_name Unique name for the database. Must match the DB_UNIQUE_NAME
initialization parameter setting. If DB_UNIQUE_NAME is
unspecified, then this option must match the DB_NAME
initialization parameter setting. The default setting for DB_
UNIQUE_NAME uses the setting for DB_NAME.
-o stop_options SHUTDOWN command options (for example: NORMAL,
TRANSACTIONAL, IMMEDIATE, or ABORT). Default is IMMEDIATE.
-f Force. Performs a SHUTDOWN ABORT of the database.
Table 4–71 srvctl stop diskgroup Options
Option Description
-g diskgroup_name Disk group name
-f Force. Dismount the disk group even if some files in the disk
group are open.](https://image.slidesharecdn.com/e25494-140702182938-phpapp02/85/E25494-210-320.jpg)
![SRVCTL Command Reference for Oracle Restart
Configuring Automatic Restart of an Oracle Database 4-69
Syntax and Options
Use the srvctl stop home command with the following syntax:
srvctl stop home -o oracle_home -s state_file [-t stop_options] [-f]
srvctl stop listener
Stops the designated listener or all Oracle Restart–managed listeners. Stopping a
listener does not cause databases that are registered with the listener to be stopped.
Syntax and Options
Use the srvctl stop listener command with the following syntax:
srvctl stop listener [-l listener_name] [-f]
Example
An example of this command is:
srvctl stop listener -l crmlistener
srvctl stop ons
Stops ONS.
Syntax and Options
Use the srvctl stop ons command with the following syntax:
Note:
■ Before stopping the components in an Oracle Grid Infrastructure
home, stop the components in a dependent Oracle Database
home.
■ Use this command to stop components before you install a patch
in an Oracle home.
Table 4–72 srvctl stop home Options
Option Description
-o Complete path of the Oracle home
-s Complete path of the state file
-t stop_options SHUTDOWN command options for the database (for example:
NORMAL, TRANSACTIONAL, IMMEDIATE, or ABORT). Default is
IMMEDIATE.
-f Force stop each component
Table 4–73 srvctl stop listener Options
Option Description
-l listener_name Listener name. If omitted, all Oracle Restart–managed listeners
are stopped.
-f Force. Passes the stop command with the -f option to Oracle
Clusterware. See Oracle Clusterware Administration and
Deployment Guide for more information about the Oracle
Clusterware -f option.](https://image.slidesharecdn.com/e25494-140702182938-phpapp02/85/E25494-211-320.jpg)
![stop
4-70 Oracle Database Administrator's Guide
srvctl stop ons -v
srvctl stop service
Stops one or more database services.
Syntax and Options
Use the srvctl stop service command with the following syntax:
srvctl stop service -d db_unique_name [-s service_name_list] [-f]
Examples
The following example stops the sales database service on the database with a DB_
UNIQUE_NAME of dbcrm:
srvctl stop service -d dbcrm -s sales
Table 4–74 srvctl stop ons Options
Option Description
-v Verbose output
Table 4–75 srvctl stop service Options
Option Description
-d db_unique_name Unique name for the database. Must match the DB_UNIQUE_NAME
initialization parameter setting. If DB_UNIQUE_NAME is
unspecified, then this option must match the DB_NAME
initialization parameter setting. The default setting for DB_
UNIQUE_NAME uses the setting for DB_NAME.
-s service_name_list Comma-delimited list of database service names. If you do not
provide a service name list, then SRVCTL stops all services on
the database
-f Force. This option disconnects all of the stopped services'
sessions immediately. Uncommitted transactions are rolled back.
If this option is omitted, active sessions remain connected to the
services, but no further connections to the services can be made.](https://image.slidesharecdn.com/e25494-140702182938-phpapp02/85/E25494-212-320.jpg)
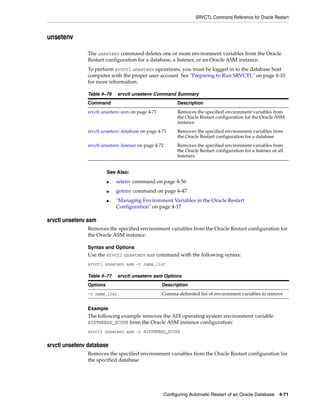
![unsetenv
4-72 Oracle Database Administrator's Guide
Syntax and Options
Use the srvctl unsetenv database command as follows:
srvctl unsetenv database -d db_unique_name -t name_list
Example
The following example deletes the AIXTHREAD_SCOPE environment variable from the
Oracle Restart configuration for the database with a DB_UNIQUE_NAME of dbcrm:
srvctl unsetenv database -d dbcrm -t AIXTHREAD_SCOPE
srvctl unsetenv listener
Removes the specified environment variables from the Oracle Restart configuration for
the specified listener or all listeners.
Syntax and Options
Use the srvctl unsetenv listener command with the following syntax:
srvctl unsetenv listener [-l listener_name] -t name_list
Example
The following example removes the AIX operating system environment variable
AIXTHREAD_SCOPE from the listener configuration for the listener named crmlistener:
srvctl unsetenv listener -l crmlistener -t AIXTHREAD_SCOPE
Table 4–78 srvctl unsetenv database Options
Options Description
-d db_unique_name Unique name for the database. Must match the DB_UNIQUE_NAME
initialization parameter setting. If DB_UNIQUE_NAME is
unspecified, then this option must match the DB_NAME
initialization parameter setting. The default setting for DB_
UNIQUE_NAME uses the setting for DB_NAME.
-t name_list Comma-delimited list of environment variables to remove
Table 4–79 srvctl unsetenv listener Options
Options Description
-l listener_name Listener name. If omitted, the specified environment
variables are removed from the configurations of all
listeners.
-t name_list Comma-delimited list of environment variables to remove](https://image.slidesharecdn.com/e25494-140702182938-phpapp02/85/E25494-214-320.jpg)
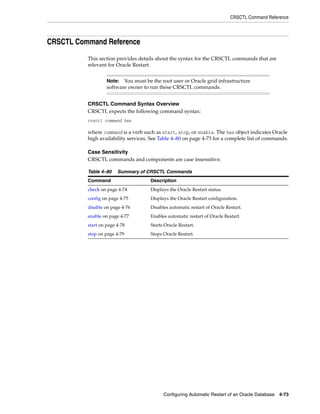


![CRSCTL Command Reference
Configuring Automatic Restart of an Oracle Database 4-79
stop
Stops Oracle Restart.
4Syntax and Options
crsctl stop has [-f]
Table 4–81 crsctl stop has Options
Options Description
-f Force. If any resources that are managed by Oracle Restart are
still running, then try to stop these resources gracefully. If a
resource cannot be stopped gracefully, then try to force the
resource to stop.
For example, if an Oracle ASM instance is running, then
SHUTDOWN IMMEDIATE attempts to stop the Oracle ASM instance
gracefully, while SHUTDOWN ABORT attempts to force the Oracle
ASM instance to stop.
When the -f option is not specified, this command tries to stop
resources managed by Oracle Restart gracefully but does not try
to force them to stop.](https://image.slidesharecdn.com/e25494-140702182938-phpapp02/85/E25494-221-320.jpg)

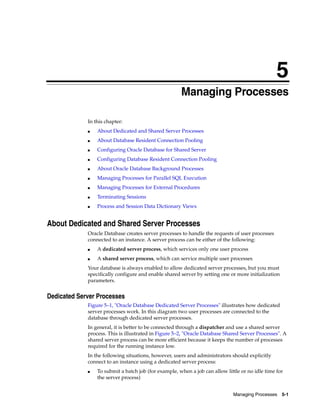
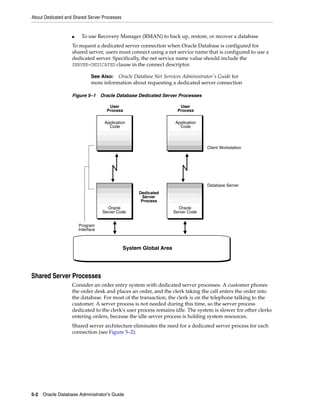
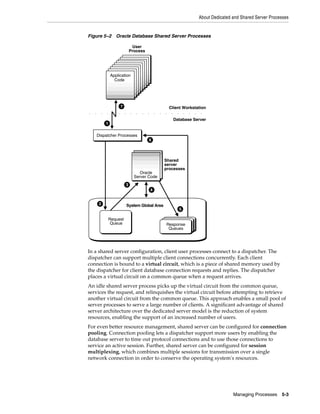
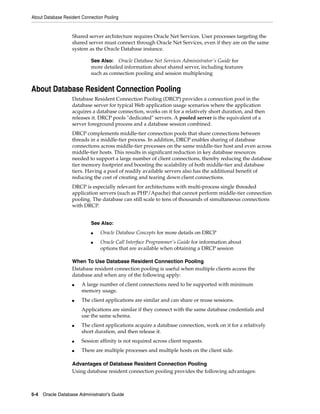
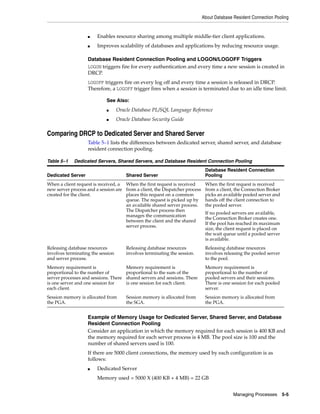
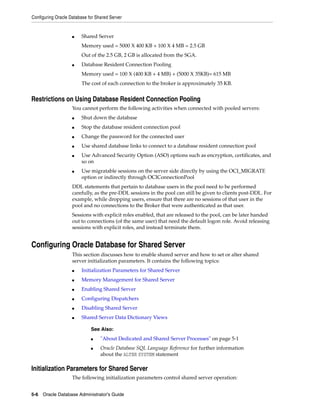
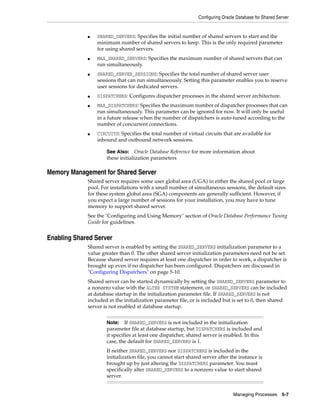
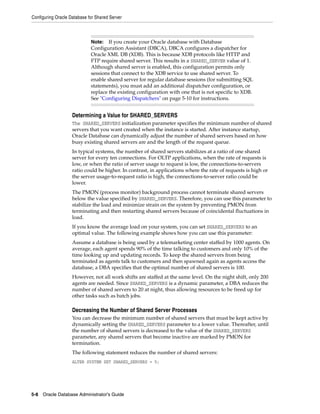
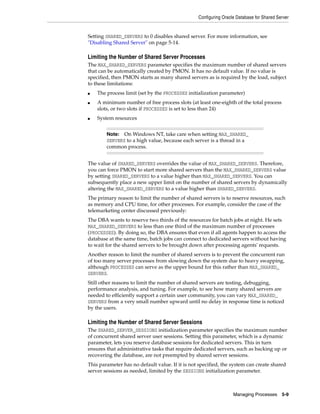
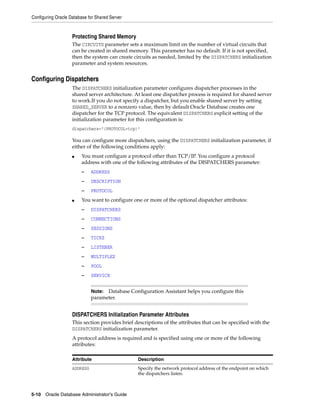
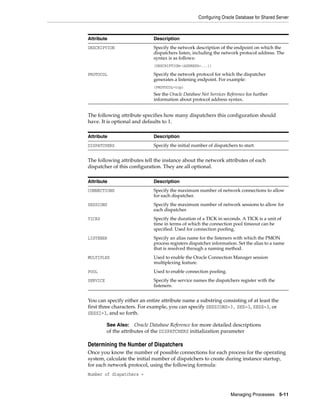
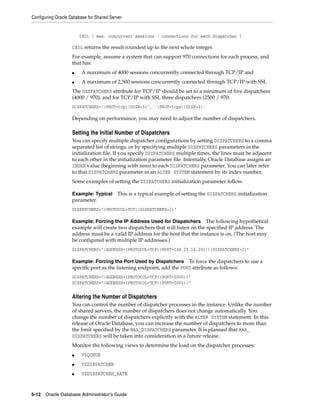
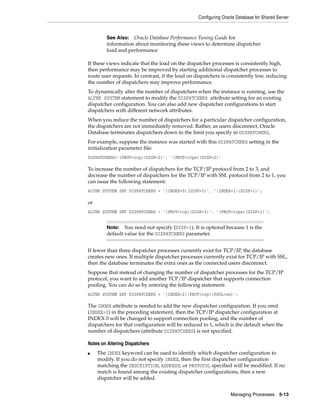
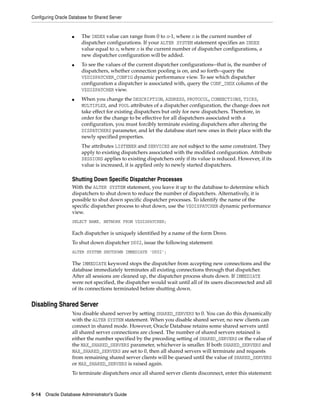
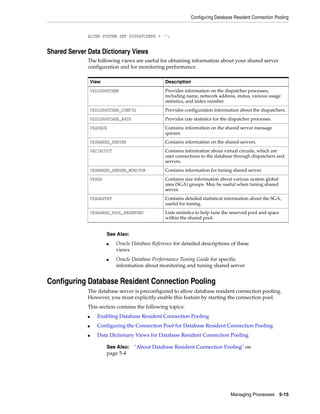
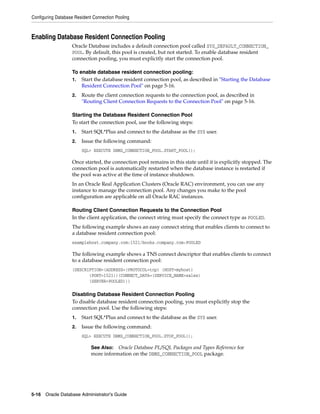
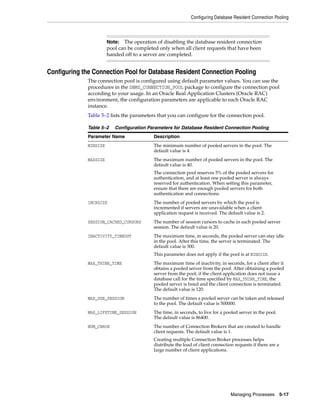
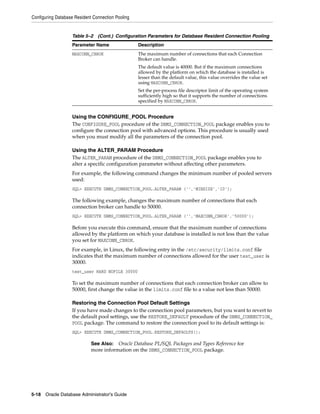
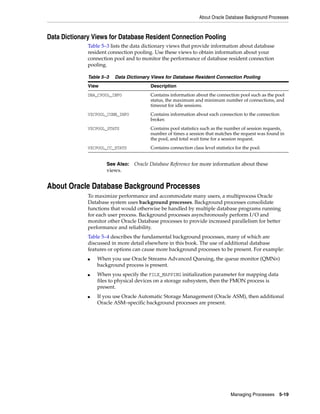
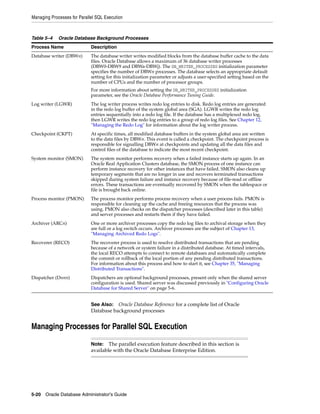
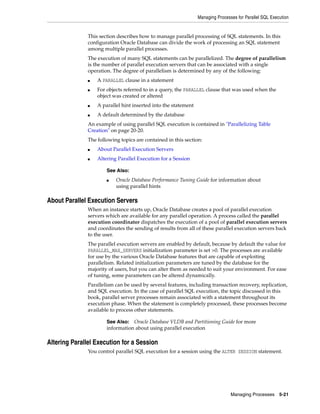
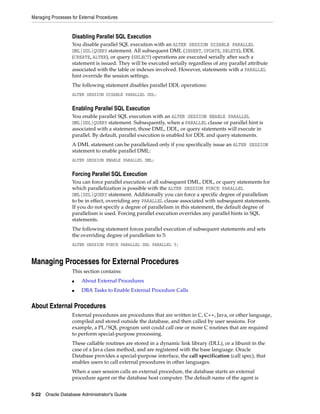
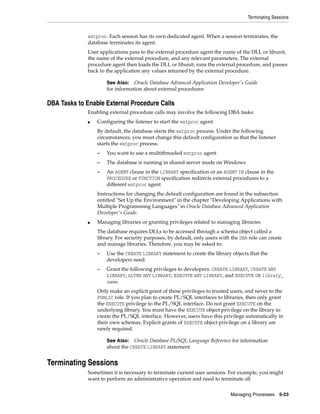
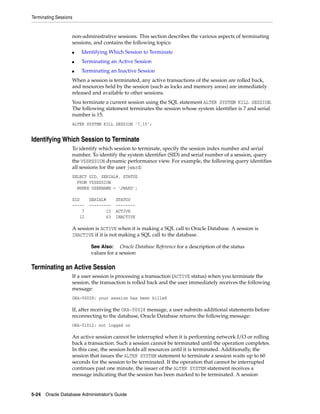
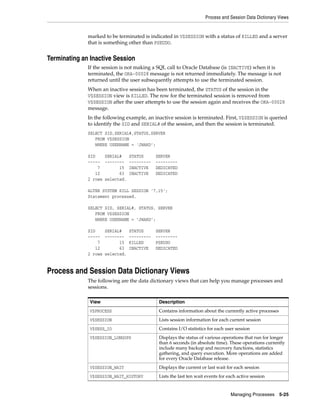
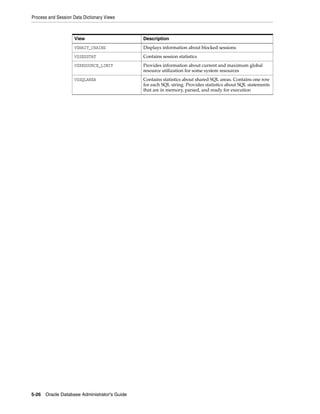

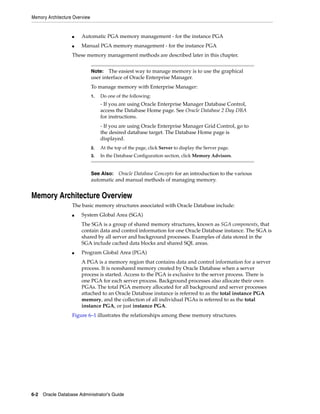
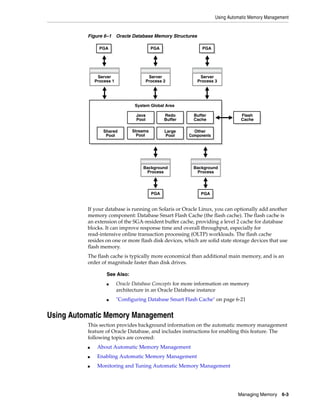
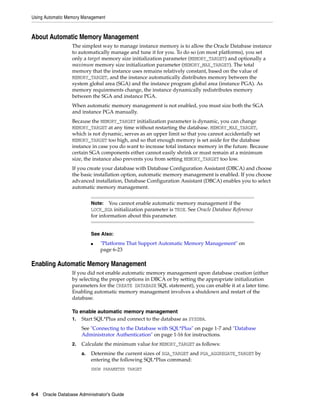
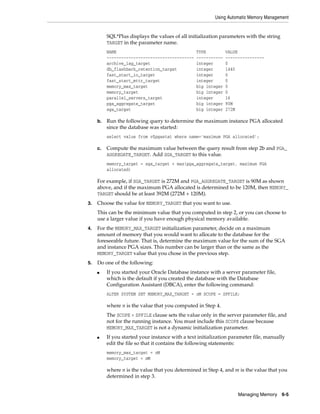
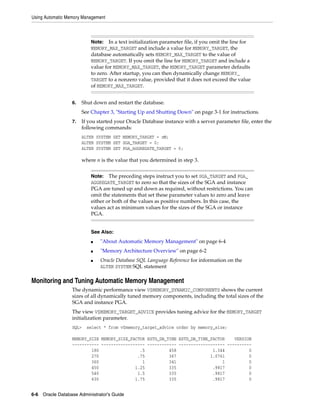
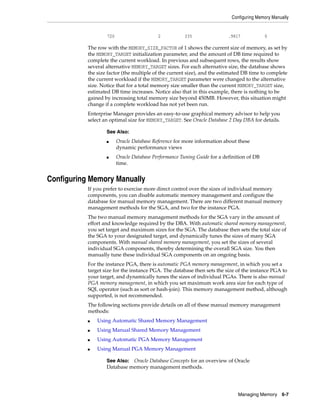
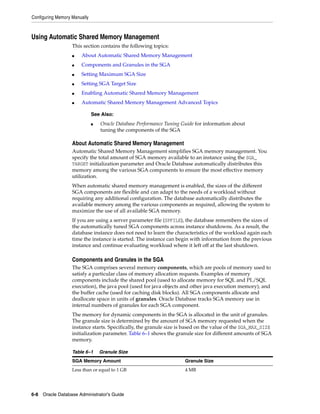
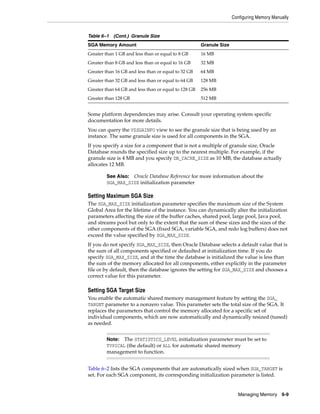
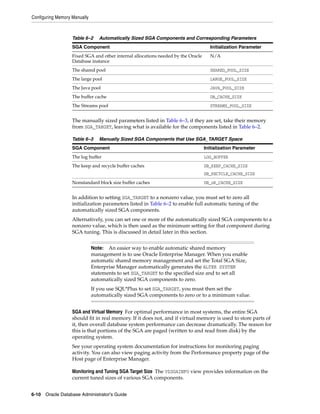
![Configuring Memory Manually
Managing Memory 6-11
The V$SGA_TARGET_ADVICE view provides information that helps you decide on a value
for SGA_TARGET.
SQL> select * from v$sga_target_advice order by sga_size;
SGA_SIZE SGA_SIZE_FACTOR ESTD_DB_TIME ESTD_DB_TIME_FACTOR ESTD_PHYSICAL_READS
---------- --------------- ------------ ------------------- -------------------
290 .5 448176 1.6578 1636103
435 .75 339336 1.2552 1636103
580 1 270344 1 1201780
725 1.25 239038 .8842 907584
870 1.5 211517 .7824 513881
1015 1.75 201866 .7467 513881
1160 2 200703 .7424 513881
The information in this view is similar to that provided in the V$MEMORY_TARGET_
ADVICE view for automatic memory management. See "Monitoring and Tuning
Automatic Memory Management" on page 6-6 for an explanation of that view.
Enterprise Manager provides an easy-to-use graphical memory advisor to help you
select an optimal size for SGA_TARGET. See Oracle Database 2 Day DBA for details.
Enabling Automatic Shared Memory Management
The procedure for enabling automatic shared memory management (ASMM) differs
depending on whether you are changing to ASMM from manual shared memory
management or from automatic memory management.
To change to ASMM from manual shared memory management:
1. Run the following query to obtain a value for SGA_TARGET:
SELECT (
(SELECT SUM(value) FROM V$SGA) -
(SELECT CURRENT_SIZE FROM V$SGA_DYNAMIC_FREE_MEMORY)
) "SGA_TARGET"
FROM DUAL;
2. Set the value of SGA_TARGET, either by editing the text initialization parameter file
and restarting the database, or by issuing the following statement:
ALTER SYSTEM SET SGA_TARGET=value [SCOPE={SPFILE|MEMORY|BOTH}]
where value is the value computed in step 1 or is some value between the sum of
all SGA component sizes and SGA_MAX_SIZE. For more information on the ALTER
SYSTEM statement and its SCOPE clause, see Oracle Database SQL Language Reference.
3. Do one of the following:
■ For more complete automatic tuning, set the values of the automatically sized
SGA components listed in Table 6–2 to zero. Do this by editing the text
initialization parameter file or by issuing ALTER SYSTEM statements.
■ To control the minimum size of one or more automatically sized SGA
components, set those component sizes to the desired value. (See the next
section for details.) Set the values of the other automatically sized SGA
components to zero. Do this by editing the text initialization parameter file or
by issuing ALTER SYSTEM statements.
See Also: Oracle Database Reference for more information about these
dynamic performance views](https://image.slidesharecdn.com/e25494-140702182938-phpapp02/85/E25494-259-320.jpg)
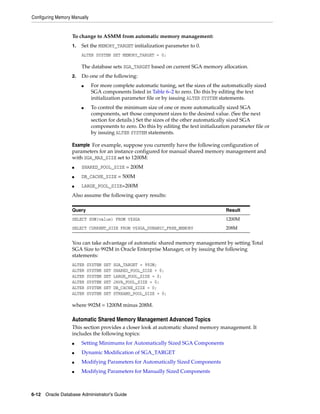
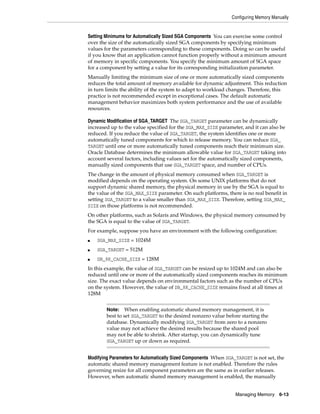

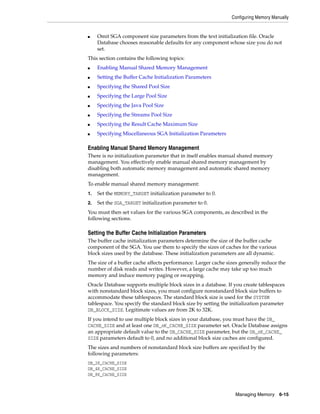
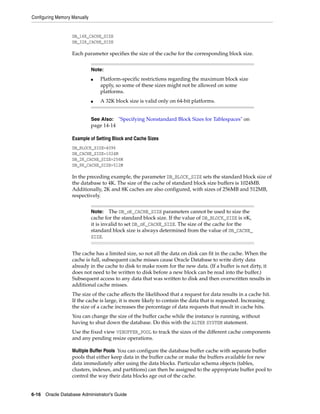

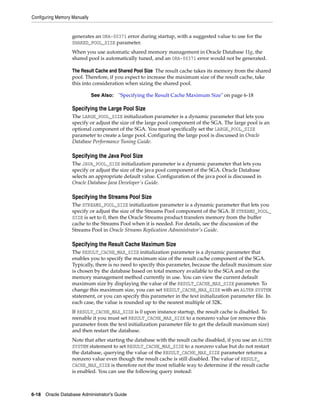
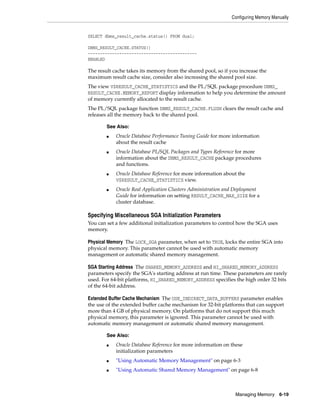
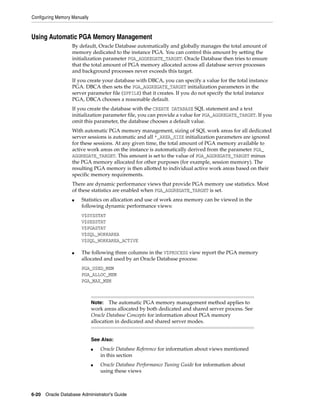
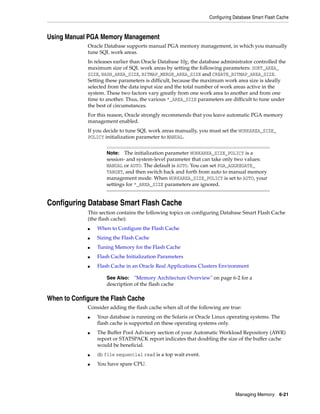
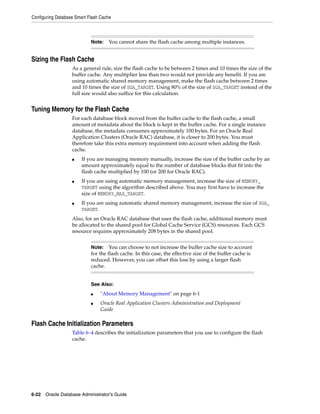
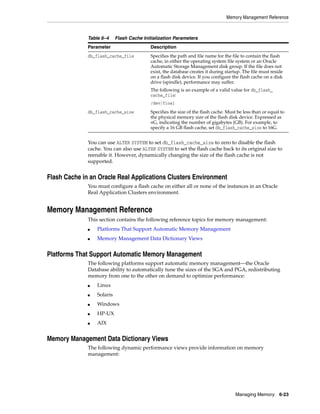
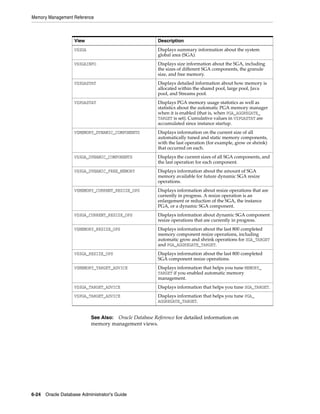
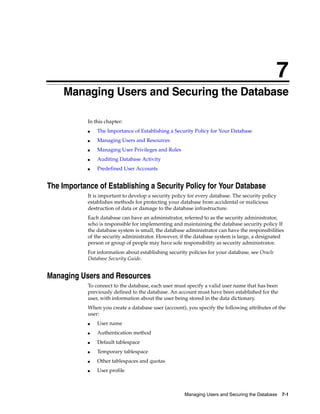
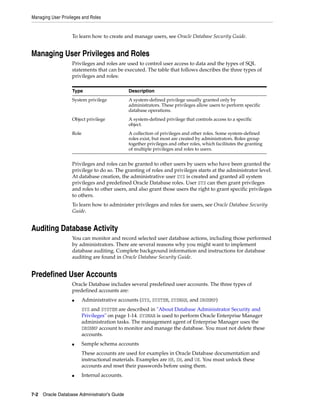


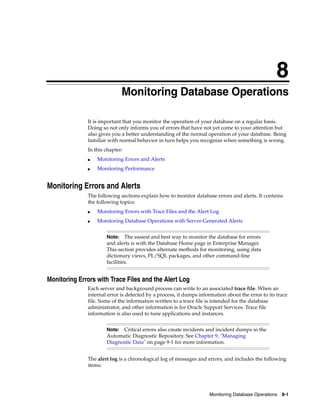
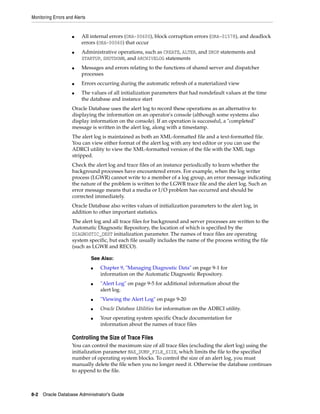
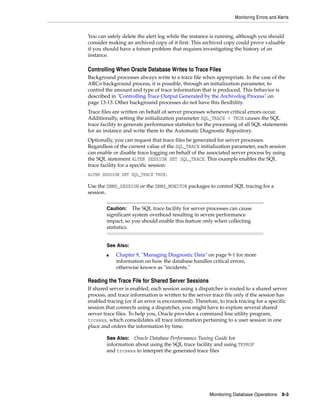
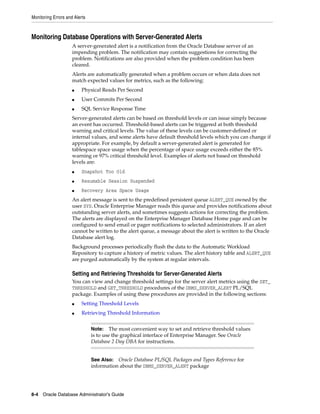
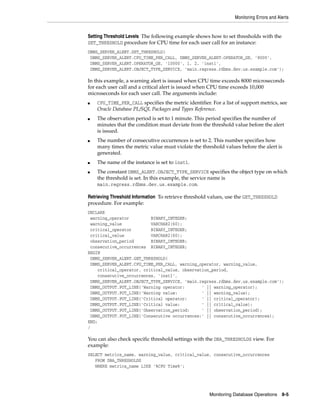
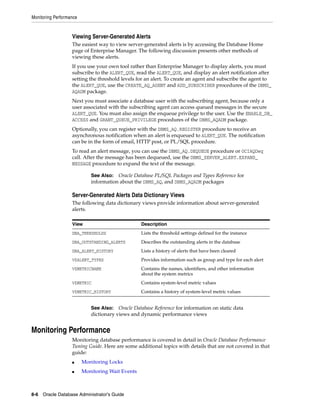
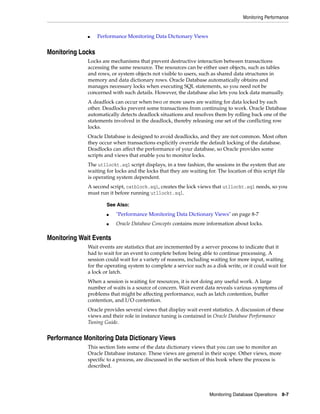
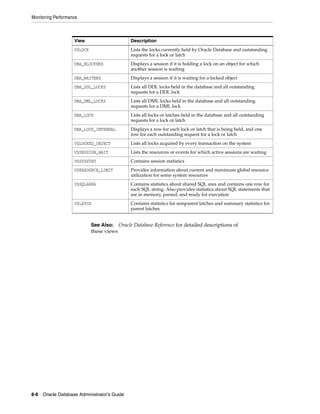

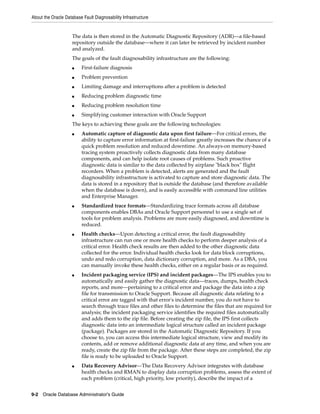
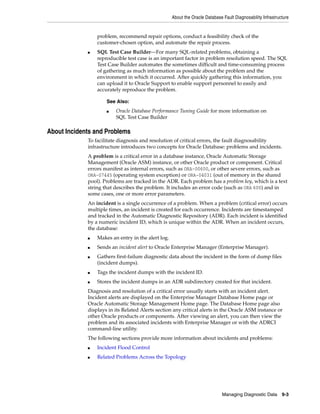
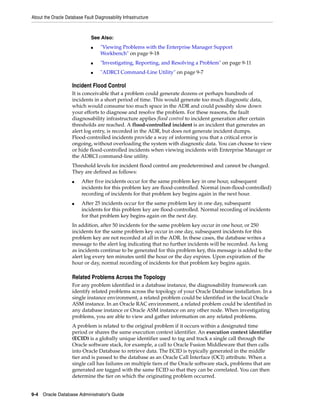
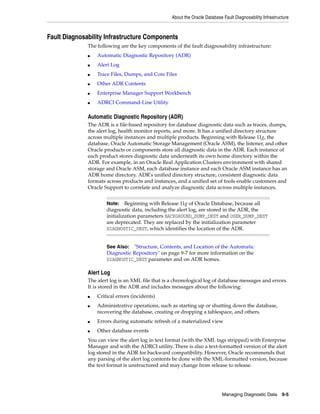
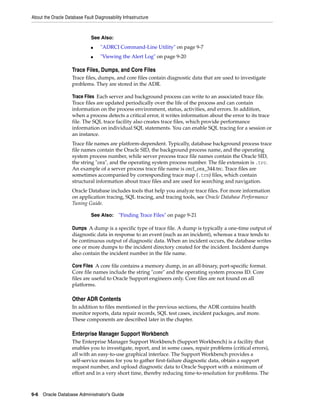
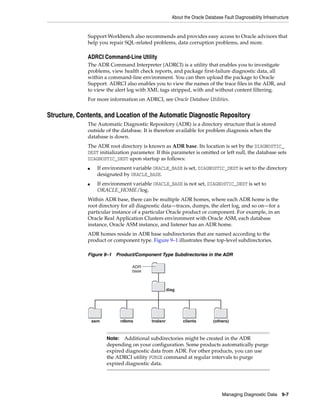
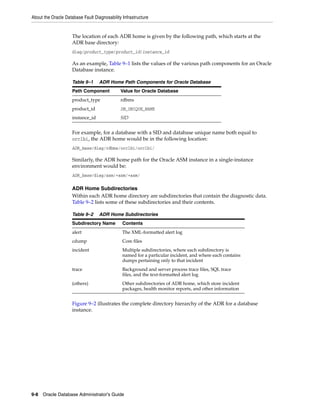
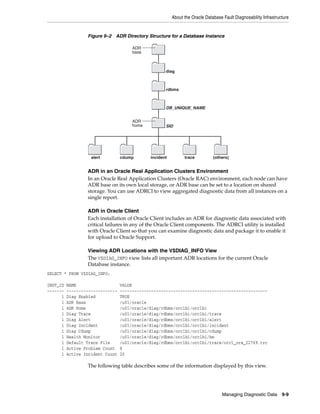
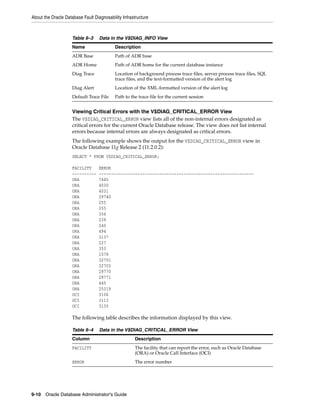
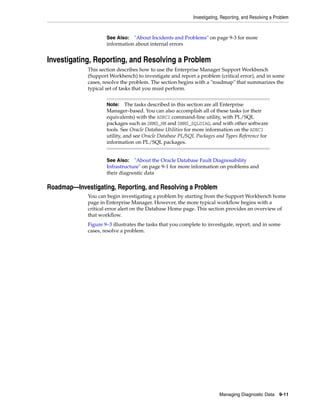
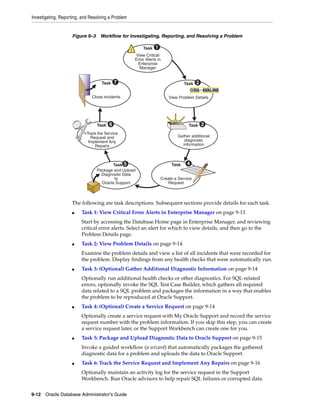
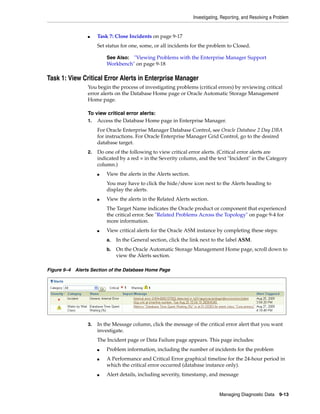
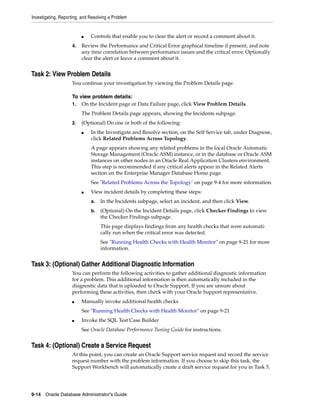
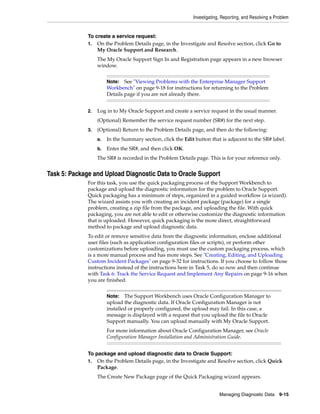
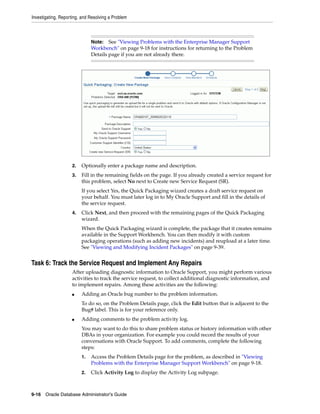
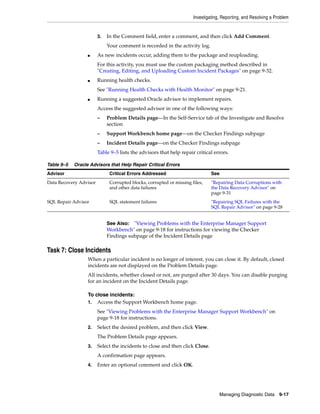
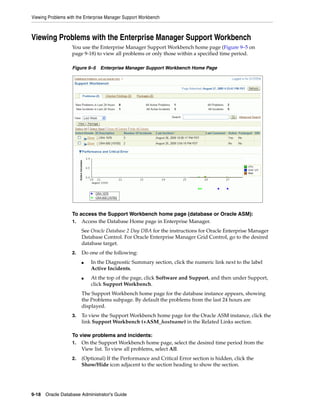
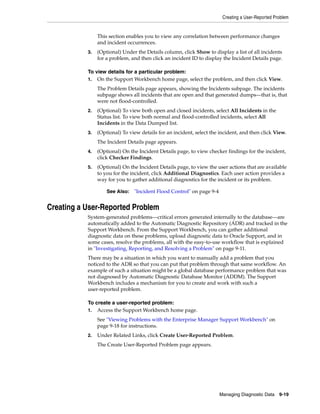
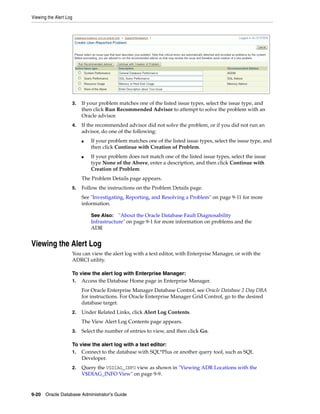
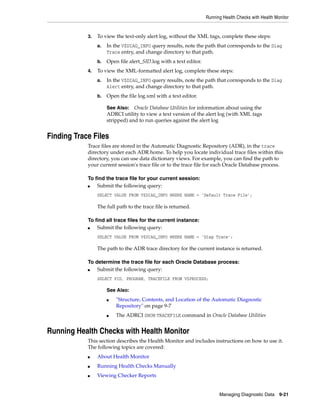


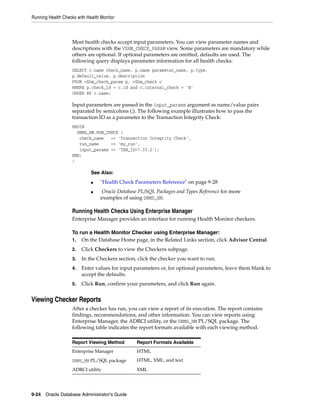
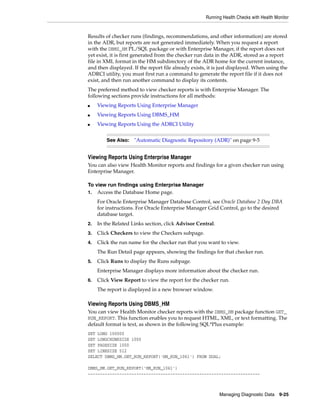
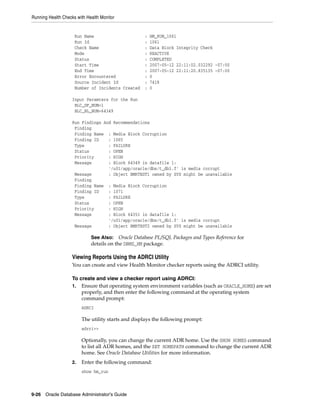

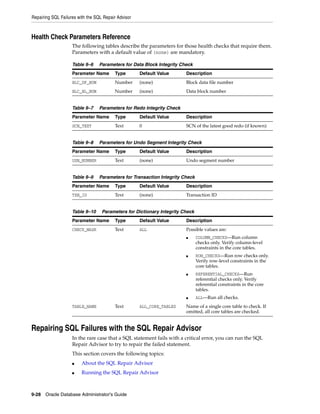
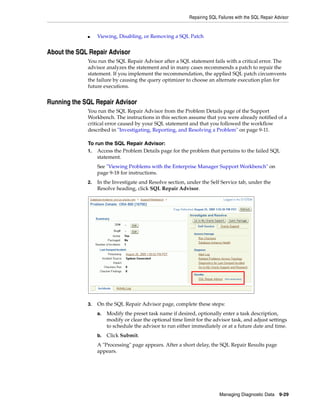
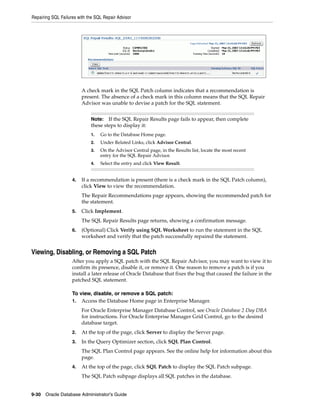
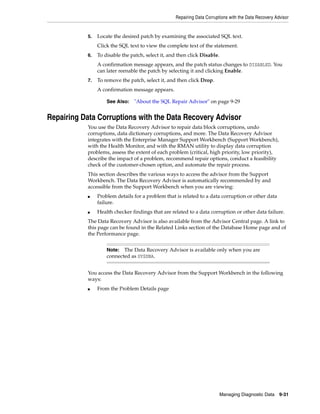
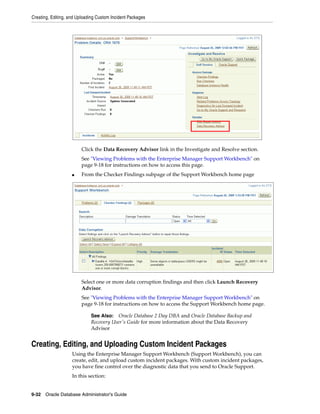
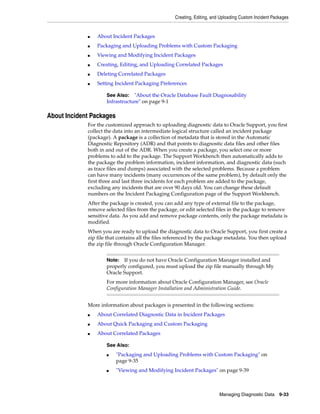
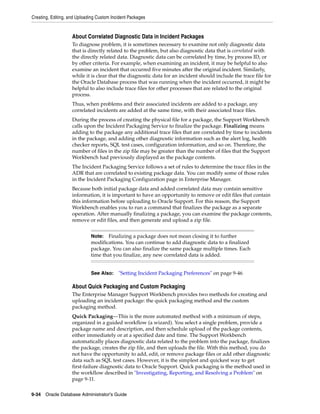
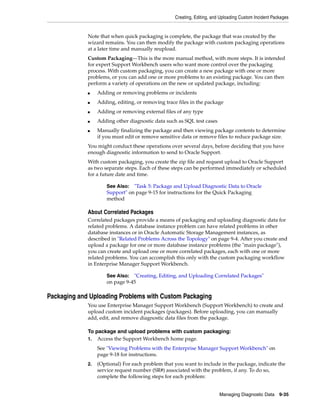
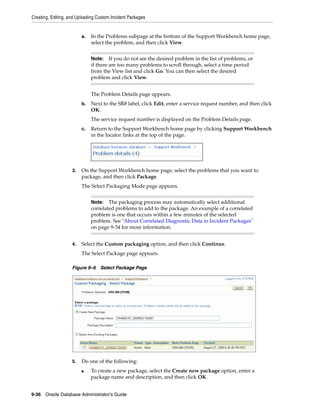
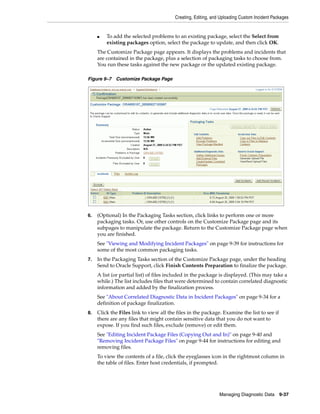
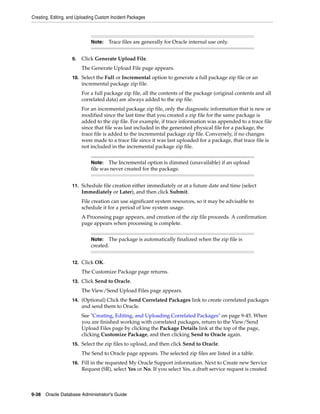
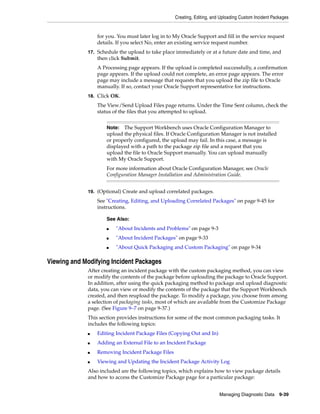

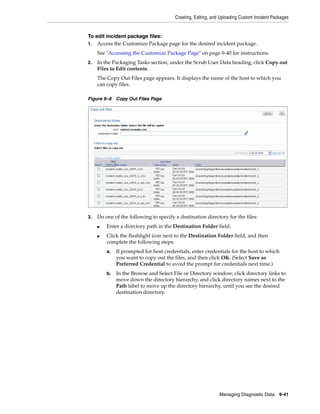
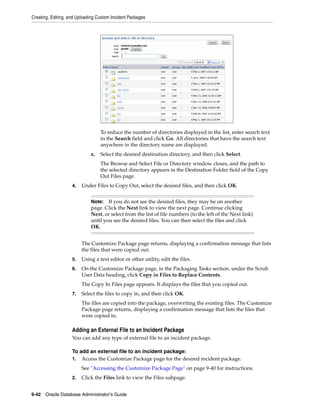
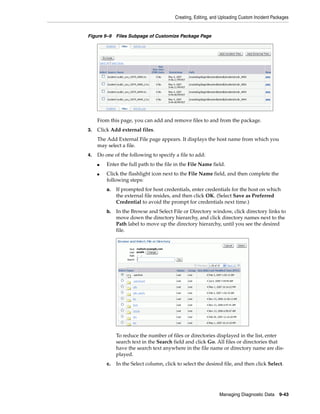
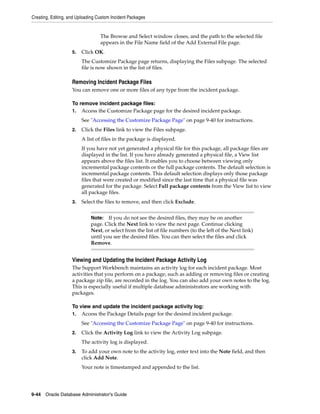
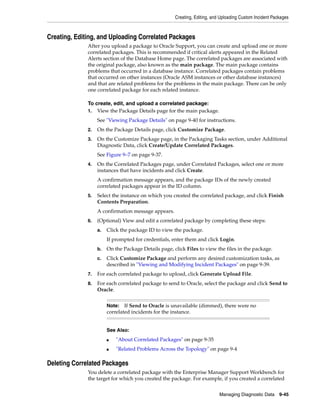
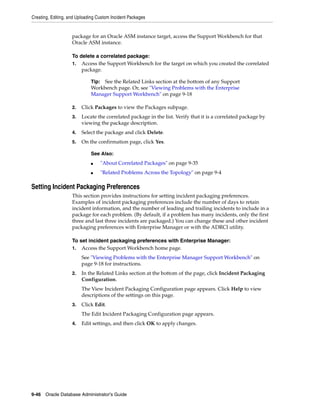


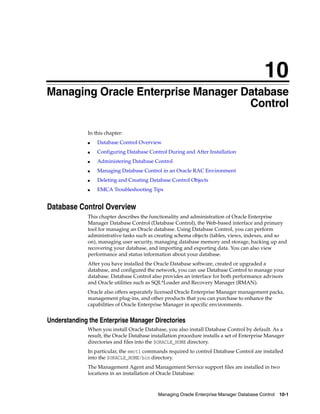
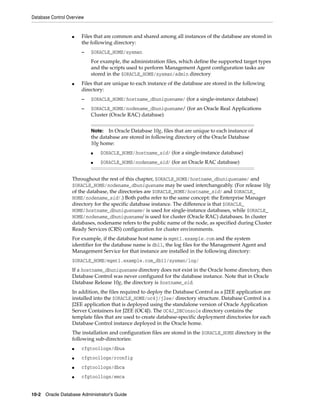
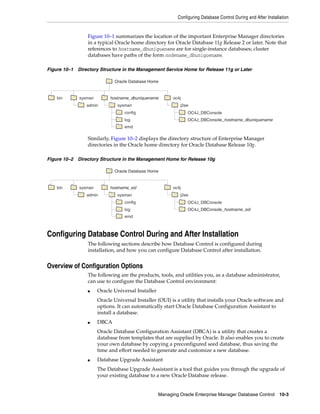
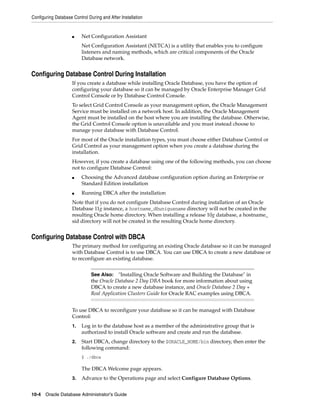
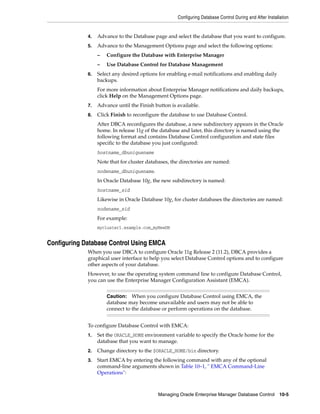
![Configuring Database Control During and After Installation
10-6 Oracle Database Administrator's Guide
$ ./emca
Depending on the arguments that you include on the EMCA command line,
EMCA prompts you for the information required to configure Database Control.
For example, enter the following command to configure Database Control so that
it will perform automatic daily backups of your database:
$ ./emca -config dbcontrol db -backup
EMCA commands are in the following form:
emca [operation] [mode] [flags] [parameters]
Table 10–1 describes the valid execution operations and modes and lists the optional
parameters in brackets. Table 10–2 discusses the flags and their behavior and
Table 10–3 defines the optional parameters in detail. EMCA parameters are in the form
[-parameterName parameterValue]. Multiple parameters can be used in combination
at the command line.
Note: To configure Database Control for single-instance database
using Oracle Automatica Storage Management (ASM), no extra
parameters need to be passed along with the EMCA command. Run
the following command to configure the Database Control which will
automatically detect the Oracle ASM instance:
$ emca -config dbcontrol db -repos create
Table 10–1 EMCA Command-Line Operations
Command Description
emca -h | --h | -help |
--help
Use this option to display help messages for the EMCA utility.
The options described in Table 10–1, Table 10–2, and
Table 10–3, and the valid parameters you may include are
listed.
emca –version Prints the version information associated with EMCA.
emca -config dbcontrol db
[-repos (create |
recreate)] [-cluster]
[-silent] [-backup]
[parameters]
Configures Database Control for a database. Options include
creating (or re-creating) the Database Control repository,
configuring automatic backups, and performing these
operations on a cluster database.
emca -config centralAgent
(db | asm) [-cluster]
[-silent] [parameters]
Configures central agent management for a database or an
Oracle ASM instance. Options include performing this
operation on a cluster environment. This operation will
configure the database so that it can be centrally managed by
the Oracle Enterprise Manager Grid Control Console. To use
this option, you must have previously installed the Oracle
Management Service component of Enterprise Manager on a
network host. In addition, the Oracle Management Agent must
be installed on the host on which you are running the database.
emca -config all db
[-repos (create |
recreate)] [-cluster]
[-silent] [-backup]
[parameters]
Configures both Database Control and central agent
management for a database. The possible configuration options
are similar to those described above.](https://image.slidesharecdn.com/e25494-140702182938-phpapp02/85/E25494-338-320.jpg)
![Configuring Database Control During and After Installation
Managing Oracle Enterprise Manager Database Control 10-7
emca -deconfig dbcontrol
db [-repos drop]
[-cluster] [-silent]
[parameters]
Deconfigures Database Control for a database. Options include
dropping the Database Control repository and performing
these operations on a cluster database. For example, you might
use this command to remove the Database Control
configuration from a database you are planning to delete. In
such a scenario, remove the Database Control configuration
before physically deleting the database. This operation does
not remove the actual database or its data files.
emca -deconfig
centralAgent (db | asm)
[-cluster] [-silent]
[parameters]
Deconfigures central agent management for a database or an
Oracle ASM instance. Options include performing this
operation on a cluster environment. For example, you might
use this command to remove the central agent management
configuration from a database you are planning to delete. In
such a scenario, remove the central agent management
configuration before physically deleting the database. This
operation does not remove the actual database or its data files.
emca -deconfig all db
[-repos drop] [-cluster]
[-silent] [parameters]
Deconfigures both Database Control and central agent
management for a database. The possible deconfiguration
options are similar to those described above.
emca -addNode (db | asm)
[-silent] [parameters]
Configures Enterprise Manager for a new cluster instance of a
database or ASM storage. For more information, see "Using
EMCA With Oracle RAC" on page 10-11. This option applies
only to Release 11g.
emca -deleteNode (db |
asm) [-silent]
[parameters]
Deconfigures Enterprise Manager for a node being deleted. For
more information, see "Using EMCA With Oracle RAC" on
page 10-11. This option applies only to Oracle Database Release
11g.
emca -addInst (db | asm)
[-silent] [parameters]
Configures Enterprise Manager for a newly added cluster
instance of an administrator-managed database or Oracle ASM
storage. This parameter takes a SID for the instance being
added. For more information, see "Using EMCA With Oracle
RAC" on page 10-11.
emca -deleteInst (db |
asm) [-silent]
[parameters]
Deconfigures Enterprise Manager for a newly deleted cluster
instance of an administrator-managed database or Oracle ASM
storage. This parameter takes a SID for the instance being
deleted. This is discussed further below, in "Using EMCA With
Oracle RAC" on page 10-11.
emca -reconfig ports
[-cluster] [parameters]
Explicitly reassigns Database Control ports. Options include
performing this operation on a cluster environment. For more
information, see "Specifying the Ports Used by Database
Control" on page 10-11.
emca -reconfig dbcontrol
-cluster [-silent]
[parameters]
Reconfigures Database Control deployment for a cluster
database. Note that this command must be used with the
-cluster option. For more information, see "Using EMCA
With Oracle RAC" on page 10-11.
emca -displayConfig
dbcontrol -cluster
[-silent] [parameters]
Displays information about the current deployment
configuration of Database Control in a cluster environment.
Note that this command must be used with the -cluster
option. For more information, see "Using EMCA With Oracle
RAC" on page 10-11.
Table 10–1 (Cont.) EMCA Command-Line Operations
Command Description](https://image.slidesharecdn.com/e25494-140702182938-phpapp02/85/E25494-339-320.jpg)
![Configuring Database Control During and After Installation
10-8 Oracle Database Administrator's Guide
emca -upgrade (db | asm |
db_asm) [-cluster]
[-silent] [parameters]
Upgrades the configuration of an earlier release of Enterprise
Manager to the current release. This operation can be
performed for Oracle Database, Oracle ASM, or Oracle
Database and Oracle ASM instances together simultaneously.
This does not upgrade the actual database or Oracle ASM
instances, nor does it upgrade the Enterprise Manager
software. Instead, it upgrades the configuration files for the
specified instance so that they are compatible with the current
version of the Enterprise Manager software. EMCA will
attempt to upgrade all instances of the specified database or
Oracle ASM target, or both, on the host, across all Oracle
homes (because it is likely that certain target properties, such as
the listener port or Oracle home, have changed).
emca -restore (db | asm |
db_asm) [-cluster]
[-silent] [parameters]
Restores the current version of Enterprise Manager
configuration to an earlier version. This is the inverse of the
-upgrade option (and will reverse any changes that result from
this operation).
emca -migrate -from
dbcontrol -to
centralAgent [-repos
drop] [-cluster]
[-silent] [parameters]
Migrates the Enterprise Manager configuration from Database
Control to Central Agent.
Table 10–2 EMCA Command-Line Flags
Flag Description
db Performs the operation for a database (including cluster
databases). Use this option for databases that use Oracle ASM to
store the data files. If a database is using Oracle ASM, all the
configuration operations and modes described above (except for
-upgrade and -restore) will detect this automatically and apply
the changes to both the database and Oracle ASM instances.
asm Performs the operation for an Oracle ASM-only instance
(including cluster Oracle ASM instances).
db_asm This flag can only be used in -upgrade and -restore mode.
Performs the upgrade or restore operation for an Oracle
Database and an Oracle ASM instance together. Database and
Oracle ASM instances may be upgraded or restored separately
(that is, upgrading an Oracle ASM instance does not require
upgrading the database instances it services). Therefore, the
Enterprise Manager configuration can be upgraded or restored
separately for a database and its respective Oracle ASM instance.
-repos create Creates a new Database Control management repository.
-repos drop Drops the current Database Control management repository.
-repos recreate Drops the current Database Control management repository and
then re-creates a new one.
-cluster Performs the operation for a cluster database or Oracle ASM
instance.
-silent Performs the operation without prompting for additional
information. If this mode is specified, all the required
parameters must be entered at the command line or specified in
an input file using the –respFile argument. You can view a list
of the available parameters by entering emca -help at the
command line.
Table 10–1 (Cont.) EMCA Command-Line Operations
Command Description](https://image.slidesharecdn.com/e25494-140702182938-phpapp02/85/E25494-340-320.jpg)
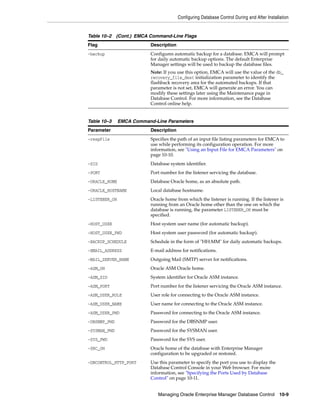
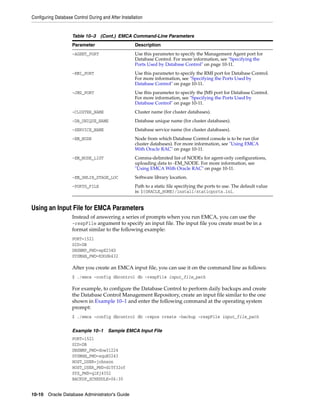
![Configuring Database Control During and After Installation
Managing Oracle Enterprise Manager Database Control 10-11
Specifying the Ports Used by Database Control
When you initially install Oracle Database or configure Database Control with EMCA,
Database Control uses a set of default system ports. For example, by default, you
access Database Control using port 1158, as shown in the following example:
http://host.domain:1158/em
This is the default port assigned to Database Control by the Internet Assigned
Numbers Authority (IANA). Likewise, the default Database Control Agent port, as
assigned by the IANA, is 3938.
To use ports other than the default ports, use the following EMCA command-line
arguments when you initially configure the Database Control with EMCA.
Alternatively, you can explicitly assign ports after configuring Database Control using
the following command:
$ emca -reconfig ports [-cluster]
The following list summarizes the EMCA command-line arguments that control the
standard Database Control port assignments:
■ -DBCONTROL_HTTP_PORT port_number
This port is used in the Database Control Console URL. For example, if you set this
port to 5570, you can then use the following URL to display the Database Control
Console:
http://host.domain:5570/em
■ -RMI_PORT port_number
This port is used by the Remote Method Invocation (RMI) system, which is part of
the J2EE software required by Database Control. The default port can be changed
if you want to configure a specific port for Database Control. When a port other
than the default port (1521) is used, use the -RMI_PORT or -JMS_PORT options along
with the emca reconfig command.
■ -JMS_PORT port_number
This port is used by the OC4J Java Message Service (JMS), which is part of the
J2EE software required by Database Control. The default port can be changed if
the user wants to configure a specific port for Database Control. When a port other
than the default port (1521) is used, use the -RMI_PORT or -JMS_PORT options along
with the emca reconfig command.
■ -AGENT_PORT port_number
This port is used by the Database Control Management Agent, which is
monitoring and administering the database for the Database Control.
Using EMCA With Oracle RAC
Each EMCA command can be used in Oracle RAC environments, and certain
commands are only applicable in cluster setups. To perform cluster commands using
EMCA, use the cluster flag that is available in almost every EMCA operational mode.
Note: You can also use the following EMCA command-line
arguments to configure Database Control after you have installed and
configured Oracle Database.](https://image.slidesharecdn.com/e25494-140702182938-phpapp02/85/E25494-343-320.jpg)
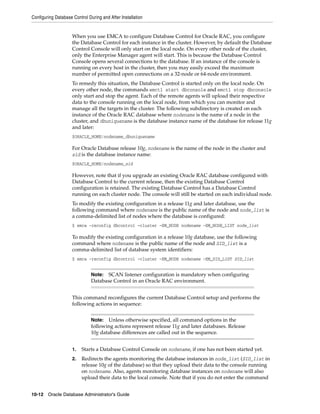

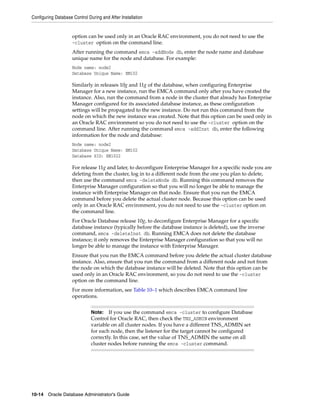
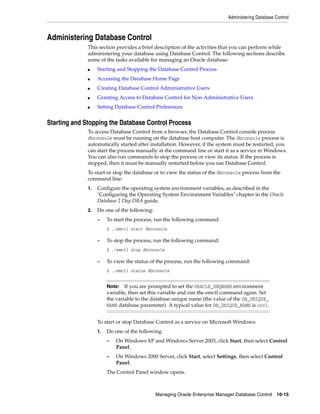
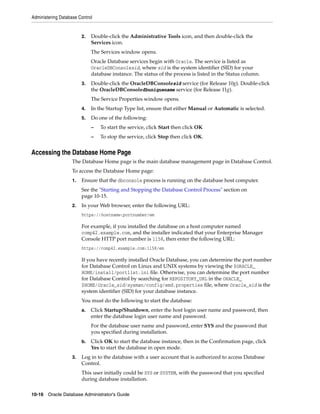
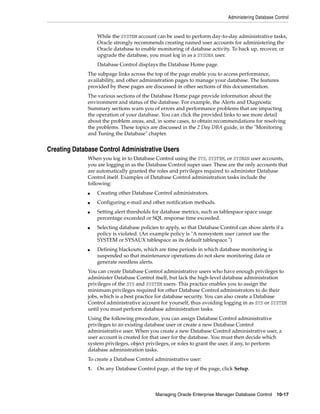
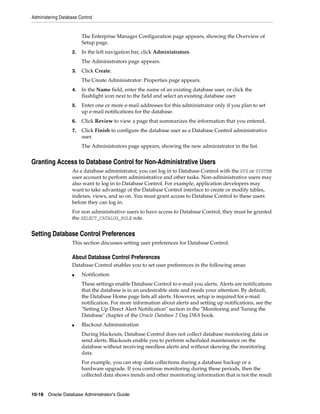
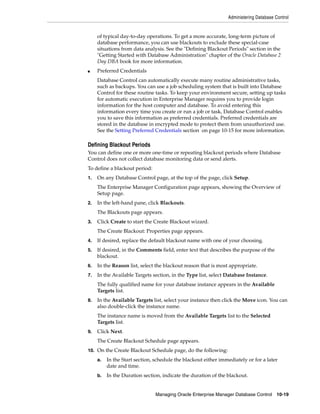
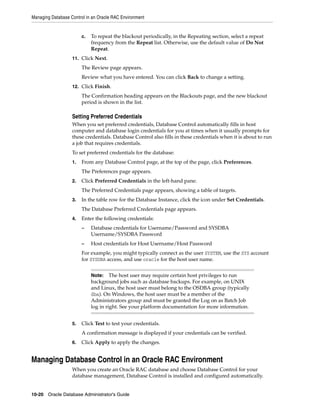
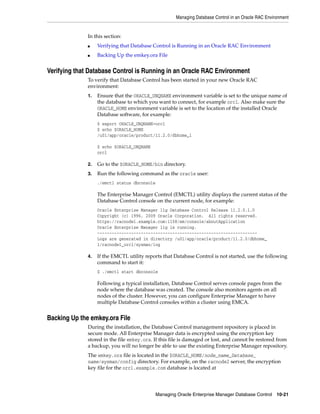
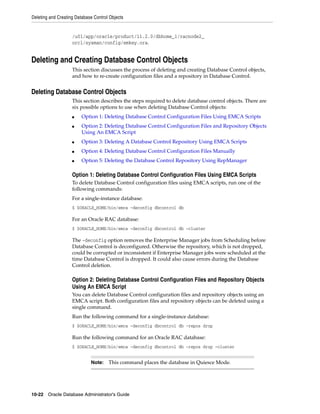
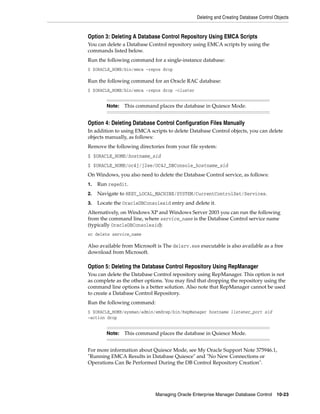
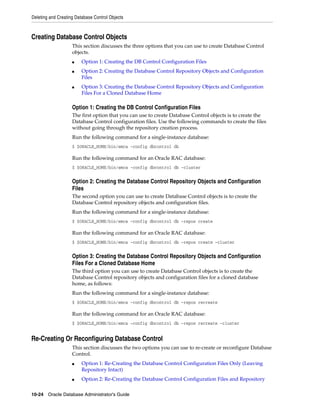
![EMCA Troubleshooting Tips
Managing Oracle Enterprise Manager Database Control 10-25
Option 1: Re-Creating the Database Control Configuration Files Only (Leaving
Repository Intact)
The first option you can use to re-create Database Control is to re-create only the
Database Control configuration files, as follows:
Run the following command for a single-instance database:
$ $ORACLE_HOME/bin/emca -config dbcontrol db
Run the following command for an Oracle RAC database:
$ $ORACLE_HOME/bin/emca -config dbcontrol db -cluster
Option 2: Re-Creating the Database Control Configuration Files and Repository
The second option you can use to re-create Database Control is to re-create the
Database Control configuration files and the repository.
Run the following command for a single-instance database:
$ $ORACLE_HOME/bin/emca -config dbcontrol db -repos recreate
Run the following command for an Oracle RAC database:
$ $ORACLE_HOME/bin/emca -config dbcontrol db -repos recreate -cluster
EMCA Troubleshooting Tips
The following sections describe troubleshooting tips to consider when using EMCA to
configure Database Control.
■ Using EMCA After Changing the Database Listener Port
■ Upgrading 11g Release 2 Grid Control Agents
■ Using EMCA When the Database Host Name or IP Address Changes
■ Using EMCA When the TNS Configuration Is Changed
■ Using EMCA for Desktop Class Installations
■ Handling EMCA Error Messages
Using EMCA After Changing the Database Listener Port
If you change the listener port of the database after you have configured Database
Control, the database status will appear as down. To reconfigure Database Control so it
uses the new listener port, run the EMCA command using the -config dbcontrol db
[-cluster] command-line arguments.
Upgrading 11g Release 2 Grid Control Agents
When upgrading an Oracle Database 11g Release 2 database or an Oracle ASM
instance that was configured for Oracle Enterprise Manager (either Database Control
or a Grid Control central agent) to an Oracle Database 11g Release 2 (11.2) database, all
Enterprise Manager targets on the relevant hosts referring to the upgraded instances
are updated automatically. This occurs because the upgrade involves altering the
instance Oracle home, port, or other target-associated properties. However, some of
Note: This command places the database in Quiesce Mode.](https://image.slidesharecdn.com/e25494-140702182938-phpapp02/85/E25494-357-320.jpg)
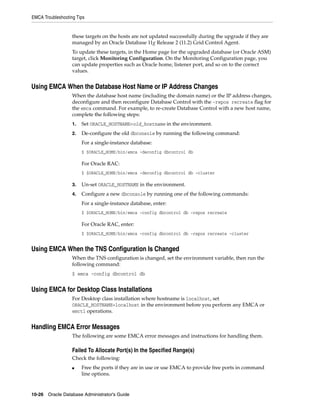
![EMCA Troubleshooting Tips
Managing Oracle Enterprise Manager Database Control 10-27
■ Open up the required ports in the firewall and re-run the emca -config
dbcontrol db [-cluster] command by specifying free ports in the command
line.
■ Check the /etc/hosts file. It should contain an entry for the physical host. Enter
the following command to determine the physical host name:
$ CMD>hostname
Set the environment variable:
$ set ORACLE_HOSTNAME=output of above command
Try to run the following command:
$ $ORACLE_HOME/bin/emca -config dbcontrol db
By completing these steps you are fixing the environment variable and then
running the –config dbcontrol db command again to re-attempt to allocate the
ports.
Listener Is Not Up or Database Service Is Not Registered With It
Check the following:
■ If the listener is not up on the specified port, then start it and rerun the EMCA
script.
■ Check whether the database service is registered with the listener. If not, then
register it and rerun the EMCA script.
■ If the listener is configured with a different host name than the physical host
name, configure Database Control as follows:
$ set ORACLE_HOSTNAME=listener host
$ $ORACLE_HOME/bin/emca -config dbcontrol db
If the listener port changes, then reconfigure Database Control by providing the
new listener port:
$ $ORACLE_HOME/bin/emca -config dbcontrol db](https://image.slidesharecdn.com/e25494-140702182938-phpapp02/85/E25494-359-320.jpg)

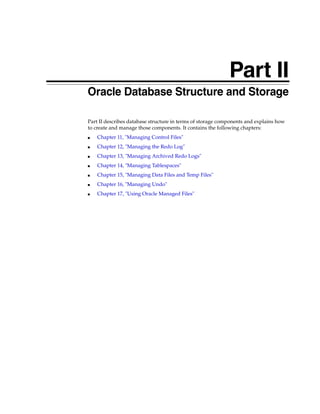


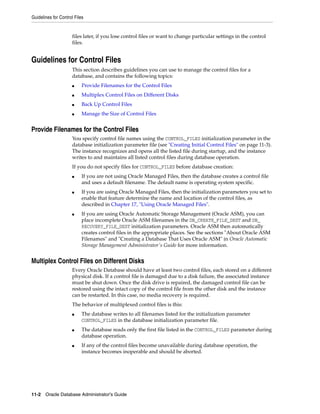

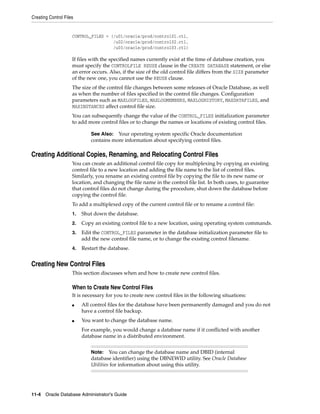
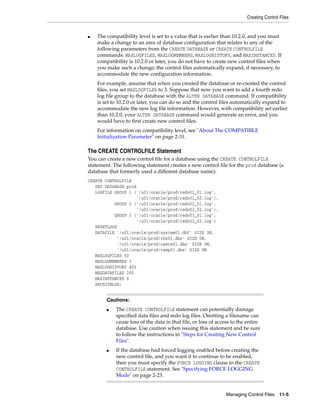
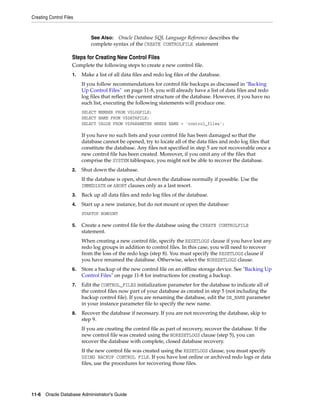
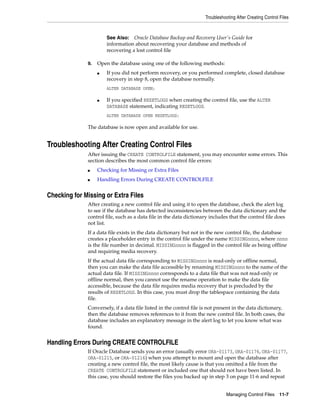

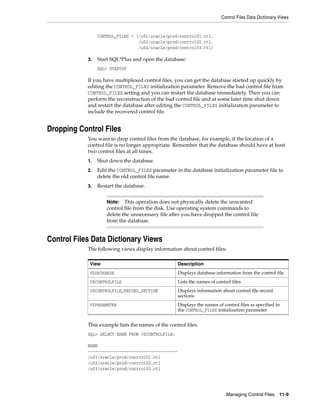

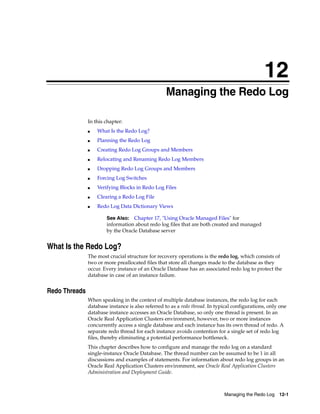
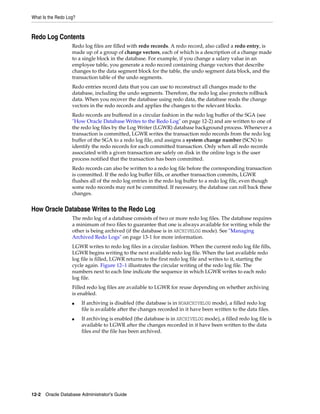
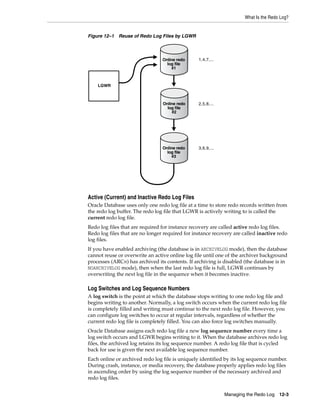
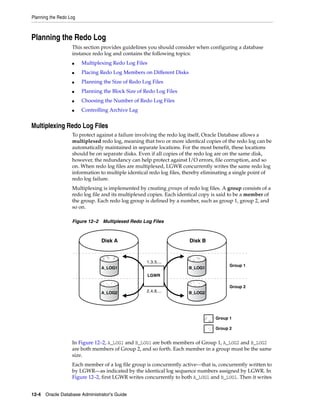
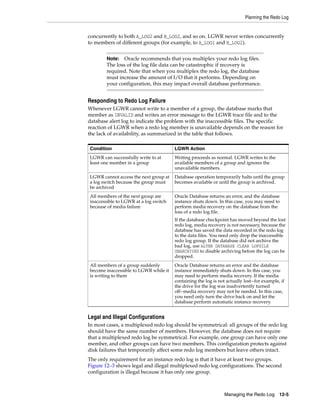
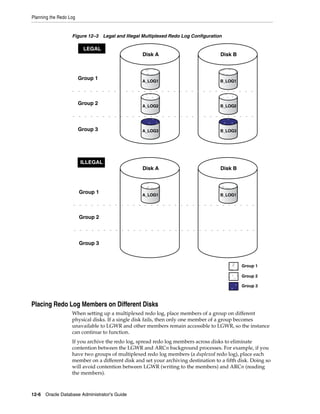
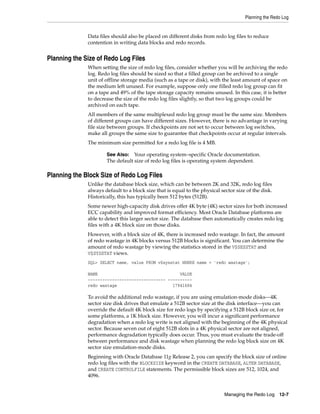
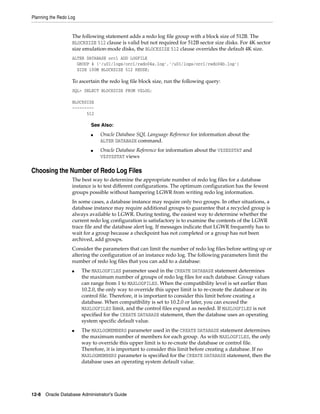

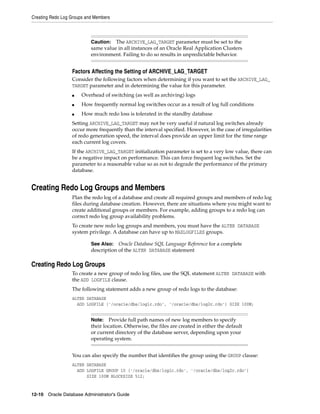
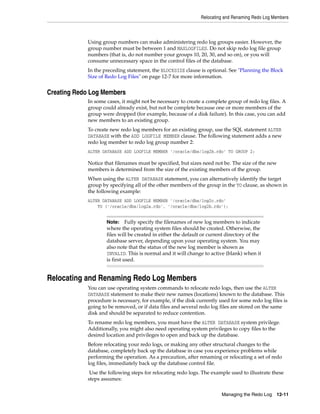
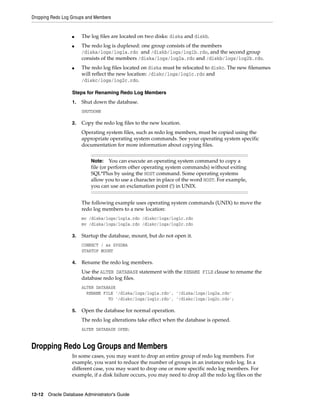
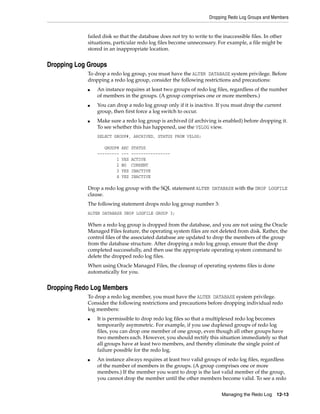
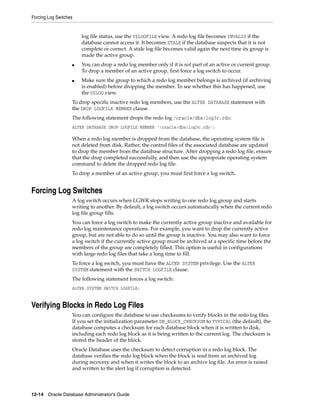
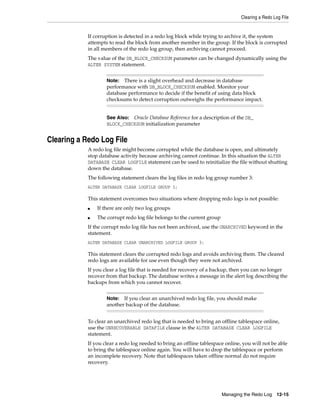
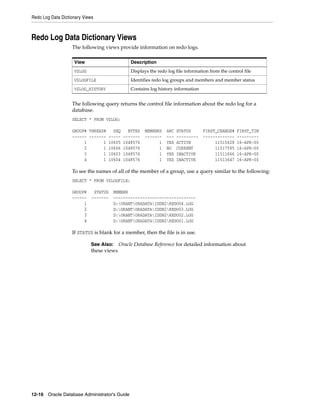
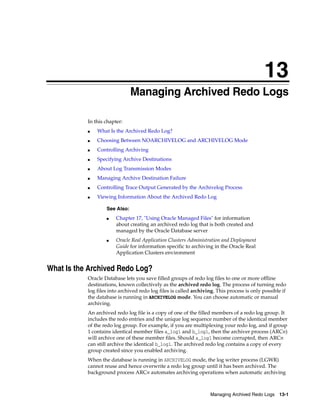

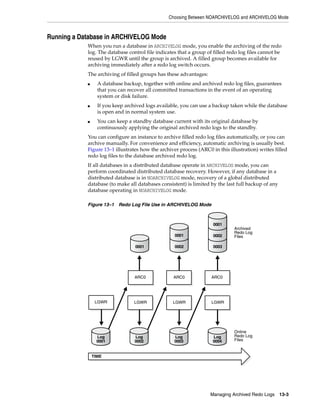
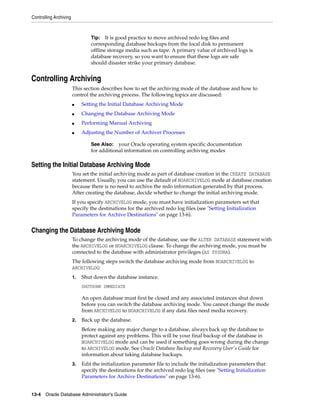
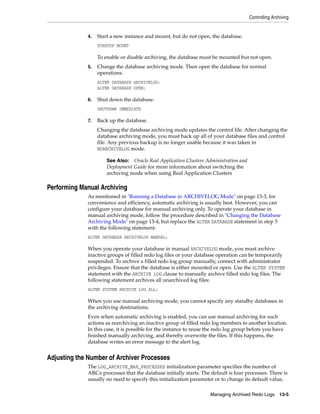
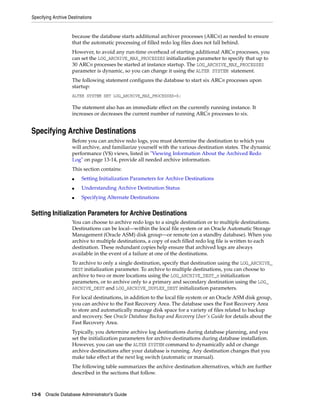
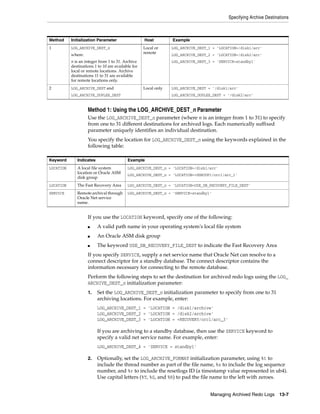
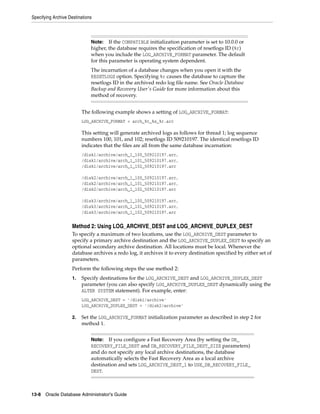

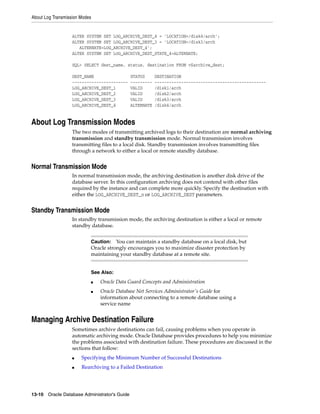
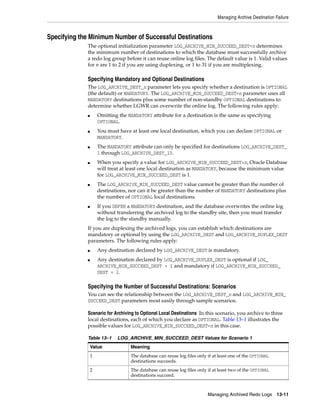
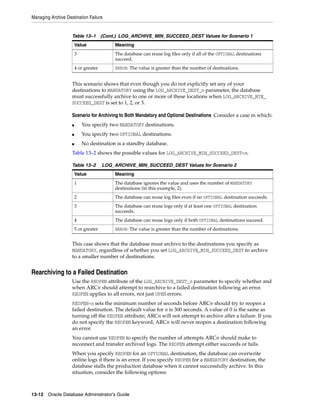

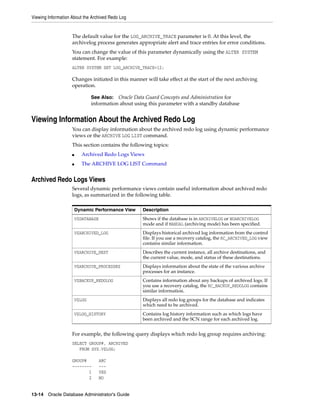
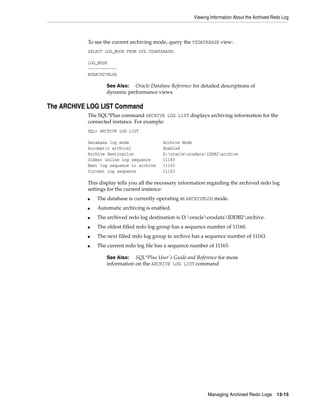

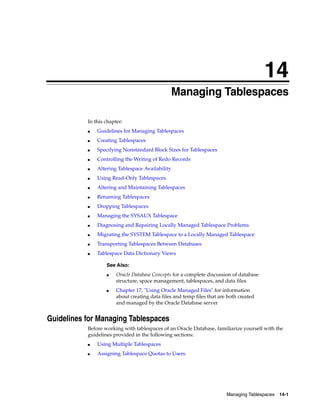

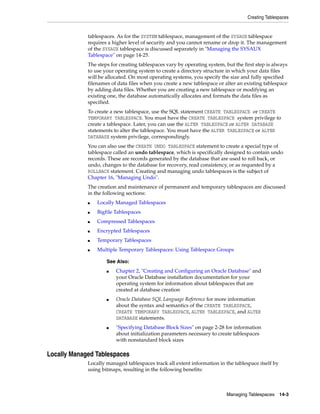

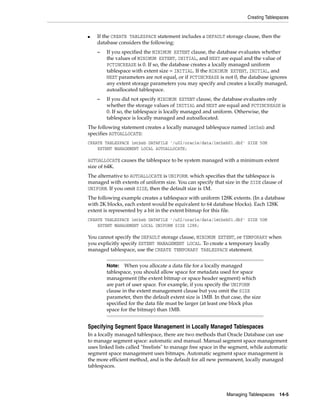
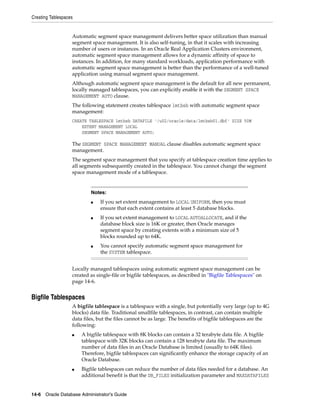
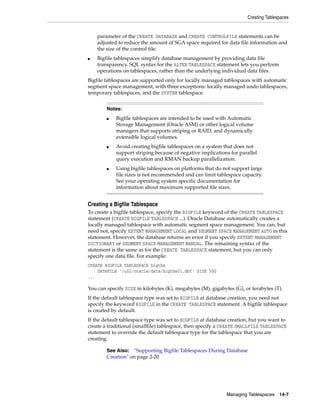
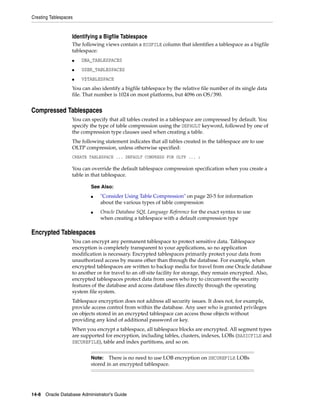
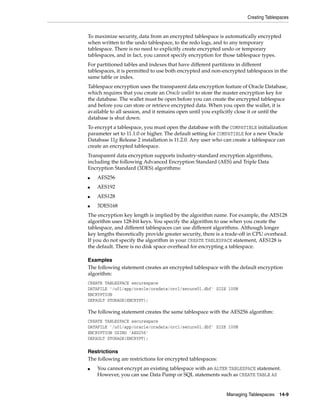
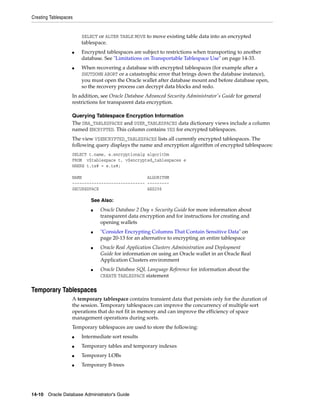
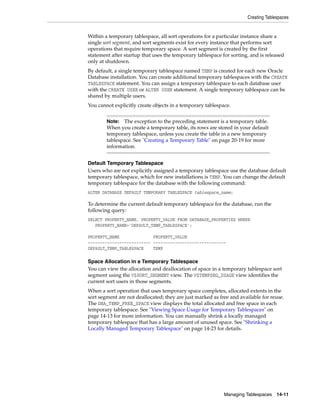
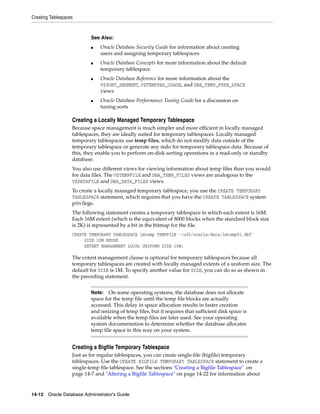
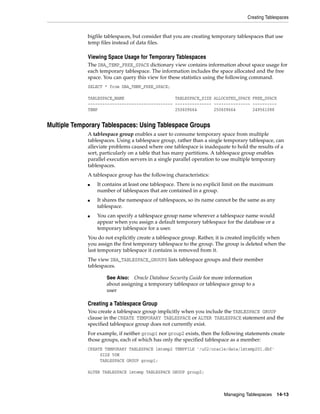
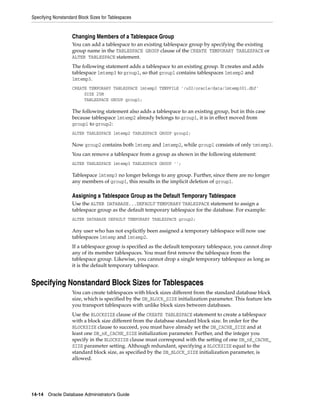
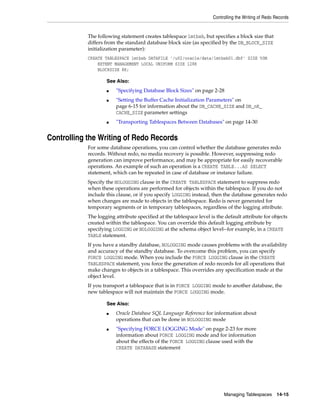
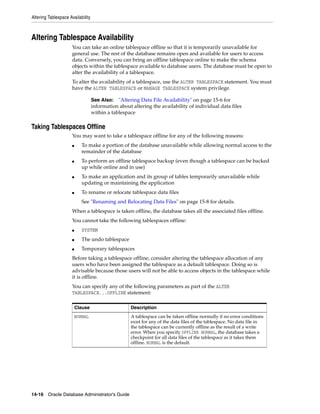
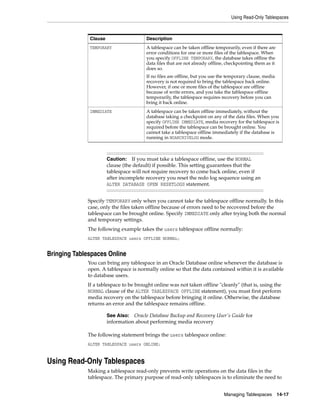
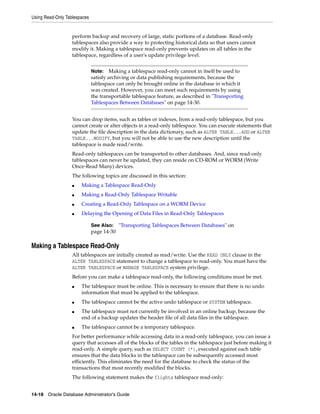
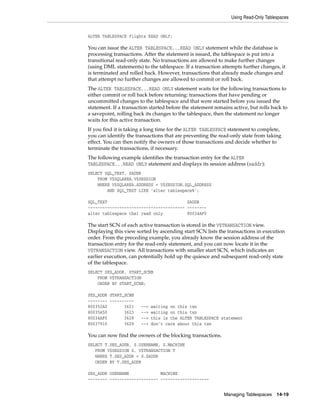
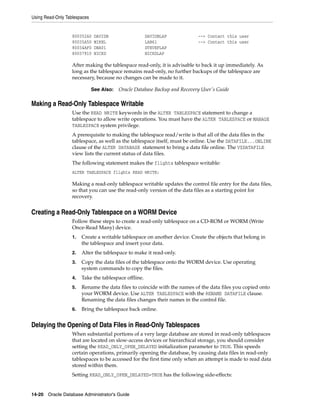
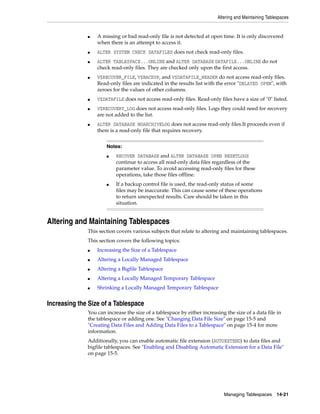
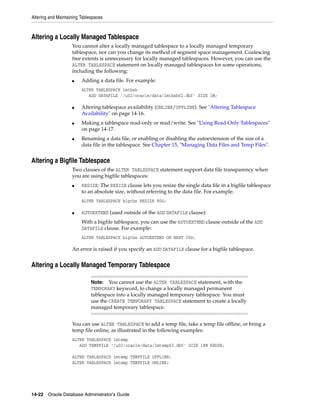
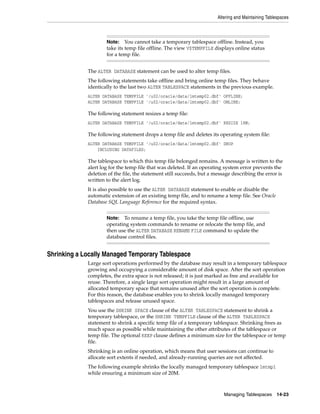
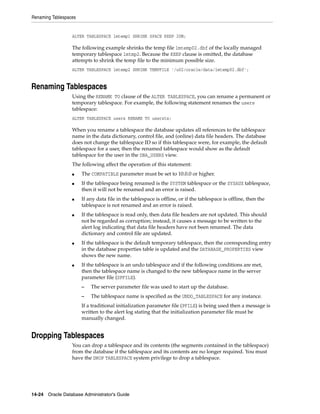
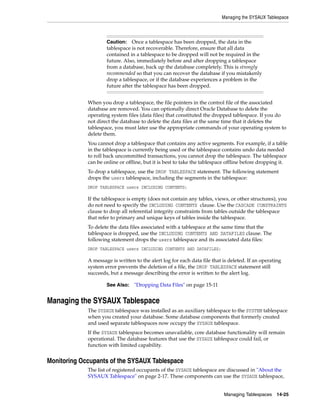
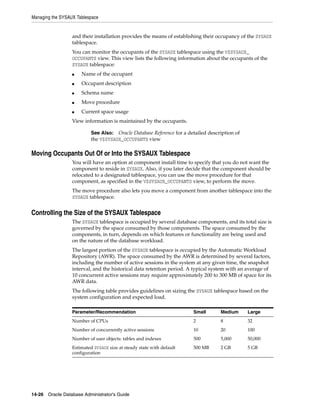
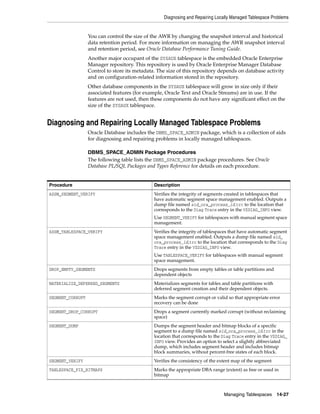
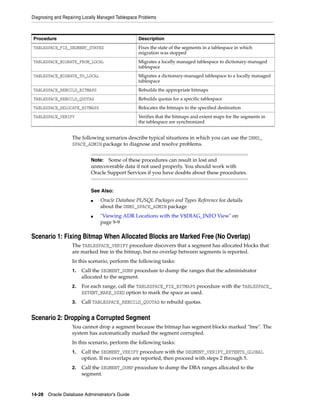
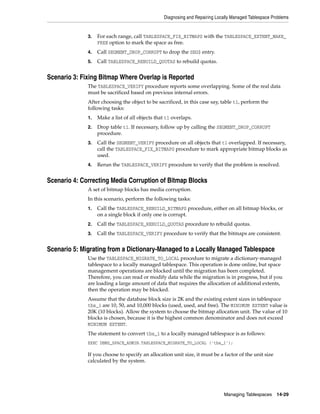
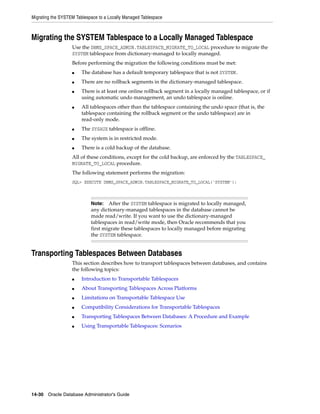
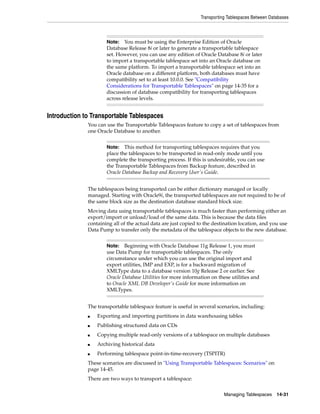
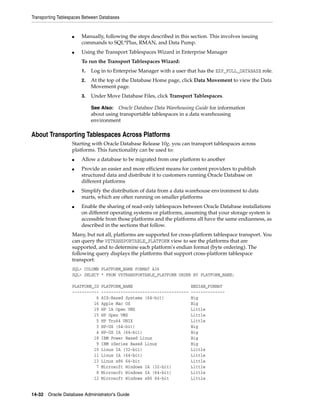
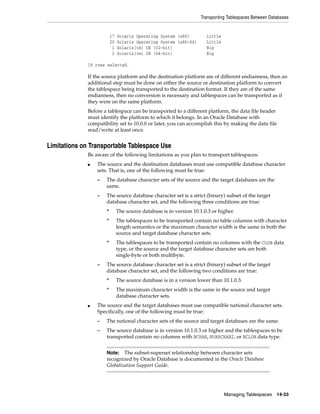
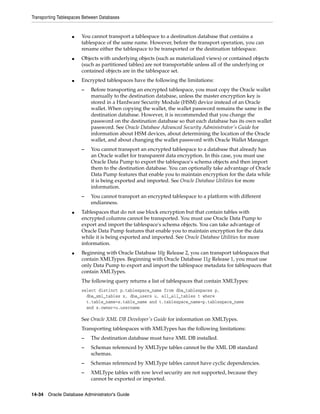
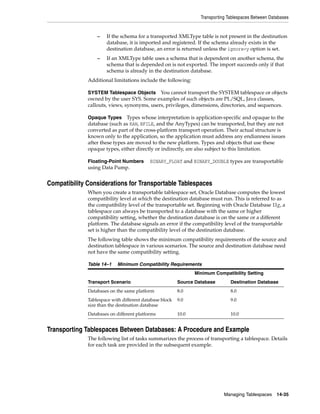
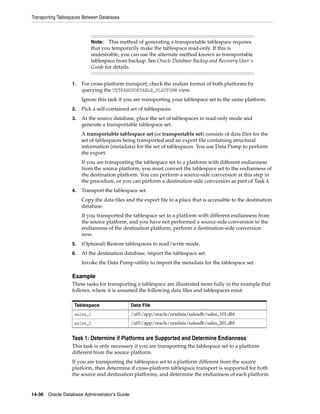
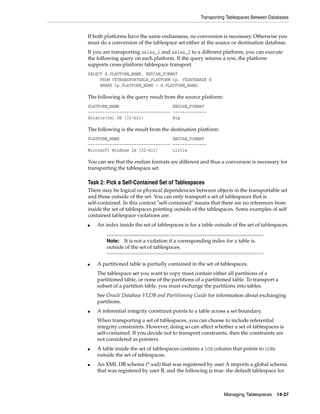
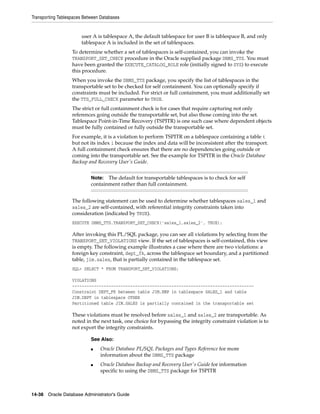
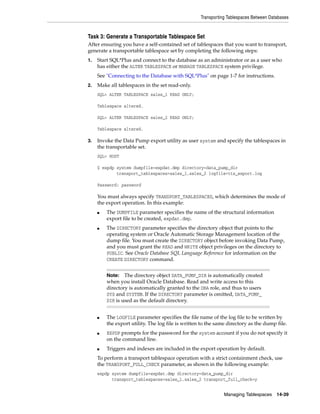
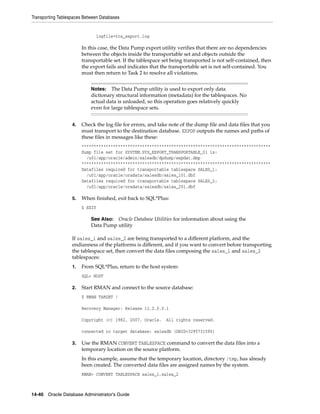
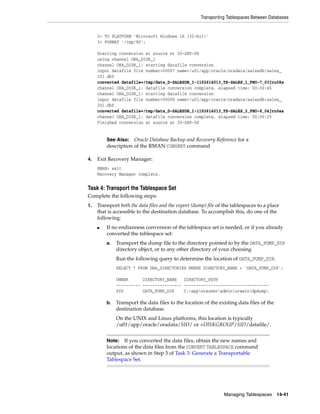
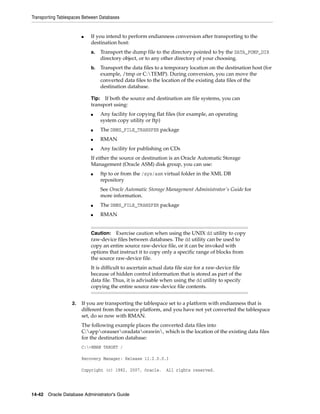
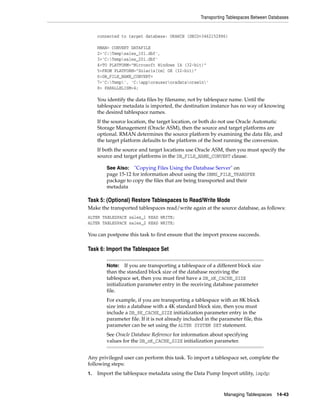
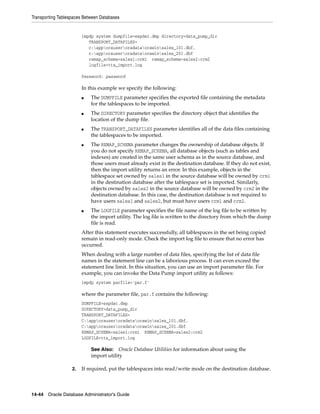
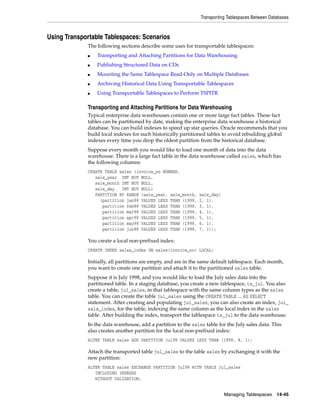
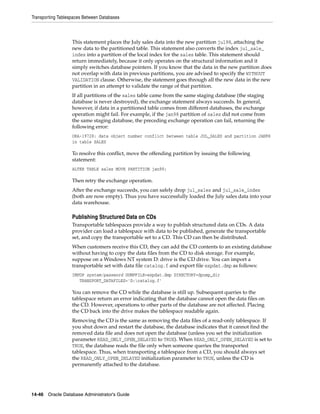
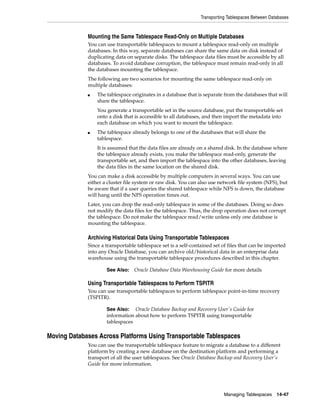
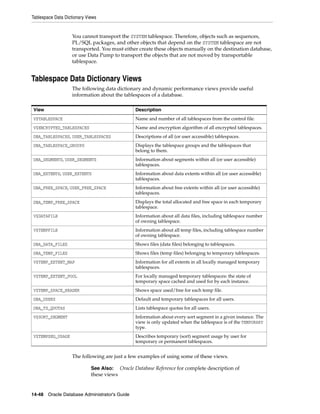


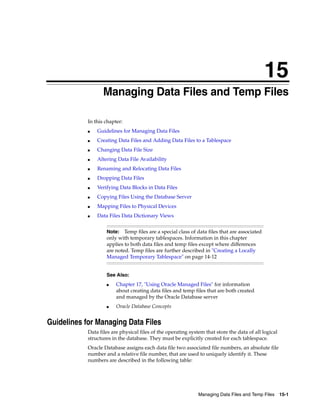
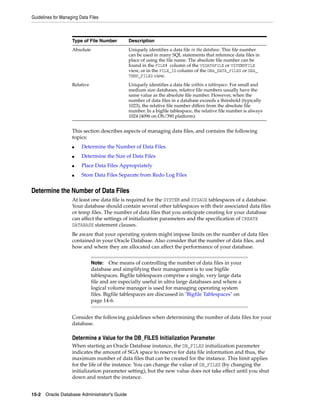
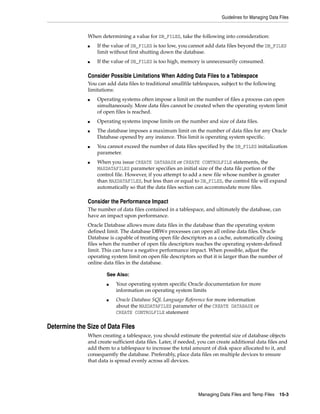
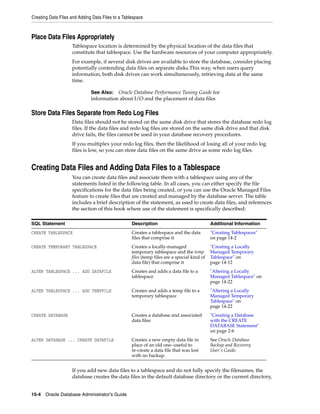
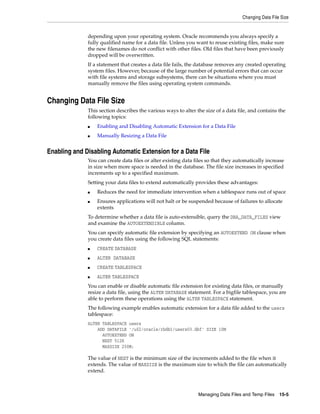
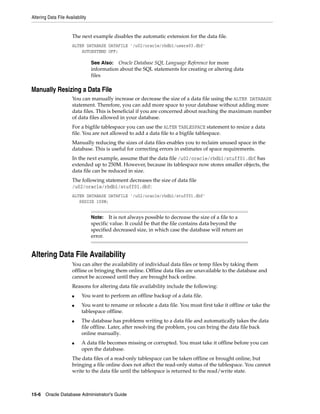

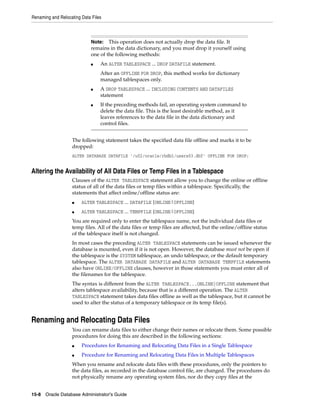
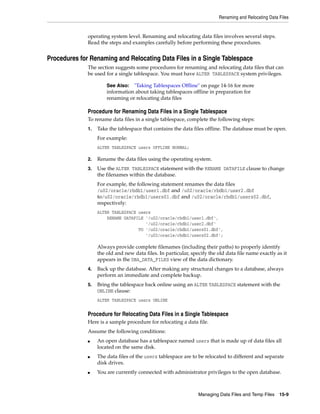

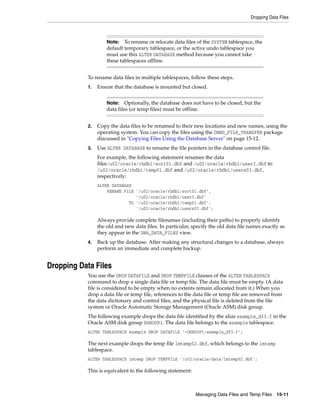
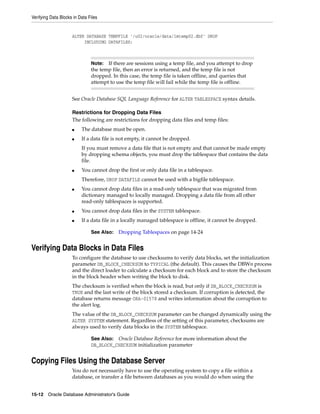
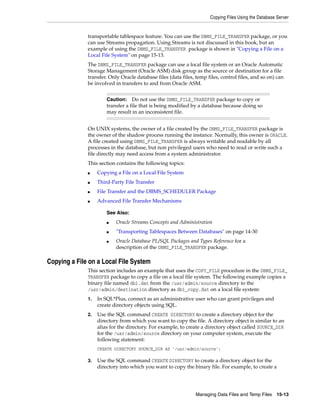
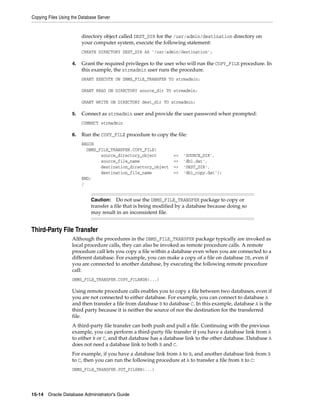
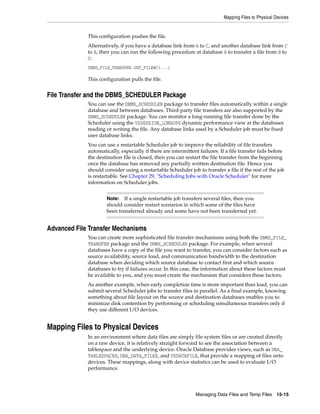
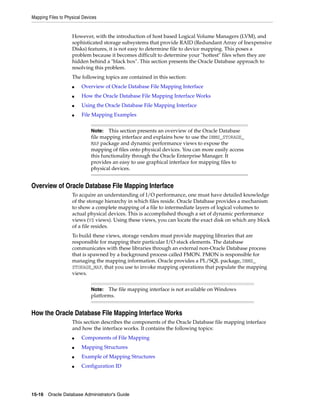
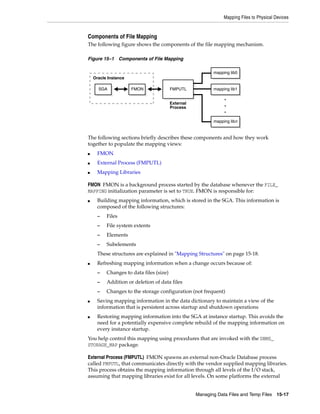
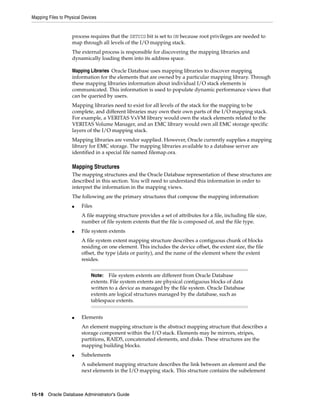
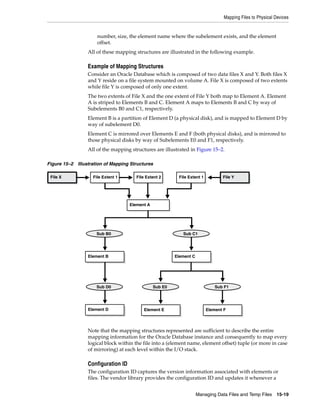
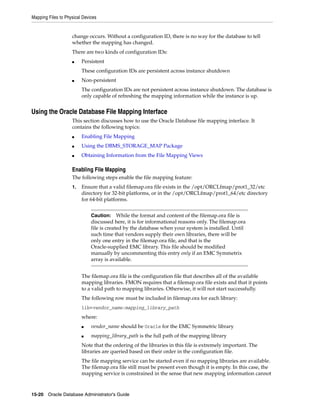
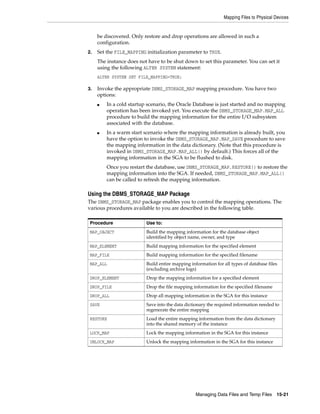
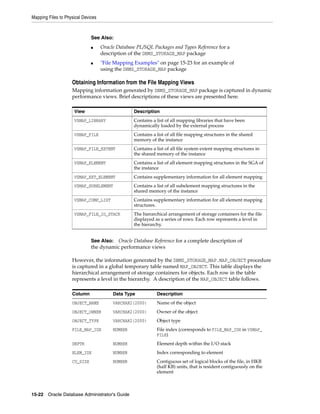
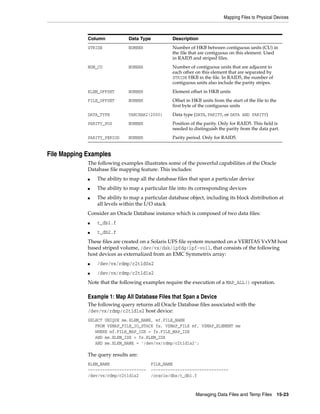
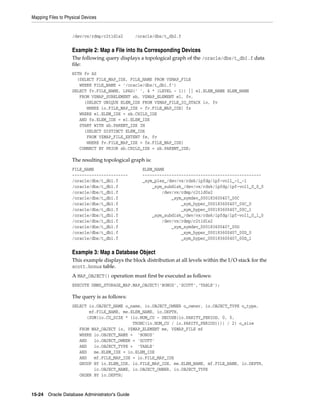
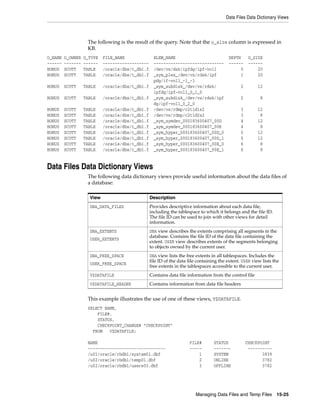

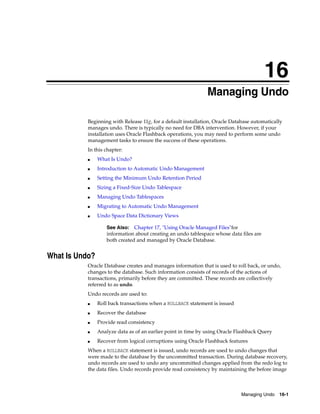

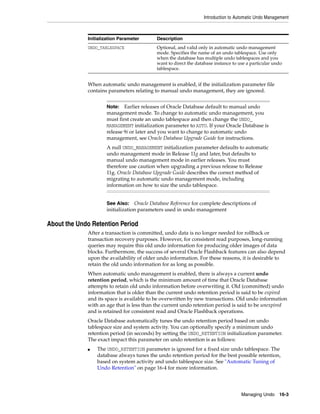
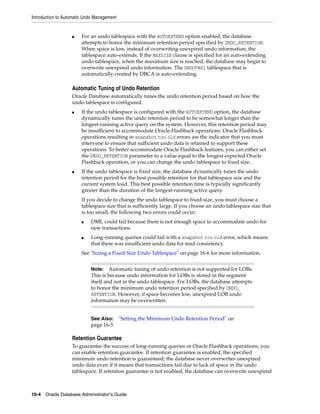
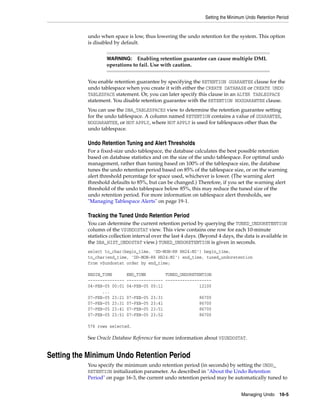
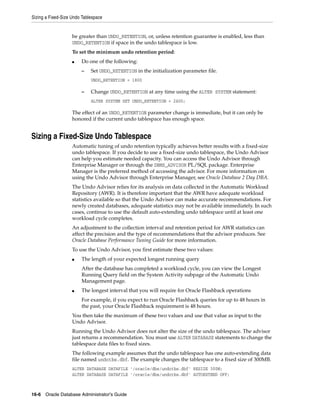
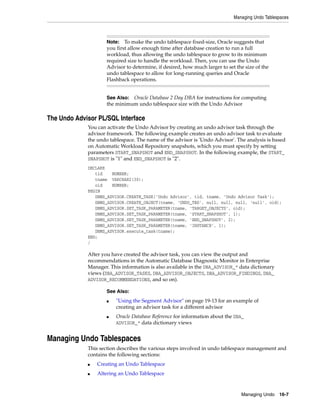
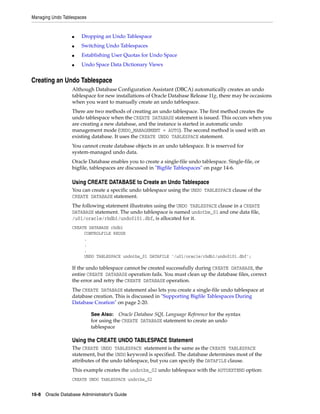
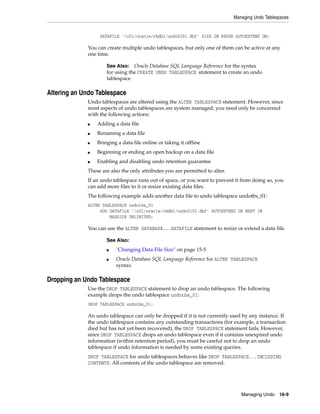
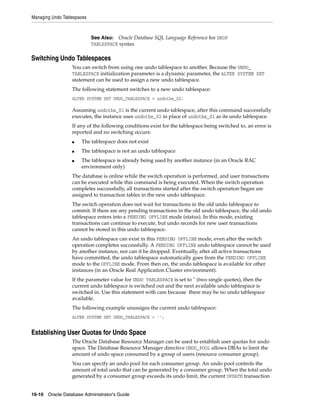
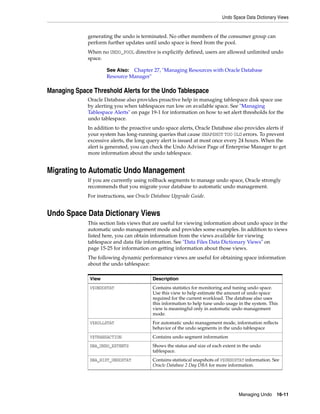
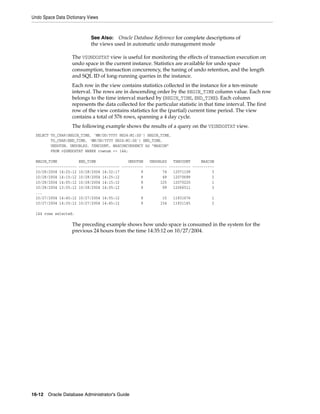
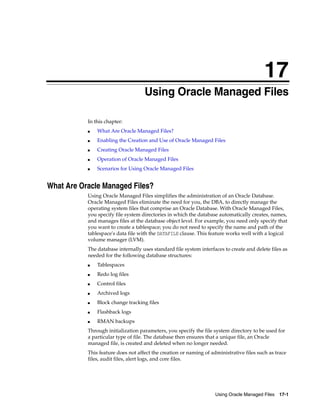

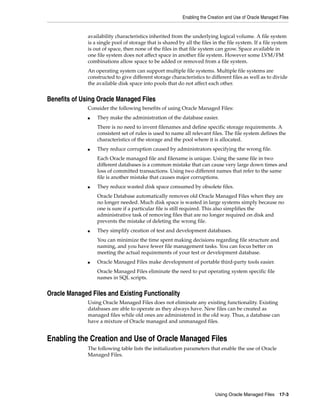
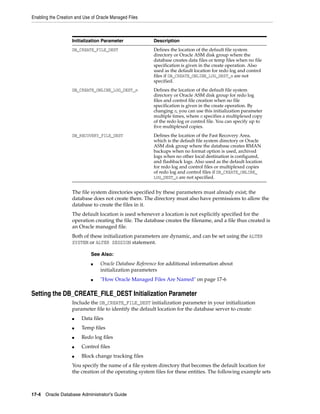
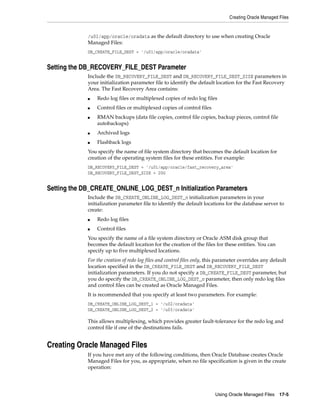
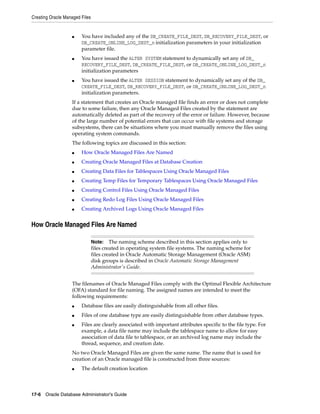
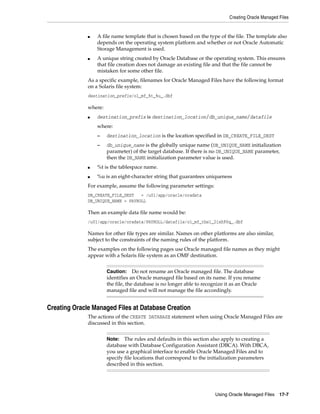
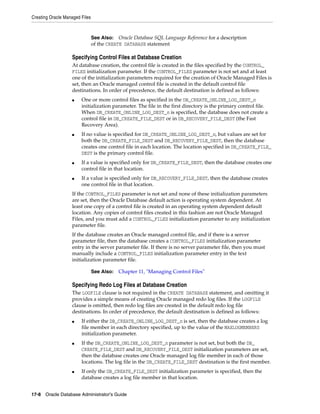
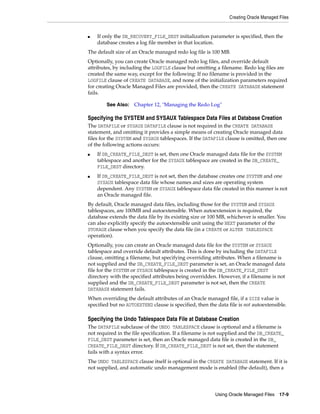
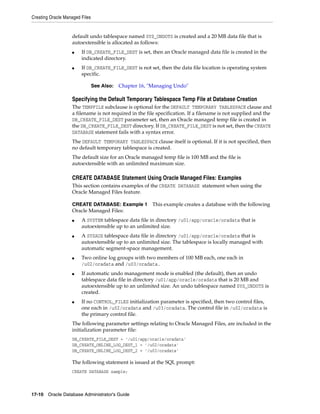
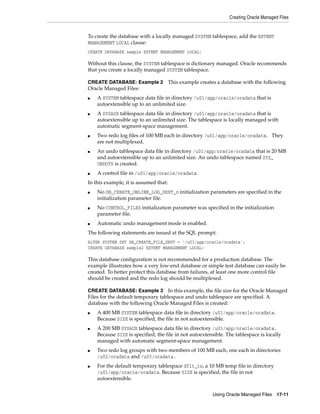
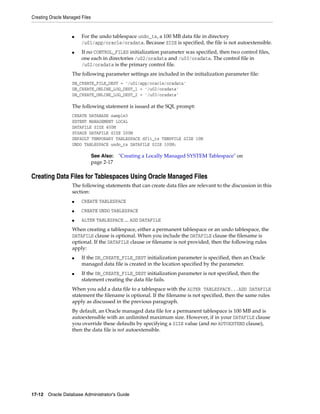
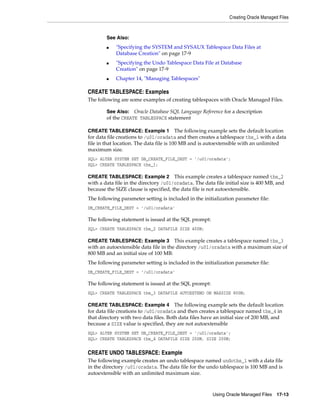

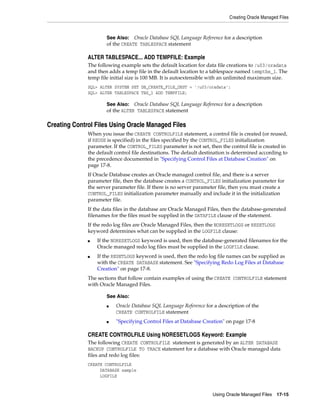
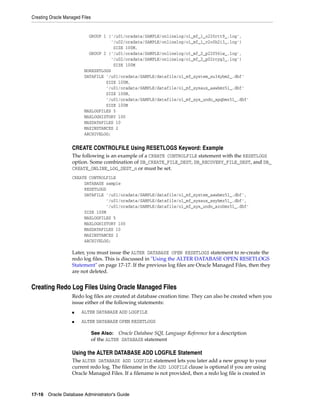
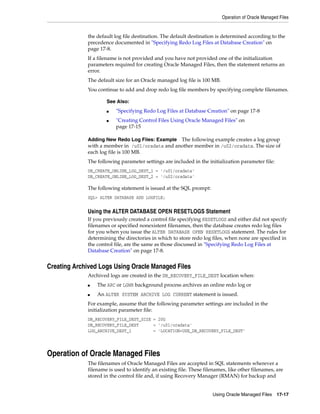
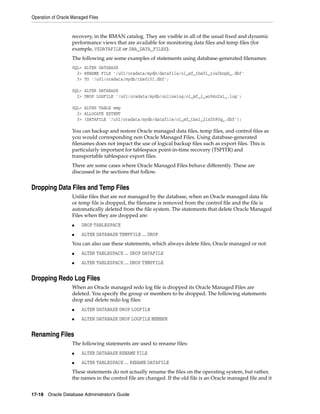
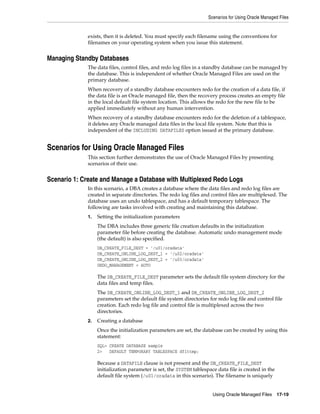
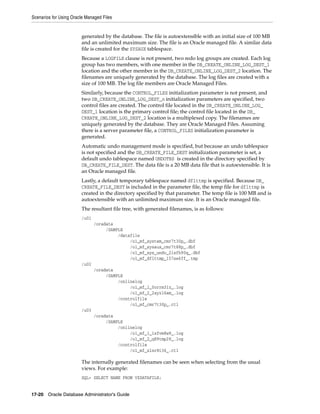
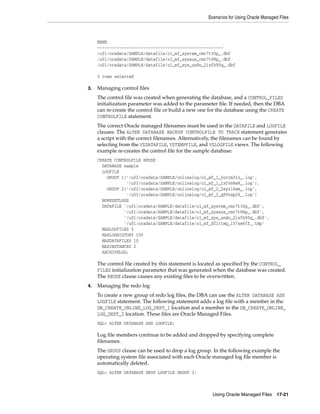
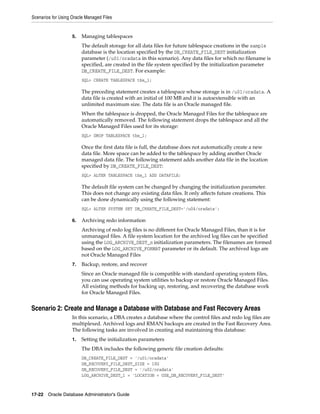
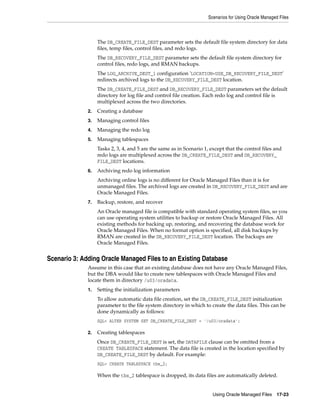

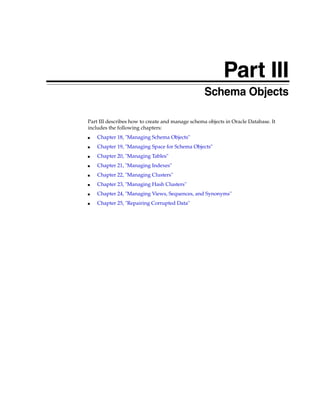

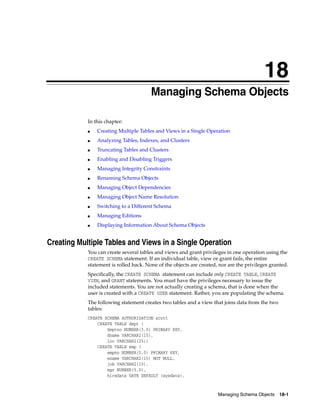
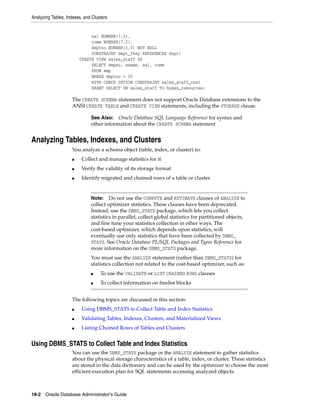
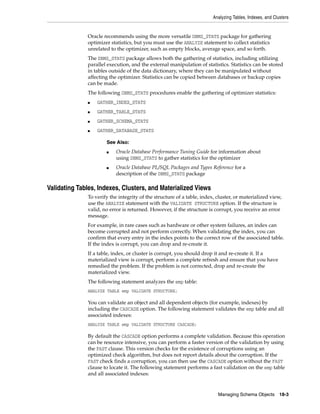
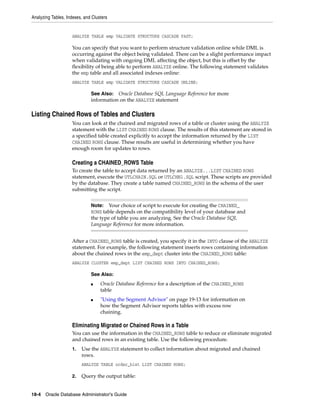
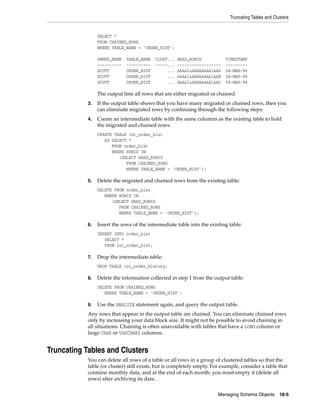
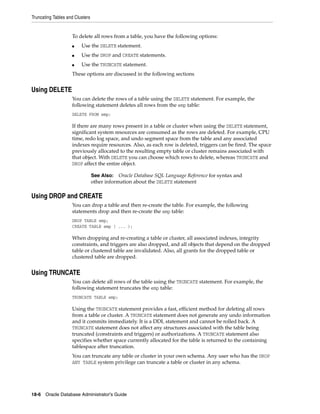
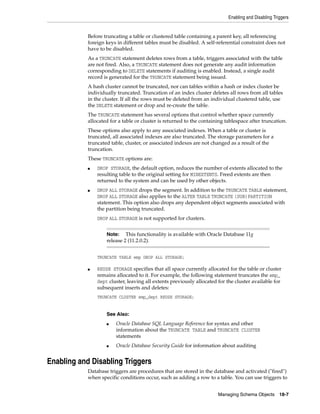

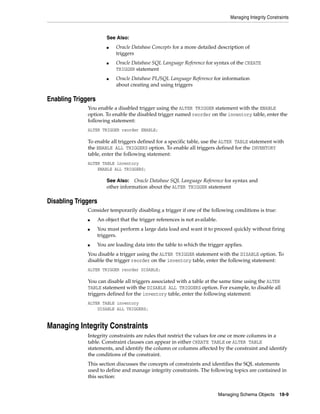
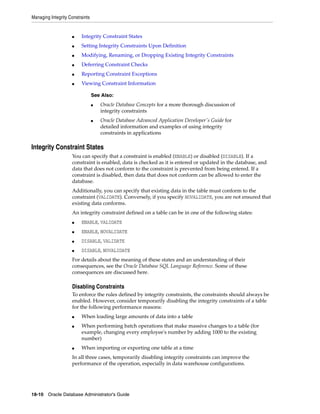
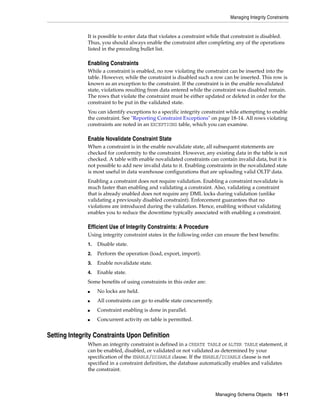
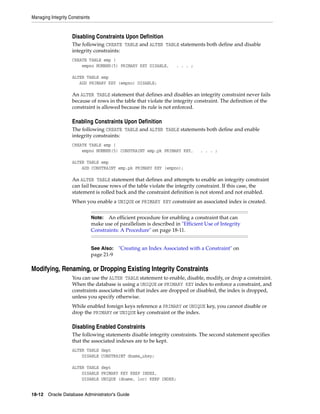
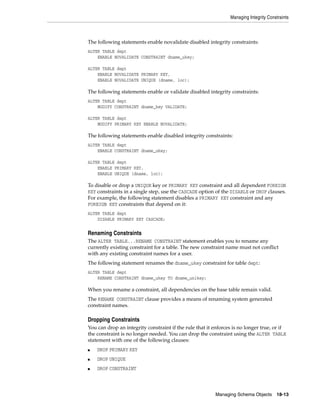
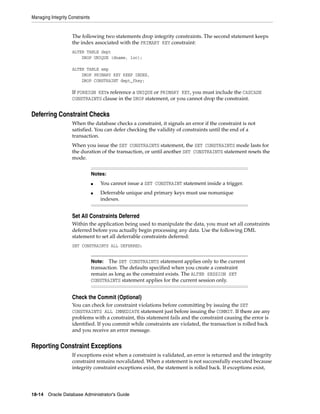
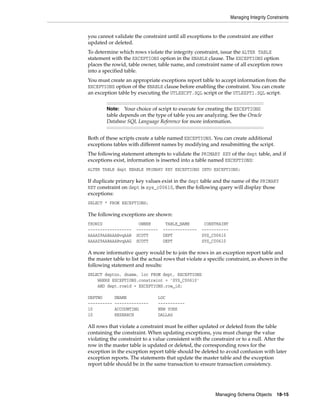
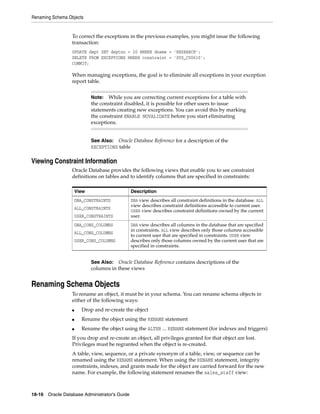
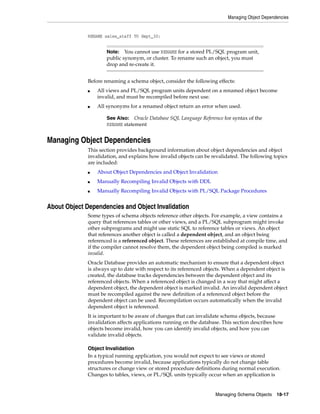
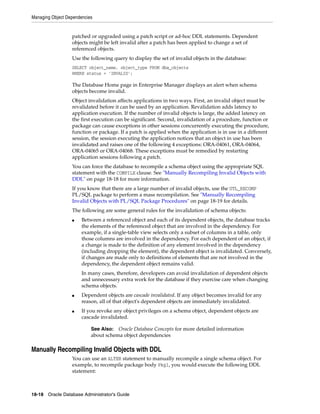
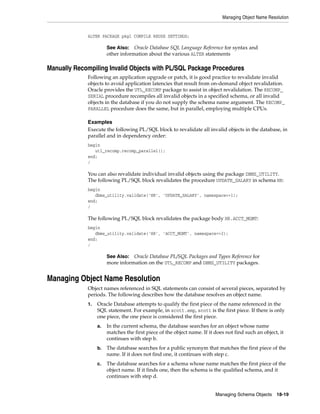
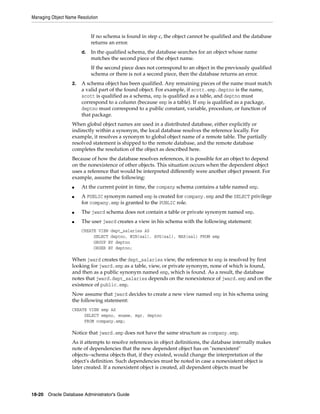
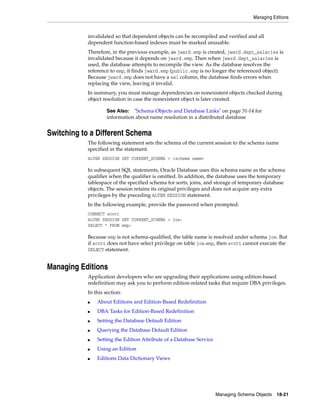
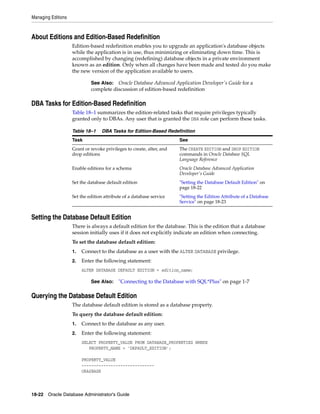
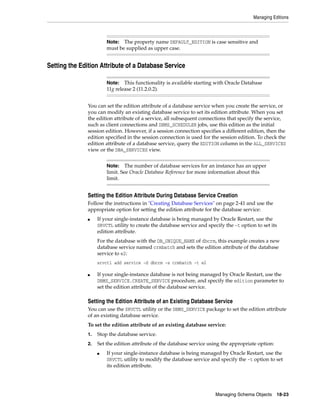
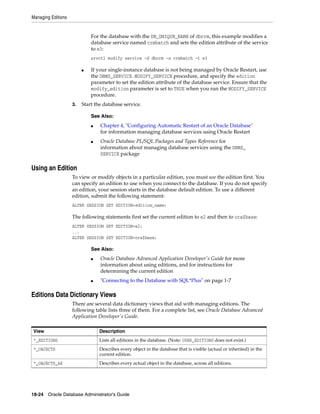
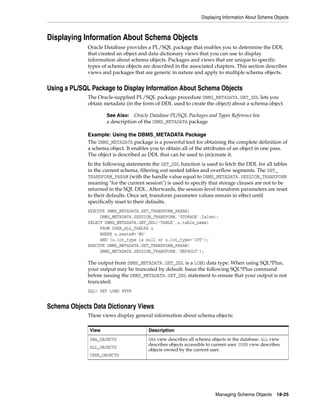
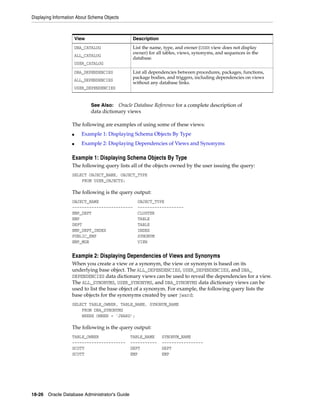
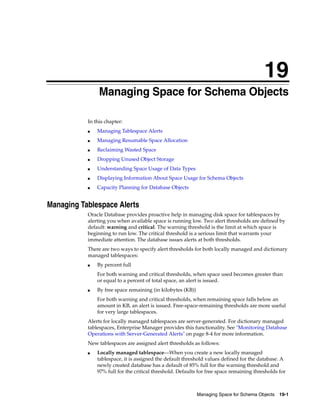
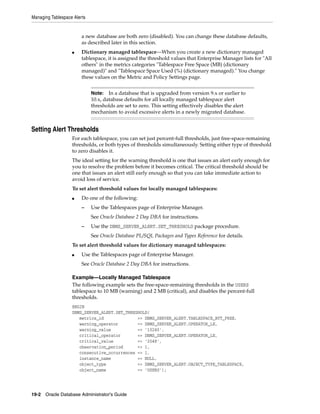
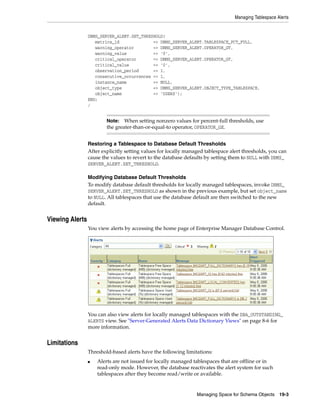
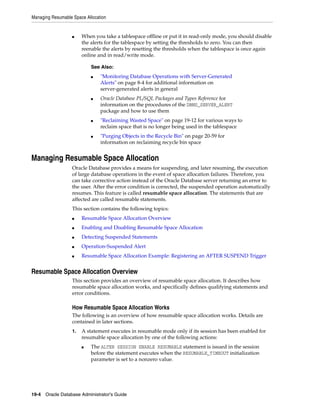
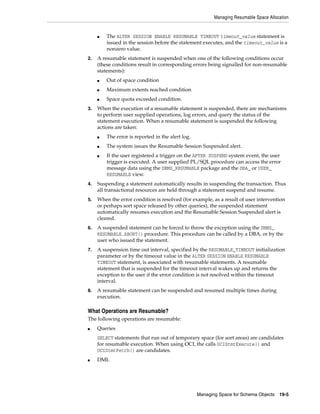
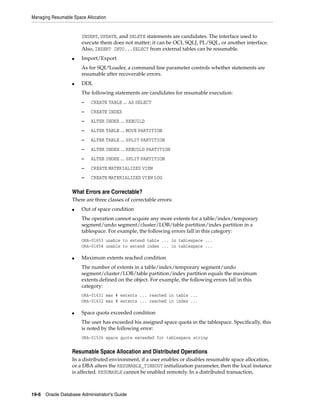
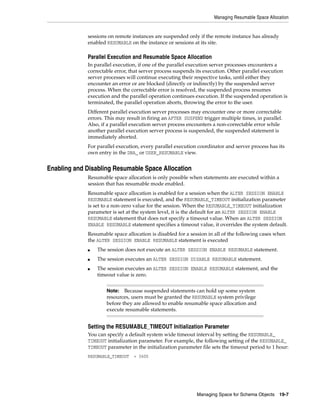

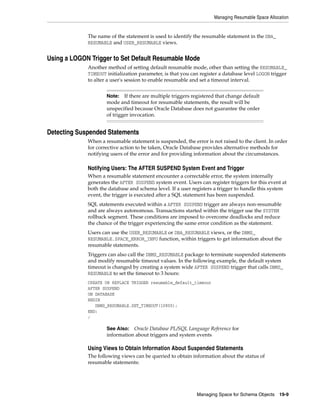
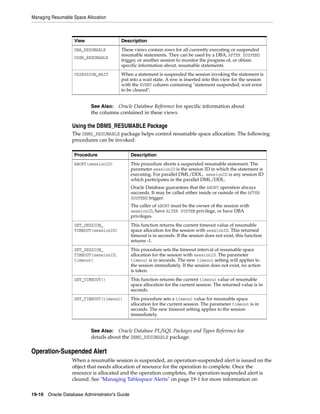
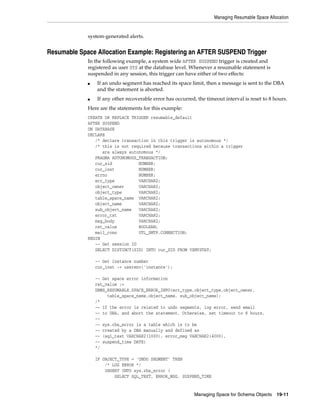
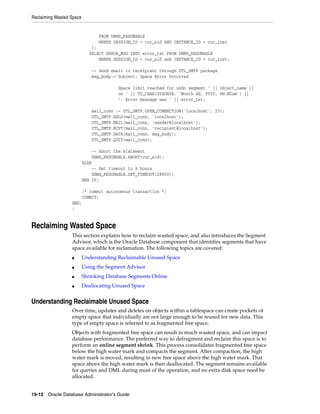

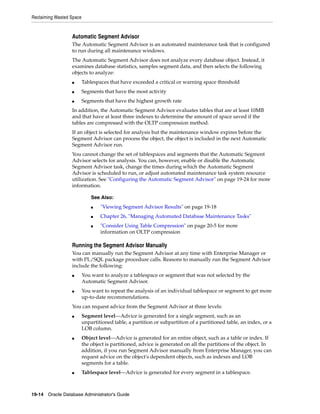

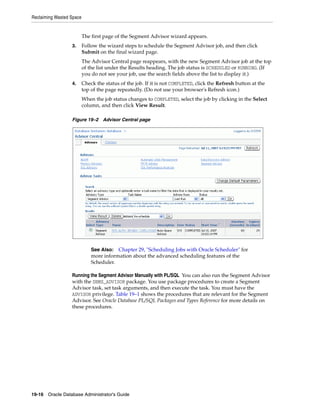
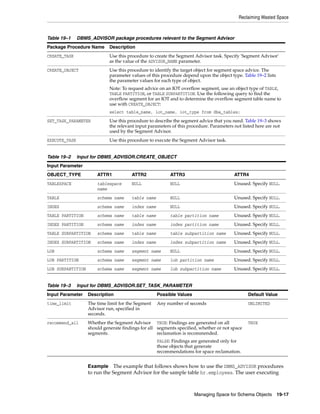
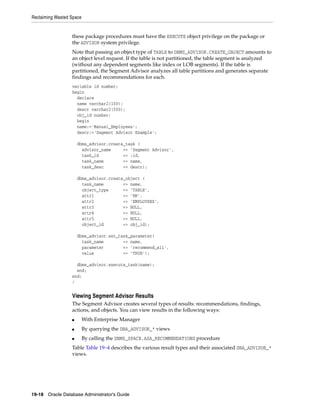
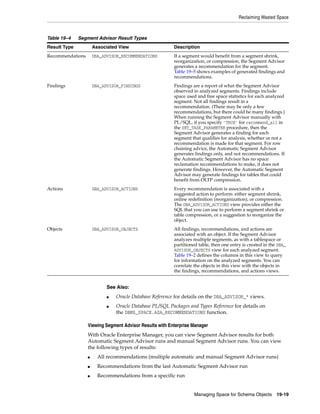

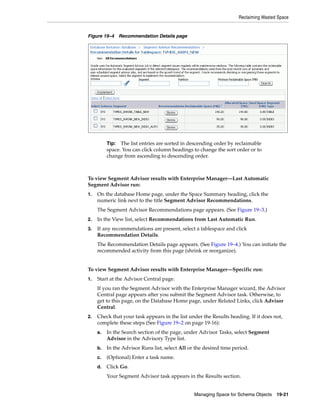
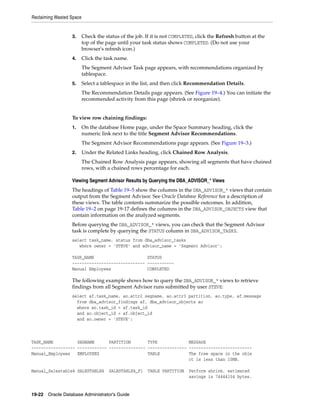
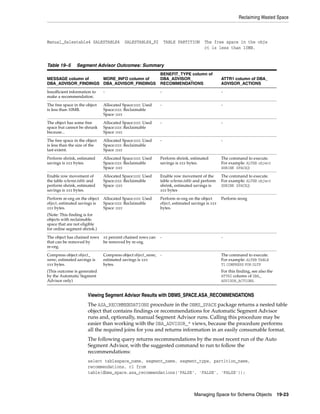
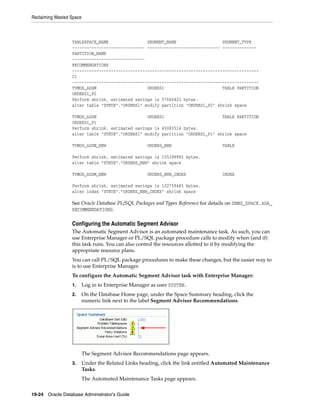
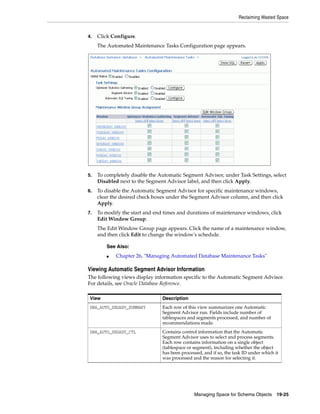
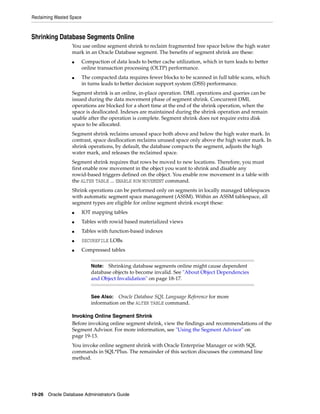
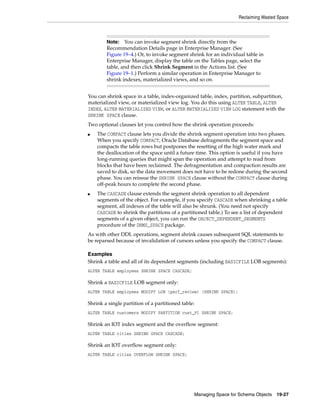
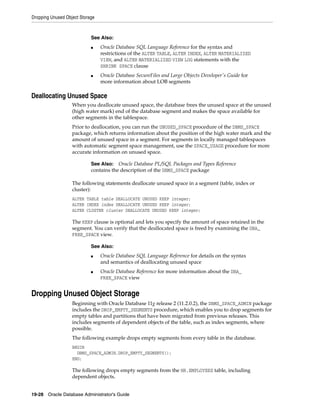
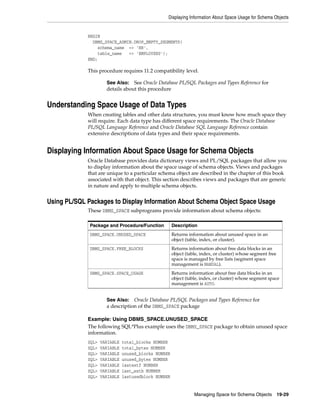
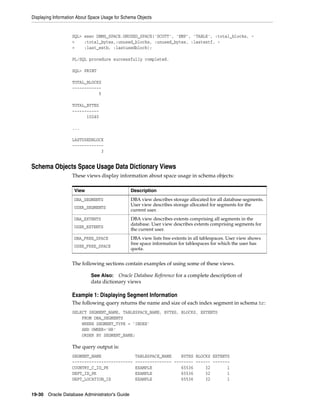

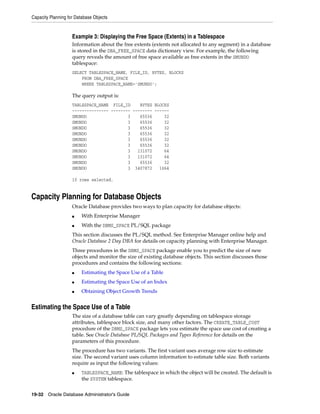

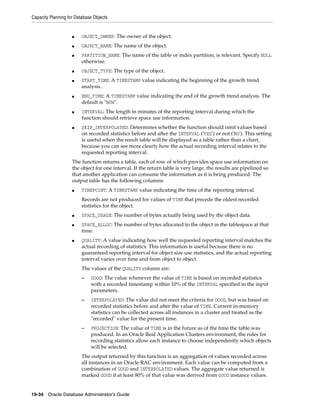
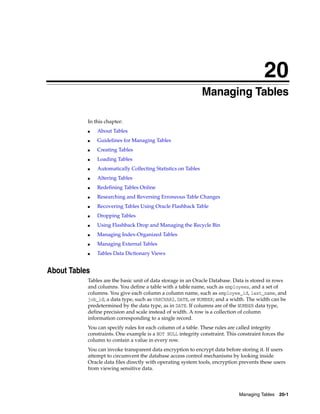
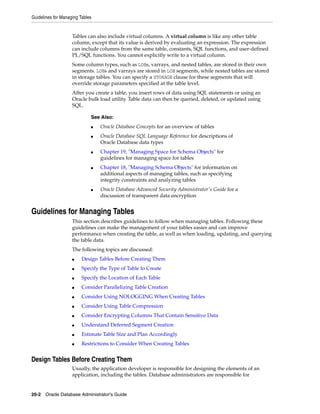
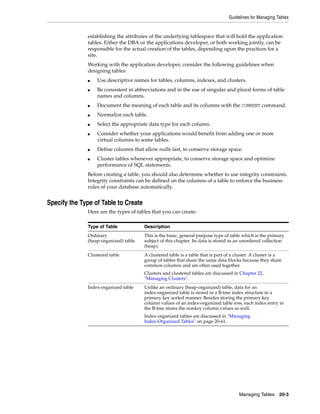
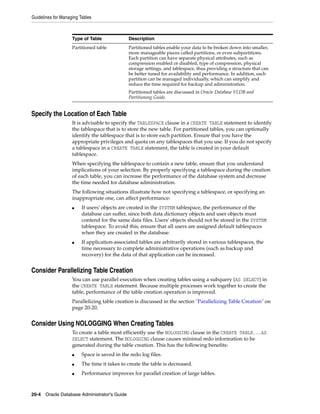
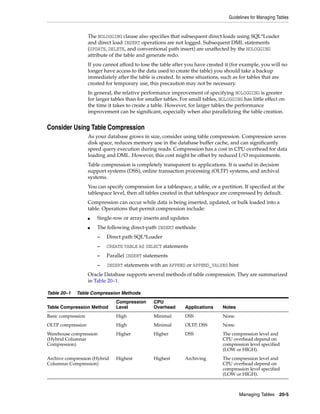
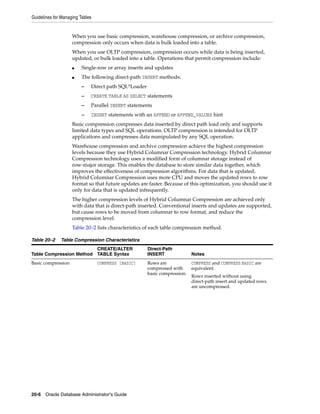
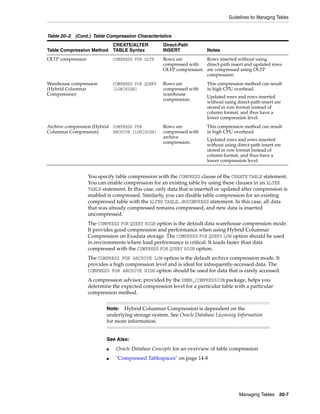
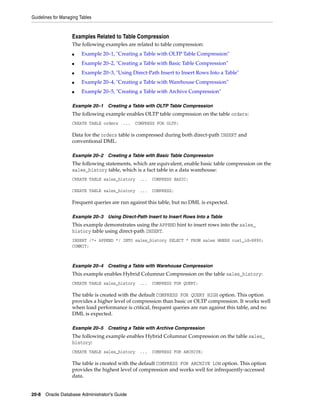
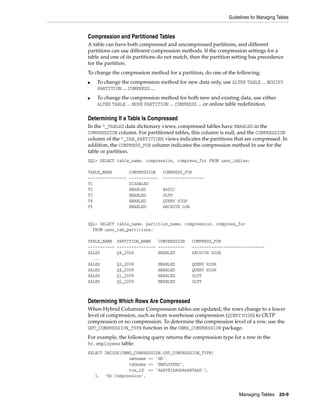
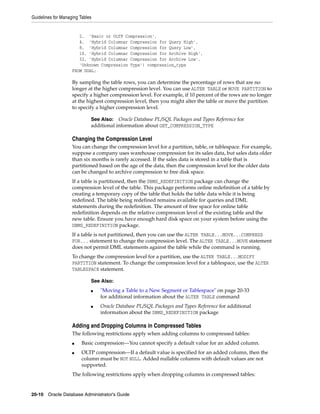
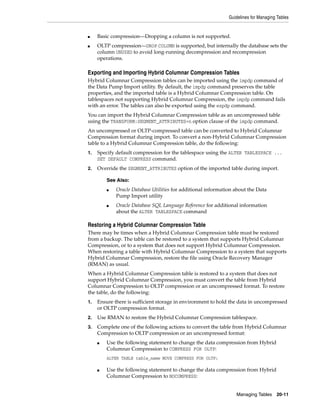
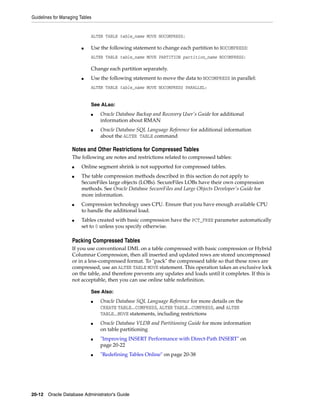
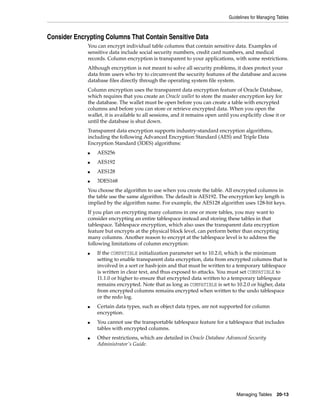

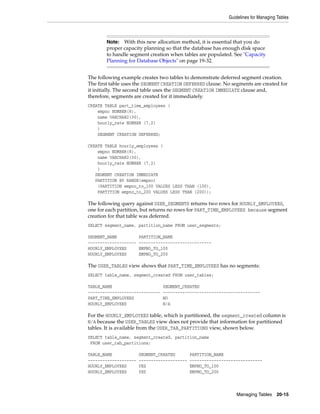
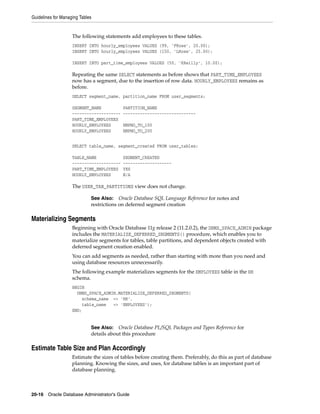
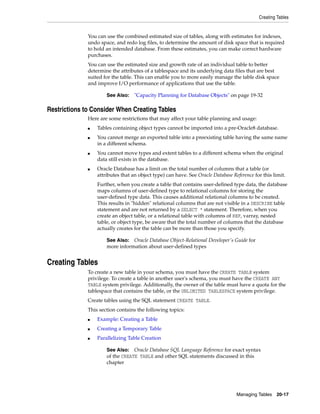
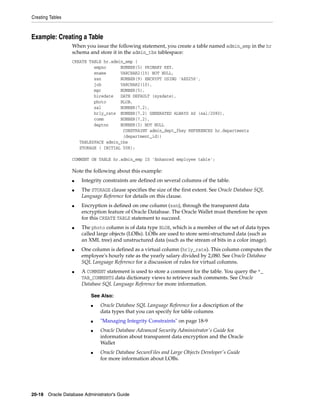
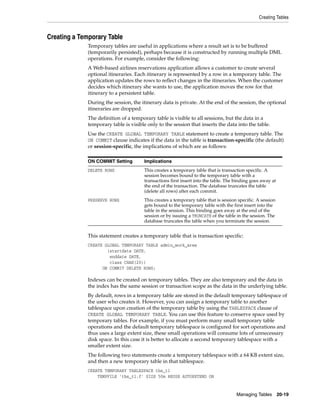
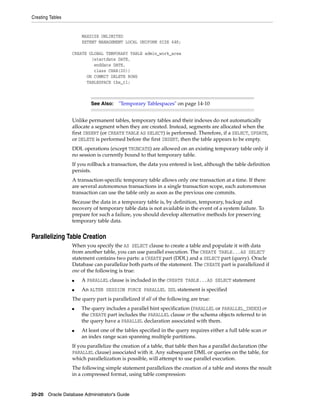
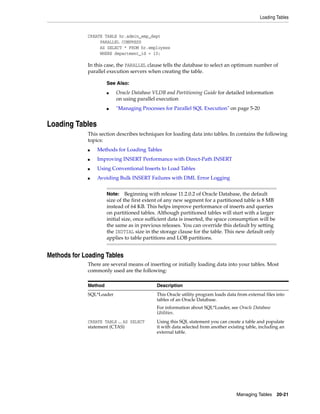
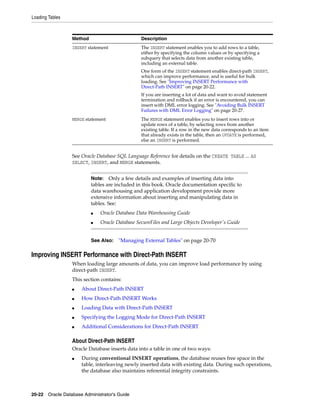
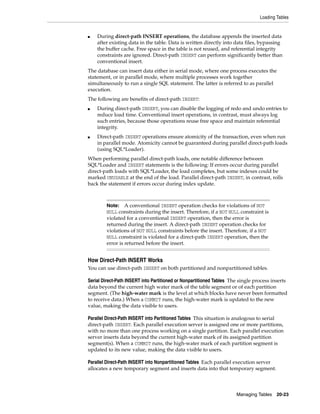
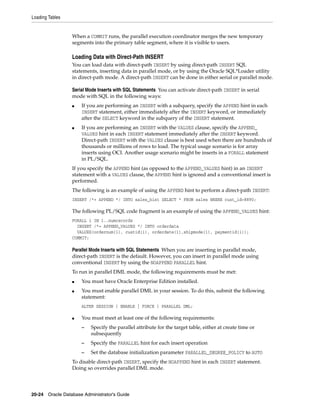
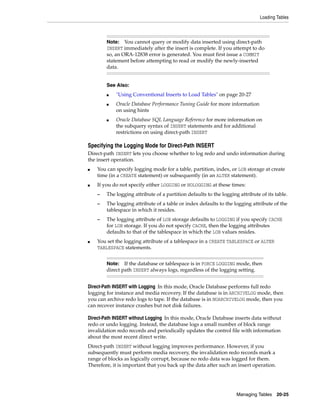

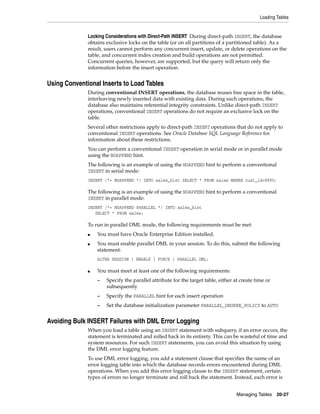

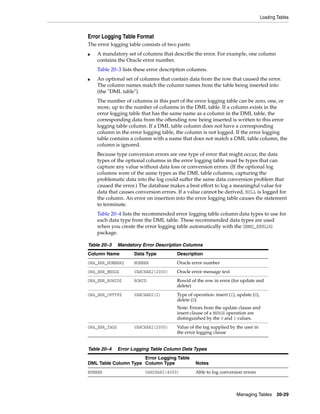
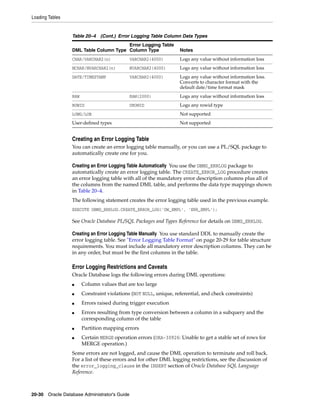
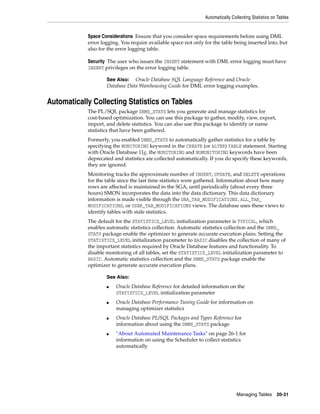
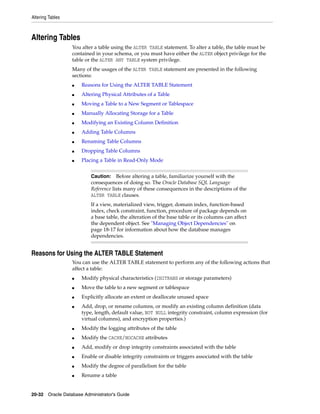
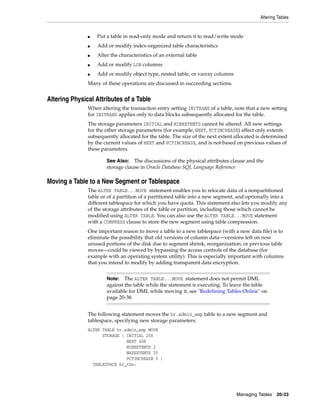

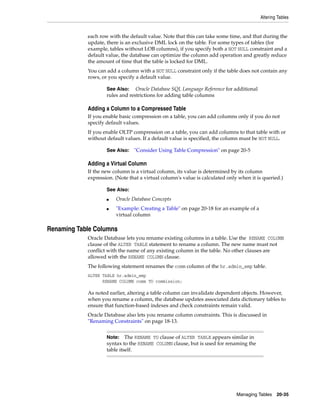
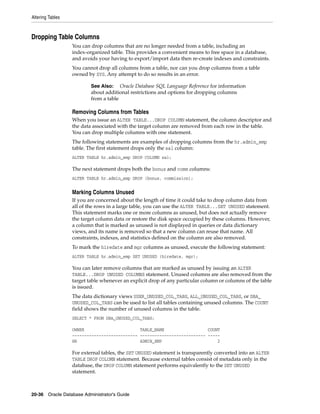

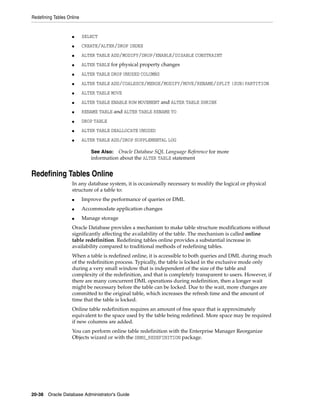
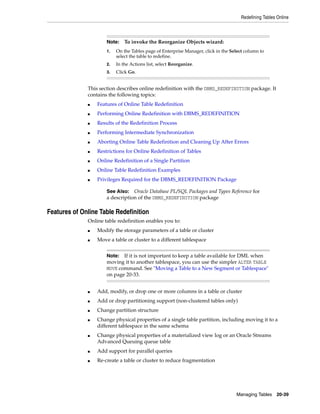
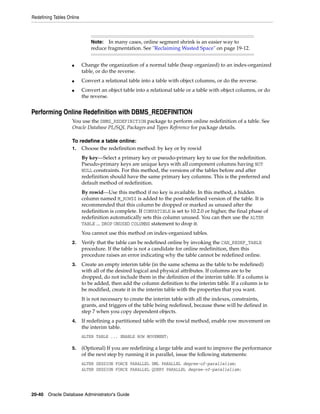
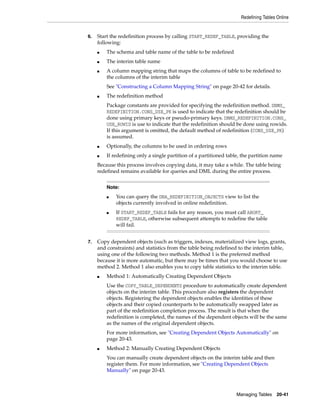
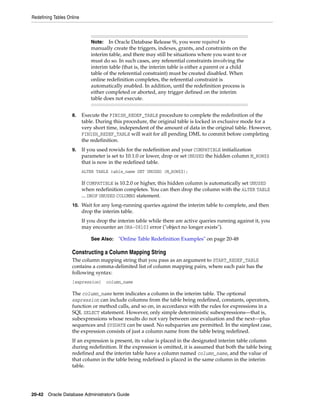
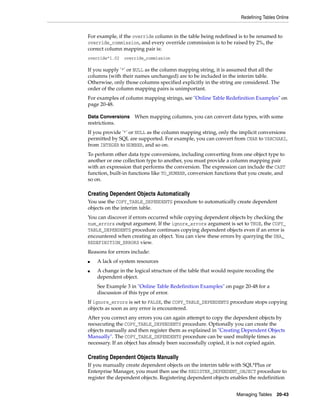

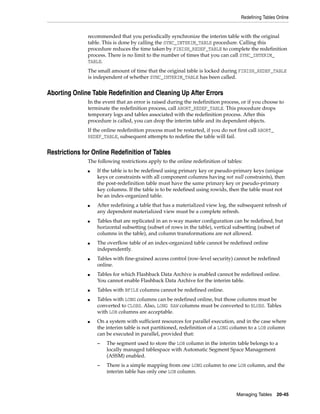
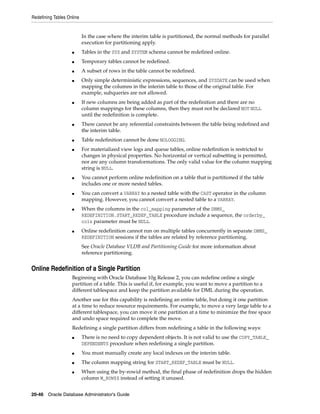
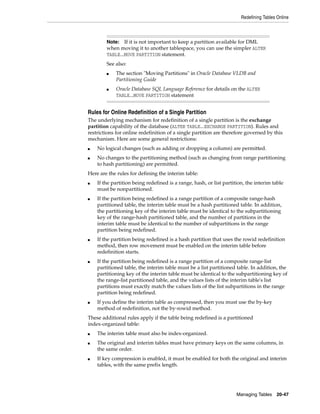
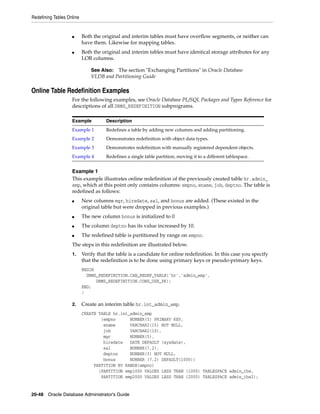
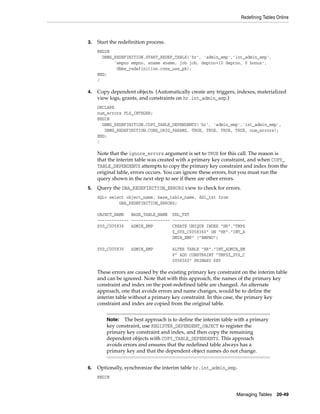
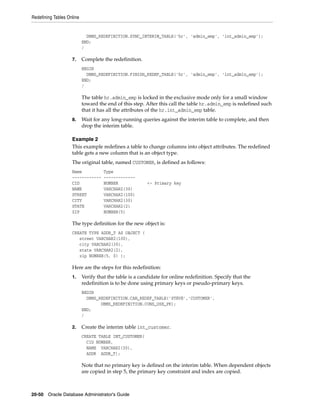
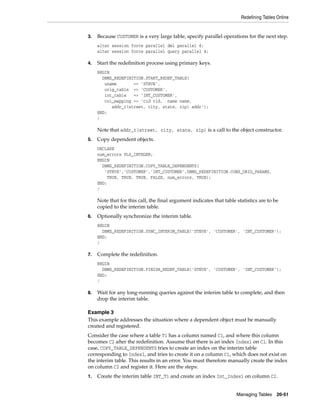
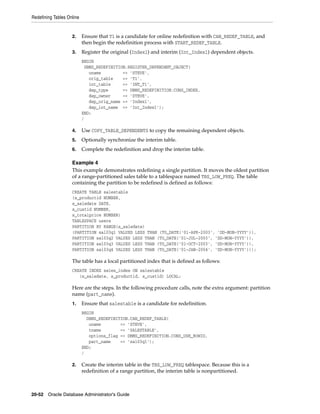

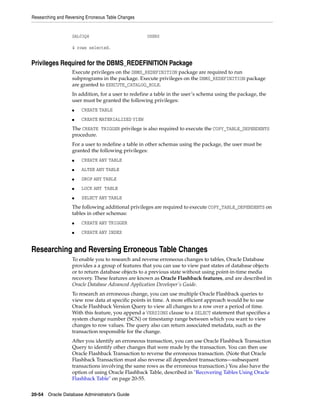
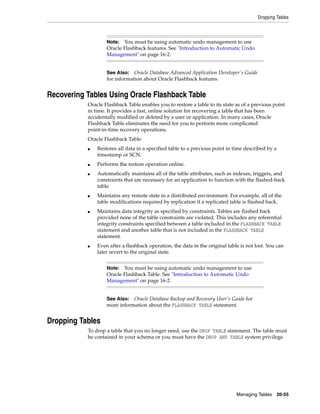
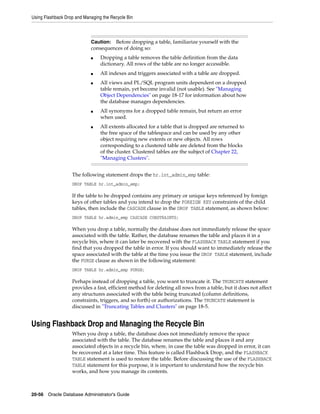
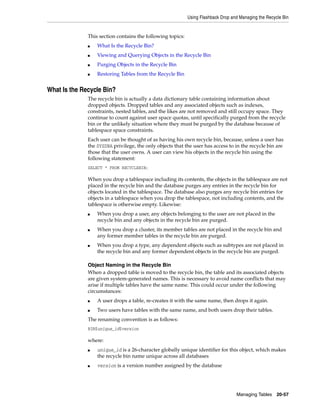
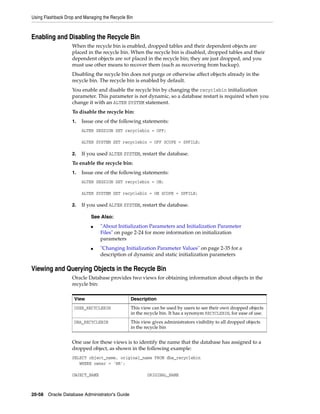

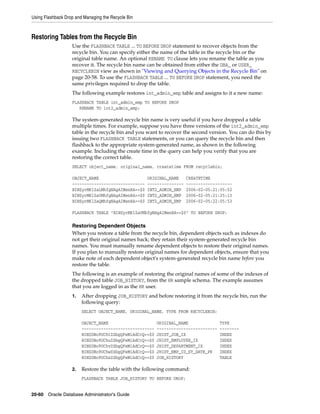
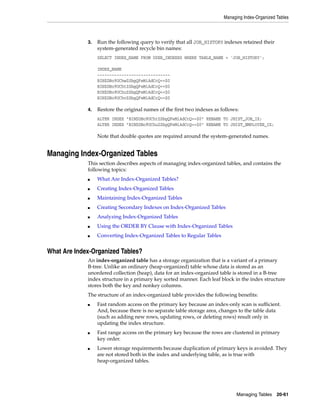
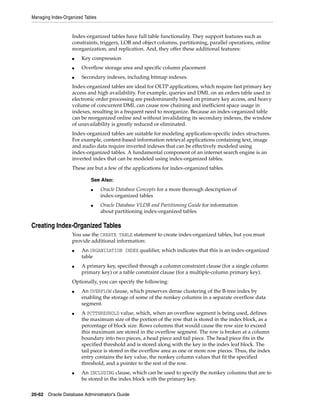
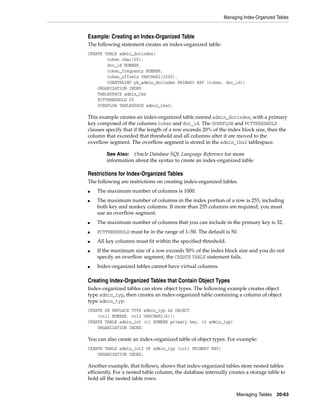
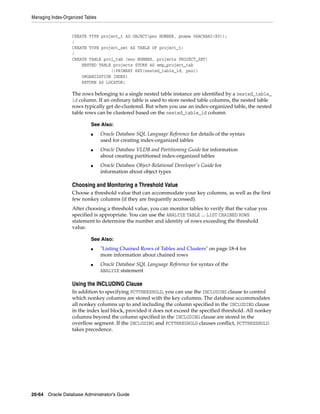
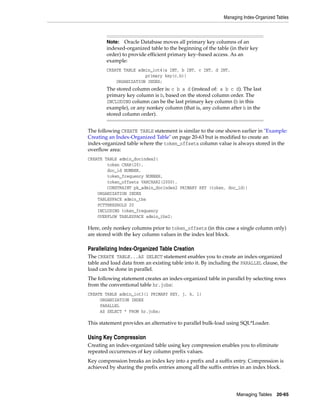
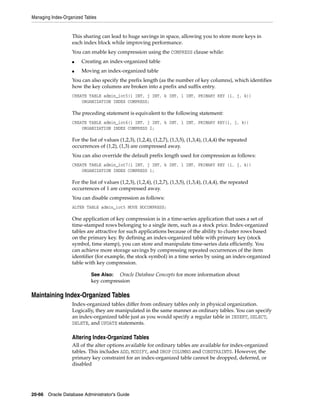
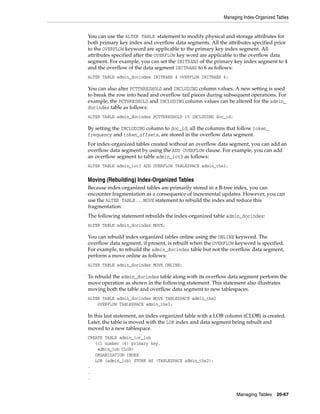
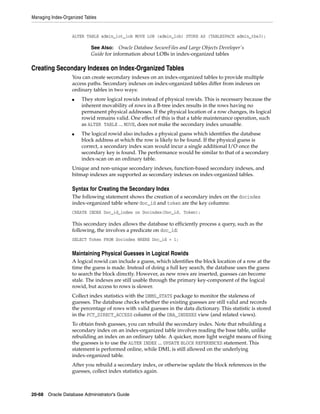
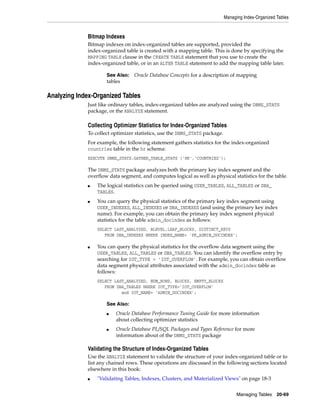
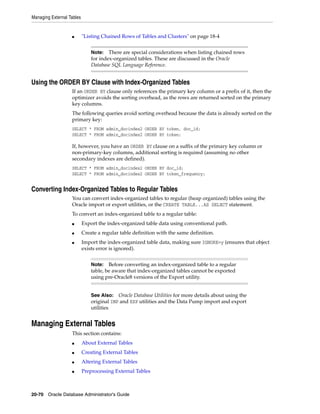
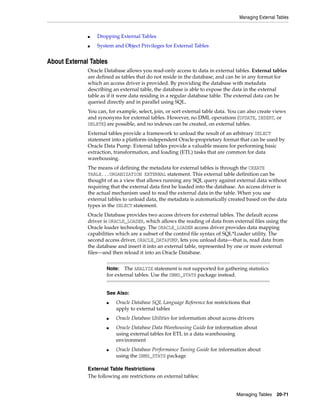
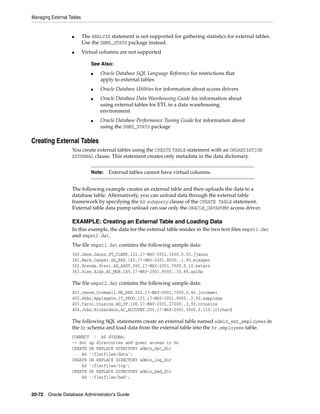
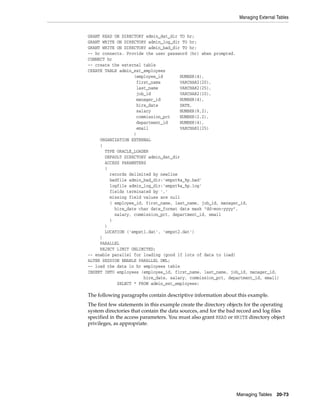

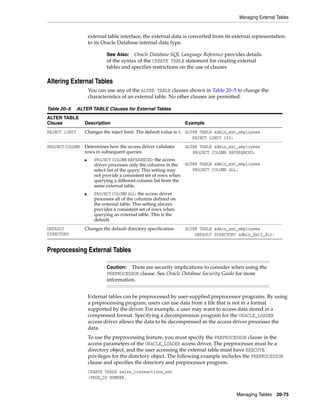
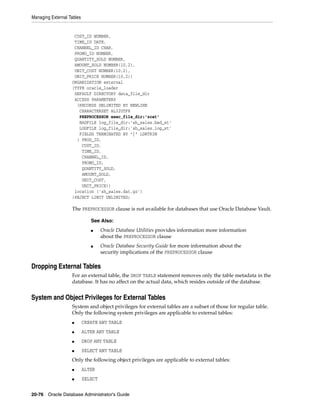

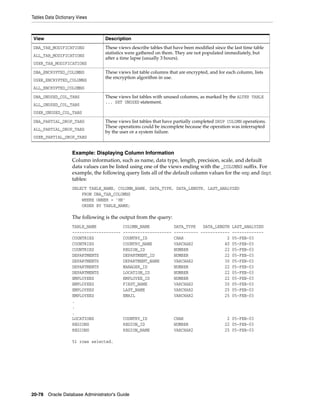


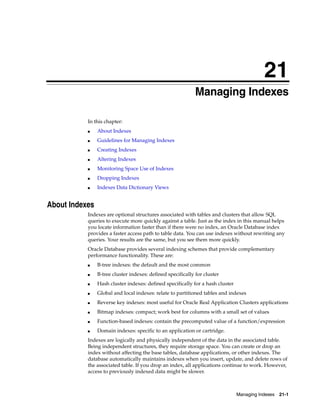
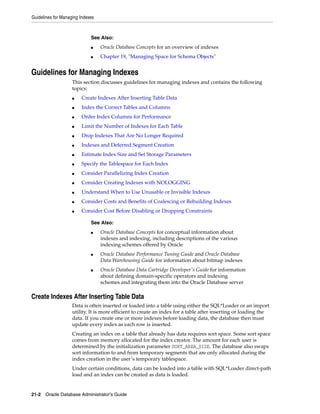
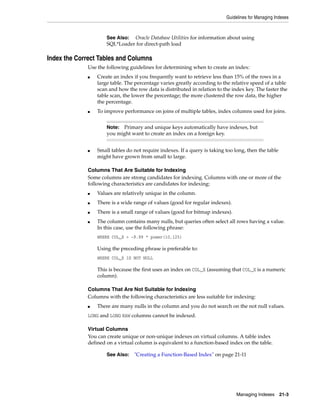
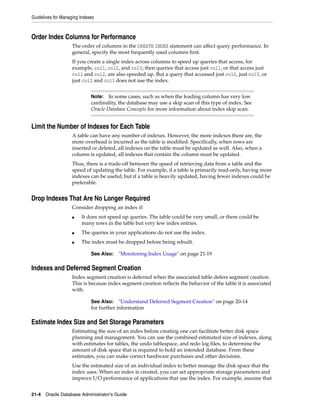

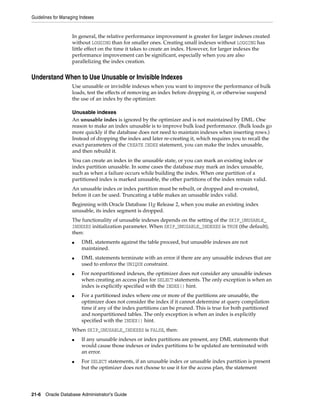
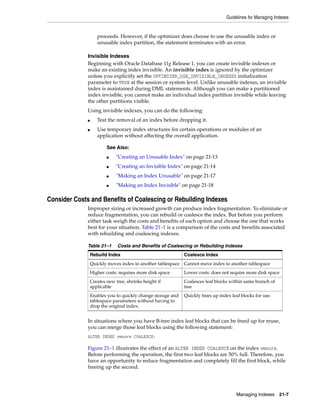
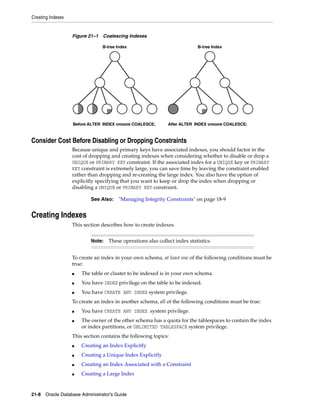
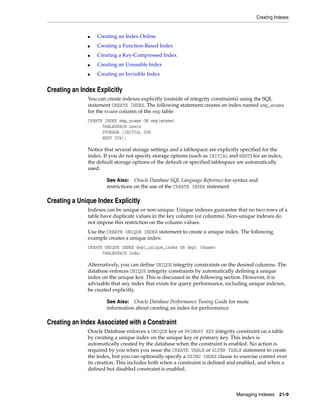
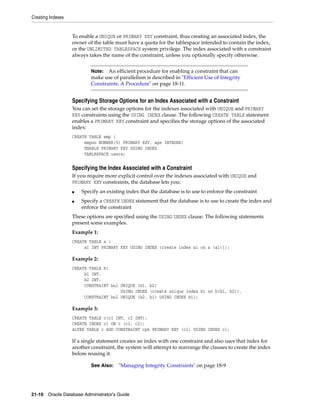
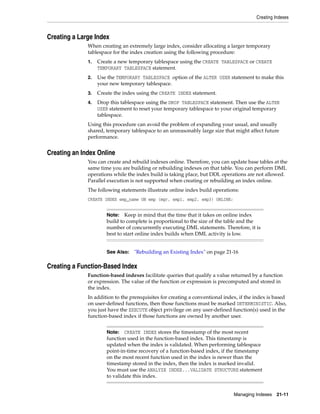
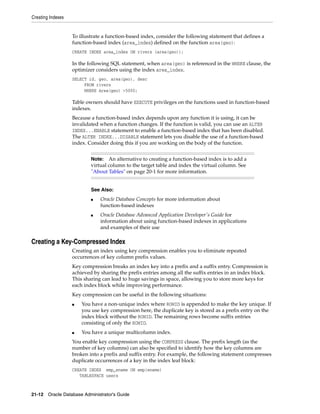
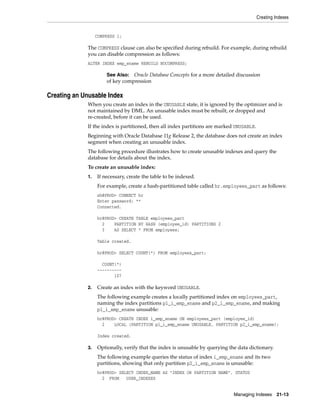
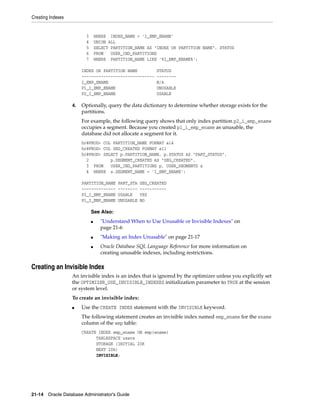
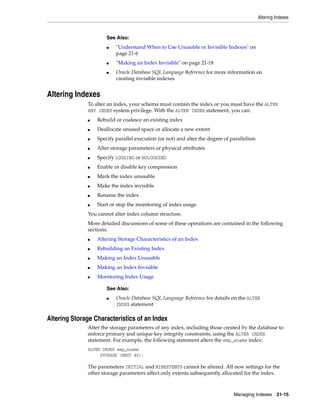
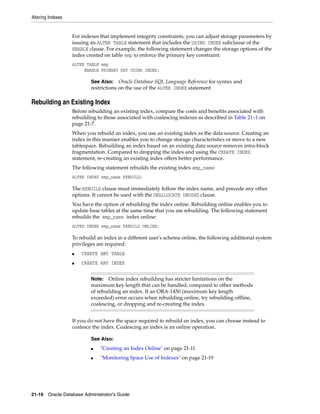

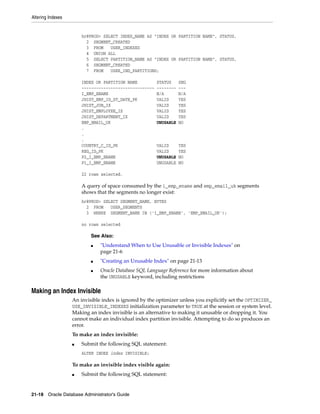
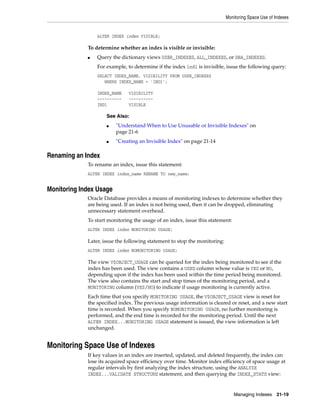
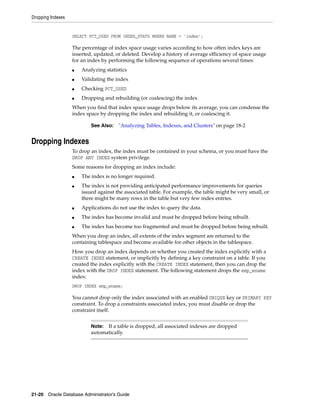
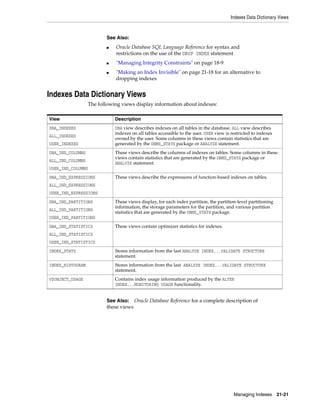

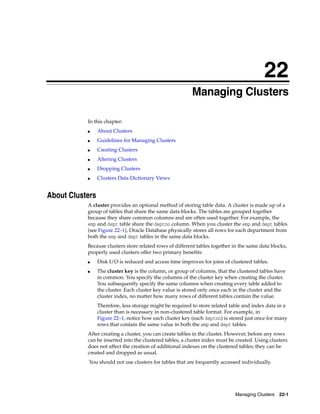
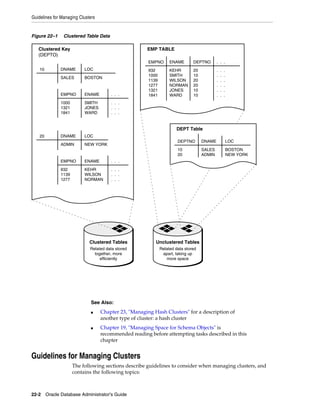
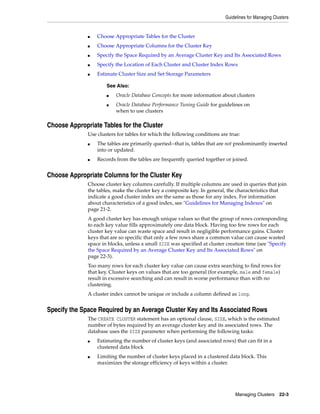
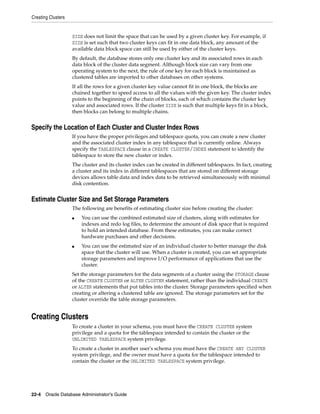
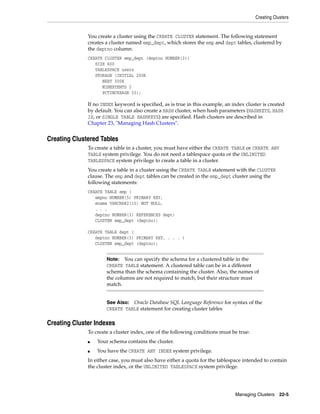
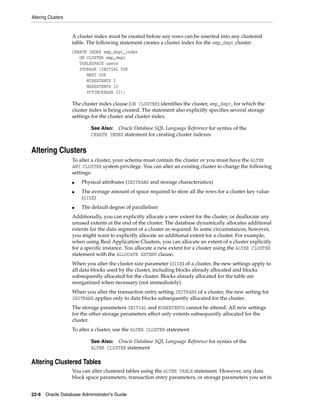
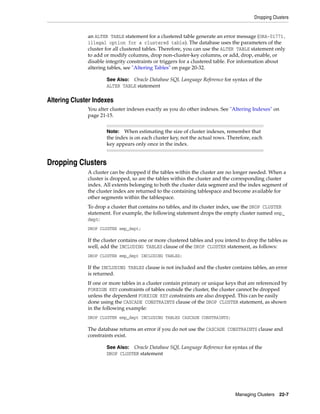

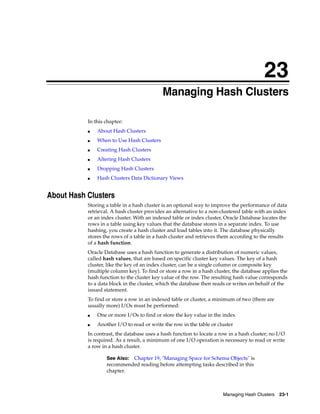
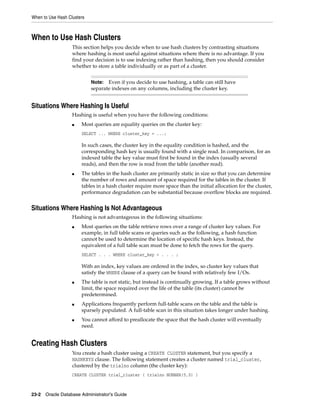
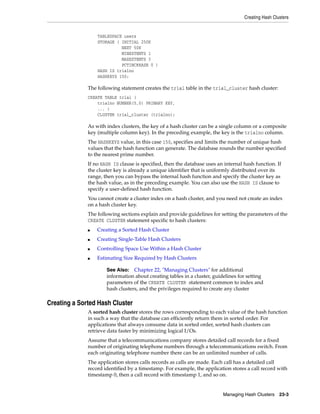
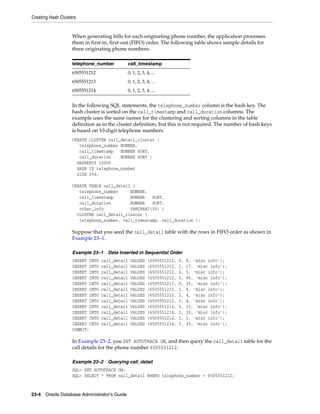
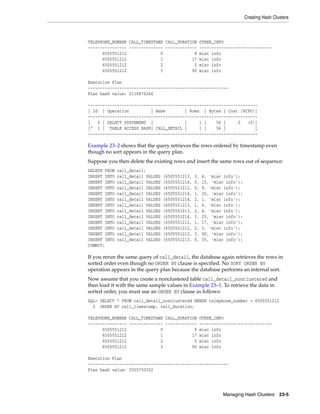
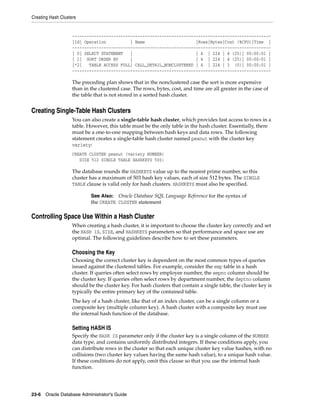
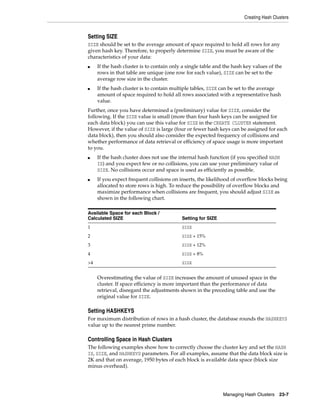
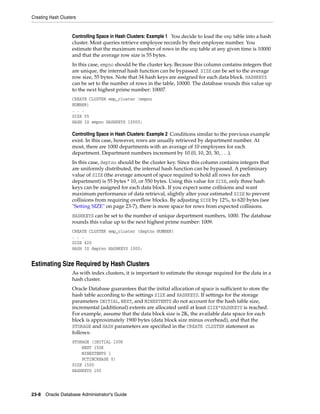
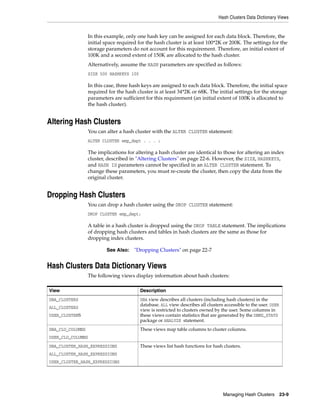

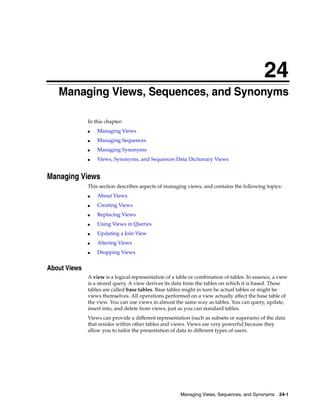
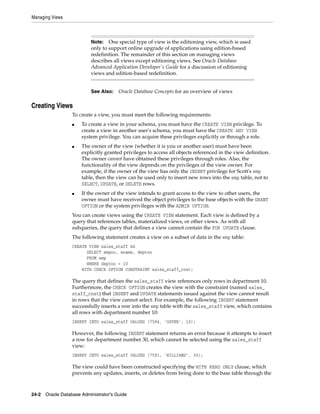

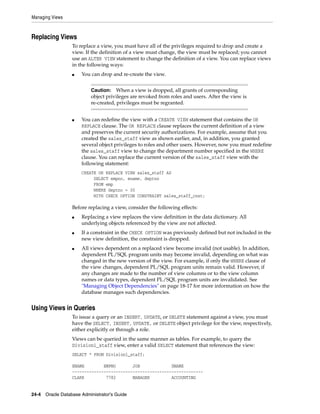
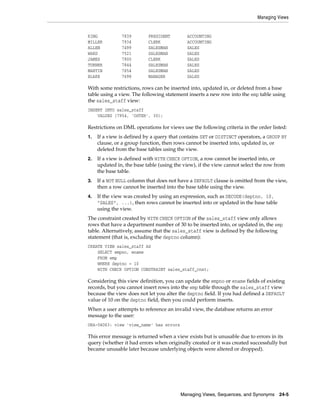
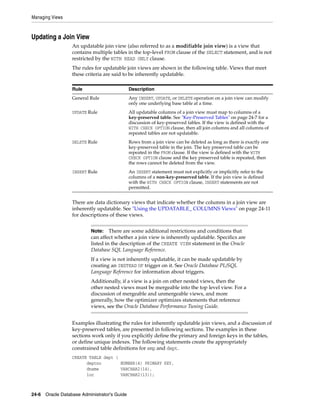
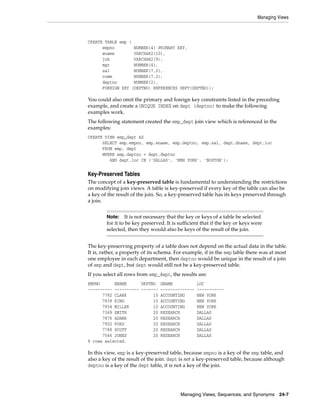
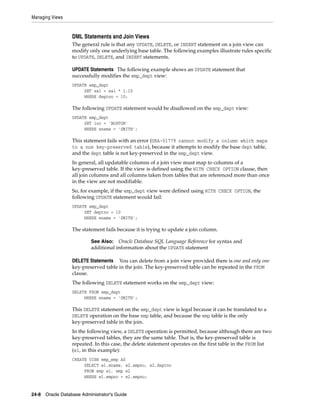
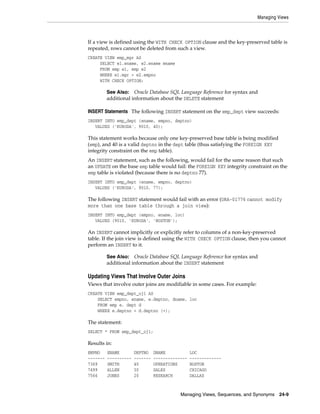
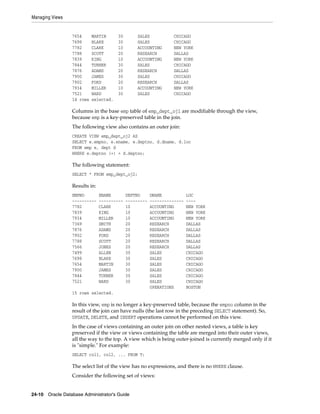
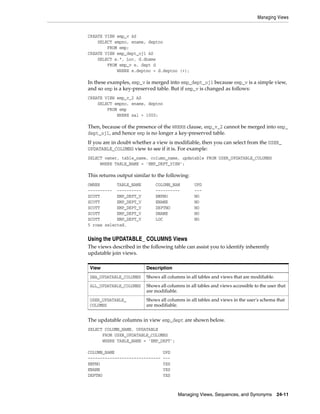
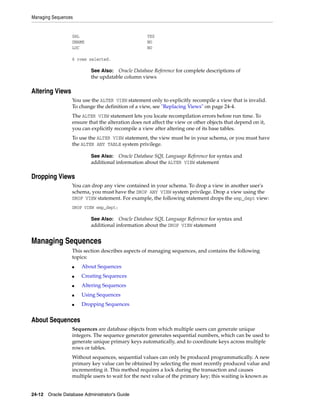
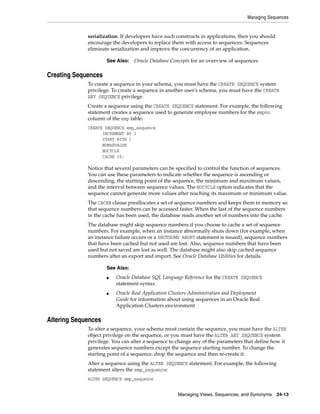
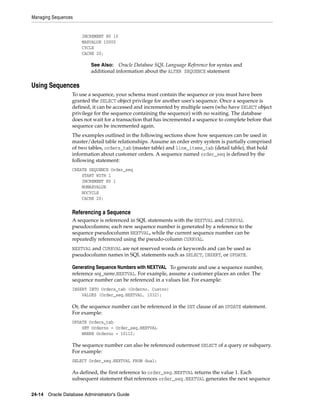

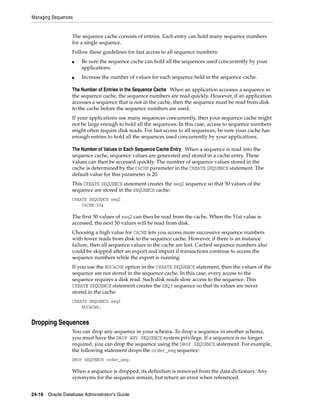

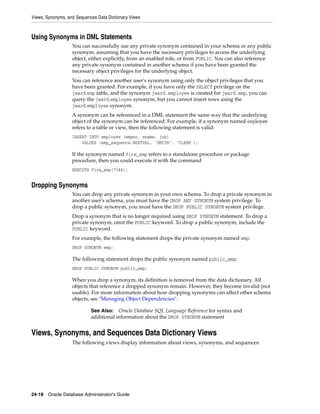
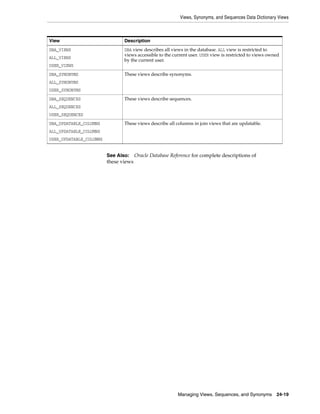

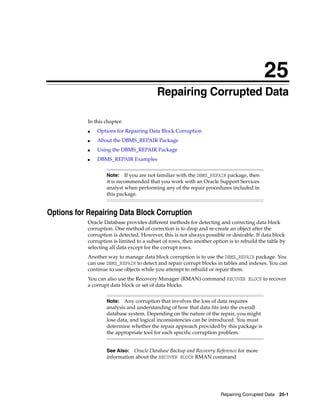
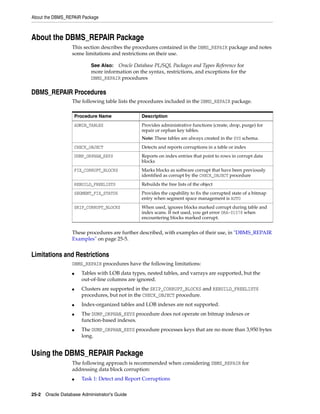
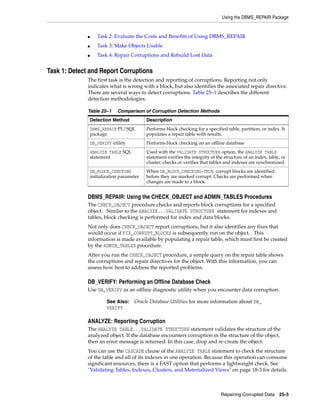
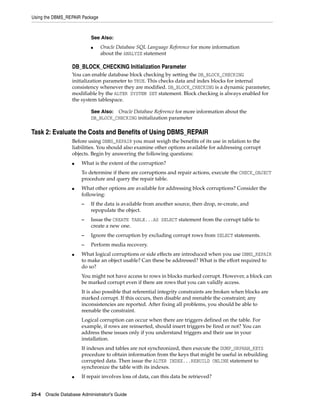
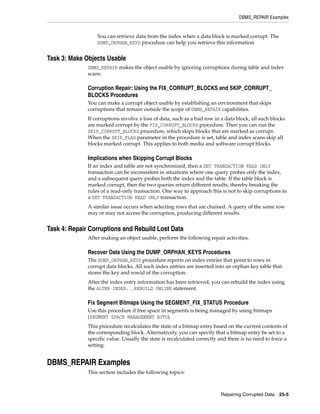
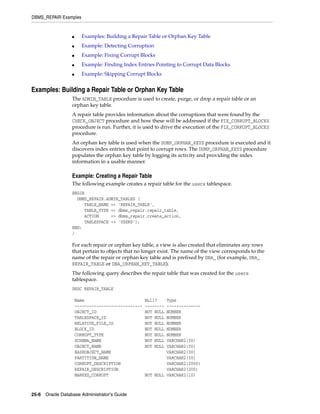
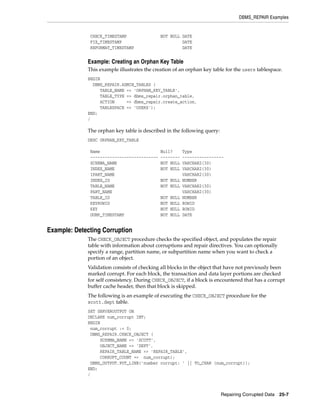
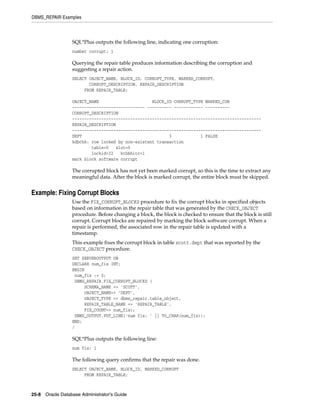
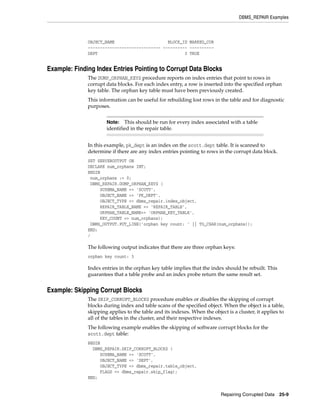

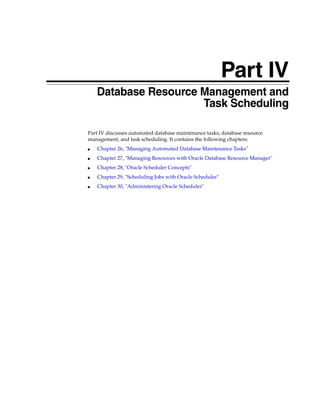

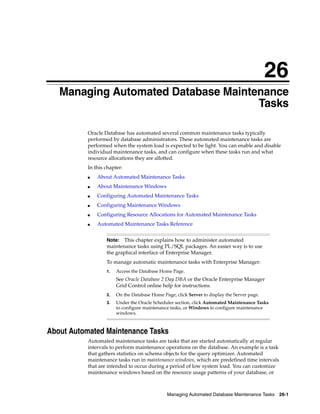
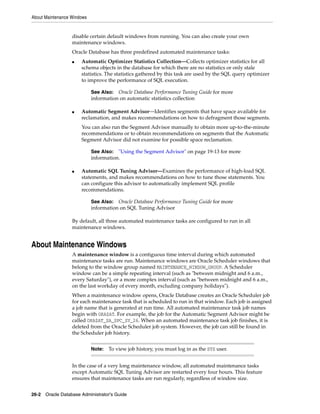
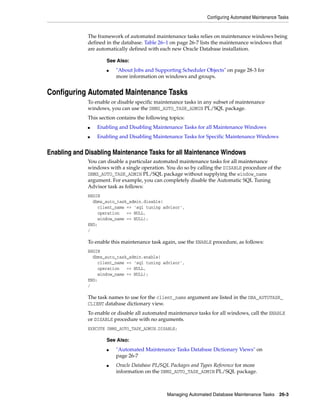
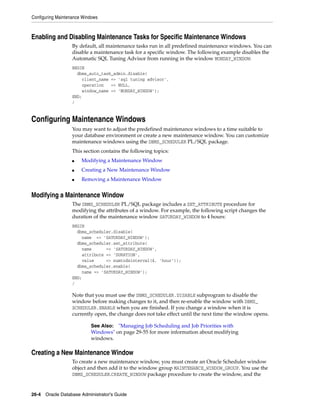

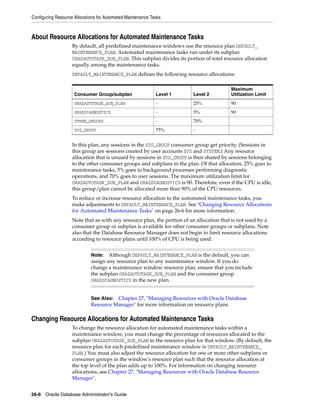
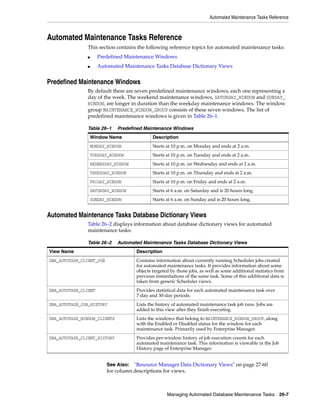

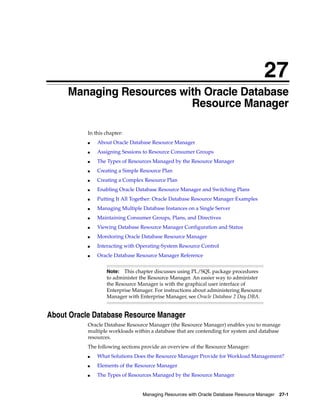
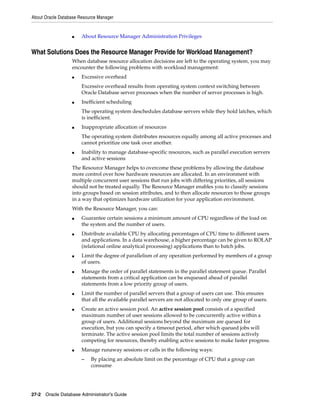
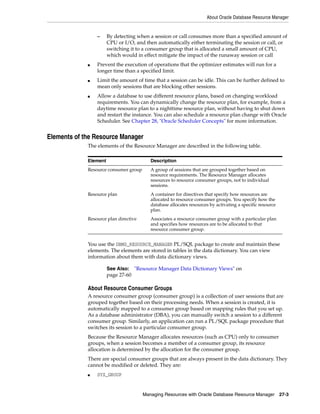
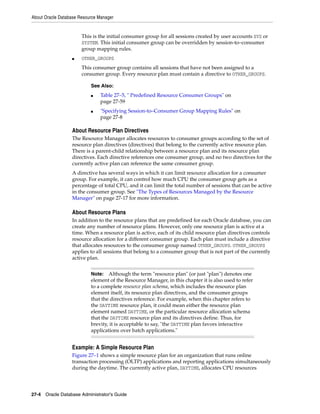
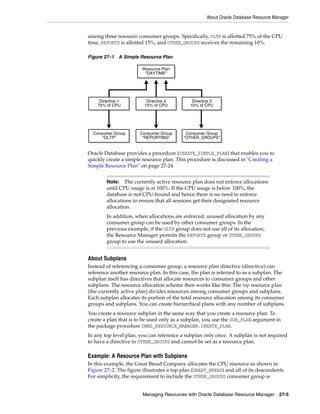
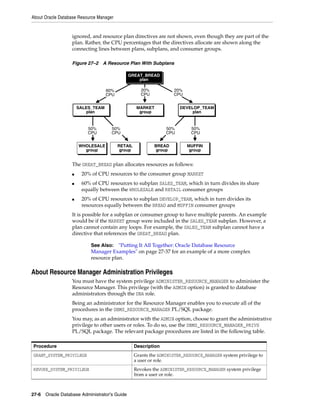
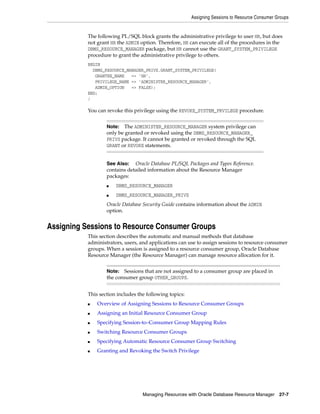
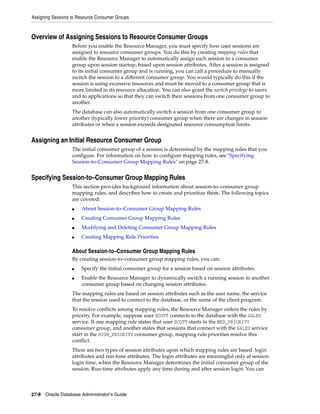

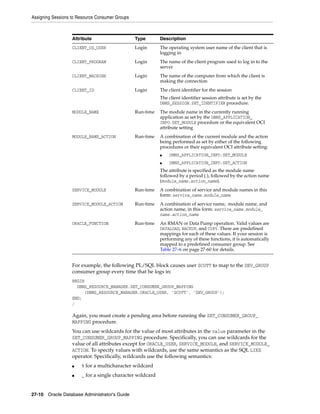
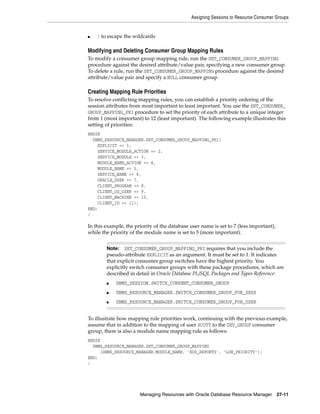
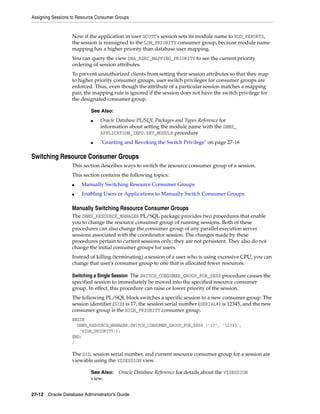
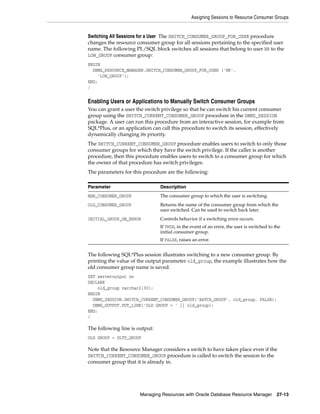
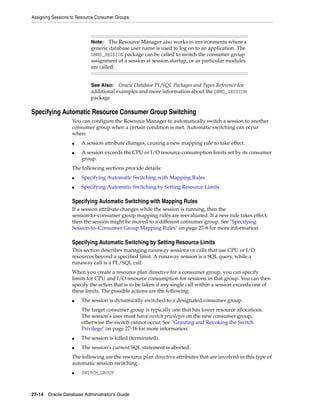
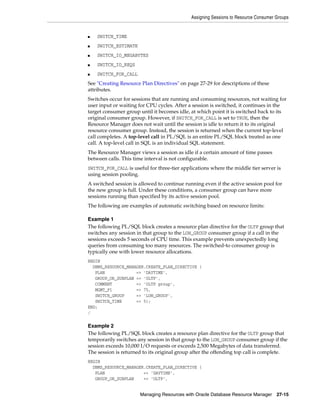
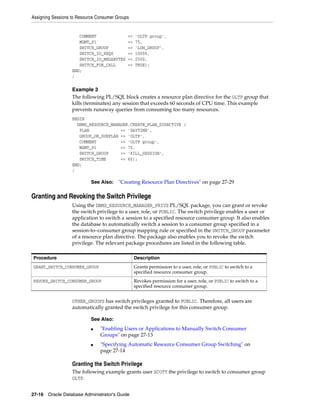
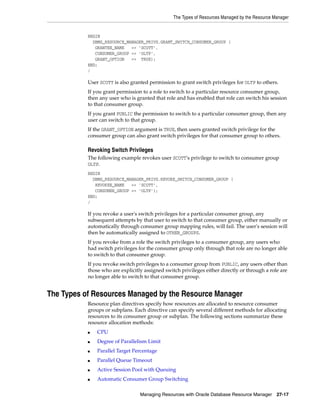
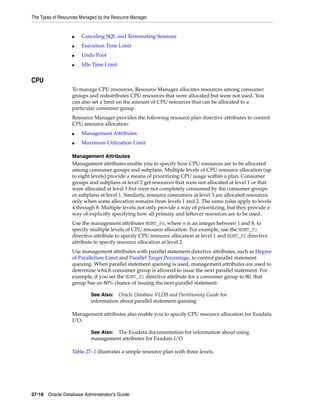
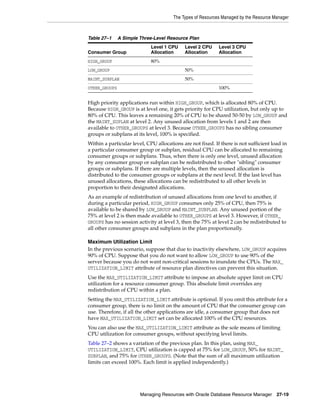
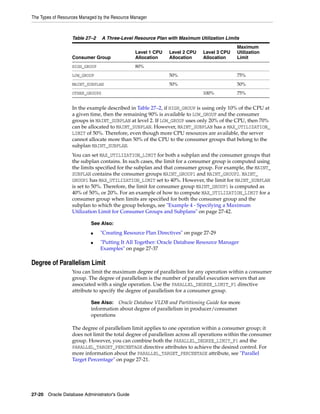
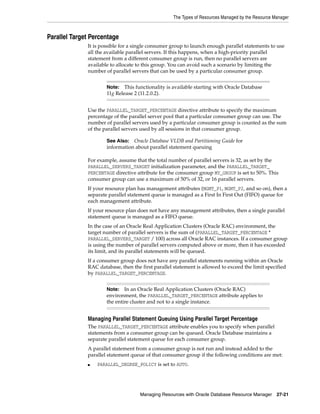
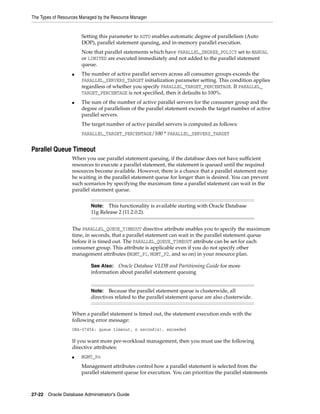
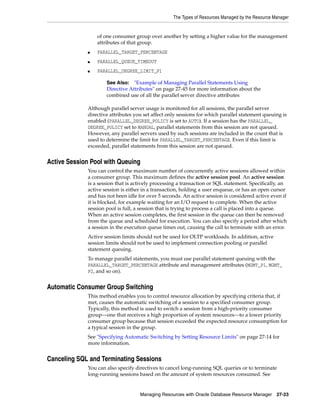
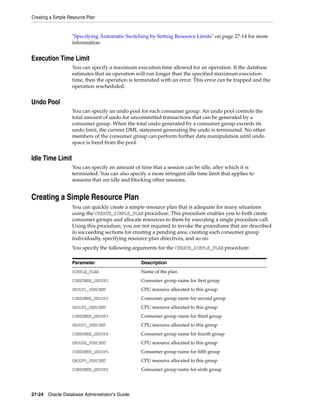
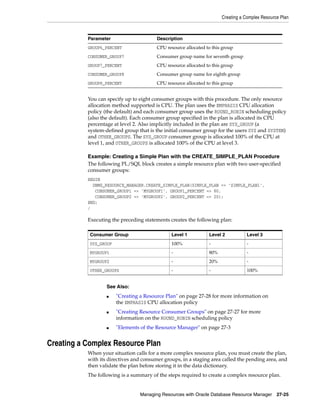
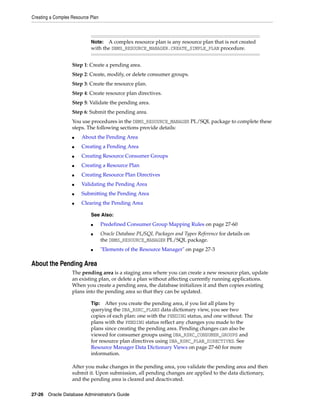
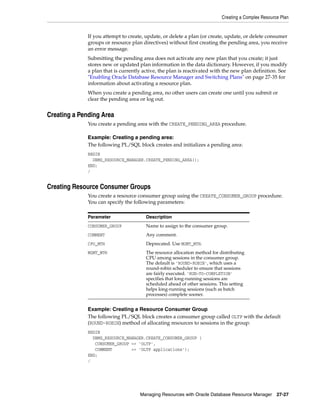
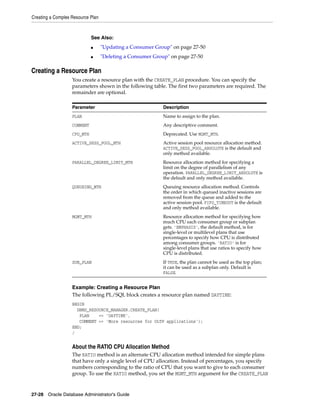
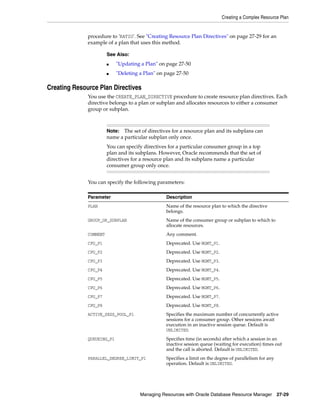
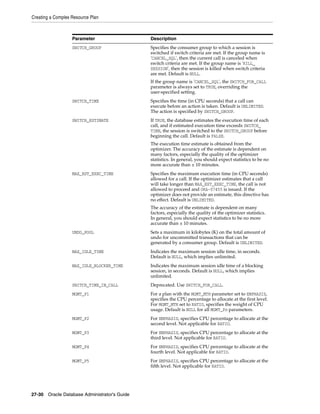
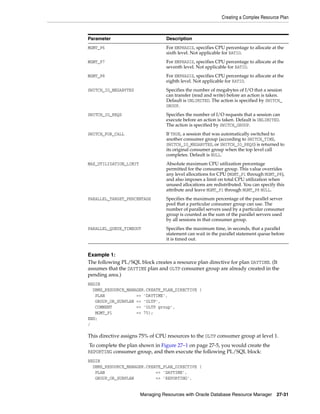
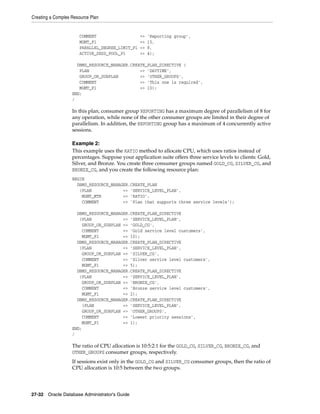
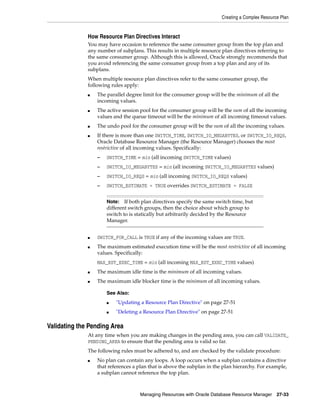

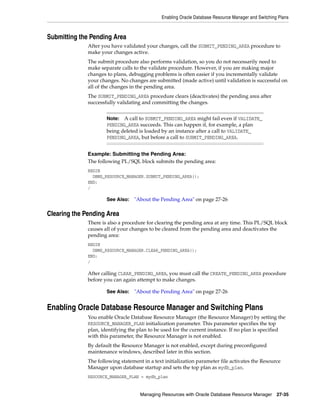
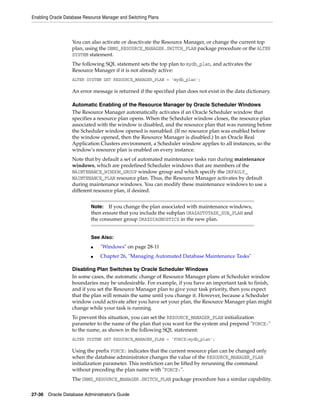
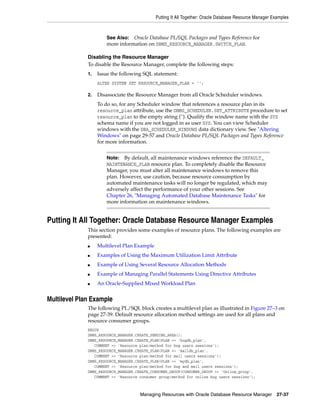

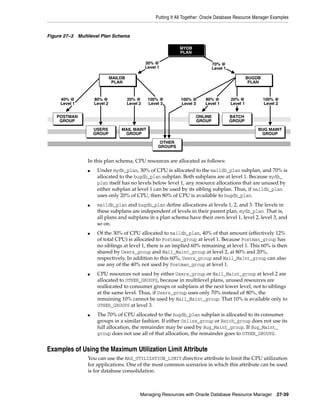
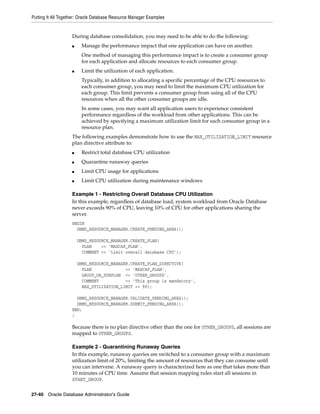
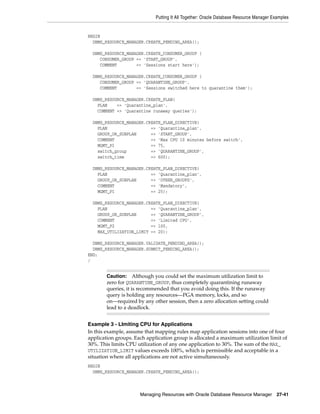

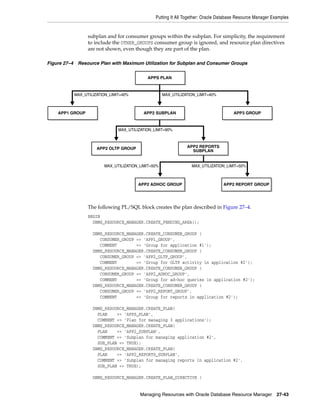
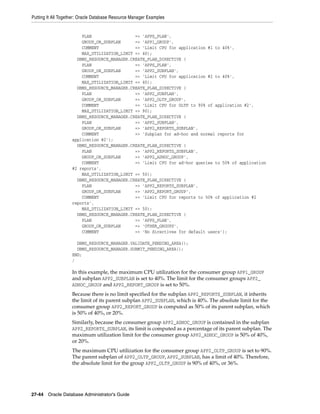
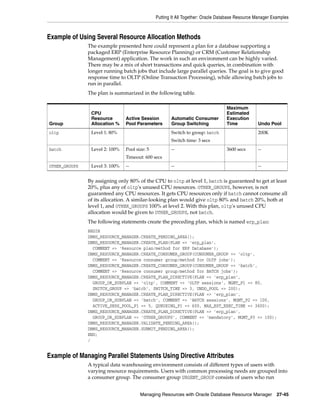
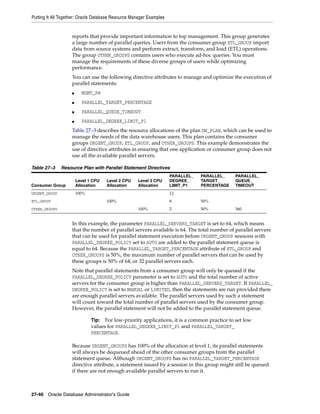
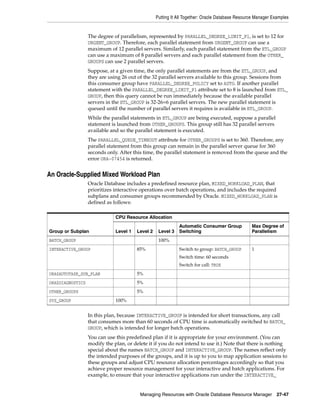
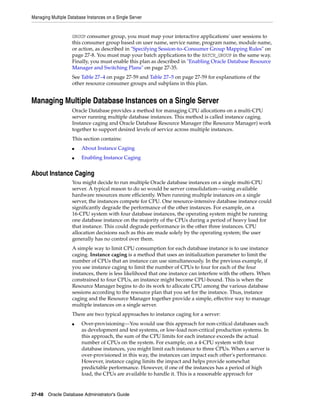
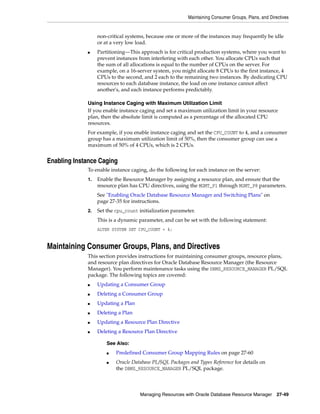
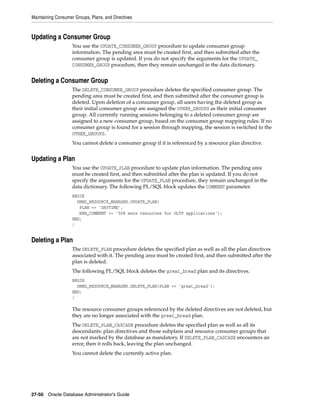
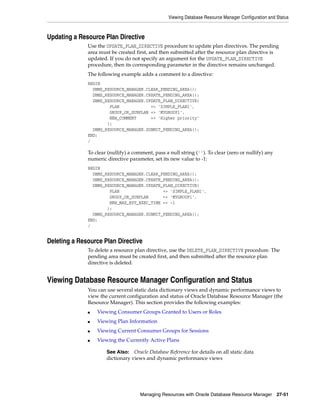
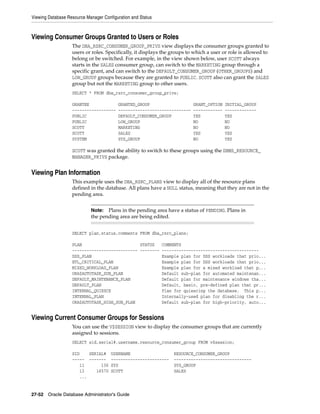
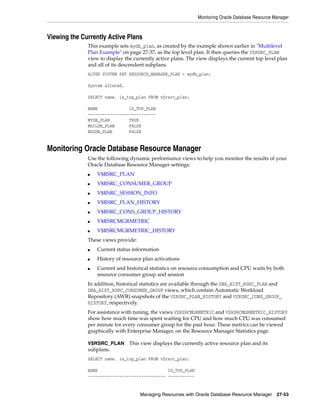
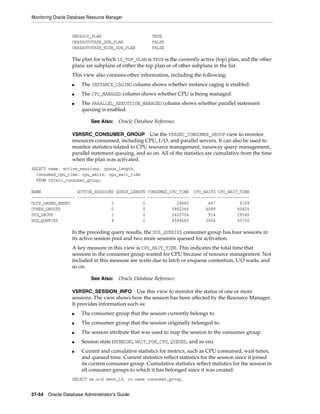
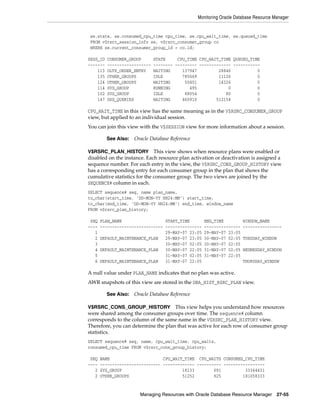
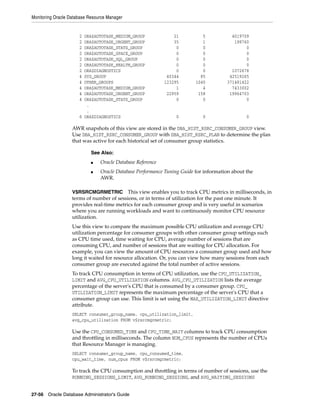
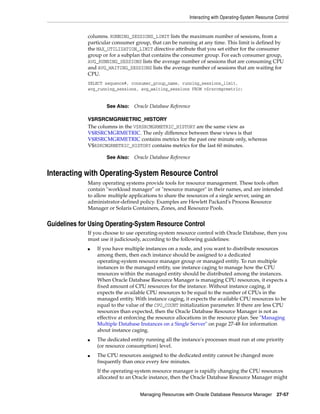
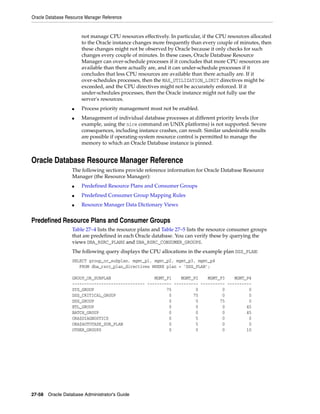
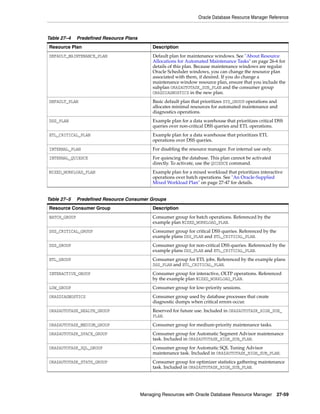
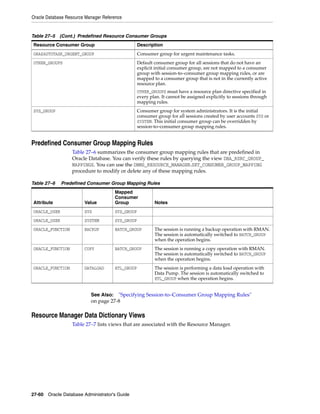
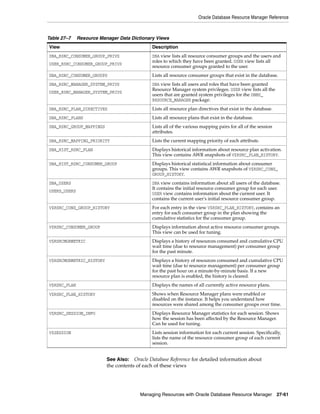

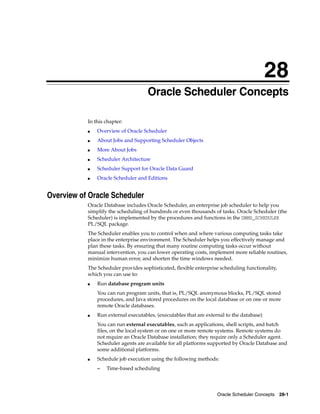
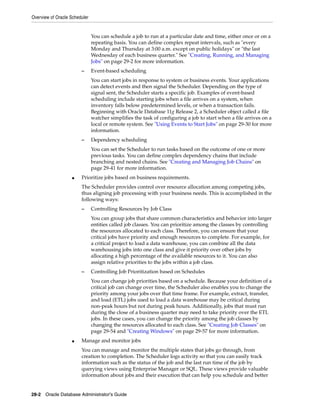
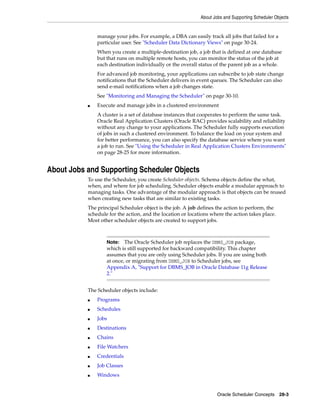
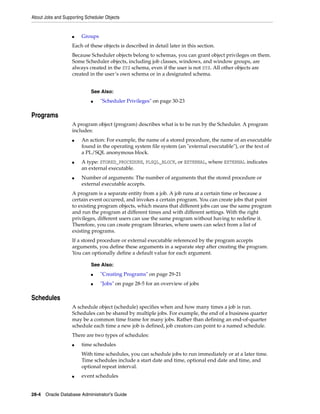
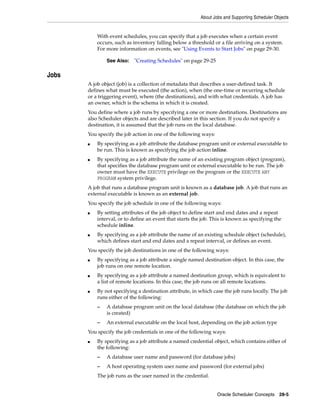
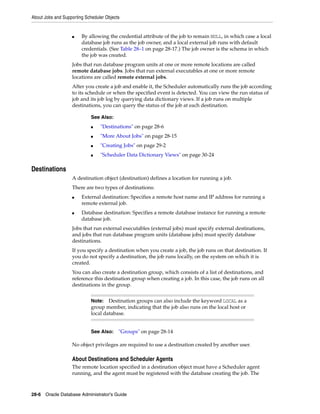
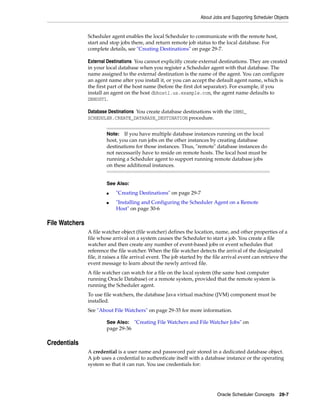
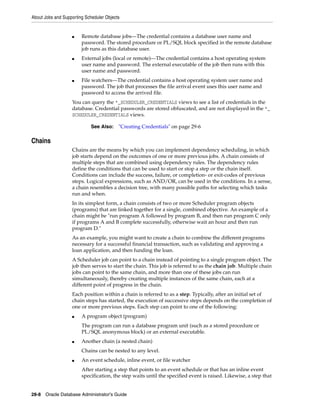
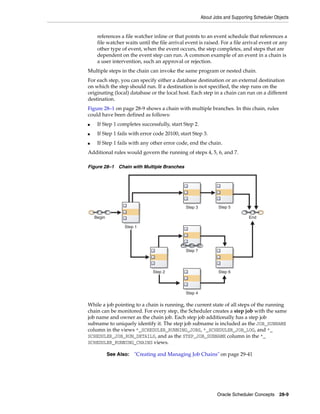
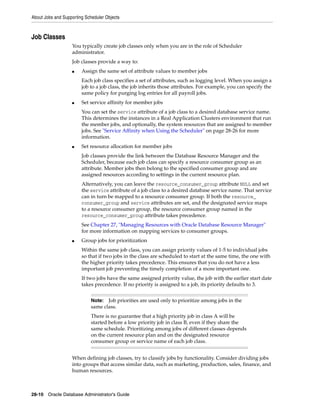
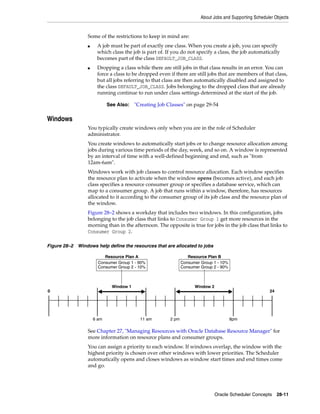

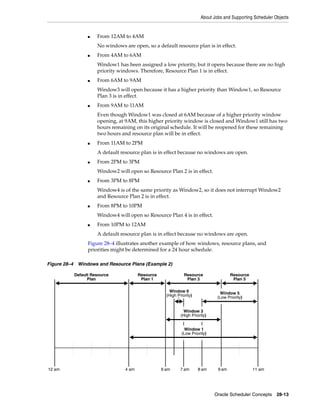
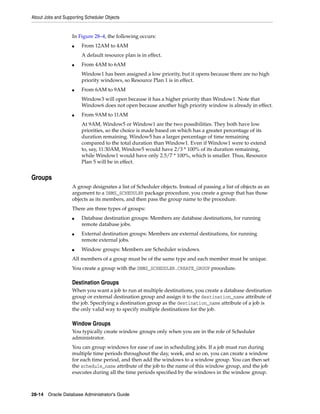
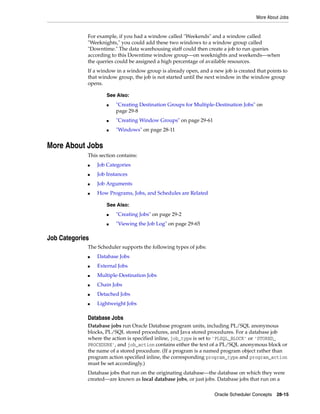
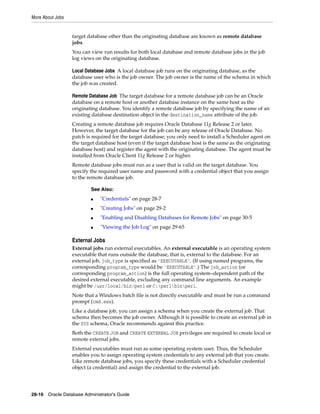
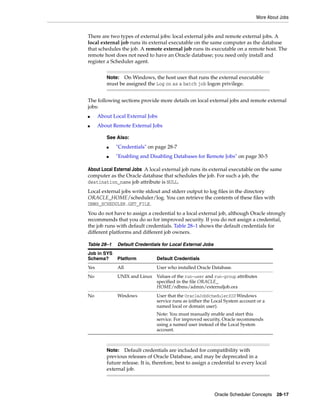

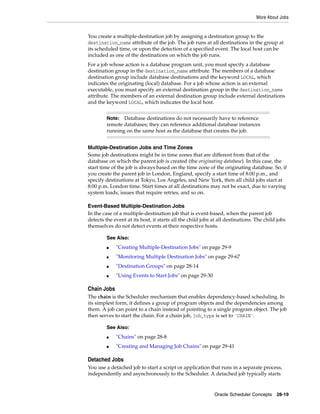
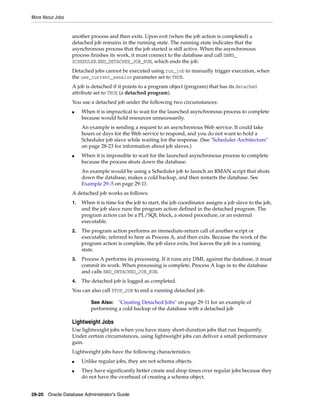
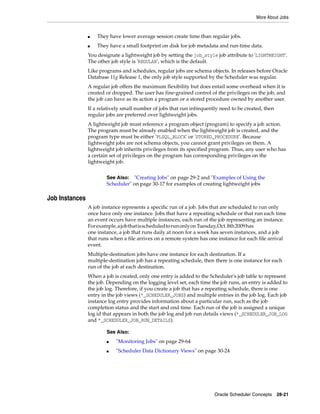
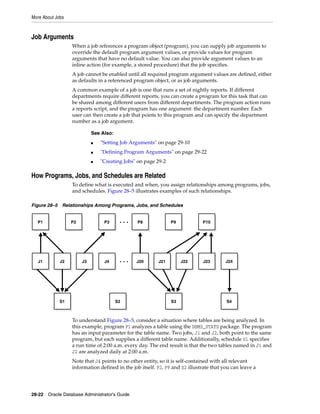
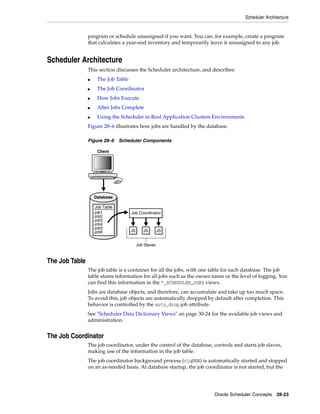

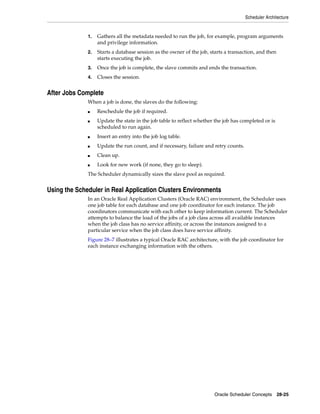
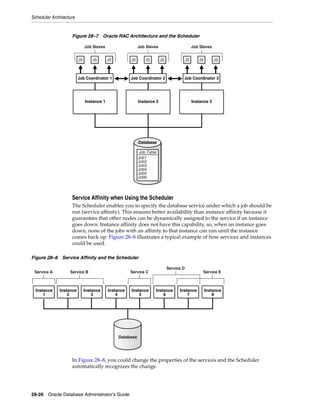
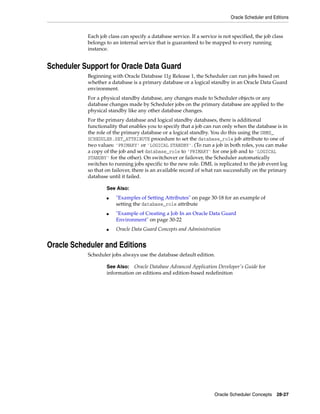

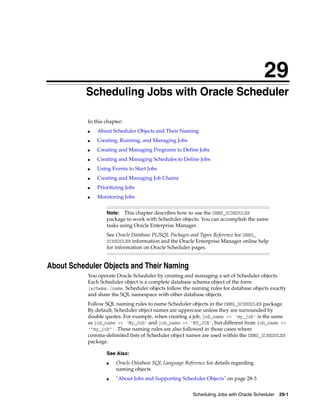
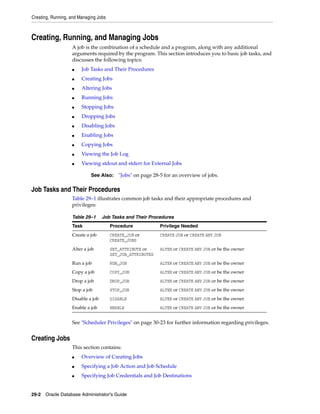
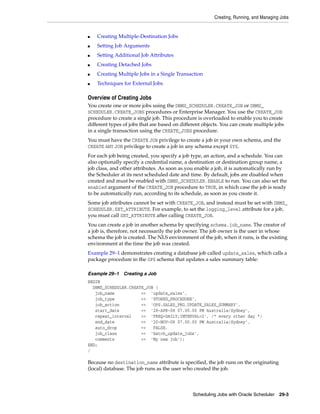
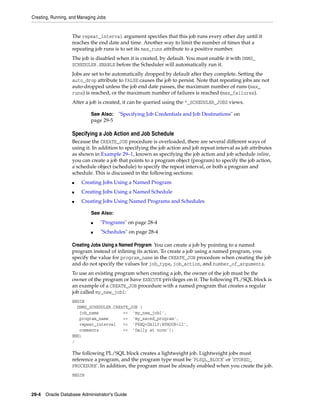
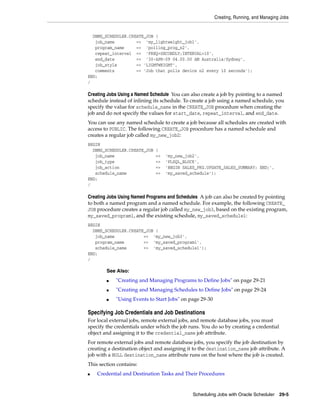
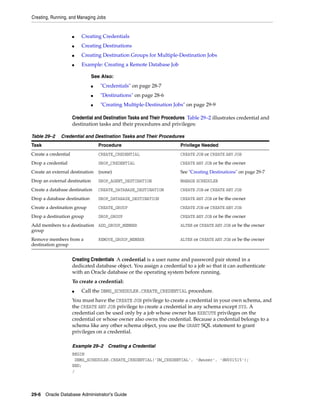
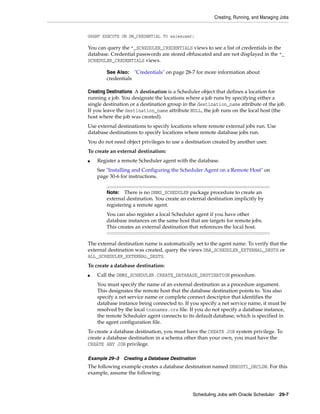
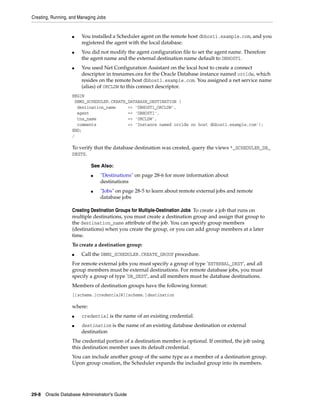
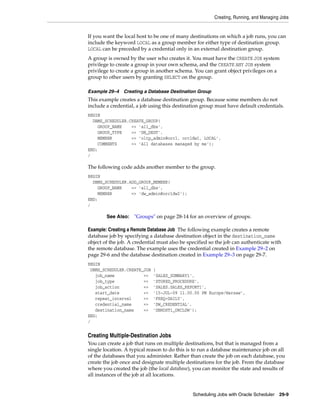
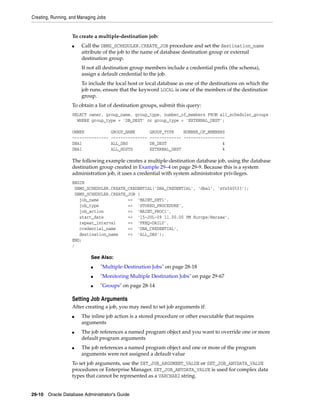
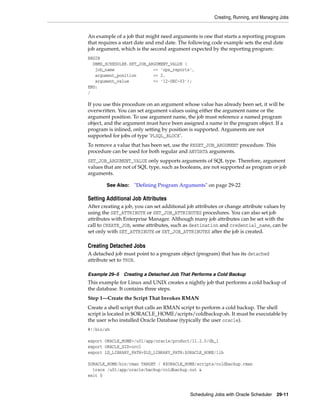
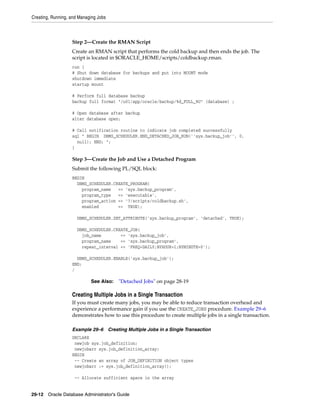
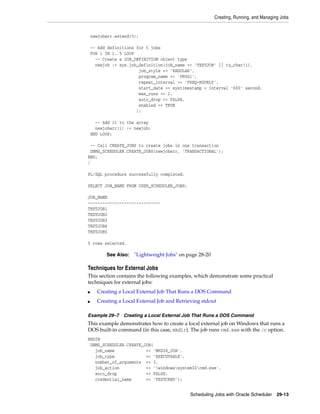
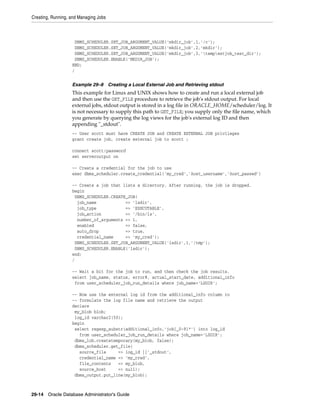
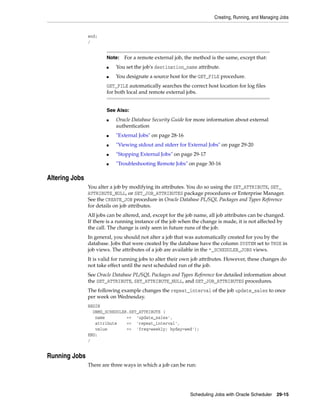
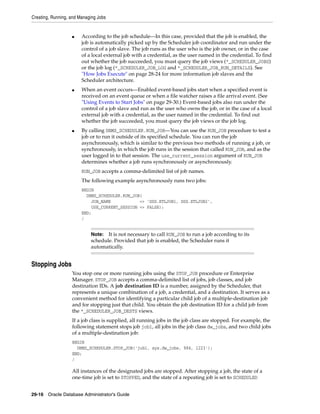
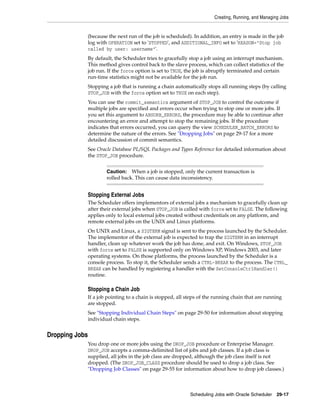
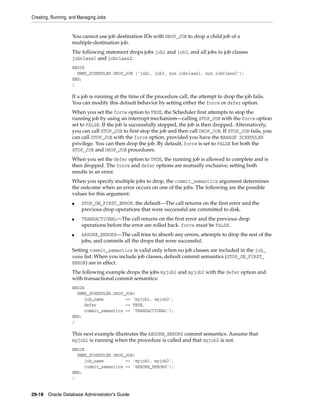
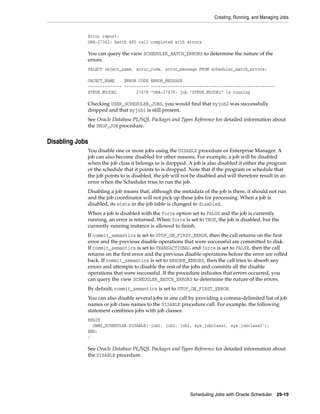
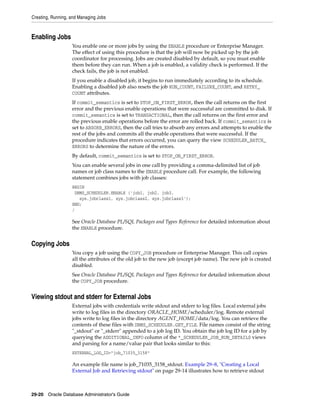
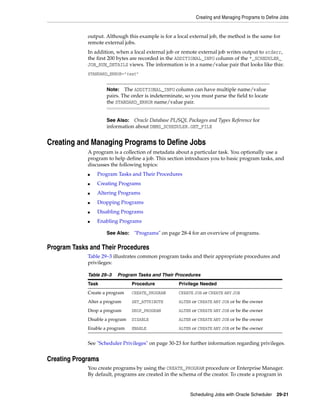

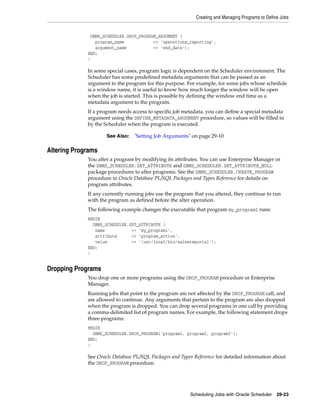
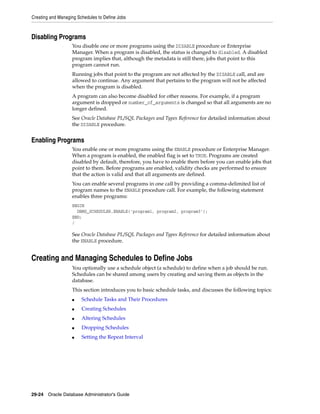
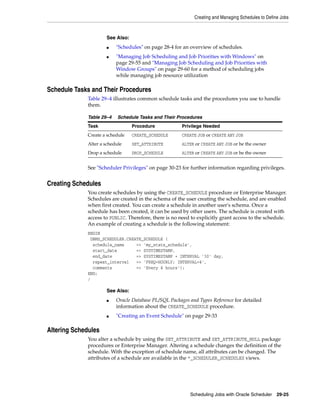
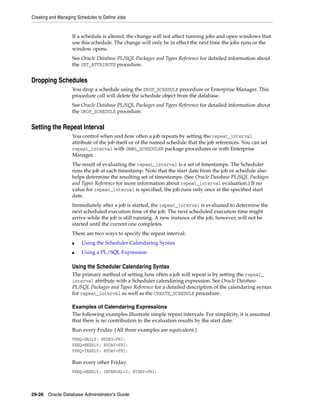

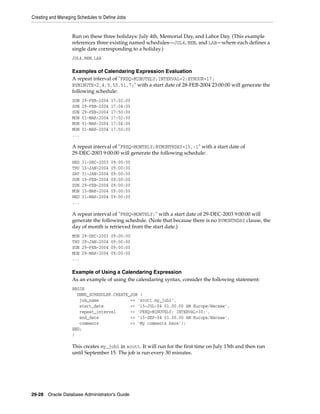
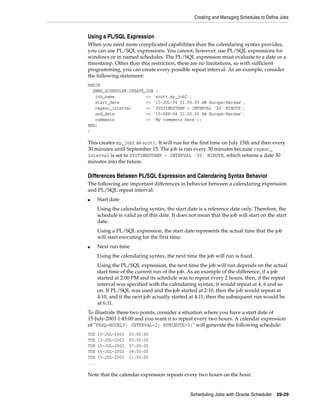
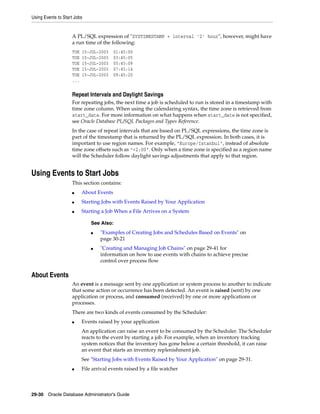
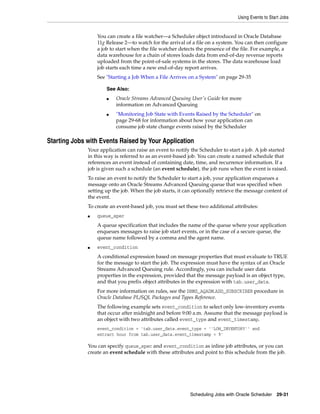
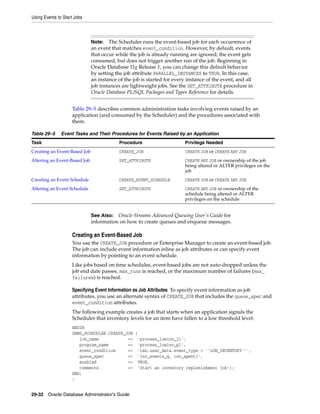
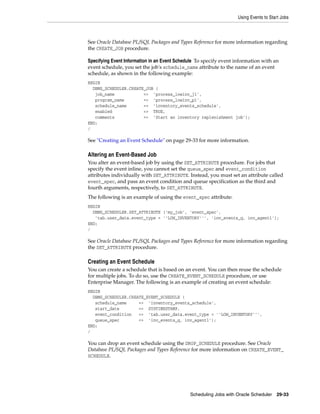
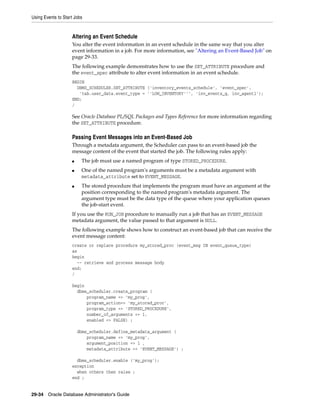
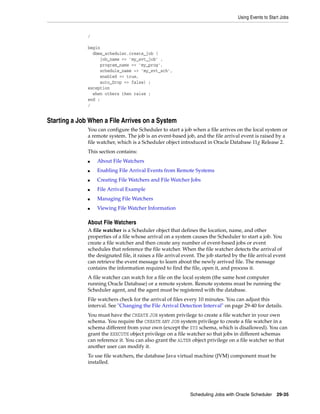
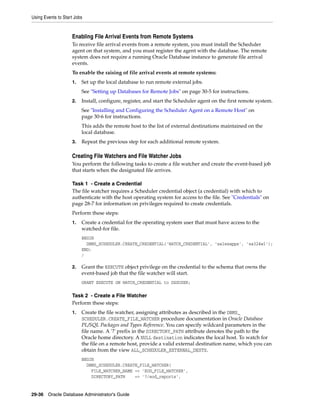

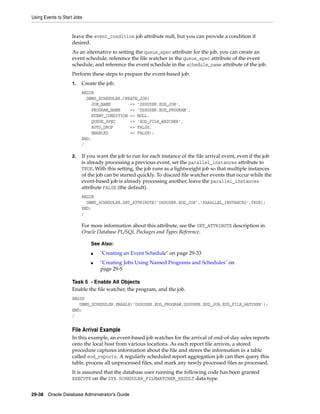
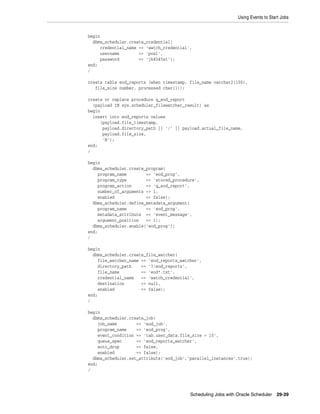
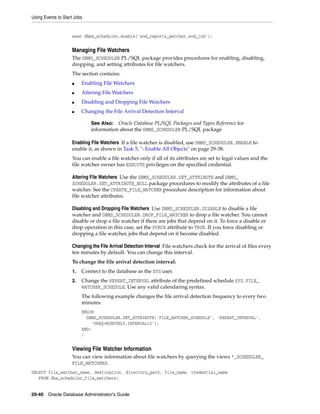
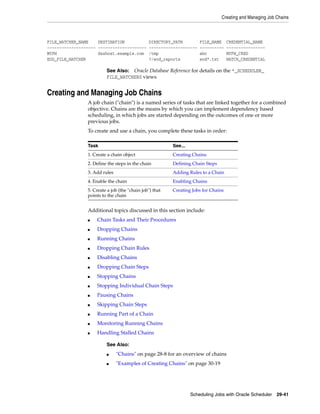
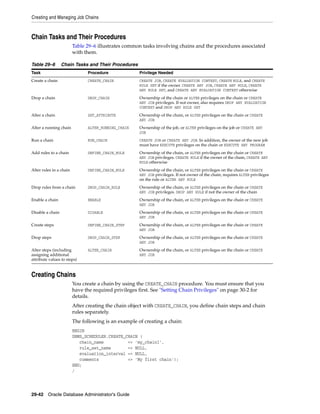
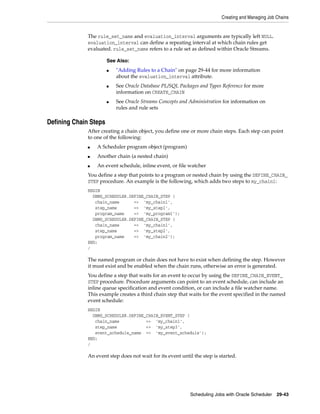
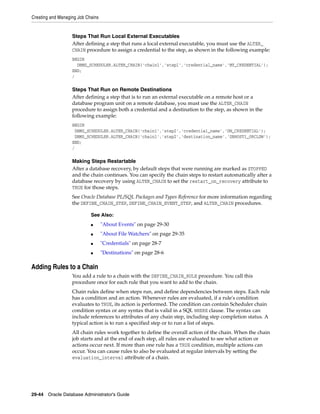
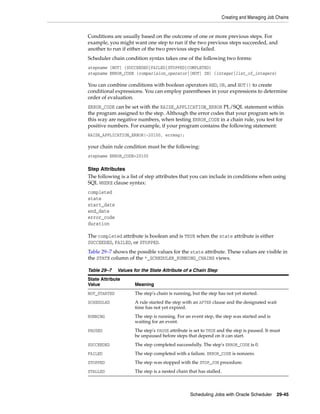

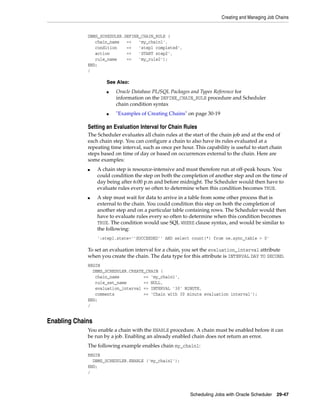
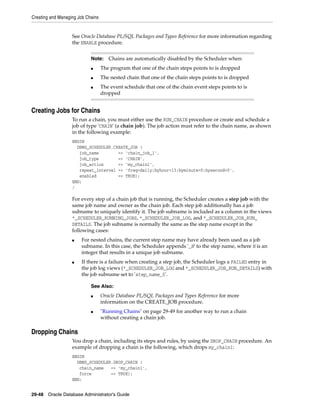
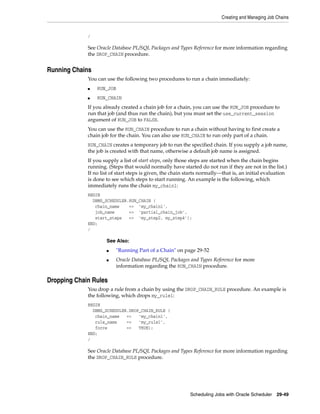

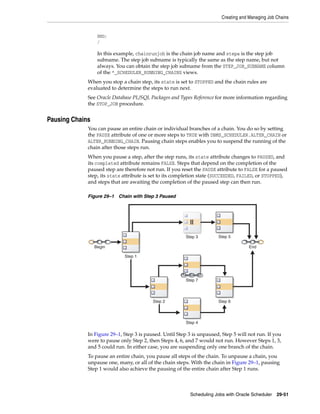
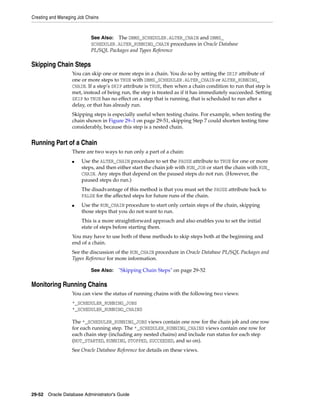
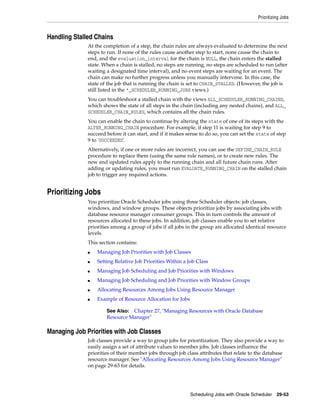
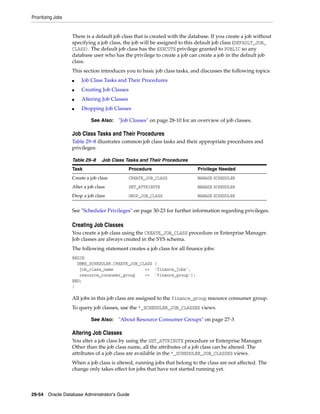
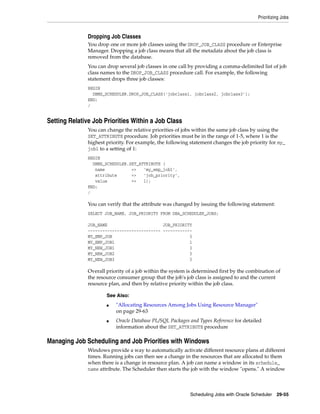
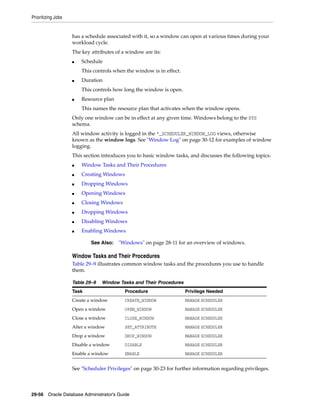
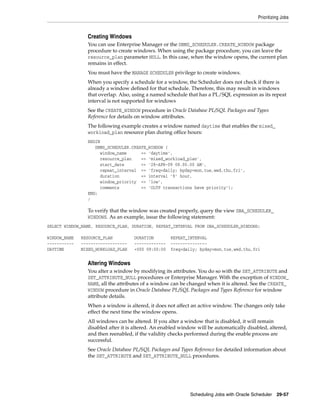
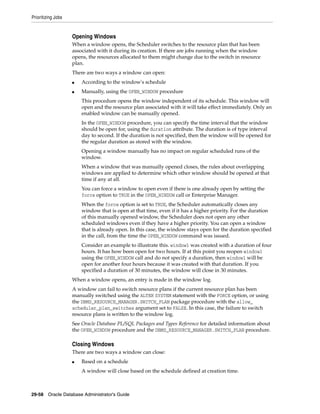
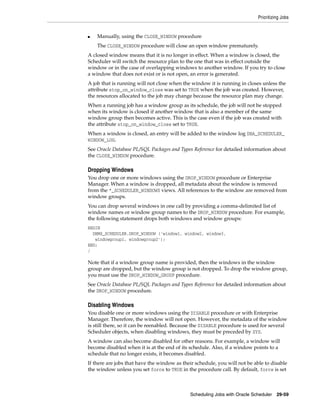
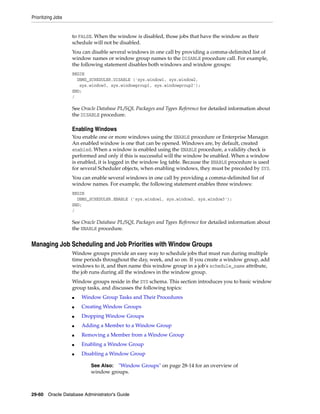

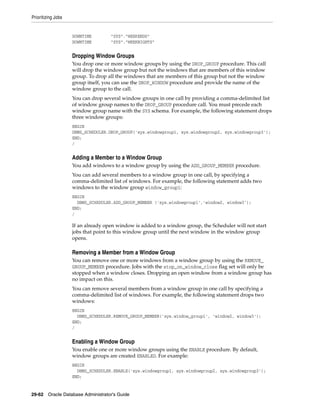
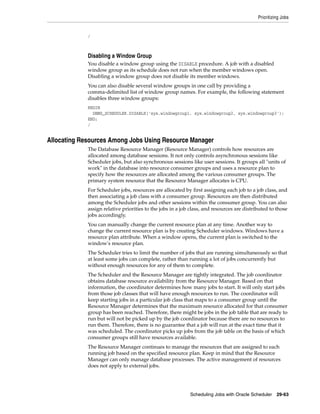
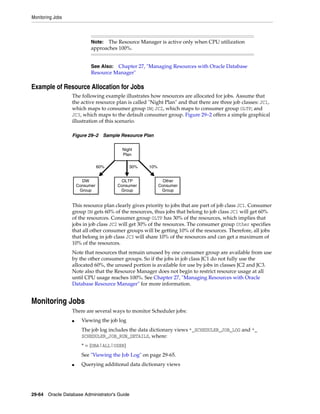
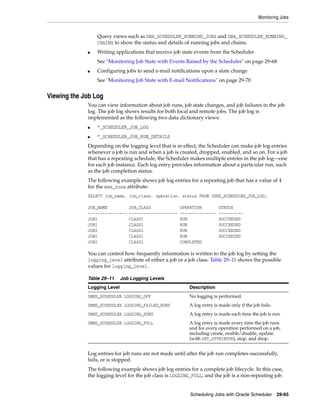

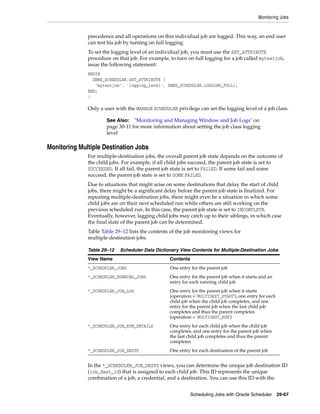
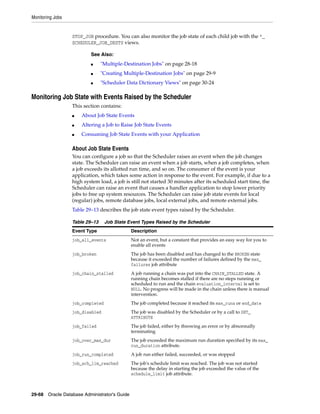
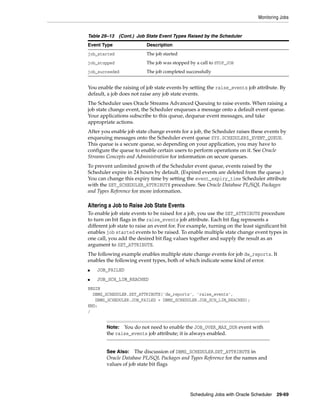
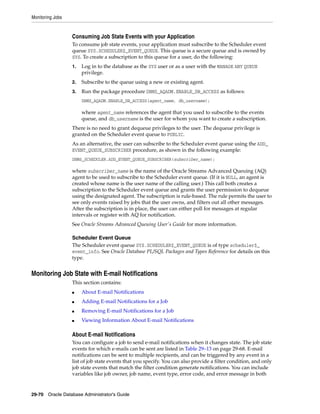
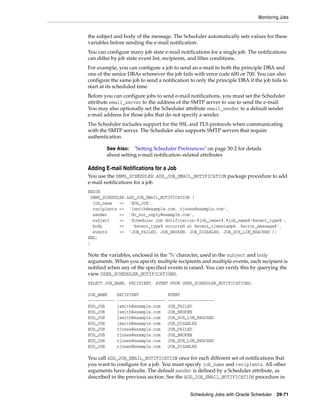
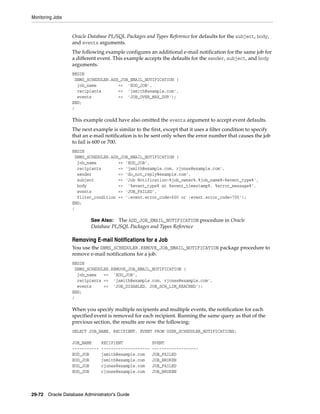
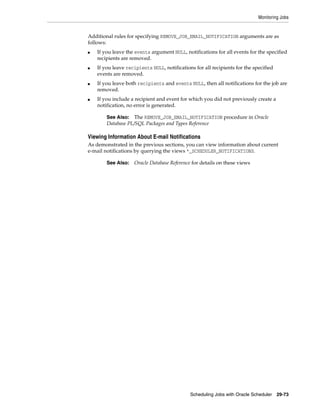

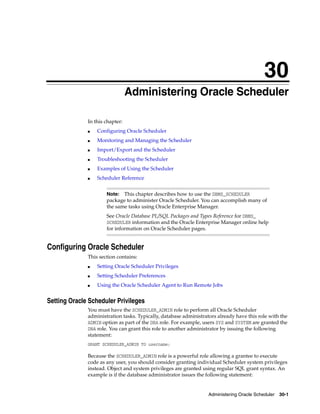
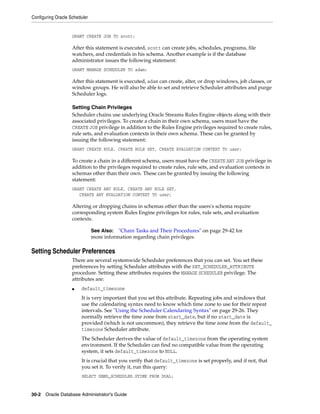
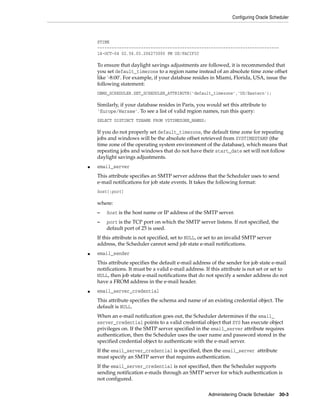
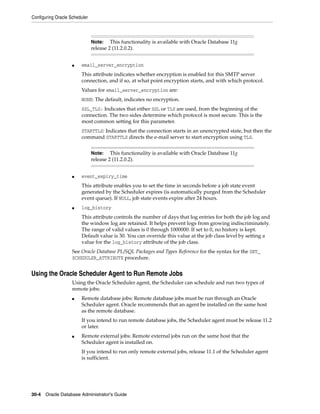
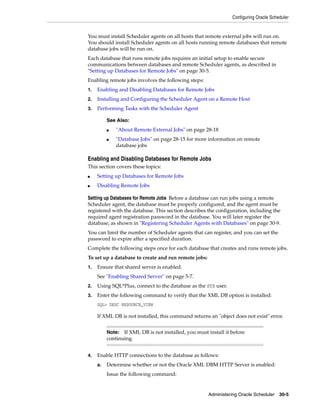
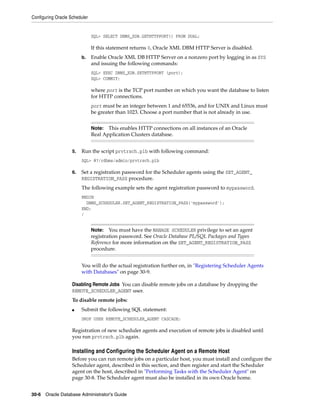

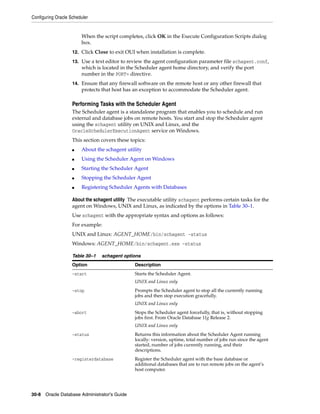
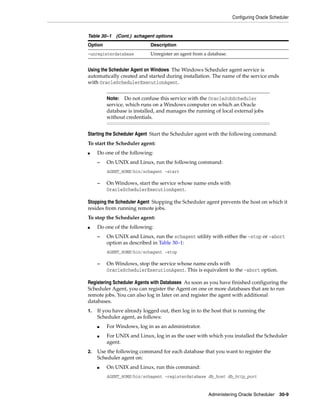
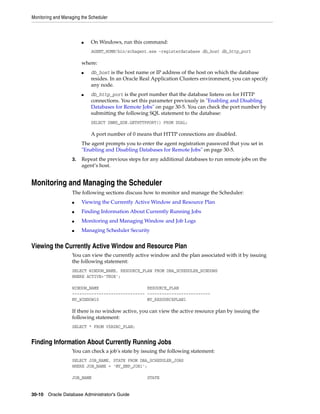
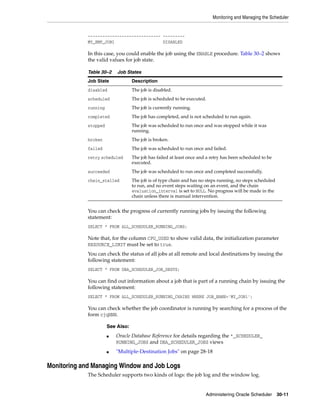
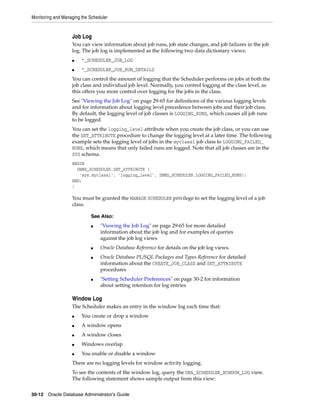
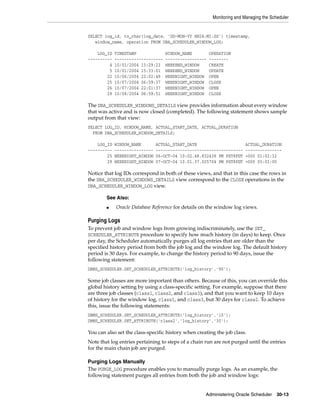
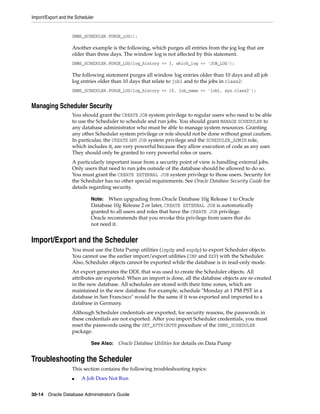
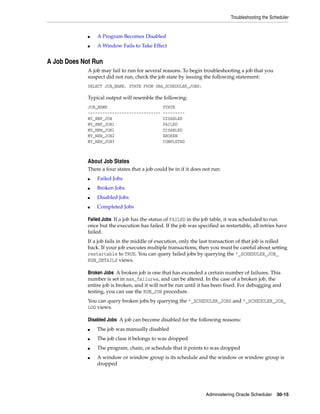
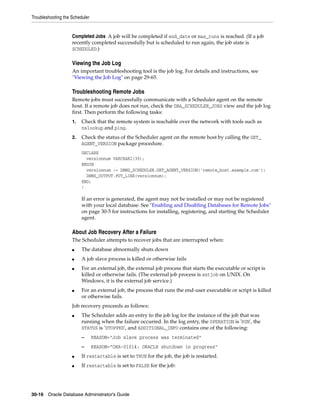
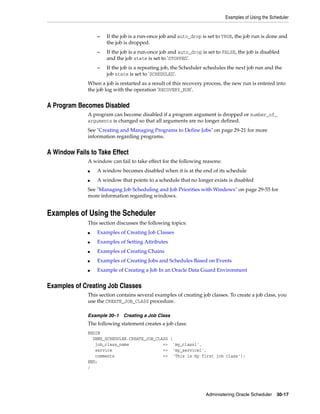
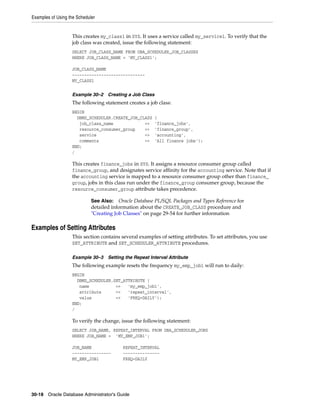
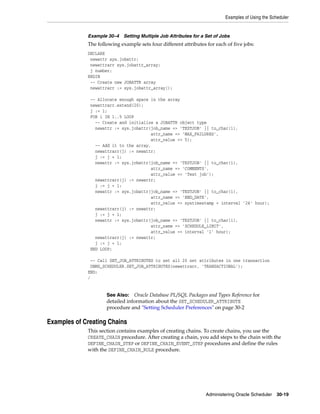
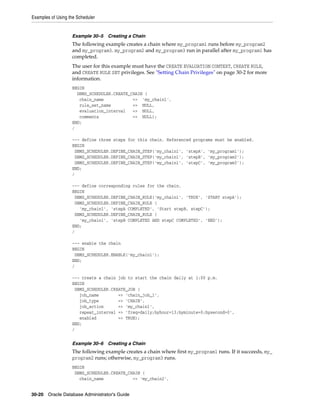
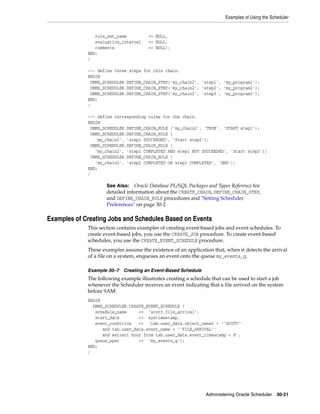
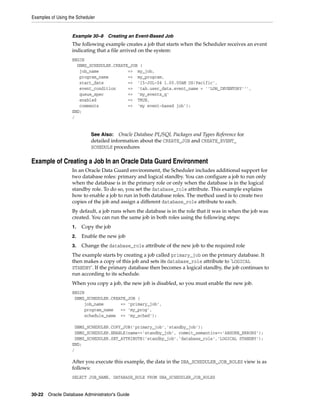
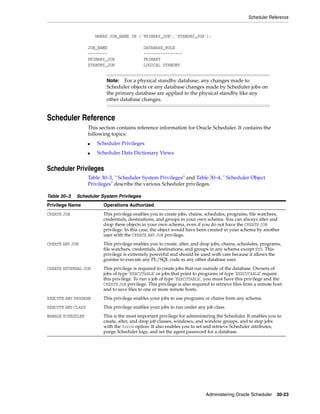
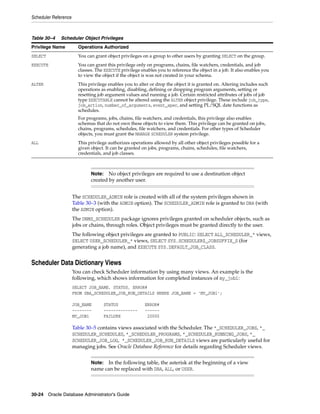


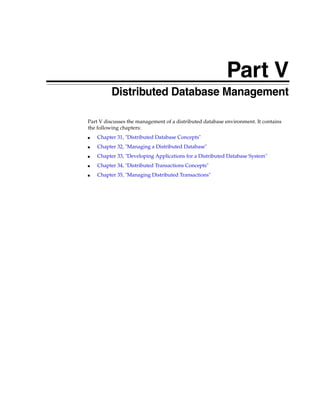

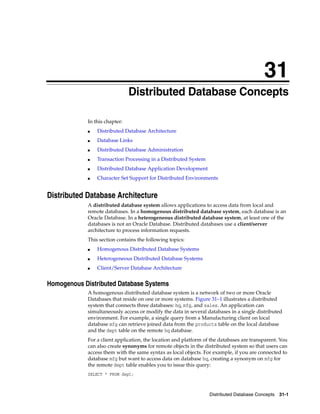
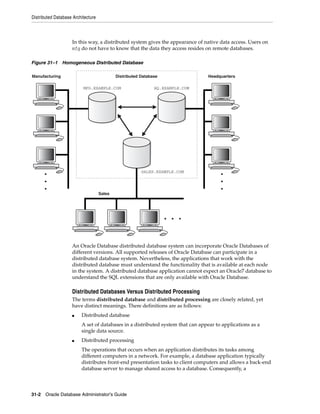
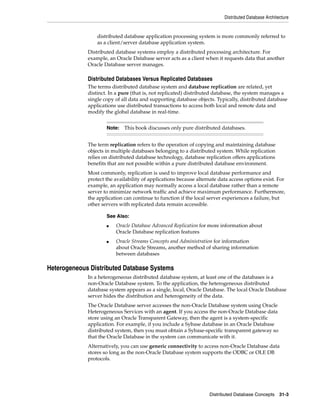
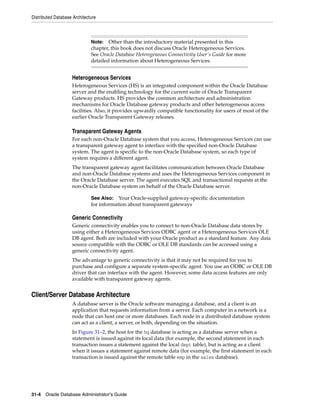
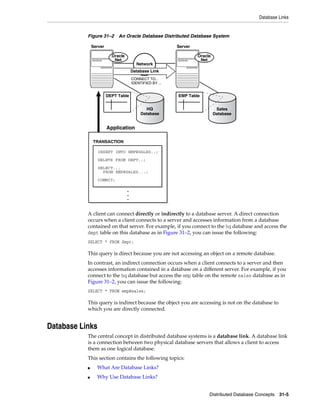
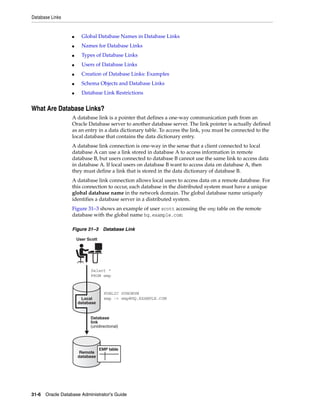
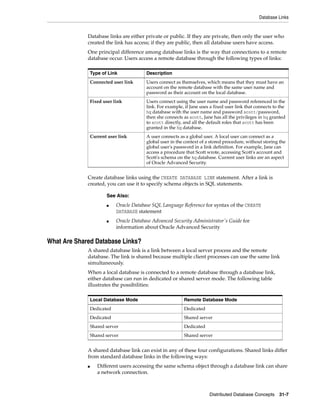
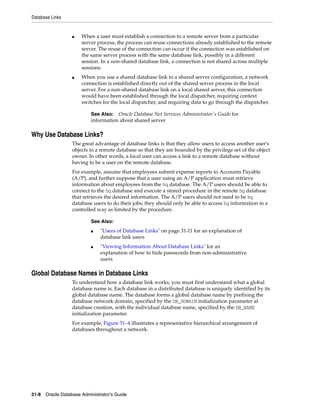

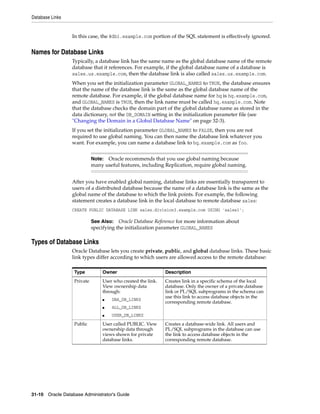
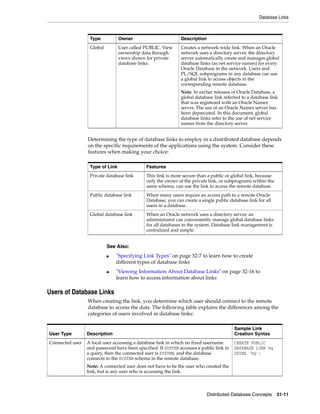

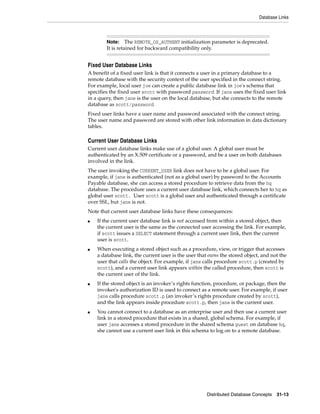

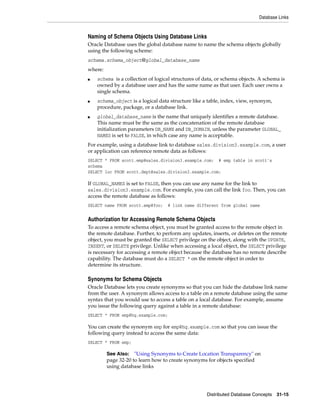
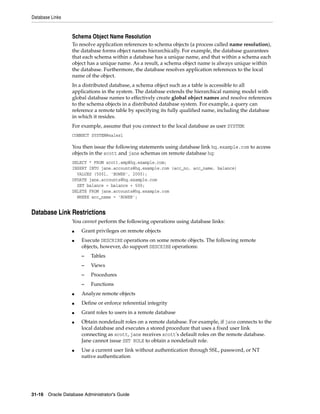
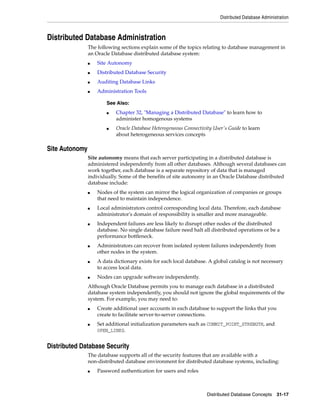
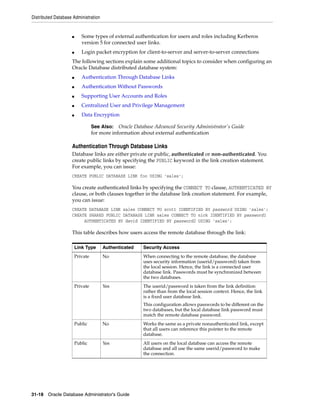
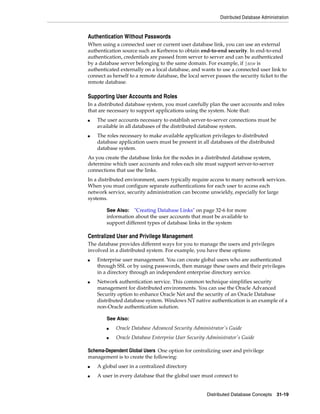
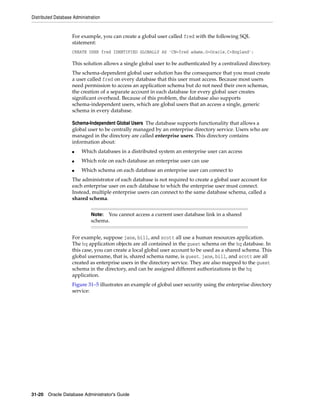
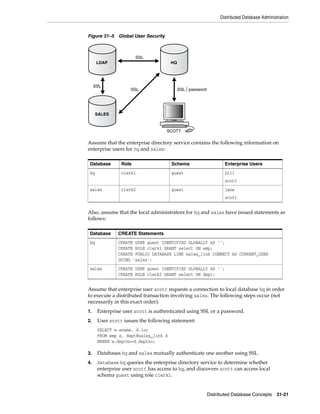
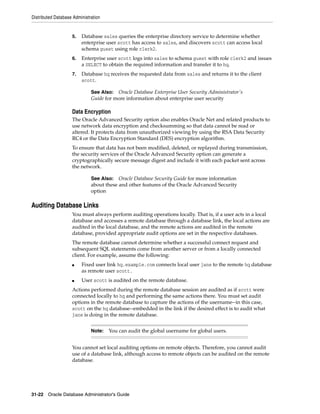
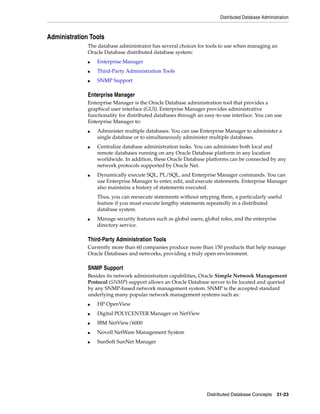
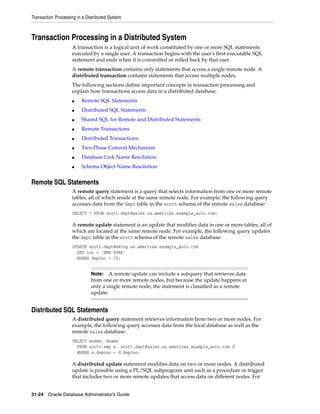
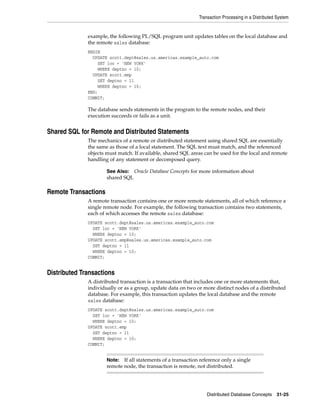
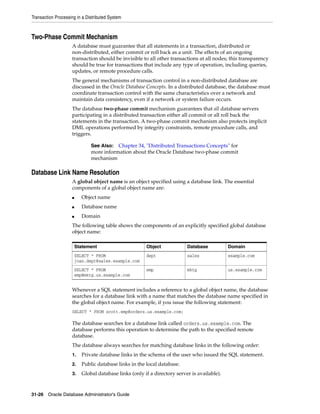
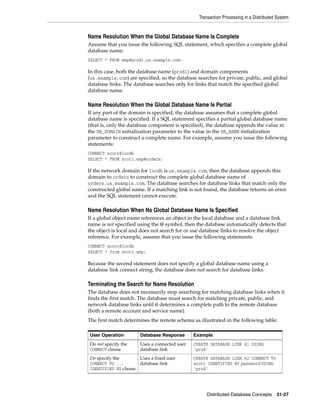
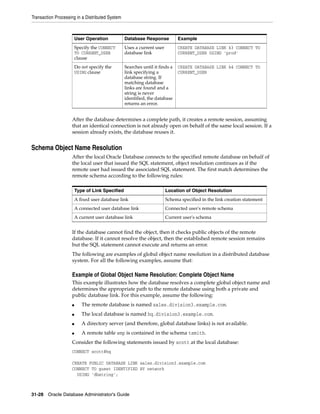


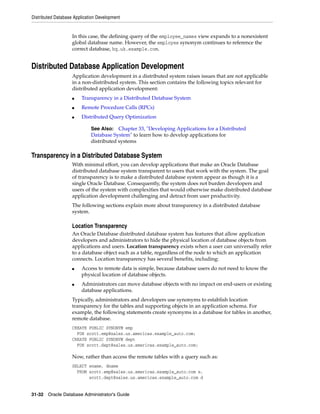
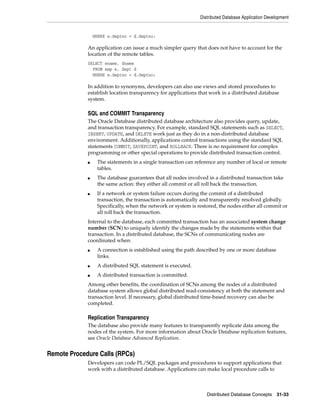
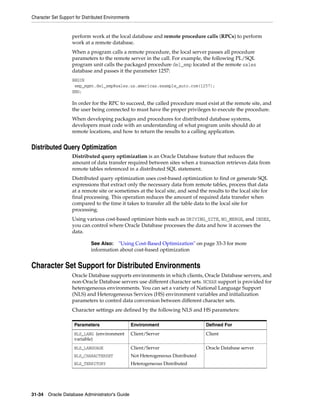
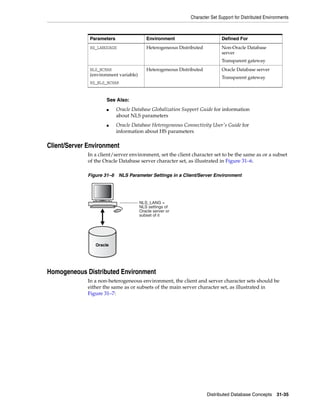
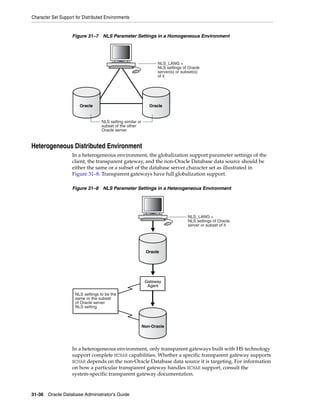


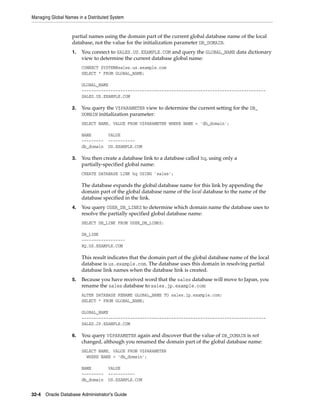
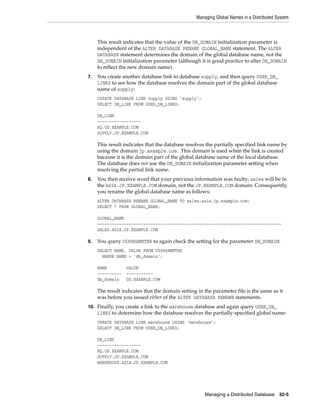
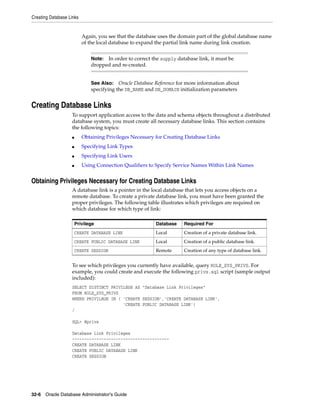
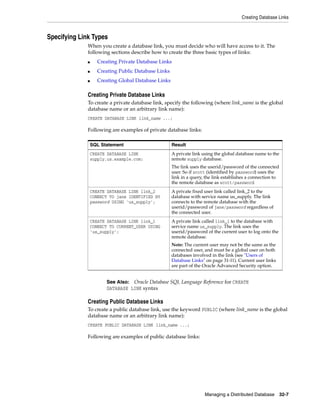
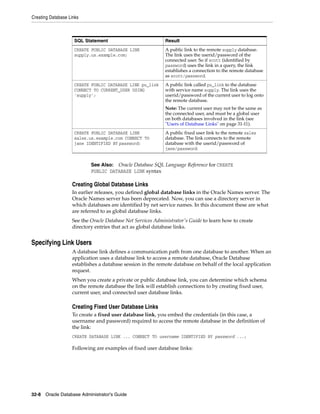
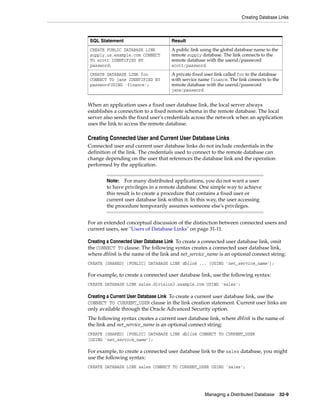
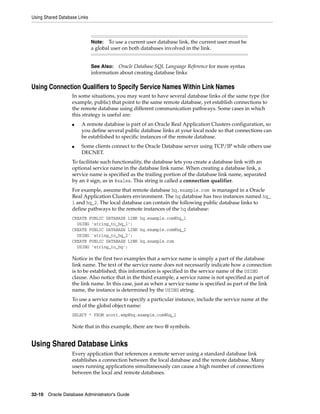
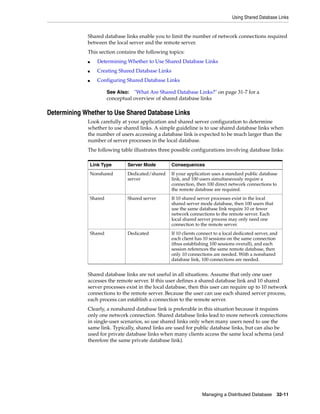
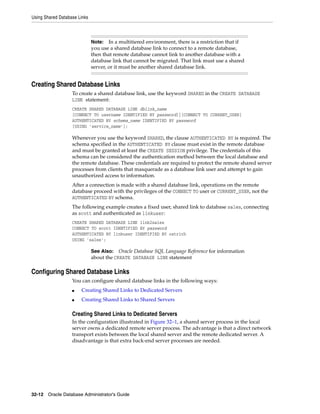
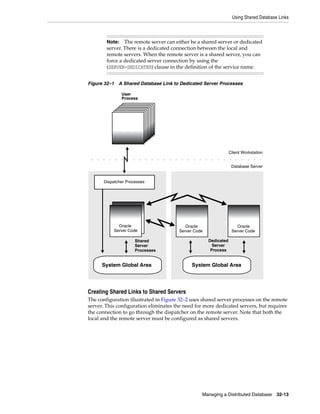
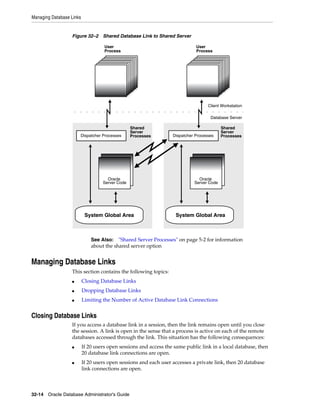
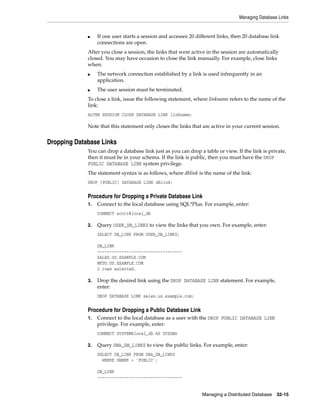
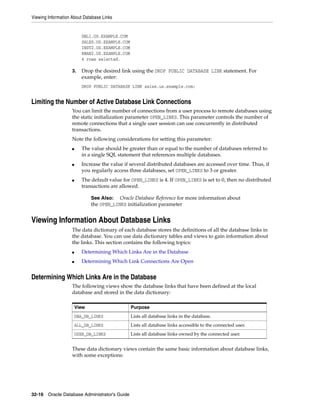
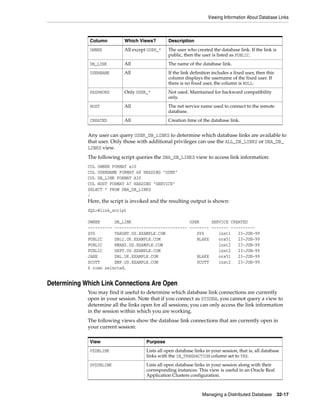
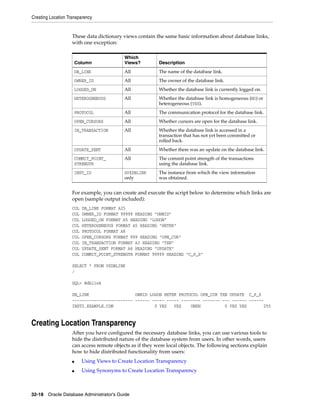
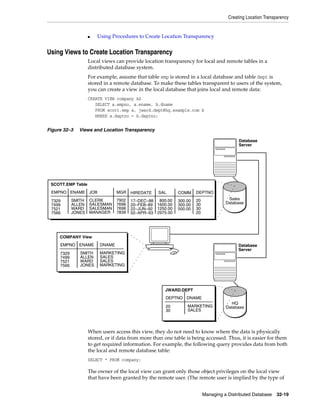
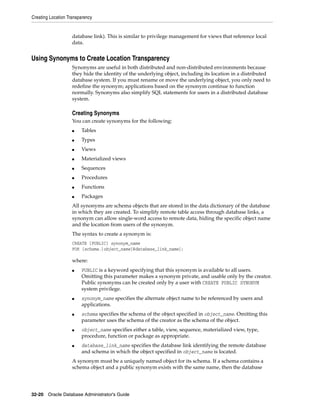
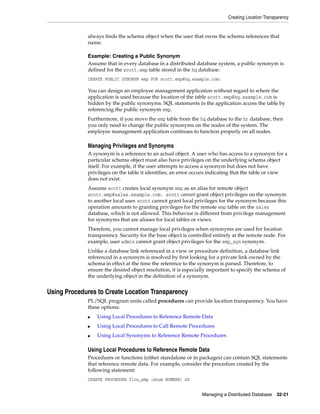
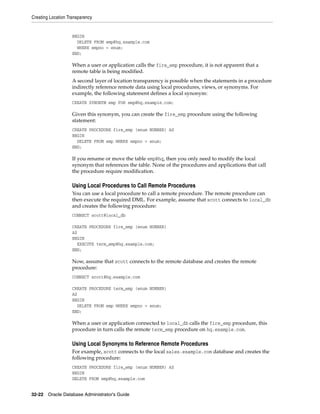
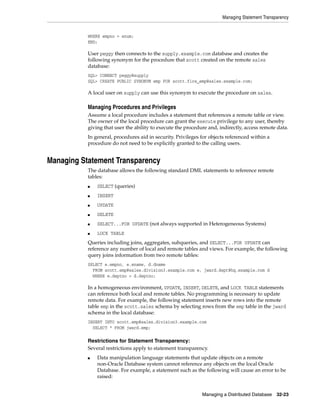
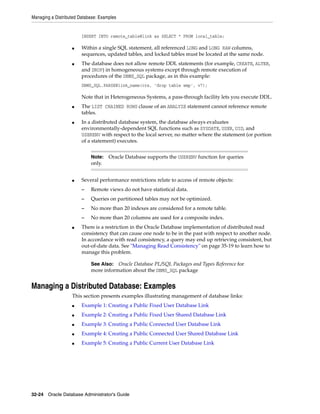
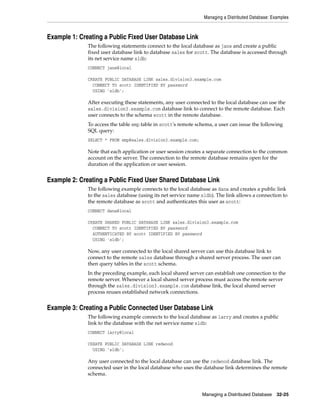
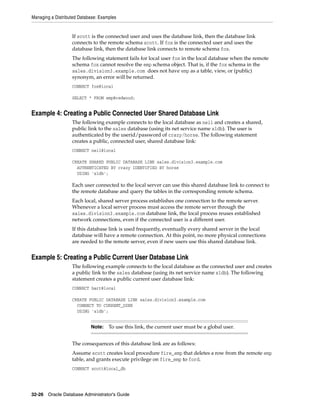
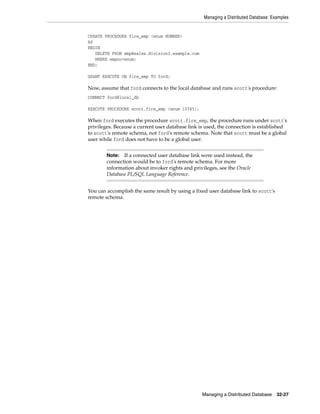

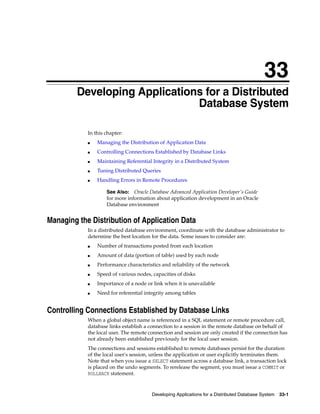
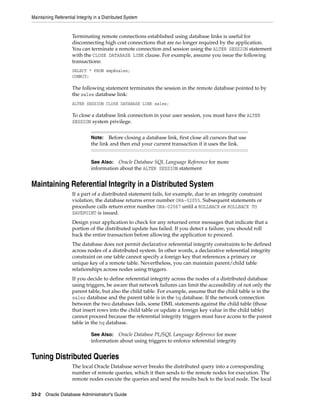
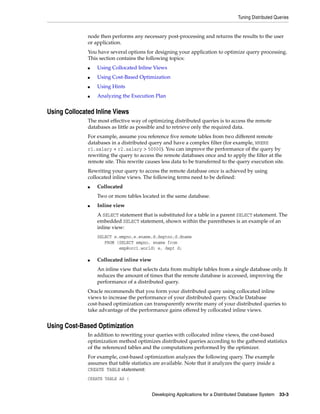
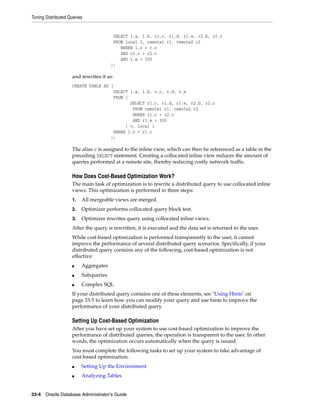

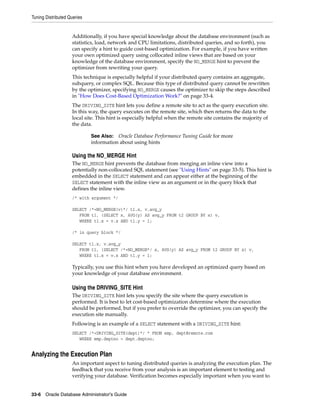
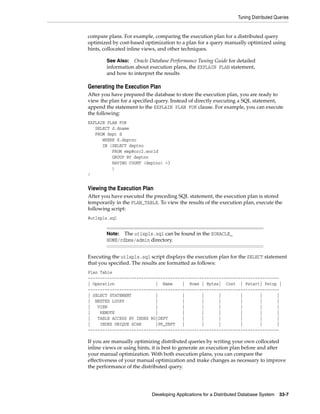
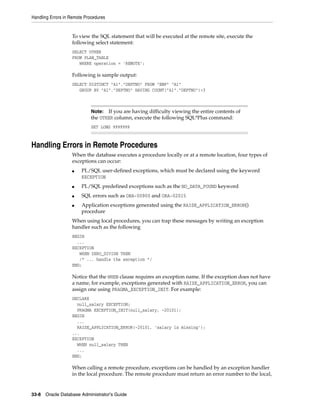


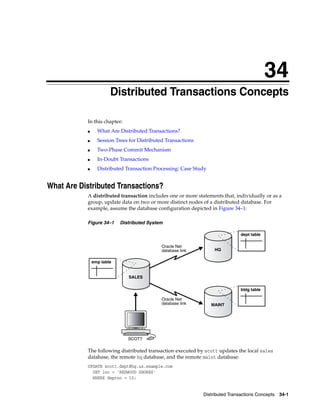
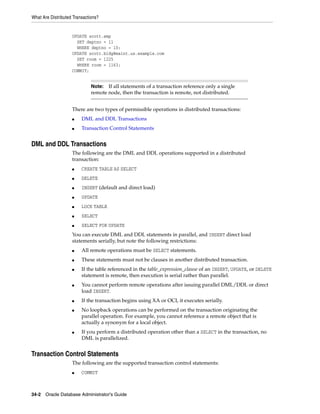
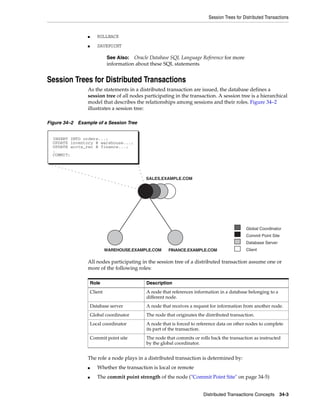
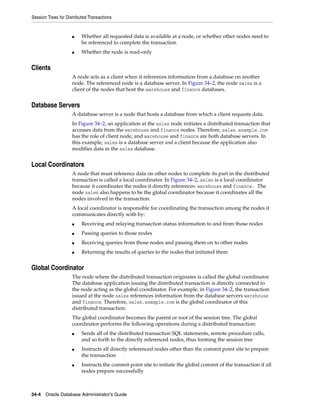
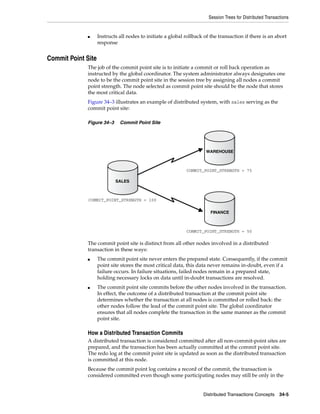
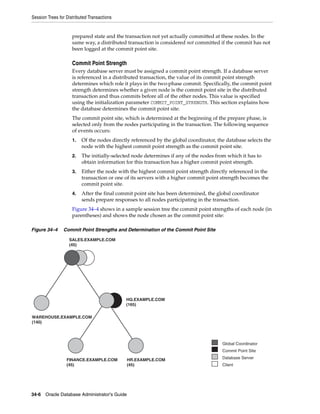
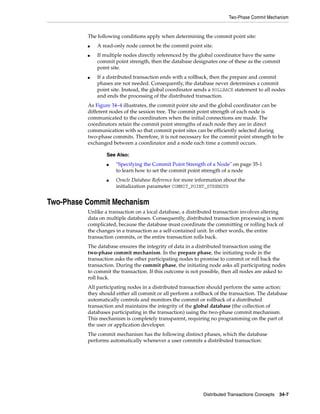
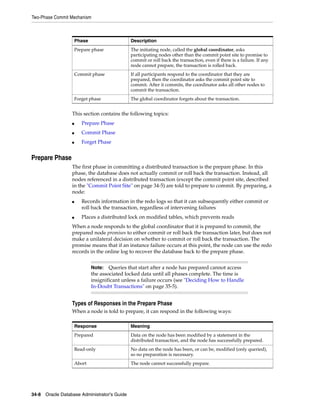
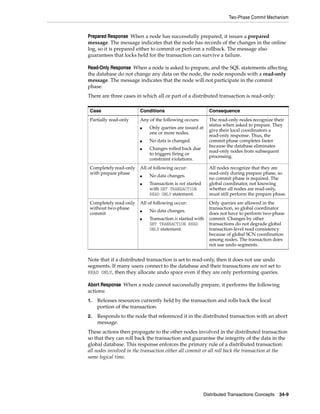

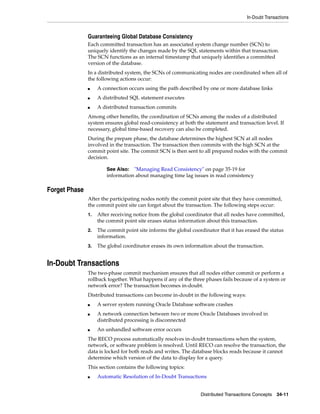
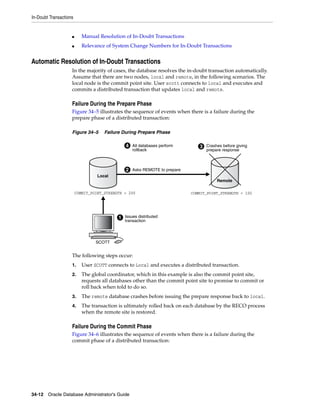
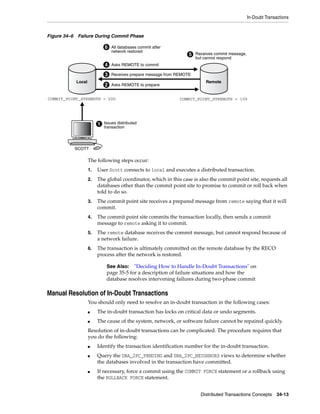
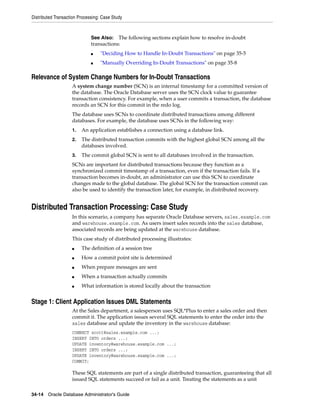
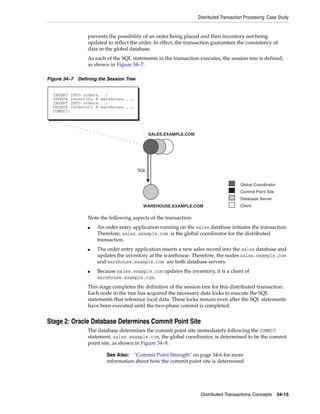
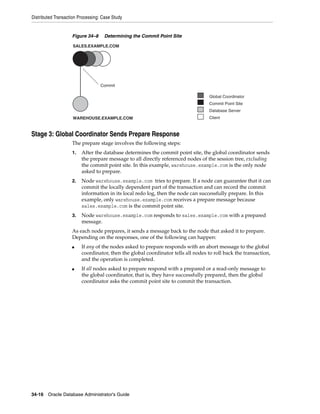
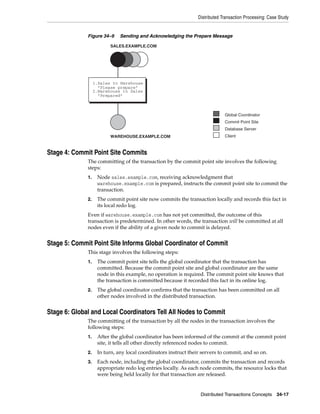
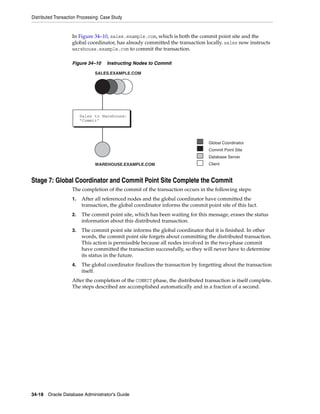

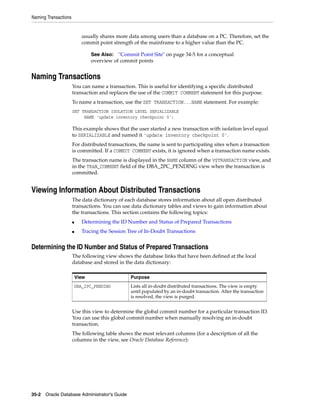
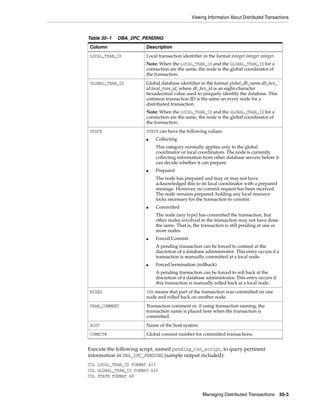
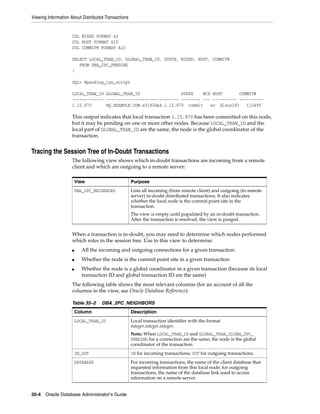
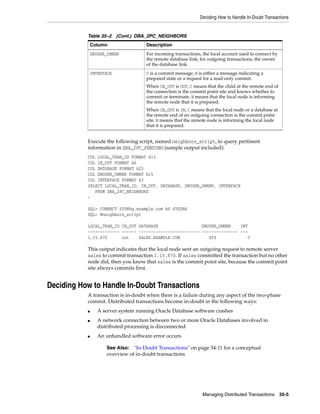
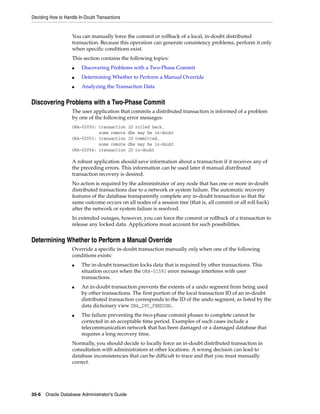
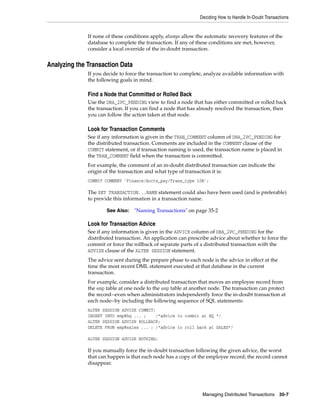
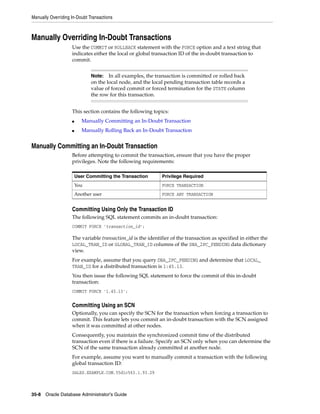
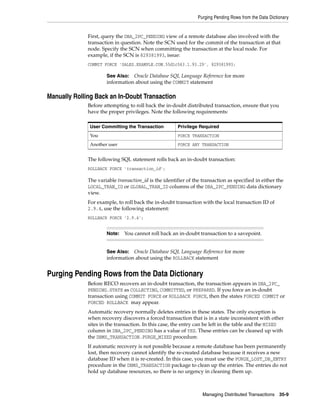
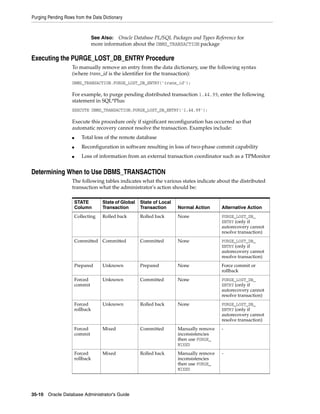
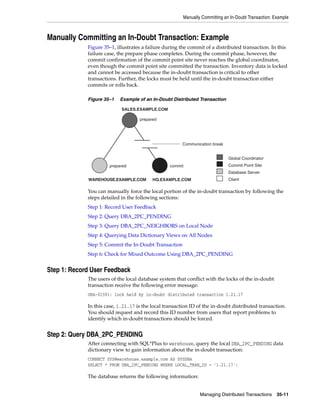

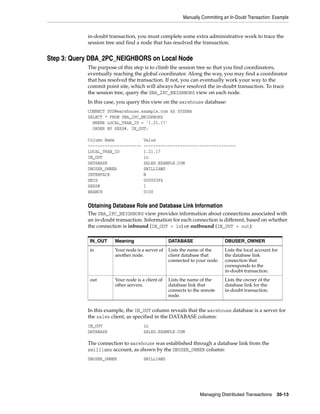
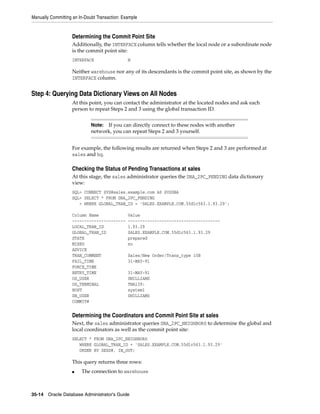

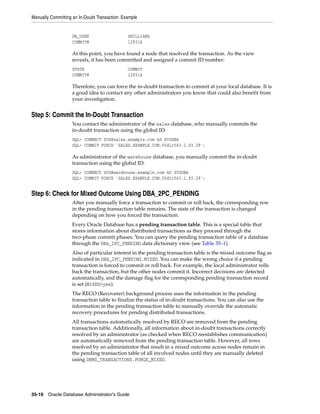
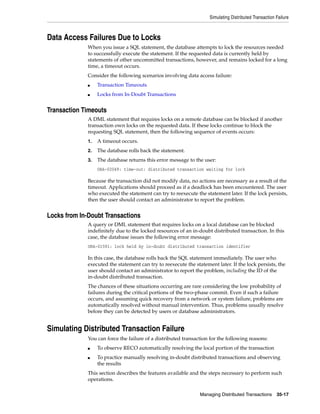
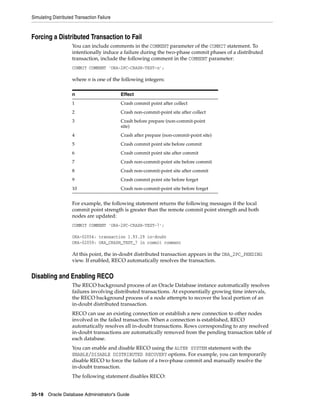
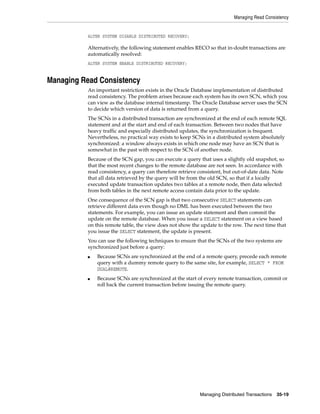

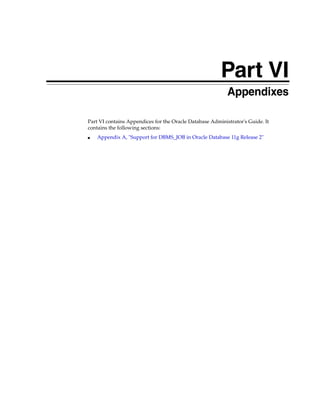

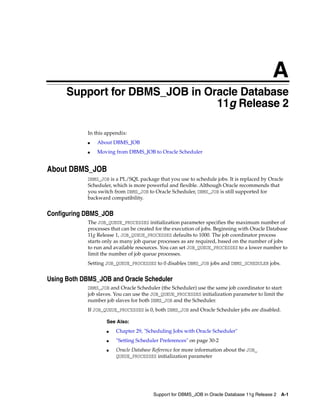
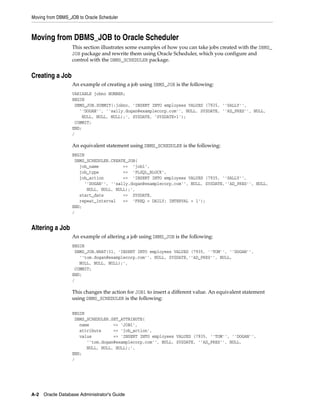
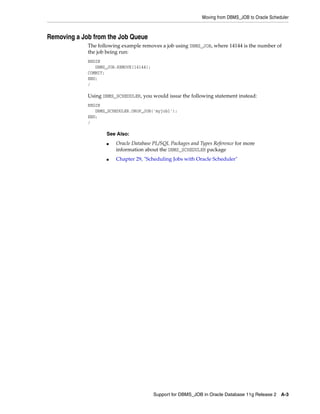


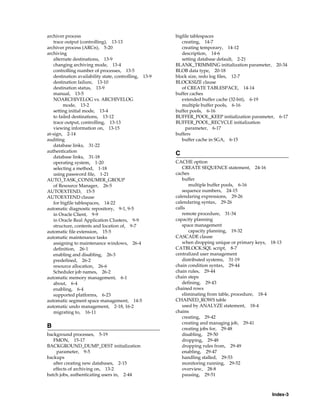


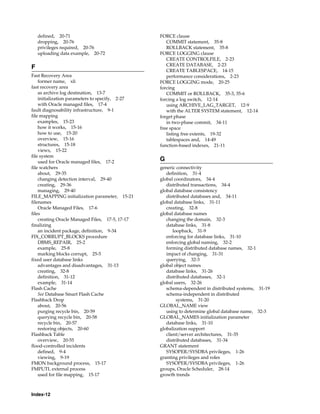


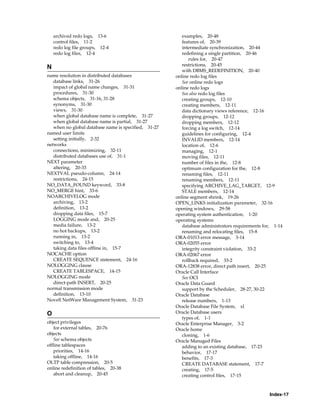


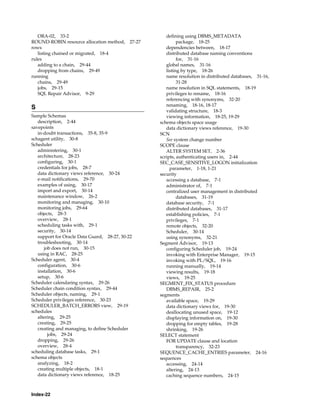


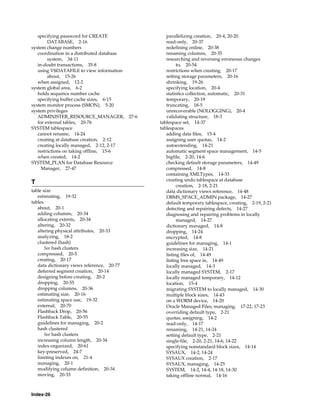


This document is the Oracle Database Administrator's Guide for Oracle Database 11g Release 2. It contains information for database administrators on installing, configuring, managing, and performing other administrative tasks for Oracle Database. The guide has multiple contributors and is copyrighted by Oracle. It is intended to help database administrators administer Oracle Database and contains information that is subject to Oracle's licensing terms.