Downloaded 49 times

![Drawing Faces
head. It doesn't matter if you are only
drawing a small snippet of the neck in
fact, the shorter the line, the more crucial
the correct angle becomes. If the line
fragment angles outward or inward a
little too much, the error will become
magnified once you imagine the line
extending outside of the image, inferring
an implausible body type for the head.
Body postures and their relationships
4 www.artistdaily.com
to the head are numerous, and they
can be quite evocative of an individual's
character, psychology, and emotion.
Getting a Likeness
It may seem like a waste of time wor-rying
about whether you’ve captured a
likeness or not. It’s unlikely the viewer
will notice that something is missing.
True, it will not matter in the end to
the viewer. But I feel it’s imperative
to always give it a sincere try. The
pursuit of likeness keeps my concen-tration
focused, it keeps the entire
drawing process compelling, and, in
the end, the struggle leads to a more
active-looking and vigorous drawing.
There is no doubt that the individual
features and the distance between the
features are essential in getting a like-ness
and a psychologically animated
head and figure. I explained several fea-ture-
measuring techniques in my first
article for American Artist [“Painting
Portraits”] in the February 1993 issue.
It’s useful to draw numerous studies
of the features—like Jusepe de Ribera
did in Study of Eyes—cataloguing and
committing their basic construction
to memory. At the same time, try to
be sensitive to the bilateral symmetry
that underlies the face and its features.
Use guidelines to line up one side of
the face with the other. But remember
this very important caveat: As much as
you may want them to, features do not
conform to a simplistic rule of abso-lute
symmetry. Look closely at any Old
Master portrait. You will usually find
that one eye is almost always a little
bigger or a little farther from the nose
than the other, one nostril a little taller,
one side of the mouth a bit lower than
the other. These artists’ use of subtle
asymmetry gives their subjects’ heads
and figures life and a sense of action,
as if the features are in motion. This
asymmetry is vitally important from
the likeness standpoint as well. It’s
been proven in clinical and psychologi-cal
studies that when a photo is sliced
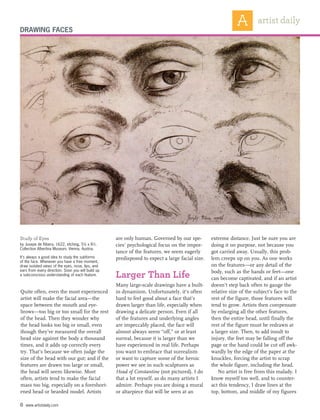
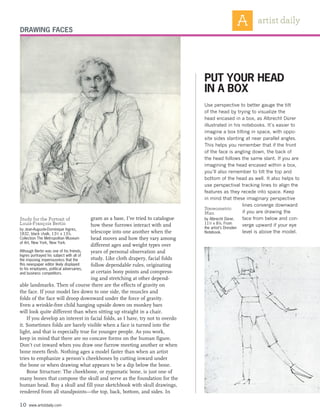
above left
Drawing of a Woman With Loop Earring
by Dan Gheno, 2006, graphite with white chalk
on toned paper, 10 x 8. Collection the artist.
above right
My Father Posing for Facial Folds
by Dan Gheno, 2006, graphite, 12 x 9.
Collection the artist.
Facial folds occur at right angles to the direction
of the muscles underneath, very similar to a
theater curtain being pulled across the stage by
a horizontal cord. The zygomatic muscle runs
from the cheekbone to the corner of the mouth
and, when contracted, creates dependable
creases in the face, the most important being
the jugal furrow (left of A) and the accessory
jugal furrow (B). Note how the shape of the
large chewing muscle, called the masseter (C),
becomes more defined when the chin is pulled in.
a
c
b](https://image.slidesharecdn.com/drawingfaces-140905180026-phpapp01/85/Drawing-faces-4-320.jpg)


The document provides guidance on drawing dynamic heads and faces with attitude. It discusses depicting features as well as capturing attitude by giving the head a direction of gaze and tilt. The neck angle should complement the body's gesture. Subtle asymmetry in features gives faces life. The ratio of head size and shape to the body is crucial for likeness, more so than individual features. Distilling the head into a simple geometric shape provides guidance.


![[How to-draw] andrew loomis - drawing the head and hands](https://cdn.slidesharecdn.com/ss_thumbnails/how-to-drawandrewloomis-drawingtheheadandhands-150219125448-conversion-gate02-thumbnail.jpg?width=640&height=640&fit=bounds)


