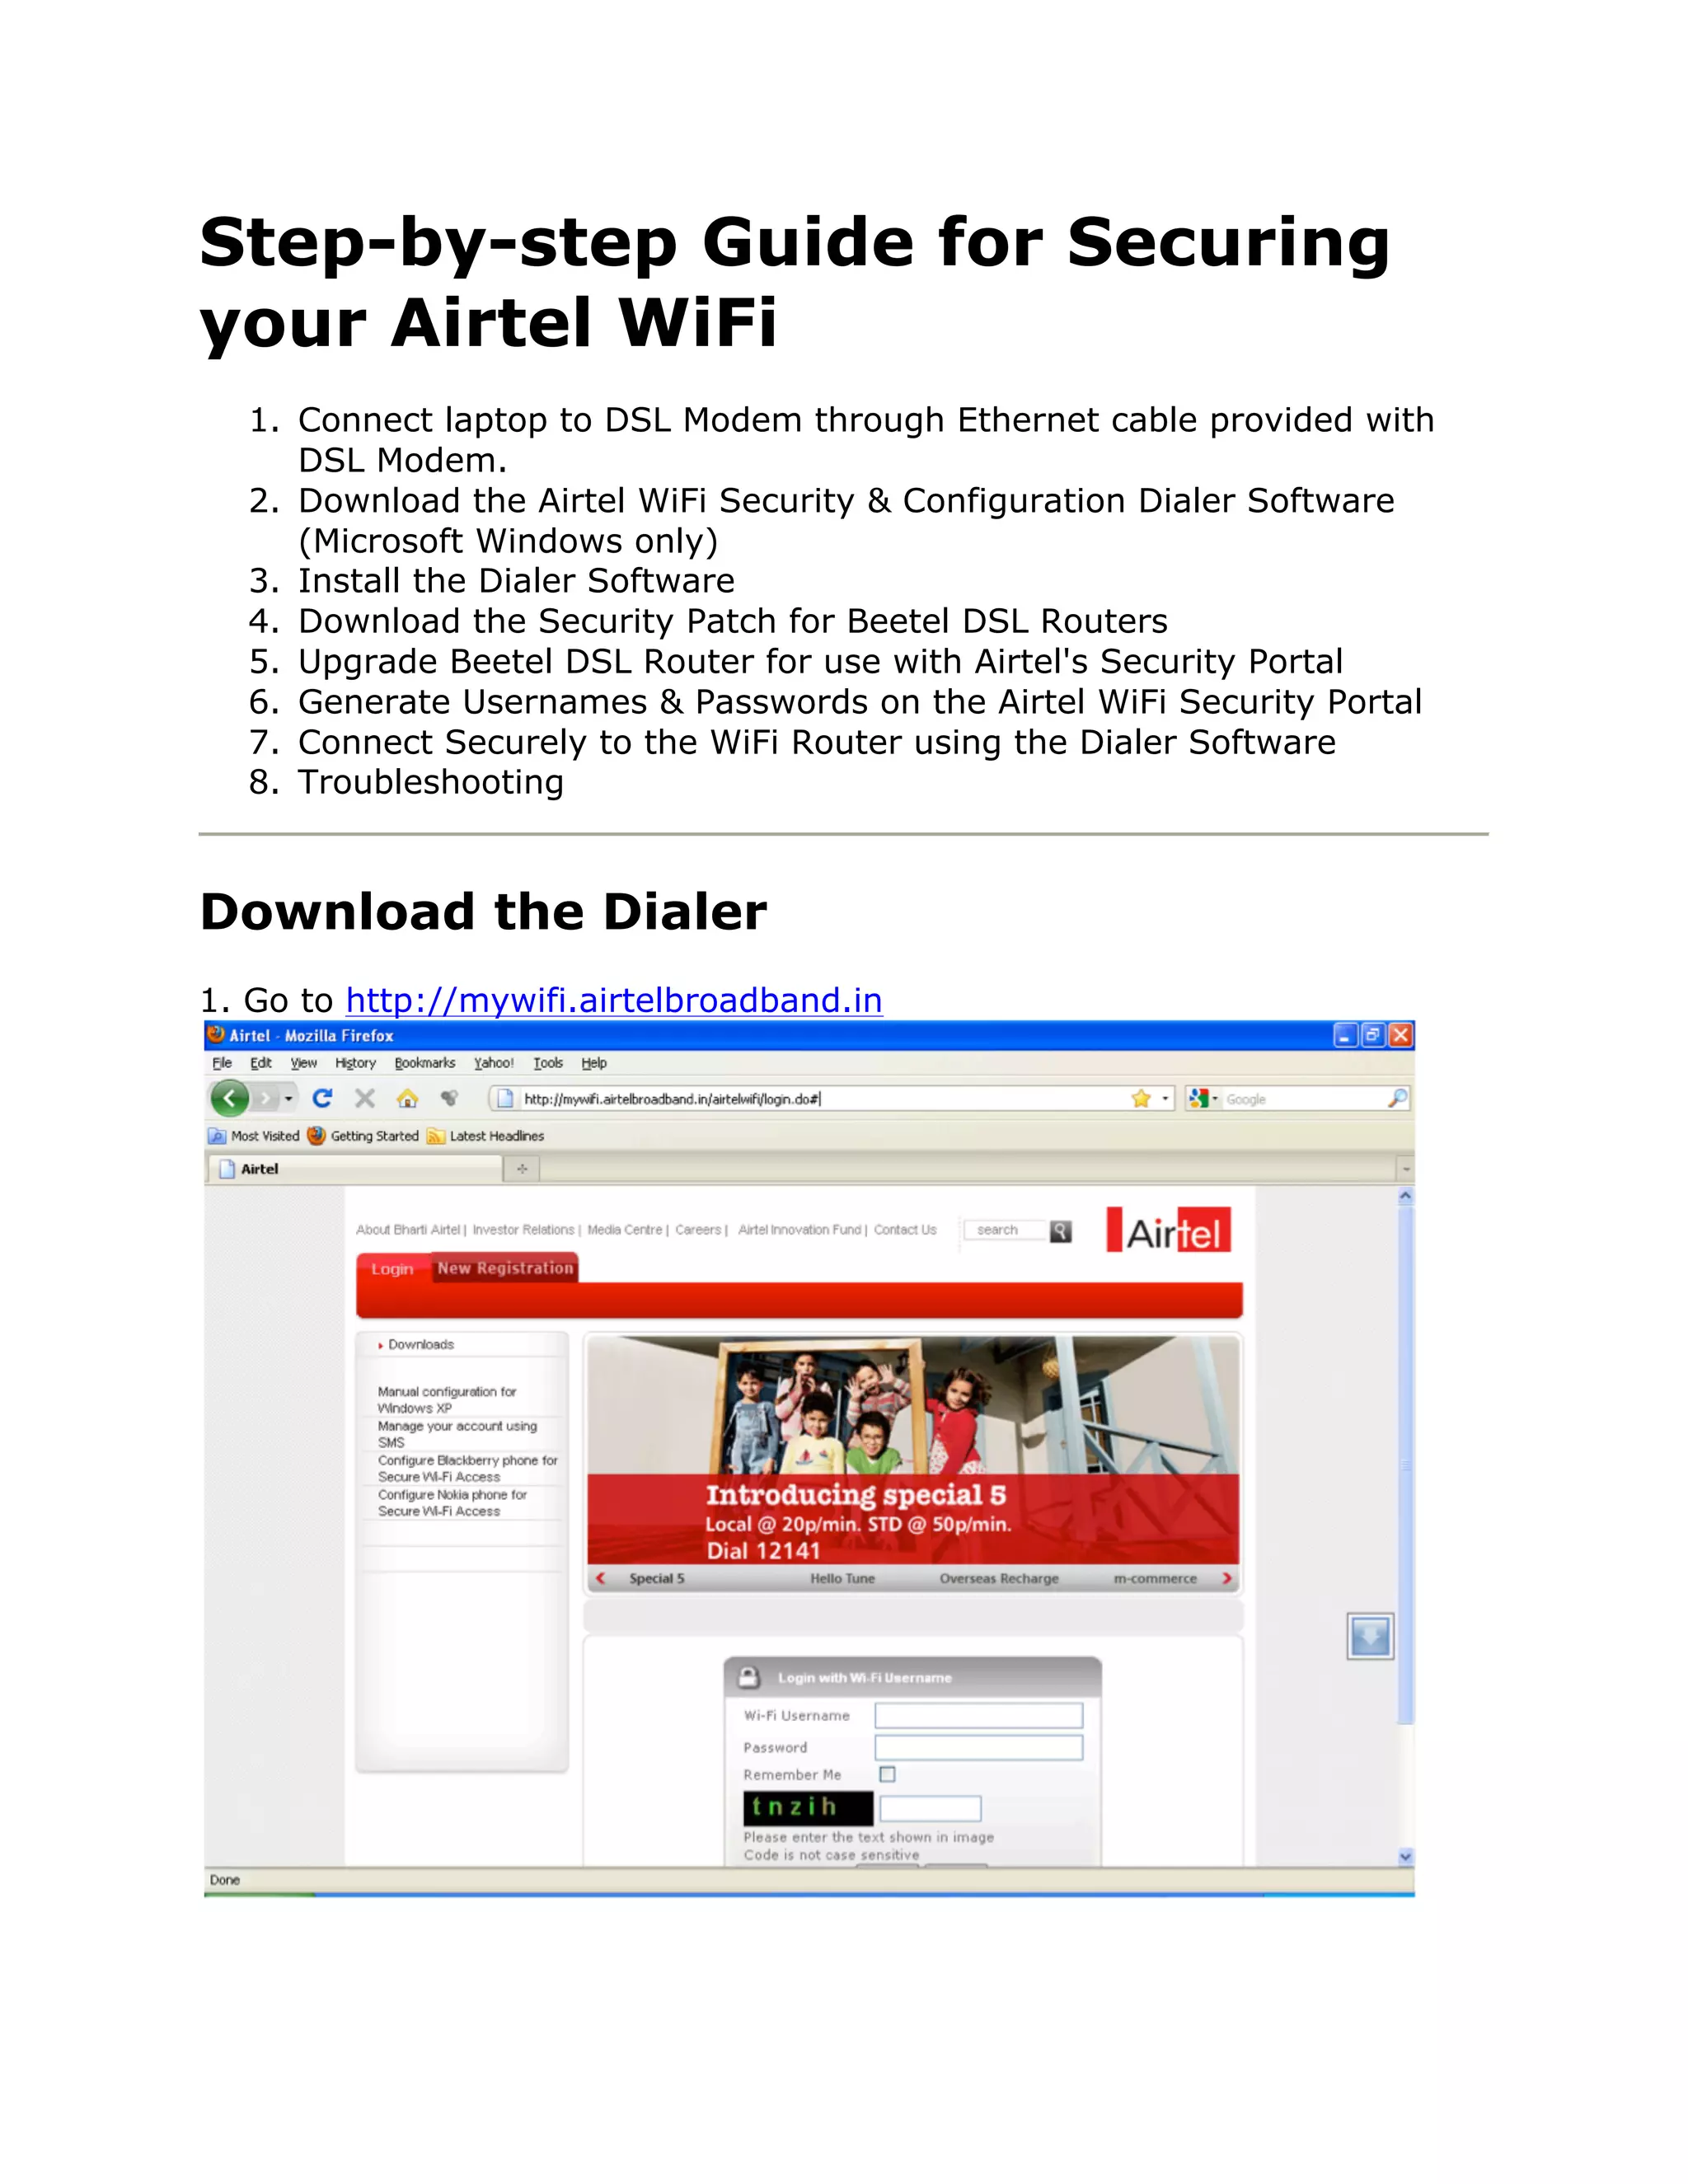
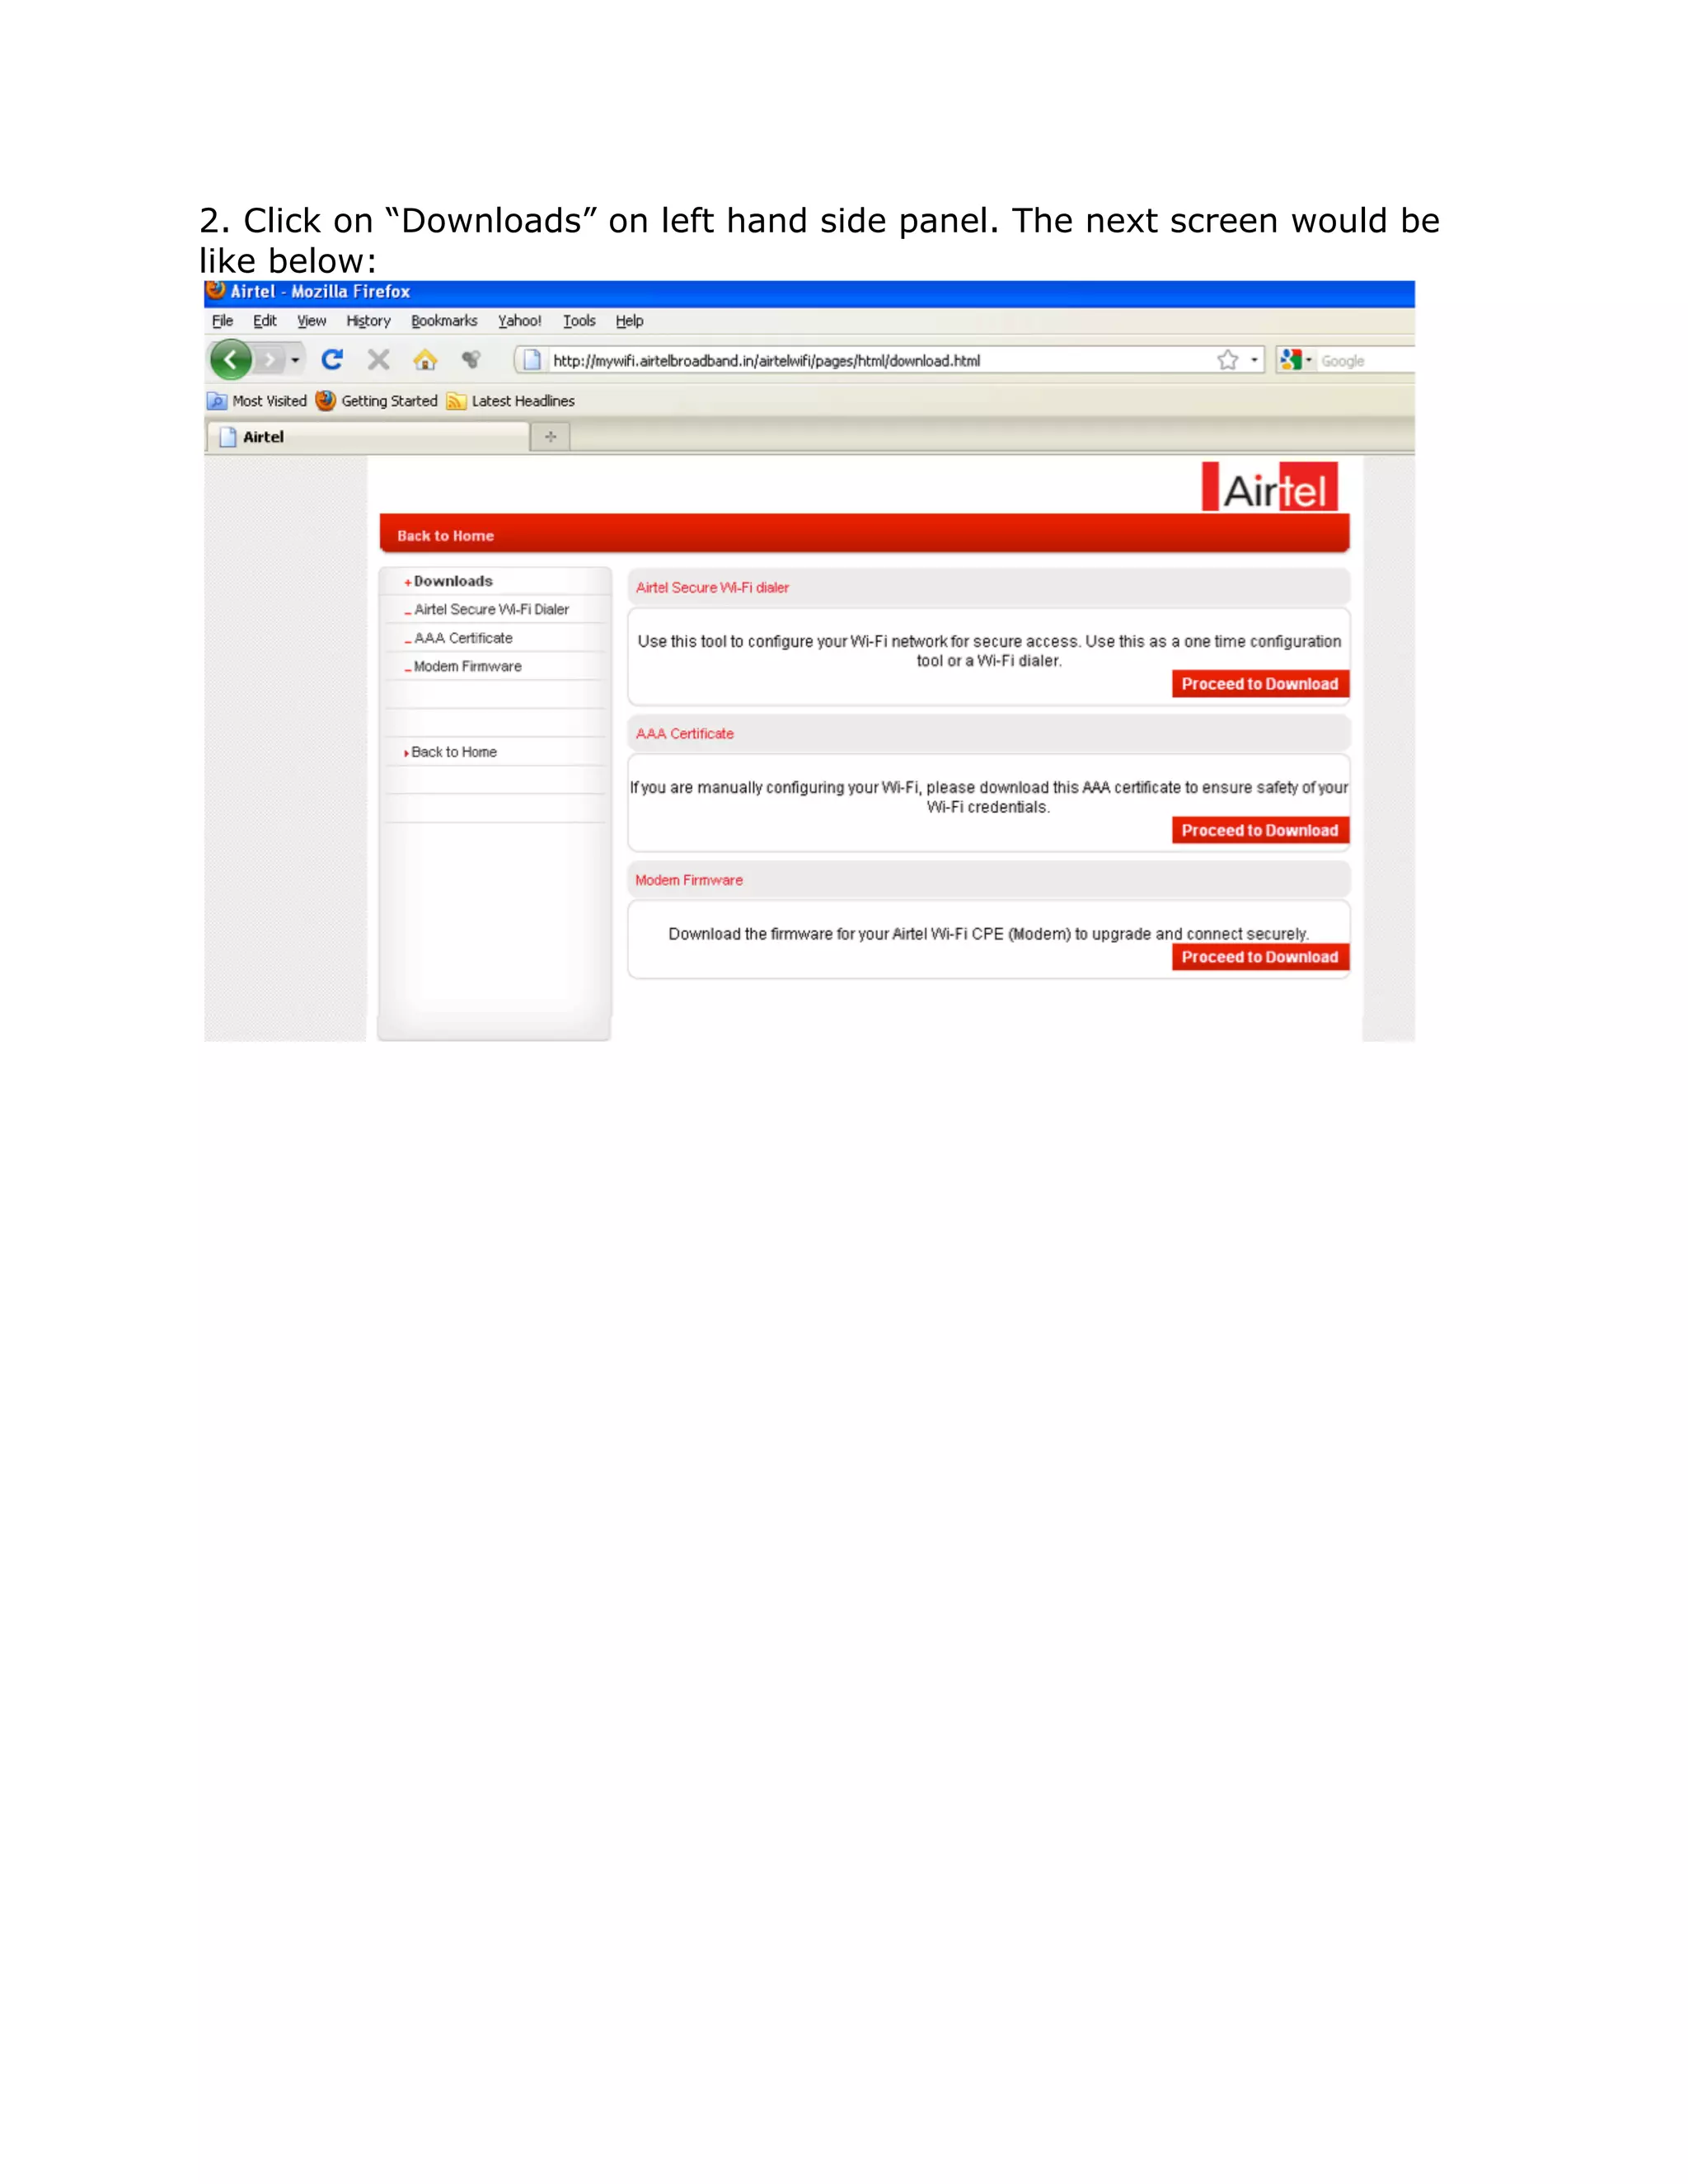
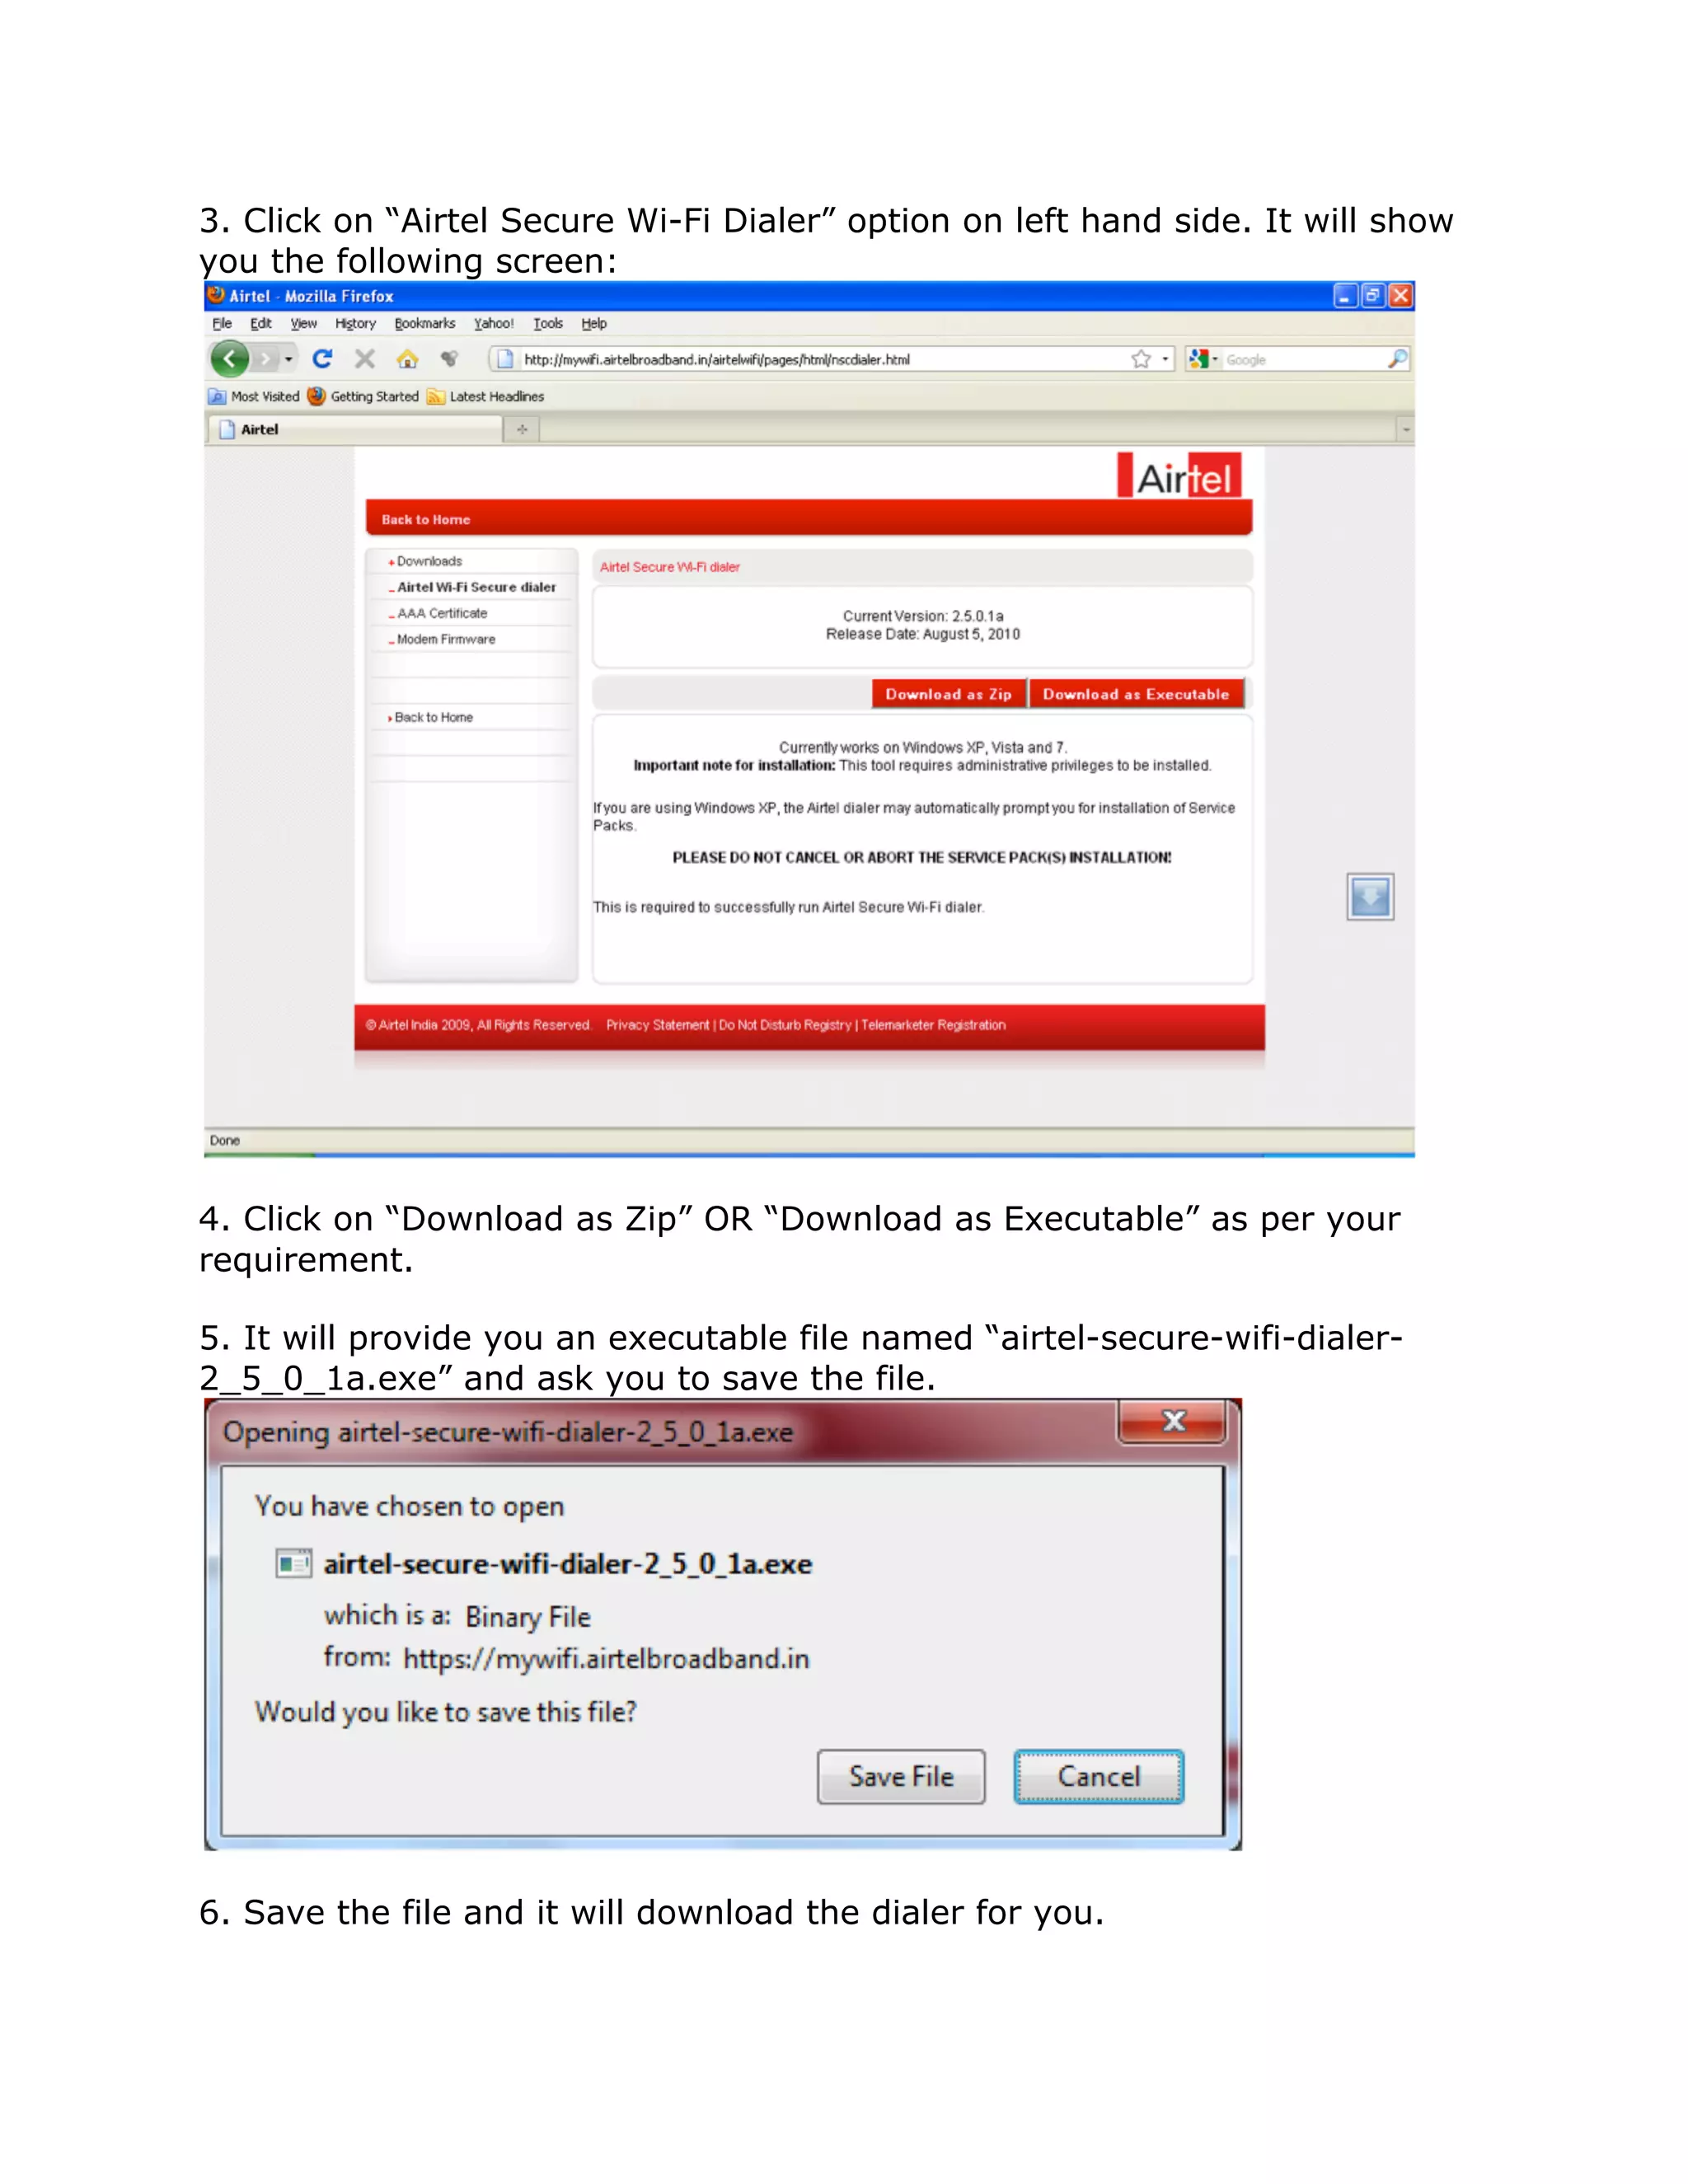
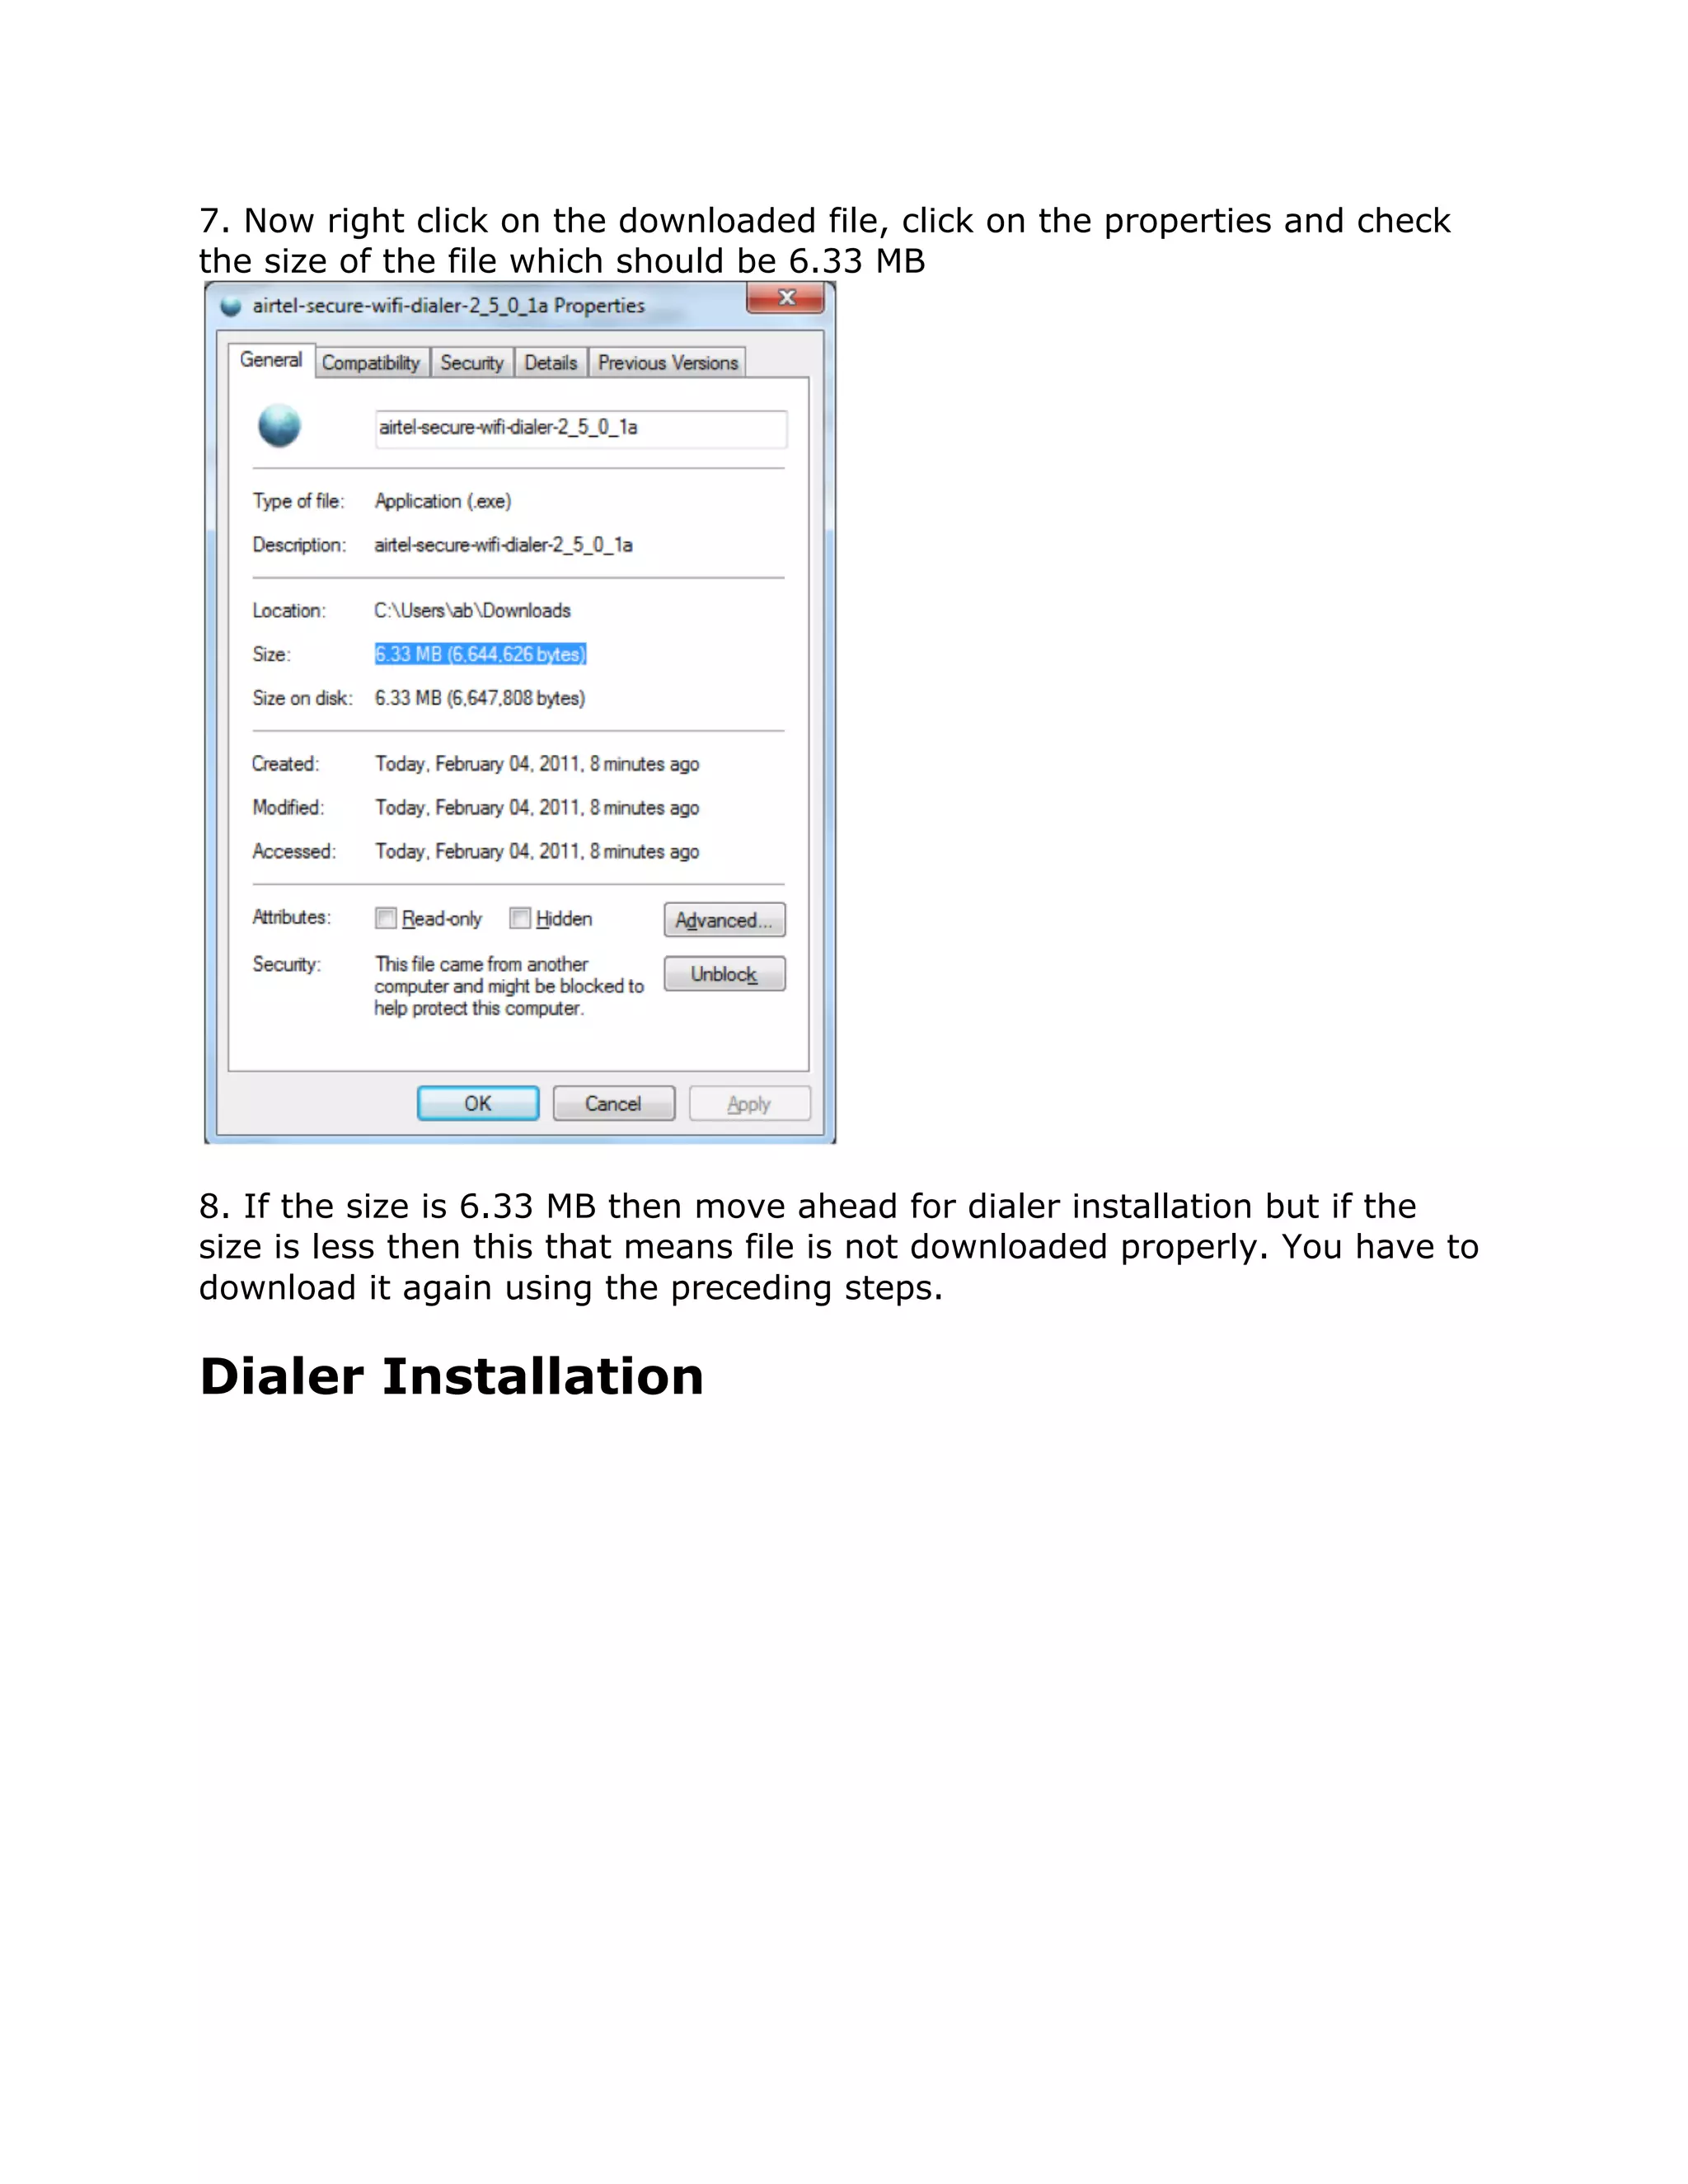
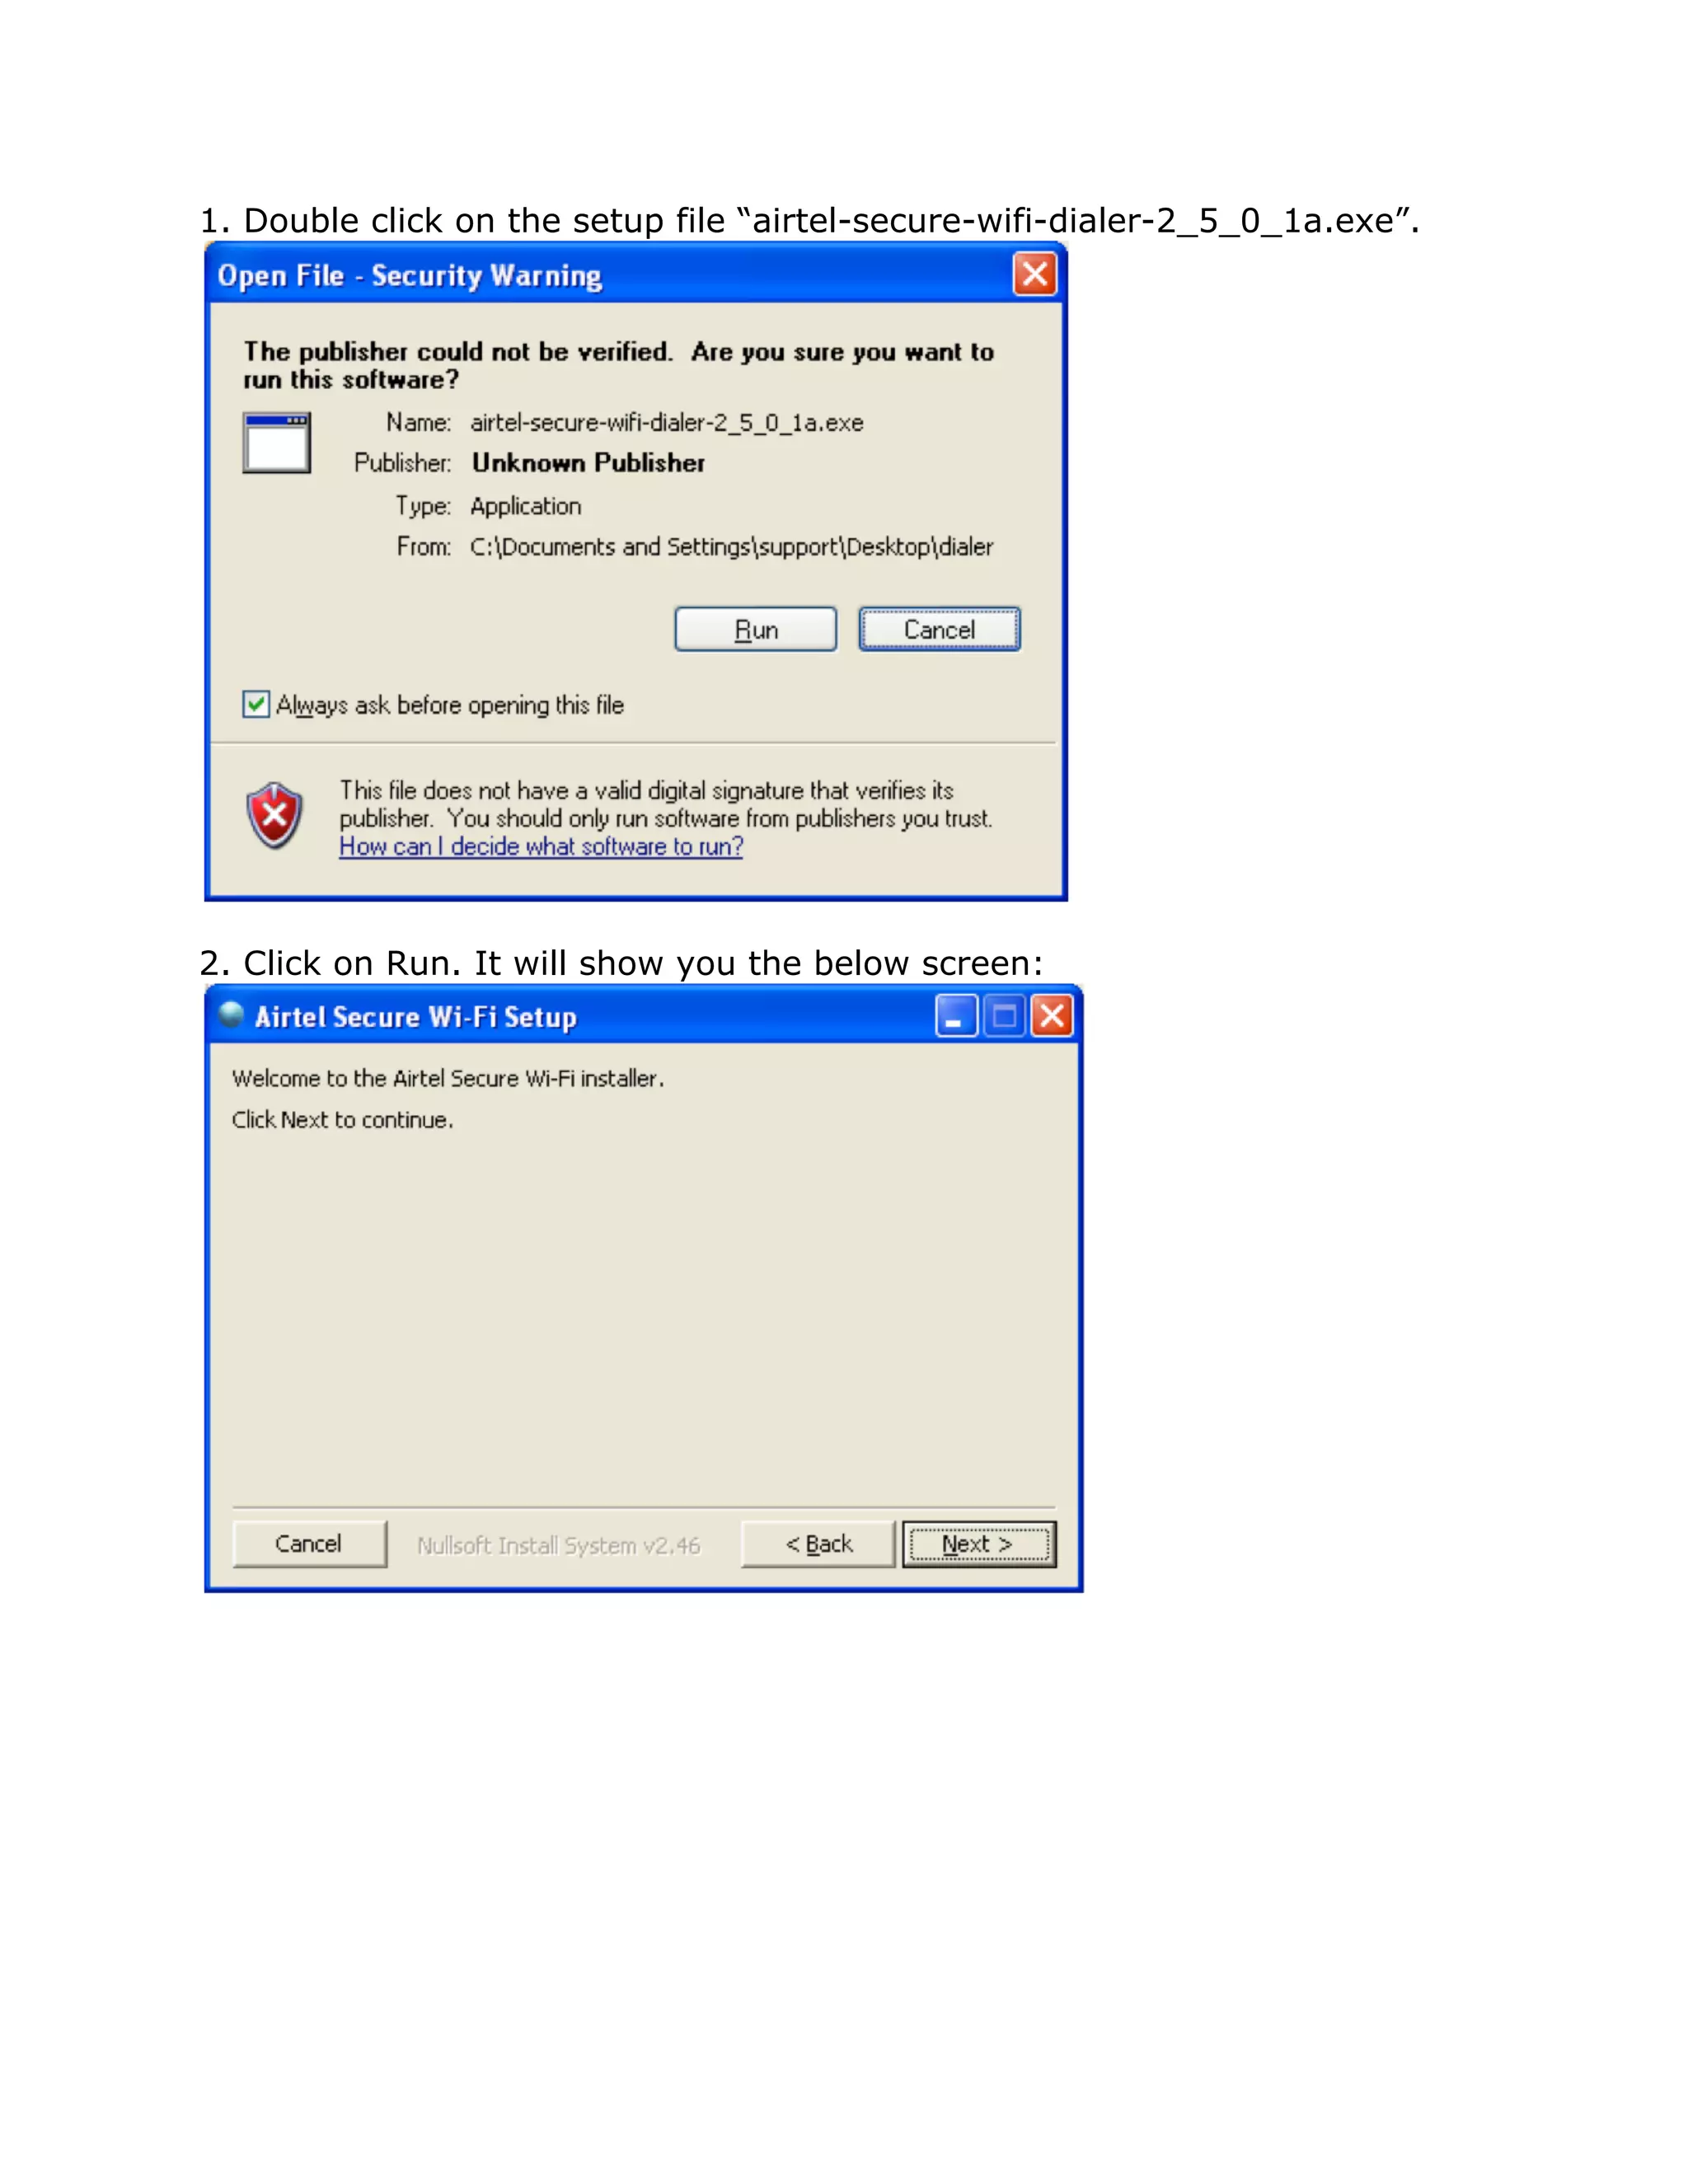
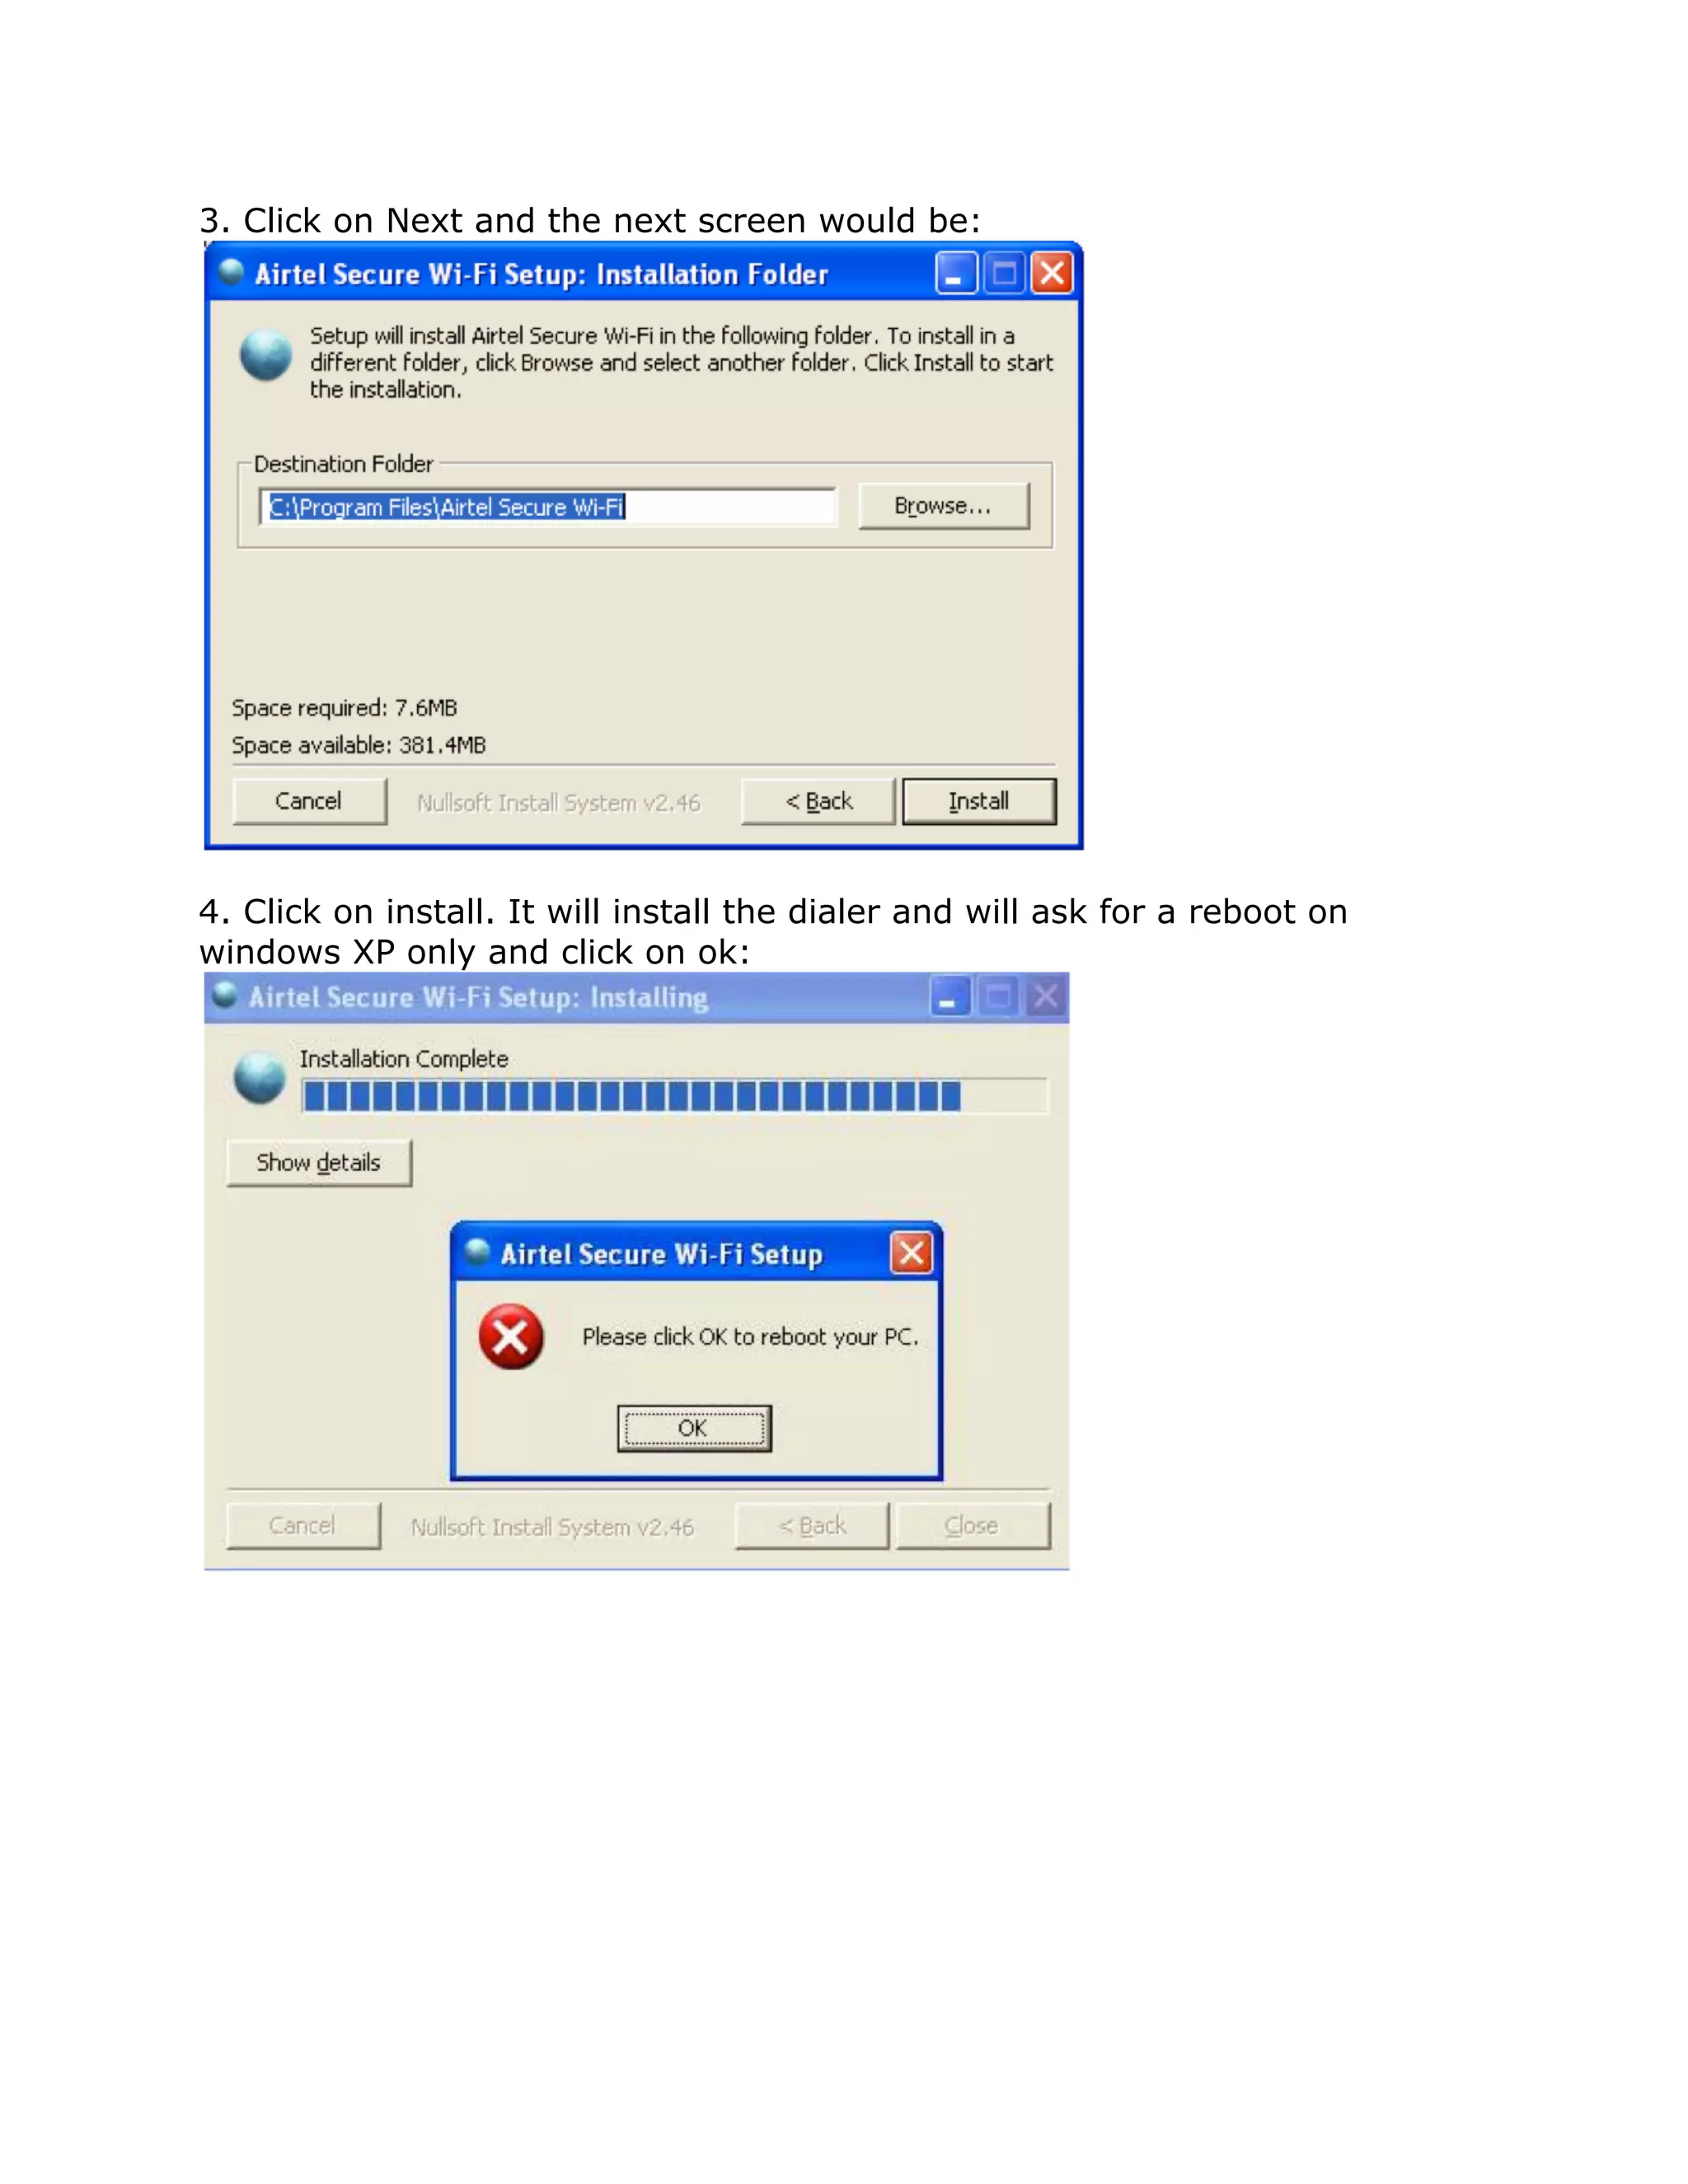
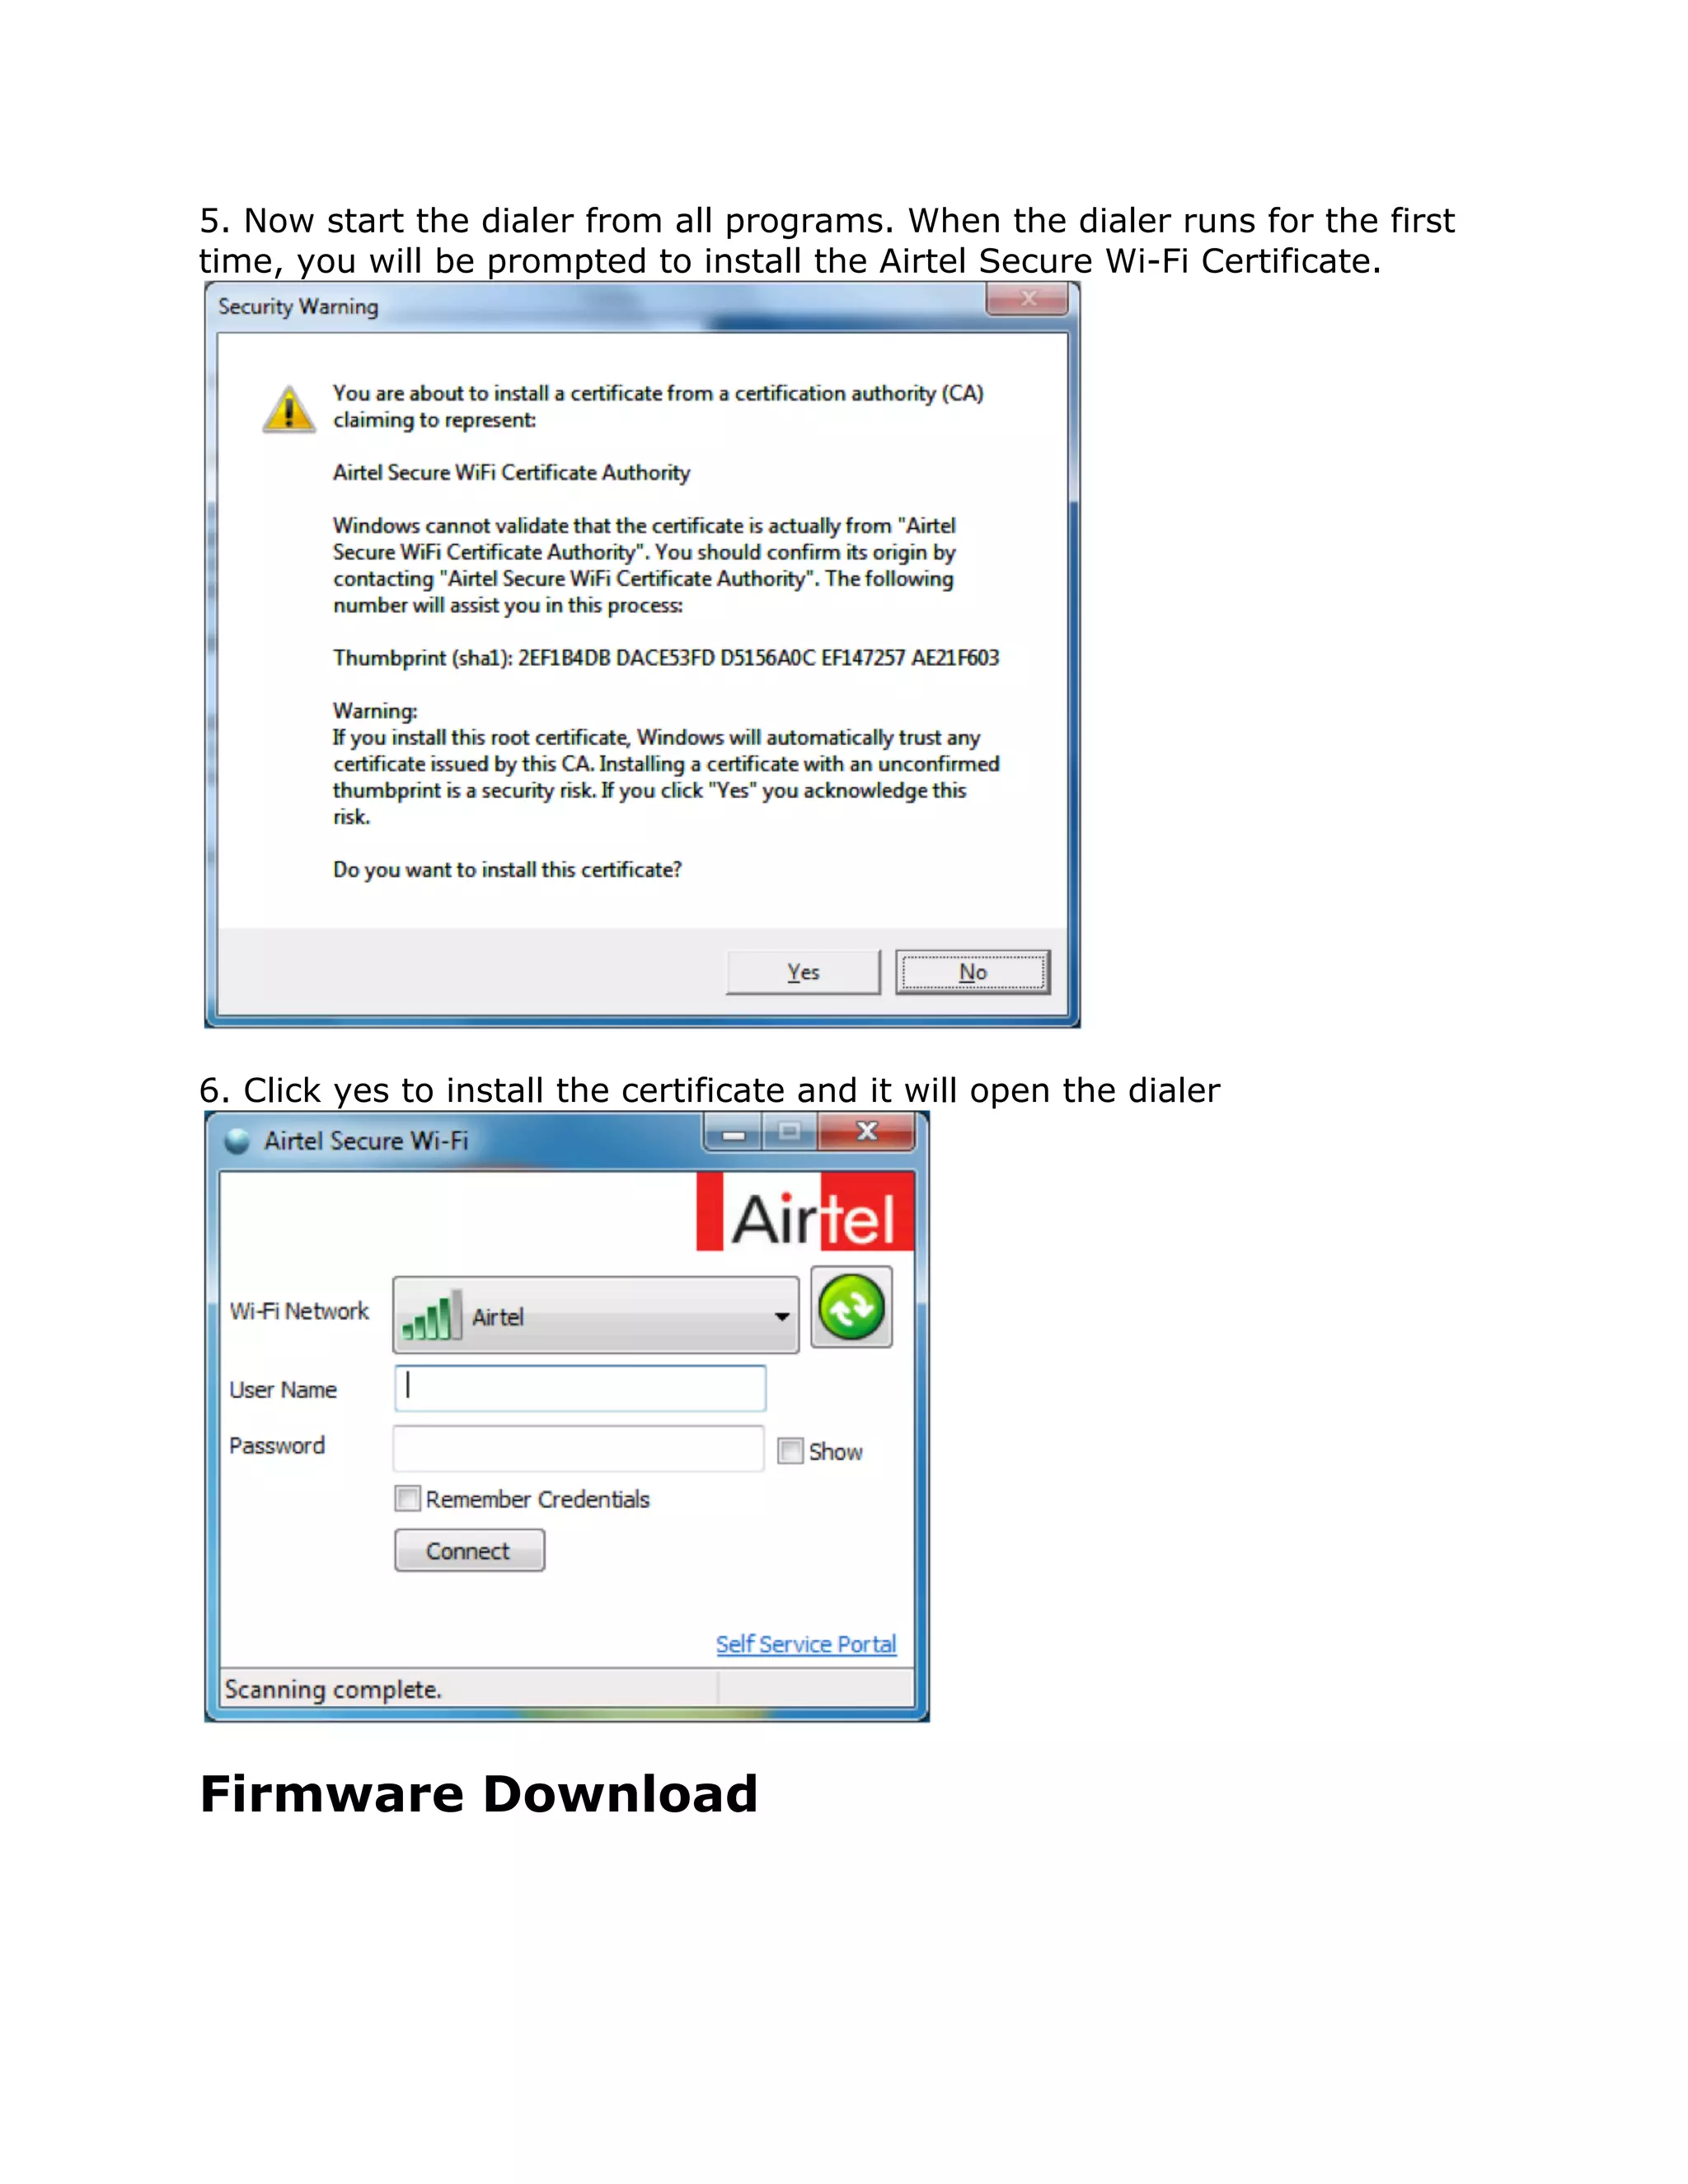
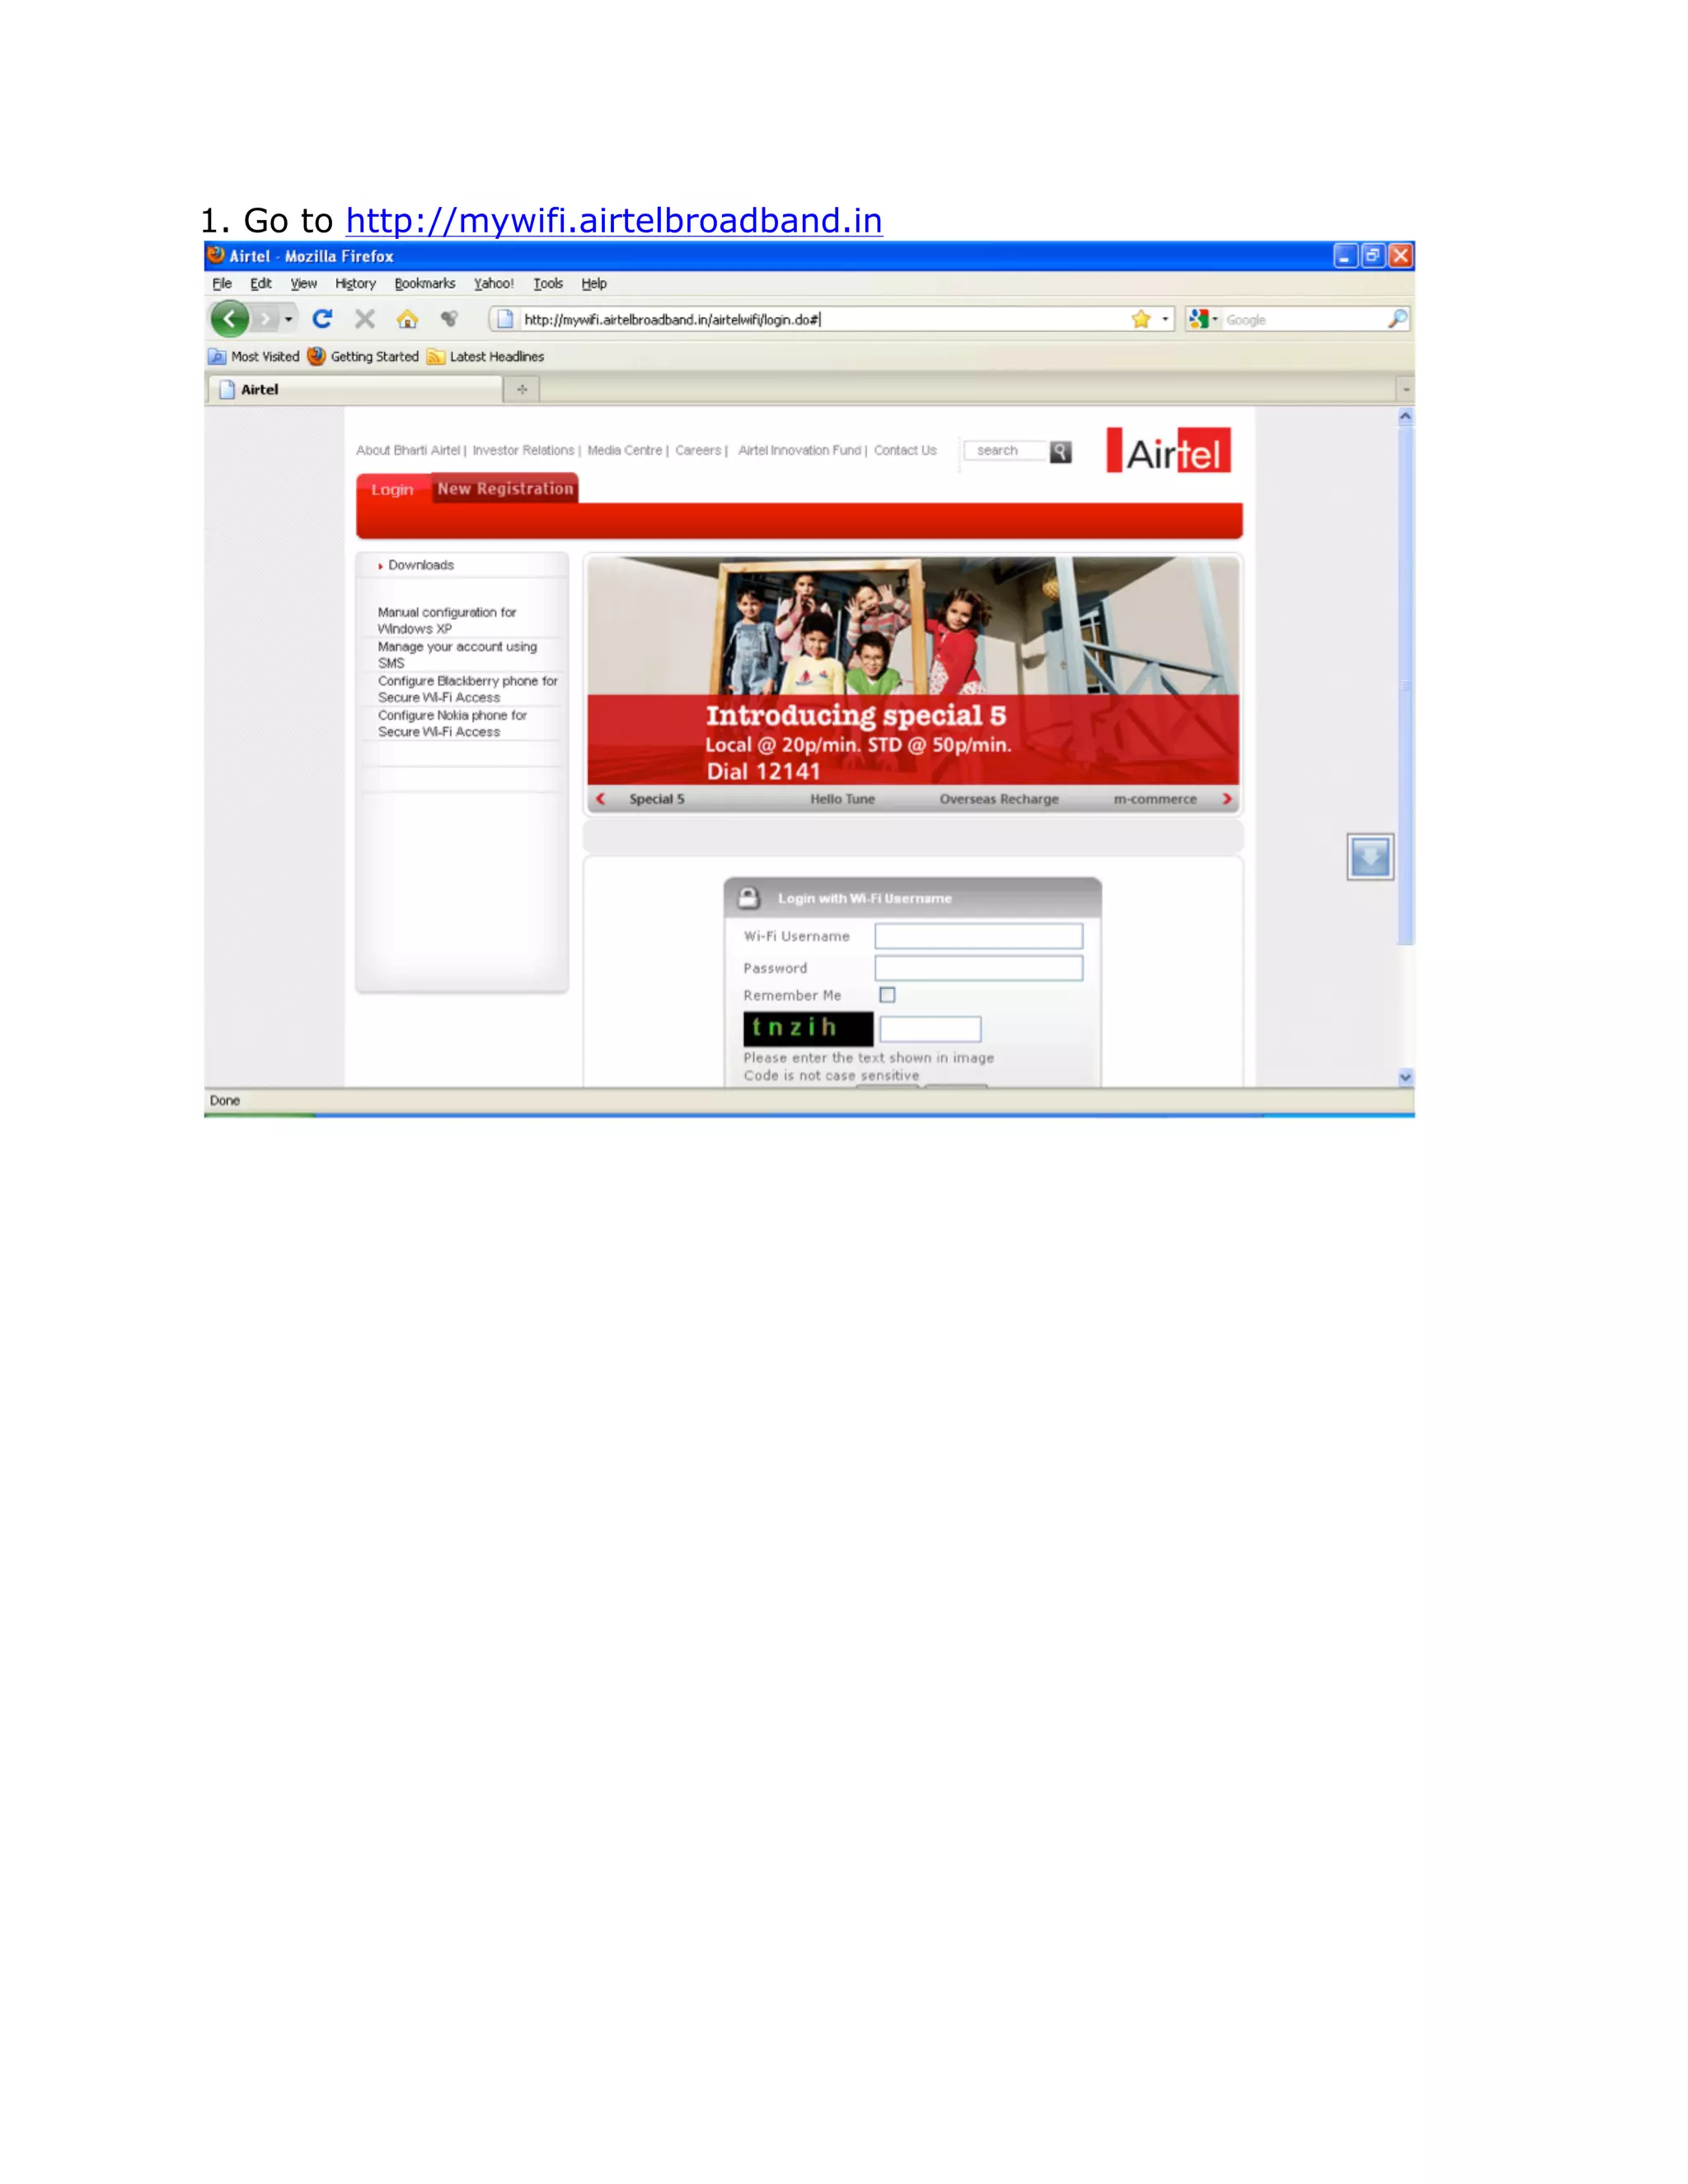
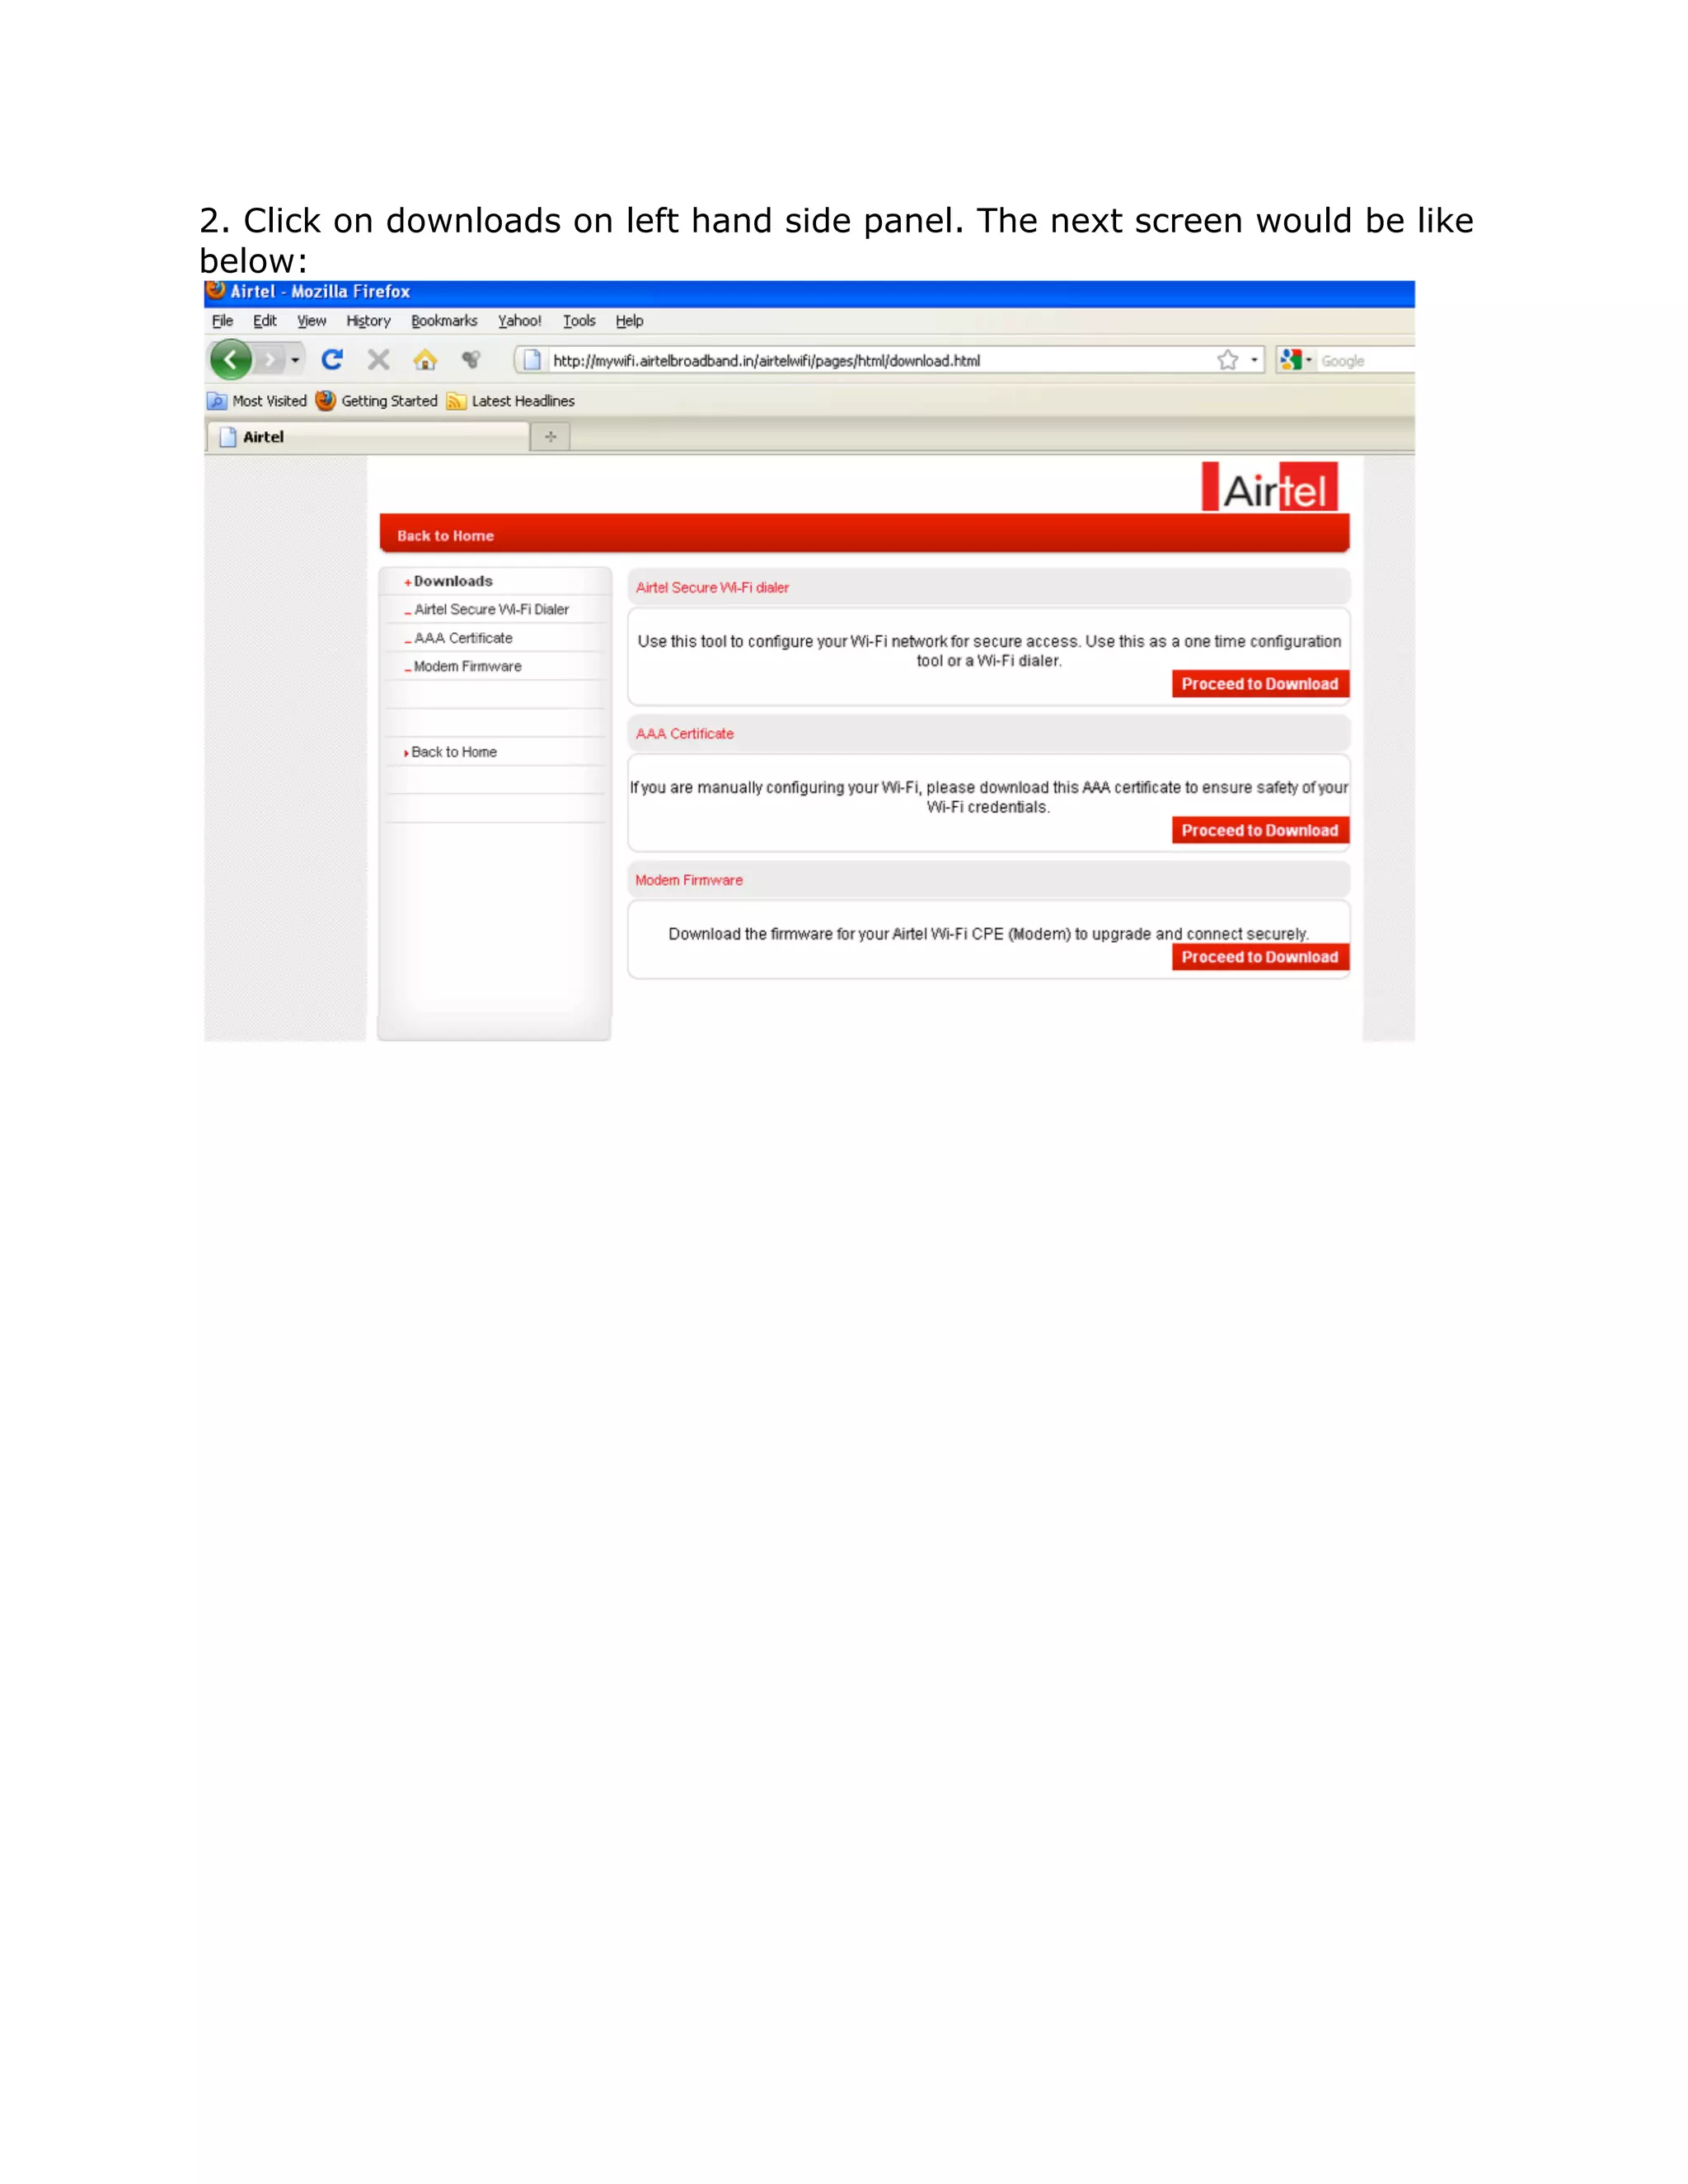
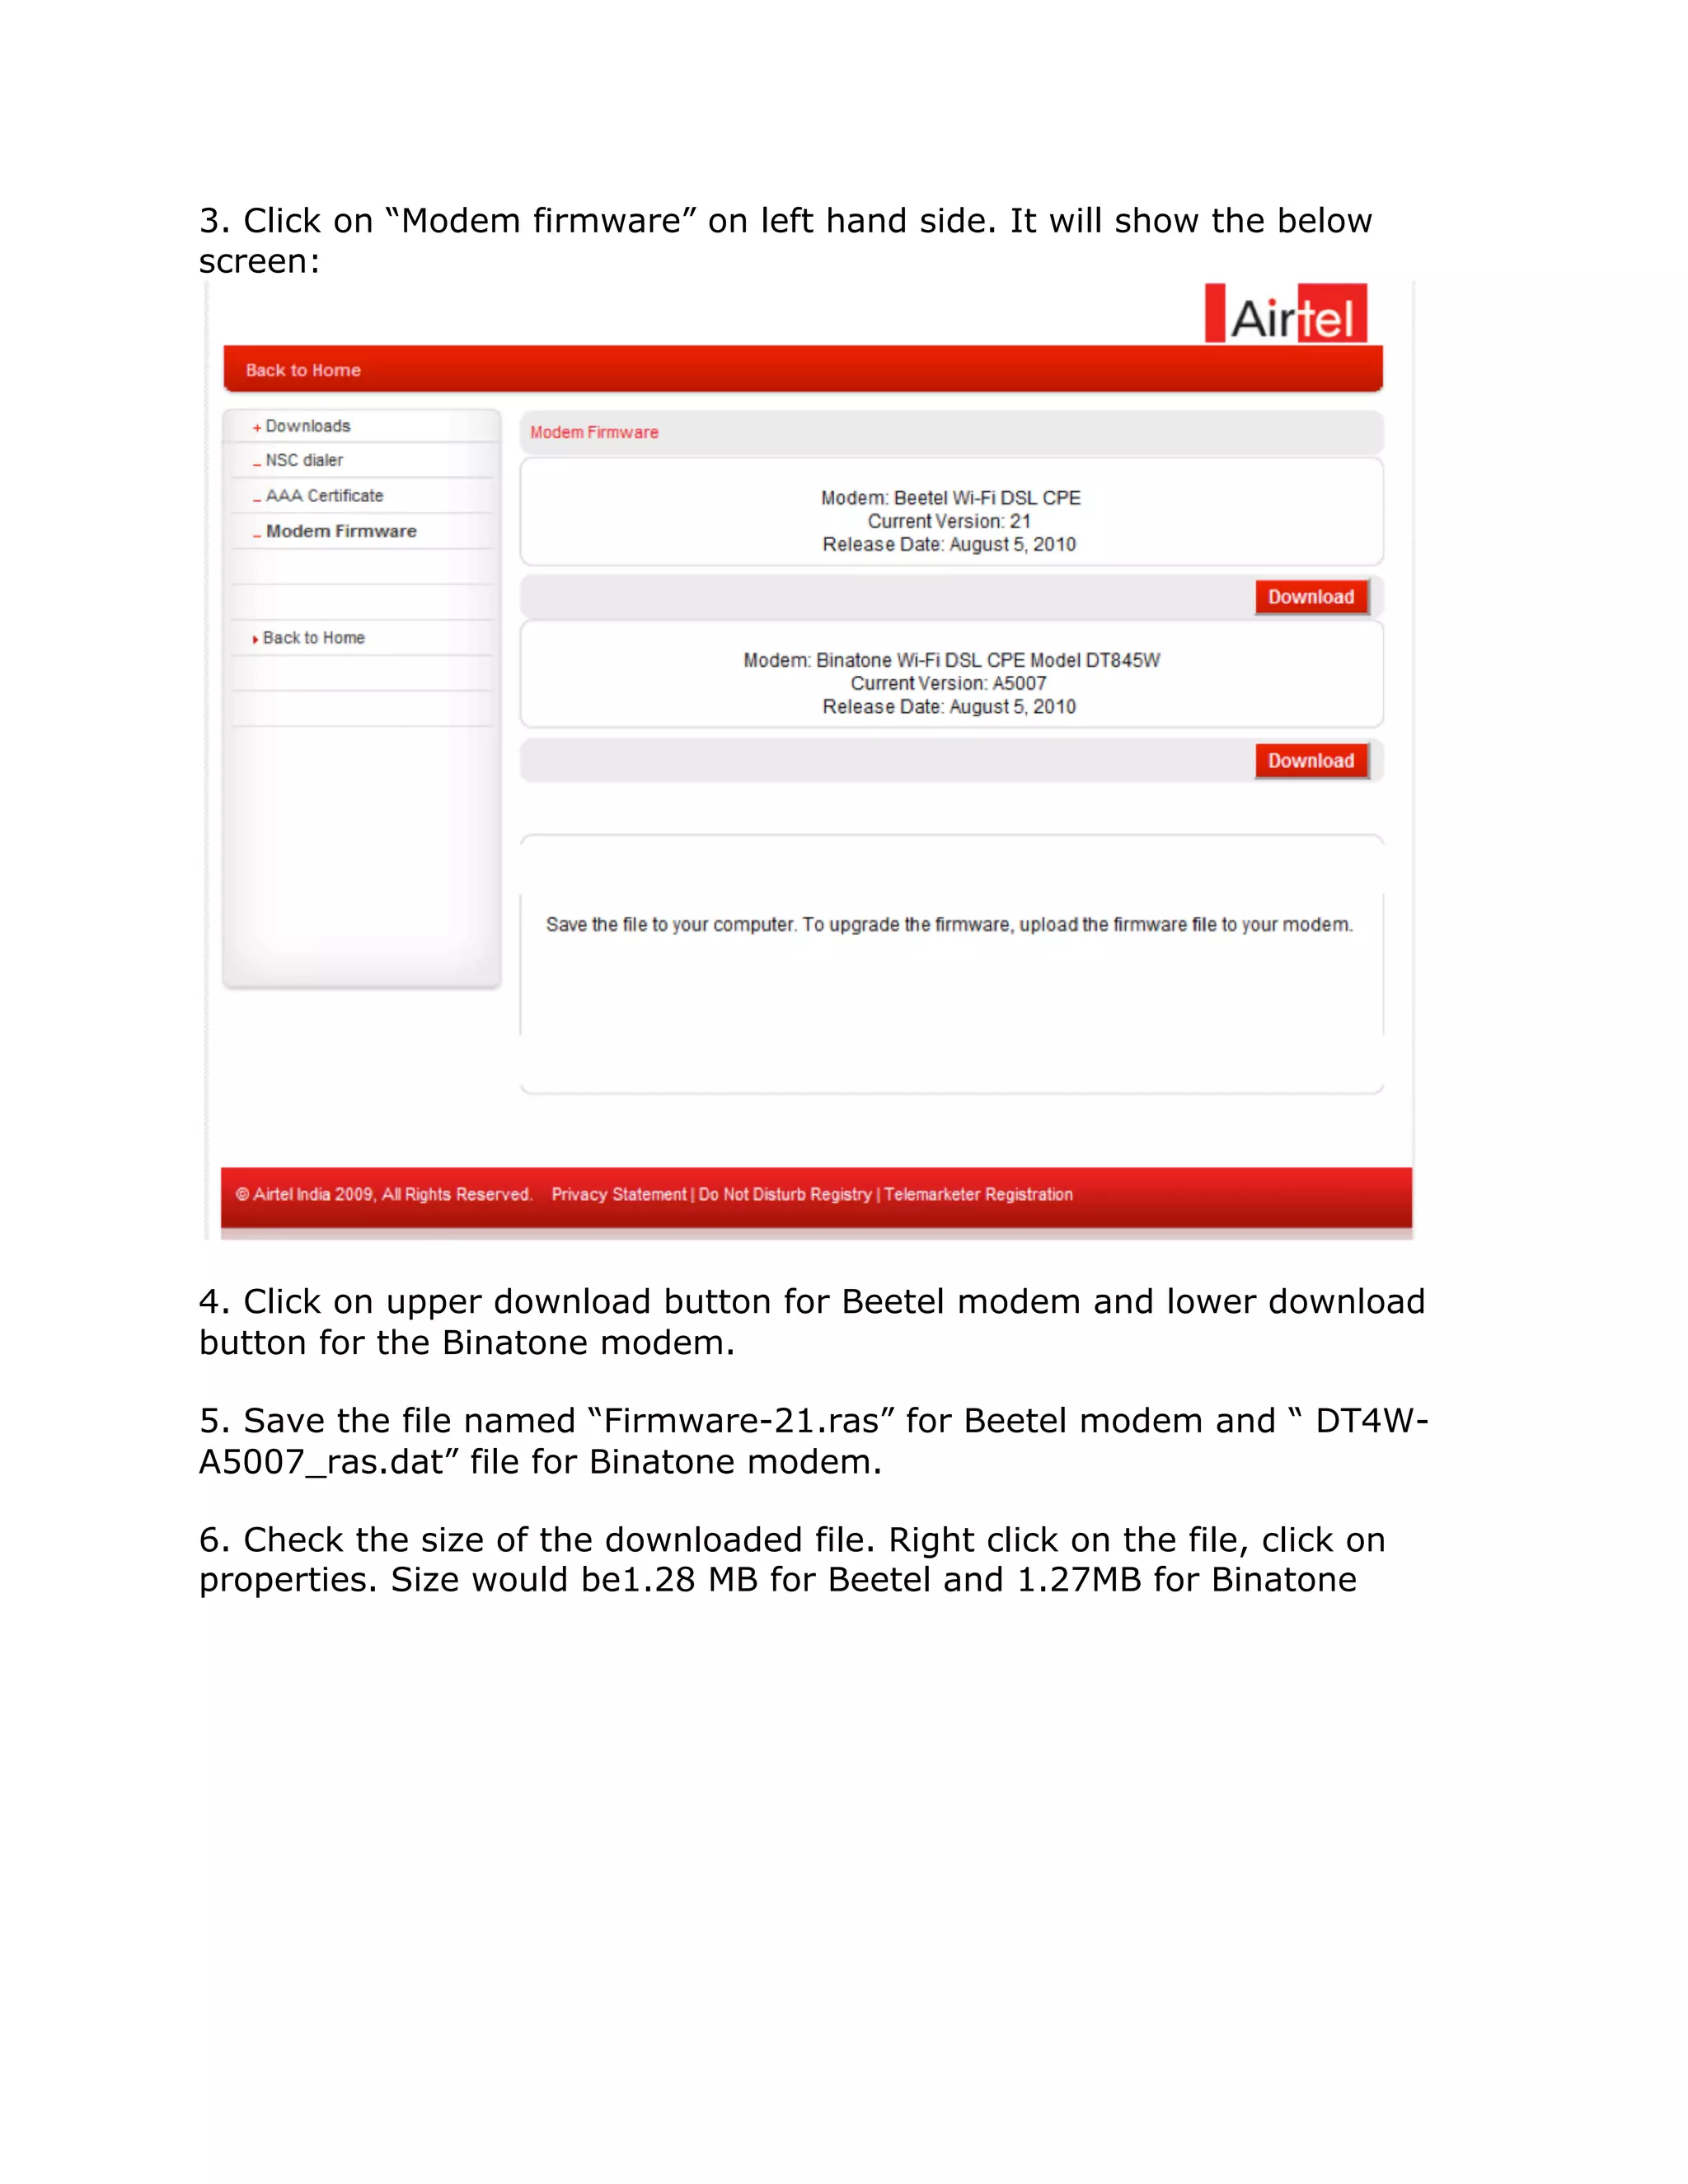
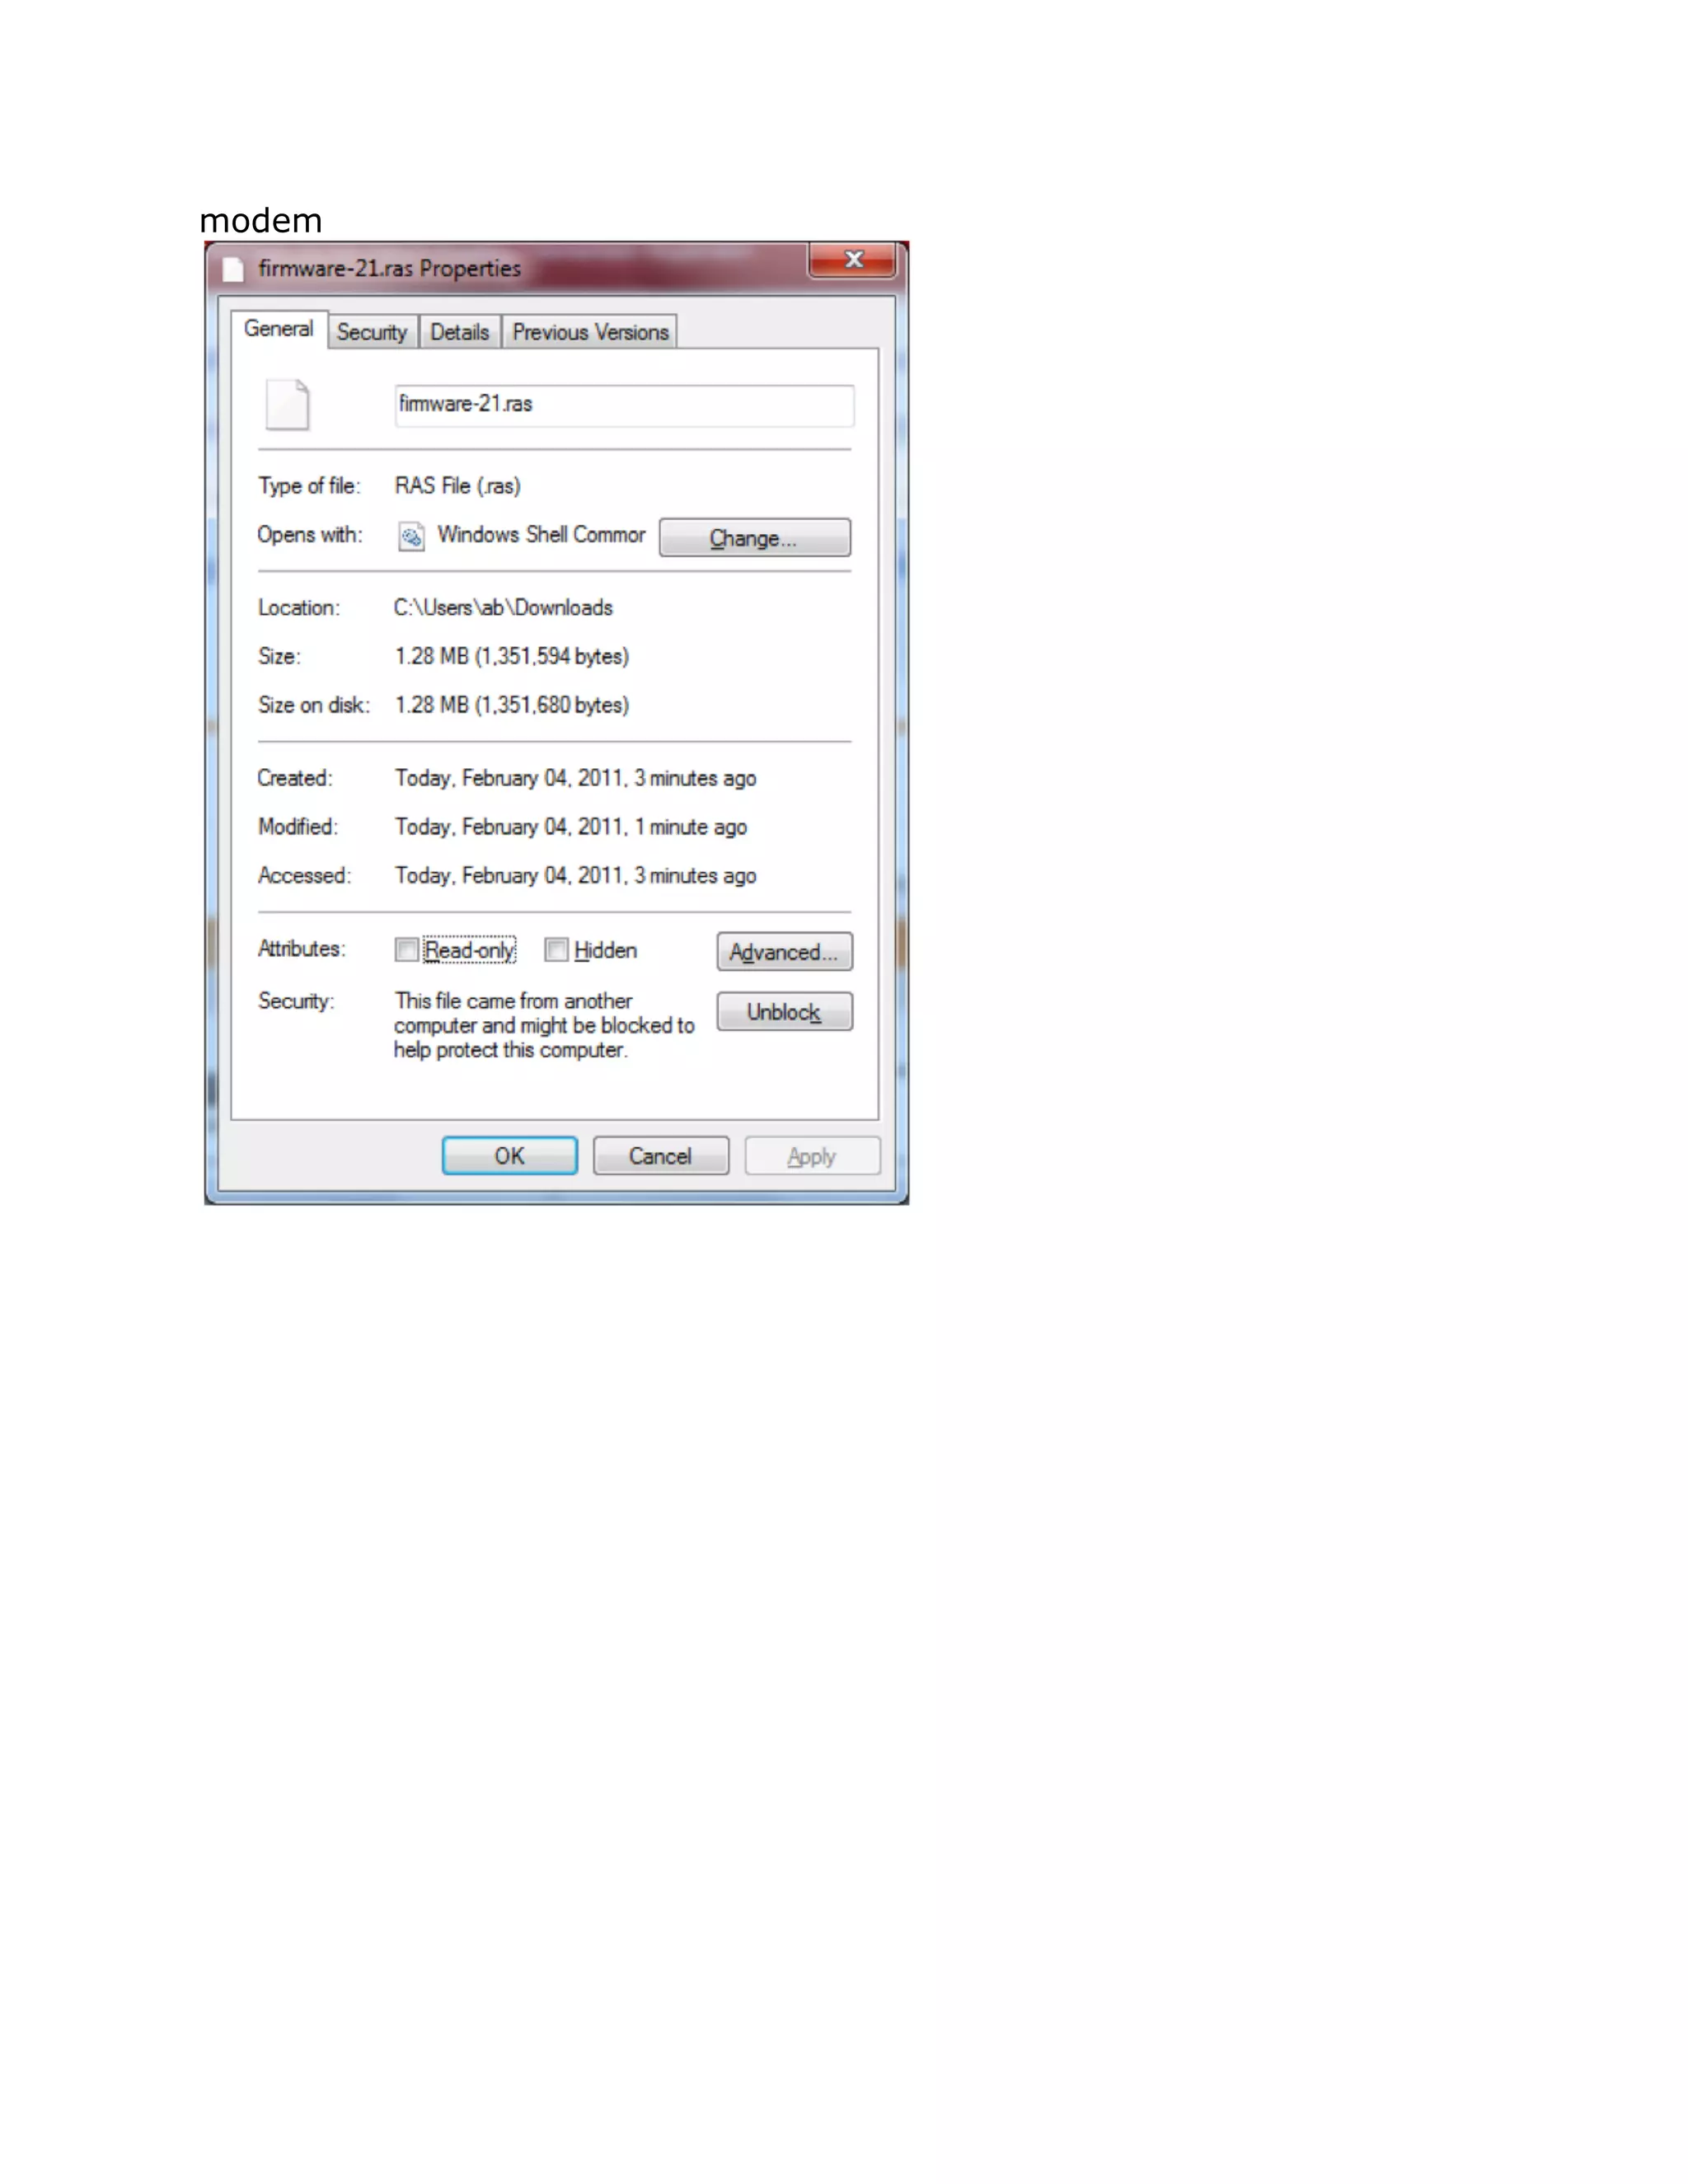
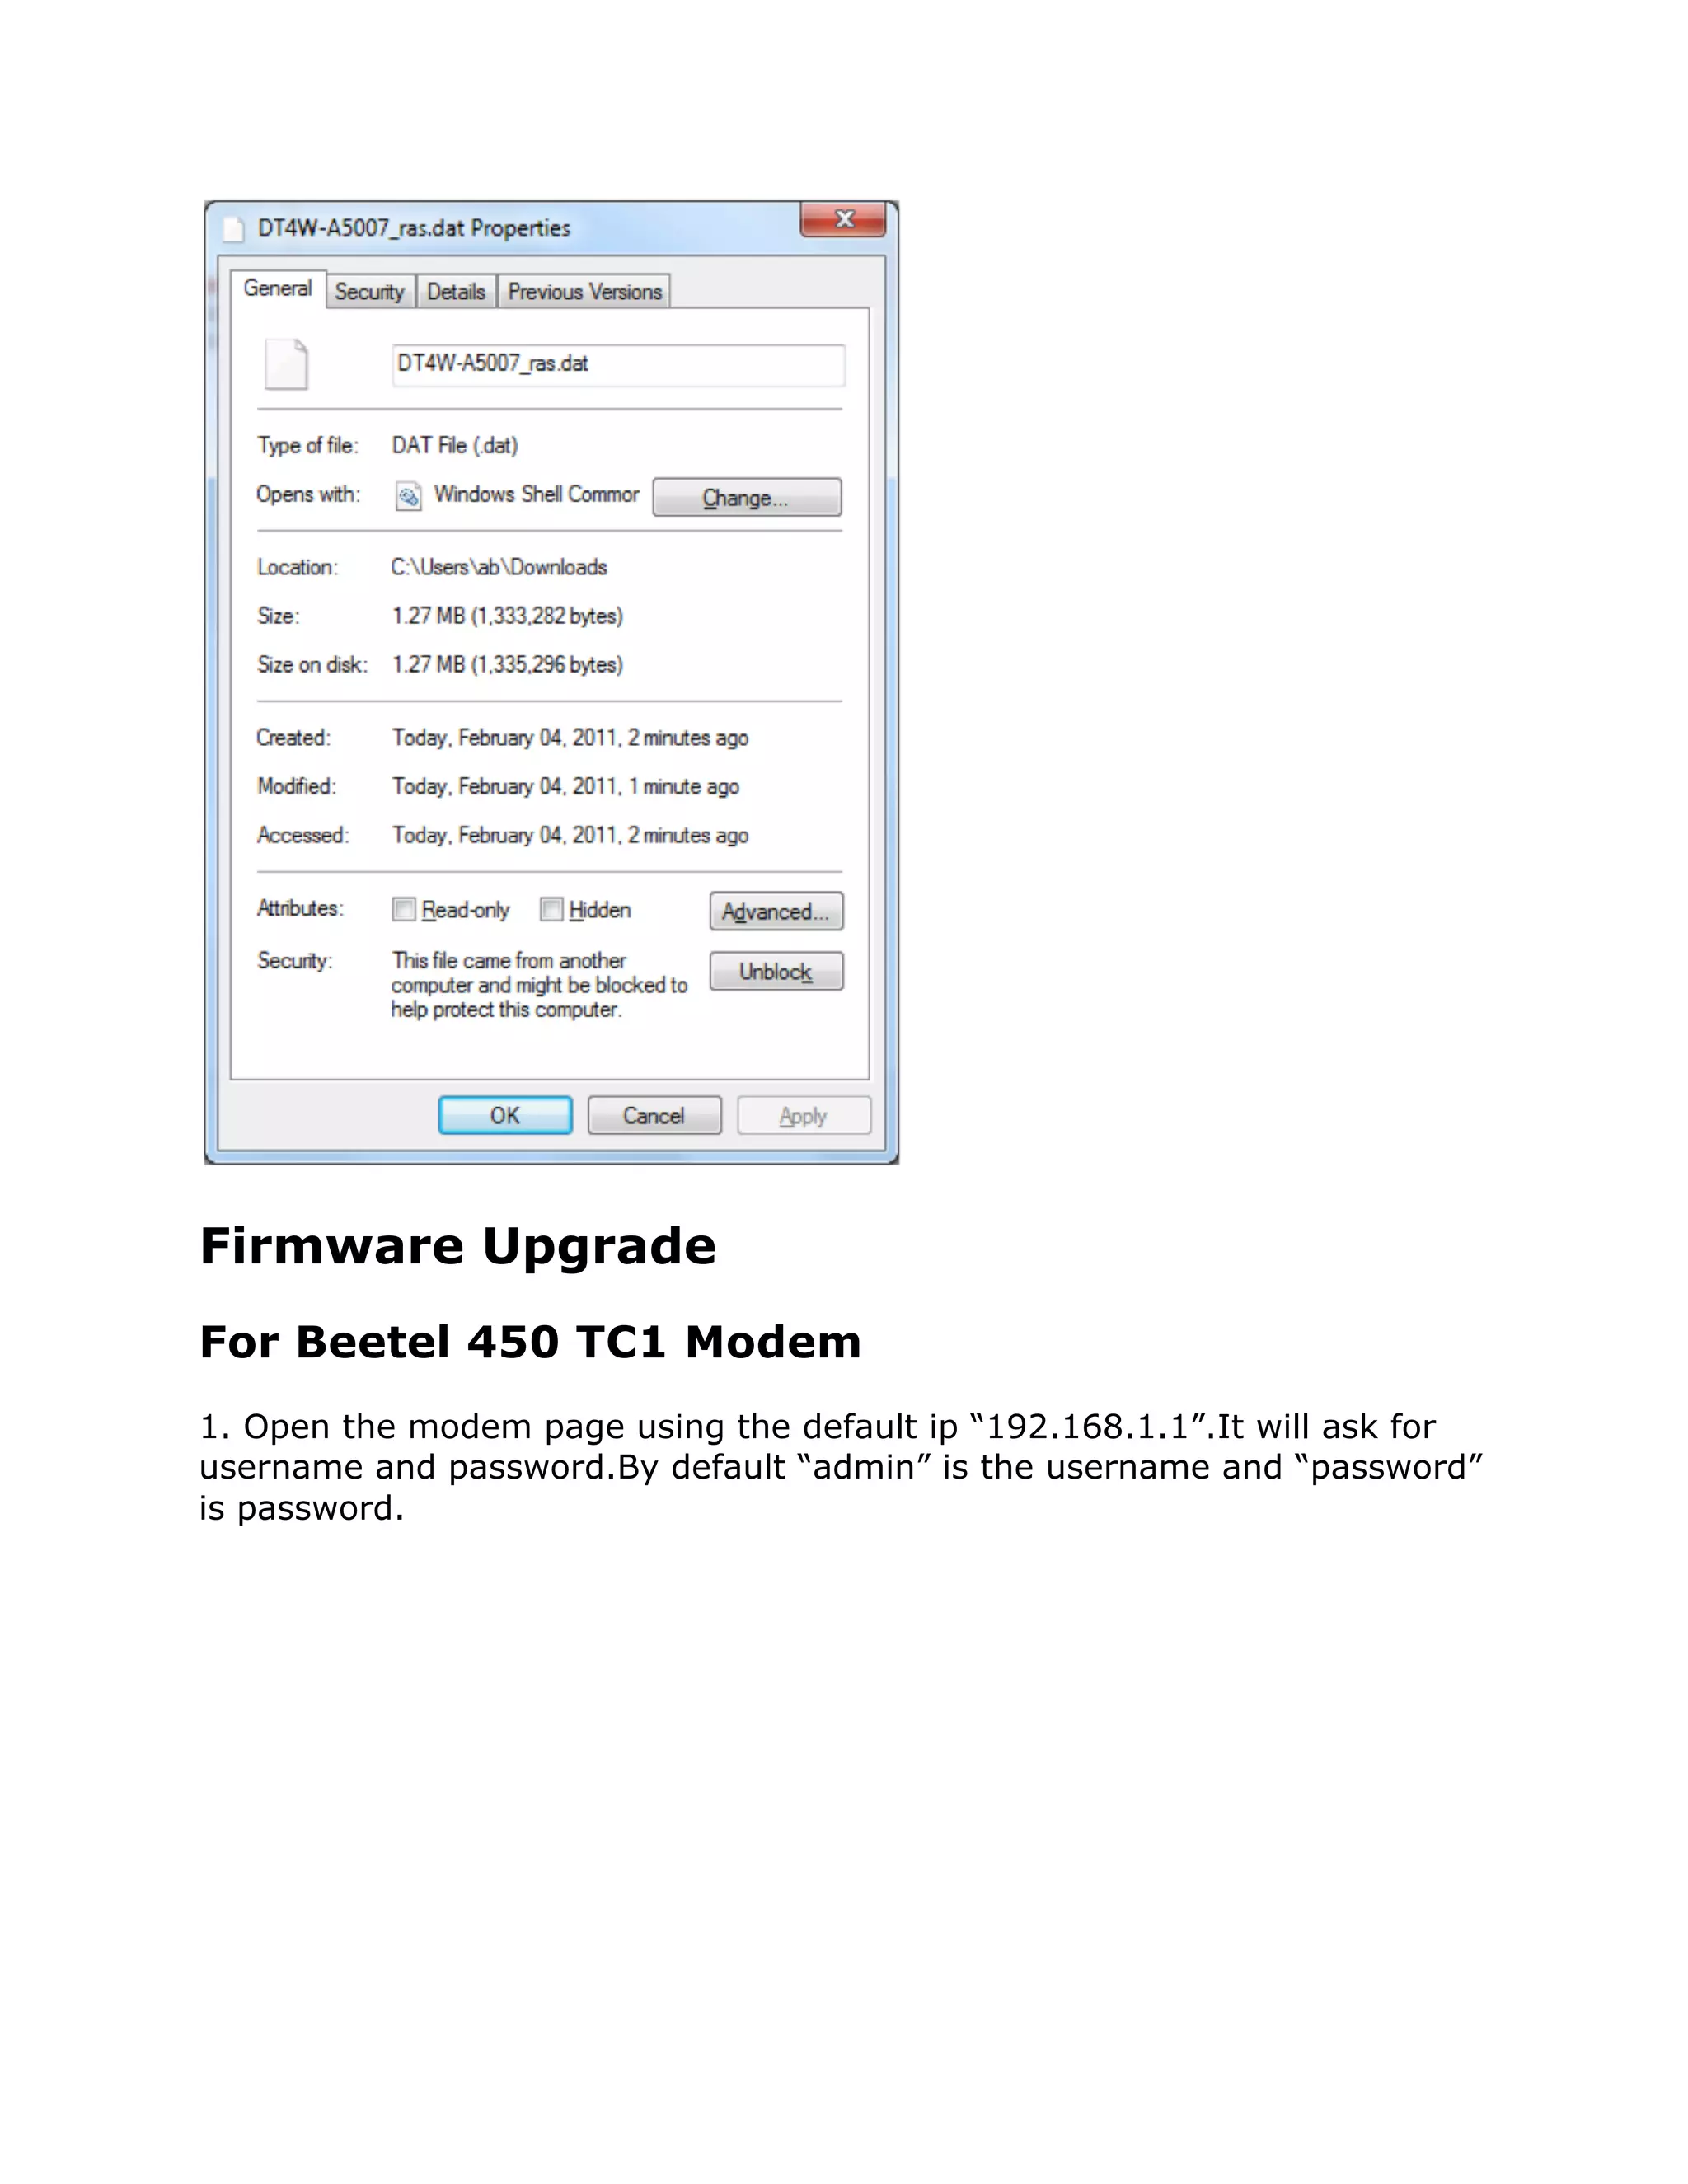
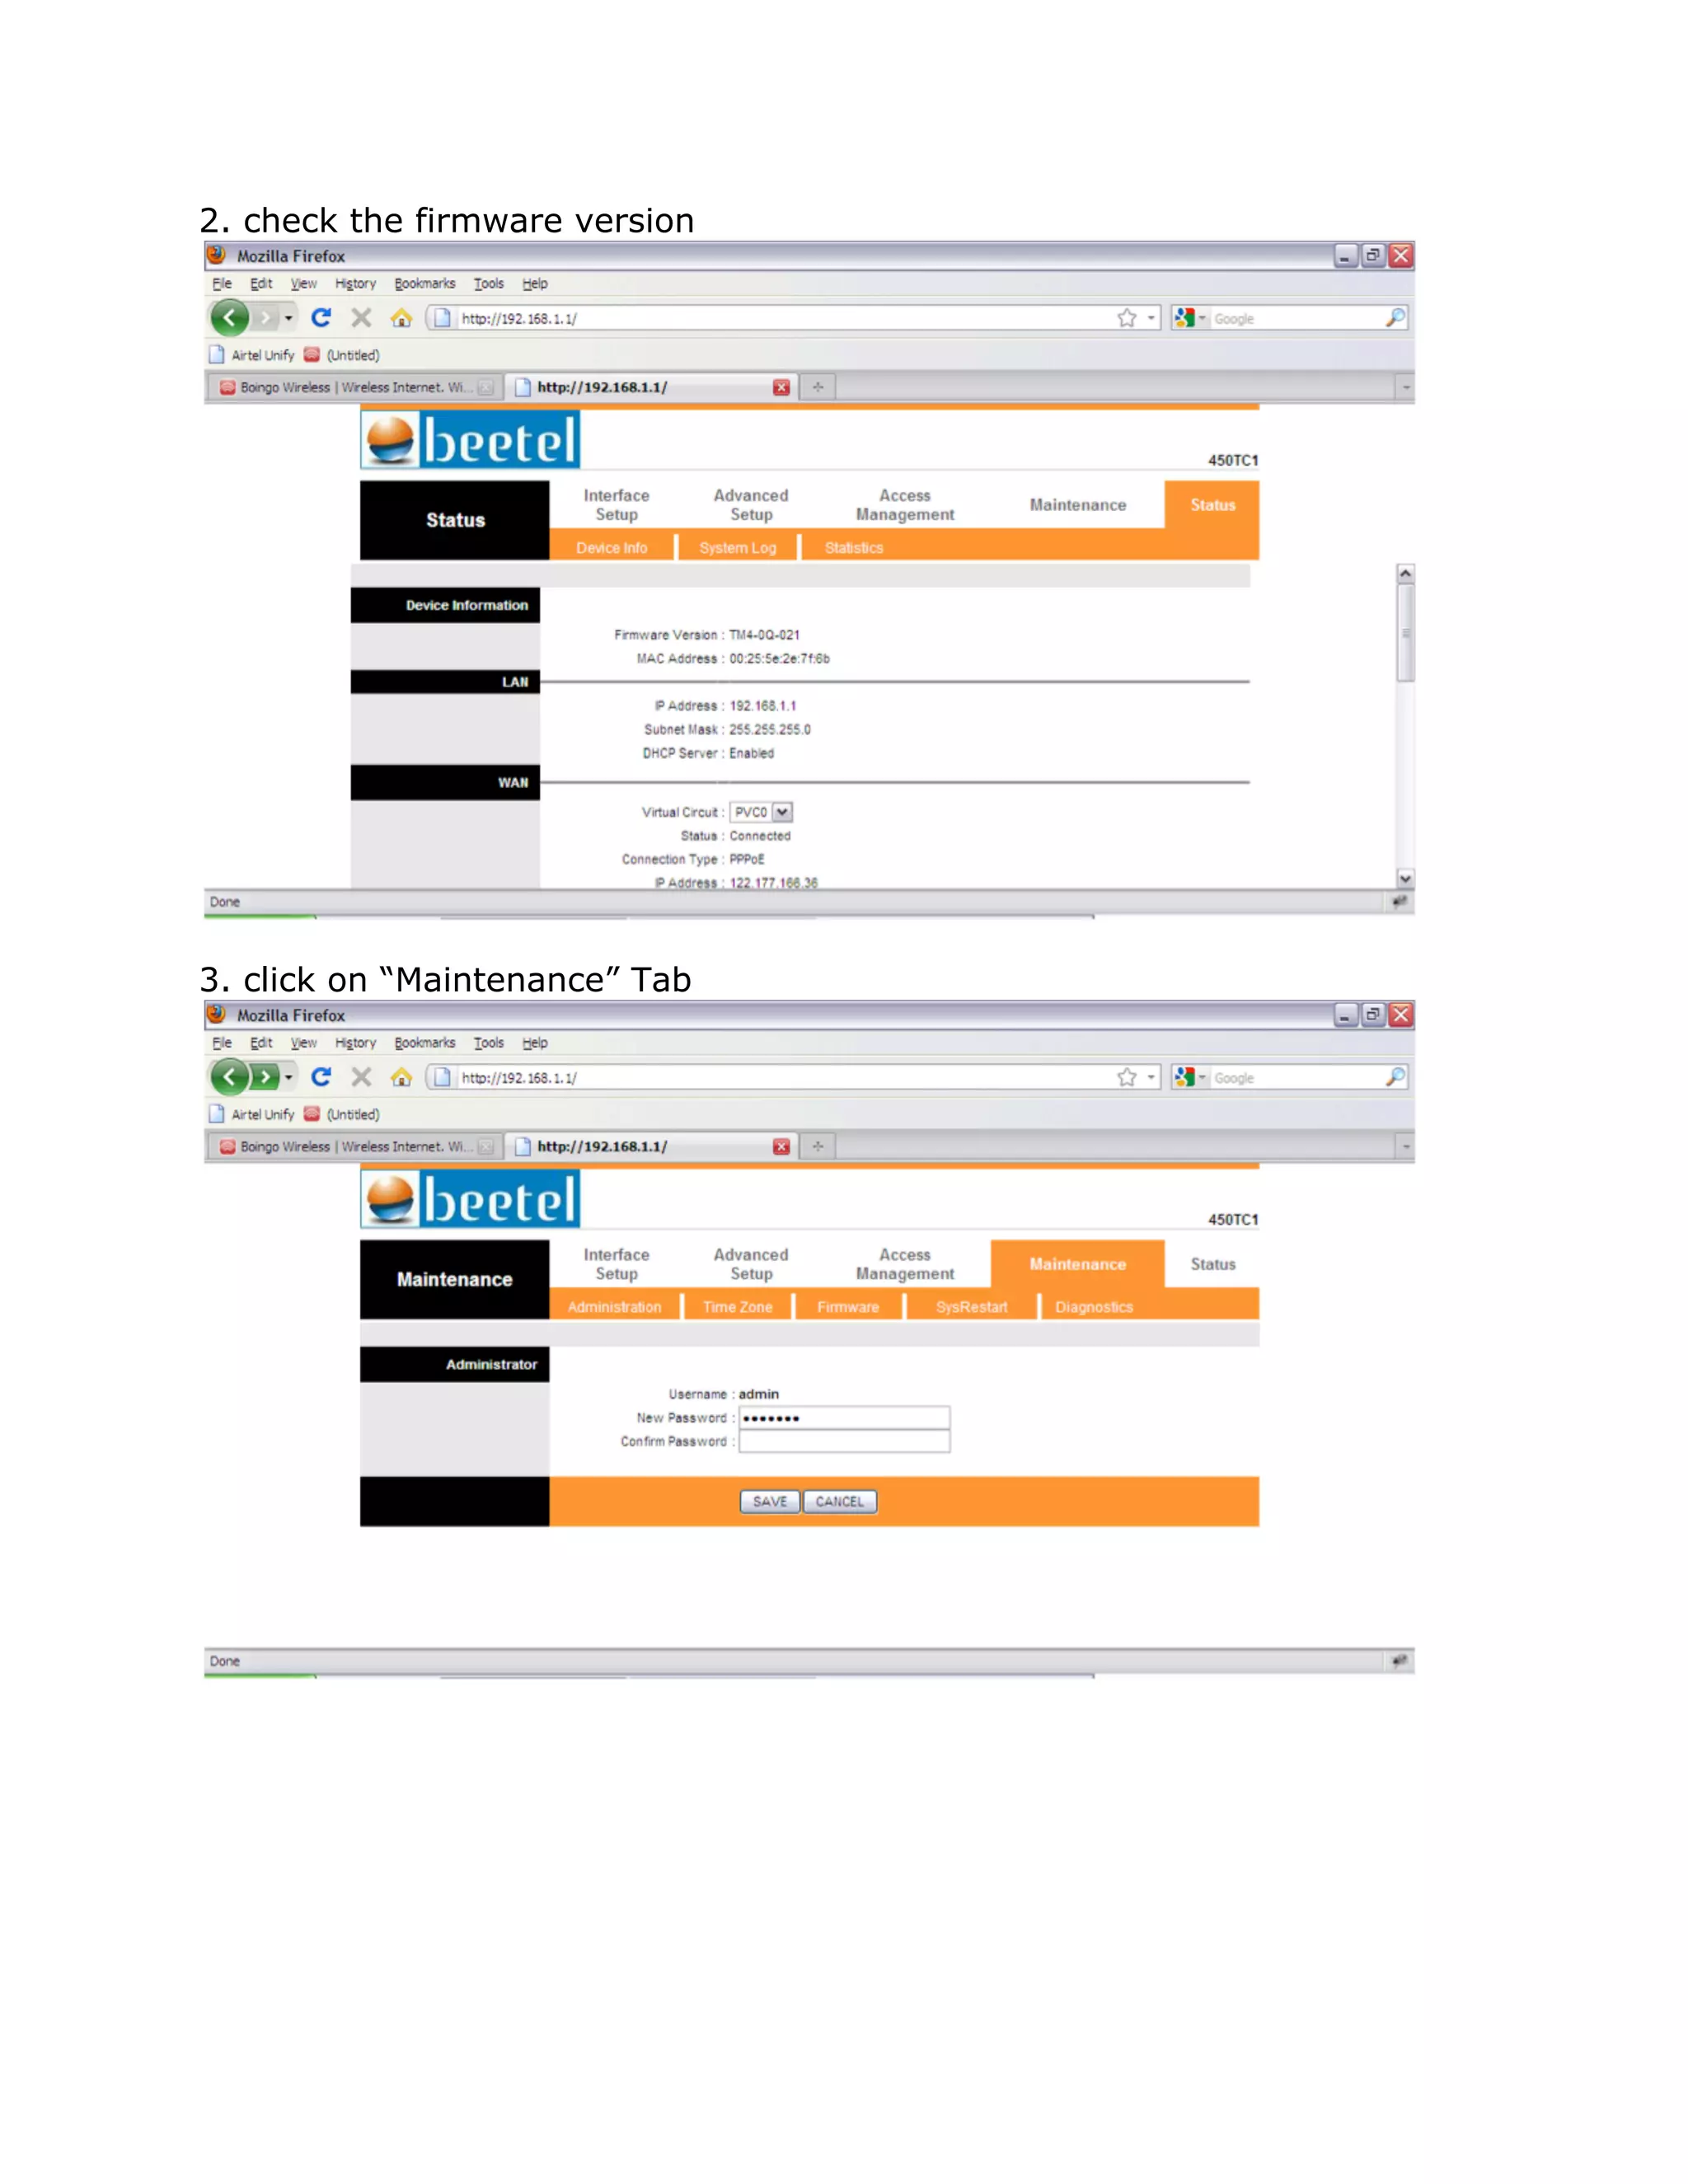
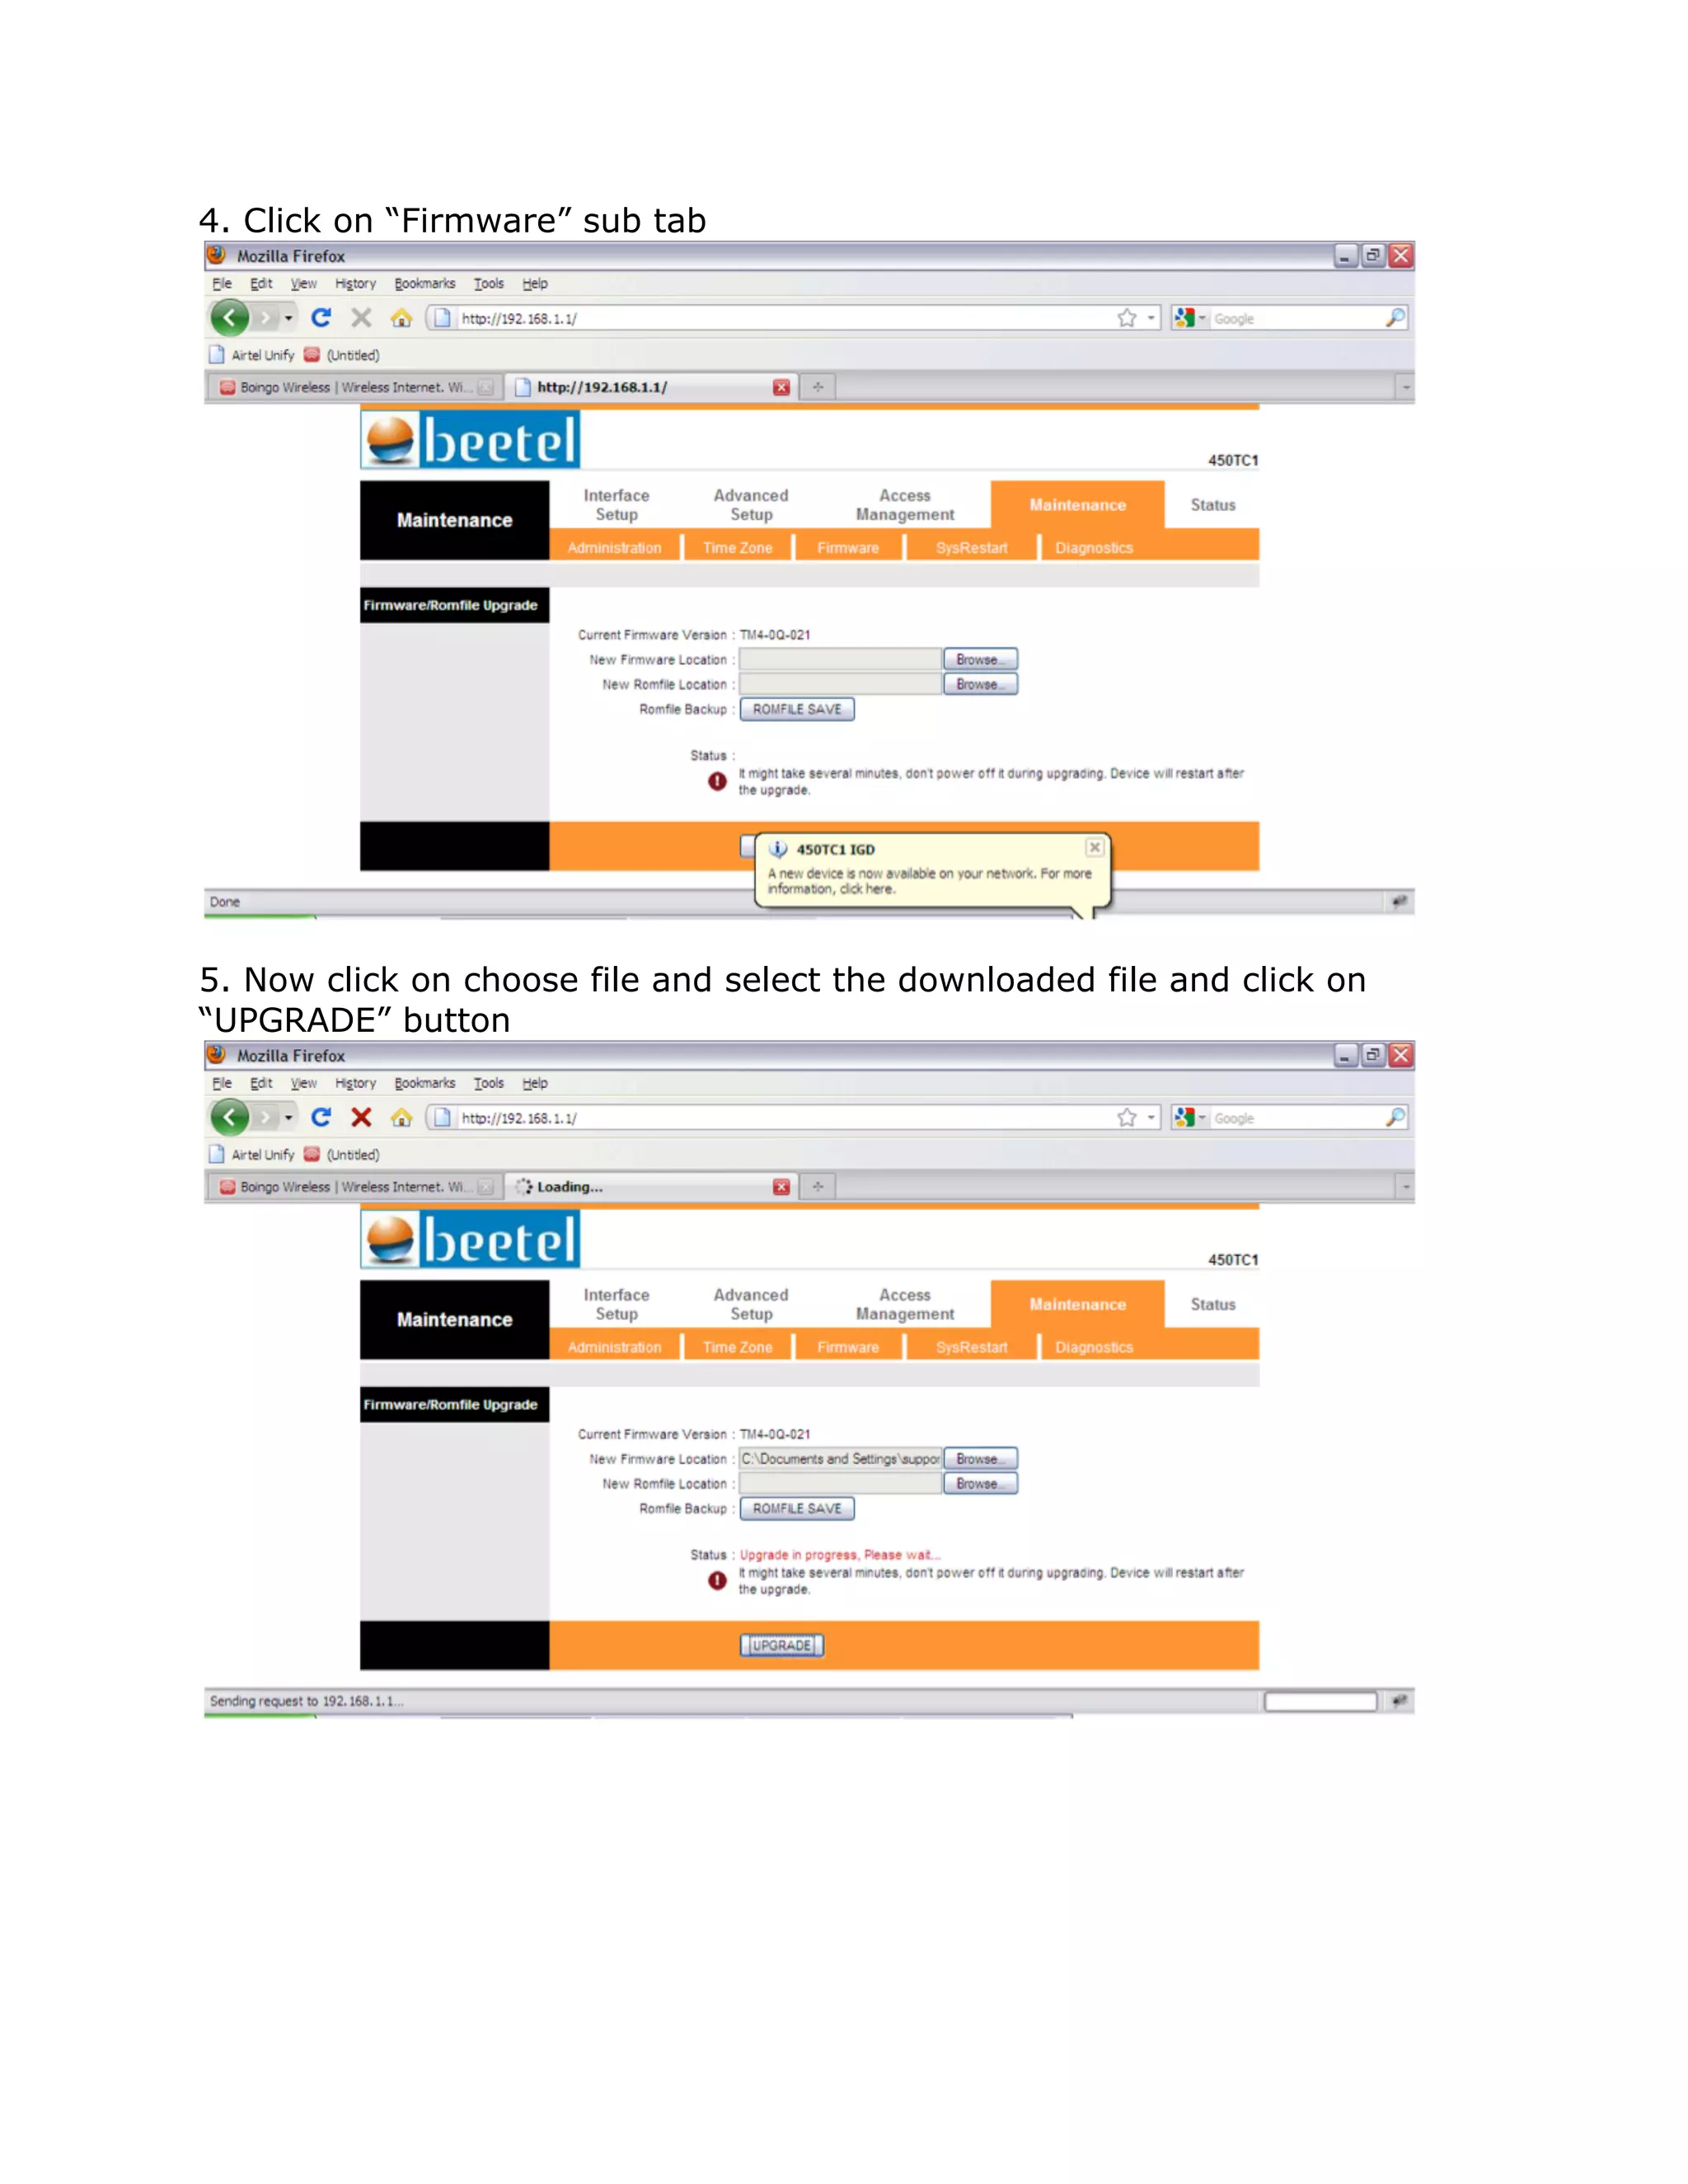
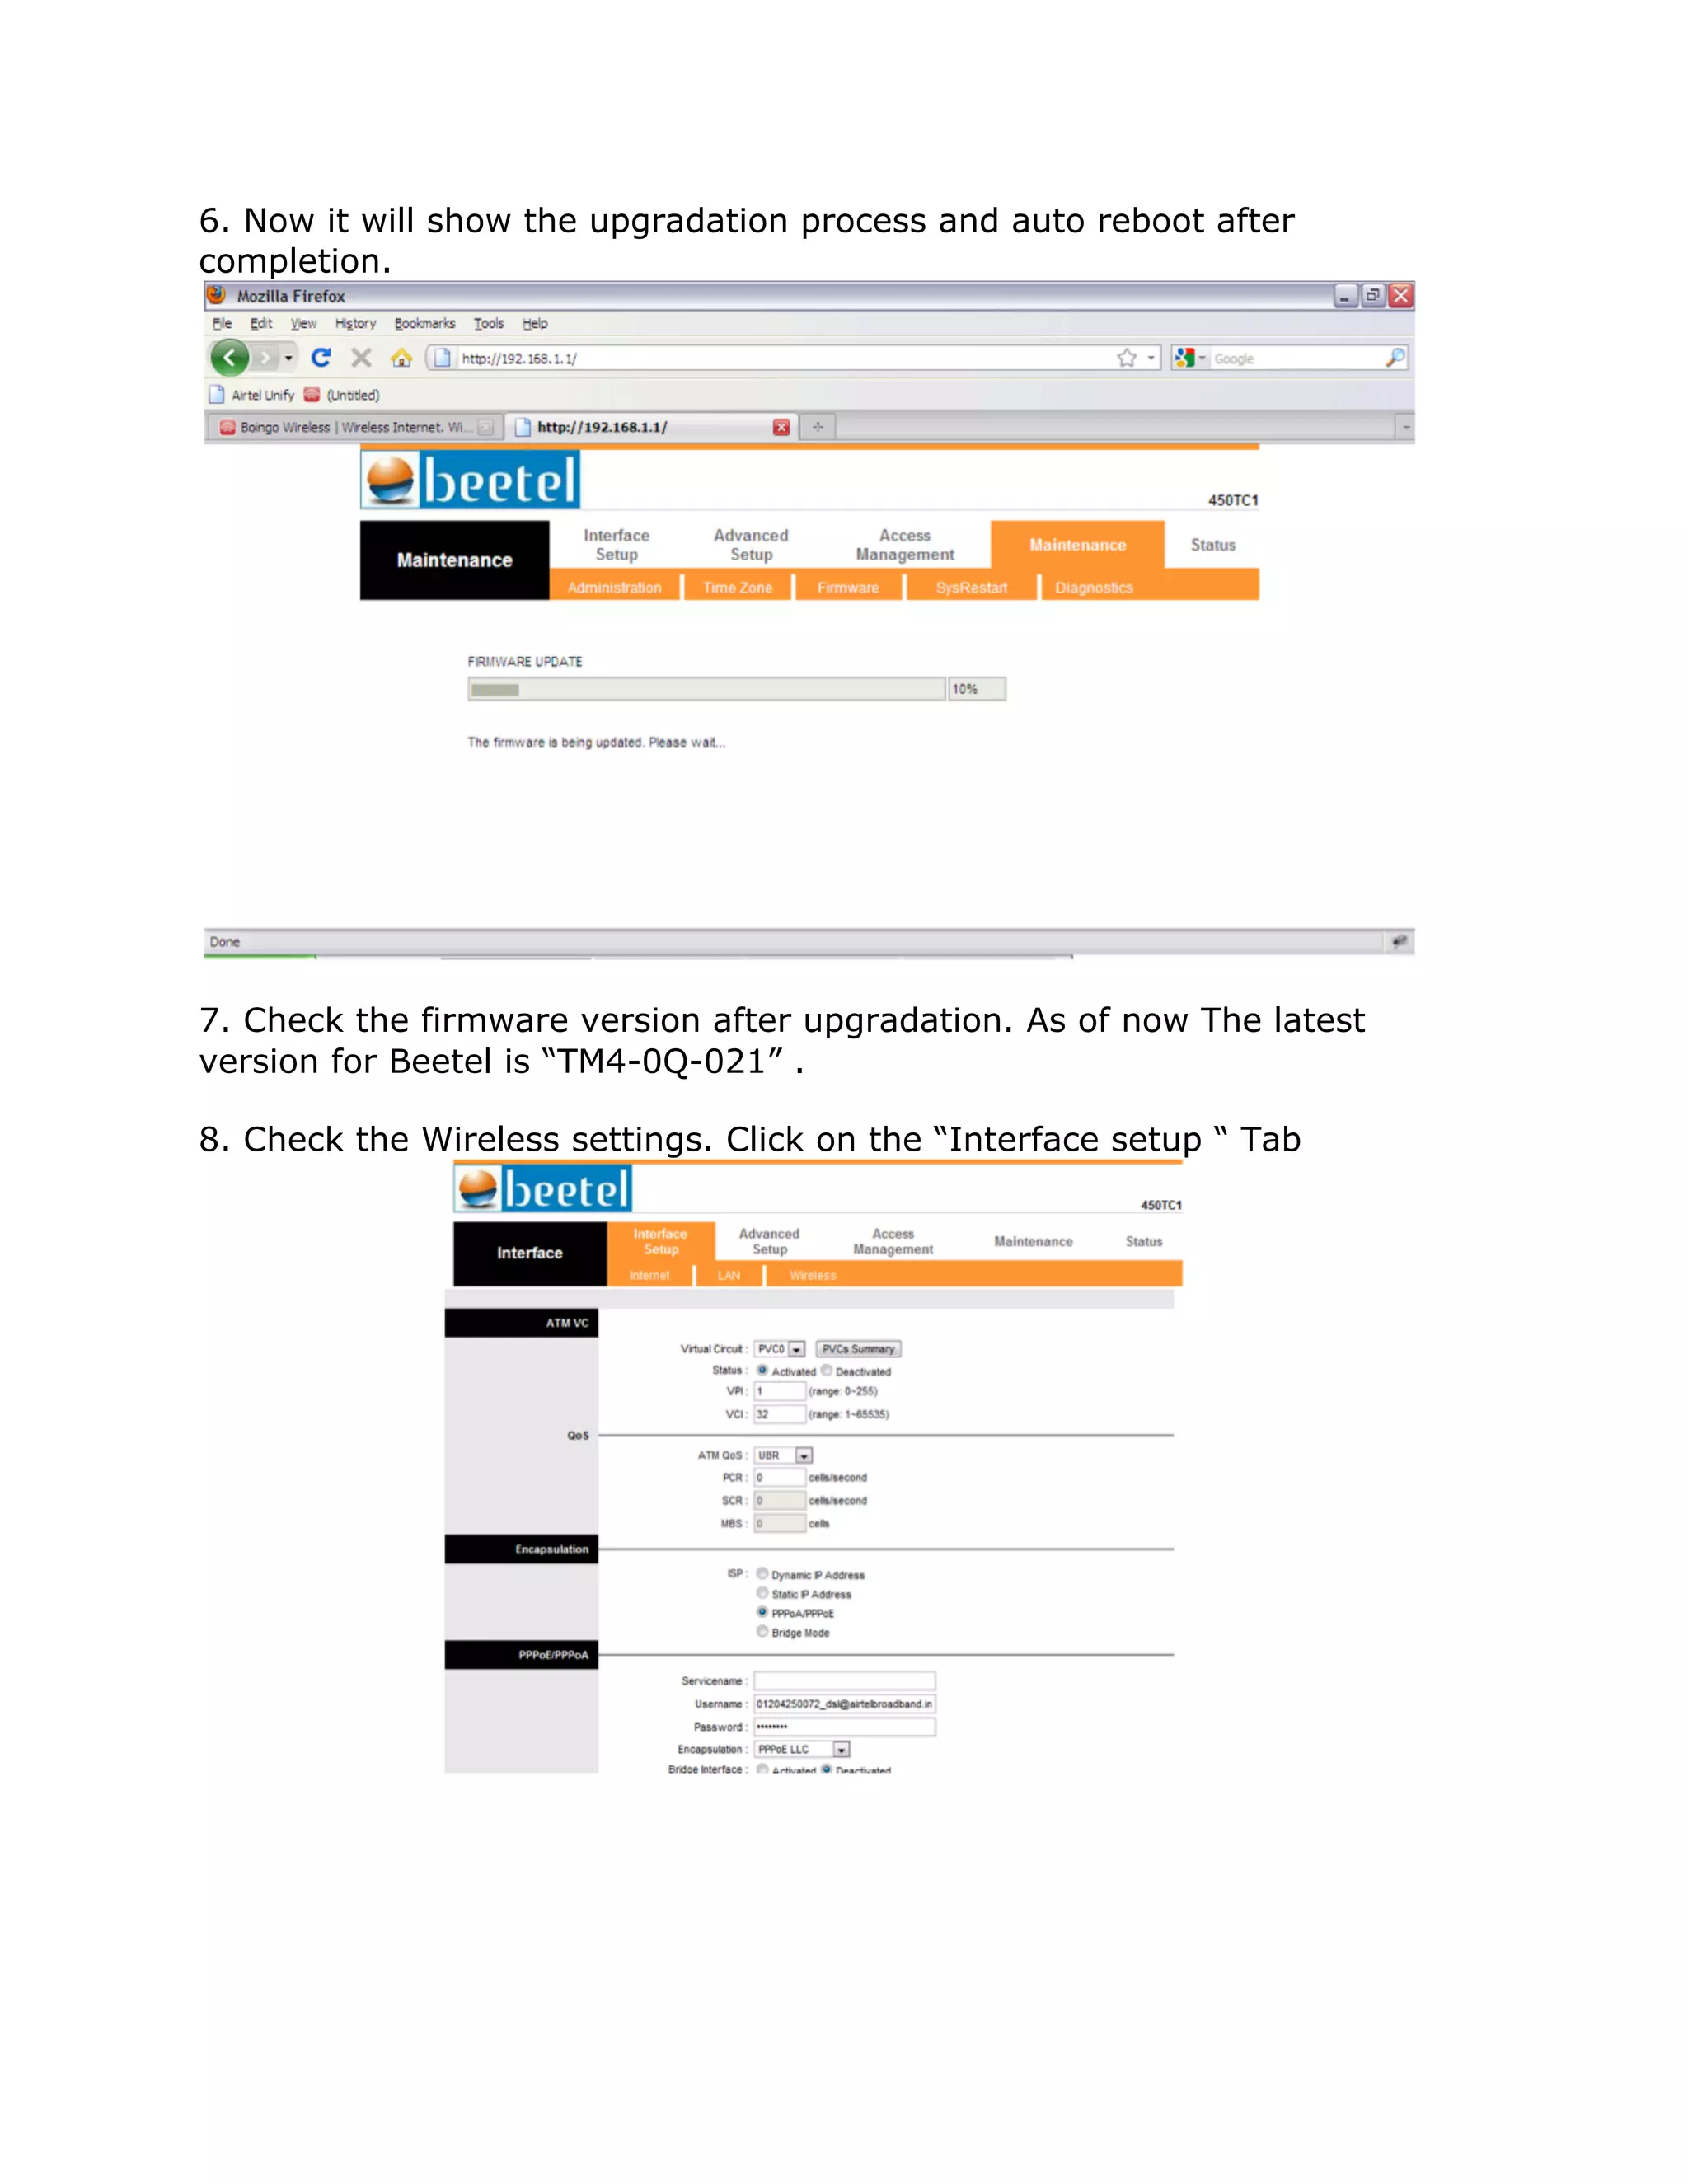
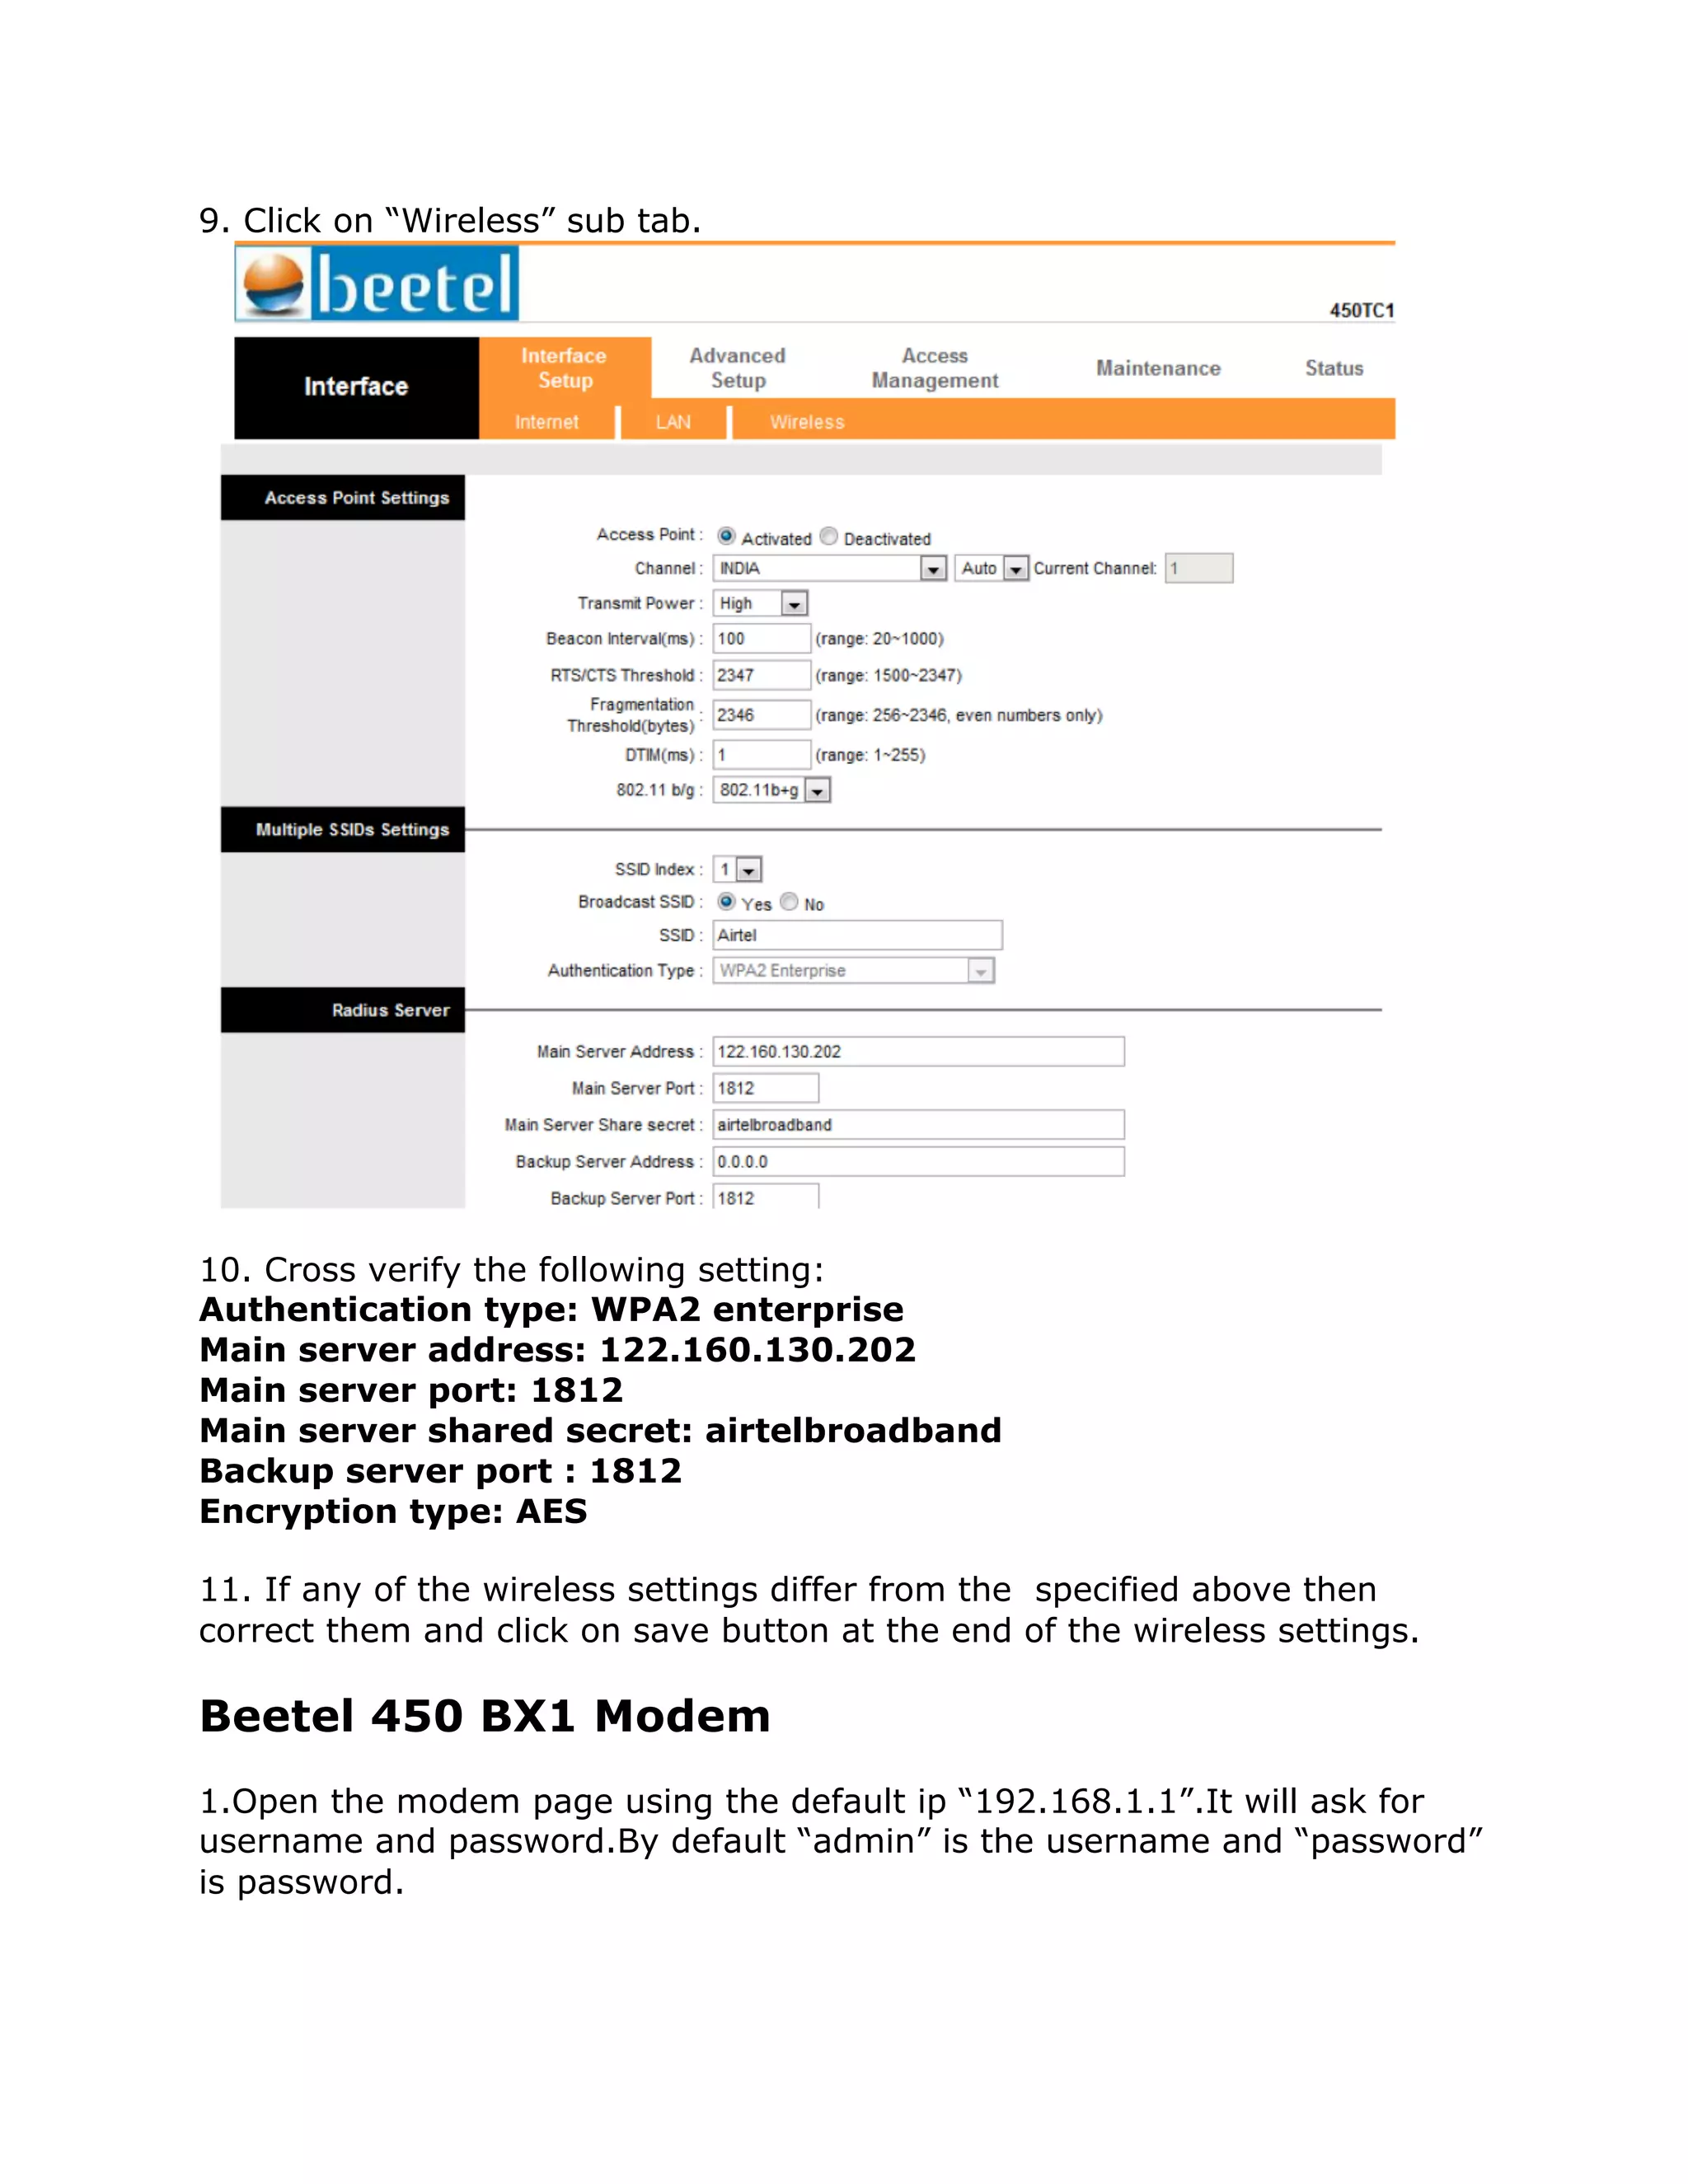
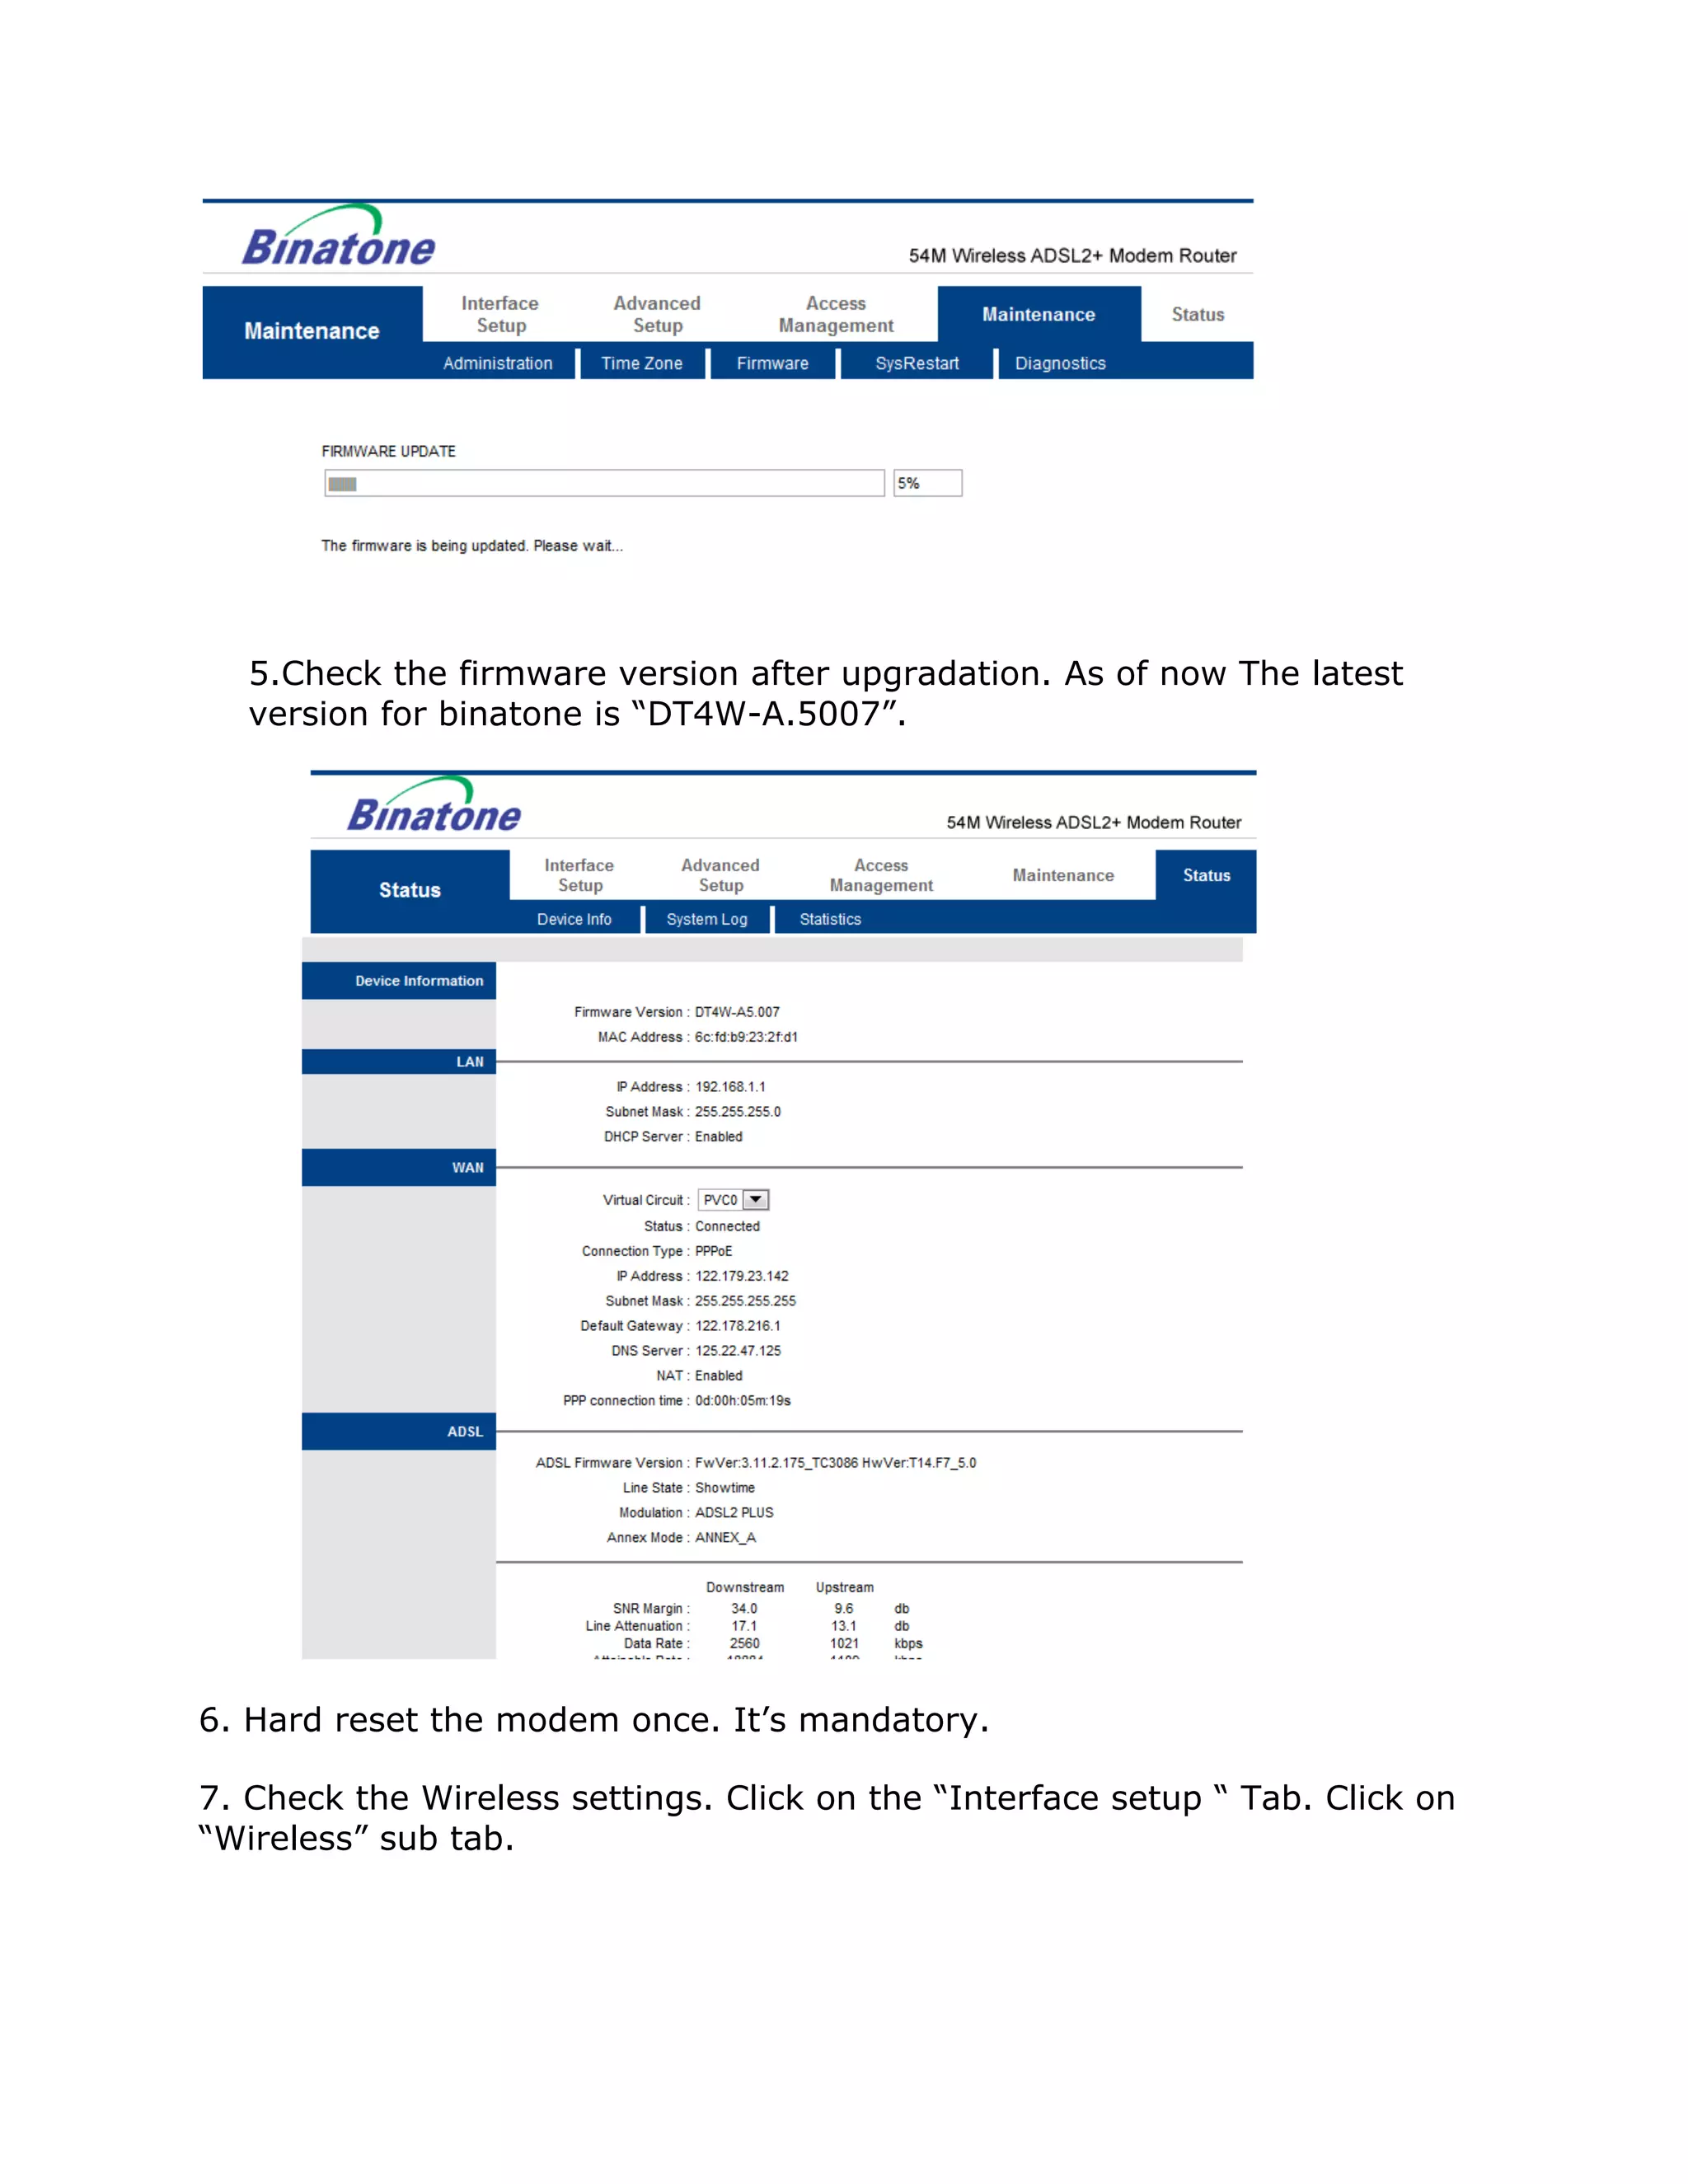
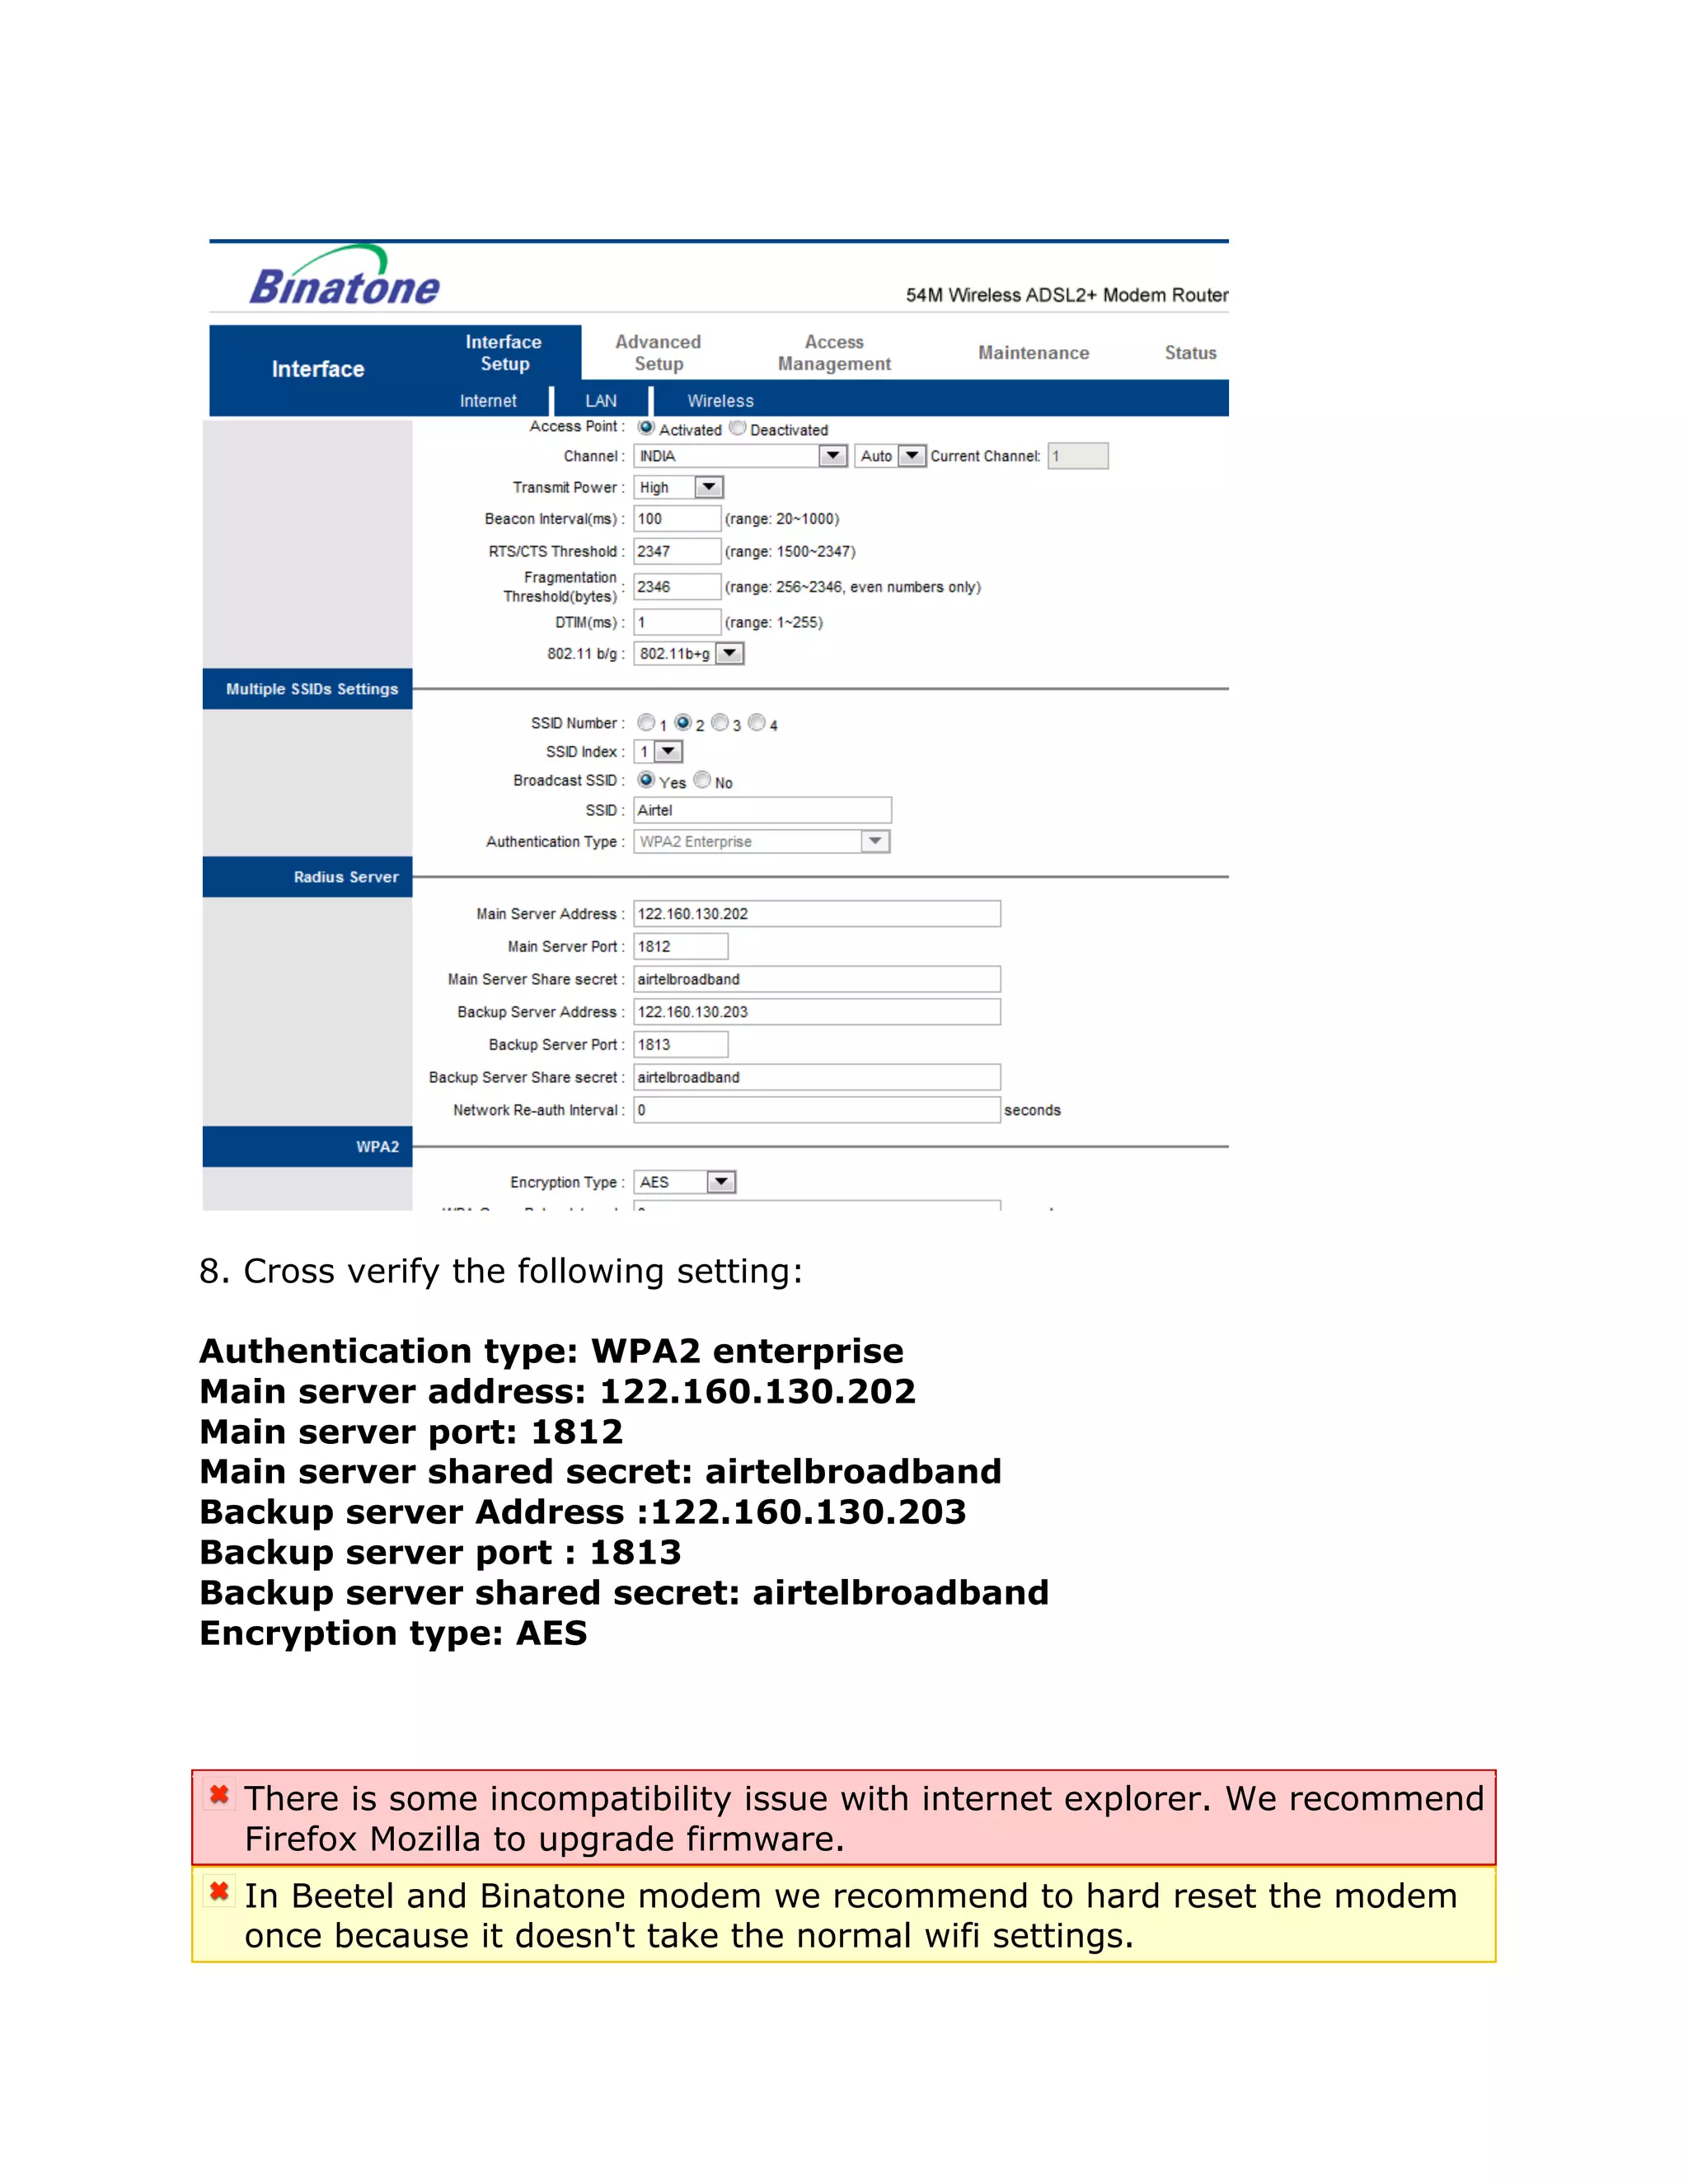
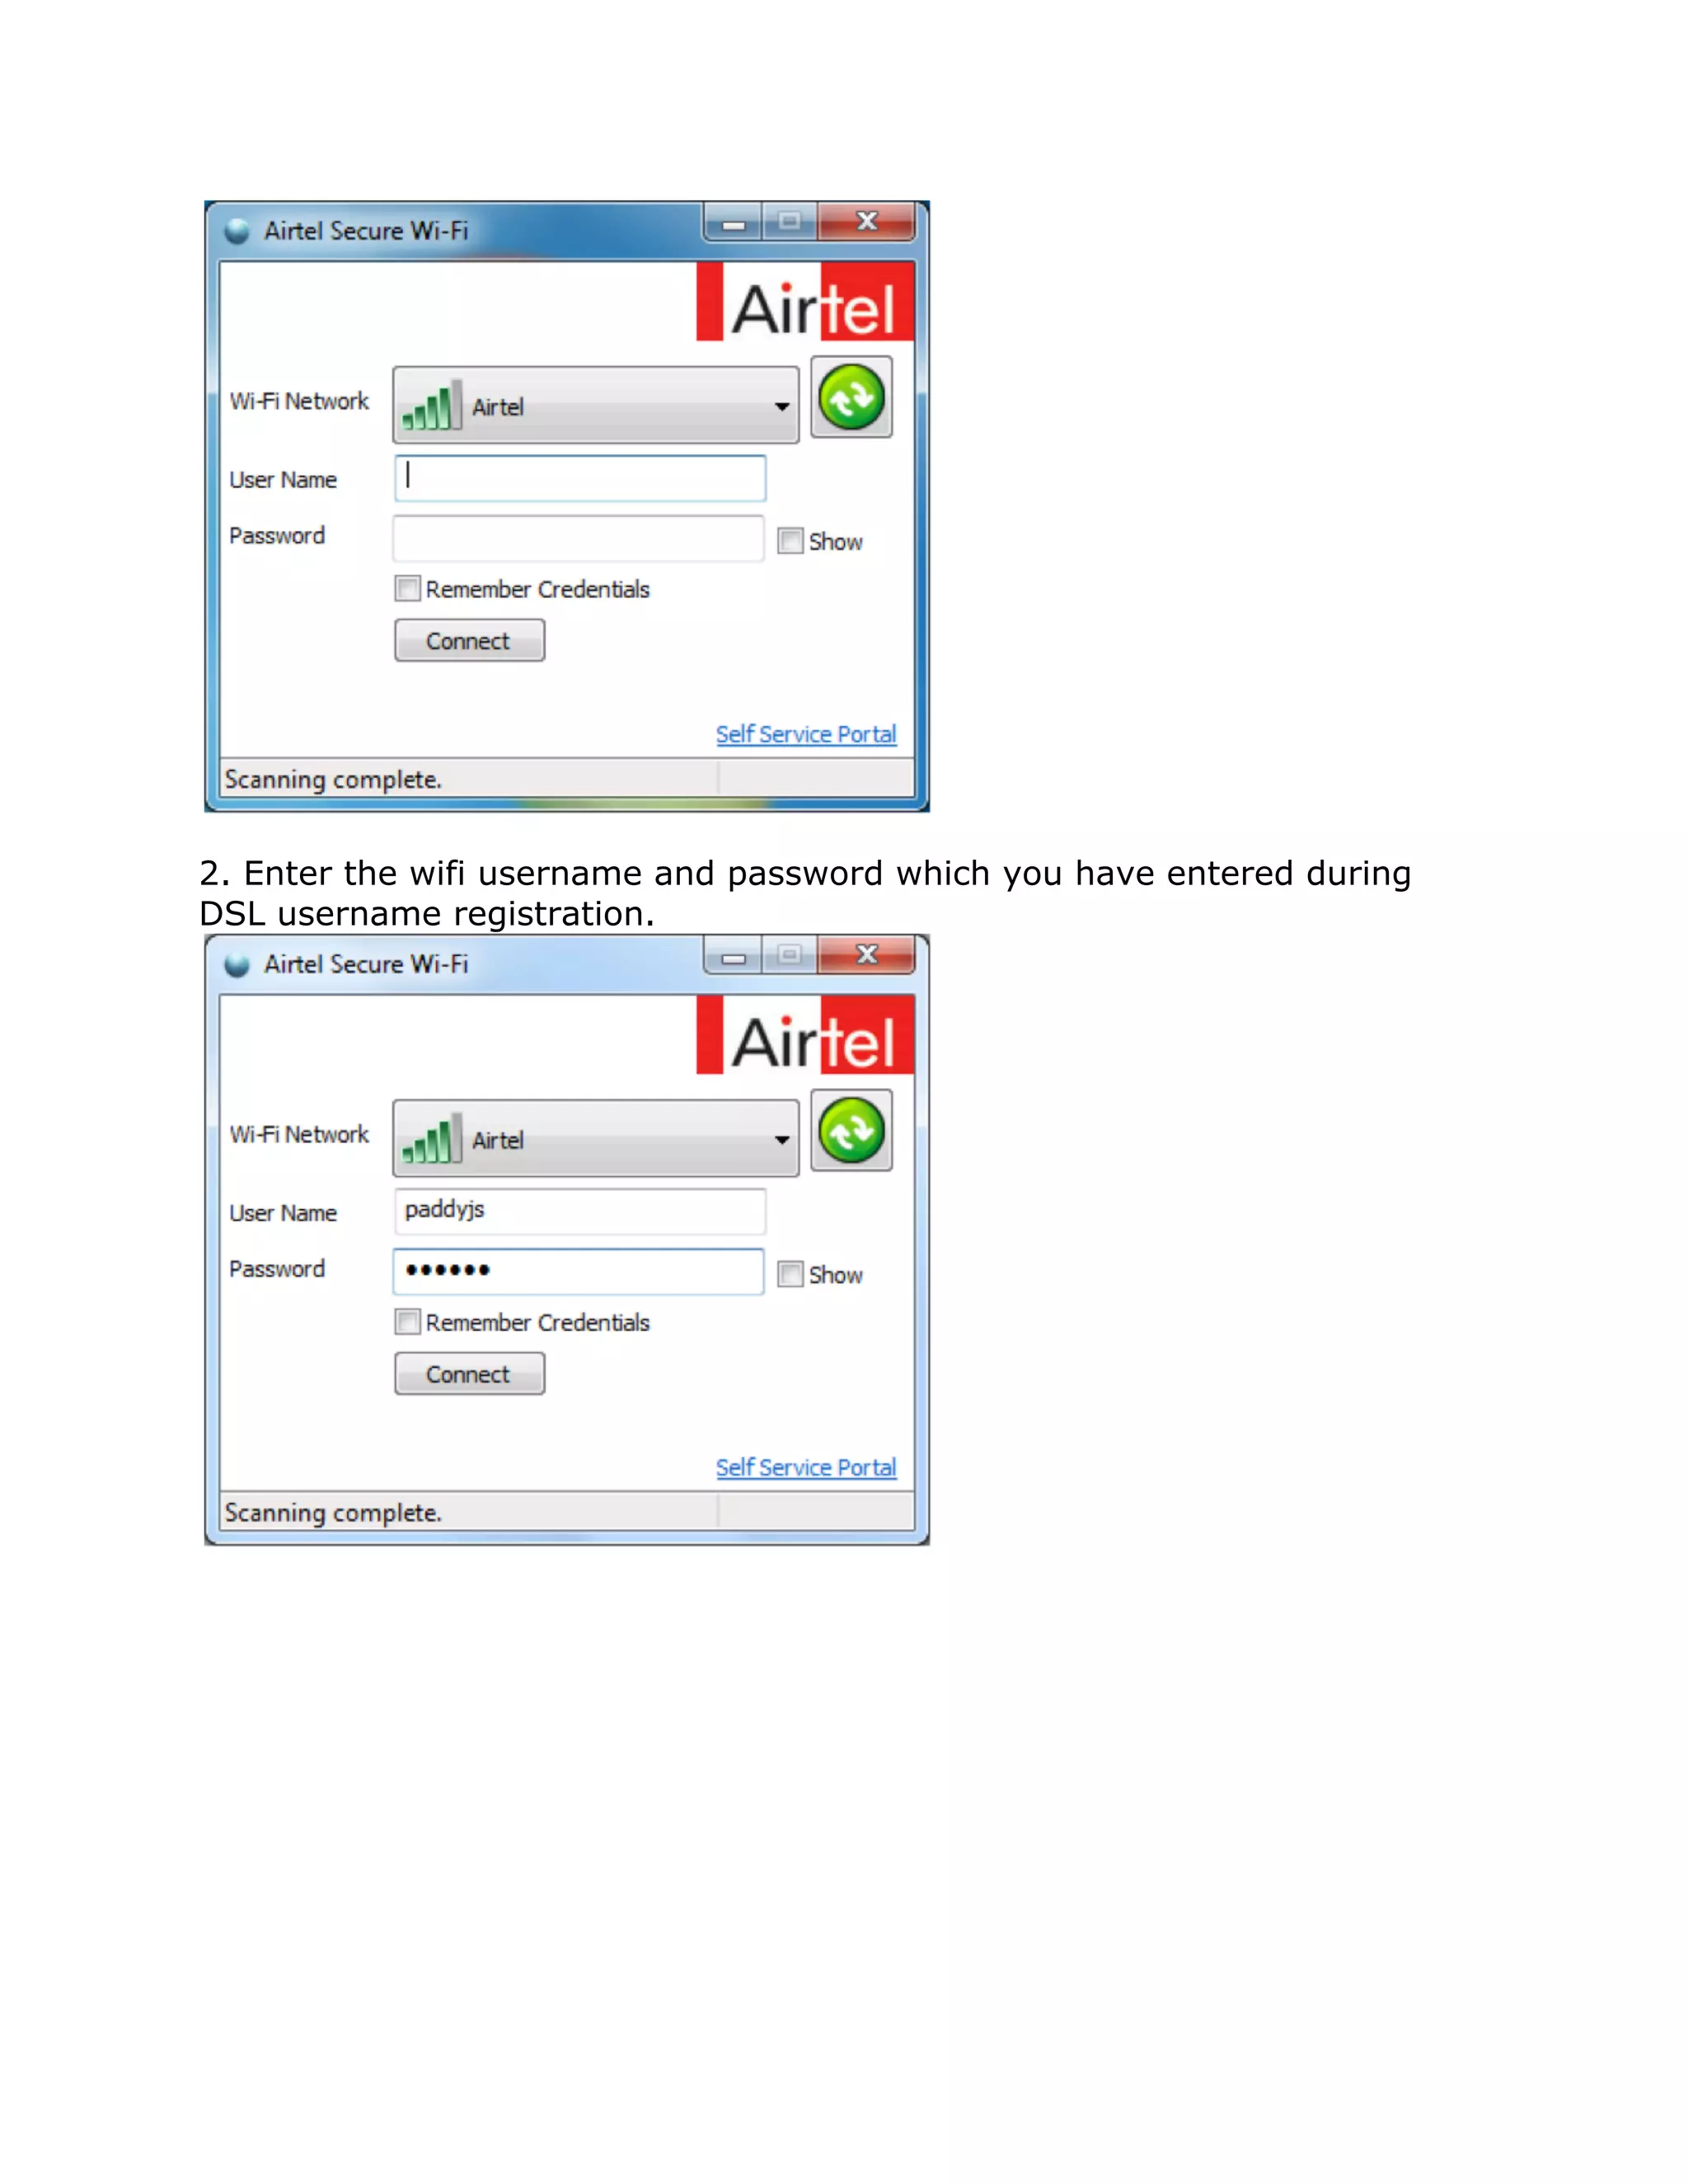
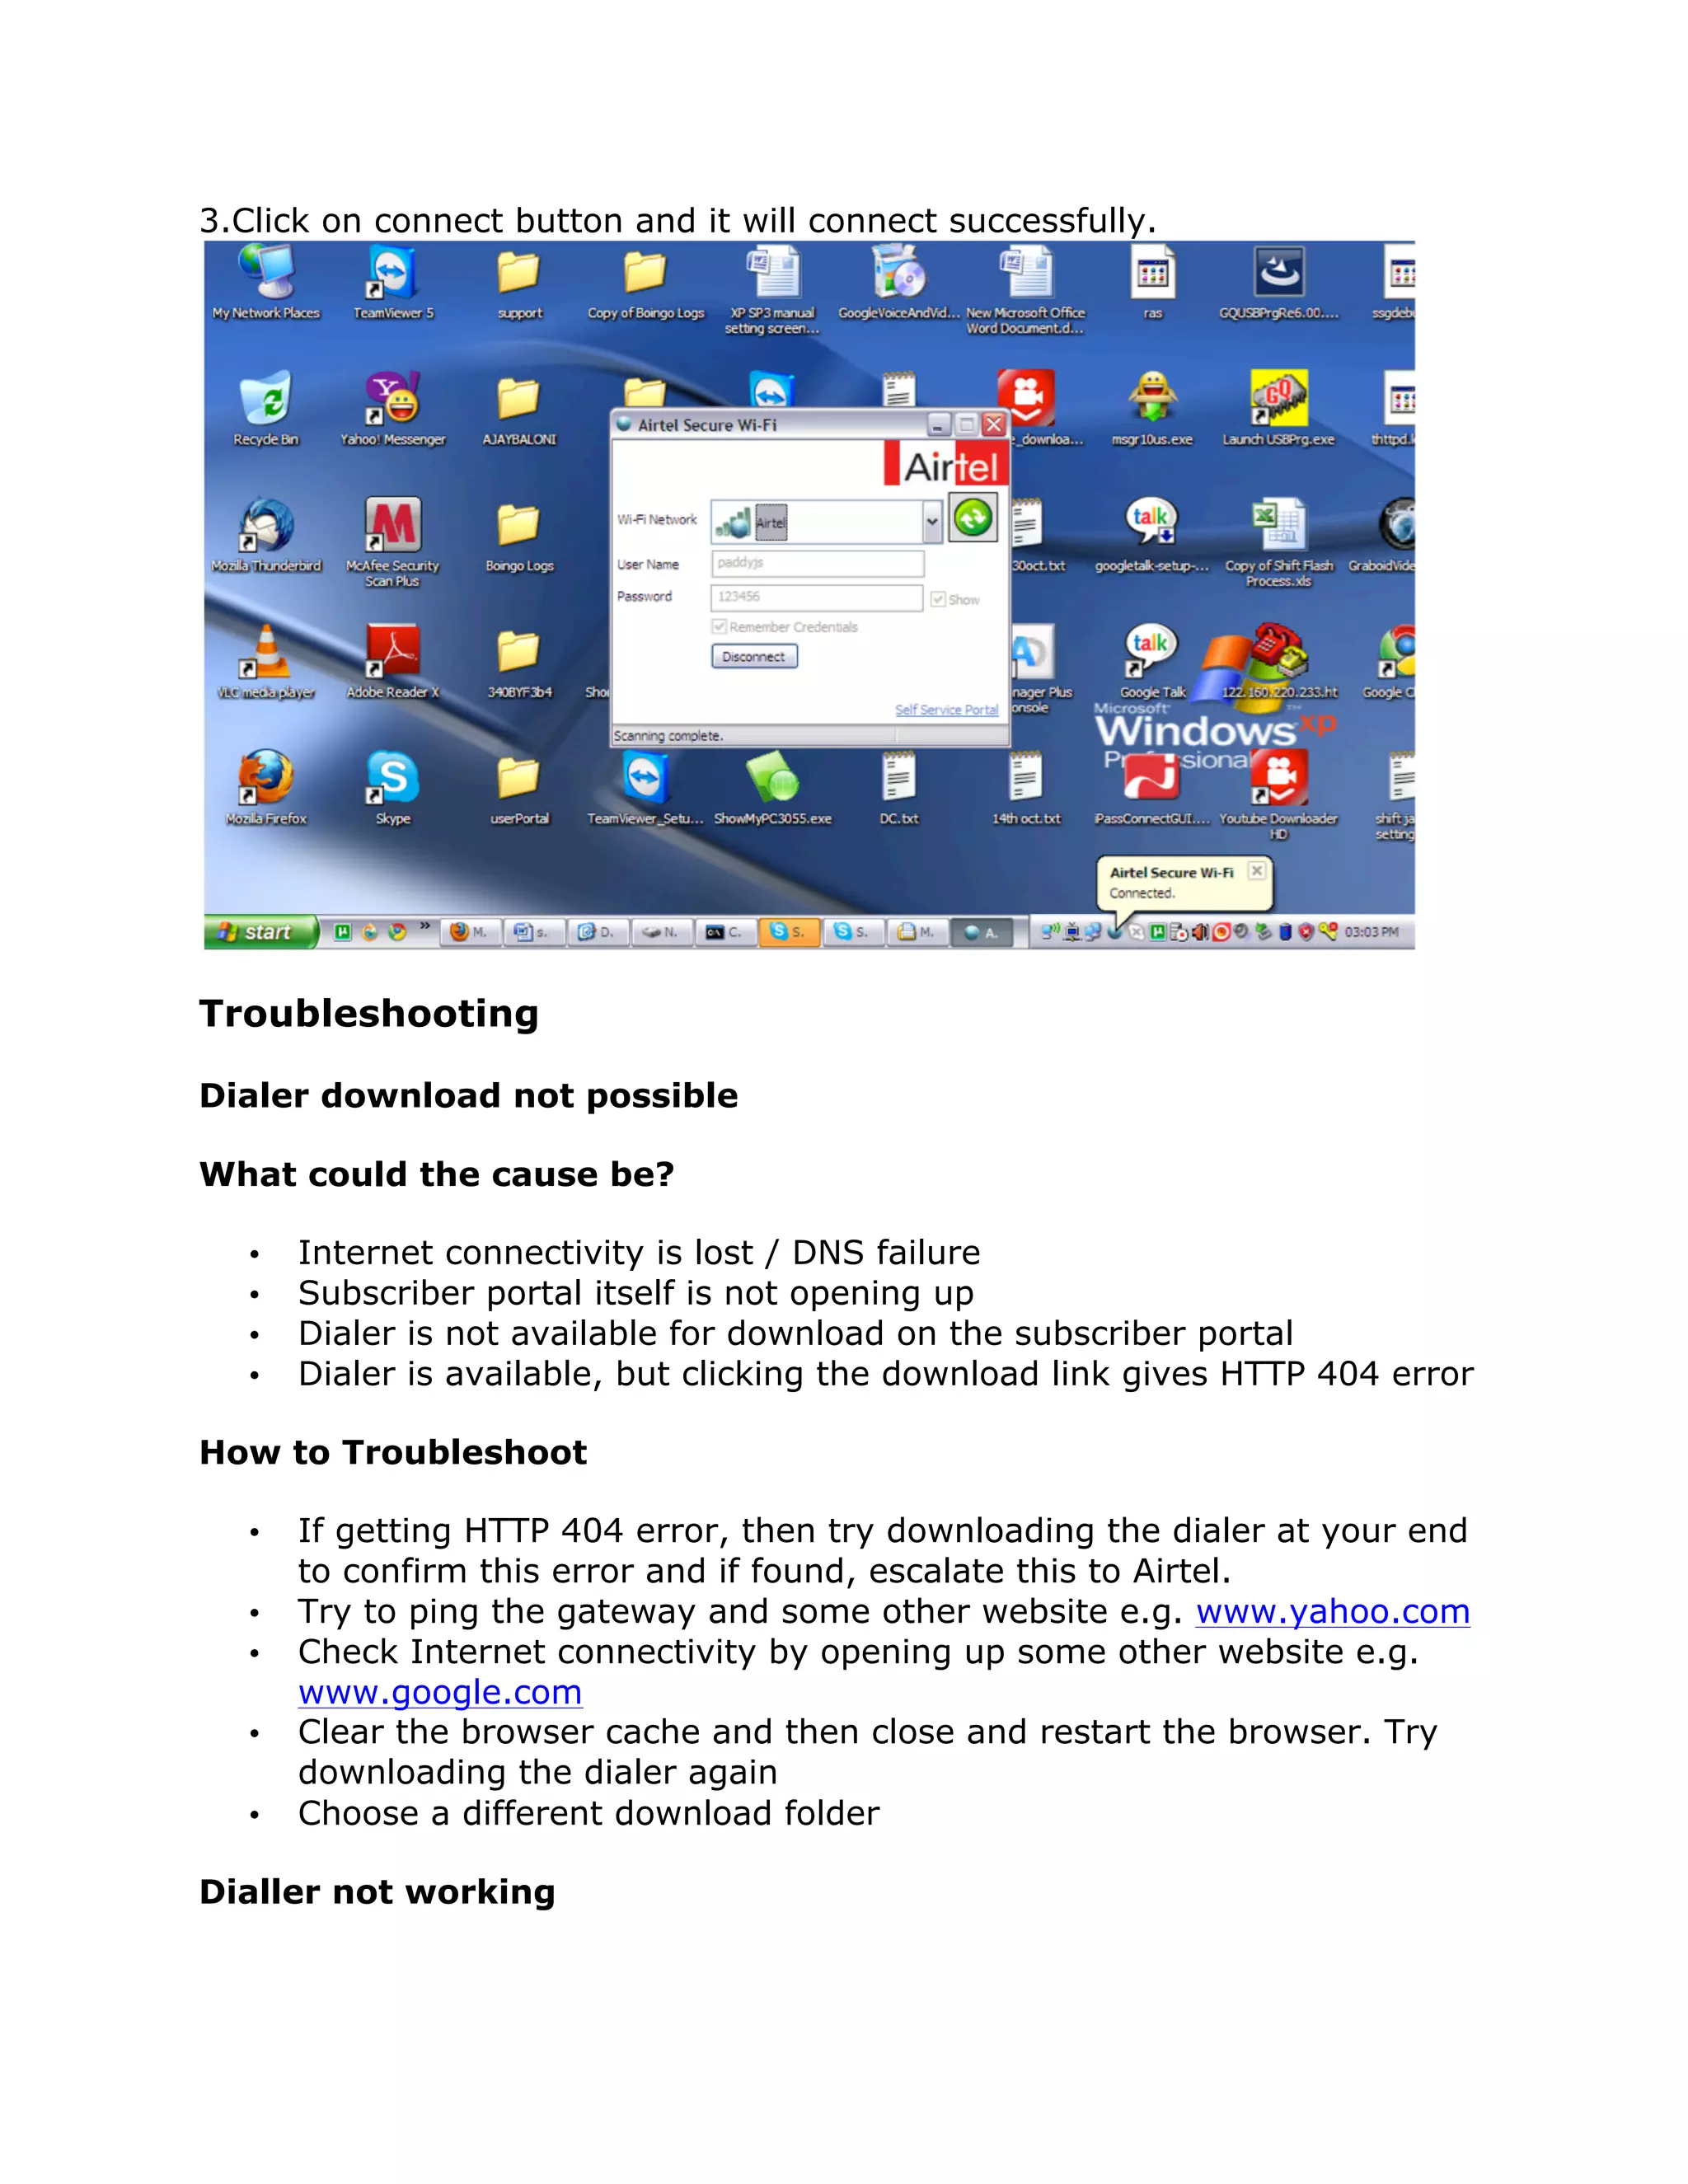
Step-by-step Guide for Securing
your Airtel WiFi
  1. Connect laptop to DSL Modem through Ethernet cable provided with
     DSL Modem.
  2. Download the Airtel WiFi Security & Configuration Dialer Software
     (Microsoft Windows only)
  3. Install the Dialer Software
  4. Download the Security Patch for Beetel DSL Routers
  5. Upgrade Beetel DSL Router for use with Airtel's Security Portal
  6. Generate Usernames & Passwords on the Airtel WiFi Security Portal
  7. Connect Securely to the WiFi Router using the Dialer Software
  8. Troubleshooting


Download the Dialer
1. Go to http://mywifi.airtelbroadband.in
2. Click on “Downloads” on left hand side panel. The next screen would be
like below:
3. Click on “Airtel Secure Wi-Fi Dialer” option on left hand side. It will show
you the following screen:


4. Click on “Download as Zip” OR “Download as Executable” as per your
requirement.

5. It will provide you an executable file named “airtel-secure-wifi-dialer-
2_5_0_1a.exe” and ask you to save the file.


6. Save the file and it will download the dialer for you.
7. Now right click on the downloaded file, click on the properties and check
the size of the file which should be 6.33 MB


8. If the size is 6.33 MB then move ahead for dialer installation but if the
size is less then this that means file is not downloaded properly. You have to
download it again using the preceding steps.

Dialer Installation
1. Double click on the setup file “airtel-secure-wifi-dialer-2_5_0_1a.exe”.


2. Click on Run. It will show you the below screen:
3. Click on Next and the next screen would be:


4. Click on install. It will install the dialer and will ask for a reboot on
windows XP only and click on ok:
5. Now start the dialer from all programs. When the dialer runs for the first
time, you will be prompted to install the Airtel Secure Wi-Fi Certificate.


6. Click yes to install the certificate and it will open the dialer


Firmware Download
1. Go to http://mywifi.airtelbroadband.in
2. Click on downloads on left hand side panel. The next screen would be like
below:
3. Click on “Modem firmware” on left hand side. It will show the below
screen:


4. Click on upper download button for Beetel modem and lower download
button for the Binatone modem.

5. Save the file named “Firmware-21.ras” for Beetel modem and “ DT4W-
A5007_ras.dat” file for Binatone modem.

6. Check the size of the downloaded file. Right click on the file, click on
properties. Size would be1.28 MB for Beetel and 1.27MB for Binatone
modem
Firmware Upgrade
For Beetel 450 TC1 Modem
1. Open the modem page using the default ip “192.168.1.1”.It will ask for
username and password.By default “admin” is the username and “password”
is password.
2. check the firmware version


3. click on “Maintenance” Tab
4. Click on “Firmware” sub tab


5. Now click on choose file and select the downloaded file and click on
“UPGRADE” button
6. Now it will show the upgradation process and auto reboot after
completion.


7. Check the firmware version after upgradation. As of now The latest
version for Beetel is “TM4-0Q-021” .

8. Check the Wireless settings. Click on the “Interface setup “ Tab
9. Click on “Wireless” sub tab.


10. Cross verify the following setting:
Authentication type: WPA2 enterprise
Main server address: 122.160.130.202
Main server port: 1812
Main server shared secret: airtelbroadband
Backup server port : 1812
Encryption type: AES

11. If any of the wireless settings differ from the specified above then
correct them and click on save button at the end of the wireless settings.

Beetel 450 BX1 Modem
1.Open the modem page using the default ip “192.168.1.1”.It will ask for
username and password.By default “admin” is the username and “password”
is password.
2. check the firmware version by typing http://192.168.1.1/look.html. The
modem will show current firmware version.


3. Check the wireless settings. It will show WPA-PSK in “Network
authentication” field.


4. Click On “Management” on left hand panel. Then click on “update
software” and choose the firmware file
4. Click on “update software” button. It will take approx. 2 min and Modem
will reboot automatically. Relogin into the modem and check the firmware
version again.


5. At last check the wireless settings and it will only show WPA2 in “Network
authentication” field.
For Binatone ADSL modem
1. Open the modem page using the default ip “192.168.1.1”.It will ask for
username and password.By default “admin” is the username and “password”
is password.

2. check the firmware version. Click on “Maintenance” Tab. Click on
“Firmware” sub tab
3. Now click on choose file and select the downloaded file and click on
“UPGRADE” button


4. Now it will show the upgradation process and auto reboot after
completion.
5.Check the firmware version after upgradation. As of now The latest
   version for binatone is “DT4W-A.5007”.


6. Hard reset the modem once. It’s mandatory.

7. Check the Wireless settings. Click on the “Interface setup “ Tab. Click on
“Wireless” sub tab.
8. Cross verify the following setting:

Authentication type: WPA2 enterprise
Main server address: 122.160.130.202
Main server port: 1812
Main server shared secret: airtelbroadband
Backup server Address :122.160.130.203
Backup server port : 1813
Backup server shared secret: airtelbroadband
Encryption type: AES


  There is some incompatibility issue with internet explorer. We recommend
  Firefox Mozilla to upgrade firmware.
  In Beetel and Binatone modem we recommend to hard reset the modem
  once because it doesn't take the normal wifi settings.
if you are degrading modem firmware, sometime windows 7 does not
  allow you to open the admin page after degradation. In this case open the
  page using windows XP.

DSL username Registration

1. Go to http://mywifi.airtelbroadband.in
2.   Click on “New Registration” Tab
3.   Enter the DSL Username and password provided by airtel in the “DSL
Username” and “password” and captcha code in the text box.
4. Click on login and It will open Subscriber Self Provisioning wizard


5.     Enter the required details.

     Always check the modem Mac address (WLAN mac) from the admin page.
     Don’t trust on the label printed under the modem.
6. Make sure the WlanMAC and Wifi username should be available. After
entering the Wlan Mac if it’s showing “already in use” contact Airtel team.

7. After entering the wifi username if it’s showing “already in use”, please
put some another username as the entered username is already used by any
other customer.
8. Click on the submit button and it will show you the registered wifi
username


9. You can logout now.

Connect to WiFi

1. Open the dialer.

  In some cases your O.S neither creates shortcut on desktop nor shows
  the dialer in all programs (may be some O.S fault). In that case browse to
  "c:Program FilesAirtel secure Wi-fi" and double click on
  AirtelDotOneXDialer executable.
2. Enter the wifi username and password which you have entered during
DSL username registration.
3.Click on connect button and it will connect successfully.


Troubleshooting

Dialer download not possible

What could the cause be?

   •   Internet connectivity is lost / DNS failure
   •   Subscriber portal itself is not opening up
   •   Dialer is not available for download on the subscriber portal
   •   Dialer is available, but clicking the download link gives HTTP 404 error

How to Troubleshoot

   •   If getting HTTP 404 error, then try downloading the dialer at your end
       to confirm this error and if found, escalate this to Airtel.
   •   Try to ping the gateway and some other website e.g. www.yahoo.com
   •   Check Internet connectivity by opening up some other website e.g.
       www.google.com
   •   Clear the browser cache and then close and restart the browser. Try
       downloading the dialer again
   •   Choose a different download folder

Dialler not working
What could the cause be?

  •   Dialer fails to start
  •   Dialer gives the error "Unable to initialize Wireless Networking.“
  •   Wireless radio is switched off
  •   What to troubleshoot:*
  •   If dialer fails to start to start and give some dll related error, try re-
      installing the dialer again
  •   Most of the laptops and some PCs have the ability to switch off the
      wireless radio by pressing a keyboard key or by toggling the wireless
      switch. Ensure that wireless is turned on
  •   Running the dialer gives “Unable to initialize Wireless Networking “
      error, then ensure that the following services are enabled and set to
      automatically start on boot
  •   Windows XP             : Wireless Zero Configuration
  •   On Windows 7          : WLAN AutoConfig
  •   On Windows Vista : WLAN AutoConfig

Unable to Upgrade Firmware

  •   Modem is not accepting the firmware file
  •   Unable to upgrade firmware

How to Troubleshoot

  •   Check the size of firmware file if it is fully downloaded or not
  •   Hard rest the modem once
  •   Try with the Mozilla browser as there is some compatibility issue with
      explorer.

No Network while scanning

What could the cause be?

  •   CPE is switched off
  •   Wireless radio is switched off
  •   CPE firmware is not updated or the settings have been fiddled with

  •   How to Troubleshoot:*

  •   Ensure that the CPE is switched on
  •   Most of the laptops and some PCs have the ability to switch off the
      wireless radio by pressing a keyboard key or by toggling the wireless
      switch. Ensure that wireless is turned on
•   Check the CPE settings to ensure that it is running the right firmware
      & settings for WPA2/Enterprise are correct.
  •   Broadcast SSID should be enabled in wireless sub section under
      Interface setup section of modem.

Not getting authenticated

  •   Connecting to the wrong SSID
  •   Connecting from the wrong laptop/PC
  •   Dialer shows the error message “Please check user name and
      password”
  •   Dialer show the error message “Request timed out”
  •   Dialer shows the error “Unable to connect wifi 1168 error. Please
      configure the wifi manually.”

How to Troubleshoot:

  •   Ensure that the user is connecting to his own SSID and not his
      neighbor’s
  •   Ensure that you are entering the correct username & password
  •   Check if the antivirus firewall is disabled or not.
  •   Ensure that any third party utility is not managing the wireless.
  •   In Binatone modem ensure that SSID number should be set to 1.
  •   In case of 1168 error please create a wifi profile manually. Refer
      https://mywifi.airtelbroadband.in/airtelwifi/pages/html/Windows_XP_
      manual_setting.pdf
  •   In case of 1169 error, wifi card is not supporting WPA2 Enterprise and
      CAS can’t be configured on that Pc/laptop.
  •   In case the dialer shows “Request timed out”, check the following:
  •   Internet connectivity

The radius server should be reachable from the CPE. Tell the customer to
connect a machine to the CPE using a Ethernet cable and ping the RADIUS
server IP address.

  Always check the modem mac address (WLANmac) from the admin page.
  Don’t trust on the label printed under the modem.

Do it yourself

  • 1.
    Step-by-step Guide forSecuring your Airtel WiFi 1. Connect laptop to DSL Modem through Ethernet cable provided with DSL Modem. 2. Download the Airtel WiFi Security & Configuration Dialer Software (Microsoft Windows only) 3. Install the Dialer Software 4. Download the Security Patch for Beetel DSL Routers 5. Upgrade Beetel DSL Router for use with Airtel's Security Portal 6. Generate Usernames & Passwords on the Airtel WiFi Security Portal 7. Connect Securely to the WiFi Router using the Dialer Software 8. Troubleshooting Download the Dialer 1. Go to http://mywifi.airtelbroadband.in
  • 2.
    2. Click on“Downloads” on left hand side panel. The next screen would be like below:
  • 3.
    3. Click on“Airtel Secure Wi-Fi Dialer” option on left hand side. It will show you the following screen: 4. Click on “Download as Zip” OR “Download as Executable” as per your requirement. 5. It will provide you an executable file named “airtel-secure-wifi-dialer- 2_5_0_1a.exe” and ask you to save the file. 6. Save the file and it will download the dialer for you.
  • 4.
    7. Now rightclick on the downloaded file, click on the properties and check the size of the file which should be 6.33 MB 8. If the size is 6.33 MB then move ahead for dialer installation but if the size is less then this that means file is not downloaded properly. You have to download it again using the preceding steps. Dialer Installation
  • 5.
    1. Double clickon the setup file “airtel-secure-wifi-dialer-2_5_0_1a.exe”. 2. Click on Run. It will show you the below screen:
  • 6.
    3. Click onNext and the next screen would be: 4. Click on install. It will install the dialer and will ask for a reboot on windows XP only and click on ok:
  • 7.
    5. Now startthe dialer from all programs. When the dialer runs for the first time, you will be prompted to install the Airtel Secure Wi-Fi Certificate. 6. Click yes to install the certificate and it will open the dialer Firmware Download
  • 8.
    1. Go tohttp://mywifi.airtelbroadband.in
  • 9.
    2. Click ondownloads on left hand side panel. The next screen would be like below:
  • 10.
    3. Click on“Modem firmware” on left hand side. It will show the below screen: 4. Click on upper download button for Beetel modem and lower download button for the Binatone modem. 5. Save the file named “Firmware-21.ras” for Beetel modem and “ DT4W- A5007_ras.dat” file for Binatone modem. 6. Check the size of the downloaded file. Right click on the file, click on properties. Size would be1.28 MB for Beetel and 1.27MB for Binatone
  • 11.
  • 12.
    Firmware Upgrade For Beetel450 TC1 Modem 1. Open the modem page using the default ip “192.168.1.1”.It will ask for username and password.By default “admin” is the username and “password” is password.
  • 13.
    2. check thefirmware version 3. click on “Maintenance” Tab
  • 14.
    4. Click on“Firmware” sub tab 5. Now click on choose file and select the downloaded file and click on “UPGRADE” button
  • 15.
    6. Now itwill show the upgradation process and auto reboot after completion. 7. Check the firmware version after upgradation. As of now The latest version for Beetel is “TM4-0Q-021” . 8. Check the Wireless settings. Click on the “Interface setup “ Tab
  • 16.
    9. Click on“Wireless” sub tab. 10. Cross verify the following setting: Authentication type: WPA2 enterprise Main server address: 122.160.130.202 Main server port: 1812 Main server shared secret: airtelbroadband Backup server port : 1812 Encryption type: AES 11. If any of the wireless settings differ from the specified above then correct them and click on save button at the end of the wireless settings. Beetel 450 BX1 Modem 1.Open the modem page using the default ip “192.168.1.1”.It will ask for username and password.By default “admin” is the username and “password” is password.
  • 17.
    2. check thefirmware version by typing http://192.168.1.1/look.html. The modem will show current firmware version. 3. Check the wireless settings. It will show WPA-PSK in “Network authentication” field. 4. Click On “Management” on left hand panel. Then click on “update software” and choose the firmware file
  • 18.
    4. Click on“update software” button. It will take approx. 2 min and Modem will reboot automatically. Relogin into the modem and check the firmware version again. 5. At last check the wireless settings and it will only show WPA2 in “Network authentication” field.
  • 19.
    For Binatone ADSLmodem 1. Open the modem page using the default ip “192.168.1.1”.It will ask for username and password.By default “admin” is the username and “password” is password. 2. check the firmware version. Click on “Maintenance” Tab. Click on “Firmware” sub tab
  • 20.
    3. Now clickon choose file and select the downloaded file and click on “UPGRADE” button 4. Now it will show the upgradation process and auto reboot after completion.
  • 21.
    5.Check the firmwareversion after upgradation. As of now The latest version for binatone is “DT4W-A.5007”. 6. Hard reset the modem once. It’s mandatory. 7. Check the Wireless settings. Click on the “Interface setup “ Tab. Click on “Wireless” sub tab.
  • 22.
    8. Cross verifythe following setting: Authentication type: WPA2 enterprise Main server address: 122.160.130.202 Main server port: 1812 Main server shared secret: airtelbroadband Backup server Address :122.160.130.203 Backup server port : 1813 Backup server shared secret: airtelbroadband Encryption type: AES There is some incompatibility issue with internet explorer. We recommend Firefox Mozilla to upgrade firmware. In Beetel and Binatone modem we recommend to hard reset the modem once because it doesn't take the normal wifi settings.
  • 23.
    if you aredegrading modem firmware, sometime windows 7 does not allow you to open the admin page after degradation. In this case open the page using windows XP. DSL username Registration 1. Go to http://mywifi.airtelbroadband.in
  • 24.
    2. Click on “New Registration” Tab
  • 25.
    3. Enter the DSL Username and password provided by airtel in the “DSL Username” and “password” and captcha code in the text box.
  • 26.
    4. Click onlogin and It will open Subscriber Self Provisioning wizard 5. Enter the required details. Always check the modem Mac address (WLAN mac) from the admin page. Don’t trust on the label printed under the modem.
  • 27.
    6. Make surethe WlanMAC and Wifi username should be available. After entering the Wlan Mac if it’s showing “already in use” contact Airtel team. 7. After entering the wifi username if it’s showing “already in use”, please put some another username as the entered username is already used by any other customer.
  • 28.
    8. Click onthe submit button and it will show you the registered wifi username 9. You can logout now. Connect to WiFi 1. Open the dialer. In some cases your O.S neither creates shortcut on desktop nor shows the dialer in all programs (may be some O.S fault). In that case browse to "c:Program FilesAirtel secure Wi-fi" and double click on AirtelDotOneXDialer executable.
  • 29.
    2. Enter thewifi username and password which you have entered during DSL username registration.
  • 30.
    3.Click on connectbutton and it will connect successfully. Troubleshooting Dialer download not possible What could the cause be? • Internet connectivity is lost / DNS failure • Subscriber portal itself is not opening up • Dialer is not available for download on the subscriber portal • Dialer is available, but clicking the download link gives HTTP 404 error How to Troubleshoot • If getting HTTP 404 error, then try downloading the dialer at your end to confirm this error and if found, escalate this to Airtel. • Try to ping the gateway and some other website e.g. www.yahoo.com • Check Internet connectivity by opening up some other website e.g. www.google.com • Clear the browser cache and then close and restart the browser. Try downloading the dialer again • Choose a different download folder Dialler not working
  • 31.
    What could thecause be? • Dialer fails to start • Dialer gives the error "Unable to initialize Wireless Networking.“ • Wireless radio is switched off • What to troubleshoot:* • If dialer fails to start to start and give some dll related error, try re- installing the dialer again • Most of the laptops and some PCs have the ability to switch off the wireless radio by pressing a keyboard key or by toggling the wireless switch. Ensure that wireless is turned on • Running the dialer gives “Unable to initialize Wireless Networking “ error, then ensure that the following services are enabled and set to automatically start on boot • Windows XP : Wireless Zero Configuration • On Windows 7 : WLAN AutoConfig • On Windows Vista : WLAN AutoConfig Unable to Upgrade Firmware • Modem is not accepting the firmware file • Unable to upgrade firmware How to Troubleshoot • Check the size of firmware file if it is fully downloaded or not • Hard rest the modem once • Try with the Mozilla browser as there is some compatibility issue with explorer. No Network while scanning What could the cause be? • CPE is switched off • Wireless radio is switched off • CPE firmware is not updated or the settings have been fiddled with • How to Troubleshoot:* • Ensure that the CPE is switched on • Most of the laptops and some PCs have the ability to switch off the wireless radio by pressing a keyboard key or by toggling the wireless switch. Ensure that wireless is turned on
  • 32.
    Check the CPE settings to ensure that it is running the right firmware & settings for WPA2/Enterprise are correct. • Broadcast SSID should be enabled in wireless sub section under Interface setup section of modem. Not getting authenticated • Connecting to the wrong SSID • Connecting from the wrong laptop/PC • Dialer shows the error message “Please check user name and password” • Dialer show the error message “Request timed out” • Dialer shows the error “Unable to connect wifi 1168 error. Please configure the wifi manually.” How to Troubleshoot: • Ensure that the user is connecting to his own SSID and not his neighbor’s • Ensure that you are entering the correct username & password • Check if the antivirus firewall is disabled or not. • Ensure that any third party utility is not managing the wireless. • In Binatone modem ensure that SSID number should be set to 1. • In case of 1168 error please create a wifi profile manually. Refer https://mywifi.airtelbroadband.in/airtelwifi/pages/html/Windows_XP_ manual_setting.pdf • In case of 1169 error, wifi card is not supporting WPA2 Enterprise and CAS can’t be configured on that Pc/laptop. • In case the dialer shows “Request timed out”, check the following: • Internet connectivity The radius server should be reachable from the CPE. Tell the customer to connect a machine to the CPE using a Ethernet cable and ping the RADIUS server IP address. Always check the modem mac address (WLANmac) from the admin page. Don’t trust on the label printed under the modem.