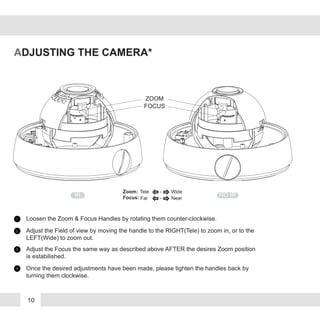
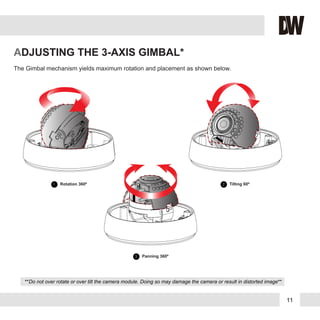
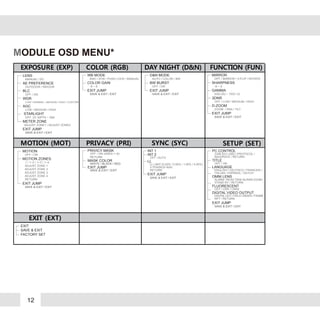
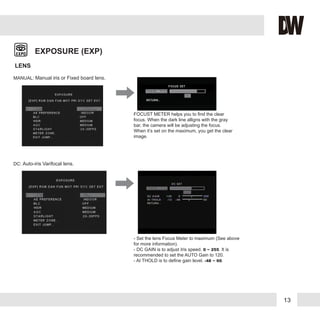
The document provides instructions and specifications for a PIXIM Vandal Dome Camera model DWC-V365/DWC-V365TIR. It includes 3 sentences:
The manual outlines precautions, features, parts, dimensions, installation instructions and adjusting the camera lens and 3-axis gimbal. It provides details on connecting to monitors and adjusting exposure, color, day/night settings, and configuring motion detection zones through the on-screen display menu. The document specifies the camera has a 1/3" CMOS sensor, 3.3-12mm auto iris lens, IP66 rating, and options for setting white balance, digital noise reduction, privacy masking and other functions.
Digital Watchdog DWC-D3563DIR User ManualJMAC Supply
Buy the Digital Watchdog DWC-D3563DIR at JMAC Supply.
https://www.jmac.com/Digital_Watchdog_DWC_D3563DIR_p/digital-watchdog-dwc-d3563dir.htm?=slideshare
Digital Watchdog DWC-D4363TIRB User ManualJMAC Supply
Buy the Digital Watchdog DWC-D4363TIRB at JMAC Supply.
https://www.jmac.com/Digital_Watchdog_DWC_D4363TIRB_BLACK_p/watchdog-dwcd4363tirbblack.htm?=slideshare
Digital Watchdog DWC-V6361WTIR User ManualJMAC Supply
Buy the Digital Watchdog DWC-V6361WTIR at JMAC Supply.
https://www.jmac.com/Digital_Watchdog_DWC_V6361WTIR_p/digital-watchdog-dwc-v6361wtir.htm?=slideshare
Digital Watchdog DWC-B6563DIR User ManualJMAC Supply
Buy the Digital Watchdog DWC-B6563DIR at JMAC Supply.
https://www.jmac.com/Digital_Watchdog_DWC_B6563DIR_p/digital-watchdog-dwc-b6563dir.htm?=slideshare
Digital Watchdog DWC-BL2553DIR User ManualJMAC Supply
Buy the Digital Watchdog DWC-BL2553DIR at JMAC Supply.
https://www.jmac.com/Digital_Watchdog_DWC_BL2553DIR_p/digital-watchdog-dwc-bl2553dir.htm?=slideshare
Digital Watchdog DWC-V6361WTIR Data SheetJMAC Supply
Buy the Digital Watchdog DWC-V6361WTIR at JMAC Supply.
https://www.jmac.com/Digital_Watchdog_DWC_V6361WTIR_p/digital-watchdog-dwc-v6361wtir.htm?=slideshare
Avtron Technologies LLC. A US based company manufacturing Video Surveillance Systems. Avtron Offer the best Dome camera for you..This Dome camera providing full hd recording, support super wide dynamic range and etc.
Digital Watchdog DWC-V4363TIRB User ManualJMAC Supply
Buy the Digital Watchdog DWC-V4363TIRB at JMAC Supply.
https://www.jmac.com/Digital_Watchdog_DWC_V4363TIRB_p/digital-watchdog-dwc-v4363tirb.htm?=slideshare
Digital Watchdog DWVMAX480D86T User ManualJMAC Supply
Buy the Digital Watchdog DWVMAX480D86T at JMAC Supply.
https://www.jmac.com/Digital_Watchdog_DW_VMAX480D_86T_p/digital-watchdog-dwvmax480d86t.htm?=slideshare
Digital Watchdog DW-V960H1612T User ManualJMAC Supply
Buy the Digital Watchdog DW-V960H1612T at JMAC Supply.
https://www.jmac.com/Digital_Watchdog_DW_V960H1612T_p/digital-watchdog-dw-v960h1612t.htm?=slideshare
Presentación sobre cómo surge la Web 2.0, y su incursión en la educación; qué herramientas 2.0 debe usar un docente en el aula, para mejorar el proceso de enseñanza-aprendizaje de los alumnos.
Digital Watchdog DW-VF960H161T User ManualJMAC Supply
Buy the Digital Watchdog DW-VF960H161T at JMAC Supply.
https://www.jmac.com/Digital_Watchdog_DW_VF960H161T_p/digital-watchdog-dw-vf960h161t.htm?=slideshare
Digital Watchdog DWC-V4567WTIR User ManualJMAC Supply
Buy the Digital Watchdog DWC-V4567WTIR at JMAC Supply.
https://www.jmac.com/Digital_Watchdog_DWC_V4567WTIR_p/digital-watchdog-dwc-v4567wtir.htm?=slideshare
Digital Watchdog DWC-D2367WTIR User ManualJMAC Supply
Buy the Digital Watchdog DWC-D2367WTIR at JMAC Supply.
https://www.jmac.com/Digital_Watchdog_DWC_D2367WTIR_p/digital-watchdog-dwc-d2367wtir.htm?=slideshare
Digital Watchdog DWC-B6563TIR550 User ManualJMAC Supply
Buy the Digital Watchdog DWC-B6563TIR550 at JMAC Supply.
https://www.jmac.com/Digital_Watchdog_DWC_B6563TIR550_p/watchdog-dwcb6563tir550.htm?=slideshare
HD 720P Waterproof IR camera has been recently launched by BPL iQ. It's features includes 1.0Megapixel high performance CMOS sensor with 25/30fps@720P and many more. For more details visit http://www.bpliq.com/
HuddleCamHD 10x User Manual available here to review everything from video quality, presets, the remote control, mounting information (ceiling, tripod and wall mounts), and USB video connection for Pan Tilt Zoom Control. User manual for the HuddleCamHD 10X Camera.
Digital Watchdog DWC-MC352DIR User ManualJMAC Supply
Buy the Digital Watchdog DWC-MC352DIR at JMAC Supply.
https://www.jmac.com/Digital_Watchdog_DWC_MC352DIR_p/digital-watchdog-dwc-mc352dir.htm?=slideshare
Digital Watchdog DWC-D2367WTIR Data SheetJMAC Supply
Buy the Digital Watchdog DWC-D2367WTIR at JMAC Supply.
https://www.jmac.com/Digital_Watchdog_DWC_D2367WTIR_p/digital-watchdog-dwc-d2367wtir.htm?=slideshare
Epistemic Interaction - tuning interfaces to provide information for AI supportAlan Dix
Paper presented at SYNERGY workshop at AVI 2024, Genoa, Italy. 3rd June 2024
https://alandix.com/academic/papers/synergy2024-epistemic/
As machine learning integrates deeper into human-computer interactions, the concept of epistemic interaction emerges, aiming to refine these interactions to enhance system adaptability. This approach encourages minor, intentional adjustments in user behaviour to enrich the data available for system learning. This paper introduces epistemic interaction within the context of human-system communication, illustrating how deliberate interaction design can improve system understanding and adaptation. Through concrete examples, we demonstrate the potential of epistemic interaction to significantly advance human-computer interaction by leveraging intuitive human communication strategies to inform system design and functionality, offering a novel pathway for enriching user-system engagements.
Transcript: Selling digital books in 2024: Insights from industry leaders - T...BookNet Canada
The publishing industry has been selling digital audiobooks and ebooks for over a decade and has found its groove. What’s changed? What has stayed the same? Where do we go from here? Join a group of leading sales peers from across the industry for a conversation about the lessons learned since the popularization of digital books, best practices, digital book supply chain management, and more.
Link to video recording: https://bnctechforum.ca/sessions/selling-digital-books-in-2024-insights-from-industry-leaders/
Presented by BookNet Canada on May 28, 2024, with support from the Department of Canadian Heritage.
Key Trends Shaping the Future of Infrastructure.pdfCheryl Hung
Keynote at DIGIT West Expo, Glasgow on 29 May 2024.
Cheryl Hung, ochery.com
Sr Director, Infrastructure Ecosystem, Arm.
The key trends across hardware, cloud and open-source; exploring how these areas are likely to mature and develop over the short and long-term, and then considering how organisations can position themselves to adapt and thrive.
Software Delivery At the Speed of AI: Inflectra Invests In AI-Powered QualityInflectra
In this insightful webinar, Inflectra explores how artificial intelligence (AI) is transforming software development and testing. Discover how AI-powered tools are revolutionizing every stage of the software development lifecycle (SDLC), from design and prototyping to testing, deployment, and monitoring.
Learn about:
• The Future of Testing: How AI is shifting testing towards verification, analysis, and higher-level skills, while reducing repetitive tasks.
• Test Automation: How AI-powered test case generation, optimization, and self-healing tests are making testing more efficient and effective.
• Visual Testing: Explore the emerging capabilities of AI in visual testing and how it's set to revolutionize UI verification.
• Inflectra's AI Solutions: See demonstrations of Inflectra's cutting-edge AI tools like the ChatGPT plugin and Azure Open AI platform, designed to streamline your testing process.
Whether you're a developer, tester, or QA professional, this webinar will give you valuable insights into how AI is shaping the future of software delivery.
Connector Corner: Automate dynamic content and events by pushing a buttonDianaGray10
Here is something new! In our next Connector Corner webinar, we will demonstrate how you can use a single workflow to:
Create a campaign using Mailchimp with merge tags/fields
Send an interactive Slack channel message (using buttons)
Have the message received by managers and peers along with a test email for review
But there’s more:
In a second workflow supporting the same use case, you’ll see:
Your campaign sent to target colleagues for approval
If the “Approve” button is clicked, a Jira/Zendesk ticket is created for the marketing design team
But—if the “Reject” button is pushed, colleagues will be alerted via Slack message
Join us to learn more about this new, human-in-the-loop capability, brought to you by Integration Service connectors.
And...
Speakers:
Akshay Agnihotri, Product Manager
Charlie Greenberg, Host
Neuro-symbolic is not enough, we need neuro-*semantic*Frank van Harmelen
Neuro-symbolic (NeSy) AI is on the rise. However, simply machine learning on just any symbolic structure is not sufficient to really harvest the gains of NeSy. These will only be gained when the symbolic structures have an actual semantics. I give an operational definition of semantics as “predictable inference”.
All of this illustrated with link prediction over knowledge graphs, but the argument is general.
Accelerate your Kubernetes clusters with Varnish CachingThijs Feryn
A presentation about the usage and availability of Varnish on Kubernetes. This talk explores the capabilities of Varnish caching and shows how to use the Varnish Helm chart to deploy it to Kubernetes.
This presentation was delivered at K8SUG Singapore. See https://feryn.eu/presentations/accelerate-your-kubernetes-clusters-with-varnish-caching-k8sug-singapore-28-2024 for more details.
State of ICS and IoT Cyber Threat Landscape Report 2024 previewPrayukth K V
The IoT and OT threat landscape report has been prepared by the Threat Research Team at Sectrio using data from Sectrio, cyber threat intelligence farming facilities spread across over 85 cities around the world. In addition, Sectrio also runs AI-based advanced threat and payload engagement facilities that serve as sinks to attract and engage sophisticated threat actors, and newer malware including new variants and latent threats that are at an earlier stage of development.
The latest edition of the OT/ICS and IoT security Threat Landscape Report 2024 also covers:
State of global ICS asset and network exposure
Sectoral targets and attacks as well as the cost of ransom
Global APT activity, AI usage, actor and tactic profiles, and implications
Rise in volumes of AI-powered cyberattacks
Major cyber events in 2024
Malware and malicious payload trends
Cyberattack types and targets
Vulnerability exploit attempts on CVEs
Attacks on counties – USA
Expansion of bot farms – how, where, and why
In-depth analysis of the cyber threat landscape across North America, South America, Europe, APAC, and the Middle East
Why are attacks on smart factories rising?
Cyber risk predictions
Axis of attacks – Europe
Systemic attacks in the Middle East
Download the full report from here:
https://sectrio.com/resources/ot-threat-landscape-reports/sectrio-releases-ot-ics-and-iot-security-threat-landscape-report-2024/
GraphRAG is All You need? LLM & Knowledge GraphGuy Korland
Guy Korland, CEO and Co-founder of FalkorDB, will review two articles on the integration of language models with knowledge graphs.
1. Unifying Large Language Models and Knowledge Graphs: A Roadmap.
https://arxiv.org/abs/2306.08302
2. Microsoft Research's GraphRAG paper and a review paper on various uses of knowledge graphs:
https://www.microsoft.com/en-us/research/blog/graphrag-unlocking-llm-discovery-on-narrative-private-data/
Let's dive deeper into the world of ODC! Ricardo Alves (OutSystems) will join us to tell all about the new Data Fabric. After that, Sezen de Bruijn (OutSystems) will get into the details on how to best design a sturdy architecture within ODC.
FIDO Alliance Osaka Seminar: Passkeys and the Road Ahead.pdf
Digital Watchdog DWC-V365TIR User Manual
1. ABOUT MANUAL
Before installing and using the camera, please read this manual carefully.
Be sure to keep it handy for future reference.
07132012
PIXIM Vandal Dome Camera
DWC-V365
DWC-V365TIR
User Manual
2. 2
PRECAUTIONS
FCC COMPLIANCE
WARNING : Changes or modifications are not expressly approved by the manufacturer.
Do not open or modify.
Do not open the case except during maintenence and installation,
for it may be dangerous and can cause damages.
Do not put objects into the unit.
Keep metal objects and flammable substances from entering the camera.
It can cause fire, short-circuits, or other damages.
Be careful when handling the unit.
To prevent damages, do not drop the camera or subject it to shock or vibration.
Do not install near electric or magnetic fields.
Protect from humidity and dust.
Protect from high temperature.
Be careful when installing near the ceiling of kitchen or a boiler room,
as the temperature may rise to high levels.
Cleaning :
To remove dirt from the case, moisten a soft cloth with a soft detergent solution and wipe.
Mounting Surface :
The material of the mounting surface must be strong enough to support the camera.
This equipment has been tested and found to comply with the limits for a Class B
digital device, pursuant to part 15 of the FCC rules. These limits are designed to
Provide reasonable protection against harmful interference. when the equipment is
operated in a residential environment. This equipment generates, uses, and radiates
radio frequency energy; and if it is not installed and used in accordance with the
instruction manual, it may cause harmful interference to radio communications.
3. 3
TABLE OF CONTENTS
Introduction
Installation
Module OSD Menu
Troubleshooting
Warranty Information
Specifications
Features
Parts and Descriptions
Dimensions
Inside the Box
Easy Installation
Connecting to Monitors
Adjusting the Camera Lens
4
5
6
7
8
9
10
12-26
27
28-29
30-31
Adjusting the 3-Axis Gimbal 11
4. 4
FEATURES*
DWC-V365 / DWC-V365TIR
1/3” PIXIM Nightwolf CMOS Sensor
690 Horizontal TV Lines
3.3~12mm Varifocal Auto Iris Lens
85ft IR Distance with Smart IR [V365TIR Only]
TDN (True Day and Night / IR Cut Filter)
3D DNR (Digital Noise Reduction)
Powerful Wide Dynamic Range
Star-Light (Super Low Light Technology)
8X Digital Zoom
Ultra Low Light Sensitivity
Smear Cancelation
Low Power Consumption
Programmable Privacy Zones (6) & Motion Detection
AGC/ BLC/ AWB
OSD Menu with Built-In Joystick
IP66 Certified
Auto Sensing 12VDC or 24VAC with Line Lock
Secondary Video-BNC Output
5. 5
PART & DESCRIPTIONS*
1 Lens
4 Upper Case
5 Bubble
2 Power Input Connctor
12VDC/24VAC Dual Voltage
3 Video Output Connector - BNC
6 Bubble Rubber
7 Mounting Plate
Assemby Screws9
Bottom Case10
Control Board11
Power Board12
Mounting Screws13
8 Upper Ring
11
10
12
13
3
2
1
6
9
7
8
4
5
NO IR
IR
6. DIMENSIONS IN MILLIMETERS (IN)*
6
See the diagrams below for the exact dimensions for the Surface Mount Housing.
52.2
(2.05”)
96.2
(3.79”)
Ø 149.9
(Ø 5.9”)
37.0
(1.46”)
Ø149.9
(Ø 5.9”)
Ø115.0
(Ø 4.53”)
Ø5.0
(Ø 0.2”)
3- Ø4.5
(3- Ø0.18”)
7. 7
INSIDE THE BOX*
Included with Snapit Vandal Dome Camera
User Manual
Mounting Template
4 Machine Screws and 4 Dry Wall Anchors
Secondary Video-BNC Cable
L-Wrench
1
2
3
4
5
Ø144.0
Ø5.0
Mounting template
VD101
Ø15.0
8. 8
BASE INSTALLATION*
1. Pull wires through and make connections.
Refer to page 10. Use mounting template to
mount camera with dry wall mounts and wood
screws.
3. Use the joystick to adjust the OSD menu.
See page 13~16 for details.
2. Adjust the camera’s pan,tilt and zoom.
See page 12 for details.
4. Attach the camera housing to the
junction box using the assembly screws.
9. 9
CONNECTING TO MONITORS*
Power Connection: 12VDC & 24VDC Dual Voltage (Auto Polarity Detection and Protection)
All cameras are equipped with a second video output for on-site configuration.
Use the diagram below to connect to a Monitor or CRT Monitor properly.
DC 12V / AC 24V
CCTV Monitor
Monitor
300.0mm(11.8”)
Second Video Output
NO IR
IR
10. 10
ADJUSTING THE CAMERA*
ZOOM
FOCUS
NO IRIR
Zoom:
Focus:
Tele - Wide
Far - Near
Loosen the Zoom & Focus Handles by rotating them counter-clockwise.1
Adjust the Field of view by moving the handle to the RIGHT(Tele) to zoom in, or to the
LEFT(Wide) to zoom out.
2
Adjust the Focus the same way as described above AFTER the desires Zoom position
is estabilished.
3
Once the desired adjustments have been made, please tighten the handles back by
turning them clockwise.
4
11. 11
ADJUSTING THE 3-AXIS GIMBAL*
The Gimbal mechanism yields maximum rotation and placement as shown below.
1 Rotation 360º
3 Panning 360º
2 Tilting 60º
**Do not over rotate or over tilt the camera module. Doing so may damage the camera or result in distorted image**
12. 12
MODULE OSD MENU*
LENS
MANUAL / DC
AE PREFERENCE
OUTDOOR / INDOOR
BLC
OFF / ON
WDR
LOW / NORMAL / MEDIUM / HIGH / CUSTOM
AGC
LOW / MEDIUM / HIGH
STARLIGHT
OFF 2X 30FPS ~ X64
METER ZONE
ADJUST ZONE1 / ADJUST ZONE2
EXIT JUMP
SAVE & EXIT / EXIT
WB MODE
AWC / ATW / PUSH LOCK / MANUAL
COLOR GAIN
-8 ~ 8
EXIT JUMP
SAVE & EXIT / EXIT
D&N MODE
AUTO / COLOR / BW
BW BURST
OFF / ON
EXIT JUMP
SAVE & EXIT / EXIT
MIRROR
OFF / MIRROR / V-FLIP / ROTATE
SHARPNESS
-8 ~ 8
GAMMA
25(0.25) ~ 100(1.0)
3DNR
OFF / LOW / MEDIUM / HIGH
D-ZOOM
ZOOM / PAN / TILT
EXIT JUMP
SAVE & EXIT / EXIT
MOTION
OFF / ON
MOTION ZONES
1 / 1~2 / 1~3 / 1~4
ADJUST ZONE 1
ADJUST ZONE 2
ADJUST ZONE 3
ADJUST ZONE 4
RETURN
EXIT JUMP
SAVE & EXIT / EXIT
PRIVICY MASK
OFF / ON (AREA 1~6)
RETURN
MASK COLOR
WHITE / BLACK / RED
EXIT JUMP
SAVE & EXIT / EXIT
PC CONTROL
CAM ID(1~255) / PROTOCOL /
BAUDRATE / RETURN
TITLE
OFF / ON
LANGUAGE
ENGLISH / DEUTSCH / FRANCAIS /
ITALIAN / ESPANOL / DUTCH
OMNI LENS
ALARM / READ TIEM /ALRAM ZOOM /
STAND BY / RETURN
FLUORESCENT
OFF / CRR / CRR2
DIGITAL VIDEO OUTPUT
DIGITAL OUT / FIELD ORDER / FRAME
RPT / RETURN
EXIT JUMP
SAVE & EXIT / EXIT
EXIT
SAVE & EXIT
FACTORY SET
INT 1
INT 2
OFF / AUTO
LL
LL LIMIT (0.25% / 0.50% / 1.00% / 5.00%)
V PHASE(0~624)
RETURN
EXIT JUMP
SAVE & EXIT / EXIT
MOTION (MOT) PRIVACY (PRI)
EXPOSURE (EXP) COLOR (RGB) FUNCTION (FUN)
SYNC (SYC)
DAY NIGHT (D&N)
EXIT (EXT)
SETUP (SET)
13. 13
EXPOSURE (EXP)
LENS
FOCUST METER helps you to find the clear
focus. When the dark line alligns with the gray
bar, the camera will be adjusting the focus.
When it’s set on the maximum, you get the clear
image.
- Set the lens Focus Meter to maximum (See above
for more information).
- DC GAIN is to adjust Iris speed. 0 ~ 255. It is
recommended to set the AUTO Gain to 120.
- AI THOLD is to define gain level. -48 ~ 60.
DC mode is supported for Auto-iris
Varifocal lens.
Set the Focus Meter to maximum.
MANUAL: Manual iris or Fixed board lens.
DC: Auto-iris Varifocal lens.
14. 14
EXPOSURE (EXP)
SHADOW GAIN (10~50) The higher the number, the stronger the BLC masking.
AE PREFERENCE
BLC
Auto Exposure
Set AE PREFERENCE depending on the environment in
which the camera is installed. Select from the following
options:
INDOOR / OUTDOOR
Backlight compensation prevents subjects in defined areas from appearing too dark
when backlighting is present.
If BLC is enabled, adjust the SHADOW GAIN as desired.
15. 15
EXPOSURE
Enables the camera to capture clear images in the same frame,
even when there are both very bright and very dark areas in the
same field.Select from the following options:
LOW / NORMAL / MEDIUM(Factory Default) / HIGH/ CUSTOM
If CUSTOM is selected, adjust the Bias / Limit as you wish.
- BIAS (-30~30): Decide the WDR level in the range of LIMIT.
The higher the number, the stronger the WDR
adjustment.
- LIMIT (0~36): Decide the range of WDR effect level.
0 means WDR is OFF. The higher the number, the
stronger the WDR will be.
WDR (Wide Dynamic Range)
WDR OFF WDR ON
16. 16
AGC (Auto Gain Control)
EXPOSURE
STARLIGHT
Starlight mode automatically activates slow shutter function when the
image is too dark. You can adjust the frame integration level from
X2-30FPS ~ X64**. x2 - 30FPS is the default.
EXPOSURE (EXP)
Auto Gain Control automatically adjusts the video gain to
enhance picture brightness in low light conditions.The higher
number the better sensitivity. However, higher settings mean
more digital noise in the image. Select one of the options.
LOW / MEDIUM / HIGH(Factory Default)
**Note: Increase the setting may cause the image to lag.**
17. 17
METER ZONE
EXPOSURE (EXP)
You can setup up to two (2) zones.
1. Select the zone you wish to adjust and enter edit mode.
2. The zone’s borders will appear in white. Use the camera’s joystick contrller to move the zone across the image.
When the zone’s desired position is achieved, press the joystick controller.
3. The zone’s borders will appear in green. Use the camera’s joystick controller to increase the size of the zone.
a. Moving the joystick to the right will move the zone’s right border further to the right.
b. Moving the joystivk to the left will move the zone’s left border further to the left.
c. Moving the joystivk up will move the zone’s top border further up.
e. Moving the joystivk down will move the zone’s bottom border further down.
4. Press the joystick again. The zone’s borders will appear red. Use this option to reduce the size of the zone.
a. Moving the joystick to the right will move the zone’s left border further to the right.
b. Moving the joystivk to the left will move the zone’s right border further to the left.
c. Moving the joystivk up will move the zone’s bottom border further up.
e. Moving the joystivk down will move the zone’s top border further down.
5. To exit edit mode, press & hold the camera’s joystick controller for three (3) seconds.
Defines an area in the image where the AE and WB settings will be applied. This option is
useful when a camera is installed in an environment such as an ATM.
EXIT_JUMP
Go to the Exit menu to save & exit, or exit without saving
18. 18
COLOR (RGB)
WB MODE
Select on of the options:
ATW- Auto Tracking White Balance Control mode compensates for color
temperature changes between 2500K and 9500K. It is
recommended to set the low level to 2.5K, and the high tp 11K.
MANUAL**- Users can control the white balance manually by
changing RED GAIN and BLUE GAIN (see below).
KELVIN (2K~11K)- The color temperature level that will trigger the AWB.
The lower the number, the cooler the image will appear.
The higher the number, the warmer the image will appear.
R-GAIN (-20~20) Adjusts the amount of red in the image.
The higher the number, the image will appear red.
The lower the number, the image will appear green.
B-GAIN (-20~20)- Adjusts the amount of blue in the image.
The higher the number, the image will appear blue.
The lower the number, the image will appear yellow.
PUSH LOCK- Pushlock is to fix the white balance based on current lighting.
AWC - Auto White Balance Control mode compensates for
color temperature changes between 2000K and 18000K.
COLOR GAIN
-8 (complete B/W) ~ 8 (Full Color)
(Factory setting is 0.)
It’s to adjust the amount of color in the image.
EXIT_JUMP
**All user properties will be written to ROM.**
Go to the Exit menu to save & exit, or exit without saving
19. 19
DAY NIGHT (D&N)
D&N MODE
BW BURST**
AUTO If AUTO is selected, the camera will automatically switch between color
and B/W depending on the levels of light available. The camera will stay
in color mode when there is enough light. The camera will switch to
B&W at night or other low light environments.Please define the following
settings:
READ TIME (3~255): Time interval delay before switching from day mode
to night mode. It is adjustable from 3 seconds to 255 seconds.
S LEVEL (Color -> B/W) (0~60): Adjusts the light level at which the
camera switches from day (color) to night (B&W) mode. The higher the
number, the lower the light level.
E LEVEL (B/W -> Color) (0~60): Adjusts the light level at which the
camera switches from night (B&W) to day (color) mode. This number
should be lower than the value of COLOR->B&W above.
BW AGC (0~60): You can fix the Gain levels when the camera switches
between Color and B/W.
COLOR Camera always stays in day mode.
BW
OFF
Camera always stays in night mode.
Remove BURST when converting to B/W.
ON Output BURST when converting to B/W.
EXIT_JUMP
Go to the Exit menu to save & exit, or exit without saving
**BW BURST available only if Day/ Night Mode is set to AUTO.**
20. 20
FUNCTION (FUN)
MIRROR Flips the imge horizontally / vertically
or both(rotate).
OFF / MIRROR / V-FLIP / ROTATE
SHARPNESS
-8~8 (-4 Default)
Sets the image’s sharpness. The higher the
number, the sharper lines and details will appear
in the image.
However, the sharper the image, the more digital
noise will be visible.
GAMMA
3D-DNR
(Digital Noise Reduction)
D-ZOOM
Select the desired gamma level.
25~100 (45 is default.)
3D-DNR reduces the noise on the screen in low light conditions
and allows for clearer images, even at night.
Select from the following options:
OFF / LOW / MEDIUM / HIGH
The digital zoom function zooms to the center of the image by
default. Set the Zoom level from 1~ X8.
This menu also allows you adjust the camera’s Pan and Tilt.**
EXIT_JUMP
Go to the Exit menu to save & exit, or exit without saving
**Note: Pan & Tilt Setup options are disabled for this camera module.**
3D-DNR OFF 3D-DNR ON
21. 21
MOTION (MOT)
The camera can detect the movement and display an alarm on the
screen when movement is detected.
MOTION
SET MOTION ZONE
Select from four (4) available zones. To display them, select :
1 Zones- Activate only the first zone.
1-2 Zones- Activat zones 1 & 2.
1-3 Zones- Activate zones 1, 2, & 3.
1-4 Zones- Activate all zones.
To edit a motion zone:
1. Select the zone you want to setup. The selected zone’s botrders will appear in white.
2. Using your joystick, move the zone to the desired area.
3. Press the joystick to adjust the zone’s size. The zone’s borders will be green.
a. Move the joystick to the right to move the zone’s right border further to the right.
b. Move the joystivk to the left to move the zone’s left border further to the left.
c. Move the joystivk up to move the zone’s top border further up.
e. Moving the joystivk down will move the zone’s bottom border further down.
4. Press the joystick again to reduce the zone’s size. The zone’s borders will appear red.
a. Moving the joystick to the right will move the zone’s left border further to the right.
b. Moving the joystivk to the left will move the zone’s right border further to the left.
c. Moving the joystivk up will move the zone’s bottom border further up.
e. Moving the joystivk down will move the zone’s top border further down.
5. To exit edit mode, press & hold the camera’s joystick controller for three (3) seconds.
OFF / ON
If Motion is enabled, you can setup the ACTIVITY THRESHOLD.
This setups the camera’s sensitivity to movement. The higher the
number the camera will be more sensitive to smaller movements.
Select from 0 ~ 255.
When motion is enabled, “ALARM!” will appear on the top
right-hand corner of the screen when the camera detects motion.
EXIT_JUMP
Go to the Exit menu to save & exit, or exit without saving
22. 22
PRIVACY (PRI)
You can hide some parts of the screen for privacy purposes. A total of 6 privacy
masks are available.
To enable Privacy Zone Masking, Select ON.
1. Select a mask (1~6) and enable by selecting ON
2. Enter edit mode for a desired mask. The edit mode will display all masks that
have been turnied ON. The mask you selected will appear in WHITE. All other
enabled masks will appear in GREEN.
3. When the mask in WHITE, use the joystick to move the mask to the area you
wish to hide.
4. Press the joystick. The mask’s color will change to BLUE. Use this option to
adjust the mask’s size.
5. Move the joystick Left and Right to adjust the width of the mask.
6. Move the joystick Up and Down to adjust the height of the mask.
NOTE: when adjusting the size of the mask, the top and left borders of the
mask will remain stationary. Only the right and bottom borders of the mask will
move to adjust the mask’s size.
7. If you have enabled multiple masks, press the joystick again to remain in edit
mode and move to the next mask chronologically.If you are in size edit mode
(BLUE mask) and you press the joystick once, the next mask will turn WHITE,
and the previous mask would turn GREEN.
8. To exit edit mode, press & hold the joystick for three (3) seconds.
PRIVACY MASK
MASK COLOR
Adjust the color of the privacy masks. Select from:
WHITE / BLACK / RED
EXIT_JUMP
Go to the Exit menu to save & exit, or exit without saving
23. 23
EXIT_JUMP
SAVE & EXIT
EXIT
Exit the OSD after saving the current settings.
Exit the OSD without saving.
SYNC (SYC)
INT1: SYNC to 59.94Hz
INT2: SYNC to 60.01Hz
In PAL, INT1 & INT2 SYNC to 50.00Hz.
Select INTERNAL if camera uses DC power, or
if L/L is not required. Please note this setup
option is only for NTSC version.
**Consult your installer for additional information and
assistance with configuration.**
Select L/L to syncronize video signals when two or
more cameras are using AC power in a switching
system.
INT1
INT2
LL (Line Lock)
24. 24
SET-UP (SET)
- CAMERA ID (1~255)
You can assign ID number for the camera (1 by Default).
- PROTOCOL (PELCO-D by Default)
- BAUD RATE (2400 / 4800 / 9600 / 19200)
Adjust data communication speed. Default is 9600.
PC CONTROL
Select if you want to display the camera’s title on screen. You can setup
a title up to 8 characters long. To edit the camera’s title, move the
joystick to the right. The 1st letter will be highlighted. Move the joystick
left and right to select the desired character. Press the joystick to move
to the next space and repeat as necessary.
ID POSITION- Select the position for the camera’s Title:
-Up-Left
-Up-Center
-Up-Right
-Down-Left
-Down-Center
-Down-Right
TITLE
You can select langaue you want to dispay on the monitor.
ENGLISH / DEUTSCH / FRANCAIS / ITALIAN / ESPANOL /
DUTCH
LANGUAGE
25. 25
SET-UP (SET)
EXIT_JUMP
SAVE & EXIT
EXIT
CRR (Color Rolling Reduction)
**Only for NTSC version**
Exit the OSD after saving the current settings.
Exit the OSD without saving.
You can set OMNI LENS menus when you use Omni
Focus Lens.
When OMNI LENS is set ON , you can set the folloing
sub-menus.
- ALARM works with MOTION DETECT fuction.
When motion is deteced, camera gives
an alaram. Select ON or OFF.
- READ TIME is to set how many seconds to stay in
zoom in. Select from 5 to 15 seconds.
- ALARM ZOOM is to set zoom rate when alarm occurs.
Select from 4 to 214.
- STAND BY is the zoom rate when it’s normal
scene. Therefore, when alarm
disappear the zoom rate comes back
to STAND BY rate. Select from 0 to 214.
OMNI LENS**
- CRR1 If you use a manual lens, select CRR1 to release
Rolling/Flicker problem.
- CRR2 If you use a DC lens, select CRR1 to release
Rolling/Flicker problem.
FLUORESCENT
- DIGITAL OUTPUT (OFF / ON)
- FIELD ORDER (NORMAL / REVERS)
- FRAME RPT (OFF/ 2X / FREEZE)
DIGITAL VIDEO OUTPUT
**Omni-Lens Settings available only in cameras with Moni Lens.**
26. 26
EXIT (EXT)
EXIT
Exit the OSD without saving.
SAVE & EXIT
Exit the OSD after saving the current settings.
FACTORY SET
Go back to factory default.
27. 27
FOR NO VIDEO
FOR OUT-OF-FOCUS VIDEO
Before sending your camera for repair, check the following or contact our technical specialist.
Check the coaxial cable and make sure it is connected securely.
Check the lens’ iris adjustment at the camera’s OSD menu.
Check the power supply and make sure the camera has the proper voltage and current.
Check the clear dome cover and the lens for dirt or fingerprints. Use a soft cloth and gently clean.
Check the lens’ manual focal and zoom adjustment. The use of a field test monitor is recommended.
TROUBLESHOOTING
28. 28
WARRANTY INFORMATION*
Digital Watchdog (referred to as “the Warrantor”) warrants the Digital Watchdog Camera against defects
in materials or workmanship as follows:
LABOR: For the initial five (5) years and one (1) year on IR LED from the original purchase date,
if the camera is determined to be defective, the Warrantor will repair or replace the unit with a new
or refurbished product at its option at no charge.
PARTS: In addition, the Warrantor will supply replacement parts for the initial five (5) years and
one (1) year on IR LED.
To obtain warranty or out of warranty service, please contact a Technical Support Representative at
1-866-446-3595 Monday through Friday from 8:30AM to 8:00PM Eastern Standard Time.
A purchase receipt or other proof of the original purchase date is required before warranty service
is rendered. This warranty only covers failures due to defects in materials and workmanship which
arise during normal use. This warranty does not cover damage which occurs in shipment or failures
which are caused by products not supplied by the Warrantor or failures which result from accident,
misuse, abuse, neglect, mishandling, misapplication, alteration, modification, faulty installation,
set-up adjustments, improper antenna, inadequate signal pickup, maladjustment of consumer
controls, improper operation, power line surge, improper voltage supply, lightning damage, rental
use of the product or service by anyone other than an authorized repair facility or damage that is
attributable to acts of God.
29. 29
LIMITS AND EXCLUSIONS*
There are no express warranties except as listed. The warrantor will not be liable for incidental
or consequential damages (including damage to recording media without limitation) resulting
from the use of these products or arising out of any breach of the warranty. All express and
implied warranties, including the warranties of merchantability and fitness for particular purpose,
are limited to the applicable warranty period set forth above.
Some states do not allow the exclusion or limitation of incidental or consequential damages, or
limitatons on how long an implied warranty lasts, so the exclusions or limitations listed above
may not apply to you. This warranty gives you specific legal rights, and you may also have other
rights that vary from state-to-state.
If the problem is not handled to your satisfaction, please call our technical support at (813) 888-9555,
Option #4, or visit our website at http://www.digital-watchdog.com, go to the Support tab, and select
Online RMA Form for additional information on openning an RMA ticket and mailing information.
Service calls which do not involve defective materials or workmanship as determined by the
Warrantor, in its sole discretion, are not covered. Costs of such service calls are the responsibility
of the purchaser.
30. 30
SPECIFICATIONS*
Lens MANUAL / DC
AE Preference OUTDOOR / INDOOR
Back Light Compensation OFF/ ON
Wide Dynamic Range LOW / NORMAL / MEDIUM / HIGH / CUSTOM
Auto Gain Control LOW / MEDIUM / HIGH
Star-Light OFF, x2-30FPS ~ x64
OPERATIONAL
Image Sensor 1/3" PIXIM Nightwolf CMOS Sensor
Total Pixels 768 (H) x 548 (V)
Minimum Illumination F1.2 (30IRE): 0.22 Lux [Color] (V365T Only)
F1.2 (30IRE): 0.08 Lux [B&W] (V365T Only)
F1.2 (30IRE): 0 Lux (V365TIR Only)
Horizontal Resolution 690 Effective Horizontal TV Lines
S/N Ratio 53dB (AGC off)
Synchronization Internal / Line Lock
Video Output CVBS: 1.0Vp-p / 75 Ω
Frequency 15.734KHz (H), 59.95Hz (V)
Scanning System 525 Lines, 2 : 1 Interlace
Lens Type DC Auto Iris
LENS
Focal Length 2.8-11mm
VIDEO
IR Distance 85ft Range IR
31. 31
White Balance Mode ATW/ PUSHLOKC / MANUAL / AWC/ NORMAL
Day & Night AUTO / COLOR / B&W
Mirror OFF / MIRROR / V-FLIP / ROTATE
Sharpness -8 ~ 8
Gamma 25 (0.25)~ 100 (1.0)
3D Digital Noise Reduction OFF/ LOW/ MEDIUM/ HIGH
Digital Zoom x1 ~ x8
Privacy Zones OFF / ON (6 Programmable Zones)
Baudrate 2400 ~ 38500
Protocol PELCO-D
Language ENGLISH, DEUTSCH, FRANCIAS, ITALIAN, ESPAÑOL, DUTCH
ENVIRONMENTAL
ELECTRICAL
MECHANICAL
Storage Temperature -20
o
C ~ 70
o
C (-4
o
F ~ 158
o
F)
Operating Temperature -10
o
C ~ 55
o
C (14
o
F ~ 131
o
F)
IP Rating IP66 (Protects against dust and high pressure water.)
Power Requirement Dual (DC12V & AC24V)
Power Consumption DC12V: 2.46W, 198mA/ 5.6W, 443mA (LED On)
AC24V: 3.0W, 146mA/ 5.4W, 272mA (LED On)
Operating Humidity Less than 90% (Non-Condensing)
Housing Material Aluminum Housing
Dimensions ∅149.9 X 96.2 mm (∅5.9 X 3.79 in)
Dome Cover Material Polycarbonate
Weight 2.05 lbs
OPERATIONAL
32. 5436 W Crenshaw St. Tampa, FL 33634
Tel : 866-446-3595 / 813-888-9555
Fax : 813-888-9262
www.Digital-Watchdog.com
technicalsupport@dwcc.tv
Technical Support Hours : Monday-Friday
8:30am to 8:00pm EST