- The document provides instructions for using an Olympus digital camera, including how to prepare the camera, shoot and playback images, use shooting modes and functions, and print photos.
- It explains how to use the camera's direct buttons and menus to access frequently used shooting settings like flash, self-timer, and white balance as well as playback, editing and printing functions.
- The manual also provides information on setup menu options for configuring other camera settings such as date/time, video output, and power save.

![4 EN
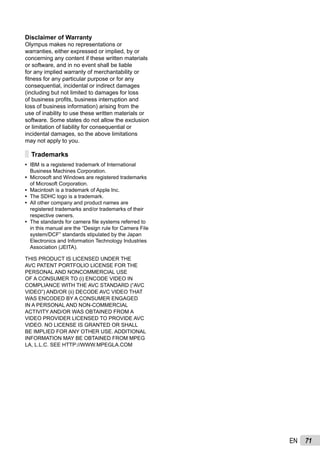
Using the MenuUsing the Menu
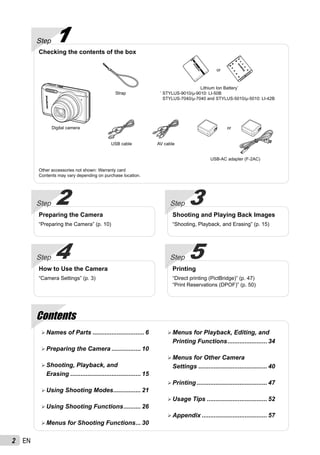
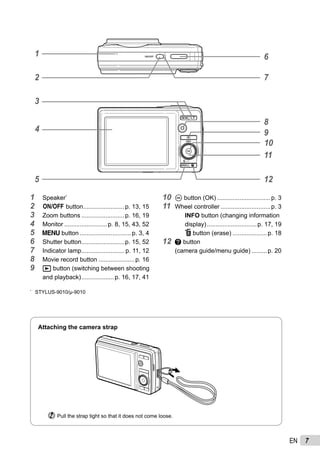
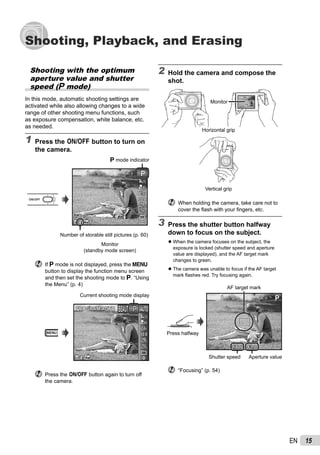
Use the menu to change camera settings such as the shooting mode.
Press the m button to display the function menu. The function menu can be used to set frequently
used shooting and playback functions such as shooting mode.
PHOTO SURFING
EVENT
BEAUTY FIX
EDIT
ERASE
SETUP
SLIDESHOWSLIDESHOW
Use FG to select a menu and press
the A button.
14M44
PP
0.00.0
AUTO
WB
AUTO
WB
AUTO
ISO
AUTO
ISO
PROGRAM AUTOPROGRAM AUTO
Shooting PlaybackSelected option
To select the shooting mode
Use HI to select the shooting mode and
press the A button.
To select the function menu
Use FG to select a menu and use HI to
select a menu option. Press the A button to
set the function menu.
o [SETUP]
menu
Function
menu
Shooting
mode
In the [SETUP] menu, various camera functions can be set,
including shooting and playback functions not displayed in the
function menu, and other settings such as date, time and screen
display.
1 Select [SETUP] and then press the A
button.
The [SETUP] menu is displayed.
SHADOW ADJUST AUTO
AF MODE FACE/iESP
ESP/ ESP
FINE ZOOM OFF
DIGITAL ZOOM OFF
COMPRESSION NORMAL
MENU OKSETEXIT
1
2
3
1
2
IMAGE SIZEIMAGE SIZE 14M14M
2 Press H to select the page tabs. Use FG
to select the desired page tab and press I.
x
--.--.-- --:--X
MENU OKSETEXIT
WORLD TIME
TV OUT
OFFPOWER SAVE
1
2
3
1
2
Page tab
MENU OKSETEXIT
TV OUT
1
2
3
1
2
OFFPOWER SAVE
x
--.--.-- --:----.--.-- --:--XX --.--.-- --:----.--.-- --:--XX
WORLD TIME
Submenu 1
3 Use FG to select the desired submenu 1
and then press the A button.
MENU OKSETEXIT
1
2
3
1
2
--.--.-- --:--X
WORLD TIME
TV OUT
x
OFFPOWER SAVEPOWER SAVE OFF
MENU OKSETEXIT
1
2
3
1
2 HOME
--.--.-- --:--X
WORLD TIME
VIDEO OUTTV OUT
OFFPOWER SAVEPOWER SAVE OFF
POWER SAVE
ON
OFFOFF
Submenu 2
●
4 Use FG to select the desired submenu 2
and then press the A button.
Once a setting is selected, the display returns
to the previous screen.
There may be additional operations.
“Menu Settings” (p. 30 to 46)
MENU OKSETEXIT
1
2
3
1
2
--.--.-- --:--X
WORLD TIME
TV OUT
x
ONONPOWER SAVEPOWER SAVE
5 Press the m button to complete the
setting.
Some functions cannot be used in some
shooting modes. In such cases, the
following message is displayed after
setting.
SHADOW ADJUST AUTO
AF MODE iESP
ESP/*1 ESP
FINE ZOOM OFF
DIGITAL ZOOM OFF
COMPRESSION NORMAL
MENU OKSETEXIT
1
2
3
1
2
CONFLICTING SETTINGS
IMAGE SIZEIMAGE SIZE 14M14M
●](https://image.slidesharecdn.com/mju901070405010en-141023000835-conversion-gate01/85/Mju-9010-7040_5010_en-4-320.jpg)
![8 EN
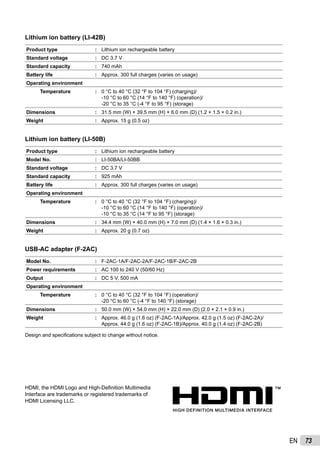
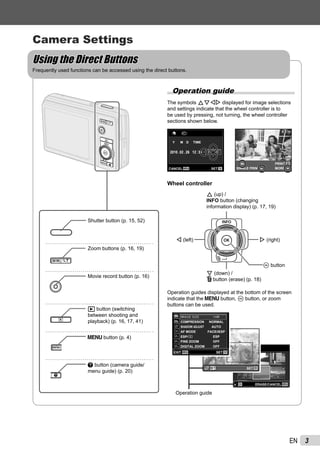
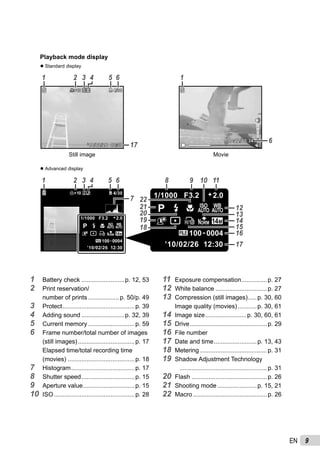
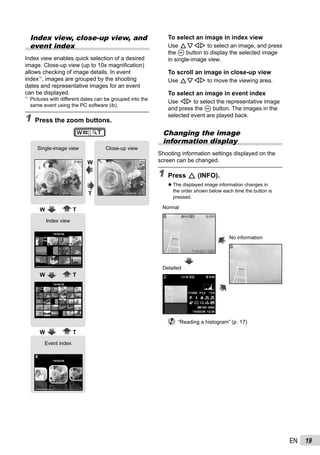
Monitor
Shooting mode display
1/100 F3.21/100 F3.2
PP
14M44 NORM
PP
0.00.0
AUTO
WB
AUTO
WB
AUTO
ISO
AUTO
ISO
00:3400:34
1 2
3
4
5
6
7
8
9
10
14151617 13 12 11
18
2526
19
22
20
21
23
24
1 Battery check .........................p. 12, 53
2 Shooting mode.......................p. 15, 21
3 Flash ............................................p. 26
Flash standby/flash charge ..........p. 52
4 Macro/super macro ......................p. 26
5 Self-timer......................................p. 27
6 Exposure compensation...............p. 27
7 White balance ..............................p. 27
8 ISO...............................................p. 28
9 Drive.............................................p. 29
10 [SETUP] menu ...........................p. 4, 5
11 World time ....................................p. 44
12 Image stabilization (still images)/
Digital image stabilization (movies)
....................................................p. 32
13 Metering .......................................p. 31
14 Shadow Adjustment Technology
....................................................p. 31
15 Compression (still images).....p. 30, 60
16 Image size (still images).........p. 30, 60
17 Number of storable still pictures
(still images).................................p. 15
18 Current memory ...........................p. 59
19 Movie recording icon....................p. 16
20 Remaining recording time (movies)
21 Image size (movies)...............p. 30, 61
22 Histogram.....................................p. 17
23 AF target mark .............................p. 15
24 Camera shake warning
25 Aperture value..............................p. 15
26 Shutter speed...............................p. 15](https://image.slidesharecdn.com/mju901070405010en-141023000835-conversion-gate01/85/Mju-9010-7040_5010_en-8-320.jpg)

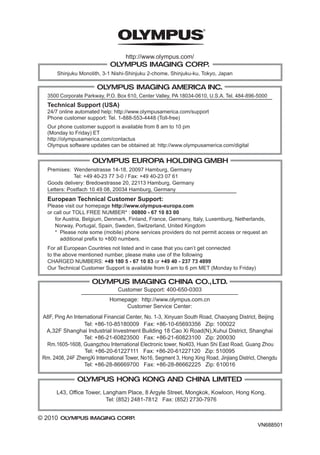
![13EN
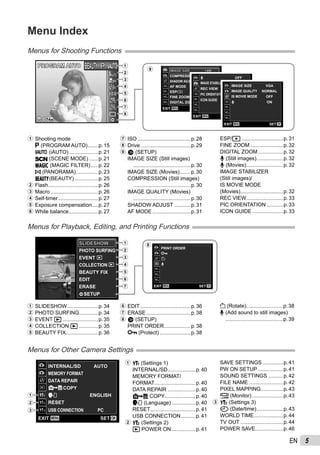
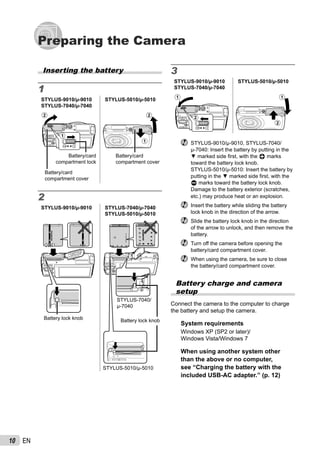
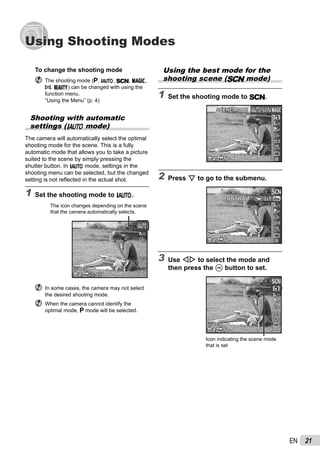
Setting the date, time and
time zone
The date and time set here are saved to image
file names, date prints, and other data.
1 Press the n button to turn on
the camera.
The date and time setting screen is displayed
when the date and time are not set.
Date and time setting screen
X
Y/M/D
Y M D TIME
-- -- -- --:..
MENUCANCEL
--------
2 Use FG to select the year for [Y].
-- -- -- --:.
MENUCANCEL
X
. Y/M/D
Y M D TIME
20102010
3 Press I to save the setting for [Y].
-- -- --:..2010
X
Y/M/D
Y M D TIME
MENUCANCEL
0000
●
4 As in Steps 2 and 3, use FGHI
and the A button to set [M]
(month), [D] (day), [TIME] (hours
and minutes), and [Y/M/D] (date
order).
For precise time setting, press the A button
as the time signal strikes 00 seconds.
To change the date and time, adjust the
setting from the menu. [X] (Date/time)
(p. 43)
5 Use HI to select the [x] time
zone and then press the A button.
Use FG to turn daylight saving time ([SUMMER])
on or off.
’10.02.26 12:30
SUMMER OKSET
Seoul
Tokyo
Seoul
Tokyo
The menus can be used to change the
selected time zone. [WORLD TIME] (p. 44)
●](https://image.slidesharecdn.com/mju901070405010en-141023000835-conversion-gate01/85/Mju-9010-7040_5010_en-13-320.jpg)
![14 EN
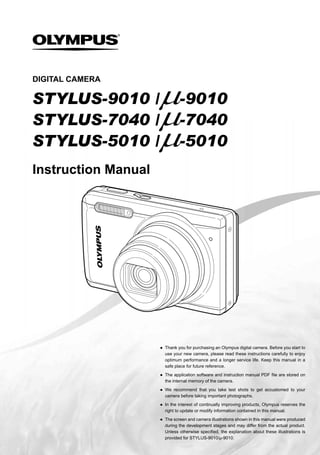
Changing the display language
The language for the menu and error messages
displayed on the monitor is adjustable.
1 Display the [SETUP] menu.
“Using the Menu” (p. 4)
2 Use FG to select the r (Settings
1) tab and then press I.
COPY
ENGLISH
RESET
USB CONNECTION PC
MENU OK
MEMORY FORMAT
DATA REPAIR
SETEXIT
1
2
3
1
2
INTERNAL/SDINTERNAL/SD AUTOAUTO
3 Use FG to select [l] and press
the A button.
4 Use FGHI to select your
language and press the A button.
5 Press the m button.
Inserting the SD/SDHC
memory card (sold separately)
Always use SD/SDHC memory cards with
this camera. Do not insert other types of
memory card. “Using a SD/SDHC memory
card” (p. 58)
Although the camera can store images in
internal memory, SD/SDHC memory cards
(sold separately) can be also used to store
pictures.
1
STYLUS-9010/μ-9010
STYLUS-5010/μ-5010
STYLUS-7040/μ-7040
Write-protect
switch
Contact area
Write-protect
switch
Insert the card straight until it clicks into
place.
Do not touch the contact area directly.
2
STYLUS-9010/μ-9010
STYLUS-7040/μ-7040
STYLUS-5010/μ-5010
1
2
1
2
“Number of storable pictures (still images)/
Continuous recording length (movies) in the
internal memory and SD/SDHC memory
cards” (p. 60)
To remove the SD/SDHC memory card
1 2
Press the card in until it clicks and comes
out slightly, then remove the card.](https://image.slidesharecdn.com/mju901070405010en-141023000835-conversion-gate01/85/Mju-9010-7040_5010_en-14-320.jpg)
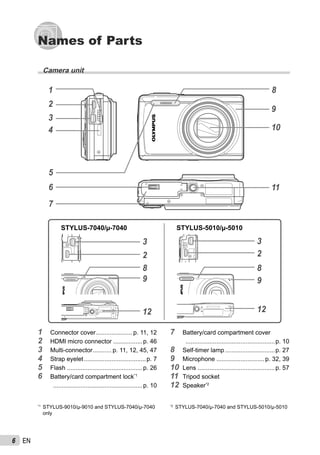
![16 EN
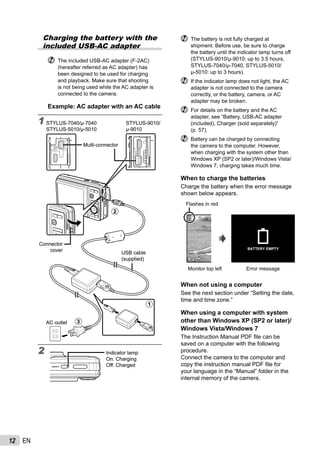
4 To take the picture, gently press
the shutter button all the way down
while being careful not to shake the
camera.
PP
1/400 F3.21/400 F3.2
Image review screen
Press fully
To view images during shooting
Pressing the q button enables playback of
images. To return to shooting, either press
the q button or press the shutter button
halfway down.
Shooting movies
1 Press the movie record button to
start recording.
00:12
00:34
00:1200:12RECREC
00:3400:34
Lights up red when recording
Recording time
Continuous recording length
(p. 61)
The effects of the set shooting mode can
be used when shooting movies (when
P mode, p mode or Q mode is
set, shooting is performed with the P mode
setting).
2 Press the movie record button
again to stop recording.
Sound will also be recorded.
During sound recording, only the digital
zoom can be used. To record a movie with
optical zoom, set [R] (movies) (p. 32) to
[OFF].
Using the zoom
Pressing the zoom buttons adjusts the shooting
range.
Pressing the wide
(W) button
Pressing the telephoto
(T) button
14M44 44
PP
0.00.0
AUTO
WB
AUTO
WB
AUTO
ISO
AUTO
ISO
14M
PP
0.00.0
AUTO
WB
AUTO
WB
AUTO
ISO
AUTO
ISO
00:3400:34 00:3400:34
Zoom bar
Model No. Optical zoom Digital zoom
STYLUS-9010/μ-9010 10× 5×
STYLUS-7040/μ-7040 7× 5×
STYLUS-5010/μ-5010 5× 5×
To take larger images without reducing
image quality
[FINE ZOOM] (p. 32)
To take larger images
[DIGITAL ZOOM] (p. 32)
The zoom bar appearance identifies the
status of the fine zoom/digital zoom.
Fine zoom
range
Digital zoom
range
When using
optical zoom
When using
fine zoom
When using
digital zoom
Optical zoom range](https://image.slidesharecdn.com/mju901070405010en-141023000835-conversion-gate01/85/Mju-9010-7040_5010_en-16-320.jpg)
![17EN
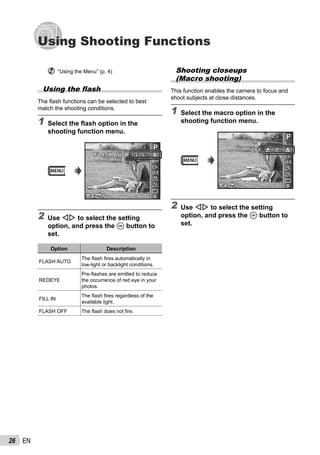
Changing the shooting
information display
The display of the screen information can
be changed to best match the situation, for
example, the need for a clear view of the screen
or for making a precise composition by using the
grid display.
1 Press F (INFO).
The displayed shooting information changes in
the order shown below each time the button is
pressed. “Shooting mode display” (p. 8)
14M44
PP
0.00.0
AUTO
WB
AUTO
WB
AUTO
ISO
AUTO
ISO
14M44 NORM
PP
0.00.0
AUTO
WB
AUTO
WB
AUTO
ISO
AUTO
ISO
00:3400:34
00:3400:34
Normal
Detailed
No information
Reading a histogram
If the peak fills too much of the frame,
the image will appear mostly white.
If the peak fills too
much of the frame,
the image will
appear mostly black.
The green section shows
luminance distribution
within the screen’s center.
●
Viewing images
1 Press the q button.
Number of frames/
Total number of images
’10/02/26 12:30’10/02/26 12:30
4/304/30
Playback image
2 Turn the wheel controller to select
an image.
It can be performed by pressing HI.
Displays
previous
image
Displays
next image
Keep turning the wheel controller to fast
forward or reverse. It can be performed by
holding HI.
The display size of the images can be
changed. “Index view, close-up view, and
event index” (p. 19)
To play sound recordings
To play sound recorded with an image,
select the image and press the A button. A
! icon appears on images with which sound
has been recorded.
[R] (still images) (p. 32, 39)
During audio playback
●](https://image.slidesharecdn.com/mju901070405010en-141023000835-conversion-gate01/85/Mju-9010-7040_5010_en-17-320.jpg)
![18 EN
Operations while playback is paused
During pause
00:14/00:3400:14/00:34
Cueing
Use F to display the first
frame and press G to display
the last frame.
Advancing
and rewinding
one frame at a
time*1
Turn the wheel controller to
advance or rewind by one
frame at a time. Keep turning
the wheel controller for
continuous advance or rewind.
Resuming
playback
Press the A button to resume
playback.
To operate with HI
*1
Press I or H to advance or rewind one frame
at a time. Hold I or H pressed for continuous
advance or rewind.
To stop movie playback
Press the m button.
Erasing images during
playback (Single image erase)
1 Display the image you want to erase
and press G (D).
MENU OK
ERASE
SEL. IMAGE
ALL ERASE
CANCELCANCEL
ERASE
SETBACK
2 Press FG to select [ERASE], and
press the A button.
[ALL ERASE] (p. 39) and [SEL. IMAGE]
(p. 38) can be used to erase multiple images
at the same time.
To play back movies
Select a movie, and press the A button.
’10/02/26 12:30’10/02/26 12:30
4/304/30
OKMOVIE PLAYMOVIE PLAY
Movie
Operations during movie playback
00:12/00:3400:12/00:34
During playback
Elapsed time/
Total recording
time
Pausing and
restarting
playback
Press the A button to pause
playback. During pause, fast
forward or reverse, press the
A button to restart playback.
Fast forward
Press I to fast forward. Press
I again to increase the fast
forward speed.
Rewind
Press H to rewind. The speed
at which the recording rewinds
increases each time H is
pressed.
Adjusting the
volume
Turn the wheel controller
or use FG to adjust the
volume.](https://image.slidesharecdn.com/mju901070405010en-141023000835-conversion-gate01/85/Mju-9010-7040_5010_en-18-320.jpg)
![20 EN
Playing back panorama
images
Panorama images that were combined together
using [AUTO] or [MANUAL] can be scrolled for
viewing.
“Creating panoramic images (p mode)”
(p. 23)
1 Select a panorama image during
playback.
“Viewing images” (p. 17)
’10/02/26 12:30’10/02/26 12:30
4/304/30
OKREPLAY
2 Press the A button.
Current viewing area
To control panorama image playback
Zoom in/Zoom out: Press the A button to
pause playback. Then press the zoom button
to enlarge/shrink the image.
Playback direction: Press FGHI to
pause playback and scroll the image in the
direction of the pressed button.
Pause: Press the A button.
Restart scrolling: Press the A button.
Stop playback: Press the m button.
Using the menu guide
If the E button is pressed while settings are
being adjusted in the playback function or
[SETUP] menus, a description of the selected
option is displayed.
“Using the Menu” (p. 4)
Using the camera guide
Use the camera guide to look up camera
operations.
1 Press the E button in the standby
mode screen or the playback
screen.
IN-CAMERA MANUAL
Learn about the camera
OK
History
Message
SETEXIT
SearchSearch
Submenu 2 Application
Search
Functions or operating methods
can be searched from a term or
shooting objective.
Learn about the
camera
Information is shown about
recommended functions and basic
operating methods for the camera.
History
Searches can be performed from
the search history.
Message
Messages from the camera can
be viewed.
2 Use FG to select the desired item.
OK
Search
IN-CAMERA MANUAL
History
Message
SETEXIT
Learn about the cameraLearn about the camera
Follow the on-screen instructions to search the
desired contents.
●](https://image.slidesharecdn.com/mju901070405010en-141023000835-conversion-gate01/85/Mju-9010-7040_5010_en-20-320.jpg)
![22 EN
In s modes, the optimum shooting
settings are pre-programmed for specific
shooting scenes. For this reason, settings
may not be changed in some modes.
Option Application
BPORTRAIT/FLANDSCAPE/
GNIGHT SCENE*1
/
MNIGHT+PORTRAIT/
CSPORT/NINDOOR/
WCANDLE/
RSELF PORTRAIT/
SSUNSET*1
/XFIREWORKS*1
/
VCUISINE/dDOCUMENTS/
qBEACH & SNOW/PET
The camera
takes a picture
using the
optimum settings
for the scene
conditions.
*1
When the subject is dark, noise reduction is
automatically activated. This approximately doubles
the shooting time during which no other pictures can
be taken.
To take pictures of a moving subject
like a pet ([ PET] mode)
1 Use HI to select [ PET], and press
the A button to set.
2 Hold the camera to align the AF target
mark on the subject and press the A
button.
When the camera recognizes the subject,
the AF target mark automatically tracks the
subject movement to focus on it continuously.
“To focus on a moving subject continuously
(AF Tracking)” (p. 31).
●
Shooting with special effects
(P mode)
To add expression to your photo, select the
desired special effect.
1 Set the shooting mode to P.
MAGIC FILTERMAGIC FILTER
0.00.0
AUTO
WB
AUTO
WB
14M44
2 Press G to go to the submenu.
POP ART
0.00.0
AUTO
WB
AUTO
WB
3 Use HI to select the desired effect
and then press the A button to set.
0.00.0
AUTO
WB
AUTO
WB
14M44
00:3400:34
Icon indicating P mode that
is set
Shooting mode Option
MAGIC FILTER
[POP ART
PIN HOLE
]FISH EYE
@DRAWING
In P mode, the optimum shooting
settings are pre-programmed for each
scene effect. For this reason, some settings
cannot be changed in some modes.](https://image.slidesharecdn.com/mju901070405010en-141023000835-conversion-gate01/85/Mju-9010-7040_5010_en-22-320.jpg)
![23EN
Creating panoramic images
(p mode)
1 Set the shooting mode to p.
PANORAMAPANORAMA
0.00.0
AUTO
WB
AUTO
WB
AUTOAUTO
14M44
2 Press G to go to the submenu.
3 Use HI to select the desired mode
and then press the A button to set.
Submenu 1 Application
AUTO
Three frames are taken and
combined by the camera. The
user only composes the shots
so that the target marks and
pointers overlap, and the camera
automatically releases the shutter.
MANUAL
Three frames are taken and
combined by the camera. The
user composes the shots using
the guide frame and manually
releases the shutter.
PC
The frames that were taken are
combined into a panorama image
using the PC software (ib).
For details on installing the PC software
(ib), see “Battery charge and camera setup”
(p. 10).
When set to [AUTO] or [MANUAL], [IMAGE
SIZE] (p. 30) is fixed to [2].
The focus, exposure (p. 27), zoom position
(p. 16), and white balance (p. 27) are locked
at the first frame.
The flash (p. 26) is fixed to $ (FLASH OFF)
mode.
Taking pictures with [AUTO]
1 Press the shutter button to take the first
frame.
2 Move the camera slightly in the direction
of the second frame.
AUTOAUTO
MENU OKSAVECANCEL
Target mark
Pointer
Screen when combining images
from left to right
3 Move the camera slowly while keeping it
straight, and stop the camera where the
pointer and target mark overlap.
The camera releases the shutter
automatically.
AUTOAUTO
MENU OKSAVECANCEL
To combine only two pictures, press the
A button before taking a third frame.
4 Repeat Step 3 to take a third frame.
After the third frame is taken, the camera
automatically processes the frames and the
combined panorama image is displayed.
To exit the panorama function without
saving an image, press the m button.
If the shutter does not automatically release,
try [MANUAL] or [PC].
●
●](https://image.slidesharecdn.com/mju901070405010en-141023000835-conversion-gate01/85/Mju-9010-7040_5010_en-23-320.jpg)
![24 EN
Taking pictures with [MANUAL]
1 Use HI to specify at which edge the
next picture is to be connected.
MANUALMANUAL
1 21 2
MENUBACK
Direction for
combining the
next frame
2 Press the shutter button to take the first
frame.
1st frame
MANUALMANUAL
1 21 2
MANUALMANUAL
1 21 2
MENUBACK MENU OKSAVECANCEL
Joint areas
3 Compose the next shot so that joint area
1 overlaps joint area 2.
Composition of the 2nd frame
MANUALMANUAL
1 21 2
MENU OKSAVECANCEL
4 Press the shutter button to take the next
shot.
To combine only two pictures, press the
A button before taking the third frame.
5 Repeat steps 3 and 4 to take a third
frame.
After the third frame is taken, the camera
automatically processes the frames and the
combined panorama image is displayed.
To exit the panorama function without
saving an image, press the m button.
●
Taking pictures with [PC]
1 Use FGHI to select the direction that
the frames are combined.
2 Press the shutter button to take the first
frame, and then compose the second
shot.
PCPC
1 21 2
MENUEXIT
PCPC
1 21 2
MENUBACK
Before first
shot
After first
shot
After the first shot, the area shown in white
reappears on the side of the display opposite
the pan direction. Frame subsequent
photographs so that they overlap with the
image in the monitor.
3 Repeat Step 2 until the number of
desired frames is taken, and then press
the A button or m button when
finished.
Panorama shooting is possible for up to
10 frames.
Refer to the PC software (ib) help guide for
details on how to make panorama images.
●](https://image.slidesharecdn.com/mju901070405010en-141023000835-conversion-gate01/85/Mju-9010-7040_5010_en-24-320.jpg)
![25EN
Smoothing out skin tone and
texture (Q mode)
The camera identifies a person’s face and gives
the skin a smooth, translucent look for taking
the picture.
1 Set the shooting mode to Q.
14M44
0.00.0
AUTO
WB
AUTO
WB
BEAUTYBEAUTY PP
2 Point the camera toward the
subject. Check the frame appearing
around the face detected by the
camera, and then press the shutter
button to take the picture.
The unedited image and edited image are both
saved.
If the image cannot be retouched, only the
unedited image is saved.
The frame may not appear or may take
some time to appear for some subjects. In
addition, this function may have no visible
effect on some subjects.
The [IMAGE SIZE] of the retouched image
is limited to [n] or lower.
●
●](https://image.slidesharecdn.com/mju901070405010en-141023000835-conversion-gate01/85/Mju-9010-7040_5010_en-25-320.jpg)
![27EN
Option Application Description
OFF
Macro mode is
deactivated.
―
MACRO
This enables the
camera to shoot
subjects at close
distances.
When the zoom is at the widest (W) position, this function enables
shooting as close as the following distances.
STYLUS-9010/μ-9010 STYLUS-7040/μ-7040 STYLUS-5010/μ-5010
10 cm (3.9 in.) 10 cm (3.9 in.) 15 cm (5.9 in.)
When the zoom is at the most telephoto (T) position, this function
enables shooting as close as the following distances.
STYLUS-9010/μ-9010 STYLUS-7040/μ-7040 STYLUS-5010/μ-5010
90 cm (35.4 in.) 60 cm (23.6 in.) 60 cm (23.6 in.)
SUPER MACRO*1
This enables the
camera to shoot
subjects at even
closer distances.
This function enables shooting as close as the following distances.
STYLUS-9010/μ-9010 STYLUS-7040/μ-7040 STYLUS-5010/μ-5010
1 cm (0.4 in.) 2 cm (0.8 in.) 7 cm (2.8 in.)
Subjects at the following or farther distances cannot be brought into
focus.
STYLUS-9010/μ-9010 STYLUS-7040/μ-7040 STYLUS-5010/μ-5010
50 cm (19.7 in.) 70 cm (27.6 in.) 60 cm (23.6 in.)
*1
The zoom is automatically fixed.
The flash (p. 26) and zoom (p. 16) cannot be set when [a SUPER MACRO] (p. 26) is selected.
Using the self-timer
After the shutter button is pressed all the way
down, the picture is taken after a short delay.
1 Select the self-timer option in the
shooting function menu.
14M44
PP
0.00.0
AUTO
WB
AUTO
WB
AUTO
ISO
AUTO
ISO
OFF 121222OFF
2 Use HI to select the setting
option, and press the A button to
set.
Option Description
Y OFF The self-timer is deactivated.
Y 12 SEC
The self-timer lamp turns on for
approx. 10 seconds, then blinks
for approx. 2 seconds, and then
the picture is taken.
Y 2 SEC
The self-timer lamp blinks for
approx. 2 seconds, then the
picture is taken.
Self-timer shooting is automatically canceled
after one shot.
To cancel the self-timer after it starts
Press the m button.](https://image.slidesharecdn.com/mju901070405010en-141023000835-conversion-gate01/85/Mju-9010-7040_5010_en-27-320.jpg)

![29EN
1 Select the ISO setting option in the
shooting function menu.
PP
0.00.0
AUTO
WB
AUTO
WB
200
ISO
200
ISO
100
ISOISO
100
1/400 F3.21/400 F3.2
400
ISO
400
ISO
ISO 200ISO 200
2 Use HI to select the setting
option, and press the A button to
set.
Option Description
ISO AUTO
The camera automatically adjusts
the sensitivity according to the
shooting scene.
HIGH ISO AUTO
The camera uses a higher
sensitivity compared to
[ISO AUTO] to minimize blur
caused by a moving subject or by
camera shake.
Value
The ISO sensitivity is fixed to the
selected value.
Sequential shooting (Drive)
Pictures are taken sequentially while the shutter
button is held down.
1 Select the drive option in the
shooting function menu.
0.00.0
AUTO
WB
AUTO
WB
AUTO
ISO
AUTO
ISO
PP
SEQUENTIALSEQUENTIAL
Option Description
o
One frame is shot each time the
shutter button is pressed.
j*1
Take sequential shots using the
focus, brightness (exposure) and
white balance set in the first frame.
c
The camera takes sequential shots
at a faster speed than in [j].
d
The camera takes sequential shots
at approximately 10 frames/sec*2
.
*1
The shooting speed varies depending on the
settings for [IMAGE SIZE/COMPRESSION] (p. 30).
*2
STYLUS-7040/μ-7040
approximately 14 frames/
sec.
STYLUS-5010/μ-5010
approximately 10 frames/
sec.
When set to [j], the flash (p.26) cannot
be set to [REDEYE]. In addition, when
set to [c] or [d], the flash is fixed to
[FLASH OFF].
When set to [c] or [d], [IMAGE SIZE]
is limited to [3] or lower, and the ISO
sensitivity is fixed to [ISO AUTO].](https://image.slidesharecdn.com/mju901070405010en-141023000835-conversion-gate01/85/Mju-9010-7040_5010_en-29-320.jpg)
![30 EN
Menus for Shooting Functions
The default settings of the function are highlighted in .
Selecting the image quality for still images [IMAGE SIZE/COMPRESSION]
I (Shooting menu 1) IMAGE SIZE/COMPRESSION
Available shooting modes: P M s P p Q
Submenu 1 Submenu 2 Application
IMAGE SIZE
14M (4288×3216) Suitable for printing pictures over A3 (11×17 in.).
8M (3264×2448) Suitable for printing pictures up to A3 (11×17 in.).
5M (2560×1920) Suitable for printing pictures at A4 (8.5×11 in.).
3M (2048×1536) Suitable for printing pictures up to A4 size (8.5×11 in.).
2M (1600×1200) Suitable for printing pictures at A5 (5×7 in.).
1M (1280×960) Suitable for printing pictures at postcard size.
VGA (640×480)
Suitable for viewing pictures on a TV or using pictures on emails and
web sites.
16:9G (4288×2416)
Suitable for playing pictures on a widescreen TV and for printing on A3
or 11"×17".
16:9F (1920×1080)
Suitable for playing pictures on a widescreen TV and for printing on A5
or 5"×7".
COMPRESSION
FINE Shooting at high quality.
NORMAL Shooting at normal quality.
“Number of storable pictures (still images)/Continuous recording length (movies) in the internal
memory and SD/SDHC memory cards” (p. 60)
Selecting the image quality for movies [IMAGE SIZE/IMAGE QUALITY]
A (Movie menu) IMAGE SIZE/IMAGE QUALITY
Available shooting modes: P M s P p Q
Submenu 1 Submenu 2 Application
IMAGE SIZE
720P
VGA (640×480)
QVGA (320×240)
Select the image quality based on the image size and frame rate.
IMAGE QUALITY FINE/NORMAL Select [FINE] to shoot with higher image quality.
“Number of storable pictures (still images)/Continuous recording length (movies) in the internal
memory and SD/SDHC memory cards” (p. 60)
When [IMAGE SIZE] is set to [QVGA], [IMAGE QUALITY] is fixed to [FINE].](https://image.slidesharecdn.com/mju901070405010en-141023000835-conversion-gate01/85/Mju-9010-7040_5010_en-30-320.jpg)
![31EN
For information on using the menus, see “Using the Menu” (p. 4).
Brightening the subject against
backlight [SHADOW ADJUST]
I (Shooting menu 1) SHADOW ADJUST
Available shooting modes: P M s P p
Q
Submenu 2 Application
AUTO
The shadow adjustment effect is
applied when shooting against
backlight.
OFF The effect is not applied.
ON
Shoot with automatic adjustment
to brighten an area that has
become darker.
When set to [ON], [ESP/n] (p. 31) is
automatically fixed to [ESP].
Selecting the focusing area [AF MODE]
I (Shooting menu 1) AF MODE
Available shooting modes: P M s P p
Q
Submenu 2 Application
FACE/iESP*1
The camera focuses automatically.
(If a face is detected, it is shown
by a white frame*1
; when the
shutter button is pressed halfway
and the camera focuses, the
frame turns to green*2
. If no face is
detected, the camera chooses a
subject in the frame and focuses
automatically.)
SPOT
The camera focuses on the
subject located within the AF
target mark.
AF TRACKING
The camera tracks the subject
movement automatically to focus
on it continuously.
*1
For some subjects, the frame may not appear or
may take some time to appear.
*2
If the frame blinks in red, the camera cannot focus.
Try refocusing on the subject.
To focus on a moving subject
continuously (AF Tracking)
1 Hold the camera to align the AF target
mark on the subject and press the
A button.
2 When the camera recognizes the subject,
the AF target mark automatically tracks
the subject movement to focus on it
continuously.
3 To cancel the tracking, press the
A button.
Depending on the subjects or the shooting
conditions, the camera may be unable to
lock the focus or fail to track the subject
movement.
When the camera fails to track the subject
movement, the AF target mark changes to
red.
Selecting the method for measuring
the brightness [ESP/n]
I (Shooting menu 1) ESP/n
Available shooting modes: P M s P p
Q
Submenu 2 Application
ESP
Shoots to obtain a balanced
brightness over the entire screen
(Meters the brightness at the
center and surrounding areas of
the screen separately).
5 (spot)
Shoots the subject at the center
during backlighting (Meters the
brightness at the center of the
screen).
When set to [ESP], the center may
appear dark when shooting against strong
backlighting.](https://image.slidesharecdn.com/mju901070405010en-141023000835-conversion-gate01/85/Mju-9010-7040_5010_en-31-320.jpg)
![32 EN
Shooting at higher magnifications than
optical zoom without reducing the
image quality [FINE ZOOM]
I (Shooting menu 1) FINE ZOOM
Available shooting modes: P M s P p
Q
Submenu 2 Application
OFF
Optical zoom is used to zoom in
for shooting.
ON
Optical zoom and image cropping
are combined to zoom in for
shooting.*1
*1
STYLUS-9010/μ-9010 Approx. 67× (max.)
STYLUS-7040/μ-7040 Approx. 47× (max.)
STYLUS-5010/μ-5010 Approx. 33.5× (max.)
This function will not reduce the image
quality since it dose not convert the data with
fewer pixels into the data with larger pixels.
When set to [ON], [IMAGE SIZE] is limited
to [4] or lower.
The setting is not available when
[DIGITAL ZOOM] is set to [ON].
[FINE ZOOM] is not available when
[a SUPER MACRO] (p. 26) is selected.
Shooting at higher magnifications than
optical zoom [DIGITAL ZOOM]
I (Shooting menu 1) DIGITAL ZOOM
Available shooting modes: P M s P p
Q
Submenu 2 Application
OFF
Only optical zoom is used to zoom
in for shooting.
ON
Optical zoom and digital zoom
are combined to zoom in for
shooting.*1
*1
STYLUS-9010/μ-9010 Approx. 50× (max.)
STYLUS-7040/μ-7040 Approx. 35× (max.)
STYLUS-5010/μ-5010 Approx. 25× (max.)
The setting is not available when [FINE
ZOOM] is set to [ON].
[DIGITAL ZOOM] is not available when
[a SUPER MACRO] (p. 26) is selected.
Recording sound when shooting still
images [R]
J (Shooting menu 2) R
Available shooting modes: P M s P p
Q
Submenu 2 Application
OFF No sound is recorded.
ON
The camera automatically starts
recording sound for approx.
4 seconds after a picture is taken.
This is useful for recording notes
or comments about the picture.
When recording, aim the microphone (p. 6) at
the source of the sound you want to record.
Recording sound when shooting
movies [R]
A (Movie menu) R
Available shooting modes: P M s P p
Q
Submenu 2 Application
OFF No sound is recorded.
ON Sound is recorded.
When set to [ON], only the digital zoom can
be used during movie recording. To record
the movie with the optical zoom, set [R]
(movies) to [OFF].
Reducing the blur caused by the
camera shake when shooting
[IMAGE STABILIZER] (still images)/
[IS MOVIE MODE] (movies)
I (Shooting menu 1)
IMAGE STABILIZER (still images)/
A (Movie menu)
IS MOVIE MODE (movies)
Available shooting modes: P M s P p
Q
Submenu 2 Application
OFF
The image stabilizer is
deactivated. This is recommended
for shooting when the camera is
fixed in place on a tripod or other
stable surface.
ON The image stabilizer is activated.](https://image.slidesharecdn.com/mju901070405010en-141023000835-conversion-gate01/85/Mju-9010-7040_5010_en-32-320.jpg)
![33EN
For information on using the menus, see “Using the Menu” (p. 4).
The camera’s default settings are [IMAGE
STABILIZER] (still images) to [ON] and [IS
MOVIE MODE] (movies) to [OFF].
There may be a noise coming from inside
the camera when the shutter button is
pressed with [IMAGE STABILIZER] (still
images) set to [ON].
Images may not be stabilized if camera
shake is too severe.
When the shutter speed is extremely slow,
such as when taking pictures at night,
[IMAGE STABILIZER] (still images) may not
be as effective.
When shooting while the [IS MOVIE MODE]
(movies) is set to [ON], the image will be
enlarged somewhat before saving.
Viewing the image immediately after
shooting [REC VIEW]
J (Shooting menu 2) REC VIEW
Available shooting modes: P M s P p
Q
Submenu 2 Application
OFF
The image being recorded is not
displayed. This allows the user
to prepare for the next shot while
following the subject in the monitor
after shooting.
ON
The image being recorded is
displayed. This allows the user to
make a brief check of the image
that was just taken.
Automatically rotating images shot
with the camera in a vertical position
during playback [PIC ORIENTATION]
J (Shooting menu 2) PIC ORIENTATION
Available shooting modes: P M s P p
Q
During shooting, the [y] (p. 39) setting on
the playback menu is set automatically.
This function may not work properly if
the camera is facing up or down during
shooting.
Submenu 2 Application
OFF
Information about the vertical/
horizontal orientation of the
camera during shooting is not
recorded with images. Images
shot with the camera in a vertical
position are not rotated during
playback.
ON
Information about the vertical/
horizontal orientation of the
camera during shooting is
recorded with images. Images
are automatically rotated during
playback.
Displaying icon guides [ICON GUIDE]
J (Shooting menu 2) ICON GUIDE
Available shooting modes: P M s P p
Q
Submenu 2 Application
OFF No icon guide is displayed.
ON
The explanation of the selected
icon will be displayed when
a shooting mode or shooting
function menu icon is selected
(position the cursor on the icon for
a while to display the explanation).
Icon guide
14M44
0.00.0
AUTO
WB
AUTO
WB
AUTO
ISO
AUTO
ISO
PP
Functions can be changed
manually.
PROGRAM AUTOPROGRAM AUTO](https://image.slidesharecdn.com/mju901070405010en-141023000835-conversion-gate01/85/Mju-9010-7040_5010_en-33-320.jpg)
![34 EN
Menus for Playback, Editing, and
Printing Functions
The default settings of the function are highlighted in .
Data must have been created with the PC software (ib) before using some function.
Refer to the PC software (ib) help guide for details on how to use the PC software (ib).
For details on installing the PC software (ib), see “Battery charge and camera setup” (p. 10).
Playing back pictures automatically
[SLIDESHOW]
SLIDESHOW
Submenu 1 Submenu 2 Application
SLIDE
ALL/EVENT/
COLLECTION
Selects the content
to be included in the
slideshow.
BGM
OFF/Cosmic/
Breeze/
Mellow/
Dreamy/
Urban
Selects the
background music
options.
TYPE
STANDARD/
FADE/ZOOM
Selects the type of
transition effect used
between slides.
START ― Starts the slideshow.
Single-frame advance/rewind:
During a slideshow, press I to skip ahead
one frame or press H to go back one frame.
Searching for images and playing back
the related images [PHOTO SURFING]
PHOTO SURFING
In [PHOTO SURFING], images can be
searched and related images can be played
back by selecting the related items.
To start [PHOTO SURFING]
Press the A button to start
[PHOTO SURFING].
When a related item of the image displayed
is selected with FG, images related to the
item are displayed in the lower part of the
monitor. Use HI to display an image.
To select the related items undisplayed,
press the A button when selecting an item.
To stop [PHOTO SURFING], press the
m button, or select [BACK] and press
the A button.
2010/
02/26
2010/
02/26
35ºN
139ºE
35ºN
139ºE
BACKBACK
Related items
Images corresponding the
related items](https://image.slidesharecdn.com/mju901070405010en-141023000835-conversion-gate01/85/Mju-9010-7040_5010_en-34-320.jpg)
![35EN
For information on using the menus, see “Using the Menu” (p. 4).
Viewing images by event [EVENT q]
EVENT q
In [EVENT q], images in an event are
played back. (Images with the same
shooting date are grouped into the same
event.)
To start [EVENT q]
Press the A button to start [EVENT q].
(The event, including the image for which
single-image view was being performed
when the playback function menu was
selected, is played back.)
Use HI to advance or rewind by one
frame.
To stop [EVENT q], press the
m button.
’10/02/26 12:30’10/02/26 12:30
4/304/30
MENU
OK
EXITEXIT
PLAYPLAY
Playing back images by Collection
created with the PC software (ib)
[COLLECTION q]
COLLECTION q
In [COLLECTION q], the collection is
played back that has been created with the
PC software (ib) and imported back from a
computer.
To start [COLLECTION q]
Press the A button, and then use
FGHI to select the desired collection.
Press the A button again to start playback
of the selected collection. Use HI to
advance or rewind by one frame.
To stop [COLLECTION q], press the
m button.
COLLECTION
MENU OKSETBACK
Using a PC software (ib) and importing
data back to the camera
The following functions can be performed
when data created with the PC software (ib)
is imported back to the camera.
Refer to the PC software (ib) help guide for
details on how to use the PC software (ib).
[PHOTO SURFING]
Information of persons or shooting locations
and new Collections can be added in the
related items.
[EVENT q]
Images can be played back by event created
with the PC software (ib).
Event index (p. 19)
The representative images for an event
created with the PC software (ib) can be
displayed.](https://image.slidesharecdn.com/mju901070405010en-141023000835-conversion-gate01/85/Mju-9010-7040_5010_en-35-320.jpg)
![36 EN
Retouching the skin and eyes
[BEAUTY FIX]
BEAUTY FIX
Depending on the picture, the editing may
not be effective.
Submenu 1 Submenu 2 Application
ALL ―
[CLEAR SKIN],
[SPARKLE EYE] and
[DRAMATIC EYE] are
applied together.
CLEAR SKIN
SOFT/AVG/
HARD
Makes skin look
smooth and
translucent. Select the
correction effect from
3 levels.
SPARKLE EYE ―
Enhances the contrast
of the eyes.
DRAMATIC
EYE
―
Enlarges the subject’s
eyes.
1 Use FG to select a correction item, and
press the A button.
2 Use HI to select an image for
retouching, and press the A button.
The retouched image is saved as a separate
image.
When [CLEAR SKIN] is selected
Use FG to select the retouching level, and
press the A button.
CLEAR SKIN
MENU OKSETBACK
AVG
SOFTSOFT
HARD
●
Changing the image size [Q]
EDIT Q
Submenu 2 Application
C 640 × 480
This saves a high-resolution image
as a separate image with a smaller
size for use in e-mail attachments
and other applications.E 320 × 240
1 Use HI to select an image.
2 Use FG to select an image size and
press the A button.
The resized image is saved as a separate
image.
Cropping image [P]
EDIT P
1 Use HI to select an image, and press
the A button.
2 Use the zoom buttons to select the size of
the cropping frame, and use FGHI to
move the frame.
Cropping frame
OKSET
3 Press the A button after you have
selected the area to trim.
The edited image is saved as a separate
image.
●
●](https://image.slidesharecdn.com/mju901070405010en-141023000835-conversion-gate01/85/Mju-9010-7040_5010_en-36-320.jpg)
![37EN
For information on using the menus, see “Using the Menu” (p. 4).
Changing the color tone of image
[COLOR EDIT]
EDIT COLOR EDIT
Submenu 2 Application
BLACK & WHITE
This changes the image to black
and white.
SEPIA
This changes the image to a
sepia tone.
HIGH
SATURATION
This increases the color saturation
of the image.
LOW
SATURATION
This slightly increases the color
saturation of the image.
COLOR EDIT
MENU OKSETEXIT
SEPIA
1 Use HI to select an image, and press
the A button.
2 Use HI to select the desired color, and
press the A button.
The image with the selected color is saved as
a separate image.
Adding a calendar to an image
[CALENDAR]
EDIT CALENDAR
CALENDAR
OKSET
●
1 Use HI to select an image, and press
the A button.
2 Use HI to select a calendar. Use FG
to select the image orientation, and then
press the A button.
3 Use FG to select the Year of the
calendar, and press I.
4 Use FG to select the Month of the
calendar, and press the A button.
The edited image is saved as a separate
image.
Brightening areas that are dark
due to backlight or other reasons
[SHADOW ADJ]
EDIT SHADOW ADJ
1 Use HI to select an image, and press
the A button.
The edited image is saved as a separate
image.
Depending on the picture, the editing may
not be effective.
The retouching process may lower the
image resolution.
Retouching red eyes in flash shooting
[REDEYE FIX]
EDIT REDEYE FIX
1 Use HI to select an image, and press
the A button.
The edited image is saved as a separate
image.
Depending on the picture, the editing may
not be effective.
The retouching process may lower the
image resolution.
●
●
●](https://image.slidesharecdn.com/mju901070405010en-141023000835-conversion-gate01/85/Mju-9010-7040_5010_en-37-320.jpg)
![38 EN
Erasing images [ERASE]
ERASE
Submenu 1 Application
ALL ERASE
All images in the internal memory
or card will be erased.
SEL. IMAGE
Images are individually selected
and erased.
ERASE/
ERASE EVENT*1 Deletes the image displayed.
CANCEL Cancels deletion of the image.
*1
If G is pressed when an event is played back, all
images in the event are erased.
When erasing pictures in the internal
memory, do not insert the card into the
camera. Or set [INTERNAL/SD] to [IN].
Before erasing pictures from a memory
card, insert the card into the camera and
select [AUTO] for [INTERNAL/SD].
“Selecting a storage device [INTERNAL/
SD]” (p. 40)
Protected images cannot be erased.
To individually select and erase
images [SEL. IMAGE]
1 Use FG to select [SEL. IMAGE], and
press the A button.
2 Use HI to select the image to be
erased, and press the A button to add a
R mark to the image.
Press the W zoom button to display an index
view. Images can be quickly selected using
the FGHI buttons. Press the T button to
return to the single frame display.
MENUOK
SEL. IMAGE
ERASE/CANCEL
R mark
3 Repeat Step 2 to select the images to be
erased, and then press the m button
to erase the selected images.
4 Use FG to select [YES], and press the
A button.
The images with a R mark are erased.
●
●
To erase all images [ALL ERASE]
1 Use FG to select [ALL ERASE], and
press the A button.
2 Use FG to select [YES], and press the
A button.
Saving print settings to the image data
[PRINT ORDER]
q (Playback menu) PRINT ORDER
“Print reservations (DPOF)” (p. 50)
Print reservation can be set only for still
images that are recorded to the card. Set
[INTERNAL/SD] to [AUTO].
Protecting images [0]
q (Playback menu) 0
Protected images cannot be erased by
[ERASE] (p. 18, 38), [ERASE EVENT]
(p. 38), [SEL. IMAGE] (p. 38), or
[ALL ERASE] (p. 38), but all images are
erased by [MEMORY FORMAT]/[FORMAT]
(p. 40).
1 Use HI to select an image.
2 Press the A button.
Press the A button again to cancel the
settings.
3 If necessary, repeat Steps 1 and 2
to protect other images, and press the
m button.
Rotating images [y]
q (Playback menu) y
1 Use HI to select an image.
2 Press the A button to rotate the image.
3 If necessary, repeat Steps 1 and 2 to
make settings for other images, and press
the m button.
The new picture orientations will be saved
even after the power is turned off.
●](https://image.slidesharecdn.com/mju901070405010en-141023000835-conversion-gate01/85/Mju-9010-7040_5010_en-38-320.jpg)
![39EN
For information on using the menus, see “Using the Menu” (p. 4).
Adding sound to still images [R]
q (Playback menu) R
1 Use HI to select an image.
2 Aim the microphone toward the sound
source.
Microphone
3 Press the A button.
Recording starts.
The camera adds (records) sound for approx.
4 seconds while playing back the image.
●
●](https://image.slidesharecdn.com/mju901070405010en-141023000835-conversion-gate01/85/Mju-9010-7040_5010_en-39-320.jpg)
![40 EN
The default settings of the function are highlighted in .
Restoring data in the camera
[DATA REPAIR]
r (Settings 1) [DATA REPAIR]
Playback will become available by
performing [DATA REPAIR] when images
never appear on the monitor after q button
is pressed. However, data such as
collections and other groups created with
the PC software (ib) is deleted from the
database in the camera.
Import the data back into the camera from a
computer to playback the data created with
the PC software (ib).
Copying images in the internal memory
to the card [u COPY]
r (Settings 1) u COPY
To copy images in the internal memory
to the card
Use HI to select an image, and press the
A button.
Changing the display language [l]
r (Settings 1) l
“Changing the display language” (p. 14)
Submenu 2 Application
Languages
The language for the menus and
error messages displayed on the
monitor is selected.
Menus for Other Camera Settings
Selecting a storage device
[INTERNAL/SD]
r (Settings 1) INTERNAL/SD
Submenu 2 Application
AUTO
If a card is inserted, the card is
automatically selected. If no card
is inserted, internal memory is
used.
IN*1
Internal memory is selected.
*1
Internal memory is used even if a card is inserted.
Erasing data completely
[MEMORY FORMAT]/[FORMAT]
r (Settings 1) MEMORY FORMAT/
FORMAT
Before formatting, check that no important
data is left in the internal memory or card.
If the internal memory is formatted, the
camera instruction manual and the PC
software (ib) data that are stored on the
internal memory are erased. If necessary,
store the backup before formatting.
Cards must be formatted with this camera
before first use or after being used with
other cameras or computers.
Submenu 2 Application
YES*1
Completely erases the image data
in the internal memory or card
(including protected images).
NO Cancels formatting.
*1
If [AUTO] is selected for [INTERNAL/SD] and a card
is inserted, the card will be formatted. If no card is
inserted, internal memory will be formatted.
If [IN] is selected for [INTERNAL/SD], internal
memory will be formatted whether a card is inserted
or not.](https://image.slidesharecdn.com/mju901070405010en-141023000835-conversion-gate01/85/Mju-9010-7040_5010_en-40-320.jpg)
![41EN
For information on using the menus, see “Using the Menu” (p. 4).
Restoring the shooting functions to the
default settings [RESET]
r (Settings 1) RESET
Submenu 2 Application
YES
Restores the following menu
functions to the default settings.
Flash (p. 26)
Macro (p. 26)
Self-timer (p. 27)
Exposure compensation (p. 27)
White balance (p. 27)
ISO (p. 28)
Drive (p. 29)
Menu functions in [I, J,
A] (p. 30 to 33)
•
•
•
•
•
•
•
•
NO
The current settings will not be
changed.
Selecting a method for connecting
the camera to other devices
[USB CONNECTION]
r (Settings 1) USB CONNECTION
Submenu 2 Application
AUTO
When the camera is connected
to another device, the settings
selection screen is displayed.
STORAGE
Select when connecting the
camera to a computer via a
storage device.
PC
Select when connecting a camera
and computer.
PRINT
Select when connecting to a
PictBridge-compatible printer.
System requirements
Windows : Windows 2000 Professional/
XP Home Edition/
XP Professional/Vista/
Windows 7
Macintosh : Mac OS X v10.3 or later
When using another system other than
Windows XP (SP2 or later)/Windows Vista/
Windows 7, set to [STORAGE].
Even if a computer has USB ports, proper
operation is not guaranteed in the following
cases:
Computers with USB ports installed using an
expansion card, etc.
Computers without a factory-installed OS and
home-built computers
Turning on the camera with the q
button [q POWER ON]
s (Settings 2) q POWER ON
Submenu 2 Application
YES
Pressing the q button turns on
the camera and starts the camera
in the playback mode.
NO
The camera is not turned on. To
turn on the camera, press the
n button.
Saving the mode when the camera is
turned off [SAVE SETTINGS]
s (Settings 2) SAVE SETTINGS
Submenu 2 Application
YES
The shooting mode is saved
when the camera is turned off and
is reactivated the next time the
camera is turned on.
NO
The shooting mode is set to P
mode when the camera is turned
on.
Choosing the opening screen display
[PW ON SETUP]
s (Settings 2) PW ON SETUP
Submenu 2 Application
OFF No opening screen is displayed.
ON
The opening screen is displayed
when the camera is turned on.
●
●](https://image.slidesharecdn.com/mju901070405010en-141023000835-conversion-gate01/85/Mju-9010-7040_5010_en-41-320.jpg)
![42 EN
Selecting the camera sound and its volume [SOUND SETTINGS]
s (Settings 2) SOUND SETTINGS
Submenu 2 Submenu 3 Submenu 4 Application
SILENT MODE*1, 2
OFF/ON —
Select [ON] to disable camera sounds
(operation sounds, shutter sound, and
warning sounds) and mute sound during
playback.
BEEP
SOUND TYPE 1/2/3 Selects the operating sound and volume
of the camera buttons (except the shutter
button).VOLUME
OFF (No Sound)/
LOW/HIGH
SHUTTER SOUND
SOUND TYPE 1/2/3
Selects the type and volume of the shutter
sound.VOLUME
OFF (No Sound)/
LOW/HIGH
8
OFF (No Sound)/
LOW/HIGH
— Selects the warning sound volume.
q VOLUME
OFF (No Sound) or
5 levels of volume
— Selects the image playback volume.
*1
Even when [SILENT MODE] is [ON], FG can be used to adjust volume during playback.
*2
Even when [SILENT MODE] is [ON], sound is played when images are displayed on a television.
Resetting the file names of pictures
[FILE NAME]
s (Settings 2) FILE NAME
Month: 1 to C
(A=October,
B=November,
C=December)
Day: 01 to 31
Pmdd
Folder name Folder name File name
DCIM 100OLYMP
999OLYMP
Pmdd0001.jpg
Pmdd9999.jpg
Automatic
numbering
Automatic
numbering
Submenu 2 Application
RESET
This resets the sequential number
for the folder name and file name
whenever a new card is inserted.*1
This is useful when grouping
images on separate cards.
AUTO
Even when a new card is inserted,
this continues the numbering for
the folder name and file name from
the previous card. This is useful for
managing all image folder names
and files names with sequential
numbers.
*1
The number for the folder name is reset to 100, and
the one for the file name is reset to 0001.](https://image.slidesharecdn.com/mju901070405010en-141023000835-conversion-gate01/85/Mju-9010-7040_5010_en-42-320.jpg)
![43EN
For information on using the menus, see “Using the Menu” (p. 4).
Adjusting the CCD and the image
processing function [PIXEL MAPPING]
s (Settings 2) PIXEL MAPPING
This function has already been adjusted
at factory shipping, and no adjustment is
needed right after purchase. Approximately
once a year is recommended.
For best results, wait at least one minute
after taking or viewing pictures before
performing pixel mapping. If the camera is
turned off during pixel mapping, be sure to
perform it again.
To adjust the CCD and the image
processing function
Press the A button when [START]
(Submenu 2) is displayed.
The camera checks and adjusts the CCD and the
image processing function at the same time.
Adjusting the brightness of the monitor
[s]
s (Settings 2) s
To adjust the monitor brightness
1 Use FG to adjust the brightness while
viewing the screen, and then press the
A button.
MENU OKSETBACK
s
●
Setting the date and time [X]
t (Settings 3) X
“Setting the date, time and time zone”
(p. 13)
To select the date display order
1 Press I after setting Minute, and use
FG to select the date display order.
02 26 12 30:..2010
MENU OKSETCANCEL
X
Y M D TIME
Y/M/DY/M/D
Date order](https://image.slidesharecdn.com/mju901070405010en-141023000835-conversion-gate01/85/Mju-9010-7040_5010_en-43-320.jpg)
![44 EN
Choosing home and alternate time zones [WORLD TIME]
t (Settings 3) WORLD TIME
You will not be able to select a time zone using [WORLD TIME] if the camera clock has not first been
set using [X].
Submenu 2 Submenu 3 Application
HOME/ALTERNATE
x
The time in the home time zone (the time zone selected for x in
submenu 2).
y
The time in the travel destination time zone (the time zone selected
for y in submenu 2).
x*1
— Select the home time zone (x).
y*1, 2
— Select the travel destination time zone (y).
*1
In areas where daylight saving time is in effect, use FG to turn daylight saving time ([SUMMER]) on.
*2
When you select a time zone, the camera automatically calculates the time difference between the selected
zone and the home time zone (x) to display the time in the travel destination time zone (y).
Playing back images on a TV [TV OUT]
t (Settings 3) TV OUT
The TV video signal system varies depending on the countries and regions. Before viewing camera
images on your TV, select the video output according to your TV’s video signal type.
Submenu 2 Submenu 3 Application
VIDEO OUT
NTSC
Connecting the camera to a TV in North America, Taiwan, Korea,
Japan, and so on.
PAL
Connecting the camera to a TV in European countries, China, and
so on.
HDMI OUT 480p/720p/1080i Set the playback format.
HDMI CONTROL
OFF Operate with the camera.
ON Operate with the TV remote control.
The factory default settings differ according to the region where the camera is sold.](https://image.slidesharecdn.com/mju901070405010en-141023000835-conversion-gate01/85/Mju-9010-7040_5010_en-44-320.jpg)
![45EN
For information on using the menus, see “Using the Menu” (p. 4).
To play back camera images on a TV
Connection via AV cable
1 Use the camera to select the same video signal system as the one of connected TV
([NTSC]/[PAL]).
2 Connect the TV and camera.
Connect to the TV video
input jack (yellow) and
audio input jack (white).
AV cable (supplied)
Multi-connector
STYLUS-9010/
μ-9010
STYLUS-7040/
μ-7040
STYLUS-5010/
μ-5010
Multi-connector Multi-connector
Connection via HDMI cable
1 On the camera, select the digital signal format that will be connected ([480p]/[720p]/[1080i]).
2 Connect the TV and camera.
When set to [1080i], 1080i format takes priority for HDMI output. However, if this setting does not
match the input setting of the TV, the signal format is changed first to 720p and then to 480p. For
details on changing the input setting of the TV, refer to the TV’s instruction manual.
When the camera is connected to the computer by the USB cable, do not connect the HDMI
cable to the camera.
●
●](https://image.slidesharecdn.com/mju901070405010en-141023000835-conversion-gate01/85/Mju-9010-7040_5010_en-45-320.jpg)
![46 EN
Connect to the HDMI
connector on the TV.
HDMI micro
connector
HDMI cable (type D/sold separately)
STYLUS-9010/
μ-9010
STYLUS-7040/
μ-7040
STYLUS-5010/
μ-5010
HDMI micro
connector
HDMI micro
connector
3 Turn on the TV, and change “INPUT” to “VIDEO (an input jack connected to the camera).”
For details on changing the input source of the TV, refer to the TV’s instruction manual.
4 Turn on the camera, and use HI to select the image for playback.
Use an HDMI cable that matches the HDMI micro connector on the camera and the HDMI connector on
the TV.
When the camera and TV are connected by both an AV cable and an HDMI cable, the HDMI cable
will take priority.
Depending on the TV’s settings, the displayed images and information may become cropped.
To operate images with the TV remote
control
1 Set [HDMI CONTROL] to [ON], and turn
off the camera.
2 Connect the camera and TV with an
HDMI cable. “Connection via HDMI cable”
(p. 45)
3 First turn on the TV, and then turn on the
camera.
Operate by following the operation guide that
is displayed on the TV.
With some TVs, operations cannot be
performed with the TV remote control even
though the operation guide is displayed on
the screen.
If operations cannot be performed with the
TV remote control, set [HDMI CONTROL] to
[OFF] and operate using the camera.
●
Saving battery power between shots
[POWER SAVE]
t (Settings 3) POWER SAVE
Submenu 2 Application
OFF Cancels [POWER SAVE].
ON
When the camera is not being
used for approx. 10 seconds, the
monitor automatically turns off to
save battery power.
To resume standby mode
Press any button.](https://image.slidesharecdn.com/mju901070405010en-141023000835-conversion-gate01/85/Mju-9010-7040_5010_en-46-320.jpg)
![47EN
Printing
2 Turn on the printer, and then
connect the printer and camera.
OKCUSTOM PRINT
EASYPRINT START
I button
USB cable (supplied)
Multi-connector
STYLUS-7040/μ-7040
STYLUS-5010/μ-5010
STYLUS-9010/
μ-9010
3 Press I to start printing.
4 To print another image, use HI
to select an image, and press the
A button.
To exit printing
After a selected image is displayed on the
screen, disconnect the USB cable from the
camera and printer.
OKPRINTEXIT
Direct printing (PictBridge*1
)
By connecting the camera to a PictBridge-
compatible printer, you can print images directly
without using a computer.
To find out if your printer supports PictBridge,
refer to the printer’s instruction manual.
*1
PictBridge is a standard for connecting digital
cameras and printers of different makers and
printing out pictures directly.
The printing modes, paper sizes, and other
parameters that can be set with the camera
vary depending on the printer that is used.
For details, refer to the printer’s instruction
manual.
For details on the available paper types,
loading paper, and installing ink cassettes,
refer to the printer’s instruction manual.
Printing images at the
printer’s standard settings
[EASY PRINT]
In the [SETUP] menu, set [USB
CONNECTION] to [PRINT]. “Using the
Menu” (p. 4)
1 Display the image to be printed on
the monitor.
“Viewing images” (p. 17)](https://image.slidesharecdn.com/mju901070405010en-141023000835-conversion-gate01/85/Mju-9010-7040_5010_en-47-320.jpg)
![48 EN
Changing the printer’s settings
for printing [CUSTOM PRINT]
1 Follow Steps 1 and 2 for [EASY
PRINT] (p. 47).
2 Press the A button.
3 Use FG to select the print mode,
and press the A button.
PRINT MODE SELECT
MULTI PRINT
PRINT ORDER
ALL INDEX
MENU OKSETEXIT
ALL PRINT
PRINTPRINT
Submenu 2 Application
PRINT
This prints the image selected in
Step 6.
ALL PRINT
This prints all images stored in the
internal memory or card.
MULTI PRINT
This prints one image in a multiple
layout format.
ALL INDEX
This prints an index of all images
stored in the internal memory
or card.
PRINT ORDER*1 This prints images based on the
print reservation data on the card.
*1
[PRINT ORDER] is available only when print
reservations have been made. “Print Reservations
(DPOF)” (p. 50)
4 Use FG to select [SIZE] (Submenu
3), and press I.
If the [PRINTPAPER] screen is not
displayed, the [SIZE], [BORDERLESS],
and [PICS/SHEET] are set to the printer’s
standard.
PRINTPAPER
SIZE BORDERLESS
STANDARD
OKSETMENUBACK
STANDARDSTANDARD
5 Use FG to select the
[BORDERLESS] or [PICS/SHEET]
settings, and press the A button.
Submenu 4 Application
OFF/ON*1
The image is printed with a border
around it ([OFF]).
The image is printed to fill the
entire paper ([ON]).
(The number of
images per sheet
varies depending
on the printer.)
The number of images per sheet
([PICS/SHEET]) is selectable only
when [MULTI PRINT] is selected
in Step 3.
*1
The available settings for [BORDERLESS] vary
depending on the printer.
If [STANDARD] is selected in Steps 4 and 5,
the image is printed at the printer’s standard
settings.
NORM
OK
SINGLE PRINT
PRINT
4/304/30
MORE
’10/02/26 12:30’10/02/26 12:30
NORM 14M
FILE 100 0004100 0004
6 Use HI to select an image.
7 Press F to make a print reservation
for the current image. Press G to
make the detailed printer settings
for the current image.
To make the detailed printer settings
1 Use FGHI to select the setting, and
press the A button.
PRINT INFO
FILE NAME
P
DATE
WITHOUT
WITHOUT
MENU OKSETEXIT
<x<x 11](https://image.slidesharecdn.com/mju901070405010en-141023000835-conversion-gate01/85/Mju-9010-7040_5010_en-48-320.jpg)
![49EN
Submenu
5
Submenu
6
Application
<× 0 to 10
This selects the number
of prints.
DATE
WITH/
WITHOUT
Selecting [WITH] prints the
images with the date.
Selecting [WITHOUT]
prints the images without
the date.
FILE NAME
WITH/
WITHOUT
Selecting [WITH] prints the
file name on the image.
Selecting [WITHOUT] does
not print any file name on
the image.
P
(Proceeds
to the
setting
screen.)
This selects a portion of
the image for printing.
To crop an image [P]
1 Use the zoom buttons to select the size
of the cropping frame, use FGHI
to move the frame, and then press the
A button.
Cropping frame
OKSET
2 Use FG to select [OK], and press the
A button.
MENU OK
P
CANCEL
OKOK
SETBACK
8 If necessary, repeat Steps 6 and 7
to select the image to be printed,
make the detailed settings, and set
[SINGLEPRINT].
9 Press the A button.
PRINT
MENU OK
CANCEL
SETBACK
PRINTPRINT
10Use FG to select [PRINT], and
press the A button.
Printing starts.
When [OPTION SET] is selected in [ALL PRINT]
mode, [PRINT INFO] screen is displayed.
When printing is finished, the [PRINT MODE
SELECT] screen is displayed.
PRINT MODE SELECT
MULTI PRINT
PRINT ORDER
ALL INDEX
MENU OKSETEXIT
ALL PRINT
PRINTPRINT
To cancel printing
1 Press the m button while [DO NOT
REMOVE USB CABLE] is displayed.
2 Select [CANCEL] using FG and then
press the A button.
PRINT
OKSET
CONTINUE
CANCELCANCEL
MENU
DO NOT REMOVE USB CABLE
CANCEL
●
●
●](https://image.slidesharecdn.com/mju901070405010en-141023000835-conversion-gate01/85/Mju-9010-7040_5010_en-49-320.jpg)
![50 EN
11Press the m button.
12When the message [REMOVE USB
CABLE] is displayed, disconnect
the USB cable from the camera and
printer.
Print Reservations (DPOF*1
)
In print reservations, the number of prints and
date imprint option are saved in the image on
the card. This enables easy printing at a printer
or print shop supporting DPOF by using only the
print reservations on the card without a computer
or a camera.
*1
DPOF is a standard for storing automatic printout
information from digital cameras.
Print reservations can be set only for the
images stored on the card. Insert a card
with recorded images before making print
reservations.
DPOF reservations set by another DPOF
device cannot be changed by this camera.
Make changes using the original device.
Making new DPOF reservations with this
camera will erase the reservations made by
the other device.
DPOF print reservations can be made for up
to 999 images per card.
Single-frame print
reservations [<]
1 Display the [SETUP] menu.
“Using the Menu” (p. 4)
2 From the playback menu q, select
[PRINT ORDER] and then press the
A button.
PRINT ORDER
U
MENU OKSETEXIT
<<
3 Use FG to select [<], and press
the A button.
NORM
4/304/30
’10/02/26 12:30’10/02/26 12:30
NORM 14M
FILE 100 0004100 0004
OK
00
SET
4 Use HI to select the image for
print reservation. Use FG to select
the quantity. Press the A button.
MENU OK
X
DATE
TIME
SETBACK
NONO
5 Use FG to select the [X] (date
print) screen option, and press the
A button.
Submenu 2 Application
NO This prints the image only.
DATE
This prints the image with the
shooting date.
TIME
This prints the image with the
shooting time.
PRINT ORDER
CANCEL
1 ( 1)1 ( 1)
MENU OKSETBACK
SETSET
6 Use FG to select [SET], and press
the A button.](https://image.slidesharecdn.com/mju901070405010en-141023000835-conversion-gate01/85/Mju-9010-7040_5010_en-50-320.jpg)
![51EN
Reserving one print each of all
images on the card [U]
1 Follow Steps 1 and 2 in [<] (p. 50).
2 Use FG to select [U], and press
the A button.
3 Follow Steps 5 and 6 in [<].
Resetting all print reservation
data
1 Follow Steps 1 and 2 in [<] (p. 40).
2 Select either [<] or [U], and press
the A button.
PRINT ORDER SETTING
MENU OK
PRINT ORDERED
SETBACK
KEEP
RESETRESET
3 Use FG to select [RESET], and
press the A button.
Resetting the print reservation
data for selected images
1 Follow Steps 1 and 2 in [<] (p. 50).
2 Use FG to select [<], and press
the A button.
3 Use FG to select [KEEP] and
press the A button.
4 Use HI to select the image with
the print reservation you want to
cancel. Use FG to set the print
quantity to “0”.
5 If necessary, repeat Step 4, and then
press the A button when finished.
6 Use FG to select the [X] (date
print) screen option, and press the
A button.
The settings are applied to the remaining images
with the print reservation data.
7 Use FG to select [SET], and press
the A button.
●](https://image.slidesharecdn.com/mju901070405010en-141023000835-conversion-gate01/85/Mju-9010-7040_5010_en-51-320.jpg)

![53EN
Error message
When one of the messages below is
displayed on the monitor, check the
corrective action.
Error message Corrective action
CARD ERROR
Card problem
Insert a new card.
WRITE
PROTECT
Card problem
The card write-protect switch is
set to the “LOCK” side. Release
the switch.
MEMORY FULL
Internal memory problem
Insert a card.
Erase unwanted images.*1
•
•
CARD FULL
Card problem
Replace the card.
Erase unwanted images.*1
•
•
CARD SETUP
OKSET
FORMAT
POWER OFFPOWER OFF
Card problem
Use FG to select [FORMAT],
and press the A button. Next,
use FG to select [YES], and
press the A button.*2
MEMORY SETUP
OK
MEMORY FORMAT
SET
POWER OFFPOWER OFF
Internal memory problem
Use FG to select [MEMORY
FORMAT], and press the
A button. Next, use FG to
select [YES], and press the
A button.*2
NO PICTURE
Internal memory/Card problem
Take pictures before viewing
them.
PICTURE
ERROR
Problem with selected image
Use photo retouch software,
etc. to view the image on a
computer. If the image still
cannot be viewed, the image file
is corrupted.
THE IMAGE
CANNOT
BE EDITED
Problem with selected image
Use photo retouch software, etc.
to edit the image on a computer.
BATTERY
EMPTY
Battery problem
Charge the battery.
NO
CONNECTION
Connection problem
Connect the camera and
computer or printer correctly.
NO PAPER
Printer problem
Load paper into the printer.
Error message Corrective action
NO INK
Printer problem
Refill the ink in the printer.
JAMMED
Printer problem
Remove the jammed paper.
SETTINGS
CHANGED*3
Printer problem
Return to the status where the
printer can be used.
PRINT ERROR
Printer problem
Turn off the camera and printer,
check the printer for any
problems, and then turn the
power on again.
CANNOT PRINT*4
Problem with selected image
Use a computer to print.
*1
Before erasing important images, download them to
a computer.
*2
All data will be erased.
*3
This is displayed, for instance, when the printer’s
paper tray has been removed. Do not operate
the printer while making the print settings on the
camera.
*4
This camera may be unable to print images taken by
other cameras.](https://image.slidesharecdn.com/mju901070405010en-141023000835-conversion-gate01/85/Mju-9010-7040_5010_en-53-320.jpg)
![54 EN
Shooting tips
When you are unsure of how to take a picture
that you envision, refer to the information below.
Focusing
“Focusing on the subject”
Taking a picture of a subject not in the center
of the screen
After focusing on an object at the same distance
as the subject, compose the shot, and take the
picture.
Pressing the shutter button halfway (p. 15)
Set [AF MODE] (p. 31) to [FACE/iESP]
Taking a picture in [AF TRACKING] mode
(p. 31)
The camera tracks the subject movement
automatically to focus on it continuously.
Taking a picture of subjects where autofocus
is difficult
In the following cases, after focusing on an object
(by pressing the shutter button halfway down) with
high contrast at the same distance as the subject,
compose the shot, and take the picture.
Subjects with low contrast
When extremely bright objects
appear in the center of the
screen
Object with no vertical lines*1
*1
It is also effective to compose the shot by holding the
camera vertically to focus, and then returning to the
horizontal position to take the picture.
When objects are at different
distances
●
●
●
●
Fast-moving object
The subject is not in the center
of the frame
Camera shake
“Taking pictures without camera shake”
Taking pictures using [IMAGE STABILIZER]
(p. 32)
When a picture is taken of a shadowy subject, the
CCD*1
shifts to correct for camera shake even if
the ISO speed is not increased. This function is
also effective when taking pictures at a high zoom
magnification.
*1
A device that takes light received through the
lens and converts it into electric signals.
Shooting movies using [IS MOVIE MODE]
(p. 32)
Select C (SPORT) in the scene mode (p. 22)
The C (SPORT) mode uses a fast shutter speed
and can reduce the blur incurred by a moving
subject.
Taking pictures at a high ISO sensitivity
If a high ISO sensitivity is selected, pictures can
be taken at a high shutter speed even at locations
where a flash cannot be used.
“Selecting the ISO sensitivity” (p. 28)
●
●
●
●](https://image.slidesharecdn.com/mju901070405010en-141023000835-conversion-gate01/85/Mju-9010-7040_5010_en-54-320.jpg)
![55EN
Exposure (brightness)
“Taking pictures with the right
brightness”
Taking pictures of a subject against a backlight
Faces or backgrounds are bright even when shot
against backlight.
[SHADOW ADJUST] (p. 31)
Taking pictures using [FACE/iESP] (p. 31)
Appropriate exposure is obtained for a face
against backlight, and the face is brightened.
Taking pictures using [n] for [ESP/n]
(p. 31)
Brightness is matched with a subject in the center
of the screen and the image is not affected by
background light.
Taking pictures using [FILL IN] (p. 26) flash
A subject against backlight is brightened.
Taking pictures of a white beach or snow
scene
Set the mode to [q BEACH & SNOW] (p. 22)
Taking pictures using exposure compensation
(p. 27)
Adjust the brightness while viewing the screen
for taking the picture. Normally, taking pictures of
white subjects (such as snow) results in images
that are darker than the actual subject. Use the
exposure compensation to adjust in the positive
(+) direction to express whites as they appear.
When taking pictures of black subjects, on the
other hand, it is effective to adjust in the negative
(-) direction.
Color hue
“Taking pictures with colors at the same
shade as they appear”
Taking pictures by selecting white balance
(p. 28)
Best results in most environments can normally
be obtained with the [WB AUTO] setting, but for
some subjects, you should try experimenting
with different settings. (This is especially true for
sunshade under a clear sky, mixed natural and
artificial light settings, and so on.)
Taking pictures using [FILL IN] (p. 26) flash
Use of the flash is also effective for shooting under
fluorescent and other artificial lighting.
●
●
●
●
●
●
●
●
Image quality
“Taking sharper pictures”
Taking pictures with the optical zoom
Avoid using digital zoom (p. 32) to take pictures.
Taking pictures at a low ISO sensitivity
If the picture is taken with a high ISO sensitivity,
noise (small colored spots and color unevenness
that were not in the original image) can occur, and
the image can appear grainy.
“Selecting the ISO sensitivity” (p. 28)
Panorama
“Taking pictures so that the frames are
stitched smoothly”
A tip for panoramic shooting
Taking pictures by pivoting with the camera at the
center prevents shifting of the image. When taking
pictures of close objects in particular, pivoting with
the lens end at the center produces favorable
results.
[PANORAMA] (p. 23)
Batteries
“Making batteries last longer”
Avoid any of the following operations when not
actually taking pictures because they deplete
the battery power
Repeatedly pressing the shutter button
halfway.
Repeatedly using the zoom.
Set [POWER SAVE] (p. 46) to [ON]
●
●
●
●
●
●
●](https://image.slidesharecdn.com/mju901070405010en-141023000835-conversion-gate01/85/Mju-9010-7040_5010_en-55-320.jpg)
![56 EN
Playback/Editing tips
Playback
“Playing images in the internal memory
and card”
Remove the card and display the images in
internal memory
“Inserting the battery” (p. 10), “Inserting the
SD/SDHC memory card (sold separately)”
(p. 14)
Selecting a storage device
[INTERNAL/SD] (p. 40)
“Viewing images with high picture quality
on a high-definition TV”
Connect the camera to the TV using an HDMI
cable (sold separately)
“To play back camera images on a TV” (p. 45)
Editing
“Erasing the sound recorded to a still
image”
Record over the sound with silence when
playing back the image
“Adding sound to still images [R]” (p. 39)
●
●
●
●
●
●](https://image.slidesharecdn.com/mju901070405010en-141023000835-conversion-gate01/85/Mju-9010-7040_5010_en-56-320.jpg)
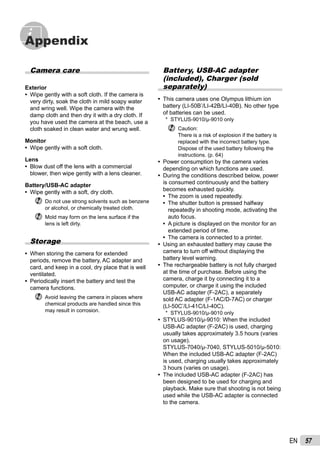
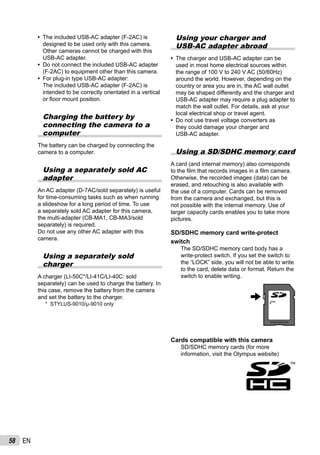
![59EN
Using a new card
Cards must be formatted with this camera
before first use or after being used with other
cameras or computers.
[MEMORY FORMAT]/[FORMAT] (p. 40)
Checking the image saving location
The memory indicator shows whether the
internal memory or card is being used during
shooting and playback.
Current memory indicator
v: Internal memory is being used
w: Card is being used
Current memory
indicator
Playback mode
Shooting mode
’10/02/26 12:30’10/02/26 12:30
4/304/3044
PP
0.00.0
AUTO
WB
AUTO
WB
AUTO
ISO
AUTO
ISO
14M
00:3400:34
Even if [MEMORY FORMAT]/[FORMAT],
[ERASE], [ERASE EVENT], [SEL. IMAGE],
or [ALL ERASE] is performed, the data in
the card is not completely erased. When
disposing of the card, damage the card to
prevent the disclosure of personal data.
Readout/recording process of the card
During shooting, the current memory
indicator blinks red while the camera is
writing data. Never open the battery/card
compartment cover or unplug the USB
cable. This can not only damage the image
data but also render the internal memory or
card unusable.
44
PP
0.00.0
AUTO
WB
AUTO
WB
AUTO
ISO
AUTO
ISO
14M
00:3400:34
Flashes in red](https://image.slidesharecdn.com/mju901070405010en-141023000835-conversion-gate01/85/Mju-9010-7040_5010_en-59-320.jpg)
![60 EN
Number of storable pictures (still images)/Continuous recording length (movies) in the
internal memory and SD/SDHC memory cards
The figures in the following tables are quoted only as a rough guideline. The actual number of
storable pictures or continuous recording lengths will differ according to the shooting conditions and
memory cards used.
The figures in the table below are the number of the storable pictures when using the internal
memory formatted. [MEMORY FORMAT]/[FORMAT] (p. 40)
Still pictures
IMAGE SIZE
COMPRES-
SION
Number of storable still pictures
Internal memory
STYLUS-9010/μ-9010 STYLUS-7040/μ-7040 STYLUS-5010/μ-5010
With
sound
Without
sound
With
sound
Without
sound
With
sound
Without
sound
6 4288×3216
L 265 266 265 266 123 124
M 518 523 518 523 242 244
4 3264×2448
L 452 456 452 456 210 212
M 877 891 877 891 408 414
n 2560×1920
L 722 731 722 731 335 340
M 1,426 1,463 1,426 1,462 671 688
3 2048×1536
L 1,141 1,164 1,140 1,164 530 541
M 2,194 2,282 2,194 2,281 1,020 1,060
2 1600×1200
L 1,840 1,902 1,840 1,901 855 884
M 3,356 3,566 3,355 3,565 1,607 1,711
1 1280×960
L 2,717 2,853 2,716 2,852 1,293 1,360
M 5,187 5,706 5,186 5,704 2,411 2,652
7 640×480
L 8,151 9,510 8,149 9,508 4,080 4,822
M 14,265 19,020 14,262 19,016 6,630 8,841
K 3968×2232
L 350 352 349 352 163 164
M 687 695 687 695 319 323
0 1920×1080
L 1,678 1,729 1,677 1,728 791 816
M 3,170 3,356 3,169 3,355 1,515 1,607
IMAGE SIZE
COMPRES-
SION
Number of storable still pictures
SD/SDHC memory card (1 GB)
STYLUS-9010/μ-9010 STYLUS-7040/μ-7040 STYLUS-5010/μ-5010
With
sound
Without
sound
With
sound
Without
sound
With
sound
Without
sound
6 4288×3216
L 141 141 141 141 141 141
M 276 279 276 278 276 278
4 3264×2448
L 240 242 240 242 240 242
M 465 473 465 472 465 472
n 2560×1920
L 383 388 383 387 383 387
M 766 786 766 786 766 786
3 2048×1536
L 605 617 605 617 605 617
M 1,164 1,210 1,163 1,210 1,163 1,210
2 1600×1200
L 976 1,009 976 1,008 976 1,008
M 1,834 1,953 1,834 1,952 1,834 1,952
1 1280×960
L 1,476 1,552 1,476 1,551 1,476 1,551
M 2,752 3,027 2,751 3,026 2,751 3,026
7 640×480
L 4,657 5,504 4,655 5,502 4,655 5,502
M 7,568 10,091 7,565 10,087 7,565 10,087
K 3968×2232
L 186 187 186 187 186 187
M 364 369 364 369 364 369
0 1920×1080
L 903 931 903 931 903 931
M 1,729 1,834 1,729 1,834 1,729 1,834](https://image.slidesharecdn.com/mju901070405010en-141023000835-conversion-gate01/85/Mju-9010-7040_5010_en-60-320.jpg)
![61EN
Movies
IMAGE SIZE
IMAGE
QUALITY
Continuous recording length
Internal memory
STYLUS-9010/μ-9010 STYLUS-7040/μ-7040 STYLUS-5010/μ-5010
With
sound
Without
sound
With
sound
Without
sound
With
sound
Without
sound
L 1280×720
L
19 min.
53 sec.
20 min.
13 sec.
19 min.
53 sec.
20 min.
13 sec.
9 min.
13 sec.
9 min.
22 sec.
M 29 min. 29 min. 29 min. 29 min.
18 min.
9 sec.
18 min.
44 sec.
8 640×480
L
39 min.
9 sec.
40 min.
25 sec.
39 min.
8 sec.
40 min.
24 sec.
18 min.
9 sec.
18 min.
44 sec.
M
75 min.
51 sec.
80 min.
43 sec.
75 min.
50 sec.
80 min.
42 sec.
35 min.
10 sec.
37 min.
25 sec.
9 320×240 L
75 min.
51 sec.
80 min.
43 sec.
75 min.
50 sec.
80 min.
42 sec.
35 min.
10 sec.
37 min.
25 sec.
IMAGE SIZE
IMAGE
QUALITY
Continuous recording length
SD/SDHC memory card (1 GB)
STYLUS-9010/μ-9010 STYLUS-7040/μ-7040 STYLUS-5010/μ-5010
With
sound
Without
sound
With
sound
Without
sound
With
sound
Without
sound
L 1280×720
L
10 min.
32 sec.
10 min.
42 sec.
10 min.
31 sec.
10 min.
42 sec.
10 min.
31 sec.
10 min.
42 sec.
M
20 min.
43 sec.
21 min.
24 sec.
20 min.
43 sec.
21 min.
23 sec.
20 min.
43 sec.
21 min.
23 sec.
8 640×480
L
20 min.
43 sec.
21 min.
24 sec.
20 min.
43 sec.
21 min.
23 sec.
20 min.
43 sec.
21 min.
23 sec.
M
40 min.
10 sec.
42 min.
44 sec.
40 min.
9 sec.
42 min.
43 sec.
40 min.
9 sec.
42 min.
43 sec.
9 320×240 L
40 min.
10 sec.
42 min.
44 sec.
40 min.
9 sec.
42 min.
43 sec.
40 min.
9 sec.
42 min.
43 sec.
The maximum file size of a single movie is 4 GB, regardless of the capacity of the card.
Increasing the number of pictures that can be taken
Either erase unwanted images, or connect the camera to a computer or other device to save
the images, and then erase the images in the internal memory or card. [ERASE] (p. 18, 38),
[ERASE EVENT] (p. 38), [SEL. IMAGE] (p. 38), [ALL ERASE] (p. 38), [MEMORY FORMAT]/
[FORMAT] (p. 40)](https://image.slidesharecdn.com/mju901070405010en-141023000835-conversion-gate01/85/Mju-9010-7040_5010_en-61-320.jpg)
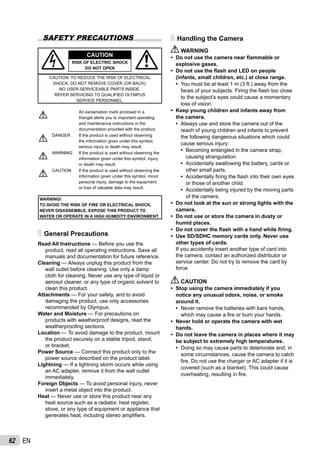
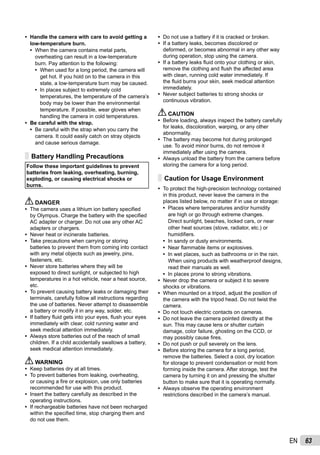
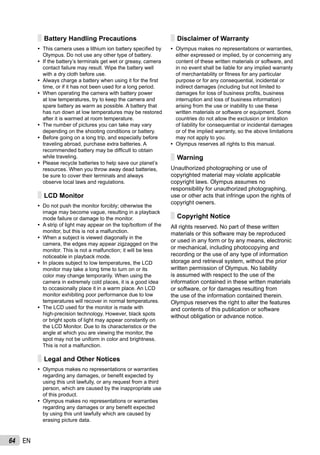
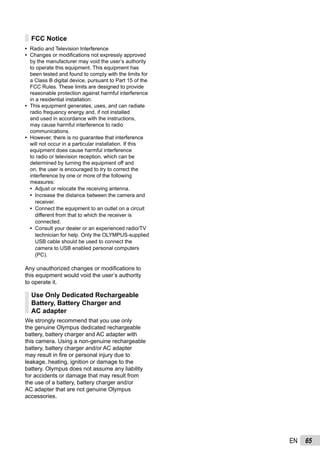
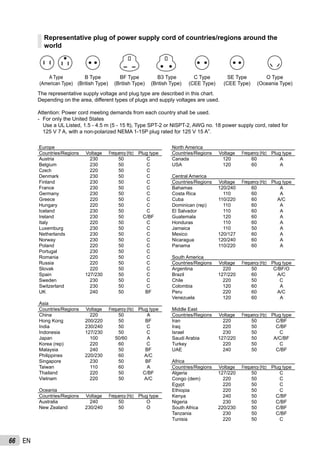

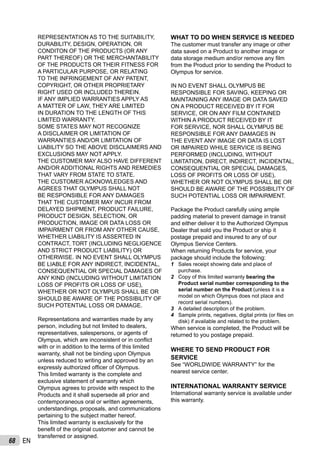
![69EN
For customers in Europe
“CE” mark indicates that this product complies
with the European requirements for safety,
health, environment and customer protection.
“CE” mark cameras are intended for sales in
Europe.
This symbol [crossed-out wheeled bin WEEE
Annex IV] indicates separate collection of waste
electrical and electronic equipment in the EU
countries.
Please do not throw the equipment into the
domestic refuse.
Please use the return and collection systems
available in your country for the disposal of this
product.
This symbol [crossed-out wheeled bin Directive
2006/66/EC Annex II] indicates separate
collection of waste batteries in the EU countries.
Please do not throw the batteries into the
domestic refuse. Please use the return and
collection systems available in your country for
the disposal of the waste batteries.
Provisions of warranty
1 If this product proves to be defective, although it
has been used properly (in accordance with the
written Handling Care and Operating instructions
supplied with it), during the applicable national
warranty period and has been purchased from
an authorized Olympus distributor within the
business area of Olympus Europa Holding GmbH
as stipulated on the website: http://www.olympus.
com this product will be repaired, or at Olympus’s
option replaced, free of charge. To claim under
this warranty the customer must take the product
before the end of the applicable national warranty
period to the dealer where the product was
purchased or any other Olympus service station
within the business area of Olympus Europa
Holding GmbH as stipulated on the website:
http://www.olympus.com. During the one year
period of the World Wide Guarantee the customer
may turn the product in at any Olympus service
station. Please notice that not in all countries
such Olympus service station exists.
2 The customer shall transport the product to the
dealer or Olympus authorized service station
at his own risk and shall be responsible for any
costs incurred in transporting the product.
Provisions of Guarantee
1 “OLYMPUS IMAGING CORP., Shinjuku
Monolith, 2-3-1 Nishi-Shinjuku, Shinjuku-ku,
Tokyo 163-0914, Japan grants a one year World
Wide Guarantee. This worldwide Guarantee
must be presented at an Olympus authorized
repair service station before any repair can
be made under conditions of this Guarantee.
This Guarantee is valid only if the Guarantee
Certificate and proof of purchase are presented
at the Olympus repair service station. Please note
that this Guarantee is in addition to and does not
affect the customer’s legal warranty rights under
the applicable national legislation governing the
sale of consumer goods mentioned above.
2 This Guarantee does not cover the following
and the customer will be required to pay repair
charge, even for defects occurring within the
Guarantee period referred to above.
Any defect that occurs due to mishandling
(such as an operation performed that is not
mentioned in the Handling Care or other
sections of the instructions, etc.)
Any defect that occurs due to repair,
modification, cleaning, etc. performed by
anyone other than Olympus or an Olympus
authorized service station.
Any defect or damage that occurs due to
transport, a fall, shock, etc. after purchase of
the product.
Any defect or damage that occurs due to fire,
earthquake, flood damage, thunderbolt, other
natural disasters, environmental pollution and
irregular voltage sources.
Any defect that occurs due to careless or
improper storage (such as keeping the
product under conditions of high temperature
and humidity, near insect repellents such as
naphthalene or harmful drugs, etc.), improper
maintenance, etc.
Any defect that occurs due to exhausted
batteries, etc.
Any defect that occurs due to sand, mud, etc.
entering the inside of the product casing.
When the Guarantee Certificate is not
returned with the product.
When any alterations whatsoever are made to
the Guarantee Certificate regarding the year,
month and date of purchase, the customer’s
name, the dealer’s name, and the serial
number.
When proof of purchase is not presented with
this Guarantee Certificate.
3 This Guarantee applies to the product only; the
Guarantee does not apply to any other accessory
equipment, such as the case, strap, lens cap and
batteries.
4 Olympus’s sole liability under this Guarantee shall
be limited to repairing or replacing the product.
Any liability under the Guarantee for indirect
or consequential loss or damage of any kind
incurred or suffered by the customer due to a
defect of the product, and in particular any loss
or damage caused to any lenses, films, other
equipment or accessories used with the product
or for any loss resulting from a delay in repair or
loss of data, is excluded. Compelling regulations
by law remain unaffected by this.
a.
b.
c.
d.
e.
f.
g.
h.
i.
j.](https://image.slidesharecdn.com/mju901070405010en-141023000835-conversion-gate01/85/Mju-9010-7040_5010_en-69-320.jpg)