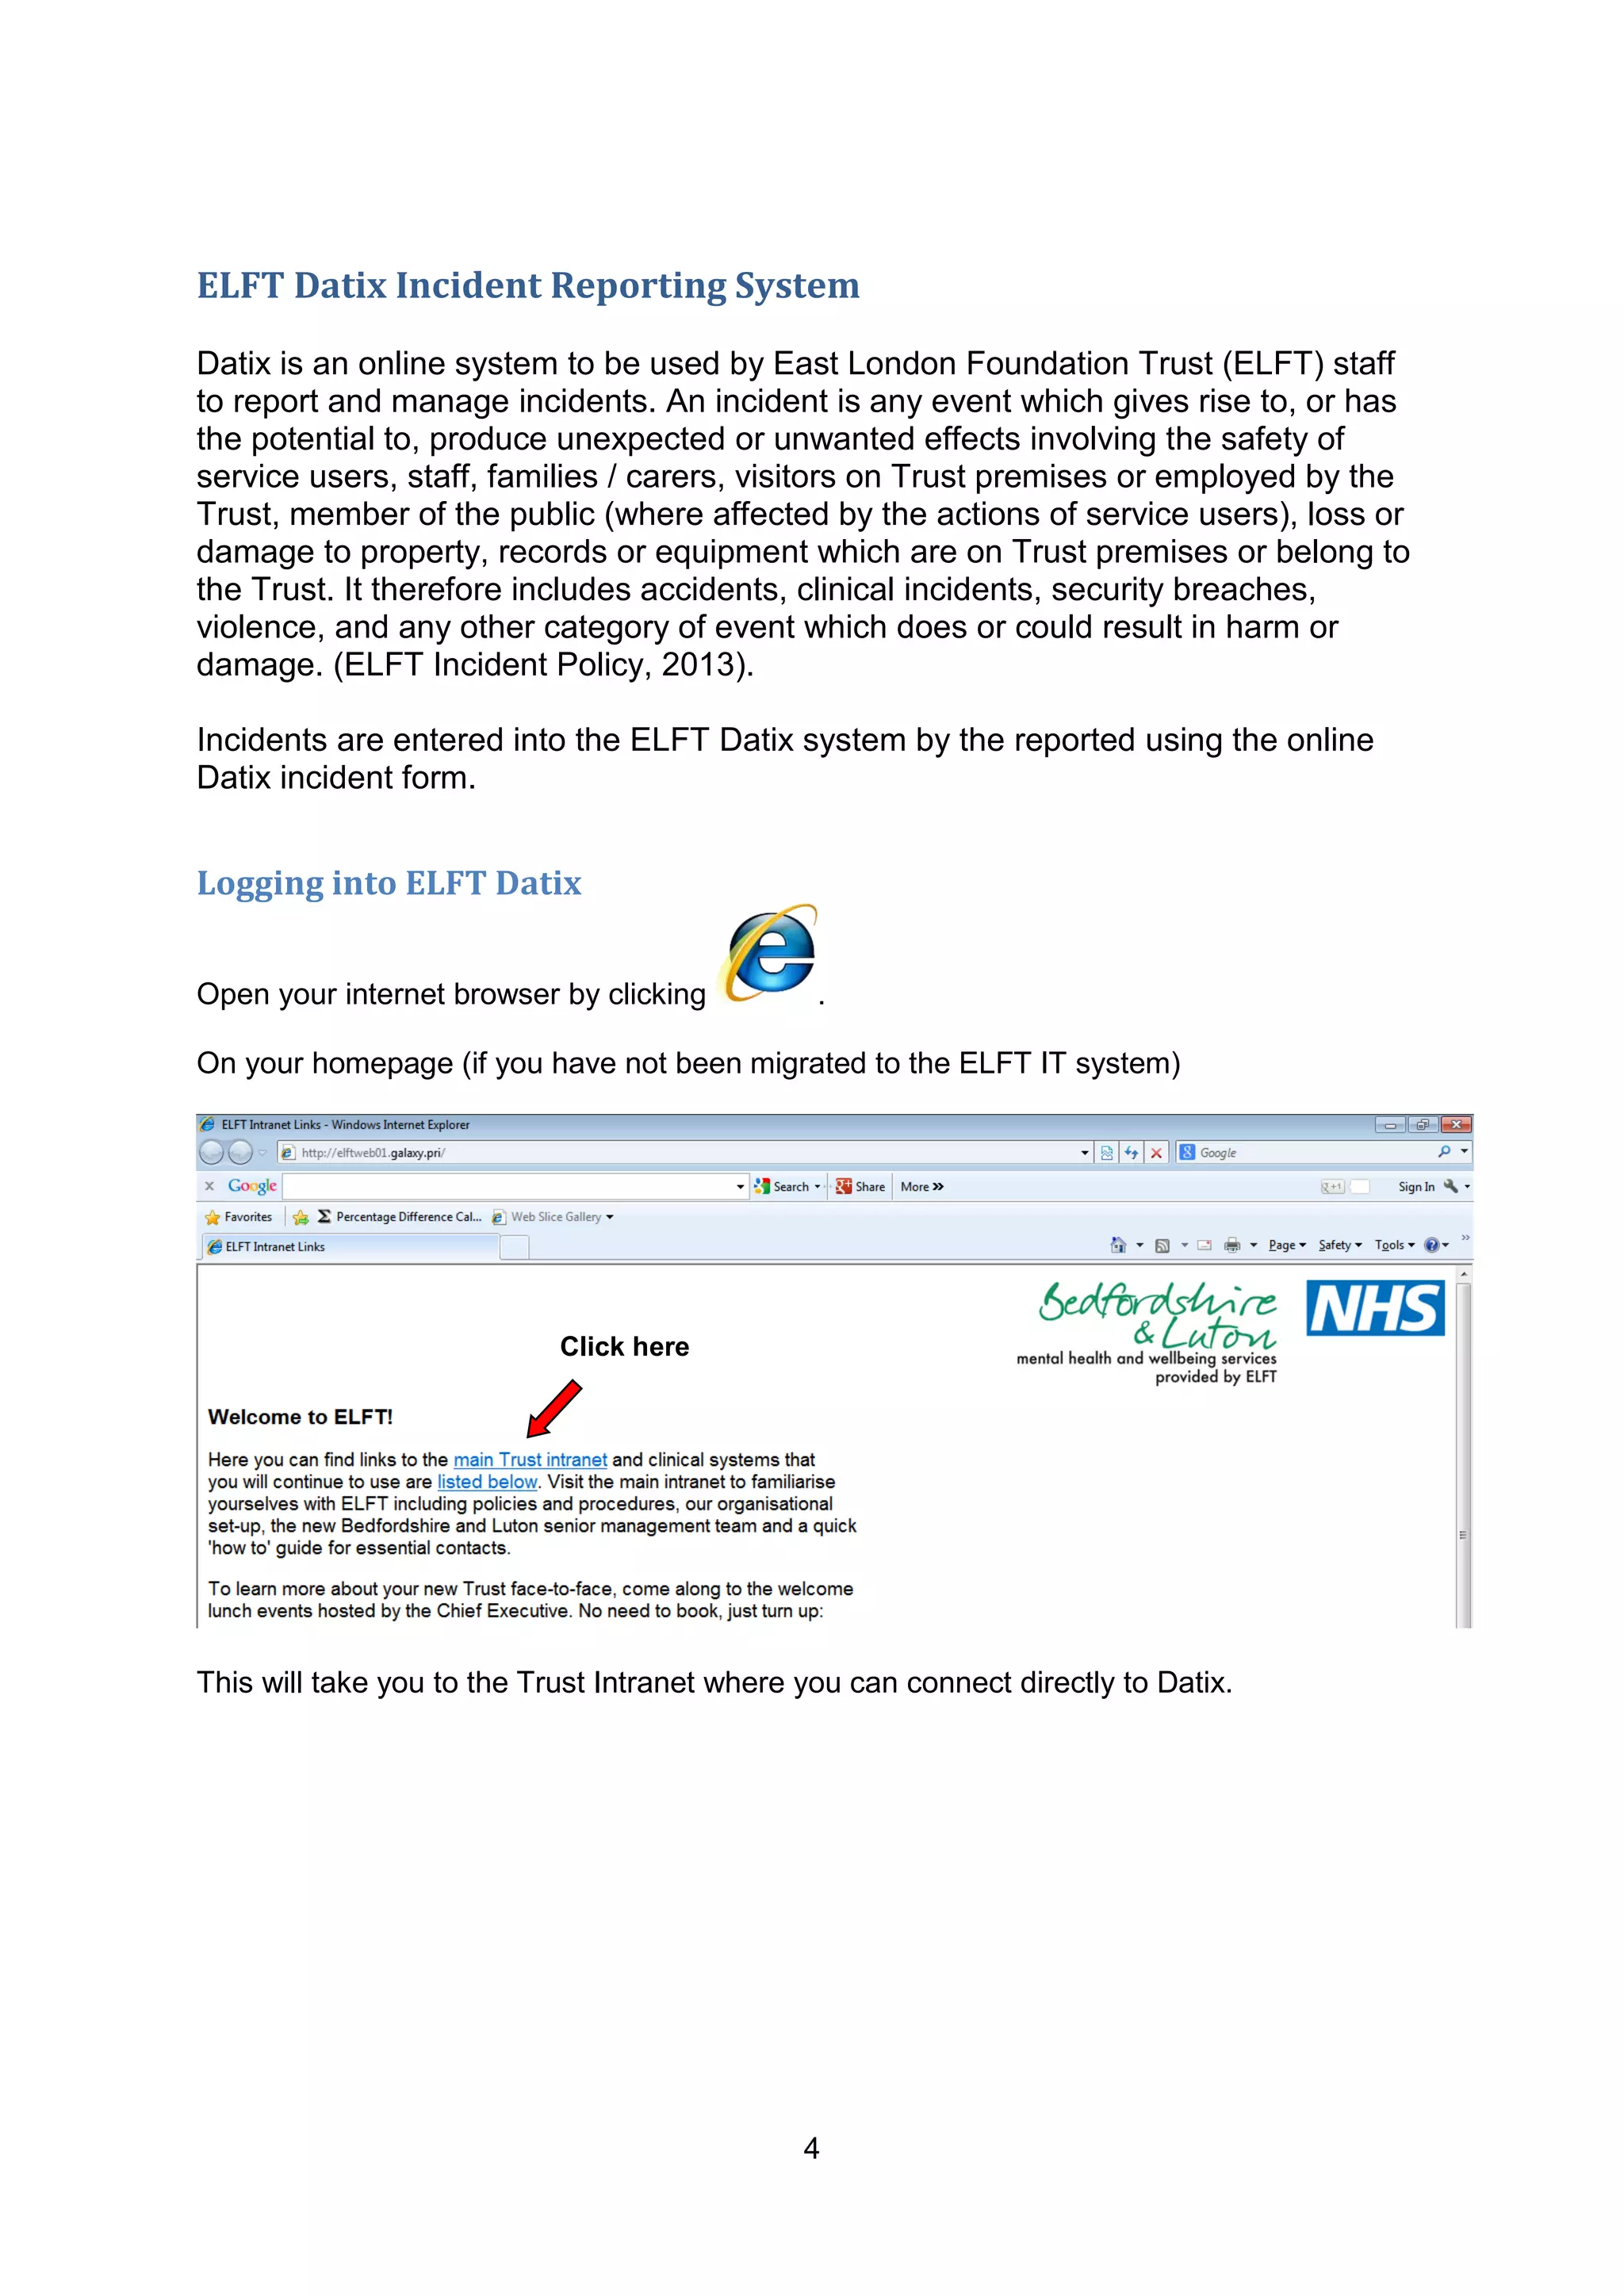
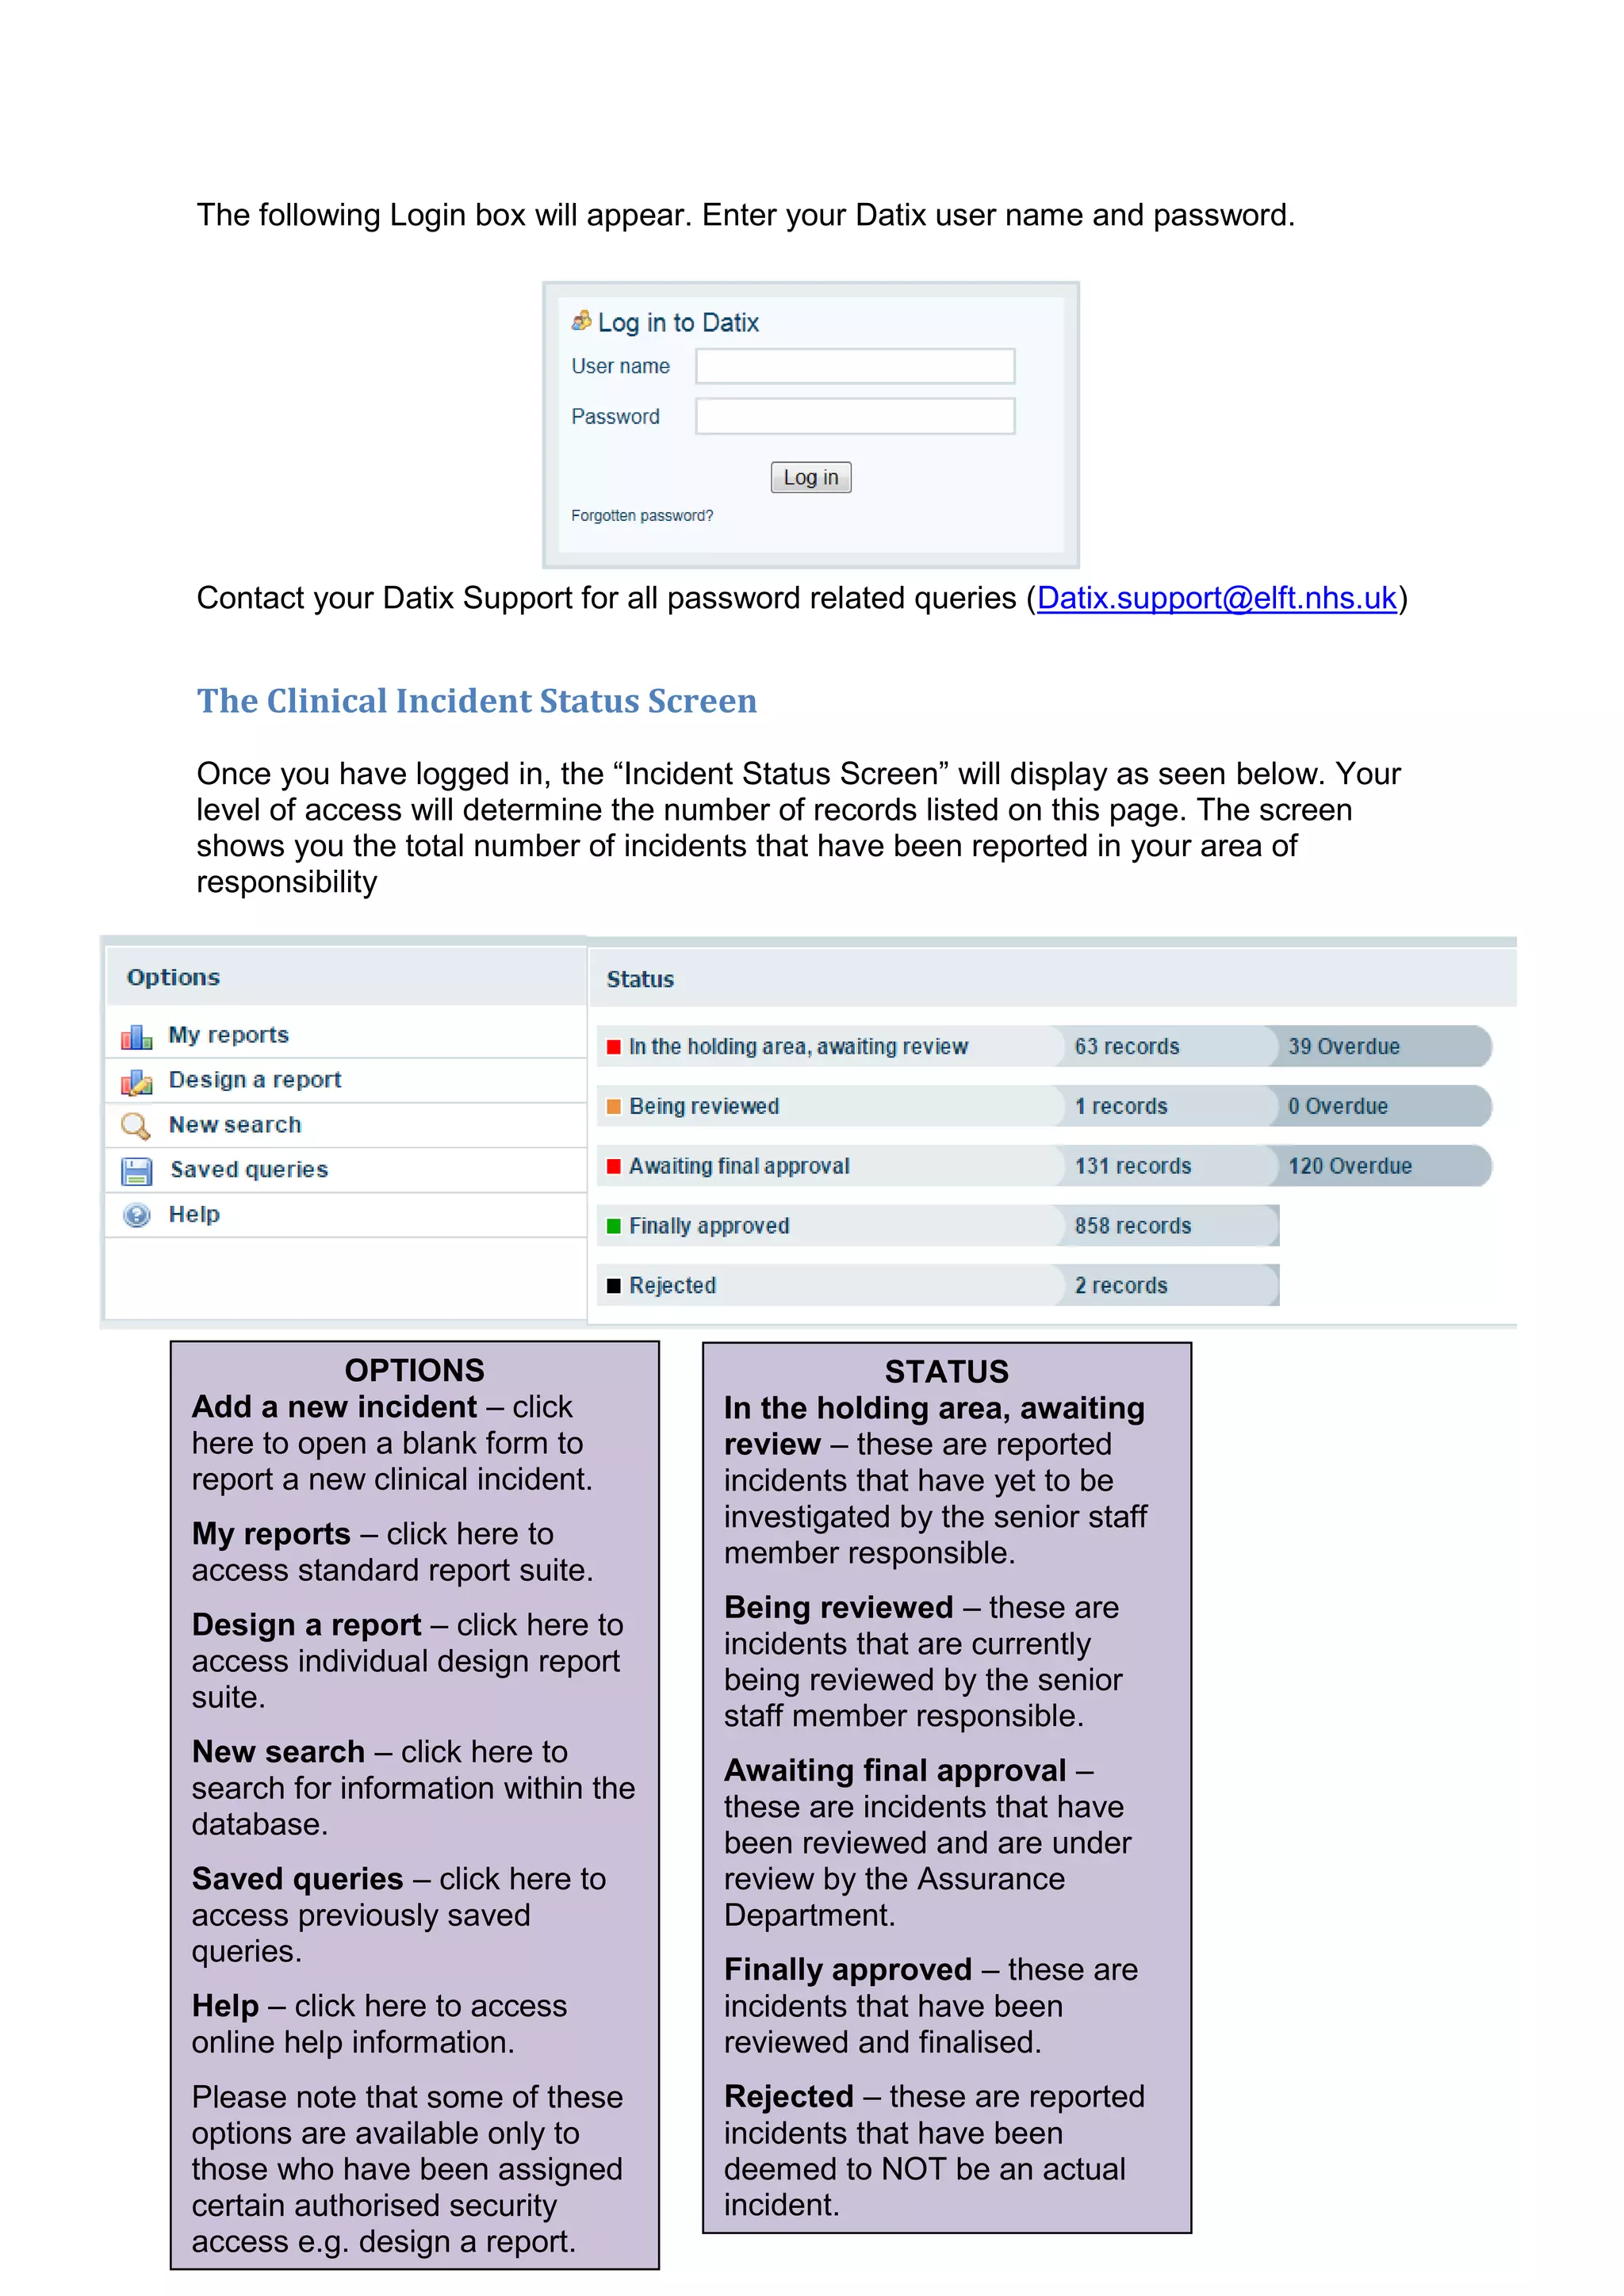
This document provides guidance on using the ELFT Datix incident reporting system. It describes how to log in to Datix, view the clinical incident status screen, and understand the different incident status pages and workflow stages. Key features of the Datix system are also outlined, including how to search for records, create reports, and log out of Datix. The document is intended to help ELFT staff properly report, review, and manage incidents using the Datix online reporting tool.
Short presentation-on incident management, as per ITIL definition,In today’s article we are going to learn all about the “Incident Tracking and management” Process – How to track and manage incidents in Software Testing with sample templates.
Are you thinking- “STH has published a lot of content on defect/bug tracking, so how is this going to be different”? That is exactly the reason why we have to look at what we mean by incident first.
We struggled because of too many issues in the live products. They didn't allow project teams to make any forecasts or develop new features without interruptions. In the presentation I share the successful experience how we applied ITIL Problem and Incident Management processes, by talking only the best from them. It allowed to start fixing the problems that existed in our organization more effectively, while organization allowed to use different methodologies for different teams.
Making Problem Management Work for Your OrganizationAtlassian
Houston, we have a problem. Too many companies are fixated on the definitions of ITIL and problem management instead of actually getting value out of them. When you don't have a bonafide problem management policy, plus the training and skills to back it up, your team is likely to spend too much energy on ineffective activities. But there's hope. IT veteran John Custy will introduce the concepts you need to understand, dispel a few misconceptions, and explain the different problem management methodologies. He'll also cover the pros and cons of each methodology, and when to use each of them.
An Orientation to quality and patient safety for new hire in health care faci...kiran
An introduction to quality and patient safety for new employees in health care with basic concepts on quality and patient safety that every new hire must know.
Introducing our content ready ITIL Incident Management Workflow PowerPoint Presentation Slides. Talk about the need for implementing incident management processes such as maintaining service levels, meeting service availability requirements and so on. The topic-specific incident resolution workflow PowerPoint presentation contains twenty-two editable PPT slides to serve all your business needs. Take advantage of the professionally designed problem management best practices PPT slideshow to discuss with your team the key issues of ITIL workflow like lack of transparency, decreased customer satisfaction, high risk of business etc. Demonstrate best practice of ITIL management like creating and maintaining a knowledge base and handling major incidents etc. Utilize the visually appealing ITIL framework PowerPoint compete deck to showcase benefits of ITIL e.g. maintain dashboard and reports etc. You can also use the PPT slides to represent stages of the IT incident management lifecycle. Thus, download the informative and interactive PowerPoint templates to list down the key performance indicators of IT incident management. From this day forward you won't look back. Our ITIL Incident Management Workflow PowerPoint Presentation Slides keep you focused ahead. https://bit.ly/2So2pXt
Ensure that the best possible level of service quality and availability is maintained with this Incident Management Powerpoint Presentation Slides. Showcase the activities within the incident management procedure by incorporating this incident detection and recording PPT visuals. Determine how quickly a resolution of the incident is required by using this professionally designed investigation and analysis PPT graphic. Present the primary ITIL management roles with the help of our incident closure PowerPoint infographics. Also, determine the relative impact of an issue on business processes by taking the aid of the resolution and record the PPT template. Take the advantage of this problem management PowerPoint layout to determine the level of risk by considering the category of probability against consequence severity. Showcase the procedures to deal with the potential problems using the incident monitoring PPT templates. Download problem reporting and communication PPT presentation to restore a normal service operation as quickly as possible. https://bit.ly/3jH7J6u
EHR Integration: Achieving this Digital Health ImperativeHealth Catalyst
As the digital trajectory of healthcare rises, health systems have an array of new resources available to make more effective and timely care decisions. However, to use these data analytics, machine learning, predictive analytics, and wellness applications to gain real-time, data-driven insight at the point of care, health systems must fully integrate the tools with their EHRs. Integration brings technical and administrative challenges, requiring organizations to coordinate around standards, administrative processes, regulatory principles, and functional integration, as well as develop compelling integration use cases that drive demand. When realized, full EHR integration will allow clinicians to leverage data from across the continuum of care (from health plan to patient-generated data) to improve patient diagnosis and treatment.
Risk Management has been a valuable and essential subject in projects and financial businesses but it is new to health care management. This presentation will help you understanding basics of Risk Managment.
AES Technologies drive digital hospital transformation with highly automated hospital information management system -- I.C.E. Apple. It automates all clinical, administrative, laboratory and financial process by integrating with your existing medical systems, wireless technology, desktops and more.
Powering Self Service Business Intelligence with Hadoop and Data VirtualizationDenodo
A Webinar with Hortonworks and Denodo (watch on demand here: https://goo.gl/xuP1Ak)
Vizient needed a unified view of their accounting and financial data marts to enable business users to discover the information they need in a self-service manner and to be able to provide excellent service to their members. Vizient selected Hortonworks Big Data Platform and Denodo Data Virtualization Platform so that they can unify their distributed data sets in a data lake, and at the same time provide an abstraction for end users for easy self-serviceable information access.
During this webinar, you will learn:
1) The role, use, and benefits of Hortonworks Data Platform in the Modern Data Architecture.
2) How Hadoop and data virtualisation simplify data management and self-service data discovery.
3) What data virtualisation is and how it can simplify big data projects. Best practices of using Hadoop with data virtualisation
About Vizient
Vizient, Inc. is the largest nationwide network of community-owned health care systems and their physicians in the US. Vizient™ combines the strengths of VHA, University HealthSystem Consortium (UHC), Novation and MedAssets SCM and Sg2, trusted leaders focused on solving health care's most pressing challenges. Vizient delivers brilliant resources and powerful data driven insights to healthcare organizations.
In a value driven world, building trust and confidence cannot be overestimated.In a financial relationship, the role of trust becomes pivotal.This plan is to bail out micro finance companies seeking to build trust
IT 552 Module Five Assignment Rubric The purpose of t.docxchristiandean12115
IT 552 Module Five Assignment Rubric
The purpose of this assignment is to develop an incident response plan to combat a specific security gap.
Prompt: In the Case Document, one of the security gap analyses indicated a high number of laptop thefts and a high number of security incidents. Because of
this recent increase in theft and security incidents, the chief information security officer asks you to develop an incident response plan. Submit a plan including
the eight basic elements of an incident response plan, and procedures for sharing information with outside parties. See the Oregon state incident response
template as a sample, but all work should be original.
Specifically, the following critical elements must be addressed:
Include the eight basic elements of an incident response plan.
Describe procedures for sharing information with outside parties.
Guidelines for Submission: Your paper must be submitted as a 4 to 6 page Microsoft Word document with double spacing, 12-point Times New Roman font, and
one-inch margins.
Critical Elements Proficient (100%) Needs Improvement (70%) Not Evident (0%) Value
Eight Basic Elements Explains the eight basic elements of
an incident response plan
Minimally explains eight basic elements of
an incident response plan
Does not explain the eight basic
elements of an incident response plan
35
Procedures for Sharing
Information
Describes the procedures for sharing
information with outside parties
Insufficiently describes the procedures for
sharing information with outside parties
Does not describe the procedures for
sharing information with outside
parties
35
Articulation of
Response
Submission has no major errors
related to citations, grammar,
spelling, syntax, or organization
Submission has major errors related to
citations, grammar, spelling, syntax, or
organization that negatively impact
readability and articulation of main ideas
Submission has critical errors related
to citations, grammar, spelling, syntax,
or organization that prevent the
understanding of ideas
30
Earned Total 100%
http://nvlpubs.nist.gov/nistpubs/SpecialPublications/NIST.SP.800-61r2.pdf
http://www.oregon.gov/das/OSCIO/Documents/incidentresponseplantemplate.pdf
<agency> Information Security Incident Response Plan <Date>
1
Information Security
Incident Response Plan
Agency:
Date:
Contact:
<agency> Information Security Incident Response Plan <Date>
2
TABLE OF CONTENTS
Introduction ...................................................................................................... 3
Authority ........................................................................................................... 4
Terms and Definitions ......................................................................................
Are you a business owner in the UAE looking to stay compliant with corporate tax regulations?
https://www.bmsauditing.com/blogs/how-to-register-for-uae-corporate-tax-in-emaratax
Our latest article breaks down the Corporate Tax registration process for EmaraTax, the online platform for tax filing in the UAE. Don't miss out on these detailed steps and tips for a smooth registration process.
AM What is a common size income statement, it is the presentat.docxdaniahendric
AM
What is a common size income statement, it is the presentation of all the line items in an income statement in a separate column in the form of relative percentages of total sales primarily. It is not another type of income statement, but it is a technique used by financial managers to analyze the income statement of a company.
This technique have its advantages and disadvantages, some of the advantages are that it helps the financial user to comprehend the income statement more clearly based on percentages ratios of each individual item in the income statement. Another advantage is that help the user to determine trends of each item in the income statement. It also allows the user to compare financial performance between two entities at a quick look since everything is expressed in percentages.
Some of the disadvantages are that some financial experts believe it is impractical as there is no approved standard proportion of each item contained in the income statement. It also can become a challenge to properly compare the items in the income statement if the company change the reporting basis (Wall Street Mojo, n.d.).
Charter Communication Common Size Income Statement
Period, year ended on December 31*
2018
2017
2016
2018
2017
2016
Total Revenue
$43,634.00
$41,581.00
$29,003.00
100.00%
100.00%
100.00%
Cost of revenue
$38,413.00
$37,475.00
$26,547.00
88.03%
90.13%
91.53%
Income from Operations
$5,221.00
$4,106.00
$2,456.00
11.97%
9.87%
8.47%
Other expenses
$3,535.00
$3,078.00
$1,636.00
67.71%
74.96%
66.61%
Income before income taxes
$1,686.00
$1,028.00
$820.00
47.69%
33.40%
50.12%
Income Tax Benefit (expense)
-$180.00
$9,087.00
$2,925.00
-10.68%
883.95%
356.71%
Consolidated Net Income
$1,506.00
$10,115.00
$3,745.00
3.45%
24.33%
12.91%
Less Net income attribute to non-controlling interest
-$276.00
-$220.00
-$223.00
-18.33%
-2.17%
-5.95%
Net Income to Charter Shareholders
$1,230.00
$9,895.00
$3,522.00
2.82%
23.80%
12.14%
* In Millions
(Charter Communications, 2018)
Some of the trends that can be identified at a glance are how the cost of revenue percentage decreased from 2016 to 2018, while in direct relation the operational income increase from 2016 to 2018. The income tax benefit (expense) showed drastic fluctuations which need to be further analyze to understand where it comes from since it has a direct impact on the net incomes to the shareholders.
FMG
According to the opinion of the auditors of Ernst & Young LLP, the financial statements fairly show the financial position of Motorcar Parts of America. The consolidated financial statements reflect the results and cash flows of the last three fiscal years of the company. Although the Income Statement shows a tendency to increase revenues, sales costs are growing in a larger proportion. In 2019, sales costs represented 81.14% of net sales while in 2017 and 2016 this indicator is shown at 74.97 and 72.30 perce ...
Assignments Unit 4· Listen to the audio lecture.· Read chapte.docxrock73
Assignments: Unit 4
· Listen to the audio lecture.
· Read chapter four.
· Watch adjusting and closing entries videos.
· Complete the Interactive Presentation below.
· Complete the self quiz below.
· Complete the quiz below.
· Complete the homework exercises below.
Unit 4 - Complete by Sunday 11:59 pm (EST) September 25, 2016 End of Unit 4
Chapter 4 - Adjustments, Financial Statements and the Quality of Financial Reporting
Interactive Presentation, Assignments, Discussion Board #4 and Quiz
Note: if you click the Course Information Tab (top left hand corner) Click hyperlink Launch Book Holder, you will be able to launch the E=Book for this class.
Risk Assessment documentation templates are located within this section. Make additional copies as needed. In a real risk analysis process, one of the first steps is meeting with all department managers, upper management, employee representatives, and workers in the production environment, human resources staff, and other staff members to get their input. Without input from the people actually doing the work, you might not think of essential factors. That isn't possible here, so direct any questions you have to the instructor, or do independent research to find your answers.
· First, identify the business processes that must continue for the organization to keep functioning—for example, collecting money from customers, receiving and processing sales, developing new products, and so on. Document major business processes that drive SunGrafix, using the Business Process column of the Business Process Identification Worksheet. (You need your imagination and some common sense for this step.) Assign a priority level to each process (using the priority rankings in the following list). Write down the department that performs the process, and leave the Assets Used column blank for now. Next, identify the organization's assets. Using the Asset Identification Worksheet that is provided in the Course Documents section on Blackboard, list each asset, its location, and approximate value, if known. (For multiple identical assets, describe the asset and list the quantity instead of listing each individual asset.) In organization-wide risk assessments, you would list all assets, including office furniture, industrial equipment, personnel, and other assets. For this project, stick to information technology assets, such as computers, servers, and networking equipment, etc. The information you enter depends on the network design you completed earlier. All the equipment needed to build your network should be listed here as well as any cabling in the facility. (Assume the facility is already wired for a computer network with network drops available for each computer.) Hint: Remember to list items such as electricity and your Internet connection.Next, determine which assets support each business process. On your Business Process Identification Worksheet, list the assets needed for each business process in the Assets U ...
2. 2
Version No Version Date Author Description
01 22/09/2015 Ola Hill Initial draft
Disclaimer
All information and content in this material is provided in good faith by the Bedfordshire &
Luton Mental Health & Wellbeing Service (provided by ELFT), and was accurate at the time
of development. Due to changing system configurations, information provided in this User
Guide may not be accurate at the time of reading and is only accurate as at the date of
publication.
This user guide will be updated every six months from the date of publication.
Please address any quality improvement suggestions to ola.hill@elft.nhs.uk
3. 3
Table of Contents
ELFT Datix Incident Reporting System ................................................................................. 4
Logging into ELFT Datix .................................................................................................... 4
The Clinical Incident Status Screen................................................................................... 6
Incident Status Pages........................................................................................................ 7
System administration features ......................................................................................... 7
Incident review...................................................................................................................... 9
Workflow status................................................................................................................. 9
In the holding area, awaiting review ............................................................................... 9
Being reviewed ............................................................................................................ 10
Awaiting final approval ................................................................................................. 11
Finally approved........................................................................................................... 11
Rejected ...................................................................................................................... 11
48 Hour Reports.................................................................................................................. 11
Other features..................................................................................................................... 12
Documentation ................................................................................................................ 12
Feedback and general e-mail correspondence................................................................ 13
Searching for records and creating reports ......................................................................... 13
Searching for records ...................................................................................................... 13
Search Prompts in Datix .............................................................................................. 14
Creating reports............................................................................................................... 16
My reports.................................................................................................................... 16
Listing report................................................................................................................ 16
Crosstab report ............................................................................................................ 17
Graphical reports ......................................................................................................... 18
Design a report ............................................................................................................ 18
My dashboard .............................................................................................................. 19
Useful Contact Details......................................................................................................... 20
4. 4
ELFT Datix Incident Reporting System
Datix is an online system to be used by East London Foundation Trust (ELFT) staff
to report and manage incidents. An incident is any event which gives rise to, or has
the potential to, produce unexpected or unwanted effects involving the safety of
service users, staff, families / carers, visitors on Trust premises or employed by the
Trust, member of the public (where affected by the actions of service users), loss or
damage to property, records or equipment which are on Trust premises or belong to
the Trust. It therefore includes accidents, clinical incidents, security breaches,
violence, and any other category of event which does or could result in harm or
damage. (ELFT Incident Policy, 2013).
Incidents are entered into the ELFT Datix system by the reported using the online
Datix incident form.
Logging into ELFT Datix
Open your internet browser by clicking .
On your homepage (if you have not been migrated to the ELFT IT system)
This will take you to the Trust Intranet where you can connect directly to Datix.
Click here
5. 5
This will bring you to the Incident Reporting Form on Datix.
Click here
Click here
6. 6
The following Login box will appear. Enter your Datix user name and password.
Contact your Datix Support for all password related queries (Datix.support@elft.nhs.uk)
The Clinical Incident Status Screen
Once you have logged in, the “Incident Status Screen” will display as seen below. Your
level of access will determine the number of records listed on this page. The screen
shows you the total number of incidents that have been reported in your area of
responsibility
OPTIONS
Add a new incident – click
here to open a blank form to
report a new clinical incident.
My reports – click here to
access standard report suite.
Design a report – click here to
access individual design report
suite.
New search – click here to
search for information within the
database.
Saved queries – click here to
access previously saved
queries.
Help – click here to access
online help information.
Please note that some of these
options are available only to
those who have been assigned
certain authorised security
access e.g. design a report.
STATUS
In the holding area, awaiting
review – these are reported
incidents that have yet to be
investigated by the senior staff
member responsible.
Being reviewed – these are
incidents that are currently
being reviewed by the senior
staff member responsible.
Awaiting final approval –
these are incidents that have
been reviewed and are under
review by the Assurance
Department.
Finally approved – these are
incidents that have been
reviewed and finalised.
Rejected – these are reported
incidents that have been
deemed to NOT be an actual
incident.
7. 7
Incident Status Pages
Once you have selected the incident status area that you want to review, another menu will
be displayed. Below is an example of an incident status page.
System administration features
A number of features are common to the ELFT Datix System.
Icon Icon Title Description
Mandatory field This indicates the field is mandatory
and you are required to complete it
prior to saving or submitting the form.
Calendar Click the date button to display a
calendar, or free type the date, for
example 01/09/2015 into the cell
Drop-down menu Typing the first few letters of preference
allows the drop down menu to generate
a list of possible matches to select from.
Add Another Click on this to add an identical
section e.g. patient details
Spell check Click to check spelling
Pencil Click to resume entering information
after completing spell check.
Datix help Click to display additional help
information.
Search This allows a “search” of the data to
be conducted
Clear section This enables the section within the
form to be cleared of all entered or
selected data.
Hint: Records may be displayed over a number of pages. Navigate records by
selecting the page options found on the right side at the top and bottom of each
page. Records are ordered according to the Datix ID Number, records can be
reordered by clicking on the column headings e.g. name or location. Open a record
by clicking on the text displayed within the record.
8. 8
Delete In a multi-select field, where more than
one option can be chosen, clicking this
icon will remove the selected value(s)
Choose File This enables selection of
documentation to be attached
Menu Quick Links: These icons enable use
of the “Menu”, “Save / Submit” &
“Cancel” functions. These icons are at
the bottom left hand side of the screen.
Save / Submit
Cancel
Free Text
Logging Out
To Log out of Datix, select the logout option at the top of the screen.
9. 9
Incident review
Following the notification of an incident, Datix will automatically send an email to the senior
staff individual who has been selected by the reporter as being responsible for
investigating or progressing the incident. The email notification to senior staff includes a
Datix ID number and hyperlink to log into Datix. Alternatively, senior staff can log into Datix
as per page 4-5.
It is the senior staff member‟s responsibility to ensure that information in Datix is accurate,
factual, and objective, contains no staff names (only initials and/or designations) and to
amend the information as necessary to meet ELFT Policy requirements.
Workflow status
ELFT Datix utilises a workflow status for each reported incident, which is an indication of
the progress of an incident through investigation and management processes. ELFT
Datix has five stages of workflow status, though not all of these will be applicable to all
reported incidents;
In the holding area, awaiting review
Being reviewed
Awaiting final approval
Finally approved
Rejected
Logging into Datix will display the Incident Status Screen
In the holding area, awaiting review
These are those that have been notified but not yet reviewed by a senior staff member, with
these incidents located in the „Holding Area‟ section of Datix.
Senior staff have 48 hours to „acknowledge and review‟ new incidents, which will ensure
Serious Incidents are notified to the National Patient Safety Agency (NPSA) National
Reporting and Learning System (NRLS) within 24 hours of being identified, a requirement by
the Department of Health.
An incident not reviewed within 48 hours will become „overdue‟ and appear in the overdue
count. Overdue incidents are marked with a check overdue symbol.
Hint: The Incident Status Screen is individualised to your area of responsibility, for
example a Ward Matron will only see incidents reported within his/her ward area.
10. 10
To review an incident, click on the „number of records‟. The total number of records in the list
is displayed at the top.
To select an incident for review, click on the text displayed for that record. When an incident
has been selected, the Incident details of the incident record will be displayed, containing
all of the information provided by the reporter.
Senior staff members are required to verify the content of an incident, including;
That the incident location is correct – NOTE changes to „Service/Ward/Department‟
will not lead to a change in „Manager required to sign-off‟. You will need to notify
Datix Support of this change.
That the specific location where the incident occurred (e.g. bed / bay / bathroom).
If a patient was involved in the clinical incident. Senior staff are required to approve
the patient details:
o Open the patient hyperlink
o Conduct a search by clicking – if a match is applicable
select this and create a link, if not close the search, change the status to
approved and then return to the incident.
That the date and time of incident are correct.
Objective information of the known facts of the clinical incident within free text fields:
o Do not include staff names only their initials and/or designation
o Avoid statements of blame
o Do not second guess what happened.
The outcome and severity rating of the incident
Once the senior staff member is satisfied with the review, the incident must be progressed
and the approval status changed to „Awaiting final approval‟.
Being reviewed
If a senior staff member requires more time check the incident details prior to progressing,
they can move the incident to the „Being reviewed‟ status.
Incidents cannot stay at this status indefinitely and must be fully reviewed and progressed
within 24 hours.
11. 11
Awaiting final approval
Final approval is required:
For any actions identified following an incident review.
To change the workflow status of an incident to „Finally approved‟; which signifies the
completion of an incident investigation
On changing the workflow status to Awaiting final approval, Datix will inform the
Assurance Department that their approval is required.
Finally approved
An incident is finally approved when:
The incident has been local resolved and any actions taken following the incident
were conclusive
The 48 hour report has been completed and the incident is not classified as a Serious
Incident (SI)
The 48 hour report has been completed, the incident is classified as a SI and the
investigation is underway.
Rejected
The Assurance Department may reject an incident if:
The incident has already been notified within Datix
The incident is in fact not an adverse incident
For example, an incident may be considered inactive if, after investigation, no causative
factors contributed to the patient‟s outcome and in fact the event was not preventable.
48 Hour Reports
When the incident is a suspected serious incident, the Medical Director or nominated person
will request for a 48hr report to be completed. This includes all incidents, except grade 3 and
4 pressure ulcers which automatically trigger a serious incident review.
If a 48 hour report request is received, the assigned senior member of staff must will be sent
a link to the incident and must complete the additional fields on the incident form.
12. 12
Once completed, the assigned senior staff member must scroll to the bottom of the incident
form to the Actions section and ensure they click „Complete‟.
The report is due back to the Assurance Department within 2 working days of the request
being made.
Other features
Documentation
It is possible to attach electronic documents to an incident record. Once attached, these
documents can be accessed by anyone who has permission to view the incident.
To attach a document:
1. Select „Additional Documentation‟ from the left-hand menu
2. Select „Attach a new document‟
3. On the „link as‟ drop down button, select the document type, such as „letter‟ or
„agenda‟.
4. Add a description of the document in the „description‟ section.
5. Click the „Choose File‟ button to search for the document to be attached. Once found,
double click to select it.
Click Here
13. 13
6. When returned to the document details screen, click on the save button to confirm the
attachment.
7. Repeat the process to attach other electronic documents
To access the document from the documents list, click on the description for that document,
then select the open option.
Feedback and general e-mail correspondence
This section is used to facilitate all communication regarding an incident. Emails can be sent
from any incident record within Datix, providing an easy method of communicating incident
information to other users within ELFT.
Emails sent via this page are recorded within Datix, with the message able to be read on the
screen when the incident is open.
To compose an email:
1. Scroll down to the „Feedback and general e-mail correspondence‟ section
2. Begin to type the email address into the „All users‟ field and a list of staff member
names will be generated.
a. To send an email to people already named as contacts for the incident, type
into the „Staff and contacts attached to this record‟ field and a list of staff
member names will be generated.
3. Double click on the intended recipient name. To email multiple personnel repeat
steps 2 and 3.
4. To send to a generic @elft.nhs.uk email address, type the address in the „Additional
recipients‟ field.
5. Complete the body of the message ensuring the content is factual, professional and
to the point. The body of the message includes a default standard template that
includes a hyperlink to Datix and the incident ID number.
6. Press Send Message.
Searching for records and creating reports
Searching for records
It is possible to search Datix in order to find a record or group of records. From the Status
Screen:
14. 14
1. Select „New search‟ from the options menu
2. A blank record screen will open, into which any number of search criteria can be
entered. Each section of the incident record is listed on the left hand menu. A search
can involve selecting criteria from multiple sections (for example a search might
include criteria from the incident details and incident approval details sections).
3. Enter search criteria
Any field within Datix can be searched, noting that some fields are free-text and others drop
down boxes. Selecting multiple search fields will narrow-down the clinical incident records
your search will generate.
Datix employs a number of search symbols which can assist in defining search
requirements.
Search Prompts in Datix
SYMBOL DEFINITION
*
The asterisk identifies any number of unknown characters in string or text fields. For
instance, *fall* in the description field will find all records where „fall‟ appears
somewhere in the field, regardless of what appears either side of the keyword.
*keyword*|*keyword* To find fields that contain either of the two keywords. For example, *trip*|*fall*
displays any records where the field contains the word „trip‟ OR the word „fall‟.
*keyword*_|_*keyword* To find fields that contain both the two keywords. For example, *trip*_|_*fall* displays
any records where the field contains the word „trip‟ AND the word „fall‟.
= The single equals sign tells the system that you want all records where the field
concerned does not contain a value (that is, the field is empty).
== This tells the system that you want all records where the field concerned does
contain a value.
| To make multiple selections in any drop-down field, keep the Ctrl key pressed down
and click on each selection you require. Once selected, your choices are separated
by the | symbol (Shift + )
!=
To exclude values from a search. For instance, !=WOMEN will exclude any record
where Womens is recorded as the directorate. Similarly, !=WOMEN|PATHO will
exclude any records where Womens and Pathology are recorded as the directorate.
!=*keyword* To exclude a keyword. For example, !=*patient* will locate all the records that do not
contain the word patient.
> When searching any date or time field, you can use the right chevron to search for all
records where the field contains a date or time which is later than that stated. For
instance, >31/12/2007 will find all records where the field contains a date falling after
31/12/007.
Please note: When searching for terms on the search page, various terms will
change to DATIX codes. For example, if searching for an „incident affecting:
organisation‟ (from drop down menu), the search term will change to „Slip, Trip or
Fall: FALLS‟ because the Datix Code for Slip, Trip or Fall is FALLS.
15. 15
SYMBOL DEFINITION
>= Similar to the above instruction, the more-than OR equals sign will list any records
with the date / time you have stated.
< When searching any date or time field, you can use the left chevron to search for all
records where the field contains a date or time which is earlier than that stated. For
instance, <01/04/2008 will find all records where the field contains a date falling
before 01/04/2008.
<= Similar to the above instruction, the less-than OR equals sign will list any records with
the date / time you have stated.
: The colon is used between two dates to indicate a date range. For example, putting
01/01/2009:31/01/2009 in the opened date field will find all incidents which were
opened in January 2009.
@today This instruction can be used only for date fields. It will return all records where the
date concerned is today's date.
@week This instruction can be used only for date fields. Using this will return all records
where the date concerned falls within the current week. Note: The 'week' runs from
Monday until Sunday, so using this search instruction on a Monday would return only
that day's records (as Monday is the first day of the week).
@lastweek This instruction can be used only for date fields. It will return all records where the
date concerned falls within the previous week. Note: The 'week' runs from Monday
until Sunday, so this search instruction will return all records for the week up to the
previous Sunday, instead of simply returning records for the past 7 days.
@month This instruction can be used only for date fields. It will return all records where the
date concerned falls within the current month.
@lastmonth This instruction can be used only for date fields. It will return all records where the
date concerned falls within the previous month.
@quarter This instruction can be used only for date fields. It will return all records where the
date concerned falls within the current quarter. DATIXWeb uses the standard
quarters when returning records using this search instruction: 01/01 - 31/03, 01/04 -
30/06, 01/07 - 30/09 and 01/10 - 31/12.
@lastquarter This instruction can be used only for date fields. It will return all records where the
date concerned falls within the previous quarter. See above entry for further
information on searching by quarter.
@year This instruction can be used only for date fields. It will return all records where the
date concerned falls within the current calendar year (01/01 - 31/12).
@lastyear This instruction can be used only for date fields. It will return all records where the
date concerned falls within the previous calendar year (01/01 - 31/12).
@finyear This instruction can be used only for date fields. It will return all records where the
date concerned falls within the current financial year (01/04 - 31/03).
@lastfinyear This instruction can be used only for date fields. It will return all records where the
date concerned falls within the previous financial year (01/04 - 31/03).
@prompt This instruction can be used for date fields. After pressing the Search button, you will
be prompted to enter the start and end dates for a date range. In version 9.3 or above
this instruction can be used in any coded (picklist) field to prompt for your
selection(s).
>@today-30
The >@today- instruction can be used in date fields in version 9.3 onwards to find
records where the date falls a certain number of days prior to the current date. In this
example, we are searching for records where the date is later than 30 days before
today, i.e. records where the date falls within the last 30 days. >@today-7 will locate
records where the date falls within the last 7 days.
For example, by entering @month in the date of incident field, your search will return all
incidents that occurred in the current month.
4. Once a search criterion has been specified, click the search button at the bottom of
the page or from the search button at the bottom left of the web page. A list of
records which match your search criteria will be displayed.
5. Select a record to view by clicking on any of the blue text displayed for that record in
the list.
16. 16
By default, records are displayed 20 to a page. To scroll between the pages, click next page
or previous page.
Creating reports
Datix can generate a variety of reports including; listing, crosstab, bar chart, line graph,
pareto graph, pie chart, SPC chart, traffic lights, gauge and graphical. All users have a “my
reports” option in the main menu. If you have access to the design a report option, you will
also be able to design your own reports.
My reports
The “my reports” section will list reports which have been designed. These reports combine
the report template (which identifies the layout and the fields to appear in the report) and a
saved query (which identifies the records which appear in the report).
To run a report:
1. Select My reports from the options section.
A list of reports similar to those in the image below will be displayed.
2. Click on a report in the list. You may be prompted to select a value which will identify
the records which should appear in the report; this will happen if the saved query
used to determine the records to appear has a @prompt instruction listed within it.
Each type of report is explained below.
Listing report
A listing report displays information from specified fields within Datix records.
This is not a statistical report – it‟s a text-based report which displays data in the identified
fields. The example shown below includes the Datix ID, Name, Incident Date, (date)
Reported, Service/Ward/Dept, Category and Sub category. Each record makes up a
17. 17
separate row in the report, with each column showing the relevant information for the field
specified.
Although it‟s possible to print the report directly from the internet browser screen, a better
result will be achieved if you export the report. To do this once your search has provided you
with your data, scroll to the bottom of the screen and select export.
You will be asked if you want to export the data as a Adobe PDF or Microsoft Excel file. Click
Export and save the file to your preferred location.
Crosstab report
A crosstab report contains rows and columns of data – values from one field are used to
make the rows, and values from another field are used to make the columns. In the
generated report, there will be a number where the column and row intersect, indicating how
many records are available with those values.
Where the number given in the report is greater than zero, it is possible to view those
records. Hover over the number until the pointer turns into a hand, then click the left mouse
18. 18
button to be taken to a list of the records. To return to the crosstab report from the list of
records, hit the Back button at the bottom of that list.
The data from a crosstab report can be exported as explained in the listing report section
above.
Graphical reports
There are a number of different graphical reports available in Datix. For example, the image
below is of a bar chart displaying count of reportable falls by location.
It‟s possible to view the records represented by any section in a graphical report. Hover over
any section and left click to be taken to a list of records displayed. To return to the graphical
report from the list of records, hit the back button at the bottom of the list.
The report may be printed by selecting the print option below the report. This will open a new
window where a printable version of the report is displayed. Print the report from there.
Alternatively, the report can be exported as above or even copied over to another
application, such as Word for inclusion in a larger document. To do this, right-click while the
pointer is hovering over the report image. Select Copy, open the other application and then
paste the image into it.
Design a report
If your account has report designer permissions, you will see a „design a report‟ option in the
main menu for the incidents and feedback modules. This allows the creation of crosstab and
graphical reports (explained above), in addition to the ones provided by your administrator
within the „my reports‟ section.
To design a report:
1. Select Design a report from the options section.
2. On the Design a report page, select a previously saved query which you will base
the new report on.
19. 19
3. Select the type of report that you want to design from the Report type images.
4. Based on the „report type‟ that you selected, configure the other parameters for your
report design: crosstab, bar chart, line graph, pareto graph, pie chart, SPC chart,
listing report and gauge.
5. Click „the Run a report‟ button.
My dashboard
Users can add any report to their Dashboard. The dashboard displays a set of reports on
one or multiple dashboard screens, providing users with an overview of clinical incidents
stored within Datix CIMS.
Users can create their own reports and choose to display them on their dashboard, allowing
full control over the information presented.
Alternatively system administrators can push dashboards to users, security groups and
profiles. Users will not be able to edit a dashboard that has been assigned to them by their
administrator. Any report not already selected for display on the dashboard will offer an ‘add
to my dashboard’ option.
To add a report to your dashboard:
1. Design a report
2. Once the Add to my dashboard button has been selected, the user will be prompted
to enter a suitable name for the report, and select which dashboard they would like
the report placed on.
3. Click Save, and the system will save your report to the selected dashboard and take
you to that dashboard, where you will see it displayed.
Each time you load the dashboard, the reports are updated to reflect any new records that
have been added that meet the criteria for the report. You can force the report to refresh at
any time by clicking on the spanner icon and selecting refresh from the list.
Reports can be exported directly from the dashboard by clicking on the spanner icon and
selecting export.
Hint: Some report types cannot be exported to Excel as Excel
doesn‟t recognise the format, for example Traffic lights and Gauge
reports. You will be able to export them as PDF documents.
20. 20
Useful Contact Details
Datix Support (Alison Rollason) Datix.support@elft.nhs.uk 01582 556454
Contact for
support when completing incident form
login issues
password resets
general Datix enquiries
Interim Governance Manager (Ola Hill) ola.hill@elft.nhs.uk 01582 700167
Contact for
location queries
technical issues pertaining to Datix
escalation from Datix Support