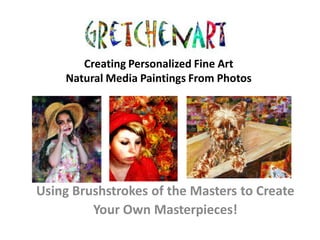
Creating Personalized Fine Art From Photos
•
0 likes•217 views
Example of One photo that is edited in Photoshop, pre-painted in Corel Painter and natural media painted in acrylic on canvas for a customer.
Report
Share
Report
Share
Download to read offline

Recommended
Photoshop How To
This document provides instructions for using various tools in Photoshop to edit and combine photographs. It describes how to open images, adjust qualities like brightness and color, and resize images. Tools like the move, marquee, lasso, crop, clone stamp, and eraser tools are mentioned. The document explains how to add one image on top of another by using the move tool to drag it into place as a new layer. It emphasizes using layers and the opacity and eraser tools to blend images together so they look like one photo. The reader is advised to use at least 5 layers in their photomontage and that the edit undo function or "step backward" can be used to fix mistakes.
008 photo editing and printing
The document provides guidance on photo editing and printing. It discusses choosing photos that convey the intended meaning and have proper exposure, saturation, and content. The steps include editing photos on a contact sheet to select the best exposures and saturation. It emphasizes having clear intentions for the photos and using symbols to express that intention. Photoshop is recommended for printing to properly expose and correct photos. Tools like the crop, dodge and burn, and adjustment tools can be used to refine exposures, colors, brightness and contrast.
Photoshop training
This document provides an overview of basic photo editing tools in Photoshop including cropping and rotating images, adjusting brightness, removing red eye, using the healing tool, retouching images, and exporting photos for different uses such as web or print. It discusses how to enhance photos using these tools and techniques.
Curs photoshop
This document provides instructions for using Photoshop to create and edit images. It demonstrates creating a lightning bolt image from scratch using gradient and filter tools. It then shows how to use the rubber stamp and heal tools to retouch images. The rubber stamp tool samples one image area and paints it onto another to remove objects like logos. The heal tool also samples and paints over areas but preserves color and lighting better for removing blemishes or other minor retouching.
Week 6 Pt2 Guided Fixes In Elements
Photoshop Elements allows users to edit photos through various modes like Quick Fix, Full Edit, and Guided Edit. It also enables photo composites through features like Photomerge. The document discusses how to import photos, perform one-click fixes, work on projects, and edit color and selections. It provides tips on cropping, resizing images for both web and print, and changing image size and resolution settings.
Editing images used in the Production of my magazine- Showing Technologies
This document discusses skills developed in editing images for a product. It describes using Adobe Photoshop and Windows Photo Viewer to edit images by adjusting brightness, contrast, color, and cropping. The editing tools allow previewing changes in real-time and producing final images that are brighter, more eye-catching, and well-suited to pages in the product. Skills developed include editing images efficiently using various tools to enhance visual appeal.
Photoshop Tutorial
This document provides instructions for manipulating a portrait image in Photoshop using techniques like resizing, layering, posterization, and adjusting colors and contrasts. The objectives are to learn basic Photoshop techniques, understand resizing and layers, apply the posterization effect, and relate the techniques to Andy Warhol's pop art style. The steps demonstrate how to open an image, convert it to grayscale, adjust brightness/contrast and posterize the image. It describes using the magic wand tool to select tones, copy them to new layers, and fill layers with different colors. Students are asked to repeat the process six times at smaller sizes to create color variations inspired by Warhol's work.
Photoshop step by step powerpoint presentation - hayley ip 10 f
The document provides step-by-step instructions for creating an album cover in Photoshop. The creator imports background images of a city skyline and a photo of themselves, then uses selection and layer tools to combine the images. Additional elements like clouds, an audience, lights, and fire effects are added to make the cover dynamic. Text is also styled and positioned to complete the final product. The overall process involves selecting and preparing multiple images, adjusting layers and effects to merge elements realistically, and adding specialized touches to convey the upbeat nature of pop music.
Technology Action Plan
The technology action plan aims to integrate technology at Lamar University to provide a global learning community. Key goals are to establish short-term technology plans, review the state's long-range technology plan, and work with various stakeholders like instructional specialists, administrators, teachers and students to incorporate technology into the curriculum and assess needs and professional development. An evaluation plan is also outlined to assess outcomes.
Pop rain presentation
This document discusses an artist's third album and activities in America. It begins with a biographical sketch of the artist and then discusses their third album titled "It's raining". The document also briefly mentions the artist's activities while in America.
Life Cycle Soa Presentation
Är förvaltning en tråkig grej? Titta på denna presentation för att inse att det är extremt viktigt.
Our people our place
A powhiri is a Māori welcoming ceremony. It involves speeches, singing, and dancing to welcome visitors onto a marae or meeting place. Photos are then sometimes taken after the formal powhiri ceremony has concluded.
Burton elementary star chart
The document discusses the Texas STaR Chart, which is used to assess progress towards technology goals at Burton Elementary school. The STaR Chart evaluates four key areas: Teaching and Learning, Educator Preparation, Leadership/Administration, and Infrastructure. It is designed to help schools determine needs, track progress, and identify priorities to improve student learning with technology. The document also outlines standards from the State Board for Educator Certification that all teachers must meet regarding technology proficiency. Burton Elementary has been at the "Developing Technology" level for three years, and the summary discusses next steps to advance to the next level.
Texas star chart
The document introduces the Texas STaR Chart, a self-assessment tool for schools to evaluate their level of technology integration based on the state's long-range technology plan. The STaR chart addresses four areas: teaching and learning, educator preparation, leadership and support, and infrastructure. It provides four levels--early, developing, advanced, and target--to classify a school's technology use. The document then discusses an assessment done at Deepwater Elementary, finding they have begun technology integration but need more collaboration and staff development due to budget cuts.
Selling skills
The document provides tips for sales skills, time management, relationships with customers, company image, and communication skills. It advises establishing rapport with doctors by not discussing politics, religion, or sports. Sales representatives are told to sell themselves first to sell their company and products. Effective communication involves active listening, asking questions, focusing on key products, and making doctors feel more than just a sales target. High-impact communication skills include reflecting on what was discussed and filing away key information from meetings.
Print17 slides p5
This document discusses various techniques for graphic design projects in Adobe CC software, including resizing and resampling images, creating vector shapes and paths, applying styles, effects, and filters, and developing custom artistic backgrounds. It provides information on vector tools, clipping masks, built-in styles, layer styles, filters, the eyedropper tool, gradient tool, paint bucket tool, blending modes, and printing.
Photoshop 2018 Car Magazine Cover
This document discusses various techniques for graphic design projects in Adobe CC software including Photoshop, Illustrator, and InDesign. It covers resizing and resampling images, creating vector shapes and paths, applying styles, effects, and filters, and developing custom artistic backgrounds. Specific topics include vector tools, clipping masks, built-in styles, layer styles, filters like Liquify, the Eyedropper tool, Gradient tool, Paint Bucket tool, blending modes, and printing considerations.
photoshop_workshop_01
This document is a 10 page workshop on using Adobe Photoshop CS3. It provides instructions on opening and viewing files, scaling images, manipulating canvas sizes, cropping images, drawing selections, working with layers, selecting colors, combining content from multiple files, flattening layers, and saving files in different formats such as PSD, TIFF, JPEG, GIF, and PNG. The workshop also includes screenshots to demonstrate the Photoshop tools and instructions.
photoshop_workshop_01
This document is a 10 page workshop on using Adobe Photoshop CS3. It provides instructions on opening and viewing files, scaling images, manipulating canvas sizes, cropping images, drawing selections, working with layers, selecting colors, combining content from multiple files, flattening layers, and saving files in different formats such as PSD, TIFF, JPEG, GIF, and PNG. The workshop also includes screenshots to demonstrate the Photoshop tools and interfaces discussed.
Pscc slides p2
The document discusses techniques for image editing and manipulation in Adobe Photoshop CC including resizing and resampling images, creating vector shapes and paths, applying non-destructive styles, effects and filters, and developing custom artistic backgrounds. Specific topics covered include resizing vs resampling images, the canvas size dialog box, vector shape layers, vector tools, vector paths and anchor points, clipping masks, built-in styles, layer styles, filters, the liquify filter, the eyedropper tool, gradient tool, paint bucket tool, blending modes, and printing.
How to Create a Comic Style Photo Effect in Photoshop
Interested to know How to Create a 'Comic Style Photo Effect' in Photoshop? This step-by-step tutorial will show you how to achieve this feat.
Module
This document provides an overview of Adobe Photoshop, including descriptions of the main work area, tools, and how to perform basic tasks like resizing images, modifying color, using layers, and some drawing tools. The work area includes menus, toolboxes, palettes, and options to access commands and edit images. Basic tools are demonstrated for selecting, brushing, penciling, and patching. Modifying color and using layers to edit parts of an image separately are also outlined.
Photoshop
This document provides an overview of how to use Adobe Photoshop. It discusses basic concepts like pixels and resolution. It describes common tasks like resizing, cropping and adjusting images. It also covers topics like layers, tools, filters and more advanced editing techniques. The goal is to enable students to use Photoshop for photo editing and graphic design.
Photo Shop
Photoshop is unlike other common software interfaces which emulate virtual typewriters or graphing paper. Photoshop creates an artist's virtual studio/darkroom. When you open the program you see a toolbox on the left with tools you will use to manipulate your images, and on the right, a white square which is your "canvas" or work area. The gray area surrounding the canvas is not part of your image, but only defines its edges.
Year 10 photoshop
The document provides instructions for editing a photograph in Photoshop and using the edited image as a reference for a canvas painting. Students are told to open Photoshop, experiment with editing tools like brightness and contrast, take screenshots of their edits, and create a double page in their sketchbook to document the Photoshop process. They should also save the edited photo, print it at A4 size, and bring a canvas and painting supplies to class.
Process of creating front cover
The document outlines the step-by-step process of creating a magazine front cover in Photoshop. Key steps include:
1. Choosing a base magazine cover image and photo to use.
2. Transferring the photo onto the cover image and changing the background using various tools to suit EDM genre.
3. Adding elements like a gradient background, checker pattern, darker uniform, and customized masthead with effects.
4. Changing the model's glasses, adding "freebie" text and posters graphic, and placing artist names in different fonts and styles to complete the cover design.
Presentation on Adobe Photoshop
This document provides an overview of key concepts in Photoshop including the workspace, tools, image file types, layers, and basic photo editing tasks. It explains how to open, crop and resize images, create new images, work with layers, add text, and save files in common formats like JPEG, GIF and PNG. Transparency tools are also covered for removing backgrounds and creating transparent images.
Evaluation PowerPoint - Q6: What have you learnt about technologies from the ...
Evaluation PowerPoint - Q6: What have you learnt about technologies from the process of constructing this product?
More Related Content
Viewers also liked
Technology Action Plan
The technology action plan aims to integrate technology at Lamar University to provide a global learning community. Key goals are to establish short-term technology plans, review the state's long-range technology plan, and work with various stakeholders like instructional specialists, administrators, teachers and students to incorporate technology into the curriculum and assess needs and professional development. An evaluation plan is also outlined to assess outcomes.
Pop rain presentation
This document discusses an artist's third album and activities in America. It begins with a biographical sketch of the artist and then discusses their third album titled "It's raining". The document also briefly mentions the artist's activities while in America.
Life Cycle Soa Presentation
Är förvaltning en tråkig grej? Titta på denna presentation för att inse att det är extremt viktigt.
Our people our place
A powhiri is a Māori welcoming ceremony. It involves speeches, singing, and dancing to welcome visitors onto a marae or meeting place. Photos are then sometimes taken after the formal powhiri ceremony has concluded.
Burton elementary star chart
The document discusses the Texas STaR Chart, which is used to assess progress towards technology goals at Burton Elementary school. The STaR Chart evaluates four key areas: Teaching and Learning, Educator Preparation, Leadership/Administration, and Infrastructure. It is designed to help schools determine needs, track progress, and identify priorities to improve student learning with technology. The document also outlines standards from the State Board for Educator Certification that all teachers must meet regarding technology proficiency. Burton Elementary has been at the "Developing Technology" level for three years, and the summary discusses next steps to advance to the next level.
Texas star chart
The document introduces the Texas STaR Chart, a self-assessment tool for schools to evaluate their level of technology integration based on the state's long-range technology plan. The STaR chart addresses four areas: teaching and learning, educator preparation, leadership and support, and infrastructure. It provides four levels--early, developing, advanced, and target--to classify a school's technology use. The document then discusses an assessment done at Deepwater Elementary, finding they have begun technology integration but need more collaboration and staff development due to budget cuts.
Selling skills
The document provides tips for sales skills, time management, relationships with customers, company image, and communication skills. It advises establishing rapport with doctors by not discussing politics, religion, or sports. Sales representatives are told to sell themselves first to sell their company and products. Effective communication involves active listening, asking questions, focusing on key products, and making doctors feel more than just a sales target. High-impact communication skills include reflecting on what was discussed and filing away key information from meetings.
Viewers also liked (9)
Similar to Creating Personalized Fine Art From Photos
Print17 slides p5
This document discusses various techniques for graphic design projects in Adobe CC software, including resizing and resampling images, creating vector shapes and paths, applying styles, effects, and filters, and developing custom artistic backgrounds. It provides information on vector tools, clipping masks, built-in styles, layer styles, filters, the eyedropper tool, gradient tool, paint bucket tool, blending modes, and printing.
Photoshop 2018 Car Magazine Cover
This document discusses various techniques for graphic design projects in Adobe CC software including Photoshop, Illustrator, and InDesign. It covers resizing and resampling images, creating vector shapes and paths, applying styles, effects, and filters, and developing custom artistic backgrounds. Specific topics include vector tools, clipping masks, built-in styles, layer styles, filters like Liquify, the Eyedropper tool, Gradient tool, Paint Bucket tool, blending modes, and printing considerations.
photoshop_workshop_01
This document is a 10 page workshop on using Adobe Photoshop CS3. It provides instructions on opening and viewing files, scaling images, manipulating canvas sizes, cropping images, drawing selections, working with layers, selecting colors, combining content from multiple files, flattening layers, and saving files in different formats such as PSD, TIFF, JPEG, GIF, and PNG. The workshop also includes screenshots to demonstrate the Photoshop tools and instructions.
photoshop_workshop_01
This document is a 10 page workshop on using Adobe Photoshop CS3. It provides instructions on opening and viewing files, scaling images, manipulating canvas sizes, cropping images, drawing selections, working with layers, selecting colors, combining content from multiple files, flattening layers, and saving files in different formats such as PSD, TIFF, JPEG, GIF, and PNG. The workshop also includes screenshots to demonstrate the Photoshop tools and interfaces discussed.
Pscc slides p2
The document discusses techniques for image editing and manipulation in Adobe Photoshop CC including resizing and resampling images, creating vector shapes and paths, applying non-destructive styles, effects and filters, and developing custom artistic backgrounds. Specific topics covered include resizing vs resampling images, the canvas size dialog box, vector shape layers, vector tools, vector paths and anchor points, clipping masks, built-in styles, layer styles, filters, the liquify filter, the eyedropper tool, gradient tool, paint bucket tool, blending modes, and printing.
How to Create a Comic Style Photo Effect in Photoshop
Interested to know How to Create a 'Comic Style Photo Effect' in Photoshop? This step-by-step tutorial will show you how to achieve this feat.
Module
This document provides an overview of Adobe Photoshop, including descriptions of the main work area, tools, and how to perform basic tasks like resizing images, modifying color, using layers, and some drawing tools. The work area includes menus, toolboxes, palettes, and options to access commands and edit images. Basic tools are demonstrated for selecting, brushing, penciling, and patching. Modifying color and using layers to edit parts of an image separately are also outlined.
Photoshop
This document provides an overview of how to use Adobe Photoshop. It discusses basic concepts like pixels and resolution. It describes common tasks like resizing, cropping and adjusting images. It also covers topics like layers, tools, filters and more advanced editing techniques. The goal is to enable students to use Photoshop for photo editing and graphic design.
Photo Shop
Photoshop is unlike other common software interfaces which emulate virtual typewriters or graphing paper. Photoshop creates an artist's virtual studio/darkroom. When you open the program you see a toolbox on the left with tools you will use to manipulate your images, and on the right, a white square which is your "canvas" or work area. The gray area surrounding the canvas is not part of your image, but only defines its edges.
Year 10 photoshop
The document provides instructions for editing a photograph in Photoshop and using the edited image as a reference for a canvas painting. Students are told to open Photoshop, experiment with editing tools like brightness and contrast, take screenshots of their edits, and create a double page in their sketchbook to document the Photoshop process. They should also save the edited photo, print it at A4 size, and bring a canvas and painting supplies to class.
Process of creating front cover
The document outlines the step-by-step process of creating a magazine front cover in Photoshop. Key steps include:
1. Choosing a base magazine cover image and photo to use.
2. Transferring the photo onto the cover image and changing the background using various tools to suit EDM genre.
3. Adding elements like a gradient background, checker pattern, darker uniform, and customized masthead with effects.
4. Changing the model's glasses, adding "freebie" text and posters graphic, and placing artist names in different fonts and styles to complete the cover design.
Presentation on Adobe Photoshop
This document provides an overview of key concepts in Photoshop including the workspace, tools, image file types, layers, and basic photo editing tasks. It explains how to open, crop and resize images, create new images, work with layers, add text, and save files in common formats like JPEG, GIF and PNG. Transparency tools are also covered for removing backgrounds and creating transparent images.
Evaluation PowerPoint - Q6: What have you learnt about technologies from the ...
Evaluation PowerPoint - Q6: What have you learnt about technologies from the process of constructing this product?
Using photoshop to create ancillary products
The document discusses how the author used Photoshop CS5 to create ancillary music products like a digipak and advert. Key techniques included using the pen tool to select an artist from a background, adjusting contrast and colors, applying displacement and selective color features, and properly arranging layers and fonts. Photoshop offered many tools that helped the author develop their ideas and produce finished products they were satisfied with, though it took practice to learn the program.
How to Setup an Audimute Acoustic image Panel
Want to set up the artwork for your Audimute custom image panel yourself? These slides will show you exactly how to do that!
Wt1110 sb unit 1
The document provides instructions for a multi-section introduction to Adobe Photoshop course. It outlines the three main sections - Explore, Practice, and Apply. In the Explore section, learners can review course topics through icons on the right side. The Practice activities help reinforce the material and the Apply activities help solve real-world problems. The document then provides specific instructions on using Photoshop tools to edit an image by selecting objects, changing colors, adding layers and textures, scaling elements, and cropping.
Pscc slides p7
The document discusses various tools and techniques for painting and filling selections in Photoshop, including brushes, patterns, strokes, and eraser tools. It covers adjusting brush settings, creating custom brushes and patterns, and filling selections with the paint bucket or fill dialog box. The document also provides tips for exporting Photoshop files to PDF for print.
008 photo editing and printing
The document provides instructions for photo editing and printing using Photoshop. It discusses choosing photos through contact sheets, ensuring proper exposure and saturation. It emphasizes intentional content and conveying meaning. The steps outlined include creating a contact sheet to edit photos, adjusting exposure and color, reflecting on the photos, and using Photoshop tools to crop, adjust brightness and color correct before printing.
Image manipulation
The document provides instructions for a Photoshop project where students take a self-portrait and composite it into a Renaissance painting by erasing the background, copying their portrait, and pasting it into a layer above the painting layer. Students are then directed to transform, move, and adjust the layers and colors to blend the portrait with the painting. The final instructions are to save the composite as a JPEG and upload it to a class gallery.
Photoshop
This document provides an introduction and overview of using Photoshop for graphic editing. It discusses the basic tools in Photoshop like selection tools, cropping tools, and painting tools. It also outlines some key advantages of using Photoshop such as improving photo quality, creating new artwork, and easily editing numerous photos. The document concludes by describing the basic procedures for creating a Photoshop file, adding layers and images, adding borders and titles, and saving the file.
Similar to Creating Personalized Fine Art From Photos (20)
How to Create a Comic Style Photo Effect in Photoshop
How to Create a Comic Style Photo Effect in Photoshop
Evaluation PowerPoint - Q6: What have you learnt about technologies from the ...
Evaluation PowerPoint - Q6: What have you learnt about technologies from the ...
Creating Personalized Fine Art From Photos
- 1. Creating Personalized Fine Art Natural Media Paintings From Photos Using Brushstrokes of the Masters to Create Your Own Masterpieces!
- 2. Open selected photo in Photoshop, Crop to relative proportion desired Photo: Grace by the Window Cropped Photo
- 3. Add brushstrokes to improve Photo (example: flowers added to view) Source Result added to Photo
- 4. Add border to window Before Window border added After Window border added
- 5. Adjust Colors with Auto Levels, recrop and stretch adjustments Before Auto Levels, recropping After Auto Levels, recropping…
- 6. Use filters on portions of photo, such as extrusion tool After Extrusion (on cupboards Before extrusion and view)
- 7. Resize small for Corel Painter, open in Corel, Quick Clone file, Add brushstrokes—impressionists, etc. Photo resized from 11”x14” to Quick Clone with Van Gogh and 2”x2.5” Impressionist brushstrokes added.
- 8. Reimport to Photoshop, add signature, use other effects to adjust colors, etc. Before signature and Final composition: After adjustments signature and adjustments
- 9. Print on Canvas, Paint in Oil or Acrylic Print on Canvas Finished Acrylic Painting