Download as PDF, PPTX
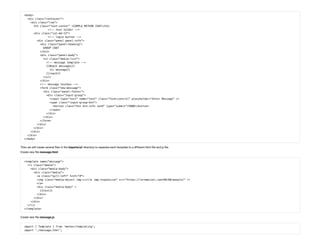
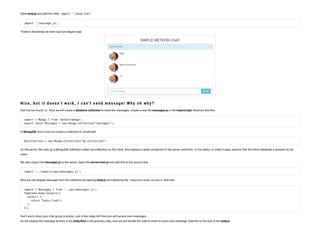
![Now add some folders like this:
This is the le structure that Meteor recommends us. You can nd out more here (http://guide.meteor.com/structure.html#javascript-structure).
Next, open client/main.html, replace all the code with this:
<head>
<title>My Simple Chat</title>
<meta name="viewport" content="width=device-width, initial-scale=1, maximum-scale=1">
</head>
We will write the body code in a new le. Let’s add some les to the imports/ui directory:
body.html
<body>
<h3>SIMPLE METEOR CHAT</h3>
<ul>
{{#each messages}}
{{> message}}
{{/each}}
</ul>
</body>
<template name="message">
<li>{{text}}</li>
</template>
and body.js
import { Template } from 'meteor/templating';
import './body.html';
Template.body.helpers({
messages: [
{ text: 'Hello,' },
{ text: 'Nice to meet you!' },
{ text: '<3' },
],
});
Also open le client/main.js and replace all the codes with this:](https://image.slidesharecdn.com/createameteorchatappin30minutes-161103035037/85/Create-a-meteor-chat-app-in-30-minutes-3-320.jpg)

This document describes how to build a simple real-time chat application using Meteor in 30 minutes. It provides step-by-step instructions on creating the app structure, adding user accounts and authentication, storing messages in a database collection, and displaying messages. Styling is added using Bootstrap. The app allows multiple users to sign in, type messages, and see them displayed in real-time. Key Meteor features demonstrated include Blaze rendering, Spacebars templating, and adding third-party packages.