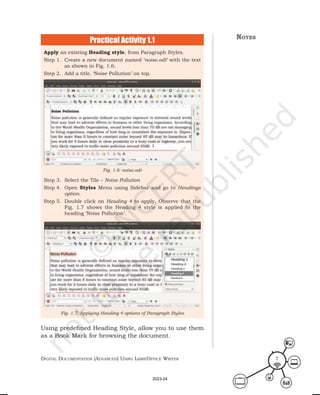
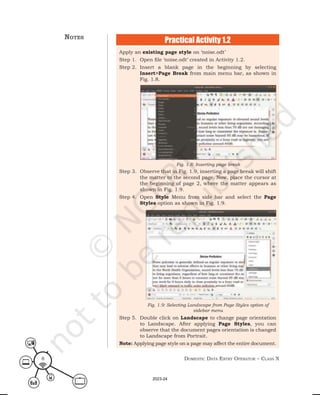
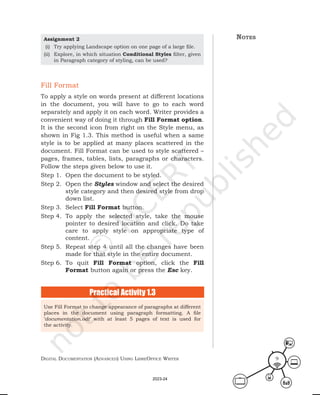
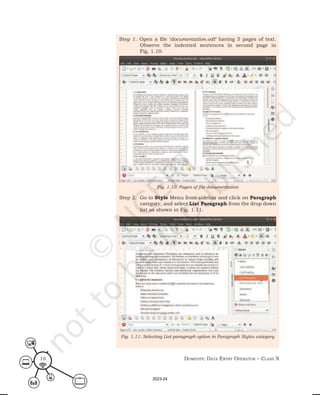
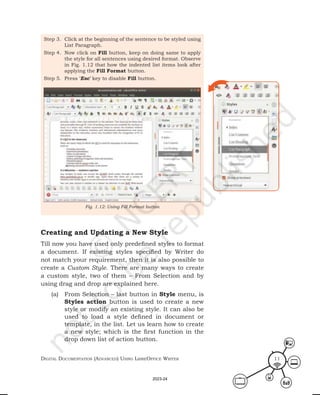
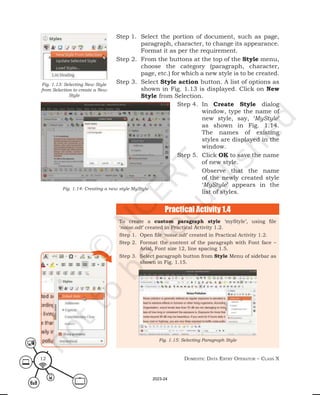
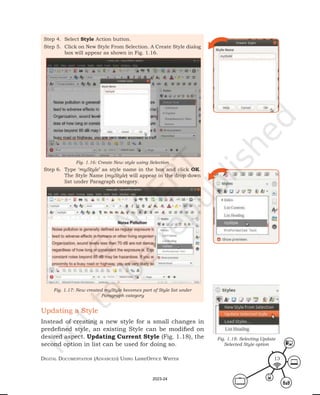
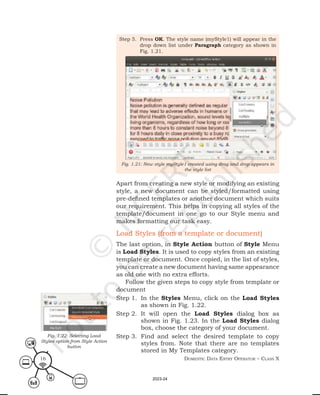
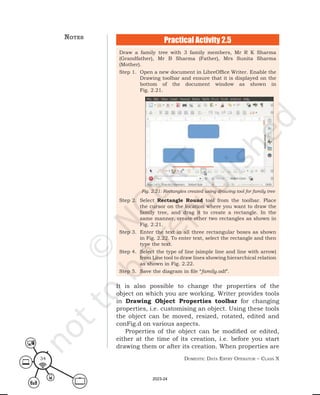
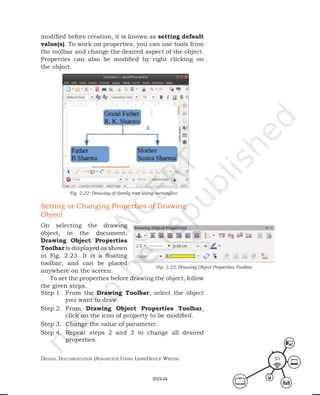
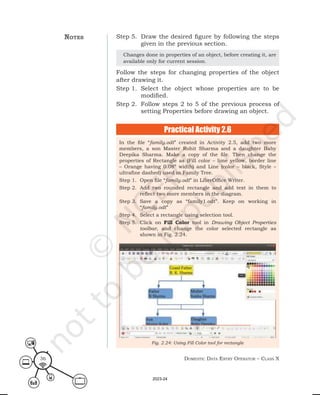
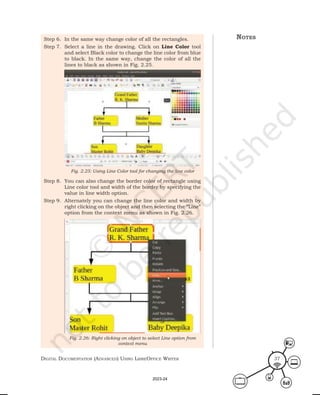
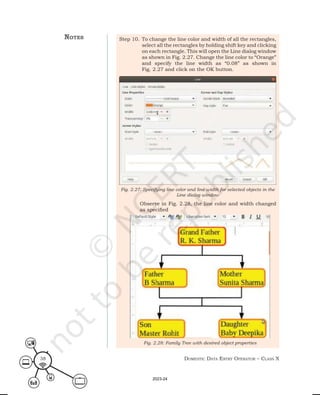
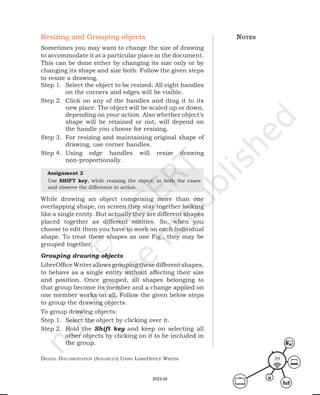
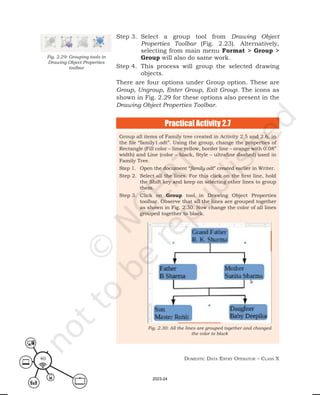
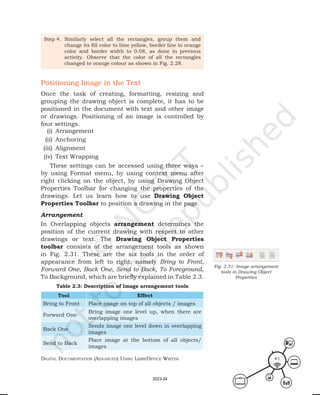
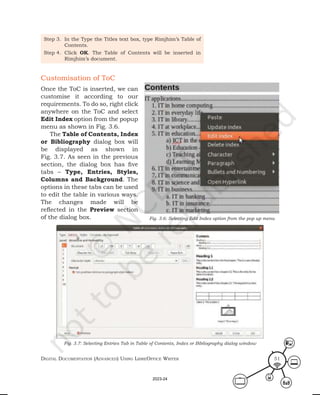
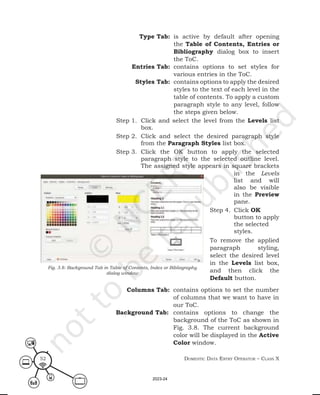
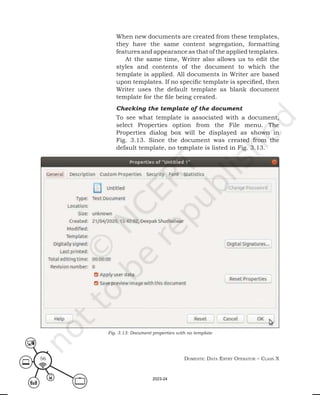
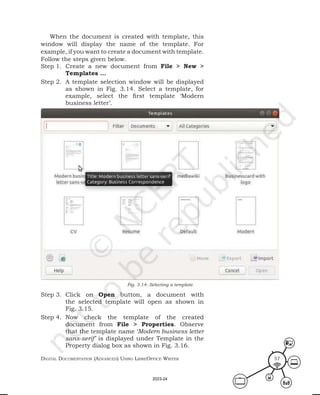
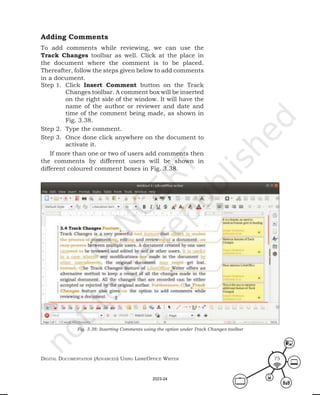
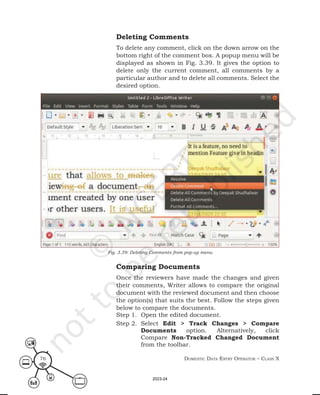
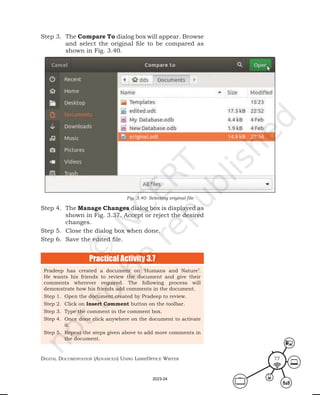
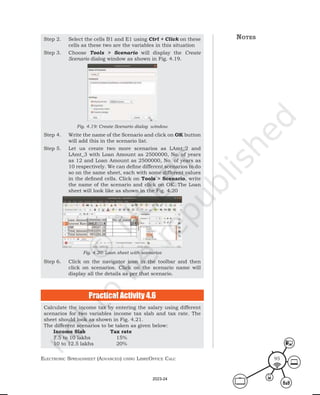
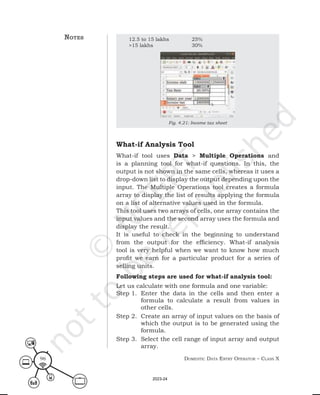
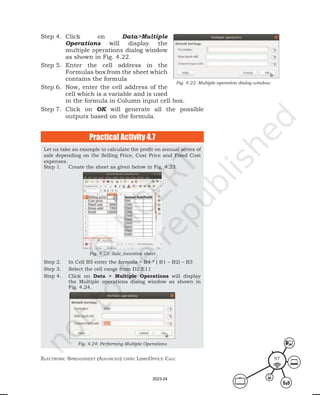
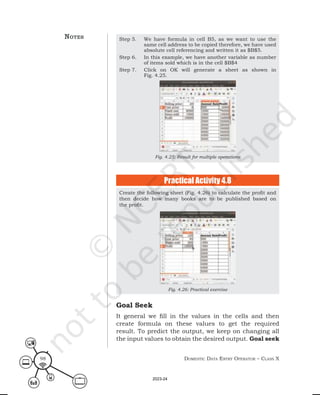
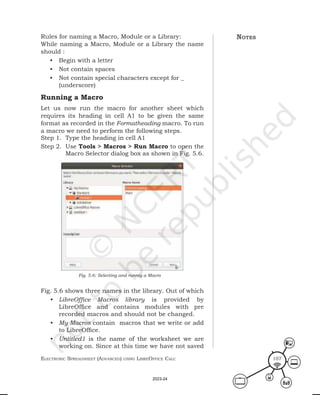
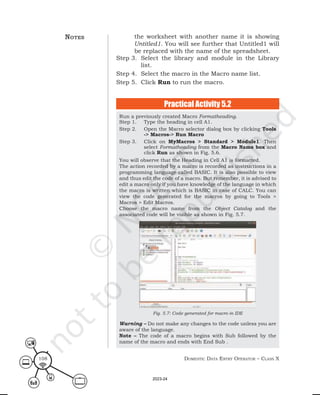
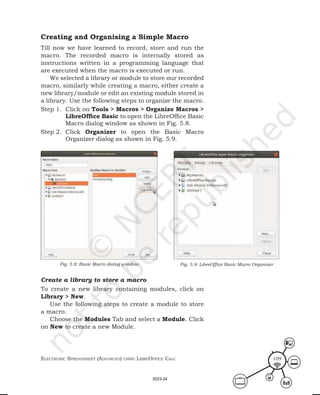
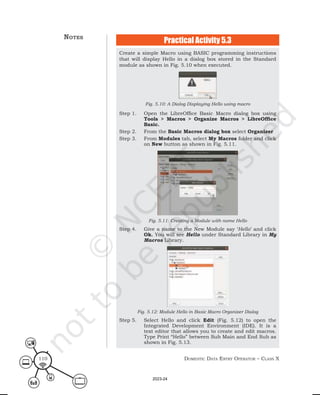
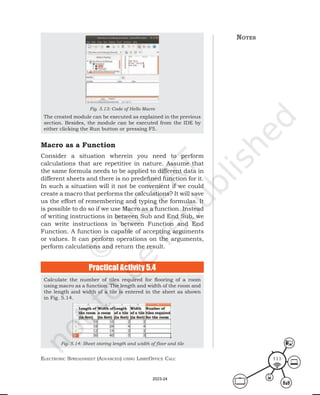
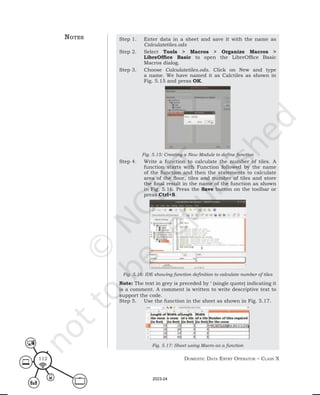
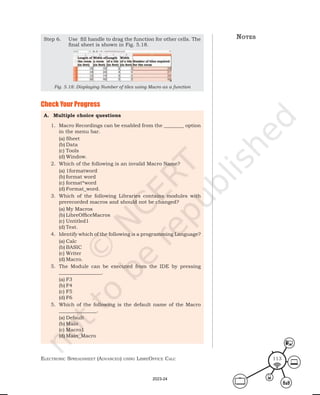
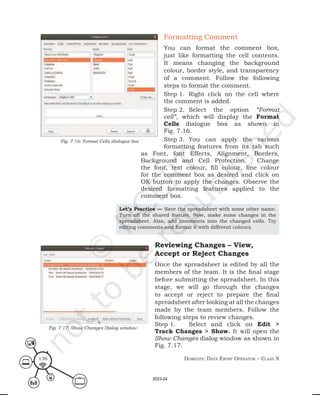
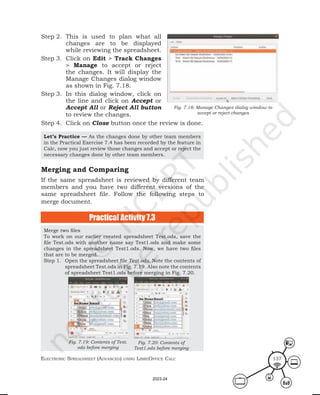
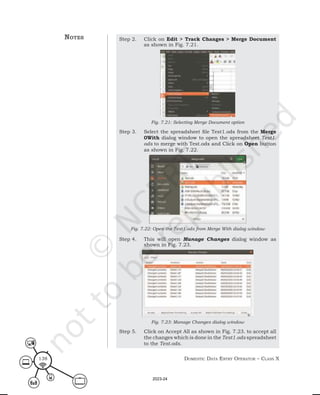
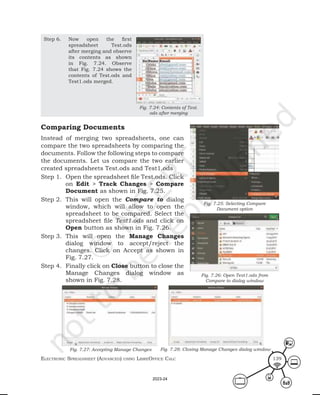
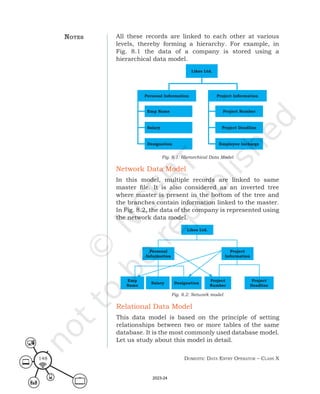
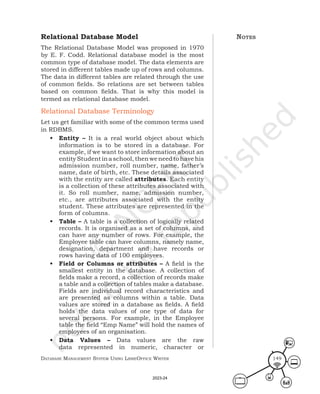
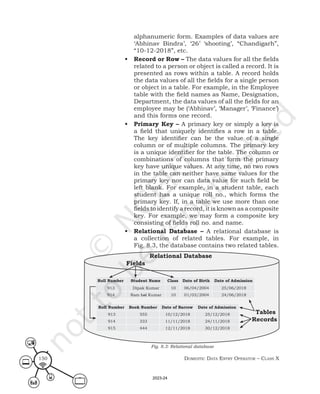
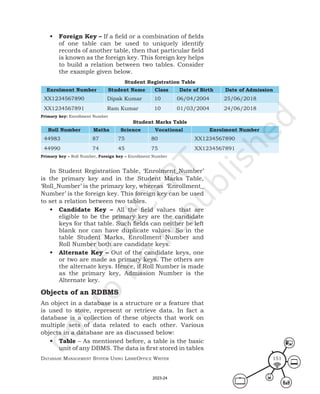
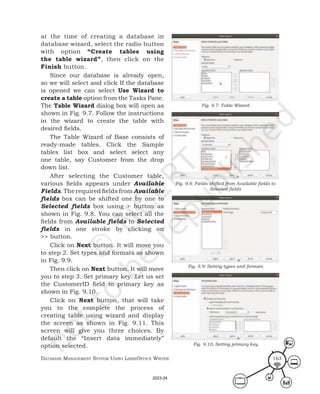
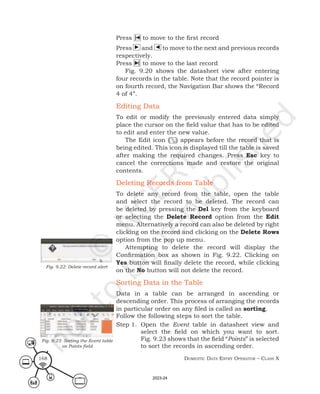
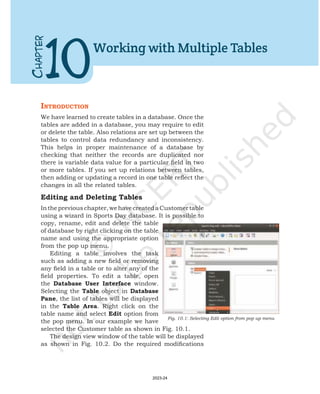
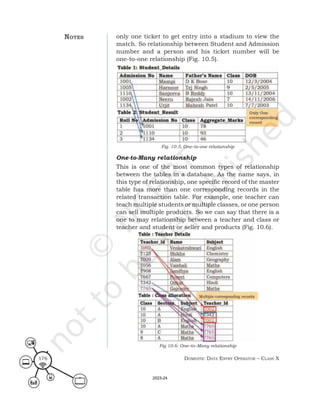
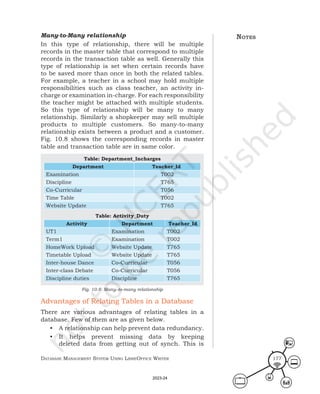
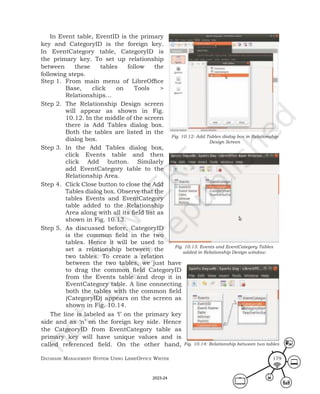
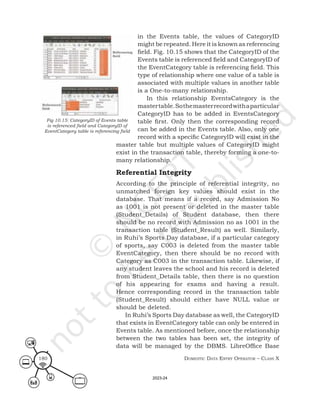
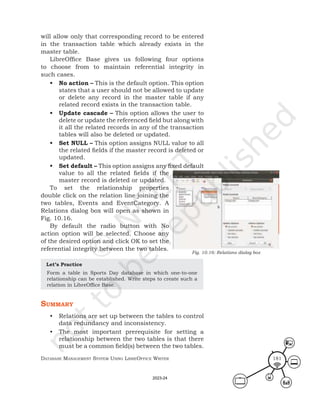
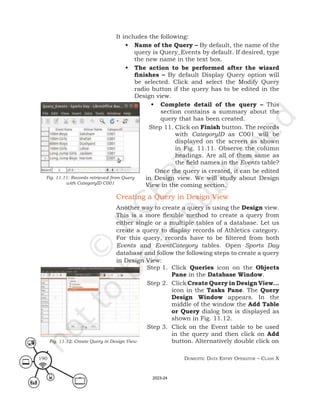
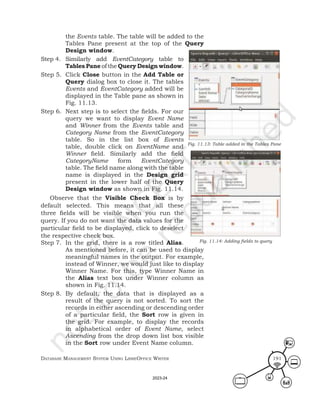
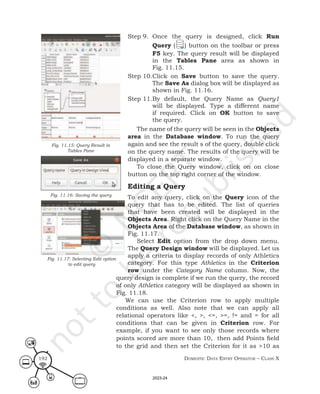
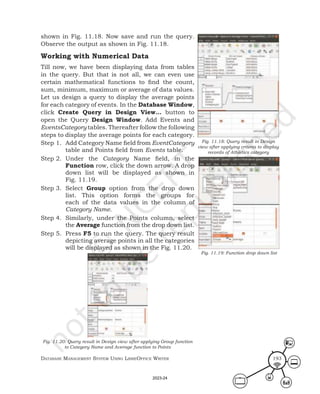
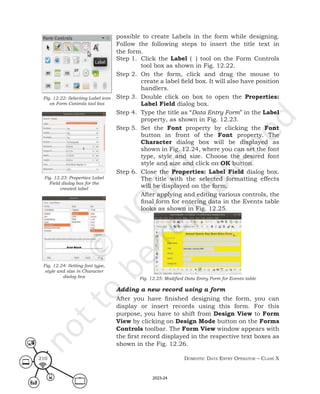
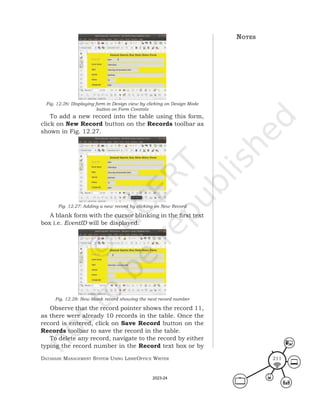
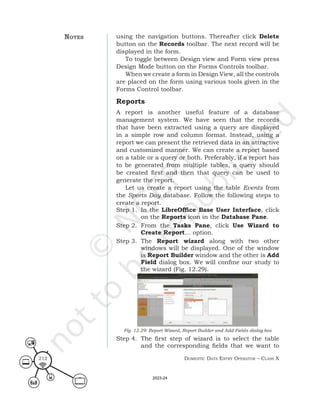
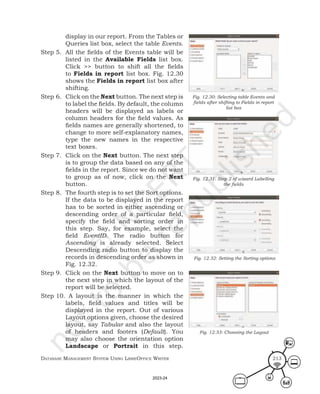
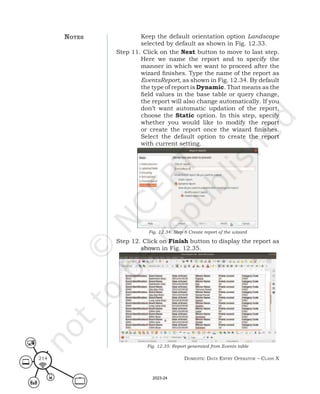
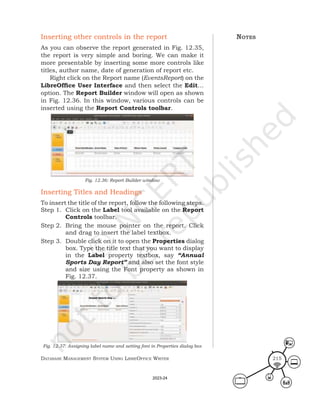
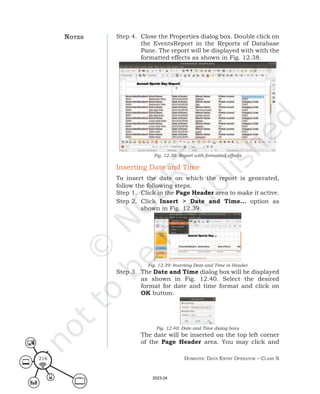
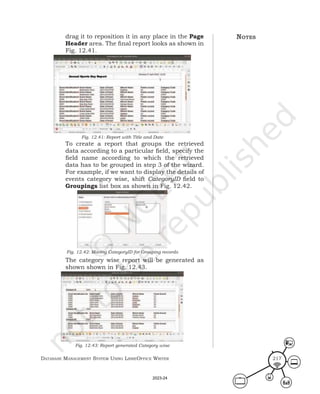
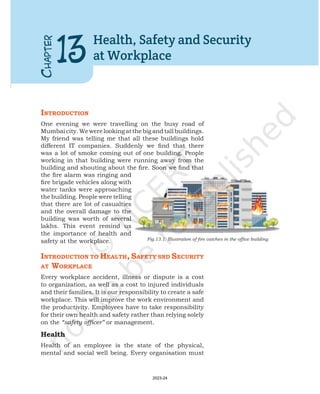
Domestic Data
Entry Operator
(Job Role)
Qualification Pack: Ref. Id. SSC/Q2212
Sector: Information Technology and Information
Technology enabled Services (IT–ITeS)
Textbook for Class X
2023-24
First Edition
November 2022 Agrahayana 1944
PD 5T BS
© National Council of Educational
Research and Training, 2022
330.00
Printed on 80 GSM paper with NCERT
watermark
Published at the Publication Division
by the Secretary, National Council of
Educational Research and Training,
Sri Aurobindo Marg, New Delhi 110 016
and printed at Saraswati Art Printers,
E-25, Sector-4, Bawana Industrial
Area, Delhi -110 039
Publication Team
Head, Publication : Anup Kumar Rajput
Division
Chief Production Officer : Arun Chitkara
Chief Business Manager : Vipin Dewan
Chief Editor (In charge) : Bijnan Sutar
Production Assistant : Rajesh Pippal
Cover and Layout
DTP Cell, Publication Division
ALL RIGHTS RESERVED
 No part of this publication may be reproduced, stored in a retrieval
system or transmitted, in any form or by any means, electronic,
mechanical, photocopying, recording or otherwise without the
prior permission of the publisher.
 This book is sold subject to the condition that it shall not, by way
of trade, be lent, re-sold, hired out or otherwise disposed off
without the publisher’s consent, in any form of binding or cover
other than that in which it is published.
 The correct price of this publication is the price printed on this
page.Any revised price indicated by a rubber stamp or by a sticker
or by any other means is incorrect and should be unacceptable.
OFFICES OF THE PUBLICATION
DIVISION, NCERT
NCERT Campus
Sri Aurobindo Marg
New Delhi 110 016 Phone : 011-26562708
108, 100 Feet Road
Hosdakere Halli Extension
Banashankari III Stage
Bengaluru 560 085 Phone : 080-26725740
Navjivan Trust Building
P.O. Navjivan
Ahmedabad 380 014 Phone : 079-27541446
CWC Campus
Opp. Dhankal Bus Stop
Panihati
Kolkata 700 114 Phone : 033-25530454
CWC Complex
Maligaon
Guwahati 781 021 Phone : 0361-2674869
ISBN 978-93-5580-007-7
171025 – DomeStIc Data eNtry operator
Textbook for Class X
2023-24
Foreword
The National Curriculum Framework (NCF)–2005 recommends
bringing out work and education into the domain of the curricular,
infusing it in all areas of learning while giving it an identity
of its own at relevant stages. It explains that work transforms
knowledge into experience and generates important personal and
social values, such as self-reliance, creativity and cooperation.
Through work, one learns to find one’s place in the society. It is
an educational activity with an inherent potential for inclusion.
Therefore, an experience of involvement in productive work in an
educational set up will make one appreciate the worth of social
life and what is valued and appreciated in the society. Work
involves interaction with material or other people (mostly both),
thus, creating a deeper comprehension and increased practical
knowledge of natural substances and social relationships.
Through work and education, school knowledge can be easily
linked to learners’ life outside the school. This also makes a departure
from the legacy of bookish learning and bridges the gap between
the school, home, community and workplace. The NCF–2005 also
emphasises Vocational Education and Training (VET) for all those
children, who wish to acquire additional skills and/or seek livelihood
through vocational education after either discontinuing or completing
their school education. VET is expected to provide a ‘preferred and
dignified’ choice rather than a terminal or ‘last resort’ option.
As a follow-up of this, the NCERT has attempted to infuse work
across subject areas and also contributed towards the development
of the National Skill Qualification Framework (NSQF) for the country,
which was notified on 27 December 2013. It is a quality assurance
framework that organises all qualifications, according to the levels of
knowledge, skills and attitude. These levels, graded from one to ten,
are defined in terms of learning outcomes, which the learner must
possess regardless of whether they are obtained through formal,
non-formal or informal learning. The NSQF sets common principles
2023-24
(iv)
and guidelines for a nationally recognised qualification system,
covering schools, vocational education and training institutions,
technical education institutions, colleges and universities.
It is under this backdrop that Pandit Sunderlal Sharma
Central Institute of Vocational Education (PSSCIVE), Bhopal, a
constituent of the NCERT has developed learning outcome based
modular curricula for vocational subjects from Classes IX to XII.
This has been developed under the Centrally Sponsored Scheme of
Vocationalisation of Secondary and Higher Secondary Education of
the Ministry of Education, erstwhile Ministry of Human Resource
Development. qaza
This textbook has been developed as per the learning outcome
based curriculum, keeping in view the National Occupation
Standards (NOSs) for the job role and to promote experiential
learning related to the vocation. This will enable the students to
acquire necessary skills, knowledge and attitude.
I acknowledge the contributions of the book development team,
reviewers, and all institutions and organisations for supporting
towards the development of this textbook.
The NCERT welcomes suggestions from students, teachers and
parents, which would help us to further improve the quality of the
material in subsequent editions.
Dinesh PrasaD saklani
Director
New Delhi National Council of Educational
September 2022 Research and Training
2023-24
aBout the textBook
The IT–ITeS sector is growing at a fast pace and is a very important
industry in India and abroad. In the growing business opportunities
in various domains around the globe, there is a huge transfer of
information from one place to another. Large amount of data is
churned thus creating a need for proper management of the data
that are collected. The companies also have to concentrate on their
core activities and resort to outsourcing the data entry process. The
rapid growth in the IT industry along with the entry of many small
and large outsourcing companies in this area, has led to a huge
demand for trained personnel for various job roles, such as Data
Entry Operator.
Domestic Data Entry Operators in the IT-ITeS Industry are also
known as Data Entry Operators. These individuals are responsible
for providing daily work reports and work on hourly basis. They
are also responsible for electronic entry of data from the client site
on to the office site or vice-versa. Individual tasks vary depending
on the size and structure of the organisation. This job requires the
individual to have thorough knowledge of various technology trends
and processes as well as have updated knowledge about database
management systems and IT initiatives. The individual should know
fast and accurate typing or data encoding. This job involves working
on a computer, and appropriate software to enter accurate data
regarding different issues like retrieving data from a computer or to
a computer.
The textbook for the job role of “Domestic Data Entry Operator”
has been developed to impart knowledge and skills through
hands-on learning experience, which forms a part of the experiential
learning. Experiential learning focusses on the learning process for
the individual. Therefore, the learning activities are student-centered
rather than teacher-centered.
The textbook has been developed with the contribution of the
expertise from the subject and industry experts and academicians for
making it a useful and inspiring teaching-learning resource material
2023-24
(vi)
for the vocational students. Open source software LibreOffice version
6.4 under Ubuntu Linux is used to demonstrate the process in this
textbook. The presentation of the screenshots may look different
in other versions of LibreOffice under Windows platform, but the
functionality, features and commands will remain the same in any
version under any platform. Adequate care has been taken to align
the content of the textbook with the National Occupational Standards
(NOSs) for the job role so that the students acquire necessary
knowledge and skills as per the performance criteria mentioned in
the respective NOSs of the Qualification Pack (QP). The textbook has
been reviewed by experts so as to make sure that the content is not
only aligned with the NOSs, but is also of high quality. The NOSs for
the job role of Domestic Data Entry Operator covered through this
textbook are as follows:
1. SSC/N3022 – Undertaking data entry services
2. SSC/N9001 – Managing work to meet requirements
3. SSC/N9003 – Maintaining a healthy, safe and secure working
environment
Unit 1 of the textbook covers the advanced features of word
processing using LibreOffice Writer. It covers applying styles to the
document, where you will learn to format a document using styles.
Unit 2 of the textbook covers the advanced features of spreadsheet
using LibreOffice Calc. It includes – analysing data to extract useful
information for making effective decisions.
Unit 3 of the textbook covers the Database Management System
(DBMS) using LibreOffice Base. It covers the general concepts of
DBMS, different database model with the focus on relational
database. Unit 4 of the textbook deals with the concept of working
environment in IT industry. It focuses on safe working practices at
workplace. It explains about health related problem caused by the
wrong practices and its solution. It also gives the knowledge about
required resources in workplace for smooth working.
DeePak D. shuDhalwar
Associate Professor (CSE) and Head
Department of Engineering and Technology
PSSCIVE, NCERT, Bhopal
2023-24
textBook DevelopmeNt team
memBerS
Anju Gupta, Freelance Educationist, New Delhi
Chetna Khanna, Freelance Educationist, New Delhi
Mohini Arora, Head, Department of Computer Science, Air Force
Golden Jubilee Institute, Subroto Park, New Delhi
Sangita Chadha, Head, Department of Computer Science, Ambience
Public School, Safdarjung Enclave, New Delhi
memBer-coorDINator
Deepak D. Shudhalwar, Professor (CSE) and Head, Department of
Engineering and Technology, PSSCIVE, NCERT, Bhopal
2023-24
ackNowleDgemeNtS
The National Council of Educational Research and Training (NCERT)
expresses its gratitude to all members of the Project Approval
Board (PAB) and officials of the Ministry of Human Resource
Development (MHRD), Government of India, for their cooperation
in the development of this textbook. The Council also extends
gratitude to all the contributors for sharing expertise and valuable
time by positively responding to the request for the development of
this textbook.
The Council acknowledges the contribution of Prakash Khanale,
Head, Department of Computer Science, DSM College Parbhani, for
carefully evaluating and giving suggestions for the improvement of
this textbook.
The Council would also like to thank Rajesh Khambayat, Joint
Director, PSS Central Institute of Vocational Education (PSSCIVE),
Bhopal, for providing support and guidance in the development of
this textbook.
The Council is grateful to Saroj Yadav, Professor and Dean (A),
NCERT, and Ranjana Arora, Professor and Head, Department of
Curriculum Studies, for their sincere efforts in coordinating the
review workshops for the finalisation of this book. The Council
acknowledges the copy editing and valuable contribution of Shilpa
Mohan, Assistant Editor (Contractual) in shaping this book. The
efforts of DTP Operator Pawan Kumar Barriar, Haridarshan Lodi and
Rajshree Saini, DTP Operators (Contractual), Publication Division,
NCERT, for flawless layout design are also acknowledged.
2023-24
coNteNtS
Foreword iii
About the Textbook v
Unit 1: Digital Documentation (Advanced) using
LibreOffice Writer
1
Chapter 1. Introduction to Styles 3
Chapter 2. Working with Images 22
Chapter 3. Advanced Features of Writer 47
Unit 2: Electronic Spreadsheet (Advanced)
using LibreOffice Calc
84
Chapter 4. Analyse Data using Scenarios and Goal Seek 86
Chapter 5. Using Macros in Spreadsheet 104
Chapter 6. Linking Spreadsheet Data 116
Chapter 7. Share and Review a Spreadsheet 130
Unit 3: Database Management System using
LibreOffice Base
142
Chapter 8. Introduction to Database Management System 144
Chapter 9. Starting with LibreOffice Base 157
Chapter 10. Working with Multiple Tables 173
Chapter 11. Queries in Base 186
Chapter 12. Forms and Reports 199
Unit 4: Maintain Healthy, Safe and Secure Working
Environment
222
Chapter 13. Health, Safety and Security at Workplace 223
Chapter 14. Workplace Quality Measures 235
Chapter 15. Prevent Accidents and Emergencies 247
Answer Key 260
2023-24
2023-24
Digital Documentation
(Advanced) using
LibreOffice Writer
1
IntroductIon
In Class IX, you have learned the basic concepts of word
processing using LibreOffice Writer, where the basic
functions, such as creating, editing and formatting the
document are covered. However, in today’s professional
set up, you need to know more features to create a
document that can be presented in a professional
style. LibreOffice Writer offers a variety of features
and commands that enable you to create an attractive
and presentable document with a consistent format.
Further, such documents are easy to read, comprehend
and edit by one and all.
In this Unit, you will learn to format a document
using styles, use style formats, create new styles,
update styles, and apply styles and to use the template
of another document to format the current document.
A document with pictures is always easier to
understand than a text document. Pictures have a
visual appeal, as our brain responds quickly to colours
in comparison to any other form of information. In digital
document, a picture can be a drawing, chart, photo,
2023-24
Domestic Data entry operator – class X
2
logo, graph or single video frame. LibreOffice Writer
provides various tools to work with images. In this
Unit you will learn to create a document with pictures,
insert and modify images in the document to make it
more attractive.
Later, it discusses some advanced features of
LibreOffice Writer that are used to create professional
documents. You will be able to use the feature ‘Table
of Contents’, which is based on different types of
heading styles and create professional documents using
templates. ‘Track changes’, an important feature, used
to keep a track of editing being done by each user is also
covered in this Unit.
The screenshots of LibreOffice version 6.4 under
Ubuntu Linux are used here to demonstrate the various
processes. The presentation of the screenshots may
look different in other versions of LibreOffice or under
Windows platform. But the functionality, features
and commands are the same in any version under
any platform.
notes
2023-24
In Class IX, you had learned to create, format and edit
documents in LibreOffice Writer. In today’s world, a
document created and presented in professional style
is appreciated by all. There are two ways of creating
an attractive digital document in Writer: manually
formatting a document or by applying styles.
You learned manual formatting in class IX, where you
selected a part of a document, such as page, paragraph
or words and then applied formatting effects using the
formatting toolbar. To format different portion(s) in the
document, having same style, steps were repeated for
all part(s) of the document. So, to change any aspect(s)
of formatting, the entire process was repeated for the
document. Manual formatting is popular, as it is easy to
use and requires less knowledge. Creating a big report
with consistent format becomes difficult when manual
formatting is used. To avoid inconsistency in formatting
and reduce time and effort in formatting a document, we
use Styles in Writer. In this chapter, you will learn how
to style a document by using– style formats, creating
new styles, updating styles, applying styles and using
template to format the current document.
Introduction to Styles
A style is a collection of all formatting information, which
you want to save and then apply on the document. For
example, following details of Font can be stored as a
style with the name ‘Title style’.
Size – 12
Name – Bookman Old Style
Weight –Bold
Alignment – Left
C
HAPTER
1 Introduction to Styles
2023-24
Domestic Data entry operator – class X
4
Now you can use and consistently apply Title style
to all titles of the document. To change the style of
Title in a document, you just need to update the Title
style and apply it to the document. Similarly, to change
the format of the complete document, just change the
style applied to it. Using Style allows you to shift your
focus from appearance of the document to the content
of document. This chapter will help you learn how to
create and apply styles in Libreoffice Writer.
Style Categories
Writer provides six Style categories, which are as follows:
(a) Page – all documents in Writer are based on
pages, hence for formatting them, Page Style is
used. It defines basic page layout like page size,
its margin, placement of header and footer,
footnote, borders and background. A document
can have one or many page styles. If a page style
is not specified, Writer uses its built-in Default
page style.
(b) Paragraph – after deciding on a page format,
next is the document content, which is organised
in paragraphs. A paragraph begins and ends
by pressing Enter key. Paragraph formatting
includes tab stops, text alignment, line spacing
and borders. Usually, it also includes Character
styling attributes.
(c) Character – this styling is used to work on block
of letters, i.e. word(s) in the paragraph instead
of the whole paragraph. By using character
styles, you can change the appearance of a part
of a paragraph without affecting the other part.
Character styles allow changing the text colour,
text size, highlighting text and emphasising it.
(d) Frame – using frames, a document can be
organised in sections, so that each section
of the page can have a different appearance.
Frames are like containers, which can hold text,
graphics and lists. Therefore, applying Frame
Styles allows to format a frame by specifying its
size, position, border and how the text is placed
around the picture.
notes
2023-24
Digital Documentation (aDvanceD) using libreoffice Writer 5
(e) List – to style lists in a document, the Writer
provides a separate category. It can be used to
style lists by putting numbering or bullets of a
different kind or specify numeric format.
(f) Table – using tables, a large amount of
information can be organised and presented
effectively. Table Style category allows to format
a table by adding borders, using different text
or border colour(s), aligning text inside the
table, having different patterns or text
colour.
Now we know which Style category should
be applied to style/format a section of the
document, let’s learn how to apply it.
Styles and Formatting
Writer provides many options and tools to
style or format a document. All formatting
options, learned in Class IX, which can be
applied using Formatting toolbar, can also be
applied using Style menu.
There are many predefined Styles in Writer,
which can be accessed by using the following
methods:
(i) Using Style option from Menu Bar
(ii) Using Style Drop Down list box, as
shown in Fig. 1.1, from the Toolbar. The
current paragraph style is displayed
in the textbox. If the Toolbar is not
visible then, click on View>Toolbars,
and enable Formatting/“Formatting
(Styles)”.
(iii) Using Sidebar Menu. On the Sidebar,
clicking on Styles icon, displays the
Style sub-menu as shown in Fig. 1.2.
(iv) Using keyboard shortcut — F11 function
key.
If you choose to style your document using
this option, you will find various available
options on top as shown in Fig. 1.3
In Fig. 1.3, first six icons allow to select
the category of style, such as Paragraph style,
Fig. 1.1: Style drop down list in Toolbar
Fig. 1.2: Style sub menu from sidebar
Fig. 1.3: Buttons at the top of sidebar
sub menu
2023-24
Domestic Data entry operator – class X
6
Character style, Frame
style, Page style, List style
and Table style to work on.
Click on any one of these
buttons to display a list
of existing styles in that
category. From the bottom
of the window selecting
Show Preview option
displays its style along with
the name in the list.
Fig. 1.4 shows the list
when preview is not selected
and Fig. 1.5 shows when the
preview is selected.
At the bottom of this
menu, there is a Drop Down
Fig. 1.5: Paragraph Styles with
Show previews
Fig. 1.4: Paragraph Styles
without Show previews
list, to select the filter for the style list to be displayed
above. By default this filter is set to Hierarchical as
shown at the bottom of Fig. 1.5.
Assignment 1
Select each of the Styles – Character style, Frame style, Page style,
List style and Table style and list the styles under each category.
Let us use these styles in a document. For applying any
styles, such as Paragraph, Character, Frame, Page, List,
Table follow the given steps.
Step 1. Select the text to be formatted. The selected
text may be a collection of characters, words,
lines, paragraph, page, frame or table.
Step 2. To format the selected text, choose appropriate
style by clicking the button from the top of the
Styles bar.
Step 3. A list of styles for that category appears.
Double click on the desired style to apply to
the selected text.
2023-24
Digital Documentation (aDvanceD) using libreoffice Writer 7
Apply an existing Heading style, from Paragraph Styles.
Step 1. Create a new document named ‘noise.odt’ with the text
as shown in Fig. 1.6.
Step 2. Add a title, ‘Noise Pollution’ on top.
Step 3. Select the Tile – Noise Pollution
Step 4. Open Styles Menu using Sidebar and go to Headings
option.
Step 5. Double click on Heading 4 to apply. Observe that the
Fig. 1.7 shows the Heading 4 style is applied to the
heading ‘Noise Pollution’.
Fig. 1.6: noise.odt
Fig. 1.7: Applying Heading 4 options of Paragraph Styles
Practical Activity 1.1
Using predefined Heading Style, allow you to use them
as a Book Mark for browsing the document.
notes
2023-24
Domestic Data entry operator – class X
8
Apply an existing page style on ‘noise.odt’
Step 1. Open file ‘noise.odt’ created in Activity 1.2.
Step 2. Insert a blank page in the beginning by selecting
Insert>Page Break from main menu bar, as shown in
Fig. 1.8.
Step 3. Observe that in Fig. 1.9, inserting a page break will shift
the matter to the second page. Now, place the cursor at
the beginning of page 2, where the matter appears as
shown in Fig. 1.9.
Step 4. Open Style Menu from side bar and select the Page
Styles option as shown in Fig. 1.9.
Step 5. Double click on Landscape to change page orientation
to Landscape. After applying Page Styles, you can
observe that the document pages orientation is changed
to Landscape from Portrait.
Note: Applying page style on a page may affect the entire document.
Fig. 1.8: Inserting page break
Fig. 1.9: Selecting Landscape from Page Styles option of
sidebar menu
Practical Activity 1.2
notes
2023-24
Digital Documentation (aDvanceD) using libreoffice Writer 9
Fill Format
To apply a style on words present at different locations
in the document, you will have to go to each word
separately and apply it on each word. Writer provides a
convenient way of doing it through Fill Format option.
It is the second icon from right on the Style menu, as
shown in Fig 1.3. This method is useful when a same
style is to be applied at many places scattered in the
document. Fill Format can be used to style scattered –
pages, frames, tables, lists, paragraphs or characters.
Follow the steps given below to use it.
Step 1. Open the document to be styled.
Step 2. Open the Styles window and select the desired
style category and then desired style from drop
down list.
Step 3. Select Fill Format button.
Step 4. To apply the selected style, take the mouse
pointer to desired location and click. Do take
care to apply style on appropriate type of
content.
Step 5. Repeat step 4 until all the changes have been
made for that style in the entire document.
Step 6. To quit Fill Format option, click the Fill
Format button again or press the Esc key.
Use Fill Format to change appearance of paragraphs at different
places in the document using paragraph formatting. A file
‘documentation.odt’ with at least 5 pages of text is used for
the activity.
Practical Activity 1.3
notes
Assignment 2
(i) Try applying Landscape option on one page of a large file.
(ii) Explore, in which situation Conditional Styles filter, given
in Paragraph category of styling, can be used?
2023-24
Domestic Data entry operator – class X
10
Step 1. Open a file ‘documentation.odt’ having 5 pages of text.
Observe the indented sentences in second page in
Fig. 1.10.
Step 2. Go to Style Menu from sidebar and click on Paragraph
category, and select List Paragraph from the drop down
list as shown in Fig. 1.11.
Fig. 1.10: Pages of file documentation
Fig. 1.11: Selecting List paragraph option in Paragraph Styles category
2023-24
Digital Documentation (aDvanceD) using libreoffice Writer 11
Step 3. Click at the beginning of the sentence to be styled using
List Paragraph.
Step 4. Now click on Fill button, keep on doing same to apply
the style for all sentences using desired format. Observe
in Fig. 1.12 that how the indented list items look after
applying the Fill Format button.
Step 5. Press ‘Esc’ key to disable Fill button.
Fig. 1.12: Using Fill Format button
Creating and Updating a New Style
Till now you have used only predefined styles to format
a document. If existing styles specified by Writer do
not match your requirement, then it is also possible to
create a Custom Style. There are many ways to create
a custom style, two of them – From Selection and by
using drag and drop are explained here.
(a) From Selection – last button in Style menu, is
Styles action button is used to create a new
style or modify an existing style. It can also be
used to load a style defined in document or
template, in the list. Let us learn how to create
a new style; which is the first function in the
drop down list of action button.
2023-24
Domestic Data entry operator – class X
12
Step 1. Select the portion of document, such as page,
paragraph, character, to change its appearance.
Format it as per the requirement.
Step 2. From the buttons at the top of the Style menu,
choose the category (paragraph, character,
page, etc.) for which a new style is to be created.
Step 3. Select Style action button. A list of options as
shown in Fig. 1.13 is displayed. Click on New
Style from Selection.
Fig. 1.13: Selecting New Style
from Selection to create a New
Style
Fig. 1.14: Creating a new style MyStyle
Step 4. In Create Style dialog
window, type the name of
new style, say, ‘MyStyle’
as shown in Fig. 1.14.
The names of existing
styles are displayed in the
window.
Step 5. Click OK to save the name
of new style.
Observe that the name
of the newly created style
‘MyStyle’ appears in the
list of styles.
To create a custom paragraph style ‘myStyle’, using file
‘noise.odt’ created in Practical Activity 1.2.
Step 1. Open file ‘noise.odt’ created in Practical Activity 1.2.
Step 2. Format the content of the paragraph with Font face –
Arial, Font size 12, line spacing 1.5.
Step 3. Select paragraph button from Style Menu of sidebar as
shown in Fig. 1.15.
Fig. 1.15: Selecting Paragraph Style
Practical Activity 1.4
2023-24
Digital Documentation (aDvanceD) using libreoffice Writer 13
Step 4. Select Style Action button.
Step 5. Click on New Style From Selection. A Create Style dialog
box will appear as shown in Fig. 1.16.
Step 6. Type ‘myStyle’ as style name in the box and click OK.
The Style Name (myStyle) will appear in the drop down
list under Paragraph category.
Fig. 1.16: Create New style using Selection
Fig. 1.17: New created myStyle becomes part of Style list under
Paragraph category
Updating a Style
Instead of creating a new style for a small changes in
predefined style, an existing Style can be modified on
desired aspect. Updating Current Style (Fig. 1.18), the
second option in list can be used for doing so.
Fig. 1.18: Selecting Update
Selected Style option
2023-24
Domestic Data entry operator – class X
14
Follow the given below steps to modify an existing user
defined style of page, frame or paragraph style.
Step 1. Select the page/paragraph to be modified.
Step 2. Format the selected portion as per the
requirement.
Step 3. Go to Style menu, and click on the button to update.
Step 4. Using Style Action button, click on Updated
Selected Style.
Note – Ensure that the aspect modified remains same
throughout the selection. For example, in paragraph, if
you are changing font face or size then, throughout the
paragraph it should remain same.
Using Drag and Drop
Another way of creating a new style is using Drag and
Drop method. It is very easy, as the desired formatted
portion of text is just dragged and dropped at correct
place in the Style menu.
Use the following steps to create a new Style using
Drag and Drop method.
Step 1. Select the text from the document and change
its formatting as desired.
Step 2. From the buttons at the top of the Style menu,
choose the desired category of style to create.
Step 3. Click on the desired style under which, new
style is to be created.
Step 4. From the document drag the selected portion of
text to the Style Menu.
Note – While dragging the text, check the cursor shape,
as it changes to indicate whether the desired operation
is possible or not.
Step 5. Create Style dialog window appears (see
Fig. 1.16), type the name of new style. Names
of existing styles are displayed in the window.
Step 6. Click OK button to save the name of new style.
The Create Style window displays the list of custom
styles. To update an existing style, choose the style
name from the list. So same method can be used to
create or update a Style. Drag and Drop cannot be used
to create a Page Style.
notes
2023-24
Digital Documentation (aDvanceD) using libreoffice Writer 15
Create a new style ‘myStyle1’ using drag and drop, by changing
line spacing to 1 and font size to 13 in myStyle.
Step 1. Open file ‘noise.odt’ created in Practical Activity 1.2.
Step 2. Format the content of the paragraph with Font size 13
and line spacing 1.
Step 3. Select paragraph button from Style menu of sidebar as
shown in Fig. 1.19.
Step 4. Now drag the selected text to Style menu, as shown in
Fig. 1.20.
Fig. 1.19: Paragraph Styles in Style menu of sidebar
Fig. 1.20: Creating a new style using drag and drop
Practical Actiivty 1.5 notes
2023-24
Domestic Data entry operator – class X
16
Step 5. Press OK. The style name (myStyle1) will appear in the
drop down list under Paragraph category as shown in
Fig. 1.21.
Fig. 1.21: New style myStyle1 created using drag and drop appears in
the style list
Apart from creating a new style or modifying an existing
style, a new document can be styled/formatted using
pre-defined templates or another document which suits
our requirement. This helps in copying all styles of the
template/document in one go to our Style menu and
makes formatting our task easy.
Load Styles (from a template or document)
The last option, in Style Action button of Style Menu
is Load Styles. It is used to copy styles from an existing
template or document. Once copied, in the list of styles,
you can create a new document having same appearance
as old one with no extra efforts.
Follow the given steps to copy style from template or
document
Step 1. In the Styles Menu, click on the Load Styles
as shown in Fig. 1.22.
Step 2. It will open the Load Styles dialog box as
shown in Fig. 1.23. In the Load Styles dialog
box, choose the category of your document.
Step 3. Find and select the desired template to copy
styles from. Note that there are no templates
stored in My Templates category.
Fig. 1.22: Selecting Load
Styles option from Style Action
button
2023-24
Digital Documentation (aDvanceD) using libreoffice Writer 17
Step 4. From the same dialog window,
also, select the options for the
types of styles to be copied,
such as Text for Paragraph
and Character styles, Frame,
Pages or Numbering (List
styles). By selecting Overwrite
option, the styles being copied
will replace any existing styles
with the same name.
Step 5. Click OK to copy the styles.
Step 6. In case styles are to be copied
from a file, then instead of
Template option, click on the From File button.
A File Selection dialog box is displayed. Select
the desired document from your computer.
Applying styles
Whenever a new document is created,
the Writer applies default style(s) to it,
and the same is displayed in the status
bar as shown in Fig. 1.24.
You may like to retain the default
style or change it.
Self Exploration
Learn other ways of accessing Style
options as listed in section 1.4.
summary
• A Style is collection of all
formatting information, which
you want to save and then apply on the document.
• Writer provides six Style categories – Page,
Paragraph, Character, Frame, List and Table.
• Predefined Heading style(s) act as bookmarks
in a document. These bookmarks allow faster
browsing in a document.
• These Style(s) tools can be accessed from Menu
bar, Drop Down List and Side bar.
• Fill Format is used to style scattered – Pages,
Frames, Tables, Lists, Paragraphs or Characters
in a document.
Fig. 1.24: The current Default Style is displayed on the
status bar
Fig. 1.23: Selecting the My Templates from Categories
of Load Styles dialog window
2023-24
Domestic Data entry operator – class X
18
• Writer allows creating custom style and saving
them for future use.
• These new styles can be created using Selection
method or Drag and Drop method.
• Drag and Drop method cannot be used to create
a Page style.
• A user defined style once created, can be updated
at any point of time. Steps used for updating a
style are same as creation of style.
• A document can be styled using another document
or a template.
1. Mr R K Sharma is planning to change his job. He
approaches a company (www.naukri.in) for helping him
in finding new job. Mr Sharma is asked to submit his
CV/Resume in the company. He has downloaded a
sample CV from “template.com”. Help him in creating his
CV in the same format. Also save the format as “CV1” on
the computer, for future reference.
2. Raghav receives a non-styled text document as shown in
Fig. 1.25, from his teacher to convert it into desired
appearance as shown in Fig. 1.26. He has to save it as
“reportStyle” for future reference. Write the process that
he should follow.
Fig. 1.25: Practical Exercise 2 Original Document
notes
Practical Exercises
2023-24
Digital Documentation (aDvanceD) using libreoffice Writer 19
3. Kendriya Vidyala No. 3, is planning to publish a monthly
digital newsletter for their school. Ravish Pandey of class
12, heads the group responsible to design it on computer.
Size of news letter finalised is 5 inch (length) by 8 inch
(height). It was also decided that:
• The newsletter will have two pages with 4 leaves.
• The first leaf will provide brief information about school.
• The second leaf will have a table, displaying the
school’s last year’s Board exam results.
• On the third leaf School achievements (at least 4) for
the current session will be given.
• The last leaf will have articles or poems (at least 2)
written by students.
You being part of the team are required to perform the following
using Style Menu from Sidebar:
(a) Suggest appropriate style category (page, frame, and
table) to be used to design the newsletter.
(b) Create digital copy of it.
(c) Apply Left Page and Right Page format on appropriate
leaves.
(d) Also set the same margins on all leaves, having same
border on all.
(e) Add page number on each leaf. The page number
should appear in Footer as “Page – number”. Right
align these numbers on each leaf.
Fig. 1.26: Appearance of Styled Document
notes
2023-24
Domestic Data entry operator – class X
20
(f) For heading(s) and sub heading(s) use Heading 2 and
Heading 4, in the newsletter.
(g) On the first leaf, while displaying information about
school, use character styling of your choice to make it
attractive.
(h) Use table to style Board Results, using grid rows and
columns.
(i) Each row of the table should have a number – in
Roman, prefixed to content.
(j) Organise school achievements in frames, where
individual frame is to be styled using Frames of
Paragraph category.
(k) Using selection method, save the style in respective
category, so that the same can be used to publish
future newsletters to maintain consistency.
A. Multiple choice questions
1. Which of the following features in LibreOffice Writer is/are
used to create the given document?
(a) Page borders
(b) Envelope
(c) Picture from
File
(d) Indexes and
Tables
2. Styles menu (from
sidebar) in Writer provide options to
work on
(a) Paragraph Styles
(b) Frame Styles
(c) Page Styles
(d) All of the above
3. What is style template in LibreOffice Writer?
(a) Pre-determined form and mode of document file
(b) One kind of model style
(c) One type of document
(d) Cluster of documents in Writer
4. Which of the following gives the status of your document
like page numbers, number of pages?
(a) Status bar (b) Standard toolbar
(c) Formatting (d) Title bar
5. Which of the following can be used to access a style menu?
(a) F11 function key (b) Sidebar Menu
(c) Formatting toolbar (d) All of these
B. Fill in the blanks
1. A __________ is a collection of different formats
2. Styles are especially handy in __________.
Check Your Progress
notes
2023-24
Digital Documentation (aDvanceD) using libreoffice Writer 21
3. Proper use of styles improves __________ in a document
4. The first five buttons at the top of the Styles window select
the category of __________.
5. Using predefined __________ creates Bookmark in the
document.
6. On opening a new file _________ Style is used for formatting
the document.
7. In page layout documents, you can arrange __________ like
text boxes and graphics.
8. Character styles are often integrated in __________ Style.
9. __________ allows to apply style at different places in the
document.
10. Predefined Style __________ be updated by Drag and Drop
method.
C. Short answer questions
1. What do you understand by styles in LibreOffice writer
document?
2. Write advantages of using Style over manual formatting,
for designing a document.
3. What are the different categories of style in LibreOffice
writer document?
4. Write down the steps to update a style.
5. What do you understand by custom styles in LibreOffice writer?
6. In a document Introduction paragraph is to be designed
extensively by setting its font (face, size, weight, colour),
space above it and giving number to heading. Given below
are the steps used to do so.
(i) Select the Introduction (paragraph)
(ii) Open Font list from Toolbar
(iii) Select the font
(iv) Open Font size from Toolbar
(v) Select the desired font size
(vi) Select Font weight (Bold) from the toolbar
(vii) Open Font color from Toolbar
(viii) Select desired color
(ix) Using Format menu option, select Spacing > Paragraph
> Indent and Spacing
(x) Edit space above paragraph
(xi) Add number by Selecting Numbered list from Toolbar.
7. Give two examples, where instead of Style, using manual
formatting will be beneficial.
8. Give one situation, in which you will prefer to use Fill
Format for styling your document.
9. Write steps to load style(s) from a template.
notes
2023-24
It is easy to read and comprehend a good interactive
document. A word processing application has rich
features, which allows to create an interactive document.
A document containing pictures is always easier to
understand than a pure text document. Pictures have
visual appeal, as our brain responds quickly to colors in
comparison to any other form of information. A picture
can be a drawing, chart, photo, logo, graph, or single video
frame. In digital document a picture can be a graphic or
image representation, which is a digital image. Till now,
we have created a text document with different features,
such as formatting and using styles. In this chapter
you will learn to create a document with pictures. You
will learn to insert and modify images in the document
to make it more attractive. LibreOffice Writer provides
various tools to work with images. A picture is a digital
image, which is representation of image in finite set of
digital values 0 or 1, known as pixels. These are stored
in various types of graphics files with the file extension,
such as GIF, JPG, JPEG, PNG, BMP, etc.
Inserting an Image in a Document
LibreOffice Writer allows to work on images, shapes,
charts and diagrams by providing various tools. The
image file stored on the computer, can be inserted into
a document using different ways, such as using Insert
Image dialog, using Drag and Drop option, using Cut,
Copy and Paste option and lastly by Linking.
Inserting Image Using Insert Image Option
A general procedure to insert an image using Insert
Image dialog box, is as follows.
Step 1. Open the document to insert an image in
LibreOffice Writer.
C
HAPTER
2Working with Images
2023-24
Digital Documentation (aDvanceD) using libreoffice Writer 23
Step 2. Place the cursor where you want to insert an
image.
Step 3. Select and click on Insert > Image from menu
bar
Step 4. An Insert Image dialog box will open which will
allow to choose the picture file to be inserted.
Step 5. Select the file and click on Open button to insert
an image in document.
Practical Acitivity 2.1
Insert an image using Insert Image dialog box in the file
“noise.odt” created in previous chapter.
Step 1. Ensure that you have an image file on your computer
hard disk. Otherwise download a relevant image from
Internet.
Step 2. Open “noise.odt” file created in Practical Activity 1.2 of
Chapter 1.
Step 3. Place the cursor to the next line of the text to insert the
image file, and then click on Insert menu from the
menu bar as shown in Fig. 2.1.
Fig. 2.1: Selecting Insert menu for inserting Image
notes
2023-24
Domestic Data entry operator – class X
24
Step 4. Click on Image option, opens Insert Image browsing
window to select an image. Select desired image as
shown in Fig. 2.2.
Step 5. Click Open button. The image appears at desired place
as shown in Fig. 2.3.
Fig. 2.2: Insert image browsing window
Fig. 2.3: Image inserted in noise.odt document
notes
2023-24
Digital Documentation (aDvanceD) using libreoffice Writer 25
Inserting Image using Drag and Drop option
Another option to insert images in the document is by
using Drag and Drop option. The standard procedure
is just drag the image from its source and drop it at
desired position in the document. A general procedure
to insert an image using drag and drop option, is as
follows.
Step 1. Open the document to insert an image in
LibreOffice Writer.
Step 2. Open a file browser window (Win+E) and select
the image file to be inserted.
Step 3. Drag the image into the document
Step 4. Drop it, where you want it to appear in
the document.
Inserting image using Copy and Paste method
As stated above, another way to insert an image in the
document is by using copy and paste method. In this
method instead of dragging the image, copy the image
and then paste into the desired location of the document.
Inserting an image using any of the above described method
saves a copy of image file in the document wherever image
is inserted, that means, the image gets embedded in
the document.
Practical Activity 2.2
Insert an image from one document (source) to another document
(target) using Clipboard. Source file is “typewriter.odt” having
different images of typewriter, and target file is “documentation.
odt” created in the previous chapter.
Step 1. Open source file
“typewriter.odt”
and target file
“documentation.
odt”.
Step 2. In the source
document, select
the image to be
copied, as shown
in Fig. 2.4.
Fig. 2.4: Selected image in typewriter.odt
notes
2023-24
Domestic Data entry operator – class X
26
Step 3. Move the mouse pointer over the selected image and
copy the image by using keyboard shortcut (Ctrl+C)
or right-click and select Copy option from the context
menu to copy the image to the clipboard.
Step 4. Switch to the target file, “documentation.odt”.
Step 5. Place the cursor on the location where you want to
insert the image as shown in Fig. 2.5.
Step 6. Paste the image by using the keyboard shortcut (Ctrl+V)
or right-click and select Paste option from the context
menu to paste the image as shown in Fig. 2.6.
Fig. 2.5: Placing cursor to insert image in documentation.odt
Fig. 2.6: documentation.odt after inserting image from typewriter.odt
notes
2023-24
Digital Documentation (aDvanceD) using libreoffice Writer 27
Inserting an image by linking
If multiple copies of the same image are required to be
inserted in the document, it is beneficial to save the link
of image instead of inserting the image. Inserting a link,
stores its reference instead of the image itself, thereby
reduces the size of the document, because actual image
is saved only once as a separate file along with the
document.
Whenever a document containing the link is opened,
the image file gets merged, at the place(s) where reference
was stored, and displayed on screen to the user. A
general procedure to link the image file is as follows.
In Insert Image dialog box, check the Link option as
shown in Fig. 2.7
Keyboard shortcut to link an image – drag and drop
the image while holding the Ctrl+Shift keys.
Fig. 2.7: Link check box in Insert image dialog window
notes
Assignment 1
Explore how to insert an image from Writer’s Gallery or from
any other device?
Modifying an Image
Sometimes we may have to modify the image inserted in
the document to suit its requirement. The Image toolbar
is used to resize, crop, delete and rotate the image.
Using the Image toolbar
The image toolbar automatically appears when an image
is inserted or selected in the document. If you want to
keep it always on screen, click on View > Toolbars >
Image from the menu bar. The Image toolbar will be
2023-24
Domestic Data entry operator – class X
28
displayed as shown in Fig. 2.8. Table 2.1 describes
various tools that are made available through this image
toolbar.
Table 2.1: Description of Image Toolbar
Tool Effect on image
Image Filter
There are 11 types of filters available
for improving an image. Details given in
Table 2.2
Image Mode
Image can be changed to black and white,
gray-scale or a watermark
Crop Cuts off non-desirable part of the image
Flip Horizontally Flips the image Horizontally by 180
o
Flip Vertically Flips the image Vertically by 180
o
Rotate 90
o
left Rotates the image by 90
o
left
Rotate 90
o
right Rotates the image by 90
o
right
Rotate
Image can be rotated by any angle using
this tool
Transparency
Makes an image transparent by using the
value provided in percentage
Colour
Using Drop Down list (as shown in
Fig. 2.9), Red, Blue or Green colour can
be modified or adjustment for brightness,
contrast and gamma can be made
To apply any of the tools from image toolbar, select the
image on which tool is to be applied and then click on
the tool. Clicking on the colour button will display the
colour drop down list as shown in Fig. 2.9. It consists of
six components in the drop down list. One can increase
or decrease the percentage of these components. The
first components represent the three primary colours
Red, Green and Blue, respectively. The fourth component
represent the Brightness, fifth component represent
the Contrast and last sixth component represent
the Gamma.
Fig. 2.8: Image Toolbar
Fig. 2.9: Color dropdown list
2023-24
Digital Documentation (aDvanceD) using libreoffice Writer 29
Clicking on Image Filter opens up a window with
11 filters, as shown in Fig. 2.10. Table 2.2 gives the
brief description of various tools available in the Image
Filter window.
Table 2.2: Description of Image Filter
Tool Effect on Image
Invert
Inverts the colour values of coloured
image. In case image is gray-scale then its
brightness is inverted.
Smooth
Softens the contrast of image. Another
dialogue box appears to adjust parameter
Sharpen Increases the contrast of image
Remove Noise Removes single pixels from the image
Solarisation
Used in Photographs to reverse the tone.
Dark appears light and light appears dark.
Another dialogue box appears to adjust
parameter.
Aging
Simulates the effect of time on picture. On
clicking it, another dialogue box appears to
adjust parameter.
Posterise
Makes a picture appear like painting by
reducing colours in the image. Another
dialogue box appears to adjust parameter,
when this icon is clicked.
Charcoal Sketch Changes image as charcoal sketch
Relief
Adjusts light source to create shadow using
dialogue box to adjust parameter
Mosaic
Joins group of pixels into a single area of
one colour. Another dialogue box appears
to adjust parameter.
Fig. 2.10: Image Filter window
Practical Acitivity 2.3
Insert an image in a document
and rotate the image.
Step 1. Open a new document
in LibreOffice Writer.
Step 2. Go to Insert menu and
Select Image >> From
File
Step 3. Insert an image from
library as shown in
Fig. 2.11. Fig. 2.11: Image inserted in a new
document
2023-24
Domestic Data entry operator – class X
30
Step 4. Select image and then click on rotate tool. Observe that
four dots known as handles, appeared on four corners
of the image.
Step 5. Move the mouse on any corner and observe that the
‘rotate’ symbol is activated.
Step 6. Click on rotate symbol on the top right corner of the image
and drag it to downward direction, as shown in Fig. 2.12.
Step 7. The image rotated is shown in the Fig. 2.13.
Fig. 2.12: Rotating image Fig. 2.13: Image after rotation
notes
Practical Acitivity 2.4
Crop an image in a new file.
Step 1. Open a new document in LibreOffice Writer.
Step 2. Insert an image in the document as shown in Fig. 2.14
using Insert >> Image >> From File option as
demonstrated above.
Step 3. Select the image by clicking on the image. Observe that
the selected image is surrounded by eight small squares
as shown in Fig. 2.14.
Step 4. Click on crop tool from Image toolbar. Now observe that
the eight small squares surrounding the image will be
changed into the blue coloured handles as shown in
Fig. 2.15. These are the handles used to crop the image.
Fig. 2.15: Changed handles for
cropping the image
Fig. 2.14: Document after inserting
image
2023-24
Digital Documentation (aDvanceD) using libreoffice Writer 31
Step 5. Click any of these edges of the image and drag the
cursor towards the center of image as shown in
Fig. 2.16. Observe that the image is being cropped up to
the dotted lines. It is possible to crop the image by clicking
on dragging any of the edge as per the requirement.
Step 6. Click anywhere on the page or press Esc key to leave
the crop tool and observe the cropped image as shown
in Fig. 2.17.
Fig. 2.17: Image after cropping
from upper right edge
Fig. 2.16: Cropping the image
Resizing an Image
Sometimes you may want to resize the image to fit an
image at the desired place in a document. Resizing
is the process of reducing or enlarging the size of the
image. This can be done in various ways. Quick and
easy way to resize an image is by dragging the image’s
sizing handles. Use the following steps to resize image:
Step 1. Click on the image inserted in the
previous activity. Observe that there are
eight sizing handles surrounding the
image as shown in Fig. 2.14.
Step 2. Position the pointer over one of the sizing
handles. The pointer changes shape
indicating the direction of resizing.
Step 3. Click and drag to resize the image as
shown in Fig. 2.18.
Step 4. Release the mouse button when satisfied
with the new size and observe the size of
the image is reduced.
Fig. 2.18: Resizing the image
2023-24
Domestic Data entry operator – class X
32
By dragging the corner handles, one can resize
both the width and the height of the image
simultaneously, while the other four handles
only resize one dimension at a time.
Note that while resizing the image its size
gets changed, but while cropping the image
cuts it.
Deleting an Image
It is possible to delete the image from the document just
like we delete the text. To delete the image, just select the
image by clicking on the image and press the Delete key.
Drawing Objects
If you need to draw a flowchart or a callout box in your
document, LibreOffice Writer provides the feature of
drawing tools for such work. The set of drawing tools
available in Writer are easy to use, and helps in creating
good quality designs, diagrams and drawings. Once you
create the drawings, you can directly place it in the
document. These diagrams can also be copied or
imported in other packages.
Using Drawing Tools
To display Drawing Toolbar
in the Writer window, click on
View > Toolbars > Drawing
as shown in Fig. 2.19. This
will display the Drawing
Toolbar in the Writer window
as shown in Fig. 2.20. The
toolbar contains various basic
drawing objects of different
types to create any design of
your choice.
There are many default drawing objects used to
create designs in document. To use them –
Step 1. Place the cursor in the document where you
want the drawing to be placed (anchored). You
can change the anchor later, if required.
Fig. 2.19: Enabling Drawing tools
2023-24
Digital Documentation (aDvanceD) using libreoffice Writer 33
Step 2. Select the tool from the Drawing toolbar as
shown in Fig. 2.20. The mouse pointer changes
to a drawing-functions pointer.
Note – One more toolbar appears on the screen, the
Drawing Object Properties. It is shown in Fig. 2.23
and explained later.
Step 3. Move the pointer to the place in the document
where you want the image to appear and then
click-and-drag to create the drawing object.
Step 4. Release the mouse button to finish drawing.
The selected drawing function remains active,
so that you can draw another object of the
same type.
Step 5. To cancel the selected drawing function, press
the Esc key or click the Select icon (the arrow)
on the Drawing toolbar.
Select
Insert Line
Curve (list)
Polygon
Square
Circle Symbol (list)
Star (list)
Flowchart (list)
Fontwork
Right angle triangle
Rectangle rounded
Rectangle
Curve Oval
Lines & Arrows (list)
Isosceles triangle
Arrow (list)
Call Out (list)
Call outs
Points
Text Box
Toggle Extrusion
Basic shapes (list)
Fig. 2.20: Drawing Toolbar
2023-24
Domestic Data entry operator – class X
34
Draw a family tree with 3 family members, Mr R K Sharma
(Grandfather), Mr B Sharma (Father), Mrs Sunita Sharma
(Mother).
Step 1. Open a new document in LibreOffice Writer. Enable the
Drawing toolbar and ensure that it is displayed on the
bottom of the document window as shown in
Fig. 2.21.
Step 2. Select Rectangle Round tool from the toolbar. Place
the cursor on the location where you want to draw the
family tree, and drag it to create a rectangle. In the
same manner, create other two rectangles as shown in
Fig. 2.21.
Step 3. Enter the text in all three rectangular boxes as shown
in Fig. 2.22. To enter text, select the rectangle and then
type the text.
Step 4. Select the type of line (simple line and line with arrow)
from Line tool to draw lines showing hierarchical relation
as shown in Fig. 2.22.
Step 5. Save the diagram in file “family.odt”.
Fig. 2.21: Rectangles created using drawing tool for family tree
Practical Activity 2.5
notes
It is also possible to change the properties of the
object on which you are working. Writer provides tools
in Drawing Object Properties toolbar for changing
properties, i.e. customising an object. Using these tools
the object can be moved, resized, rotated, edited and
conFig.d on various aspects.
Properties of the object can be modified or edited,
either at the time of its creation, i.e. before you start
drawing them or after its creation. When properties are
2023-24
Digital Documentation (aDvanceD) using libreoffice Writer 35
Setting or Changing Properties of Drawing
Object
On selecting the drawing
object, in the document,
Drawing Object Properties
Toolbar is displayed as shown
in Fig. 2.23. It is a floating
toolbar, and can be placed
anywhere on the screen.
To set the properties before drawing the object, follow
the given steps.
Step 1. From the Drawing Toolbar, select the object
you want to draw.
Step 2. From Drawing Object Properties Toolbar,
click on the icon of property to be modified.
Step 3. Change the value of parameter.
Step 4. Repeat steps 2 and 3 to change all desired
properties.
Fig. 2.23: Drawing Object Properties Toolbar
modified before creation, it is known as setting default
value(s). To work on properties, you can use tools from
the toolbar and change the desired aspect of the object.
Properties can also be modified by right clicking on
the object.
Fig. 2.22: Drawing of family tree using rectangles
2023-24
Domestic Data entry operator – class X
36
Step 5. Draw the desired figure by following the steps
given in the previous section.
Changes done in properties of an object, before creating it, are
available only for current session.
Follow the steps for changing properties of the object
after drawing it.
Step 1. Select the object whose properties are to be
modified.
Step 2. Follow steps 2 to 5 of the previous process of
setting Properties before drawing an object.
In the file “family.odt” created in Activity 2.5, add two more
members, a son Master Rohit Sharma and a daughter Baby
Deepika Sharma. Make a copy of the file. Then change the
properties of Rectangle as (Fill color – lime yellow, border line
– Orange having 0.08” width) and Line (color – black, Style –
ultrafine dashed) used in Family Tree.
Step 1. Open file “family.odt” in LibreOffice Writer.
Step 2. Add two rounded rectangle and add text in them to
reflect two more members in the diagram.
Step 3. Save a copy as “family1.odt”. Keep on working in
“family.odt”
Step 4. Select a rectangle using selection tool.
Step 5. Click on Fill Color tool in Drawing Object Properties
toolbar, and change the color selected rectangle as
shown in Fig. 2.24.
Fig. 2.24: Using Fill Color tool for rectangle
Practical Activity 2.6
notes
2023-24
Digital Documentation (aDvanceD) using libreoffice Writer 37
Step 6. In the same way change color of all the rectangles.
Step 7. Select a line in the drawing. Click on Line Color tool
and select Black color to change the line color from blue
to black. In the same way, change the color of all the
lines to black as shown in Fig. 2.25.
Step 8. You can also change the border color of rectangle using
Line color tool and width of the border by specifying the
value in line width option.
Step 9. Alternately you can change the line color and width by
right clicking on the object and then selecting the “Line”
option from the context menu as shown in Fig. 2.26.
Fig. 2.25: Using Line Color tool for changing the line color
Fig. 2.26: Right clicking on object to select Line option from
context menu
notes
2023-24
Domestic Data entry operator – class X
38
Step 10. To change the line color and width of all the rectangles,
select all the rectangles by holding shift key and clicking
on each rectangle. This will open the Line dialog window
as shown in Fig. 2.27. Change the line color to “Orange”
and specify the line width as “0.08” as shown in
Fig. 2.27 and click on the OK button.
Observe in Fig. 2.28, the line color and width changed
as specified
Fig. 2.27: Specifying line color and line width for selected objects in the
Line dialog window
Fig. 2.28: Family Tree with desired object properties
notes
2023-24
Digital Documentation (aDvanceD) using libreoffice Writer 39
Resizing and Grouping objects
Sometimes you may want to change the size of drawing
to accommodate it at a particular place in the document.
This can be done either by changing its size only or by
changing its shape and size both. Follow the given steps
to resize a drawing.
Step 1. Select the object to be resized. All eight handles
on the corners and edges will be visible.
Step 2. Click on any of the handles and drag it to its
new place. The object will be scaled up or down,
depending on your action. Also whether object’s
shape will be retained or not, will depend on
the handle you choose for resizing.
Step 3. For resizing and maintaining original shape of
drawing, use corner handles.
Step 4. Using edge handles will resize drawing
non-proportionally.
Assignment 2
Use SHIFT key, while resizing the object, in both the cases
and observe the difference in action.
While drawing an object comprising more than one
overlapping shape, on screen they stay together looking
like a single entity. But actually they are different shapes
placed together as different entities. So, when you
choose to edit them you have to work on each individual
shape. To treat these shapes as one Fig., they may be
grouped together.
Grouping drawing objects
LibreOfficeWriter allowsgrouping thesedifferentshapes,
to behave as a single entity without affecting their size
and position. Once grouped, all shapes belonging to
that group become its member and a change applied on
one member works on all. Follow the given below steps
to group the drawing objects.
To group drawing objects:
Step 1. Select the object by clicking over it.
Step 2. Hold the Shift key and keep on selecting all
other objects by clicking on it to be included in
the group.
notes
2023-24
Domestic Data entry operator – class X
40
Step 3. Select a group tool from Drawing Object
Properties Toolbar (Fig. 2.23). Alternatively,
selecting from main menu Format > Group >
Group will also do same work.
Step 4. This process will group the selected drawing
objects.
There are four options under Group option. These are
Group, Ungroup, Enter Group, Exit Group. The icons as
shown in Fig. 2.29 for these options also present in the
Drawing Object Properties Toolbar.
Fig. 2.29: Grouping tools in
Drawing Object Properties
toolbar
Practical Activity 2.7
Group all items of Family tree created in Activity 2.5 and 2.6, in
the file “family1.odt”. Using the group, change the properties of
Rectangle (Fill color – lime yellow, border line – orange with 0.08”
width) and Line (color – black, Style – ultrafine dashed) used in
Family Tree.
Step 1. Open the document “family.odt” created earlier in Writer.
Step 2. Select all the lines. For this click on the first line, hold
the Shift key and keep on selecting other lines to group
them.
Step 3. Click on Group tool in Drawing Object Properties
toolbar. Observe that all the lines are grouped together
as shown in Fig. 2.30. Now change the color of all lines
grouped together to black.
Fig. 2.30: All the lines are grouped together and changed
the color to black
2023-24
Digital Documentation (aDvanceD) using libreoffice Writer 41
Positioning Image in the Text
Once the task of creating, formatting, resizing and
grouping the drawing object is complete, it has to be
positioned in the document with text and other image
or drawings. Positioning of an image is controlled by
four settings.
(i) Arrangement
(ii) Anchoring
(iii) Alignment
(iv) Text Wrapping
These settings can be accessed using three ways –
by using Format menu, by using context menu after
right clicking on the object, by using Drawing Object
Properties Toolbar for changing the properties of the
drawings. Let us learn how to use Drawing Object
Properties Toolbar to position a drawing in the page.
Arrangement
In Overlapping objects arrangement determines the
position of the current drawing with respect to other
drawings or text. The Drawing Object Properties
toolbar consists of the arrangement tools as shown
in Fig. 2.31. These are the six tools in the order of
appearance from left to right, namely Bring to Front,
Forward One, Back One, Send to Back, To Foreground,
To Background, which are briefly explained in Table 2.3.
Table 2.3: Description of Image arrangement tools
Tool Effect
Bring to Front Place image on top of all objects / images
Forward One
Bring image one level up, when there are
overlapping images
Back One
Sends image one level down in overlapping
images
Send to Back
Place image at the bottom of all objects/
images
Fig. 2.31: Image arrangement
tools in Drawing Object
Properties
Step 4. Similarly select all the rectangles, group them and
change its fill color to lime yellow, border line to orange
color and border width to 0.08, as done in previous
activity. Observe that the color of all the rectangles
changed to orange colour as shown in Fig. 2.28.
2023-24
Domestic Data entry operator – class X
42
To Foreground Moves the drawing object in front of the text
To Background Moves the drawing object behind the text
Note – First four settings can be applied on an image
or drawing, but last two are available for drawings only.
Anchoring
It acts as a reference point for image or drawing.
Anchoring allows an image to retain its position to a
page, paragraph, character or frame. Anchor tool is
shown in Fig. 2.32. Clicking on the downward arrow
you can observe that an image can be anchored to Page,
Paragraph, Character or Frame. So whenever a page,
paragraph, character or frame is aligned, the anchored
image moves along with it.
Alignment
It allows the vertical or horizontal placement of the
image with respect to its anchor. Alignment tools are
located under Drawing Properties Toolbar, as shown
in Fig. 2.33. An image can be aligned in six different
styles – 3 horizontal and 3 vertical.
Text Wrapping
It allows the placement of image in relation to text. Text
Wrapping tools are available under Drawing Object
Properties Toolbar. There are six choices, namely Wrap
off, Page Wrap, Optimal Page Wrap, Wrap left, Wrap
right, Wrap through, in the order of their appearance
from left to right as shown in Fig. 2.34. Table 2.4 briefly
describes these tools.
Table 2.4: Description of Text Wrapping tools
Tool Wrapping Effect
Wrap off Text is placed above and below the image
Page Wrap
Text flows around the image. Moving an
image will rearrange the text on the page
Optimal Page
wrap
In Page Wrap, if the space between image
and margin is less than 2 cm then text will
not be placed on that side
Wrap left Text is placed on left side of the image
Wrap right Text is placed on the right side of the image
Wrap through Superimposes the image on the text
Fig. 2.32: Anchored tool with
its options
Fig. 2.33: Alignment tools
in Drawing Object Property
toolbar
Fig. 2.34: Text wrapping tools
in Drawing Object Properties
toolbar
2023-24
Digital Documentation (aDvanceD) using libreoffice Writer 43
summary
• In a digital document, a graphic or image is called
digital image.
• A digital image is represented in pixels.
• Predefined image can be inserted using Drag-
Drop method, Copy-Paste method or using Insert
Image dialog box.
• Inserting an image embeds a copy of the image in
the document.
• An image can be linked to a document using
Insert Image dialog box.
• Linking an image saves only the link of the image
instead of embedding the image. This saves
space in case multiple copies of the same image
are required.
• Image Toolbar can be used to modify an image.
Tools for filtering, resizing, cropping, deleting and
rotating an image are available in this toolbar.
• Drawing Tools are used to create pictures (objects),
such as Flowchart, Call out box, designs, etc.
• Properties of Object can be customised by resizing,
rotating, moving or editing.
• Drawing object properties can be modified either
at the time of creation (when you start drawing)
or after its creation.
• Properties when modified before creation, is
known as setting Default values.
• An object drawn using different shapes, can be
grouped to behave as single object.
• Writer provide various tools to arrange text and
image or drawing on a page.
Practical Exercises
Q.1 In Practical Exercise of chapter 1 (Question 3), you created a
school newsletter. Leaf-wise content of the newsletter were:
(a) School Information
(b) Result for Class X & XII in table
(c) School Achievement
(d) Students’ article(s)/poem(s)
notes
2023-24
Domestic Data entry operator – class X
44
For improving the visual appeal of the newsletter, add some
images in it. Following are the details given for adding images.
Leaf 1: Add a relevant photo
of school in bottom
right corner, as
shown in picture.
Photo should have
good contrast and
brightness. Add black
border to photo.
Leaf 2: Add photograph
of toppers of Class
X and Class XII.
Make adjustment to
display photograph
of student in
appropriate table
and in front of their
name. As this page
might be printed in
black, convert them
to grayscale with
proper contrast.
Leaf 3: Add few relevant
pictures in the given
style on this leaf. Apply at least two types of image filter
on the pictures.
Q.2 Master Udit is helping his drawing teacher to create digital
drawings. His teacher asks him to write down the steps
to create the following two drawings. In the first drawing,
objects are grouped and second drawing was created by
resizing objects of first drawing. How would you help her
to do so using drawing tools of Writer?
Q.3 Miss Roshni has
downloaded a flowchart
to be included in her
report. She asks for
your help, in creating
an editable copy of
the flowchart. Write
steps to draw it using
Drawing tools of Writer.
notes
Start
End
Read Input
Process Data Create Report
End of
Data
Read Input
2023-24
Digital Documentation (aDvanceD) using libreoffice Writer 45
A. Multiple choice questions
1. The text or image which appears faintly in the background
of a page is called _________________.
(a) Water mark (b) Trade mark
(c) Copyright (d) Embossing
2. JPG or JPEG in image format stands for _________________.
(a) Joint Photographic Experts Group
(b) Joint Picture Experts Group
(c) Joint Photographic Experts Graph
(d) Joint Photographic Experts General
3. In Drawing Object Properties toolbar, Grouping options
provided are _________________.
(a) Exit Group (b) Ungroup
(c) Enter Group (d) All of these
4. Which of the following is not the correct file extension for
an image file?
(a) GIF (b) JPEG
(c) Odt (d) PNG
5. Image toolbar does not provide a tool for _________________.
(a) filtering (b) cropping
(c) copying (d) flipping
B. Fill in the blanks
1. _________ tool cuts off non-desirable part of the image.
2. To change both brightness and contrast of the image
________________ tool can be used.
3. To simulate the effect of time on picture _____________
tool is used.
4. _________ place image at the bottom of all objects.
5. An image can be deleted by ____________ it and pressing
DELETE key.
6. In drawing tools, basic shapes list provide ____________
shapes.
7. Anchor act as _____________ point for a drawing.
8. There are ________________ options for aligning an image
horizontally.
9. The ___________ handles of image are used for rotating it.
10. Changing properties of an object _____________ creation,
retain them throughout the session
C. Short answer type questions
1. What is a digital image? How can you create one?
2. Write steps to insert an image from the gallery using
Drag and Drop method.
Check Your Progress notes
2023-24
Domestic Data entry operator – class X
46
3. How is resizing of image different from cropping it?
4. What are the tools available in drawing toolbar? Describe
any five tools.
5. How is linking of an image different from embedding?
Give a situation in which you would prefer to link
an image.
6. Write steps to change properties for drawing objects.
7. What are the benefits and drawbacks of grouping drawing
objects?
8. Describe any two tools from Drawing Object Properties
toolbar.
9. Write steps to insert an image in a basic drawing shape.
10. Write factors controlling positioning of an image in
a document.
notes
2023-24
As we all know that LibreOffice Writer is a word processor
that provides a variety of features. You have already
learned some of the features, such as formatting, editing,
inserting tables and images, styling the text and inserting
graphics in the document. In this chapter, you will be
learning some advanced features of LibreOffice Writer
that will be used to create professional documents. To
give the listing of the contents of the document, we can
use the Table of Contents feature, which is based on
different types of heading styles. LibreOffice Writer also
provides templates to create professional documents.
When multiple users are working on a single document,
the Track Changes feature can be used to keep a track
of the editing being done by each user.
Table of Contents
In Class IX, you had learned to insert tables in a
document, where the data was represented in a row and
column format. In this chapter, we will discuss Table of
Contents (ToC). You must have seen table of contents
in the beginning of your books. It contains a list of topics
and subtopics that have been covered in the book along
with page numbers.
Table of Contents, allows to insert an automated
table of contents in a document. The entries or contents
of this table are automatically taken from the headings
and sub headings of the document. Also, these contents
are hyperlinked in the table. So by clicking on any topic
in the table of contents, we can navigate directly to the
selected topic. But before creating table of contents,
you need to first understand the concept of hierarchy
of headings.
C
HAPTER
3Advanced Features of Writer
2023-24
Domestic Data entry operator – class X
48
Hierarchy of Headings
LibreOffice Writer supports up to 10 levels of headings H1
to H10. These headings are applied to the headings of the
document. The following process will demonstrate how
to apply these headings to the headings in the document.
Step 1. Create a new document in
LibreOffice Writer and enter
the text Heading 1 to Heading
10 as shown in Fig. 3.1.
Step 2. Click on the Styles button
from the right side bar. Click
on the Paragraph Styles and
then Headings. The Styles
dialog window will display the
list of headings from Heading
1 to Heading 10 as shown in
Fig. 3.1.
Step 3. Place the cursor on Heading
1 as typed in the document.
Then click on the Heading 1
from the Styles dialog window.
Step 4. Repeat Step 2 for the words
Heading 2 to Heading 10.
Step 4. Observe that Heading 1 to
Heading 10 is applied to the
words Heading 1 to Heading
10 of the document and these
headings have changed as per
the applied style as shown in
Fig. 3.2. Observe the change
in Figs. 3.1 and 3.2.
Once the desired heading styles
are applied in the document, the same
hierarchy will be reflected in the table of
contents also.
Creating a Table of Contents (ToC)
Before you start creating the table of contents or ToC in
a document, you must ensure that proper heading
styles, such as Heading 1, Heading 2, Heading 3 and so
on are inserted in the document. The correct ToC will be
Fig. 3.2: Document after applying 10 Headings
Fig. 3.1: Hierarchy of 10 Headings
2023-24
Digital Documentation (aDvanceD) using libreoffice Writer 49
generated only if proper paragraph styling for headings
is applied to the document. Once a styled document is
created, follow the steps given below to insert the ToC in
the given document:
Step 1. Open the earlier
created file
“documentation.odt”.
Step 2. Assign proper heading
styles to the various
headings in the
document from the
Styles dialog box. For
example, assign the
heading styles as
shown in Fig. 3.3 in
the “documentation.
odt” file.
Step 3. Place the cursor at
the position where the
table of contents is to
be inserted. Usually, it
is in the beginning of
the document.
Step 4. From main menu,
select Insert > Table of
Contents and Index
> Table of Contents,
IndexorBibliography.
The Table of
Contents, Index and
Bibliography dialog
box will be displayed as shown in Fig. 3.4.
Step 5. By default, the Type tab will be selected with
a preview of ToC on the right side of the dialog
box. On the left of the dialog box, is the Types
and Title section. In the Title text box, the
default name of the ToC, i.e. Table of Contents
is displayed. You can change this name, just
by typing in the text box. Type the desired title
of the ToC say “Contents” in the Title text box.
The title will be changed in the Preview section
as shown in Fig. 3.4.
Fig. 3.3: Planning for assigning headings styles
Fig. 3.4: Table of Contents, Index or Bibliography dialog box
2023-24
Domestic Data entry operator – class X
50
By default, the checkbox
for Protected against
Manual Changes option is
selected. This protects the
ToC from any accidental
change. If this box is
unchecked, then the
contents of ToC can be
changed directly on the
document page, just like any
other text on the document.
In the Create Index or
Table of Contents List
box, the Entire Document
option is selected in the For
list box. So the ToC will be automatically created from
the headings and sub-headings of entire document.
The Outline check box is selected, so the complete
outline of the ToC is shown in the preview. Click and
deselect it if you do not want to see it.
Step 5. Click OK button. The Table of Contents will be
inserted in the document as shown in Fig. 3.5.
Note that all the headings will appear with page
numbers in the ToC. The entries in the ToC are
hyperlinked. Moving a mouse pointer over any of the
entries will show a tool tip stating to press Ctrl+click to
open hyperlink followed by the heading title. Pressing
Ctrl+click the cursor will directly move on to the selected
section heading.
Fig. 3.5: Table of Contents inserted in a document
Practical Activity 3.1
Rimjhim has created a report on Environmental Pollution
in LibreOffice Writer. She has applied proper heading styles
to all section headings of the document. Now, to add table of
contents to the document with the heading as Rimjhim’s Table
of Contents, follow the steps given below.
Step 1. Open the document in LibreOffice Writer.
Step 2. Select Insert > Table of Contents and Index > Table
of Contents, Index or Bibliography. The Table of
Contents, Index and Bibliography dialog box will be
displayed.
2023-24
Digital Documentation (aDvanceD) using libreoffice Writer 51
Step 3. In the Type the Titles text box, type Rimjhim’s Table of
Contents.
Step 4. Click OK. The Table of Contents will be inserted in
Rimjhim’s document.
Customisation of ToC
Once the ToC is inserted, we can
customise it according to our
requirements. To do so, right click
anywhere on the ToC and select
Edit Index option from the popup
menu as shown in Fig. 3.6.
The Table of Contents, Index
or Bibliography dialog box will
be displayed as shown in
Fig. 3.7. As seen in the previous
section, the dialog box has five
tabs – Type, Entries, Styles,
Columns and Background. The
options in these tabs can be used
to edit the table in various ways.
The changes made will be
reflected in the Preview section
of the dialog box.
Fig. 3.7: Selecting Entries Tab in Table of Contents, Index or Bibliography dialog window
Fig. 3.6: Selecting Edit Index option from the pop up menu
2023-24
Domestic Data entry operator – class X
52
Type Tab: is active by default after opening
the Table of Contents, Entries or
Bibliography dialog box to insert
the ToC.
Entries Tab: contains options to set styles for
various entries in the ToC.
Styles Tab: contains options to apply the desired
styles to the text of each level in the
table of contents. To apply a custom
paragraph style to any level, follow
the steps given below.
Step 1. Click and select the level from the Levels list
box.
Step 2. Click and select the desired paragraph style
from the Paragraph Styles list box.
Step 3. Click the OK button to apply the selected
paragraph style to the selected outline level.
The assigned style appears in square brackets
Fig. 3.8: Background Tab in Table of Contents, Index or Bibliography
dialog window
in the Levels
list and will
also be visible
in the Preview
pane.
Step 4. Click OK
button to apply
the selected
styles.
To remove the applied
paragraph styling,
select the desired level
in the Levels list box,
and then click the
Default button.
Columns Tab: contains options to set the number
of columns that we want to have in
our ToC.
Background Tab: contains options to change the
background of the ToC as shown in
Fig. 3.8. The current background
color will be displayed in the Active
Color window.
2023-24
Digital Documentation (aDvanceD) using libreoffice Writer 53
To change the background color follow the following
steps.
Step 1. Click the Color button on the top of the
dialog box.
Step 2. Select the desired color from the Colors palette.
The selected color
will appear in the
New color window.
Step 3. To add the selected
color to the custom
palette, click Add
Button below the
color palette. Now,
the added color
can be re-used
whenever required.
Step 4. Click OK to apply
the desired color to
the ToC (Fig. 3.9).
To remove the
background colour from
the ToC, click None button
present on the top of the
dialog box.
LibreOffice Writer also
allows to add a graphic as
a background of the ToC.
For this, select the Bitmap
button in the Background
tab of the dialog box.
Select the desired graphic
option and click OK button
(Fig. 3.10).
Maintaining a Table of Contents
As we know now that a table of contents is a snapshot
of the entire document at any given point in time. If any
changes are made to the document section headings
or page numbering, it should be reflected in the Table
of Contents as well. Maintaining a Table of Contents
consists of updating and deleting the ToC.
Fig. 3.9: ToC with changed background color
Fig. 3.10: Adding graphic as a background of the ToC
2023-24
Domestic Data entry operator – class X
54
Updating the ToC
Writer does not update the ToC automatically.
The following activity shows how to update a
ToC manually.
Practical Activity 3.2
Some more sections are added in the document, accordingly the
ToC needs to be changed. To update a ToC manually, follow the
steps given below.
Step 1. Right-click anywhere in the ToC.
Step 2. From the pop-up menu as shown in Fig. 3.11, select
Update Index option. Writer updates the ToC so as to
reflect any changes made in the document. The reflected
changes in ToC is shown in Fig. 3.12.
Fig. 3.12: Updated ToC
Fig. 3.11: Selecting options for updating and editing a ToC
notes
2023-24
Digital Documentation (aDvanceD) using libreoffice Writer 55
Rimjhim has edited her document after the ToC was inserted.
Now she wants to update the ToC and also wants a pink coloured
background. Write the steps that Rimjhim should follow.
Step 1. To update the ToC, right-click anywhere in the ToC.
From the pop-up menu, select Update Index option as
shown in Fig. 3.11.
Step 2. To apply a coloured background, right click anywhere
on the ToC and select Edit Index option from the pop-
up menu.
Step 3. From the Table of Contents, Index or Bibliography
dialog box, select the Background tab. The current
background color will be displayed in the Active Color
window.
Step 4. Click the Color button on the top of the dialog box.
Step 5. Select the desired color from the Colors palette. The
selected color will appear in the New color window.
Step 6. Click OK to apply the desired color to the ToC.
Deleting ToC
To delete the ToC, right click on the table and select
Delete Index option from the pop-up menu. The ToC will
be deleted.
Practical Activity 3.3
Using Templates
A template is a preset layout that helps to create
professional and/or formal documents easily. In the
previous chapters, we have learned styling of different
document objects using templates. In this section, we will
learn to create document templates. Sometimes there is
a need to copy specific content including graphics, such
as logo of a company, image of a product or text, such
as tag lines of a product or a company, legal notices or
even headers and footers in multiple documents.
Instead of adding and then formatting the objects
in all documents, we can use templates. For example,
templates can be used to create a resume, chapter or
project report. A template can contain all the features
or objects that a regular document can contain – text,
graphics, styles and can even use any language. In a
template we can create and save defined headings, text
formats, styles, page numbers, headers and footers.
notes
2023-24
Domestic Data entry operator – class X
56
When new documents are created from these templates,
they have the same content segregation, formatting
features and appearance as that of the applied templates.
At the same time, Writer also allows us to edit the
styles and contents of the document to which the
template is applied. All documents in Writer are based
upon templates. If no specific template is specified, then
Writer uses the default template as blank document
template for the file being created.
Checking the template of the document
To see what template is associated with a document,
select Properties option from the File menu. The
Properties dialog box will be displayed as shown in
Fig. 3.13. Since the document was created from the
default template, no template is listed in Fig. 3.13.
Fig. 3.13: Document properties with no template
2023-24
Digital Documentation (aDvanceD) using libreoffice Writer 57
When the document is created with template, this
window will display the name of the template. For
example, if you want to create a document with template.
Follow the steps given below.
Step 1. Create a new document from File > New >
Templates …
Step 2. A template selection window will be displayed
as shown in Fig. 3.14. Select a template, for
example, select the first template ‘Modern
business letter’.
Step 3. Click on Open button, a document with
the selected template will open as shown in
Fig. 3.15.
Step 4. Now check the template of the created
document from File > Properties. Observe
that the template name ‘Modern business letter
sans-serif’ is displayed under Template in the
Property dialog box as shown in Fig. 3.16.
Fig. 3.14: Selecting a template
2023-24
Domestic Data entry operator – class X
58
Fig. 3.16: Document Properties with template name Modern business letter sans-serif
Fig. 3.15: Document created by selecting template
2023-24
Digital Documentation (aDvanceD) using libreoffice Writer 59
Creating a Template
You have learnt how to create a
document with predefined template.
It is also possible to create your own
template and save the current styles
and appearance of a document for
future use. Follow the steps given
below to create and save a template
in Writer.
Step 1. Open the document in
LibreOffice Writer whose
template is to be created.
Step 2. From main menu bar, select
File > Templates > Save.
The Save As Template
dialog box appears as
shown in Fig. 3.17.
Step 3. Type the name of the new
template (T1) in Template
Name text box.
Step 4. Select the category of the
template being created.
A category is just like a
folder that helps to organise the templates.
Some of the categories that can be seen in
the dialog box are My Templates, Business
Correspondence, Online Business Documents
and Presentations.
Step 5. Click and select Set as default template
checkbox to make the current template as the
default template.
Step 6. Click Save button to save the template.
A template in Writer is saved with an extension
.ott. Now this template file can be used by any
document in LibreOffice Writer.
Using In-built/Saved Templates
LibreOffice allows to use the in-built templates, online
templates as well as the templates created and saved
by us. Follow the following steps to use a predefined
template to style a document.
Step 1. Open the new document in LibreOffice Writer.
Fig. 3.17: Save As Template dialog box
2023-24
Domestic Data entry operator – class X
60
Step 2. From main menu bar, select File > Templates
> Manage Templates. You can also use the
keyboard shortcut key Ctrl+Shift+N to open
the Templates dialog box. The Templates dialog
box will be displayed as shown in Fig. 3.18
showing a list of all available templates. Observe
that it also shows the Template T1 created in
the previous section.
Step 3. Select the desired template, (say T1) and click
Open button. The new document (with name as
Untitled) will be opened with the same content,
appearance and formatting effects as the saved
template.
Step 4. Make the desired changes and save the file.
Fig. 3.18: Templates dialog box
2023-24
Digital Documentation (aDvanceD) using libreoffice Writer 61
Practical Activity 3.4
Niaz works in a garment factory. He has to give the report of each
garment being designed and stitched in his factory. His manager
wants the same type of report for each garment. Instead of typing
every time, he has been suggested to use the template feature
of Writer. He wants to create his own default template and then
use it to create multiple reports with same format and style. Give
the solution to complete this task.
Procedure
Follow the following steps to create and save a template in Writer.
Step 1. Create or open the document whose template is to be
created.
Step 2. From main menu bar, select File > Templates > Save.
The Save As Template dialog box appears as shown in
Fig. 3.17.
Step 3. Type the name of the new template (Niaz_template) in
the Template Name text box.
Step 4. Select the category of the template (Business
Correspondence)
Step 5. Click and select Set as default template check box.
Step 6. Click Save button to save the template with an extension
.ott.
Now follow the steps given below to use the template.
Step 1. Select File > Templates > Manage Templates.
Step 2. Select the desired template, (Niaz_template) from the
Templates dialog box.
Step 3. Click on Open button. The new document with
name as Untitled, will be opened with the same
content, appearance and formatting effects as the
saved template.
Step 4. Make the desired changes and save the file.
Using Online Templates
LibreOffice provides a wide range of online templates,
which can be downloaded from Internet. Once these
templates are installed on the computer, they will
appear in Templates window. To view and select
online templates provided by Writer, follow the steps
given below.
Step 1. From main menu bar of LibreOffice Writer,
select File > Templates > Manage Templates.
notes
2023-24
Domestic Data entry operator – class X
62
Step 2. Templates dialog box will be displayed as shown
in Fig. 3.18. Observe the small circular icon
Browse Online Templates in the lower left corner
above the Help button.
Step 3. Click on Browse Online Templates button on the
bottom left of the Templates window (Fig 3.19).
The official templates page of OpenOffice Writer
(https://extensions.libreoffice.org/templates)
will open in the browser as shown in Fig. 3.20.
Fig. 3.19: Browse Online Templates option in Templates dialog box
Fig. 3.20: The official templates page of libreoffice.org
2023-24
Digital Documentation (aDvanceD) using libreoffice Writer 63
Step 1. If you click on any of the templates, you will see
the detailed information about that template.
Step 2. Download the desired template, say Calendar
Creator and save it on your computer.
Step 3. Open LibreOffice Writer.
Step 4. Click File > Templates > Open Template...
Step 5. From the Open dialog box, browse for the
template Company Letter, that is to be opened,
and click on Open button.
Step 6. The template file Company Letter.ott will open.
Step 7. Make the desired changes in the content
or appearance.
Step 8. Save the file as text file Company Letter.odt
Libreoffice.org also provides extensions on https://
extensions.libreoffice.org/extensions. These are
independent programs that can be added or removed
from the main existing application. Some templates
are available in the form of extensions which can be
downloaded and installed on the computer.
Importing a Template
Once a template is downloaded and saved in any file or
folder, it is possible to import it so that it is visible in the
list of templates in the Templates dialog box. Use the
following steps to import the template.
Step 1. Open the Templates dialog box.
Step 2. Click Import Templates button located in
the bottom right corner of the dialog box. The
Select Category dialog box will open as shown
in Fig. 3.21.
Step 3. To add the new template into any existing
category, click and choose that category from
the list box. Otherwise click and select Create
a New Category check box.
Step 4. Type the name of new category in the text box.
Step 5. Click OK button. The Open dialog box will
appear.
Step 6. Browse for the folder where the downloaded
template file Company Letter was saved.
notes
2023-24
Domestic Data entry operator – class X
64
Step 7. Select the file and click Open button. The
selected file will be added to the list of templates
as shown in Fig. 3.22.
Fig. 3.22: Templates dialog box showing the imported template
Fig. 3.21: Select category dialog box
2023-24
Digital Documentation (aDvanceD) using libreoffice Writer 65
Niaz’s colleague, Balwinder has to create Employee IDs for all the
employees of her company, but there is no pre-defined template
for the same. She searched some templates on the Internet
that suit her requirement. Although, she has learned to create
and use a template but does not know how to download and
use an online template from the Internet. How will she resolve
this issue?
Follow the steps given below to solve this problem.
Step 1. Open the new document in LibreOffice Writer.
Step 2. Open the Templates dialog box by using the keyboard
shortcut Ctrl+Shift+N.
Step 3. Click on the Online Templates button.
Step 4. From the templates page in the browser click and
select the desired template, Employee ID Badge, as
shown in Fig. 3.23. The description of the template will
be displayed.
Practical Activity 3.5
Fig. 3.23: Online template Employee ID Badge
notes
2023-24
Domestic Data entry operator – class X
66
Step 5. Download the template Employee ID Badge and close the
browser. By default the template gets downloaded and
saved in Download
folder.
Step 6. Open Templates
dialog box again
and click on Import
button, as shown
in Fig. 3.24.
Step 7. Then select the category in the Select Category dialog
box and click on OK button as shown in Fig. 3.25.
Step 8. Browse the Download folder to select the template
Employee ID Badge, as shown in Fig. 3.26.
Fig. 3.25: Selecting Category while importing Template.jpg
Fig. 3.26: Select the template Employee ID Badge to import
Fig. 3.24: Clicking on Import Template
notes
2023-24
Digital Documentation (aDvanceD) using libreoffice Writer 67
Step 9. Click on Open button to add the Employee ID Badge
template. The template imported appears in the list of
templates as shown in Fig. 3.27.
Step 10.Double click on Employee ID Badge template. A new
file in a new window with the selected template will be
opened as shown in Fig. 3.28.
Step 11.Make the desired changes and save it as a
document file.
Fig. 3.27: Updated list of templates in Template dialog window
Fig. 3.28: New document created with selected template
notes
2023-24
Domestic Data entry operator – class X
68
Editing a Template
Once a template is created, desired changes can be
made in it by following the steps given below.
Step 1. Click File > Templates > Manage Templates.
The Templates dialog box will be displayed.
Step 2. Right click on the template file (say T1) that has
to be edited.
Step 3. Select the Edit option from the popup menu.
The template file will be opened. Make the
desired changes and save the file. Now if we
apply this template for any document, the
edited file will be used.
Setting Up a Custom Default Template
Any template can be set as a default template. Writer
gives a blank document as a default template. At the
same time, any template file can be set as a default
template by following the steps given below.
Step 1. Open the Templates dialog box by pressing
Ctrl+Shift+N.
Step 2. Right click on the template that you wish to set
as the default template.
Step 3. From the popup menu, select option Set as
Default as shown in Fig. 3.29.
The default icon will
appear on the top left
of the template file. The
next time you create
a new document by
selecting File > New >
Text Document, the
new document will use
the last edited template.
Moving a Template
When you place a
mouse pointer on any
of the templates in
the Templates dialog
box, a tool tip appears
displaying the name of
Fig. 3.29: Setting up a default template
2023-24
Digital Documentation (aDvanceD) using libreoffice Writer 69
the template and its respective category. You can move
a template from one category to another by following the
steps given below.
Step 1. Open the Templates dialog box.
Step 2. Click and select the template to be moved.
Step 3. Click Move button.
Step 4. Select the new category where the template has
to be moved.
Step 5. Click OK button.
Exporting a Template
Export template feature
allows to store the
template file in the
desired folder on your
computer. It is different
from moving a template
from one category
folder to another. When
a template is exported,
it is saved as a template
file at any desired
location. Exporting the
template is a useful
feature for sharing the templates with multiple users.
Follow the steps given below to export a template:
Step 1. In the Templates dialog box, select the template
to be exported.
Step 2. Click on
Export button
located in the
bottom right of
the dialog box
as shown in
Fig. 3.30.
Step 3. Then the
Select Path
dialog box
appears as
shown in Fig.
3.31 to select the folder where you want to
export the template.
Fig. 3.30: Selecting Export Template button
Fig. 3.31: Select Path dialog box
2023-24
Domestic Data entry operator – class X
70
Step 5. Select the folder and
press on OK button.
The selected template
will be exported in
that folder and a
confirmation dialog
box, as shown in
Fig. 3.32 will be
displayed.
Applying Templates to a
Blank Document
You can apply the template
from the available template list
to any blank document. Follow
the steps given below to apply
the template.
Fig. 3.32: Confirmation after exporting a template
Step 1. Open a new document in LibreOffice Writer by
selecting File > New > Text Document.
Step 2. Select File > New > Templates to display the
Templates dialog box.
Step 3. Select the desired template. The template will be
opened in a new window.
Step 4. Copy the entire content of the template by using
keyboard shortcut key Ctrl+A for selection and
Ctrl+C to copy.
Step 6. Open the blank document and paste the copied
content of the template by using keyboard
shortcut key Ctrl+V.
Step 7. Add or delete the content as desired and save it
as a text file.
Once a template is created, it can be applied to an
existing document by selecting Insert >Text From
File option. Browse and select the template file
that has been saved on the computer. The selected
template will be inserted in the document.
2023-24
Digital Documentation (aDvanceD) using libreoffice Writer 71
Niaz wants to store the template created by him and another one
that was imported by Balwinder in a folder named Company_
Templates on the desktop.
Follow the steps given below to complete this task.
Step 1. Create a new document in LibreOffice Writer and press
Ctrl+Shift+N to open the Templates dialog box.
Step 2. Select the template (Niaz_template) to be exported.
Step 3. Click Export button in the bottom right of the dialog
box. The Save As dialog box appears.
Step 4. Browse for the folder named Company_Templates stored
on the desktop.
Step 5. Click Select Folder button to export the selected
template.
Step 6. Repeat the steps 1 to 5 to import the template Employee
ID Badge in the Company_Templates folder.
Practical Activity 3.6
Track Changes Feature
Track Changes is a powerful tool that makes the
process of commenting, editing and reviewing of a
document easy between multiple users. A document
created by one user need to be reviewed and edited
by self or other users. If any modifications are made
in the document directly, the original document might
get lost. Instead, the Track Changes feature of Writer
offers an alternative method to keep a record of all the
changes made in the original document. All the changes
that are recorded can be either accepted or rejected by
the original author. Furthermore, the Track Changes
feature also gives us the option to add comments while
reviewing a document.
The Track Changes toolbar contains various tools
that help to track the changes made by different users.
To view the Track Changes toolbar, from main menu
bar, select View > Toolbars > Track Changes. The
Track Changes toolbar will appear in the bottom left
corner of the Writer window as shown in Fig. 3.33.
Fig. 3.33: Track Changes Toolbar
2023-24
Domestic Data entry operator – class X
72
The various buttons present on the Track
Changes toolbar shown in the Fig. 3.33 are briefly
explained below.
(a) View Track Changes – Clicking on this button
displays all the changes made in the document
by different users.
(b) Record Track Changes – Clicking on this
button, turns on the Track Changes feature.
After this, any sort of editing done will be marked.
Any character added to the document will be
displayed in a different color and any deletion
done will be seen in strike-through style.
(c) Previous Track Changes/Next Track Changes
– Click on these buttons to navigate between
the changes made.
(d) Accept/Accept All Track Changes – Once the
editing is done, the original author may accept
the change made to the document by clicking
Accept All Track Changes button will accept
all the changes made to the document.
(e) Reject/Reject All Track Changes – The original
author of the document may reject a single
change or all changes made to the document by
clicking Reject Track Changes or Reject All
Track Changes button, respectively.
(f) Manage Track Changes – By clicking on
this button the Manage Changes dialog box
is displayed, which contains a detailed list
of all changes made to the document along
with the author’s name and date and time of
modification.
(g) Insert Comment – This button is used to add a
comment in a document.
Preparing a Document for Review
Track Changes feature is used when a document is
shared with one or more users for review or editing
purposes. So, before the document is shared, one should
make sure that the changes made should be recorded.
This will ensure that after the review is done, the original
author of the document has the option to accept or
reject the changes made. Hence, before the document is
notes
2023-24
Digital Documentation (aDvanceD) using libreoffice Writer 73
sent for review, the original author should prepare the
document for review and start recording the changes
being made. For that, select Edit > Track Changes
>Record option. Alternatively, select the Record button
from the Track Changes toolbar. To make sure that no
user is able to disable the track changes option, we can
protect the document with password. Follow the
following steps for the same.
Step 1. Create a new document in LibreOffice Writer.
From the main menu, select Edit > Track
Changes > Protect option. The
Enter Password dialog box will
appear as shown in Fig. 3.34.
Alternately, you can click on Protect
Track Changes button located on the
Track Changes Toolbar to protect
the document.
Step 2. Enter the same password in
Password and confirm text box and
click on OK button. After protecting
the document with password, if
any user tries to disable the Track
Changes feature, Writer will prompt
to enter the password.
Recording Changes
Once the Track
Changes features is
ON, the reviewers
can begin recording
the changes in the
document. For that,
click Edit > Track
Changes > Record
option. Alternatively
select Record button
from the toolbar. The
shortcut key to start
recording the changes
is Ctrl+Shift+C.
Once the Record
option is selected,
the Track Changes
Fig. 3.34: Enter Password dialog box allowing
to enter password after clicking on Protect
Track Changes button
Fig. 3.35: Recording the changes
2023-24
Domestic Data entry operator – class X
74
feature is ON. Now, any
character being deleted will be
shown as strike through text
and any character added will
be shown in different colour as
shown in Fig. 3.35. Also when
you place the mouse pointer
over any of the changes, a tool
tip is displayed giving details of
the author, change made, date
and time of change done as
shown in Fig. 3.36.
To stop recording, deselect the record option by
selecting Edit > Track Changes > Record or click the
Record button on the toolbar.
Accepting and Rejecting Changes
Once the changes are made by all the reviewers, the
original author may accept or reject them. Open the
document and follow the steps given below.
Step 1. To accept or reject a change, click on the change
made and then select Accept Track Change /
Reject Track Change button.
Fig. 3.37: Manage Changes dialog box
Fig. 3.36: Tool tip showing the details of changes made
Step 2. To navigate between the
changes made to the
document click Previous
Track Changes and Next
Track Changes buttons.
Step 3. To accept or reject all the
changes made, select
Accept All Tracked
Changes / Reject All
Tracked Changes button
respectively.
Step 4. If Manage Track Changes
button is clicked, a Manage
Changes dialog box appears
as shown in Fig. 3.37. It
contains the details of all
the changes made in the
document. The dialog box
contains buttons to accept
and reject changes as well.
2023-24
Digital Documentation (aDvanceD) using libreoffice Writer 75
Adding Comments
To add comments while reviewing, we can use the
Track Changes toolbar as well. Click at the place in
the document where the comment is to be placed.
Thereafter, follow the steps given below to add comments
in a document.
Step 1. Click Insert Comment button on the Track
Changes toolbar. A comment box will be inserted
on the right side of the window. It will have the
name of the author or reviewer and date and
time of the comment being made, as shown in
Fig. 3.38.
Step 2. Type the comment.
Step 3. Once done click anywhere on the document to
activate it.
If more than one or two of users add comments then
the comments by different users will be shown in
different coloured comment boxes in Fig. 3.38.
Fig. 3.38: Inserting Comments using the option under Track Changes toolbar
2023-24
Domestic Data entry operator – class X
76
Deleting Comments
To delete any comment, click on the down arrow on the
bottom right of the comment box. A popup menu will be
displayed as shown in Fig. 3.39. It gives the option to
delete only the current comment, all comments by a
particular author and to delete all comments. Select the
desired option.
Comparing Documents
Once the reviewers have made the changes and given
their comments, Writer allows to compare the original
document with the reviewed document and then choose
the option(s) that suits the best. Follow the steps given
below to compare the documents.
Step 1. Open the edited document.
Step 2. Select Edit > Track Changes > Compare
Documents option. Alternatively, click
Compare Non-Tracked Changed Document
from the toolbar.
Fig. 3.39: Deleting Comments from pop-up menu
2023-24
Digital Documentation (aDvanceD) using libreoffice Writer 77
Step 3. The Compare To dialog box will appear. Browse
and select the original file to be compared as
shown in Fig. 3.40.
Step 4. The Manage Changes dialog box is displayed as
shown in Fig. 3.37. Accept or reject the desired
changes.
Step 5. Close the dialog box when done.
Step 6. Save the edited file.
Fig. 3.40: Selecting original file
Practical Activity 3.7
Pradeep has created a document on ‘Humans and Nature’.
He wants his friends to review the document and give their
comments wherever required. The following process will
demonstrate how his friends add comments in the document.
Step 1. Open the document created by Pradeep to review.
Step 2. Click on Insert Comment button on the toolbar.
Step 3. Type the comment in the comment box.
Step 4. Once done click anywhere on the document to activate
it.
Step 5. Repeat the steps given above to add more comments in
the document.
2023-24
Domestic Data entry operator – class X
78
After incorporating the reviews, Pradeep mailed the document to
his editor with the Track Changes ON. He made certain changes
in the document. Pradeep wants to compare his original
document with the reviewed document. The following process
will demonstrate how Pradeep will compare the edited document
with the original document.
Step 1. Open the edited document.
Step 2. Select Edit > Track Changes > Compare Documents
option.
Step 3. The Compare To dialog box will appear. Browse and select
the original file to be compared as shown in Fig. 3.40.
Step 4. The Manage Changes dialog box is displayed as shown
in Fig. 3.37.
Step 5. Accept or reject the desired changes.
Step 6. Close the dialog box when done.
Step 7. Save the edited file.
Practical Activity 3.8
summary
• A Table of Contents (ToC) contains a list of topics
and subtopics that have been covered in the book
along with page numbers.
• A ToC in Writer allows to insert an automated
table of contents in a document.
• The contents in the ToC are hyperlinked in the
table.
• LibreOffice Writer supports up to 10 levels of
headings H1 to H10.
• To insert a ToC, select Insert > Table of Contents
and Index > Table of Contents, Index or
Bibliography.
• To add a graphic as a background of the ToC,
select the Bitmap button in the Background tab
of the Table of Contents, Index or Bibliography
dialog box.
• Once inserted, a ToC can be edited or deleted
from the document.
• A template is a preset layout that helps to create
professional and/or formal documents easily.
• In a template we can create and save defined
headings, text formats, styles, page numbers,
headers and footers.
notes
2023-24
Digital Documentation (aDvanceD) using libreoffice Writer 79
• The new documents created from these templates
have the same content segregation, formatting
features and appearance as that of the applied
templates.
• To create a new document with a template, select
File > New > Templates …
• To create and save your own template, select File
> Templates > Save.
• LibreOffice provides a wide range of online
templates which can be downloaded from then
Internet.
• Once these templates are installed on your
computer, they will appear in Templates window
from where they can be viewed and selected.
• Any template can be set as a default template.
• Export template option allows to store the template
file in the desired folder on your computer.
• Exporting a template is a very useful feature to
share the templates with multiple users.
• Track Changes feature of Writer makes the
process of commenting, editing and reviewing of
a document easy between multiple users.
• The Track Changes feature of Writer helps to
record all the changes made in the original
document. All the changes that are recorded can be
either accepted or rejected by the original author.
• The Track Changes feature also gives us the option
to add comments while reviewing a document.
• The Track Changes toolbar contains various tools
that help to track the changes made by different
users.
• To view the Track Changes toolbar, from main menu
bar, select View > Toolbars > Track Changes.
1. Rajnikant has created a detailed report on Education in
India using the LibreOffice Writer tool. He has styled the
document well by inserting proper paragraph and section
headings. His colleague Murugan advised him to insert
a Table of Contents that will give a complete glimpse of
his report. Help Rajnikant to insert a ToC with a green
background.
Practical Exercises
notes
2023-24
Domestic Data entry operator – class X
80
2. After the ToC was inserted, Rajnikant made some changes
in the report but the changes were not reflected in the
ToC. Will he have to again insert a new ToC? Suggest him
a better way to update the ToC.
3. Rukhsat has just downloaded a template from
libreoffice.org. Now she wants to import it in My templates
category of the Templates folder. How can she complete
her task?
4. Rimit loves to create cards on his computer. This time he
decided to make his own Christmas cards and send them
to his friends. He wants to do the task using the templates
feature of Writer. He has already saved and imported the
desired template(card.ott). Help him to create cards for at
least five of his friends.
5. Teena is a member of the editorial team of her school.
She wants to set the newspaper template as her default
template. Write the steps to help Teena complete
the task.
6. Venkat has created a document on India’s Trade Review.
He wants two of his friends, Rinky and Sujoy to review
his document and if required, add comments to it. But
none of them know how to use the Track Changes feature
of Writer. Help them to complete the task.
7. Venkat has received the reviewed file with modifications
and comments. What steps will he follow now to accept
or reject the changes done by his friends.
8. Write steps to compare the original document created
by Venkat and the edited document sent by Rinky and
Sujoy.
Check Your Progress
A. Multiple choice questions
1. Which of the following is NOT true about Table of Contents,
Index or Bibliography dialog box?
(a) It has four tabs
(b) On the Type tab, by default, the checkbox for Protected
against Manual Changes option will be selected.
(c) The Styles tab contains options to change the
background colour.
(d) None of the above
2. Which of the following tabs is by default active when the
Table of Contents, Entries or Bibliography dialog box is
opened?
(a) Entries (b) Background
(c) Styles (d) Type
notes
2023-24
Digital Documentation (aDvanceD) using libreoffice Writer 81
3. Which of the following tabs contains options to set styles
for various entries in the ToC?
(a) Entries (b) Background
(c) Styles (d) Type
4. Which of the following can be added in the background of
Table of Contents in LibreOffice Writer?
(a) Color (b) Graphic
(c) Both a and b (d) Neither a nor b
5. Which of the following is NOT true about templates?
(a) The styles and formatting features can be reused.
(b) LibreOffice provides online templates
(c) We cannot create our own templates.
(d) None of the above.
6. Which of the following is the shortcut key to open the
Templates dialog box?
(a) Ctrl+Alt+N (b) Shift+Ctrl+N
(c) Ctrl+Alt+T (d) Shift+Alt+T
7. Which of the following buttons, in the Templates dialog
box, will be clicked to save a template displayed in the list
of templates?
(a) Export (b) Import
(c) Move (d) None of the above
8. Which of the following is the shortcut key to select he
entire document?
(a) Ctrl+S (b) Ctrl+A
(c) Ctrl+D (d) Ctrl+B
9. Which of the following is the correct sequence of options to
open the Templates dialog box?
(a) File > Manage Templates > Templates
(b) File > Templates > Manage Templates
(c) Insert > Templates >Manage Templates
(d) Insert > Manage Templates > Templates
10. Which of the following is true about Track Changes feature
of Writer?
(a) You cannot record a change made in the document.
(b) A comment of a particular author only can be deleted
(c) Any change made to the document is permanent.
(d) None of the above
11. Which of the following menus contains the Track Changes
option?
(a) File (b) Edit
(c) View (d) Insert
12. Which of the following is the shortcut key to start recording
the changes being made in the document?
(a) Ctrl+Shift+C. (b) Alt+Shift+C
(c) Ctrl+Alt+C (d) Shift+C+F2
notes
2023-24
Domestic Data entry operator – class X
82
B. Fill in the blanks
1. To navigate to the topic from the ToC, press ___________
key while clicking the mouse button on that topic.
2. To remove the applied paragraph styling in the ToC, select
the outline level in the Levels list box, and then click the
_______ button.
3. If the checkbox for___________________ option is selected,
the ToC is protected from any accidental change.
4. To update the ToC manually, right click and select
___________ option from the pop up menu.
5. The ___________ tab contains options to set the number of
columns that we want to have in our ToC.
6. A ________________________ is a preset layout that helps us
to create professional and formal documents easily.
7. The default template in Writer is ____________________.
8. To find the template that is being used in the current
document, select ___________ option from the File menu.
9. The ____________________ button is clicked in Templates
dialog box to view online templates.
10. The __________________ feature of Writer offers us an
alternative method to keep a record of all the changes
made in the original document.
11. The shortcut key to start recording the changes is
_________.
12. After the Track Changes feature is ON, the added
characters are shown as ____________ text.
C. State whether the given statements are True or False
1. The topics in Table of Contents are hyperlinked.
2. The Table of Contents in LibreOffice Writer can be updated
automatically.
3. TABLE of Contents can be inserted even if the section
headings are not styled.
4. Once a ToC is created, it cannot be edited.
5. We cannot add a graphic as a background of ToC.
6. A single template can be used for multiple documents.
7. A template cannot contain graphics.
8. All documents in Writer are based upon templates.
9. The online templates cannot be added to the list of
templates in the templates dialog box.
10. A template once created can be edited again and again.
11. The changes recorded have to be accepted by the original
author.
12. We can delete the comments added in a document by the
user.
notes
2023-24
Digital Documentation (aDvanceD) using libreoffice Writer 83
D. Answer the following questions
1. What is the need of table of contents?
2. What will happen if the ‘Protected Against Manual
Changes’ option is not selected in the Type tab of Table of
Contents, Index or Bibliography dialog box?
3. Name the five tabs present in the Table of Contents, Index
or Bibliography dialog box.
4. What do you mean by customization of ToC?
5. How headings and sub-headings of a document
differentiated in ToC?
6. Define a template.
7. Give any one advantage of using a template for your
document.
8. What is the difference between importing and exporting a
template?
9. Name any two categories of templates.
10. When is exporting of templates useful? Give any one
reason.
11. What is the difference between Accept Track Change and
Accept All Tracked Changes buttons?
12. How do we prepare a document for review?
13. Identify and label the Record button, Insert Comments
button, Accept All Tracked Changes, Reject Track Change
buttons in the following figures of Track Changes toolbar
(shown in Fig 3.41).
14. Identify and label “Browse Online Templates button,
Export button, Import button” in the following Templates
dialog box.
Fig. 3.41: Track Changes Toolbar
notes
2023-24
Electronic
Spreadsheet
(Advanced) using
LibreOffice Calc
2
IntroductIon
In the modern digital world, one of the most important
thing is counting and calculations. Every profession,
household, institution and even our smart devices have
to deal with numbers. In computers we can do the
calculations on number of records spread over the long
sheet using the spreadsheet software that helps to work
with numbers efficiently. It resembles an accountant’s
ledger book wherein everything is recorded under
suitable headings. We have already learned in Class 9,
that how the spreadsheet software performs calculations
and present data in tabular format. It becomes easy
to visualise a huge grid of numbers when represented
using charts in electronic spreadsheet. Moving further,
in this unit you will learn advanced features of electronic
spreadsheet using LibreOffice Calc to perform analysis,
automate repeated tasks, link, share and review data. It
includes – analysing data to extract useful information
for making effective decisions. Macros, is the another
powerful feature of spreadsheet covered in this unit.
Macros are a set of stored functions used to automate
processes repeatedly. They are tools which can be used
2023-24
ElEctronic SprEadShEEt (advancEd) uSing librEofficE calc 85
notes
to perform most of the redundant tasks with relative
ease. In the second chapter of this unit, you will learn
to create multiple sheets and link the data in multiple
sheets. It can be done in two ways, one is creating
reference to other sheets by using keyboard and mouse,
and other is by linking external data. LibreOffice Calc
also provides the sharing feature that allows to share
the spreadsheet for editing purpose. This saves to
keep track of multiple copies of the same spreadsheet
corrected by different users. Sharing allows the users to
work on the same spreadsheet in collaboration.
2023-24
IntroductIon
Analysing data is the process to extract useful information
for making effective decisions. The spreadsheet is one of
the best software used for data analysis. It is used to
retrieve, correlate, explore and visualise data to identify
patterns, trends and relationships. The spreadsheet
component in LibreOffice known as Calc includes several
tools used to manipulate the data in the spreadsheet.
You can analyse the data and interpret the results from
it. In this chapter, you will learn to analyse data using
LibreOffice Calc.
Consolidating Data
Consolidate is a function used to combine information
from multiple sheets of the spreadsheet into one place
to summarize the information. It is used to view and
compare variety of data in a single spreadsheet for
identifying trends and relationships.
You need to check the following before consolidating
data.
• Open each sheet in the spreadsheet and check
that the data types must match which you want
to consolidate.
• Match the labels from all the sheets which are
used for consolidating.
• Enter the first column as the primary column on
the basis of which the data is to be consolidated.
Steps to consolidate the data are as follows:
Step 1. Open the spreadsheet which has the data to be
consolidated.
Step 2. Create a new sheet where the data has to be
consolidated.
Step 3. Choose Data > Consolidate option that will open
Consolidate dialog as shown in Fig. 4.1.
C
HAPTER
4
Analyse Data using
Scenarios and Goal Seek
2023-24
ElEctronic SprEadShEEt (advancEd) uSing librEofficE calc 87
Step 4. Observe that the default function
“Sum” is seen in the Function drop-
down. You will be able to see the
list of functions as shown in the
Fig. 4.2 by clicking on the Function
drop-down.
Step 5. Choose the required function from
the drop-down list.
Step 6. The sources data range list contains
existing named ranges to quickly
select from that. But if the source
range is undefined, then click and
select the range from the sheet
which is to be consolidated.
Step 7. Click on Add to add this range
under the ‘Consolidation ranges’ of
the Consolidation dialog.
Step 8. Repeat steps 6 and 7 to add more
sheets to be consolidated.
Step 9. Remember to check the target
range specified under Use ‘Copy
results to’. If it is not mentioned,
then click on the cell of sheet where
the final data has to be produced.
Step 10.Click on Options that will list two
checkbox under Consolidate by
“Row labels” and “Column labels”
and “Link to source data” under
Options, as shown in Fig. 4.3. From
this you can select the additional
feature as per requirement. The
option consolidate by rows and
columns are checked to consolidate
data as per row labels and column
label. Link to source data is
checked to make the modification
automatically in the consolidated
(target) sheet while making any
changes in the source data.
Step 11.Finally click on OK button.
Let us illustrate this through following
activity.
Fig. 4.1: Consolidate dialog box
Fig. 4.2: Functions under consolidate
Fig. 4.3: Consolidate options
2023-24
Domestic Data entry operator – class X
88
Let us take an example that we have two branches of our
shop namely ABC and XYZ. We have the Sales records for the
month of January and February of both the branches in two
different sheets named ABC_Branch and XYZ_Branch. Now we
have to consolidate these two sheets to get the sum of both the
sheets monthly to get the insight about the sale as per product
and branch.
Now let us create the following sheets in a spreadsheet sales.
Now let us use the two sheets ‘ABC_Branch’ and ‘XYZ_Branch’
of a spreadsheet sales.ods which will be consolidated using the
following steps:
Step 1. Add a new sheet and rename it as Consolidate
Step 2. Click on Data > Consolidate or use the keyboard
shortcut key ALT+D, the Consolidate dialog window
will open as shown in Fig. 4.6.
Fig. 4.6: Consolidate dialog window
Step 3. In the Function box, choose Sum function from the drop
down as we want to add the data from all the sheets.
Step 4. Click in the Source data ranges box and then click
on the worksheet ABC_Branch and select the area to
be consolidated and then click on the Add button will
add the copy reference in the consolidation ranges
(Fig. 4.7).
Fig. 4.4: Data for ABC_Branch Fig. 4.5: Data for XYZ_Branch
notes
Practical Activity 4.1
2023-24
ElEctronic SprEadShEEt (advancEd) uSing librEofficE calc 89
Fig. 4.7: Selecting the source data range from the sheet
Step 5. Click on the sheet XYZ_Branch and select the area to
be consolidated and then click on ADD will add the
next consolidation range (Fig. 4.8).
Step 6. Click on the ‘+’ sign next to Options in the Consolidate
dialog window to change the settings.
‘Consolidate by’ has two options Row labels and Column labels.
Check row label or column label or both if you want to consolidate
it by matching the label.
If Link to source data is checked, then it will keep on updating
the data of the Consolidate sheet automatically if there is any
change made in the selected ranges.
Fig. 4.8: Options for setting more properties
Step 7. Click on ‘Copy
results to’ and
then click on any
of the cell in the
Consolidate sheet
where you want to
copy the final result
after consolidation.
Step 8. Click on OK button.
Fig. 4.9 will display
the Consolidate
sheet with data after
consolidation.
notes
Fig. 4.9: Consolidated sheet
2023-24
Domestic Data entry operator – class X
90
The consolidated sheet will have all the consolidated data along
with the original data. You can view the original data of both the
sheets and by clicking on the ‘+’ sign in front of the consolidated
row. Fig. 4.10 shows the original data and consolidated data.
Fig. 4.10: Consolidated sheet details by clicking on
the + sign in front of rows
Create two sheets Marks_Term1 and Marks_Term2 to store the
marks in Term1 and Term2 for a set of students taking the
following columns:
1. Name
2. Marks in English
3. Marks in Hindi
4. Marks in Maths
5. Marks in Science
6. Marks in Social Science
7. Total marks (using function Sum)
8. Percentage (using function Average)
Now, use the consolidate function to merge these two sheets.
Practical Activity 4.2
notes
Groups and Subtotals
Group and Outline in Calc is used to create an outline
of the selected data and can group rows and columns
together so that one can collapse (-) to hide it or expand
(+) it using a single click on it.
Select the data to be grouped, click on Data>Group
and Outline. Then choose Rows to group the data on
the basis of rows or columns to group it on the basis of
columns.
2023-24
ElEctronic SprEadShEEt (advancEd) uSing librEofficE calc 91
The Subtotal tool in Calc creates
the group automatically and applies
common functions like sum, average on
the grouped data. One can use any type
of summary function for each column as
per the requirement of data analysis.
It can group subtotals by using
category and sorts them in ascending or
descending order so that one need not to
use filters.
Follow the following steps to apply
Subtotal tool.
Step 1. The sheet where this is to be
applied must have labels to the
column
Step 2. Click on Data menu and choose
Subtotals (Data>Subtotals) as
shown in Fig. 4.11.
Step 3. Choose the column in the Group
by list in the subtotal dialog
which is to be used for grouping
the data in the sheet as shown in
Fig. 4.12.
Step 4. Select the column by clicking
the checkbox under Calculate
subtotals for to create subtotals
for.
Step 5. Select the desired function by
clicking the function under Use
function.
Step 6. You can use the 2nd
Group and 3rd
Group tabs
to group the data in further levels.
Step 7. Click on OK button.
Fig. 4.11: Choosing subtotal option from
Data menu
Fig .4.12: Choose the column in the
Group by list
Let us take an example to store marks in various subjects by
students of Class X as shown in the table given in Fig. 4.13. To
take out the average of the subjects scored in each class, use the
subtotal tool which automatically group the data on a particular
column and perform the selected function on any of the column.
Practical Activity 4.3
2023-24
Domestic Data entry operator – class X
92
To solve this, perform the following steps:
Step 1. Create a sheet as shown in the Fig. 4.13 to take the
marks for students in a term for a class.
Fig. 4.13: Spreadsheet with student marks in two class
Step 2. Now, to calculate the average marks scored by the
students of each class in each subject, i.e. class-wise
and subject analysis.
Step 3. To do so, click on Data > Subtotal, the subtotal dialog
as shown in Fig. 4.14 will open.
Step 4. Choose the column i.e. Class under Group by in the 1st
Group on which we need to group the whole data. Also,
select the subjects i.e. English, Hindi, Maths, Science
and Social Science under Calculate subtotals for. For
each subject
click on the
Average under
Use function
individually
otherwise Sum
function will
be used by
default.
Step 5. Click OK and
the sheet will
look like as
shown in the
Fig. 4.15.
Fig. 4.14: Subtotal dialog window
notes
Fig. 4.15: Marks list after Subtotal
2023-24
ElEctronic SprEadShEEt (advancEd) uSing librEofficE calc 93
Observe that outline to the left of the row numbers
which is inserted after performing the subtotal tool.
This outline shows the hierarchical structure which can
be used to show or hide different levels by clicking on
the group indicators ‘+’ sign to expand and ‘–’ sign to
collapse the data.
You can hide the low-level details and just look at
the final totals and grand totals.
If you want to remove the outline feature from
the sheet at any point of time then it is possible
by just clicking on Data > Group and Outline >
Remove Outline.
notes
Create a sheet as shown in Fig. 4.16 and then calculate the
average of marks subject wise on the basis of class and stream.
Also, try out another function Count to calculate the number of
students in each subject.
Fig. 4.16: Marksheet
Practical Activity 4.4
What-if Scenarios
What-if scenario is a set of values that can be used
within the calculations in the spreadsheet. A name
is given to the scenario and several scenarios can be
created on the same sheet.
It is used to explore and compare various alternatives
depending on changing conditions. It can be used in the
beginning of any project to optimise the output. This tool
is used to predict the output while changing the inputs
which reflects the output and thus one can choose the
best plan of action based on it.
2023-24
Domestic Data entry operator – class X
94
For example, a person who is taking car loan has to
decide on certain factors as given below:
• The number of years for which the car loan is
taken.
• The total amount of car loan
The above two factors, i.e. Principal amount and
Number of years can display the EMI to be paid monthly.
Follow the following steps to create scenario.
Step 1. Select the cells which contains values in the
sheet that needs to be changed. To select
multiple cells, hold Ctrl key and click on the
cell to be selected.
Step 2. Choose Tools>Scenarios will open scenario
dialog window as shown in Fig. 4.17.
Step 3. Enter a name for the new scenario and leave
the other fields unchanged.
Step 4. Click on OK button.
Step 5. This will create a new scenario which is activated
automatically.
Practical Activity 4.5
Fig. 4.17: Create Scenario
dialog window
Let us take an example to get the insight of the EMI, Total Amount
paid and Total Interest paid on the Loan Amount (Principal)
taken for a fixed Rate of Interest for a number of time period. So,
now we want to see what will be the EMI and how much is the
total interest paid for different loan amount and time period. To
do so, let us use the Scenario tool by using the following steps:
Step 1. Create the following sheet (Fig. 4.18) and remember to
put the formula to calculate EMI in B3 as
= ABS(PMT(B2/1200,E1*12,B1))
Total Amount in B4
= B3*E1*12
Total Interest in B8
= B4-B1
Fig. 4.18: Loan sheet
2023-24
ElEctronic SprEadShEEt (advancEd) uSing librEofficE calc 95
Step 2. Select the cells B1 and E1 using Ctrl + Click on these
cells as these two are the variables in this situation
Step 3. Choose Tools > Scenario will display the Create
Scenario dialog window as shown in Fig. 4.19.
Fig. 4.19: Create Scenario dialog window
Step 4. Write the name of the Scenario and click on OK button
will add this in the scenario list.
Step 5. Let us create two more scenarios as LAmt_2 and
LAmt_3 with Loan Amount as 2500000, No. of years
as 12 and Loan Amount as 2500000, No. of years as
10 respectively. We can define different scenarios to do
so on the same sheet, each with some different values
in the defined cells. Click on Tools > Scenario, write
the name of the scenario and click on OK. The Loan
sheet will look like as shown in the Fig. 4.20
Fig. 4.20: Loan sheet with scenarios
Step 6. Click on the navigator icon in the toolbar and then
click on scenarios. Click on the scenario name will
display all the details as per that scenario.
Calculate the income tax by entering the salary using different
scenarios for two variables income tax slab and tax rate. The
sheet should look as shown in Fig. 4.21.
The different scenarios to be taken as given below:
Income Slab Tax rate
7.5 to 10 lakhs 15%
10 to 12.5 lakhs 20%
Practical Activity 4.6
notes
2023-24
Domestic Data entry operator – class X
96
12.5 to 15 lakhs 25%
>15 lakhs 30%
Fig. 4.21: Income tax sheet
What-if Analysis Tool
What-if tool uses Data > Multiple Operations and
is a planning tool for what-if questions. In this, the
output is not shown in the same cells, whereas it uses a
drop-down list to display the output depending upon the
input. The Multiple Operations tool creates a formula
array to display the list of results applying the formula
on a list of alternative values used in the formula.
This tool uses two arrays of cells, one array contains the
input values and the second array uses the formula and
display the result.
It is useful to check in the beginning to understand
from the output for the efficiency. What-if analysis
tool is very helpful when we want to know how much
profit we earn for a particular product for a series of
selling units.
Following steps are used for what-if analysis tool:
Let us calculate with one formula and one variable:
Step 1. Enter the data in the cells and then enter a
formula to calculate a result from values in
other cells.
Step 2. Create an array of input values on the basis of
which the output is to be generated using the
formula.
Step 3. Select the cell range of input array and output
array.
notes
2023-24
ElEctronic SprEadShEEt (advancEd) uSing librEofficE calc 97
Let us take an example to calculate the profit on annual series of
sale depending on the Selling Price, Cost Price and Fixed Cost
expenses.
Step 1. Create the sheet as given below in Fig. 4.23
Fig. 4.23: Sale_incentive sheet
Step 2. In Cell B5 enter the formula = B4 * ( B1 – B2) – B3
Step 3. Select the cell range from D2:E11
Step 4. Click on Data > Multiple Operations will display
the Multiple operations dialog window as shown in
Fig. 4.24.
Fig. 4.24: Performing Multiple Operations
Practical Activity 4.7
Fig. 4.22: Multiple operation dialog window
Step 4. Click on Data>Multiple
Operations will display the
multiple operations dialog window
as shown in Fig. 4.22.
Step 5. Enter the cell address in the
Formulas box from the sheet which
contains the formula
Step 6. Now, enter the cell address of the
cell which is a variable and is used
in the formula in Column input cell box.
Step 7. Click on OK will generate all the possible
outputs based on the formula.
2023-24
Domestic Data entry operator – class X
98
Step 5. We have formula in cell B5, as we want to use the
same cell address to be copied therefore, we have used
absolute cell referencing and written it as $B$5.
Step 6. In this example, we have another variable as number
of items sold which is in the cell $B$4
Step 7. Click on OK will generate a sheet as shown in
Fig. 4.25.
Fig. 4.25: Result for multiple operations
Create the following sheet (Fig. 4.26) to calculate the profit and
then decide how many books are to be published based on
the profit.
Fig. 4.26: Practical exercise
Practical Activity 4.8
Goal Seek
It general we fill in the values in the cells and then
create formula on these values to get the required
result. To predict the output, we keep on changing all
the input values to obtain the desired output. Goal seek
notes
2023-24
ElEctronic SprEadShEEt (advancEd) uSing librEofficE calc 99
Let us take a very simple example to perform the backward
calculation to find out an input depending upon the specific
output. A student has received marks in 4 subjects and has to
appear for the 5th
subject and plans an aggregate as 70. So, he
can use goal seek tool to check how many marks he has to score
in the 5th
subject to get the required percentage. Follow the
following steps to perform this task.
Step 1. Create the marksheet as shown below in the
Fig. 4.28. Enter the average function in cell B7 as =
Average(B2:B6)
Fig. 4.28: Marksheet
Practical Activity 4.9
Fig. 4.27: Goal seek
dialog window
helps in finding out the input for the specific output.
For example, if you want to know the number of units
produced to get the desired output then use Goal seek
analysis tool. Follow the following steps to use Goal
seek tool.
Step 1. Enter the values in the worksheet.
Step 2. Write the formula in the cell where the
calculation has to be used.
Step 3. Place the cursor in the formula cell, choose
Tools > Goal Seek.
Step 4. The Goal seek dialog window will appear as
shown in Fig. 4.27, the Formula cell box will
have the correct formula.
Step 5. Place the cursor on the Variable cell box and
click on the cell that contains the value to be
changed.
Step 6. Enter the desired result in the Target value box.
Step 7. Click on OK button.
2023-24
Domestic Data entry operator – class X
100
Step 2. Click on Tools > Goal Seek will display the Goal seek
dialog window as shown in Fig. 4.29.
Fig. 4.29: Goal seek dialog window
Step 4. Write the cell address of the formula, i.e. B7 in the
Formula cell box.
Step 5. Write the cell address of the cell which is to be
generated by the system in the Variable cell box. In
this example, it is cell B6 which we want to be filled as
per the average marks needed.
Step 6. Enter the result in the Target value box. As per our
question, we have to get minimum 70 aggregate so we
will write 70 in the target value.
Step 7. Clicking on OK will display an error as LibreOffice
Calc will not accept the Variable cell to be empty. So,
this error dialog window will prompt to add 0 value in
the variable cell as shown in Fig. 4.30.
Fig. 4.30: Goal Seek failed alert
Step 8. Click on Yes and then repeat the step 2 will display the
dialog window and prompts whether to change the cell
with the calculated value as shown in Fig. 4.31.
Fig. 4.31: Goal Seek succeeded
Step 9. Click on Yes will change the value with the calculated
one in the sheet as shown in the Fig. 4.32.
Fig. 4.32: Marksheet after applying Goal seek
notes
2023-24
ElEctronic SprEadShEEt (advancEd) uSing librEofficE calc 101
A. Multiple choice questions
1. Which of the following feature is not used for data analysis
in spreadsheet?
(b) Consolidating data
(c) Goal Seek
(d) Subtotal
(e) Page layout
2. Which of the following office tool is known for data
analysis?
(a) Writer
(b) Calc
(c) Impress
(d) Draw
3. Which of the following operations cannot be performed
using LibreOffice Calc?
(a) Store and manipulate data
(b) Create graphical representation of data
(c) Analysis of data
(d) Mail merge
4. What is the extension of spreadsheet file in Calc?
(a) .odb
(b) .odt
(c) .odg
(d) .ods
5. The default function while using Consolidate is
____________.
(a) Average
(b) Sum
(c) Max
(d) Count
6. Group by is used in _____________ tool to apply summary
functions on columns.
(a) Consolidate function
(b) Group and Outline
(c) What-if scenario
(d) Subtotal tool
Create the following spreadsheet (Fig. 4.33) to find out the quantity
to be sold for the item Talc so as to get the total amount of 50000.
Fig. 4.33: Practical Exercise
Practical Activity 4.10 notes
Check Your Progress
2023-24
Domestic Data entry operator – class X
102
7. Which tool is used to predict the output while changing
the input?
(a) Consolidate function
(b) What-if scenario
(c) Goal seek
(d) Fine and Replace
5. Which of the following is an example for absolute cell
referencing?
(a) C5
(b) $C$5
(c) $C
(d) #C
5. _____________ analysis tool works in reverse order, finding
input based on the output.
(a) Consolidate function
(b) Goal seek
(c) What-if analysis
(d) Scenario
B. State whether the following statements are True or False
1. Consolidate function is used to combine information from
two or more sheets into one.
2. Consolidate function cannot be used to view and compare
data.
3. Link to source data is checked updates the target sheet if
any changes made in the source data.
4. Using subtotal in Calc needs to use filter data for sorting.
5. Subtotal tool can use only one type of summary function
for all columns.
6. Only one scenario can be created for one sheet.
7. What-if analysis tool uses one array of cells.
8. Goal seek analysis tool is used while calculating the output
depending on the input.
9. The output of What-if tool is displayed in the same cell
C. Fill in the blanks
1. Consolidate function is used to combine information from
multiple sheets to _______________________ the information.
2. Data can be viewed and compared in a single sheet for
identifying trends and relationships using ______________
function.
3. ________________ under Data menu can be used to
combine information from multiple sheets into one sheet
to compare data.
4. The _________________ tool in Calc creates the group
automatically and applies functions on the grouped data.
notes
2023-24
ElEctronic SprEadShEEt (advancEd) uSing librEofficE calc 103
5. _______________ scenario is used to explore and compare
various alternatives depending on changing conditions.
6. ______________ is a planning tool for what-if questions.
7. What-if analysis tool uses ____________ array of cells,
one array contains input values and the second uses the
_____________.
8. _____________ helps in finding out the input for the specific
output.
D. Answer the following questions
1. Define the terms
(a) Consolidate function
(b) What-if analysis
(c) Goal seek
2. Give one point of difference between
(a) Subtotal and What-if
(b) What-if scenario and What-if tool
3. Give any two advantages of data analysis tools.
4. Name any two tools for data analysis.
5. What are the criteria for consolidating sheets?
6. Which tool is used to create an outline for the selected
data?
Lab Exercise
1. Mr Gurdeep has to take a loan of Rs. 10 lakhs to buy a
house. After assessing his situation, he has realized that
he can pay the loan in 15 years by paying out an EMI
of 20,000.
(a) Use Goal seek to find out the interest rate at which he
can borrow the loan.
(b) Use What If Scenario to depict payment of loan in 25
years by paying out an EMI of 10,000.
(c) Use Scenario manager to find the best case.
2. Power Motors has 3 branches all over Bhopal. Each
branch maintains monthly sales of different models of
electric scooter and at the end of month mails it to the
State Head. Prepare a consolidated sheet that shows
total and average sales made for each model of the
electric scooter with respect to the spreadsheet sent
by the branches to the head office. You are required to
identify the column headings for the various branches,
enter data in three different spreadsheets indicating
different branches and consolidate data to find total
sales and average sales for each model.
notes
2023-24
IntroductIon
Many times, we have to perform repeated tasks such
as typing school name, address, contact numbers with
a specific formatting or apply the same formula at a
particular cell for different sheets in a workbook. How
easy would it be if we could get this done at the click
of a button? This will ensure that we maintain the
standardization in terms of font style without any typing
mistake. Can you think of any other advantage? In this
chapter, you will learn how to use a macro to automate
repeated tasks that are always performed in the same
way over and over again.
Recording a Macro
A macro is a single instruction that executes a set of
instructions. These set of instructions can be a sequence
of commands or keystrokes that can be used for any
number of times later. A sequence of actions such as
keystrokes and clicks can be recorded and then run as
per the requirement.
It is important to know that by default
the macro recording feature is turned
off when LibreOffice is installed on your
computer. Hence, to record a Macro ensure
that the macro recording is enabled. Macro
recording can be enabled using the Tools
option on the main menu bar by selecting
Tools>Options>LibreOffice>Advanced.
Observe the Optional Features. There are
two options which are not check marked.
Put the checkmark on the option “Enable
macro recording” as shown in Fig. 5.1.
C
HAPTER
5
Using Macros in Spreadsheet
Fig. 5.1: Enabling a Macro
2023-24
ElEctronic SprEadShEEt (advancEd) uSing librEofficE calc 105
Observe in Fig. 5.2, that the Record
Macro option found under Tools>Macros
is visible now.
The Macro records all the keyboard and
mouse actions but the following actions
are not recorded.
• Opening of windows
• Actions carried out in another
window than where the recording
was started.
• Window switching
• Actions that are not related to the
spreadsheet contents. For example,
changes made in the Options dialog,
macro organizer, customizing.
Fig. 5.2: Record Macro option after enabling macro
• Selections are recorded only if they are done by
using the keyboard (cursor traveling), but not
when the mouse is used.
• The macro recorder works only in Calc
and Writer.
Follow the steps given below to record a macro.
Step 1. Click on Tools > Macros and then click on
the Record Macro option.
Step 2. Now start taking actions that will
be recorded.
Step 3. Once you click on Record Macro option,
recording of actions starts and a small
alert will be displayed as shown in Fig. 5.3.
Clicking on “Stop Recording” button will
stop the recording of actions.
Step 4. This will open the Basic Macros dialog
window to save and run the created macro,
as shown in Fig. 5.4.
Step 5. To save the macro, first select the object
where you want the macro to be saved in
the Save Macro to list box.
Step 6. The name of the macro by default is Main
and is saved in the Standard Library in
Module1. You can change the name of
the macro.
Step 7. Click on Save button.
Fig. 5.3: Stop Recording button
Fig. 5.4: Basic Macros dialog
window
2023-24
Domestic Data entry operator – class X
106
Record a macro to apply the following style to the Heading “Data
Analysis” in the cell A1.
The font style should be “Times New Roman”
The font size should be “14”
The font colour should be “Blue”
Cells from A1 to G1 should be merged and centred
Procedure
Step 1. Create the spreadsheet. Write the heading “Data
Analysis” in cell A1.
Step 2. Choose Tools > Macros > Record Macro. Perform the
actions mentioned above in Practical Activity 5.1 in
the spreadsheet.
Step 3. Click Stop Recording to stop the Macro Recorder.
Step 4. The Basic Macro dialog appears as shown in Fig. 5.4,
in which you can save and run the macro.
Step 5. A Standard library is present by default when a
spreadsheet is created and saved.
Step 6. To save the macro, first select the object where you
want to save the macro in the Save macro in list
box. Fig. 5.5 shows that the Main macro is saved by
default in the Standard Library in Module1. You can
change the name of the macro. Here, we have named
the macro as FormatHeading.
Fig. 5.5: Naming a Macro
Practical Activity 5.1
Note : If all the macros will be given the same name then they
will overwrite the previous Macro created by that name.
notes A Library is a collection of modules which in turn is a
collection of macros.
2023-24
ElEctronic SprEadShEEt (advancEd) uSing librEofficE calc 107
notes
Rules for naming a Macro, Module or a Library:
While naming a Macro, Module or a Library the name
should :
• Begin with a letter
• Not contain spaces
• Not contain special characters except for _
(underscore)
Running a Macro
Let us now run the macro for another sheet which
requires its heading in cell A1 to be given the same
format as recorded in the Formatheading macro. To run
a macro we need to perform the following steps.
Step 1. Type the heading in cell A1
Step 2. Use Tools > Macros > Run Macro to open the
Macro Selector dialog box as shown in Fig. 5.6.
Fig. 5.6 shows three names in the library. Out of which
• LibreOffice Macros library is provided by
LibreOffice and contains modules with pre
recorded macros and should not be changed.
• My Macros contain macros that we write or add
to LibreOffice.
• Untitled1 is the name of the worksheet we are
working on. Since at this time we have not saved
Fig. 5.6: Selecting and runnig a Macro
2023-24
Domestic Data entry operator – class X
108
Run a previously created Macro Formatheading.
Step 1. Type the heading in cell A1.
Step 2. Open the Macro selector dialog box by clicking Tools
-> Macros-> Run Macro
Step 3. Click on MyMacros > Standard > Module1. Then
select Formatheading from the Macro Name box and
click Run as shown in Fig. 5.6.
You will observe that the Heading in Cell A1 is formatted.
The action recorded by a macro is recorded as instructions in a
programming language called BASIC. It is also possible to view
and thus edit the code of a macro. But remember, it is advised to
edit a macro only if you have knowledge of the language in which
the macro is written which is BASIC in case of CALC. You can
view the code generated for the macros by going to Tools >
Macros > Edit Macros.
Choose the macro name from the Object Catalog and the
associated code will be visible as shown in Fig. 5.7.
Fig. 5.7: Code generated for macro in IDE
Warning – Do not make any changes to the code unless you are
aware of the language.
Note – The code of a macro begins with Sub followed by the
name of the macro and ends with End Sub .
the worksheet with another name it is showing
Untitled1. You will see further that Untitled1 will
be replaced with the name of the spreadsheet.
Step 3. Select the library and module in the Library
list.
Step 4. Select the macro in the Macro name list.
Step 5. Click Run to run the macro.
Practical Activity 5.2
notes
2023-24
ElEctronic SprEadShEEt (advancEd) uSing librEofficE calc 109
Creating and Organising a Simple Macro
Till now we have learned to record, store and run the
macro. The recorded macro is internally stored as
instructions written in a programming language that
are executed when the macro is executed or run.
We selected a library or module to store our recorded
macro, similarly while creating a macro, either create a
new library/module or edit an existing module stored in
a library. Use the following steps to organize the macro.
Step 1. Click on Tools > Macros > Organize Macros >
LibreOffice Basic to open the LibreOffice Basic
Macro dialog window as shown in Fig. 5.8.
Step 2. Click Organizer to open the Basic Macro
Organizer dialog as shown in Fig. 5.9.
Fig. 5.8: Basic Macro dialog window Fig. 5.9: LibreOffice Basic Macro Organiser
Create a library to store a macro
To create a new library containing modules, click on
Library > New.
Use the following steps to create a module to store
a macro.
Choose the Modules Tab and select a Module. Click
on New to create a new Module.
2023-24
Domestic Data entry operator – class X
110
Create a simple Macro using BASIC programming instructions
that will display Hello in a dialog box stored in the Standard
module as shown in Fig. 5.10 when executed.
Fig. 5.10: A Dialog Displaying Hello using macro
Step 1. Open the LibreOffice Basic Macro dialog box using
Tools > Macros > Organize Macros > LibreOffice
Basic.
Step 2. From the Basic Macros dialog box select Organizer
Step 3. From Modules tab, select My Macros folder and click
on New button as shown in Fig. 5.11.
Fig. 5.11: Creating a Module with name Hello
Step 4. Give a name to the New Module say ‘Hello’ and click
Ok. You will see Hello under Standard Library in My
Macros Library.
Fig. 5.12: Module Hello in Basic Macro Organizer Dialog
Step 5. Select Hello and click Edit (Fig. 5.12) to open the
Integrated Development Environment (IDE). It is a
text editor that allows you to create and edit macros.
Type Print “Hello” between Sub Main and End Sub as
shown in Fig. 5.13.
Practical Activity 5.3
notes
2023-24
ElEctronic SprEadShEEt (advancEd) uSing librEofficE calc 111
notes
Fig. 5.13: Code of Hello Macro
The created module can be executed as explained in the previous
section. Besides, the module can be executed from the IDE by
either clicking the Run button or pressing F5.
Calculate the number of tiles required for flooring of a room
using macro as a function. The length and width of the room and
the length and width of a tile is entered in the sheet as shown
in Fig. 5.14.
Fig. 5.14: Sheet storing length and width of floor and tile
Macro as a Function
Consider a situation wherein you need to perform
calculations that are repetitive in nature. Assume that
the same formula needs to be applied to different data in
different sheets and there is no predefined function for it.
In such a situation will it not be convenient if we could
create a macro that performs the calculations? It will save
us the effort of remembering and typing the formulas. It
is possible to do so if we use Macro as a function. Instead
of writing instructions in between Sub and End Sub, we
can write instructions in between Function and End
Function. A function is capable of accepting arguments
or values. It can perform operations on the arguments,
perform calculations and return the result.
Practical Activity 5.4
2023-24
Domestic Data entry operator – class X
112
Step 1. Enter data in a sheet and save it with the name as
Calculatetiles.ods
Step 2. Select Tools > Macros > Organize Macros >
LibreOffice Basic to open the LibreOffice Basic
Macros dialog.
Step 3. Choose Calculatetiles.ods. Click on New and type
a name. We have named it as Calctiles as shown in
Fig. 5.15 and press OK.
Fig. 5.15: Creating a New Module to define function
Step 4. Write a function to calculate the number of tiles. A
function starts with Function followed by the name
of the function and then the statements to calculate
area of the floor, tiles and number of tiles and store
the final result in the name of the function as shown
in Fig. 5.16. Press the Save button on the toolbar or
press Ctrl+S.
Fig. 5.16: IDE showing function definition to calculate number of tiles
Note: The text in grey is preceded by ‘ (single quote) indicating it
is a comment. A comment is written to write descriptive text to
support the code.
Step 5. Use the function in the sheet as shown in Fig. 5.17.
Fig. 5.17: Sheet using Macro as a function
notes
2023-24
ElEctronic SprEadShEEt (advancEd) uSing librEofficE calc 113
A. Multiple choice questions
1. Macro Recordings can be enabled from the ________ option
in the menu bar.
(a) Sheet
(b) Data
(c) Tools
(d) Window.
2. Which of the following is an invalid Macro Name?
(a) 1formatword
(b) format word
(c) format*word
(d) Format_word.
3. Which of the following Libraries contains modules with
prerecorded macros and should not be changed?
(a) My Macros
(b) LibreOfficeMacros
(c) Untitled1
(d) Test.
4. Identify which of the following is a programming Language?
(a) Calc
(b) BASIC
(c) Writer
(d) Macro.
5. The Module can be executed from the IDE by pressing
_________________.
(a) F3
(b) F4
(c) F5
(d) F6
5. Which of the following is the default name of the Macro
_______________.
(a) Default
(b) Main
(c) Macro1
(d) Main_Macro
Step 6. Use fill handle to drag the function for other cells. The
final sheet is shown in Fig. 5.18.
Fig. 5.18: Displaying Number of tiles using Macro as a function
Check Your Progress
notes
2023-24
Domestic Data entry operator – class X
114
B. Fill in the blanks
1. ________ library is automatically loaded when the document
is opened.
2. IDE stands for _______________________________.
3. Macro as a function is capable of accepting ___________
and returning a ____________.
4. Macro ________________ allows us to add, delete a module.
5. The code of macro begins with __________ followed by the
name of the macro and ends with __________.
6. By default a macro is saved in the _____________ .
C. State whether the following statements are True or False
1. Macro is a group of instructions executing a single
instruction.
2. Once created, Macro can be used any number of times.
3. By default, the Macro recording feature is turned on.
4. It is not possible to stop recording of a Macro.
5. Every Macro should be given a unique name.
6. A macro once created can be edited later.
D. Answer the following questions
1. What is a Macro? List any two real life situations where
they can be used.
2. List the actions that are not recorded by a macro.
3. How is LibreOffice Macros Library different from my
Macros?
4. Differentiate between predefined function in Calc and
Macros as a function
5. List the rules that should be kept in mind while naming
a macro.
6. Give any one advantage of macros.
Lab Exercises
1. Record a Macro that performs Bold, Underline on the
Heading in Cell A1. Give macro the name BoldunderlineA1
and save it in a New Module named Basic Formatting which
is created in a New Library named DocumenHeadingA1.
2. Record a Macro that creates a bar chart for data stored in
cells A2 – A9 and K2 to K9.
3. Run the macro recorded in (i) and display a barchart
for the following data showing Minimum and Maximum
temperature from 2010-2017.
notes
2023-24
ElEctronic SprEadShEEt (advancEd) uSing librEofficE calc 115
notes
Source: https://data.gov.in/resources/seasonal-and-annual-minmax-
temp-series-india-1901-2017
Collect information about the population of the South
Asian countries form the Internet and store it in a Calc
sheet. Run the Macro created in (i) to display a chart for the
data stored.
Create Macro as a function to calculate Amount to be
paid after a 5% discount. A sample sheet for the same is
given below.
Fig. 5.19: Lab Exercise 5
4. Anuja has to create a Marks list for every term. The format
is as follows :
Fig. 5.20: Sample Sheet for Marks Entry
(a) Record two macros to create the format given in
Fig. 5.20.
(b) To enter names of students in the list so that she
doesn’t need to retype or copy the names
Run the above created macros for a new sheet.
5. Use Macro as a function to calculate Mileage of a vehicle.
Mileage (in km/L) is calculated as Distance Travelled
(in km)/ Fuel filled (in Litre). Create a sheet with three
columns Distance Travelled (in Km), Fuel filled (in L) and
Mileage (in km/L).
2023-24
IntroductIon
We have learned in Class IX to organise the data in a
spreadsheet. Let us take a situation where the marks
scored by each student of three terms in three terminal
examinations are stored in three different sheets
Term1, Term2, Term3. Now to generate final result in
single result sheet by finding the average marks of each
subject, what would be the ideal solution?
Retyping or copying the marks can be one solution
but it will be time consuming and also there are chances
of committing typing errors.
Instead, the ideal solution will be to find a way to
refer the marks stored in the sheets Term1, Term2 and
Term3. In this manner, there are nearly no chances of
errors and if the marks of a subject are changed, they
will be reflected and thus ensuring correctness while
performing calculations, such as calculating average.
In this chapter, we will learn how to create multiple
sheets, and also to link the data in multiple sheets. It
can be done in two ways, one is creating reference to
other sheets/documents by using keyboard and mouse,
and other is by linking external data.
Setting up Multiple Sheets
Let us consider a worksheet
storing marks of the first term in
a sheet named Term1 as shown in
Fig. 6.1.
To add a new sheet in the
spreadsheet, click on the Add Sheet
by clicking on the (+) sign located
intheleftbottomofthespreadsheet.
C
HAPTER
6
Linking Spreadsheet Data
Fig. 6.1: Marks scored by students in Term1
2023-24
ElEctronic SprEadShEEt (advancEd) uSing librEofficE calc 117
Alternatively, you can right click anywhere on the sheet
tab and select Insert sheet option from the drop-down
list displayed as shown in Fig. 6.2. It gives us a choice
to put the new sheet, assign the name of the sheets,
delete a sheet and so on.
Note: Insert Sheet dialog box can be invoked from the
menu option Sheet > Insert Sheet
Fig. 6.2: Inserting a new sheet
using context menu displayed
after right click option
Add a new sheet to store data for Term2 in the spreadsheet by
using the Insert Sheet Dialog box.
Step 1. Open the Insert Sheet Dialog and add a sheet after
the current sheet by selecting After Current Sheet
option. The current sheet is our active sheet which in
this case is Term1 as shown in Fig. 6.1.
Step 2. Name the Sheet as Term2 as shown in Fig. 6.3.
Fig. 6.3: Insert sheet dialog
Step 3. Enter the marks obtained by the students in second
term in Term2 sheet as shown in Fig. 6.4.
Step 4. Insert a new sheet and name it as “Result”.
Fig. 6.4: Marks scored by students in Term2
Note: You can use the macro created by you in the previous
chapter to create the format of the result sheet and populate the
name of the student column to save time.
Practical Activity 6.1
2023-24
Domestic Data entry operator – class X
118
Creating Reference to Other Sheets by Using
Keyboard and Mouse
We have been using cell references for applying functions
and formulas in class IX. In this section we will learn
how to reference cells in other sheets using mouse and
keyboard.
To calculate the final result, it is required to store the
final marks for each subject in the sheet named “Result”
inserted in Activity 6.1 by applying the formula (Marks
obtained in Term1 + Marks obtained in Term2)/2. As
we know that marks obtained in Term1 and Term2
are stored in different sheets named Term1 and Term2
respectively.
To calculate the final marks for English in in the
cell C4 of Result sheet, as shown in Fig. 6.5, follow the
following steps.
Step 1. First copy the Roll No and Name of the
Student from Term1 sheet to Result sheet,
copy all headings of and give the name as
Final Result.
Step 2. Click on the = icon next to the input line (or
type = in cell C4), type Sum() and click between
the brackets.
Step 3. Now click on the Term1 sheet and click the
English Marks for the first student and add (,)
comma for the next value
Step 4. Next click on the Term 2 sheet and click the
English Marks for the first student.
Step 5. To calculate average type /2 after the sum(+) as
shown in Fig. 6.5 to calculate average.
Step 6. Press Enter key, the average is displayed in cell
C4 of Result sheet. Then use fill handle to fill
the cells up to the last student’s data.
Step 7. The result sheet gives the average marks
scored by each student in English as shown in
Fig. 6.5.
Step 8. You can copy the same formula for other
subjects.
notes
2023-24
ElEctronic SprEadShEEt (advancEd) uSing librEofficE calc 119
notes
Fig. 6.5: Result sheet after referencing the data from
Term1 and Term2 sheets
Any changes made to marks in Term1 and Term2
sheet will be reflected in the result sheet as well. That
is how the sheets are linked together.
We had selected cell reference by clicking on the
cells. An alternative could be to type the reference. First,
we need to understand how referencing is performed
across sheets in the same spreadsheet document.
Hence, to refer to a cell in another sheet precede the
cell reference with a ‘$’ sign. It is then followed by the
name of the sheet in ‘ ‘ ’ (single quotes) followed by a .
(dot) and then the cell address. For example, to refer a
cell C4 of sheet named Term1 we will type:
$‛Term 1’.C4
Note: Single quotes (‘ ’) are used as there is a space
between Term and 1 in the sheet name.
Let’s Practice– Calculate Final marks for all the subjects by
referencing with Keyboard for one of the columns and mouse for
other columns.
Creating Reference to Other Documents
by Using Keyboard and Mouse
In the previous section we had0 created references to
other sheets in a spreadsheet. Sometimes we may intend
to reference sheets stored in another spreadsheet file.
Let us consider a situation where it is required to
create a Summary report consisting of the average of
result sheets for each section of a class. To do so, we
need to insert sheets that are stored in different files.
Fig. 6.6 shows the final result of class X-A and Fig. 6.7
shows Final Result of class X-B.
2023-24
Domestic Data entry operator – class X
120
Create Summary of result in a spreadsheet document named
Result Analysis of class X-A and X-B as shown in Fig. 6.8.
Fig. 6.8: Result Analysis spreadsheet
Since the marks of both the classes are stored in separate
spreadsheet file and Result Analysis itself is a separate
spreadsheet, therefore we need to create reference to other
spreadsheets.
Step 1. Open the spreadsheets namely Result-X-A, Result-X-B
and Result Analysis.
Step 2. Click on cell B4 of Result Analysis spreadsheet and
type =MAX(), as shown in Fig. 6.9.
Step 3. Click between the brackets of MAX() and then click on
the cell range containing marks of English in Result
sheet of Result-X-A spreadsheet.
Step 4. Type (,) comma and click on the cell containing
marks of English in the Result sheet of Result-X-B
spreadsheet.
Step 5. Press Enter, Maximum of the marks will be displayed
in cell B4 as shown in Fig. 6.9.
Fig. 6.6: Result of class X-A stored in
Result-X-A spreadsheet
Fig. 6.7: Result of class X-B stored in
Result-X-B spreadsheet
Practical Activity 6.2
2023-24
ElEctronic SprEadShEEt (advancEd) uSing librEofficE calc 121
Fig. 6.9: Displaying the highest score in English using Max function
We had selected cell reference by clicking on the cells in the
separate spreadsheet and an alternative could be to type the
reference. First, we need to understand how referencing is
performed across different spreadsheet files.
To refer to a cell in a different spreadsheet we write in single
quotes the path of the file followed by #$ then the name of the
sheet followed by a . (dot) and then the cell address.
For example: ‘file:///C:/Users/ADMIN/Documents/X-A.ods’#
$Result.C4
Note : The path of a file has three forward slash ///. A filename
can have space within its name hence single quotes (‘ ‘) are used.
It is also possible to insert a sheet from another file. The From
file option of Insert Sheet Dialog box allows us to insert sheet
from another file as well (refer Fig. 6.10).
Insert a sheet from an existing file into the current document.
Practical Activity 6.3
Step 1. To insert the sheet “Result” from Result-X-A spreadsheet
in the Result Analysis spreadsheet, open the Result
Analysis spreadsheet.
Step 2. Select Sheet > Insert Sheet > From File as shown in
Fig. 6.10.
Step 3. Click on Browse button, which will open a file selection
dialog box.
Step 4. Select the file from
which you want to
import the sheets.
After selecting the file,
the sheets contained
in it are displayed in
the list box, as shown
in Fig. 6.10. The file
path is displayed
below this box.
Select the sheet to
be inserted from the
list box.
Fig. 6.10: Inserting Result sheet of
Result-X-A spreadsheet into Result
Analysis spreadsheet
notes
2023-24
Domestic Data entry operator – class X
122
Step 5. Click on the required “Result” sheet from the file “Result-
X-A.ods” as shown in Fig. 6.10.
Step 6. Check the Link checkbox to ensure that the changes
made in the selected sheet “Result” are reflected.
Step 7. Press OK. You will find the Result sheet added to the
sheet tab as shown in Fig. 6.11.
Fig. 6.11: Result sheet added to the sheet Tab of ResultAnalysis
You could have also copied and pasted data but linking a sheet
allows us to always have access to “live” data from another
spreadsheet. A “live” data means that the data is always the
same as in the original file.
The links can be updated by selecting Tools > Options >
LibreOffice Calc > General > Updating, as shown in Fig. 6.12,
whenever the file is opened to ensure that you have access to the
updated data always.
Fig. 6.12: Selecting online update option
notes
2023-24
ElEctronic SprEadShEEt (advancEd) uSing librEofficE calc 123
Hyperlinks to the Sheet
Sometimes it is required to jump to a document stored
at a different location from within a document. It can be
done by creating a hyperlink. It is possible to jump from
a sheet in the same spreadsheet, different spreadsheet
or a website by creating a hyperlink.
Relative and Absolute Hyperlinks
A hyperlink can be either absolute or relative. An
absolute hyperlink stores the complete location where
the file is stored. So, if the file is removed from the
location, absolute hyperlink will not work. For example:
C:UsersADMINDownloadstry.ods is an absolute
link as it defines the complete path of the file.
A relative hyperlink stores the location with respect to
the current location. For example: AdminDownloads
try.ods is a relative hyperlink as it is dependent on the
current location and thus the folder admin is searched
where the active spreadsheet is being stored. If the
complete folder containing the active spreadsheet is
moved the relative link will still be accessible as it is
bound to the source folder where the active spreadsheet
is stored.
Creating Hyperlinks
It is possible to hyperlink a sheet of other spreadsheet
document in a spreadsheet. Suppose, you have to
hyperlink a Result sheet of “Result-X-A” spreadsheet
document in the “Result-X-B” spreadsheet document,
then follow the following steps:
Step 1. Open the Result-
X-B spreadsheet
document.
Step 2. From the main
menu, select and
click on Insert
> Hyperlink.
An Hyperlink
dialog box will
open as shown in
Fig. 6.13.
Fig. 6.13: Hyperlink dialog box
2023-24
Domestic Data entry operator – class X
124
Step 3. To insert the spreadsheet document, click on
the Document on the left pan of dialog box,
then to select the spreadsheet document, click
on the button located after the Path. Select the
required document. In our case we select the
spreadsheet document “Result-X-A”.
Step 4. Then click on the Target button to choose the
sheet which is to be hyperlinked. Target in
Document helps to specifically choose a target
in the document such as sheet, tables, frames,
images, headings and so on. Here in our case
we will select the sheet Result as shown in
Fig. 6.13.
Step 5. Click on Apply and Close button to exit the
Target Document window.
Step 6. Enter the text in the Text box to assign the
hyperlink to that text. In our case we have
entered the text as “Result-X-A” as shown in
Fig. 6.14. So the hyperlink will be assigned to
the text “Result-X-A”.
Fig. 6.14: Specifying Target and Text for inserting a Hyperlink
Step 7. Click on Apply and Close button to confirm the
changes and exit the Hyperlink dialog box.
Step 8. Observe that the hyperlink is assigned to the
word “Result-X-A” as shown in Fig. 6.15.
2023-24
ElEctronic SprEadShEEt (advancEd) uSing librEofficE calc 125
Fig. 6.15: Hyperlink inserted in the spreadsheet
Step 9. To open the hyperlinked sheet, press the Ctrl
key and click on the hyperlinked word “Result-
X-A”, the sheet will be opened in the new
window as shown in Fig. 6.16.
Fig. 6.16: Hyperlinked sheet open in new window
Editing a Hyperlink
To edit an existing link, place the
cursor anywhere in the link and
right click the hyperlink. A context
menu will be displayed as shown in
Fig. 6.17.
Click on Edit Hyperlink...,
the Hyperlink dialog box will be
displayed, where you can make
changes to the hyperlink.
Let’s Practice
Create a Hyper link to
Result Analysis
spreadsheet.
Fig. 6.17: Selecting Edit Hyperlink from context menu
on right clicking the Hyperlink
2023-24
Domestic Data entry operator – class X
126
On clicking the Remove Hyperlink option, the link
will be removed from the text and thus it will not point
to any other location.
Linking to External Data
Internet is a rich source of information, which is stored
in the form of web pages. The web pages are written in
HTML documents. Data on a web page can be stored in
the form of tables.
The versatility of a spreadsheet allows us to insert
tables from HTML documents into Calc. To insert the
tables from a HTML document, we can use the External
Data Dialog box. The steps for the same are given below.
Step 1. Open the spreadsheet where external data is to
be inserted.
Step 2. Select the cell to store the first cell of the table
in the external data.
Step 3. Select Sheet > Link to External Data.
Step 4. The External Data dialog box is displayed as
shown in Fig. 6.18. Type the URL of the source
document or select it from the drop-down list if
it is listed and press enter.
Step 5. A dialog box is displayed to select the language
for import as shown in Fig. 6.18. Selecting
Automatic shows data in the same language as
in the webpage.
Let us Practice
Create a Hyper link to Result Analysis spreadsheet.
From the Available Tables/Ranges list, choose the
desired table. If you choose HTML_all option, then the
entire HTML document is selected. Here in our example
suppose we select HTML_10 table to insert as shown in
Fig. 6.19.
Fig. 6.19: Inserting a table from a webpage
Fig. 6.18: Slecting language to
import for the webpage
2023-24
ElEctronic SprEadShEEt (advancEd) uSing librEofficE calc 127
The table is inserted in the spreadsheet as shown in
Fig. 6.20.
Linking to Registered Data Sources
LibreOffice Calc allows us to link spreadsheet documents
with databases and other data sources. The data source
needs to be registered with LibreOffice. Registration is
a means to inform LibreOffice about the type of data
source and the location of the file. We will restrict
our discussion to LibreOffice Base. The extension of
LibreOffice Base is .odb. You will learn about LibreOffice
Base in detail in Unit 3. You can access a variety of
databases and other data sources and link them to Calc
documents. To register a data source
that is in *.odb format, follow the steps
given below.
Step 1. Select Tools > Options >
LibreOfficeBase>Databases.
The Options - LibreOffice
Base-Databases dialog box
appears.
Step 2. Click the New button to
open the Create Database
Link dialog box as shown in
Fig. 6.21.
Fig. 6.20: HTML_10 table inserted from the webpage https://en.wikipedia.org/
wiki/List_of_gravitationally_rounded_objects_of_the_Solar_System#Planets
Fig. 6.21: Registering databases
2023-24
Domestic Data entry operator – class X
128
Check Your Progress
A. Multiple choice questions
1. Insert Sheet dialog can be invoked from _______________.
(a) sheet
(b) insert
(c) tools
(d) Windows
2. ______________ refers to cell G5 of sheet named My Sheet.
(a) $My Sheet.’G5’
(b) $My Sheet_’G5’
(c) $ ‘MySheet’.G5
(d) $ ‘MySheet’_G5
3. The path of a file has ____________ forward slashes.
(a) four
(b) three
(c) two
(d) one
4. Which of the following feature is used to jump to a different
spreadsheet from the current spreadsheet in LibreOffice
Calc?
(a) Macro
(b) Hyperlink
(c) connect
(d) Copy
B. Fill in the blanks
1. A relative hyperlink stores the location with respect to the
___________ location.
2. While inserting tables from a webpage _____________
selects the entire HTML document.
3. The extension of LibreOffice base is ______________.
4. __________ are used to enclose sheet names as there might
be a space within sheet names.
5. The From file option of ___________ Dialog box allows to
insert sheet from another file.
notes Step 3. Enter the location of the database file, or click
Browse to open a file browser and select the
database file.
Step 4. Type a name to use as the registered name for
the database and click OK. The database is
added to the list of registered databases.
Note – The OK button is enabled only when both fields
are filled in.
2023-24
ElEctronic SprEadShEEt (advancEd) uSing librEofficE calc 129
notes
C. State whether the following statements are True or False
1. A sheet can only be added before the current sheet.
2. If ‘sales’ sheet has a reference to ‘cost’ sheet then any
changes made to ‘cost’ sheet will be reflected in the sales
sheet as well.
3. It is not possible to link a sheet as a reference in another
sheet.
4. We can insert data from a table created on a web page into
a spreadsheet.
5. A hyperlink once created on a sheet cannot be deleted.
D. Answer the following questions
1. Name the two ways to link the sheets in a LibreOffice Calc.
2. Differentiate between Relative and Absolute Hyperlink.
3. Write steps to extract a table from a web page in a
spreadsheet.
4. Write steps to register a data source that is in *.odb format.
5. State advantages of extracting data from a web page into
spreadsheet.
Lab Exercises
1. Create three sheets named Jan, Feb and March. In each
sheet store the attendance of employees for a month. Apply
count function to count the number of days the employees
were present by counting P.
2. Add another sheet named ‘Consolidated Attendance’ that
stores total attendance of three months and calculates the
percentage.
3. Create a spreadsheet containing the list of Prime ministers
of India with their tenure from the website https://
knowindia.gov.in/general-information/prime-ministers-
of-india.php. Perform steps to extract the table from the
website into a Calc Sheet and display the count of Prime
Ministers of India till date.
2023-24
IntroductIon
In LibreOffice Calc, one spreadsheet can be used by
more than one user at a time by sharing it. A shared
spreadsheet is a same sheet that can be accessed by
more than one user and can allow them to make changes
simultaneously on it. It saves the trouble of keeping track
of multiple copies of the same spreadsheet. Sharing
allows working in collaboration so that everyone can
contribute, make changes and view it.
C
HAPTER
7
Share and Review a
Spreadsheet
Fig 7.1: Share Document dialog window
Fig. 7.2: Confirmation dialog window for
sharing a spreadsheet
Sharing Spreadsheet
Sharing a spreadsheet is just like a
teamwork to work in collaboration with
other users. The following are the steps
to share the spreadsheet.
Step 1. Open a new spreadsheet and
save it with some name.
Step 2. Select and click on Tools >
Share Spreadsheet from main menu
bar. This will open the Share Document
dialog window as shown in Fig. 7.1
which can be used to enable or disable
sharing option.
Step 3. Click on the checkbox “Share
this spreadsheet with other users” to
share the spreadsheet and click on OK
button. This will open the confirmation
dialog window as shown in Fig. 7.2 to
save the spreadsheet to activate the
shared mode.
2023-24
ElEctronic SprEadShEEt (advancEd) uSing librEofficE calc 131
Step 4. Click on Yes to continue.
Step 5. Once the spreadsheet is saved, the name of the
spreadsheet in the title bar will display (shared)
along with the name of the spreadsheet.
Create a spreadsheet and save it with the name Test_1.ods
Step 1. Create the spreadsheet with the data and save it with
Test.ods, as shown in Fig. 7.3.
Fig. 7.3: Contents of spreadsheet Test.ods
Step 2. Select and click on Tools > Share Spreadsheet from
main menu bar. This will open the Share Document
dialog window as shown in Fig. 7.1. Put the check-
mark on the check box, “Share this spreadsheet with
other users”, as shown in the Fig. 7.1.
Step 3. Click on the checkbox and then on OK button. It will
display the Confirmation dialog window to activate
the sharing mode as shown in Fig. 7.2. Click Yes to
continue.
Step 4. Observe that shared is added with the name of the
document in the title bar as shown in Fig. 7.4.
Fig. 7.4: Title bar showing the spreadsheet changed to shared
Practical Activity 7.1
notes
2023-24
Domestic Data entry operator – class X
132
Opening and Saving a Shared Spreadsheet
Opening a Spreadsheet
To open a shared spreadsheet, follow the
following steps.
Step 1. While opening a spreadsheet which is
a shared spreadsheet, a message will appear
as shown in Fig. 7.5 that the spreadsheet is
in shared mode and some of the features are
not available to use in this spreadsheet.
Step 2. Click on OK button to open the spreadsheet in
shared mode.
Step 3. If you don’t want this warning option to be
displayed again, then check the mark in the
checkbox ‘Do not show warning again’.
Step 4. Once the spreadsheet is saved in shared mode,
some of the features will become unavailable
for used.
Step 5. Observe the Edit menu on the main menu
bar as shown in Fig. 7.6, that shows Undo,
Redo, Repeat, Paste, Links to External files,
ImageMap, Object are not available for use.
Saving a Shared Spreadsheet
Follow the steps given below to save a shared
spreadsheet:
Step 1. After making the changes in the shared
spreadsheet, you need to save it before closing
the spreadsheet.
Step 2. If two or more users are working at the same
time and the changes do not conflict, then the
message will appear stating that the spreadsheet
has been updated with changes saved by other
users.
Step 3. If there is any conflict for the changes, then
resolve conflict dialog window will appear.
Step 4. No other user can save the shared spreadsheet
when you are resolving the conflicts.
Step 5. If another user is trying to save the shared
document and resolve conflicts, then you will be
notified with a message that the file is locked.
Now, you cannot save it.
Fig. 7.5: Message box while opening
shared spreadsheet
Fig. 7.6: Edit menu of shared
spreadsheet
2023-24
ElEctronic SprEadShEEt (advancEd) uSing librEofficE calc 133
Recording Changes
This feature of LibreOffice Calc provides different ways
to record the changes made by one or other users in
the spreadsheet. While recording the changes, the
spreadsheet will turn off its shared feature. Follow the
following steps for recording changes:
Step 1. To enable the Record changes, first disable the
shared mode of spreadsheet.
Step 2. To disable the shared mode, open the
spreadsheet “Test.ods”.
Step 3. Select and click on Tools > Share Spreadsheet
from main menu bar. This will open the
Share Document dialog window. Remove the
check-mark on the check
box, “Share this spreadsheet
with other users”, and click
on OK button. It will display
the Confirmation dialog
window to disable the sharing
mode. It will give warning to
disable the shared mode of a
spreadsheet as shown in Fig.
7.7. Click Yes to continue.
Step 4. Observe that (shared) word from
the name of the spreadsheet has
disappeared from the title bar of the
spreadsheet.
Step 5. The feature of Track Changes >
Record under Edit menu is turned
ON as shown in Fig. 7.8, which was
disabled and not working in the shared
spreadsheet.
Step 6. Now to record track changes, click on
Edit > Track Changes > Record as
shown in Fig. 7.8.
Step 7. Now change name Sia to Sita in cell
B5 as shown in Fig. 7.9. Observe that
the border colour of the cell in which
data has been changed turns to red.
Also, the changed cell will display the
description if the cursor moves to the
changed cell.
Fig. 7.8: Recording Track
changes under Edit
menu enabled
Fig. 7.9: Displaying the information of
changes recorded under track changes
Fig. 7.7: Confirmation dialog window to disable sharing
mode of spreadsheet
2023-24
Domestic Data entry operator – class X
134
Step 8. Thus, by looking at the spreadsheet, other
users can easily know the changes made in the
cell and the changes made by whom.
Assume that you are captain of your school cricket team. Prepare
the budget in the spreadsheet for the current academic year.
Turn ON the feature Track Changes > Record and ask other
team members to make necessary changes in the spreadsheet.
Practical Activity 7.2
Add, Edit and Format the Comments
In Calc, the comments are automatically added.
Also, the author or reviewer can add their own
comments as well. Follow the following steps to
add your comments:
Step 1. Select from main menu bar and click
on Edit > Track Changes > Comment
as shown in Fig. 7.10, to add your own
comments.
Step 2. This will open the Add comment window.
Enter your comments. Fig. 7.11 shows
the comments entered.
Step 3. Now to view the entered comment, click
on the cell B6 as shown in Fig. 7.12. It
shows the complete description of the
comments entered.
Fig. 7.10: Selecting Comment under
Track Changes
Fig. 7.11: Entering text in Comment
dialog window
Fig. 7.12: Comment displayed with full description
2023-24
ElEctronic SprEadShEEt (advancEd) uSing librEofficE calc 135
Step 4. You can also insert comments to a
cell. Click on the cell where you
want to insert comments. Then
select from main menu Insert >
Comment as shown in Fig. 7.13.
Step 5. This type of comments is known
as notes or suggestions in the
spreadsheet. The box will appear
to write the comment as shown
in Fig. 7.14. The comment box
shows the comments entered as
“Contains only alphabets”. Once
this text is typed in the text box,
you can observe a coloured dot in
the upper-hand corner of the cell
where the comment is added using
insert comment.
Step 6. Once the comment is added, you
can display, edit or delete it. To
perform these operations, right
click on the cell where you have
inserted the comments as shown
in Fig. 7.15. Observe the options
under popup menu.
Step 7. Select the “Edit Comment” option
to edit the comments. It will take
you again to the comment textbox
to make any changes.
Step 8. Select “Delete Comment” option to
delete the comment.
Step 9. Select the “Show Comment” to
view the comment. By selecting
this option, the comments will be
displayed. Again when you right
click on the cell, you will observe
that “Hide Comment” option will
be activated in place of “Show
Comment”. This is because when
you are displaying the comments it
is already in show mode, which has
to be hide.
Fig. 7.13: Insert Comment
Fig. 7.14: Comments inserted in comment box
Fig. 7.15: Right click menu options after
inserting comments
2023-24
Domestic Data entry operator – class X
136
Formatting Comment
You can format the comment box,
just like formatting the cell contents.
It means changing the background
colour, border style, and transparency
of a comment. Follow the following
steps to format the comment.
Step 1. Right click on the cell where
the comment is added.
Step 2. Select the option “Format
cell”, which will display the Format
Cells dialogue box as shown in
Fig. 7.16.
Step 3. You can apply the various
formatting features from its tab such
as Font, font Effects, Alignment, Borders,
Background and Cell Protection. Change
the font, text colour, fill colour, line colour
for the comment box as desired and click on
OK button to apply the changes. Observe the
desired formatting features applied to the
comment box.
Fig. 7.16: Format Cells dialogue box
Let’s Practice — Save the spreadsheet with some other name.
Turn off the shared feature. Now, make some changes in the
spreadsheet. Also, add comments into the changed cells. Try
editing comments and format it with different colours.
Reviewing Changes – View,
Accept or Reject Changes
Once the spreadsheet is edited by all the
members of the team. It is the final stage
before submitting the spreadsheet. In this
stage, we will go through the changes
to accept or reject to prepare the final
spreadsheet after looking at all the changes
made by the team members. Follow the
following steps to review changes.
Step 1. Select and click on Edit >
Track Changes > Show. It will open the
Show Changes dialog window as shown in
Fig. 7.17.
Fig. 7.17: Show Changes Dialog window
2023-24
ElEctronic SprEadShEEt (advancEd) uSing librEofficE calc 137
Step 2. This is used to plan what all
changes are to be displayed
while reviewing the spreadsheet.
Step 3. Click on Edit > Track Changes
> Manage to accept or reject
the changes. It will display the
Manage Changes dialog window
as shown in Fig. 7.18.
Step 3. In this dialog window, click on
the line and click on Accept or
Accept All or Reject All button
to review the changes.
Step 4. Click on Close button once the review is done.
Let’s Practice — As the changes done by other team members
in the Practical Exercise 7.4 has been recorded by the feature in
Calc, now you just review those changes and accept or reject the
necessary changes done by other team members.
Merge two files
To work on our earlier created spreadsheet Test.ods, save the
file Test.ods with another name say Test1.ods and make some
changes in the spreadsheet Test1.ods. Now, we have two files
that are to be merged.
Step 1. Open the spreadsheet file Test.ods. Note the contents of
spreadsheet Test.ods in Fig. 7.19. Also note the contents
of spreadsheet Test1.ods before merging in Fig. 7.20.
Fig. 7.18: Manage Changes dialog window to
accept or reject changes
Merging and Comparing
If the same spreadsheet is reviewed by different team
members and you have two different versions of the
same spreadsheet file. Follow the following steps to
merge document.
Practical Activity 7.3
Fig. 7.19: Contents of Test.
ods before merging
Fig. 7.20: Contents of
Test1.ods before merging
2023-24
Domestic Data entry operator – class X
138
Step 2. Click on Edit > Track Changes > Merge Document
as shown in Fig. 7.21.
Fig. 7.21: Selecting Merge Document option
Step 3. Select the spreadsheet file Test1.ods from the Merge
0With dialog window to open the spreadsheet Test1.
ods to merge with Test.ods and Click on Open button
as shown in Fig. 7.22.
Fig. 7.22: Open the Test1.ods from Merge With dialog window
Step 4. This will open Manage Changes dialog window as
shown in Fig. 7.23.
Fig. 7.23: Manage Changes dialog window
Step 5. Click on Accept All as shown in Fig. 7.23. to accept all
the changes which is done in the Test1.ods spreadsheet
to the Test.ods.
notes
2023-24
ElEctronic SprEadShEEt (advancEd) uSing librEofficE calc 139
Step 6. Now open the first
spreadsheet Test.ods
after merging and observe
its contents as shown
in Fig. 7.24. Observe
that Fig. 7.24 shows the
contents of Test.ods and
Test1.ods merged.
Comparing Documents
Instead of merging two spreadsheets, one can
compare the two spreadsheets by comparing the
documents. Follow the following steps to compare
the documents. Let us compare the two earlier
created spreadsheets Test.ods and Test1.ods
Step 1. Open the spreadsheet file Test.ods. Click
on Edit > Track Changes > Compare
Document as shown in Fig. 7.25.
Step 2. This will open the Compare to dialog
window, which will allow to open the
spreadsheet to be compared. Select the
spreadsheet file Test1.ods and click on
Open button as shown in Fig. 7.26.
Step 3. This will open the Manage Changes
dialog window to accept/reject the
changes. Click on Accept as shown in
Fig. 7.27.
Step 4. Finally click on Close button to close the
Manage Changes dialog window as
shown in Fig. 7.28.
Fig. 7.25: Selecting Compare
Document option
Fig. 7.26: Open Test1.ods from
Compare to dialog window
Fig. 7.27: Accepting Manage Changes Fig. 7.28: Closing Manage Changes dialog window
Fig. 7.24: Contents of Test.
ods after merging
2023-24
Domestic Data entry operator – class X
140
Check Your Progress
A. Multiple choice questions
1. Sharing allows to edit the spredshheet by
(a) single user
(b) different users simultaneously
(c) one by one users
(d) one after other users
2. Sharing spredsheet feature allows to save the changes in
(a) multiple sheets
(b) user’s sheet
(c) in a same sheet
(d) in different sheet
3. The Recording Changes feature of LibreOffice Calc provides
different ways to record the changes made by ____________
in the spreadsheet.
(a) one user
(b) other user
(c) the user
(d) one or other users
4. In Calc, the comments are added
(a) automatically
(b) by author
(c) by reviewer
(d) all of above
5. The changes by team members in the spreadsheet can be
accepted or rejected by
(a) the team members
(b) any of the user
(c) owner
(d) other users
B. State whether the following statements are True or False
1. Spreadsheet cannot be shared to work with more than one
user?
2. Some of the features becomes unavailable when the
spreadsheet is in shared mode.
3. You can record changes in the spreadsheet when the
spreadsheet is opened in shared mode.
4. File menu is used to Record changes for the spreadsheet.
5. You can add a note or suggestion in the spreadsheet using
Insert Comment.
6. Formatting comment can be used to change the font
colour of the comment.
notes
2023-24
ElEctronic SprEadShEEt (advancEd) uSing librEofficE calc 141
notes
C. Fill in the blanks
1. The title bar of the document shows __________________
along with the filename for the shared mode of the
spreadsheet.
2. The shared mode spreadsheet allows __________ users to
access and edit the spreadsheet at the same time.
3. Recording changes automatically ____________ the shared
mode of a spreadsheet.
4. Click on Edit menu, Track Changes and then select
____________ to record the changes in the spreadsheet.
5. The border color of the changed cell will be ______________.
6. ____________ is used to add notes or suggestions to a cell
in a spreadsheet.
7. The comment box can be formatted just like formatting
the __________ (cell contents).
D. Answer the following questions
1. Define the terms
(a) Sharing Spreadsheet
(b) Record changes
2. Write the commands to perform
(a) Sharing Spreadsheet
(b) Record changes
3. Which menu is used to perform the functions
(a) Track Changes
(b) Saving Spreadsheet
4. What do you understand by reviewing the changes in the
spreadsheet?
5. DifferentiatebetweenMergingandComparingSpreadsheet.
Lab Exercise
Anushka and Niyaz have been made the class representative.
Anushka has been asked to collect the class assignments for the
various subjects. Create a spreadsheet to store the roll number,
name of the students and subject names. Perform the following
operations so that Niyaz can access the file:
1. Enable Track changes
2. Add comment to show the date on which the assignment
has been submitted.
3. Share the document with the class teacher.
2023-24
Database
Management System
using LibreOffice Base
3
IntroductIon
Management of data is of prime importance for any
organisation. The ease of entering data, its efficient
storage, accurate and fast retrieval is the primary
objective of any database management system. In this
unit you will learn about various methodologies of data
management using LibreOffice Base, which is an open
source application.
The first chapter starts with the general concepts of
database management system, different database model
with the focus on relational database. It explains the
concept of primary key and foreign key and the various
database objects of RDBMS.
In the second chapter you will learn about LibreOffice
Base application interface, how to start and use it, how
to create database and tables, enter and edit the data in
the table. Different data types used by LibreOffice Base
have also been discussed.
After creating a table, you can edit or delete the table
and set up relations between the tables to control data
redundancy and inconsistency for proper maintenance
of a database. In the third chapter, you will learn how
2023-24
Database ManageMent systeM Using LibreOffice Writer 143
the changes are reflected in the related tables after
setting up relations.
In the fourth chapter, you will learn to retrieve the
data from the database as per your requirement by
providing the desired specifications, which is called
as Query. Depending upon given specifications, the
specific records are searched form the database and
then displayed in the desired manner.
In the last chapter, you will learn to create Forms
and Reports using LibreOffice Base. Form is the user
friendly data entry screen that allows to enter the data
in the table easily by any user. The Report feature
helps to present the retrieved data in a user friendly,
understandable and formatted manner.
notes
2023-24
C
HAPTER
8
Introduction to Database
Management System
IntroductIon
Databases and database systems are essential parts of
our life. We have been interacting with databases since
a time. Recall the process of looking for a word in a
dictionary or finding the telephone number of a friend
from the telephone directory. With the advancement
in ever changing technology, computerized databases
are being used to store, manipulate, and manage the
database. Today, we use databases in almost all spheres
of life. When we go to book railway tickets, to search
for a book in a library, to get the salary details, to get
the balance amount after withdrawal of money from the
ATM and so on, this list can run into several pages. Data
being stored in databases can be of varied types like
text, images, audio and video. This data is then stored
and/or processed so as to get meaningful information.
Data and Information
The raw facts constitutes data. The facts may be related
to any person, place, activity or things. It may be stored
in the form of text, graphics, audio or video. This data
must be processed by any computing machine in a
proper way to generate the useful and meaningful
information. The examples of data are marks scored by
the students, weights, prices, costs, numbers of items
sold, employee names, product names, addresses, tax
codes, registration, marks etc.
Information is the processed or organized form of
data. If data is not correct or accurate, the information
obtained by processing such data may not be correct.
For example, marks obtained by students and their roll
numbers is the data, while the report card/sheet is the
2023-24
Database ManageMent systeM Using LibreOffice Writer 145
information. Other forms of information are pay-slips,
schedules, worksheet, bar charts, invoices, account
returns etc. Similarly the temperature recorded is data
which can be processed to find out the maximum or
minimum temperature of day and night. Also this data
is generally organised in tabular form as shown in the
Table 8.1.
Table 8.1: Data Stored in Tabular Form
Day Day Temperature Night Temperature
Sunday 35 15
Monday 37 17
Tuesday 36 16
Wednesday 34 15
Thursday 35 17
Friday 35 16
Saturday 33 14
Databases and DBMS
A database is a collection of logically related data items
stored in an organised manner. The information being
stored in a database can be added, modified, deleted
or displayed according to the requirements of the user.
The software that is used to create, update and retrieve
data is known as database management system
(DBMS). It facilitates planning and maintenance of the
database for the user. Some of the common examples
of DBMS are MS Access, Open Office or LibreOffice
Base, Oracle, Ingress, MySQL. In this book, we will use
LibreOffice Base version 6.4 to learn various aspects
of DBMS.
We all know that it is easy to remember names of our
friends, but it is difficult to retain their phone numbers
in our memory. If details like names and phone numbers
are stored in a diary or mobile phone in an orderly
manner, then it becomes easy to retrieve the phone
number of a required person. Thus, the phone book
can be considered a simple database and to manage
this database electronically, we will require a database
management system or a DBMS.
notes
2023-24
Domestic Data entry operator – class X
146
Let us discuss some of the advantages of DBMS:
• Organised Storage – The data in the database is
stored in an organised manner, so that retrieval
of the required data is fast and accurate.
• Data Analysis – A database helps in analysis of
data based on certain criteria. It is easy to find
out maximum or minimum value, average or
mean using a database.
• Data Sharing – If the same data set is required
for different applications then the database can
be shared with other applications. Hence using
a database means making once and using it
repeatedly for multiple applications.
• Minimal Data Redundancy – In the event of
requiring the same data field in several tables the
data field might get repeated in number of tables.
This is called as data redundancy. This can be
reduced by using DBMS tools.
• Data Consistency – By minimising data
redundancy, chances of inconsistent data being
stored is reduced. For example, it should not
happen that the name of the student is changed in
one table and not in another. Such inconsistency
is reduced by using a DBMS.
Let us consider a situation where, for example,
Murugan looks after the data management of ABC
School. There are two tables in his database– Admission
table and Library table. ‘Ram Lal Kumar’ wants to
change his name to ‘Ram Kumar’ has recently shifted
his house. So, he hands over the application for the
same to Murugan. In the absence of a DBMS, Murugan
has to change the name of the student separately in the
admission table and also in the library table. But as we
can set a relation between the two tables using a DBMS,
any change in one table is automatically reflected in
all the related tables. There is no need to add another
record with the changed name. The same record will
be updated. Hence, this reduces the chances of data
redundancy and inconsistency.
Admission Table
Roll Number Student Name Class Date of Birth Date of Admission
913 Dipak Kumar 10 06/04/2004 25/06/2018
914 Ram Lal Kumar 10 01/03/2004 24/06/2018
2023-24
Database ManageMent systeM Using LibreOffice Writer 147
• Increases Efficiency – Since database tables are
properly organised, saving, reading and searching
data can be carried out efficiently.
• Increases Accuracy – Since data redundancy and
inconsistency can be minimised in a database,
the data is retrieved accurately from the database.
• Increases Validity – Properties of different data
fields can be assigned when a database is planned.
So whether or not valid data is being entered can
be checked at the data entry stage. This increases
the validity of the database. For instance, we may
set up a restriction while creating the table that
the amount of fees being entered should be more
than 1000.
• Security – Unauthorised access can be controlled
by assigning passwords to the users. The data
might be translated in such a manner that
unauthorised users are not able to read it. This
is known as encryption. Both these measures
increase the security of the database.
Data Models
A database can be designed in different ways depending
on the data being stored. This structure of database
is known as data model that describes the manner in
which data will be stored and retrieved.
A data model consists of components for describing
the data, relationships among them and the constraints
that hold data. There are different data models such
as hierarchical data model, network data model and
relational data model.
Hierarchical Data Model
In this model the data is organized into a tree like
structure. The data is stored in the form of records.
A record is a collection of fields and its data values.
Library Table
Student Name Name of the Book Date of Borrow Date of Return
Dipak Kumar IT 10/12/2018 25/12/2018
Ram Lal Kumar Science 11/11/2018 24/11/2018
Sham Lal Mathematics 12/11/2018 30/12/2018
2023-24
Domestic Data entry operator – class X
148
All these records are linked to each other at various
levels, thereby forming a hierarchy. For example, in
Fig. 8.1 the data of a company is stored using a
hierarchical data model.
Fig. 8.1: Hierarchical Data Model
Network Data Model
In this model, multiple records are linked to same
master file. It is also considered as an inverted tree
where master is present in the bottom of the tree and
the branches contain information linked to the master.
In Fig. 8.2, the data of the company is represented using
the network data model.
Likes Ltd.
Project Information
Project Number
Project Deadline
Employee Incharge
Personal Information
Emp Name
Salary
Designation
Likes Ltd.
Project
Deadline
Project
Number
Designation
Salary
Emp
Name
Personal
Information
Project
Information
Fig. 8.2: Network model
Relational Data Model
This data model is based on the principle of setting
relationships between two or more tables of the same
database. It is the most commonly used database model.
Let us study about this model in detail.
notes
2023-24
Database ManageMent systeM Using LibreOffice Writer 149
Relational Database Model
The Relational Database Model was proposed in 1970
by E. F. Codd. Relational database model is the most
common type of database model. The data elements are
stored in different tables made up of rows and columns.
The data in different tables are related through the use
of common fields. So relations are set between tables
based on common fields. That is why this model is
termed as relational database model.
Relational Database Terminology
Let us get familiar with some of the common terms used
in RDBMS.
• Entity – It is a real world object about which
information is to be stored in a database. For
example, if we want to store information about an
entityStudentinaschool,thenweneedtohavehis
admission number, roll number, name, father’s
name, date of birth, etc. These details associated
with the entity are called attributes. Each entity
is a collection of these attributes associated with
it. So roll number, name, admission number,
etc., are attributes associated with the entity
student. These attributes are represented in the
form of columns.
• Table – A table is a collection of logically related
records. It is organised as a set of columns, and
can have any number of rows. For example, the
Employee table can have columns, namely name,
designation, department and have records or
rows having data of 100 employees.
• Field or Columns or attributes – A field is the
smallest entity in the database. A collection of
fields make a record, a collection of records make
a table and a collection of tables make a database.
Fields are individual record characteristics and
are presented as columns within a table. Data
values are stored in a database as fields. A field
holds the data values of one type of data for
several persons. For example, in the Employee
table the field “Emp Name” will hold the names of
employees of an organisation.
• Data Values – Data values are the raw
data represented in numeric, character or
notes
2023-24
Domestic Data entry operator – class X
150
alphanumeric form. Examples of data values are
‘Abhinav Bindra’, ‘26’ ‘shooting’, “Chandigarh”,
“10-12-2018”, etc.
• Record or Row – The data values for all the fields
related to a person or object is called a record. It is
presented as rows within a table. A record holds
the data values of all the fields for a single person
or object in a table. For example, in the Employee
table with the field names as Name, Designation,
Department, the data values of all the fields for an
employee may be (‘Abhinav’, ‘Manager’, ‘Finance’)
and this forms one record.
• Primary Key – A primary key or simply a key is
a field that uniquely identifies a row in a table.
The key identifier can be the value of a single
column or of multiple columns. The primary key
is a unique identifier for the table. The column or
combinations of columns that form the primary
key have unique values. At any time, no two rows
in the table can neither have same values for the
primary key nor can data value for such field be
left blank. For example, in a student table, each
student has a unique roll no., which forms the
primary key. If, in a table we use more than one
fields to identify a record, it is known as a composite
key. For example, we may form a composite key
consisting of fields roll no. and name.
• Relational Database – A relational database is
a collection of related tables. For example, in
Fig. 8.3, the database contains two related tables.
Roll Number Student Name Class Date of Birth Date of Admission
913 Dipak Kumar 10 06/04/2004 25/06/2018
914 Ram Lal Kumar 10 01/03/2004 24/06/2018
Roll Number Book Number Date of Barrow Date of Admission
913 555 10/12/2018 25/12/2018
914 333 11/11/2018 24/11/2018
915 444 12/11/2018 30/12/2018
Relational Database
Fields
Tables
Records
Fig. 8.3: Relational database
2023-24
Database ManageMent systeM Using LibreOffice Writer 151
• Foreign Key – If a field or a combination of fields
of one table can be used to uniquely identify
records of another table, then that particular field
is known as the foreign key. This foreign key helps
to build a relation between two tables. Consider
the example given below.
In Student Registration Table, ‘Enrolment_Number’
is the primary key and in the Student Marks Table,
‘Roll_Number’ is the primary key, whereas ‘Enrollment_
Number’ is the foreign key. This foreign key can be used
to set a relation between two tables.
• Candidate Key – All the field values that are
eligible to be the primary key are the candidate
keys for that table. Such fields can neither be left
blank nor can have duplicate values. So in the
table Student Marks, Enrollment Number and
Roll Number both are candidate keys.
• Alternate Key – Out of the candidate keys, one
or two are made as primary keys. The others are
the alternate keys. Hence, if Roll Number is made
as the primary key, Admission Number is the
Alternate key.
Objects of an RDBMS
An object in a database is a structure or a feature that
is used to store, represent or retrieve data. In fact a
database is a collection of these objects that work on
multiple sets of data related to each other. Various
objects in a database are as discussed below:
• Table – As mentioned before, a table is the basic
unit of any DBMS. The data is first stored in tables
Student Registration Table
Enrolment Number Student Name Class Date of Birth Date of Admission
XX1234567890 Dipak Kumar 10 06/04/2004 25/06/2018
XX1234567891 Ram Kumar 10 01/03/2004 24/06/2018
Primary key: Enrollment Number
Student Marks Table
Roll Number Maths Science Vocational Enrolment Number
44983 87 75 80 XX1234567890
44990 74 45 75 XX1234567891
Primary key – Roll Number, Foreign key – Enrollment Number
2023-24
Domestic Data entry operator – class X
152
in row and column format. A column represents
a field or an attribute while a row represents
a record.
• Forms – A form is a feature of a database using
which we can enter data in a table in an easy
and user friendly manner. A form consists of text
boxes, labels, radio buttons, list boxes, check
boxes etc. that give a user friendly interface for
entering data. The data entered through the forms
is stored in tables.
• Queries – A query is used to retrieve the desired
information from the database. In simple terms,
it is a question asked from the database. For
example, if we want to view the names of only
those students who have scored more than
50 marks, then we post a query. The data set
matching the given criterion is retrieved from the
table and displayed on the screen.
• Reports – The output of a query may be displayed
in the form of reports. The usual result of the
query is in the form of rows and columns. But
if we want the report to be formal and in proper
layout, then we can use the Reports feature
of RDBMS.
Let’s Practice
Consider the following table and answer the questions that
follow.
Item
No.
Name Price Quantity
Discount
(in%)
A001 Pen 20 12 0
A003 Pencil 15 5 1
A010 Notebook 50 25 5
From the above table, identify the primary key. Justify
your choice.
How many fields and how many records does the table have?
summary
• The raw facts constitutes data.
• Information is the processed or organised form
of data.
• A database is a collection of logically related data
items stored in an organised manner.
notes
2023-24
Database ManageMent systeM Using LibreOffice Writer 153
• The software that is used to create, update and
retrieve data is known as database management
system (DBMS).
• Some of the common examples of DBMS are MS
Access, Open Office or LibreOffice Base, Oracle,
Ingress, MySQL.
• Data Model is the structure of database and it
describes the manner in which data will be stored
and retrieved.
• There are different data models, such as
hierarchical data model, network data model and
relational data model.
• In Hierarchical Data Model, the data is organised
into a tree like structure. The data is stored in the
form of linked records.
• In Network Data model, multiple records are
linked to same master file.
• The Relational data model is based on the
principle of setting relationships between two or
more tables of the same database.
• Entity is a real world object about which
information is to be stored in a database.
• The details associated with the entity are called
attributes.
• A table is a collection of logically related records.
It is organised as a set of columns, and can have
any number of rows.
• A field is the smallest entity in the database.
These are individual record characteristics and
are presented as columns within a table.
• Data values are the raw data represented in
numeric, character or alphanumeric form.
• The data values for all the fields related to a
person or object is called a record. It is presented
as rows within a table.
• A primary key is a field that uniquely identifies a
row in a table.
• This foreign key helps to build a relation between
two or more tables in a database.
• All the field values that are eligible to be the
primary key are the candidate keys for that table.
notes
2023-24
Domestic Data entry operator – class X
154
• Out of the candidate keys, one or two are made as
primary keys. The others are the alternate keys.
• An object in a database is a structure or a feature
that is used to store, represent or retrieve data.
The various objects in a database are tables,
forms, reports and queries.
• A form is a feature of a database using which
we can enter data in a table in an easy and user
friendly manner.
• A query is used to retrieve the desired information
from the database.
• The output of a query may be displayed in the
form of reports.
A. Multiple choice questions
1. Which of the following can be considered as an example
of a database?
(a) Dictionary
(b) Telephone directory
(c) Marks Register
(d) Newspaper
2. Which of the following is NOT a DBMS?
(a) MS Access
(b) Open Office Base
(c) MS Excel
(d) MySQL
3. DBMS stands for ______________________.
(a) Data and Books Management System
(b) Database Management System
(c) Duplicate Books Management System
(d) Data Management Multi System
4. Which of the following data models sets a relation between
the two or more tables?
(a) Relational Data Model
(b) Network Data Model
(c) Hierarchical Data Model
(d) Connection Data Model
5. The details associated with an entity are called
____________.
(a) Table
(b) Attributes
(c) Records
(d) Primary key
Check Your Progress
notes
2023-24
Database ManageMent systeM Using LibreOffice Writer 155
6. A __________ is represented as rows in a table.
(a) field
(b) attribute
(c) record
(d) candidate key
7. In which of the following forms can a data value be
represented?
(a) Numeric
(b) Character
(c) Alphanumeric
(d) All of the above
8. Which of the following uniquely identifies a row in a table?
(a) Primary key
(b) Alternate key
(c) Foreign key
(d) Candidate key
9. A ___________is a feature of a database using which we can
enter data in a table in an easy and user friendly manner.
(a) query
(b) report
(c) form
(d) field
10. A _____________ is a question asked from a database.
(a) query
(b) report
(c) form
(d) field
B. State whether the following statements are True or False
1. A database cannot be organised.
2. Data is the collection of raw facts.
3. A table can be created without a primary key.
4. Two tables can be related in a network data model.
5. MS Access is an example of a database.
C. Fill in the blanks
1. The raw facts constitutes _____________.
2. An _____________ is a real world object about which
information is to be stored in a database
3. The output of a query may be displayed in the form of
________.
4. The data values for all the fields related to a person or
object is called a _________.
5. All the field values that are eligible to be the primary key
are the ___________ keys for that table
notes
2023-24
Domestic Data entry operator – class X
156
D. Answer the following questions
1. Define the terms
(a) Database
(b) Data redundancy
(c) Report
2. Give one point of difference between
(a) Data and Information,
(b) Form and Query,
(c) Network and hierarchical data model
3. Give any four advantages of a DBMS.
4. Consider the table given below and answer the questions
that follow
Table: Library
Book_Id Book Name Author Name Price Publisher
F001 Pride and Prejudice Jane Austen 550 ABC
S004 Amazing Astronomy E. Shane 1050 ABC
C005 IT and Mankind MHA Diwaan 2500 HYM
(a) Name the fields in the given table.
(b) Which field should be made the primary key?
(c) Is there any alternate key in the table?
(d) How is primary key different from foreign key? Explain
with example.
notes
2023-24
IntroductIon
In the previous chapter we have learned about
databases and database management system (DBMS).
LibreOffice Base is a free and open source DBMS. It can
be downloaded from www.libreoffice.org and is available
for both Linux and Windows operating systems. Data
has to be stored in an organised manner using a DBMS.
Also, the data being stored can be a text, number, date
or in any other form. So, we need to understand different
types of data that can be stored in a table. The data
types of the fields have to be specified while creating
tables in a database. Thereafter valid data is entered
and stored in a table.
Data Types
The nature of data to be entered for various fields are
of different types. For example, names are stored in the
form of text, age in numbers, fees in decimal numbers,
date of birth in date format and so on. A data type refers
to the type of data that will be stored in that particular
field. The memory size of a field varies according to its
data type.
Some commonly used data types are described below.
Text Data Type – The text data is a combination of
letters, numbers or special characters. No arithmetic
calculations can be performed on text data. Examples of
text data type is PAN Card Number, Name, Marks, etc.
C
HAPTER
9
Starting with LibreOffice Base
2023-24
Domestic Data entry operator – class X
158
Table 9.1: Text Data Types
Name Data type Description
Memo LONGVARCHAR
Stores up to the maximum length indicated by user. It is
used to store some descriptive data having more than 255
characters. Memo data type allows to store text data up to
64,000 characters.
Text (fix) CHAR
Stores exactly the length specified by user. Character data
type is used to enter fixed number of characters. It can be
used for license number, passport number as they have
fixed number of characters.
Text VARCHAR
Stores upto the specified length. The number of bytes
allocated depends on the number of characters entered by
the user. For example, the address is defined as varchar (50),
and if the address entered by the user is of 20 characters
then only 20 bytes will be occupied in the database.
• Numeric Data Type – Numeric data types
consists of numbers. The numbers can be integer
or real numbers on which any type of arithmetic
calculations can be performed. For example, 10,
-34.8, 90.6789 , -86 are of numeric data type.
Table 9.2 lists different numeric data types along
with the number of bits/bytes it uses and its range.
Table 9.2: Numeric data types
Name Data type Signed Range
Tiny Integer TYNYINT No 0-255
Small Integer SMALLINT Yes -32768 to 32768
Integer INTEGER Yes -2.14×10⁹ to 2.14×10⁹
BigInt BIGINT Yes -2.3×10¹⁸ to 2.3×10¹⁸
Number NUMERIC Yes Unlimited
Decimal DECIMAL Yes Unlimited
Float FLOAT Yes
Real REAL Yes 5×10(-324) to 1.79×10(308)
Double DOUBLE Yes
• Currency Data Type – The currency data type
indicates the monetary values and can be stored
using currencies of various countries. For example
$100, £ 500 or Rs. 25.50.
• Date Data Type – This data type is used to indicate
dates and time. For example 12/25/2019, 08:45 AM.
The data and time can be stored in various formats.
Table 9.3 list various forms of date data type.
The table below lists various data types that can store
textual data.
2023-24
Database ManageMent systeM Using LibreOffice Writer 159
Table 9.3: Various forms of Date data type
Name Description
Date Stores the year, month and day as it is stored in the system.
Time Stores the time of the day as hour, minute and second.
Timestamp Stores date and time information at once.
• Boolean – In boolean data type there can be only
two values- True or False. This also can be given
in multiple formats like Yes/No, True/False,
On/Off.
• Binary – The Binary data type used to store
digitized images and sounds that comes as long
string of zeros and ones. It is possible to store
photos of the products or employees, or sound
snippets or voice messages in Base database.
Starting with LibreOffice Base
Annual Sports Day is being held in Ruhi’s school in
which various sports competitions will be conducted.
Ruhi has been asked to create a database consisting of
various sports activities and its players. She decides to
create a database named, ‘Sports Day’ consisting of a
table ‘Events’ that contains the following fields:
Event_Id - to store Event identification
no like E001, E002, etc.
Event Name - to store name of the event
Date - to store date on which the
event will be conducted
Winner 1 Name - name of the winner
Winner 1 Points - points earned y the winner
Let’s Practice
What should be the data type of the fields of the table Events
that has to be created by Ruhi?
Which field should be made the primary key?
Once the table with its fields has been decided, Ruhi
decides to start creating the database using LibreOffice
Base. Follow the following steps to create the database.
Step 1. Start the LibreOffice Base as per the standard
process of starting the application in Windows
or Linux. In Windows, click Start > LibreOffice
or double click on the LibreOffice icon on the
desktop or Select Base Database option from
the bottom left panel.
2023-24
Domestic Data entry operator – class X
160
In Ubuntu Linux, click on the Base icon
located on the left panel as shown in Fig.
9.1(a) or click on the Show Applications as
shown in Fig. 9.1(b) to search for its icon. Type
Base in the search box. The LibreOffice Base
application icon will be displayed as shown in
Fig. 9.1(c). Click on the Base icon to open the
Base application.
Step 2. A Database Wizard opens as shown in Fig. 9.2.
It allows you to create a new database or open
an existing database.
Fig. 9.2: LibreOffice Database Wizard
Tip: To open LibreOffice Base, you may search
the application Base on your computer and
click on the LibreOffice Base icon.
Step 3. Since we want to create a new database, so
click Create a new database radio button. If
any database that has already been created is
to be opened, then select Open an Existing
Database option to select the database to be
opened. Thereafter click Next button.
Step 4. The Next step gives the option to register our
database with LibreOffice.org. If we register the
database, then our database is made public
and hence can be accessed by other people.
As of now, we would not like to register, so we
click and select the radio button with option,
‘No, do not register the database’.
Fig. 9.1(a): Clicking on
the Base icon on the left
panel to open Base
Fig. 9.1(b): Clicking on Show
Applications to search for
installed packages
Fig. 9.1(c): Clicking on the
searched Base icon
to open Base
2023-24
Database ManageMent systeM Using LibreOffice Writer 161
Fig. 9.3: Decide How to Proceed After Saving the Database
Step 5. This step also asks whether
you want to open the
database for editing or
want to create a table using
the wizard. The option Open
the database for editing is
already selected.
Step 6. Click Finish button to
complete the database
creation process. The Save
As dialog box appears.
Step 7. Browse for the drive and folder where you want
to store your database.
Step 8. Type the name (Sports Day) in the File name
text box.
Step 9. Click Save button. The database in Base is
saved with an extension .odb. Also note that
if no name is given to the database, then it is
saved with a default name as NewDatabse.odb.
User Interface of Libre
Office Base
Once a database is created,
the screen as shown in
Fig. 9.5 appears. This is the
User Interface of Open Office
Base.
The various components
of the Base User Interface are
discussed below:
Fig. 9.4: Save As dialog box
Fig. 9.5: User Interface of LibreOffice Base
2023-24
Domestic Data entry operator – class X
162
• Title Bar – The title bar displays the name of a
database and an application in which it is made.
The windows buttons to maximize, minimize or
close the window are located on the right corner
of the title bar.
• Menu Bar – The menu bar appears below the
title bar. It consists of seven menu items – File,
Edit, View, Insert, Tools, Window and Help. All
these menu items contain commands that help to
perform various operations on the database.
• Standard Toolbar – It is located below the menu
bar. It is used to access frequently used tools.
• Status Bar – It is located at the bottom of the
interface window. It displays information about
the type of view of the object in the database.
Database Pane – The database pane is located on
the left side of the window. LibreOffice Base is the
collection of related data objects known as Tables,
Forms, Queries, Reports and application modules.
Depending on the object that is selected, the
respective Task Pane and Object Area displaying
the created object appears.
Opening a Database
To open an already created database, click
File > Open. The Open dialogue box appears
as shown in Fig. 9.6. Browse for the folder
where the database to be opened is stored.
Select the desired database and click on
Open button.
Tip: Use the keyboard shortcut key Ctrl+O
to open an already existing database.
Creating a Table
Once the database is created, we can start working
with objects of the database. First and foremost is the
creation of the table and then entering data in the table.
A table in LibreOffice Base can be created using a wizard
or using the Design view.
Creating a Table using a Wizard
A table can be created at the time of creating a
database or after creating database. To create a table
Fig. 9.6: Opening database from menu option
2023-24
Database ManageMent systeM Using LibreOffice Writer 163
at the time of creating a database in
database wizard, select the radio button
with option “Create tables using
the table wizard”, then click on the
Finish button.
Since our database is already open,
so we will select and click If the database
is opened we can select Use Wizard to
create a table option from the Tasks Pane.
The Table Wizard dialog box will open as
shown in Fig. 9.7. Follow the instructions
in the wizard to create the table with
desired fields.
The Table Wizard of Base consists of
ready-made tables. Click the Sample
tables list box and select select any
one table, say Customer from the drop
down list.
After selecting the Customer table,
various fields appears under Available
Fields. The required fields from Available
fields box can be shifted one by one to
Selected fields box using > button as
shown in Fig. 9.8. You can select all the
fields from Available fields to Selected
fields in one stroke by clicking on
>> button.
Click on Next button. It will move you
to step 2. Set types and formats as shown
in Fig. 9.9.
Then click on Next button. It will move
you to step 3. Set primary key. Let us set
the CustomerID field to primary key as
shown in Fig. 9.10.
Click on Next button, that will take
you to the complete the process of
creating table using wizard and display
the screen as shown in Fig. 9.11. This
screen will give you three choices. By
default the “Insert data immediately”
option selected.
Fig. 9.7: Table Wizard
Fig. 9.8: Fields shifted from Available fields to
Selected fields
Fig. 9.9: Setting types and formats
Fig. 9.10: Setting primary key
2023-24
Domestic Data entry operator – class X
164
Click on the Finish button to complete
the process of creating the table and
using wizard. The next screen will
allow to enter the data as per the
selected fields. The data sheet view
interface as as shown in Fig. 9.12 will
open that allow to enter the data in the
Customer table.
Creating Table in Design View
Creating the table using wizard
restricts us to use the same fields in the
per-designed tables. It may not solve
the purpose in real scenario, as we
may require to create a table with the
different fields for our purpose. Creating
tables using Design View gives us more
flexibility to do our work.
To create table using Design View, in
main Database window, click on the
option Create Table in Design View
in the Tasks Pane and Table Design
Window will be opened as shown in
Fig. 9.13.
The screen is broadly divided into
two sections or horizontal panes.
The upper half consists of a grid
structure with three columns Field
Name, Field Type and Description.
• Field Name – It is the name of the
field assigned at the time of creation of
table.
• Field Type – It allows to assign a data type to the
field.
• Description – It allows to describe the purpose
of the field. It is not the part of database table,
but it is meant for the user to understand the
purpose of the field. We may or may not enter
field description.
The Field Properties pane is located at the bottom half
of the window. It displays the field properties assigned
by the database designer. These properties can also be
Fig. 9.11: Creating table using wizard
Fig. 9.12: Datasheet view of Customer table
Fig .9.13: Creating Table in Design view
2023-24
Database ManageMent systeM Using LibreOffice Writer 165
changed as per the requirement and are
used to control and validate the data that
is to be entered.
Let us help Ruhi to create a table
named Events using in the option Create
Table in Design view in the Sports Day
database. Follow the follow the following
steps to do so.
Step 1. Type the first field name (EventId)
in the Field Name column. Press
Tab key. The cursor moves to the
second column i.e. Field Type.
Step 2. The Field Type column contains
a list box. As you click on the
down arrow, it appears and we
can select the desired data type
from the list box. Select the
datatype (Varchar).
Step 3. Observe that certain properties
appear in the Field Properties
Pane as the data type is selected.
Some of the properties are Entry
required, Length, Default value,
Format example. Set the desired
properties for the entered field.
Step 4. Press Tab key to move to the next
column. Add any description if
you want in the third column.
Step 5. Once the properties for the field
are set, press Tab key to move to
next row.
Fig. 9.14: Selecting data type for field
Fig. 9.15: Fields entered using Creating Table
in Design View
Step 6. Enter the next field by repeating steps 1,2 and
3. Repeat the process for adding all fields in the
table. Fig. 9.15 shows the Design View with all
the fields.
Setting the Primary Key
As you have learned that every table must have a primary
key that uniquely identifies a record in the table. To
make a particular field as the primary key, place the
mouse pointer before the field name, say Event Id in our
above example and right click. A pop up menu appears.
2023-24
Domestic Data entry operator – class X
166
Select the Primary Key option from pop
up menu as shown in Fig. 9.16. A key icon
appears before the field name indicating
that it is a primary key.
Saving a Table
After creating the table you need to save it
on the disk. To save the table click on the
save button or follow menu option File >
Save As. A Save As dialog box is displayed
as shown in Fig. 9.17. Enter the name of
table and click on OK button.
Fig. 9.17: Saving a table
Tip: Press Ctrl + S to save the table or click Save icon
from the toolbar. If the table is being saved after making
some changes, simply select File-> Save option.
Once the table design is complete, click on Close
button on the toolbar to return to the Database screen.
The name of the table will appear in the Tables Object
Area as shown in the Fig. 9.18.
Fig. 9.18: Event table added to the database
Entering Data in a Table
To enter data in the table, double click on the created
table Events icon in the Tables Object Area on the
database screen. Alternatively, we can open the table
by right clicking on the desired table and then selecting
More to know
To set a composite
key, i.e. a primary
key consisting of two
fields, keep the Ctrl
key pressed and then
click on multiple
fields to select them.
Thereafter right click
on selected fields and
choose Primary Key
option from the pop
up menu.
Fig. 9.16: Assigning primary key
2023-24
Database ManageMent systeM Using LibreOffice Writer 167
the Open option from the drop
down menu. The datasheet view
of the table will appear as shown
in Fig. 9.19. It displays the field
names in the top row. These fields
are displayed in the same order
as they were added while creating
the table.
If the number of fields are more
and cannot fit in the single row, you
can use the horizontal scroll bar to
view all the fields. The cursor will
be blinking in the second row. Start
typing the data value for each field.
Use Tab to move to next field. Once
all the data values are entered for
a single record, the cursor moves
to the next record. This process is
called as data entry. Enter 4-5 records in the Events
table as shown in Fig. 9.20.
Navigating through the Table
The black pointing arrow ( )just before the field name
is the record pointer. To navigate through various
records of the table, we use the navigation box present
at the bottom of the datasheet window as shown in
Fig. 9.21. It indicates a current record of the table at
any given time.
Fig. 9.21: Navigation box
The various components of Navigation Box are
as follows:
• Record Selector Box – T his is the text box where
the currently active record number is displayed.
We may enter the record number that we want to
see in this text box.
• Navigation Buttons – These are used to scroll
vertically in the table.
Fig. 9.19: Datasheet view of Events table
Fig. 9.20: Data entry in Event table
2023-24
Domestic Data entry operator – class X
168
Press to move to the first record
Press ► and ◄ to move to the next and previous records
respectively.
Press to move to the last record
Fig. 9.20 shows the datasheet view after entering
four records in the table. Note that the record pointer is
on fourth record, the Navigation Bar shows the “Record
4 of 4”.
Editing Data
To edit or modify the previously entered data simply
place the cursor on the field value that has to be edited
to edit and enter the new value.
The Edit icon ( ) appears before the record that is
being edited. This icon is displayed till the table is saved
after making the required changes. Press Esc key to
cancel the corrections made and restore the original
contents.
Deleting Records from Table
To delete any record from the table, open the table
and select the record to be deleted. The record can
be deleted by pressing the Del key from the keyboard
or selecting the Delete Record option from the Edit
menu. Alternatively a record can also be deleted by right
clicking on the record and clicking on the Delete Rows
option from the pop up menu.
Attempting to delete the record will display the
Confirmation box as shown in Fig. 9.22. Clicking on
Yes button will finally delete the record, while clicking
on the No button will not delete the record.
Sorting Data in the Table
Data in a table can be arranged in ascending or
descending order. This process of arranging the records
in particular order on any filed is called as sorting.
Follow the following steps to sort the table.
Step 1. Open the Event table in datasheet view and
select the field on which you want to sort.
Fig. 9.23 shows that the field “Points” is selected
to sort the records in ascending order.
Fig. 9.22: Delete record alert
Fig. 9.23: Sorting the Event table
on Points field
2023-24
Database ManageMent systeM Using LibreOffice Writer 169
Step 2. From the tool bar click Sort Ascending
icon if the table has to be sorted in ascending
order of selected field. Alternatively select Sort
Descending icon if the table has to be sorted
in descending order of selected field.
Step 3. The table will be sorted in the ascending order
of points as shown in Fig. 9.24.
Sometimes we may need to sort the table based on
more than one fields. In such case, click Sort icon
on the toolbar. The Sort Order dialog will be displayed
as shown in the Fig. 9.25.
Select the appropriate field name and field value
according to which the records are to be sorted. Choose
the order of sorting ascending or descending as required
from the Order drop down box. Multiple fields may be
selected in this dialog box. Click OK button once done.
Closing LibreOffice Base
To close the application window of LibreOffice Base,
click on the File > Close or click on the cross (x) button
of the LibreOffice Base window.
Let’s Practice
There are 5 houses in Ruhi’s school – Ganga, Yamuna, Satluj,
Beas and Narmada. Once student can participate from each
house in a particular event. Create a table Participants with
following fields.
1. Event_Id
2. Event Name
3. Ganga
4. Yamuna
5. Satluj
6. Beas
7. Narmada
Also add minimum five records in the table.
summary
• Baseisafreeandopensourcedatabasecomponent
of LibreOffice suit.
• It can be downloaded from www.libreoffice.org
• A data type refers to the type of data that will be
stored in that particular field.
Fig. 9.24: Event table after
sorting on Points field
Fig. 9.25: Sort Order dialog box
2023-24
Domestic Data entry operator – class X
170
• Various in Base can be categorized into Text ,
Numeric, Currency and Date.
• LibreOffice Base is the collection of related data
objects known as Tables, Forms, Queries, Reports
and application modules.
• Depending on the object that is selected, the
respective Task Pane and Object Area displaying
the created object appears on the User Interface
Window.
• A table in LibreOffice Base can be created using a
wizard or using the Design view.
Check Your Progress
A. Multiple choice questions
1. Which of the following is NOT a type of text data type?
(a) Memo
(b) Varchar
(c) Float
(d) Char
2. A currency data type can only store monetary data that is
in dollars.
(a) True
(b) False
(c) Neither a nor b
(d) Both a and b
3. Which of the following data can a date data type store?
(a) Date
(b) Time
(c) Both date and time
(d) Neither date nor time
4. Which of the following is true about LibreOffice Base?
(a) It is a spreadsheet software
(b) It is free and open source software
(c) It can store only character data
(d) It is a licensed software.
Practical Exercise
Ananthu wants to create a directory containing data – Serial
No, Name, Mobile Number, Email id, Date of birth of his friends.
Create a table using LibreOffice Base. Make Serial No as primary
key. Enter minimum 5 records in the table. Sort the table in
alphabetical order of name.
notes
2023-24
Database ManageMent systeM Using LibreOffice Writer 171
5. Which of the following methods can be used to create a
table in Base?
(a) Using a table wizard
(b) Design View
(c) Both a and b
(d) Neither a nor b
6. The related objects of a database can be seen in ____________
pane of the Base Database window.
(a) Database
(b) Task
(c) Title Bar
(d) Menu Bar
7. Which is the shortcut key to open an existing database?
(a) Ctrl+ D
(b) Ctrl+O
(c) Ctrl+E
(d) Ctrl+F
8. The Design view of Table Creation window in LibreOffice
Base is divided into ______ sections or panes.
(a) 2
(b) 3
(c) 4
(d) 5
9. While entering records in a table, we can move to the next
field by pressing the _________ key.
(a) Tab
(b) Ctrl
(c) Enter
(d) Shift
10. Which of the following is true about primary key of a table?
(a) Every table must have a primary key
(b) The data values in primary key field cannot be
duplicated.
(c) A primary key field cannot be left blank
(d) All of the above
B. State whether the following statements are True or False
1. The text data can contain special characters.
2. Memo data type can be used to store descriptive data.
3. A Boolean data type can have two or more than two values.
4. We cannot store audio data in LibreOffice Base.
5. The properties of a field change according to the data
type selected.
6. Field description may or may not be entered while
designing a table.
7. is pressed to move to the last record.
8. appears when the record is being edited.
notes
2023-24
Domestic Data entry operator – class X
172
9. A table once created in a database cannot be edited.
10. Sort dialog box can only help to sort data in
ascending order.
C. Fill in the blanks
1. A data type refers to the type of data that will be stored in
that particular field.
2. The _____________ data is a combination of letters, numbers
or special characters.
3. ________ data type can be used to store Aadhar number.
4. The __________ data type used to store digitized images.
5. The shortcut key to save a table is _______________.
6. ______________ on the Base Interface Window displays
information about the type of view of the object in the
database.
7. A __________ icon appears before the field name indicating
that it is a primary key.
8. The data can be entered in a table only in __________ view.
9. The black pointing arrow just before the field name in a
table is called ____________.
10. The process of arranging the records in particular order
on any filed is called _______________.
D. Answer the given questions
1. Differentiate between:
(a) Memo and Varchar data type
(b) Number and Decimal data type
(c) Design View and Datasheet view of a table
2. Name the menu items present on the Base User Interface,
3. Label the components – Title Bar, Database Pane, Tasks
Pane, Status Bar of the LibreOffice Base User Interface.
4. How can we define a primary key in a table?
5. Write steps to sort the table in descending order of
primary key.
6. What is the use of navigation box with respect to tables in
a database?
notes
2023-24
IntroductIon
We have learned to create tables in a database. Once the
tables are added in a database, you may require to edit
or delete the table. Also relations are set up between the
tables to control data redundancy and inconsistency.
This helps in proper maintenance of a database by
checking that neither the records are duplicated nor
there is variable data value for a particular field in two
or more tables. If you set up relations between tables,
then adding or updating a record in one table reflect the
changes in all the related tables.
Editing and Deleting Tables
Inthepreviouschapter,wehavecreatedaCustomertable
using a wizard in Sports Day database. It is possible to
copy, rename, edit and delete the table
of database by right clicking on the table
name and using the appropriate option
from the pop up menu.
Editing a table involves the task
such as adding a new field or removing
any field in a table or to alter any of the
field properties. To edit a table, open
the Database User Interface window.
Selecting the Table object in Database
Pane, the list of tables will be displayed
in the Table Area. Right click on the
table name and select Edit option from
the pop menu. In our example we have
selected the Customer table as shown in Fig. 10.1.
The design view window of the table will be displayed
as shown in Fig. 10.2. Do the required modifications
C
HAPTER
10
Working with Multiple Tables
Fig. 10.1: Selecting Edit option from pop up menu
2023-24
Domestic Data entry operator – class X
174
and save the table. Also note that the changes so
made will not affect the previous records entered in
the table.
Similarly to delete a table, right click on the table
to be deleted, say Customer table and select the
Delete option from the pop up menu as shown in
Fig. 10.3.
A confirmation box to confirm for deletion of the
table will be displayed as shown in Fig. 10.4. Click
on Yes button to finally delete the table.
To rename a table, right click on the table name
in the Table Area and select Rename.. option from
the pop up menu. A cursor will appear. Type the
new name and press the Enter key.
Relationships between Tables
While working with multiple tables, you need to
check the redundancy and inconsistency of data.
The record for a particular entity should neither be
repeated nor different data values should appear for
a single entity in the database.
This is done by setting relationship between the
tables of a database. The most important prerequisite
for setting a relationship is that there must be a
common field(s) between the two tables to create
a relationship.
Fig. 10.2: Table in design
view window
Fig. 10.3: Selecting Delete option
from pop up menu
Fig. 10.4: Confirm Deletion Alert
Let us consider an example of a database containing
following two tables–Student_Details and Student_Result
Table 10.1: Student_Details
Admission No Name Father’s Name Class DOB
1001 Mampi D K Bose 10 12/3/2004
1005 Harnoor Tej Singh 9 2/5/2005
1110 Sanjeeva B Reddy 10 13/11/2004
1002 Neeru Rajesh Jain 7 14/11/2006
1134 Urjit Mahesh Patel 10 7/7/2003
Table 10.2: Student_Result
Roll No Admission No Class Aggregate_Marks
1 1001 10 78
2 1110 10 93
3 1134 10 46
2023-24
Database ManageMent systeM Using LibreOffice Writer 175
In Table 10.1 (Student_Details), Admission No is the
primary key. In table 2 (Student_ Result), Roll No is the
primary key and Admission No is the foreign key. So
each record in Table 10.2 has a value of Admission No
that corresponds to a record in Table 10.1 with same
value of Admission No. It is important to note that the
data types of the common field in both the tables must
be same. If they are not same then LibreOffice Base will
display an error message and will not allow to set the
relationship between the two tables.
Once the relationship between the two tables has
been set, the integrity of data will be managed by the
DBMS. That means once a student’s record has been
entered in the Student_Details table, only then that
particular Admission No can be entered in the Student_
Result table. The record pertaining to Admission No in
Student_Details table is considered as the master record
while the corresponding record in the related table
(Student_Result) is the transaction record. Therefore
Student_Details is called the master table and Student_
Result is called the transaction table.
Types of Relationships
The type of relationship between any two tables in a
database is based on the number of records that are
present in the transaction table corresponding to the
master table. Primarily three types of relationships can
be set up between two tables in a relational database
These are:
(i) One-to-One
(ii) One-to-many
(iii) Many-to-Many
One-to-One relationship
In this type of relationship, one specific record of a
master table has one and only one corresponding
record in the transaction table. For example, the record
for Admission_No in the master table (Student_Detail)
will have only one corresponding record of same value
of Admission No in the transaction table of Student_
Result. This is because no two students will be given
same admission number. Similarly one person can have
notes
2023-24
Domestic Data entry operator – class X
176
only one ticket to get entry into a stadium to view the
match. So relationship between Student and Admission
number and a person and his ticket number will be
one-to-one relationship (Fig. 10.5).
Fig. 10.5: One–to-one relationship
One-to-Many relationship
This is one of the most common types of relationship
between the tables in a database. As the name says, in
this type of relationship, one specific record of the master
table has more than one corresponding records in the
related transaction table. For example, one teacher can
teach multiple students or multiple classes, or one person
can sell multiple products. So we can say that there is a
one to may relationship between a teacher and class or
teacher and student or seller and products (Fig. 10.6).
Fig 10.6: One–to–Many relationship
notes
2023-24
Database ManageMent systeM Using LibreOffice Writer 177
Many-to-Many relationship
In this type of relationship, there will be multiple
records in the master table that correspond to multiple
records in the transaction table as well. Generally this
type of relationship is set when certain records have
to be saved more than once in both the related tables.
For example, a teacher in a school may hold multiple
responsibilities such as class teacher, an activity in-
charge or examination in-charge. For each responsibility
the teacher might be attached with multiple students.
So this type of relationship will be many to many
relationship. Similarly a shopkeeper may sell multiple
products to multiple customers. So many-to-many
relationship exists between a product and a customer.
Fig. 10.8 shows the corresponding records in master
table and transaction table are in same color.
notes
Table: Department_Incharges
Department Teacher_Id
Examination T002
Discipline T765
Co-Curricular T056
Time Table T002
Website Update T765
Table: Activity_Duty
Activity Department Teacher_Id
UT1 Examination T002
Term1 Examination T002
HomeWork Upload Website Update T765
Timetable Upload Website Update T765
Inter-house Dance Co-Curricular T056
Inter-class Debate Co-Curricular T056
Discipline duties Discipline T765
Fig. 10.8: Many–to-many relationship
Advantages of Relating Tables in a Database
There are various advantages of relating tables in a
database. Few of them are as given below.
• A relationship can help prevent data redundancy.
• It helps prevent missing data by keeping
deleted data from getting out of synch. This is
2023-24
Domestic Data entry operator – class X
178
called referential integrity. We will study in detail
about referential integrity later in the chapter.
• Creating relationships between tables restricts
the user from entering invalid data in the
referenced fields.
• Any updation in the master table is automatically
reflected in the transaction tables.
Let’s Practice
Name the type of relationship for the following:
• Citizen and his Driving License
• Customer and Product
• Student and Course
• Team and Match
• Player and Country
• Employee and Project
Creating Relationships
between Tables
Let us get back to Sports Day database
created in the previous chapter. Let us
add another field, CategoryID to the table
Events using Edit option as shown in
Fig. 10.9.
Enter 10 records in the Events table of
various categories as shown in Fig. 10.10.
Create another table with the name
EventCategory with the fields – CategoryID,
CategoryName, TeacherIncharge and
enter the records as shown in Fig. 10.11.
Hence, there are two tables in the
database – Events and EventCategory
with a common field as CategoryID.
Fig. 10.9: Adding field CategoryID in Event table
Fig. 10.10: Records entered in Event table with
added field CategoryID Fig. 10.11: Records entered in EventCategory table
2023-24
Database ManageMent systeM Using LibreOffice Writer 179
In Event table, EventID is the primary
key and CategoryID is the foreign key.
In EventCategory table, CategoryID is
the primary key. To set up relationship
between these tables follow the
following steps.
Step 1. From main menu of LibreOffice
Base, click on Tools >
Relationships…
Step 2. The Relationship Design screen
will appear as shown in Fig.
10.12. In the middle of the screen
there is Add Tables dialog box.
Both the tables are listed in the
dialog box.
Step 3. In the Add Tables dialog box,
click Events table and then
click Add button. Similarly
add EventCategory table to the
Relationship Area.
Step 4. Click Close button to close the Add
Tables dialog box. Observe that the
tables Events and EventCategory
table added to the Relationship
Area along with all its field list as
shown in Fig. 10.13.
Step 5. As discussed before, CategoryID
is the common field in the two
tables. Hence it will be used to
set a relationship between the
two tables. To create a relation
Fig. 10.12: Add Tables dialog box in Relationship
Design Screen
Fig. 10.13: Events and EventCategory Tables
added in Relationship Design window
Fig. 10.14: Relationship between two tables
between the two tables, we just have
to drag the common field CategoryID
from the Events table and drop it in
EventCategory table. A line connecting
both the tables with the common field
(CategoryID) appears on the screen as
shown in Fig. 10.14.
The line is labeled as ‘l’ on the primary key
side and as ‘n’ on the foreign key side. Hence
the CatgeoryID from EventCategory table as
primary key will have unique values and is
called referenced field. On the other hand,
2023-24
Domestic Data entry operator – class X
180
in the Events table, the values of CategoryID
might be repeated. Here it is known as referencing
field. Fig. 10.15 shows that the CategoryID of the
Events table is referenced field and CategoryID of
the EventCategory table is referencing field. This
type of relationship where one value of a table is
associated with multiple values in another table
is a One-to-many relationship.
In this relationship EventsCategory is the
mastertable.Sothemasterrecordwithaparticular
CategoryID has to be added in EventsCategory
table first. Only then the corresponding record
can be added in the Events table. Also, only one
record with a specific CategoryID will exist in the
master table but multiple values of CategoryID might
exist in the transaction table, thereby forming a one-to-
many relationship.
Referential Integrity
According to the principle of referential integrity, no
unmatched foreign key values should exist in the
database. That means if a record, say Admission No
as 1001 is not present or deleted in the master table
(Student_Details) of Student database, then there
should be no record with Admission no as 1001 in the
transaction table (Student_Result) as well. Similarly,
in Ruhi’s Sports Day database, if a particular category
of sports, say C003 is deleted from the master table
EventCategory, then there should be no record with
Category as C003 in the transaction table. Likewise, if
any student leaves the school and his record is deleted
from Student_Details table, then there is no question
of his appearing for exams and having a result.
Hence corresponding record in the transaction table
(Student_Result) should either have NULL value or
should be deleted.
In Ruhi’s Sports Day database as well, the CategoryID
that exists in EventCategory table can only be entered in
Events table. As mentioned before, once the relationship
between the two tables has been set, the integrity of
data will be managed by the DBMS. LibreOffice Base
Fig 10.15: CategoryID of Events table
is referenced field and CategoryID of
EventCategory table is referencing field
2023-24
Database ManageMent systeM Using LibreOffice Writer 181
will allow only that corresponding record to be entered
in the transaction table which already exists in the
master table.
LibreOffice Base gives us following four options
to choose from to maintain referential integrity in
such cases.
• No action – This is the default option. This option
states that a user should not be allowed to update
or delete any record in the master table if any
related record exists in the transaction table.
• Update cascade – This option allows the user to
delete or update the referenced field but along with
it all the related records in any of the transaction
tables will also be deleted or updated.
• Set NULL – This option assigns NULL value to all
the related fields if the master record is deleted or
updated.
• Set default – This option assigns any fixed default
value to all the related fields if the
master record is deleted or updated.
To set the relationship properties
double click on the relation line joining the
two tables, Events and EventCategory. A
Relations dialog box will open as shown in
Fig. 10.16.
By default the radio button with No
action option will be selected. Choose any
of the desired option and click OK to set the
referential integrity between the two tables.
Let’s Practice
Form a table in Sports Day database in which one-to-one
relationship can be established. Write steps to create such a
relation in LibreOffice Base.
summary
• Relations are set up between the tables to control
data redundancy and inconsistency.
• The most important prerequisite for setting a
relationship between the two tables is that there
must be a common field(s) between the two tables.
Fig. 10.16: Relations dialog box
2023-24
Domestic Data entry operator – class X
182
• Three types of relationships can be set up between
two tables in a relational database. These are
One-to-One, One-to-Many and Many-to-Many.
• In One-to-One type of relationship, one specific
record of a master table has one and only one
corresponding record in the transaction table.
• In One-to-Many type of relationship, one
specific record of the master table has more
than one corresponding records in the related
transaction table.
• In Many-to-Many type of relationship, there
are multiple records in the master table
that correspond to multiple records in the
transaction table.
• According to the principle of referential integrity,
no unmatched foreign key values should exist in
the database.
Prakasan lives in Happy Home Society. He wants to create a
database so as to store and manage the maintenance dues
received from flat owners of the society. Create the following
tables for his database.
Table: Residents Details Table: Maintenance Dues
Flat no Receipt_Id
Owner Name Flat No
Contact No Date
Flat Category Amount
Relate the two tables and thereafter enter minimum five records
in both the tables. Which type of relationship did you create? In
which table did you enter the data first?
Uzair manages a boys hostel in an engineering college. He
wants to manage the records of the people staying in his hostel
by creating a database with the following tables and also set a
relationship between the tables.
Table: Student_Details
Student_Id
Name
DOB
Course
Father’s Name
Contact No_student
Practical Exercises
notes
2023-24
Database ManageMent systeM Using LibreOffice Writer 183
Contact No_ guardian
Room No
Table: Room Details
Room No
Floor (data value can be first, second or third)
Category (data value can be AC / Non- AC)
Student Id
DOO (Date of occupancy)
Monthly Rent
Check Your Progress
A. Multiple choice questions
1. Which of the following actions can be performed once the
tables are created in a database?
(a) Add a field in a table
(b) Rename a table
(c) Delete a table
(d) All of the above
2. Which of the following is checked by a DBMS?
(a) Redundancy
(b) Inconsistency
(c) Both (a) and (b)
(d) Neither (a) nor (b)
3. Which of the following is required to set a relationship
between the two tables?
(a) Both the tables must be in different databases
(b) Both the tables must have a common field
(c) Both the tables must have the same name
(d) Both tables must be stored in documents folder only.
4. If a record is added in a master table, which of the following
is NOT true for transaction table
(a) The record in the master table is called the master
record
(b) The corresponding record in transaction table can only
be entered once.
(c) The record in the transaction table is called the
transaction record.
(d) It is possible to add a record in the master table
5. Which type of relationship exists between a student and
the subjects studied by him/her?
(a) One-to-one
(b) One-to-many
(c) Many-to-many
(d) All of the above
notes
2023-24
Domestic Data entry operator – class X
184
6. Consider the following tables. Which type of relationship
can be established between the two tables?
(a) One-to-one
(b) One-to-many
(c) Many-to-many
(d) None of the above
Table 1: Item Table 2: Item_Category
Item_Code Category_Code
Item_Name Cat_Name
Price Item_Code
Qty Cat_Disc
Category_Code
7. Which of the following menus contains the Relationship
option?
(a) Edit
(b) File
(c) Tools
(d) View
8. The list of tables to be added is displayed in the __________
dialog box in the Relationship Screen.
(a) Add Tables
(b) Add Databases
(c) Both (a) and (b)
(a) Neither (a) nor (b)
9. In the relationship design screen, the relationship between
the two tables is done using __________ operation.
(a) Click
(b) Double Click
(c) Drag and Drop
(d) Right click
10. Which of the following is NOT an option that can be used
to maintain referential integrity in a database?
(a) No Action
(b) Set NULL
(c) Set Default
(d) Set Value
B. State whether the following statements are True or False
1. Redundancy is preferred in a database.
2. In a table, a record for a particular entity should not
be repeated.
3. A single field should always have only one data value.
4. If a table is edited, the records already entered in it
are deleted.
5. The record in master table should be entered before the
corresponding record is entered in the transaction table.
notes
2023-24
Database ManageMent systeM Using LibreOffice Writer 185
6. In one-to-many relationship, one specific record of the
master table has more than one corresponding records in
the related transaction table.
7. The Relationship option is present in the Widows menu.
8. In a database, the referential integrity is maintained by
the user.
9. A relationship is always set between the tables based on a
common field.
10. If the master record is deleted, the transaction records will
always be deleted.
C. Fill in the blanks
1. A table to be edited is displayed in ___________ view.
2. The most important prerequisite for setting a relationship
between the two tables is that there must be a
________________between them.
3. In ________________relationship, one specific record of a
master table has one and only one corresponding record
in the transaction table.
4. ___________________is one of the most common types of
relationship between the tables in a database.
5. A record being entered in a _________ table must always
exist in a ________ table.
6. The principle of _______________helps prevent missing data
by keeping deleted data from getting out of synch.
7. Creating ____________ between tables restricts the user
from entering invalid data in the referenced fields.
8. Data integrity is maintained by ______________.
9. A relationship between customers and products is an
example of __________________ relationship.
10. The __________________ window is used to set relationships
between the tables.
D. Answer the following questions
1. Give any two advantages of relating a table in a database.
2. How is redundancy or inconsistency controlled in a
database? Explain with an example.
3. Define referential integrity. Who maintains referential
integrity in a database?
4. Differentiate between one to one relationship and one to
many relationship. Give suitable examples to explain your
answer.
5. Explain many to many relationship with an example.
notes
2023-24
IntroductIon
A database is used to store data in an organized manner
so as to retrieve it easily and accurately from database.
To search for the desired record and to retrieve the
desired data, we have to give its specifications to DBMS.
Such specifications are given to the database in the
form of queries. For example, we may have to specify
the fields that we want to display or any particular data
value based on which the records are to be filtered from
the table(s). Therefore, we can say that a query is a sort
of question asked from a database. Depending upon
specifications given in the query, the specific records
are searched from the table(s) in the database and then
displayed in the desired manner. Such information
may be difficult to find by just looking at a single table
or multiple tables. In fact as the number of records
increase, finding the desired information becomes
more and more difficult. By using queries, we are able
to retrieve data without going individually through
each record in the table(s) and also display them in
desired format.
QuerIes
A query is one of the most important feature of any
DBMS. Using a query, we can retrieve and display data
from one or more tables in a database. This is done by
giving specific search criteria to the DBMS so that we
are able to view the exact information that we want.
LibreOffice Base allows us to create a query and
even save it as an object in a database. This helps us
to run the query multiple times as and when required.
C
HAPTER
11
Queries in Base
2023-24
Database ManageMent systeM Using LibreOffice Writer 187
Using a query, we can specify the fields that we want
to display and also the criterion based on which the
records to be filtered. The information may be retrieved
from a single table or from multiple tables. Also the
result of the query is displayed in tabular form with
field names in columns and the records in rows.
For example, in a Student database, if we want
to display the names and marks of the students in a
particular class from the Result table, who have scored
less than 320 aggregate marks, then we need to give the
following information to the database:
Name of the table – Result
Fields to be specified – Name, Marks
Criterion – Aggregate marks should be less than 320
In this chapter you will learn to create a query, save
it and then run it as and when required.
Creating a Query
A query can be created in three ways. In this
chapter you will learn the first two methods to
create a query.
(i) Using a Wizard
(ii) In Design View
(iii) In SQL view
Fig. 11.1: Records in Events table
Fig. 11.2: Records in Event Category table
Creating a Query Using a Wizard
Let us recall the Sports Day database created in
the previous chapters with two tables – Events
and EventCategory.
Let us create a query that will display the
Event Name and Winner for each event with
CategoryID as C001. The desired data has to
be retrieved from the Events table. To create a
query using a wizard, follow the following steps.
Step 1. Open the Sports Day database. In
the Database Design window, click
on Queries button present in the
Database Pane on the left as shown in
Fig. 11.3.
Step 2. In the Tasks Area, click on Use Wizard
to Create Query… option. The Query Fig. 11.3: Queries icon in Database Pane
2023-24
Domestic Data entry operator – class X
188
Wizard will start as shown in Fig. 11.4.
It contains the Steps Pane on the
left and the Query Details Area on
the right.
Step 3. The first step of the wizard is to select
fields from the respective tables. For
our query, to display Event Name and
Winner and the criterion to filter the
records based on CategoryID. All these
fields are present in Events table.
Therefore select Events table from the
Tables list box. The corresponding
fields are displayed in the Available
Fields list box as shown in
Fig. 11.5.
Step 4. Select Event Name field from the
list box and click the right arrow (>)
button. The field name will appear
in the Fields in the Query list
box. Repeat the process for Winner
and CategoryID fields as shown in
Fig. 11.5. Observe that these three
fields are moved to Fields in the Query
list box.
Note that once the fields are added
they can be moved up and down in
order by clicking ∧ and ∨ buttons
present on the extreme right of the
wizard. Clicking on » button moves all
fields to Fields in the Query area and
« button moves all the fields back to
Available fields area.
Step 5. Clicking on the Next button will
display the screen to select the sorting
order as shown in Fig. 11.7. It will set
the sorting order. The result of the
query can be displayed in ascending
or descending order of any particular
field of the table. Since we do not want
to set in a particular order, so we click
on Next button.
Step 6. The next step is to set the search
conditions or the criteria on the basis
Fig. 11.4: First step of Query wizard
Fig. 11.5: Fields of selected Events table
displayed in the Available Fields list box
Fig. 11.6: Fields moved from Available fields
to Fields in the Query list box
Fig. 11.7: Select sorting order
2023-24
Database ManageMent systeM Using LibreOffice Writer 189
of which records will be filtered from the table.
This is the step where actually the query is set
up or the criterion is given to the database. As
per our query, the criterion is to display the
records of events with CategoryID as C001. By
default, the radio button with option Match all
of the following is selected.
Step 7. Select Events.CategoryID field from
Fields drop down list, is equal to
from Condition drop down list and
type the value as C001 as shown
in Fig. 11.8, and click on Click
Next button.
Three search conditions can be given
at the most in the wizard. Click and
select the radio button with option
‘Match any of the following’ if any
one of the given condition are to be
matched for filtering the records.
Step 8. Steps 4, 5 and 6 given in the Steps Pane deal
with tasks like summarizing and performing
numerical calculations. Such steps are not
required if there is no numeric field involved
in the query. So you can skip these steps and
move directly to “Step 7. Aliases” of
the wizard.
Step 9. The next step to give alias name i.e. the
column header name will be displayed
when we run the query. By default
the field names will be displayed as
column headers. Many times field
names are not user friendly, so an
alias name which is more readable, is
chosen to be displayed in the query
output. For example, the name of the
field in the Events table is Winner.
To display the name of winner as the
column header, type ‘Winner Name’
and click on Next button as shown in
Fig. 11.9.
Step 10. The last step of the Query wizard
displays the entire overview of the
query as shown in Fig. 11.10. All the
steps performed till now are shown in
a summarised manner.
Fig. 11.8: Selecting the Search condition and
specifying value
Fig. 11.9: Assigning Alias Names
Fig. 11.10: Overview of Query
2023-24
Domestic Data entry operator – class X
190
It includes the following:
• Name of the Query – By default, the name of the
query is Query_Events by default. If desired, type
the new name in the text box.
• The action to be performed after the wizard
finishes – By default Display Query option will
be selected. Click and select the Modify Query
radio button if the query has to be edited in the
Design view.
• Complete detail of the query – This
section contains a summary about the
query that has been created.
Step 11. Click on Finish button. The records
with CategoryID as C001 will be
displayed on the screen as shown
in Fig. 11.11. Observe the column
headings. Are all of them same as
the field names in the Events table?
Once the query is created, it can be edited
in Design view. We will study about Design
View in the coming section.
Creating a Query in Design View
Another way to create a query is using the Design view.
This is a more flexible method to create a query from
either single or a multiple tables of a database. Let us
create a query to display records of Athletics category.
For this query, records have to be filtered from both
Events and EventCategory tables. Open Sports Day
database and follow the following steps to create a query
in Design View:
Step 1. Click Queries icon on the Objects
Pane in the Database Window.
Step 2. Click Create Query in Design View…
icon in the Tasks Pane. The Query
Design Window appears. In the
middle of the window the Add Table
or Query dialog box is displayed as
shown in Fig. 11.12.
Step 3. Click on the Event table to be used
in the query and then click on Add
button. Alternatively double click on
Fig. 11.12: Create Query in Design View
Fig. 11.11: Records retrieved from Query
with CategoryID C001
2023-24
Database ManageMent systeM Using LibreOffice Writer 191
the Events table. The table will be added to the
Tables Pane present at the top of the Query
Design window.
Step 4. Similarly add EventCategory table to
Tables Pane of the Query Design window.
Step 5. Click Close button in the Add Table or
Query dialog box to close it. The tables
Events and EventCategory added will be
displayed in the Table pane as shown in
Fig. 11.13.
Step 6. Next step is to select the fields. For our
query we want to display Event Name
and Winner from the Events table and
Category Name from the EventCategory
table. So in the list box of Events
table, double click on EventName and
Winner field. Similarly add the field
CategoryName form EventCategory
table. The field name along with the table
name is displayed in the Design grid
present in the lower half of the Query
Design window as shown in Fig. 11.14.
Observe that the Visible Check Box is by
default selected. This means that all these
three fields will be visible when you run the
query. If you do not want the data values for the
particular field to be displayed, click to deselect
the respective check box.
Step 7. In the grid, there is a row titled Alias.
As mentioned before, it can be used to display
meaningful names in the output. For example,
instead of Winner, we would just like to display
Winner Name. For this, type Winner Name in
the Alias text box under Winner column as
shown in Fig. 11.14.
Step 8. By default, the data that is displayed as a
result of the query is not sorted. To sort the
records in either ascending or descending order
of a particular field, the Sort row is given in
the grid. For example, to display the records
in alphabetical order of Event Name, select
Ascending from the drop down list box visible
in the Sort row under Event Name column.
Fig. 11.13: Table added in the Tables Pane
Fig. 11.14: Adding fields to query
2023-24
Domestic Data entry operator – class X
192
Step 9. Once the query is designed, click Run
Query ( ) button on the toolbar or press
F5 key. The query result will be displayed
in the Tables Pane area as shown in
Fig. 11.15.
Step 10.Click on Save button to save the query.
The Save As dialog box will be displayed as
shown in Fig. 11.16.
Step 11.By default, the Query Name as Query1
will be displayed. Type a different name
if required. Click on OK button to save
the query.
The name of the query will be seen in the Objects
area in the Database window. To run the query
again and see the result s of the query, double click
on the query name. The results of the query will be
displayed in a separate window.
To close the Query window, click on on close
button on the top right corner of the window.
Editing a Query
To edit any query, click on the Query icon of the
query that has to be edited. The list of queries
that have been created will be displayed in the
Objects Area. Right click on the Query Name in the
Objects Area of the Database window, as shown in
Fig. 11.17.
Select Edit option from the drop down menu.
The Query Design window will be displayed. Let us
apply a criteria to display records of only Athletics
Fig. 11.15: Query Result in
Tables Pane
Fig. 11.16: Saving the query
Fig. 11.17: Selecting Edit option
to edit query category. For this type Athletics in the Criterion
row under the Category Name column. Now, the
query design is complete if we run the query, the record
of only Athletics category will be displayed as shown in
Fig. 11.18.
We can use the Criterion row to apply multiple
conditions as well. Also note that we can apply all
relational operators like <, >, <=, >=, != and = for all
conditions that can be given in Criterion row. For
example, if you want to see only those records where
points scored are more than 10, then add Points field
to the grid and then set the Criterion for it as >10 as
2023-24
Database ManageMent systeM Using LibreOffice Writer 193
shown in Fig. 11.18. Now save and run the query.
Observe the output as shown in Fig. 11.18.
Working with Numerical Data
Till now, we have been displaying data from tables
in the query. But that is not all, we can even use
certain mathematical functions to find the count,
sum, minimum, maximum or average of data values.
Let us design a query to display the average points
for each category of events. In the Database Window,
click Create Query in Design View… button to
open the Query Design Window. Add Events and
EventsCategory tables. Thereafter follow the following
steps to display the average points for each category.
Step 1. Add Category Name field from EventCategory
table and Points field from Events table.
Step 2. Under the Category Name field, in the
Function row, click the down arrow. A drop
down list will be displayed as shown in
Fig. 11.19.
Step 3. Select Group option from the drop down
list. This option forms the groups for
each of the data values in the column of
Category Name.
Step 4. Similarly, under the Points column, select
the Average function from the drop down list.
Step 5. Press F5 to run the query. The query result
depicting average points in all the categories
will be displayed as shown in the Fig. 11.20.
Fig. 11.20: Query result in Design view after applying Group function
to Category Name and Average function to Points
Fig. 11.18: Query result in Design
view after applying criteria to display
records of Athletics category
Fig. 11.19: Function drop down list
2023-24
Domestic Data entry operator – class X
194
Step 6. Further, we can also put conditions on groups
using the Criterion row. Say, for example to
display the average of only Athletics category,
type Athletics in the Criterion row under the
Category Name column. Now, if we run the
query the average of only Athletics category will
be displayed in the query result.
summary
• A query is used to retrieve and display data from
one or more tables in a database.
• A specific search criteria is given to the DBMS to
view the desired information.
• The result of the query is displayed in tabular
form with field names in columns and the records
in rows.
• A query can be created in three ways.
■ Using a Wizard
■ In Design View
■ In SQL view
Prakasan lives in Happy Home Society. He has created the
following tables in his database so as to store and manage the
maintenance dues received from flat owners of the society.
Table: Residents Details Table: Maintenance Dues
Flat no Receipt_Id
Owner Name Flat No
Contact No Date
Flat Category Amount
Create a query to display the following information
Flat No Owner Receipt Number Date Amount
(Please note the change in column headings)
Uzair manages a boys hostel in an engineering college. To
manage the records of the people saying in his hostel, he created
a database with the following related tables.
Practical Exercises
notes
2023-24
Database ManageMent systeM Using LibreOffice Writer 195
Table: Student_Details
Student_Id
Name
DOB
Course
Father’s Name
Contact No_student
Contact No_ guardian
Room No
Table: Room Details
Room No
Floor (data value can be first, second or third)
Category (data value can be AC / Non- AC)
Student Id
DOO (Date of occupancy)
Monthly Rent
Create a query to display the following tabular format
Room No Student Name Category Monthly Rent
Create a query that displays total monthly rent collected for
each category.
Project Work
Use the internet to study the process of working of hostels.
See, what all tables/fields/queries should be further added to
the existing database so that it is able to fully automate the
working of the boys hostel explained in the above exercise.
Thereafter make changes in the database created by you in
LibreOffice Base.
Check Your Progress
A. Multiple choice questions
1. Which of the following is refer to asking questions from
the database?
(a) Report
(b) Table
(c) Query
(d) Database
2. Which of the following are the ways to design a query?
(a) Wizard
(b) Design View
(c) SQL
(d) All of the above
3. Which is a flexible way to create a query?
(a) Wizard
(b) Design View
(c) Both (a) and (b)
(d) Neither (a) nor (b)
notes
2023-24
Domestic Data entry operator – class X
196
4. Into how many parts is the query design window divided?
(a) One
(b) Two
(c) Three
(d) Four
5. Which of the following is NOT true about queries?
(a) It can be created using multiple tables
(b) Multiple queries can be created in a database
(c) A query can run multiple times
(d) A query once created cannot be edited
6. Which of the following is the shortcut key to run the query?
(a) F3
(b) F4
(c) F5
(d) F6
7. Which of the following functions can be performed on
numerical data while designing a query?
(a) Sum
(b) Minimum
(c) Maximum
(d) All of the above
8. In a Query Design wizard, which of the following buttons
is clicked to move a field from ‘Available fields’ list box to
‘Fields in the query‘ list box?
(a) >
(b) < 9
(c) ∨
(d) ∧
9. Which of the following relational operators can be applied
to set the criterion while designing a query in LibreOffice
Base?
(a) >
(b) =
(c) !=
(d) Add Form
10. Which of the following dialog box is present when the
Query Design window is opened for the first time to design
a query?
(a) Add Table
(b) Add Query
(c) Add Table or Query
(d) None of the above
11. Which of the following step is not performed if there is no
numerical data to be worked upon in a query?
(a) Selection of fields
(b) Giving Aliases
(c) Summarizing
(d) Selection of tables
notes
2023-24
Database ManageMent systeM Using LibreOffice Writer 197
B. State whether the following statements are True or False
1. You can run a query only once
2. A query cannot be created from multiple tables
3. The shortcut key to run a query is F5.
4. LibreOffice Base provides us with two ways to create a
query.
5. A query with numerical data cannot be saved.
6. By default the query result is not sorted.
7. A query can be used to display the average value of a
numerical field.
8. While designing a query, the criterion can be set on only
one field.
9. Alias is an alternative name for a field in a query.
10. In query Design window, the visible check box is selected
by default.
11. A query once created using a wizard can only be edited in
the Design view.
C. Fill in the blanks
1. A ____________ is a sort of question asked from a database.
2. The result of the query is displayed in ____________ form
with field names in columns
3. A query can be created in ________ways.
4. The Query Design window is divided into __________
sections.
5. The shortcut key to run the query is ______________.
6. The conditions to filter the records are set in the _________
row.
7. WhenatableisselectedinaQuerywizard,thecorresponding
fields are displayed in the__________________list box.
8. The result of the query can be displayed in __________ or
_____________ order of any particular field of the table.
9. At the most __________ search conditions can be given in
the query wizard.
10. The last step of the Query wizard displays the entire
____________ of the query.
11. The _____________ view is a more flexible method to create
a query.
12. To edit any query, right click on the ________ icon of the
query that has to be edited.
13. In the _____________ row of the Query Design grid, we can
type the column heading that will be displayed instead of
field name when we run the query.
notes
2023-24
Domestic Data entry operator – class X
198
D. Answer the given questions
1. Define a query? What is the need of creating a query in a
database?
2. Rearrange the steps given below so as to create a query
using a wizard.
3. Give Alias
4. Select the fields
5. Set the criterion
6. Set the sorting order
7. Give table name
8. What all information is seen in the overview (last step) of
the Query wizard?
9. What is the use of Alias row in the Design grid of the Query
Design window?
10. Name any four mathematical functions that can be applied
to numerical data in a query.
11. Name the three ways of creating a query in LibreOffice
Base?
notes
2023-24
Database ManageMent systeM Using LibreOffice Writer 199
IntroductIon
We know that tables in a database are used to store
data in an organized manner. For this we have to enter
data into the tables. As seen in previous chapters, data-
sheet view is used to enter data into the tables. The
row and column format of the data-sheet view is not
a user friendly interface. So it is required to develop a
user friendly data entry screen for data entry operator
or a user, who is not very well versed with computers.
Moreover, while doing data entry, the user may
accidentally or intentionally alter the data in the table.
Therefore LibreOffice Base provides the Form feature
for data entry purposes.
Also, when the user wants to retrieve and view
the data from one or more tables in a database using
queries, it is again displayed in data-sheet view. The
Report feature of OpenOffice Base helps to present the
retrieved data in a user friendly, understandable and
formatted manner.
Both reports and forms are considered as objects
of the database and are present in the Database
Pane of the LibreOffice Base User Interface. In this
chapter we will learn to create Forms and Reports using
LibreOffice Base.
Forms
A form is an object of the database that has a user
friendly interface where data can be entered and seen in
an attractive and easy-to-read format. For any database,
it is the front end for data entry and data modification.
It displays the data in a layout design by us and not just
in a simple row and column format.
C
HAPTER
12
Forms and Reports
2023-24
Domestic Data entry operator – class X
200
Primarily, a form contains field controls arranged
in a presentable and user friendly manner. Each field
control consists of a label and the field value text box. A
label is a piece of text that specifies the data that should
be entered in the field value text box. A field value text
box is linked to the respective field in the table. We may
add all or selected fields from the table on the form. In
addition to field controls, it may contain some additional
text like titles, headings and names, graphics like logos,
list boxes and radio buttons.
There are two ways to create a form:
• Using a wizard
• Using the Design View
Creating a Form Using a Wizard
This is the simplest way to create a form. To explain how
to create a form using a wizard, we will get back to the
Sports Day database created in the previous chapters.
To create a form using wizard, follow the following steps.
Step 1. Open the Sports Day database created in
LibreOffice, and click the Form icon on the
Database Pane as shown in Fig. 12.1.
Fig. 12.1: Selecting Forms from Database Pane
Click the option Use Wizard to Create Form…
on the Tasks Pane. The Form wizard will open
along with a blank database form in design
view in the background as shown in Fig. 12.2.
notes
2023-24
Database ManageMent systeM Using LibreOffice Writer 201
Fig. 12.2: Form Wizard and Database Form in Design View
Step 2. The step 1 of the wizard is to select the tables or
queries for which the form has to be created. As
we are creating a form for Events table, select
Events table from “Tables and queries” list box
as shown in Fig. 12.2.
Step 3. After selecting the Events table, all the fields of
the Events table will be listed in the Available
Fields list box as shown in Fig. 12.3.
Fig. 12.3: Fields of Events table listed in the Available Fields
Step 4. As we require all the fields to appear in the
Form, shift all the fields of Event table from
Available Fields list box to Fields in the Form
list box using >> button. Observe that in Fig.
12.4, all the fields are shifted to Fields in the
Form list box. Click on Next button to move
forward.
Fig. 12.4: All fields of Events table in Available Fields
are shifted to Fields in the Form
notes
2023-24
Domestic Data entry operator – class X
202
Step 5. The second step consists of setting up a
subform, i.e. a form within a form. You need
to check the checkbox “Add Subform” in
Fig. 12.5 to add the subform. Since we do not
want to set up any subform, click Next button
to proceed further.
Fig. 12.5: Step 2 Set up a subform
Step 6. The wizard skips the next two steps that relate
to the subform and moves on to step 5. This step
arrange controls i.e. to set up the design of the
form. Observe in Fig. 12.6 that, by default, all
controls will be left aligned. Click Right Align
radio button to align the controls from the right
side of the form. As mentioned before, a field
control consists of two parts – label and the
field value text box. So in this step we arrange
the label and field value text boxes as we want
them to be visible on the screen.
Fig. 12.6: Selecting the Layout of the form
Four layouts are given in this step of the wizard to
choose from:
• Columnar display with Labels on the left of the
field value
notes
2023-24
Database ManageMent systeM Using LibreOffice Writer 203
• Columnar display with Labels on top of the field
value
• Display as datasheet
• Block display with labels on top
Let us select Columnar Display with labels on the
left arrangement. Also note that as we choose the
Layout type, the fields are arranged in the Form Design
view also.
Step 7. Click Next button.
Step 8. The step 6 of the wizard asks whether the form
will be used for displaying data, entering data
or both. As we go with the default settings, so
we click Next button as shown in Fig. 12.7.
Fig. 12.7: Step 6 of form wizard
Step 9. The next step is to apply styles to the form being
created. We can select the desired background
colour and border type of the field value text
boxes. Observe in Fig. 12.8, by default the
border of the field text value is displayed in 3D
look. We can select the options No Border or
Flat if required.
Fig. 12.8: Applying styles to the form
Step 10.Click Next button.
Step 11.The next step is to set the name of the form.
By default the name of the form is same as the
name of the table. Click in the textbox and type
a different name if desired, say EventsForm,
notes
2023-24
Domestic Data entry operator – class X
204
as shown in Fig. 12.9. In the same step, by
default, the radio button with the option Work
with the form is selected. If you wish to modify
the form after the wizard finishes, click Modify
the form option.
Fig. 12.9: Assigning name to form
Step 12.Click Finish button. The form with the first
record will be displayed on the screen in
a separate window. Also, observe that in
Fig. 12.10, the name of the form, EventsForm
will appear in the Object Area of LibreOffice
User Interface window.
Fig. 12.10: Form created for Events table
As shown in Fig. 12.10, on the left of the Form Design
window is the Forms Control toolbar and at the bottom
is the Records toolbar.
Forms Control Toolbar
This toolbar contains various controls that can be added
to the form. We will learn about some of the controls
later in the chapter.
Records Toolbar
The Records toolbar contains the navigation control
buttons in the extreme left. With the help of these
notes
2023-24
Database ManageMent systeM Using LibreOffice Writer 205
buttons, we can traverse and view the records in
the file. As we move from one record to another, the
record number in the record text boxes changes.
Fig. 12.11 shows the navigation control buttons, there
are commands to add a new record, save a record, delete
a record and so on.
Fig. 12.11: Records toolbar
Modifying a Form
It is possible to modify the form in any manner once
it is created. The modification can be to change the
background color, font size and color of the text or even
positioning of various controls in the form.
Changing the background color
Follow the following steps to change the background
color of the form.
Step 1. Open OpenOffice Base User Interface for
Sports Day database and click on Forms icon
in the Database Pane. The name of the saved
form (EventsForm) will be displayed in the
Objects Area.
Step 2. Right click on the form name and select Edit…
option. A separate Form Design View will open.
Step 3. To change the background color of the form,
right click on the form and select Page Style...
option from the pop up menu as shown in
Fig. 12.12.
Fig. 12.12: Selecting the Page Style option from the Edit pop down
Step 4. The Page Style dialog box will appear, where
you select Area tab and choose the desired
color from the palette, as shown in Fig. 12.13.
notes
2023-24
Domestic Data entry operator – class X
206
Fig. 12.13: Selecting Colors Palette in Page Style dialog box
Step 5. Click on OK button. The selected color will be
applied on the form as shown in Fig. 12.14.
Fig. 12.14: Forms with changed background color
Editing the labels
To edit the labels, either by changing the text or by
changing the formatting effects, follow the following
steps.
Step 1. Place the mouse pointer over the label, say
EventID to change it.
Step 2. Press the keyboard shortcut key Ctrl+Click to
select the label. The position boxes will appear
around the label.
Step 3. Right click on the selected label and select
Control Properties… option from the pop up
menu as shown in Fig. 12.15.
Fig. 12.15: Selecting Control Properties by right clicking on the label
notes
2023-24
Database ManageMent systeM Using LibreOffice Writer 207
Step 4. The Properties: Label Field dialog box will
appear as shown in Fig. 12.16. It contains
various properties of the selected label. In the
text box after Label property, type Event ID. The
label caption on the form changes accordingly.
Fig. 12.16: Changing the label caption from the Properties Label Field
Similarly we can change other properties of the
selected label like width, height, alignment,
font style and font size.
Step 5. After making the desired changes close the
Properties dialog box by clicking the cross
(x) button on the top right of the dialog box.
The changes made will be applied on the
selected text.
Moving a control
It is possible to move the to another location in the
form. Click on the control that has to be moved. Both the
label and the text box for field value will be selected and
position handlers will be placed around the control. If
only one of these have to be re-positioned then press Ctrl
key while clicking on that control. Now, click and drag
the control to move to the desired location (Fig. 12.17).
Fig. 12.17: Moving a control
notes
2023-24
Domestic Data entry operator – class X
208
Changing the size of the textbox control
To change the size of the textbox control, press Ctrl
button while clicking on the textbox. It will be selected
with position handlers around it. Place the mouse
pointer on any of these handlers. It will change to a
double sided arrow. Click and drag them to the desired size.
Adding a Tool tip
A tool-tip is a small piece of text that is displayed when
the mouse pointer is placed on a particular control. Say
for example, if the mouse pointer is placed over EventID
text-box, a message ‘Enter Event Identification Number’
can be displayed. This will make entering data for the
user easy. Such type of text that appears when the
mouse pointer is placed on a particular control is called
the tool-tip text or help text. Let us add a tool-tip for
EventID control by following the steps given below.
Step 1. Press Ctrl button and click on EventID text box.
Step 2. Right click and select Control Properties…
option. The Properties: Text Box dialog box
will be displayed as shown in Fig. 12.18.
Fig. 12.18: Adding a tooltip in Properties Text Box
Step 3. In the dialog box, scroll down till Help Text
property appears.
Step 4. Type ‘Enter Event Identification number’ in the
text box.
Step 5. Close the dialog box by clicking on cross (X)
button. Now, if the mouse pointer is placed over
EventID text box, the tool tip will be displayed
as shown in the Fig. 12.19.
Fig. 12.19: Displaying tool tip
notes
2023-24
Database ManageMent systeM Using LibreOffice Writer 209
Forms Controls Toolbar
The forms control toolbar contains various tools to add
or edit controls on the form. Let us learn to use few of
these tools.
Adding a calendar for the date field
While filling up a form on a computer, mostly a calendar
is displayed. This is because it is easy to choose a date
rather than typing it. To add the calendar to the date
field in the form, follow the steps given below:
Step 1. Place the mouse pointer over the Date text box
and press Ctrl+Click to select it.
Step 2. Right click and select Control Properties….
option.
Step 3. In the Properties: Date Field dialog box, scroll
down for Date Format property. By default,
Standard (short) format will be displayed.
Step 4. Click to open the list box and select Standard
(long) format.
Step 5. Scroll down further till you find the DropDown
property. By default its value will be No. Select
Yes. The control properties set is shown in
Fig. 12.20.
Fig. 12.20: Control Properties set for Date field
Step 6. Close the dialog box. The selected date control
text box on the form changes to a list box with
an arrow being displayed in the extreme right
as shown in Fig. 12.21.
Fig. 12.21: Date Control field with Calender
Adding text to the form
While designing a form, we may need to enter titles,
headings or subheadings. It is called as Labels. It is
notes
2023-24
Domestic Data entry operator – class X
210
possible to create Labels in the form while designing.
Follow the following steps to insert the title text in
the form.
Step 1. Click the Label ( ) tool on the Form Controls
tool box as shown in Fig. 12.22.
Step 2. On the form, click and drag the mouse to
create a label field box. It will also have position
handlers.
Step 3. Double click on box to open the Properties:
Label Field dialog box.
Step 4. Type the title as “Data Entry Form” in the Label
property, as shown in Fig. 12.23.
Step 5. Set the Font property by clicking the Font
button in front of the Font property. The
Character dialog box will be displayed as
shown in Fig. 12.24, where you can set the font
type, style and size. Choose the desired font
style and size and click on OK button.
Step 6. Close the Properties: Label Field dialog box.
The title with the selected formatting effects
will be displayed on the form.
After applying and editing various controls, the
final form for entering data in the Events table
looks as shown in Fig. 12.25.
Fig. 12.25: Modified Data Entry Form for Events table
Adding a new record using a form
After you have finished designing the form, you can
display or insert records using this form. For this
purpose, you have to shift from Design View to Form
View by clicking on Design Mode button on the Forms
Controls toolbar. The Form View window appears with
the first record displayed in the respective text boxes as
shown in the Fig. 12.26.
Fig. 12.22: Selecting Label icon
on Form Controls tool box
Fig. 12.23: Properties Label
Field dialog box for the
created label
Fig. 12.24: Setting font type,
style and size in Character
dialog box
2023-24
Database ManageMent systeM Using LibreOffice Writer 211
Fig. 12.26: Displaying form in Design view by clicking on Design Mode
button on Form Controls
To add a new record into the table using this form,
click on New Record button on the Records toolbar as
shown in Fig. 12.27.
Fig. 12.27: Adding a new record by clicking on New Record
A blank form with the cursor blinking in the first text
box i.e. EventID will be displayed.
Fig. 12.28: New blank record showing the next record number
Observe that the record pointer shows the record 11,
as there were already 10 records in the table. Once the
record is entered, click on Save Record button on the
Records toolbar to save the record in the table.
To delete any record, navigate to the record by either
typing the record number in the Record text box or by
notes
2023-24
Domestic Data entry operator – class X
212
using the navigation buttons. Thereafter click Delete
button on the Records toolbar. The next record will be
displayed in the form.
To toggle between Design view and Form view press
Design Mode button on the Forms Controls toolbar.
When we create a form in Design View, all the controls
are placed on the form using various tools given in the
Forms Control toolbar.
Reports
A report is another useful feature of a database
management system. We have seen that the records
that have been extracted using a query are displayed
in a simple row and column format. Instead, using a
report we can present the retrieved data in an attractive
and customized manner. We can create a report based
on a table or a query or both. Preferably, if a report has
to be generated from multiple tables, a query should
be created first and then that query can be used to
generate the report.
Let us create a report using the table Events from
the Sports Day database. Follow the following steps to
create a report.
Step 1. In the LibreOffice Base User Interface, click
on the Reports icon in the Database Pane.
Step 2. From the Tasks Pane, click Use Wizard to
Create Report… option.
Step 3. The Report wizard along with two other
windows will be displayed. One of the window
is Report Builder window and the other is Add
Field dialog box. We will confine our study to
the wizard (Fig. 12.29).
Fig. 12.29: Report Wizard, Report Builder and Add Fields dialog box
Step 4. The first step of wizard is to select the table
and the corresponding fields that we want to
notes
2023-24
Database ManageMent systeM Using LibreOffice Writer 213
display in our report. From the Tables or
Queries list box, select the table Events.
Step 5. All the fields of the Events table will be
listed in the Available Fields list box.
Click >> button to shift all the fields
to Fields in report list box. Fig. 12.30
shows the Fields in report list box after
shifting.
Step 6. Click on the Next button. The next step is
to label the fields. By default, the column
headers will be displayed as labels or
column headers for the field values. As
fields names are generally shortened, to
change to more self-explanatory names,
type the new names in the respective
text boxes.
Step 7. Click on the Next button. The next step
is to group the data based on any of the
fields in the report. Since we do not want
to group as of now, click on the Next
button.
Step 8. The fourth step is to set the Sort options.
If the data to be displayed in the report
has to be sorted in either ascending or
descending order of a particular field,
specify the field and sorting order in
this step. Say, for example, select the
field EventID. The radio button for
Ascending is already selected. Select
Descending radio button to display the
records in descending order as shown in
Fig. 12.32.
Step 9. Click on the Next button to move on to
the next step in which the layout of the
report will be selected.
Step 10. A layout is the manner in which the
labels, field values and titles will be
displayed in the report. Out of various
Layout options given, choose the desired
layout, say Tabular and also the layout
of headers and footers (Default). You
may also choose the orientation option
Landscape or Portrait in this step.
Fig. 12.30: Selecting table Events and
fields after shifting to Fields in report
list box
Fig. 12.31: Step 2 of wizard Labelling
the fields
Fig. 12.32: Setting the Sorting options
Fig. 12.33: Choosing the Layout
2023-24
Domestic Data entry operator – class X
214
Keep the default orientation option Landscape
selected by default as shown in Fig. 12.33.
Step 11. Click on the Next button to move to last step.
Here we name the report and to specify the
manner in which we want to proceed after the
wizard finishes. Type the name of the report as
EventsReport, as shown in Fig. 12.34. By default
the type of report is Dynamic. That means as the
field values in the base table or query change,
the report will also change automatically. If you
don’t want automatic updation of the report,
choose the Static option. In this step, specify
whether you would like to modify the report
or create the report once the wizard finishes.
Select the default option to create the report
with current setting.
Fig. 12.34: Step 6 Create report of the wizard
Step 12. Click on Finish button to display the report as
shown in Fig. 12.35.
Fig. 12.35: Report generated from Events table
notes
2023-24
Database ManageMent systeM Using LibreOffice Writer 215
Inserting other controls in the report
As you can observe the report generated in Fig. 12.35,
the report is very simple and boring. We can make it
more presentable by inserting some more controls like
titles, author name, date of generation of report etc.
Right click on the Report name (EventsReport) on the
LibreOffice User Interface and then select the Edit…
option. The Report Builder window will open as shown
in Fig. 12.36. In this window, various controls can be
inserted using the Report Controls toolbar.
Fig. 12.36: Report Builder window
Inserting Titles and Headings
To insert the title of the report, follow the following steps.
Step 1. Click on the Label tool available on the Report
Controls toolbar.
Step 2. Bring the mouse pointer on the report. Click
and drag to insert the label textbox.
Step 3. Double click on it to open the Properties dialog
box. Type the title text that you want to display
in the Label property textbox, say “Annual
Sports Day Report” and also set the font style
and size using the Font property as shown in
Fig. 12.37.
Fig. 12.37: Assigning label name and setting font in Properties dialog box
notes
2023-24
Domestic Data entry operator – class X
216
Step 4. Close the Properties dialog box. Double click on
the EventsReport in the Reports of Database
Pane. The report will be displayed with with the
formatted effects as shown in Fig. 12.38.
Fig. 12.38: Report with formatted effects
Inserting Date and Time
To insert the date on which the report is generated,
follow the following steps.
Step 1. Click in the Page Header area to make it active.
Step 2. Click Insert > Date and Time… option as
shown in Fig. 12.39.
Fig. 12.39: Inserting Date and Time in Header
Step 3. The Date and Time dialog box will be displayed
as shown in Fig. 12.40. Select the desired
format for date and time format and click on
OK button.
Fig. 12.40: Date and Time dialog boxu
The date will be inserted on the top left corner
of the Page Header area. You may click and
notes
2023-24
Database ManageMent systeM Using LibreOffice Writer 217
drag it to reposition it in any place in the Page
Header area. The final report looks as shown in
Fig. 12.41.
Fig. 12.41: Report with Title and Date
To create a report that groups the retrieved
data according to a particular field, specify the
field name according to which the retrieved
data has to be grouped in step 3 of the wizard.
For example, if we want to display the details of
events category wise, shift CategoryID field to
Groupings list box as shown in Fig. 12.42.
Fig. 12.42: Moving CategoryID for Grouping records
The category wise report will be generated as
shown shown in Fig. 12.43.
Fig. 12.43: Report generated Category wise
notes
2023-24
Domestic Data entry operator – class X
218
summary
• A form is an object of the database that has a user
friendly interface where data can be entered and
seen in an attractive and easy-to-read format.
• A form contains field controls arranged in a
presentable and user friendly manner.
• Each field control consists of a label and the field
value text box.
• There are two ways to create a form – Using a
wizard, Using the Design View
• The forms control toolbar contains various tools
to add or edit controls on the form.
• A report is used to present the retrieved data in
an attractive and customized manner.
• We can create a report based on a table or a query
or both.
1. Prakasan lives in Happy Home Society. He has created
the following tables in his database so as to store and
manage the maintenance dues received from flat owners of
the society.
Table: Residents Details
Receipt_Id
Flat No
Date
Amount
Table : Maintenance Dues
Flat no
Owner Name
Contact No
Flat Category
In the previous chapter, Prakasan had created a query to display
the following information
Flat No Owner Receipt Number Date Amount
(Please note the change in column headings)
Create a form for data entry of Resident Details and Maintenance
Dues table. Also create a report based on the query created above.
Practical Exercises
notes
2023-24
Database ManageMent systeM Using LibreOffice Writer 219
2. Uzair manages a boys hostel in an engineering college. To
manage the records of the people saying in his hostel, he
created a database with the following related tables.
Table : Student_Details
Student_Id
Name
DOB
Course
Father’s Name
Contact No_student
Contact No_ guardian
Room No
Table: Room Details
Room No
Floor (data value can be first, second or third)
Category (data value can be AC / Non- AC)
Student Id
DOO (Date of occupancy)
Monthly Rent
Create a query to display the following tabular format
Room No Student Name Category Monthly Rent
Create a query that displays total monthly rent collected for each
category.
Create a form for data entry of both the tables.
Generate a report the displays information retrieved from both
the queries in a presentable manner.
Check Your Progress
A. Multiple choice questions
1. Which of the following toolbars contains the Label tool?
(a) Standard Toolbar
(b) Forms Controls Toolbar
(c) Records toolbar
(d) Formatting toolbar
2. The Record toolbar has the buttons to move to the
(a) first record
(b) second record
(c) last record
(d) all records
3. Which of the following is NOT true about forms?
(a) It is the front end for data entry
(b) It can contain only text fields
(c) Graphics can be inserted on the form
(d) It can contain only fixed number of records
notes
2023-24
Domestic Data entry operator – class X
220
4. Which of the following keys is pressed to select only textbox
on the form?
(a) Alt
(b) Shift
(c) Ctrl
(d) Tab
5. Which of the following properties in the Properties: Label
Field text box is used to insert a tool-tip on the form?
(a) Tool Text
(b) Help Text
(c) Tool Tip
(d) Help Tip
6. Which of the following objects of LibreOffice Base is used
to display data retrieved from one or more tables in a
presentable manner?
(a) Query
(b) Form
(c) Report
(d) Panel
7. Which of the following values of Date Format property is
selected to view a calendar on the form?
(a) Standard (short)
(b) Standard (long)
(c) Default
(d) Standard (Medium)
8. Which of the following commands on the Forms Control
toolbar is used to toggle between Design View and Form
view?
(a) Design Mode
(b) Toggle Mode
(c) View Mode
(d) Print mode
9. Using which of the following objects in a database, can a
report be generated?
(a) Tables
(b) Queries
(c) Both a and b
(d) Neither a nor b
10. Which of the following components open along with the
Report Wizard?
(a) Report Builder
(b) Add Fields dialog box
(c) Both (a) and (b)
(d) Neither (a) nor (b)
B. State whether the following statements are True or False
1. Report is an object of a database but form is not.
2. We can choose the layout of the form.
notes
2023-24
Database ManageMent systeM Using LibreOffice Writer 221
3. We have to add all fields of the table on the form.
4. There are two ways n which a form can be created.
5. A report is generated in a separate window.
6. Once a control is added on to the form, it cannot be re-
positioned.
7. The Record toolbar has the button to add a new record.
8. We can create a report only using a table.
9. By default, the records in a report are sorted in descending
order.
10. We can group data based on a particular field in a report.
11. A report can have data only in row and column format.
12. We can insert both date and time of generation of report.
13. A report once created cannot be edited.
C. Fill in the blanks
1. A form can be used for ____________ and _____________.
2. Each field control consists of a ____________and
________________
3. A ________________ is a piece of text that specifies the data
that should be entered in the field value text box.
4. By default the border of the field text value is displayed in
_________.
5. A ____________ is a small piece of text that is displayed
when the mouse pointer is placed on a particular control
on the form.
6. Thedefaultorientationoptionforareportis_______________.
7. A ____________ is the manner in which the labels, field
values, titles etc. will be displayed in the report.
8. The option to insert date and time in the report is present
in ___________ menu.
9. A Report Wizard contains _____________ steps.
10. A _______ type of report changes automatically as the field
values in the base table or query change.
D. Answer the following questions
1. Give one difference between a form and a report.
2. What is a field control with respect to forms?
3. Which tool on the Forms Record toolbar is used to insert
text on the form?
4. Name the two ways to create a form in LibreOffice Base.
5. What is the difference between a static and a dynamic
report?
6. Write the function of Forms Controls toolbar and Records
toolbar.
notes
2023-24
Maintain Healthy,
Safe and Secure
Working Environment
4
IntroductIon
The work culture in IT industry is different from routine
office work, where working hours are also not fixed.
Continuously working in front of the computer creates
health problems especially in your eyes. Adopting the
safe work practice in the work place, the productivity
can be increased.
This Unit deals with the concept of working
environment in IT industry. It focuses on safe working
practices at work place. It explains about health related
problem caused by the wrong practices and it’s solution.
It also gives the knowledge about resources required
in workplace for smooth working. Further it explains
how to deal with computer component and problem
related to electrical hazards. It also explains workplace
safety guidelines, workplace hazard and it’s control.
The medical emergency situations and its solution is
illustrated.
2023-24
C
HAPTER
13
Health, Safety and Security
at Workplace
IntroductIon
One evening we were travelling on the busy road of
Mumbaicity.Wewerelookingatthebigandtallbuildings.
My friend was telling me that all these buildings hold
different IT companies. Suddenly we find that there
was a lot of smoke coming out of one building. People
working in that building were running away from the
building and shouting about the fire. Soon we find that
the fire alarm was ringing and
fire brigade vehicles along with
water tanks were approaching
the building. People were telling
that there are lot of casualties
and the overall damage to the
building was worth of several
lakhs. This event remind us
the importance of health and
safety at the workplace.
IntroductIon to HealtH, Safety Snd SecurIty
at Workplace
Every workplace accident, illness or dispute is a cost
to organization, as well as a cost to injured individuals
and their families. It is our responsibility to create a safe
workplace. This will improve the work environment and
the productivity. Employees have to take responsibility
for their own health and safety rather than relying solely
on the “safety officer” or management.
Health
Health of an employee is the state of the physical,
mental and social well being. Every organisation must
Fig.13.1: Illustration of fire catches in the office building
2023-24
Domestic Data entry operator – class X
224
provide healthy and safety working environment for
their employees at the workplace. Health of an employee
must be in a good condition so that the employees
of the organisation will not suffer from any diseases.
Cleanliness at the workplace is mandatory. The work
places must be cleaned in the morning before the people
start working. If it is neat and clean then the people
will feel happy to work in that environment. A proper
air conditioning is mandatory to provide clean and cool
air at workplace. A properly filtered water facility must
be available for the employees of the company. A fresh
food cafeteria must provide the good quality food for
the employees. This will help to maintain the health
of the employee. The organisation should maintain a
clean washroom facility in good condition to be used by
the employees.
Safety
The work environment of the organisation must be safe.
It must be free from hazards and risk. A hazard is the
something that can cause harm to the people. A risk is
a probability of causing harm to the people. A proper
safety guidelines must be prepared by the company
and it should be strictly followed. At regular intervals
of time, the safety procedures must be practised
by employees.
Security
Every employee working in an organisation must
feel that they are secured in the company campus.
Security is a kind of freedom from any potential harm.
Security ensures the safety of the people working
in the organisation. Every organisation must have
separate security department. This department should
be responsible for various security such as personal
safety, computer system safety, electrical safety,
transport safety and other equipment safety. The proper
security procedures will reduce liabilities, insurance
and compensation for organisation. This will increase
the business revenue and will reduce the operational
charges of the company.
noteS
2023-24
Maintain HealtHy, Safe and Secure Working environMent 225
Policies and Procedures for Health, Safety
and Security
The Department of Information Technology (DoIT) has
prepared the policy to provide employees with a healthy
and safe work environment.
Definition
A health, safety and security policy is a written statement
by an employer stating the company’s commitment
for the protection of the health, safety and security
of employees and to the public. It is an endorsed
commitment by management to its employees regarding
their health, safety and security.
A health, safety and security program/policy
contains the health, safety and security elements of an
organisation and objectives which make it possible for
the company to achieve its goal in the protection of its
workers at the workplace.
The government has a specific section mentioned
in their company laws, which states the minimum
requirements to be followed for health, safety and
security programme. Each employer or company should
follow these requirements. Apart from that the company
should also have their own health, safety and security
committee to determine the hazards present at the
workplace. Once these hazards are identified then their
control measures should be specified in the health,
safety and security programme.
Reasons for Health, Safety and Security
Programs or Policies in Workplace
There are several reasons that can be specified for safety
policy as given below.
• It clearly indicates the company’s commitment
for their employee’s health and safety;
• It shows the performance of the business and
the safety performance are compatible with each
other;
• It clearly state that the company is not only doing
the business for profits but it is taking care of all
its stake holders.
noteS
2023-24
Domestic Data entry operator – class X
226
• The accountability of every one working for the
company is outlined for the workplace health,
safety and security;
• Company can comply national policy on
Occupational Health and Safety (OH&S) of
Government of India;
• Injuries and illness of the employees is prevented
through such policy
A typical policy of an IT company may contain the
following OH&S clauses.
• Provide adequate resources to ensure continual
improvement in its OH&S performance.
• Comply with relevant OH&S legal and other
requirements applicable to the organisation and
drive for ‘beyond compliance’ leadership.
• Set appropriate OH&S objectives & targets and
conduct periodic performance reviews against
these targets.
• Adopt measures and processes that focus on
the prevention of occupation related accidents,
injuries, illnesses, and near-misses and strive to
continuously improve such processes.
• Ensure OH&S awareness and build competency
associated at all levels to handle individual OH&S
responsibilities.
Workplace Safety Hazards
The most common definition of hazard is ‘a danger or
risk’ that is associated with something. Something can
even be considered a hazard if it would be a trigger for
causing another hazard to become present, which could
hurt someone or something in the area. Workplace
hazards poses potential harm to people at work, and
that can cause damage to the work environment and
everything else in it. Hazards could cause adverse
health effects and losses of property and equipment
for organisations.
There is a common way to classify hazards, and
not all these are present in all workplaces. In some
industries like manufacturing and pharmaceuticals,
there are biological and chemical risks that pose risks
to the workers. Physical hazards are present as well in
noteS
2023-24
Maintain HealtHy, Safe and Secure Working environMent 227
many industries where there is exposure to electricity,
radiation, extreme pressures, noises and magnetic
fields. On the other hand, ergonomic hazards are present
in facilities where there are repetitive movements and
where workstations are set up haphazardly.
But it can be generalized that in all these
classifications, there are always safety hazards that
come up along with the highlighted workplace hazards.
Physical Hazards
It is the risks arising from the physical work environment
– floors, facilities, walls, and ceilings. Physical hazards
could also mean working with machinery and electricity-
operated machines. Work processes or specific
assignments could also qualify as areas where physical
hazards are present. There is a vast list of physical
hazards across all industries, but when we look at one
specific sector, these hazards are also specific to the
work setting.
Falling Off Heights, Slipping and Tripping
The reasons for falling are attributed to faulty scaffolding
and ladders, as a result of contact with electricity, and
slipping or crashing into anything that throws the worker
off balance (Fig. 13.2). On the other hand, trips and
slips occur right on lower levels, particularly the floor,
on ramps and any uneven
surface in the workplace.
Various injuries result
from simply tripping over
things at work, while
many more accidents
occur when employees
slip on the floor, from
motorized vehicles or from
scaffolding or ladders.
To avoid falls and slips, all things must be arranged
properly. Any spilt liquid, food or other items such
as paints must be immediately cleaned to avoid any
accidents. Make sure there is proper lighting and all
damaged equipment, stairways and light fixtures are
repaired immediately.
Fig.13.2: Falling off height, slipping and tripping
2023-24
Domestic Data entry operator – class X
228
Electrical Hazards
There are many reasons why workers get electrocuted
or suffer from electric shock at work. For the most part,
it’s due to coming in direct contact with live wires, or
having indirect contact through a conductor. While not
all electrical accidents lead to death, there are many
life-threatening, severe and often permanent injuries
that could result from it. At work, the common causes
of electrical accidents are exposed, worn-out wiring,
overloading of electrical outlets, ungrounded or faulty
equipment, and unsafe use of electrical equipment.
Employees must be provided basic knowledge of
using electrical equipment and common problems.
Employees must also be provided instructions about
electrical safety, such as keeping water and food items
away from electrical equipment. Electrical technician
and engineers should carry out routine inspections
of all wiring to make sure there are no damaged or
broken wires.
Fire Hazards
Each establishment must comply with housekeeping
standards to ensure fire safety. Everyone not follows such
requirements, and this leads to accidents resulting to
fire. Such incidents not only damage the vital workplace
equipment, stock and other items, and the building;
it could also lead to injuries among its employees. To
avoid fire, it is important to observe safety precautions
at workplace. The whole organisation must also have
first response and emergency mitigation systems in
place. Employees should be aware of all emergency
exits, including fire escape routes, of the office building
and also the locations of fire extinguishers and alarms.
Health Hazards
Health refers to the physical well-being of the workers,
and this includes the condition of their skin, eyes, ears
and all other body parts. But it also includes the health
situationofwhatwecannotseeupfront–theirrespiratory
and cardiovascular system, and the nervous system.
Hazards are present in most workplaces that could
noteS
2023-24
Maintain HealtHy, Safe and Secure Working environMent 229
impact any part of the human body. For example, a
noisy machine or factory environment could damage the
sense of hearing of the workers. In the same manner,
exposure to bright lights and toxic fumes and vapour
could damage the eyes and nose. There are also more
serious and long-term health issues arising from
hazardous workplaces, such as damage to the lungs
because of the exposure to harmful chemicals (Fig. 13.3).
potentIal SourceS of HazardS In an
organISatIon
Bright light sources behind the display screen can
create contrast problems, making it difficult to clearly
see your work. Apply the following possible solutions to
avoid this.
• Use blinds or drapes on windows to eliminate
bright light. Blinds and furniture placement
should be adjusted to allow light into the room,
but not directly into your field of view.
• Use indirect or shielded lighting where possible
and avoid intense or uneven lighting in your field
of vision. Ensure that lamps have glare shields or
shades to direct light away from your line of sight.
• Reorient the workstation so bright lights from
open windows are at right angles with the
computer screen.
• High contrast between light and dark areas of
the computer screen, horizontal work surface,
and surrounding areas can cause eye fatigue and
headaches. So, use well-distributed diffuse light.
Safety Hazards Biological Hazards Physical Hazards Ergonomic Hazards Chemical Hazards
Fig.13.3: Health hazards
2023-24
Domestic Data entry operator – class X
230
Hazards using Computers
Hazards while using computers include poor sitting
postures or excessive duration of sitting in one position.
These hazards may result in pain and strain. Making
the same movemen`t repetitively can also cause muscle
fatigue. In addition, glare from the computer screen can
be harmful to the eyes. Stretching at regular intervals
or doing some simple yoga in your seat can mitigate
such hazards.
Handling Office Equipment
Improper handling of office equipment can result in
injuries. For example, sharp-edged equipment if not
handled properly, can cause cuts. Staff members should
be trained to handle equipment properly. A relevant
manual should be made available by the administration
on handling equipment.
Handling Objects
Lifting or moving heavy items without proper procedure
or techniques can be a source of potential hazard.
Always follow approved procedure and proper posture
for lifting or moving objects.
Stress at Work
In organisations, you may encounter various stress-
causing hazards. Long working hours can be stressful
and so can aggressive conflicts or arguments with
colleagues. Always look for ways for conflict resolution
with colleagues. Have some relaxing hobbies for stress
against long working hours.
Working Environment
Potential hazards may include poor ventilation, chairs
and tables of inappropriate height, hard furniture, poor
lighting, staff unaware of emergency procedures, or
poor housekeeping. Hazards may also include physical
or emotional intimidation, such as bullying or ganging
up against someone. The staff should be made aware
of organisation’s policies to fight against all the given
hazards related to a working environment.
noteS
2023-24
Maintain HealtHy, Safe and Secure Working environMent 231
Hazard Control
Hazards that have been identified and assessed as
priorities require to implement adequate control
measures. Control measures should follow the hierarchy
with a strong emphasis on eliminating hazards at the
source, whenever possible.
• Take all feasible measures to eliminate the
hazard, for example, by substituting or modifying
the process.
• If elimination is impractical or remains incomplete,
take all feasible measures to isolate the hazard,
for example, instituting engineering controls such
as insulating noise.
• If it is totally impossible to eliminate or isolate
the hazard, its likelihood to cause injury should
be minimised. Ensure that effective control
measures are being applied, such as installing
proper exhaust ventilation and providing personal
protective clothing and equipment that is properly
used and maintained, and monitoring exposure
among at-risk workers
Safety Guidelines Checklist
1. Store all cleaning chemicals in tightly closed
containers in separate cupboards.
2. Throw garbage daily.
3. Make sure all areas have proper lighting.
4. Do not wear loose clothing or jewellery when
working with machines.
5. Never distract the attention of people who are
working near a fire or with some machinery, tools
or equipment.
6. Where required, wear protective items, such
as goggles, safety glasses, masks, gloves, and
hair nets.
7. Shut down all machines before leaving for
the workplace.
8. Do not play with electrical controls or switches.
noteS
2023-24
Domestic Data entry operator – class X
232
9. Do not operate machines or equipment until you
have been properly trained and allowed to do so
by your supervisor.
10. Repair torn wires or broken plugs before using
any electrical equipment.
11. Do not use equipment if it smokes, sparks or
looks unsafe.
12. Cover all food with a lid, plastic wrap or aluminium
foil.
13. Do not smoke in ‘No Smoking’ areas.
14. Report any unsafe condition or acts to your
supervisor.
Check Your Progress
A. Multiple choice questions
1. Workplace safety is essential in organisation ____________.
(a) to avoide the accident and injury
(b) to increase the productivity
(b) to improve the work environment
(d) All of the above
2. Which of the following is not mandatory to keep the good
health of an employee?
(a) Cleanliness
(b) Food court
(c) Clean and fresh air
(d) Clean washroom
3. The security department is not responsible for __________.
(a) personal safety
(b) computer system and equipment safety
(c) electrical safety
(d) personal belongings
4. The proper security procedures will increase ____________.
(a) liabilities
(b) insurance
(c) business revenue
(d) operational charges of the company
5. Which kind of hazards can occur in IT industry?
(a) Biological
(b) Chemical
(c) Physical
(d) Ergonomic
noteS
2023-24
Maintain HealtHy, Safe and Secure Working environMent 233
6. Which of the following can cause hazards while using
computers?
(a) Poor sitting postures or excessive duration of sitting in
one position
(b) Lifting heavy object
(c) Mishandling of tools and equipment
(d) Improper handling of office equipment
7. Which of the following statements is likely to result in an
injury to the operator?
(a) Selecting the right tool for the job
(b) Wearing safety goggles or glasses
(c) Using a tool with loose handles
(d) Keeping cutting tools sharp
8. What are the potential cause of hazards at workplace?
(a) Poor ventilation
(b) Poor lighting
(c) Poor housekeeping
(d) All of the above
B. Fill in the blanks
1. Health of an employee is the state of the physical,
_________________ and _________________ well being.
2. The work places must be cleaned in the _________________
before the people start working.
3. A proper _________________ provide clean and cool air at
the workplace.
4. A fresh food cafeteria helps to maintain the ______________
of the employee.
5. The work environment of the organisation must be
_________________ and free from _________________ and
_________________.
6. The proper security procedures will increase the
____________ and will reduce the _______________ of the
company.
7. Injuries and illness of the employees is prevented through
national policy on ____________________.
8. Physical hazards occurs due to _______________.
9. Electrical hazards mostly caused due to coming in direct
contact with _________________, or indirect contact through
a _________________.
10. Hazards while using computers occurs due to
_________________ or excessive duration of sitting in
_________________.
noteS
2023-24
Domestic Data entry operator – class X
234
C. State whether the following statements are True or False
1. The employer and employees are responsible for workplace
safety.
2. Any injury at work should be reported to the supervisor
immediately.
3. No matter how big or small the injury; the injured person
should receive medical attention.
4. While working with machines and equipment, employees
must follow the safety guidelines set by the company.
5. Bright light sources behind the display screen can create
contrast problems.
6. Exposure to bright lights and toxic fumes and vapour
could damage the mouth and ears.
7. The use of personal protective clothing and equipment can
control the hazards at workplace.
8. Do not throw rubbish daily.
9. Proper handling of office equipment can result in injuries.
10. Stress at workplace can cause hazard in today’s
organisation.
D. Short answer questions
1. Briefly explain the concept of health, safety and security
at workplace.
2. State the most important reasons for health, safety and
security programs in workplace
3. List out the various workplace safety hazards.
4. List out the potential sources of hazards in an organisation.
5. List some of the IT workplace hazards.
6. What are the examples of potential hazards?
7. Describe information technology workplace hazards.
8. What are the workplace safety rules?
9. List out different safety guidelines?
10. Describe type of emergency with example.
noteS
2023-24
IntroductIon
In any organisation it is necessary to maintain a good air
quality to improve the working capabilities of employees.
A pollution free air is an essential requirement for any
organisation. Also most of the IT companies makes
use of centralised air conditioning system to keep the
temperature of working
place at pleasant level.
Water pollution is another
problem faced by many
organisations. Most of the
human activities makes
water polluted. The polluted
water may cause the
disease. So an organisation
must ensure to prevent air
pollution or water pollution.
aIr and Water QualIty MonItorIng proceSS
Air and water pollution can be analysed by using several
methods. There are three common forms of analysis –
physical, chemical and biological. For such analysis
samples can be collected in the surrounding region of
the organisation.
The water and air samples can be analysed by
performing some physical, chemical and bilogical tests.
The temperature and content of the sample can be
easily measured. For example, the various gases or
percentage of various gases, such as oxygen, nitrogen,
carbon dioxide present in the air can be measured.
The PH value of the water can be measured through
chemical analysis. The effect of air and water on these
C
HAPTER
14 Workplace Quality Measures
Fig. 14.1: Air pollution and water pollution
2023-24
Domestic Data entry operator – class X
236
plants and animals is studied. The microbial indicators
are used to monitor the health of the ecosystem.
Guidelines for Clean Air and Clean Water
A proper guidelines may be followed by organisation to
keep the surrounding air and water clean. Some of the
points of such guidelines can be.
1. Air pollution is mostly caused by production of
the dust, mixture of solid particles and gases in
the surrounding air. So avoid dust production,
generation of solid particles and gases in the air.
2. Extensiveuseofautomobilevehiclesinthecampus
can lead to the air pollution. So organisation
must use limited number of vehicles to avoid air
pollution. Practice a no vehicle day in every week.
3. Ozone produced in the air can pollute the air.
Many times it is called as a smog. The generation
of ozone gas must be kept at low level by the
organisation.
4. Most of the human activities pollute the surrounding
water. The sewage or the waste water can also cause
the water pollution. Take care that their waste is
not mixed with the surrounding water.
5. Extensive use of fertilizers and pesticide must be
avoided as it can make the ground water polluted.
Importance of Cleanliness at Workplace
It is always safe to keep your workplace clean to avoid
hazardous. The poor handling and storage practices
result in damages. A clean work station makes your
job easier and more pleasant. Common areas should be
cleaned up by all personnel, when necessary.
• All areas must be kept neat and clean. Each
employee is responsible for the cleanliness of
their work area and all tools and equipment used.
• Spills and breakage are to be cleaned up
immediately.
• Spaces around machines and equipment should
be kept clear and clean at all times to permit free
movement.
noteS
2023-24
Maintain HealtHy, Safe and Secure Working environMent 237
• Floors should be kept clean and clear to prevent
slipping and collision.
• Lighting fixtures are to be checked regularly
to permit clear vision. Faulty lights should be
reported to administration, so that building
maintenance/ facilities can be contacted to rectify
the situation.
offIce ergonoMIcS
Ergonomics is the science concerned with designing
and arranging things so that people can use them
easily and safely. Applying ergonomics can reduce the
potential for accidents, injury to improve performance
and productivity. In an office setting, the repetition of
a seemingly innocuous task over a period of time can
cause an injury. The resulting injuries can be physically
painful and rehabilitation can be difficult and time
consuming. The following office ergonomics emphasize
the identification of early warning signs.
Early Warning Signs Potential Cause Try This
Sore lower back No lumbar support Use back rest of chair, put small pillow
or lumbar support on backrest of chair
Burning in the upper
back
No upper back support
from chair
Put document holder or prop up so
you can see without leaning forward
Stiff neck Working with head turned
to side tilting head forward
holding telephone between
the ear and shoulder
Move or raise monitor to centre of
desk check if headset is available
Sore shoulders Reaching forward for long
periods or reaching forward
frequently
Move closer to the keyboard,
Bring mouse down to level of keyboard
or 1” higher
Arching wrists Working with wrists
extended too much
repetition
Add a wrist rest to the front of
keyboard and mouse pad rest thumbs
on front edge of keyboard so wrists
can’t drop.
Dry eyes Forget to blink Rest eyes periodically and do simple
eye exercises
Eye strain and sore
eyes
Glares from overhead lights
or windows eye glasses not
correct need vision check
Re-orient your desk and computer so
light is not directly behind or in front of
you.
Computer Health and Safety Tips
With the increase use of computer, several health and
safety issues related to vision, musculoskeletal issues,
2023-24
Domestic Data entry operator – class X
238
body aches and pains may occur. Many of these issues
are preventable and if incurred are temporary. They can
be resolved by adopting simple corrective action.
Musculoskeletal Problems
This problem include different areas of your body, such
as neck, back, chests, arms shoulders and feet. It occurs
because of your wrong posture, uncomfortable chair for
sitting that is not ergonomically correct while working
on the computer.
To avoid this problem,
• Position your computer such that the end of the
monitor should be at your eye level.
• Keep the neck neutral with monitor directly ahead
to prevent to turn your neck.
• Keep your monitor at least arm length distance,
or 20 to 30 inch away from you.
• Maximise contact of your back against the
backrest of the chair.
• Adjust height of armrests so that your elbows are
at a 100–110 degrees open angle.
• Place keyboard at a slight negative tilt if you are
sitting upright.
• While typing, keep your hands slightly lower
than elbows, with fingers pointing downwards at
the floor.
• Minimise any twisting of your wrists from side to
side or up and down.
• Use a keyboard palm rest as needed only when
you are not typing. Do not rest your wrists when
typing. It leads to wrist strain.
• Always take small breaks while working on the
computer to stretch your muscles, keep your
blood flowing, and to rest your eyes.
Occupational Overuse Syndrome
Occupational overuse syndrome, also known as
repetition strain injury (RSI), is a collective term for
a range of conditions, characterised by discomfort or
persistent pain in muscles, tendons and other soft
tissues, with or without physical manifestations. It is
Fig. 14.2: Ideal Neck and Monitor
position
2023-24
Maintain HealtHy, Safe and Secure Working environMent 239
usually caused or aggravated by work, and
is associated with repetitive movement,
sustained or constrained postures and/or
forceful movements. Psycho-social factors,
including stress in the working environment,
may be important in the development of
occupational overuse syndrome.
Repetitive use of muscle may feel pain in
your neck, shoulder, wrist or fingers. One of the most
common conditions related to repetitive use of muscles
when using the computer is carpal tunnel syndrome. It
causes pain, numbness, and tingling in the hand and
arm as shown in Fig. 14.3.
Ensure that you use appropriate posture when
typing. For example, your fingers should be above the
‘home position’ (asdf and jkl; keys) on the keyboard,
when your elbows are by your sides. Users should avoid
gripping the mouse too tightly. The keyboard and mouse
should be kept at the same level. In addition, use of
ergonomic keyboard and mouse help to reduce the risk
of wrist related conditions.
Strain in Legs and Feet
Sitting to work for long time may cause strain in legs.
Position your desk chair to sit comfortably with your
feet flat on the floor and your lower legs vertical. Use
a footrest for more support. Make sure that there’s
enough space to change position and stretch your legs
out every now and then, too.
Eye Strain
Computer’s bright light, glare and flickering images
can cause eye strain and visual fatigue. When you
constantly focus on screen, you forget about blinking
your eyes that can cause of drying eyes. Computer
Vision Syndrome is caused by poor lighting and glare
on the computer screen. Both of these factors place
strain on the users eyes, causes blurry vision, burning
and/or watering eyes, headaches and in some instances
shoulder and neck pain. It is important to look after
your eye health. Specifically wear anti-glare glasses to
work on computer.
Fig. 14.3: Symptoms of carpal tunnel syndrome
2023-24
Domestic Data entry operator – class X
240
To reduce the risks of visual problems:
• Adjust the brightness of computer screen to save
your eyes from strain.
• Reposition the screen to avoid glare from lights or
windows.
• Keep a proper vision distance from computer
screen and blink your eyes in an interval.
• Wear anti-glareglasseswhileworking incomputer.
• Keep the screen clean and use a desk lamp to
make it easier to see.
• Ensure the screen colours are easy to look at, and
that the characters are sharp and legible.
• Give your eyes periodic breaks from the screen
and perform frequent blinking. Look away from
the screen into the distance for a few moments
to relax your eyes; focus on something 30 metres
away for 30 seconds every 30 minutes.
• Keep your monitor between 18 to 24 inches away
from your face. Lastly, position monitors to avoid
glare from sunlight and keep them clean.
Headaches
Headache may occur due to muscle tension or pain in the
neck. Strain on the eyes or vision problem can also cause
headaches. Attend regular eye exams to work toward
correcting any vision problems. Try your best to keep your
neck straight in front of the computer and take breaks.
Obesity
Spending long hours on computers may lead lacks of
physical activity and exercise. In children prolonged
use of computers or electronics in general, is a major
contributing factor to obesity. You should take a break
and try to squeeze in some exercise until you go back
to work.
Stress Disorders
Technology impacts our behaviors and emotions.
Prolonged use of computers may be accompanied by
poor health and increased pressure on you in your
workplace, which may lead to stress. The longer the
noteS
2023-24
Maintain HealtHy, Safe and Secure Working environMent 241
stress untreated, the greater the chances of contracting
more serious health problems. Stress can lead to
decreased attention span, lack of concentration,
dizziness and becoming easily burned out. To tackle this
problem, promote your own health and prevent future
health conditions or by seeking treatment options for
any stress that you may encounter. Try things from
yoga, to natural remedies, to medications as prescribed
by a medical provider to combat your stress.
Injuries from Laptop Use
The growing use of laptops cause more pain and
strain. Laptops are designed for short periods of use.
In present day individuals choose to use laptops over
desktops more frequently, due to convenience. In laptop
the screen and keyboard are very close together and
there is really no right way to use a laptop because if
you position the screen at the right height for your back
and neck, it will cause you to have to lift your arms
and shoulders too high to use it and vice versa. It will
probably cause a problem. To overcome this problem,
you may use desktop that is set up ergonomically-
correct, while working for long hours.
Sleeping Problems
Artificial lighting from computer screens can trick your
brain and suppress its release of melatonin substance
that assists your sleeping patterns. To tackle this,
refrain from using a computer right before going to bed.
Health and Safety Requirements for
Computer Workplace
The minimum health and safety requirements for
computers including Desktop computers, Laptops,
Tablets, Smart phones, Television screens and Video
monitors are as follows:
Display Screen (Monitor)
Use the modern LED monitors of legible size and with
adequate spacing between the characters and lines. The
image on the screen should be stable, with no flickering
or other forms of instability. The screen must be free of
noteS
2023-24
Domestic Data entry operator – class X
242
reflective glare and reflections liable to cause discomfort
to the user.
Keyboard
The keyboard should tilt and separate from the screen
to find a comfortable working position and avoid fatigue
in the arms or hands. The space in front of the keyboard
must be sufficient to provide support for the hands and
arms of the user. The keyboard should have a matt
surface to avoid reflective glare. The symbols on the
keys must be adequately contrasted and legible from
the design working position.
Work Surface
The work desk should be sufficiently large, low-
reflectance surface and allow a flexible arrangement of
the screen, keyboard, documents and related equipment.
The document holder shall be stable and adjustable so
as to minimise the need for uncomfortable head and eye
movements.
Work Chair
The work chair must be stable and allow the user to
move easily and find a comfortable position. It should
be adjustable in height. The user’s feet must be placed
flat on the floor or a footrest should be used.
Space Requirements
The workstation should be designed to provide
sufficient space for the user to change position and vary
movements. The user should have enough desk space
for the equipment they use.
Lighting
There must be satisfactory lighting conditions with
appropriatecontrastbetweenthescreenandbackground
environment. Possible disturbing glare and reflections
on the screen or other equipment should be prevented.
Reflections and Glare
Workstations should be designed so that sources of
light, such as windows and other openings, transparent
noteS
2023-24
Maintain HealtHy, Safe and Secure Working environMent 243
or translucid walls, and brightly coloured fixtures or
walls cause no direct glare and no distracting reflections
on the screen. Windows shall be fitted with a suitable
system of adjustable covering to attenuate the daylight
that falls on the workstation.
Noise and Heat
Noise emitted by equipment should not distract the
attention. Noise cancelling earphones may provide a
solution if some noise is unavoidable. The equipment
may not produce excess heat which could cause
discomfort to users.
Cautions while Working on the Computer
It is important to work safely on computer. The static
electricity generated just by walking on the carpet can
damage your computer component. So use a surge
protector when you plug your system in.
A battery backup system is the best way to
protect against a power outage, as it provides the
system with constant voltage.
Remove rings, watches and necklaces while
working on the computer. These ornaments are
often made of conductive metals which can damage
Computer components by striking them static
electricity.
Unplug all power sources and cables from
computer. If you are working with plugged in computer
then it might damage your hardware. Modern processors
will overheat within 7 sec if heat sink is not attached.
Watch Out for Cords and Wires
Loose cords and wires can cause hazard and even
electrical hazards as shown in Fig. 14.5.
If a cord or wire will cross a pathway safety it should
be mark it with hazard tape as shown in Fig. 14.6.
Fig. 14.6: Hazard tape
Fig. 14.4: Unplug power source
from computer
Fig. 14.5: Loose cord that can
be hazardous
2023-24
Domestic Data entry operator – class X
244
Avoid water at all times when working with electricity.
Never touch or try repairing any electrical equipment
or circuits with wet hands. It increases the electrical
conductivity of the body for the flow of electric currents.
Fig. 14.7: Avoid water while
working with electricity
Check Your Progress
A. Multiple choice questions
1. To provide healthy and safety working environment, every
organisation must have ___________________.
(a) Cleanliness
(b) Filtered water
(c) Clean wash-room
(d) All of the above
2. Air pollution is mostly caused by production of the ________
in the surrounding air.
(a) dust
(b) mixture of solid particles
(c) gases
(d) All of above
3. Repetitive use of muscle may feel pain in your ___________.
(a) neck
(b) shoulder
(c) wrist or fingers
(d) All of the above
4. The security department organisation is not responsible
for __________________.
(a) other safety
(b) computer system safety
(c) electrical safety
(d) transport safety
5. For an organisation, the proper security procedures will
reduce ________________.
(a) liabilities
(b) insurance
(c) business revenue
(d) operational charges of the company
6. Do not wear ________ when working with machines.
(a) jewellery
(b) safety glasses
(c) masks
(d) gloves
7. Sore lower back is caused due to _________________.
(a) reaching forward frequently
(b) no lumbar support
(c) no upper back support from chair
(d) reaching forward for long periods
2023-24
Maintain HealtHy, Safe and Secure Working environMent 245
8. What should you do with the problem of dry eyes?
(a) Forget to blink
(b) Rest eyes periodically and do simple eye exercises
(c) Do exercise
(d) Blink the eyes
9. If light is coming directly behind or in front of you then
you may suffer from _________________.
(a) eye strain
(b) sore eyes
(c) dry eyes
(d) eye strain and sore eyes
B. Fill in the blanks
1. Air and water pollution can be analysed by using –
physical, _________ and ____________ analysis.
2. The PH value of the water can be measured through
_________ analysis.
3. The _________ indicators are used to monitor the health of
the ecosystem.
4. Ergonomics is the science concerned with _________ and
arranging things.
5. Working with wrists extended too much repetition can
cause ___________.
6. The repetition of a seemingly _________ task over a period
of time can cause an injury.
7. If a cord or wire will cross a pathway safety it should be
mark it with ___________.
8. Loose cords and wires can cause _____________.
9. Glare and __________ on the screen should be prevented.
10. The keyboard should have a matt surface to avoid
____________ glare.
C. State whether the following statements are True or False
1. The work environment of the organisation must be free
from hazards and risk.
2. Practice a no vehicle day in every week to avoid
air pollution.
3. Applying ergonomics can improve performance
and productivity.
4. Wear rings, watches and necklaces while working on
the computer.
5. Never touch or try repairing any electrical equipment or
circuits with wet hands.
6. Unplug all power sources and cables from computer while
working on computer.
noteS
2023-24
Domestic Data entry operator – class X
246
7. Occupational overuse syndrome, also known as repetition
strain injury.
8. The work chair must be stable and allow the user to
move easily.
9. Artificial lighting from computer screens can cause
sleeping problems.
10. The keyboard and mouse should not be kept at the
same level.
D. Short answer type questions
1. What causes the water pollution?
2. What is occupational overuse syndrome?
3. What are musculoskeletal problems?
4. What cautions to be taken while working on the computer?
5. Why there is no right way to use a laptop?
6. What causes eye strain and how to avoid it?
7. What type of display screen is suitable to work
on computer?
8. What type of keyboard is suitable to work on computer?
noteS
2023-24
IntroductIon
In an organisation, any small accident or unforeseen
situation may turn into emergencies if not given due
attention.Theemergenciescanbenatural,suchasfloods,
hurricanes, earthquakes or man-made emergencies
may include fire, toxic gas releases, chemical spills,
illness, explosions, and civil disturbances. Such
situations may disrupt or shut down your operations,
or may cause physical or environmental damage. While
no one expects such emergencies and disasters that
can strike anyone, anytime, anywhere. The best way
to protect yourself and your organisation is to develop
a well thought-out emergency action plan to guide the
employees in the event of an emergency. This chapter
explains the general workplace hazards, its prevention,
care and how to keep workplace safe.
accIdentS and eMergencIeS
An accident is an unplanned, uncontrolled, or
unforeseen event resulting in injury or harm to people
and damages to goods. For example, a person falling
down and getting injured or a glassware item that broke
upon being knocked over. Emergency is a serious or
crisis situation that needs immediate attention and
action. For example, a customer having a heart attack
or sudden outbreak of fire in your organisation needs
immediate attention.
Each organisation has procedures and practices
to handle and report accidents and to take care of
emergencies. Although most of these procedures
and practices common across the industry, some
C
HAPTER
15
Prevent Accidents
and Emergencies
2023-24
Domestic Data entry operator – class X
248
procedures might be modified to fit a particular type of
business within the industry. For example, procedure
to handle accidents caused by slipping or falling will be
similar across the industry. You need to be aware of the
general procedures and practices as well as specific to
your organisation.
The following are some of the guidelines for identifying
and reporting an accident or emergency:
Notice and Correctly Identify Accidents
and Emergencies
You need to be aware of what constitutes an emergency
and what constitutes an accident in an organisation.
The organisation’s policies and guidelines will be
the best guide in this matter. You should be able to
identify such incidents in your organization, and be
aware of the procedures to tackle each form of accident
and emergency.
Get help Promptly and in the Most Suitable Way
Follow the procedure for handling a particular type
of accident and emergency. Promptly act as per the
guidelines. Ensure that you provide the required help
and support as laid down in the policies. Do not act
outside the guidelines and policies laid down for
your role even if your actions are motivated by the
best intention.
Remember that only properly trained and certified
professionals may be authorized to take decisions
beyond the organisation’s policies and guidelines, if the
situation requires.
Follow Company Policies and Procedures for
Preventing Further Injury While Waiting for
Help to Arrive
If someone is injured, do not act as per your impulse or
gut feeling. Go as per the procedures laid down by your
organisation’s policy for tackling injuries. You need to
stay calm and follow the prescribed procedures.
noteS
2023-24
Maintain HealtHy, Safe and Secure Working environMent 249
Act within the Limits of your Responsibility and
Authority when Accidents and Emergencies Arise
Provide help and support within authorised limit.
Provide medical help to the injured only if you are
certified to provide the necessary aid. Otherwise, wait
for the professionals to arrive and give necessary help.
Promptly Follow Instructions given by Senior
Staff and the Emergency Services
Provide necessary services as described by the
organisation’s policy for your role. Also, follow the
instructions of senior staff who are trained to handle
particular situations. Work under their supervision
when handling accidents and emergencies.
Types of Accidents
The following are some of commonly occurring accidents
in organisations:
Trip and Fall
Customers or employees can trip on carelessly left
loose material and fall down, such as tripping on loose
wires, goods left on aisles, elevated threshold. This
type of accident may result in simple bruises to serious
fractures.
Slip and Fall
slips are mainly due to wet floors, spilling
of liquids or throwing of other slip-causing
material on floors. Slip and fall is generally
caused by negligence. It can also be due
to broken or uneven walking surface, such
as broken or loose floor tile. People should
be properly cautioned against tripping and
slipping. For example, a “wet floor” sign will
warn people to walk carefully on freshly
mopped floors. Similarly, “watch your steps”
signs can prevent accidents on a staircase
with a sharp bent or warn against a loose
floor tile.
Fig. 15.1: Types of accidents
2023-24
Domestic Data entry operator – class X
250
Injuries caused due to Escalators or Elevators
(or lifts)
Although such injuries are uncommon, they mainly
happen to children, ladies, and elderly. Injuries can
be caused by falling on escalators and getting hurt.
People may be injured in elevators by falling down due
to sudden, jerking movement of elevators or by tripping
on elevators’ threshold. They may also get stuck in
elevators resulting in panic and trauma. Escalators
and elevators should be checked regularly for proper
and safe functioning by the right person or department.
If you notice any sign of malfunctioning of escalators
or elevators, immediately inform the right people.
If organization’s procedures are not being followed
properly for checking and maintaining these, escalate
to appropriate authorities in the organization.
Accidents due to Falling of Goods
Goods can fall on people from shelves or wall hangings
and injure them. This typically happens if pieces of goods
have been piled improperly or kept in an inappropriate
manner. Always check that pieces of goods are placed
properly and securely.
Accidents due to Moving Objects
Moving objects, such as trolleys, can also injure people
in the organisation. In addition, improperly kept props
and lighting fixtures can result in accidents. For
example, nails coming out dangerously from props can
cause cuts. Loosely plugged in lighting fixtures can
result in electric shocks.
Handling Accidents
Try to avoid accidents in your organization by finding
out all potential hazards and eliminating them. In case
of an injury to a colleague due to an accident, do the
following.
Attend to the Injured Person Immediately
Depending on the level and seriousness of the injury,
see that the injured person receives first aid or medical
help at the earliest.
noteS
2023-24
Maintain HealtHy, Safe and Secure Working environMent 251
Inform your Supervisor
Give details about the probable cause of accident and a
description of the injury.
Assist your Supervisor
Investigate and find out the actual cause of the accident.
Help your supervisor to take appropriate actions to
prevent occurrences of similar accidents in future.
Types of Emergencies
It is important to have policies and procedures to
tackle the given categories of emergencies. You should
be aware of at least the basic procedures to handle
emergencies. Here are some general emergency
handling procedures that you can follow:
First Aid
Should be quickly accesseble to the employees. It should
contain all the important items for first aid required
to deal with common problems such as cuts, burns,
headaches and muscle cramps.
Electrical Safety
Employees must be provided instructions about
electrical safety such as keeping water and food
items away from electrical equipment. Electrical staff
and engineers should carry out routine inspections
of all wiring to make sure there are no damaged or
broken wires.
Keep a list of numbers to call during emergency, such
as those of police, fire brigade, security, ambulance etc.
Regularly check that all emergency handling
equipment such as the fire extinguisher and fire alarm
system are in working condition.
Ensure that emergency exits are not obstructed and
keys to such exists are easily accessible. Never place
any objects near the emergency doors or windows
Evacuation
It is critical for employee to know who is the coordinator
or authority to make decisions during emergencies.
noteS
2023-24
Domestic Data entry operator – class X
252
The coordinator should be responsible to handle
evacuation process.
General Evacuation Procedures
Each organization has its own evacuation procedures
as listed in its policies. You should be aware of these
procedures and follow them properly during an
emergency evacuation. In addition to organization’s
policies, here are some general evacuation steps useful
in such situations,
• Leave the premises immediately and start moving
towards the nearest emergency exit.
• Guide your customers to the emergency exits.
• If possible, assist the person with disability to
move towards the emergency exit.
• You may carry your hand-held belongings, as you
move towards the emergency exit. Do not come
back to pick up your belongings unless the area
is declared safe.
• Do not use the escalators or elevators (lifts) to
avoid overcrowding and getting trapped, in case
there is a power failure. Use the stairs instead.
• Go to the emergency assembly area. Check if any
of your colleagues are missing and immediately
inform the person concerned.
Fire Hazards in the Workplace
The first step to fire safety is assessing the existence of fire
hazards in workplace. In most facilities, there are three
main types of hazards to evaluate – electrical hazards,
combustible materials, and flammable materials.
Electrical issues, such as damaged extension cords,
blocked electrical panels and heaters, and overloaded
circuitsoftenleadtofires.Firesarealsocommonlycaused
by electrical events such as arc flash. Maintenance of
power cords and other electrical equipment should be
conducted on a regular basis.
Workplace fires are also commonly caused by
improper storage of flammable material or combustible
dust. Both are dangerous and should be properly
noteS
2023-24
Maintain HealtHy, Safe and Secure Working environMent 253
handled and stored. Dust explosions can be another
cause of fire hazard.
Fire Prevention
• All employees must know where the fire
extinguishers are located, and how to properly
use them.
• Fire extinguishers and First Aid Stations should
be clearly marked with signs.
• Never block access to Exits, fire extinguishers,
electric switches and panels.
• Do not block or stack material against doors,
which would prevent them from operating properly
in event of a fire.
• Do not use flammable material near electrical
panels, switches, lift trucks or any electrical
equipment.
• Make sure all equipment is properly grounded
where needed.
• Fire extinguishers must be inspected regularly.
• Report to your supervisor of any defect in electrical,
fire prevention or material handling equipment.
• No flammable material are to be placed around
an exit door way.
Identification of Material and Ignition Sources
Materials are classified by risk, and are sorted according
to these fire classifications:
Class A Material: materials such as wood, cloth, and
paper, which won’t ignite on their own but will continue
to burn once exposed to a heat source.
Class B Material: all liquid, grease, and gas materials
that burn when exposed to ignition sources.
Class C Material: electrical materials and equipment.
These materials cause fires very quickly and present a
serious risk of arc flash.
Class D Material: any materials that are volatile and
able to quickly ignite, such as magnesium, potassium,
and sodium.
noteS
2023-24
Domestic Data entry operator – class X
254
Examples of ignition sources include:
Open flames such as gas ovens, lighters in smoking
areas, and welding torches.
Sparks from wood or metal saws and other types of
equipment.
Heat sources such as combustion engines, space
heaters, ovens, and machines that produce heat during
operation.
Chemical ignition from chemicals that combust under
normal working temperatures.
Select the suitable type of fire extinguisher
Water CO2 Dry chemical
powder
Carbon dioxide Mechanical
foam
ABC dry
powder
Class A Suitable Not suitable Not suitable Suitable Suitable
Class B Not suitable Suitable Suitable Suitable Suitable
Class C Not suitable Suitable Suitable Not suitable Suitable
Class D Not suitable Suitable Not suitable Not suitable Suitable
Fire Extinguisher
Afireextinguisherisaprotectiondeviceusedtoextinguish
fires. It is a cylindrical pressure vessel containing an
agent which can be discharged to extinguish a fire. The
Fig. 15.2 shows the different parts of fire extinguisher.
The following activity will demonstrate the operation
of fire extinguisher.
Fig. 15.2: Fire extinguisher
with its parts labeled
Demonstrate the operation of a fire extinguisher.
Procedure
Step 1: Identify the safety pin of the fire extinguisher, present in
its handle.
Step 2: Break the seal and
pull the safety pin
from the handle.
Step 3: Use the fire
extinguisher by
squeezing the
lever.
Step 4: Sweep it from side
to side.
Fig. 15.3: Steps to open the seal and
safety pin
Practical Exercises
2023-24
Maintain HealtHy, Safe and Secure Working environMent 255
First Aid for Electrical Emergencies
Electrical accidents cause
countless injuries. Injury could be
minimised and many lives can be
saved if proper rescue techniques
and treatment are used. Electrical
accidents may occur at any time
or place. Timely response and
treatment of victims is a major
concern. When an electrical
accident occurs, due to the effect
of muscle cramping, a victim
is often incapable of moving or
releasing the electrical conductor.
There should always be an emergency response plan for
scheduled electrical maintenance or work.
Electrical Rescue Techniques
Approaching the accident
• Never rush into an accident situation.
• Call 108 as soon as possible.
• Approach the accident place cautiously.
Examining the scene
• Visually examine victims to determine if they are
in contact with energised conductors.
• Metal surfaces, objects near the victim itself may
be energised.
• Do not touch the victim or conductive surfaces
while they are energised.
• Switch off the electrical circuits if possible.
Hazards and solutions
• Be alert for hazards, such as heated surfaces
and fire.
• In case you cannot switch off the power source,
take extreme care.
• Ensure that your hands and feet are dry.
• Wear protective equipment, such as gloves and
shoes. Stand on a clean dry surface.
• Use non-conductive material to remove a victim
from the conductor.
Fig. 15.4: An unconscious state because of an electrical shock
Restless or irritable,
Loss of consciousness,
possible convulsions
Exit Burn
Difficult breathing
or respiratory arrest
Muscle tenderness
and possible twitching
Paralysis
Irregular
heartbeat of
cardiac arrest
Swollen tongue may
obstruct airways
Vision Problems
Fracture
Bones
Entry
Burn
2023-24
Domestic Data entry operator – class X
256
High voltage rescue
• Special training is required for rescues if high
voltage is present.
• Protective equipment, such as gloves and shoes
must be worn.
First Aid
• A victim may require Cardio-Pulmonary
Resuscitation (CPR). Steps to perform in CPR are
shown in the Fig. 15.6 and 15.7.
Fig. 15.7: Open the mouth for airway Fig. 15.8: Rescue breathing
• If the victim is breathing and has a heartbeat,
give first aid for injuries and treat for shock.
• Ensure the victim gets medical care as soon as
possible.
• Physician attending the victim must have detailed
information to properly diagnose and care for the
victim.
Fig. 15.5: Beware of high voltage
Fig. 15.6: Gloves and shoes
for safety
Identify and name the steps mentioned in the following figures.
Practical Exercises
2023-24
Maintain HealtHy, Safe and Secure Working environMent 257
Check Your Progress
A. Multiple choice questions
1. What are the steps necessary for operating a fire
extinguisher?
(a) Identify the safety pin of the fire extinguisher which is
generally present in its handle
(b) Break the seal and pull the safety pin from the handle
(c) Use the fire extinguisher by squeezing the lever
(d) All of the above
2. Which of the following is an examples of ignition sources
of open flames?
(a) Gas ovens
(b) Lighters in smoking areas
(c) Welding torches
(d) All of the above
3. In fire classification, all liquid, grease, and gas material
comes under __________________.
(a) Class A material
(b) Class B material
(c) Class C material
(d) Class A material
4. In fire classification, material magnesium, potassium, and
sodium comes under _______________.
(a) Class A material
(b) Class B material
(c) Class C material
(d) Class D material
5. In fire classification, material wood, cloth, and paper
comes under ________________.
(a) Class A material
(b) Class B material
(c) Class C material
(d) Class D material
6. In fire classification, electrical material and equipment
comes under ____________________.
(a) Class A material
(b) Class B material
(c) Class C material
(d) Class D material
7. When do we use a fire extinguisher?
(a) In case of flood
(b) In case of electric shock
(c) In case of fire
(d) In case of burn injury
8. What is the primary fire emergency telephone number is?
(a) 011
(b) 101
(c) 108
(d) 111
noteS
2023-24
Domestic Data entry operator – class X
258
9. Which of the following contains everything you need to
know about evacuating your facility safely?
(a) Evacuation Diagram
(b) Emergency Action Plan
(c) Employee Directory
(d) Both (a) and (b)
10. The best course of action to take during a medical
emergency is to ________________.
(a) Begin first aid immediately
(b) Activate the emergency plan for reporting injuries
(c) Notify the person's family about the situation
(d) Both (a) and (b)
B. Fill in the blanks
1. Emergency is a serious or crisis situation that
needs__________attention and ________.
2. A ___________ sign will warn people to walk carefully on
freshly mopped floors.
3. ____________ signs can prevent accidents on a staircase
with a sharp bent or warn against a loose floor tile.
4. The ___________ should be responsible to handle evacuation
process.
5. Workplace fires are commonly caused by improper storage
of ______________ material or _________ dust.
6. There should always be an _________________ plan for
scheduled electrical maintenance or work.
7. If the victim is breathing and has a heartbeat, give ________
for injuries and treat for shock.
8. A fire extinguisher is a _________________ containing an
agent which can be discharged to extinguish a fire.
C. State whether the following statements are True or False
1. The organisation’s policies and guidelines is the best guide
to handle emergency.
2. If someone is injured, act as per your impulse or gut
feeling.
3. Keep water and food items away from electrical equipment.
4. Always switch off the electrical circuits.
5. Always wear protective equipment, such as gloves and
shoes.
6. A fire extinguisher is a protection device used to
extinguish fires.
7. Flammable materials can be placed around an door exit.
8. You can determine possible evacuation routes from floor
plan diagrams posted in your facility.
noteS
2023-24
Maintain HealtHy, Safe and Secure Working environMent 259
D. Short answer questions
1. What is a workplace emergency?
2. How do you protect yourself, your employees, and your
business?
3. What is an emergency action plan?
4. What should your emergency action plan include?
5. How do you develop an evacuation policy and procedures?
6. How do you establish evacuation routes and exits?
7. What are the various types of fire extinguisher and their
extinguishing material?
8. What are the steps for operating a fire extinguisher in case
of a fire emergency.
9. Compare the different type of fire extinguisher.
10. List the different class of fire.
11. List out electrical rescue techniques.
12. What is the first aid for electrical emergencies?
noteS
2023-24
Answer Key
Unit 1. Digital Documentation (Advance) using
LibreOffice Writer
Chapter 1. Introduction to Styles-Paragraph, Page, Character
and List
A. Multiple choice questions
1. (b) 2. (d) 3. (b) 4. (a) 5. (d)
B. Fill in the blanks
1. style
2. LibreOffice
3. consistency
4. styles
5. Heading Style
6. Default
7. objects
8. Paragraph
9. Fill format
10. cannot
Chapter 2. Working with Images
A. Multiple choice questions
1. (a) 2. (a) 3. (d) 4. (c) 5. (c)
B. Fill in the blanks
1. Crop
2. gamma correction
3. ageing
4. Send Back
5. selecting
6. 25
7. reference
8. three
9. corner
10. before its
Chapter 3. Advanced Features of Writer
A. Multiple choice questions
1. (a) 2. (d) 3. (c)
4. (c) 5. (c) 6. (b)
7. (b) 8. (b) 9. (b)
10. (d) 11. (b) 12. (a)
2023-24
Answer Key 261
notes
B. Fill in the blanks
1. Ctrl
2. Default
3. Protected Against Manual Changes
4. Update Index
5. Columns
6. Template
7. Blank Document template
8. Properties
9. Browse Online Templates
10. Track Changes
11. Ctrl+Shift+C
12. coloured
C. State whether the following statements are True or False
1. True 2. False 3. False 4. False 5. False 6. True
7. False 8. True 9. False 10. True 11. False
Unit 2. Electronic Spreadsheet (Advance) using
LibreOffice Calc
Chapter 4. Analyse Data using Scenarios and Goal Seek
A. Multiple choice questions
1. (d) 2. (b) 3. (d) 4. (d) 5. (b)
6. (d) 7. (b) 8. (b) 9. (b)
B. State whether the following statements are True or False
1. True 2. False 3. True 4. False 5. False
6. False 7. False 8. False 9. False
C. Fill in the blanks
1. summarize
2. consolidate
3. Subtotal
4. Subtotal
5. What-if
6. What-if tool
7. two, formula and display output 8. Goal seek
Chapter 5. Use Macros in Spreadsheet
A. Multiple choice questions
1. (c) 2. (d) 3. (b) 4. (b) 5. (c) 6. (b)
B. Fill in the blanks
1. Standard
2. Integrated Development Environment
3. arguments/values, result/value
2023-24
Domestic Data entry operator – class X
262
notes 4. Organizer
5. Sub, End Sub
6. Standard Library
C. State whether the following statements are True or False
1. False 2. True 3. False
4. False 5. True 6. True
Chapter 6. Link Spreadsheet data
A. Multiple choice questions
1. (a) 2. (c) 3. (b) 4. (b)
B. Fill in the blanks
1. current
2. HTML_all
3. .odb.
4. Single quotes (‘ ’)
5. Insert Sheet
C. State whether the following statements are True or False
1. False 2. True 3. False 4. True 5. False
Chapter 7. Share and Review a Spreadsheet
A. Multiple choice questions
1. (b) 2. (a) 3. (d) 4. (d) 5. (c)
B. State whether the following statements are True or False
1. False 2. True 3. False
4. False 5. False 6. True
C. Fill in the blanks
1. shared
2. many
3. turn off
4. record
5. red
6. Comment
7. cell contents
Unit 3. Database Management System using
LibreOffice Base
Chapter 8. Introduction to Database Management System
A. Multiple choice questions
1. (d) 2. (c) 3. (b) 4. (a) 5. (b)
6. (d) 7. (d) 8. (a) 9. (c) 10. (a)
2023-24
Answer Key 263
notes
B. State whether the following statements are True or False
1. False 2. True 3. False 4. False 5. False
C. Fill in the blanks
1. Data
2. Entity
3. Report
4. Record
5. Candidate
Chapter 9. Starting with LibreOffice Base
A. Multiple choice questions
1. (c) 2. (b) 3. (c) 4. (b) 5. (c)
6. (a) 7. (b) 8. (a) 9. (a) 10. (d)
B. State whether the following statements are True or False
1. True 2. True 3. False 4. False 5. True
6. True 7. False 8. True 9. False 10. False
C. Fill in the blanks
1. Data type
2. Text
3. Text
4. Binary
5. Ctrl+S
6. Tasks Pane
7. Key
8. Datasheet
9. Record pointer
10. Sorting
Chapter 10. Working With Multiple Tables
A. Multiple choice questions
1. (d) 2. (c) 3. (b) 4. (b) 5. (b)
6. (b) 7. (c) 8. (a) 9. (c) 10. (d)
B. State whether the following statements are True or False
1. False 2. True 3. False 4. False 5. True
6. True 7. False 8. False 9. True 10. False
C. Fill in the blanks
1. Design
2. common field
3. one-to-one
4. one-to-many
5. transaction, master
2023-24
Domestic Data entry operator – class X
264
6. referential integrity
7. relationship
8. DBMS
9. Many-to-many
10. 10.
Chapter 11. Queries in Base
A. Multiple choice questions
1. (c) 2. (d) 3. (b)
4. (b) 5. (d) 6. (c)
7. (d) 8. (a) 9. (d)
10. (c) 11. (c)
B. State whether the following statements are True or False
1. False 2. False 3. True
4. False 5. False 6. True
7. True 8. False 9. True
10. True 11. True
C. Fill in the blanks
1. Query
2. Report
3. Three
4. two
5. F5
6. Criterion
7. Available fields
8. ascending, descending
9. three
10. Overview
11. Design
12. Query
13. Alias
Chapter 12. Forms and Reports
A. Multiple choice questions
1. (b) 2. (d) 3. (b) 4. (c) 5. (b)
6. (c) 7. (b) 8. (a) 9. (c) 10. (c)
B. State whether the following statements are True or False
1. False 2. True 3. False
4. True 5. True 6. False
7. True 8. False 9. False
10. True 11. False 12. True 13. False
notes
2023-24
Answer Key 265
C. Fill in the blanks
1. Enter, view data
2. label, field value
3. label
4. 3D
5. tool tip
6. landscape
7. Layout
8. Insert
9. Six
10. dynamic
Unit 4. Maintain Healthy, Safe and Secure Working
Environment
Chapter 13. Health, Safety and Security at Work Place
A. Multiple choice questions
1. (d) 2. (b) 3. (d) 4. (c)
5. (d) 6. (a) 7. (c) 8. (d)
B. Fill in the blanks
1. mental, social
2. morning
3. air conditioning
4. health
5. safe, hazards, risk
6. business revenue, operational charges
7. Occupational Health and Safety
8. physical work environment
9. live wires, conductor
10. poor sitting postures, one position
C. State True or False
1. True 2. True 3. True 4. True 5. True
6. False 7. True 8. True 9. False 10. True
Chapter 14. Workplace Quality Measures
A. Multiple choice questions
1. (b) 2. (d) 3. (b) 4. (c) 5. (b)
6. (c) 7. (b) 8. (a) 9. (c) 10. (c)
B. Fill in the blanks
1. chemical, biological
2. chemical
3. microbial
notes
2023-24
Domestic Data entry operator – class X
266
4. designing
5. arching wrists
6. innocuous
7. hazard tape
8. electrical hazards
9. reflections
10. reflective
C. State whether the following statements are True or False
1. True 2. True 3. True 4. False 5. True
6. False 7. True 8. True 9.True 10. False
Chapter 15. Prevent Accidents and Emergencies
A. Multiple choice questions
1. (d) 2. (d) 3. (b) 4. (d) 5. (a)
6. (c) 7. (c) 8. (b) 9. (d) 10. (d)
B. Fill in the blanks
1. immediate, action
2. wet floor
3. watch your steps
4. coordinator
5. flammable, combustible
6. emergency response
7. first aid
8. cylindrical pressure vessel
C. State True or False
1. True 2. False 3. True 4. False
5. False 6. True 7. False 8. True
notes
2023-24

Class X IT 402 Textbook Part B CBSE LibreOffice based

  • 1.
    Domestic Data Entry Operator (JobRole) Qualification Pack: Ref. Id. SSC/Q2212 Sector: Information Technology and Information Technology enabled Services (IT–ITeS) Textbook for Class X 2023-24
  • 2.
    First Edition November 2022Agrahayana 1944 PD 5T BS © National Council of Educational Research and Training, 2022 330.00 Printed on 80 GSM paper with NCERT watermark Published at the Publication Division by the Secretary, National Council of Educational Research and Training, Sri Aurobindo Marg, New Delhi 110 016 and printed at Saraswati Art Printers, E-25, Sector-4, Bawana Industrial Area, Delhi -110 039 Publication Team Head, Publication : Anup Kumar Rajput Division Chief Production Officer : Arun Chitkara Chief Business Manager : Vipin Dewan Chief Editor (In charge) : Bijnan Sutar Production Assistant : Rajesh Pippal Cover and Layout DTP Cell, Publication Division ALL RIGHTS RESERVED  No part of this publication may be reproduced, stored in a retrieval system or transmitted, in any form or by any means, electronic, mechanical, photocopying, recording or otherwise without the prior permission of the publisher.  This book is sold subject to the condition that it shall not, by way of trade, be lent, re-sold, hired out or otherwise disposed off without the publisher’s consent, in any form of binding or cover other than that in which it is published.  The correct price of this publication is the price printed on this page.Any revised price indicated by a rubber stamp or by a sticker or by any other means is incorrect and should be unacceptable. OFFICES OF THE PUBLICATION DIVISION, NCERT NCERT Campus Sri Aurobindo Marg New Delhi 110 016 Phone : 011-26562708 108, 100 Feet Road Hosdakere Halli Extension Banashankari III Stage Bengaluru 560 085 Phone : 080-26725740 Navjivan Trust Building P.O. Navjivan Ahmedabad 380 014 Phone : 079-27541446 CWC Campus Opp. Dhankal Bus Stop Panihati Kolkata 700 114 Phone : 033-25530454 CWC Complex Maligaon Guwahati 781 021 Phone : 0361-2674869 ISBN 978-93-5580-007-7 171025 – DomeStIc Data eNtry operator Textbook for Class X 2023-24
  • 3.
    Foreword The National CurriculumFramework (NCF)–2005 recommends bringing out work and education into the domain of the curricular, infusing it in all areas of learning while giving it an identity of its own at relevant stages. It explains that work transforms knowledge into experience and generates important personal and social values, such as self-reliance, creativity and cooperation. Through work, one learns to find one’s place in the society. It is an educational activity with an inherent potential for inclusion. Therefore, an experience of involvement in productive work in an educational set up will make one appreciate the worth of social life and what is valued and appreciated in the society. Work involves interaction with material or other people (mostly both), thus, creating a deeper comprehension and increased practical knowledge of natural substances and social relationships. Through work and education, school knowledge can be easily linked to learners’ life outside the school. This also makes a departure from the legacy of bookish learning and bridges the gap between the school, home, community and workplace. The NCF–2005 also emphasises Vocational Education and Training (VET) for all those children, who wish to acquire additional skills and/or seek livelihood through vocational education after either discontinuing or completing their school education. VET is expected to provide a ‘preferred and dignified’ choice rather than a terminal or ‘last resort’ option. As a follow-up of this, the NCERT has attempted to infuse work across subject areas and also contributed towards the development of the National Skill Qualification Framework (NSQF) for the country, which was notified on 27 December 2013. It is a quality assurance framework that organises all qualifications, according to the levels of knowledge, skills and attitude. These levels, graded from one to ten, are defined in terms of learning outcomes, which the learner must possess regardless of whether they are obtained through formal, non-formal or informal learning. The NSQF sets common principles 2023-24
  • 4.
    (iv) and guidelines fora nationally recognised qualification system, covering schools, vocational education and training institutions, technical education institutions, colleges and universities. It is under this backdrop that Pandit Sunderlal Sharma Central Institute of Vocational Education (PSSCIVE), Bhopal, a constituent of the NCERT has developed learning outcome based modular curricula for vocational subjects from Classes IX to XII. This has been developed under the Centrally Sponsored Scheme of Vocationalisation of Secondary and Higher Secondary Education of the Ministry of Education, erstwhile Ministry of Human Resource Development. qaza This textbook has been developed as per the learning outcome based curriculum, keeping in view the National Occupation Standards (NOSs) for the job role and to promote experiential learning related to the vocation. This will enable the students to acquire necessary skills, knowledge and attitude. I acknowledge the contributions of the book development team, reviewers, and all institutions and organisations for supporting towards the development of this textbook. The NCERT welcomes suggestions from students, teachers and parents, which would help us to further improve the quality of the material in subsequent editions. Dinesh PrasaD saklani Director New Delhi National Council of Educational September 2022 Research and Training 2023-24
  • 5.
    aBout the textBook TheIT–ITeS sector is growing at a fast pace and is a very important industry in India and abroad. In the growing business opportunities in various domains around the globe, there is a huge transfer of information from one place to another. Large amount of data is churned thus creating a need for proper management of the data that are collected. The companies also have to concentrate on their core activities and resort to outsourcing the data entry process. The rapid growth in the IT industry along with the entry of many small and large outsourcing companies in this area, has led to a huge demand for trained personnel for various job roles, such as Data Entry Operator. Domestic Data Entry Operators in the IT-ITeS Industry are also known as Data Entry Operators. These individuals are responsible for providing daily work reports and work on hourly basis. They are also responsible for electronic entry of data from the client site on to the office site or vice-versa. Individual tasks vary depending on the size and structure of the organisation. This job requires the individual to have thorough knowledge of various technology trends and processes as well as have updated knowledge about database management systems and IT initiatives. The individual should know fast and accurate typing or data encoding. This job involves working on a computer, and appropriate software to enter accurate data regarding different issues like retrieving data from a computer or to a computer. The textbook for the job role of “Domestic Data Entry Operator” has been developed to impart knowledge and skills through hands-on learning experience, which forms a part of the experiential learning. Experiential learning focusses on the learning process for the individual. Therefore, the learning activities are student-centered rather than teacher-centered. The textbook has been developed with the contribution of the expertise from the subject and industry experts and academicians for making it a useful and inspiring teaching-learning resource material 2023-24
  • 6.
    (vi) for the vocationalstudents. Open source software LibreOffice version 6.4 under Ubuntu Linux is used to demonstrate the process in this textbook. The presentation of the screenshots may look different in other versions of LibreOffice under Windows platform, but the functionality, features and commands will remain the same in any version under any platform. Adequate care has been taken to align the content of the textbook with the National Occupational Standards (NOSs) for the job role so that the students acquire necessary knowledge and skills as per the performance criteria mentioned in the respective NOSs of the Qualification Pack (QP). The textbook has been reviewed by experts so as to make sure that the content is not only aligned with the NOSs, but is also of high quality. The NOSs for the job role of Domestic Data Entry Operator covered through this textbook are as follows: 1. SSC/N3022 – Undertaking data entry services 2. SSC/N9001 – Managing work to meet requirements 3. SSC/N9003 – Maintaining a healthy, safe and secure working environment Unit 1 of the textbook covers the advanced features of word processing using LibreOffice Writer. It covers applying styles to the document, where you will learn to format a document using styles. Unit 2 of the textbook covers the advanced features of spreadsheet using LibreOffice Calc. It includes – analysing data to extract useful information for making effective decisions. Unit 3 of the textbook covers the Database Management System (DBMS) using LibreOffice Base. It covers the general concepts of DBMS, different database model with the focus on relational database. Unit 4 of the textbook deals with the concept of working environment in IT industry. It focuses on safe working practices at workplace. It explains about health related problem caused by the wrong practices and its solution. It also gives the knowledge about required resources in workplace for smooth working. DeePak D. shuDhalwar Associate Professor (CSE) and Head Department of Engineering and Technology PSSCIVE, NCERT, Bhopal 2023-24
  • 7.
    textBook DevelopmeNt team memBerS AnjuGupta, Freelance Educationist, New Delhi Chetna Khanna, Freelance Educationist, New Delhi Mohini Arora, Head, Department of Computer Science, Air Force Golden Jubilee Institute, Subroto Park, New Delhi Sangita Chadha, Head, Department of Computer Science, Ambience Public School, Safdarjung Enclave, New Delhi memBer-coorDINator Deepak D. Shudhalwar, Professor (CSE) and Head, Department of Engineering and Technology, PSSCIVE, NCERT, Bhopal 2023-24
  • 8.
    ackNowleDgemeNtS The National Councilof Educational Research and Training (NCERT) expresses its gratitude to all members of the Project Approval Board (PAB) and officials of the Ministry of Human Resource Development (MHRD), Government of India, for their cooperation in the development of this textbook. The Council also extends gratitude to all the contributors for sharing expertise and valuable time by positively responding to the request for the development of this textbook. The Council acknowledges the contribution of Prakash Khanale, Head, Department of Computer Science, DSM College Parbhani, for carefully evaluating and giving suggestions for the improvement of this textbook. The Council would also like to thank Rajesh Khambayat, Joint Director, PSS Central Institute of Vocational Education (PSSCIVE), Bhopal, for providing support and guidance in the development of this textbook. The Council is grateful to Saroj Yadav, Professor and Dean (A), NCERT, and Ranjana Arora, Professor and Head, Department of Curriculum Studies, for their sincere efforts in coordinating the review workshops for the finalisation of this book. The Council acknowledges the copy editing and valuable contribution of Shilpa Mohan, Assistant Editor (Contractual) in shaping this book. The efforts of DTP Operator Pawan Kumar Barriar, Haridarshan Lodi and Rajshree Saini, DTP Operators (Contractual), Publication Division, NCERT, for flawless layout design are also acknowledged. 2023-24
  • 9.
    coNteNtS Foreword iii About theTextbook v Unit 1: Digital Documentation (Advanced) using LibreOffice Writer 1 Chapter 1. Introduction to Styles 3 Chapter 2. Working with Images 22 Chapter 3. Advanced Features of Writer 47 Unit 2: Electronic Spreadsheet (Advanced) using LibreOffice Calc 84 Chapter 4. Analyse Data using Scenarios and Goal Seek 86 Chapter 5. Using Macros in Spreadsheet 104 Chapter 6. Linking Spreadsheet Data 116 Chapter 7. Share and Review a Spreadsheet 130 Unit 3: Database Management System using LibreOffice Base 142 Chapter 8. Introduction to Database Management System 144 Chapter 9. Starting with LibreOffice Base 157 Chapter 10. Working with Multiple Tables 173 Chapter 11. Queries in Base 186 Chapter 12. Forms and Reports 199 Unit 4: Maintain Healthy, Safe and Secure Working Environment 222 Chapter 13. Health, Safety and Security at Workplace 223 Chapter 14. Workplace Quality Measures 235 Chapter 15. Prevent Accidents and Emergencies 247 Answer Key 260 2023-24
  • 10.
  • 11.
    Digital Documentation (Advanced) using LibreOfficeWriter 1 IntroductIon In Class IX, you have learned the basic concepts of word processing using LibreOffice Writer, where the basic functions, such as creating, editing and formatting the document are covered. However, in today’s professional set up, you need to know more features to create a document that can be presented in a professional style. LibreOffice Writer offers a variety of features and commands that enable you to create an attractive and presentable document with a consistent format. Further, such documents are easy to read, comprehend and edit by one and all. In this Unit, you will learn to format a document using styles, use style formats, create new styles, update styles, and apply styles and to use the template of another document to format the current document. A document with pictures is always easier to understand than a text document. Pictures have a visual appeal, as our brain responds quickly to colours in comparison to any other form of information. In digital document, a picture can be a drawing, chart, photo, 2023-24
  • 12.
    Domestic Data entryoperator – class X 2 logo, graph or single video frame. LibreOffice Writer provides various tools to work with images. In this Unit you will learn to create a document with pictures, insert and modify images in the document to make it more attractive. Later, it discusses some advanced features of LibreOffice Writer that are used to create professional documents. You will be able to use the feature ‘Table of Contents’, which is based on different types of heading styles and create professional documents using templates. ‘Track changes’, an important feature, used to keep a track of editing being done by each user is also covered in this Unit. The screenshots of LibreOffice version 6.4 under Ubuntu Linux are used here to demonstrate the various processes. The presentation of the screenshots may look different in other versions of LibreOffice or under Windows platform. But the functionality, features and commands are the same in any version under any platform. notes 2023-24
  • 13.
    In Class IX,you had learned to create, format and edit documents in LibreOffice Writer. In today’s world, a document created and presented in professional style is appreciated by all. There are two ways of creating an attractive digital document in Writer: manually formatting a document or by applying styles. You learned manual formatting in class IX, where you selected a part of a document, such as page, paragraph or words and then applied formatting effects using the formatting toolbar. To format different portion(s) in the document, having same style, steps were repeated for all part(s) of the document. So, to change any aspect(s) of formatting, the entire process was repeated for the document. Manual formatting is popular, as it is easy to use and requires less knowledge. Creating a big report with consistent format becomes difficult when manual formatting is used. To avoid inconsistency in formatting and reduce time and effort in formatting a document, we use Styles in Writer. In this chapter, you will learn how to style a document by using– style formats, creating new styles, updating styles, applying styles and using template to format the current document. Introduction to Styles A style is a collection of all formatting information, which you want to save and then apply on the document. For example, following details of Font can be stored as a style with the name ‘Title style’. Size – 12 Name – Bookman Old Style Weight –Bold Alignment – Left C HAPTER 1 Introduction to Styles 2023-24
  • 14.
    Domestic Data entryoperator – class X 4 Now you can use and consistently apply Title style to all titles of the document. To change the style of Title in a document, you just need to update the Title style and apply it to the document. Similarly, to change the format of the complete document, just change the style applied to it. Using Style allows you to shift your focus from appearance of the document to the content of document. This chapter will help you learn how to create and apply styles in Libreoffice Writer. Style Categories Writer provides six Style categories, which are as follows: (a) Page – all documents in Writer are based on pages, hence for formatting them, Page Style is used. It defines basic page layout like page size, its margin, placement of header and footer, footnote, borders and background. A document can have one or many page styles. If a page style is not specified, Writer uses its built-in Default page style. (b) Paragraph – after deciding on a page format, next is the document content, which is organised in paragraphs. A paragraph begins and ends by pressing Enter key. Paragraph formatting includes tab stops, text alignment, line spacing and borders. Usually, it also includes Character styling attributes. (c) Character – this styling is used to work on block of letters, i.e. word(s) in the paragraph instead of the whole paragraph. By using character styles, you can change the appearance of a part of a paragraph without affecting the other part. Character styles allow changing the text colour, text size, highlighting text and emphasising it. (d) Frame – using frames, a document can be organised in sections, so that each section of the page can have a different appearance. Frames are like containers, which can hold text, graphics and lists. Therefore, applying Frame Styles allows to format a frame by specifying its size, position, border and how the text is placed around the picture. notes 2023-24
  • 15.
    Digital Documentation (aDvanceD)using libreoffice Writer 5 (e) List – to style lists in a document, the Writer provides a separate category. It can be used to style lists by putting numbering or bullets of a different kind or specify numeric format. (f) Table – using tables, a large amount of information can be organised and presented effectively. Table Style category allows to format a table by adding borders, using different text or border colour(s), aligning text inside the table, having different patterns or text colour. Now we know which Style category should be applied to style/format a section of the document, let’s learn how to apply it. Styles and Formatting Writer provides many options and tools to style or format a document. All formatting options, learned in Class IX, which can be applied using Formatting toolbar, can also be applied using Style menu. There are many predefined Styles in Writer, which can be accessed by using the following methods: (i) Using Style option from Menu Bar (ii) Using Style Drop Down list box, as shown in Fig. 1.1, from the Toolbar. The current paragraph style is displayed in the textbox. If the Toolbar is not visible then, click on View>Toolbars, and enable Formatting/“Formatting (Styles)”. (iii) Using Sidebar Menu. On the Sidebar, clicking on Styles icon, displays the Style sub-menu as shown in Fig. 1.2. (iv) Using keyboard shortcut — F11 function key. If you choose to style your document using this option, you will find various available options on top as shown in Fig. 1.3 In Fig. 1.3, first six icons allow to select the category of style, such as Paragraph style, Fig. 1.1: Style drop down list in Toolbar Fig. 1.2: Style sub menu from sidebar Fig. 1.3: Buttons at the top of sidebar sub menu 2023-24
  • 16.
    Domestic Data entryoperator – class X 6 Character style, Frame style, Page style, List style and Table style to work on. Click on any one of these buttons to display a list of existing styles in that category. From the bottom of the window selecting Show Preview option displays its style along with the name in the list. Fig. 1.4 shows the list when preview is not selected and Fig. 1.5 shows when the preview is selected. At the bottom of this menu, there is a Drop Down Fig. 1.5: Paragraph Styles with Show previews Fig. 1.4: Paragraph Styles without Show previews list, to select the filter for the style list to be displayed above. By default this filter is set to Hierarchical as shown at the bottom of Fig. 1.5. Assignment 1 Select each of the Styles – Character style, Frame style, Page style, List style and Table style and list the styles under each category. Let us use these styles in a document. For applying any styles, such as Paragraph, Character, Frame, Page, List, Table follow the given steps. Step 1. Select the text to be formatted. The selected text may be a collection of characters, words, lines, paragraph, page, frame or table. Step 2. To format the selected text, choose appropriate style by clicking the button from the top of the Styles bar. Step 3. A list of styles for that category appears. Double click on the desired style to apply to the selected text. 2023-24
  • 17.
    Digital Documentation (aDvanceD)using libreoffice Writer 7 Apply an existing Heading style, from Paragraph Styles. Step 1. Create a new document named ‘noise.odt’ with the text as shown in Fig. 1.6. Step 2. Add a title, ‘Noise Pollution’ on top. Step 3. Select the Tile – Noise Pollution Step 4. Open Styles Menu using Sidebar and go to Headings option. Step 5. Double click on Heading 4 to apply. Observe that the Fig. 1.7 shows the Heading 4 style is applied to the heading ‘Noise Pollution’. Fig. 1.6: noise.odt Fig. 1.7: Applying Heading 4 options of Paragraph Styles Practical Activity 1.1 Using predefined Heading Style, allow you to use them as a Book Mark for browsing the document. notes 2023-24
  • 18.
    Domestic Data entryoperator – class X 8 Apply an existing page style on ‘noise.odt’ Step 1. Open file ‘noise.odt’ created in Activity 1.2. Step 2. Insert a blank page in the beginning by selecting Insert>Page Break from main menu bar, as shown in Fig. 1.8. Step 3. Observe that in Fig. 1.9, inserting a page break will shift the matter to the second page. Now, place the cursor at the beginning of page 2, where the matter appears as shown in Fig. 1.9. Step 4. Open Style Menu from side bar and select the Page Styles option as shown in Fig. 1.9. Step 5. Double click on Landscape to change page orientation to Landscape. After applying Page Styles, you can observe that the document pages orientation is changed to Landscape from Portrait. Note: Applying page style on a page may affect the entire document. Fig. 1.8: Inserting page break Fig. 1.9: Selecting Landscape from Page Styles option of sidebar menu Practical Activity 1.2 notes 2023-24
  • 19.
    Digital Documentation (aDvanceD)using libreoffice Writer 9 Fill Format To apply a style on words present at different locations in the document, you will have to go to each word separately and apply it on each word. Writer provides a convenient way of doing it through Fill Format option. It is the second icon from right on the Style menu, as shown in Fig 1.3. This method is useful when a same style is to be applied at many places scattered in the document. Fill Format can be used to style scattered – pages, frames, tables, lists, paragraphs or characters. Follow the steps given below to use it. Step 1. Open the document to be styled. Step 2. Open the Styles window and select the desired style category and then desired style from drop down list. Step 3. Select Fill Format button. Step 4. To apply the selected style, take the mouse pointer to desired location and click. Do take care to apply style on appropriate type of content. Step 5. Repeat step 4 until all the changes have been made for that style in the entire document. Step 6. To quit Fill Format option, click the Fill Format button again or press the Esc key. Use Fill Format to change appearance of paragraphs at different places in the document using paragraph formatting. A file ‘documentation.odt’ with at least 5 pages of text is used for the activity. Practical Activity 1.3 notes Assignment 2 (i) Try applying Landscape option on one page of a large file. (ii) Explore, in which situation Conditional Styles filter, given in Paragraph category of styling, can be used? 2023-24
  • 20.
    Domestic Data entryoperator – class X 10 Step 1. Open a file ‘documentation.odt’ having 5 pages of text. Observe the indented sentences in second page in Fig. 1.10. Step 2. Go to Style Menu from sidebar and click on Paragraph category, and select List Paragraph from the drop down list as shown in Fig. 1.11. Fig. 1.10: Pages of file documentation Fig. 1.11: Selecting List paragraph option in Paragraph Styles category 2023-24
  • 21.
    Digital Documentation (aDvanceD)using libreoffice Writer 11 Step 3. Click at the beginning of the sentence to be styled using List Paragraph. Step 4. Now click on Fill button, keep on doing same to apply the style for all sentences using desired format. Observe in Fig. 1.12 that how the indented list items look after applying the Fill Format button. Step 5. Press ‘Esc’ key to disable Fill button. Fig. 1.12: Using Fill Format button Creating and Updating a New Style Till now you have used only predefined styles to format a document. If existing styles specified by Writer do not match your requirement, then it is also possible to create a Custom Style. There are many ways to create a custom style, two of them – From Selection and by using drag and drop are explained here. (a) From Selection – last button in Style menu, is Styles action button is used to create a new style or modify an existing style. It can also be used to load a style defined in document or template, in the list. Let us learn how to create a new style; which is the first function in the drop down list of action button. 2023-24
  • 22.
    Domestic Data entryoperator – class X 12 Step 1. Select the portion of document, such as page, paragraph, character, to change its appearance. Format it as per the requirement. Step 2. From the buttons at the top of the Style menu, choose the category (paragraph, character, page, etc.) for which a new style is to be created. Step 3. Select Style action button. A list of options as shown in Fig. 1.13 is displayed. Click on New Style from Selection. Fig. 1.13: Selecting New Style from Selection to create a New Style Fig. 1.14: Creating a new style MyStyle Step 4. In Create Style dialog window, type the name of new style, say, ‘MyStyle’ as shown in Fig. 1.14. The names of existing styles are displayed in the window. Step 5. Click OK to save the name of new style. Observe that the name of the newly created style ‘MyStyle’ appears in the list of styles. To create a custom paragraph style ‘myStyle’, using file ‘noise.odt’ created in Practical Activity 1.2. Step 1. Open file ‘noise.odt’ created in Practical Activity 1.2. Step 2. Format the content of the paragraph with Font face – Arial, Font size 12, line spacing 1.5. Step 3. Select paragraph button from Style Menu of sidebar as shown in Fig. 1.15. Fig. 1.15: Selecting Paragraph Style Practical Activity 1.4 2023-24
  • 23.
    Digital Documentation (aDvanceD)using libreoffice Writer 13 Step 4. Select Style Action button. Step 5. Click on New Style From Selection. A Create Style dialog box will appear as shown in Fig. 1.16. Step 6. Type ‘myStyle’ as style name in the box and click OK. The Style Name (myStyle) will appear in the drop down list under Paragraph category. Fig. 1.16: Create New style using Selection Fig. 1.17: New created myStyle becomes part of Style list under Paragraph category Updating a Style Instead of creating a new style for a small changes in predefined style, an existing Style can be modified on desired aspect. Updating Current Style (Fig. 1.18), the second option in list can be used for doing so. Fig. 1.18: Selecting Update Selected Style option 2023-24
  • 24.
    Domestic Data entryoperator – class X 14 Follow the given below steps to modify an existing user defined style of page, frame or paragraph style. Step 1. Select the page/paragraph to be modified. Step 2. Format the selected portion as per the requirement. Step 3. Go to Style menu, and click on the button to update. Step 4. Using Style Action button, click on Updated Selected Style. Note – Ensure that the aspect modified remains same throughout the selection. For example, in paragraph, if you are changing font face or size then, throughout the paragraph it should remain same. Using Drag and Drop Another way of creating a new style is using Drag and Drop method. It is very easy, as the desired formatted portion of text is just dragged and dropped at correct place in the Style menu. Use the following steps to create a new Style using Drag and Drop method. Step 1. Select the text from the document and change its formatting as desired. Step 2. From the buttons at the top of the Style menu, choose the desired category of style to create. Step 3. Click on the desired style under which, new style is to be created. Step 4. From the document drag the selected portion of text to the Style Menu. Note – While dragging the text, check the cursor shape, as it changes to indicate whether the desired operation is possible or not. Step 5. Create Style dialog window appears (see Fig. 1.16), type the name of new style. Names of existing styles are displayed in the window. Step 6. Click OK button to save the name of new style. The Create Style window displays the list of custom styles. To update an existing style, choose the style name from the list. So same method can be used to create or update a Style. Drag and Drop cannot be used to create a Page Style. notes 2023-24
  • 25.
    Digital Documentation (aDvanceD)using libreoffice Writer 15 Create a new style ‘myStyle1’ using drag and drop, by changing line spacing to 1 and font size to 13 in myStyle. Step 1. Open file ‘noise.odt’ created in Practical Activity 1.2. Step 2. Format the content of the paragraph with Font size 13 and line spacing 1. Step 3. Select paragraph button from Style menu of sidebar as shown in Fig. 1.19. Step 4. Now drag the selected text to Style menu, as shown in Fig. 1.20. Fig. 1.19: Paragraph Styles in Style menu of sidebar Fig. 1.20: Creating a new style using drag and drop Practical Actiivty 1.5 notes 2023-24
  • 26.
    Domestic Data entryoperator – class X 16 Step 5. Press OK. The style name (myStyle1) will appear in the drop down list under Paragraph category as shown in Fig. 1.21. Fig. 1.21: New style myStyle1 created using drag and drop appears in the style list Apart from creating a new style or modifying an existing style, a new document can be styled/formatted using pre-defined templates or another document which suits our requirement. This helps in copying all styles of the template/document in one go to our Style menu and makes formatting our task easy. Load Styles (from a template or document) The last option, in Style Action button of Style Menu is Load Styles. It is used to copy styles from an existing template or document. Once copied, in the list of styles, you can create a new document having same appearance as old one with no extra efforts. Follow the given steps to copy style from template or document Step 1. In the Styles Menu, click on the Load Styles as shown in Fig. 1.22. Step 2. It will open the Load Styles dialog box as shown in Fig. 1.23. In the Load Styles dialog box, choose the category of your document. Step 3. Find and select the desired template to copy styles from. Note that there are no templates stored in My Templates category. Fig. 1.22: Selecting Load Styles option from Style Action button 2023-24
  • 27.
    Digital Documentation (aDvanceD)using libreoffice Writer 17 Step 4. From the same dialog window, also, select the options for the types of styles to be copied, such as Text for Paragraph and Character styles, Frame, Pages or Numbering (List styles). By selecting Overwrite option, the styles being copied will replace any existing styles with the same name. Step 5. Click OK to copy the styles. Step 6. In case styles are to be copied from a file, then instead of Template option, click on the From File button. A File Selection dialog box is displayed. Select the desired document from your computer. Applying styles Whenever a new document is created, the Writer applies default style(s) to it, and the same is displayed in the status bar as shown in Fig. 1.24. You may like to retain the default style or change it. Self Exploration Learn other ways of accessing Style options as listed in section 1.4. summary • A Style is collection of all formatting information, which you want to save and then apply on the document. • Writer provides six Style categories – Page, Paragraph, Character, Frame, List and Table. • Predefined Heading style(s) act as bookmarks in a document. These bookmarks allow faster browsing in a document. • These Style(s) tools can be accessed from Menu bar, Drop Down List and Side bar. • Fill Format is used to style scattered – Pages, Frames, Tables, Lists, Paragraphs or Characters in a document. Fig. 1.24: The current Default Style is displayed on the status bar Fig. 1.23: Selecting the My Templates from Categories of Load Styles dialog window 2023-24
  • 28.
    Domestic Data entryoperator – class X 18 • Writer allows creating custom style and saving them for future use. • These new styles can be created using Selection method or Drag and Drop method. • Drag and Drop method cannot be used to create a Page style. • A user defined style once created, can be updated at any point of time. Steps used for updating a style are same as creation of style. • A document can be styled using another document or a template. 1. Mr R K Sharma is planning to change his job. He approaches a company (www.naukri.in) for helping him in finding new job. Mr Sharma is asked to submit his CV/Resume in the company. He has downloaded a sample CV from “template.com”. Help him in creating his CV in the same format. Also save the format as “CV1” on the computer, for future reference. 2. Raghav receives a non-styled text document as shown in Fig. 1.25, from his teacher to convert it into desired appearance as shown in Fig. 1.26. He has to save it as “reportStyle” for future reference. Write the process that he should follow. Fig. 1.25: Practical Exercise 2 Original Document notes Practical Exercises 2023-24
  • 29.
    Digital Documentation (aDvanceD)using libreoffice Writer 19 3. Kendriya Vidyala No. 3, is planning to publish a monthly digital newsletter for their school. Ravish Pandey of class 12, heads the group responsible to design it on computer. Size of news letter finalised is 5 inch (length) by 8 inch (height). It was also decided that: • The newsletter will have two pages with 4 leaves. • The first leaf will provide brief information about school. • The second leaf will have a table, displaying the school’s last year’s Board exam results. • On the third leaf School achievements (at least 4) for the current session will be given. • The last leaf will have articles or poems (at least 2) written by students. You being part of the team are required to perform the following using Style Menu from Sidebar: (a) Suggest appropriate style category (page, frame, and table) to be used to design the newsletter. (b) Create digital copy of it. (c) Apply Left Page and Right Page format on appropriate leaves. (d) Also set the same margins on all leaves, having same border on all. (e) Add page number on each leaf. The page number should appear in Footer as “Page – number”. Right align these numbers on each leaf. Fig. 1.26: Appearance of Styled Document notes 2023-24
  • 30.
    Domestic Data entryoperator – class X 20 (f) For heading(s) and sub heading(s) use Heading 2 and Heading 4, in the newsletter. (g) On the first leaf, while displaying information about school, use character styling of your choice to make it attractive. (h) Use table to style Board Results, using grid rows and columns. (i) Each row of the table should have a number – in Roman, prefixed to content. (j) Organise school achievements in frames, where individual frame is to be styled using Frames of Paragraph category. (k) Using selection method, save the style in respective category, so that the same can be used to publish future newsletters to maintain consistency. A. Multiple choice questions 1. Which of the following features in LibreOffice Writer is/are used to create the given document? (a) Page borders (b) Envelope (c) Picture from File (d) Indexes and Tables 2. Styles menu (from sidebar) in Writer provide options to work on (a) Paragraph Styles (b) Frame Styles (c) Page Styles (d) All of the above 3. What is style template in LibreOffice Writer? (a) Pre-determined form and mode of document file (b) One kind of model style (c) One type of document (d) Cluster of documents in Writer 4. Which of the following gives the status of your document like page numbers, number of pages? (a) Status bar (b) Standard toolbar (c) Formatting (d) Title bar 5. Which of the following can be used to access a style menu? (a) F11 function key (b) Sidebar Menu (c) Formatting toolbar (d) All of these B. Fill in the blanks 1. A __________ is a collection of different formats 2. Styles are especially handy in __________. Check Your Progress notes 2023-24
  • 31.
    Digital Documentation (aDvanceD)using libreoffice Writer 21 3. Proper use of styles improves __________ in a document 4. The first five buttons at the top of the Styles window select the category of __________. 5. Using predefined __________ creates Bookmark in the document. 6. On opening a new file _________ Style is used for formatting the document. 7. In page layout documents, you can arrange __________ like text boxes and graphics. 8. Character styles are often integrated in __________ Style. 9. __________ allows to apply style at different places in the document. 10. Predefined Style __________ be updated by Drag and Drop method. C. Short answer questions 1. What do you understand by styles in LibreOffice writer document? 2. Write advantages of using Style over manual formatting, for designing a document. 3. What are the different categories of style in LibreOffice writer document? 4. Write down the steps to update a style. 5. What do you understand by custom styles in LibreOffice writer? 6. In a document Introduction paragraph is to be designed extensively by setting its font (face, size, weight, colour), space above it and giving number to heading. Given below are the steps used to do so. (i) Select the Introduction (paragraph) (ii) Open Font list from Toolbar (iii) Select the font (iv) Open Font size from Toolbar (v) Select the desired font size (vi) Select Font weight (Bold) from the toolbar (vii) Open Font color from Toolbar (viii) Select desired color (ix) Using Format menu option, select Spacing > Paragraph > Indent and Spacing (x) Edit space above paragraph (xi) Add number by Selecting Numbered list from Toolbar. 7. Give two examples, where instead of Style, using manual formatting will be beneficial. 8. Give one situation, in which you will prefer to use Fill Format for styling your document. 9. Write steps to load style(s) from a template. notes 2023-24
  • 32.
    It is easyto read and comprehend a good interactive document. A word processing application has rich features, which allows to create an interactive document. A document containing pictures is always easier to understand than a pure text document. Pictures have visual appeal, as our brain responds quickly to colors in comparison to any other form of information. A picture can be a drawing, chart, photo, logo, graph, or single video frame. In digital document a picture can be a graphic or image representation, which is a digital image. Till now, we have created a text document with different features, such as formatting and using styles. In this chapter you will learn to create a document with pictures. You will learn to insert and modify images in the document to make it more attractive. LibreOffice Writer provides various tools to work with images. A picture is a digital image, which is representation of image in finite set of digital values 0 or 1, known as pixels. These are stored in various types of graphics files with the file extension, such as GIF, JPG, JPEG, PNG, BMP, etc. Inserting an Image in a Document LibreOffice Writer allows to work on images, shapes, charts and diagrams by providing various tools. The image file stored on the computer, can be inserted into a document using different ways, such as using Insert Image dialog, using Drag and Drop option, using Cut, Copy and Paste option and lastly by Linking. Inserting Image Using Insert Image Option A general procedure to insert an image using Insert Image dialog box, is as follows. Step 1. Open the document to insert an image in LibreOffice Writer. C HAPTER 2Working with Images 2023-24
  • 33.
    Digital Documentation (aDvanceD)using libreoffice Writer 23 Step 2. Place the cursor where you want to insert an image. Step 3. Select and click on Insert > Image from menu bar Step 4. An Insert Image dialog box will open which will allow to choose the picture file to be inserted. Step 5. Select the file and click on Open button to insert an image in document. Practical Acitivity 2.1 Insert an image using Insert Image dialog box in the file “noise.odt” created in previous chapter. Step 1. Ensure that you have an image file on your computer hard disk. Otherwise download a relevant image from Internet. Step 2. Open “noise.odt” file created in Practical Activity 1.2 of Chapter 1. Step 3. Place the cursor to the next line of the text to insert the image file, and then click on Insert menu from the menu bar as shown in Fig. 2.1. Fig. 2.1: Selecting Insert menu for inserting Image notes 2023-24
  • 34.
    Domestic Data entryoperator – class X 24 Step 4. Click on Image option, opens Insert Image browsing window to select an image. Select desired image as shown in Fig. 2.2. Step 5. Click Open button. The image appears at desired place as shown in Fig. 2.3. Fig. 2.2: Insert image browsing window Fig. 2.3: Image inserted in noise.odt document notes 2023-24
  • 35.
    Digital Documentation (aDvanceD)using libreoffice Writer 25 Inserting Image using Drag and Drop option Another option to insert images in the document is by using Drag and Drop option. The standard procedure is just drag the image from its source and drop it at desired position in the document. A general procedure to insert an image using drag and drop option, is as follows. Step 1. Open the document to insert an image in LibreOffice Writer. Step 2. Open a file browser window (Win+E) and select the image file to be inserted. Step 3. Drag the image into the document Step 4. Drop it, where you want it to appear in the document. Inserting image using Copy and Paste method As stated above, another way to insert an image in the document is by using copy and paste method. In this method instead of dragging the image, copy the image and then paste into the desired location of the document. Inserting an image using any of the above described method saves a copy of image file in the document wherever image is inserted, that means, the image gets embedded in the document. Practical Activity 2.2 Insert an image from one document (source) to another document (target) using Clipboard. Source file is “typewriter.odt” having different images of typewriter, and target file is “documentation. odt” created in the previous chapter. Step 1. Open source file “typewriter.odt” and target file “documentation. odt”. Step 2. In the source document, select the image to be copied, as shown in Fig. 2.4. Fig. 2.4: Selected image in typewriter.odt notes 2023-24
  • 36.
    Domestic Data entryoperator – class X 26 Step 3. Move the mouse pointer over the selected image and copy the image by using keyboard shortcut (Ctrl+C) or right-click and select Copy option from the context menu to copy the image to the clipboard. Step 4. Switch to the target file, “documentation.odt”. Step 5. Place the cursor on the location where you want to insert the image as shown in Fig. 2.5. Step 6. Paste the image by using the keyboard shortcut (Ctrl+V) or right-click and select Paste option from the context menu to paste the image as shown in Fig. 2.6. Fig. 2.5: Placing cursor to insert image in documentation.odt Fig. 2.6: documentation.odt after inserting image from typewriter.odt notes 2023-24
  • 37.
    Digital Documentation (aDvanceD)using libreoffice Writer 27 Inserting an image by linking If multiple copies of the same image are required to be inserted in the document, it is beneficial to save the link of image instead of inserting the image. Inserting a link, stores its reference instead of the image itself, thereby reduces the size of the document, because actual image is saved only once as a separate file along with the document. Whenever a document containing the link is opened, the image file gets merged, at the place(s) where reference was stored, and displayed on screen to the user. A general procedure to link the image file is as follows. In Insert Image dialog box, check the Link option as shown in Fig. 2.7 Keyboard shortcut to link an image – drag and drop the image while holding the Ctrl+Shift keys. Fig. 2.7: Link check box in Insert image dialog window notes Assignment 1 Explore how to insert an image from Writer’s Gallery or from any other device? Modifying an Image Sometimes we may have to modify the image inserted in the document to suit its requirement. The Image toolbar is used to resize, crop, delete and rotate the image. Using the Image toolbar The image toolbar automatically appears when an image is inserted or selected in the document. If you want to keep it always on screen, click on View > Toolbars > Image from the menu bar. The Image toolbar will be 2023-24
  • 38.
    Domestic Data entryoperator – class X 28 displayed as shown in Fig. 2.8. Table 2.1 describes various tools that are made available through this image toolbar. Table 2.1: Description of Image Toolbar Tool Effect on image Image Filter There are 11 types of filters available for improving an image. Details given in Table 2.2 Image Mode Image can be changed to black and white, gray-scale or a watermark Crop Cuts off non-desirable part of the image Flip Horizontally Flips the image Horizontally by 180 o Flip Vertically Flips the image Vertically by 180 o Rotate 90 o left Rotates the image by 90 o left Rotate 90 o right Rotates the image by 90 o right Rotate Image can be rotated by any angle using this tool Transparency Makes an image transparent by using the value provided in percentage Colour Using Drop Down list (as shown in Fig. 2.9), Red, Blue or Green colour can be modified or adjustment for brightness, contrast and gamma can be made To apply any of the tools from image toolbar, select the image on which tool is to be applied and then click on the tool. Clicking on the colour button will display the colour drop down list as shown in Fig. 2.9. It consists of six components in the drop down list. One can increase or decrease the percentage of these components. The first components represent the three primary colours Red, Green and Blue, respectively. The fourth component represent the Brightness, fifth component represent the Contrast and last sixth component represent the Gamma. Fig. 2.8: Image Toolbar Fig. 2.9: Color dropdown list 2023-24
  • 39.
    Digital Documentation (aDvanceD)using libreoffice Writer 29 Clicking on Image Filter opens up a window with 11 filters, as shown in Fig. 2.10. Table 2.2 gives the brief description of various tools available in the Image Filter window. Table 2.2: Description of Image Filter Tool Effect on Image Invert Inverts the colour values of coloured image. In case image is gray-scale then its brightness is inverted. Smooth Softens the contrast of image. Another dialogue box appears to adjust parameter Sharpen Increases the contrast of image Remove Noise Removes single pixels from the image Solarisation Used in Photographs to reverse the tone. Dark appears light and light appears dark. Another dialogue box appears to adjust parameter. Aging Simulates the effect of time on picture. On clicking it, another dialogue box appears to adjust parameter. Posterise Makes a picture appear like painting by reducing colours in the image. Another dialogue box appears to adjust parameter, when this icon is clicked. Charcoal Sketch Changes image as charcoal sketch Relief Adjusts light source to create shadow using dialogue box to adjust parameter Mosaic Joins group of pixels into a single area of one colour. Another dialogue box appears to adjust parameter. Fig. 2.10: Image Filter window Practical Acitivity 2.3 Insert an image in a document and rotate the image. Step 1. Open a new document in LibreOffice Writer. Step 2. Go to Insert menu and Select Image >> From File Step 3. Insert an image from library as shown in Fig. 2.11. Fig. 2.11: Image inserted in a new document 2023-24
  • 40.
    Domestic Data entryoperator – class X 30 Step 4. Select image and then click on rotate tool. Observe that four dots known as handles, appeared on four corners of the image. Step 5. Move the mouse on any corner and observe that the ‘rotate’ symbol is activated. Step 6. Click on rotate symbol on the top right corner of the image and drag it to downward direction, as shown in Fig. 2.12. Step 7. The image rotated is shown in the Fig. 2.13. Fig. 2.12: Rotating image Fig. 2.13: Image after rotation notes Practical Acitivity 2.4 Crop an image in a new file. Step 1. Open a new document in LibreOffice Writer. Step 2. Insert an image in the document as shown in Fig. 2.14 using Insert >> Image >> From File option as demonstrated above. Step 3. Select the image by clicking on the image. Observe that the selected image is surrounded by eight small squares as shown in Fig. 2.14. Step 4. Click on crop tool from Image toolbar. Now observe that the eight small squares surrounding the image will be changed into the blue coloured handles as shown in Fig. 2.15. These are the handles used to crop the image. Fig. 2.15: Changed handles for cropping the image Fig. 2.14: Document after inserting image 2023-24
  • 41.
    Digital Documentation (aDvanceD)using libreoffice Writer 31 Step 5. Click any of these edges of the image and drag the cursor towards the center of image as shown in Fig. 2.16. Observe that the image is being cropped up to the dotted lines. It is possible to crop the image by clicking on dragging any of the edge as per the requirement. Step 6. Click anywhere on the page or press Esc key to leave the crop tool and observe the cropped image as shown in Fig. 2.17. Fig. 2.17: Image after cropping from upper right edge Fig. 2.16: Cropping the image Resizing an Image Sometimes you may want to resize the image to fit an image at the desired place in a document. Resizing is the process of reducing or enlarging the size of the image. This can be done in various ways. Quick and easy way to resize an image is by dragging the image’s sizing handles. Use the following steps to resize image: Step 1. Click on the image inserted in the previous activity. Observe that there are eight sizing handles surrounding the image as shown in Fig. 2.14. Step 2. Position the pointer over one of the sizing handles. The pointer changes shape indicating the direction of resizing. Step 3. Click and drag to resize the image as shown in Fig. 2.18. Step 4. Release the mouse button when satisfied with the new size and observe the size of the image is reduced. Fig. 2.18: Resizing the image 2023-24
  • 42.
    Domestic Data entryoperator – class X 32 By dragging the corner handles, one can resize both the width and the height of the image simultaneously, while the other four handles only resize one dimension at a time. Note that while resizing the image its size gets changed, but while cropping the image cuts it. Deleting an Image It is possible to delete the image from the document just like we delete the text. To delete the image, just select the image by clicking on the image and press the Delete key. Drawing Objects If you need to draw a flowchart or a callout box in your document, LibreOffice Writer provides the feature of drawing tools for such work. The set of drawing tools available in Writer are easy to use, and helps in creating good quality designs, diagrams and drawings. Once you create the drawings, you can directly place it in the document. These diagrams can also be copied or imported in other packages. Using Drawing Tools To display Drawing Toolbar in the Writer window, click on View > Toolbars > Drawing as shown in Fig. 2.19. This will display the Drawing Toolbar in the Writer window as shown in Fig. 2.20. The toolbar contains various basic drawing objects of different types to create any design of your choice. There are many default drawing objects used to create designs in document. To use them – Step 1. Place the cursor in the document where you want the drawing to be placed (anchored). You can change the anchor later, if required. Fig. 2.19: Enabling Drawing tools 2023-24
  • 43.
    Digital Documentation (aDvanceD)using libreoffice Writer 33 Step 2. Select the tool from the Drawing toolbar as shown in Fig. 2.20. The mouse pointer changes to a drawing-functions pointer. Note – One more toolbar appears on the screen, the Drawing Object Properties. It is shown in Fig. 2.23 and explained later. Step 3. Move the pointer to the place in the document where you want the image to appear and then click-and-drag to create the drawing object. Step 4. Release the mouse button to finish drawing. The selected drawing function remains active, so that you can draw another object of the same type. Step 5. To cancel the selected drawing function, press the Esc key or click the Select icon (the arrow) on the Drawing toolbar. Select Insert Line Curve (list) Polygon Square Circle Symbol (list) Star (list) Flowchart (list) Fontwork Right angle triangle Rectangle rounded Rectangle Curve Oval Lines & Arrows (list) Isosceles triangle Arrow (list) Call Out (list) Call outs Points Text Box Toggle Extrusion Basic shapes (list) Fig. 2.20: Drawing Toolbar 2023-24
  • 44.
    Domestic Data entryoperator – class X 34 Draw a family tree with 3 family members, Mr R K Sharma (Grandfather), Mr B Sharma (Father), Mrs Sunita Sharma (Mother). Step 1. Open a new document in LibreOffice Writer. Enable the Drawing toolbar and ensure that it is displayed on the bottom of the document window as shown in Fig. 2.21. Step 2. Select Rectangle Round tool from the toolbar. Place the cursor on the location where you want to draw the family tree, and drag it to create a rectangle. In the same manner, create other two rectangles as shown in Fig. 2.21. Step 3. Enter the text in all three rectangular boxes as shown in Fig. 2.22. To enter text, select the rectangle and then type the text. Step 4. Select the type of line (simple line and line with arrow) from Line tool to draw lines showing hierarchical relation as shown in Fig. 2.22. Step 5. Save the diagram in file “family.odt”. Fig. 2.21: Rectangles created using drawing tool for family tree Practical Activity 2.5 notes It is also possible to change the properties of the object on which you are working. Writer provides tools in Drawing Object Properties toolbar for changing properties, i.e. customising an object. Using these tools the object can be moved, resized, rotated, edited and conFig.d on various aspects. Properties of the object can be modified or edited, either at the time of its creation, i.e. before you start drawing them or after its creation. When properties are 2023-24
  • 45.
    Digital Documentation (aDvanceD)using libreoffice Writer 35 Setting or Changing Properties of Drawing Object On selecting the drawing object, in the document, Drawing Object Properties Toolbar is displayed as shown in Fig. 2.23. It is a floating toolbar, and can be placed anywhere on the screen. To set the properties before drawing the object, follow the given steps. Step 1. From the Drawing Toolbar, select the object you want to draw. Step 2. From Drawing Object Properties Toolbar, click on the icon of property to be modified. Step 3. Change the value of parameter. Step 4. Repeat steps 2 and 3 to change all desired properties. Fig. 2.23: Drawing Object Properties Toolbar modified before creation, it is known as setting default value(s). To work on properties, you can use tools from the toolbar and change the desired aspect of the object. Properties can also be modified by right clicking on the object. Fig. 2.22: Drawing of family tree using rectangles 2023-24
  • 46.
    Domestic Data entryoperator – class X 36 Step 5. Draw the desired figure by following the steps given in the previous section. Changes done in properties of an object, before creating it, are available only for current session. Follow the steps for changing properties of the object after drawing it. Step 1. Select the object whose properties are to be modified. Step 2. Follow steps 2 to 5 of the previous process of setting Properties before drawing an object. In the file “family.odt” created in Activity 2.5, add two more members, a son Master Rohit Sharma and a daughter Baby Deepika Sharma. Make a copy of the file. Then change the properties of Rectangle as (Fill color – lime yellow, border line – Orange having 0.08” width) and Line (color – black, Style – ultrafine dashed) used in Family Tree. Step 1. Open file “family.odt” in LibreOffice Writer. Step 2. Add two rounded rectangle and add text in them to reflect two more members in the diagram. Step 3. Save a copy as “family1.odt”. Keep on working in “family.odt” Step 4. Select a rectangle using selection tool. Step 5. Click on Fill Color tool in Drawing Object Properties toolbar, and change the color selected rectangle as shown in Fig. 2.24. Fig. 2.24: Using Fill Color tool for rectangle Practical Activity 2.6 notes 2023-24
  • 47.
    Digital Documentation (aDvanceD)using libreoffice Writer 37 Step 6. In the same way change color of all the rectangles. Step 7. Select a line in the drawing. Click on Line Color tool and select Black color to change the line color from blue to black. In the same way, change the color of all the lines to black as shown in Fig. 2.25. Step 8. You can also change the border color of rectangle using Line color tool and width of the border by specifying the value in line width option. Step 9. Alternately you can change the line color and width by right clicking on the object and then selecting the “Line” option from the context menu as shown in Fig. 2.26. Fig. 2.25: Using Line Color tool for changing the line color Fig. 2.26: Right clicking on object to select Line option from context menu notes 2023-24
  • 48.
    Domestic Data entryoperator – class X 38 Step 10. To change the line color and width of all the rectangles, select all the rectangles by holding shift key and clicking on each rectangle. This will open the Line dialog window as shown in Fig. 2.27. Change the line color to “Orange” and specify the line width as “0.08” as shown in Fig. 2.27 and click on the OK button. Observe in Fig. 2.28, the line color and width changed as specified Fig. 2.27: Specifying line color and line width for selected objects in the Line dialog window Fig. 2.28: Family Tree with desired object properties notes 2023-24
  • 49.
    Digital Documentation (aDvanceD)using libreoffice Writer 39 Resizing and Grouping objects Sometimes you may want to change the size of drawing to accommodate it at a particular place in the document. This can be done either by changing its size only or by changing its shape and size both. Follow the given steps to resize a drawing. Step 1. Select the object to be resized. All eight handles on the corners and edges will be visible. Step 2. Click on any of the handles and drag it to its new place. The object will be scaled up or down, depending on your action. Also whether object’s shape will be retained or not, will depend on the handle you choose for resizing. Step 3. For resizing and maintaining original shape of drawing, use corner handles. Step 4. Using edge handles will resize drawing non-proportionally. Assignment 2 Use SHIFT key, while resizing the object, in both the cases and observe the difference in action. While drawing an object comprising more than one overlapping shape, on screen they stay together looking like a single entity. But actually they are different shapes placed together as different entities. So, when you choose to edit them you have to work on each individual shape. To treat these shapes as one Fig., they may be grouped together. Grouping drawing objects LibreOfficeWriter allowsgrouping thesedifferentshapes, to behave as a single entity without affecting their size and position. Once grouped, all shapes belonging to that group become its member and a change applied on one member works on all. Follow the given below steps to group the drawing objects. To group drawing objects: Step 1. Select the object by clicking over it. Step 2. Hold the Shift key and keep on selecting all other objects by clicking on it to be included in the group. notes 2023-24
  • 50.
    Domestic Data entryoperator – class X 40 Step 3. Select a group tool from Drawing Object Properties Toolbar (Fig. 2.23). Alternatively, selecting from main menu Format > Group > Group will also do same work. Step 4. This process will group the selected drawing objects. There are four options under Group option. These are Group, Ungroup, Enter Group, Exit Group. The icons as shown in Fig. 2.29 for these options also present in the Drawing Object Properties Toolbar. Fig. 2.29: Grouping tools in Drawing Object Properties toolbar Practical Activity 2.7 Group all items of Family tree created in Activity 2.5 and 2.6, in the file “family1.odt”. Using the group, change the properties of Rectangle (Fill color – lime yellow, border line – orange with 0.08” width) and Line (color – black, Style – ultrafine dashed) used in Family Tree. Step 1. Open the document “family.odt” created earlier in Writer. Step 2. Select all the lines. For this click on the first line, hold the Shift key and keep on selecting other lines to group them. Step 3. Click on Group tool in Drawing Object Properties toolbar. Observe that all the lines are grouped together as shown in Fig. 2.30. Now change the color of all lines grouped together to black. Fig. 2.30: All the lines are grouped together and changed the color to black 2023-24
  • 51.
    Digital Documentation (aDvanceD)using libreoffice Writer 41 Positioning Image in the Text Once the task of creating, formatting, resizing and grouping the drawing object is complete, it has to be positioned in the document with text and other image or drawings. Positioning of an image is controlled by four settings. (i) Arrangement (ii) Anchoring (iii) Alignment (iv) Text Wrapping These settings can be accessed using three ways – by using Format menu, by using context menu after right clicking on the object, by using Drawing Object Properties Toolbar for changing the properties of the drawings. Let us learn how to use Drawing Object Properties Toolbar to position a drawing in the page. Arrangement In Overlapping objects arrangement determines the position of the current drawing with respect to other drawings or text. The Drawing Object Properties toolbar consists of the arrangement tools as shown in Fig. 2.31. These are the six tools in the order of appearance from left to right, namely Bring to Front, Forward One, Back One, Send to Back, To Foreground, To Background, which are briefly explained in Table 2.3. Table 2.3: Description of Image arrangement tools Tool Effect Bring to Front Place image on top of all objects / images Forward One Bring image one level up, when there are overlapping images Back One Sends image one level down in overlapping images Send to Back Place image at the bottom of all objects/ images Fig. 2.31: Image arrangement tools in Drawing Object Properties Step 4. Similarly select all the rectangles, group them and change its fill color to lime yellow, border line to orange color and border width to 0.08, as done in previous activity. Observe that the color of all the rectangles changed to orange colour as shown in Fig. 2.28. 2023-24
  • 52.
    Domestic Data entryoperator – class X 42 To Foreground Moves the drawing object in front of the text To Background Moves the drawing object behind the text Note – First four settings can be applied on an image or drawing, but last two are available for drawings only. Anchoring It acts as a reference point for image or drawing. Anchoring allows an image to retain its position to a page, paragraph, character or frame. Anchor tool is shown in Fig. 2.32. Clicking on the downward arrow you can observe that an image can be anchored to Page, Paragraph, Character or Frame. So whenever a page, paragraph, character or frame is aligned, the anchored image moves along with it. Alignment It allows the vertical or horizontal placement of the image with respect to its anchor. Alignment tools are located under Drawing Properties Toolbar, as shown in Fig. 2.33. An image can be aligned in six different styles – 3 horizontal and 3 vertical. Text Wrapping It allows the placement of image in relation to text. Text Wrapping tools are available under Drawing Object Properties Toolbar. There are six choices, namely Wrap off, Page Wrap, Optimal Page Wrap, Wrap left, Wrap right, Wrap through, in the order of their appearance from left to right as shown in Fig. 2.34. Table 2.4 briefly describes these tools. Table 2.4: Description of Text Wrapping tools Tool Wrapping Effect Wrap off Text is placed above and below the image Page Wrap Text flows around the image. Moving an image will rearrange the text on the page Optimal Page wrap In Page Wrap, if the space between image and margin is less than 2 cm then text will not be placed on that side Wrap left Text is placed on left side of the image Wrap right Text is placed on the right side of the image Wrap through Superimposes the image on the text Fig. 2.32: Anchored tool with its options Fig. 2.33: Alignment tools in Drawing Object Property toolbar Fig. 2.34: Text wrapping tools in Drawing Object Properties toolbar 2023-24
  • 53.
    Digital Documentation (aDvanceD)using libreoffice Writer 43 summary • In a digital document, a graphic or image is called digital image. • A digital image is represented in pixels. • Predefined image can be inserted using Drag- Drop method, Copy-Paste method or using Insert Image dialog box. • Inserting an image embeds a copy of the image in the document. • An image can be linked to a document using Insert Image dialog box. • Linking an image saves only the link of the image instead of embedding the image. This saves space in case multiple copies of the same image are required. • Image Toolbar can be used to modify an image. Tools for filtering, resizing, cropping, deleting and rotating an image are available in this toolbar. • Drawing Tools are used to create pictures (objects), such as Flowchart, Call out box, designs, etc. • Properties of Object can be customised by resizing, rotating, moving or editing. • Drawing object properties can be modified either at the time of creation (when you start drawing) or after its creation. • Properties when modified before creation, is known as setting Default values. • An object drawn using different shapes, can be grouped to behave as single object. • Writer provide various tools to arrange text and image or drawing on a page. Practical Exercises Q.1 In Practical Exercise of chapter 1 (Question 3), you created a school newsletter. Leaf-wise content of the newsletter were: (a) School Information (b) Result for Class X & XII in table (c) School Achievement (d) Students’ article(s)/poem(s) notes 2023-24
  • 54.
    Domestic Data entryoperator – class X 44 For improving the visual appeal of the newsletter, add some images in it. Following are the details given for adding images. Leaf 1: Add a relevant photo of school in bottom right corner, as shown in picture. Photo should have good contrast and brightness. Add black border to photo. Leaf 2: Add photograph of toppers of Class X and Class XII. Make adjustment to display photograph of student in appropriate table and in front of their name. As this page might be printed in black, convert them to grayscale with proper contrast. Leaf 3: Add few relevant pictures in the given style on this leaf. Apply at least two types of image filter on the pictures. Q.2 Master Udit is helping his drawing teacher to create digital drawings. His teacher asks him to write down the steps to create the following two drawings. In the first drawing, objects are grouped and second drawing was created by resizing objects of first drawing. How would you help her to do so using drawing tools of Writer? Q.3 Miss Roshni has downloaded a flowchart to be included in her report. She asks for your help, in creating an editable copy of the flowchart. Write steps to draw it using Drawing tools of Writer. notes Start End Read Input Process Data Create Report End of Data Read Input 2023-24
  • 55.
    Digital Documentation (aDvanceD)using libreoffice Writer 45 A. Multiple choice questions 1. The text or image which appears faintly in the background of a page is called _________________. (a) Water mark (b) Trade mark (c) Copyright (d) Embossing 2. JPG or JPEG in image format stands for _________________. (a) Joint Photographic Experts Group (b) Joint Picture Experts Group (c) Joint Photographic Experts Graph (d) Joint Photographic Experts General 3. In Drawing Object Properties toolbar, Grouping options provided are _________________. (a) Exit Group (b) Ungroup (c) Enter Group (d) All of these 4. Which of the following is not the correct file extension for an image file? (a) GIF (b) JPEG (c) Odt (d) PNG 5. Image toolbar does not provide a tool for _________________. (a) filtering (b) cropping (c) copying (d) flipping B. Fill in the blanks 1. _________ tool cuts off non-desirable part of the image. 2. To change both brightness and contrast of the image ________________ tool can be used. 3. To simulate the effect of time on picture _____________ tool is used. 4. _________ place image at the bottom of all objects. 5. An image can be deleted by ____________ it and pressing DELETE key. 6. In drawing tools, basic shapes list provide ____________ shapes. 7. Anchor act as _____________ point for a drawing. 8. There are ________________ options for aligning an image horizontally. 9. The ___________ handles of image are used for rotating it. 10. Changing properties of an object _____________ creation, retain them throughout the session C. Short answer type questions 1. What is a digital image? How can you create one? 2. Write steps to insert an image from the gallery using Drag and Drop method. Check Your Progress notes 2023-24
  • 56.
    Domestic Data entryoperator – class X 46 3. How is resizing of image different from cropping it? 4. What are the tools available in drawing toolbar? Describe any five tools. 5. How is linking of an image different from embedding? Give a situation in which you would prefer to link an image. 6. Write steps to change properties for drawing objects. 7. What are the benefits and drawbacks of grouping drawing objects? 8. Describe any two tools from Drawing Object Properties toolbar. 9. Write steps to insert an image in a basic drawing shape. 10. Write factors controlling positioning of an image in a document. notes 2023-24
  • 57.
    As we allknow that LibreOffice Writer is a word processor that provides a variety of features. You have already learned some of the features, such as formatting, editing, inserting tables and images, styling the text and inserting graphics in the document. In this chapter, you will be learning some advanced features of LibreOffice Writer that will be used to create professional documents. To give the listing of the contents of the document, we can use the Table of Contents feature, which is based on different types of heading styles. LibreOffice Writer also provides templates to create professional documents. When multiple users are working on a single document, the Track Changes feature can be used to keep a track of the editing being done by each user. Table of Contents In Class IX, you had learned to insert tables in a document, where the data was represented in a row and column format. In this chapter, we will discuss Table of Contents (ToC). You must have seen table of contents in the beginning of your books. It contains a list of topics and subtopics that have been covered in the book along with page numbers. Table of Contents, allows to insert an automated table of contents in a document. The entries or contents of this table are automatically taken from the headings and sub headings of the document. Also, these contents are hyperlinked in the table. So by clicking on any topic in the table of contents, we can navigate directly to the selected topic. But before creating table of contents, you need to first understand the concept of hierarchy of headings. C HAPTER 3Advanced Features of Writer 2023-24
  • 58.
    Domestic Data entryoperator – class X 48 Hierarchy of Headings LibreOffice Writer supports up to 10 levels of headings H1 to H10. These headings are applied to the headings of the document. The following process will demonstrate how to apply these headings to the headings in the document. Step 1. Create a new document in LibreOffice Writer and enter the text Heading 1 to Heading 10 as shown in Fig. 3.1. Step 2. Click on the Styles button from the right side bar. Click on the Paragraph Styles and then Headings. The Styles dialog window will display the list of headings from Heading 1 to Heading 10 as shown in Fig. 3.1. Step 3. Place the cursor on Heading 1 as typed in the document. Then click on the Heading 1 from the Styles dialog window. Step 4. Repeat Step 2 for the words Heading 2 to Heading 10. Step 4. Observe that Heading 1 to Heading 10 is applied to the words Heading 1 to Heading 10 of the document and these headings have changed as per the applied style as shown in Fig. 3.2. Observe the change in Figs. 3.1 and 3.2. Once the desired heading styles are applied in the document, the same hierarchy will be reflected in the table of contents also. Creating a Table of Contents (ToC) Before you start creating the table of contents or ToC in a document, you must ensure that proper heading styles, such as Heading 1, Heading 2, Heading 3 and so on are inserted in the document. The correct ToC will be Fig. 3.2: Document after applying 10 Headings Fig. 3.1: Hierarchy of 10 Headings 2023-24
  • 59.
    Digital Documentation (aDvanceD)using libreoffice Writer 49 generated only if proper paragraph styling for headings is applied to the document. Once a styled document is created, follow the steps given below to insert the ToC in the given document: Step 1. Open the earlier created file “documentation.odt”. Step 2. Assign proper heading styles to the various headings in the document from the Styles dialog box. For example, assign the heading styles as shown in Fig. 3.3 in the “documentation. odt” file. Step 3. Place the cursor at the position where the table of contents is to be inserted. Usually, it is in the beginning of the document. Step 4. From main menu, select Insert > Table of Contents and Index > Table of Contents, IndexorBibliography. The Table of Contents, Index and Bibliography dialog box will be displayed as shown in Fig. 3.4. Step 5. By default, the Type tab will be selected with a preview of ToC on the right side of the dialog box. On the left of the dialog box, is the Types and Title section. In the Title text box, the default name of the ToC, i.e. Table of Contents is displayed. You can change this name, just by typing in the text box. Type the desired title of the ToC say “Contents” in the Title text box. The title will be changed in the Preview section as shown in Fig. 3.4. Fig. 3.3: Planning for assigning headings styles Fig. 3.4: Table of Contents, Index or Bibliography dialog box 2023-24
  • 60.
    Domestic Data entryoperator – class X 50 By default, the checkbox for Protected against Manual Changes option is selected. This protects the ToC from any accidental change. If this box is unchecked, then the contents of ToC can be changed directly on the document page, just like any other text on the document. In the Create Index or Table of Contents List box, the Entire Document option is selected in the For list box. So the ToC will be automatically created from the headings and sub-headings of entire document. The Outline check box is selected, so the complete outline of the ToC is shown in the preview. Click and deselect it if you do not want to see it. Step 5. Click OK button. The Table of Contents will be inserted in the document as shown in Fig. 3.5. Note that all the headings will appear with page numbers in the ToC. The entries in the ToC are hyperlinked. Moving a mouse pointer over any of the entries will show a tool tip stating to press Ctrl+click to open hyperlink followed by the heading title. Pressing Ctrl+click the cursor will directly move on to the selected section heading. Fig. 3.5: Table of Contents inserted in a document Practical Activity 3.1 Rimjhim has created a report on Environmental Pollution in LibreOffice Writer. She has applied proper heading styles to all section headings of the document. Now, to add table of contents to the document with the heading as Rimjhim’s Table of Contents, follow the steps given below. Step 1. Open the document in LibreOffice Writer. Step 2. Select Insert > Table of Contents and Index > Table of Contents, Index or Bibliography. The Table of Contents, Index and Bibliography dialog box will be displayed. 2023-24
  • 61.
    Digital Documentation (aDvanceD)using libreoffice Writer 51 Step 3. In the Type the Titles text box, type Rimjhim’s Table of Contents. Step 4. Click OK. The Table of Contents will be inserted in Rimjhim’s document. Customisation of ToC Once the ToC is inserted, we can customise it according to our requirements. To do so, right click anywhere on the ToC and select Edit Index option from the popup menu as shown in Fig. 3.6. The Table of Contents, Index or Bibliography dialog box will be displayed as shown in Fig. 3.7. As seen in the previous section, the dialog box has five tabs – Type, Entries, Styles, Columns and Background. The options in these tabs can be used to edit the table in various ways. The changes made will be reflected in the Preview section of the dialog box. Fig. 3.7: Selecting Entries Tab in Table of Contents, Index or Bibliography dialog window Fig. 3.6: Selecting Edit Index option from the pop up menu 2023-24
  • 62.
    Domestic Data entryoperator – class X 52 Type Tab: is active by default after opening the Table of Contents, Entries or Bibliography dialog box to insert the ToC. Entries Tab: contains options to set styles for various entries in the ToC. Styles Tab: contains options to apply the desired styles to the text of each level in the table of contents. To apply a custom paragraph style to any level, follow the steps given below. Step 1. Click and select the level from the Levels list box. Step 2. Click and select the desired paragraph style from the Paragraph Styles list box. Step 3. Click the OK button to apply the selected paragraph style to the selected outline level. The assigned style appears in square brackets Fig. 3.8: Background Tab in Table of Contents, Index or Bibliography dialog window in the Levels list and will also be visible in the Preview pane. Step 4. Click OK button to apply the selected styles. To remove the applied paragraph styling, select the desired level in the Levels list box, and then click the Default button. Columns Tab: contains options to set the number of columns that we want to have in our ToC. Background Tab: contains options to change the background of the ToC as shown in Fig. 3.8. The current background color will be displayed in the Active Color window. 2023-24
  • 63.
    Digital Documentation (aDvanceD)using libreoffice Writer 53 To change the background color follow the following steps. Step 1. Click the Color button on the top of the dialog box. Step 2. Select the desired color from the Colors palette. The selected color will appear in the New color window. Step 3. To add the selected color to the custom palette, click Add Button below the color palette. Now, the added color can be re-used whenever required. Step 4. Click OK to apply the desired color to the ToC (Fig. 3.9). To remove the background colour from the ToC, click None button present on the top of the dialog box. LibreOffice Writer also allows to add a graphic as a background of the ToC. For this, select the Bitmap button in the Background tab of the dialog box. Select the desired graphic option and click OK button (Fig. 3.10). Maintaining a Table of Contents As we know now that a table of contents is a snapshot of the entire document at any given point in time. If any changes are made to the document section headings or page numbering, it should be reflected in the Table of Contents as well. Maintaining a Table of Contents consists of updating and deleting the ToC. Fig. 3.9: ToC with changed background color Fig. 3.10: Adding graphic as a background of the ToC 2023-24
  • 64.
    Domestic Data entryoperator – class X 54 Updating the ToC Writer does not update the ToC automatically. The following activity shows how to update a ToC manually. Practical Activity 3.2 Some more sections are added in the document, accordingly the ToC needs to be changed. To update a ToC manually, follow the steps given below. Step 1. Right-click anywhere in the ToC. Step 2. From the pop-up menu as shown in Fig. 3.11, select Update Index option. Writer updates the ToC so as to reflect any changes made in the document. The reflected changes in ToC is shown in Fig. 3.12. Fig. 3.12: Updated ToC Fig. 3.11: Selecting options for updating and editing a ToC notes 2023-24
  • 65.
    Digital Documentation (aDvanceD)using libreoffice Writer 55 Rimjhim has edited her document after the ToC was inserted. Now she wants to update the ToC and also wants a pink coloured background. Write the steps that Rimjhim should follow. Step 1. To update the ToC, right-click anywhere in the ToC. From the pop-up menu, select Update Index option as shown in Fig. 3.11. Step 2. To apply a coloured background, right click anywhere on the ToC and select Edit Index option from the pop- up menu. Step 3. From the Table of Contents, Index or Bibliography dialog box, select the Background tab. The current background color will be displayed in the Active Color window. Step 4. Click the Color button on the top of the dialog box. Step 5. Select the desired color from the Colors palette. The selected color will appear in the New color window. Step 6. Click OK to apply the desired color to the ToC. Deleting ToC To delete the ToC, right click on the table and select Delete Index option from the pop-up menu. The ToC will be deleted. Practical Activity 3.3 Using Templates A template is a preset layout that helps to create professional and/or formal documents easily. In the previous chapters, we have learned styling of different document objects using templates. In this section, we will learn to create document templates. Sometimes there is a need to copy specific content including graphics, such as logo of a company, image of a product or text, such as tag lines of a product or a company, legal notices or even headers and footers in multiple documents. Instead of adding and then formatting the objects in all documents, we can use templates. For example, templates can be used to create a resume, chapter or project report. A template can contain all the features or objects that a regular document can contain – text, graphics, styles and can even use any language. In a template we can create and save defined headings, text formats, styles, page numbers, headers and footers. notes 2023-24
  • 66.
    Domestic Data entryoperator – class X 56 When new documents are created from these templates, they have the same content segregation, formatting features and appearance as that of the applied templates. At the same time, Writer also allows us to edit the styles and contents of the document to which the template is applied. All documents in Writer are based upon templates. If no specific template is specified, then Writer uses the default template as blank document template for the file being created. Checking the template of the document To see what template is associated with a document, select Properties option from the File menu. The Properties dialog box will be displayed as shown in Fig. 3.13. Since the document was created from the default template, no template is listed in Fig. 3.13. Fig. 3.13: Document properties with no template 2023-24
  • 67.
    Digital Documentation (aDvanceD)using libreoffice Writer 57 When the document is created with template, this window will display the name of the template. For example, if you want to create a document with template. Follow the steps given below. Step 1. Create a new document from File > New > Templates … Step 2. A template selection window will be displayed as shown in Fig. 3.14. Select a template, for example, select the first template ‘Modern business letter’. Step 3. Click on Open button, a document with the selected template will open as shown in Fig. 3.15. Step 4. Now check the template of the created document from File > Properties. Observe that the template name ‘Modern business letter sans-serif’ is displayed under Template in the Property dialog box as shown in Fig. 3.16. Fig. 3.14: Selecting a template 2023-24
  • 68.
    Domestic Data entryoperator – class X 58 Fig. 3.16: Document Properties with template name Modern business letter sans-serif Fig. 3.15: Document created by selecting template 2023-24
  • 69.
    Digital Documentation (aDvanceD)using libreoffice Writer 59 Creating a Template You have learnt how to create a document with predefined template. It is also possible to create your own template and save the current styles and appearance of a document for future use. Follow the steps given below to create and save a template in Writer. Step 1. Open the document in LibreOffice Writer whose template is to be created. Step 2. From main menu bar, select File > Templates > Save. The Save As Template dialog box appears as shown in Fig. 3.17. Step 3. Type the name of the new template (T1) in Template Name text box. Step 4. Select the category of the template being created. A category is just like a folder that helps to organise the templates. Some of the categories that can be seen in the dialog box are My Templates, Business Correspondence, Online Business Documents and Presentations. Step 5. Click and select Set as default template checkbox to make the current template as the default template. Step 6. Click Save button to save the template. A template in Writer is saved with an extension .ott. Now this template file can be used by any document in LibreOffice Writer. Using In-built/Saved Templates LibreOffice allows to use the in-built templates, online templates as well as the templates created and saved by us. Follow the following steps to use a predefined template to style a document. Step 1. Open the new document in LibreOffice Writer. Fig. 3.17: Save As Template dialog box 2023-24
  • 70.
    Domestic Data entryoperator – class X 60 Step 2. From main menu bar, select File > Templates > Manage Templates. You can also use the keyboard shortcut key Ctrl+Shift+N to open the Templates dialog box. The Templates dialog box will be displayed as shown in Fig. 3.18 showing a list of all available templates. Observe that it also shows the Template T1 created in the previous section. Step 3. Select the desired template, (say T1) and click Open button. The new document (with name as Untitled) will be opened with the same content, appearance and formatting effects as the saved template. Step 4. Make the desired changes and save the file. Fig. 3.18: Templates dialog box 2023-24
  • 71.
    Digital Documentation (aDvanceD)using libreoffice Writer 61 Practical Activity 3.4 Niaz works in a garment factory. He has to give the report of each garment being designed and stitched in his factory. His manager wants the same type of report for each garment. Instead of typing every time, he has been suggested to use the template feature of Writer. He wants to create his own default template and then use it to create multiple reports with same format and style. Give the solution to complete this task. Procedure Follow the following steps to create and save a template in Writer. Step 1. Create or open the document whose template is to be created. Step 2. From main menu bar, select File > Templates > Save. The Save As Template dialog box appears as shown in Fig. 3.17. Step 3. Type the name of the new template (Niaz_template) in the Template Name text box. Step 4. Select the category of the template (Business Correspondence) Step 5. Click and select Set as default template check box. Step 6. Click Save button to save the template with an extension .ott. Now follow the steps given below to use the template. Step 1. Select File > Templates > Manage Templates. Step 2. Select the desired template, (Niaz_template) from the Templates dialog box. Step 3. Click on Open button. The new document with name as Untitled, will be opened with the same content, appearance and formatting effects as the saved template. Step 4. Make the desired changes and save the file. Using Online Templates LibreOffice provides a wide range of online templates, which can be downloaded from Internet. Once these templates are installed on the computer, they will appear in Templates window. To view and select online templates provided by Writer, follow the steps given below. Step 1. From main menu bar of LibreOffice Writer, select File > Templates > Manage Templates. notes 2023-24
  • 72.
    Domestic Data entryoperator – class X 62 Step 2. Templates dialog box will be displayed as shown in Fig. 3.18. Observe the small circular icon Browse Online Templates in the lower left corner above the Help button. Step 3. Click on Browse Online Templates button on the bottom left of the Templates window (Fig 3.19). The official templates page of OpenOffice Writer (https://extensions.libreoffice.org/templates) will open in the browser as shown in Fig. 3.20. Fig. 3.19: Browse Online Templates option in Templates dialog box Fig. 3.20: The official templates page of libreoffice.org 2023-24
  • 73.
    Digital Documentation (aDvanceD)using libreoffice Writer 63 Step 1. If you click on any of the templates, you will see the detailed information about that template. Step 2. Download the desired template, say Calendar Creator and save it on your computer. Step 3. Open LibreOffice Writer. Step 4. Click File > Templates > Open Template... Step 5. From the Open dialog box, browse for the template Company Letter, that is to be opened, and click on Open button. Step 6. The template file Company Letter.ott will open. Step 7. Make the desired changes in the content or appearance. Step 8. Save the file as text file Company Letter.odt Libreoffice.org also provides extensions on https:// extensions.libreoffice.org/extensions. These are independent programs that can be added or removed from the main existing application. Some templates are available in the form of extensions which can be downloaded and installed on the computer. Importing a Template Once a template is downloaded and saved in any file or folder, it is possible to import it so that it is visible in the list of templates in the Templates dialog box. Use the following steps to import the template. Step 1. Open the Templates dialog box. Step 2. Click Import Templates button located in the bottom right corner of the dialog box. The Select Category dialog box will open as shown in Fig. 3.21. Step 3. To add the new template into any existing category, click and choose that category from the list box. Otherwise click and select Create a New Category check box. Step 4. Type the name of new category in the text box. Step 5. Click OK button. The Open dialog box will appear. Step 6. Browse for the folder where the downloaded template file Company Letter was saved. notes 2023-24
  • 74.
    Domestic Data entryoperator – class X 64 Step 7. Select the file and click Open button. The selected file will be added to the list of templates as shown in Fig. 3.22. Fig. 3.22: Templates dialog box showing the imported template Fig. 3.21: Select category dialog box 2023-24
  • 75.
    Digital Documentation (aDvanceD)using libreoffice Writer 65 Niaz’s colleague, Balwinder has to create Employee IDs for all the employees of her company, but there is no pre-defined template for the same. She searched some templates on the Internet that suit her requirement. Although, she has learned to create and use a template but does not know how to download and use an online template from the Internet. How will she resolve this issue? Follow the steps given below to solve this problem. Step 1. Open the new document in LibreOffice Writer. Step 2. Open the Templates dialog box by using the keyboard shortcut Ctrl+Shift+N. Step 3. Click on the Online Templates button. Step 4. From the templates page in the browser click and select the desired template, Employee ID Badge, as shown in Fig. 3.23. The description of the template will be displayed. Practical Activity 3.5 Fig. 3.23: Online template Employee ID Badge notes 2023-24
  • 76.
    Domestic Data entryoperator – class X 66 Step 5. Download the template Employee ID Badge and close the browser. By default the template gets downloaded and saved in Download folder. Step 6. Open Templates dialog box again and click on Import button, as shown in Fig. 3.24. Step 7. Then select the category in the Select Category dialog box and click on OK button as shown in Fig. 3.25. Step 8. Browse the Download folder to select the template Employee ID Badge, as shown in Fig. 3.26. Fig. 3.25: Selecting Category while importing Template.jpg Fig. 3.26: Select the template Employee ID Badge to import Fig. 3.24: Clicking on Import Template notes 2023-24
  • 77.
    Digital Documentation (aDvanceD)using libreoffice Writer 67 Step 9. Click on Open button to add the Employee ID Badge template. The template imported appears in the list of templates as shown in Fig. 3.27. Step 10.Double click on Employee ID Badge template. A new file in a new window with the selected template will be opened as shown in Fig. 3.28. Step 11.Make the desired changes and save it as a document file. Fig. 3.27: Updated list of templates in Template dialog window Fig. 3.28: New document created with selected template notes 2023-24
  • 78.
    Domestic Data entryoperator – class X 68 Editing a Template Once a template is created, desired changes can be made in it by following the steps given below. Step 1. Click File > Templates > Manage Templates. The Templates dialog box will be displayed. Step 2. Right click on the template file (say T1) that has to be edited. Step 3. Select the Edit option from the popup menu. The template file will be opened. Make the desired changes and save the file. Now if we apply this template for any document, the edited file will be used. Setting Up a Custom Default Template Any template can be set as a default template. Writer gives a blank document as a default template. At the same time, any template file can be set as a default template by following the steps given below. Step 1. Open the Templates dialog box by pressing Ctrl+Shift+N. Step 2. Right click on the template that you wish to set as the default template. Step 3. From the popup menu, select option Set as Default as shown in Fig. 3.29. The default icon will appear on the top left of the template file. The next time you create a new document by selecting File > New > Text Document, the new document will use the last edited template. Moving a Template When you place a mouse pointer on any of the templates in the Templates dialog box, a tool tip appears displaying the name of Fig. 3.29: Setting up a default template 2023-24
  • 79.
    Digital Documentation (aDvanceD)using libreoffice Writer 69 the template and its respective category. You can move a template from one category to another by following the steps given below. Step 1. Open the Templates dialog box. Step 2. Click and select the template to be moved. Step 3. Click Move button. Step 4. Select the new category where the template has to be moved. Step 5. Click OK button. Exporting a Template Export template feature allows to store the template file in the desired folder on your computer. It is different from moving a template from one category folder to another. When a template is exported, it is saved as a template file at any desired location. Exporting the template is a useful feature for sharing the templates with multiple users. Follow the steps given below to export a template: Step 1. In the Templates dialog box, select the template to be exported. Step 2. Click on Export button located in the bottom right of the dialog box as shown in Fig. 3.30. Step 3. Then the Select Path dialog box appears as shown in Fig. 3.31 to select the folder where you want to export the template. Fig. 3.30: Selecting Export Template button Fig. 3.31: Select Path dialog box 2023-24
  • 80.
    Domestic Data entryoperator – class X 70 Step 5. Select the folder and press on OK button. The selected template will be exported in that folder and a confirmation dialog box, as shown in Fig. 3.32 will be displayed. Applying Templates to a Blank Document You can apply the template from the available template list to any blank document. Follow the steps given below to apply the template. Fig. 3.32: Confirmation after exporting a template Step 1. Open a new document in LibreOffice Writer by selecting File > New > Text Document. Step 2. Select File > New > Templates to display the Templates dialog box. Step 3. Select the desired template. The template will be opened in a new window. Step 4. Copy the entire content of the template by using keyboard shortcut key Ctrl+A for selection and Ctrl+C to copy. Step 6. Open the blank document and paste the copied content of the template by using keyboard shortcut key Ctrl+V. Step 7. Add or delete the content as desired and save it as a text file. Once a template is created, it can be applied to an existing document by selecting Insert >Text From File option. Browse and select the template file that has been saved on the computer. The selected template will be inserted in the document. 2023-24
  • 81.
    Digital Documentation (aDvanceD)using libreoffice Writer 71 Niaz wants to store the template created by him and another one that was imported by Balwinder in a folder named Company_ Templates on the desktop. Follow the steps given below to complete this task. Step 1. Create a new document in LibreOffice Writer and press Ctrl+Shift+N to open the Templates dialog box. Step 2. Select the template (Niaz_template) to be exported. Step 3. Click Export button in the bottom right of the dialog box. The Save As dialog box appears. Step 4. Browse for the folder named Company_Templates stored on the desktop. Step 5. Click Select Folder button to export the selected template. Step 6. Repeat the steps 1 to 5 to import the template Employee ID Badge in the Company_Templates folder. Practical Activity 3.6 Track Changes Feature Track Changes is a powerful tool that makes the process of commenting, editing and reviewing of a document easy between multiple users. A document created by one user need to be reviewed and edited by self or other users. If any modifications are made in the document directly, the original document might get lost. Instead, the Track Changes feature of Writer offers an alternative method to keep a record of all the changes made in the original document. All the changes that are recorded can be either accepted or rejected by the original author. Furthermore, the Track Changes feature also gives us the option to add comments while reviewing a document. The Track Changes toolbar contains various tools that help to track the changes made by different users. To view the Track Changes toolbar, from main menu bar, select View > Toolbars > Track Changes. The Track Changes toolbar will appear in the bottom left corner of the Writer window as shown in Fig. 3.33. Fig. 3.33: Track Changes Toolbar 2023-24
  • 82.
    Domestic Data entryoperator – class X 72 The various buttons present on the Track Changes toolbar shown in the Fig. 3.33 are briefly explained below. (a) View Track Changes – Clicking on this button displays all the changes made in the document by different users. (b) Record Track Changes – Clicking on this button, turns on the Track Changes feature. After this, any sort of editing done will be marked. Any character added to the document will be displayed in a different color and any deletion done will be seen in strike-through style. (c) Previous Track Changes/Next Track Changes – Click on these buttons to navigate between the changes made. (d) Accept/Accept All Track Changes – Once the editing is done, the original author may accept the change made to the document by clicking Accept All Track Changes button will accept all the changes made to the document. (e) Reject/Reject All Track Changes – The original author of the document may reject a single change or all changes made to the document by clicking Reject Track Changes or Reject All Track Changes button, respectively. (f) Manage Track Changes – By clicking on this button the Manage Changes dialog box is displayed, which contains a detailed list of all changes made to the document along with the author’s name and date and time of modification. (g) Insert Comment – This button is used to add a comment in a document. Preparing a Document for Review Track Changes feature is used when a document is shared with one or more users for review or editing purposes. So, before the document is shared, one should make sure that the changes made should be recorded. This will ensure that after the review is done, the original author of the document has the option to accept or reject the changes made. Hence, before the document is notes 2023-24
  • 83.
    Digital Documentation (aDvanceD)using libreoffice Writer 73 sent for review, the original author should prepare the document for review and start recording the changes being made. For that, select Edit > Track Changes >Record option. Alternatively, select the Record button from the Track Changes toolbar. To make sure that no user is able to disable the track changes option, we can protect the document with password. Follow the following steps for the same. Step 1. Create a new document in LibreOffice Writer. From the main menu, select Edit > Track Changes > Protect option. The Enter Password dialog box will appear as shown in Fig. 3.34. Alternately, you can click on Protect Track Changes button located on the Track Changes Toolbar to protect the document. Step 2. Enter the same password in Password and confirm text box and click on OK button. After protecting the document with password, if any user tries to disable the Track Changes feature, Writer will prompt to enter the password. Recording Changes Once the Track Changes features is ON, the reviewers can begin recording the changes in the document. For that, click Edit > Track Changes > Record option. Alternatively select Record button from the toolbar. The shortcut key to start recording the changes is Ctrl+Shift+C. Once the Record option is selected, the Track Changes Fig. 3.34: Enter Password dialog box allowing to enter password after clicking on Protect Track Changes button Fig. 3.35: Recording the changes 2023-24
  • 84.
    Domestic Data entryoperator – class X 74 feature is ON. Now, any character being deleted will be shown as strike through text and any character added will be shown in different colour as shown in Fig. 3.35. Also when you place the mouse pointer over any of the changes, a tool tip is displayed giving details of the author, change made, date and time of change done as shown in Fig. 3.36. To stop recording, deselect the record option by selecting Edit > Track Changes > Record or click the Record button on the toolbar. Accepting and Rejecting Changes Once the changes are made by all the reviewers, the original author may accept or reject them. Open the document and follow the steps given below. Step 1. To accept or reject a change, click on the change made and then select Accept Track Change / Reject Track Change button. Fig. 3.37: Manage Changes dialog box Fig. 3.36: Tool tip showing the details of changes made Step 2. To navigate between the changes made to the document click Previous Track Changes and Next Track Changes buttons. Step 3. To accept or reject all the changes made, select Accept All Tracked Changes / Reject All Tracked Changes button respectively. Step 4. If Manage Track Changes button is clicked, a Manage Changes dialog box appears as shown in Fig. 3.37. It contains the details of all the changes made in the document. The dialog box contains buttons to accept and reject changes as well. 2023-24
  • 85.
    Digital Documentation (aDvanceD)using libreoffice Writer 75 Adding Comments To add comments while reviewing, we can use the Track Changes toolbar as well. Click at the place in the document where the comment is to be placed. Thereafter, follow the steps given below to add comments in a document. Step 1. Click Insert Comment button on the Track Changes toolbar. A comment box will be inserted on the right side of the window. It will have the name of the author or reviewer and date and time of the comment being made, as shown in Fig. 3.38. Step 2. Type the comment. Step 3. Once done click anywhere on the document to activate it. If more than one or two of users add comments then the comments by different users will be shown in different coloured comment boxes in Fig. 3.38. Fig. 3.38: Inserting Comments using the option under Track Changes toolbar 2023-24
  • 86.
    Domestic Data entryoperator – class X 76 Deleting Comments To delete any comment, click on the down arrow on the bottom right of the comment box. A popup menu will be displayed as shown in Fig. 3.39. It gives the option to delete only the current comment, all comments by a particular author and to delete all comments. Select the desired option. Comparing Documents Once the reviewers have made the changes and given their comments, Writer allows to compare the original document with the reviewed document and then choose the option(s) that suits the best. Follow the steps given below to compare the documents. Step 1. Open the edited document. Step 2. Select Edit > Track Changes > Compare Documents option. Alternatively, click Compare Non-Tracked Changed Document from the toolbar. Fig. 3.39: Deleting Comments from pop-up menu 2023-24
  • 87.
    Digital Documentation (aDvanceD)using libreoffice Writer 77 Step 3. The Compare To dialog box will appear. Browse and select the original file to be compared as shown in Fig. 3.40. Step 4. The Manage Changes dialog box is displayed as shown in Fig. 3.37. Accept or reject the desired changes. Step 5. Close the dialog box when done. Step 6. Save the edited file. Fig. 3.40: Selecting original file Practical Activity 3.7 Pradeep has created a document on ‘Humans and Nature’. He wants his friends to review the document and give their comments wherever required. The following process will demonstrate how his friends add comments in the document. Step 1. Open the document created by Pradeep to review. Step 2. Click on Insert Comment button on the toolbar. Step 3. Type the comment in the comment box. Step 4. Once done click anywhere on the document to activate it. Step 5. Repeat the steps given above to add more comments in the document. 2023-24
  • 88.
    Domestic Data entryoperator – class X 78 After incorporating the reviews, Pradeep mailed the document to his editor with the Track Changes ON. He made certain changes in the document. Pradeep wants to compare his original document with the reviewed document. The following process will demonstrate how Pradeep will compare the edited document with the original document. Step 1. Open the edited document. Step 2. Select Edit > Track Changes > Compare Documents option. Step 3. The Compare To dialog box will appear. Browse and select the original file to be compared as shown in Fig. 3.40. Step 4. The Manage Changes dialog box is displayed as shown in Fig. 3.37. Step 5. Accept or reject the desired changes. Step 6. Close the dialog box when done. Step 7. Save the edited file. Practical Activity 3.8 summary • A Table of Contents (ToC) contains a list of topics and subtopics that have been covered in the book along with page numbers. • A ToC in Writer allows to insert an automated table of contents in a document. • The contents in the ToC are hyperlinked in the table. • LibreOffice Writer supports up to 10 levels of headings H1 to H10. • To insert a ToC, select Insert > Table of Contents and Index > Table of Contents, Index or Bibliography. • To add a graphic as a background of the ToC, select the Bitmap button in the Background tab of the Table of Contents, Index or Bibliography dialog box. • Once inserted, a ToC can be edited or deleted from the document. • A template is a preset layout that helps to create professional and/or formal documents easily. • In a template we can create and save defined headings, text formats, styles, page numbers, headers and footers. notes 2023-24
  • 89.
    Digital Documentation (aDvanceD)using libreoffice Writer 79 • The new documents created from these templates have the same content segregation, formatting features and appearance as that of the applied templates. • To create a new document with a template, select File > New > Templates … • To create and save your own template, select File > Templates > Save. • LibreOffice provides a wide range of online templates which can be downloaded from then Internet. • Once these templates are installed on your computer, they will appear in Templates window from where they can be viewed and selected. • Any template can be set as a default template. • Export template option allows to store the template file in the desired folder on your computer. • Exporting a template is a very useful feature to share the templates with multiple users. • Track Changes feature of Writer makes the process of commenting, editing and reviewing of a document easy between multiple users. • The Track Changes feature of Writer helps to record all the changes made in the original document. All the changes that are recorded can be either accepted or rejected by the original author. • The Track Changes feature also gives us the option to add comments while reviewing a document. • The Track Changes toolbar contains various tools that help to track the changes made by different users. • To view the Track Changes toolbar, from main menu bar, select View > Toolbars > Track Changes. 1. Rajnikant has created a detailed report on Education in India using the LibreOffice Writer tool. He has styled the document well by inserting proper paragraph and section headings. His colleague Murugan advised him to insert a Table of Contents that will give a complete glimpse of his report. Help Rajnikant to insert a ToC with a green background. Practical Exercises notes 2023-24
  • 90.
    Domestic Data entryoperator – class X 80 2. After the ToC was inserted, Rajnikant made some changes in the report but the changes were not reflected in the ToC. Will he have to again insert a new ToC? Suggest him a better way to update the ToC. 3. Rukhsat has just downloaded a template from libreoffice.org. Now she wants to import it in My templates category of the Templates folder. How can she complete her task? 4. Rimit loves to create cards on his computer. This time he decided to make his own Christmas cards and send them to his friends. He wants to do the task using the templates feature of Writer. He has already saved and imported the desired template(card.ott). Help him to create cards for at least five of his friends. 5. Teena is a member of the editorial team of her school. She wants to set the newspaper template as her default template. Write the steps to help Teena complete the task. 6. Venkat has created a document on India’s Trade Review. He wants two of his friends, Rinky and Sujoy to review his document and if required, add comments to it. But none of them know how to use the Track Changes feature of Writer. Help them to complete the task. 7. Venkat has received the reviewed file with modifications and comments. What steps will he follow now to accept or reject the changes done by his friends. 8. Write steps to compare the original document created by Venkat and the edited document sent by Rinky and Sujoy. Check Your Progress A. Multiple choice questions 1. Which of the following is NOT true about Table of Contents, Index or Bibliography dialog box? (a) It has four tabs (b) On the Type tab, by default, the checkbox for Protected against Manual Changes option will be selected. (c) The Styles tab contains options to change the background colour. (d) None of the above 2. Which of the following tabs is by default active when the Table of Contents, Entries or Bibliography dialog box is opened? (a) Entries (b) Background (c) Styles (d) Type notes 2023-24
  • 91.
    Digital Documentation (aDvanceD)using libreoffice Writer 81 3. Which of the following tabs contains options to set styles for various entries in the ToC? (a) Entries (b) Background (c) Styles (d) Type 4. Which of the following can be added in the background of Table of Contents in LibreOffice Writer? (a) Color (b) Graphic (c) Both a and b (d) Neither a nor b 5. Which of the following is NOT true about templates? (a) The styles and formatting features can be reused. (b) LibreOffice provides online templates (c) We cannot create our own templates. (d) None of the above. 6. Which of the following is the shortcut key to open the Templates dialog box? (a) Ctrl+Alt+N (b) Shift+Ctrl+N (c) Ctrl+Alt+T (d) Shift+Alt+T 7. Which of the following buttons, in the Templates dialog box, will be clicked to save a template displayed in the list of templates? (a) Export (b) Import (c) Move (d) None of the above 8. Which of the following is the shortcut key to select he entire document? (a) Ctrl+S (b) Ctrl+A (c) Ctrl+D (d) Ctrl+B 9. Which of the following is the correct sequence of options to open the Templates dialog box? (a) File > Manage Templates > Templates (b) File > Templates > Manage Templates (c) Insert > Templates >Manage Templates (d) Insert > Manage Templates > Templates 10. Which of the following is true about Track Changes feature of Writer? (a) You cannot record a change made in the document. (b) A comment of a particular author only can be deleted (c) Any change made to the document is permanent. (d) None of the above 11. Which of the following menus contains the Track Changes option? (a) File (b) Edit (c) View (d) Insert 12. Which of the following is the shortcut key to start recording the changes being made in the document? (a) Ctrl+Shift+C. (b) Alt+Shift+C (c) Ctrl+Alt+C (d) Shift+C+F2 notes 2023-24
  • 92.
    Domestic Data entryoperator – class X 82 B. Fill in the blanks 1. To navigate to the topic from the ToC, press ___________ key while clicking the mouse button on that topic. 2. To remove the applied paragraph styling in the ToC, select the outline level in the Levels list box, and then click the _______ button. 3. If the checkbox for___________________ option is selected, the ToC is protected from any accidental change. 4. To update the ToC manually, right click and select ___________ option from the pop up menu. 5. The ___________ tab contains options to set the number of columns that we want to have in our ToC. 6. A ________________________ is a preset layout that helps us to create professional and formal documents easily. 7. The default template in Writer is ____________________. 8. To find the template that is being used in the current document, select ___________ option from the File menu. 9. The ____________________ button is clicked in Templates dialog box to view online templates. 10. The __________________ feature of Writer offers us an alternative method to keep a record of all the changes made in the original document. 11. The shortcut key to start recording the changes is _________. 12. After the Track Changes feature is ON, the added characters are shown as ____________ text. C. State whether the given statements are True or False 1. The topics in Table of Contents are hyperlinked. 2. The Table of Contents in LibreOffice Writer can be updated automatically. 3. TABLE of Contents can be inserted even if the section headings are not styled. 4. Once a ToC is created, it cannot be edited. 5. We cannot add a graphic as a background of ToC. 6. A single template can be used for multiple documents. 7. A template cannot contain graphics. 8. All documents in Writer are based upon templates. 9. The online templates cannot be added to the list of templates in the templates dialog box. 10. A template once created can be edited again and again. 11. The changes recorded have to be accepted by the original author. 12. We can delete the comments added in a document by the user. notes 2023-24
  • 93.
    Digital Documentation (aDvanceD)using libreoffice Writer 83 D. Answer the following questions 1. What is the need of table of contents? 2. What will happen if the ‘Protected Against Manual Changes’ option is not selected in the Type tab of Table of Contents, Index or Bibliography dialog box? 3. Name the five tabs present in the Table of Contents, Index or Bibliography dialog box. 4. What do you mean by customization of ToC? 5. How headings and sub-headings of a document differentiated in ToC? 6. Define a template. 7. Give any one advantage of using a template for your document. 8. What is the difference between importing and exporting a template? 9. Name any two categories of templates. 10. When is exporting of templates useful? Give any one reason. 11. What is the difference between Accept Track Change and Accept All Tracked Changes buttons? 12. How do we prepare a document for review? 13. Identify and label the Record button, Insert Comments button, Accept All Tracked Changes, Reject Track Change buttons in the following figures of Track Changes toolbar (shown in Fig 3.41). 14. Identify and label “Browse Online Templates button, Export button, Import button” in the following Templates dialog box. Fig. 3.41: Track Changes Toolbar notes 2023-24
  • 94.
    Electronic Spreadsheet (Advanced) using LibreOffice Calc 2 IntroductIon Inthe modern digital world, one of the most important thing is counting and calculations. Every profession, household, institution and even our smart devices have to deal with numbers. In computers we can do the calculations on number of records spread over the long sheet using the spreadsheet software that helps to work with numbers efficiently. It resembles an accountant’s ledger book wherein everything is recorded under suitable headings. We have already learned in Class 9, that how the spreadsheet software performs calculations and present data in tabular format. It becomes easy to visualise a huge grid of numbers when represented using charts in electronic spreadsheet. Moving further, in this unit you will learn advanced features of electronic spreadsheet using LibreOffice Calc to perform analysis, automate repeated tasks, link, share and review data. It includes – analysing data to extract useful information for making effective decisions. Macros, is the another powerful feature of spreadsheet covered in this unit. Macros are a set of stored functions used to automate processes repeatedly. They are tools which can be used 2023-24
  • 95.
    ElEctronic SprEadShEEt (advancEd)uSing librEofficE calc 85 notes to perform most of the redundant tasks with relative ease. In the second chapter of this unit, you will learn to create multiple sheets and link the data in multiple sheets. It can be done in two ways, one is creating reference to other sheets by using keyboard and mouse, and other is by linking external data. LibreOffice Calc also provides the sharing feature that allows to share the spreadsheet for editing purpose. This saves to keep track of multiple copies of the same spreadsheet corrected by different users. Sharing allows the users to work on the same spreadsheet in collaboration. 2023-24
  • 96.
    IntroductIon Analysing data isthe process to extract useful information for making effective decisions. The spreadsheet is one of the best software used for data analysis. It is used to retrieve, correlate, explore and visualise data to identify patterns, trends and relationships. The spreadsheet component in LibreOffice known as Calc includes several tools used to manipulate the data in the spreadsheet. You can analyse the data and interpret the results from it. In this chapter, you will learn to analyse data using LibreOffice Calc. Consolidating Data Consolidate is a function used to combine information from multiple sheets of the spreadsheet into one place to summarize the information. It is used to view and compare variety of data in a single spreadsheet for identifying trends and relationships. You need to check the following before consolidating data. • Open each sheet in the spreadsheet and check that the data types must match which you want to consolidate. • Match the labels from all the sheets which are used for consolidating. • Enter the first column as the primary column on the basis of which the data is to be consolidated. Steps to consolidate the data are as follows: Step 1. Open the spreadsheet which has the data to be consolidated. Step 2. Create a new sheet where the data has to be consolidated. Step 3. Choose Data > Consolidate option that will open Consolidate dialog as shown in Fig. 4.1. C HAPTER 4 Analyse Data using Scenarios and Goal Seek 2023-24
  • 97.
    ElEctronic SprEadShEEt (advancEd)uSing librEofficE calc 87 Step 4. Observe that the default function “Sum” is seen in the Function drop- down. You will be able to see the list of functions as shown in the Fig. 4.2 by clicking on the Function drop-down. Step 5. Choose the required function from the drop-down list. Step 6. The sources data range list contains existing named ranges to quickly select from that. But if the source range is undefined, then click and select the range from the sheet which is to be consolidated. Step 7. Click on Add to add this range under the ‘Consolidation ranges’ of the Consolidation dialog. Step 8. Repeat steps 6 and 7 to add more sheets to be consolidated. Step 9. Remember to check the target range specified under Use ‘Copy results to’. If it is not mentioned, then click on the cell of sheet where the final data has to be produced. Step 10.Click on Options that will list two checkbox under Consolidate by “Row labels” and “Column labels” and “Link to source data” under Options, as shown in Fig. 4.3. From this you can select the additional feature as per requirement. The option consolidate by rows and columns are checked to consolidate data as per row labels and column label. Link to source data is checked to make the modification automatically in the consolidated (target) sheet while making any changes in the source data. Step 11.Finally click on OK button. Let us illustrate this through following activity. Fig. 4.1: Consolidate dialog box Fig. 4.2: Functions under consolidate Fig. 4.3: Consolidate options 2023-24
  • 98.
    Domestic Data entryoperator – class X 88 Let us take an example that we have two branches of our shop namely ABC and XYZ. We have the Sales records for the month of January and February of both the branches in two different sheets named ABC_Branch and XYZ_Branch. Now we have to consolidate these two sheets to get the sum of both the sheets monthly to get the insight about the sale as per product and branch. Now let us create the following sheets in a spreadsheet sales. Now let us use the two sheets ‘ABC_Branch’ and ‘XYZ_Branch’ of a spreadsheet sales.ods which will be consolidated using the following steps: Step 1. Add a new sheet and rename it as Consolidate Step 2. Click on Data > Consolidate or use the keyboard shortcut key ALT+D, the Consolidate dialog window will open as shown in Fig. 4.6. Fig. 4.6: Consolidate dialog window Step 3. In the Function box, choose Sum function from the drop down as we want to add the data from all the sheets. Step 4. Click in the Source data ranges box and then click on the worksheet ABC_Branch and select the area to be consolidated and then click on the Add button will add the copy reference in the consolidation ranges (Fig. 4.7). Fig. 4.4: Data for ABC_Branch Fig. 4.5: Data for XYZ_Branch notes Practical Activity 4.1 2023-24
  • 99.
    ElEctronic SprEadShEEt (advancEd)uSing librEofficE calc 89 Fig. 4.7: Selecting the source data range from the sheet Step 5. Click on the sheet XYZ_Branch and select the area to be consolidated and then click on ADD will add the next consolidation range (Fig. 4.8). Step 6. Click on the ‘+’ sign next to Options in the Consolidate dialog window to change the settings. ‘Consolidate by’ has two options Row labels and Column labels. Check row label or column label or both if you want to consolidate it by matching the label. If Link to source data is checked, then it will keep on updating the data of the Consolidate sheet automatically if there is any change made in the selected ranges. Fig. 4.8: Options for setting more properties Step 7. Click on ‘Copy results to’ and then click on any of the cell in the Consolidate sheet where you want to copy the final result after consolidation. Step 8. Click on OK button. Fig. 4.9 will display the Consolidate sheet with data after consolidation. notes Fig. 4.9: Consolidated sheet 2023-24
  • 100.
    Domestic Data entryoperator – class X 90 The consolidated sheet will have all the consolidated data along with the original data. You can view the original data of both the sheets and by clicking on the ‘+’ sign in front of the consolidated row. Fig. 4.10 shows the original data and consolidated data. Fig. 4.10: Consolidated sheet details by clicking on the + sign in front of rows Create two sheets Marks_Term1 and Marks_Term2 to store the marks in Term1 and Term2 for a set of students taking the following columns: 1. Name 2. Marks in English 3. Marks in Hindi 4. Marks in Maths 5. Marks in Science 6. Marks in Social Science 7. Total marks (using function Sum) 8. Percentage (using function Average) Now, use the consolidate function to merge these two sheets. Practical Activity 4.2 notes Groups and Subtotals Group and Outline in Calc is used to create an outline of the selected data and can group rows and columns together so that one can collapse (-) to hide it or expand (+) it using a single click on it. Select the data to be grouped, click on Data>Group and Outline. Then choose Rows to group the data on the basis of rows or columns to group it on the basis of columns. 2023-24
  • 101.
    ElEctronic SprEadShEEt (advancEd)uSing librEofficE calc 91 The Subtotal tool in Calc creates the group automatically and applies common functions like sum, average on the grouped data. One can use any type of summary function for each column as per the requirement of data analysis. It can group subtotals by using category and sorts them in ascending or descending order so that one need not to use filters. Follow the following steps to apply Subtotal tool. Step 1. The sheet where this is to be applied must have labels to the column Step 2. Click on Data menu and choose Subtotals (Data>Subtotals) as shown in Fig. 4.11. Step 3. Choose the column in the Group by list in the subtotal dialog which is to be used for grouping the data in the sheet as shown in Fig. 4.12. Step 4. Select the column by clicking the checkbox under Calculate subtotals for to create subtotals for. Step 5. Select the desired function by clicking the function under Use function. Step 6. You can use the 2nd Group and 3rd Group tabs to group the data in further levels. Step 7. Click on OK button. Fig. 4.11: Choosing subtotal option from Data menu Fig .4.12: Choose the column in the Group by list Let us take an example to store marks in various subjects by students of Class X as shown in the table given in Fig. 4.13. To take out the average of the subjects scored in each class, use the subtotal tool which automatically group the data on a particular column and perform the selected function on any of the column. Practical Activity 4.3 2023-24
  • 102.
    Domestic Data entryoperator – class X 92 To solve this, perform the following steps: Step 1. Create a sheet as shown in the Fig. 4.13 to take the marks for students in a term for a class. Fig. 4.13: Spreadsheet with student marks in two class Step 2. Now, to calculate the average marks scored by the students of each class in each subject, i.e. class-wise and subject analysis. Step 3. To do so, click on Data > Subtotal, the subtotal dialog as shown in Fig. 4.14 will open. Step 4. Choose the column i.e. Class under Group by in the 1st Group on which we need to group the whole data. Also, select the subjects i.e. English, Hindi, Maths, Science and Social Science under Calculate subtotals for. For each subject click on the Average under Use function individually otherwise Sum function will be used by default. Step 5. Click OK and the sheet will look like as shown in the Fig. 4.15. Fig. 4.14: Subtotal dialog window notes Fig. 4.15: Marks list after Subtotal 2023-24
  • 103.
    ElEctronic SprEadShEEt (advancEd)uSing librEofficE calc 93 Observe that outline to the left of the row numbers which is inserted after performing the subtotal tool. This outline shows the hierarchical structure which can be used to show or hide different levels by clicking on the group indicators ‘+’ sign to expand and ‘–’ sign to collapse the data. You can hide the low-level details and just look at the final totals and grand totals. If you want to remove the outline feature from the sheet at any point of time then it is possible by just clicking on Data > Group and Outline > Remove Outline. notes Create a sheet as shown in Fig. 4.16 and then calculate the average of marks subject wise on the basis of class and stream. Also, try out another function Count to calculate the number of students in each subject. Fig. 4.16: Marksheet Practical Activity 4.4 What-if Scenarios What-if scenario is a set of values that can be used within the calculations in the spreadsheet. A name is given to the scenario and several scenarios can be created on the same sheet. It is used to explore and compare various alternatives depending on changing conditions. It can be used in the beginning of any project to optimise the output. This tool is used to predict the output while changing the inputs which reflects the output and thus one can choose the best plan of action based on it. 2023-24
  • 104.
    Domestic Data entryoperator – class X 94 For example, a person who is taking car loan has to decide on certain factors as given below: • The number of years for which the car loan is taken. • The total amount of car loan The above two factors, i.e. Principal amount and Number of years can display the EMI to be paid monthly. Follow the following steps to create scenario. Step 1. Select the cells which contains values in the sheet that needs to be changed. To select multiple cells, hold Ctrl key and click on the cell to be selected. Step 2. Choose Tools>Scenarios will open scenario dialog window as shown in Fig. 4.17. Step 3. Enter a name for the new scenario and leave the other fields unchanged. Step 4. Click on OK button. Step 5. This will create a new scenario which is activated automatically. Practical Activity 4.5 Fig. 4.17: Create Scenario dialog window Let us take an example to get the insight of the EMI, Total Amount paid and Total Interest paid on the Loan Amount (Principal) taken for a fixed Rate of Interest for a number of time period. So, now we want to see what will be the EMI and how much is the total interest paid for different loan amount and time period. To do so, let us use the Scenario tool by using the following steps: Step 1. Create the following sheet (Fig. 4.18) and remember to put the formula to calculate EMI in B3 as = ABS(PMT(B2/1200,E1*12,B1)) Total Amount in B4 = B3*E1*12 Total Interest in B8 = B4-B1 Fig. 4.18: Loan sheet 2023-24
  • 105.
    ElEctronic SprEadShEEt (advancEd)uSing librEofficE calc 95 Step 2. Select the cells B1 and E1 using Ctrl + Click on these cells as these two are the variables in this situation Step 3. Choose Tools > Scenario will display the Create Scenario dialog window as shown in Fig. 4.19. Fig. 4.19: Create Scenario dialog window Step 4. Write the name of the Scenario and click on OK button will add this in the scenario list. Step 5. Let us create two more scenarios as LAmt_2 and LAmt_3 with Loan Amount as 2500000, No. of years as 12 and Loan Amount as 2500000, No. of years as 10 respectively. We can define different scenarios to do so on the same sheet, each with some different values in the defined cells. Click on Tools > Scenario, write the name of the scenario and click on OK. The Loan sheet will look like as shown in the Fig. 4.20 Fig. 4.20: Loan sheet with scenarios Step 6. Click on the navigator icon in the toolbar and then click on scenarios. Click on the scenario name will display all the details as per that scenario. Calculate the income tax by entering the salary using different scenarios for two variables income tax slab and tax rate. The sheet should look as shown in Fig. 4.21. The different scenarios to be taken as given below: Income Slab Tax rate 7.5 to 10 lakhs 15% 10 to 12.5 lakhs 20% Practical Activity 4.6 notes 2023-24
  • 106.
    Domestic Data entryoperator – class X 96 12.5 to 15 lakhs 25% >15 lakhs 30% Fig. 4.21: Income tax sheet What-if Analysis Tool What-if tool uses Data > Multiple Operations and is a planning tool for what-if questions. In this, the output is not shown in the same cells, whereas it uses a drop-down list to display the output depending upon the input. The Multiple Operations tool creates a formula array to display the list of results applying the formula on a list of alternative values used in the formula. This tool uses two arrays of cells, one array contains the input values and the second array uses the formula and display the result. It is useful to check in the beginning to understand from the output for the efficiency. What-if analysis tool is very helpful when we want to know how much profit we earn for a particular product for a series of selling units. Following steps are used for what-if analysis tool: Let us calculate with one formula and one variable: Step 1. Enter the data in the cells and then enter a formula to calculate a result from values in other cells. Step 2. Create an array of input values on the basis of which the output is to be generated using the formula. Step 3. Select the cell range of input array and output array. notes 2023-24
  • 107.
    ElEctronic SprEadShEEt (advancEd)uSing librEofficE calc 97 Let us take an example to calculate the profit on annual series of sale depending on the Selling Price, Cost Price and Fixed Cost expenses. Step 1. Create the sheet as given below in Fig. 4.23 Fig. 4.23: Sale_incentive sheet Step 2. In Cell B5 enter the formula = B4 * ( B1 – B2) – B3 Step 3. Select the cell range from D2:E11 Step 4. Click on Data > Multiple Operations will display the Multiple operations dialog window as shown in Fig. 4.24. Fig. 4.24: Performing Multiple Operations Practical Activity 4.7 Fig. 4.22: Multiple operation dialog window Step 4. Click on Data>Multiple Operations will display the multiple operations dialog window as shown in Fig. 4.22. Step 5. Enter the cell address in the Formulas box from the sheet which contains the formula Step 6. Now, enter the cell address of the cell which is a variable and is used in the formula in Column input cell box. Step 7. Click on OK will generate all the possible outputs based on the formula. 2023-24
  • 108.
    Domestic Data entryoperator – class X 98 Step 5. We have formula in cell B5, as we want to use the same cell address to be copied therefore, we have used absolute cell referencing and written it as $B$5. Step 6. In this example, we have another variable as number of items sold which is in the cell $B$4 Step 7. Click on OK will generate a sheet as shown in Fig. 4.25. Fig. 4.25: Result for multiple operations Create the following sheet (Fig. 4.26) to calculate the profit and then decide how many books are to be published based on the profit. Fig. 4.26: Practical exercise Practical Activity 4.8 Goal Seek It general we fill in the values in the cells and then create formula on these values to get the required result. To predict the output, we keep on changing all the input values to obtain the desired output. Goal seek notes 2023-24
  • 109.
    ElEctronic SprEadShEEt (advancEd)uSing librEofficE calc 99 Let us take a very simple example to perform the backward calculation to find out an input depending upon the specific output. A student has received marks in 4 subjects and has to appear for the 5th subject and plans an aggregate as 70. So, he can use goal seek tool to check how many marks he has to score in the 5th subject to get the required percentage. Follow the following steps to perform this task. Step 1. Create the marksheet as shown below in the Fig. 4.28. Enter the average function in cell B7 as = Average(B2:B6) Fig. 4.28: Marksheet Practical Activity 4.9 Fig. 4.27: Goal seek dialog window helps in finding out the input for the specific output. For example, if you want to know the number of units produced to get the desired output then use Goal seek analysis tool. Follow the following steps to use Goal seek tool. Step 1. Enter the values in the worksheet. Step 2. Write the formula in the cell where the calculation has to be used. Step 3. Place the cursor in the formula cell, choose Tools > Goal Seek. Step 4. The Goal seek dialog window will appear as shown in Fig. 4.27, the Formula cell box will have the correct formula. Step 5. Place the cursor on the Variable cell box and click on the cell that contains the value to be changed. Step 6. Enter the desired result in the Target value box. Step 7. Click on OK button. 2023-24
  • 110.
    Domestic Data entryoperator – class X 100 Step 2. Click on Tools > Goal Seek will display the Goal seek dialog window as shown in Fig. 4.29. Fig. 4.29: Goal seek dialog window Step 4. Write the cell address of the formula, i.e. B7 in the Formula cell box. Step 5. Write the cell address of the cell which is to be generated by the system in the Variable cell box. In this example, it is cell B6 which we want to be filled as per the average marks needed. Step 6. Enter the result in the Target value box. As per our question, we have to get minimum 70 aggregate so we will write 70 in the target value. Step 7. Clicking on OK will display an error as LibreOffice Calc will not accept the Variable cell to be empty. So, this error dialog window will prompt to add 0 value in the variable cell as shown in Fig. 4.30. Fig. 4.30: Goal Seek failed alert Step 8. Click on Yes and then repeat the step 2 will display the dialog window and prompts whether to change the cell with the calculated value as shown in Fig. 4.31. Fig. 4.31: Goal Seek succeeded Step 9. Click on Yes will change the value with the calculated one in the sheet as shown in the Fig. 4.32. Fig. 4.32: Marksheet after applying Goal seek notes 2023-24
  • 111.
    ElEctronic SprEadShEEt (advancEd)uSing librEofficE calc 101 A. Multiple choice questions 1. Which of the following feature is not used for data analysis in spreadsheet? (b) Consolidating data (c) Goal Seek (d) Subtotal (e) Page layout 2. Which of the following office tool is known for data analysis? (a) Writer (b) Calc (c) Impress (d) Draw 3. Which of the following operations cannot be performed using LibreOffice Calc? (a) Store and manipulate data (b) Create graphical representation of data (c) Analysis of data (d) Mail merge 4. What is the extension of spreadsheet file in Calc? (a) .odb (b) .odt (c) .odg (d) .ods 5. The default function while using Consolidate is ____________. (a) Average (b) Sum (c) Max (d) Count 6. Group by is used in _____________ tool to apply summary functions on columns. (a) Consolidate function (b) Group and Outline (c) What-if scenario (d) Subtotal tool Create the following spreadsheet (Fig. 4.33) to find out the quantity to be sold for the item Talc so as to get the total amount of 50000. Fig. 4.33: Practical Exercise Practical Activity 4.10 notes Check Your Progress 2023-24
  • 112.
    Domestic Data entryoperator – class X 102 7. Which tool is used to predict the output while changing the input? (a) Consolidate function (b) What-if scenario (c) Goal seek (d) Fine and Replace 5. Which of the following is an example for absolute cell referencing? (a) C5 (b) $C$5 (c) $C (d) #C 5. _____________ analysis tool works in reverse order, finding input based on the output. (a) Consolidate function (b) Goal seek (c) What-if analysis (d) Scenario B. State whether the following statements are True or False 1. Consolidate function is used to combine information from two or more sheets into one. 2. Consolidate function cannot be used to view and compare data. 3. Link to source data is checked updates the target sheet if any changes made in the source data. 4. Using subtotal in Calc needs to use filter data for sorting. 5. Subtotal tool can use only one type of summary function for all columns. 6. Only one scenario can be created for one sheet. 7. What-if analysis tool uses one array of cells. 8. Goal seek analysis tool is used while calculating the output depending on the input. 9. The output of What-if tool is displayed in the same cell C. Fill in the blanks 1. Consolidate function is used to combine information from multiple sheets to _______________________ the information. 2. Data can be viewed and compared in a single sheet for identifying trends and relationships using ______________ function. 3. ________________ under Data menu can be used to combine information from multiple sheets into one sheet to compare data. 4. The _________________ tool in Calc creates the group automatically and applies functions on the grouped data. notes 2023-24
  • 113.
    ElEctronic SprEadShEEt (advancEd)uSing librEofficE calc 103 5. _______________ scenario is used to explore and compare various alternatives depending on changing conditions. 6. ______________ is a planning tool for what-if questions. 7. What-if analysis tool uses ____________ array of cells, one array contains input values and the second uses the _____________. 8. _____________ helps in finding out the input for the specific output. D. Answer the following questions 1. Define the terms (a) Consolidate function (b) What-if analysis (c) Goal seek 2. Give one point of difference between (a) Subtotal and What-if (b) What-if scenario and What-if tool 3. Give any two advantages of data analysis tools. 4. Name any two tools for data analysis. 5. What are the criteria for consolidating sheets? 6. Which tool is used to create an outline for the selected data? Lab Exercise 1. Mr Gurdeep has to take a loan of Rs. 10 lakhs to buy a house. After assessing his situation, he has realized that he can pay the loan in 15 years by paying out an EMI of 20,000. (a) Use Goal seek to find out the interest rate at which he can borrow the loan. (b) Use What If Scenario to depict payment of loan in 25 years by paying out an EMI of 10,000. (c) Use Scenario manager to find the best case. 2. Power Motors has 3 branches all over Bhopal. Each branch maintains monthly sales of different models of electric scooter and at the end of month mails it to the State Head. Prepare a consolidated sheet that shows total and average sales made for each model of the electric scooter with respect to the spreadsheet sent by the branches to the head office. You are required to identify the column headings for the various branches, enter data in three different spreadsheets indicating different branches and consolidate data to find total sales and average sales for each model. notes 2023-24
  • 114.
    IntroductIon Many times, wehave to perform repeated tasks such as typing school name, address, contact numbers with a specific formatting or apply the same formula at a particular cell for different sheets in a workbook. How easy would it be if we could get this done at the click of a button? This will ensure that we maintain the standardization in terms of font style without any typing mistake. Can you think of any other advantage? In this chapter, you will learn how to use a macro to automate repeated tasks that are always performed in the same way over and over again. Recording a Macro A macro is a single instruction that executes a set of instructions. These set of instructions can be a sequence of commands or keystrokes that can be used for any number of times later. A sequence of actions such as keystrokes and clicks can be recorded and then run as per the requirement. It is important to know that by default the macro recording feature is turned off when LibreOffice is installed on your computer. Hence, to record a Macro ensure that the macro recording is enabled. Macro recording can be enabled using the Tools option on the main menu bar by selecting Tools>Options>LibreOffice>Advanced. Observe the Optional Features. There are two options which are not check marked. Put the checkmark on the option “Enable macro recording” as shown in Fig. 5.1. C HAPTER 5 Using Macros in Spreadsheet Fig. 5.1: Enabling a Macro 2023-24
  • 115.
    ElEctronic SprEadShEEt (advancEd)uSing librEofficE calc 105 Observe in Fig. 5.2, that the Record Macro option found under Tools>Macros is visible now. The Macro records all the keyboard and mouse actions but the following actions are not recorded. • Opening of windows • Actions carried out in another window than where the recording was started. • Window switching • Actions that are not related to the spreadsheet contents. For example, changes made in the Options dialog, macro organizer, customizing. Fig. 5.2: Record Macro option after enabling macro • Selections are recorded only if they are done by using the keyboard (cursor traveling), but not when the mouse is used. • The macro recorder works only in Calc and Writer. Follow the steps given below to record a macro. Step 1. Click on Tools > Macros and then click on the Record Macro option. Step 2. Now start taking actions that will be recorded. Step 3. Once you click on Record Macro option, recording of actions starts and a small alert will be displayed as shown in Fig. 5.3. Clicking on “Stop Recording” button will stop the recording of actions. Step 4. This will open the Basic Macros dialog window to save and run the created macro, as shown in Fig. 5.4. Step 5. To save the macro, first select the object where you want the macro to be saved in the Save Macro to list box. Step 6. The name of the macro by default is Main and is saved in the Standard Library in Module1. You can change the name of the macro. Step 7. Click on Save button. Fig. 5.3: Stop Recording button Fig. 5.4: Basic Macros dialog window 2023-24
  • 116.
    Domestic Data entryoperator – class X 106 Record a macro to apply the following style to the Heading “Data Analysis” in the cell A1. The font style should be “Times New Roman” The font size should be “14” The font colour should be “Blue” Cells from A1 to G1 should be merged and centred Procedure Step 1. Create the spreadsheet. Write the heading “Data Analysis” in cell A1. Step 2. Choose Tools > Macros > Record Macro. Perform the actions mentioned above in Practical Activity 5.1 in the spreadsheet. Step 3. Click Stop Recording to stop the Macro Recorder. Step 4. The Basic Macro dialog appears as shown in Fig. 5.4, in which you can save and run the macro. Step 5. A Standard library is present by default when a spreadsheet is created and saved. Step 6. To save the macro, first select the object where you want to save the macro in the Save macro in list box. Fig. 5.5 shows that the Main macro is saved by default in the Standard Library in Module1. You can change the name of the macro. Here, we have named the macro as FormatHeading. Fig. 5.5: Naming a Macro Practical Activity 5.1 Note : If all the macros will be given the same name then they will overwrite the previous Macro created by that name. notes A Library is a collection of modules which in turn is a collection of macros. 2023-24
  • 117.
    ElEctronic SprEadShEEt (advancEd)uSing librEofficE calc 107 notes Rules for naming a Macro, Module or a Library: While naming a Macro, Module or a Library the name should : • Begin with a letter • Not contain spaces • Not contain special characters except for _ (underscore) Running a Macro Let us now run the macro for another sheet which requires its heading in cell A1 to be given the same format as recorded in the Formatheading macro. To run a macro we need to perform the following steps. Step 1. Type the heading in cell A1 Step 2. Use Tools > Macros > Run Macro to open the Macro Selector dialog box as shown in Fig. 5.6. Fig. 5.6 shows three names in the library. Out of which • LibreOffice Macros library is provided by LibreOffice and contains modules with pre recorded macros and should not be changed. • My Macros contain macros that we write or add to LibreOffice. • Untitled1 is the name of the worksheet we are working on. Since at this time we have not saved Fig. 5.6: Selecting and runnig a Macro 2023-24
  • 118.
    Domestic Data entryoperator – class X 108 Run a previously created Macro Formatheading. Step 1. Type the heading in cell A1. Step 2. Open the Macro selector dialog box by clicking Tools -> Macros-> Run Macro Step 3. Click on MyMacros > Standard > Module1. Then select Formatheading from the Macro Name box and click Run as shown in Fig. 5.6. You will observe that the Heading in Cell A1 is formatted. The action recorded by a macro is recorded as instructions in a programming language called BASIC. It is also possible to view and thus edit the code of a macro. But remember, it is advised to edit a macro only if you have knowledge of the language in which the macro is written which is BASIC in case of CALC. You can view the code generated for the macros by going to Tools > Macros > Edit Macros. Choose the macro name from the Object Catalog and the associated code will be visible as shown in Fig. 5.7. Fig. 5.7: Code generated for macro in IDE Warning – Do not make any changes to the code unless you are aware of the language. Note – The code of a macro begins with Sub followed by the name of the macro and ends with End Sub . the worksheet with another name it is showing Untitled1. You will see further that Untitled1 will be replaced with the name of the spreadsheet. Step 3. Select the library and module in the Library list. Step 4. Select the macro in the Macro name list. Step 5. Click Run to run the macro. Practical Activity 5.2 notes 2023-24
  • 119.
    ElEctronic SprEadShEEt (advancEd)uSing librEofficE calc 109 Creating and Organising a Simple Macro Till now we have learned to record, store and run the macro. The recorded macro is internally stored as instructions written in a programming language that are executed when the macro is executed or run. We selected a library or module to store our recorded macro, similarly while creating a macro, either create a new library/module or edit an existing module stored in a library. Use the following steps to organize the macro. Step 1. Click on Tools > Macros > Organize Macros > LibreOffice Basic to open the LibreOffice Basic Macro dialog window as shown in Fig. 5.8. Step 2. Click Organizer to open the Basic Macro Organizer dialog as shown in Fig. 5.9. Fig. 5.8: Basic Macro dialog window Fig. 5.9: LibreOffice Basic Macro Organiser Create a library to store a macro To create a new library containing modules, click on Library > New. Use the following steps to create a module to store a macro. Choose the Modules Tab and select a Module. Click on New to create a new Module. 2023-24
  • 120.
    Domestic Data entryoperator – class X 110 Create a simple Macro using BASIC programming instructions that will display Hello in a dialog box stored in the Standard module as shown in Fig. 5.10 when executed. Fig. 5.10: A Dialog Displaying Hello using macro Step 1. Open the LibreOffice Basic Macro dialog box using Tools > Macros > Organize Macros > LibreOffice Basic. Step 2. From the Basic Macros dialog box select Organizer Step 3. From Modules tab, select My Macros folder and click on New button as shown in Fig. 5.11. Fig. 5.11: Creating a Module with name Hello Step 4. Give a name to the New Module say ‘Hello’ and click Ok. You will see Hello under Standard Library in My Macros Library. Fig. 5.12: Module Hello in Basic Macro Organizer Dialog Step 5. Select Hello and click Edit (Fig. 5.12) to open the Integrated Development Environment (IDE). It is a text editor that allows you to create and edit macros. Type Print “Hello” between Sub Main and End Sub as shown in Fig. 5.13. Practical Activity 5.3 notes 2023-24
  • 121.
    ElEctronic SprEadShEEt (advancEd)uSing librEofficE calc 111 notes Fig. 5.13: Code of Hello Macro The created module can be executed as explained in the previous section. Besides, the module can be executed from the IDE by either clicking the Run button or pressing F5. Calculate the number of tiles required for flooring of a room using macro as a function. The length and width of the room and the length and width of a tile is entered in the sheet as shown in Fig. 5.14. Fig. 5.14: Sheet storing length and width of floor and tile Macro as a Function Consider a situation wherein you need to perform calculations that are repetitive in nature. Assume that the same formula needs to be applied to different data in different sheets and there is no predefined function for it. In such a situation will it not be convenient if we could create a macro that performs the calculations? It will save us the effort of remembering and typing the formulas. It is possible to do so if we use Macro as a function. Instead of writing instructions in between Sub and End Sub, we can write instructions in between Function and End Function. A function is capable of accepting arguments or values. It can perform operations on the arguments, perform calculations and return the result. Practical Activity 5.4 2023-24
  • 122.
    Domestic Data entryoperator – class X 112 Step 1. Enter data in a sheet and save it with the name as Calculatetiles.ods Step 2. Select Tools > Macros > Organize Macros > LibreOffice Basic to open the LibreOffice Basic Macros dialog. Step 3. Choose Calculatetiles.ods. Click on New and type a name. We have named it as Calctiles as shown in Fig. 5.15 and press OK. Fig. 5.15: Creating a New Module to define function Step 4. Write a function to calculate the number of tiles. A function starts with Function followed by the name of the function and then the statements to calculate area of the floor, tiles and number of tiles and store the final result in the name of the function as shown in Fig. 5.16. Press the Save button on the toolbar or press Ctrl+S. Fig. 5.16: IDE showing function definition to calculate number of tiles Note: The text in grey is preceded by ‘ (single quote) indicating it is a comment. A comment is written to write descriptive text to support the code. Step 5. Use the function in the sheet as shown in Fig. 5.17. Fig. 5.17: Sheet using Macro as a function notes 2023-24
  • 123.
    ElEctronic SprEadShEEt (advancEd)uSing librEofficE calc 113 A. Multiple choice questions 1. Macro Recordings can be enabled from the ________ option in the menu bar. (a) Sheet (b) Data (c) Tools (d) Window. 2. Which of the following is an invalid Macro Name? (a) 1formatword (b) format word (c) format*word (d) Format_word. 3. Which of the following Libraries contains modules with prerecorded macros and should not be changed? (a) My Macros (b) LibreOfficeMacros (c) Untitled1 (d) Test. 4. Identify which of the following is a programming Language? (a) Calc (b) BASIC (c) Writer (d) Macro. 5. The Module can be executed from the IDE by pressing _________________. (a) F3 (b) F4 (c) F5 (d) F6 5. Which of the following is the default name of the Macro _______________. (a) Default (b) Main (c) Macro1 (d) Main_Macro Step 6. Use fill handle to drag the function for other cells. The final sheet is shown in Fig. 5.18. Fig. 5.18: Displaying Number of tiles using Macro as a function Check Your Progress notes 2023-24
  • 124.
    Domestic Data entryoperator – class X 114 B. Fill in the blanks 1. ________ library is automatically loaded when the document is opened. 2. IDE stands for _______________________________. 3. Macro as a function is capable of accepting ___________ and returning a ____________. 4. Macro ________________ allows us to add, delete a module. 5. The code of macro begins with __________ followed by the name of the macro and ends with __________. 6. By default a macro is saved in the _____________ . C. State whether the following statements are True or False 1. Macro is a group of instructions executing a single instruction. 2. Once created, Macro can be used any number of times. 3. By default, the Macro recording feature is turned on. 4. It is not possible to stop recording of a Macro. 5. Every Macro should be given a unique name. 6. A macro once created can be edited later. D. Answer the following questions 1. What is a Macro? List any two real life situations where they can be used. 2. List the actions that are not recorded by a macro. 3. How is LibreOffice Macros Library different from my Macros? 4. Differentiate between predefined function in Calc and Macros as a function 5. List the rules that should be kept in mind while naming a macro. 6. Give any one advantage of macros. Lab Exercises 1. Record a Macro that performs Bold, Underline on the Heading in Cell A1. Give macro the name BoldunderlineA1 and save it in a New Module named Basic Formatting which is created in a New Library named DocumenHeadingA1. 2. Record a Macro that creates a bar chart for data stored in cells A2 – A9 and K2 to K9. 3. Run the macro recorded in (i) and display a barchart for the following data showing Minimum and Maximum temperature from 2010-2017. notes 2023-24
  • 125.
    ElEctronic SprEadShEEt (advancEd)uSing librEofficE calc 115 notes Source: https://data.gov.in/resources/seasonal-and-annual-minmax- temp-series-india-1901-2017 Collect information about the population of the South Asian countries form the Internet and store it in a Calc sheet. Run the Macro created in (i) to display a chart for the data stored. Create Macro as a function to calculate Amount to be paid after a 5% discount. A sample sheet for the same is given below. Fig. 5.19: Lab Exercise 5 4. Anuja has to create a Marks list for every term. The format is as follows : Fig. 5.20: Sample Sheet for Marks Entry (a) Record two macros to create the format given in Fig. 5.20. (b) To enter names of students in the list so that she doesn’t need to retype or copy the names Run the above created macros for a new sheet. 5. Use Macro as a function to calculate Mileage of a vehicle. Mileage (in km/L) is calculated as Distance Travelled (in km)/ Fuel filled (in Litre). Create a sheet with three columns Distance Travelled (in Km), Fuel filled (in L) and Mileage (in km/L). 2023-24
  • 126.
    IntroductIon We have learnedin Class IX to organise the data in a spreadsheet. Let us take a situation where the marks scored by each student of three terms in three terminal examinations are stored in three different sheets Term1, Term2, Term3. Now to generate final result in single result sheet by finding the average marks of each subject, what would be the ideal solution? Retyping or copying the marks can be one solution but it will be time consuming and also there are chances of committing typing errors. Instead, the ideal solution will be to find a way to refer the marks stored in the sheets Term1, Term2 and Term3. In this manner, there are nearly no chances of errors and if the marks of a subject are changed, they will be reflected and thus ensuring correctness while performing calculations, such as calculating average. In this chapter, we will learn how to create multiple sheets, and also to link the data in multiple sheets. It can be done in two ways, one is creating reference to other sheets/documents by using keyboard and mouse, and other is by linking external data. Setting up Multiple Sheets Let us consider a worksheet storing marks of the first term in a sheet named Term1 as shown in Fig. 6.1. To add a new sheet in the spreadsheet, click on the Add Sheet by clicking on the (+) sign located intheleftbottomofthespreadsheet. C HAPTER 6 Linking Spreadsheet Data Fig. 6.1: Marks scored by students in Term1 2023-24
  • 127.
    ElEctronic SprEadShEEt (advancEd)uSing librEofficE calc 117 Alternatively, you can right click anywhere on the sheet tab and select Insert sheet option from the drop-down list displayed as shown in Fig. 6.2. It gives us a choice to put the new sheet, assign the name of the sheets, delete a sheet and so on. Note: Insert Sheet dialog box can be invoked from the menu option Sheet > Insert Sheet Fig. 6.2: Inserting a new sheet using context menu displayed after right click option Add a new sheet to store data for Term2 in the spreadsheet by using the Insert Sheet Dialog box. Step 1. Open the Insert Sheet Dialog and add a sheet after the current sheet by selecting After Current Sheet option. The current sheet is our active sheet which in this case is Term1 as shown in Fig. 6.1. Step 2. Name the Sheet as Term2 as shown in Fig. 6.3. Fig. 6.3: Insert sheet dialog Step 3. Enter the marks obtained by the students in second term in Term2 sheet as shown in Fig. 6.4. Step 4. Insert a new sheet and name it as “Result”. Fig. 6.4: Marks scored by students in Term2 Note: You can use the macro created by you in the previous chapter to create the format of the result sheet and populate the name of the student column to save time. Practical Activity 6.1 2023-24
  • 128.
    Domestic Data entryoperator – class X 118 Creating Reference to Other Sheets by Using Keyboard and Mouse We have been using cell references for applying functions and formulas in class IX. In this section we will learn how to reference cells in other sheets using mouse and keyboard. To calculate the final result, it is required to store the final marks for each subject in the sheet named “Result” inserted in Activity 6.1 by applying the formula (Marks obtained in Term1 + Marks obtained in Term2)/2. As we know that marks obtained in Term1 and Term2 are stored in different sheets named Term1 and Term2 respectively. To calculate the final marks for English in in the cell C4 of Result sheet, as shown in Fig. 6.5, follow the following steps. Step 1. First copy the Roll No and Name of the Student from Term1 sheet to Result sheet, copy all headings of and give the name as Final Result. Step 2. Click on the = icon next to the input line (or type = in cell C4), type Sum() and click between the brackets. Step 3. Now click on the Term1 sheet and click the English Marks for the first student and add (,) comma for the next value Step 4. Next click on the Term 2 sheet and click the English Marks for the first student. Step 5. To calculate average type /2 after the sum(+) as shown in Fig. 6.5 to calculate average. Step 6. Press Enter key, the average is displayed in cell C4 of Result sheet. Then use fill handle to fill the cells up to the last student’s data. Step 7. The result sheet gives the average marks scored by each student in English as shown in Fig. 6.5. Step 8. You can copy the same formula for other subjects. notes 2023-24
  • 129.
    ElEctronic SprEadShEEt (advancEd)uSing librEofficE calc 119 notes Fig. 6.5: Result sheet after referencing the data from Term1 and Term2 sheets Any changes made to marks in Term1 and Term2 sheet will be reflected in the result sheet as well. That is how the sheets are linked together. We had selected cell reference by clicking on the cells. An alternative could be to type the reference. First, we need to understand how referencing is performed across sheets in the same spreadsheet document. Hence, to refer to a cell in another sheet precede the cell reference with a ‘$’ sign. It is then followed by the name of the sheet in ‘ ‘ ’ (single quotes) followed by a . (dot) and then the cell address. For example, to refer a cell C4 of sheet named Term1 we will type: $‛Term 1’.C4 Note: Single quotes (‘ ’) are used as there is a space between Term and 1 in the sheet name. Let’s Practice– Calculate Final marks for all the subjects by referencing with Keyboard for one of the columns and mouse for other columns. Creating Reference to Other Documents by Using Keyboard and Mouse In the previous section we had0 created references to other sheets in a spreadsheet. Sometimes we may intend to reference sheets stored in another spreadsheet file. Let us consider a situation where it is required to create a Summary report consisting of the average of result sheets for each section of a class. To do so, we need to insert sheets that are stored in different files. Fig. 6.6 shows the final result of class X-A and Fig. 6.7 shows Final Result of class X-B. 2023-24
  • 130.
    Domestic Data entryoperator – class X 120 Create Summary of result in a spreadsheet document named Result Analysis of class X-A and X-B as shown in Fig. 6.8. Fig. 6.8: Result Analysis spreadsheet Since the marks of both the classes are stored in separate spreadsheet file and Result Analysis itself is a separate spreadsheet, therefore we need to create reference to other spreadsheets. Step 1. Open the spreadsheets namely Result-X-A, Result-X-B and Result Analysis. Step 2. Click on cell B4 of Result Analysis spreadsheet and type =MAX(), as shown in Fig. 6.9. Step 3. Click between the brackets of MAX() and then click on the cell range containing marks of English in Result sheet of Result-X-A spreadsheet. Step 4. Type (,) comma and click on the cell containing marks of English in the Result sheet of Result-X-B spreadsheet. Step 5. Press Enter, Maximum of the marks will be displayed in cell B4 as shown in Fig. 6.9. Fig. 6.6: Result of class X-A stored in Result-X-A spreadsheet Fig. 6.7: Result of class X-B stored in Result-X-B spreadsheet Practical Activity 6.2 2023-24
  • 131.
    ElEctronic SprEadShEEt (advancEd)uSing librEofficE calc 121 Fig. 6.9: Displaying the highest score in English using Max function We had selected cell reference by clicking on the cells in the separate spreadsheet and an alternative could be to type the reference. First, we need to understand how referencing is performed across different spreadsheet files. To refer to a cell in a different spreadsheet we write in single quotes the path of the file followed by #$ then the name of the sheet followed by a . (dot) and then the cell address. For example: ‘file:///C:/Users/ADMIN/Documents/X-A.ods’# $Result.C4 Note : The path of a file has three forward slash ///. A filename can have space within its name hence single quotes (‘ ‘) are used. It is also possible to insert a sheet from another file. The From file option of Insert Sheet Dialog box allows us to insert sheet from another file as well (refer Fig. 6.10). Insert a sheet from an existing file into the current document. Practical Activity 6.3 Step 1. To insert the sheet “Result” from Result-X-A spreadsheet in the Result Analysis spreadsheet, open the Result Analysis spreadsheet. Step 2. Select Sheet > Insert Sheet > From File as shown in Fig. 6.10. Step 3. Click on Browse button, which will open a file selection dialog box. Step 4. Select the file from which you want to import the sheets. After selecting the file, the sheets contained in it are displayed in the list box, as shown in Fig. 6.10. The file path is displayed below this box. Select the sheet to be inserted from the list box. Fig. 6.10: Inserting Result sheet of Result-X-A spreadsheet into Result Analysis spreadsheet notes 2023-24
  • 132.
    Domestic Data entryoperator – class X 122 Step 5. Click on the required “Result” sheet from the file “Result- X-A.ods” as shown in Fig. 6.10. Step 6. Check the Link checkbox to ensure that the changes made in the selected sheet “Result” are reflected. Step 7. Press OK. You will find the Result sheet added to the sheet tab as shown in Fig. 6.11. Fig. 6.11: Result sheet added to the sheet Tab of ResultAnalysis You could have also copied and pasted data but linking a sheet allows us to always have access to “live” data from another spreadsheet. A “live” data means that the data is always the same as in the original file. The links can be updated by selecting Tools > Options > LibreOffice Calc > General > Updating, as shown in Fig. 6.12, whenever the file is opened to ensure that you have access to the updated data always. Fig. 6.12: Selecting online update option notes 2023-24
  • 133.
    ElEctronic SprEadShEEt (advancEd)uSing librEofficE calc 123 Hyperlinks to the Sheet Sometimes it is required to jump to a document stored at a different location from within a document. It can be done by creating a hyperlink. It is possible to jump from a sheet in the same spreadsheet, different spreadsheet or a website by creating a hyperlink. Relative and Absolute Hyperlinks A hyperlink can be either absolute or relative. An absolute hyperlink stores the complete location where the file is stored. So, if the file is removed from the location, absolute hyperlink will not work. For example: C:UsersADMINDownloadstry.ods is an absolute link as it defines the complete path of the file. A relative hyperlink stores the location with respect to the current location. For example: AdminDownloads try.ods is a relative hyperlink as it is dependent on the current location and thus the folder admin is searched where the active spreadsheet is being stored. If the complete folder containing the active spreadsheet is moved the relative link will still be accessible as it is bound to the source folder where the active spreadsheet is stored. Creating Hyperlinks It is possible to hyperlink a sheet of other spreadsheet document in a spreadsheet. Suppose, you have to hyperlink a Result sheet of “Result-X-A” spreadsheet document in the “Result-X-B” spreadsheet document, then follow the following steps: Step 1. Open the Result- X-B spreadsheet document. Step 2. From the main menu, select and click on Insert > Hyperlink. An Hyperlink dialog box will open as shown in Fig. 6.13. Fig. 6.13: Hyperlink dialog box 2023-24
  • 134.
    Domestic Data entryoperator – class X 124 Step 3. To insert the spreadsheet document, click on the Document on the left pan of dialog box, then to select the spreadsheet document, click on the button located after the Path. Select the required document. In our case we select the spreadsheet document “Result-X-A”. Step 4. Then click on the Target button to choose the sheet which is to be hyperlinked. Target in Document helps to specifically choose a target in the document such as sheet, tables, frames, images, headings and so on. Here in our case we will select the sheet Result as shown in Fig. 6.13. Step 5. Click on Apply and Close button to exit the Target Document window. Step 6. Enter the text in the Text box to assign the hyperlink to that text. In our case we have entered the text as “Result-X-A” as shown in Fig. 6.14. So the hyperlink will be assigned to the text “Result-X-A”. Fig. 6.14: Specifying Target and Text for inserting a Hyperlink Step 7. Click on Apply and Close button to confirm the changes and exit the Hyperlink dialog box. Step 8. Observe that the hyperlink is assigned to the word “Result-X-A” as shown in Fig. 6.15. 2023-24
  • 135.
    ElEctronic SprEadShEEt (advancEd)uSing librEofficE calc 125 Fig. 6.15: Hyperlink inserted in the spreadsheet Step 9. To open the hyperlinked sheet, press the Ctrl key and click on the hyperlinked word “Result- X-A”, the sheet will be opened in the new window as shown in Fig. 6.16. Fig. 6.16: Hyperlinked sheet open in new window Editing a Hyperlink To edit an existing link, place the cursor anywhere in the link and right click the hyperlink. A context menu will be displayed as shown in Fig. 6.17. Click on Edit Hyperlink..., the Hyperlink dialog box will be displayed, where you can make changes to the hyperlink. Let’s Practice Create a Hyper link to Result Analysis spreadsheet. Fig. 6.17: Selecting Edit Hyperlink from context menu on right clicking the Hyperlink 2023-24
  • 136.
    Domestic Data entryoperator – class X 126 On clicking the Remove Hyperlink option, the link will be removed from the text and thus it will not point to any other location. Linking to External Data Internet is a rich source of information, which is stored in the form of web pages. The web pages are written in HTML documents. Data on a web page can be stored in the form of tables. The versatility of a spreadsheet allows us to insert tables from HTML documents into Calc. To insert the tables from a HTML document, we can use the External Data Dialog box. The steps for the same are given below. Step 1. Open the spreadsheet where external data is to be inserted. Step 2. Select the cell to store the first cell of the table in the external data. Step 3. Select Sheet > Link to External Data. Step 4. The External Data dialog box is displayed as shown in Fig. 6.18. Type the URL of the source document or select it from the drop-down list if it is listed and press enter. Step 5. A dialog box is displayed to select the language for import as shown in Fig. 6.18. Selecting Automatic shows data in the same language as in the webpage. Let us Practice Create a Hyper link to Result Analysis spreadsheet. From the Available Tables/Ranges list, choose the desired table. If you choose HTML_all option, then the entire HTML document is selected. Here in our example suppose we select HTML_10 table to insert as shown in Fig. 6.19. Fig. 6.19: Inserting a table from a webpage Fig. 6.18: Slecting language to import for the webpage 2023-24
  • 137.
    ElEctronic SprEadShEEt (advancEd)uSing librEofficE calc 127 The table is inserted in the spreadsheet as shown in Fig. 6.20. Linking to Registered Data Sources LibreOffice Calc allows us to link spreadsheet documents with databases and other data sources. The data source needs to be registered with LibreOffice. Registration is a means to inform LibreOffice about the type of data source and the location of the file. We will restrict our discussion to LibreOffice Base. The extension of LibreOffice Base is .odb. You will learn about LibreOffice Base in detail in Unit 3. You can access a variety of databases and other data sources and link them to Calc documents. To register a data source that is in *.odb format, follow the steps given below. Step 1. Select Tools > Options > LibreOfficeBase>Databases. The Options - LibreOffice Base-Databases dialog box appears. Step 2. Click the New button to open the Create Database Link dialog box as shown in Fig. 6.21. Fig. 6.20: HTML_10 table inserted from the webpage https://en.wikipedia.org/ wiki/List_of_gravitationally_rounded_objects_of_the_Solar_System#Planets Fig. 6.21: Registering databases 2023-24
  • 138.
    Domestic Data entryoperator – class X 128 Check Your Progress A. Multiple choice questions 1. Insert Sheet dialog can be invoked from _______________. (a) sheet (b) insert (c) tools (d) Windows 2. ______________ refers to cell G5 of sheet named My Sheet. (a) $My Sheet.’G5’ (b) $My Sheet_’G5’ (c) $ ‘MySheet’.G5 (d) $ ‘MySheet’_G5 3. The path of a file has ____________ forward slashes. (a) four (b) three (c) two (d) one 4. Which of the following feature is used to jump to a different spreadsheet from the current spreadsheet in LibreOffice Calc? (a) Macro (b) Hyperlink (c) connect (d) Copy B. Fill in the blanks 1. A relative hyperlink stores the location with respect to the ___________ location. 2. While inserting tables from a webpage _____________ selects the entire HTML document. 3. The extension of LibreOffice base is ______________. 4. __________ are used to enclose sheet names as there might be a space within sheet names. 5. The From file option of ___________ Dialog box allows to insert sheet from another file. notes Step 3. Enter the location of the database file, or click Browse to open a file browser and select the database file. Step 4. Type a name to use as the registered name for the database and click OK. The database is added to the list of registered databases. Note – The OK button is enabled only when both fields are filled in. 2023-24
  • 139.
    ElEctronic SprEadShEEt (advancEd)uSing librEofficE calc 129 notes C. State whether the following statements are True or False 1. A sheet can only be added before the current sheet. 2. If ‘sales’ sheet has a reference to ‘cost’ sheet then any changes made to ‘cost’ sheet will be reflected in the sales sheet as well. 3. It is not possible to link a sheet as a reference in another sheet. 4. We can insert data from a table created on a web page into a spreadsheet. 5. A hyperlink once created on a sheet cannot be deleted. D. Answer the following questions 1. Name the two ways to link the sheets in a LibreOffice Calc. 2. Differentiate between Relative and Absolute Hyperlink. 3. Write steps to extract a table from a web page in a spreadsheet. 4. Write steps to register a data source that is in *.odb format. 5. State advantages of extracting data from a web page into spreadsheet. Lab Exercises 1. Create three sheets named Jan, Feb and March. In each sheet store the attendance of employees for a month. Apply count function to count the number of days the employees were present by counting P. 2. Add another sheet named ‘Consolidated Attendance’ that stores total attendance of three months and calculates the percentage. 3. Create a spreadsheet containing the list of Prime ministers of India with their tenure from the website https:// knowindia.gov.in/general-information/prime-ministers- of-india.php. Perform steps to extract the table from the website into a Calc Sheet and display the count of Prime Ministers of India till date. 2023-24
  • 140.
    IntroductIon In LibreOffice Calc,one spreadsheet can be used by more than one user at a time by sharing it. A shared spreadsheet is a same sheet that can be accessed by more than one user and can allow them to make changes simultaneously on it. It saves the trouble of keeping track of multiple copies of the same spreadsheet. Sharing allows working in collaboration so that everyone can contribute, make changes and view it. C HAPTER 7 Share and Review a Spreadsheet Fig 7.1: Share Document dialog window Fig. 7.2: Confirmation dialog window for sharing a spreadsheet Sharing Spreadsheet Sharing a spreadsheet is just like a teamwork to work in collaboration with other users. The following are the steps to share the spreadsheet. Step 1. Open a new spreadsheet and save it with some name. Step 2. Select and click on Tools > Share Spreadsheet from main menu bar. This will open the Share Document dialog window as shown in Fig. 7.1 which can be used to enable or disable sharing option. Step 3. Click on the checkbox “Share this spreadsheet with other users” to share the spreadsheet and click on OK button. This will open the confirmation dialog window as shown in Fig. 7.2 to save the spreadsheet to activate the shared mode. 2023-24
  • 141.
    ElEctronic SprEadShEEt (advancEd)uSing librEofficE calc 131 Step 4. Click on Yes to continue. Step 5. Once the spreadsheet is saved, the name of the spreadsheet in the title bar will display (shared) along with the name of the spreadsheet. Create a spreadsheet and save it with the name Test_1.ods Step 1. Create the spreadsheet with the data and save it with Test.ods, as shown in Fig. 7.3. Fig. 7.3: Contents of spreadsheet Test.ods Step 2. Select and click on Tools > Share Spreadsheet from main menu bar. This will open the Share Document dialog window as shown in Fig. 7.1. Put the check- mark on the check box, “Share this spreadsheet with other users”, as shown in the Fig. 7.1. Step 3. Click on the checkbox and then on OK button. It will display the Confirmation dialog window to activate the sharing mode as shown in Fig. 7.2. Click Yes to continue. Step 4. Observe that shared is added with the name of the document in the title bar as shown in Fig. 7.4. Fig. 7.4: Title bar showing the spreadsheet changed to shared Practical Activity 7.1 notes 2023-24
  • 142.
    Domestic Data entryoperator – class X 132 Opening and Saving a Shared Spreadsheet Opening a Spreadsheet To open a shared spreadsheet, follow the following steps. Step 1. While opening a spreadsheet which is a shared spreadsheet, a message will appear as shown in Fig. 7.5 that the spreadsheet is in shared mode and some of the features are not available to use in this spreadsheet. Step 2. Click on OK button to open the spreadsheet in shared mode. Step 3. If you don’t want this warning option to be displayed again, then check the mark in the checkbox ‘Do not show warning again’. Step 4. Once the spreadsheet is saved in shared mode, some of the features will become unavailable for used. Step 5. Observe the Edit menu on the main menu bar as shown in Fig. 7.6, that shows Undo, Redo, Repeat, Paste, Links to External files, ImageMap, Object are not available for use. Saving a Shared Spreadsheet Follow the steps given below to save a shared spreadsheet: Step 1. After making the changes in the shared spreadsheet, you need to save it before closing the spreadsheet. Step 2. If two or more users are working at the same time and the changes do not conflict, then the message will appear stating that the spreadsheet has been updated with changes saved by other users. Step 3. If there is any conflict for the changes, then resolve conflict dialog window will appear. Step 4. No other user can save the shared spreadsheet when you are resolving the conflicts. Step 5. If another user is trying to save the shared document and resolve conflicts, then you will be notified with a message that the file is locked. Now, you cannot save it. Fig. 7.5: Message box while opening shared spreadsheet Fig. 7.6: Edit menu of shared spreadsheet 2023-24
  • 143.
    ElEctronic SprEadShEEt (advancEd)uSing librEofficE calc 133 Recording Changes This feature of LibreOffice Calc provides different ways to record the changes made by one or other users in the spreadsheet. While recording the changes, the spreadsheet will turn off its shared feature. Follow the following steps for recording changes: Step 1. To enable the Record changes, first disable the shared mode of spreadsheet. Step 2. To disable the shared mode, open the spreadsheet “Test.ods”. Step 3. Select and click on Tools > Share Spreadsheet from main menu bar. This will open the Share Document dialog window. Remove the check-mark on the check box, “Share this spreadsheet with other users”, and click on OK button. It will display the Confirmation dialog window to disable the sharing mode. It will give warning to disable the shared mode of a spreadsheet as shown in Fig. 7.7. Click Yes to continue. Step 4. Observe that (shared) word from the name of the spreadsheet has disappeared from the title bar of the spreadsheet. Step 5. The feature of Track Changes > Record under Edit menu is turned ON as shown in Fig. 7.8, which was disabled and not working in the shared spreadsheet. Step 6. Now to record track changes, click on Edit > Track Changes > Record as shown in Fig. 7.8. Step 7. Now change name Sia to Sita in cell B5 as shown in Fig. 7.9. Observe that the border colour of the cell in which data has been changed turns to red. Also, the changed cell will display the description if the cursor moves to the changed cell. Fig. 7.8: Recording Track changes under Edit menu enabled Fig. 7.9: Displaying the information of changes recorded under track changes Fig. 7.7: Confirmation dialog window to disable sharing mode of spreadsheet 2023-24
  • 144.
    Domestic Data entryoperator – class X 134 Step 8. Thus, by looking at the spreadsheet, other users can easily know the changes made in the cell and the changes made by whom. Assume that you are captain of your school cricket team. Prepare the budget in the spreadsheet for the current academic year. Turn ON the feature Track Changes > Record and ask other team members to make necessary changes in the spreadsheet. Practical Activity 7.2 Add, Edit and Format the Comments In Calc, the comments are automatically added. Also, the author or reviewer can add their own comments as well. Follow the following steps to add your comments: Step 1. Select from main menu bar and click on Edit > Track Changes > Comment as shown in Fig. 7.10, to add your own comments. Step 2. This will open the Add comment window. Enter your comments. Fig. 7.11 shows the comments entered. Step 3. Now to view the entered comment, click on the cell B6 as shown in Fig. 7.12. It shows the complete description of the comments entered. Fig. 7.10: Selecting Comment under Track Changes Fig. 7.11: Entering text in Comment dialog window Fig. 7.12: Comment displayed with full description 2023-24
  • 145.
    ElEctronic SprEadShEEt (advancEd)uSing librEofficE calc 135 Step 4. You can also insert comments to a cell. Click on the cell where you want to insert comments. Then select from main menu Insert > Comment as shown in Fig. 7.13. Step 5. This type of comments is known as notes or suggestions in the spreadsheet. The box will appear to write the comment as shown in Fig. 7.14. The comment box shows the comments entered as “Contains only alphabets”. Once this text is typed in the text box, you can observe a coloured dot in the upper-hand corner of the cell where the comment is added using insert comment. Step 6. Once the comment is added, you can display, edit or delete it. To perform these operations, right click on the cell where you have inserted the comments as shown in Fig. 7.15. Observe the options under popup menu. Step 7. Select the “Edit Comment” option to edit the comments. It will take you again to the comment textbox to make any changes. Step 8. Select “Delete Comment” option to delete the comment. Step 9. Select the “Show Comment” to view the comment. By selecting this option, the comments will be displayed. Again when you right click on the cell, you will observe that “Hide Comment” option will be activated in place of “Show Comment”. This is because when you are displaying the comments it is already in show mode, which has to be hide. Fig. 7.13: Insert Comment Fig. 7.14: Comments inserted in comment box Fig. 7.15: Right click menu options after inserting comments 2023-24
  • 146.
    Domestic Data entryoperator – class X 136 Formatting Comment You can format the comment box, just like formatting the cell contents. It means changing the background colour, border style, and transparency of a comment. Follow the following steps to format the comment. Step 1. Right click on the cell where the comment is added. Step 2. Select the option “Format cell”, which will display the Format Cells dialogue box as shown in Fig. 7.16. Step 3. You can apply the various formatting features from its tab such as Font, font Effects, Alignment, Borders, Background and Cell Protection. Change the font, text colour, fill colour, line colour for the comment box as desired and click on OK button to apply the changes. Observe the desired formatting features applied to the comment box. Fig. 7.16: Format Cells dialogue box Let’s Practice — Save the spreadsheet with some other name. Turn off the shared feature. Now, make some changes in the spreadsheet. Also, add comments into the changed cells. Try editing comments and format it with different colours. Reviewing Changes – View, Accept or Reject Changes Once the spreadsheet is edited by all the members of the team. It is the final stage before submitting the spreadsheet. In this stage, we will go through the changes to accept or reject to prepare the final spreadsheet after looking at all the changes made by the team members. Follow the following steps to review changes. Step 1. Select and click on Edit > Track Changes > Show. It will open the Show Changes dialog window as shown in Fig. 7.17. Fig. 7.17: Show Changes Dialog window 2023-24
  • 147.
    ElEctronic SprEadShEEt (advancEd)uSing librEofficE calc 137 Step 2. This is used to plan what all changes are to be displayed while reviewing the spreadsheet. Step 3. Click on Edit > Track Changes > Manage to accept or reject the changes. It will display the Manage Changes dialog window as shown in Fig. 7.18. Step 3. In this dialog window, click on the line and click on Accept or Accept All or Reject All button to review the changes. Step 4. Click on Close button once the review is done. Let’s Practice — As the changes done by other team members in the Practical Exercise 7.4 has been recorded by the feature in Calc, now you just review those changes and accept or reject the necessary changes done by other team members. Merge two files To work on our earlier created spreadsheet Test.ods, save the file Test.ods with another name say Test1.ods and make some changes in the spreadsheet Test1.ods. Now, we have two files that are to be merged. Step 1. Open the spreadsheet file Test.ods. Note the contents of spreadsheet Test.ods in Fig. 7.19. Also note the contents of spreadsheet Test1.ods before merging in Fig. 7.20. Fig. 7.18: Manage Changes dialog window to accept or reject changes Merging and Comparing If the same spreadsheet is reviewed by different team members and you have two different versions of the same spreadsheet file. Follow the following steps to merge document. Practical Activity 7.3 Fig. 7.19: Contents of Test. ods before merging Fig. 7.20: Contents of Test1.ods before merging 2023-24
  • 148.
    Domestic Data entryoperator – class X 138 Step 2. Click on Edit > Track Changes > Merge Document as shown in Fig. 7.21. Fig. 7.21: Selecting Merge Document option Step 3. Select the spreadsheet file Test1.ods from the Merge 0With dialog window to open the spreadsheet Test1. ods to merge with Test.ods and Click on Open button as shown in Fig. 7.22. Fig. 7.22: Open the Test1.ods from Merge With dialog window Step 4. This will open Manage Changes dialog window as shown in Fig. 7.23. Fig. 7.23: Manage Changes dialog window Step 5. Click on Accept All as shown in Fig. 7.23. to accept all the changes which is done in the Test1.ods spreadsheet to the Test.ods. notes 2023-24
  • 149.
    ElEctronic SprEadShEEt (advancEd)uSing librEofficE calc 139 Step 6. Now open the first spreadsheet Test.ods after merging and observe its contents as shown in Fig. 7.24. Observe that Fig. 7.24 shows the contents of Test.ods and Test1.ods merged. Comparing Documents Instead of merging two spreadsheets, one can compare the two spreadsheets by comparing the documents. Follow the following steps to compare the documents. Let us compare the two earlier created spreadsheets Test.ods and Test1.ods Step 1. Open the spreadsheet file Test.ods. Click on Edit > Track Changes > Compare Document as shown in Fig. 7.25. Step 2. This will open the Compare to dialog window, which will allow to open the spreadsheet to be compared. Select the spreadsheet file Test1.ods and click on Open button as shown in Fig. 7.26. Step 3. This will open the Manage Changes dialog window to accept/reject the changes. Click on Accept as shown in Fig. 7.27. Step 4. Finally click on Close button to close the Manage Changes dialog window as shown in Fig. 7.28. Fig. 7.25: Selecting Compare Document option Fig. 7.26: Open Test1.ods from Compare to dialog window Fig. 7.27: Accepting Manage Changes Fig. 7.28: Closing Manage Changes dialog window Fig. 7.24: Contents of Test. ods after merging 2023-24
  • 150.
    Domestic Data entryoperator – class X 140 Check Your Progress A. Multiple choice questions 1. Sharing allows to edit the spredshheet by (a) single user (b) different users simultaneously (c) one by one users (d) one after other users 2. Sharing spredsheet feature allows to save the changes in (a) multiple sheets (b) user’s sheet (c) in a same sheet (d) in different sheet 3. The Recording Changes feature of LibreOffice Calc provides different ways to record the changes made by ____________ in the spreadsheet. (a) one user (b) other user (c) the user (d) one or other users 4. In Calc, the comments are added (a) automatically (b) by author (c) by reviewer (d) all of above 5. The changes by team members in the spreadsheet can be accepted or rejected by (a) the team members (b) any of the user (c) owner (d) other users B. State whether the following statements are True or False 1. Spreadsheet cannot be shared to work with more than one user? 2. Some of the features becomes unavailable when the spreadsheet is in shared mode. 3. You can record changes in the spreadsheet when the spreadsheet is opened in shared mode. 4. File menu is used to Record changes for the spreadsheet. 5. You can add a note or suggestion in the spreadsheet using Insert Comment. 6. Formatting comment can be used to change the font colour of the comment. notes 2023-24
  • 151.
    ElEctronic SprEadShEEt (advancEd)uSing librEofficE calc 141 notes C. Fill in the blanks 1. The title bar of the document shows __________________ along with the filename for the shared mode of the spreadsheet. 2. The shared mode spreadsheet allows __________ users to access and edit the spreadsheet at the same time. 3. Recording changes automatically ____________ the shared mode of a spreadsheet. 4. Click on Edit menu, Track Changes and then select ____________ to record the changes in the spreadsheet. 5. The border color of the changed cell will be ______________. 6. ____________ is used to add notes or suggestions to a cell in a spreadsheet. 7. The comment box can be formatted just like formatting the __________ (cell contents). D. Answer the following questions 1. Define the terms (a) Sharing Spreadsheet (b) Record changes 2. Write the commands to perform (a) Sharing Spreadsheet (b) Record changes 3. Which menu is used to perform the functions (a) Track Changes (b) Saving Spreadsheet 4. What do you understand by reviewing the changes in the spreadsheet? 5. DifferentiatebetweenMergingandComparingSpreadsheet. Lab Exercise Anushka and Niyaz have been made the class representative. Anushka has been asked to collect the class assignments for the various subjects. Create a spreadsheet to store the roll number, name of the students and subject names. Perform the following operations so that Niyaz can access the file: 1. Enable Track changes 2. Add comment to show the date on which the assignment has been submitted. 3. Share the document with the class teacher. 2023-24
  • 152.
    Database Management System using LibreOfficeBase 3 IntroductIon Management of data is of prime importance for any organisation. The ease of entering data, its efficient storage, accurate and fast retrieval is the primary objective of any database management system. In this unit you will learn about various methodologies of data management using LibreOffice Base, which is an open source application. The first chapter starts with the general concepts of database management system, different database model with the focus on relational database. It explains the concept of primary key and foreign key and the various database objects of RDBMS. In the second chapter you will learn about LibreOffice Base application interface, how to start and use it, how to create database and tables, enter and edit the data in the table. Different data types used by LibreOffice Base have also been discussed. After creating a table, you can edit or delete the table and set up relations between the tables to control data redundancy and inconsistency for proper maintenance of a database. In the third chapter, you will learn how 2023-24
  • 153.
    Database ManageMent systeMUsing LibreOffice Writer 143 the changes are reflected in the related tables after setting up relations. In the fourth chapter, you will learn to retrieve the data from the database as per your requirement by providing the desired specifications, which is called as Query. Depending upon given specifications, the specific records are searched form the database and then displayed in the desired manner. In the last chapter, you will learn to create Forms and Reports using LibreOffice Base. Form is the user friendly data entry screen that allows to enter the data in the table easily by any user. The Report feature helps to present the retrieved data in a user friendly, understandable and formatted manner. notes 2023-24
  • 154.
    C HAPTER 8 Introduction to Database ManagementSystem IntroductIon Databases and database systems are essential parts of our life. We have been interacting with databases since a time. Recall the process of looking for a word in a dictionary or finding the telephone number of a friend from the telephone directory. With the advancement in ever changing technology, computerized databases are being used to store, manipulate, and manage the database. Today, we use databases in almost all spheres of life. When we go to book railway tickets, to search for a book in a library, to get the salary details, to get the balance amount after withdrawal of money from the ATM and so on, this list can run into several pages. Data being stored in databases can be of varied types like text, images, audio and video. This data is then stored and/or processed so as to get meaningful information. Data and Information The raw facts constitutes data. The facts may be related to any person, place, activity or things. It may be stored in the form of text, graphics, audio or video. This data must be processed by any computing machine in a proper way to generate the useful and meaningful information. The examples of data are marks scored by the students, weights, prices, costs, numbers of items sold, employee names, product names, addresses, tax codes, registration, marks etc. Information is the processed or organized form of data. If data is not correct or accurate, the information obtained by processing such data may not be correct. For example, marks obtained by students and their roll numbers is the data, while the report card/sheet is the 2023-24
  • 155.
    Database ManageMent systeMUsing LibreOffice Writer 145 information. Other forms of information are pay-slips, schedules, worksheet, bar charts, invoices, account returns etc. Similarly the temperature recorded is data which can be processed to find out the maximum or minimum temperature of day and night. Also this data is generally organised in tabular form as shown in the Table 8.1. Table 8.1: Data Stored in Tabular Form Day Day Temperature Night Temperature Sunday 35 15 Monday 37 17 Tuesday 36 16 Wednesday 34 15 Thursday 35 17 Friday 35 16 Saturday 33 14 Databases and DBMS A database is a collection of logically related data items stored in an organised manner. The information being stored in a database can be added, modified, deleted or displayed according to the requirements of the user. The software that is used to create, update and retrieve data is known as database management system (DBMS). It facilitates planning and maintenance of the database for the user. Some of the common examples of DBMS are MS Access, Open Office or LibreOffice Base, Oracle, Ingress, MySQL. In this book, we will use LibreOffice Base version 6.4 to learn various aspects of DBMS. We all know that it is easy to remember names of our friends, but it is difficult to retain their phone numbers in our memory. If details like names and phone numbers are stored in a diary or mobile phone in an orderly manner, then it becomes easy to retrieve the phone number of a required person. Thus, the phone book can be considered a simple database and to manage this database electronically, we will require a database management system or a DBMS. notes 2023-24
  • 156.
    Domestic Data entryoperator – class X 146 Let us discuss some of the advantages of DBMS: • Organised Storage – The data in the database is stored in an organised manner, so that retrieval of the required data is fast and accurate. • Data Analysis – A database helps in analysis of data based on certain criteria. It is easy to find out maximum or minimum value, average or mean using a database. • Data Sharing – If the same data set is required for different applications then the database can be shared with other applications. Hence using a database means making once and using it repeatedly for multiple applications. • Minimal Data Redundancy – In the event of requiring the same data field in several tables the data field might get repeated in number of tables. This is called as data redundancy. This can be reduced by using DBMS tools. • Data Consistency – By minimising data redundancy, chances of inconsistent data being stored is reduced. For example, it should not happen that the name of the student is changed in one table and not in another. Such inconsistency is reduced by using a DBMS. Let us consider a situation where, for example, Murugan looks after the data management of ABC School. There are two tables in his database– Admission table and Library table. ‘Ram Lal Kumar’ wants to change his name to ‘Ram Kumar’ has recently shifted his house. So, he hands over the application for the same to Murugan. In the absence of a DBMS, Murugan has to change the name of the student separately in the admission table and also in the library table. But as we can set a relation between the two tables using a DBMS, any change in one table is automatically reflected in all the related tables. There is no need to add another record with the changed name. The same record will be updated. Hence, this reduces the chances of data redundancy and inconsistency. Admission Table Roll Number Student Name Class Date of Birth Date of Admission 913 Dipak Kumar 10 06/04/2004 25/06/2018 914 Ram Lal Kumar 10 01/03/2004 24/06/2018 2023-24
  • 157.
    Database ManageMent systeMUsing LibreOffice Writer 147 • Increases Efficiency – Since database tables are properly organised, saving, reading and searching data can be carried out efficiently. • Increases Accuracy – Since data redundancy and inconsistency can be minimised in a database, the data is retrieved accurately from the database. • Increases Validity – Properties of different data fields can be assigned when a database is planned. So whether or not valid data is being entered can be checked at the data entry stage. This increases the validity of the database. For instance, we may set up a restriction while creating the table that the amount of fees being entered should be more than 1000. • Security – Unauthorised access can be controlled by assigning passwords to the users. The data might be translated in such a manner that unauthorised users are not able to read it. This is known as encryption. Both these measures increase the security of the database. Data Models A database can be designed in different ways depending on the data being stored. This structure of database is known as data model that describes the manner in which data will be stored and retrieved. A data model consists of components for describing the data, relationships among them and the constraints that hold data. There are different data models such as hierarchical data model, network data model and relational data model. Hierarchical Data Model In this model the data is organized into a tree like structure. The data is stored in the form of records. A record is a collection of fields and its data values. Library Table Student Name Name of the Book Date of Borrow Date of Return Dipak Kumar IT 10/12/2018 25/12/2018 Ram Lal Kumar Science 11/11/2018 24/11/2018 Sham Lal Mathematics 12/11/2018 30/12/2018 2023-24
  • 158.
    Domestic Data entryoperator – class X 148 All these records are linked to each other at various levels, thereby forming a hierarchy. For example, in Fig. 8.1 the data of a company is stored using a hierarchical data model. Fig. 8.1: Hierarchical Data Model Network Data Model In this model, multiple records are linked to same master file. It is also considered as an inverted tree where master is present in the bottom of the tree and the branches contain information linked to the master. In Fig. 8.2, the data of the company is represented using the network data model. Likes Ltd. Project Information Project Number Project Deadline Employee Incharge Personal Information Emp Name Salary Designation Likes Ltd. Project Deadline Project Number Designation Salary Emp Name Personal Information Project Information Fig. 8.2: Network model Relational Data Model This data model is based on the principle of setting relationships between two or more tables of the same database. It is the most commonly used database model. Let us study about this model in detail. notes 2023-24
  • 159.
    Database ManageMent systeMUsing LibreOffice Writer 149 Relational Database Model The Relational Database Model was proposed in 1970 by E. F. Codd. Relational database model is the most common type of database model. The data elements are stored in different tables made up of rows and columns. The data in different tables are related through the use of common fields. So relations are set between tables based on common fields. That is why this model is termed as relational database model. Relational Database Terminology Let us get familiar with some of the common terms used in RDBMS. • Entity – It is a real world object about which information is to be stored in a database. For example, if we want to store information about an entityStudentinaschool,thenweneedtohavehis admission number, roll number, name, father’s name, date of birth, etc. These details associated with the entity are called attributes. Each entity is a collection of these attributes associated with it. So roll number, name, admission number, etc., are attributes associated with the entity student. These attributes are represented in the form of columns. • Table – A table is a collection of logically related records. It is organised as a set of columns, and can have any number of rows. For example, the Employee table can have columns, namely name, designation, department and have records or rows having data of 100 employees. • Field or Columns or attributes – A field is the smallest entity in the database. A collection of fields make a record, a collection of records make a table and a collection of tables make a database. Fields are individual record characteristics and are presented as columns within a table. Data values are stored in a database as fields. A field holds the data values of one type of data for several persons. For example, in the Employee table the field “Emp Name” will hold the names of employees of an organisation. • Data Values – Data values are the raw data represented in numeric, character or notes 2023-24
  • 160.
    Domestic Data entryoperator – class X 150 alphanumeric form. Examples of data values are ‘Abhinav Bindra’, ‘26’ ‘shooting’, “Chandigarh”, “10-12-2018”, etc. • Record or Row – The data values for all the fields related to a person or object is called a record. It is presented as rows within a table. A record holds the data values of all the fields for a single person or object in a table. For example, in the Employee table with the field names as Name, Designation, Department, the data values of all the fields for an employee may be (‘Abhinav’, ‘Manager’, ‘Finance’) and this forms one record. • Primary Key – A primary key or simply a key is a field that uniquely identifies a row in a table. The key identifier can be the value of a single column or of multiple columns. The primary key is a unique identifier for the table. The column or combinations of columns that form the primary key have unique values. At any time, no two rows in the table can neither have same values for the primary key nor can data value for such field be left blank. For example, in a student table, each student has a unique roll no., which forms the primary key. If, in a table we use more than one fields to identify a record, it is known as a composite key. For example, we may form a composite key consisting of fields roll no. and name. • Relational Database – A relational database is a collection of related tables. For example, in Fig. 8.3, the database contains two related tables. Roll Number Student Name Class Date of Birth Date of Admission 913 Dipak Kumar 10 06/04/2004 25/06/2018 914 Ram Lal Kumar 10 01/03/2004 24/06/2018 Roll Number Book Number Date of Barrow Date of Admission 913 555 10/12/2018 25/12/2018 914 333 11/11/2018 24/11/2018 915 444 12/11/2018 30/12/2018 Relational Database Fields Tables Records Fig. 8.3: Relational database 2023-24
  • 161.
    Database ManageMent systeMUsing LibreOffice Writer 151 • Foreign Key – If a field or a combination of fields of one table can be used to uniquely identify records of another table, then that particular field is known as the foreign key. This foreign key helps to build a relation between two tables. Consider the example given below. In Student Registration Table, ‘Enrolment_Number’ is the primary key and in the Student Marks Table, ‘Roll_Number’ is the primary key, whereas ‘Enrollment_ Number’ is the foreign key. This foreign key can be used to set a relation between two tables. • Candidate Key – All the field values that are eligible to be the primary key are the candidate keys for that table. Such fields can neither be left blank nor can have duplicate values. So in the table Student Marks, Enrollment Number and Roll Number both are candidate keys. • Alternate Key – Out of the candidate keys, one or two are made as primary keys. The others are the alternate keys. Hence, if Roll Number is made as the primary key, Admission Number is the Alternate key. Objects of an RDBMS An object in a database is a structure or a feature that is used to store, represent or retrieve data. In fact a database is a collection of these objects that work on multiple sets of data related to each other. Various objects in a database are as discussed below: • Table – As mentioned before, a table is the basic unit of any DBMS. The data is first stored in tables Student Registration Table Enrolment Number Student Name Class Date of Birth Date of Admission XX1234567890 Dipak Kumar 10 06/04/2004 25/06/2018 XX1234567891 Ram Kumar 10 01/03/2004 24/06/2018 Primary key: Enrollment Number Student Marks Table Roll Number Maths Science Vocational Enrolment Number 44983 87 75 80 XX1234567890 44990 74 45 75 XX1234567891 Primary key – Roll Number, Foreign key – Enrollment Number 2023-24
  • 162.
    Domestic Data entryoperator – class X 152 in row and column format. A column represents a field or an attribute while a row represents a record. • Forms – A form is a feature of a database using which we can enter data in a table in an easy and user friendly manner. A form consists of text boxes, labels, radio buttons, list boxes, check boxes etc. that give a user friendly interface for entering data. The data entered through the forms is stored in tables. • Queries – A query is used to retrieve the desired information from the database. In simple terms, it is a question asked from the database. For example, if we want to view the names of only those students who have scored more than 50 marks, then we post a query. The data set matching the given criterion is retrieved from the table and displayed on the screen. • Reports – The output of a query may be displayed in the form of reports. The usual result of the query is in the form of rows and columns. But if we want the report to be formal and in proper layout, then we can use the Reports feature of RDBMS. Let’s Practice Consider the following table and answer the questions that follow. Item No. Name Price Quantity Discount (in%) A001 Pen 20 12 0 A003 Pencil 15 5 1 A010 Notebook 50 25 5 From the above table, identify the primary key. Justify your choice. How many fields and how many records does the table have? summary • The raw facts constitutes data. • Information is the processed or organised form of data. • A database is a collection of logically related data items stored in an organised manner. notes 2023-24
  • 163.
    Database ManageMent systeMUsing LibreOffice Writer 153 • The software that is used to create, update and retrieve data is known as database management system (DBMS). • Some of the common examples of DBMS are MS Access, Open Office or LibreOffice Base, Oracle, Ingress, MySQL. • Data Model is the structure of database and it describes the manner in which data will be stored and retrieved. • There are different data models, such as hierarchical data model, network data model and relational data model. • In Hierarchical Data Model, the data is organised into a tree like structure. The data is stored in the form of linked records. • In Network Data model, multiple records are linked to same master file. • The Relational data model is based on the principle of setting relationships between two or more tables of the same database. • Entity is a real world object about which information is to be stored in a database. • The details associated with the entity are called attributes. • A table is a collection of logically related records. It is organised as a set of columns, and can have any number of rows. • A field is the smallest entity in the database. These are individual record characteristics and are presented as columns within a table. • Data values are the raw data represented in numeric, character or alphanumeric form. • The data values for all the fields related to a person or object is called a record. It is presented as rows within a table. • A primary key is a field that uniquely identifies a row in a table. • This foreign key helps to build a relation between two or more tables in a database. • All the field values that are eligible to be the primary key are the candidate keys for that table. notes 2023-24
  • 164.
    Domestic Data entryoperator – class X 154 • Out of the candidate keys, one or two are made as primary keys. The others are the alternate keys. • An object in a database is a structure or a feature that is used to store, represent or retrieve data. The various objects in a database are tables, forms, reports and queries. • A form is a feature of a database using which we can enter data in a table in an easy and user friendly manner. • A query is used to retrieve the desired information from the database. • The output of a query may be displayed in the form of reports. A. Multiple choice questions 1. Which of the following can be considered as an example of a database? (a) Dictionary (b) Telephone directory (c) Marks Register (d) Newspaper 2. Which of the following is NOT a DBMS? (a) MS Access (b) Open Office Base (c) MS Excel (d) MySQL 3. DBMS stands for ______________________. (a) Data and Books Management System (b) Database Management System (c) Duplicate Books Management System (d) Data Management Multi System 4. Which of the following data models sets a relation between the two or more tables? (a) Relational Data Model (b) Network Data Model (c) Hierarchical Data Model (d) Connection Data Model 5. The details associated with an entity are called ____________. (a) Table (b) Attributes (c) Records (d) Primary key Check Your Progress notes 2023-24
  • 165.
    Database ManageMent systeMUsing LibreOffice Writer 155 6. A __________ is represented as rows in a table. (a) field (b) attribute (c) record (d) candidate key 7. In which of the following forms can a data value be represented? (a) Numeric (b) Character (c) Alphanumeric (d) All of the above 8. Which of the following uniquely identifies a row in a table? (a) Primary key (b) Alternate key (c) Foreign key (d) Candidate key 9. A ___________is a feature of a database using which we can enter data in a table in an easy and user friendly manner. (a) query (b) report (c) form (d) field 10. A _____________ is a question asked from a database. (a) query (b) report (c) form (d) field B. State whether the following statements are True or False 1. A database cannot be organised. 2. Data is the collection of raw facts. 3. A table can be created without a primary key. 4. Two tables can be related in a network data model. 5. MS Access is an example of a database. C. Fill in the blanks 1. The raw facts constitutes _____________. 2. An _____________ is a real world object about which information is to be stored in a database 3. The output of a query may be displayed in the form of ________. 4. The data values for all the fields related to a person or object is called a _________. 5. All the field values that are eligible to be the primary key are the ___________ keys for that table notes 2023-24
  • 166.
    Domestic Data entryoperator – class X 156 D. Answer the following questions 1. Define the terms (a) Database (b) Data redundancy (c) Report 2. Give one point of difference between (a) Data and Information, (b) Form and Query, (c) Network and hierarchical data model 3. Give any four advantages of a DBMS. 4. Consider the table given below and answer the questions that follow Table: Library Book_Id Book Name Author Name Price Publisher F001 Pride and Prejudice Jane Austen 550 ABC S004 Amazing Astronomy E. Shane 1050 ABC C005 IT and Mankind MHA Diwaan 2500 HYM (a) Name the fields in the given table. (b) Which field should be made the primary key? (c) Is there any alternate key in the table? (d) How is primary key different from foreign key? Explain with example. notes 2023-24
  • 167.
    IntroductIon In the previouschapter we have learned about databases and database management system (DBMS). LibreOffice Base is a free and open source DBMS. It can be downloaded from www.libreoffice.org and is available for both Linux and Windows operating systems. Data has to be stored in an organised manner using a DBMS. Also, the data being stored can be a text, number, date or in any other form. So, we need to understand different types of data that can be stored in a table. The data types of the fields have to be specified while creating tables in a database. Thereafter valid data is entered and stored in a table. Data Types The nature of data to be entered for various fields are of different types. For example, names are stored in the form of text, age in numbers, fees in decimal numbers, date of birth in date format and so on. A data type refers to the type of data that will be stored in that particular field. The memory size of a field varies according to its data type. Some commonly used data types are described below. Text Data Type – The text data is a combination of letters, numbers or special characters. No arithmetic calculations can be performed on text data. Examples of text data type is PAN Card Number, Name, Marks, etc. C HAPTER 9 Starting with LibreOffice Base 2023-24
  • 168.
    Domestic Data entryoperator – class X 158 Table 9.1: Text Data Types Name Data type Description Memo LONGVARCHAR Stores up to the maximum length indicated by user. It is used to store some descriptive data having more than 255 characters. Memo data type allows to store text data up to 64,000 characters. Text (fix) CHAR Stores exactly the length specified by user. Character data type is used to enter fixed number of characters. It can be used for license number, passport number as they have fixed number of characters. Text VARCHAR Stores upto the specified length. The number of bytes allocated depends on the number of characters entered by the user. For example, the address is defined as varchar (50), and if the address entered by the user is of 20 characters then only 20 bytes will be occupied in the database. • Numeric Data Type – Numeric data types consists of numbers. The numbers can be integer or real numbers on which any type of arithmetic calculations can be performed. For example, 10, -34.8, 90.6789 , -86 are of numeric data type. Table 9.2 lists different numeric data types along with the number of bits/bytes it uses and its range. Table 9.2: Numeric data types Name Data type Signed Range Tiny Integer TYNYINT No 0-255 Small Integer SMALLINT Yes -32768 to 32768 Integer INTEGER Yes -2.14×10⁹ to 2.14×10⁹ BigInt BIGINT Yes -2.3×10¹⁸ to 2.3×10¹⁸ Number NUMERIC Yes Unlimited Decimal DECIMAL Yes Unlimited Float FLOAT Yes Real REAL Yes 5×10(-324) to 1.79×10(308) Double DOUBLE Yes • Currency Data Type – The currency data type indicates the monetary values and can be stored using currencies of various countries. For example $100, £ 500 or Rs. 25.50. • Date Data Type – This data type is used to indicate dates and time. For example 12/25/2019, 08:45 AM. The data and time can be stored in various formats. Table 9.3 list various forms of date data type. The table below lists various data types that can store textual data. 2023-24
  • 169.
    Database ManageMent systeMUsing LibreOffice Writer 159 Table 9.3: Various forms of Date data type Name Description Date Stores the year, month and day as it is stored in the system. Time Stores the time of the day as hour, minute and second. Timestamp Stores date and time information at once. • Boolean – In boolean data type there can be only two values- True or False. This also can be given in multiple formats like Yes/No, True/False, On/Off. • Binary – The Binary data type used to store digitized images and sounds that comes as long string of zeros and ones. It is possible to store photos of the products or employees, or sound snippets or voice messages in Base database. Starting with LibreOffice Base Annual Sports Day is being held in Ruhi’s school in which various sports competitions will be conducted. Ruhi has been asked to create a database consisting of various sports activities and its players. She decides to create a database named, ‘Sports Day’ consisting of a table ‘Events’ that contains the following fields: Event_Id - to store Event identification no like E001, E002, etc. Event Name - to store name of the event Date - to store date on which the event will be conducted Winner 1 Name - name of the winner Winner 1 Points - points earned y the winner Let’s Practice What should be the data type of the fields of the table Events that has to be created by Ruhi? Which field should be made the primary key? Once the table with its fields has been decided, Ruhi decides to start creating the database using LibreOffice Base. Follow the following steps to create the database. Step 1. Start the LibreOffice Base as per the standard process of starting the application in Windows or Linux. In Windows, click Start > LibreOffice or double click on the LibreOffice icon on the desktop or Select Base Database option from the bottom left panel. 2023-24
  • 170.
    Domestic Data entryoperator – class X 160 In Ubuntu Linux, click on the Base icon located on the left panel as shown in Fig. 9.1(a) or click on the Show Applications as shown in Fig. 9.1(b) to search for its icon. Type Base in the search box. The LibreOffice Base application icon will be displayed as shown in Fig. 9.1(c). Click on the Base icon to open the Base application. Step 2. A Database Wizard opens as shown in Fig. 9.2. It allows you to create a new database or open an existing database. Fig. 9.2: LibreOffice Database Wizard Tip: To open LibreOffice Base, you may search the application Base on your computer and click on the LibreOffice Base icon. Step 3. Since we want to create a new database, so click Create a new database radio button. If any database that has already been created is to be opened, then select Open an Existing Database option to select the database to be opened. Thereafter click Next button. Step 4. The Next step gives the option to register our database with LibreOffice.org. If we register the database, then our database is made public and hence can be accessed by other people. As of now, we would not like to register, so we click and select the radio button with option, ‘No, do not register the database’. Fig. 9.1(a): Clicking on the Base icon on the left panel to open Base Fig. 9.1(b): Clicking on Show Applications to search for installed packages Fig. 9.1(c): Clicking on the searched Base icon to open Base 2023-24
  • 171.
    Database ManageMent systeMUsing LibreOffice Writer 161 Fig. 9.3: Decide How to Proceed After Saving the Database Step 5. This step also asks whether you want to open the database for editing or want to create a table using the wizard. The option Open the database for editing is already selected. Step 6. Click Finish button to complete the database creation process. The Save As dialog box appears. Step 7. Browse for the drive and folder where you want to store your database. Step 8. Type the name (Sports Day) in the File name text box. Step 9. Click Save button. The database in Base is saved with an extension .odb. Also note that if no name is given to the database, then it is saved with a default name as NewDatabse.odb. User Interface of Libre Office Base Once a database is created, the screen as shown in Fig. 9.5 appears. This is the User Interface of Open Office Base. The various components of the Base User Interface are discussed below: Fig. 9.4: Save As dialog box Fig. 9.5: User Interface of LibreOffice Base 2023-24
  • 172.
    Domestic Data entryoperator – class X 162 • Title Bar – The title bar displays the name of a database and an application in which it is made. The windows buttons to maximize, minimize or close the window are located on the right corner of the title bar. • Menu Bar – The menu bar appears below the title bar. It consists of seven menu items – File, Edit, View, Insert, Tools, Window and Help. All these menu items contain commands that help to perform various operations on the database. • Standard Toolbar – It is located below the menu bar. It is used to access frequently used tools. • Status Bar – It is located at the bottom of the interface window. It displays information about the type of view of the object in the database. Database Pane – The database pane is located on the left side of the window. LibreOffice Base is the collection of related data objects known as Tables, Forms, Queries, Reports and application modules. Depending on the object that is selected, the respective Task Pane and Object Area displaying the created object appears. Opening a Database To open an already created database, click File > Open. The Open dialogue box appears as shown in Fig. 9.6. Browse for the folder where the database to be opened is stored. Select the desired database and click on Open button. Tip: Use the keyboard shortcut key Ctrl+O to open an already existing database. Creating a Table Once the database is created, we can start working with objects of the database. First and foremost is the creation of the table and then entering data in the table. A table in LibreOffice Base can be created using a wizard or using the Design view. Creating a Table using a Wizard A table can be created at the time of creating a database or after creating database. To create a table Fig. 9.6: Opening database from menu option 2023-24
  • 173.
    Database ManageMent systeMUsing LibreOffice Writer 163 at the time of creating a database in database wizard, select the radio button with option “Create tables using the table wizard”, then click on the Finish button. Since our database is already open, so we will select and click If the database is opened we can select Use Wizard to create a table option from the Tasks Pane. The Table Wizard dialog box will open as shown in Fig. 9.7. Follow the instructions in the wizard to create the table with desired fields. The Table Wizard of Base consists of ready-made tables. Click the Sample tables list box and select select any one table, say Customer from the drop down list. After selecting the Customer table, various fields appears under Available Fields. The required fields from Available fields box can be shifted one by one to Selected fields box using > button as shown in Fig. 9.8. You can select all the fields from Available fields to Selected fields in one stroke by clicking on >> button. Click on Next button. It will move you to step 2. Set types and formats as shown in Fig. 9.9. Then click on Next button. It will move you to step 3. Set primary key. Let us set the CustomerID field to primary key as shown in Fig. 9.10. Click on Next button, that will take you to the complete the process of creating table using wizard and display the screen as shown in Fig. 9.11. This screen will give you three choices. By default the “Insert data immediately” option selected. Fig. 9.7: Table Wizard Fig. 9.8: Fields shifted from Available fields to Selected fields Fig. 9.9: Setting types and formats Fig. 9.10: Setting primary key 2023-24
  • 174.
    Domestic Data entryoperator – class X 164 Click on the Finish button to complete the process of creating the table and using wizard. The next screen will allow to enter the data as per the selected fields. The data sheet view interface as as shown in Fig. 9.12 will open that allow to enter the data in the Customer table. Creating Table in Design View Creating the table using wizard restricts us to use the same fields in the per-designed tables. It may not solve the purpose in real scenario, as we may require to create a table with the different fields for our purpose. Creating tables using Design View gives us more flexibility to do our work. To create table using Design View, in main Database window, click on the option Create Table in Design View in the Tasks Pane and Table Design Window will be opened as shown in Fig. 9.13. The screen is broadly divided into two sections or horizontal panes. The upper half consists of a grid structure with three columns Field Name, Field Type and Description. • Field Name – It is the name of the field assigned at the time of creation of table. • Field Type – It allows to assign a data type to the field. • Description – It allows to describe the purpose of the field. It is not the part of database table, but it is meant for the user to understand the purpose of the field. We may or may not enter field description. The Field Properties pane is located at the bottom half of the window. It displays the field properties assigned by the database designer. These properties can also be Fig. 9.11: Creating table using wizard Fig. 9.12: Datasheet view of Customer table Fig .9.13: Creating Table in Design view 2023-24
  • 175.
    Database ManageMent systeMUsing LibreOffice Writer 165 changed as per the requirement and are used to control and validate the data that is to be entered. Let us help Ruhi to create a table named Events using in the option Create Table in Design view in the Sports Day database. Follow the follow the following steps to do so. Step 1. Type the first field name (EventId) in the Field Name column. Press Tab key. The cursor moves to the second column i.e. Field Type. Step 2. The Field Type column contains a list box. As you click on the down arrow, it appears and we can select the desired data type from the list box. Select the datatype (Varchar). Step 3. Observe that certain properties appear in the Field Properties Pane as the data type is selected. Some of the properties are Entry required, Length, Default value, Format example. Set the desired properties for the entered field. Step 4. Press Tab key to move to the next column. Add any description if you want in the third column. Step 5. Once the properties for the field are set, press Tab key to move to next row. Fig. 9.14: Selecting data type for field Fig. 9.15: Fields entered using Creating Table in Design View Step 6. Enter the next field by repeating steps 1,2 and 3. Repeat the process for adding all fields in the table. Fig. 9.15 shows the Design View with all the fields. Setting the Primary Key As you have learned that every table must have a primary key that uniquely identifies a record in the table. To make a particular field as the primary key, place the mouse pointer before the field name, say Event Id in our above example and right click. A pop up menu appears. 2023-24
  • 176.
    Domestic Data entryoperator – class X 166 Select the Primary Key option from pop up menu as shown in Fig. 9.16. A key icon appears before the field name indicating that it is a primary key. Saving a Table After creating the table you need to save it on the disk. To save the table click on the save button or follow menu option File > Save As. A Save As dialog box is displayed as shown in Fig. 9.17. Enter the name of table and click on OK button. Fig. 9.17: Saving a table Tip: Press Ctrl + S to save the table or click Save icon from the toolbar. If the table is being saved after making some changes, simply select File-> Save option. Once the table design is complete, click on Close button on the toolbar to return to the Database screen. The name of the table will appear in the Tables Object Area as shown in the Fig. 9.18. Fig. 9.18: Event table added to the database Entering Data in a Table To enter data in the table, double click on the created table Events icon in the Tables Object Area on the database screen. Alternatively, we can open the table by right clicking on the desired table and then selecting More to know To set a composite key, i.e. a primary key consisting of two fields, keep the Ctrl key pressed and then click on multiple fields to select them. Thereafter right click on selected fields and choose Primary Key option from the pop up menu. Fig. 9.16: Assigning primary key 2023-24
  • 177.
    Database ManageMent systeMUsing LibreOffice Writer 167 the Open option from the drop down menu. The datasheet view of the table will appear as shown in Fig. 9.19. It displays the field names in the top row. These fields are displayed in the same order as they were added while creating the table. If the number of fields are more and cannot fit in the single row, you can use the horizontal scroll bar to view all the fields. The cursor will be blinking in the second row. Start typing the data value for each field. Use Tab to move to next field. Once all the data values are entered for a single record, the cursor moves to the next record. This process is called as data entry. Enter 4-5 records in the Events table as shown in Fig. 9.20. Navigating through the Table The black pointing arrow ( )just before the field name is the record pointer. To navigate through various records of the table, we use the navigation box present at the bottom of the datasheet window as shown in Fig. 9.21. It indicates a current record of the table at any given time. Fig. 9.21: Navigation box The various components of Navigation Box are as follows: • Record Selector Box – T his is the text box where the currently active record number is displayed. We may enter the record number that we want to see in this text box. • Navigation Buttons – These are used to scroll vertically in the table. Fig. 9.19: Datasheet view of Events table Fig. 9.20: Data entry in Event table 2023-24
  • 178.
    Domestic Data entryoperator – class X 168 Press to move to the first record Press ► and ◄ to move to the next and previous records respectively. Press to move to the last record Fig. 9.20 shows the datasheet view after entering four records in the table. Note that the record pointer is on fourth record, the Navigation Bar shows the “Record 4 of 4”. Editing Data To edit or modify the previously entered data simply place the cursor on the field value that has to be edited to edit and enter the new value. The Edit icon ( ) appears before the record that is being edited. This icon is displayed till the table is saved after making the required changes. Press Esc key to cancel the corrections made and restore the original contents. Deleting Records from Table To delete any record from the table, open the table and select the record to be deleted. The record can be deleted by pressing the Del key from the keyboard or selecting the Delete Record option from the Edit menu. Alternatively a record can also be deleted by right clicking on the record and clicking on the Delete Rows option from the pop up menu. Attempting to delete the record will display the Confirmation box as shown in Fig. 9.22. Clicking on Yes button will finally delete the record, while clicking on the No button will not delete the record. Sorting Data in the Table Data in a table can be arranged in ascending or descending order. This process of arranging the records in particular order on any filed is called as sorting. Follow the following steps to sort the table. Step 1. Open the Event table in datasheet view and select the field on which you want to sort. Fig. 9.23 shows that the field “Points” is selected to sort the records in ascending order. Fig. 9.22: Delete record alert Fig. 9.23: Sorting the Event table on Points field 2023-24
  • 179.
    Database ManageMent systeMUsing LibreOffice Writer 169 Step 2. From the tool bar click Sort Ascending icon if the table has to be sorted in ascending order of selected field. Alternatively select Sort Descending icon if the table has to be sorted in descending order of selected field. Step 3. The table will be sorted in the ascending order of points as shown in Fig. 9.24. Sometimes we may need to sort the table based on more than one fields. In such case, click Sort icon on the toolbar. The Sort Order dialog will be displayed as shown in the Fig. 9.25. Select the appropriate field name and field value according to which the records are to be sorted. Choose the order of sorting ascending or descending as required from the Order drop down box. Multiple fields may be selected in this dialog box. Click OK button once done. Closing LibreOffice Base To close the application window of LibreOffice Base, click on the File > Close or click on the cross (x) button of the LibreOffice Base window. Let’s Practice There are 5 houses in Ruhi’s school – Ganga, Yamuna, Satluj, Beas and Narmada. Once student can participate from each house in a particular event. Create a table Participants with following fields. 1. Event_Id 2. Event Name 3. Ganga 4. Yamuna 5. Satluj 6. Beas 7. Narmada Also add minimum five records in the table. summary • Baseisafreeandopensourcedatabasecomponent of LibreOffice suit. • It can be downloaded from www.libreoffice.org • A data type refers to the type of data that will be stored in that particular field. Fig. 9.24: Event table after sorting on Points field Fig. 9.25: Sort Order dialog box 2023-24
  • 180.
    Domestic Data entryoperator – class X 170 • Various in Base can be categorized into Text , Numeric, Currency and Date. • LibreOffice Base is the collection of related data objects known as Tables, Forms, Queries, Reports and application modules. • Depending on the object that is selected, the respective Task Pane and Object Area displaying the created object appears on the User Interface Window. • A table in LibreOffice Base can be created using a wizard or using the Design view. Check Your Progress A. Multiple choice questions 1. Which of the following is NOT a type of text data type? (a) Memo (b) Varchar (c) Float (d) Char 2. A currency data type can only store monetary data that is in dollars. (a) True (b) False (c) Neither a nor b (d) Both a and b 3. Which of the following data can a date data type store? (a) Date (b) Time (c) Both date and time (d) Neither date nor time 4. Which of the following is true about LibreOffice Base? (a) It is a spreadsheet software (b) It is free and open source software (c) It can store only character data (d) It is a licensed software. Practical Exercise Ananthu wants to create a directory containing data – Serial No, Name, Mobile Number, Email id, Date of birth of his friends. Create a table using LibreOffice Base. Make Serial No as primary key. Enter minimum 5 records in the table. Sort the table in alphabetical order of name. notes 2023-24
  • 181.
    Database ManageMent systeMUsing LibreOffice Writer 171 5. Which of the following methods can be used to create a table in Base? (a) Using a table wizard (b) Design View (c) Both a and b (d) Neither a nor b 6. The related objects of a database can be seen in ____________ pane of the Base Database window. (a) Database (b) Task (c) Title Bar (d) Menu Bar 7. Which is the shortcut key to open an existing database? (a) Ctrl+ D (b) Ctrl+O (c) Ctrl+E (d) Ctrl+F 8. The Design view of Table Creation window in LibreOffice Base is divided into ______ sections or panes. (a) 2 (b) 3 (c) 4 (d) 5 9. While entering records in a table, we can move to the next field by pressing the _________ key. (a) Tab (b) Ctrl (c) Enter (d) Shift 10. Which of the following is true about primary key of a table? (a) Every table must have a primary key (b) The data values in primary key field cannot be duplicated. (c) A primary key field cannot be left blank (d) All of the above B. State whether the following statements are True or False 1. The text data can contain special characters. 2. Memo data type can be used to store descriptive data. 3. A Boolean data type can have two or more than two values. 4. We cannot store audio data in LibreOffice Base. 5. The properties of a field change according to the data type selected. 6. Field description may or may not be entered while designing a table. 7. is pressed to move to the last record. 8. appears when the record is being edited. notes 2023-24
  • 182.
    Domestic Data entryoperator – class X 172 9. A table once created in a database cannot be edited. 10. Sort dialog box can only help to sort data in ascending order. C. Fill in the blanks 1. A data type refers to the type of data that will be stored in that particular field. 2. The _____________ data is a combination of letters, numbers or special characters. 3. ________ data type can be used to store Aadhar number. 4. The __________ data type used to store digitized images. 5. The shortcut key to save a table is _______________. 6. ______________ on the Base Interface Window displays information about the type of view of the object in the database. 7. A __________ icon appears before the field name indicating that it is a primary key. 8. The data can be entered in a table only in __________ view. 9. The black pointing arrow just before the field name in a table is called ____________. 10. The process of arranging the records in particular order on any filed is called _______________. D. Answer the given questions 1. Differentiate between: (a) Memo and Varchar data type (b) Number and Decimal data type (c) Design View and Datasheet view of a table 2. Name the menu items present on the Base User Interface, 3. Label the components – Title Bar, Database Pane, Tasks Pane, Status Bar of the LibreOffice Base User Interface. 4. How can we define a primary key in a table? 5. Write steps to sort the table in descending order of primary key. 6. What is the use of navigation box with respect to tables in a database? notes 2023-24
  • 183.
    IntroductIon We have learnedto create tables in a database. Once the tables are added in a database, you may require to edit or delete the table. Also relations are set up between the tables to control data redundancy and inconsistency. This helps in proper maintenance of a database by checking that neither the records are duplicated nor there is variable data value for a particular field in two or more tables. If you set up relations between tables, then adding or updating a record in one table reflect the changes in all the related tables. Editing and Deleting Tables Inthepreviouschapter,wehavecreatedaCustomertable using a wizard in Sports Day database. It is possible to copy, rename, edit and delete the table of database by right clicking on the table name and using the appropriate option from the pop up menu. Editing a table involves the task such as adding a new field or removing any field in a table or to alter any of the field properties. To edit a table, open the Database User Interface window. Selecting the Table object in Database Pane, the list of tables will be displayed in the Table Area. Right click on the table name and select Edit option from the pop menu. In our example we have selected the Customer table as shown in Fig. 10.1. The design view window of the table will be displayed as shown in Fig. 10.2. Do the required modifications C HAPTER 10 Working with Multiple Tables Fig. 10.1: Selecting Edit option from pop up menu 2023-24
  • 184.
    Domestic Data entryoperator – class X 174 and save the table. Also note that the changes so made will not affect the previous records entered in the table. Similarly to delete a table, right click on the table to be deleted, say Customer table and select the Delete option from the pop up menu as shown in Fig. 10.3. A confirmation box to confirm for deletion of the table will be displayed as shown in Fig. 10.4. Click on Yes button to finally delete the table. To rename a table, right click on the table name in the Table Area and select Rename.. option from the pop up menu. A cursor will appear. Type the new name and press the Enter key. Relationships between Tables While working with multiple tables, you need to check the redundancy and inconsistency of data. The record for a particular entity should neither be repeated nor different data values should appear for a single entity in the database. This is done by setting relationship between the tables of a database. The most important prerequisite for setting a relationship is that there must be a common field(s) between the two tables to create a relationship. Fig. 10.2: Table in design view window Fig. 10.3: Selecting Delete option from pop up menu Fig. 10.4: Confirm Deletion Alert Let us consider an example of a database containing following two tables–Student_Details and Student_Result Table 10.1: Student_Details Admission No Name Father’s Name Class DOB 1001 Mampi D K Bose 10 12/3/2004 1005 Harnoor Tej Singh 9 2/5/2005 1110 Sanjeeva B Reddy 10 13/11/2004 1002 Neeru Rajesh Jain 7 14/11/2006 1134 Urjit Mahesh Patel 10 7/7/2003 Table 10.2: Student_Result Roll No Admission No Class Aggregate_Marks 1 1001 10 78 2 1110 10 93 3 1134 10 46 2023-24
  • 185.
    Database ManageMent systeMUsing LibreOffice Writer 175 In Table 10.1 (Student_Details), Admission No is the primary key. In table 2 (Student_ Result), Roll No is the primary key and Admission No is the foreign key. So each record in Table 10.2 has a value of Admission No that corresponds to a record in Table 10.1 with same value of Admission No. It is important to note that the data types of the common field in both the tables must be same. If they are not same then LibreOffice Base will display an error message and will not allow to set the relationship between the two tables. Once the relationship between the two tables has been set, the integrity of data will be managed by the DBMS. That means once a student’s record has been entered in the Student_Details table, only then that particular Admission No can be entered in the Student_ Result table. The record pertaining to Admission No in Student_Details table is considered as the master record while the corresponding record in the related table (Student_Result) is the transaction record. Therefore Student_Details is called the master table and Student_ Result is called the transaction table. Types of Relationships The type of relationship between any two tables in a database is based on the number of records that are present in the transaction table corresponding to the master table. Primarily three types of relationships can be set up between two tables in a relational database These are: (i) One-to-One (ii) One-to-many (iii) Many-to-Many One-to-One relationship In this type of relationship, one specific record of a master table has one and only one corresponding record in the transaction table. For example, the record for Admission_No in the master table (Student_Detail) will have only one corresponding record of same value of Admission No in the transaction table of Student_ Result. This is because no two students will be given same admission number. Similarly one person can have notes 2023-24
  • 186.
    Domestic Data entryoperator – class X 176 only one ticket to get entry into a stadium to view the match. So relationship between Student and Admission number and a person and his ticket number will be one-to-one relationship (Fig. 10.5). Fig. 10.5: One–to-one relationship One-to-Many relationship This is one of the most common types of relationship between the tables in a database. As the name says, in this type of relationship, one specific record of the master table has more than one corresponding records in the related transaction table. For example, one teacher can teach multiple students or multiple classes, or one person can sell multiple products. So we can say that there is a one to may relationship between a teacher and class or teacher and student or seller and products (Fig. 10.6). Fig 10.6: One–to–Many relationship notes 2023-24
  • 187.
    Database ManageMent systeMUsing LibreOffice Writer 177 Many-to-Many relationship In this type of relationship, there will be multiple records in the master table that correspond to multiple records in the transaction table as well. Generally this type of relationship is set when certain records have to be saved more than once in both the related tables. For example, a teacher in a school may hold multiple responsibilities such as class teacher, an activity in- charge or examination in-charge. For each responsibility the teacher might be attached with multiple students. So this type of relationship will be many to many relationship. Similarly a shopkeeper may sell multiple products to multiple customers. So many-to-many relationship exists between a product and a customer. Fig. 10.8 shows the corresponding records in master table and transaction table are in same color. notes Table: Department_Incharges Department Teacher_Id Examination T002 Discipline T765 Co-Curricular T056 Time Table T002 Website Update T765 Table: Activity_Duty Activity Department Teacher_Id UT1 Examination T002 Term1 Examination T002 HomeWork Upload Website Update T765 Timetable Upload Website Update T765 Inter-house Dance Co-Curricular T056 Inter-class Debate Co-Curricular T056 Discipline duties Discipline T765 Fig. 10.8: Many–to-many relationship Advantages of Relating Tables in a Database There are various advantages of relating tables in a database. Few of them are as given below. • A relationship can help prevent data redundancy. • It helps prevent missing data by keeping deleted data from getting out of synch. This is 2023-24
  • 188.
    Domestic Data entryoperator – class X 178 called referential integrity. We will study in detail about referential integrity later in the chapter. • Creating relationships between tables restricts the user from entering invalid data in the referenced fields. • Any updation in the master table is automatically reflected in the transaction tables. Let’s Practice Name the type of relationship for the following: • Citizen and his Driving License • Customer and Product • Student and Course • Team and Match • Player and Country • Employee and Project Creating Relationships between Tables Let us get back to Sports Day database created in the previous chapter. Let us add another field, CategoryID to the table Events using Edit option as shown in Fig. 10.9. Enter 10 records in the Events table of various categories as shown in Fig. 10.10. Create another table with the name EventCategory with the fields – CategoryID, CategoryName, TeacherIncharge and enter the records as shown in Fig. 10.11. Hence, there are two tables in the database – Events and EventCategory with a common field as CategoryID. Fig. 10.9: Adding field CategoryID in Event table Fig. 10.10: Records entered in Event table with added field CategoryID Fig. 10.11: Records entered in EventCategory table 2023-24
  • 189.
    Database ManageMent systeMUsing LibreOffice Writer 179 In Event table, EventID is the primary key and CategoryID is the foreign key. In EventCategory table, CategoryID is the primary key. To set up relationship between these tables follow the following steps. Step 1. From main menu of LibreOffice Base, click on Tools > Relationships… Step 2. The Relationship Design screen will appear as shown in Fig. 10.12. In the middle of the screen there is Add Tables dialog box. Both the tables are listed in the dialog box. Step 3. In the Add Tables dialog box, click Events table and then click Add button. Similarly add EventCategory table to the Relationship Area. Step 4. Click Close button to close the Add Tables dialog box. Observe that the tables Events and EventCategory table added to the Relationship Area along with all its field list as shown in Fig. 10.13. Step 5. As discussed before, CategoryID is the common field in the two tables. Hence it will be used to set a relationship between the two tables. To create a relation Fig. 10.12: Add Tables dialog box in Relationship Design Screen Fig. 10.13: Events and EventCategory Tables added in Relationship Design window Fig. 10.14: Relationship between two tables between the two tables, we just have to drag the common field CategoryID from the Events table and drop it in EventCategory table. A line connecting both the tables with the common field (CategoryID) appears on the screen as shown in Fig. 10.14. The line is labeled as ‘l’ on the primary key side and as ‘n’ on the foreign key side. Hence the CatgeoryID from EventCategory table as primary key will have unique values and is called referenced field. On the other hand, 2023-24
  • 190.
    Domestic Data entryoperator – class X 180 in the Events table, the values of CategoryID might be repeated. Here it is known as referencing field. Fig. 10.15 shows that the CategoryID of the Events table is referenced field and CategoryID of the EventCategory table is referencing field. This type of relationship where one value of a table is associated with multiple values in another table is a One-to-many relationship. In this relationship EventsCategory is the mastertable.Sothemasterrecordwithaparticular CategoryID has to be added in EventsCategory table first. Only then the corresponding record can be added in the Events table. Also, only one record with a specific CategoryID will exist in the master table but multiple values of CategoryID might exist in the transaction table, thereby forming a one-to- many relationship. Referential Integrity According to the principle of referential integrity, no unmatched foreign key values should exist in the database. That means if a record, say Admission No as 1001 is not present or deleted in the master table (Student_Details) of Student database, then there should be no record with Admission no as 1001 in the transaction table (Student_Result) as well. Similarly, in Ruhi’s Sports Day database, if a particular category of sports, say C003 is deleted from the master table EventCategory, then there should be no record with Category as C003 in the transaction table. Likewise, if any student leaves the school and his record is deleted from Student_Details table, then there is no question of his appearing for exams and having a result. Hence corresponding record in the transaction table (Student_Result) should either have NULL value or should be deleted. In Ruhi’s Sports Day database as well, the CategoryID that exists in EventCategory table can only be entered in Events table. As mentioned before, once the relationship between the two tables has been set, the integrity of data will be managed by the DBMS. LibreOffice Base Fig 10.15: CategoryID of Events table is referenced field and CategoryID of EventCategory table is referencing field 2023-24
  • 191.
    Database ManageMent systeMUsing LibreOffice Writer 181 will allow only that corresponding record to be entered in the transaction table which already exists in the master table. LibreOffice Base gives us following four options to choose from to maintain referential integrity in such cases. • No action – This is the default option. This option states that a user should not be allowed to update or delete any record in the master table if any related record exists in the transaction table. • Update cascade – This option allows the user to delete or update the referenced field but along with it all the related records in any of the transaction tables will also be deleted or updated. • Set NULL – This option assigns NULL value to all the related fields if the master record is deleted or updated. • Set default – This option assigns any fixed default value to all the related fields if the master record is deleted or updated. To set the relationship properties double click on the relation line joining the two tables, Events and EventCategory. A Relations dialog box will open as shown in Fig. 10.16. By default the radio button with No action option will be selected. Choose any of the desired option and click OK to set the referential integrity between the two tables. Let’s Practice Form a table in Sports Day database in which one-to-one relationship can be established. Write steps to create such a relation in LibreOffice Base. summary • Relations are set up between the tables to control data redundancy and inconsistency. • The most important prerequisite for setting a relationship between the two tables is that there must be a common field(s) between the two tables. Fig. 10.16: Relations dialog box 2023-24
  • 192.
    Domestic Data entryoperator – class X 182 • Three types of relationships can be set up between two tables in a relational database. These are One-to-One, One-to-Many and Many-to-Many. • In One-to-One type of relationship, one specific record of a master table has one and only one corresponding record in the transaction table. • In One-to-Many type of relationship, one specific record of the master table has more than one corresponding records in the related transaction table. • In Many-to-Many type of relationship, there are multiple records in the master table that correspond to multiple records in the transaction table. • According to the principle of referential integrity, no unmatched foreign key values should exist in the database. Prakasan lives in Happy Home Society. He wants to create a database so as to store and manage the maintenance dues received from flat owners of the society. Create the following tables for his database. Table: Residents Details Table: Maintenance Dues Flat no Receipt_Id Owner Name Flat No Contact No Date Flat Category Amount Relate the two tables and thereafter enter minimum five records in both the tables. Which type of relationship did you create? In which table did you enter the data first? Uzair manages a boys hostel in an engineering college. He wants to manage the records of the people staying in his hostel by creating a database with the following tables and also set a relationship between the tables. Table: Student_Details Student_Id Name DOB Course Father’s Name Contact No_student Practical Exercises notes 2023-24
  • 193.
    Database ManageMent systeMUsing LibreOffice Writer 183 Contact No_ guardian Room No Table: Room Details Room No Floor (data value can be first, second or third) Category (data value can be AC / Non- AC) Student Id DOO (Date of occupancy) Monthly Rent Check Your Progress A. Multiple choice questions 1. Which of the following actions can be performed once the tables are created in a database? (a) Add a field in a table (b) Rename a table (c) Delete a table (d) All of the above 2. Which of the following is checked by a DBMS? (a) Redundancy (b) Inconsistency (c) Both (a) and (b) (d) Neither (a) nor (b) 3. Which of the following is required to set a relationship between the two tables? (a) Both the tables must be in different databases (b) Both the tables must have a common field (c) Both the tables must have the same name (d) Both tables must be stored in documents folder only. 4. If a record is added in a master table, which of the following is NOT true for transaction table (a) The record in the master table is called the master record (b) The corresponding record in transaction table can only be entered once. (c) The record in the transaction table is called the transaction record. (d) It is possible to add a record in the master table 5. Which type of relationship exists between a student and the subjects studied by him/her? (a) One-to-one (b) One-to-many (c) Many-to-many (d) All of the above notes 2023-24
  • 194.
    Domestic Data entryoperator – class X 184 6. Consider the following tables. Which type of relationship can be established between the two tables? (a) One-to-one (b) One-to-many (c) Many-to-many (d) None of the above Table 1: Item Table 2: Item_Category Item_Code Category_Code Item_Name Cat_Name Price Item_Code Qty Cat_Disc Category_Code 7. Which of the following menus contains the Relationship option? (a) Edit (b) File (c) Tools (d) View 8. The list of tables to be added is displayed in the __________ dialog box in the Relationship Screen. (a) Add Tables (b) Add Databases (c) Both (a) and (b) (a) Neither (a) nor (b) 9. In the relationship design screen, the relationship between the two tables is done using __________ operation. (a) Click (b) Double Click (c) Drag and Drop (d) Right click 10. Which of the following is NOT an option that can be used to maintain referential integrity in a database? (a) No Action (b) Set NULL (c) Set Default (d) Set Value B. State whether the following statements are True or False 1. Redundancy is preferred in a database. 2. In a table, a record for a particular entity should not be repeated. 3. A single field should always have only one data value. 4. If a table is edited, the records already entered in it are deleted. 5. The record in master table should be entered before the corresponding record is entered in the transaction table. notes 2023-24
  • 195.
    Database ManageMent systeMUsing LibreOffice Writer 185 6. In one-to-many relationship, one specific record of the master table has more than one corresponding records in the related transaction table. 7. The Relationship option is present in the Widows menu. 8. In a database, the referential integrity is maintained by the user. 9. A relationship is always set between the tables based on a common field. 10. If the master record is deleted, the transaction records will always be deleted. C. Fill in the blanks 1. A table to be edited is displayed in ___________ view. 2. The most important prerequisite for setting a relationship between the two tables is that there must be a ________________between them. 3. In ________________relationship, one specific record of a master table has one and only one corresponding record in the transaction table. 4. ___________________is one of the most common types of relationship between the tables in a database. 5. A record being entered in a _________ table must always exist in a ________ table. 6. The principle of _______________helps prevent missing data by keeping deleted data from getting out of synch. 7. Creating ____________ between tables restricts the user from entering invalid data in the referenced fields. 8. Data integrity is maintained by ______________. 9. A relationship between customers and products is an example of __________________ relationship. 10. The __________________ window is used to set relationships between the tables. D. Answer the following questions 1. Give any two advantages of relating a table in a database. 2. How is redundancy or inconsistency controlled in a database? Explain with an example. 3. Define referential integrity. Who maintains referential integrity in a database? 4. Differentiate between one to one relationship and one to many relationship. Give suitable examples to explain your answer. 5. Explain many to many relationship with an example. notes 2023-24
  • 196.
    IntroductIon A database isused to store data in an organized manner so as to retrieve it easily and accurately from database. To search for the desired record and to retrieve the desired data, we have to give its specifications to DBMS. Such specifications are given to the database in the form of queries. For example, we may have to specify the fields that we want to display or any particular data value based on which the records are to be filtered from the table(s). Therefore, we can say that a query is a sort of question asked from a database. Depending upon specifications given in the query, the specific records are searched from the table(s) in the database and then displayed in the desired manner. Such information may be difficult to find by just looking at a single table or multiple tables. In fact as the number of records increase, finding the desired information becomes more and more difficult. By using queries, we are able to retrieve data without going individually through each record in the table(s) and also display them in desired format. QuerIes A query is one of the most important feature of any DBMS. Using a query, we can retrieve and display data from one or more tables in a database. This is done by giving specific search criteria to the DBMS so that we are able to view the exact information that we want. LibreOffice Base allows us to create a query and even save it as an object in a database. This helps us to run the query multiple times as and when required. C HAPTER 11 Queries in Base 2023-24
  • 197.
    Database ManageMent systeMUsing LibreOffice Writer 187 Using a query, we can specify the fields that we want to display and also the criterion based on which the records to be filtered. The information may be retrieved from a single table or from multiple tables. Also the result of the query is displayed in tabular form with field names in columns and the records in rows. For example, in a Student database, if we want to display the names and marks of the students in a particular class from the Result table, who have scored less than 320 aggregate marks, then we need to give the following information to the database: Name of the table – Result Fields to be specified – Name, Marks Criterion – Aggregate marks should be less than 320 In this chapter you will learn to create a query, save it and then run it as and when required. Creating a Query A query can be created in three ways. In this chapter you will learn the first two methods to create a query. (i) Using a Wizard (ii) In Design View (iii) In SQL view Fig. 11.1: Records in Events table Fig. 11.2: Records in Event Category table Creating a Query Using a Wizard Let us recall the Sports Day database created in the previous chapters with two tables – Events and EventCategory. Let us create a query that will display the Event Name and Winner for each event with CategoryID as C001. The desired data has to be retrieved from the Events table. To create a query using a wizard, follow the following steps. Step 1. Open the Sports Day database. In the Database Design window, click on Queries button present in the Database Pane on the left as shown in Fig. 11.3. Step 2. In the Tasks Area, click on Use Wizard to Create Query… option. The Query Fig. 11.3: Queries icon in Database Pane 2023-24
  • 198.
    Domestic Data entryoperator – class X 188 Wizard will start as shown in Fig. 11.4. It contains the Steps Pane on the left and the Query Details Area on the right. Step 3. The first step of the wizard is to select fields from the respective tables. For our query, to display Event Name and Winner and the criterion to filter the records based on CategoryID. All these fields are present in Events table. Therefore select Events table from the Tables list box. The corresponding fields are displayed in the Available Fields list box as shown in Fig. 11.5. Step 4. Select Event Name field from the list box and click the right arrow (>) button. The field name will appear in the Fields in the Query list box. Repeat the process for Winner and CategoryID fields as shown in Fig. 11.5. Observe that these three fields are moved to Fields in the Query list box. Note that once the fields are added they can be moved up and down in order by clicking ∧ and ∨ buttons present on the extreme right of the wizard. Clicking on » button moves all fields to Fields in the Query area and « button moves all the fields back to Available fields area. Step 5. Clicking on the Next button will display the screen to select the sorting order as shown in Fig. 11.7. It will set the sorting order. The result of the query can be displayed in ascending or descending order of any particular field of the table. Since we do not want to set in a particular order, so we click on Next button. Step 6. The next step is to set the search conditions or the criteria on the basis Fig. 11.4: First step of Query wizard Fig. 11.5: Fields of selected Events table displayed in the Available Fields list box Fig. 11.6: Fields moved from Available fields to Fields in the Query list box Fig. 11.7: Select sorting order 2023-24
  • 199.
    Database ManageMent systeMUsing LibreOffice Writer 189 of which records will be filtered from the table. This is the step where actually the query is set up or the criterion is given to the database. As per our query, the criterion is to display the records of events with CategoryID as C001. By default, the radio button with option Match all of the following is selected. Step 7. Select Events.CategoryID field from Fields drop down list, is equal to from Condition drop down list and type the value as C001 as shown in Fig. 11.8, and click on Click Next button. Three search conditions can be given at the most in the wizard. Click and select the radio button with option ‘Match any of the following’ if any one of the given condition are to be matched for filtering the records. Step 8. Steps 4, 5 and 6 given in the Steps Pane deal with tasks like summarizing and performing numerical calculations. Such steps are not required if there is no numeric field involved in the query. So you can skip these steps and move directly to “Step 7. Aliases” of the wizard. Step 9. The next step to give alias name i.e. the column header name will be displayed when we run the query. By default the field names will be displayed as column headers. Many times field names are not user friendly, so an alias name which is more readable, is chosen to be displayed in the query output. For example, the name of the field in the Events table is Winner. To display the name of winner as the column header, type ‘Winner Name’ and click on Next button as shown in Fig. 11.9. Step 10. The last step of the Query wizard displays the entire overview of the query as shown in Fig. 11.10. All the steps performed till now are shown in a summarised manner. Fig. 11.8: Selecting the Search condition and specifying value Fig. 11.9: Assigning Alias Names Fig. 11.10: Overview of Query 2023-24
  • 200.
    Domestic Data entryoperator – class X 190 It includes the following: • Name of the Query – By default, the name of the query is Query_Events by default. If desired, type the new name in the text box. • The action to be performed after the wizard finishes – By default Display Query option will be selected. Click and select the Modify Query radio button if the query has to be edited in the Design view. • Complete detail of the query – This section contains a summary about the query that has been created. Step 11. Click on Finish button. The records with CategoryID as C001 will be displayed on the screen as shown in Fig. 11.11. Observe the column headings. Are all of them same as the field names in the Events table? Once the query is created, it can be edited in Design view. We will study about Design View in the coming section. Creating a Query in Design View Another way to create a query is using the Design view. This is a more flexible method to create a query from either single or a multiple tables of a database. Let us create a query to display records of Athletics category. For this query, records have to be filtered from both Events and EventCategory tables. Open Sports Day database and follow the following steps to create a query in Design View: Step 1. Click Queries icon on the Objects Pane in the Database Window. Step 2. Click Create Query in Design View… icon in the Tasks Pane. The Query Design Window appears. In the middle of the window the Add Table or Query dialog box is displayed as shown in Fig. 11.12. Step 3. Click on the Event table to be used in the query and then click on Add button. Alternatively double click on Fig. 11.12: Create Query in Design View Fig. 11.11: Records retrieved from Query with CategoryID C001 2023-24
  • 201.
    Database ManageMent systeMUsing LibreOffice Writer 191 the Events table. The table will be added to the Tables Pane present at the top of the Query Design window. Step 4. Similarly add EventCategory table to Tables Pane of the Query Design window. Step 5. Click Close button in the Add Table or Query dialog box to close it. The tables Events and EventCategory added will be displayed in the Table pane as shown in Fig. 11.13. Step 6. Next step is to select the fields. For our query we want to display Event Name and Winner from the Events table and Category Name from the EventCategory table. So in the list box of Events table, double click on EventName and Winner field. Similarly add the field CategoryName form EventCategory table. The field name along with the table name is displayed in the Design grid present in the lower half of the Query Design window as shown in Fig. 11.14. Observe that the Visible Check Box is by default selected. This means that all these three fields will be visible when you run the query. If you do not want the data values for the particular field to be displayed, click to deselect the respective check box. Step 7. In the grid, there is a row titled Alias. As mentioned before, it can be used to display meaningful names in the output. For example, instead of Winner, we would just like to display Winner Name. For this, type Winner Name in the Alias text box under Winner column as shown in Fig. 11.14. Step 8. By default, the data that is displayed as a result of the query is not sorted. To sort the records in either ascending or descending order of a particular field, the Sort row is given in the grid. For example, to display the records in alphabetical order of Event Name, select Ascending from the drop down list box visible in the Sort row under Event Name column. Fig. 11.13: Table added in the Tables Pane Fig. 11.14: Adding fields to query 2023-24
  • 202.
    Domestic Data entryoperator – class X 192 Step 9. Once the query is designed, click Run Query ( ) button on the toolbar or press F5 key. The query result will be displayed in the Tables Pane area as shown in Fig. 11.15. Step 10.Click on Save button to save the query. The Save As dialog box will be displayed as shown in Fig. 11.16. Step 11.By default, the Query Name as Query1 will be displayed. Type a different name if required. Click on OK button to save the query. The name of the query will be seen in the Objects area in the Database window. To run the query again and see the result s of the query, double click on the query name. The results of the query will be displayed in a separate window. To close the Query window, click on on close button on the top right corner of the window. Editing a Query To edit any query, click on the Query icon of the query that has to be edited. The list of queries that have been created will be displayed in the Objects Area. Right click on the Query Name in the Objects Area of the Database window, as shown in Fig. 11.17. Select Edit option from the drop down menu. The Query Design window will be displayed. Let us apply a criteria to display records of only Athletics Fig. 11.15: Query Result in Tables Pane Fig. 11.16: Saving the query Fig. 11.17: Selecting Edit option to edit query category. For this type Athletics in the Criterion row under the Category Name column. Now, the query design is complete if we run the query, the record of only Athletics category will be displayed as shown in Fig. 11.18. We can use the Criterion row to apply multiple conditions as well. Also note that we can apply all relational operators like <, >, <=, >=, != and = for all conditions that can be given in Criterion row. For example, if you want to see only those records where points scored are more than 10, then add Points field to the grid and then set the Criterion for it as >10 as 2023-24
  • 203.
    Database ManageMent systeMUsing LibreOffice Writer 193 shown in Fig. 11.18. Now save and run the query. Observe the output as shown in Fig. 11.18. Working with Numerical Data Till now, we have been displaying data from tables in the query. But that is not all, we can even use certain mathematical functions to find the count, sum, minimum, maximum or average of data values. Let us design a query to display the average points for each category of events. In the Database Window, click Create Query in Design View… button to open the Query Design Window. Add Events and EventsCategory tables. Thereafter follow the following steps to display the average points for each category. Step 1. Add Category Name field from EventCategory table and Points field from Events table. Step 2. Under the Category Name field, in the Function row, click the down arrow. A drop down list will be displayed as shown in Fig. 11.19. Step 3. Select Group option from the drop down list. This option forms the groups for each of the data values in the column of Category Name. Step 4. Similarly, under the Points column, select the Average function from the drop down list. Step 5. Press F5 to run the query. The query result depicting average points in all the categories will be displayed as shown in the Fig. 11.20. Fig. 11.20: Query result in Design view after applying Group function to Category Name and Average function to Points Fig. 11.18: Query result in Design view after applying criteria to display records of Athletics category Fig. 11.19: Function drop down list 2023-24
  • 204.
    Domestic Data entryoperator – class X 194 Step 6. Further, we can also put conditions on groups using the Criterion row. Say, for example to display the average of only Athletics category, type Athletics in the Criterion row under the Category Name column. Now, if we run the query the average of only Athletics category will be displayed in the query result. summary • A query is used to retrieve and display data from one or more tables in a database. • A specific search criteria is given to the DBMS to view the desired information. • The result of the query is displayed in tabular form with field names in columns and the records in rows. • A query can be created in three ways. ■ Using a Wizard ■ In Design View ■ In SQL view Prakasan lives in Happy Home Society. He has created the following tables in his database so as to store and manage the maintenance dues received from flat owners of the society. Table: Residents Details Table: Maintenance Dues Flat no Receipt_Id Owner Name Flat No Contact No Date Flat Category Amount Create a query to display the following information Flat No Owner Receipt Number Date Amount (Please note the change in column headings) Uzair manages a boys hostel in an engineering college. To manage the records of the people saying in his hostel, he created a database with the following related tables. Practical Exercises notes 2023-24
  • 205.
    Database ManageMent systeMUsing LibreOffice Writer 195 Table: Student_Details Student_Id Name DOB Course Father’s Name Contact No_student Contact No_ guardian Room No Table: Room Details Room No Floor (data value can be first, second or third) Category (data value can be AC / Non- AC) Student Id DOO (Date of occupancy) Monthly Rent Create a query to display the following tabular format Room No Student Name Category Monthly Rent Create a query that displays total monthly rent collected for each category. Project Work Use the internet to study the process of working of hostels. See, what all tables/fields/queries should be further added to the existing database so that it is able to fully automate the working of the boys hostel explained in the above exercise. Thereafter make changes in the database created by you in LibreOffice Base. Check Your Progress A. Multiple choice questions 1. Which of the following is refer to asking questions from the database? (a) Report (b) Table (c) Query (d) Database 2. Which of the following are the ways to design a query? (a) Wizard (b) Design View (c) SQL (d) All of the above 3. Which is a flexible way to create a query? (a) Wizard (b) Design View (c) Both (a) and (b) (d) Neither (a) nor (b) notes 2023-24
  • 206.
    Domestic Data entryoperator – class X 196 4. Into how many parts is the query design window divided? (a) One (b) Two (c) Three (d) Four 5. Which of the following is NOT true about queries? (a) It can be created using multiple tables (b) Multiple queries can be created in a database (c) A query can run multiple times (d) A query once created cannot be edited 6. Which of the following is the shortcut key to run the query? (a) F3 (b) F4 (c) F5 (d) F6 7. Which of the following functions can be performed on numerical data while designing a query? (a) Sum (b) Minimum (c) Maximum (d) All of the above 8. In a Query Design wizard, which of the following buttons is clicked to move a field from ‘Available fields’ list box to ‘Fields in the query‘ list box? (a) > (b) < 9 (c) ∨ (d) ∧ 9. Which of the following relational operators can be applied to set the criterion while designing a query in LibreOffice Base? (a) > (b) = (c) != (d) Add Form 10. Which of the following dialog box is present when the Query Design window is opened for the first time to design a query? (a) Add Table (b) Add Query (c) Add Table or Query (d) None of the above 11. Which of the following step is not performed if there is no numerical data to be worked upon in a query? (a) Selection of fields (b) Giving Aliases (c) Summarizing (d) Selection of tables notes 2023-24
  • 207.
    Database ManageMent systeMUsing LibreOffice Writer 197 B. State whether the following statements are True or False 1. You can run a query only once 2. A query cannot be created from multiple tables 3. The shortcut key to run a query is F5. 4. LibreOffice Base provides us with two ways to create a query. 5. A query with numerical data cannot be saved. 6. By default the query result is not sorted. 7. A query can be used to display the average value of a numerical field. 8. While designing a query, the criterion can be set on only one field. 9. Alias is an alternative name for a field in a query. 10. In query Design window, the visible check box is selected by default. 11. A query once created using a wizard can only be edited in the Design view. C. Fill in the blanks 1. A ____________ is a sort of question asked from a database. 2. The result of the query is displayed in ____________ form with field names in columns 3. A query can be created in ________ways. 4. The Query Design window is divided into __________ sections. 5. The shortcut key to run the query is ______________. 6. The conditions to filter the records are set in the _________ row. 7. WhenatableisselectedinaQuerywizard,thecorresponding fields are displayed in the__________________list box. 8. The result of the query can be displayed in __________ or _____________ order of any particular field of the table. 9. At the most __________ search conditions can be given in the query wizard. 10. The last step of the Query wizard displays the entire ____________ of the query. 11. The _____________ view is a more flexible method to create a query. 12. To edit any query, right click on the ________ icon of the query that has to be edited. 13. In the _____________ row of the Query Design grid, we can type the column heading that will be displayed instead of field name when we run the query. notes 2023-24
  • 208.
    Domestic Data entryoperator – class X 198 D. Answer the given questions 1. Define a query? What is the need of creating a query in a database? 2. Rearrange the steps given below so as to create a query using a wizard. 3. Give Alias 4. Select the fields 5. Set the criterion 6. Set the sorting order 7. Give table name 8. What all information is seen in the overview (last step) of the Query wizard? 9. What is the use of Alias row in the Design grid of the Query Design window? 10. Name any four mathematical functions that can be applied to numerical data in a query. 11. Name the three ways of creating a query in LibreOffice Base? notes 2023-24
  • 209.
    Database ManageMent systeMUsing LibreOffice Writer 199 IntroductIon We know that tables in a database are used to store data in an organized manner. For this we have to enter data into the tables. As seen in previous chapters, data- sheet view is used to enter data into the tables. The row and column format of the data-sheet view is not a user friendly interface. So it is required to develop a user friendly data entry screen for data entry operator or a user, who is not very well versed with computers. Moreover, while doing data entry, the user may accidentally or intentionally alter the data in the table. Therefore LibreOffice Base provides the Form feature for data entry purposes. Also, when the user wants to retrieve and view the data from one or more tables in a database using queries, it is again displayed in data-sheet view. The Report feature of OpenOffice Base helps to present the retrieved data in a user friendly, understandable and formatted manner. Both reports and forms are considered as objects of the database and are present in the Database Pane of the LibreOffice Base User Interface. In this chapter we will learn to create Forms and Reports using LibreOffice Base. Forms A form is an object of the database that has a user friendly interface where data can be entered and seen in an attractive and easy-to-read format. For any database, it is the front end for data entry and data modification. It displays the data in a layout design by us and not just in a simple row and column format. C HAPTER 12 Forms and Reports 2023-24
  • 210.
    Domestic Data entryoperator – class X 200 Primarily, a form contains field controls arranged in a presentable and user friendly manner. Each field control consists of a label and the field value text box. A label is a piece of text that specifies the data that should be entered in the field value text box. A field value text box is linked to the respective field in the table. We may add all or selected fields from the table on the form. In addition to field controls, it may contain some additional text like titles, headings and names, graphics like logos, list boxes and radio buttons. There are two ways to create a form: • Using a wizard • Using the Design View Creating a Form Using a Wizard This is the simplest way to create a form. To explain how to create a form using a wizard, we will get back to the Sports Day database created in the previous chapters. To create a form using wizard, follow the following steps. Step 1. Open the Sports Day database created in LibreOffice, and click the Form icon on the Database Pane as shown in Fig. 12.1. Fig. 12.1: Selecting Forms from Database Pane Click the option Use Wizard to Create Form… on the Tasks Pane. The Form wizard will open along with a blank database form in design view in the background as shown in Fig. 12.2. notes 2023-24
  • 211.
    Database ManageMent systeMUsing LibreOffice Writer 201 Fig. 12.2: Form Wizard and Database Form in Design View Step 2. The step 1 of the wizard is to select the tables or queries for which the form has to be created. As we are creating a form for Events table, select Events table from “Tables and queries” list box as shown in Fig. 12.2. Step 3. After selecting the Events table, all the fields of the Events table will be listed in the Available Fields list box as shown in Fig. 12.3. Fig. 12.3: Fields of Events table listed in the Available Fields Step 4. As we require all the fields to appear in the Form, shift all the fields of Event table from Available Fields list box to Fields in the Form list box using >> button. Observe that in Fig. 12.4, all the fields are shifted to Fields in the Form list box. Click on Next button to move forward. Fig. 12.4: All fields of Events table in Available Fields are shifted to Fields in the Form notes 2023-24
  • 212.
    Domestic Data entryoperator – class X 202 Step 5. The second step consists of setting up a subform, i.e. a form within a form. You need to check the checkbox “Add Subform” in Fig. 12.5 to add the subform. Since we do not want to set up any subform, click Next button to proceed further. Fig. 12.5: Step 2 Set up a subform Step 6. The wizard skips the next two steps that relate to the subform and moves on to step 5. This step arrange controls i.e. to set up the design of the form. Observe in Fig. 12.6 that, by default, all controls will be left aligned. Click Right Align radio button to align the controls from the right side of the form. As mentioned before, a field control consists of two parts – label and the field value text box. So in this step we arrange the label and field value text boxes as we want them to be visible on the screen. Fig. 12.6: Selecting the Layout of the form Four layouts are given in this step of the wizard to choose from: • Columnar display with Labels on the left of the field value notes 2023-24
  • 213.
    Database ManageMent systeMUsing LibreOffice Writer 203 • Columnar display with Labels on top of the field value • Display as datasheet • Block display with labels on top Let us select Columnar Display with labels on the left arrangement. Also note that as we choose the Layout type, the fields are arranged in the Form Design view also. Step 7. Click Next button. Step 8. The step 6 of the wizard asks whether the form will be used for displaying data, entering data or both. As we go with the default settings, so we click Next button as shown in Fig. 12.7. Fig. 12.7: Step 6 of form wizard Step 9. The next step is to apply styles to the form being created. We can select the desired background colour and border type of the field value text boxes. Observe in Fig. 12.8, by default the border of the field text value is displayed in 3D look. We can select the options No Border or Flat if required. Fig. 12.8: Applying styles to the form Step 10.Click Next button. Step 11.The next step is to set the name of the form. By default the name of the form is same as the name of the table. Click in the textbox and type a different name if desired, say EventsForm, notes 2023-24
  • 214.
    Domestic Data entryoperator – class X 204 as shown in Fig. 12.9. In the same step, by default, the radio button with the option Work with the form is selected. If you wish to modify the form after the wizard finishes, click Modify the form option. Fig. 12.9: Assigning name to form Step 12.Click Finish button. The form with the first record will be displayed on the screen in a separate window. Also, observe that in Fig. 12.10, the name of the form, EventsForm will appear in the Object Area of LibreOffice User Interface window. Fig. 12.10: Form created for Events table As shown in Fig. 12.10, on the left of the Form Design window is the Forms Control toolbar and at the bottom is the Records toolbar. Forms Control Toolbar This toolbar contains various controls that can be added to the form. We will learn about some of the controls later in the chapter. Records Toolbar The Records toolbar contains the navigation control buttons in the extreme left. With the help of these notes 2023-24
  • 215.
    Database ManageMent systeMUsing LibreOffice Writer 205 buttons, we can traverse and view the records in the file. As we move from one record to another, the record number in the record text boxes changes. Fig. 12.11 shows the navigation control buttons, there are commands to add a new record, save a record, delete a record and so on. Fig. 12.11: Records toolbar Modifying a Form It is possible to modify the form in any manner once it is created. The modification can be to change the background color, font size and color of the text or even positioning of various controls in the form. Changing the background color Follow the following steps to change the background color of the form. Step 1. Open OpenOffice Base User Interface for Sports Day database and click on Forms icon in the Database Pane. The name of the saved form (EventsForm) will be displayed in the Objects Area. Step 2. Right click on the form name and select Edit… option. A separate Form Design View will open. Step 3. To change the background color of the form, right click on the form and select Page Style... option from the pop up menu as shown in Fig. 12.12. Fig. 12.12: Selecting the Page Style option from the Edit pop down Step 4. The Page Style dialog box will appear, where you select Area tab and choose the desired color from the palette, as shown in Fig. 12.13. notes 2023-24
  • 216.
    Domestic Data entryoperator – class X 206 Fig. 12.13: Selecting Colors Palette in Page Style dialog box Step 5. Click on OK button. The selected color will be applied on the form as shown in Fig. 12.14. Fig. 12.14: Forms with changed background color Editing the labels To edit the labels, either by changing the text or by changing the formatting effects, follow the following steps. Step 1. Place the mouse pointer over the label, say EventID to change it. Step 2. Press the keyboard shortcut key Ctrl+Click to select the label. The position boxes will appear around the label. Step 3. Right click on the selected label and select Control Properties… option from the pop up menu as shown in Fig. 12.15. Fig. 12.15: Selecting Control Properties by right clicking on the label notes 2023-24
  • 217.
    Database ManageMent systeMUsing LibreOffice Writer 207 Step 4. The Properties: Label Field dialog box will appear as shown in Fig. 12.16. It contains various properties of the selected label. In the text box after Label property, type Event ID. The label caption on the form changes accordingly. Fig. 12.16: Changing the label caption from the Properties Label Field Similarly we can change other properties of the selected label like width, height, alignment, font style and font size. Step 5. After making the desired changes close the Properties dialog box by clicking the cross (x) button on the top right of the dialog box. The changes made will be applied on the selected text. Moving a control It is possible to move the to another location in the form. Click on the control that has to be moved. Both the label and the text box for field value will be selected and position handlers will be placed around the control. If only one of these have to be re-positioned then press Ctrl key while clicking on that control. Now, click and drag the control to move to the desired location (Fig. 12.17). Fig. 12.17: Moving a control notes 2023-24
  • 218.
    Domestic Data entryoperator – class X 208 Changing the size of the textbox control To change the size of the textbox control, press Ctrl button while clicking on the textbox. It will be selected with position handlers around it. Place the mouse pointer on any of these handlers. It will change to a double sided arrow. Click and drag them to the desired size. Adding a Tool tip A tool-tip is a small piece of text that is displayed when the mouse pointer is placed on a particular control. Say for example, if the mouse pointer is placed over EventID text-box, a message ‘Enter Event Identification Number’ can be displayed. This will make entering data for the user easy. Such type of text that appears when the mouse pointer is placed on a particular control is called the tool-tip text or help text. Let us add a tool-tip for EventID control by following the steps given below. Step 1. Press Ctrl button and click on EventID text box. Step 2. Right click and select Control Properties… option. The Properties: Text Box dialog box will be displayed as shown in Fig. 12.18. Fig. 12.18: Adding a tooltip in Properties Text Box Step 3. In the dialog box, scroll down till Help Text property appears. Step 4. Type ‘Enter Event Identification number’ in the text box. Step 5. Close the dialog box by clicking on cross (X) button. Now, if the mouse pointer is placed over EventID text box, the tool tip will be displayed as shown in the Fig. 12.19. Fig. 12.19: Displaying tool tip notes 2023-24
  • 219.
    Database ManageMent systeMUsing LibreOffice Writer 209 Forms Controls Toolbar The forms control toolbar contains various tools to add or edit controls on the form. Let us learn to use few of these tools. Adding a calendar for the date field While filling up a form on a computer, mostly a calendar is displayed. This is because it is easy to choose a date rather than typing it. To add the calendar to the date field in the form, follow the steps given below: Step 1. Place the mouse pointer over the Date text box and press Ctrl+Click to select it. Step 2. Right click and select Control Properties…. option. Step 3. In the Properties: Date Field dialog box, scroll down for Date Format property. By default, Standard (short) format will be displayed. Step 4. Click to open the list box and select Standard (long) format. Step 5. Scroll down further till you find the DropDown property. By default its value will be No. Select Yes. The control properties set is shown in Fig. 12.20. Fig. 12.20: Control Properties set for Date field Step 6. Close the dialog box. The selected date control text box on the form changes to a list box with an arrow being displayed in the extreme right as shown in Fig. 12.21. Fig. 12.21: Date Control field with Calender Adding text to the form While designing a form, we may need to enter titles, headings or subheadings. It is called as Labels. It is notes 2023-24
  • 220.
    Domestic Data entryoperator – class X 210 possible to create Labels in the form while designing. Follow the following steps to insert the title text in the form. Step 1. Click the Label ( ) tool on the Form Controls tool box as shown in Fig. 12.22. Step 2. On the form, click and drag the mouse to create a label field box. It will also have position handlers. Step 3. Double click on box to open the Properties: Label Field dialog box. Step 4. Type the title as “Data Entry Form” in the Label property, as shown in Fig. 12.23. Step 5. Set the Font property by clicking the Font button in front of the Font property. The Character dialog box will be displayed as shown in Fig. 12.24, where you can set the font type, style and size. Choose the desired font style and size and click on OK button. Step 6. Close the Properties: Label Field dialog box. The title with the selected formatting effects will be displayed on the form. After applying and editing various controls, the final form for entering data in the Events table looks as shown in Fig. 12.25. Fig. 12.25: Modified Data Entry Form for Events table Adding a new record using a form After you have finished designing the form, you can display or insert records using this form. For this purpose, you have to shift from Design View to Form View by clicking on Design Mode button on the Forms Controls toolbar. The Form View window appears with the first record displayed in the respective text boxes as shown in the Fig. 12.26. Fig. 12.22: Selecting Label icon on Form Controls tool box Fig. 12.23: Properties Label Field dialog box for the created label Fig. 12.24: Setting font type, style and size in Character dialog box 2023-24
  • 221.
    Database ManageMent systeMUsing LibreOffice Writer 211 Fig. 12.26: Displaying form in Design view by clicking on Design Mode button on Form Controls To add a new record into the table using this form, click on New Record button on the Records toolbar as shown in Fig. 12.27. Fig. 12.27: Adding a new record by clicking on New Record A blank form with the cursor blinking in the first text box i.e. EventID will be displayed. Fig. 12.28: New blank record showing the next record number Observe that the record pointer shows the record 11, as there were already 10 records in the table. Once the record is entered, click on Save Record button on the Records toolbar to save the record in the table. To delete any record, navigate to the record by either typing the record number in the Record text box or by notes 2023-24
  • 222.
    Domestic Data entryoperator – class X 212 using the navigation buttons. Thereafter click Delete button on the Records toolbar. The next record will be displayed in the form. To toggle between Design view and Form view press Design Mode button on the Forms Controls toolbar. When we create a form in Design View, all the controls are placed on the form using various tools given in the Forms Control toolbar. Reports A report is another useful feature of a database management system. We have seen that the records that have been extracted using a query are displayed in a simple row and column format. Instead, using a report we can present the retrieved data in an attractive and customized manner. We can create a report based on a table or a query or both. Preferably, if a report has to be generated from multiple tables, a query should be created first and then that query can be used to generate the report. Let us create a report using the table Events from the Sports Day database. Follow the following steps to create a report. Step 1. In the LibreOffice Base User Interface, click on the Reports icon in the Database Pane. Step 2. From the Tasks Pane, click Use Wizard to Create Report… option. Step 3. The Report wizard along with two other windows will be displayed. One of the window is Report Builder window and the other is Add Field dialog box. We will confine our study to the wizard (Fig. 12.29). Fig. 12.29: Report Wizard, Report Builder and Add Fields dialog box Step 4. The first step of wizard is to select the table and the corresponding fields that we want to notes 2023-24
  • 223.
    Database ManageMent systeMUsing LibreOffice Writer 213 display in our report. From the Tables or Queries list box, select the table Events. Step 5. All the fields of the Events table will be listed in the Available Fields list box. Click >> button to shift all the fields to Fields in report list box. Fig. 12.30 shows the Fields in report list box after shifting. Step 6. Click on the Next button. The next step is to label the fields. By default, the column headers will be displayed as labels or column headers for the field values. As fields names are generally shortened, to change to more self-explanatory names, type the new names in the respective text boxes. Step 7. Click on the Next button. The next step is to group the data based on any of the fields in the report. Since we do not want to group as of now, click on the Next button. Step 8. The fourth step is to set the Sort options. If the data to be displayed in the report has to be sorted in either ascending or descending order of a particular field, specify the field and sorting order in this step. Say, for example, select the field EventID. The radio button for Ascending is already selected. Select Descending radio button to display the records in descending order as shown in Fig. 12.32. Step 9. Click on the Next button to move on to the next step in which the layout of the report will be selected. Step 10. A layout is the manner in which the labels, field values and titles will be displayed in the report. Out of various Layout options given, choose the desired layout, say Tabular and also the layout of headers and footers (Default). You may also choose the orientation option Landscape or Portrait in this step. Fig. 12.30: Selecting table Events and fields after shifting to Fields in report list box Fig. 12.31: Step 2 of wizard Labelling the fields Fig. 12.32: Setting the Sorting options Fig. 12.33: Choosing the Layout 2023-24
  • 224.
    Domestic Data entryoperator – class X 214 Keep the default orientation option Landscape selected by default as shown in Fig. 12.33. Step 11. Click on the Next button to move to last step. Here we name the report and to specify the manner in which we want to proceed after the wizard finishes. Type the name of the report as EventsReport, as shown in Fig. 12.34. By default the type of report is Dynamic. That means as the field values in the base table or query change, the report will also change automatically. If you don’t want automatic updation of the report, choose the Static option. In this step, specify whether you would like to modify the report or create the report once the wizard finishes. Select the default option to create the report with current setting. Fig. 12.34: Step 6 Create report of the wizard Step 12. Click on Finish button to display the report as shown in Fig. 12.35. Fig. 12.35: Report generated from Events table notes 2023-24
  • 225.
    Database ManageMent systeMUsing LibreOffice Writer 215 Inserting other controls in the report As you can observe the report generated in Fig. 12.35, the report is very simple and boring. We can make it more presentable by inserting some more controls like titles, author name, date of generation of report etc. Right click on the Report name (EventsReport) on the LibreOffice User Interface and then select the Edit… option. The Report Builder window will open as shown in Fig. 12.36. In this window, various controls can be inserted using the Report Controls toolbar. Fig. 12.36: Report Builder window Inserting Titles and Headings To insert the title of the report, follow the following steps. Step 1. Click on the Label tool available on the Report Controls toolbar. Step 2. Bring the mouse pointer on the report. Click and drag to insert the label textbox. Step 3. Double click on it to open the Properties dialog box. Type the title text that you want to display in the Label property textbox, say “Annual Sports Day Report” and also set the font style and size using the Font property as shown in Fig. 12.37. Fig. 12.37: Assigning label name and setting font in Properties dialog box notes 2023-24
  • 226.
    Domestic Data entryoperator – class X 216 Step 4. Close the Properties dialog box. Double click on the EventsReport in the Reports of Database Pane. The report will be displayed with with the formatted effects as shown in Fig. 12.38. Fig. 12.38: Report with formatted effects Inserting Date and Time To insert the date on which the report is generated, follow the following steps. Step 1. Click in the Page Header area to make it active. Step 2. Click Insert > Date and Time… option as shown in Fig. 12.39. Fig. 12.39: Inserting Date and Time in Header Step 3. The Date and Time dialog box will be displayed as shown in Fig. 12.40. Select the desired format for date and time format and click on OK button. Fig. 12.40: Date and Time dialog boxu The date will be inserted on the top left corner of the Page Header area. You may click and notes 2023-24
  • 227.
    Database ManageMent systeMUsing LibreOffice Writer 217 drag it to reposition it in any place in the Page Header area. The final report looks as shown in Fig. 12.41. Fig. 12.41: Report with Title and Date To create a report that groups the retrieved data according to a particular field, specify the field name according to which the retrieved data has to be grouped in step 3 of the wizard. For example, if we want to display the details of events category wise, shift CategoryID field to Groupings list box as shown in Fig. 12.42. Fig. 12.42: Moving CategoryID for Grouping records The category wise report will be generated as shown shown in Fig. 12.43. Fig. 12.43: Report generated Category wise notes 2023-24
  • 228.
    Domestic Data entryoperator – class X 218 summary • A form is an object of the database that has a user friendly interface where data can be entered and seen in an attractive and easy-to-read format. • A form contains field controls arranged in a presentable and user friendly manner. • Each field control consists of a label and the field value text box. • There are two ways to create a form – Using a wizard, Using the Design View • The forms control toolbar contains various tools to add or edit controls on the form. • A report is used to present the retrieved data in an attractive and customized manner. • We can create a report based on a table or a query or both. 1. Prakasan lives in Happy Home Society. He has created the following tables in his database so as to store and manage the maintenance dues received from flat owners of the society. Table: Residents Details Receipt_Id Flat No Date Amount Table : Maintenance Dues Flat no Owner Name Contact No Flat Category In the previous chapter, Prakasan had created a query to display the following information Flat No Owner Receipt Number Date Amount (Please note the change in column headings) Create a form for data entry of Resident Details and Maintenance Dues table. Also create a report based on the query created above. Practical Exercises notes 2023-24
  • 229.
    Database ManageMent systeMUsing LibreOffice Writer 219 2. Uzair manages a boys hostel in an engineering college. To manage the records of the people saying in his hostel, he created a database with the following related tables. Table : Student_Details Student_Id Name DOB Course Father’s Name Contact No_student Contact No_ guardian Room No Table: Room Details Room No Floor (data value can be first, second or third) Category (data value can be AC / Non- AC) Student Id DOO (Date of occupancy) Monthly Rent Create a query to display the following tabular format Room No Student Name Category Monthly Rent Create a query that displays total monthly rent collected for each category. Create a form for data entry of both the tables. Generate a report the displays information retrieved from both the queries in a presentable manner. Check Your Progress A. Multiple choice questions 1. Which of the following toolbars contains the Label tool? (a) Standard Toolbar (b) Forms Controls Toolbar (c) Records toolbar (d) Formatting toolbar 2. The Record toolbar has the buttons to move to the (a) first record (b) second record (c) last record (d) all records 3. Which of the following is NOT true about forms? (a) It is the front end for data entry (b) It can contain only text fields (c) Graphics can be inserted on the form (d) It can contain only fixed number of records notes 2023-24
  • 230.
    Domestic Data entryoperator – class X 220 4. Which of the following keys is pressed to select only textbox on the form? (a) Alt (b) Shift (c) Ctrl (d) Tab 5. Which of the following properties in the Properties: Label Field text box is used to insert a tool-tip on the form? (a) Tool Text (b) Help Text (c) Tool Tip (d) Help Tip 6. Which of the following objects of LibreOffice Base is used to display data retrieved from one or more tables in a presentable manner? (a) Query (b) Form (c) Report (d) Panel 7. Which of the following values of Date Format property is selected to view a calendar on the form? (a) Standard (short) (b) Standard (long) (c) Default (d) Standard (Medium) 8. Which of the following commands on the Forms Control toolbar is used to toggle between Design View and Form view? (a) Design Mode (b) Toggle Mode (c) View Mode (d) Print mode 9. Using which of the following objects in a database, can a report be generated? (a) Tables (b) Queries (c) Both a and b (d) Neither a nor b 10. Which of the following components open along with the Report Wizard? (a) Report Builder (b) Add Fields dialog box (c) Both (a) and (b) (d) Neither (a) nor (b) B. State whether the following statements are True or False 1. Report is an object of a database but form is not. 2. We can choose the layout of the form. notes 2023-24
  • 231.
    Database ManageMent systeMUsing LibreOffice Writer 221 3. We have to add all fields of the table on the form. 4. There are two ways n which a form can be created. 5. A report is generated in a separate window. 6. Once a control is added on to the form, it cannot be re- positioned. 7. The Record toolbar has the button to add a new record. 8. We can create a report only using a table. 9. By default, the records in a report are sorted in descending order. 10. We can group data based on a particular field in a report. 11. A report can have data only in row and column format. 12. We can insert both date and time of generation of report. 13. A report once created cannot be edited. C. Fill in the blanks 1. A form can be used for ____________ and _____________. 2. Each field control consists of a ____________and ________________ 3. A ________________ is a piece of text that specifies the data that should be entered in the field value text box. 4. By default the border of the field text value is displayed in _________. 5. A ____________ is a small piece of text that is displayed when the mouse pointer is placed on a particular control on the form. 6. Thedefaultorientationoptionforareportis_______________. 7. A ____________ is the manner in which the labels, field values, titles etc. will be displayed in the report. 8. The option to insert date and time in the report is present in ___________ menu. 9. A Report Wizard contains _____________ steps. 10. A _______ type of report changes automatically as the field values in the base table or query change. D. Answer the following questions 1. Give one difference between a form and a report. 2. What is a field control with respect to forms? 3. Which tool on the Forms Record toolbar is used to insert text on the form? 4. Name the two ways to create a form in LibreOffice Base. 5. What is the difference between a static and a dynamic report? 6. Write the function of Forms Controls toolbar and Records toolbar. notes 2023-24
  • 232.
    Maintain Healthy, Safe andSecure Working Environment 4 IntroductIon The work culture in IT industry is different from routine office work, where working hours are also not fixed. Continuously working in front of the computer creates health problems especially in your eyes. Adopting the safe work practice in the work place, the productivity can be increased. This Unit deals with the concept of working environment in IT industry. It focuses on safe working practices at work place. It explains about health related problem caused by the wrong practices and it’s solution. It also gives the knowledge about resources required in workplace for smooth working. Further it explains how to deal with computer component and problem related to electrical hazards. It also explains workplace safety guidelines, workplace hazard and it’s control. The medical emergency situations and its solution is illustrated. 2023-24
  • 233.
    C HAPTER 13 Health, Safety andSecurity at Workplace IntroductIon One evening we were travelling on the busy road of Mumbaicity.Wewerelookingatthebigandtallbuildings. My friend was telling me that all these buildings hold different IT companies. Suddenly we find that there was a lot of smoke coming out of one building. People working in that building were running away from the building and shouting about the fire. Soon we find that the fire alarm was ringing and fire brigade vehicles along with water tanks were approaching the building. People were telling that there are lot of casualties and the overall damage to the building was worth of several lakhs. This event remind us the importance of health and safety at the workplace. IntroductIon to HealtH, Safety Snd SecurIty at Workplace Every workplace accident, illness or dispute is a cost to organization, as well as a cost to injured individuals and their families. It is our responsibility to create a safe workplace. This will improve the work environment and the productivity. Employees have to take responsibility for their own health and safety rather than relying solely on the “safety officer” or management. Health Health of an employee is the state of the physical, mental and social well being. Every organisation must Fig.13.1: Illustration of fire catches in the office building 2023-24
  • 234.
    Domestic Data entryoperator – class X 224 provide healthy and safety working environment for their employees at the workplace. Health of an employee must be in a good condition so that the employees of the organisation will not suffer from any diseases. Cleanliness at the workplace is mandatory. The work places must be cleaned in the morning before the people start working. If it is neat and clean then the people will feel happy to work in that environment. A proper air conditioning is mandatory to provide clean and cool air at workplace. A properly filtered water facility must be available for the employees of the company. A fresh food cafeteria must provide the good quality food for the employees. This will help to maintain the health of the employee. The organisation should maintain a clean washroom facility in good condition to be used by the employees. Safety The work environment of the organisation must be safe. It must be free from hazards and risk. A hazard is the something that can cause harm to the people. A risk is a probability of causing harm to the people. A proper safety guidelines must be prepared by the company and it should be strictly followed. At regular intervals of time, the safety procedures must be practised by employees. Security Every employee working in an organisation must feel that they are secured in the company campus. Security is a kind of freedom from any potential harm. Security ensures the safety of the people working in the organisation. Every organisation must have separate security department. This department should be responsible for various security such as personal safety, computer system safety, electrical safety, transport safety and other equipment safety. The proper security procedures will reduce liabilities, insurance and compensation for organisation. This will increase the business revenue and will reduce the operational charges of the company. noteS 2023-24
  • 235.
    Maintain HealtHy, Safeand Secure Working environMent 225 Policies and Procedures for Health, Safety and Security The Department of Information Technology (DoIT) has prepared the policy to provide employees with a healthy and safe work environment. Definition A health, safety and security policy is a written statement by an employer stating the company’s commitment for the protection of the health, safety and security of employees and to the public. It is an endorsed commitment by management to its employees regarding their health, safety and security. A health, safety and security program/policy contains the health, safety and security elements of an organisation and objectives which make it possible for the company to achieve its goal in the protection of its workers at the workplace. The government has a specific section mentioned in their company laws, which states the minimum requirements to be followed for health, safety and security programme. Each employer or company should follow these requirements. Apart from that the company should also have their own health, safety and security committee to determine the hazards present at the workplace. Once these hazards are identified then their control measures should be specified in the health, safety and security programme. Reasons for Health, Safety and Security Programs or Policies in Workplace There are several reasons that can be specified for safety policy as given below. • It clearly indicates the company’s commitment for their employee’s health and safety; • It shows the performance of the business and the safety performance are compatible with each other; • It clearly state that the company is not only doing the business for profits but it is taking care of all its stake holders. noteS 2023-24
  • 236.
    Domestic Data entryoperator – class X 226 • The accountability of every one working for the company is outlined for the workplace health, safety and security; • Company can comply national policy on Occupational Health and Safety (OH&S) of Government of India; • Injuries and illness of the employees is prevented through such policy A typical policy of an IT company may contain the following OH&S clauses. • Provide adequate resources to ensure continual improvement in its OH&S performance. • Comply with relevant OH&S legal and other requirements applicable to the organisation and drive for ‘beyond compliance’ leadership. • Set appropriate OH&S objectives & targets and conduct periodic performance reviews against these targets. • Adopt measures and processes that focus on the prevention of occupation related accidents, injuries, illnesses, and near-misses and strive to continuously improve such processes. • Ensure OH&S awareness and build competency associated at all levels to handle individual OH&S responsibilities. Workplace Safety Hazards The most common definition of hazard is ‘a danger or risk’ that is associated with something. Something can even be considered a hazard if it would be a trigger for causing another hazard to become present, which could hurt someone or something in the area. Workplace hazards poses potential harm to people at work, and that can cause damage to the work environment and everything else in it. Hazards could cause adverse health effects and losses of property and equipment for organisations. There is a common way to classify hazards, and not all these are present in all workplaces. In some industries like manufacturing and pharmaceuticals, there are biological and chemical risks that pose risks to the workers. Physical hazards are present as well in noteS 2023-24
  • 237.
    Maintain HealtHy, Safeand Secure Working environMent 227 many industries where there is exposure to electricity, radiation, extreme pressures, noises and magnetic fields. On the other hand, ergonomic hazards are present in facilities where there are repetitive movements and where workstations are set up haphazardly. But it can be generalized that in all these classifications, there are always safety hazards that come up along with the highlighted workplace hazards. Physical Hazards It is the risks arising from the physical work environment – floors, facilities, walls, and ceilings. Physical hazards could also mean working with machinery and electricity- operated machines. Work processes or specific assignments could also qualify as areas where physical hazards are present. There is a vast list of physical hazards across all industries, but when we look at one specific sector, these hazards are also specific to the work setting. Falling Off Heights, Slipping and Tripping The reasons for falling are attributed to faulty scaffolding and ladders, as a result of contact with electricity, and slipping or crashing into anything that throws the worker off balance (Fig. 13.2). On the other hand, trips and slips occur right on lower levels, particularly the floor, on ramps and any uneven surface in the workplace. Various injuries result from simply tripping over things at work, while many more accidents occur when employees slip on the floor, from motorized vehicles or from scaffolding or ladders. To avoid falls and slips, all things must be arranged properly. Any spilt liquid, food or other items such as paints must be immediately cleaned to avoid any accidents. Make sure there is proper lighting and all damaged equipment, stairways and light fixtures are repaired immediately. Fig.13.2: Falling off height, slipping and tripping 2023-24
  • 238.
    Domestic Data entryoperator – class X 228 Electrical Hazards There are many reasons why workers get electrocuted or suffer from electric shock at work. For the most part, it’s due to coming in direct contact with live wires, or having indirect contact through a conductor. While not all electrical accidents lead to death, there are many life-threatening, severe and often permanent injuries that could result from it. At work, the common causes of electrical accidents are exposed, worn-out wiring, overloading of electrical outlets, ungrounded or faulty equipment, and unsafe use of electrical equipment. Employees must be provided basic knowledge of using electrical equipment and common problems. Employees must also be provided instructions about electrical safety, such as keeping water and food items away from electrical equipment. Electrical technician and engineers should carry out routine inspections of all wiring to make sure there are no damaged or broken wires. Fire Hazards Each establishment must comply with housekeeping standards to ensure fire safety. Everyone not follows such requirements, and this leads to accidents resulting to fire. Such incidents not only damage the vital workplace equipment, stock and other items, and the building; it could also lead to injuries among its employees. To avoid fire, it is important to observe safety precautions at workplace. The whole organisation must also have first response and emergency mitigation systems in place. Employees should be aware of all emergency exits, including fire escape routes, of the office building and also the locations of fire extinguishers and alarms. Health Hazards Health refers to the physical well-being of the workers, and this includes the condition of their skin, eyes, ears and all other body parts. But it also includes the health situationofwhatwecannotseeupfront–theirrespiratory and cardiovascular system, and the nervous system. Hazards are present in most workplaces that could noteS 2023-24
  • 239.
    Maintain HealtHy, Safeand Secure Working environMent 229 impact any part of the human body. For example, a noisy machine or factory environment could damage the sense of hearing of the workers. In the same manner, exposure to bright lights and toxic fumes and vapour could damage the eyes and nose. There are also more serious and long-term health issues arising from hazardous workplaces, such as damage to the lungs because of the exposure to harmful chemicals (Fig. 13.3). potentIal SourceS of HazardS In an organISatIon Bright light sources behind the display screen can create contrast problems, making it difficult to clearly see your work. Apply the following possible solutions to avoid this. • Use blinds or drapes on windows to eliminate bright light. Blinds and furniture placement should be adjusted to allow light into the room, but not directly into your field of view. • Use indirect or shielded lighting where possible and avoid intense or uneven lighting in your field of vision. Ensure that lamps have glare shields or shades to direct light away from your line of sight. • Reorient the workstation so bright lights from open windows are at right angles with the computer screen. • High contrast between light and dark areas of the computer screen, horizontal work surface, and surrounding areas can cause eye fatigue and headaches. So, use well-distributed diffuse light. Safety Hazards Biological Hazards Physical Hazards Ergonomic Hazards Chemical Hazards Fig.13.3: Health hazards 2023-24
  • 240.
    Domestic Data entryoperator – class X 230 Hazards using Computers Hazards while using computers include poor sitting postures or excessive duration of sitting in one position. These hazards may result in pain and strain. Making the same movemen`t repetitively can also cause muscle fatigue. In addition, glare from the computer screen can be harmful to the eyes. Stretching at regular intervals or doing some simple yoga in your seat can mitigate such hazards. Handling Office Equipment Improper handling of office equipment can result in injuries. For example, sharp-edged equipment if not handled properly, can cause cuts. Staff members should be trained to handle equipment properly. A relevant manual should be made available by the administration on handling equipment. Handling Objects Lifting or moving heavy items without proper procedure or techniques can be a source of potential hazard. Always follow approved procedure and proper posture for lifting or moving objects. Stress at Work In organisations, you may encounter various stress- causing hazards. Long working hours can be stressful and so can aggressive conflicts or arguments with colleagues. Always look for ways for conflict resolution with colleagues. Have some relaxing hobbies for stress against long working hours. Working Environment Potential hazards may include poor ventilation, chairs and tables of inappropriate height, hard furniture, poor lighting, staff unaware of emergency procedures, or poor housekeeping. Hazards may also include physical or emotional intimidation, such as bullying or ganging up against someone. The staff should be made aware of organisation’s policies to fight against all the given hazards related to a working environment. noteS 2023-24
  • 241.
    Maintain HealtHy, Safeand Secure Working environMent 231 Hazard Control Hazards that have been identified and assessed as priorities require to implement adequate control measures. Control measures should follow the hierarchy with a strong emphasis on eliminating hazards at the source, whenever possible. • Take all feasible measures to eliminate the hazard, for example, by substituting or modifying the process. • If elimination is impractical or remains incomplete, take all feasible measures to isolate the hazard, for example, instituting engineering controls such as insulating noise. • If it is totally impossible to eliminate or isolate the hazard, its likelihood to cause injury should be minimised. Ensure that effective control measures are being applied, such as installing proper exhaust ventilation and providing personal protective clothing and equipment that is properly used and maintained, and monitoring exposure among at-risk workers Safety Guidelines Checklist 1. Store all cleaning chemicals in tightly closed containers in separate cupboards. 2. Throw garbage daily. 3. Make sure all areas have proper lighting. 4. Do not wear loose clothing or jewellery when working with machines. 5. Never distract the attention of people who are working near a fire or with some machinery, tools or equipment. 6. Where required, wear protective items, such as goggles, safety glasses, masks, gloves, and hair nets. 7. Shut down all machines before leaving for the workplace. 8. Do not play with electrical controls or switches. noteS 2023-24
  • 242.
    Domestic Data entryoperator – class X 232 9. Do not operate machines or equipment until you have been properly trained and allowed to do so by your supervisor. 10. Repair torn wires or broken plugs before using any electrical equipment. 11. Do not use equipment if it smokes, sparks or looks unsafe. 12. Cover all food with a lid, plastic wrap or aluminium foil. 13. Do not smoke in ‘No Smoking’ areas. 14. Report any unsafe condition or acts to your supervisor. Check Your Progress A. Multiple choice questions 1. Workplace safety is essential in organisation ____________. (a) to avoide the accident and injury (b) to increase the productivity (b) to improve the work environment (d) All of the above 2. Which of the following is not mandatory to keep the good health of an employee? (a) Cleanliness (b) Food court (c) Clean and fresh air (d) Clean washroom 3. The security department is not responsible for __________. (a) personal safety (b) computer system and equipment safety (c) electrical safety (d) personal belongings 4. The proper security procedures will increase ____________. (a) liabilities (b) insurance (c) business revenue (d) operational charges of the company 5. Which kind of hazards can occur in IT industry? (a) Biological (b) Chemical (c) Physical (d) Ergonomic noteS 2023-24
  • 243.
    Maintain HealtHy, Safeand Secure Working environMent 233 6. Which of the following can cause hazards while using computers? (a) Poor sitting postures or excessive duration of sitting in one position (b) Lifting heavy object (c) Mishandling of tools and equipment (d) Improper handling of office equipment 7. Which of the following statements is likely to result in an injury to the operator? (a) Selecting the right tool for the job (b) Wearing safety goggles or glasses (c) Using a tool with loose handles (d) Keeping cutting tools sharp 8. What are the potential cause of hazards at workplace? (a) Poor ventilation (b) Poor lighting (c) Poor housekeeping (d) All of the above B. Fill in the blanks 1. Health of an employee is the state of the physical, _________________ and _________________ well being. 2. The work places must be cleaned in the _________________ before the people start working. 3. A proper _________________ provide clean and cool air at the workplace. 4. A fresh food cafeteria helps to maintain the ______________ of the employee. 5. The work environment of the organisation must be _________________ and free from _________________ and _________________. 6. The proper security procedures will increase the ____________ and will reduce the _______________ of the company. 7. Injuries and illness of the employees is prevented through national policy on ____________________. 8. Physical hazards occurs due to _______________. 9. Electrical hazards mostly caused due to coming in direct contact with _________________, or indirect contact through a _________________. 10. Hazards while using computers occurs due to _________________ or excessive duration of sitting in _________________. noteS 2023-24
  • 244.
    Domestic Data entryoperator – class X 234 C. State whether the following statements are True or False 1. The employer and employees are responsible for workplace safety. 2. Any injury at work should be reported to the supervisor immediately. 3. No matter how big or small the injury; the injured person should receive medical attention. 4. While working with machines and equipment, employees must follow the safety guidelines set by the company. 5. Bright light sources behind the display screen can create contrast problems. 6. Exposure to bright lights and toxic fumes and vapour could damage the mouth and ears. 7. The use of personal protective clothing and equipment can control the hazards at workplace. 8. Do not throw rubbish daily. 9. Proper handling of office equipment can result in injuries. 10. Stress at workplace can cause hazard in today’s organisation. D. Short answer questions 1. Briefly explain the concept of health, safety and security at workplace. 2. State the most important reasons for health, safety and security programs in workplace 3. List out the various workplace safety hazards. 4. List out the potential sources of hazards in an organisation. 5. List some of the IT workplace hazards. 6. What are the examples of potential hazards? 7. Describe information technology workplace hazards. 8. What are the workplace safety rules? 9. List out different safety guidelines? 10. Describe type of emergency with example. noteS 2023-24
  • 245.
    IntroductIon In any organisationit is necessary to maintain a good air quality to improve the working capabilities of employees. A pollution free air is an essential requirement for any organisation. Also most of the IT companies makes use of centralised air conditioning system to keep the temperature of working place at pleasant level. Water pollution is another problem faced by many organisations. Most of the human activities makes water polluted. The polluted water may cause the disease. So an organisation must ensure to prevent air pollution or water pollution. aIr and Water QualIty MonItorIng proceSS Air and water pollution can be analysed by using several methods. There are three common forms of analysis – physical, chemical and biological. For such analysis samples can be collected in the surrounding region of the organisation. The water and air samples can be analysed by performing some physical, chemical and bilogical tests. The temperature and content of the sample can be easily measured. For example, the various gases or percentage of various gases, such as oxygen, nitrogen, carbon dioxide present in the air can be measured. The PH value of the water can be measured through chemical analysis. The effect of air and water on these C HAPTER 14 Workplace Quality Measures Fig. 14.1: Air pollution and water pollution 2023-24
  • 246.
    Domestic Data entryoperator – class X 236 plants and animals is studied. The microbial indicators are used to monitor the health of the ecosystem. Guidelines for Clean Air and Clean Water A proper guidelines may be followed by organisation to keep the surrounding air and water clean. Some of the points of such guidelines can be. 1. Air pollution is mostly caused by production of the dust, mixture of solid particles and gases in the surrounding air. So avoid dust production, generation of solid particles and gases in the air. 2. Extensiveuseofautomobilevehiclesinthecampus can lead to the air pollution. So organisation must use limited number of vehicles to avoid air pollution. Practice a no vehicle day in every week. 3. Ozone produced in the air can pollute the air. Many times it is called as a smog. The generation of ozone gas must be kept at low level by the organisation. 4. Most of the human activities pollute the surrounding water. The sewage or the waste water can also cause the water pollution. Take care that their waste is not mixed with the surrounding water. 5. Extensive use of fertilizers and pesticide must be avoided as it can make the ground water polluted. Importance of Cleanliness at Workplace It is always safe to keep your workplace clean to avoid hazardous. The poor handling and storage practices result in damages. A clean work station makes your job easier and more pleasant. Common areas should be cleaned up by all personnel, when necessary. • All areas must be kept neat and clean. Each employee is responsible for the cleanliness of their work area and all tools and equipment used. • Spills and breakage are to be cleaned up immediately. • Spaces around machines and equipment should be kept clear and clean at all times to permit free movement. noteS 2023-24
  • 247.
    Maintain HealtHy, Safeand Secure Working environMent 237 • Floors should be kept clean and clear to prevent slipping and collision. • Lighting fixtures are to be checked regularly to permit clear vision. Faulty lights should be reported to administration, so that building maintenance/ facilities can be contacted to rectify the situation. offIce ergonoMIcS Ergonomics is the science concerned with designing and arranging things so that people can use them easily and safely. Applying ergonomics can reduce the potential for accidents, injury to improve performance and productivity. In an office setting, the repetition of a seemingly innocuous task over a period of time can cause an injury. The resulting injuries can be physically painful and rehabilitation can be difficult and time consuming. The following office ergonomics emphasize the identification of early warning signs. Early Warning Signs Potential Cause Try This Sore lower back No lumbar support Use back rest of chair, put small pillow or lumbar support on backrest of chair Burning in the upper back No upper back support from chair Put document holder or prop up so you can see without leaning forward Stiff neck Working with head turned to side tilting head forward holding telephone between the ear and shoulder Move or raise monitor to centre of desk check if headset is available Sore shoulders Reaching forward for long periods or reaching forward frequently Move closer to the keyboard, Bring mouse down to level of keyboard or 1” higher Arching wrists Working with wrists extended too much repetition Add a wrist rest to the front of keyboard and mouse pad rest thumbs on front edge of keyboard so wrists can’t drop. Dry eyes Forget to blink Rest eyes periodically and do simple eye exercises Eye strain and sore eyes Glares from overhead lights or windows eye glasses not correct need vision check Re-orient your desk and computer so light is not directly behind or in front of you. Computer Health and Safety Tips With the increase use of computer, several health and safety issues related to vision, musculoskeletal issues, 2023-24
  • 248.
    Domestic Data entryoperator – class X 238 body aches and pains may occur. Many of these issues are preventable and if incurred are temporary. They can be resolved by adopting simple corrective action. Musculoskeletal Problems This problem include different areas of your body, such as neck, back, chests, arms shoulders and feet. It occurs because of your wrong posture, uncomfortable chair for sitting that is not ergonomically correct while working on the computer. To avoid this problem, • Position your computer such that the end of the monitor should be at your eye level. • Keep the neck neutral with monitor directly ahead to prevent to turn your neck. • Keep your monitor at least arm length distance, or 20 to 30 inch away from you. • Maximise contact of your back against the backrest of the chair. • Adjust height of armrests so that your elbows are at a 100–110 degrees open angle. • Place keyboard at a slight negative tilt if you are sitting upright. • While typing, keep your hands slightly lower than elbows, with fingers pointing downwards at the floor. • Minimise any twisting of your wrists from side to side or up and down. • Use a keyboard palm rest as needed only when you are not typing. Do not rest your wrists when typing. It leads to wrist strain. • Always take small breaks while working on the computer to stretch your muscles, keep your blood flowing, and to rest your eyes. Occupational Overuse Syndrome Occupational overuse syndrome, also known as repetition strain injury (RSI), is a collective term for a range of conditions, characterised by discomfort or persistent pain in muscles, tendons and other soft tissues, with or without physical manifestations. It is Fig. 14.2: Ideal Neck and Monitor position 2023-24
  • 249.
    Maintain HealtHy, Safeand Secure Working environMent 239 usually caused or aggravated by work, and is associated with repetitive movement, sustained or constrained postures and/or forceful movements. Psycho-social factors, including stress in the working environment, may be important in the development of occupational overuse syndrome. Repetitive use of muscle may feel pain in your neck, shoulder, wrist or fingers. One of the most common conditions related to repetitive use of muscles when using the computer is carpal tunnel syndrome. It causes pain, numbness, and tingling in the hand and arm as shown in Fig. 14.3. Ensure that you use appropriate posture when typing. For example, your fingers should be above the ‘home position’ (asdf and jkl; keys) on the keyboard, when your elbows are by your sides. Users should avoid gripping the mouse too tightly. The keyboard and mouse should be kept at the same level. In addition, use of ergonomic keyboard and mouse help to reduce the risk of wrist related conditions. Strain in Legs and Feet Sitting to work for long time may cause strain in legs. Position your desk chair to sit comfortably with your feet flat on the floor and your lower legs vertical. Use a footrest for more support. Make sure that there’s enough space to change position and stretch your legs out every now and then, too. Eye Strain Computer’s bright light, glare and flickering images can cause eye strain and visual fatigue. When you constantly focus on screen, you forget about blinking your eyes that can cause of drying eyes. Computer Vision Syndrome is caused by poor lighting and glare on the computer screen. Both of these factors place strain on the users eyes, causes blurry vision, burning and/or watering eyes, headaches and in some instances shoulder and neck pain. It is important to look after your eye health. Specifically wear anti-glare glasses to work on computer. Fig. 14.3: Symptoms of carpal tunnel syndrome 2023-24
  • 250.
    Domestic Data entryoperator – class X 240 To reduce the risks of visual problems: • Adjust the brightness of computer screen to save your eyes from strain. • Reposition the screen to avoid glare from lights or windows. • Keep a proper vision distance from computer screen and blink your eyes in an interval. • Wear anti-glareglasseswhileworking incomputer. • Keep the screen clean and use a desk lamp to make it easier to see. • Ensure the screen colours are easy to look at, and that the characters are sharp and legible. • Give your eyes periodic breaks from the screen and perform frequent blinking. Look away from the screen into the distance for a few moments to relax your eyes; focus on something 30 metres away for 30 seconds every 30 minutes. • Keep your monitor between 18 to 24 inches away from your face. Lastly, position monitors to avoid glare from sunlight and keep them clean. Headaches Headache may occur due to muscle tension or pain in the neck. Strain on the eyes or vision problem can also cause headaches. Attend regular eye exams to work toward correcting any vision problems. Try your best to keep your neck straight in front of the computer and take breaks. Obesity Spending long hours on computers may lead lacks of physical activity and exercise. In children prolonged use of computers or electronics in general, is a major contributing factor to obesity. You should take a break and try to squeeze in some exercise until you go back to work. Stress Disorders Technology impacts our behaviors and emotions. Prolonged use of computers may be accompanied by poor health and increased pressure on you in your workplace, which may lead to stress. The longer the noteS 2023-24
  • 251.
    Maintain HealtHy, Safeand Secure Working environMent 241 stress untreated, the greater the chances of contracting more serious health problems. Stress can lead to decreased attention span, lack of concentration, dizziness and becoming easily burned out. To tackle this problem, promote your own health and prevent future health conditions or by seeking treatment options for any stress that you may encounter. Try things from yoga, to natural remedies, to medications as prescribed by a medical provider to combat your stress. Injuries from Laptop Use The growing use of laptops cause more pain and strain. Laptops are designed for short periods of use. In present day individuals choose to use laptops over desktops more frequently, due to convenience. In laptop the screen and keyboard are very close together and there is really no right way to use a laptop because if you position the screen at the right height for your back and neck, it will cause you to have to lift your arms and shoulders too high to use it and vice versa. It will probably cause a problem. To overcome this problem, you may use desktop that is set up ergonomically- correct, while working for long hours. Sleeping Problems Artificial lighting from computer screens can trick your brain and suppress its release of melatonin substance that assists your sleeping patterns. To tackle this, refrain from using a computer right before going to bed. Health and Safety Requirements for Computer Workplace The minimum health and safety requirements for computers including Desktop computers, Laptops, Tablets, Smart phones, Television screens and Video monitors are as follows: Display Screen (Monitor) Use the modern LED monitors of legible size and with adequate spacing between the characters and lines. The image on the screen should be stable, with no flickering or other forms of instability. The screen must be free of noteS 2023-24
  • 252.
    Domestic Data entryoperator – class X 242 reflective glare and reflections liable to cause discomfort to the user. Keyboard The keyboard should tilt and separate from the screen to find a comfortable working position and avoid fatigue in the arms or hands. The space in front of the keyboard must be sufficient to provide support for the hands and arms of the user. The keyboard should have a matt surface to avoid reflective glare. The symbols on the keys must be adequately contrasted and legible from the design working position. Work Surface The work desk should be sufficiently large, low- reflectance surface and allow a flexible arrangement of the screen, keyboard, documents and related equipment. The document holder shall be stable and adjustable so as to minimise the need for uncomfortable head and eye movements. Work Chair The work chair must be stable and allow the user to move easily and find a comfortable position. It should be adjustable in height. The user’s feet must be placed flat on the floor or a footrest should be used. Space Requirements The workstation should be designed to provide sufficient space for the user to change position and vary movements. The user should have enough desk space for the equipment they use. Lighting There must be satisfactory lighting conditions with appropriatecontrastbetweenthescreenandbackground environment. Possible disturbing glare and reflections on the screen or other equipment should be prevented. Reflections and Glare Workstations should be designed so that sources of light, such as windows and other openings, transparent noteS 2023-24
  • 253.
    Maintain HealtHy, Safeand Secure Working environMent 243 or translucid walls, and brightly coloured fixtures or walls cause no direct glare and no distracting reflections on the screen. Windows shall be fitted with a suitable system of adjustable covering to attenuate the daylight that falls on the workstation. Noise and Heat Noise emitted by equipment should not distract the attention. Noise cancelling earphones may provide a solution if some noise is unavoidable. The equipment may not produce excess heat which could cause discomfort to users. Cautions while Working on the Computer It is important to work safely on computer. The static electricity generated just by walking on the carpet can damage your computer component. So use a surge protector when you plug your system in. A battery backup system is the best way to protect against a power outage, as it provides the system with constant voltage. Remove rings, watches and necklaces while working on the computer. These ornaments are often made of conductive metals which can damage Computer components by striking them static electricity. Unplug all power sources and cables from computer. If you are working with plugged in computer then it might damage your hardware. Modern processors will overheat within 7 sec if heat sink is not attached. Watch Out for Cords and Wires Loose cords and wires can cause hazard and even electrical hazards as shown in Fig. 14.5. If a cord or wire will cross a pathway safety it should be mark it with hazard tape as shown in Fig. 14.6. Fig. 14.6: Hazard tape Fig. 14.4: Unplug power source from computer Fig. 14.5: Loose cord that can be hazardous 2023-24
  • 254.
    Domestic Data entryoperator – class X 244 Avoid water at all times when working with electricity. Never touch or try repairing any electrical equipment or circuits with wet hands. It increases the electrical conductivity of the body for the flow of electric currents. Fig. 14.7: Avoid water while working with electricity Check Your Progress A. Multiple choice questions 1. To provide healthy and safety working environment, every organisation must have ___________________. (a) Cleanliness (b) Filtered water (c) Clean wash-room (d) All of the above 2. Air pollution is mostly caused by production of the ________ in the surrounding air. (a) dust (b) mixture of solid particles (c) gases (d) All of above 3. Repetitive use of muscle may feel pain in your ___________. (a) neck (b) shoulder (c) wrist or fingers (d) All of the above 4. The security department organisation is not responsible for __________________. (a) other safety (b) computer system safety (c) electrical safety (d) transport safety 5. For an organisation, the proper security procedures will reduce ________________. (a) liabilities (b) insurance (c) business revenue (d) operational charges of the company 6. Do not wear ________ when working with machines. (a) jewellery (b) safety glasses (c) masks (d) gloves 7. Sore lower back is caused due to _________________. (a) reaching forward frequently (b) no lumbar support (c) no upper back support from chair (d) reaching forward for long periods 2023-24
  • 255.
    Maintain HealtHy, Safeand Secure Working environMent 245 8. What should you do with the problem of dry eyes? (a) Forget to blink (b) Rest eyes periodically and do simple eye exercises (c) Do exercise (d) Blink the eyes 9. If light is coming directly behind or in front of you then you may suffer from _________________. (a) eye strain (b) sore eyes (c) dry eyes (d) eye strain and sore eyes B. Fill in the blanks 1. Air and water pollution can be analysed by using – physical, _________ and ____________ analysis. 2. The PH value of the water can be measured through _________ analysis. 3. The _________ indicators are used to monitor the health of the ecosystem. 4. Ergonomics is the science concerned with _________ and arranging things. 5. Working with wrists extended too much repetition can cause ___________. 6. The repetition of a seemingly _________ task over a period of time can cause an injury. 7. If a cord or wire will cross a pathway safety it should be mark it with ___________. 8. Loose cords and wires can cause _____________. 9. Glare and __________ on the screen should be prevented. 10. The keyboard should have a matt surface to avoid ____________ glare. C. State whether the following statements are True or False 1. The work environment of the organisation must be free from hazards and risk. 2. Practice a no vehicle day in every week to avoid air pollution. 3. Applying ergonomics can improve performance and productivity. 4. Wear rings, watches and necklaces while working on the computer. 5. Never touch or try repairing any electrical equipment or circuits with wet hands. 6. Unplug all power sources and cables from computer while working on computer. noteS 2023-24
  • 256.
    Domestic Data entryoperator – class X 246 7. Occupational overuse syndrome, also known as repetition strain injury. 8. The work chair must be stable and allow the user to move easily. 9. Artificial lighting from computer screens can cause sleeping problems. 10. The keyboard and mouse should not be kept at the same level. D. Short answer type questions 1. What causes the water pollution? 2. What is occupational overuse syndrome? 3. What are musculoskeletal problems? 4. What cautions to be taken while working on the computer? 5. Why there is no right way to use a laptop? 6. What causes eye strain and how to avoid it? 7. What type of display screen is suitable to work on computer? 8. What type of keyboard is suitable to work on computer? noteS 2023-24
  • 257.
    IntroductIon In an organisation,any small accident or unforeseen situation may turn into emergencies if not given due attention.Theemergenciescanbenatural,suchasfloods, hurricanes, earthquakes or man-made emergencies may include fire, toxic gas releases, chemical spills, illness, explosions, and civil disturbances. Such situations may disrupt or shut down your operations, or may cause physical or environmental damage. While no one expects such emergencies and disasters that can strike anyone, anytime, anywhere. The best way to protect yourself and your organisation is to develop a well thought-out emergency action plan to guide the employees in the event of an emergency. This chapter explains the general workplace hazards, its prevention, care and how to keep workplace safe. accIdentS and eMergencIeS An accident is an unplanned, uncontrolled, or unforeseen event resulting in injury or harm to people and damages to goods. For example, a person falling down and getting injured or a glassware item that broke upon being knocked over. Emergency is a serious or crisis situation that needs immediate attention and action. For example, a customer having a heart attack or sudden outbreak of fire in your organisation needs immediate attention. Each organisation has procedures and practices to handle and report accidents and to take care of emergencies. Although most of these procedures and practices common across the industry, some C HAPTER 15 Prevent Accidents and Emergencies 2023-24
  • 258.
    Domestic Data entryoperator – class X 248 procedures might be modified to fit a particular type of business within the industry. For example, procedure to handle accidents caused by slipping or falling will be similar across the industry. You need to be aware of the general procedures and practices as well as specific to your organisation. The following are some of the guidelines for identifying and reporting an accident or emergency: Notice and Correctly Identify Accidents and Emergencies You need to be aware of what constitutes an emergency and what constitutes an accident in an organisation. The organisation’s policies and guidelines will be the best guide in this matter. You should be able to identify such incidents in your organization, and be aware of the procedures to tackle each form of accident and emergency. Get help Promptly and in the Most Suitable Way Follow the procedure for handling a particular type of accident and emergency. Promptly act as per the guidelines. Ensure that you provide the required help and support as laid down in the policies. Do not act outside the guidelines and policies laid down for your role even if your actions are motivated by the best intention. Remember that only properly trained and certified professionals may be authorized to take decisions beyond the organisation’s policies and guidelines, if the situation requires. Follow Company Policies and Procedures for Preventing Further Injury While Waiting for Help to Arrive If someone is injured, do not act as per your impulse or gut feeling. Go as per the procedures laid down by your organisation’s policy for tackling injuries. You need to stay calm and follow the prescribed procedures. noteS 2023-24
  • 259.
    Maintain HealtHy, Safeand Secure Working environMent 249 Act within the Limits of your Responsibility and Authority when Accidents and Emergencies Arise Provide help and support within authorised limit. Provide medical help to the injured only if you are certified to provide the necessary aid. Otherwise, wait for the professionals to arrive and give necessary help. Promptly Follow Instructions given by Senior Staff and the Emergency Services Provide necessary services as described by the organisation’s policy for your role. Also, follow the instructions of senior staff who are trained to handle particular situations. Work under their supervision when handling accidents and emergencies. Types of Accidents The following are some of commonly occurring accidents in organisations: Trip and Fall Customers or employees can trip on carelessly left loose material and fall down, such as tripping on loose wires, goods left on aisles, elevated threshold. This type of accident may result in simple bruises to serious fractures. Slip and Fall slips are mainly due to wet floors, spilling of liquids or throwing of other slip-causing material on floors. Slip and fall is generally caused by negligence. It can also be due to broken or uneven walking surface, such as broken or loose floor tile. People should be properly cautioned against tripping and slipping. For example, a “wet floor” sign will warn people to walk carefully on freshly mopped floors. Similarly, “watch your steps” signs can prevent accidents on a staircase with a sharp bent or warn against a loose floor tile. Fig. 15.1: Types of accidents 2023-24
  • 260.
    Domestic Data entryoperator – class X 250 Injuries caused due to Escalators or Elevators (or lifts) Although such injuries are uncommon, they mainly happen to children, ladies, and elderly. Injuries can be caused by falling on escalators and getting hurt. People may be injured in elevators by falling down due to sudden, jerking movement of elevators or by tripping on elevators’ threshold. They may also get stuck in elevators resulting in panic and trauma. Escalators and elevators should be checked regularly for proper and safe functioning by the right person or department. If you notice any sign of malfunctioning of escalators or elevators, immediately inform the right people. If organization’s procedures are not being followed properly for checking and maintaining these, escalate to appropriate authorities in the organization. Accidents due to Falling of Goods Goods can fall on people from shelves or wall hangings and injure them. This typically happens if pieces of goods have been piled improperly or kept in an inappropriate manner. Always check that pieces of goods are placed properly and securely. Accidents due to Moving Objects Moving objects, such as trolleys, can also injure people in the organisation. In addition, improperly kept props and lighting fixtures can result in accidents. For example, nails coming out dangerously from props can cause cuts. Loosely plugged in lighting fixtures can result in electric shocks. Handling Accidents Try to avoid accidents in your organization by finding out all potential hazards and eliminating them. In case of an injury to a colleague due to an accident, do the following. Attend to the Injured Person Immediately Depending on the level and seriousness of the injury, see that the injured person receives first aid or medical help at the earliest. noteS 2023-24
  • 261.
    Maintain HealtHy, Safeand Secure Working environMent 251 Inform your Supervisor Give details about the probable cause of accident and a description of the injury. Assist your Supervisor Investigate and find out the actual cause of the accident. Help your supervisor to take appropriate actions to prevent occurrences of similar accidents in future. Types of Emergencies It is important to have policies and procedures to tackle the given categories of emergencies. You should be aware of at least the basic procedures to handle emergencies. Here are some general emergency handling procedures that you can follow: First Aid Should be quickly accesseble to the employees. It should contain all the important items for first aid required to deal with common problems such as cuts, burns, headaches and muscle cramps. Electrical Safety Employees must be provided instructions about electrical safety such as keeping water and food items away from electrical equipment. Electrical staff and engineers should carry out routine inspections of all wiring to make sure there are no damaged or broken wires. Keep a list of numbers to call during emergency, such as those of police, fire brigade, security, ambulance etc. Regularly check that all emergency handling equipment such as the fire extinguisher and fire alarm system are in working condition. Ensure that emergency exits are not obstructed and keys to such exists are easily accessible. Never place any objects near the emergency doors or windows Evacuation It is critical for employee to know who is the coordinator or authority to make decisions during emergencies. noteS 2023-24
  • 262.
    Domestic Data entryoperator – class X 252 The coordinator should be responsible to handle evacuation process. General Evacuation Procedures Each organization has its own evacuation procedures as listed in its policies. You should be aware of these procedures and follow them properly during an emergency evacuation. In addition to organization’s policies, here are some general evacuation steps useful in such situations, • Leave the premises immediately and start moving towards the nearest emergency exit. • Guide your customers to the emergency exits. • If possible, assist the person with disability to move towards the emergency exit. • You may carry your hand-held belongings, as you move towards the emergency exit. Do not come back to pick up your belongings unless the area is declared safe. • Do not use the escalators or elevators (lifts) to avoid overcrowding and getting trapped, in case there is a power failure. Use the stairs instead. • Go to the emergency assembly area. Check if any of your colleagues are missing and immediately inform the person concerned. Fire Hazards in the Workplace The first step to fire safety is assessing the existence of fire hazards in workplace. In most facilities, there are three main types of hazards to evaluate – electrical hazards, combustible materials, and flammable materials. Electrical issues, such as damaged extension cords, blocked electrical panels and heaters, and overloaded circuitsoftenleadtofires.Firesarealsocommonlycaused by electrical events such as arc flash. Maintenance of power cords and other electrical equipment should be conducted on a regular basis. Workplace fires are also commonly caused by improper storage of flammable material or combustible dust. Both are dangerous and should be properly noteS 2023-24
  • 263.
    Maintain HealtHy, Safeand Secure Working environMent 253 handled and stored. Dust explosions can be another cause of fire hazard. Fire Prevention • All employees must know where the fire extinguishers are located, and how to properly use them. • Fire extinguishers and First Aid Stations should be clearly marked with signs. • Never block access to Exits, fire extinguishers, electric switches and panels. • Do not block or stack material against doors, which would prevent them from operating properly in event of a fire. • Do not use flammable material near electrical panels, switches, lift trucks or any electrical equipment. • Make sure all equipment is properly grounded where needed. • Fire extinguishers must be inspected regularly. • Report to your supervisor of any defect in electrical, fire prevention or material handling equipment. • No flammable material are to be placed around an exit door way. Identification of Material and Ignition Sources Materials are classified by risk, and are sorted according to these fire classifications: Class A Material: materials such as wood, cloth, and paper, which won’t ignite on their own but will continue to burn once exposed to a heat source. Class B Material: all liquid, grease, and gas materials that burn when exposed to ignition sources. Class C Material: electrical materials and equipment. These materials cause fires very quickly and present a serious risk of arc flash. Class D Material: any materials that are volatile and able to quickly ignite, such as magnesium, potassium, and sodium. noteS 2023-24
  • 264.
    Domestic Data entryoperator – class X 254 Examples of ignition sources include: Open flames such as gas ovens, lighters in smoking areas, and welding torches. Sparks from wood or metal saws and other types of equipment. Heat sources such as combustion engines, space heaters, ovens, and machines that produce heat during operation. Chemical ignition from chemicals that combust under normal working temperatures. Select the suitable type of fire extinguisher Water CO2 Dry chemical powder Carbon dioxide Mechanical foam ABC dry powder Class A Suitable Not suitable Not suitable Suitable Suitable Class B Not suitable Suitable Suitable Suitable Suitable Class C Not suitable Suitable Suitable Not suitable Suitable Class D Not suitable Suitable Not suitable Not suitable Suitable Fire Extinguisher Afireextinguisherisaprotectiondeviceusedtoextinguish fires. It is a cylindrical pressure vessel containing an agent which can be discharged to extinguish a fire. The Fig. 15.2 shows the different parts of fire extinguisher. The following activity will demonstrate the operation of fire extinguisher. Fig. 15.2: Fire extinguisher with its parts labeled Demonstrate the operation of a fire extinguisher. Procedure Step 1: Identify the safety pin of the fire extinguisher, present in its handle. Step 2: Break the seal and pull the safety pin from the handle. Step 3: Use the fire extinguisher by squeezing the lever. Step 4: Sweep it from side to side. Fig. 15.3: Steps to open the seal and safety pin Practical Exercises 2023-24
  • 265.
    Maintain HealtHy, Safeand Secure Working environMent 255 First Aid for Electrical Emergencies Electrical accidents cause countless injuries. Injury could be minimised and many lives can be saved if proper rescue techniques and treatment are used. Electrical accidents may occur at any time or place. Timely response and treatment of victims is a major concern. When an electrical accident occurs, due to the effect of muscle cramping, a victim is often incapable of moving or releasing the electrical conductor. There should always be an emergency response plan for scheduled electrical maintenance or work. Electrical Rescue Techniques Approaching the accident • Never rush into an accident situation. • Call 108 as soon as possible. • Approach the accident place cautiously. Examining the scene • Visually examine victims to determine if they are in contact with energised conductors. • Metal surfaces, objects near the victim itself may be energised. • Do not touch the victim or conductive surfaces while they are energised. • Switch off the electrical circuits if possible. Hazards and solutions • Be alert for hazards, such as heated surfaces and fire. • In case you cannot switch off the power source, take extreme care. • Ensure that your hands and feet are dry. • Wear protective equipment, such as gloves and shoes. Stand on a clean dry surface. • Use non-conductive material to remove a victim from the conductor. Fig. 15.4: An unconscious state because of an electrical shock Restless or irritable, Loss of consciousness, possible convulsions Exit Burn Difficult breathing or respiratory arrest Muscle tenderness and possible twitching Paralysis Irregular heartbeat of cardiac arrest Swollen tongue may obstruct airways Vision Problems Fracture Bones Entry Burn 2023-24
  • 266.
    Domestic Data entryoperator – class X 256 High voltage rescue • Special training is required for rescues if high voltage is present. • Protective equipment, such as gloves and shoes must be worn. First Aid • A victim may require Cardio-Pulmonary Resuscitation (CPR). Steps to perform in CPR are shown in the Fig. 15.6 and 15.7. Fig. 15.7: Open the mouth for airway Fig. 15.8: Rescue breathing • If the victim is breathing and has a heartbeat, give first aid for injuries and treat for shock. • Ensure the victim gets medical care as soon as possible. • Physician attending the victim must have detailed information to properly diagnose and care for the victim. Fig. 15.5: Beware of high voltage Fig. 15.6: Gloves and shoes for safety Identify and name the steps mentioned in the following figures. Practical Exercises 2023-24
  • 267.
    Maintain HealtHy, Safeand Secure Working environMent 257 Check Your Progress A. Multiple choice questions 1. What are the steps necessary for operating a fire extinguisher? (a) Identify the safety pin of the fire extinguisher which is generally present in its handle (b) Break the seal and pull the safety pin from the handle (c) Use the fire extinguisher by squeezing the lever (d) All of the above 2. Which of the following is an examples of ignition sources of open flames? (a) Gas ovens (b) Lighters in smoking areas (c) Welding torches (d) All of the above 3. In fire classification, all liquid, grease, and gas material comes under __________________. (a) Class A material (b) Class B material (c) Class C material (d) Class A material 4. In fire classification, material magnesium, potassium, and sodium comes under _______________. (a) Class A material (b) Class B material (c) Class C material (d) Class D material 5. In fire classification, material wood, cloth, and paper comes under ________________. (a) Class A material (b) Class B material (c) Class C material (d) Class D material 6. In fire classification, electrical material and equipment comes under ____________________. (a) Class A material (b) Class B material (c) Class C material (d) Class D material 7. When do we use a fire extinguisher? (a) In case of flood (b) In case of electric shock (c) In case of fire (d) In case of burn injury 8. What is the primary fire emergency telephone number is? (a) 011 (b) 101 (c) 108 (d) 111 noteS 2023-24
  • 268.
    Domestic Data entryoperator – class X 258 9. Which of the following contains everything you need to know about evacuating your facility safely? (a) Evacuation Diagram (b) Emergency Action Plan (c) Employee Directory (d) Both (a) and (b) 10. The best course of action to take during a medical emergency is to ________________. (a) Begin first aid immediately (b) Activate the emergency plan for reporting injuries (c) Notify the person's family about the situation (d) Both (a) and (b) B. Fill in the blanks 1. Emergency is a serious or crisis situation that needs__________attention and ________. 2. A ___________ sign will warn people to walk carefully on freshly mopped floors. 3. ____________ signs can prevent accidents on a staircase with a sharp bent or warn against a loose floor tile. 4. The ___________ should be responsible to handle evacuation process. 5. Workplace fires are commonly caused by improper storage of ______________ material or _________ dust. 6. There should always be an _________________ plan for scheduled electrical maintenance or work. 7. If the victim is breathing and has a heartbeat, give ________ for injuries and treat for shock. 8. A fire extinguisher is a _________________ containing an agent which can be discharged to extinguish a fire. C. State whether the following statements are True or False 1. The organisation’s policies and guidelines is the best guide to handle emergency. 2. If someone is injured, act as per your impulse or gut feeling. 3. Keep water and food items away from electrical equipment. 4. Always switch off the electrical circuits. 5. Always wear protective equipment, such as gloves and shoes. 6. A fire extinguisher is a protection device used to extinguish fires. 7. Flammable materials can be placed around an door exit. 8. You can determine possible evacuation routes from floor plan diagrams posted in your facility. noteS 2023-24
  • 269.
    Maintain HealtHy, Safeand Secure Working environMent 259 D. Short answer questions 1. What is a workplace emergency? 2. How do you protect yourself, your employees, and your business? 3. What is an emergency action plan? 4. What should your emergency action plan include? 5. How do you develop an evacuation policy and procedures? 6. How do you establish evacuation routes and exits? 7. What are the various types of fire extinguisher and their extinguishing material? 8. What are the steps for operating a fire extinguisher in case of a fire emergency. 9. Compare the different type of fire extinguisher. 10. List the different class of fire. 11. List out electrical rescue techniques. 12. What is the first aid for electrical emergencies? noteS 2023-24
  • 270.
    Answer Key Unit 1.Digital Documentation (Advance) using LibreOffice Writer Chapter 1. Introduction to Styles-Paragraph, Page, Character and List A. Multiple choice questions 1. (b) 2. (d) 3. (b) 4. (a) 5. (d) B. Fill in the blanks 1. style 2. LibreOffice 3. consistency 4. styles 5. Heading Style 6. Default 7. objects 8. Paragraph 9. Fill format 10. cannot Chapter 2. Working with Images A. Multiple choice questions 1. (a) 2. (a) 3. (d) 4. (c) 5. (c) B. Fill in the blanks 1. Crop 2. gamma correction 3. ageing 4. Send Back 5. selecting 6. 25 7. reference 8. three 9. corner 10. before its Chapter 3. Advanced Features of Writer A. Multiple choice questions 1. (a) 2. (d) 3. (c) 4. (c) 5. (c) 6. (b) 7. (b) 8. (b) 9. (b) 10. (d) 11. (b) 12. (a) 2023-24
  • 271.
    Answer Key 261 notes B.Fill in the blanks 1. Ctrl 2. Default 3. Protected Against Manual Changes 4. Update Index 5. Columns 6. Template 7. Blank Document template 8. Properties 9. Browse Online Templates 10. Track Changes 11. Ctrl+Shift+C 12. coloured C. State whether the following statements are True or False 1. True 2. False 3. False 4. False 5. False 6. True 7. False 8. True 9. False 10. True 11. False Unit 2. Electronic Spreadsheet (Advance) using LibreOffice Calc Chapter 4. Analyse Data using Scenarios and Goal Seek A. Multiple choice questions 1. (d) 2. (b) 3. (d) 4. (d) 5. (b) 6. (d) 7. (b) 8. (b) 9. (b) B. State whether the following statements are True or False 1. True 2. False 3. True 4. False 5. False 6. False 7. False 8. False 9. False C. Fill in the blanks 1. summarize 2. consolidate 3. Subtotal 4. Subtotal 5. What-if 6. What-if tool 7. two, formula and display output 8. Goal seek Chapter 5. Use Macros in Spreadsheet A. Multiple choice questions 1. (c) 2. (d) 3. (b) 4. (b) 5. (c) 6. (b) B. Fill in the blanks 1. Standard 2. Integrated Development Environment 3. arguments/values, result/value 2023-24
  • 272.
    Domestic Data entryoperator – class X 262 notes 4. Organizer 5. Sub, End Sub 6. Standard Library C. State whether the following statements are True or False 1. False 2. True 3. False 4. False 5. True 6. True Chapter 6. Link Spreadsheet data A. Multiple choice questions 1. (a) 2. (c) 3. (b) 4. (b) B. Fill in the blanks 1. current 2. HTML_all 3. .odb. 4. Single quotes (‘ ’) 5. Insert Sheet C. State whether the following statements are True or False 1. False 2. True 3. False 4. True 5. False Chapter 7. Share and Review a Spreadsheet A. Multiple choice questions 1. (b) 2. (a) 3. (d) 4. (d) 5. (c) B. State whether the following statements are True or False 1. False 2. True 3. False 4. False 5. False 6. True C. Fill in the blanks 1. shared 2. many 3. turn off 4. record 5. red 6. Comment 7. cell contents Unit 3. Database Management System using LibreOffice Base Chapter 8. Introduction to Database Management System A. Multiple choice questions 1. (d) 2. (c) 3. (b) 4. (a) 5. (b) 6. (d) 7. (d) 8. (a) 9. (c) 10. (a) 2023-24
  • 273.
    Answer Key 263 notes B.State whether the following statements are True or False 1. False 2. True 3. False 4. False 5. False C. Fill in the blanks 1. Data 2. Entity 3. Report 4. Record 5. Candidate Chapter 9. Starting with LibreOffice Base A. Multiple choice questions 1. (c) 2. (b) 3. (c) 4. (b) 5. (c) 6. (a) 7. (b) 8. (a) 9. (a) 10. (d) B. State whether the following statements are True or False 1. True 2. True 3. False 4. False 5. True 6. True 7. False 8. True 9. False 10. False C. Fill in the blanks 1. Data type 2. Text 3. Text 4. Binary 5. Ctrl+S 6. Tasks Pane 7. Key 8. Datasheet 9. Record pointer 10. Sorting Chapter 10. Working With Multiple Tables A. Multiple choice questions 1. (d) 2. (c) 3. (b) 4. (b) 5. (b) 6. (b) 7. (c) 8. (a) 9. (c) 10. (d) B. State whether the following statements are True or False 1. False 2. True 3. False 4. False 5. True 6. True 7. False 8. False 9. True 10. False C. Fill in the blanks 1. Design 2. common field 3. one-to-one 4. one-to-many 5. transaction, master 2023-24
  • 274.
    Domestic Data entryoperator – class X 264 6. referential integrity 7. relationship 8. DBMS 9. Many-to-many 10. 10. Chapter 11. Queries in Base A. Multiple choice questions 1. (c) 2. (d) 3. (b) 4. (b) 5. (d) 6. (c) 7. (d) 8. (a) 9. (d) 10. (c) 11. (c) B. State whether the following statements are True or False 1. False 2. False 3. True 4. False 5. False 6. True 7. True 8. False 9. True 10. True 11. True C. Fill in the blanks 1. Query 2. Report 3. Three 4. two 5. F5 6. Criterion 7. Available fields 8. ascending, descending 9. three 10. Overview 11. Design 12. Query 13. Alias Chapter 12. Forms and Reports A. Multiple choice questions 1. (b) 2. (d) 3. (b) 4. (c) 5. (b) 6. (c) 7. (b) 8. (a) 9. (c) 10. (c) B. State whether the following statements are True or False 1. False 2. True 3. False 4. True 5. True 6. False 7. True 8. False 9. False 10. True 11. False 12. True 13. False notes 2023-24
  • 275.
    Answer Key 265 C.Fill in the blanks 1. Enter, view data 2. label, field value 3. label 4. 3D 5. tool tip 6. landscape 7. Layout 8. Insert 9. Six 10. dynamic Unit 4. Maintain Healthy, Safe and Secure Working Environment Chapter 13. Health, Safety and Security at Work Place A. Multiple choice questions 1. (d) 2. (b) 3. (d) 4. (c) 5. (d) 6. (a) 7. (c) 8. (d) B. Fill in the blanks 1. mental, social 2. morning 3. air conditioning 4. health 5. safe, hazards, risk 6. business revenue, operational charges 7. Occupational Health and Safety 8. physical work environment 9. live wires, conductor 10. poor sitting postures, one position C. State True or False 1. True 2. True 3. True 4. True 5. True 6. False 7. True 8. True 9. False 10. True Chapter 14. Workplace Quality Measures A. Multiple choice questions 1. (b) 2. (d) 3. (b) 4. (c) 5. (b) 6. (c) 7. (b) 8. (a) 9. (c) 10. (c) B. Fill in the blanks 1. chemical, biological 2. chemical 3. microbial notes 2023-24
  • 276.
    Domestic Data entryoperator – class X 266 4. designing 5. arching wrists 6. innocuous 7. hazard tape 8. electrical hazards 9. reflections 10. reflective C. State whether the following statements are True or False 1. True 2. True 3. True 4. False 5. True 6. False 7. True 8. True 9.True 10. False Chapter 15. Prevent Accidents and Emergencies A. Multiple choice questions 1. (d) 2. (d) 3. (b) 4. (d) 5. (a) 6. (c) 7. (c) 8. (b) 9. (d) 10. (d) B. Fill in the blanks 1. immediate, action 2. wet floor 3. watch your steps 4. coordinator 5. flammable, combustible 6. emergency response 7. first aid 8. cylindrical pressure vessel C. State True or False 1. True 2. False 3. True 4. False 5. False 6. True 7. False 8. True notes 2023-24