Downloaded 15 times
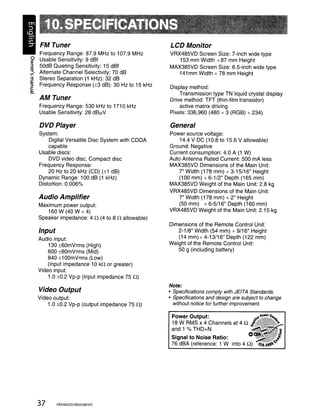
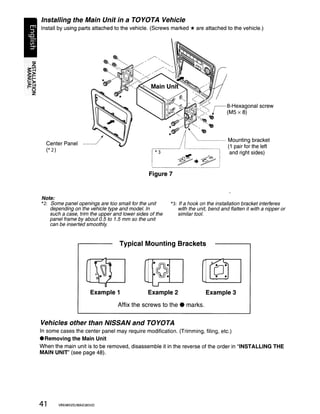
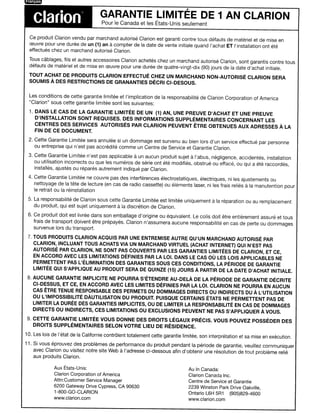
![3. CONTROLS
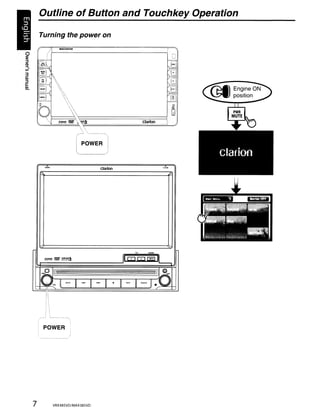
• Operation panel
SENSOR
3
DI
~ [DVD]
c
~i [A]
I(
Ii
,I
,, [V]
Ii I
! II ["III ]
II Ii I [PS] [AS]
IIII r RESET
[OPEN]
11,11 [CLOSE]
III Ii
I .I
II ~mPI ~ ~!~I!J~! Clarion
~~~~~~~~~=================================================!:b:dI
Iii I, L
I,: Il'",'-,- - - - - - - [ M O D E ] [MENU] ~~~i~
l~_===.=======~~~-=---
'-- [AM]
[FM]
' ' - - - - [MONITOR ADJ.]
[INFO] BAND CLOSE
- - [PWR]
[MUTE]
~~l==============:i;=1~
.."" Clarloo ,.;..
/ __~-'----++fI-'- [TILT DOWN]
/ "___ [TILT UP]
! ( /' [INFO]
[MONITOR ADJ.]
I "., I .J...
IIG0811
----,
SENSOR- -~ [I I] ~ [EJECT]
(/- -;~ - I
• I '; I -; I ~ I ~~' I ,-. JJ r/ " . '
.un ~
....++--[ENT]
! I I I I
~~~~] I I I i I
I I
[RESET]
I
[MUTE] [..... ] [~] [_] [~/II] [SOURCE]
5 VRX485VD/MAX385VD](https://image.slidesharecdn.com/max385vd-121220040148-phpapp02/85/Clarion-Max385vd-user-manual-5-320.jpg)
![Names of Buttons
Note: [BAND] Button
Be sure to read this chapter while referring to the • Use this button to enter the AM/FM tuner
front diagrams for chapter "3. CONTROLS" on mode from any source.
page 5 (unfold). • Once in the AM/FM tuner mode, you can
[POWER/MUTE] Button press it to change bands between FM1, FM2,
• Press this button to turn on the power. Keep FM3, and AM bands.
pressing this button more than 1 second to turn [MENU] Button
off the power. • Pressing this button in the any mode will return
• Press this button to attenuate the sound of the the unit to the main menu.
receiver, press again to restore sound. • The main menu allows selection of any avail-
[D.d OPEN/CLOSE Button able source to included AMiFM tuner, DVD
• Use this button to open/close the operation mode, AV input, Sirius radio, and iPod mode.
panel. The main menu also has a MONITOR OFF
• Keep pressing this button more than 2 seconds function to turn off the display to reduce glare
to adjust the angle of the operation panel. The or distraction while driving.
angle of the operation panel is adjustable in the • The SETIING menu is also located in the main
range of 0° to 30°. (MAX385VD only) menu. Please do not make adjustments to the
setting menu while the vehicle is in motion.
Sensor
• Receiver for the remote control unit (operating [DVD] Button
range: 30° in all directions). • Press this button to enter the DVD mode from
any source.
[AM/FM] Button
• Use this button to enter the AM/FM tuner [AS/PS] Button
mode from any source. • Press this button to start the preset scan mode.
• Once in the AM/FM tuner mode, you can • Press and hold this button to start the auto preset
press it to change bands between FM1, FM2, scan and setting mode. This function is very useful
FM3, and AM bands. when traveling to unfamiliar areas.
[Reset] Button [~] (EJECT) Button
• Press this button to reset the unit. • Use this button to eject the disc set in this unit.
[MONI/ADJ] button
• Press this button to enter/exit the playback
information mode while in DVD mode.
• Keep pressing this button more than 1 second
to enter/exit the Monitor Adjust mode.
[Mode] Button
Press this button to scroll through the available
sources such as AM/FM tuner, DVD mode, AV
input, Sirius Radio, and iPod mode.
[~!II] Button
• Press this button to enter the play pause mode
in the DVD/CD/MP3IWMA , and iPod modes.
Press the button again to resume playback.
[A], [V] [..... ] [~] Buttons
• Use these buttons to change to the previous/
next preset station in the TUNER/Sirius Radio
modes.
• Use these buttons to select a track in the CD,
MP3IWMA,and iPod modes.
• Use these buttons to select a chapter in the
DVD video mode.
VRX485VD/MAX385VD 6](https://image.slidesharecdn.com/max385vd-121220040148-phpapp02/85/Clarion-Max385vd-user-manual-6-320.jpg)
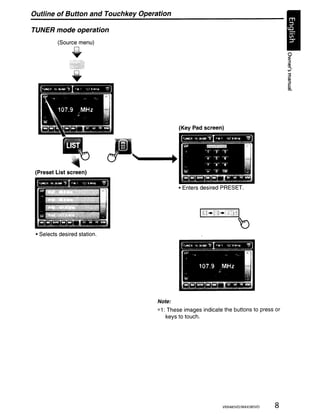
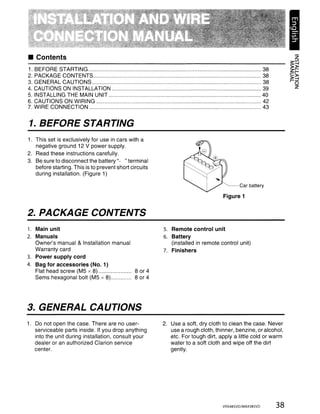
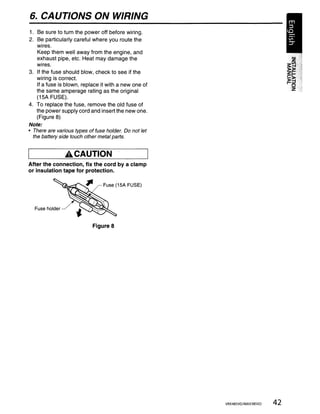
![Remote Control
Remote control unit
~ Signal transmitter
[MUTE]-+-------..
------- / Operating range: 30' in all directions
~---<I---[OPEN]
[MODE]-+-~---.J -++-+--[POWER]
[O-g]-+- -+-+--[VOLUME]
[INFO]
r---+--[.' BAND]
[SRCH]-+-""'-l +--+--[SEL]
[.] ['Y]-+---- .;----t--[MENU]
[ESC] [PIC]
[<llII][~ ] ---------[ A - B]
~-[OK]
[TITLE] (REPEAT]
~-[ROOT]
[~][~]
[~]
[ZOOM] [SUB TITLEIVIDEO iPod MODE*]
[AUDIO] [ANGLE/AUDIO iPod MODE*]
clarion
* Only when capable iPod
is connected
Replacing the Batteries
1. Press the retention tab and pull out the battery
tray and remove the old battery.
2. Insert the new CR2025 battery and slide the
battery tray back in the remote control the
same direction that you removed it. Please
ensure the tray is inserted in the correct direction.
Note:
Using batteries improperly can cause them to
explode. Take note of the following points:
• When replacing batteries, replace both batteries
with new ones.
• Do not short-circuit, disassemble or heat batteries.
• Do not dispose of batteries into fire or flames.
• Dispose of spent batteries properly.
VRX485VD/MAX385VD 10](https://image.slidesharecdn.com/max385vd-121220040148-phpapp02/85/Clarion-Max385vd-user-manual-10-320.jpg)
![Functions of Remote Control Unit Buttons
You can use the remote control unit to control the MAX385VD and VRX485VD.
Note:
• The wireless remote control operation may not be optimal in direct sunlight.
Shared modes [..... ], [~] buttons
[MODE] button • Press to manually select the next higher or
• Press this button to scroll through the various lower station in TUNER and Satellite Radio
available sources such as the AM/FM tuner, modes.
DVD player, iPod, Sirius Radio, or AUX IN. [ .A ], [ ~ ] buttons
[VOLUME] buttons • Press to scroll through the saved presets in
• Increase and decrease volume. the TUNER mode. Press [OK] to tune to the
highlighted preset.
[MUTE] button
[INFO] button
• Turns mute on and off.
• Press to switch in and out of the LIST mode
[POWER] button while in the TUNER/ Sirius Radio mode.
• Press this button to turn the unit on or off.
menu screens.
DVD PLA YER mode
[OPEN] button
• Press this button to OPEN or CLOSE the [INFO] button
motorized screen. Please ensure there are • Press to turn on and off the playtime display in
no obstructions before starting the operation. the DVD video.
[MENU] button • Press to switch in and out of the LIST mode
• Press this button to enter the MAIN MENU. while playing CD audio.
From the main menu, you can select your [SEARCH] button
desired source or change your settings. • Press to open the direct search menu while in
[PIC] button the DVD video mode.
• Press this button to change your monitor [OK] button
settings such as Brightness, Color, and • Press to select, play or pause video and
Contrast. audio media.
[SEL] button [ ./BAND] button
• Press this button to change your audio • Press to stop video and audio media playback.
settings such as Tone, Fader, and Balance. [0 - 9] buttons
[ESC] button • Press to enter DVD video chapters/titles in the
• Press this button to exit selection and Key Pad screen. .
adjustment menus. • Press to set the track/folder number of the CD,
TUNER/Satellite Radio mode or MP3IWMA in the Key Pad screen.
[BAND] button [DISC SEL] button
• Press to show/hide the Track List screen in the
• Switches reception band.
CD mode.
[0 - 9] buttons
• Press to show/hide the Folder List screen in the
• Use in the Key Pad screen to set the radio
MP3IWMA mode.
frequency or Satellite Radio channels.
• Use to select the preset number in the Preset [TITLE] button
List screen. • Press to go to the title menu on the DVD.
[SEARCH] button [ROOT] button
• Press to show/hide the Key Pad screen. • Press to go to the root menu on the DVD.
[OK] button [.A], [~], [.... ], [~] buttons
• Press to fix the entered data in the Key Pad • Press to select button items on the menu
screen. screen of a DVD video.
• Press [.... ], [~] to scroll the through the page
[......], [~] buttons
screens in the CD and MP3IWMA modes.
• Press to seek the next available higher or
lower station in TUNER mode. In Sirius Radio
mode,you will scroll through the categories.
11 VRX485VD/MAX385VD](https://image.slidesharecdn.com/max385vd-121220040148-phpapp02/85/Clarion-Max385vd-user-manual-11-320.jpg)
![Functions of Remote Control Unit Buttons
[..... ], [~] buttons iPodmode
• Press to select the next higher or lower chapter [OK] button
number in DVD video mode. • Press to play or pause the selected media.
• Press to select the next higher or lower track in [.], [~] buttons
CD. • Press to scroll the list screens.
[.... ], [~ ] buttons
[..... ], [~] buttons
• Press to perform fast-forward and fast- • Press to select the next higher or lower track
backward. Press again to advance to higher numbers.
speed reversing or forwarding such as 2x,
[.... ], [~] buttons
4x, ax and 16x. Press once more to resume
• Press to perform fast-forward or fast-backward
normal speed playback.
searching. Press again to change the speed
[RPn button to 2x, 4x, ax or 16x.
• Press to perform chapter repeat in the DVD
video mode, and track repeat in CD and MP3/
WMA modes.
• Press again to perform title repeat in DVD video
mode or folder repeat in MP3IWMA mode. In
CD mode, this will activate the repear all mode.
• Press again to perform all repeat in MP3IWMA
playback mode.
[A->B] button
• Press to set initial starting point of repeat.
The screen will show 'REP A-'.
• Press again to set repeat ending point.
The screen will show 'REP A-B'
• Press again to turn off A-B repeating. The
screen will show 'REP AB Off'
[ZOOM] button
• Press to turn on and zoom in while in DVD
Video mode. You can zoom in up to 3x.
[AUDIO] button
• Press to switch the AUDIO function in the DVD
video mode.
[SUB-T] button
• Press to display subtitles in the DVD video
mode.
[ANGLE] button
• Press to switch the ANGLE function in the DVD
video mode when the Angle mark is displayed.
VRX485VO/MAX385VO 12](https://image.slidesharecdn.com/max385vd-121220040148-phpapp02/85/Clarion-Max385vd-user-manual-12-320.jpg)

![Discs
Playable discs Discs that cannot be played back
This DVD video player can play the following This DVD video player cannot play back DVD-
discs. Audio, DVD-RAM, Photo CDs, etc. 0
Note: :e
Playable discs • It may also not be possible to play back CDs ~ .
recorded on a CD-R unit and CD-RW unit. (Cause: ~
DVD video discs MP31D3TAG disc characteristics, cracks, dust/dirt, dust/dirt on
~ m?3 player's lens, etc.)
103 TAG • If a CD-R or CD-RW disc that has not been
VIDEO
finalized is played, it will take a long time to start
Audio CDs WMA playing. Also, it may not be possible to play
rnJD~~ I ••",.=~~~ J
depending on its recording conditions.
••Gmll AU•••
··~ • You cannot play Super Audio CDs. Playback of the
CD player is not supported even if it is a hybrid
disc.
About CD Extra discs About MP3IWMA playback
A CD Extra disc is a disc in which a total of two This unit can play back CD-R/CD-RW, DVD-R/
sessions have been recorded. The first session is RW and DVD+R/RW discs on which MP3IWMA
Audio session and the second session is Data music data have been recorded.
session. For a detailed information, see the section
Your personally-created CDs with more than entitled "Listening to an MP3IWMA" (page 42).
second data sessions recorded cannot be played
on this DVD video player. Note on region numbers
Note: The DVD video system assigns a region number
• When you playa CD Extra disc, only the first
to DVD video players and DVD discs by sales
session will be recognized.
area. DVD video players sold in the United States
can play back DVD discs with the region number
About playing a CD-R/CD-RW disc "ALL", "1" or any combination of numbers that
(MP3, WMA) also incorporate a "1".
This player cen play CD-R/CD-RW discs The DVD video region number is marked on the
previously recorded in music CD format (MP3, disc jacket as shown below.
WMA) or video CD format.
About playing a DVD-R/RW or fll.·.·.·.·.'j·.·.·.£.L.·.·]
":-'.-," 'i,:-/
~,-~,;y
. 1
DVD+R/RW disc
This player cannot play DVD-R/RW and DVD+R/
RW discs previously recorded in video CD
format.
However, MP3IWMA files recorded on DVD-R/
RW and DVD+R/RW discs can be played.
About the registered marks etc.
• This product incorporates copyright protection • Manufactured under license from Dolby
technology that is protected by U.S. patents Laboratories.
and other intellectual property rights. Use of • "Dolby" and the double-D symbol
this copyright protection technology must be are trademarks of Dolby Laboratories.
authorized by Macrovision, and is intended for • "iPod" is for legal or rightholder-authorized
home and other limited viewing uses only copying only. Do not steal music.
unless otherwise authorized by Macrovision. • Windows Media™, and the Windows® logo are
Reverse engineering or disassembly is trademarks, or registered trademarks of
prohibited. Microsoft Corporation in the United States and/
or other countries.
VRX48SVD/MAX38SVD 16](https://image.slidesharecdn.com/max385vd-121220040148-phpapp02/85/Clarion-Max385vd-user-manual-16-320.jpg)
![Basic Operations
~
;:,
~
Note:
• Be sure to read this chapter referring to the chapter
Adjusting the volume
3 "3. CONTROLS" (page 5). 1. Turn the volume knob to adjust the volume.
01
;:, Clockwise: Increases the volume.
C
Counter- clockwise: Decreases the volume.
~ ACAUTION • The volume level indicated in the display is
When the unit is turned on, starting and in a range from 0 (min.) to 40 (max.).
stopping the engine with its volume raised to
the maximum level may harm your hearings.
Be careful about adjusting the volume. ACAUTION
While driving, keep the volume level at which
Turning on and off the power external sounds can be heard.
Note: Mute
• Start the engine before using this unit.
1. If using a MAX385VD, press the PWR/MUTE
• Be careful about using this unit for a long time
without running the engine. If you drain the car's button to turn the mute on and off.
battery too far, you may not be able to start the the mute on and off.
engine and this can reduce the service life of the 2. If using a VRX485VD, press the [MUTE] button
battery. to turn the mute on and off.
• When the mute is turned on, "-4x" appears
1. Start the engine. The power button / knob
on the LCD screen.
illumination on the unit will light up.
~ EngineON
Opening the operation panel
~ position and adjusting the angle
Open the operation panel when inserting/ejecting
2. Press the (POWER) button to turn on the a disc.
power. The angle of the operation panel can be adjusted
* Pressing this button while the power is turned depending on the mounting angle of the unit or
on will mute the volume on the MAX385VD, light coming into the car.
on the VRX485VD, the audio settings appear.
3. To turn off the power, press and hold the
[POWER] button for more than 1 second.
ACAUTION
• Do not move the operation panel forcibly or
Selecting a mode do not apply strong force to the operation
panel.
1. Press the [MENU] button to display the • When the operation panel is operating, be
Source menu. careful not to get your hand or finger caught
* External equipment not connected to this unit between the operation panel and main unit
is not displayed. or its mechanical parts.
• The driver should not operate the operation
2. Touch the desired mode key. panel while driving.
17 VRX485VD/MAX385VD](https://image.slidesharecdn.com/max385vd-121220040148-phpapp02/85/Clarion-Max385vd-user-manual-17-320.jpg)
![Basic Operations
Opening/closing the operation panel Returning the operation panel to the
1. Press the [0/:.1 (OPEN/CLOSE) button. original angle (MAX385VD)
The operation panel will be opened or closed. 1. Press the [lk] (OPEN/CLOSE) button
to open the motorized LCD panel. 0
2. Keep pressing the Wt.] (OPEN/CLOSE) button :E
until the panel is back at the normal position. ~
""l
lI
Adjusting the AUDIO
1. Press the [EO] button on the screen or
the [SEL] button on the remote control.
2. Touch the item key to adjust.
3. Perform the adjustment.
See the following sections for detail.
Note:
4. Touch the [Back] key to return to the previous
• The operation panel will close automatically when
screen.
a disc is inserted. (MAX385VO only)
• When the operation panel is open, the touch panel * In the following sections, only the details
should not be operated. (MAX385VO only) regarding adjustments are described,
procedures to select items are skipped.
Adjusting the angle of the operation Adjusting the balance/fader
panel
The angle of the operation panel can be adjusted 1. Touch the BALANCE or FADER in the
in the range of 00 to 30 0. audio menu.
1. Keep pressing the [OA] (OPEN/CLOSE) button 2. Touch the [F ] or [R] key to adjust to the
more than 2 seconds. fader level.
A beep will sound and the operation panel • The factory default setting is "0".
will start moving. (Adjustment range: front 9 to rear -9)
3. Touch the [L] or [R] key to adjust to the
balance level.
• The factory default setting is "0".
(Adjustment range: left -9 to right 9)
Adjusting the BASS
The bass gain and bass frequency can be
adjusted as follows.
1. Enter the Audio settings menu.
2. Touch the [-] or [+] key to set the desirable
level.
GAIN:
-7 to 7 (The factory default setting is "0")
3. To set the bass center frequency, enter
the ASP adjustment in the SETTING menu.
~ ... - ... ~
I
1: :0-1-1'1-11.
__,,- . '---L_
Adjusting the TREBLE
The treble gain and treble frequency can be
2. When the operation panel is moved to your adjusted as follows.
desired angle, release the button. 1. Enter the Audio settings menu.
The operation panel will stop.
2. Touch the [-] or [+] key to set the desirable
3. For the VRX485VD, simply adjust your level.
desired angle by pressing the [v] or [A] tilt
GAIN:
buttons on your control panel.
-7 to 7 (The factory default setting is "0".)
3. To set the treble center frequency, enter
the ASP adjustment in the SETTING menu.
VRX485VD/MAX385VD 18](https://image.slidesharecdn.com/max385vd-121220040148-phpapp02/85/Clarion-Max385vd-user-manual-18-320.jpg)
![Basic Operations
• Adjusting the non fader output Adjusting the brightness, contrast
phase and color levels
You can adjust the subwoofer phase from the 1. Touch the [PIC] key on the remote control
SETTING adjustment menu. or [MONI/ADJ] key on the MAX385VD.
1. Touch the ASP tab in the SETTING menu. 2. Touch the [-] or [+] key to make adjustments
2. Touch the [SUB PHASE] button in the ASP to the settings to your desired levels.
menu and a selection menu will appear. "Bright":
Setting range: Adjusts the brightness of the display.
o or 180 (The factory default setting is "0") "Color":
Adjusts the color saturation.
Adjusting the non fader output "Contrast":
Low Pass Crossover Adjusts the level of black.
You can adjust the subwoofer phase from the or green is emphasized).
SETTING adjustment menu.
Bright/Color/Contrast:
1. Touch the ASP tab in the SETTING menu. The factory default setting is medium level.
2. Touch the [SUB FILTER] button in the ASP
menu and a selection menu will appear. Adjusting the SETTING
Setting range: 1. Press the [MENU] button, then touch the
80,120 or 160Hz (The default setting is "60") [SETTING] key.
Adjusting the non fader output 2. Touch the top navigation tabs to switch
volume between the SETTING menus. You can
navigate between General, Screen, ASP,
You can adjust the volume output from the unit's
Regional, and Rating.
Audio adjustment menu.
3. Perform the adjustment for the desired item.
1. Touch the [-] or [+] key of the SW VOL item
See the following sections for detail.
to adjust to desirable level.
4. Touch the [Back] key to return to the previous
Setting range: screen.
-7 to 7 (The factory default setting is "0".) * In the following sections, only the details
regarding adjustments are described,
Turning on/off the LOUDNESS procedures to select items are skipped.
The Loudness setting emphasizes the low and
high sound level areas to provide a more full and
dynamic sound without distortion.
1. Enter the Audio settings menu.
2. Touch [ON] or [OFF] of the [LOUDNESS]
item to turn on or off the loudness effect.
(The factory default setting is "OFF").
Adjusting the MONITOR
1. Press the [PIC] button on the remote control
or [MONI/ADJ] button on the MAX385VD.
2. Perform the adjustment for the desired item.
See the following sections for detail.
3. Touch the [Back] key to return to the previous
screen.
* In the following sections, only the details
regarding adjustments are described,
procedures to select items are skipped.
19 VRX485VD/MAX385VD](https://image.slidesharecdn.com/max385vd-121220040148-phpapp02/85/Clarion-Max385vd-user-manual-19-320.jpg)
![Basic Operations
Adjusting the CLOCK
1. Press the [SETTING] button, then touch the
[CLOCK] key.
2. The entry keypad will appear. Enter your time
without spaces. For example, 12:45 would be
entered as '1245'. Press [OK] to accept or [... ]
to backspace and correct your entry. If you
have selected to display your time in 24 hour
format, you must enter your time in 24 hour
format such as '1745' for 5:45PM.
3. To change your time from AM to PM, press
AM or PM text in the CLOCK selection box.
If you have selected to display your time in 24
hour format, you will not have this selection.
Adjusting the RADIO region
1. Press the [SETTING] button, then touch the
[RADIO] key.
2. A region selection menu will appear. Scroll
down using the arrow at the bottom of the menu.
Scroll up using the arrow at the top of the menu.
Once you have located the region that matches
your area's radio spacing and frequency range,
touch the region to make your selection. If the
region selected is incorrect, radio reception will
be poor.
Reset to Factory Defaults
1. Press the [SETTING] button, then touch the
[LOAD FACTORY] key.
2. A selection menu will appear. Select [YES] to
restore your unit to factory default settings. This
function will erase all memory from the unit and
you must reset all personalized items such as
tuner presets.
NOTE: You will be asked once to confirm that
you would like to reset the unit. The unit will
power down and restart with factory defaults.
VRX485VD/MAX385VD 20](https://image.slidesharecdn.com/max385vd-121220040148-phpapp02/85/Clarion-Max385vd-user-manual-20-320.jpg)
![Radio Operations
Listening to the radio Recalling a preset station
1. Press the [MENU] button, and touch the There are total of 48 preset positions (12-FM1,
[TUNER] key. 12-FM2, 12-FM3, 12-AM) to store individual
o The TUNER mode screen is displayed. radio stations in memory.
:E There are 2 ways available to recall the preset
~
ttl
.... station.
Vl~
3 .Using the remote controller
Ql
:::l 1. Press the [BAND] button to select the desired
C
Ql band (FM or AM).
2. Press the preset number desired on the 0-9
numeric keypad .
• Using the Preset List screen
2. Press the [BAND] button or touch the [Band] 1. Touch the [List] key.
key to select the radio band. Each time the
button is pressed, the radio reception band
changes in the following order:
FM1 ... FM2'" FM3'" AM ... FM1 ...
Seek tuning
1. Press the [BAND] button or touch the [Band]
key to select the desired band (FM or AM).
2. Touch the [..... ] or [~] key to automatically
seek a station. 2. Touch the corresponding Preset key to recall
• When touching the [~] key, the station is the stored station.
sought in the direction of higher * You can select the desired band by touching
frequencies. the [Band] key. Scroll through pages using
• When touching the [..... ] key, the station is scroll bar buttons to the right of the presets.
sought in the direction of lower frequencies. * Touching and holding the desired Preset key
for more than 2 seconds will store the current
Selecting presets by direct access station to the preset memory.
This function displays the Key Pad on the screen 3. Touch the [List] key to return to the previous
allowing you to tune by entering a preset number. screen.
1. Press the [BAND] button or touch the [Band] Manual memory
key to select the desired band (FM or AM).
1. Touch the [Band] key to select the desired
2. Touch the [DIRECT] key to display the Key
band. (FM or AM)
Pad screen.
2. Select the desired station with the seek
3. Touch the [0] to [9] key corresponding with the
tuning, manual tuning, or preset tuning.
preset you desired. When you input the
wrong number, touch the [~ ] key to delete 3. Touch the [List] key.
the last input number. 4. Touch and hold one of the Preset key for more
4. Touch the [ENT] key to tune in to the entered than 2 seconds to store the current station into
preset. the preset memory.
5. Scroll through the 3 pages of presets in each
Manual tuning band by pressing the scroll bar buttons to the
1. Press the [BAND] button or touch the [Band] right of the presets.
key to select the desired band (FM or AM).
2. Touch the [....] or [. .] key to manually
select a station.
• When touching the [. .] key, the frequency
is tuned in the direction of higher
frequencies.
• When touching the [.... ] key, the frequency
is tuned in the direction of lower frequencies.
21 VRX485VD/MAX385VD](https://image.slidesharecdn.com/max385vd-121220040148-phpapp02/85/Clarion-Max385vd-user-manual-21-320.jpg)
![Radio Operations
Auto store Channel scan
The Auto Store is a function for storing up to 12 The Channel Scan receives the stations seq-
stations that are automatically tuned in uentially and scans continuously. This function
sequentially. If 12 receivable stations cannot be is useful when searching for the desired station
received, a previously stored station remains in an unfamiliar area.
unoverwritten at the memory position. 1. Touch the [Band] key to select the desired
1. Touch the [Band] key to select the desired band. (FM or AM)
band. (FM or AM) 2. Touch the [SCAN] key to start the Channel 3
QI
2. Touch the [AS] key momentarily to start Scan. The unit starts scanning each station ::::l
c:
the Auto Store function. for 10 seconds sequentially. QI
A beep sounds and the stations with good 3. When the desired station is tuned in, touch the
reception are stored automatically to the [SCAN] key again to continue receiving that
preset channels. station.
DX / LOC setting
Preset scan The OX / LOC setting changes the tuner sen-
The Preset Scan receives the stations stored in sitivity in order to seperate closely spaced
the preset memory in order. This function is stations. This feature is useful in areas that
useful when searching for the desired station in have many radio stations in close proximity.
memory. 1. Touch the [DX] key to switch to LOCAL
1. Touch the [Band] key to select the desired tuner sensitivity.
band. (FM or AM) 2. Touch the [LOC] key to switch to OX tuner
2. Touch the [PS] key to start the Preset Scan. sensitivity.
The unit starts scanning each station for 10
seconds sequentially.
3. When the desired station is tuned in, touch the
[PS] key again to continue receiving that
station.
DVD Video Player Operations
Changing DVD System Screen Saver Feature
Settings 1. Press the [MENU] button, and touch the
[SETIING] key.
Note: The main SETIING screen is displayed.
• If the Setup operation is performed in the middle of 2. Touch the [Screen] key to display the Display
DVD video play, the disc will restart from settings menu.
beginning.
3. Touch the [Screen Saver] key to display the
Selecting the DVD SETUP menu screen saver selection menu.
1. Press the [MENU] button, and touch the 4. Touch the [OFF] or [ON] key to turn off or on
[SETIING] key. the screen saver feature
The main SETIING screen is displayed.
2. Touch the [Screen] key to display the Display Note:
• If the screen saver is not for entertainment purposes.
settings menu.
The feature is intended to prevent screen damage if
3. Touch the [Regional] key to display the the unit is paused or stopped for an extended period
Language settings menu. of time.
3. Touch the [Rating] key to display the
Parental Controls settings menu.
4. Perform setting for the desired setting items.
See the following sections for detail.
5. Touch the [Back] key.
* In the following sections, only the details
regarding settings are described, the
procedures to select items are skipped.
VRX485VD/MAX385VD 22](https://image.slidesharecdn.com/max385vd-121220040148-phpapp02/85/Clarion-Max385vd-user-manual-22-320.jpg)
![DVD Video Player Operations
Setting up the screen size Setting up the password for setting
1. Touch the [Aspect Ratio] button to enter up of the parental level
the TV DISPLAY item to change the screen • The factory default setting is "0000".
~ size to " 16:9 " or" 4:3 ".
4-1. Touch the [RATING] key in the SETIING
:::l • The factory default setting is" 4:3 ".
/'l) menu.
;;} • When watching a wide type through a con-
3 4-2. Touch the [Set Password] key and a key
Qj
ventional type of the rear view monitor (4:3)
:::l pad will appear.
c:
Qj
4:3 : • Input the old password, and touch the
The leftmost and rightmost areas of the screen [OK] key.
are cut off.
* Input "4356" to return password to "0000".
• Input a new password, and touch the
[ENT] key.
Note:
• When a disc with view restrictions is inserted, you
will be prompted to input a password. The disc will
not be viewable until the correct password is
This function allows displaying the important entered.
part of image fully on the screen. In some
cases, image is displayed while being panned Setting up the parental level
(scrolled).
You can change the level of parental lock (audio-
• When watching a wide type through a wide visual restriction) .
type of the rear view monitor (16:9) This function allows cutting scenes that are
16:9 : unfavorable for children or replacing them
The leftmost and rightmost areas of the screen automatically with other scenes prepared in
are cut off. advance. For example, by replacing scenes of
radical violence or portrayals of sex with safe
scenes, you can make a trouble-free story as if it
were so from the beginning.
4-1. Touch the [RATING] key in the SETIINGS
menu.
4-1. Touch the [PARENTAL CONTROL] key in
Setting up the audio language the RATING menu.
4-2. Touch the ten-key (0 to 9) to input a 4-digit
4-1. Touch the [REGIONAL] key in the SETIING password, and touch the [ENT] key.
menu. • The factory default setting of the
The Language menu is displayed. password is "0000".
4-2. Touch the [Audio] key to select a. desired 4-3. Touch the appropriate parental rating that
language and set it by touching the is desired. 1 is similar to G and 8 is similar
available languages. to NR.
• The factory default setting is "ENGLISH". • The factory default setting is "8".
Setting up the subtitle language
4-1. Touch the [REGIONAL] key in the SETIING
menu.
The Language menu is displayed.
4-2. Touch the [Subtitle] key to select a desired
language and set it by touching the
available languages.
• The factory default setting is "ENGLISH".
23 VRX485VD/MAX385VD](https://image.slidesharecdn.com/max385vd-121220040148-phpapp02/85/Clarion-Max385vd-user-manual-23-320.jpg)
![DVD Video Player Operations
The relationship between DVD video category
codes and parental level are shown in the table
below. Use this table when setting the parental
level.
• Some videos may be recorded at higher
than desired volume levels. Increase the
LEVEL7 NC-17 volume gradually from the minimal
(NO ONE 17 AND UNDER setting after the video has started.
ADMITTED) • For your safety, the driver should not
watch the video or operate the controls
LEVEL6 R
while driving. Please note that watching
(RESTRICTED)
and operating the video while driving are
LEVEL4 PG-13 prohibited by law in some countries.
(PARENTS STRONGLY
CAUTIONED) Note:
LEVEL3 PG • For your safety, your entertainment system has a
(PARENTAL GUIDANCE safety function which turns off the picture when the
car is moving, so only the audio can be heard. The
SUGGESTED)
picture can only be watched when the car is
LEVEL1 G stopped and the parking brake is applied.
(GENERAL AUDIENCES) • If "AUDIO ONL Y" appears on the screen just after
turning on the ACC power of the car, release the
• The contents that the parental level restricts parking brake while confirming safety, and then
vary with the country code. engage the parking brake again.
Basic Operations Pausing play
1. Press the [OK] button or touch the [~/II]
key to pause play.
Loading a disc "PAUSE" appears in the display.
1. Press the [01.] (OPEN/CLOSE) button to open 2. To resume disc play, press the [~III] button
the operation panel. (MAX385VD only) again.
2. Insert a disc into the center of the insertion
slot with the label side facing up. The disc Ejecting a disc
plays automatically after loading.
1. Press the [01.] (OPEN/CLOSE) button to open
Note: the operation panel. (MAX385VD only)
• Never insert foreign objects into the disc insertion
slot. 2. Press the [~] (EJECT) button to eject disc.
• If the disc is not inserted easily, there may be "EJECT" appears in the display. The play
another disc in the mechanism or the unit may mode then switches to the TUNER mode.
require service. * If a disc is left in the ejected position for 15
• 8 cm (single play) discs cannot be used. seconds, the disc is automatically reloaded
(Auto reload). In this case, however, the play
mode will remain set to the TUNER mode.
ACAUTION Note:
For your safety, the driver should not insert • If you force a disc into before auto reloading, this
or eject a disc opening the operation panel can damage the disc.
while driving.
Watching/Listening to a disc already
inserted
1. Press the [MENU] button, and touch the
[DVD/CD] key to select the DVD PLAYER
mode.
Play starts automatically.
If no disc is loaded in the unit, the DVD/CD
icon will be shaded in the display.
VRX485VD/MAX385VD 24](https://image.slidesharecdn.com/max385vd-121220040148-phpapp02/85/Clarion-Max385vd-user-manual-24-320.jpg)
![DVD Video Player Operations
Watching a DVD-Video Operating the DVD menu
After disc loading, the play mode is automatically You can select the button items displayed in the
engaged. DVD menu by directly touching it.
• When playback is not started, press the [OK] If the button items are hard to select correctly,
~ button or touch the [~/II ] key. you can also operate them by using the remote
~ • Button operation may differ depending on the control directional buttons.
;} story of the disc.
3 On the MAX385VD, you can press the volume
~ • After the menu screen is displayed
knob in momentarily, then turn it to change the
~ For normal DVD-Video discs, the DVD menu selected items on the screen. Press the [~/II]
screen appears.
button to select it.
After the DVD menu screen is displayed, select
an item in the following operations and play it
back. On the VRX485VD, you can use the right knob
to change the selected items on the screen.
Press the right knob or [~/II] button to select it.
Showing the DVD PLA YER mode
screen Stopping playback
The DVD PLAYER mode screen is used to 1. Showing the DVD PLAYER mode screen,
control the playback mode from the screen. touch the [ • ] key. Playback is stopped.
1. Touch the screen. On the VRX485VD, you can also press the
The DVD PLAYER mode screen is displayed. [.] key on the front control panel.
If you do not touch the screen for 5 seconds, 2. To resume playback, press the [~/II ] button.
the display will return to the playback screen. Playback resumes from the scene where
playback is stopped.
Pausing playback
1. Press the [ OK] button or touch the [~/II ]
key during playback.
Playback pauses.
2. To resume playback, press the [ ~!II] button
again.
Playback resumes.
Showing the DVD menu
1. Showing the DVD PLAYER mode screen,
touch the [Menu] key during playback.
The DVD menu appears.
The displayed contents may differ depending
* on the DVD software.
• Example showing DVD menu display
25 VRX485VO/MAX385VO](https://image.slidesharecdn.com/max385vd-121220040148-phpapp02/85/Clarion-Max385vd-user-manual-25-320.jpg)
![DVD Video Player Operations
Skipping a chapter (searching) • Title
• About chapter A large segment to divide the data area of
the disc.
Chapter means a small segment to divide the
• Chapter
data area of the disc.
A small segment to divide the data area of 0
1-1. Press the [A] or [v] button during the disc. ~
playback. (MAX385VD) • Time !!{
1-2. Press the [ .... ] or [~] button during A specific time on the disc. 3
playback. (VRX485VD) 2. Input the number of the title/chapter/time that ~
til
Chapters are skipped, as many as the times you want to play back with the [0] to [9] key. !!!.
the button is pressed, and playback starts. 3. Touch the [ENT] key.
Playback starts from the scene of the input
Current title number, time or chapter number.
~ location ~
T * If the input title/chapter/time number does not
'<i, 'i'i
exist or searching with a title/chapter number
I is not allowed, the screen image will not change.
Chapter Chapter Chapter 4. Touch the [Back] key.
down.....- ---+ up
• Pressing the [~] or [V] button starts play-
back from the beginning of the next chapter.
• Pressing the [.... ] or [A] button starts play-
back from the beginning of the current chapter.
When this button is pressed again within
about 3 seconds, playback starts from the
beginning of the previous chapter.
Fast forward and fast backward Repeat playback
1. Press the [..... ] or [~] button to start your
This operation plays back chapters recorded on
fast backward or fast forward during playback.
the DVD-Video repeatedly.
The playback speed starts at 2x, then will in-
crease to 4x,8x, and 16x with each additional 1. Showing the DVD PLAYER mode screen,
press. touch the [Repeat] key.
* No audio is reproduced during fast forward and 2. Touch the [Repeat] key once for Chapter
fast backward operation. Repeat, again for Title Repeat.
* The fast forward and fast backward speed may 3. Press the [Repeat] button again to turn off
differ depending on the disc. the repeat playback.
Using the title menu
Searching with a chapter/title
On DVD discs containing two or more titles, you
number can select from the title menu for playback.
You can locate the beginning of a scene using 1. Showing the DVD PLAYER mode screen,
the chapter numbers or title numbers recorded touch the [Top Menu] key during playback.
on the DVD-Video disc. The title menu screen appears.
1. Showing the DVD PLAYER mode screen, * Depending on the disc, the title menu cannot
touch the [CHAP] key. be called.
The Key Pad screen appears with the chapter
number input mode. Touching the [Title] key 2. Select the button items displayed in the title
turns the Key Pad to the title number input menu screen by the same way of the DVD
mode. Touching the [Time] key turns the Key menu operation.
Pad to the time number input mode. * Depending on the disc, items cannot be
selected with the ten-key buttons.
VRX485VD/MAX385VD 26](https://image.slidesharecdn.com/max385vd-121220040148-phpapp02/85/Clarion-Max385vd-user-manual-26-320.jpg)
![DVD Video Player Operations
Switching among languages Switching angles
On discs in which two or more audios or audio On DVD discs in which video images have been
languages have bee' recorded, you can switch recorded in two or more angles, you can switch
among the audio langLlages during playback. among the angles during playback.
~
::l 1. Touch the [Audio] key during playback.
1. Touch the [Angle] button on the remote
m controller during playback. Each time you
"',
III
• Each time you touch the key, you can switch touch the key, you can switch among angles.
among audio languages. • It may take time to switch among angles.
• It may take time to switch among audios.
* Depending on the disc, up to 9 angles may be
* Depending on the disc, up to 8 audios may be recorded. For details, see the mark of the disc
recorded. For details, see the mark of the disc (fIt: indicates multi-angie).
(0)): Indicates that 8 audios have been
recorded). * Depending on the disc, angles may switch
smoothly or switch with a momentary still
* When the power is turned on and when the image.
disc is changed to a new one, the language set
as the factory default is selected. If that * Depending on the disc, switching may be
language has not been recorded, the language completely impossible or impossible on some
specified on the disc. scenes.
* Depending on the disc, switching may be * Depending on the disc, scenes recorded in two
completely impossible or impossible on some or more angles may be played back.
scenes.
2. The DVD PLAYER mode screen will hide in
Displaying the playback status
5 seconds after your selection is made. 1. Showing the DVD PLAYER mode screen,
touch the [INFO] key.
Switching subtitles 2. or Touch the [INFO] button on the remote.
On DVD discs in which two or more subtitle 3. Touch the screen to hide the playback status
languages have been recorded, you can switch screen.
among the subtitle languages during playback. Playback status is displayed on the screen
until it is manually hidden.
1. Touch the [Sub T.] key during playback.
Each time you touch the key, you can switch
among subtitles.
• It may take time to switch among subtitles.
* Depending on the disc, up to 32 kinds of
subtitles may be recorded. For details, see the
mark of the disc (QJ Indicates that 8 kinds of
subtitles have been recorded).
* Depending on the disc, switching may be
completely impossible or impossible on some
scenes.
2. The DVD PLAYER mode screen will hide in
5 seconds after your selection is made .
• To turn off subtitles
1. Repeat touching the [Sub T.] key until" Sub
Title: OFF" is displayed on the screen.
Subtitles are turned off.
27 VRX48SVD/MAX385VD](https://image.slidesharecdn.com/max385vd-121220040148-phpapp02/85/Clarion-Max385vd-user-manual-27-320.jpg)
![DVD Video Player Operations
Listening to a CD Selecting a track on the Track List •
screen
Pausing playback This function allows you to select tracks from a
1. Press the [OK] button or touch the [~/II] displayed list.
key during playback. 1. Touch the [List] key. ~
Playback pauses. The Track List screen is displayed. ~
2. To resume playback, press the [OK] button 2. When the desired track is not displayed, touc!" 3~
or touch the [~!II] key. the [A] or [~] key to scroll the track list. ~
Playback resumes. 3. Touch the desired track title key. ~
The corresponding track is started playback. -
Skipping a track (searching) 4. Press the [LIST] key to return to the previous
1. Press the [ .....] or [~] button during screen.
playback.
Tracks are skipped, as many as the times the Other various play functions
button is pressed, and playback starts.
• Pressing the [~] button starts playback 1. Touch the touch key of the function you want
from the beginning of the next track. to play.
• Pressing the [ ..... ] button starts playback [Repeat]: Press once to start a single track
from the beginning of the current track. repeat. Press again to activate a repeat all.
When this button is pressed again within To turn off, press until 'Repeat Off' is shown
about 2 seconds, playback starts from the on the display.
beginning of the previous track. • Repeat symbols are displayed in the info
window in the upper right area of the screen.
Fast forward and fast backward [Track Random]: track random playback
1. Press the [~ ] or [~] button during play- This operation plays back all tracks on the
back. disc in no particular order. Press again to
Press again to advance to higherspeed turn off the feature.
reversing or forwarding such as 2x,4x, ax • A random symbol is displayed in the info
and 16x. Press once more to resume window in the upper right area of the screen.
normal speed playback.
Searching with a track number
This operation allows searching using the track
numbers recorded on the CDs.
1. Touch the [Direct] key.
2. Input the track number that you want to play
back with [0] to [9] key.
3. Touch the [OK] key.
Playback starts from the track of the input
track number.
• If the input track number does not exist or
searching with a track number is not
allowed, the screen image will not change.
VRX485VD/MAX385VD 28](https://image.slidesharecdn.com/max385vd-121220040148-phpapp02/85/Clarion-Max385vd-user-manual-28-320.jpg)
![DVD Video Player Operations
Regarding MP3IWMA folder creation Selecting a folder/track on the LIST •
up to 8 folder levels (including the root directory) screen
can be created for MP3IWMA files (items 1 - in 1. Touch the [List) key during playback.
the illustration). However, on this unit, folders Folder List screen is displayed.
created above the third level will be converted to o
2. When the desired folder is not displayed, ~
2 levels. touch the [A] or [~] key to scroll the list. ~
3. Touch the desired folder name key. 3
"".
The Track List screen appears. nI
::l
4. Touch the [~] or [A] key to scroll the list, and C
~
touch the desired track name key.
The corresponding track is started playback.
5. Touch the [LIST] key.
Other various play functions
1. Touch the touch key of the function you want
Pausing playback to play.
1. Press the [ OK] button or touch the [ ~/ II ] [Repeat): track random playback
key during playback. Repeat Single: track repeat playback
Playback pauses. This operation plays back the tracks currently
2. To resume playback, press the [ OK] button being played back repeatedly.
or touch the [ ~!II) key again. • An icon is displayed in the info window in
Playback resumes. the upper right corner of the display.
Repeat Folder: folder repeat playback
Skipping a track (searching) This operation plays back tracks in an MP31
WMA folder repeatedly.
1. Press the [~] or [~] button during • An icon is displayed in the info window in
playback. the upper right corner of the display.
Tracks are skipped, as many as the times the
Repeat All : repeat all playback
button is pressed, and playback starts.
This operation plays back tracks in an MP31
• Press the [~) button starts playback from
WMA disc repeatedly.
the beginning of the next track.
• An icon is displayed in the info window in
• Press the [~] button starts playback from
the upper right corner of the display.
the beginning of the current track. When this
button is pressed again within about 2 [Random]: folder random playback
seconds, playback starts from the This operation plays back tracks recorded on
beginning of the previous track. the disc in no particular order.
* This function performs in the current folder • An icon is displayed in the info window in
only. the upper right corner of the display.
Fast forward and fast backward
1. Press the [.... ) or [~) button during play-
back to start the fast backward or fast for-
ward. A second press will increase speed
to 4x , then 8x, and 16x. Press [ ~/ II] for
normal playback speed.
VRX485VD/MAX385VD 30](https://image.slidesharecdn.com/max385vd-121220040148-phpapp02/85/Clarion-Max385vd-user-manual-30-320.jpg)
![iPod Operations
o
~ This unit can be used to control a connected Controlling the iPod
~ Apple iPod (iPod Mini, fourth generation, iPod
3 nano, iPod with video).
• Selecting the iPod mode
1. Connect the iPod to the connector.
~ Note:
i · Note that iPod versions higher than those noted 2. Press the [iPod] key on the Source menu.
above may not be playable or offer all features. • ,Pod menu screen operation keys
• The unit will not operate, or may operate
[VIDEO] key
improperly with unsupported versions.
• First, second and third generation iPod and iPod • Switches to the screen of which the video
shuffle cannot be used. output from the iPod is displayed.
Note:
• Note that not all iPod devices are compatible
Notes regarding use of Apple iPod to output video to this unit.
• When using an iPod, after connecting the iPod
to the connector, select the iPod mode by [FOLDER] List key
touching the [iPod] key on the Source menu. • Displays the corresponding list screen.
• After the iPod has been connected to this unit [Composers], [Artists], [Albums], [Songs]
the iPod's buttons are disabled for operation. ' and [Genres] are available from the iPod
• When the iPod mode has been selected, a folder list menu screen.
special iPod control screen is displayed different
[Shuffle] key
from the main screens for other modes.
• Use to switch the shuffle mode on or off.
• This unit can display the Podcast titles*, Artist When enabled, this function performs
names, Album titles, Song titles, Genre names, playback of tracks in random order,
Composer names and Audio Book titles* regardless of the order in which they are
registered on the iPod. When no data is recorded.
present, the title display will remain blank.
* Whether these functions are available or not [~/II] key
depends on the iPod version. • Use to control playback and pause.
• The iPod is used with the equalizer function
turned OFF. • Operation display
• Do NOT connect an iPod to the unit with a
headset connected to the iPod.
Pausing playback
1. Press the [ OK] button or touch the [~/II ]
key during playback.
• Precautions regarding battery
Playback pauses.
consumption:
2. To resume playback, press the [ OK] button
When the iPod's internal battery becomes
or touch the [~/II] key again.
depleted, the recharge warning indicator
Playback resumes.
will appear in the iPod's display. In this
condition, the iPod cannot be played even
if attached to the unit. Also, the unit's Skipping a track (searching)
recharging function cannot be used to 1. Press the [~] or [~] button during
recharge the iPod. playback.
As a result, when the iPod's battery Tracks are skipped, as many as the times the
becomes depleted, use the dedicated button is pressed, and playback starts.
charger provided with it to recharge the • Pressing the [~] button starts playback
battery. from the beginning of the next track.
• Pressing the [~] button starts playback
from the beginning of the current track.
When this button is pressed again within
about 2 seconds, playback starts from the
beginning of the previous track.
31 VRX485VD/MAX385VD](https://image.slidesharecdn.com/max385vd-121220040148-phpapp02/85/Clarion-Max385vd-user-manual-31-320.jpg)
![iPod Operations
Fast forward and fast backward 1. Touch the [VIDEO] key on the iPod menu
1. Press the [.... ] or [~] button during play- screen. The screen will be changed to a
back. "waiting for iPod video" screen.
The first press will advance the music at 2x In this condition, the iPod cannot be controlled
speed. Following presses will increase the from this unit. The iPod is turned into the 0
speed to 4x, ax, and 16x. normal operation mode, and you can control ~
Press the [~/ II ] button to resume normal the iPod using the original controls of the iPod ~
speed playback. (iPod operation mode). 3
QI
Selecting a list item from a list screen 2. Play back your desired video data or ::;l
C
1. Touch the Folder List icon in the iPod slideshow data from the iPod. ~
selection screen. The specified image data will be displayed on
the display.
2. Touch a desired list item on the screen to
display the corresponding list of tracks. 3. To return to the iPod menu screen, stop your
• Use the [A] and [¥] keys to scroll the list. video content and press the[VIDEO] key.
* Skip this operation for the Songs list. * When you touch the [Music] key during playing
back image data, the playback is terminated
3. Touch the desired track name on the list to and the first track of the first playlist will be
played back.
play back.
• Use the [A] and [¥] keys to scroll the list. Note:
• "AUDIO ONLY" is displayed when the automobile
Viewing video data in the iPod (only is moving.
for the iPod with video features) • Image data may not be played back according to
the status of the iPod.
When you connect an iPod with video features by
using the optional connector cable for iPod with
video, you can enjoy the video data and
slideshow data stored in the iPod showing them
on the display of this unit (and the rear monitor if
connected).
Note:
• Do not connect the iPod to this unit when a Video
Playlists item is selected on the iPod.
AUX IN Operations
This function is available when a VTR, etc. is connected to the visual terminal.
A. WARNING
For your safety, the driver should not watch
the VTR, etc. or operate the controls while
driving. Please note that watching and
operating the VTR, etc. while driving are
prohibited by law in some countries.
Switching to the AUX IN mode
Note:
• For your safety, the unit has a safety function
which turns off the picture when the car is
moving, so only the audio can be heard. The
picture can only be watched when the car is
stopped and the parking brake is applied.
Press the [MENU] button, and touch the
[AV IN] key.
VRX485VD/MAX385VD 32](https://image.slidesharecdn.com/max385vd-121220040148-phpapp02/85/Clarion-Max385vd-user-manual-32-320.jpg)
![Sirius Satellite Radio Operations
This function is available when a Sirius Satellite Confirming your Radio ID
Radio Receiver is connected through the.
.SIRIUS
dedicated connection. This unit requires the
following receiver: 1. Touch the [Search] key to display the Key
~ • SIRIUS Satellite Radio Receiver: SC-C1
Pad screen.
~
2. Touch the [0] key, then touch the [ENT] key.
(I) Note: Your Radio ID (12-digits number) will be
......
II> SIRIUS satellite radio is a subscription service. displayed.
~ Please contact Sirius Radio to begin or alter
~ your subscription: 3. To return to the Sirius Radio, enter a new
c channel to resume.
Q1 • Internet: www.sirius.com
Telephone: 888-539-SIRIUS (747487)
Selecting a Satellite Radio mode
1. Press the [MODE] or [SOURCE] button until
SIRIUS is displayed or select 'SIRIUS' in the
main menu. You can reach the main menu
by pressing the [MENU] button on your unit.
The system changes to the Sirius Satellite
Radio mode.
Displaying channel labels
1. Touch the [LIST] button and the next four
channels are displayed for your ease of
viewing.
2. Touch the [LIST] button again to return to
the main display screen.
Selecting your presets
1. Press the [BAND] button or touch the [Band]
key to enter the preset memory menu. You
can save up to 20 presets for your favorite
channels for quick access.
• Information displayed during reception
The following information is displayed when the Channel selection
satellite radio cannot be received normally.
Channels are selected with the [ ........ ] or [~ ~ ]
• When the receiver is turned on the first time or
buttons.
after a reset: "UPDATING" followed by a
percentage of completion.
* For details, see the following operation
descriptions.
• When a channel is being tuned in (no signal is
yet received): "ACQUIRING SIGNAL" Note:
• A channel without a broadcast has been • The audio output is muted and other button
operations are not accepted during channel
selected: "INVALID CHANNEL"
selection.
• A channel not covered by your contract:
" CALL 888-539-SIRIUS"
Call (888)539-747487 to activate your radio
• When a channel is out of air time: "OFF AIR"
• When the antenna is disconnected or has
been damaged: "ANTENNA ERROR"
33 VRX485VD/MAX385VD](https://image.slidesharecdn.com/max385vd-121220040148-phpapp02/85/Clarion-Max385vd-user-manual-33-320.jpg)
![Satellite Radio Operations
Selecting a station with the channel Recalling a preset station
number A total of 20 satellite radio stations can be recalled
1. Touch the direct access button on the Sirius from the receiver's memory. You can access the
screen to enter direct channel selection. The presets by pressing the BAND button This allows
button is at the top right corner. you to store your favorite satellite radio stations ~
the memory for later recall. :)
2. Enter the channel number of your desired fl)
station by touching the [0] to [9] keys. 1. Touch the [BAND] button to enter the preset ~
list to select or save your presets. 3
If you enter a wrong number, you can cancel QJ
::J
it by touching the [BACK] key. 2. Touch the corresponding Preset key (1 to 4) c:
QJ
3. Touch the [OK] key. to recall the desired preset station.
The radio channel you entered will be tuned. * There are 5 pages of preset memory space
available for your use. You can scroll the
Selecting a station with in the pages using the scroll bar buttons to the right
of the screen.
tuning mode
3. Touch the [BAND] key to return to the previous
• Seek tuning
screen.
Only channels that can be received are selected.
Channels that are locked and channels not
covered by the contract will be skipped.
Deleting a preset
1. Touch the [~ ~] or [~ ~] key. 1. Touch the [BAND] button and enter the preset
The receiver seeks the next available channel menu.
below or above the current channel. 2. Select the preset you would like to delete by
touching it in the preset menu.
Saving a preset station 3. Touch and hold the [DEL] button for more than
A total of 20 satellite radio stations can be stored 3 seconds.
in the receiver's memory. You can access the
presets by pressing the BAND button This allows Receiving stations selected by
you to store your favorite satellite radio stations category
the memory for later recall.
Satellite Radio allows you to select broadcast
1. Touch the [BAND] button to enter the preset
channel category (contents).
list to select or save your presets.
1. Touch the [I ~~] or [~ ~ I] key.
2. Touch and hold for more than 2 seconds the
corresponding preset key to save the selected Scroll the category and select a channel
channel. 1-1. Touch the scroll bar buttons on the right
* There are 5 pages of preset memory space to scroll through the available pages.
available for your use. You can scroll the
pages using the scroll bar buttons to the right 1-2. Touch the [I ~~] or [~ ~ I] key to
of the screen. scroll through the available categories.
3. Touch the [BAND] key to return to the previous 1-3. Select your desired channel by touching
screen. it momentarily on the screen.
1-2. Touch the desired Category item key to
A uto preset store select the category.
1. Touch the [BAND] button and hold it for 3 sec- 2. Touch the [LIST] button to exit category
onds and the selected channel will be stored in tuning mode.
the next available empty preset location.
Note:
• When the category selection mode is entered. the
category of the last received channel is displayed
first.
VRX48SVO/MAX38SVO 34](https://image.slidesharecdn.com/max385vd-121220040148-phpapp02/85/Clarion-Max385vd-user-manual-34-320.jpg)
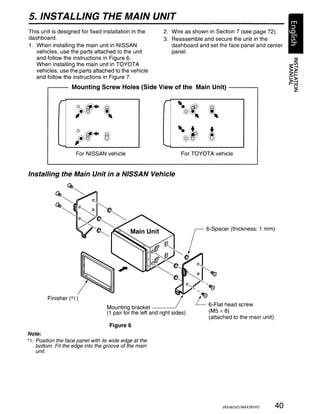
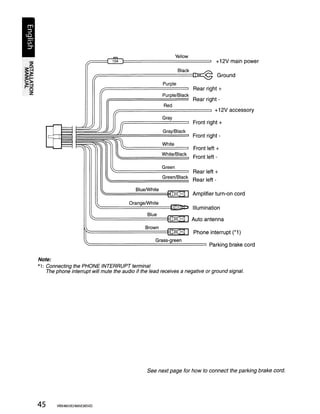
![7. WIRE CONNECTION
Note:
• Before installing, be sure to disconnect the negative cable of the car battery. e
• In the optional devices, the RCA cables and the Connector cables are separately-sold items.
MAX385VD
Black SIRlusii
Black
Radio rr=:~=====!llillil_tI1!, •••••• fip=i1 SATEWTE RADIO
Antenna Jack IC=JI::ydB~la~c~kb=#=ll Sirius
'---------'
I 1111111
Sirius
@
!
I tuner
: (SC-C1)
White l
i
iPod
- t ==lIII[
D:
1111I
w White
,.__._._._•• Refer to the following page
Purole ~
Connector cable
(CCUIPOD1)
@~
-
~te
Line Out
PurDie Subwoofer
IIII'rTi
-
111I1
Gray ~ Line Out
Gray
- RearR
~te Line Out
!
I
I
-- ---- ----------- - ------ --- ---
4-Channel Amplifier
Black
..l.L- RearL
~ Line Out
--
•
,
!
:J=====C:
:J===t::
I
Front R !
Black ~e Line Out
-- Front L
g
~
- - ... "'" ,'" '."
I
-- "'" "" "" ~ - ~.
-- - - - -- -- - - - -
Black
1!#=~======tIlII(_lJEDLJ
~ow Rear Monitor :
!~
~ Rear monitor
I
I
_ _ _ _ _ _ _ _ _ _ _ _ _ _ _ _ _ _ _ J!
l!= =:=:=:= -:I ~rnl]:dlilile. :~: ::~ ~isu-a~i:~)
-
)-
terminal !
BI k Yellow I
l!====a:::::c=::::lIII(:JTi]lill'LLD AUX In Video !
I
, __. - __ 0 ' ... _.0.
43 VRX485VD/MAX385VD](https://image.slidesharecdn.com/max385vd-121220040148-phpapp02/85/Clarion-Max385vd-user-manual-43-320.jpg)
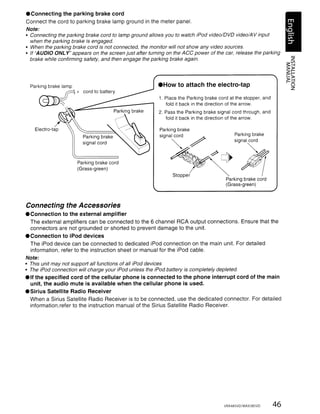
![VRX485VD
rr=====:sCII==:]1 Radio Antenna Jack
Wh ite White iPod f
i@:
iPod
r.:=======~===~u~~*~-~*¥~·
I
D:
I
I
I ,
I
[
Connector cable
f::::::: : ! III U (CCUIPOD1)
t ~~
,-
. ...- _------------------
I
- - - - - - - - - - - - -- - -
~
~----...,i
~
Black I
SIRlusii
b:::::::l:B~la~c:£k==III!I-B' • d ••• , tI~.-==;] SATEUITE RADIO
Refer to the following Sirius
page. ~._._._,_ ••'
'--------'
: Connector
I cable
: (SC-C1)
,
"- - - - - - - - --------- -- ~
! ---------------------;
I I
I !
:~
I
Yellow Rear monitor I
k I
I
!:::::=====B:::la:::c==:::m(::=m.:::n Rear Monitor I
I ,
I
I
- _. - - - - - - - - - I
VRX485VD/MAX385VD 44](https://image.slidesharecdn.com/max385vd-121220040148-phpapp02/85/Clarion-Max385vd-user-manual-44-320.jpg)


The document is an owner's manual for Clarion multimedia stations that include a 7-inch or 6.5-inch touch panel display, describing features like DVD/CD/MP3 playback and controls for the touch panel, remote control, basic and advanced operations, specifications and installation instructions.


