Chelsea U-21 Analysis (Wolves)
•
1 like•230 views

Chelsea's U-21 team played a possession-based style with the #10 playing a key creative role. Defensively, they were well-organized and focused on maintaining their structure. The #10 stood out offensively with his passing and chance creation, while the center back partnership was solid defensively. Overall, Chelsea dominated possession but failed to score, with the goalkeeper and defense performing well to earn a clean sheet.

Recommended
More Related Content
What's hot
What's hot (20)
Viewers also liked
Viewers also liked (20)
Similar to Chelsea U-21 Analysis (Wolves)
Similar to Chelsea U-21 Analysis (Wolves) (20)
More from Mattar M'Boge
More from Mattar M'Boge (13)
Chelsea U-21 Analysis (Wolves)
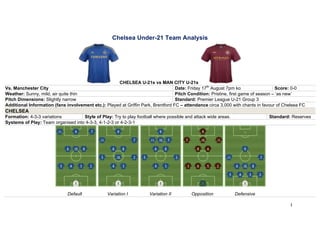
- 1. 1 Chelsea Under-21 Team Analysis CHELSEA U-21s vs MAN CITY U-21s Vs. Manchester City Date: Friday 17th August 7pm ko Score: 0-0 Weather: Sunny, mild, air quite thin Pitch Condition: Pristine, first game of season – ‘as new’ Pitch Dimensions: Slightly narrow Standard: Premier League U-21 Group 3 Additional Information (fans involvement etc.): Played at Griffin Park, Brentford FC – attendance circa 3,000 with chants in favour of Chelsea FC CHELSEA Formation: 4-3-3 variations Style of Play: Try to play football where possible and attack wide areas. Standard: Reserves Systems of Play: Team organised into 4-3-3, 4-1-2-3 or 4-2-3-1 Default Variation I Variation II Opposition Defensive
- 2. 2 WITH POSSESSION Style of Play: Passing is short and crisp and movement is fluid across the board, players more than happy to inter-change positions and move into different areas of the field. Good attacking width – wingers have skill and confidence to beat their markers, plenty of passes to both fullbacks and both went forward where possible. Attacking and defensive tasks are split across the team and players capable of handling both duties at moderate to very good levels. Team did try to dominate and take the initiative and would have been worthy winners. Player Involvement and Confidence: #10 involved In most positive phases of play – always looking for the ball and was confidently spraying passes down both channels. #7 comes in from the right to get involved but sometimes at the expense of running into the space behind the defenders, confident enough to take free- kicks. #8 and #6 happy to share passing duties in midfield but #6 really comes alive when in defensive phase and trying to win the ball back. Attacks are a variation of tidy and patient build-up as well as long passes. # 10 played most frequent passes across the flanks – team more than happy to circulate the ball at a slow to medium tempo but did well to increase tempo and limit touches in final third. Playmaker duties assigned to # 10. Creative or Dangerous Players: #10 outstanding from the start – always looking for the ball and was confidently spraying passes down both channels – faded in and out after very strong start and seemed pre-occupied with defensive duties and found himself very deep. Has a good touch and an effective trick or two but alongside his opposite number, best two gifted players on show. Tendencies: Play runs through # 10 – #7 goes inside off his wing to look for the ball, always looking to receive to feet and play out again in one or two touches with mixed success, #11 also tends to look for the ball coming off his wing – #8 and #10 interchange positions very well – #10 does his best work in opposition third but goes to look for the ball in all areas of the pitch. Success: #4 and #3 are strong centre-back partnership, very good readers of the game – #2 attacked well and went forward well just lacking final ball. #8 closes down very well, excellent athlete, strong, powerful and good and confident on the ball – #9 strong effort with left foot on goal and good forward runs. Chances are created through a mix of wide players cutting inside, quick passes to feed the third man running, overlapping full-backs following switch-play and RW and LW running at defenders and finding CF or incoming midfielder on the edge of the box - #10 has goals in him. Pace: Both full-backs are quick with plenty of running in their legs – plenty of pace across the team - #4 is quick but is still happy to stay in the line rather than drop to compensate – lack of pace clearly in #9 who looked stiff – the substitutes that were introduced also possessed a fair amount of pace, particularly #14. Overall a dangerous threat as a team on the break whilst also quick and athletic enough to cover in defensive situations. Areas to exploit: Provide intense pressure when #6 is on the ball, can be pressured into mistakes which are more likely when he is forced to play long Press #10 when on the ball and not allow him time on the ball – potential to assign a man-marker or alert CF when #10 drops deep to receive ball.
- 3. 3 Areas for improvement: Team need to work to improve passing out to the wide channels - particularly when full-backs overlap, attacks were slowed or broke down as a result of FBs/Wingers having to check their run or come inside to receive ball, however, are the runners going too early? #10 drops very deep, sometimes settling behind the play in order to receive the ball so could work on improving his movement into dangerous areas and become tactically aware of creating space for others - doesn’t always have to have the ball at his feet to be an effective player, could he spend more time in opposition third? This would allow #8 or #6 to receive ball off the back four and GK. Couple of chances dropped on left foot for both #9 & #7, work on finishing ability in these areas (ball dropping unexpectedly). #9 was unlucky with one-on- one chance but play could be developed in this area too (composure, not snatching at chances). WITHOUT POSSESSION Organisation: Back-line very well organised after nervous opening period, lots of communication as the game progressed – #3 and #2 dictate height of the line. Attacking unit happy to let opposition back four have possession of the ball. When ball is in middle third, level of pressing is intensified but still calm and composed defending. Defenders have a preference to jockey and wait for cover tackle when opposition are on the ball in final attacking third – offside trap rarely used. Very good co-operation between GK and defenders although GK also tries to encourage quick movement in counter-attacking periods. Team not overly aggressive when going in for challenges although # 6 had good battle with opposition # 10 and mentally got the better of him. Concentration: # 9, although isolated could work on being more alert when his own centre-halves go for high balls, found himself behind opposition defenders when ball was headed in his direction – #3 and #2 very good at keeping eyes on the ball when faced with tricky striker (opposition # 9) – #5 sometimes gets caught deeper than the rest of back-line. When opposition keeper has ball, #11 or #7 (depending on which side opposition has the ball) picks up one of the centre-halves along with # 9 while the opposition full-backs are left unmarked. Aerial Ability: #3 and #4 both strong in the air, #3 best header of the ball on the pitch which wasn’t taken advantage of at set-pieces, #2 strong in the air, #5 needs work on his timing, has an incredible leap but jumps too early. Tackling: Players tend to stay on their feet to force opposition into conceding possession and team is generally well disciplined although #3 dived in on one occasion and was exposed as a result - #4 was on hand to make recovery blocks, interceptions and tackles where needed - #6 strongest player in this area. Tendencies: # 3 got drawn to the ball on throw-ins on a couple of occasions and could have left that duty to midfielder – rest of team well-organised though could react slightly quicker. Areas to exploit and how: #5 and #3 can be targeted, particularly in switch plays and encouraging players to join attacks to create 2 v 1. Both wingers come inside so when possession is won, counter-attack needs to be at maximum speed and into space, full-backs should also push forward to support this phase. There will be space and big gap to exploit when full-backs go forward, wingers not committed enough to drop back.
- 4. 4 TRANSITION PHASES Organisation: Quick organised counter-attack when on the ball in the attacking phases although most success when maintain slow build-up play when ball is won. Team has strong understanding of roles and when to pick players up, press and stand-off Concentration: Could be improved – slow tempo and patient passing and build-up meant that quality and conviction was lacking at certain points, biggest examples in five to ten yard passes being missed - Slow concentration when possession is lost Tackling: #8 was wary of giving away fouls on certain occasions and could’ve gone in stronger on a couple of challenges #6 always hungry to win the ball back quickly Pace: Plenty of pace across the team as a whole and is a strength to draw on in counter-attacking movements, passes however need to be played in space in front of runners to allow them maximum opportunity to operate effectively. Tendencies: If ball is given away, player responsible is sometimes slow to react and win possession instead allowing opposition to make pass to team- mate before switching on to defensive shape, #7 biggest culprit Areas to exploit and how: Opposition teams are able to take advantage through quick passing once possession is regained. Particularly if full-backs have joined attacked, there will be space to exploit on either flank. Could also expose space left in midfield when one of the runners (likely #8 or #10) joins an attack that has broken down. GOALKEEPER Size & Build: Tall, strong, very athletic with great reflexes Aerial Ability: Strong and comfortable in the air – very comfortable and confident when handling high balls Shot Stopping: Excellent save in early moments of game – showed good concentration too – on 55 mins great athleticism to go down low to his left to prevent goal – great save. Fantastic reaction this time to his right at the final whistle – very good goalkeeper – would be difficult to beat on this showing Kicking: Good and competent – happy to play out to CBs to encourage and start build-up play Communication: Very good, loud and clear although tried to get too involved in attacking phases which created confusion and hesitance from team-mates on a couple of occasions, also noticed tone of his voice changed from calm and composed to quicker and more panicky in these situations Command of Area: Excellent – very strong coming out at set-pieces and organising defenders Starting Position: Not required to mop up behind often but also happy to start on edge of box for sweeping duties Decision Making: Wasn’t tested on too many occasions but made good decisions throughout the game particularly when coming out for crosses/high-balls/set-pieces.
- 5. 5 Preferred Distribution: Quick throw to feet of defenders How to beat him: Shots need to be placed wider than his reach if aiming low, curled out to in or fired in with pace – test him early from long-range SET - PLAYS (ATTACKING) Set Up: Not too many of note – # 10 most frequent taker – both CBs go up on corners Concentration: Desire could have been greater to meet set-pieces but were delivered too high to be met aggressively Exploitable Areas: Quick full-backs are left to defend at half-way line – potential to slow possession when set-piece SET - PLAYS (DEFENDING) Set Up: 2 men on both posts Concentration: High – strong desire to mark opposite man and also had confidence provided by goalkeeper in dealing with high deliveries Number in Wall and on Posts: 2 men on both posts – 4 to 5 in wall including one charger in dangerous situations – just 2 in free-kicks on the flanks Exploitable Areas: Deliveries need to be whipped in to ensure that keeper stays on his line, could be vulnerable on second balls when both men come off their posts – could also be blocked or assigned a marker in order to limit his ability in the air THROW INS Distance: From Were: Special Arrangements: Clever Movements: KICK OFF Focus is to keep the ball and this included playing ball back to defence or GK – possession is key – start narrow and play out wide, be patient. REACTION TO GOING BEHIND Team: Bench: REACTION TO GOING AHEAD Team: Bench:
- 6. 6 PLAYER ANALYSIS # Position & Description Performance, Strength's & Weaknesses 1 JAMAL BLACKMAN GK – giant, agile, great reactions Outstanding display put him in top three of performers – deserved his clean- sheet. 2 TODD KANE (c) RB – quick, medium build, strong Skipper who led by example but was let down by the passes into him apart from one occasion however, decided to play inside instead of continuing outside run. Kept possession very well and was happy to lead the back-line. 3 ALEX DAVEY RCB – big, strong in the air and in the tackle, not lightning but not slow either Mis-timed attempted dive into a tackle and slow to an early challenge – great in the air – tired towards the end when reactions and concentration decreased but continued to defend well 4 NATHAN AKE LCB – the epitomy of composure, never looked rattled, athletic and great reader of the game Made majority of clearances and blocks – calm and composed defender with good left foot – opposition # 16 gave him more of a problem but did well to cope – stand out defender 5 AZIZ DEEN-CONTEH LB – panicked on a couple of occasions, outstanding going forward but was asked plenty of questions defensively – did well to cope Inconsistent game – found feet with the ball to his inside man on his left foot every time but struggled to pick out any other passes – also looked worried about pace of man he was marking – gets forward well but should DEMAND the ball more. Several good and forceful runs and battled well with opposition #2 – looked burdened by defensive responsibility which held him back when going forward – threat in the attacking third. 6 GEORGE SAVILLE LCM – strong tackler and good passer Strong tackler with both feet – cultured passer on left foot – needs to work on intensity of pressure when without the ball as he should be confidence to be able to win the ball back with force 7 LEWIS BAKER RW – lively, happy to come inside, good technical ability Good strength to win ball back – confident on the ball – always looking but just needs to work on the simpler passes which he tended to mis-place. Very good use of both feet – fantastic engine and work-rate 8 NATHANIEL CHALOBAH RCM – tall, mobile, athletic and picked his runs going forward – won majority of 50-50s Excellent midfielder with good all-round ability and engine, strong tackler but as he’s so strong doesn’t get the benefit of the doubt with refereeing decisions – physically ready for the first-team on this display - subbed at 75 for #12
- 7. 7 9 PATRICK BAMFORD CF – lack of pace and killer instinct but relentless work ethic and didn’t hide Subbed at 65mins for # 14 – surprised he was able to still move with the amount of running he did – had a couple of chances to get on the score-sheet 10 BILLY CLIFFORD CAM – outstanding, looks like a typical talented Iberian player Constant menace – string puller – looked liked he was asked to drop deeper in the second half to dictate tempo – far too deep to be of any threat though on several occasions. Grew frustrated towards the end after introduction of subs (waving arms in the air) – needs to understand that play can’t always go through him and that he can do his bit for the team by acting as decoy, show for the ball, create space for others - desperately unlucky to hit the bar when he deserved the goal for his performance and good idea with curler that was comfortably held – exceptional talent. Best player on the pitch. 11 LUCAS PIAZON LW – tall, good feet and difficult to regain possession from Came inside from left hand channel with plenty of success – quality of his passing was at a high standard, technically gifted with superb vision and awareness of team-mates. 14 THORGEN HAZARD CF – medium build, very quick and switched on when not in possession Introduced on 65mins for # 9 – dropped much deeper than # 9 but did well to get the ball out of his feet quickly – lively and very mobile, ready and able to nip at heels of opposition at any given opportunity – made a strong impact 12 REUBEN LOFTUS-CHEEK RCM – bigger than the man he replaced – could easily play at CB Came on for #8 after 75 mins – physically a like-for-like replacement but more intense pressuring – technically not at same level as #8 but still good on the ball and confident to receive it 15 ALEX KIWOMYA RW – looks to have plenty of pace but no opportunity to really show it Came on for #7 at 80 mins – clearly has that raw pace and good ball control, skill and ability but lack of conviction and late stage of match meant that he couldn’t make as big an impact as he could have.
- 8. 8 GENERAL PATTERNS OF PLAY ATTACKING MOVEMENT POSITIONAL INTERCHANGE OVERLAPS
- 9. 9 #10 POSITIONS ACROSS THE PITCH HOW TO BEAT THEM 1. COUNTER-ATTACK SPACE LEFT BY ATTACKING FULL-BACKS 2. ASSIGN MARKER OR GET TIGHT TO PLAYMAKER #10 3. PRESS OPPOSITION INTO MAKING ERRORS PARTICULARLY #6 and #7 4. WIDE MIDFIELDERS SHOULD STAY NARROW AS OPPOSITION WINGERS LIKE TO COME INSIDE – BACK FOUR BE AWARE 5. GOALKEEPER VERY GOOD AT HANDLING HIGH BALLS AND OPPOSITION DEFENDERS WILL REMAIN STATIC AND WAIT FOR BALL TO ARRIVE – CROSSES NEED TO BE DRILLED IN AND MEN IN BOX NEED TO MAKE NEAR POST RUN TO MEET THE BALL
- 10. 10 RECOMMENDED TACTICS • 3 man midfield to match up man for man -‐ #7 could latch on to opposition playmaker by dropping deeper when Clifford moves into advanced positions, however when Clifford tries to pick up ball from deep positions, McAlinden (#10) would drop slightly deeper to apply pressure and force play. • 3 man attack with wide players staying high in order to occupy opposition full-‐backs, Winnall (#9) has the pace, guile and work ethic to trouble Kane or Aziz-‐Conteh. • When Wolves regain possession the first option on the pass should be to one of the wingers on either side depending on where the space is.