Smartcoach tutorial for real-time soccer analysis
•Download as PPTX, PDF•
0 likes•565 views

User manual for Smartcoach

Recommended
More Related Content
Viewers also liked
Viewers also liked (19)
Similar to Smartcoach tutorial for real-time soccer analysis
Similar to Smartcoach tutorial for real-time soccer analysis (20)
Recently uploaded
Recently uploaded (20)
Smartcoach tutorial for real-time soccer analysis
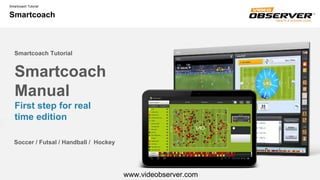
- 1. Tutorial Smartcoach Smartcoach Smartcoach Manual First Steps in Real Time Edition Tutorial Smartcoach Soccer / Futsal / Handball / Roller Hockey www.videobserver.com
- 2. Tutorial Smartcoach Configuration Login 1. Set the language in “Change Language” 2. Login into your account • User: the same email as in www.videobserver.com • Password Note: The login credentials needed to login in Smartcoach are the ones used to access www.videobserver.com 1 2
- 3. Tutorial Smartcoach Configuration Create an Observation System 1. Click on the SC logo to open the Smartcoach menu (SC) 2. Select “Custom Action Settings” 3. Click “Create New Custom Action” to create a Custom Action 1 2 3
- 4. • Normal - click to start the clip and to stop the clip, being a more manual mode • Quickfire – the clip is recorded when you click with seconds before and seconds after the click • Auto on – click to initiate and end the clip recording, with the clip being recorded with seconds before the click Additional Options • Show Counter – shows the number of times an action was clicked • Show Timer – shows the time duration of the number of times an action was clicked Example: “Offensive Org” was clicked 99 times, with duration of 99 minutes Tutorial Smartcoach Create a New Custom Action 1. Give the action a name 2. Set the action button color in “Pick Color” 3. Set the record mode: Normal, Is Quickfire or Auto On 1 Recording Modes Tempo de ação Action moment (click) X Y Configuration X Z Y X Y Z Home Team Away Team Offensive Org
- 5. Tutorial Smartcoach Setting Up Individual Actions Menu 1. Open Smartcoach Menu (SC) 2. Go to “Field Action Settings” 3. Individual Actions Menu will appear similarly to the following image 1 2 Configuration
- 6. Tutorial Smartcoach Create an Individual Action’s Grid VideObserver created an innovative system to register actions that not only makes all the process very intuitive and easy but also offers the coach different results from individual statistic to team reports. Button Configuration 1. On the “Select Actions” tab, choose the actions you want to analyze during the match. The chosen actions will be added to the grid (region identified by ) 2. Organize the grid according to your preferences: - Arrange actions – To trade places between actions just click on the actions you wish to trade places. For example, click on action “Miss Shot” and then click on action “Wrong Pass” and they will trade places automatically. - Edit Name and Color - Hold the left mouse button on the action you want to edit - Change name and/or color and press “Ok” 1 a b b a Configuration C C
- 7. Tutorial Smartcoach Start Analyzing Create a match 1. Click “New Match” 2. Select an online created team or create a new one 3. To create a new team press “New” 4. Create Players using the “New Player” icon 5. Fill in the blank gaps with the player information 4 3 1 5
- 8. Tutorial Smartcoach Create a match Team Management 1. After selecting the team and players you need to indicate the starting line up and the substitutes 2. Click once on the selected player. It will change colors, from grey (not summoned) to green (summoned) 3. Click again on the player to put him on the starting line up. It will change from green to orange (starting line up) 4. Setting the player as substitute or part of the starting line up is useful as this information can be measured to calculate the playing time of each player 5. Players marked as grey are not available during the match 6. Press “Continue Game” to move to the match screen 6 Start Analyzing
- 9. Tutorial Smartcoach Real Time Analysis Marking Individual Actions To change the team’s side click on the following button As soon as the referee begins the match, press “Touch to Start” on the field. Marking an Individual Action 1. When the action occurs, click on the field where the action just took place 2. Select the player involved in the action (In the example: no. 3 – Pepe) 3. Select an action from the grid (In the example, “Goal”) 4. In the case of “Goal” point out the goal area where the ball entered 5. The action is automatically registered 1 2 3 4 5
- 10. Tutorial Smartcoach Marking Custom Actions Before marking a custom action, be aware of which team is selected. You can select each team by clicking on the Team’s Name . In the example, the selected team is Portugal. Mark a Quickfire Action If Quickfire is enabled just click on the custom action when the action occurs so it is automatically registered. Mark an Auto-On action Click on the custom action when it occurs and click again when it is over. Show the marked actions / Delete an action 1. Go To “Custom Action List” 2. Delete the action by clicking on 3. Go to “Custom Stats” to see the action’s statistics 1 2 1 2 X X Real Time Analysis
- 11. Tutorial Smartcoach Save and synchronize with the Cloud Upload to the Cloud (requires an Internet connection) In order to take the most of Smartcoach we suggest synchronizing the Smartcoach account with the Cloud account. To do that, be sure to have an Internet connection and press “Send” . In case there is always an Internet connection available enable the “Auto Send” option in the SC menu which automatically synchronizes the data. Save the match in your device (does not require Internet) 1. Go to the Smartcoach Menu 2. Click “Save Match to Device” You also have the option the see the statistics in “Stats” 3 1 2 Save and Synchronize 3 4 4 1 2
- 12. Tutorial Smartcoach Real Time Analysis Live game information To access the information you just registered go to “Stats” in the SC menu Select the actions you want to see Filter by team, player position or player Open the match statistics Switch between Heatmaps and Actions Breakdown data by course of play. All actions are oriented towards one direction 1 2 3 4 5 5432 1 6 1 2 3 4 56