
Recommended
Recommended
More Related Content
Similar to Caterpillar Cat 631K WHEEL TRACTOR (Prefix WT6) Service Repair Manual Instant Download.pdf
Similar to Caterpillar Cat 631K WHEEL TRACTOR (Prefix WT6) Service Repair Manual Instant Download.pdf (17)
More from fujkskemdmdm4r
More from fujkskemdmdm4r (20)
Recently uploaded
Recently uploaded (8)
Caterpillar Cat 631K WHEEL TRACTOR (Prefix WT6) Service Repair Manual Instant Download.pdf
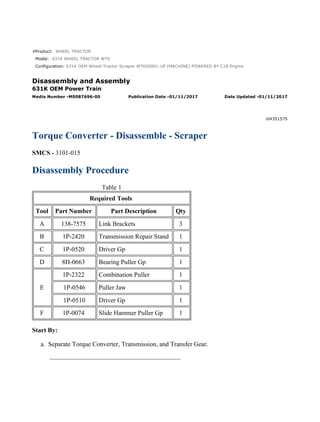
- 1. Product: WHEEL TRACTOR Model: 631K WHEEL TRACTOR WT6 Configuration: 631K OEM Wheel-Tractor Scraper WT600001-UP (MACHINE) POWERED BY C18 Engine Disassembly and Assembly 631K OEM Power Train Media Number -M0087696-00 Publication Date -01/11/2017 Date Updated -01/11/2017 i04351575 Torque Converter - Disassemble - Scraper SMCS - 3101-015 Disassembly Procedure Table 1 Required Tools Tool Part Number Part Description Qty A 138-7575 Link Brackets 3 B 1P-2420 Transmission Repair Stand 1 C 1P-0520 Driver Gp 1 D 8H-0663 Bearing Puller Gp 1 E 1P-2322 Combination Puller 1 1P-0546 Puller Jaw 1 1P-0510 Driver Gp 1 F 1P-0074 Slide Hammer Puller Gp 1 Start By: a. Separate Torque Converter, Transmission, and Transfer Gear. 1/10(W) w 2021/5/16 https://127.0.0.1/sisweb/sisweb/techdoc/techdoc_print_page.jsp?returnurl=/sisweb/sisw...
- 2. Illustration 1 g02477139 Illustration 2 g02477145 1. Attach Tooling (A) and a suitable lifting device to housing assembly (2) . Reposition housing assembly (2) onto Tooling (B). The weight of housing assembly (2) is approximately 73 kg (160 lb). 2. Remove bolts (1) and lift housing assembly (2) from torque converter assembly (3). Illustration 3 g02477249 3. Reposition torque converter assembly (3) on Tooling (B) as shown. The weight of torque converter assembly (3) is approximately 34 kg (76 lb). 2/10(W) w 2021/5/16 https://127.0.0.1/sisweb/sisweb/techdoc/techdoc_print_page.jsp?returnurl=/sisweb/sisw...
- 3. 4. Remove bolts (4). Illustration 4 g02477847 5. Attach Tooling (A) and a suitable lifting device to cover assembly (5). Remove cover assembly (5) from torque converter assembly (3). Illustration 5 g02494878 6. Remove clutch piston (6). Illustration 6 g02495236 3/10(W) w 2021/5/16 https://127.0.0.1/sisweb/sisweb/techdoc/techdoc_print_page.jsp?returnurl=/sisweb/sisw...
- 4. 7. Remove friction disk (7). Remove bolts (10) and shaft retainer (8). Remove hub (9) and seal rings. Illustration 7 g02487237 Illustration 8 g02491136 8. Remove bolts (12). Remove bearing retainer (11). Remove retaining ring (13). Remove upper bearing race (16). Remove retaining ring (14). Remove bearing (15). Illustration 9 g02487278 9. Reposition torque converter assembly (3) on Tooling (B) as shown. The weight of torque converter assembly (3) is approximately 34 kg (76 lb). 4/10(W) w 2021/5/16 https://127.0.0.1/sisweb/sisweb/techdoc/techdoc_print_page.jsp?returnurl=/sisweb/sisw...
- 5. 10. Remove bolts (17). Illustration 10 g02494482 11. Attach Tooling (A) to impeller wheel assembly (18). Remove impeller wheel assembly (18). The weight of impeller wheel assembly (18) is approximately 34 kg (76 lb). Illustration 11 g02484296 12. Remove retaining ring (19) from bearing (20). Illustration 12 g02488758 5/10(W) w 2021/5/16 https://127.0.0.1/sisweb/sisweb/techdoc/techdoc_print_page.jsp?returnurl=/sisweb/sisw...
- 6. 13. Use Tooling (E) to separate shaft assembly (21) from bearing assembly (20) and carrier assembly (22). Illustration 13 g02492076 Illustration 14 g02488997 14. Remove bolts (23). Use Tooling (F) to remove stator assembly (24) from carrier assembly (22) and impeller wheel assembly (18). Illustration 15 g02489038 6/10(W) w 2021/5/16 https://127.0.0.1/sisweb/sisweb/techdoc/techdoc_print_page.jsp?returnurl=/sisweb/sisw...
- 7. Illustration 16 g02489042 15. Remove bolts (25). Use Tooling (C) to remove carrier assembly (22) from impeller wheel assembly (18). Illustration 17 g02489047 16. Using Tooling (C) and a suitable press to remove bearing (26) and gear (27) from carrier assembly (22). Illustration 18 g02489056 17. Remove seal ring (28). 7/10(W) w 2021/5/16 https://127.0.0.1/sisweb/sisweb/techdoc/techdoc_print_page.jsp?returnurl=/sisweb/sisw...
- 8. Illustration 19 g02492176 18. Remove seal rings (29). Remove retaining ring (30) from shaft assembly (21). Illustration 20 g02489277 Illustration 21 g02489280 19. Install Tooling (D). Note: Tooling (D) must be seated on the shoulder of turbine (31) in order to support turbine and prevent damage. Tooling (D) must not contact the splines on shaft (21). 8/10(W) w 2021/5/16 https://127.0.0.1/sisweb/sisweb/techdoc/techdoc_print_page.jsp?returnurl=/sisweb/sisw...
- 9. 20. Use a suitable press to remove shaft assembly (21) from turbine (31). Remove bearing race (32) and the spacer from turbine (31). Illustration 22 g02492441 21. Position housing assembly (2) as shown. 22. Remove bolts (33) and gear (34). Illustration 23 g02492458 23. Remove retaining rings (35) from gear (34). Illustration 24 g02492476 9/10(W) w 2021/5/16 https://127.0.0.1/sisweb/sisweb/techdoc/techdoc_print_page.jsp?returnurl=/sisweb/sisw...
- 10. 24. Use a suitable press and Tooling (C) in order to remove bearing (36) and shaft from gear (34). 10/10(W) w 2021/5/16 https://127.0.0.1/sisweb/sisweb/techdoc/techdoc_print_page.jsp?returnurl=/sisweb/sisw...
- 11. Product: WHEEL TRACTOR Model: 631K WHEEL TRACTOR WT6 Configuration: 631K OEM Wheel-Tractor Scraper WT600001-UP (MACHINE) POWERED BY C18 Engine Disassembly and Assembly 631K OEM Power Train Media Number -M0087696-00 Publication Date -01/11/2017 Date Updated -01/11/2017 i04578058 Torque Converter - Assemble - Scraper SMCS - 3101-016 Assembly Procedure Table 1 Required Tools Tool Part Number Part Description Qty A 138-7575 Link Brackets 3 B 1P-2420 Transmission Repair Stand 1 C 1P-0520 Driver Gp 1 G - Threaded Rod 3/8-16 by 4.00 1 H - Locktite 242 1 NOTICE Keep all parts clean from contaminants. Contaminants may cause rapid wear and shortened component life. 1/12(W) w 2021/5/16 https://127.0.0.1/sisweb/sisweb/techdoc/techdoc_print_page.jsp?returnurl=/sisweb/sisw...
- 12. Illustration 1 g02492476 1. Use a suitable press and Tooling (C) to install bearing (36) and shaft into gear (34). Illustration 2 g02492458 2. Install retaining ring (35) on each side of gear (34) . Illustration 3 g02492441 3. Position housing assembly (2) as shown. 2/12(W) w 2021/5/16 https://127.0.0.1/sisweb/sisweb/techdoc/techdoc_print_page.jsp?returnurl=/sisweb/sisw...
- 13. 4. Install gear (34). Install bolts (33) . Illustration 4 g02492617 5. Lower the temperature of shaft assembly (21). Install retaining ring (30). Install shaft assembly (21) in the turbine (31) until ring (30) rests on the turbine (31). Install seal rings (29) . Illustration 5 g02492679 6. Install the spacer. Raise the temperature of bearing race (32). Install bearing race (32) on shaft assembly (21) . 3/12(W) w 2021/5/16 https://127.0.0.1/sisweb/sisweb/techdoc/techdoc_print_page.jsp?returnurl=/sisweb/sisw...
- 14. Illustration 6 g02489056 7. Install seal ring (28) . Illustration 7 g02482957 8. Install gear (27) to carrier assembly (22) . Illustration 8 g02482978 9. Raise the temperature of bearing (26). Install bearing (26) on carrier assembly (22) . 4/12(W) w 2021/5/16 https://127.0.0.1/sisweb/sisweb/techdoc/techdoc_print_page.jsp?returnurl=/sisweb/sisw...
- 15. Illustration 9 g02483898 Illustration 10 g02483903 10. Position lower part of carrier assembly (22) under impeller wheel assembly (18) . 11. Install Tooling (G) to align carrier assembly (22) with impeller wheel assembly (18) . Illustration 11 g02483983 5/12(W) w 2021/5/16 https://127.0.0.1/sisweb/sisweb/techdoc/techdoc_print_page.jsp?returnurl=/sisweb/sisw...
- 16. 12. Install bolts (25). Tighten bolts (25) to a torque of 50 ± 7 N·m (37 ± 5 lb ft). Illustration 12 g02492076 13. Position stator assembly (24) on carrier assembly (22). Apply Tooling (H) to bolts (23). Install bolts (23). Tighten bolts (23) to a torque of 40 ± 5 N·m (30 ± 4 lb ft). Illustration 13 g02484278 14. Install carrier assembly (22) and impeller wheel assembly (18) on turbine (31) and shaft assembly (21) . 6/12(W) w 2021/5/16 https://127.0.0.1/sisweb/sisweb/techdoc/techdoc_print_page.jsp?returnurl=/sisweb/sisw...
- 17. Illustration 14 g02484377 Note: Install bearing (20) with Radius Side (X) facing down, toward carrier assembly (22). Illustration 15 g02484296 15. Raise the temperature of bearing (20). Install bearing. Install retaining ring (19) . Illustration 16 g02487297 7/12(W) w 2021/5/16 https://127.0.0.1/sisweb/sisweb/techdoc/techdoc_print_page.jsp?returnurl=/sisweb/sisw...
- 18. 16. Attach Tooling (A) and a suitable lifting device to impeller wheel assembly (18). The weight of impeller wheel assembly (18) is approximately 34 kg (76 lb). Install impeller wheel assembly (18) into torque converter assembly (3) . Illustration 17 g02487278 17. Install bolts (17). Tighten bolts (17) to a torque of 30 ± 5 N·m (22 ± 4 lb ft). 18. Reposition torque converter assembly (3) on Tooling (B). The weight of torque converter assembly (3) is approximately 64 kg (142 lb). Illustration 18 g02491136 19. Lower the temperature of bearing (15) and install bearing. Install retaining ring (14). Install upper bearing race (16) and retaining ring (13) . 8/12(W) w 2021/5/16 https://127.0.0.1/sisweb/sisweb/techdoc/techdoc_print_page.jsp?returnurl=/sisweb/sisw...
- 19. Illustration 19 g02487237 20. Install bearing retainer (11). Install bolts (12). Tighten bolts (12) to a torque of 50 ± 7 N·m (37 ± 5 ft). Illustration 20 g02495236 21. Install hub (9). Install shaft retainer (8) and the seal rings. Install bolts (10). Tighten bolts (10) to a torque of 50 ± 7 N·m (37 ± 5 lb ft). Install friction disk (7) . Illustration 21 g02494878 9/12(W) w 2021/5/16 https://127.0.0.1/sisweb/sisweb/techdoc/techdoc_print_page.jsp?returnurl=/sisweb/sisw...
- 20. 22. Install clutch piston (6) . Illustration 22 g02495556 Note: When lowering cover assembly (5) down over clutch piston (6), align pins in cover assembly (5) into notch on clutch piston (6). Illustration 23 g02477847 23. Attach Tooling (A) and a suitable lifting device to cover assembly (5). Install cover assembly (5) into torque converter assembly (3) . 10/12(W) w 2021/5/16 https://127.0.0.1/sisweb/sisweb/techdoc/techdoc_print_page.jsp?returnurl=/sisweb/sisw...
- 21. Illustration 24 g02494257 24. Install bolts (4). Tighten bolts (4) to a torque of 50 ± 7 N·m (37 ± 5 lb ft). Illustration 25 g02477145 Illustration 26 g02477139 25. Attach Tooling (A) and a suitable lifting device to housing assembly (2). The weight of housing assembly (2) is approximately 119 kg (263 lb). Lower housing assembly (2) onto torque converter assembly (3). Install bolts (1) . 11/12(W) w 2021/5/16 https://127.0.0.1/sisweb/sisweb/techdoc/techdoc_print_page.jsp?returnurl=/sisweb/sisw...
- 22. End By: Connect the torque converter, transmission, and transfer gear. 12/12(W) w 2021/5/16 https://127.0.0.1/sisweb/sisweb/techdoc/techdoc_print_page.jsp?returnurl=/sisweb/sisw...
- 23. Product: WHEEL TRACTOR Model: 631K WHEEL TRACTOR WT6 Configuration: 631K OEM Wheel-Tractor Scraper WT600001-UP (MACHINE) POWERED BY C18 Engine Disassembly and Assembly 631K OEM Power Train Media Number -M0087696-00 Publication Date -01/11/2017 Date Updated -01/11/2017 i06636123 Torque Converter - Assemble SMCS - 3101-016 Assembly Procedure Table 1 Required Tools Tool Part Number Part Description Qty A 2P-8312 Retaining Ring Pliers 1 B 1P-0510 Driver Group 1 Illustration 1 g00528674 1. Use Tooling (B) and a suitable hydraulic press to install sleeve bearing (33) into flange (32). 1/7(W) w 2021/5/16 https://127.0.0.1/sisweb/sisweb/techdoc/techdoc_print_page.jsp?returnurl=/sisweb/sisw...
- 24. Illustration 2 g00528612 2. Position flange (32) and install bolts (31) onto housing (9). Tighten bolts (31) to a torque of 120 ± 15 N·m (89 ± 11 lb ft). Illustration 3 g00525322 3. Install thrust bearing (29) and thrust race (30) into housing (9). Illustration 4 g00525321 4. Install turbine (23) and clamp ring (28) onto hub (3). 2/7(W) w 2021/5/16 https://127.0.0.1/sisweb/sisweb/techdoc/techdoc_print_page.jsp?returnurl=/sisweb/sisw...
- 25. Illustration 5 g00525320 5. Install bolts (27) into turbine (23). Tighten bolts (27) to a torque of 50 ± 7 N·m (37 ± 5 lb ft). Install thrust race (26) onto hub (3). Illustration 6 g01102582 6. Install thrust race (25) and thrust bearing (24) onto hub (3). Illustration 7 g00525315 7. Install turbine (23) and hub (3) as a unit into housing (9). 3/7(W) w 2021/5/16 https://127.0.0.1/sisweb/sisweb/techdoc/techdoc_print_page.jsp?returnurl=/sisweb/sisw...
- 26. Illustration 8 g00528953 8. Use Tooling (B) and a suitable press to install sleeve bearing (22) into carrier assembly (12). Install thrust bearing (21) onto carrier assembly (12). Illustration 9 g01110492 9. Install side plate (20) to stator (13). Use Tooling (A) to install retaining ring (19) to stator (13). Illustration 10 g01102579 10. Use Tooling (B) and a suitable hydraulic press to install freewheel cam (18) into stator (13). 4/7(W) w 2021/5/16 https://127.0.0.1/sisweb/sisweb/techdoc/techdoc_print_page.jsp?returnurl=/sisweb/sisw...
- 27. 11. Install stator (13) to carrier assembly (12). Install freewheel springs (16) and freewheel rollers (17) to freewheel cam (18). Always install new freewheel springs (16) and freewheel rollers (17). Install freewheel springs (16) with the maximum number of loops in freewheel springs (16) to the outside of freewheel cam (18). Stator (13) should turn freely in the clockwise direction. Stator (13) should not turn freely in the counterclockwise direction. Illustration 11 g01110494 12. Install thrust race (15) to stator (13). Use Tooling (A) to install retaining ring (14) onto stator (13). Illustration 12 g00525308 13. Install carrier assembly (12) and stator (13) as a unit into housing (9). 5/7(W) w 2021/5/16 https://127.0.0.1/sisweb/sisweb/techdoc/techdoc_print_page.jsp?returnurl=/sisweb/sisw...
- 28. Illustration 13 g01108447 14. Install thrust bearing (11) and seal ring (12A) onto carrier assembly (12). Illustration 14 g00525305 15. Install impeller hub (8) to impeller (5). Install thrust race (10) onto impeller (5). Illustration 15 g01102576 16. Install clamp plate (7) and bolts (6) onto impeller hub (8). Tighten bolts (6) to a torque of 50 ± 7 N·m (37 ± 5 lb ft). 17. Install bolts (4) into impeller (5). Tighten bolts (4) to a torque of 50 ± 7 N·m (37 ± 5 lb ft). 6/7(W) w 2021/5/16 https://127.0.0.1/sisweb/sisweb/techdoc/techdoc_print_page.jsp?returnurl=/sisweb/sisw...
- 29. Suggest: If the above button click is invalid. Please download this document first, and then click the above link to download the complete manual. Thank you so much for reading
- 30. Illustration 16 g00525299 18. Use Tooling (B) and a suitable press to install the sleeve bearing in carriage support assembly (2). Install the sleeve bearing until the sleeve bearing is flush with the outside machined surface of carriage support assembly (2). 19. Install carriage support assembly (2) onto hub (3). Use Tooling (A) to install retaining ring (1) onto carriage support assembly (2). End By: a. Install the torque converter. Refer to Disassembly and Assembly, "Torque Converter - Install". 7/7(W) w 2021/5/16 https://127.0.0.1/sisweb/sisweb/techdoc/techdoc_print_page.jsp?returnurl=/sisweb/sisw...