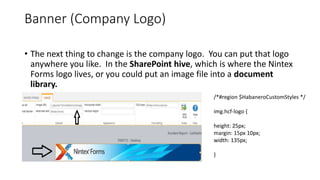
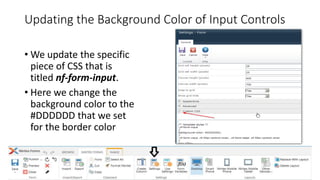
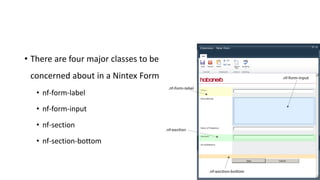
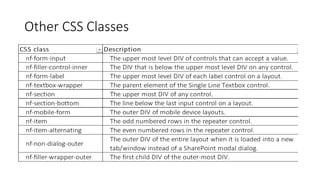
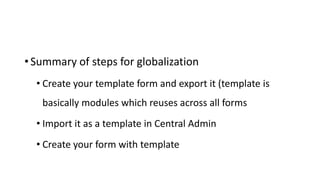
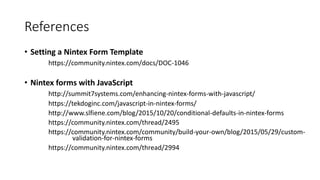
Branding Nintex Forms
Kushan Lahiru Perera
Objectives
• Now that your forms work the way that you want them to
we next spend some time to get them looking great.
• You will learn how to edit the component of an individual
form to ensure that they conform to your companies style
guide or branding.
• At first we focus on editing individual forms and later we will
look at how to edit the default styles that are applied when a
new form is created – this is a great way to ensure that all
new forms are consistent and align with your corporate
branding
Branding
• its visual presentation
of information
• the writing style
• the balance between
imagery, text, and
whitespace
• clean and simple
functional elements
• error-free delivery
Prerequisites
• Understanding Form Tools
• Installing, Configuring, and Deploying Nintex Forms 2013
• Form Design Basics
• Some knowledge on CSS, JavaScript and some JQuery
Some Facts..
• Nintex Forms is a really neat product and a much more user-
friendly alternative to Microsoft’s InfoPath for designing
SharePoint forms.
• Nintex Forms also provides the ability to add optimized layouts
for a selection of smartphones and tablets. You can also add
your own devices (by user agent string) if Nintex’s default set of
device layouts don’t serve all of your needs.
• Not every company will want to use Nintex’s logo and the
Nintex company colors for their forms.
Cleanup is the Best way start
So the first step here is to get rid of all
the controls that will not be available on
all the designs, leaving only the logo and
the bottom border line that will make
my forms look purity.
Banner (Company Logo)
• The next thing to change is the company logo. You can put that logo
anywhere you like. In the SharePoint hive, which is where the Nintex
Forms logo lives, or you could put an image file into a document
library.
/*#region $HabaneroCustomStyles */
img.hcf-logo {
height: 25px;
margin: 15px 10px;
width: 135px;
}
Updating the Background Color of Input Controls
• We update the specific
piece of CSS that is
titled nf-form-input.
• Here we change the
background color to the
#DDDDDD that we set
for the border color
• There are four major classes to be
concerned about in a Nintex Form
• nf-form-label
• nf-form-input
• nf-section
• nf-section-bottom
Other CSS Classes
Other CSS Classes…continued
Demo (Organizational News letter subscriptions)
• Change the banner and add
logo as a separate image
• Change background color to
#6699FF
• Format the button style using
CSS
• User must agree to proceed
with submit
Globalize Form Template
• If we have the template we have done so far we can reuse it in other
forms you have
• Export this form by clicking on the Export button in the ribbon and
save it in the local location
• You can make this template available across the farm
Central Administration -> Nintex Forms Management -> Manage Device
Layouts.
Under the devices, there's the template section where you can browse
to your *.xml and Upload it
• Summary of steps for globalization
• Create your template form and export it (template is
basically modules which reuses across all forms
• Import it as a template in Central Admin
• Create your form with template
References
• Setting a Nintex Form Template
https://community.nintex.com/docs/DOC-1046
• Nintex forms with JavaScript
http://summit7systems.com/enhancing-nintex-forms-with-javascript/
https://tekdoginc.com/javascript-in-nintex-forms/
http://www.slfiene.com/blog/2015/10/20/conditional-defaults-in-nintex-forms
https://community.nintex.com/thread/2495
https://community.nintex.com/community/build-your-own/blog/2015/05/29/custom-
validation-for-nintex-forms
https://community.nintex.com/thread/2994
Thank you!

Branding Nintex Forms

  • 1.
  • 2.
    Objectives • Now thatyour forms work the way that you want them to we next spend some time to get them looking great. • You will learn how to edit the component of an individual form to ensure that they conform to your companies style guide or branding. • At first we focus on editing individual forms and later we will look at how to edit the default styles that are applied when a new form is created – this is a great way to ensure that all new forms are consistent and align with your corporate branding
  • 3.
    Branding • its visualpresentation of information • the writing style • the balance between imagery, text, and whitespace • clean and simple functional elements • error-free delivery
  • 4.
    Prerequisites • Understanding FormTools • Installing, Configuring, and Deploying Nintex Forms 2013 • Form Design Basics • Some knowledge on CSS, JavaScript and some JQuery
  • 5.
    Some Facts.. • NintexForms is a really neat product and a much more user- friendly alternative to Microsoft’s InfoPath for designing SharePoint forms. • Nintex Forms also provides the ability to add optimized layouts for a selection of smartphones and tablets. You can also add your own devices (by user agent string) if Nintex’s default set of device layouts don’t serve all of your needs. • Not every company will want to use Nintex’s logo and the Nintex company colors for their forms.
  • 6.
    Cleanup is theBest way start So the first step here is to get rid of all the controls that will not be available on all the designs, leaving only the logo and the bottom border line that will make my forms look purity.
  • 7.
    Banner (Company Logo) •The next thing to change is the company logo. You can put that logo anywhere you like. In the SharePoint hive, which is where the Nintex Forms logo lives, or you could put an image file into a document library. /*#region $HabaneroCustomStyles */ img.hcf-logo { height: 25px; margin: 15px 10px; width: 135px; }
  • 8.
    Updating the BackgroundColor of Input Controls • We update the specific piece of CSS that is titled nf-form-input. • Here we change the background color to the #DDDDDD that we set for the border color
  • 9.
    • There arefour major classes to be concerned about in a Nintex Form • nf-form-label • nf-form-input • nf-section • nf-section-bottom
  • 10.
  • 11.
  • 12.
    Demo (Organizational Newsletter subscriptions) • Change the banner and add logo as a separate image • Change background color to #6699FF • Format the button style using CSS • User must agree to proceed with submit
  • 13.
    Globalize Form Template •If we have the template we have done so far we can reuse it in other forms you have • Export this form by clicking on the Export button in the ribbon and save it in the local location
  • 14.
    • You canmake this template available across the farm Central Administration -> Nintex Forms Management -> Manage Device Layouts. Under the devices, there's the template section where you can browse to your *.xml and Upload it
  • 15.
    • Summary ofsteps for globalization • Create your template form and export it (template is basically modules which reuses across all forms • Import it as a template in Central Admin • Create your form with template
  • 16.
    References • Setting aNintex Form Template https://community.nintex.com/docs/DOC-1046 • Nintex forms with JavaScript http://summit7systems.com/enhancing-nintex-forms-with-javascript/ https://tekdoginc.com/javascript-in-nintex-forms/ http://www.slfiene.com/blog/2015/10/20/conditional-defaults-in-nintex-forms https://community.nintex.com/thread/2495 https://community.nintex.com/community/build-your-own/blog/2015/05/29/custom- validation-for-nintex-forms https://community.nintex.com/thread/2994
  • 17.

Editor's Notes

  • #2 Site URL: https://virtusa9.2013.trial.nintex.com Username: EXT\kushan.perera Password: B*eK6u5
  • #14 https://virtusa9.2013.trial.nintex.com/_layouts/15/NintexForms/ListFormDesigner.aspx?List=%7B8E5DAD23%2DA17F-492C-A692-D10E69987AA7%7D function UserAgreement(source, arguments) { alert(NWF$('#'+varAgree).prop("checked")); if(NWF$('#'+varAgree).prop("checked")) { arguments.IsValid=true; } else{ //not aggreed arguments.IsValid=false; } }