SlideShare a Scribd company logo
1. Create Master Data -Go to Slide
2. Quotation from Vendor -Go to Slide
3. Purchase Order to Vendor -Go to Slide
4. Purchase Invoice from Vendor after receiving material -Go to Slide
5. GRN for received material -Go to Slide
6. Sample Test Report (ATR) -Go to Slide
7. Payment to vendor -Go to Slide
8. Stock Updated after GRN -Go to Slide
Batch Production Process – Part 1
Purchase & Stock creation of Raw/Pack Material
Master
Data
Create Item,
Customer , Vendor,
Equipment , Notes
Quotation from
Vendor
Create RFQ of type Vendor
Save & Submit for
Quotation
Purchase
Order
Create PO to
Vendor for raw
material
Purchase
Invoice
Create PI from Vendor
after receiving raw
material
GRN
Create GRN for
Received
Material
ATR
Create sample
test report for
item.
Payment
Create Payable for
Vendor Payment
Stock updated
Check Item for Updated
Stock after GRN
Process Flow Chart
•To Create Item Click on Item master , and then click on plus icon for add new Item.
2.Click on plus
Icon for Creating
New Item.
1.Click on Item
master .
Creation of Master Data
Create Item Master
1.Click on type of
Item.
2.Select the Type
of Item .
3.Click on
Select icon.
• Click on type of item and select item type from open window.
• Click on select icon.
Creation of Master Data
1.Select the Status
of Item .2.Fill all the Details such as
item no,name,description.
• For create item fill the item details such as item number , code and description.
Creation of Master Data
1.Click on
Comments/notes
tab.
3.Write Comments
4.Click on
Select icon.
2.Click on plus
Icon .
• To add notes Click on notes tab ,Write a note and save it.
Creation of Master Data
• Note is added successfully in item master.
1.Note is added
in item master.
• To add AML click on AML tab and select the manufacturer from open
window and click on select icon.
1.Click on AML
tab.
3.Select the
manufacturer
4.Click on
Select icon.
2.Click on plus
Icon .
aa
• AML is added successfully in item master.
1.AML is added in
item master.
1.Click on Item
tab.
3.Select the
Item.
4.Click on
Select icon.
2.Click on plus
Icon .
5.Click on Save
and Close Icon
Button
• To add item click on item tab click plus icon select the item and click on select icon
then click on save and close icon.
Creation of Master Data
• Item is added successfully in item master.
1.Item is added in
item master.
• To Promote the Item master click on item and then click promote icon.
2.Click on
promote item.
1.Click on item .
Creation of Master Data
• To approved the Item master select the state from open window.
1.Click on
approved .
2.Click on
select.
Creation of Master Data
• Approved state of Item .
Creation of Master Data
1.Approved
state of
item.
Creation of Master Data
Create Customer
•To create customer click on customer and click plus icon to create new.
1.Click on
customer.
2.Click on plus icon
to create new.
Creation of Master Data
1.Click on
customer
type.
2.Select the
classification.
3.Click on
select icon.
• Click on customer type and select the classification from open window
•Click select icon.
Creation of Master Data
•To create customer fill the customer details such as name , contact, address ,etc .
• click on save and close icon.
2.Click on save
and close icon.
1.Fill the
details.
1.Click on
vendor.
2.Click on plus
Icon for Creating
New
Create Vender
Creation of Master Data
• To create vender click on vendor and click plus icon to create new.
Creation of Master Data
1.Fill all the
details
correctly.
•To Create Vendor fill the details such as name ,contact ,address.
Creation of Master Data
1.Click on Rating
tab.
2.Click on plus
Icon .
4.Click on Save
and Close Icon
Button
3.Select the
Rating.
• Click on rating tab and plus icon then select rating .
•click on save and close icon.
Creation of Master Data
Create Equipment
•To create Equipment click on equipment and click on plus icon to create new.
1.Click on
Equipment.
2.Click on plus
icon .
Creation of Master Data
• Click on equipment for and select the classification from open window.
•Click on select icon.
1.Click on
equipment for.
2.Select the
classification.
3.Click on
select icon.
Creation of Master Data
• To create equipment fill the equipment details such as name , type ,Description.
• Click on save and close icon.
1.Fill the
Equipment details.
2.Click on save
and close icon.
Create Notes
1.Click on Notes
2.Click on plus
Icon for Creating
New
Creation of Master Data
• To create notes click on notes and then plus icon to add new .
1.Select the
note type.
Creation of Master Data
• To create notes select notes type.
1.Fill all the
details .
2.Click on Save
and Close Icon
Button
Creation of Master Data
• To create notes fill the notes details and click on save and close icon
RFQ to Vendor
Creation Of RFQ to Vendor
2.Click on plus
icon .
1.Click on
RFQ.
• To create RFQ to vendor, click on RFQ and then plus icon for create new.
Creation Of Quotation from Vendor
2.Select the
Classification.
1.Click on
Type.
3.Click on select
icon.
•To create RFQ click on type and select classification.
Creation Of RFQ to Vendor
• Enter the details for RFQ such as Vendor , to add vendor click on vendor field
and select vendor from opened window then select vendor
1.Click Vendor
filed “...” sign
2.Select vendor
from opened dialog
3.Click on
select icon
Creation Of RFQ to Vendor
• Vendor added to rfq , done same step to add tooling po and part po then enter
cost for tool, part and total cost calculated automatically
1.Selected
vendor added
2.Select part , tooling
po , part po using
same step of add
vendor
3.Enter tool cost and part cost
and total cost calculated
automatically
Creation Of RFQ to Vendor
• To add attachment to rfq, Change pick related option to create related then click on
plus icon and select file from opened dialog after that click on select icon
1.Change Pick
Related to
Create Related
2.Click on plus
icon
3.Choose file from
opened window
4.Click on
Open button
Creation Of RFQ to Vendor
• Attachment added successfully, now click on save and close icon
1.Click on save
and close icon
Creation Of RFQ to Vendor
• For RFQ Report, click on Report Menu and then select RFQ Report option
1.Click on
Report menu
2.Click on RFQ
Report option
Creation Of RFQ to Vendor
• Select from and to date from opened window and click on Run Report button
1.Select From and To date by
click on textbox and select date
from opened calendar
2.Click on Run
Report button
Creation Of Quotation from Vendor
RFQ Report
Quotation from Vendor
Creation Of Quotation from Vendor
• To Promote RFQ to submitted state, click on promote icon
1.Click on
Promote icon
Creation Of Quotation from Vendor
• Select state from opened window and click on select icon.
1.Select state from
opened window
2.Click on
Select icon
Creation Of Quotation from Vendor
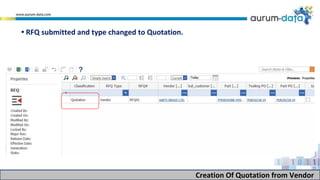
• RFQ submitted and type changed to Quotation.
1.Click on Purchase
Order.
2.Click on plus
Icon for Creating
New
Purchase Order to Vendor
Creation Of Purchase Order To Vendor
• To create purchase order to vendor click on purchase order and then plus icon.
3.Click on
Select icon.
1.Click on
PO type.
2.Select the
PO.
Creation Of Purchase Order To Vendor
• Click on PO type and select the type from opened window, then click on select icon
1.Click on
Vendor.
2.Select the
vendor.
3.Click on
Select icon.
Creation Of Purchase Order To Vendor
• To add vendor, click on vendor field and select the vendor then click on select icon
1.Click on
Authorised By.
2.Select the
User.
3.Click on
Select icon.
Creation Of Purchase Order To Vendor
• Vendor added, now to add authorised by,click on Authorised By field and select user from
opened window then click on select icon
3.Select the
Item.
4.Click on
Select icon.
1.Click on
Item tab.
Creation Of Purchase Order To Vendor
• To add item, click on Item tab, then plus icon and select item from opened window then
click on select icon
2.Click on
plus icon
Creation Of Purchase Order To Vendor
• After adding item, enter qty, rate , gst rate details and amount , igst, cgst, sgst, gross
total calculated automatically
1.Enter qty,
rate and gst
rate.
2.Amount, IGST, CGSt,
SGST and Gross total
calculated automatically
Creation Of Purchase Order To Vendor
•Enter amt of transportation and gst rate, gross transportation calculated and gross total
updated automatically
1.Enter amt of
transportation
and gst rate
2.Transportation
calculated and gross
total updated
Creation Of Purchase Order To Vendor
• To add advance in PO, select Advance tab and click on plus icon then enter date and
advance amount
1.Enter
advance amt,
date
2.Advance amt and
Amount remaining
calculated automatically
Creation Of Purchase Order To Vendor
• Click on save and close icon.
1.Click on save
and close icon
Creation Of Purchase Order To Vendor
• Click on Report menu then select and click on Po Report option.
1.Click Report
menu
2.Select and
click on PO
Report option
Creation Of Purchase Order To Vendor
• Purchase Order Report
1.Click on
Purchase
Invoice.
2.Click on plus Icon.
Create Purchase Invoice from Vendor after receiving material
Creation Of Purchase Invoice
• To Create Purchase Invoice from Vendor click on Purchase Invoice and plus icon.
2.Select the
Type.
3.Click on
Select icon.
1.Click on
Type.
Creation Of Purchase Invoice
•Click on type field and then select type from opened window and click on select icon
2.Select the
Vendor.
3.Click on
Select icon.
1.Click on Vendor.
Creation Of Purchase Invoice
•To Select the Vendor, click on vendor field and select vendor from opened window then
click on select icon .
1.Click on
part tab.
2.Click on plus
Icon for Add New
Creation Of Purchase Invoice
•To add the part, click on part tab and click on plus icon.
2.Select the
Part.
3.Click on
Select icon.
1.Click on
Part.
Creation Of Purchase Invoice
• To add the part , click on Part field and select part from opened window then click on
select icon.
Creation Of Purchase Invoice
•Add PO by following same step done for part, then rate is automatically filled from
selected po
1.After selecting po , rate filled
automatically from selected po
Creation Of Purchase Invoice
•Enter qty, gst rate and amount, IGST, CGST, SGST, Gross total calculated automatically
1.Enter qty, gst rate and amount, igst,
cgst, sgst gross total calculated
automatically
1.Enter amt
and gst rate
Creation Of Purchase Invoice
•Fill the amt of transportation and gst rate, then transportation amount calculated
and gross total updated automatically
2.Transportation
calculated and gross
total updated
1.Click on GRN.
2.Click on plus
Icon for Creating
New
GRN For Received Material
Creation Of GRN For Received Material
• To create GRN Click on GRN and then plus icon for add new .
1.Click on Type.
2.Select the
Type.
3.Click on
Select icon.
Creation Of GRN For Received Material
• Click on type field and select type of material from opened window
1.Select the
PO.
2.Select the
Location.
4.Select the
Supplier.
5.Click on
Select icon.
3.Click on
Supplier.
Creation Of GRN For Received Material
•Enter po details and the other details and select the supplier by click on supplier field and
select supplier from opened window then click on select icon
1.Click on
Date.
2.Select the
Date.
Creation Of GRN For Received Material
•Select date by click on date field and select date from opened calendar.
1.Click on
Item.
2.Select the
Item.
3.Click on
Select icon.
Creation Of GRN For Received Material
• To add the Item in GRN , click on Item field and select item from opened window then
click on select icon
3.Click on
Select icon.
1.Click on
Manufactur
er.
2.Select the
Manufactur
er.
Creation Of GRN For Received Material
• Item added to grn, now to add manufacturer , click on manufacturer field and select
manufacturer from opened window then click on select icon
3.Select the
Item.
4.Click on
Select icon.
1.Select Goods
received tab.
2.Click on plus
Icon .
Creation Of GRN For Received Material
• To add the item for goods received , select goods received tab , click on plus icon and
select item from opened window then click on select icon
1.Fill the details
such as batch
no, exp, mfg
date, quantity
2. Total received
qty calculated
automatically
Creation Of GRN For Received Material
• Fill the details for goods received such as batch no, mfg, exp date,quantity etc. .
Creation Of GRN For Received Material
• Click on save and close icon. 1.Click on save
and close icon
1.Click on Report.
Creation Of GRN For Received Material
• For GRN Report click on report menu then select and click GRN Report
option.
2.Select and click on
GRN Report option
Creation Of GRN For Received Material
GRN Report
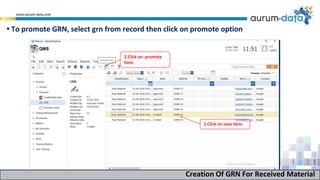
2.Click on promote
Item.
1.Click on save Item.
Creation Of GRN For Received Material
• To promote GRN, select grn from record then click on promote option
1.Select the
state.
2.Click on
Select icon.
Creation Of GRN For Received Material
Select state from opened window then click on select icon
1.Select the
state.
2.Click on
Select icon.
Creation Of GRN For Received Material
•Select approved state to promote grn to approved state.
1.Approved
GRN state .
Creation Of GRN For Received Material
•GRN item approved successfully.
Creation Of Sample Test Report
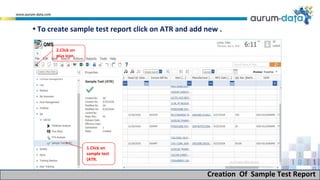
• To create sample test report click on ATR and add new .
1.Click on
sample test
(ATR.
2.Click on
plus icon.
Creation Of Sample Test Report
• Click on Sample type and select type from opened window and click on select icon
2.Select the
type.
1.Click on
Sample type.
2.Click on
Select icon.
Creation Of Sample Test Report
1.Fill the Details
such as invoice no,
item, grn no etc.
2.Click on
save.
• Fill the details such as date, invoice no, grn no etc. and click on save icon
Creation Of Sample Test Report
• To add parameter, select parameter tab , click on plus icon and select parameter from
opened window then click on select icon.
1.Select
Parameter Tab
2.Click on plus
icon
3.Select parameter
4.Click on select
icon
Creation Of Sample Test Report
• Parameter added successfully to ATR then click on save icon.
1.Click on save
icon
Creation Of Sample Test Report
1.Click on
Report.
• To open report, click on report menu then select and click Sample Test Report.
2.Select and click on Sample
Test Report
Report for Sample Test Report(ATR)
Creation Of Sample Test Report
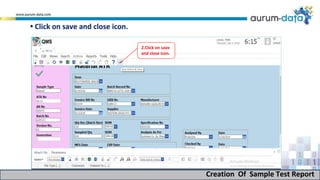
2.Click on save
and close icon.
• Click on save and close icon.
Payment to vendor
Creation Of Payment To Vendor
1.Click on
payables.
2.Click on
plus icon.
• To create payment click on payables and add new.
Creation Of Payment To Vendor
2.Click on save
and close icon. 1.Fill the details such as vendor,
payment for, payment amt etc.
• Fill the payment details such as vendor, payment for, amt and click on save and
close icon.
1.Quantity
Received from
GRN.
Stock Updated after GRN
Creation Of Stock Update
• The item quantity updates after GRN .
Batch production Part 1.pptx

More Related Content

Similar to Batch production Part 1.pptx

Sc training 1 managing products.
Sc training 1 managing products.Sc training 1 managing products.
Sc training 1 managing products.
Rory Maclnnes
 
Hand on procurementcycle-gem
Hand on procurementcycle-gemHand on procurementcycle-gem
Hand on procurementcycle-gem
Rahul Boga
 
Upload a new product
Upload a new productUpload a new product
Upload a new product
paytmslides1
 
Upload a new product
Upload a new productUpload a new product
Upload a new product
Paytm
 
Upload a new product
Upload a new productUpload a new product
Upload a new product
paytmslides1
 
Upload new products
Upload new productsUpload new products
Upload new products
Paytm
 
Upload a new product
Upload a new productUpload a new product
Upload a new product
Paytm
 
Add edit delete client in office timer
Add edit delete client in office timerAdd edit delete client in office timer
Add edit delete client in office timer
OfficeTimer
 
Seller app - Catalogue
Seller app - CatalogueSeller app - Catalogue
Seller app - Catalogue
paytmslides2
 
Seller center training
Seller center training Seller center training
Seller center training
vendorSupport
 
Amazan FBA
Amazan FBAAmazan FBA
Amazan FBA
Atif Munir
 
Order Management System 2
Order Management System 2 Order Management System 2
Order Management System 2 SellOnFlipkart
 
dop User manual
dop User manualdop User manual
dop User manual
Trade Home Limited
 
This is Better than Google?(FREE)
This  is  Better  than Google?(FREE)This  is  Better  than Google?(FREE)
This is Better than Google?(FREE)
Gashaw10
 
Seller app - Catalogue
Seller app - CatalogueSeller app - Catalogue
Seller app - Catalogue
paytmslides1
 
Invoicing software
Invoicing softwareInvoicing software
Invoicing software
Vivek Bhardwaj
 
Invoice software
Invoice softwareInvoice software
Invoice software
Vivek Bhardwaj
 
03 how to create product
03 how to create product03 how to create product
03 how to create product
Jadavsejal
 

Similar to Batch production Part 1.pptx (20)

Sc training 1 managing products.
Sc training 1 managing products.Sc training 1 managing products.
Sc training 1 managing products.
 
Catch mymoment
Catch mymomentCatch mymoment
Catch mymoment
 
Hand on procurementcycle-gem
Hand on procurementcycle-gemHand on procurementcycle-gem
Hand on procurementcycle-gem
 
Upload a new product
Upload a new productUpload a new product
Upload a new product
 
Catch mymoment
Catch mymomentCatch mymoment
Catch mymoment
 
Upload a new product
Upload a new productUpload a new product
Upload a new product
 
Upload a new product
Upload a new productUpload a new product
Upload a new product
 
Upload new products
Upload new productsUpload new products
Upload new products
 
Upload a new product
Upload a new productUpload a new product
Upload a new product
 
Add edit delete client in office timer
Add edit delete client in office timerAdd edit delete client in office timer
Add edit delete client in office timer
 
Seller app - Catalogue
Seller app - CatalogueSeller app - Catalogue
Seller app - Catalogue
 
Seller center training
Seller center training Seller center training
Seller center training
 
Amazan FBA
Amazan FBAAmazan FBA
Amazan FBA
 
Order Management System 2
Order Management System 2 Order Management System 2
Order Management System 2
 
dop User manual
dop User manualdop User manual
dop User manual
 
This is Better than Google?(FREE)
This  is  Better  than Google?(FREE)This  is  Better  than Google?(FREE)
This is Better than Google?(FREE)
 
Seller app - Catalogue
Seller app - CatalogueSeller app - Catalogue
Seller app - Catalogue
 
Invoicing software
Invoicing softwareInvoicing software
Invoicing software
 
Invoice software
Invoice softwareInvoice software
Invoice software
 
03 how to create product
03 how to create product03 how to create product
03 how to create product
 

More from johnsqms

Is qms really needed
Is qms really needed Is qms really needed
Is qms really needed
johnsqms
 
Passing the iatf test
Passing the iatf testPassing the iatf test
Passing the iatf test
johnsqms
 
Maintenance metrics in oee
Maintenance metrics in oeeMaintenance metrics in oee
Maintenance metrics in oee
johnsqms
 
Analysing control charts
Analysing control chartsAnalysing control charts
Analysing control charts
johnsqms
 
Understanding the organization and its context
Understanding the organization and its contextUnderstanding the organization and its context
Understanding the organization and its context
johnsqms
 
Seven quality management principles behind iso9001 requirements
Seven quality management principles behind iso9001 requirementsSeven quality management principles behind iso9001 requirements
Seven quality management principles behind iso9001 requirements
johnsqms
 
Quality management system PPT
Quality management system PPTQuality management system PPT
Quality management system PPT
johnsqms
 
Quality Introduction Quiz - Series 1 By Maya.
Quality Introduction Quiz - Series 1 By Maya.Quality Introduction Quiz - Series 1 By Maya.
Quality Introduction Quiz - Series 1 By Maya.
johnsqms
 

More from johnsqms (8)

Is qms really needed
Is qms really needed Is qms really needed
Is qms really needed
 
Passing the iatf test
Passing the iatf testPassing the iatf test
Passing the iatf test
 
Maintenance metrics in oee
Maintenance metrics in oeeMaintenance metrics in oee
Maintenance metrics in oee
 
Analysing control charts
Analysing control chartsAnalysing control charts
Analysing control charts
 
Understanding the organization and its context
Understanding the organization and its contextUnderstanding the organization and its context
Understanding the organization and its context
 
Seven quality management principles behind iso9001 requirements
Seven quality management principles behind iso9001 requirementsSeven quality management principles behind iso9001 requirements
Seven quality management principles behind iso9001 requirements
 
Quality management system PPT
Quality management system PPTQuality management system PPT
Quality management system PPT
 
Quality Introduction Quiz - Series 1 By Maya.
Quality Introduction Quiz - Series 1 By Maya.Quality Introduction Quiz - Series 1 By Maya.
Quality Introduction Quiz - Series 1 By Maya.
 

Recently uploaded

anas about venice for grade 6f about venice
anas about venice for grade 6f about veniceanas about venice for grade 6f about venice
anas about venice for grade 6f about venice
anasabutalha2013
 
Digital Transformation and IT Strategy Toolkit and Templates
Digital Transformation and IT Strategy Toolkit and TemplatesDigital Transformation and IT Strategy Toolkit and Templates
Digital Transformation and IT Strategy Toolkit and Templates
Aurelien Domont, MBA
 
Unveiling the Secrets How Does Generative AI Work.pdf
Unveiling the Secrets How Does Generative AI Work.pdfUnveiling the Secrets How Does Generative AI Work.pdf
Unveiling the Secrets How Does Generative AI Work.pdf
Sam H
 
ikea_woodgreen_petscharity_dog-alogue_digital.pdf
ikea_woodgreen_petscharity_dog-alogue_digital.pdfikea_woodgreen_petscharity_dog-alogue_digital.pdf
ikea_woodgreen_petscharity_dog-alogue_digital.pdf
agatadrynko
 
Memorandum Of Association Constitution of Company.ppt
Memorandum Of Association Constitution of Company.pptMemorandum Of Association Constitution of Company.ppt
Memorandum Of Association Constitution of Company.ppt
seri bangash
 
20240425_ TJ Communications Credentials_compressed.pdf
20240425_ TJ Communications Credentials_compressed.pdf20240425_ TJ Communications Credentials_compressed.pdf
20240425_ TJ Communications Credentials_compressed.pdf
tjcomstrang
 
ModelingMarketingStrategiesMKS.CollumbiaUniversitypdf
ModelingMarketingStrategiesMKS.CollumbiaUniversitypdfModelingMarketingStrategiesMKS.CollumbiaUniversitypdf
ModelingMarketingStrategiesMKS.CollumbiaUniversitypdf
fisherameliaisabella
 
Tata Group Dials Taiwan for Its Chipmaking Ambition in Gujarat’s Dholera
Tata Group Dials Taiwan for Its Chipmaking Ambition in Gujarat’s DholeraTata Group Dials Taiwan for Its Chipmaking Ambition in Gujarat’s Dholera
Tata Group Dials Taiwan for Its Chipmaking Ambition in Gujarat’s Dholera
Avirahi City Dholera
 
ikea_woodgreen_petscharity_cat-alogue_digital.pdf
ikea_woodgreen_petscharity_cat-alogue_digital.pdfikea_woodgreen_petscharity_cat-alogue_digital.pdf
ikea_woodgreen_petscharity_cat-alogue_digital.pdf
agatadrynko
 
RMD24 | Retail media: hoe zet je dit in als je geen AH of Unilever bent? Heid...
RMD24 | Retail media: hoe zet je dit in als je geen AH of Unilever bent? Heid...RMD24 | Retail media: hoe zet je dit in als je geen AH of Unilever bent? Heid...
RMD24 | Retail media: hoe zet je dit in als je geen AH of Unilever bent? Heid...
BBPMedia1
 
Kseniya Leshchenko: Shared development support service model as the way to ma...
Kseniya Leshchenko: Shared development support service model as the way to ma...Kseniya Leshchenko: Shared development support service model as the way to ma...
Kseniya Leshchenko: Shared development support service model as the way to ma...
Lviv Startup Club
 
Project File Report BBA 6th semester.pdf
Project File Report BBA 6th semester.pdfProject File Report BBA 6th semester.pdf
Project File Report BBA 6th semester.pdf
RajPriye
 
Buy Verified PayPal Account | Buy Google 5 Star Reviews
Buy Verified PayPal Account | Buy Google 5 Star ReviewsBuy Verified PayPal Account | Buy Google 5 Star Reviews
Buy Verified PayPal Account | Buy Google 5 Star Reviews
usawebmarket
 
Affordable Stationery Printing Services in Jaipur | Navpack n Print
Affordable Stationery Printing Services in Jaipur | Navpack n PrintAffordable Stationery Printing Services in Jaipur | Navpack n Print
Affordable Stationery Printing Services in Jaipur | Navpack n Print
Navpack & Print
 
VAT Registration Outlined In UAE: Benefits and Requirements
VAT Registration Outlined In UAE: Benefits and RequirementsVAT Registration Outlined In UAE: Benefits and Requirements
VAT Registration Outlined In UAE: Benefits and Requirements
uae taxgpt
 
一比一原版加拿大渥太华大学毕业证(uottawa毕业证书)如何办理
一比一原版加拿大渥太华大学毕业证(uottawa毕业证书)如何办理一比一原版加拿大渥太华大学毕业证(uottawa毕业证书)如何办理
一比一原版加拿大渥太华大学毕业证(uottawa毕业证书)如何办理
taqyed
 
What is the TDS Return Filing Due Date for FY 2024-25.pdf
What is the TDS Return Filing Due Date for FY 2024-25.pdfWhat is the TDS Return Filing Due Date for FY 2024-25.pdf
What is the TDS Return Filing Due Date for FY 2024-25.pdf
seoforlegalpillers
 
falcon-invoice-discounting-a-premier-platform-for-investors-in-india
falcon-invoice-discounting-a-premier-platform-for-investors-in-indiafalcon-invoice-discounting-a-premier-platform-for-investors-in-india
falcon-invoice-discounting-a-premier-platform-for-investors-in-india
Falcon Invoice Discounting
 
April 2024 Nostalgia Products Newsletter
April 2024 Nostalgia Products NewsletterApril 2024 Nostalgia Products Newsletter
April 2024 Nostalgia Products Newsletter
NathanBaughman3
 
Introduction to Amazon company 111111111111
Introduction to Amazon company 111111111111Introduction to Amazon company 111111111111
Introduction to Amazon company 111111111111
zoyaansari11365
 

Recently uploaded (20)

anas about venice for grade 6f about venice
anas about venice for grade 6f about veniceanas about venice for grade 6f about venice
anas about venice for grade 6f about venice
 
Digital Transformation and IT Strategy Toolkit and Templates
Digital Transformation and IT Strategy Toolkit and TemplatesDigital Transformation and IT Strategy Toolkit and Templates
Digital Transformation and IT Strategy Toolkit and Templates
 
Unveiling the Secrets How Does Generative AI Work.pdf
Unveiling the Secrets How Does Generative AI Work.pdfUnveiling the Secrets How Does Generative AI Work.pdf
Unveiling the Secrets How Does Generative AI Work.pdf
 
ikea_woodgreen_petscharity_dog-alogue_digital.pdf
ikea_woodgreen_petscharity_dog-alogue_digital.pdfikea_woodgreen_petscharity_dog-alogue_digital.pdf
ikea_woodgreen_petscharity_dog-alogue_digital.pdf
 
Memorandum Of Association Constitution of Company.ppt
Memorandum Of Association Constitution of Company.pptMemorandum Of Association Constitution of Company.ppt
Memorandum Of Association Constitution of Company.ppt
 
20240425_ TJ Communications Credentials_compressed.pdf
20240425_ TJ Communications Credentials_compressed.pdf20240425_ TJ Communications Credentials_compressed.pdf
20240425_ TJ Communications Credentials_compressed.pdf
 
ModelingMarketingStrategiesMKS.CollumbiaUniversitypdf
ModelingMarketingStrategiesMKS.CollumbiaUniversitypdfModelingMarketingStrategiesMKS.CollumbiaUniversitypdf
ModelingMarketingStrategiesMKS.CollumbiaUniversitypdf
 
Tata Group Dials Taiwan for Its Chipmaking Ambition in Gujarat’s Dholera
Tata Group Dials Taiwan for Its Chipmaking Ambition in Gujarat’s DholeraTata Group Dials Taiwan for Its Chipmaking Ambition in Gujarat’s Dholera
Tata Group Dials Taiwan for Its Chipmaking Ambition in Gujarat’s Dholera
 
ikea_woodgreen_petscharity_cat-alogue_digital.pdf
ikea_woodgreen_petscharity_cat-alogue_digital.pdfikea_woodgreen_petscharity_cat-alogue_digital.pdf
ikea_woodgreen_petscharity_cat-alogue_digital.pdf
 
RMD24 | Retail media: hoe zet je dit in als je geen AH of Unilever bent? Heid...
RMD24 | Retail media: hoe zet je dit in als je geen AH of Unilever bent? Heid...RMD24 | Retail media: hoe zet je dit in als je geen AH of Unilever bent? Heid...
RMD24 | Retail media: hoe zet je dit in als je geen AH of Unilever bent? Heid...
 
Kseniya Leshchenko: Shared development support service model as the way to ma...
Kseniya Leshchenko: Shared development support service model as the way to ma...Kseniya Leshchenko: Shared development support service model as the way to ma...
Kseniya Leshchenko: Shared development support service model as the way to ma...
 
Project File Report BBA 6th semester.pdf
Project File Report BBA 6th semester.pdfProject File Report BBA 6th semester.pdf
Project File Report BBA 6th semester.pdf
 
Buy Verified PayPal Account | Buy Google 5 Star Reviews
Buy Verified PayPal Account | Buy Google 5 Star ReviewsBuy Verified PayPal Account | Buy Google 5 Star Reviews
Buy Verified PayPal Account | Buy Google 5 Star Reviews
 
Affordable Stationery Printing Services in Jaipur | Navpack n Print
Affordable Stationery Printing Services in Jaipur | Navpack n PrintAffordable Stationery Printing Services in Jaipur | Navpack n Print
Affordable Stationery Printing Services in Jaipur | Navpack n Print
 
VAT Registration Outlined In UAE: Benefits and Requirements
VAT Registration Outlined In UAE: Benefits and RequirementsVAT Registration Outlined In UAE: Benefits and Requirements
VAT Registration Outlined In UAE: Benefits and Requirements
 
一比一原版加拿大渥太华大学毕业证(uottawa毕业证书)如何办理
一比一原版加拿大渥太华大学毕业证(uottawa毕业证书)如何办理一比一原版加拿大渥太华大学毕业证(uottawa毕业证书)如何办理
一比一原版加拿大渥太华大学毕业证(uottawa毕业证书)如何办理
 
What is the TDS Return Filing Due Date for FY 2024-25.pdf
What is the TDS Return Filing Due Date for FY 2024-25.pdfWhat is the TDS Return Filing Due Date for FY 2024-25.pdf
What is the TDS Return Filing Due Date for FY 2024-25.pdf
 
falcon-invoice-discounting-a-premier-platform-for-investors-in-india
falcon-invoice-discounting-a-premier-platform-for-investors-in-indiafalcon-invoice-discounting-a-premier-platform-for-investors-in-india
falcon-invoice-discounting-a-premier-platform-for-investors-in-india
 
April 2024 Nostalgia Products Newsletter
April 2024 Nostalgia Products NewsletterApril 2024 Nostalgia Products Newsletter
April 2024 Nostalgia Products Newsletter
 
Introduction to Amazon company 111111111111
Introduction to Amazon company 111111111111Introduction to Amazon company 111111111111
Introduction to Amazon company 111111111111
 

Batch production Part 1.pptx

  • 1.
  • 2. 1. Create Master Data -Go to Slide 2. Quotation from Vendor -Go to Slide 3. Purchase Order to Vendor -Go to Slide 4. Purchase Invoice from Vendor after receiving material -Go to Slide 5. GRN for received material -Go to Slide 6. Sample Test Report (ATR) -Go to Slide 7. Payment to vendor -Go to Slide 8. Stock Updated after GRN -Go to Slide Batch Production Process – Part 1 Purchase & Stock creation of Raw/Pack Material
  • 3. Master Data Create Item, Customer , Vendor, Equipment , Notes Quotation from Vendor Create RFQ of type Vendor Save & Submit for Quotation Purchase Order Create PO to Vendor for raw material Purchase Invoice Create PI from Vendor after receiving raw material GRN Create GRN for Received Material ATR Create sample test report for item. Payment Create Payable for Vendor Payment Stock updated Check Item for Updated Stock after GRN Process Flow Chart
  • 4. •To Create Item Click on Item master , and then click on plus icon for add new Item. 2.Click on plus Icon for Creating New Item. 1.Click on Item master . Creation of Master Data Create Item Master
  • 5. 1.Click on type of Item. 2.Select the Type of Item . 3.Click on Select icon. • Click on type of item and select item type from open window. • Click on select icon. Creation of Master Data
  • 6. 1.Select the Status of Item .2.Fill all the Details such as item no,name,description. • For create item fill the item details such as item number , code and description. Creation of Master Data
  • 7. 1.Click on Comments/notes tab. 3.Write Comments 4.Click on Select icon. 2.Click on plus Icon . • To add notes Click on notes tab ,Write a note and save it. Creation of Master Data
  • 8. Creation of Master Data • Note is added successfully in item master. 1.Note is added in item master.
  • 9. • To add AML click on AML tab and select the manufacturer from open window and click on select icon. 1.Click on AML tab. 3.Select the manufacturer 4.Click on Select icon. 2.Click on plus Icon . aa
  • 10. • AML is added successfully in item master. 1.AML is added in item master.
  • 11. 1.Click on Item tab. 3.Select the Item. 4.Click on Select icon. 2.Click on plus Icon . 5.Click on Save and Close Icon Button • To add item click on item tab click plus icon select the item and click on select icon then click on save and close icon. Creation of Master Data
  • 12. Creation of Master Data • Item is added successfully in item master. 1.Item is added in item master.
  • 13. • To Promote the Item master click on item and then click promote icon. 2.Click on promote item. 1.Click on item . Creation of Master Data
  • 14. • To approved the Item master select the state from open window. 1.Click on approved . 2.Click on select. Creation of Master Data
  • 15. • Approved state of Item . Creation of Master Data 1.Approved state of item.
  • 16. Creation of Master Data Create Customer •To create customer click on customer and click plus icon to create new. 1.Click on customer. 2.Click on plus icon to create new.
  • 17. Creation of Master Data 1.Click on customer type. 2.Select the classification. 3.Click on select icon. • Click on customer type and select the classification from open window •Click select icon.
  • 18. Creation of Master Data •To create customer fill the customer details such as name , contact, address ,etc . • click on save and close icon. 2.Click on save and close icon. 1.Fill the details.
  • 19. 1.Click on vendor. 2.Click on plus Icon for Creating New Create Vender Creation of Master Data • To create vender click on vendor and click plus icon to create new.
  • 20. Creation of Master Data 1.Fill all the details correctly. •To Create Vendor fill the details such as name ,contact ,address.
  • 21. Creation of Master Data 1.Click on Rating tab. 2.Click on plus Icon . 4.Click on Save and Close Icon Button 3.Select the Rating. • Click on rating tab and plus icon then select rating . •click on save and close icon.
  • 22. Creation of Master Data Create Equipment •To create Equipment click on equipment and click on plus icon to create new. 1.Click on Equipment. 2.Click on plus icon .
  • 23. Creation of Master Data • Click on equipment for and select the classification from open window. •Click on select icon. 1.Click on equipment for. 2.Select the classification. 3.Click on select icon.
  • 24. Creation of Master Data • To create equipment fill the equipment details such as name , type ,Description. • Click on save and close icon. 1.Fill the Equipment details. 2.Click on save and close icon.
  • 25. Create Notes 1.Click on Notes 2.Click on plus Icon for Creating New Creation of Master Data • To create notes click on notes and then plus icon to add new .
  • 26. 1.Select the note type. Creation of Master Data • To create notes select notes type.
  • 27. 1.Fill all the details . 2.Click on Save and Close Icon Button Creation of Master Data • To create notes fill the notes details and click on save and close icon
  • 28. RFQ to Vendor Creation Of RFQ to Vendor 2.Click on plus icon . 1.Click on RFQ. • To create RFQ to vendor, click on RFQ and then plus icon for create new.
  • 29. Creation Of Quotation from Vendor 2.Select the Classification. 1.Click on Type. 3.Click on select icon. •To create RFQ click on type and select classification.
  • 30. Creation Of RFQ to Vendor • Enter the details for RFQ such as Vendor , to add vendor click on vendor field and select vendor from opened window then select vendor 1.Click Vendor filed “...” sign 2.Select vendor from opened dialog 3.Click on select icon
  • 31. Creation Of RFQ to Vendor • Vendor added to rfq , done same step to add tooling po and part po then enter cost for tool, part and total cost calculated automatically 1.Selected vendor added 2.Select part , tooling po , part po using same step of add vendor 3.Enter tool cost and part cost and total cost calculated automatically
  • 32. Creation Of RFQ to Vendor • To add attachment to rfq, Change pick related option to create related then click on plus icon and select file from opened dialog after that click on select icon 1.Change Pick Related to Create Related 2.Click on plus icon 3.Choose file from opened window 4.Click on Open button
  • 33. Creation Of RFQ to Vendor • Attachment added successfully, now click on save and close icon 1.Click on save and close icon
  • 34. Creation Of RFQ to Vendor • For RFQ Report, click on Report Menu and then select RFQ Report option 1.Click on Report menu 2.Click on RFQ Report option
  • 35. Creation Of RFQ to Vendor • Select from and to date from opened window and click on Run Report button 1.Select From and To date by click on textbox and select date from opened calendar 2.Click on Run Report button
  • 36. Creation Of Quotation from Vendor RFQ Report
  • 37. Quotation from Vendor Creation Of Quotation from Vendor • To Promote RFQ to submitted state, click on promote icon 1.Click on Promote icon
  • 38. Creation Of Quotation from Vendor • Select state from opened window and click on select icon. 1.Select state from opened window 2.Click on Select icon
  • 39. Creation Of Quotation from Vendor • RFQ submitted and type changed to Quotation.
  • 40. 1.Click on Purchase Order. 2.Click on plus Icon for Creating New Purchase Order to Vendor Creation Of Purchase Order To Vendor • To create purchase order to vendor click on purchase order and then plus icon.
  • 41. 3.Click on Select icon. 1.Click on PO type. 2.Select the PO. Creation Of Purchase Order To Vendor • Click on PO type and select the type from opened window, then click on select icon
  • 42. 1.Click on Vendor. 2.Select the vendor. 3.Click on Select icon. Creation Of Purchase Order To Vendor • To add vendor, click on vendor field and select the vendor then click on select icon
  • 43. 1.Click on Authorised By. 2.Select the User. 3.Click on Select icon. Creation Of Purchase Order To Vendor • Vendor added, now to add authorised by,click on Authorised By field and select user from opened window then click on select icon
  • 44. 3.Select the Item. 4.Click on Select icon. 1.Click on Item tab. Creation Of Purchase Order To Vendor • To add item, click on Item tab, then plus icon and select item from opened window then click on select icon 2.Click on plus icon
  • 45. Creation Of Purchase Order To Vendor • After adding item, enter qty, rate , gst rate details and amount , igst, cgst, sgst, gross total calculated automatically 1.Enter qty, rate and gst rate. 2.Amount, IGST, CGSt, SGST and Gross total calculated automatically
  • 46. Creation Of Purchase Order To Vendor •Enter amt of transportation and gst rate, gross transportation calculated and gross total updated automatically 1.Enter amt of transportation and gst rate 2.Transportation calculated and gross total updated
  • 47. Creation Of Purchase Order To Vendor • To add advance in PO, select Advance tab and click on plus icon then enter date and advance amount 1.Enter advance amt, date 2.Advance amt and Amount remaining calculated automatically
  • 48. Creation Of Purchase Order To Vendor • Click on save and close icon. 1.Click on save and close icon
  • 49. Creation Of Purchase Order To Vendor • Click on Report menu then select and click on Po Report option. 1.Click Report menu 2.Select and click on PO Report option
  • 50. Creation Of Purchase Order To Vendor • Purchase Order Report
  • 51. 1.Click on Purchase Invoice. 2.Click on plus Icon. Create Purchase Invoice from Vendor after receiving material Creation Of Purchase Invoice • To Create Purchase Invoice from Vendor click on Purchase Invoice and plus icon.
  • 52. 2.Select the Type. 3.Click on Select icon. 1.Click on Type. Creation Of Purchase Invoice •Click on type field and then select type from opened window and click on select icon
  • 53. 2.Select the Vendor. 3.Click on Select icon. 1.Click on Vendor. Creation Of Purchase Invoice •To Select the Vendor, click on vendor field and select vendor from opened window then click on select icon .
  • 54. 1.Click on part tab. 2.Click on plus Icon for Add New Creation Of Purchase Invoice •To add the part, click on part tab and click on plus icon.
  • 55. 2.Select the Part. 3.Click on Select icon. 1.Click on Part. Creation Of Purchase Invoice • To add the part , click on Part field and select part from opened window then click on select icon.
  • 56. Creation Of Purchase Invoice •Add PO by following same step done for part, then rate is automatically filled from selected po 1.After selecting po , rate filled automatically from selected po
  • 57. Creation Of Purchase Invoice •Enter qty, gst rate and amount, IGST, CGST, SGST, Gross total calculated automatically 1.Enter qty, gst rate and amount, igst, cgst, sgst gross total calculated automatically
  • 58. 1.Enter amt and gst rate Creation Of Purchase Invoice •Fill the amt of transportation and gst rate, then transportation amount calculated and gross total updated automatically 2.Transportation calculated and gross total updated
  • 59. 1.Click on GRN. 2.Click on plus Icon for Creating New GRN For Received Material Creation Of GRN For Received Material • To create GRN Click on GRN and then plus icon for add new .
  • 60. 1.Click on Type. 2.Select the Type. 3.Click on Select icon. Creation Of GRN For Received Material • Click on type field and select type of material from opened window
  • 61. 1.Select the PO. 2.Select the Location. 4.Select the Supplier. 5.Click on Select icon. 3.Click on Supplier. Creation Of GRN For Received Material •Enter po details and the other details and select the supplier by click on supplier field and select supplier from opened window then click on select icon
  • 62. 1.Click on Date. 2.Select the Date. Creation Of GRN For Received Material •Select date by click on date field and select date from opened calendar.
  • 63. 1.Click on Item. 2.Select the Item. 3.Click on Select icon. Creation Of GRN For Received Material • To add the Item in GRN , click on Item field and select item from opened window then click on select icon
  • 64. 3.Click on Select icon. 1.Click on Manufactur er. 2.Select the Manufactur er. Creation Of GRN For Received Material • Item added to grn, now to add manufacturer , click on manufacturer field and select manufacturer from opened window then click on select icon
  • 65. 3.Select the Item. 4.Click on Select icon. 1.Select Goods received tab. 2.Click on plus Icon . Creation Of GRN For Received Material • To add the item for goods received , select goods received tab , click on plus icon and select item from opened window then click on select icon
  • 66. 1.Fill the details such as batch no, exp, mfg date, quantity 2. Total received qty calculated automatically Creation Of GRN For Received Material • Fill the details for goods received such as batch no, mfg, exp date,quantity etc. .
  • 67. Creation Of GRN For Received Material • Click on save and close icon. 1.Click on save and close icon
  • 68. 1.Click on Report. Creation Of GRN For Received Material • For GRN Report click on report menu then select and click GRN Report option. 2.Select and click on GRN Report option
  • 69. Creation Of GRN For Received Material GRN Report
  • 70. 2.Click on promote Item. 1.Click on save Item. Creation Of GRN For Received Material • To promote GRN, select grn from record then click on promote option
  • 71. 1.Select the state. 2.Click on Select icon. Creation Of GRN For Received Material Select state from opened window then click on select icon
  • 72. 1.Select the state. 2.Click on Select icon. Creation Of GRN For Received Material •Select approved state to promote grn to approved state.
  • 73. 1.Approved GRN state . Creation Of GRN For Received Material •GRN item approved successfully.
  • 74. Creation Of Sample Test Report • To create sample test report click on ATR and add new . 1.Click on sample test (ATR. 2.Click on plus icon.
  • 75. Creation Of Sample Test Report • Click on Sample type and select type from opened window and click on select icon 2.Select the type. 1.Click on Sample type. 2.Click on Select icon.
  • 76. Creation Of Sample Test Report 1.Fill the Details such as invoice no, item, grn no etc. 2.Click on save. • Fill the details such as date, invoice no, grn no etc. and click on save icon
  • 77. Creation Of Sample Test Report • To add parameter, select parameter tab , click on plus icon and select parameter from opened window then click on select icon. 1.Select Parameter Tab 2.Click on plus icon 3.Select parameter 4.Click on select icon
  • 78. Creation Of Sample Test Report • Parameter added successfully to ATR then click on save icon. 1.Click on save icon
  • 79. Creation Of Sample Test Report 1.Click on Report. • To open report, click on report menu then select and click Sample Test Report. 2.Select and click on Sample Test Report
  • 80. Report for Sample Test Report(ATR) Creation Of Sample Test Report
  • 81. Creation Of Sample Test Report 2.Click on save and close icon. • Click on save and close icon.
  • 82. Payment to vendor Creation Of Payment To Vendor 1.Click on payables. 2.Click on plus icon. • To create payment click on payables and add new.
  • 83. Creation Of Payment To Vendor 2.Click on save and close icon. 1.Fill the details such as vendor, payment for, payment amt etc. • Fill the payment details such as vendor, payment for, amt and click on save and close icon.
  • 84. 1.Quantity Received from GRN. Stock Updated after GRN Creation Of Stock Update • The item quantity updates after GRN .