This document discusses various techniques for rendering audio files in the REAPER audio workstation software. It explains how to select tracks for rendering, choose rendering options like sample rate and bit depth, name and save the rendered file, and monitor the rendering process. Key areas covered include the master mix option for rendering all tracks, options for stereo vs mono and different sample rates and quality settings, and ensuring the rendered file is saved in the desired location once complete.
![James Fox
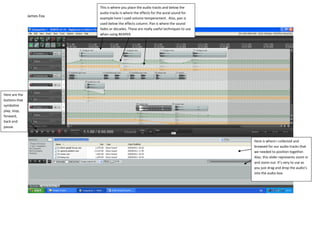
In this print screen the selection of rendering a file is shown.
Firstly, when rendering its accessional that master mix is picked
as it illustrates all of the track rather than specific tracks. There
are other options such as Stems which represents selected
tracks and the other alternative is Master Mix and Stems. This
portrays where to save the rendered file when you’ve finished.
This is where you choose the name for your composition. Just
below the name is clarification for the name of your
composition.
Here the options of choosing stereo or mono are impeccable
because stereo represents two and mono is only one. Also the
Sample rate depicts how much of your composition you would
like to render. Resample mode tells you what quality you what
your tracks and the render to be. I’ve picked ‘Better [192pt Sinc
– SLOW] ‘but there is other qualities that are better than the
one I’ve used such as ‘Extreme [512pt HQ Sinc – NON-
REALTIME]’. WAV also alters the quality of your compostion and
the tracks inside it but internally depends on which one you pick
for example I’ve kept mine on its original format but could have
tempered with it and made it to FLAC or MP3 but WAV is a good
quality Output format. Also WAV bit depth modifies the quality
I’ve kept it on 16 bit PCM but could be changed to a higher
standard such as 64 bit FP which is defiantly of a enhanced
criterion.](https://image.slidesharecdn.com/audiosequencingannotations-120621054810-phpapp01/85/Audio-sequencing-annotations-2-320.jpg)


![Questionare for magazine_powerpoint[1]](https://cdn.slidesharecdn.com/ss_thumbnails/questionareformagazinepowerpoint1-130620051535-phpapp01-thumbnail.jpg?width=640&height=640&fit=bounds)


