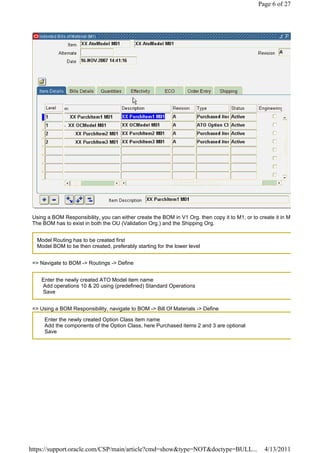
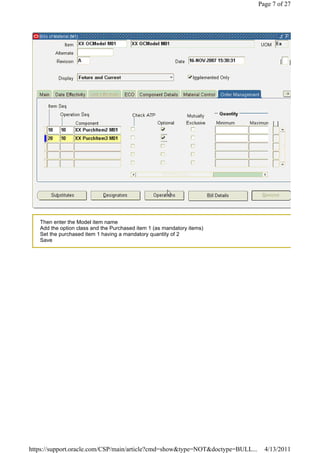
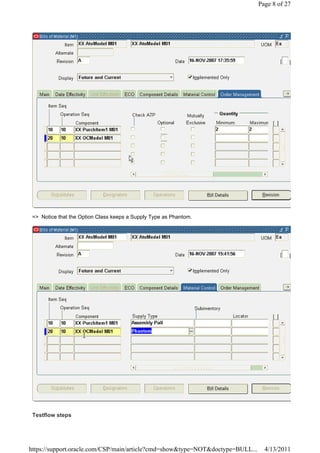
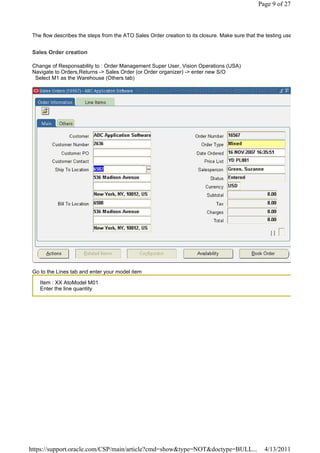
The document provides steps to set up and test an Assemble-to-Order (ATO) configuration cycle in Oracle Order Management, including creating items, assigning prices, building bills of materials, generating configured items from sales orders, progressing discrete jobs, and closing out order lines. Screenshots illustrate each step of the process from order entry through fulfillment and invoicing.
![Page 1 of 27
ATO Configuration Cycle In Order Management [ID 844847.1]
Modified 07-OCT-2010 Type BULLETIN Status
In this Document
Purpose
Scope and Application
ATO Configuration Cycle In Order Management
Setup Steps
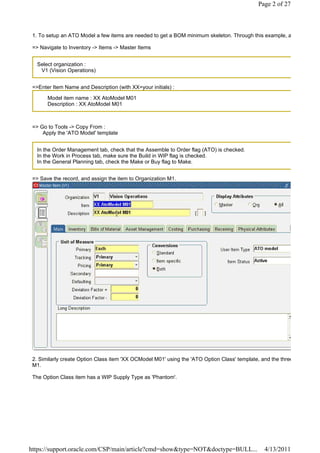
Create items
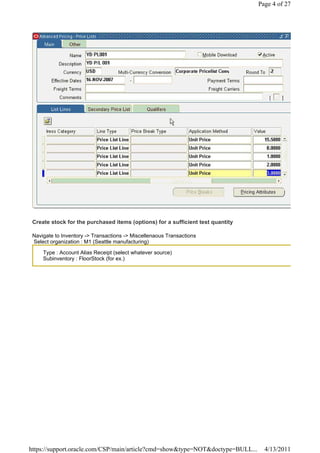
Assign a sales price to the newly created items
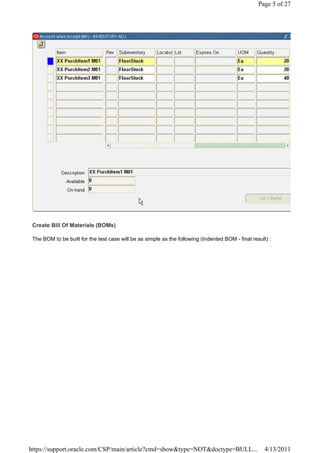
Create stock for the purchased items (options) for a sufficient test quantity
Create Bill Of Materials (BOMs)
Testflow steps
Sales Order creation
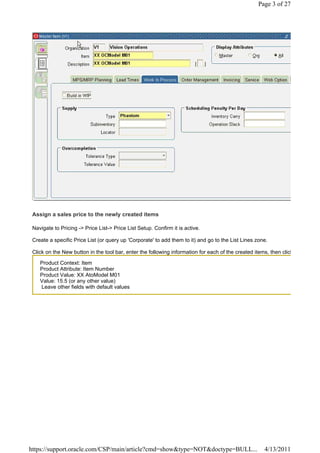
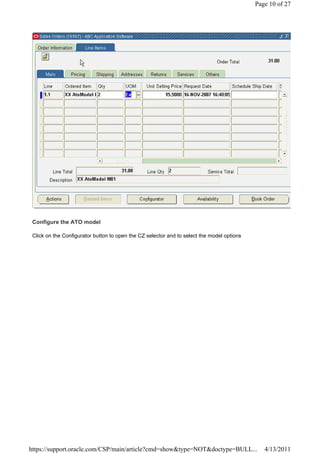
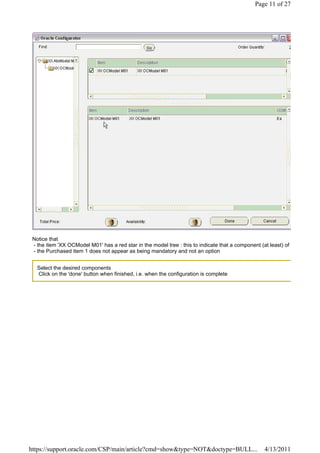
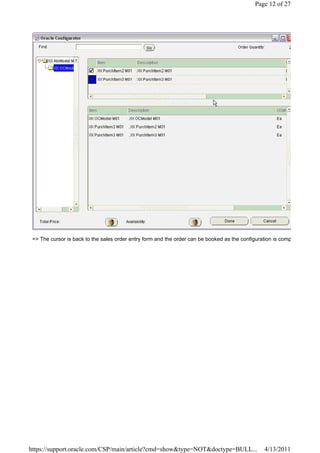
Configure the ATO model
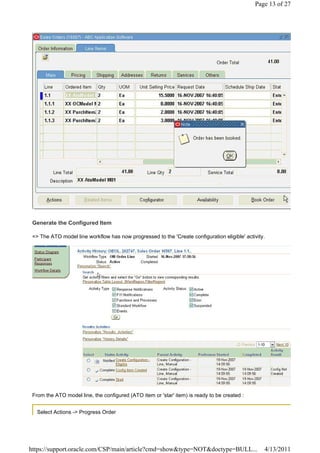
Generate the Configured Item
Generate the WIP discrete job
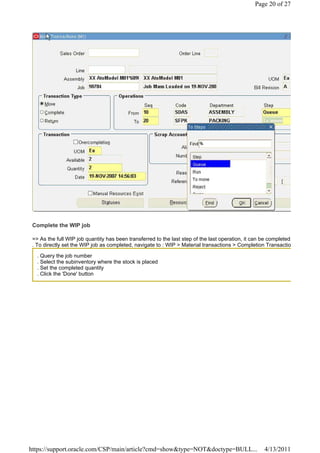
Progress the WIP job
Complete the WIP job
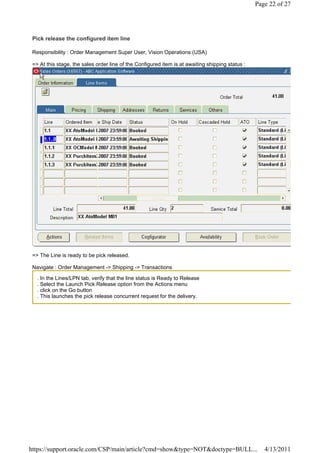
Pick release the configured item line
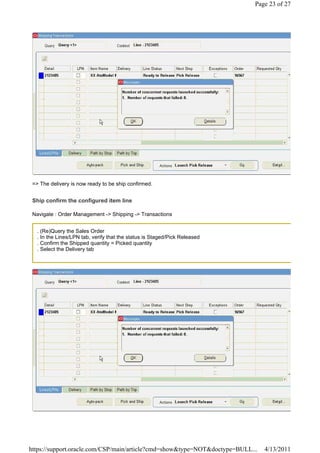
Ship confirm the configured item line
Close the configured item line and invoicing process
References
Applies to:
Oracle Order Management - Version: 11.5.7 to 12.1.1 - Release: 11.5 to
Oracle Order Management - Version: 11.5.8 to 12.1.1 [Release: 11.5 to ]
Information in this document applies to any platform.
Purpose
The purpose of this bulletin is to provide Oracle Customers with a good understanding and the to build a test
Scope and Application
This document helps the Support Engineers and Oracle Customers to understand the setup steps with the re
Screen shots of setups and test case in this note were done in an R11.5.10 instance on an Oracle Internal Te
ATO Configuration Cycle In Order Management
Setup Steps
Login
User : OPERATIONS / WELCOME
Responsibility : Manufacturing and Distribution Manager
Create items
https://support.oracle.com/CSP/main/article?cmd=show&type=NOT&doctype=BULL... 4/13/2011](https://image.slidesharecdn.com/atocycle-121129235809-phpapp01/85/Ato-cycle-1-320.jpg)
![Page 1 of 27
ATO Configuration Cycle In Order Management [ID 844847.1]
Modified 07-OCT-2010 Type BULLETIN Status
In this Document
Purpose
Scope and Application
ATO Configuration Cycle In Order Management
Setup Steps
Create items
Assign a sales price to the newly created items
Create stock for the purchased items (options) for a sufficient test quantity
Create Bill Of Materials (BOMs)
Testflow steps
Sales Order creation
Configure the ATO model
Generate the Configured Item
Generate the WIP discrete job
Progress the WIP job
Complete the WIP job
Pick release the configured item line
Ship confirm the configured item line
Close the configured item line and invoicing process
References
Applies to:
Oracle Order Management - Version: 11.5.7 to 12.1.1 - Release: 11.5 to
Oracle Order Management - Version: 11.5.8 to 12.1.1 [Release: 11.5 to ]
Information in this document applies to any platform.
Purpose
The purpose of this bulletin is to provide Oracle Customers with a good understanding and the to build a test
Scope and Application
This document helps the Support Engineers and Oracle Customers to understand the setup steps with the re
Screen shots of setups and test case in this note were done in an R11.5.10 instance on an Oracle Internal Te
ATO Configuration Cycle In Order Management
Setup Steps
Login
User : OPERATIONS / WELCOME
Responsibility : Manufacturing and Distribution Manager
Create items
https://support.oracle.com/CSP/main/article?cmd=show&type=NOT&doctype=BULL... 4/13/2011](https://image.slidesharecdn.com/atocycle-121129235809-phpapp01/75/Ato-cycle-1-2048.jpg)