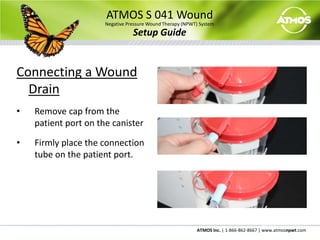
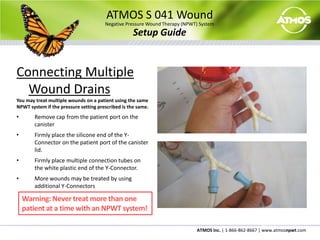
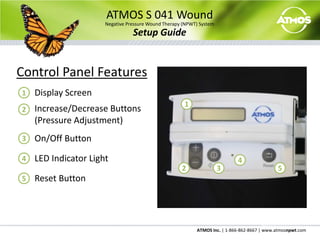
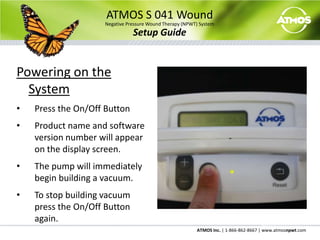
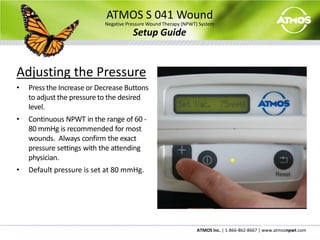
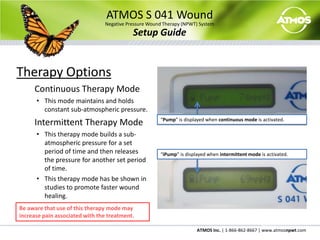
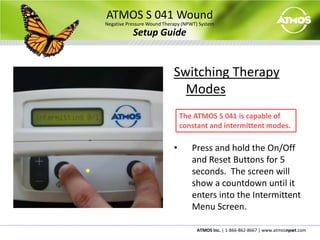
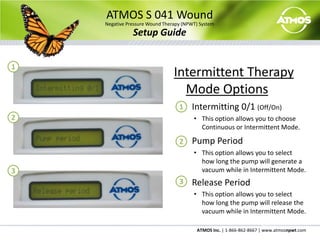
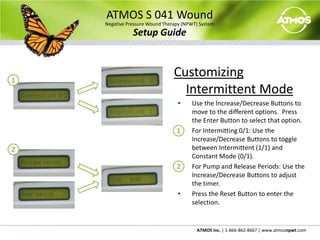
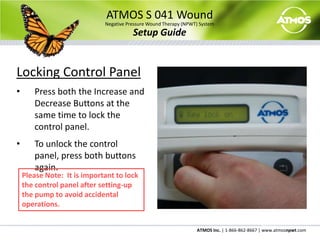
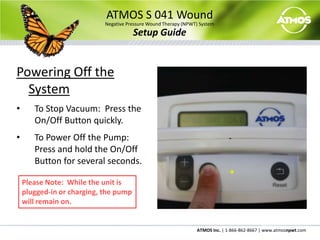
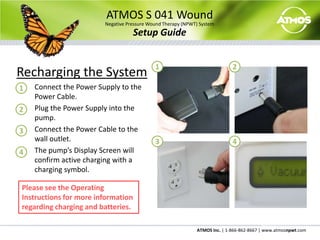
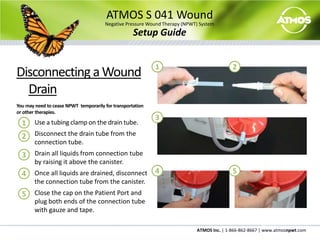
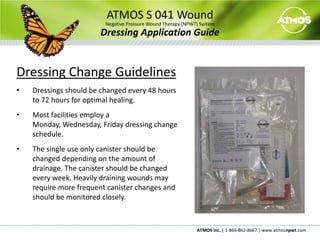
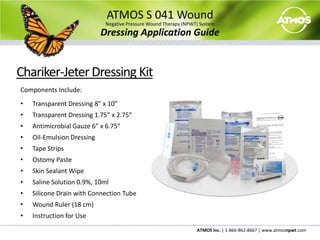
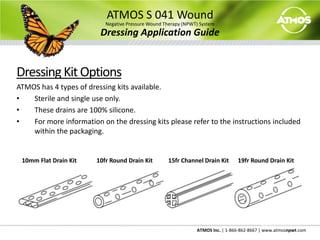
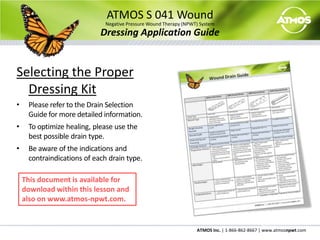
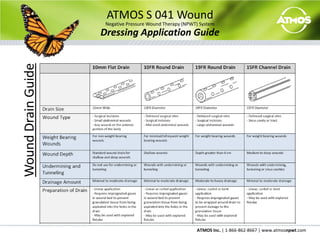
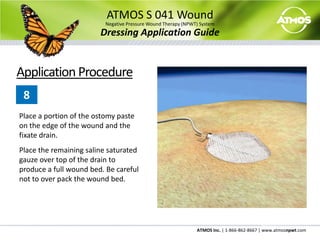
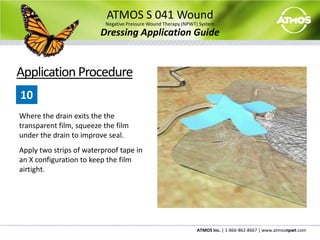
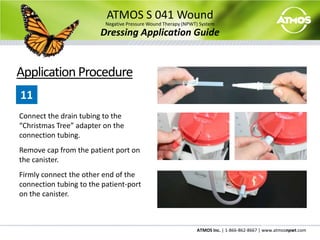
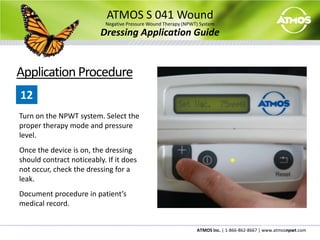
ATMOS S 041 WoundNegative Pressure Wound Therapy (NPWT) SystemSetup Guide© 2009 ATMOS Inc.  All Rights Reserved. S041.SG.V1.R0.080409.US
ATMOS S 041 WoundNegative Pressure Wound Therapy (NPWT) SystemSetup GuideSetup GuideNotice to Clinicians The following content and procedural suggestions are intended for use with an ATMOS Negative Pressure Wound Therapy (NPWT) system. These guidelines are not intended as a guarantee certain clinical results, outcomes or system performance nor does ATMOS guarantee the efficacy of their NPWT systems. These guidelines are recommendations to help clinicians to integrate an ATMOS NPWT system into preexisting wound-treatment protocols. Please consult with the patient’s attending physician for specific instructions concerning the patient’s individual wound treatment. Before using an ATMOS NPWT system please refer to the following documents:Clinical Protocols ManualProduct Operating InstructionsReference Guides Please be aware of the following sections from the Product Operating Instructions before using the ATMOS S041 Wound NPWT system on a patient.IndicationsContraindicationsWarnings Precautions In event of a medical emergency, immediately dial 911 for emergency medical support. Additional product information can be obtained at www.atmos-npwt.com or by calling ATMOS at 1-866-862-8667. Federal law restricts this device to sale or rental by or on the order of a physician.
ATMOS S 041 WoundNegative Pressure Wound Therapy (NPWT) SystemSetup GuideComponents	Pump	Vacuum Tube	Hydrophobic Canister211233
ATMOS S 041 WoundNegative Pressure Wound Therapy (NPWT) SystemSetup GuideOther Components	Shoulder Strap	Carrying Bag	Universal HolderFor use with Beds, Wheel Chairs and IV Poles	Power Supply and Power Cable12123344
ATMOS S 041 WoundNegative Pressure Wound Therapy (NPWT) SystemSetup GuidePlace the Canister	The patient port of the canister should be facing toward the patient.	The canister should have a snug fit and will be completely level.	The pour-spout should be closed.3Make sure you are using an 800cc Hydrophobic Canister!11223
ATMOS S 041 WoundNegative Pressure Wound Therapy (NPWT) SystemSetup GuideConnect Vacuum Tube	Connect the Vacuum Tube to the port on the pump.	Connect the other end of the Vacuum Tube to the Vacuum Port on the top of the canister.This tube does not require a filter.  ATMOS uses canister which uses an integrated filter.1122
ATMOS S 041 WoundNegative Pressure Wound Therapy (NPWT) SystemSetup GuideConnecting a Wound DrainRemove cap from the patient port on the canister
Firmly place the connection tube on the patient port.ATMOS S 041 WoundNegative Pressure Wound Therapy (NPWT) SystemSetup GuideConnecting Multiple Wound DrainsYou may treat multiple wounds on a patient using the same NPWT system if the pressure setting prescribed is the same.Remove cap from the patient port on the canister
Firmly place the silicone end of the Y-Connector on the patient port of the canister lid.
Firmly place multiple connection tubes on the white plastic end of the Y-Connector.
More wounds may be treated by using additional Y-ConnectorsWarning: Never treat more than one patient at a time with an NPWT system!
ATMOS S 041 WoundNegative Pressure Wound Therapy (NPWT) SystemSetup GuideControl Panel Features	Display Screen	Increase/Decrease Buttons (Pressure Adjustment)	On/Off Button	LED Indicator Light	Reset Button1123442535
ATMOS S 041 WoundNegative Pressure Wound Therapy (NPWT) SystemSetup GuidePowering on the SystemPress the On/Off Button
Product name and software version number will appear on the display screen.
The pump will immediately begin building a vacuum.
To stop building vacuum press the On/Off Button again.ATMOS S 041 WoundNegative Pressure Wound Therapy (NPWT) SystemSetup GuideAdjusting the PressurePress the Increase or Decrease Buttons to adjust the pressure to the desired level.
Continuous NPWT in the range of 60 - 80 mmHg is recommended for most wounds.  Always confirm the exact pressure settings with the attending physician.
Default pressure is set at 80 mmHg.ATMOS S 041 WoundNegative Pressure Wound Therapy (NPWT) SystemSetup GuideTherapy OptionsContinuous Therapy ModeThis mode maintains and holds constant sub-atmospheric pressure.Intermittent Therapy ModeThis therapy mode builds a sub-atmospheric pressure for a set period of time and then releases the pressure for another set period of time.
This therapy mode has be shown in studies to promote faster wound healing. “Pump” is displayed when continuous mode is activated.“iPump” is displayed when intermittent mode is activated.Be aware that use of this therapy mode may increase pain associated with the treatment.
ATMOS S 041 WoundNegative Pressure Wound Therapy (NPWT) SystemSetup GuideSwitching Therapy ModesPress and hold the On/Off and Reset Buttons for 5 seconds.  The screen will show a countdown until it enters into the Intermittent Menu Screen.The ATMOS S 041 is capable of constant and intermittent modes.
ATMOS S 041 WoundNegative Pressure Wound Therapy (NPWT) SystemSetup GuideIntermittent Therapy  Mode OptionsIntermitting 0/1 (Off/On)This option allows you to choose Continuous or Intermittent Mode.Pump PeriodThis option allows you to select how long the pump will generate a vacuum while in Intermittent Mode.	Release PeriodThis option allows you to select how long the pump will release the vacuum while in Intermittent Mode.112233
ATMOS S 041 WoundNegative Pressure Wound Therapy (NPWT) SystemSetup GuideCustomizing Intermittent ModeUse the Increase/Decrease Buttons to move to the different options.  Press the Enter Button to select that option.  For Intermitting 0/1: Use the Increase/Decrease Buttons to toggle between Intermittent (1/1) and Constant Mode (0/1).For Pump and Release Periods: Use the Increase/Decrease Buttons to adjust the timer.  Press the Reset Button to enter the selection.1122
ATMOS S 041 WoundNegative Pressure Wound Therapy (NPWT) SystemSetup GuideLocking Control PanelPress both the Increase and Decrease Buttons at the same time to lock the control panel.
To unlock the control panel, press both buttons again.Please Note:  It is important to lock the control panel after setting-up the pump to avoid accidental operations.
ATMOS S 041 WoundNegative Pressure Wound Therapy (NPWT) SystemSetup GuidePowering Off the SystemTo Stop Vacuum:  Press the On/Off Button quickly.
To Power Off the Pump:  Press and hold the On/Off Button for several seconds.       Please Note:  While the unit is plugged-in or charging, the pump will remain on.
ATMOS S 041 WoundNegative Pressure Wound Therapy (NPWT) SystemSetup GuideRecharging the SystemConnect the Power Supply to the Power Cable.Plug the Power Supply into the pump.Connect the Power Cable to the wall outlet.The pump’s Display Screen will confirm active charging with a charging symbol.   12123344Please see the Operating Instructions for more information regarding charging and batteries.
ATMOS S 041 WoundNegative Pressure Wound Therapy (NPWT) SystemSetup GuideDisconnecting a Wound DrainYou may need to cease NPWT  temporarily for transportation or other therapies.	Use a tubing clamp on the drain tube.	Disconnect the drain tube from the connection tube.	Drain all liquids from connection tube by raising it above the canister.	Once all liquids are drained, disconnect the connection tube from the canister.  	Close the cap on the Patient Port and plug both ends of the connection tube with gauze and tape.1231234545
ATMOS S 041 WoundNegative Pressure Wound Therapy (NPWT) SystemSetup GuideCleaning and DisinfectingTo minimize the risk of infection, always use personal protective equipment when cleaning and  disinfecting ATMOS NPWT systems. Follow institutional or other written protocol for equipment cleaning and disinfecting, where applicable. ATMOS S 041 HousingThe housing can be wiped with a damp cloth or with a mild surface disinfectant such as Viragard or other EPA approved medical surface disinfectants. Do not use solvents. Liquids must not enter the device.If liquids have penetrated into the device, it must be inspected by an authorized service technician before being used again. Suction Canisters & TubingFor each new patient a new canister and tubing set is required. Canisters are single use only, and should be replaced weekly at a minimum.  Disposal of used canisters and tubing should follow your institutional protocols and/or local medical waste management protocols.
ATMOS S 041 WoundNegative Pressure Wound Therapy (NPWT) SystemDressing Application Guide© 2009 ATMOS Inc.  All Rights Reserved. S041.SG.V1.R0.080409.US
ATMOS S 041 WoundNegative Pressure Wound Therapy (NPWT) SystemDressing Application GuideDressing Change GuidelinesDressings should be changed every 48 hours to 72 hours for optimal healing.
Most facilities employ a Monday, Wednesday, Friday dressing change schedule.
The single use only canister should be changed depending on the amount of drainage. The canister should be changed every week. Heavily draining wounds may require more frequent canister changes and should be monitored closely.ATMOS S 041 WoundNegative Pressure Wound Therapy (NPWT) SystemDressing Application GuideChariker-Jeter Dressing KitComponents Include:Transparent Dressing 8” x 10”
Transparent Dressing 1.75” x 2.75”
Antimicrobial Gauze 6” x 6.75”
Oil-Emulsion Dressing
Tape Strips
Ostomy Paste
Skin Sealant Wipe
Saline Solution 0.9%, 10ml
Silicone Drain with Connection Tube
Wound Ruler (18 cm)
Instruction for UseATMOS S 041 WoundNegative Pressure Wound Therapy (NPWT) SystemDressing Application GuideDressing Kit OptionsATMOS has 4 types of dressing kits available.Sterile and single use only.
These drains are 100% silicone.

ATMOS NPWT System and Dressing Setup

  • 1.
    ATMOS S 041WoundNegative Pressure Wound Therapy (NPWT) SystemSetup Guide© 2009 ATMOS Inc. All Rights Reserved. S041.SG.V1.R0.080409.US
  • 2.
    ATMOS S 041WoundNegative Pressure Wound Therapy (NPWT) SystemSetup GuideSetup GuideNotice to Clinicians The following content and procedural suggestions are intended for use with an ATMOS Negative Pressure Wound Therapy (NPWT) system. These guidelines are not intended as a guarantee certain clinical results, outcomes or system performance nor does ATMOS guarantee the efficacy of their NPWT systems. These guidelines are recommendations to help clinicians to integrate an ATMOS NPWT system into preexisting wound-treatment protocols. Please consult with the patient’s attending physician for specific instructions concerning the patient’s individual wound treatment. Before using an ATMOS NPWT system please refer to the following documents:Clinical Protocols ManualProduct Operating InstructionsReference Guides Please be aware of the following sections from the Product Operating Instructions before using the ATMOS S041 Wound NPWT system on a patient.IndicationsContraindicationsWarnings Precautions In event of a medical emergency, immediately dial 911 for emergency medical support. Additional product information can be obtained at www.atmos-npwt.com or by calling ATMOS at 1-866-862-8667. Federal law restricts this device to sale or rental by or on the order of a physician.
  • 3.
    ATMOS S 041WoundNegative Pressure Wound Therapy (NPWT) SystemSetup GuideComponents Pump Vacuum Tube Hydrophobic Canister211233
  • 4.
    ATMOS S 041WoundNegative Pressure Wound Therapy (NPWT) SystemSetup GuideOther Components Shoulder Strap Carrying Bag Universal HolderFor use with Beds, Wheel Chairs and IV Poles Power Supply and Power Cable12123344
  • 5.
    ATMOS S 041WoundNegative Pressure Wound Therapy (NPWT) SystemSetup GuidePlace the Canister The patient port of the canister should be facing toward the patient. The canister should have a snug fit and will be completely level. The pour-spout should be closed.3Make sure you are using an 800cc Hydrophobic Canister!11223
  • 6.
    ATMOS S 041WoundNegative Pressure Wound Therapy (NPWT) SystemSetup GuideConnect Vacuum Tube Connect the Vacuum Tube to the port on the pump. Connect the other end of the Vacuum Tube to the Vacuum Port on the top of the canister.This tube does not require a filter. ATMOS uses canister which uses an integrated filter.1122
  • 7.
    ATMOS S 041WoundNegative Pressure Wound Therapy (NPWT) SystemSetup GuideConnecting a Wound DrainRemove cap from the patient port on the canister
  • 8.
    Firmly place theconnection tube on the patient port.ATMOS S 041 WoundNegative Pressure Wound Therapy (NPWT) SystemSetup GuideConnecting Multiple Wound DrainsYou may treat multiple wounds on a patient using the same NPWT system if the pressure setting prescribed is the same.Remove cap from the patient port on the canister
  • 9.
    Firmly place thesilicone end of the Y-Connector on the patient port of the canister lid.
  • 10.
    Firmly place multipleconnection tubes on the white plastic end of the Y-Connector.
  • 11.
    More wounds maybe treated by using additional Y-ConnectorsWarning: Never treat more than one patient at a time with an NPWT system!
  • 12.
    ATMOS S 041WoundNegative Pressure Wound Therapy (NPWT) SystemSetup GuideControl Panel Features Display Screen Increase/Decrease Buttons (Pressure Adjustment) On/Off Button LED Indicator Light Reset Button1123442535
  • 13.
    ATMOS S 041WoundNegative Pressure Wound Therapy (NPWT) SystemSetup GuidePowering on the SystemPress the On/Off Button
  • 14.
    Product name andsoftware version number will appear on the display screen.
  • 15.
    The pump willimmediately begin building a vacuum.
  • 16.
    To stop buildingvacuum press the On/Off Button again.ATMOS S 041 WoundNegative Pressure Wound Therapy (NPWT) SystemSetup GuideAdjusting the PressurePress the Increase or Decrease Buttons to adjust the pressure to the desired level.
  • 17.
    Continuous NPWT inthe range of 60 - 80 mmHg is recommended for most wounds. Always confirm the exact pressure settings with the attending physician.
  • 18.
    Default pressure isset at 80 mmHg.ATMOS S 041 WoundNegative Pressure Wound Therapy (NPWT) SystemSetup GuideTherapy OptionsContinuous Therapy ModeThis mode maintains and holds constant sub-atmospheric pressure.Intermittent Therapy ModeThis therapy mode builds a sub-atmospheric pressure for a set period of time and then releases the pressure for another set period of time.
  • 19.
    This therapy modehas be shown in studies to promote faster wound healing. “Pump” is displayed when continuous mode is activated.“iPump” is displayed when intermittent mode is activated.Be aware that use of this therapy mode may increase pain associated with the treatment.
  • 20.
    ATMOS S 041WoundNegative Pressure Wound Therapy (NPWT) SystemSetup GuideSwitching Therapy ModesPress and hold the On/Off and Reset Buttons for 5 seconds. The screen will show a countdown until it enters into the Intermittent Menu Screen.The ATMOS S 041 is capable of constant and intermittent modes.
  • 21.
    ATMOS S 041WoundNegative Pressure Wound Therapy (NPWT) SystemSetup GuideIntermittent Therapy Mode OptionsIntermitting 0/1 (Off/On)This option allows you to choose Continuous or Intermittent Mode.Pump PeriodThis option allows you to select how long the pump will generate a vacuum while in Intermittent Mode. Release PeriodThis option allows you to select how long the pump will release the vacuum while in Intermittent Mode.112233
  • 22.
    ATMOS S 041WoundNegative Pressure Wound Therapy (NPWT) SystemSetup GuideCustomizing Intermittent ModeUse the Increase/Decrease Buttons to move to the different options. Press the Enter Button to select that option. For Intermitting 0/1: Use the Increase/Decrease Buttons to toggle between Intermittent (1/1) and Constant Mode (0/1).For Pump and Release Periods: Use the Increase/Decrease Buttons to adjust the timer. Press the Reset Button to enter the selection.1122
  • 23.
    ATMOS S 041WoundNegative Pressure Wound Therapy (NPWT) SystemSetup GuideLocking Control PanelPress both the Increase and Decrease Buttons at the same time to lock the control panel.
  • 24.
    To unlock thecontrol panel, press both buttons again.Please Note: It is important to lock the control panel after setting-up the pump to avoid accidental operations.
  • 25.
    ATMOS S 041WoundNegative Pressure Wound Therapy (NPWT) SystemSetup GuidePowering Off the SystemTo Stop Vacuum: Press the On/Off Button quickly.
  • 26.
    To Power Offthe Pump: Press and hold the On/Off Button for several seconds. Please Note: While the unit is plugged-in or charging, the pump will remain on.
  • 27.
    ATMOS S 041WoundNegative Pressure Wound Therapy (NPWT) SystemSetup GuideRecharging the SystemConnect the Power Supply to the Power Cable.Plug the Power Supply into the pump.Connect the Power Cable to the wall outlet.The pump’s Display Screen will confirm active charging with a charging symbol. 12123344Please see the Operating Instructions for more information regarding charging and batteries.
  • 28.
    ATMOS S 041WoundNegative Pressure Wound Therapy (NPWT) SystemSetup GuideDisconnecting a Wound DrainYou may need to cease NPWT temporarily for transportation or other therapies. Use a tubing clamp on the drain tube. Disconnect the drain tube from the connection tube. Drain all liquids from connection tube by raising it above the canister. Once all liquids are drained, disconnect the connection tube from the canister. Close the cap on the Patient Port and plug both ends of the connection tube with gauze and tape.1231234545
  • 29.
    ATMOS S 041WoundNegative Pressure Wound Therapy (NPWT) SystemSetup GuideCleaning and DisinfectingTo minimize the risk of infection, always use personal protective equipment when cleaning and disinfecting ATMOS NPWT systems. Follow institutional or other written protocol for equipment cleaning and disinfecting, where applicable. ATMOS S 041 HousingThe housing can be wiped with a damp cloth or with a mild surface disinfectant such as Viragard or other EPA approved medical surface disinfectants. Do not use solvents. Liquids must not enter the device.If liquids have penetrated into the device, it must be inspected by an authorized service technician before being used again. Suction Canisters & TubingFor each new patient a new canister and tubing set is required. Canisters are single use only, and should be replaced weekly at a minimum. Disposal of used canisters and tubing should follow your institutional protocols and/or local medical waste management protocols.
  • 30.
    ATMOS S 041WoundNegative Pressure Wound Therapy (NPWT) SystemDressing Application Guide© 2009 ATMOS Inc. All Rights Reserved. S041.SG.V1.R0.080409.US
  • 31.
    ATMOS S 041WoundNegative Pressure Wound Therapy (NPWT) SystemDressing Application GuideDressing Change GuidelinesDressings should be changed every 48 hours to 72 hours for optimal healing.
  • 32.
    Most facilities employa Monday, Wednesday, Friday dressing change schedule.
  • 33.
    The single useonly canister should be changed depending on the amount of drainage. The canister should be changed every week. Heavily draining wounds may require more frequent canister changes and should be monitored closely.ATMOS S 041 WoundNegative Pressure Wound Therapy (NPWT) SystemDressing Application GuideChariker-Jeter Dressing KitComponents Include:Transparent Dressing 8” x 10”
  • 34.
  • 35.
  • 36.
  • 37.
  • 38.
  • 39.
  • 40.
  • 41.
    Silicone Drain withConnection Tube
  • 42.
  • 43.
    Instruction for UseATMOSS 041 WoundNegative Pressure Wound Therapy (NPWT) SystemDressing Application GuideDressing Kit OptionsATMOS has 4 types of dressing kits available.Sterile and single use only.
  • 44.
    These drains are100% silicone.