Table of
contents
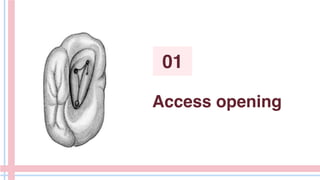
01
04
02
05
03
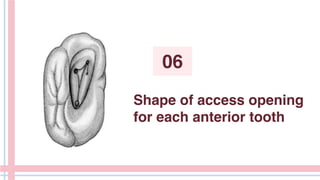
06
Access opening
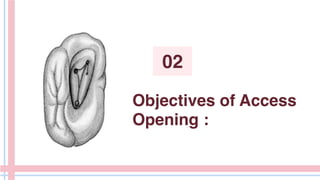
Objectivesof Access Opening
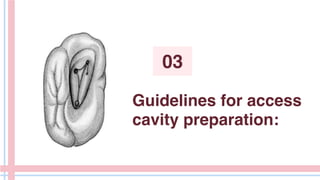
Guidelines for access cavity preparation
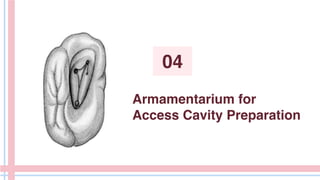
Armamentarium for Access Cavity Preparation
Shape of access opening for each anterior tooth
Krasner and Rankow’s Laws of Access Opening
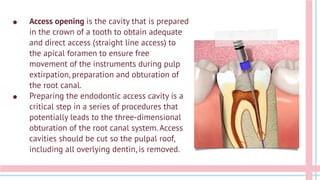
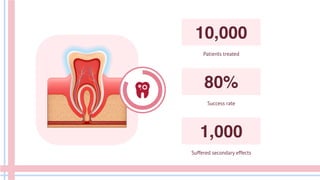
● Access openingis the cavity that is prepared
in the crown of a tooth to obtain adequate
and direct access (straight line access) to
the apical foramen to ensure free
movement of the instruments during pulp
extirpation, preparation and obturation of
the root canal.
● Preparing the endodontic access cavity is a
critical step in a series of procedures that
potentially leads to the three-dimensional
obturation of the root canal system. Access
cavities should be cut so the pulpal roof,
including all overlying dentin, is removed.
Removal of allcarious tooth
structure
Conservation of sound tooth
structure
Complete deroofing of the pulp
chamber
Removal of coronal pulp tissue (vital
and necrotic)
Location of all root canal orifices
01 02 03
04 05 06
Straight line access to the root canal
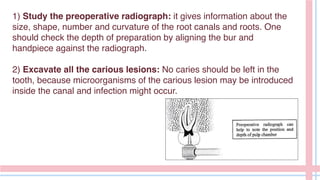
1) Study thepreoperative radiograph: it gives information about the
size, shape, number and curvature of the root canals and roots. One
should check the depth of preparation by aligning the bur and
handpiece against the radiograph.
2) Excavate all the carious lesions: No caries should be left in the
tooth, because microorganisms of the carious lesion may be introduced
inside the canal and infection might occur.
10.
3) Replace anydefective filling: The defective filling should be replaced
before beginning the access opening because it will not ensure proper seal of
the tooth.
4) Remove unsupported tooth structure: Any weak tooth structure might
fracture that causes loss of the seal of the tooth and the reference point which
changes the length of the tooth.
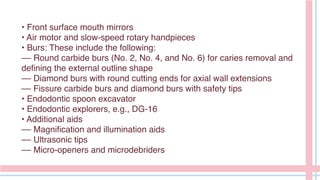
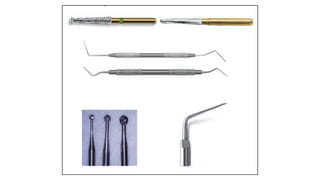
• Front surfacemouth mirrors
• Air motor and slow-speed rotary handpieces
• Burs: These include the following:
–– Round carbide burs (No. 2, No. 4, and No. 6) for caries removal and
defining the external outline shape
–– Diamond burs with round cutting ends for axial wall extensions
–– Fissure carbide burs and diamond burs with safety tips
• Endodontic spoon excavator
• Endodontic explorers, e.g., DG-16
• Additional aids
–– Magnification and illumination aids
–– Ultrasonic tips
–– Micro-openers and microdebriders
14.
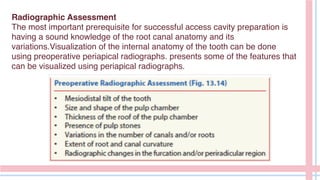
Radiographic Assessment
The mostimportant prerequisite for successful access cavity preparation is
having a sound knowledge of the root canal anatomy and its
variations.Visualization of the internal anatomy of the tooth can be done
using preoperative periapical radiographs. presents some of the features that
can be visualized using periapical radiographs.
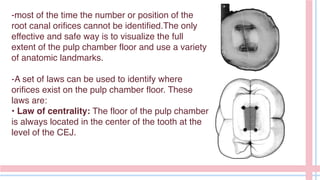
-most of thetime the number or position of the
root canal orifices cannot be identified.The only
effective and safe way is to visualize the full
extent of the pulp chamber floor and use a variety
of anatomic landmarks.
-A set of laws can be used to identify where
orifices exist on the pulp chamber floor. These
laws are:
• Law of centrality: The floor of the pulp chamber
is always located in the center of the tooth at the
level of the CEJ.
17.
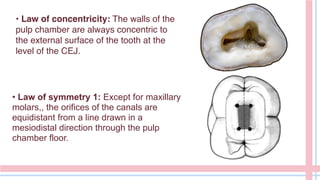
• Law ofconcentricity: The walls of the
pulp chamber are always concentric to
the external surface of the tooth at the
level of the CEJ.
• Law of symmetry 1: Except for maxillary
molars,, the orifices of the canals are
equidistant from a line drawn in a
mesiodistal direction through the pulp
chamber floor.
18.
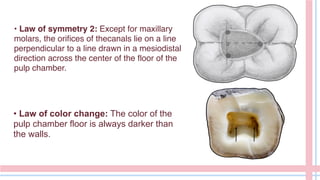
• Law ofsymmetry 2: Except for maxillary
molars, the orifices of thecanals lie on a line
perpendicular to a line drawn in a mesiodistal
direction across the center of the floor of the
pulp chamber.
• Law of color change: The color of the
pulp chamber floor is always darker than
the walls.
19.
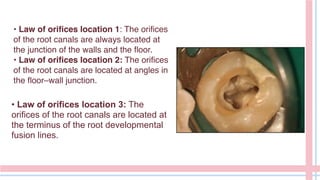
• Law oforifices location 1: The orifices
of the root canals are always located at
the junction of the walls and the floor.
• Law of orifices location 2: The orifices
of the root canals are located at angles in
the floor–wall junction.
• Law of orifices location 3: The
orifices of the root canals are located at
the terminus of the root developmental
fusion lines.
20.
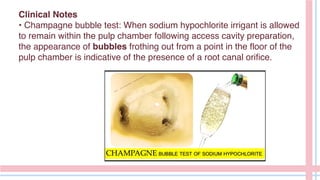
Clinical Notes
• Champagnebubble test: When sodium hypochlorite irrigant is allowed
to remain within the pulp chamber following access cavity preparation,
the appearance of bubbles frothing out from a point in the floor of the
pulp chamber is indicative of the presence of a root canal orifice.
21.
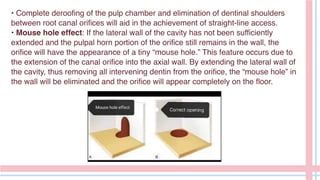
• Complete deroofingof the pulp chamber and elimination of dentinal shoulders
between root canal orifices will aid in the achievement of straight-line access.
• Mouse hole effect: If the lateral wall of the cavity has not been sufficiently
extended and the pulpal horn portion of the orifice still remains in the wall, the
orifice will have the appearance of a tiny “mouse hole.” This feature occurs due to
the extension of the canal orifice into the axial wall. By extending the lateral wall of
the cavity, thus removing all intervening dentin from the orifice, the “mouse hole” in
the wall will be eliminated and the orifice will appear completely on the floor.
-Maxillary Central Incisor:The
access opening is triangular in
shape.The root is straight, single,
large, oval at the beginning, then
tapered till it becomes rounded
apically. Average tooth
length=22.5mm
24.
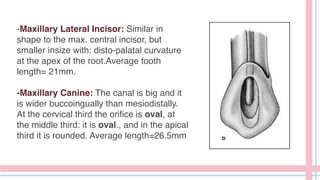
-Maxillary Lateral Incisor:Similar in
shape to the max. central incisor, but
smaller insize with: disto-palatal curvature
at the apex of the root.Average tooth
length= 21mm.
-Maxillary Canine: The canal is big and it
is wider buccoingually than mesiodistally.
At the cervical third the orifice is oval, at
the middle third: it is oval., and in the apical
third it is rounded. Average length=26.5mm
25.
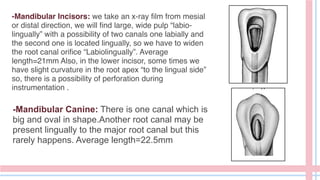
-Mandibular Incisors: wetake an x-ray film from mesial
or distal direction, we will find large, wide pulp “labio-
lingually” with a possibility of two canals one labially and
the second one is located lingually, so we have to widen
the root canal orifice “Labiolingually”. Average
length=21mm Also, in the lower incisor, some times we
have slight curvature in the root apex “to the lingual side”
so, there is a possibility of perforation during
instrumentation .
-Mandibular Canine: There is one canal which is
big and oval in shape.Another root canal may be
present lingually to the major root canal but this
rarely happens. Average length=22.5mm
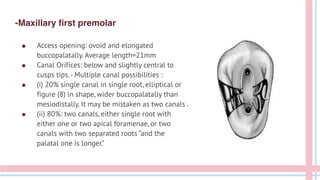
-Maxillary first premolar
●Access opening: ovoid and elongated
buccopalatally. Average length=21mm
● Canal Orifices: below and slightly central to
cusps tips.- Multiple canal possibilities :
● (i) 20% single canal in single root, elliptical or
figure (8) in shape, wider buccopalatally than
mesiodistally. It may be mistaken as two canals .
● (ii) 80%: two canals, either single root with
either one or two apical foramenae, or two
canals with two separated roots “and the
palatal one is longer.”
28.
-Maxillary Second Premolar
●Mandibular first premolar has well developed buccal cusp and
a small lingual cusp, the root is more rounded than
mandibular second premolar and shorter. The pulp chamber is
ovoid and buccal pulp horn higher. Average length=21.5mm
● Access opening: ovoid and made slightly buccally to the
central groove and the final preparation should have a
slightly lingual inclination.
-Mandible First Premolar :
● Mostly it has a single root and the canal shape is ovoid and very wide in buccopalatal
direction, ovoid in the mid root, and rounded in the apical area. Average length=21.5mm
● Canal orifice is centrally located and often appears as a slot than as a single ovoid
opening.
● Multiple canals possibilities: 40% 2 canals, 60% one canal.
29.
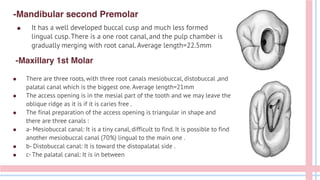
-Maxillary 1st Molar
●It has a well developed buccal cusp and much less formed
lingual cusp. There is a one root canal, and the pulp chamber is
gradually merging with root canal. Average length=22.5mm
-Mandibular second Premolar
● There are three roots, with three root canals mesiobuccal, distobuccal ,and
palatal canal which is the biggest one. Average length=21mm
● The access opening is in the mesial part of the tooth and we may leave the
oblique ridge as it is if it is caries free .
● The final preparation of the access opening is triangular in shape and
there are three canals :
● a- Mesiobuccal canal: It is a tiny canal, difficult to find. It is possible to find
another mesiobuccal canal (70%) lingual to the main one .
● b- Distobuccal canal: It is toward the distopalatal side .
● c- The palatal canal: It is in between
30.
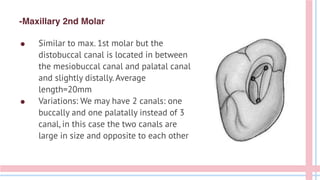
-Maxillary 2nd Molar
●Similar to max. 1st molar but the
distobuccal canal is located in between
the mesiobuccal canal and palatal canal
and slightly distally. Average
length=20mm
● Variations: We may have 2 canals: one
buccally and one palatally instead of 3
canal, in this case the two canals are
large in size and opposite to each other
31.
-Mandibular 1st Molar
●There are 3 canals, 2 mesial “mesiobuccal and mesiolingual” and
one locateddistally. Average length=21mm
● We start preparation in mesial part of the tooth and access opening
is triangular rectangular in shape .
● There is a possibility of 2 canals located distally (33%) “and they
may end with separate orifices or joined orifice so if thendistal
canal is tiny and more toward the buccal side then thenpossibility of
2 canals is high but if it is in the center buccolingually then the
possibility of one canal is high
-Mandibular 2nd Molar
● The access opening resembles that of the mand. 1st molar with 3 root
canals, 2 mesially and 1 distally. Average length=20mm
● There is a possibility of 2 canals: mesial canal and distal canal with each
canal opposite to other
32.
Introduction to
the disease
Onthe first part of the presentation, it’s
important to give an overview of the disease
you’re going to speak about. This helps your
audience understand:
● The context
● The health risks
● Likelihood of developing it
● Prevalence
33.
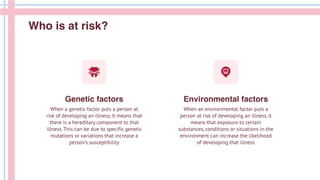
Environmental factors
Who isat risk?
When an environmental factor puts a
person at risk of developing an illness, it
means that exposure to certain
substances, conditions or situations in the
environment can increase the likelihood
of developing that illness
When a genetic factor puts a person at
risk of developing an illness, it means that
there is a hereditary component to that
illness. This can be due to specific genetic
mutations or variations that increase a
person's susceptibility
Genetic factors
34.
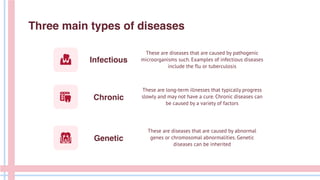
Three main typesof diseases
Infectious
Chronic
These are diseases that are caused by pathogenic
microorganisms such. Examples of infectious diseases
include the flu or tuberculosis
These are long-term illnesses that typically progress
slowly and may not have a cure. Chronic diseases can
be caused by a variety of factors
These are diseases that are caused by abnormal
genes or chromosomal abnormalities. Genetic
diseases can be inherited
Genetic
35.
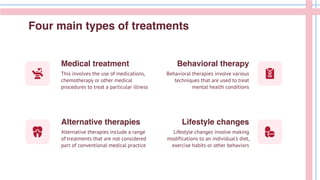
This involves theuse of medications,
chemotherapy or other medical
procedures to treat a particular illness
Behavioral therapies involve various
techniques that are used to treat
mental health conditions
Alternative therapies include a range
of treatments that are not considered
part of conventional medical practice
Lifestyle changes involve making
modifications to an individual's diet,
exercise habits or other behaviors
Four main types of treatments
Medical treatment
Alternative therapies
Behavioral therapy
Lifestyle changes
36.
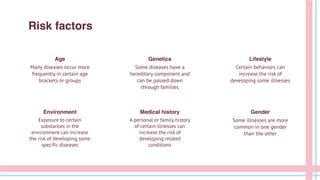
Risk factors
Many diseasesoccur more
frequently in certain age
brackets or groups
Some diseases have a
hereditary component and
can be passed down
through families
Exposure to certain
substances in the
environment can increase
the risk of developing some
specific diseases
A personal or family history
of certain illnesses can
increase the risk of
developing related
conditions
Age Genetics Lifestyle
Certain behaviors can
increase the risk of
developing some illnesses
Some illnesses are more
common in one gender
than the other
Environment Medical history Gender
Investment in diseaseresearch is crucial for
improving public health outcomes, advancing
medicine and improving quality of life for
patients, which in turn has the potential for
significant economic growth and global health
benefits
$1 billion
39.
Disease prevalence
Follow thelink in the map to modify its data and then paste the new one here. For more info, click here
15-30% of the population in
these regions are affected by
the disease
6-14% of the population in
these regions are affected by
the disease
0-5% of the population in
these regions are affected by
the disease
40.
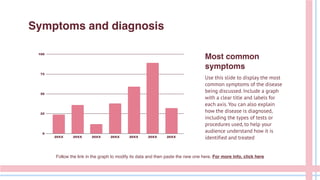
Symptoms and diagnosis
Followthe link in the graph to modify its data and then paste the new one here. For more info, click here
Most common
symptoms
Use this slide to display the most
common symptoms of the disease
being discussed. Include a graph
with a clear title and labels for
each axis. You can also explain
how the disease is diagnosed,
including the types of tests or
procedures used, to help your
audience understand how it is
identified and treated
41.
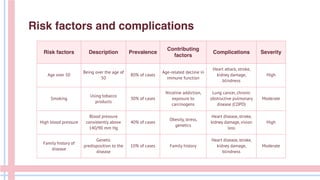
Risk factors DescriptionPrevalence
Contributing
factors
Complications Severity
Age over 50
Being over the age of
50
80% of cases
Age-related decline in
immune function
Heart attack, stroke,
kidney damage,
blindness
High
Smoking
Using tobacco
products
30% of cases
Nicotine addiction,
exposure to
carcinogens
Lung cancer, chronic
obstructive pulmonary
disease (COPD)
Moderate
High blood pressure
Blood pressure
consistently above
140/90 mm Hg
40% of cases
Obesity, stress,
genetics
Heart disease, stroke,
kidney damage, vision
loss
High
Family history of
disease
Genetic
predisposition to the
disease
10% of cases Family history
Heart disease, stroke,
kidney damage,
blindness
Moderate
Risk factors and complications
42.
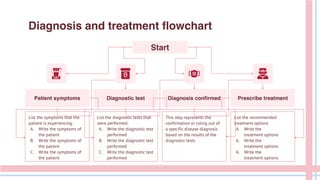
Diagnosis and treatmentflowchart
Start
Diagnostic test
Patient symptoms Diagnosis confirmed
List the symptoms that the
patient is experiencing:
A. Write the symptoms of
the patient
B. Write the symptoms of
the patient
C. Write the symptoms of
the patient
List the diagnostic tests that
were performed:
A. Write the diagnostic test
performed
B. Write the diagnostic test
performed
C. Write the diagnostic test
performed
Prescribe treatment
List the recommended
treatment options
A. Write the
treatment options
A. Write the
treatment options
A. Write the
treatment options
This step represents the
confirmation or ruling out of
a specific disease diagnosis
based on the results of the
diagnostic tests
43.
Real life impact
Aphoto showcase can be a useful addition to any
presentation, as it showcases the most human side
of every subject
44.
Region Number ofcases Percentage of cases
North 1,000 20%
South 2,500 50%
East 1,200 24%
Disease management
Number of cases of the disease over time
Follow the link in the graph to modify its data and then paste the new one here. For more info, click here
● Describe the trend of the disease cases
over time
● Provide key insights or observations
about the graph
● Explain any significant changes or
patterns in the graph
● List the regions or areas that are relevant
for the disease
● Enter the number of cases for each region,
area or country
● Describe any notable variations or trends
among the regions
● Provide additional details or observations
about the table
45.
01
02
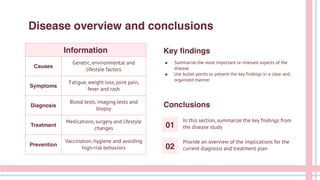
Disease overview andconclusions
Information
Causes
Genetic, environmental and
lifestyle factors
Symptoms
Fatigue, weight loss, joint pain,
fever and rash
Diagnosis
Blood tests, imaging tests and
biopsy
Treatment
Medications, surgery and lifestyle
changes
Prevention
Vaccination, hygiene and avoiding
high-risk behaviors
Key findings
● Summarize the most important or relevant aspects of the
disease
● Use bullet points to present the key findings in a clear and
organized manner
Conclusions
In this section, summarize the key findings from
the disease study
Provide an overview of the implications for the
current diagnosis and treatment plan
46.
CREDITS: This presentationtemplate was created by
Slidesgo, and includes icons by Flaticon and
infographics & images by Freepik
Do you have any questions?
youremail@freepik.com
838 421 620 91+
yourwebsite.com
Thanks
Please keep this slide for attribution
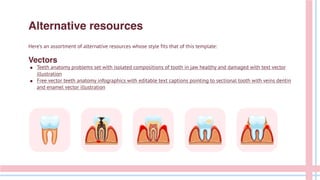
Here’s an assortmentof alternative resources whose style fits that of this template:
Vectors
● Teeth anatomy problems set with isolated compositions of tooth in jaw healthy and damaged with text vector
illustration
● Free vector teeth anatomy infographics with editable text captions pointing to sectional tooth with veins dentin
and enamel vector illustration
Alternative resources
49.
Resources
Did you likethe resources on this template? Get them for free at our other websites:
Photos
● Close-up of multicolored dental tools in a row
● Close-up of woman getting a check-up at dentist
● Medium shot smiley woman posing
● Dentist hand in pink gloves arranging dental tools on tray
Vectors
● Human teeth realistic infographics with flat images of tooth profile views with dentine gum and pulp vector
illustration
● Free vector dental oral problems educational infographic set with caries inflammation tooth plaque bad breath
enamel erosion vector illustration
Icon pack
● Icon Pack: Dentist | Filled
50.
Instructions for use
Ifyou have a free account, in order to use this template, you must credit Slidesgo by keeping the Thanks slide. Please
refer to the next slide to read the instructions for premium users.
As a Free user, you are allowed to:
● Modify this template.
● Use it for both personal and commercial projects.
You are not allowed to:
● Sublicense, sell or rent any of Slidesgo Content (or a modified version of Slidesgo Content).
● Distribute Slidesgo Content unless it has been expressly authorized by Slidesgo.
● Include Slidesgo Content in an online or offline database or file.
● Offer Slidesgo templates (or modified versions of Slidesgo templates) for download.
● Acquire the copyright of Slidesgo Content.
For more information about editing slides, please read our FAQs or visit our blog:
https://slidesgo.com/faqs and https://slidesgo.com/slidesgo-school
51.
As a Premiumuser, you can use this template without attributing Slidesgo or keeping the Thanks slide.
You are allowed to:
● Modify this template.
● Use it for both personal and commercial purposes.
● Hide or delete the “Thanks” slide and the mention to Slidesgo in the credits.
● Share this template in an editable format with people who are not part of your team.
You are not allowed to:
● Sublicense, sell or rent this Slidesgo Template (or a modified version of this Slidesgo Template).
● Distribute this Slidesgo Template (or a modified version of this Slidesgo Template) or include it in a database or in
any other product or service that offers downloadable images, icons or presentations that may be subject to
distribution or resale.
● Use any of the elements that are part of this Slidesgo Template in an isolated and separated way from this
Template.
● Register any of the elements that are part of this template as a trademark or logo, or register it as a work in an
intellectual property registry or similar.
For more information about editing slides, please read our FAQs or visit our blog:
https://slidesgo.com/faqs and https://slidesgo.com/slidesgo-school
Instructions for use (premium users)
52.
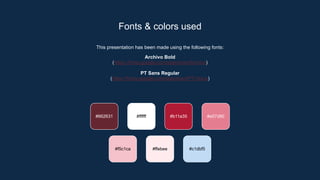
This presentation hasbeen made using the following fonts:
Archivo Bold
(https://fonts.google.com/specimen/Archivo)
PT Sans Regular
(https://fonts.google.com/specimen/PT+Sans)
#662631 #ffffff #b11a35 #e57d90
#ffebee #c1dbf5
#f5c1ca
Fonts & colors used
53.
Create your Storywith our illustrated concepts. Choose the style you like the most, edit its colors, pick
the background and layers you want to show and bring them to life with the animator panel! It will
boost your presentation. Check out how it works.
Storyset
Pana Amico Bro Rafiki Cuate
54.
You can easilyresize these resources without losing quality. To change the color, just ungroup the resource and click on
the object you want to change. Then, click on the paint bucket and select the color you want. Group the resource again
when you’re done. You can also look for more infographics on Slidesgo.
Use our editable graphic resources...
57.
JANUARY FEBRUARY MARCHAPRIL MAY JUNE
PHASE 1
PHASE 2
Task 1
Task 2
Task 1
Task 2
JANUARY FEBRUARY MARCH APRIL
PHASE 1
Task 1
Task 2
60.
You can resizethese icons without losing quality.
You can change the stroke and fill color; just select the icon and click on the paint bucket/pen.
In Google Slides, you can also use Flaticon’s extension, allowing you to customize and add even more icons.
...and our sets of editable icons


![PERI-PROSTHETIC FRACTURE NAIL-PLATE CONSTRUCT [NPC].pptx](https://cdn.slidesharecdn.com/ss_thumbnails/drarunkumardrmohamedashrafperiprostheticfrasturenail-plateconstructnpc-260209164459-7e9d15a1-thumbnail.jpg?width=640&height=640&fit=bounds)
