Download to read offline


![Chaining The Blocks Into Blockchain
Here we will create a new class that will define the blockchain. Altogether,
here we will have to ensure the immutability of the entire blockchain with a
smart solution "Hash" that connects every preceding block to the previous
block. It provides that each block is based on a mechanism for protecting
the entire chain's integrity.
This is the reason for including the previous-hash variable in block class.
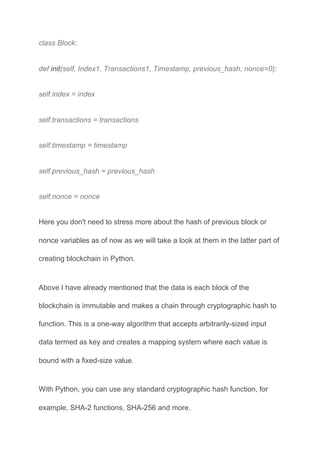
Here we need to initialize the block. Thus, we will define the
create_genesis_blockmethod. It depicts an initial block having index value
O, and the previous hash value 0. Subsequently, we will be able to create a
chain of blocks.
import time
class Blockchain:
def init(self):
self.unconfirmed_transactions = []
self.chain = []](https://image.slidesharecdn.com/how-to-create-a-blockchain-in-python-201208054730/85/A-Comprehensive-Guide-To-Create-Blockchain-In-Python-Blockchain-Development-In-Python-7-320.jpg)
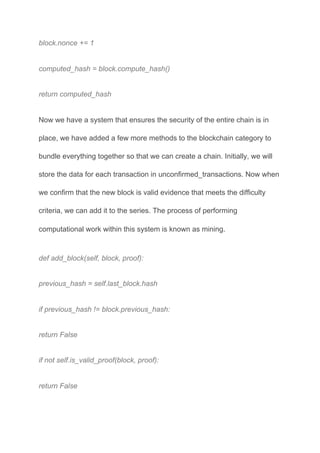
![self.create_genesis_block()
def create_genesis_block(self):
genesis_block = Block(0, [], time.time(), "0")
genesis_block.hash = genesis_block.compute_hash()
self.chain.append(genesis_block)
@property
def last_block(self):
return self.chain[-1]
Blockchain Proof Of Work System
The hash we've described so far is getting us part of the way there. As it is,
it is possible for someone to modify a previous block in the chain and then
recalculate each of the following blocks to create another good chain. We
also want to implement a method that allows users to reach consensus on
a single chronological date for the chain in the correct order in which the
transactions were made. To solve this problem, Satoshi Nakamoto created
the Proof of Work system.](https://image.slidesharecdn.com/how-to-create-a-blockchain-in-python-201208054730/85/A-Comprehensive-Guide-To-Create-Blockchain-In-Python-Blockchain-Development-In-Python-8-320.jpg)


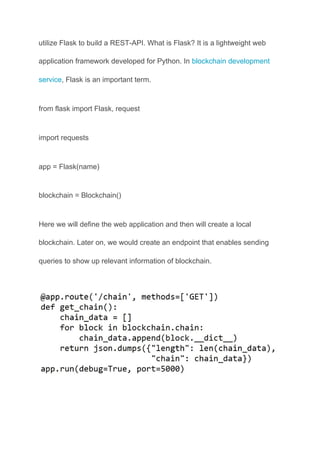
![timestamp=time.time(),
previous_hash=last_block.hash)
proof = self.proof_of_work(new_block)
self.add_block(new_block, proof)
self.unconfirmed_transactions = []
return new_block.index
Till here, we have seen an explanation of fundamentals for creating a
blockchain:
Creating a single block
Building a blockchain
Proof-of-work system
Using a mining procedure
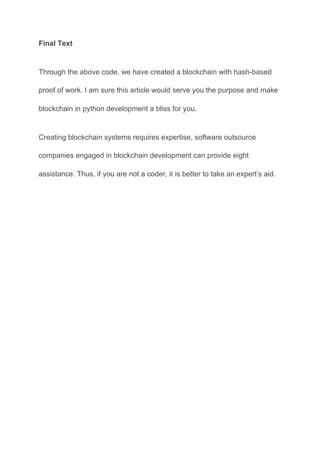
Now the time is to use it. For that, we need to create an interface that can
enable multiple users, or nodes, supply interaction. To do this, we will](https://image.slidesharecdn.com/how-to-create-a-blockchain-in-python-201208054730/85/A-Comprehensive-Guide-To-Create-Blockchain-In-Python-Blockchain-Development-In-Python-12-320.jpg)
![Now we would have to activate the blockchain application, which can be
done through command prompts.
python3 Blockchain.py
You need to feed something like:
● Running on http://127.0.0.1:5000/ (Press CTRL+C to quit)
● Restarting with stat
● Debugger is active!
● Debugger PIN: 105-118-129
Then, in another shell, we can send a query with cURL by running:
curl http://127.0.0.1:5000/chain
The output will contain information like :
{"length": 1, "chain": [{"index": 0, "transactions": [], "timestamp":
1576665446.403836, "previous_hash": "0", "nonce": 0, "hash":
"e2a1ec32fcf89d0388f3d0d8abcd914f941d056c080df1c765a3f6035626fc9
4"}]}](https://image.slidesharecdn.com/how-to-create-a-blockchain-in-python-201208054730/85/A-Comprehensive-Guide-To-Create-Blockchain-In-Python-Blockchain-Development-In-Python-14-320.jpg)

This document is a comprehensive guide on creating a blockchain using Python, covering the key concepts, structure, and components required for development. It explains the fundamental principles of blockchain technology, including immutability and proof-of-work, and provides practical coding examples for building blocks and chaining them together. Additionally, it highlights the use of Flask for creating a REST API to interact with the blockchain, making it accessible for users.