More Related Content
Similar to 25_Create_swatches (20)
More from tutorialsruby (20)
25_Create_swatches
- 1. Page 1 of 4 – Tutorial 25 – Create swatches from your own pictures
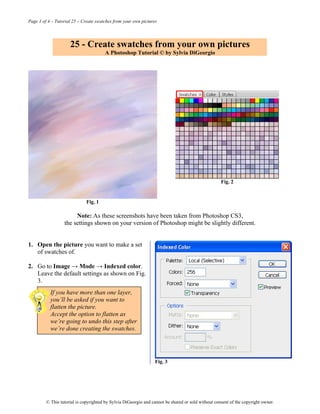
25 - Create swatches from your own pictures
A Photoshop Tutorial © by Sylvia DiGeorgio
Fig. 2
Fig. 1
Note: As these screenshots have been taken from Photoshop CS3,
the settings shown on your version of Photoshop might be slightly different.
1. Open the picture you want to make a set
of swatches of.
2. Go to Image → Mode → Indexed color.
Leave the default settings as shown on Fig.
3.
If you have more than one layer,
you’ll be asked if you want to
flatten the picture.
Accept the option to flatten as
we’re going to undo this step after
we’re done creating the swatches.
Fig. 3
© This tutorial is copyrighted by Sylvia DiGeorgio and cannot be shared or sold without consent of the copyright owner.
- 2. Page 2 of 4 – Tutorial 25 – Create swatches from your own pictures
3. Now select Image → Mode → Color
Table.
4. Click on Save (Fig. 4), choose the
place where you want to save your
swatches, name your file, and click
OK to close the dialog box.
Fig. 4
5. Now open the swatches
palette (Window,
Swatches), click on the
little triangle (see Fig. 5),
and select “load swatches”.
Fig. 5
6. In the “Files of type” drop-down menu (see
Fig. 6), select “Color Table (*.ACT), select
the file you just created and click on Load.
Fig. 6
© This tutorial is copyrighted by Sylvia DiGeorgio and cannot be shared or sold without consent of the copyright owner.
- 3. Page 3 of 4 – Tutorial 25 – Create swatches from your own pictures
7. The colors contained in your picture are now
visible underneath the previous set of
swatches (see Fig. 7).
8. Undo the indexing of colors with Ctrl Z /
Cmd Z.
You’re now back to the original picture.
Fig. 7
You’re done! OK, so now you have a new set of swatches.
What do you do with them?
You can use them to paint new backgrounds, to adjust colors in your painting, to match colors from
other pictures.
Swatches are also helpful to keep consistency of colors for web design.
They’re also very useful if you work on portraits, one click and you have access to skin colors, hair
colors, etc.
You’ll find them practical too to adjust the color of the sky, of the grass, the ocean, whatever you’re
working on… You can have sets for winter colors, fall colors, etc. There’s no limit to their use.
Edit your set of swatches
• To remove a color: Ctrl click (Cmd
click) on any color in your swatches.
• To edit your set: select the
Swatches palette, click on the triangle
(see Fig. 8) and select Preset Manager.
Fig. 8
• To organize the sets: once you’re in the Preset Manager (see fig. 9 below), you can select the
swatches and move them around, rename them, delete them, etc. Don’t forget to save your set if
you modify it…
© This tutorial is copyrighted by Sylvia DiGeorgio and cannot be shared or sold without consent of the copyright owner.
- 4. Page 4 of 4 – Tutorial 25 – Create swatches from your own pictures
Fig. 9
Don't forget to visit my website at
http://abc-impact.com/photo_art/tutorials.htm
H
for new tutorials and goodies to download!
Feel free to contact me for more information
or feedback at sylvia@abc-impact.com
© This tutorial is copyrighted by Sylvia DiGeorgio
and cannot be shared or sold without consent of the copyright owner.
© This tutorial is copyrighted by Sylvia DiGeorgio and cannot be shared or sold without consent of the copyright owner.