Download to read offline


![404 C Programming: Just the FAQs
XXI.22: How do you get the date and time in a
Windows program?
Answer:
To get the date and time in a Windows program, you should call the standard C library functions time()
and localtime() or some derivative (asctime(), ctime(), _ftime(), gmttime()). These functions are
compatible with both DOS and Windows. You should never attempt to call a DOS-only or a ROM BIOS
function directly. You should always use either Windows API function calls or standard C library routines.
Here is an example of code that can be used to print the current date and time in a Windows program:
char* szAmPm = “PM”;
char szCurrTime[128];
char szCurrDate[128];
struct tm* tmToday;
time_t lTime;
time(&lTime);
tmToday = localtime(lTime);
wsprintf(szCurrDate, “Current Date: %02d/%02d/%02d”,
tmToday->tm_month, tmToday->tm_mday,
tmToday->tm_year);
if (tmToday->tm_hour < 12 )
strcpy(szAmPm, “AM” );
if (tmToday->tm_hour > 12 )
tmToday->tm_hour -= 12;
wsprintf(szCurrTime, “Current Time: %02d:%02d:%02d %s”,
tmToday->tm_hour, tmToday->tm_min,
tmToday->tm_sec, szAmPm);
TextOut(50, 50, szCurrDate, strlen(szCurrDate));
TextOut(200, 50, szCurrTime, strlen(szCurrTime));
}
The time() and localtime() functions are used to get the current local time (according to the Windows
timer, which gets its time from MS-DOS). The time() function returns a time_t variable, and the
localtime() function returns a tm structure. The tm structure can easily be used to put the current date and
time into a readable format. After this task is completed, the wsprintf() function is used to format the date
and time into two strings, szCurrDate and szCurrTime, which are then printed in the current window via
the TextOut() Windows API function call.
Cross Reference:
None.](https://image.slidesharecdn.com/21-windows-100817093340-phpapp01/85/21-windows-20-320.jpg)
![Chapter XXI • Windows 405
XXI.23: How do you update the title bar in a
Windows program?
Answer:
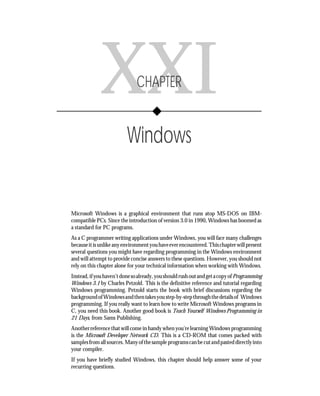
The title bar (or caption bar, as it is often called) can be updated in a Windows program by using the Windows
API function SetWindowText(). The SetWindowText() function takes two parameters. The first parameter
is the handle to the window, and the second parameter is the new title you want to display on the window.
One reason you might want to take this action is to provide your users with the current date and time on
the title bar. This task can be accomplished with the following code:
char* szAmPm = “PM”;
char szNewCaption[200];
struct tm* tmToday;
time_t lTime;
time(&lTime);
tmToday = localtime(lTime);
wsprintf(szNewCaption,
“My Application - %02d/%02d/%02d %02d:%02d:%02d %s”,
tmToday->tm_month, tmToday->tm_mday, tmToday->tm_year,
tmToday->tm_hour, tmToday->tm_min,
tmToday->tm_sec, szAmPm);
SetWindowText(hwnd, szNewCaption);
Of course, you probably will want to set up this code in some sort of timer event loop so that the title is
updated every second (or minute).
Cross Reference:
None.
XXI.24: How do you access the system colors in a
Windows program?
Answer:
You can obtain the system colors by calling the Windows API function GetSysColor(). The GetSysColor()
function takes one parameter, which signifies which color element you want to obtain. The color elements
are represented by color constants defined in the windows.h header file. The Windows system color constants
are listed in the following FAQ (XXI.25).
For instance, to obtain the color for the window’s active border, you might make the following function call:
rgbColor = GetSysColor(COLOR_ACTIVEBORDER);](https://image.slidesharecdn.com/21-windows-100817093340-phpapp01/85/21-windows-21-320.jpg)
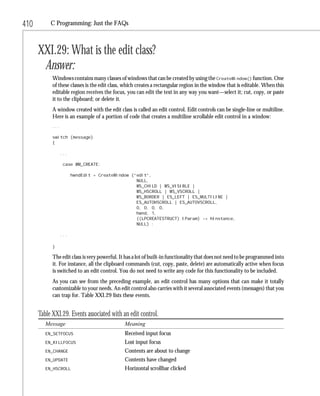
![406 C Programming: Just the FAQs
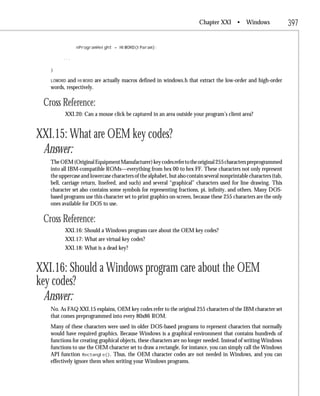
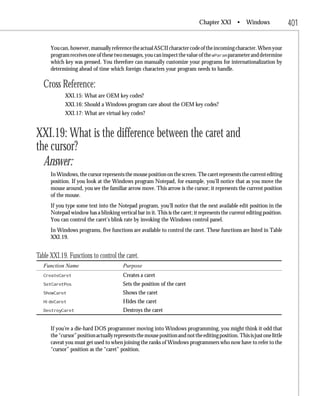
The GetSysColor() function returns an RGB value. The RGB value represents the intensity of the colors
red, green, and blue that are present in the returned color. An RGB value of 0 signifies black, and an RGB
value of 255 signifies white. You can extract the individual red, green, and blue values from the RGB value
by calling the GetRValue(), GetGValue(), and GetBValue() Windows API functions.
The Windows API function SetSysColors() can be used to set system colors. Here is an example of some
code that sets the color of the active border to red:
int aiColorElements[1];
DWORD argbColor[1];
aiColorElements[0] = COLOR_ACTIVEBORDER;
argbColor[0] = RGB(0xFF, 0x00, 0x00);
SetSysColors(1, aiColorElements, argbColor);
The SetSysColors() function takes three arguments. The first argument is the number of elements to set
color for, the second is an array of integers holding the system color constants to set color for, and the third
is an array of RGB values that correspond to the colors you want to invoke for the elements represented by
the second argument.
Cross Reference:
XXI.25: What are the system color constants?
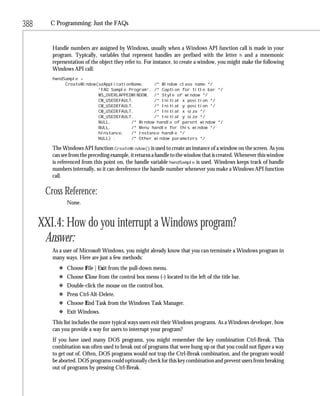
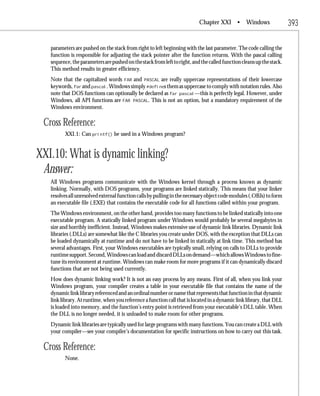
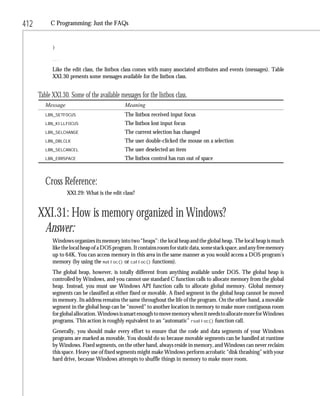
XXI.25: What are the system color constants?
Answer:
The system color constants are used by Windows to control the colors of various objects included in the
Windows environment. Table XXI.25 lists the system color constants (as defined in windows.h).
Table XXI.25. The system color constants.
Color Constant Target Object
COLOR_SCROLLBAR Scrollbar
COLOR_BACKGROUND Windows desktop
COLOR_ACTIVECAPTION Active title
COLOR_INACTIVECAPTION Inactive title
COLOR_MENU Menu bar
COLOR_WINDOW Window
COLOR_WINDOWFRAME Window frame
COLOR_MENUTEXT Menu text
COLOR_WINDOWTEXT Window text](https://image.slidesharecdn.com/21-windows-100817093340-phpapp01/85/21-windows-22-320.jpg)
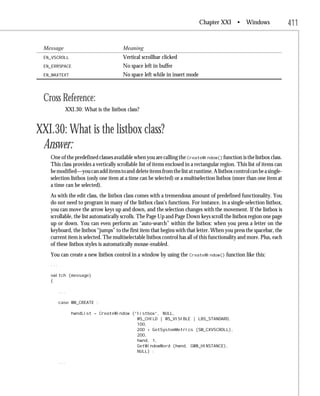
![Chapter XXI • Windows 407
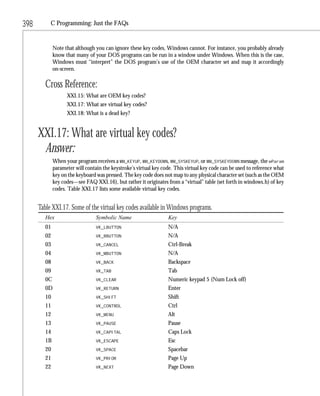
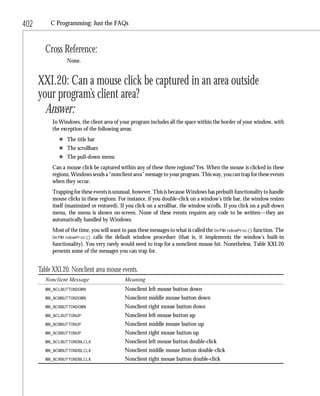
Color Constant Target Object
COLOR_CAPTIONTEXT Title text
COLOR_ACTIVEBORDER Active border
COLOR_INACTIVEBORDER Inactive border
COLOR_APPWORKSPACE Application workspace
COLOR_HIGHLIGHT Highlight
COLOR_HIGHLIGHTTEXT Highlight text
COLOR_BTNFACE Button face
COLOR_BTNSHADOW Button shadow
COLOR_GRAYTEXT Grayed-out text
COLOR_BTNTEXT Button text
You can change the system colors from within your Windows programs by calling the GetSysColor() and
SetSysColor() functions. You can also set these colors by altering the [colors] section of your WIN.INI
(Windows initialization) file, or you can interactively set them by using the Windows control panel.
Cross Reference:
XXI.24: How do you access the system colors in a Windows program?
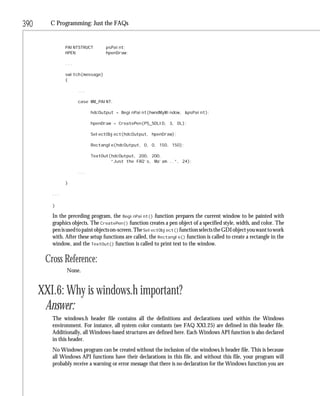
XXI.26: How do you create your own buttons or controls?
Answer:
Controls such as buttons are typically created with a resource editor. With a resource editor, you can
interactively design your windows and place pushbuttons, check boxes, radio buttons, and other controls in
your window. You can then access them from within your Windows program by referring to each resource’s
unique resource id (which you define).
This is not the only way, however, to create controls such as buttons. Buttons and other controls are called
“child window controls.” Each child window control has the capability to trap incoming messages (such as
the WM_COMMAND message) and pass them on to the parent window control. A child window control such as
a pushbutton can be created by using the Windows API function CreateWindow(). It might seem odd to call
the function CreateWindow() to create a pushbutton, but a control is, in effect, its own “virtual” window,
and thus it needs to have its own handle. Here is some sample code that shows how this task is performed:
...
switch (message)
{
...
case WM_CREATE:](https://image.slidesharecdn.com/21-windows-100817093340-phpapp01/85/21-windows-23-320.jpg)


- The document discusses programming in the Windows environment using C. - It recommends the book "Programming Windows 3.1" by Charles Petzold as the definitive reference for learning Windows programming in C. - The Microsoft Developer Network CD is also mentioned as a useful reference that includes sample programs. - The chapter aims to answer common questions about programming in Windows using C.