SlideShare a Scribd company logo
1 of 71
1 
PERFORMING URETHRAL URINARY CATHETERIZATION 
PREPARATION 
1. Assess 
 The client’s overall condition 
 If the client is able to cooperate and hold still during procedure 
 If the client can be positioned supine with head relatively flat 
 When the client last voided or was last catheterized 
 Percuss the bladder to check for fullness or distension 
2. Determine 
 The most appropriate method of catheterization 
3. Assemble Equipment 
 Sterile catheter of appropriate size. An extra catheter should also be at hand. 
 Catheterization kit or individual sterile items 
o 1-2 pair of sterile gloves 
o Water proof drape(s) 
o Antiseptic solution 
o Cleansing balls 
o Forceps 
o Water soluble lubricant 
o Urine receptacle 
o Specimen container 
 For an indwelling catheter 
o Syringe prefilled with sterile water in amount specified by the catheter’s 
manufacturer 
o Collection bag and tubing 
o 2% xylocaine gel (if agency permits) 
o Disposable clean gloves 
o Supplies for performing perineal cleansing 
o Both blanket or sheet for draping the client 
o Adequate lighting – obtain a flashlight or lamp if necessary 
4. Perform routine perineal care to cleanse the meatus from gross contamination.
2 
Procedure 
1. Check the doctor’s order for catheterization. 
2. Introduce yourself and verify the client’s identity. Explain to the client what you 
are going to do, why it is necessary and how the client can cooperate. 
3. Perform hand hygiene and observe for other appropriate infection control 
procedure. 
4. Provide for the client’s privacy. 
5. Place the client in the appropriate position and drape all the areas except the 
perineum. 
o Female: Supine, kness flexed 2 feet apart 
o Male supine, legs slightly abducted 
6. Establish adequate lighting. Stand on the client’s right if you are a right handed. 
On the client’s left if you are a left handed. 
7. If using a collecting bag not contained within the catheterization kit. Open the 
drainage package and place the end of the tubing within reach. 
8. If agency policy permits, apply clean gloves and inject 10-15 mL Xylocaine gel 
into the urethra of the female client. Wipe the underside of the shaft to distribute 
to get up the urethra. Wait atleast 5 minutes for the gel to take effect before 
inserting the catheter. Remove the gloves. 
9. Open the catheterization kit. Place the waterproof drape under the buttocks 
(female) or penis (male) without contaminating the center of the drape with your 
hands. 
10. Apply sterile gloves. 
11. Organize the remaining supplies. 
o Saturate the cleansing balls with the antiseptic solution 
o Open the lubricant package 
o Remove the specimen container and place it nearby with the lid loosely on 
top 
12. Attach the prefilled syringe to the indwelling catheter inflation hub.and test the 
balloon. 
13. Lubricate the catheter and place it with drainage end inside the collecting 
container. 
14. If desired, place the fenestrated drape over the perineum exposing the urinary 
meatus. 
15. Cleanse the meatus
3 
Female: 
1. The nondominant hand is considered contaminated once it touches the client’s 
client. 
2. Use your nondominant hand to spread labia. Establish a firm but gentle position. 
3. Pick up a cleansing ball with the forceps in your dominant hand and wipe one 
side of the labia majora in a anteroposterior direction. 
4. Use a new ball for the opposite side. 
5. Repeat for the labia minora. 
6. Use the past ball to cleanse directly over one meatus. 
Male: 
1. Use the nondominant hand to grasp the penis just below the glans. If necessary, 
retract the foreskin. Hold the penis firmly upright with slightly tension. 
2. Pick up a cleansing ball with the forceps in your dominant hand and wipe from 
the m.eatus in a circular motion around the glands. 
3. Use a new ball and repeat 3 more times. 
16. Insert the catheter 
Grasp the catheter firmly 2-3 inches from the tip. Ask the client to take a slow deep 
breath and insert the catheter as the client exhales. 
Advance the catheter 2 inches further after the urine begins to flow through it or per 
agency policy. 
If the catheter accidentally contacts the labia or slips into the vagina, it is considered 
contaminated and a new sterile catheter must be used. The contaminated catheter may 
be left in the vagina until the new catheter is inserted to help avoid mistaking the vaginal 
opening for the urethral meatus.
4 
17. Hold the catheter with the nondominant hand. In males, lay the penis down onto 
the drape, being careful that the catheter does not pull out. 
18. For indwelling catheter inflate the retention balloon with the designated volume. 
 Without releasing the catheter, hold the inflation valve between two fingers 
of your nondominant hand while you attach the syringe and inflate with 
your nondominant hand. 
 If the client complains of discomfort immediately withdraw the instilled 
fluid, advance the catheter further and attempt to inflate the balloon again. 
 Pull gently on the catheter until resistance is felt to insure that the balloon 
has inflated and to place it in the trigone of the bladder. 
19. Collect a urine specimen, if needed. Allow 20-30 mL to flow into the bottle 
without touching the catheter to the bottle.
20. Allow straight catheter to continue draining. If necessary attach the drainage end 
5 
of an indwelling catheter to the collecting tubing and bag. 
21. Examine and measure the urine. In some cases only 750-1000 mL of urine are to 
be drain from the bladder at one time. Check agency policy. 
22. Remove the straight catheter, secure the catheter tubing to the inner thigh for 
female clients or the upper thigh/abdomen for the male clients, with enough slack 
to allow usual movement. 
Also secure the collecting tubing to the bed linens and hang the bag below the 
level of the bladder. No tubing should fall below the top of the bag. 
23. Wipe the perineal area of any remaining antiseptic or lubricant. Replace the 
foreskin, if retracted earlier. Return the client to a comfortable position. 
24. Discard all used supplies in appropriate receptacles and perform hand hygiene. 
25. Document the catheterization procedure including catheter procedure and result 
in the client records.
6 
REMOVING AND SERVING OF BED PAN 
PURPOSE: 
To facilitate and encourage normal elimination of urinary abd bowel wastes 
for patient confined to bed. 
EQUIPMENT: 
Obtain from central supply or from designated storage area: 
1. Disposable bedpan or urinal 
2. Disposable washbasin 
3. Bedpan cover (towel) 
4. Disposable gloves 
5. Disposable “wet” wiped 
6. Linen saver pad 
Obtain from the laundry: 
1. Hand towel 
2. Wash cloth 
Have soap available
7 
PROCEDURE 
Giving a bedpan: 
1. Provide screen or close door. To minimize embarrassment and ensure privacy. 
2. Wash hands, and apply disposable glove. To prevent cross-contamination. 
3. Obtain bedpan from designated area or bedside stand. Make certain it is labeled with 
the patient’s name and number if bedpan is being re-used for the same patient. To 
Avoid cross-contamination. 
4. Turn bedding back, exposing as little of the patient as possible. To maintain the 
patient’s privacy. 
5. Have patient flex his knees and raise buttocks, if possible. Assist him where it is 
necessary by placing hand under low back and lifting. Allows space for bedpan between 
the individual and bed. Check to ensure that he is not restricted from moving or certain 
types of posture. 
6. If patient cannot use his legs to raise himself, turn him on his side. Position 
bedpan to buttocks and roll him onto his back with bedpan under him. Be sure bedpan 
is in proper position. 
7. Adjust the bed to the most comfortable position for the patient if orders allow. If 
possible, elevate the head of the bed slightly to prevent hyperextension of the spine. If 
elevation of the head is contraindicated, tuck a pillow or folded blanked under the 
patient’s back to cushion the sacrum against he bedpan and support the lumbar area. 
Using the bedpan is difficult for most people. When permitted elevating the head of the 
bed aids in elimination. 
8. Leave the patient alone with the toilet tissue within easy reach (Unit 1 ensures patient 
has access to call bell). Minimizes patient embarrassment. 
9. Dispose of gloves, wash hands per hand hygiene policy.
8 
Removing a bedpan: 
1. Apply disposable gloves. The patient’s condition and the physicians order will 
determine how much he is able to do for himself. 
2. . Lower head of bed have patient flex his knees and rise up buttocks; then 
remove the bedpan. Assist and support the patient as necessary. The patient’s 
condition and the physicians order will determine how much he is able to do for himself. 
3. If the patient is unable to care for and clean himself, hold the bedpan firmly and turn 
the patient to his side off the bedpan. Hold the bedpan to prevent it from tipping as the 
patient turns. 
4. Remove and cover bedpan and place it to the side of the bed. To protect bedding and 
prevent odors. 
5. Cleanse anal area with disposable “wet” wipe, then wash, and dry anal area and 
buttocks. To prevent excoriation and breakdown of skin 
6. Provide materials for patient to wash and dry his hands and position him for comfort. 
To provide hygiene and comfort. 
7. Empty contents of bedpan into toilet and flush. Discard per I.C.M. All disposable 
items will be discarded per I.C.M. III.C. To Eliminate risk of cross contamination and 
reduce the risk of communicable disease transmission. 
8. Open door or remove screen 
9. Measure and record contents if patients are on I&O and dispose of contents in toilet 
room. Return urinal to bedside stand. Disposable articles will be discarded per ICM. To 
eliminate risk of cross contamination and reduce risk of communicable disease 
transmission.
9 
HOT SITZ BATH 
Definition 
Sitz bath or hip bath is a bath in which a patient sits in water up to the hips to relieve 
discomfort and pain in the lower part of the body. Sitz bath works by keeping the 
affected area clean and increasing the flow of blood. 
A sitz bath may be created simply by filling a bathtub with some water and sitting in it 
for a few minutes. Alternatively, a large basin can be used. There are also special 
devices that fit into toilet bowls. Sitz baths may either be warm or cool. Some people 
find alternating between hot and cold water soothing. Sitz baths may be filled with just 
water, or substances such as salt, baking soda or vinegar can be added. 
Origin of Term 
The term sitz bath is derived from the German word Sitzbad,meaning a bath (Bad) in 
which one sits (sitzen). 
Objectives 
 To relieve muscle spasm 
 To soften exudates 
 To hasten the suppuration process 
 To hasten healing 
 To reduce congestion and provide comfort in the perineal area 
Purposes 
 To aid healing a wound in the area by cleaning on discharges and slough 
 To induce voiding in urinary retention 
 To relieve pain, congestion and inflammation in cases of: hemorroids, tenesmus, 
rectal surgery, anal fissures, after proctoscopic or cycloscopic exams., sciatica, 
uterine and renal colic. 
 To induce menstruation. 
Indications 
 Hemorrhoids 
 Anal Fissures/Surgery 
 Episiotomy 
 Uterine Cramps
10 
Important Considerations 
 Warm water should not be used if considerable congestion is already present. 
 The patient should be observed closely for signs of weakness and faintness. 
 After the patient is in the tub or the chair, check to see whether or not there is 
pressure against the patient’s thighs or legs. 
 Support patient’s back in the lumbar region. 
Contraindication 
Menstruating or pregnant women 
Equipment 
 Sitz tub half filled with water 105F 
 Pitcher of water 130F 
 Bath thermometer 
 Ice cap-with cover 
 Fresh camisa 
 Bath towel 
 Bath blanket 
 Rubber ring p.r.n. 
Preparation 
 Take all necessary equipment to bathroom or treatment room. 
 Run water into tub and check temperature—105F or 40.5C 
 Place rubber ring at bottom of tub p.r.n. or line bottom with towel. 
 Charting 
 Type of solution 
 Length of time of application 
 Type of heat application 
 Condition and appearance of wound 
 Comfort of patient 
Equipment 
Available bathroom with appropriate size tub for patient. 
 Towels and bathmat 
 Bath blanket 
 Inflatable ring 
 Patient’s clean clothes
11 
Procedure 
Nursing Interventions Rationale 
Check physician’s order for sitz 
bath patient. 
To know if it is indicated for the patient. 
Prepare the materials needed: 
Take linen to bathroom. 
Fill clean tub about one-third full 
with warm water. 
Check with your hand to determine 
that temperature of water is 
between 105°F and 110°F (40.5°C 
to 43.3°C). 
Place towel or inflatable ring, if 
appropriate, on tub bottom and 
bathmat on floor beside tub. 
To save time and effort 
Explain purpose and procedure to 
patient. 
For the patient to be aware on the purpose and 
procedure. 
Test the water in a sitz with a 
thermometer before the patient 
enters the tub. If the purpose of the 
sitz bath is to apply heat, water at 
a temperature of 43°C to 46°C for 
15 minutes will produce relaxation 
of the parts involved after a short 
contraction. 
Warm water should not be used if considerable 
congestion is already present. If the purpose of the sitz 
bath is to produce relaxation or to help promote 
healing in a wound by cleaning it of discharge and 
debris, then water at a temperature of 34°C to 37°C is 
used.
12 
Assist the patient into the tub and 
position him properly.Check to see 
whether there is pressure against 
the patient’s thighs or legs.If the 
patient’s feet do not touch the 
floor, and the weight of the legs is 
resting on the edge of the tub, a 
stool should be used to support the 
feet and to relieve the pressure on 
the back of the legs.It may also be 
necessary to place a towel in the 
water to support the patient’s back 
in the lumbar region.The bath can 
seem very long if one’s body is not 
in good alignment and 
comfortable. 
Wrap a bath blanket around the 
patient’s shoulders, and drape the 
ends over the tub. 
This protects the patient’s from feeling chilly and form 
exposure. 
Observe the patient closely for 
signs of weakness and fatigue. A 
cold compress may be placed at 
the back of the neck or forehead, 
to help prevent the patient from 
feeling weak. Discontinue the bath 
if the patient’s condition warrants. 
Typical signs of faintness include skin pallor, a rapid 
pulse rate, and nausea. 
Test the water in the tub several 
times, and keep it at the desired 
temperature. Additional hot water 
may be added by pouring it slowly 
form a pitcher or by opening a hot-water 
fauce a little bit. 
The water should be agitated by stirring it as hot water 
and added to prevent burning the patient. 
Do not leave the patient alone 
unless it is absolutely certain that it 
is safe to do so.
13 
Help the patient out of the tub 
when the bath is completed. 
Normally, a hot sitz bath should be 
continued for 15 to 30 minutes. 
Help the patient dry, and cover the patient adequately. 
Assist the patient to his bed, where it is best for him to lie down, and out of drafts until 
normal circulation returns.
14 
APPLICATION OF HOT AND COLD 
COLD 
Cold causes vasoconstriction (shrinkage of blood vessels), decreasing blood flow 
to an area, and slowing the body’s metabolism and its demand for oxygen. The 
therapeutic goals of cold applications include controlling hemorrhage, reducing edema, 
easing inflammation, and blocking pain receptors. 
Rationale for Cold Application 
Cold application prevents escape of heat from the body by slowing circulation, 
which also relieves congestion and often relieves muscle pain. A cold 
application: 
• Slows or stops bleeding 
• Slows bacterial activity in clients with an infection 
• Relieves pain following some types of surgery, tooth extraction, headache, or muscle 
or joint injury 
• Reduces swelling in injured tissues, including sprains and fractures 
• Prevents peristalsis in clients with abdominal inflammation 
• Relieves pain in engorged breasts
15 
• Controls pain and fluid loss in the initial treatment of burns 
• Diminishes muscle contraction and muscle spasms 
• Slows the basal metabolism for certain types of surgery. 
APPLYING COLD THERAPY 
• Stop the cold application immediately if the client complains of numbness or the 
skin appears white or spotty. Rationale: Cold numbs nerve endings. 
• As cold decreases the flow of blood in one area of the body, flow increases to 
other areas. Rationale: This explains why cold or chilling drafts striking the body often 
cause congestion in the nasal passages. 
• Continued application of cold affects deeper tissues. It is important to monitor the 
client closely. Rationale: Prolonged exposure to extreme cold may cause serious injury. 
• Cold often is applied to a sprain, strain, fracture, or burn. Rationale: This helps 
remove blood and lymph congestion in the area and reduces pain. 
HEAT 
Heat is often applied in general client care. Heat causes vasodilation (enlargement of 
blood vessels), increasing blood flow to a specific area. This increases the oxygen, 
nutrients, and various blood cells delivered to body tissues. Vasodilation also aids in 
removal of wastes from injured tissues, such as debris from phagocytosis.
16 
Rationale for Heat Application 
Heat application serves to: 
• Relieve local pain, stiffness, or aching, particularly of muscles and joints 
• Assist in wound healing 
• Reduce inflammation and infection 
• Make the chilly client more comfortable 
• Raise body temperature to help maintain normothermia 
• Promote drainage (draw infected material out of wounds) 
Because heat must be fairly intense to be effective, burns may result if heat is 
applied improperly or for too long. The application must be sufficiently hot to accomplish 
its purpose, but within a safe temperature range. Box 54-1 provides temperature ranges 
for hot and cold applications. Heat applied over a large area affords more warmth; 
however, the potential for injury is greater than that of heat applied over a small area. 
Protect the client from possible burn injury by observing safety precautions. In Practice: 
Nursing Care Guidelines 54-1 outlines steps for applying heat therapy. 
Both dry heat and moist heat have local effects. Apply dry heat with a heating 
blanket, warm-water bag, waterproof, water-filled heating pad (aquathermia pad), heat 
lamp, electric heat cradle, or electric heating pad. Moist heat warms the skin more 
quickly and is more penetrating than dry heat, because water is a better heat conductor 
than air. Apply moist heat with compresses, packs, or soaks, including the sitz bath. 
Sometimes wet compresses are used in combination with the aquathermia pad to 
provide longer-lasting moist heat. Skin maceration (abnormal softening) may develop 
when moisture is applied directly to the skin for long periods. The client’s skin may be 
protected by first applying a thin layer of petroleum jelly, if ordered. The provider’s order 
typically specifies the length of time for heat applications to be administered. For
example, the order may be: “Moist compresses for 15 minutes every hour WA (while 
awake).” 
Approximate Range of Temperatures for Hot and Cold Applications 
17 
Hot 37.7°C-40.5°C I00°F-I05°F 
Warm 35°C-37.7°C 95°F-!00°F 
Tepid 26.6°C-35°C 80°F-95°F 
Cool 8.3°C-26.6°C 65°F-80°F 
Cold 0°C-!8.3°C 50°F-65°F 
To convert Fahrenheit to Celsius: C = (F – 32) X 5/9 
To convert Celsius to Fahrenheit: F = (C X 9/5) + 32 
APPLYING HEAT THERAPY 
• Heat is applied only when specifically ordered by a primary provider and applied 
with the utmost caution. Rationale: Nerves in the skin are numbed easily. The client 
may not feel the pain of a burn, especially if heat has been applied often. 
• Specific body parts, such as the eyelids, neck, and inside an arm, are especially 
sensitive to heat. 
• Each person has his or her own sensitivity to heat. Apply the heat source slowly 
and ask the client for feedback. Rationale: This helps determine how much heat is safe 
and for how long.
• Infants, older people, and those with fair, thin skin have less heat resistance. 
Lowered body resistance because of illness also makes body tissues less resistant to 
heat. Rationale: It is important to consider each client individually. 
• Clients who are unresponsive or anesthetized and those with neurologic or 
psychological disorders or dementia are at increased risk for injury from heat 
applications. Rationale: These clients are often unable to report when heat is too 
intense. 
• Impaired circulation and some metabolic diseases make people more susceptible 
to burns (e.g., clients who are in shock or have any type of peripheral vascular disorder, 
or clients who have diabetes). Rationale: Changes in body systems interfere with skin 
integrity and healing and may impair the client’s ability to identify discomfort. 
• Clients receiving radiation therapy or chemotherapy and those with any degree of 
paralysis are particularly susceptible to burns. Rationale: Such clients have 
compromised immune systems or skin integrity. 
• Client complaints are very important. Listen to the client; if he or she complains of 
pain or discomfort, stop the treatment and consult the primary provider Rationale: Each 
client is different. Only the client can state how the treatment feels. 
18
19 
PERINEAL HEAT APPLICATION 
Purpose: 
1. To increase the flow of blood to relieve congetion over the perineum. 
2. To hasten the absorption of inflammatory exudates. 
3. To hasten the healing of wounds by stimulating granulation of tissue and drying the 
exudation. 
Equipments: 
 Heat lamp 
 Bed sheet 
 Bath towel 
 Tape measure 
Procedure 
 Assemble equipment 
 To prevent errors 
2. Identify the patient by checking the ID Bracelet. 
 To prevent errors 
 Explain the procedure and provide privacy and proper draping technique. 
 To ensure cooperation. 
4. Remove the underware and the peripad. 
 To expose the perineal area. 
 Position if modified lithotomy position, keeping feet on mattress with knees bent 
and separated. 
 Distance of heat lamp from area of exposure is 18 inches unless otherwise 
indicated. 
 To prevent burning, blanching of skin from too much heat. 
 Keep all linens away from the lamp. 
NOTE: contact with lamp may lead to accidental burning of linens. 
8. Expose the area for 10 minutes unless otherwise ordered. 
NOTE: prolonged exposure leads to burn. 
9. Check the skin for redness or blanching from time to time. 
10. After the procedure, keep the patient as comfortable as possible. Replace 
peripad. 
11. Clean and return the equipment properly. 
12. Chart the following: 
 Time the heat was apllied and lenght of treatment. 
 Relavant observations.
20 
 Patient’s response 
BREAST CARE 
Purpose: 
 To train all nursing staff who care for the new mother - baby dyad in the skills 
necessary to implement this policy. 
 To inform all pregnant patients about the benefits and management of 
breastfeeding. 
 To assist the staff in providing consistent breastfeeding information to all 
maternity patients and assistance to the breastfeeding mother - baby couplet to 
best support exclusive breastfeeding for her baby for the first six months of life. 
Procedure: 
1. Gather equipment 
• Breastfeeding handouts/resources - Breast feeding Resources/Log, Breast 
Engorgement, Breast Milk Collection and Storage. 
• Breast pump (if needed) 
• Breast cream (if needed) 
• Bed pillows or Breastfeeding pillow 
2. Within 30 minutes of delivery place the infant skin-to-skin across the mother’s 
chest. Maintain infant's body temperature with a knit cap and warm blankets 
tucked close. Encourage eye contact and light touch. 
3. Encourage the mother to breast feed the infant within the first hour after birth, 
preferably within the first 20-30 minutes, prior to initial bath. 
4. Assist mother with breast-feeding and provide teaching and support as indicated. 
Points to include are: 
 Use pillows to support the mother’s arms and to position infant level with 
the breast. 
 Express a small amount of colostrum onto the nipple to interest the infant 
in sucking. 
 Mother supports her breast using the "C” hold. The thumb is placed on 
top of the breast and the four fingers support the breast underneath. All 
fingers should be well back from the areola. 
 Mother tickles the center of the infant’s lower lip with her nipple until the 
infant opens his mouth wide as possible. This may take several attempts 
to do. 
 When infant’s mouth is open very wide with the tongue down, mother
21 
should center her nipple quickly and draw the baby in close to her body. 
 Infant’s mouth and lips should form a flanged seal around the breast 
tissue. The tongue should be curved around the areola, cupping it and 
extending over the gum line. 
 Infant’s nose and chin should be touching the breast. There is no need to 
create an air space for most infants. 
 Identify nutritive sucking, which is 8 -10 long, drawing sucks w/ audible 
swallows followed with a 5 -10 second rest period. Non-nutritive sucking is 
usually 2-3 short, choppy sucks that are ineffective. 
 Identify quiet sounds of swallowing i.e. a “k” or “h” phonics sound. 
 Infant should finish the first breast or self-detach before offering the 
second breast. 
 De-latch the infant if feeding becomes uncomfortable, latch does not 
appear deep enough, or a non-nutritive sucking pattern is seen, by placing 
a clean finger in the side of the infant’s mouth between his jaws to release 
the suction. Then assist mother to correctly re-latch the infant. 
 Frequency and duration of feedings at the breast should be infant - led. 
 Infant is expected to nurse approximately 8-12 times in 24 hours. Feeding 
sessions may last 5-50 minutes or longer.
22 
Breastfeeding Interventions 
1. If a mother has a flat or inverted nipple and the infant is unable to latch, the nurse 
may use a manual breast pump or inverted syringe to draw out nipple prior to 
initiating latch. After consulting with a lactation team member, consider a nipple 
shield to attain latch. 
2. Provide a functional assessment of the infant at the breast during a feeding, 
utilizing the LATCH tool a minimum of once every shift, to be documented on 
infant’s chart. 
3. The Lactation Consultant/Educator/mother-baby nurse examines nipples 
whenever mother expresses concerns or complaints of sore nipples. 
LC/LE/mother-baby nurse to observe/assess the next feeding. 
4. When prolonged separation of mother and infant is expected (i.e. premature, ill 
infant), help the mother initiate pumping as soon as medically feasible, optimally 
within 3 hours and no later than 6 hours after delivery. 
5. The colostrum or milk obtained by expression should be collected and made 
available to the baby when feedings begin. 
6. For mothers experiencing a fetal demise or newborn loss, provide the “Milk 
Suppression” handout. 
Breast Care/Education 
1. Examine mother's breasts and nipples during daily shift assessments. The nurse 
can demonstrate breast care by teaching hand expression of colostrum/breast 
milk onto the areola after feeds, then allow to air dry. The nurse may provide 
breast cream if there are visible signs of redness, cracking or bleeding of the 
nipple or if the mother complains of soreness. 
2. Encourage exclusive breast feeding for the first 6 months of infant’s life. 
3. If the mother insists on supplementing after breastfeeding, recommend limiting 
the amount of formula to ½ - 1 oz and to discontinue supplementation once the 
milk has come in (approximately day 3-5). Offer alternative feeding methods in 
lieu of traditional bottle- feeding and provide the printed handout on “Breast 
feeding and Alternative Feeding Choices”. 
4. Instruct the mother on pumping techniques using the electric breast pump, when 
the infant demonstrates inadequate suckling or if the mother-baby dyad are 
separated indefinitely. 
5. When pumping is necessary, provide written guidelines to the mother on 
pumping, collection bottles, labels and lids for expressed milk. The information 
will include resource numbers for rental of a hospital grade electric breast pump 
for use after discharge.
6. Instruct all patients regarding infant-led feeding cues-Watch the infant for signs 
of readiness to feed such as increased alertness or activity, mouthing or rooting, 
rapid eye movement while asleep, and hand-to-mouth movement. Crying is a late 
sign of hunger. If feeding cues are not responded to in a timely manner, the 
infant may not be cooperative. 
23 
7. Instruct all patients regarding cluster feeding patterns-Frequent feeding, during 
periods of increased wakefulness; a series of mini-feedings snacks or courses, 
usually followed by a period of deep sleep; normal in the first 3 weeks. 
8. Instruct all patients how to manually ex press their milk, in the eve nt a feeding is 
delayed, or they are separated from their infant. 
9. Instruct all patients in t he use of the feeding log, and to monitor diaper count for 
the first week of their infant’s life; evidence of adequate nourishment from the 
breast would be sufficient output of urine and stool. Day 1>one urine, one stool; 
Day 2>two urine, two stools; Day 3>three urine, two stools; etc.-Day 6 and 
beyond>5-6 urine, 4+stools. Instruct mother to contact pediatrician if diaper 
count not as described on breastfeeding resource log. 
10. Instruct all patients in the “Supply and Dem and” principle of milk production- 
The more the infant breastfeeds, the more milk will be produced. During growth 
spurts infants nurse more often to stimulate the mother’s milk supply to meet 
their new requirements. 
11. Educate the mothers who are undecided about breastfeeding on the benefits of 
breastfeeding and human milk. Points to include are: 
American Academy of Pediatrics recommends exclusive breastfeeding for the 
first six months of life. 
Breast milk provides optimal composition for brain and eye development, 
decreases incidence of diarrhea, upper respiratory infections and some allergies, 
promotes bonding and mother/infant closeness, reduces incidence of postpartum 
hemorrhage for mother and is economical and convenient. 
12. Provide the mother with the postpartum parent educational booklet on self-care, 
nutrition, infant care and infant feeding. Encourage the mother to watch the 
Newborn Channel to reinforce other teaching provided for infant care and 
feeding. 
13. Provide all patients with a breastfeeding packet with additional breastfeeding 
recommendations including feeding/diaper log and resource numbers for 
breastfeeding assistance after discharge 
14. Instruct mothers on normal infant weight loss.
24
25 
Documentation 
1. Document on the infant's chart the attempt to get the infant to breast feed; if 
supplementation medically indicated, document rationale in electronic medical 
record prior to supplementation. 
2. Document the infant's response and the method of feeding used to provide 
nourishment to the infant. 
3. If the mother insists that the baby be fed in the nursery during the night, requests 
a pacifier or bottle supplementation, document in the mother’s electronic medical 
record the mother’s request and the education provided as to the impact 
separation and/ or use of artificial nipples and/or formula, may have on the 
success of breastfeeding 
4. Document observed or patient reported LATCH assessment with each feeding 
on infant’s chart.
26 
ORAL MEDICATION 
The most common way people take medications is orally (by mouth). Depending on what your 
doctor has prescribed, your oral medication can be swallowed, chewed or placed under your 
tongue to dissolve. 
Assess 
 Allergies. 
 Client’s ability to swallow medication. 
 Presence of vomiting or diarrhea that would interfere with the ability to absorb the 
medication. 
 Specific drug action, side effects, interactions, and adverse reaction. 
 Client’s knowledge of and learning needs about the medication. 
 Perform appropriate assessment specific to the medication. 
 Determine if the assessment date influences the administration of the medication. 
Assemble equipment and supplies: 
 Dispensing system. 
 Disposable medication cups: small paper or plastic cups for tablets and capsules, or 
waxed or plastic calibrated medication cups for liquids. 
 Medication administration record (MAR), or computer printout. 
 Pill crusher/cutter. 
 Straws to administer medication that might discolor the teeth, or to facilitate the ingestion 
of liquid medication for clients. 
 Drinking glass and water or juice. 
 Applesauce or pudding to use for crushed medication. 
Know the reason why the client is receiving the medication, the drug classification, 
contradiction, usual dosage range, side effects, and nursing considerations for 
administrating and evaluating the intended outcomes for the medication. 
Check the MAR 
 Check the MAR for the drug name, dosage, and frequency, route of administration, and 
expiration, date for administering the medication, if appropriate. 
 If the MAR is unclear or pertinent information is missing, compare the MAR with the 
most recent primary care provider’s written order. 
 Report any discrepancies to the charge nurse or the primary care provider, as agency 
policy dictates.
27 
Verify the client’s ability to take medication orally. 
 Determine whether the client can swallow, is NPO, is nauseated or vomiting, has gastric 
suction, or has diminished or absent bowel sounds. 
Organized the supplies. 
 Assemble the MAR(s) for each client together so that medication can be prepared for 
one client at a time. 
PROCEDURE 
Perform hand hygiene, and observe other appropriate infection control procedures. 
Unlock the dispensing system 
Obtain appropriate medication 
 Read the MAR and take the appropriate medication from the shelf, drawer, or 
refrigerator. 
 Compare the label of the medication container or unit-dose package with the order on 
the MAR or computer printout. If they are not identical, recheck the prescriber’s written 
order in the clients chart. If there is still is a discrepancy, check with the nurse in charge, 
or with the pharmacist. 
 Check the expiration date of the medication. Return expired medication to the pharmacy. 
 Use only medications that have clear, legible labels. 
Prepare the medication. 
 Calculate medication dosage accurately. 
 Prepare the correct amount of medication for the required dose, without contaminating 
the medication. 
 While preparing the medication, recheck each prepared drug and container with the 
MAR again. 
Tables of Capsules 
 Place package unit-dose capsules or tablets directly into the medicine cup. Do not 
remove the medication from the wrapper until at the bedside. 
 If using a stock container, pour the required number into the bottle cap, the transfer the 
medication to the disposable cup without touching the tablets. 
 Keep narcotics and medication that require specific assessment-such as pulse 
measurements, respiratory rate or depth, or blood pressure-separate from others. 
 Break scored tablets only, if necessary to obtain the correct dosage. Use a file or cutting 
devise if needed. Check the agency policy as to whether unused portions of a 
medication can be discarded and, if so how they are to be discarded.
 If the client has difficulty swallowing, crush the tablets (check to make sure tablets may 
be crushed) to a fine powder with a pill crusher, or between two medication cups. Then 
mix the powder with a small amount of soft food such as applesauce. 
28 
Liquid Medication 
 Thoroughly mix the medication before pouring. Discard any medication that has changed 
color or turned cloudy. 
 Remove the cap, and place it upside down on the countertop. 
 Hold the bottle so the label is next to your palm, and pour the medication away from the 
label. 
 Place the medication cup at eye level, and fill it to the desired level, using the bottom of 
the meniscus to align with the container scale. 
 Before capping the bottle, wipe the lip with paper towel. 
 When giving small amounts of liquids (< 5ml), prepare the medication in a syringe 
without the needle, or in a specially designed oral syringe. Label the syringe with the 
name of the medication and route (PO). 
 Keep unit-dose liquids in their packages, and open them at 
the bedside. 
Oral Narcotics 
 If an agency uses a manual recording system for controlled substances, check the 
narcotic record for the previous drug count, and compare it with the supply available. 
 Remove the next available tablet, and drop it in the medicine cup. 
 After removing a tablet, record the necessary information on the appropriate narcotic 
control record, and sign it.
29 
 Note: Computer-controlled dispensing system allow access only to the selected drug, 
and automatically record its use. 
All Medication 
 Place the prepared medication and MAR together on the medication chart. 
 Recheck the label on the container before returning the bottle, box, or envelope to its 
storage place. 
 Avoid leaving prepared medication unattended. 
 Lock the medication cart entering the clients room. 
 Check the room number against the MAR if agency policy does not allow the MAR to be 
removed from the medication cart. 
Provide for client privacy. 
Prepare the client. 
 Check the client’s identification band. 
 Assist the client to sitting position or, if not possible, to a side lying position. 
 If not previously assessed, take the required assessment measures such as pulse and 
respiratory rates or blood pressure. 
Explain the purpose of the medication and how it will help, using language that the client 
can understand, Include relevant information about effects. 
Administer the medication at the correct time. 
 Take the medication to the client within 30 minutes before or after the scheduled time. 
 Give the client sufficient water or preferred juice to swallow the medication. Before using 
juice, check for any food and medication incompatibilities. 
 If the client is unable to hold the pill cup, use it to introduce the medication into the 
client’s mouth, and give only one tablet or capsule at a time. 
 If an older child or adult ha difficulty swallowing, and ask the client to place the 
medication on the back of the tongue before taking the water. 
 If the medication has an objectionable taste, ask the patients to suck a few ice chips 
beforehand, or give the medication with juice, applesauce, or bread, if there are no 
contraindications. 
 If the client says that the medication you are about to give is different from what the 
client has been receiving, do not give the medication without first checking the original 
order. 
 Stay with the client until all medications have been swallowed.
30 
Document each medication given. 
 Record the medication given, dosage, time, any complaints or assessment of the client, 
and your signature 
 If medication was refused or omitted, record this fact on the appropriate record; 
document the reason, when possible, and the nurse’s actions, according to agency 
policy. 
Dispose of all supplies appropriately. 
 Replenish stock, and return the cart to the appropriate place. 
 Discard used disposable supplies. 
Evaluate the effects of the medication. 
 Return to the client when the medication is expected to take effect to evaluate the effects 
of the medication on the client.
31 
Subcutaneous Injection 
Where can I give a subcutaneous injection? 
The following are sites where you can give a subcutaneous injection: 
 Abdomen: Uncover your abdomen. You may give an injection within the 
following area: below the waist to just above the hip bone and from the side to about 
2 inches from the belly button. Avoid the belly button. 
 Thigh: Uncover the entire leg. Find the area halfway between the knee and hip 
and slightly to the side. Gently grasp the area to make sure you can pinch 1 to 2 
inches of skin. 
 Upper Arm: Uncover the arm to the shoulder. Have the person getting the 
injection stand with his hand on his hip. Stand next to and a little behind the person. 
Find the area halfway between the elbow and shoulder. Gently grasp the skin at the 
back of the arm between your thumb and first 2 fingers. You should be able to grasp 
1 to 2 inches of skin
32 
Materials needed 
Syringe with the drug to be administered (without air), needle (Gauss 25, short and thin; 
on syringe), liquid disinfectant, cotton wool, adhesive tape. 
Technique 
1. Wash hands. 
2. Reassure the patient and explain the procedure. 
3. Uncover the area to be injected (upper arm, upper leg, abdomen). 
4. Disinfect skin. 
5. ‘Pinch’ fold of the skin. 
6. Insert needle in the base of the skin-fold at an angle of 20 to 30 degrees. 
7. Release skin. 
8. Aspirate briefly; if blood appears: withdraw needle, replace it with a new one, if 
possible, and start again from point 4. 
9. Inject slowly (0.5 - 2 minutes!). 
10. Withdraw needle quickly. 
11. Press sterile cotton wool onto the opening. Fix with adhesive tape. 
12. Check the patient's reaction and give additional reassurance, if necessary. 
13. Clean up; dispose of waste safely; wash hands.
33 
INTRAMUSCULAR INJECTION 
Safe areas to give an IM injection: 
 Vastus Lateralis Muscle (Thigh): Look at your thigh and divide it into 3 equal 
parts. The middle third is where the injection will go. The thigh is a good place to 
give yourself an injection because it is easy to see. It is also a good spot for children 
younger than 3 years old. 
 Ventrogluteal Muscle (Hip): Have the person getting the injection lie on his or her 
side. To find the correct location, place the heel of your hand on the upper, outer 
part of the thigh where it meets the buttocks. Point your thumb at the groin and your 
fingers toward the person's head. Form a V with your fingers by separating your first 
finger from the other 3 fingers. You will feel the edge of a bone along the tips of your 
little and ring fingers. The place to give the injection is in the middle of the V. The hip 
is a good place for an injection for adults and children older than 7 months.
 Deltoid Muscle (Upper arm muscle): Completely expose the upper arm. You will 
give the injection in the center of an upside down triangle. Feel for the bone that 
goes across the top of the upper arm. This bone is called the acromion process. The 
bottom of it will form the base of the triangle. The point of the triangle is directly 
below the middle of the base at about the level of the armpit. The correct area to 
give an injection is in the center of the triangle, 1 to 2 inches below the acromion 
process. 
 Dorsogluteal Muscle (buttocks): Expose one side of the buttocks. With an alcohol 
wipe draw a line from the top of the crack between the buttocks to the side of the 
body. Find the middle of that line and go up 3 inches. From that point, draw another 
line down and across the first line, ending about halfway down the buttock. You 
should have drawn a cross. In the upper outer square you will feel a curved bone. 
The injection will go in the upper outer square below the curved bone. Do not use 
this site for infants or children younger than 3 years old. Their muscles are not 
developed enough. 
34
35 
PROCEDURE: 
Wash your hands with soap and dry them completely. Put on gloves if necessary. 
 Open the alcohol wipe: Wipe the area where you plan to give the injection. Let the 
area dry. Do not touch this area until you give the injection. 
 Prepare the needle: Hold the syringe with your writing hand and pull the cover off 
with your other hand. Place the syringe between your thumb and first finger. Let the 
barrel of the syringe rest on your second finger. 
 Hold the skin around where you will give the injection: With your free hand, 
gently press on and pull the skin so that it is slightly tight. 
 Insert the needle into the muscle: Hold the syringe barrel tightly and use your 
wrist to inject the needle through the skin and into the muscle at a 90 degree angle. 
 Check the needle: Let go of the skin with your other hand. Hold the syringe so it 
stays pointed straight in. Pull back on the plunger a little to make sure you did not hit 
a blood vessel. If blood comes back, remove the needle immediately. Do not inject 
the medicine. Dispose of both the syringe and the medicine. Get more medicine in a 
new syringe. When you give the second injection, give it on the other side. 
 Inject the medicine: Push down on the plunger to inject the medicine. Do not force 
the medicine by pushing hard. Some medicines hurt. You can inject the medicine 
slowly to reduce the pain. 
 Remove the needle: Once the medicine is injected, remove the needle at the same 
angle as it went in. Place gauze over the area where you gave the injection.
36 
ADMINISTERING INTRADERMAL INJECTIONS 
GENERAL 
a. An intradermal (ID) injection is the injection of a small amount of fluid into the dermal 
layer of the skin (see figure 2-10). It is frequently done as a diagnostic measure, such 
as for tuberculin testing (screening test for tuberculosis referred to as a tine test) and 
allergy testing (placing very small amounts of the suspected antigen or allergen in a 
solution under the skin). The intradermal injection is made in skin areas of the body that 
are soft and yielding. 
b. Often the tuberculin syringe is the only syringe with fine enough calibrations to 
measure the minute dose that is used. A 26-gauge needle, which is one-fourth to one-half 
inch in length, is usually selected. The fluid is in a small welt or "wheal" (a small 
swelling of the skin due to the medication placed under the skin) just under the surface 
of the skin and between its layers.
37 
PROCEDURE FOR ADMINISTERING AN INTRADERMAL INJECTION 
Select Injection Site and Prepare Patient. 
1. Selecting site. Usually palmer (inner) forearm or subscapular region of the back is 
selected. The site selected should be an easily obtainable area and relatively free from 
being rubbed by clothing. 
2. Position patient. To position the patient, proceed as follows: 
(a) Place arm in a relaxed position, elbow flexed. 
(b) Place palm up, exposing palmer or inner arm area. 
c. Prepare Injection Site 
d. Remove Needle Guard. Pull the guard straight off. 
e. Stabilize Injection Site. 
1. Using your nondominant thumb, apply downward pressure, directly below and 
outside the prepared injection site. (Do not draw the skin back or move the skin to the 
side because the skin will return to its normal position when pressure is released and 
will cause the needle bevel to either go deeper into the skin or to leave the skin, 
depending upon which direction the skin moves.) 
2Hold the skin taut until the needle bevel has been inserted between the skin layers. 
f. Insert Needle. 
1. Using your dominant hand, hold syringe, bevel up, with fingers and thumb resting on 
the sides of the barrel. If you insert the needle at a 20 degree angle, lower it at once to 
15 degrees. Do not place thumb or fingers under syringe because this will cause the 
angle of insertion to exceed 15 degrees causing the needle to insert beyond the dermis. 
2.Insert needle, bevel up, just under the skin at an angle of 15 to 20 degrees until the 
bevel is covered. Continue stabilizing thumb pressure. You should feel some resistance. 
If the needle tip moves freely, you have inserted the needle too deeply. At this point, 
withdraw needle slightly and check again for resistance.
g. Inject Medication. It is not necessary to aspirate the syringe since no large vessels 
are commonly found in the superficial layer of the skin. Inject the medication as follows: 
38 
1. Continue holding syringe with same hand. 
2. Release skin tension with other hand. 
3. With free hand, push plunger slowly forward until the medication is injected and a 
wheal appears at the site of the injection. The appearance of a wheal indicates that the
medication has entered the area between the intradermal tissues. If a wheal does not 
appear, withdraw the needle and repeat the procedure in another site. 
h. Withdraw Needle. To withdraw the needle, quickly withdraw it at the same angle that 
it was inserted. 
i. Cover Injection Site. Without applying pressure, quickly cover injection site with a dry 
sterile small gauze. 
39 
j. Perform Post injection Patient Care. 
k. Evaluate Reaction of Medication. Usually you, as the medical specialist, will not 
evaluate the reaction of a suspected allergic reaction or a tuberculin test, but will record 
the reaction. For a tuberculin test, the patient will wait 48 to 72 hours and then return to 
have an evaluation to determine if the patient has been exposed to tuberculosis. If the 
intradermal injection is done to determine if the patient is allergic to dust, pollen, or 
similar substances, a reaction will take place in a few minutes after the substance has 
been placed under the skin. 
(1) Instruct the patient to wait or return to have the test read according to local SOP. 
(2) Caution patient not to rub, scratch, or wash injection site. Rubbing, scratching, or 
washing may spread or dilute the medication, causing a false reading at a later time. 
l. Dispose of Equipment. Dispose of equipment according to local SOP. 
m. Record Administration of Intradermal Injection. Record the injection information on 
the patient's chart or record.
40 
Stages of labor 
First stage: Cervical Dilatation Stage 
-begins with the onset of regular contractions. 
Phases of labor: 
Latent phase: dilation of cervix to3 to 4 cm. contraction become increasing 
Active phase: dilation continues from 3 to 4 cm to 7 cm. Contraction become stronger 
and painful 
Transition phase: cervix dilates from 8 to 10 cm 
What happen during the first stage of labor? 
Cervical dilatation and effacement 
Causes of cervical dilatation 
Contraction and retraction of the cervical dilation of uterine musculature 
Mechanical pressure by the bulging membrane(forewater) 
The descend of the presenting part 
Phases of cervical dilatation 
Latent phase- the first 3cm dilatation; a slow process(8 hours in nulliparous and 3 hours 
in multiparous) 
Active phase - this is active process of cervical dilatation; the normal rate is 1cm/hour 
Latent phase Active phase 
Begins with onset of contraction 
Slow progress. 
Little cervical dilatation 
Progressive cervical effacement 
Ends once the cervix reaches 3cm 
dilatation 
Duration 
- 8 hours nulliparous 
- 6 hours multiparous 
Active process 
Begins after 3 cm cervical dilatation 
Period of active cervical 
dilatation(average rate 1cm/hour) 
S-shaped curved which is usedto 
defined the progress of labor 
It has three components 
A. Acceleration - slow 
B. Maximum- fast 
C. Deceleration- slow
41 
Contraction: is the power of labor 
Type of contraction: 
Regular 
Increasing in frequency 
Irregular 
Second stage. (expulsive stage) 
begins with complete dilatation of the cervix and ends with delivery of the newborn. 
-it should be complete within one hour after complete dilatation. 
Two phases of expulsive stage 
Propulsive phase- from full dilatation until presenting part has descended to the pelvic 
floor. 
Expulsive phase- which end in the complete delivery of the baby. 
Features of expulsive phase: 
Mothers irresistible desire to bear down 
Distension of the perinium. 
Dilatation of the anus. 
Average length: 
Nulliparous: 40 minutes 
Multiparous: 20 minutes 
Mechanism of labor 
 Descent 
 Flexion 
 Internal rotaion 
 Extension 
 Internal rotation 
 Expulsion 
”crowning” occurs when the newborns head or presenting part appears at the vaginal 
opening. 
-”Episiotomy” surgical incision in the perineum-may be done to facilitate delivery and 
avoid laceration of the perineum. 
Progress of second stage of labor 
Finding suggestive of satisfactory progress of second stage of labor are: 
- steady descent of fetus 
- onset of expulsive(pushing phase) 
Findings suggestive of unsatisfactory progress in the second stage of labor are: 
- lack of descent of fetus through the birth canal
42 
- failure of expulsion during the late (expulsive) phase. 
Third stage (placental stage) 
-This stage begins with delivery of the newborn and ends with delivery of placenta. 
-It occurs in two phases –placental separation and placental expulsion. 
Two phases: 
Separation phase 
Expulsion phase 
Duration: 15-20 minutes for separation 
Average blood loss: 150ml to 250 ml 
Fourth stage: Postpartum 
-It lasts from 1 to 4 hours after birth. 
-the mother and the newborn recover from physical process of labor. 
-systems readjustment. 
Newborn body systems begins to adjust to extrauterine life. 
PHYSIOLOGICAL MATERNAL CHANGES 
LOCHIA – discharge from the uterus during the first 3 weeks after delivery. 
Increasing Lochia as the day passes by may indicate Heparin Intoxication. 
LOCHIAL CHANGES 
LOCHIA RUBRA 
-Dark red discharge occurring in the first 2-3 days. 
-Contains epithelial cells, erythrocytes and decidua. 
-Characteristic human odor. 
LOCHIA SEROSA 
-Pinkish to brownish discharge occurring 3-10 days after delivery. 
-Serosanguineous discharge containing decidua, erythrocytes, leukocytes, cervical 
mucus and microorganisms. 
-Has a strong odor. 
LOCHIA ALBA 
-Almost colorless to creamy yellowish discharge occurring from 10 days to 3 weeks 
after delivery.
-Contains leukocytes, decidua,epithelial cells, fat, cervical mucus, cholesterol crystals, 
and bacteria. 
-Has no odor. 
B. UTERUS 
-Process of involution takes 4-6 weeks to complete. 
-Weight decreases from 2 lbs to 2 oz. 
-Fundus steadily descends into true pelvis; Fundal height decreases about 1 
fingerbreadth (1 cm)/day; by 
-10-14 days postpartum, cannot be palpated abdominally. 
43 
Uterine Involution 
Description 
a. The rapid decrease in the size of the uterus as it returns to the nonpregnant state 
b. Clients who breastfeed may experience a more rapid involution 
Assessment 
a. Weight of the uterus decreases from 2 pounds 
to 2 ounces in 6 week 
b. Endometrium regenerates 
c. Fundus steadily descends into the pelvis 
d. Fundal height decreases about 1 fingerbreadth (1 cm) per day 
e. By 10 days postpartum, uterus cannot be palpated abdominally
44 
ENEMA 
It is an introduction of a solution into the large intestine, generally for the purpose of 
removing feces. The instilled solution distends the intestine, may irritate intestinal 
mucosa, thus increases peristalsis. 
Types of Enema: 
1. Cleansing Enema – given to remove feces from the colon. 
Purposes: 
 To relieve constipation or fecal impaction. 
 To prevent involuntary escape of fecal material during surgical 
procedures. 
 To promote visualization of the intestinal tract by x-ray film or instrument 
examination. 
 To help establish regular bowel function during a bowel training program. 
2. Retention Enema – retained in the bowel for a prolonged period for different 
reasons. 
3. Retention Flow Enemas – or Harris Flush enemas are used to expel flatus. 
Types of Solutions: 
Solution Amount Action Time to take 
effect 
Adverse Side 
Effect
45 
Tap Water 
(Hypotonic) 
500-1000 ml Distends 
intestine, 
increases 
peristalsis, 
softens stool 
15 min. Fluid and 
Electrolyte 
imbalance, 
water 
intoxication 
Normal Saline 
(Isotonic) 
500-1000 ml Distends 
intestine, 
increases 
peristalsis, 
softens stool 
15 min. Fluid and 
Electrolyte 
imbalance, 
sodium 
retention 
Soap Solution 500-1000 ml 
(concentrate at 
3ml-5ml/ 
1000ml) 
Distends 
intestine, 
irritates 
intestinal 
mucosa, 
softens stool 
10-15 min. Rectal mucosa 
irritation or 
damage 
Hypertonic 
solutions 
70ml – 130ml Distends 
intestine, 
irritates 
intestinal 
mucosa 
5-10 min. Sodium 
retention 
Oil solutions 
(mineral, olive, 
or cottonseed 
oil) 
150-200ml Lubricate stool 
and intestinal 
mucosa 
30min. 
Equipments: 
- enema can 
- kelly forcep 
- IV pole 
- solution 
- KY jelly 
- rectal tube 
- gloves 
- hose 
Procedure: 
Nursing action Rationale 
1. Inform the client about the procedure To promote cooperation 
2. Assemble articles For efficiency 
3. If using an enema bag, fill it with 750- 
1000 ml warm tap water 
Hot water can burn intestinal mucosa, cold 
water can cause abdominal cramping 
4. Clamp tubing To keep solution intact
46 
5. Place waterproof pad absorbent To prevent soiling 
6. Assist client into the left side lying with 
knee flexed 
Allows enema solution to flow downward 
by gravity 
7. Cover client with bath blanket exposing 
only rectal area 
Provide warmth, allows client to feel more 
relaxed 
8. Lubricate 3-4 inches tip of rectal tube Provides smooth insertion without irritation 
and trauma 
9. Gently separate buttocks and locate 
anus 
For accurate exposure 
10. Instruct client to relax It promotes relaxation of external anal 
sphincter 
11. Insert tip of rectal tube 3-4 inches Careful insertion prevents trauma to rectal 
mucosa 
12. Hold tubing in rectum constantly until 
end of instillation 
/ Bowel contraction can cause expulsion of 
tube 
13. With container at client's hip level, 
open regulating clamp and allow solution 
to enter slowly 
Rapid infusion can stimulate evacuation 
and cause cramping 
14. Raise height of enema bag slowly to 
30-45cm (12-18 inches) 
Raising container too high causes rapid 
infusion and possible painful distention of 
colon 
15. Hang container on IV pole 
16. Clamp tubing if client complains of 
cramping 
Temporary cessation minimizes cramping 
17. Tell client that the procedure is 
completed and that you will be removing 
rectal tube 
Client may misinterpret the sensation of 
removing the tube as a loss of control 
18. Explain feeling of distention is normal. 
Tell client to retain 5-10 minutes 
Solution distend bowel. Longer retention 
promotes more effective stimulation. 
19. Assist to bathroom 
20. Instuct client with a history of 
cardiovascular disease to exhale while 
expelling enema to avoid valsalva 
maneuver 
Valsalva maneuver- strenuously trying to 
move a constipated stool and may result in 
cardiac arrest 
21. Assist client to wash anal area with 
wearm soap and water 
Fecal content can irritate the skin. Hygiene 
promotes comfort. 
22. Do after care 
Characteristics of a Good Recording: 
1. Accuracy 
2. Conciseness 
3. Thoroughness 
4. Currentness
47 
ESSENTIAL NEWBORN CARE 
Before you look at the eight steps of essential newborn care (ENC) you need to 
remember the importance of the ‘three cleans’ that you learned in Study Session 3 of 
the Labour and Delivery Care Module. These are clean hands, clean surface and clean 
equipment. Your equipment should include two clean dry towels, cord clamps, razor 
blade, cord tie, functional resuscitation equipment, vitamin K, syringe and needles, and 
tetracycline eye ointment. 
Figure 2.1 Drying and wrapping the newborn baby. 
Step 1 Deliver the baby onto the mother’s 
abdomen or a dry warm surface close to the 
mother. 
Continue to support and reassure the mother. 
Tell her the sex of the baby and congratulate 
her. 
Step 2 Dry the baby’s body with a dry warm 
towel as you try to stimulate breathing. Wrap the 
baby with another dry warm cloth and cover the 
head (Figure 2.1). 
Dry the baby well, including the head, 
immediately and then discard the wet cloth. 
Wipe the baby’s eyes. Rub up and down the 
baby’s back, using a clean, warm cloth. Drying 
often provides sufficient stimulation for breathing to start in mildly depressed newborn 
babies. Do your best not to remove the vernix (the creamy, white substance which may 
be on the skin) as it protects the skin and may help prevent infection. Then wrap the 
baby with another dry cloth and cover the head. 
Step 3 Assess breathing and colour; if not breathing, gasping or there are less than 30 
breaths per minute, then resuscitate. 
You will remember that you learned how to manage a newborn baby with birth asphyxia 
in Study Session 7 of the Labour and Delivery Care Module. 
As you dry the baby, assess its breathing. If a baby is breathing normally, both sides of 
the chest will rise and fall equally at around 30–60 times per minute. Thus, check if the 
baby is: 
 Breathing normally 
 Having trouble breathing 
 Breathing less than 30 breaths per minute, or
48 
 Not breathing at all. 
Resuscitation of a baby who is not breathing must start within one minute of birth. 
If the baby needs resuscitation, quickly clamp or tie and cut the cord, leaving a stump at 
least 10 cm long for now and then start resuscitation 
immediately. Functional resuscitation equipment 
should always be ready and close to the delivery area 
since you must start resuscitation within one minute of 
birth. It may sound as if you have a lot to do in one 
minute, but the steps described here are ones that you 
can take simultaneously. That is, while you are 
delivering the baby onto the mother’s abdomen and 
drying the baby, you can assess breathing and colour 
and take urgent action if necessary. 
Figure 2.2 Tying and cutting the cord. 
Step 4 Tie the cord two fingers’ length from the baby’s 
abdomen and make another tie two fingers from the 
first one (Figure 2.2). Cut the cord between the first 
and second tie. If the baby needs resuscitation, cut the 
cord immediately. If not, wait for 7–3 minutes before 
cutting the cord. 
1. Tie the cord securely in two places: 
o Tie the first one two fingers away from the 
baby’s abdomen. 
o Tie the second one four fingers away from 
the baby’s abdomen. 
o Make sure that tie is well secured; the thread you use to tie the cord must be 
clean. 
2. Cut the cord between the ties: 
o Use a new razor blade, or a boiled one if it has been used before, or sterile 
scissors. 
o Use a small piece of cloth or gauze to cover the part of the cord you are 
cutting so no blood splashes on you or on others. 
o Be careful not to cut or injure the baby. Either cut away from the baby or 
place your hand between the cutting instrument and the baby. 
3. Do not put anything on the cord stump.
Step 5 Place the baby in skin-to-skin contact with the mother, cover with a warm 
cloth and initiate breastfeeding. 
49 
The newborn loses heat in four ways (see Figure 2.3 below): 
 Evaporation: when amniotic fluid evaporates from the skin. 
 Conduction: when the baby is placed naked on a cooler surface, such as the floor, 
table, weighing scales, cold bed. 
 Convection: when the baby is exposed to cool surrounding air or to a draught from 
open doors and windows or a fan. 
 Radiation: when the baby is near cool objects, walls, tables, cabinets, without 
actually being in contact with them. 
Figure 2.3 The newborn can lose heat in four ways. (Source: WHO, 1997, Safe 
Motherhood: Thermal Protection of the Newborn, a Practical Guide 
The warmth of the mother passes easily to the baby and helps stabilise the baby’s 
temperature. 
1. Put the baby on the mother’s chest, between the breasts, for skin-to-skin warmth. 
2. Cover both mother and baby together with a warm cloth or blanket. 
3. Cover the baby’s head. 
The first skin-to-skin contact should last uninterrupted for at least one hour after birth or 
until after the first breastfeed. The baby should not be bathed at birth because a bath 
can cool the baby dangerously. After 24 hours, the baby can have the first sponge bath, 
if the temperature is stabilized.
50 
Figure 2.4 Initiating immediate breastfeeding. 
If everything is normal, the mother should 
immediately start breastfeeding. 
For optimal breastfeeding you should do the 
following: 
1. Help the mother begin breastfeeding within the 
first hour of birth (Figure 2.4). 
2. Help the mother at the first feed. Make sure the 
baby has a good position, attachment, and is 
sucking well. Do not limit the length of time the 
baby feeds; early and unlimited breastfeeding 
gives the newborn energy to stay warm, 
nutrition to grow, and antibodies to fight 
infection. 
The steps to keep the newborn warm are called the 
warm chain. 
1. Warm the delivery room. 
2. Immediate drying. 
3. Skin-to-skin contact at birth. 
4. Breastfeeding. 
5. Bathing and weighing postponed. 
6. Appropriate clothing/bedding. 
7. Mother and baby together. 
8. Warm transportation for a baby that needs referral. 
Step 6 Give eye care (while the baby is held by its 
mother). 
Figure 2.5 Putting tetracycline eye ointment into the eyes 
of the newborn baby. 
Shortly after breastfeeding and within one hour of being 
born, give the newborn eye care with an antimicrobial 
medication. Eye care protects the baby from serious eye 
infection which can result in blindness or even death. 
The steps for giving the baby eye care are these: 
First, wash your hands, and then using tetracycline 1% eye 
ointment:
1. Hold one eye open and apply a rice grain size of ointment along the inside of the 
lower eyelid. Make sure not to let the medicine dropper or tube touch the baby’s 
eye or anything else (see Figure 2.5). 
51 
2. Repeat this step to put medication into the other eye. 
3. Do not rinse out the eye medication. 
4. Wash your hands again. 
Step 7 Give the baby vitamin K, 1 mg by intramuscular injection (IM) on the 
outside of the upper thigh (while the baby is held by its mother). 
After following correct infection prevention steps, with the other hand stretch the 
skin on either side of the injection site and place the needle straight into the outside of 
the baby’s upper thigh (perpendicular to the skin). Then press the plunger to inject the 
medicine. You will be learning more about safe injection techniques in your practical 
skills training sessions. There is also a study session on routes of injection in 
the Immunization Module. 
Step 8 Weigh the baby. 
Weigh the baby an hour after birth or after the first breastfeed. If the baby weighs 
less than 1,500 gm you must refer the mother and baby urgently.
52 
INTRAPARTUM CARE 
1. Examine the woman for emergency signs. 
 Unconscious, Convulsing 
 Vomiting 
 Severe headache with blurring of vision 
 Vaginal bleeding 
 Severe abdominal pain 
 Looks very ill 
 Fever 
 Severe breathing difficulty 
Do NOT make a very sick woman wait, attend to her quickly! 
2. Greet the woman and make her comfortable. 
 Ask for informed consent before examination or any procedure 
 Respect privacy 
 Communicate result of examination 
3. Assess the woman in labor. 
 Take the history of labor and record on the labor form. 
 Review Home Based Maternal Record (HBMR)/ Mother and Child Book 
 When is delivery expected? Preterm or term? 
 Prior pregnancies 
 Birth plan 
 Assess uterine contractions: intensity, duration, and interval 
 Observe the woman’s response to contractions. 
 Perform abdominal exam: (Leopold’s maneuver, FHT) between 
contractions
53 
4) Determine the stage of labor. 
Explain to the woman that you will perform a vaginal examination and ask for her 
consent. 
 Respect privacy 
 Observe standard precautions 
4) Determine the stage of labor. 
 Inspect the vulva for: 
 Bulging perineum 
 Any visible fetal parts 
 Vaginal bleeding 
 Leaking amniotic fluid; if yes, is it meconium stained, foul smelling? 
 Warts, keloid tissue or scars that may interfere with delivery 
4) Determine the stage of labor. 
 Perform gentle vaginal examination (do not start during contraction). 
 Explain findings to the woman. Reassure her. 
 RECORD findings in labor record or in partograph. 
 Determining Stage of Labor 
5. Decide if the woman can safely deliver. If there is indication for referral … 
 in early labor and the referral hospital can be timely reached: 
 Refer urgently 
 in late active labor: 
 Monitor progress of labor and deliver the baby 
 Prepare for immediate referral if still necessary 
 If the woman or her family refuses referral
54 
 Explain the possible consequences 
6. Give supportive care throughout labor. 
7. Monitor and manage labor. 
 First stage: not yet in active labor, cervix is dilated 0-3 cm., contractions are 
weak, <2 in 10 minutes 
 Every hour: check for emergency signs, frequency, intensity & duration of 
contractions, FHR, mood and behavior. 
 Every 4 hours: check vital signs and cervical dilatation. 
 Record findings in Labor record 
 Assess progress of labor: After 8 hrs, if contractions are stronger & more 
frequent but no progress in cervical dilatation: REFER 
 First stage: in active labor, cervix is dilated at 4 cm or more 
 Check every 30 mins for emergency signs, frequency and duration of 
contractions, FHR, mood and behavior. 
 Check every 4 hours: fever, PR, BP, cervical dilatation. 
 Record time of rupture of membranes and color of the amniotic fluid. 
 Record findings in partograph. 
 RELIEF of PAIN and DISCOMFORT 
 Suggest change of position 
 Encourage mobility as comfortable for her 
 Encourage proper breathing: breath more slowly, make a sighing noise, make 2 
short breaths followed by a long breath out. 
 Massage her lower back if she finds it helpful 
 CAUTION 
 DO NOT do IE more frequently than every 4 hours unless necessary. 
 DO NOT allow the woman to push unless delivery is imminent → pushing does 
not speed up labor, mother will become tired, cervix will swell.
 DO NOT give medications to speed up labor → DANGEROUS: may cause 
55 
trauma to the mother and baby (ex: Uterine rupture) 
 DO NOT DO FUNDAL PRESSURE-may 
cause uterine rupture, fetal death 
Second stage: from full dilatation (10cm) of the cervix until birth of baby. 
How to tell if a woman is in the 2nd stage: 
 On IE, cervix is fully dilated 
 Woman wants to bear down 
 Strong uterine contractions every 2-3 minutes 
 Bulging thin perinium fetal head visible during 
contractions. 
 BOW will rupture 
 Monitoring the 2nd stage 
 Check uterine contractions, fetal heart rate, mood and behavior 
 Continue recording in the partograph 
REMINDER: 
1. Massaging or stretching the perineum have not been shown to be 
beneficial. 
2. DO NOT apply fundal pressure to help deliver the baby → may harm 
mother and baby. 
8. Deliver the Baby 
Implement the 3 CLEANS 
1. Clean hands 
2. Clean delivery surface 
3. Clean cutting and care of the cord 
WEAR DOUBLE GLOVES
56 
 Stay with the woman and encourage her. Make her comfortable. 
 Check fetal heart tones every 15 minutes 
 Deliver the Baby 
When the birth opening is stretching, support the perineum and anus with a clean 
swab to prevent lacerations 
 Ensure controlled delivery of the head 
 Controlled delivery of the head 
 Keep one hand on the head as it advances during contractions. Keep the head 
from coming out too quickly. 
 Support the perineum with other hand. 
 Controlled delivery of the head, cont’d . . 
 Discard pad and replace when soiled to prevent infection. 
 During delivery of the head, encourage woman to stop pushing and breathe 
rapidly with mouth open. 
Delivering the Baby 
 Gently feel if the cord is around the neck 
 If it is loosely around the neck, slip it over the shoulders or head 
 If it is tight, place a finger under the cord, clamp and cut the cord, and 
unwind it from around the neck. 
 Delivering the Baby 
 Gently wipe the baby’s nose and mouth with a clean gauze or cloth. 
 Wait for external rotation (within 1-2 min), head will turn sideways bringing one 
shoulder just below the symphysis pubis and other facing the perineum 
 Delivering the baby 
1. Put baby on mother’s abdomen in prone position. Cover with dry towel. 
2. Thoroughly dry the baby immediately. Wipe eyes. 
3. Discard wet cloth.
4. Put baby prone, in skin-to-skin contact on mother’s abdomen,. Keep the baby 
57 
warm. 
5. Exclude 2nd baby by palpating mother’s abdomen. 
6. Give 10 IU oxytocin IM to the mother. 
active management of the 3rd stage of labor.)* 
*May be done by the midwife under supervision of doctor. 
7. Watch for vaginal bleeding. 
8. Remove first set of gloves. 
9. When no more cord pulsation is felt on the cord (usually within 3 mins.) 
clamp the cord 2cm from the base using sterile plastic cord clamp 
10. Sweep the cord and apply a second Kelly forceps 5cm from the base and then 
cut in-between. 
Third Stage: Between birth of the baby and delivery of the placenta 
11. Deliver the placenta by controlled cord traction (with counter traction on the 
uterus above the symphysis pubis). 
12. Massage uterus over the fundus. 
13. Inject oxytocin. 
(if not yet given as part of active management) 
14. Encourage initiation of breastfeeding. Let baby stay on mother’s abdomen for 
60-90 min 
Third stage: between birth of the baby and delivery of the placenta. 
ACTIVE MANAGEMENTof the third stage of labor 
 Cord is clamped 
 Oxytocin is given within 2 min of delivery of the baby 
 Placenta is delivered by controlled cord traction with countertraction above the 
symphysis pubis. 
 Massage fundus.
58 
May only be done by a midwife under supervision of doctor. 
9. Monitor closely within 1-hour after delivery (Immediate postpartum period) and give 
supportive care. 
 Check for vaginal tears and bleeding. 
 Clean the woman and make her comfortable. 
 Check BP, PR, emergency signs & uterine contraction every 15 minutes. 
 Initiate breastfeeding within 1-hour when the baby is ready. 
10. Continue care after 1 hour postpartum. Keep watch closely for at least 2 hours. 
 Temperature, BP and pulse every 30 minutes 
 Check at 2, 3 and 4 hours, then every 4 hours: 
 emergency signs 
 uterine contraction 
 Check for bladder distension if unable to void. 
 Advise clean cloth/napkin to collect vaginal blood. 
 Eat and drink high-energy food that are easily digestible. 
Companion: to watch her and to call you for bleeding or pain, dizzy or for any other 
problem 
 Keep the baby in the room with the mother, in her bed or within easy reach. 
 Support exclusive breastfeeding on demand, day and night, as often and as long 
as the baby wants. 
 Immunize according to the EPI schedule. 
 Mother and companion to watch the baby: 
 breastfeeding difficulty 
 difficulty of breathing 
 cold feet 
 bleeding from the cord
59 
 Check baby at around 4 and 8 hours and then daily: 
 cold feet, breastfeeding and breathing difficulty. 
 Advise postpartum care and hygiene. 
 Wash from waist down or have a sponge bath or a shower with warm 
water each morning or when she feels like it. 
 Use guava leaves decoction if woman prefers, for her wash or bath. 
Continue care after 1 hour postpartum. 
Medications 
 Iron 60 mg/ Folic acid 400ug 1 tablet daily… until 3 months postpartum 
 Vitamin A 200, 000 IU, 1 capsule after delivery or within 1 month 
postpartum 
11. Educate and counsel on family planning and provide the family planning method if 
available. 
 Ask what are the couple’s plans regarding having more children. 
 Give relevant information and advice. 
 Advice that exclusive breastfeeding is the best contraceptive in the 1st six 
months. 
 Help her to choose the most appropriate method for her and her partner. 
12. Inform, teach and counsel the woman on important MCH messages. 
 Talk to the woman when she is rested and comfortable. 
 Also give important information and advice to her companion. 
13. Discharge the woman and her baby. 
 The woman and her baby may be discharged 24 hours after delivery. 
 Ensure that the woman is able to breastfeed successfully before discharge. 
 Repeat important health information. 
 Check understanding and arrange follow-up.
60 
POSTPARTUM NURSING INTERVENTIONS 
Monitor Vital Signs 
 NOTE: Maternal temperature during the first 24 hours following delivery may rise 
to 100. 4` F (38`C) as a result of dehydration. The nurse can reassure the new 
mother that these symptoms are normal. 
 Postpartum Exercise 
 Supine Position with the knee’s flexed, and then inhale deeply while allowing the 
abdomen to expand and exhale while contracting the abdominal muscles. The 
purpose of this exercise is to strengthen the abdominal muscles. Examples are 
reaching for the knees; push ups and sits ups on the first postpartum day. 
 Assess height, consistency, and location of the fundus 
 Monitor color, amount, and odor of lochia 
 Assess lochia and color volume 
 Give RhoGAM to mother if ordered. RhoGAM promotes lysis of fetal Rh (+) 
RBCs. Administer RhoGam as prescribed within 72 hours postpartum to 
the Rh-negative client who has given birth to an Rh-positive neonate. 
Rhogam (D) immune globulin is given by intramuscular injection 
 Check episiotomy and perineum for signs of infection. 
 Promote successful feeding. 
 Non-nursing woman- tight bra for 72 hours, ice packs, minimizes breast 
stimulation. 
 Nursing woman- success depends on infant sucking and maternal 
production of milk. 
 “Postpartum Blues” (3-7 days) – Normal occurrence of “roller coaster” 
emotions 
 Sexual activities- abstain from intercourse until episiotomy is healed and 
lochia ceased around 3-4 weeks. Remind that Assess height, consistency, and 
location of the fundus breastfeeding does not give adequate protection. 
 Assess breasts for engorgement 
 Monitor episiotomy for healing ( assess dehiscence & evisceration)
61 
 Assess incisions or dressings of cesarean birth client ( prone to infection) 
 Monitor bowel status ( prone to constipation) 
 Monitor I &0 
 Encourage frequent voiding (prevent urinary retention which will predispose the 
mother to uterus displacement & infection) 
 Encourage ambulation ( to prevent thromboplebitis & paralytic ileus 
 Assess bonding with the newborn infant ( to prevent failure to thrive) 
NOTE: 
 A positive bonding experience is indicated when the mother turns her face 
toward the baby to initiate eye-to-eye contact. Observation of new mothers has 
shown that a fairly regular pattern of maternal behaviors is exhibited at first 
contact with the newborn. The mother follows a progression of touching activities 
from fingertip exploration toward palmar contact to enfolding the infant with the 
whole hand and arm. The mother also increase the time spent in the en face 
position. The mother arranges herself or the newborn so that her face and eyes 
are in the same plane as in her infant. 
 III. POSTPARTUM DISCOMFORTS 
A. Perineal discomfort 
 Apply ice packs to the perineum during the first 24 hours to reduce swelling after 
the first 24 hours, apply warmth by sitz baths 
B. Episiotomy 
 1. Instruct the client to administer perineal care after each voiding 
 2. Encourage the use of an analgesic spray as prescribed 
 3. Administer analgesics as prescribed if comfort measures are unsuccessful 
 C. Breast discomfort 
PREVENTION: 
The BEST PREVENTION TECHNIQUE IS TO EMPTY THE BREST REGULARLY AND 
FREQUENTLY WITH FEEDINGS. The 2nd is EXPRESSING A LITTLE MILK BEFORE
NURSING, MASSAGING THE BREASTS GENTLY OR TAKING A WARM SHOWER 
BEFORE FEEDING MAY HELP TO IMPROVE MILK FLOW. 
Placing as much of the areola as possible into the neonate’s mouth is one method. 
Other methods include changing position with each nursing so that different areas of the 
nipples receive the greatest stress from nursing and avoiding breast engorgement, 
which make I difficult for the neonate to grasp. In addition, nursing more frequently, so 
that a ravenous neonate is not sucking vigorously at the beginning of the feedings, AND 
FEEDING ON DEMAND to prevent over hunger is helpful. AIRDRYING THE NIPPLES 
AND EXPOSING THEM TO THE LIGHT HAVE ALSO BEEN RECOMMENDED. Warm 
Tea bags, which contain tannic acid also, will sooth soreness. WEARING A 
SUPPORTIVE BRASSIERE DOES NOT PREVENT BREAST ENGORGEMENT. 
APPLYING ICE and LANOLIN DOES NOT RELIEVE BREAST ENGORGEMENT. 
INTERVENTION: Measures that help relieve nipple soreness in a breast-feeding client 
include lubricating the nipples with a few drops of expressed milk before feedings, 
applying ice compresses just before feedings, letting the nipples air dry after feedings, 
and avoiding the use of soap on the nipples. 
62 
NOTE: Specific nursing care for breast Engorgement 
 Breastfeed frequently 
 Apply warm packs before feeding 
 Apply ice packs between feedings 
NOTE: Specific Nursing Care for Cracked nipples 
 Expose nipples to air for 10 to 20 minutes after feeding 
 Rotate the position of the baby for each feeding 
 Be sure that the baby is latched on to the areola, not just the nipple 
NOTE: Do not use soap on the breasts, as it tends to remove natural oils, which 
increases the chance of cracked nipples 
 IV. POST PARTUM COMPLICATIONS 
A. HEMORRHAGE 
B. THROMBOPLEBITIS 
Inflammation of the vein caused by a clot 
The positive Homan’s sign indicate is possibility of thrombophlebitis or a deep 
venous thrombosis that is present in the lower extremities.
When assessing for Homan’s sign ask the patient to stretch her kegs out with the 
knee slightly flexed while dorsiflex the foot. A positive sign is present when pain 
is felt at the back of the knee or calf. It is normal for a patient on magnesium 
sulfate to feel tired because it acts as a central nervous depressant and often 
makes the patient drowsy. 
63 
C. INFECTION 
D. MASTITIS 
E. Postpartum Mood Disorders 
 POSTPARTUM WARNING S/S TO REPORT TO THE PHYSICIAN 
 Increased bleeding, clots or passage of tissue. 
 Bright red vaginal bleeding anytime after birth. 
 Pain greater than expected. 
 Temperature elevation to 100.4º F. 
 Feeling of full bladder accompanied by inability to void. 
 Enlarging hematoma. 
 Feeling restless accompanied by pallor; cool, clammy skin; rapid HR; dizziness; 
and visual disturbance. 
 Pain, redness, and warmth accompanied by a firm area in the calf. 
 Difficulty breathing, rapid heart rate, chest pain, cough, feeling of apprehension, 
pale, cold, or blue skin color 
 V. Psychological Adaptation 
 Rubin's Postpartum Phases of Regeneration (POSTPARTUM 
PSYCHOSOCIAL ADAPTATION) 
“TAKING IN” PHASE (DEPENDENT) First 3 Days 
 During this time, food and sleep are a major focus for the client. In addition, she 
works through the birth experience to sort out reality from fantasy and to clarify 
any misunderstandings. This phase lasts 1 to 3 days after birth. The primary 
concern is to meet her own needs.
64 
• Takes place 1-2 days postpartum 
• Mother is passive and dependent; concerned with own needs. 
• Verbalizes about the delivery experience. 
• Sleep/food important. 
• Mother focuses on her own primary needs, such as sleep and food 
 Important for the nurse to listen and to help the mother interpret the events 
of delivery to make them more meaningful 
 Not an optimum time to teach the mother about baby care 
“TAKING HOLD” PHASE (DEPENDENT/INDEPENDENT) 
The client is concerned regarding her need to resume control of all facets of her 
life in a competent manner. At this time, she is ready to learn self-care and infant 
care skills. 
• 3-10 days postpartum 
• Mother strives for independence and begins to reassert herself. 
• Mood swings occur. May cry for no reason. 
• Maximal stage of learning readiness. 
• Mother requires reassurance that she can perform tasks of motherhood. 
• Begins to assume the tasks of mothering 
• An optimum time to teach the mother about baby care. 
“LETTING GO” PHASE (INTERDEPENCE) 
• 10 to 6 weeks postpartum 
• Realistic regarding role transition. 
• Shows pattern of life-style that includes the new baby but still focuses on entire family 
as a unit. 
• Accepts baby as separate person. 
 Mother may feel deep loss over separation of the baby from part of the body and 
may grieve over the loss
 Mother may be caught in a dependent/independent role, wanting to feel safe and 
65 
secure yet wanting to make decisions 
 Teenage mothers need special consideration because of the conflict taking place 
within them as part of adolescence
66 
Unang yakap 
A program that been formulated by Department of Health to decrease the Newborn 
Mortality Rate and improving Maternal Health. AO 25 (2009), it is a time bound 
intervention. A protocol that must be carried out in a specific time. 
Preparation: 
3 Pairsof surgical glove 
2 Warm blankets 
1 Bonnet 
Cordcare Set 
Erythromycin 
Vitamin K 
Hepa. B Shot 
Other requirements: 
Breastfeeding 
Delayed bathing until 6 hours of life 
New born Screening 
Steps 
1. Immediate and thorough drying for 30 seconds to stimulate breathing after delivery 
of the baby and prevent heat loss. 
2. Early skin to skin contact maintaining a delivery room temperature of 25-28 degrees 
centigrade andwrapping the newborn with clean, dry cloth. (To promote bonding and 
prvent heat loss). 
3. Properly timed clamping and cutting of umbilical cord 1-3 minutesoruntil cord 
pulsation stops.(To reduce anemia or intraventricular hemorrage on pre-term 
newborn). 
4. Non separation of the newborn and mother for early breast-feeding. Immediate 
latching on and initiation of breastfeeding within the firsthour after birth. (To provide 
support for early breastfeeding and transfer of colostrum)
67 
PERINEAL CARE 
Assessment 
 Check for the skin redness, inflammation,excoriation, irritation 
 Excessive discharge 
 Odor pain discomfort 
 Urinary or fecal incontinence 
 Recent rectal or perineal surgery 
 An indwelling catheter 
Determine: 
 Perianeal genital practices 
 Self care abilities 
Assesmble equipment 
Perineal genital care provided in conjunction with the bed bath: 
 Bath towel 
 Bath blanket 
 Clean gloves 
 Bath basin with water @ 43 degree to 46 degree 
 Soap 
 Washcloth 
Special perineal genital care: 
 Bath towel 
 Bath blanket 
 Clean gloves 
 Cotton balls or swab 
 Solution bottles, pitcher, or container filled with warm water or a prescribed solution 
 Bedpan to receive rinse water 
 Moisture resistant bag or receptacle for use cotton swabs 
 Perineal pad 
Procedure: 
4. Introduce your self and verify the clients identity.explain to the client what is the 
procedure are you going to do, why it is necessary, and how the client can 
cooperate,being sensitive to any embarrassment felt by the client. 
5. Perform hand hygiene and other appropriate infection control procedure.
68 
6. Provide for client privacy by drawing the curtains and closing the door. 
7. Prepare the client: 
 Fold the top bedlinen to the foot of the bed the gown up to expose the genital area 
 Place a bath towel under the clients hip 
 Position and drape the client, and clean the upper inner thighs. 
Females 
 Position the female in back lying position with knees flexed and spread well a part. 
 Cover her body and legs with the bath blanket drape the legs by tucking the bottom 
corners of the blanket under the inside of the legs. Bring the middle portion of the 
base of the blanket up over the pubic area. 
 Put on gloves and wash and dry the under inner thighs. 
For males 
 Position the male client in a supine position with his knees are flexed and his hips 
slightly externally rotated. 
 Put on gloves, and wash and dry the upper inner thighs. 
 Inspect the perineal area. 
 Note particular areas of inflammation, excoriation,or swelling,especially between the 
labia in females or the scrotal folds in male. 
 Also note excessive discharge or secretion from the orifices, and the presence of 
odors. 
 Wash and dry the perineal genital area. 
For female 
 Clean the labia majora. Then spread the labia to wash the folds between the labia 
majora and the labia minora. 
 Use separate quarter of the wash cloth of the wash cloth for each stroke, and wipe 
from the pubis to the rectum. For menstruating woman and clients with indwelling 
catheter,use clean wipes,cotton balls, or gauze.take a clean wipe for each stroke. 
 Rinse the perineal area as well. 
 Dry the perineum thoroughly. 
For male 
 Wash and dry the penis,using firm strokes. 
 If the client is uncircumcised,retract the prefuce foreskinto expose the glans penis 
for cleaning. Replace the foreskin after cleaning the glans penis. 
 Wash and dry the scrotum. The posterior fold of the scrotum might need to be 
cleaned in step 9, with the buttocks. 
 Inspect perineal orifices for intactness.
69 
 Inspect particularly around the urethra in clients with indwelling catheter. 
 Clean between the buttocks. 
 Pay particular attention to the anal area and posterior fold of the scrotum in 
males.clean the anus with toilet tissue before washing it, if necessary. 
 Dry the area well. 
 For post delivery or menstruating females, apply the perineal pad as needed, from 
front to back. 
10. Clean the area and equipment. 
11.Document the procedure done. 
PERINEAL SHAVING 
Assessment 
 Check for the skin redness, inflammation,excoriation, irritation 
 Excessive discharge 
 Odor pain discomfort 
 Urinary or fecal incontinence. 
Determine: 
 Perianeal genital practices 
 Self care abilities 
Assesmble equipment 
Perineal genital care provided in conjunction with the bed bath: 
 Bath towel 
 Bath blanket 
 Clean gloves 
 Bath basin with water @ 43 degree to 46 degree 
 Soap 
 Cotton balls 
 Shaving cream if necessary 
 Shaving blade 
 Straight forceps 
Procedure: 
 Introduce your self and verify the clients identity.explain to the client what is the
70 
procedure are you going to do, why it is necessary, and how the client can 
cooperate,being sensitive to any embarrassment felt by the client. 
2.Perform hand hygiene and other appropriate infection control procedure. 
3.Provide for client privacy by drawing the curtains and closing the door. 
4.Prepare the client: 
 Fold the top bedlinen to the foot of the bed the gown up to expose the genital area 
 Place a bath towel under the clients hip 
5. Position and drape the client, and clean the upper inner thighs. 
Females 
 Position the female in back lying position with knees flexed and spread well a part. 
 Cover her body and legs with the bath blanket drape the legs by tucking the bottom 
corners of the blanket under the inside of the legs. Bring the middle portion of the 
base of the blanket up over the pubic area. 
 Put on gloves and wash and dry the under inner thighs. 
For males 
 Position the male client in a supine position with his knees are flexed and his hips 
slightly externally rotated. 
 Put on gloves, and wash and dry the upper inner thighs. 
6. Inspect the perineal area. 
 Note particular areas of inflammation, excoriation,or swelling,especially between the 
labia in females or the scrotal folds in male. 
 Also note excessive discharge or secretion from the orifices, and the presence of 
odors. 
 Apply cotton balls with soap the perineum. 
 Shave the perineum starts from the symphisis pubis down to the labia majora. 
 Wash the genitals using the clean water. 
 Dry the area well. 
 Clean the area and equipment. 
 Document the procedure done.
71 
References: 
American Academy of P ediatrics Policy Statement (2005) Breastfeeding and the use of 
human milk. Pediatrics, 115, 496-505. 
Jensen, D., et al . (1993) LA TCH: A breastfeeding charting system and doc umentation 
Tool. JOGGN, 23 (1), 27-32. 
Lawrence, R. M. & R. A. (2005). Breastfeeding: A guide f or the medical profession (6th 
Ed.). St. Louis: C.V. Mosby. 
Lawers, J., Swis her, A. (2000). Counseling the Nursing Mother (3rd Edition). Sudbury, 
Massachusetts. Jones & Bartlett Publishers. 
Lazaroy, M., Fedlman, A. WHO/UNIFCEF Ten Steps to Successful Breastfeeding, 
United States Committee for UNICEF Annotated Bibliography for each step, 1995. 
Riordan, J . (2005). Breastfeeding and Human Lactation (3rd Edition). Sudbury, 
Massachusetts. Jones & Bartlett Publishers. 
[Howard, C. R., et al. (1999). The effects of early pacifier use on breastfeeding 
duration. Pediatrics, 103, 659.] 
http://carolmelcher.com/assets/Assisting%20with%20Breastfeeding.pdf 
Kozier & Erb's Fundamentals of Nursing 
http://www.drugs.com/cg/how-to-give-an-intramuscular- injection.html 
http://nurseslabs.com/hot-sitz-bath-nursing-interventions-procedure/ 
http://nursingreviewbyozlek.blogspot.com/2010/08/enema.html 
http://labspace.open.ac.uk/mod/oucontent/view.php?id=452806&section=1.4

More Related Content

What's hot

Nursing Assessment
Nursing AssessmentNursing Assessment
Nursing Assessment
preet kaur
 
Sample Gordon's Functional Health Pattern: Intestinal Obstruction Powerpoint ...
Sample Gordon's Functional Health Pattern: Intestinal Obstruction Powerpoint ...Sample Gordon's Functional Health Pattern: Intestinal Obstruction Powerpoint ...
Sample Gordon's Functional Health Pattern: Intestinal Obstruction Powerpoint ...
Katherine 'Chingboo' Laud
 
Perioperative Nursing (complete)
Perioperative Nursing (complete)Perioperative Nursing (complete)
Perioperative Nursing (complete)
MarkFredderickAbejo
 
Disturbed sleeping pattern
Disturbed sleeping patternDisturbed sleeping pattern
Disturbed sleeping pattern
Mj Hernandez
 
Fdar charting
Fdar chartingFdar charting
Fdar charting
kataliya
 

What's hot (20)

Cystoclysis bladder irrigation
Cystoclysis bladder irrigationCystoclysis bladder irrigation
Cystoclysis bladder irrigation
 
Nursing Assessment
Nursing AssessmentNursing Assessment
Nursing Assessment
 
Fcp chn duty
Fcp chn dutyFcp chn duty
Fcp chn duty
 
IV Fluids Clinical Discussion
IV Fluids Clinical DiscussionIV Fluids Clinical Discussion
IV Fluids Clinical Discussion
 
F-Dar, Focus Charting
F-Dar, Focus ChartingF-Dar, Focus Charting
F-Dar, Focus Charting
 
2012 NATIONAL NURSING CORE COMPETENCY STANDARDS
2012 NATIONAL NURSING CORE COMPETENCY STANDARDS2012 NATIONAL NURSING CORE COMPETENCY STANDARDS
2012 NATIONAL NURSING CORE COMPETENCY STANDARDS
 
Patient's Bill of Rights
Patient's Bill of RightsPatient's Bill of Rights
Patient's Bill of Rights
 
Republic act no 9173
Republic act no 9173Republic act no 9173
Republic act no 9173
 
F-Dar, Focus Charting
F-Dar, Focus ChartingF-Dar, Focus Charting
F-Dar, Focus Charting
 
Nursing code of ethics
Nursing code of ethicsNursing code of ethics
Nursing code of ethics
 
Sample Gordon's Functional Health Pattern: Intestinal Obstruction Powerpoint ...
Sample Gordon's Functional Health Pattern: Intestinal Obstruction Powerpoint ...Sample Gordon's Functional Health Pattern: Intestinal Obstruction Powerpoint ...
Sample Gordon's Functional Health Pattern: Intestinal Obstruction Powerpoint ...
 
Perioperative Nursing (complete)
Perioperative Nursing (complete)Perioperative Nursing (complete)
Perioperative Nursing (complete)
 
Nursing Health Assessment: Purpose, Types, Sources cld
Nursing Health Assessment: Purpose, Types, Sources cldNursing Health Assessment: Purpose, Types, Sources cld
Nursing Health Assessment: Purpose, Types, Sources cld
 
Handout Prenatal
Handout PrenatalHandout Prenatal
Handout Prenatal
 
For delivery fdar charting
For delivery fdar chartingFor delivery fdar charting
For delivery fdar charting
 
Babitha's Note On Bed making
Babitha's Note On Bed makingBabitha's Note On Bed making
Babitha's Note On Bed making
 
Essential intrapartum-newborn-care
Essential intrapartum-newborn-careEssential intrapartum-newborn-care
Essential intrapartum-newborn-care
 
Family health assessment
Family health assessmentFamily health assessment
Family health assessment
 
Disturbed sleeping pattern
Disturbed sleeping patternDisturbed sleeping pattern
Disturbed sleeping pattern
 
Fdar charting
Fdar chartingFdar charting
Fdar charting
 

Viewers also liked (8)

Website nurse assistant text
Website nurse assistant textWebsite nurse assistant text
Website nurse assistant text
 
Fever in children
Fever in childrenFever in children
Fever in children
 
What are symptoms of hemorrhoids
What are symptoms of hemorrhoidsWhat are symptoms of hemorrhoids
What are symptoms of hemorrhoids
 
Hypothyroidism
HypothyroidismHypothyroidism
Hypothyroidism
 
End of-life care
End of-life careEnd of-life care
End of-life care
 
Nurse assisting skills ppt
Nurse assisting skills pptNurse assisting skills ppt
Nurse assisting skills ppt
 
Postpartum
PostpartumPostpartum
Postpartum
 
care of dying patient
care of dying patientcare of dying patient
care of dying patient
 

Similar to Related Learning Experience (RLE)

Urinarycatheterization 091016170505-phpapp01
Urinarycatheterization 091016170505-phpapp01Urinarycatheterization 091016170505-phpapp01
Urinarycatheterization 091016170505-phpapp01
Kiran Kumare
 
Urinary Catheterization
Urinary CatheterizationUrinary Catheterization
Urinary Catheterization
Tosca Torres
 
Tracheostomy site care procedure
Tracheostomy site care procedureTracheostomy site care procedure
Tracheostomy site care procedure
chrissie argana
 

Similar to Related Learning Experience (RLE) (20)

Catheterization.ppt
Catheterization.pptCatheterization.ppt
Catheterization.ppt
 
Urinary Catheterization-Training.pptx
Urinary Catheterization-Training.pptxUrinary Catheterization-Training.pptx
Urinary Catheterization-Training.pptx
 
Urinarycatheterization 091016170505-phpapp01
Urinarycatheterization 091016170505-phpapp01Urinarycatheterization 091016170505-phpapp01
Urinarycatheterization 091016170505-phpapp01
 
genital Care by Yosra Raziani
genital  Care by Yosra Raziani genital  Care by Yosra Raziani
genital Care by Yosra Raziani
 
Procedure checklist
Procedure checklistProcedure checklist
Procedure checklist
 
Urinary Catheterization
Urinary CatheterizationUrinary Catheterization
Urinary Catheterization
 
Urinary Catheterization
Urinary CatheterizationUrinary Catheterization
Urinary Catheterization
 
Dressing procedure for nursing officer working in health care setting
Dressing procedure for nursing officer working in health care settingDressing procedure for nursing officer working in health care setting
Dressing procedure for nursing officer working in health care setting
 
dressingprocedureppt-210910173151.pdf
dressingprocedureppt-210910173151.pdfdressingprocedureppt-210910173151.pdf
dressingprocedureppt-210910173151.pdf
 
Dressing procedure ppt
Dressing procedure  pptDressing procedure  ppt
Dressing procedure ppt
 
Urinary Elimination Unit 10th of FON
Urinary Elimination Unit 10th of FONUrinary Elimination Unit 10th of FON
Urinary Elimination Unit 10th of FON
 
ASSISTING-WITH-PERINEAL-CARE.pptx
ASSISTING-WITH-PERINEAL-CARE.pptxASSISTING-WITH-PERINEAL-CARE.pptx
ASSISTING-WITH-PERINEAL-CARE.pptx
 
Dressing procedure ppt.pptx
Dressing procedure  ppt.pptxDressing procedure  ppt.pptx
Dressing procedure ppt.pptx
 
Tracheostomy site care procedure
Tracheostomy site care procedureTracheostomy site care procedure
Tracheostomy site care procedure
 
dressing procedure.pptx
dressing procedure.pptxdressing procedure.pptx
dressing procedure.pptx
 
Catheterization.pptx
Catheterization.pptxCatheterization.pptx
Catheterization.pptx
 
Presentation group 4-Patrick Nkemba
Presentation group 4-Patrick NkembaPresentation group 4-Patrick Nkemba
Presentation group 4-Patrick Nkemba
 
Performing a urinary cathetrization Presented by :- Vivek chauhan
Performing a urinary cathetrization Presented by :- Vivek chauhanPerforming a urinary cathetrization Presented by :- Vivek chauhan
Performing a urinary cathetrization Presented by :- Vivek chauhan
 
Perineal care
Perineal carePerineal care
Perineal care
 
Bed bath procedure
Bed bath procedureBed bath procedure
Bed bath procedure
 

More from Rozelle Mae Birador

More from Rozelle Mae Birador (20)

Documentation - Case Presentation 2015
Documentation - Case Presentation 2015Documentation - Case Presentation 2015
Documentation - Case Presentation 2015
 
Dengue Hemorrhagic Fever- Case Study
Dengue Hemorrhagic Fever- Case StudyDengue Hemorrhagic Fever- Case Study
Dengue Hemorrhagic Fever- Case Study
 
HUNGTINGTON'S CHOREA
HUNGTINGTON'S CHOREAHUNGTINGTON'S CHOREA
HUNGTINGTON'S CHOREA
 
Head injuries
Head injuriesHead injuries
Head injuries
 
Herpes Zoster (Shigella) NCM 104
Herpes Zoster (Shigella) NCM 104Herpes Zoster (Shigella) NCM 104
Herpes Zoster (Shigella) NCM 104
 
Tetanus ( Lock Jaw) NCM 104
Tetanus ( Lock Jaw) NCM 104Tetanus ( Lock Jaw) NCM 104
Tetanus ( Lock Jaw) NCM 104
 
Infections of the Urinary Tract
Infections of the Urinary TractInfections of the Urinary Tract
Infections of the Urinary Tract
 
Inflammatory Bowel Disease
Inflammatory Bowel DiseaseInflammatory Bowel Disease
Inflammatory Bowel Disease
 
Fecal Incontinence
Fecal IncontinenceFecal Incontinence
Fecal Incontinence
 
Pancreatitis NCM 103
Pancreatitis NCM 103Pancreatitis NCM 103
Pancreatitis NCM 103
 
Hepatic Cirrhosis NCM 103
 Hepatic Cirrhosis NCM 103 Hepatic Cirrhosis NCM 103
Hepatic Cirrhosis NCM 103
 
Gastritis NCM 103
Gastritis NCM 103Gastritis NCM 103
Gastritis NCM 103
 
Peritonitis NCM 103
Peritonitis NCM 103Peritonitis NCM 103
Peritonitis NCM 103
 
Addisons Disease
Addisons DiseaseAddisons Disease
Addisons Disease
 
Cholecystitis NCM 103
Cholecystitis NCM 103Cholecystitis NCM 103
Cholecystitis NCM 103
 
Cholelithiasis NCM 103
Cholelithiasis NCM 103Cholelithiasis NCM 103
Cholelithiasis NCM 103
 
Letter lmc
Letter lmcLetter lmc
Letter lmc
 
Angina Pectoris
Angina PectorisAngina Pectoris
Angina Pectoris
 
Diabetes case-study
Diabetes case-studyDiabetes case-study
Diabetes case-study
 
Nutrition and Diet Theraphy
Nutrition and Diet TheraphyNutrition and Diet Theraphy
Nutrition and Diet Theraphy
 

Recently uploaded

Salient Features of India constitution especially power and functions
Salient Features of India constitution especially power and functionsSalient Features of India constitution especially power and functions
Salient Features of India constitution especially power and functions
KarakKing
 
Jual Obat Aborsi Hongkong ( Asli No.1 ) 085657271886 Obat Penggugur Kandungan...
Jual Obat Aborsi Hongkong ( Asli No.1 ) 085657271886 Obat Penggugur Kandungan...Jual Obat Aborsi Hongkong ( Asli No.1 ) 085657271886 Obat Penggugur Kandungan...
Jual Obat Aborsi Hongkong ( Asli No.1 ) 085657271886 Obat Penggugur Kandungan...
ZurliaSoop
 

Recently uploaded (20)

How to Manage Global Discount in Odoo 17 POS
How to Manage Global Discount in Odoo 17 POSHow to Manage Global Discount in Odoo 17 POS
How to Manage Global Discount in Odoo 17 POS
 
How to Add New Custom Addons Path in Odoo 17
How to Add New Custom Addons Path in Odoo 17How to Add New Custom Addons Path in Odoo 17
How to Add New Custom Addons Path in Odoo 17
 
Exploring_the_Narrative_Style_of_Amitav_Ghoshs_Gun_Island.pptx
Exploring_the_Narrative_Style_of_Amitav_Ghoshs_Gun_Island.pptxExploring_the_Narrative_Style_of_Amitav_Ghoshs_Gun_Island.pptx
Exploring_the_Narrative_Style_of_Amitav_Ghoshs_Gun_Island.pptx
 
Basic Civil Engineering first year Notes- Chapter 4 Building.pptx
Basic Civil Engineering first year Notes- Chapter 4 Building.pptxBasic Civil Engineering first year Notes- Chapter 4 Building.pptx
Basic Civil Engineering first year Notes- Chapter 4 Building.pptx
 
Jamworks pilot and AI at Jisc (20/03/2024)
Jamworks pilot and AI at Jisc (20/03/2024)Jamworks pilot and AI at Jisc (20/03/2024)
Jamworks pilot and AI at Jisc (20/03/2024)
 
Sociology 101 Demonstration of Learning Exhibit
Sociology 101 Demonstration of Learning ExhibitSociology 101 Demonstration of Learning Exhibit
Sociology 101 Demonstration of Learning Exhibit
 
Interdisciplinary_Insights_Data_Collection_Methods.pptx
Interdisciplinary_Insights_Data_Collection_Methods.pptxInterdisciplinary_Insights_Data_Collection_Methods.pptx
Interdisciplinary_Insights_Data_Collection_Methods.pptx
 
Application orientated numerical on hev.ppt
Application orientated numerical on hev.pptApplication orientated numerical on hev.ppt
Application orientated numerical on hev.ppt
 
Salient Features of India constitution especially power and functions
Salient Features of India constitution especially power and functionsSalient Features of India constitution especially power and functions
Salient Features of India constitution especially power and functions
 
HMCS Vancouver Pre-Deployment Brief - May 2024 (Web Version).pptx
HMCS Vancouver Pre-Deployment Brief - May 2024 (Web Version).pptxHMCS Vancouver Pre-Deployment Brief - May 2024 (Web Version).pptx
HMCS Vancouver Pre-Deployment Brief - May 2024 (Web Version).pptx
 
SOC 101 Demonstration of Learning Presentation
SOC 101 Demonstration of Learning PresentationSOC 101 Demonstration of Learning Presentation
SOC 101 Demonstration of Learning Presentation
 
HMCS Max Bernays Pre-Deployment Brief (May 2024).pptx
HMCS Max Bernays Pre-Deployment Brief (May 2024).pptxHMCS Max Bernays Pre-Deployment Brief (May 2024).pptx
HMCS Max Bernays Pre-Deployment Brief (May 2024).pptx
 
FSB Advising Checklist - Orientation 2024
FSB Advising Checklist - Orientation 2024FSB Advising Checklist - Orientation 2024
FSB Advising Checklist - Orientation 2024
 
On National Teacher Day, meet the 2024-25 Kenan Fellows
On National Teacher Day, meet the 2024-25 Kenan FellowsOn National Teacher Day, meet the 2024-25 Kenan Fellows
On National Teacher Day, meet the 2024-25 Kenan Fellows
 
Mehran University Newsletter Vol-X, Issue-I, 2024
Mehran University Newsletter Vol-X, Issue-I, 2024Mehran University Newsletter Vol-X, Issue-I, 2024
Mehran University Newsletter Vol-X, Issue-I, 2024
 
Jual Obat Aborsi Hongkong ( Asli No.1 ) 085657271886 Obat Penggugur Kandungan...
Jual Obat Aborsi Hongkong ( Asli No.1 ) 085657271886 Obat Penggugur Kandungan...Jual Obat Aborsi Hongkong ( Asli No.1 ) 085657271886 Obat Penggugur Kandungan...
Jual Obat Aborsi Hongkong ( Asli No.1 ) 085657271886 Obat Penggugur Kandungan...
 
On_Translating_a_Tamil_Poem_by_A_K_Ramanujan.pptx
On_Translating_a_Tamil_Poem_by_A_K_Ramanujan.pptxOn_Translating_a_Tamil_Poem_by_A_K_Ramanujan.pptx
On_Translating_a_Tamil_Poem_by_A_K_Ramanujan.pptx
 
Fostering Friendships - Enhancing Social Bonds in the Classroom
Fostering Friendships - Enhancing Social Bonds  in the ClassroomFostering Friendships - Enhancing Social Bonds  in the Classroom
Fostering Friendships - Enhancing Social Bonds in the Classroom
 
Accessible Digital Futures project (20/03/2024)
Accessible Digital Futures project (20/03/2024)Accessible Digital Futures project (20/03/2024)
Accessible Digital Futures project (20/03/2024)
 
2024-NATIONAL-LEARNING-CAMP-AND-OTHER.pptx
2024-NATIONAL-LEARNING-CAMP-AND-OTHER.pptx2024-NATIONAL-LEARNING-CAMP-AND-OTHER.pptx
2024-NATIONAL-LEARNING-CAMP-AND-OTHER.pptx
 

Related Learning Experience (RLE)

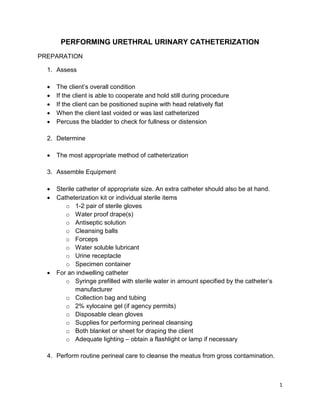
  • 1. 1 PERFORMING URETHRAL URINARY CATHETERIZATION PREPARATION 1. Assess  The client’s overall condition  If the client is able to cooperate and hold still during procedure  If the client can be positioned supine with head relatively flat  When the client last voided or was last catheterized  Percuss the bladder to check for fullness or distension 2. Determine  The most appropriate method of catheterization 3. Assemble Equipment  Sterile catheter of appropriate size. An extra catheter should also be at hand.  Catheterization kit or individual sterile items o 1-2 pair of sterile gloves o Water proof drape(s) o Antiseptic solution o Cleansing balls o Forceps o Water soluble lubricant o Urine receptacle o Specimen container  For an indwelling catheter o Syringe prefilled with sterile water in amount specified by the catheter’s manufacturer o Collection bag and tubing o 2% xylocaine gel (if agency permits) o Disposable clean gloves o Supplies for performing perineal cleansing o Both blanket or sheet for draping the client o Adequate lighting – obtain a flashlight or lamp if necessary 4. Perform routine perineal care to cleanse the meatus from gross contamination.
  • 2. 2 Procedure 1. Check the doctor’s order for catheterization. 2. Introduce yourself and verify the client’s identity. Explain to the client what you are going to do, why it is necessary and how the client can cooperate. 3. Perform hand hygiene and observe for other appropriate infection control procedure. 4. Provide for the client’s privacy. 5. Place the client in the appropriate position and drape all the areas except the perineum. o Female: Supine, kness flexed 2 feet apart o Male supine, legs slightly abducted 6. Establish adequate lighting. Stand on the client’s right if you are a right handed. On the client’s left if you are a left handed. 7. If using a collecting bag not contained within the catheterization kit. Open the drainage package and place the end of the tubing within reach. 8. If agency policy permits, apply clean gloves and inject 10-15 mL Xylocaine gel into the urethra of the female client. Wipe the underside of the shaft to distribute to get up the urethra. Wait atleast 5 minutes for the gel to take effect before inserting the catheter. Remove the gloves. 9. Open the catheterization kit. Place the waterproof drape under the buttocks (female) or penis (male) without contaminating the center of the drape with your hands. 10. Apply sterile gloves. 11. Organize the remaining supplies. o Saturate the cleansing balls with the antiseptic solution o Open the lubricant package o Remove the specimen container and place it nearby with the lid loosely on top 12. Attach the prefilled syringe to the indwelling catheter inflation hub.and test the balloon. 13. Lubricate the catheter and place it with drainage end inside the collecting container. 14. If desired, place the fenestrated drape over the perineum exposing the urinary meatus. 15. Cleanse the meatus
  • 3. 3 Female: 1. The nondominant hand is considered contaminated once it touches the client’s client. 2. Use your nondominant hand to spread labia. Establish a firm but gentle position. 3. Pick up a cleansing ball with the forceps in your dominant hand and wipe one side of the labia majora in a anteroposterior direction. 4. Use a new ball for the opposite side. 5. Repeat for the labia minora. 6. Use the past ball to cleanse directly over one meatus. Male: 1. Use the nondominant hand to grasp the penis just below the glans. If necessary, retract the foreskin. Hold the penis firmly upright with slightly tension. 2. Pick up a cleansing ball with the forceps in your dominant hand and wipe from the m.eatus in a circular motion around the glands. 3. Use a new ball and repeat 3 more times. 16. Insert the catheter Grasp the catheter firmly 2-3 inches from the tip. Ask the client to take a slow deep breath and insert the catheter as the client exhales. Advance the catheter 2 inches further after the urine begins to flow through it or per agency policy. If the catheter accidentally contacts the labia or slips into the vagina, it is considered contaminated and a new sterile catheter must be used. The contaminated catheter may be left in the vagina until the new catheter is inserted to help avoid mistaking the vaginal opening for the urethral meatus.
  • 4. 4 17. Hold the catheter with the nondominant hand. In males, lay the penis down onto the drape, being careful that the catheter does not pull out. 18. For indwelling catheter inflate the retention balloon with the designated volume.  Without releasing the catheter, hold the inflation valve between two fingers of your nondominant hand while you attach the syringe and inflate with your nondominant hand.  If the client complains of discomfort immediately withdraw the instilled fluid, advance the catheter further and attempt to inflate the balloon again.  Pull gently on the catheter until resistance is felt to insure that the balloon has inflated and to place it in the trigone of the bladder. 19. Collect a urine specimen, if needed. Allow 20-30 mL to flow into the bottle without touching the catheter to the bottle.
  • 5. 20. Allow straight catheter to continue draining. If necessary attach the drainage end 5 of an indwelling catheter to the collecting tubing and bag. 21. Examine and measure the urine. In some cases only 750-1000 mL of urine are to be drain from the bladder at one time. Check agency policy. 22. Remove the straight catheter, secure the catheter tubing to the inner thigh for female clients or the upper thigh/abdomen for the male clients, with enough slack to allow usual movement. Also secure the collecting tubing to the bed linens and hang the bag below the level of the bladder. No tubing should fall below the top of the bag. 23. Wipe the perineal area of any remaining antiseptic or lubricant. Replace the foreskin, if retracted earlier. Return the client to a comfortable position. 24. Discard all used supplies in appropriate receptacles and perform hand hygiene. 25. Document the catheterization procedure including catheter procedure and result in the client records.
  • 6. 6 REMOVING AND SERVING OF BED PAN PURPOSE: To facilitate and encourage normal elimination of urinary abd bowel wastes for patient confined to bed. EQUIPMENT: Obtain from central supply or from designated storage area: 1. Disposable bedpan or urinal 2. Disposable washbasin 3. Bedpan cover (towel) 4. Disposable gloves 5. Disposable “wet” wiped 6. Linen saver pad Obtain from the laundry: 1. Hand towel 2. Wash cloth Have soap available
  • 7. 7 PROCEDURE Giving a bedpan: 1. Provide screen or close door. To minimize embarrassment and ensure privacy. 2. Wash hands, and apply disposable glove. To prevent cross-contamination. 3. Obtain bedpan from designated area or bedside stand. Make certain it is labeled with the patient’s name and number if bedpan is being re-used for the same patient. To Avoid cross-contamination. 4. Turn bedding back, exposing as little of the patient as possible. To maintain the patient’s privacy. 5. Have patient flex his knees and raise buttocks, if possible. Assist him where it is necessary by placing hand under low back and lifting. Allows space for bedpan between the individual and bed. Check to ensure that he is not restricted from moving or certain types of posture. 6. If patient cannot use his legs to raise himself, turn him on his side. Position bedpan to buttocks and roll him onto his back with bedpan under him. Be sure bedpan is in proper position. 7. Adjust the bed to the most comfortable position for the patient if orders allow. If possible, elevate the head of the bed slightly to prevent hyperextension of the spine. If elevation of the head is contraindicated, tuck a pillow or folded blanked under the patient’s back to cushion the sacrum against he bedpan and support the lumbar area. Using the bedpan is difficult for most people. When permitted elevating the head of the bed aids in elimination. 8. Leave the patient alone with the toilet tissue within easy reach (Unit 1 ensures patient has access to call bell). Minimizes patient embarrassment. 9. Dispose of gloves, wash hands per hand hygiene policy.
  • 8. 8 Removing a bedpan: 1. Apply disposable gloves. The patient’s condition and the physicians order will determine how much he is able to do for himself. 2. . Lower head of bed have patient flex his knees and rise up buttocks; then remove the bedpan. Assist and support the patient as necessary. The patient’s condition and the physicians order will determine how much he is able to do for himself. 3. If the patient is unable to care for and clean himself, hold the bedpan firmly and turn the patient to his side off the bedpan. Hold the bedpan to prevent it from tipping as the patient turns. 4. Remove and cover bedpan and place it to the side of the bed. To protect bedding and prevent odors. 5. Cleanse anal area with disposable “wet” wipe, then wash, and dry anal area and buttocks. To prevent excoriation and breakdown of skin 6. Provide materials for patient to wash and dry his hands and position him for comfort. To provide hygiene and comfort. 7. Empty contents of bedpan into toilet and flush. Discard per I.C.M. All disposable items will be discarded per I.C.M. III.C. To Eliminate risk of cross contamination and reduce the risk of communicable disease transmission. 8. Open door or remove screen 9. Measure and record contents if patients are on I&O and dispose of contents in toilet room. Return urinal to bedside stand. Disposable articles will be discarded per ICM. To eliminate risk of cross contamination and reduce risk of communicable disease transmission.
  • 9. 9 HOT SITZ BATH Definition Sitz bath or hip bath is a bath in which a patient sits in water up to the hips to relieve discomfort and pain in the lower part of the body. Sitz bath works by keeping the affected area clean and increasing the flow of blood. A sitz bath may be created simply by filling a bathtub with some water and sitting in it for a few minutes. Alternatively, a large basin can be used. There are also special devices that fit into toilet bowls. Sitz baths may either be warm or cool. Some people find alternating between hot and cold water soothing. Sitz baths may be filled with just water, or substances such as salt, baking soda or vinegar can be added. Origin of Term The term sitz bath is derived from the German word Sitzbad,meaning a bath (Bad) in which one sits (sitzen). Objectives  To relieve muscle spasm  To soften exudates  To hasten the suppuration process  To hasten healing  To reduce congestion and provide comfort in the perineal area Purposes  To aid healing a wound in the area by cleaning on discharges and slough  To induce voiding in urinary retention  To relieve pain, congestion and inflammation in cases of: hemorroids, tenesmus, rectal surgery, anal fissures, after proctoscopic or cycloscopic exams., sciatica, uterine and renal colic.  To induce menstruation. Indications  Hemorrhoids  Anal Fissures/Surgery  Episiotomy  Uterine Cramps
  • 10. 10 Important Considerations  Warm water should not be used if considerable congestion is already present.  The patient should be observed closely for signs of weakness and faintness.  After the patient is in the tub or the chair, check to see whether or not there is pressure against the patient’s thighs or legs.  Support patient’s back in the lumbar region. Contraindication Menstruating or pregnant women Equipment  Sitz tub half filled with water 105F  Pitcher of water 130F  Bath thermometer  Ice cap-with cover  Fresh camisa  Bath towel  Bath blanket  Rubber ring p.r.n. Preparation  Take all necessary equipment to bathroom or treatment room.  Run water into tub and check temperature—105F or 40.5C  Place rubber ring at bottom of tub p.r.n. or line bottom with towel.  Charting  Type of solution  Length of time of application  Type of heat application  Condition and appearance of wound  Comfort of patient Equipment Available bathroom with appropriate size tub for patient.  Towels and bathmat  Bath blanket  Inflatable ring  Patient’s clean clothes
  • 11. 11 Procedure Nursing Interventions Rationale Check physician’s order for sitz bath patient. To know if it is indicated for the patient. Prepare the materials needed: Take linen to bathroom. Fill clean tub about one-third full with warm water. Check with your hand to determine that temperature of water is between 105°F and 110°F (40.5°C to 43.3°C). Place towel or inflatable ring, if appropriate, on tub bottom and bathmat on floor beside tub. To save time and effort Explain purpose and procedure to patient. For the patient to be aware on the purpose and procedure. Test the water in a sitz with a thermometer before the patient enters the tub. If the purpose of the sitz bath is to apply heat, water at a temperature of 43°C to 46°C for 15 minutes will produce relaxation of the parts involved after a short contraction. Warm water should not be used if considerable congestion is already present. If the purpose of the sitz bath is to produce relaxation or to help promote healing in a wound by cleaning it of discharge and debris, then water at a temperature of 34°C to 37°C is used.
  • 12. 12 Assist the patient into the tub and position him properly.Check to see whether there is pressure against the patient’s thighs or legs.If the patient’s feet do not touch the floor, and the weight of the legs is resting on the edge of the tub, a stool should be used to support the feet and to relieve the pressure on the back of the legs.It may also be necessary to place a towel in the water to support the patient’s back in the lumbar region.The bath can seem very long if one’s body is not in good alignment and comfortable. Wrap a bath blanket around the patient’s shoulders, and drape the ends over the tub. This protects the patient’s from feeling chilly and form exposure. Observe the patient closely for signs of weakness and fatigue. A cold compress may be placed at the back of the neck or forehead, to help prevent the patient from feeling weak. Discontinue the bath if the patient’s condition warrants. Typical signs of faintness include skin pallor, a rapid pulse rate, and nausea. Test the water in the tub several times, and keep it at the desired temperature. Additional hot water may be added by pouring it slowly form a pitcher or by opening a hot-water fauce a little bit. The water should be agitated by stirring it as hot water and added to prevent burning the patient. Do not leave the patient alone unless it is absolutely certain that it is safe to do so.
  • 13. 13 Help the patient out of the tub when the bath is completed. Normally, a hot sitz bath should be continued for 15 to 30 minutes. Help the patient dry, and cover the patient adequately. Assist the patient to his bed, where it is best for him to lie down, and out of drafts until normal circulation returns.
  • 14. 14 APPLICATION OF HOT AND COLD COLD Cold causes vasoconstriction (shrinkage of blood vessels), decreasing blood flow to an area, and slowing the body’s metabolism and its demand for oxygen. The therapeutic goals of cold applications include controlling hemorrhage, reducing edema, easing inflammation, and blocking pain receptors. Rationale for Cold Application Cold application prevents escape of heat from the body by slowing circulation, which also relieves congestion and often relieves muscle pain. A cold application: • Slows or stops bleeding • Slows bacterial activity in clients with an infection • Relieves pain following some types of surgery, tooth extraction, headache, or muscle or joint injury • Reduces swelling in injured tissues, including sprains and fractures • Prevents peristalsis in clients with abdominal inflammation • Relieves pain in engorged breasts
  • 15. 15 • Controls pain and fluid loss in the initial treatment of burns • Diminishes muscle contraction and muscle spasms • Slows the basal metabolism for certain types of surgery. APPLYING COLD THERAPY • Stop the cold application immediately if the client complains of numbness or the skin appears white or spotty. Rationale: Cold numbs nerve endings. • As cold decreases the flow of blood in one area of the body, flow increases to other areas. Rationale: This explains why cold or chilling drafts striking the body often cause congestion in the nasal passages. • Continued application of cold affects deeper tissues. It is important to monitor the client closely. Rationale: Prolonged exposure to extreme cold may cause serious injury. • Cold often is applied to a sprain, strain, fracture, or burn. Rationale: This helps remove blood and lymph congestion in the area and reduces pain. HEAT Heat is often applied in general client care. Heat causes vasodilation (enlargement of blood vessels), increasing blood flow to a specific area. This increases the oxygen, nutrients, and various blood cells delivered to body tissues. Vasodilation also aids in removal of wastes from injured tissues, such as debris from phagocytosis.
  • 16. 16 Rationale for Heat Application Heat application serves to: • Relieve local pain, stiffness, or aching, particularly of muscles and joints • Assist in wound healing • Reduce inflammation and infection • Make the chilly client more comfortable • Raise body temperature to help maintain normothermia • Promote drainage (draw infected material out of wounds) Because heat must be fairly intense to be effective, burns may result if heat is applied improperly or for too long. The application must be sufficiently hot to accomplish its purpose, but within a safe temperature range. Box 54-1 provides temperature ranges for hot and cold applications. Heat applied over a large area affords more warmth; however, the potential for injury is greater than that of heat applied over a small area. Protect the client from possible burn injury by observing safety precautions. In Practice: Nursing Care Guidelines 54-1 outlines steps for applying heat therapy. Both dry heat and moist heat have local effects. Apply dry heat with a heating blanket, warm-water bag, waterproof, water-filled heating pad (aquathermia pad), heat lamp, electric heat cradle, or electric heating pad. Moist heat warms the skin more quickly and is more penetrating than dry heat, because water is a better heat conductor than air. Apply moist heat with compresses, packs, or soaks, including the sitz bath. Sometimes wet compresses are used in combination with the aquathermia pad to provide longer-lasting moist heat. Skin maceration (abnormal softening) may develop when moisture is applied directly to the skin for long periods. The client’s skin may be protected by first applying a thin layer of petroleum jelly, if ordered. The provider’s order typically specifies the length of time for heat applications to be administered. For
  • 17. example, the order may be: “Moist compresses for 15 minutes every hour WA (while awake).” Approximate Range of Temperatures for Hot and Cold Applications 17 Hot 37.7°C-40.5°C I00°F-I05°F Warm 35°C-37.7°C 95°F-!00°F Tepid 26.6°C-35°C 80°F-95°F Cool 8.3°C-26.6°C 65°F-80°F Cold 0°C-!8.3°C 50°F-65°F To convert Fahrenheit to Celsius: C = (F – 32) X 5/9 To convert Celsius to Fahrenheit: F = (C X 9/5) + 32 APPLYING HEAT THERAPY • Heat is applied only when specifically ordered by a primary provider and applied with the utmost caution. Rationale: Nerves in the skin are numbed easily. The client may not feel the pain of a burn, especially if heat has been applied often. • Specific body parts, such as the eyelids, neck, and inside an arm, are especially sensitive to heat. • Each person has his or her own sensitivity to heat. Apply the heat source slowly and ask the client for feedback. Rationale: This helps determine how much heat is safe and for how long.
  • 18. • Infants, older people, and those with fair, thin skin have less heat resistance. Lowered body resistance because of illness also makes body tissues less resistant to heat. Rationale: It is important to consider each client individually. • Clients who are unresponsive or anesthetized and those with neurologic or psychological disorders or dementia are at increased risk for injury from heat applications. Rationale: These clients are often unable to report when heat is too intense. • Impaired circulation and some metabolic diseases make people more susceptible to burns (e.g., clients who are in shock or have any type of peripheral vascular disorder, or clients who have diabetes). Rationale: Changes in body systems interfere with skin integrity and healing and may impair the client’s ability to identify discomfort. • Clients receiving radiation therapy or chemotherapy and those with any degree of paralysis are particularly susceptible to burns. Rationale: Such clients have compromised immune systems or skin integrity. • Client complaints are very important. Listen to the client; if he or she complains of pain or discomfort, stop the treatment and consult the primary provider Rationale: Each client is different. Only the client can state how the treatment feels. 18
  • 19. 19 PERINEAL HEAT APPLICATION Purpose: 1. To increase the flow of blood to relieve congetion over the perineum. 2. To hasten the absorption of inflammatory exudates. 3. To hasten the healing of wounds by stimulating granulation of tissue and drying the exudation. Equipments:  Heat lamp  Bed sheet  Bath towel  Tape measure Procedure  Assemble equipment  To prevent errors 2. Identify the patient by checking the ID Bracelet.  To prevent errors  Explain the procedure and provide privacy and proper draping technique.  To ensure cooperation. 4. Remove the underware and the peripad.  To expose the perineal area.  Position if modified lithotomy position, keeping feet on mattress with knees bent and separated.  Distance of heat lamp from area of exposure is 18 inches unless otherwise indicated.  To prevent burning, blanching of skin from too much heat.  Keep all linens away from the lamp. NOTE: contact with lamp may lead to accidental burning of linens. 8. Expose the area for 10 minutes unless otherwise ordered. NOTE: prolonged exposure leads to burn. 9. Check the skin for redness or blanching from time to time. 10. After the procedure, keep the patient as comfortable as possible. Replace peripad. 11. Clean and return the equipment properly. 12. Chart the following:  Time the heat was apllied and lenght of treatment.  Relavant observations.
  • 20. 20  Patient’s response BREAST CARE Purpose:  To train all nursing staff who care for the new mother - baby dyad in the skills necessary to implement this policy.  To inform all pregnant patients about the benefits and management of breastfeeding.  To assist the staff in providing consistent breastfeeding information to all maternity patients and assistance to the breastfeeding mother - baby couplet to best support exclusive breastfeeding for her baby for the first six months of life. Procedure: 1. Gather equipment • Breastfeeding handouts/resources - Breast feeding Resources/Log, Breast Engorgement, Breast Milk Collection and Storage. • Breast pump (if needed) • Breast cream (if needed) • Bed pillows or Breastfeeding pillow 2. Within 30 minutes of delivery place the infant skin-to-skin across the mother’s chest. Maintain infant's body temperature with a knit cap and warm blankets tucked close. Encourage eye contact and light touch. 3. Encourage the mother to breast feed the infant within the first hour after birth, preferably within the first 20-30 minutes, prior to initial bath. 4. Assist mother with breast-feeding and provide teaching and support as indicated. Points to include are:  Use pillows to support the mother’s arms and to position infant level with the breast.  Express a small amount of colostrum onto the nipple to interest the infant in sucking.  Mother supports her breast using the "C” hold. The thumb is placed on top of the breast and the four fingers support the breast underneath. All fingers should be well back from the areola.  Mother tickles the center of the infant’s lower lip with her nipple until the infant opens his mouth wide as possible. This may take several attempts to do.  When infant’s mouth is open very wide with the tongue down, mother
  • 21. 21 should center her nipple quickly and draw the baby in close to her body.  Infant’s mouth and lips should form a flanged seal around the breast tissue. The tongue should be curved around the areola, cupping it and extending over the gum line.  Infant’s nose and chin should be touching the breast. There is no need to create an air space for most infants.  Identify nutritive sucking, which is 8 -10 long, drawing sucks w/ audible swallows followed with a 5 -10 second rest period. Non-nutritive sucking is usually 2-3 short, choppy sucks that are ineffective.  Identify quiet sounds of swallowing i.e. a “k” or “h” phonics sound.  Infant should finish the first breast or self-detach before offering the second breast.  De-latch the infant if feeding becomes uncomfortable, latch does not appear deep enough, or a non-nutritive sucking pattern is seen, by placing a clean finger in the side of the infant’s mouth between his jaws to release the suction. Then assist mother to correctly re-latch the infant.  Frequency and duration of feedings at the breast should be infant - led.  Infant is expected to nurse approximately 8-12 times in 24 hours. Feeding sessions may last 5-50 minutes or longer.
  • 22. 22 Breastfeeding Interventions 1. If a mother has a flat or inverted nipple and the infant is unable to latch, the nurse may use a manual breast pump or inverted syringe to draw out nipple prior to initiating latch. After consulting with a lactation team member, consider a nipple shield to attain latch. 2. Provide a functional assessment of the infant at the breast during a feeding, utilizing the LATCH tool a minimum of once every shift, to be documented on infant’s chart. 3. The Lactation Consultant/Educator/mother-baby nurse examines nipples whenever mother expresses concerns or complaints of sore nipples. LC/LE/mother-baby nurse to observe/assess the next feeding. 4. When prolonged separation of mother and infant is expected (i.e. premature, ill infant), help the mother initiate pumping as soon as medically feasible, optimally within 3 hours and no later than 6 hours after delivery. 5. The colostrum or milk obtained by expression should be collected and made available to the baby when feedings begin. 6. For mothers experiencing a fetal demise or newborn loss, provide the “Milk Suppression” handout. Breast Care/Education 1. Examine mother's breasts and nipples during daily shift assessments. The nurse can demonstrate breast care by teaching hand expression of colostrum/breast milk onto the areola after feeds, then allow to air dry. The nurse may provide breast cream if there are visible signs of redness, cracking or bleeding of the nipple or if the mother complains of soreness. 2. Encourage exclusive breast feeding for the first 6 months of infant’s life. 3. If the mother insists on supplementing after breastfeeding, recommend limiting the amount of formula to ½ - 1 oz and to discontinue supplementation once the milk has come in (approximately day 3-5). Offer alternative feeding methods in lieu of traditional bottle- feeding and provide the printed handout on “Breast feeding and Alternative Feeding Choices”. 4. Instruct the mother on pumping techniques using the electric breast pump, when the infant demonstrates inadequate suckling or if the mother-baby dyad are separated indefinitely. 5. When pumping is necessary, provide written guidelines to the mother on pumping, collection bottles, labels and lids for expressed milk. The information will include resource numbers for rental of a hospital grade electric breast pump for use after discharge.
  • 23. 6. Instruct all patients regarding infant-led feeding cues-Watch the infant for signs of readiness to feed such as increased alertness or activity, mouthing or rooting, rapid eye movement while asleep, and hand-to-mouth movement. Crying is a late sign of hunger. If feeding cues are not responded to in a timely manner, the infant may not be cooperative. 23 7. Instruct all patients regarding cluster feeding patterns-Frequent feeding, during periods of increased wakefulness; a series of mini-feedings snacks or courses, usually followed by a period of deep sleep; normal in the first 3 weeks. 8. Instruct all patients how to manually ex press their milk, in the eve nt a feeding is delayed, or they are separated from their infant. 9. Instruct all patients in t he use of the feeding log, and to monitor diaper count for the first week of their infant’s life; evidence of adequate nourishment from the breast would be sufficient output of urine and stool. Day 1>one urine, one stool; Day 2>two urine, two stools; Day 3>three urine, two stools; etc.-Day 6 and beyond>5-6 urine, 4+stools. Instruct mother to contact pediatrician if diaper count not as described on breastfeeding resource log. 10. Instruct all patients in the “Supply and Dem and” principle of milk production- The more the infant breastfeeds, the more milk will be produced. During growth spurts infants nurse more often to stimulate the mother’s milk supply to meet their new requirements. 11. Educate the mothers who are undecided about breastfeeding on the benefits of breastfeeding and human milk. Points to include are: American Academy of Pediatrics recommends exclusive breastfeeding for the first six months of life. Breast milk provides optimal composition for brain and eye development, decreases incidence of diarrhea, upper respiratory infections and some allergies, promotes bonding and mother/infant closeness, reduces incidence of postpartum hemorrhage for mother and is economical and convenient. 12. Provide the mother with the postpartum parent educational booklet on self-care, nutrition, infant care and infant feeding. Encourage the mother to watch the Newborn Channel to reinforce other teaching provided for infant care and feeding. 13. Provide all patients with a breastfeeding packet with additional breastfeeding recommendations including feeding/diaper log and resource numbers for breastfeeding assistance after discharge 14. Instruct mothers on normal infant weight loss.
  • 24. 24
  • 25. 25 Documentation 1. Document on the infant's chart the attempt to get the infant to breast feed; if supplementation medically indicated, document rationale in electronic medical record prior to supplementation. 2. Document the infant's response and the method of feeding used to provide nourishment to the infant. 3. If the mother insists that the baby be fed in the nursery during the night, requests a pacifier or bottle supplementation, document in the mother’s electronic medical record the mother’s request and the education provided as to the impact separation and/ or use of artificial nipples and/or formula, may have on the success of breastfeeding 4. Document observed or patient reported LATCH assessment with each feeding on infant’s chart.
  • 26. 26 ORAL MEDICATION The most common way people take medications is orally (by mouth). Depending on what your doctor has prescribed, your oral medication can be swallowed, chewed or placed under your tongue to dissolve. Assess  Allergies.  Client’s ability to swallow medication.  Presence of vomiting or diarrhea that would interfere with the ability to absorb the medication.  Specific drug action, side effects, interactions, and adverse reaction.  Client’s knowledge of and learning needs about the medication.  Perform appropriate assessment specific to the medication.  Determine if the assessment date influences the administration of the medication. Assemble equipment and supplies:  Dispensing system.  Disposable medication cups: small paper or plastic cups for tablets and capsules, or waxed or plastic calibrated medication cups for liquids.  Medication administration record (MAR), or computer printout.  Pill crusher/cutter.  Straws to administer medication that might discolor the teeth, or to facilitate the ingestion of liquid medication for clients.  Drinking glass and water or juice.  Applesauce or pudding to use for crushed medication. Know the reason why the client is receiving the medication, the drug classification, contradiction, usual dosage range, side effects, and nursing considerations for administrating and evaluating the intended outcomes for the medication. Check the MAR  Check the MAR for the drug name, dosage, and frequency, route of administration, and expiration, date for administering the medication, if appropriate.  If the MAR is unclear or pertinent information is missing, compare the MAR with the most recent primary care provider’s written order.  Report any discrepancies to the charge nurse or the primary care provider, as agency policy dictates.
  • 27. 27 Verify the client’s ability to take medication orally.  Determine whether the client can swallow, is NPO, is nauseated or vomiting, has gastric suction, or has diminished or absent bowel sounds. Organized the supplies.  Assemble the MAR(s) for each client together so that medication can be prepared for one client at a time. PROCEDURE Perform hand hygiene, and observe other appropriate infection control procedures. Unlock the dispensing system Obtain appropriate medication  Read the MAR and take the appropriate medication from the shelf, drawer, or refrigerator.  Compare the label of the medication container or unit-dose package with the order on the MAR or computer printout. If they are not identical, recheck the prescriber’s written order in the clients chart. If there is still is a discrepancy, check with the nurse in charge, or with the pharmacist.  Check the expiration date of the medication. Return expired medication to the pharmacy.  Use only medications that have clear, legible labels. Prepare the medication.  Calculate medication dosage accurately.  Prepare the correct amount of medication for the required dose, without contaminating the medication.  While preparing the medication, recheck each prepared drug and container with the MAR again. Tables of Capsules  Place package unit-dose capsules or tablets directly into the medicine cup. Do not remove the medication from the wrapper until at the bedside.  If using a stock container, pour the required number into the bottle cap, the transfer the medication to the disposable cup without touching the tablets.  Keep narcotics and medication that require specific assessment-such as pulse measurements, respiratory rate or depth, or blood pressure-separate from others.  Break scored tablets only, if necessary to obtain the correct dosage. Use a file or cutting devise if needed. Check the agency policy as to whether unused portions of a medication can be discarded and, if so how they are to be discarded.
  • 28.  If the client has difficulty swallowing, crush the tablets (check to make sure tablets may be crushed) to a fine powder with a pill crusher, or between two medication cups. Then mix the powder with a small amount of soft food such as applesauce. 28 Liquid Medication  Thoroughly mix the medication before pouring. Discard any medication that has changed color or turned cloudy.  Remove the cap, and place it upside down on the countertop.  Hold the bottle so the label is next to your palm, and pour the medication away from the label.  Place the medication cup at eye level, and fill it to the desired level, using the bottom of the meniscus to align with the container scale.  Before capping the bottle, wipe the lip with paper towel.  When giving small amounts of liquids (< 5ml), prepare the medication in a syringe without the needle, or in a specially designed oral syringe. Label the syringe with the name of the medication and route (PO).  Keep unit-dose liquids in their packages, and open them at the bedside. Oral Narcotics  If an agency uses a manual recording system for controlled substances, check the narcotic record for the previous drug count, and compare it with the supply available.  Remove the next available tablet, and drop it in the medicine cup.  After removing a tablet, record the necessary information on the appropriate narcotic control record, and sign it.
  • 29. 29  Note: Computer-controlled dispensing system allow access only to the selected drug, and automatically record its use. All Medication  Place the prepared medication and MAR together on the medication chart.  Recheck the label on the container before returning the bottle, box, or envelope to its storage place.  Avoid leaving prepared medication unattended.  Lock the medication cart entering the clients room.  Check the room number against the MAR if agency policy does not allow the MAR to be removed from the medication cart. Provide for client privacy. Prepare the client.  Check the client’s identification band.  Assist the client to sitting position or, if not possible, to a side lying position.  If not previously assessed, take the required assessment measures such as pulse and respiratory rates or blood pressure. Explain the purpose of the medication and how it will help, using language that the client can understand, Include relevant information about effects. Administer the medication at the correct time.  Take the medication to the client within 30 minutes before or after the scheduled time.  Give the client sufficient water or preferred juice to swallow the medication. Before using juice, check for any food and medication incompatibilities.  If the client is unable to hold the pill cup, use it to introduce the medication into the client’s mouth, and give only one tablet or capsule at a time.  If an older child or adult ha difficulty swallowing, and ask the client to place the medication on the back of the tongue before taking the water.  If the medication has an objectionable taste, ask the patients to suck a few ice chips beforehand, or give the medication with juice, applesauce, or bread, if there are no contraindications.  If the client says that the medication you are about to give is different from what the client has been receiving, do not give the medication without first checking the original order.  Stay with the client until all medications have been swallowed.
  • 30. 30 Document each medication given.  Record the medication given, dosage, time, any complaints or assessment of the client, and your signature  If medication was refused or omitted, record this fact on the appropriate record; document the reason, when possible, and the nurse’s actions, according to agency policy. Dispose of all supplies appropriately.  Replenish stock, and return the cart to the appropriate place.  Discard used disposable supplies. Evaluate the effects of the medication.  Return to the client when the medication is expected to take effect to evaluate the effects of the medication on the client.
  • 31. 31 Subcutaneous Injection Where can I give a subcutaneous injection? The following are sites where you can give a subcutaneous injection:  Abdomen: Uncover your abdomen. You may give an injection within the following area: below the waist to just above the hip bone and from the side to about 2 inches from the belly button. Avoid the belly button.  Thigh: Uncover the entire leg. Find the area halfway between the knee and hip and slightly to the side. Gently grasp the area to make sure you can pinch 1 to 2 inches of skin.  Upper Arm: Uncover the arm to the shoulder. Have the person getting the injection stand with his hand on his hip. Stand next to and a little behind the person. Find the area halfway between the elbow and shoulder. Gently grasp the skin at the back of the arm between your thumb and first 2 fingers. You should be able to grasp 1 to 2 inches of skin
  • 32. 32 Materials needed Syringe with the drug to be administered (without air), needle (Gauss 25, short and thin; on syringe), liquid disinfectant, cotton wool, adhesive tape. Technique 1. Wash hands. 2. Reassure the patient and explain the procedure. 3. Uncover the area to be injected (upper arm, upper leg, abdomen). 4. Disinfect skin. 5. ‘Pinch’ fold of the skin. 6. Insert needle in the base of the skin-fold at an angle of 20 to 30 degrees. 7. Release skin. 8. Aspirate briefly; if blood appears: withdraw needle, replace it with a new one, if possible, and start again from point 4. 9. Inject slowly (0.5 - 2 minutes!). 10. Withdraw needle quickly. 11. Press sterile cotton wool onto the opening. Fix with adhesive tape. 12. Check the patient's reaction and give additional reassurance, if necessary. 13. Clean up; dispose of waste safely; wash hands.
  • 33. 33 INTRAMUSCULAR INJECTION Safe areas to give an IM injection:  Vastus Lateralis Muscle (Thigh): Look at your thigh and divide it into 3 equal parts. The middle third is where the injection will go. The thigh is a good place to give yourself an injection because it is easy to see. It is also a good spot for children younger than 3 years old.  Ventrogluteal Muscle (Hip): Have the person getting the injection lie on his or her side. To find the correct location, place the heel of your hand on the upper, outer part of the thigh where it meets the buttocks. Point your thumb at the groin and your fingers toward the person's head. Form a V with your fingers by separating your first finger from the other 3 fingers. You will feel the edge of a bone along the tips of your little and ring fingers. The place to give the injection is in the middle of the V. The hip is a good place for an injection for adults and children older than 7 months.
  • 34.  Deltoid Muscle (Upper arm muscle): Completely expose the upper arm. You will give the injection in the center of an upside down triangle. Feel for the bone that goes across the top of the upper arm. This bone is called the acromion process. The bottom of it will form the base of the triangle. The point of the triangle is directly below the middle of the base at about the level of the armpit. The correct area to give an injection is in the center of the triangle, 1 to 2 inches below the acromion process.  Dorsogluteal Muscle (buttocks): Expose one side of the buttocks. With an alcohol wipe draw a line from the top of the crack between the buttocks to the side of the body. Find the middle of that line and go up 3 inches. From that point, draw another line down and across the first line, ending about halfway down the buttock. You should have drawn a cross. In the upper outer square you will feel a curved bone. The injection will go in the upper outer square below the curved bone. Do not use this site for infants or children younger than 3 years old. Their muscles are not developed enough. 34
  • 35. 35 PROCEDURE: Wash your hands with soap and dry them completely. Put on gloves if necessary.  Open the alcohol wipe: Wipe the area where you plan to give the injection. Let the area dry. Do not touch this area until you give the injection.  Prepare the needle: Hold the syringe with your writing hand and pull the cover off with your other hand. Place the syringe between your thumb and first finger. Let the barrel of the syringe rest on your second finger.  Hold the skin around where you will give the injection: With your free hand, gently press on and pull the skin so that it is slightly tight.  Insert the needle into the muscle: Hold the syringe barrel tightly and use your wrist to inject the needle through the skin and into the muscle at a 90 degree angle.  Check the needle: Let go of the skin with your other hand. Hold the syringe so it stays pointed straight in. Pull back on the plunger a little to make sure you did not hit a blood vessel. If blood comes back, remove the needle immediately. Do not inject the medicine. Dispose of both the syringe and the medicine. Get more medicine in a new syringe. When you give the second injection, give it on the other side.  Inject the medicine: Push down on the plunger to inject the medicine. Do not force the medicine by pushing hard. Some medicines hurt. You can inject the medicine slowly to reduce the pain.  Remove the needle: Once the medicine is injected, remove the needle at the same angle as it went in. Place gauze over the area where you gave the injection.
  • 36. 36 ADMINISTERING INTRADERMAL INJECTIONS GENERAL a. An intradermal (ID) injection is the injection of a small amount of fluid into the dermal layer of the skin (see figure 2-10). It is frequently done as a diagnostic measure, such as for tuberculin testing (screening test for tuberculosis referred to as a tine test) and allergy testing (placing very small amounts of the suspected antigen or allergen in a solution under the skin). The intradermal injection is made in skin areas of the body that are soft and yielding. b. Often the tuberculin syringe is the only syringe with fine enough calibrations to measure the minute dose that is used. A 26-gauge needle, which is one-fourth to one-half inch in length, is usually selected. The fluid is in a small welt or "wheal" (a small swelling of the skin due to the medication placed under the skin) just under the surface of the skin and between its layers.
  • 37. 37 PROCEDURE FOR ADMINISTERING AN INTRADERMAL INJECTION Select Injection Site and Prepare Patient. 1. Selecting site. Usually palmer (inner) forearm or subscapular region of the back is selected. The site selected should be an easily obtainable area and relatively free from being rubbed by clothing. 2. Position patient. To position the patient, proceed as follows: (a) Place arm in a relaxed position, elbow flexed. (b) Place palm up, exposing palmer or inner arm area. c. Prepare Injection Site d. Remove Needle Guard. Pull the guard straight off. e. Stabilize Injection Site. 1. Using your nondominant thumb, apply downward pressure, directly below and outside the prepared injection site. (Do not draw the skin back or move the skin to the side because the skin will return to its normal position when pressure is released and will cause the needle bevel to either go deeper into the skin or to leave the skin, depending upon which direction the skin moves.) 2Hold the skin taut until the needle bevel has been inserted between the skin layers. f. Insert Needle. 1. Using your dominant hand, hold syringe, bevel up, with fingers and thumb resting on the sides of the barrel. If you insert the needle at a 20 degree angle, lower it at once to 15 degrees. Do not place thumb or fingers under syringe because this will cause the angle of insertion to exceed 15 degrees causing the needle to insert beyond the dermis. 2.Insert needle, bevel up, just under the skin at an angle of 15 to 20 degrees until the bevel is covered. Continue stabilizing thumb pressure. You should feel some resistance. If the needle tip moves freely, you have inserted the needle too deeply. At this point, withdraw needle slightly and check again for resistance.
  • 38. g. Inject Medication. It is not necessary to aspirate the syringe since no large vessels are commonly found in the superficial layer of the skin. Inject the medication as follows: 38 1. Continue holding syringe with same hand. 2. Release skin tension with other hand. 3. With free hand, push plunger slowly forward until the medication is injected and a wheal appears at the site of the injection. The appearance of a wheal indicates that the
  • 39. medication has entered the area between the intradermal tissues. If a wheal does not appear, withdraw the needle and repeat the procedure in another site. h. Withdraw Needle. To withdraw the needle, quickly withdraw it at the same angle that it was inserted. i. Cover Injection Site. Without applying pressure, quickly cover injection site with a dry sterile small gauze. 39 j. Perform Post injection Patient Care. k. Evaluate Reaction of Medication. Usually you, as the medical specialist, will not evaluate the reaction of a suspected allergic reaction or a tuberculin test, but will record the reaction. For a tuberculin test, the patient will wait 48 to 72 hours and then return to have an evaluation to determine if the patient has been exposed to tuberculosis. If the intradermal injection is done to determine if the patient is allergic to dust, pollen, or similar substances, a reaction will take place in a few minutes after the substance has been placed under the skin. (1) Instruct the patient to wait or return to have the test read according to local SOP. (2) Caution patient not to rub, scratch, or wash injection site. Rubbing, scratching, or washing may spread or dilute the medication, causing a false reading at a later time. l. Dispose of Equipment. Dispose of equipment according to local SOP. m. Record Administration of Intradermal Injection. Record the injection information on the patient's chart or record.
  • 40. 40 Stages of labor First stage: Cervical Dilatation Stage -begins with the onset of regular contractions. Phases of labor: Latent phase: dilation of cervix to3 to 4 cm. contraction become increasing Active phase: dilation continues from 3 to 4 cm to 7 cm. Contraction become stronger and painful Transition phase: cervix dilates from 8 to 10 cm What happen during the first stage of labor? Cervical dilatation and effacement Causes of cervical dilatation Contraction and retraction of the cervical dilation of uterine musculature Mechanical pressure by the bulging membrane(forewater) The descend of the presenting part Phases of cervical dilatation Latent phase- the first 3cm dilatation; a slow process(8 hours in nulliparous and 3 hours in multiparous) Active phase - this is active process of cervical dilatation; the normal rate is 1cm/hour Latent phase Active phase Begins with onset of contraction Slow progress. Little cervical dilatation Progressive cervical effacement Ends once the cervix reaches 3cm dilatation Duration - 8 hours nulliparous - 6 hours multiparous Active process Begins after 3 cm cervical dilatation Period of active cervical dilatation(average rate 1cm/hour) S-shaped curved which is usedto defined the progress of labor It has three components A. Acceleration - slow B. Maximum- fast C. Deceleration- slow
  • 41. 41 Contraction: is the power of labor Type of contraction: Regular Increasing in frequency Irregular Second stage. (expulsive stage) begins with complete dilatation of the cervix and ends with delivery of the newborn. -it should be complete within one hour after complete dilatation. Two phases of expulsive stage Propulsive phase- from full dilatation until presenting part has descended to the pelvic floor. Expulsive phase- which end in the complete delivery of the baby. Features of expulsive phase: Mothers irresistible desire to bear down Distension of the perinium. Dilatation of the anus. Average length: Nulliparous: 40 minutes Multiparous: 20 minutes Mechanism of labor  Descent  Flexion  Internal rotaion  Extension  Internal rotation  Expulsion ”crowning” occurs when the newborns head or presenting part appears at the vaginal opening. -”Episiotomy” surgical incision in the perineum-may be done to facilitate delivery and avoid laceration of the perineum. Progress of second stage of labor Finding suggestive of satisfactory progress of second stage of labor are: - steady descent of fetus - onset of expulsive(pushing phase) Findings suggestive of unsatisfactory progress in the second stage of labor are: - lack of descent of fetus through the birth canal
  • 42. 42 - failure of expulsion during the late (expulsive) phase. Third stage (placental stage) -This stage begins with delivery of the newborn and ends with delivery of placenta. -It occurs in two phases –placental separation and placental expulsion. Two phases: Separation phase Expulsion phase Duration: 15-20 minutes for separation Average blood loss: 150ml to 250 ml Fourth stage: Postpartum -It lasts from 1 to 4 hours after birth. -the mother and the newborn recover from physical process of labor. -systems readjustment. Newborn body systems begins to adjust to extrauterine life. PHYSIOLOGICAL MATERNAL CHANGES LOCHIA – discharge from the uterus during the first 3 weeks after delivery. Increasing Lochia as the day passes by may indicate Heparin Intoxication. LOCHIAL CHANGES LOCHIA RUBRA -Dark red discharge occurring in the first 2-3 days. -Contains epithelial cells, erythrocytes and decidua. -Characteristic human odor. LOCHIA SEROSA -Pinkish to brownish discharge occurring 3-10 days after delivery. -Serosanguineous discharge containing decidua, erythrocytes, leukocytes, cervical mucus and microorganisms. -Has a strong odor. LOCHIA ALBA -Almost colorless to creamy yellowish discharge occurring from 10 days to 3 weeks after delivery.
  • 43. -Contains leukocytes, decidua,epithelial cells, fat, cervical mucus, cholesterol crystals, and bacteria. -Has no odor. B. UTERUS -Process of involution takes 4-6 weeks to complete. -Weight decreases from 2 lbs to 2 oz. -Fundus steadily descends into true pelvis; Fundal height decreases about 1 fingerbreadth (1 cm)/day; by -10-14 days postpartum, cannot be palpated abdominally. 43 Uterine Involution Description a. The rapid decrease in the size of the uterus as it returns to the nonpregnant state b. Clients who breastfeed may experience a more rapid involution Assessment a. Weight of the uterus decreases from 2 pounds to 2 ounces in 6 week b. Endometrium regenerates c. Fundus steadily descends into the pelvis d. Fundal height decreases about 1 fingerbreadth (1 cm) per day e. By 10 days postpartum, uterus cannot be palpated abdominally
  • 44. 44 ENEMA It is an introduction of a solution into the large intestine, generally for the purpose of removing feces. The instilled solution distends the intestine, may irritate intestinal mucosa, thus increases peristalsis. Types of Enema: 1. Cleansing Enema – given to remove feces from the colon. Purposes:  To relieve constipation or fecal impaction.  To prevent involuntary escape of fecal material during surgical procedures.  To promote visualization of the intestinal tract by x-ray film or instrument examination.  To help establish regular bowel function during a bowel training program. 2. Retention Enema – retained in the bowel for a prolonged period for different reasons. 3. Retention Flow Enemas – or Harris Flush enemas are used to expel flatus. Types of Solutions: Solution Amount Action Time to take effect Adverse Side Effect
  • 45. 45 Tap Water (Hypotonic) 500-1000 ml Distends intestine, increases peristalsis, softens stool 15 min. Fluid and Electrolyte imbalance, water intoxication Normal Saline (Isotonic) 500-1000 ml Distends intestine, increases peristalsis, softens stool 15 min. Fluid and Electrolyte imbalance, sodium retention Soap Solution 500-1000 ml (concentrate at 3ml-5ml/ 1000ml) Distends intestine, irritates intestinal mucosa, softens stool 10-15 min. Rectal mucosa irritation or damage Hypertonic solutions 70ml – 130ml Distends intestine, irritates intestinal mucosa 5-10 min. Sodium retention Oil solutions (mineral, olive, or cottonseed oil) 150-200ml Lubricate stool and intestinal mucosa 30min. Equipments: - enema can - kelly forcep - IV pole - solution - KY jelly - rectal tube - gloves - hose Procedure: Nursing action Rationale 1. Inform the client about the procedure To promote cooperation 2. Assemble articles For efficiency 3. If using an enema bag, fill it with 750- 1000 ml warm tap water Hot water can burn intestinal mucosa, cold water can cause abdominal cramping 4. Clamp tubing To keep solution intact
  • 46. 46 5. Place waterproof pad absorbent To prevent soiling 6. Assist client into the left side lying with knee flexed Allows enema solution to flow downward by gravity 7. Cover client with bath blanket exposing only rectal area Provide warmth, allows client to feel more relaxed 8. Lubricate 3-4 inches tip of rectal tube Provides smooth insertion without irritation and trauma 9. Gently separate buttocks and locate anus For accurate exposure 10. Instruct client to relax It promotes relaxation of external anal sphincter 11. Insert tip of rectal tube 3-4 inches Careful insertion prevents trauma to rectal mucosa 12. Hold tubing in rectum constantly until end of instillation / Bowel contraction can cause expulsion of tube 13. With container at client's hip level, open regulating clamp and allow solution to enter slowly Rapid infusion can stimulate evacuation and cause cramping 14. Raise height of enema bag slowly to 30-45cm (12-18 inches) Raising container too high causes rapid infusion and possible painful distention of colon 15. Hang container on IV pole 16. Clamp tubing if client complains of cramping Temporary cessation minimizes cramping 17. Tell client that the procedure is completed and that you will be removing rectal tube Client may misinterpret the sensation of removing the tube as a loss of control 18. Explain feeling of distention is normal. Tell client to retain 5-10 minutes Solution distend bowel. Longer retention promotes more effective stimulation. 19. Assist to bathroom 20. Instuct client with a history of cardiovascular disease to exhale while expelling enema to avoid valsalva maneuver Valsalva maneuver- strenuously trying to move a constipated stool and may result in cardiac arrest 21. Assist client to wash anal area with wearm soap and water Fecal content can irritate the skin. Hygiene promotes comfort. 22. Do after care Characteristics of a Good Recording: 1. Accuracy 2. Conciseness 3. Thoroughness 4. Currentness
  • 47. 47 ESSENTIAL NEWBORN CARE Before you look at the eight steps of essential newborn care (ENC) you need to remember the importance of the ‘three cleans’ that you learned in Study Session 3 of the Labour and Delivery Care Module. These are clean hands, clean surface and clean equipment. Your equipment should include two clean dry towels, cord clamps, razor blade, cord tie, functional resuscitation equipment, vitamin K, syringe and needles, and tetracycline eye ointment. Figure 2.1 Drying and wrapping the newborn baby. Step 1 Deliver the baby onto the mother’s abdomen or a dry warm surface close to the mother. Continue to support and reassure the mother. Tell her the sex of the baby and congratulate her. Step 2 Dry the baby’s body with a dry warm towel as you try to stimulate breathing. Wrap the baby with another dry warm cloth and cover the head (Figure 2.1). Dry the baby well, including the head, immediately and then discard the wet cloth. Wipe the baby’s eyes. Rub up and down the baby’s back, using a clean, warm cloth. Drying often provides sufficient stimulation for breathing to start in mildly depressed newborn babies. Do your best not to remove the vernix (the creamy, white substance which may be on the skin) as it protects the skin and may help prevent infection. Then wrap the baby with another dry cloth and cover the head. Step 3 Assess breathing and colour; if not breathing, gasping or there are less than 30 breaths per minute, then resuscitate. You will remember that you learned how to manage a newborn baby with birth asphyxia in Study Session 7 of the Labour and Delivery Care Module. As you dry the baby, assess its breathing. If a baby is breathing normally, both sides of the chest will rise and fall equally at around 30–60 times per minute. Thus, check if the baby is:  Breathing normally  Having trouble breathing  Breathing less than 30 breaths per minute, or
  • 48. 48  Not breathing at all. Resuscitation of a baby who is not breathing must start within one minute of birth. If the baby needs resuscitation, quickly clamp or tie and cut the cord, leaving a stump at least 10 cm long for now and then start resuscitation immediately. Functional resuscitation equipment should always be ready and close to the delivery area since you must start resuscitation within one minute of birth. It may sound as if you have a lot to do in one minute, but the steps described here are ones that you can take simultaneously. That is, while you are delivering the baby onto the mother’s abdomen and drying the baby, you can assess breathing and colour and take urgent action if necessary. Figure 2.2 Tying and cutting the cord. Step 4 Tie the cord two fingers’ length from the baby’s abdomen and make another tie two fingers from the first one (Figure 2.2). Cut the cord between the first and second tie. If the baby needs resuscitation, cut the cord immediately. If not, wait for 7–3 minutes before cutting the cord. 1. Tie the cord securely in two places: o Tie the first one two fingers away from the baby’s abdomen. o Tie the second one four fingers away from the baby’s abdomen. o Make sure that tie is well secured; the thread you use to tie the cord must be clean. 2. Cut the cord between the ties: o Use a new razor blade, or a boiled one if it has been used before, or sterile scissors. o Use a small piece of cloth or gauze to cover the part of the cord you are cutting so no blood splashes on you or on others. o Be careful not to cut or injure the baby. Either cut away from the baby or place your hand between the cutting instrument and the baby. 3. Do not put anything on the cord stump.
  • 49. Step 5 Place the baby in skin-to-skin contact with the mother, cover with a warm cloth and initiate breastfeeding. 49 The newborn loses heat in four ways (see Figure 2.3 below):  Evaporation: when amniotic fluid evaporates from the skin.  Conduction: when the baby is placed naked on a cooler surface, such as the floor, table, weighing scales, cold bed.  Convection: when the baby is exposed to cool surrounding air or to a draught from open doors and windows or a fan.  Radiation: when the baby is near cool objects, walls, tables, cabinets, without actually being in contact with them. Figure 2.3 The newborn can lose heat in four ways. (Source: WHO, 1997, Safe Motherhood: Thermal Protection of the Newborn, a Practical Guide The warmth of the mother passes easily to the baby and helps stabilise the baby’s temperature. 1. Put the baby on the mother’s chest, between the breasts, for skin-to-skin warmth. 2. Cover both mother and baby together with a warm cloth or blanket. 3. Cover the baby’s head. The first skin-to-skin contact should last uninterrupted for at least one hour after birth or until after the first breastfeed. The baby should not be bathed at birth because a bath can cool the baby dangerously. After 24 hours, the baby can have the first sponge bath, if the temperature is stabilized.
  • 50. 50 Figure 2.4 Initiating immediate breastfeeding. If everything is normal, the mother should immediately start breastfeeding. For optimal breastfeeding you should do the following: 1. Help the mother begin breastfeeding within the first hour of birth (Figure 2.4). 2. Help the mother at the first feed. Make sure the baby has a good position, attachment, and is sucking well. Do not limit the length of time the baby feeds; early and unlimited breastfeeding gives the newborn energy to stay warm, nutrition to grow, and antibodies to fight infection. The steps to keep the newborn warm are called the warm chain. 1. Warm the delivery room. 2. Immediate drying. 3. Skin-to-skin contact at birth. 4. Breastfeeding. 5. Bathing and weighing postponed. 6. Appropriate clothing/bedding. 7. Mother and baby together. 8. Warm transportation for a baby that needs referral. Step 6 Give eye care (while the baby is held by its mother). Figure 2.5 Putting tetracycline eye ointment into the eyes of the newborn baby. Shortly after breastfeeding and within one hour of being born, give the newborn eye care with an antimicrobial medication. Eye care protects the baby from serious eye infection which can result in blindness or even death. The steps for giving the baby eye care are these: First, wash your hands, and then using tetracycline 1% eye ointment:
  • 51. 1. Hold one eye open and apply a rice grain size of ointment along the inside of the lower eyelid. Make sure not to let the medicine dropper or tube touch the baby’s eye or anything else (see Figure 2.5). 51 2. Repeat this step to put medication into the other eye. 3. Do not rinse out the eye medication. 4. Wash your hands again. Step 7 Give the baby vitamin K, 1 mg by intramuscular injection (IM) on the outside of the upper thigh (while the baby is held by its mother). After following correct infection prevention steps, with the other hand stretch the skin on either side of the injection site and place the needle straight into the outside of the baby’s upper thigh (perpendicular to the skin). Then press the plunger to inject the medicine. You will be learning more about safe injection techniques in your practical skills training sessions. There is also a study session on routes of injection in the Immunization Module. Step 8 Weigh the baby. Weigh the baby an hour after birth or after the first breastfeed. If the baby weighs less than 1,500 gm you must refer the mother and baby urgently.
  • 52. 52 INTRAPARTUM CARE 1. Examine the woman for emergency signs.  Unconscious, Convulsing  Vomiting  Severe headache with blurring of vision  Vaginal bleeding  Severe abdominal pain  Looks very ill  Fever  Severe breathing difficulty Do NOT make a very sick woman wait, attend to her quickly! 2. Greet the woman and make her comfortable.  Ask for informed consent before examination or any procedure  Respect privacy  Communicate result of examination 3. Assess the woman in labor.  Take the history of labor and record on the labor form.  Review Home Based Maternal Record (HBMR)/ Mother and Child Book  When is delivery expected? Preterm or term?  Prior pregnancies  Birth plan  Assess uterine contractions: intensity, duration, and interval  Observe the woman’s response to contractions.  Perform abdominal exam: (Leopold’s maneuver, FHT) between contractions
  • 53. 53 4) Determine the stage of labor. Explain to the woman that you will perform a vaginal examination and ask for her consent.  Respect privacy  Observe standard precautions 4) Determine the stage of labor.  Inspect the vulva for:  Bulging perineum  Any visible fetal parts  Vaginal bleeding  Leaking amniotic fluid; if yes, is it meconium stained, foul smelling?  Warts, keloid tissue or scars that may interfere with delivery 4) Determine the stage of labor.  Perform gentle vaginal examination (do not start during contraction).  Explain findings to the woman. Reassure her.  RECORD findings in labor record or in partograph.  Determining Stage of Labor  Determining Stage of Labor 5. Decide if the woman can safely deliver. If there is indication for referral …  in early labor and the referral hospital can be timely reached:  Refer urgently  in late active labor:  Monitor progress of labor and deliver the baby  Prepare for immediate referral if still necessary  If the woman or her family refuses referral
  • 54. 54  Explain the possible consequences 6. Give supportive care throughout labor. 7. Monitor and manage labor.  First stage: not yet in active labor, cervix is dilated 0-3 cm., contractions are weak, <2 in 10 minutes  Every hour: check for emergency signs, frequency, intensity & duration of contractions, FHR, mood and behavior.  Every 4 hours: check vital signs and cervical dilatation.  Record findings in Labor record  Assess progress of labor: After 8 hrs, if contractions are stronger & more frequent but no progress in cervical dilatation: REFER  First stage: in active labor, cervix is dilated at 4 cm or more  Check every 30 mins for emergency signs, frequency and duration of contractions, FHR, mood and behavior.  Check every 4 hours: fever, PR, BP, cervical dilatation.  Record time of rupture of membranes and color of the amniotic fluid.  Record findings in partograph.  RELIEF of PAIN and DISCOMFORT  Suggest change of position  Encourage mobility as comfortable for her  Encourage proper breathing: breath more slowly, make a sighing noise, make 2 short breaths followed by a long breath out.  Massage her lower back if she finds it helpful  CAUTION  DO NOT do IE more frequently than every 4 hours unless necessary.  DO NOT allow the woman to push unless delivery is imminent → pushing does not speed up labor, mother will become tired, cervix will swell.
  • 55.  DO NOT give medications to speed up labor → DANGEROUS: may cause 55 trauma to the mother and baby (ex: Uterine rupture)  DO NOT DO FUNDAL PRESSURE-may cause uterine rupture, fetal death Second stage: from full dilatation (10cm) of the cervix until birth of baby. How to tell if a woman is in the 2nd stage:  On IE, cervix is fully dilated  Woman wants to bear down  Strong uterine contractions every 2-3 minutes  Bulging thin perinium fetal head visible during contractions.  BOW will rupture  Monitoring the 2nd stage  Check uterine contractions, fetal heart rate, mood and behavior  Continue recording in the partograph REMINDER: 1. Massaging or stretching the perineum have not been shown to be beneficial. 2. DO NOT apply fundal pressure to help deliver the baby → may harm mother and baby. 8. Deliver the Baby Implement the 3 CLEANS 1. Clean hands 2. Clean delivery surface 3. Clean cutting and care of the cord WEAR DOUBLE GLOVES
  • 56. 56  Stay with the woman and encourage her. Make her comfortable.  Check fetal heart tones every 15 minutes  Deliver the Baby When the birth opening is stretching, support the perineum and anus with a clean swab to prevent lacerations  Ensure controlled delivery of the head  Controlled delivery of the head  Keep one hand on the head as it advances during contractions. Keep the head from coming out too quickly.  Support the perineum with other hand.  Controlled delivery of the head, cont’d . .  Discard pad and replace when soiled to prevent infection.  During delivery of the head, encourage woman to stop pushing and breathe rapidly with mouth open. Delivering the Baby  Gently feel if the cord is around the neck  If it is loosely around the neck, slip it over the shoulders or head  If it is tight, place a finger under the cord, clamp and cut the cord, and unwind it from around the neck.  Delivering the Baby  Gently wipe the baby’s nose and mouth with a clean gauze or cloth.  Wait for external rotation (within 1-2 min), head will turn sideways bringing one shoulder just below the symphysis pubis and other facing the perineum  Delivering the baby 1. Put baby on mother’s abdomen in prone position. Cover with dry towel. 2. Thoroughly dry the baby immediately. Wipe eyes. 3. Discard wet cloth.
  • 57. 4. Put baby prone, in skin-to-skin contact on mother’s abdomen,. Keep the baby 57 warm. 5. Exclude 2nd baby by palpating mother’s abdomen. 6. Give 10 IU oxytocin IM to the mother. active management of the 3rd stage of labor.)* *May be done by the midwife under supervision of doctor. 7. Watch for vaginal bleeding. 8. Remove first set of gloves. 9. When no more cord pulsation is felt on the cord (usually within 3 mins.) clamp the cord 2cm from the base using sterile plastic cord clamp 10. Sweep the cord and apply a second Kelly forceps 5cm from the base and then cut in-between. Third Stage: Between birth of the baby and delivery of the placenta 11. Deliver the placenta by controlled cord traction (with counter traction on the uterus above the symphysis pubis). 12. Massage uterus over the fundus. 13. Inject oxytocin. (if not yet given as part of active management) 14. Encourage initiation of breastfeeding. Let baby stay on mother’s abdomen for 60-90 min Third stage: between birth of the baby and delivery of the placenta. ACTIVE MANAGEMENTof the third stage of labor  Cord is clamped  Oxytocin is given within 2 min of delivery of the baby  Placenta is delivered by controlled cord traction with countertraction above the symphysis pubis.  Massage fundus.
  • 58. 58 May only be done by a midwife under supervision of doctor. 9. Monitor closely within 1-hour after delivery (Immediate postpartum period) and give supportive care.  Check for vaginal tears and bleeding.  Clean the woman and make her comfortable.  Check BP, PR, emergency signs & uterine contraction every 15 minutes.  Initiate breastfeeding within 1-hour when the baby is ready. 10. Continue care after 1 hour postpartum. Keep watch closely for at least 2 hours.  Temperature, BP and pulse every 30 minutes  Check at 2, 3 and 4 hours, then every 4 hours:  emergency signs  uterine contraction  Check for bladder distension if unable to void.  Advise clean cloth/napkin to collect vaginal blood.  Eat and drink high-energy food that are easily digestible. Companion: to watch her and to call you for bleeding or pain, dizzy or for any other problem  Keep the baby in the room with the mother, in her bed or within easy reach.  Support exclusive breastfeeding on demand, day and night, as often and as long as the baby wants.  Immunize according to the EPI schedule.  Mother and companion to watch the baby:  breastfeeding difficulty  difficulty of breathing  cold feet  bleeding from the cord
  • 59. 59  Check baby at around 4 and 8 hours and then daily:  cold feet, breastfeeding and breathing difficulty.  Advise postpartum care and hygiene.  Wash from waist down or have a sponge bath or a shower with warm water each morning or when she feels like it.  Use guava leaves decoction if woman prefers, for her wash or bath. Continue care after 1 hour postpartum. Medications  Iron 60 mg/ Folic acid 400ug 1 tablet daily… until 3 months postpartum  Vitamin A 200, 000 IU, 1 capsule after delivery or within 1 month postpartum 11. Educate and counsel on family planning and provide the family planning method if available.  Ask what are the couple’s plans regarding having more children.  Give relevant information and advice.  Advice that exclusive breastfeeding is the best contraceptive in the 1st six months.  Help her to choose the most appropriate method for her and her partner. 12. Inform, teach and counsel the woman on important MCH messages.  Talk to the woman when she is rested and comfortable.  Also give important information and advice to her companion. 13. Discharge the woman and her baby.  The woman and her baby may be discharged 24 hours after delivery.  Ensure that the woman is able to breastfeed successfully before discharge.  Repeat important health information.  Check understanding and arrange follow-up.
  • 60. 60 POSTPARTUM NURSING INTERVENTIONS Monitor Vital Signs  NOTE: Maternal temperature during the first 24 hours following delivery may rise to 100. 4` F (38`C) as a result of dehydration. The nurse can reassure the new mother that these symptoms are normal.  Postpartum Exercise  Supine Position with the knee’s flexed, and then inhale deeply while allowing the abdomen to expand and exhale while contracting the abdominal muscles. The purpose of this exercise is to strengthen the abdominal muscles. Examples are reaching for the knees; push ups and sits ups on the first postpartum day.  Assess height, consistency, and location of the fundus  Monitor color, amount, and odor of lochia  Assess lochia and color volume  Give RhoGAM to mother if ordered. RhoGAM promotes lysis of fetal Rh (+) RBCs. Administer RhoGam as prescribed within 72 hours postpartum to the Rh-negative client who has given birth to an Rh-positive neonate. Rhogam (D) immune globulin is given by intramuscular injection  Check episiotomy and perineum for signs of infection.  Promote successful feeding.  Non-nursing woman- tight bra for 72 hours, ice packs, minimizes breast stimulation.  Nursing woman- success depends on infant sucking and maternal production of milk.  “Postpartum Blues” (3-7 days) – Normal occurrence of “roller coaster” emotions  Sexual activities- abstain from intercourse until episiotomy is healed and lochia ceased around 3-4 weeks. Remind that Assess height, consistency, and location of the fundus breastfeeding does not give adequate protection.  Assess breasts for engorgement  Monitor episiotomy for healing ( assess dehiscence & evisceration)
  • 61. 61  Assess incisions or dressings of cesarean birth client ( prone to infection)  Monitor bowel status ( prone to constipation)  Monitor I &0  Encourage frequent voiding (prevent urinary retention which will predispose the mother to uterus displacement & infection)  Encourage ambulation ( to prevent thromboplebitis & paralytic ileus  Assess bonding with the newborn infant ( to prevent failure to thrive) NOTE:  A positive bonding experience is indicated when the mother turns her face toward the baby to initiate eye-to-eye contact. Observation of new mothers has shown that a fairly regular pattern of maternal behaviors is exhibited at first contact with the newborn. The mother follows a progression of touching activities from fingertip exploration toward palmar contact to enfolding the infant with the whole hand and arm. The mother also increase the time spent in the en face position. The mother arranges herself or the newborn so that her face and eyes are in the same plane as in her infant.  III. POSTPARTUM DISCOMFORTS A. Perineal discomfort  Apply ice packs to the perineum during the first 24 hours to reduce swelling after the first 24 hours, apply warmth by sitz baths B. Episiotomy  1. Instruct the client to administer perineal care after each voiding  2. Encourage the use of an analgesic spray as prescribed  3. Administer analgesics as prescribed if comfort measures are unsuccessful  C. Breast discomfort PREVENTION: The BEST PREVENTION TECHNIQUE IS TO EMPTY THE BREST REGULARLY AND FREQUENTLY WITH FEEDINGS. The 2nd is EXPRESSING A LITTLE MILK BEFORE
  • 62. NURSING, MASSAGING THE BREASTS GENTLY OR TAKING A WARM SHOWER BEFORE FEEDING MAY HELP TO IMPROVE MILK FLOW. Placing as much of the areola as possible into the neonate’s mouth is one method. Other methods include changing position with each nursing so that different areas of the nipples receive the greatest stress from nursing and avoiding breast engorgement, which make I difficult for the neonate to grasp. In addition, nursing more frequently, so that a ravenous neonate is not sucking vigorously at the beginning of the feedings, AND FEEDING ON DEMAND to prevent over hunger is helpful. AIRDRYING THE NIPPLES AND EXPOSING THEM TO THE LIGHT HAVE ALSO BEEN RECOMMENDED. Warm Tea bags, which contain tannic acid also, will sooth soreness. WEARING A SUPPORTIVE BRASSIERE DOES NOT PREVENT BREAST ENGORGEMENT. APPLYING ICE and LANOLIN DOES NOT RELIEVE BREAST ENGORGEMENT. INTERVENTION: Measures that help relieve nipple soreness in a breast-feeding client include lubricating the nipples with a few drops of expressed milk before feedings, applying ice compresses just before feedings, letting the nipples air dry after feedings, and avoiding the use of soap on the nipples. 62 NOTE: Specific nursing care for breast Engorgement  Breastfeed frequently  Apply warm packs before feeding  Apply ice packs between feedings NOTE: Specific Nursing Care for Cracked nipples  Expose nipples to air for 10 to 20 minutes after feeding  Rotate the position of the baby for each feeding  Be sure that the baby is latched on to the areola, not just the nipple NOTE: Do not use soap on the breasts, as it tends to remove natural oils, which increases the chance of cracked nipples  IV. POST PARTUM COMPLICATIONS A. HEMORRHAGE B. THROMBOPLEBITIS Inflammation of the vein caused by a clot The positive Homan’s sign indicate is possibility of thrombophlebitis or a deep venous thrombosis that is present in the lower extremities.
  • 63. When assessing for Homan’s sign ask the patient to stretch her kegs out with the knee slightly flexed while dorsiflex the foot. A positive sign is present when pain is felt at the back of the knee or calf. It is normal for a patient on magnesium sulfate to feel tired because it acts as a central nervous depressant and often makes the patient drowsy. 63 C. INFECTION D. MASTITIS E. Postpartum Mood Disorders  POSTPARTUM WARNING S/S TO REPORT TO THE PHYSICIAN  Increased bleeding, clots or passage of tissue.  Bright red vaginal bleeding anytime after birth.  Pain greater than expected.  Temperature elevation to 100.4º F.  Feeling of full bladder accompanied by inability to void.  Enlarging hematoma.  Feeling restless accompanied by pallor; cool, clammy skin; rapid HR; dizziness; and visual disturbance.  Pain, redness, and warmth accompanied by a firm area in the calf.  Difficulty breathing, rapid heart rate, chest pain, cough, feeling of apprehension, pale, cold, or blue skin color  V. Psychological Adaptation  Rubin's Postpartum Phases of Regeneration (POSTPARTUM PSYCHOSOCIAL ADAPTATION) “TAKING IN” PHASE (DEPENDENT) First 3 Days  During this time, food and sleep are a major focus for the client. In addition, she works through the birth experience to sort out reality from fantasy and to clarify any misunderstandings. This phase lasts 1 to 3 days after birth. The primary concern is to meet her own needs.
  • 64. 64 • Takes place 1-2 days postpartum • Mother is passive and dependent; concerned with own needs. • Verbalizes about the delivery experience. • Sleep/food important. • Mother focuses on her own primary needs, such as sleep and food  Important for the nurse to listen and to help the mother interpret the events of delivery to make them more meaningful  Not an optimum time to teach the mother about baby care “TAKING HOLD” PHASE (DEPENDENT/INDEPENDENT) The client is concerned regarding her need to resume control of all facets of her life in a competent manner. At this time, she is ready to learn self-care and infant care skills. • 3-10 days postpartum • Mother strives for independence and begins to reassert herself. • Mood swings occur. May cry for no reason. • Maximal stage of learning readiness. • Mother requires reassurance that she can perform tasks of motherhood. • Begins to assume the tasks of mothering • An optimum time to teach the mother about baby care. “LETTING GO” PHASE (INTERDEPENCE) • 10 to 6 weeks postpartum • Realistic regarding role transition. • Shows pattern of life-style that includes the new baby but still focuses on entire family as a unit. • Accepts baby as separate person.  Mother may feel deep loss over separation of the baby from part of the body and may grieve over the loss
  • 65.  Mother may be caught in a dependent/independent role, wanting to feel safe and 65 secure yet wanting to make decisions  Teenage mothers need special consideration because of the conflict taking place within them as part of adolescence
  • 66. 66 Unang yakap A program that been formulated by Department of Health to decrease the Newborn Mortality Rate and improving Maternal Health. AO 25 (2009), it is a time bound intervention. A protocol that must be carried out in a specific time. Preparation: 3 Pairsof surgical glove 2 Warm blankets 1 Bonnet Cordcare Set Erythromycin Vitamin K Hepa. B Shot Other requirements: Breastfeeding Delayed bathing until 6 hours of life New born Screening Steps 1. Immediate and thorough drying for 30 seconds to stimulate breathing after delivery of the baby and prevent heat loss. 2. Early skin to skin contact maintaining a delivery room temperature of 25-28 degrees centigrade andwrapping the newborn with clean, dry cloth. (To promote bonding and prvent heat loss). 3. Properly timed clamping and cutting of umbilical cord 1-3 minutesoruntil cord pulsation stops.(To reduce anemia or intraventricular hemorrage on pre-term newborn). 4. Non separation of the newborn and mother for early breast-feeding. Immediate latching on and initiation of breastfeeding within the firsthour after birth. (To provide support for early breastfeeding and transfer of colostrum)
  • 67. 67 PERINEAL CARE Assessment  Check for the skin redness, inflammation,excoriation, irritation  Excessive discharge  Odor pain discomfort  Urinary or fecal incontinence  Recent rectal or perineal surgery  An indwelling catheter Determine:  Perianeal genital practices  Self care abilities Assesmble equipment Perineal genital care provided in conjunction with the bed bath:  Bath towel  Bath blanket  Clean gloves  Bath basin with water @ 43 degree to 46 degree  Soap  Washcloth Special perineal genital care:  Bath towel  Bath blanket  Clean gloves  Cotton balls or swab  Solution bottles, pitcher, or container filled with warm water or a prescribed solution  Bedpan to receive rinse water  Moisture resistant bag or receptacle for use cotton swabs  Perineal pad Procedure: 4. Introduce your self and verify the clients identity.explain to the client what is the procedure are you going to do, why it is necessary, and how the client can cooperate,being sensitive to any embarrassment felt by the client. 5. Perform hand hygiene and other appropriate infection control procedure.
  • 68. 68 6. Provide for client privacy by drawing the curtains and closing the door. 7. Prepare the client:  Fold the top bedlinen to the foot of the bed the gown up to expose the genital area  Place a bath towel under the clients hip  Position and drape the client, and clean the upper inner thighs. Females  Position the female in back lying position with knees flexed and spread well a part.  Cover her body and legs with the bath blanket drape the legs by tucking the bottom corners of the blanket under the inside of the legs. Bring the middle portion of the base of the blanket up over the pubic area.  Put on gloves and wash and dry the under inner thighs. For males  Position the male client in a supine position with his knees are flexed and his hips slightly externally rotated.  Put on gloves, and wash and dry the upper inner thighs.  Inspect the perineal area.  Note particular areas of inflammation, excoriation,or swelling,especially between the labia in females or the scrotal folds in male.  Also note excessive discharge or secretion from the orifices, and the presence of odors.  Wash and dry the perineal genital area. For female  Clean the labia majora. Then spread the labia to wash the folds between the labia majora and the labia minora.  Use separate quarter of the wash cloth of the wash cloth for each stroke, and wipe from the pubis to the rectum. For menstruating woman and clients with indwelling catheter,use clean wipes,cotton balls, or gauze.take a clean wipe for each stroke.  Rinse the perineal area as well.  Dry the perineum thoroughly. For male  Wash and dry the penis,using firm strokes.  If the client is uncircumcised,retract the prefuce foreskinto expose the glans penis for cleaning. Replace the foreskin after cleaning the glans penis.  Wash and dry the scrotum. The posterior fold of the scrotum might need to be cleaned in step 9, with the buttocks.  Inspect perineal orifices for intactness.
  • 69. 69  Inspect particularly around the urethra in clients with indwelling catheter.  Clean between the buttocks.  Pay particular attention to the anal area and posterior fold of the scrotum in males.clean the anus with toilet tissue before washing it, if necessary.  Dry the area well.  For post delivery or menstruating females, apply the perineal pad as needed, from front to back. 10. Clean the area and equipment. 11.Document the procedure done. PERINEAL SHAVING Assessment  Check for the skin redness, inflammation,excoriation, irritation  Excessive discharge  Odor pain discomfort  Urinary or fecal incontinence. Determine:  Perianeal genital practices  Self care abilities Assesmble equipment Perineal genital care provided in conjunction with the bed bath:  Bath towel  Bath blanket  Clean gloves  Bath basin with water @ 43 degree to 46 degree  Soap  Cotton balls  Shaving cream if necessary  Shaving blade  Straight forceps Procedure:  Introduce your self and verify the clients identity.explain to the client what is the
  • 70. 70 procedure are you going to do, why it is necessary, and how the client can cooperate,being sensitive to any embarrassment felt by the client. 2.Perform hand hygiene and other appropriate infection control procedure. 3.Provide for client privacy by drawing the curtains and closing the door. 4.Prepare the client:  Fold the top bedlinen to the foot of the bed the gown up to expose the genital area  Place a bath towel under the clients hip 5. Position and drape the client, and clean the upper inner thighs. Females  Position the female in back lying position with knees flexed and spread well a part.  Cover her body and legs with the bath blanket drape the legs by tucking the bottom corners of the blanket under the inside of the legs. Bring the middle portion of the base of the blanket up over the pubic area.  Put on gloves and wash and dry the under inner thighs. For males  Position the male client in a supine position with his knees are flexed and his hips slightly externally rotated.  Put on gloves, and wash and dry the upper inner thighs. 6. Inspect the perineal area.  Note particular areas of inflammation, excoriation,or swelling,especially between the labia in females or the scrotal folds in male.  Also note excessive discharge or secretion from the orifices, and the presence of odors.  Apply cotton balls with soap the perineum.  Shave the perineum starts from the symphisis pubis down to the labia majora.  Wash the genitals using the clean water.  Dry the area well.  Clean the area and equipment.  Document the procedure done.
  • 71. 71 References: American Academy of P ediatrics Policy Statement (2005) Breastfeeding and the use of human milk. Pediatrics, 115, 496-505. Jensen, D., et al . (1993) LA TCH: A breastfeeding charting system and doc umentation Tool. JOGGN, 23 (1), 27-32. Lawrence, R. M. & R. A. (2005). Breastfeeding: A guide f or the medical profession (6th Ed.). St. Louis: C.V. Mosby. Lawers, J., Swis her, A. (2000). Counseling the Nursing Mother (3rd Edition). Sudbury, Massachusetts. Jones & Bartlett Publishers. Lazaroy, M., Fedlman, A. WHO/UNIFCEF Ten Steps to Successful Breastfeeding, United States Committee for UNICEF Annotated Bibliography for each step, 1995. Riordan, J . (2005). Breastfeeding and Human Lactation (3rd Edition). Sudbury, Massachusetts. Jones & Bartlett Publishers. [Howard, C. R., et al. (1999). The effects of early pacifier use on breastfeeding duration. Pediatrics, 103, 659.] http://carolmelcher.com/assets/Assisting%20with%20Breastfeeding.pdf Kozier & Erb's Fundamentals of Nursing http://www.drugs.com/cg/how-to-give-an-intramuscular- injection.html http://nurseslabs.com/hot-sitz-bath-nursing-interventions-procedure/ http://nursingreviewbyozlek.blogspot.com/2010/08/enema.html http://labspace.open.ac.uk/mod/oucontent/view.php?id=452806&section=1.4