SlideShare a Scribd company logo
1 of 41
Download to read offline
SEP4 Roadway Lighting Design Guide
Page 1 of 41 January 10, 2013
Standard Engineering Practice Section 4
ROADWAY LIGHTING DESIGN GUIDE
Table Of Contents
1. Objectives ............................................................................................................................... 4
2. Scope of the Standard ............................................................................................................. 4
2.1. Luminaires Available....................................................................................................... 4
2.2. High Mast Lighting.......................................................................................................... 4
3. Glossary .................................................................................................................................. 4
4. Basic Principles of Streetlight Design .................................................................................... 6
5. Design Considerations ............................................................................................................ 6
5.1. Customer Requirements................................................................................................... 7
5.2. Light Pollution.................................................................................................................. 7
5.3. Airports............................................................................................................................. 7
5.4. Basic Lighting Design...................................................................................................... 8
5.4.1. Roadway Terminology.............................................................................................. 8
5.4.2. Lighting Design Methodology................................................................................ 10
5.4.3. Pedestrian Conflict.................................................................................................. 10
5.4.4. Light Arrangement Styles....................................................................................... 11
5.4.5. Pavement Classification.......................................................................................... 13
5.4.6. Roadway Classifications......................................................................................... 13
5.4.7. Area Classifications ................................................................................................ 17
5.4.8. Light Calculation Grid............................................................................................ 17
5.4.9. Typical Pole Height and Overhang......................................................................... 18
5.4.10. Light Loss Factors............................................................................................... 20
5.5. Luminaire Selection ....................................................................................................... 21
5.5.1. Lateral Light Distribution ....................................................................................... 21
5.5.2. Vertical Light Distribution...................................................................................... 23
5.5.3. Cutoff Optics........................................................................................................... 26
5.5.4. Lighting Sources ..................................................................................................... 30
5.5.5. SaskPower Luminaire Models................................................................................ 31
6. Streetlight Mounting Options ............................................................................................... 33
6.1. Streetlight Poles.............................................................................................................. 33
6.2. Breakaway Bases........................................................................................................... 34
7. Physical Layout Considerations............................................................................................ 35
7.1. Streetlight Placement...................................................................................................... 35
7.2. Clear Zone...................................................................................................................... 36
7.3. Clearances ...................................................................................................................... 37
SEP4 Roadway Lighting Design Guide
Page 2 of 41 January 10, 2013
8. Electrical Design................................................................................................................... 38
8.1. Streetlight Power Supply................................................................................................ 38
8.2. Fusing/Protection ........................................................................................................... 38
8.3. Specifications ................................................................................................................. 39
9. Decorations on Streetlight Poles........................................................................................... 40
10. Streetlighting Waiver Form ............................................................................................... 41
SEP4 Roadway Lighting Design Guide
Page 3 of 41 January 10, 2013
List of Figures
Figure 5-1 Roadway Terminology.................................................................................................. 9
Figure 5-2 One Sided Arrangement.............................................................................................. 11
Figure 5-3 Two Sided Opposite Arrangement.............................................................................. 11
Figure 5-4 Two Sided Staggered Arrangement ............................................................................ 11
Figure 5-5 Double Davit Median Arrangement............................................................................ 12
Figure 5-6 Double Davit Opposite Arrangement.......................................................................... 12
Figure 5-7 Double Davit Staggered Arrangement........................................................................ 12
Figure 5-8 Roadway Classifications............................................................................................. 16
Figure 5-9 IES Pattern Types........................................................................................................ 22
Figure 5-10 Vertical Light Distribution........................................................................................ 24
Figure 5-11 Half Maximum Candlepower Projection .................................................................. 25
Figure 5-12 Lateral Light Distribution ......................................................................................... 26
Figure 5-13 Luminaire Cutoff Classification................................................................................ 28
Figure 5-14 Reduction of Glare with Full Cutoff Luminaire ....................................................... 29
Figure 5-15 Reduction in Light Trespass From Full Cutoff......................................................... 29
Figure 5-16 Cobra Head (Semi-Cutoff Lens)............................................................................... 31
Figure 5-17 Cobra Head (Full Cutoff Lens) ................................................................................. 31
Figure 5-18 Sentinel Luminaire.................................................................................................... 32
Figure 5-19 Post Top Luminaires ................................................................................................. 32
List of Tables
Table 5-1 Classification of Pedestrian Conflict............................................................................ 10
Table 5-2 Lighting Requirement by Pedestrian Conflict.............................................................. 11
Table 5-3 Pavement Classification ............................................................................................... 13
Table 5-4 Roadway Classification Designations .......................................................................... 14
Table 5-5 RP-8 Recommended Light Levels For Luminance And STV...................................... 15
Table 5-6 Illuminance for Intersections........................................................................................ 15
Table 5-7 Light Calculation Grid Definitions............................................................................... 18
Table 5-8 Pole Height by Roadway Configuration....................................................................... 19
Table 5-9 Roadway Lighting Design by Luminance Method ...................................................... 19
Table 5-10 Light Loss Factors...................................................................................................... 21
Table 5-11 SaskPower HPSV Cobrahead Luminaires.................................................................. 31
Table 5-12 HPSV Sentinel Luminaires......................................................................................... 32
Table 5-13 Post Top Luminaires................................................................................................... 33
Table 6-1 Wood Pole Mounting Heights...................................................................................... 33
Table 6-2 Steel and Concrete Standard Mounting Heights .......................................................... 34
Table 7-1 Streetlight Clearances................................................................................................... 38
Table 8-1 Fuses and Fuseholders.................................................................................................. 39
Table 8-2 Maximum Luminaire Operating Current...................................................................... 39
Table 8-3 Secondary Buried Cable Ampacities............................................................................ 39
Table 8-4 Aerial Insulated Secondary Conductor Electrical Properties ....................................... 40
SEP4 Roadway Lighting Design Guide
Page 4 of 41 January 10, 2013
1. Objectives
The purpose of “Roadway Lighting Design Guide” is to provide guidelines and information
required to design roadway lighting systems that achieves the following objectives in an
economical and cost-effective manner:
-To provide energy efficient lighting system that will meet standard design criteria with the
minimum possible Unit Power Density (UPD) as per TAC 2006 – guide for the Design of
Roadway Lighting.
-To provide adequate and uniform lighting levels on our roadways for drivers and pedestrians
safety.
2. Scope of the Standard
The Classification of Roadways and their Recommended Luminance Light Levels as per IESNA
RP-8-2005 and TAC- 2006 –Guide for the Design of Roadway Lighting
2.1. Luminaires Available
SaskPower supplies and installs roadway lighting to customers within our franchise area. The
lighting materials supplied are limited to stock coded items. Should a customer wish to install
luminaires and poles other than our stock coded items, they are required to procure, install and
maintain the luminaires. SaskPower would provide a meter point to supply the lighting.
2.2. High Mast Lighting
Since the Ministry of Highways and Infrastructure install and maintain their own lighting around
major interchanges, High Mast Lighting as typically required around these interchanges is not
covered in this document. This would be customer owned lighting, and SaskPower would only
provide a meter point.
3. Glossary
Candela (cd) - Candela is the unit of light Intensity - the strength of light emitted in a certain
direction. Symbol: I
Cutoff - A luminaire’s light distribution is designated as cutoff when the measured candela
output is less than 2.5% of rated lumens at 90˚ above nadir and less than 10% of rated lumens at
80˚above nadir.
Footcandle (fc) - Footcandle is the unit of Illuminance - the measure of light arriving on a
surface.(See “Illuminance”)
Symbol: E
SEP4 Roadway Lighting Design Guide
Page 5 of 41 January 10, 2013
Full Cutoff - “Flat Lens” – A luminaire’s light distribution is designated as full cutoff when the
measured candela output is 0 at 90˚ above nadir and less than 10% of rated lumens at 80˚ above
nadir.
Illuminance - Light that reaches the road surface and other objects. Illuminance is a measure of
the incident light, and is expressed in lux. 1 Lux = 1 lumen/m2
.
Lumen (lm) - Lumen is the unit of flux - the quantity of light produced by a source. Symbol: Φ
Luminance - Light perceived by a motorist on a roadway. Luminance is a measure of the
reflected light and is expressed in candela/m2
.
Nadir - the vertical projection directly beneath the apparent light source of a luminaire.
Non-Cutoff - A luminaire’s light distribution is designated as Non-Cutoff when there is no
specific luminous limitation in any direction.
Pedestrian Conflict - A measure of the number of people that will be walking in the area.
Reflectance - the ratio of the reflected flux (or luminance) to the incident flux (or illuminance) -
cd/m2
.
Semi-Cutoff - “Sag Lens” - A luminaire’s light distribution is designated as Semi-Cutoff when
the measured candela output is less than 5% of rated lumens at 90˚above nadir and less than 20%
of rated lumens above 80˚ nadir.
Small Target Visibility - is a method of design that determines the visibility of an array of
targets on the roadway. The weighted average of the visibility level of these targets result in the
Small Target Visibility
Unit Power Density (UPD) - Electrical energy used per unit of area. Usually expressed in watts
per square meter.
SEP4 Roadway Lighting Design Guide
Page 6 of 41 January 10, 2013
4. Basic Principles of Streetlight Design
There are five basic principles to consider when doing a lighting design.
1. Safety – pedestrian and driver safety. Creating a lighting level sufficient that drivers are
aware of any pedestrians and or objects near the roadway.
2. Security – providing a setting that will deter some forms of criminal activity through the
use and placement of lights.
3. Limit the amount of Light Trespass – avoiding the over lighting of areas such as in
residential neighbourhoods where the backlight may shine on houses.
4. Environmental Responsibility – consideration should be given to the following:
• Energy usage
• Lighting levels – to determine the correct level of light output required as per
Transportation Association of Canada (TAC) recommendations, which use the
following criteria:
- road classification
- pedestrian conflict activity
- road type
- calculation of lighting
• Lamp type – through the use of one of four different luminaires that can provide
varied lighting patterns. These types are: Full Cutoff , Cutoff, Semi-cutoff, and Non-
cutoff
5. To provide uniformity and consistency in lighting designs throughout the province while
meeting the industry standard.
5. Design Considerations
It is the responsibility of the individual doing a lighting design to make sure they are making
reference to TAC and using the latest version. At the time of the creation of this document TAC
2006 was used.
When starting a lighting design, attention to the surrounding area and any special requirements
must be taken into consideration, ie…schools, shopping districts, or airports.
It is important to note that there are three different design methods that can be used for
calculating the roadway lighting levels. Each method may produce different designs and provide
different amounts of lighting levels through luminaire spacing and configurations. Each of these
methods is acceptable and the preferred method SaskPower uses will be indicated later in this
document. The three types are the Illuminance Method, Luminance Method and Small Target
Visibility Method. All three of these methods are fully explained in the 2006 edition of the
IESNA RP-8, American National Standard Practise for Roadway Lighting. The appropriate
application stating when/where to use each design method is stated in Section 5.4 Basic Lighting
Design of this document.
SEP4 Roadway Lighting Design Guide
Page 7 of 41 January 10, 2013
5.1. Customer Requirements
SaskPower’s standard practice is to design roadway lighting as per TAC standards. There are
situations where a customer may not wish to have streetlights designed to this standard, often due
to the cost. If customer does not want to meet TAC requirements, they are required to sign a
Streetlighting Waiver Form before SaskPower will install the streetlights. SaskPower will not
install lighting facilities that do not meet the TAC requirements without this waiver as it would
leave SaskPower open to liability.
5.2. Light Pollution
Light pollution is becoming an increasing concern and typically takes one of two forms:
Light trespass or back lighting where there is an excessive amount of light towards a residence.
Certain homeowners are particularly sensitive to light coming into their homes from streetlights
and complain of sleep disruption, etc. While our typical luminaires do a reasonable job of
controlling the light toward the residence, there have been complaints from homeowners
regarding excessive light trespass. Mitigation may require selection of different luminaires,
repositioning luminaires or the addition of light shields to block the light.
Up-lighting where there is excessive light upwards from the luminaire. This will impact visibility
of the night sky and is a particular concern among astronomers. The International Dark-Sky
Association (IDA) is an organization which promotes the use of luminaires with zero uplight (ie.
Full Cut-off). They will assess luminaires and provide a Fixture Seal of Approval (FSA) for
luminaires which meet their requirements for Uplighting. As of the writing of this document, the
City of Saskatoon has required SaskPower install Full Cut-off lights. For more information on
the International Dark-sky Association see www.darksky.org.
5.3. Airports
Installations in close proximity to airports may pose a hazard to airplanes or helicopters. For this
reason attention to pole heights and light spill is required, as well as approval from Transport
Canada and NAV Canada. The required forms are available on-line at each of the agency web-
sites. It is the responsibility of the person doing a light study to research any restrictions that may
be imposed on the lighting design.
Transport Canada
Areodomes & Air Navigation (RAEM)
1100-9700 Jasper Ave., N.W.
Edmonton, Alberta T5J 4E6
Tel: 780-577-0247
Fax: 780-495-5190
SEP4 Roadway Lighting Design Guide
Page 8 of 41 January 10, 2013
It will also be necessary to contact NAV Canada and obtain the most recent land use proposal
submission form. This form is to be completed and submitted to NAV Canada. The approval
process may take up to 30 days.
NAV Canada
1601 Tom Roberts Road
P.O. Box 9824, Station T
Ottawa, Ontario K1G 6R2
Tel: 866-577-0247
Fax: 613-248-4094
e-mail: landuse@navcanada.ca
website: www.navcanada.ca
***Note: The land use office prefers to receive proposal submissions electronically.
5.4. Basic Lighting Design
5.4.1. Roadway Terminology
This section includes general terminology associated with typical roadways in Saskatchewan.
Roadway – The portion of the road surface, including shoulders, for vehicular use.
Traveled Way – The portion of the roadway provided for the movement of vehicles, exclusive of
shoulders, auxiliary lanes and bicycle lanes.
Median – The portion of the roadway separating the traveled way for accommodation of stopped
vehicles for emergency use, and for lateral support of the base and surface courses.
Shoulder – The portion of the roadway adjacent with the traveled way for accommodation of
stopped vehicles for emergency use and for lateral support of the base and surface courses.
Sidewalk – An exterior pathway with a prepared surface (concrete, bituminous, brick, stone, etc.)
intended for pedestrian use.
Setback – The distance from the streetlight pole to the front of the curb.
Arm Length – The distance from the approximate location of the bulb to the center of the vertical
part of the light standard/pole. The typical arm length is 2.40m.
House-side Lateral Distance – the distance from the imaginary vertical line directly below the
luminaire and running back toward the adjacent curb. Also referred to as “Overhang”.
Street-side Lateral Distance – the distance from the imaginary vertical line directly below the
luminaire to the curb on the opposite side of the roadway.
SEP4 Roadway Lighting Design Guide
Page 9 of 41 January 10, 2013
Mounting Height – the distance from the location of the bulb to the road surface directly below.
The typical steel streetlight standard heights are: 25’, 30’, 35’, 40’, and 45’. There are also
typical wood pole mounted streetlights.
Figure 5-1 Roadway Terminology
SEP4 Roadway Lighting Design Guide
Page 10 of 41 January 10, 2013
5.4.2. Lighting Design Methodology
There are three lighting design methodologies – Luminance, Illuminance and Small Target
Visibility (STV). Luminance measures the incident lighting on the roadway while illuminance is
a measure of the reflected light.
Small Target Visibility (STV) differs from Illuminance and luminance design in that values are
given in terms of a weighted average visibility level. This is a relatively new design method
adopted in 2000 by IESNA and has come under scrutiny within roadway lighting community. At
this time STV should be used only as a method for assessing different lighting designs, and not
as the primary method of calculation.
The Luminance method shall be used for roadway and interchange, the Illuminance method shall
be used for intersections and cul-de-sacs. Lighting designs for curved sections with greater than
600m radius should be evaluated as if it were a straight section, otherwise they should be
evaluated as an intersection.
5.4.3. Pedestrian Conflict
The next step in developing a Roadway Lighting Design is to identify the amount of pedestrian
traffic in the area to establish the Average Illuminance, Average to Minimum Uniformity Ratio
and Minimum Illuminance.
- According to IES RP-8-05, there are three types of classifications.
- Low conflict area: residential
- Medium conflict areas: schools, recreational centers
- High conflict areas: restaurants, shopping, theatres
Pedestrian Conflict is assumed to be the total number of people on both sides of a street within a
given section (200 meters). This number also includes those people crossing the street between
the hours of 18:00 and 19:00.
Table 5-1 Classification of Pedestrian Conflict
LOW : 10 or fewer pedestrians
MEDIUM : 11 to 100 pedestrians
HIGH : over 100 pedestrians
SEP4 Roadway Lighting Design Guide
Page 11 of 41 January 10, 2013
Table 5-2 Lighting Requirement by Pedestrian Conflict
PEDESTRIAN
ACTIVITY
MAINTAINED
AVERAGE
HORIZONTAL
ILLUMINANCE (LUX)
AVERAGE-TO-
MINIMUM
HORIZONTAL
UNIFORMITY RATIO
MINIMUM
MAINTAINED
VERTICAL
ILLUMINANCE
(LUX)
HIGH 20.00 4.00 10.00
MEDIUM 5.00 4.00 2.00
LOW 3.00 6.00 0.80
Copied from TAC 9-27 2006
5.4.4. Light Arrangement Styles
There are several options available for the placement of lighting standards. Some of these are as
follows:
Figure 5-2 One Sided Arrangement
Figure 5-3 Two Sided Opposite Arrangement
Figure 5-4 Two Sided Staggered Arrangement
SEP4 Roadway Lighting Design Guide
Page 12 of 41 January 10, 2013
Figure 5-5 Double Davit Median Arrangement
Figure 5-6 Double Davit Opposite Arrangement
Figure 5-7 Double Davit Staggered Arrangement
Typically a one-sided spacing is used on roadways with one to three lanes, staggered spacing on
roadways with three to six lanes, and opposite spacing on roadways with five or more lanes.
Median lighting is typically used when the median is of sufficient size to allow for the
installation of a light standard while meeting the clear zone requirements and/or there are barriers
in place.
SEP4 Roadway Lighting Design Guide
Page 13 of 41 January 10, 2013
5.4.5. Pavement Classification
The first step in developing the Roadway Lighting Design is to determine the Pavement
Classification. Pavement classification is a measure of how reflective the roadway surface is to
establish the lighting levels required. The pavement classification will establish the Q0 Mean
Luminance Coefficient.
The four pavement classifications in TAC are R1, R2, R3, and R4. The R represents the
reflective quality of the pavement. For SaskPower, a typical roadway would be represented by a
R3 classification.
Table 5-3 Pavement Classification
CLASS QO DESCRIPTION OF ROADWAY SURFACE
MODE OF
REFLECTANCE
R1 0.10
Portland cement concrete road surface. Asphalt road
surface with a minimum of 15 percent of the
aggregate composed of artificial brightener *(e.g.
Synopal) aggregates (e.g. Labradorite, quartzite)
Mostly Diffuse
R2 0.07
An asphalt road surface with an aggregate
comprised of minimum 60% gravel (size greater
than 10mm). Asphalt road surface with 10-60%
artificial brightener in aggregate mix.
Mixed (diffuse and
specular)
R3 0.07
An asphalt road surface (regular and carpet seal)
with dark aggregates ( e.g. trap rock, blast furnace
slag); rough texture after some month of use
(typical highways).
Slightly Specular
R4 0.08
Asphalt road surface with very smooth texture
Mostly Specular
Copied from TAC 2-37 2006
5.4.6. Roadway Classifications
In order to establish appropriate lighting levels for a given road, a classification system is used to
separate roadways based on traffic volumes and use. The definitions below are based upon TAC
2006 9.1.2 and Table 9-1 Roadway Classification Designations
Freeway
A Freeway is defined as a fully-controlled access roadway for through traffic, with a
classification of RFD or UFD (see table 9-1 – Roadway Classification Designations). Freeways
are typically characterized by the presence of interchanges which allow motorists to enter and
exit the freeway in a fully controlled fashion onto local, collector and arterial roads. As defined
in the TAC Geometric Design Guide for Canadian Roads, interchanges have various
configurations and spacing. Typical interchange configurations include diamond, cloverleaf,
parclo, trumpet and rotary. Freeways are typically high-speed facilities with a posted speed of
90km/h, or greater.
SEP4 Roadway Lighting Design Guide
Page 14 of 41 January 10, 2013
Expressway
Expressway-highway is defined as a roadway for through traffic with full or partial
control of access via interchanges, intersections or roundabouts. Classifications include REU,
RED, UEU, or UED (see Table 9-1 – Roadway Classification Designations). An expressway-
highway may have at grade signalized or unsignalized intersections of roundabouts. In some
cases an expressway-highway may have interchanges similar to those for freeways.
Arterial
An arterial is defined as a roadway primarily for high volume through traffic with
classification of RAU, RAD, UAU, or UAD (see Table 9-1 Roadway Classification
Designations). An arterial will typically have partially-controlled access via traffic signals or
roundabouts or non-controlled access via intersections or driveways.
Collector
A collector is defined as a roadway feeding an arterial classification of RCU, RCD,
USU, or UCD (see Table 9-1 Roadway Classification Designations). A collector will typically
have partially-controlled access via traffic signals or roundabouts or non-controlled access via
intersections or driveways.
Local
A local is defined as a roadway feeding a collector or arterial, with classification of RLU,
or ULU (see Table 9-1 Roadway Classification Designations). A local roadway will typically
have partially-controlled access via traffic signals or roundabouts or non-controlled access via
intersections or driveways.
Alleyway
An alleyway is defined as a non-controlled access roadway located along the rear of, or
between buildings for servicing or access purposes. Alleyways typically connect to local or
collector roads. Where lighting is desired for alleyways it should meet the criteria for local roads.
Table 5-4 Roadway Classification Designations
FIRST LETTER SECOND LETTER THIRD LETTER
R Rural L Local U Undivided
U Urban C Collector D Divided
A Arterial
E Expressway
F Freeway
Copied from Table 9-1 TAC 2006
This Design Guide does not cover lighting for areas other than Roadway such as Alleys,
Sidewalks, Pedestrian Walkways and Bikeways.
SEP4 Roadway Lighting Design Guide
Page 15 of 41 January 10, 2013
Table 5-5 RP-8 Recommended Light Levels For Luminance And STV
Road
Classification
Pedestrian
Conflict
Area1
Lav
(cd/sq.m)
Lav/L
min
Lmax/Lmin Lmax/Lavg STV
Freeway Class A N/A 0.6 3.5 6 0.3 3.2
Freeway Class B N/A 0.4 3.5 6 0.3 2.6
Express Way High 1 3 5 0.3 3.8
Medium 0.8 3 5 0.3 3.8
Low 0.6 3.5 6 0.3 3.8
Major High 1.2 3 5 0.3 4.9
Medium 0.9 3 5 0.3 4.0
Low 0.6 3.5 6 0.3 3.2
Collector High 0.8 3.0 5 0.4 3.8
Medium 0.6 3.5 6 0.4 3.2
Low 0.4 4.0 8 0.4 2.7
Local High 0.6 6 10 0.4 2.7
Medium 0.5 6 10 0.4 2.2
Low 0.3 6 10 0.4 1.6
NOTES: 1. Low = 10 or fewer pedestrians, Medium = 11 to 100, High = >100
Copied from IESNA RP-8-05
Table 5-6 Illuminance for Intersections
Functional
Classifications
Average Maintained Illumination at
Pavement by Pedestrian Area
Classification
Eavg/Emin
High Medium Low
Major/Major 34.0/3.4 26.0/2.6 18.0/1.8 3.0
Major/Collector 29.0/2.9 22.0/2.2 15.0/1.5 3.0
Major/Local 26.0/2.6 20.0/2.0 13.0/1.3 3.0
Collector/Collector 24.0/2.4 18.0/1.8 12.0/1.2 4.0
Collector/Local 21.0/2.1 16.0/1.6 10.0/1.0 4.0
Local/Local 18.0/1.8 14.0/1.4 8.0/0.8 6.0
Illuminance table for Intersections excerpt from IESNA RP-8-05
Figure 5-8 Roadway Classifications shows the southwest portion of the City of Regina, with
roads classified according to TAC.
SEP4 Roadway Lighting Design Guide
Page 16 of 41 January 10, 2013
Figure 5-8 Roadway Classifications
SEP4 Roadway Lighting Design Guide
Page 17 of 41 January 10, 2013
5.4.7. Area Classifications
In order to determine appropriate lighting levels, it is important to consider what the land
adjacent to the roadway is being used for, and in particular to identify the amount of pedestrian
and vehicular traffic. There are three classifications:
1) Commercial. A business area of a municipality where ordinarily there are many
pedestrians during night hours. The definition applies to densely developed business
areas outside, as well as within, the central part of municipality. The area contains land
use which attracts a relatively heavy volume of night time traffic vehicular and or
pedestrian traffic on a frequent basis.
2) Intermediate. Those areas of a municipality often characterized by moderately heavy
night time pedestrian activity such as in blocks having libraries, community recreation
centers, large apartment buildings, industrial buildings or neighbourhood retail stores.
3) Residential. A residential development, or a mixture residential and small commercial
establishments, characterized by few pedestrians at night. This definition includes areas
with single family homes, town houses, and or small apartment buildings.
5.4.8. Light Calculation Grid
Setting up a grid in lighting design software should be as per IESNA RP-08-05. Using more or
less points will alter the calculations and you may or may not achieve the proper lighting levels.
As well any change of the grid spacing’s will also have an effect upon the calculations.
The following is taken from TAC 9.6.2
The calculation grid for a roadway should consist of two grid lines per lane located ¼ of the
distance from the edge of each lane as shown in TAC Figure 9-16 – Grid Points For Luminance
Calculations and Illuminance Measurements on Roadways. The following criteria should be
applied:
- The grid should be based on the number of lanes for the majority of the length of
roadway.
- In the event that the roadway width and number of lanes change, then a revised grid
should be used for the new length of roadway.
- In the longitudinal direction, the distance between grid lines should be one-tenth (1/10) of
the spacing between luminaires, or 0.5m, whichever is smaller. The starting point for the
gridlines should not be located directly under a pole, but should start instead at a point
one-half (1/2) of the grid cell size from the luminaire pole.
When calculating lighting on curves, all curves with a wide radius (i.e., 600m or greater) may be
treated as a straight roadway section. Curves with a radius of less than 600m require separate
illuminance calculations.
SEP4 Roadway Lighting Design Guide
Page 18 of 41 January 10, 2013
The same principles should be followed to create luminance calculation grids for curved sections
of roadway as for straight sections. The main issue will be the location of the observer point,
which shall be located on the road as per CIE standards, but with observer distance at 83.07m as
shown in TAC Figure 9-17 – Luminance Calculation Grid Geometry for Curved Roadway
Sections (this observer point distance is consistent with IESNA standards for a tangent section of
road: the CIE practice uses a 60.0m observer point).
Table 5-7 Light Calculation Grid Definitions
Area Grid Spacing’s
ROADWAY: both straight and
curved sections
2.0m grid, centered on the roadway,
extending laterally from the lane
edge to lane edge
INTERSECTIONS 2.0m grid, centered on the
intersection, extending laterally from
lane edge to lane edge
BRIDGES AND
OVERPASSES
2.0m grid, centered on the roadway,
extending laterally from the lane
edge to lane edge
INTERCHANGES Interchange components as described
above
REST AREAS AND
VEHICLE INSPECTION
STATIONS
2.0m grid, to cover the entire travel
portion of the roadway and parking
area
SIGNS 300mm grid on the face of the sign
VEHICLE TUNNELS Refer to IESNA PR - 22
5.4.9. Typical Pole Height and Overhang
Table 5-8 shows the typical pole height for different Roadway Classifications and
Configurations.
Table 5-9 show the typical mounting spacing and arrangements using the Luminance method
with corresponding unit power density for different Roadway Classifications.
SEP4 Roadway Lighting Design Guide
Page 19 of 41 January 10, 2013
Table 5-8 Pole Height by Roadway Configuration
Pole Height (m)
Road
Classification
Pedestrian
Conflict
Area
1 lane
One side
2 lanes
One side
3 lanes
One side
4 lanes
opposite
5 lanes
opposite
Freeway Class A 12(40’) 12(40’) 12(40’) 15(49’) 15(49’)
Freeway Class B 12(40’) 12(40’) 12(40’) 15(49’) 15(49’)
Express Way High 12(40’) 12(40’) 12(40’) 12(40’)
Medium 12(40’) 12(40’) 12(40’) 12(40’)
Low 12(40’) 12(40’) 12(40’) 12(40’)
Major High 12(40’) 12(40’) 12(40’) 12(40’)
Medium 12(40’) 12(40’) 12(40’) 12(40’)
Low 12(40’) 12(40’) 12(40’) 12(40’)
Collector High 10(33’) 10(33’) 10(33’) 12(40’)
Medium 10(33’) 10(33’) 10(33’) 12(40’)
Low 10(33’) 10(33’) 10(33’) 12(40’)
Local High 7(23’) 7(23’) 10(33’)
Medium 7(23’) 7(23’) 10(33’)
Low 7(23’) 7 (23’) 10(33’)
NOTES: Copied from IESNA RP-8-05
Table 5-9 Roadway Lighting Design by Luminance Method
Road and Pedestrian Conflict
Area
Luminance
Criteria
Lamp
Wattage
Input
wattage
Mountng
Height
Arrangement Spacing Roadwidth UPD
Road Pedestrian
conflict Area
Cd/sq. m (m) (m) Watts/m2
Freeway “B”
2 lane 0.4 150 190 12 One Side 89 7.5 0.28
Freeway “B”
3 lane 0.4 150 190 12 One Side 76 11.25 0.22
Freeway “B”
4 lane 0.4 150 190 12 Opposite 90 15 0.28
Major
13.4 Meter
High
Medium
Low
1.2
0.9
0.6
250 290 10 Opposite 83 13.4 0.52
Major 15.8
Meter
High
Medium
Low
1.2
0.9
0.6
250 290 10 Opposite 73 13.4 0.37
Major
22
Meter
High
Medium
Low
1.2
0.9
0.6
400 460 10 Opposite 83 22 0.50
Collector
13.4 Meter
High
Medium
Low
0.8
0.6
0.4
150
150
100
190
190
138
10
10
10
Opposite
Opposite
Opposite
77
87
96
13.4
13.4
13.4
0.37
0.33
0.21
Collector
14.8 Meter
High
Medium
Low
0.8
0.6
0.4
150
150
100
190
190
138
10
10
10
Opposite
Opposite
Opposite
72
85
92
14.8
14.8
14.8
0.36
0.30
0.20
Local 8.7
Meter
High
Medium
Low
0.6
0.5
0.3
150
100
70
190
138
95
7.6
7.6
7.6
One side
One side
One side
59
55
59
8.7
8.7
8.7
0.37
0.29
0.15
Local 11
Meter
High
Medium
Low
0.6
0.5
0.3
150
150
70
190
190
95
7.6
7.6
7.6
One side
One side
One side
57
57
55
11
11
11
0.30
0.30
0.16
Copied from IESNA RP-8-05
SEP4 Roadway Lighting Design Guide
Page 20 of 41 January 10, 2013
5.4.10. Light Loss Factors
Light Loss Factors (LLF) are multiplier values to estimate the overall performance at different
times during the life of the lighting system. LLF values reflect the performance of the lamp and
luminaire as well as the maintenance level of a lighting system. The LLF are:
Lamp Lumen Depreciation (LLD)
Luminaire Dirt Depreciation (LDD)
Luminaire Ambient Temperature Factor (TF)
Ballast Factor (BF)
Equipment Factor (EF)
The Light Loss Factor can be summed up as: LLF = LLD x LDD x TF x BF x EF
LLD Lamp Lumen Depreciation (TAC 2-39)
LLD is the reduction in the light output as the lamp ages. The rated Lumen are provided by the
manufacturer based upon 100 hours of usage. The can be shown as ‘Lumen Depreciation
curves”. The typical LLD factor for high pressure sodium vapour base on 5 year maintenance
group re-lamping program is 0.78.
LDD Luminaire Dirt Depreciation (TAC 2-40)
LDD takes into account the luminaire output depreciation due to an accumulation of dirt on the
luminaire and in the air. The designer should pick a ‘clean’ LDD value in most situations unless
in an area of heavy manufacturing or areas prone to dust storm use moderate LLD value. The
typical LDD value for a five year maintenance cycle adopted by SaskPower is 0.88.
TF Luminaire Ambient Temperature Factor (TAC 2-42)
TF accounts for variations in lumen output based on ambient temperature. HPSV luminaires are
not affected significantly by ambient termperature, the TF adopted by SaskPower is 1.0.
BF Ballast Factor (TAC 2-42)
BF is meant to cover reductions in light output due to the ballast. For HID sources it is assumed
to be 1.0 unless otherwise noted by the manufacturer.
EF Equipment Factor (TAC 2-42)
EF is used to account for other reductions in light output due to the equipment used such as:
• manufacturing tolerances for both the luminaire and lamp
• luminaire depreciating over time (reflective surface)
• input voltage that varies from location to location
SaskPower has adopted an Equipment Factor of 0.95.
SEP4 Roadway Lighting Design Guide
Page 21 of 41 January 10, 2013
Table 5-10 Light Loss Factors
Area
Lamp Lumen
depreciation
(LLD) 1
Luminaire Dirt
Depreciation
(LDD) 1
Luminaire
Component
Depreciation
(LCD) 2
Equipment
Factor 3
Total Light
Loss Factor
General 0.78 0.88 0.98 0.95 0.65
Notes:
(1) Based upon a 5 year maintenance program.
(2) Degradation of the reflector and refractor.
(3) Effect of ambient temperature, voltage fluctuations, and the ballast and lamp factors.
Note: Only photometric files approved by Standards shall be used in lighting calculations. These
files will be kept in the Streetlight section of EIN.
LDD is based upon a clean area, if installing lights in an area that is prone to high pollution, an
alternative factor must be applied to the calculation in order to determine the correct Total Light
Loss Factor. See chart in TAC 2006 page 2-41.
LLD is based upon an approximate assumption of approximately 4,000 hours of usage per year.
See TAC 2006 chart on page 2-40.
5.5. Luminaire Selection
5.5.1. Lateral Light Distribution
Lateral Light Distribution is the lighting pattern the luminaire puts out on the roadway. There are
five types classified as Type I through V. The higher the Distribution Type number, the more
light that will be spread across the roadway.
Type I - Usually used for median mounting.
Type I, Four Way – Mainly used for intersection lighting. This light provides four beams of light
from one light standard. An uncommon item and not very popular, would be placed in middle of
intersection for proper lighting.
Type II – Used to light the street front, not much light provided on the back side of the luminaire.
Type II, Four Way – Mainly used for intersection lighting. Provides four beams of light and is
installed on a corner. This is an uncommon item and not very popular for lighting.
Type III – Provides the majority of light to the roadside of the luminaire while the backside does
not project as much light.
Type IV - Provides the majority of light to the roadside of the luminaire while the backside does
not project as much light. The Type IV puts light out further from the curb than a Type III.
SEP4 Roadway Lighting Design Guide
Page 22 of 41 January 10, 2013
Type V – Ideal to be installed in the center of the intersection and puts out a light pattern that is
evenly dispersed around its axis.
Type V Quadrate – has a square form of light pattern around its axis.
Figure 5-9 IES Pattern Types
SEP4 Roadway Lighting Design Guide
Page 23 of 41 January 10, 2013
5.5.2. Vertical Light Distribution
Vertical light distribution is divided into three categories, Short, Medium and Long as illustrated
in Figure 5-10. Classification is on the basis of the distance from the luminaire to where the
beam of maximum candlepower strikes the roadway surface. The classifications are:
Short Distribution – The maximum candlepower beam strikes the roadway surface between 1.0
and 2.25 times mounting heights distance from the luminaire. See Figure 5-11.
Medium Distribution – The maximum candlepower beam strikes the roadway surface between
2.25 and 3.75 times mounting height distance from the luminaire.
Long Distribution – The maximum candlepower beam strikes the roadway surface between 3.75
and 6.0 times mounting height from the luminaire.
On the basis of the vertical light distribution, theoretical maximum candlepower beams from
adjacent luminaires are joined on the roadway surface. With this assumption, the maximum
spacing of luminaires are:
Short Distribution – 4.5 X mounting heights
Medium Distribution – 7.5 X mounting heights
Long Distribution – 12.0 X mounting heights
From a practical standpoint, the medium distribution is predominantly used in practice, and the
spacing of luminaires normally does not exceed five to six times mounting heights. Short
distribution is not used extensively for economic reasons, because extremely short spacing is
required. At the other extreme, the long distribution is not used to any great extent because the
high beam angle of maximum candlepower often produces glare.
SEP4 Roadway Lighting Design Guide
Page 24 of 41 January 10, 2013
Figure 5-10 Vertical Light Distribution
Longitudinal
Roadway lines Reference
Line
1 x MH
2.25 x MH
3.75 x MH
6 x MH
Short
Medium
Long
Transverse
Roadway lines
Max
CP
MH = Mounting Height
SEP4 Roadway Lighting Design Guide
Page 25 of 41 January 10, 2013
Figure 5-11 Half Maximum Candlepower Projection
SEP4 Roadway Lighting Design Guide
Page 26 of 41 January 10, 2013
Figure 5-12 Lateral Light Distribution
5.5.3. Cutoff Optics
The amount of glare generated by a luminaire is strongly influenced by the intensity (candle-
power) emitted at angles close to the horizontal. The cutoff classification is based on the
intensity of rays emitted at 80-degrees and 90-degrees vertical angle. As the intensity of either of
these angles will vary in different vertical planes for typical roadway luminaires, the maximum
intensity considering all planes is used. (see TAC 2.8.1)
Non-Cutoff
- no intensity limits apply.
- are designed to allow for light to be emitted in all directions. These are the least efficient
of the four types to light a roadway due to the amount of light pollution and glare they
produce. Post-top lights without shrouds or shielding are often Non-Cutoff.
SEP4 Roadway Lighting Design Guide
Page 27 of 41 January 10, 2013
Semi-Cutoff
- are designed so that the intensity at 80 degrees vertical angle must not exceed 20% of the
rated lamp lumens, and the intensity at 90 degrees must not exceed 5 % of the rated lamp
lumens.
- are designed to allow the majority of light to be emitted below 90 degrees, with up to 5%
allowed to be emitted above 90 degrees. The most common type of light that fits this
description is the Cobrahead.
Cutoff
- has more controlled emitted light than semi-cutoff. Less than 2.5% of the emitted light is
allowed to escape the fixture above 90 degrees. The light spread is greater than a full
cutoff, and the spacing is not as far apart as a semi-cutoff.
- are designed so that the intensity at 80 degrees vertical angle must not exceed 10% of the
rated lamp lumens, and the intensity at 90 degrees must not exceed 2.5% of the rated
lamp lumens.
Full Cutoff
- are designed so that light will only hit the ground below with no light escaping above 90
degrees. The light is in a tight pattern on the ground which requires the use of more lights
than if one were using any of the other three types of lamps.
- are designed so that the intensity at 80 degrees vertical angle must not exceed 10% of the
rated lamp lumens, and no light can be emitted at 90 degrees or above. Full cutoff
normally requires that the luminaire have a flat bottom opening.
- Full Cutoff luminaires may have an International Dark Sky Fixture Seal of Approval (see
section 5.2 Light Pollution).
SEP4 Roadway Lighting Design Guide
Page 28 of 41 January 10, 2013
Figure 5-13 Luminaire Cutoff Classification
Cutoff
@ 90° < 2 ½% Cd
@ 80° < 10% Cd
Semi-cutoff
@ 90°< 5% Cd
@ 80°< 20% Cd
Non-cutoff
@ 90° No Limit
@ 80° No Limit
Full Cutoff
@ 90°= 0 Cd
@ 80°<10% Cd
90
80
SEP4 Roadway Lighting Design Guide
Page 29 of 41 January 10, 2013
Figure 5-14 Reduction of Glare with Full Cutoff Luminaire
Figure 5-15 Reduction in Light Trespass From Full Cutoff
SEP4 Roadway Lighting Design Guide
Page 30 of 41 January 10, 2013
5.5.4. Lighting Sources
High Pressure Sodium (HPS) lamps, a member of the high intensity discharge (HID) lamp
family, are the most efficient white light source commercially available today. HPS lamps were
developed and introduced in 1968 as energy-efficient source for exterior, security and industrial
lighting applications and are particularly prevalent in street lighting applications. Due to their
high efficiency and long life, today’s HPS lamps are also suitable for many interior applications,
particularly where color rendering is not a crucial concern. HPS lamps are offered in sizes
ranging from 35 to 1000 watts. Efficacies are between 70 to 120 lumens/watt (including ballast),
increasing with wattage. Electronic ballasts, under development, could provide a small increase
in system efficacy. Lamp life is typically 24,000 hours or 6 years. The Color Rendering Index
(CRI) for HPS is 25.
Metal Halide (MH) Lamps are also a member of the high intensity discharge (HID) lamp
family. Compared to other lighting sources such as incandescent or high-output fluorescent, they
have significantly higher efficiency and longer lives. Among HID lamps, metal halide lamps are
not the most energy efficient but the produce the whitest light with the best color rendition, and
are generally selected for that characteristic. Like most HID Lamps, Metal Halide lamps are slow
to start and restart. The two primary types of metal halide lighting are standard and pulse-start.
The pulse-start type is more efficient, starts more quickly, and starts more reliably in cold spaces
and stabilizes color rendition over time. Efficacies are between 60 and 100. Lamp life is typically
12,000 hours or 3 years based on 4,000 burning hours/year. The color rendering index is 80.
Induction light is a light source in which the power required to generate light is transferred from
outside the lamp envelope to inside via electromagnetic fields, in contrast with a typical
electrical lamp that uses electrical connections through the lamp envelope to transfer power.
There are three advantages of eliminating electrodes:
• Extended lamp life, because the electrodes are usually the limiting factor in lamp life.
• The ability to use light-generating substances of higher efficiency that would react with
metal electrodes in normal lamps.
• Improved collection efficiency because the source can be made very small without
shortening life, a problem in electroded lamps
Luminous efficacy is between 70 and 90 and excellent light quality, but it is because of its
unprecedented lifetime. Luminaire system life expectancy is rated at 60,000 hours or about 15
years based on 4000 burning hrs/year. The color rendering index is 80.
LED luminaires are getting to be quite efficient, rivalling HPS at 90 lumens/watt. There is
continuous development and it is expected that LED lights will surpass HPS in the near future.
While most other light sources are omnidirectional, LED emitters tend to be highly directional,
requiring optics to help spread the light. The expected life of the emitters is often directly
proportional to how hard they are driven – higher outputs tend to shorten the life. Managing heat
is also a concern, and LED luminaires tend to have large heat sinks as part of the design. The
color rendering index is between 85 to 90.
SEP4 Roadway Lighting Design Guide
Page 31 of 41 January 10, 2013
5.5.5. SaskPower Luminaire Models
The luminaires currently available for SaskPower lighting installation/designs are identified
below.
Figure 5-16 Cobra Head (Semi-Cutoff Lens) Figure 5-17 Cobra Head (Full Cutoff Lens)
Table 5-11 SaskPower HPSV Cobrahead Luminaires
Item Code Manufacturer Model Number:
American Electric
Cooper Lighting
Wattage Light
Distribution
IES
TYPE
3 42 07 115 07S CT 120 R2 DPCS
OVZ70SCF2E4PSASK
70 w Semi-Cutoff II
3 42 08 115 07S CT 120 RX DGCS
OVZ07SCF2E4G3SASK
70 w Semi-Cutoff II- 4 way
3 42 10 115 10S CT 120 R2 DPCS
OVZ10SCF2E4PSASK
100 w Semi-Cutoff II
3 42 11 115 10S CT 120 R2 FGCS
OVH10SCF2D4GA-SASK
100 w Full Cutoff III
3 42 15 115 15S CT DT1R3DP
OVZ15SCF3E4PASASK
150 w Semi-Cutoff III
3 42 16 115 15S CT 120 R3 FG CS
OVH15SCF3D4GA-SASK
150 w Full Cutoff III
3 42 25 125 25S CT DT1 R3 DPCS
OVZ25SCF3E4PASASK
250 w Semi-Cutoff III
3 42 26 125 25S CT MT1 R3 FG 250 w Full Cutoff III
3 42 40 125 40S CT DT1 R3 DG CS
OVX40SCF3EYASASK
400 w Semi-Cutoff III
SEP4 Roadway Lighting Design Guide
Page 32 of 41 January 10, 2013
Figure 5-18 Sentinel Luminaire
(3 43 46 , 3 43 50)
Table 5-12 HPSV Sentinel Luminaires
Item Code Manufacturer Model Number:
American Electric
Cooper Lighting
Wattage IES
TYPE
3 43 46 DTD 07SCA120R2BAAR7926
VAN70SHCAH255-SASK
70 w II
3 43 50 DTD10SHCA120R3BAAR7926
VAN10SH255-SASK
100 w II
Figure 5-19 Post Top Luminaires
Colonial
(3 43 10)
Washington
(3 43 15,
3 43 30)
Accessory Ribs Bands
and Medallions for
Washington (3 43 40)
Arlington
(3 43 20, 3 43 35)
Acorn
(3 43 42)
SEP4 Roadway Lighting Design Guide
Page 33 of 41 January 10, 2013
Table 5-13 Post Top Luminaires
Item Code Manufacturer and Model Number Wattage Description IES
Type
3 43 10 American Electric
24520SCA-120R5PYBKT2RSCF
Cooper - MPW10SH25547
100 w HPSV - Post Top – Colonial
(“Cooley Hat”)
II
3 43 15 Holophane Lighting
AWU15AHP12B3NCUHPTR
150 w HPSV - Post Top Washington III
3 43 20 Holophane Lighting
ARU15AHP12BA3SHP
150 w HPSV - Post Top Arlington III
3 43 30 Holophane Lighting
AWU175WMH12BA3H
175 w MH - Post Top Washington III
3 43 35 Holophane Lighting
ARU175WMH12BA3H
175 w MH - Post Top Arlington III
3 43 42 King Luminaire
K424R-EAR II 165 IND 120
165 w Induction – Post Top Acorn III
X XX XX King Luminaire
K424R-EAR II 60 LED 120
60 w LED - Post Top Acorn III
The IES file for a given fixture will be named by the code number (eg 34207.ies)
6. Streetlight Mounting Options
6.1. Streetlight Poles
Table 6-1 shows the effective mounting heights for steel davit arms mounted on wood poles as
per CSM A-20-05. Note that pole keys are to be used for overhead spans greater than 25m (code
1 01 92).
Table 6-1 Wood Pole Mounting Heights
Pole
Length
Setting
Depth
Height of
Pole Top
Attachment
Point *
Arm Rise **
Mounting
Height
30' (9.1m) 5' (1.5m) 25' (7.6m) 1' (0.3m) 5' (1.5m) 29' (8.8m)
35' (10.6m) 5.5' (1.7m) 29.5' (9.0m) 1' (0.3m) 5' (1.5m) 33.5' (10.2m)
40' (12.2m) 6' (1.8m) 34' (10.4m) 1' (0.3m) 5' (1.5m) 38' (11.6m)
45' (13.7m) 6.5' (2.0m) 38.5' (11.7m) 1' (0.3m) 5' (1.5m) 42.5' (12.9m)
*Attachment Point is measured down from top of pole.
** Assuming 3.0m (10’) Streetlight Bracket (3 05 30)
If using Sentinel luminaire (3 43 46 or 3 43 50) or 0.6m (2’) Streetlight Bracket (30502)
the mounting height is effectively the height of the pole top.
Mounting Height = Height of pole top - point of attachment + arm rise
Table 6-2 shows the mounting heights for steel and concrete poles, and corresponding precast
bases and break-away bases (where required) as per CSM B-20-25, B-20-41 and B-20-42.
Installation of the precast bases and breakaway bases is shown on CSM B-20-15.
SEP4 Roadway Lighting Design Guide
Page 34 of 41 January 10, 2013
Table 6-2 Steel and Concrete Standard Mounting Heights
Poles Height Code #
Precast
Base
Break-
away Base
Single Davit
Galvanized Steel
7.6m (25') 36026 39000 39010
9.1m (30') 36031 39000 39010
10.7m (35') 36037 39000 39010
12.2m (40') 36141 39002 39012
13.7m (45') 36146 39002 39012
Green
7.6m (25') 36025* 39000 39010
9.1m (30') 36030* 39000 39010
10.7m (35') 36035* 39000 39010
12.2m (40') 36140* 39002 39012
13.7m (45') 36145* 39002 39012
Self Weathering 10.7m (35') 36036* 39000 39010
Double Davit Galvanized Steel
9.1m (30') 36032 39000 39010
10.7m (35') 36038 39000 39010
12.2m (40') 36142 39002 39012
13.7m (45') 36147 39002 39012
Post Top
Black 4.28m (14') 36014 39000 39010
Self Weathering 4.28m (14') 36015* 39000 39010
Decorative
Black Steel 4.88m (16') 36016 39000 39010
Black Concrete 6.71m (22') 36156 Included N/A
Shroud
Trillium 36020*
Florentine 36021
* These items are not for new construction.
Note: one must factor in any ground level difference between the streetlight base and
the top of the road surface.
6.2. Breakaway Bases
Breakaway bases consist of safety devices installed between the pole base plate and the concrete
base, allowing the pole to break away when impacted by a vehicle. They consist of a reaction
plate with couplers that have a designed weak point in the form of a machined groove. The
coupler will shear off at the groove when struck with sufficient force.
Breakaway bases must only be used where there is sufficient room for the pole to fall or not
impact other structures or traffic lanes in the event of a collision. They are typically used on
davit-style poles up to 18m high.
SEP4 Roadway Lighting Design Guide
Page 35 of 41 January 10, 2013
Based on the departure angle of an errant vehicle (20 degrees), the minimum light pole offset for
a breakaway base pole should be approximately one third of the pole height to lessen the
potential of the pole falling into the travel lane. Breakaway bases are typically used on poles
located within the clear zone see section 7.2.
7. Physical Layout Considerations
7.1. Streetlight Placement
Determining an appropriate physical location for the streetlight pole depends on a number of
often conflicting requirements. The lighting design will determine an appropriate spacing, but
this has to be worked into the plan for the subdivision, where there are many other facilities and
structures which also need to be accommodated.
The developer should provide a drawing of the proposed subdivision showing all pertinent
structures including water and sewer lines, catch basins, fire hydrants, lot lines and proposed
locations of driveways.
To effectively light each intersection, a light will typically be placed as close as possible to the
intersection. Lights will then be spaced according to the lighting design starting at the
intersection.
Streetlight poles are typically installed on the property line between residential lots. This will
likely result in an adjustment from the optimum streetlight spacing as determined by the lighting
design. Where large multifamily units are planned, placement of streetlight poles between lot
lines may be necessary.
Driveways are often designed to be adjacent to one another, streetlights should not be placed
between them, but moved to the next lot line where there is no driveway.
Placement of street lights near fire hydrants and catch basins should be avoided. This is to
mitigate conflicts that may occur should excavation be required to repair hydrants or drains in
the future. This should also be considered when placing underground conductors.
When using one sided lighting arrangement along a continuous roadway, streetlight poles should
remain on the same side along the entire length of the road. The lights should not change sides
from block to block.
Underground feeds should originate from a pedestal, or transformer, located at the end of the
block, on the same side of the road as the street lights. Side lot easements should be avoided.
Street crossings with underground conductors should be avoided. If a two sided lighting
arrangement is used, the lights should be fed from conductors running on both sides of the road.
When road crossings are required, they should cross the road adjacent to an intersection and
cross perpendicular to the roadway. Angled, or diagonal crossings are not permitted.
SEP4 Roadway Lighting Design Guide
Page 36 of 41 January 10, 2013
Installations on the outside of a curve should be avoided, due to the increased possibility of being
struck by a vehicle running off the road. Where other constraints force the installation of
streetlight poles on the outside of a curve, Break-away bases may be required even though the
speed limit is reduced in these areas as a part of due diligence.
7.2. Clear Zone
The clear zone is defined as the area adjacent to the roadway which is to be kept clear of fixed
objects. Its purpose is to minimize the risk of vehicles leaving the road striking the object, and
causing significant harm to passengers and vehicles.
Determining the clear zone is a complex calculation based on several factors, including traffic
speed and volume and road geometry. The TAC Geometric Design Guide for Canadian Roads
has the calculation methodology for determining the clear zone. Many of these factors would
have to be provided by the local municipality. In most cases, however, these calculations are
unnecessary for the poles that SaskPower installs as discussed below.
On local streets, with low speed limits (60 km/hr or less), parking lanes, and sidewalks, the clear
zone is typically only 2.5m meters, and easily achievable, so no further consideration is
necessary.
SEP4 Roadway Lighting Design Guide
Page 37 of 41 January 10, 2013
On roadways with speed limits equal to or greater than 70 km/hr, the clear zone will be several
meters. With the luminaires that SaskPower uses, many streetlight poles need to be installed
within the clear zone and the danger from being struck by vehicles needs to be mitigated. There
are several solutions proposed in TAC, but SaskPower utilizes breakaway bases (see section 6.2)
on our steel streetlight poles. Concrete and wood streetlight poles which are direct embedded
must be either located outside the clear zone, or some other method of protection must be
utilized, such as traffic barriers or crash cushions. As of the writing of this document, the only
concrete streetlight poles SaskPower utilizes are post-top style which are typically only used on
local streets and outside of the clear zone.
There are a couple situations where the use of breakaway bases needs further consideration. One
is the possibility of pedestrian traffic. A streetlight pole on a breakaway base that is struck by a
vehicle leaving a roadway may then strike a pedestrian. Roadways with speeds greater than or
equal to 70km/hr typically have limited pedestrian access, so this may not be a concern.
Another situation is for poles mounted in the median, where there is a possibility of a pole falling
into the traffic lane on the opposite side and must be avoided.
If either of these situations arises, the lighting designer should consult with the local municipality
to evaluate the situation and develop solutions. These may be to establish what the clear zone is,
and locate the streetlight outside of the zone, or to have the municipality install traffic barriers.
7.3. Clearances
For future maintenance and operations of the streetlights, and to minimize damage from the
activities of others it is important to maintain certain minimum separations or clearances. In
addition to SaskPower’s clearance requirements, the Municipality may also have requirements.
To determine the proper clearance, both SaskPower and if available, the Municipality’s clearance
standard must be considered. The proper clearance to be used is the greatest between the two.
For example, if the SaskPower clearance is 1.0m and the Municipality’s is 3.0m, use the 3.0m
clearance.
Table 7-1 shows the clearances required from streetlight facilities to other objects. See also CSM
sections C-24-02 and C-26-02 for other clearance requirements.
SEP4 Roadway Lighting Design Guide
Page 38 of 41 January 10, 2013
Table 7-1 Streetlight Clearances
STREET LIGHT BASE STREET LIGHT CABLE
Fire Hydrants 1.0m 1.0m
Pedestals 1.0m 1.0m
Misc. above ground facilities 1.0m 1.0m
Curbs/sidewalks 0.5m* 1.0m
Roadway without curbs/sidewalks 1.5m* 1.0m
Buried high voltage cables 1.0m n/a
Property pins 1.0m 1.0m
Streetlight base n/a 0.5m
Residential Driveway 1.0m n/a
Commercial Driveway 3.0m n/a
* See also section 7.2 Clear Zone
In addition to these separations the following should also be followed:
For maintenance reasons, there must be a separation of 0.5m from the edge of the
sidewalk/curb to the streetlight pole. Greater offset is desirable, particularly where there is a
probability of snowplows clearing snow in the winter.
8. Electrical Design
8.1. Streetlight Power Supply
The supply for a streetlight may be from either an overhead transformer (see CSM B-20-21) or
underground transformer or a service pedestal (see CSM B-20-35).
A maximum of three connections can be made in a streetlight (ie: one circuit coming in and two
may branch out to feed lights in different directions).
The voltage drop is not to be more than 8% (as per URD voltage drop spreadsheet).
SaskPower luminaires are designed for use at 120V or 240V, and are configured for 120V
operation when shipped.
8.2. Fusing/Protection
All street light supplies are to be fused at either the transformer or the pedestal where the power
supply to the circuit is being provided.
Fusing at each luminaire is to be a (3 45 51) inline fuse holder with (3 45 50) 6 amp fuse. Any
problems on an existing streetlight fuse should be replaced with this new fuse holder and fuse.
See CSM A-20-04, A-20-05, B-20-16
Fusing of overhead streetlight feeds, if required, should be at the source point. Use a 15 amp fuse
(7 52 25) and weatherproof fuse holder (71 95 05) with connectors (5 09 XX). See CSM B-20-
21.
Fusing at a supply pedestal requires that a 15 amp fuse holder (71 01 10) and fuse cartridge (7 53
15). Refer to B-20-35 for mounting of fuse holder in the pedestal. Below are some additional
fuse sizes if required.
SEP4 Roadway Lighting Design Guide
Page 39 of 41 January 10, 2013
Table 8-1 Fuses and Fuseholders
Item # Use with Amps
7 53 02 C30A Holder 2
7 53 04 C30A Holder 4
7 53 06 C30A Holder 6
7 53 10 C30A Holder 10
7 53 15 C30A Holder 15
7 53 20 C30A Holder 20
7 53 30 C30A Holder 30
7 53 50 C60A Holder 50
7 53 60 C60A Holder 60
8.3. Specifications
Table 8-2 shows the maximum operating current for HPS luminaires. This can be used to
determine the appropriate feeder cables for a given section of streetlights. Supply current for
other types of luminaires to be determined from the manufacturer.
Table 8-2 Maximum Luminaire Operating Current
HIGH PRESSURE SODIUM VAPOUR
LUMINAIRE
TYPE
70 W 100W 150W 250W 400W
120V 0.85 1.16 1.70 2.80 4.20
240V 0.43 0.58 0.85 1.40 2.10
Taken from CSM A-20-00
Note: See section A-22, Service Drops, for voltage drop
information and allowable length of street light supply conductors.
Table 8-3 and Table 8-4 show the properties of the buried and aerial cables used as streetlight
feeder cables. SaskPower uses a #12 duplex cable (stock code 3 12 14) to individual streetlight
luminaires for all types of streetlight installations (steel, concrete and wood poles).
Table 8-3 Secondary Buried Cable Ampacities
Stock Code Description
Direct Buried
100% LF amps
In Duct
100% LF amps
2 94 51 2 x #4 145 125
2 94 62 3 x #2 150 130
2 94 64 3 x 1/0 200 175
Taken from CSM B-22-11
SEP4 Roadway Lighting Design Guide
Page 40 of 41 January 10, 2013
Table 8-4 Aerial Insulated Secondary Conductor Electrical Properties
CONDUCTOR - NEUTRAL CODE NO.
AMPACITY
(AMPS)
RAC PHASE
OHMS/Km
RAC NEUTRAL
OHMS/Km
#6 AL Duplex - #6 ACSR 3 12 02 92 2.692 2.461
#4 AL Triplex - #6 ACSR 5 38 03 97 1.692 2.461
1/0 AL Triplex - #2 ACSR 5 38 17 169 0.6692 1.013
Taken from CSM C-24-04.03
9. Decorations on Streetlight Poles
Frequently municipalities and other groups desire to attach decorations such as flags, flower
pots, and seasonal lighting on streetlight poles. The rules regarding such attachments are
contained in Directive 08-00 in the SaskPower Business Administration Manual and SaskPower
CSM A-20-10 and B-20-27.
SEP4 Roadway Lighting Design Guide
Page 41 of 41 January 10, 2013
10. Streetlighting Waiver Form
To be added at a later date

More Related Content

What's hot

Sappress sap governance risk and compliance
Sappress sap governance risk and complianceSappress sap governance risk and compliance
Sappress sap governance risk and complianceSiva Pradeep Bolisetti
 
Supply chain management
Supply chain managementSupply chain management
Supply chain managementShwe Zin
 
Sap mm-configuration-step-by-step-guide
Sap mm-configuration-step-by-step-guideSap mm-configuration-step-by-step-guide
Sap mm-configuration-step-by-step-guidevenkat1571
 
S4 HANA New GL Configuration
S4 HANA New GL Configuration S4 HANA New GL Configuration
S4 HANA New GL Configuration Pradeep Hota
 
Byron Schaller - Challenge 2 - Virtual Design Master
Byron Schaller - Challenge 2 - Virtual Design MasterByron Schaller - Challenge 2 - Virtual Design Master
Byron Schaller - Challenge 2 - Virtual Design Mastervdmchallenge
 
N(I)2 FaQs (V4)
N(I)2 FaQs (V4)N(I)2 FaQs (V4)
N(I)2 FaQs (V4)kvz
 
Management by competencies tulay bozkurt
Management by competencies tulay bozkurtManagement by competencies tulay bozkurt
Management by competencies tulay bozkurtTulay Bozkurt
 
Protel 99 se_traning_manual_pcb_design
Protel 99 se_traning_manual_pcb_designProtel 99 se_traning_manual_pcb_design
Protel 99 se_traning_manual_pcb_designhoat6061
 
Production Scheduling Using Microsoft Dynamics AX
Production Scheduling Using Microsoft Dynamics AXProduction Scheduling Using Microsoft Dynamics AX
Production Scheduling Using Microsoft Dynamics AXJulien Lecadou,MSc.
 
133688798 frequency-planning-guidelines-alu
133688798 frequency-planning-guidelines-alu133688798 frequency-planning-guidelines-alu
133688798 frequency-planning-guidelines-alupkamoto
 
Sap MM-configuration-step-by-step-guide
Sap MM-configuration-step-by-step-guideSap MM-configuration-step-by-step-guide
Sap MM-configuration-step-by-step-guideVenet Dheer
 
Sap mm-configuration-step-by-step-guide-121029154857-phpapp01
Sap mm-configuration-step-by-step-guide-121029154857-phpapp01Sap mm-configuration-step-by-step-guide-121029154857-phpapp01
Sap mm-configuration-step-by-step-guide-121029154857-phpapp01Ramesh G
 
rigid and flexiable pavement of highway Project bbjr report
rigid and flexiable pavement of highway Project bbjr reportrigid and flexiable pavement of highway Project bbjr report
rigid and flexiable pavement of highway Project bbjr reportrakeshchoudhary129
 

What's hot (17)

Sappress sap governance risk and compliance
Sappress sap governance risk and complianceSappress sap governance risk and compliance
Sappress sap governance risk and compliance
 
Supply chain management
Supply chain managementSupply chain management
Supply chain management
 
Ca 7 primer
Ca 7 primerCa 7 primer
Ca 7 primer
 
Sap mm-configuration-step-by-step-guide
Sap mm-configuration-step-by-step-guideSap mm-configuration-step-by-step-guide
Sap mm-configuration-step-by-step-guide
 
S4 HANA New GL Configuration
S4 HANA New GL Configuration S4 HANA New GL Configuration
S4 HANA New GL Configuration
 
Byron Schaller - Challenge 2 - Virtual Design Master
Byron Schaller - Challenge 2 - Virtual Design MasterByron Schaller - Challenge 2 - Virtual Design Master
Byron Schaller - Challenge 2 - Virtual Design Master
 
Sql developer usermanual_en
Sql developer usermanual_enSql developer usermanual_en
Sql developer usermanual_en
 
N(I)2 FaQs (V4)
N(I)2 FaQs (V4)N(I)2 FaQs (V4)
N(I)2 FaQs (V4)
 
Good sql server interview_questions
Good sql server interview_questionsGood sql server interview_questions
Good sql server interview_questions
 
TEST UPLOAD
TEST UPLOADTEST UPLOAD
TEST UPLOAD
 
Management by competencies tulay bozkurt
Management by competencies tulay bozkurtManagement by competencies tulay bozkurt
Management by competencies tulay bozkurt
 
Protel 99 se_traning_manual_pcb_design
Protel 99 se_traning_manual_pcb_designProtel 99 se_traning_manual_pcb_design
Protel 99 se_traning_manual_pcb_design
 
Production Scheduling Using Microsoft Dynamics AX
Production Scheduling Using Microsoft Dynamics AXProduction Scheduling Using Microsoft Dynamics AX
Production Scheduling Using Microsoft Dynamics AX
 
133688798 frequency-planning-guidelines-alu
133688798 frequency-planning-guidelines-alu133688798 frequency-planning-guidelines-alu
133688798 frequency-planning-guidelines-alu
 
Sap MM-configuration-step-by-step-guide
Sap MM-configuration-step-by-step-guideSap MM-configuration-step-by-step-guide
Sap MM-configuration-step-by-step-guide
 
Sap mm-configuration-step-by-step-guide-121029154857-phpapp01
Sap mm-configuration-step-by-step-guide-121029154857-phpapp01Sap mm-configuration-step-by-step-guide-121029154857-phpapp01
Sap mm-configuration-step-by-step-guide-121029154857-phpapp01
 
rigid and flexiable pavement of highway Project bbjr report
rigid and flexiable pavement of highway Project bbjr reportrigid and flexiable pavement of highway Project bbjr report
rigid and flexiable pavement of highway Project bbjr report
 

Similar to Residential streetlight engineering_practices (1)

Design for public services- The fourth way
Design for public services- The fourth wayDesign for public services- The fourth way
Design for public services- The fourth wayforumvirium
 
WebIT2 Consultants Proposal
WebIT2 Consultants ProposalWebIT2 Consultants Proposal
WebIT2 Consultants ProposalSarah Killey
 
SSTRM - StrategicReviewGroup.ca - Workshop 2: Power/Energy and Sustainability...
SSTRM - StrategicReviewGroup.ca - Workshop 2: Power/Energy and Sustainability...SSTRM - StrategicReviewGroup.ca - Workshop 2: Power/Energy and Sustainability...
SSTRM - StrategicReviewGroup.ca - Workshop 2: Power/Energy and Sustainability...Phil Carr
 
Ppdg Robust File Replication
Ppdg Robust File ReplicationPpdg Robust File Replication
Ppdg Robust File Replicationguest0dc8a2
 
Utility-Scale Solar Photovoltaic Power Plants - A Project Developer’s Guide
Utility-Scale Solar Photovoltaic Power Plants - A Project Developer’s GuideUtility-Scale Solar Photovoltaic Power Plants - A Project Developer’s Guide
Utility-Scale Solar Photovoltaic Power Plants - A Project Developer’s GuidePrivate Consultants
 
ODD and Project Control v0.957
ODD and Project Control v0.957ODD and Project Control v0.957
ODD and Project Control v0.957Jonathan Herring
 
Grid connected pv power system
Grid connected pv power systemGrid connected pv power system
Grid connected pv power systemZelalem Girma
 
Relazione forno orizzontale
Relazione forno orizzontaleRelazione forno orizzontale
Relazione forno orizzontaleALESSANDRO LOTTI
 
SAP MM Tutorial ds_42_tutorial_en.pdf
SAP MM Tutorial    ds_42_tutorial_en.pdfSAP MM Tutorial    ds_42_tutorial_en.pdf
SAP MM Tutorial ds_42_tutorial_en.pdfsjha120721
 
Solar Energy - A Complete Guide
Solar Energy - A Complete GuideSolar Energy - A Complete Guide
Solar Energy - A Complete GuideNaman Pratap Singh
 
Ifc+solar+report web+ 08+05
Ifc+solar+report web+ 08+05Ifc+solar+report web+ 08+05
Ifc+solar+report web+ 08+05Mohammed Selim
 
Naval op pln_nwp_5-01
Naval op pln_nwp_5-01Naval op pln_nwp_5-01
Naval op pln_nwp_5-01Triplo Sof
 

Similar to Residential streetlight engineering_practices (1) (20)

Pdf 1.pptx
Pdf 1.pptxPdf 1.pptx
Pdf 1.pptx
 
Design for public services- The fourth way
Design for public services- The fourth wayDesign for public services- The fourth way
Design for public services- The fourth way
 
WebIT2 Consultants Proposal
WebIT2 Consultants ProposalWebIT2 Consultants Proposal
WebIT2 Consultants Proposal
 
Course lab 2_guide_eng
Course lab 2_guide_engCourse lab 2_guide_eng
Course lab 2_guide_eng
 
Course lab 2_guide_eng
Course lab 2_guide_engCourse lab 2_guide_eng
Course lab 2_guide_eng
 
SSTRM - StrategicReviewGroup.ca - Workshop 2: Power/Energy and Sustainability...
SSTRM - StrategicReviewGroup.ca - Workshop 2: Power/Energy and Sustainability...SSTRM - StrategicReviewGroup.ca - Workshop 2: Power/Energy and Sustainability...
SSTRM - StrategicReviewGroup.ca - Workshop 2: Power/Energy and Sustainability...
 
Ppdg Robust File Replication
Ppdg Robust File ReplicationPpdg Robust File Replication
Ppdg Robust File Replication
 
U M Lvs I D E F
U M Lvs I D E FU M Lvs I D E F
U M Lvs I D E F
 
Utility-Scale Solar Photovoltaic Power Plants - A Project Developer’s Guide
Utility-Scale Solar Photovoltaic Power Plants - A Project Developer’s GuideUtility-Scale Solar Photovoltaic Power Plants - A Project Developer’s Guide
Utility-Scale Solar Photovoltaic Power Plants - A Project Developer’s Guide
 
ODD and Project Control v0.957
ODD and Project Control v0.957ODD and Project Control v0.957
ODD and Project Control v0.957
 
Grid connected pv power system
Grid connected pv power systemGrid connected pv power system
Grid connected pv power system
 
Supplemental pack ddk
Supplemental pack ddkSupplemental pack ddk
Supplemental pack ddk
 
Supplemental pack ddk
Supplemental pack ddkSupplemental pack ddk
Supplemental pack ddk
 
Relazione forno orizzontale
Relazione forno orizzontaleRelazione forno orizzontale
Relazione forno orizzontale
 
SAP MM Tutorial ds_42_tutorial_en.pdf
SAP MM Tutorial    ds_42_tutorial_en.pdfSAP MM Tutorial    ds_42_tutorial_en.pdf
SAP MM Tutorial ds_42_tutorial_en.pdf
 
Me
MeMe
Me
 
Solar Energy - A Complete Guide
Solar Energy - A Complete GuideSolar Energy - A Complete Guide
Solar Energy - A Complete Guide
 
Ifc+solar+report web+ 08+05
Ifc+solar+report web+ 08+05Ifc+solar+report web+ 08+05
Ifc+solar+report web+ 08+05
 
Naval op pln_nwp_5-01
Naval op pln_nwp_5-01Naval op pln_nwp_5-01
Naval op pln_nwp_5-01
 
Apache Maven
Apache MavenApache Maven
Apache Maven
 

Recently uploaded

Call Girls Delhi {Jodhpur} 9711199012 high profile service
Call Girls Delhi {Jodhpur} 9711199012 high profile serviceCall Girls Delhi {Jodhpur} 9711199012 high profile service
Call Girls Delhi {Jodhpur} 9711199012 high profile servicerehmti665
 
Gfe Mayur Vihar Call Girls Service WhatsApp -> 9999965857 Available 24x7 ^ De...
Gfe Mayur Vihar Call Girls Service WhatsApp -> 9999965857 Available 24x7 ^ De...Gfe Mayur Vihar Call Girls Service WhatsApp -> 9999965857 Available 24x7 ^ De...
Gfe Mayur Vihar Call Girls Service WhatsApp -> 9999965857 Available 24x7 ^ De...srsj9000
 
Gurgaon ✡️9711147426✨Call In girls Gurgaon Sector 51 escort service
Gurgaon ✡️9711147426✨Call In girls Gurgaon Sector 51 escort serviceGurgaon ✡️9711147426✨Call In girls Gurgaon Sector 51 escort service
Gurgaon ✡️9711147426✨Call In girls Gurgaon Sector 51 escort servicejennyeacort
 
Sachpazis Costas: Geotechnical Engineering: A student's Perspective Introduction
Sachpazis Costas: Geotechnical Engineering: A student's Perspective IntroductionSachpazis Costas: Geotechnical Engineering: A student's Perspective Introduction
Sachpazis Costas: Geotechnical Engineering: A student's Perspective IntroductionDr.Costas Sachpazis
 
HARMONY IN THE NATURE AND EXISTENCE - Unit-IV
HARMONY IN THE NATURE AND EXISTENCE - Unit-IVHARMONY IN THE NATURE AND EXISTENCE - Unit-IV
HARMONY IN THE NATURE AND EXISTENCE - Unit-IVRajaP95
 
pipeline in computer architecture design
pipeline in computer architecture  designpipeline in computer architecture  design
pipeline in computer architecture designssuser87fa0c1
 
An experimental study in using natural admixture as an alternative for chemic...
An experimental study in using natural admixture as an alternative for chemic...An experimental study in using natural admixture as an alternative for chemic...
An experimental study in using natural admixture as an alternative for chemic...Chandu841456
 
Artificial-Intelligence-in-Electronics (K).pptx
Artificial-Intelligence-in-Electronics (K).pptxArtificial-Intelligence-in-Electronics (K).pptx
Artificial-Intelligence-in-Electronics (K).pptxbritheesh05
 
IVE Industry Focused Event - Defence Sector 2024
IVE Industry Focused Event - Defence Sector 2024IVE Industry Focused Event - Defence Sector 2024
IVE Industry Focused Event - Defence Sector 2024Mark Billinghurst
 
Architect Hassan Khalil Portfolio for 2024
Architect Hassan Khalil Portfolio for 2024Architect Hassan Khalil Portfolio for 2024
Architect Hassan Khalil Portfolio for 2024hassan khalil
 
Electronically Controlled suspensions system .pdf
Electronically Controlled suspensions system .pdfElectronically Controlled suspensions system .pdf
Electronically Controlled suspensions system .pdfme23b1001
 
Biology for Computer Engineers Course Handout.pptx
Biology for Computer Engineers Course Handout.pptxBiology for Computer Engineers Course Handout.pptx
Biology for Computer Engineers Course Handout.pptxDeepakSakkari2
 
EduAI - E learning Platform integrated with AI
EduAI - E learning Platform integrated with AIEduAI - E learning Platform integrated with AI
EduAI - E learning Platform integrated with AIkoyaldeepu123
 
Risk Assessment For Installation of Drainage Pipes.pdf
Risk Assessment For Installation of Drainage Pipes.pdfRisk Assessment For Installation of Drainage Pipes.pdf
Risk Assessment For Installation of Drainage Pipes.pdfROCENODodongVILLACER
 
Introduction to Machine Learning Unit-3 for II MECH
Introduction to Machine Learning Unit-3 for II MECHIntroduction to Machine Learning Unit-3 for II MECH
Introduction to Machine Learning Unit-3 for II MECHC Sai Kiran
 
Call Girls Narol 7397865700 Independent Call Girls
Call Girls Narol 7397865700 Independent Call GirlsCall Girls Narol 7397865700 Independent Call Girls
Call Girls Narol 7397865700 Independent Call Girlsssuser7cb4ff
 
Oxy acetylene welding presentation note.
Oxy acetylene welding presentation note.Oxy acetylene welding presentation note.
Oxy acetylene welding presentation note.eptoze12
 
complete construction, environmental and economics information of biomass com...
complete construction, environmental and economics information of biomass com...complete construction, environmental and economics information of biomass com...
complete construction, environmental and economics information of biomass com...asadnawaz62
 

Recently uploaded (20)

Call Girls Delhi {Jodhpur} 9711199012 high profile service
Call Girls Delhi {Jodhpur} 9711199012 high profile serviceCall Girls Delhi {Jodhpur} 9711199012 high profile service
Call Girls Delhi {Jodhpur} 9711199012 high profile service
 
Gfe Mayur Vihar Call Girls Service WhatsApp -> 9999965857 Available 24x7 ^ De...
Gfe Mayur Vihar Call Girls Service WhatsApp -> 9999965857 Available 24x7 ^ De...Gfe Mayur Vihar Call Girls Service WhatsApp -> 9999965857 Available 24x7 ^ De...
Gfe Mayur Vihar Call Girls Service WhatsApp -> 9999965857 Available 24x7 ^ De...
 
Gurgaon ✡️9711147426✨Call In girls Gurgaon Sector 51 escort service
Gurgaon ✡️9711147426✨Call In girls Gurgaon Sector 51 escort serviceGurgaon ✡️9711147426✨Call In girls Gurgaon Sector 51 escort service
Gurgaon ✡️9711147426✨Call In girls Gurgaon Sector 51 escort service
 
Design and analysis of solar grass cutter.pdf
Design and analysis of solar grass cutter.pdfDesign and analysis of solar grass cutter.pdf
Design and analysis of solar grass cutter.pdf
 
Sachpazis Costas: Geotechnical Engineering: A student's Perspective Introduction
Sachpazis Costas: Geotechnical Engineering: A student's Perspective IntroductionSachpazis Costas: Geotechnical Engineering: A student's Perspective Introduction
Sachpazis Costas: Geotechnical Engineering: A student's Perspective Introduction
 
HARMONY IN THE NATURE AND EXISTENCE - Unit-IV
HARMONY IN THE NATURE AND EXISTENCE - Unit-IVHARMONY IN THE NATURE AND EXISTENCE - Unit-IV
HARMONY IN THE NATURE AND EXISTENCE - Unit-IV
 
pipeline in computer architecture design
pipeline in computer architecture  designpipeline in computer architecture  design
pipeline in computer architecture design
 
An experimental study in using natural admixture as an alternative for chemic...
An experimental study in using natural admixture as an alternative for chemic...An experimental study in using natural admixture as an alternative for chemic...
An experimental study in using natural admixture as an alternative for chemic...
 
Artificial-Intelligence-in-Electronics (K).pptx
Artificial-Intelligence-in-Electronics (K).pptxArtificial-Intelligence-in-Electronics (K).pptx
Artificial-Intelligence-in-Electronics (K).pptx
 
IVE Industry Focused Event - Defence Sector 2024
IVE Industry Focused Event - Defence Sector 2024IVE Industry Focused Event - Defence Sector 2024
IVE Industry Focused Event - Defence Sector 2024
 
Architect Hassan Khalil Portfolio for 2024
Architect Hassan Khalil Portfolio for 2024Architect Hassan Khalil Portfolio for 2024
Architect Hassan Khalil Portfolio for 2024
 
Electronically Controlled suspensions system .pdf
Electronically Controlled suspensions system .pdfElectronically Controlled suspensions system .pdf
Electronically Controlled suspensions system .pdf
 
Biology for Computer Engineers Course Handout.pptx
Biology for Computer Engineers Course Handout.pptxBiology for Computer Engineers Course Handout.pptx
Biology for Computer Engineers Course Handout.pptx
 
EduAI - E learning Platform integrated with AI
EduAI - E learning Platform integrated with AIEduAI - E learning Platform integrated with AI
EduAI - E learning Platform integrated with AI
 
Risk Assessment For Installation of Drainage Pipes.pdf
Risk Assessment For Installation of Drainage Pipes.pdfRisk Assessment For Installation of Drainage Pipes.pdf
Risk Assessment For Installation of Drainage Pipes.pdf
 
Introduction to Machine Learning Unit-3 for II MECH
Introduction to Machine Learning Unit-3 for II MECHIntroduction to Machine Learning Unit-3 for II MECH
Introduction to Machine Learning Unit-3 for II MECH
 
Call Girls Narol 7397865700 Independent Call Girls
Call Girls Narol 7397865700 Independent Call GirlsCall Girls Narol 7397865700 Independent Call Girls
Call Girls Narol 7397865700 Independent Call Girls
 
Oxy acetylene welding presentation note.
Oxy acetylene welding presentation note.Oxy acetylene welding presentation note.
Oxy acetylene welding presentation note.
 
🔝9953056974🔝!!-YOUNG call girls in Rajendra Nagar Escort rvice Shot 2000 nigh...
🔝9953056974🔝!!-YOUNG call girls in Rajendra Nagar Escort rvice Shot 2000 nigh...🔝9953056974🔝!!-YOUNG call girls in Rajendra Nagar Escort rvice Shot 2000 nigh...
🔝9953056974🔝!!-YOUNG call girls in Rajendra Nagar Escort rvice Shot 2000 nigh...
 
complete construction, environmental and economics information of biomass com...
complete construction, environmental and economics information of biomass com...complete construction, environmental and economics information of biomass com...
complete construction, environmental and economics information of biomass com...
 

Residential streetlight engineering_practices (1)

  • 1. SEP4 Roadway Lighting Design Guide Page 1 of 41 January 10, 2013 Standard Engineering Practice Section 4 ROADWAY LIGHTING DESIGN GUIDE Table Of Contents 1. Objectives ............................................................................................................................... 4 2. Scope of the Standard ............................................................................................................. 4 2.1. Luminaires Available....................................................................................................... 4 2.2. High Mast Lighting.......................................................................................................... 4 3. Glossary .................................................................................................................................. 4 4. Basic Principles of Streetlight Design .................................................................................... 6 5. Design Considerations ............................................................................................................ 6 5.1. Customer Requirements................................................................................................... 7 5.2. Light Pollution.................................................................................................................. 7 5.3. Airports............................................................................................................................. 7 5.4. Basic Lighting Design...................................................................................................... 8 5.4.1. Roadway Terminology.............................................................................................. 8 5.4.2. Lighting Design Methodology................................................................................ 10 5.4.3. Pedestrian Conflict.................................................................................................. 10 5.4.4. Light Arrangement Styles....................................................................................... 11 5.4.5. Pavement Classification.......................................................................................... 13 5.4.6. Roadway Classifications......................................................................................... 13 5.4.7. Area Classifications ................................................................................................ 17 5.4.8. Light Calculation Grid............................................................................................ 17 5.4.9. Typical Pole Height and Overhang......................................................................... 18 5.4.10. Light Loss Factors............................................................................................... 20 5.5. Luminaire Selection ....................................................................................................... 21 5.5.1. Lateral Light Distribution ....................................................................................... 21 5.5.2. Vertical Light Distribution...................................................................................... 23 5.5.3. Cutoff Optics........................................................................................................... 26 5.5.4. Lighting Sources ..................................................................................................... 30 5.5.5. SaskPower Luminaire Models................................................................................ 31 6. Streetlight Mounting Options ............................................................................................... 33 6.1. Streetlight Poles.............................................................................................................. 33 6.2. Breakaway Bases........................................................................................................... 34 7. Physical Layout Considerations............................................................................................ 35 7.1. Streetlight Placement...................................................................................................... 35 7.2. Clear Zone...................................................................................................................... 36 7.3. Clearances ...................................................................................................................... 37
  • 2. SEP4 Roadway Lighting Design Guide Page 2 of 41 January 10, 2013 8. Electrical Design................................................................................................................... 38 8.1. Streetlight Power Supply................................................................................................ 38 8.2. Fusing/Protection ........................................................................................................... 38 8.3. Specifications ................................................................................................................. 39 9. Decorations on Streetlight Poles........................................................................................... 40 10. Streetlighting Waiver Form ............................................................................................... 41
  • 3. SEP4 Roadway Lighting Design Guide Page 3 of 41 January 10, 2013 List of Figures Figure 5-1 Roadway Terminology.................................................................................................. 9 Figure 5-2 One Sided Arrangement.............................................................................................. 11 Figure 5-3 Two Sided Opposite Arrangement.............................................................................. 11 Figure 5-4 Two Sided Staggered Arrangement ............................................................................ 11 Figure 5-5 Double Davit Median Arrangement............................................................................ 12 Figure 5-6 Double Davit Opposite Arrangement.......................................................................... 12 Figure 5-7 Double Davit Staggered Arrangement........................................................................ 12 Figure 5-8 Roadway Classifications............................................................................................. 16 Figure 5-9 IES Pattern Types........................................................................................................ 22 Figure 5-10 Vertical Light Distribution........................................................................................ 24 Figure 5-11 Half Maximum Candlepower Projection .................................................................. 25 Figure 5-12 Lateral Light Distribution ......................................................................................... 26 Figure 5-13 Luminaire Cutoff Classification................................................................................ 28 Figure 5-14 Reduction of Glare with Full Cutoff Luminaire ....................................................... 29 Figure 5-15 Reduction in Light Trespass From Full Cutoff......................................................... 29 Figure 5-16 Cobra Head (Semi-Cutoff Lens)............................................................................... 31 Figure 5-17 Cobra Head (Full Cutoff Lens) ................................................................................. 31 Figure 5-18 Sentinel Luminaire.................................................................................................... 32 Figure 5-19 Post Top Luminaires ................................................................................................. 32 List of Tables Table 5-1 Classification of Pedestrian Conflict............................................................................ 10 Table 5-2 Lighting Requirement by Pedestrian Conflict.............................................................. 11 Table 5-3 Pavement Classification ............................................................................................... 13 Table 5-4 Roadway Classification Designations .......................................................................... 14 Table 5-5 RP-8 Recommended Light Levels For Luminance And STV...................................... 15 Table 5-6 Illuminance for Intersections........................................................................................ 15 Table 5-7 Light Calculation Grid Definitions............................................................................... 18 Table 5-8 Pole Height by Roadway Configuration....................................................................... 19 Table 5-9 Roadway Lighting Design by Luminance Method ...................................................... 19 Table 5-10 Light Loss Factors...................................................................................................... 21 Table 5-11 SaskPower HPSV Cobrahead Luminaires.................................................................. 31 Table 5-12 HPSV Sentinel Luminaires......................................................................................... 32 Table 5-13 Post Top Luminaires................................................................................................... 33 Table 6-1 Wood Pole Mounting Heights...................................................................................... 33 Table 6-2 Steel and Concrete Standard Mounting Heights .......................................................... 34 Table 7-1 Streetlight Clearances................................................................................................... 38 Table 8-1 Fuses and Fuseholders.................................................................................................. 39 Table 8-2 Maximum Luminaire Operating Current...................................................................... 39 Table 8-3 Secondary Buried Cable Ampacities............................................................................ 39 Table 8-4 Aerial Insulated Secondary Conductor Electrical Properties ....................................... 40
  • 4. SEP4 Roadway Lighting Design Guide Page 4 of 41 January 10, 2013 1. Objectives The purpose of “Roadway Lighting Design Guide” is to provide guidelines and information required to design roadway lighting systems that achieves the following objectives in an economical and cost-effective manner: -To provide energy efficient lighting system that will meet standard design criteria with the minimum possible Unit Power Density (UPD) as per TAC 2006 – guide for the Design of Roadway Lighting. -To provide adequate and uniform lighting levels on our roadways for drivers and pedestrians safety. 2. Scope of the Standard The Classification of Roadways and their Recommended Luminance Light Levels as per IESNA RP-8-2005 and TAC- 2006 –Guide for the Design of Roadway Lighting 2.1. Luminaires Available SaskPower supplies and installs roadway lighting to customers within our franchise area. The lighting materials supplied are limited to stock coded items. Should a customer wish to install luminaires and poles other than our stock coded items, they are required to procure, install and maintain the luminaires. SaskPower would provide a meter point to supply the lighting. 2.2. High Mast Lighting Since the Ministry of Highways and Infrastructure install and maintain their own lighting around major interchanges, High Mast Lighting as typically required around these interchanges is not covered in this document. This would be customer owned lighting, and SaskPower would only provide a meter point. 3. Glossary Candela (cd) - Candela is the unit of light Intensity - the strength of light emitted in a certain direction. Symbol: I Cutoff - A luminaire’s light distribution is designated as cutoff when the measured candela output is less than 2.5% of rated lumens at 90˚ above nadir and less than 10% of rated lumens at 80˚above nadir. Footcandle (fc) - Footcandle is the unit of Illuminance - the measure of light arriving on a surface.(See “Illuminance”) Symbol: E
  • 5. SEP4 Roadway Lighting Design Guide Page 5 of 41 January 10, 2013 Full Cutoff - “Flat Lens” – A luminaire’s light distribution is designated as full cutoff when the measured candela output is 0 at 90˚ above nadir and less than 10% of rated lumens at 80˚ above nadir. Illuminance - Light that reaches the road surface and other objects. Illuminance is a measure of the incident light, and is expressed in lux. 1 Lux = 1 lumen/m2 . Lumen (lm) - Lumen is the unit of flux - the quantity of light produced by a source. Symbol: Φ Luminance - Light perceived by a motorist on a roadway. Luminance is a measure of the reflected light and is expressed in candela/m2 . Nadir - the vertical projection directly beneath the apparent light source of a luminaire. Non-Cutoff - A luminaire’s light distribution is designated as Non-Cutoff when there is no specific luminous limitation in any direction. Pedestrian Conflict - A measure of the number of people that will be walking in the area. Reflectance - the ratio of the reflected flux (or luminance) to the incident flux (or illuminance) - cd/m2 . Semi-Cutoff - “Sag Lens” - A luminaire’s light distribution is designated as Semi-Cutoff when the measured candela output is less than 5% of rated lumens at 90˚above nadir and less than 20% of rated lumens above 80˚ nadir. Small Target Visibility - is a method of design that determines the visibility of an array of targets on the roadway. The weighted average of the visibility level of these targets result in the Small Target Visibility Unit Power Density (UPD) - Electrical energy used per unit of area. Usually expressed in watts per square meter.
  • 6. SEP4 Roadway Lighting Design Guide Page 6 of 41 January 10, 2013 4. Basic Principles of Streetlight Design There are five basic principles to consider when doing a lighting design. 1. Safety – pedestrian and driver safety. Creating a lighting level sufficient that drivers are aware of any pedestrians and or objects near the roadway. 2. Security – providing a setting that will deter some forms of criminal activity through the use and placement of lights. 3. Limit the amount of Light Trespass – avoiding the over lighting of areas such as in residential neighbourhoods where the backlight may shine on houses. 4. Environmental Responsibility – consideration should be given to the following: • Energy usage • Lighting levels – to determine the correct level of light output required as per Transportation Association of Canada (TAC) recommendations, which use the following criteria: - road classification - pedestrian conflict activity - road type - calculation of lighting • Lamp type – through the use of one of four different luminaires that can provide varied lighting patterns. These types are: Full Cutoff , Cutoff, Semi-cutoff, and Non- cutoff 5. To provide uniformity and consistency in lighting designs throughout the province while meeting the industry standard. 5. Design Considerations It is the responsibility of the individual doing a lighting design to make sure they are making reference to TAC and using the latest version. At the time of the creation of this document TAC 2006 was used. When starting a lighting design, attention to the surrounding area and any special requirements must be taken into consideration, ie…schools, shopping districts, or airports. It is important to note that there are three different design methods that can be used for calculating the roadway lighting levels. Each method may produce different designs and provide different amounts of lighting levels through luminaire spacing and configurations. Each of these methods is acceptable and the preferred method SaskPower uses will be indicated later in this document. The three types are the Illuminance Method, Luminance Method and Small Target Visibility Method. All three of these methods are fully explained in the 2006 edition of the IESNA RP-8, American National Standard Practise for Roadway Lighting. The appropriate application stating when/where to use each design method is stated in Section 5.4 Basic Lighting Design of this document.
  • 7. SEP4 Roadway Lighting Design Guide Page 7 of 41 January 10, 2013 5.1. Customer Requirements SaskPower’s standard practice is to design roadway lighting as per TAC standards. There are situations where a customer may not wish to have streetlights designed to this standard, often due to the cost. If customer does not want to meet TAC requirements, they are required to sign a Streetlighting Waiver Form before SaskPower will install the streetlights. SaskPower will not install lighting facilities that do not meet the TAC requirements without this waiver as it would leave SaskPower open to liability. 5.2. Light Pollution Light pollution is becoming an increasing concern and typically takes one of two forms: Light trespass or back lighting where there is an excessive amount of light towards a residence. Certain homeowners are particularly sensitive to light coming into their homes from streetlights and complain of sleep disruption, etc. While our typical luminaires do a reasonable job of controlling the light toward the residence, there have been complaints from homeowners regarding excessive light trespass. Mitigation may require selection of different luminaires, repositioning luminaires or the addition of light shields to block the light. Up-lighting where there is excessive light upwards from the luminaire. This will impact visibility of the night sky and is a particular concern among astronomers. The International Dark-Sky Association (IDA) is an organization which promotes the use of luminaires with zero uplight (ie. Full Cut-off). They will assess luminaires and provide a Fixture Seal of Approval (FSA) for luminaires which meet their requirements for Uplighting. As of the writing of this document, the City of Saskatoon has required SaskPower install Full Cut-off lights. For more information on the International Dark-sky Association see www.darksky.org. 5.3. Airports Installations in close proximity to airports may pose a hazard to airplanes or helicopters. For this reason attention to pole heights and light spill is required, as well as approval from Transport Canada and NAV Canada. The required forms are available on-line at each of the agency web- sites. It is the responsibility of the person doing a light study to research any restrictions that may be imposed on the lighting design. Transport Canada Areodomes & Air Navigation (RAEM) 1100-9700 Jasper Ave., N.W. Edmonton, Alberta T5J 4E6 Tel: 780-577-0247 Fax: 780-495-5190
  • 8. SEP4 Roadway Lighting Design Guide Page 8 of 41 January 10, 2013 It will also be necessary to contact NAV Canada and obtain the most recent land use proposal submission form. This form is to be completed and submitted to NAV Canada. The approval process may take up to 30 days. NAV Canada 1601 Tom Roberts Road P.O. Box 9824, Station T Ottawa, Ontario K1G 6R2 Tel: 866-577-0247 Fax: 613-248-4094 e-mail: landuse@navcanada.ca website: www.navcanada.ca ***Note: The land use office prefers to receive proposal submissions electronically. 5.4. Basic Lighting Design 5.4.1. Roadway Terminology This section includes general terminology associated with typical roadways in Saskatchewan. Roadway – The portion of the road surface, including shoulders, for vehicular use. Traveled Way – The portion of the roadway provided for the movement of vehicles, exclusive of shoulders, auxiliary lanes and bicycle lanes. Median – The portion of the roadway separating the traveled way for accommodation of stopped vehicles for emergency use, and for lateral support of the base and surface courses. Shoulder – The portion of the roadway adjacent with the traveled way for accommodation of stopped vehicles for emergency use and for lateral support of the base and surface courses. Sidewalk – An exterior pathway with a prepared surface (concrete, bituminous, brick, stone, etc.) intended for pedestrian use. Setback – The distance from the streetlight pole to the front of the curb. Arm Length – The distance from the approximate location of the bulb to the center of the vertical part of the light standard/pole. The typical arm length is 2.40m. House-side Lateral Distance – the distance from the imaginary vertical line directly below the luminaire and running back toward the adjacent curb. Also referred to as “Overhang”. Street-side Lateral Distance – the distance from the imaginary vertical line directly below the luminaire to the curb on the opposite side of the roadway.
  • 9. SEP4 Roadway Lighting Design Guide Page 9 of 41 January 10, 2013 Mounting Height – the distance from the location of the bulb to the road surface directly below. The typical steel streetlight standard heights are: 25’, 30’, 35’, 40’, and 45’. There are also typical wood pole mounted streetlights. Figure 5-1 Roadway Terminology
  • 10. SEP4 Roadway Lighting Design Guide Page 10 of 41 January 10, 2013 5.4.2. Lighting Design Methodology There are three lighting design methodologies – Luminance, Illuminance and Small Target Visibility (STV). Luminance measures the incident lighting on the roadway while illuminance is a measure of the reflected light. Small Target Visibility (STV) differs from Illuminance and luminance design in that values are given in terms of a weighted average visibility level. This is a relatively new design method adopted in 2000 by IESNA and has come under scrutiny within roadway lighting community. At this time STV should be used only as a method for assessing different lighting designs, and not as the primary method of calculation. The Luminance method shall be used for roadway and interchange, the Illuminance method shall be used for intersections and cul-de-sacs. Lighting designs for curved sections with greater than 600m radius should be evaluated as if it were a straight section, otherwise they should be evaluated as an intersection. 5.4.3. Pedestrian Conflict The next step in developing a Roadway Lighting Design is to identify the amount of pedestrian traffic in the area to establish the Average Illuminance, Average to Minimum Uniformity Ratio and Minimum Illuminance. - According to IES RP-8-05, there are three types of classifications. - Low conflict area: residential - Medium conflict areas: schools, recreational centers - High conflict areas: restaurants, shopping, theatres Pedestrian Conflict is assumed to be the total number of people on both sides of a street within a given section (200 meters). This number also includes those people crossing the street between the hours of 18:00 and 19:00. Table 5-1 Classification of Pedestrian Conflict LOW : 10 or fewer pedestrians MEDIUM : 11 to 100 pedestrians HIGH : over 100 pedestrians
  • 11. SEP4 Roadway Lighting Design Guide Page 11 of 41 January 10, 2013 Table 5-2 Lighting Requirement by Pedestrian Conflict PEDESTRIAN ACTIVITY MAINTAINED AVERAGE HORIZONTAL ILLUMINANCE (LUX) AVERAGE-TO- MINIMUM HORIZONTAL UNIFORMITY RATIO MINIMUM MAINTAINED VERTICAL ILLUMINANCE (LUX) HIGH 20.00 4.00 10.00 MEDIUM 5.00 4.00 2.00 LOW 3.00 6.00 0.80 Copied from TAC 9-27 2006 5.4.4. Light Arrangement Styles There are several options available for the placement of lighting standards. Some of these are as follows: Figure 5-2 One Sided Arrangement Figure 5-3 Two Sided Opposite Arrangement Figure 5-4 Two Sided Staggered Arrangement
  • 12. SEP4 Roadway Lighting Design Guide Page 12 of 41 January 10, 2013 Figure 5-5 Double Davit Median Arrangement Figure 5-6 Double Davit Opposite Arrangement Figure 5-7 Double Davit Staggered Arrangement Typically a one-sided spacing is used on roadways with one to three lanes, staggered spacing on roadways with three to six lanes, and opposite spacing on roadways with five or more lanes. Median lighting is typically used when the median is of sufficient size to allow for the installation of a light standard while meeting the clear zone requirements and/or there are barriers in place.
  • 13. SEP4 Roadway Lighting Design Guide Page 13 of 41 January 10, 2013 5.4.5. Pavement Classification The first step in developing the Roadway Lighting Design is to determine the Pavement Classification. Pavement classification is a measure of how reflective the roadway surface is to establish the lighting levels required. The pavement classification will establish the Q0 Mean Luminance Coefficient. The four pavement classifications in TAC are R1, R2, R3, and R4. The R represents the reflective quality of the pavement. For SaskPower, a typical roadway would be represented by a R3 classification. Table 5-3 Pavement Classification CLASS QO DESCRIPTION OF ROADWAY SURFACE MODE OF REFLECTANCE R1 0.10 Portland cement concrete road surface. Asphalt road surface with a minimum of 15 percent of the aggregate composed of artificial brightener *(e.g. Synopal) aggregates (e.g. Labradorite, quartzite) Mostly Diffuse R2 0.07 An asphalt road surface with an aggregate comprised of minimum 60% gravel (size greater than 10mm). Asphalt road surface with 10-60% artificial brightener in aggregate mix. Mixed (diffuse and specular) R3 0.07 An asphalt road surface (regular and carpet seal) with dark aggregates ( e.g. trap rock, blast furnace slag); rough texture after some month of use (typical highways). Slightly Specular R4 0.08 Asphalt road surface with very smooth texture Mostly Specular Copied from TAC 2-37 2006 5.4.6. Roadway Classifications In order to establish appropriate lighting levels for a given road, a classification system is used to separate roadways based on traffic volumes and use. The definitions below are based upon TAC 2006 9.1.2 and Table 9-1 Roadway Classification Designations Freeway A Freeway is defined as a fully-controlled access roadway for through traffic, with a classification of RFD or UFD (see table 9-1 – Roadway Classification Designations). Freeways are typically characterized by the presence of interchanges which allow motorists to enter and exit the freeway in a fully controlled fashion onto local, collector and arterial roads. As defined in the TAC Geometric Design Guide for Canadian Roads, interchanges have various configurations and spacing. Typical interchange configurations include diamond, cloverleaf, parclo, trumpet and rotary. Freeways are typically high-speed facilities with a posted speed of 90km/h, or greater.
  • 14. SEP4 Roadway Lighting Design Guide Page 14 of 41 January 10, 2013 Expressway Expressway-highway is defined as a roadway for through traffic with full or partial control of access via interchanges, intersections or roundabouts. Classifications include REU, RED, UEU, or UED (see Table 9-1 – Roadway Classification Designations). An expressway- highway may have at grade signalized or unsignalized intersections of roundabouts. In some cases an expressway-highway may have interchanges similar to those for freeways. Arterial An arterial is defined as a roadway primarily for high volume through traffic with classification of RAU, RAD, UAU, or UAD (see Table 9-1 Roadway Classification Designations). An arterial will typically have partially-controlled access via traffic signals or roundabouts or non-controlled access via intersections or driveways. Collector A collector is defined as a roadway feeding an arterial classification of RCU, RCD, USU, or UCD (see Table 9-1 Roadway Classification Designations). A collector will typically have partially-controlled access via traffic signals or roundabouts or non-controlled access via intersections or driveways. Local A local is defined as a roadway feeding a collector or arterial, with classification of RLU, or ULU (see Table 9-1 Roadway Classification Designations). A local roadway will typically have partially-controlled access via traffic signals or roundabouts or non-controlled access via intersections or driveways. Alleyway An alleyway is defined as a non-controlled access roadway located along the rear of, or between buildings for servicing or access purposes. Alleyways typically connect to local or collector roads. Where lighting is desired for alleyways it should meet the criteria for local roads. Table 5-4 Roadway Classification Designations FIRST LETTER SECOND LETTER THIRD LETTER R Rural L Local U Undivided U Urban C Collector D Divided A Arterial E Expressway F Freeway Copied from Table 9-1 TAC 2006 This Design Guide does not cover lighting for areas other than Roadway such as Alleys, Sidewalks, Pedestrian Walkways and Bikeways.
  • 15. SEP4 Roadway Lighting Design Guide Page 15 of 41 January 10, 2013 Table 5-5 RP-8 Recommended Light Levels For Luminance And STV Road Classification Pedestrian Conflict Area1 Lav (cd/sq.m) Lav/L min Lmax/Lmin Lmax/Lavg STV Freeway Class A N/A 0.6 3.5 6 0.3 3.2 Freeway Class B N/A 0.4 3.5 6 0.3 2.6 Express Way High 1 3 5 0.3 3.8 Medium 0.8 3 5 0.3 3.8 Low 0.6 3.5 6 0.3 3.8 Major High 1.2 3 5 0.3 4.9 Medium 0.9 3 5 0.3 4.0 Low 0.6 3.5 6 0.3 3.2 Collector High 0.8 3.0 5 0.4 3.8 Medium 0.6 3.5 6 0.4 3.2 Low 0.4 4.0 8 0.4 2.7 Local High 0.6 6 10 0.4 2.7 Medium 0.5 6 10 0.4 2.2 Low 0.3 6 10 0.4 1.6 NOTES: 1. Low = 10 or fewer pedestrians, Medium = 11 to 100, High = >100 Copied from IESNA RP-8-05 Table 5-6 Illuminance for Intersections Functional Classifications Average Maintained Illumination at Pavement by Pedestrian Area Classification Eavg/Emin High Medium Low Major/Major 34.0/3.4 26.0/2.6 18.0/1.8 3.0 Major/Collector 29.0/2.9 22.0/2.2 15.0/1.5 3.0 Major/Local 26.0/2.6 20.0/2.0 13.0/1.3 3.0 Collector/Collector 24.0/2.4 18.0/1.8 12.0/1.2 4.0 Collector/Local 21.0/2.1 16.0/1.6 10.0/1.0 4.0 Local/Local 18.0/1.8 14.0/1.4 8.0/0.8 6.0 Illuminance table for Intersections excerpt from IESNA RP-8-05 Figure 5-8 Roadway Classifications shows the southwest portion of the City of Regina, with roads classified according to TAC.
  • 16. SEP4 Roadway Lighting Design Guide Page 16 of 41 January 10, 2013 Figure 5-8 Roadway Classifications
  • 17. SEP4 Roadway Lighting Design Guide Page 17 of 41 January 10, 2013 5.4.7. Area Classifications In order to determine appropriate lighting levels, it is important to consider what the land adjacent to the roadway is being used for, and in particular to identify the amount of pedestrian and vehicular traffic. There are three classifications: 1) Commercial. A business area of a municipality where ordinarily there are many pedestrians during night hours. The definition applies to densely developed business areas outside, as well as within, the central part of municipality. The area contains land use which attracts a relatively heavy volume of night time traffic vehicular and or pedestrian traffic on a frequent basis. 2) Intermediate. Those areas of a municipality often characterized by moderately heavy night time pedestrian activity such as in blocks having libraries, community recreation centers, large apartment buildings, industrial buildings or neighbourhood retail stores. 3) Residential. A residential development, or a mixture residential and small commercial establishments, characterized by few pedestrians at night. This definition includes areas with single family homes, town houses, and or small apartment buildings. 5.4.8. Light Calculation Grid Setting up a grid in lighting design software should be as per IESNA RP-08-05. Using more or less points will alter the calculations and you may or may not achieve the proper lighting levels. As well any change of the grid spacing’s will also have an effect upon the calculations. The following is taken from TAC 9.6.2 The calculation grid for a roadway should consist of two grid lines per lane located ¼ of the distance from the edge of each lane as shown in TAC Figure 9-16 – Grid Points For Luminance Calculations and Illuminance Measurements on Roadways. The following criteria should be applied: - The grid should be based on the number of lanes for the majority of the length of roadway. - In the event that the roadway width and number of lanes change, then a revised grid should be used for the new length of roadway. - In the longitudinal direction, the distance between grid lines should be one-tenth (1/10) of the spacing between luminaires, or 0.5m, whichever is smaller. The starting point for the gridlines should not be located directly under a pole, but should start instead at a point one-half (1/2) of the grid cell size from the luminaire pole. When calculating lighting on curves, all curves with a wide radius (i.e., 600m or greater) may be treated as a straight roadway section. Curves with a radius of less than 600m require separate illuminance calculations.
  • 18. SEP4 Roadway Lighting Design Guide Page 18 of 41 January 10, 2013 The same principles should be followed to create luminance calculation grids for curved sections of roadway as for straight sections. The main issue will be the location of the observer point, which shall be located on the road as per CIE standards, but with observer distance at 83.07m as shown in TAC Figure 9-17 – Luminance Calculation Grid Geometry for Curved Roadway Sections (this observer point distance is consistent with IESNA standards for a tangent section of road: the CIE practice uses a 60.0m observer point). Table 5-7 Light Calculation Grid Definitions Area Grid Spacing’s ROADWAY: both straight and curved sections 2.0m grid, centered on the roadway, extending laterally from the lane edge to lane edge INTERSECTIONS 2.0m grid, centered on the intersection, extending laterally from lane edge to lane edge BRIDGES AND OVERPASSES 2.0m grid, centered on the roadway, extending laterally from the lane edge to lane edge INTERCHANGES Interchange components as described above REST AREAS AND VEHICLE INSPECTION STATIONS 2.0m grid, to cover the entire travel portion of the roadway and parking area SIGNS 300mm grid on the face of the sign VEHICLE TUNNELS Refer to IESNA PR - 22 5.4.9. Typical Pole Height and Overhang Table 5-8 shows the typical pole height for different Roadway Classifications and Configurations. Table 5-9 show the typical mounting spacing and arrangements using the Luminance method with corresponding unit power density for different Roadway Classifications.
  • 19. SEP4 Roadway Lighting Design Guide Page 19 of 41 January 10, 2013 Table 5-8 Pole Height by Roadway Configuration Pole Height (m) Road Classification Pedestrian Conflict Area 1 lane One side 2 lanes One side 3 lanes One side 4 lanes opposite 5 lanes opposite Freeway Class A 12(40’) 12(40’) 12(40’) 15(49’) 15(49’) Freeway Class B 12(40’) 12(40’) 12(40’) 15(49’) 15(49’) Express Way High 12(40’) 12(40’) 12(40’) 12(40’) Medium 12(40’) 12(40’) 12(40’) 12(40’) Low 12(40’) 12(40’) 12(40’) 12(40’) Major High 12(40’) 12(40’) 12(40’) 12(40’) Medium 12(40’) 12(40’) 12(40’) 12(40’) Low 12(40’) 12(40’) 12(40’) 12(40’) Collector High 10(33’) 10(33’) 10(33’) 12(40’) Medium 10(33’) 10(33’) 10(33’) 12(40’) Low 10(33’) 10(33’) 10(33’) 12(40’) Local High 7(23’) 7(23’) 10(33’) Medium 7(23’) 7(23’) 10(33’) Low 7(23’) 7 (23’) 10(33’) NOTES: Copied from IESNA RP-8-05 Table 5-9 Roadway Lighting Design by Luminance Method Road and Pedestrian Conflict Area Luminance Criteria Lamp Wattage Input wattage Mountng Height Arrangement Spacing Roadwidth UPD Road Pedestrian conflict Area Cd/sq. m (m) (m) Watts/m2 Freeway “B” 2 lane 0.4 150 190 12 One Side 89 7.5 0.28 Freeway “B” 3 lane 0.4 150 190 12 One Side 76 11.25 0.22 Freeway “B” 4 lane 0.4 150 190 12 Opposite 90 15 0.28 Major 13.4 Meter High Medium Low 1.2 0.9 0.6 250 290 10 Opposite 83 13.4 0.52 Major 15.8 Meter High Medium Low 1.2 0.9 0.6 250 290 10 Opposite 73 13.4 0.37 Major 22 Meter High Medium Low 1.2 0.9 0.6 400 460 10 Opposite 83 22 0.50 Collector 13.4 Meter High Medium Low 0.8 0.6 0.4 150 150 100 190 190 138 10 10 10 Opposite Opposite Opposite 77 87 96 13.4 13.4 13.4 0.37 0.33 0.21 Collector 14.8 Meter High Medium Low 0.8 0.6 0.4 150 150 100 190 190 138 10 10 10 Opposite Opposite Opposite 72 85 92 14.8 14.8 14.8 0.36 0.30 0.20 Local 8.7 Meter High Medium Low 0.6 0.5 0.3 150 100 70 190 138 95 7.6 7.6 7.6 One side One side One side 59 55 59 8.7 8.7 8.7 0.37 0.29 0.15 Local 11 Meter High Medium Low 0.6 0.5 0.3 150 150 70 190 190 95 7.6 7.6 7.6 One side One side One side 57 57 55 11 11 11 0.30 0.30 0.16 Copied from IESNA RP-8-05
  • 20. SEP4 Roadway Lighting Design Guide Page 20 of 41 January 10, 2013 5.4.10. Light Loss Factors Light Loss Factors (LLF) are multiplier values to estimate the overall performance at different times during the life of the lighting system. LLF values reflect the performance of the lamp and luminaire as well as the maintenance level of a lighting system. The LLF are: Lamp Lumen Depreciation (LLD) Luminaire Dirt Depreciation (LDD) Luminaire Ambient Temperature Factor (TF) Ballast Factor (BF) Equipment Factor (EF) The Light Loss Factor can be summed up as: LLF = LLD x LDD x TF x BF x EF LLD Lamp Lumen Depreciation (TAC 2-39) LLD is the reduction in the light output as the lamp ages. The rated Lumen are provided by the manufacturer based upon 100 hours of usage. The can be shown as ‘Lumen Depreciation curves”. The typical LLD factor for high pressure sodium vapour base on 5 year maintenance group re-lamping program is 0.78. LDD Luminaire Dirt Depreciation (TAC 2-40) LDD takes into account the luminaire output depreciation due to an accumulation of dirt on the luminaire and in the air. The designer should pick a ‘clean’ LDD value in most situations unless in an area of heavy manufacturing or areas prone to dust storm use moderate LLD value. The typical LDD value for a five year maintenance cycle adopted by SaskPower is 0.88. TF Luminaire Ambient Temperature Factor (TAC 2-42) TF accounts for variations in lumen output based on ambient temperature. HPSV luminaires are not affected significantly by ambient termperature, the TF adopted by SaskPower is 1.0. BF Ballast Factor (TAC 2-42) BF is meant to cover reductions in light output due to the ballast. For HID sources it is assumed to be 1.0 unless otherwise noted by the manufacturer. EF Equipment Factor (TAC 2-42) EF is used to account for other reductions in light output due to the equipment used such as: • manufacturing tolerances for both the luminaire and lamp • luminaire depreciating over time (reflective surface) • input voltage that varies from location to location SaskPower has adopted an Equipment Factor of 0.95.
  • 21. SEP4 Roadway Lighting Design Guide Page 21 of 41 January 10, 2013 Table 5-10 Light Loss Factors Area Lamp Lumen depreciation (LLD) 1 Luminaire Dirt Depreciation (LDD) 1 Luminaire Component Depreciation (LCD) 2 Equipment Factor 3 Total Light Loss Factor General 0.78 0.88 0.98 0.95 0.65 Notes: (1) Based upon a 5 year maintenance program. (2) Degradation of the reflector and refractor. (3) Effect of ambient temperature, voltage fluctuations, and the ballast and lamp factors. Note: Only photometric files approved by Standards shall be used in lighting calculations. These files will be kept in the Streetlight section of EIN. LDD is based upon a clean area, if installing lights in an area that is prone to high pollution, an alternative factor must be applied to the calculation in order to determine the correct Total Light Loss Factor. See chart in TAC 2006 page 2-41. LLD is based upon an approximate assumption of approximately 4,000 hours of usage per year. See TAC 2006 chart on page 2-40. 5.5. Luminaire Selection 5.5.1. Lateral Light Distribution Lateral Light Distribution is the lighting pattern the luminaire puts out on the roadway. There are five types classified as Type I through V. The higher the Distribution Type number, the more light that will be spread across the roadway. Type I - Usually used for median mounting. Type I, Four Way – Mainly used for intersection lighting. This light provides four beams of light from one light standard. An uncommon item and not very popular, would be placed in middle of intersection for proper lighting. Type II – Used to light the street front, not much light provided on the back side of the luminaire. Type II, Four Way – Mainly used for intersection lighting. Provides four beams of light and is installed on a corner. This is an uncommon item and not very popular for lighting. Type III – Provides the majority of light to the roadside of the luminaire while the backside does not project as much light. Type IV - Provides the majority of light to the roadside of the luminaire while the backside does not project as much light. The Type IV puts light out further from the curb than a Type III.
  • 22. SEP4 Roadway Lighting Design Guide Page 22 of 41 January 10, 2013 Type V – Ideal to be installed in the center of the intersection and puts out a light pattern that is evenly dispersed around its axis. Type V Quadrate – has a square form of light pattern around its axis. Figure 5-9 IES Pattern Types
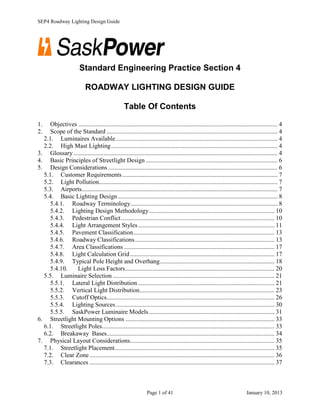
  • 23. SEP4 Roadway Lighting Design Guide Page 23 of 41 January 10, 2013 5.5.2. Vertical Light Distribution Vertical light distribution is divided into three categories, Short, Medium and Long as illustrated in Figure 5-10. Classification is on the basis of the distance from the luminaire to where the beam of maximum candlepower strikes the roadway surface. The classifications are: Short Distribution – The maximum candlepower beam strikes the roadway surface between 1.0 and 2.25 times mounting heights distance from the luminaire. See Figure 5-11. Medium Distribution – The maximum candlepower beam strikes the roadway surface between 2.25 and 3.75 times mounting height distance from the luminaire. Long Distribution – The maximum candlepower beam strikes the roadway surface between 3.75 and 6.0 times mounting height from the luminaire. On the basis of the vertical light distribution, theoretical maximum candlepower beams from adjacent luminaires are joined on the roadway surface. With this assumption, the maximum spacing of luminaires are: Short Distribution – 4.5 X mounting heights Medium Distribution – 7.5 X mounting heights Long Distribution – 12.0 X mounting heights From a practical standpoint, the medium distribution is predominantly used in practice, and the spacing of luminaires normally does not exceed five to six times mounting heights. Short distribution is not used extensively for economic reasons, because extremely short spacing is required. At the other extreme, the long distribution is not used to any great extent because the high beam angle of maximum candlepower often produces glare.
  • 24. SEP4 Roadway Lighting Design Guide Page 24 of 41 January 10, 2013 Figure 5-10 Vertical Light Distribution Longitudinal Roadway lines Reference Line 1 x MH 2.25 x MH 3.75 x MH 6 x MH Short Medium Long Transverse Roadway lines Max CP MH = Mounting Height
  • 25. SEP4 Roadway Lighting Design Guide Page 25 of 41 January 10, 2013 Figure 5-11 Half Maximum Candlepower Projection
  • 26. SEP4 Roadway Lighting Design Guide Page 26 of 41 January 10, 2013 Figure 5-12 Lateral Light Distribution 5.5.3. Cutoff Optics The amount of glare generated by a luminaire is strongly influenced by the intensity (candle- power) emitted at angles close to the horizontal. The cutoff classification is based on the intensity of rays emitted at 80-degrees and 90-degrees vertical angle. As the intensity of either of these angles will vary in different vertical planes for typical roadway luminaires, the maximum intensity considering all planes is used. (see TAC 2.8.1) Non-Cutoff - no intensity limits apply. - are designed to allow for light to be emitted in all directions. These are the least efficient of the four types to light a roadway due to the amount of light pollution and glare they produce. Post-top lights without shrouds or shielding are often Non-Cutoff.
  • 27. SEP4 Roadway Lighting Design Guide Page 27 of 41 January 10, 2013 Semi-Cutoff - are designed so that the intensity at 80 degrees vertical angle must not exceed 20% of the rated lamp lumens, and the intensity at 90 degrees must not exceed 5 % of the rated lamp lumens. - are designed to allow the majority of light to be emitted below 90 degrees, with up to 5% allowed to be emitted above 90 degrees. The most common type of light that fits this description is the Cobrahead. Cutoff - has more controlled emitted light than semi-cutoff. Less than 2.5% of the emitted light is allowed to escape the fixture above 90 degrees. The light spread is greater than a full cutoff, and the spacing is not as far apart as a semi-cutoff. - are designed so that the intensity at 80 degrees vertical angle must not exceed 10% of the rated lamp lumens, and the intensity at 90 degrees must not exceed 2.5% of the rated lamp lumens. Full Cutoff - are designed so that light will only hit the ground below with no light escaping above 90 degrees. The light is in a tight pattern on the ground which requires the use of more lights than if one were using any of the other three types of lamps. - are designed so that the intensity at 80 degrees vertical angle must not exceed 10% of the rated lamp lumens, and no light can be emitted at 90 degrees or above. Full cutoff normally requires that the luminaire have a flat bottom opening. - Full Cutoff luminaires may have an International Dark Sky Fixture Seal of Approval (see section 5.2 Light Pollution).
  • 28. SEP4 Roadway Lighting Design Guide Page 28 of 41 January 10, 2013 Figure 5-13 Luminaire Cutoff Classification Cutoff @ 90° < 2 ½% Cd @ 80° < 10% Cd Semi-cutoff @ 90°< 5% Cd @ 80°< 20% Cd Non-cutoff @ 90° No Limit @ 80° No Limit Full Cutoff @ 90°= 0 Cd @ 80°<10% Cd 90 80
  • 29. SEP4 Roadway Lighting Design Guide Page 29 of 41 January 10, 2013 Figure 5-14 Reduction of Glare with Full Cutoff Luminaire Figure 5-15 Reduction in Light Trespass From Full Cutoff
  • 30. SEP4 Roadway Lighting Design Guide Page 30 of 41 January 10, 2013 5.5.4. Lighting Sources High Pressure Sodium (HPS) lamps, a member of the high intensity discharge (HID) lamp family, are the most efficient white light source commercially available today. HPS lamps were developed and introduced in 1968 as energy-efficient source for exterior, security and industrial lighting applications and are particularly prevalent in street lighting applications. Due to their high efficiency and long life, today’s HPS lamps are also suitable for many interior applications, particularly where color rendering is not a crucial concern. HPS lamps are offered in sizes ranging from 35 to 1000 watts. Efficacies are between 70 to 120 lumens/watt (including ballast), increasing with wattage. Electronic ballasts, under development, could provide a small increase in system efficacy. Lamp life is typically 24,000 hours or 6 years. The Color Rendering Index (CRI) for HPS is 25. Metal Halide (MH) Lamps are also a member of the high intensity discharge (HID) lamp family. Compared to other lighting sources such as incandescent or high-output fluorescent, they have significantly higher efficiency and longer lives. Among HID lamps, metal halide lamps are not the most energy efficient but the produce the whitest light with the best color rendition, and are generally selected for that characteristic. Like most HID Lamps, Metal Halide lamps are slow to start and restart. The two primary types of metal halide lighting are standard and pulse-start. The pulse-start type is more efficient, starts more quickly, and starts more reliably in cold spaces and stabilizes color rendition over time. Efficacies are between 60 and 100. Lamp life is typically 12,000 hours or 3 years based on 4,000 burning hours/year. The color rendering index is 80. Induction light is a light source in which the power required to generate light is transferred from outside the lamp envelope to inside via electromagnetic fields, in contrast with a typical electrical lamp that uses electrical connections through the lamp envelope to transfer power. There are three advantages of eliminating electrodes: • Extended lamp life, because the electrodes are usually the limiting factor in lamp life. • The ability to use light-generating substances of higher efficiency that would react with metal electrodes in normal lamps. • Improved collection efficiency because the source can be made very small without shortening life, a problem in electroded lamps Luminous efficacy is between 70 and 90 and excellent light quality, but it is because of its unprecedented lifetime. Luminaire system life expectancy is rated at 60,000 hours or about 15 years based on 4000 burning hrs/year. The color rendering index is 80. LED luminaires are getting to be quite efficient, rivalling HPS at 90 lumens/watt. There is continuous development and it is expected that LED lights will surpass HPS in the near future. While most other light sources are omnidirectional, LED emitters tend to be highly directional, requiring optics to help spread the light. The expected life of the emitters is often directly proportional to how hard they are driven – higher outputs tend to shorten the life. Managing heat is also a concern, and LED luminaires tend to have large heat sinks as part of the design. The color rendering index is between 85 to 90.
  • 31. SEP4 Roadway Lighting Design Guide Page 31 of 41 January 10, 2013 5.5.5. SaskPower Luminaire Models The luminaires currently available for SaskPower lighting installation/designs are identified below. Figure 5-16 Cobra Head (Semi-Cutoff Lens) Figure 5-17 Cobra Head (Full Cutoff Lens) Table 5-11 SaskPower HPSV Cobrahead Luminaires Item Code Manufacturer Model Number: American Electric Cooper Lighting Wattage Light Distribution IES TYPE 3 42 07 115 07S CT 120 R2 DPCS OVZ70SCF2E4PSASK 70 w Semi-Cutoff II 3 42 08 115 07S CT 120 RX DGCS OVZ07SCF2E4G3SASK 70 w Semi-Cutoff II- 4 way 3 42 10 115 10S CT 120 R2 DPCS OVZ10SCF2E4PSASK 100 w Semi-Cutoff II 3 42 11 115 10S CT 120 R2 FGCS OVH10SCF2D4GA-SASK 100 w Full Cutoff III 3 42 15 115 15S CT DT1R3DP OVZ15SCF3E4PASASK 150 w Semi-Cutoff III 3 42 16 115 15S CT 120 R3 FG CS OVH15SCF3D4GA-SASK 150 w Full Cutoff III 3 42 25 125 25S CT DT1 R3 DPCS OVZ25SCF3E4PASASK 250 w Semi-Cutoff III 3 42 26 125 25S CT MT1 R3 FG 250 w Full Cutoff III 3 42 40 125 40S CT DT1 R3 DG CS OVX40SCF3EYASASK 400 w Semi-Cutoff III
  • 32. SEP4 Roadway Lighting Design Guide Page 32 of 41 January 10, 2013 Figure 5-18 Sentinel Luminaire (3 43 46 , 3 43 50) Table 5-12 HPSV Sentinel Luminaires Item Code Manufacturer Model Number: American Electric Cooper Lighting Wattage IES TYPE 3 43 46 DTD 07SCA120R2BAAR7926 VAN70SHCAH255-SASK 70 w II 3 43 50 DTD10SHCA120R3BAAR7926 VAN10SH255-SASK 100 w II Figure 5-19 Post Top Luminaires Colonial (3 43 10) Washington (3 43 15, 3 43 30) Accessory Ribs Bands and Medallions for Washington (3 43 40) Arlington (3 43 20, 3 43 35) Acorn (3 43 42)
  • 33. SEP4 Roadway Lighting Design Guide Page 33 of 41 January 10, 2013 Table 5-13 Post Top Luminaires Item Code Manufacturer and Model Number Wattage Description IES Type 3 43 10 American Electric 24520SCA-120R5PYBKT2RSCF Cooper - MPW10SH25547 100 w HPSV - Post Top – Colonial (“Cooley Hat”) II 3 43 15 Holophane Lighting AWU15AHP12B3NCUHPTR 150 w HPSV - Post Top Washington III 3 43 20 Holophane Lighting ARU15AHP12BA3SHP 150 w HPSV - Post Top Arlington III 3 43 30 Holophane Lighting AWU175WMH12BA3H 175 w MH - Post Top Washington III 3 43 35 Holophane Lighting ARU175WMH12BA3H 175 w MH - Post Top Arlington III 3 43 42 King Luminaire K424R-EAR II 165 IND 120 165 w Induction – Post Top Acorn III X XX XX King Luminaire K424R-EAR II 60 LED 120 60 w LED - Post Top Acorn III The IES file for a given fixture will be named by the code number (eg 34207.ies) 6. Streetlight Mounting Options 6.1. Streetlight Poles Table 6-1 shows the effective mounting heights for steel davit arms mounted on wood poles as per CSM A-20-05. Note that pole keys are to be used for overhead spans greater than 25m (code 1 01 92). Table 6-1 Wood Pole Mounting Heights Pole Length Setting Depth Height of Pole Top Attachment Point * Arm Rise ** Mounting Height 30' (9.1m) 5' (1.5m) 25' (7.6m) 1' (0.3m) 5' (1.5m) 29' (8.8m) 35' (10.6m) 5.5' (1.7m) 29.5' (9.0m) 1' (0.3m) 5' (1.5m) 33.5' (10.2m) 40' (12.2m) 6' (1.8m) 34' (10.4m) 1' (0.3m) 5' (1.5m) 38' (11.6m) 45' (13.7m) 6.5' (2.0m) 38.5' (11.7m) 1' (0.3m) 5' (1.5m) 42.5' (12.9m) *Attachment Point is measured down from top of pole. ** Assuming 3.0m (10’) Streetlight Bracket (3 05 30) If using Sentinel luminaire (3 43 46 or 3 43 50) or 0.6m (2’) Streetlight Bracket (30502) the mounting height is effectively the height of the pole top. Mounting Height = Height of pole top - point of attachment + arm rise Table 6-2 shows the mounting heights for steel and concrete poles, and corresponding precast bases and break-away bases (where required) as per CSM B-20-25, B-20-41 and B-20-42. Installation of the precast bases and breakaway bases is shown on CSM B-20-15.
  • 34. SEP4 Roadway Lighting Design Guide Page 34 of 41 January 10, 2013 Table 6-2 Steel and Concrete Standard Mounting Heights Poles Height Code # Precast Base Break- away Base Single Davit Galvanized Steel 7.6m (25') 36026 39000 39010 9.1m (30') 36031 39000 39010 10.7m (35') 36037 39000 39010 12.2m (40') 36141 39002 39012 13.7m (45') 36146 39002 39012 Green 7.6m (25') 36025* 39000 39010 9.1m (30') 36030* 39000 39010 10.7m (35') 36035* 39000 39010 12.2m (40') 36140* 39002 39012 13.7m (45') 36145* 39002 39012 Self Weathering 10.7m (35') 36036* 39000 39010 Double Davit Galvanized Steel 9.1m (30') 36032 39000 39010 10.7m (35') 36038 39000 39010 12.2m (40') 36142 39002 39012 13.7m (45') 36147 39002 39012 Post Top Black 4.28m (14') 36014 39000 39010 Self Weathering 4.28m (14') 36015* 39000 39010 Decorative Black Steel 4.88m (16') 36016 39000 39010 Black Concrete 6.71m (22') 36156 Included N/A Shroud Trillium 36020* Florentine 36021 * These items are not for new construction. Note: one must factor in any ground level difference between the streetlight base and the top of the road surface. 6.2. Breakaway Bases Breakaway bases consist of safety devices installed between the pole base plate and the concrete base, allowing the pole to break away when impacted by a vehicle. They consist of a reaction plate with couplers that have a designed weak point in the form of a machined groove. The coupler will shear off at the groove when struck with sufficient force. Breakaway bases must only be used where there is sufficient room for the pole to fall or not impact other structures or traffic lanes in the event of a collision. They are typically used on davit-style poles up to 18m high.
  • 35. SEP4 Roadway Lighting Design Guide Page 35 of 41 January 10, 2013 Based on the departure angle of an errant vehicle (20 degrees), the minimum light pole offset for a breakaway base pole should be approximately one third of the pole height to lessen the potential of the pole falling into the travel lane. Breakaway bases are typically used on poles located within the clear zone see section 7.2. 7. Physical Layout Considerations 7.1. Streetlight Placement Determining an appropriate physical location for the streetlight pole depends on a number of often conflicting requirements. The lighting design will determine an appropriate spacing, but this has to be worked into the plan for the subdivision, where there are many other facilities and structures which also need to be accommodated. The developer should provide a drawing of the proposed subdivision showing all pertinent structures including water and sewer lines, catch basins, fire hydrants, lot lines and proposed locations of driveways. To effectively light each intersection, a light will typically be placed as close as possible to the intersection. Lights will then be spaced according to the lighting design starting at the intersection. Streetlight poles are typically installed on the property line between residential lots. This will likely result in an adjustment from the optimum streetlight spacing as determined by the lighting design. Where large multifamily units are planned, placement of streetlight poles between lot lines may be necessary. Driveways are often designed to be adjacent to one another, streetlights should not be placed between them, but moved to the next lot line where there is no driveway. Placement of street lights near fire hydrants and catch basins should be avoided. This is to mitigate conflicts that may occur should excavation be required to repair hydrants or drains in the future. This should also be considered when placing underground conductors. When using one sided lighting arrangement along a continuous roadway, streetlight poles should remain on the same side along the entire length of the road. The lights should not change sides from block to block. Underground feeds should originate from a pedestal, or transformer, located at the end of the block, on the same side of the road as the street lights. Side lot easements should be avoided. Street crossings with underground conductors should be avoided. If a two sided lighting arrangement is used, the lights should be fed from conductors running on both sides of the road. When road crossings are required, they should cross the road adjacent to an intersection and cross perpendicular to the roadway. Angled, or diagonal crossings are not permitted.
  • 36. SEP4 Roadway Lighting Design Guide Page 36 of 41 January 10, 2013 Installations on the outside of a curve should be avoided, due to the increased possibility of being struck by a vehicle running off the road. Where other constraints force the installation of streetlight poles on the outside of a curve, Break-away bases may be required even though the speed limit is reduced in these areas as a part of due diligence. 7.2. Clear Zone The clear zone is defined as the area adjacent to the roadway which is to be kept clear of fixed objects. Its purpose is to minimize the risk of vehicles leaving the road striking the object, and causing significant harm to passengers and vehicles. Determining the clear zone is a complex calculation based on several factors, including traffic speed and volume and road geometry. The TAC Geometric Design Guide for Canadian Roads has the calculation methodology for determining the clear zone. Many of these factors would have to be provided by the local municipality. In most cases, however, these calculations are unnecessary for the poles that SaskPower installs as discussed below. On local streets, with low speed limits (60 km/hr or less), parking lanes, and sidewalks, the clear zone is typically only 2.5m meters, and easily achievable, so no further consideration is necessary.
  • 37. SEP4 Roadway Lighting Design Guide Page 37 of 41 January 10, 2013 On roadways with speed limits equal to or greater than 70 km/hr, the clear zone will be several meters. With the luminaires that SaskPower uses, many streetlight poles need to be installed within the clear zone and the danger from being struck by vehicles needs to be mitigated. There are several solutions proposed in TAC, but SaskPower utilizes breakaway bases (see section 6.2) on our steel streetlight poles. Concrete and wood streetlight poles which are direct embedded must be either located outside the clear zone, or some other method of protection must be utilized, such as traffic barriers or crash cushions. As of the writing of this document, the only concrete streetlight poles SaskPower utilizes are post-top style which are typically only used on local streets and outside of the clear zone. There are a couple situations where the use of breakaway bases needs further consideration. One is the possibility of pedestrian traffic. A streetlight pole on a breakaway base that is struck by a vehicle leaving a roadway may then strike a pedestrian. Roadways with speeds greater than or equal to 70km/hr typically have limited pedestrian access, so this may not be a concern. Another situation is for poles mounted in the median, where there is a possibility of a pole falling into the traffic lane on the opposite side and must be avoided. If either of these situations arises, the lighting designer should consult with the local municipality to evaluate the situation and develop solutions. These may be to establish what the clear zone is, and locate the streetlight outside of the zone, or to have the municipality install traffic barriers. 7.3. Clearances For future maintenance and operations of the streetlights, and to minimize damage from the activities of others it is important to maintain certain minimum separations or clearances. In addition to SaskPower’s clearance requirements, the Municipality may also have requirements. To determine the proper clearance, both SaskPower and if available, the Municipality’s clearance standard must be considered. The proper clearance to be used is the greatest between the two. For example, if the SaskPower clearance is 1.0m and the Municipality’s is 3.0m, use the 3.0m clearance. Table 7-1 shows the clearances required from streetlight facilities to other objects. See also CSM sections C-24-02 and C-26-02 for other clearance requirements.
  • 38. SEP4 Roadway Lighting Design Guide Page 38 of 41 January 10, 2013 Table 7-1 Streetlight Clearances STREET LIGHT BASE STREET LIGHT CABLE Fire Hydrants 1.0m 1.0m Pedestals 1.0m 1.0m Misc. above ground facilities 1.0m 1.0m Curbs/sidewalks 0.5m* 1.0m Roadway without curbs/sidewalks 1.5m* 1.0m Buried high voltage cables 1.0m n/a Property pins 1.0m 1.0m Streetlight base n/a 0.5m Residential Driveway 1.0m n/a Commercial Driveway 3.0m n/a * See also section 7.2 Clear Zone In addition to these separations the following should also be followed: For maintenance reasons, there must be a separation of 0.5m from the edge of the sidewalk/curb to the streetlight pole. Greater offset is desirable, particularly where there is a probability of snowplows clearing snow in the winter. 8. Electrical Design 8.1. Streetlight Power Supply The supply for a streetlight may be from either an overhead transformer (see CSM B-20-21) or underground transformer or a service pedestal (see CSM B-20-35). A maximum of three connections can be made in a streetlight (ie: one circuit coming in and two may branch out to feed lights in different directions). The voltage drop is not to be more than 8% (as per URD voltage drop spreadsheet). SaskPower luminaires are designed for use at 120V or 240V, and are configured for 120V operation when shipped. 8.2. Fusing/Protection All street light supplies are to be fused at either the transformer or the pedestal where the power supply to the circuit is being provided. Fusing at each luminaire is to be a (3 45 51) inline fuse holder with (3 45 50) 6 amp fuse. Any problems on an existing streetlight fuse should be replaced with this new fuse holder and fuse. See CSM A-20-04, A-20-05, B-20-16 Fusing of overhead streetlight feeds, if required, should be at the source point. Use a 15 amp fuse (7 52 25) and weatherproof fuse holder (71 95 05) with connectors (5 09 XX). See CSM B-20- 21. Fusing at a supply pedestal requires that a 15 amp fuse holder (71 01 10) and fuse cartridge (7 53 15). Refer to B-20-35 for mounting of fuse holder in the pedestal. Below are some additional fuse sizes if required.
  • 39. SEP4 Roadway Lighting Design Guide Page 39 of 41 January 10, 2013 Table 8-1 Fuses and Fuseholders Item # Use with Amps 7 53 02 C30A Holder 2 7 53 04 C30A Holder 4 7 53 06 C30A Holder 6 7 53 10 C30A Holder 10 7 53 15 C30A Holder 15 7 53 20 C30A Holder 20 7 53 30 C30A Holder 30 7 53 50 C60A Holder 50 7 53 60 C60A Holder 60 8.3. Specifications Table 8-2 shows the maximum operating current for HPS luminaires. This can be used to determine the appropriate feeder cables for a given section of streetlights. Supply current for other types of luminaires to be determined from the manufacturer. Table 8-2 Maximum Luminaire Operating Current HIGH PRESSURE SODIUM VAPOUR LUMINAIRE TYPE 70 W 100W 150W 250W 400W 120V 0.85 1.16 1.70 2.80 4.20 240V 0.43 0.58 0.85 1.40 2.10 Taken from CSM A-20-00 Note: See section A-22, Service Drops, for voltage drop information and allowable length of street light supply conductors. Table 8-3 and Table 8-4 show the properties of the buried and aerial cables used as streetlight feeder cables. SaskPower uses a #12 duplex cable (stock code 3 12 14) to individual streetlight luminaires for all types of streetlight installations (steel, concrete and wood poles). Table 8-3 Secondary Buried Cable Ampacities Stock Code Description Direct Buried 100% LF amps In Duct 100% LF amps 2 94 51 2 x #4 145 125 2 94 62 3 x #2 150 130 2 94 64 3 x 1/0 200 175 Taken from CSM B-22-11
  • 40. SEP4 Roadway Lighting Design Guide Page 40 of 41 January 10, 2013 Table 8-4 Aerial Insulated Secondary Conductor Electrical Properties CONDUCTOR - NEUTRAL CODE NO. AMPACITY (AMPS) RAC PHASE OHMS/Km RAC NEUTRAL OHMS/Km #6 AL Duplex - #6 ACSR 3 12 02 92 2.692 2.461 #4 AL Triplex - #6 ACSR 5 38 03 97 1.692 2.461 1/0 AL Triplex - #2 ACSR 5 38 17 169 0.6692 1.013 Taken from CSM C-24-04.03 9. Decorations on Streetlight Poles Frequently municipalities and other groups desire to attach decorations such as flags, flower pots, and seasonal lighting on streetlight poles. The rules regarding such attachments are contained in Directive 08-00 in the SaskPower Business Administration Manual and SaskPower CSM A-20-10 and B-20-27.
  • 41. SEP4 Roadway Lighting Design Guide Page 41 of 41 January 10, 2013 10. Streetlighting Waiver Form To be added at a later date