2. What is Hydrographics?
• Hydrographics also known as Water transfer printing ,
Cubic printing is a method of applying printed designs to
three-dimensional surfaces. The hydrographic process can be
used on metal, plastic, glass, hard woods, and various other
materials.
• The water transfer printing process is extensively used
to decorate items that range from entire all-terrain
vehicles and car dashboards, to small items like bike
helmets or other automotive trim.
3.
4. Water transfer printing | The Process
• The whole process takes place in 6 stages.
• Stage 1: Film printing
• Stage 2: Primer & Base coating
• Stage 3: Activation
• Stage 4: Ink transfer
• Stage 5: Washing process
• Stage 6: Clear coating
5. Stage 1 : Film printing
• The first step is to prepare a film
of the print , which will later be used
to transfer the design on the surface.
• The film developed contains the
pattern or design according to the
requirement.
• A film printer is used for this
purpose.
• The polyvinyl alcohol film produced
is water soluble.
6. Stage 2 : Primer & Base coating
• The surface to be painted is coated with a layer of primer
initially.
• A primer or undercoat is a preparatory coating put on
materials before painting. Priming ensures better adhesion of
paint to the surface, increases paint durability, and provides
additional protection for the material being painted.
• After the primer dries up layers of base coating is done on the
surface.
• Base coat determines the color of the surface after the process
is finished.
7.
8. Stage 3 : Activation
• The film is spread evenly on the water using an automatic
unrolling unit.
• An activator chemical is sprayed on the film to dissolve it into
a liquid and activate a bonding agent.
• The film once dissolved leaves a liquefied floating pattern on
the surface.
• Care should be taken while spreading the film on the water
surface.
• The activator chemical should be sprayed evenly throughout
the surface of the film.
9.
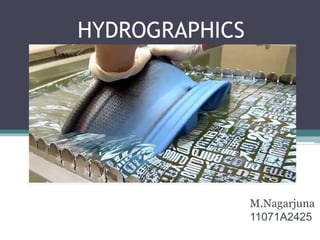
10. Stage 4 : Ink Transfer
• The next step is to transfer the print from the water to the
surface.
• For this , the parts are dipped are dipped into the water
either manually or by an automatic dipping arm.
• The print layer along with the polyvinyl alcohol backing then
wraps around and adheres to the part.
• The adhesion is a result of the chemical components of the
activator softening the base coat layer and allowing the ink to
form a bond with it.
11. • One of the most
common causes of a
failure to achieve
adhesion between
the two layers is a
poorly applied
activator. This can
be either too much
activator being
applied or too little
12. Stage 5 : Washing Process
• This step involves washing the dipped parts using the
automatic washing machine.
• The machine washes the printed surface at a preheated
temperature , thus impressing the pattern further.
13. Stage 6 : Clear coating
• In the final process step, the decorated product is
covered with an automotive-grade urethane. This gives
the object a glossy or matte shine, depending on
preference.
• The urethane also acts as a protector from harmful UV
rays and chemicals that may ruin the pattern.
• When the final coat has dried, the object is sanded and
polished to shin