Lumbar puncture - a detailed medical study | all aspects of lumbar puncture
•Download as PPTX, PDF•
2 likes•235 views

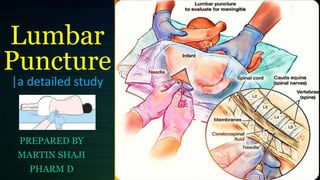
It is a procedure that involves the insertion of a needle into the spinal canal ,to remove a sample of cerebrospinal fluid for tests and diagnosis .....in this study all the aspects of lumbar puncture is detailed in this study ... please comment thank you

Recommended
More Related Content
What's hot
What's hot (20)
Similar to Lumbar puncture - a detailed medical study | all aspects of lumbar puncture
Similar to Lumbar puncture - a detailed medical study | all aspects of lumbar puncture (20)
More from martinshaji
More from martinshaji (20)
Recently uploaded
Recently uploaded (20)
Lumbar puncture - a detailed medical study | all aspects of lumbar puncture
- 1. Lumbar Puncture |a detailed study PREPARED BY MARTIN SHAJI PHARM D
- 2. • Diagnostic:— Infectious Meningitis Encephalitis— Inflammatory • Multiple Sclerosis Guillain-Barre syndrome — Oncologic — Metabolic — Spontaneous Subarachnoid haemorrhage Therapeutic: — Analgesia — Anaesthesia — Antibiotics — Antineoplastic Indications
- 3. Spinal needle — Less than 1 yr: 1.Sin — l yr to middle childhood:2.51n — Older children and adults: 3.51n • Three-way stopcock • Manometer • 4 specimen tubes • Local anaesthesia . Drapes . Betadine Equipment's required
- 4. — Generally performed in the lateral decubitus position. — A pillow is placed under the head to keep it in the same plane as the spine. — Shoulders and hips are positioned. perpendicular with the table. — Lower back should breached toward practitioner. Position of the patient
- 5. • Performed with the patient in the lateral recumbent position. • A line connecting the posterior superior iliac crest will intersect the midline at approx. the 14spinous process. • Spinal needles entering the subarachnoid space at this point are well below the termination of the spinal cord.
- 6. 1) Place infant on blue underpad (ensure underpad is removed after skin preparation if any pooling of skin preparation solution has occurred). 2) Position baby. Identify landmarks. Ensure the baby is as straight as possible (particularly avoid rotation), but do not apply flexion to the trunk until the needle is about to be inserted. 3) Apply face mask. Procedure for lumbar puncture:
- 7. 4) Wash hands, gown and glove. 5) Cut 3 cm diameter hole in middle of plastic drape. (Plastic drape helps visualization of infant during procedure.) 6) Prepare the skin. Wait for prep to dry 7) Identify L4. It helps to keep two fingers of your left hand locating it - one each side. 8) Enter skin strictly in midline, aiming slightly towards the head at between 70 and 90 degrees.
- 8. 9) Once through the skin, STOP. Wait for the infant to resettle. 10) Reorient yourself, making sure that you are still in the midline and advancing at the appropriate angle. The subsequent advance of the needle is less distressing than the initial insertion. 11) Advance needle about 0.5 cm. Remove stylette and observe for CSF flow. If negative, fully reinsert the stylette and advance a little further. Repeat this process until CSF is obtained.
- 9. 12) A ‘pop’ or ‘give’ may be felt as the needle passes through the posterior ligaments and dura, but do not rely on this. The ‘stop-start’ approach is less likely to give a bloody tap. 13) Allow CSF to drip into at least two tubes. A minimum of 10 drops/tube is required for microbiological and biochemical examination. 14) Measure CSF pressure using a manometer if you are doing a therapeutic tap. For a therapeutic tap, the maximum volume to be tapped is 2 per cent of body weight.
- 10. 15) When adequate CSF has been obtained, replace the stylet and then remove the needle. Apply pressure to the puncture site with a sterile cotton wool ball or gauze to control ooze. When ooze has ceased, use a band-aid or flexible collodion as dressing. 16) Wipe excessive antiseptic prep from the skin with sterile water. 17) Discard stylette and needle into sharps container.
- 11. LP in older children maybe performed from L2 toL3 interspace to the L5 to S1 interspace. • At birth, the cord ends at the level of L3. • LP in infant may be performed at the L4 to L5 or L5 to S1 interspace.
- 12. • CSF volume of 1cc obtained in 3 tubes. • In the neonate, 2m1 in total can be safely removed. • In an older child 3 to 6 ml can be sampled depending on the child’s size. • Tube 1 is used for determining protein and glucose • Tube 2 is used for microbiologic and cytologic studies‘ Tube 3 is for cell counts and serologic tests for syphilis Quantity required / drawm
- 13. • Herniation • Cardiorespiratory compromise • Pain • Headache (36.5%) • Bleeding • Infection • Subarachnoid epidermal cyst • CSF leakage Complications