1. VPN + NAT
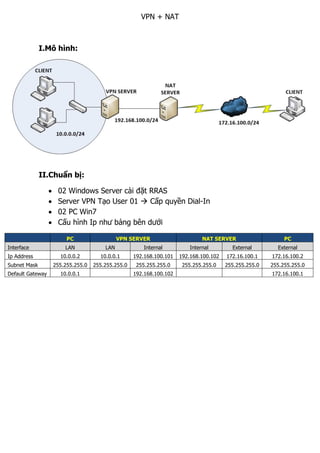
I.Mô hình:
II.Chuẩn bị:
02 Windows Server cài đặt RRAS
Server VPN Tạo User 01 Cấp quyền Dial-In
02 PC Win7
Cấu hình Ip như bảng bên dưới
PC VPN SERVER NAT SERVER PC
Interface LAN LAN Internal Internal External External
Ip Address 10.0.0.2 10.0.0.1 192.168.100.101 192.168.100.102 172.16.100.1 172.16.100.2
Subnet Mask 255.255.255.0 255.255.255.0 255.255.255.0 255.255.255.0 255.255.255.0 255.255.255.0
Default Gateway 10.0.0.1 192.168.100.102 172.16.100.1
2. III.Thực Hiện :
1.Cấu hình VPN trên Windows Server VPN
Mở RRAS Chuột phải Server Config and Enable…..
Chọn NEXT
21. Cấu hình VPN L2TP
1.Cấu hình Trên VPN Server
Chuột phải Server VPN Properties
Qua TAB Security Check như hình bên dưới
22. All Task Restart
2.Cấu hình trên NAT Server
NAT 3 Dịch vụ như bên dưới về Ip VPN Server ( 192.168.100.101 )
23. 3 .Import Registry ( Thực hiện Trên VPN Server và Win 7 )
1. Log on to the Windows Vista client computer as a user who is a
member of the Administrators group.
2. Click Start Run Regedit
3. Locate and then click the following registry subkey:
HKEY_LOCAL_MACHINESYSTEMCurrentControlSetServicesPolicyAgent
4. On the Edit menu, point to New, and then click DWORD (32-bit)
Value.
5. Type AssumeUDPEncapsulationContextOnSendRule, and then
press ENTER.
6. Right-click AssumeUDPEncapsulationContextOnSendRule, and then
click Modify.
7. In the Value Data box, type one of the following values:
A value of 2 configures Windows so that it can establish security
associations when both the server and the Windows Vista-based or
Windows Server 2008-based VPN client computer are behind NAT
devices.
8. Click OK, and then exit Registry Editor.
9. Restart the computer.